

Page 1
he world leader in products for a healthy and comfortable
T
environment - bringing the Garden of Eden into your home.
AQUA2000
OWNER’S MANUAL
INCLUDES:
• Restrictions
• Installation
• Operation
• Maintenance
• Changing the Filter
• Changing the UV Lamp
• Specifications
• Warranty
ADVANCED WATER TREATMENT SYSTEMS
CAUTION: Read manual carefully for proper procedures and operation.
Page 2

Table of Contents
Use Restrictions: . . . . . . . . . . . . . . . . . . . . . . . . . . . . . . . . . . . . . . .2
Specifications . . . . . . . . . . . . . . . . . . . . . . . . . . . . . . . . . . . . . . . . .2
Installation of Countertop Models . . . . . . . . . . . . . . . . . . . . . . . .3
Operation . . . . . . . . . . . . . . . . . . . . . . . . . . . . . . . . . . . . . . . . . . . . .4
Filter Maintenance . . . . . . . . . . . . . . . . . . . . . . . . . . . . . . . . . . . . .5
Changing the Filter . . . . . . . . . . . . . . . . . . . . . . . . . . . . . . . . . . . .5
Removing the Filter Cap(s) . . . . . . . . . . . . . . . . . . . . . . . . . . . . . .6
Changing the UV Lamp . . . . . . . . . . . . . . . . . . . . . . . . . . . . . . . . .6
Questions and Answers . . . . . . . . . . . . . . . . . . . . . . . . . . . . . . . .7-8
Warranty Information . . . . . . . . . . . . . . . . . . . . . . . . . . . . . . . . . .9
Warranty Registration . . . . . . . . . . . . . . . . . . . . . . . . . . . . . . . . .10
1 10
Page 3

Thank you for your purchase of the AQUA2000. This system has been designed
to provide you with years of trouble-free operation and thousands of gallons of
safer, great-tasting water with a minimal amount of maintenance.
Use Restrictions
A minimum water pressure of 15 psi is required to operate the AQUA2000 Unit
(45– 60 psi is recommended).
CAUTION: Do not drink water from the AQUA2000 if the UV Lamp does not
activate or when there is no electricity.
In addition, the AQUA2000 is not designed to process warm or hot water. Allow
only cold or ambient temperatures to flow through the system.
Do not use with water that is microbiologically unsafe or of unknown quality
without adequate disinfection before or after the system.
System and installation must comply with local state regulations.
Specifications
AQUA2000
Flow Rate . . . . . . . . . . . . . . . . . . . . . . . . . . . . . . . . . 1/2 gallon/minute (1.9 Liters/minute)
Min. Operating Pressure . . . . . . . . . . . . . . . . . . . . . . . . . . . . . . . . . . . . . . . 15 psi (105kPa)
Max. Operating Pressure . . . . . . . . . . . . . . . . . . . . . . . . . . . . . . . . . . . . . 100 psi (609kPa)
Water Temp . . . . . . . . . . . . . . . . . . . . . . . . . . . . . . . . . . . . . . . . . . . . 40 – 100 F (5 – 38 C)
Electrical Requirements. . . . . . . . . . . . . . . . . . . . . . . . . . . . . . 20 watts, 50 – 60 Hz, 110v.
Filter. . . . . . . . . . . . . . . . . . . . . . . . . . . . . . . . . . . . . . . Activated Carbon Block with Lead
Adsorbent Media
Particulate Reduction . . . . . . . . . . . . . . . . . . . . . . . . . . . . . . . . . . . . . . . . . 0.5 to 1 micron
Filter Life
Chemical Additives . . . . . . . . . . . . . . . . . . . . . . . . . . . . . . . . . . . . . . . . . . . . . . . . . . . None
UV Lamp Life . . . . . . . . . . . . . . . . . . . . . . . . . . . 10,000+ on/off cycles (approx. 2 years)
Dimensions
Dry Weight. . . . . . . . . . . . . . . . . . . . . . . . . . . . . . . . . . . . . . . . . . . . . . . . . . 6 lbs. (2.75 kg)
. . . . . . . . . . . . . . . . . . . . . . . . . . . . . . . . .
. . . . . . . . . . . . . . . . . . . . . . . . . . . . . . . . . .
1 year or 1000 gallons (3,800 Liters)
7.5 x 13 x 4 in. (19 x 33 x 10 cm)
Page 4
Installation of Countertop Models (CT)
The AQUA2000 is ready to install to most faucets. Installation takes just a few
minutes and requires a pair of pliers.
NOTE: The unit must be installed vertically (not horizontal)
WARNING: Remove protective packaging from inside the UV lamp housing
before operation.
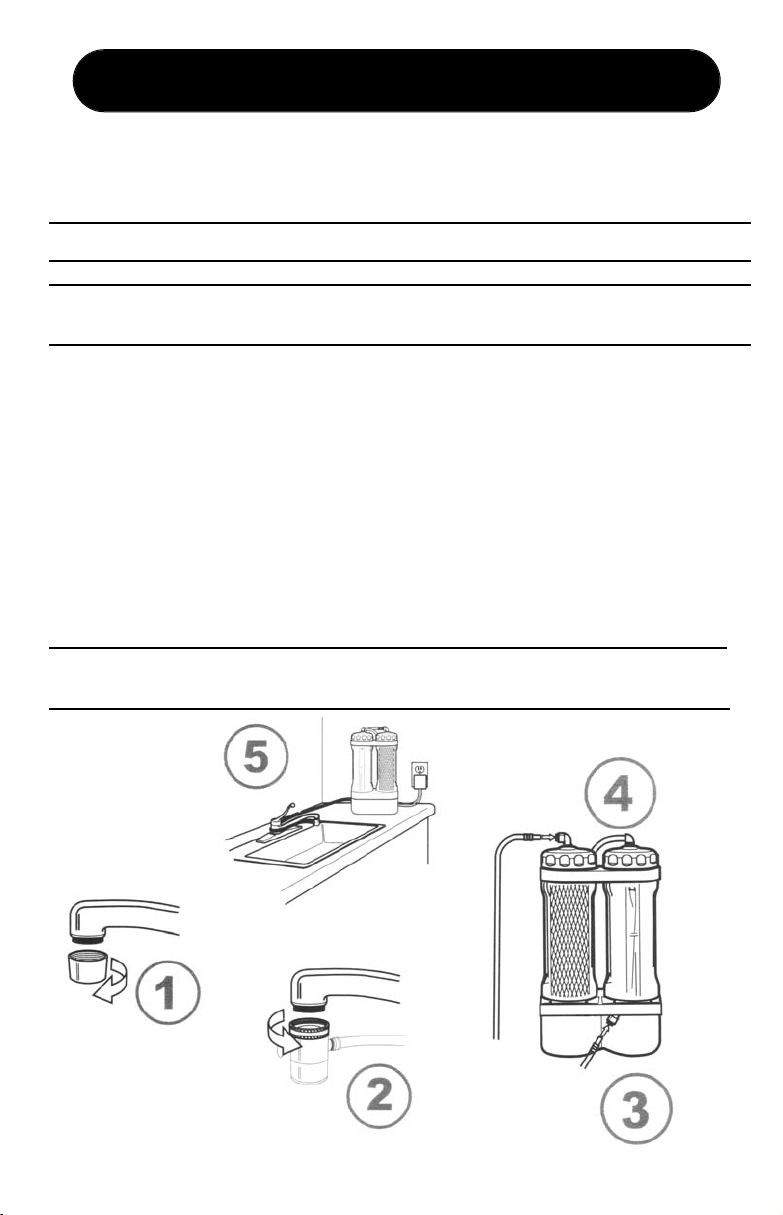
1. Remove the existing aerator and gasket from the faucet. If the threads on the
hose assembly do not match your faucet’s threads, use the included adapter or
obtain one from your local hardware store.
2. Thread the hose assembly onto the faucet.
3. Connect the shorter tubing of the diverter assembly to the inlet of the system by
simply pushing the metal tube all the way into the lower fitting (located at the
rear of the unit, towards the bottom).
4. Connect the longer tubing to the outlet of the system by pushing the metal tube
all the way into the top fitting (located in the cap of the filter chamber).
5. Place hoses as shown and plug the power supply into a nearby receptacle.
IMPORTANT: Do not plug your AQUA2000 unit into an outlet that can be
turned off with a switch, such as an outlet for a garbage disposal.
3 8
Page 5
Operation
Your new water system has been designed to be exceptionally simple to use. Be
sure to read and follow all instructions before operating.
IMPORTANT: INITIAL START-UP: Before using your new AQUA2000 system,
allow the water to flow though the system for at least five (5) minutes. Do not
drink the water coming from the system during this initial start-up.
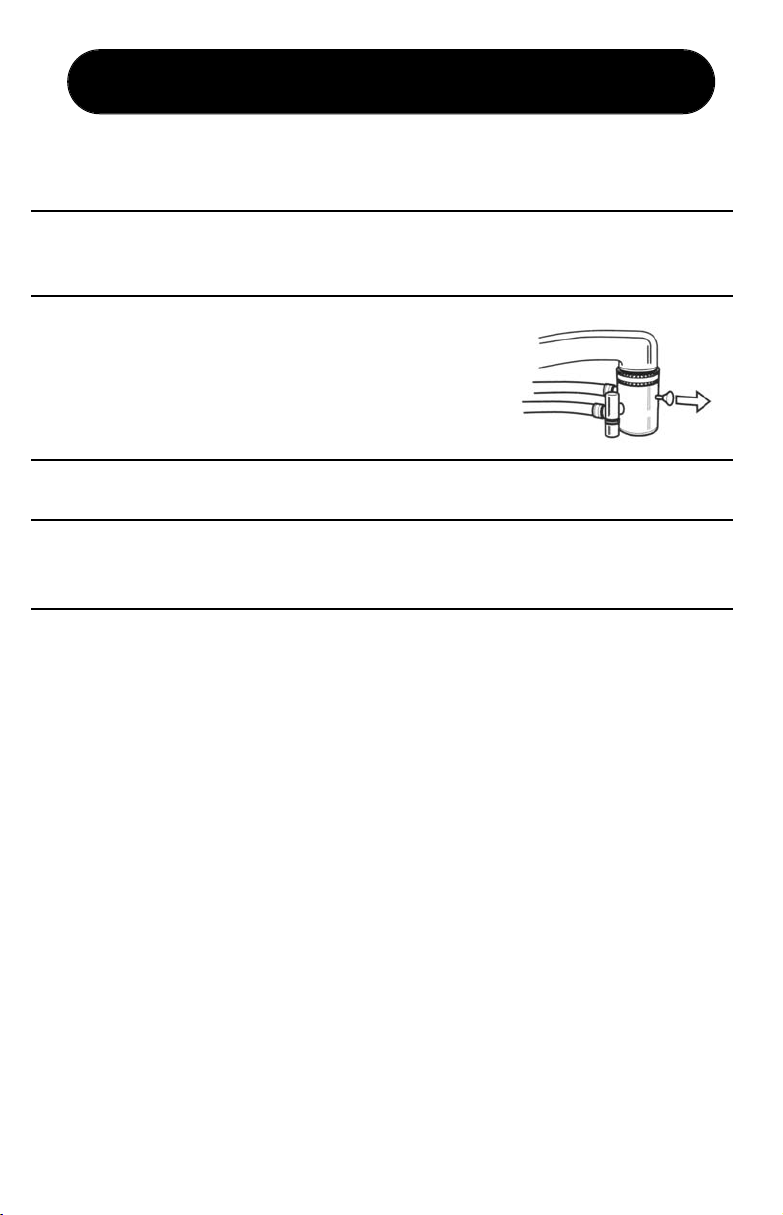
1. To operate the AQUA2000, simply turn on the cold
water and pull the small pin outward. This will direct
water through the system and return the treated water
out of the small spigot. Once the filter chambers are
filled, the UV lamp will activate automatically
CAUTION: If the water flows from the top of the system to the bottom, the hose
connections are reversed. See page 3 for correct hose installation instructions.
IMPORTANT: If the diverter pin does not remain in the "out" position by itself,
or the UV lamp does not activate, there is not sufficient water pressure
(a minimum of 15 psi) to operate the system.
2. If this is the first time you are using your new system, or you have performed
maintenance, see IMPORTANT: INITIAL
begin enjoying great tasting AQUA2000 water immediately.
You can maximize the life of the UV lamp and reduce maintenance cost by
Note:
filling one-gallon containers or large pitchers with treated water and storing them
in the refrigerator for use.
.
START-UP above. Otherwise you can
Page 6
Filter Maintenance
The filter cartridges in the AQUA2000 require periodic replacement for peak
performance.
CAUTION: Use only replacement filters provided by your AQUA2000
distributor. Contact your service center for replacement filters.
The filter should be replaced when it appears dirty and/or the normal flow of
water through the system has decreased.
The filter should be replaced when one or
more of the following occur:
• The filter has been in service for one year.
• The filter has processed more than 1000 gallons
of water.
• The system has not been activated for more
than two weeks.
• There is a noticeable decrease in water flow.
Changing the Filter
CAUTION: Unplug the system to prevent electrical
shock and potential exposure to UV light.
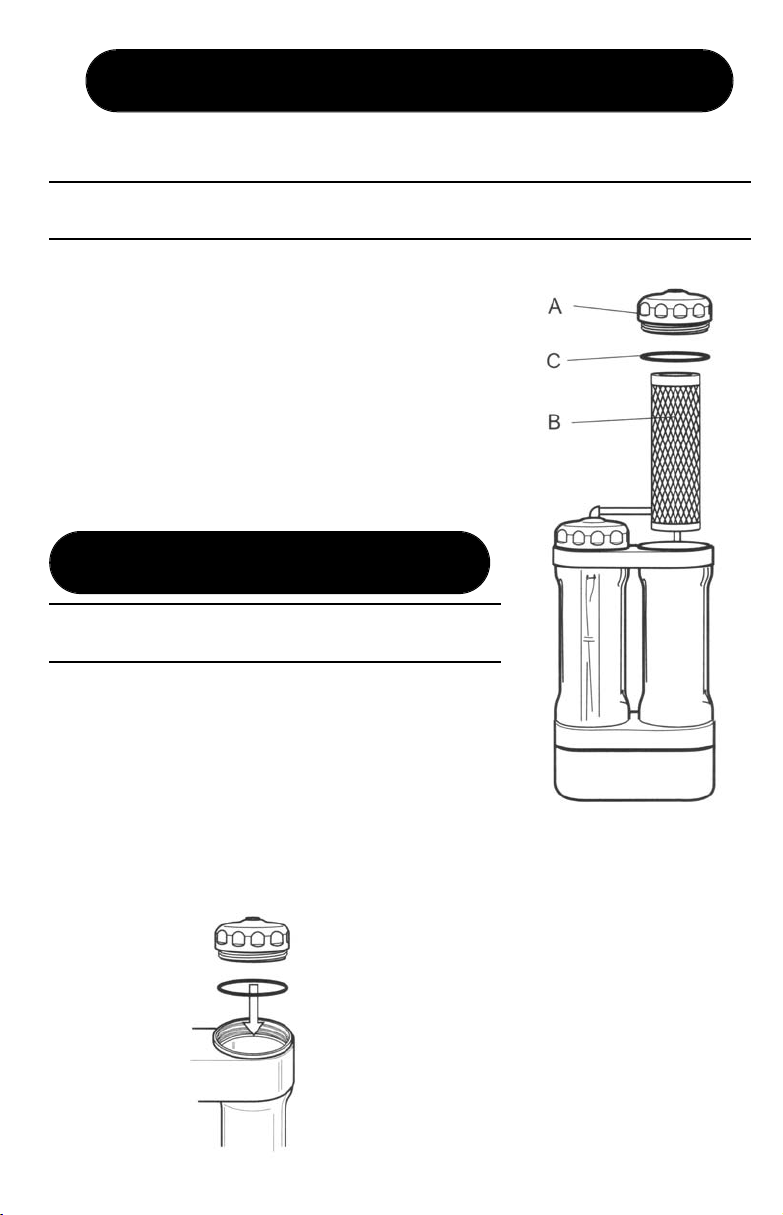
1. Remove the filter chamber cap (see page 6).
2. Remove the filter (B) and discard.
3. Install the new filter (B).
4. Replace the top cap (A) making sure the
o-ring (C) is seated properly in the chamber
when the cap is tightened. Make sure to hold the
chamber securely with one hand while you
tighten its cap with your other hand.
5. Reconnect the tubing by reinserting
the connector into the collar. Press
down on the tubing until the
connector is seated properly
6. Plug in the power supply, turn on the
system and allow water to flow
through the new filter for a minimum
of five (5) minutes before drinking
the water.
Please Note: If your AQUA2000 unit develops leakage
5 6
around the top cap, simply remove the cap, reseat the blue
o-ring (C), and carefully replace the cap (see step 4 above).
.
Page 7
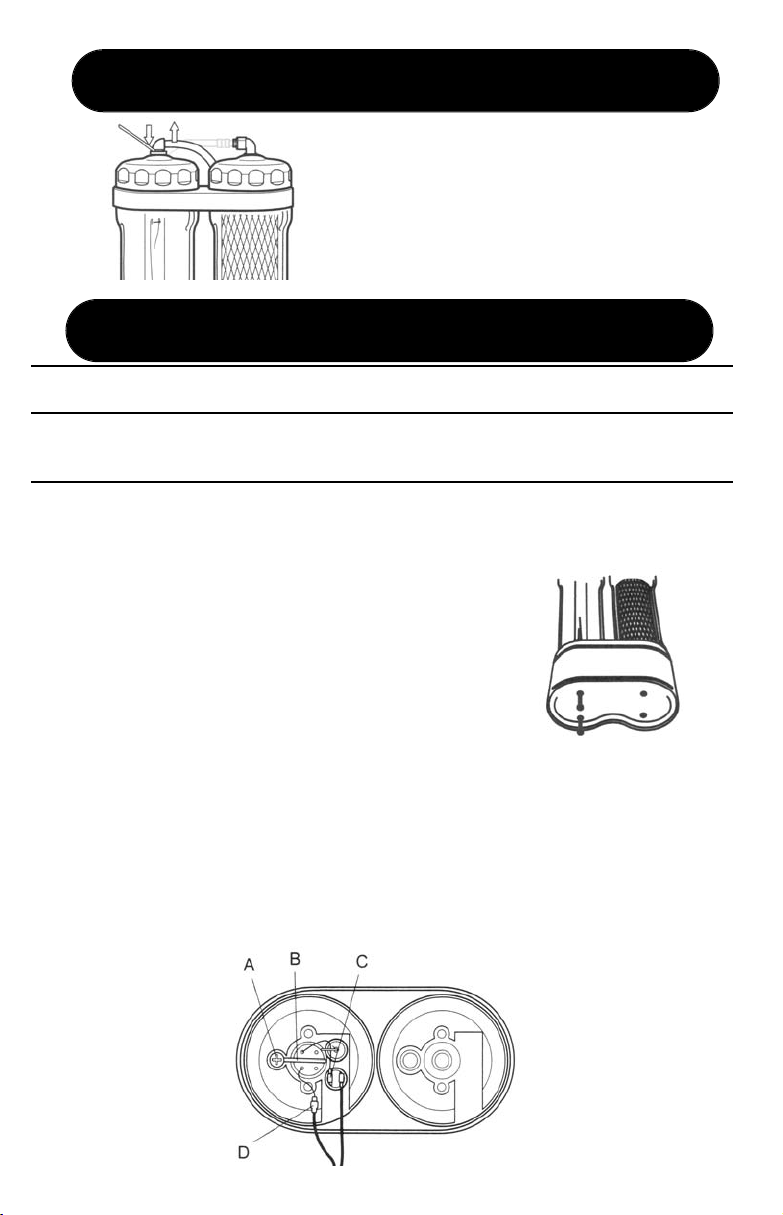
Removing the Filter Cap(s)
Maintaining your AQUA2000 will require the
removal of the filter chamber caps. To remove
a cap, disconnect the tubing by pressing down
on the connector collar using the included tool
while pulling up on the tubing. Once the
tubing is disconnected, hold each chamber
securely with one hand while you unscrew its
cap with your other hand.
Changing the UV Lamp
It is recommended that you contact your authorized AQUA2000 distributor to
replace the UV lamp when it is no longer working, or every two years.
WARNING: To prevent electrical shock, unplug the power supply from the
electrical outlet. DO NO
NO ELECTRICITY GOING TO THE SYSTEM.
1. Disconnect the tubing from the top and bottom of the system. Remove the
unit from the wall mounts if applicable. Lay the system down horizontally.
2. Using a Phillips head screwdriver, remove the four
screws located on the bottom of the unit.
3. Slide the bottom cup off the unit.
4. Remove the screw (A) and the retainer wire (B)
5. Disconnect the two wire connectors (C) and (D)
coming from the lamp and gently slide the lamp out
of the system.
6. Carefully slide the replacement UV lamp into the
system holding it by the ceramic base only. Reconnect
the two wire connectors (C) and (D).
7. Reinstall the retainer wire (B) back into its original position
and tighten screw (A).
8. Replace the bottom cup and secure with screws. Do not overtighten screws.
9. Remount the system, reconnect the tubing and plug in the power adapter.
If the lamp does not illuminate, contact your authorized local service center. Do
not use the system until the lamp is functioning properly. You can find your local
service center by visiting www.rppurchase.com or by calling 1-866-786-8946.
OCEED BEFORE MAKING SURE THERE IS
T PR
Page 8

Questions and Answers
Q. I changed the filter and now I have a leak?
A. If your AQUA2000 unit develops leakage around the cap, simply remove
the cap, reseat the o-ring (C), and carefully replace the cap.
Refer to “Removing the Filter Cap(s)” and “Changing the Filter”.
Q. The UV light does not turn on?
A. The filter may need to be changed (a minimum water pressure of 15 psi is
required). Make sure you have it plugged into a working outlet. If attached
to a GFI, the GFI might need to be reset. If none of the above works, please
contact your local service center for assistance. You can find your local
service center by visiting www.rppurchase.com or by calling 866-786-8946.
Q. Does the filter remove fluoride?
A. The filter does not remove fluoride. There are very few filters that do; and
they only work for 100 gallons or so.
Q. Does the filter remove lead?
A. Lead in your water is reduced by over 99%.
Q. How often should I change my filter?
A. Expected filter life is 1 year or 1000 gallons. It is also recommended that you
replace your filter if it hasn’
t been used for over 2 weeks.
Q. I don’t feel up to changing my UV bulb, is there a local service center that
will do it for me?
A. Yes, and it is recommended. You can find your local service center by visiting
www.rppurchase.com or by calling 866-786-8946.
Q. Can the UV light damage my eyes or skin?
A. No, unless you try to operate the UV
bulb outside of the UV protective
chamber. The bulb chamber provides 100% UV protection.
7 4
A-3
Page 9

Q. Can I install the filter under my sink?
A. Yes, you will need to purchase the under counter kit. The installation
instructions will be included with the kit.
Q. Can I use a different brand post filter, such as the one from my local home
center?
A. It is not recommended to use any other post filters. Our filters are specially
designed for use with the AQUA2000. Using any other brand filters may
cause undesirable results and could void the warranty and certifications.
Q. How do I obtain parts or filters?
A. You can buy parts or filters through your local dealers or service centers. You
can find your local service center by visiting www.rppurchase.com or by calling
866-786-8946.
Q. Can I use the AQUA2000 with my RV, boat, etc.?
A. Yes, as long as the water pressure is 15min - 100max psi and you don’t have
to alter the AQUA2000’
warranty.
Q. Can I use the AQUA2000 in a hotel room?
A. You can use the filter anywhere you have a power source and a standard faucet
that you can connect to without having to alter the
s design. Altering the AQUA2000 will void the
AQUA2000’s design.
Page 10

Warranty
WARRANTY:
SCI Resource Partners warrants this product, to the original purchaser or gift recipient, to be free from defects
in workmanship and materials under normal use and service, for a period of one year from the date of purchase.
LIMITATIONS:
ALL WARRANTIES IMPLIED BY LAW, INCLUDING THE IMPLIED WARRANTIES OF MERCHANTABILITY AND FITNESS
FOR A PARTICULAR PURPOSE, ARE EXPRESSLY LIMITED TO THE DURATION OF THE WARRANTY SET FORTH ABOVE.
Some jurisdictions do not allow limitations on the length of the implied warranty, so the above limitation may
not apply to you. IN NO EVENT SHALL SCI RESOURCE PARTNERS BE LIABLE FOR ANY INCIDENTAL OR
CONSEQUENTIAL DAMAGES, LOSS OF PROFIT, OR MEDICAL EXPENSES CAUSED BY ANY DEFECT, FAILURE,
MISUSE, OR MALFUNCTION OF THE PRODUCT.
Some jurisdictions do not allow the exclusion of limitation of incidental or consequential damages, so the above
limitation or exclusion may not apply to you. The Company will not be responsible for damages or losses, direct
or indirect, caused by misuse, abuse, accident, negligence, conditions of transportation or storage, or failure to
follow instructions. The Company will not be responsible for any statements that are made or published, written
or oral, that are inconsistent with this written warranty, or which are misleading or inconsistent with the facts
as published in the literature or specifications by the Company.
WARRANTY RESTRICTION:
This warranty is invalid if the factory-applied serial number has been altered or removed from the product.
WARRANTY CLAIM PROCEDURE:
To obtain warranty service customer must:
1) Provide proof of purchase in the form of a Bill of Sale or receipted invoice, evidence unit is within the warranty
period.
2) Contact the Dealer you purchased your equipment from.
If the original order was shipped from our facility within 30 days, SCI Resource Partners will pay shipping both ways.
Within 31-60 days the customer will pay shipping charges back to the point of purchase for repair or replacement.
SCI Resource Partners will pay for return shipping to the customer.
After 61 days the customer will be responsible for shipping expenses incurred both ways.
If the original order was purchased from a local dealer, return to your local dealer for service.
EXTENDED WARRANTY:
Within 30 days from date of purchase customer will have the option of purchasing extended warranty coverage
through their Authorized local Service Center.
For more information, or for assistance, please call or write:
Resource Partners
Whipple Ave NW
7800
North Canton, OH 44720
9 2
1-866-786-8946
A-2
Page 11

Suarez Corporation Industries
Resource Partners
7800 Whipple Ave. NW
North Canton, Ohio 44720
Please clip and return the
warranty card below.
Please Clip and return warranty card below
SCI Resource Partners’ Warranty Registration
Please return this card within 30 days of purchase to
activate your warranty. Thank You.
E-mail Address _________________________@ ____________________
Firstname _________________ M.I. _____ Lastname ________________
Street ______________________________ Apt.# ____________________
City ____________________ State _________ Zip code _______________
Model purchased ______________ Serial# __________________________
Date of purchase: ______________
Name of Representative or Service Center __________________________
Are you interested in your own Distribution Business? Yes____ No _____
Phone : _____-_____-_______ Best time to contact you _______________
Place of Purchase: ________________
Page 12
Suarez Corporation Industries
Resource Partners
7800 Whipple Ave. NW
North Canton, Ohio 44720-6928
1-866-786-8946
www.rppurchase.com
©2006 SCI B-6280 BR7242R-1 A-1
Suarez Corporation Industries
Resource Partners
7800 Whipple Ave. NW
North Canton, Ohio 44720-6928
First-Class
Postage
Required
Post Office
will not deliver
without proper
postage.
 Loading...