

Page 1
ADVANCED COUNTERTOP DRINKING WATER APPLIANCE
Installation, Operation and Maintenance Manual
Page 2

TABLE OF CONTENTS
INSTALLATION, OPERATION AND MAINTENANCE MANUAL
This manual provides the necessary consumer information for the hook-up, daily use and maintenance
of the PURIST countertop drinking water appliance. Refer to enclosed warranty and operating param-
eters to ensure proper use with your water supply. Save manual for future reference. Please read
carefully before proceeding with installation. Your failure to follow the instructions or operating
parameters may lead to the product’s failure and possible damage to property. Refer to enclosed
warranty and operating parameters to ensure proper use with your water supply.
Congratulations! . . . . . . . . . . . . . . . . . . . . . . . . . . . . . . . . . . . . . . . . . . . . . . . . . . . . . . . . 3
General Information and Component Identification . . . . . . . . . . . . . . . . . . . . . . . . . . 4
Required Operating Specifications – Water Supply. . . . . . . . . . . . . . . . . . . . . . . . . . . 6
Performance Specifications . . . . . . . . . . . . . . . . . . . . . . . . . . . . . . . . . . . . . . . . . . . . . . 6
Component and Feature Description. . . . . . . . . . . . . . . . . . . . . . . . . . . . . . . . . . . . . . . 7
Set Up and Operating Instructions . . . . . . . . . . . . . . . . . . . . . . . . . . . . . . . . . . . . . . . 10
Maintenance and Servicing. . . . . . . . . . . . . . . . . . . . . . . . . . . . . . . . . . . . . . . . . . . . . . 13
Frequently Asked Questions. . . . . . . . . . . . . . . . . . . . . . . . . . . . . . . . . . . . . . . . . . . . . 17
Appendix . . . . . . . . . . . . . . . . . . . . . . . . . . . . . . . . . . . . . . . . . . . . . . . . . . . . . . . . . . . . . 19
Advanced Service . . . . . . . . . . . . . . . . . . . . . . . . . . . . . . . . . . . . . . . . . . . . . . . . . . . . . . 20
Replacement and Spare Parts List . . . . . . . . . . . . . . . . . . . . . . . . . . . . . . . . . . . . . . . 21
Exchanges . . . . . . . . . . . . . . . . . . . . . . . . . . . . . . . . . . . . . . . . . . . . . . . . . . . . . . . . . . . . 22
Service Record. . . . . . . . . . . . . . . . . . . . . . . . . . . . . . . . . . . . . . . . . . . . . . . . . . . . . . . . . 22
Contacting Customer Service . . . . . . . . . . . . . . . . . . . . . . . . . . . . . . . . . . . . . . . . . . . . 23
Limited Warranty . . . . . . . . . . . . . . . . . . . . . . . . . . . . . . . . . . . . . . . . . . . . . . . . . . . . . . 23
Water & Wellness Solutions, Inc. • Fax 888-551-1298 • [email protected]
For all customer service inquiries see page 23.
2
Page 3
CONGRATULATIONS! You are about to enjoy the
ADVANCED COUNTERTOP DRINKING WATER APPLIANCE
benefits of the most effective and versatile
drinking water appliance available today…
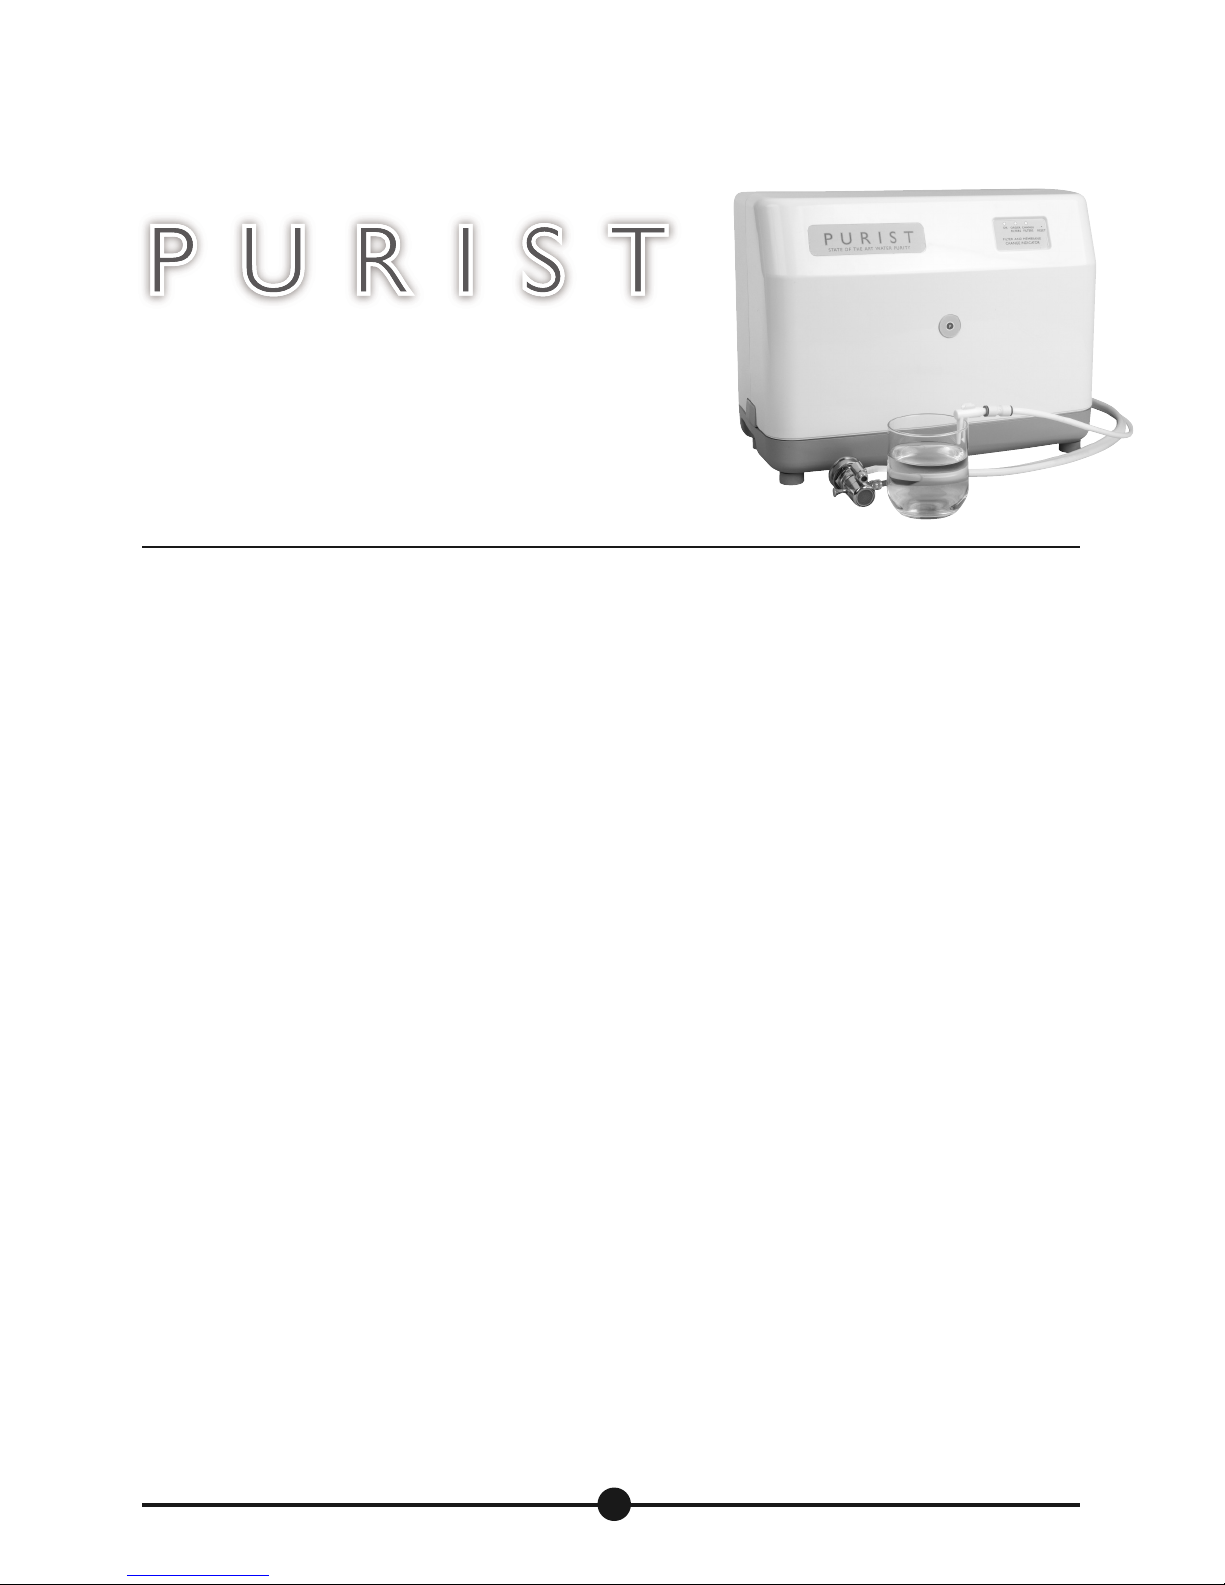
As the PURIST name suggests, the scientifically based, no-frills design of this Point of Use (POU)
drinking water appliance is responsible for its extraordinary performance and versatility. When it
comes to significantly reducing virtually all categories of tap water contaminants, the PURIST is
without equal. Discriminating consumers and those who are seeking health, wellness and healing,
will appreciate the PURIST in supporting their goals.
The PURIST offers a four-stage (three cartridge) water purification system that incorporates the
following essential water treatment technologies to achieve the first responsibility of any drinking
water system – a significant reduction of every category of tap water impurity and contaminant.
• Sediment particle filtration to 5 microns (#1 PREFILTER)
• Activated carbon (AC) adsorption and REDOX (#1 PREFILTER)
• Reverse Osmosis (RO) membrane separation (#2 RO MEMBRANE)
• Coconut-shell activated carbon (AC) adsorption (#3 POSTFILTER)
The PURIST also incorporates two electronic monitors to provide valuable information to the user.
advises
One
other digitally displays the actual
when to replace the filters and RO membrane using red, yellow and green LED’s. The
performance
of PURIST’s key component, the RO membrane.
The PURIST does not incorporate any storage tank, which assures a consistently higher standard of
chemical and biological purity than other conventional systems using advanced RO and AC technology.
We consider this feature an
essential
especially infants, the elderly and those diagnosed auto-immune diseases.
To protect the exceptional purity of the water processed by the PURIST we recommend it be stored
exclusively in glass containers. For longer-term storage we advise that the water be refrigerated
until the day of use.
The PURIST can also be supplied with an optional pump & emergency kit that enables it to treat non-
pressurized sources of water (e.g. a swimming pool). This makes the PURIST suitable for emergency
and survival situations (www.purative.com).
benefit to those who may already be immuno-compromised,
3
Page 4
GENERAL INFORMATION AND COMPONENT IDENTIFICATION
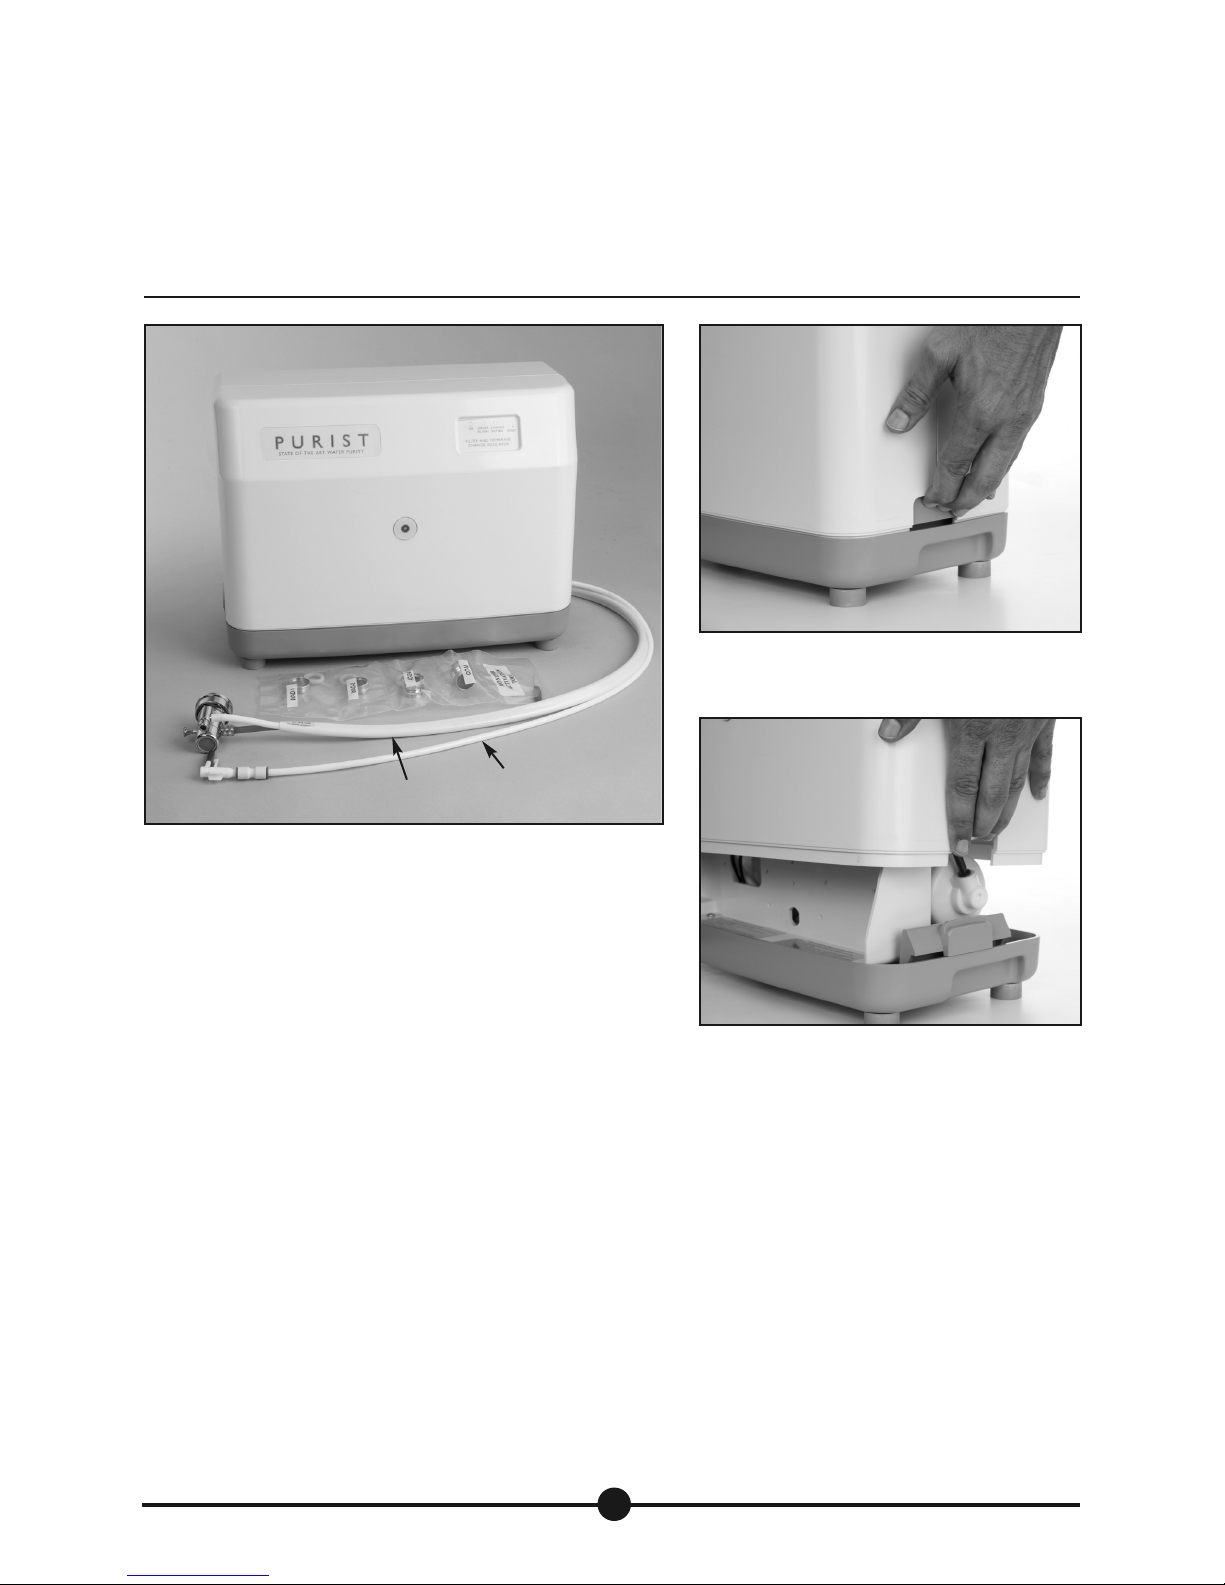
Fig. 2a. Press on Both Latches
Pure Water
Main Hose
Tube
Fig. 1. Photo of PURIST with Parts
Unpack the PURIST and Check Parts (Fig. 1)
If you notice any visible damage to the shipping container,
please notify the shipper and the person/company from
whom you purchased your PURIST system. It is helpful
to take a picture of the damaged box.
Compare parts found in the box with the photo above
and/or the parts list at the back of the manual. If any
parts are missing or damaged, please notify Purative
Customer Service at [email protected].
Lifting and Moving the PURIST
Always lift the PURIST appliance with both hands using
the indentations in the gray base. Do not attempt to lift
the unit from the cover itself or the cover latches. This
may cause the premature unlocking of the cover latches,
leading to damage.
Fig. 2b. Lift Cover Straight Up
Removing the PURIST Cover (Fig. 2a, 2b)
Firmly and simultaneously press in on
both
latches located at each end of the
base and lift the cover straight up and off.
Set the cover aside on the counter.
Remove the cardboard spacer and store
with the original box. To replace the cover,
place it over the base assembly (making
sure it is aligned properly with the base)
and press down firmly until the latches
snap shut on both sides.
4
Page 5
BECOMING FAMILIAR WITH THE COMPONENTS
C
B
A
D
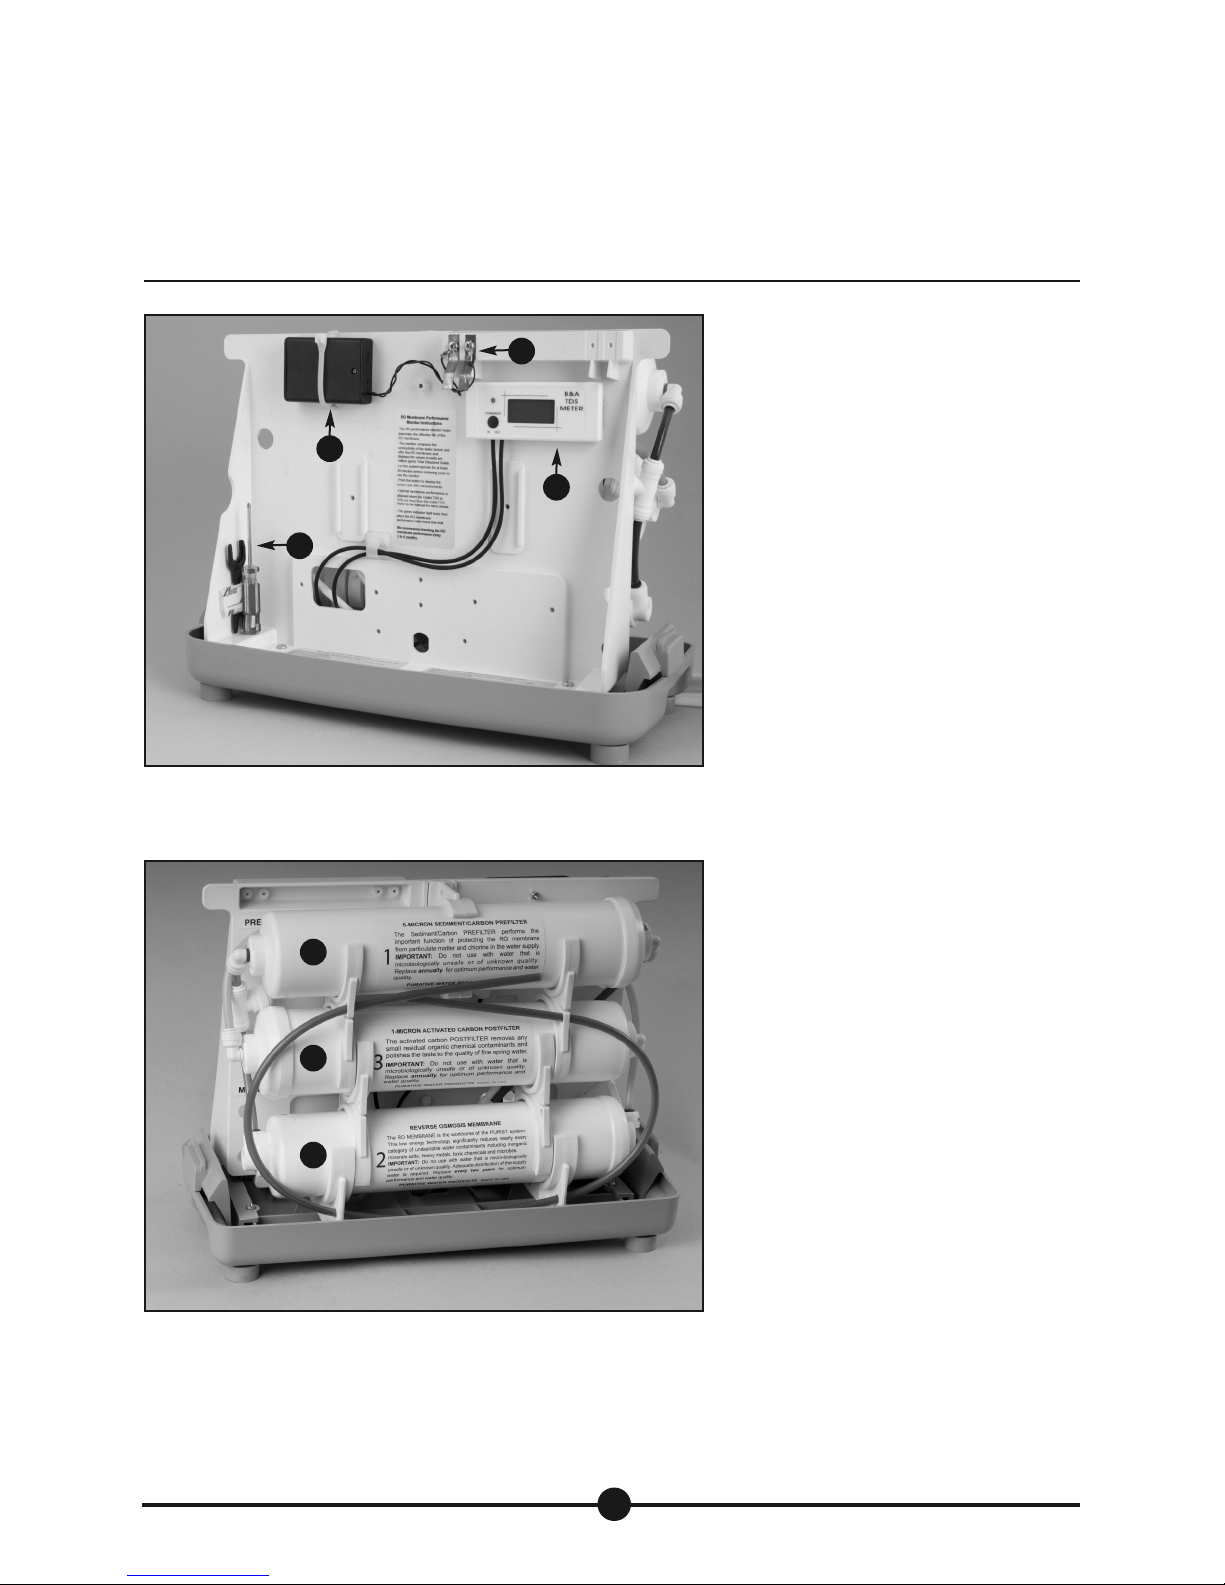
Fig. 3a. Under the Cover (Front)
E
A:Water Quality Monitor
B:Battery Holder
C:Battery Contacts
D:Tools
F
G
Fig. 3b. Under the Cover (Back)
E: Prefilter #1 Cartridge
F: Postfilter #3 Cartridge
G: RO Membrane #2 Cartridge
5
Page 6

REQUIRED OPERATING CONDITIONS – WATER SUPPLY
Water Pressure: 40 psi to 85 psi (2.7 to 5.8 BAR)
Water pressure determines pure water production rate. Higher pressure - more water production.
Lower pressure - less water production.
o
Water Temperature: 40
Water temperature determines pure water production rate. Higher temperature – more water
production. Lower temperature – less water production. CAUTION: Water temperature exceeding
o
F (43oC) will damage the membrane.
110
IMPORTANT! The PURIST unit must NOT be exposed to freezing temperatures. Freezing of the
filter and membrane components will result in permanent damage and water leakage. Evidence
of freezing will void the warranty.
F to 85oF (4oC to 30oC)
Total Dissolved Solids (TDS): Tap water supplied to the PURIST should be
•
NOTE: Virtually all US public water supplies in the US are less than 1000 ppm TDS
•
NOTE: Higher TDS water supplies (>1000 ppm) require higher water pressure to give satisfactory performance
less than
2000 ppm (mg/l) TDS.
from the RO membrane. The pressure should be at least 30 psi (1.7 BAR) greater than the TDS/100*.
•
NOTE: The tap water TDS is the reading on the left-side of the Water Quality Monitor display.
Water Iron Level: Less than 0.3 ppm (mg/l) as total iron.
Water Microbial Quality: Source must be a public
potable
water supply free of microbial contamination.
For survival/emergency use on water of unknown microbiological, follow the instructions that are
included in the optional pump kit.
PERFORMANCE SPECIFICATIONS
Pure Water Production Rate: Nominally, 1 to 2 gallons per hour (25 to 40 gallons in a 24 hour period)
at typical municipal water supply pressures and temperatures (e.g. 40 - 75 psi water pressure and
o
40 - 85
effects at different pressures and temperatures)
Water Purity: The PURIST’s superior combination of water treatment technologies is unmatched for
producing drinking water free of harmful levels of contaminants. Virtually every category (heavy
metals, fluoride, pesticides, hydrocarbons, disinfection by-products (DBP’s), radionuclides, etc.) is
significantly reduced by the PURIST’s proven combination of technologies.
F (25oC) water temperature. (See REQUIRED OPERATING CONDITIONS above for performance
6
Page 7
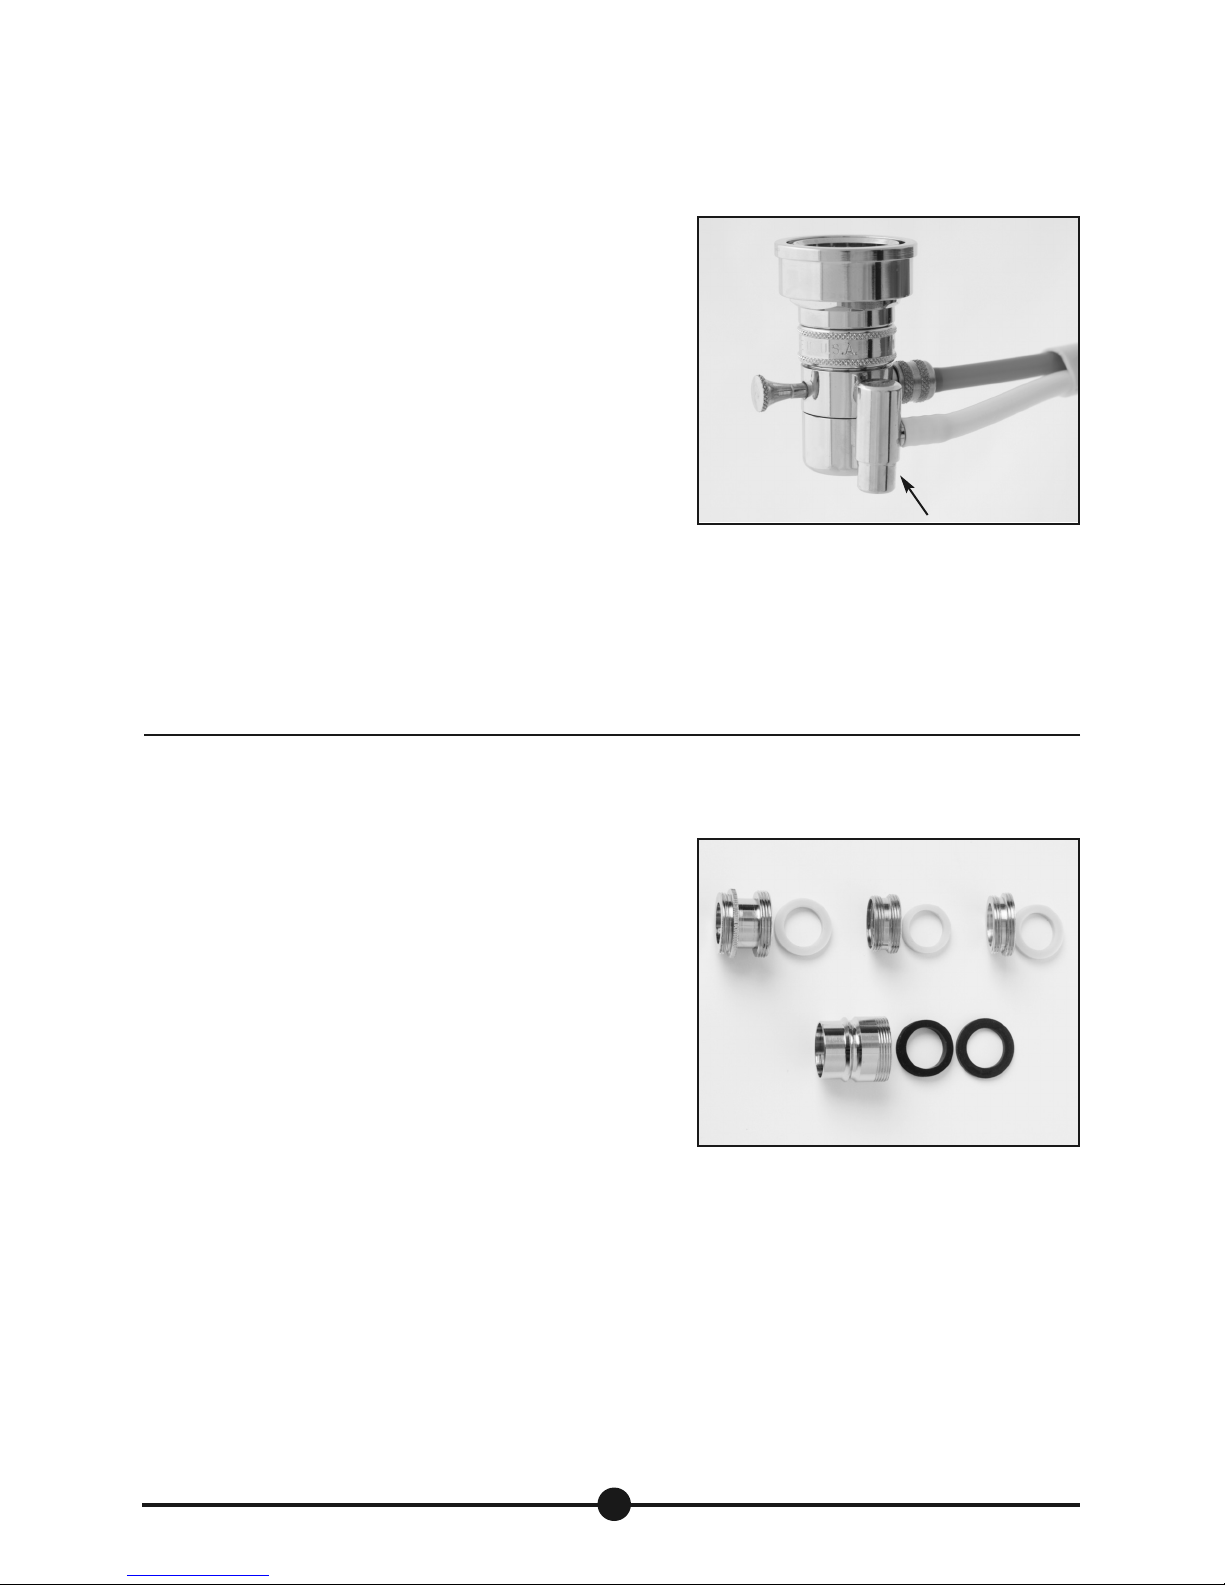
Membrane Rinse Water Flow: The RO rinse water performs
the critical function of continuously transporting impurities
away from the surface of the membrane so it remains clean
and effective for a long period of time (typically two or more
years). This is one of the great advantages of RO technology.
The rinse water flows into the sink drain from the outlet
on the Quick Connect (QC) Faucet Attachment (see Fig. 4)
at the rate of about 3 to 6 gallons per hour depending on
water pressure.
•
NOTE: For the conservation-minded, the rinse water usage
can easily be compensated by incorporating inexpensive
water reduction measures such as faucet and shower
Fig. 4 Rinse Water Outlet
restrictors and toilet dams, available on the Internet.
COMPONENT AND FEATURE DESCRIPTION
The main components the user will interact with are briefly described in this section. A replacement
parts list can be found at the back of the manual.
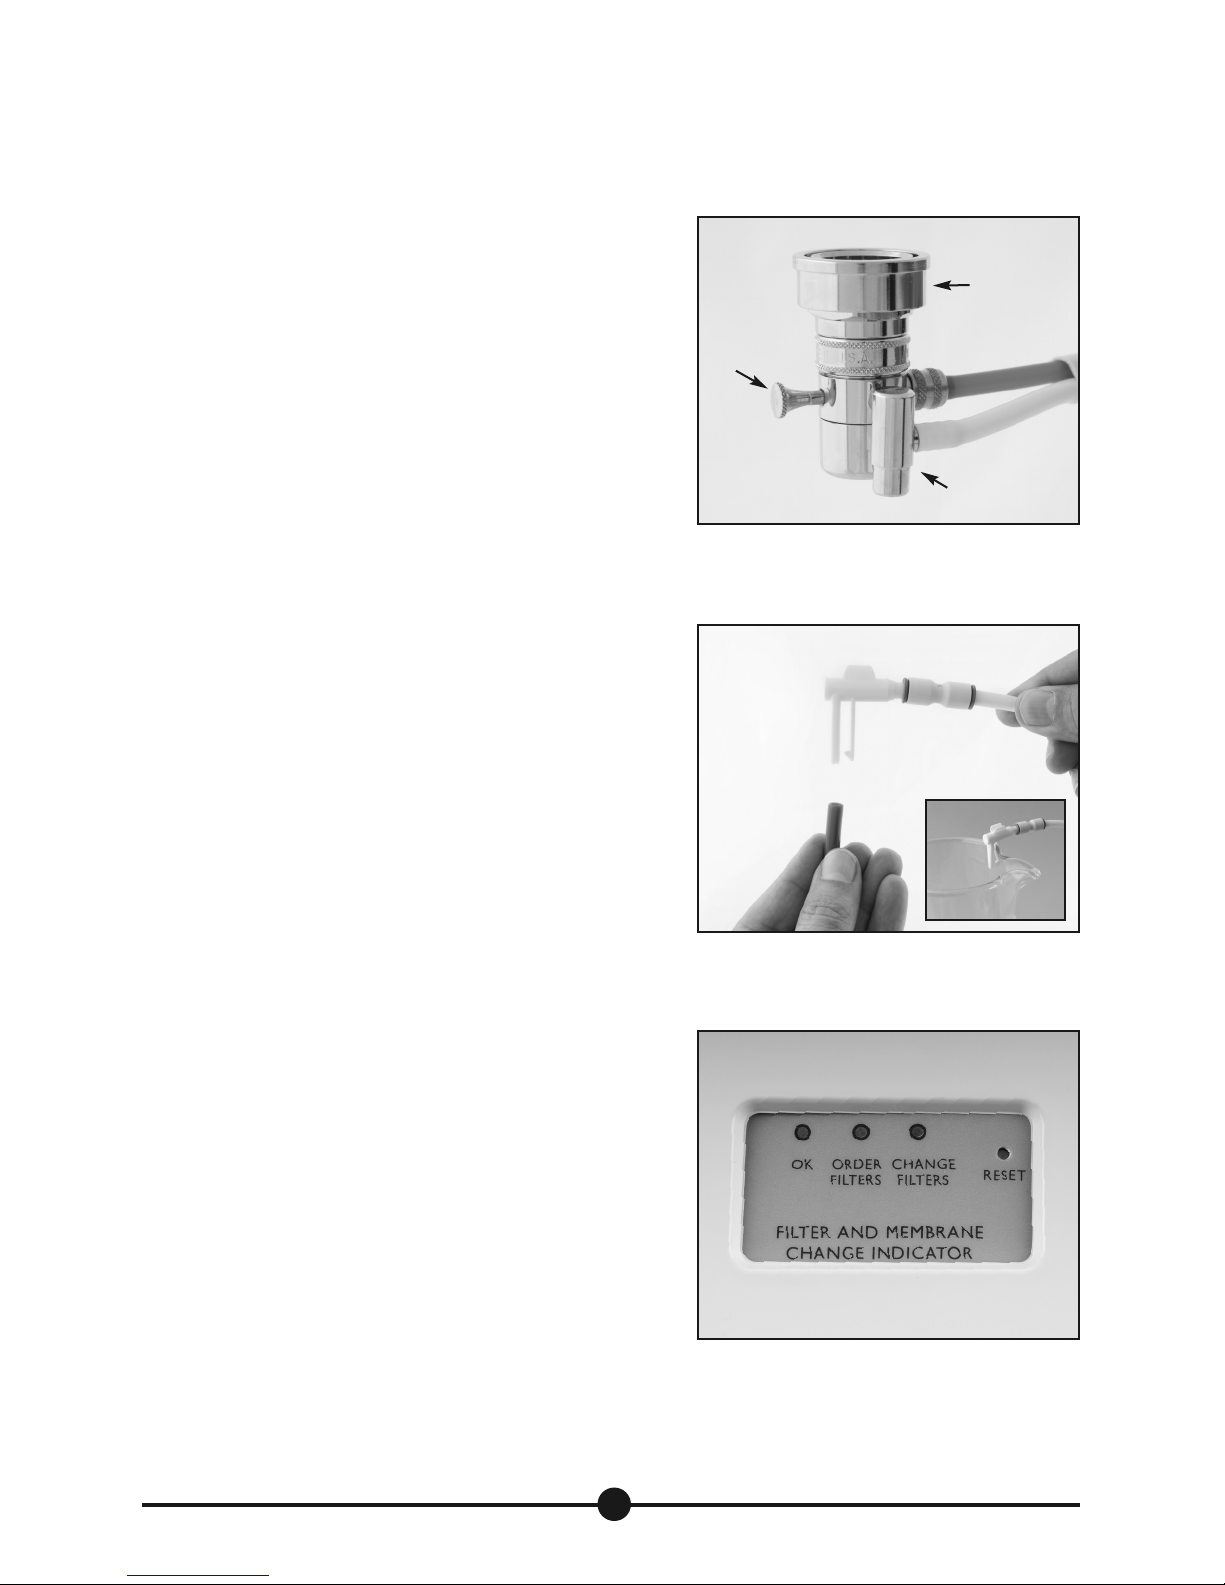
PURIST Quick Connect (QC) Aerator and Adapters
(Fig. 5)
This special PURIST QC Aerator (QC-M) replaces the existing
aerator on your kitchen faucet. It allows the QC Faucet
Attachment (Fig. 6) to easily connect and release from the
end of your faucet. A selection of various optional adapters
are provided which allow connecting the QC Aerator to
various faucet threads.
Adapters
AC24 WAD-2 WAD-1
QC Aerator
Fig. 5. QC Aerator and Adapters
7
Page 8
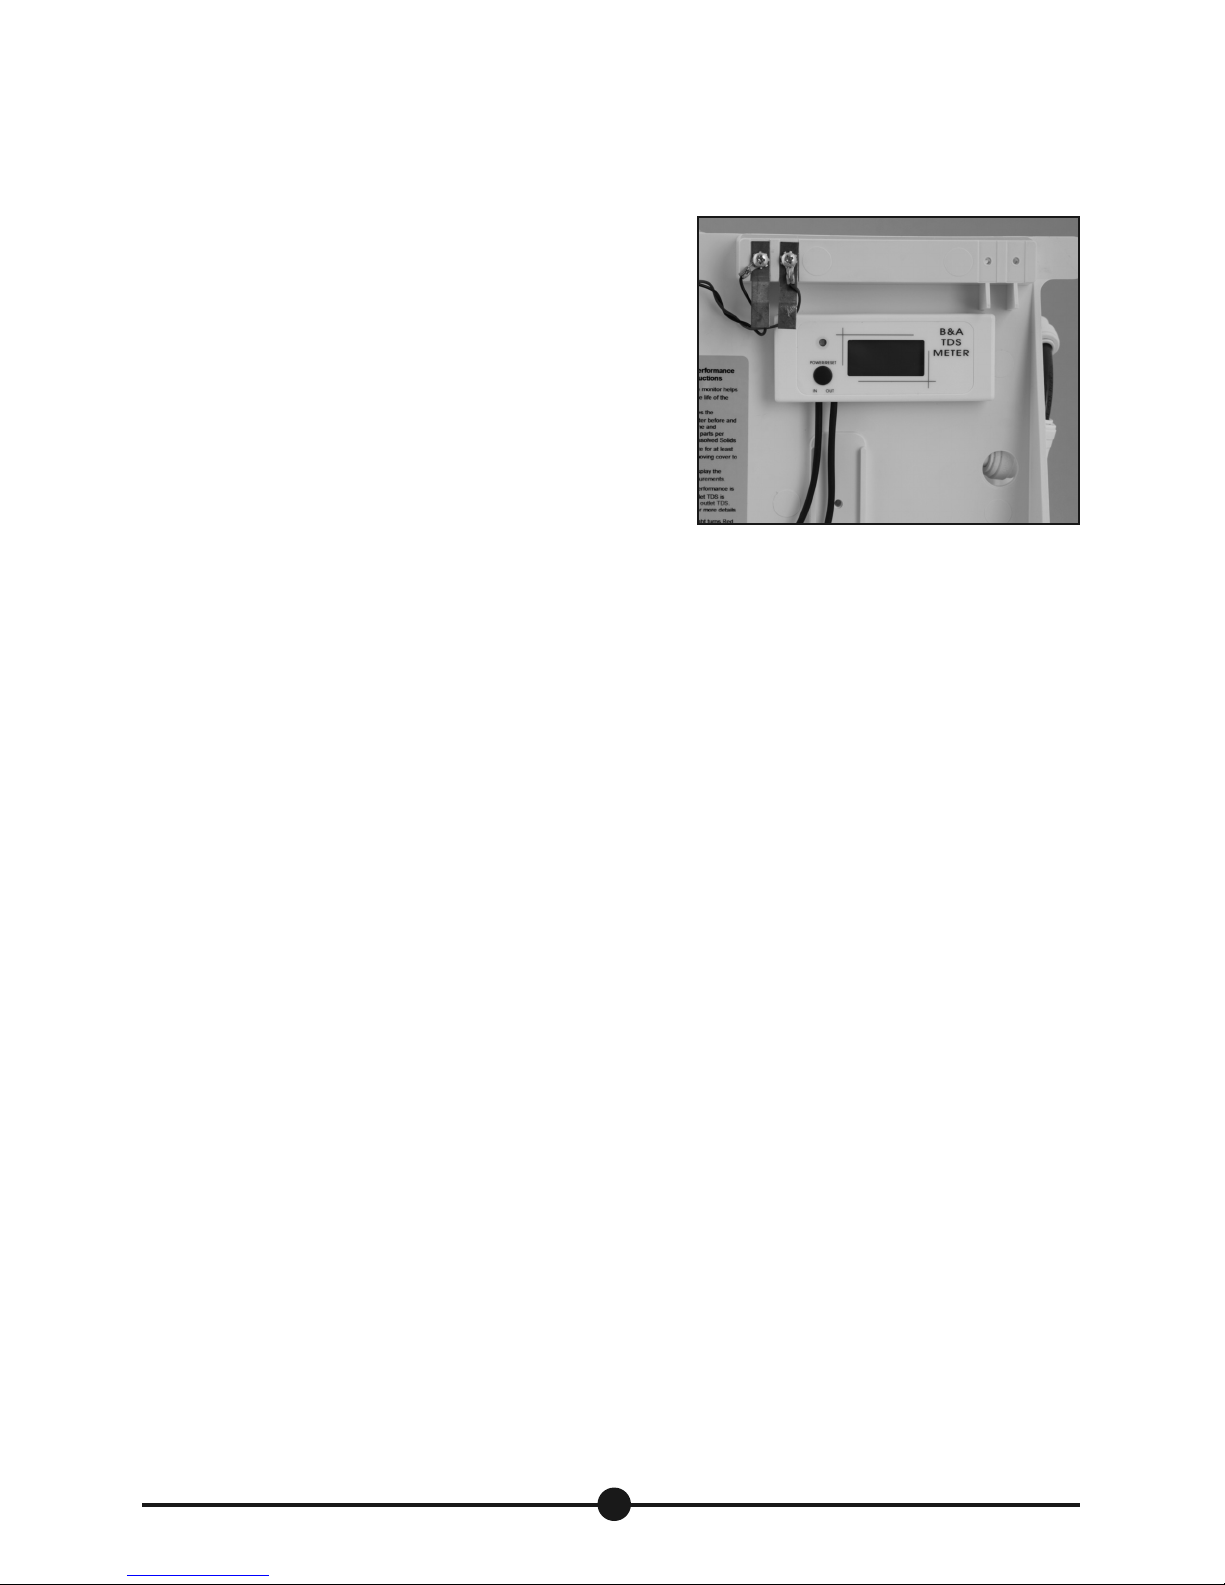
Snap Coupler (Fig. 6)
This convenient attachment allows the user to easily
connect the PURIST appliance whenever pure water is
needed. PURIST can even be taken with you to a vacation
home – just make sure you have an extra PURIST aerator
kit with you (See spare parts list to order).
Snap
Coupler
Diverter
Valve
Tap Water Diverter Valve
(Fig. 6)
This valve is built into the QC Faucet Attachment. When
pulled out fully, water flows into the PURIST system.
Rinse Water Outlet
(Fig. 6)
This outlet port is attached to the side of the QC Faucet
Attachment and allows the RO membrane rinse water to
flow into the sink. Make sure the drain is not blocked
when using the PURIST. This rinse water serves the critical
function of removing impurities and contaminants from
the RO membrane so you are not wasting water any more
then when you shower or wash clothes.
Pure Water Outlet: The Bottle-Clip
(Fig. 7)
The special Bottle-Clip secures the pure water outlet to
glass
the top edge of a clean
or non-toxic (BPA-free) plastic
carafe, bottle, jar or cup, which must be placed inside of
the sink when filling. Use the convenient rotating coupling
to adjust the clip position. There is also a protective blue
sleeve to keep the pure water outlet sanitary when not in
use. Take care to keep this tube away from dirt and contamination and regularly rinse it under a stream of hot water.
Rinse Water
Outlet
Fig. 6. QC Faucet Attachment with
Diverter Valve
Fig 7. Pure Water Bottle-Clip with
Blue Sleeve
Maintenance Indicator
(Filter and Membrane Change Indicator)
This electronic indicator is located on the upper right of the
PURIST cover and notifies the user of the filter and membrane
replacement status with flashing green, yellow and red LEDs.
Since the indicator is based solely on the elapsed time of
only
service it should serve
as a general guideline because
the water conditions can vary so widely depending on location.
On most large modern municipal water supplies the elapsed
time settings are very conservative and both the filters and
RO membrane can maintain their effectiveness up to 50%
longer than the programmed indicator settings.
(Fig. 8)
Fig 8. Maintenance Indicator
(Filter and Membrane Change Indicator)
8
Page 9
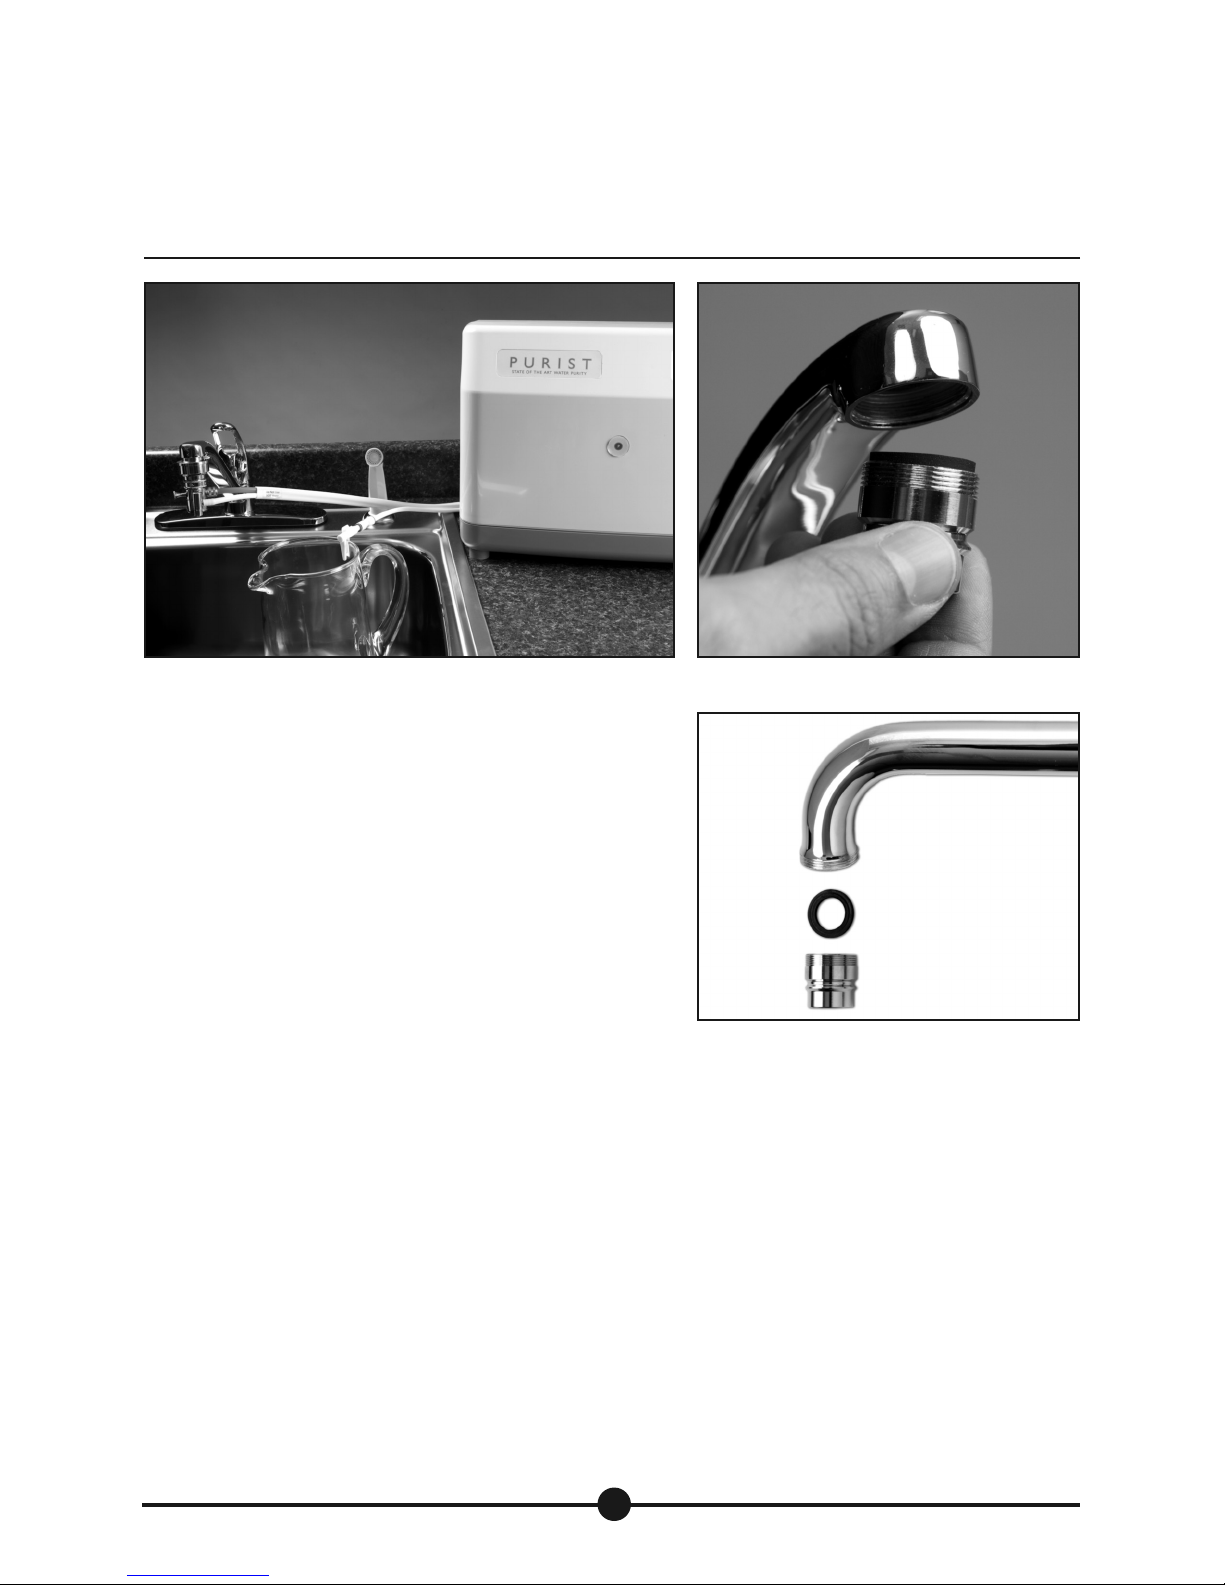
Water Quality Monitor (Fig. 9)
The PURIST incorporates an advanced digital water quality
monitor that
compares
the Total Dissolved Solids (TDS)
of the tap water IN with the processed water OUT. No
other competitive product includes this exacting tool for
measuring the RO membrane performance. Furthermore,
this monitor can serve as a true measure of when to
change the RO membrane, which can last up to 50% longer
than the two-year setting of the Filter and Membrane
Change Indicator.
Fig. 9. Water Quality Monitor
9
Page 10
SET-UP AND OPERATING INSTRUCTIONS
(outside thread
both washers)
Fig. 10. Typical PURIST Set-Up at Kitchen Sink
Fig. 11. PURIST QC Aerator
IMPORTANT: Always lift the PURIST with both hands from
the handholds in the base. Do not attempt to lift the unit
from the upper part of the cover or the latches. This may
cause the premature release of the cover latches resulting
in damage.
(inside thread
Countertop Placement. Place your PURIST system in a
one washer)
convenient spot on your kitchen counter to the left or right
of the sink so the QC Attachment hose does not restrict
the kitchen faucet’s range of motion.
Fig. 12. PURIST QC Aerator
Install the Special PURIST QC Aerator
(Figs. 11, 12)
1. Remove the regular aerator from the end of your faucet. (You may need to use a pair of pliers with
the jaws wrapped with tape).
2. Determine if any of the optional adapters (WAD-1, WAD-2 and AC-24) are required to attach the QC
Aerator (QC-M), which has threads on both the outside and inside to accommodate different faucet
designs. There are two black washers, one thin and one thick. If you use the internal threads you will
only use the thin black washer. If you use the external threads you will use both the thick and thin
washers. With the necessary adapter and washer(s) in place, thread on the QC Aerator to the right
(clockwise viewed from below) until it is tight. You may need to use a pair of pliers (jaws wrapped
with tape) to make a secure seal. Occasionally the threads on a faucet are worn and may drip water.
If this happens try wrapping some Teflon tape on the threads and remounting the aerator.
•
NOTE: It is rare that none of the adapters supplied fit your faucet. However, there are situations that
may need extra effort. One requires some other less common aerator adapter. The other is where the
10
Page 11
faucet aerator is attached to a pull-out sprayer that is built into the faucet spout. If the pull-out
sprayer cannot accommodate the QC Aerator, the only options are to a) relocate the PURIST to another
sink faucet (such as a wet-bar, laundry sink or bathroom), b) replace the faucet with a conventional
one with a separate sprayer or c) install an additional single-handle, single-temperature faucet on
the sink or counter exclusively for the PURIST (contact [email protected] for recommendations).
First Time Start Up
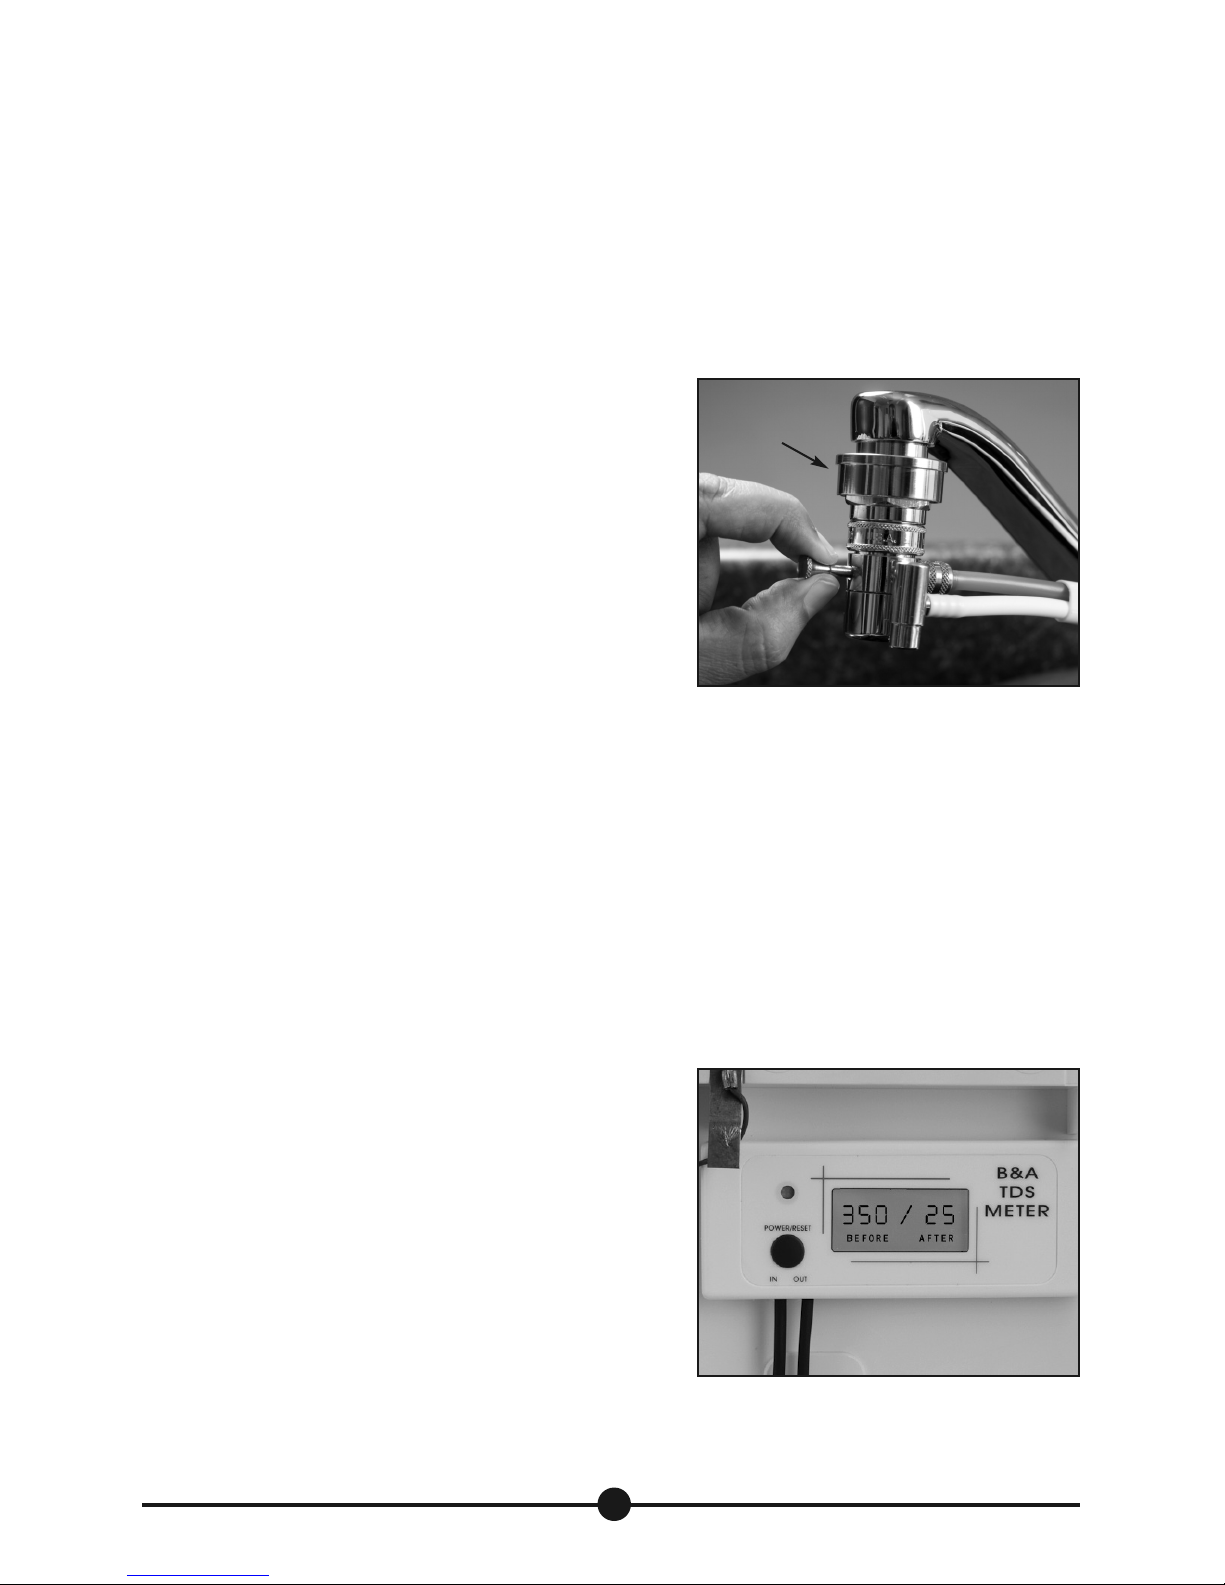
1. Grasp the QC Faucet Attachment at the end of the hose
(Fig. 13)
Snap Coupler
in the palm of your hand, hold down the Snap Coupler
and push it onto the QC Aerator. Release the Snap Coupler
and it should remain securely attached to the QC aerator.
2. Remove the blue plastic sleeve from the end of the
Bottle-Clip (failure to do this will result in pressure
building in the tube and ejecting the sleeve). Place the
Bottle-Clip on the edge of a container and place the
container in the sink. (See Fig. 10 above).
3. Slowly turn on the COLD water (Hot water can damage
the PURIST). You will observe tap water flowing from the
bottom of the QC Faucet Attachment. Now, carefully pull
out the Diverter Valve stem about 1/2" and hold while
Fig. 13. Pull out Diverter Valve Stem
to start cold water flow.
Never push in when the faucet is ON.
water starts flowing into the PURIST. Once the PURIST
is pressurized you can release the Diverter Valve stem and it will remain in the “out” position.
•
CAUTION: Once you have pulled the stem out, DO NOT force it back in while the PURIST is operating,
Always turn off the COLD water first and allow the stem to retract by itself.
4. Allow the PURIST to operate for at least one-hour. It’s OK if the container overflows into the sink.
Do not consume this water but it can be used for watering plants and household cleaning tasks.
•
NOTE: This procedure is
only required
for the initial start-up of a new PURIST and whenever new
cartridges are installed.
Using the Water Quality Monitor
With the PURIST still operating for at least one-hour,
remove the cover and set aside. Momentarily press the
red button to activate the Water Quality Monitor. Immediately two numbers will be displayed – the TDS of your
tap water on the left (“Before”) and the TDS of the PURIST
pure water on the right (“After”). If the values represent
greater than
80% TDS rejection the green light will illuminate. With daily operation we recommend the Water
Quality Monitor be checked about every 3-4 months to
verify RO Membrane Performance. (See APPENDIX to
determine how to calculate the exact TDS rejection.)
(Fig. 14)
Fig. 14. Water Quality Monitor “ON”
Button, Green LED and TDS Readings
11
Page 12
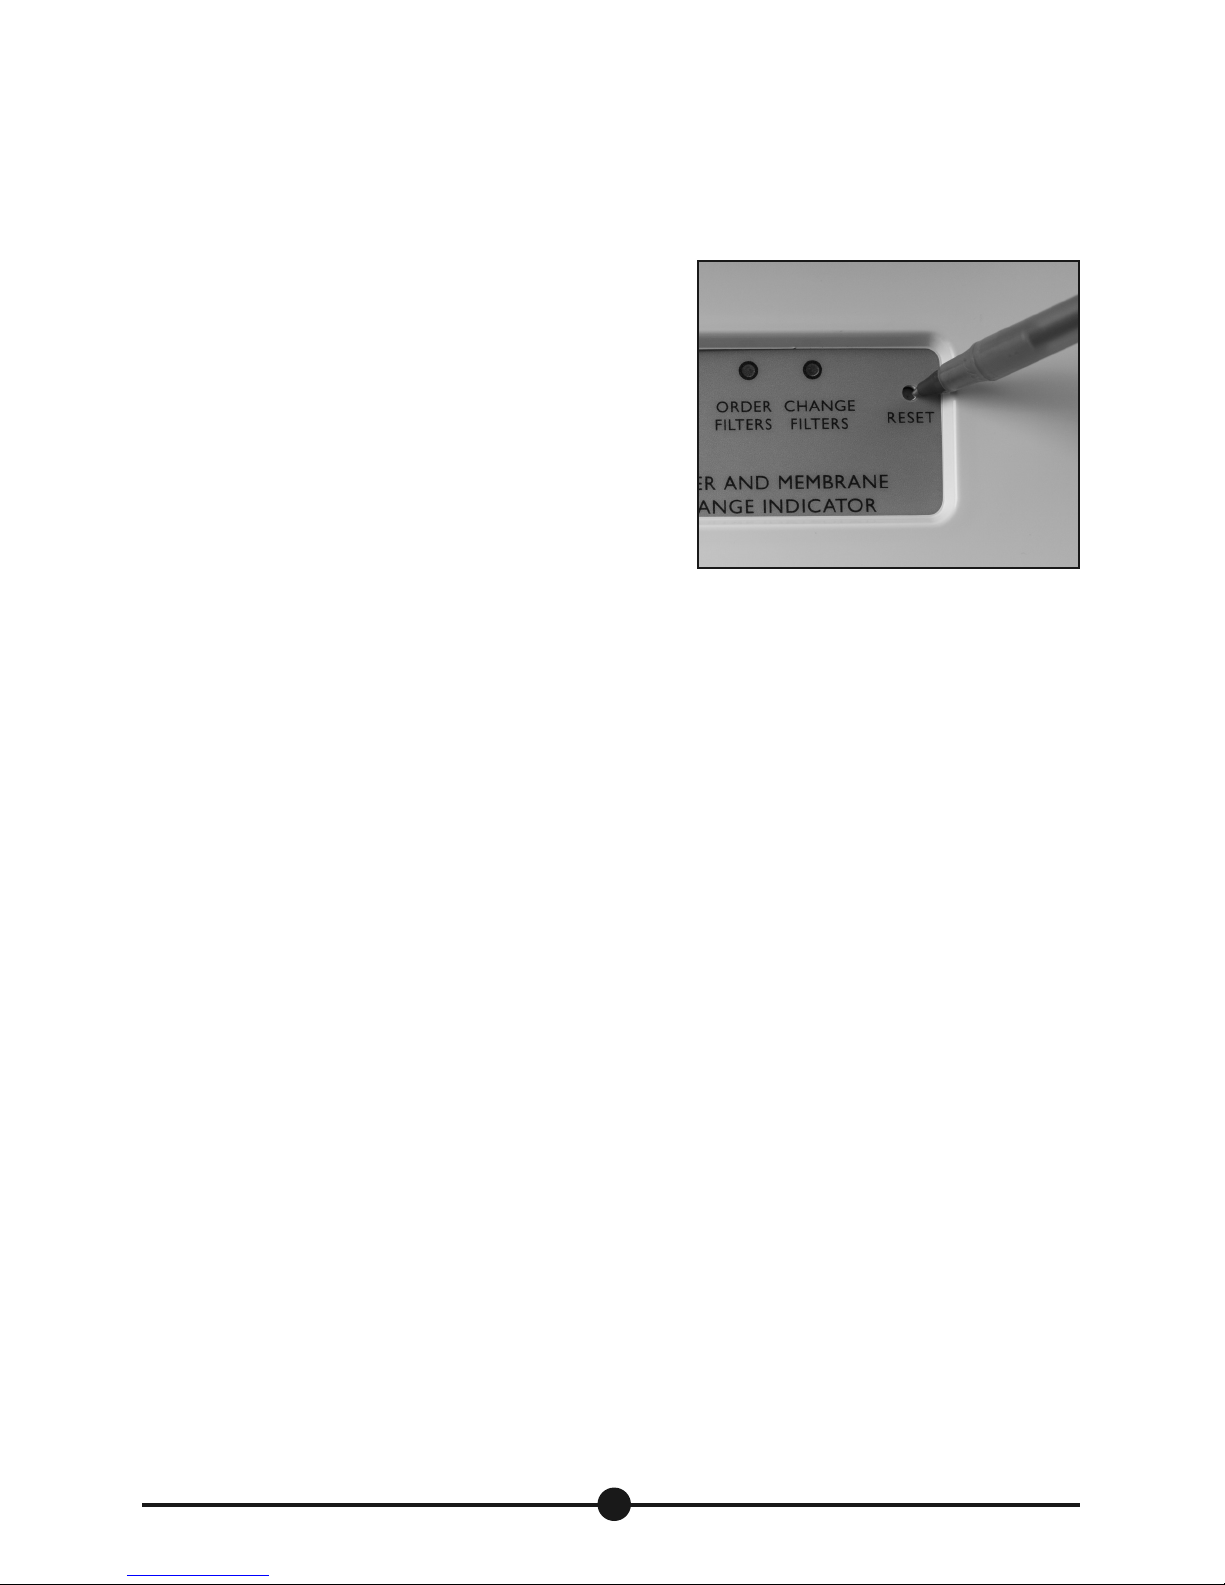
AWAKEN the Maintenance Indicator (Filter and Membrane Change Indicator) (Fig. 15)
1. Carefully put the PURIST cover back in place, making
sure to align it properly.
2. The PURIST is shipped with the Filter and Membrane
Change Indicator in the SLEEP MODE. Awaken (AWAKE
MODE) the Indicator by inserting the end of the Activation Tool (supplied in the parts bag or use a ball-point
pen) into the hole above the words “RESET” and quickly
once
pressing
. The three lights will flash in succession,
then the green light will flash every 10 seconds for the
next 11 months. After 11 months the yellow light will
flash to notify the user that replacement cartridges
should be on hand for replacement in 30 days. (See
APPENDIX for more detailed information)
Fig. 15. Awaken the Maintenance
Indicator (use activation tool provided or
ball point pen).
Daily Use
For regular daily usage, allow the processed water to flow
into the sink for a few minutes before collecting water. This assures the very highest quality drinking
water. Securely attach the Bottle-Clip to a suitable container, preferably glass. Remember, always
place the container in an open sink with the drain unobstructed. When you are finished operating
the PURIST, replace the protective sleeve on the end of the Bottle-Clip to keep it sanitary.
12
Page 13
MAINTENANCE AND SERVICING
Exterior and Interior Surface Cleaning
Minimal work is required to keep the PURIST in perfect operating condition. As with any home
appliance we recommend keeping the unit clean both externally and internally. Use a clean soft nonscratch cloth and a mild, non-toxic household surface cleaner to wipe down the exterior surfaces.
The internal surfaces and components remain protected most of the time. When the cover is removed
simply spot clean any dust that may have accumulated. If for any reason moisture accumulates
inside the PURIST, always dry the area thoroughly and inspect for leaks.
#1 PREFILTER and #3 POSTFILTER Cartridge Replacement – Yearly Maintenance*
When the red indicator light is flashing, it is time to replace
your #1 PREFILTER and #3 POSTFILTER cartridges so you can
continue to enjoy the highest quality drinking water possible.
* The actual usable life of the #1 PREFILTER and #3 POST-
FILTER cartridges is impossible to determine accurately
due to the variations of the public water supply. Modern
municipal water plants typically provide water that is
clean enough to allow these cartridges to last longer
than the 12 month setting programmed into the Maintenance Maintenance Indicator* (see APPENDIX).
Prefilter and Postfilter Cartridge Change Procedure
(top two cartridges)
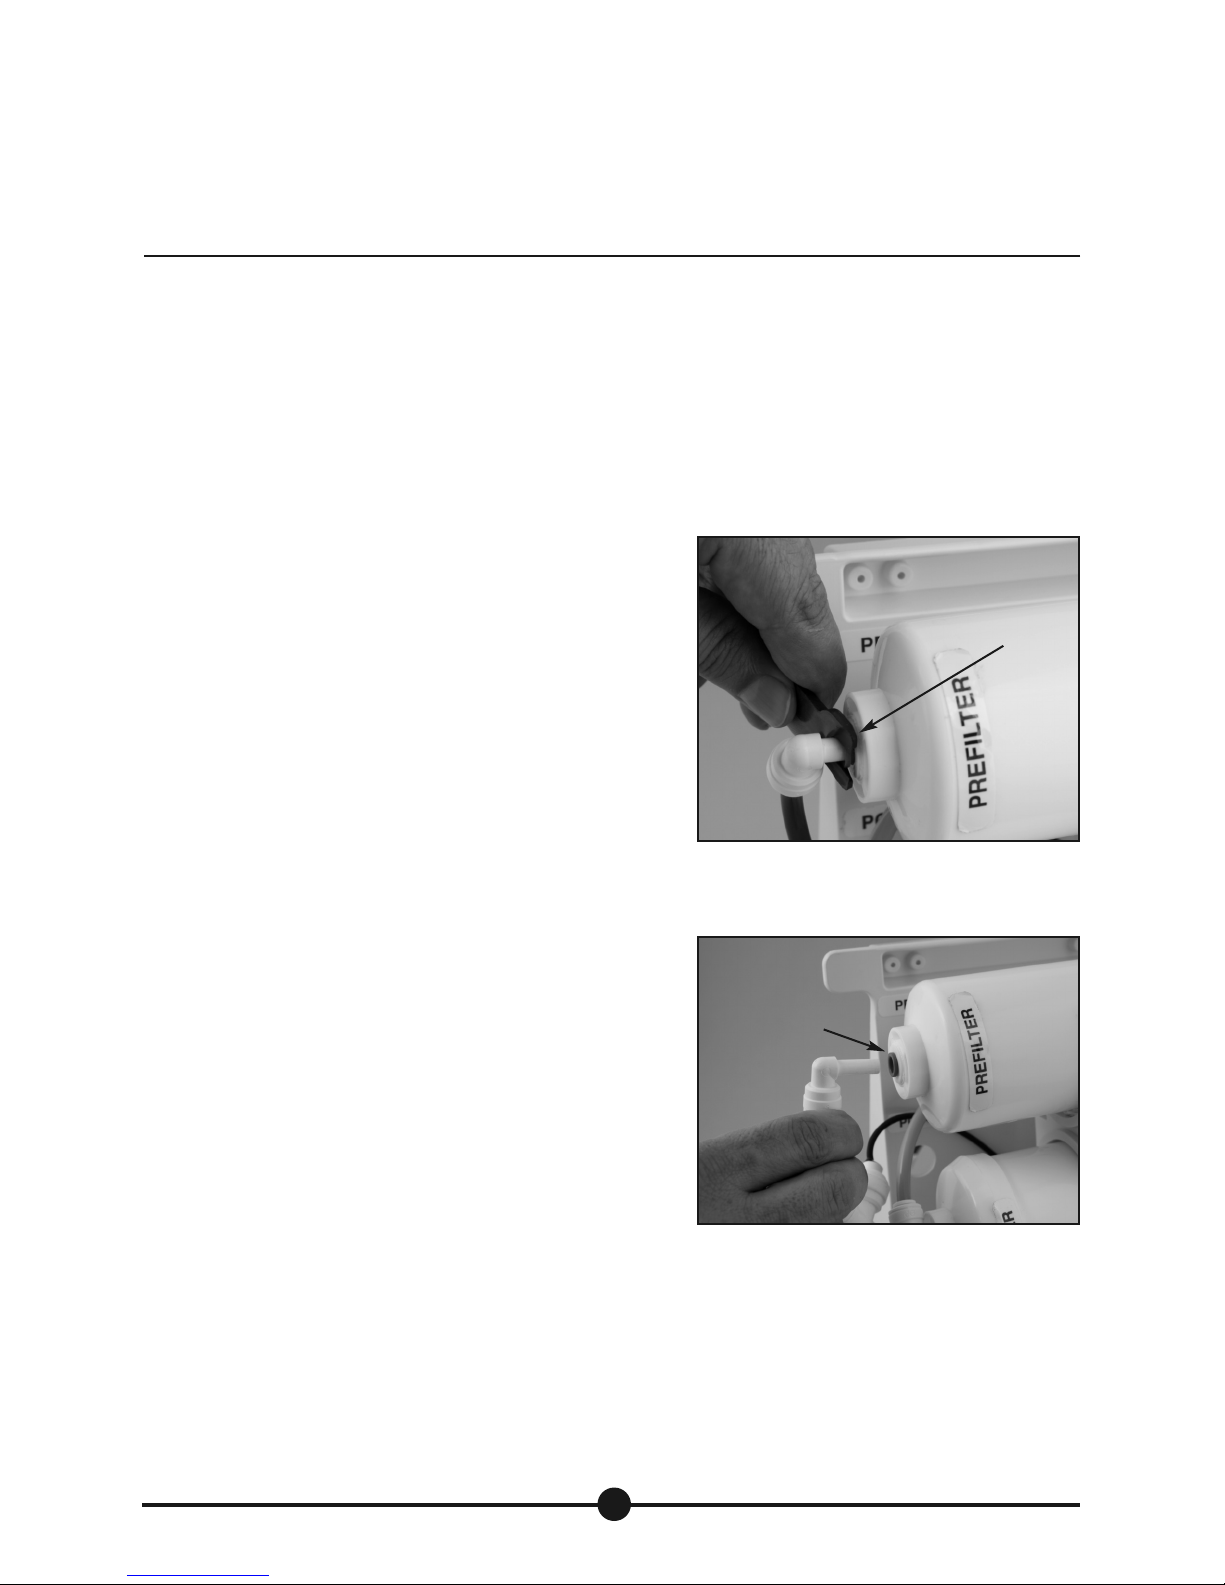
Fig. 16. Use tool to press against blue
Tube-Keeper and then gently pull elbow.
1. Disconnect the QC Faucet Attachment from the faucet;
place in the sink to catch water that may drain out.
2. Remove the PURIST cover.
3. Remove the ends of the red RO membrane fast-flush
Blue
Tube-Keeper
tubing from the upper cartridge clips.
4. Access the cartridges. The top cartridge is the #1
PREFILTER and the second is the #3 POSTFILTER (The
bottom cartridge is the #2 RO MEMBRANE).
(Figs. 16, 17, 18, 19)
Blue
Tube-Keeper
(behind tool)
5. With the cartridges still held in place by the mounting
clips, you are now ready to remove the fittings from the
cartridges of #1 PRETFILTER and #3 POSTFILTER at each
filter end. Firmly press the small end (flat side) of the
black plastic tubing release tool (located inside the front
of the PURIST)
against
the outermost side of the blue
and white tube-keepers while carefully pulling the plastic elbow fitting from the cartridge end.
Repeat this procedure for the top two cartridges (4 fittings).
•
NOTE: You may also press in the tube-keepers with your finger-tip. NEVER slide the tool
tube-keeper while pulling the elbow fitting out as this will damage it and it will have to be replaced.
13
Fig. 17. Disconnect fitting from
cartridge
behind
the
Page 14
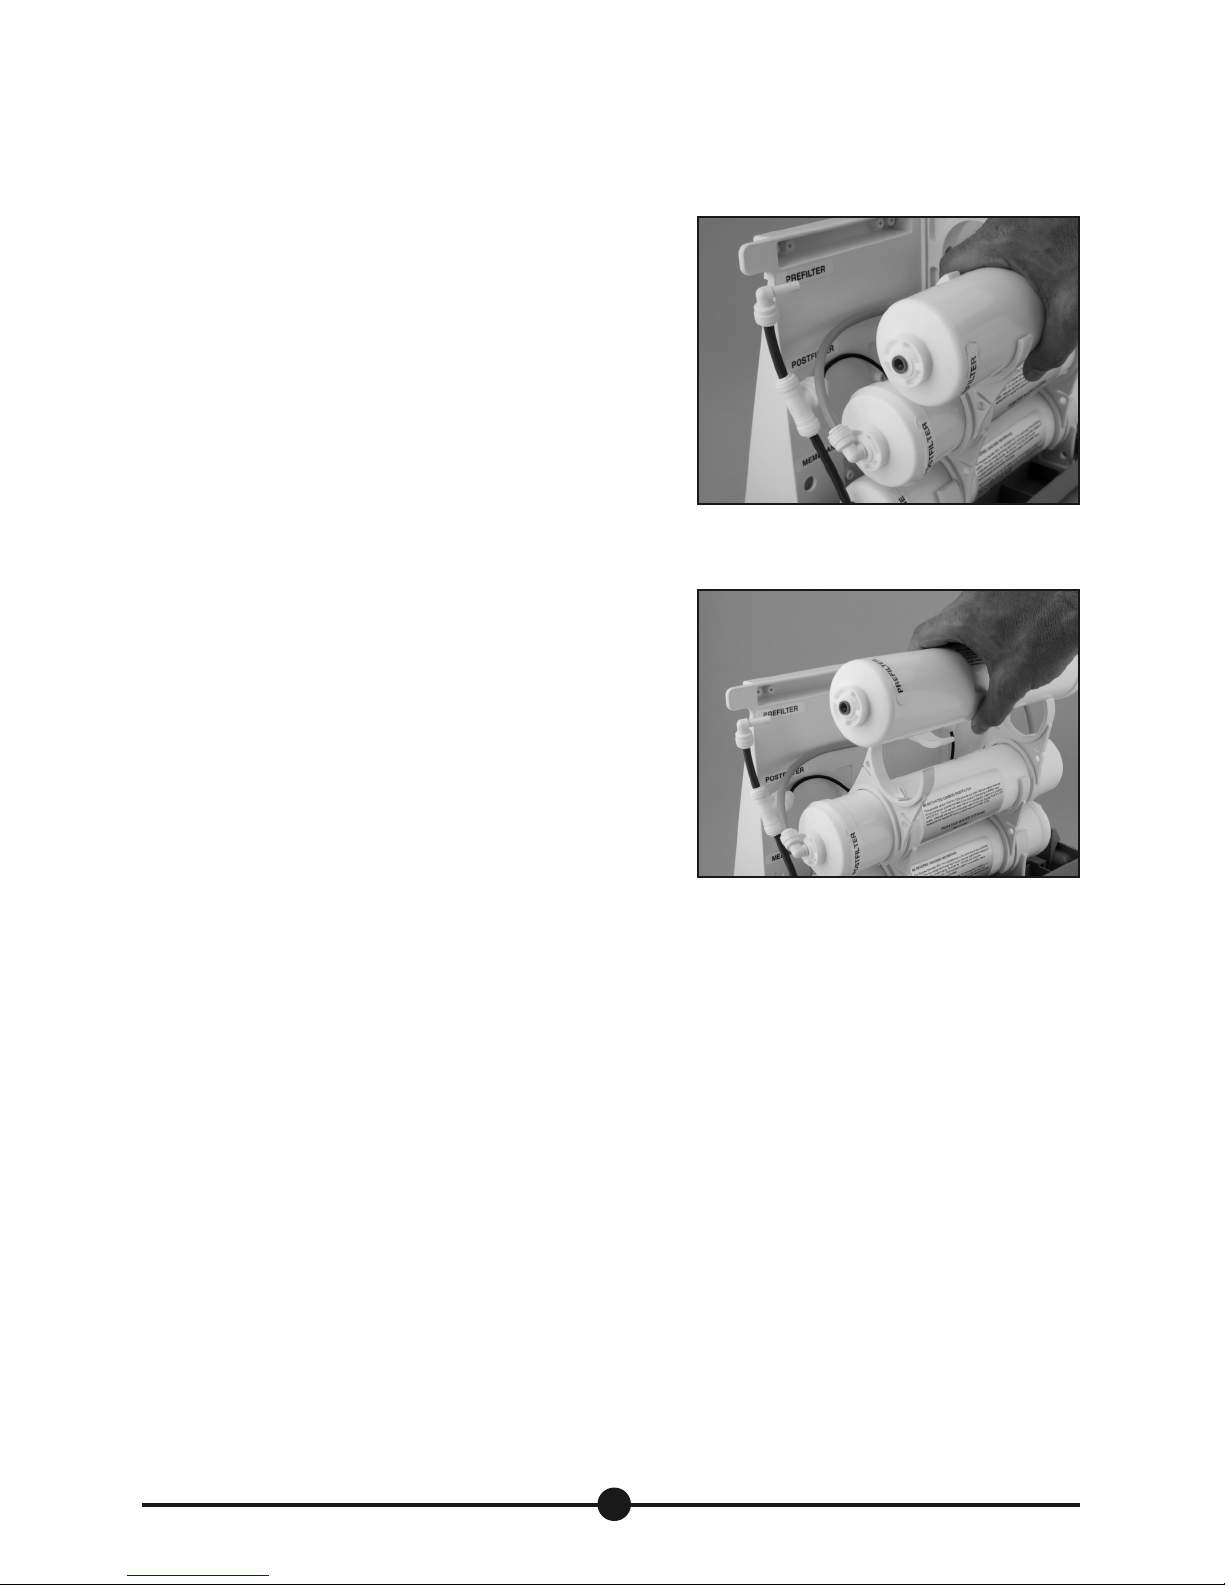
6. Firmly pull the top #1 PREFILTER cartridge towards
you to disengage it from the top clip and then remove
it entirely from the next lower set of clips. Now remove
this set of clips and set aside.
7. Remove the middle #3 POSTFILTER cartridge from the
next set of clips.
8. Install a new #3 POSTFILTER cartridge in the open set
of clips.
9. Mount the available set of clips onto the #3 POSTFILTER cartridge
10. Install the new #1 PREFILTER cartridge on the open
set of clips.
11. Reconnect the tubing connection to each cartridge by
pressing the elbow fitting into the appropriate
openings of the new cartridges. Elbow fittings must
be fully inserted into cartridges.
12. Re-insert the ends of the red RO membrane fast-flush
tubing into the upper clips.
13. With the cover still removed, connect the PURIST to
the faucet and turn on the water. Allow the unit to
operate for at least 15 minutes to eliminate trapped
air and then check for leaks around the connections.
If there are any leaks, try slightly rotating the plastic
elbow back and forth to readjust the seal. If that fails,
turn off the water, allow the PURIST to depressurize,
remove the leaking elbow and repeat step #10.
Fig. 18. Disengage top cartridge
from clip
Fig. 19. Remove top cartridge from
mounting clips
14. Replace the PURIST cover.
15. First, AWAKEN the Maintenance Indicator by
the Maintenance Indicator by pressing and
The red LED will light followed by the green LED flashing every 10 seconds.
quickly
holding
14
pressing the RESET button
once
. Then, RESET
the reset button for at least three seconds.
Page 15
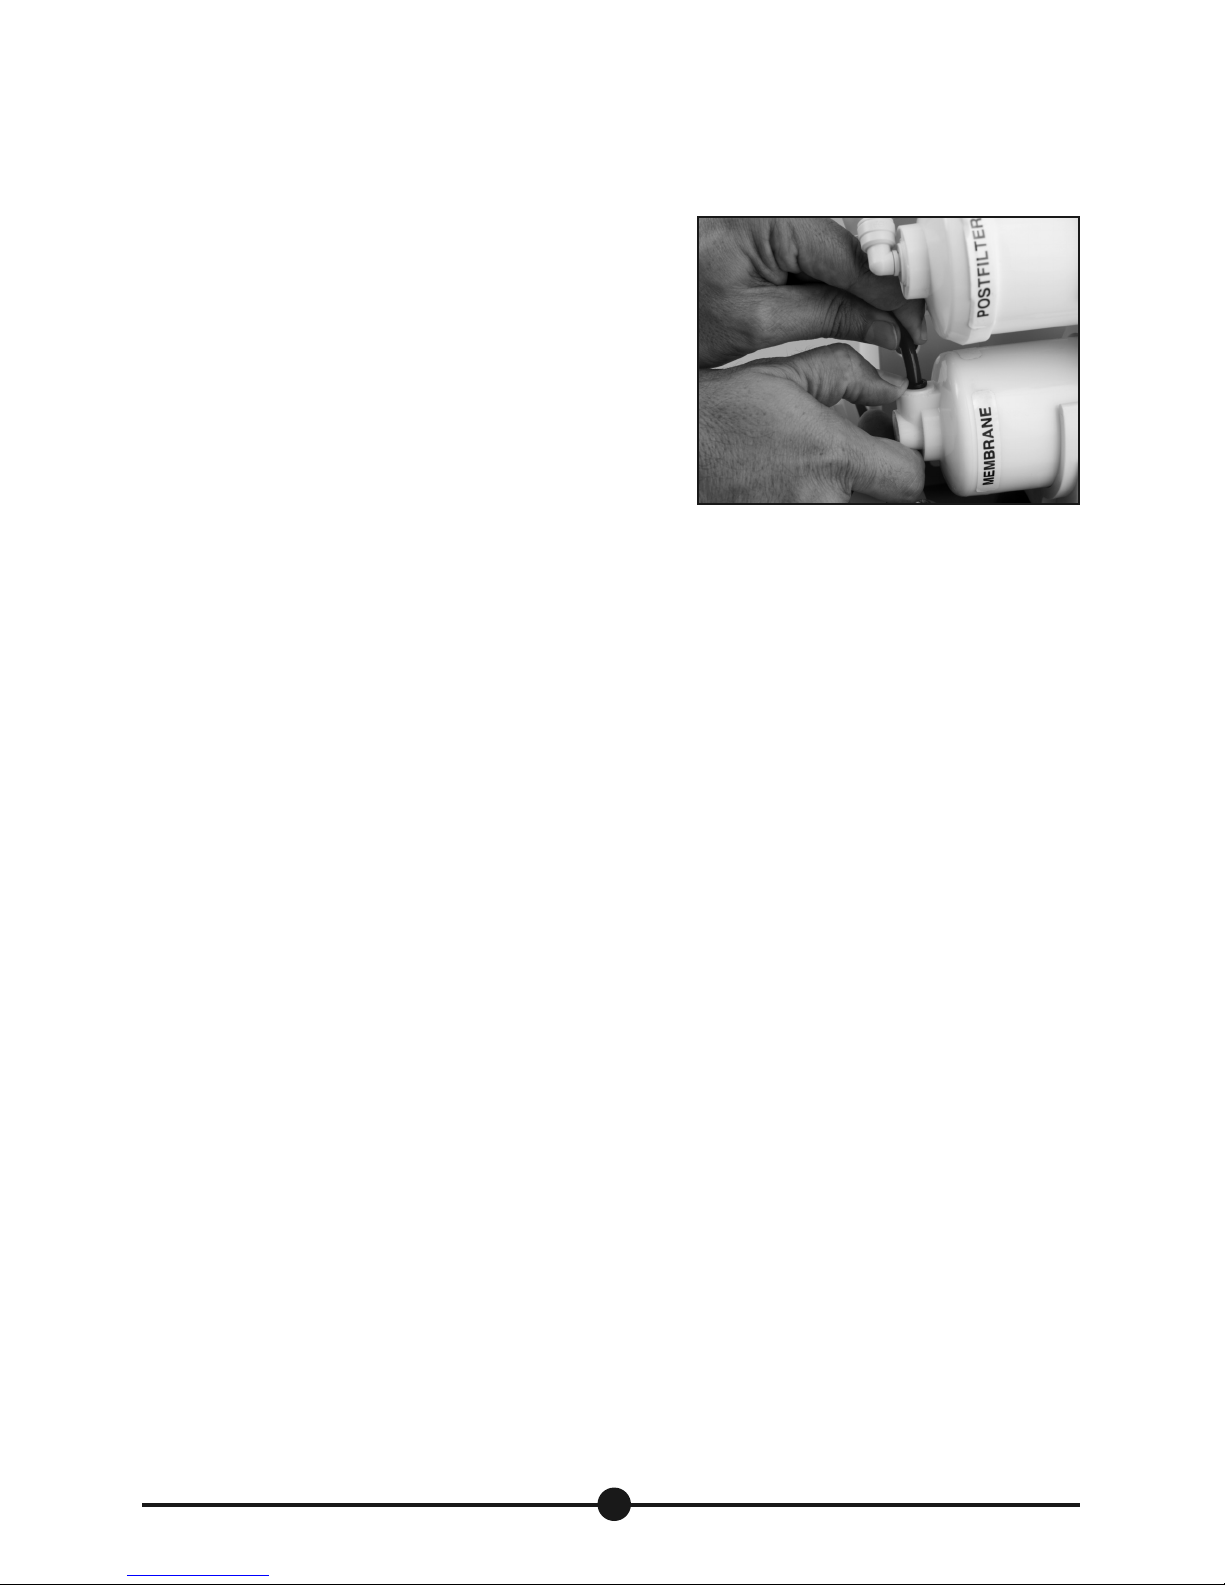
#2 RO MEMBRANE Cartridge Replacement –
Two-Year Maintenance*
(Fig. 20)
At the heart of the PURIST is an NSF Certified Reverse
Osmosis membrane component. It has the unique
advantage of
rinsing
them away to the drain. This is the true benefit of
rejecting
impurities and contaminants and
the RO process and the primary reason it can remain
effective for two or more years.
* Replacement of the #2 RO MEMBRANE is based on a
two-year schedule as indicated by the Maintenance Indicator on the front cover. In other words, the #2 RO
MEMBRANE should be changed
every other
year unless
Fig. 20. Disconnecting Tubing from
the RO Membrane
the user considers extending the RO Membrane life
described in the APPENDIX.
RO Membrane Cartridge Change Procedure (Bottom cartridge)
1. Because the prefilter and postfilter are always changed whenever the RO Membrane is replaced,
simply continue from steps #1 – 7 above.
2. Carefully remove the lower set of clips from the #2 RO MEMBRANE.
3. Firmly press the small end (flat side) of the tubing release tool (located inside the front of the
PURIST)
against
the outermost side of the small red, white and gray tube-keepers while gently
pulling out the corresponding orange, white and yellow tubing from each connection.
•
NOTE:You may also press in the tube-keeper with your finger. NEVER slide the tool
behind
the tube-
keeper while pulling the tubing out as this could damage the tubing and it will have to be replaced.
7. Firmly pry the #2 RO MEMBRANE out of the two clips holding it onto the base. You may have to
use a large screwdriver or piece of wood to serve as a lever. Be careful not to damage the base.
8. Install a new #2 RO MEMBRANE in the lower clips, taking note of the correct orientation.
9. Carefully attach the orange, white and yellow tubing in the corresponding cartridge connections,
making sure the tubing is pushed in as far as possible.
10. Attach the clips (two pairs) to remount the two upper cartridges to the lower cartridge.
11. Re-insert the ends of the red RO membrane flush tubing into the upper clips.
12. With the cover still removed, connect the PURIST to the faucet and turn on the cold water. Allow
the unit to operate for at least 15 minutes to eliminate trapped air and then check for leaks
around the connections. If there are any leaks, try slightly rotating the plastic tubing back and
forth in the connection to readjust the seal. If that fails, turn off the water, allow the appliance
to depressurize, remove the leaking tubing and repeat step 9.
•
NOTE: If the leak cannot be stopped, cut 5/8” off the tubing end with a razor knife and re-insert
tubing in connection. If the white “DRAIN” tubing is leaking, first pull out the yellow insert restrictor
(use pliers if necessary), cut 5/8” off the white tubing end with a razor knife, reinsert the restrictor
and reinsert tubing in the drain connection.
15
Page 16
13. Replace the cover, reset the filter indicator by quickly pressing the RESET once.
14. Allow the PURIST to operate for at least one-hour. Do not consume this water but it can be used
for watering plants and household cleaning tasks.
Enjoy great-tasting pure water until the next membrane change.
Maintenance Indicator
(Filter and Membrane Change Indicator)
Battery Change
(Figs. 21, 22)
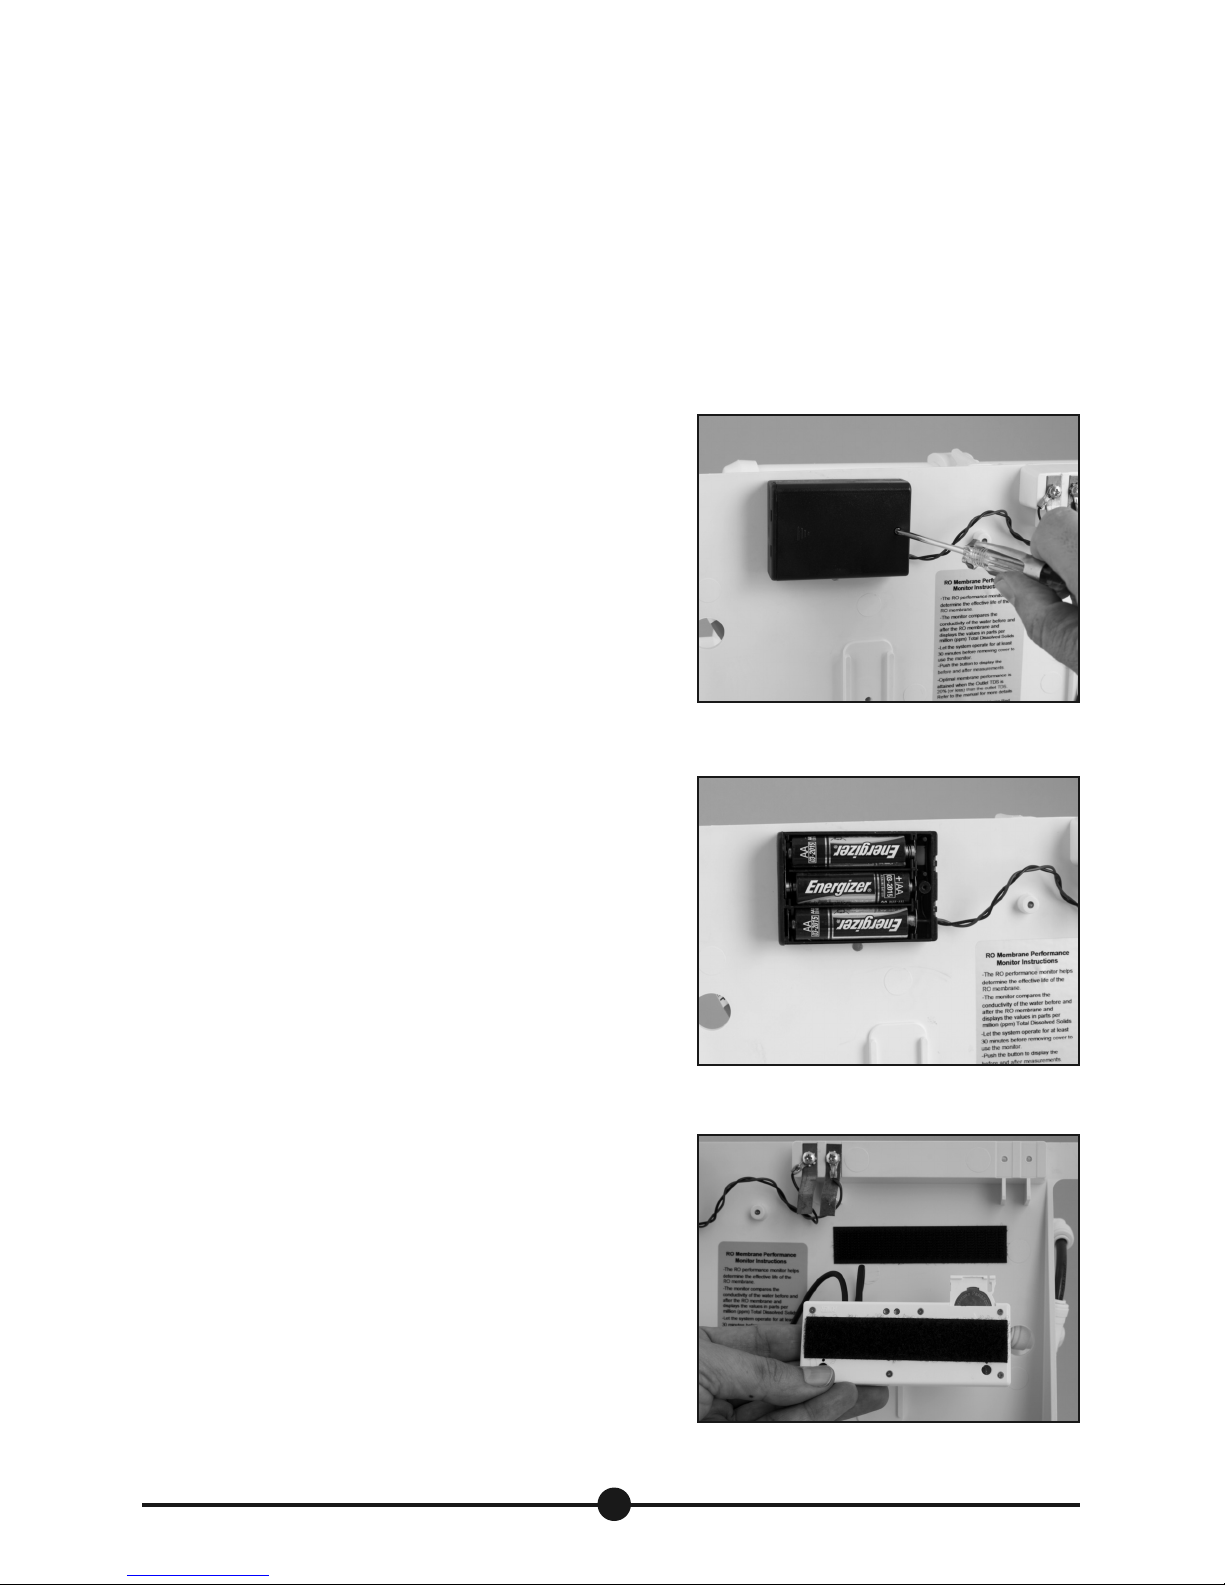
The batteries should be changed whenever the #1
PREFILTER and #3 POSTFILTER are replaced (12 to 18
months). First, cut and remove the zip-tie around the battery
case. Use the enclosed screwdriver to open the battery
compartment to gain access to the batteries. Use three
high-quality alkaline AA batteries. CAUTION: The batteries
must be installed correctly as noted on the battery case or
damage may occur to the circuit.
Fig. 21. Opening Battery Holder
Water Quality Monitor Battery Change
(Fig. 23)
1. With the PURIST cover removed during a cartridge
replacement, activate the monitor by pressing the red
ON button. If the number displays are dim or there is
no display, it is time to replace the battery.
2. Starting with the right end, pull the monitor from the
Velcro attachment.
3. Remove the battery compartment located on the bottom
by prying it out of the slot with a suitable tool.
4. Install a new CR2032 3V button battery in the
compartment, making sure that the positive “+ side” is
up. Note the molded image on the back of the monitor
for reference.
5. Push the battery compartment back into the slot, making
sure it is positioned as shown by the molded image.
6. Press the red ON button to confirm that the monitor is
displaying the numbers clearly.
Fig. 22. Use Three AA Batteries
Fig. 23.
16
Page 17

FREQUENTLY ASKED QUESTIONS
Q: What water supplies can the PURIST be used on?
A: While the PURIST is primarily designed for use on potable municipal water supplies (public tap
water) it can also be used on private well systems. However, there are considerations that must be
taken into account to assure long-term user satisfaction. These include:
• Is the pressure sufficient to produce enough water for daily use? We recommend at least 45 psi
(3 Bar) although the PURIST will operate on as little as 30 psi (2 Bar) with reduced production.
• Are there any well water constituents that might impair the performance of the PURIST such
as excessive levels of iron, manganese, H2S (sulfur) and tannins? If there are contaminates they
must be removed before the water is suitable for the PURIST. ANY LOSS OF PERFORMANCE DO
TO THESE CONSTITUENTS IS NOT COVERED UNDER THE WARRANTY.
• Is there a presence of pathogenic microorganisms in the well water that exceeds EPA regulations?
Federal law does not allow the PURIST to be recommended for consumer use on microbiologically
contaminated water supplies.
Q: Can I use the PURIST if I have a water softener that uses salt?
A: Yes. In fact, the water softener provides a welcome measure of added protection for the RO
membrane by reducing certain impurities such as hardness and iron. This will substantially extend
the life of the RO membrane, which you can verify with the Water Quality Monitor.
Q: How can I use the PURIST in survival or emergency situations when the city water is turned off?
A: Purative offers an optional pump kit that provides pressure from any open vessel of water such
as a bucket or a swimming pool. The pump connects to the PURIST with some simple modifications
and will produce pure drinking water up to 50 gallons per day. Since open sources of water may be
of unknown microbiological quality, instructions are provided to pre-disinfect the source water to
assure that the PURIST water is always safe.
Q: Will I lose valuable minerals when I drink Reverse Osmosis water?
A: Most tap water does not contain a significant amount or a beneficial combination of minerals in
the first place. Also, there is no technology that can magically leave in the “good” and take out the
“bad” constituents. We obtain the majority of the
major
minerals from the foods and juices we
consume. However, due to modern farming practices and food processing, most trace elements are
no longer available in sufficient quantity or form in our foods to support optimal health. Complete
“83 mineral and trace element” supplementation is therefore essential. The Purative approach is
to remove as many contaminants as possible followed by re-mineralizing and molecular restructuring.
Then if the user requires further health promoting enhancements they can elect to add alkaline
buffering and/or active hydrogen anti-oxidizing tablets for a high negative ORP.
Q: How should I store my PURIST appliance when not in use for longer periods (> one month)?
A: The reverse osmosis membrane actually works better and lasts longer the more it is used, so operate
at least
it
twice weekly even if the water is given away. When not in use for longer than a month, dry off
the cover, replace the blue cap on the Bottle-Clip and store it in a cool, dry environment. If you need to
17
Page 18

store the unit for even longer periods of time, remove all three cartridges and store in a refrigerator, making
sure they cannot freeze.
Q: Should I store my PURIST water in the refrigerator?
The PURIST removes virtually all of the disinfectants used to inhibit bacterial growth in the city water
pipes. If you are not going to use the PURIST water for more than a day, make sure that it is in a
glass container and keep in the refrigerator to prevent harmless airborne bacteria from multiplying.
Q: Will hot water ruin the RO Membrane?
A: Hot water over 110° F will damage the RO Membrane in a fairly short time and result in a decline
in the reduction of impurities. It will also weaken some of the plastic components that are under
pressure and this may result in a failure and leak. Make sure you only use cold water with your
PURIST appliance.
18
Page 19
APPENDIX
Maintenance Indicator (Filter and Membrane Change Indicator) Operation
There are three operations associated with the Maintenance Indicator:
1. Sleep Mode: The PURIST is shipped in the SLEEP MODE. Whenever the cover is removed from the
appliance the indicator goes into the SLEEP MODE and stops the filter and membrane timer. When
the cover is replaced the indicator is ready to be put into the AWAKE mode.
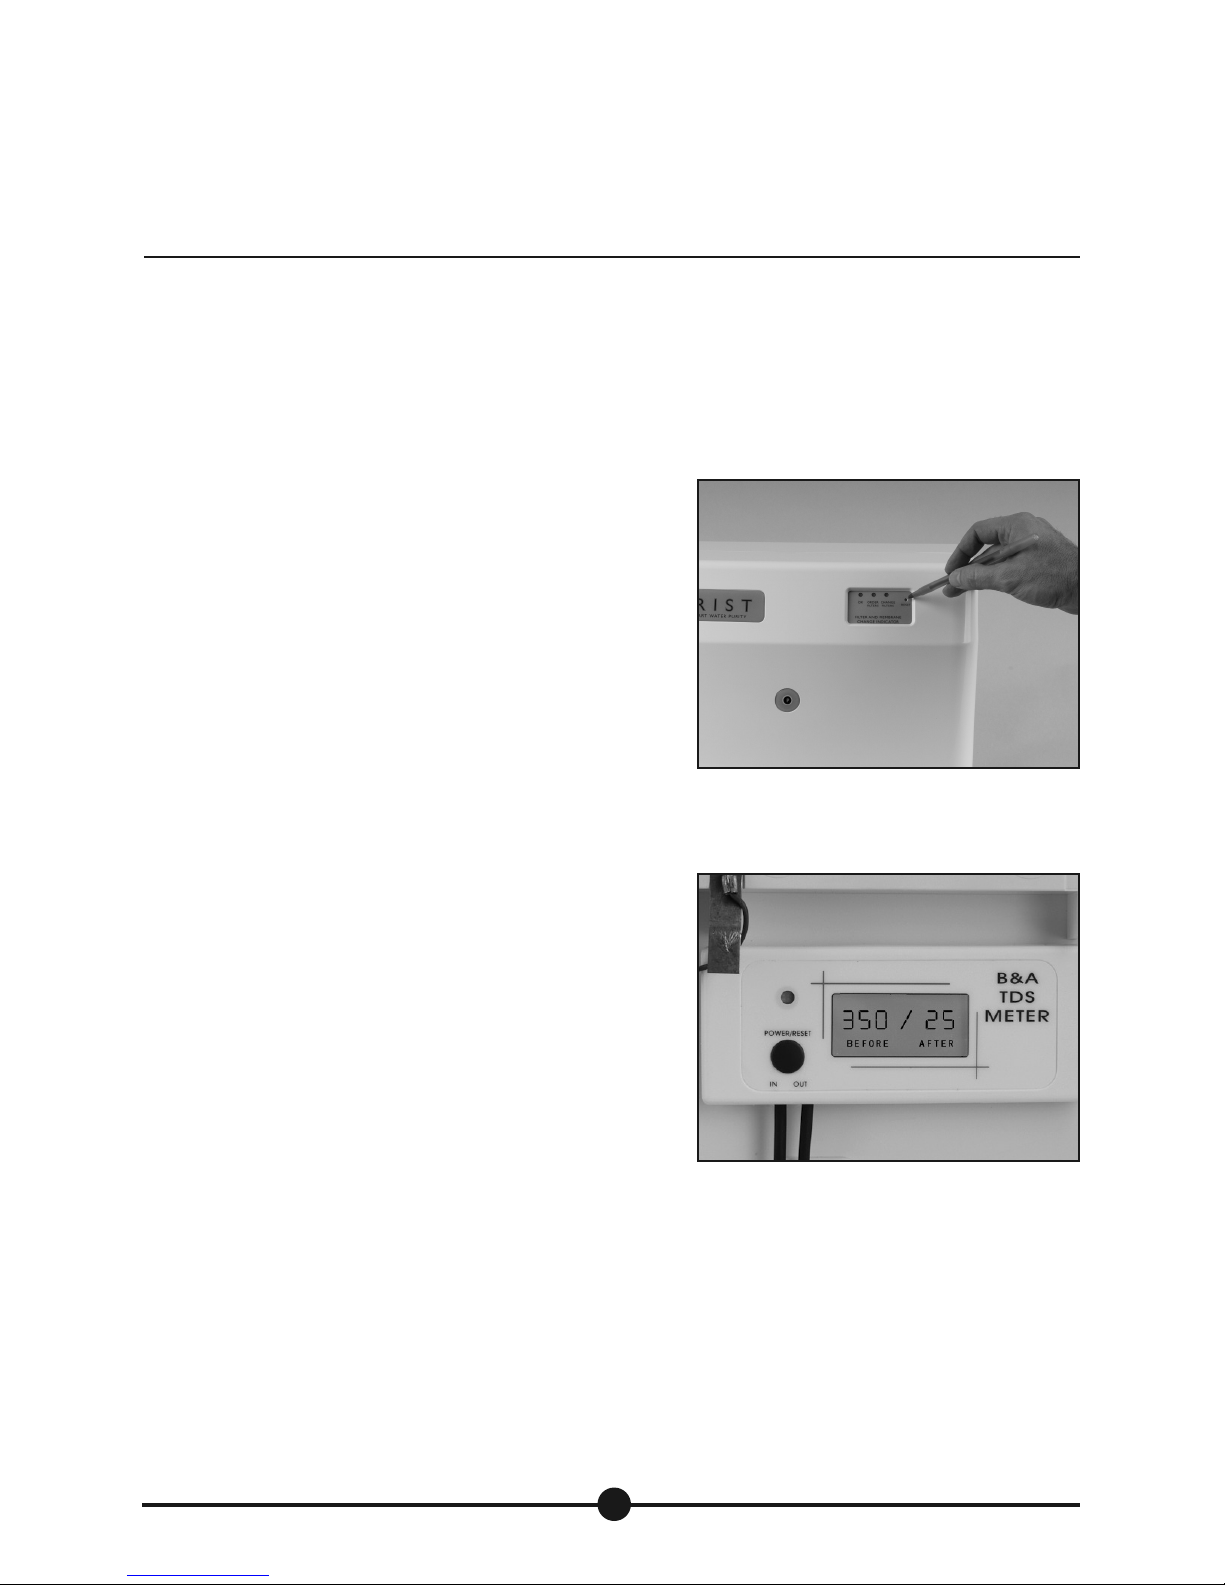
2. Awake Mode: Insert the Activation Tool or ball-point
pen into the hole market “RESET” and quickly press
to awaken the indicator to start or resume timing. The
indicator’s three LED’s (green, yellow, red) will flash once
and then the green LED will continue to flash every 10
seconds for eleven (11) months. Then the yellow LED will
begin to flash every 10 seconds for one month, prompting
the user to purchase new cartridges. Finally, the red LED
will begin to flash, indicating it is time to change filters
(12 month) or filters and RO membrane (two years).
once
3. Reset: After replacing Filter Cartridges, RO Membrane
Cartridge and Batteries, the Maintenance Indicator must
be RESET. By pressing and holding the RESET button for
at least three seconds, the Maintenance Indicator timer
is reset to zero and a new 12-month timing cycle is
initiated.
Batteries
(3) AA alkaline. Approximate battery life based on alkaline
Duracell batteries = 3 months sleep mode + 16 months
operation.
Extending the Service Life of #1 PREFILTER and
#3 POSTFILTER up to 18 Months
(Fig. 25)
If you are connected to a large modern city water supply,
you can probably extend the service life of the prefilter and
postfilter cartridges up to 18 months. Before you take this
step, check the Water Quality Monitor TDS readings and
confirm that the pure water TDS (right side of display) is less
than 10% of the city water supply TDS (left side of display).
Fig. 24. Awaken the Filter and
Membrane Change Indicator
Fig. 25. Water Quality Monitor
Readings
19
Page 20

Extending the Service Life of #2 RO MEMBRANE Using the
Water Quality Monitor TDS Readings
(Fig. 25)
The more accurate measure of when to change the #2 RO MEMBRANE is based on a comparison of
the TDS readings of the tap water (IN) and the PURIST pure water (OUT). We suggest if the TDS OUT
less than
is
20% of the TDS IN then the membrane should be changed.
than
20% of the TDS IN then the membrane performance is excellent. If the TDS OUT is
greater
Example 1:
TDS IN reading = 350 ppm
TDS OUT reading = 25 ppm
25 = 7% of 350 (Excellent #2 RO MEMBRANE performance; continue use)
Example 2:
TDS IN reading = 350 ppm
TDS OUT reading = 75 ppm
75 = 21% of 350 (Marginal #2 RO MEMBRANE performance; change soon)
ADVANCED SERVICE
Monitoring Production Rate
The production rate of the PURIST is another factor the user can consider for changing the #2 RO
MEMBRANE. After your PURIST is broken-in, measure how much time, in minutes, it takes to produce
a specific volume of water such as a quart or liter. Record and save this information in your manual.
Bear in mind that both the water pressure and the water temperature have a big influence on the
production rate (lower pressure and lower temperature result in the less water production) so there
is a significant variation from location to location. If there is a gradual decline in production rate over
time and it cannot be attributed to lower pressure or water temperature then the membrane surface
may be plugging up (fouling) due to the poor tap water quality. Change the membrane if the production
rate is inadequate to meet your daily requirements.
Fast-Flushing the RO Membrane to Restore Performance
In anticipation that the PURIST being used on high sediment water supplies (e.g. potable rural water
supplies and potable well water) a simple means of fast-flushing the RO membrane has been provided.
This procedure can further extend the performance of the RO membrane. It is especially effective if
the TDS of the pure water is still <10% of the TDS of the tap water but the production rate has noticeably
decreased. A short piece of red-tubing is attached to the cartridge clips for this procedure. Simply
remove it from the clips and follow these steps:
1. Wiith the PURIST still connected to the faucet and the water turned off, move the PURIST to the
other side of the sink so the back is facing you. Remove the cover and set aside.
2. Firmly press the small end (flat side) of the tubing release tool
white “DRAIN” tube-keeper while gently pulling out the corresponding white tubing from the connection.
3. Insert one end of the red fast-flush tubing securely into the connection. Hold the free end into the
sink and turn on the cold water fully. Allow water to rapidly flow through the RO membrane and
dislodge sediment build-up.
20
against
the outermost side of the
Page 21

4. Allow the water to flush the membrane for 3-5 minutes. You can help dislodge the sediment by
firmly taping along the length of the RO membrane cartridge with a hard rubber mallet or the
rubber coated grip of a hammer.
5. After the flushing step is completed, remove the red tubing and reinsert the white drain tubing.
6. Remount the red fast-flush tubing to the appropriate clips to store.
REPLACEMENT AND SPARE PARTS LIST WITH PART NUMBERS
PURIST Replacement Cartridges Part #
#1 Prefilter Cartridge (Fig. 3b) . . . . . . . . . . . . . . . . . . . . . . . . . . . . P1-Prefilter
#3 Postfilter Cartridge (Fig. 3b) . . . . . . . . . . . . . . . . . . . . . . . . . . . P1-Postfilter
#2 RO Membrane Cartridge (Fig. 3b). . . . . . . . . . . . . . . . . . . . . . . P1-Membrane
PURIST Spare Parts
Part #
Main hose assembly (Fig. 1) . . . . . . . . . . . . . . . . . . . . . . . . . . . . . . P1-Hoseasy
Snap Coupler (Fig. 6). . . . . . . . . . . . . . . . . . . . . . . . . . . . . . . . . . . . . P1-Snapcoup
Aerator & Adapter Assortment (Fig. 1) . . . . . . . . . . . . . . . . . . . . . P1-Aeradapt
Pure Water Tubing with 4 Bottle-Clips (Fig. 1) . . . . . . . . . . . . . . P1-Tubenclip
Cover Assembly with Maintenance Indicator (Fig. 1) . . . . . . . . . P1-Coverasy
Battery Pack (Fig. 3a) . . . . . . . . . . . . . . . . . . . . . . . . . . . . . . . . . . . P1-Bathold
Water Quality Monitor (Fig. 3a) . . . . . . . . . . . . . . . . . . . . . . . . . . . P1-Tdsmon
Tube Fitting Assortment with 4 Elbows Pkg . . . . . . . . . . . . . . . . P1-Ftgpak
Owner’s Manual . . . . . . . . . . . . . . . . . . . . . . . . . . . . . . . . . . . . . . . . P1-Manual
21
Page 22
EXCHANGES
If you feel there was an error in your order, please contact customer service at 1-866-257-8168 or
email at [email protected] within 7 calendar days for an approved RMA. We will attempt every
effort to correct your order. If you were shipped an incorrect item, Water & Wellness Solutions Inc. /
Purative will pay your return standard insured shipping. If you need to exchange your item because
of a factory defect, please inform customer service within 10 calendar days. You will not be charged
shipping for any defective items. If your order was damaged during delivery, (if damaged you must
take a picture and contact your carrier (ex: UPS or FedEx) immediately to file a claim - we will settle
the claim but you must open the claim), you must contact Water & Wellness Solutions, Inc. / Purative
within 7 days of delivery by phone or email. Please make sure that you include your Proof of Purchase,
quantity sent, any applicable shipping fees, and most importantly your name, shipping address phone
number and email address. Delivery times may be shorter or longer depending on the current market
situation and due to unexpected delays and circumstances beyond our control, i.e, weather, natural
disasters, acts of God. We are not responsible for any special compensation due to extended delays.
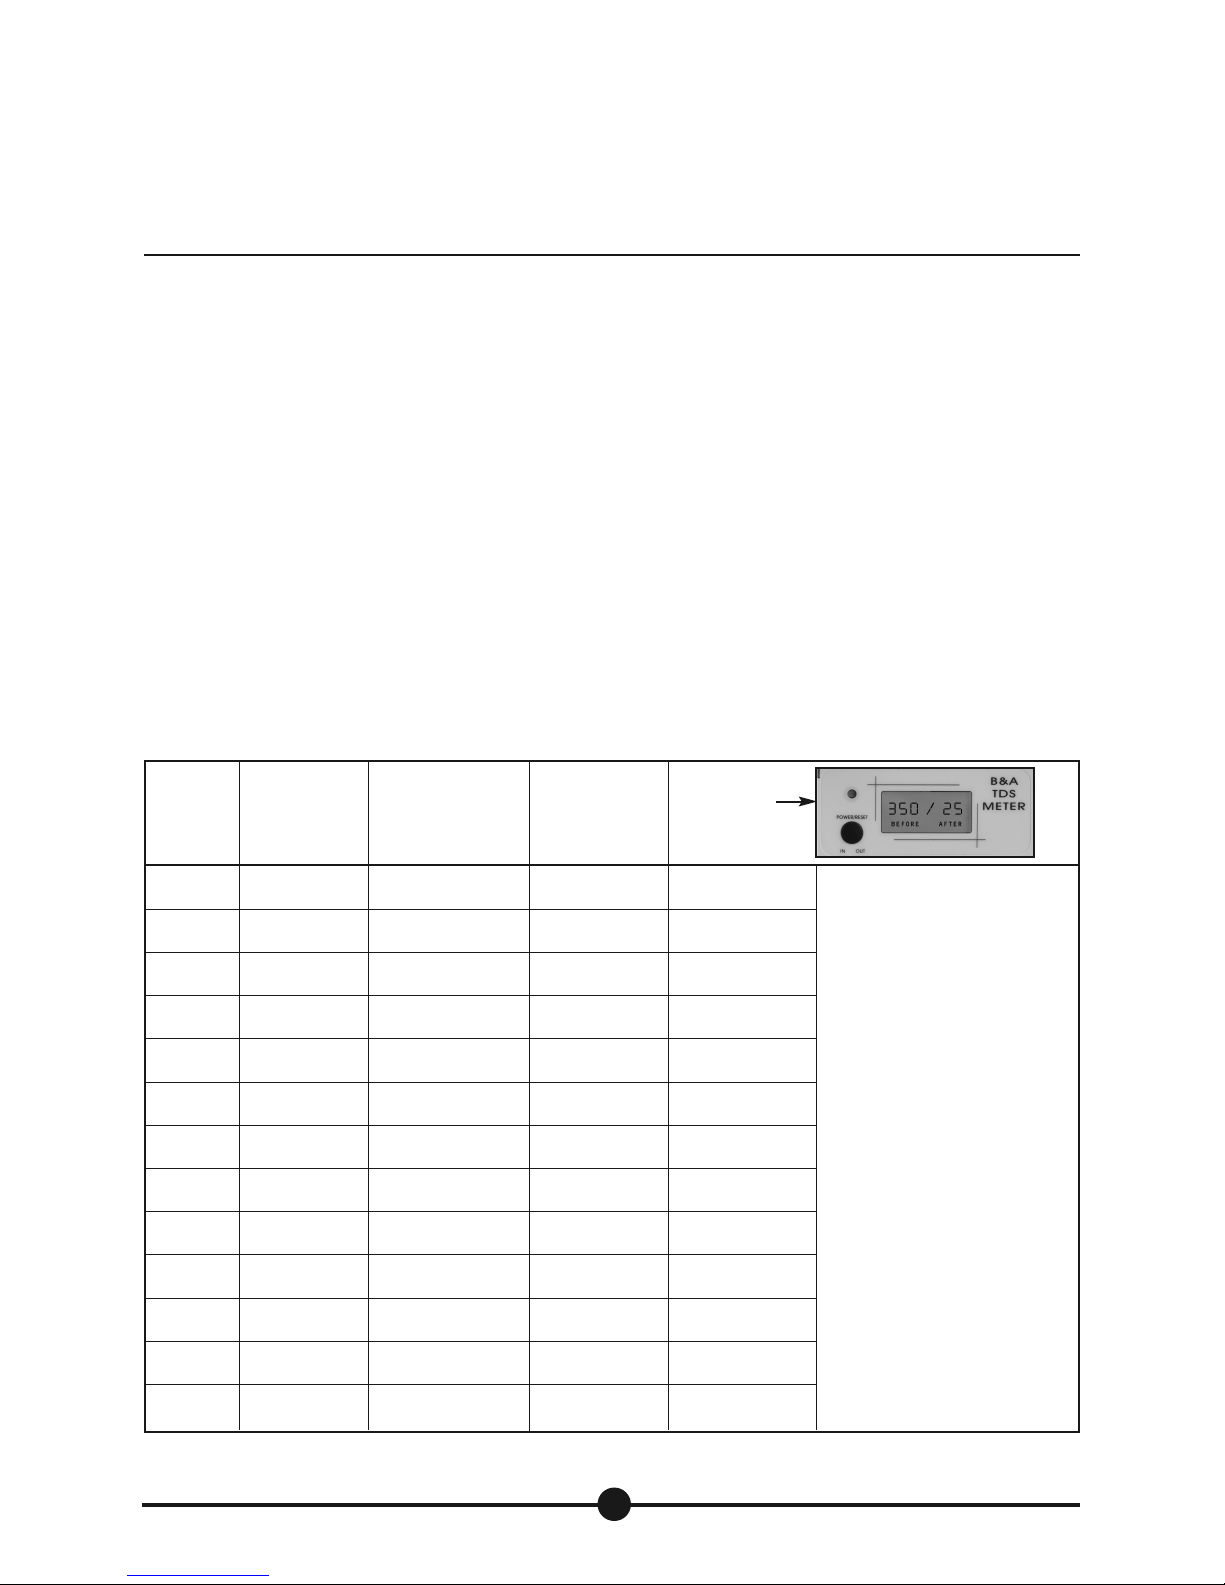
SERVICE RECORD
#1 PREFILTER #3 POSTFILTER #2 RO MEMBRANE WATER QUALITY
Cartridge Cartridge Cartridge MONITOR
Replace Every Replace Every Replace Every TDS
DATE 12-18 mo. 12-18 mo. 24-36 mo. Before | After
|
|
|
|
|
|
|
|
|
|
|
|
|
NOTES:
22
Page 23

CONTACTING CUSTOMER SERVICE
Our customer service hours are Mon.-Fri. 9 am - 4 pm PST (*excluding holidays).
You can reach us by phone toll free at 1-866-257-8168 or email at [email protected].
WATER & WELLNESS SOLUTIONS, INC. / PURATIVE WATER SYSTEMS 5 YEAR LIMITED WARRANTY
BUYER MIUST RETURN THE WARRANTY REGISTRATION
CARD TO W&W AT THE ADDRESS WHICH APPEARS BELOW
WITHIN 30 DAYS FROM THE DATE OF INSTALLATION TO
VALIDATE WARRANTY.
Your drinking water system is warranted to the original
owner to be free of defects in material and workmanship
from the date of purchase as follows:
I. The Entire System (excluding Reverse Osmosis Membrane
and disposable filter cartridges - see below)
For a period of ten years.
II. Reverse Osmosis (RO) Membrane
Warranted for defects in material and workmanship for a
period of two years. Service life of RO membrane varies
with local water conditions and is thus not warranted.
III. Disposable Filter Cartridge
Warranted for defects in material and workmanship for a
period of two years. Service life of disposable filter cartridges
varies with local water conditions and is thus not warranted.
IV. Booster Pump
Warranted for one year service life (if applicable).
V. Conditions of Warranty
a) SYSTEM MUST BE MAINTAINED AND SERVICED WITH
APPROVED PWP REPLACEMENT PARTS AND FILTERS.
b) The performance and functioning of your drinking water
system is directly related to the quality of the water being
treated and the particular application in which it is used.
PWP LIABILITY IS LIMITED TO THE COST OF REPAIR OR
REPLACEMENT (AT OUR OPTION) OF ANY DEFECTIVE PART
AND DOES NOT INCLUDE INCIDENTAL OR CONSEQUENTIAL
DAMAGES OF ANY KIND. This warranty gives you specific
legal rights and you may also have other rights which vary
from state to state.
c) Systems must be installed and operated in accordance with
manufacturer's recommended procedures and guidelines.
d) Warranty is void if product failure or damage results
from freezing, neglect, misapplication, fouling with sediment
or scale, or failure to operate the system in accordance
with the instructions contained in the owners manual.
VI. What W&W Solutions, Inc. Will Do:
a) W&WS will repair or replace (at our option) under this
warranty any part which is discovered to be defective.
b) If it is necessary to ship the product or any part thereof
to W&WS or to an authorized distributor for service, buyer
must pay any shipping and handling charges to destination.
c) W&WS will pay return shipping charges in the U.S. for
parts or products covered by the warranty.
d) W&WS will furnish factory labor to make repairs to any
parts or products returned to our factory under this
warranty.
VII. What W&WS Does Not Do:
a) W&WS will not pay for any repairs not specifically covered
by this warranty or authorized by W&WS.
b) W&WS will not be liable for any incidental or consequential damages caused by a failure of this product.
VIII. Obtaining Warranty Service
To obtain warranty service the buyer may:
a) Contact the local W&WS authorized distributor who
supplied the product; or
b) Contact W&WS Customer Service at 1-866-257-8168
for a RMA # (return merchandise authorization) # and
shipping instructions.
c) Contact:
Water & Wellness Solutions, Inc.
Customer Service
6900 Aragon Circle
Buena Park, CA 90620
IX. THIS WARRANTY IS IN LIEU OF ALL OTHER WARRANTIES,
EXPRESSED OR IMPLIED, INCLUDING WARRANTIES OF
MERCHANTABILITY OR FITNESS FOR A PARTICULAR
PURPOSE. THIS IS THE EXCLISIVE REMEDY AND LIABILITY
FOR CONSEQUENTIAL DAMAGES, UNDER ANY AND ALL
WARRANTIES, ARE EXCLUDED TO THE EXTENT EXCLUSION
IS PERMITTED BY LAW.
23
Page 24

Water & Wellness Solutions, Inc.
Fax 888-551-1298
For all customer service inquiries see page 23.
 Loading...