

Page 1

Precision coee tamper
Precision coee tamper
ana
eiennsaneitn
version 1.0.1
Zur gewerblichen
Verwendung
EN
DE
EN
1
Page 2

Dear coee enthusiast,
First o we would like to congratulate you with your very own
Puqpress and thank you for showing condence in our product.
The Puqpress is a fully automatic tamper developed by people with
a passion for perfect coee and elegant technology.
Our specialists have spent all their knowledge and devotion in
developing the ultimate tool to standardise the tamping pressure, a
crucial parameter for a perfect cup of coee.
Please investigate this manual closely so you and your customers
will enjoy the Puqpress to the fullest and store the manual away
safely after reading. If anything remains unclear please feel free to
contact your authorized dealer or contact us directly.
We wish you all the fun and perfection with your new Puqpress!
Greetings from Amsterdam,
Barista Technology BV
2
Page 3

Precision coee tamper
Table of content
1 Safety 4
1.1 Safety instructions
1.2 Personel requirements
2 Technical data 5
3 Description 5
4 Set-up and basic adjustment 7
4.1 Adjustment of port-a-lter clamp
4.2 Usage location
4.3 Set-up with Mythos
4.4 Electrical Installation
5 Operation 12
5.1 Normal operation of the tamper
5.2 Tamping force adjustment
5.3 Clean modus
6 Remove tamper disk 14
7 Operating faults 16
8 Service 17
4
5
7
9
9
12
12
12
13
9 Spare parts 17
10 Warranty conditions 18
EN
3
Page 4

1. Safety
Read all instructions and information in this manual and
other literature that might be included in the package
before the coee tamp device is used.
1.1 Safety instructions
1. The appliance is not to be used by persons (including children) with
reduced physical, sensory or mental capabilities, or lack of experience
and knowledge, unless they have been given supervision or instruction
2. Children being supervised not to play with the appliance
3. This appliance can be used by children aged from 8 years and above
and persons with reduced physical, sensory or mental capabilities or
lack of experience and knowledge if they have been given supervision
or instruction concerning use of the appliance in a safe way and
understand the hazards involved
4. Cleaning and user maintenance shall not be made by children without
supervision
5. Do not immerge cables , plugs or the device itself into water or other
liquids to avoid electric shock, or injury.
6. Always remove the electrical plug from the outlet prior to conducting
maintenance or cleaning work on the tamper.
7. Do not use the device if the cord or plug is damaged or in case of
damage or breakage. Any required repairs may only be conducted
by authorized service personnel. For this reason, please contact a
customer service repair facility or your dealer.
8. Do not make any modications or alterations to the tamper. The
manufacturer holds absolutely no liability for damages occurring from
failure to observe these instructions.
9. Do not insert your hand (or other limbs) between the tamper disk and
lower clamp.
4
Page 5

Precision coee tamper
1.2 Personnel requirements
No special requirements are necessary for the users of this tamper.
Nevertheless it is a prerequisite that these operating instructions
have been carefully read and understood and that all instructions
provided are observed. In addition, safety-conscious operation is
expected.
2 Technical data
Model number 2-000-01XX-2, 2-000-02XX-2,
2-000-03XX-2, 2-000-04XX-2,
2-000-05XX-2, 2-000-07XX-2
Voltage / Frequency 100-240 Vac
50-60 Hz
Power 76 W
Dimensions [mm] W 230, D 270 , H170
Weight 4.5 kg (10lbs)
Year built See tag plate top side
Tamper diameter See tag plate top side
3 Description
The main components and operating elements are pictured in the
illustration.
Pos. Part name
1 Top plate
EN
5
Page 6
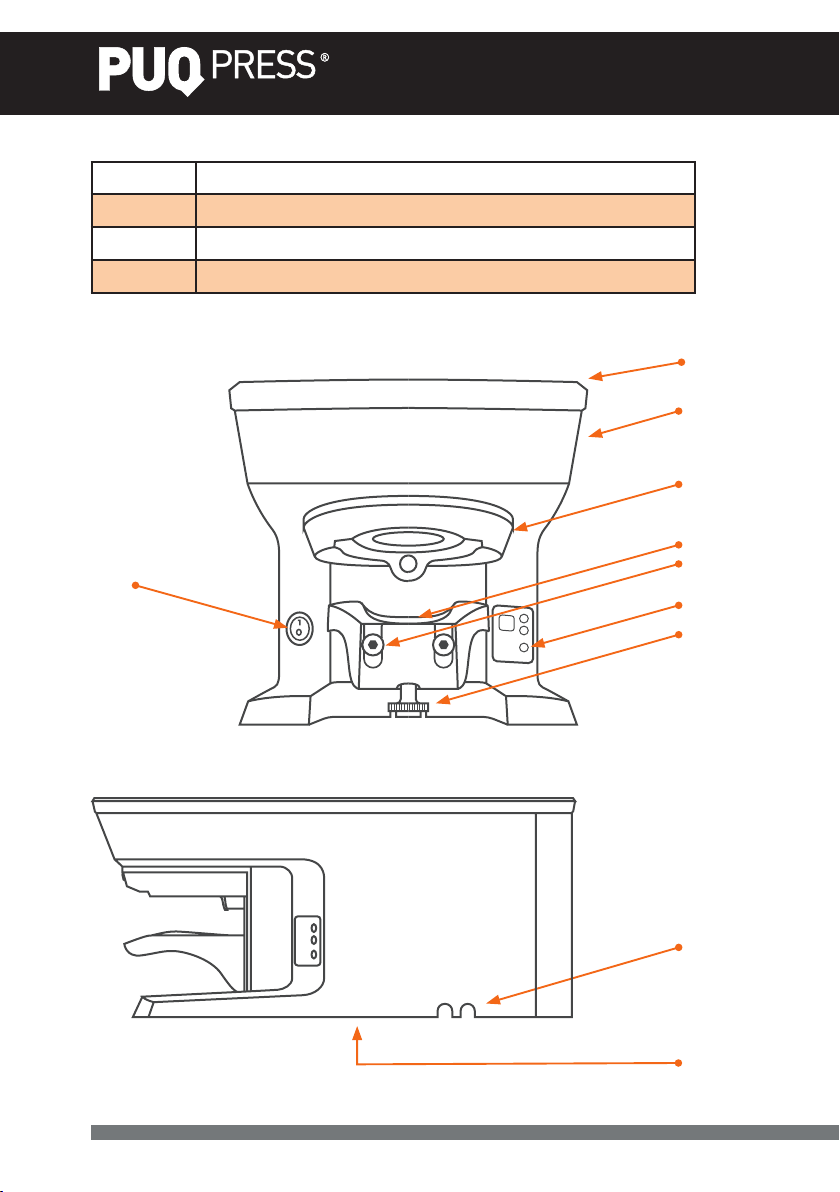
2 Main Body
3 Upper clamp
4 Lower clamp
5 Bolts to fasten lower clamp
8
1
2
3
4
5
6
7
6
9
10
Page 7

Precision coee tamper
6 Display
7 Fine adjustment wheel
8 ON/OFF switch
9 Bottom side: power entry
10 tag label
4 Set-up and basic adjustment
You have received your tamper in operating condition. Now you only
need to adjust the port-a-lter clamp, connect the tamper to the
power grid and insert drip tray. Proceed as follows:
4.1 Adjustment of port-a-lter clamp
The tamper is designed so that all dierent portalter from various
espresso machines t into the clamp (pos. 3 & 4 ) for even and level
tamping.
If the portalter clamp is not correctly adjusted, even and level
tamping cannot be guaranteed!
Proceed as follows for adjustment of the portalter clamp:
1. Retract the power cord from the socket at the bottom side.
EN
7
Page 8
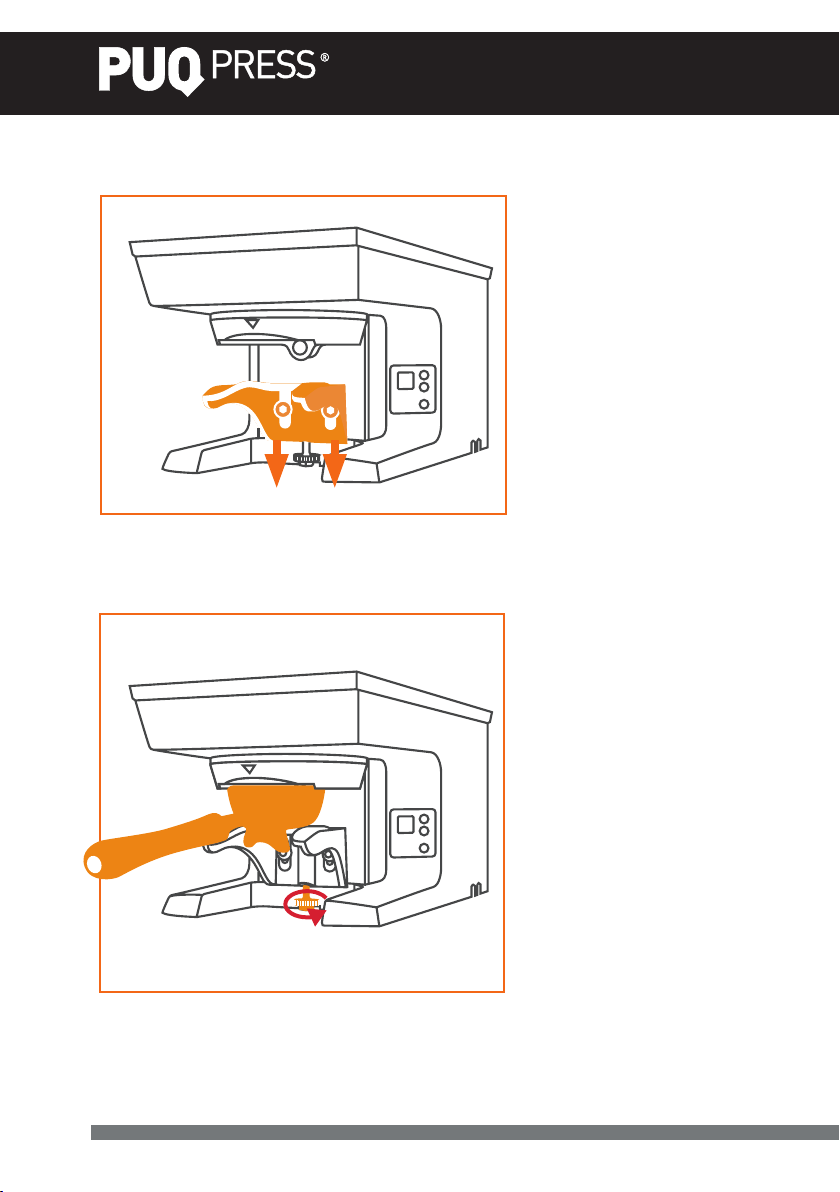
2. Slightly loosen the bolts (pos. 5) with the provided T-wrench and
pull down the portalter clamp.
3. Insert the portalter in between the upper- and lower clamp.
Turn the adjustment wheel counter-clockwise to move the lower
clamp up against the portalter.
4. Refasten the bolts (pos. 5) screws slightly. Do not fasten the bolts
entirely.
8
Page 9
Precision coee tamper
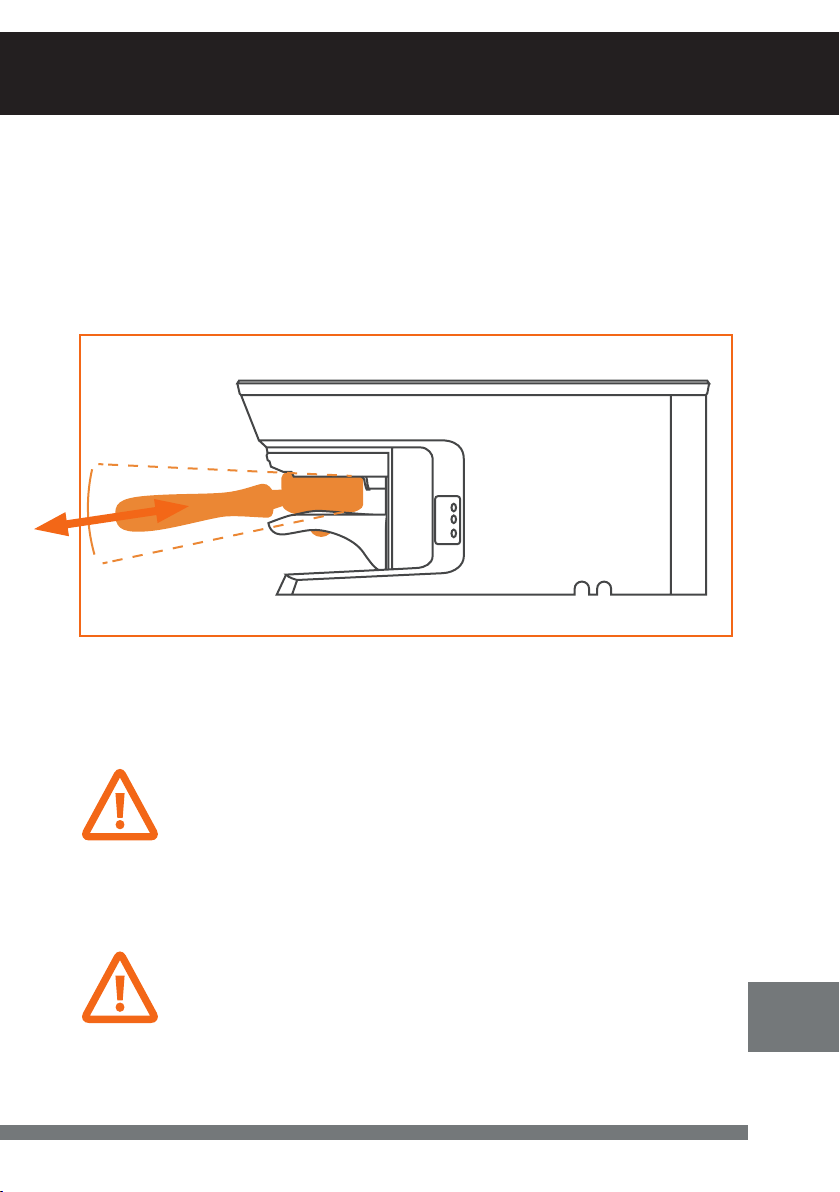
5. Remove the port-a-lter and fasten the screws rmly.
6. Try to insert the portalter in the clamp and check if the port-alter slides in the clamp easily. If the adjustment of the clamp is
too loose, start again at step 2.
7. The portalter should not wiggle!
4.2 Usage location
Place the tamper on a level, vibration-free surface.
Never operate the tamper in moist, or even worse, in wet
surroundings!
4.3 Set-up with Mythos
For a safe set-up with the Mythos grinder, make sure you
handle it with 2 people with care.
EN
9
Page 10
10
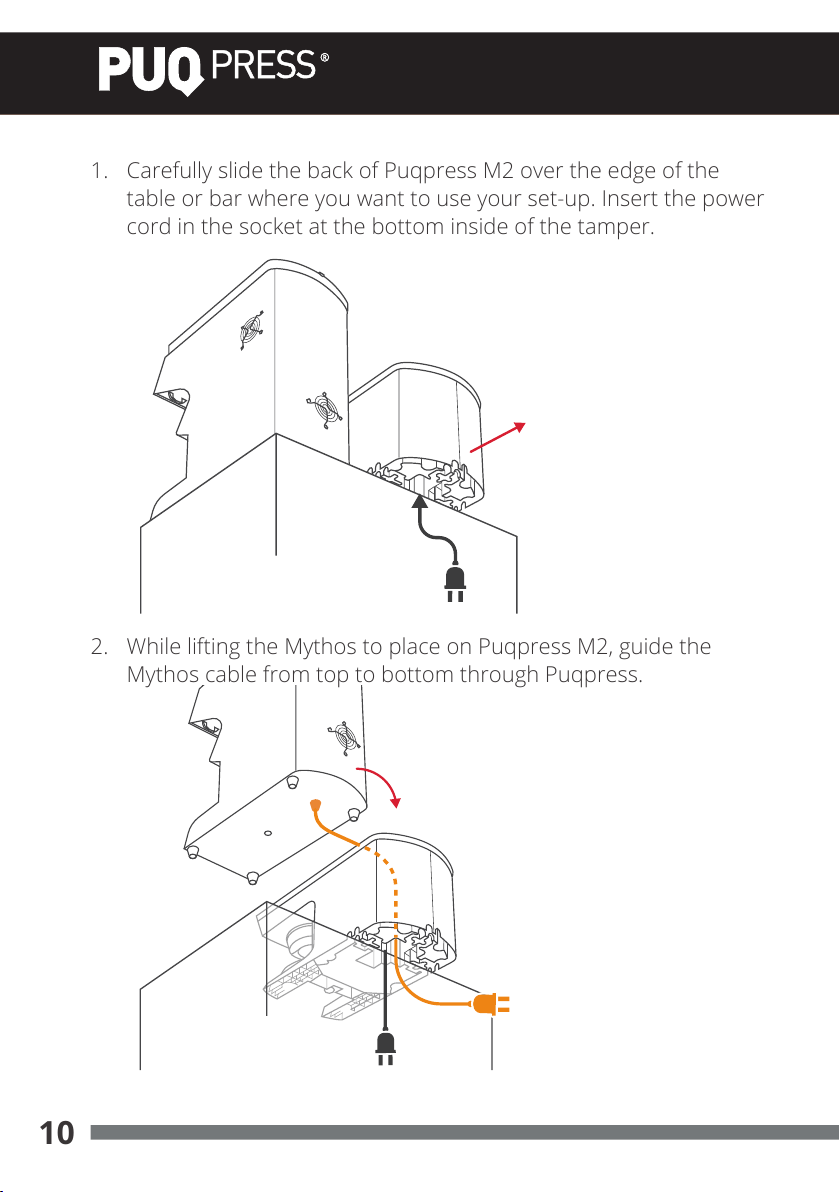
1. Carefully slide the back of Puqpress M2 over the edge of the
table or bar where you want to use your set-up. Insert the power
cord in the socket at the bottom inside of the tamper.
2. While lifting the Mythos to place on Puqpress M2, guide the
Mythos cable from top to bottom through Puqpress.
Page 11
11
EN
Precision coee tamper
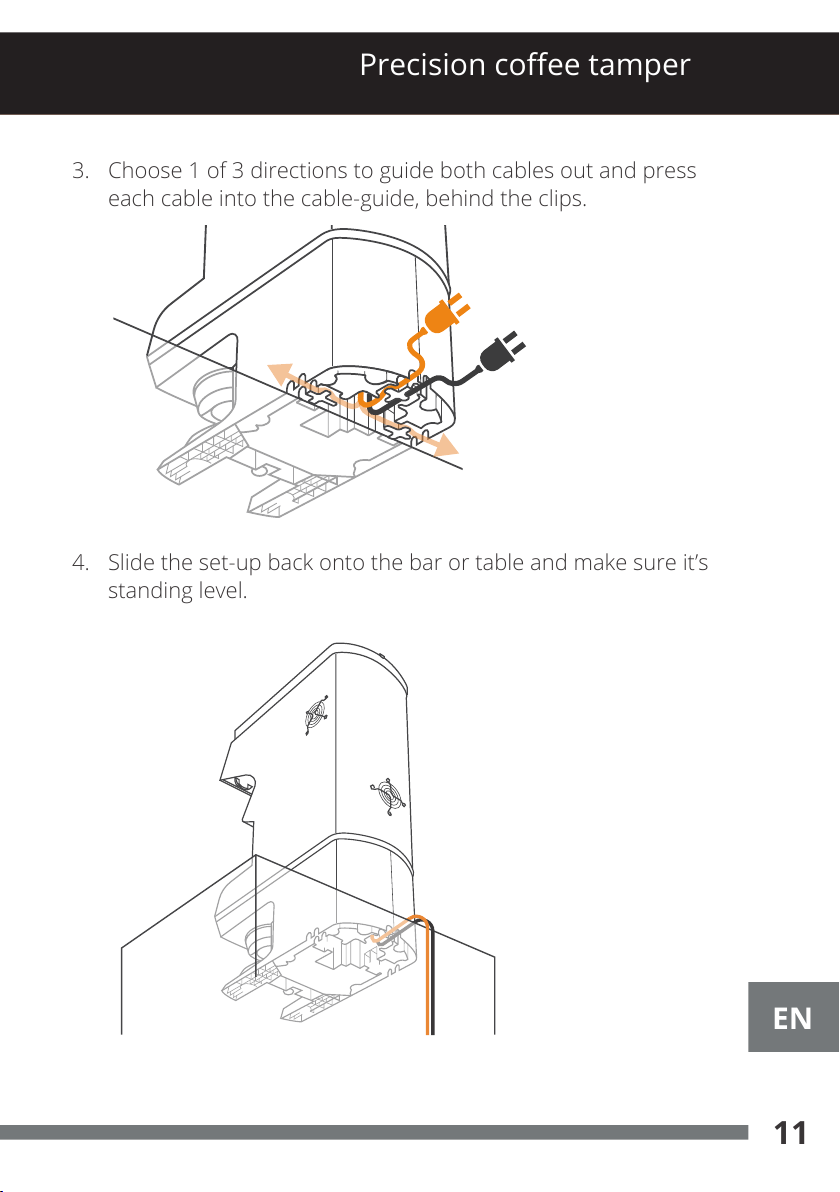
3. Choose 1 of 3 directions to guide both cables out and press
each cable into the cable-guide, behind the clips.
4. Slide the set-up back onto the bar or table and make sure it’s
standing level.
Page 12

4.4 Electrical installation
A damaged power cable must be replaced immediately.
Let the defective cords and plugs be replaced immediately
at a customer service repair facility or your dealer.
1. Insert the power cord in the socket at the bottom inside of the
tamper.
2. Insert the plug into the corresponding grounded outlet.
3. Switch on the tamper using the main switch at the back side
(pos. 12).
5 Operation
5.1 Normal operation of the tamper
1. Actuate the main switch on the front side of the tamper (pos. 8).
2. Insert the port-a-lter entirely in the clamp after initial levelling of
ground coee in lter basket.
3. The tamper automatically detects the metal port-a-lter using
the contactless sensor.
4. Remove the port-a-lter after a full cycle of approx. 1.5 seconds.
5.2 Tamping force adjustment
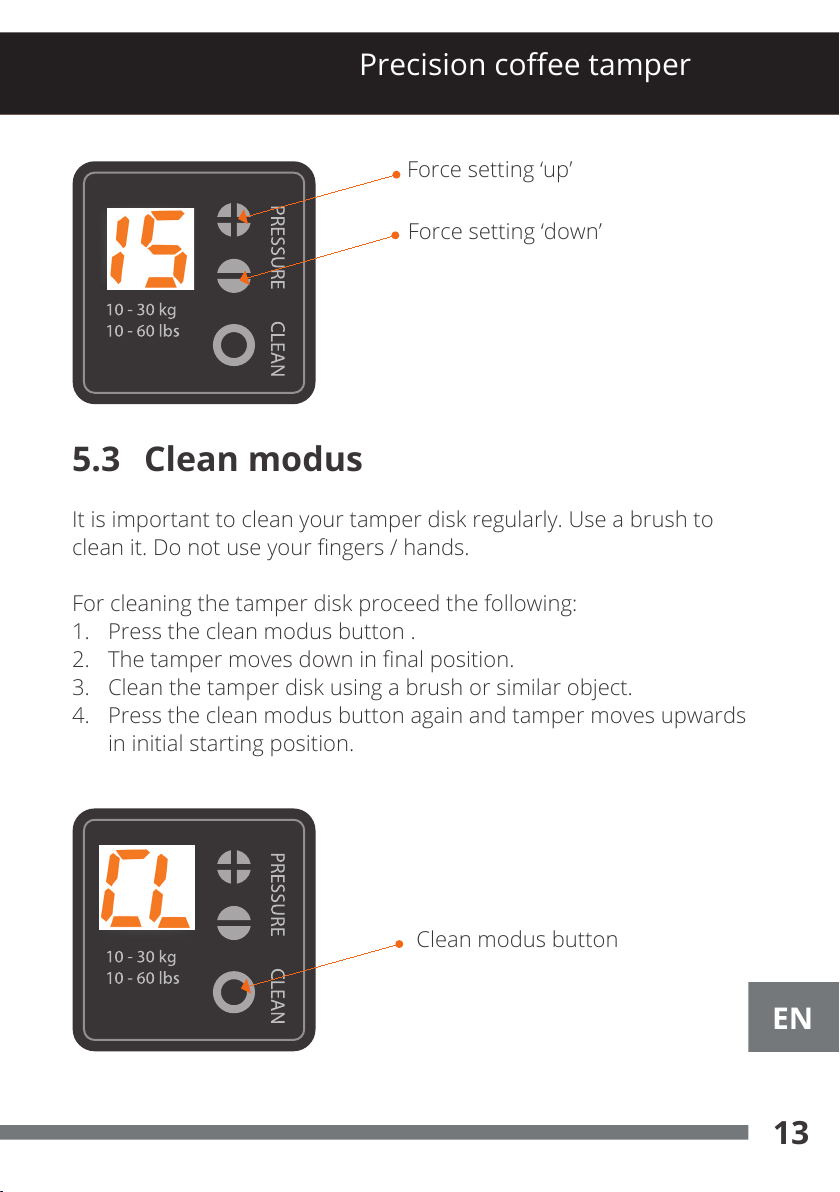
The tamping force (kg) can be adjusted on the display at the right
side. For force adjustment use the “+” or “- “ button. The force
setting is presented on the display in kilograms (kg) or pounds (lbs).
12
Page 13
13
EN
Precision coee tamper
5.3 Clean modus
It is important to clean your tamper disk regularly. Use a brush to
clean it. Do not use your ngers / hands.
For cleaning the tamper disk proceed the following:
1. Press the clean modus button .
2. The tamper moves down in nal position.
3. Clean the tamper disk using a brush or similar object.
4. Press the clean modus button again and tamper moves upwards
in initial starting position.
Force setting ‘down’
Force setting ‘up’
Clean modus button
Page 14
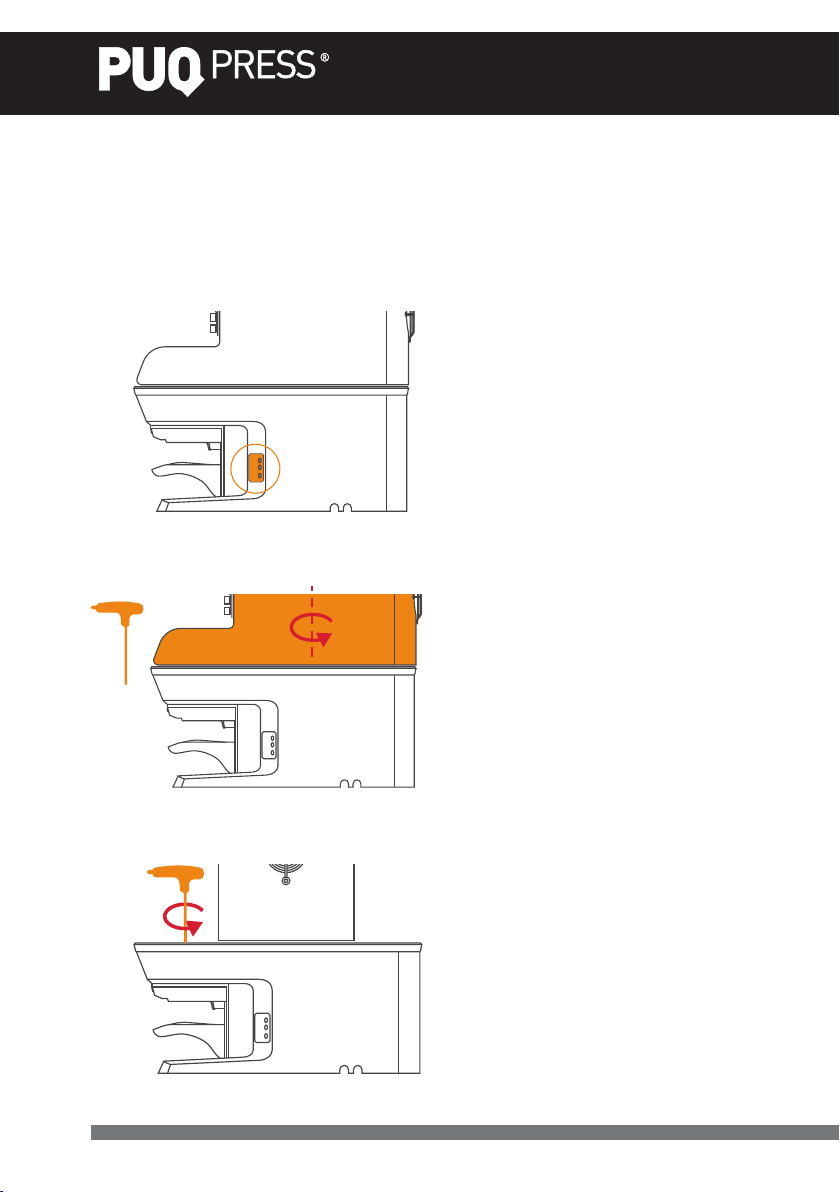
6 Remove tamper disk
1. Put the unit in ‘cleaning’ mode: tamper disk goes down in lowest
position.
2. Turn the Mythos 90 degrees and get the Allen key.
3. Unscrew by turning counter-clockwise and remove the bolt.
(M5x50mm)
14
Page 15
Precision coee tamper
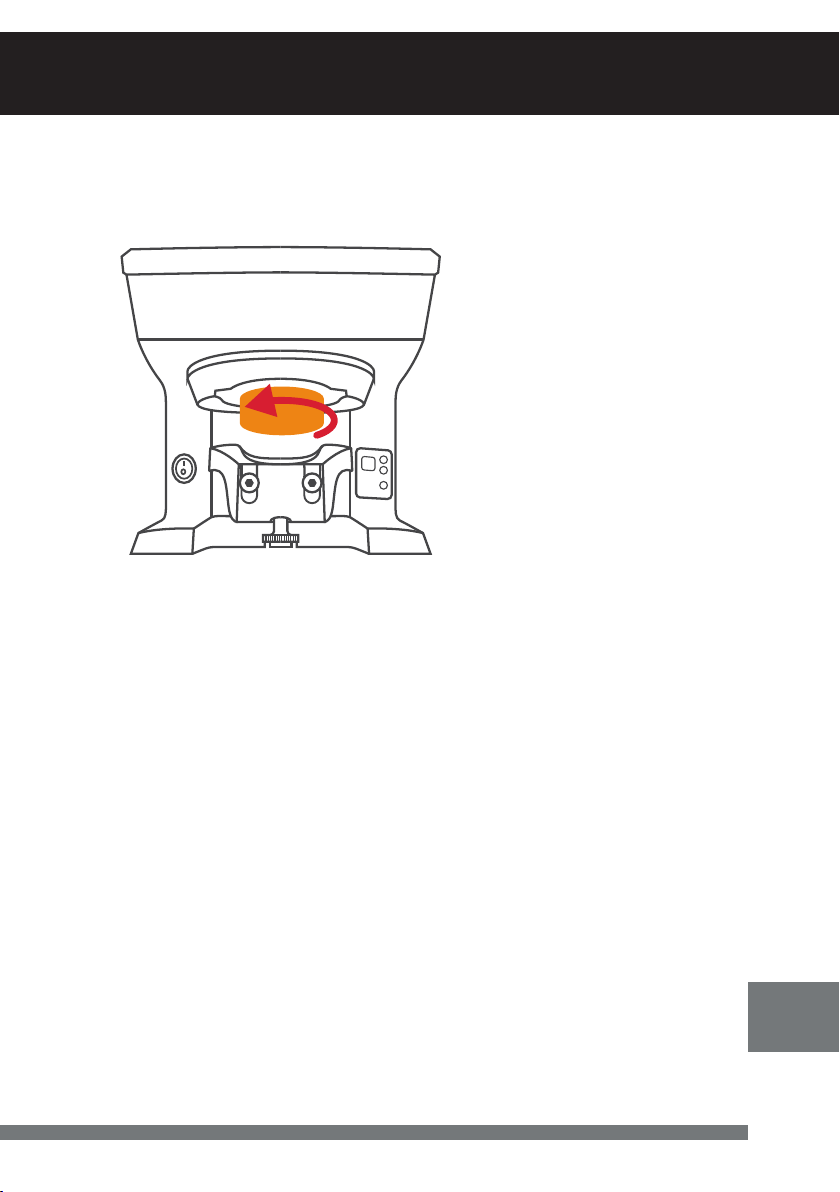
4. Unscrew the tamper disk. NOTE: this is left-handed thread! See
direction to remove below:
EN
15
Page 16
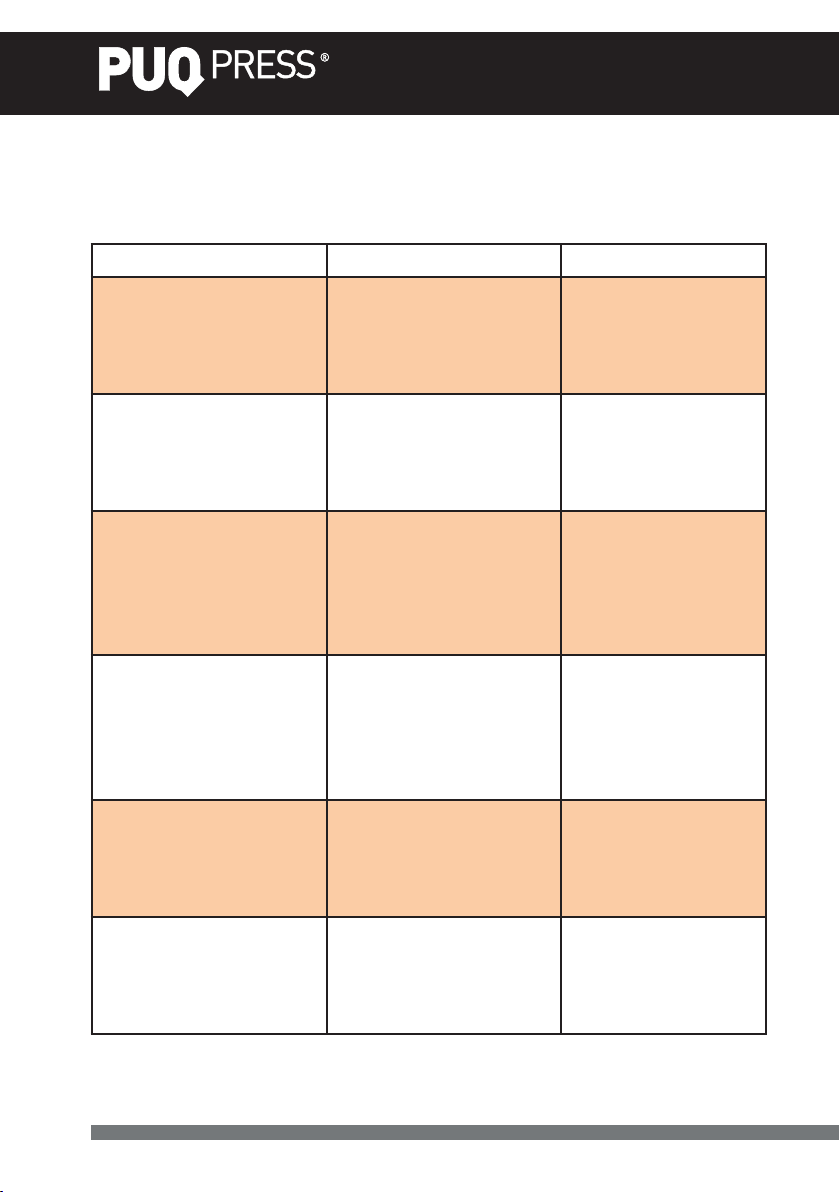
7 Operating faults
Defect Cause Remedy
Ground coee sticks
to the tamper disk.
The tamper disk is
greasy or dirty.
Use the clean
modus and clean
the tamper disk.
The tamper disk is
wet.
The tamper does not
start, the display does
not work.
The tamping
operation does not
start while the clean
modus is still working.
The tamper does not
tamp level and even.
The main plug is not
inserted.
Sensor does not
detect a port-a-lter
because it is not
inserted completely.
The adjustment of the
clamp is too loose.
Coee ground is
not levelled before
tamping.
Use the clean
modus and dry the
tamper disk.
Insert the main
plug in the socket and/or (wall)
outlet.
Re-adjust the
port-a-lter clamp
as is explained in
section 4.1.
Re-adjust the
port-a-lter clamp
as is explained in
section 4.1.
Level the ground
coee in lter
basket before
tamping.
16
Page 17

Precision coee tamper
In the case of other malfunctions or continued faults, please contact
your dealer or your authorised customer service centre.
8 Service
Always pull out the main plug from the socket before carrying out
maintenance or cleaning work on the tamper!
Any required repairs may only be conducted by authorized specialist
personnel. For this reason, please contact a customer service repair
facility or your dealer. Please observe the safety instructions under
1.1.
It is advised to conduct all maintenance and repairs by the customer
service centre or your dealer.
If you have a new espresso machine with dierent tamper diameter,
please contact your local dealer. They can provide new tamping disk
and handle the procedure to interchange the disks.
9 Spare parts
Spare parts can be ordered from your customer service centre or
your local dealer. To ensure quick and correct processing of your
order, the following information is essential:
1) Serial number
2) Description of the part to be replaced according to section 3.
EN
17
Page 18

10 Warranty Conditions
1. The warranty period is 1 year from the date of purchase.
2. The warranty covers all damages that can be attributed to
inferior materials or defective workmanship. The corresponding
tamper will be repaired or replaced free-of-charge, with the
exception of transport or freight charges. Proper transport is the
responsibility of the customer so please try to avoid damages
during a product return by correctly packing the device.
3. This warranty does not cover damages which have occurred
through: improper usage, improper maintenance, lack of
servicing, usage for purposes other than those intended,
incorrect installation, breakage, natural wear or for reasons
beyond our sphere of inuence.
4. In order to maintain the warranty, only original spare parts and
accessory parts may be used.
5. The manufacturer is in no way liable for consecutive or
secondary damages.
6. The warranty does not cover costs resulting from repairs
conducted by non-authorized personnel.
18
Page 19

Precision coee tamper
EN
19
 Loading...