

Page 1

ES 01
Extension Socket
Quick Guide
Page 2
English – ES 01 Instructions for use
Getting started
1
OPEN
2
2300 W / 18 00W*
maximum
5
6
7
RESETTABLE
FUSE
3
4
CLOSE
8
Surge prote ction*
indic ator LED
Page 3

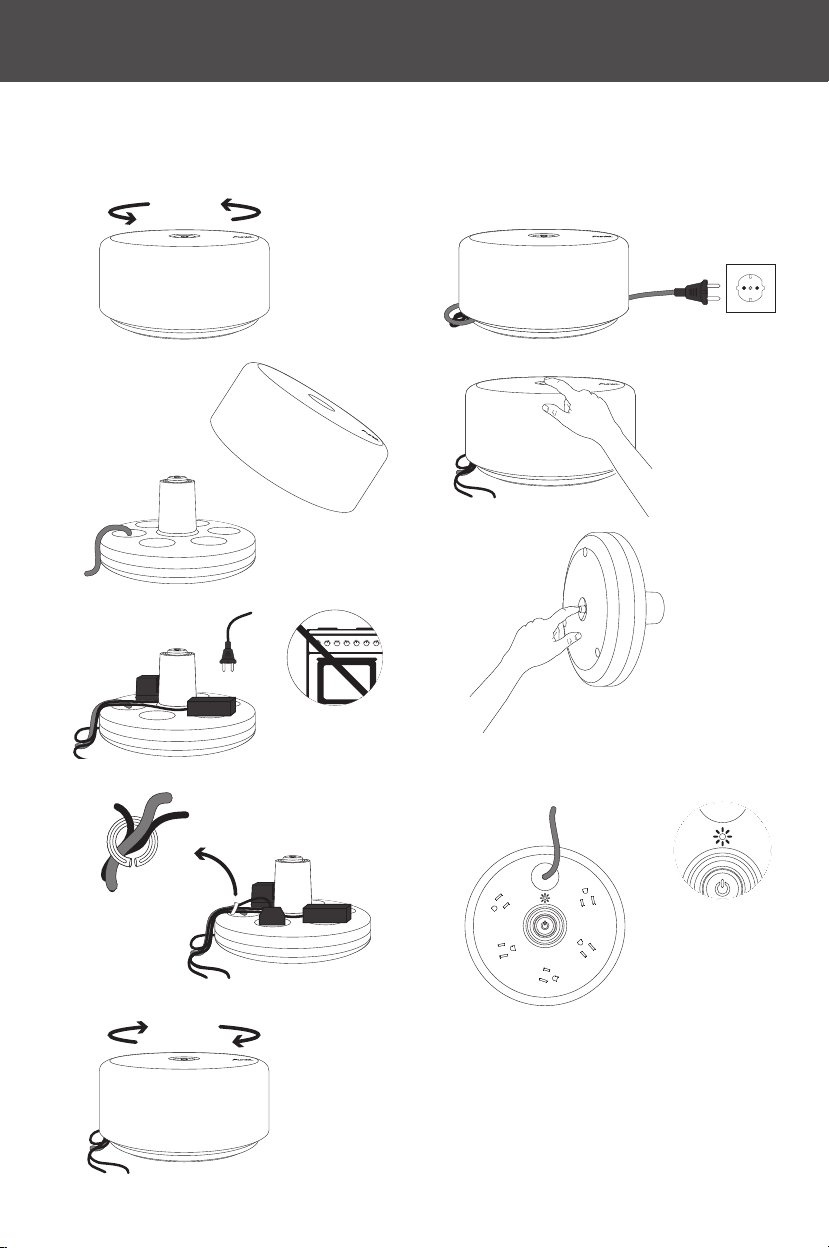
1 Remove t he lid by gently ro tating it 20 ° anticlock wise and
lif ting it up fro m the base.
2 Plug in yo ur devices a nd AC adapters . Position plug s
care fully to pre vent collis ion with the l id when it is
closed.
The max imum load of t he ES 01 is 2300 W for T ypes E, F,
F/L , G and J. Please note T ype B has a ma ximum load o f
1800 W. Plea se check the watt age of the devic es you are
connecting ar e compatible.
3 To group y our cables co ming out of th e ES 01 use t he
rub ber C-clip pr ovided as il lustrated i n the diag ram.
4 Replac e the lid on the to wer of the base a nd lock it by
gently r otating it 20 ° clockwis e until the me chanis m
stops. D o not use excess ive force or you mi ght damage t he
locking mechanism.
5 Connec t the ES 01 power-c ord to a wall so cket.
6 Push t he on/off but ton on top of the ES 01 to sw itch on the
ES 01. The light o f the power icon w ill illu minate to
indi cate status i s on.
Overload protection
7 In the e vent of the ES 01 bein g overloaded, th e fuse wil l
automat ically tri p and cut the ci rcuit. The re set button on
the un derside of the b ase will pr otrude when t ripped and
the powe r icon will s witch off. To st art up agai n simply
press t he fuse res et button on the ba se.
Surge protection*
8 Voltage pr otection rat ing: L-N 500 V, L-G 50 0V, N-G 500 V.
When il luminat ed the surge p rotection s tatus LED
indi cates the sur ge protect ion circu it is functi oning.
Please no te that when the L ED ceases to i llumin ate the
devic e is not protec ted and shou ld be replaced .*Only
avail able on Typ e B.
Safety and handling
– For safet y reasons and t o prevent dam age to the ES 01
always h old and carr y it from the ba se, not from the l id.
– The ES 01 Exte nsion Socket i s designed fo r indoor usa ge
on ly.
– To preven t a short cir cuit, fire or d amage to t he product,
never ex pose the ES 01 to heat, w ater or dire ct sunli ght.
– Please a lways hold the ba se when pluggi ng and
unplug ging pow er-cords or A C adapters i nto the ES 01.
– To unplug a p ower-cord or a n AC adapter, alwa ys grip the
body con nected to t he socket. Never “r ip” plugs out fr om
the bas e.
– Use a dr y cloth to clea n the ES 01 and ensu re the devic e is
disconnected before cleaning.
– The ES 01 power -cord cann ot be replaced . If the
power- cord is dam aged the whole de vice should b e
destroyed.
– Never con nect the ES 01 to a si milar dev ice such as
reloc atable power ta ps or other ext ension socke ts.
Typ e E, F, F/ L, G and J: 10A 230V ~ Max 2 300W
Typ e B: 15A 120VAC 60H z Max 1800W. Voltage pr otection
rati ng L-N 500V, L-G 50 0V, N-G 500 V. Typ e 3 SPD.
This product is compliant with
the following directives and
requirements
Europe
2006/95 /EC Low voltage Dire ctive
2011/65/EC R oHs Direc tive
2002/96/EC WEEE Directive
USA a nd Canada
UL 1363 3r d Edition, Relo catable Powe r taps
UL 1449 3r d Edition, Su rge Prote ctive Device s
The produ ct cannot b e disposed a s unsort ed municipa l
waste . It must be collec ted separ ately to prevent ne gative
envir onmental i mpacts. In ac cordance w ith the proce dures
of Dir ective 2002 /96 and rele vant nationa l laws and
regu lations adop ted pursua nt to this D irective on t he
dis posal of wast e at the end of the l ife cycle of the pr oduct,
any vio lation is sanc tioned by law. Please i nform you rself
about lo cal separ ate collect ion system for ele ctrical a nd
electron ic products.
For more in formation on t his produc t go to Punk t.’s websit e
www.punktgroup.com
Page 4
Deutsch – ES 01 Bedienungsanleitung
Erste Schritte
1
ÖFFNEN
2
2300 W / 18 00W*
maximum
5
6
7
RESET-K NOPF
3
4
SCHLIESSEN
8
Überspannungsschutz*
LED
Page 5

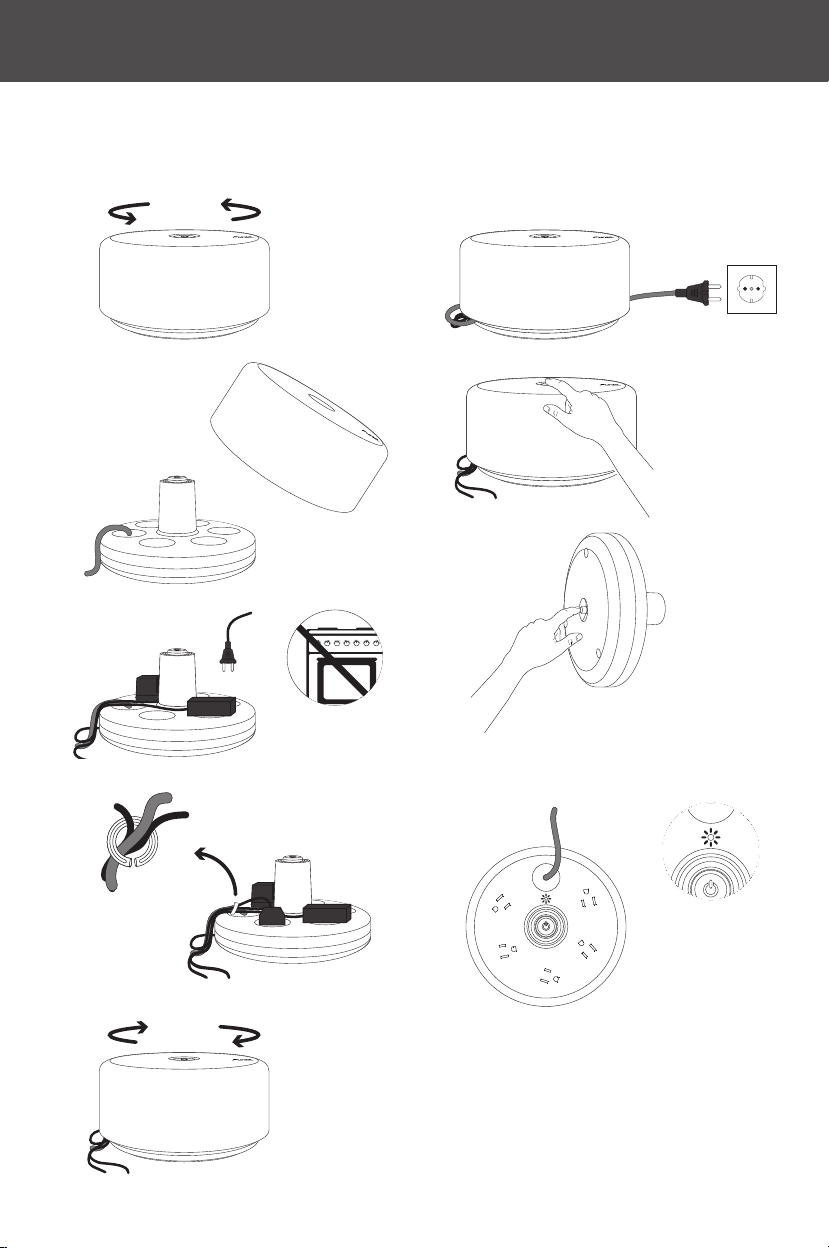
1 Entfer nen Sie den Deck el durch ein le ichtes Drehe n von
20° im U hrzeiger sinn und he ben Sie ihn von d er Basis auf.
2 Packen Si e den Stromk abel aus dem m ittleren Tu rm aus
und st ecken Sie Ihr e Geräte und A C-Adapter ei n. Die
maxi male Bela stung des ES 01 ist 2 300 W für Ty p E, F,
F / L, G und J. Bi tte beachten: T yp B hat eine ma ximale
Belas tung von 1800 W. Bitt e überprü fen Sie, ob die
Watt Zahl , der Geräte Sie a nschließ en, kompatibel i st.
3 Gruppie ren Sie Ihr e Kabel, d ie aus dem ES 01 kommen,
mit der Gu mmi C-Kla mmer, wie in de r Abbildu ng
dargestellt.
4 Setze n Sie den Deckel au f dem Turm de r Basis und
verr iegeln Sie ih n durch vor sichtiges D rehen von 20° i m
Uhrz eigersin n bis zum An schlag. Ver wenden Sie bitte
keine ü bermäß ige Kraf t um die Verri egelung nic ht zu
beschädigen.
5 Schl ießen Sie die E S 01 Netzle itung an ei ner
Wandsteckdose an.
6 Drüc ken Sie den Ein /Aus-Knopf au f der Oberseit e des ES
01, um das ES 01 ein zuschalt en. Die Anze ige des
Strom -Symbols l euchtet auf, um a nzuzeig en, dass die
Mehrfachsteckdose eingeschaltet ist.
Überlastsicherung
7 Bei Str omüberlas tung wir d die Sicher ung ausgelös t und
unterb richt automat isch den Str omkreis . Die Reset-Taste
auf der Unt erseite der Ba sis wird b ei Auslösu ng
heraus ragen und d ie Anzeige d es Strom-Sy mbols sch altet
aus. Zum W iedereins chalten d rücken Sie ei nfach die
Sicher ung Reset-Tas te an der Basi sstation.
Überspannungsschutz*
8 Span nung Schutz art: L-N 500V, L- G 500V, N-G 500V.
Wenn die L ED-Anz eige der Über spannu ngsschutz
aufleuc htet, heißt es d aß die Üb erspannu ngsschutz-
Scha ltung ein geschalte t ist. Bitte be achten Sie, das s,
wenn d ie LED-An zeige Beleuc htung schwac h ist, ist da s
Gerät nicht geschützt und sollte ersetzt
werden .*Verfü gbar nur be i Typ B).
Sicherheits- und
Handhabungshinweise
– Aus Sic herheitsgr ünden und u m eine Beschä digun g der
ES 01 zu verhi ndern, ha lten und tra gen sie es imme r von
der Bas is, nicht vom De ckel.
– Die ES 01 Meh rfachstec kdose ist fü r die Verwendu ng in
Innenr äumen konzipiert.
– Um einen Ku rzschlu ss, Feuer oder Sch äden am Prod ukt zu
vermei den, sollen Sie n iemals d ie ES 01
Mehr fachsteck dose gegen Wär me, Wasser oder d irektem
Sonnenlicht aussetzen.
– Halte n Sie bitte imm er die Basis, w enn Sie Strom kabel
oder AC-A dapter in d ie ES 01 ein- und auss tecken.
– Um Strom kabel ode r AC-Adapter ei n- oder auszu stecken,
grei fen Sie immer d en Körper der S teckdose an u nd reißen
Sie nie S tecker aus der Ba sis heraus.
– Verwende n Sie ein troc kenes Tuch, u m das ES 01 zu
rein igen und sor gen Sie dafü r, das s das Gerät, vo r der
Reinigung, vom Strom getrennt wird.
– Das St romkabe l des ES 01 kann nic ht ersetzt we rden.
Wird d as Stromk abel besc hädigt, s o ist das gan ze Gerät zu
zerstören.
– Verbinde n Sie niemals d en ES 01 zu einem äh nlichen
Gerät , wie versetz bare Lei stungsa bgrif fen oder andere
Mehrfachsteckdosen.
Typ E , F, F/L , G und J: 10A 230V ~ Max 230 0W
Typ B: 15A 120 VAC 60H z Max 1800W. Span nung
Schutz art: L-N 500V, L-G 5 00V, N-G 500V. Typ 3 SPD
Dieses Produkt ist kompatibel
mit den folgenden europäischen
Richtlinien und Anforderungen
Europa
2006/95/ EC Niederspan nungs-Ric htlin ie
2011/65/EC R oHs Richtl inie
2002 /96/EC W EEE Richtl inie
USA u nd Kanada
UL 1363 d ritte Edit ion, versetz bare Leis tungsa bgriffe n
UL 1449 d ritte Edit ion, Übers pannung sschutzger äte
Das Pr odukt dar f nicht als u nsortie rter Sied lungsabf all
entsor gt werden. Zu r Vermeidung vo n negativen Ein flüssen
auf di e Umwelt muss es sepa rat gesam melt werden. I n
Über einsti mmung mit de r Richtli nie 2002/ 96 und den
eins chlägi gen nationale n Gesetzen u nd Regelunge n gemäß
dies er Richtli nie über d ie Entsorgu ng von Altge räten ist jede
Zuwider handlun g straf bar. Inform ieren Sie sich bi tte über
Ihr lo kales Syst em zur separ aten Samm lung von Elekt ro-
und Ele ktronik produkte n. Für weiter e Informat ionen über
dies es Produkt b esuchen Sie bit te unsere P unkt. Webs eite
unter ww w.punk tgroup.com
Page 6
Italiano – ES 01 Istruzioni d’uso
Messa in funzione
1
APRIRE
2
2300 W / 18 00W*
massimo
5
6
7
TAST O DI
RESET
3
4
CHIUDERE
8
Indi catore LED
per protezione
contro le
sovratensioni*
Page 7

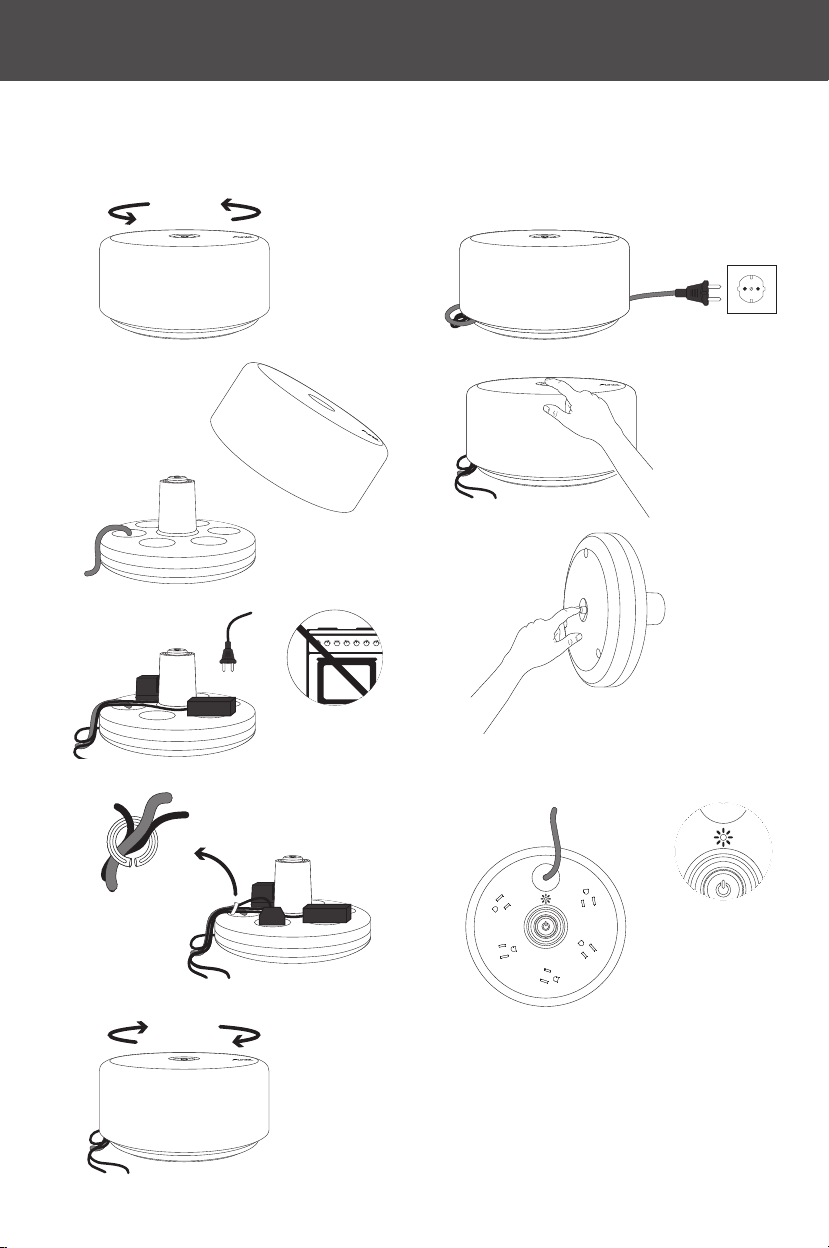
1 Rimu overe il coper chio ruot andolo genti lmente di 20° i n
senso a ntiorar io e sollevarlo d alla base .
2 Colleg are le spine d i corrente o g li accumu latori che
s’intend ono aliment are attrave rso l’ES 01. Posizion are le
spine e /o gli accumu latori af finché ques ti non collid ano il
coper chio dell’ES 01 un a volta chius o. La potenza
massi ma complessiva del l’ES01 è di 23 00 W per il Tipo
E, F, F/L, G a nd J. Il Tipo B ha u na potenza ma ssima di
1800W. Si p rega di control lare la con formità dell a
potenz a prima di col legare alc un disposit ivo all’ES 01.
3 Util izzare il fe rmaglio d i gomma per ra ggruppa re i cavi
come indicato nell’illustrazione.
4 Ripor re il coper chio sull a base e chiude rlo ruotand olo
genti lmente di 20° i n senso ora rio fino a qu ando si blocca .
Si preg a di non applica re eccessiv a forza sul mecc anismo
di bloc caggio per e vitare d i dannegg iarlo.
5 Colleg are il cavo d i alimenta zione dell’ES 01 a un a presa di
corr ente a muro.
6 Preme re il bottone o n/off al cent ro del coperc hio per
ali mentare l’ES 01. Qua ndo acceso l’icona d el bottone
s’illumina.
Protezione da sovraccarico
7 Nel caso i n cui avven ga un sovrac carico di c orrente, il
fusi bile stacc herà immed iatamente i l circui to. Questo
stato è id entificab ile control lando il pos izionament o del
tast o di reset che s i trova al di s otto della ba se dell’ES 01:
qua ndo il circ uito è staccat o, il tasto d i reset spor ge dalla
super ficie e l’icona sul b ottone on/of f al centro del
coper chio si speg ne. Per rimet tere l’ES 01 in fun zione,
premer e il tasto d i reset.
Protezione contro le
sovratensioni*
8 Para metri di pr otezione: LN 50 0V, LG 50 0V, 500V NG.
Quan do il LED di s tato di prote zione è illum inato sig nifica
che il s istema di pr otezione cont ro le sovraten sioni è in
funz ione. Si prega d i notare che, q uando il L ED non è
illu minato, il d isposit ivo non è protett o e deve essere
sosti tuito.*Solo nella v ersione Ty pe B.
Istruzioni di gestione e
sicurezza
– Per rag ioni di sicu rezza e al fi ne di non dan neggiar e il
prodo tto, afferr are sempre l’E S 01 dal la base e non da l
coper chio quan do mosso o tras portato.
– L’ES 01 è stato proge ttato unic amente per un u so
all’in terno di spa zi chiusi e no n per un uso al l’este rno.
– Per evit are possi bili cor tocircu iti, incend i o danni a l
prodo tto, mai espor re l’ES 01 al calor e, all’acqua o al la
luce sola re dire tta.
– Si preg a di tener sempr e saldament e con una mano l a base
dell’ES 01 nel m omento in cui v i vengono coll egati o
scoll egati spine e acc umulator i.
– Mai ti rare i cav i per scollega re spine e acc umulator i,
sempre a fferrar e il corpo de lla spina o d ell’accumulat ore
colleg ato alla pre sa.
– Util izzare un p anno asciut to per puli re l’ES 01 e
assicurarsi di togliere tensione all’apparecchio
scoll egandolo pri ma di puli rlo.
– Il cavo d i corrente d ell’ES 01 non può esser e sostituit o, in
caso do vesse risu ltare da nneggiat o, l’appar ecchio
dev’essere distrutto.
– Non colle gare l’ES01 a dis positivi si mili com e ad esempio
altre mult iprese elettriche.
Typ e E, F, F/ L, G and J: 10A 230V ~ Max 23 00W
Typ e B: 15A 120VAC 60H z Max 1800W
Voltage pr otection rat ing L-N 500V, L- G 500V, N-G 500V
Typ e 3 SPD
Questo prodotto è conforme alle
seguenti direttive
Europa
2006/95 /EC Low voltage Dire ctive
2011/65/EC R oHs Direc tive
2002/96/EC WEEE Directive
USA e Ca nada
UL 1363 3r d Edition, Relo catable Powe r taps
UL 1449 3r d Edition, Su rge Prote ctive Device s
L’apparecch io non dev’essere s maltito come r ifiuto urb ano.
Deve ess ere sogget to a raccolta sep arata per ev itare da nni
all’am biente. Nel ris petto della D irettiva 2 002/96 e del le
Legg i nazional i di recepi mento per lo sma ltimento del
prodo tto a fine vita, i l mancato r ispetto d i quanto sop ra
descr itto è sanz ionato dall a Legge. Si pre ga di infor marsi in
merit o al sistema lo cale di racc olta differ enziata pe r i
prodotti elettrici ed elettronici.
Per mag giori in formazion i sul prodot to visitar e il sito
uffic iale di Pu nkt. ww w.pun ktgroup.com
Page 8
Español – ES 01 Instrucciones de uso
Para comenzar
1
ABRIR
2
2300 W / 18 00W*
máximo
5
6
7
FUSIBLE
REINICIABLE
3
4
CERRAR
8
Indicador LED de
la protección
contra picos de
tensión*
Page 9

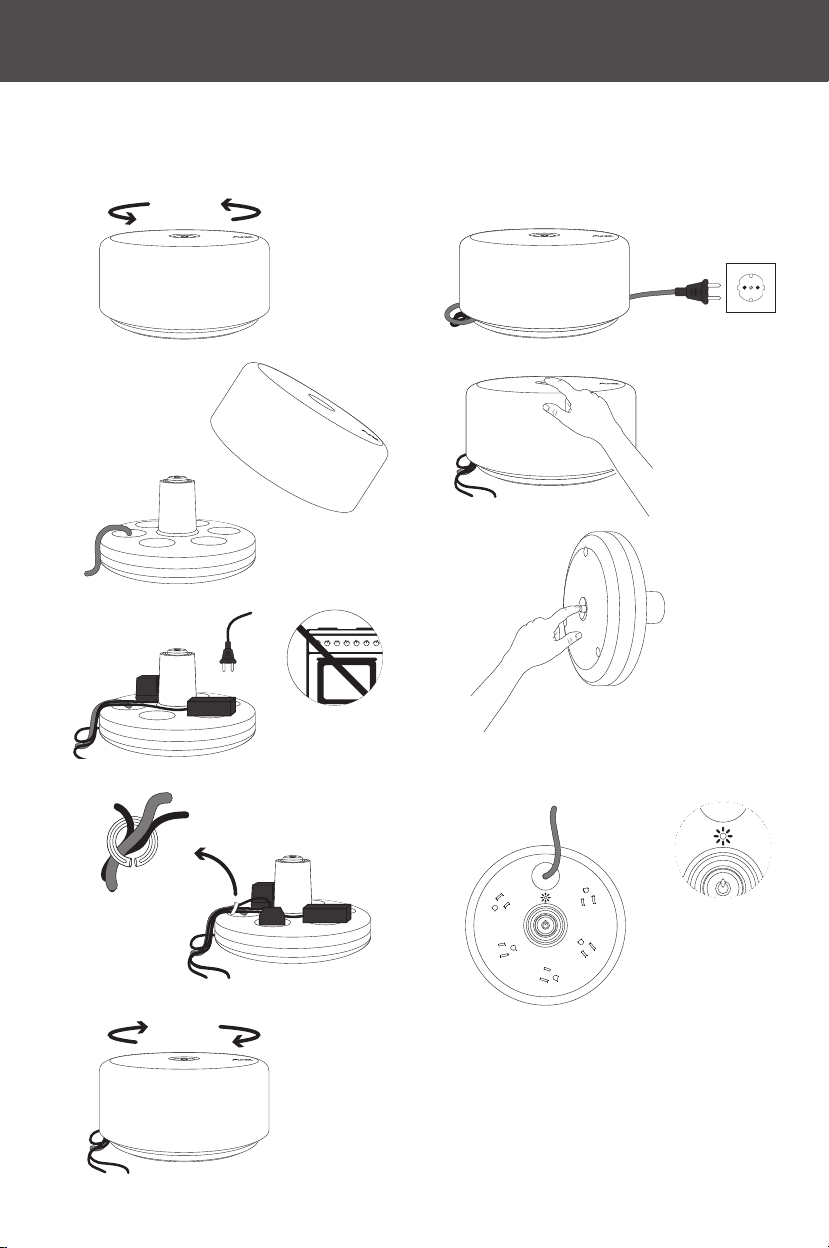
1 Reti re la tapa gi rándola suav emente 20° en sent ido
contra rio a las ag ujas del reloj y lev ántela de la ba se.
2 Coloq ue los enchufes co n cuidado pa ra evitar co lisiones
con la tap a cuando est á cerrada. L a potencia total
máxi ma de salid a del ES 01 es de 2300 W (T ipos E, F,
F/L , G y J). Nótese que el t ipo B tiene una sa lida total
máxi ma de 1800 W. Por favor c erciórese de q ue el
voltaje de los a paratos que es tá conectand o sean
compatibles.
3 Para a grupar lo s cables proc edentes del ES 01 use e l clip
de goma C su minis trado tal com o se muestra en el
diagrama.
4 Cierr e el ES 01 colocando d e nuevo la tapa sobr e la base y
bloqu ee la tapa gir ándola suavem ente 20° en el sent ido de
las ag ujas del reloj ha sta que el mec anismo se p are. No
apliq ue demasiad a fuerza par a evitar da ñar el mecan ismo
de bloq ueo.
5 Enchu fe el cable del ES 01 a un a toma de corr iente.
6 Encien da el ES 01 pulsa ndo el botón de apa gado/encend ido
en la pa rte superi or del product o. Tras ello s e encenderá la
luz del ico no que indic a el estado del E S 01.
Protección contra sobrecargas
7 En caso d e que el ES 01 tenga u na sobreca rga, el fusi ble
salta rá automátic amente y cort ará el circ uito. Cuan do se
activa e l fusible, el b otón de rein icio en la par te inferior d e
la base s obresale y el íc ono de estado se ap aga. Para
encende r de nuevo el ES 01 solo tiene q ue pulsar e l botón
rojo de r einicio en la b ase Infer ior del product o.
Protección contra picos de
tensión*
8 Clasi ficaciones de p rotección de v oltajes: L-N 500V, L-G
500V, N-G 500 V. Cuand o está ilum inada la luz L ED de la
prote cción contra lo s picos de tensió n indica qu e el
circ uito de prot ección de picos d e tensión está
func ionando. Nótes e que cuando l a luz LED deja de
ilum inar, el produc to no está pro tegido y deber ía ser
reempl azado. *Solo di sponible e n el tipo B.
Instrucciones de manipulación
y seguridad
– Por razo nes de segur idad y para ev itar dañ ar el ES 01,
sosté ngalo y tra nspórtel o siempre sujetá ndolo de la base y
no de la tap a.
– El ES 01 está pr evisto pa ra uso exclus ivo en interio res.
– Para e vitar cor tocircu itos, incend ios o daños en e l
produc to, no exponga nu nca el ES 01 al calor, al a gua o a la
expo sición solar d irecta .
– Sujete s iempre la base de l disposit ivo cuando enc hufe y
desenc hufe los cable s de aliment ación o adaptador es AC al
ES 01.
– Para d esenchufar u n cable o un ad aptador AC, suje te el
cuer po conectado a l ES 01. No tir e nunca de los ca bles para
desenchufarlos de la base.
– Para l impiar el ES 01 uti lice un pañ o seco y, antes de la
limpi eza, asegú rese de que el d ispositi vo está
desconectado.
– No es posi ble reemplaz ar el cable de a limentaci ón del ES
01. Si el cable se d aña, deber á elimin ar todo el di spositivo.
– Nunca con ecte el ES 01 a otros ap aratos si milare s o a otros
alargos eléc tricos.
Tipo E, F, F/ L, G y J: 10A 230V ~ Max 230 0W
Tipo B: 15A 120VAC 60 Hz Max 1800W. Clas ificaciones d e
prote cción de voltajes L -N 500V, L-G 500V, N-G 500 V.
Tipo 3 SP D.
Este producto cumple las
siguientes directivas y
condiciones
Europa
2006/95 /EC Low voltage Dire ctive
2011/65/EC R oHs Direc tive
2002/96/EC WEEE Directive
EE.U U. y Canadá
UL 1363 3r d Edition, Relo catable Powe r taps
UL 1449 3r d Edition, Su rge Prote ctive Device s
Este pr oducto no se deb e desechar a t ravés de la rec olección
munic ipal de basu ra doméstica , sino que se de berá
desec harse por se parado como ba sura espe cial, par a evitar la
conta minación a mbiental. D e acuerdo con los
proce dimiento s de la Direc tiva 2002/ 96 y a las leyes y
regulac iones nacionales aplicables, adoptad as por esta
Dir ectiva sobre l a elimi nación de resid uos al final d el ciclo de
vida de l producto, to da violación s erá sanciona da por la ley.
Infór mese acerca d el sistema lo cal de recole cción especi al de
productos eléctricos y electrónicos.
Para m ás inform ación sobre est e producto, v isite la pág ina de
Inter net de Pun kt.’s ww w.pun ktgroup.co m
Page 10
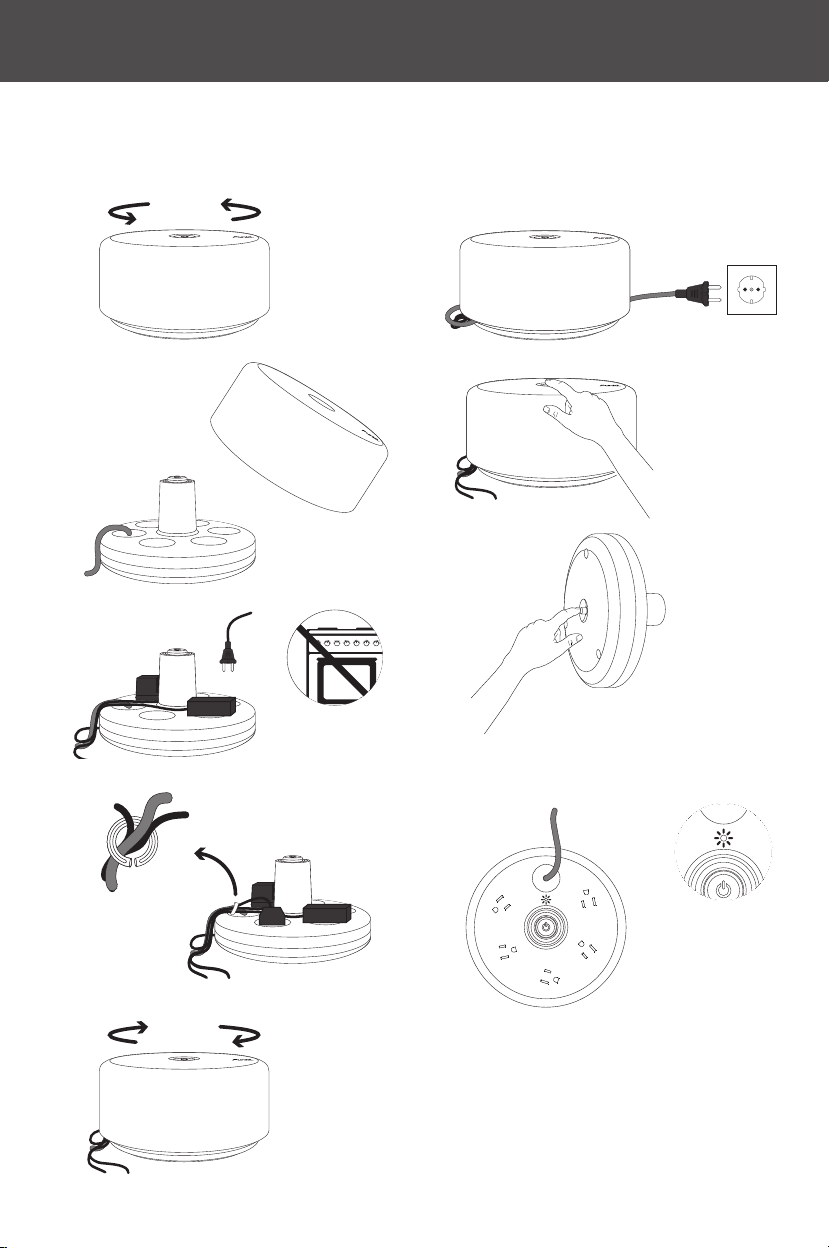
Français – ES 01 Mode d’emploi
Raccordement
1
OUVRIR
2
2300 W / 18 00W*
maximum
5
6
7
DISJONCT EUR
3
4
FERMER
8
Protect ion contre
les sur tensions *
Indi cateur LED t
Page 11

1 Reti rez le couvercl e en le faisant t ourner avec pr écaution
de 20° da ns le sens inv erse des aig uilles d’u ne montre,
puis le s oulevez de la ba se.
2 Dégag ez le cordon d’ali mentation de la to ur centrale e t
branc hez vos appare ils et adapta teurs CA de s orte qu’ils
ne heur tent pas le couve rcle lorsq u’il es t fermé. La
puiss ance maxi male de sorti e de l’ES 01 est de 2 300 W
(Ty pes E, F, F/L, G et J). At tention le Ty pe B a une
char ge maxima le de 1800 W. Vérifie z, s’il vous pla ît, la
confor mité de l’alim entation avant de co nnecter un
périphé rique au ES 01.
3 Pour re grouper les c âbles sort ant de l’ES 01, utilis ez le
serre-câble fourni, comme illustré.
4 Fermez l’ES 01 en r eplaçant le couv ercle sur la b ase et en le
faisa nt tourner a vec précaution d e 20° dans le se ns des
aig uilles d’une m ontre, jusq u’au verr ouilla ge. N’appliquez
pas un e force excessive a fin de ne pas end ommager le
dis positif de ve rrouil lage.
5 Branc hez le cordon d’ali mentation de l’E S 01 dan s une
pris e murale.
6 Appuyez s ur le bouton on /off situé sur l’E S 01 pour m ettre
l’ES 01 sous ten sion. La dio de de l’icône de tensi on
s’allume p our indiq uer que l’ES 01 est so us tension.
Protection contre les
surcharges
7 En cas de s urchar ge de couran t, le disjonct eur coupe
automat iquement le ci rcuit. Dan s ce cas, l’icône de te nsion
s’éteint et le b outon de réta blissement du d isjoncte ur
dépas se de la base. Pou r redémar rer, il suffit d’appuy er sur
ce bouton.
Protection contre les
surtensions*
8 Para mètres de pr otection: 50 0V LN, LG 500V, 500V NG.
Lors que le statut de pr otection L ED est allu mé le système
de prot ection contr e les surte nsions LED e st en marche.
S’il vou s plaît notez q ue lorsque le L ED cesse d’il luminer
l’apparei l, il n’est pas prot égé et doit être r emplacé.
*Uniq uement dispo nible sur T ype B.
Sécurité et manipulation
– Pour de s raisons de s écurité e t pour éviter d’endo mmager
la pri se multiple ES 01, tenez-la e t déplacez-la touj ours par
la base e t non par le couver cle.
– La pri se multiple ES 01 est c onçue pour un e utilisat ion en
intérieur uniq uement.
– Pour év iter d’endommage r la prise mul tiple ES 01 ou de
provoq uer un cour t-circ uit ou un ince ndie, ne l’exposez
jama is à la chaleu r, au soleil ou à l’eau.
– Lorsque vous br anchez et débranchez des cordons
d’alime ntation ou des ada ptateurs C A dans l’ES 01, veill ez
toujou rs à mainten ir la base.
– Pour dé brancher un c ordon d’alime ntation ou un
adapta teur CA de la ba se de l’ES 01, saisis sez toujours l a
pris e du cordon ou de l’adapta teur par son b oîtier. Ne tirez
jama is par le cordo n.
– Util isez un chi ffon sec pour n ettoyer la pr ise ES 01 et
veil lez à la débranc her avant de la net toyer.
– Le cord on d’al imentation de l’E S 01 ne peut p as être
remplac é. Si ce cordon es t endommagé, l’ens emble doit
être m is au rebut.
– Ne jama is branchez l’E S 01 à des d ispositi fs simil aires ou
des prises d’alimentation amovibles.
Tipo E, F, F/ L, G y J: 10A 230V ~ Max 230 0W
Tipo B: 15A 120VAC 60 Hz Max 1800W. Clas ificaciones d e
prote cción de voltajes L -N 500V, L-G 500V, N-G 500 V.
Tipo 3 SP D.
Ce produit respecte les
directives ci-dessous
Europe
2006/95 /EC Low voltage Dire ctive
2011/65/EC R oHs Direc tive
2002/96/EC WEEE Directive
États-Unis et Canada
UL 1363 3r d Edition, Relo catable Powe r taps
UL 1449 3r d Edition, Su rge Prote ctive Device s
Ce produ it est soum is aux règles d e tri des déc hets. Il doit
être m is au rebut sépa rément pou r éviter tout imp act négatif
sur l’environnement. Conformé ment aux dis positions de la
dir ective 2002 /96 et des loi s et réglementat ions nationa les en
vig ueur adoptée s en vertu de cet te direc tive sur la mi se au
rebut de p roduits en fi n de cycle de vie, t out non-respec t est
sanc tionné par la l oi. Veillez à vous i nformer su r les
dis positions loc ales de tri s électif po ur les produi ts
électriq ues et électroniques. Pour plus d’infor mations sur ce
produ it, rendez-vous s ur le site Web de Pu nkt. à l’adres se
www.punktgroup.com
Page 12

 Loading...