

Page 1

DP 01/ DP 01S
DECT Phone
User Guide
1
Page 2

Notes
1 If you purchased the Punkt DP 01S kit (“Slave unit”), to make and
receive calls with your DP 01S handset you first need to register it to
your DP 01 Base station (“Main unit”), or to another DECT model
base station. In this case, please refer to the “Multi-Handset” section
of this User Guide for the registration procedure.
2 If your DP 01 Base station is connected to the French phone
network, to use the “Flash” option during a conversation you first
need to set the “Flash time” parameter to “270ms”. In this case, please
refer to the “Base settings” section of this User Guide.
Please visit http://www.punktgroup.com to download the latest
available version of this User Guide.
th
Current user manual version is: Ver. 1.00 (Nov 19
, 2010).
Change Log
User Guide version and date Modified sections
th
Ver. 1.00 (Nov 19
, 2010) Initial release
2
Page 3

Contents
1 Content of the box 4
2 Technical specifications 5
3 Health & Safety instructions 6
4 Care of the product 7
5 Disposal of the product and batteries 8
6 Installation 9
7 Display icons and function keys 10
8 Basic use of the phone (initial settings) 11
9 In call options 13
10 Phone book 14
11 Call history 15
12 Answering machine (TAM) 16
13 Handset settings 19
14 Base settings 20
15 Multi-Handset configuration 21
16 Internal calls: internal direct calls and external call transfer 23
17 Factory default settings 24
18 FAQ (Frequently Asked Questions) 25
19 CE Declaration of Conformity 26
3
Page 4

Content of the box
Please check that all of the below items are contained in the box of your
Punkt DP 01 (Main unit) / DP 01S (Slave unit).
1 Punkt base unit (*) with external connectors for “Power” and “Line”
plugs.
2 Punkt handset unit (identical for both DP 01 and DP 01S models).
3 Power adaptor with power cable (**) to be connected to the base unit.
4 Telephone line cable (**) for connection to the DP 01 (Main unit) on ly.
5 2 x “AAA” Ni-MH rechargeable batteries (1.2V - 650 mAh) for the
handset unit.
6 Quick guide
7 Regulatory norms for EU Countries
8 International Warranty.
(*) For the DP 01 model (Main unit), the base unit incorporates both the DECT base
station and the battery charger. For the DP 01S model (Slave unit), the base unit
includes only the battery charger. In the latter case, to make and receive calls with
this handset you need to register it to another DECT base station, for example the
base station of your Punkt DP 01 (Main unit). The registration procedure for a
Punkt handset (valid for both the DP 01 and DP 01S handsets) is explained in a later
section of this User Guide.
1
(**) For some countries, a specific Power adaptor and/or a telephone line adaptor
may be provided inside the box. Please check this with your dealer.
4
Page 5

Technical specifications
2
Type of technology:
RF cha nnels:
Frequency range:
Channel spacing:
Audio coding:
Type of modulation:
Maximum transmitted RF power:
Operating range:
Handset power supply:
Base dimensions and weight:
Handset dimensions and weight:
Display:
Connectable handsets to a single DP 01 base unit:
Connectable bases to a single Punkt handset:
Dial ing type:
Battery charge duration (autonomy):
Time required for first charge:
Time required for subsquent charging cycles:
Phone book capacity:
Supported Languages:
DECT (Digital European Cordless Telephone) standard
with GA P (Generic Access Profile) profile
10 c hannels
1.881 GHz – 1.897 GHz
1.728 M Hz
ADPCM/32 Kbit per second
GFSK
250 mW (24 dBm)
max 40 m indoor, max 200 m
Transmission range may vary according to the position of the
base, construction materials used in the area, electromagnetic
pollution, interference with other radio devices, etc. DECT
performance levels are given as a reference only and are not
guaranteed.
2 x “AAA” Ni-MH rechargeable batteries (1.2V - 650 mAh)
(155 mm x 48 mm x 50 mm) x 175 gr (including connector)
(155 mm x 48 mm x 20 mm) x 125 gr (without batteries)
1.6’’ horizontal, 128 x 64 dots, PWM back-lit with black font
on white background
6
4
DTMF (“tone dial”, default setting) or pulse mode (“decadic dial”)
up to 100 hours in stand-by mode and up to 10 hours
in conversation mode
16 hours
8 hours
100 contacts, with 3 numbers for each entry
English (UK)
French (France)
German
Italian
Spanish
Danish
Swedish
Finnish
Norwegian
Visual answering machine (TAM) with message registration sorted by date and time.
Total storage capacity for recorded messages:
Note: the TAM service is accessible from a DP 01S handset only if paired with a DP 01 Base
unit (TAM data is stored in the DP 01 Base unit only).
Nominal working temperature:
Extreme working temperature:
Relative humidity:
Note: Battery charging time and lifetime depend on phone usage by the user. If batteries are not
used properly, the actual values for both parameters may differ from the information given above.
5
15 minutes (max 1 minute for each message)
15° to 35°C
0° to 40°C
5% to 75%
Page 6

Health & Safety Instructions
– Only use the mains unit and the phone cord supplied.
– Both the power cord and the phone cord must be plugged in
at all times.
– It is not possible to make and receive phone calls if the mains unit
is disconnected from the electrical network.
– We recommend that the base unit should be located in a place not easily
accessible by young children and near a wall power socket.
– When inserting the batteries in the handset, ensure correct polarity
(+ / –) of the batteries as indicated by the diagram in the battery
compartment. Always keep batteries out of reach of children.
– Charge the battery for the first time for at least 16 hours before use.
Subsequently, a recharging time of 8 hours will suffice for a full
re-charge. We recommend that you do not use the phone to make
or receive calls during initial battery charging.
– Fit only recommended rechargeable batteries (A AA size (R03); Ni-MH;
1.2V, 650mAh). Do not use a different battery type or non-rechargeable
batteries (conventional batteries) as this could result in significant
health risks and personal injury. Do not attempt to open or damage
the batteries. Do not throw batteries into the fire: they could explode.
Read the section: “Disposal of the product and batteries” for more
details.
– When the phone is not in use, put the handset on the base in order to
keep the batteries charged. When battery level is low, a warning tone
will be emitted by the handset. Put the handset on the base to recharge
the batteries.
– If the telephone is not used for a prolonged period (for example 1 month),
it is recommended that batteries should be removed from
the unit. Always keep batteries out of reach of children!
– The display is protected by a plastic film. Please remove
the protective film!
– The operation of medical appliances may be affected. Be aware
of the technical conditions in your particular environment,
e.g. doctor’s surgery.
– Do not hold the rear of the handset to your ear when it is ringing as this
entails a risk of serious and permanent damage to your hearing.
The handset may cause an unpleasant humming noise in hearing aids.
– Do not install the phone in a bathroom, shower room or in locations
where there are high levels of humidity. The handset and base station
are not splash-proof.
– Do not use your phone in environments where there is a potential
explosion hazard, e.g. paint shops.
– The operating temperature for use of this product is between 0°C and
35°C, while the non-operating temperature is between -20°C and +45°C.
3
CAUTION: RISK OF EXPLOSION IF BATTERIES ARE R EPLACED BY AN INCORRECT
TYPE. DISPOSE OF USED BATTERIES ACCORDING TO INSTRUCTIONS GIVEN
IN THE SECTION: “DISPOSAL OF THE PRODUCT AND BATTERIES” IN THIS GUIDE.
6
Page 7

Care of the product
Cleaning the product
Wipe the base and the handset with a damp cloth (do not use solvent) or an
antistatic cloth. Never use a dry cloth. This can cause static.
Contact with liquids
If the handset comes into contact with liquids:
– Switch off the handset and remove the batteries immediately.
– Allow the liquid to drain from the handset.
– Pat all parts dry, then place the handset with the battery compartment
open and the keypad facing down in a dry, warm place for at least 72
hours (not in a microwave, oven, etc).
– Do not switch on the handset again until it is completely dry.
– When fully dried out, it will often be possible to use the handset again
although some problems could arise.
– Oxidation caused by liquids such as water that has penetrated into the
phone can cause serious functional problems. Such problems are not
covered by the warranty service.
4
Product transportation
If transporting this product, use the original packaging to protect the
product from potential damage.
Wall mounting solution
The base station can be mounted on a wall if preferred. A magnet in the
base station next to the charging contacts holds the handset vertically
during the charging phase. To ensure that the phone does not become
detached from its base and fall to the ground, make sure the handset is
properly seated on the base station before removing your hand from the
handset. Damage and /or broken parts due to user negligence in this
phase are not covered under the terms of the warranty.
7
Page 8

Disposal of the product and batteries
(European WEEE Directive: 2002/96/EC)
Batteries should not be disposed of in general household waste. Observe
local waste disposal regulations, details of which can be obtained from
your local authority or the dealer where you purchased the product. All
electrical and electronic equipment (EEE) must be disposed of separately
from general household waste at sites designated by local authorities. If a
product displays the symbol of a crossed-out rubbish bin, the product is
subject to European Directive 2002/96/EC. The appropriate disposal and
separate collection of used equipment help to prevent damage to the
environment and health. They are a precondition for the re-use and
recycling of used electrical and electronic equipment.
For further information on how to dispose of your used equipment, please
contact your local authority, your refuse collection service or the dealer
where you purchased the product.
5
8
Page 9
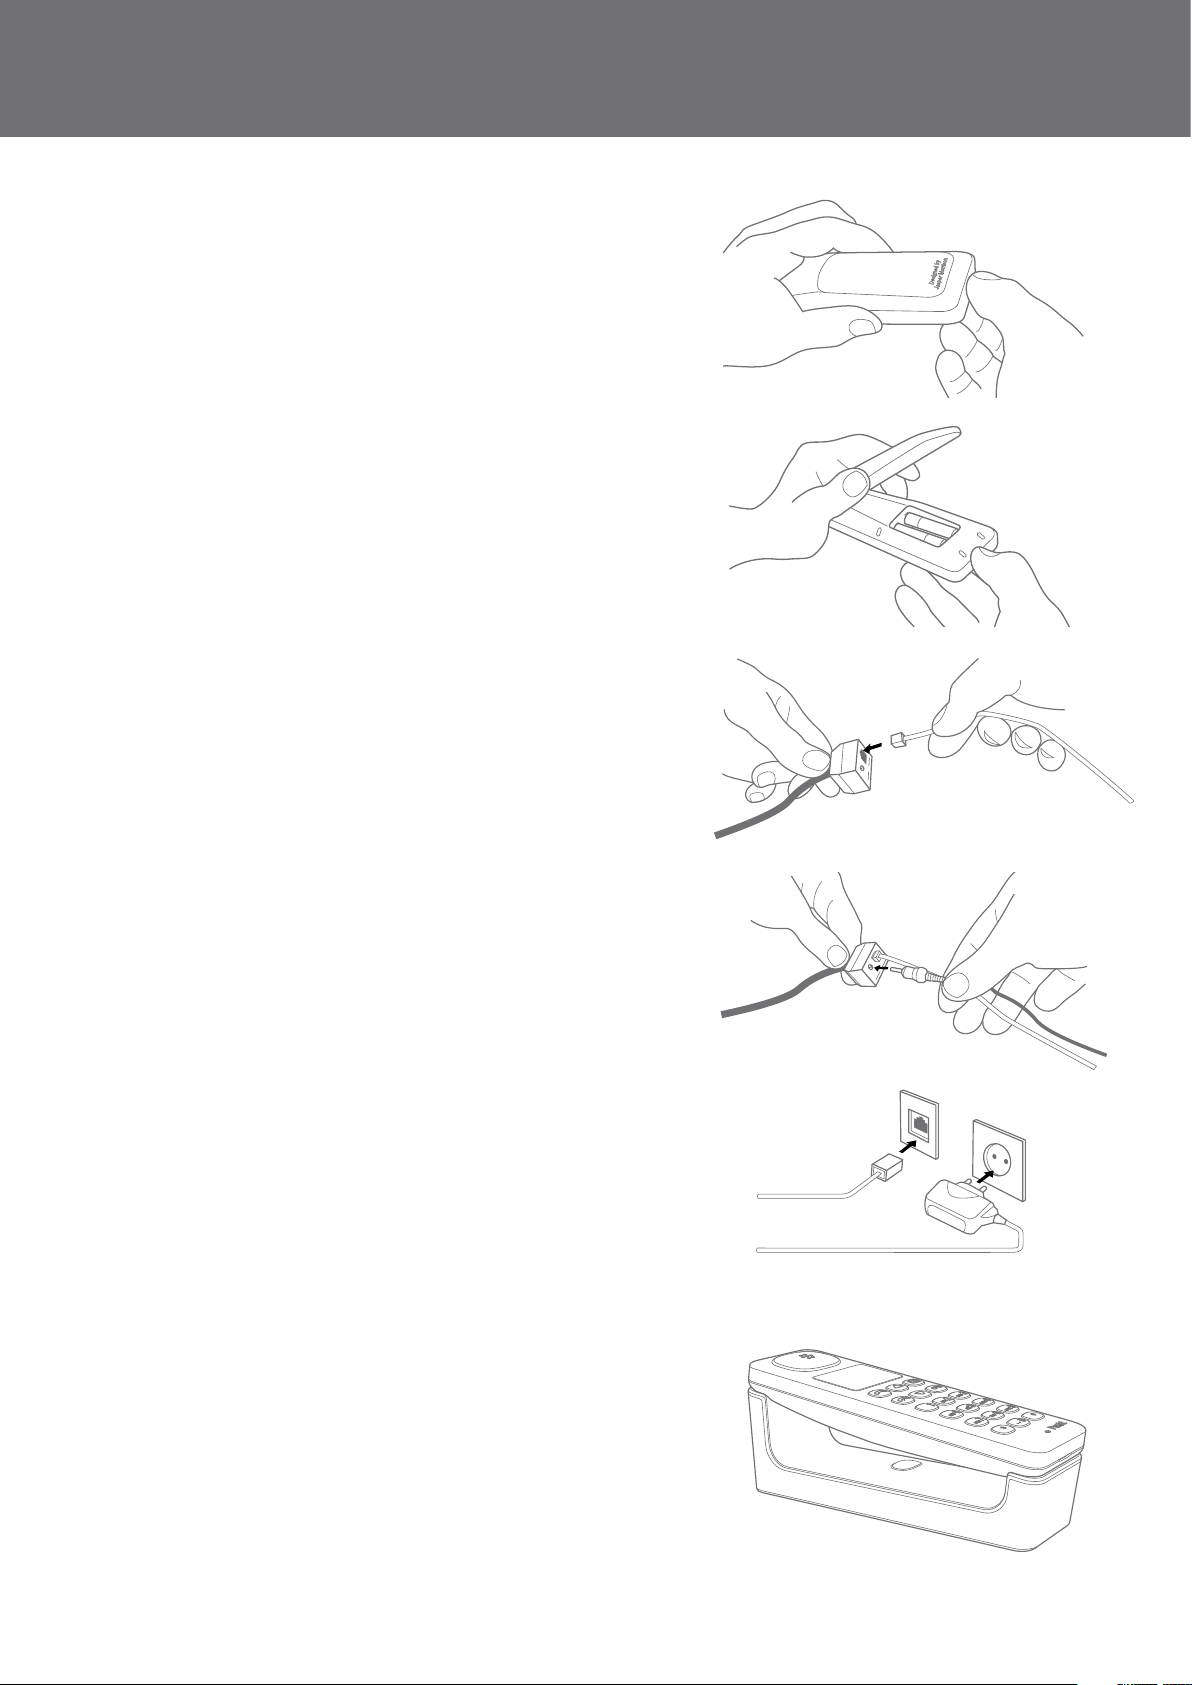
Installation
To install your Punkt phone (DP 01 “Master unit” or DP 01S “Slave unit”),
please follow the steps below.
1 Remove the back cover of the phone (insert your finger in the opening
near the charging contacts and remove the battery flap).
2 Insert the batteries into the handset, then replace the cover (be sure to
observe the correct polarity indications (‘+’ and ‘-’) as shown inside the
battery compartment).
6
3 Inser t the phone cable (for the DP 01 “Main unit” unit only, not for the
DP 01S - “Slave unit”). The base unit of the “DP 01S” serves only to
charge the handset batteries. You therefore need only connect the
power adaptor cable to this base unit. You do not need to connect the
phone cable to the base unit of the “DP 01S”.
4 Insert the power cable (for both DP 01 and DP 01S models).
5 Connect to phone and power sockets. A specific adaptor for your phone
socket and/or your mains socket may be requested, depending on the
country you are in and the standard socket configuration.
6 Place the handset on the base for battery charging (a docking sound
indicates that the handset has been placed correctly on the base).
7 Allow the batteries to charge for at least 16 hours before using your
phone for the first time. Subsequently, 8 hours will be sufficient for
a full recharge.
9
Page 10
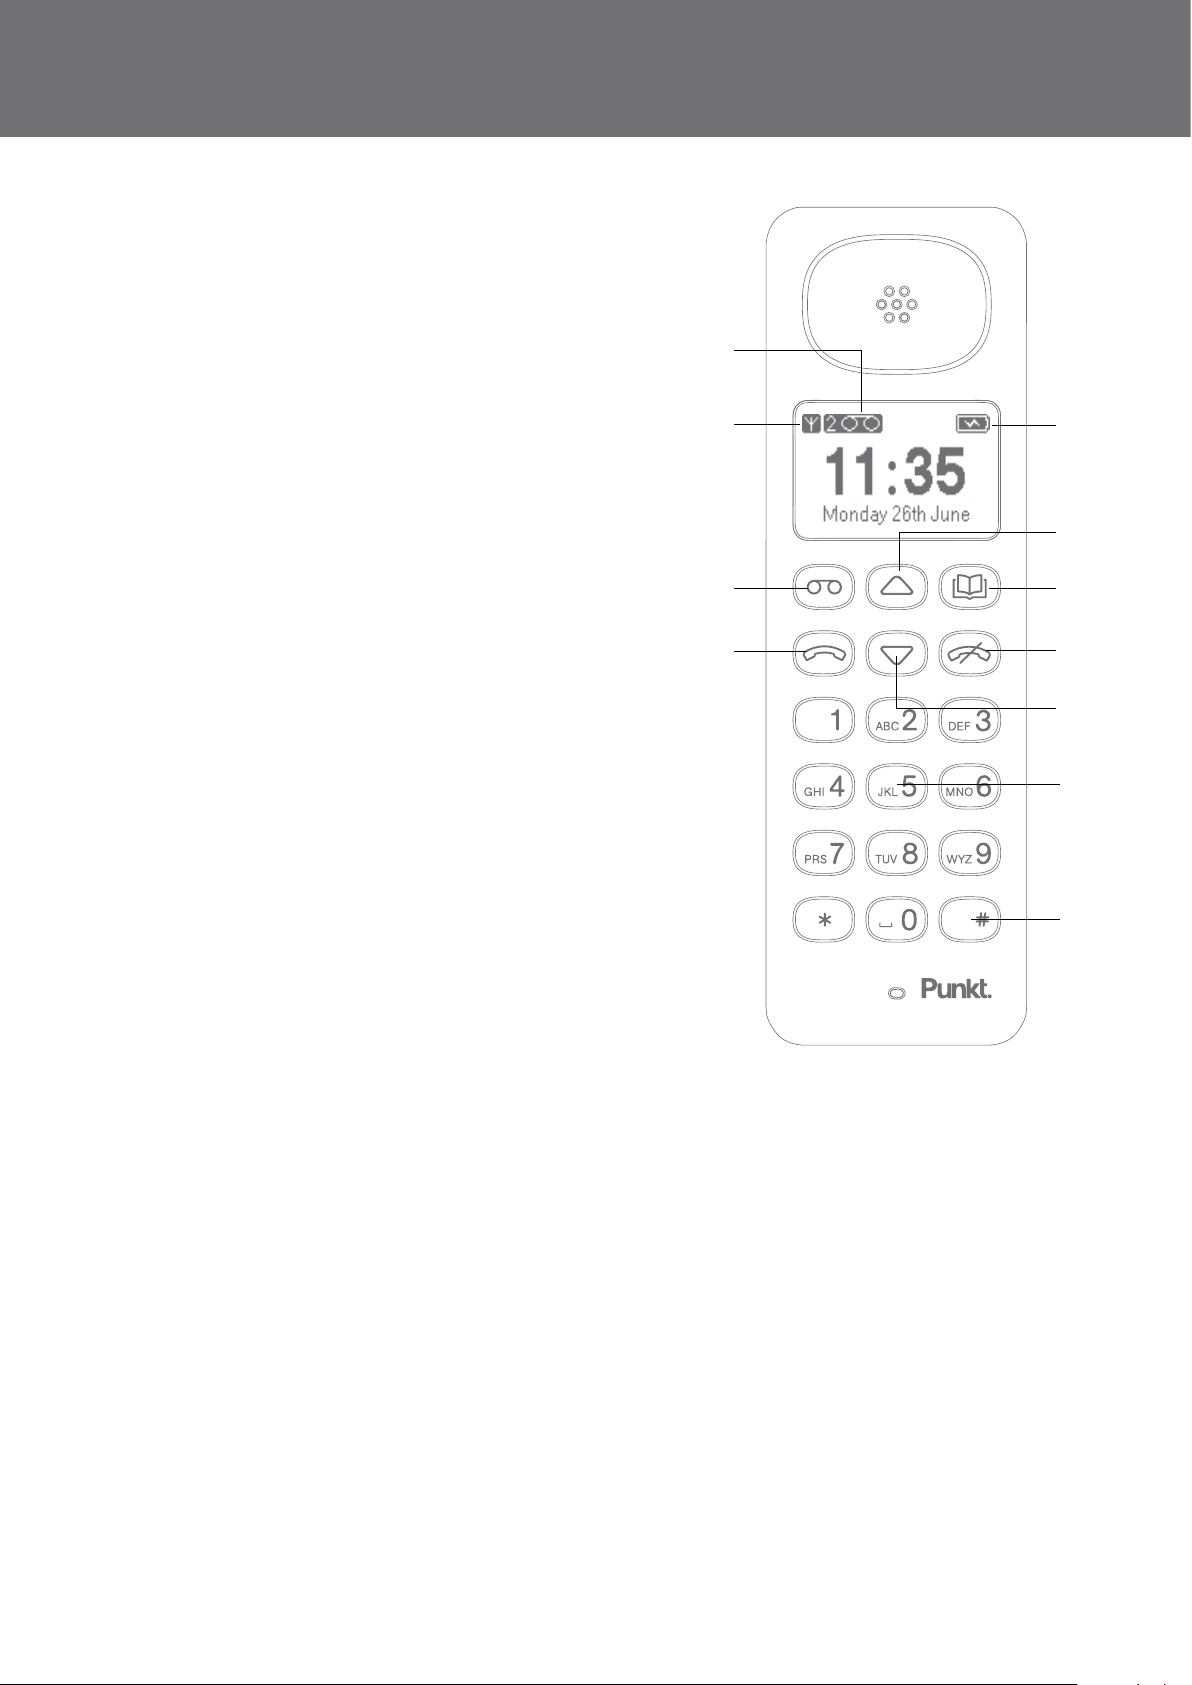
Display icons and function keys
With reference to the diagram below:
A Select (/Send /Yes)
B Cancel (/End /No/Backspace) (Exit Menu – hold for 2 seconds)
(Power On/Off –hold for 2 seconds in Home screen)
C Scroll up and Scroll down
D Phone Book
E Answering machine
F Signal Power
G Number of answering machine message(s)
H Battery Power
I Upper/Lower Case
J Keypad
G
F
7
H
C
E
A
A-a
D
E
C
J
I
10
Page 11

Basic use of the phone
(initial settings)
Menu language selection at first power on
During the very first handset power on, the list of selectable languages is
shown automatically on the display. Please select your language and press
D button to confirm. Later you can change the current language at
the
any time, as explained below.
Change the menu language:
The Punkt handset (DP 01/DP 01S) supports the following menu languages:
English (UK), French (France), German, Italian, Spanish, Danish, Swedish,
Finnish, Norwegian.
8
– Press
– Select ‘Language’ and press
– Select required language.
– Press
Make a phone call:
– Enter the number using the keypad (to call a contact stored in the
– Press
– Press
Set time/date:
Time and date settings are stored in the Punkt base station. For this
reason, if the power cable is disconnected and then reconnected,
the previously set time and date will be cleared and the display will show
default values: 00:00 Friday 1st January. In this case, you should
reconfigure the time and date settings, or wait for an incoming call w ith
time and date information provided by your telephone operator.
Normally, if you can see the CLI (calling number) on an incoming call then
you can also obtain time and date settings automatically from the
telephone network. Otherwise this will not be possible. Please contact your
telephone operator for more information.
F, select ‘Handset settings’ and press D.
D.
D to confirm.
phone book, refer to the “Phone book” section of this Guide).
D to start the call.
E to end the call.
– Press
– Enter the time.
– Enter the date.
– Select ‘Done‘ and press
Change the ringtone melody:
– Press
– Select ‘Ring tone’ and press
– Press
– Press
11
F select ‘Time/date’ and press D.
D to confirm.
F select ‘Sounds’ and press D.
F B to select your favorite sound.
D to confirm.
D.
Page 12

Change the ringtone volume – disable ringtone:
– Press
– Select ‘Ring volume’ and press
– Press
– Press
Activate/De-activate key tones:
– Press
– Press
– Press
F select ‘Sounds’ and press D.
D.
F B to select the required level (1–6, where level 1 stands for
“Ringtone mute”).
D to confirm the choice.
F select ‘Sounds’ and press D.
F B to select “Key tones”.
D to toggle key tones On/Off.
12
Page 13

In call options
Hands-free mode:
– When in call, press
Mute:
– When in call, press
Mute On/Off.
Note: When the mute option is “On”, the other party will not hear your
voice.
Volume control:
– When in call, press
– Press
– Press
– Press
Call Transfer:
Refer to the “Internal calls” section in this Guide for further details.
D.
F B to adjust the volume.
D or wait 2 seconds to return to the in call menu.
D on the “Hands-free” option to toggle On/Off.
F and select D on the “Mute” option to toggle
F and select ‘Volume’.
9
Flash (“R button” service activation):
Note: If you are in France and are connected to the French public
analogue line (PSTN network), before using the Flash button you
should set the “Flash time” parameter to 270 ms, as explained in the
“Base settings” section of this Guide.
During a conversation, the “Flash” option is used normally to access special
services (also known as “supplementary services”) if supported by your
telephone operator, such as the “Call waiting” service, “3-way conference”,
etc. Please check with your telephone operator for availability and
activation of the above services on your phone line.
In order to use the “Flash” option during an external conversation:
– During an external conversation, press the
– Select ‘Flash’ and press
– Dial additional digits, according to the instructions provided by your
telephone operator (for example, in Italy you can dial “R2” to switch
between 2 external connected calls and then dial “R3” to activate the
3-way conference service).
D. The “R” symbol will appear on the display.
B button.
13
Page 14

Phone book
Enter a new contact in the phone book:
– Press
– Press
– Use the keypad to enter the name (
– Select ‘Done’ and press
– Press
– Enter the number using the keypad.
– Select ‘Done’ and press
Make a phone call using the phone book:
– Press
– Use
– Press
– Use
– Press
– Press to end the call.
C to open phone book.
D to select ‘New’.
E operates as backspace).
Press the # key to toggle between “lower case” (abc) and “upper case”
(ABC) mode.
D to confirm.
F B to select the option (Home, Office, Mobile) you wish to
assign to the inserted number and press
D to confirm.
D to save the contact and end the procedure.
C to open the phone book.
F B to browse your contacts.
D to select the required contact.
F B to browse phone numbers.
D to start the call.
10
Delete a single contact from the phone book:
– Press
– Use
– Select “Edit” and press
– Select “Delete” and press
– Select “Delete contact” and press
– Select “Yes” and press
Delete all contacts from the phonebook:
– Press
– Use
– Select “Yes” and press
Modify a contact’s details (name and/or associated phone numbers):
– Press
– Use
– Select “Edit” and press
– If you wish to modify one of the 3 possible telephone numbers
– If you wish to modify the contact’s name, select “Name” with
– When finished, press
C to open the phone book.
F B to search for the contact you wish to delete then select it by
pressing
D.
D.
D.
D.
D to confirm.
C to open the phone book.
F B to select “Delete all” and press D.
D to confirm.
C to open the phone book.
F B to search for the contact you wish to modify, then select it
by pressing
D.
D.
related to that contact, select it in the list with
Then modify the telephone number (
“Done” and press
D to finish.
E operates as backspace), select
F B and press D.
F B
and press
the # key toggles between small letters and capital letters), select
“Done” and press
D. Then modify the name (E operates as backspace,
D to finish.
E repeatedly to exit the phone book.
14
Page 15

Call history
NOTICE CONCERNING VISUALIZATION OF CA LLER NUMBER
ON INCOMING CALLS
After the first ringtone, caller number information will be shown
on the display only if the “CLI service” is supported by your
telephone operator, and is also activated on your own phone line.
In the case of some operators, activation of the “CLI service” may
be subject to a special (additional) service fee. Please contact your
operator for further details.
Please note that if the caller voluntarily hides his own phone number, the
Punkt display will show “Number withheld” even if the CLI service is
activated, while if the CLI service is not active on your phone line the
display will simply show “Number unknown”.
Access Call history:
– Press
– The calls stored in this list are identified by the following icons:
F, select “Call history” and press D.
1111
identifies a received call (answered call). The caller number is
shown only if the CLI service is activated on your phone line (see
text box above).
identifies a missed call (unanswered call). The caller number is
shown only if the CLI service is activated on your phone line (see
text box above).
identifies an outgoing call (a dialed phone number).
Call or save a number in the phone book from the call history
Once a telephone number is highlighted in the call history, by pressing the
D button you can choose either to:
– Call the selected number. Select “Call” and press
– Save the selected number in the phone book. Select “Save” and press
D to start the call.
D. Select “New contact” if you wish to create a new contact for that
number (refer to the “Phone book” section in this Guide), or select
“Add to existing” if you wish to add the selected number to an
already existing contact. In this case, select the desired contact in the
phone book and press
(Home, Office, Mobile) you wish to add or replace it with. To replace an
already existing number, press
is shown (a confirmation tone will be audible).
D to confirm. Then select the type of number
D when the option “Replace number”
15
Page 16

Answering machine (TAM)
The Punkt integrated answering machine (TAM) provides 15 minutes of
total storage capacity for recorded messages. Each recorded message can
be up to 1 minute long. The default setting of the TAM is not active (“Off”)
and the TAM “Ring count” parameter is set to “10 Rings” (when “On”, the
TAM will answer the incoming call automatically after 10 rings).
To activate the TAM service (“On”) and change the TAM Ring count
setting, please read the sections below.
Note: From the DP 01S handset, the TAM option is accessible only if
paired with a DP 01 Base unit (TAM data is stored in the DP 01 Base
unit only).
Activate/de-activate the answering machine (TAM):
– Press
– Press
– Press
– Press
A to open the answer phone.
F and select ‘Settings’.
D.
D to toggle the answering machine On/Off.
12
– When the answering machine (TAM) is on, the TAM icon
will be shown on the display in standby mode.
Greeting message: Record, Listen, Delete
For the default setting, only an acoustic tone will be played when the TAM
feature is activated and an external incoming call is received. If you wish
to record your own greeting message, listen to it or delete it, please follow
the procedure below.
– Press
– Press
– Select “Record greeting” and press
– Select “Record” and press
– When you have finished recording the greeting, select “Listen” and
– Select “Delete” to delete the recorded greeting message (after this
A to open the answer phone.
F and select ‘Settings’.
D.
D. You now have 30 seconds to record your
own greeting message, which will be played on incoming calls when
the TAM is activated (press
D to listen to the greeting message which is now stored in your
press
Punkt phone (press
operation, only the default acoustic tone will be heard by the caller
and no greeting message will be played when an incoming call is
received).
E to stop playback).
E to stop the recording).
16
Page 17

Listen to received voice messages:
When the TAM is activated, the number of new voice messages received
will be notified on the display according to the indication below (in this
example only 2 voice messages have been left by external callers).
In order to play received voice messages, follow the procedure below:
Listen to all new messages:
– Press
– Select ‘New’ and press
– Press
After a single “new” voice message has been played for the first time, it will
subsequently be classified as an “old” message. You can replay it by
selecting the “Old” option in the main TAM menu.
Listen to a selected new message:
– Press
– Select ‘New’ and press
– Press
– Press
– Select ‘Play’ and press
A.
D.
D to play all.
A.
D.
F B to browse the messages.
D to select.
D to play the message.
After a single “new” voice message has been played for the first time, it will
subsequently be classified as an “old” message. You can replay it by
selecting the “Old” option in the main TAM menu.
Options for a single voice message: call the caller and delete a
message
– Press
– Select the “New” or “Old” folder and press
– Press
– Press
Delete all voice messages:
– Press
– Select the “New” or “Old” folder and press
– Press
– Press to select “Yes” and press
A.
F B to browse the messages.
D to select the required message. At this point:
• Select ‘Play’ and press
• Select ‘Call’ and press
• Select ‘Delete’ and press
D to play the message.
D to call the caller directly.
D to delete the selected message.
A.
F B to select “Delete all”.
D.
D.
D.
17
Page 18

Listen to old voice messages:
After a single “new” voice message has been played for the first time, it will
subsequently be classified as an “old” message. You can play it again by
selecting the “Old” option in the main TAM menu.
The procedure to listen an old voice message and the available options are
the same as described for “new” voice messages above (refer to above
sections for more details).
Change the number of rings before TAM activation:
– Press
– Select “Settings” and press
– Press
– Use
Set the speaker ON/OFF while listening to voice messages:
– Press
– Select “Settings” and press
– Press
– While listening to a recorded voice message, you can press the
A.
D.
F B to select “Ring count” and press D.
D B to choose one of the available values and press D
to confirm.
A.
D.
F B to select “Speaker” and press D to toggle the speaker
On/Off.
D
button to toggle the speaker On/Off.
18
Page 19

Handset settings
Registration:
Refer to the “Multi-Handset” section of this Guide for more details.
Select base:
Refer to the “Multi-Handset” section of this Guide for more details.
Change language:
– Press
– Select ‘Language’ and press
– Select required language.
– Press
Answer on pickup:
The default setting for “Answer on pick up” is “Off” (the user needs to press
the
When the “Answer on pickup” option is set to “On” and the handset is
located on the base station, the incoming call is automatically connected
(answered) once the handset is removed from the base station.
– Press
– Select ‘Answer on pickup’ and press
– Press
– Press
F select ‘Handset settings’ and press D.
D.
D to confirm.
D key to answer an incoming call).
F select ‘Handset settings’ and press D.
D.
F B to select “On” or “Off”.
D to confirm.
13
19
Page 20

Base settings
Set Base PIN:
The default base PIN is “0000”. You can change it if you do not want other
users to register additional handsets to your Punkt Base station. Please
refer to the “Multi-Handset” section in this Guide for further information
concerning the registration procedure.
Note: make a note of your new PIN and keep it in a safe place.
14
– Press
– Select ‘Set base PIN’ and press
– Enter the new PIN (4 digits), select “Done” and press
Note: Make a note of your new PIN and keep it in a safe place.
Deregistration:
Refer to the “Multi-Handset” section of this Guide for more details.
Dial mode:
– Press
– Select ‘Dial mode’ and press
– Select “Tone” for DTMF dialing (default setting)
– Press
Flash time:
Note: If you are in France and are connected to the public analogue
line (PSTN network), you should set “Flash time” = 270 ms as
explained below.
During a conversation, the “Flash” option is normally used to access
special services (also known as “supplementary services”) if these
are supported by your telephone operator, such as “Call waiting”
service, “3-way conference”, etc. Please check with your telephone
operator for availability of the above services.
F select ‘Base settings’ and press D.
D.
D to confirm.
F select ‘Base settings’ and press D.
D.
or “Pulse” for decadic dialing.
D to confirm your choice.
– Press
– Select ‘Flash time’ and press
– Select one of the available settings: 98 ms (default setting); 270 ms;
– Press
Reset to default:
After this operation:
– Press
– Select ‘Reset to default’ and press
– Select ‘Yes’ and press
20
F select ‘Base settings’ and press D.
D.
380 ms; 900 ms). If you are located in France, you should choose 270
ms.
D to confirm your choice.
• the “Call History” will be emptied.
• the “Flash time” will be restored to “98 ms”.
• the “Dial mode” will be restored to “Tone” (DTMF).
F select ‘Base settings’ and press D.
D.
D to confirm.
Page 21

(setting up the DP 01S – “Slave unit”)
If you purchased the DP 01S kit (“Slave unit”), to make and receive calls
with your DP 01S Handset you first need to register it to your DP 01 Base
station (“Main unit”) or to another DECT model base station. Please refer
to the “Registration” procedure explained under point “a” below.
Note: If another manufacturer’s products are connected to the
Punkt DP 01 Base unit, only the ability to make and receive phone
calls is guaranteed according to the DECT-GAP standard. Proprietary
features (for example TAM service or CLI display) may not be
available if another manufacturer’s products are being used with
Punkt products.
Registration:
a) To register a DP 01 or a DP 01S handset to the DP 01 Base unit, please
follow the procedure below.
– On the DP 01 or DP 01S handset, press
and press
– Select the ‘Registration’ option and press
– Select ‘Base 1’ and press
(DP 01 – “Main unit”) already available and switched on. If your
Punkt handset was previously registered to another Base unit, you
can select ‘Base 2’ (or ’Base 3; 4’) to keep your handset’s previous
registration setting(s) with that base unit
– Insert the base PIN code (4 digits, default: 0000), then press
highlight the ‘Done’ option
– Press
appear on the display.
– Hold down the page button on the DP 01 base until the display
shows the list ‘Handset 1,2,3,4,5,6’, then release the page button.
– Select your ‘Handset number’ from the list that appears (default
selection: ‘Handset 2’), then press
procedure.
– Once the registration procedure is finished, briefly press the page
button again on the base to check that all handsets registered to that
base ring at the same time when an incoming call is received.
D.
D if you have only one Punkt Base unit
D. The message: ‘Press and hold page button on base’ will
F, select ‘Handset settings’
D.
F to
D to end the registration
15Multi-Handset configuration
b) To register a DP 01 or a DP 01S handset to the Base unit of a different
manufacturer (brand), you should first set the other manufacturer’s
Base unit to “Registration mode” (refer to the user manual for details).
Then, using your Punkt handset, follow the registration procedure as
explained under paragraph “a” of this section.
c) To register another manufacturer’s handset to the Base unit of the
DP 01 (Main unit), begin the registration procedure with that handset
in accordance with the manufacturer’s instructions, then hold down
the “Page” button on your DP 01 Base unit for 5 seconds to activate the
registration procedure on the DP 01 Base unit. Finally, complete the
registration procedure on the other manufacturer’s handset according
to the manufacturer’s instructions.
21
Page 22

Select base:
If your Punkt handset is already registered to more than one DECT base
(a maximum of 4 bases are allowed), you can switch between the current
linked base and a new base by following the procedure described below.
By default, the DP 01 Handset is registered to its own DP 01 Base which is
identified as “Base 1”.
– Press
– Choose ‘Select base’ and press
– Select the base you wish to connect to. If you choose the “Auto” option,
Deregistration:
If you want to deregister a Handset from your Punkt DP 01 Base, you can
do so from your DP 01/DP 01S handset (or from another handset connected
to the same Punkt DP 01 Base) as explained below.
– Press
– Select ‘Deregistration’ and press
– Insert the PIN of the Punkt DP 01 Base unit (4 digits) and select “Done”
– Press
– Select the Handset number you want to deregister from those shown
F, select ‘Handset settings’ and press D.
D.
the handset will search for the nearest available base with which it
was registered in advance, provided the Base is connected to the
mains and there is sufficient signal strength to allow the connection.
F, select ‘Base settings’ and press D.
D.
D.
in this list. Press
D to confirm cancellation.
Note: If you wish to re-use the “cancelled Handset” on the same base,
you must repeat the “Registration” procedure as explained earlier
in this Guide.
22
Page 23

internal direct calls and external call transfer
If you have more than one handset registered to your Punkt DP 01 Base
unit, you can make internal calls between handsets registered on the same
DECT Base and also transfer an incoming external call to another handset.
To place an internal direct call:
– Press
– Select the handset you wish to call and press
To transfer an external call to another handset:
– During an external conversation, on handset 1, press
– With
– When Handset 2 answers the internal call, on Handset 1, press the
F, select ‘Internal call’ and press D.
D to start the call.
F, select
‘Transfer’ and press
D.
F B , select the handset you wish to transfer the call to (for
example Handset 2) and press
external caller will remain connected with an intermittent acoustic
tone)
button to end the internal call and transfer the external call to
Handset 2.
D to start the internal call (the
E
16Internal calls:
23
Page 24

Factory default settings
HANDSET UNIT SETTINGS
Handset number: Handset 1
Menu language: user selectable at first Handset power on
Answer on pickup: Off
In call earpiece volume: 5
In call speaker phone volume: 5
Ring tone melody: Motion
Ring volume: 5 (level 1 stands for “Ring mute”)
Key tones: On
Connected Base: Base 1
Base unit SETTINGS (for DP 01 Base unit only)
PIN code: 0000
Flash time (“R” key): 98 ms (*)
Dial mode: Tone (DTMF) (*)
Predefined associated handset: “Handset 1”
Time/date: 00:00 Friday 1st Jan
Phonebook: empty (*)
Call history: empty
17
(*) Settings will be restored to the above values if the user carries out the “Reset to default”
procedure explained in the “Base settings” section.
TAM-TELEPHONE ANSWERING MACHINE SETTINGS
(for DP 01 Base unit only)
Answering machine status: Off (not active)
Voice message folders (“New” and “Old”): empty
Pre-recorded greeting message: none
TAM Ring count: 10 Rings
Speaker: On
24
Page 25

FAQ (Frequently Asked Questions)
Problem: I can’t see the caller’s number when I receive an incoming
call. Why?
Reason: the “CLI service” is not activated on your phone line.
Possible solution: Contact your telephone operator for activation (ask also
if there is an additional price to be paid for activation). Please note that if
the caller hides his own phone number, the Punkt display will show
“Number withheld” even if the CLI service is active, while if the CLI
service is not active on your phone line the display will simply show
“Number unknown”. Refer to the “Call History” section in this Guide for
more details.
Problem: Even though I have set up the correct time/date settings,
st
the display still shows: 00:00 Friday 1
Reason: The power adaptor (power cable) has been disconnected from the
base unit or from the electrical wall socket (mains).
Possible solution: Reconnect the power adaptor to the base and reset the
time/date. If the CLI service is enabled on your phone line, you can also
simply wait for the first incoming call to ring.
Jan. Why?
18
Problem: When the TAM is “On”, the device answers after too long a
time (10 Rings). Why?
Reason: The “TAM Ring count” parameter is set on too long a value
(example: 10 Rings).
Possible solution: Change the “TAM Ring count” parameter as explained
in the “TAM” section of this User Guide.
Problem: The “Flash” option (“R Button”) does not work correctly.
Why?
Reason 1: The “Flash time” setting on the Base unit is incompatible with
your country’s telephone network. For example if you are located in
France, then you may have to change the default setting (98 ms) to a new
setting (270 ms). If it still does not work correctly, please set another
possible “Flash time” value and try again (make sure that the service you
are trying to use is actually activated on your phone line).
Reason 2: The service you are trying to use is not activated on your phone
line. Please contact your telephone operator.
Possible solution: Contact your telephone operator to check if the desired
service is actually active on your phone line then try to set a different
value for the “Flash time” as explained above.
25
Page 26
CE Declaration of Conformity
In accordance with European standards ISO / IEC Guide 22 and EN 45014
and with reference to Annex IV of Council Directive 1999/5/EC(R&TTE).
We, Promelit S.p.A. (Via Modigliani 20, 20092 Cinisello Balsamo, Italy)
declare under our sole responsibility that this device meets the essential
requirements and other relevant regulations laid down in Directive
1999/5/EC.
In particular this product is compliant with the following standards:
Radio Part: ETSI EN 301-406 V 1.5.1 (TBR6)
EMC (Electromagnetic Compatibility):
EN3014 89-1 V.1.8.1; EN301489 -6 V.1.3.1
Electrical Safety: EN60950-1:2001+A11:2004
Additionally the above mentioned product conforms to the following
standards:
ETSI ES 203021-3 V2.1.2
Conformity to Directive 2009/125/EC (ecodesign requirements for energy-
related products) is ensured according to the following regulations:
External power supplies: Regulation (EC) No 278/2009
Standby and off mode: Regulation (EC) No 1275/2008: not applicable.
19
This device is intended for analogue phone lines in your network. Country-
specific requirements have been taken into consideration.
According to the above statement, this product is marked with the
following mark:
A copy of the 1999/5/EC Declaration of Conformity is available at this
internet address: http://www.promelit.it/punkt/EC-declaration.pdf
Place of issue: Cinisello Balsamo (MI) – ITALY
Date of issue: August 4, 2010.
26
Page 27

www.punktgroup.com
[email protected]
Tel +41 91 924 9003
Fax +41 91 924 9004
Punkt. Tronics AG
Via Losanna 4
CH-6900 Lugano
Switzerland
Punkt.® is a registered trademark of Punkt Tronics AG.
27
 Loading...