

Page 0 of 19
10.1” Android KITKAT 4.4 Quad Core Edition
American Pum pk ins .com
Pumpkin X
Android KITKAT 4.4 Tablet PC
Reference Guide

Table of Contents
Table of Contents .................................................................................................................................... 0
Thank You ............................................................................................................................................... 3
Safety Information .................................................................................................................................. 3
Android Kitkat 4.4.................................................................................................................................... 5
Quick Start .............................................................................................................................................. 5
Powering On/Off ................................................................................................................................. 5
Using Touch Screen ............................................................................................................................. 5
Home Screen ....................................................................................................................................... 6
Organize Your Home-screen ................................................................................................................ 6
Settings ................................................................................................................................................... 7
Date & Time ........................................................................................................................................ 7
Wi-Fi .................................................................................................................................................... 7
Display................................................................................................................................................. 7
Sound .................................................................................................................................................. 8
Bluetooth ............................................................................................................................................ 8
Basic Functions ........................................................................................................................................ 9
Internet ............................................................................................................................................... 9
Email ................................................................................................................................................... 9
Video ................................................................................................................................................. 10
Music ................................................................................................................................................ 10
Audio Recorder.................................................................................................................................. 10
Camera .............................................................................................................................................. 11
Gallery ............................................................................................................................................... 11
Google Play Store .............................................................................................................................. 12
Calendar ............................................................................................................................................ 12
1 | P a g e

Clock ................................................................................................................................................. 12
File Storage........................................................................................................................................ 13
Check Storage & Android Updates ..................................................................................................... 13
Printing.............................................................................................................................................. 14
Downloads ........................................................................................................................................ 14
Chromecast ....................................................................................................................................... 15
Extended Storage Options ................................................................................................................. 15
Connecting to PC ............................................................................................................................... 16
Connecting to Keyboard / Joystick / mice & other devices ................................................................. 16
HDMI – Link Pumpkin X to your TV..................................................................................................... 16
3G Calling .......................................................................................................................................... 16
Accessibility ........................................................................................................................................... 17
Service and Support: ............................................................................................................................. 17
2 | P a g e
Thank You
Thank you for purchasing the Pumpkin X Android KitKat 4.4 tablet PC. We sincerely hope
this product meets your expectation. Enjoy!
Please contact us at help@americanpumpkins.com if you are unsatisfied with your purchase
or have received a defective unit.
Safety Information
Use Responsibly. Read all instructions and safety information before use.
Do not use this device near water.
Clean only with a microfiber cloth. Clean
Do not cover or block any ventilation opening. When placing the device on a shelf,
leave 5 cm (2”) free space around the whole device.
Install in accordance with the supplied user manual.
Don’t step on or pinch the power cord. Be very careful, particularly near the plugs
and the cable’s exit point. Do not place heavy items on the power cord, which may
damage it. Keep the entire device out of children’s reach! When playing with the
power cable, they can seriously injure themselves.
Unplug this device unplugged during lightning storms or when unused for a long
period(s) of time.
Keep the device away from heat sources such as radiators, heaters, stoves, candles
and other heat-generating products.
Avoid using the device near strong magnetic fields.
ESD can disturb normal usage of this device. If so, simply reset and restart the
device following the instruction manual. During file transmission, please handle with
care and operate in a static-free environment.
WARNING! NEVER INSERT AN OBJECT INTO THE PRODUCT THROUGH THE VENTS
OR OPENINGS. HIGH VOLTAGE FLOWS THRU THE PRODUCT AND INSERTING AN
OBJECT CAN CAUSE ELECTRIC SHOCK AND/OR SHORT CIRCUIT INTERNAL PARTS.
FOR THE SAME REASON, DO NOT SPILL WATER OR LIQUID ON THE PRODUCT.
Do NOT use in wet or moist areas such as bathrooms, steamy kitchens or near
swimming pools. Do not use this device when condensation may occur.
3 | P a g e
This tablet is produced according to all current safety regulations. The following
safety tips should safeguard users against careless use and dangers involved with
such use.
Although this device is manufactured with the utmost care and checked several
times before leaving the factory, it is still possible that problems may occur, as with
all electrical appliances. If you notice smoke, an excessive build-up of heat or any
other unexpected phenomena, you should disconnect the plug from the main power
socket immediately.
This device must be well ventilated at all time!
To clean the device, use a soft dry cloth. Do NOT use solvents or petrol based fluids.
To remove severe stains, you may use a damp cloth with dilute detergent.
The seller/manufacturer is not responsible for damage or lost data caused by
malfunction, misuse, modification of the device or battery replacement.
If the device will not be used for an extended period, please charge the battery at
least once per month to maintain battery life.
Charge the battery if:
o The battery level icon displays (An empty battery)
o The device switches off automatically when restarted.
Do not interrupt the connection when the device is formatting or transferring files.
Otherwise, data may be corrupted or lost.
WARNING: Prolonged exposure to loud sounds from personal music players may
lead to temporary or permanent hearing loss.
Do not distribute copyright-protected material without the permission of the
content owners. Doing this may violate copyright laws. The manufacturer is not
liable for any legal issues caused by the user’s illegal use of copyrighted material.
4 | P a g e
Android Kitkat 4.4
Android 4.4 (KitKat®) is the latest version of the world’s favorite operating system for
mobile phones and tablets. Pumpkin X features this latest Android version.
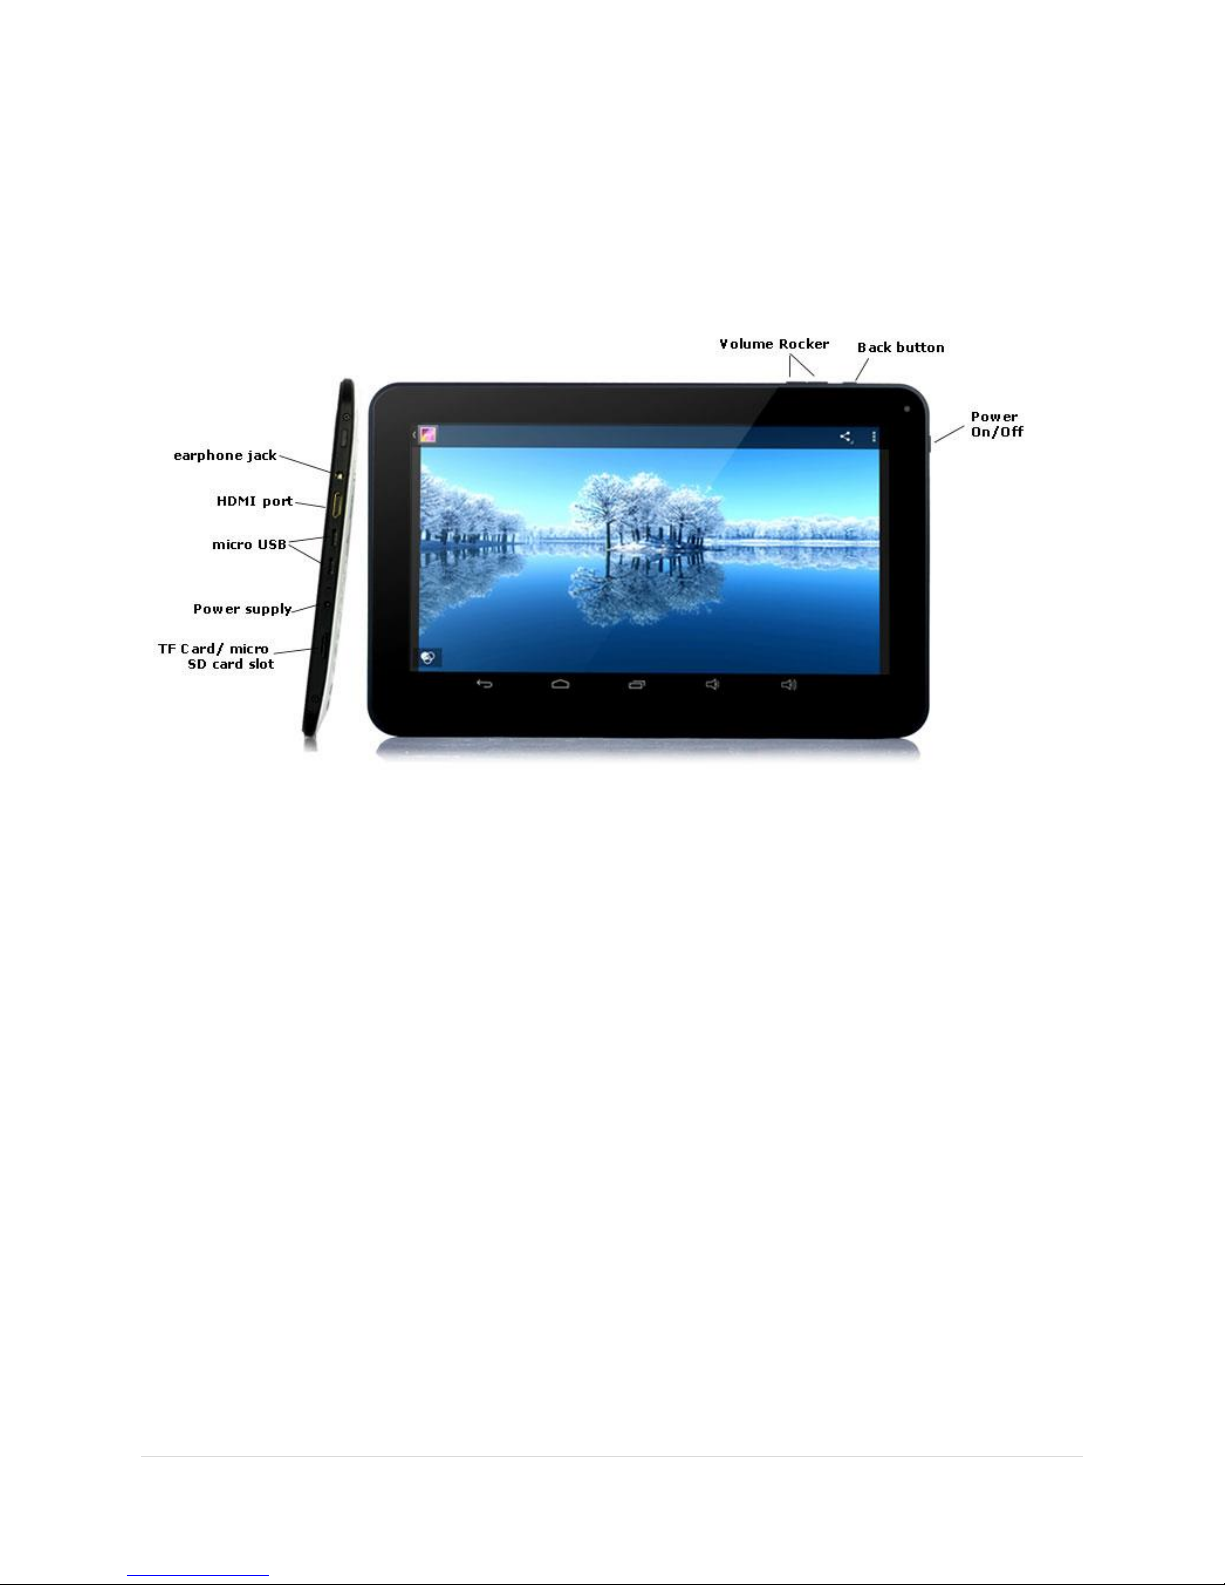
Pumpkin X Tablet Computer
Quick Start
Powering On/Off
Power on: press and hold the power key for 5 seconds.
Power off: press and hold the power key for 5 seconds → click Power off → click OK
Lock/unlock screen: press the power key to lock/unlock the screen.
Forced shutdown: In the event when the tablet is un-responsive, press Reset key to reset
the device by force. Note: Do not use forced shutdown unless necessary. Shut down the
device following power off steps.
Using Touch Screen
Single tap: click an icon to select the option you require.
Press and hold: select an icon and hold to drag it to the desktop.
Drag: drag on the desk to switch among different interfaces. To avoid scratching or
damaging the screen, never put anything on it
5 | P a g e

Home Screen
Here is an example of how a typical home-screen looks like with most commonly found
items.
At the bottom of every tablet screen, no matter what you’re doing, you’ll always find the
navigation bar with three buttons:
Some apps hide these buttons temporarily, or fade them to small dots in the same position.
To bring them back, touch the dots, touch the screen in the middle, or swipe up from the
bottom.
Back
Opens the previous screen you were working in, even if it was in a different app.
Once you back up to the Home screen, you can’t go back any further.
Home
Opens the central Home screen. To open Google
Now, swipe up.
Recent apps
Opens a list of thumbnail images of apps you’ve worked with recently. To open an
app, touch it. To re-move a thumbnail from the list, swipe it left or right.
Organize Your Home-screen
To add an app icon to a Home screen:
Go to the Home screen where you want to place the app.
Touch the All Apps icon.
6 | P a g e

Swipe from right to left, if necessary, to find the app you want.
Touch & hold the app until the Home screen appears, slide it into place, and lift your
finger.
Settings
The Settings app controls the core Android settings for networks, hardware, location,
security, language, accounts, and so on.
Date & Time
Go to Settings → Date & Time
Un-Check the Automatic date & time option
Un-Check the Automatic time zone option
Touch the Select time zone and pick your time zone from the list (scroll up/down to
pick your time zone)
Now, check the Automatic date & time
Now, check the Automatic time zone
Your tablet should now be set to your local time zone.
Wi-Fi
Follow the below steps to connect to a Wi-Fi network.
Click Settings → Wi-Fi
Enable Wi-Fi. The device will search and list all available Wi-Fi networks automatically. The
icon next to Wi-Fi means you need to enter a password to connect to it.
Click the Wi-Fi network you want to connect to → if there is password, you will need to
enter the password → Click Connect. After connecting to WIFI network, you will see an icon
on the top right.
Click to return to desktop.
Note: If your Wi-Fi is set to be hidden, it will not be searched automatically. You need to
click Add Wi-Fi network, and then enter required information to add your Wi-Fi.
Display
After powering on the tablet, on the home-screen, always swipe right to unlock the tablet.
By default, when the tablet is inactive, it goes into standby mode. To re-start from the
stand-by mode, simply press the power button, and swipe right on the locked screen.
7 | P a g e

Home Screen Wallpaper: To change the home-screen wallpaper, go to
SETTINGS>DISPLAY>WALLPAPER and choose the wallpaper of your choice.
Sound
Sound can be controlled via the volume rocker buttons location on the top of the tablet.
Additionally, you can also control volume via SETTINGS > SOUND
Bluetooth
To connect the tablet to another Bluetooth enabled device, follow the below steps:
Turn on Bluetooth:
Go to SETTINGS > BLUETOOTH and switch it to ON position.
When Bluetooth is on, the Bluetooth status icon appears, which looks like a little Bluetooth
logo.
Pairing to Bluetooth Device:
Ensure that Bluetooth is on. Turn on the Bluetooth device or ensure that its Bluetooth radio
is on. On the Pumpkin X tablet, go to SETTINGS> BLUETOOTH
You’ll see the Bluetooth screen. The Bluetooth screen shows any devices already paired with
the tablet.
8 | P a g e

If the Bluetooth device has an option to become visible or discoverable, select it. After
making the Bluetooth device visible, it should appear on the Bluetooth screen. If it doesn't,
touch the Search for Devices button. Choose the Bluetooth device from the list. If
necessary, input the device’s passcode or otherwise acknowledge the connection.
After you acknowledge the passcode (or not), the Bluetooth device and your Pumpkin X
tablet are connected and communicating. You can begin using the device. Connected
devices appear on the Bluetooth Settings window, under the heading Paired Devices.
Basic Functions
Internet
Tap the Chrome Browser icon to access the internet. Note: Make sure your Wi-Fi is
enabled and connected to a network.
Email
You can use any of the following icons to check your personal and company email.
Gmail: You will need it to set it up via SETTINGS > ADD ACCOUNT
OFFICE EMAIL: To setup office email, select the Email App.
If you do not have another account configured already, you will be prompted to enter
your username and password, select Manual setup. Keep in mind that your username is
your full business email address, for example john@yourdomain.com
9 | P a g e

If you have already configured an email account, go to Menu on your device and select
Settings. In the upper right hand corner you should have the option to Add Account,
select this option.
Select the POP3 / IMAP / Exchange account type. Enter your credentials and your office
email account should be setup.
Note: Setting up office email involves additional steps that have not been listed above due
to the differences in the account setup process; it is advised that you contact your company
network administrator to assist you in this process.
Video
Tap the video app to play videos from your tablet hard drive.
Select a video file to play and the system will enter video playing interface. Click on the
screen to display the control menu as shown in the following picture to adjust the video
accordingly (volume +/-, playing process bar, previous video, pause/play, next video,
screen size and return menu).
Note: Android 4.4 supports desktop multi-menu video playing mode. You can simply
desktop-play the video by selecting the desktop playing menu. With this function more than
one video can be played at the same time on the same device.
Music
Click the music icon to enter player interface.
Select the music you want to play from track/album/artist/playlist.
Click Previous → Pause → Next icons for playing.
You can click to go back to previous interface or click to return to
desktop while keeping the music playing. The interface is shown as below:
Audio Recorder
Use the audio recorder app to record audio messages.
10 | P a g e

Camera
The Camera app lets you take photos, panoramic photos, videos, and immersive 360degree photo sphere shots, including what’s above and below you.
You can drag the photos taken to enter the album directly. When entering the album from
camera mode, you can view the pictures in thumbnail mode up to nine pictures. You can
return to camera interface, and you can drag the interface to the front to display and go on
taking photos, without needing to click other keys to return camera status.
Press return key or desktop key to exit from camera
Recording Video:
Tap to switch to the video mode. Tap to start recording.
Tap to stop recording. All videos are saved automatically.
Tap on the thumbnail to view the movie. Move the 0 towards the + to zoom in.
Press to change to the front or rear camera
Gallery
The Gallery app gives you an easy way to browse pictures and videos you’ve taken with
Camera. It also displays screenshots, synced G+ or Picasa albums, and auto backups from
other devices.
To open Gallery from the Home screen. Touch the Gallery icon.
To get to the top level of the Gallery app, touch the icon at the upper left. From there, open
the drop-down menu to view the available categories.
Within each category you can browse groups of images, crop, edit, and tag them, create
slideshows, make pictures or videos available offline, and share with friends.
11 | P a g e

Google Play Store
Google Play brings together all your favorite movies, TV shows, books, music, apps,
and more in one place, so you can reach it from any of your devices. To open the Google
Play Store app, touch the Play Store icon.
If you purchased content on Google Play in the past, you’ll automatically have access to this
content on any Android device — just make sure you’re signed in using the same account
that you used to purchase it. To check:
1. Open the Play Store app.
2. Touch the Drawer icon at the top left.
From here, you can view the current account or switch to another, view your purchased
apps, check your wish list, and so on.
To set preferences, clear your search history, and turn on user controls, go to Menu >
Settings. For example, to filter Android apps based on maturity level or require a PIN before
completing any purchase, touch Content filtering or Password.
To find your content, open any of the Google Play apps from the All Apps screen.
Google Play support: For more details about Google Play, including phone and email
support options, visit support.google.com/googleplay.
Calendar
Click calendar icon.
When running the calendar for the first time, you will be asked to login. Enter your email
address and password, click next, and complete the settings according to the guide. Then
you can use the calendar.
New event
1. In Calendar interface, click the date you want to add a new event to.
2. Select the time of the event →Input the details of the event in each field.
3. Click Complete.
4. Press Menu key to select the calendar interface you want.
Date showing in gray means there is an agenda.
Clock
1. Click Clock icon.
2. Click menu→ Add alarm clock
12 | P a g e

3. Set the alarm clock you require. If Repeat is not selected, the alarm clock will be
deleted after alarming.
4. Click Activate clock.
5. Click Complete.
Closing alarm clock
When the set alarm time reaches, a window with the name of the alarm clock will pop
up. If you want the clock to alarm again in 10 minutes, click Pause and alarm again.
Click Cancel to stop the alarm.
Map
To use this function, make sure you are connected to a Wi-Fi network.
Click on the maps icon and make your selection.
File Storage
File storage
Android 4.4 makes it easy to store and browse through pictures, videos, and other files on
your device and attach them to an email, Hangout message, and so on. You can also use
stored images as your Home screen wallpaper.
For example, to attach an image to an email you’re composing, choose Menu > Attach
picture or Attach video.
A set of thumbnails appears. To view more choices, touch the Drawer icon at the top left.
You’ll see something like this:
From here, you can view any of these sources:
• Recent shows you the photos or videos you’ve taken or opened most recently.
• Drive lets you attach any Drive documents associated with your account.
• Images displays any photos, videos, or other images on your device.
Downloads includes most files (excluding Play content) you’ve downloaded from emails or
the Web
Check Storage & Android Updates
To check the storage of your Pumpkin X tablet, go to SETTINGS > STORAGE
13 | P a g e

You will see three sections:
Section 1: RAM: Shows approx. ~1.98 GB
Section 2: 16GB – Actual may be around ~10.9GB (due to various apps installed on
the tablet)
Section 3: Inner Card: 16GB – Actual may be around 15GB (due to apps)
Note: You can uninstall any apps that you do not use, and you will start seeing the
AVAILABLE SPACE go back up to 16GB.
Android version & updates: To check your version number or get the latest system
update for a Nexus or Google Play edition phone, first go to Settings > System > About
tablet. Then look for these labels:
System updates. Touch to check whether you have any pending system updates.
Android version. Look partway down the list for this heading and the number just
below it.
Printing
With Pumpkin X, you can print the content of certain screens (such as web pages
displayed in Chrome) to a printer on the same Wi-FI network as your Android device.
Before you can print, you need a printing service installed on your device. To check what
services are currently available, go to Settings > System > Printing.
From here, you can open each available service to turn it on or off, check which printers it
makes available, add new printers, and adjust the service’s settings.
To print a document, such as a webpage in Chrome:
1.Touch Menu > Print.
2.In the dialog that appears, adjust settings such as printer, copies, orientation, and so
on.
3.Touch Print.
Downloads
Use the Downloads app to view, reopen, or delete files you download from Gmail or other
14 | P a g e

sources (excluding Google Play books, videos, magazines, and other media.)
In the Downloads app:
Touch an item to open it.
Touch headings for earlier downloads to view them.
Check items you want to share. Then touch the Share icon and choose a sharing
method from the list.
Check items you want to delete. Then touch the Trash icon.
At the bottom of the screen, touch Sort by size or Sort by date to switch back and forth.
Because Google Play streams your purchases and rentals from Google servers while you’re
playing them, they don’t occupy storage space persistently
Chromecast
Chromecast is a small device that plugs into the back of your TV. It allows you to send
videos and music straight from your phone or tablet to your TV. Supported apps currently
include:
• YouTube
• Netflix
• Google Play Movies & TV
• Google Play Music
• Hulu Plus
Make sure your phone or tablet is using the same Wi-Fi network as your Chromecast, and
that Chromecast is selected as your TV’s source input.
To display content from your phone or tablet on your TV:
1. Open the video or music in one of the apps listed above. 2. Touch the Cast button.
3. Play the content as usual to stream it to your TV.
Additional Functions
Extended Storage Options
SD Card: The device supports storage card of up to 32GB. Insert the storage card into
the card slot, and press it down with your finger, the message
Preparing for SD card will display on screen. When this message disappears, it means the
TF card is ready, and you can use it.
Removing SD Card: Close all applications or files on the card. Click → Settings → SD card→
Remove SD card. Press the card softly and it will be ejected. Then move it out. Do not insert
and remove the card repeatedly in a short time, otherwise it may be damaged. We
recommend you use a card of famous brand so as to avoid incompatibility issues.
15 | P a g e

USB Disk: Insert the USB disk into OTG connection wire, → then insert the OTG connection
wire into the USB OTG port of the device. You can use the U disk when it is ready.
Do not insert and remove USB disk repeatedly in a short time, otherwise the USB disk may
be damaged.
Connecting to PC
Use the OTG supplied cable to connect to the PC via the USB port.
Connecting to Keyboard / Joystick / mice & other devices
You can connect a keyboard, mouse, or even a joystick or other input device to your device
via USB or Bluetooth and use it just as you would with a PC.
To connect more than one USB device at a time, use a powered USB hub to reduce the
drain on your device's battery.
HDMI – Link Pumpkin X to your TV
The Pumpkin X comes with micro-HDMI port. Simply plug one end of the cable into your
device and the other end into your TV. Once connected, what appears on the device will
also appear on the TV, so you can look at pictures and video, surf the web, use apps or play
games. Be sure to select the HDMI cable that’s compatible with your device. You will need 1
micro-HDMI to standard-HDMI cable for this.
3G Calling
3G calling is supported via external USB dongle (not included). Please follow below steps to
setup 3G calling from this tablet.
Before connecting to a 3G network, make sure you are using a 3G network card
supported by the device. This device only supports external USB 3G network card.
After installing a SIM UIM card to 3G network card, install the 3G network card on
USB OTG connection wire, and then connect to the device.
After 3G network card is connected, click Settings →Wireless and
network→More→Mobile network for 3G network settings.
Enable mobile network, tick Enable data traffic→Data roaming, then select Access
point name, select Menu and select available network for 3G network access.
General device can be used directly, but for a few devices, APN needs to be created
and network access shall be set before use.
After setting, you will be able to connect to 3G network. After connection, you will
see the 3G icon in the screen. When this 3G icon is gray, it means the system is
searching for network, and when it is blue, it means the network is successfully
connected.
16 | P a g e

Accessibility
To use the accessibility options, open Settings > System > Accessibility.
To view detailed information about setting up these options, visit Google Accessibility.
Options for people with visual impairments include the following:
• TalkBack is a pre-installed screen reader from Google. It uses spoken feedback to describe
events, such as notifications, and the results of your actions, such as opening an app.
• Explore by Touch is a system feature that works with TalkBack, allowing you to touch your
device’s screen and hear what’s under your finger via spoken feedback. This feature is
helpful to people with no vision.
• Accessibility settings let you modify your device’s display and sound options, such as
increasing the text size, changing the speed at which text is spoken, and more.
If you have low vision and don’t plan to use Explore by Touch, visit
support.google.com/nexus to see Help content formatted for sighted users. You can make
reading and navigating this material easier by increasing the text size – just open Chrome,
go to Menu > Settings > Accessibility, and drag the slider to adjust the text size.
You can also try magnification gestures, which allow you to zoom in and out, as well as
temporarily magnify what’s under your finger. To try magnification gestures, go to Settings
> Accessibility > Magnification gestures.
Service and Support:
Please contact us at help@americanpumpkins.com for all after sales and technical support.
Glass Parts
The outside cover of your device’s screen is made of glass. This glass could break if the
device is dropped or receives a substantial impact. If the glass breaks, chips, or cracks, stop
using your Pumpkin X and do not touch or attempt to remove the damaged glass.
Battery Safety
The rechargeable battery in your Pumpkin X should be replaced only by an authorized
service provider. Charge the battery only in temperatures that range from 32° to 95°
Fahrenheit (0° to 35° Celsius).
Product Specifications
Display — 10.1" diagonal display, 1024 x 600 high-resolution display, 16 million
colors.
Audio — 3.5mm stereo headphone jack, built-in stereo speakers.
Power — AC power adapter and rechargeable lithium polymer battery.
Connectivity — Bluetooth, Wi-Fi, HDMI, USB 3.0 (micro-B connector).
Operating temperature — 32°F to 95°F (0°C to 35°C).
17 | P a g e

Storage temperature — 14°F to 113°F (-10°C to 45°C).
This symbol indicates that the relevant electrical product or battery should not be
disposed of as general household waste in North America / Europe. To ensure the correct
waste treatment of the product and battery, please dispose them in accordance to any
applicable local laws of requirement for disposal of electrical equipment or bat teries. In so
doing, you will help to conserve natural resources and improve standards of
environmental protection in treatment and disposal of electrical waste (Waste Electrical
and Electronic Equipment Directive).
Wi-Fi — 802.11b/g/n
18 | P a g e
 Loading...