

Puma Pumaphone User Manual

2 PUMA User Manual
CONTENTS
DESCRIPTION................................................................ 6
GENERAL USAGE .......................................................... 8
QUICK START .............................................................. 11
Information on the SIM card..........................................................11
Installing the SIM card and the battery.........................................12
Charging the battery ......................................................................13
Charging from the sun...................................................................14
Inserting the memory card ............................................................15
Removing the memory card ..........................................................15
Increase the battery life of your phone .........................................16
Getting started................................................................................16
Switching ON/OFF..........................................................................17
Network ..........................................................................................17
CALLS ......................................................................... 18
CALLING .........................................................................................18
RECEIVING A CALL ........................................................................19
DURING A CALL .............................................................................19
CALLS SETTINGS ...........................................................................20
CAMERA...................................................................... 22
TAKE A PHOTO ...............................................................................22
TAKE A VIDEO.................................................................................23
PHOTO BOOTH ...............................................................................24
CHECK YOUR MESSAGES ............................................ 26
TEXT MESSAGE ..............................................................................26
MMS&EMAIL ..................................................................................30
SPORT APPLICATIONS ................................................ 32
TRACK YOUR RUN .........................................................................32
TRACK YOUR RIDE......................................................................... 33
CHECK THE COMPASS .................................................................. 33
SET AN ALARM...............................................................................33
FOLLOW YOUR TEAM.....................................................................34

User Manual PUMA 3
BEAT THE CLOCK.......................................................................... 35
LIFESTYLE APPLICATIONS..........................................36
SEE PICS & CLIPS ......................................................................... 36
MAKE A VIDEO CALL ..................................................................... 37
CHECK SOLAR POWER ................................................................. 37
SURF THE NET .............................................................................. 38
JUMP INTO THE PUMA WORLD.................................................... 38
HAVE SOME FUN ........................................................................... 38
SORT YOURSELF OUT ................................................................... 40
NEVER-GET-LOST GPS ................................................................. 40
YOU DO THE MATH ........................................................................ 42
PLAY TUNES .................................................................................. 42
LISTEN TO THE RADIO .................................................................. 44
PHONE SETTINGS........................................................46
CALLS............................................................................................. 46
DISPLAY ......................................................................................... 46
SOUNDS ......................................................................................... 47
DATE & TIME.................................................................................. 48
LANGUAGE..................................................................................... 49
CONNECTIONS .............................................................................. 49
SECURITY....................................................................................... 53
TECHNICAL FEATURES ...............................................54
DECLARATION OF CONFORMITY..................................55
CERTIFICATION AND SAFETY INFORMATION FOR THE
UNITED STATES AND COUNTRIES USING FCC
STANDARDS ................................................................56
FCC Part 15 statement.................................................................. 56
FCC SAR information..................................................................... 57
Safety Information ......................................................................... 58
Distance of operation .................................................................... 59
FDA consumer information on wireless phones.......................... 60
Driving safety tips .......................................................................... 64
FOR CUSTOMERS IN THE UNITED STATES ..................66
Limited Warranty ........................................................................... 67

4 PUMA User Manual
FOR CUSTOMERS OUTSIDE THE UNITED STATES ....... 71
Warranty .........................................................................................71
END USER LICENCE AGREEMENT (EULA) ................. 76
JAVA™ ........................................................................ 82
TROUBLESHOOTING.................................................... 86
INDEX.......................................................................... 87

User Manual PUMA 5
You have just purchased a PUMA Phone, we congratulate you; it is
recommended that you read this handbook carefully in order to use
your phone efficiently and in the best conditions.
Your phone can be used internationally in the various networks
(GSM 850 MHz / 900 MHz / 1800 MHz / 1900 MHz,
3G 900 (VIII) / 2100 (I) MHz (HSDPA/HSUPA)) depending on the
roaming arrangements with your operator.
This phone is approved to meet European standards.
WARNING
Depending on the model, network configuration and associated
subscription cards, certain functions may not be available.
© PUMA AG 2010. All rights reserved.
PUMA is a registered trademark of PUMA AG Rudolf Dassler Sport.
Other product and company names mentioned herein may be the
trademarks of their respective owners. Any rights not expressly
granted herein are reserved. All terms are subject to change
without prior notice.
T9® Text Input is a trademark of ©Tegic Communications Inc.
Java™ and all Java™ based trademarks and logos are trademarks
or registered trademarks of Sun Microsystems, Inc. in the U.S. and
other countries.
The Bluetooth® word mark and logos are owned by the Bluetooth
®
SIG, Inc. Bluetooth® SIG, Inc. Bluetooth® QDID (Qualified Design
ID) : B016260.
MicroSD™ is a trade mark of SD Card Association.
6 PUMA User Manual
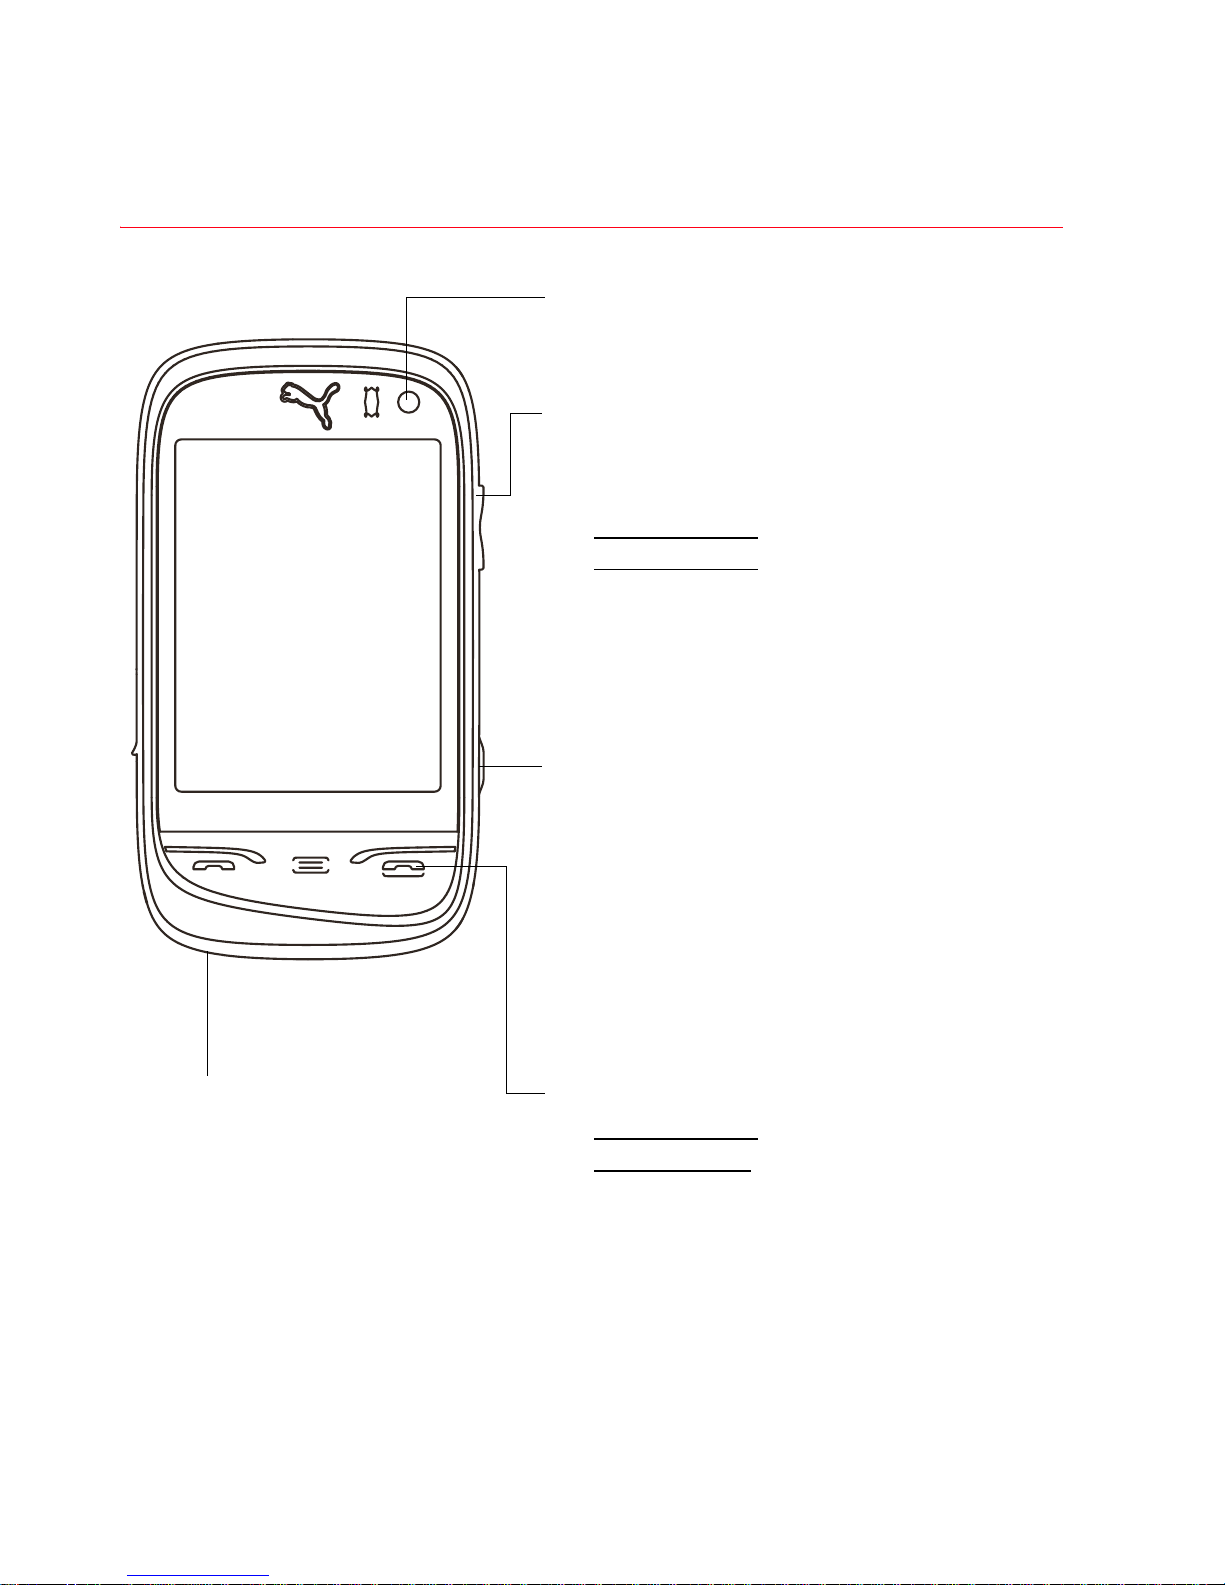
DESCRIPTION
Front camera
From camera preview screen
- Change the zoom level
When music is playing
- Short press: change the volume
- Long press: change the music
track.
During call
- Change the volume.
Camera key
- Press to enter camera preview
screen.
- Press to take a photo or video
when the camera preview
screen.
Right Key
- Short press
: lock/unlock
- Long press: switch ON/OFF
- In call context: reject a call -
hang up
- In menus: exit or back.
Microphone
WARNING: Ensure that
you are not obstructing
the microphone in call
context.
Left key
- In dialing/contacts/call log
context: call - receiving a call
- Short press: Activate/
Deactivate hands-free mode
during a call (WARNING: do not
use the phone in hands-free
mode near to your ear, or you
may suffer hearing loss)
Connector for charger, handset
and USB cable.
FAVORITES Key
Short press
: go back to
the Favorites screen.
Double press: Dylan on
demand.
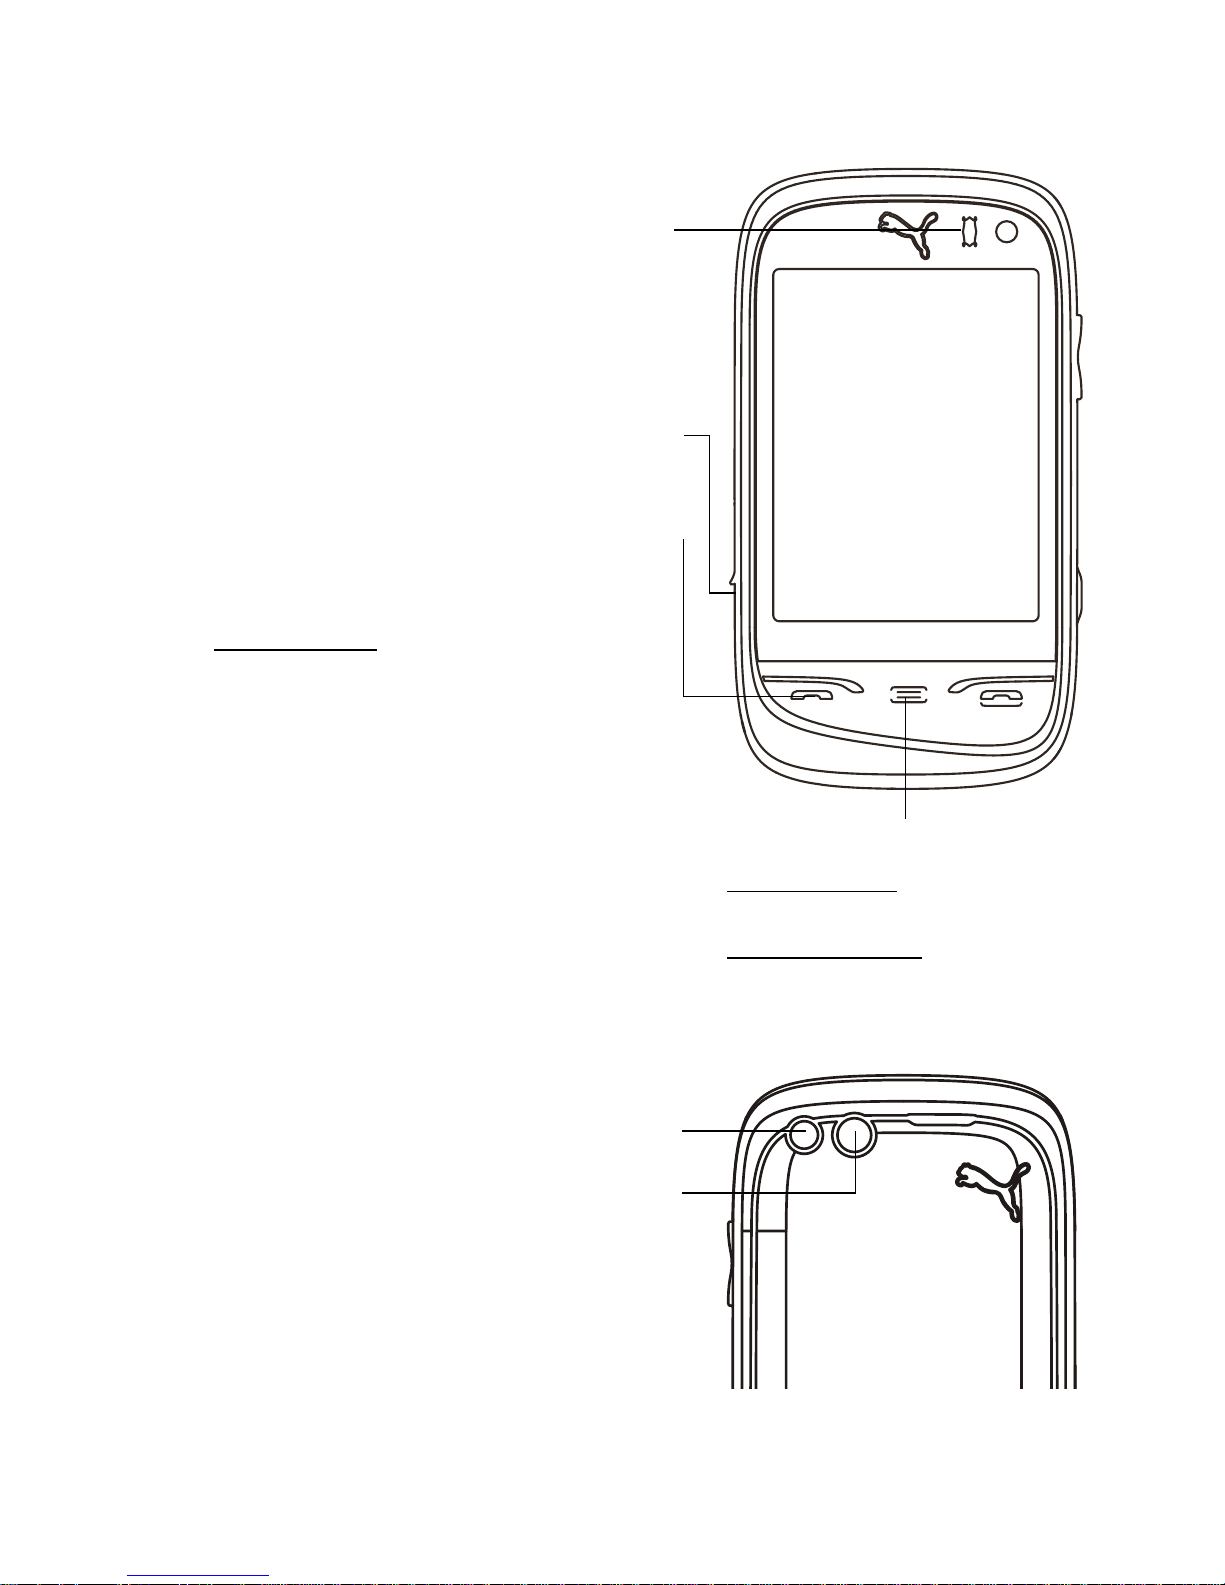
Flashlight
Camera
Proximity/light sensor
Automatically locks the phone in
your pocket or bag, and adjusts the
back light intensity.
User Manual PUMA 7
8 PUMA User Manual
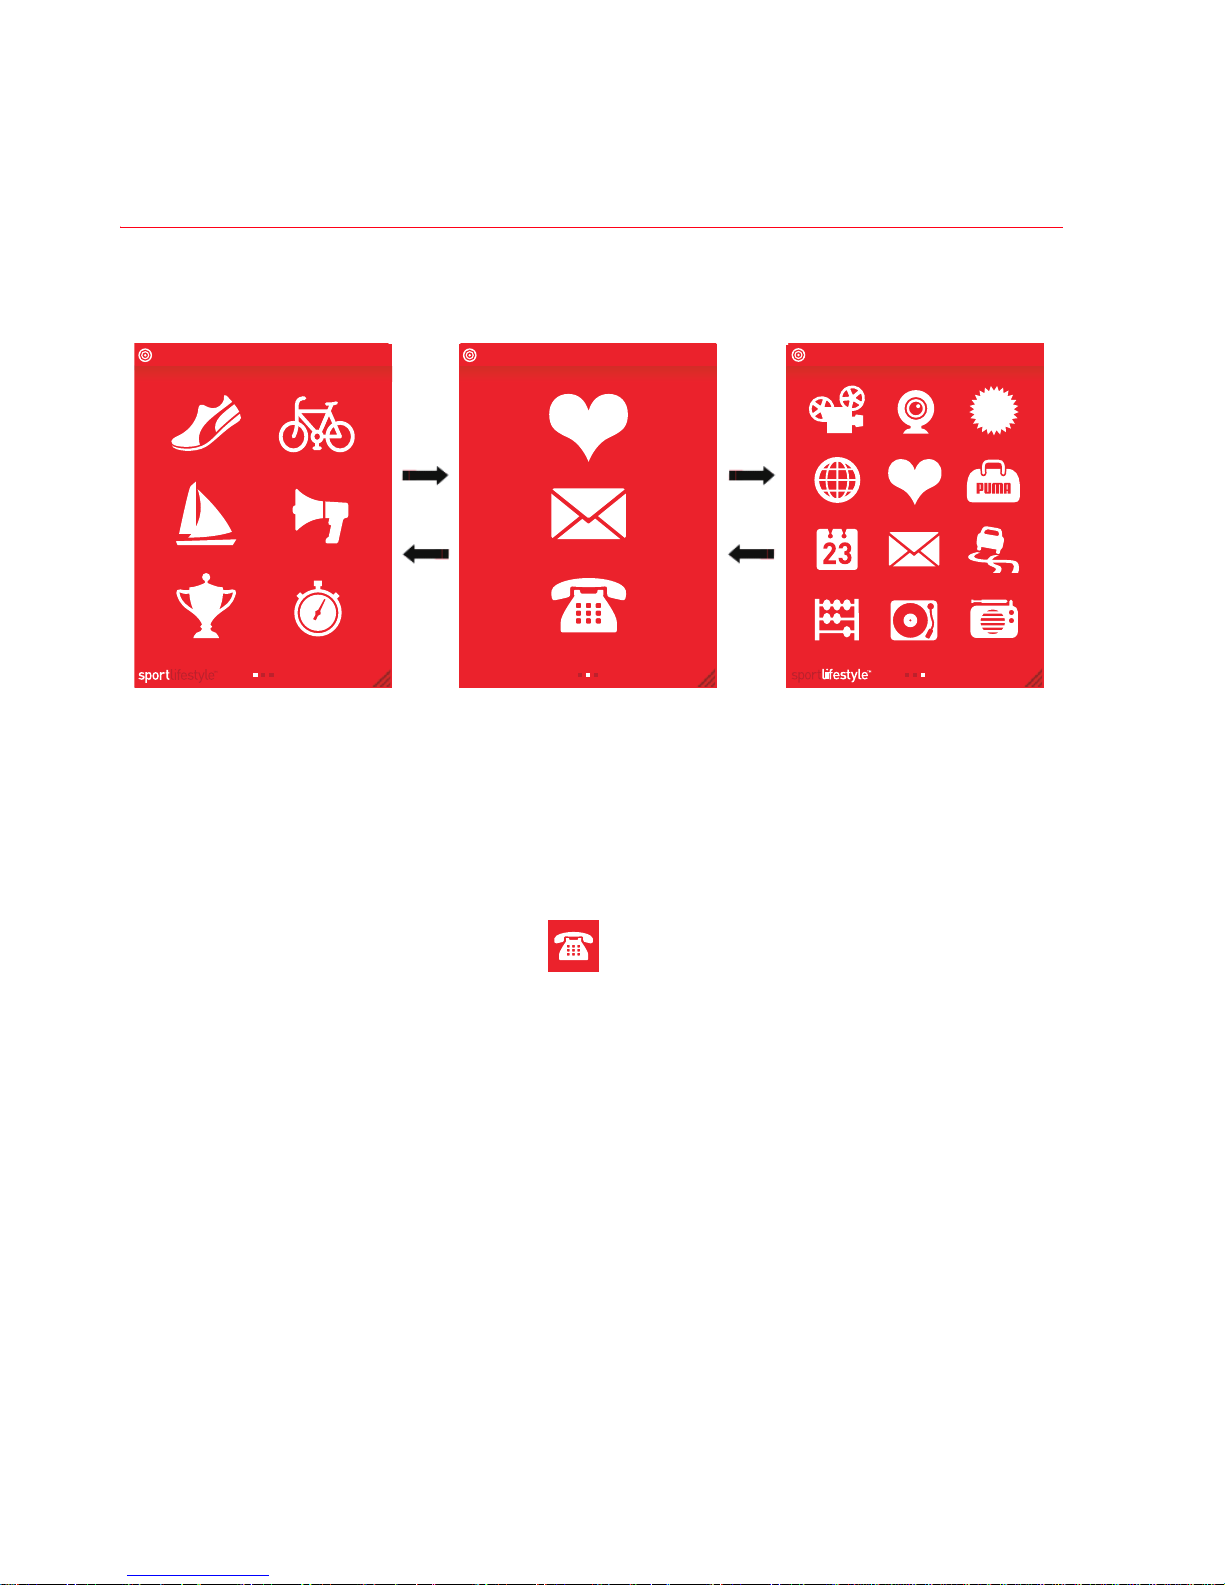
GENERAL USAGE
A screen consisting of three sets of menu screens, you can sliding
left/right the screen to access each screen.
SPORT screen FAVORITES screen LIFESTYLE screen
15:37
T-MOBILE
FULL
15:37
T-MOBILE
FULL
15:37
T-MOBILE
FULL
FAVORITES screen
“FAVORITES” is the default screen, you can access “SPORT” and
“LIFESTYLE ” screen by sliding left /right.
The icons for the applications of the favorites screen are to be
selected by you, and the icon is preset for the phone to enter
the dial screen, which also can enter the phonebook and the call log
screen by sliding left/right.
You can add or remove application to FAVORITES screen from
SPORT and LIFESTYLE apps. Such as: Hold an icon on the SPORT
screen 3 seconds, it will automatically be added to the FAVORITES
screen. Conversely, if holds an icon on the FAVORITES screen 3
seconds, then the application icon will be removed.
FAVORITES screen can only store a maximum of 6 icons.
NOTE:
when there are several small boxes display at the below
central, you can slide left/right to enter the other corresponding
screens.
User Manual PUMA 9
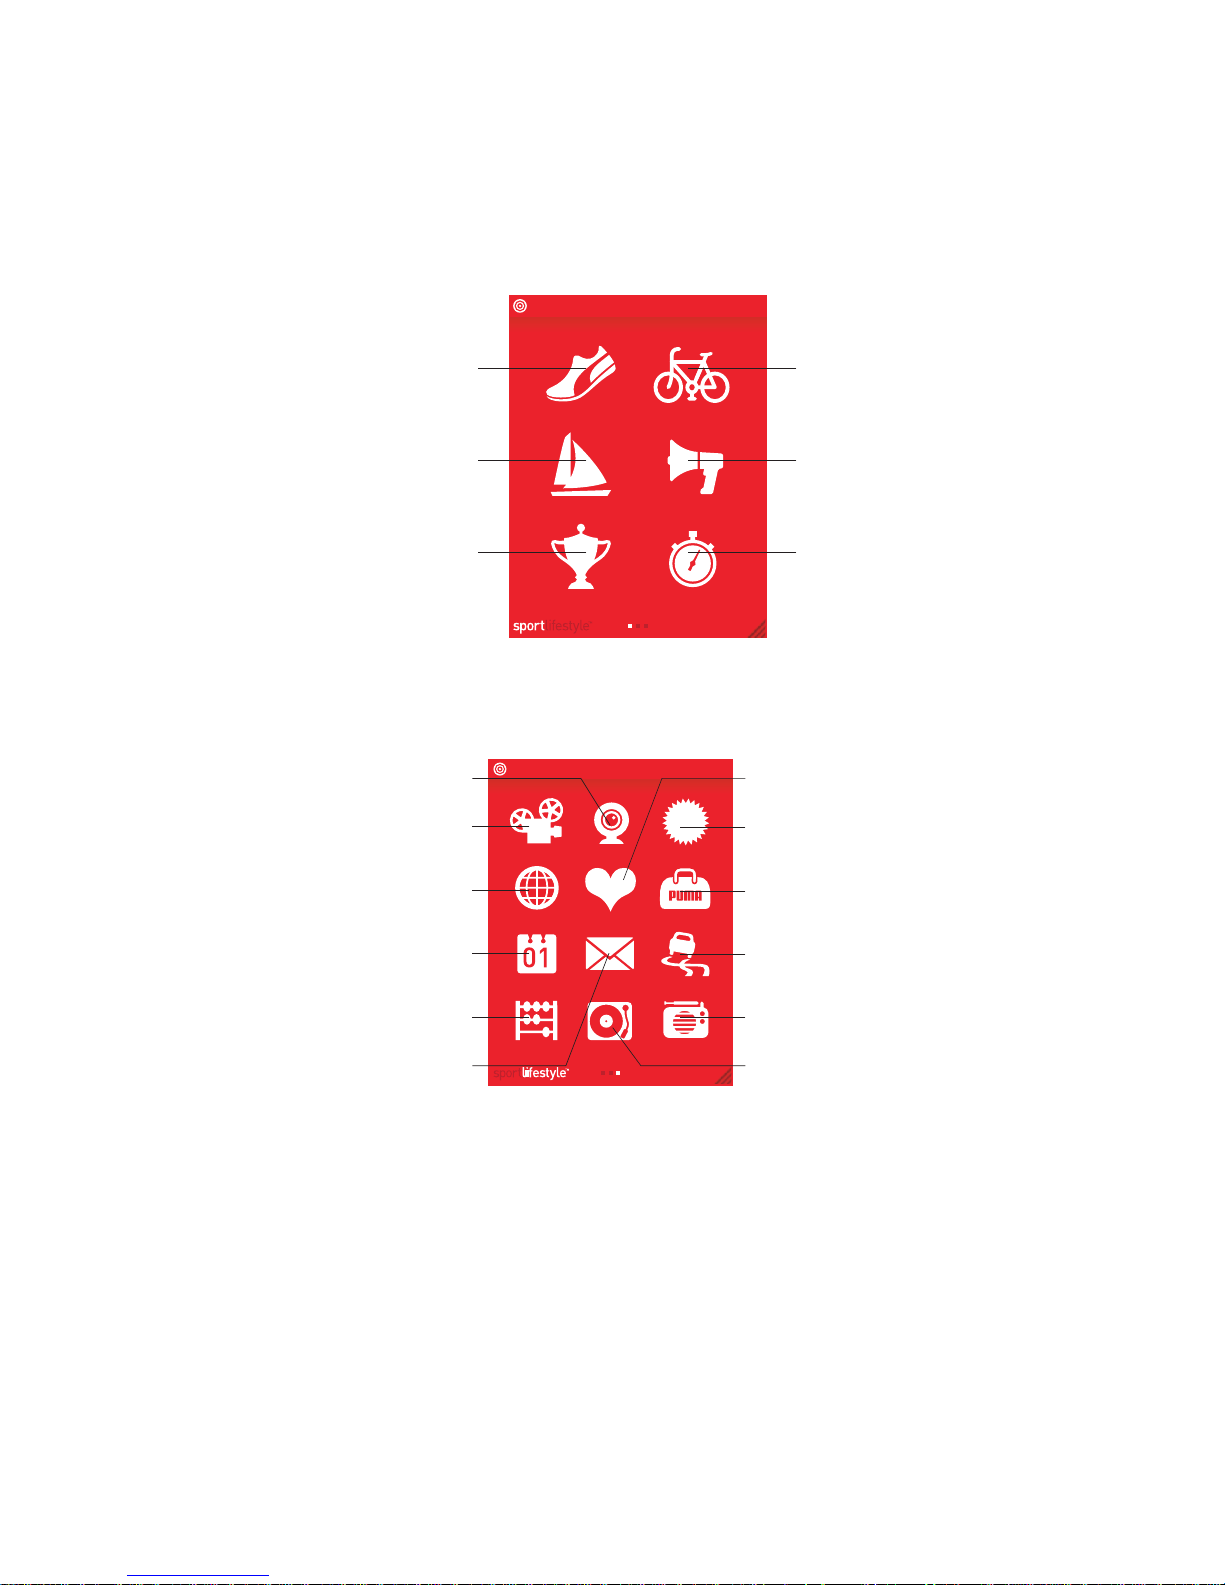
SPORT and LIFESTYLE screen
The corresponding applications icons for the SPORT screen are
displayed as follows:
15:37
T-MOBILE
FULL
TRACK YOUR RUN
CHECK THE COMPASS
FOLLOW YOUR TEAM
TRACK YOUR RIDE
SET AN ALARM
BEAT THE CLOCK
The LIFESTYLE applications icons are displayed as follows:
15:37
T-MOBILE
FULL
MAKE A VIDEO CALL
SEE PICS & CLIPS
SURF THE NET
SORT YOURSELF OUT
YOU DO THE MATH
CHECK YOUR MESSAGES
JUMP INTO THE PUMA WORLD
CHECK SOLAR POWER
HAVE SOME FUN
NEVER-GET-LOST GPS
LISTEN TO THE RADIO
PLAY TUNES
NOTE:
Application icons on “SPORT” and “LIFESTYLE” screen are
fixed and cannot be changed.
10 PUMA User Manual
Red Carpet
All options (phone or within an application) are hidden by the Red
Carpet. When you see a triangle at the bottom right of a screen,
drag it to lift the carpet and access the application settings below.
Example, you can access the phone settings menu by dragging the
Red Carpet corner peel, slide down the Red Carpet or press the
Right key to cancel the Red Carpet mode.
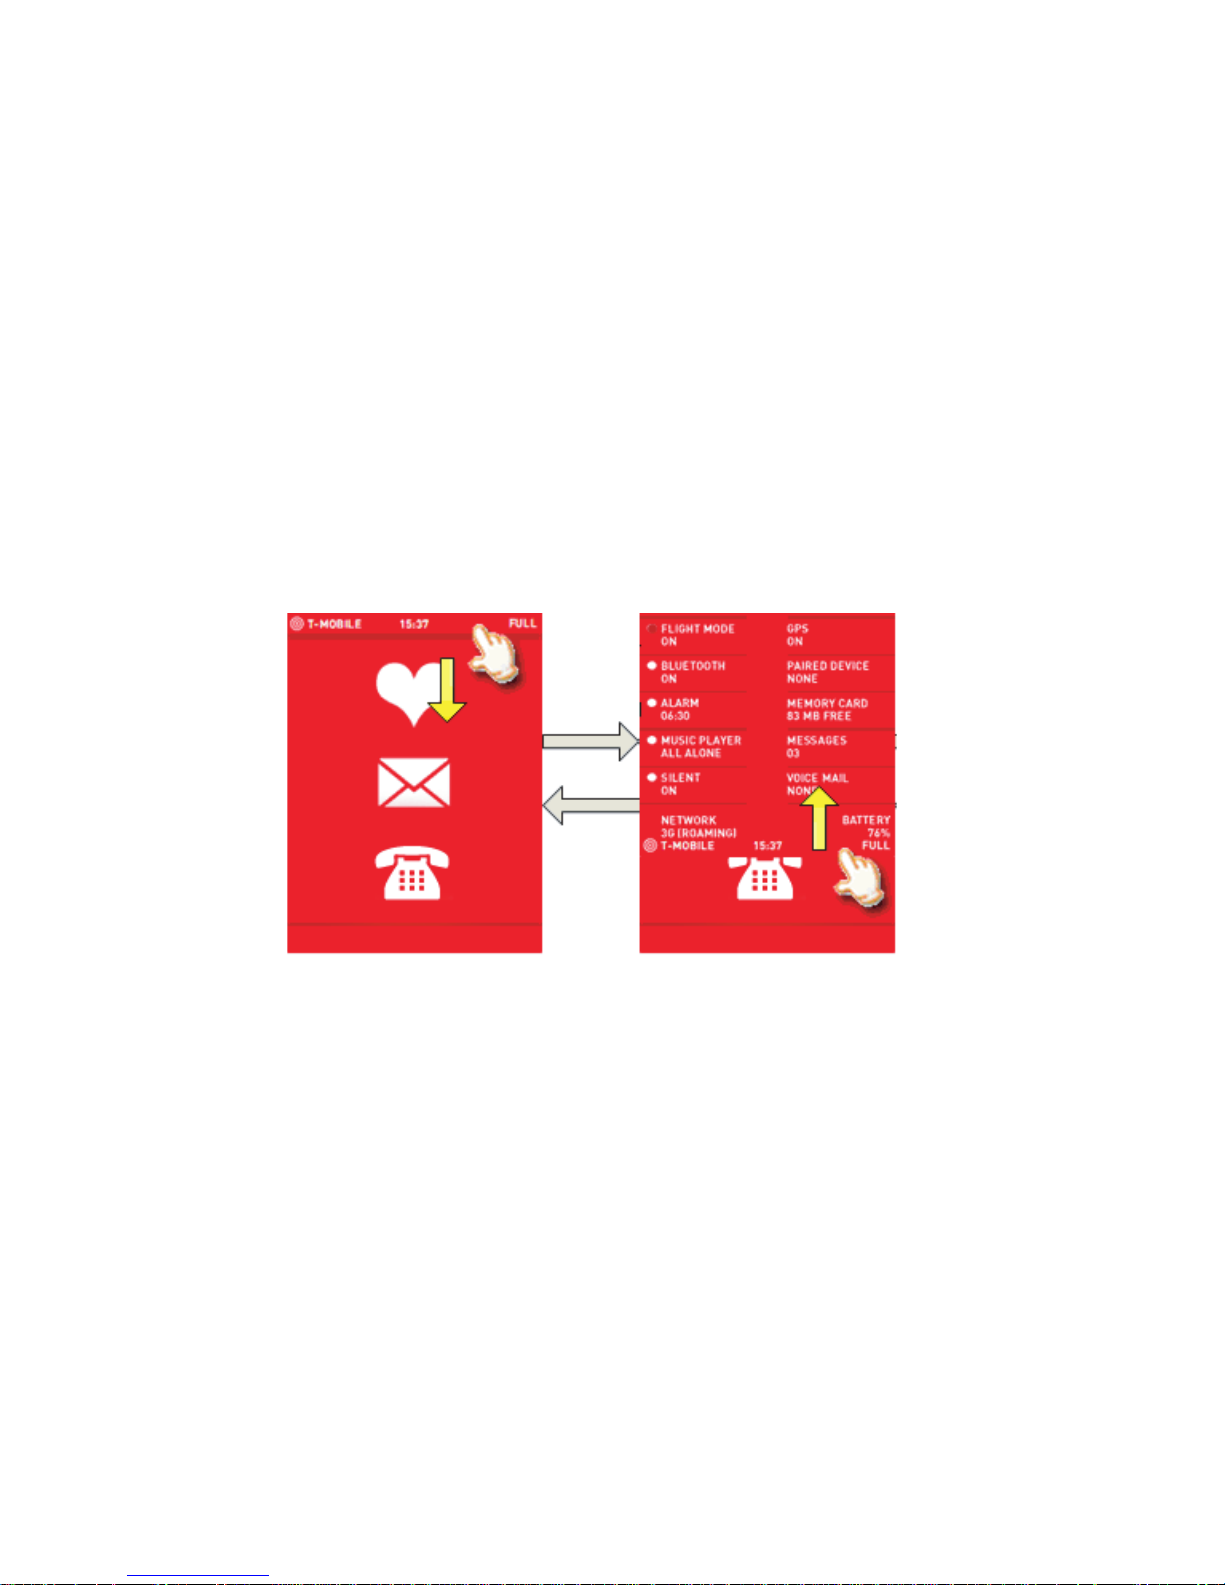
Status Bar
This part always displays on the top and only displays informations
about strength, service provider, time and battery status.
You can slide out draw to show additional details any interface, and
slide up to close the extended status bar.
It displays the system status (FLIGHT MODE ON/OFF, BT ON/OFF,
ALARM ON/OFF, Roaming, possible to turn on/off radios, memory
status….)
As is shown in the picture, the options with dots on the left can be
turned on/off by a press on the option (both dot and label). The dot
on the left will be high-lighted when it is turned on and gray
otherwise. The options without dots display the status of the
corresponding functions, which could not be manually turned
on/off.
NOTE:
for the ALARM ON/OFF, only the first alarm can to be turned
on or off.
User Manual PUMA 11
QUICK START
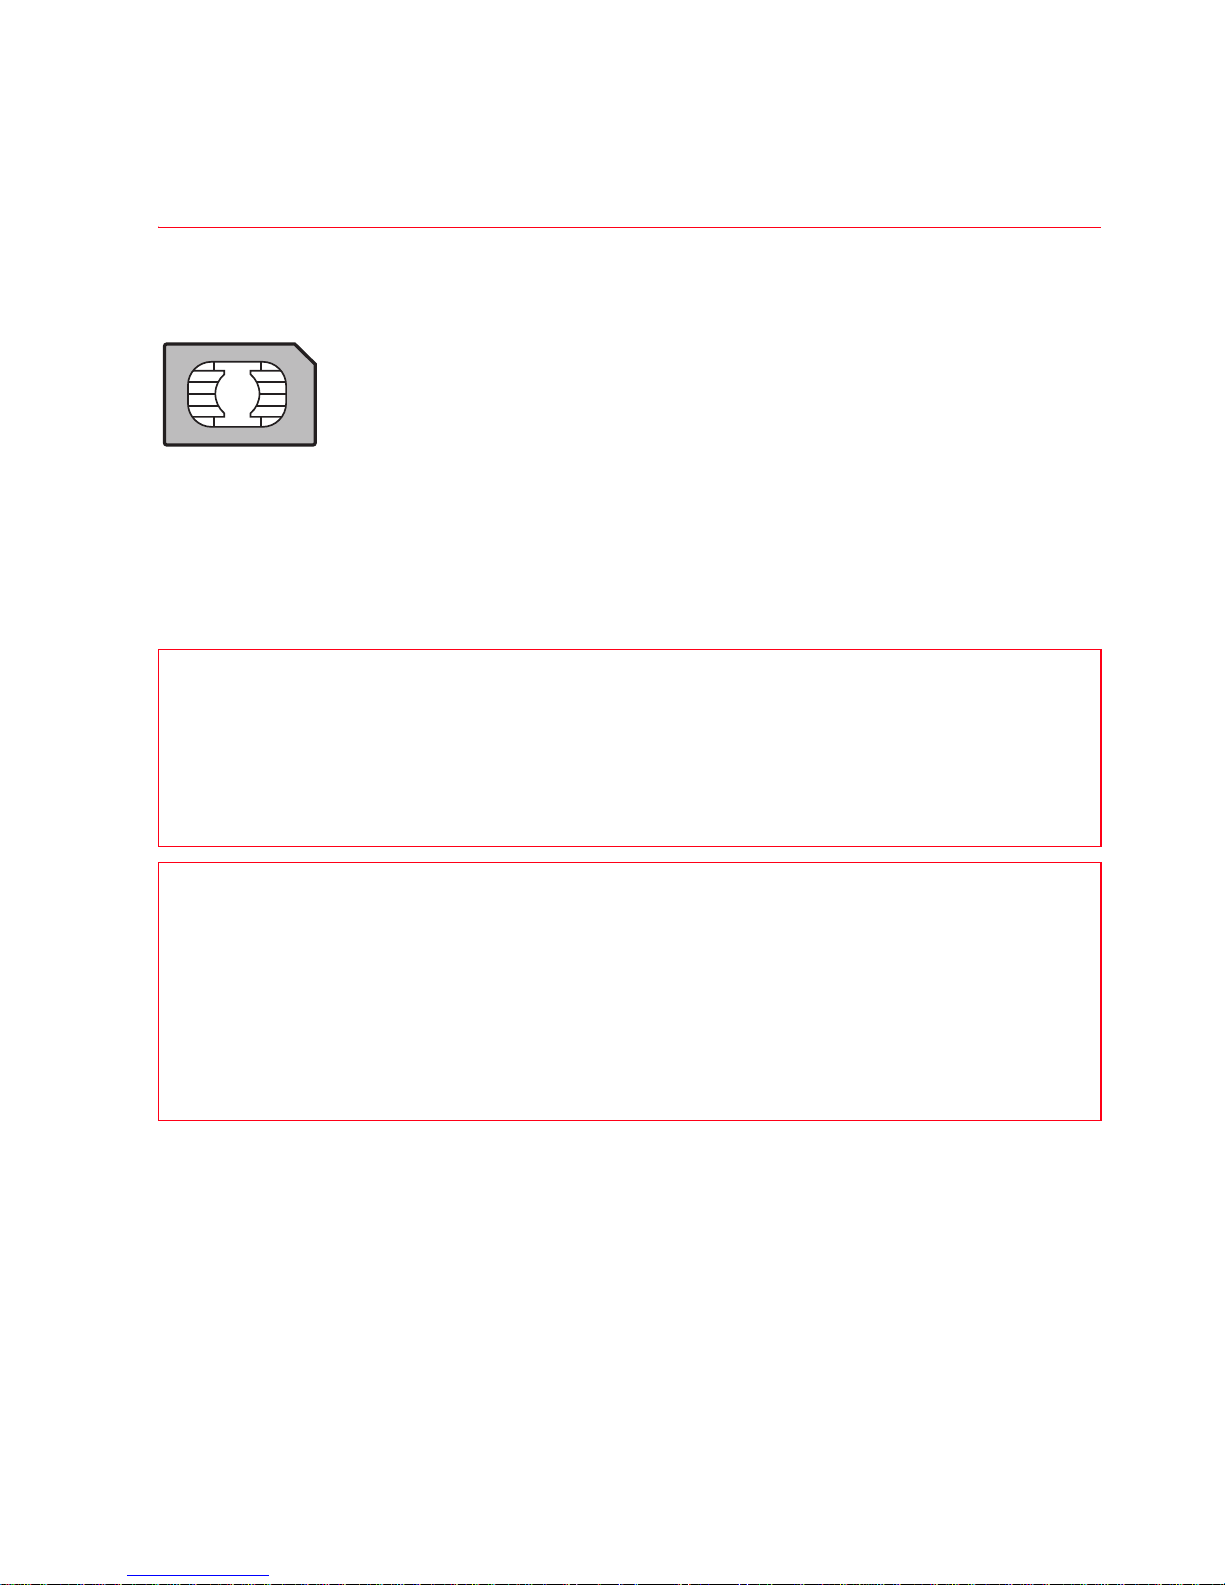
Information on the SIM card
To use your phone, you need a card called SIM or USIM
card. It contains personal information that you can
modify:
- Secret codes (PIN(s): Personal Identification
Numbers), these codes allow you to protect access
to your SIM card and phone
- Phonebook
- Messages
- How special services work
WARNING
This card must be handled and stored with care in order not to be
damaged. If you should lose your SIM card, contact your network
provider immediately.
Please keep your SIM card out of reach of young children.
WARNING
Your phone is identified by its IMEI number. Write this number
down, and do not keep it with your phone, because you may be
asked for it in the event of your phone being stolen, in order to
prevent it from being used, even with a different SIM card. In
order to display the IMEI on your phone's screen, press the Left
key, then slide right to enter the dial screen, then type: *#06#.
12 PUMA User Manual
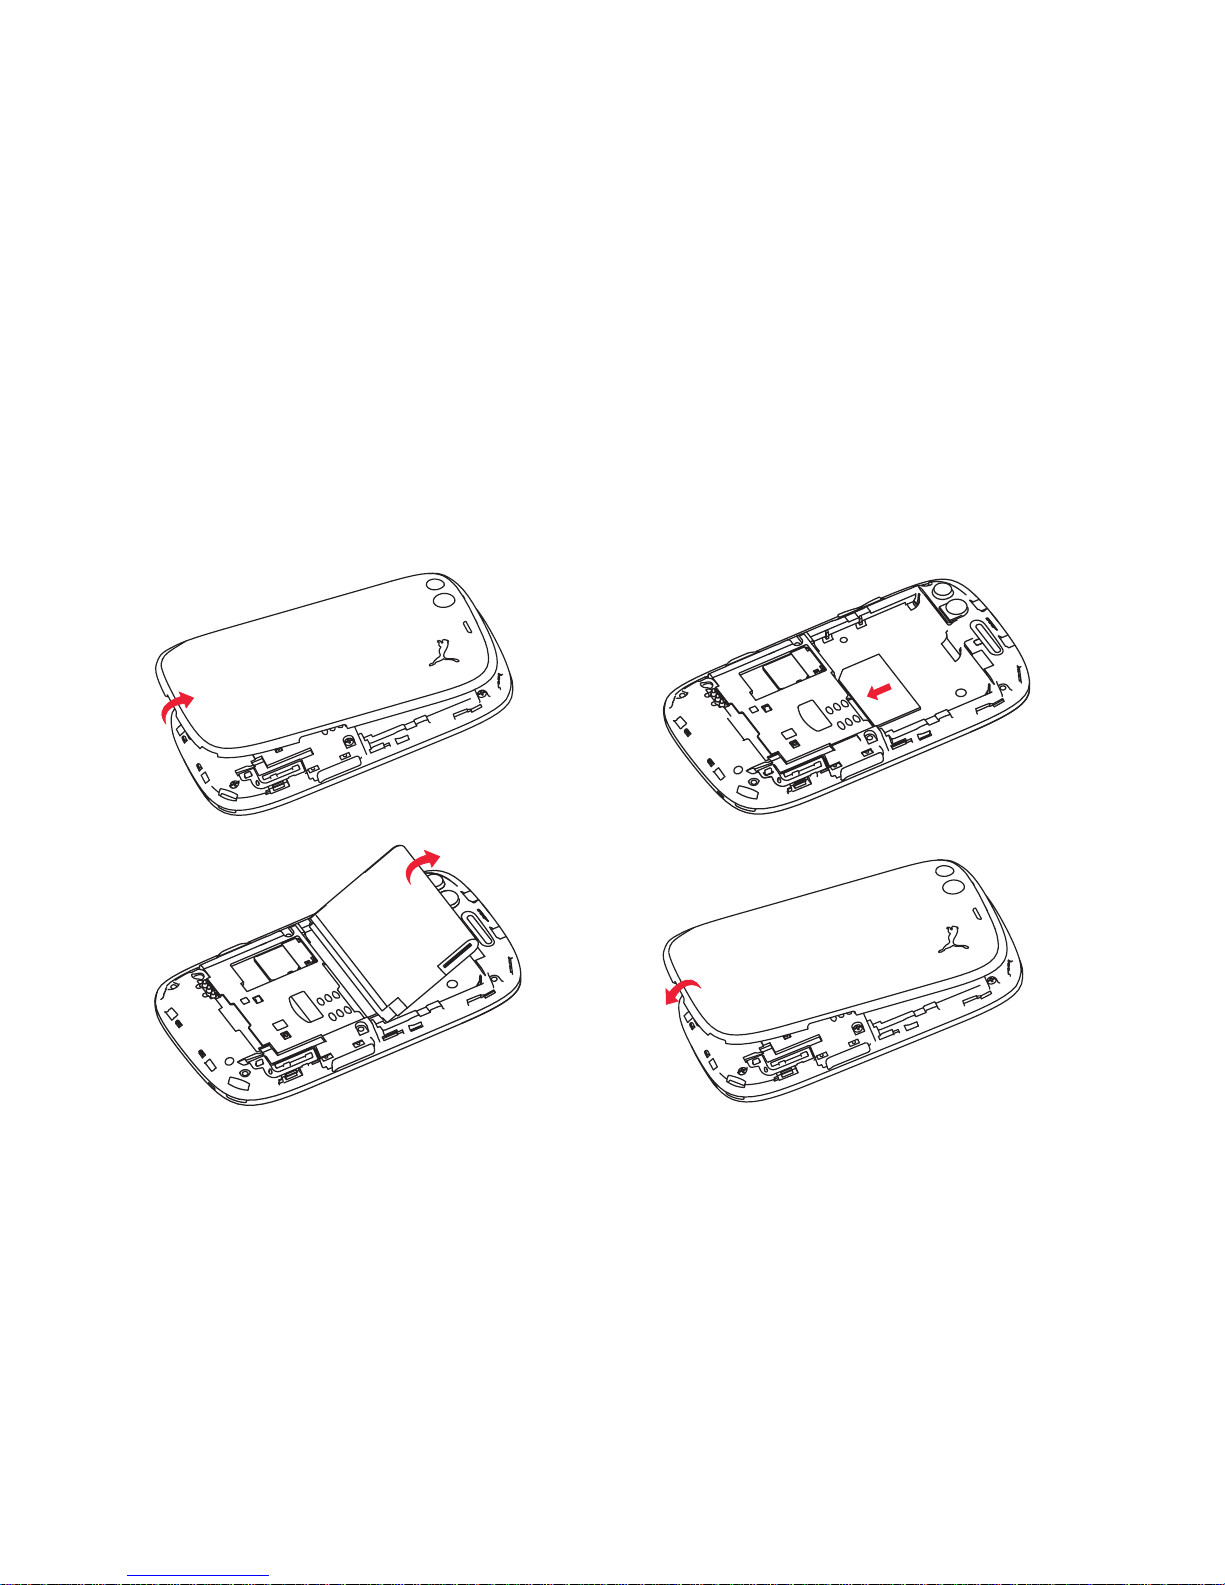
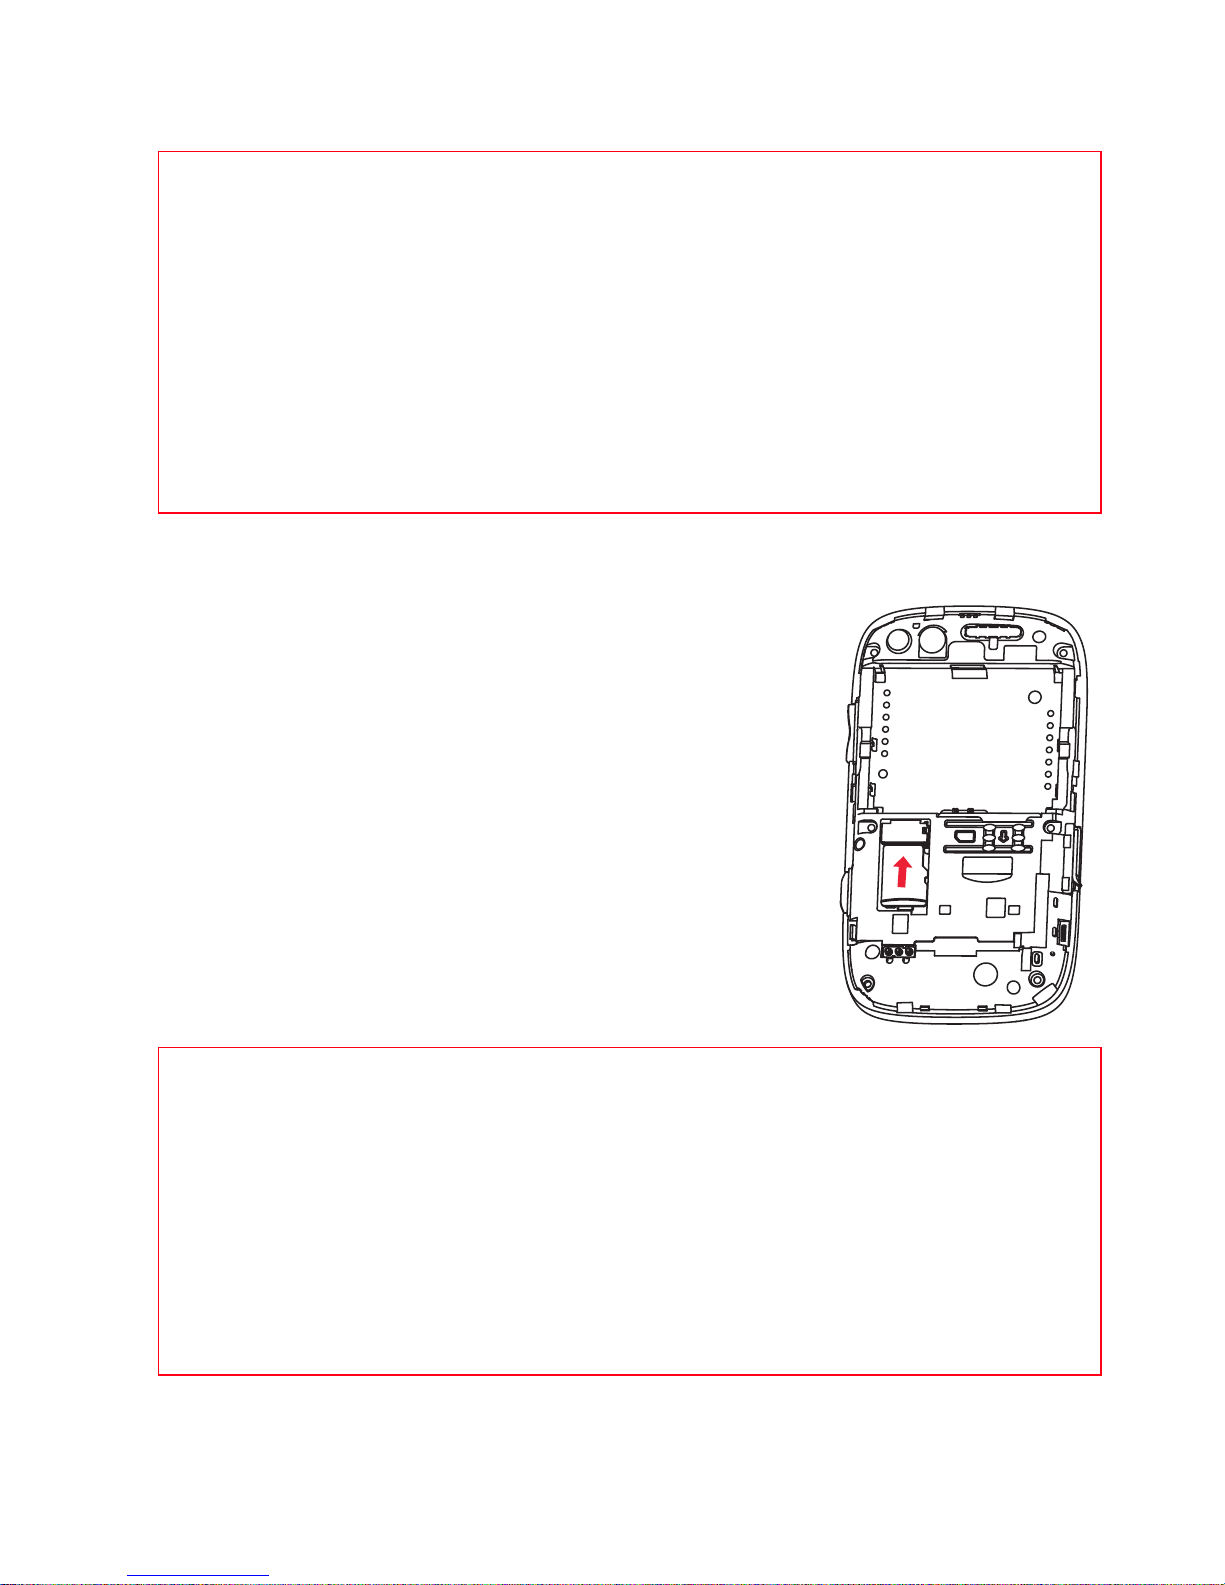
Installing the SIM card and the battery
Ensure that the phone is switched off and the charger disconnected.
1. Open the back cover using the notch located at the bottom of the
phone. Take out battery if already installed.
2. Slide the SIM card into the card holder with gold face down and
cut corner.
3. Place the battery by positioning first the bottom of it, as shown on
the battery.
4. Place the back cover, clicking in first the upper part then the
lower part.
12
34
User Manual PUMA 13
Charging the battery
Your phone is powered by a
rechargeable battery. A new battery
must be charged for 4 hours at
least before being used for the first
time. It reaches its optimum
capacity after a few cycles of use.
Some status of battery information
such as LOW, HUNGRY, HAPPY or
FULL will be displayed on the Status Bar.
When your battery has been discharged, the LOW battery
information displays on the Status Bar. In this case, recharge your
battery for 15 minutes at least before making any calls, or
communication will be cut off quickly.
NOTE:
Each phone has a specific charger with the appropriate
connectors for the phone with which it is sold. Using any other
charger, or using the charger with any device other than the phone
will lead to an exclusion of warranty.
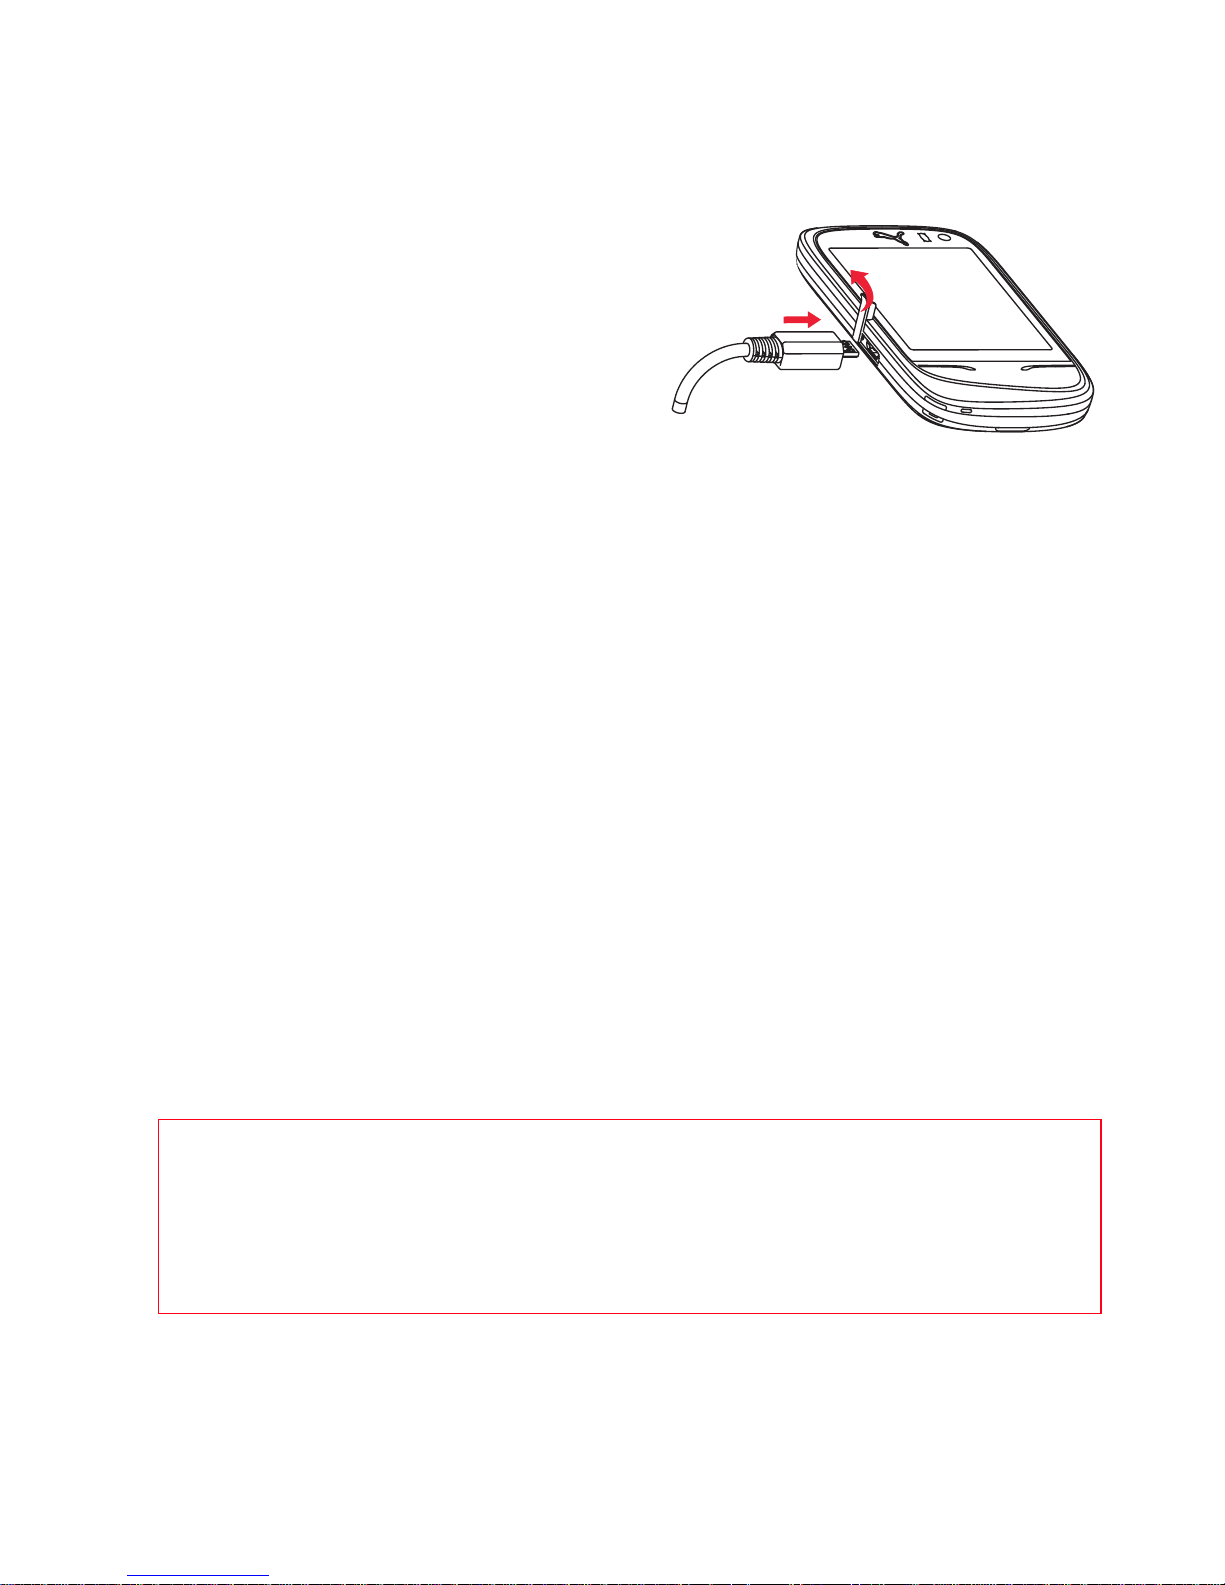
To recharge the battery:
- Plug the USB cable in the side connector of the phone.
- Plug the other end of the USB cable in the charger.
- Plug the charger in the socket.
The phone is then charging up, the battery FEEDING information
displays on the Status Bar. When the battery is FULL charged, the
charging stops on its own. Disconnect the cable.
When charging, the battery may warm up, this is normal.
When charging the battery, the socket on which the charger is
plugged must be easily accessible.
WARNING
If the battery has been entirely discharged, the phone cannot
start. Plug the phone to the charger. The phone will switch on
after a few minutes of charge. You can use the phone again when
the START option is displayed on the screen.

WARNING
There is danger of explosion if the battery is placed in an
incorrectly way or if it is exposed to fire.
Do not short circuit it.
The battery does not have any part that you can change.
Do not try to open the battery casing.
Use only the appropriate chargers and batteries as shown in the
phone manufacturer's catalogue.
The use of other types of chargers or batteries may be dangerous
or invalidate the warranty.
Used batteries must be disposed of in the appropriate places.
We advise you to take the battery out if you plan not to use the
phone for extended periods.
You are strongly advised not to connect your phone to the charger
if it doesn’t contain a battery.
The charger is a safety step-down transformer, it is forbidden to
modify, alter or replace it by another component (power supply
plug, etc).
14 PUMA User Manual
Charging from the sun
The PUMA Phone has its own solar cell integrated in the back cover.
Forgot your charger? Not a problem, all you need is the good old
sun up there.
To charge your phone under the sun, just place it with its back side
facing sunlight. As soon as there is enough light, the little sun icon
above the solar cell will blink slowly, indicating that solar power is
being pumped in. The more light you can find, the more power you
will get. You can still charge when the phone is off, and it may even
work indoor.
Once you get enough solar power, your PUMA Phone will use it for
voice calls, text messages and music playback. From the menu,
press the Sun icon to check out the Solarometer: those counters
will keep track of your activity using free solar energy so you can
improve and see the sunny side of life.
WARNING
The solar charging can't work when battery temperature over
75°C, or when the remaining battery level is over 4.05V (or
equivalent capacity to 85%).
Do not plug the normal charger and do solar charging at same
time.
Do not leave your PUMA Phone as a solar charger in a car with all
the windows and doors closed.
Do not leave a light-concentrator (such as a mirror or magnifying
lens) on your PUMA Phone's solar panel.
User Manual PUMA 15
Inserting the memory card
- Turn the phone back and remove the back
cover.
- Insert the memory card into the slot,
halfway up as shown on the figure opposite
(with gold face down).
Removing the memory card
WARNING
The memory card is very fragile. Take care when you insert or
remove the memory card.
The memory card can be inserted or withdrawn while the phone
is in use. However, it may suffer damage if withdrawn during a
read or write operation. Ensure that no application accesses the
card during its withdrawal.
Some memory cards must be formatted with a PC before first use
with the phone.
- Remove the back cover.
- Slide the memory card to extract it from its
location.
- Turn your phone and shake it slightly to drop
the memory card and retrieve it.

16 PUMA User Manual
Increase the battery life of your phone
- Don't press the keys when not necessary: each keypress activates
the backlight, and uses much power.
- Don't obstruct the antenna with your fingers
- Activation of Bluetooth® function reduces the phone battery life.
We advise you to deactivate it when not in use.
Getting started
When you switch on your phone for the first time, follow instructions
displayed on the screen.
If access to the SIM card is protected, the device prompts you to
enter the PIN number:
Enter the code between 4 and 8 digits given to you when the SIM
card was issued. These digits do not appear on the screen for
security reasons.
After pressing [GO!], the phone activates the SIM card settings and
switches on again if necessary (depending on the SIM card).
If there are contacts saved in your SIM card, you are invited, if you
wish, to copy them in the phone contacts memory.
Warning
If a wrong PIN number is entered three times in succession, your
SIM card is blocked. You must then:
After 5 or 10 failed attempts (depending on the type of SIM card),
the SIM card is definitely locked. You must then contact your
operator to obtain a new card.
- Enter the PUK (Personal Unblocking Key) code provided by your
operator, and validate.
- Enter your PIN number and validate.
- Enter your PIN number again and validate.

User Manual PUMA 17
Switching ON/OFF
When the phone is off, a long press on the Right key will turn it ON.
When the phone is on, if you are browsing inside the menus, a short
press on the FAVOURITES key will come back to the idle screen.
When you are in the idle screen, a long press on the Right key will
switch OFF the phone.
Network
Once ON, the phone is searching for a network on which it can make
calls. If it finds one, it displays the name of the network on the
screen.
NOTE:
if it finds a 3G/UMTS network, the NETWORK 3G and
icon+network name are displayed on the Status Bar.
You are then ready to send or receive a call.
If the network’s name appears, calls are possible on your
operator's network.
If the network name flashes, the phone is in permanent search
mode.
If roaming and a network name are displayed, calls are possible
on a roaming network provider.
If “NO SIGNAL” on the Status Bar is displayed without any
network name, no network is available, only the emergency
services are accessible (ambulance, police, fire brigade).

18 PUMA User Manual
CALLS
This paragraph gives a description about the call feature, which may
refer to dialing, calling, in a call, call handling and other features.
CALLING
To call a number, you can select the under:
- Press the Left key to enter the call log list screen, select a
number to read the details, and press the number to dial.
- Slide right to enter the phonebook list, select a contact and press
the number of it, the phone will call the contact automatically.
- Slide right to enter the dial screen, enter the number you want to
make a call and press the Left key.
- Press the icon in the FAVORITES screen directly to enter the
dial screen, then slide left/right to enter the call log or phonebook
list screen to dial a number.
In the moment of get calling screen, press the Right key to hand
down the call.
Press the contact name/number or the Left key in the call log
screen to the caller name/number. If the call log is a number list
(not stored in phonebook)/the contact name not set head portrait,
the number and default contact icon are shown in the ringing and in
calling picture.
International call
In the dial screen, press 0 key (hold down) to display " + ", then
dial the country code without waiting for the dial tone, then the
number of the called party.
Emergency services
Depending on the network you can obtain the emergency service
with or without SIM card or when the keypad is locked. It is
enough to be in an area served by a network.
To obtain the international emergency service, dial 112 then press
the Left key.

User Manual PUMA 19
RECEIVING A CALL
If a call is incoming, the screen is shown with the contact picture,
and “SPEAKER”, “SILENT” list is selected to control the incoming
call.
If you do not want to answer the incoming call, press the Right key
to cancel the call, and which will be shown as a missed call in the
call log screen. If you accept the incoming call, press the Left key to
answer the call.
When on a call, you can select different functions
Hands-free mode
During a call:
WARNING:
in this mode do not bring the phone up to your ear.
DURING A CALL
During a call, pressing the Plus/Minus buttons on the right side of
the phone to change the volume.
When in a calling, you can select a contact to give a second call via
selecting the [CONTACTS] option. The animation of the screen
changing is the Status Bar animating up, title bar animating down
from top, and contacts screen animating up from the bottom. If the
second call is connected, the first call may be hold.
When in a calling, and there is another one incoming call received, if
you do not want to accept the second incoming call, tap the
[IGNORE] to come back to the in communication screen for first
one.
If you want to accept the second incoming call and hold the first
one, tap the [HOLD + ANSWER], then screen comes into the in call
screen and the first call is on hold, tap the item (contact name
/number) to change the calling to the hold one.
- make a long press on the Left key and confirm
or
- Press the option of the [SPEAKER] to active.

20 PUMA User Manual
CALLS SETTINGS
This menu allows you to manage all the call functions (call forward,
displaying numbers, call waiting, voicemail number, etc.).
In the one of the three sets of menu screens, dragging the Red
Carpet then select [CALLS] to display the call setting options:
FORWARD
Depending on your subscription, this service allows you to forward
incoming calls (including voice calls and video calls) to a different
number or to the voice mailbox.
Choose the type of forwarding you want from the options available.
CALL WAITING
(Network dependent service)
During a call, you may be informed that a caller is trying to reach
you: you hear a special tone. The caller's number is displayed on
the screen.
BAR
This menu allows you to block the making or receiving of certain
calls.
Before you can use this service, a password will be provided by your
operator when you take out your subscription.
Access to this service depends on your subscription type.
To activate call barring:
- Select incoming or outgoing calls.
- Select the call type on which you want to activate call barring.
- Select the call origin.
- Select Activation and enter password.
VOICEMAIL
This function is for storing your voicemail number.
CONTACTS
This function allows you to copy the contacts from phone to SIM or
SIM to phone.

User Manual PUMA 21
AUTO REDIAL
This menu allows you to call back a caller you have not managed to
reach.
You can set the redial function to INACTIVE, AUTOMATIC or ON
REQUEST.
If you choose ON REQUEST, your phone will offer to redial your
caller automatically if his number is busy.
SHOW NUMBER
SHOW MY ID
You can decide whether or not your phone number will be displayed
on the phone of the person you call.
- YES: You choose to active anonymous mode and then not to
display your number.
- NO: You choose not to activate anonymous mode and then to
display your number.
- DEFAULT: The phone default mode.
MY ID
- FOR OUTGOING CALLS: status of the display numbers function.
- FOR INCOMING CALLS: status of the display numbers function
when you have forwarded the incoming calls to another number.
CALLER’S ID
- FOR OUTGOING CALLS: status of the display numbers function
when your call is forwarded to another number.
- FOR INCOMING CALLS: status of the caller’s display numbers
function.
22 PUMA User Manual
CAMERA
This menu allows you to take photos and videos and use them for
different purposes. For instance, you can send them to another
phone or an Internet address, store them, use them as wallpapers.
TAKE A PHOTO
From the menus, press the Camera key on the right side of the
phone to turn it on.
If phone is unlocked, and no Non-shared application running,
camera displays full screen image and nothing else after turn on.
Look into your phone display and position your subject, move your
phone to position your photo.
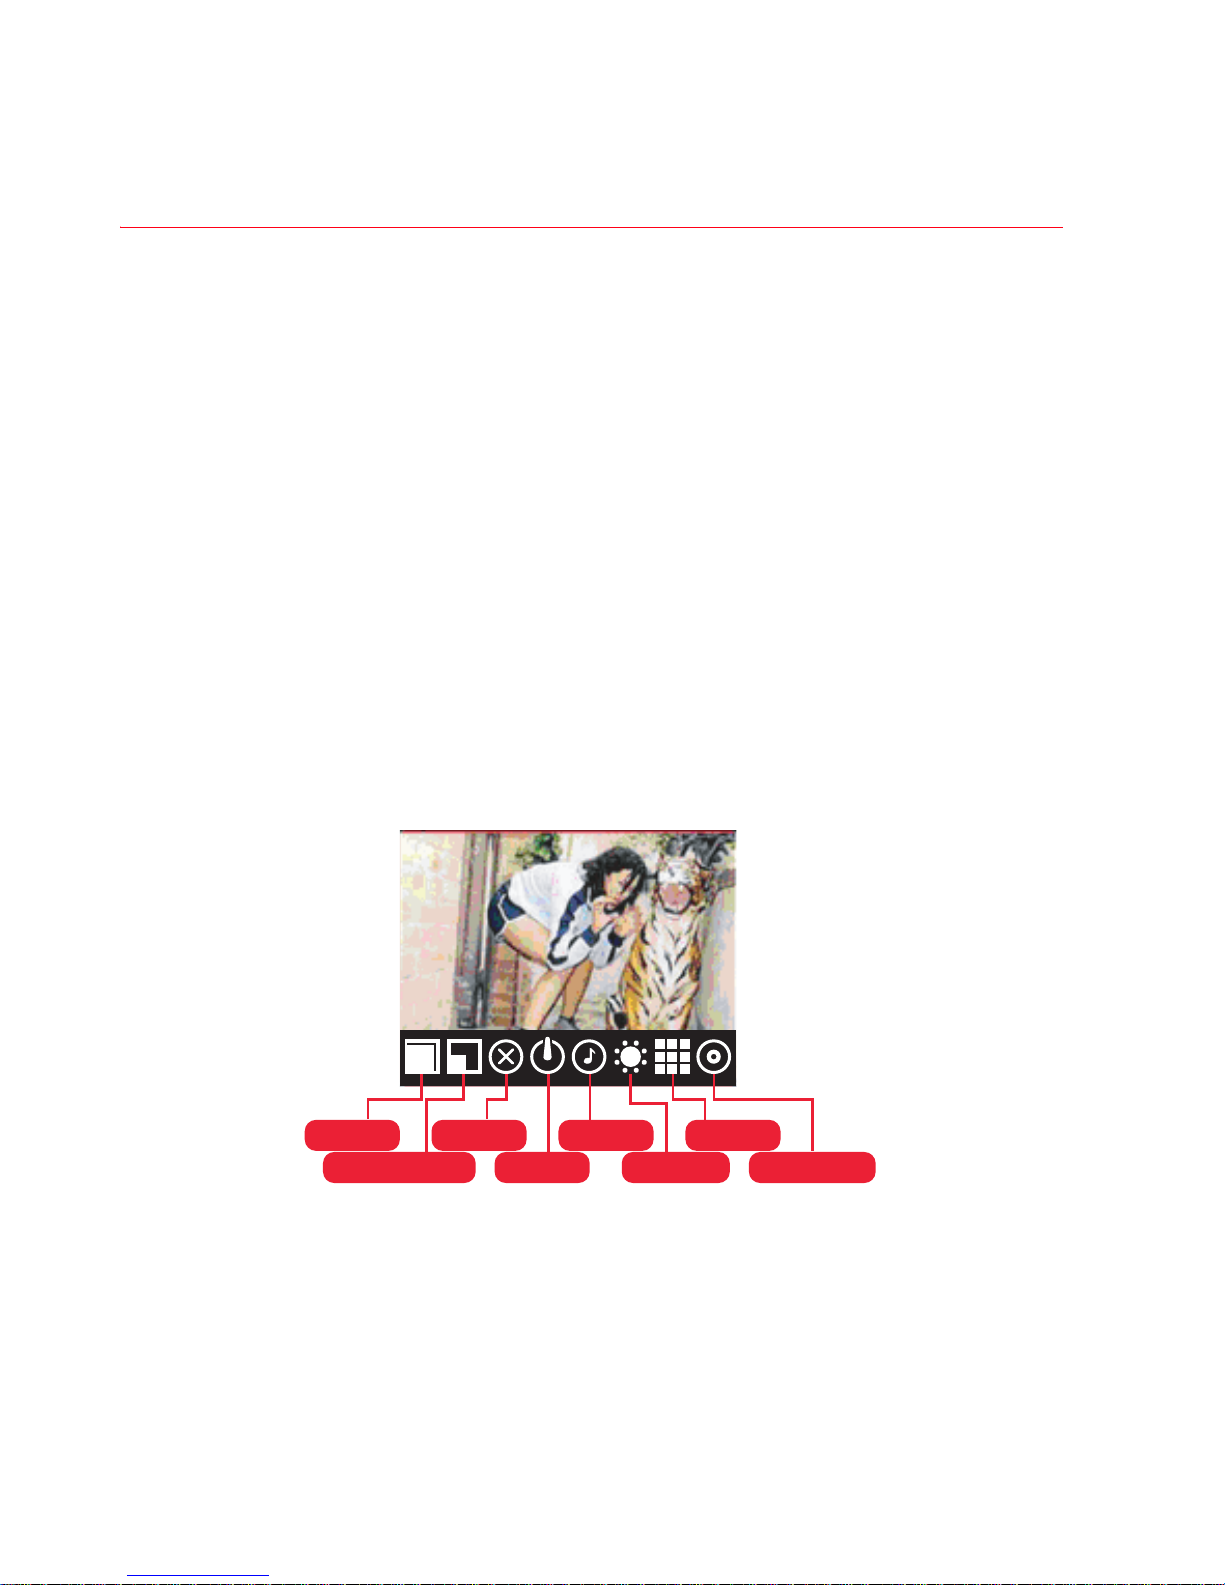
Settings before taking a photo
- ZOOM: use the Plus/Minus buttons on the right side of the phone
to activate the zoom IN/OUT.
- Other settings: press on the screen, an icon bar will appear,
press on one of the icons to enter the settings menu:
• MODE: to select the camera mode is CAMERA, VIDEO or
PHOTO BOOTH.
• RESOLUTION: to select the resolution of the phone.
• FLASH: to select whether turn on the Flashlight or not.
• TIMER: to select the delay time (None, 5 SEC, 10 SEC or 15
SEC).
MODE
MODE
FLASH
FLASH
SOUND
SOUND
EFFECT
EFFECT
RESOLUTION
RESOLUTION
TIMER
TIMER
QUALITY
QUALITY
EXPOSURE
EXPOSURE

User Manual PUMA 23
• SOUND: to turn ON/OFF the sound when taking a photo.
• EFFECTS: to select an effect (NORMAL, GREY SCALE, SEPIA,
NEGATIVE or SOLARIZATION).
• QUALITY: to select the photo quality.
• EXPOSURE: to select luminosity (NORMAL, BACKLIGHT,
NIGHT etc.).
- Press [DONE] to save the select options and return in preview
mode.
TAKING A PHOTO
- Press the Camera key in preview mode to take a photo, the taken
picture displays in whole screen, and it is saved automatically in
the album.
- When select to take snapshot with timer, it should display a timer
icon on left top corner.
- Dragging the Red Carpet to display the under options:
• SHARE: share the taken picture by PUMA PHONE,
BLUETOOTH, EMAIL or MMS.
• SLIDESHOW: to slideshow all the saved pictures.
• DELETE: to delete the taken picture ot not.
- Press the Right key to return in preview mode.
NOTE:
- Front camera is only used for video chat and photo booth, you can
not switch to front camera to take a picture.
- Using the camera during a call may affect the call quality.
TAKE A VIDEO
- After enter the Camera, select the Camera mode is VIDEO.
- If necessary, press on the screen, an icon bar will appears, press
on one of the icons to enter the settings menu:
• MODE: to select the camera mode is CAMERA, VIDEO or
PHOTO BOOTH.
• TORCH LAMP: to select whether turn on the Flashlight or not.
• QUALITY: to select the photo quality.
• EFFECTS: to select effects (NORMAL, BACKLIGHT, NIGHT
etc.).
- Press on the Camera key to begin recording, there is a red point
flicking on the top-left to notify that it’s working.
24 PUMA User Manual
- Press on the Camera key to stop recording, the screen direclty
return to the preview mode, and the video is stored automatically
in the album in .3gp format.
NOTE:
- When coming a ring call, the camera is turned off, and turned on
after the call has been finished. If the phone is recording, it will
store the video that has been recorded before the camera turned
off.
- If there’s no accessory storage (like microSD), it will create an
alert screen to warn you, when the Camera key is pressed to take
a photo. (It is possible to enter the application, but cannot take a
photo.)
- When the storage is full, it will also create an alert screen to warn
you, when the Camera key is pressed to take a photo.
PHOTO BOOTH
After enter the Camera, select the Camera mode is PHOTO BOOTH.
This application is used to take photos and amusement user by
warping the picture.
When tap the phone booth entry, the camera switches on the front
camera automatically.
The capture screen is the similar to the capture screen using back
camera. Display the supported setting options for front camera
when tap on the viewfinder screen.
- After taken a picture using front camera, display the picture with
an action bar in the bottom screen.
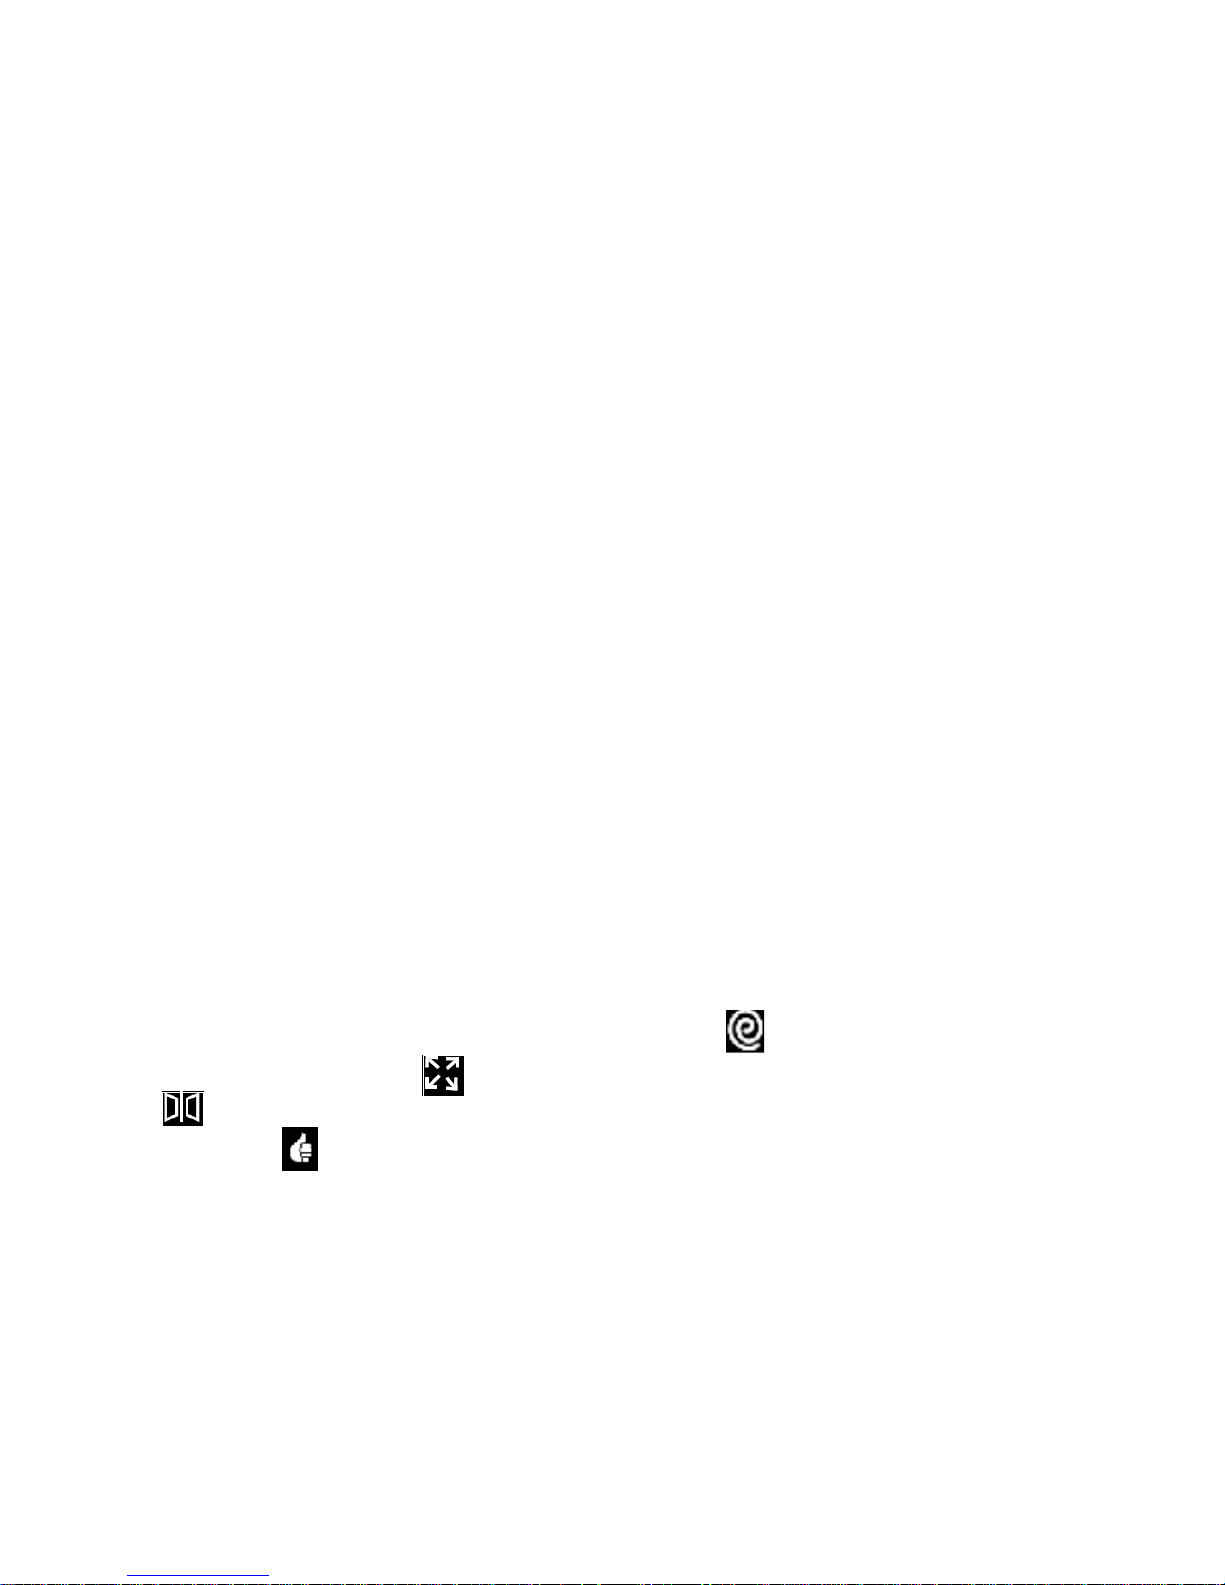
- There are three effects can be applied. icon to swirl area of
the picture center, icon to bulge the area of the picture center,
icon to give entry of mirroring the picture center area.
- Tap the icon to save the changed picture and back to front
camera viewfinder. The picture can be used for contacts, video
chat etc.
- Press the Right key to back to the front camera view finder, and
the current effect picture is not saved.

User Manual PUMA 25
NOTE:
- The effect will not be superposition, which means when you tap
the first icon to do the swirl effect based on the capture picture,
and then tap the second icon, the bulge effect based on the
capture picture not based on the swirl effect.
- When using camera to taking picture for contacts, you can also be
able to select PHOTO BOOTH mode.
26 PUMA User Manual
CHECK YOUR MESSAGES
This application contains the following message types: text
messages (SMS, MMS), voice messages and e-mail. MMS is a
Multimedia Message Service, which allows you to enclose photos,
audio files, hundreds of different PUMA icons, and others rich
contents to your messages; these messages can even be composed
of several slides. MMS are differently charged to SMS are. Please
contact your network provider to get more information on their cost
and the service availability.
Tap the [CHECK YOUR MESSAGES] on LIFESTYLE screen to enter
SMS main screen.
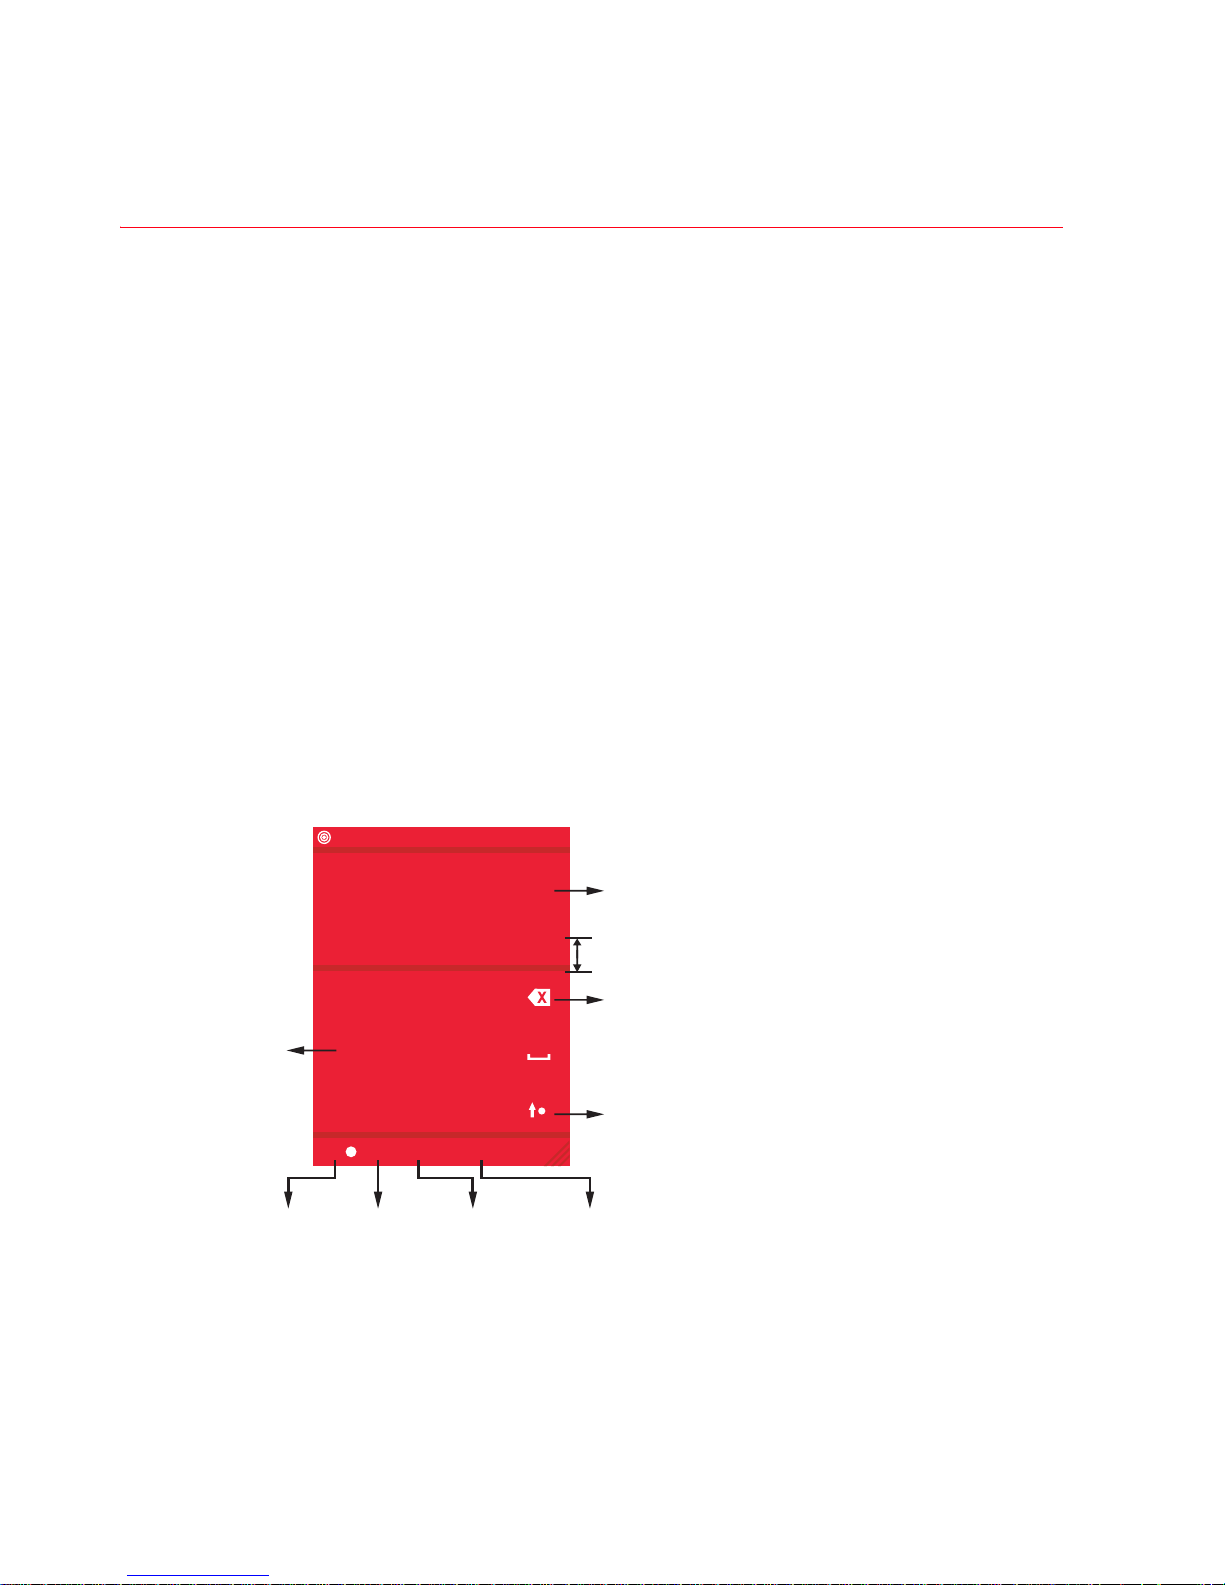
TEXT MESSAGE
CREATE A NEW TEXT MESSAGE
Press the [NEW MESSAGE] launch the message composer to create
a new message.
T-MOBILE
15:27 FULL
.,-? ABC DEF
GHI JKL MNO
PQRS TUV WXYZ
T9 123 SYM DONE
Input the content of message
To display the possible letters
when at T9 or ABC input mode.
keypad
T9
feature
switch
Delete
Change case
123
input
mode
Symbol
input
mode
Confirm

User Manual PUMA 27
Using T9 Mode
Press the key corresponding to the letter chosen once
and compose the word by continuing to press the keys
corresponding to the various letters without paying
attention to the display: the word is highlighted.
The same sequence of keys pressed can correspond to several
words, existing in the dictionary. If the word that appears is not the
word you expected, press the navigator upwards to scroll through
the words corresponding to this key sequence.
Once you agree on the word proposed on the screen, press the
navigator rightwards to validate it or on the SPACE key (which
validates and inserts a space after the word), and continue writing
the next word.
If the word you are expecting is not proposed, the message “SPELL
WORD” will be displayed and press the “+” to enter the next screen,
please add characters and press the [DONE] to validate to return
the edit message screen.
Press the “T9” to switch the T9 mode and ABC mode.
The ABC mode allows you to type letters: press one key several
times to display the letter you want (for example: press the 2 key
twice to display B).
Upper case/Lower case/Figures
Press the “Change case” to switch the text to upper case, lower
case or figures.
Punctuation characters/123 input
Punctuation characters are obtained by pressing the “SYM”.
Press the [123] enter to 123 input mode.
At same time, the [T9] option change to [ABC].
Other options:
Dragging the Red Carpet you can select the text zoom, input
language and the spell word you edited.
After enter the contents of message, tap [DONE] to enter the send
message screen.
 Loading...