


EXCEL
INSTRUCTION MANUAL
2OO
QUAD
Download
English Manual
Download
French Manual
Téléchargez
le Manuel en
Français
Download
German Manual
Download
Deutsche
Anleitung
#PC-020 -002

Table Of Contents
Introduction ....................................................................................................................... 1
Special Features...............................................................................................................3
Warning And Safety Notes ...............................................................................................7
Explanation of Buttons.................................................................................................... 11
Operation Program ......................................................................................................... 14
Lithium Battery Program (LiPo/LiFe/LiIon/LiHV).............................................................15
NiMH/NiCd Battery Program ..........................................................................................18
Pb Lead-acid Battery Program ....................................................................................... 22
Battery Memory Set and Call Out ................................................................................... 24
System Setting ...............................................................................................................26
Battery Voltage Meter .....................................................................................................28
Battery Resistance Meter ............................................................................................... 29
Controlling the Charger Using the App ...........................................................................31
Using the Charge Control Software “Charge Master PRO” ............................................ 37
Use Voltage Calibration ..................................................................................................38
Specication ................................................................................................................... 38
Regulatory Information ................................................................................................... 40
Warranty and Service .....................................................................................................42
WARNING
This charger is not intended for use by persons (including children) with reduced physical, sensory or mental capabilities, or lack of experience and knowledge, unless they
have been given supervision or instruction concerning use of the appliance by a person
responsible for their safety.
Children should be supervised to ensure that they do not play with the charger.
Do not recharge non-rechargeable batteries!
During charging, the battery must be placed in a well-ventilated area!
Never leave the charger unattended when charging the batter y.
2

Introduction
Congratulations on your choice of PULSETEC EXCEL 200 QUAD AC/DC Dual Balance
Charger/Discharger/Power Supply. This unit is simple to use, but the operation of a so-
phisticated automatic charger such as PULSETEC EXCEL 200 QUAD does require some
knowledge on the part of the user. These operating instructions are designed to ensure
that you quickly become familiar with its functions. It is therefore important that you read
right through the Operating Instructions, Warning and Safety Notes before you attempt
to use your new charger for the rst time. We hope you have many years of pleasure and
success with your new battery charger.
PULSETEC EXCEL 200 QUAD is a high-performance, microprocessor-controlled
charge/discharge station with battery management suitable for use with all current bat-
tery types, with an integrated balancer for 6-cell Lithium-Polymer (LiPo), Lithium Iron
Phosphate (LiFe) and Lithium-Ion (LiIon) batteries; the additional LiHV mode is able to
charge the new generation of LiPo batteries with a 4.35V end of charge voltage.
The EXCEL 200 QUAD is a four-channel charger with four independent circuits, which
can charge four different kinds of batteries simultaneously, and is equipped with a
480x320 colour LCD display. The two dual channels support power distribution in AC
power mode to make full use of the power when charging a small battery in one chan-
nel and allocating all remaining power to charge another big battery pack in the second
channel. What’s more, users could connect the charger to PC for operation and rmware
upgrade. Besides that, users could also use it as Lithium Battery Voltage Meter and Bat-
tery Internal Resistance Meter.
There are safety settings such as Automatic Charge Current Limit, Capacity Limit, Tem-
perature Threshold and Processing Time Limit which make the charger safe to use.
Finally, your charger gets its own apps. Bluetooth Module is inside of the charger and you
could control your charger by your smart phone via Bluetooth 4.0
Please BE SURE to read these INSTRUCTIONS, WARNING and SAFETY NOTES be-
fore you use the charger for the rst time.
Mishandling batteries and battery chargers is extremely dangerous, which may
cause re and explosion.
3

Introduction
Please read this manual carefully before use. This manual contains impor tant information on
the safe use of this charger. If you are a beginner in battery charging, please use this charger
with an experienced user.
LCD- Colour
Display
Cooling Fan
CHANNEL A
Output Charge Lead
4mm Banana Plug
Balance Lead Sock-
et JST-XH Ports
Temperature
Sensor Port
CHANNEL C
CHANNEL D
Micro USB Port for
PC Link
USB Port
5V/ 2 .1A
CHANNEL B
4
Power Switch
AC Input : 100 - 240V
DC Input : 11-18V
Special Features
Four-Channel Charger
PULSETEC EXCEL 200 QUAD allows you to connect 4 batteries to one charger simultaneously, the charger will intelligently and automatically charge 4 batteries at once to their
maximum capacities. And the batteries being charged do not even need to have the same
cell conguration or same battery chemistry. You can connect different chemistry (NiMH/
NiCd/LiPo/LiFe/Lilon/LiHV/Pb) batteries to any of the charging channels.
DISPLAY
Channel B
Pb
Channel A
EXCEL
2OO
QUAD
Channel C Channel D
LiPo Battery
LiHV Battery
Colour LCD Display
The charger is equipped with a 480x320 w3.5” color LCD display.
The user interface looks clean and intuitive.
Dual Input and Power Distribution
PULSETEC EXCEL 200 QUAD has a AC/DC input
comprised of AC 100-240V and DC 11-18V.
In AC mode, it supports power distribution.
For example, the output power total = Channel A
(65W) + Channel C (35W) = 100W
AC Max Power Set
A
65W
LIPO BALANCE
B
2.0A 7.4V(2S)
AC Max Power Set
C
35W
LIPO BALANCE
D
2.0A 7.4V(2S)
NiMH Battery
100W
5

Special Features
Optimized Operating Software
PULSETEC EXCEL 200 QUAD features the so-called AUTO function that sets the feeding
current during the process of charging or discharging. Especially for lithium batteries, it
can prevent the overcharging which may lead to an explosion due to the user’s fault. It
can disconnect the circuit automatically and alarm once detecting any malfunction. All the
programs of this product were controlled through two way linkage and communication, to
achieve the maximum safety and minimize the trouble. All the settings can be congured
by users.
Battery Memory (Data Store/Load)
The charger can store up to 10 different charge/discharge proles for each channel. You
can keep the data pertaining to program setting of the battery of continuous charging or
discharging. Users can call out these data at any time without any special program setting.
Charge/Discharge Indication
When the charger is active, a clear icon on the display
indicates the charge or discharge status and the present
capacity percentage. (The percentage display is for Lithium batteries only.)
Terminal Voltage Control(TVC)
The charger allows user to change the end voltage. (for expert user only)
PC Control Soft ware “Charge Master PRO”
The free “Charge Master PRO” software gives you unparalleled ability to operate the
charger through the computer. You can monitor pack voltage, cell voltage and other data
during the charging, view charge data in real-time graphs. And you can initiate, control the
charger from “Charge Master PRO”.
Smart Phone Control via Bluetooth (both iOS and Android)
The charger can be operated with a smart phone via Bluetooth 4.0
connection.
Internal Independent Lithium Batter y Balancer
EXCEL 200 QUAD employs an individual-cell-voltage balancer. It isn’t necessary to connect an external balancer for balance charging.
1.5A 12.14V
LP4s
BAL 000:50 00022
6

Special Features
Supports Various Types of Lithium Batteries
EXCEL 200 QUAD supports various types of lithium batteries, such as LiPo, LiIon and the
new LiFe series of batteries.
LiHV Mode Available
The additional LiHV mode is able to charge the new generation of LiPo and LiIon batteries
with a higher end of charge voltage (4.35V).
Fast Charge Mode and Storage Mode of Lithium Battery
Special modes for specic needs. Fast Charge reduces the duration of charging. Storage
Mode lets you control the nal voltage of your battery as preparation for long time storage
in order to prolong the usable lifetime of the battery.
Re-Peak Mode of NiMH/NiCd Battery
In re-peak charge mode, the charger can peak-charge the battery once, twice or thrice in a
row automatically. This is good for making certain the battery stays fully charged.
Delta-peak Sensitivity for NiMH/NiCd
Delta-peak sensitivity for NiMH/NiCd battery: The automatic charge termination program
based on the principle of the Delta-peak voltage detection. When the battery’s voltage
exceeds the threshold, the process will be terminated automatically.
Cyclic Charging/Discharging
1 to 5 cyclic and continuous process of charge > discharge or discharge > charge is operable for battery refreshing and balancing to stimulate the battery’s activity.
Automatic Charging Current Limit
You can set up the upper limit of the charging current when charging your NiMH or NiCd
battery, it is useful for the NiMH battery of low impedance and capacity in the ‘AUTO’
charging mode.
Battery Voltage Meter
The user can check battery’s total voltage, the highest voltage, the lowest voltage and each
cell’s voltage.
Battery Internal Resistance Meter
The user can check battery’s total internal resistance and each cell’s internal resistance.
Capacity Limit
The charging capacity is always calculated as the charging current multiplied by time. If the
charging capacity exceeds the limit, the process will be terminated automatically when you
set the maximum value.
7
Special Features
Temperature Threshold*
The battery’s internal chemical reaction will cause the temperature of the battery to rise. If
the temperature limit is reached, the process will be terminated.
* This function is only available by conn ecting optional t emperat ure prob e, which is not included in the p ackage.
Processing Time Limit
You can also limit the maximum process time to avoid any possible defect.
USB Power 5V/2.1A
You can charge your Smartphone
or Tablet using the built-in USB
power output port.
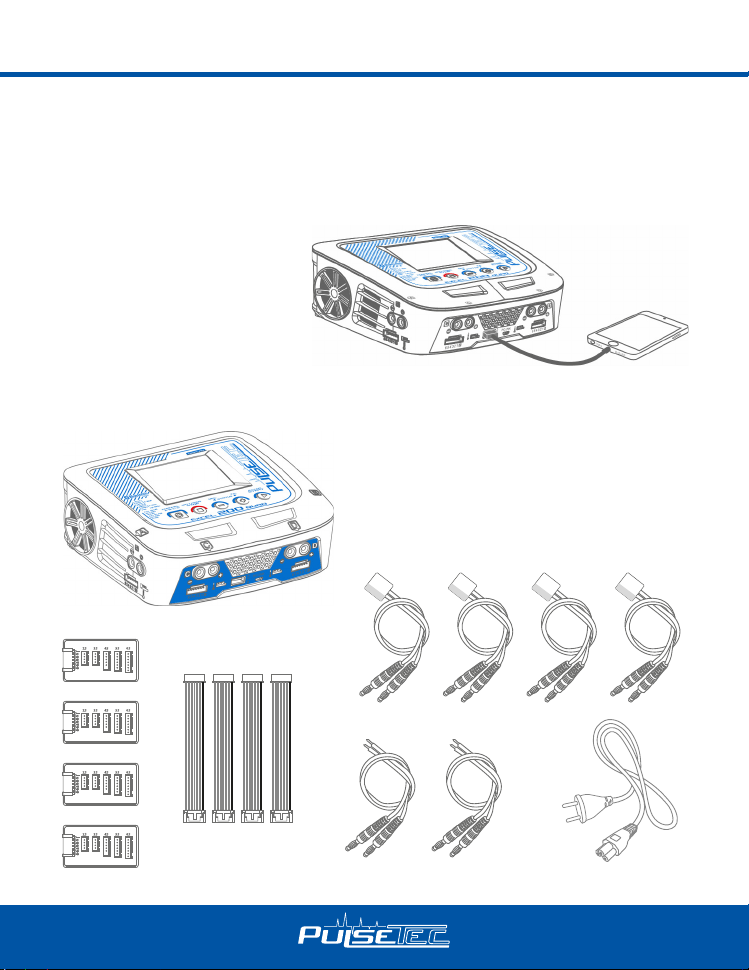
BOX CONTENT
EXCEL 200 QUAD
Charging Cable with XT60 connector
XH Adaptor (4pcs)
Charging Cable
(2pc s)
8
(4pc s)
Power Cord

Warning and Safety Notes
These warnings and safety notes are particularly important. Please follow the
instructions for maximum safety; otherwise the charger and the battery can be
damaged or at worst it can cause a re.
Never leave the charger unattended when it is connected to its power supply. If any
🛑
malfunction is found, TERMINATE THE PROCESS AT ONCE and refer to the operation manual.
Keep the charger well away from dust, damp, rain, heat, direct sunshine and vibra-
🛑
tion. Never drop it.
The allowable DC input voltage is 11~18V DC.
🛑
The allowable AC input voltage is 100~240V AC.
🛑
This charger and the battery should be put on a heat-resistant, non-inammable and
🛑
non-conductive surface. Never place them on a car seat, carpet or similar. Keep all
the inammable volatile materials away from operating area.
Make sure you know the specications of the battery to be charged or discharged to
🛑
ensure it meets the requirements of this charger. If the program is set up incorrect-
ly, the battery and charger may be damaged .It can cause re or explosion due to
overcharging.
Standard Battery Parameters
LiPo LiIon LiFe LiHV NiCd NiMh Pb
Nominal
Voltage
Max Charge
Voltage
Storage
Voltage
Fast Charge ≤ 1C ≤ 1C ≤ 4C ≤ 1C 1C-2C 1C-2C ≤0.4C
Min. Discharge
Voltage
3.7V/Cell 3.6V/Cell 3.3V/Cell 3.8V/Cell 1.2V/Cell 1.2V/Cell 2.0V/Cell
4.2V/Cell 4.1V/Cell 3.6V/Cell 4.35V/Cell 1.5V/Cell 1.5V/Cell 2.46V/Cell
3.8V/Cell 3.7V/Cell 3.3V/Cell 3.85V/Cell n/a n/a n/a
3.0-3.3V/Cell 2.9-3.2V/Cell 2.6-2.9V/Cell 3.1-3.4V/Cell 0.1-1.1V/Cell 0.1-1.1V/Cell 1.8V/Cell
Be very careful to choose the correct voltage for different types of battery otherwise you
may cause damage to the batteries. Incorrect settings could cause the cells to re or
explode.
9

Warning and Safety Notes
Never attempt to charge or discharge the following types of batteries.
🛑
A battery pack which consists of different types of cells (including different manufacturers).
A battery that is already fully charged or just slightly discharged.
Non-rechargeable batteries (Explosion hazard).
Batteries that require a different charge technique from NiCd, NiMh, LiPo or Gelcell (Pb,
Lead acid).
A faulty or damaged battery.
A battery tted with an integral charge circuit or a protection circuit.
Batteries installed in a device or which are electrically linked to other components.
Batteries that are not expressly stated by the manufacturer to be suitable for the currents
the charger delivers during the charge process.
Please bear in mind the following points before commencing charging:
🛑
Did you select the appropriate program suitable for the type of battery you are charging?
Did you set up adequate current for charging or discharging?
Have you checked the batter y voltage? Lithium battery packs can be wired in parallel
and in series, i.e. a 2 cell pack can be 3.7V (in parallel) or 7.4V (in series).
Have you checked that all connections are rm and secure?
Make sure there are no intermittent contacts at any point in the circuit.
Charging
🛑
During charge process, a specic quantity of electrical energy is fed into the battery.
The charge quantity is calculated by multiplying charge current by charge time. The
maximum permissible charge current varies depending on the battery type or its performance, and can be found in the information by the battery manufacturer. Only batteries
that are expressly stated to be capable of quickcharge are allowed to be charged at
rates higher than the standard charge current.
Connect the batter y to the terminal of the charger: red is positive and black is negative.
Due to the dif ference between resistance of cable and connector, the charger can not
detect resistance of the batter y pack, the essential requirement for the charger to work
properly is that the charge lead should be of adequate conductor cross-section, and high
quality connectors which are normally goldplated should be tted to both ends.
Always refer to the manual by battery manufacturer about charging methods, recommended charging current and charging time. Especially, the lithium battery should be
charged according the charging instruction provided by the manufacturer strictly.
Attention should be paid to the connection of lithium batter y.
Do not attempt to disassemble the battery pack arbitrarily.
10

Warning and Safety Notes
Please get highlighted that lithium battery packs can be wired in parallel and in series. In
the parallel connection, the battery s capacity is calculated by multiplying single battery
capacity by the number of cells with total voltage stay the same. The voltages imbalance
may cause re or explosion .Lithium battery is recommended to charge in series.
Discharging
🛑
The main purpose of discharging is to clean residual capacity of the battery, or to reduce
the battery voltage to a dened level. The same attention should be paid to the discharging process as charging. The nal discharge voltage should be set up correctly to avoid
deep-discharging. Lithium battery can not be discharged to lower than the minimum voltage, or it will cause a rapid loss of capacity or a total failure. Generally, lithium battery
doesn‘t need to be discharged. Please pay attention to the minimum voltage of lithium
battery to protect the batter y.
Some rechargeable batteries have a memory effect. If they are partly used and recharged
before the whole charge is accomplished, they remember this and will only use that part
of their capacity next time. This is a memory effect. It is said that NiCd and NiMH batteries
are suffering from memory effect. NiCd has more memor y effect than NiMH.
The socket-outlet should be installed near the equipment and easily accessible.
🛑
FCC Caution:
This device complies with part 15 of the FCC Rules. Operation is subject to the following
two conditions: (1) This device may not cause harmful interference, and (2) this device
must accept any interference received, including interference that may cause undesired
operation.
Any changes or modications not expressly approved by the par ty responsible for compliance could void the user’s authority to operate the equipment.
This equipment has been tested and found to comply with the limits for a Class B digital
device, pursuant to part 15 of the FCC Rules. These limits are designed to provide
reasonable protection against harmful interference in a residential installation. This
equipment generates uses and can radiate radio frequency energy and, if not installed
and used in accordance with the instructions, may cause harmful interference to radio
communications. However, there is no guarantee that inter ference will not occur in a
particular installation. If this equipment does cause harmful interference to radio or
television reception, which can be determined by turning the equipment off and on, the
user is encouraged to try to correct the interference by one or more of the following
measures:
- Reorient or relocate the receiving antenna.
- Increase the separation between the equipment and receiver.
- Connect the equipment into an outlet on a circuit different from that to which the receiver is connected.
- Consult the dealer or an experienced radio/ TV technician for help.
11

Program Flow Chart
Note: The Flow Chart shows the example of a single output.
(Channel A, B,C and D are identical)
DECINC
BATT/PROGRAM
LiPo BATT
DECINC
BATT/PROGRAM
LiFe BATT
DECINC
BATT/PROGRAM
LiIo BATT
DECINC
BATT/PROGRAM
LiHV BATT
DECINC
BATT/PROGRAM
NiMH BATT
DECINC
BATT/PROGRAM
NiCd BATT
DECINC
BATT/PROGRAM
Pb BATT
DECINC
BATT/PROGRAM
BATT METER
DECINC
BATT/PROGRAM
BATT RESISTANCE
DECINC
BATT/PROGRAM
SYSTEM SETTING->
DECINC
Stop
Batt Type
BATT/PROGRAM
BATT MEMORY
ENTER
START
ENTER
START
START
LiPo BALANCE CHG
2.0A 7.4V (2S)
ENTER
START
LiFe BALANCE CHG
2.0A 6.6V (2S)
ENTER
START
Lilo BALANCE CHG
2.0A 7.2V (2S)
ENTER
START
LiHV BALANCE CHG
2.0A 7.6V (2S)
ENTER
START
NiMH CHARGE
CURRENT 2.0A
ENTER
START
NiCd CHARGE
CURRENT 2.0A
ENTER
START
Pb CHARGE
2.0A 2.0V (1P)
ENTER
START
4.20 4.19 4.19 V
0.00 0.00 0.00 V
ENTER
START
005 003 003 mΩ
005 mΩ
ENTER
START
Safety Timer
ON 120Min
ENTER
Load Factory Set
ENTER
Version
HW:1.00 SW: 1.00
START
[ BATT MEMORY 1 ]
ENTER SET->
ENTER
STARG/ENTER>3 Seconds
ENTER CHARGER
LOAD……
[ BATT MEMORY 2 ]
ENTER SET->
[ BATT MEMORY 2 ]
C:1.0A D:1.0A
START ENTER > 3s
ENTER CHARGER
LOAD……
[ BATT MEMORY 3 ]
ENTER SET->
Pb CHARGE
3.3A 4.0V(2P)
Pb DISCHARGE
1.5A 4.0V(2P)
DECINC
INC
LiPo CHARGE
2.0A 7.4V (2S)
DEC
INC
LiFe CHARGE
2.0A 6.6V (2S)
DEC
INC
Lilo CHARGE
2.0A 7.2V (2S)
DEC
INC
LiHV CHARGE
2.0A 7.6V (2S)
DEC
INC
NiMH Auto CHARGE
CURRENT 2.0A
DEC
INC
NiCd Auto CHARGE
CURRENT 2.0A
DEC
INC
Pb DISCHARGE
0.1A 2.0V (1P)
DEC
INC
MAIN 0.00V
H0.000V L0.000V
DEC
INC
TATAL: 16mΩ
H: 5mΩ L: 3mΩ
DEC
INC
Capacity Cut-Off
ON 5000mAH
DEC
INC
AC Max Power Set
50W
DEC
START
BATT TYPE
LiPo
ENTER
[ BATT MEMORY 1 ]
C:4.9A D:2.2A
LiPo BALANCE CHG
4.9A 7.4V(2S)
START
BATT TYPE
NiMH
ENTER
[ BATT MEMORY 2 ]
NiMH 2.4V (2S )
NiMH CHARGE
CURRENT 1.0A
START
BATT TYPE
Pb
ENTER
ENTER CHARGER
LOAD……
INC
DEC
INC
DEC
INC
DEC
INC
DEC
INC
DEC
INC
DEC
INC
DEC
INC
DEC
INC
DEC
INC
DEC
INC
DEC
INC
DEC
INC
DEC
START/ENTER>3s
LiPo FAST CHARGE
2.0A 7.4V (2S)
LiFe FAST CHARGE
2.0A 6.6V (2S)
Lilo FAST CHARGE
2.0A 7.2V (2S)
LiHV FAST CHARGE
2.0A 7.6V (2S)
NiMH DISCHARGE
0.1A CUT: 1.0V
NiCd DISCHARGE
0.1A CUT: 1.0V
Temp Cut-Off
ON 50°C 122°F
Bal. Connection
ON
BATT VOLTS
7.4V ( 2S )
[ BATT MEMORY 1 ]
LiPo 7.4V (2S )
LiPo CHARGE
4.9A 7.4V(2S)
BATT VOLTS
2.4V (2S)
SAVE PROGRAM
SAVE….
NiMH Auto CHARGE
CURRENT 1.2A
BATT VOLTS
4.0V (2P)
[ BATT MEMORY 3 ]
C:3.3A D:1.5A
INC
LiPo STORAGE
2.0A 7.4V (2S)
DEC
INC
LiFe STORAGE
2.0A 6.6V (2S)
DEC
INC
Lilo STORAGE
2.0A 7.2V (2S)
DEC
INC
LiHV STORAGE
2.0A 7.6V (2S)
DEC
INC
NiMH RE-PEAK
1
DEC
INC
NiCd RE-PEAK
1
DEC
INC
Temperature Unit
Celsius
DEC
INC
DC Input Low
CUT-OFF 11.0V
DEC
INC
CHARGE CURRENT
4.9A
DEC
SAVE PROGRAM
SAVE….
INC
LiPo FAST CHARGE
4.9A 7.4V(2S)
DEC
INC
CHARGE CURRENT
3.3A
DEC
START
SAVE PROGRAM
ENTER
INC
NiMH DISCHARGE
1.0A CUT: 2.0V
DEC
INC
CHARGE CURRENT
3.3A
DEC
[ BATT MEMORY 3 ]
Pb 4.0V (2S )
ENTER
INC
LiPo DISCHARGE
2.0A 7.4V (2S)
DEC
INC
LiFe DISCHARGE
2.0A 6.6V (2S)
DEC
INC
Lilo DISCHARGE
2.0A 7.2V (2S)
DEC
INC
LiHV DISCHARGE
2.0A 7.6V (2S)
DEC
INC
NiMH CYCLE
CHG>DCHG 1
DEC
INC
NiCd CYCLE
CHG>DCHG 1
DEC
INC
Rest Time
CHG>DCHG 10Min
DEC
INC
Key Beep ON
Buzzer ON
DEC
INC
DSCH CURRENT
2.2A
DEC
START
SAVE PROGRAM
ENTER
ENTER
INC
LiPo STORAGE
4.9A 7.4V(2S)
DEC
INC
TRICKLE
100mA
DEC
INC
DSCH VOLTAGE
1.1V/CELL
DEC
INC
NiMH RE-PEAK
2
DEC
INC
DSCH CURRENT
1.5A
DEC
SAVE PROGRAM
SAVE….
INC
NiMH Sensitivity
D.Peak 4mv
DEC
INC
NiCd Sensitivity
D.Peak
DEC
INC
DSCH VOLTAGE
3.0V/CELL
DEC
INC
TVC=YOUR RISK
4.20V
DEC
INC
LiPo DISCHARGE
2.2A 7.4V(2S)
DEC
INC
PEAK DELAY
1Min
DEC
INC
DSCH CURRENT
2.0A
DEC
INC
NiMH CYCLE
CHG>DCHG 1
DEC
INC
DSCH VOLTAGE
1.7V/CELL
DEC
START
SAVE PROGRAM
ENTER
DECINC
DECINC
DECINC
4mv
DECINC
ENTER
12

Buttons Explanation
CH A / CH B
It is used to switch from Channel A, B ,C ,D
BATT PROG / STOP
It is used to STOP the progress or GO Back to previous Step/Screen
DEC Button
It is used to go through the menus and DECREASE the parameter value
INC Button
It is used to go through the menus and INCREASE the parameter value
ENTER/START Button
It is used to ENTER parameter on screen and START the program
When you are willing to alter the parameter value in the program, press the START/ENTER
button to make it blink then change the value by pressing DEC and INC button. The value
will be stored by re-pressing the START/ENTER button. If there is another parameter can
be altered in the same screen, when you conrm the rst parameter value, the next parameter value will start to blink which means it is ready to alert.
When you are willing to start the process, press and hold the START/ENTER button for 3
seconds.
When you are willing to stop the progress or go back to previous step/screen, press the
BATT PROG/STOP button once.
13

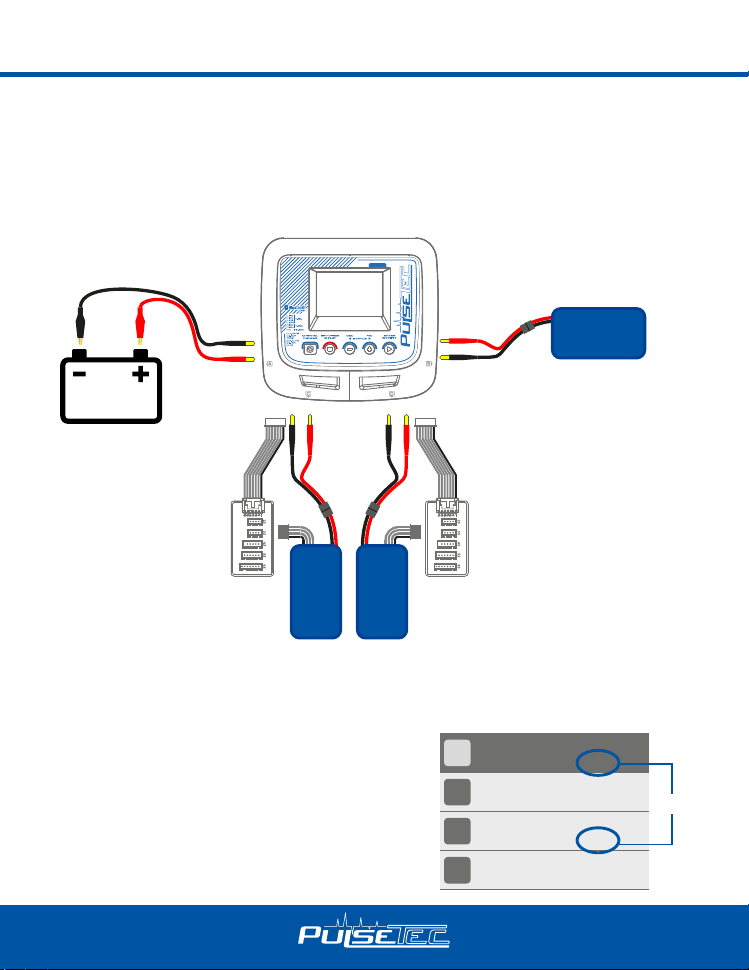
Power and Battery Connection
1. Connecting to Power Source
There are two kinds of inputs for EXCEL 200 QUAD, DC 11-18V and AC 100-240V.
AC 100-240V POWER SOURCE CONNECTION.
DISPLAY
EXCEL 2OO QUAD
12V DC BATTERY / DC POWER SUPPLY CONNECTION.
XT60
DISPLAY
EXCEL 2OO QUAD
14
Power and Battery Connection
NOTE : We will explain the operating procedure of one channel.
The procedure for Channel A, B, C, D is identical.
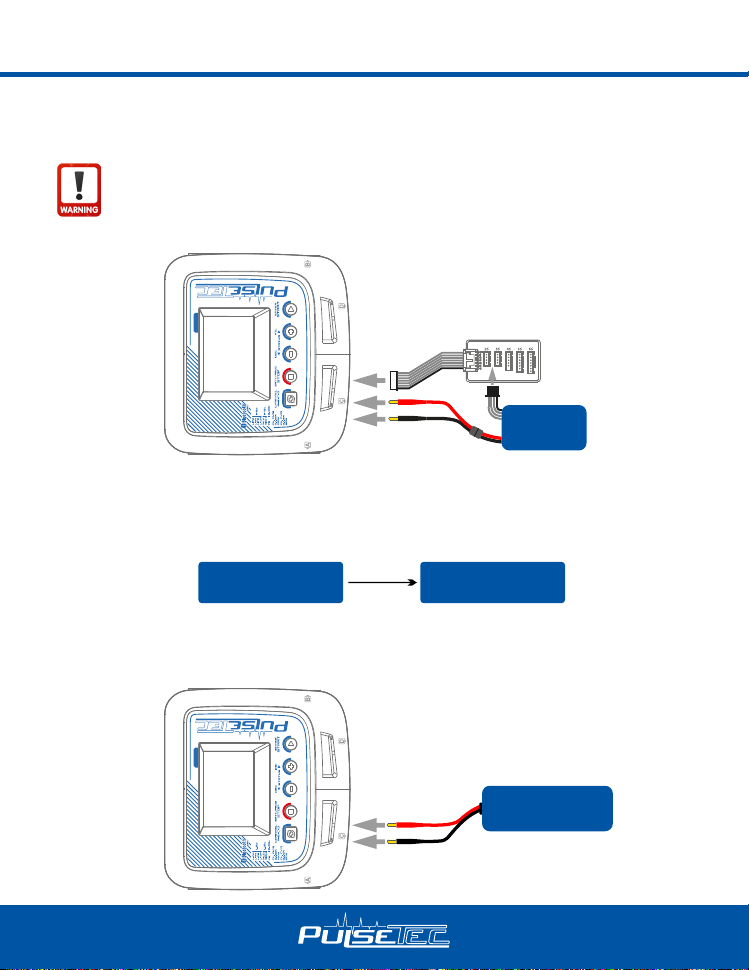
2. Connecting the Battery
TO AVOID SHORT CIRCUITS, ALWAYS CONNECT THE CHARGE LEADS TO
THE CHARGER FIRST, AND THEN TO THE BATTERY.
REVERSE THE SEQUENCE WHEN DISCONNECTING THE PACK.
1) LiPo Battery Connection with Balance Adapter
DISPLAY
EXCEL 2OO QUAD
LiPo
Balance Socket
For safety reasons, the default setting for charging Lithium (LiPo, Lilo, LiFe and
LiHV) battery is using balance adaptor to connect battery and charger in Charge,
Fast Charge, Balance Charge and Storage modes. But if the battery comes with
no balance wire, you could disable this function in the system settings as follows :
BATT/PROGRAM
SYSTEM SETTING
BAL.Connection
OFF
The balance wire attached to the battery must be connected to the charger with
the black wire aligned with the negative marking. Ensure correct polarity!
2) NiMH/NiCd or Pb Batter y Connection
DISPLAY
EXCEL 2OO QUAD
NiMH
15

Power Distribution
1- Operating in AC Mode
EXCEL 200 QUAD comes with a built-in switching power supply. You can connect the AC
power cord directly to the AC mains socket. (100-240V AC).
In AC mode, it supports Power Distribution. You could set the AC Max Power for one channel (Take Channel A for example) as follows,
BATT/PROGRAM
A
SYSTEM SETTING->
LIPO BALANCE
B
2.0A 7.4V(2S)
LIPO BALANCE
C
2.0A 7.4V(2S)
LIPO BALANCE
D
2.0A 7.4V(2S)
AC Max Power Set
A
65W
LIPO BALANCE
B
2.0A 7.4V(2S)
AC Max Power Set
C
35W
LIPO BALANCE
D
2.0A 7.4V(2S)
ENTER
Press INC
or DEC
Button
Safety Timer
A
ON 120Min
LIPO BALANCE
B
2.0A 7.4V(2S)
LIPO BALANCE
C
2.0A 7.4V(2S)
LIPO BALANCE
D
2.0A 7.4V(2S)
AC Max Power Set
A
50W
LIPO BALANCE
B
2.0A 7.4V(2S)
AC Max Power Set
C
50W
LIPO BALANCE
D
2.0A 7.4V(2S)
Press DEC
Button 3
times and
push ENTER
Button
And the other channel (Channel C) will take the remaining power automatically (For exam-
ple, if you set Channel A as 65W, the Channel C will be 35W).
✽ If Channel A and Channel C are both charging, you can’t change the power distribution.
✽ If Channel A is charging, you can change AC power of Channel C and Channel A will
take the remaining power automatically.
2- Operating in DC Mode
Please connect EXCEL 200 QUAD to AC/DC power supply with the supplied DC input
cable. You could also use terminal clips with DC connectors and attach them directly to 12V
car batteries. It is critically impor tant that you use either a fully charged 13.8V car battery or
a high quality AC/DC power supply in the range of 11-18V DC output with minimum power
400W or higher to ensure reliable performance.
Impor tant Notice : Low quality DC power source may damage the charger.
16
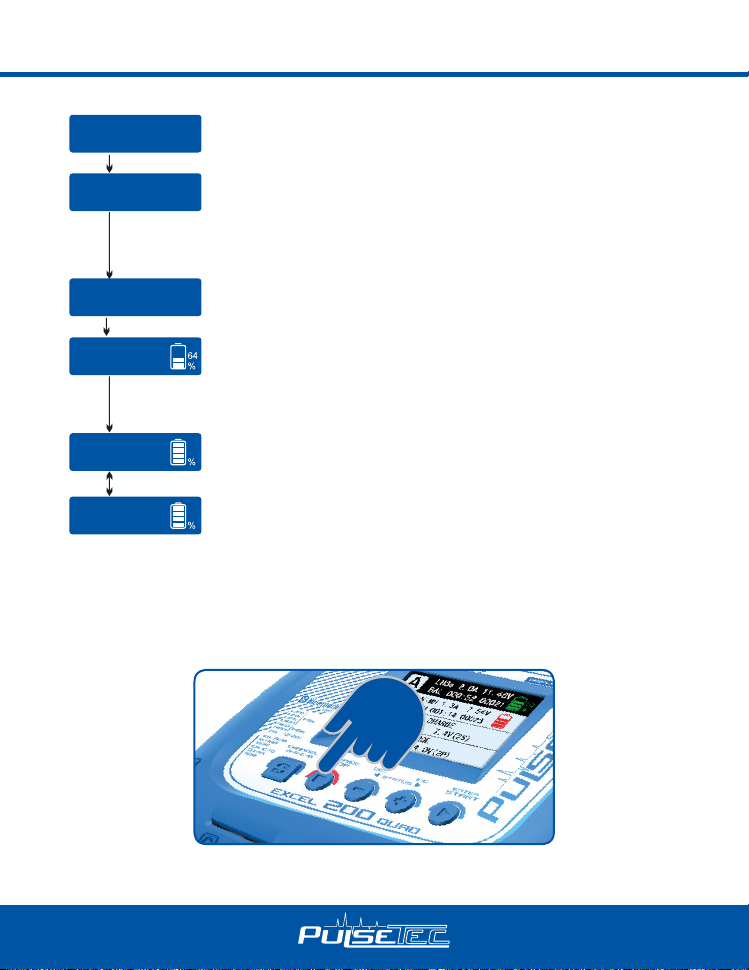
Lithium Battery Program (LiPo/LiFe/LiIon/LiHV)
(1) A memory prole is available for setting and storing pertinent information for up
to 20 different program sets; each channel can store 10 program. Once a battery
program is stored into memory, it will be retained until changed again manually.
Recalling a program memory number makes the charger instantly ready to go!
(2) If you do not wish to use the battery program memories, this charger can be man-
ually set before each use.
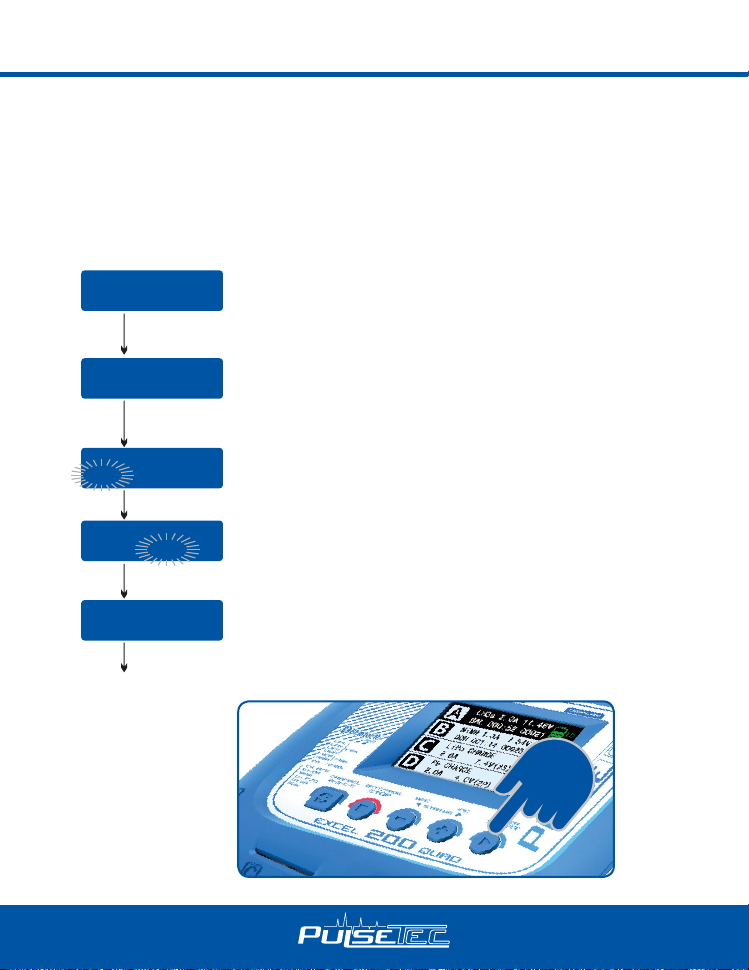
The following owchart shows how the program is set manually :
BATT/PROGRAM
LiPo BATT
STA RT/ EN TE R
LiPo BALANCE
2.0A 11.1V (3S)
STA RT/ EN TE R
LiPo BALANCE
2.0A 11.1V (3S)
STA RT/ EN TE R
LiPo BALANCE
2.0A 11.1V (3S)
STA RT/ EN TE R
LiPo BALANCE
2.0A 11.1V (3S)
STA RT/ EN TE R
> 3 Se co nd s
BATT/PROGRAM Select
Press INC and DEC to go through all the programs and press
START/ENTER to enter LiPo BATT Program.
Mode Select
Press INC and DEC to go through all the modes and press
START/ENTER to enter LiPo Balance Charge Mode.
Battery Setting
Press START/ENTER, the present value will star t to blink.
Press INC and DEC to change the value and press START/
ENTER to conrm your setting.
At the same time, the battery pack’s cell count will start to
blink, press INC and DEC to change the value and press
START/ ENTER to conrm your setting.
Program Start
Press and hold START/ENTER for 3 seconds to star t the
program.
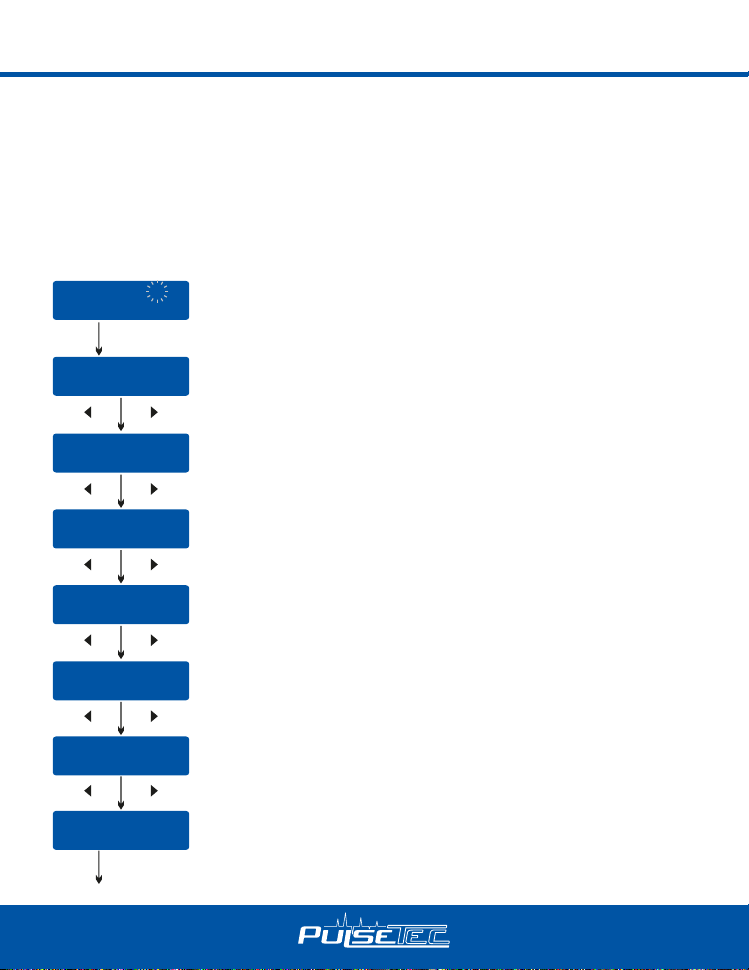
17
Lithium Battery Program (LiPo/LiFe/LiIon/LiHV)
BATTERY CHECK
WAIT...
R:3SER S:3SER
CANCEL(STOP)
The charger is detecting the battery cell.
R shows the number of cells detected by the charger and S is the
number of cells set by you on the previous screen. If the two numbers
are not identical, press STOP to go back to the previous screen to
recheck the number of cells of the battery pack that you set before
going ahead.
R:3SER S:3SER
CONFIRM(ENTER)
STA RT/ EN TE R
Lp4s 1.5A 12.14V
BAL 000:50 00022
R shows the number of cells detected by the charger and S is the
number of cells set by you on the previous screen. If the two numbers
are identical, press START/ENTER to start the charging process.
Charging Status Monitor
During charge process, real-time status will be shown as seen on the
left.
[ END: FINISHED ]
16.8V 2600mAh
100
Program Complete
Once the battery is fully charged, the screen will read
[ Time: 00: 45: 32 ]
16.8V 2600mAh
“END: FINISHED” and the charger will emit a ringing sound. The
100
charger also displays battery voltage, charged capacity and elapsed
time.
PROGRAM STOP
During the charging process, press STOP to stop the charging process.
18

Lithium Battery Program (LiPo/LiFe/LiIon/LiHV)
VARIOUS INFORMATION DURING THE PROCESS
Press INC or DEC during the charging or discharging process to view further pertinent
information on the LCD screen.
Lp3s 1.5A 12.14V
BAL 000:50 00022
INC
4.07 4.06 4.11 V
0.00 0.00 0.00 V
INC
Fuel= 90%
Cell= 4.10V
Lp4s 1.5A 12.14V
BAL 000:50 00022
End Voltage
12.6V(3S)
IN Power Voltage
12.56V
Ext. Temp ---Int. Temp 37°C
Temp Cut-Off
Safety Timer
ON 200min
Capacity Cut-Off
ON 5000mAh
DEC
DEC
DEC
DEC
DEC
DEC
Real-time status: battery type, battery cell count, charge current, battery
pack total voltage,working mode, elapsed time and charged capacity.
Voltage of each cell in the battery pack when the battery is connected
with balance lead.
Charged capacity percentage and average cell voltage of the battery
pack.
Final voltage when the program ends.
Input voltage.
Internal temperature.
Temperature probe needs to be connected to show external tempera
ture.
Cut-off temperature.
50C
Safety timer ON and duration of time in minutes.
Capacity cut-off ON and value of the set capacity limit.
-
19

Battery Program (NiMH/NiCD)
NiMH/NiCD:
This program is only suitable for charging/discharging NiMH/NiCd batteries.
The EXCEL 200 QUAD offers the following NiMH/NiCd charge modes: Charge, Auto
Charge, Discharge, Re-Peak and Cycle.
Selecting the Battery Type:
After powering on the EXCEL 200 QUAD, press the INC or DEC button repeatedly until you
reach the appropriate program for the battery type you wish to charge. For this example we
have chosen the “NiMH BATT“ or “NiCD BATT” program. Now press the ENTER button to
enter the desired program.
BEFORE YOU BEGIN CHARGING YOUR BATTERY, MAKE SURE YOU ARE
CHARGING NIMH/NICD BATTERIES. CHARGING LiPO BATTERY UNDER
NIMH/NiCD BATTERY WILL CAUSE FIRE.
NiMH/NiCD Charge Mode:
BEFORE YOU BEGIN CHARGING YOUR BATTERY, MAKE SURE YOU HAVE READ
AND UNDERSTOOD ALL OF THE WARNINGS AND SAFETY INFORMATION CONTAINED ON PREVIOUS PAGES.
After selecting the correct battery type, if the screen does not read “CHARGE”, use the
DEC or INC buttons to change it to the “CHARGE” mode.
NiMH CHARGE
CURRENT 2.0A
Press the ENTER button and the amp rate value will begin blinking.
Use the DEC or INC button to adjust the value to the desired rate.
Follow the instructions provided on your battery when setting the
STA RT/ EN TE R
NiMH 2.0A 5.42V
CHG 002:22 00106
charge current.
Press and hold the ENTER button for 3 seconds to start charging.
Once charging has commenced, the charger will display the following real-time information: battery type, charging current, battery
voltage, working mode, elapsed time and charged capacity. Once
the battery is fully charged, the screen will read “END: FINISHED”
and the charger will emit a ringing sound. You can press the STOP
button at any time during the charging process to stop charging.
NiMH/NiCd Auto Charge Mode :
In this mode, the charger automatically detects the connected NiMH or NiCD battery and
determines the proper full charge and cut-off thresholds. Setting the upper charge current
limit for safe levels based on your battery specications will ensure safe charging of your
specic battery. If you are unsure of the maximum allowable charge rates, set the charger
to a maximum of 1C (battery mAh/1000, e.g. 3200mAh = 3.2A).
20

Battery Program (NiMH/NiCD)
NiMH Auto CHARGE
CURRENT 1.3A
After selecting the correct battery type, use the INC or DEC button to change the charge mode to the “Auto CHARGE” setting.
Press the START button and the amp rate value will begin ashing. Use the INC or DEC button to adjust the value to the desired
rate. Follow the instructions provided on your battery when
STA RT/ EN TE R
setting the upper charge amperage rate.
Press and hold the START button for 3 seconds to start charging.
Once charging has commenced, the charger will display the
NiMH 1.3A 5.42V
AUT 002:22 00106
following real-time information: battery type, charging current,
battery voltage, elapsed time and charged capacity.
Once the battery is fully charged, the screen will read “END:
FINISHED” and the charger will emit a ringing sound. You can
press the STOP button at any time during the charging process
to stop charging.
NiMH/NiCd Discharge Mode :
NiMH DISCHARGE
1.3A CUT:9.6V
After selecting the correct battery type, use the INC or DEC
button to select the “DISCHARGE” mode. Press the START
button and the amp rate value will begin ashing. Use the INC
or DEC buttons to adjust the value to the desired discharge rate.
Press the START button again and the voltage cut-off will begin
to ash. Use the INC or DEC button to adjust the value to the
desired rate.
Follow the instructions provided on your battery when setting
the voltage cut-of f. The EXCEL 200 QUAD will stop discharging
when the battery has reached the preset voltage cut-off.
Press and hold the START button for 3 seconds to start
NiMH 1.3A 10.42V
AUT 002:22 00106
discharging. Once discharging has commenced, the charger
will display the following real-time information: battery type,
discharging current, battery voltage, working mode,elapsed time
and discharged capacity.
21

Battery Program (NiMH/NiCD)
[ TIME: 00:04:04 ]
9.6V 00640mAh
When discharging is complete, the screen will read
“END: CUTOFF-VOL” and the charger will emit a ringing sound.
The charger will display the elapsed time, end voltage and the discharged capacity in mAh.
You can press the STOP button at any time during the discharging
process to stop the discharge process.
NiMH/NiCd Re- Peak Mode :
Applicable to NiMH and NiCD batteries only, in re-peak mode the charger can peakcharge the battery once, twice, or three times in a row automatically. This process is good
for conrming that the batter y is fully charged and for verifying how well the batter y can
accept a fast charge. A ve-minute cool-down delay occurs after each re-peak charge.
IN RE-PEAK MODE, THE EXCEL 200 QUAD USES THE CHARGE AMPERAGE AND
VOLTAGE SETTINGS ENTERED IN CHARGE MODE.
NiMH RE-PEAK
2
After selecting the correct battery type, use the INC or DEC button
to select the “RE-PEAK” mode. Press the START button and the
Re-peak cycle number 1 begins to ash on the screen. Use the INC
or DEC button to scroll through the cycle count and set a number
between 1 and 3.
STA RT/ EN TE R
Press and hold the START button for 3 seconds to start the re-peak
process.
NiMH 1.3A 10.42V
RPC 004:04 00686
Once the Re-Peak process has begun, the charger will display the
following real-time information: battery type, charging current, battery voltage, elapsed time and charged capacity. Once the Re-Peak
process has completed, the screen will read “END: RE-PEAK” and
the charger will emit a ringing sound. The charger will display the
charge/discharge capacity for each cycle. Using the + and - buttons,
you can scroll through the history data of each cycle.
22

Battery Program (NiMH/NiCD)
NiMH/NiCd Cycle Mode :
The EXCEL 200 QUAD makes cycling of NiMH/NiCd batteries easy. The process of
discharging and recharging (cycling) can be performed automatically with one simple step
and will improve the performance of NiMH/NiCd batteries. We strongly recommend cycling
any battery that has been discharged and stored for a period of time. This will increase the
remaining usable battery life and also improve the batter y performance.
NiMH CYCLE
DCHG > CHG 2
After selecting the correct battery type, use the INC or DEC button
to select the “CYCLE” mode. The Cycle Mode gives you two cycling
options: “DCHG>CHG” or “CHG>DCHG“. The “DCHG>CHG” option
STA RT/ EN TE R
NiMH CYCLE
CHG > DCHG 5
will rst discharge the batter y and then recharge the battery.
The “CHG>DCHG” option will rst charge the batter y and then dis-
charge the battery. If this screen does not show your desired cycling
option, press the START button once and this setting will begin
ashing. Use the INC or DEC button to change this setting.
Pressing the START button again will cause the cycle count to begin
ashing. Use the INC or DEC button to change this to the number
of cycles you want the EXCEL 200 QUAD to run. The EXCEL 200
QUAD can cycle the battery a maximum of 5 times consecutively.
Press and hold the START button for 3 seconds to start the Cycle
Mode.
NiMH 0.5A 9.6V
D > C 004:04 00034
Once cycling has commenced, the charger will display the following
real-time information: battery type, charging/ discharging current,
battery voltage, working mode,elapsed time and charged/discharged
capacity. You will also see “D>C“ or
“C>D“. This will indicate which cycling order you have chosen. Either
“D“ or “C“ will be ashing. This ashing indicates which part of the
cycle is currently being executed.
Once the cycling process is complete, the screen will read “END: CYCLE” and the charger
will emit a ringing sound. The EXCEL 200 QUAD will display the charged/discharged capacity for each cycle. Using the + and - buttons, you can scroll through this data for each cycle.
23

Battery Program (NiMH/NiCD)
Additional NiMH/NiCd Process Information :
During the NiMH/NiCd battery charging/discharging process the EXCEL 200 QUAD can
display a variety of information. Using the INC or DEC buttons, you can also view the
following information:
NiMH Sensitivity
D.Peak 4mV/CELL
Ext. Temp ---Int. Temp 37 C
Safety Timer
ON 200min
Delta Peak Voltage
Sensitivity setting
External*/ internal
temperature
Safety Timer setting Capacity Limit
In Power Voltage
12.56V
Temp Cut-off
50 C/122 F
Capacity Cut-Off
ON 5000mAh
Input Voltage
Temperature
Cut-Off
setting
Battery Program (Pb Lead-Acid)
BATT/PROGRAM
Pb BATT
Pb Charge Mode :
After selecting the correct battery type, use the INC or DEC button to change it to the
“CHARGE“ mode.
Press the START button and the amp rate value will begin ashing. Use the INC or DEC
buttons to adjust the value to the desired charge rate. The amp rate should be set to 1/10th
of capacity. For example, if you are charging a 20Ah batter y the charge rate should be set
to 2A. Follow the instructions provided on your battery when setting the amp rate.
This program is only suitable for charging Pb (lead-acid) batteries
with nominal voltage ranging from 2 to 20V which are signicantly
different from NiMH/NiCd batteries. Pb batteries are suggested
to charge with a low current of 0.1C and cannot be used for fast
charging. Please follow the instructions provided by the battery
manufacturer.
The EXCEL 200 QUAD offers the following Pb charge modes:
Charge and Discharge.
24

Battery Program (Pb Lead-Acid)
Pb Charge
1.5A 12.0V(6P)
Press the START button again and the nominal battery pack
voltage will begin ashing. Use the INC or DEC button to set the
voltage and the number of cells.
Press and hold the START button for 3 seconds to start charging.
Once charging has commenced, the charger will display the fol-
P-6 1.5A 13.56V
CHG 002:22 00106
lowing real-time information: battery type, charging current, battery
voltage, working mode, elapsed time and charged capacity.
When charging is complete, the screen will read “FINISHED” and
the charger will emit a ringing sound.
Pb Discharge Mode :
After selecting the correct battery type, use the INC or DEC button to change it to the
“DISCHARGE“ mode.
Press the START button and the amp rate value will begin ashing. Use the INC or DEC
buttons to adjust the value to the desired discharge rate. Follow the instructions provided
with your battery when setting the amp rate.
Pb Discharge
1.5A 12.0V(6P)
Press the START button again and the nominal battery pack
voltage will begin ashing. Use the INC or DEC buttons to set the
voltage and the number of cells.
Press and hold the START button and discharging will begin.
P-6 1.0A 13.56V
DCH 005:10 00964
Once discharging has commenced, the charger will display the
following real-time information: battery type, cell count,discharging
current, battery voltage, elapsed time and discharged capacity.
When discharging is complete, the screen will read “FINISHED”
and the charger will emit a ringing sound.
Additional Pb Process Information:
During the Pb battery charging/discharging process the EXCEL 200 QUAD can display
a variety of information. Using the INC or DEC buttons you can also view the following
information:
Capacity Cut-Off
ON 5000mAh
Temp Cut-off
50 C
In Power Voltage
12.56V
Capacity Cut-Off
setting
Temperature
Cut-Off
Input Voltage
Safety Timer
ON 200min
Ext. Temp ---Int. Temp 37 C
Safety Timer setting
External*/Internal
Temperature
25
Battery Memory Set and Call Out
The charger can store up to 40 different charge/discharge proles (each channel 10 sets)
for your convenience, and the stored proles can be recalled quickly without having to go
through the setup process.
When you are willing to alter the parameter value in the program, press START/ENTER to
make it blink then change the value with INC or DEC. The value will be stored by pressing
START/ENTER once.
Note: All following screen are taking 6S (22.2V) LiPo battery for example.
1. Battery Memory Set
[ BATT MEMORY 3 ]
ENTER SET->
STA RT/E NT ER
BATT TYPE
LiPo
DE C INC
BATT VOLTS
22.2V ( 6S )
DE C INC
CHARGE CURRENT
4.9A
DE C INC
DSCH CURRENT
2.0A
DE C INC
DSCH VOLTAGE
3.0V/CELL
DE C INC
TVC=YOUR RISK
4.20V
DE C INC
SAVE PROGRAM
ENTER
STA RT/E NT ER
Enter the battery memory program.
(10 different charge/discharge proles can be stored in each channel).
Set the battery type(LiPo/LiFe/LiIon/LiHV/NiMH/NiCd/Pb).
Set the voltage and number of cells(1S-6S).
Set the charge current(0.1-10.0A).
Set the discharge current (0.1A-2.0A).
Set the discharge voltage(3.0-3.3V/Cell).
Set the terminal voltage(4.18-4.25V).
Press ENTER to save program.
26
Battery Memory Set and Call Out
SAVE PROGRAM
SAVE…...
[ BATT MEMORY 3 ]
LiPo 22.2V (6S)
[ BATT MEMORY 3 ]
C:4.9A D:2.2A
Saving
Indicates the battery type and batter y cell of the saved prole.
Indicates the charge and discharge current of the saved prole.
2. Battery Memor y Call Out
BATT/PROGRAM
BATT MEMORY
From the BATT/PROGR AM menu use the INC or DEC buttons to
scroll to the BATT MEMORY program and press START button to
enter the battery memory program.
[ BATT MEMORY 3 ]
LiPo 22.2V(6S)
Use the INC or DEC buttons to scroll through the memories and
select the desired program memory. Press the START button to
conrm the selection.
Press the START button again and hold it to recall the selected
memory.
LiPo BALANCE
2.5A 22.2V(6S)
Press and hold the START button for 3 seconds to start the program.
27

System Setting
The charger will operate with default values for the essential user settings when it is powered
on for the rst time. The screen displays the following system settings in sequence and the
user can change the parameter value on each screen.
When you want to change the parameter value, press START/ENTER to make it blink, then
change the value with INC or DEC. The value will be stored by pressing START/ENTER once.
ITEM
Safety Timer
ON 120Min
Capacity Cut-Off
ON 8000mAH
Temp Cut-Off
ON 50°C 122°F
Temperature Unit
Celsius
Rest Time
CHG>DCHG 10Min
SELECTION
OFF/ON
(1-7 20 MIN)
OFF/ON
(100-50000MAH)
OFF/ON
(20°C/68°F -
80 °C /176° F)
Celsius
Fahrenheit
1-60min
DESCRIPTION
When you start a charge process, the integral safety timer automatically star ts running
at the same time. This is programmed to
prevent overcharge the battery if it proves to
be faulty, or if the termination circuit cannot
detect the battery full. The value for the safety timer should be generous enough to allow
a full charge of the battery.
This program sets the maximum charge
capacity that will be supplied to the battery
during charge. If the delta peak voltage is not
detected nor the safet y timer expired by any
reason, this feature will automatically stop
the process at the selected capacity value.
The battery’s internal chemical reaction
will cause the temperature of the battery to
rise. If the temperature limit is reached, the
process will be terminated.
You can choose the temperature displayed
by Celsius or Fahrenheit as you like.
Rest time allows the battery to cool down
between charging/discharging cycle.
28

System Setting
ITEM
NiMH Sensitivity
D.Peak Default
NiCd Sensitivity
D.Peak Default
Key Beep ON
Buzzer ON
DC Input. Low
Cut-Off 11.0V
BAL.Connection
ON
AC Max Power Set
100W
SELECTION
Default: 4mV/Cell
3-15mV/Cell
OFF/ON
10.0-11.0V
OFF/ON
0-100W
DESCRIPTION
This setting is for NiMH/NiCd battery only.
When the charger detects that the delta peak
value you set has been reached, the charger
will say the battery is fully charged.
Key Beep sounds every time you press a
button. Buzzer beep or melody sounds at
various instances during operation to alert
certain process events.
This setting controls the DC input voltage.
If the voltage drops below the value you set
the charging operation will be terminated to
protect the input channel.
The default setting for charging Lithium
batteries is the use of a balance adaptor to
connect the battery and charger in Charge,
Fast Charge, Balance Charge and Storage
modes. This function could be disabled here.
It is to set the max AC power of the present
channel. Once you set it, the other channel
will take the remaining power.
Max Charge Power for CH A/CH B 100W
Max Charge Power for CH C/CH D 50W
Load Factory Set
Enter
Version
HW:1.00 SW: 1.00
Press ENTER to load factory default setting.
It indicates the hardware and rmware
version.
29

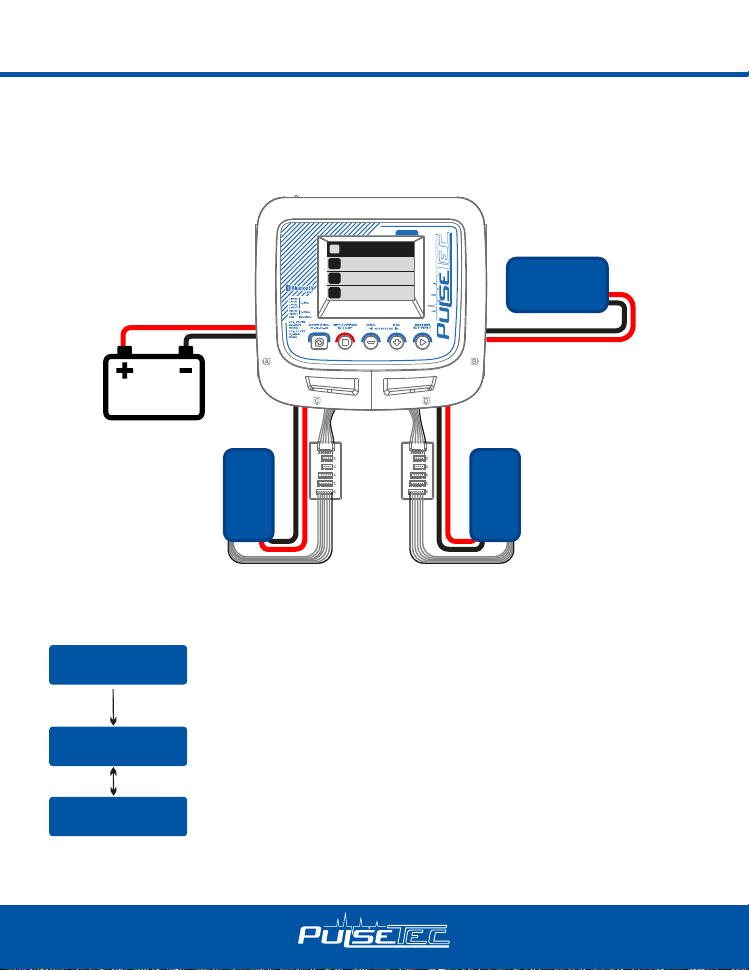
Battery Voltage Meter
The user can check battery’s total voltage, the highest voltage, the lowest voltage and each
cell’s voltage.
Connect the batter y to the charger’s charging output and connect the balancing board to the
charger. See Below
DISPLAY
MAIN: 11.5V
A
MAIN: 7.58V
B
4.19 4.15 4.18V
C
4.15 4.19 4.18V
4.19 4.15 4.18V
D
4.15 4.19 4.18V
EXCEL 2OO QUAD
NiMH Battery
Pb
LiPo Battery
LiPo Battery
This diagram shows the correct way to connect your battery to check the voltage.
BATT/PROGRAM
BATT METER
4.20 4.19 4.19 V
4.18 4.18 4.19 V
MAIN 25.13V
H4.200V L4.182V
30
START
ENT ER
DE CIN C
Press the START/ENTER to enter the Lithium Batter y Meter program.
The screen indicate each cell’s voltage.
The screen indicate the total voltage, the highest cell voltage and the
lowest cell voltage.
Battery resistance Meter
The user can check battery’s total resistance, the highest resistance, the lowest resistance
and each cell’s resistance.
Connect the batter y to the charger’s charging output and connect the balancing board to
the charger. See Below
DISPLAY
MAIN: 11.5V
Ω
MAIN 56m
A
A
MAIN: 7.58V
MAIN 56mΩ
B
B
4.19 4.15 4.18V
005 003 003 mΩ
C
C
4.15 4.19 4.18V
005 003 003 mΩ
4.19 4.15 4.18V
005 003 003 mΩ
D
D
4.15 4.19 4.18V
005 003 003 mΩ
EXCEL 2OO QUAD
NiMH Battery
Pb
LiPo Battery
LiPo Battery
This diagram shows the correct way to connect your battery to check the voltage.
BATT/PROGRAM
BATT RESISTANCE
Sta rt
Ent er
012 005 005 mΩ
006 mΩ
DE CIN C
TOTAL: 28mΩ
H: 12mΩ L: 5mΩ
Press the START/ENTER to enter the Lithium Batter y Resistance
program.
The screen indicate each cell’s resistance.
The screen indicate the total resistance, the highest cell resistance
and the lowest cell resistance.
31

Warning and Error Message
In case of an error the screen will display the cause of error and emit an audible sound.
REVERSE POLARITY
NO BATT DETECTED
CONNECT ERROR
CHECK MAIN PORT
BALANCE CONNECT
ERROR
DC IN TOO LOW
DC IN TOO HIGH
CELL ERROR
LOW VOLTAGE
CELL ERROR
HIGH VOLTAGE
CELL ERROR
VOLTAGE-INVALID
CELL NUMBER
INCORRECT
INT.TEMP.TOO HI
EXT.TEMP.TOO HI
Incorrect polarity connected.
The battery is not connected to charger, or interrupted.
The battery main connection is wrong.
The battery balance connection is wrong.
Input voltage less than 11V.
Input voltage higher than 18V.
Voltage of one cell in the battery pack is too low.
Voltage of one cell in the battery pack is too high.
Voltage of one cell in the battery pack is invalid.
The number of cells is wrong.
The internal temperature of the charger went too high.
The battery temperature went too high.
OVER CHARGE
CAPACITY LIMIT
OVER TIME LIMIT
BATTERY WAS FULL
32
The battery capacity has exceeded the maximum capacity which the
user has set.
The charging time is longer than the maximum charging time which
the user has set.
The battery voltage is higher than the maximum voltage which the
user has set when charging in balance mode.

Setting the PULSETEC LINK app
The Bluetooth connectivity allows the user to control and monitor the EXCEL 200 QUAD
comfor tably through an app on a portable device such as smar tphone or tablet. The iOS
app can be downloaded from ‘App Store’, the Android app from ‘Google Play Store’. Oper-
ation of the app is self-explanatory and the same on iOS and on Android. Explicit pairing is
not required; after download and installation just activate Bluetooth on your mobile device
and launch the PULSETEC LINK App and your device will establish Bluetooth connection
automatically.
33

Setting the PULSETEC LINK app
OP ERATIO N
1. Connect the power cord to the charger, then plug the power cord into the outlet
(100~240V AC, 50/60Hz).
2. Connect the batteries to the corresponding channels.
3. Enable Bluetooth function on your mobile device and launch the PULSTEC LINK app.
1). Launch the App and set the password
(Please DO NOT set the password to 5793 which is the reserved for the system using)
Pulsetec
1 5:53
Pulsetec
Battery
Type
Please setup your password
HOME
How to Reset Password and Charger
B AT T / P R O G RA M
S YS T E M S E T T IN G - >
START
ENT ER
D C SU P P L Y : O F F
C HA : 5 0 C H B : 5 0
L oa d F a c t o r y Se t
EN T E R
Press ENTER Button.
Press DEC twice.
Press and hold the ENTER button for 3 seconds to reset password.
1 5:53
CH. A CH. B
Battery
Operation
Cells
4
5
Alert
6
.CHARGE
CHARGER
Ignore OK
DISCHARGER
NEXT
SCAN TO GO
PROGRAM
Mode
SYSTEM
Pulsetec
BACK
HOME
1 5:53
PROGRAM
SYSTEM
34

Setting the PULSETEC LINK app
2). Operation Steps for Charging (The example shows a 6S LiPo battery)
Connect the batteries to the corresponding channels,select battery type, cells. Press
“NEXT” to set the correct charge current.
Pulsetec
Battery
Type
1 5:53
CH. A CH. B
Battery
Cells
Operation
Mode
4
5
6
LiPo
LiIon
LiFe
HOME
BAL.CHARGE
CHARGER
DISCHARGER
NEXT
SCAN TO GO
PROGRAM
SYSTEM
3). How to use Memory Program
Pulsetec
Battery
Type
LiPo
LiIon
LiFe
1 5:53
CH. A CH. B
Battery
Operation
Cells
4
5
BAL.CHARGE
6
CHARGER
DISCHARGER
NEXT
Mode
Pulsetec
Battery
LiPo
Pulsetec
Type
1 5:53
CH. A CH. B
Battery
Operation
Cells
6
BAL.CHARGE
Charge
Current
1.1A
1.2A
1.3A
1.4A
1.5A
1.6A
1.7A
START
1 5:53
CH. A CH. B
Mode
MoreBack
Pulsetec
1 5:53
CH. A CH. B
Balance Charge
Battery Type
LiPo
Current
4.65
Capacity
mAh
Battery Fuel
Gauge
%
89
Battery ID
0D0E07D5 1
4.09 V 4.10 V 4.10 V
STOP
Pulsetec
1 5:53
EditBACK
Battery
Battery
Type
Cells
4
5
LiPo
6
LiIon
LiFe
Save
Battery Cells
6
Voltage
24.58
VA
Duration
00:10:071500
Charger
Temperature
50
C
122
No. of charger
4.09 V 4.10 V 4.10 V
Operation
Mode
BAL.CHARGE
CHARGER
DISCHARGER
F
SCAN TO GO
HOME
PROGRAM
Press
PROGRAM Button
SYSTEM
Enter into
PROGRAM interface
Set battery type, cells and
working modes
35

Setting the PULSETEC LINK app
Pulsetec
1 5:53
Cancel Edit Save
LiPo 6Cell BAL.CHARGE >
Charge Current
Voltage Cut-Off
5.0 A
4.20 V
Press to save the program
after set the charge current
and voltage cut-off
Pulsetec
Battery
Type
LiPo
LiIon
LiFe
1 5:53
CH. A CH. B
Battery
Cells
Operation
2
3
4
BAL.CHARGE
5
CHARGER
6
DISCHARGER
NEXT
SCAN TO GO
Mode
Pulsetec
HOME
1 5:53
CH. A CH. B
PROGRAM
Memor y program setting
nishes.
SYSTEM
Pulsetec
START EDIT CANCEL
HOME
Press“START”button to
start charge. Press“EDIT”
button to change the setting
4). System Setting
Pulsetec
Safety Timer
1 5:53
CH. A CH. B CH. A CH. B
120 Min
Capacity Cut-Off
5000 mAh
Temperature Cut-Off
50
C
122
F
Rest Time Between Cycle
Charge
10 Min
Discharge
DC Input Low Cut-Off
V
11.0
Balance Port Enable
Pulsetec
Change Password >
1 5:53
CH. A CH. B
PROGRAM
1 5:53
Key Beep
Buzzer
SYSTEM
HOME
PROGRAM
Enter into System Setting
36
SYSTEM
HOME PROGRAM
PROGRAM
SYSTEM
HOME
SYSTEM

Setting the PULSETEC LINK app
5). SCAN TO GO
A very unique feature of EXCEL 200 QUAD is SCAN TO GO (automatically charging
system). As the range of battery types and capacity becomes more and more, each battery
requires its own dedicated charging process. It is easy to set up the charger incorrectly for
a specic type of battery, resulting damage the battery or even cause accident.
The revolutionary SCAN TO GO provides a solution to this problem by allowing the user
to assign a QR Code which contains all the relevant data for the battery for charging or
discharging. The user can create a unique QR Code by using “PULSETEC” app. Print it
and paste it on the battery.
Using your smart phone and launch “PULSETEC” App. Since all the essential information
is stored in the QR Code. All you need to do is press the Scan button, and the charge or
discharge process will star t automatically.
HOW TO PRINT THE QR CODE
Pulsetec
CH. A CH. B
1 5:53
CH. C CH. D
Pulsetec
LiPo BAL.CHARGE
Cells: 6 Charge Current: 5.0A
Voltage:4.20V
1 5:53
CH. A CH. B
CH. C CH. D
Pulsetec
1 5:53
HOME
PROGRAM
SYSTEM
HOME
PROGRAM
6S
5.0A
SYSTEM
Gallery
Press the QR Code Save the QR code to Gallery Open the Gallery
37

Setting the PULSETEC LINK app
Pulsetec
1 5:53
Select the QR code and
open it.
Pulsetec
Battery
CH. A CH. B
Type
LiPo
LiIon
LiFe
Battery
Cells
2
3
4
5
6
1 5:53
Operation
BAL.CHARGE
CHARGER
DISCHARGER
NEXT
SCAN TO GO
Mode
Pulsetec
1 5:53
You can print it from your
mobile phone or send the
QR code image to computer
to print it out.
SCAN TO CHARGE
Pulsetec
BACK
1 5:53
Please Select Channel
B
CAD
5.0A
6S
Place the printed QR code
on your battery.
Pulsetec
BACK
Align QR Code/Barcode within frame to scan
1 5:53
Channel A
PROGRAM
HOME
Press
“SCAN TO GO”
38
SYSTEM
Select the
corresponding channel.
Scan to launch the app.
The Charge Control Software “Charge Master PRO”
The free “Charge Master PRO” software gives you unparalleled ability to operate the
charger through the computer. You can monitor pack voltage, cell voltage and other data
during the charging, view charge data in real-time graphs. And you can initiate, control
charging from “Charge Master PRO”.
In order to connect the charger to the computer and use the “Charge Master PRO”, you
are required to use a USB cable which is not included in this package. The cable must be
terminated on one end with “A” plug and the opposite end is terminated with “micro-B” plug
which can connect to charger directly.
You can control, monitor, operate two channels with one computer.
The “Charge Master PRO” can be download from
http://data.tcrp-intl.com/Pulsetec_Charge_Master_Pro_Software.exe
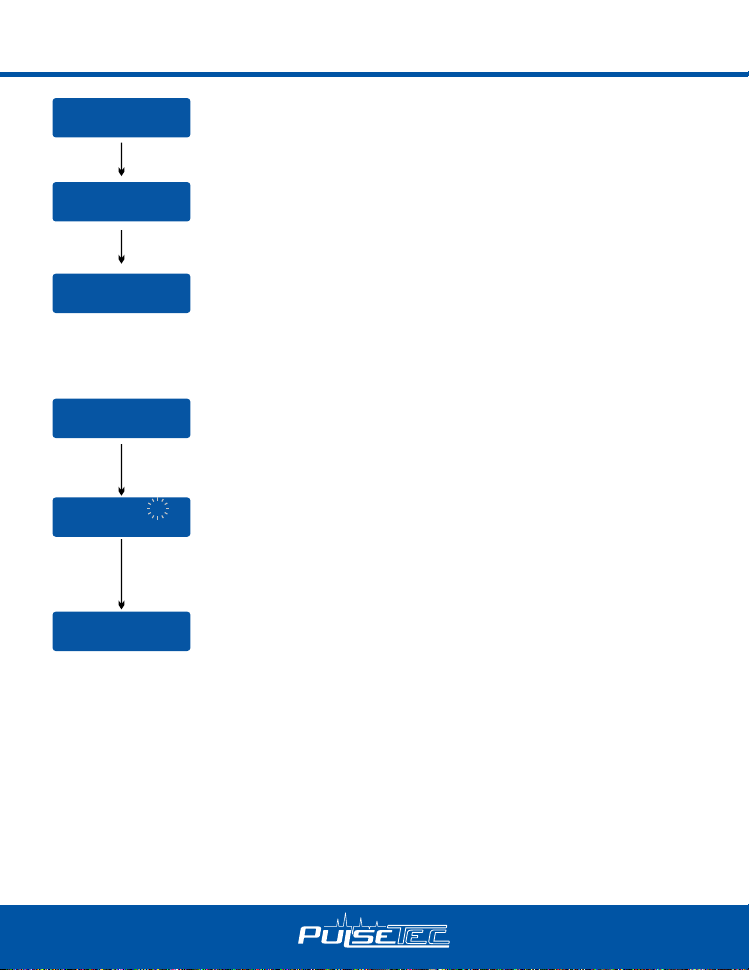
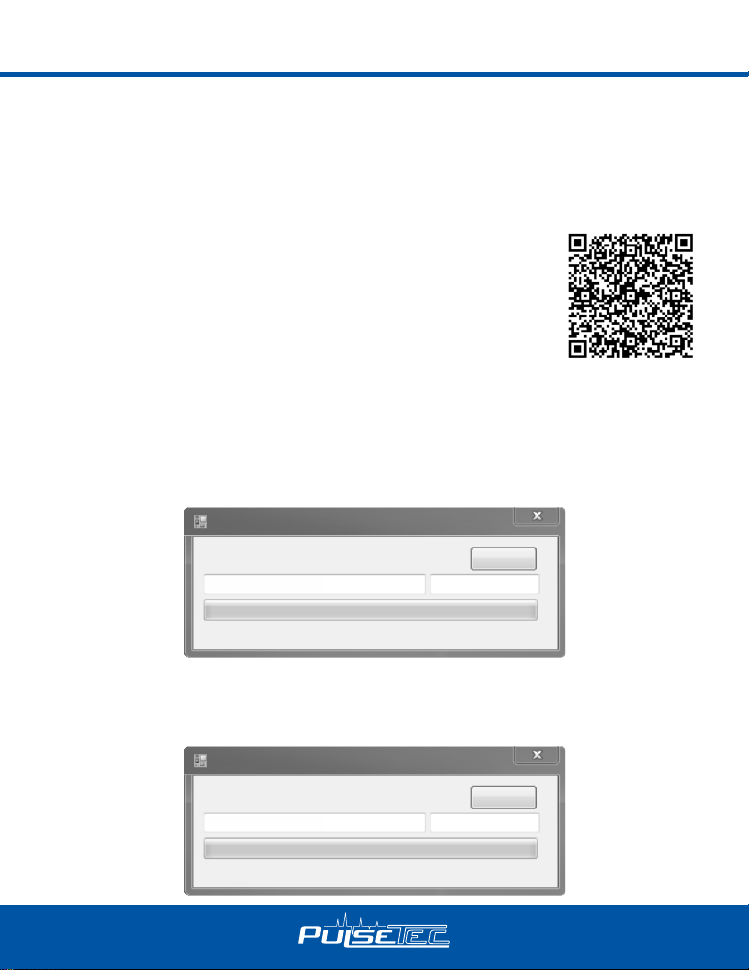
FIRMWARE UPDATE
Follow the instructions below to update the rmware for the EXCEL 200 QUAD.
1. Download the rmware (File Name: EXCEL 200_Update_VX.XX.exe) from
www.pulsetec.eu.
2. Power the charger and Press START button once.
3. Connect the charger to a computer with a USB cable.
4. Launch EXCEL 200_Update_VX.XX
EXCEL 200 QUAD Firmware Update V1.05
Update
Charger is detected
file length: 186368
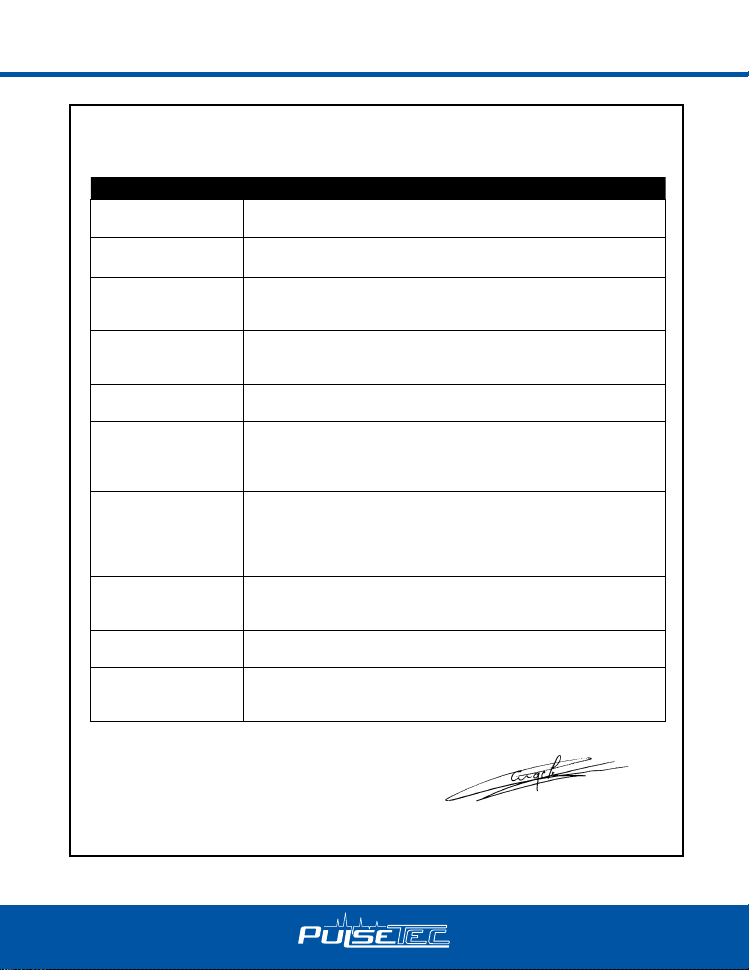
5. Click on the “Update”, the rmware update will start automatically. Do not disconnect the
charger from the computer during rmware update.
6. The rmware update will take around 2 minutes.
EXCEL 200 QUAD Firmware Update V1.05
Update
Charger is detected Progressing: 53
file length: 186368
39

User Voltage Calibration
During the manufacturing process every EXCEL 200 QUAD production unit gets tested and
calibrated after highest factory standards. Ambitious users who trust their own expensive
equipment more or who prefer their personal uke to serve as reference have the possibility to adjust the EXCEL 200 QUAD factory calibration by a few counts.
Note: We will explain Channel D as the calibration procedure.
The procedure for other channels are identical.
1. Use a 6S LiPo battery pack with stable voltage, preferably voltage range from 3.9V to
4.2V, at hand. With your digital multimeter, measure their voltages accurately with a
resolution of 3+ decimals, e.g. “3.918V, 3.939V, 3.928V, 3.908V, 3.923V, 3.908V ”.
2. Connect 6S LiPo battery balance wire to channel D. Select “BATT METER” menu and
press “STA RT” button. Then press and hold “STAR T ” button for 5 seconds to enter
calibrations screen.
Press “INC” button to adjust the voltage value from 3908 to 3918mV for the rst cell.
3908 3954 3943mV
D
3923 3903 3923mV
Press INC
or DEC button
3918 3954 3943mV
D
3923 3903 3923mV
Press “ENTER” button to conrm the rst cell value. Repeat same procedure to adjust other cells voltage. Press and hold the “STA RT” button for 3 seconds to save calibration date.
3918 3939 3928mV
D
3908 3923 3908mV
40
Press and hold
START button
for 3S
Saving calibrate
D
Date......
3.92 3.94 3.93V
D
3.91 3.92 3.91V

Specication
• DC Input Voltage: .....11-18 V
• Display Type: 480x320 LCD color
• Case Material: ...Plastic Case
• Size: .........197x182x71mm
• PC Communications: USB Port for PC Control & Firmware Upgrade
• External Port: 2-6S Balance Socket-XH, Temperature Probe Socket, Battery Socket,
DC Input, Micro USB Por t for PC, 5V-2.1A USB Output.
• Delta Peak Detection for NiMH/NiCd: 3-15mV/cell / Default: 4mV/cell
• Charge Cut-off Temperature: 20ºC/68ºF-80ºC/176ºF(adjustable)
• Charge Voltage: NiMH/NiCd: Delta Peak detection
LiPo: 4.18 -4.25V/cell LiIon: 4.08 -4.2V/cell
LiFe: 3.58-3.7V/cell LiHV: 4.25-4.35V/cell
• Balance Current: 200mA/cell
• Reading Voltage Range: 0.1 -26.1V/Cell
• Battery Types/Cells: LiPo/LiIon/LiFe/LiHV: 1-6cells
NiMH/NiCd: 1-15cells
Pb: 2-20V
• Charge Current: Channel A/B: 0.1-10A; Channel C/D: 0.1- 5A
• Safety Timer: 1-720minutes / OFF
• Charge (W): AC Channel. A+C=100W Channel B+D=100W
(Channel A/B: 50-100W Channel C/D: 0-50W)
DC Channel A/B: 100W Channel C/D: 50W
• Discharge Current: (0.1A-2.0A) x4
• Discharge Cut-off Voltage: N i M H / Ni C d: 0 .1 -1 .1V /c ell
LiPo: 3.0-3.3V/cell LiIon: 2.9 -3.2V/cell
LiFe: 2.6-2.9V/cell LiHV: 3.1-3.4V/cell
Pb: 1.8-2.0V/cell
• Discharge (W): 10Wx4
• Balance Cells: 2-6 cells
• Memory: 10x4 Different Charge/Discharge Proles
• Charge Method: CC/CV for Lithium Types and Lead (Pb) Batteries
Delta-peak Sensitivity for NiMH/NiCd.
• Bluetooth Communication: Bluetooth 4.0 (Bluetooth Low Energy)
• Range: 20 meters (65 Feet)
• AC Input Voltage: ..100-240V
• Display Backlight: . Cool White
• Controls: ........Five Buttons
• Weight: ..............1335g
41
Declaration of Conformity
TCRP INTERNATIONA L LLC Ltd declares under sole responsibility that the battery
charger EXCEL 20 0 QUAD to which this declaration relate, conforms with the following
LVD standards;
TEST STANDARDS TITLE
EN55014-1: 2006+
A1: 2009+A2: 2011
EN 55014-1
EN 55014-2
EN61000-3-2: 2014
EN61000-3-3: 2013
EN 300 328 V2.1.1
EN 301489-1
EN 301489-17
EN 62479
EN 60950-1
FCC Part 15B
Electromagnetic compatibility – Requirements for household appliances, electric tools and similar apparatus – Part 1: Emission
Electromagnetic Compatibility - Requirements for household appliances, electric tools and similar apparatus - Part 1: Emission.
Electromagnetic Compatibility - Requirements For Household Appliances, Electric Tools And Similar Apparatus - Part 2: Immunity
Product Family Standard.
Electromagnetic compatibility (EMC) –
Part 3-2: – Limits for harmonic current emissions (equipment
input current up to and incelding 16 A per phase)
Electromagnetic compatibility (EMC) - Part 3-3: Limitation of
voltage supply systems for equipment with rated current ≤16 A.
Wideband transmission systems; Data transmission equipment
operating in the 2,4 GHz ISM band and using wide band modulation techniques; Harmonised Standard covering the essential
requirements of article 3.2 of Directive 2014/53/EU
Electromagnetic compatibility and Radio spectrum Matters
(ERM); ElectroMagnetic Compatibility (EMC) standard for radio
equipment and services; Part 1: Common technical requirements. Part 17: Specic conditions for Broadband Data Transmission Systems.
Assessment of electronic and electrical equipment related to
human exposure restrictions for electromagnetic elds (0 Hz -
300 Ghz).
Information Technology Equipment-Safety- Part 1: General
Requirements
Title 47 Telecommunication
PART 15—RADIO FREQUENCY DEVICES Subpart B—Unintentional Radiators
TCRP INTERNATIONA L LLC Ltd
21B Moskovska Street. Floor 3
1000 Soa - Bulgar ia
info@tcrp-intl.com
42
Stefan Engelen
Ceo

Warranty Conditions & Liability Disclaimer
If material defects or manufacturing faults should arise in a product distributed or manufactured
by PULSETEC a division of TCRP INTERNATIONAL LLC Ltd, and purchased by a consumer, we
PULSETEC acknowledge the obligation to cor rect those faults or defects within the limitations described
below. This manufacturers warranty is in addition to, and does not affect, the legal or contractual rights
of the consumer which arise from the purchase of such products. PULSETEC guarantees the consumer
that its products are free from material, manufacturing, and construction faults, as determined by the
general state of knowledge and technology valid at the time of manufacturing. The fault responsible for
causing the damage must be proven to have been present in the product at this time. Claims for compensation arising from consequential damage or product liability will not be considered valid unless they
fall under peremptory provisions of the law. If material defects or manufacturing faults should arise in a
product distributed or manufactured by PULSETEC in the European community (EC) and purchased by
a consumer, then PULSETEC under takes to correct those defects within the limitations described below.
This manufacturer’s declaration does not affect the c onsumer’s legal or contrac tual rights regarding defects ar ising from the purchase contract between the consumer and the dealer or reseller.
Extend of the Warranty
If a claim is made under warranty, we take at our discretion to repair or replace the defective goods.
We will not consider supplementary claims, especially for reimbursement of costs relating to the defect
(e;g. installation / removal costs) and compensation for consequent damages unless they are allowed by
statute. This does not affect claims on legal regulations, especially acc ording to the product liability law.
Provisions of the Warranty
The purchaser is required to make the warranty claim in writing, and must enclose original proof of purchase (e.g. invoice, receipt, delivery note) and the appropriate war ranty c ard. He must send the defective
goods to our local representatives or directly to PULSETEC a division of TCRP INTERNATIONAL LLC Ltd
21B Moskovska Street. Floor 3 - 1000 Soa - Bulgaria at his own risk and cost. The purchaser should
state the material defect or manufacturing fault, or symptoms of the fault, as accurate as possible, so that
we can check if our war ranty obligation is applicable. The goods are transported from the consumer to
us, and from us to the consumer, entirely at the risk and cost of the consumer.
Invalidation of the Warrant y
The consumer cannot make a claim under war ranty when the fault is affecting the use of the product
arising from natural wear, competition use, or improper use (including installation) or external forces.
The consumer’s adherence to the building and operating instructions relevant to the model, including the
installation, operation, use of, and maintenance of, model- related components cannot be supervised by
PULSETEC. Therefore PULSETEC is in no way liable for loss, damage, or costs resulting from improper
use, or behaviour in any way c onnected to the above described provisions. Unless otherwise required
by law, PULSETEC is in no way whatever liable to provide compensation for damages arising from the
improper use of the model (including personal injury, death, damage to buildings, loss of turnover, loss
of business, or inter ruption of business, or any other direct, or indirectly caused, consequential damage).
Duration of Validity
The claim period is 24 months from the date of purchase of the product by the consumer from a dealer in
the European Community (EC) counted from the date of purchase. The claim per iod is 12 months from
the date of purchase of the product by the consumer from a dealer outside the European Community (EC)
counted from the date of purchase. If a defect arises after the end of the claim period, or if evidence or
43

Warranty Conditions & Liability Disclaimer
documents required according to this declaration in order to make the claim valid are not presented until
after this period, then the consumer forfeits any rights or claims from this declaration. The guarantee
period is not prolonged by the granting of any claims within the framework of this warranty, especially in
the case of repair or replacement. The guarantee period also does not restar t in such cases.
Warranty Expiration
If we do not acknowledge the validity of a claim based on this declaration within the claim period, all
claims based on this declaration will expire after six months from the time of registering the claim; however this cannot occur prior to the end of the claim period.
Applicable Law
This declaration, and the claims, rights and obligations arising from it, are based exclusively on the per tinent Belgium Law, without the nor ms of international private law, and excluding U N retail law. Place of ful-
lm ent for li abi lit ies ari sin g from this de claration is So a, Bulgar ia. Court of jurisd iction is So a, Bulgar ia.
Copyright
This manual is protected by a copyright. Any publication, transmission or commercial use of this manual
is prohibited without written permission.
PULSETEC and TCRP INTERNATIONAL LLC Ltd assumes no responsibility for printing errors in this
manual and all specications and gures are subject to change without notice..
App stor e is a ser vice mar k of Appl e Inc. • An droid an d Google Play are trademarks of Goog le Inc. Th e Bluetoo th word
mark and logos ar e registe red trad emarks o wned by Blu etooth SI G, Inc.
WEEE: At th e end of thi s device’s useful life, p lease re move all the batter ies and di spose of t hem separately.
Take electr ical appliances to the local collection points for waste electrical and electronic equipment. Other
compo nents can be dispo sed of in do mestic r efuse. Th ank you for your co-oper ation!
www.pulsetec.eu
21B Moskovska Street. Floor 3 • 1000 Soa - Bulgaria
44
TCRP INTERNATIONAL LLC Ltd
info@tcrp-intl.com - www.pulsetec.eu
 Loading...