

PulseOn SP-2D-W User Instructions

PulseOn OHR Tracker User Instructions
SP-2D-W
Firmware version 1.0.1
Application version 1.0.5
21.6.2018
© PulseOn Oy

Table of Contents
1 Wrist device .................................................................................................................................... 3
1.1 Power off/on ........................................................................................................................... 3
1.2 Positioning of the device ......................................................................................................... 3
1.3 Low battery/charging .............................................................................................................. 3
1.4 Usage modes ........................................................................................................................... 3
1.4.1 Different screens ............................................................................................................. 4
2 Android app .................................................................................................................................... 5
2.1 Installing the app ..................................................................................................................... 5
2.2 Connecting to a device ............................................................................................................ 5
2.3 Automatic firmware update ................................................................................................... 5
2.4 Using the app .......................................................................................................................... 6
2.5 Recording raw data and streaming PPG ................................................................................. 7
3 Data transfer and storing ................................................................................................................ 9
3.1 Exporting the database as a CSV-file ...................................................................................... 9
4 Data column explanations ............................................................................................................ 11
4.1 ContinuousData table ........................................................................................................... 11
4.2 RawData table ....................................................................................................................... 12
4.3 ADL table ............................................................................................................................... 12
4.4 Notifications table ................................................................................................................. 13
4.5 AdlStatistics table .................................................................................................................. 13
5 Regulatory information ................................................................................................................. 14
5.1 Trademark holder ................................................................................................................. 14
5.2 CE regulatory information ..................................................................................................... 14
5.3 Operating parameters ........................................................................................................... 14
5.4 Safety Statements ................................................................................................................. 14
5.5 FCC statement ....................................................................................................................... 14
1 Wrist device
1.1 Power off/on
The device is turned on by pressing the button firmly once for one second. The device will vibrate
when it is ready to use.
The device can be turned off (and rebooted) by pressing the button down for 10 seconds. The
display will show a power off warning at first during which you can still release the button without
powering off the device.
Holding the button down for over eight seconds will start the device in the DFU mode and
the display will stay dark. In this case, the device should be turned off and back on again
with a shorter press.
For the off-hand detection to work properly, the device should not be worn when turning it
on.
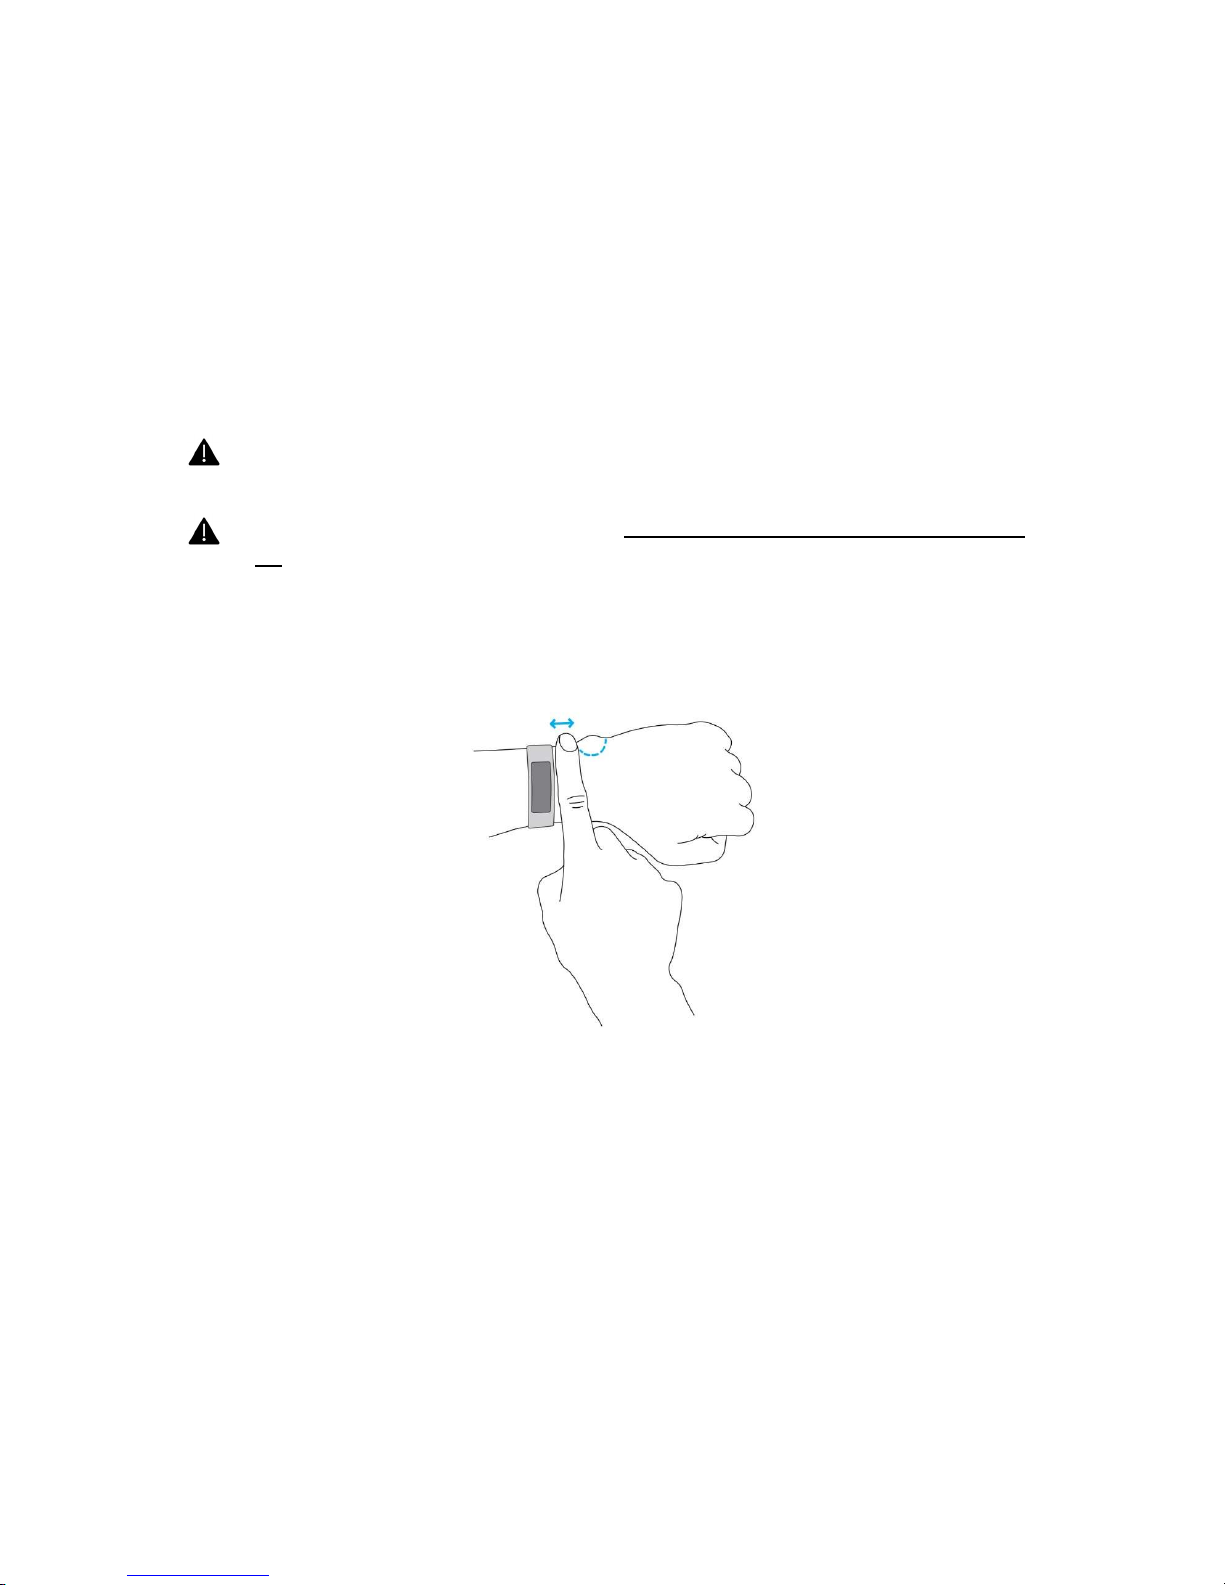
1.2 Positioning of the device
When wearing the device, position the device approximately one finger width up the arm from the
wrist bone. If possible, prefer the non-dominant hand as this will increase the quality of the data.
1.3 Low battery/charging
The device has a screen showing remaining battery. Currently no warning for low battery exists.
The device can be recharged using a normal USB cable. When connecting the device to a charger, it
will vibrate and display a recharging screen. Removing the device from the charger will also cause
the device to vibrate.
1.4 Usage modes
The device has two modes: the sampled mode and the continuous mode. During the sampled mode,
the device measures the heart rate every 5 minutes or whenever the button is pressed.
In the continuous mode, PPG and acceleration is sampled constantly at 100 Hz and averaged over 4
samples. HR is estimated once per second.
The operating mode can be changed from the device by pressing the button down for one second.
The device vibrates as an indicator of mode change. In addition, a small heart is shown in the
display’s upper-left corner while the device is in sport mode.
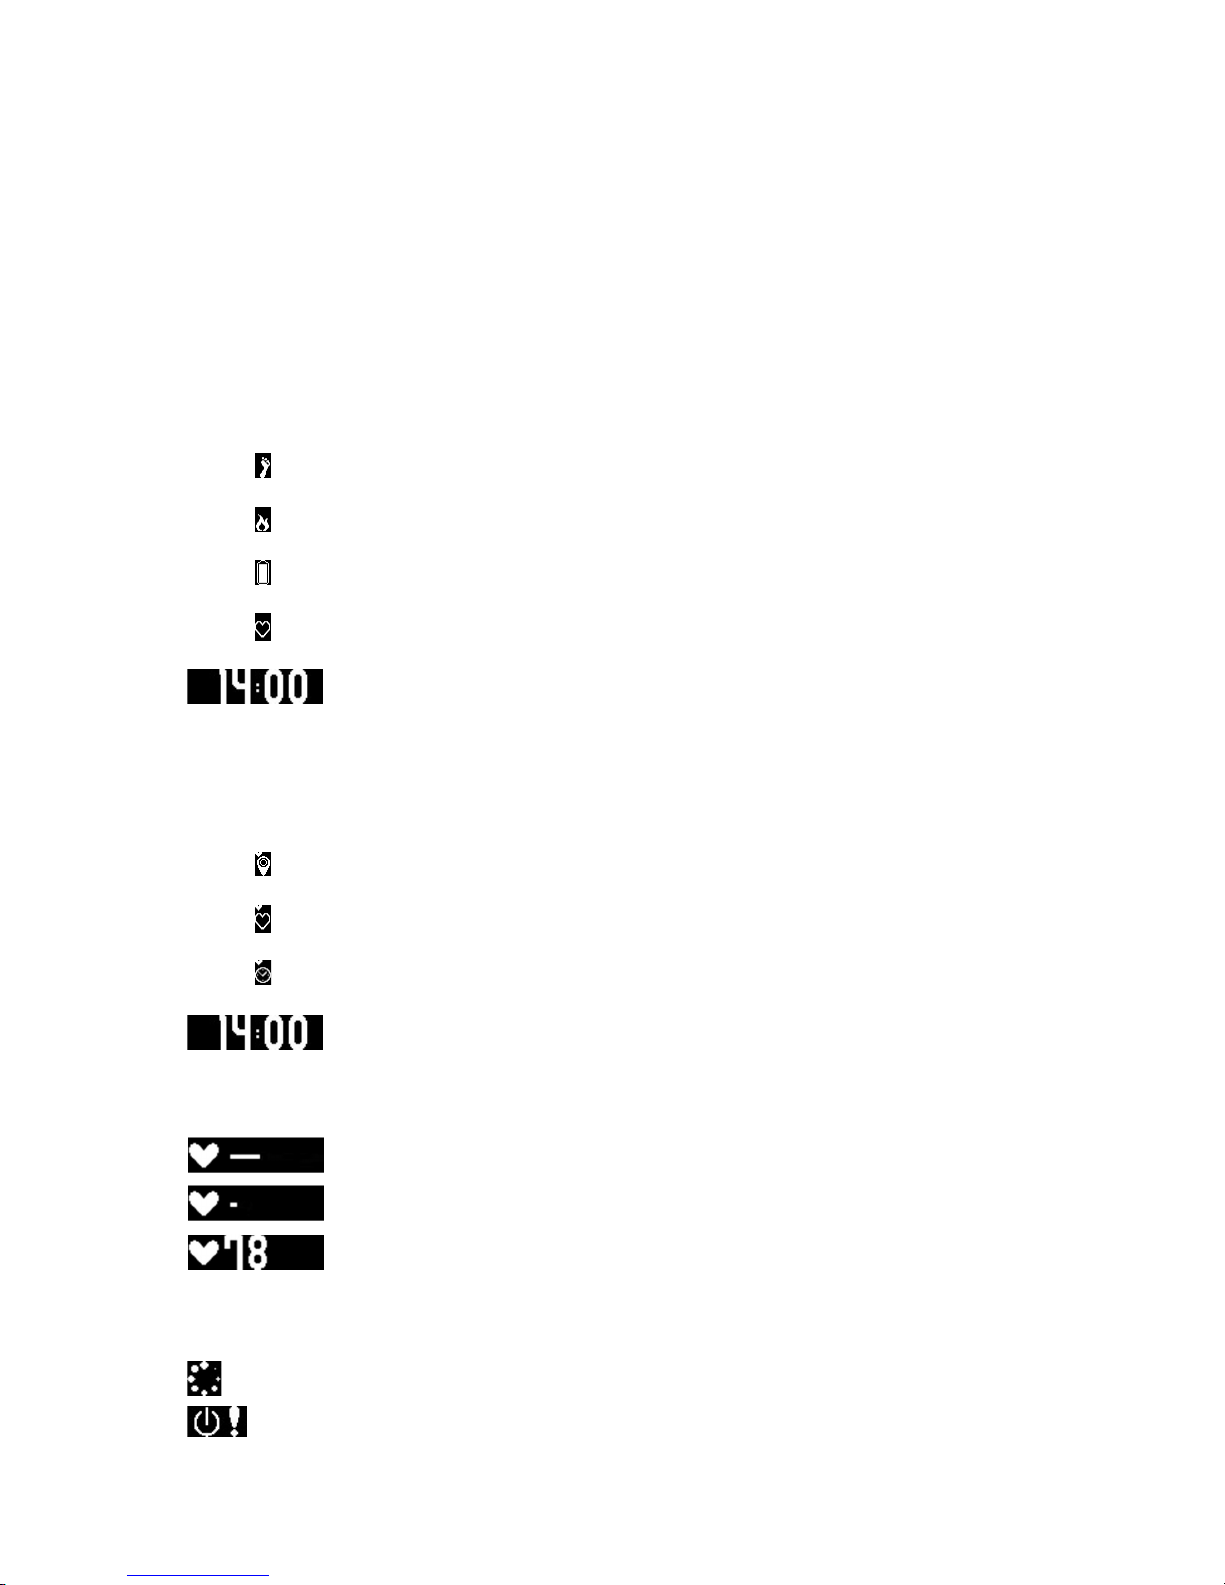
1.4.1 Different screens
The following is a listing of different screens and their meanings in the different modes. The screen
can be cycled through by pressing the button for one second for every new screen.
1.4.1.1 Sampled mode
Steps taken since starting the device
Calories burned since starting the device
Battery level
Heart rate
Clock
Note that for the clock to show, the device must have been connected to
the android app at least once for syncing.
1.4.1.2 Continuous mode
Covered distance since activating the mode
Heart rate
Time since activating the mode
Clock
1.4.1.3 Heart rate display in both modes
Device off-hand
Searching for HR
HR quality ok – displaying actual HR
1.4.1.4 Operating and warning displays
Device starting. Please wait.
Power-off warning: If button is kept pressed, device will shut down.
2 Android app
The Bluetooth LE HR and HRV data is not bound to using a specific app. Other software (for example,
nRF Toolbox) can be used to receive HR and HRV information. However, all other data (steps,
calories, raw data) can only be read using the specific software. In addition, to get the clock display
to work, the device must be connected to the app after a reboot.
2.1 Installing the app
Save the provided apk-file to a location that you can access by phone (for example: the phone
memory if you have a file browser or Dropbox). Accessing the file should prompt the user about
installing an app.
Since the app is not downloaded through the Play Store, it will require permission. Newer
Android versions will bring up the settings for installing outside files, but if it this does not
happen the settings can be found in Advanced Settings -> Security -> Unknown sources.
The app will ask for permission to access the files on the phone and to access the location. These are
required for the Bluetooth connection to work.
2.2 Connecting to a device
Starting the app, it should display an empty screen with a SCAN button in the top right corner.
Pressing SCAN brings up a list of devices in range. The name of the sample device is OHR Tracker.
Distinguishing between different devices can be done based on their MAC-address that is shown
under the name. The signal strength is also displayed to assist with finding the right device: a device
next to the phone will usually give a strength between -35 and -55 dB while -95 dB is a very bad
connection.
If no device is selected, the app will connect to a device if one is clearly closer to the phone than any
other. However, if multiple devices are close according to the signal strength, none will be chosen,
and an error message will appear. The user can then manually connect to the right device.
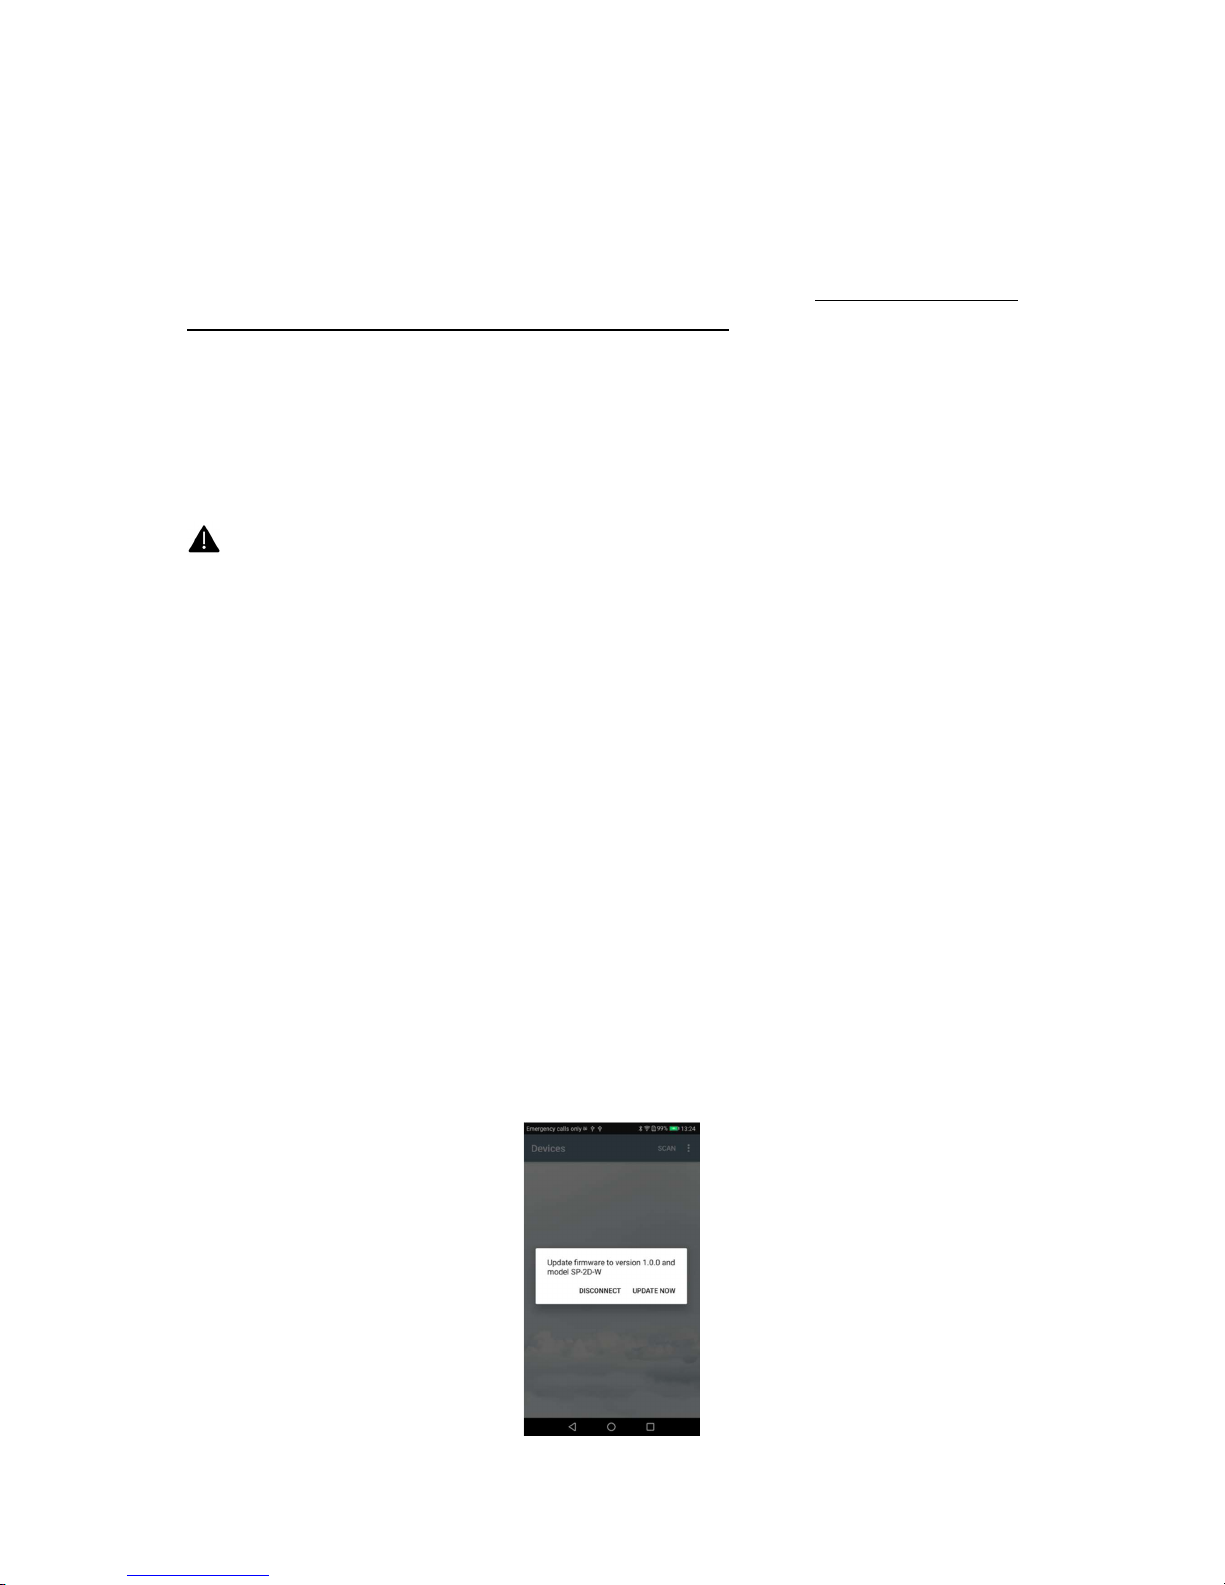
2.3 Automatic firmware update
If the application detects that the device has a firmware version that is outdated, it will prompt the
user for an update in the following way:
 Loading...