

Page 1

1
USER MANUAL
PMX1204 & PMX1604
WWW.PULSE-AUDIO.CO.UK
Page 2

2
SAVE THESE SAFETY INSTRUCTIONS
Thank you for purchasing our product. To assure the optimum performance,
please read this manual carefully and keep it in a safe place for future reference.
Explanation of Graphical Symbols
The lightning ash with arrowhead symbol, within an equilateral triangle, is intended to alert the user to the presence of
uninsulated “dangerous voltage” within the product’s enclosure that may be of sufcient magnitude to constitute a risk of
electronic shock to persons.
The exclamation point within an equilateral triangle is intended
to alert the user to the presence of important operating and
maintenance (servicing) instructions in the literature accompanying the product.
Waste Electrical and Electronic Equipment or WEEE symbol.
When this product reaches the end of its life, do not dispose
with the household waste. This includes remote controls and
batteries. See www.recycle-more.co.uk. For more details of
how to dispose of PULSE products in an environmentally
sound fashion, or contact PULSE directly via www.pulse-
audio.co.uk.
CE marking is a declaration by the manufacturer that the
product meets all the appropriate provisions of the relevant
legislation implementing certain European Directives.
Please take care when working with any audio equipment.
If you are not fully aware how this unit works then it is best
practice to turn down all monitors and then turn them up slowly.
If you are unsure on how to use any equipment seek help from
a professional. Although your new console will not output any
sound until you feed it signals, it has the capability to produce
sounds which when monitored through an amplier or headphones may dam-
age your hearing permanently.
Page 3

3
• This product has a 12 month warranty. This warrant will be voided if it appears the product has been opened, modied or repaired by an unauthorised
technician
• Unplug the mixer from the wall outlet before cleaning Do not use liquid
cleaners or aerosol cleaner. Use a damp cloth for cleaning.
• Do not use this appliance near water for example, near a bathtub, washbowl, kitchen sink, in a damp room or near a swimming pool, etc.
• Do not place this appliance on an unstable platform, stand, or table. The ap-
pliance may fall causing serious injury to a child or adult, and serious damage
to the appliance. Use only with a stable platform or stand recommended by
the manufacturer, and use a mounting kit approved by the manufacturer. Do
not put this equipment on a platform that is portable.
•Do not connect 2 amplied outputs to 1 speaker
•Do not short circuit or cross-connect inputs or outputs
• This appliance should never be placed near any heat source. This appliance should not be place in a built-in installation, unless proper ventilation is
provided.
•Keep away from magnetic recording media (tape, mini disc, hard drives ect).
•Power ampliers produce an electromagnetic eld, which could effect stored
les.
•Use adequate amplication and speakers for your needs. Always ensure the
output rating of the amplier is equal to or more than the RMS ratings of your
speakers.
• This appliance should be operated only from the type of power source
indicated on the marking label. The following wiring convention is used in all
product mains leads, and this must be strictly observed: Green/Yellow = Earth,
Brown = Live, Blue = Neutral. THIS UNIT MUST BE EARTHED. If you are not
sure consult your dealer or a qualied electrician.
• Do not allow anything to rest on the power cord. Do not locate this appliance
where the cord will be damaged by people walking on it.
Page 4

4
• Do not overload wall outlets or extension cords, as this can result in re or
electric shock (MAX 3000W).
• Follow all warnings and instructions marked on the appliance.
• Do not attempt to service this appliance yourself, as opening or removing
covers may expose you to dangerous voltage or other hazards. Refer all ser-
vicing to qualied service personnel.
• Unplug this appliance from the wall outlet and refer servicing to qualied
service personnel under the following conditions:
A. When the power cord or plug is damaged or frayed.
B. If liquid has been spilled into or into the appliance.
C. If the appliance has been exposed to rain or water.
D. If the appliance has been dropped or the cabinet has been damaged.
E. When the appliance exhibits a distinct change in performance this indicates
a need for service.
•Never remove warning or information labels from the equipment
•Check all connections (input and output, at both ends of cable)
•With all speaker wiring care must be taken to ensure no wires can present a
short cirtcuit to the amplier. Speaker wires carry high voltages, care should
be taken to ensure no bare wires can be touched as this may result in electric
shock.
• When replacement parts are required, be sure the service technician has
used replacement parts specied by the manufacturer that have the same
characteristics as the original part. Unauthorized substitutions may result in
re,electric shock, or other hazards. Upon completion of any service or repairs
to the appliance, ask the service technician to perform routine safety checks to
determine that the appliance is in safe operating condition.
• If the mains fuse needs replacing, DISCONNECT THE PRODUCT FROM
THE MAINS SUPPLY. The fuses are located under the IEC socket and inside
the mains products. The fuses must only be replaced with a fuse of the type
and rating stated on the rear panel. If the replacement fuse fails do not use a
higher rated fuse, contact your local service agent or PULSE via www.pulse-
audio.co.uk.
Page 5

5
BACK PANEL
All the connections on this page our found on the back panel of the mixer
PHANTOM POWER switch
This switch activates and deactivates the Phantom power on all the microphone inputs. Most condenser microphones require phantom power, which is
a lower DC voltage delivered to the XLR microphone connector.
MAIN OUTPUT 6.35mm (¼") SOCKETS
These ¼" output sockets provide balanced or unbalanced line-level signals.
This is the same signal that appears at the XLR’s main outputs, (except the
¼" jacks are unaffected by the main output level switch. Connect these to the
next device in the signal chain like an external processor, or directly to the
input of the main amplier.
MAIN OUTPUT XLR SOCKETS
Connect directly from the mixer directly to the speakers. Gain can be adjusted
using the main mixers controls. Use none powered speakers and dedicated
speaker cable. Connect one speaker to the left XLR and one speaker to the
right XLR connections.
CHANNEL INSERTS 1-4
These unbalanced ¼" Jacks are for connecting serial effects processors such
as compressor, equalizer, de-esses, lters ect. The insert point is after the gain
control, and the low cut lter, but before the channel’s EQ and level. The channel signal can go out of the insert jack to an external device, be processed and
come back in via the same jack plug.
ALT 3-4 OUTPUTS
The ALT 3-4 outputs are unbalanced and carry the signals from all the channels that you have muted. This can be used to send a group of signals to a
further mixing console, or it could be used as a recording output in tandem
with the main output.. This means you could record to four tracks all at the
same time.
CONTROL ROOM OUTPUTS
The control room outputs normally connected to a monitor system in the con-
trol room and provides the stereo mix or, when required, the solo signal.
IEC MAINS INLET with fuse
For connecting to the mains outlet plate via an IEC lead
Page 6

6
SPEAKON™ SOCKETS AND SPEAKER TERMINAL POSTS - These
speakon™ connectors or Terminal posts are the output of the built in power
amplifier, (see spec table for model and Wrms).
IMPORTANT: Do not connect both speaker types at the same time doing so
can damage the built in amplifier. Make sure that the impedance of the speakers are never less than 4Ω (ie 1x4Ω or 2x8Ω in parallel), otherwise the power
amplifier may become damaged. Make certain to always use only power
cables for speakers (1.5mm²) and not signal cable. You can also hard-wire
your speakers directly to the amplier using the terminal posts. Unscrew the
terminals until you can see the connections at the side of the post, make sure
you match the polarity of the speakers with the polarity on the ampliers, RED
+, BLACK ground. Insert the bare wire or the speaker and tighten the terminal
post until it grips the cable tightly. Make sure no bare wire is visible after you
have tightened the terminal.
Speakon; 1+ = speaker position, 1- = speaker negative
VENTILATION - In order to keep the mixers power amplier working correctly
it is essential that all the air vents are kept clear at all times and not near any
other product that is dissipating heat. The fan is used to not only cool down
the amplier but also do dissipate heat from the ventilation vents around the
amplier.
Page 7

7
FRONT PANEL
All the various controls will be described in this manual in sections. So
before you start to read what each piece of equipment does nd it rst
in the mixer. The manual will be starting in the top right hand corner
beginning with MIC1 and working its way down the
channel.
MIC 1 - The mic input accepts a balanced or unbal-
anced XLR plug and can also accept a balanced or an
unbalanced 6.35mm (¼") jack plug. There is also the
option of using Phantom power supply (+48V) for when
the use of a condenser microphone is needed. Caution
should be taken when using Phantom power. Firstly
that you are using the correct microphone for accept-
ing a +48V signal and that the signal you are using is
balanced. Secondly before turning the Phantom power
on or off you must make sure you have turned down
the gain control and that your amplier is switched off
to prevent the switch on thump coming through to your
speakers. You can also used a balanced or an unbal-
anced 6.35mm (¼") jack plug instead of using a XLR.
LINE - This line input accepts a 3-pole 6.35mm (¼")
jack plug. This is useful for accepting other signal inputs other than from a microphone, for example laptop,
keyboards, drums ect. The line input is a balanced
input, but it will still accept an unbalanced signal if
there is one present. If you are using the line input then
unplug anything that is inserted into the MIC input only
one signal input should be connected at any one time
per channel.
LOW CUT BUTTON - Use this button when there is
excess noise from low frequencies like stage rumble or
popping from mics. (75 Hz, 18dB/octive).
GAIN CONTROL - The gain control controls the
amount of signal being sent to the mixer from either mic
or line inputs If the gain control is to high it may distort
as it overloads the channel, too low and the background hiss may be more noticeable. Make sure that
when you connect or disconnect any signal source that
the gain control is turned fully anti-clockwise.
Page 8

8
EQUALISER. HF,MF, LF
There are 3 dial controls to the equaliser, these are HF
(high frequency above 12kHz), MF (medium frequency
around 2.5kHz) and LF (low frequency below 80Hz).
All dials can be turned to the centre-detented position
when they are not required to change the signal levels
of that particular frequency.
HF EQ - Turn to the right boosts the signal by up to
+15dB, move it to the left to lower the signal by up to
-15dB. This can be used to either sharpen the higher
level frequencies such as cymbals or it may be used to
reduce a background hiss.
MF EQ - Turn to the right boosts the signal by up to
+15dB, move it to the left to lower the signal by up to
-15dB. This can be used to control vocal range signals.
LF EQ- -Turn to the right boosts the signal by up to
+15dB, move it to the left to lower the signal by up
to -15dB. This can be used to control the deep bass
noises for example reducing the rumble made by low
frequencies.
AUX CONTROL AND PRE BUTTON - The AUX control
is used to change the amount of signal sent to a users
headphones or other items to monitor the signal levels.
PRE BUTTON - Pre-fader button allows you to change
the level for the auxiliary dial but not with the channel
fader. You usually want to use pre-fader so you can
control monitor mixes.
FX - The FX control is used to set the level of the post
fade signal being sent to the FX bus and from there it is
routed to the FX processor.
PAN CONTROL - The PAN dial is designed to distribute the input sounds with constant power, so with the
dial pointing to the 8 o'clock position (dials line point-
ing to left), the sound appears in only the left channel.
Conversely, when placed in the 4 o'clock position (dials
line pointing to the right), the sound only appears in the
Page 9

9
right. In the middle, at the 12 o’clock position, the sound
in each channel is evenly distributed.
MUTE - Mutes the sound from the main mix and redi-
rects it to the sub group faders 3-4.
MUTE LED - This illuminates to indicate a muted chan-
nel. The mute switch breaks the link to the pre channel
fader. This signal is then set to post-fader to the sub
group so the channel can still be heard separately from
the rest of the channels on the mixer.
CLIP LED - This illuminates when the channel is either
close to or distorting. Lower the gain to bring the sound
levels down. Also you may need to check the levels on
the equalizer.
SOLO BUTTON - Press this button to single out that
channel so that the channel can be listened to through
headphones and can be set to work at an optimum
level without distorting. Whilst in solo this is the best
time to adjust your gain and equaliser.
INPUT CHANNEL FADER - The channel has a fader
(slider) to adjust the volume of the channel's signal
before it is sent to the next stage (bus mix). There are
two ways to adjust a channel's level: The input gain and
the output fader. Make sure the input gain provides a
strong signal level to the channel without clipping and
leave it at that level, use the fader for ongoing adjust-
ments.
The STEREO AUX RETURNS SOCKETS - These are
used to introduce an external signal to the mixer (where
the input from the external device was derived from the
AUX SEND). If you only wish to operate on mono and
not stereo then the jack plug should be connected the
left jack socket only This input signal can then pass
through the STEREO AUX RETURNS channel.
AUX SENDS 6.35mm (¼") SOCKETS
The AUX SENDS sockets send the signal from the AUX
bus to either a different room or to a different audio
system where you may wish to monitor the settings or
add other audio signal before sending it back via the
Page 10
10
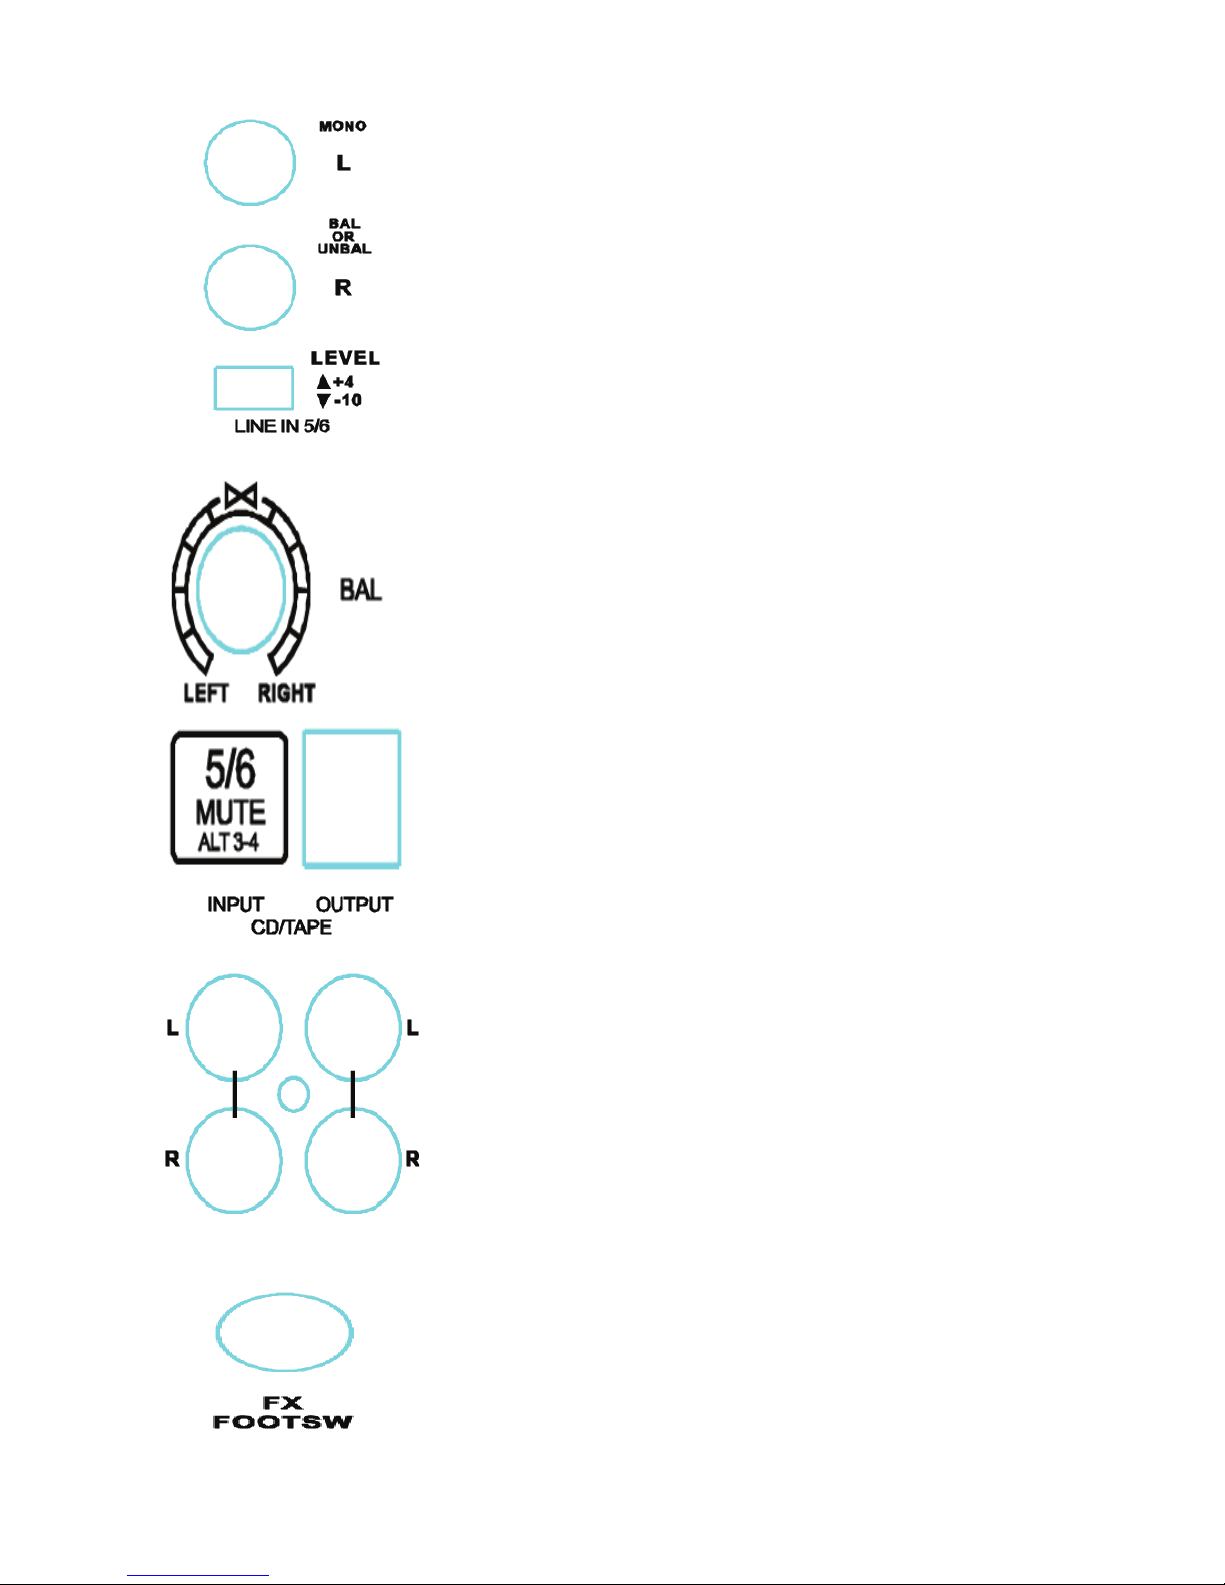
STEREO AUX RETURN SOCKET
BALANCED/UNBALANCED 6.35mm (¼") SOCKETS
AND LEVEL BUTTON
A stereo signal input via both left and right 6.35mm
(¼") sockets. Same as the other channels on the
mixer accept this channel can work in stereo. If you
wish to run in mono connect the left jack plug only.
The Level button is used to switch between two set-
tings to match the audio levels. The professional level
is considered to be +4 dBu. The homeowner level is
−10 dBV. Pressing the button will give you one or the
other state.
BALANCED DIAL on CH 5/6 & 7/8
This is used to control the left and right stereo signals
in the channel. Turning the dial to 7 o’clock means that
the majority of the Left signal will pass through to the
fader. Turning the dial to the 5 o’clock means that only
the majority of the Right signal will go through to the
fader.
INPUT TAPE 6.35mm (¼") SOCKET - This takes any
analogue signal and sends it to the main mix fader.
This could be anything from tape to MP3 players.
OUTPUT CD/TAPE 6.35mm (¼") SOCKET - This
takes the output signal from the main mixer and sends
it to any recordable device, e.g. Tape, CD or Laptops.
Note: With an adapter it may be possible to put your
laptop into the input and into the output at the same
time. So you can send a signal into the mixer and record the signal coming out from the main mix fader.
FX FOOT SWITCH 6.35mm (¼") SOCKET
Allows you to connect a foot switch to the mixer via a
6.35mm (¼") plug, this mutes the sound by pressing
down on the foot switch.
Page 11

11
PHONES 6.35mm (¼") SOCKET
Connect headphones to the mixer via this socket so
you can listen to individual channels, change settings
and listen to them separate from the audio signal being
played.
AUX SENDS DIAL AND SOLO SWITCH - Controls the
gain of all the AUX busses and sends the signal to the
AUX OUTPUT.
FX DIAL AND SOLO SWITCH - Controls the gain of all
the FX busses and sends the signal to the FX OUTPUT.
SOLO SWITCH - You can use the SOLO switch to
separately monitor the aux via the control room/phones
outputs and check these with the level meters.
BUTTON SELECTOR ,HEADPHONES GAIN CONTROL AND TAPE TO MAIN - The buttons are as
follows CD/TAPE, ALT 3-4 and MAIN MIX. You can
press any one of these channels to get a signal to come
through to the headphones. Pressing 2 will allow both
the signals to come through at the same time.
CTRL R. & PHONES - Use this dial to set control room
output level and headphone volume respectively
NOTE : When you are listening to your headphones
for the rst time make sure that the gain control dial is
turned fully anti-clockwise so if the audio signal is too
high it does not damage your hearing.
TAPE TO MAIN - When the TAPE TO MAIN switch is
pressed, the 2 track input is routed to the main mix and
thus serves as an additional input for tape machines.
You can also connect MIDI instruments or any other signal sources here that don’t require any further processing. When you have pressed the TAPE TO MAIN this
switch also disables the main mix to tape output link
Page 12
12
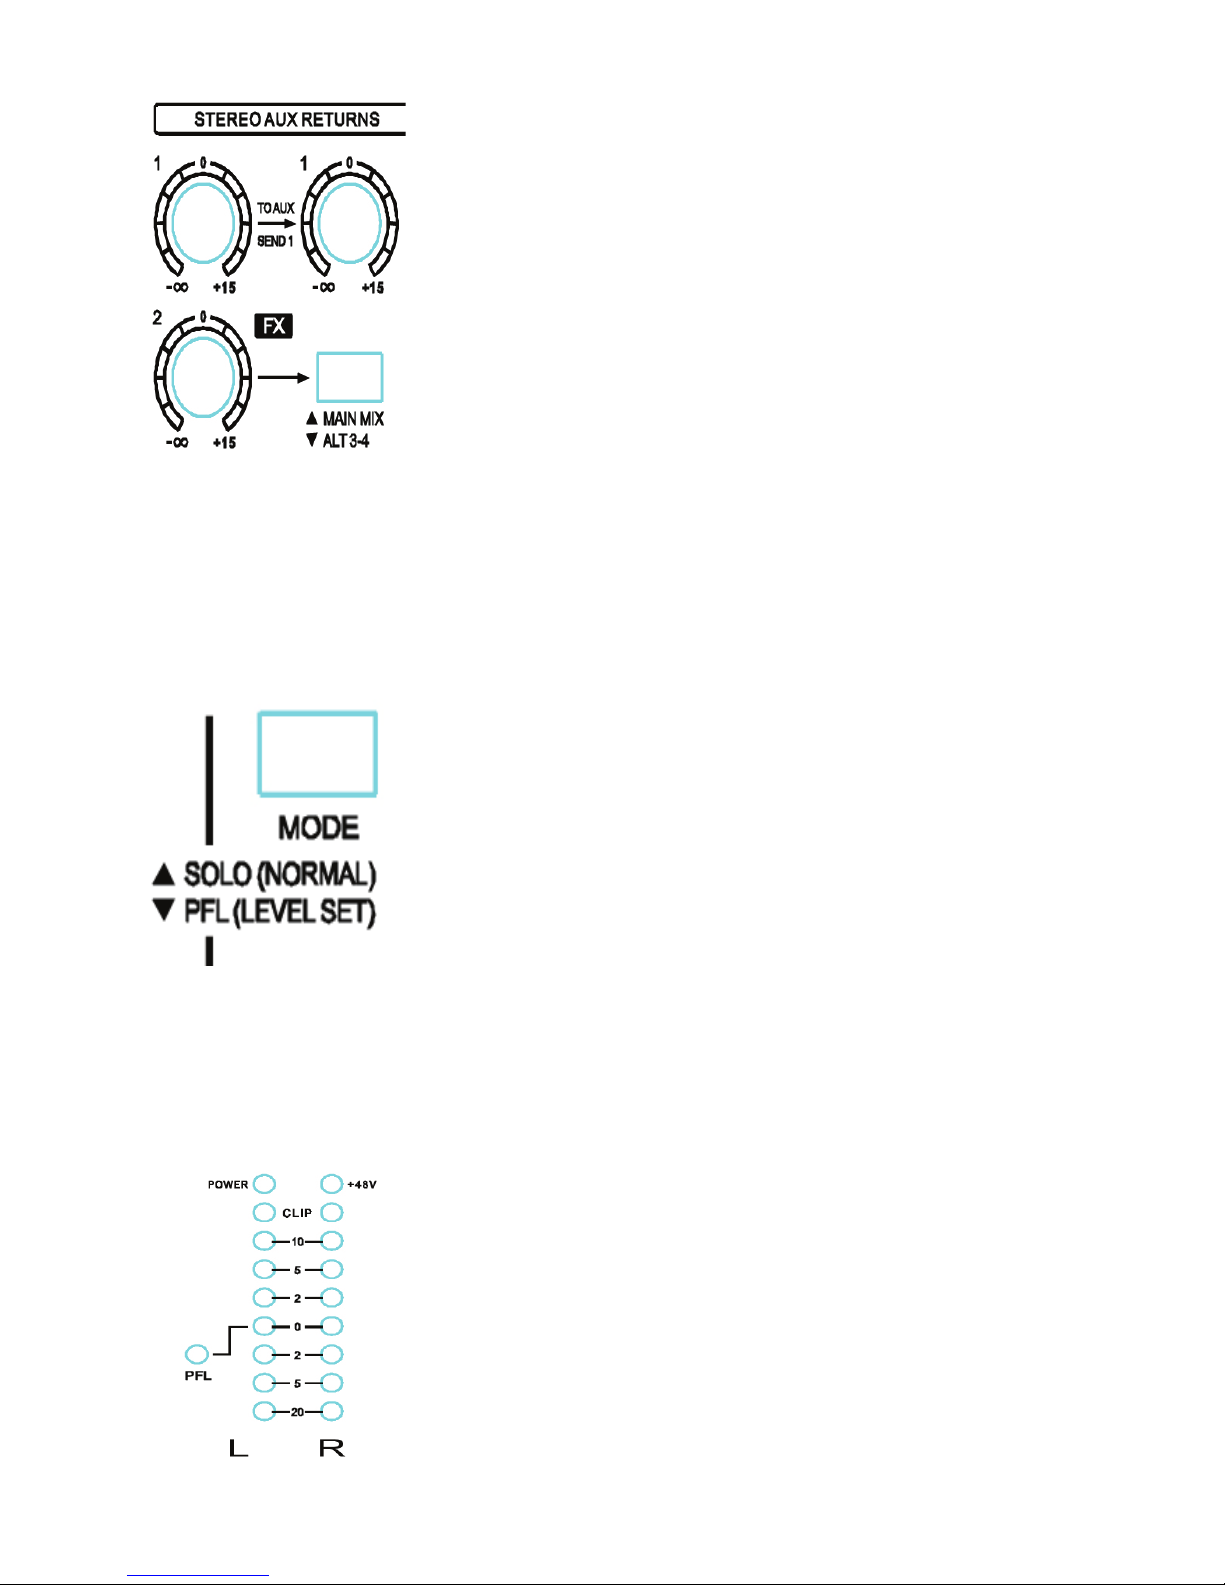
STEREO AUX RETURNS DIALS
The STEREO AUX RETURN 1 control determines the
level of signal in the main mix. If STEREO AUX RE-
TURNS 1 is used as effects return, this will determine
the level effect when mixed with any “dry” channel.
Note: when used this way, the effect device should be
set at 100% effect. The right hand dial is there to add an
effect to a monitor mix.
FX DIAL AND MAIN MIX / ALT 3-4 SWITCH
Works similar to the STEREO AUX RETURN. This
dial controls the level of signal from the AUX FX JACK
SOCKET back into the main mix.
The MAIN MIX/ALT 3-4 switch is used to send the sig-
nal from the FX DIAL to either the MAIN MIX FADER or
to ALT 3-4 fader.
MODE SWITCH - This switch switches between SOLO
(Solo In Place) and PFL (Pre Fader Listen). The LED
above this switch will illuminate to tell you what state
the switch is in. When in PFL mode the signals will be
shown on the LED display.
PFL (Pre Fader Listen)
The PFL function should be used for level setting
(GAIN). The signal is sourced pre-fader and assigned to
the mono PFL bus.
SOLO
This is used for listening to an individual signal or a
group of signals. When SOLO is activated all other
channels that are not SOLO selected are muted in the
control room / headphones. The SOLO bus carries the
output signals to the channel pan controls. Usually the
SOLO signals are monitored via the control room outputs and headphones jack and displayed on the level
meters.
LED DISPLAY
The top two LEDS are power on the left and phantom
power (+48V) on the right. The green, yellow and red
led’s are indicators for the signal level. If all the LEDS
illuminate then the signals are too high. Use the MAIN
Page 13
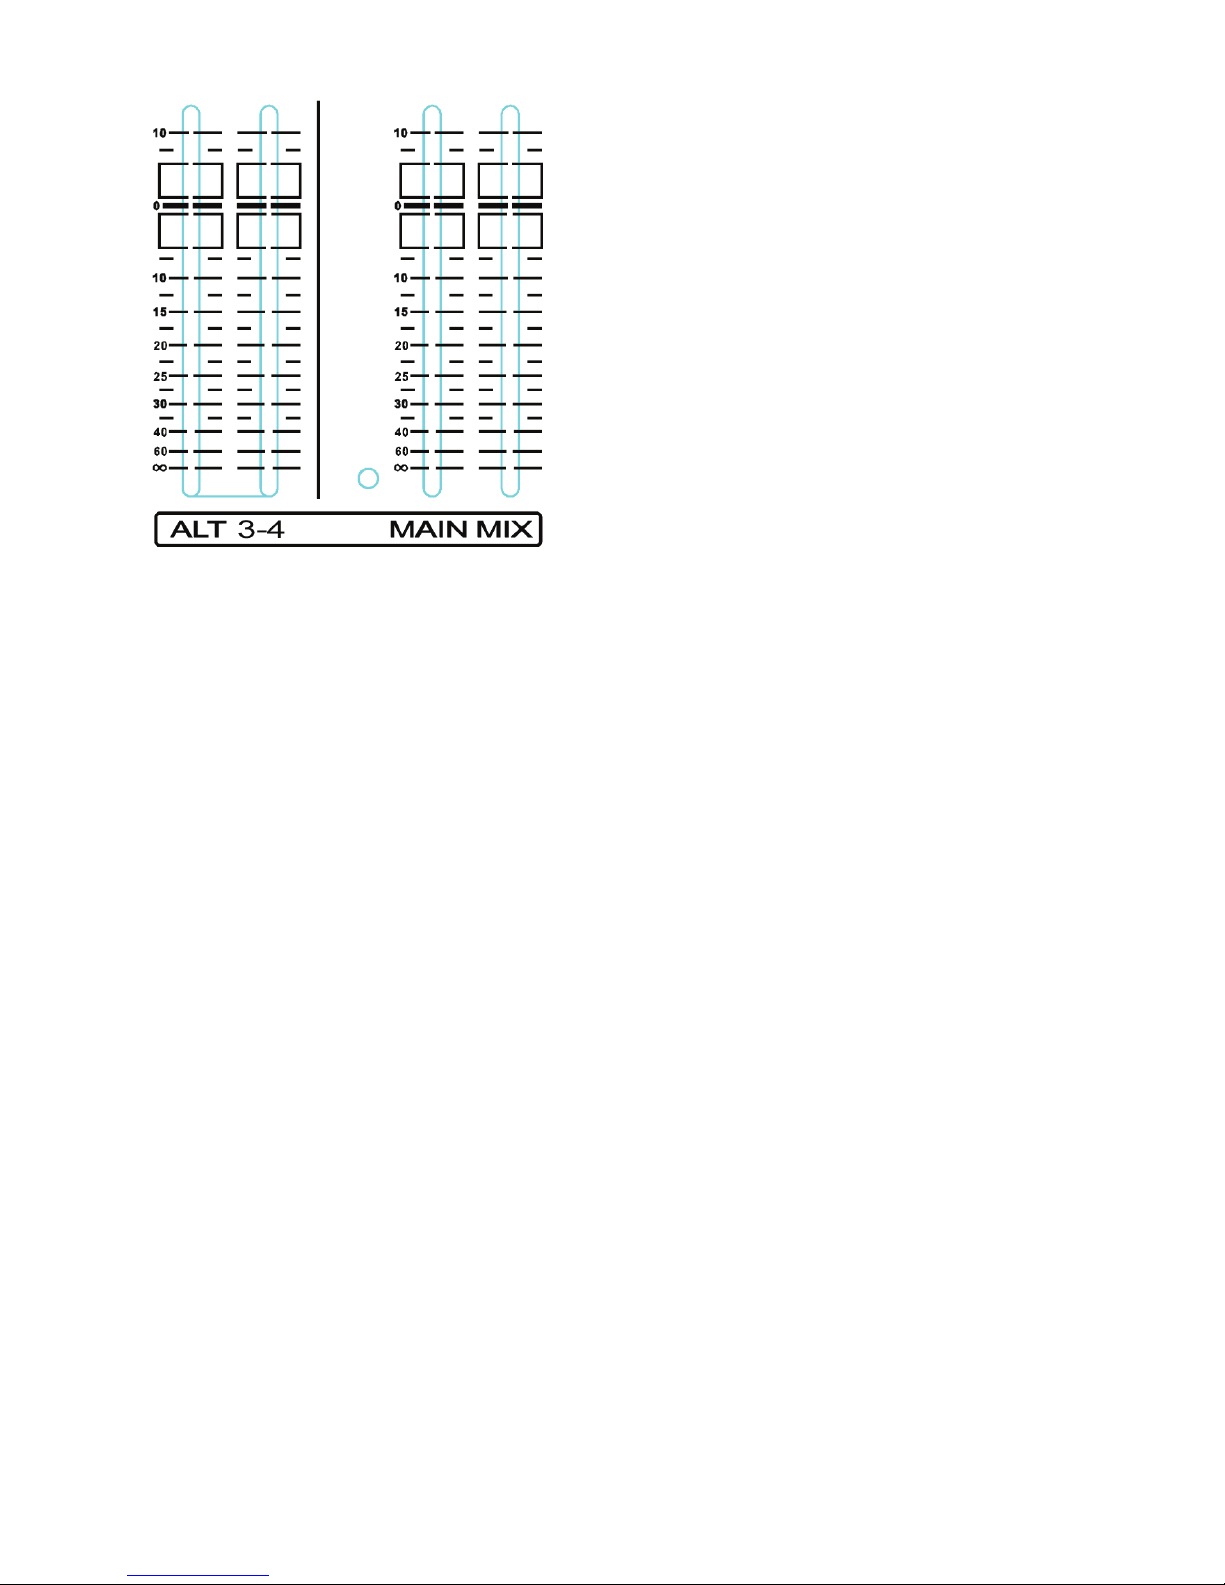
13
MIX fader to lower the signal levels. Signals may be distorted if the signal levels
are set to high.
ALT 3-4 outputs are unbalanced and
carry the signal of the channels that you
have assigned to this group using the
mute switch. This can be used to route a
subgroup to a further mixing console for
example, or used as a recording output
working alongside the main output.
MAIN MIX FADER - The faders are used
to control the overall signal levels from all
channels.
NOTE: There is a BNC connector for connecting a 12V BNC type lamp for
lighting up the mixer, ideal when you in a dark or poorly lit area .
PROGRAM
The dial can be used to scroll through and pick the program effect that you
want. The display ashes the number of the current preset. To recall the selected preset, press the button; and the ashing stops.
24-BIT MULTI-EFFECTS PROCESSOR
This built in effects module produces various effects including reverb, chorus,
anger and other various combination effects. The advantage of the effects
module being integrated is that it requires no wiring. This way there is no
chance of creating ground loops or uneven sound levels. These effects are
designed to be added to dry signals. If you move the FX TO MAIN control, you
mix the channel signal (dry) and the effect signal.
Page 14

14
SPECIFICATION TABLE
Power
230V AC 50Hz
Mixer spec
PMX1204: 2 x 200Wrms / 8 ohms
2 x 300Wrms / 4 ohms
PMX1604: 2 x 300Wrms / 8 ohms
2 x 500Wrms / 4 ohms
Mic pre amps (4 mics PMX1204 & 8 mics PMX1604)
130dB Range for 24-bit, 192 kHz sampling rate inputs
60dB Gain range
Total Harmonic Distortion: 0.0007% (20Hz to 20 kHz)
24 Bit digital stereo FX processor
3 Band equaliser
2 Aux sends per channel: 1 pre/post fader switchable, 1 post fader
2 Stereo aux returns with exible routing
2 Sub groups with separate outputs for added routing exibility
Peak LEDs, mute / alt 3-4, SOLO and PFL functions on all channels
Balanced line inputs with +4 / -10 level section
FX send control per channel
Control room / phones output with multi-input source matrix
Tape inputs assignable to main mix or control room/phones outputs
+48V Phantom power
Page 15

15
Cable connections
You are going to use a large amount or cable that run to and fro from your
console and have different plugs connected. When running your cables please
make sure all cables are out of the way of where people may be walking.
Damaged cables or your console being pulled off your workstation by cables
being pulled on may damage the console. Here are diagrams on how to wire
different plug connectors. These are for illustration purposes only, if you have
any doubt about how to wire your console do not attempt to install it yourself
but seek
out a qualied techni-
cian.
 Loading...