

Page 1
Splash Shower System
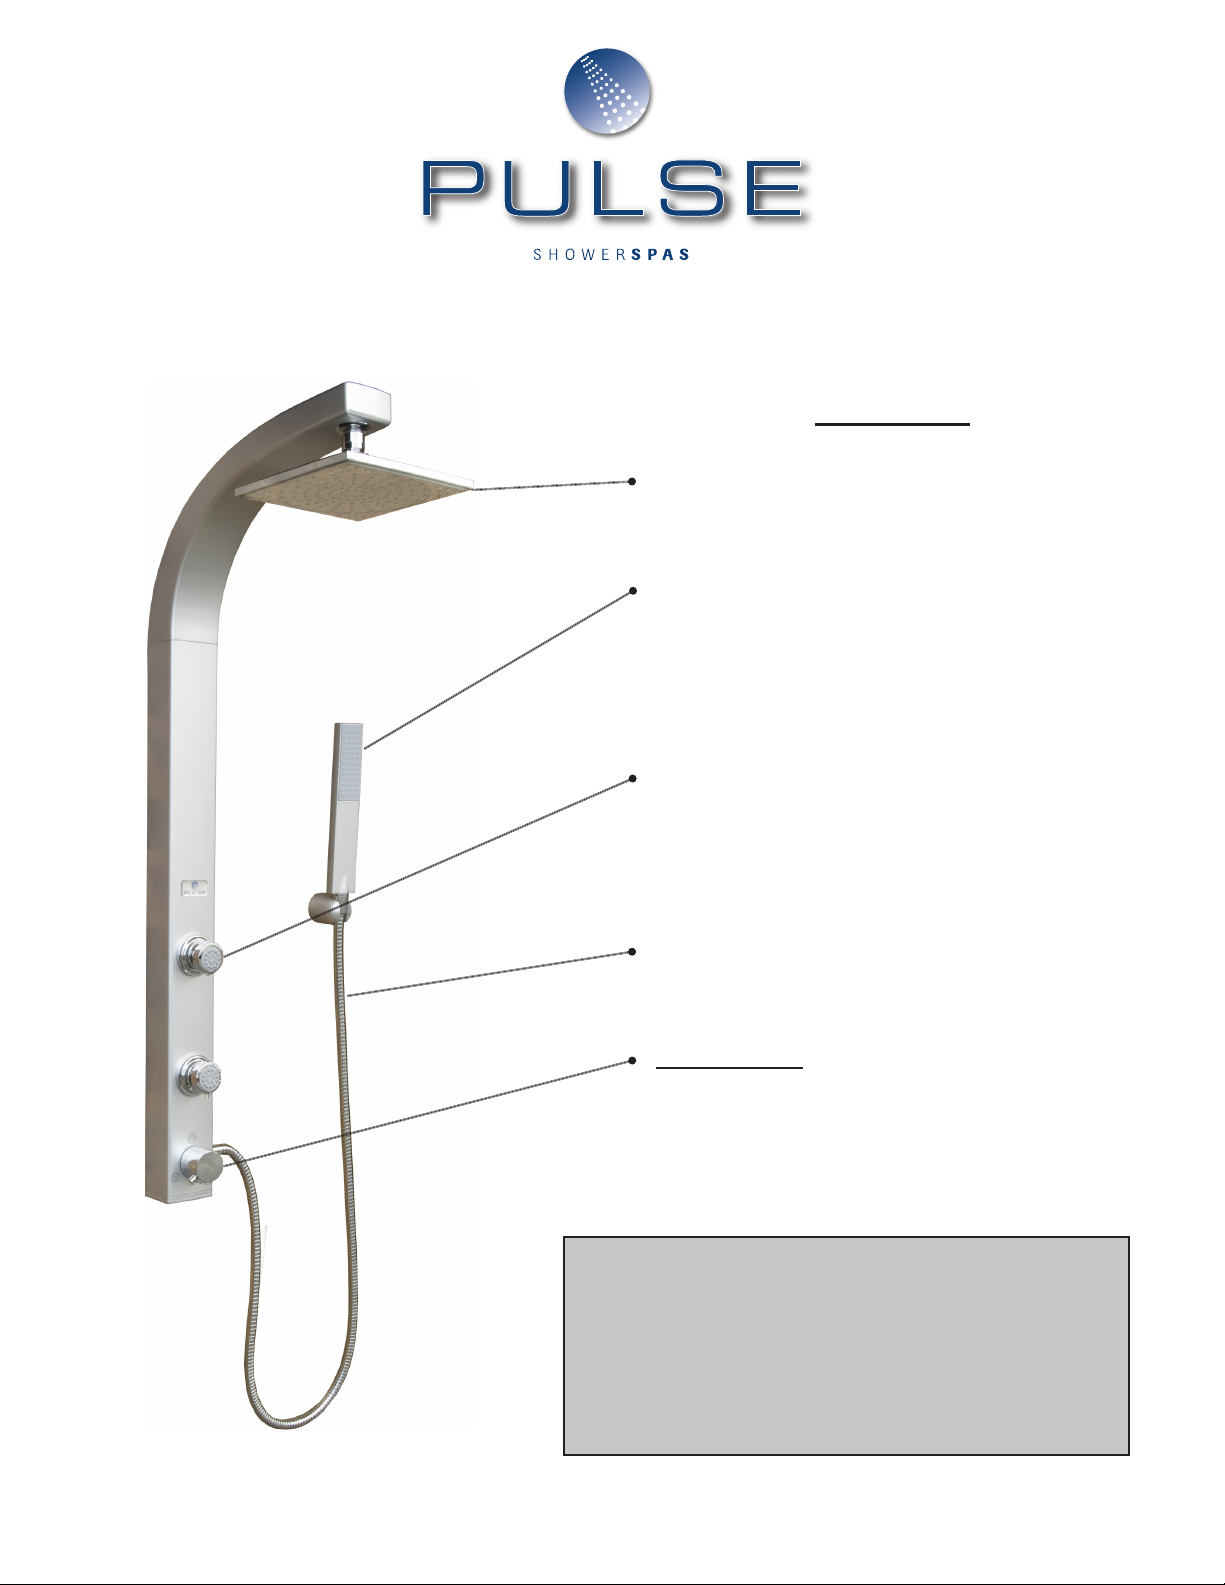
Model # 1020S / 1020B
8-In. Rain Style Shower Head/Chrome Finish
Hand-Held Shower Wand
2 - Adjustable Body Spray Jets
ww Features ww
Stainless Steel Hose/Chrome Finish
Diverter Valve
Selects 3 Functions: Shower Head, Body
Spray Jets, Hand-Held
Shower Wand
The Splash rain shower system replaces your existing
shower head in minutes with a complete shower
system. Simply select the function or combination of
functions you desire via the conveniently located brass
diverter, soothing rain shower, stimulating body spray
jets or convenient hand-held shower wand. Specifically
designed for ease of installation.
Page 2

Installation Instructions
Splash Rain Shower System
Model # 1020
Invigorate. Decorate. Rejuvenate.
C
ongratulations on your purchase of a Splash PULSE Showerspa. We take great pride
in the styling, quality and workmanship of this product. With proper installation and
care, your Showerspa will give you a showering experience like never before. Get
ready to start your day in a whole new way and
FEEL THE PULSE!
Page 3

6
A
B
7
10
8
C
Figure A
7
6
11
No.
No. Description
Description Qty.
No.No.
1
9
4
5
13
12
14
15
8
9
13
22
8
13
5
14
9
23
4
1
13
17
21
2
3
16
18
20
19
24
2
3
DescriptionDescription
1.
1. Splash Showerspa 1
1.1.
2.
2. 6mm rubber washer 1
2.2.
3.
3. Shower head 1
3.3.
4.
4. 90 degree fitting 1
4.4.
5.
5. Compression nut 1
5.5.
6.
6. Mounting plate 1
6.6.
7.
7.
7.7.
½ X 2½ inch brass nipple
8.
8. Mushroom head wall anchor 6
8.8.
9.
9. 1in. (25.5 mm) Nail insert 6
9.9.
10.
10. Two faced tape 1
10.10.
11.
11. Retaining washer 1
11.11.
12.
12. Brass nut 1
12.12.
13.
13. Rubber Washer 2mm 3
13.13.
14.
14. Supply line 1
14.14.
15.
15. Handshower mount 1
15.15.
16.
16. Handshower 1
16.16.
17.
17. Nylon wall anchor 2
17.17.
18.
18.
18.18.
1½ (40mm) Philips coarse thread screw
19.
19.
1⅜ (36mm) machine
19.19.
20.
20. Non slip washer 2
20.20.
21.
21. 4mm Nut 2
21.21.
22
22 Escutcheon base plate (ABS) 1
2222
23
23 Escutcheon cover (ABS) 1
2323
24.
24. Handshower hose 1
24.24.
25.
25. Shower arm plug (not shown) 1
25.25.
26.
26. Chrome metal escutcheon (not shown) 1
26.26.
353mm
Qty.
Qty.Qty.
1
2
2
10
Figure B
16
24
21
13
17
18
20
19
15
9
8
13
925mm
53mm
72mm
Page 4

If you encounter any problems during installation call customer service toll free
) and adequately tighten into elbow in
nipple threads protruding from
) through predetermined
at 888-785-7320 before returning item to store.
Tools Needed: Cordless Drill, 3/16in.(5mm) tile/masonry bit, ¼ in.(7mm) drill bit, hammer, adj. wrench, Philips
screwdriver and pencil.
1. Insert mounting plate (6) into slots on back of Splash (1). Hold Splash to wall and evaluate preferred
mounting location based on shower head and body spray height and existing valve height. The convenient
“cut to fit” supply line (14) allows the Splash to be mounted over, below or adjacent to existing shower arm
outlet.
2. If mounting over existing outlet, supply line (14) and 90 degree fitting (4) are concealed in body of Splash
and drilling wall surface is optional (Fig A). If mounting adjacent to or below existing outlet, supply line (14)
and 90 degree fitting (4) are exposed and drilling wall surface is required (Fig B).
3. Remove shower head and any escutcheon (cover) from existing shower arm.
4. Determine length of ½ inch NPT nipple required:
a. Place mark on existing shower arm at the wall surface.
b. Unscrew shower arm from elbow in wall.
c. Measure distance from mark made on shower arm to end of shower arm threads.
d. Add ½ inch to this measurement, then round up to nearest ½ inch. (I.e. measurement = 1 ¾ in. + ½
inch = 2¼ in. rounded up to nearest ½ in increment = 2½ inch NPT nipple. This is the minimum length
required with maximum length to be + 1 inch. Note: If supplied 2½ in. nipple (7) is not correct length
you must obtain the correct size - sold separately. NPT brass nipples are readily available at most
hardware stores.
5. Apply generous amount of Teflon tape and/or pipe sealant to nipple (7
wall ensuring no leaks. Important: Do not damage or mar the final ½ inch of
wall.
6. Splash mounted over existing outlet (Figure A).
a. Determine which hole in mounting plate (6) will be used; A, B or C. Remove mounting plate from
Splash. Push supply line through outlet hole in shower arm and insert shower arm plug (25). Cut the
supply line (14) at the predetermined mark depending on hole choice. Important: Supply line must be
cut clean and square to ensure no leaks - take your time!
b. Slide compression nut (5) onto supply line (14).
c. Push supply line (14) over 90 degree fitting (4) until it bottoms against base of threads.
d. Slide compression nut (5) onto to 90 degree fitting (4) and securely tighten
e. Remove face of tape (10) from mounting plate (6) and slide plate over nipple (7
hole A, B or C. Level plate before adhering to wall.
f. Push retaining washer (11) over nipple (7) securing mounting plate (6) to wall and/or use nut (12).
[Optional: secure mounting plate using supplied wall fasteners. Drill 5mm (3/16in.) wide X 25mm (1in.)
deep holes using a masonry/tile drill bit. Insert anchors (8) through plate and carefully hammer nail (9)
flush to nylon anchor.]
g. Insert washer (13) into 90° fitting (4) and connect to nipple (7). Turn on water and check for leaks.
Once leak free carefully slide Splash (1) onto mounting plate (6) and push down to secure.
7. Splash mounted adjacent or below existing outlet (Figure B).
a. Place escutcheon (22 or 26) onto nipple (7) and attach 90 degree fitting (4).
b. Position Splash in desired location ensuring supply line reaches 90 degree fitting (4) and no
interference from optional escutcheon cover (23).
c. Mark shower wall at top and bottom of mounting plate (6). Remove mounting plate from unit, remove
face of tape (10) and adhere plate to wall making sure it is level.
d. Using the plate as a guide, drill 5mm (3/16in) holes X 25mm (1in.) deep CAUTION: Live plumbing
behind wall. Insert anchors (8) through plate and into holes and lightly hammer nail (9) until flush with
nylon anchor. Note: anchors provided are for solid surface walls; if fiberglass walls are present,
different type anchors must be used – not included.
e. Place Splash (1) on mounting plate (6) and accurately mark supply line (14) for cutting. Cut square and
clean!
f. Follow steps 6b – 6d above.
g. Install escutcheon; either (22) or (26), insert washer (3) into 90° fitting (4) and connect to nipple (7).
Turn on water and check for leaks. Once leak free carefully slide Splash (1) onto mounting plate (6)
and push down to secure.
8. Handshower mount (15) can be attached to side of Splash (1) or secured to wall.
a. If mounting to side of Splash (1), drill 5mm holes through side of Splash (1) and use screws (19) and
washer (20) and nut (21) to secure. Caution: do not damage internal supply hoses.
b. If mounting to wall use 7mm masonry/tile drill bit and nylon anchors (17) and screws (18).
9. Insert washer (2) into showerhead (3) and attach to Splash (1).Insert washer (13) into each end of shower
hose (24) and secure hex head to Splash (1) and cone shape end to handshower (16).
Page 5

Manufacturer’s Limited Warranty
PULSE Showerspas, Inc. warrants that all Showerspas are free from defect in workmanship
and/or materials for a period of three years from the date of purchase. This warranty
extends to the original purchaser only and is non-transferable.
This warranty does not
malfunctions or damages resulting from (1) normal wear and tear, improper installation,
whether performed by a contractor, service company or the consumer, improper
maintenance, misuse, abuse, negligence, accident or alteration; (2) the use of abrasive
and/or caustic cleaning agents or “no-rinse” cleaning products or the use of the product in
any manner contrary to the product instruction; or (3) conditions in the home such as
excessive water pressure or corrosion.
Should any Showerspa be determined by PULSE Showerspas, Inc. to be defective in normal
residential use, at the option of PULSE Showerspas, Inc., such product shall either be
replaced or repaired and returned to the customer free of defects. The consumer shall give
notice of any defects to PULSE Showerspas, Inc. within thirty days of discovery of such
defect.
Proof of purchase (original sales receipt) must be provided to PULSE Showerspas, Inc. with
all warranty claims. PULSE Showerspas, Inc. is not responsible for labor charges, removal
charges, installation or other consequential costs. In no event shall the liability of PULSE
Showerspas, Inc. exceed the purchase price of the Showerspa.
Some states/provinces do not allow limitations of how long an implied warranty lasts or
the exclusion or limitation of such damages, so these limitations and exclusions may not
apply to you. This warranty gives the consumer specific legal rights. You may also have
other rights that vary from state/province to state/province.
Follow manufacturers recommended installation. Use caution with children under ten
years of age. Do not use Showerspa as a support device. Do not use harsh chemicals or
abrasives when cleaning. Turn water supply off when servicing Showerspa.
cover, and PULSE Showerspas will not pay for conditions,
PULSE Showerspas, Inc
e-mail: info@pulseshowerspas.com * website: www.pulseshowerspas.com
.
49-A Hangar Way
Watsonville, CA 95076
888.785.7320
 Loading...