

Pulsatom Health Care GM3+ Operating Instructions Manual

Operating Instructions
Blood Glucose Monitoring System
G
M
3
+

NOTICE:
The essential features of the type described and illustrations herein remaining unaltered, Pulsatom Health Care Pvt. Ltd.
reserves the right to carry out modifications at any moment on the monitor, strips or any other accessories as may be
convenient and necessary without being obliged to bring this booklet up-to-date. The descriptions and illustrations in
this booklet are not to be taken binding on the manufacturers.

NOTICE:
ê The essential features of the type described and illustrations herein remaining unaltered,
Pulsatom Health Care Pvt. Ltd. reserves the right to carry out modifications at any moment on the
monitor, strips or any other accessories as may be convenient and necessary without being
obliged to bring this booklet up-to-date. The descriptions and illustrations in this booklet are not
to be taken binding on the manufacturers.
ê Any text that appears in italics and with these symbols is important information that should be
read carefully and adhered to while using the monitor.
ê Various Memory Configurations are available. Please check your package for the Memory
configuration of your monitor.

1. Introduction
GM3+ is the latest Glucometer coming from Pulsatom Health Care Pvt. Ltd., manufacturers of India's
first indigenous Blood Glucose Monitors. Please read this users’ manual thoroughly before you
begin using the GM3+ Blood Glucose Monitor, as it provides all the information you need to use it
correctly. It consists of GM3+ Blood Glucose Monitor, GM3+ Test Strips, Blood Lancet Device,
Lancets, 2 Nos AAA batteries, Carry Case and User Manual. The above list is a comprehensive list of
items that form a part of the Gm3+ Blood Glucose Monitoring System. The actual contents of the
package purchased by you may vary according to the package.
Front View of your GM3+
Back View of your GM3+
2. Get to know your Gm3+
Decrease Button
Power Button
Increase Button
Strip Slot
Battery Compartment
Serial Number
Display
10:01
202
17-02-09
GM3+ Blood Glucose Test Strips
1) Contact Area - Indicated by the arrow mark. Insert this end of
the test strip into the Gm3+ monitor with the arrow facing
upwards and towards the monitor.
2) Test Area - Blood sample is applied to this area of this test strip
for testing.
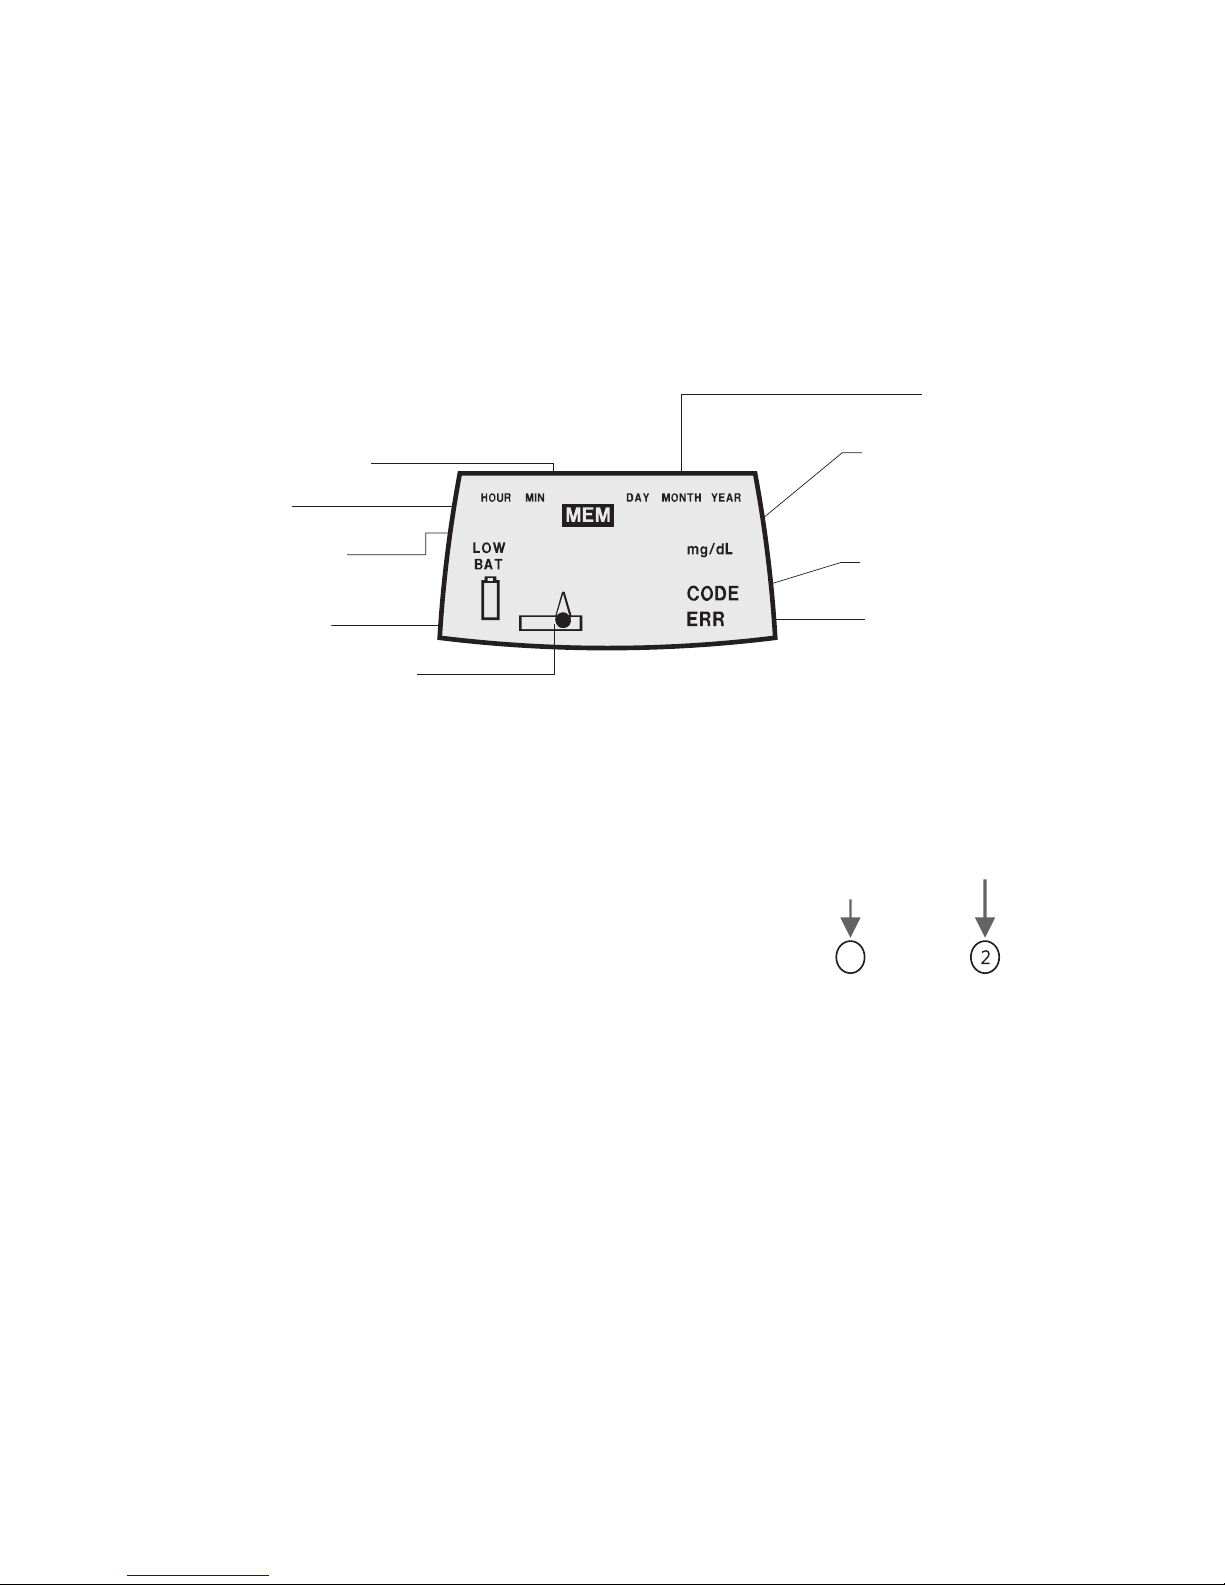
Display Panel of your Gm3+ Blood Glucose Monitor
Gm3+
Blood Glucose Test Strip
Date
Units - mg/dl
Code Symbol
Error Symbol
Apply Sample Symbol
Low Battery
Symbol
Result/ Code
Display
Time
Memory Symbol
1
10:01
202
17-02-09

3. Installing Batteries in your GM3+
Your monitor requires two external 1.5 Volts (AAA) alkaline batteries (type LR 03) that
need to be installed in the monitor before the monitor can be used.
ê When replacing external batteries, always replace both batteries at the same time and both
should be of the same brand. Use good quality alkaline batteries only. Inferior/ Cheap batteries
may damage your monitor. If the batteries show signs of leakage, please replace immediately.
Leaking batteries will damage your monitor.
The life of the batteries depends on the extent of use and the brand of battery used.
1) Press lightly on the battery compartment cover lock and lift
the cover off the back of monitor.
2) Insert two 1.5 Volts (AAA) alkaline batteries (type LR03) one at
a time into the battery compartment.
3) While inserting the batteries into the compartment, ensure
that the positive & negative terminals are aligned correctly as
marked in the compartment.
4) Place the battery cover back on the GM3+ and snap it in place
to lock the battery compartment lid.
ê Be sure that the positive (+) side of the each battery is facing in
the correct direction. If batteries are incorrectly installed, the
monitor may be permanently damaged.

4. Switching ON your GM3+
1) When you press the POWER Button, the monitor
switches ON and, displays the initial screen in which all the
segment’s of the display are shown.
2) It next displays the current Code set on your GM3+ monitor.
This is indicated by the tag, CODE displayed on the monitor.
3) It then displays the “strip along with a drop” symbol
indicating it is ready to accept a sample for a test.
5) If no sample is applied within 60 seconds, the monitor
switches OFF automatically.
6) Press the POWER Button for 2 seconds to manually
switch OFF the monitor
5. Date and Time Settings
Set the date and time on your your GM3+ monitor before use. However, even if you
do not set the date and time, test results are not affected.
For example, let us set on your GM3+ monitor the time to 22:46 (10:46PM) and date
to 23 September 2008.
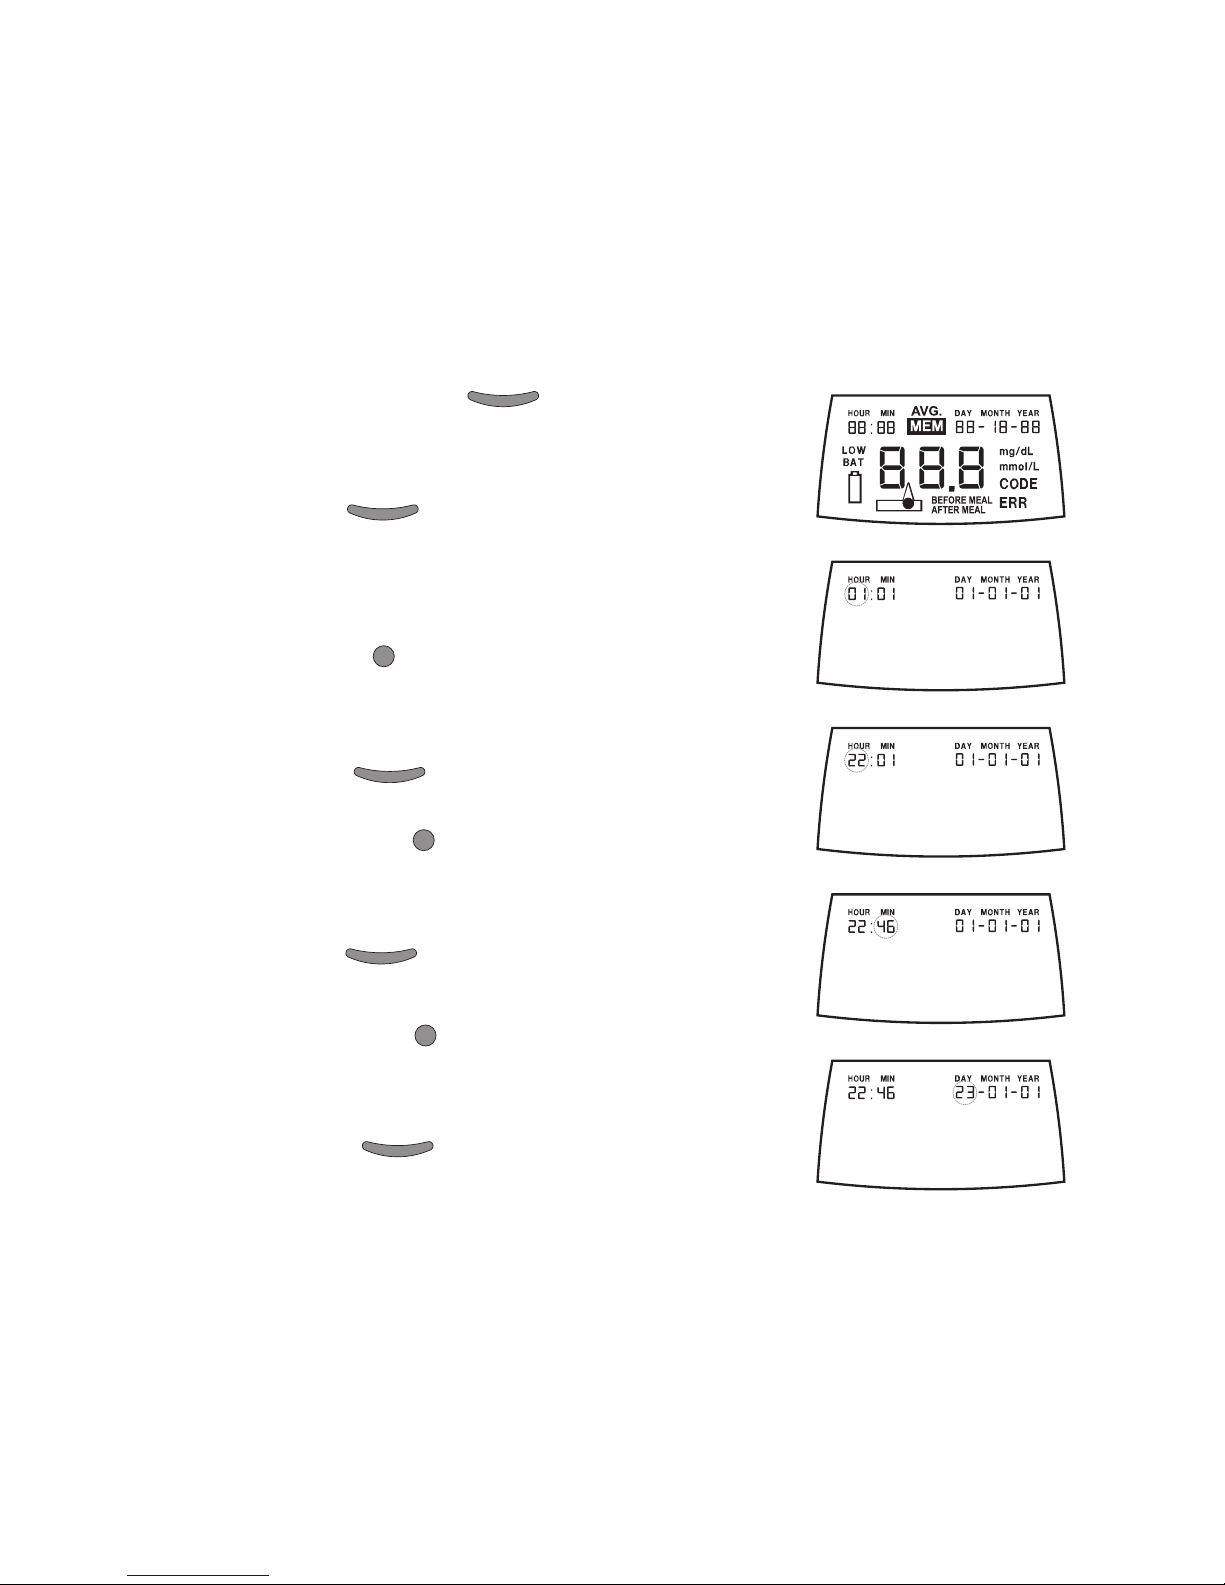
1) When you press the POWER Button, the monitor
switches ON and displays the initial screen in which all the
segment’s of the display are shown.
2) Press the POWER Button when the initial display is
shown to enter the time and date setting mode. Your
monitor now displays the current time and date set on your
monitor and the hour is blinking.
3) Press NEXT or PREV Button to increase or decrease the
hour setting till it displays the desired hour value. For
example, 22 to set a time of 22:46 (10:46 PM).
4) Press the POWER Button to go to the minutes set
mode. The minutes now start to blink.
5) Press the NEXT or PREV Button to increase or decrease
the minutes setting till it displays the desired minutes value.
For example, 46 to set a time of 22:46 (10:46 PM).
6) Press the POWER Button to go to the set day mode.
The day now starts to blink.
7) Press the NEXT or PREV Button to increase or decrease
the day setting till it displays the desired date value. For
example, 23 to set a date of 23 September 2008.
8) Press the POWER Button to go to the set month
mode. The month now starts to blink.
 Loading...