

Pulsarlube M 125cc, M 250cc User Manual
Available Mounting Options
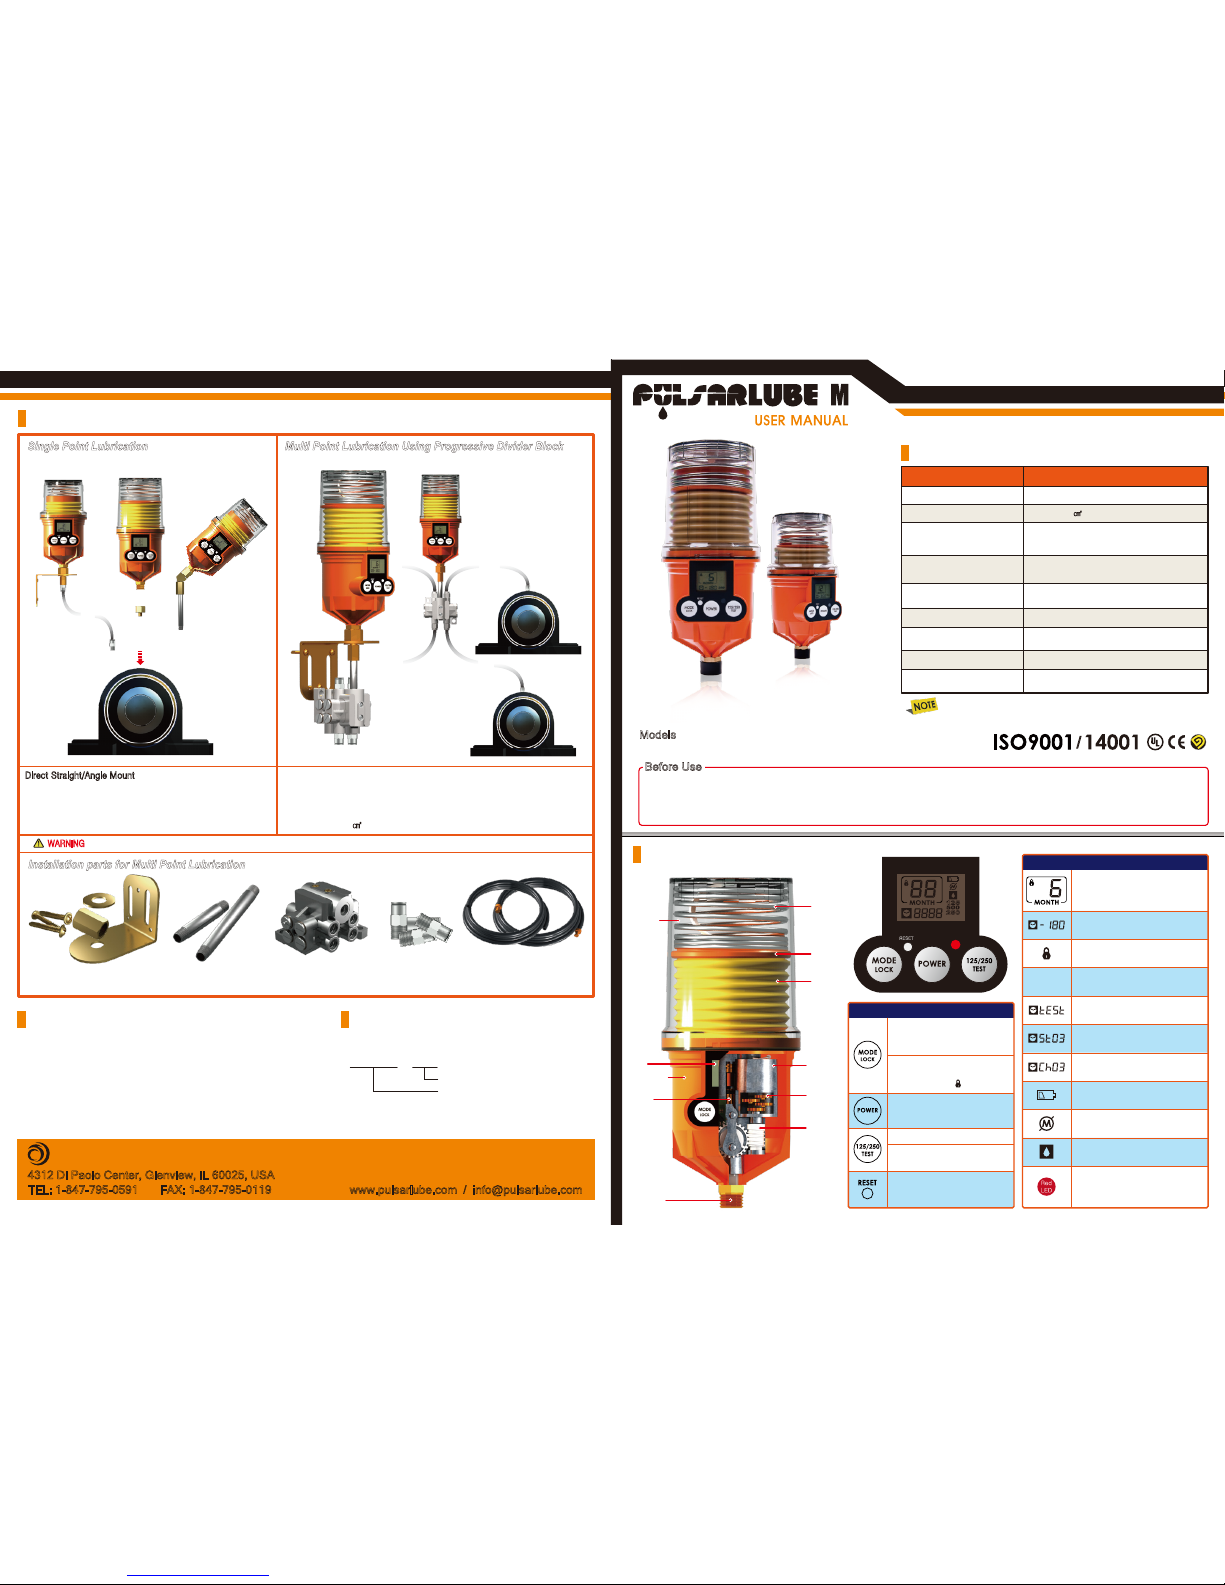
Direct Straight/Angle Mount (with or without extension tube) is
always preferable. However, for applications not allowing any
direct mounts or extension mounts, remotely mount the unit
using a 6mm O.D. (1/4") pre-filled lube line.
WARNING
Keep the maximum distance per lube point at 6m (20ft) or less.
Single Point Lubrication Multi Point Lubrication Using Progressive Divider Block
Installation parts for Multi Point Lubrication
Mounting Bracket Assembly Extension Tube Progressive Divider Block
Remote multi point lubrication is available with the Pulsarlube M using
a divider block. It is recommended to test the back pressure of the bearing,
lube lines, and divider block after assembly using a grease gun connected to
a pressure gauge. Ensure the break-off pressure is below the average operating
pressure of 30kgf/㎠
(425psi).
High Performance Automac Grease Lubricator
PULSARLUBE M 125/250cc Grease Lubricator
Models
Specifications
Grease Pouch
Installation Thread Size
Available Dispensing Periods
Multi Point
Weight
Product Size
Remote Installation
125 / 250cc (replaceable)
-15˚C ~ 60˚C (5˚F ~ 140˚F)
-40˚C ~ 60˚C (-40˚F ~ 140˚F) *
30~60kgf/㎠
(425~850psi)
3/8" Male BSPT
Up to 8 points
Half (H), 1, 2, 3, 6 & 12 months
125cc: Ø91mm (3.6") × 183mm (7.2")
125cc: 860g (1.89 lb)
250cc: 1,050g (2.31 lb)
250cc: Ø91mm (3.6") × 210mm (8.2")
Up to 6m (20ft) using a 6mm (1/4") O.D.
pre-filled lube line
Operating Pressure
Operating Temperature
Specifications Description
Product Details
How to Order
Technical information is subject to change without notice.
Before Use
Shelf Life and Product Warranty
KLT125 / PL1
KLT250 / PL1
Pulsarlube Model #
(KLT125: 125cc, KLT250: 250cc)
Grease Type
Pulsarlube USA, Inc.
4312 Di Paolo Center, Glenview, IL 60025, USA
www.pulsarlube.com / info@pulsarlube.com
Doc No. 1042-000 REV. 120600
TEL: 1-847-795-0591 FAX: 1-847-795-0119
The shelf life of each Pulsarlube M unit is 1 year from the date of production.
Product warranty is limited to original defects in material and workmanship
and will not cover any collateral damage due to mishandling, abuse and /or any
other inappropriate use of this product. Warranty period is 1 year from the date
of purchase.
/
Deactivate "Automatic Lock Out"by
pressing the MODE/LOCK button
until the lock icon ( ) disappears
125 / 250
Thank you for purchasing the Pulsarlube M, the electromechanical automatic grease lubricator from Pulsarlube USA, Inc.
To ensure the safe operation and proper installation of the Pulsarlube M unit, we strongly recommend that you read the
following information carefully before use.
If you require further information, please contact your local supplier or manufacturer.
* with optional Lithium Battery Pack
The dispensing period setting
The # of days remaining until the end
of lube cycle
The unit is in"Automatic Lock Out"
mode
Selected grease pouch capacity
The test mode is activated
Select the dispensing rate in
ascending order: 1▶2 ▶ 3 ▶ 6 ▶
12 ▶ Half (H)
Press the POWER button for 2
seconds to turn unit on or off
Select the volume of grease pouch
Run a test cycle by pressing the
TEST button for two seconds
Reset the unit when the unit
malfunctions and/or after changing
the service pack
The # of days after dispensing has
completed
The # of days on stand-by mode
due to excessive backpressure
Low battery power
Excessive backpressure exists
Empty grease level
Signal lamp blinks periodically
when battery power is low, excessive
backpressure exists, or if grease
level is empty
250
125
OIL
Buttons
LCD Display - Function
Pouch
Spring
Pouch
Plate
Grease
Pouch
Motor
Gear
Set
Worm
Gear
Connecting Thread
3/8"BSPT
Piston
LCD
Main Body
Housing
Push-in One-touch
Fitting
Empty & Pre-filled Nylon
Tubing

If after running test mode is
still present:
250
125
Installation Instructions
For Completely Assembled Pulsarlube M unit - Initial Installation
Before installation of the Pulsarlube M unit, remove contaminants around the lube
point and ensure a clear passage by purging the lube point with a manual grease gun.
Remove the grease nipple and check for hardened grease at the bearing lube point.
If hardened grease exists, clean the lube point before mounting the Pulsarlube M unit
on the bearing.
125
125
125/250
Turn the Pulsarlube M unit ON by pressing the POWER button for 2 seconds.
To confirm that the LCD is turned on, make sure that the red LED blinks once as
soon as the POWER button is depressed.
Press the TEST button for 2 seconds to run a test cycle.
The unit will start to dispense grease and operate continuously in purge / test mode.
This process will last approximately 2 minutes to ensure every function of lubricator
works properly.
Select the appropriate grease pouch volume by pressing the 125/250/TEST button.
Press the MODE button to program the dispensing period.
Each time the MODE button is pressed, the dispensing period changes in ascending
order: 1▶ 2 ▶ 3 ▶ 6 ▶ 12 ▶ H (H=Half month)
125
125/250
Install the Pulsarlube M unit on the lube point using appropriate adapters and
accessories as needed. Make sure that adapters and accessories are firmly tightened.
The installation date and the scheduled date of lube cycle completion should be
logged for maintenance purposes.
Service Pack Installation
If the Pulsarlube M unit is provided with a replaceable service pack, the following procedure is required before step #2 of above.
For complete service pack installation instruction, please refer to the Service Pack user manual, step #3~7 in the section of "How to
Replace a Service Pack".
Quick Reference for Service Pack Installation
1
2
3
4
1 2 3 4 5 6
5
Troubleshooting Guideline
WARNING
Symptom Possible Cause of TroubleLCD Display Troubleshooting Steps
^Electrical malfunction of CPU or circuitry
^Contact problem (open circuit) at buttons in
control panel
^Electrical malfunction of CPU or circuitry
^Battery pack installed incorrectly
^Faulty or damaged battery pack
^Old battery pack was not replaced
1. Make sure the battery pack is installed correctly
2. Replace battery pack
Contact your local supplier or manufacturer for either repair
or replacement
3. Contact your local supplier or manufacturer for either
repair or replacement
^The battery pack m
ust be replaced together with each
grease pouch replacement
^Keep battery pack stored in a cool, dry place to prevent
damage
^Expired battery pack
^Extreme storage conditions (temperature or
humidity)
^Faulty or damaged battery pack
^Extreme operating conditions
1. Ensure operating environment meets requirements
2. Replace battery pack
^Over lubrication
^High backpressure in lube line due to hardened
grease, ruptured lube line, long distance remote
installation, etc.
^Low battery power due to extreme operating
conditions
^Grease pouch incorrectly fitted
^Grease pouch empty
^Grease hardens due to cold temperature or
high oil separation
^Install and secure grease pouch correctly
^Replace grease pouch and battery pack
^Use appropriate q
uality grease for operating environment
Unit Won't
operate
Low Battery
Indication
Excessive backpressure exists due to:
Unit Won't
Dispense
Grease
Normal
Normal
Blank
Screen
^Pump priming issue due to
inadvertently entrapped air pockets
unlock
unlock
1. Gently depress the check
valve a few times with a
thin Allen wrench,
screwdriver, or similar tool
1. Deactivate Auto Lock
3. Check if grease is
dispensing
^Replace battery pack
^Check backpressure in lube line
^Check grease dispensing rate
^Reduce remote installation distance
^Use a lithium battery pack in
extreme environments
2. Run test mode and check
that grease is dispensing
2. Run test mode
If the issue is not solved, refer to
the steps below.
If after running test mode is
no longer present, it is okay to
reinstall the lubricator.
 Loading...