

Page 1
AXION
Thermal Imaging Monoculars
Operating Instructions
English / Français / Deutsch / Español / Italiano / Русский
Page 2
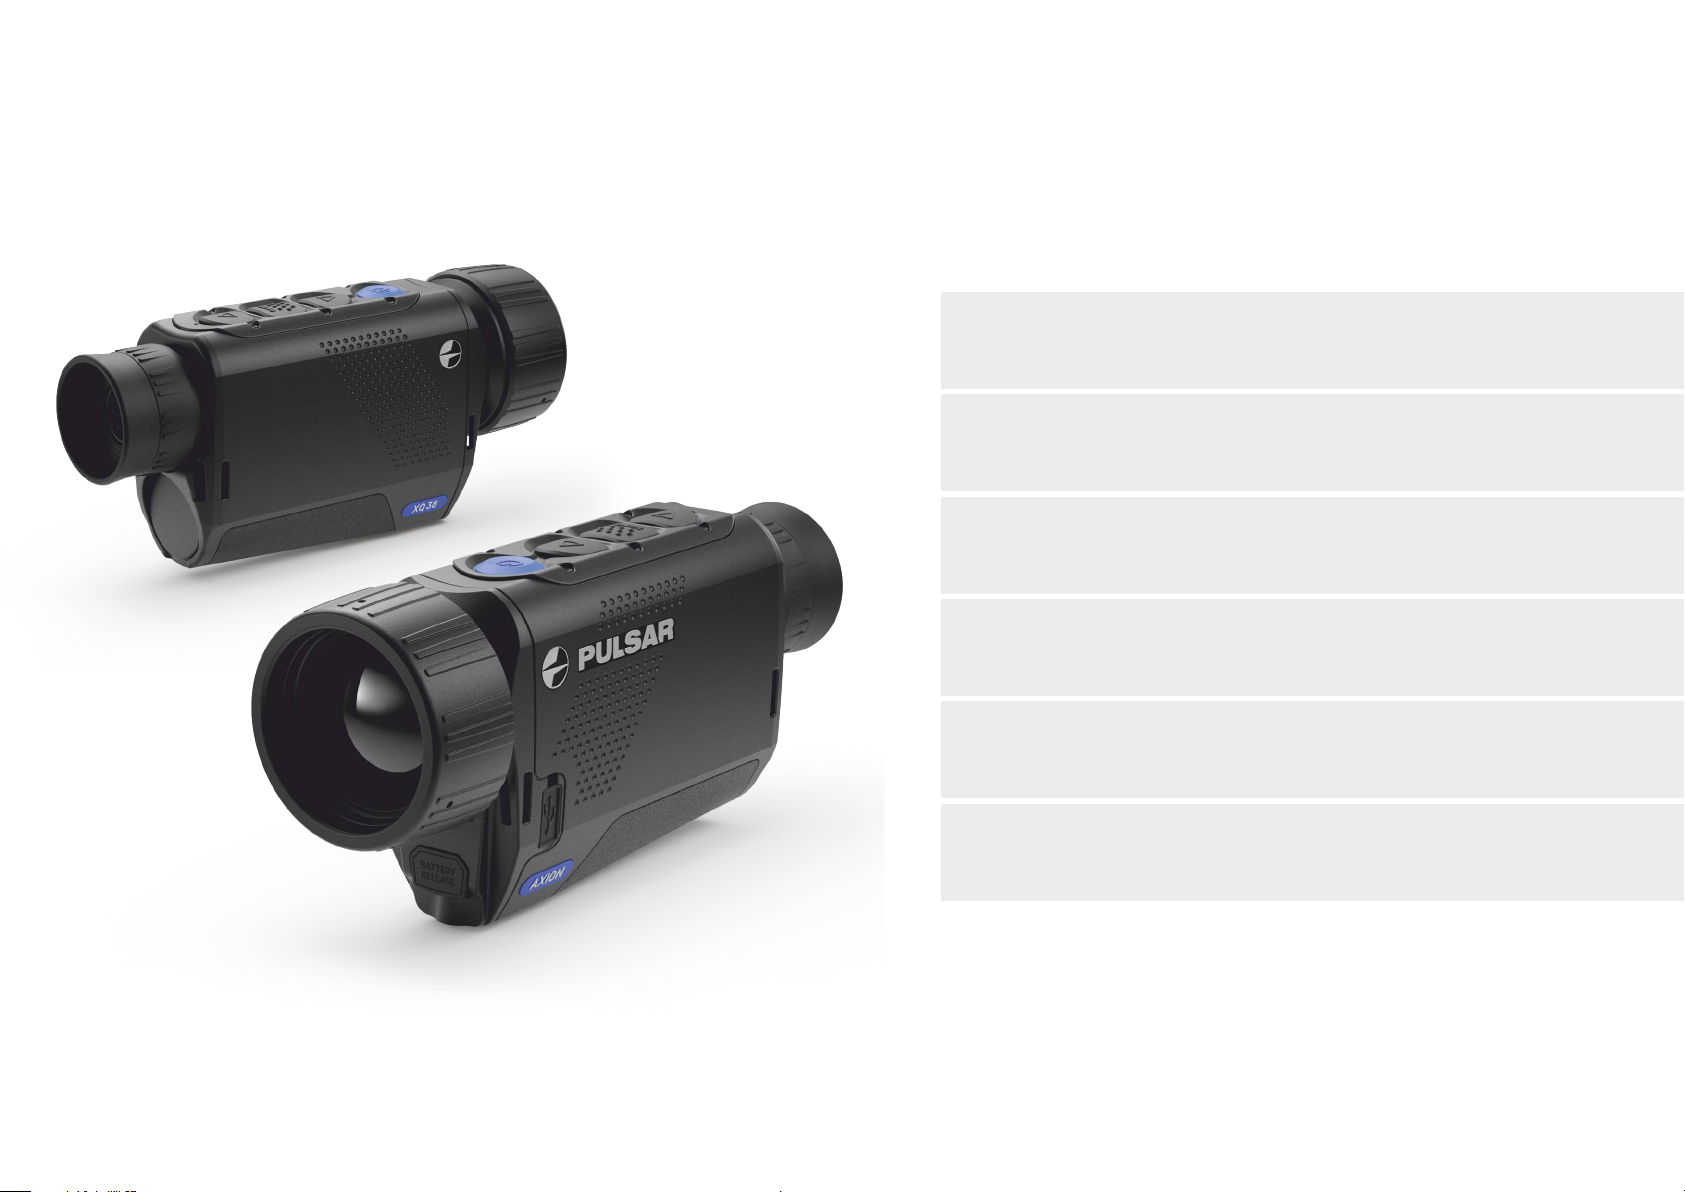
Thermal Imaging Monoculars AXION 1-8 English
Operating Instructions
Imageurs Thermiques AXION 9-16 Français
Mode d'emploi
Wärmebildkameras AXION 17-24 Deutsch
Bedienungsanleitung
Generador de imágenes térmico AXION 25-32 Español
Instrucciones de uso
Termovisori AXION 33-40 Italiano
Istruzioni per l'uso
Тепловизор AXION 14 -48 Русский
Инструкция по эксплуатации
Page 3
ENGLISH
SPECIFICATIONS
SKU#
AXION Model
Microbolometer
Type
Resolution (pixels)
Frame refresh rate (Hz)
Pixel size (microns)
Optical specifications
Optical magnification (x)
Smooth digital zoom (x)
Digital zoom (x)
Relative aperture (D/f)
Minimum focusing Distance (m/y)
Exit pupil diameter (mm/inch)
Angle of field of view (HxV), degrees
Angle of field of view, metres at 100m
Focusing range of eyepiece (dioptres)
Maximum observation distance (m/y) *
Display
Type
Resolution (pixels)
Operational specifications
External power voltage
Battery type
Capacity
Rated Output Voltage
External power supply
Battery charge life in hours ** (at 22°C)
IP code (IEC60529) degree of protection
Stream Vision compatibility
Operating temperature range
Dimensions (mm/inch)
Weight without batteries (kg/oz)
Video recorder
Video/photo resolution (pixels)
Video / photo format
Amount of built-in memory
Wi-Fi channel
Frequency
Standard
Reception range in direct line of sight (m)
* Actual running time depends on the intensity of Wi-Fi use and the built-in video recorder.
** For animal object, such as a deer.
Improvements may be made to the design and software of this product to enhance its user features.
The current version of the User's Manual may be found on the website www.pulsar-vision.com
77421
XМ30
uncooled
320x240
50
12
4
4-16
2/4
1.2
3/3.28
3.5/0.12
7.3
12.8
±5
1300/1420
AMOLED
1024x768
3 – 4.3V
Li-Ion Battery Pack АPS3
3200 mAh
DC 3.7V
5V (USB)
4
IpХ7
Yes
-25°С ... +40°С/-13F ... +104F
143x41x69/5.63х1.61х2.71
0.25/8.82
1024х768
.mp4/.jpg
16 GB
2.4 Ghz
802.11 b/g/n
15
77422
XМ38
uncooled
320x240
50
12
5.5
5.5-22
2/4
1.2
3/3.28
3.5/0.12
5.8
10.1
±5
1700/1860
AMOLED
1024x768
3 – 4.3V
Li-Ion Battery Pack АPS3
3200 mAh
DC 3.7V
5V (USB)
4
IpХ7
Yes
-25°С ... +40°С/-13F ... +104F
149x49x70/5.87х1.93х2.75
0.27/9.52
1024х768
.mp4/.jpg
16 GB
2.4 Ghz
802.11 b/g/n
15
DELIVERY PACKAGE
џ AXION Thermal Imager
џ APS3 rechargeable battery
џ APS Battery Charger with power adapter
џ USB cable
џ Case
џ Hand strap
џ Quick start guide
џ Cloth for cleaning optics
џ Warranty card
DESCRIPTION
AXION IR-matrix (microbolometer) based thermal imaging monoculars are represented by a number of models
that differ in magnification and lens diameter. These devices are designed for use both at night-time and during
the day in difficult weather conditions (fog, smog, rain), as well as where obstacles are present that impede the
detection of a target (branches, tall grass, dense shrubs etc.). Unlike night-vision devices that are based on
electron-optical converters, thermal vision monoculars do not require an external light source and are resistant
to the effects of bright light.
AXION monoculars can be used for night-time hunting, observation and terrain orientation, and carrying out
rescue operations.
DISTINGUISHING FEATURES
џ Microbolometer pixel size of 12 microns
џ High-resolution AMOLED display
џ Lightweight and compact
џ Functional and ergonomic design
џ Convenient user interface
џ Observation in eight colour modes
џ Three calibration modes (manual, semi-automatic and automatic)
џ Long detection distance
џ High magnification
џ Three observation modes (forest, city and identification)
џ Stadiametric rangefinder
џ Display off function
џ Pixel correction function
џ Upgradeable software
џ Wide operating temperature range (-25 °С – +40°С)
џ Fully watertight (IPX7 protection class)
Video/audio recording
џ Built-in video recorder
џ Integration with iOS and Android devices
џ Wi-Fi Smartphone remote control and surveillance
џ YouTube Live broadcasting and direct recording on the Internet via a smartphone and the Stream Vision app.
Battery Pack
џ Quick-change APS3 Li-ion battery pack
џ USB charging option
1
Page 4
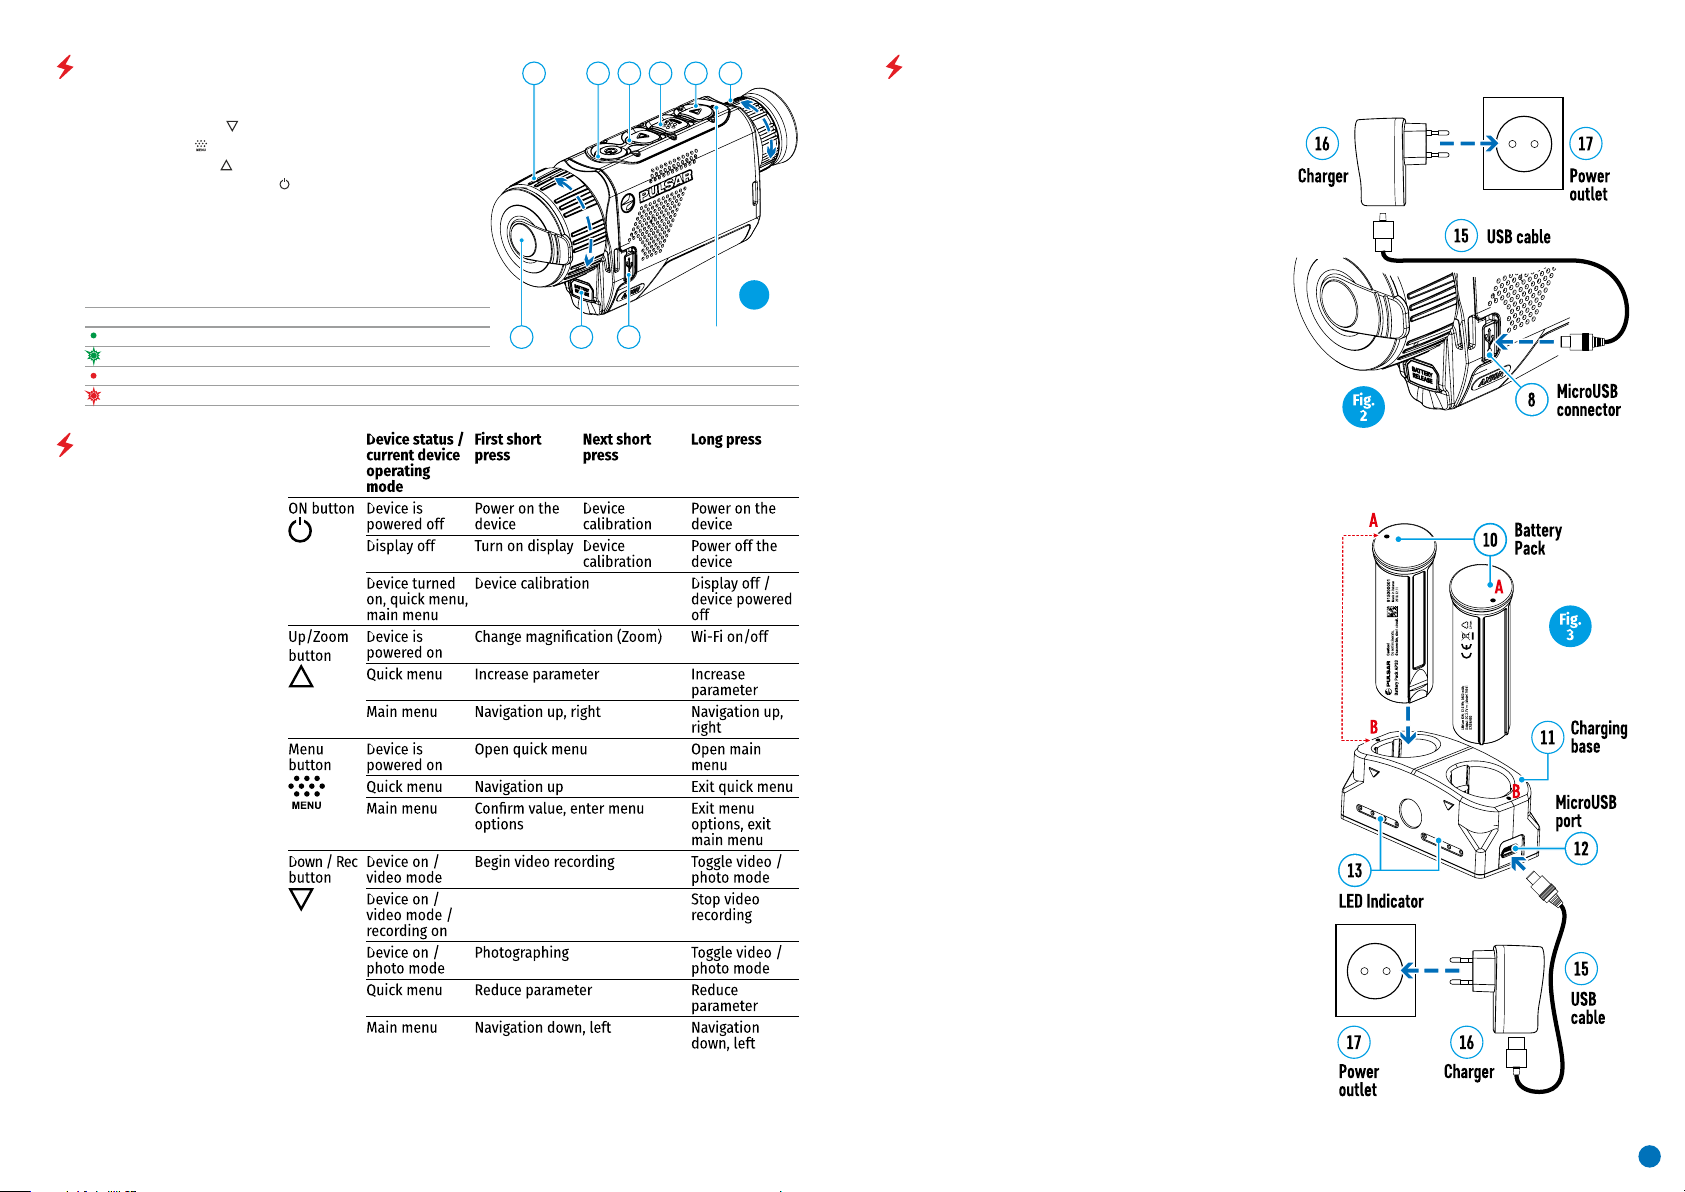
COMPONENTS AND CONTROLS
123456
USING THE RECHARGEABLE BATTERY
1. Eyepiece dioptre adjustment ring
2. Down/Rec button
3. Menu button
4. Up/Zoom button
5. On/Calibration ON button
6. Lens focus ring
7. Lens cap
8. MicroUSB connector
9. Battery release button
LED indicator displaying current status of the device
LED Indicator Operating Mode
Device is powered on
7 9 8
Device on / video recording
Device on / battery charge <10%
Device on / video recording / battery charge <10%
BUTTON OPERATION
LED indicator
Fig.
AX ION thermal image rs are suppli ed with a
rechargeable APS3 Lithium-ion Battery Pack which
enables the thermal imager to be used for up to 3
hours. The battery should be charged before first use.
Charging the battery
Option 1 (Fig.2) :
џ Install the battery (10) into its slot on the instrument
case (14) by aligning the icons to form a 'dot' on the
device and the battery. (see Fig. 4).
1
џ Attach a USB cable (15) to the microUSB connector
(8) on the device.
џ Connect the other end of the USB cable (15) to the
mains charger (16) or to a USB socket connected to
another power source with rated output of 5V or less.
џ Connect the mains charger (16) to the mains power
supply.
Note: The PB8I* Power Bank may be used as a charger
(see Item 7).
Option 2 (Fig.3) :
џ Insert the rechargeable battery (10) supplied with
your device, or purchased separately, fully along the
guide rail into the APS charger slot (11).
џ Point A on the battery and Point B on the charger
should be aligned.
џ Two batteries can be charged at the same time – a
second slot is provided for this.
џ Attach the microUSB plug on the USB cable (15) to
the microUSB connector on the mains device (16). Plug
the device into a 100–240V power outlet (17).
џ Attach the second plug of the microUSB cable to the
socket (12) of the mains charger (11).
Attention! AXION thermal imagers require a licence
when exported outside your country.
џ The LED indicator (13) will light up.
2
Page 5
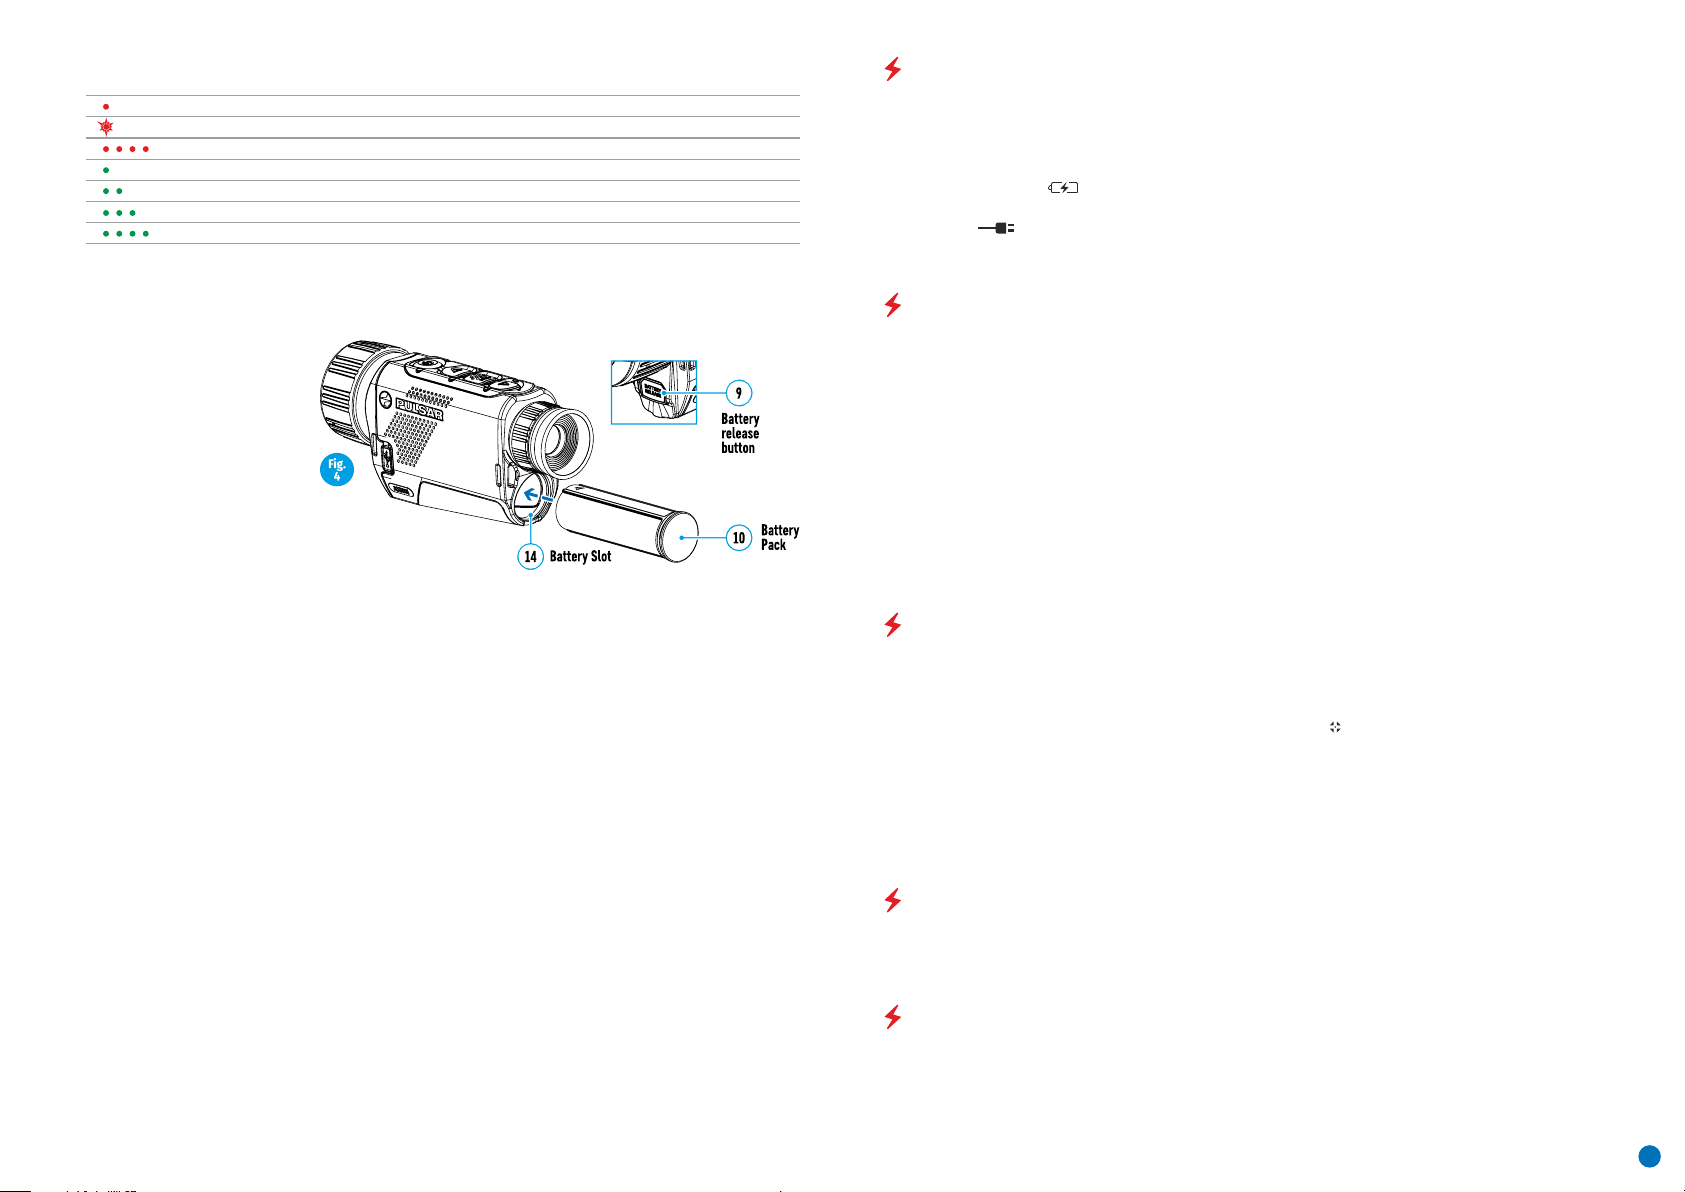
Battery charge status (see table).
LED Indicator * Battery charge status
Battery charge from 0% to 10%; Charger not connected to the mains power supply.
Battery charge from 0% to 10%; Charger connected to the mains power supply.
Battery defective. Battery should not be used.
Battery charge from 10% to 20%.
Battery charge from 20% to 60%.
Battery charge from 60% to 95%.
Battery completely charged. Can be disconnected from the charger.
* The LED indicator displays the current level of charge of the battery for 30 seconds when the APS charger is not
plugged in. When the power is connected, the display shows the current status of the battery constantly, the LEDs
additionally flickering to indicate the battery charging process.
Installation:
џ Insert the battery (10) into the
assigned slot on the device casing
(14), aligning the images on the
instrument and the battery.
џ When properly installed, the
battery is locked into the slot with
a special clip.
џ To remove the battery, press the
Battery Release button (9).
Safety measures:
џ When charging, always use the
charger supplied with your optical
device. The use of a different
charger may cause irreparable
damage to the battery or the charger and may cause the battery to ignite.
џ After being stored for a long time, the battery should be partially charged – it should not be fully charged or
completely discharged.
џ Do not charge the battery immediately after bringing it from the cold into a warm atmosphere. Wait 30–40
minutes for the battery to warm up.
џ Do not leave the battery unattended during charging.
џ Do not use the charger if it has been modified or damaged.
џ The battery should be charged at a temperature of between 0° C and +45° C, otherwise the battery life will be
significantly reduced.
џ Do not leave a charger with a battery connected to the mains for more than 24 hours after full charge.
џ Do not expose the battery to high temperatures or naked flame.
џ The battery is not intended to be immersed in water.
џ The connecting of third-party devices with an energy consumption greater than permissible is not
recommended.
џ The battery is equipped with a short circuit protection system. However, situations that may lead to short
circuiting should be avoided.
џ Do not dismantle or deform the battery.
џ Do not subject the battery to shocks or falls.
џ Where the battery is used in below-zero temperatures, capacity will decrease. This is normal and does not
indicate a defect.
џ Do not use the battery in temperatures that exceed those shown in the table – this may shorten battery life.
Store the battery out of the reach of children.
EXTERNAL POWER SUPPLY
External power is supplied from an external source, such as a 5V Power Bank.
џ Attach the external power source to the device's USB connector (8) (Fig. 1)
џ The device will switch to operation from the external power source, while the APS3 battery will be gradually
recharged.
џ An icon of a battery will appear on the display showing its charge as a percentage.
џ If the device is operated from an external power source and the APS3 battery is not connected, an icon is
displayed .
џ When the external power supply is disconnected, the device switches to the internal power supply without the
device powering off.
OPERATION
ATTENTION! The lens of the device must not be pointed at any sources of intense energy, such as laser-emitting
devices or the sun. This may damage the electronic components in the device. Damage caused by failure to
comply with the operating guidelines is not covered under warranty.
Switching on and adjusting the image
џ Remove the lens cover (7). Secure the cover to the strap using the magnet built into the cover.
џ Power up the device by pressing the ON button (5).
џ Adjust the resolution of the icons on the display by rotating the dioptre adjustment ring on the eyepiece (1). In
future, it will not be necessary to rotate the eyepiece dioptre adjustment ring, regardless of distance and other
conditions.
џ To focus on the object being observed, rotate the lens focus ring (6).
џ Adjustment of brightness and contract in the display, as well as turning on the smooth digital zoom, are
described in the FAST ACCESS MENU FUNCTIONS section.
џ Turn the device off after use with a long press of the ON button (5).
CALIBRATING THE SENSOR
Calibration enables the microbolometer temperature background to be equalised and defects in the image
(such as vertical lines, phantom images etc.) to be eliminated.
There are three calibration modes: manual (M), semi-automatic (SA) and automatic (A).
Select the required mode in the CALIBRATION section of the menu .
џ M mode (manual). Secure the lens cap and briefly press the ON button (5). After completing the calibration
process, remove the lens cap.
џ SA mode (semi-automatic). Calibration is engaged by a brief press of the ON button (5). The lens cap need not
be secured (the sensor is closed by an internal shutter).
џ A mode (automatic). The device is calibrated autonomously, in accordance with the software algorithm. The
lens cap need not be secured (the sensor is closed by an internal shutter). In this mode, the device may be
calibrated by the user using the ON button (5) (in semi-automatic mode).
DISCRETE DIGITAL ZOOM
The device's functionality offers the possibility of quickly increasing its base multiplicity (see the table of
technical properties in the Digital Zoom line) by a factor of 2 or 4. Adjust the digital zoom accordingly by pressing
the DOWN button (2).
THE QUICK ACCESS MENU FUNCTIONS
The basic settings (brightness and contrast adjustment, use of the smooth digital zoom function and the
stadiametric rangefinder) are changed via the Quick Access Menu.
џ Enter the menu with a short press of the Menu button (3).
џ A short press of the Menu button (3) enables you to switch between functions.
3
Page 6
Brightness – by pressing the UP (4) / DOWN (2) buttons and changing the display brightness value from 00 to
20.
Contrast – by pressing the UP (4) / DOWN (2) buttons and changing the display contrast value from 00 to 20.
Smooth digital zoom – by pressing the UP (4) / DOWN (2) buttons and changing the digital zoom value from 1.0
to 4.0. The increment size of the digital zoom is 0.1.
To exit the menu, press and hold down the Menu button (3), or wait 10 seconds for automatic selection.
The initial smooth digital zoom factor displayed is equal to x1.0 if the discrete zoom is inactive, x2.0 if is 2x, and
x4.0 if 4x.
Note. Current magnification is calculated as the product of the base magnification and the smooth digital zoom
ratio. Example: where the basic device magnification is 3.0x and the smooth digital zoom ratio is x1.7, the actual
magnification is 5,1х (3,0*1,7). The next time the device is turned on, the image is projected onto the display with
the brightness and contrast settings saved from the previous power off.
Stadiametric rangefinder – press the UP (4) / DOWN (2) buttons to change the position of the markings for
determining the distance of the object being observed (see Section 16 for further information on the
rangefinder).
Composition and description of the menu
Mode
Selection of observation mode The thermal imager has three automatic operating modes.
Each of these modes includes an optimum combination of parameters (brightness, contrast,
intensity etc.) for ensuring the best image quality under any given observation conditions.
џ Press and hold the Menu button (3) to enter the menu.
џ Select the ‘Mode’ option.
џ A short press of the Menu button (3) opens the menu.
џ Select one of the settings described below with the UP (4) / DOWN (2) buttons.
џ A short press of the Menu button (3) confirms the selection.
Mountains/Rocks – High Contrast Mode This is the optimum mode for observing wildlife
against a background of rocks, and soil in an upland situation.
Forest – Low Contrast Mode This is the optimum mode for observing wildlife against a
background of vegetation.
Identification Mode – A universal mode for application under various observation
conditions.
MAIN MENU FUNCTIONS
џ Enter the menu with a long press of the Menu button (3).
џ Press the UP (4) / DOWN (2) buttons to move through the menu functions.
џ Menu navigation is be means of scrolling. When the last item on the first tab is reached, navigation moves to
the first item of the second tab.
џ One short press of the Menu button (3) opens a menu item.
џ To exit the menu, press and hold down the Menu button (3).
џ Automatic exit from the menu occurs after 10 seconds of inactivity.
џ When exiting the menu, the cursor location ( ) is remembered only for the duration of the one working session
(i.e. until the device is powered off). The next time the device is powered on and the menu is accessed, the cursor
will be at the first item on the menu.
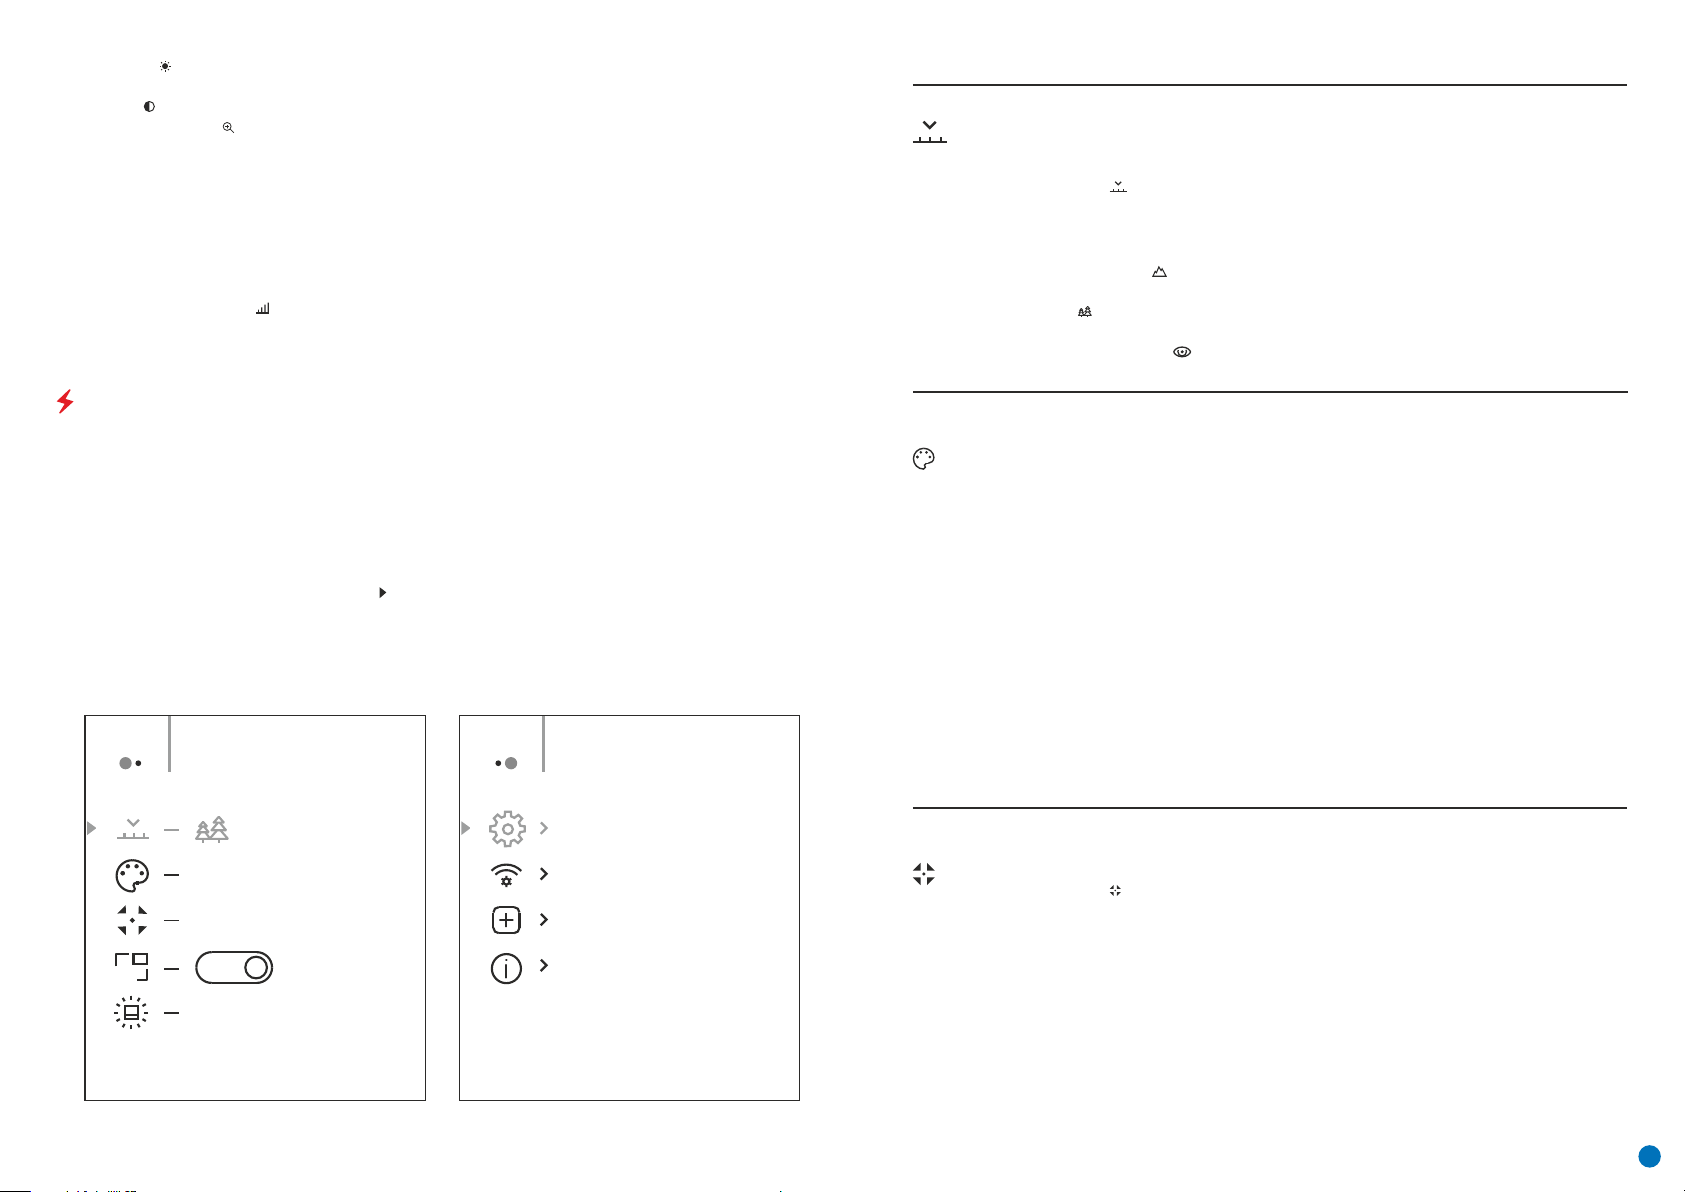
General view of the menu
Tab 1 Tab 2
Menu General SettingMenu Mode
Hot White
Automatic
PIP
Off
10
Colour
Palettes
Calibration
Mode
Colour Palette Selection The principal display mode for an observed image is ‘Hot White’. The
‘Colour Palettes’ menu item allows you to select an alternative palette:
џ Press and hold the Menu button (3) to enter the menu.
џ Select the ‘Colour Palettes’ option.
џ A short press of the Menu button (3) opens the menu.
џ Select one of the palettes described below with the UP (4) / DOWN (2) buttons.
џ A short press of the Menu button (3) confirms the selection.
Hot White
A black and white palette (cold temperature corresponds to black, and hot temperature to
white).
Hot Black
A black and white palette (cold temperature corresponds to white, and hot temperature to
black).
Hot Red
Red Monochrome
Rainbow
Ultramarine
Violet
Sepia
Selection of calibration mode There are three calibration modes: manual, semi-automatic
and automatic.
џ Press and hold the Menu button (3) to enter the menu.
џ Select the 'Calibration Mode' option.
џ A short press of the Menu button (3) opens the submenu.
џ Select one of the calibration modes described below with the UP (4) / DOWN (2) buttons.
џ A short press of the Menu button (3) confirms the selection.
Automatic
Calibration requirements in the automatic mode are determined programmatically, with the
calibration process being started automatically.
Semi-automatic
The user independently sets the calibration requirements (according to the image being
observed).
Manual
Manual calibration. Close the lens cap before beginning calibration.
4
Page 7
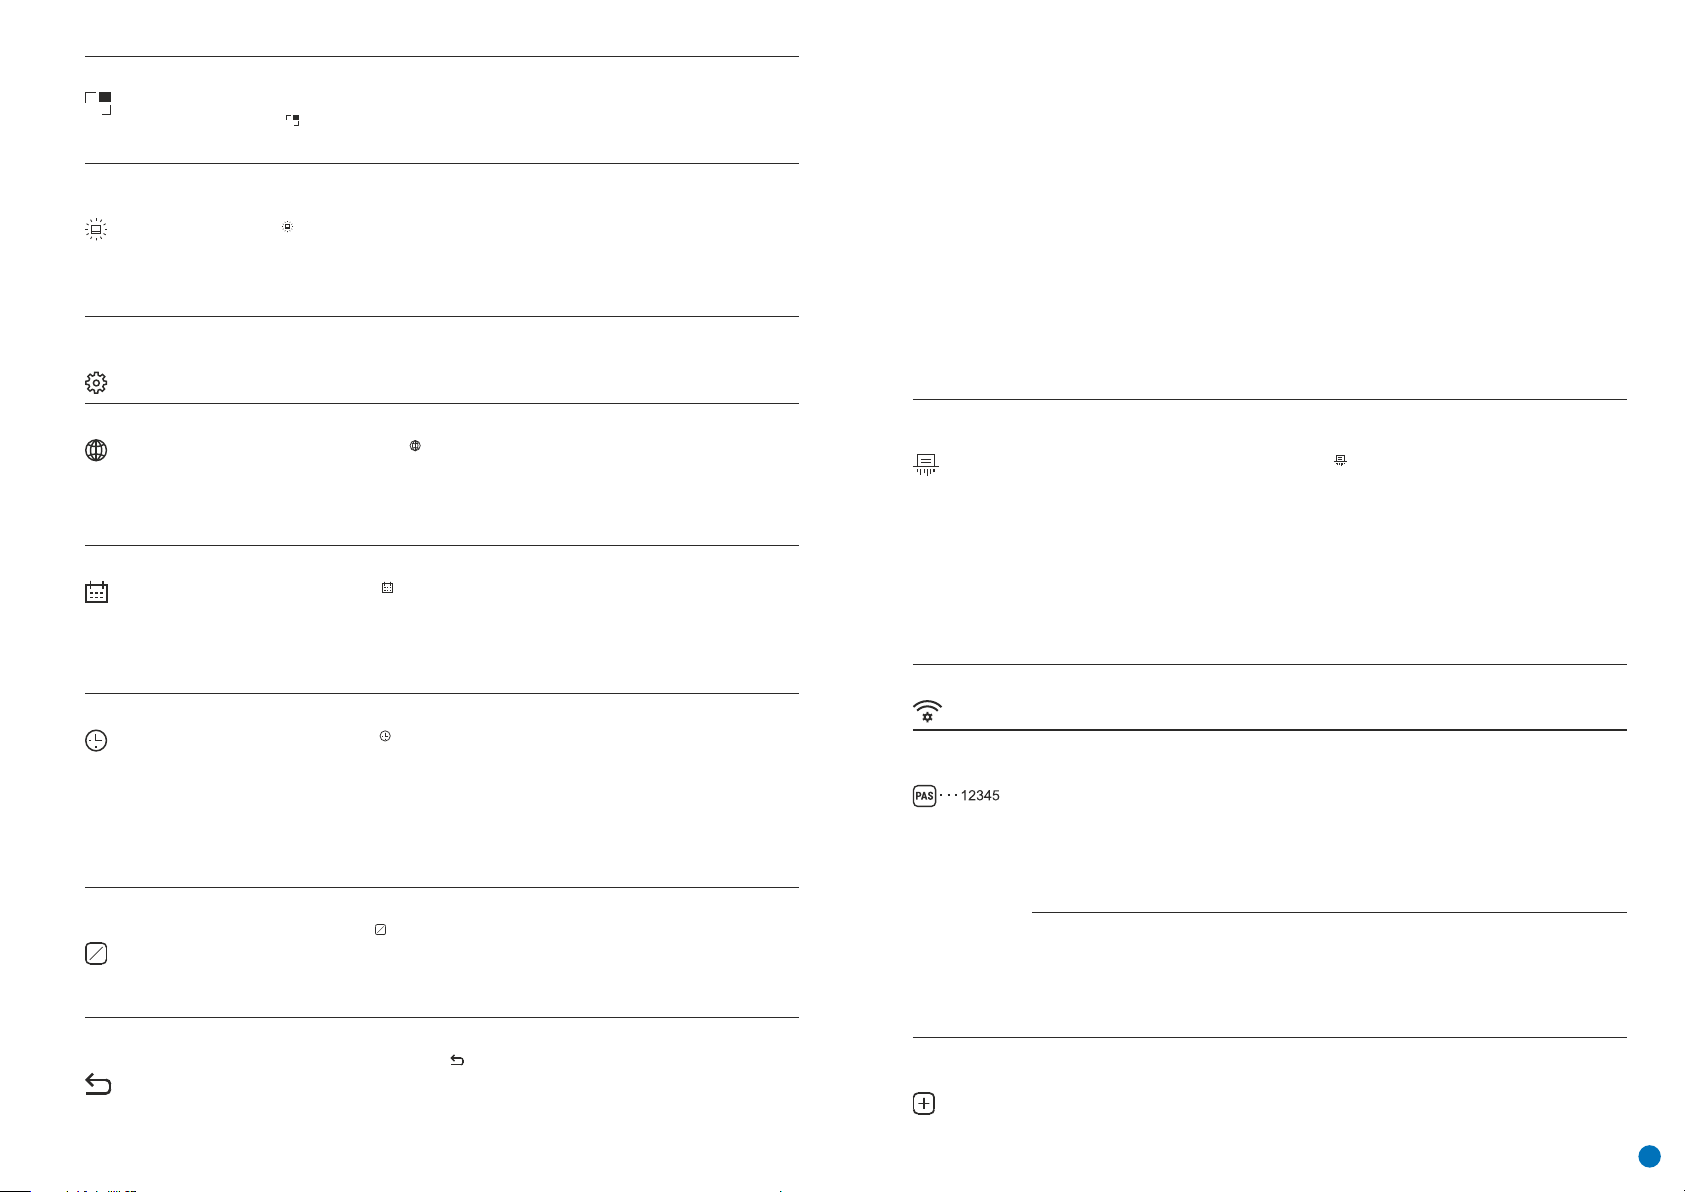
PiP Mode
PIP
Icon
brightness
General
Settings
Language
Date
Time
Units of
Measurement
M
Y
Default
Settings
Selection of the Picture in Picture Mode
џ Press and hold the Menu button (3) to enter the menu.
џ Select the 'PiP Mode' option
џ A short press of the Menu button (3) switches the mode on/off.
Adjusting icon brightness.
џ Press and hold the Menu button (3) to enter the menu.
џ Select the 'Icon Brightness' option.
џ A short press of the Menu button (3) opens the submenu.
џ Select the brightness level of the pictograms with the UP (4) / DOWN (2) buttons.
џ A short press of the Menu button (3) confirms the selection.
This menu item allows you to program the following settings
Choose Language
џ Enter the 'Language' submenu with a short press of the Menu button (3).
џ Select one of the available interface languages (English, French, German, Spanish or
Russian) with the UP (4) / DOWN (2) buttons.
џ Confirm your selection with a short press of the Menu button (3).
џ To save your choice and exit the submenu, press and hold down the Menu button (3).
Setting the Date
џ Enter the 'Date' submenu with a short press of the Menu button (3). The date appears in
dd/mm/yyyy format.
џ Set the required year, month and day with the UP (4) / DOWN (2) buttons. Press the Menu
button (3) to move through the digits.
џ To save your chosen date and exit the submenu, press and hold down the Menu button (3).
Setting the Time
џ Enter the 'Time' submenu with a short press of the Menu button (3).
џ Select the time format (24-hour clock or AM/PM) by pressing the UP (4) / DOWN (2) buttons.
џ Press the Menu button (3) to move to the hour setting.
џ Set the hour by pressing the UP (4) / DOWN (2) buttons.
џ Press the Menu button (3) to move to the minute setting.
џ Set the minute by pressing the UP (4) / DOWN (2) buttons.
џ To save your chosen time and exit the submenu, press and hold down the Menu button (3).
Selecting a unit of measurement
џ Enter the 'M/Y' submenu with a short press of the Menu button (3).
џ Set the unit of measurement (metres or yards) by pressing the UP (4) / DOWN (2) buttons;
then press the Мenu button (3) .
џ Return to the submenu occurs automatically.
Restore Factory Settings
џ Enter the 'Default Settings' submenu with a short press of the Menu button (3).
џ Select the 'YES' option to reset to factory settings or 'NO' to cancel with the UP (4) / DOWN (2)
buttons.
џ Confirm your selection with a short press of the Menu button (3).
PIP
M
Y
Formatting the
Memory Card
Wi-Fi Settings
Setting
a password
Setting
Access Levels
Removal of
Defective Pixels
џ If the YES option has been selected, the message 'Do you want to return to default settings?'
will appear together with options YES and NO. Select YES to format the memory card.
џ If the NO option has been selected, formatting will be cancelled and the submenu will
reappear.
The following settings will be restored to their factory state before being set by the user:
Operating mode – video
Mode – forest
Calibration mode – automatic
Language – English
Wi-Fi – off (default password)
Magnification – original value
PiP – off
Colour palette – Hot White
Unit of measurement – metres
Note: When resetting to factory settings the date/time settings and the user pixel map are
saved.
This function enables the device's Flash Card (memory card) to be formatted (all files to be
deleted from its memory).
џ Enter the 'Memory Card Formatting' submenu with a short press of the Menu button (3).
џ Select the 'YES' option to reset to format the memory card or 'NO' to return to the submenu
with the UP (4) / DOWN (2) buttons.
џ Confirm your selection with a short press of the Menu button (3).
џ If the YES option has been selected, the message 'Format the Memory Card?' will appear
together with options 'YES' and 'NO'. Select YES to format the memory card.
џ The message 'Formatting memory card' means that formatting is in progress.
џ The message 'Formatting completed' means that formatting is completed.
џ If the NO option has been selected, formatting will be cancelled and the submenu will
reappear.
This option enables you to configure the device to operate on a Wi-Fi network.
This function enables you to set a password to access the device from an external device. This
password is used when linking an external device (e.g. a smartphone) to the device.
џ Press the Menu button (3) to enter the 'Wi-Fi' submenu.
џ The default password (12345678) will appear on the screen.
џ Set your desired password with the UP (4) / DOWN (2) buttons. The UP (4) button increases
the number and the DOWN (2) button reduces the numbers. Press the Menu button (3) to move
through the digits.
џ To save the password and exit the submenu, press and hold down the Menu button (3).
This sub-function enables you to configure the appropriate level of access to your device
made available to the Stream Vision app.
Owner level. A Stream Vision user has full access to all the device's functions.
Guest level. A Stream Vision user is able to view video footage from the device only in real
time.
When using the device, defective (broken) pixels may appear on the sensor: i.e. bright or dark
points of constant brightness that are visible on the image. AXION thermal imagers offer the
possibility of removing any defective pixels on the sensor programmatically, as well as to
cancel any deletion.
5
Page 8
Return to
factory
'pixel map'
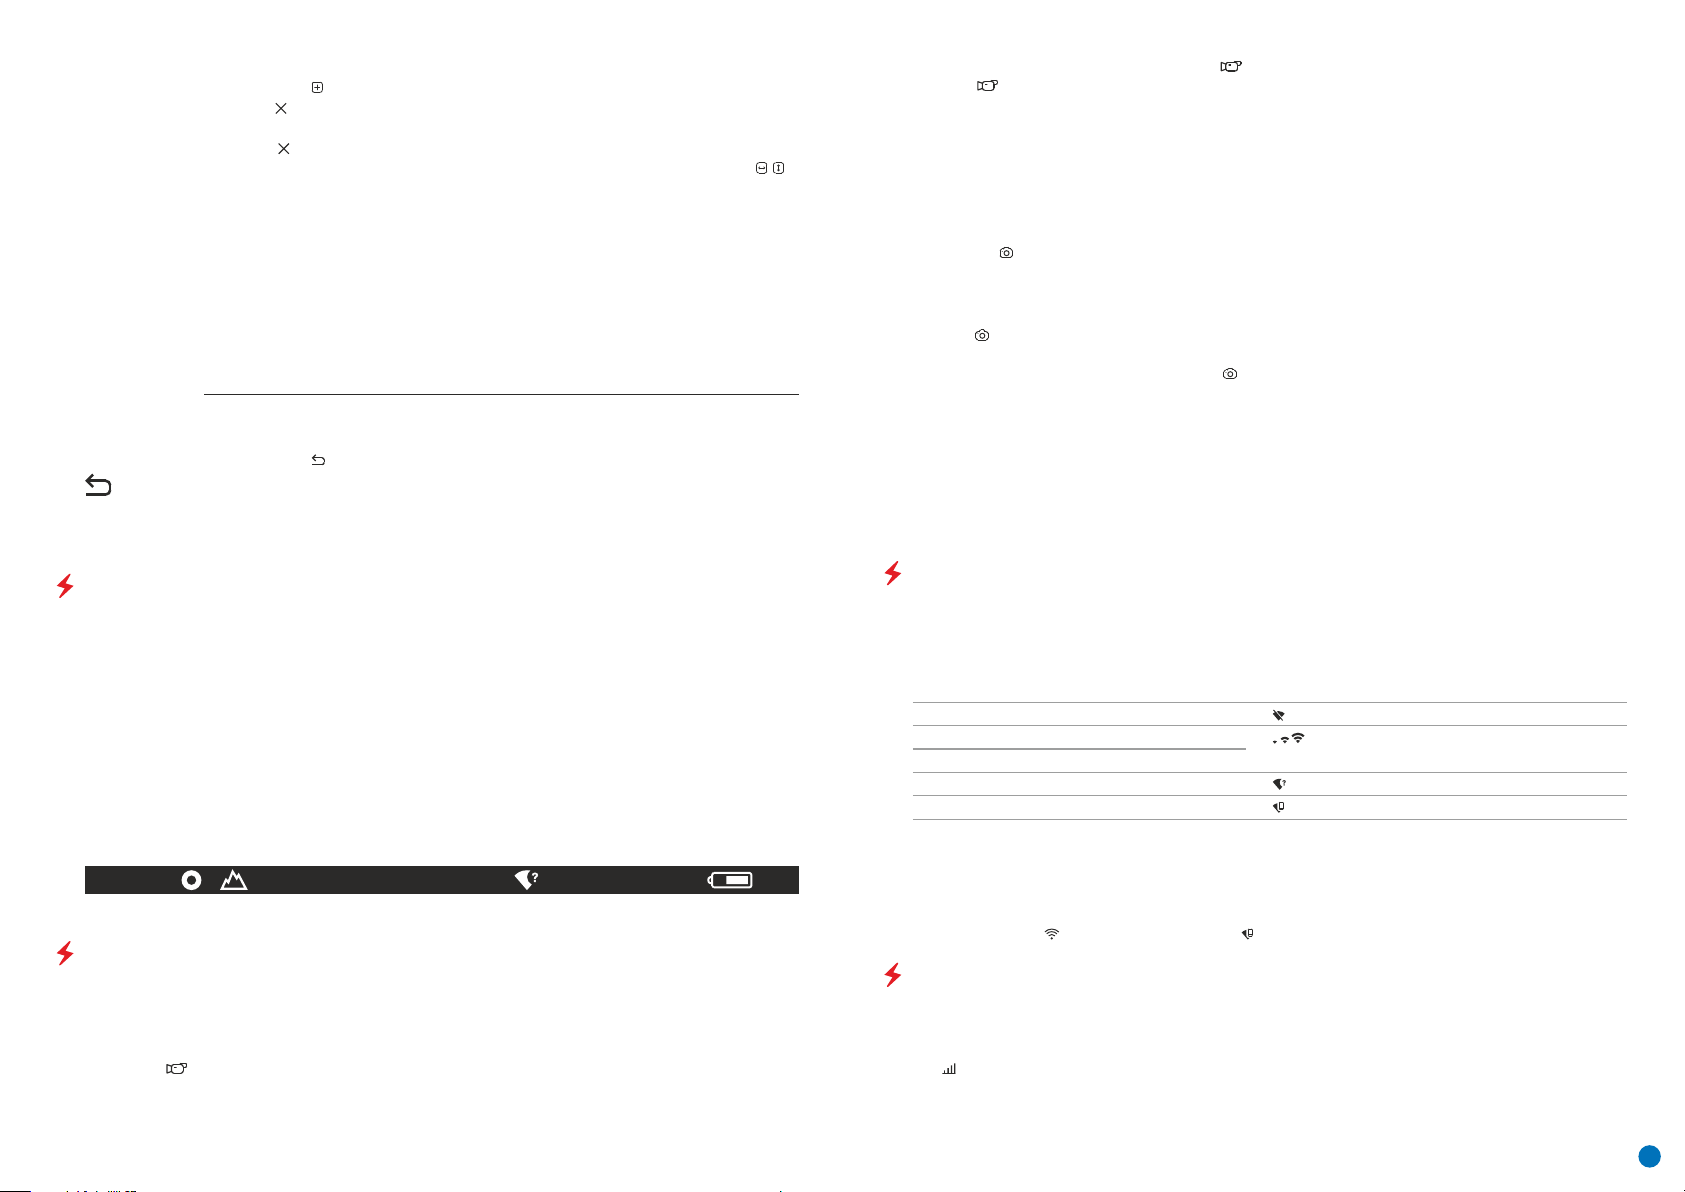
џ Open the submenu by pressing the Menu button (3).
џ Select the icon with a short press of the Menu button (3).
џ A marker will appear on the left side of the display.
џ A magnifying glass will appear on the right side of the display – an enlarged image with a
fixed cross – that is required to facilitate a search for the defective pixel and to align the
marker with it. There are horizontal and vertical directional arrows to move the marker
with the coordinates along the X and Y axes.
џ Use the UP (4)/DOWN (2) buttons to move the marker to align its centre with the defective pixel.
џ A short press of the Menu button (3) switches the marker direction from the horizontal to the
vertical and vice versa.
џ Using the UP (4) and DOWN (2) buttons, align the defective pixel with the fixed cross in the
frame – the pixel should disappear.
џ Delete the defective pixel with a short press of the On/Calibration ON button (5).
џ Where a pixel has been successfully deleted, the word ‘OK’ will appear briefly on the screen.
џ Then, by moving the marker across the display, you can delete the next defective tile.
џ To exit the ‘Delete defective pixels’ function, press and hold down the Menu button (3).
Return all defective pixels previously disabled by the user to their original state:
џ Open the submenu by pressing the Menu button (3).
џ Select the icon and press the Menu button (3).
џ Select 'YES' if you want to return to the factory pixel map and 'NO' if you do not.
џ Confirm your selection with a short press of the Menu button (3).
Attention! One or two pixels on the imager display in the form of black, bright white or
coloured (blue or red) dots may appear. These are not a defect.
џ An icon is displayed in the upper left corner with the remaining recording time (in hh:mm format), for
example, 5:12.
џ Start video recording with a short press of the Down/REC button (2).
џ Once video recording has begun, the icon will disappear, with a REC icon appearing in its place and the record
timer showing in MM:SS (minutes:seconds) format;
џ Pause the video recording and resume recording with a short press of the Down/REC button (2).
џ Stop the video recording by pressing and holding down the Down/REC button (2).
џ Video files are stored in the built-in memory card after video recording has been turned off.
џ To toggle between Video and Photo modes press and hold down the Down/REC button (2).
PHOTO mode . Photographing an image
џ Switch to PHOTO mode with a long press of the Down/REC button (2).
џ Take a photograph with a short press of the Down/REC button (2). The image freezes for 0.5 seconds and the
image file is saved to the build-in memory card.
џ An icon , ‘>100’ is displayed in the upper left corner which indicates that the device can take more than 100
photographs. Where the number of photographs available is less than 100, the actual number of photographs
available (e.g. 98) is displayed alongside the icon .
Notes: You can enter and work on the menu during video recording. Recorded videos and photographs are saved
to the device’s built-in memory card in the format: img_xxx.jpg (for photos); video_xxx.mp4 (for video). xxx three-digit common file counter (for photos and video). The counter used in the naming of multimedia files is
NOT reset.
Attention: The maximum duration of a video recording file is seven minutes. After this time, the video will be
recorded onto a new file. The number of files is limited by the capacity of the device’s built-in memory. Regularly
monitor the amount of free memory in the built-in memory card, transferring footage and photographs to other
media to free up space on the memory card.
STATUS BAR
The status bar is located at the bottom of the display and displays information relating to the operational status
of the device, including:
џ Observation mode
џ Calibration mode (when in automatic calibration mode with 3 seconds remaining until automatic calibration, a
countdown timer will appear in place of the calibration icon).
џ Current full magnification
џ Wi-Fi connection
џ USB connection (if the device is connected)
џ Colour palette (displayed only when the Hot Black palette is installed)
џ Current time
џ Battery discharge level (when the device is powered by the rechargeable battery)
џ External power supply indicator (when the device is powered from an external supply)
SA
11.0x 08:13PM
Note: when calibration is in progress, the display image freezes for the duration of the calibration
VIDEO RECORDING AND PHOTOGRAPHING AN OBSERVED IMAGE
AXION thermal imagers are equipped with a function for video recording and photographing an observed image
onto the built-in memory card. It is recommended that the date and time be set before using the video recording
and photographing function (see the corresponding menu items).
The built-in recording device operates in two modes:
VIDEO mode . Video recording of an image
џ The device is in VIDEO mode as soon as it is turned on.
Wi-Fi FUNCTION
The device is equipped with wireless communication with external devices (computer, smartphone) via Wi-Fi.
џ Turn on the wireless connection module with a long press of the Up button (4). Wireless operation is displayed
in the status bar in the following way:
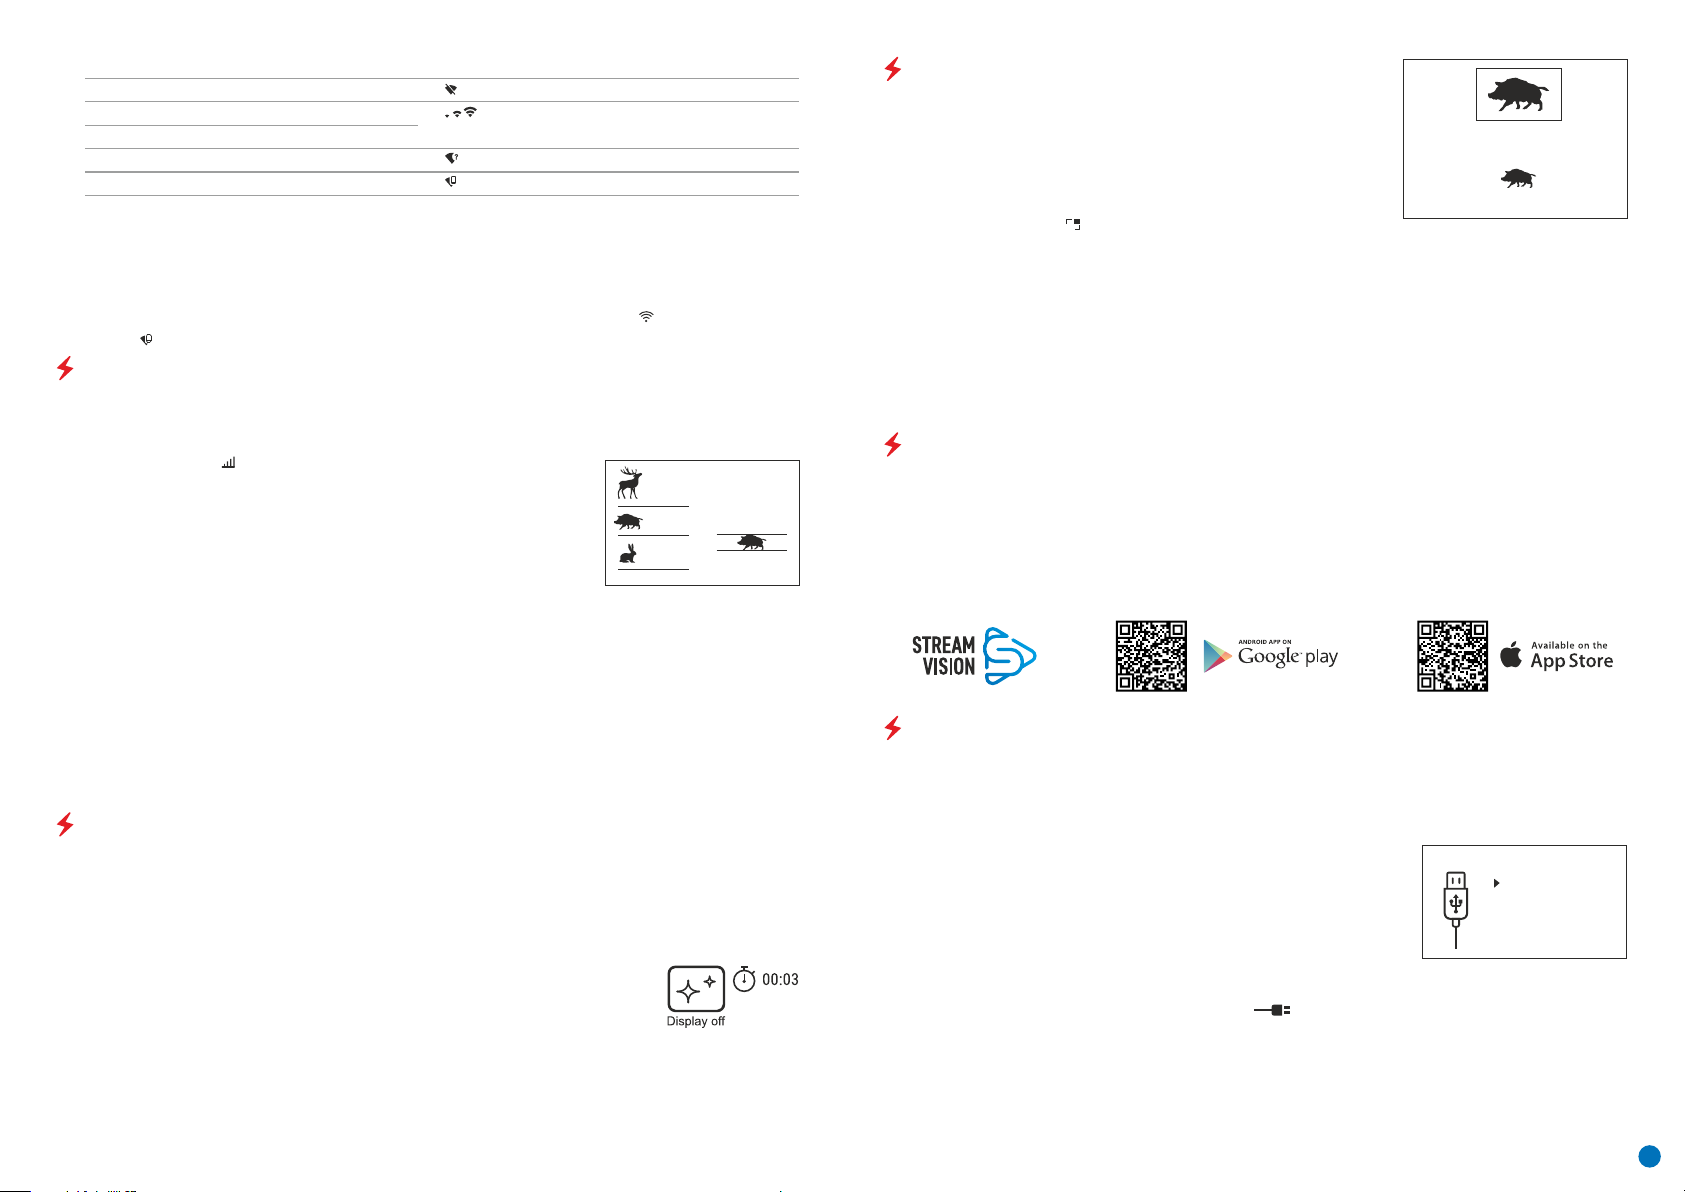
Connection status Status bar indication
Wi-Fi disconnected
Wi-Fi enabled by the user
Wi-Fi connection process in progress
Wi-Fi turned on, no connection to the device
Wi-Fi turned on, the device is connected
џ The device is recognised by an external device under the label ‘AXION_XXXX’, where XXXX are the four last digits
of the serial number.
џ After entering the password on an external device (for more detailed information of setting passwords, see the
subsection entitled ‘Setting up Wi-Fi’ in the section, ‘Main Menu Functions’ of the Instructions) and establishing a
connection, the icon in the status bar changes to .
STADIAMETRIC RANGEFINDER
Thermal imagers are fitted with a stadiametric rangefinder that enables the distance to an object to be defined
where its size is known.
џ The stadiametric rangefinder function is accessed by a short press of the Menu button (3) and selecting the
icon .
џ Bars will appear on the display to determine the distance, icons of three objects and digits of the estimated
distance of these three objects.
6
Page 9
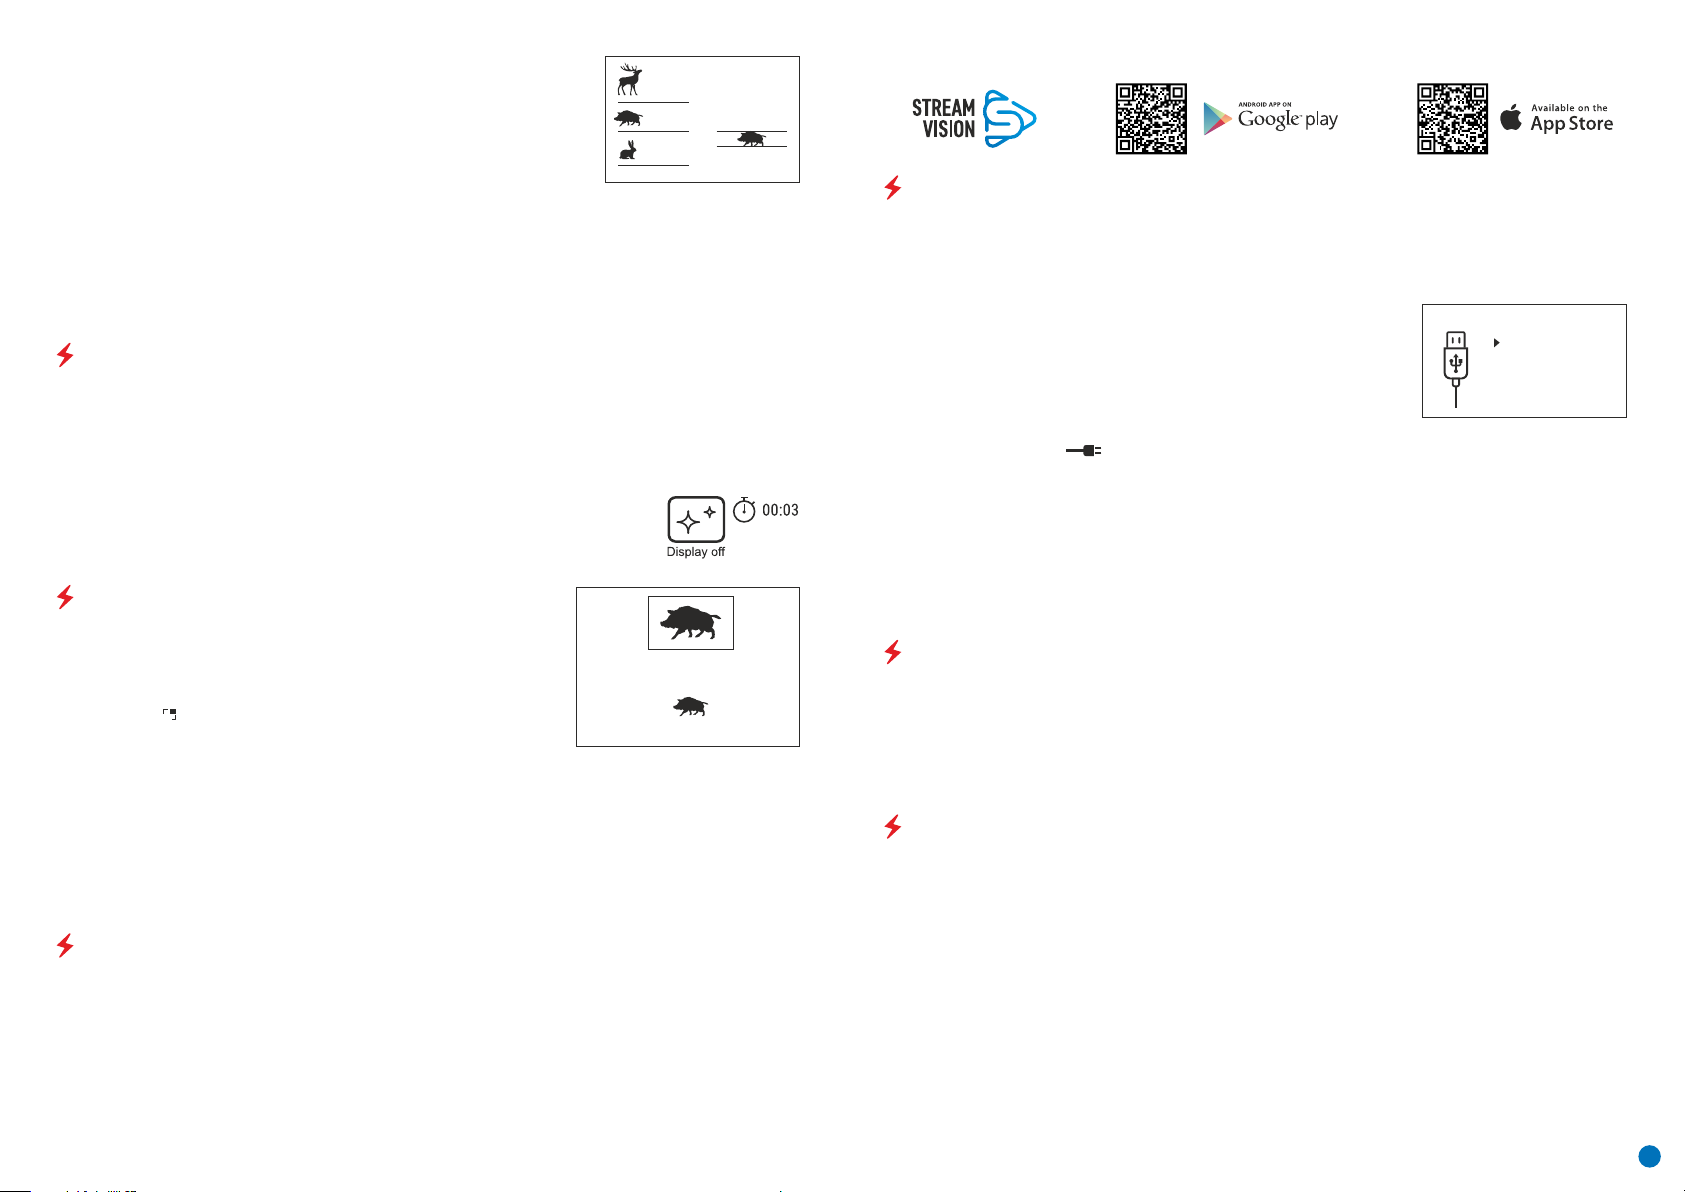
There are three pre-set values for objects:
Hare – height 0.3 m
Boar – height 0.7 m
Deer – height 1.7 m
џ Place the lower fixed cursor beneath the object and, with the UP (4) / DOWN (2)
160m
66m
28m
navigation buttons, move the upper horizontal cursor relative to the lower
horizontal fixed cursor so that the object is positioned between the cursors. An
automatic recalculation of the distance to the target occurs simultaneously with this movement.
џ If the distance is not determined within 10 seconds, the information disappears from the display.
џ Go to the relevant item on the menu to select a unit of measurement (metres or yards).
џ A distance value is rounded up or down before appearing on the display to 5 metres for longer distance
readings and 1 metre for shorter distance readings.
џ To exit the rangefinder mode, press the Menu button (3) briefly, or wait 10 seconds for automatic exit.
DISPLAY OFF FUNCTION
This function disables the transfer of images to the display, reducing the intensity of its illumination to a
minimum. This helps prevent inadvertent unmasking. The device will continue to function.
џ When this function is in use, the device switches to standby mode, which allows it to be quickly turned off, if
necessary.
џ When the device is switched on, press and hold the ON button (5). The display will disappear and the message
'Display off.' will appear.
џ To switch on the display, press the ON button (5) briefly.
џ When the ON button (5) is held, the display will show 'Display off.' and a countdown.
Then the device will turn off.
PiP FUNCTION
PiP (Picture in Picture) enables you to view a magnified digital zoom image
in a separate 'window' simultaneously with the main image.
Enabling/disabling the PiP function:
џ Press and hold the Menu button (3) to enter the main menu.
џ Select the 'PiP Mode' option
џ A short press of the Menu button (3) switches the mode on/off.
џ Press and hold the Menu button (3) to exit the main menu.
џ The enlarged image is displayed in a separate window using the full optical zoom value.
џ To alter the zoom ratio in the PiP window, briefly press the UP button (4).
џ The remaining image is displayed with the optical zoom value which corresponds to the value of the x1.0
PIP
coefficient.
џ When the PiP is turned on, you can control the discrete and smooth zooms. In this instance, the full optical
magnification value will appear only in the separate window.
џ When PiP is turned off, the image is displayed with the optical zoom value set for the PiP mode.
6.9x
3.1x
STREAM VISION
AXION thermal imagers support Stream Vision technology, which enables the transmission of an image in real
time from the thermal imager to your smartphone or tablet via Wi-Fi.
Detailed instructions on the operation of Stream Vision technology can be found in a separate booklet or on the
www.pulsar-vision.com website.
Note: the device's design includes the possibility of updating software. Updating is possible via the Stream
Vision app.
Scan the QR codes to download the Stream Vision app:
USB CONNECTION
џ Connect one end of the USB cable to the device's microUSB connector (8) and the other end to the port on your
computer.
џ Switch the device on by pressing the ON button (5) (the computer will not detect the device if it is turned off).
џ The device is detected automatically by the computer and no installation of drivers is required.
џ Two connection options will appear on the display:
Use as power
Use as memory card
џ Select the connection option with the UP (4) / DOWN (2) buttons.
џ A short press of the Menu button (3) confirms the selection.
USB connection
Use as power
Use as memory card
Use as power
џ When this option is selected, the computer is used by the device as an external power source. An icon will
appear in the status bar . The device will continue to function, and all functions are available.
џ The battery installed in the device will not be charged.
џ When the USB is disconnected from the device when in Power mode, the device will continue to function on
battery power, where present and sufficiently charged.
Use as memory card
џ When this option is selected, the device will be recognised by the computer as a flash card. This option is
designed for working with files that are stored in the device's memory; the device's functions are not accessible,
and the device turns itself off.
џ If a video was being recorded at the time of connection, the recording will cease and be saved.
TECHNICAL INSPECTION
A technical inspection of the device is recommended before each use. Check:
џ The external appearance of the device (there should be no cracks in the casing).
џ The condition of the lens and eyepiece (there should be no cracks, greasy spots, dirt or other deposits).
џ The condition of the rechargeable battery (this should be charged) and the electrical contracts (there should
be no presence of salts or oxidation).
џ The controls should be in working order.
MAINTENANCE
џ Maintenance should be carried out at least twice a year and consist of the following actions.
џ Wipe the external surfaces of metal and plastic parts free of dust and dirt with a cotton cloth Silicone grease
may be used for this.
џ Clean the electrical contacts of the battery and battery slot on the unit using a non-greasy organic solvent.
џ Check the glass surfaces of the eyepiece and the lens. If necessary, remove dust and sand from the lenses
(preferably using a non-contact method). Cleaning of the external surfaces of the optics should be done with
substances designed specially for this purpose.
7
Page 10
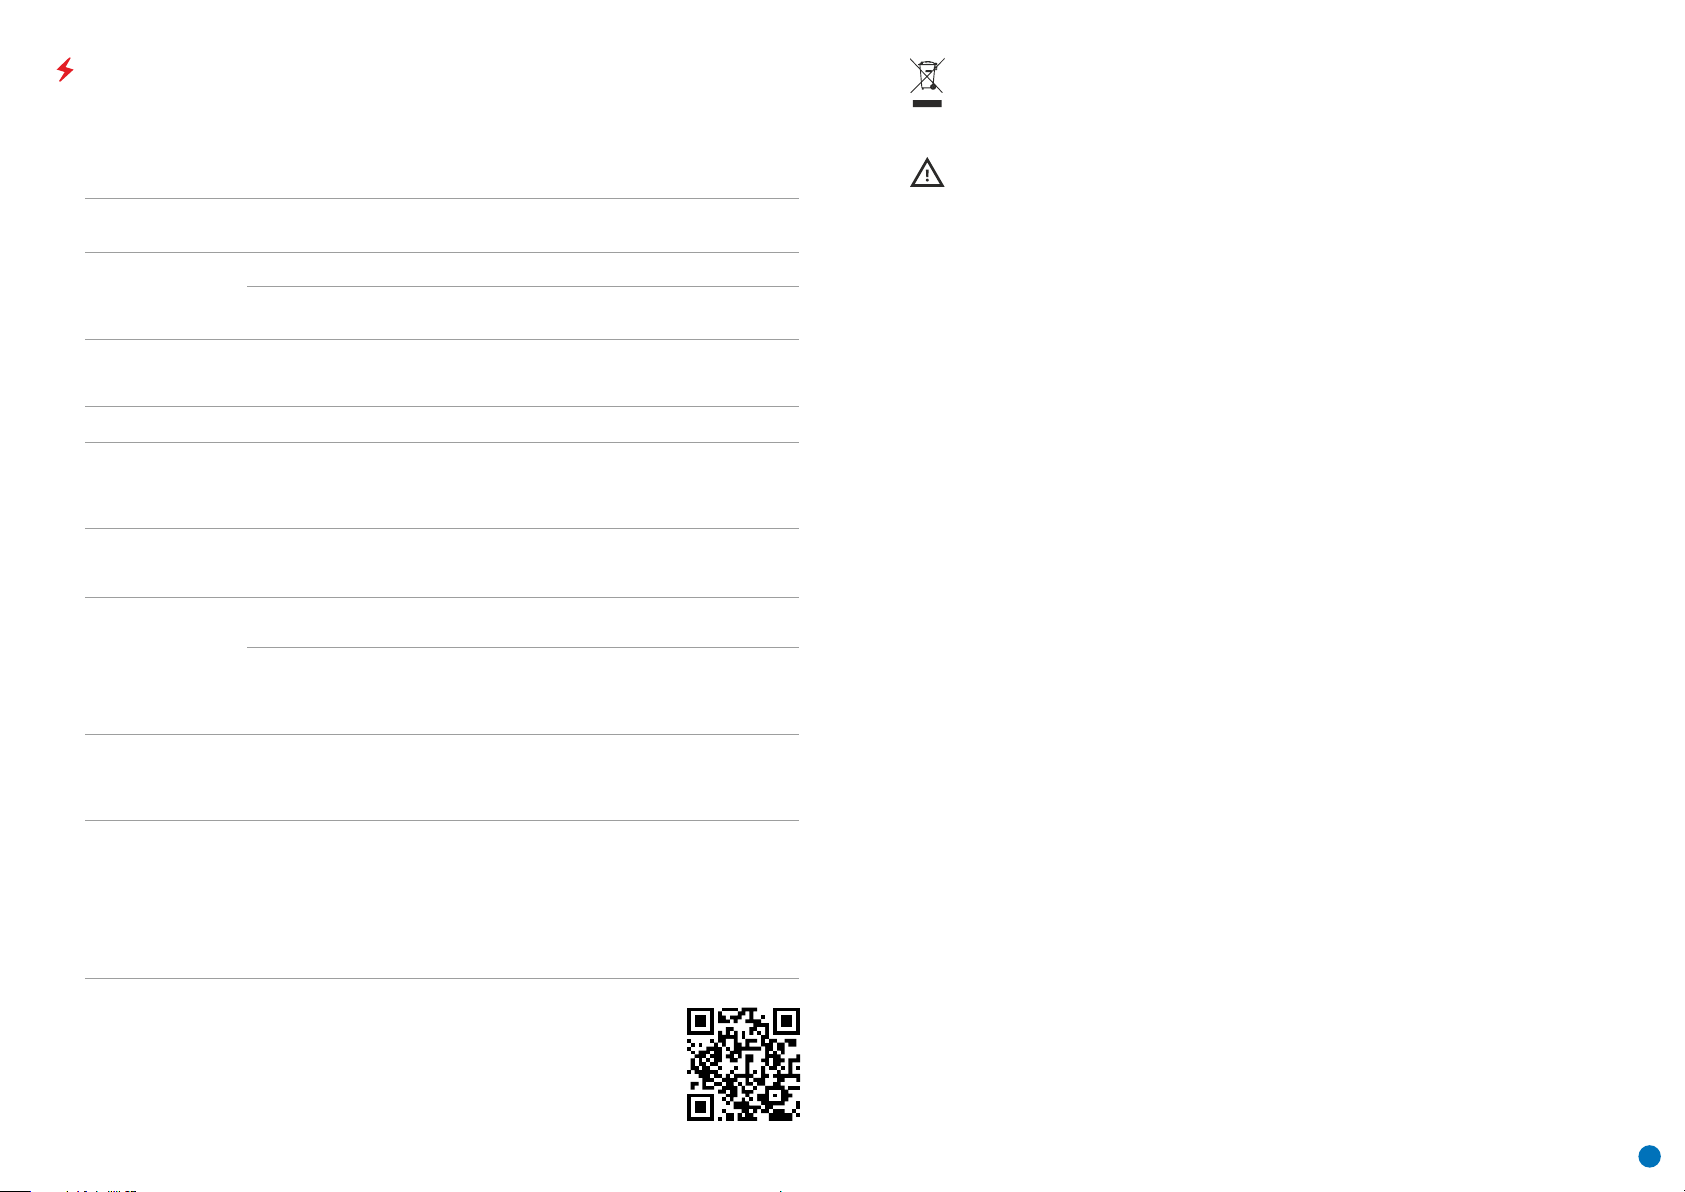
TROUBLESHOOTING
This table lists all the problems that may arise when operating the device. Carry out the recommended checks
and repairs in the order shown in the table. If a defect should occur that is not listed in the table, or if it is
impossible to repair the defect yourself, the device should be returned for repair.
Environment protection first!
Your appliance contains valuable material which can be recovered or recycled.
Leave it at a local civic waste collection point.
Malfunction
Thermal imager does
not power up.
Does not operate
from external power
source.
Image is unclear, with
vertical lines and
uneven background.
Image is too dark.
Coloured lines
appeared on display
or image has
disappeared.
Poor image quality /
reduced detection
distances.
Smartphone or tablet
cannot be connected
to the device.
Wi-Fi signal nonexistent or
interrupted.
Possible reason
Battery completely discharged.
USB cable damaged.
External power source discharged.
Calibration required.
Low brightness or contrast level set.
The device was exposed to static
electricity during operation.
These problems may occur during observation in difficult weather conditions (snow,
rain, fog etc.).
Device password has been changed.
The device is in an area with a large
number of Wi-Fi networks that may
cause interference.
Device is outside the area of Wi-Fi
coverage. There are obstacles between
the device and the receiver (e.g.
concrete walls).
Correction
Charge the battery.
Replace USB cable.
Charge external power source (if
necessary).
Perform image calibration according to
Section 8 'Operation' of the Instructions.
Adjust brightness or contrast.
After exposure to static electricity, the
device may either reboot automatically,
or require turning off and on again.
Delete the network and reconnect using
the device password.
To ensure stable Wi-Fi operation,
relocate the device to an area with fewer
Wi-Fi networks, or into an area with
none.
Relocate the device into direct line of
sight of the Wi-Fi signal.
Attention! AXION thermal imagers require a licence when exported outside your country.
Electromagnetic compatibility.
This product complies with the requirements of European standard EN 55032: 2015, Class A.
Caution: Operating this product in a residential area may cause radio interference.
When used in low
temperature
conditions, image
quality of the
surroundings is
worse than in
positive temperature
conditions.
By following the link below you can find answers to the most frequently asked
questions about thermal imaging https://www.pulsar-nv.com/glo/support/faq/79
In positive temperature conditions, objects being observed (surroundings and
background) heat up differently because of thermal conductivity, thereby generating
a high temperature contrast. Accordingly, image quality produced by the device will
be higher.
In low-temperature conditions, objects being observed (background) do, as a rule,
cool down to roughly the same temperature, because of which temperature contrast
is substantially reduced and image quality (detail) is poorer. This is a feature of
thermal imaging devices.
8
Page 11
FRANÇAIS
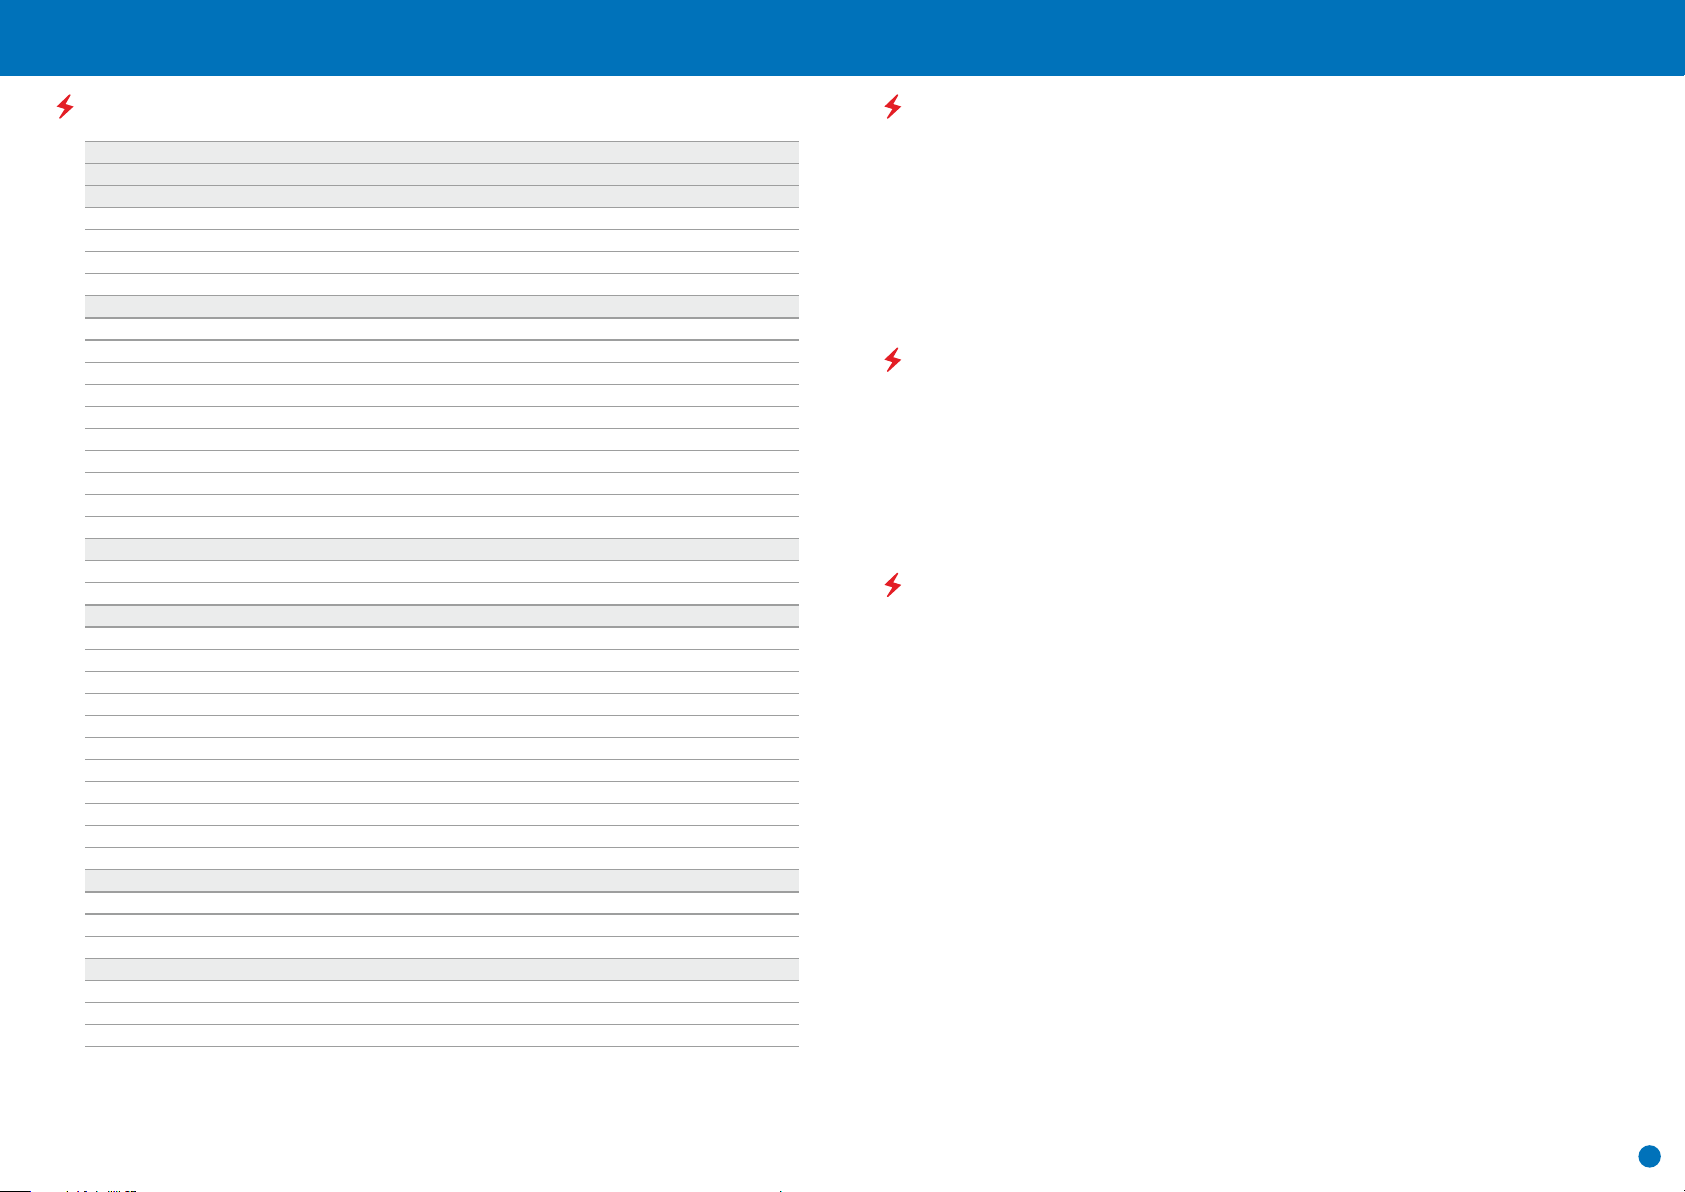
SPECIFICATIONS
SKU#
Modèle AXION
Microbolomètre
Type
Résolution (pixels)
Fréquence de rafraîchissement d'image (Hz)
Taille pixels (microns)
Spécifications optiques
Grossissement optique (x)
Zoom numérique continu (x)
Zoom numérique (x)
Ouverture relative (D/f )
Distance minimum de mise au point (m)
Diamètre pupille de sortie (mm)
Angle du champ de vision (horizontal), degrés
Angle du champ de vision, mètres à 100 m
Distance de mise au point de l'oculaire (dioptries)
Distance d'observation maximale (m)*
Affichage
Type
Résolution (pixels)
Spécifications opérationnelles
Tension d'alimentation extérieure
Type de batterie
Capacité
Tension de sortie nominale
Alimentation extérieure
La durée de charge de la batterie en heures (à 22°C)
Code IP (IEC60529) degré de protection
Compatibilité Stream Vision
Plage de températures d'utilisation
Dimensions (mm)
Poids sans batteries (kg)
Enregistreur vidéo
Résolution vidéo/photo (pixels)
Format vidé/photo
Capacité de mémoire incorporée
Voie Wi-Fi
Fréquence
Standard
Distance de réception en ligne de visée directe (m)
* pour un animal, comme un chevreuil
Des améliorations peuvent être apportées à la conception et au logiciel de ce produit pour améliorer ses
fonctionnalités pour l'utilisateur.
Une version mise à jour du mode d'emploi peut être obtenue sur le site web www.pulsar-vision.com
77421
XМ30
Non refroidi
320x240
50
12
4
4-16
2/4
1.2
3/3.28
3.5/0.12
7.3
12.8
±5
1300/1420
AMOLED
1024x768
3 – 4.3V
Bloc batterie Li-Ion АPS3
3200 mAh
DC 3.7V
5V (USB)
4
IpХ7
Oui
-25°С ... +40°С
143x41x69
0.25
1024х768
.mp4/.jpg
16 GB
2.4 Ghz
802.11 b/g/n
15
77422
XМ38
Non refroidi
320x240
50
12
5.5
5.5-22
2/4
1.2
3/3.28
3.5/0.12
5.8
10.1
±5
1700/1860
AMOLED
1024x768
3 – 4.3V
Bloc batterie Li-Ion АPS3
3200 mAh
DC 3.7V
5V (USB)
4
IpХ7
Oui
-25°С ... +40°С
149x49x70
0.27
1024х768
.mp4/.jpg
16 GB
2.4 Ghz
802.11 b/g/n
15
EMBALLAGE DE LIVRAISON
џ Imageur thermique AXION
џ Batterie rechargeable APS3
џ APS chargeur de batterie avec alimentation secteur
џ Câble USB
џ Caisse
џ Dragonne
џ Manuel d'utilisation
џ Chiffon pour nettoyer l'optique
џ Carte de garantie
DESCRIPTION
Les monoculaires d'imagerie thermique à matrice IR (microbolomètre) AXION sont représentés par plusieurs
modèles qui diffèrent par le grossissement et le diamètre de lentille. Ces appareils sont conçus pour être utilisés
à la fois de nuit et de jour dans des conditions météo difficiles (brouillard, smog, pluie), ainsi qu'aux endroits
avec présence d'obstacles empêchant la détection d'une cible (branches, herbes hautes, arbustes denses, etc.).
A la différence des dispositifs de vision de nuit utilisant des convertisseurs électro-optiques, les monoculaires
de vision thermique n'ont pas besoin d'une source de lumière externe et résistent aux effets d'une lumière
brillante.
Les monoculaires AXION peuvent être utilisés pour la chasse de nuit, l'observation et l'orientation sur le terrain,
et également pour effectuer des opérations de sauvetage.
1. CARACTERISTIQUES PARTICULIERES
џ Taille de pixel du microbolomètre de 12 microns
џ Ecran AMOLED haute résolution
џ Léger et compact
џ Conception fonctionnelle et ergonomique
џ Interface utilisateur conviviale
џ Observation dans huit modes de couleur
џ Trois modes de calibration (manuel, semi-automatique et automatique)
џ Détection à grande distance
џ Grossissement important
џ Trois modes d'observation (forêt, ville et identification)
џ Télémètre stadiamétrique
џ Fonction extinction de l'écran
џ Fonction correction des pixels
џ Logiciel évolutif
џ Large gamme de températures de fonctionnement (-25 °С – +40°С)
џ Parfaitement étanche à l'eau (indice de protection IPX7)
џ Enregistrement vidéo/audio
џ Enregistreur vidéo incorporé
џ Intégration avec les appareils iOS et Android
џ Wi-Fi Smartphone télécommande et surveillance
џ YouTube Diffusion en direct et enregistrement direct sur Internet via un smartphone et l'application Stream
Vision.
Bloc batterie
џ Bloc batterie Li-ion APS3 à remplacement rapide
џ Option de chargement USB
9
Page 12
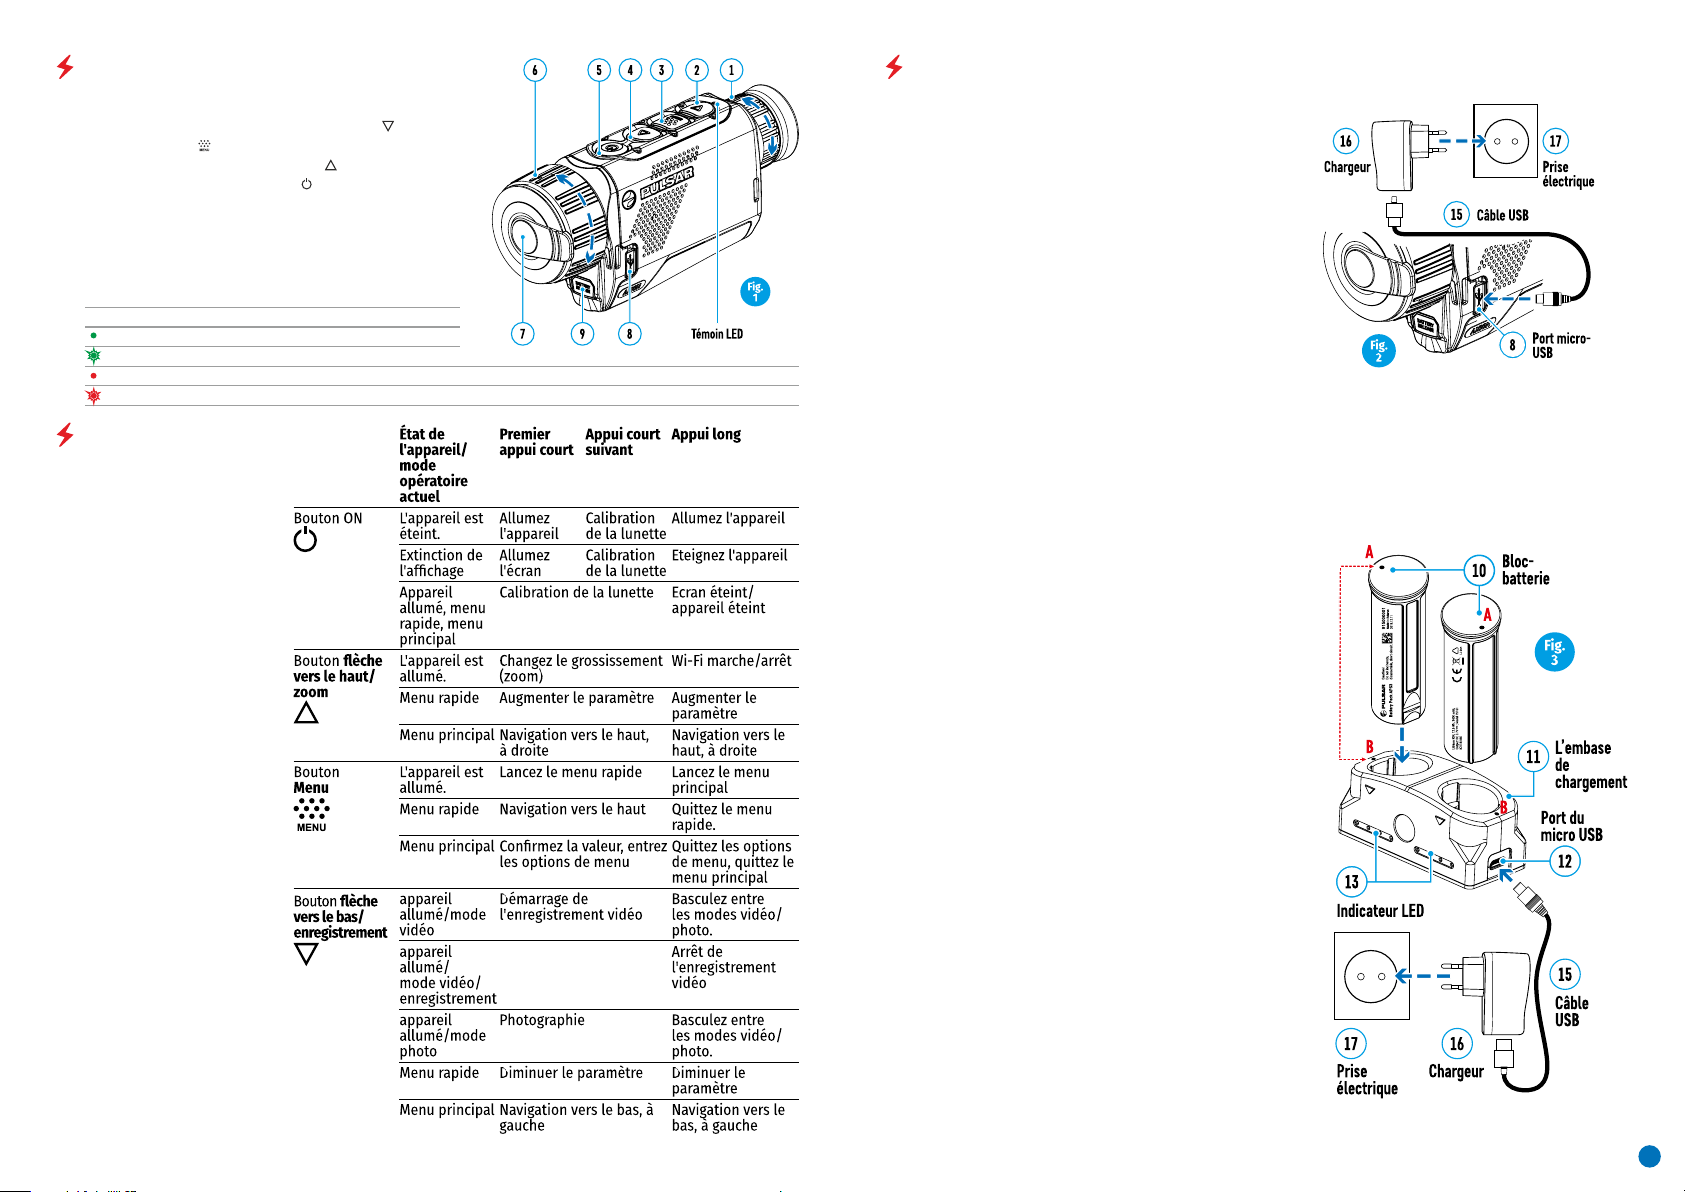
COMPOSANTS ET COMMANDES
UTILISATION DE LA BATTERIE RECHARGEABLE
1. Bague de réglage de dioptre d'oculaire
2. Bouton flèche vers le bas/enregistrement
3. Bouton Menu
4. Bouton flèche vers le haut/zoom
5. Bouton allumage/étalonnage
6. Bague de mise au point de l'objectif
7. Couvercle de lentille
8. Connecteur MicroUSB
9. Bouton de déverrouillage de batterie
Témoin LED affichant l'état actuel de l'appareil :
Témoin LED Mode opératoire
L'appareil est allumé.
Appareil allumé/enregistrement vidéo
Appareil allumé/charge batterie <10%
Appareil allumé/enregistrement vidéo/charge batterie <10%
FONCTIONNEMENT
DES BOUTONS
Les imageurs thermiques AXION sont livrés avec un bloc
batterie ion-lithium APS3 rechargeable permettant
d'utiliser l'imageur thermique pendant 4 heures. La
batterie doit être chargée avant la première utilisation.
Recharge de la batterie
Option 1 (Fig.2.) :
џ Installez la batterie (10) dans son logement sur le boîtier
de l'instrument (14) en alignant les icônes pour former un
"point" sur l'appareil et la batterie. (voir Fig. 4).
џ Connectez un câble USB (15) au connecteur microUSB (8)
sur l'appareil.
џ Connectez l'autre extrémité du câble USB (15) au
chargeur par alimentation secteur (16) ou à une prise
femelle USB connectée à une autre source d'alimentation
avec une tension nominale de sortie de 5V ou moins.
џ Connectez le chargeur secteur (16) à l'alimentation
électrique du secteur.
Note: Le PB8I* Power Bank peut servir ce chargeur.
Option 2 (Fig.3.) :
џ Insérez la batterie rechargeable (10) fournie avec votre
appareil, ou achetée séparément, le long du rail de
guidage dans l'emplacement du chargeur APS (11) (voir Fig.
3).
џ Le point A sur la batterie et le point B sur le chargeur
doivent être alignés.
џ Deux batteries peuvent être chargées simultanément –
un second emplacement est prévu pour cela.
џ Raccordez la fiche microUSB sur le câble USB (15) au
connecteur microUSB sur le chargeur (16). Branchez
l'appareil dans une prise électrique 100–240V (17).
џ Raccordez la seconde fiche mâle du câble microUSB à la
prise femelle (12) du chargeur secteur (11).
џ Le témoin LED (13) s'allumera.
10
Page 13
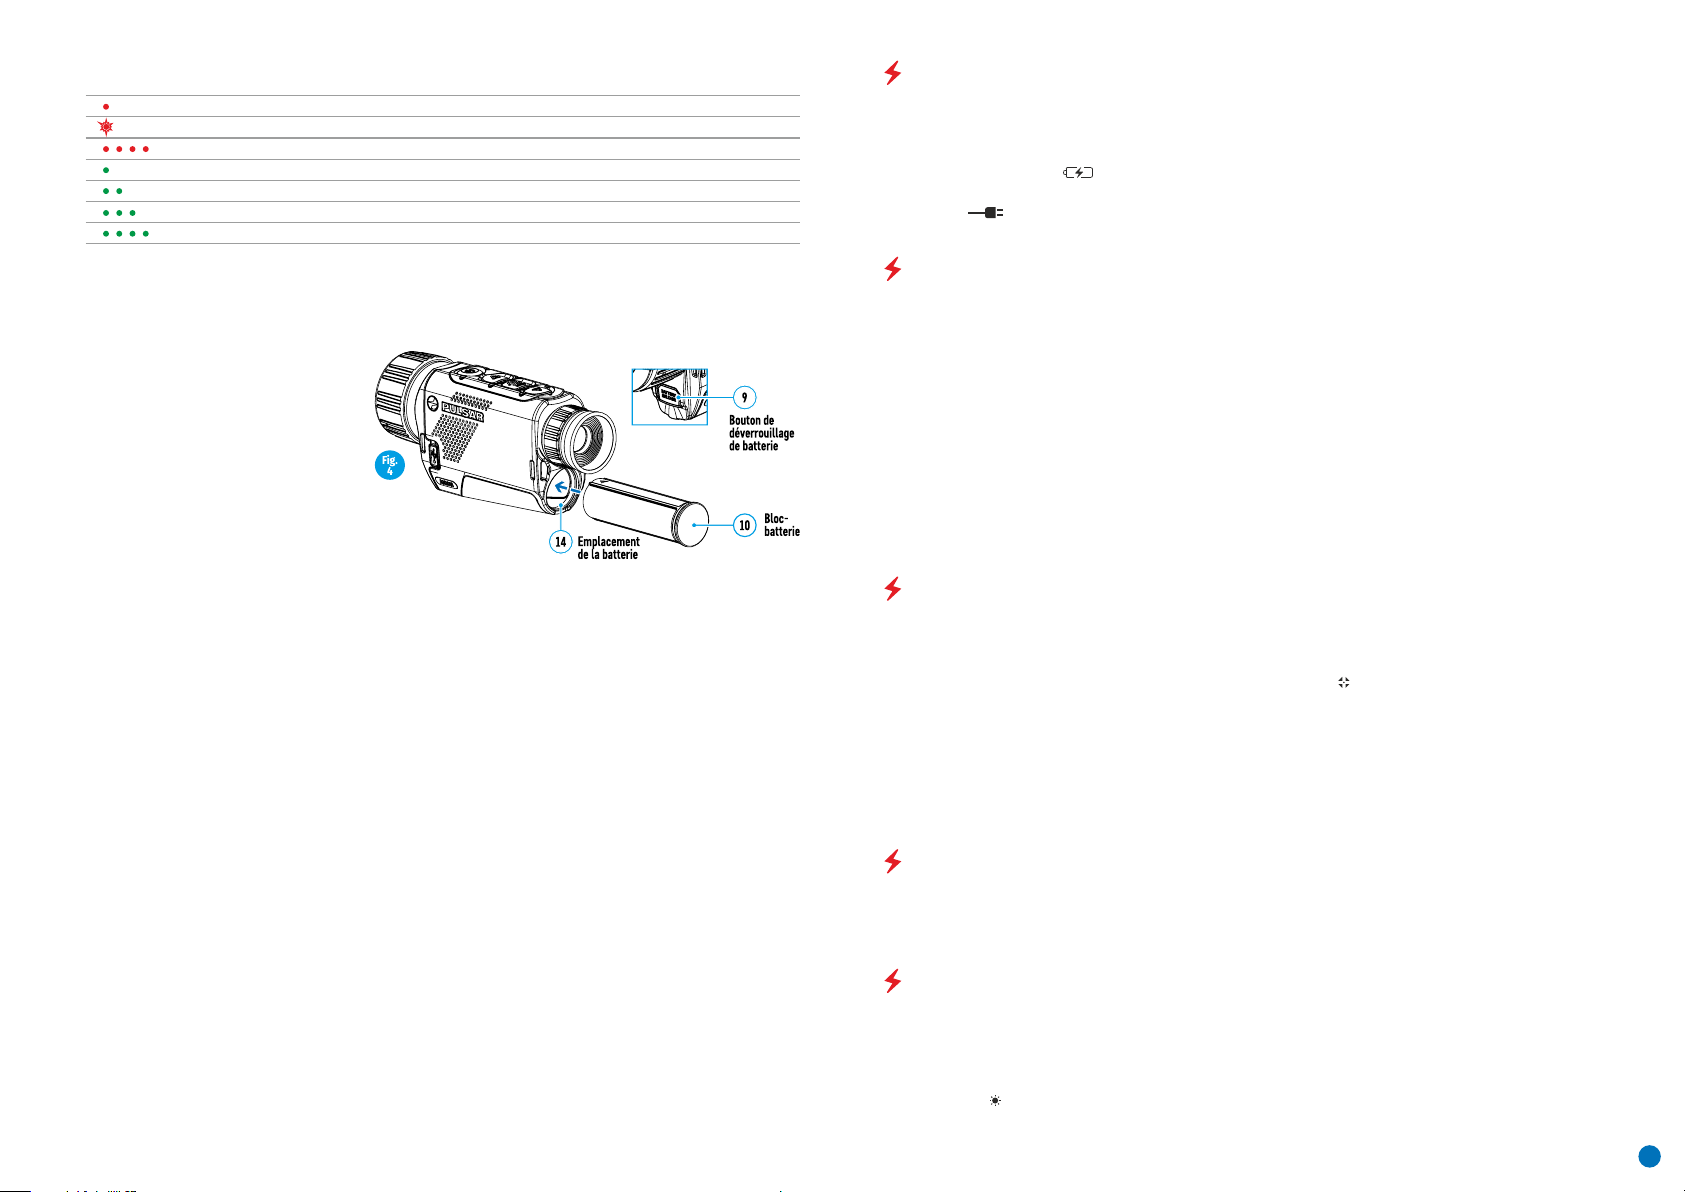
État de charge de la batterie (voir tableau).
Témoin LED* État de charge de la batterie
Charge de la batterie de 0 à 10%; Chargeur non raccordé à l'alimentation secteur.
Charge de la batterie de 0 à 10%; Chargeur raccordé à l'alimentation secteur.
Batterie défectueuse. La batterie ne doit pas être utilisée.
Charge de la batterie entre 10% et 20%
Charge de la batterie entre 20% et 60%
Charge de la batterie entre 60% et 95%
Batterie complètement chargée. Peut être débranchée du chargeur.
* Le témoin LED affiche le niveau actuel de charge de la batterie pendant 30 secondes lorsque le chargeur APS
n'est pas branché. Lorsque l'alimentation est connectée, l'écran affiche l'état actuel de la batterie en
permanence, de plus les témoins LED clignotent pour indiquer que la batterie est en cours de charge.
Installation
џ Insérez la batterie (10) dans l'emplace-
ment attribué sur le boîtier de l'appareil
(14) (voir Fig. 4), en alignant les images sur
l'instrument et la batterie.
џ Lorsqu'elle est bien installée, la batterie
se verrouille dans l'emplacement à l'aide
d'un clip spécial.
џ Pour retirer la batterie, appuyez sur le
bouton de déverrouillage de la batterie (9).
Mesures de sécurité
џ Pour recharger, utilisez toujours le
chargeur fourni avec votre appareil optique. L'utilisation d'un chargeur différent
peut causer des dommages irréparables à la batterie ou au chargeur et peut provoquer l'inflammation de la
batterie.
џ Après un stockage de longue durée, la batterie doit être partiellement chargée – elle ne doit pas être chargée
au maximum ou complètement déchargée.
џ Ne chargez pas la batterie immédiatement après l'avoir transférée d'une atmosphère froide à une atmosphère
chaude. Attendez 30-40 minutes pour que la batterie se réchauffe.
џ Ne laissez pas une batterie sans surveillance pendant sa charge.
џ N'utilisez pas le chargeur s'il a été modifié ou endommagé.
џ La batterie doit être chargée à une température comprise entre 0°C et +45°C, sinon sa durée de vie sera
considérablement réduite.
џ Ne laissez pas un chargeur avec une batterie connectée à l'alimentation secteur pendant plus de 24 heures
après une recharge complète.
џ N'exposez pas la batterie à des températures élevées ou à une flamme nue.
џ La batterie ne doit pas être utilisée en immersion dans l'eau.
џ La connexion d'appareils tiers avec une consommation électrique supérieure à celle autorisée n'est pas
recommandée.
џ La batterie est équipée d'un système de protection contre les courts-circuits. Cependant, il faut éviter les
situations pouvant provoquer un court-circuit.
џ Ne pas démonter ni déformer la batterie.
џ Ne soumettez pas la batterie à des chocs ou à des chutes.
џ Lorsque la batterie est utilisée à une température en dessous de zéro, sa capacité diminuera. Ceci est normal et
n'indique pas un défaut.
џ N'utilisez pas la batterie à des températures supérieures à celles indiquées dans le tableau – ceci pourrait
diminuer la durée de vie de la batterie.
џ Rangez les batteries hors de portée des enfants.
ALIMENTATION EXTÉRIEURE
L'alimentation doit provenir d'une source externe, comme un chargeur 5V.
џ Raccordez l'alimentation externe au port USB (8) de l'appareil (Fig. 1).
џ L'appareil basculera sur l'alimentation externe pendant la recharge progressive de la batterie APS3.
џ Une icône de batterie apparaîtra sur l'écran en indiquant sa charge en pourcentage.
џ Si l'appareil fonctionne sur une alimentation externe et si la batterie APS3 n'est pas connectée, une icône est
affichée .
џ Lorsque l'alimentation externe est déconnectée, l'appareil passe sur l'alimentation interne sans s'éteindre.
FONCTIONNEMENT
ATTENTION ! L'objectif de l'appareil ne doit pas être dirigé sur une source d'énergie intense, telle que des
appareils émettant un rayon laser et telle que le soleil. Ceci peut endommager les composants électroniques
dans l'appareil. Les dommages causés par le non-respect des directives d'utilisation ne sont pas couverts par la
garantie.
Allumage de l'appareil et réglage de l'image
џ Retirez le couvercle de lentille (7). Fixez le couvercle sur la sangle à l'aide de l'aimant intégré dans le couvercle.
џ Allumez l'appareil en appuyant sur le bouton ON (5).
џ Réglez la résolution des icônes sur l'écran en faisant tourner la bague de réglage dioptrique sur l'oculaire (1). A
l'avenir, il ne sera pas nécessaire de faire tourner la bague de réglage dioptrique de l'oculaire, quelles que soient
la distance et les autres conditions.
џ Pour mettre au point sur l'objet observé, faites tourner la bague de mise au point (6).
џ Le réglage de la luminosité et du contraste sur l'écran, ainsi que le réglage du zoom numérique continu sont
décrits dans la section FONCTIONS DU MENU D'ACCES RAPIDE.
џ Éteignez l'appareil après utilisation en appuyant longuement sur le bouton ON (5).
CALIBRATION DU CAPTEUR
La calibration permet d'égaliser la température de fond du microbolomètre et de supprimer les défauts dans
l'image (tels que les lignes verticales, les images fantômes, etc.).
Il y a trois modes de calibration : manuel (M), semi-automatique (SA) et automatique (A).
Sélectionnez le mode requis dans la section CALIBRATION du menu .
џ Mode M (manuel). Fixez le couvercle de lentille et appuyez brièvement sur le bouton ON (5). À la fin de la
calibration, enlevez le couvercle de l'objectif.
џ Mode SA (semi-automatique). La calibration est activée en appuyant rapidement sur le bouton ON (5). Il n'est
pas nécessaire de fixer le couvercle de l'objectif (le capteur est fermé par un obturateur interne).
џ Mode A (automatique). L'appareil est calibré de manière autonome, selon l'algorithme logiciel. Il n'est pas
nécessaire de fixer le couvercle de l'objectif (le capteur est fermé par un obturateur interne). Dans ce mode,
l'appareil peut être calibré par l'utilisateur à l'aide du bouton ON (5) (en mode semi-automatique).
ZOOM NUMÉRIQUE DISCRET
La fonctionnalité de l'appareil permet d'augmenter rapidement son grossissement de base (voir le tableau des
propriétés techniques dans la ligne Zoom numérique) par un facteur de 2 ou 4. Réglez le zoom numérique en
appuyant sur le bouton flèche vers le bas (2).
FONCTIONS DU MENU D'ACCES RAPIDE
Les paramètres de base (réglage de la luminosité et du contraste, utilisation du zoom numérique continu et
télémètre stadiamétrique) sont modifiés via le menu Quick Access (accès rapide).
џ Lancez le menu en appuyant rapidement sur le bouton Мenu (3).
џ Un appui court sur le bouton Menu (3) permet de basculer entre les fonctions.
Luminosité – en appuyant sur les boutons flèche vers le haut (4) et flèche vers le bas (2) et en modifiant la
luminosité de l'écran entre 00 et 20.
11
Page 14
Contraste – en appuyant sur les boutons flèche vers le haut (4) et flèche vers le bas (2) et en changeant le
contraste de l'écran entre 00 et 20.
Zoom numérique continu – en appuyant sur les boutons flèche vers le haut (4) et flèche vers le bas (2) et en
modifiant la valeur du zoom numérique entre 1,0 et 4,0. L'incrément du zoom numérique est 0.1.
Pour quitter le menu, appuyez et maintenez enfoncé le bouton Menu (3), ou attendez 10 secondes pour la
sélection automatique.
Le facteur de zoom numérique continu initial affiché est égal à x1.0 si le zoom discret est inactif, x2.0 s'il est 2x, et
x4.0 s'il est 4x.
Note. le grossissement est calculé comme le produit du grossissement de base et du rapport de zoom numérique
continu. Exemple : lorsque le grossissement de base est 3.0x et lorsque le rapport du zoom numérique continu
est x1.7, le grossissement réel est 5,1х (3,0*1,7). lorsque l'appareil est allumé la fois suivante, l'image est projetée
sur l'écran avec les réglages de luminosité et de contraste sauvegardés lors de l'extinction précédente.
Télémètre stadiamétrique – Appuyez sur les boutons flèche vers le haut (4) et flèche vers le bas (2) pour
modifier la position des repères permettant de déterminer la distance de l'objet observé (voir la Section 16 pour
plus d'informations sur le télémètre).
FONCTIONS DU MENU PRINCIPAL
џ Lancez le menu en appuyant rapidement sur le bouton Мenu (3).
џ Appuyez sur les boutons flèche vers le haut (4) et flèche vers le bas (2) pour parcourir les fonctions du menu.
џ La navigation dans le menu utilise le défilement. Lorsque la dernière option sur le premier onglet est atteinte,
la navigation se déplace sur la première option du second onglet.
џ Un appui court sur le bouton Menu (3) ouvre une option du menu.
џ Pour quitter le menu, appuyez et maintenez enfoncé le bouton Menu (3),
џ La sortie automatique du menu se produit après 10 secondes d'inactivité.
џ À la sortie du menu, l'emplacement du curseur ( ) n'est mémorisé que pendant la durée de la séance de travail
(c'est-à-dire jusqu'à ce que l'appareil soit éteint). La fois suivante, lorsque l'appareil est allumé et que l'on
accède au menu, le curseur se placera sur la première option du menu.
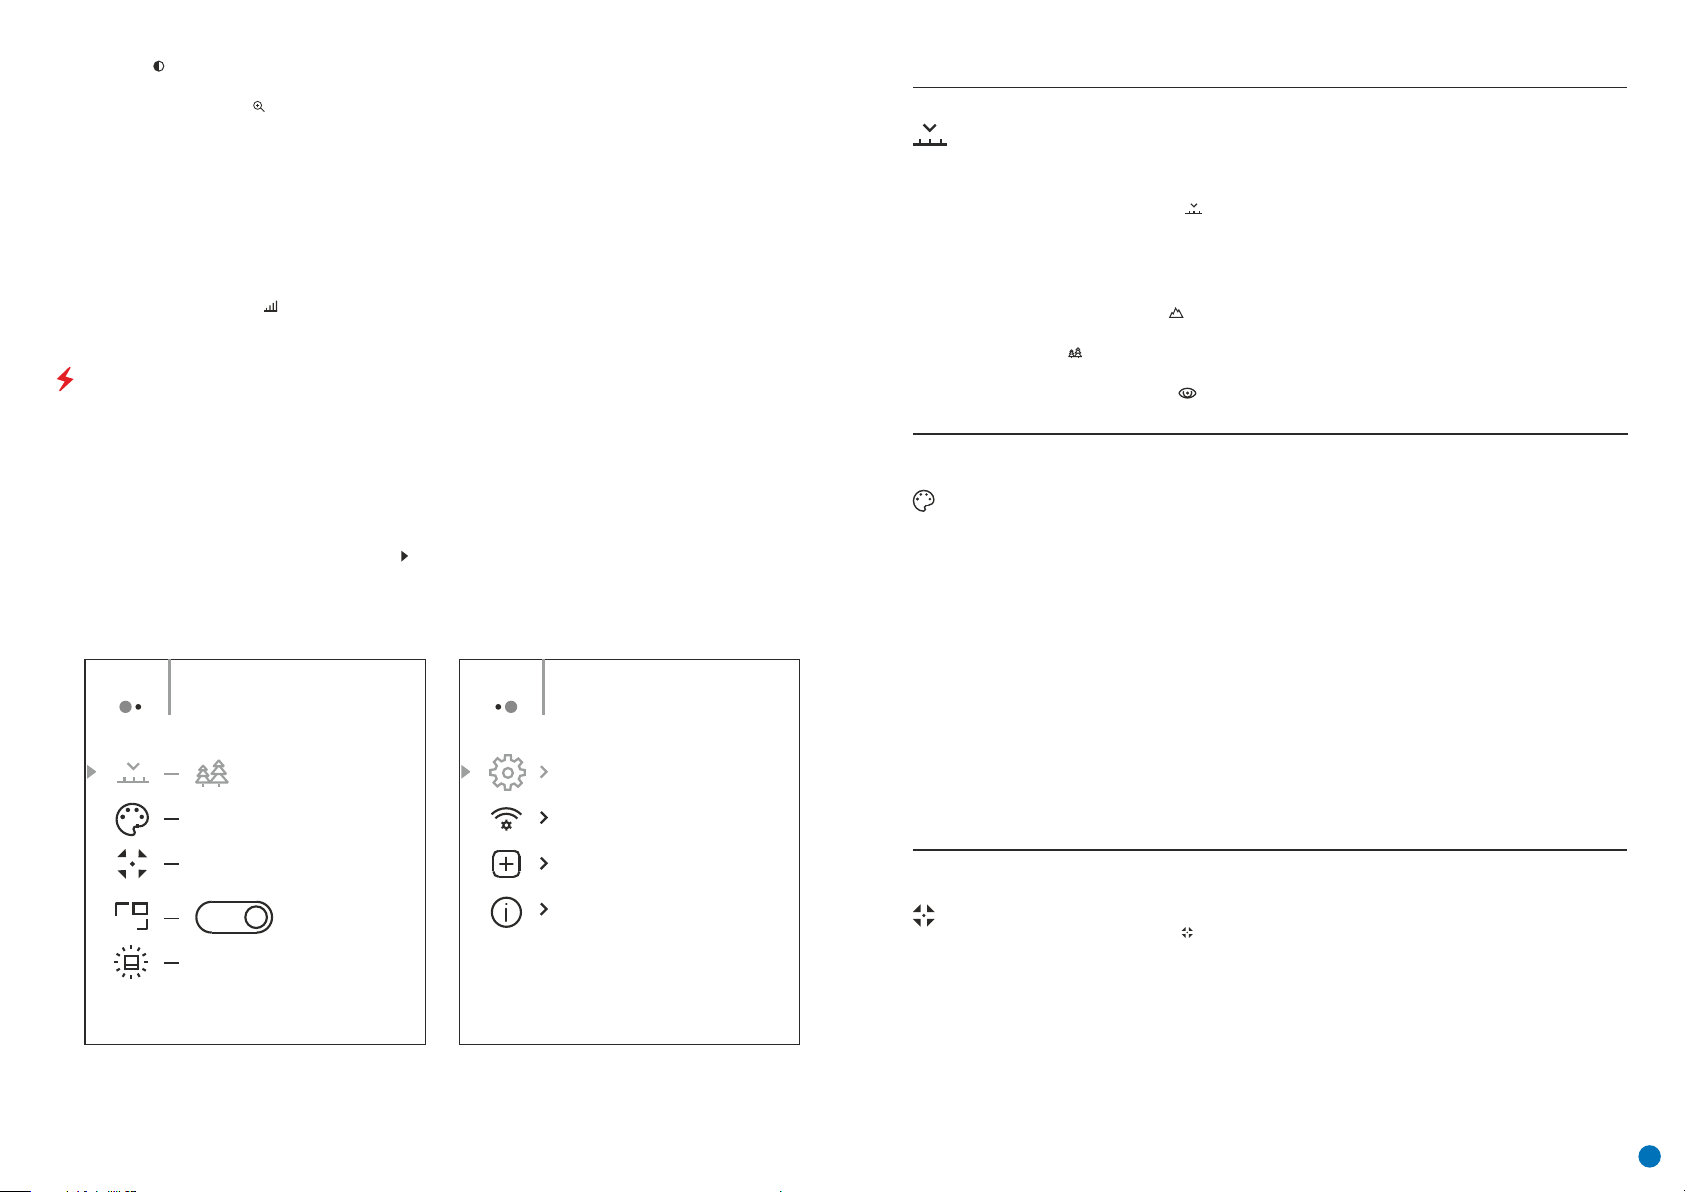
Vue générale du menu :
Onglet 1 Onglet 2
Menu General SettingMenu Mode
Hot White
Composition et description du menu
Mode
Palettes de
couleurs
Sélection du mode d'observation L'imageur thermique a trois modes de fonctionnement
automatique. Chacun de ces modes comporte une combinaison optimale de paramètres
(luminosité, contraste, intensité, etc.) pour obtenir la qualité d'image optimale dans toutes
les conditions d'observation.
џ Appuyez et maintenez enfoncé le bouton Menu (3) pour lancer le menu.
џ Sélectionnez l'option "Mode".
џ Un appui court sur le bouton Menu (3) ouvre le menu.
џ Sélectionnez l'un des réglages décrits ci-dessous à l'aide des boutons flèche vers le haut (4)
et flèche vers le bas (2).
џ Un appui court sur le bouton Menu (3) confirme la sélection.
Montagnes/Rochers – Mode contraste élevé C'est le mode optimal pour observer la faune
sur un fond de rochers et de sol dans une région montagneuse.
Forêt – Mode à faible contraste C'est le mode optimal pour observer la faune sur un fond de
végétation.
Mode d'identification – Mode universel pouvant être appliqué sous diverses conditions
d'observation.
Sélection de palette de couleurs Le principal mode d'affichage pour une image observée est
le mode "Hot White" (blanc chaud). L'option du menu "Colour palettes" vous permet de
sélectionner une autre palette :
џ Appuyez et maintenez enfoncé le bouton Menu (3) pour lancer le menu.
џ Sélectionnez l'option "Colour Palettes".
џ Un appui court sur le bouton Menu (3) ouvre le menu.
џ Sélectionnez l'une des palettes décrites ci-dessous à l'aide des boutons flèche vers le haut
(4) et flèche vers le bas (2).
џ Un appui court sur le bouton Menu (3) confirme la sélection.
Blanc chaud. Une palette de noir et blanc (température froide correspondant au noir et
température chaude au blanc).
Chaud noir. Une palette de noir et blanc (température froide correspondant au blanc et
température chaude au noir).
Chaud rouge
Rouge monochrome
Arc-en-ciel
Ultramarin
Violet
Sépia
PIP
Automatic
Off
10
Mode
calibration
Sélection du mode de calibration Il y a trois modes de calibration : manuel, semi-automatique
et automatique.
џ Appuyez et maintenez enfoncé le bouton Menu (3) pour lancer le menu.
џ Sélectionnez l'option "Mode de calibration".
џ Un appui court sur le bouton Menu (3) ouvre le sous-menu.
џ Sélectionnez l'un des modes de calibration décrits ci-dessous à l'aide des boutons flèche
vers le haut (4) / flèche vers le bas (2).
џ Un appui court sur le bouton Menu (3) confirme la sélection.
Automatique. Les exigences de calibration en mode automatique sont déterminées par
programme, la calibration étant démarrée automatiquement.
Semi-automatique. L'utilisateur définit les exigences de calibration de façon indépendante
(en fonction de l'image observée).
Manuel. Calibration manuelle. Fermez le couvercle de lentille avant de commencer la
calibration.
12
Page 15
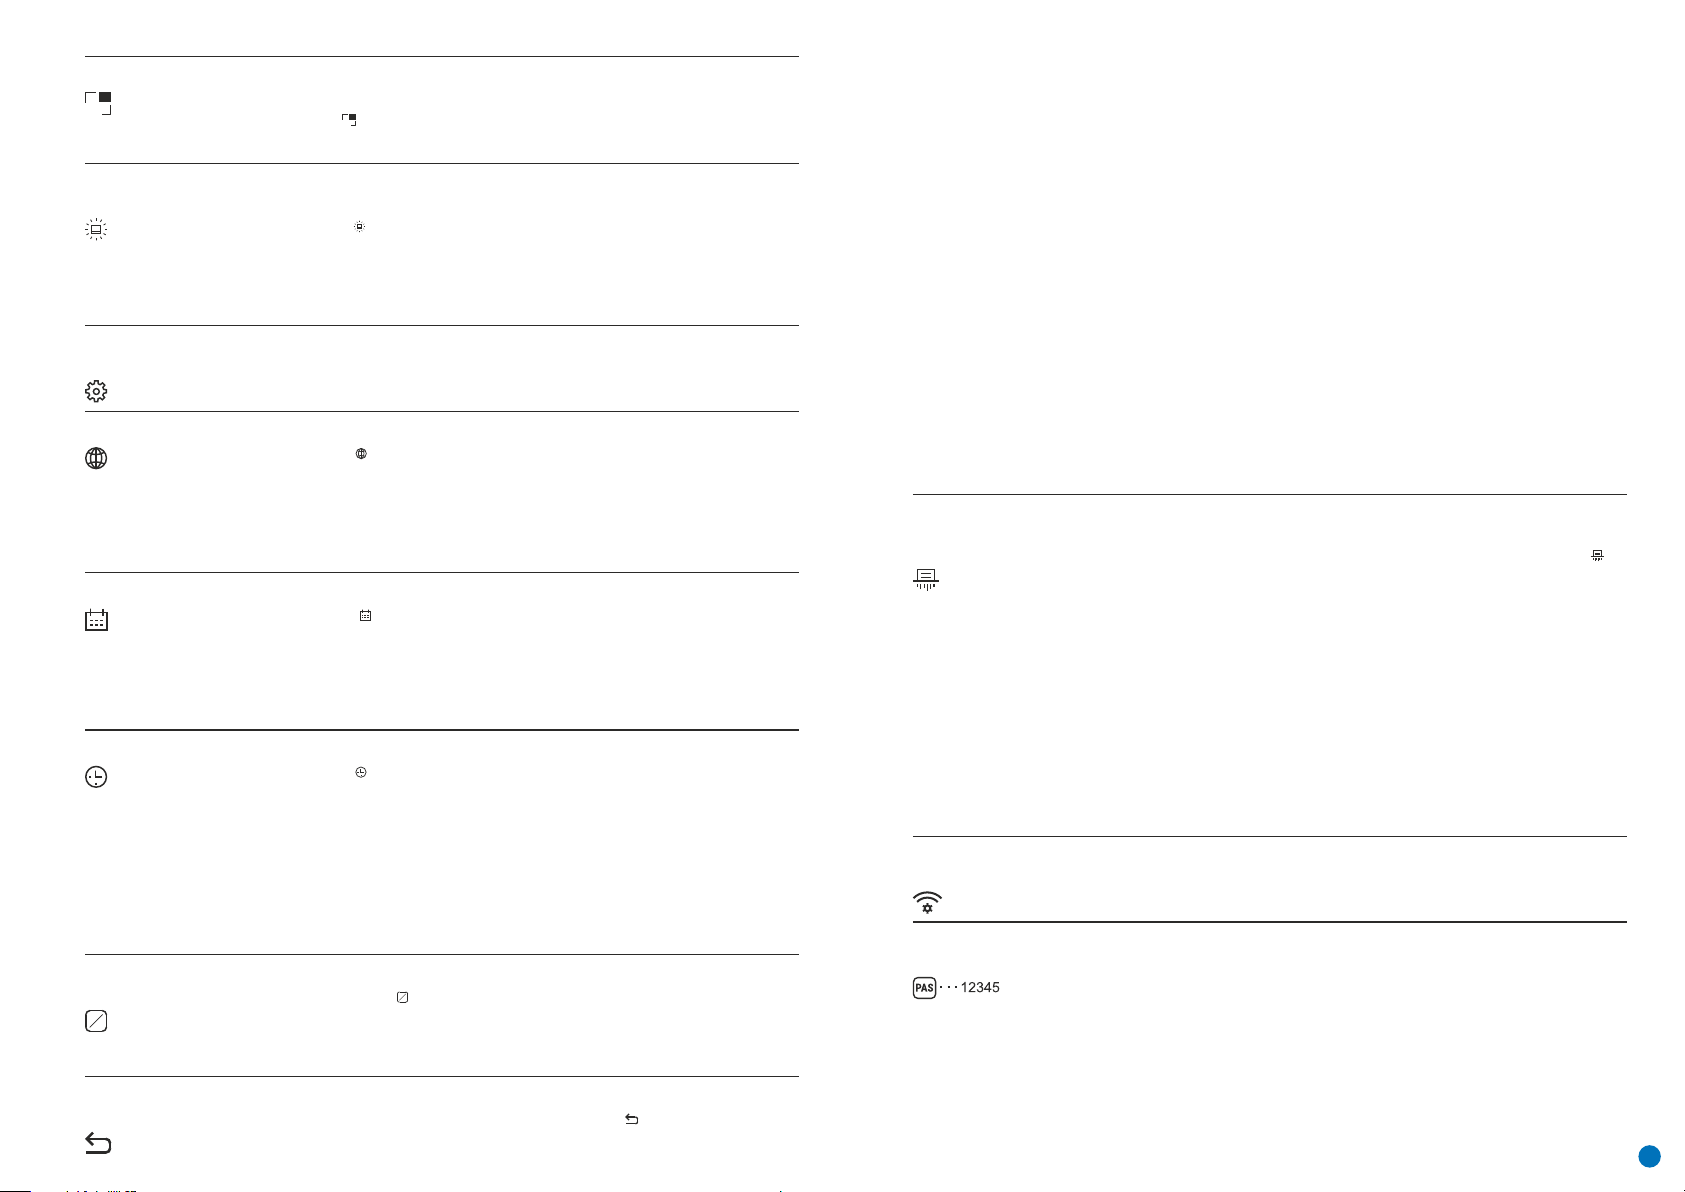
Mode PiP
PIP
Luminosité
de l'icône
Paramètres
généraux
Langue
Date
Heure
Unités
de mesure
M
Y
Paramètres
par défaut
Sélection du mode Picture in Picture (image dans image)
Appuyez et maintenez enfoncé le bouton Menu (3) pour lancer le menu.
Sélectionnez l'option "Mode PiP".
Un appui court sur le bouton Menu (3) active/désactive le mode (on/off).
Réglage de la luminosité de l'icône.
џ Appuyez et maintenez enfoncé le bouton Menu (3) pour lancer le menu.
џ Sélectionnez l'option "Luminosité icône".
џ Un appui court sur le bouton Menu (3) ouvre le sous-menu.
џ Sélectionnez la luminosité des pictogrammes à l'aide des boutons flèche vers le haut (4) /
flèche vers le bas (2).
џ Un appui court sur le bouton Menu (3) confirme la sélection.
Cette option du menu vous permet de programmer les paramètres suivants
Choisir la langue
џ Lancez le sous-menu "Langue" en appuyant rapidement sur le bouton Мenu (3).
џ Sélectionnez l'une des langues d'interface disponibles (anglais, français, allemand,
espagnol ou russe) à l'aide des boutons flèche vers le haut (4) / flèche vers le bas (2).
џ Confirmez votre sélection en appuyant rapidement sur le bouton Menu(3).
џ Pour enregistrer votre choix et quitter le sous-menu, appuyez et maintenez enfoncé le
bouton Menu (3).
Réglage de la date
џ Lancez le sous-menu "Date" en appuyant rapidement sur le bouton Мenu (3). La date
apparaît sous le format jj/mm/aaaa.
џ Réglez l'année, le mois et le jour souhaités à l'aide des boutons flèche vers le haut (4) /
flèche vers le bas (2). Appuyez sur le bouton Menu (3) pour parcourir les chiffres.
џ Pour sauvegarder la date choisie et pour quitter le sous-menu, appuyez et maintenez
enfoncé le bouton Menu (3).
Réglage de l'heure
џ Lancez le sous-menu "Heure" en appuyant rapidement sur le bouton Мenu (3).
џ Sélectionnez le format de l'heure (sur 24 heures ou AM/PM) à l'aide des boutons flèche vers
le haut (4) / flèche vers le bas (2).
џ Appuyez sur le bouton Menu (3) pour passer au réglage de l'heure.
џ Réglez l'heure en appuyant sur les boutons flèche vers le haut (4) / flèche vers le bas (2).
џ Appuyez sur le bouton Menu (3) pour passer au réglage des minutes.
џ Réglez les minutes en appuyant sur les boutons flèche vers le haut (4) / flèche vers le bas (2).
џ Pour sauvegarder l'heure choisie et pour quitter le sous-menu, appuyez et maintenez
enfoncé le bouton Menu (3).
Sélection d'une unité de mesure
џ Lancez le sous-menu "M/Y" en appuyant rapidement sur le bouton Мenu (3).
џ Réglez l'unité de mesure (mètres ou yards) en appuyant sur les boutons flèche vers le haut
(4) / flèche vers le bas (2) ; puis appuyez sur le bouton Мenu (3) .
џ Le retour au sous-menu s'effectue automatiquement.
Rétablissement des paramètres usine
џ Lancez le sous-menu "Default Settings" (paramètres par défaut) en appuyant rapidement
sur le bouton Мenu (3).
PIP
M
Y
Formatage de
la carte
mémoire
Paramétrages
Wi-Fi
Définition d'un
mot de passe
џ Sélectionnez l'option "YES" pour rétablir les paramètres usine ou sur "NO" pour les annuler
à l'aide des boutons flèche vers le haut (4) / flèche vers le bas (2).
џ Confirmez votre sélection en appuyant rapidement sur le bouton Menu(3).
џ Si l'option YES a été sélectionnée, le message "Do you want to return to default settings?"
(voulez-vous revenir aux paramètres par défaut ?) apparaîtra avec les options YES et NO.
Sélectionnez YES pour formater la carte mémoire.
џ Si l'option NO a été sélectionnée, le formatage sera annulé et le sous-menu s'affichera à
nouveau.
Les paramètres suivants seront rétablis sur leur valeur fixée en usine avant d'être initialisés
par l'utilisateur :
Mode opératoire – vidéo
Mode – forêt
Mode calibration – automatique
Langue – Anglais
Wi-Fi – éteint (mot de passe par défaut)
Grossissement – valeur d'origine
PiP – éteint
Palette de couleurs – chaud blanc
Unité de mesure – mètres
Note : Lors du rétablissement des paramètres usine, les réglages de date/heure et la carte des
pixels de l'utilisateur sont sauvegardés.
Formatage de la carte mémoire. Cette fonction permet de sauvegarder la carte de l'appareil
(carte mémoire) (tous les fichiers seront supprimés de sa mémoire).
џ Lancez le sous-menu "Memory Card Formatting" (formatage de carte mémoire) en
appuyant rapidement sur le bouton Мenu (3).
џ Sélectionnez l'option "YES" pour formater la carte mémoire ou sur "NO" pour revenir au
sous-menu à l'aide des boutons flèche vers le haut (4) / flèche vers le bas (2).
џ Confirmez votre sélection en appuyant rapidement sur le bouton Menu(3).
џ Si l'option YES a été sélectionnée, le message "Format the Memory Card?" (Formater la carte
mémoire ?) apparaîtra avec les options YES et NO. Sélectionnez YES pour formater la carte
mémoire.
џ Le message "Formatting memory card" (formatage de la carte mémoire) indique que le
formatage est en cours.
џ Le message "Formatting completed" (Formatage terminé) indique que le formatage est
terminé.
џ Si l'option NO a été sélectionnée, le formatage sera annulé et le sous-menu s'affichera à
nouveau.
Cette option vous permet de configurer l'appareil pour le faire fonctionner sur un réseau
Wi-Fi.
Cette fonction vous permet de définir un mot de passe pour accéder à l'appareil à partir d'un
périphérique extérieur. Ce mot de passe est utilisé au moment du raccordement d'un
périphérique extérieur (par exemple un smartphone) à l'appareil.
џ Appuyez sur le bouton Menu (3) pour lancer le sous-menu "Wi-Fi".
џ Le mot de passe par défaut (12345678) apparaîtra sur l'écran.
џ Initialisez votre mot de passe souhaité à l'aide des boutons flèche vers le haut (4) / flèche
vers le bas (2). Le bouton flèche vers le haut (4) augmente le nombre et le bouton flèche vers le
bas (2) le diminue. Appuyez sur le bouton Menu (3) pour parcourir les chiffres.
џ Pour sauvegarder le mot de passe et quitter le sous-menu, appuyez et maintenez enfoncé le
bouton Menu (3).
13
Page 16
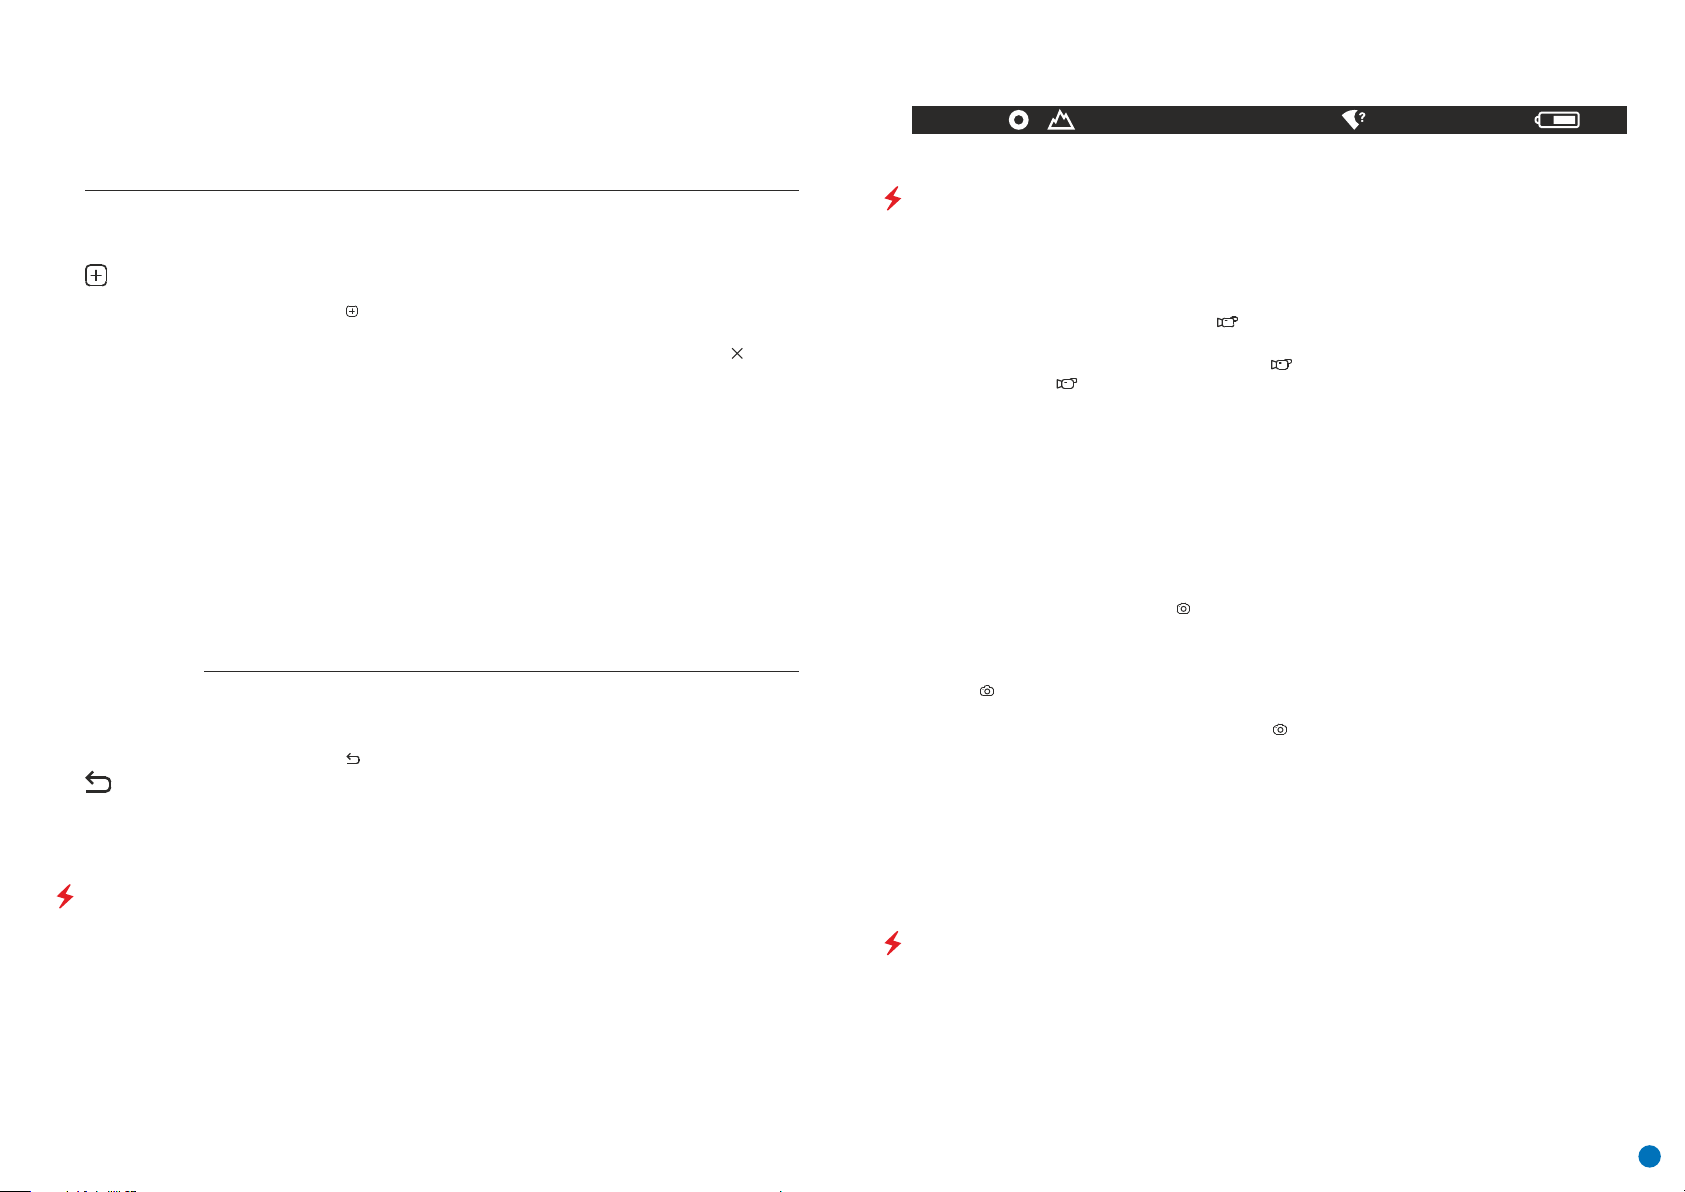
Définition des
niveaux d'accès
џ Cette sous-fonction vous permet de configurer le niveau approprié d'accès à votre appareil,
rendu disponible sur l'application Stream Vision.
џ Niveau Owner (propriétaire). Un utilisateur de Stream Vision a un accès complet à toutes les
fonctions de l'appareil.
џ Niveau Guest (invité). Un utilisateur de Stream Vision peut afficher les vidéos de l'appareil
uniquement en temps réel.
џ Niveau de décharge de la batterie (lorsque la lunette est alimentée par le bloc batterie rechargeable)
џ Témoin d'alimentation extérieure (lorsque la lunette est alimentée par une alimentation extérieure)
SA
11.0x 08:13PM
Note : Lorsque la calibration est en cours, l'image sur l'écran se fige pendant la durée de la calibration
Suppression
des pixels
défectueux
Lors de l'utilisation de l'appareil, les pixels défectueux (cassés) peuvent apparaître sur le
capteur par des points brillants ou sombres de luminosité constante qui sont visibles sur
l'image. Les imageurs thermiques AXION permettent de supprimer les pixels défectueux sur le
capteur par programme et permettent aussi d'annuler une suppression.
џ Lancez le sous-menu en appuyant sur le bouton Menu (3).
џ Sélectionnez l'icône en appuyant rapidement sur le bouton Мenu (3).
џ Un marqueur apparaîtra à gauche de l'écran.
џ Une loupe apparaîtra à droite de l'écran – une image agrandie avec une croix fixe – qui est
nécessaire pour faciliter une recherche des pixels défectueux et pour aligner le marqueur
avec. Il y a des flèches de direction horizontale et verticale pour déplacer le marqueur avec
les coordonnées le long des axes X et Y.
џ Utilisez les boutons flèche vers le haut (4) / flèche vers le bas (2) pour déplacer le marqueur
afin d'aligner son centre avec le pixel défectueux.
џ Un appui court du bouton Menu (3) commute la direction du marqueur de l'horizontale à la
verticale et vice-versa.
џ A l'aide des boutons flèche vers le haut (4) / flèche vers le bas (2), alignez le pixel défectueux
avec la croix fixe dans le cadre – le pixel doit disparaître.
џ Supprimez le pixel défectueux en appuyant rapidement sur le bouton ON On/Calibration.
џ Lorsqu'un pixel a été supprimé avec succès, le mot "OK" s'affiche brièvement sur l'écran.
џ Ensuite, en déplaçant le marqueur sur l'écran, vous pouvez supprimer le prochain pixel
défectueux.
џ Pour quitter la fonction "Suppression des pixels défectueux", appuyez et maintenez enfoncé
le bouton Menu (3).
Rétablissement
de la "carte de
pixels" créée
en usine
Ramenez tous les pixels défectueux précédemment supprimés par l'utilisateur à leur état
d'origine :
џ Lancez le sous-menu en appuyant sur le bouton Menu (3).
џ Sélectionnez l'icône et appuyez sur le bouton Мenu (3).
џ Sélectionnez "YES" si vous voulez rétablir la carte de pixels créée en usine et sur "NO" si
vous ne voulez pas.
џ Confirmez votre sélection en appuyant rapidement sur le bouton Menu(3).
Attention ! Un ou deux pixels sur l'écran de l'imageur, sous la forme de points noirs, brillants
blancs ou colorés (bleu ou rouge) peuvent apparaître. Ce ne sont pas des défauts.
BARRE D'ÉTAT
La barre d'état se trouve en bas de l'écran et elle affiche des informations concernant l'état opératoire de la
lunette, incluant :
џ Mode d'observation
џ Mode calibration (en mode calibration automatique, 3 secondes avant la calibration automatique, un
temporisateur à rebours apparaîtra à la place de l'icône calibration).
џ Grossissement maximum actuel
џ Connexion Wi-Fi
џ Connexion USB (si la lunette est connectée)
џ Palette de couleurs (affichée uniquement lorsque la palette Hot Black ("chaud noir") est installée).
џ Heure actuelle
ENREGISTREMENT VIDEO ET PHOTOGRAPHIE D'UNE IMAGE OBSERVEE
Les imageurs thermiques AXION sont équipés d'une fonction pour faire un enregistrement vidéo et une photo
d'une image observée sur la carte mémoire incorporée. Il est recommandé de régler la date et l'heure avant
d'utiliser la fonction enregistrement vidéo et photographie (voir les options du menu correspondant).
L'enregistreur incorporé a deux modes de fonctionnement :
Mode VIDEO. Enregistrement vidéo d'une image
џ La lunette est en mode VIDEO dès qu'elle est allumée.
џ Une icône est affichée dans le coin supérieur gauche avec le temps d'enregistrement restant (en format
hh:mm), par exemple, 5:12.
џ Démarrez l'enregistrement vidéo en appuyant rapidement sur le bouton flèche vers le bas/REC (2).
џ Une fois que l'enregistrement vidéo a commencé, l'icône disparaîtra et une icône REC apparaîtra à sa place et
la minuterie d'enregistrement sera affichée en format MM:SS (minutes:secondes).
џ Faites une pause de l'enregistrement vidéo et reprenez l'enregistrement en appuyant rapidement sur le
bouton flèche vers le bas/REC (2).
џ Arrêtez l'enregistrement vidéo en appuyant et en maintenant enfoncé le bouton flèche vers le bas/REC (2).
џ Les fichiers vidéo sont stockés dans la carte mémoire incorporée une fois que l'enregistrement vidéo a été
arrêté.
џ Pour basculer entre les modes Vidéo et Photo, appuyez et maintenez enfoncé le bouton flèche vers le bas/REC
(2).
Mode PHOTO. Photographie d'une image
Passez en mode photo en appuyant longuement sur le bouton flèche vers le bas/REC (2).
Prenez une photo en appuyant rapidement sur le bouton flèche vers le bas/REC (2). L'image est figée pendant 0,5
secondes et le fichier image est sauvegardé dans la carte mémoire incorporée.
Une icône , ">100" est affichée dans le coin supérieur gauche pour indiquer que la lunette peut prendre plus
de 100 photographies. Lorsque le nombre des photos disponibles est inférieur à 100, le nombre réel des photos
disponibles (par exemple 98) est affiché à côté de l'icône .
Notes : Vous pouvez lancer et utiliser le menu pendant l'enregistrement vidéo. Les vidéos et les photos
enregistrées sont sauvegardées sur la carte mémoire incorporée dans le format : img_xxx.jpg (pour les photos),
video_xxx.mp4 (pour les vidéos), xxx - compteur de fichier à trois chiffres (pour les photos et les vidéos). Le
compteur utilisé pour la dénomination des fichiers multimédia n'est PAS réinitialisé.
Attention : La durée maximum d'un fichier d'enregistrement vidéo est de sept minutes. À la fin de ce temps, la
vidéo sera enregistrée dans un nouveau fichier. Le nombre des fichiers est limité par la capacité de la mémoire
incorporée dans la lunette. Contrôlez régulièrement la quantité de mémoire libre dans la carte mémoire
incorporée, en transférant les vidéos et les photos sur d'autres médias pour libérer de l'espace sur la carte
mémoire.
FONCTION Wi-Fi
L'appareil est équipé d'un système de communication radio avec des périphériques extérieurs (ordinateur,
smartphone) via Wi-Fi.
џ Allumez le module Wi-Fi par un appui long sur le bouton flèche vers le haut (4). Le fonctionnement Wi-Fi est
affiché dans la barre d'état de la manière suivante :
14
Page 17
État connexion Indication de la barre d'état
Wi-Fi déconnecté
Wi-Fi activé par l'utilisateur
Connexion Wi-Fi en cours
Wi-Fi allumé, pas de connexion avec le périphérique
Wi-Fi allumé, le périphérique est connecté
џ L'appareil est reconnu par un périphérique extérieur sous l'étiquette "AXION_XXXX", où XXXX sont les quatre
derniers chiffres du numéro de série.
џ Après avoir entré le mot de passe sur un périphérique extérieur (pour avoir des informations plus détaillées
concernant l'initialisation des mots de passe, voir la sous-section intitulée "Configuration Wi-Fi" dans la section
"Fonctions du menu principal" des instructions), établissez une connexion ; l'icône dans la barre d'état
devient .
TÉLÉMÈTRE STADIAMÉTRIQUE
Les imageurs thermiques sont équipés d'un télémètre stadiamétrique permettant de déterminer la distance à
un objet lorsque sa taille est connue.
џ La fonction du télémètre stadiamétrique est accessible en appuyant rapidement sur le bouton Menu (3) et en
sélectionnant l'icône .
џ Des barres s'afficheront sur l'écran pour déterminer la distance, les icônes des
trois objets et les chiffres de la distance estimée de ces trois objets.
Il y a trois valeurs prédéterminées pour les objets :
Lièvre – hauteur 0,3 m
Sanglier sauvage – hauteur 0,7 m
160m
66m
28m
Cerf – hauteur 1,7 m
џ Placez le curseur fixe inférieur sous l'objet et, à l'aide des boutons de navigation flèche vers le haut (4) / flèche
vers le bas (2), déplacez le curseur horizontal supérieur par rapport au curseur fixe horizontal inférieur afin de
placer l'objet entre les curseurs. La distance à la cible est recalculée automatiquement et simultanément avec ce
mouvement.
џ Si la distance n'est pas déterminée dans un délai de 10 secondes, l'information disparaît de l'écran.
џ Allez à l'option correspondante sur le menu pour sélectionner une unité de mesure (mètres ou yards).
џ La valeur de distance est arrondie vers le haut ou vers le bas avant d'être affichée sur l'écran, elle est arrondie à
5 mètres pour les grandes distances et à 1 mètre pour les distances plus courtes.
џ Pour quitter le mode télémètre, appuyez rapidement sur le bouton Menu (3), ou attendez 10 secondes pour une
sortie automatique.
FONCTION DISPLAY OFF (EXTINCTION DE L'ECRAN)
Cette fonction désactive le transfert d'images sur l'écran, ce qui minimise l'intensité de son éclairage. Cela
permet d'éviter un démasquage intempestif. L'appareil continuera à fonctionner.
Lorsque cette fonction est utilisée, l'appareil passe en mode veille, ce qui permet de l'éteindre rapidement, si
nécessaire.
џ Lorsque l'appareil est allumé, appuyez et maintenez enfoncé le bouton ON (5). L'affichage disparaîtra et le
message "Display off" (affichage éteint) apparaîtra.
џ Pour allumer l'écran, appuyez rapidement sur le bouton ON (5).
џ Lorsque le bouton ON (5) est maintenu enfoncé, l'écran affichera "Display off »
џ (affichage éteint) et un compte à rebours débutera. Ensuite l'appareil s'éteindra.
FONCTION PiP
La fonction PiP (image dans image) vous permet de visualiser une image
zoomée numérique agrandie dans une "fenêtre" séparée simultanément
avec l'image principale.
Activation/désactivation de la fonction PiP :
џ Appuyez et maintenez enfoncé le bouton Menu (3) pour lancer le menu
principal.
џ Sélectionnez l'option "Mode PiP".
џ Un appui court sur le bouton Menu (3) active/désactive le mode (on/off).
џ Appuyez et maintenez enfoncé le bouton Menu (3) pour quitter le menu principal.
џ L'image agrandie est affichée dans une fenêtre séparée en utilisant la valeur de zoom optique maximum.
џ Pour modifier le rapport de zoom dans la fenêtre PiP, appuyez rapidement sur le bouton flèche vers le haut (4).
џ L'image restante est affichée avec la valeur de zoom optique correspondant à la valeur du grossissement x1.0.
џ Lorsque la fonction PiP est activée, vous pouvez effectuer des zooms discrets et des zooms continus. Dans ce
PIP
cas, la valeur maximum de grossissement optique apparaîtra uniquement dans la fenêtre séparée.
џ Lorsque la fonction PiP est désactivée, l'image est affichée avec la valeur de zoom optique fixée pour le mode
PiP.
6.9x
3.1x
STREAM VISION (transmission en continu)
Les imageurs thermiques AXION prennent en charge la technologie Stream Vision, ce qui permet de transmettre
une image en temps réel depuis l'imageur thermique vers votre smartphone ou votre tablette via le Wi-Fi.
Des instructions détaillées sur l'utilisation de la technologie Stream Vision peuvent être trouvées dans un
manuel séparé ou sur le site webwww.pulsar-vision.com
Note : la conception de l'appareil permet de mettre à jour le logiciel. La mise à jour est possible via l'application
Stream Vision.
Scannez les codes QR pour télécharger l'application Stream Vision :
CONNEXION USB
џ Raccordez une extrémité du câble USB au connecteur microUSB (8) de l'appareil et l'autre extrémité au port sur
votre ordinateur.
џ Allumez l'appareil en appuyant sur le bouton ON (5) (l'ordinateur ne détectera pas l'appareil s'il est éteint).
џ L'appareil est détecté automatiquement par l'ordinateur et aucune installation de pilote n'est nécessaire.
џ Deux options de connexion apparaîtront sur l'écran :
Use as power (utilisation comme alimentation)
Use as memory card (utilisation comme carte mémoire)
џ Sélectionnez l'option de connexion à l'aide des boutons flèche vers le haut
(4) / flèche vers le bas (2).
џ Un appui court sur le bouton Menu (3) confirme la sélection.
Use as power (utilisation comme alimentation)
џ Lorsque cette option est sélectionnée, l'ordinateur est utilisé par l'appareil comme une source d'alimentation
externe. Une icône apparaîtra dans la barre d'état . L'appareil continuera à fonctionner et toutes les
fonctions sont disponibles.
џ La batterie installée dans l'appareil ne sera pas chargée.
џ Lorsque l'USB est débranché de l'appareil en mode alimentation, l'appareil continuera à fonctionner sur la
batterie lorsqu'elle est présente et suffisamment chargée.
USB connection
Use as power
Use as memory card
15
Page 18
Use as memory card (utilisation comme carte mémoire)
џ Lorsque cette option est sélectionnée, l'appareil sera reconnu par l'ordinateur comme une carte flash. Cette
option est conçue pour pouvoir utiliser des fichiers stockés dans la mémoire de l'appareil ; les fonctions de
l'appareil ne sont pas accessibles, et l'appareil s'éteindra automatiquement.
џ Si une vidéo était en cours d'enregistrement au moment de la connexion, l'enregistrement cessera et sera
sauvegardé.
INSPECTION TECHNIQUE
Une inspection technique de l'appareil est recommandée avant chaque utilisation. Vérification :
џ L'aspect extérieur de l'appareil (il ne doit pas y avoir de fissures dans le boîtier).
џ L'état de la lentille et de l'oculaire (il ne doit pas y avoir de fissures, de points graisseux, de poussières ou
d'autres dépôts).
џ L'état de la batterie rechargeable (elle doit être chargée) et des contacts électriques (il ne doit pas y avoir de
présence de sels ou d'oxydation).
џ Les commandes doivent être en bon état de fonctionnement.
ENTRETIEN
џ La maintenance doit être effectuée au moins deux fois par an et doit comprendre les mesures suivantes :
џ Essuyez les surfaces extérieures des pièces en métal et en plastique, et dépoussiérez avec un chiffon en coton ;
de la graisse au silicone peut être utilisée pour cela.
џ Nettoyez les contacts électriques de la batterie et l'emplacement de la batterie sur l'appareil à l'aide d'un
solvant organique non graisseux.
џ Vérifiez les surfaces en verre de l'oculaire et de la lentille. Si nécessaire, enlevez la poussière et le sable sur les
lentilles (en utilisant de préférence une méthode sans contact). Le nettoyage des surfaces extérieures de
l'optique doit être effectué avec des produits conçus spécialement dans ce but.
DÉPANNAGE
Ce tableau répertorie tous les problèmes pouvant survenir lors de l'utilisation de l'appareil. Exécutez les
vérifications et les réparations recommandées dans l'ordre indiqué sur le tableau. Si un défaut se produit qui
n'est pas indiqué dans le tableau, ou si vous ne pouvez pas réparer vous-même le défaut, l'appareil doit être
retourné pour réparation.
Mauvais fonctionnement
Raison possible
Correction
Le smartphone ou la
tablette ne peuvent pas
être connectés à
l'appareil.
Signal Wi-Fi inexistant ou
interrompu.
En cas d'utilisation par
basses températures, la
qualité de l'image de
l'environnement est
moins bonne que dans
des conditions de
température positives.
En suivant le lien ci-dessous, vous pourrez trouver des réponses aux
questions les plus fréquemment posées à propos de l'imagerie thermique
https://www.pulsar-nv.com/glo/support/faq/79
Le mot de passe de l'appareil a été
modifié.
L'appareil se trouve dans une zone
avec un grand nombre de réseaux WiFi pouvant causer des interférences et
des parasites.
L'appareil est en dehors de la zone de
couverture Wi-Fi. Il y a des obstacles
entre l'appareil et le récepteur (par
exemple murs en béton).
Dans des conditions de température positives, les objets observés
(environnement et arrière-plan) se réchauffent de manière différente en raison
de la conductivité thermique et de ce fait générant un contraste élevé de
température. En conséquence, la qualité de l'image produite par l'appareil sera
meilleure.
Dans des conditions à basse température, les objets observés (arrière-plan) se
refroidissent en général à peu près à la même température, et de ce fait le
contraste de température est considérablement réduit et la qualité de l'image
(détail) est plus médiocre. Ceci est normal pour un imageur thermique.
Supprimez la connexion réseau et
reconnectez-vous en utilisant le mot
de passe de l'appareil.
Pour obtenir un fonctionnement stable
du Wi-Fi, déplacez l'appareil dans une
zone avec moins de réseaux Wi-Fi, ou
allez dans une zone n'en comportant
aucun.
Déplacez l'appareil pour qu'il soit dans
la ligne directe de vision du signal
Wi-Fi.
L'imageur thermique ne
s'allume pas.
L'appareil ne fonctionne
pas à partir d'une source
d'alimentation externe.
L'image est floue, avec
des rayures verticales et
un fond inégal.
L'image est trop sombre.
Des rayures colorées
apparaissent sur l'écran
ou l'image a disparu.
Mauvaise qualité de
l'image/distances
réduites de détection.
Batterie complètement déchargée.
Câble USB endommagé.
Source d'alimentation externe
déchargée.
La calibration est nécessaire.
Faible niveau de luminosité ou de
contraste.
L'appareil a été exposé à de
l'électricité statique pendant son
fonctionnement.
Ces problèmes peuvent survenir pendant l'observation dans des conditions
météo difficiles (neige, pluie, brouillard, etc.).
Rechargez la batterie.
Remplacez le câble USB.
Rechargez la source d'alimentation
externe (si nécessaire).
Exécutez la calibration d'image
conformément à la Section 8
"Fonctionnement" des Instructions.
Réglez la luminosité ou le contraste.
Après exposition à de l'électricité
statique, l'appareil peut redémarrer
automatiquement, ou il doit être
éteint et allumé à nouveau.
Attention ! Les imageurs thermiques AXION exigent une licence lorsqu'ils sont exportés à l'extérieur
de votre pays.
Compatibilité électromagnétique.
Ce produit est conforme aux exigences de la norme européenne EN 55032: 2015, Classe A.
Attention : L'utilisation de ce produit dans une zone résidentielle peut provoquer des
interférences radio.
16
Page 19
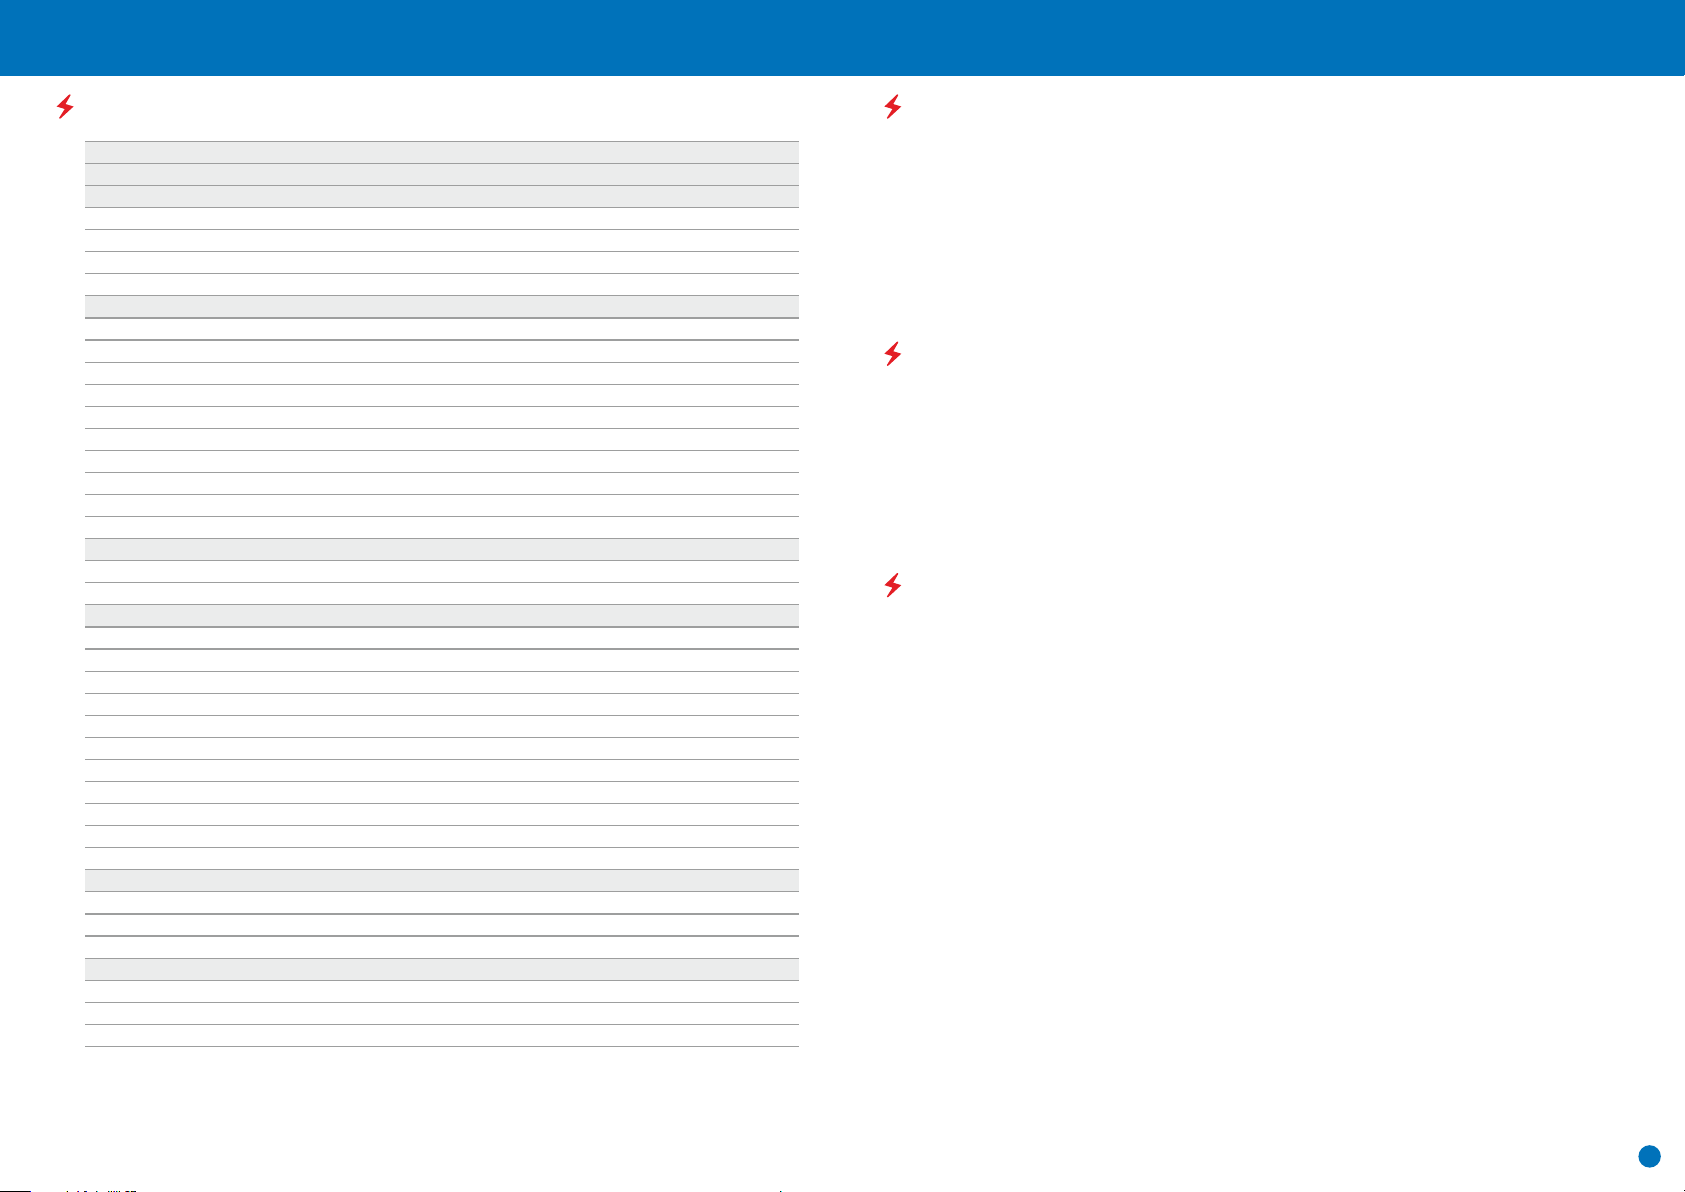
DEUTSCH
TECHNISCHE DATEN
Lagereinheit-Nr. (Stock Keeping Unit; SKU)
AXION-Modell
Mikrobolometer
Typ
Auflösung (Pixel)
Bildwiederholfrequenz (Hz)
Pixelgröße (Mikron)
Optische Daten
Optische Vergrößerung (x)
Stufenloses digitales Zoom (x)
Digitales Zoom (x)
Relatives Öffnungsverhältnis (D/f)
Minimaler Fokussierabstand (m)
Durchmesser Austrittspupille (mm)
Blickwinkel des Sichtfeldes (horizontal), Grad
Blickwinkel des Sichtfeldes, Meter bei 100 m
Fokussierbereich des Okulars (Dioptrien)
Maximale Beobachtungsentfernung (m) **
Display
Typ
Auflösung (Pixel)
Betriebstechnische Daten
Externe Versorgungsspannung
Akkutyp
Kapazität
Nennausgangsspannung
Externe Stromversorgung
Akkulaufzeit in Stunden * (bei 22 °C)
IP-Code (IEC60529) Schutzart
Stream Vision-Kompatibilität
Betriebstemperatur- Bereich
Abmessungen (mm)
Gewicht ohne Akku (kg)
Videorecorder
Video-/Bildauflösung (Pixel)
Video-/Fotoformat
Größe des integrierten Speichers
Wi-Fi-Kanal
Frequenz
Standard
Empfangsreichweite in direkter Sichtlinie (m)
**für ein Tierobjekt, wie z. B. ein Hirsch.
Es können Optimierungen am Design und an der Software dieses Produkts vorgenommen werden, um die
Benutzerfunktionen zu verbessern.
Eine aktualisierte Version des Benutzerhandbuchs finden Sie auf der Website www.pulsar-vision.com
77421
XМ30
ungekühlt
320x240
50
12
4
4-16
2/4
1.2
3
3.5
7.3
12.8
±5
1300
AMOLED
1024x768
3 – 4.3V
Li-Ion Akkupack АPS3
3200 mAh
DC 3.7V
5V (USB)
4
IpХ7
Yes
-25°С ... +40°С
143x41x69
0.25/8.82
1024х768
.mp4/.jpg
16 GB
2.4 Ghz
802.11 b/g/n
15
77422
XМ38
ungekühlt
320x240
50
12
5.5
5.5-22
2/4
1.2
3
3.5
5.8
10.1
±5
1700
AMOLED
1024x768
3 – 4.3V
Li-Ion Akkupack АPS3
3200 mAh
DC 3.7V
5V (USB)
4
IpХ7
Yes
-25°С ... +40°С
149x49x70
0.27/9.52
1024х768
.mp4/.jpg
16 GB
2.4 Ghz
802.11 b/g/n
15
LIEFERUMFANG
џ AXION Wärmebildkamera
џ Wiederaufladbarer APS3-Akku
џ Akkuladegerät APS mit Netzanschlussmöglichkeit
џ USB-Kabel
џ Aufbewahrungstasche
џ Handschlaufe
џ Benutzerhandbuch
џ Optikreinigungstuch
џ Garantiekarte
BESCHREIBUNG
Auf AXION IR-Matrix (Mikrobolometer) basierende Monokulare der Wärmebildtechnik werden durch eine Reihe
von Modellen dargestellt, die sich in der Vergrößerung und dem Durchmesser der Objektive unterscheiden.
Diese Geräte sind sowohl für den Einsatz in der Nacht als auch am Tage bei schwierigen Wetterverhältnissen
(Nebel, Smog, Regen) entwickelt, sowie in Umgebungen mit Hindernissen, welche die Erkennung eines Ziels
erschweren (Äste/Zweige, hohes Gras, dichte Sträucher, usw.). Im Gegensatz zu Nachtsichtgeräten, die auf
elektronenoptischen Wandlern basieren, benötigen Wärmebildmonokulare keine externe Lichtquelle und sind
gegen die Einwirkung von hellem Licht resistent.
AXION Monokulare können zur Nachtjagd, Beobachtung und Geländeorientierung und zur Durchführung von
Rettungsaktionen verwendet werden.
UNTERSCHEIDENDE MERKMALE
џ Mikrobolometer-Pixelgröße von 12 Mikron
џ AMOLED-Display mit hoher Auflösung
џ Leicht und kompakt
џ Funktionales und ergonomisches Design
џ Komfortable Benutzeroberfläche
џ Beobachtung in acht Farbmodi
џ Drei Kalibrierungsmodi (manuell, halbautomatisch und automatisch)
џ Hohe Erkennungsreichweite
џ Starke Vergrößerung
џ Drei Beobachtungsmodi (Wald, Stadt und Identifizierung)
џ Stadiametrischer Entfernungsmesser
џ Funktion „Display Off“ (Anzeige aus)
џ Funktion „Pixelkorrektur“
џ Aktualisierbare Software
џ Großer Betriebstemperaturbereich (–25 °C bis +40 °C)
џ Absolut Wasserdicht (Schutzklasse IPX7)
Video-/Audioaufzeichnung
џ Integrierter Videorecorder
џ Integration in iOS- und Android-Geräte
џ Wi-Fi Fernbedienung und Überwachung mit dem Smartphone
џ YouTube Live-Übertragung und direkte Aufzeichnung im Internet über ein Smartphone und der App „Stream
Vision“.
Akkupack
џ APS3 Li-Ion Schnellwechsel-Akkupack
џ USB-Ladeoption
17
Page 20
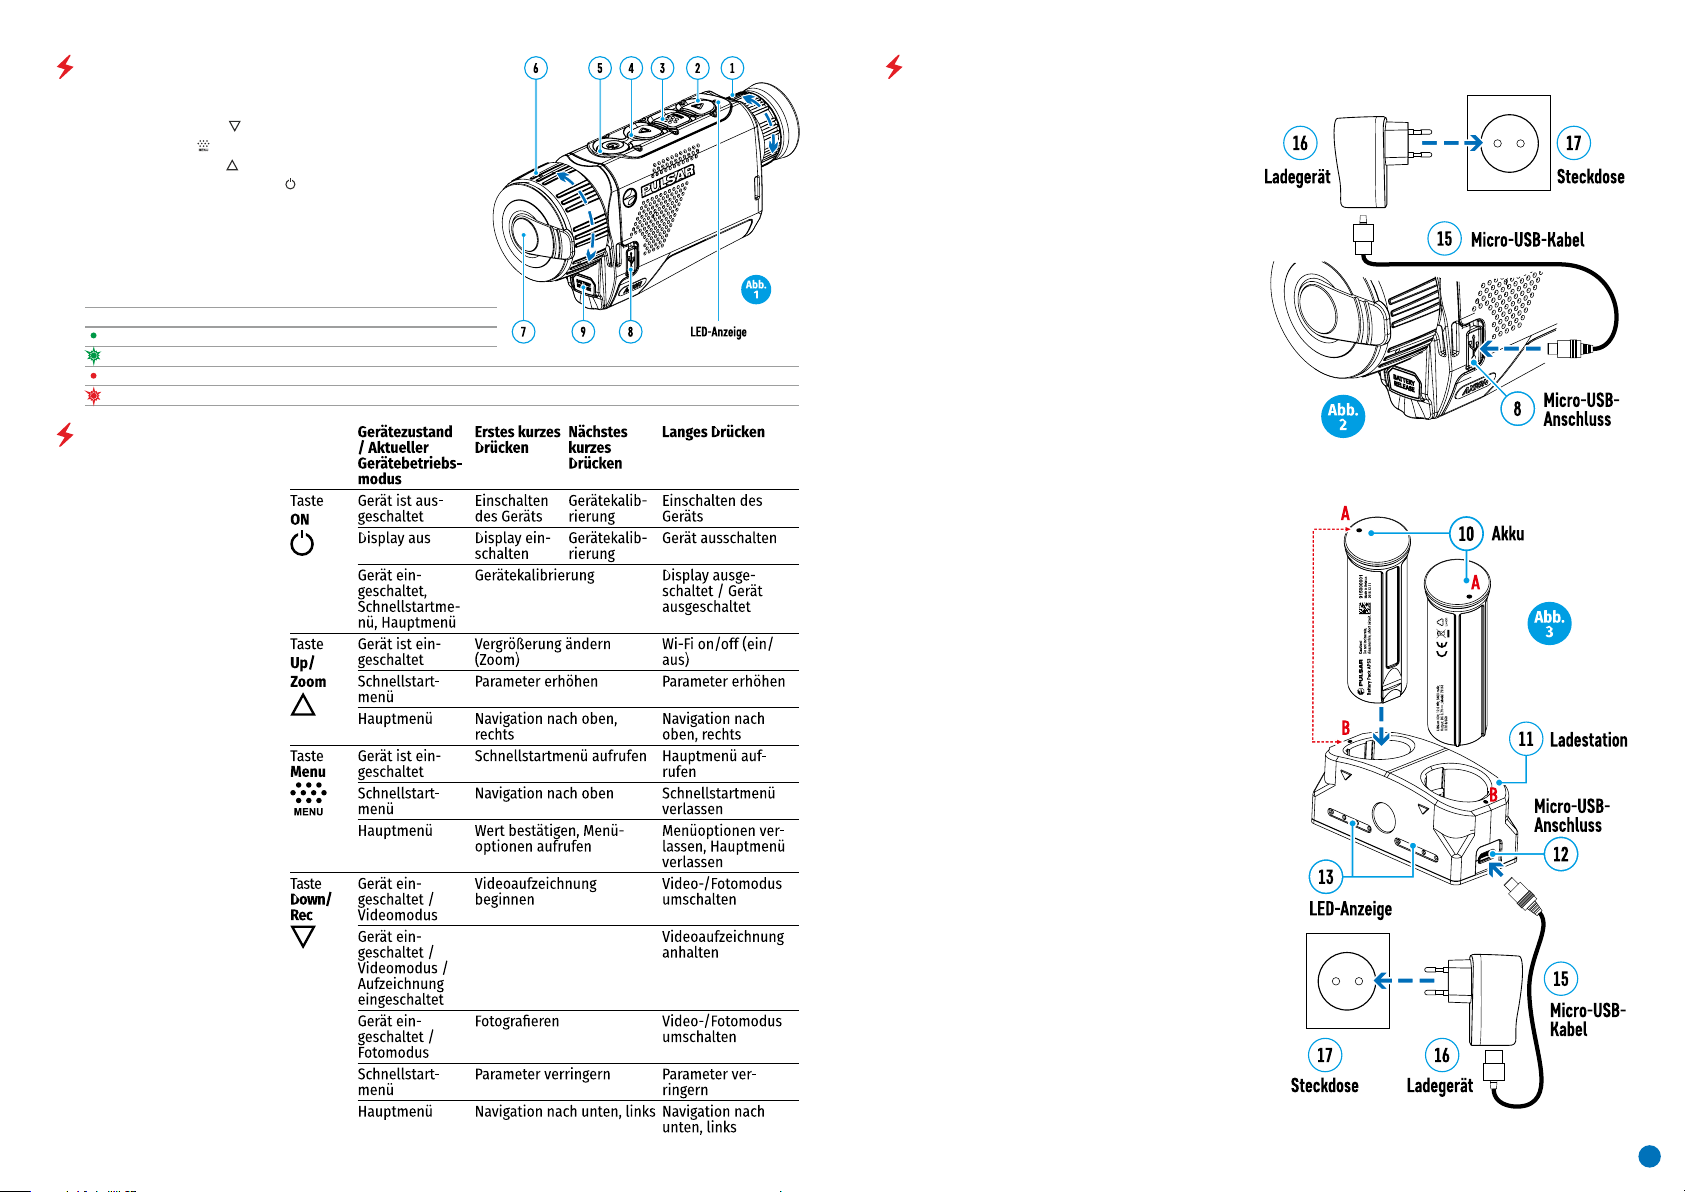
KOMPONENTEN UND BEDIENELEMENTE
VERWENDEN DES WIEDERAUFLADBAREN AKKUS
1. Okular-Dioptrieneinstellring
2. Taste „Down/Rec“
3. Taste „Menu“
4. Taste „Up/Zoom“
5. Taste „On/Calibration ON“
6. Fokussierring
7. Objektivkappe
8. microUSB-Anschluss
9. Taste „Akkuentriegelung“
LED-Anzeige, die den aktuellen Zustand des Geräts anzeigt:
LED-Anzeige Betriebsmodus
Gerät ist eingeschaltet
Gerät eingeschaltet / Video wird aufgezeichnet
Gerät eingeschaltet / Akkustand < 10 %
Gerät eingeschaltet / Video wird aufgezeichnet / Akkustand < 10 %
BEDIENUNG DER TASTEN
AXION Wärmebildkameras werden mit einem
wiedera ufladbare n APS3 L i t h ium-IonenAkkupack geliefert, mit dem die Wärmebildkamera bis zu 4 Stunden verwendet werden kann.
Der Akku sollte vor dem ersten Gebrauch
aufgeladen werden.
Aufladen des Akkus
Option 1 (Abb. 2):
џ Setzen Sie den Akku (10) in seinen Schacht im
Gerätegehäuse (14) ein, indem Sie die Symbole so
ausrichten, dass sie auf dem Gerät und dem Akku
einen „Punkt“ bilden. (siehe Abb. 4).
џ Schließen Sie an dem microUSB-Anschluss (8)
des Geräts ein USB-Kabel (15) an.
џ Verbinden Sie das andere Ende des USB-Kabels
(15) mit dem Netzladeadapter (16) oder mit einer
USB-Buchse, die an eine andere Stromquelle mit
einer Ausgangsspannung von 5V oder weniger
angeschlossen ist.
џ Stecken Sie den Netzladeadapter (16) in die
Netzsteckdose.
Hinweis: Die PB8I Power Bank kann als Ladegerät
verwendet werden.
Option 2 (Abb. 3):
џ Schieben Sie den mit dem Gerät gelieferten
oder separat erworbenen wiederaufladbaren
Akku (10 ) en t l a ng d er Führu n gsschie n e
vollständig in den APS-Ladeschacht (11) (siehe
Abb. 3).
џ Punkt A auf dem Akku und Punkt B auf dem
Ladegerät müssen zueinander ausgerichtet sein.
џ Es können zwei Akkus gleichzeitig geladen
we rden – hierzu ist ein zweiter Schacht
vorgesehen.
џ Verbinden Sie den microUSB-Stecker des USB-
Kabels (15) mit dem microUSB-Anschluss des
Netzsteckers (16). Stecken Sie das Gerät in eine
Steckdose mit 100 – 240 V (17).
џ Verbinden Sie den z weiten Stecker des
microUSB-Kabels mit der Buchse (12) des
Netzladeadapters (11).
џ Die LED-Anzeige (13) leuchtet auf.
18
Page 21
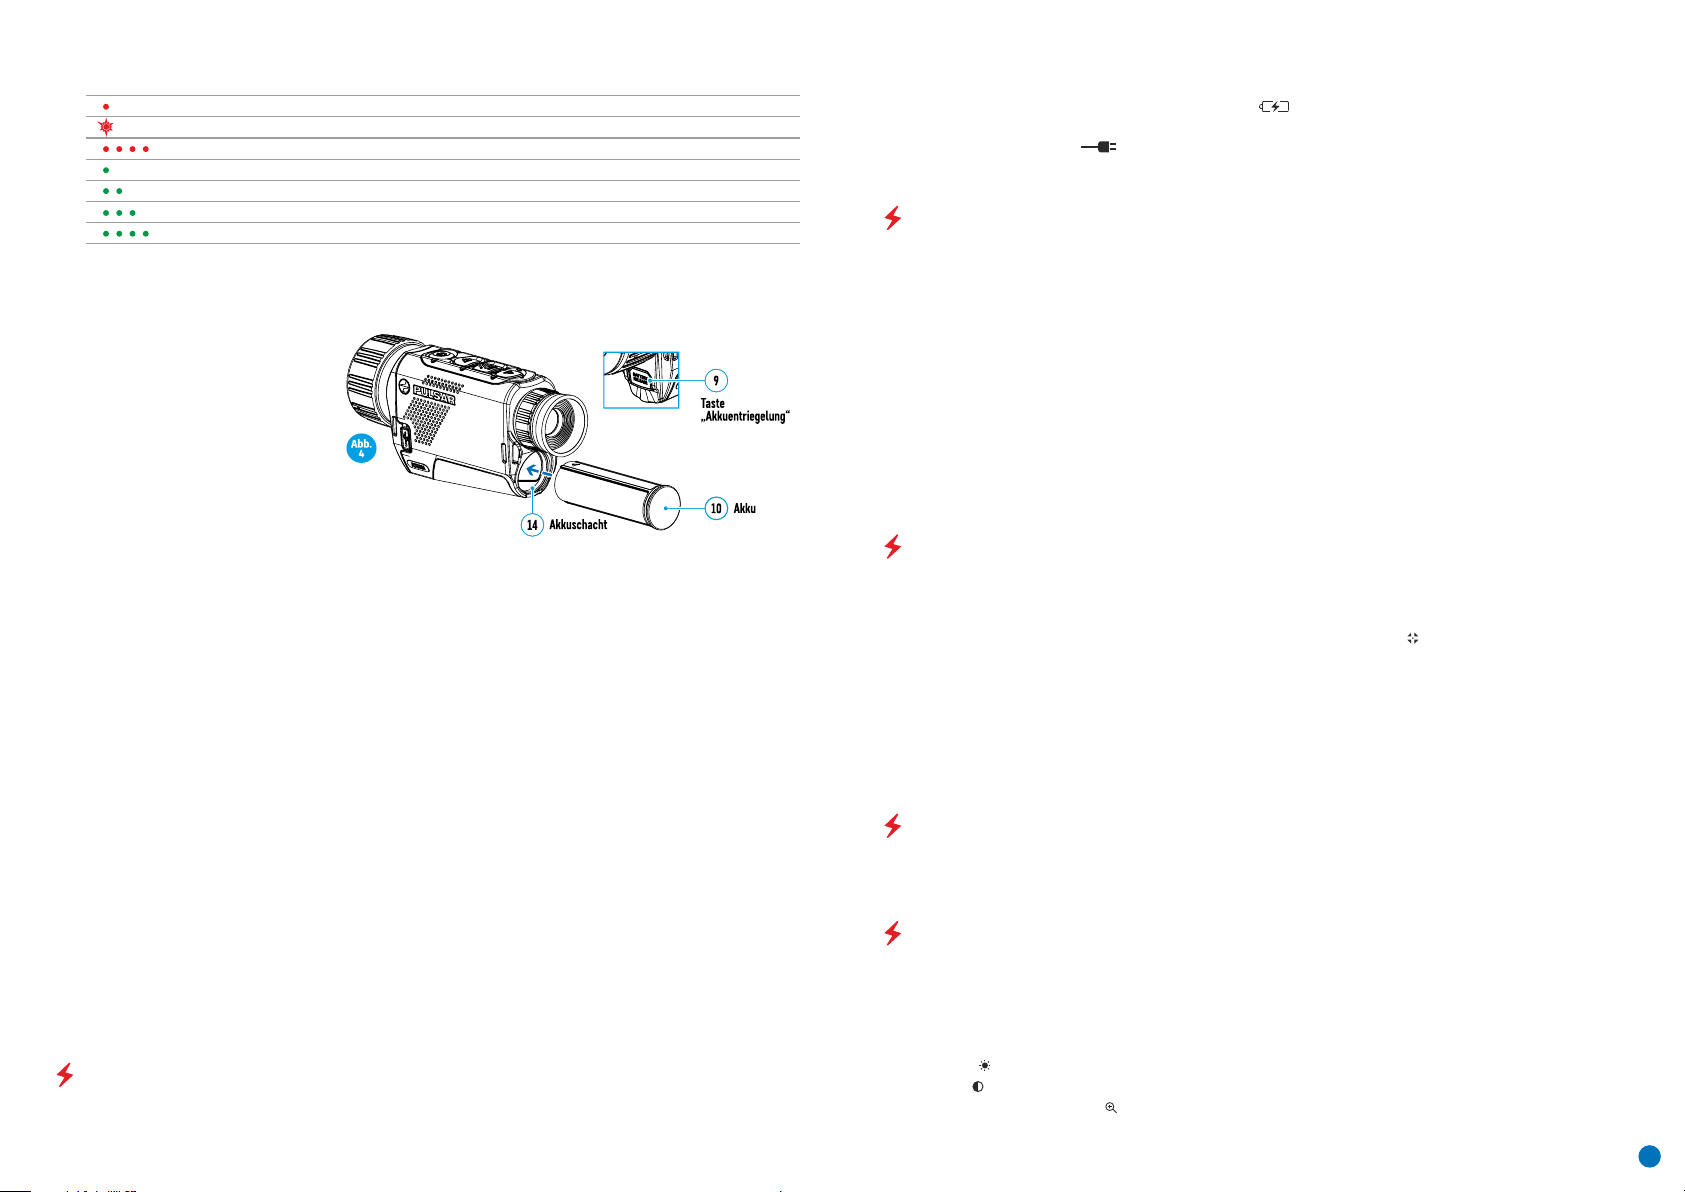
Akkuladezustand (siehe Tabelle).
LED-Anzeige* Akkuladezustand
Akkuladung beträgt 0 % bis 10 %. Ladegerät ist nicht am Stromnetz angeschlossen.
Akkuladung beträgt 0 % bis 10 %. Ladegerät ist am Stromnetz angeschlossen.
Akku ist defekt. Akku sollte nicht verwendet werden.
Akkuladung beträgt 10% bis 20%.
Akkuladung beträgt 20 % bis 60 %.
Akkuladung beträgt 60% bis 95%.
Akku vollständig geladen. Kann vom Ladegerät getrennt werden.
*Die LED-Anzeige zeigt den aktuellen Ladezustand des Akkus 30 Sekunden lang an, wenn das APS-Ladegerät
nicht angeschlossen ist. Wenn die Stromversorgung angeschlossen wird, zeigt das Display den aktuellen
Zustand des Akkus ständig an und die LEDs flackern zusätzlich, um den Ladevorgang des Akkus anzuzeigen.
Einsetzen:
џ Setzen Sie den Akku (10) in seinen
vorgesehenen Schacht im Gerätegehäuse (14) ein (siehe Abb. 4), indem Sie
die Bilder auf dem Gerät und dem Akku
ausrichten.
џ Bei ordnungsgemäßer Installation
wird der Akku mit einem speziellen Clip
im Akkufach verriegelt.
џ Um den Akku zu entnehmen, drücken
Sie auf die Taste Akkuentriegelung (9).
Sicherheitsmaßnahmen:
џ Verwenden Sie zum Laden immer das
mit Ihrem optischen Gerät gelieferte Ladegerät. Die Verwendung eines anderen Ladegeräts kann zu irreparablen
Schäden am Akku oder am Ladegerät führen und der Akku kann sich entzünden.
џ Wurde der Akku eine lange Zeit gelagert, sollte er teilweise geladen werden – er sollte nicht vollständig geladen
oder entladen werden.
џ Laden Sie den Akku nicht sofort, nachdem Sie ihn aus der Kälte in eine wärmere Umgebung gebracht haben.
Warten Sie 30 – 40 Minuten, damit sich der Akku aufwärmen kann.
џ Lassen Sie den Akku während des Ladevorgangs nicht unbeaufsichtigt.
џ Verwenden Sie das Ladegerät nicht, falls es modifiziert oder beschädigt wurde.
џ Der Akku sollte bei einer Temperatur zwischen 0 °C und +45 °C geladen werden, andernfalls wird die Lebenszeit
des Akkus erheblich reduziert.
џ Lassen Sie ein Ladegerät mit angeschlossenem Akku nicht länger als 24 Stunden nach dem vollständigen
Laden am Netz.
џ Setzen Sie den Akku keinen hohen Temperaturen oder offenen Flammen aus.
џ Der Akku darf nicht in Wasser getaucht werden.
џ Der Anschluss von Fremdgeräten mit einem höheren Energieverbrauch als zulässig wird nicht empfohlen.
џ Der Akku ist mit einem Verpolungsschutz ausgestattet. Situationen, die zu einem Kurzschluss führen können,
sollten jedoch vermieden werden.
џ Zerlegen oder verformen Sie den Akku nicht.
џ Setzen Sie den Akku keinen Stößen oder Stürzen aus.
џ Wenn der Akku bei Temperaturen unter Null verwendet wird, nimmt die Kapazität ab. Dies ist normal und
deutet nicht auf einen Defekt hin.
џ Verwenden Sie den Akku nicht bei höheren als in der Tabelle angegebenen Temperaturen – dies kann die
Lebensdauer des Akkus verringern.
џ Bewahren Sie den Akku außerhalb der Reichweite von Kindern auf.
EXTERNE STROMVERSORGUNG
Die externe Stromversorgung wird von einer externen Quelle, wie z. B. einer 5 V Power Bank, bereitgestellt.
џ Schließen Sie die externe Stromversorgung an den USB-Anschluss (8) des Geräts an (Abb. 1)
џ Das Gerät schaltet zum Betrieb über die externe Stromversorgung um, während der APS3-Akku allmählich
geladen wird.
џ Auf dem Display erscheint das Symbol einer Batterie , das den Ladezustand in Prozent anzeigt.
џ Wenn das Gerät an einer externen Stromversorgung betrieben wird und der APS3-Akku nicht eingesetzt ist,
wird ein Symbol angezeigt .
џ Wenn die externe Stromversorgung unterbrochen wird, schaltet das Gerät auf die interne Stromversorgung
um, ohne das Gerät abzuschalten.
BETRIEB
ACHTUNG! Das Objektiv des Geräts darf nicht auf starke Energiequellen, wie z. B. Laser-emittierende Geräte oder
die Sonne, gerichtet werden. Dies kann die elektronischen Komponenten im Gerät beschädigen. Schäden, die
durch Nichtbeachtung der Betriebsanleitung entstehen, fallen nicht unter die Garantie.
Einschalten und Einstellen des Bilds
џ Entfernen Sie den Objektivschutz (7). Befestigen Sie den Schutz mit dem im Schutz eingebauten Magneten an
der Schlaufe.
џ Schalten Sie das Gerät ein, indem Sie Taste ON (5) drücken.
џ Stellen Sie die Auflösung der Symbole im Display durch Drehen des Dioptrieneinstellrings am Okular (1) ein. In
Zukunft ist es nicht mehr notwendig, den Dioptrieneinstellring zu drehen, unabhängig von der Entfernung und
anderen Bedingungen.
џ Um das zu beobachtende Objekt zu fokussieren, drehen Sie den Fokussierring (6).
џ Die Einstellung der Helligkeit und des Kontrasts im Display sowie das einschalten des stufenlosen digitalen
Zooms werden im Abschnitt SCHNELLZUGRIFFSMENÜ-FUNKTIONEN beschrieben.
џ Schalten Sie das Gerät nach Gebrauch durch langes Drücken auf die Taste ON (5) aus.
KALIBRIERUNG DES SENSORS
Durch die Kalibrierung kann der Temperaturhintergrund des Mikrobolometers ausgeglichen und Defekte im Bild
(wie vertikale Linien, Phantombilder, usw.) eliminiert werden.
Es gibt drei Kalibrierungsmodi: manuell (M), halbautomatisch (SA) und automatisch (A).
Wählen Sie im Abschnitt KALIBRIERUNG des Menüs den benötigten Modus aus .
џ Modus „M“ (manuell). Bringen Sie die Objektivkappe an und drücken Sie kurz die Taste ON (5). Entfernen Sie die
Objektivkappe, nachdem der Kalibrierungsvorgang abgeschlossen ist.
џ Modus „SA“ (halbautomatisch). Die Kalibrierung wird durch kurzes Drücken auf die Taste ON (5) aktiviert. Die
Objektivkappe muss nicht angebracht werden (der Sensor ist durch einen internen Verschluss geschlossen).
џ Modus „A“ (automatisch). Das Gerät wird selbstständig, in Übereinstimmung mit einem Softwarealgorithmus,
kalibriert. Die Objektivkappe muss nicht angebracht werden (der Sensor ist durch einen internen Verschluss
geschlossen). In diesem Modus kann das Gerät vom Benutzer kalibriert werden, indem er die Taste ON (5) (im
halbautomatischen Modus) verwendet.
DISKRETES DIGITALES ZOOM
Die Funktionalität des Geräts bietet die Möglichkeit, die Basismultiplizität um den Faktor 2 oder 4 schnell zu
erhöhen (siehe Tabelle der technischen Eigenschaften in der Zeile „Digitales Zoom“). Stellen Sie das digitale
Zoom entsprechend ein, indem Sie die Taste DOWN (2) drücken.
DIE SCHNELLSTARTMENÜ-FUNKTIONEN
Die grundlegenden Einstellungen (Anpassung der Helligkeit und des Kontrasts, Verwendung der stufenlosen
digitalen Zoom-Funktion und des stadiametrischen Entfernungsmessers) werden über das Schnellzugriffsmenü
geändert.
џ Rufen Sie das Menü durch kurzes Drücken der Taste Menu (3) auf.
џ Durch kurzes Drücken der Taste Menu (3) können Sie zwischen den Funktionen wechseln.
Helligkeit – Durch Drücken der Tasten UP (4) / DOWN (2) und Ändern der Displayhelligkeit von 00 bis 20.
Kontrast – Durch Drücken der Tasten UP (4) / DOWN (2) und Ändern des Displaykontrastes von 00 bis 20.
Stufenloses digitales Zoom – Durch Drücken der Tasten UP (4) / DOWN (2) und Ändern des digitalen
Zoomwerts von 1,0 bis 4,0. Die Schrittweite des digitalen Zooms beträgt 0,1.
19
Page 22
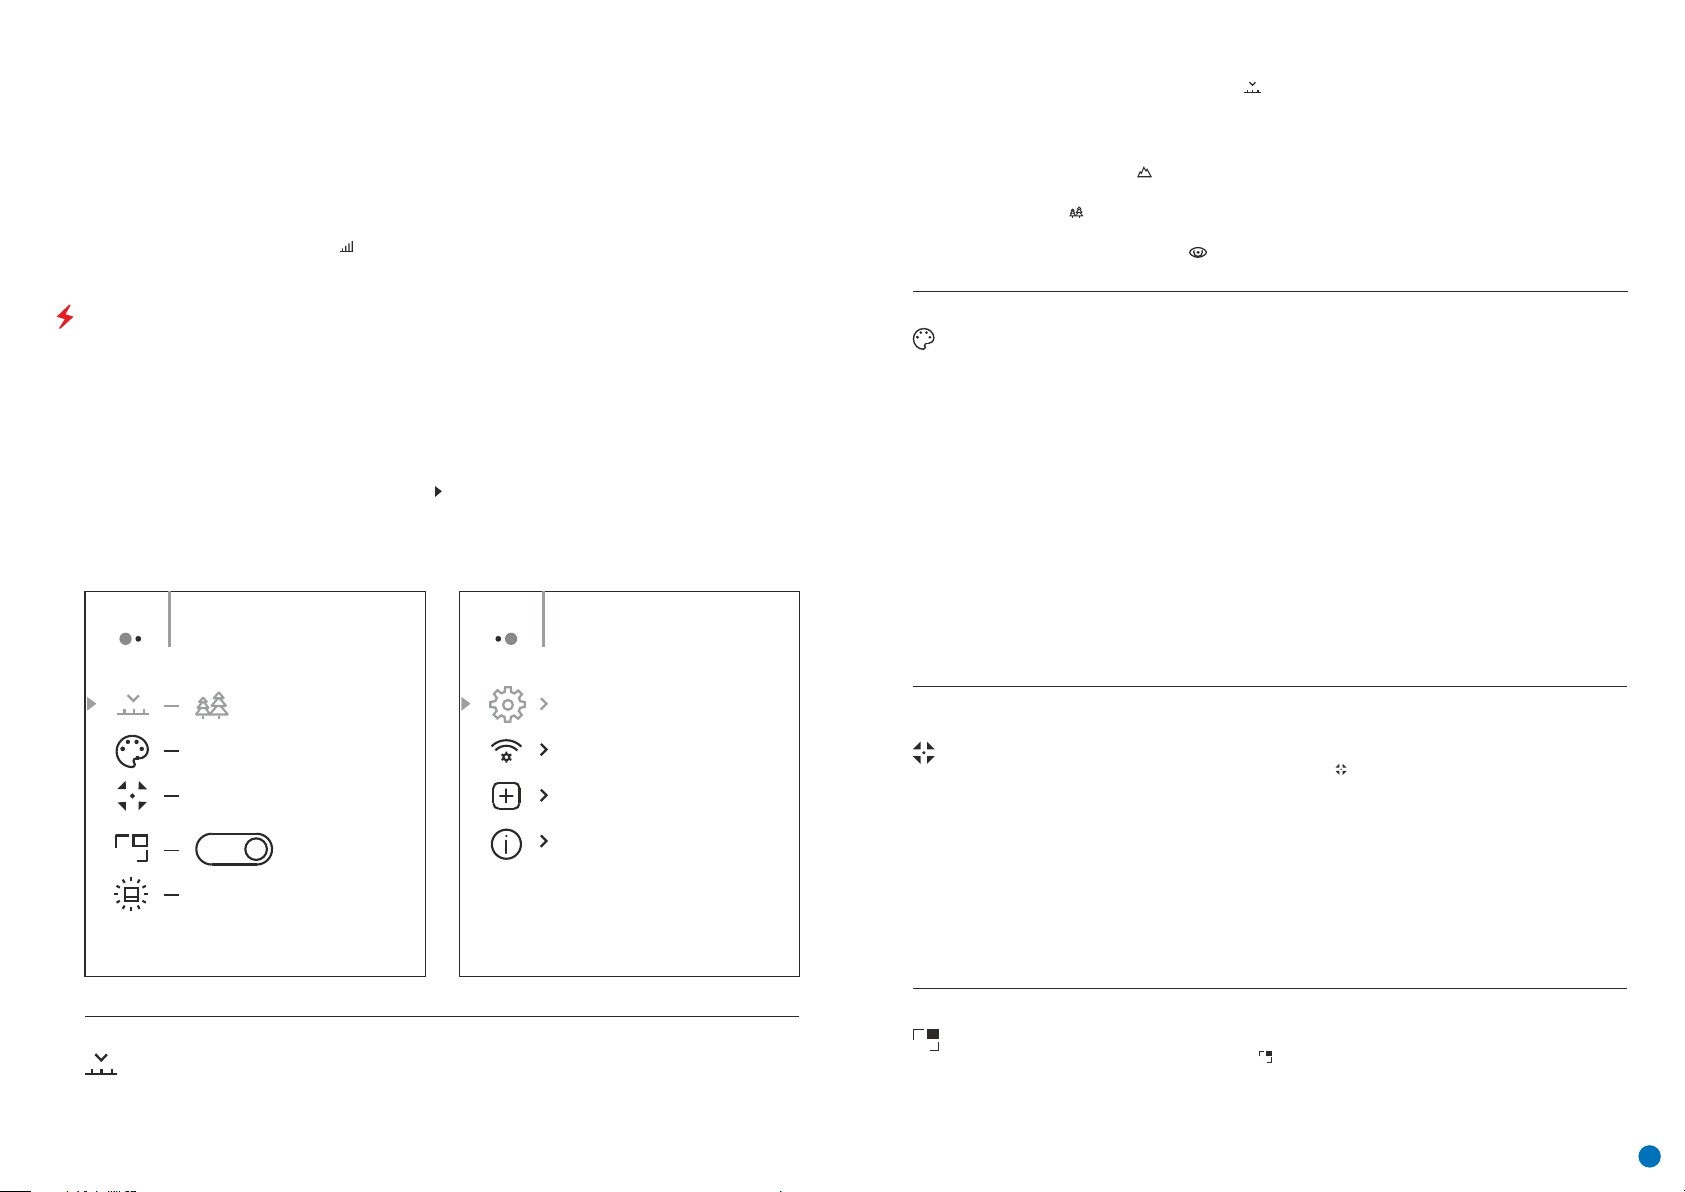
Zum Verlassen des Menüs halten Sie die Taste Menu (3) gedrückt oder
warten Sie 10 Sekunden auf die automatische Auswahl.
Der anfänglich angezeigte stufenlose digitale Zoomfaktor ist x1,0, wenn das diskrete Zoom nicht aktiv ist, x2,0,
wenn er 2x und x4,0, wenn er 4x ist.
Hinweis. Die aktuelle Vergrößerung wird als das Produkt der Basisvergrößerung und dem Verhältnis des
stufenlosen digitalen Zooms berechnet. Beispiel: wenn die Basisvergrößerung des Geräts 3,0x und das
Verhältnis des stufenlosen digitalen Zooms x1,7 ist, dann beträgt die tatsächliche Vergrößerung 5,1x (3,0 * 1,7).
Beim nächsten Einschalten des Geräts, wird das Bild mit den Helligkeits- und Kontrasteinstellungen auf das
Display projiziert, die beim vorherigen Abschalten gespeichert wurden.
Stadiametrischer Entfernungsmesser – Drücken Sie die Tasten UP (4) / DOWN (2), um die Position der
Markierungen zur Bestimmung der Entfernung des zu beobachtenden Objekts zu ändern. (weitere
Informationen zum Entfernungsmesser finden Sie im Abschnitt 16).
HAUPTMENÜFUNKTIONEN
џ Rufen Sie das Menü durch langes Drücken der Taste Menu (3) auf.
џ Drücken Sie die Tasten UP (4) / DOWN (2), um sich durch die Menüfunktionen zu bewegen.
џ Die Menünavigation ist eine Möglichkeit zu blättern. Wenn der letzte Eintrag auf der ersten Registerkarte
erreicht ist, springt die Navigation auf den ersten Eintrag der zweiten Registerkarte.
џ Ein kurzes Drücken auf die Taste Menu (3) öffnet eine Menüoption.
џ Zum Verlassen des Menüs halten Sie die Taste Menu (3) gedrückt.
џ Das automatische Verlassen des Menüs erfolgt nach 10 Sekunden Inaktivität.
џ Beim Verlassen des Menüs wird die Cursor-Position ( ) nur für die Dauer der einen Arbeitssitzung gespeichert
(d. h. bis das Gerät abgeschaltet wird). Wenn beim nächsten Einschalten des Geräts das Menü aufgerufen wird,
befindet sich der Cursor auf dem ersten Eintrag des Menüs.
Allgemeine Ansicht des Menüs:
Registerkarte 1 Registerkarte 2
Menu General SettingMenu Mode
Farbtonpaletten
џ Drücken und halten Sie die Taste Menu (3), um das Menü aufzurufen.
џ Wählen Sie die Option „Modus“ .
џ Kurzes Drücken auf die Taste Menu (3) öffnet das Menü.
џ Wählen Sie mit den Tasten UP (4)/DOWN (2) eine der unten beschriebenen Einstellungen aus.
џ Kurzes Drücken auf die Taste Menu (3) bestätigt die Auswahl.
Berge/Fe lsen – Kontrastreicher Modus Dies ist der optimale Modus für die
Tierbeobachtung vor einem Hintergrund mit Felsen und Erde in einer Berglandschaft.
Wald – Kontrastarmer Modus Dies ist der optimale Modus für die Tierbeobachtung vor
einem Hintergrund mit Vegetation.
Identifizierungsmodus – Ein universeller Modus zur Anwendung unter verschieden
Beobachtungsbedingungen.
Farbtonpalettenauswahl Der Hauptanzeigemodus für ein beobachtetes Bild ist „Hot White“
(Weiß heiß). Mit der Menüoption „Farbtonpaletten“ können Sie eine alternative Palette
auswählen:
џ Drücken und halten Sie die Taste Menu (3), um das Menü aufzurufen.
џ Wählen Sie die Option „Farbtonpaletten“.
џ Kurzes Drücken auf die Taste Menu (3) öffnet das Menü.
џ Wählen Sie mit den Tasten UP (4) / DOWN (2) eine der unten beschriebenen Paletten aus.
џ Kurzes Drücken auf die Taste Menu (3) bestätigt die Auswahl.
Hot White (Weiß heiß). Eine Schwarzweiß-Palette (kalte Temperatur entspricht schwarz und
warme Temperatur entspricht weiß).
Hot Black (Schwarz heiß). Eine Schwarzweiß-Palette (kalte Temperatur entspricht weiß und
warme Temperatur entspricht schwarz).
Hot Red (Rot heiß).
Red Monochrome (Rot einfarbig).
Rainbow (Regenbogenfarben).
Ultramarine (Ultramarinblau).
Violet (Violett).
Sepia (Sepiabraun).
Hot White
Automatic
PIP
Off
10
Zusammensetzung und Beschreibung des Menüs
Modus
Auswahl des Beobachtungsmodus Die Wärmebildkamera verfügt über drei automatische
Betriebsmodi. Jeder dieser Modi enthält eine optimale Kombination von Parametern
(Helligkeit, Kontrast, Intensität, usw.), um die beste Bildqualität unter allen gegebenen
Beobachtungsbedingungen zu gewährleisten.
Kalibrierungsmodus
PiP Modus
PIP
Auswahl des Kalibrierungsmodus Es gibt drei Kalibrierungsmodi: manuell, halbautomatisch
und automatisch.
џ Drücken und halten Sie die Taste Menu (3), um das Menü aufzurufen.
џ Wählen Sie die Option „Kalibrierungsmodus“ .
џ Kurzes Drücken auf die Taste Menu (3) öffnet das Untermenü.
џ Wählen Sie mit den Tasten UP (4) / DOWN (2) einen der unten beschriebenen
Kalibrierungsmodi aus.
џ Kurzes Drücken auf die Taste Menu (3) bestätigt die Auswahl.
Automatisch. Die Kalibrierungsvoraussetzungen im automatischen Modus werden
programmgesteuert ermittelt, wobei der Kalibrierprozess automatisch gestartet wird.
Halbautomatisch. Der Benutzer legt die Kalibrierungsvoraussetzungen unabhängig fest
(entsprechend dem zu beobachtenden Bild).
Manuell. Manuelle Kalibrierung. Schließen Sie die Objektivkappe, bevor Sie mit der
Kalibrierung beginnen.
Auswahl des Bild-in-Bild-Modus
Drücken und halten Sie die Taste Menu (3), um das Menü aufzurufen.
Wählen Sie die Option „PiP-Modus“ .
Kurzes Drücken auf die Taste Menu (3) schaltet den Modus ein/aus.
PIP
20
Page 23

Symbolhelligkeit
Allgemeine
Einstellungen
Sprache
Datum
Uhrzeit
Maßeinheiten
M
Y
Standardeinstellungen
Einstellen der Symbolhelligkeit.
џ Drücken und halten Sie die Taste Menu (3), um das Menü aufzurufen.
џ Wählen Sie die Option „Symbolhelligkeit“ .
џ Kurzes Drücken auf die Taste Menu (3) öffnet das Untermenü.
џ Wählen Sie mit den Tasten UP (4) / DOWN (2) die Helligkeitsstufe der Piktogramme aus.
џ Kurzes Drücken auf die Taste Menu (3) bestätigt die Auswahl.
Mit dieser Menüoption können Sie folgende Einstellungen vornehmen:
Sprachauswahl
џ Rufen Sie das Untermenü „Sprache“ durch kurzes Drücken der Taste Menu (3) auf.
џ Wählen Sie mit den Tasten UP (4) / DOWN (2) eine der verfügbaren Sprachen (Englisch,
Französisch, Deutsch, Spanisch oder Russisch) aus.
џ Bestätigen Sie die Auswahl mit einem kurzen Drücken der Taste Menu (3).
џ Zum Speichern Ihrer Auswahl und zum Verlassen des Menüs halten Sie die Taste Menu (3)
gedrückt.
Einstellen des Datums
џ Rufen Sie das Untermenü „Datum“ durch kurzes Drücken der Taste Menu (3) auf. Das
Datum erscheint im Format tt.mm.yyyy.
џ Stellen Sie mit den Tasten UP (4) / DOWN (2) das gewünschte Jahr, den Monat und den Tag
ein. Drücken Sie die Taste Menu (3), um sich durch die Ziffern zu bewegen.
џ Zum Speichern Ihres ausgewählten Datums und zum Verlassen des Untermenüs halten Sie
die Taste Menu (3) gedrückt.
Einstellen der Uhrzeit
Rufen Sie das Untermenü „Uhrzeit“ durch kurzes Drücken der Taste Menu (3) auf.
Wählen Sie durch Drücken der Tasten UP (4) / DOWN (2) das Zeitformat (24-Stunden oder
AM/PM) aus.
Drücken Sie die Taste Menu (3), um zur Stundeneinstellung zu gelangen.
Stellen Sie die Stunde durch Drücken der Tasten UP (4) / DOWN (2) ein.
Drücken Sie die Taste Menu (3), um zur Minuteneinstellung zu gelangen.
Stellen Sie die Minute durch Drücken der Tasten UP (4) / DOWN (2) ein.
Zum Speichern Ihrer ausgewählten Uhrzeit und zum Verlassen des Untermenüs halten Sie die
Taste Menu (3) gedrückt.
Auswahl der Maßeinheit
Rufen Sie das Untermenü „M/Y“ durch kurzes Drücken der Taste Menu (3) auf.
Legen Sie die Maßeinheit (Meter oder Yards) fest, indem Sie die Tasten UP (4) / DOWN (2)
drücken. Drücken Sie dann die Taste Menu (3).
Die Rückkehr zum Untermenü erfolgt automatisch.
Werkseinstellungen wiederherstellen
Rufen Sie das Untermenü „Standardeinstellungen“ durch kurzes Drücken der Taste Menu
(3) auf.
џ Wählen Sie mit den Tasten UP (4) / DOWN (2) die Option „JA“, um auf die Werkseinstellungen
zurückzusetzen oder „NEIN“ um abzubrechen.
џ Bestätigen Sie die Auswahl mit einem kurzen Drücken der Taste Menu (3).
џ Wenn die Option JA ausgewählt wurde, erscheint die Meldung „Möchten Sie die
Standardeinstellungen wiederherstellen?“ zusammen mit den Optionen JA und NEIN. Wählen
Sie JA, um die Speicherkarte zu formatieren.
M
Y
Formatieren
der
Speicherkarte
Wi-FiEinstellungen
Festlegen eines
Passworts
Festlegen von
Zugriffsebenen
џ Wenn die Option NEIN ausgewählt wurde, wird die Formatierung abgebrochen und es
erscheint wieder das Untermenü.
Die folgenden Einstellungen werden in den Auslieferungszustand zurückgesetzt, bevor sie
vom Benutzer eingestellt werden:
Betriebsmodus – Video
Modus – Wald
Kalibrierungsmodus – automatisch
Sprache – Englisch
Wi-Fi – aus (Standardpasswort)
Vergrößerung – Ursprungswert
PiP – aus
Farbtonpalette – Hot White (Weiß heiß)
Maßeinheit – Meter
Hinweis: Wenn auf die Werkseinstellungen zurückgesetzt wird, werden die Datum/Uhrzeit-
Einstellungen und die benutzerdefinierte Pixelkarte gespeichert.
Mit dieser Funktion kann die Flash-Karte (Speicherkarte) des Geräts formatiert werden (alle
Dateien im Speicher werden gelöscht).
џ Rufen Sie das Untermenü „Formatieren der Speicherkarte“ durch kurzes Drücken der
Taste Menu (3) auf.
џ Wählen Sie mit den Tasten UP (4) / DOWN (2) die Option „JA“, um die Speicherkarte zu
formatieren oder „NEIN“ um zum Untermenü zurückzukehren.
џ Bestätigen Sie die Auswahl mit einem kurzen Drücken der Taste Menu (3).
џ Wenn die Option JA ausgewählt wurde, erscheint die Meldung „Speicherkarte formatieren?“
zusammen mit den Optionen „JA“ und „NEIN“. Wählen Sie JA, um die Speicherkarte zu
formatieren.
џ Die Meldung „Speicherkarte wird formatiert“ bedeutet, dass die Formatierung ausgeführt
wird.
Die Meldung „Formatierung abgeschlossen“ bedeutet, dass die Formatierung beendet ist.
џ Wenn die Option NEIN ausgewählt wurde, wird die Formatierung abgebrochen und es
erscheint wieder das Untermenü.
Mit dieser Option können Sie das Gerät zur Verwendung in einem Wi-Fi-Netzwerk
konfigurieren.
Mit dieser Funktion können Sie ein Passwort festlegen, um von einem externen Gerät auf
dieses Gerät zuzugreifen. Dieses Passwort wird verwendet, wenn ein externes Gerät (z. B. ein
Smartphone) mit dem Gerät verbunden wird.
џ Drücken Sie die Taste Menu (3), um zum Untermenü „Wi-Fi“ zu gelangen.
џ Das Standardpasswort (12345678) erscheint auf dem Bildschirm.
џ Legen Sie durch Drücken der Tasten UP (4) / DOWN (2) ihr gewünschtes Passwort fest. Die
Taste UP (4) erhöht die Zahl und die Taste DOWN (2) verringert die Zahl. Drücken Sie die Taste
Menu (3), um sich durch die Ziffern zu bewegen.
џ Zum Speichern des Passworts und zum Verlassen des Untermenüs halten Sie die Taste Menu
(3) gedrückt.
Mit dieser Unterfunktion können Sie die entsprechende Zugriffsebene auf Ihr Gerät
konfigurieren, die der App Stream Vision zur Verfügung gestellt werden.
џ Ebene Besitzer. Ein Benutzer von Stream Vision hat den vollständigen Zugriff auf alle
Funktionen des Geräts.
џ Ebene Gast. Ein Benutzer von Stream Vision ist in der Lage, Videomaterial vom Gerät nur in
Echtzeit anzusehen.
21
Page 24
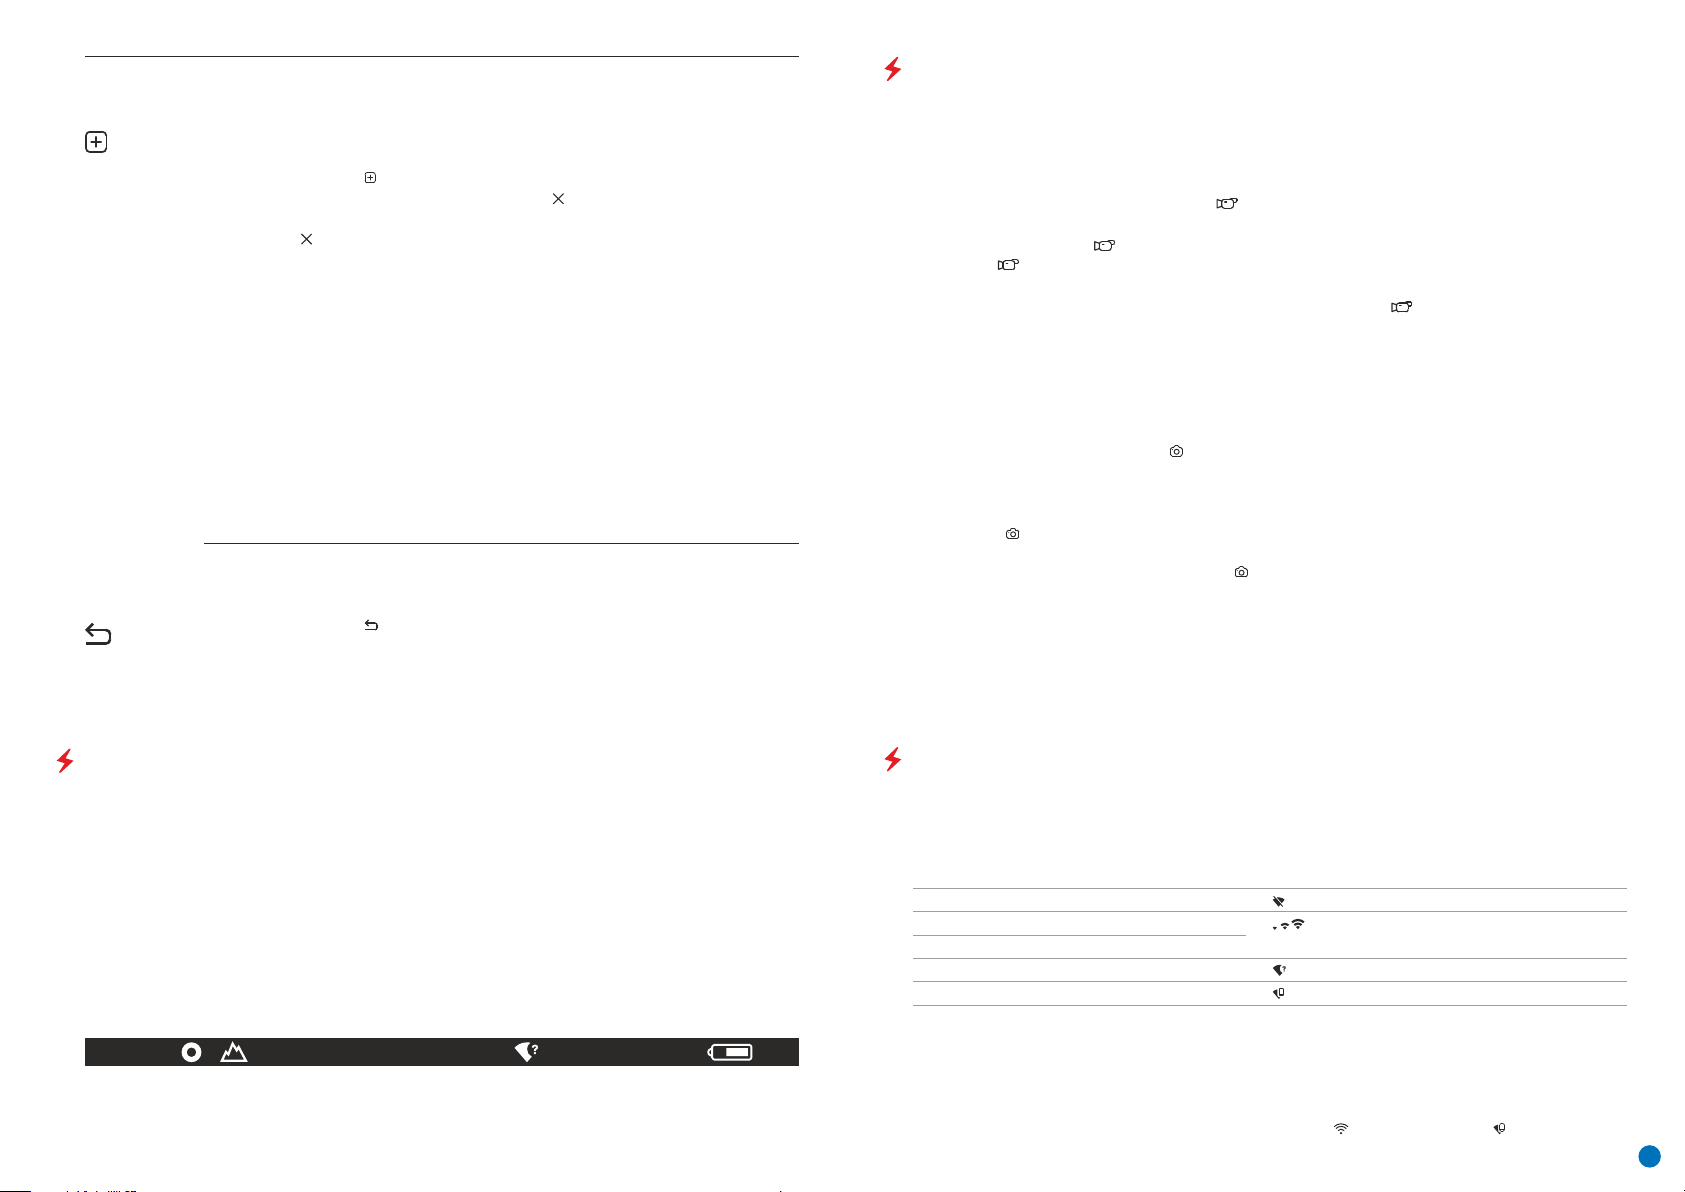
Entfernen von
fehlerhaften
Pixeln
Rückkehr zur
werksseitigen
«Pixelkarte»
Beim Verwenden des Geräts können auf dem Sensor fehlerhafte (defekte) Pixel erscheinen: d.
h. helle oder dunkle Punkte mit konstanter Helligkeit, die im Bild sichtbar sind. AXION
Wärmebildkameras bieten die Möglichkeit, fehlerhafte Pixel im Sensor programmgesteuert
zu entfernen sowie die Löschung abzubrechen.
џ Öffnen Sie das Untermenü, indem Sie Taste Menu (3) drücken.
џ Wählen Sie das Symbol durch kurzes Drücken der Taste Menu (3) aus.
џ An der linken Seite des Displays erscheint ein Marker .
џ Auf der rechten Seite des Displays erscheint eine Lupe – ein vergrößertes Bild mit einem
fixierten Kreuz – das erforderlich ist, die Suche nach dem fehlerhaften Pixel zu erleichtern
und den Marker darauf auszurichten. Es gibt horizontale und vertikale Richtungspfeile, um
den Marker mit den Koordinaten entlang der X- und Y-Achse zu bewegen.
џ Verwenden Sie die Tasten UP (4) / DOWN (2), um den Marker zu bewegen und seine Mitte auf
das fehlerhafte Pixel auszurichten.
џ Kurzes Drücken der Taste Menu (3) wechselt die Markerrichtung von horizontal nach vertikal
und umgekehrt.
џ Richten Sie mit den Tasten UP (4) und DOWN (2) das fehlerhafte Pixel mit dem festen Kreuz
im Rahmen aus – das Pixel sollte verschwinden.
џ Löschen Sie das fehlerhafte Pixel durch kurzes Drücken auf die Taste ON/Calibration ON (5).
џ Wenn ein Pixel erfolgreich gelöscht wurde, erscheint auf dem Bildschirm kurz das Wort „OK“.
џ Dann können Sie, indem Sie den Marker über das Display bewegen, das nächste fehlerhafte
Pixel löschen.
џ Zum Verlassen der Funktion „Fehlerhafte Pixel löschen“ halten Sie die Taste Menu (3)
gedrückt.
Alle zuvor vom Benutzer deaktivierten fehlerhaften Pixel in ihren ursprünglichen Zustand
zurückbringen:
џ Öffnen Sie das Untermenü, indem Sie Taste Menu (3) drücken.
џ Wählen Sie das Symbol und drücken Sie die Taste Menu (3).
џ Wählen Sie „JA“, wenn Sie zur werksseitigen Pixelkarte zurückkehren möchten und „NEIN“
wenn Sie nicht möchten.
џ Bestätigen Sie die Auswahl mit einem kurzen Drücken der Taste Menu (3).
Achtung! Im Display der Kamera können ein oder zwei Pixel in Form von schwarzen, hellen
weißen oder farbigen (blau oder rot) Punkten erscheinen. Diese sind keine Mängel.
VIDEOAUFZEICHNUNG UND FOTOGRAFIEREN EINES BEOBACHTETEN BILDES
AXION Wärmebildkameras sind mit einer Funktion zur Videoaufzeichnung und Aufnahme eines beobachteten
Bildes auf der integrierten Speicherkarte ausgestattet. Es wird empfohlen, das Datum und die Uhrzeit vor der
Verwendung der Videoaufzeichnung und der Foto-Funktion einzustellen (siehe die entsprechenden
Menüoptionen).
Das integrierte Aufzeichnungsgerät arbeitet in zwei Modi:
VIDEOMODUS. Videoaufzeichnung eines Bildes
џ Das Gerät befindet sich im VIDEOMODUS, sobald es eingeschaltet wird.
џ In der linken oberen Ecke wird ein Symbol mit der verbleibenden Aufzeichnungszeit angezeigt (im Format
hh:mm), z. B. 5:12.
џ Beginnen Sie mit der Videoaufzeichnung durch kurzes Drücken auf die Taste Down/REC (2).
џ Sobald die Videoaufzeichnung begonnen hat, verschwindet das Symbol , wobei ein REC-Symbol an seiner
Stelle erscheint und der Aufzeichnungs-Timer im Format MM:SS (Minuten:Sekunden) angezeigt wird
џ Durch kurzes Drücken auf die Taste Down/REC (2) können Sie die Aufzeichnung unterbrechen und fortführen.
џ Stoppen Sie die Videoaufzeichnung, indem Sie die Taste Down/REC (2) gedrückt halten.
џ Videodateien werden auf der integrierten Speicherkarte gespeichert, nachdem die Videoaufzeichnung
ausgeschaltet wurde.
џ Um zwischen dem Video- und Fotomodus zu wechseln, halten Sie die Taste Down/REC (2) gedrückt.
FOTOMODUS Fotografieren eines Bildes
џ Wechseln Sie durch langes Drücken auf die Taste Down/REC (2) zum FOTOMODUS.
џ Machen durch kurzes Drücken auf die Taste Down/REC (2) ein Foto. Das Bild bleibt für 0,5 Sekunden stehen und
die Bilddatei wird auf der integrierten Speicherkarte gespeichert.
џ Das Symbol , „> 100“ wird in der linken oberen Ecke angezeigt, das angibt, dass das Gerät mehr als 100 Fotos
aufnehmen kann. Wenn die Anzahl der verfügbaren Fotos weniger als 100 beträgt, wird die tatsächliche Anzahl
der verfügbaren Fotos (z. B. 98) neben dem Symbol angezeigt.
Hinweise: Sie können während der Videoaufzeichnung das Menü aufrufen und darin arbeiten. Aufgezeichnete
Videos und Fotos werden auf der integrierten Speicherkarte des Geräts in folgenden Format gespeichert:
img_xxx.jpg (für Fotos), video_xxx.mp4 (für Videos). xxx – dreistellige allgemeiner Dateizähler (für Fotos und
Videos). Der zur Benennung von Multimedia-Dateien verwendete Zähler wird NICHT zurückgesetzt.
Achtung: Die maximale Dauer eine Videoaufzeichnung beträgt sieben Minuten. Danach wird das Video in eine
neue Datei geschrieben. Die Anzahl der Dateien ist auf die Kapazität des im Gerät integrierten Speichers
begrenzt. Überwachen Sie regelmäßig die Menge an freiem Speicherplatz auf der integrierten Speicherkarte und
übertragen Sie Filmmaterial und Fotos auf andere Medien, um Platz auf der Speicherkarte zu schaffen.
SYMBOLLEISTE
Die Symbolleiste befindet sich im unteren Teil des Displays und zeigt Informationen bezüglich des
Betriebsstatus des Geräts, einschließlich der folgenden an:
џ Beobachtungsmodus
џ Kalibrierungsmodus (wenn im automatischen Kalibrierungsmodus, wobei noch drei Sekunden verbleiben,
erscheint anstelle des Kalibrierungssymbols ein Countdown-Timer).
џ Aktuelle vollständige Vergrößerung
џ Wi-Fi-Verbindung
џ USB-Verbindung (wenn das Gerät angeschlossen ist)
џ Farbtonpalette (wird nur angezeigt, wenn die Palette „Hot Black (Schwarz Heiß)“ installiert ist)
џ Aktuelle Uhrzeit
џ Entladezustand des Akkus (wenn das Gerät durch den wiederaufladbaren Akku versorgt wird)
џ Anzeige der externen Stromversorgung (wenn das Gerät über eine externe Stromversorgung versorgt wird)
SA
Hinweis: Wenn die Kalibrierung ausgeführt wird, bleibt das Display-Bild für die Dauer der Kalibrierung stehen.
11.0x 08:13PM
Wi-Fi-FUNKTION
Das Gerät ist mit Funkkommunikation über Wi-Fi mit externen Geräten (Computer, Smartphone) ausgestattet.
џ Schalten Sie das drahtlose Verbindungsmodul durch langes Drücken auf die Taste UP (4) ein. Der drahtlose
Betrieb wird in der Statusleiste wie folgt angezeigt:
Verbindungsstatus Anzeige in der Statusleiste
Wi-Fi getrennt
Wi-Fi durch den Benutzer aktiviert
Wi-Fi-Verbindungsvorgang wird ausgeführt
Wi-Fi eingeschaltet, keine Verbindung zum Gerät
Wi-Fi eingeschaltet, das Gerät ist verbunden
џ Das Gerät wird von einem externen Gerät unter der Bezeichnung „AXION_XXXX“ erkannt, wobei XXXX die letzten
vier Stellen der Seriennummer darstellen.
џ Nach der Eingabe des Passworts auf einem externen Gerät (detailliertere Informationen über das Festlegen
von Passwörtern finden Sie im Teilabschnitt „Wi-Fi einrichten“ des Abschnitts „Hauptmenüfunktionen“ der
Anleitung) und dem Herstellen einer Verbindung, wird das Symbol in der Statusleiste zu geändert.
22
Page 25
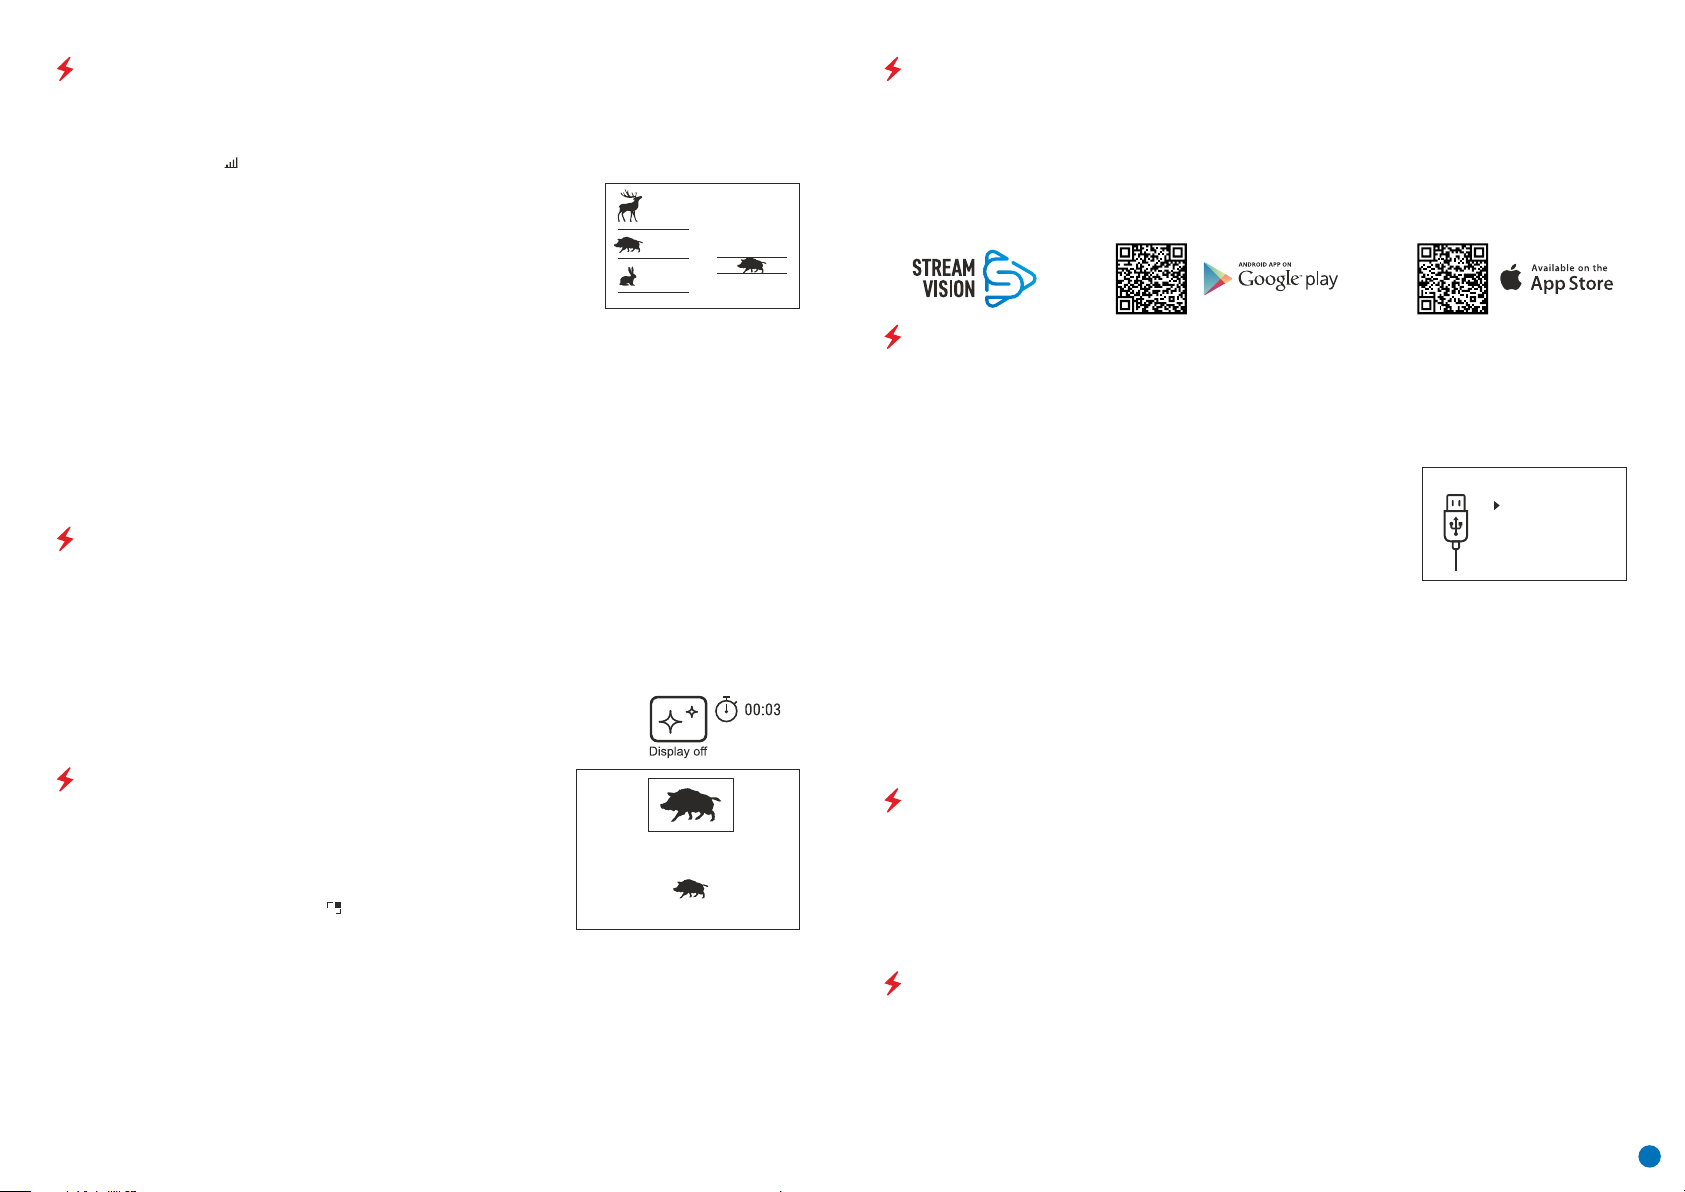
STADIAMETRISCHER ENTFERNUNGSMESSER
Wärmebildkameras sind mit einem stadiametrischen Entfernungsmesser ausgestattet, der die Definition des
Abstands zu einem Objekt mit bekannter Größe ermöglicht.
џ Die Funktion der stadiametrischen Entfernungsmessung wird durch kurzes Drücken der Taste Menu (3) und
Auswahl des Symbols aufgerufen.
џ Auf dem Display erscheinen Balken, um die Entfernung anzugeben, Symbole
von drei Objekten und Ziffern der geschätzten Entfernung dieser drei Objekte.
Es gibt drei voreingestellte Werte für Objekte:
Hase – 0,3 m hoch
Wildschwein – 0,7 m hoch
Hirsch – 1,7 m hoch
џ Bringen Sie den unteren fixierten Cursor unter das Objekt und bewegen Sie
160m
66m
28m
mit den Tasten UP (4) / DOWN (2) den oberen horizontalen Cursor relativ zum
unteren horizontalen fixierten Cursor, so dass das Objekt sich zwischen den Cursors befindet. Bei dieser
Bewegung wird gleichzeitig eine automatische Neuberechnung der Entfernung zum Ziel durchgeführt.
џ Wenn die Entfernung nicht innerhalb von 10 Sekunden festgelegt wird, verschwinden die Informationen aus
dem Display.
џ Gehen Sie zu dem relevanten Eintrag im Menü, um eine Maßeinheit auszuwählen (Meter oder Yards).
џ Ein Entfernungswert wird auf- oder abgerundet, bevor sie auf dem Display erscheint, fünf Meter für größere
Entfernungsmessungen und ein Meter für kleinere Entfernungsmessungen.
џ Um der Entfernungsmessermodus zu verlassen, drücken Sie kurz die Taste Menu (3) oder warten Sie 10
Sekunden auf das automatische Verlassen.
FUNKTION „DISPLAY OFF“ (ANZEIGE AUS)
Diese Funktion deaktiviert die Übertragung von Bildern zum Display und reduziert dadurch die Intensität der
Beleuchtung auf ein Minimum. Dies verhindert eine unbeabsichtigte Enttarnung. Das Gerät funktioniert
weiterhin.
џ Bei der Verwendung dieser Funktion wird das Gerät in den Standby-Modus versetzt, der bei Bedarf ein
schnelles Ausschalten ermöglicht.
џ Wenn das Gerät eingeschaltet ist, halten Sie die Taste ON (5) gedrückt. Das Display verschwindet und die
Meldung „Display ausgeschaltet“ erscheint.
џ Um das Display einzuschalten, drücken Sie kurz die Taste ON (5).
џ Wenn die Taste ON (5) gehalten wird, zeigt das Display „Display aus.“ und einen
Countdown an. Dann wird das Gerät ausgeschaltet.
PiP-FUNKTION
PiP (Picture in Picture – Bild-in-Bild) ermöglicht es Ihnen, ein vergrößertes
digitales Zoombild in einem getrennten „Fenster“ gleichzeitig mit dem
Hauptbild anzuzeigen. Aktivieren/deaktivieren der PiP-Funktion:
џ Drücken und halten Sie die Taste Menu (3), um das Hauptmenü
aufzurufen.
џ Wählen Sie die Option „PiP-Modus“
џ Kurzes Drücken auf die Taste Menu (3) schaltet den Modus ein/aus.
џ Drücken und halten Sie die Taste Menu (3), um das Hauptmenü zu verlassen.
џ Das vergrößerte Bild erscheint in einem separaten Fenster, wobei der vollständige optische Zoomwert
PIP
verwendet wird.
џ Um das Zoomverhältnis im PiP-Fenster zu verändern, drücken Sie kurz die Taste UP (4).
џ Das verbleibende Bild wird mit dem optischen Zoomwert angezeigt, der dem Wert des x1,0-Koeffizienten
entspricht.
џ Wenn PiP eingeschaltet ist, können Sie den diskreten und stufenlosen Zoom steuern. In diesem Fall erscheint
der volle optische Vergrößerungswert nur in dem separaten Fenster.
џ Wenn PiP ausgeschaltet ist, wird das Bild mit dem für den PiP-Modus festgelegten optischen Zoomwert
angezeigt.
6.9x
3.1x
STREAM VISION
AXION Wärmebildkameras unterstützen die Stream Vision-Technologie, welche die Übertragung eines Bildes von
der Wärmebildkamera über Wi-Fi auf Ihr Smartphone oder Tablet in Echtzeit unterstützt.
Detaillierte Anweisungen zur Bedienung der Stream Vision-Technologie finden Sie in einer separaten Broschüre
oder auf der Websitewww.pulsar-vision.com.
Hinweis: Das Design des Geräts beinhaltet die Möglichkeit der Softwareaktualisierung. Die Aktualisierung ist
über die Stream Vision-App möglich.
Scannen Sie die QR-Codes, um die Stream Vision-App herunterzuladen:
USB-VERBINDUNG
Verbinden Sie ein Ende des USB-Kabels mit dem microUSB-Anschluss (8) des Geräts und das andere Ende mit
dem Anschluss Ihres Computers.
џ Schalten Sie das Gerät ein, indem Sie die Taste ON (5) drücken (der Computer erkennt das Gerät nicht, wenn es
ausgeschaltet ist).
џ Das Gerät wird vom Computer automatisch erkannt und es ist keine Installation von Treibern erforderlich.
Auf dem Display erscheinen zwei Verbindungsoptionen:
Als Stromversorgung verwenden
Als Speicherkarte verwenden
џ Wählen Sie mit den Tasten UP (4) / DOWN (2) die Verbindungsoption aus.
џ Kurzes Drücken auf die Taste Menu (3) bestätigt die Auswahl.
USB connection
Use as power
Use as memory card
Als Stromversorgung verwenden
џ Wenn diese Option ausgewählt ist, wird der Computer vom Gerät als externe Stromversorgung verwendet. In
der Statusleiste erscheint ein Symbol . Das Gerät funktioniert weiterhin und alle Funktionen sind verfügbar.
џ Der im Gerät eingesetzte Akku wird nicht geladen.
џ Wenn der USB im Stromversorgungs-Modus vom Gerät getrennt wird, funktioniert das Gerät weiterhin mit
Akkuspannung, wenn diese vorhanden und der Akku ausreichend geladen ist.
Als Speicherkarte verwenden
џ Wenn diese Option ausgewählt ist, wird das Gerät vom Computer als Flash-Karte erkannt. Diese Option wurde
für das Arbeiten mit Dateien entworfen, die im Speicher des Geräts gespeichert sind. Auf die Funktionen des
Geräts kann nicht zugegriffen werden und das Gerät schaltet sich selbst aus.
џ Wenn zur Zeit der Verbindung ein Video aufgezeichnet wurde, wird die Aufzeichnung beendet und gespeichert.
TECHNISCHE INSPEKTION
џ Vor dem Gebrauch des Geräts wird eine Inspektion empfohlen. Prüfen Sie:
џ Das äußere Erscheinungsbild des Geräts (es sollten keine Risse im Gehäuse vorhanden sein).
џ Den Zustand des Objektivs und des Okulars (Es sollten keine Risse, Fettflecken, Schmutz oder andere
Rückstände vorhanden sein).
џ Den Zustand des wiederaufladbaren Akkus (dieser sollte geladen sein) und die elektrischen Kontakte (es
sollten keine Salze oder Oxidation sichtbar sein).
џ Die Bedienelemente sollten funktionstüchtig sein.
WARTUNG
џ Die Wartung sollte mindestens zwei Mal pro Jahr durchgeführt werden und besteht aus den folgenden
Aktionen.
џ Wischen Sie die Außenflächen von Metall- und Kunststoffteilen mit einem Baumwolltuch staub- und
schmutzfrei. Dafür kann Silikonfett verwendet werden.
џ Reinigen Sie die elektrischen Kontakte des Akkus und des Akkufachs im Gerät mit einem fettfreien organischen
Lösungsmittel.
23
Page 26
џ Prüfen Sie die Glasoberflächen des Okulars und des Objektivs. Entfernen Sie bei Bedarf Staub und Sand von
den Linsen (vorzugsweise durch Verwendung einer berührungsfreien Methode). Das Reinigen der Außenflächen
der Optiken sollte mit Substanzen erfolgen, die speziell für diesen Zweck entwickelt wurden.
FEHLERBEHEBUNG
In dieser Tabelle finden Sie alle Probleme, die beim Betrieb des Geräts auftreten können. Führen Sie die
empfohlenen Prüfungen und Reparaturen in der Reihenfolge durch, wie sie in der Tabelle aufgeführt sind. Sollte
ein Defekt auftreten, der nicht in der Tabelle vorhanden ist oder wenn Sie den Defekt nicht selbst beheben
können, sollte das Gerät zur Reparatur zurückgesendet werden.
Wenn Sie dem nachfolgenden Link folgen finden Sie Antworten zu den am meisten
gestellten Fragen über die Wärmebildtechnik
https://www.pulsar-nv.com/glo/de/service/faq/94
Fehlfunktion
Die Wärmebildkamera
schaltet nicht ein.
Funktioniert nicht mit
externer
Stromversorgung.
Bild ist undeutlich mit
vertikalen Linien und
unregelmäßigem
Hintergrund.
Bild ist zu dunkel.
Auf dem Display
erscheinen farbige
Linien oder das Bild ist
verschwunden.
Schlechte Bildqualität /
verringerte
Erkennungsreichweiten.
Smartphone oder
Tablet können nicht mit
dem Gerät verbunden
werden.
Mögliche Ursache
Akku vollständig entladen.
USB-Kabel beschädigt.
Externe Stromversorgung entladen.
Kalibrierung nötig.
Helligkeit oder Kontrast zu niedrig
eingestellt.
Das Gerät wurde während des Betriebs
einer statischen Aufladung ausgesetzt.
Diese Probleme können bei der Beobachtung unter schlechten Wetterbedingungen
auftreten (Schneefall, Regen, Nebel, usw.).
Gerätepasswort wurde geändert.
Das Gerät befindet sich ein einem
Bereich mit vielen Wi-Fi-Netzwerken, die
möglicherweise eine Interferenz
verursachen.
Beseitigung
Akku aufladen.
USB-Kabel ersetzen.
Externe Stromversorgung laden (bei
Bedarf).
Durchführung eine Bildkalibrierung
entsprechend Abschnitt 8 „Bedienung“
in der Anleitung.
Helligkeit oder Kontrast einstellen.
Nach der Einwirkung statischer
Aufladung startet das Gerät entweder
automatisch neu oder es muss aus- und
wieder eingeschaltet werden.
Netzwerk löschen und mithilfe des
Gerätepassworts neu verbinden.
Um einen stabilen Wi-Fi-Betrieb
sicherzustellen, bringen Sie das Gerät in
einen Bereich mit weniger oder keinen
Wi-Fi-Netzwerken.
Achtung! AXION Wärmebildkameras erfordern eine Lizenz, wenn sie außerhalb Ihres Landes
exportiert werden.
Elektromagnetische Kompatibilität.
Dieses Produkt entspricht den Anforderungen des Europäischen Standards EN 55032: 2015, Klasse A.
Warnung: Der Betrieb dieses Produkts in einem Wohngebiet kann zu Funkstörungen führen.
Kein oder
unterbrochenes Wi-FiSignal.
Bei der Verwendung bei
Minusgraden ist die
Bildqualität der
Umgebung schlechter
als bei Plusgraden.
Gerät befindet sich außerhalb der Wi-FiAbdeckung. Zwischen dem Gerät und
dem Empfänger befinden sich
Hindernisse (z. B. Betonwände).
Bei positiven Temperaturbedingungen erwärmen sich beobachtete Objekte
(Umgebung und Hintergrund) wegen der Wärmeleitfähigkeit unterschiedlich und
daher wird ein hoher Temperaturkontrast erzeugt. Demzufolge ist die vom Gerät
erzeugte Bildqualität höher.
Bei tiefen Temperaturen kühlen die zu beobachtenden Objekte (Hintergrund) in der
Regel auf etwa die gleiche Temperatur ab, wodurch der Temperaturkontrast
erheblich reduziert und die Bildqualität (Detail) schlechter wird. Dies ist ein
charakteristisches Merkmal von Wärmebildgeräten.
Bringen Sie das Gerät in eine direkte
Sichtlinie des Wi-Fi-Signals.
24
Page 27
ESPAÑOL
ESPECIFICACIONES
SKU#
Modelo AXION
Microbolómetro
Tipo
Resolución (píxeles)
Tasa de actualización de fotogramas (Hz)
Tamaño de píxel (micras)
Especificaciones ópticas
Aumento óptico (x)
Zoom digital suave (x)
Zoom digital (x)
Apertura relativa (D/f )
Distancia mínima de enfoque (m)
Diámetro de límite pupilar (mm)
Ángulo de campo de visión (horizontal), grados
Ángulo de campo de visión, metros a 100 m
Rango de enfoque de visor (dioptrías)
Distancia máxima de observación (m)*
Pantalla
Tipo
Resolución (píxeles)
Especificaciones operativas
Tensión de alimentación externa
Tipo de pila
Capacidad
Tensión de salida nominal
Alimentación eléctrica externa
Duración de la carga de la batería en horas* (a 22 °C)
Código IP (IEC60529) grado de protección
Compatibilidad con Stream Vision
Rango de temperaturas de funcionamiento
Dimensiones (mm)
Peso sin pilas (kg)
Grabador de vídeo
Resolución de vídeo / foto (píxeles)
Formato de vídeo / foto
Cantidad de memoria interna
Canal Wi-Fi
Frecuencia
Estándar
Rango de recepción en la línea visual directa (m)
* Para objetos animales como un ciervo
Pueden realizarse mejoras al diseño y software de este producto para mejorar sus funciones del usuario.
Una versión actualizada del Manual de usuario puede encontrarse en el sitio web www.pulsar-vision.com
77421
XМ30
no refrigerado
320x240
50
12
4
4-16
2/4
1.2
3/3.28
3.5/0.12
7.3
12.8
±5
1300/1420
AMOLED
1024x768
3 – 4.3V
Li-Ion Battery Pack АPS3
3200 mAh
DC 3.7V
5V (USB)
4
IpХ7
Yes
-25°С ... +40°С
143x41x69
0.25
1024х768
.mp4/.jpg
16 GB
2.4 Ghz
802.11 b/g/n
15
77422
XМ38
no refrigerado
320x240
50
12
5.5
5.5-22
2/4
1.2
3/3.28
3.5/0.12
5.8
10.1
±5
1700/1860
AMOLED
1024x768
3 – 4.3V
Li-Ion Battery Pack АPS3
3200 mAh
DC 3.7V
5V (USB)
4
IpХ7
Yes
-25°С ... +40°С
149x49x70
0.27/9.52
1024х768
.mp4/.jpg
16 GB
2.4 Ghz
802.11 b/g/n
15
PAQUETE DE ENTREGA
џ Generador de imágenes térmico AXION
џ Batería recargable APS3
џ Cargador de batería APS con capacidad de red
џ Cable USB
џ Caja
џ Correa de mano
џ Manual de usuario
џ Paño para limpieza de óptica
џ Tarjeta de garantía
DESCRIPCIÓN
La matriz IR (microbolómetro) de AXION, basada en monoculares de generación de imágenes térmica, está
representada por un número de modelos con diferentes aumentos y diámetros de lente. Estos dispositivos
están diseñados para utilizarse tanto por la noche como durante el día en condiciones metereológicas adversas
(niebla, contaminación, lluvia), así como con obstáculos que dificultan la detección de un objetivo (ramas,
hierba alta, arbustos espesos, etc.). A diferencia de los dispositivos de visión nocturna que se basan en
convertidores electro-ópticos, los monoculares de visión térmica no requieren una fuente externa de luz ni se
ven afectados por la exposición a la luz brillante.
Los monoculares AXION pueden utilizarse para la caza, observación y orientación sobre el terreno nocturnas, así
como la realización de operaciones de rescate.
CARACTERÍSTICAS DISTINTIVAS
џ Tamaño de píxel del microbolómetro de 12 micras
џ Pantalla AMOLED de alta resolución
џ Ligero y compacto
џ Diseño funcional y ergonómico
џ Interfaz fácil de usar
џ Observación en ocho modos de color
џ Tres modos de calibración (manual, semiautomático y automático)
џ Distancia larga de detección
џ Gran aumento
џ Tres modos de observación (bosque, ciudad e identificación)
џ Telémetro estadiamétrico
џ Función de pantalla apagada
џ Función de corrección de píxeles
џ Software actualizable
џ Amplio rango de temperaturas de funcionamiento (-25 °С – +40°С)
џ Totalmente estanco (clase de protección IPX7)
Grabación de vídeo/audio
џ Grabador de vídeo integrado
џ Integración con dispositivos iOS y Android
џ Control remoto y vigilancia a través de un smartphone por Wi-Fi
џ Retransmisión en directo por YouTube y grabación directa en Internet a través de un smartphone y la
aplicación Stream Vision.
Paquete de pilas
џ Paquete de pilas de ion de litio APS3 de cambio rápido
џ Opción de carga por USB
25
Page 28
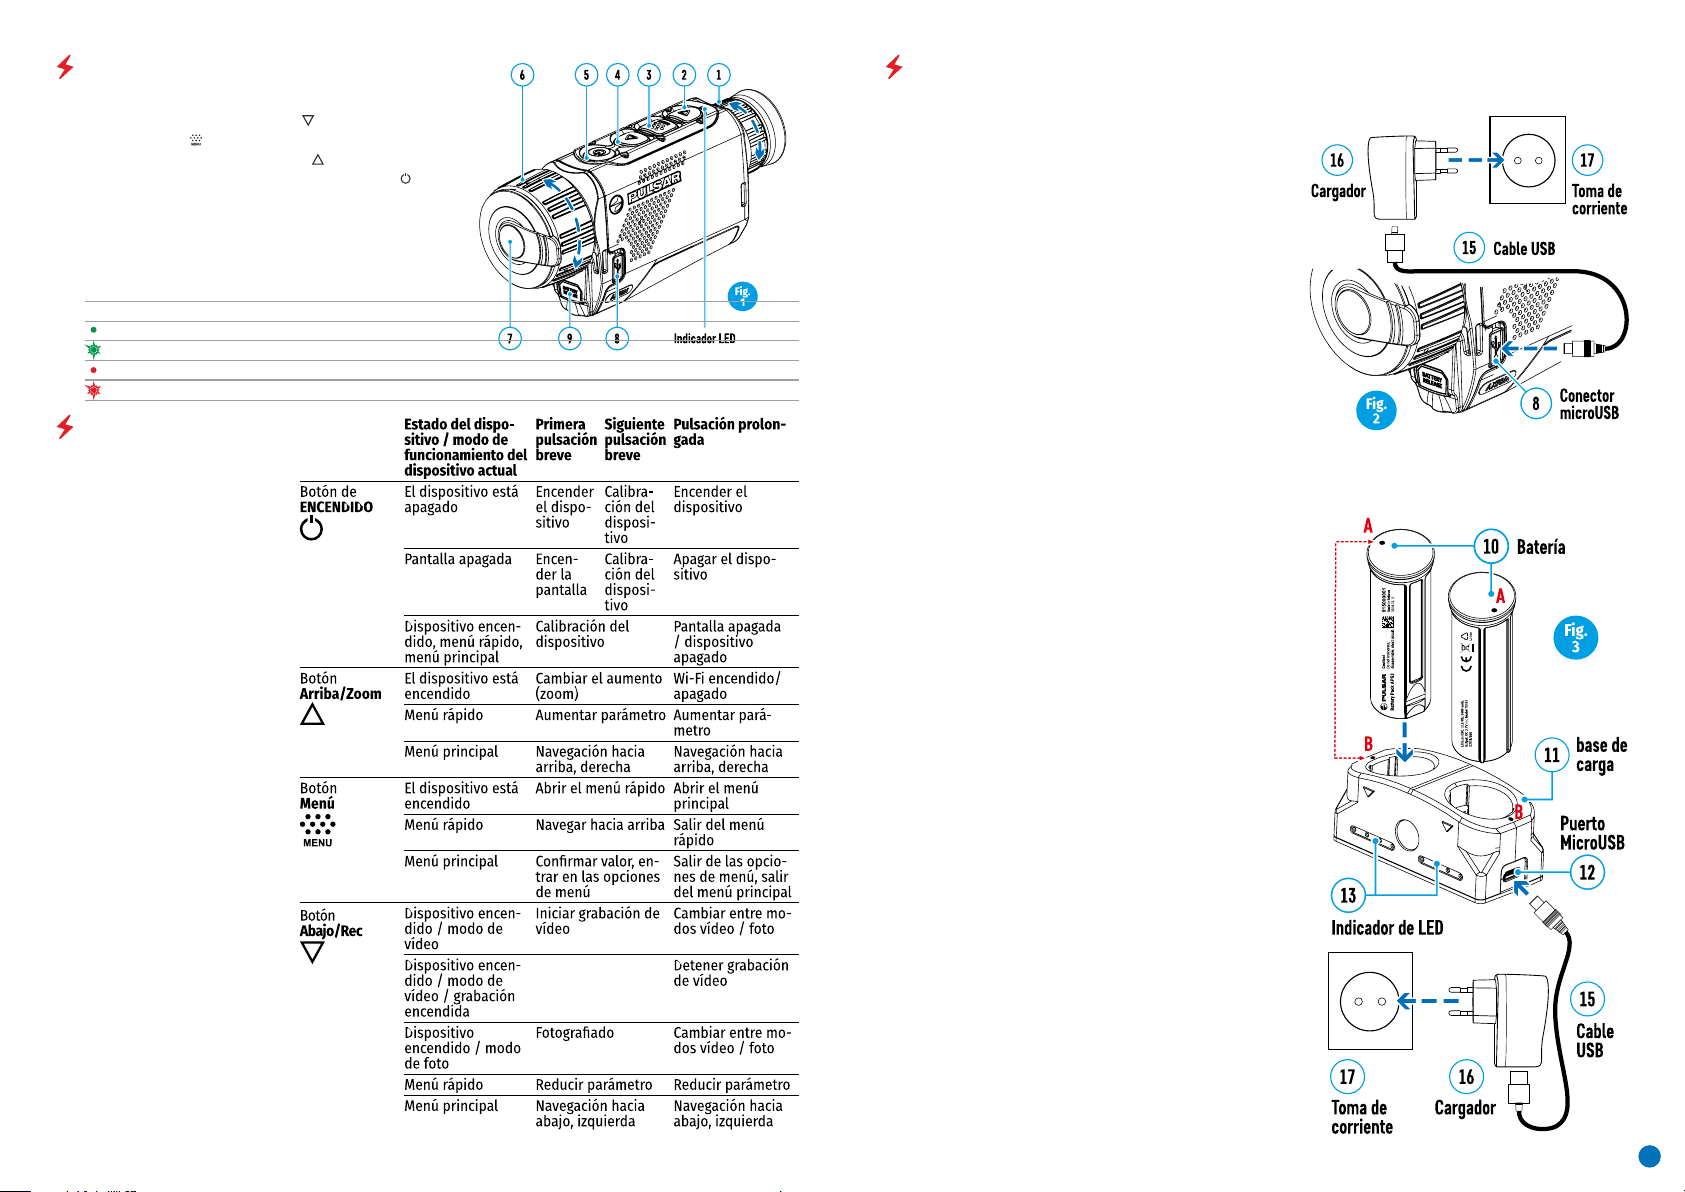
COMPONENTES Y CONTROLES
1. Anillo de ajuste de dioptrías de visor
2. Botón Down/Rec (Abajo/Rec)
3. Botón Menú
4. Botón Up/Zoom (Arriba/Zoom)
5. Botón de encendido/Calibración ENCENDIDA
6. Anillo de enfoque de la lente
7. Tapa de lente
8. Conector microUSB
9. Botón de liberación de batería
Indicador LED que muestra el estado actual del dispositivo:
Indicador LED Modo de funcionamiento
El dispositivo está encendido
Dispositivo encendido / grabación de vídeo
Dispositivo encendido / carga de batería < 10 %
Dispositivo encendido / grabación de vídeo / carga de batería < 10 %
FUNCIONAMIENTO
DE LOS BOTONES
USO DE LA BATERÍA RECARGABLE
Los generadores de imágenes térmicos AXION se
suministran con un paquete de pilas de ion de litio
recargables APS3 que permite utilizar el generador
de imágenes hasta 4 horas. La batería debe estar
cargada antes del primer uso.
Carga de la batería
Opción 1 (Fig.2) :
џ Instale la batería (10) en su ranura en la carcasa del
instrumento (14) alineando los iconos para formar
un «punto» sobre la unidad y la batería. (véase Fig.
4).
џ Conecte un cable USB (15) al conector microUSB (8)
del dispositivo.
џ Conecte el otro extremo del cable USB (15) al
cargador de red (16) o a una toma USB conectada a
otras fuentes de alimentación con una salida
nominal de 5 V o menos.
џ Conecte el cargador de red (16) a la alimentación
eléctrica de la red.
Nota: La batería externa PB8I* puede utilizarse
como cargador.
Opción 2 (Fig.3) :
џ Inserte la batería recargable (10) suministrada con
su dispos itiv o, o c ompra da po r s epa rado,
totalmente a lo largo del carril de guía hasta la
ranura del cargador APS (11) (véase Fig. 3).
џ El punto A en la batería y el punto B en el cargador
deben coincidir.
џ Se pueden cargar dos baterías al mismo tiempo,
hay una segunda ranura para ello.
џ Conecte el conector microUSB del cable USB (15)
en el conector microUSB del cargador de red (16).
Enchufe el dispositivo a una toma de corriente de
100–240 V (17).
џ Conecte el segundo conector del cable microUSB a
la toma (12) del cargador de red (11).
џ El indicador LED (13) se encenderá.
26
Page 29
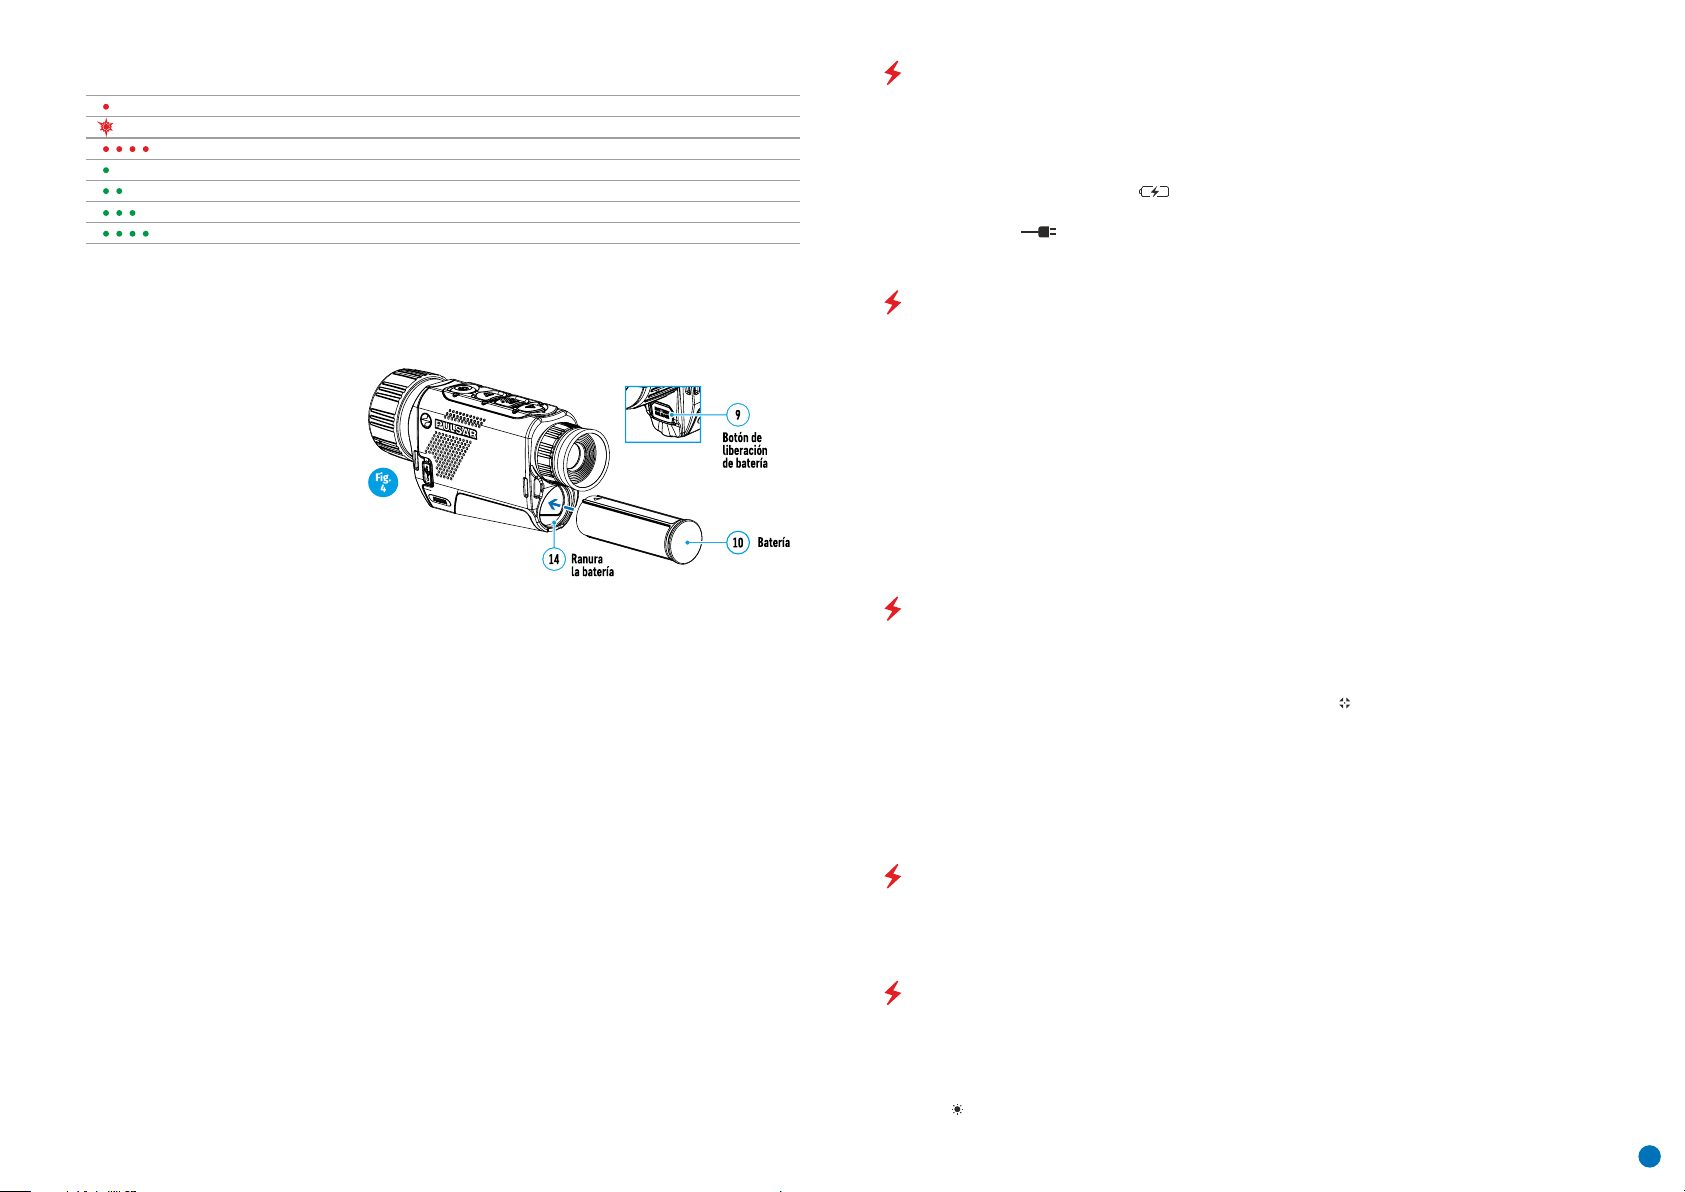
Estado de carga de la batería (véase la tabla)
Indicador LED* Estado de carga de la batería
Carga de la batería entre 0% y 10% / Cargador no conectado a la alimentación eléctrica de la red.
Carga de la batería entre 0% y 10% / Cargador conectado a la alimentación eléctrica de la red.
Batería defectuosa. La batería no debe utilizarse.
Carga de la batería entre 10% y 20%
Carga de la batería entre 20 % y 60 %
Carga de la batería entre 60 % y 95 %
Batería totalmente cargada. Puede desconectarse del cargador.
El indicador LED muestra el nivel de carga de la batería actual durante 30 segundos cuando el cargador APS no
está conectado. Si la alimentación está conectada, la pantalla muestra el estado actual de la batería
permanentemente, mientras que el LED parpadea de forma adicional para indicar el proceso de carga de la
batería.
Instalación
џ Inserte la batería (10) en la ranura
asignada en la carcasa del dispositivo (14)
(véase Fig. 4) alineando las imágenes en la
unidad y la batería.
џ Si se instala correctamente, la batería
queda bloqueada en la ranura con un clip
especial.
џ Para retirar la batería, pulse el botón de
Liberación de batería (9).
Medidas de seguridad
џ Al cargar, utilice siempre el cargador
suministrado con su dispositivo óptico. El
uso de un cargador distinto puede causar
daños irreparables a la batería o al cargador y podría causar que la batería se incendiara.
џ Después de estar guardada durante un periodo largo, la batería debería estar cargada parcialmente, no
debería estar totalmente cargada ni descargada.
џ No cargue la batería inmediatamente si ha pasado de un entorno frío a un entorno cálido. Espere 30–40
minutos hasta que la batería se temple.
џ No deje la batería sin supervisión durante su carga.
џ No utilice el cargador se se ha modificado o dañado.
џ La batería debe cargarse a una temperatura de entre 0° C y +45° C, de lo contrario la vida útil de la batería se
reducirá considerablemente.
џ No deje un cargador con una batería conectada a la red durante más de 24 horas después de una carga
completa.
џ No exponga la batería a temperaturas altas ni a una llama viva.
џ La batería no ha sido diseñada para sumergirse en agua.
џ No se recomienda la conexión de dispositivos de otros fabricantes con un consumo de energía mayor al
permitido.
џ La batería está equipada con un sistema de protección contra cortacircuitos. No obstante, debería evitarse
cualquier situación que pueda causar cortocircuito.
џ No desmonte ni deforme la batería.
џ No someta la batería a golpes ni caídas.
џ Si la batería se utiliza en temperaturas bajo cero, la capacidad disminuye. Esto es normal y no indica ningún
defecto.
џ No utilice la batería a temperaturas que excedan las que se muestran en la tabla, ya que podría acortar la vida
útil de la batería.
џ Guarde la batería fuera del alcance de los niños.
ALIMENTACIÓN ELÉCTRICA EXTERNA
La alimentación externa la suministra una fuente externa como una batería externa de 5 V.
џ Conecte la fuente de alimentación externa al conector USB del dispositivo (8) (Fig. 1)
џ El dispositivo se pondrá en funcionamiento desde la fuente de alimentación externa, mientras que la batería
APS3 se recargará gradualmente.
џ Aparecerá el icono de una batería en la pantalla que muestra su carga como un porcentaje.
џ Si el dispositivo funciona con una fuente de alimentación externa y la batería APS3 no está conectada, se
muestra el icono .
џ Cuando se desconecta la alimentación eléctrica externa, el dispositivo cambia a la alimentación eléctrica
interna sin apagarse.
FUNCIONAMIENTO
¡ATENCIÓN! La lente del dispositivo no debe apuntar a ninguna fuente de energía intensa como dispositivos
emisores de láser o el sol. Esto podría dañar los componentes electrónicos del dispositivo. El daño causado por
el incumplimiento de las instrucciones de funcionamiento no está cubierto por la batería.
Encendido y ajuste de la imagen
џ Retire la tapa de la lente (7) Fije la tapa a la correa con el imán integrado en la tapa.
џ Encienda el dispositivo pulsando el botón de ON (ENCENDIDO) (5).
џ Ajuste la resolución de los iconos en la pantalla girando el anillo de ajuste de dioptrías en el visor (1). En el
futuro,no será necesario girar el anillo de ajuste de dioptrías del visor, independientemente de la distancia y
otras condiciones.
џ Para enfocar el objeto que se está observando, gire el anillo de enfoque de la lente (6).
џ El ajuste del brillo y el contraste de la pantalla, así como el encendido del zoom digital suave, se describen en la
sección FUNCIONES DE MENÚ DE ACCESO RÁPIDO.
џ Apague el dispositivo tras el uso pulsando prolongadamente el botón de ON (ENCENDIDO) (5).
1. CALIBRACIÓN DEL SENSOR
La calibración permite ecualizar el fondo de temperatura del microbolómetro y eliminar los defectos de la
imagen (como líneas verticales, imágenes fantasma, etc.).
Hay tres modos de calibración: manual (M), semiautomático (SA) y automático (А).
Seleccione el modo necesario en la sección CALIBRACIÓN del menú .
џ Modo M (manual). Fijar la tapa de la lente y pulsar brevemente el botón de ON (ENCENDIDO) (5). Tras completar
el proceso de calibración, retire la tapa de la lente.
џ Modo SA (semiautomático). La calibración se activa pulsando brevemente el botón de ON (ENCENDIDO) (5). La
tapa de la lente no necesita estar fijada (el sensor está cerrado por un obturador interno).
џ Modo A (automático). El dispositivo se calibra de forma autónoma de acuerdo al algoritmo del software. La
tapa de la lente no necesita estar fijada (el sensor está cerrado por un obturador interno). En este modo, el
usuario puede calibrar el dispositivo con el botón de ON (ENCENDIDO) (5) (en modo semiautomático).
ZOOM DIGITAL DISCONTINUO
La funcionalidad del dispositivo ofrece la posibilidad de aumentar rápidamente su multiplicidad de base (véase
la tabla de propiedades técnicas en la línea de zoom digital) por un factor de 2 o 4. Ajuste el zoom digital como
corresponda pulsando el botón DOWN (ABAJO) (2).
FUNCIONES DE MENÚ DE ACCESO RÁPIDO
Los ajustes básicos (ajuste de brillo y contraste, uso de la función de zoom digital suave y el telémetro
estadiamétrico) se modifican a través del Menú de acceso rápido.
Entre en el menú pulsando brevemente el botón Menú (3).
Pulsando brevemente el botón Menú (3) le permite cambiar entre funciones.
Brillo : pulsando los botones UP (ARRIBA) (4) / DOWN (ABAJO) (2) y cambiando el valor del brillo de la pantalla
de 00 a 20.
27
Page 30
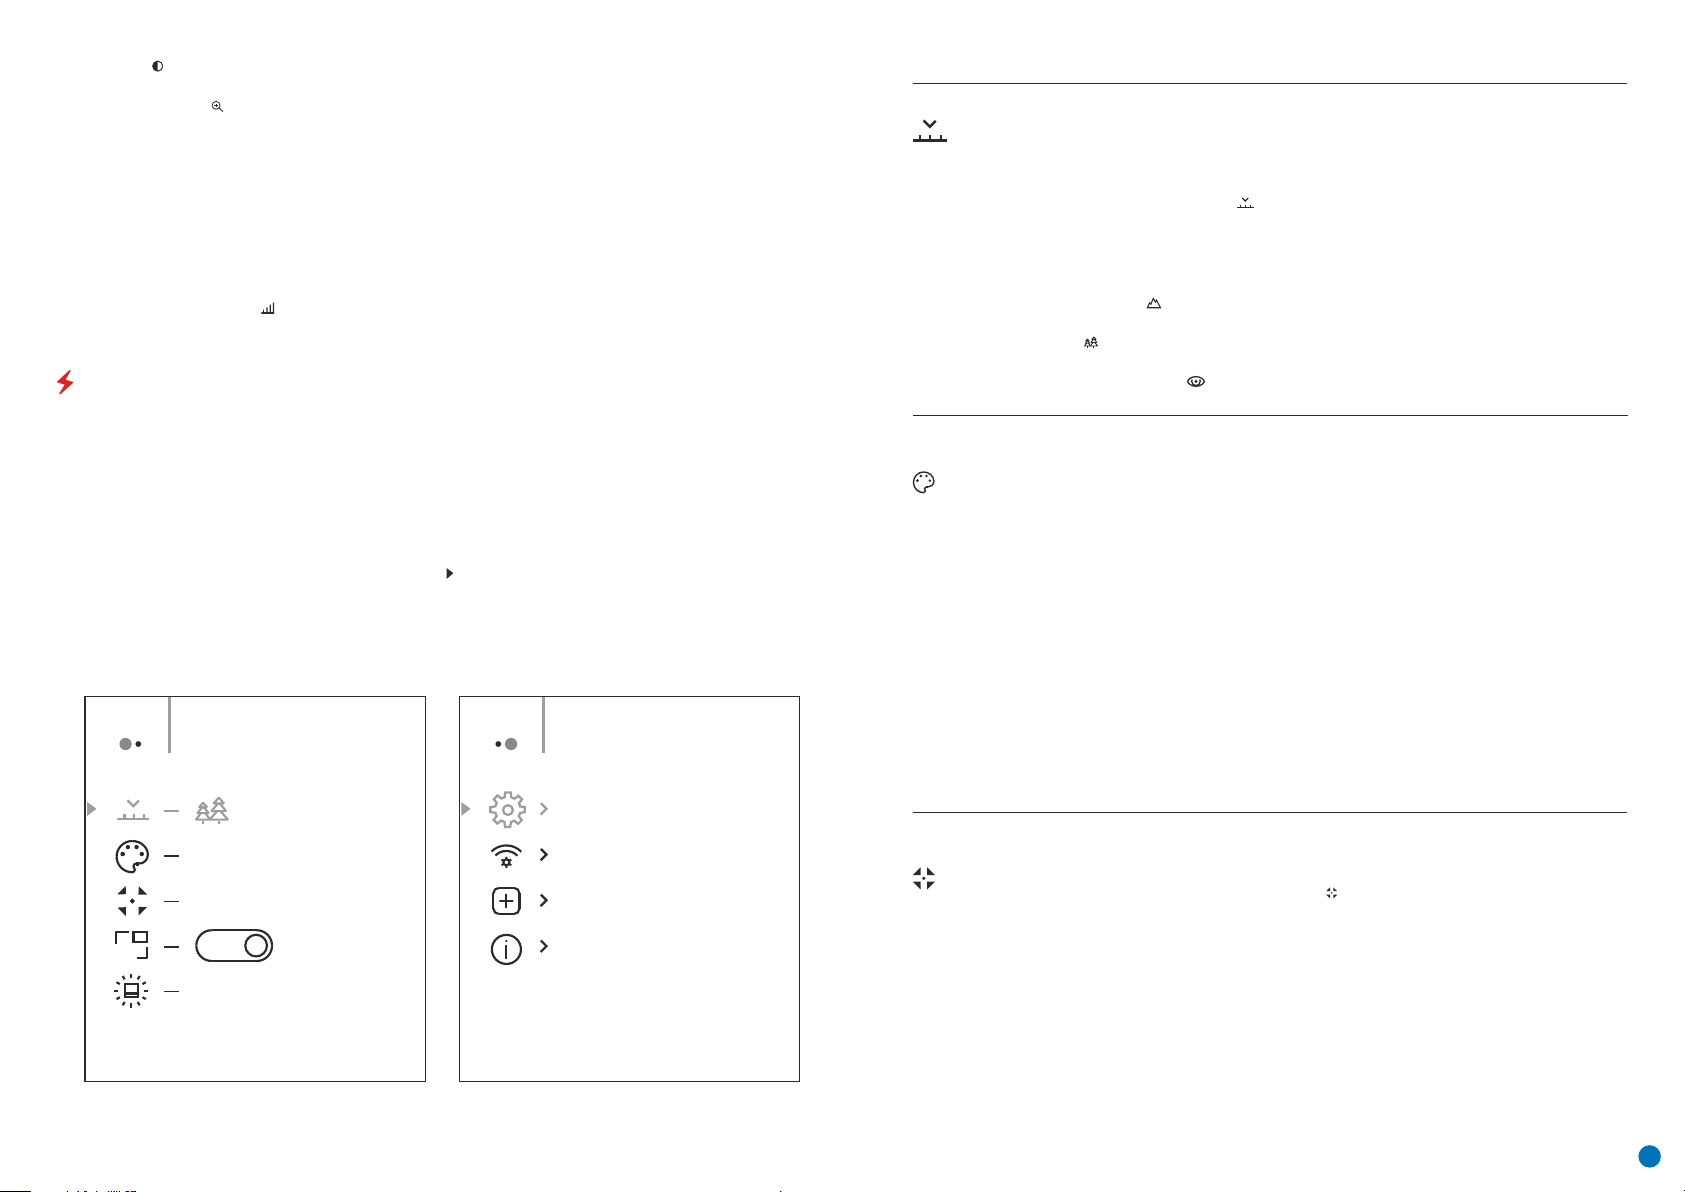
Contraste : pulsando los botones UP (ARRIBA) (4) / DOWN (ABAJO) (2) y cambiando el valor del contraste de la
pantalla de 00 a 20.
Zoom digital suave : pulsando los botones UP (ARRIBA) (4) / DOWN (ABAJO) (2) y cambiando el valor del zoom
digital de la pantalla de 1,0 a 4,0. El tamaño del aumento del zoom digital es de 0,1.
Para salir del menú, pulse y mantenga pulsado el botón Menú (3) o
espere 10 segundos para la selección automática.
El factor de zoom digital suave inicial mostrado es igual a x1,0 si el zoom discontinuo está inactivo, x2,0 si es 2x y
x4.0 si es 4x.
Nota: El aumento actual se calcula como el producto del aumento de base y la relación de zoom digital suave.
Ejemplo: si el aumento del dispositivo básico es 3,0x y la relación de zoom digital suave es x1,7, el aumento real es
5,1х (3,0*1,7). La próxima vez que se encienda el dispositivo, la imagen se proyectará en la pantalla con los ajustes
de brillo y contraste guardados del anterior apagado.
Telémetro estadiamétrico : Pulse los botones UP (ARRIBA) (4) / DOWN (ABAJO) (2) para cambiar la posición de
las marcas para determinar la distancia del objeto que se está observando (véase la Sección 16 para obtener más
información sobre el telémetro).
FUNCIONES DEL MENÚ PRINCIPAL
џ Entre en el menú pulsando prolongadamente el botón Menú (3).
џ Pulse los botones UP (ARRIBA) (4) / DOWN (ABAJO) (2) para desplazarse por las funciones del menú.
џ La navegación del menú se realiza mediante desplazamiento. Cuando se alcanza el último elemento de la
primera pestaña, la navegación se desplaza al primer elemento dela segunda pestaña.
џ Una pulsación breve del botón Menú (3) abre una opción de menú.
џ Para salir del menú, pulse y mantenga pulsado el botón Menú (3)
џ Al cabo de 10 segundos de inactividad, se produce la salida automática del menú.
џ Al salir del menú, se memoriza la ubicación del cursor ( ) solo durante la duración de una sesión de trabajo (es
decir, hasta que se apaga el dispositivo). La próxima vez que se encienda el dispositivo y se acceda el menú, el
cursor se encontrará en el primer elemento del menú.
Vista general del menú:
Pestaña 1 Pestaña 2
Menu General SettingMenu Mode
Composición y descripción del menú
Modo
Gamas
de colores
Selección del modo de observación El generador de imágenes térmicas tiene tres modos de
funcionamiento automáticos. Cada uno de estos modos incluye una combinación óptima de
parámetros (brillo, contraste, intensidad, etc.) para asegurar la mejor calidad de imagen en
cualquier condición dada de observación.
џ Pulse y mantenga pulsado el botón Menú (3) para entrar en el menú.
џ Seleccione la opción «Modo» .
џ Una pulsación breve del botón Menú (3) abre el menú.
џ Seleccione uno de los ajustes descritos a continuación con los botones UP (ARRIBA) (4) /
DOWN (ABAJO) (2).
џ Una pulsación breve del botón Menú (3) confirma la selección.
Montañas/Rocas Modo de alto contraste Este es el modo óptimo para observar fauna con
un fondo de rocas y terreno en una situación de tierras altas.
Bosque Modo de bajo contraste Este es el modo óptimo para observar fauna con un fondo
de vegetación.
Modo de identificación Un modo universal para aplicaciones en diversas condiciones de
observación.
Selección de gamas de colores El modo de pantalla principal para una imagen observada es
«Hot White» (blanco cálido). La opción de menú «Gama de colores» le permite seleccionar
una gama alternativa:
џ Pulse y mantenga pulsado el botón Menú (3) para entrar en el menú.
џ Seleccione la opción «Gamas de colores».
џ Una pulsación breve del botón Menú (3) abre el menú.
џ Seleccione una de las paletas descritas a continuación con los botones UP (ARRIBA) (4) /
DOWN (ABAJO) (2).
џ Una pulsación breve del botón Menú (3) confirma la selección.
Hot White (blanco cálido) Una paleta en blanco y negro (la temperatura fría corresponde al
negro y la temperatura cálida, al blanco).
Hot Black (Negro cálido) Una paleta en blanco y negro (la temperatura fría corresponde al
blanco y la temperatura cálida, al negro).
Hot Red (Rojo cálido)
Red Monochrome (Monocromático rojo)
Rainbow (Arco iris)
Ultramarino
Violeta
Sepia
PIP
Hot White
Automatic
Off
10
Modo de
calibración
Selección del modo de calibración Hay tres modos de calibración: manual, semiautomático y
automático.
џ Pulse y mantenga pulsado el botón Menú (3) para entrar en el menú.
џ Seleccione la opción «Modo de calibración» .
џ Una pulsación breve del botón Menú (3) abre el submenú.
џ Seleccione uno de los modos de calibración descritos a continuación con los botones
ARRIBA (4) / ABAJO (2).
џ Una pulsación breve del botón Menú (3) confirma la selección.
Automático.
Los requisitos de calibración en modo automático se determinan mediante programación, el
proceso de calibración se inicia automáticamente.
Semiautomático.
El usuario establece los requisitos de forma independiente (en función de la imagen que se
está observando).
Manual.
Calibración manual. Cierre la tapa de la lente antes de iniciar la calibración.
28
Page 31
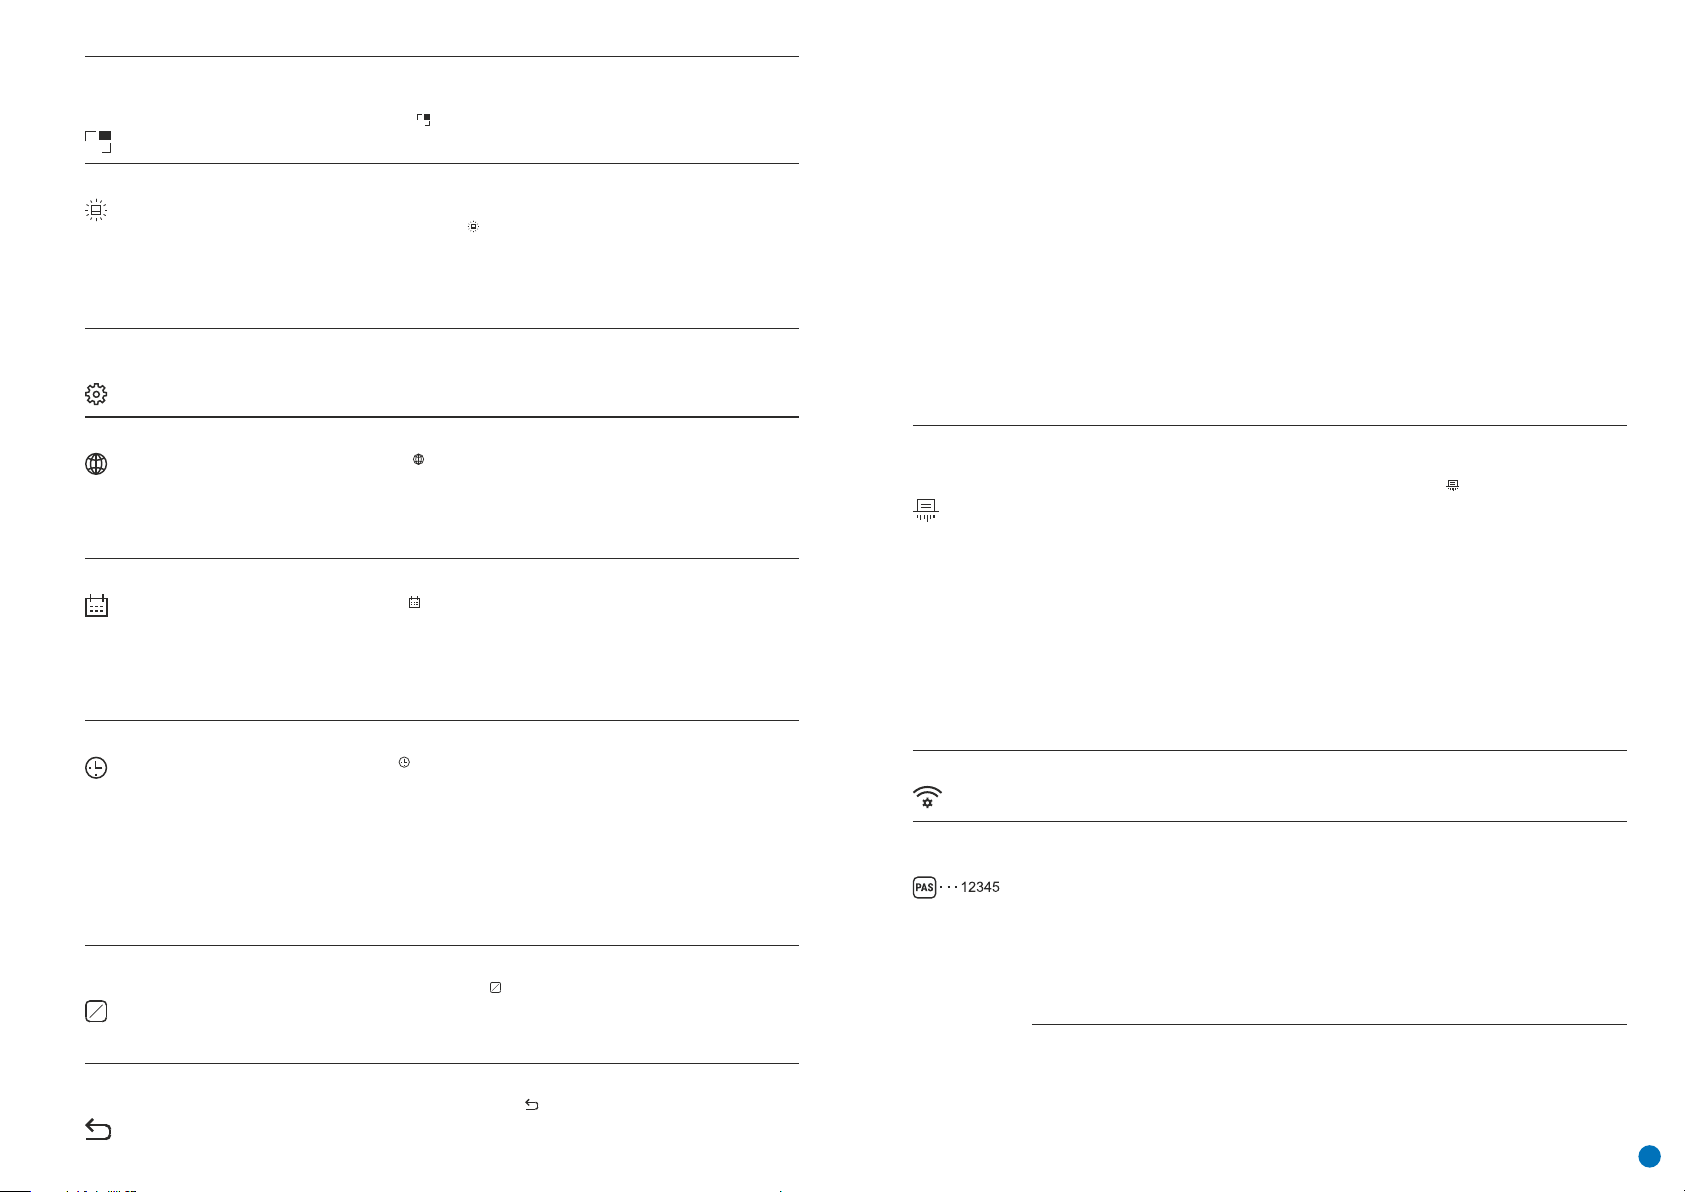
Modo PiP
(imagen
superpuesta)
PIP
Brillo de iconos
Ajustes
generales
Idioma
Fecha
Hora
Unidades de
medición
M
Y
Ajustes
predeterminados
Selección del modo de imagen superpuesta
Pulse y mantenga pulsado el botón Menú (3) para entrar en el menú.
Seleccione la opción «Modo PiP» .
Una pulsación breve del botón Menú (3) enciende/apaga el modo.
Ajuste del brillo de los iconos
џ Pulse y mantenga pulsado el botón Menú (3) para entrar en el menú.
џ Seleccione la opción «Brillo de iconos» .
џ Una pulsación breve del botón Menú (3) abre el submenú.
џ Seleccione el valor de brillo de los pictogramas con los botones UP (ARRIBA) (4) / DOWN
(ABAJO) (2).
џ Una pulsación breve del botón Menú (3) confirma la selección.
Esta opción de menú le permite programar los siguientes ajustes:
Seleccionar Idioma
џ Entre en el submenú «Idioma» pulsando brevemente el botón Menú (3).
џ Seleccione uno de los idiomas de interfaz disponibles (inglés, francés, alemán, español o
ruso) con los botones UP (ARRIBA) (4) / DOWN (ABAJO) (2).
џ Confirme su selección pulsando brevemente el botón Menú (3).
џ Para guardar su selección y salir del submenú, pulse y mantenga pulsado el botón Menú (3).
Ajuste de fecha
џ Entre en el submenú «Fecha» pulsando brevemente el botón Menú (3). La fecha aparece
en formato dd/mm/aaaa.
џ Establezca el año, mes y día requeridos con los botones UP (ARRIBA) (4) / DOWN (ABAJO) (2).
Pulse el botón Menú (3) para desplazarse por los dígitos.
џ Para guardar su fecha seleccionada y salir del submenú, pulse y mantenga pulsado el botón
Menú (3).
Ajuste de hora
џ Entre en el submenú «Hora» pulsando brevemente el botón Menú (3).
џ Seleccione el formato de hora (reloj 24 horas o AM/PM) pulsando los botones UP (ARRIBA)
(4) / DOWN (ABAJO) (2).
џ Pulse el botón del Menú (3) para desplazarse por el ajuste de hora.
џ Establezca la hora pulsando los botones UP (ARRIBA) (4) / DOWN (ABAJO) (2).
џ Pulse el botón del Menú (3) para desplazarse por el ajuste de minutos.
џ Establezca los minutos pulsando los botones UP (ARRIBA) (4) / DOWN (ABAJO) (2).
џ Para guardar su hora seleccionada y salir del submenú, pulse y mantenga pulsado el botón
Menú (3).
Selección de las unidades de medición
Entre en el submenú «M/Y» (metros/yardas) pulsando brevemente el botón Menú (3).
Establezca la unidad de medición (metros o yardas) pulsando los botones UP (ARRIBA) (4) /
DOWN (ABAJO) (2); a continuación, pulse el botón Мenú (3).
Se vuelve al submenú automáticamente.
Restaurar los ajustes de fábrica
џ Entre en el submenú «Ajustes predeterminados» pulsando brevemente el botón Menú (3).
џ Seleccione la opción «YES» (Sí) para restablecer los ajustes de fábrica o «NO» para cancelar
con los botones UP (ARRIBA) (4) / DOWN (ABAJO) (2).
PIP
M
Y
Formateado de
tarjeta de
memoria
Ajustes Wi-Fi
Configuración
de contraseña
Configuración
de los niveles
de acceso
џ Confirme su selección pulsando brevemente el botón Menú (3).
џ Si se ha seleccionado la opción YES (Sí), el mensaje «Do you want to return to default
settings?» (¿Desea volver a los ajustes predeterminados?) aparecerá junto a las opciones YES
(Sí) y NO. Seleccione YES (Sí) para formatear la tarjeta de memoria.
џ Si se ha seleccionado la opción NO, se cancelará el formateado y reaparecerá el submenú.
Los siguientes ajustes se restaurarán a su estado de fábrica antes de que el usuario los
establezca:
Modo de funcionamiento – vídeo
Modo – bosque
Modo de calibración – automático
Idioma – inglés
Wi-Fi – apagado (contraseña predeterminada)
Aumento – valor original
PiP (imagen superpuesta) – apagada
Gama de colores – Hot White (Blanco cálido)
Unidad de medición – métrica
Nota: al restablecer a los ajustes de fábrica, los ajustes de fecha/hora y el mapa de píxeles del
usuario se guardan.
Esta función permite formatear la tarjeta flash (tarjeta de memoria) del dispositivo (todos los
archivos se borran de su memoria).
џ Entre en el submenú «Formateado de tarjeta de memoria» pulsando brevemente el
botón Menú (3).
џ Seleccione la opción «YES» (Sí) para formatear la tarjeta de memoria o «NO» para volver al
submenú con los botones UP (ARRIBA) (4) y DOWN (ABAJO) (2).
џ Confirme su selección pulsando brevemente el botón Menú (3).
џ Si se ha seleccionado la opción YES (Sí), el mensaje «Format the memory card?»
(¿Formatear la tarjeta de memoria?) aparecerá junto a las opciones YES (Sí) y NO. Seleccione
YES (Sí) para formatear la tarjeta de memoria.
џ El mensaje «Formating memory card» (Formateando tarjeta de memoria) significa que el
formateado está en curso.
џ El mensaje «Formating completed» (Formateado completado) significa que el formateado
se ha completado.
џ Si se ha seleccionado la opción NO, se cancelará el formateado y reaparecerá el submenú.
Esta opción le permite configurar el dispositivo para que funcione en una red Wi-Fi.
Esta función le permite establecer una contraseña para acceder al dispositivo desde un
dispositivo externo. Esta contraseña se utiliza al enlazar un dispositivo externo (p. ej., un
smartphone) al dispositivo.
џ Pulse el botón del Menú (3) para entrar en el submenú «Wi-Fi».
џ La contraseña predeterminada «12345678» aparecerá en la pantalla.
џ Establezca la contraseña deseada con los botones UP (ARRIBA) (4) / DOWN (ABAJO) (2). El
botón UP (ARRIBA) (4) aumenta los números y el botón DOWN (ABAJO) (2) reduce los números.
Pulse el botón Menú (3) para desplazarse por los dígitos.
џ Para guardar la contraseña y salir del submenú, pulse y mantenga pulsado el botón Menú (3).
Esta subfunción le permite configurar el nivel adecuado de acceso a su dispositivo que se
pone a disposición en la aplicación Stream Vision.
Nivel Owner (Propietario). Un usuario de Stream Vision tiene acceso total a todas las
funciones del dispositivo.
Nivel Guest (Invitado). Un usuario de Stream Vision puede ver los vídeos desde el dispositivo
únicamente en tiempo real.
29
Page 32

Eliminación de
píxeles
defectuosos
Al utilizar el dispositivo, pueden aparecer píxeles defectuosos (rotos) en el sensor: es decir,
puntos brillantes u oscuros de brillo constante que son visibles en la imagen. Los generadores
de imágenes térmicos AXION ofrecen la posibilidad de eliminar cualquier píxel defectuoso en
el sensor mediante programación, así como cancelar cualquier eliminación.
џ Abra el submenú pulsando el botón Menú (3).
џ Seleccione el icono pulsando brevemente el botón Menú (3).
џ Aparecerá un marcador en el lado izquierdo de la pantalla.
џ Aparecerá una lente de aumento en el lado derecho de la pantalla (una imagen aumentada
con una cruz fija ) que se requiere para facilitar la búsqueda del píxel defectuoso y alinear el
marcador con esta. Hay flechas de dirección horizontales y verticales para mover el marcador
con las coordenadas a lo largo de los ejes X e Y.
џ Utilice los botones UP (ARRIBA) (4) / DOWN (ABAJO) (2) para mover el marcador para alinear
su centro con el píxel defectuoso.
џ Una pulsación breve del botón Menú (3) cambia la dirección del marcador de horizontal a
vertical y viceversa.
џ Utilizando los botones UP (ARRIBA) (4) y DOWN (ABAJO) (2), alinee el píxel defectuoso con la
cruz fija del marco: el píxel debería desaparecer.
џ Elimine el píxel defectuoso pulsando brevemente el botón de encendido/Calibración ON
(ENCENDIDA) (5).
џ Si se ha eliminado correctamente un píxel, la palabra «OK» aparece brevemente en la
pantalla.
џ A continuación, moviendo el marcador por la pantalla, puede eliminar el siguiente mosaico
defectuoso.
џ Para salir de la función «Delete defective pixels» (Eliminar píxeles defectuosos), pulse y
mantenga pulsado el botón Menú (3).
Volver al «mapa
de píxeles» de
fábrica
Devolver todos los píxeles defectuosos deshabilitados anteriormente por el usuario a su
estado original:
џ Abra el submenú pulsando el botón Menú (3).
џ Seleccione el icono y pulse el botón Menú (3).
џ Seleccione «YES» (Sí) si desea volver al mapa de píxeles de fábrica o «No» si no lo desea.
џ Confirme su selección pulsando brevemente el botón Menú (3).
¡Atención! Pueden aparecer uno o dos píxeles en la pantalla del generador de imágenes en
forma de puntos negros, blanco brillante o de color (azul o rojo). Estos no constituyen un
defecto.
BARRA DE ESTADO
La barra de estado está ubicada en la parte inferior de la pantalla y muestra información del estado de
funcionamiento del dispositivo que incluye:
џ Modo de observación
џ Modo de calibración (si está en el modo de calibración automático y quedan tres segundos antes de la
calibración automática, aparecerá un temporizador de cuenta atrás en lugar del icono de modo de calibración).
џ Aumento completo actual
џ Conexión Wi-Fi
џ Conexión USB (si el dispositivo está conectado)
џ Gama de colores (solo se muestra si está instalada la gama «Hot Black [Negro cálido]»)
џ Hora actual
џ Nivel de descarga de la batería (si el dispositivo está alimentado por la batería recargable)
џ Indicador de alimentación eléctrica externa (si el dispositivo está alimentado por una alimentación externa)
SA
Nota: cuando la calibración está en marcha, la imagen de la pantalla se congela durante la calibración
11.0x 08:13PM
GRABACIÓN DE VÍDEO Y FOTOGRAFÍA DE UNA IMAGEN OBSERVADA
Los generadores de imágenes térmicos AXION están equipados con una función para la grabación de vídeo y
fotografiar una imagen observada en una tarjeta de memoria integrada. Ser recomienda establecer la fecha y la
hora antes de utilizar la grabación de vídeo y la función de fotografía (véanse las opciones de menú
correspondientes).
El dispositivo de grabación integrado funciona en dos modos:
Modo VÍDEO Grabación de vídeo de una imagen
џ El dispositivo está en modo VÍDEO en cuanto se enciende.
џ Se muestra un icono en la esquina superior izquierda con el tiempo de grabación restante (en formato
hh:mm ), por ejemplo, 5:12.
џ Inicie una grabación de vídeo pulsando brevemente el botón Abajo/REC (2).
џ Una vez se haya iniciado la grabación de vídeo, el icono desaparecerá y aparecerá un icono REC en su lugar,
mientras que el temporizador de grabación se mostrará en formato MM:SS (minutos:segundos);
џ Pause la grabación de vídeo y reanude la grabación pulsando brevemente el botón Down (Abajo)/REC (2).
џ Detenga la grabación de vídeo pulsando y manteniendo pulsado el botón Down (Abajo)/REC (2).
џ Los archivos de vídeo se almacenan en la tarjeta memoria integrada después de apagar la grabación de vídeo.
џ Para cambiar entre los modos Vídeo y Foto, pulse y mantenga pulsado el botón Down (Abajo)/REC (2).
Modo FOTO fotografiar una imagen
џ Cambie al modo FOTO pulsando prolongadamente el botón Down (Abajo)/REC (2).
џ Tome una foto pulsando brevemente el botón Down (Abajo)/REC (2). La imagen se congela durante 0,5
segundos y se guarda un archivo de imagen en la tarjeta de memoria interna.
џ Se muestra un icono , «>100» en la esquina superior izquierda que indica que el dispositivo puede tomar
más de 100 fotografías. Si el número de fotografías disponibles es inferior a 100, se muestra el número real de
fotografías disponible (p. ej., 98) junto con el icono .
Notas. Puede entrar y utilizar el menú durante la grabación de vídeo. Los vídeos y fotografías registrados se
guardan en la tarjeta de memoria integrada del dispositivo en el formato: img_xxx.jpg (para fotos);
video_xxx.mp4 (para vídeos); xxx - contador de archivos común de tres dígitos (para fotos y vídeos). El contador
utilizado en los nombres de archivos multimedia NO se restablece.
Atención. La duración máxima de un archivo de grabación de vídeo es de siete minutos. Después de que se acabe
este tiempo, el vídeo se grabará en un archivo nuevo. El número de archivos está limitado por la capacidad de la
memoria integrada del dispositivo. Supervise regularmente la cantidad de memoria libre de la tarjeta de
memoria integrada y transfiera vídeos y fotografías a otros medios para liberar espacio en la tarjeta de memoria.
FUNCIÓN WI-FI
El dispositivo está equipado con comunicación inalámbrica con dispositivos externos (ordenador, smartphone)
por Wi-Fi.
џ Encienda el módulo de conexión pulsando prolongadamente el botón Up (Arriba) (4). El funcionamiento
inalámbrico se muestra en la barra de estado del siguiente modo:
Estado de conexión Indicación de barra de estado
Wi-Fi desconectado
Wi-Fi habilitado por el usuario
Proceso de conexión Wi-Fi en curso
Wi-Fi encendido, sin conexión al dispositivo
Wi-Fi encendido, el dispositivo está conectado
џ Un dispositivo externo reconoce el dispositivo bajo la etiqueta «AXION_XXXX», donde XXXX son los cuatro
últimos dígitos del número de serie.
џ Después de introducir la contraseña en un dispositivo externo (para obtener más información sobre la
configuración de contraseñas, véase la subsección «Configuración de Wi-Fi» en la sección «Funciones del menú
principal» en las instrucciones) y establecer la conexión, el icono de la barra de estado ambia a .
30
Page 33
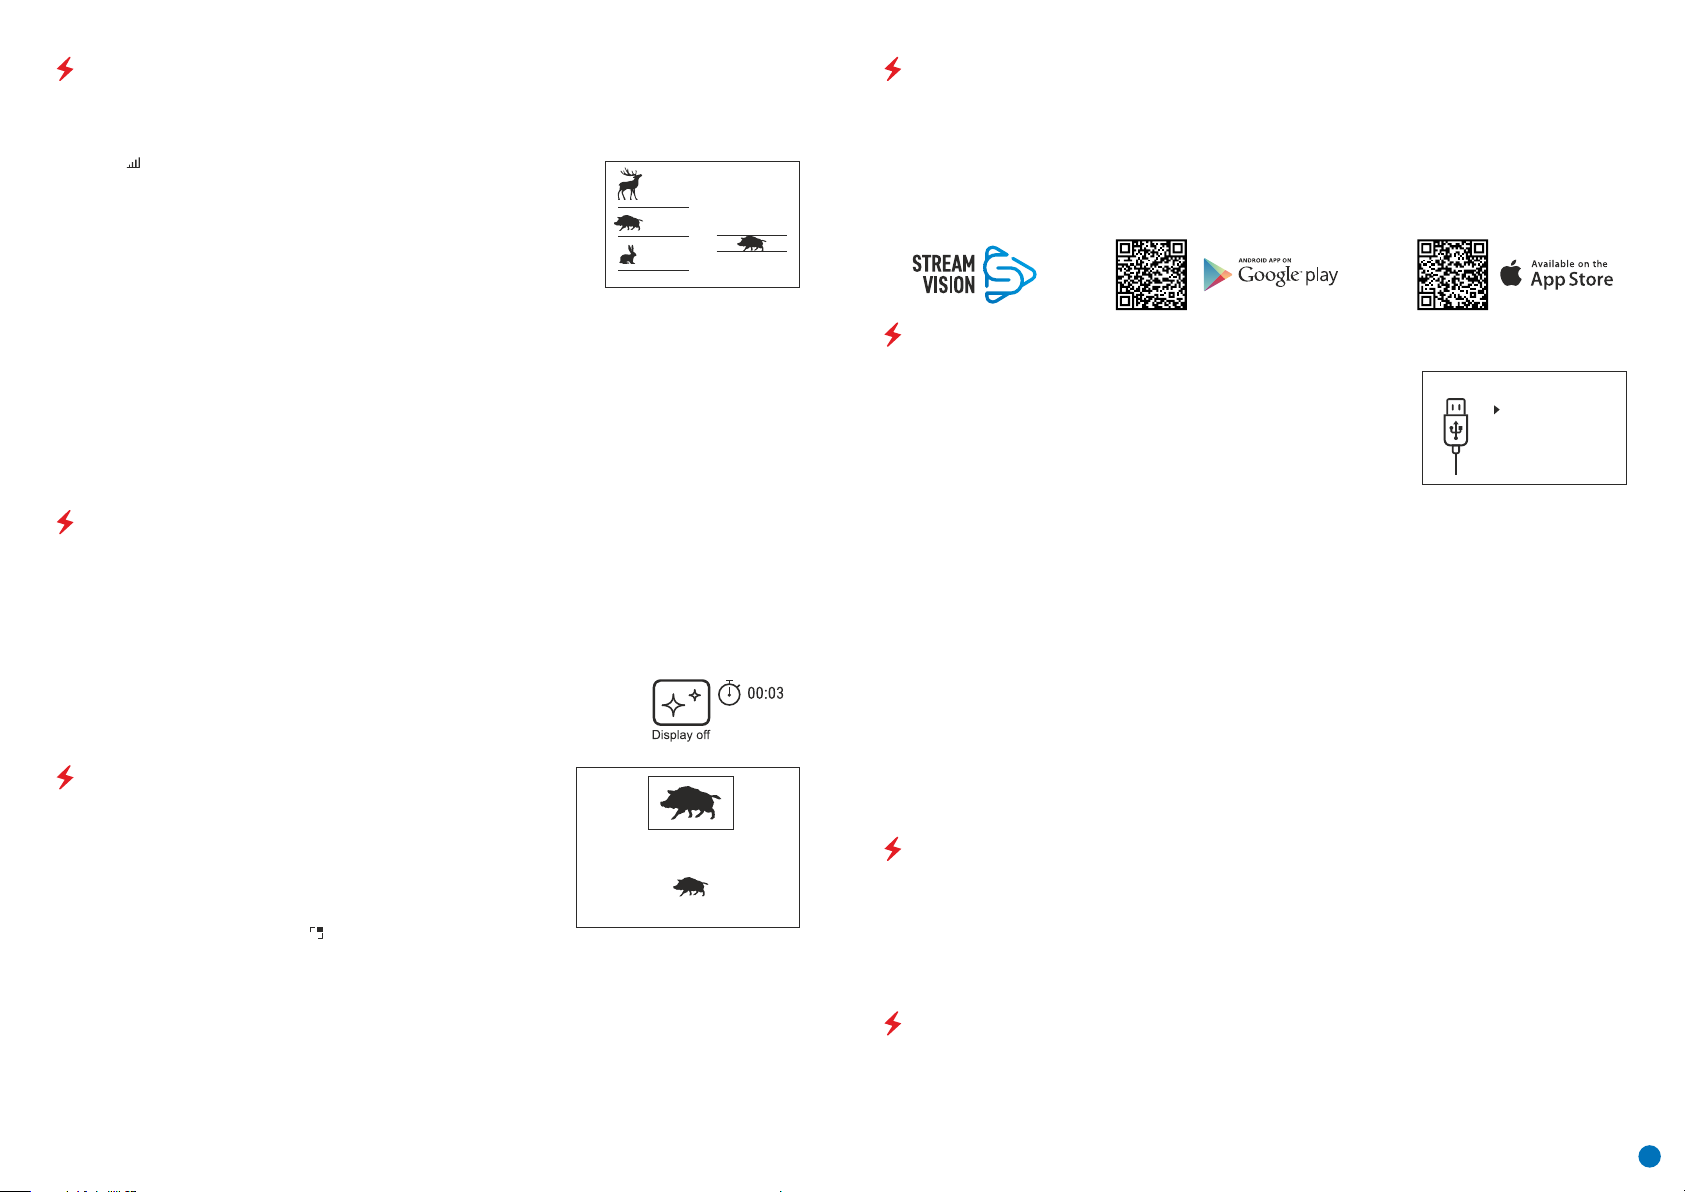
TELÉMETRO ESTADIAMÉTRICO
Los generadores de imágenes térmicos están equipados con un telémetro estadiamétrico que permite definir la
distancia al objeto cuando se conoce su tamaño.
џ Se accede a la función de telémetro estadiamétrico pulsando brevemente el botón Menú (3) y seleccionando el
icono .
џ Aparecerán barras en la pantalla para determinar la distancia, iconos de tres
objetos y dígitos de la distancia estimada a estos tres objetos.
Hay tres valores predeterminados para objetos:
Liebre: altura de 0,3 m
Jabalí: altura de 0,7 m
160m
66m
28m
Ciervo: altura de 1,7 m
џ Coloque el cursor fijo inferior debajo del objeto y, con los botones de navegación UP (ARRIBA) (4) / DOWN
(ABAJO) (2), mueva el cursor horizontal superior respecto al cursor fijo horizontal inferior de manera que el
objeto quede posicionado entre los cursores. Se vuelve a calcular automáticamente la distancia al objetivo de
forma simultánea con este movimiento.
џ Si la distancia no se define en el transcurso de 10 segundos, la información desaparece de la pantalla.
џ Vaya a la opción de menú correspondiente para seleccionar una unidad de medición (metros o yardas).
џ Antes de aparecer en la pantalla, se redondea un valor de distancia hacia arriba o hacia abajo a 5 metros para
las lecturas de distancias más largas y a 1 metro para las lecturas de distancias más cortas.
џ Para salir del modo de telémetro estadiamétrico, pulse brevemente el botón de Menú (3) o espere 10 segundos
para la salida automática.
FUNCIÓN DE PANTALLA APAGADA
Esta función deshabilita la transferencia de imágenes a la pantalla y reduce la intensidad de su iluminación a un
mínimo. Esto ayuda a evitar un desenmascaramiento involuntario. El dispositivo continuará funcionando.
Cuando esta función está en uso, el dispositivo cambia al modo standby (de espera), que permite un apagado
rápido en caso necesario.
џ Si el dispositivo está encendido, pulse y mantenga pulsado el botón de ON (ENCENDIDO) (5). La pantalla
desaparecerá y aparecerá el mensaje «Display off» (Pantalla apagada).
џ Para encender la pantalla, pulse brevemente el botón de ON (ENCENDIDO) (5).
џ Si se mantiene el botón de ON (ENCENDIDO) (5) pulsado, la pantalla mostrará
џ «Display off» (Pantalla apagada) y una cuenta atrás. A continuación, el dispositivo
џ se apagará.
FUNCIÓN PiP (imagen superpuesta)
PiP (imagen superpuesta) le permite visualizar una imagen de zoom digital
aumentada en una «ventana» aparte de forma simultánea a la imagen
principal.
Habilitar/deshabilitar la función PiP:
џ Pulse y mantenga pulsado el botón Menú (3) para entrar en el menú
principal.
џ Seleccione la opción «Modo PiP» .
џ Una pulsación breve del botón Menú (3) enciende/apaga el modo.
џ Pulse y mantenga pulsado el botón Menú (3) para salir del menú principal.
џ La imagen ampliada se visualiza en una ventana aparte utilizando el valor de zoom óptico completo.
џ Para modificar la relación de zoom en la ventana PiP, pulse brevemente el botón UP (ARRIBA) (4).
џ La imagen restante se muestra con el valor de zoom óptico que corresponde al valor del coeficiente x1,0.
џ Cuando se enciende la función PiP, puede controlar los valores de zoom discontinuos y suaves. En este caso, el
PIP
valor de aumento óptico completo aparecerá únicamente en una ventana aparte.
џ Cuando se apaga la función PiP, la imagen se muestra con el valor de zoom óptico establecido para el modo PiP.
6.9x
3.1x
STREAM VISION
Los generadores de imágenes térmicos AXION admiten la teconología Stream Vision, que permite la transmisión
de una imagen en tiempo real desde un generador de imágenes térmico a su smartphone o tableta por Wi-Fi.
Puede encontrar instrucciones detalladas del funcionamiento de la tecnología Stream Vision en un folleto
aparte o en el sitio web www.pulsar-vision.com.
Nota: el diseño del dispositivo incluye la opción de actualización de software. La actualización se realiza a través
de la aplicación Stream Vision.
Escanee los códigos QR para descargar la aplicación Stream Vision:
CONEXIÓN USB
џ Conecte un extremo del cable USB al conector microUSB del dispositivo (8) y
el otro extremo al puerto de su ordenador.
џ Encienda el dispositivo pulsando el botón de ON (ENCENDIDO) (5) (el
ordenador no detectará el dispositivo si está apagado).
џ El ordenador detectará el dispositivo automáticamente y no requiere
instalación ni controladores.
џ Aparecerán dos opciones de conexión en la pantalla:
Use as power (Uso como alimentación)
Use as memory card (Uso como tarjeta de memoria)
џ Seleccione la opción de conexión con los botones UP (ARRIBA) (4) y DOWN (ABAJO) (2).
џ Una pulsación breve del botón Menú (3) confirma la selección.
Uso como alimentación
џ Cuando se selecciona esta opción, el dispositivo utiliza el ordenador como una fuente de alimentación
externa. Aparecerá un icono en la barra de estado . El dispositivo continuará funcionando y todas las funciones
estarán disponibles.
џ La batería instalada en el dispositivo no se cargará.
џ Si se desconecta el USB del dispositivo cuando está en el modo de alimentación, el dispositivo continuará
funcionando con la carga de la batería, siempre que esté colocada y esté lo suficientemente cargada.
Uso como tarjeta de memoria
џ Cuando se selecciona esta opción, el ordenador reconocerá el dispositivo como una tarjeta Flash. Esta opción
está diseñada para procesar archivos que están guardados en la memoria del dispositivo; las funciones del
dispositivo no son accesibles y el dispositivo se apaga solo.
џ Si se estaba grabando un vídeo en el momento de la conexión, la grabación se detendrá y se guardará.
USB connection
Use as power
Use as memory card
INSPECCIÓN TÉCNICA
Se recomienda una inspección técnica del dispositivo antes de cada uso. Comprobar:
џ La apariencia externa del dispositivo (no debe haber grietas en la carcasa)
џ El estado de la lente y el visor (no debe haber grietas, puntos de grasa, suciedad ni otro tipo de residuos).
џ El estado de la batería recargable (debe estar cargada) y los contactos eléctricos (no debe haber presencia de
sales ni oxidación).
џ Los controles deben funcionar bien.
MANTENIMIENTO
џ Se debe realizar un mantenimiento al menos dos veces al año y debe consistir en las siguientes medidas:
џ Limpie las superficies externas de las partes de metal y plástico de polvo y suciedad con un paño de algodón;
puede utilizarse grasa de silicona.
џ Limpie los contactos eléctricos de la batería y la ranura de la batería de la unidad con un disolvente orgánico
no graso.
31
Page 34
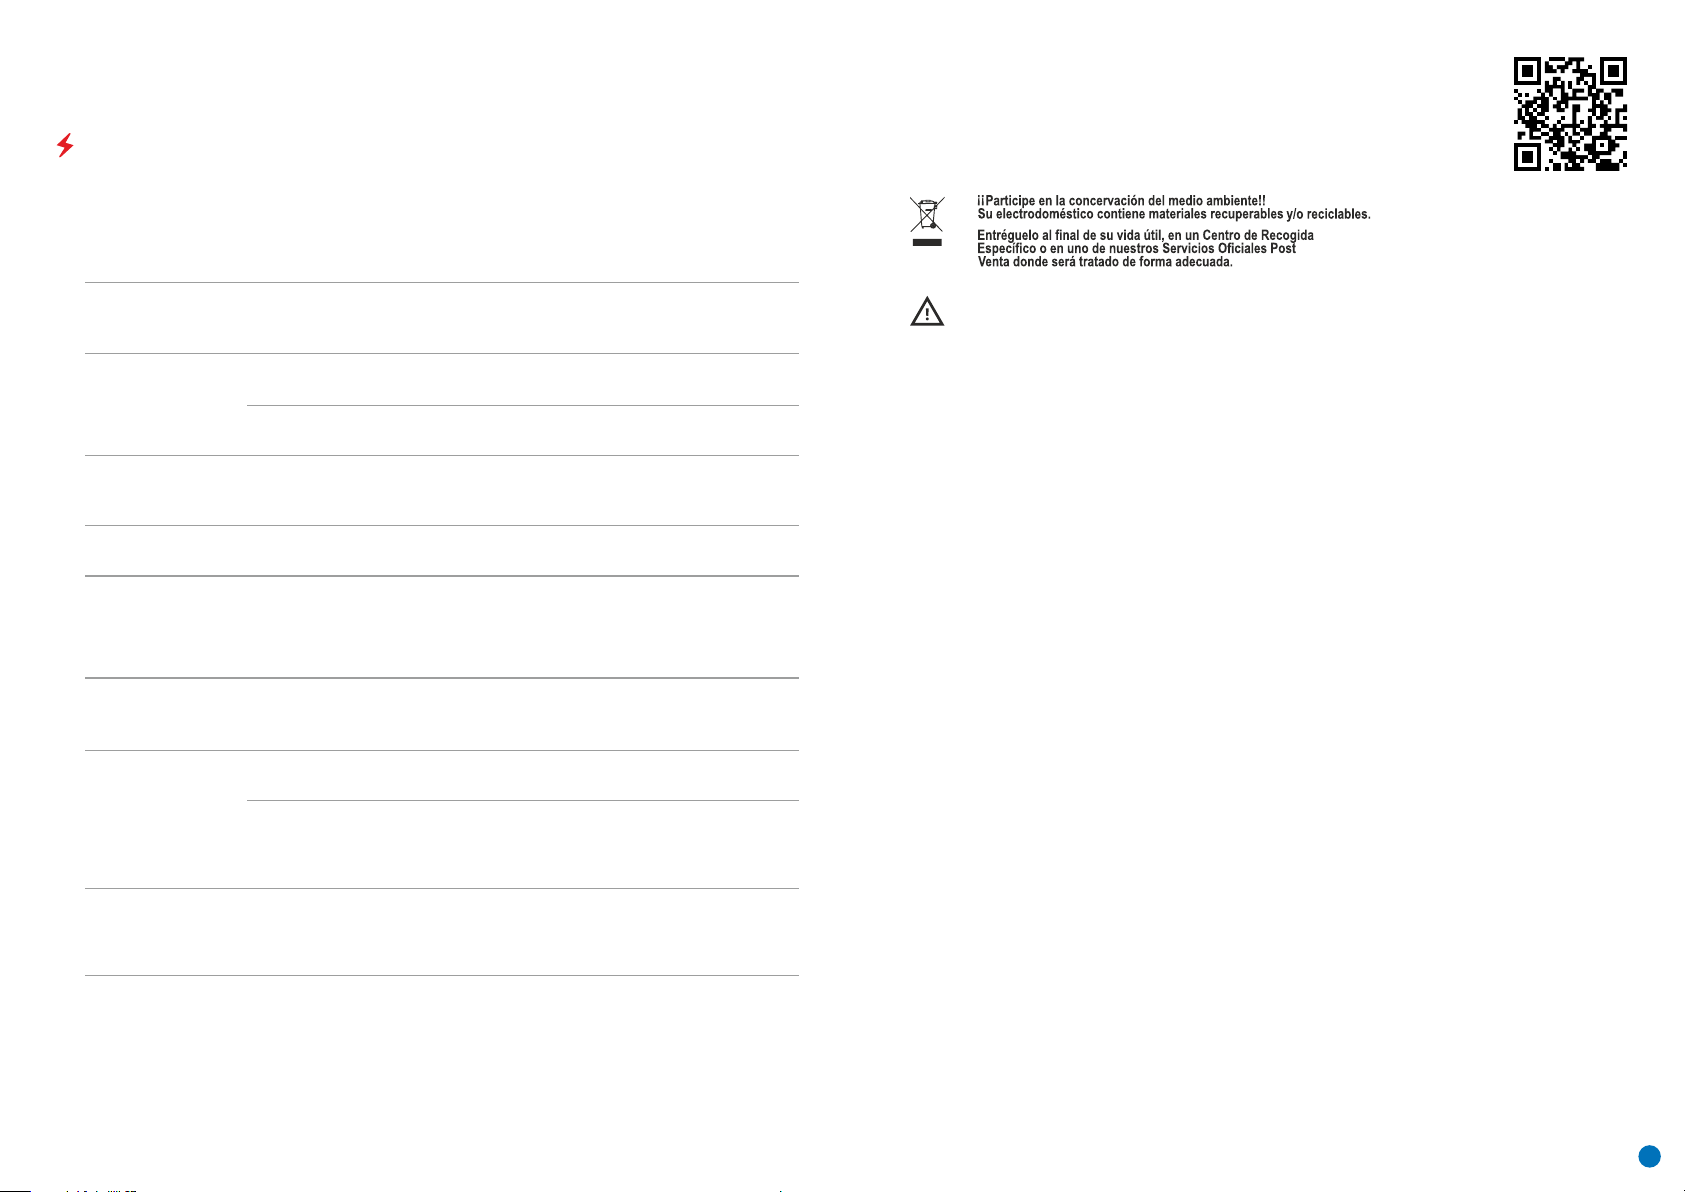
џ Compruebe las superficies de cristal del visor y la lente. En caso necesario, elimine el polvo y la arena de las
lentes (preferiblemente con un método sin contacto). La limpieza de las superficies externas de la óptica debe
realizarse con sustancias específicas para ello.
SOLUCIÓN DE PROBLEMAS
Esta tabla enumera todos los problemas que pueden surgir al utilizar el dispositivo. Realice las comprobaciones
y reparaciones recomendadas en el orden que se muestra en la tabla. Si se produce un defecto que no está
incluido en la tabla, o si no puede reparar el defecto usted mismo, deberá devolver el dispositivo para su
reparación.
Error de funcionamiento
Posible causa
Corrección
En el siguiente enlace encontrará respuestas a las preguntas más frecuentes sobre la
generación de imágenes térmicas: https://www.pulsar-nv.com/glo/support/faq/79
El generador de
imágenes no se
enciende.
No funciona desde una
fuente de alimentación
externa.
La imagen es borrosa,
con líneas verticales y
fondo irregular.
La imagen es demasiado
oscura.
Líneas de colores
aparecidas en la
pantalla o imagen
desaparecida.
Mala calidad de la
imagen / distancias de
detección reducidas
El smartphone o la
tableta no se pueden
conectar al dispositivo.
Batería totalmente descargada.
Cable USB dañado.
Fuente de alimentación externa
descargada.
Se requiere calibración.
Nivel bajo de brillo o contraste ajustado.
El dispositivo se expuso a electricidad
estática durante el funcionamiento.
Estos problemas pueden surgir durante la observación en condiciones
metereológicas adversas (nieve, lluvia, niebla, etc.)
La contraseña del dispositivo se ha
cambiado.
El dispositivo está en una zona con un
gran número de redes Wi-Fi que pueden
causar interferencias.
Cargar la batería.
Sustituir el cable USB.
Cargar la fuente de alimentación externa
(en caso necesario).
Realizar calibración de imagen según la
sección 8 «Funcionamiento» de las
instrucciones.
Ajustar brillo o contraste.
Después de la exposición a la
electricidad estática, el dispositivo
puede reiniciarse automáticamente o
requerir que se apague y encienda de
nuevo.
Elimine la red y vuelva a conectarse con
la contraseña del dispositivo.
Para asegurar un funcionamiento Wi-Fi
estable, reubique el dispositivo en una
zona con menos redes Wi-Fi, o en una
zona sin ninguna.
¡Atención! Los generadores de imágenes térmicos AXION necesitan una licencia cuando se exportan
fuera de su país.
Compatibilidad electromagnética
Este producto cumple los requisitos de la norma europea EN 55032: 2015, Clase A.
Precaución: el funcionamiento de este producto en una zona residencial puede causar
radiointerferencias.
Señal Wi-Fi inexistente o
interrumpida.
Si se utiliza en
condiciones de baja
temperatura, la calidad
de la imagen de los
alrededores es peor que
en condiciones de
temperatura positiva.
El dispositivo está fuera del área de
cobertura Wi-Fi. Hay obstáculos entre el
dispositivo y el receptor (p. ej., paredes
de hormigón).
En condiciones de temperatura positiva, los objetos que se están observando
(alrededores y fondo) se calientan de forma diferente debido a la conductividad
térmica, por lo que se genera un mayor contraste de temperatura. Por
consiguiente, la calidad de la imagen que produce el dispositivo será mayor.
En condiciones de baja temperatura, los objetos que se están observando (fondo)
normalmente se enfrían a aproximadamente la misma temperatura, con lo que su
contraste de temperatura se reduce considerablemente y la calidad de la imagen
(detalles) es peor. Esto es una característica de los dispositivos de generación de
imágenes térmicos.
Reubique el dispositivo en la línea
visual directa de la señal Wi-Fi.
32
Page 35
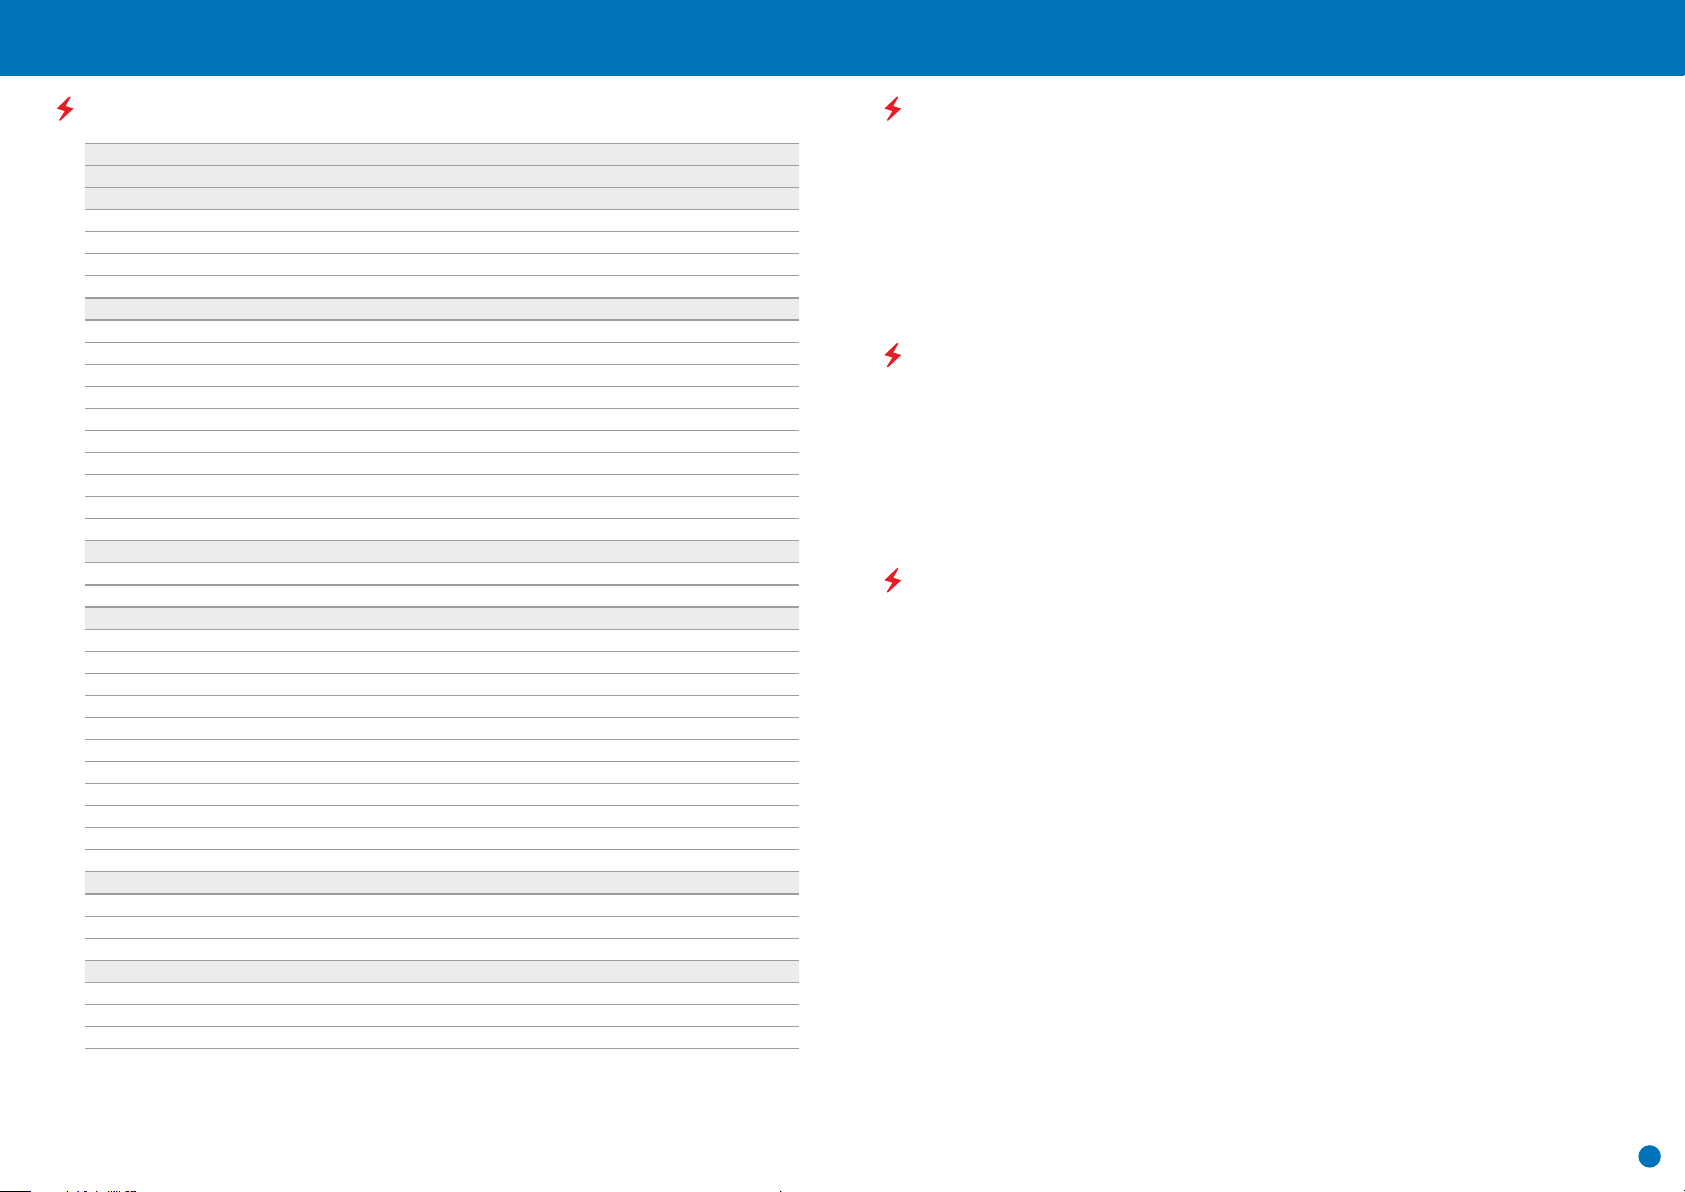
ITALIANO
SPECIFICHE
Numero SKU
AXION Mod.
Microbolometro
Tipo
Risoluzione (pixel)
Frequenza dei fotogrammi, Hz
Dimensione pixel (micron)
Specifiche ottiche
Ingrandimento ottico (x)
Zoom digitale continuo (x)
Zoom digitale (x)
Apertura relativa (D/f )
Distanza minima di messa a fuoco (m)
Diametro pupilla di uscita (mm)
Angolo campo visivo (orizzontale x verticale) gradi
Angolo campo visivo, metri a 100m
Gamma di messa a fuoco dell'oculare (diottrie)
Max. distanza di osservazione (m) *
Display
Tipo
Risoluzione (pixel)
Specifiche funzionali
Tensione di alimentazione esterna
Tipo batteria
Capacità
Tensione d'uscita
Alimentazione esterna
Durata della carica della batteria in ore (a 22°C)
Codice IP (IEC60529) grado di protezione
Compatibilità Stream Vision
Intervallo temperatura d'esercizio
Dimensioni (mm)
Peso senza batterie (kg)
Videoregistratore
Risoluzione video / foto (pixel)
Formato video / foto
Spazio della memoria incorporata
Canale Wi-Fi
Frequenza
Standard
Gamma di ricezione del raggio visivo diretto (m)
* Per oggetto animale come un daino
E' possibile effettuare miglioramenti relativi a design e software di questo prodotto per aumentare le sue
proprietà di utilizzo.
Una versione aggiornata del Manuale d'uso è disponibile sul sito web www.pulsar-vision.com
77421
XМ30
non raffreddato
320x240
50
12
4
4-16
2/4
1.2
3/3.28
3.5/0.12
7.3
12.8
±5
1300/1420
AMOLED
1024x768
3 – 4.3V
Pacco batteria agli ioni di litio АPS3
3200 mAh
DC 3.7V
5V (USB)
4
IpХ7
Yes
-25°С ... +40°С
143x41x69
0.25
1024х768
.mp4/.jpg
16 GB
2.4 Ghz
802.11 b/g/n
15
77422
XМ38
non raffreddato
320x240
50
12
5.5
5.5-22
2/4
1.2
3/3.28
3.5/0.12
5.8
10.1
±5
1700/1860
AMOLED
1024x768
3 – 4.3V
3200 mAh
DC 3.7V
5V (USB)
4
IpХ7
Yes
-25°С ... +40°С
149x49x70
0.27
1024х768
.mp4/.jpg
16 GB
2.4 Ghz
802.11 b/g/n
15
CONFEZIONE DI CONSEGNA
џ Termovisore AXION
џ Batteria ricaricabile APS3
џ Caricabatterie APS con capacità di rete
џ Cavo USB
џ Cassa
џ Cinghia da polso
џ Manuale d'uso
џ Panno per la pulizia dei componenti ottici
џ Garanzia
DESCRIZIONE
I monoculari per termovisione basati su matrice IR (microbolometro) AXION sono disponibili in una serie di
modelli che differiscono tra loro in ingrandimento e diametro della lente. Questi dispositivi sono concepiti per
l'uso sia notturno che durante il giorno in condizioni meteorologiche avverse (nebbia, smog, pioggia), nonché
laddove sono presenti ostacoli che impediscono il rilevamento di un bersaglio (rami, erba alta, fitti cespugli
ecc.). Diversamente dai dispositivi di visione notturna basati su convertitori ottici elettronici, i monoculari per
termovisione non richiedono sorgenti luminose esterne e sono resistenti agli effetti della luce chiara.
I monoculari AXION possono essere utilizzati per la caccia notturna, l'osservazione e l'orientamento territoriale e
per l'esecuzione di interventi di soccorso.
CARATTERISTICHE DISTINTIVE
џ Misura pixel microbolometro 12 micron
џ Display AMOLED ad alta risoluzione
џ Leggero e compatto
џ Design funzionale ed ergonomico
џ Comoda interfaccia utente
џ Osservazione in otto modalità cromatiche
џ Tre modalità di calibrazione (manuale, semi-automatica e automatica)
џ Rilevamento a lungo raggio
џ Alto ingrandimento
џ Tre modalità di osservazione (bosco, città e rilevamento)
џ Telemetro stadiametrico
џ Funzione Display Off
џ Funzione di correzione pixel
џ Software aggiornabile
џ Ampio intervallo temperatura d'esercizio (-25 °С – +40°С)
џ Completamente impermeabile (classe di protezione IPX7)
Video/audioregistrazione
џ Videoregistratore incorporato
џ Integrazione con dispositivi iOS e Android
џ Wi-Fi Telecomando e sistema di sorveglianza Smartphone
џ YouTube Trasmissione dal vivo e registrazione diretta su internet tramite uno smartphone e l'app Stream
Vision.
Gruppo batteria
џ Gruppo batteria agli ioni di litio APS3 a cambio rapido
џ Opzione di ricarica USB
33
Page 36
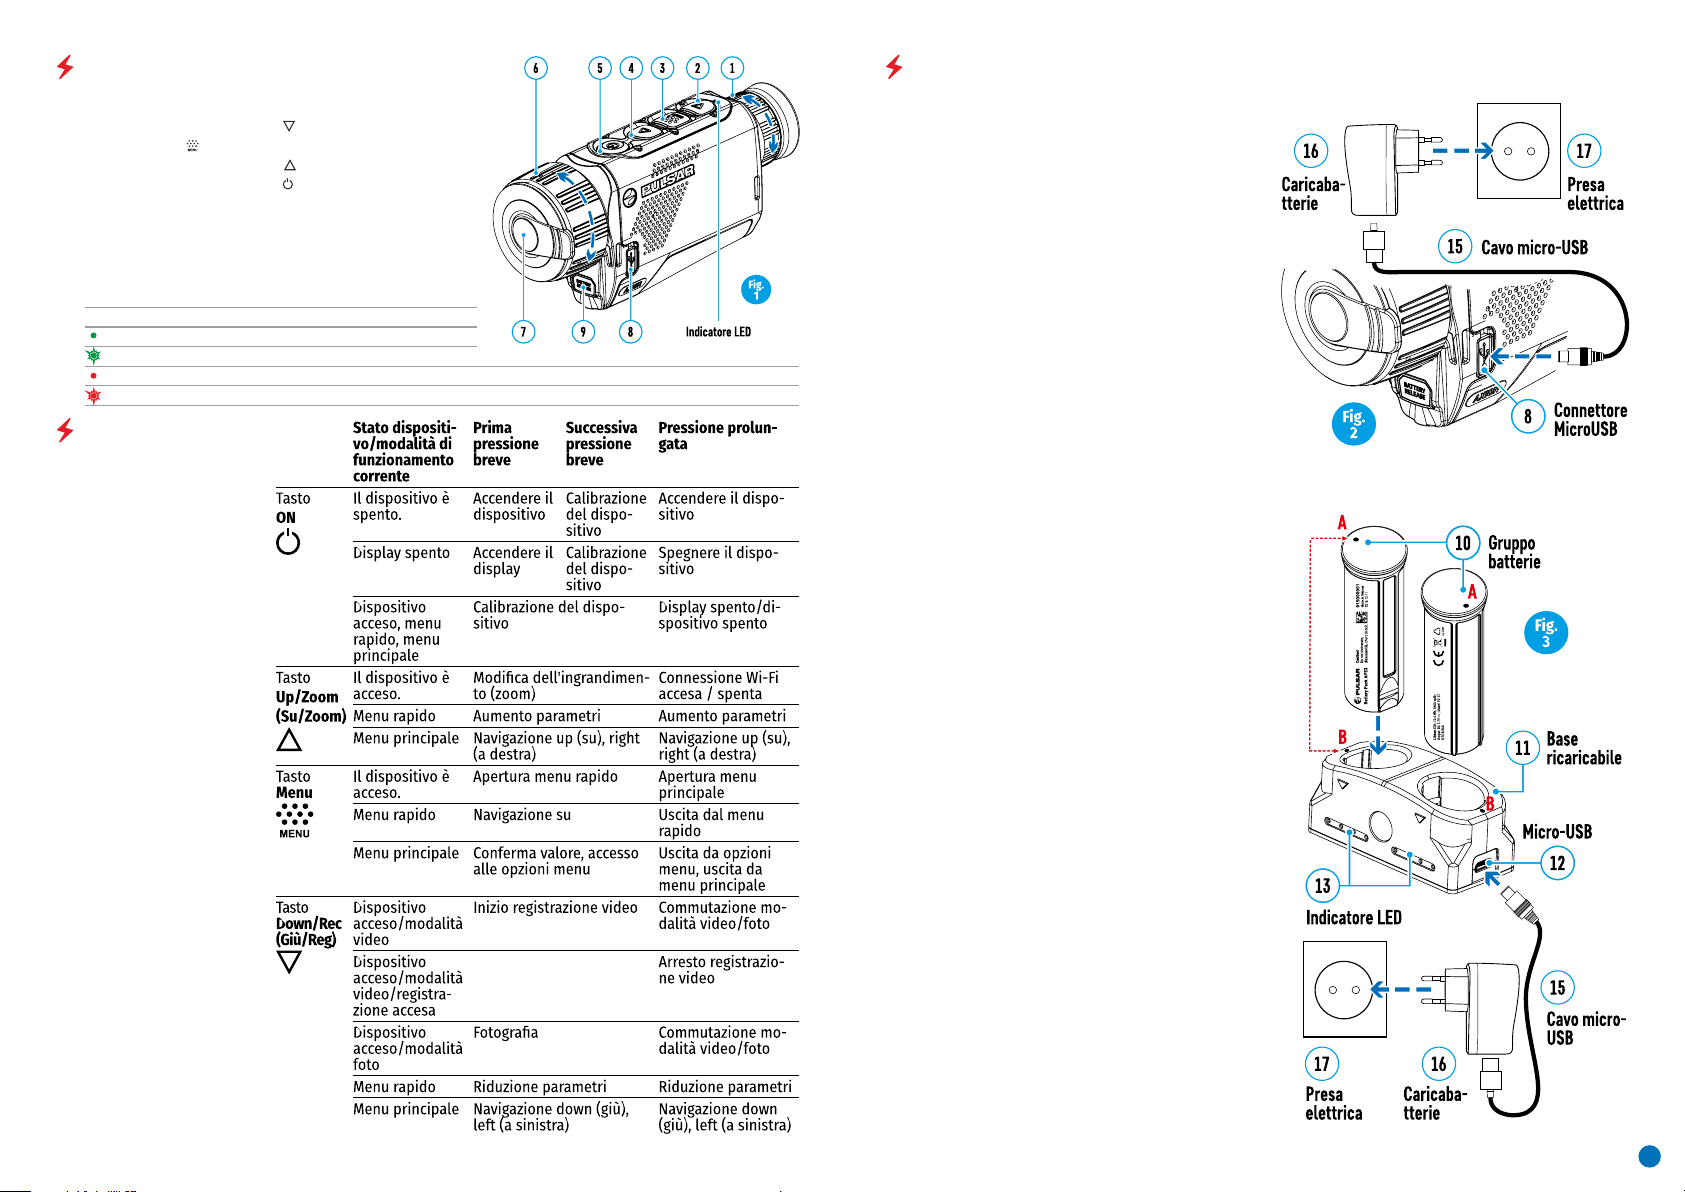
COMPONENTI E COMANDI
USO DELLA BATTERIA RICARICABILE
1. Ghiera per regolazione diottrica dell'oculare
2. Tasto Down/Rec (Giù/Reg)
3. Tasto menu
4. Tasto Up/Zoom (Su/Zoom)
5. Tasto ON On/Calibrazione
6. Ghiera per messa a fuoco
7. Coperchio lente
8. Connettore MicroUSB
9. Tasto di rilascio batteria
Indicatore LED indicante lo stato attuale del dispositivo
Indicatore LED Modalità di funzionamento
Il dispositivo è acceso
dispositivo acceso/videoregistrazione
dispositivo acceso/carica batteria <10%
dispositivo acceso/videoregistrazione/carica batteria <10%
FUNZIONAMENTO
DEI TASTI
I termovisori AXION sono dotati di un gruppo batteria
agli ioni di litio APS3 ricaricabile che consente l'uso del
termovisore fino a 4 ore. La batteria deve essere
caricata prima del primo utilizzo.
Ricarica della batteria
Opzione 1 (Fig.2.) :
џ Installare la batteria (10) nel suo alloggiamento sulla
cassa dello strumento (14) allineando le icone in modo
da formare un "punto" sull'unità e la batteria. (vedi
fig. 4).
џ Attaccare un cavo USB (15) al connettore microUSB
(8) sul dispositivo.
џ Collegare l'altra estremità del cavo USB (15)
all'alimentatore di rete (16) o a una presa USB collegata
ad altre fonti di alimentazione con potenza nominale
di 5V o meno.
џ Collegare il caricatore di rete (16) all'alimentazione di
rete.
Nota: La Power Bank PB8I* può essere utilizzata come
caricatore.
Opzione 2 (Fig.3.) :
џ Inserire la batteria (10) fornita con l'unità o
acquistata separatamente, lungo la guida nella fessura
del caricabatterie APS (11) (vedi fig. 3).
џ Il punto A sulla batteria e il punto B sul caricabatterie
devono essere allineati.
џ Due batterie possono essere caricate contempora-
neamente, a tale scopo è disponibile un secondo slot.
џ Attaccare il connettore microUSB sul cavo USB (15) al
connettore microUSB sul dispositivo di rete (16).
Inserire il connettore in una presa elettrica da
100–240V (17).
џ Collegare il secondo connettore del micro-USB alla
presa (12) del caricatore di rete (11).
џ L'indicatore a LED (13) si accenderà.
34
Page 37
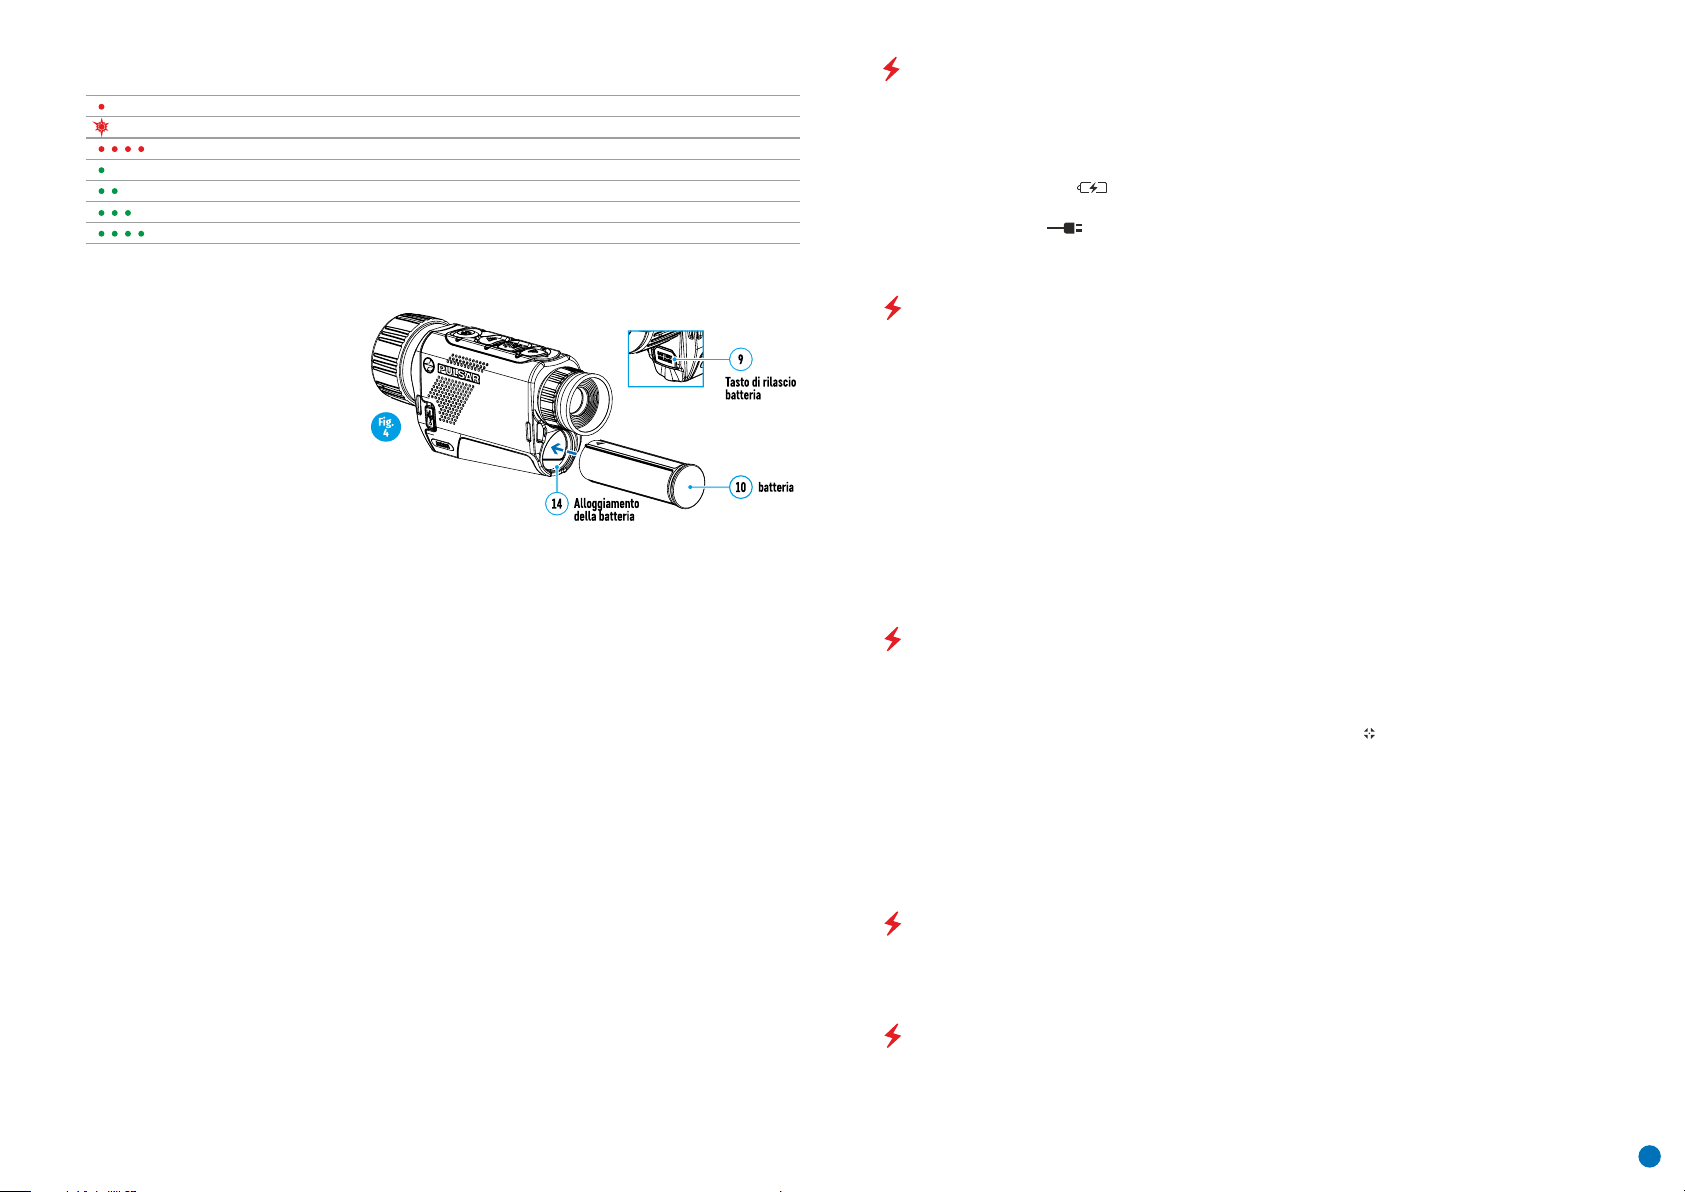
Stato di carica della batteria (vedi tabella)
Indicatore LED* Stato di carica della batteria
La ricarica della batteria è compresa tra 0 e 10%; Caricatore non collegato all'alimentazione di rete.
La ricarica della batteria è compresa tra 0 e 10%; Caricatore collegato all'alimentazione di rete.
La batteria è difettosa. La batteria non deve essere usata.
La ricarica della batteria è compresa tra 0 e 20%.
La ricarica della batteria è compresa tra 0 e 60%.
La ricarica della batteria è compresa tra 0 e 95%.
La batteria è completamente carica. Può essere disconnesso dal caricatore.
* L'indicatore LED visualizza il livello attuale di carica della batteria per 30 secondi quando il caricabatterie APS
non è attaccato. Quando la corrente è collegata, il display visualizza costantemente lo stato di corrente della
batteria, inoltre i LED lampeggiano per indicare il processo di ricarica della batteria.
Installazione:
џ Inserire la batteria (10) nello slot
assegnato sulla cassa del dispositivo (14)
(vedi fig. 4), allineando le icone sullo
strumento e la batteria.
џ Una volta installata correttamente, la
batteria è bloccata nella fessura con una
clip speciale.
џ Per rimuovere la batteria premere il tasto
Battery Release (Rilascio batteria) (9).
Misure di sicurezza:
џ Durante la carica usare sempre il
caricabatterie fornito con il dispositivo ottico. L'uso di un caricabatterie diverso può causare un danno
irriparabile alla batteria o al caricabatterie e può far sì che la batteria si bruci.
џ Dopo un lungo periodo di magazzinaggio, la batteria dovrebbe essere ricaricata parzialmente, non
completamente, o completamente scaricata.
џ Non caricare la batteria immediatamente dopo averla spostata da un ambiente freddo a uno caldo. Attendere
30-40 minuti affinché la batteria si riscaldi.
џ Non lasciare la batteria incustodita durante la ricarica.
џ Non usare il caricabatterie se è stato modificato o danneggiato.
џ Caricare la batteria ad una temperatura tra 0° C e +45° C, altrimenti la sua durata sarà notevolmente ridotta.
џ Non lasciare il caricabatterie con una batteria collegata alla rete per più di 24 ore dopo una ricarica completa.
џ Non esporre il caricabatterie ad alte temperature o a fiamme libere.
џ Non immergere la batteria nell'acqua.
џ Non è consigliato il collegamento con dispositivi di terzi aventi un consumo superiore a quello consentito.
џ La batteria è dotata di un sistema anti-cortocircuito. In ogni caso, evitare qualsiasi situazione che possa
provocare un cortocircuito.
џ Non smontare né deformare la batteria.
џ Non assoggettare la batteria a urti o cadute.
џ Se la batteria viene utilizzata a temperature sotto zero, la capacità sarà ridotta. Questo è normale e non indica
un difetto.
џ Non usare la batteria a temperature superiori a quelle indicate nella tabella, potrebbe essere ridotta la sua
durata.
џ Tenere le batterie fuori dalla portata dei bambini.
ALIMENTAZIONE ESTERNA
L'alimentazione esterna è fornita da una fonte esterna, quale Power Bank da 5V.
џ Attaccare la fonte di alimentazione esterna al connettore USB (8) del dispositivo (fig. 1).
џ Il dispositivo commuterà al funzionamento dalla fonte di alimentazione esterna, mentre la batteria APS3 sarà
gradualmente ricaricata.
џ Un'icona di una batteria apparirà sul display indicando la sua carica in percentuale.
џ Se il dispositivo funziona con la fonte di alimentazione esterna e la batteria APS3 non è collegata, viene
visualizzata un’icona .
џ Quando la fonte di alimentazione esterna viene scollegata, il dispositivo passa all'alimentazione interna senza
spegnersi.
FUNZIONAMENTO
ATTENZIONE La lente del dispositivo non deve essere puntata su fonti di energia intensa, quali dispositivi che
emettono laser o il sole, in quanto potrebbero danneggiare i componenti elettronici all'interno del dispositivo. I
danni causati dal mancato rispetto delle linee guida di funzionamento non sono coperti dalla garanzia.
Accendere e regolare l'immagine
џ Rimuovere il coperchio della lente (7). Fissare il coperchio alla cinghia utilizzando la calamita incorporata nel
coperchio.
џ Accendere il dispositivo premendo il tasto ON (5).
џ Regolare la risoluzione delle icone sul display ruotando la ghiera per la regolazione diottrica sull'oculare (1). In
futuro sarà necessario ruotare la ghiera per la regolazione diottrica dell'oculare, indipendentemente dalla
distanza e da altre condizioni.
џ Per mettere a fuoco l'oggetto osservato, ruotare la ghiera di messa a fuoco della lente (6).
џ La regolazione della luminosità e del contrasto nel display nonché l'attivazione dello zoom digitale continuo
sono descritte nella sezione FUNZIONI MENU AD ACCESSO RAPIDO.
џ Spegnere il dispositivo esercitando una pressione prolungata sul tasto ON (5).
CALIBRAZIONE DEL SENSORE
La calibrazione consente l'equalizzazione dello sfondo termico del microbolometro e l'eliminazione di difetti
nell'immagine (es. righe verticali, immagini fantasma ecc.).
Le modalità di calibrazione sono tre: Manuale (M), Semiautomatica (SA) e Automatica (A).
Selezionare la modalità richiesta nella sezione CALIBRAZONE del menu .
џ Modalità M (manuale). Fissare il coperchio della lente e premere brevemente il tasto ON (5). Una volta
completato il processo di calibrazione, rimuovere il coperchio della lente.
џ Modalità SA (semiautomatica). La calibrazione si attiva esercitando una pressione breve sul tasto ON (5). Non è
necessario fissare il coperchio della lente (il sensore è chiuso da un otturatore interno).
џ Modalità A (automatica). La calibrazione del dispositivo avviene automaticamente conformemente
all’algoritmo del software. Non è necessario fissare il coperchio della lente (il sensore è chiuso da un otturatore
interno). In questa modalità, il dispositivo può essere calibrato dall'utente utilizzando il tasto ON (5) (in modalità
semiautomatica).
ZOOM DIGITALE DISCRETO
La funzionalità del dispositivo offre la possibilità di aumentare rapidamente la sua molteplicità di base (vedi la
tabella di caratteristiche tecniche nella riga Zoom digitale) di un fattore di 2 o 4. Regolare lo zoom digitale di
conseguenza premendo il tasto DOWN (GIU') (2).
FUNZIONI DEL MENU DI ACCESSO RAPIDO
Le impostazioni base (luminosità e contrasto, l'uso della funzione dello zoom digitale continuo e del telemetro
stadiametrico) si cambiano tramite il menu Accesso rapido.
џ Accedere al menu esercitando una pressione breve sul tasto Menu (3).
џ Una breve pressione del tasto Menu (3) consente di spostarsi tra le funzioni.
35
Page 38
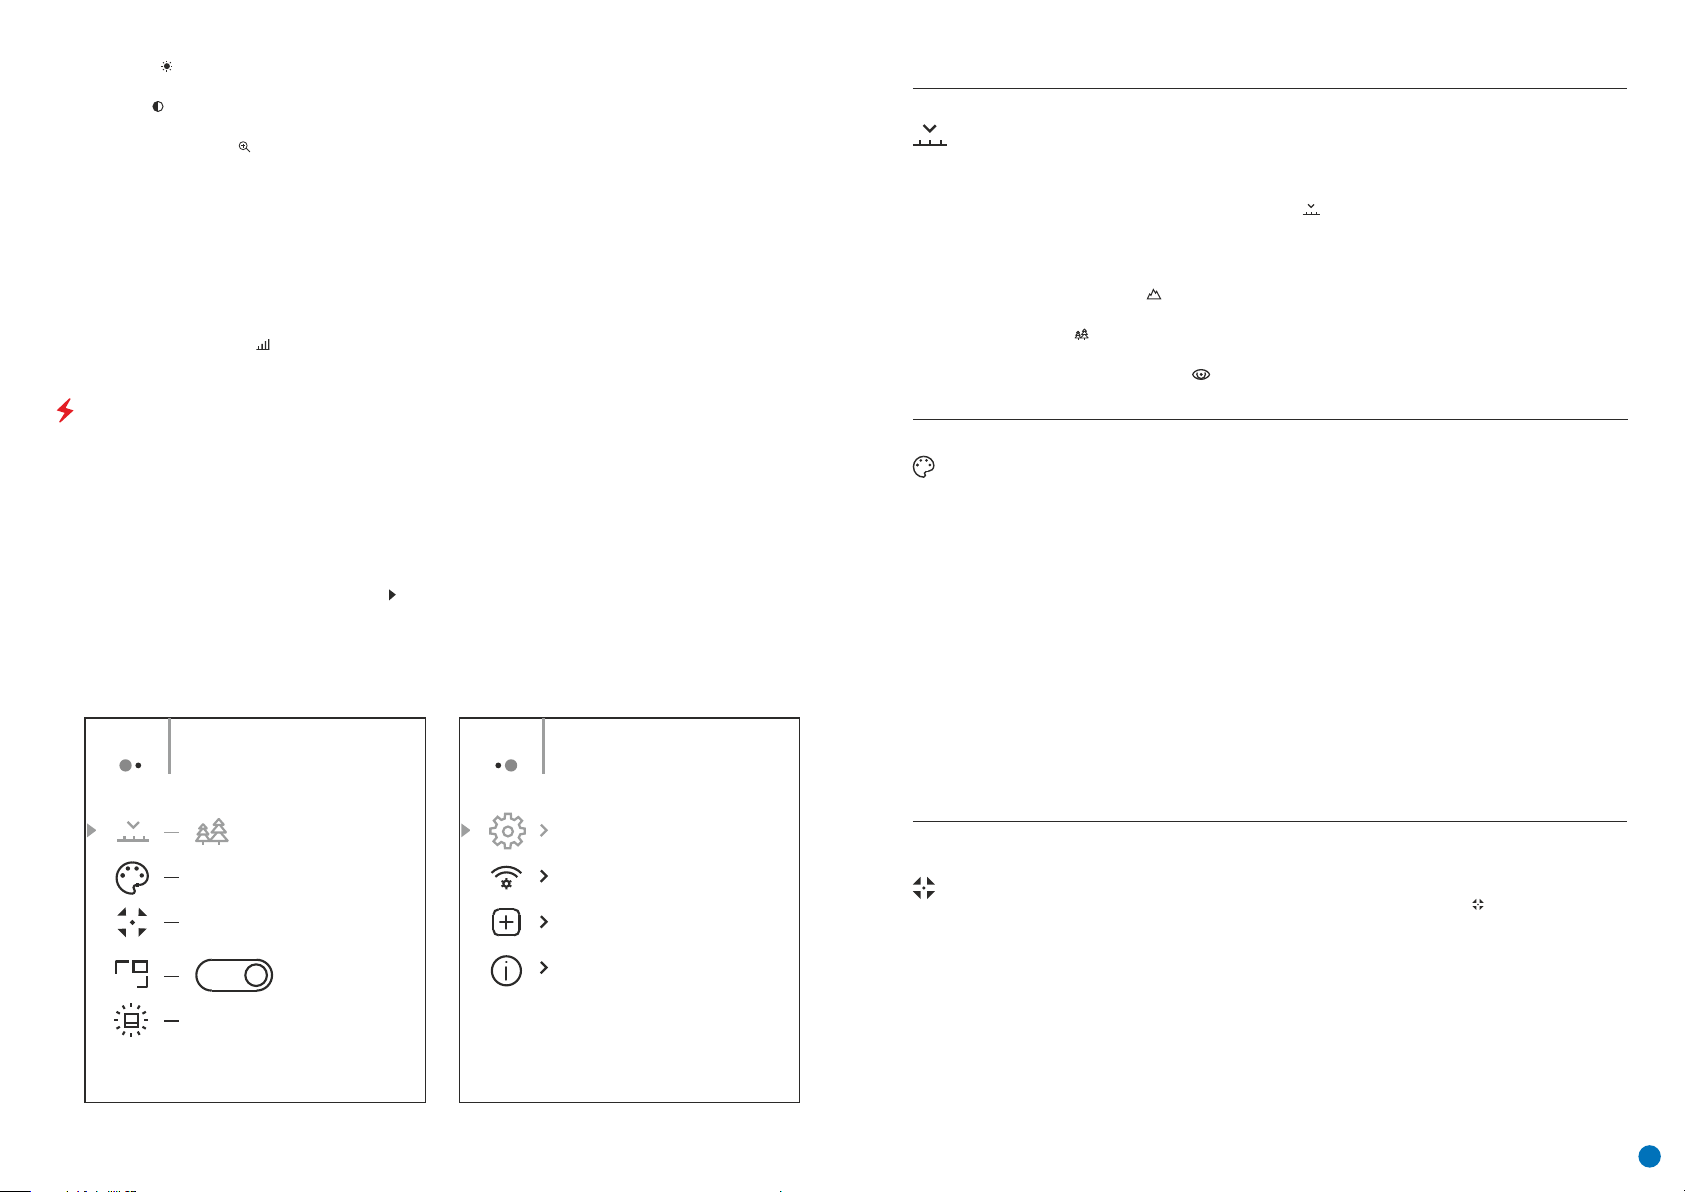
Luminosità – premere brevemente i tasti UP (SU)(4)/DOWN (GIU') (2) e modificare la luminosità del display da
00 a 20.
Contrasto – premere brevemente i tasti UP (SU) (4)/DOWN (GIU') (2) e modificare il contrasto del display da 00
a 20.
Zoom digitale continuo – premere i tasti UP (SU) (4)/DOWN (GIU') (2) e modificare il valore dello zoom digitale
da 1,0 a 4,0. L'incremento dello zoom digitale è pario a 0,1. Per uscire dal menu, premere e tenere premuto il tasto
Мenu (3), o attendere 10 secondi per la selezione automatica.
Il fattore dello zoom digitale continuo iniziale visualizzato è pari a x1.0 se lo zoom discreto non è attivo, x2.0 se è
2x e x4.0 se è 4x.
Nota: l'ingrandimento corrente viene calcolato come prodotto dell'ingrandimento di base e il rapporto zoom
digitale continuo. Esempio: laddove l'ingrandimento di base del dispositivo è pari a 3,0x e il rapporto dello zoom
digitale continuo è pari a x1,7, l'ingrandimento effettivo è pari a 5,1х (3,0*1,7). All'accensione successiva del
dispositivo, l'immagine viene proiettata sul display con le impostazioni di luminosità e contrasto salvate allo
spegnimento precedente.
Telemetro stadiametrico – Premere i tasti UP (SU) (4)/DOWN (GIU') (2) per cambiare la posizione delle
marcature per stabilire la distanza dell'oggetto osservato (vedi Sezione 16 per ulteriori informazioni sul
telemetro).
FUNZIONI DEL MENU PRINCIPALE
џ Accedere al menu esercitando una pressione prolungata sul tasto Menu (3).
џ Premere i tasti UP (SU) (4)/DOWN (GIU') (2) per passare da un'opzione di menu all'altra.
џ La navigazione del menu è il mezzo di scrolling. Al raggiungimento dell'ultima voce sulla prima scheda, la
navigazione si sposta alla prima voce della seconda scheda.
џ Una breve pressione del tasto Menu (3) apre una voce di menu.
џ Per uscire dal menu, premere e tenere premuto il tasto Мenu (3).
џ L'uscita automatica dal menu si verifica dopo 10 secondi di inattività.
џ All’uscita dal menu, la posizione del cursore ( ) viene memorizzata solo per la durata della sessione di lavoro
(ovvero fino allo spegnimento dell’unità). All'accensione successiva del dispositivo e all'accesso al menu, il
cursore si troverà alla prima voce sul menu.
Vista generale del menu:
Scheda 1 Scheda 2
Menu General SettingMenu Mode
Composizione e descrizione del menu
Modalità
Gamme di colori
Selezione della modalità di osservazione Il visore termico dispone di tre modalità di
funzionamento automatiche. Ciascuna di queste modalità include una combinazione
ottimale di parametri (luminosità, contrasto, intensità ecc.) per garantire la migliore qualità
dell'immagine a qualsiasi condizione di osservazione presente.
џ Premere e tenere premuto il tasto Menu (3) per accedere al menu.
џ Selezionare l'opzione "Mode” (Modalità) .
џ Una breve pressione del tasto Menu (3) apre il menu.
џ Selezionare una delle impostazioni descritte sotto con i tasti UP/DOWN (SU/GIU') (2).
џ Una breve pressione del tasto Menu (3) conferma la selezione.
Montagne/Rocce Modalità alto contrasto Questa è la modalità ottimale per osservare flora
e fauna selvatiche su uno sfondo di rocce, e terreno in una realtà montana.
Bosco Modalità basso contrasto Questa è la modalità ottimale per osservare flora e fauna
selvatiche su uno sfondo di vegetazione.
Modalità di rilevamento Una modalità universale per l'applicazione in varie condizioni di
osservazione.
Selezione gamma di colori La modalità di visualizzazione principale per un’immagine
osservato è ‘Bianco caldo’. La voce di menu "Gamma di colori" permette all’utente di
selezionare una gamma alternativa.
џ Premere e tenere premuto il tasto Menu (3) per accedere al menu.
џ Selezionare l'opzione "Gamma di colori".
џ Una breve pressione del tasto Menu (3) apre il menu.
џ Selezionare una delle impostazioni descritte sotto con i tasti UP (SU) (4)/DOWN (GIU') (2).
џ Una breve pressione del tasto Menu (3) conferma la selezione.
Bianco caldo.
Una gamma bianca e nera (la temperatura fredda corrisponde a nero e quella calda a bianco).
Nero caldo.
Una gamma bianca e nera (la temperatura fredda corrisponde a bianco e quella calda a nero).
Rosso caldo
Rosso monocromo
Arcobaleno
Blu oltremare
Viola
Seppia
Modalità di
Hot White
calibrazione
Automatic
PIP
Off
10
Selezione della modalità di calibrazione Ci sono tre modalità di calibrazione: manuale,
semiautomatica e automatica.
џ Premere e tenere premuto il tasto Menu (3) per accedere al menu.
џ Selezionare l'opzione "Calibration Mode" (Modalità di calibrazione) .
џ Una breve pressione del tasto Menu (3) apre il sotto-menu.
џ Selezionare una delle modalità di calibrazione descritte sotto con i tasti UP (SU) (4) e DOWN
(GIU') (2).
џ Una breve pressione del tasto Menu (3) conferma la selezione.
Automatica
I requisiti di calibrazione nella modalità automatica vengono stabiliti automaticamente con il
processo di calibrazione che si avvia automaticamente.
Semiautomatica
L'utente imposta autonomamente i requisiti di calibrazione (secondo l'immagine osservato).
Manuale Calibrazione manuale
Chiudere il coperchio della lente prima di iniziare la calibrazione.
36
Page 39
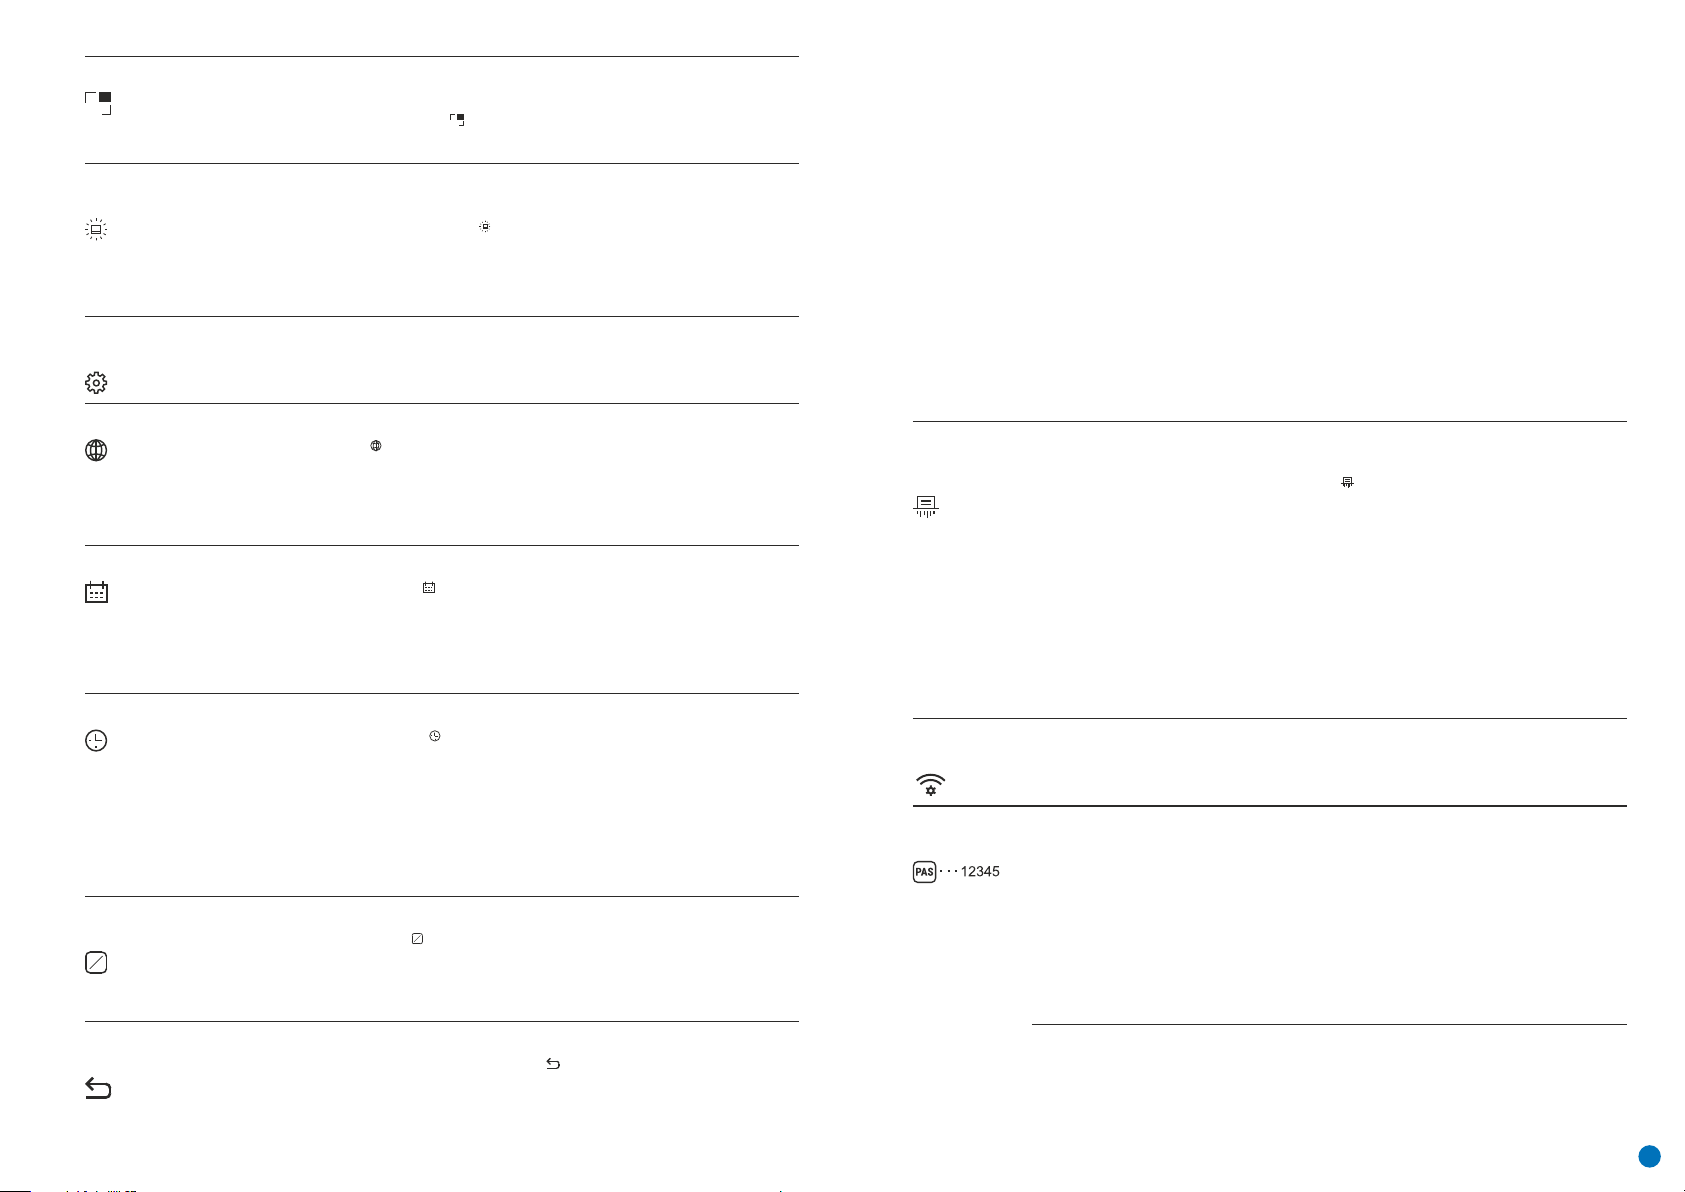
Modalità PiP
PIP
Luminosità
icone
Impostazioni
generali
Lingua
Data
Ora
Unità di
misura
M
Y
Selezione della modalità Picture in Picture
џ Premere e tenere premuto il tasto Menu (3) per accedere al menu.
џ Selezionare l'opzione "Modalità PiP" .
џ Una breve pressione del tasto Menu (3) accende/spegne la modalità.
Regolare la luminosità delle icone.
џ Premere e tenere premuto il tasto Menu (3) per accedere al menu.
џ Selezionare l'opzione "Luminosità icone" .
џ Una breve pressione del tasto Menu (3) apre il sotto-menu.
џ Selezionare il livello di luminosità dei pittogrammi con i tasti UP (SU) (4) e DOWN (GIU') (2).
џ Una breve pressione del tasto Menu (3) conferma la selezione.
Questa voce di menu consente all'utente di programmare le seguenti impostazioni:
Scegliere la lingua
џ Accedere al sotto-menu esercitando una pressione breve sul tasto Menu (3).
џ Selezionare una delle lingue d'interfaccia disponibili (inglese, francese, tedesco, spagnolo o
russo) con i tasti UP (SU) (4) e DOWN (GIU') (2).
џ Confermare la scelta esercitando una pressione breve sul tasto Menu (3).
џ Per salvare la scelta e uscire dal menu, premere e tenere premuto il tasto Мenu (3).
Impostare la data
џ Accedere al sotto-menu "Data" esercitando una pressione breve sul tasto Menu (3). La
data appare in formato gg/mm/aaaa.
џ Impostare anno, mese e giorno con i tasti UP (SU) (4)/ DOWN (GIU') (2). Premere il tasto
Menu (3) per spostarsi tra i numeri.
џ Per salvare la data scelta e uscire dal sotto-menu, premere e tenere premuto il tasto Мenu (3).
Impostare l'orario
џ Accedere al sotto-menù "Orario" esercitando una pressione breve sul tasto Menu (3).
џ Selezionare il formato dell'orario (orologio 24 ore o AM/PM) premendo i tasti UP (SU)
(4)/DOWN (GIU') (2).
џ Premere il tasto Menu (3) per accedere all'impostazione dell'ora.
џ Impostare l'ora premendo i tasti UP (SU) (4)/DOWN (GIU') (2).
џ Premere il tasto Menu (3) per accedere all'impostazione dei minuti.
џ Impostare il minuto premendo i tasti UP (SU) (4)/DOWN (GIU') (2).
џ Per salvare l'ora scelta e uscire dal sotto-menu, premere e tenere premuto il tasto Мenu (3).
Selezionare un'unità di misura
џ Accedere al sotto-menu "M/Y" esercitando una pressione breve sul tasto Menu (3).
џ Impostare l'unità di misura (metri o yard) premendo i tasti UP (SU) (4)/DOWN (GIU' (2); quindi
premere il tasto Мenu (3).
џ Il ritorno al sotto-menu si svolge automaticamente.
PIP
M
Y
Formattare la
Scheda di
memoria
Impostazioni
Wi-Fi
Impostare una
password
џ Se è stata selezionata l'opzione YES (SI), apparirà il messaggio "Vuoi ritornare alle
impostazioni di predefinite?" unitamente alle opzioni YES (SI) e NO. Selezionare “YES” (SI) per
avviare la formattazione della scheda di memoria.
џ Se è stata selezionata l'opzione NO, la formattazione sarà cancellata e riapparirà il sotto-
menu.
Le impostazioni seguenti verranno ripristinate ai rispettivi valori di fabbrica prima di essere
impostate dall'utente:
Modalità di funzionamento – Video
Modalità – Bosco
Modalità di calibrazione – Automatica
Lingua – Inglese
Wi-Fi – Spento (password predefinita)
Ingrandimento – Valore originale
PiP – Spento
Gamma di colori– Bianco caldo
Unità di misura – Metri
Nota: Nel ripristino alle impostazioni di fabbrica vengono salvate le impostazioni data/ora e
la mappa dei pixel dell'utente.
Formattare la Scheda di memoria. Questa funzione consente la formattazione della Flash
Card (scheda di memoria) del dispositivo (tutti i file da cancellare dalla sua memoria).
џ Accedere al sotto-menu "Scheda di memoria" esercitando una pressione breve sul tasto
Menu (3)
џ Selezionare l'opzione "YES" (SI) per formattare la scheda di memoria o ‘NO’ per ritornare al
sotto-menu con i tasti UP (SU) (4)/DOWN (GIU’) (2).
џ Confermare la scelta esercitando una pressione breve sul tasto Menu (3).
џ Se è stata selezionata l'opzione YES (SI), apparirà il messaggio "Formattare la Scheda di
memoria?" unitamente alle opzioni YES (SI) e NO. Selezionare “YES” (SI) per avviare la
formattazione della scheda di memoria.
џ Il messaggio "Formattazione scheda di memoria" indica che è in corso la formattazione.
џ Il messaggio "Formattazione completata" indica che la formattazione è completata.
џ Se è stata selezionata l'opzione NO, la formattazione sarà cancellata e riapparirà il sotto-
menu.
Questa opzione permette all'utente di configurare il dispositivo per funzionare su una rete
Wi-Fi.
Impostare una password. Questa opzione permette all’utente di impostare una password per
accedere al dispositivo da un dispositivo esterno. Questa password viene utilizzata per
collegare un dispositivo esterno (es. uno smartphone) al dispositivo.
џ Premere il tasto Menu (3) per accedere al sotto-menu "Wi-Fi".
џ La password predefinita (12345678) apparirà sul display.
џ Impostare la password desiderata premendo i tasti UP (SU) (4)/DOWN (GIU') (2). Il tasto UP
(SU) (4) aumenta il numero e il tasto DOWN (GIU') (2) diminuisce i numeri. Premere il tasto
Menu (3) per spostarsi tra i numeri.
џ Per salvare la password e uscire dal menu, premere e tenere premuto il tasto Мenu (3).
џ Impostare i livelli di accesso
Impostazioni
predefinite
Ripristino delle impostazioni di fabbrica
џ Accedere al sotto-menu "Impostazioni predefinite" esercitando una pressione breve sul
tasto Menu (3)
џ Selezionare l'opzione "YES" (SI) per ripristinare le impostazioni di fabbrica o ‘NO’ per
cancellare con i tasti UP (SU) (4)/DOWN (GIU') (2).
џ Confermare la scelta esercitando una pressione breve sul tasto Menu (3).
Impostare i
livelli di accesso
Questa sotto-funzione permette all'utente di configurare il livello di accesso appropriato al
suo dispositivo reso disponibile all'app Stream Vision.
Livello Proprietario. Un utente Stream Vision ha pieno accesso a tutte le funzioni del
dispositivo.
Livello Ospite. Un utente Stream Vision è in grado di visualizzare materiale video dal
dispositivo solo in tempo reale.
37
Page 40
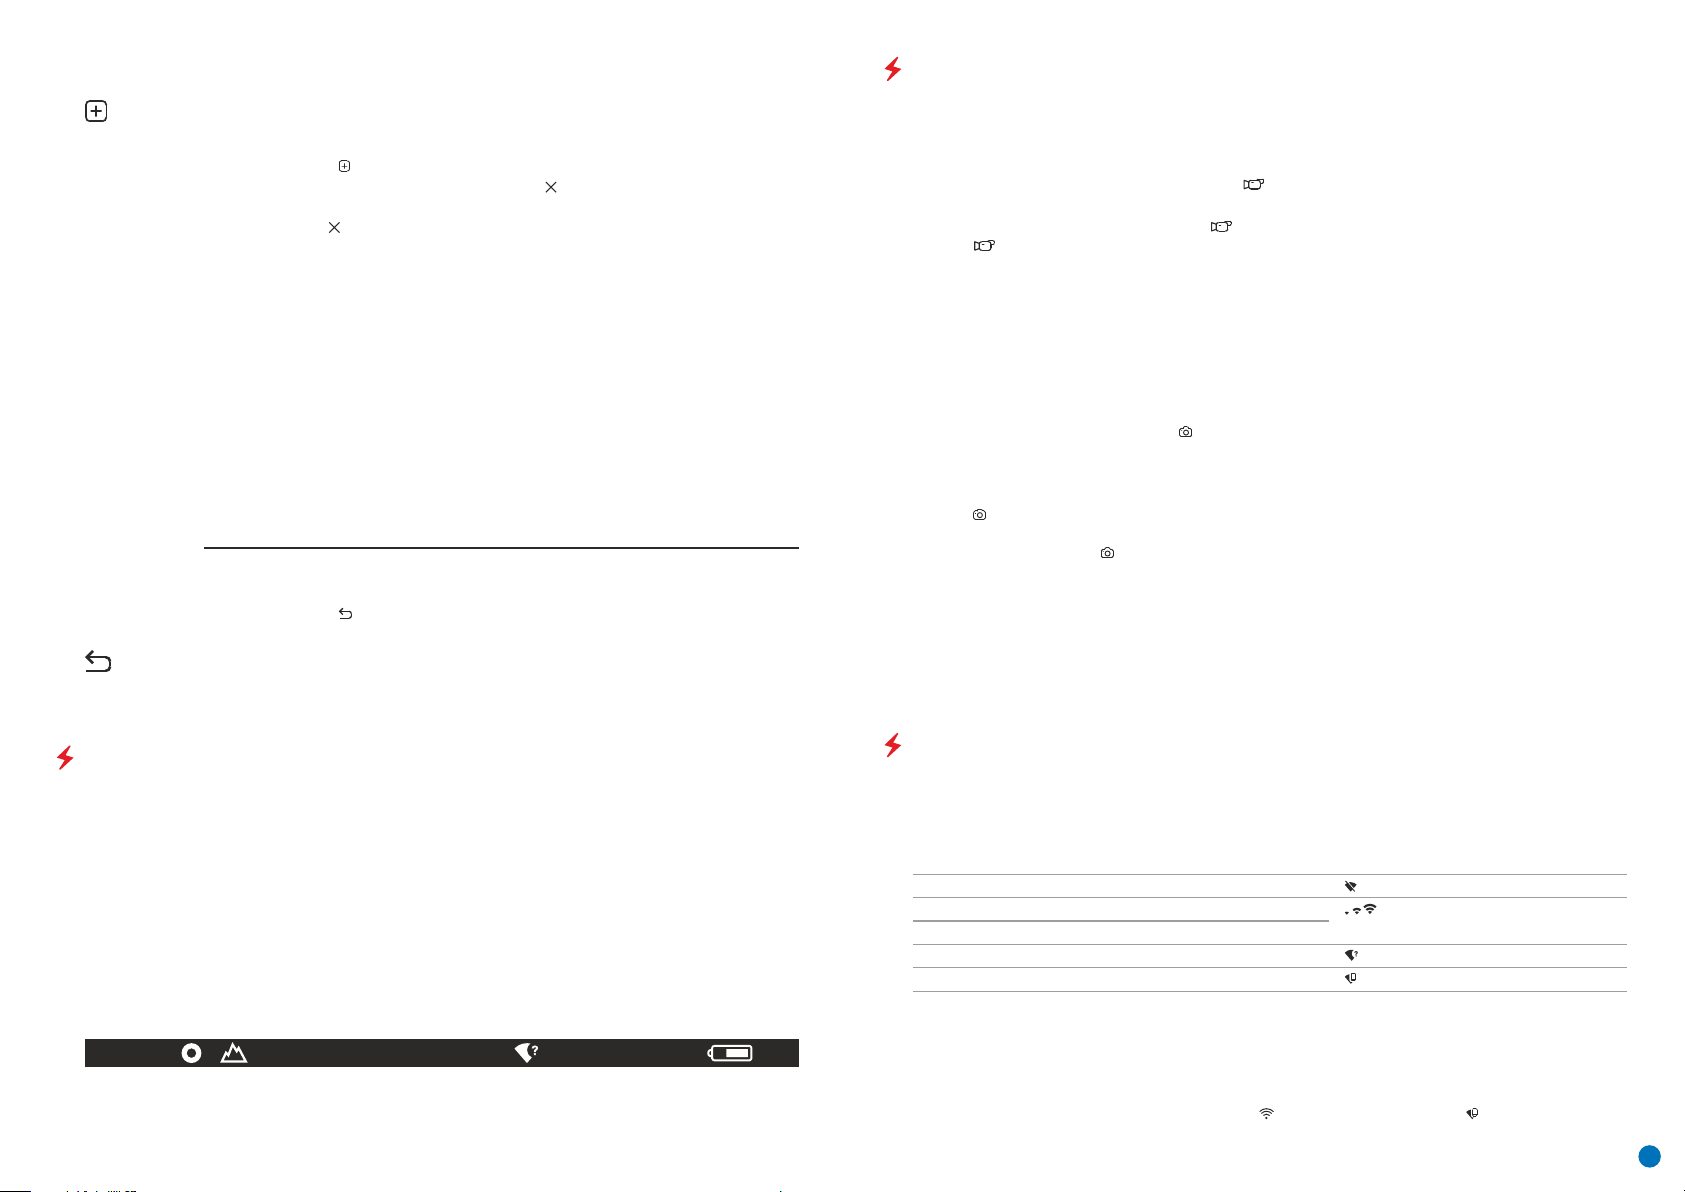
Eliminazione
di pixel difettosi
Ritornare alla
"pixel map"
(mappa dei pixel)
predefinita
Durante l'uso del dispositivo possono apparire sul sensore pixel difettosi (rotti), ovvero punti
chiari o scuri di luminosità costante che sono visibili sull'immagine. I termovisori AXION
offrono la possibilità di rimuovere sistematicamente i pixel difettosi sul sensore, nonché di
annullare qualsiasi cancellazione.
џ Aprire il sotto-menu premendo il tasto Menu (3).
џ Selezionare l'icona con una pressione breve del tasto Menu (3).
џ Sul lato sinistro del display comparirà un marcatore .
џ Una lente di ingrandimento apparirà sul lato destro del display, un'immagine ingrandita con
una crocetta fissa , che è necessaria per facilitare una ricerca del pixel difettoso e per
allineare il marcatore con esso. Ci sono frecce direzionali orizzontali e verticali per spostare il
marcatore con le coordinate lungo gli assi X e Y.
џ Usare i tasti UP (SU) (4)/DOWN (GIU') (2) per spostare il marcatore allo scopo di allineare il
suo centro con il pixel difettoso.
џ Una pressione breve del tasto Menu (3) cambia la direzione del marcatore da orizzontale a
verticale e viceversa.
џ Utilizzando i tasti UP(SU) (4) e DOWN (GIU') (2) e allineando il pixel difettoso alla crocetta
fissa nel riquadro, il pixel dovrebbe scomparire.
џ Cancellare il pixel difettoso con una breve pressione del tasto On/Calibrazione ON (5).
џ Se la cancellazione di un pixel è andata a buon fine, la parola "OK" apparirà brevemente
sullo schermo.
џ Quindi, spostando il marcatore sul display, è possibile cancellare il pixel difettoso
successivo.
џ Per uscire dalla funzione "Cancellare pixel difettosi" premere e tenere premuto il tasto
Menu (3).
Riportare tutti i pixel difettosi precedentemente disattivati dall'utente al loro stato originale:
џ Aprire il sotto-menu premendo il tasto Menu (3).
џ Selezionare l'icona e premere il tasto Menu (3).
џ Selezionare “YES” (SI) per ripristinare la mappa predefinita di pixel difettosi e “No”, se non si
desidera ripristinarla.
џ Confermare la scelta esercitando una pressione breve sul tasto Menu (3).
Attenzione! Possono apparire uno o due pixel sul display del visore sotto forma di punti neri,
bianco lucido o colorato (blu o rosso). Non si tratta di un difetto.
VIDEOREGISTRARE E FOTOGRAFARE UN'IMMAGINE OSSERVATA
I termovisori AXION sono dotati di una funzione per videoregistrare e fotografare un'immagine osservata su una
scheda di memoria incorporata. Si raccomanda di impostare la data e l'ora prima di usare la funzione di
videoregistrazione e fotografia (vedi le voci di menu corrispondenti).
Il dispositivo di registrazione incorporato funziona in due modalità:
Modalità VIDEO. Videoregistrazione di un'immagine
џ Il dispositivo si trova in modalità VIDEO non appena viene acceso.
џ Un'icona viene visualizzata in alto a sinistra con il tempo residuo di registrazione (in formato hh:mm), ad
esempio, 5:12.
џ Iniziare la videoregistrazione esercitando una pressione breve sul tasto Down/REC (Giù/REG) (2).
џ Una volta iniziata la videoregistrazione, l'icona scomparirà e al suo posto apparirà un'icona REC e il tempo di
registrazione sarà visualizzato nel formato MM:SS (minuti:secondi);
џ Interrompere la videoregistrazione e riprendere la registrazione esercitando una pressione breve sul tasto
Down/REC (Giù/Reg) (2).
џ Arrestare la videoregistrazione premendo e tenendo premuto il tasto Down/REC (Giù/REG) (2).
џ File video vengono salvati nella scheda di memoria incorporata dopo che la videoregistrazione è stata spenta.
џ Per navigare tra le modalità Video e Foto, premere e tenere premuto il tasto Down/REC (Giù/REG) (2).
Modalità FOTO. Fotografare un'immagine
Cambiare alla modalità FOTO esercitando una pressione prolungata sul tasto Down/REC (Giù/REG) (2).
Scattare una foto esercitando una pressione breve sul tasto Down/REC (Giù/REG) (2). L’immagine si ferma per 0,5
secondi e il file dell'immagine viene salvato nella scheda di memoria incorporata.
Un'icona , ">100" viene visualizzata in alto a sinistra e indica che il dispositivo può scattare più di 100 foto.
Laddove il numero di foto disponibile è inferiore a 100, il numero effettivo di foto disponibile (es. 98) viene
visualizzato accanto all'icona .
Note: è possibile accedere e operare nel menu durante la videoregistrazione; video e foto registrati vengono
salvati sulla scheda di memoria incorporata del dispositivo nel formato: img_xxx.jpg (for photos);
video_xxx.mp4 (for video). xxx - contatore file comune a tre caratteri (per foto e video); il contatore utilizzato nel
nome di file multimediali NON viene azzerato.
Attenzione: La durata massima di un file di videoregistrazione è di sette minuti. Allo scadere dei sette minuti, il
video sarà registrato in un nuovo file. Il numero dei file registrati è limitato dalla capacità della memoria
incorporata del dispositivo. Monitorare regolarmente lo spazio di memoria libero nella scheda di memoria
incorporata, trasferendo materiale e foto ad altri media per liberare spazio sulla scheda di memoria.
BARRA DI STATO
La barra di stato è posizionata nella parte inferiore del display e presenta le informazioni relative allo stato di
funzionamento del dispositivo, incluso quanto segue:
џ Modalità di osservazione
џ Modalità di calibrazione (quando nella modalità di calibrazione automatica rimangono 3 secondi fino alla
calibrazione automatica, apparirà un timer con conto alla rovescia al posto dell'icona di calibrazione).
џ Ingrandimento intero corrente
џ Connessione Wi-Fi
џ Connessione USB (se il dispositivo è collegato)
џ Gamma di colori (visualizzata solo se è selezionata la gamma Nero caldo)
џ Ora
џ Livello di carica della batteria (se il dispositivo è alimentato da una batteria ricaricabile)
џ Indicatore di alimentazione esterna (se il dispositivo è alimentato da una fonte di alimentazione esterna)
SA
Nota: quando la calibrazione è in corso, l'immagine del display si ferma per la durata della calibrazione
11.0x 08:13PM
Wi-Fi FUNCTION
Il dispositivo è dotato di comunicazione wireless con dispositivi esterni (PC, smartphone) tramite Wi-Fi.
џ Accendere il modulo di connessione wireless esercitando una pressione prolungata sul tasto Up (Su) (4). Il
funzionamento wireless viene visualizzato nella barra di stato nel modo seguente:
Stato connessione Indicazione barra di stato
Wi-Fi sconnesso
Funzione Wi-Fi attivata dall'utente
Processo di connessione Wi-Fi in corso
Funzione Wi-Fi accesa, nessuna connessione con il dispositivo
Funzione Wi-Fi accesa, il dispositivo è connesso
џ Il dispositivo viene riconosciuto da un dispositivo esterno con l'etichetta ‘AXION_XXXX’, dove XXXX sono le
quattro ultime cifre del numero di serie.
џ Dopo aver immesso la password su un dispositivo esterno (per informazioni più dettagliate sull'impostazione
di password, vedi la sotto-sezione intitolata "Configurazione Wi-Fi" nella sezione, " Funzioni menu principale"
delle istruzioni) e aver stabilito la connessione, l'icona nella barra di stato cambia in .
38
Page 41
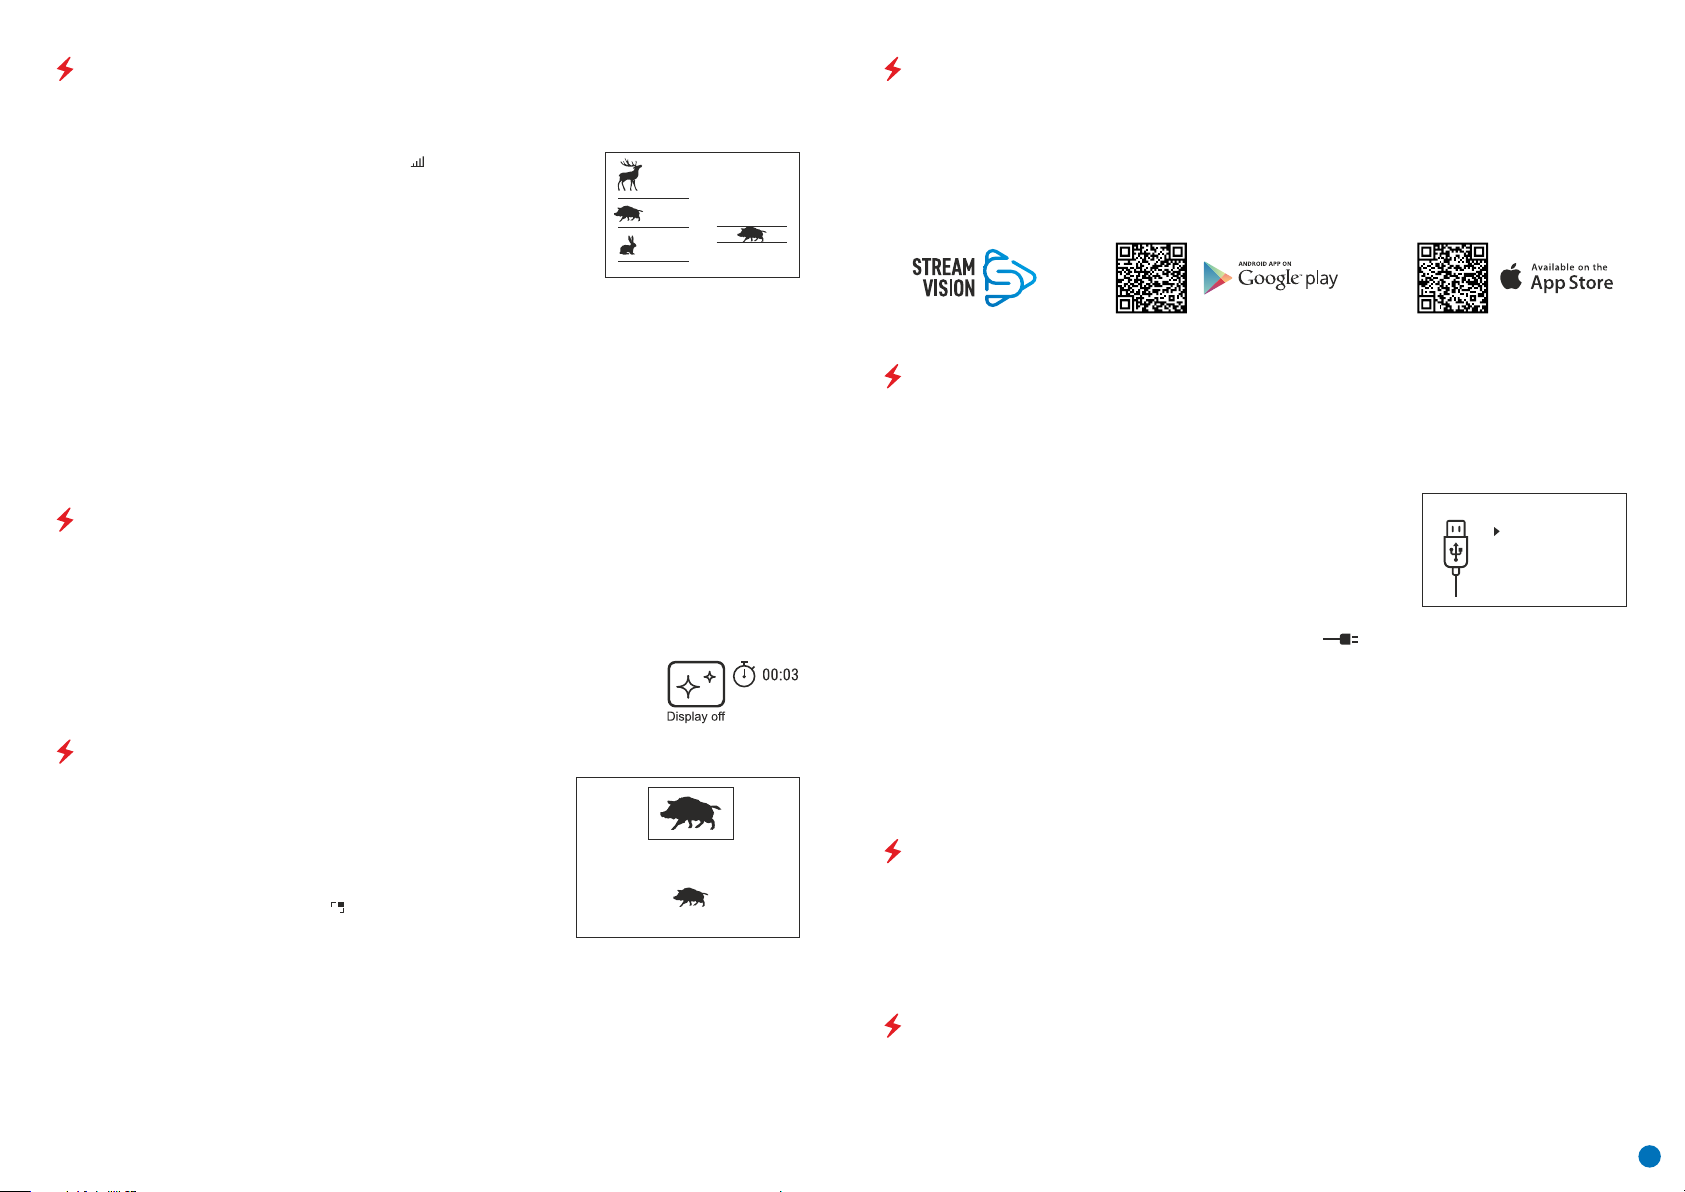
TELEMETRO STADIAMETRICO
I termovisori sono dotati di un telemetro stadiametrico che consente la definizione della distanza da un oggetto
se la sua misura è nota.
џ Alla funzione del telemetro stadiametrico si accede esercitando una breve
pressione del tasto Menu (3) e selezionando l'icona .
џ Sul display appariranno delle barre per stabilire la distanza, icone di tre
oggetti e le cifre della distanza stimata di tali tre oggetti.
Sono tre valori preimpostati per oggetti:
Lepre: altezza 0,3 m
160m
66m
28m
Cinghiale: altezza 0,7 m
Cervo: altezza 1,7 m
џ Posizionare il cursore fisso inferiore sotto l'oggetto e, con i tasti di navigazione UP (SU) (4) e DOWN (GIU') (2),
spostare il cursore orizzontale superiore rispetto al cursore fisso orizzontale inferiore in modo che l'oggetto sia
posizionato tra i cursori. Un ricalcolo automatico della distanza dal bersaglio ha luogo simultaneamente con
questo movimento.
џ Se la distanza non viene definita entro 10 secondi, le informazioni scompaiono dal display.
џ Andare alla rispettiva voce nel menu per selezionare un'unità di misura (metri o yard).
џ Un valore di distanza viene arrotondato per difetto o per eccesso prima della comparsa sul display a 5 metri per
letture di distanze più grandi e a 1 metro per quelle più piccole.
џ Per uscire dalla modalità Telemetro, premere il tasto Menu (3) brevemente, o attendere 10 secondi per l'uscita
automatica.
FUNZIONE "DISPLAY OFF"
Questa funzione disattiva il trasferimento di immagini al display, riducendo l'intensità della sua illuminazione a
un minimo. Questo aiuta a prevenire lo smascheramento involontario. Il dispositivo continuerà a funzionare.
Quando questa funzione è in uso, il dispositivo passa in modalità standby che consente il suo rapido
spegnimento, qualora necessario.
џ Quando il dispositivo è acceso, premere e tenere premuto il tasto ON (5). Il display scomparirà e apparirà il
messaggio 'Display off' ("Display spento").
џ Per accendere il display, premere brevemente il tasto ON (5).
џ Quando il tasto ON (5) viene tenuto, il display visualizzerà "Display off”
(“Display spento) ed effettuerà il conto alla rovescia. Dopodiché il dispositivo si spegnerà.
FUNZIONE PiP
PiP (immagine nell'immagine) consente di visualizzare un'immagine di
zoom digitale ingrandita in una "finestra" separata in simultanea con
l'immagine principale.
Attivare/disattivare la funzione PiP:
џ Premere e tenere premuto il tasto Menu (3) per accedere al menu
principale.
џ Selezionare l'opzione "Modalità PiP" .
џ Una breve pressione del tasto Menu (3) accende/spegne la modalità.
џ Premere e tenere premuto il tasto Menu (3) per uscire dal menu
PIP
principale.
џ L’immagine ingrandita è visualizzata in una finestra separata, utilizzando il valore dello zoom ottico intero.
џ Per cambiare il rapporto dello zoom nella finestra PiP, premere brevemente il tasto UP (SU) (4).
џ La rimanente immagine viene visualizzata con un valore di zoom ottico che corrisponde al valore del
coefficiente x1.0.
џ Quando la funzione PiP è accesa, l’utente può controllare gli zoom discreti e continui. In questo caso, il valore di
ingrandimento ottico pieno apparirà solo nella finestra separata.
џ Quando la funzione PiP non è attiva, l’immagine viene visualizzata con il valore di zoom ottico impostato per la
funzione PiP.
6.9x
3.1x
TECNOLOGIA STREAM VISION
I termovisori AXION supportano la tecnologia Stream Vision, che consente la trasmissione di un'immagine in
tempo reale dal termovisore allo smartphone o tablet dell'utente tramite Wi-Fi.
Istruzioni dettagliate sul funzionamento della tecnologia Stream Vision possono essere reperite in un opuscolo
separato o sul sito web www.pulsar-vision.com.
Nota: il progetto del dispositivo include la possibilità di aggiornare il software. L'aggiornamento è possibile
tramite l'app Stream Vision.
Scansionare i codici QR per scaricare l'app Stream Vision:
CONNESSIONE USB
џ Collegare un'estremità del cavo USB al connettore microUSB del dispositivo (8) e l'altra estremità alla porta sul
proprio computer.
џ Accendere il dispositivo premendo il tasto ON (5) (il computer non rileverà il dispositivo se è spento).
џ Il dispositivo viene rilevato automaticamente dal computer e non è richiesta l'installazione di driver.
Sul display saranno visualizzate due opzioni di connessione:
Uso come alimentazione
Uso come scheda di memoria
џ Selezionare l'opzione di connessione con i tasti UP (SU) (4)/ DOWN (GIU') (2).
џ Una breve pressione del tasto Menu (3) conferma la selezione.
USB connection
Use as power
Use as memory card
Uso come alimentazione
џ Quando viene selezionata questa opzione, il computer viene utilizzato dal dispositivo come fonte di
alimentazione esterna. Un'icona apparirà nella barra di stato ( ). Il dispositivo continuerà a funzionare e
tutte le funzioni sono disponibili.
џ La batteria installata nel dispositivo non sarà caricata.
џ Scollegando l'USB dal dispositivo quando connesso in Power Mode, il dispositivo continuerà a funzionare con
l'alimentazione della batteria, qualora presente e sufficientemente carica.
Uso come scheda di memoria
џ Quando viene selezionata questa opzione, il dispositivo viene rilevato dal computer come flash card. Questa
opzione è prevista per il funzionamento con file salvati nella memoria del dispositivo; le funzioni del dispositivo
non sono accessibili e il dispositivo stesso si spegne.
џ Se un video è stato registrato al momento della connessione, la registrazione cesserà e sarà salvata.
VERIFICA TECNICA
Un'ispezione tecnica del dispositivo è raccomandata prima di ogni uso. Controllare:
џ L'aspetto esterno del dispositivo (non ci devono essere crepe nella cassa).
џ La condizione della lente e dell'oculare (non ci devono essere crepe, macchie di grasso, sporco o altri depositi).
џ La condizione della batteria ricaricabile (questa deve essere caricata) e i contatti elettrici (assenza di sali od
ossidazione).
џ I comandi devono funzionare regolarmente.
MANUTENZIONE
La manutenzione va effettuata almeno due volte l'anno e comporta gli interventi seguenti:
џ Pulire le superfici esterne di metallo e plastica dalla polvere e dallo sporco strofinando con un panno di cotone
Per questa operazione è possibile utilizzare del grasso al silicone.
џ Pulire i contatti elettrici della batteria e il vano batteria sull'unità con un solvente organico non grasso.
39
Page 42
џ Controllare le superfici di vetro dell'oculare e della lente. Se necessario, rimuovere sporco e sabbia dalle lenti
(preferibilmente usando un metodo senza contatto). La pulizia delle superfici esterne va effettuata con sostanze
previste specificamente per questo scopo.
RISOLUZIONE DEI PROBLEMI
Questa tabella elenca tutti i problemi che possono sorgere durante il funzionamento del dispositivo. Eseguire i
controlli e le riparazioni raccomandati nell'ordine mostrato nella tabella. In caso di difetto non elencato nella
tabella, o qualora fosse impossibile riparare il difetto, il dispositivo deve essere reso per la riparazione.
Seguendo il link sotto, potete trovare risposte alle domande più frequenti sulla
termovisione https://www.pulsar-nv.com/glo/support/faq/79
Malfunzionamento
Il termovisore non si
accende.
Non funziona da
fonte di
alimentazione
esterna.
L'immagine è sfocata,
presenta righe
verticali e uno sfondo
non omogeneo.
Immagine troppo
scura.
Righe colorate
appaiono su display
o l'immagine è
scomparsa.
Scarsa qualità
dell'immagine/distan
ze di rilevamento
ridotte.
Non è possibile
collegare lo
smartphone o il
tablet al dispositivo.
Possibile causa
La batteria è completamente scarica.
Cavo USB danneggiato.
Fonte di alimentazione esterna scarica.
È necessaria la calibrazione.
Luminosità o livello di contrasto bassi.
Il dispositivo è stato esposto a
elettricità statica durante il
funzionamento.
Questi problemi possono verificarsi durante l'osservazione in condizioni
meteorologiche avverse (neve, pioggia, nebbia ecc.).
La password del dispositivo è stata
cambiata.
Il dispositivo si trova in un'area con un
grande numero di reti Wi-Fi che possono
causare interferenze.
Rimedio
Caricare la batteria.
Sostituire il cavo USB.
Caricare la fonte di alimentazione
esterna (se necessario).
Effettuare la calibrazione come indicato
in Sezione 8 "Funzionamento" delle
istruzioni.
Regolare luminosità o contrasto.
Dopo l'esposizione a elettricità statica, il
dispositivo può riavviarsi
automaticamente o può essere
necessario spegnerlo e riaccenderlo.
Cancellare la rete e ricollegare la
password del dispositivo.
Per garantire un funzionamento Wi-Fi
stabile, riposizionare il dispositivo in
un'area con un numero inferiore di reti
Wi-Fi o in un'area senza.
Attenzione! I termovisori AXION richiedono una licenza quando vengono esportati dal
paese dell'utente.
Compatibilità elettromagnetica
Questo prodotto è conforme ai requisiti della norma europea EN 55032: 2015, Classe A.
Cautela: L'uso di questo prodotto in area residenziale può causare interferenza radio.
Segnale Wi-Fi
inesistente o
interrotto.
Se utilizzato in
condizioni di bassa
temperatura, la
qualità dell'immagine
è peggiore rispetto a
condizioni di
temperatura positiva.
Il dispositivo si trova fuori dall'area di
copertura Wi-Fi. Ci sono ostacoli tra il
dispositivo e il ricevente (ad es. muri di
cemento).
In condizioni i di temperatura positive, gli oggetti osservati (circondario e sfondo) si
riscaldano diversamente a causa della conduttività termica, generando in tal modo
un elevato contrasto di temperatura. Di conseguenza, la qualità dell'immagine
prodotta dal dispositivo sarà più alta.
In condizioni di bassa temperatura, gli oggetti osservati (sfondo) normalmente si
raffreddano pressappoco alla stessa temperatura e a causa di questa temperatura il
contrasto viene sostanzialmente ridotto è la qualità dell'immagine (dettaglio) è più
scarsa. Si tratta di una caratteristica dei dispositivi di termovisione.
Riposizionare il dispositivo in linea di
vista diretta del segnale Wi-Fi.
40
Page 43
РУССКИЙ
ТЕХНИЧЕСКИЕ ХАРАКТЕРИСТИКИ
SKU#
Модель AXION
Микроболометр
Тип
Разрешение, пикселей
Частота обновления кадров, Гц
Размер пикселя, микрон
Оптические характеристики
Оптическое увеличение, х
Плавный цифровой зум, х
Цифровой зум, х
Относительное отверстие, D/f '
Минимальная дистанция фокусировки, м
Диаметр выходного зрачка, мм
Угол поля зрения, град
Угол поля зрения, м на 100м
Диапазон фокусировки окуляра, дптр
Макс. дистанция наблюдения, м*
Дисплей
Тип
Разрешение, пикселей
Эксплуатационные характеристики
Напряжение питания
Тип батарей
Емкость
Выходное напряжение
Внешнее питание
Время работы от батареи (при t=22 °C), ч**
Степень защиты, код IP (IEC60529)
Совместимость с Stream Vision
Диапазон эксплуатационных температур
Габариты, мм
Масса (без батарей), кг
Видеорекордер
Разрешение видео/фото, пикселей
Формат видеозаписи / фото
Объем встроенной памяти
Wi-Fi канал
Частота
Стандарт
Дальность приема в прямой видимости, м
* объект - животное типа "олень»
** фактическое время работы зависит от степени использования Wi-Fi и встроенного видео рекордера.
Для улучшения потребительских свойств изделия в его конструкцию и программное обеспечение могут
вноситься усовершенствования.
Актуальную версию инструкции по эксплуатации Вы можете найти на сайте www.pulsar-vision.com
77421
XМ30
неохлаждаемый
320x240
50
12
4
4-16
2/4
1.2
3/3.28
3.5/0.12
7.3
12.8
±5
1300/1420
AMOLED
1024x768
3 – 4.3 В
Li-Ion Battery Pack АPS3
3200 мАч
DC 3.7 В
5 В (USB)
4
IpХ7
да
-25°С ... +40°С
143x41x69
0.25
1024х768
.mp4/.jpg
16 Гб
2.4 ГГц
802.11 b/g/n
15
77422
XМ38
неохлаждаемый
320x240
50
12
5.5
5.5-22
2/4
1.2
3/3.28
3.5/0.12
5.8
10.1
±5
1700/1860
AMOLED
1024x768
3 – 4.3 В
Li-Ion Battery Pack АPS3
3200 мАч
DC 3.7 В
5 В (USB)
4
IpХ7
да
-25°С ... +40°С
149x49x70
0.27
1024х768
.mp4/.jpg
16 Гб
2.4 ГГц
802.11 b/g/n
15
КОМПЛЕКТ ПОСТАВКИ
џ Тепловизор AXION
џ Аккумуляторная батарея АPS3
џ Зарядное устройство APS с сетевым адаптером
џ Кабель USB
џ Чехол
џ Ремешок на руку
џ Инструкция по эксплуатации
џ Салфетка для чистки оптики
џ Гарантийный талон
ОПИСАНИЕ
Тепловизионные монокуляры AXION на основе ИК-матрицы (микроболометра) представлены рядом
моделей, отличающихся, увеличением и диаметром объектива. Приборы предназначены для
использования как ночью, так и днем в сложных погодных условиях (туман, смог, дождь), а также при
наличии препятствий, затрудняющих обнаружение цели (ветки, высокая трава, густой кустарник и т.п.). В
отличие от приборов ночного видения на базе электронно-оптических преобразователей,
тепловизионные монокуляры не нуждаются во внешнем источнике света и устойчивы к воздействию
яркого света.
Монокуляры AXION могут использоваться для ведения ночной охоты, наблюдения и ориентирования на
местности, проведения спасательных операций.
ОТЛИЧИТЕЛЬНЫЕ ОСОБЕННОСТИ
џ Размер пикселей микроболометра 12 микрон
џ AMOLED дисплей высокого разрешения
џ Компактный и легкий
џ Функциональный и эргономичный дизайн
џ Удобный пользовательский интерфейс
џ Восемь цветовых режимов наблюдения
џ Три режима калибровки (ручная, полуавтоматическая, автоматическая)
џ Большая дистанция обнаружения
џ Высокое увеличение
џ Три режима наблюдения (лес, город, идентификация)
џ Стадиометрический дальномер
џ Функция отключения дисплея
џ Функция корректировки пикселей
џ Обновляемое ПО
џ Широкий диапазон эксплуатационных температур (-25 °С …+40°С)
џ Полностью водонепроницаемый (класс защиты IPX7)
Видео/аудио запись
џ Встроенный видеорекордер
џ Интеграция c IOS и Android устройствами
џ Wi-Fi. Дистанционное управление и наблюдение со смартфона
џ Youtube. Прямая видеотрансляция и записи в Интернет через смартфон и с помощью приложения
Stream Vision
Battery Pack
џ Быстросменные Li-Ion блоки питания APS3
џ Возможность зарядки от USB
41
Page 44
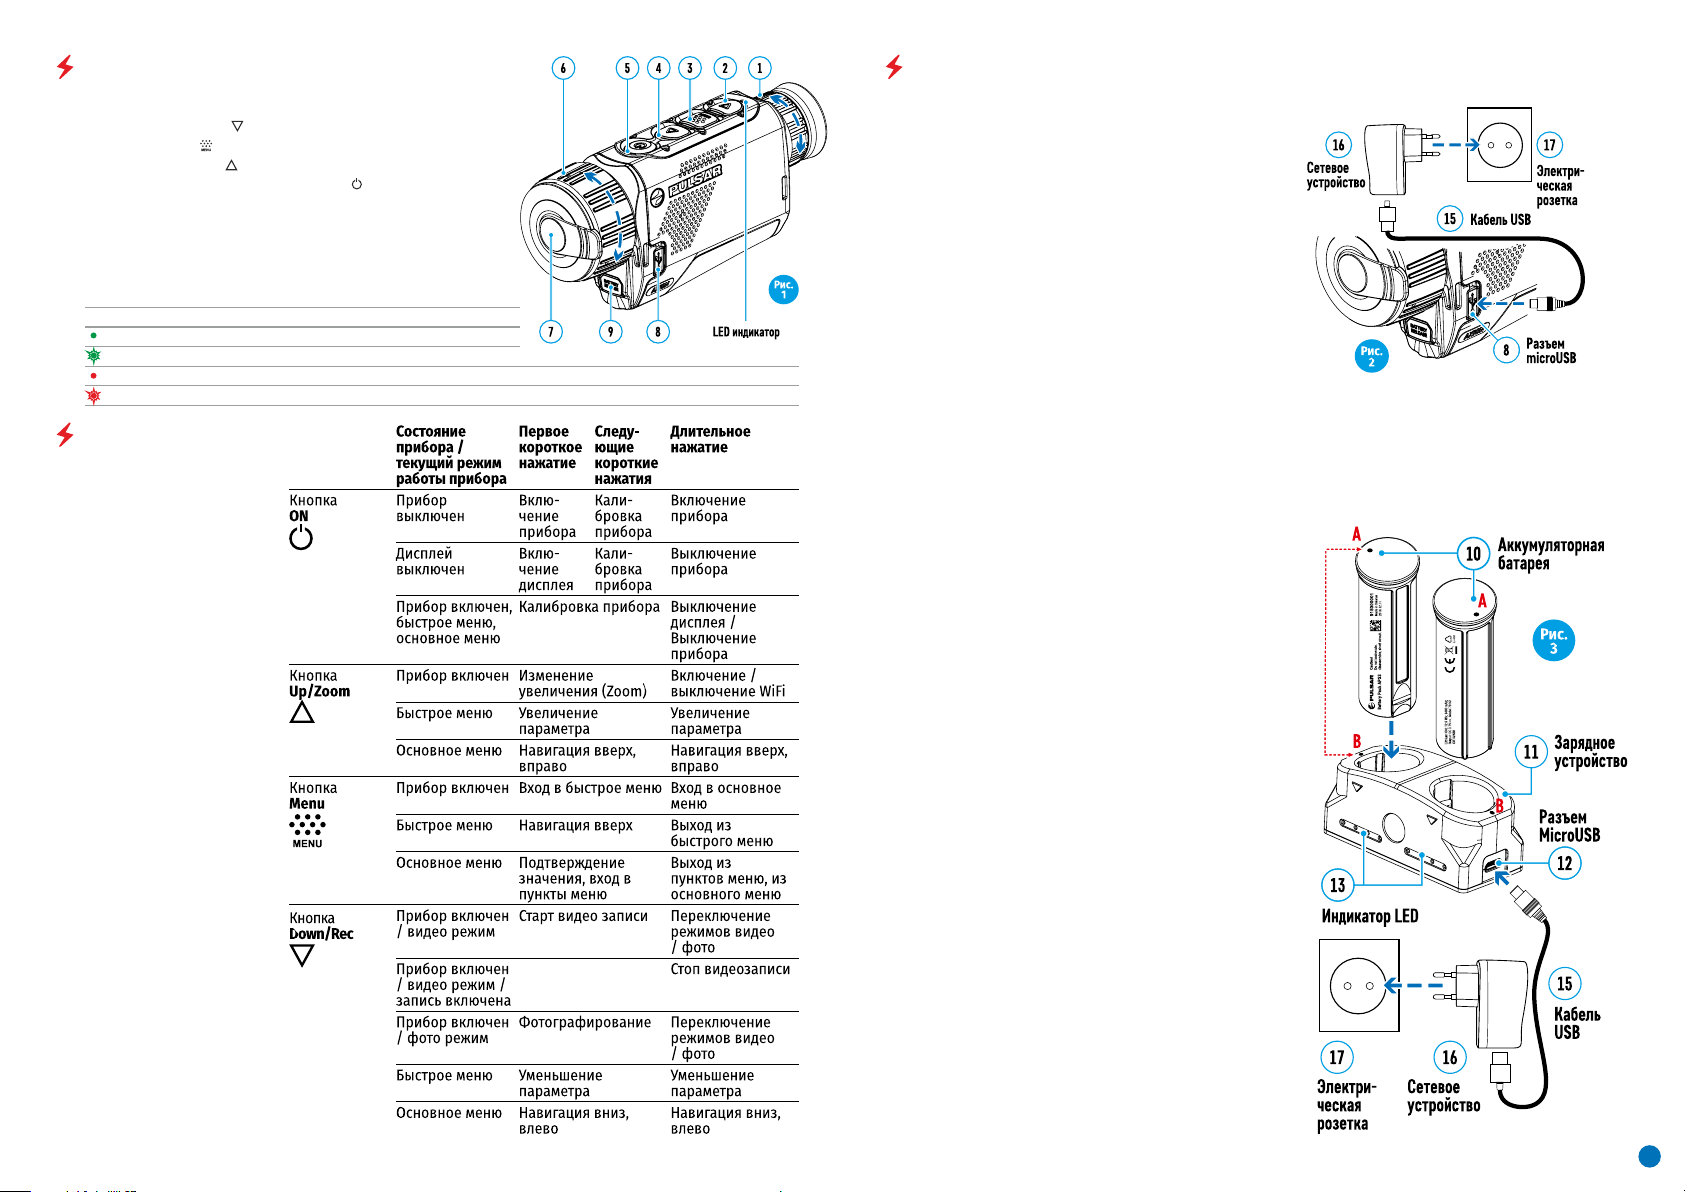
ИСПОЛЬЗОВАНИЕ АККУМУЛЯТОРНОЙ БАТАРЕИЭЛЕМЕНТЫ ПРИБОРА И ОРГАНЫ УПРАВЛЕНИЯ
1. Кольцо диоптрийной подстройки окуляра
2. Кнопка Down/Rec
3. Кнопка Menu
4. Кнопка Up/Zoom
5. Кнопка включения/калибровки ON
6. Кольцо фокусировка объектива
7. Крышка объектива
8. Разъем microUSB
9. Кнопка извлечения
аккумуляторной батареи
LED индикатор отображает текущее состояние работы прибора:
Индикация LED Режим работы
Прибор включен
Прибор включен/записывает видео
Прибор включен/ заряд батареи <10%
Прибор включен/записывает видео/ заряд батареи <10%
РАБОТА КНОПОК
Тепловизоры AXION поставляются с перезаряжаемой
литий-ионной батареей Battery Pack АPS3, которая
позволяет использовать тепловизор до 4 часов.
Перед первым использованием батарею следует
зарядить.
Зарядка батареи
Вариант 1 (Рис.2)
џ Установите батарею (10) в предназначенный для
нее слот на корпусе прибора (14) совместив пиктограммы в виде «точки» на приборе и батарее. (см.
Рис. 4).
џ Подключите к Разъем microUSB (8) прибора кабель
USB (15).
џ Другой конец кабеля USB (15) подключите к сете-
вому зарядному устройству (16) либо разъему USB
другого источника питания с номинальным выходным напряжением не более 5В.
џ Сетевое зарядное устройство (16) подключите к
сети питания.
Примечание: В качестве зарядного устройства
можно использовать Источник питания PB8I*(см.п.7).
Вариант 2 (Рис.3)
џ Установите аккумуляторную батарею (10) по напра-
вляющей до упора в слот зарядного устройства APS
(11) (см. рис.3) из комплекта поставки Вашего прибора
или приобретенного отдельно.
џ Точка А на батарее и точка B на зарядном должны
быть совмещены.
џ Одновременно Вы можете заряжать две батареи –
для этого предусмотрен второй слот.
џ Подключите штекер microUSB кабеля USB (15) к
разъему microUSB сетевого устройства (16). Подключите устройство в розетку 100-240В (17).
џ Подключите второй штекер кабеля microUSB к
разъему (12) зарядного устройства (11).
џ Индикация LED светодиода (13) будет отображать
статус заряда батареи (см. таблицу).
42
Page 45
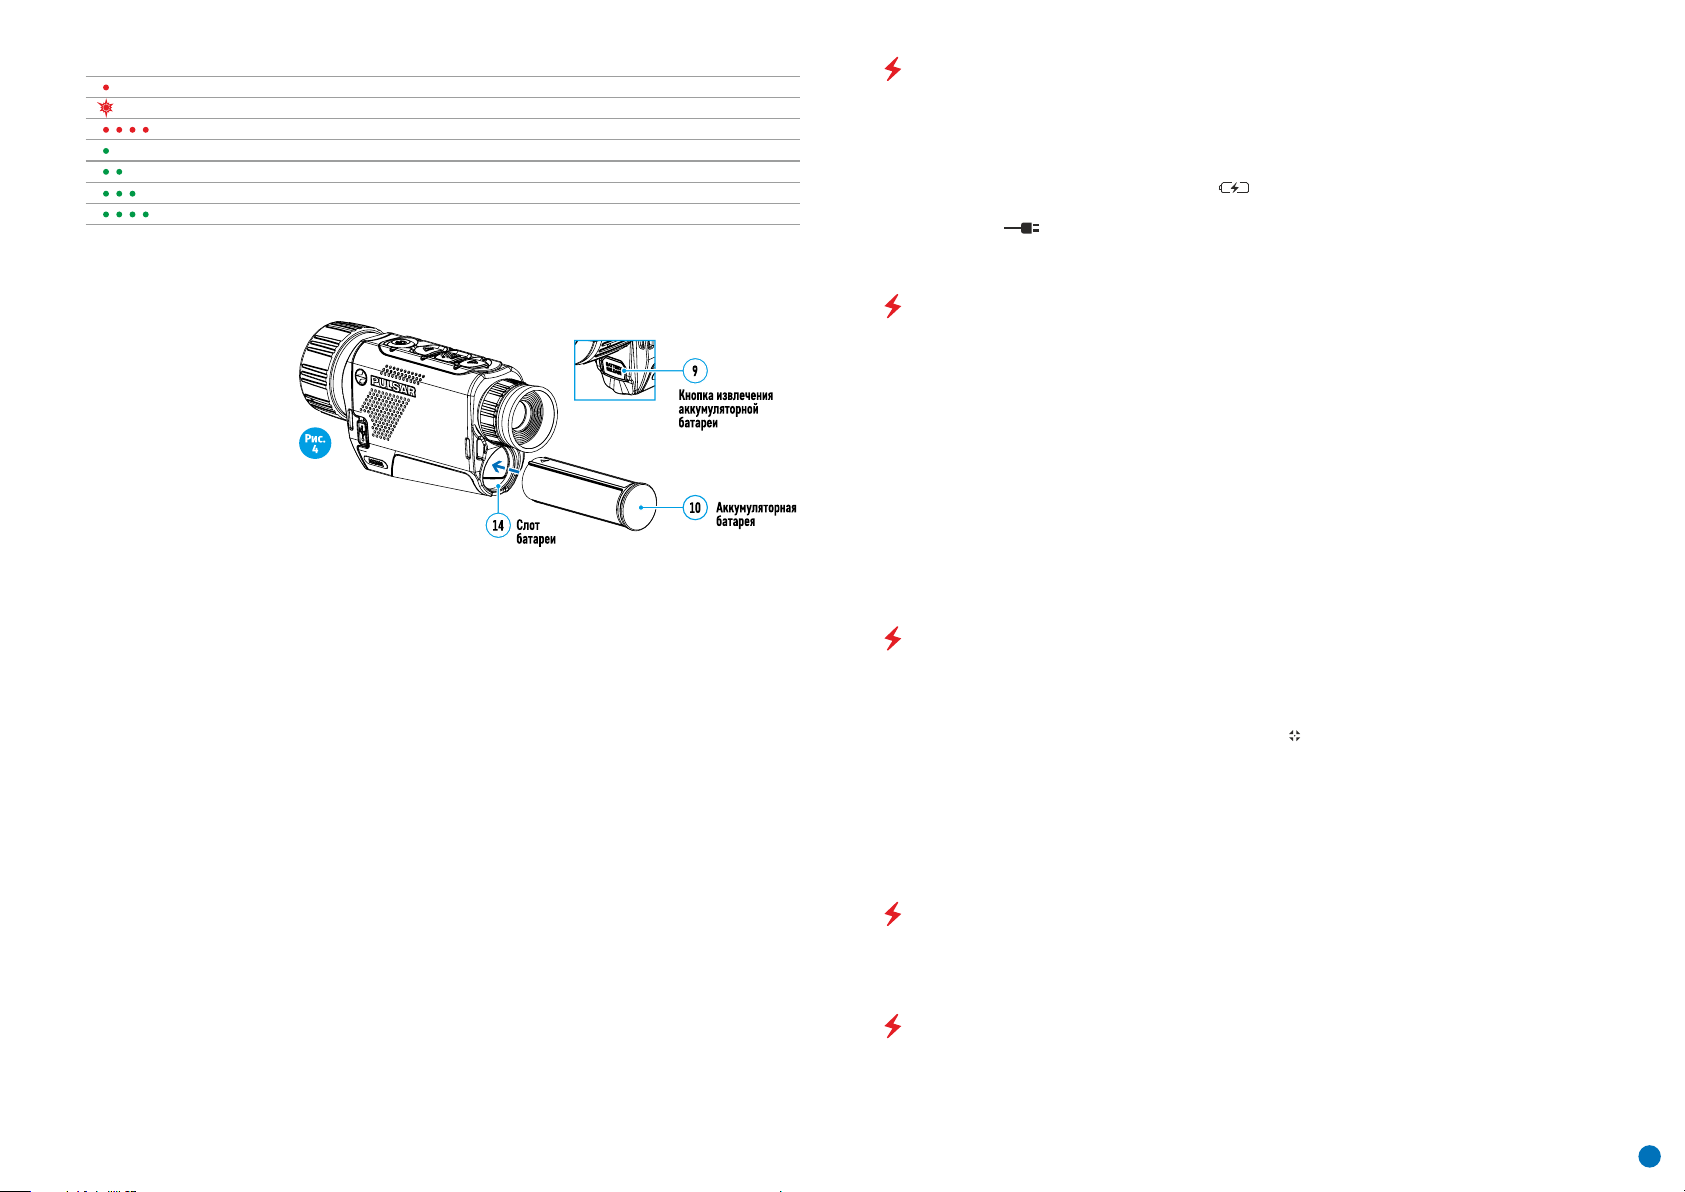
Индикация LED* Статус аккумуляторной батареи
Заряд батареи составляет от 0 до 10%; Зарядное устройство не подключено к сети питания.
Заряд батареи составляет от 0 до 10%; Зарядное устройство подключено к сети питания.
Батарея неисправна. Использовать батарею запрещается.
Заряд батареи составляет от 10 до 20%
Заряд батареи от 20 до 60%
Заряд батареи от 60 до 95%
Батарея полностью заряжена. Ее можно отключить от зарядного устройства.
*Индикация отображает текущее состояние заряда батареи в течение 30 сек. в случае, если зарядное
устройство APS не подключено к сети питания. При подключенном питании индикация отображает
текущее состояние батареи постоянно, дополнительно мерцают светодиоды, отображая процесс заряда
батареи.
Установка
џ Установите батарею (10) в
предназначенный для нее
слот на корпусе прибора
(14) (См.Рис.4), совместив
пиктограммы на приборе и
батарее.
џ При правильной уста-
новке батарея зафиксируется в слоте специальным зажимом.
џ Для извлечения батареи
из слота нажмите кнопку
Battery release (9).
Меры предосторожности
џ Для заряда всегда используйте зарядное устройство из комплекта поставки Вашего оптического
прибора. Использование другого зарядного устройства может нанести непоправимый ущерб батарее или
зарядному устройству и может привести к воспламенению батареи.
џ При длительном хранении батареи должна быть частично заряжена – не должна быть полностью
заряжена или полностью разряжена.
џ Не заряжайте батарею непосредственно после перемещения батареи из холодных условий в теплую
обстановку. Подождите 30-40 минут пока батарея нагреется.
џ Во время зарядки не оставляйте батарею без присмотра.
џ Не используйте зарядное устройство, если его конструкция была изменена или оно было повреждено.
џ Зарядка батареи должна осуществляться при температуре воздуха 0 °C … +45 °C, в противном случае
ресурс батареи существенно снизится.
џ Не оставляйте зарядное устройство с подключенной к сети батареей к сети более 24 часов после полной
зарядки.
џ Не подвергайте батарею воздействию высоких температур и открытого огня.
џ Батарея не предназначена для погружения в воду.
џ Не рекомендуется подключать сторонние устройства с током потребления больше допустимого.
џ Батарея оснащена системой защиты от короткого замыкания. Однако следует избегать ситуаций,
которые могут привести к короткому замыканию.
џ Не разбирайте и не деформируйте батарею.
џ Не подвергайте батарею ударам и падениям.
џ В случае использования батареи при отрицательных температурах емкость батареи уменьшается, это
нормально и дефектом не является.
џ Не используйте батарею при температурах, превышающих указанные в таблице – это может сократить
ресурс батареи.
џ Храните батарею в месте, недоступном для детей.
ВНЕШНЕЕ ПИТАНИЕ
Внешнее питание осуществляется от внешнего источника питания типа Power Bank (5V).
џ Подключите источник внешнего питания к разъему USB (8) прибора.
џ Прибор переключится на работу от внешнего питания, при этом батарея АPS3 будет постепенно
подзаряжаться.
џ На дисплее появится пиктограмма батареи со значением уровня заряда в процентах.
џ Если прибор работает от внешнего источника питания, но батарея АPS3 не подключена, отображается
пиктограмма .
џ При отключении внешнего источника питания происходит переключение на внутренний источник
питания без выключения прибора.
ЭКСПЛУАТАЦИЯ
ВНИМАНИЕ! Запрещается направлять объектив прибора на интенсивные источники энергии, такие как
устройства, испускающие лазерное излучение, или солнце. Это может вывести электронные компоненты
прибора из строя. На повреждения, вызванные несоблюдением правил эксплуатации, гарантия не
распространяется.
Включение и настройка изображения
џ Откройте крышку объектива (7). Зафиксируйте крышку на ремешке с помощью встроенного магнита.
џ Нажатием кнопки ON (5) включите прибор.
џ Настройте резкое изображение символов на дисплее вращением кольца диоптрийной настройки
окуляра (1). В дальнейшем, независимо от дистанции и других условий, вращать кольцо диоптрийной
настройки окуляра не требуется.
џ Для фокусировки на объект наблюдения вращайте кольцо фокусировки объектива (6).
џ Регулировка яркости и контраста дисплея, включение плавного цифрового зума описано в разделе
«ФУНКЦИИ МЕНЮ БЫСТРОГО ДОСТУПА».
џ По окончании использования выключите прибор длительным нажатием кнопки ON (5) .
КАЛИБРОВКА СЕНСОРА
Калибровка позволяет выровнять температурный фон микроболометра и устранить недостатки
изображения (такие как вертикальные полосы, фантомные изображения и пр.).
Имеется три режима калибровки: ручной (M), полуавтоматический (SA) и автоматический (А).
Выберите нужный режим в пункте меню “КАЛИБРОВКА” .
џ Режим М (ручной). Закройте крышку объектива, выполните краткое нажатие кнопки ON (5). По
завершению процесса калибровки откройте крышку.
џ Режим SA (полуавтоматический). Калибровка включается коротким нажатием кнопки ON (5). Крышку
закрывать не требуется (сенсор закрывается внутренней шторкой).
џ Режим А (automatic). Прибор калибруется самостоятельно, согласно программному алгоритму. Крышку
закрывать не требуется (сенсор закрывается внутренней шторкой). В данном режиме допускается
калибровка прибора пользователем с помощью кнопки ON (5) (в полуавтоматическом режиме).
ДИСКРЕТНЫЙ ЦИФРОВОЙ ЗУМ
Функционал прибора дает возможность быстрого увеличения базовой кратности прибора (см. таблицу
технических характеристик в строке «Цифровой зум») в 2, и 4 раза, а также возврат к базовому
увеличению. Для изменения цифрового зума последовательно нажимайте кнопку Down (2).
ФУНКЦИИ МЕНЮ БЫСТРОГО ДОСТУПА
Базовые настройки (регулировка яркости и контраста, использование функции плавного цифрового зума
и стадиометрического дальномера) изменяются средствами меню быстрого доступа.
џ Войдите в меню коротким нажатием кнопки Мenu (3).
џ Для перехода между функциями, описанными ниже, кратко нажимайте кнопку Мenu (3).
43
Page 46
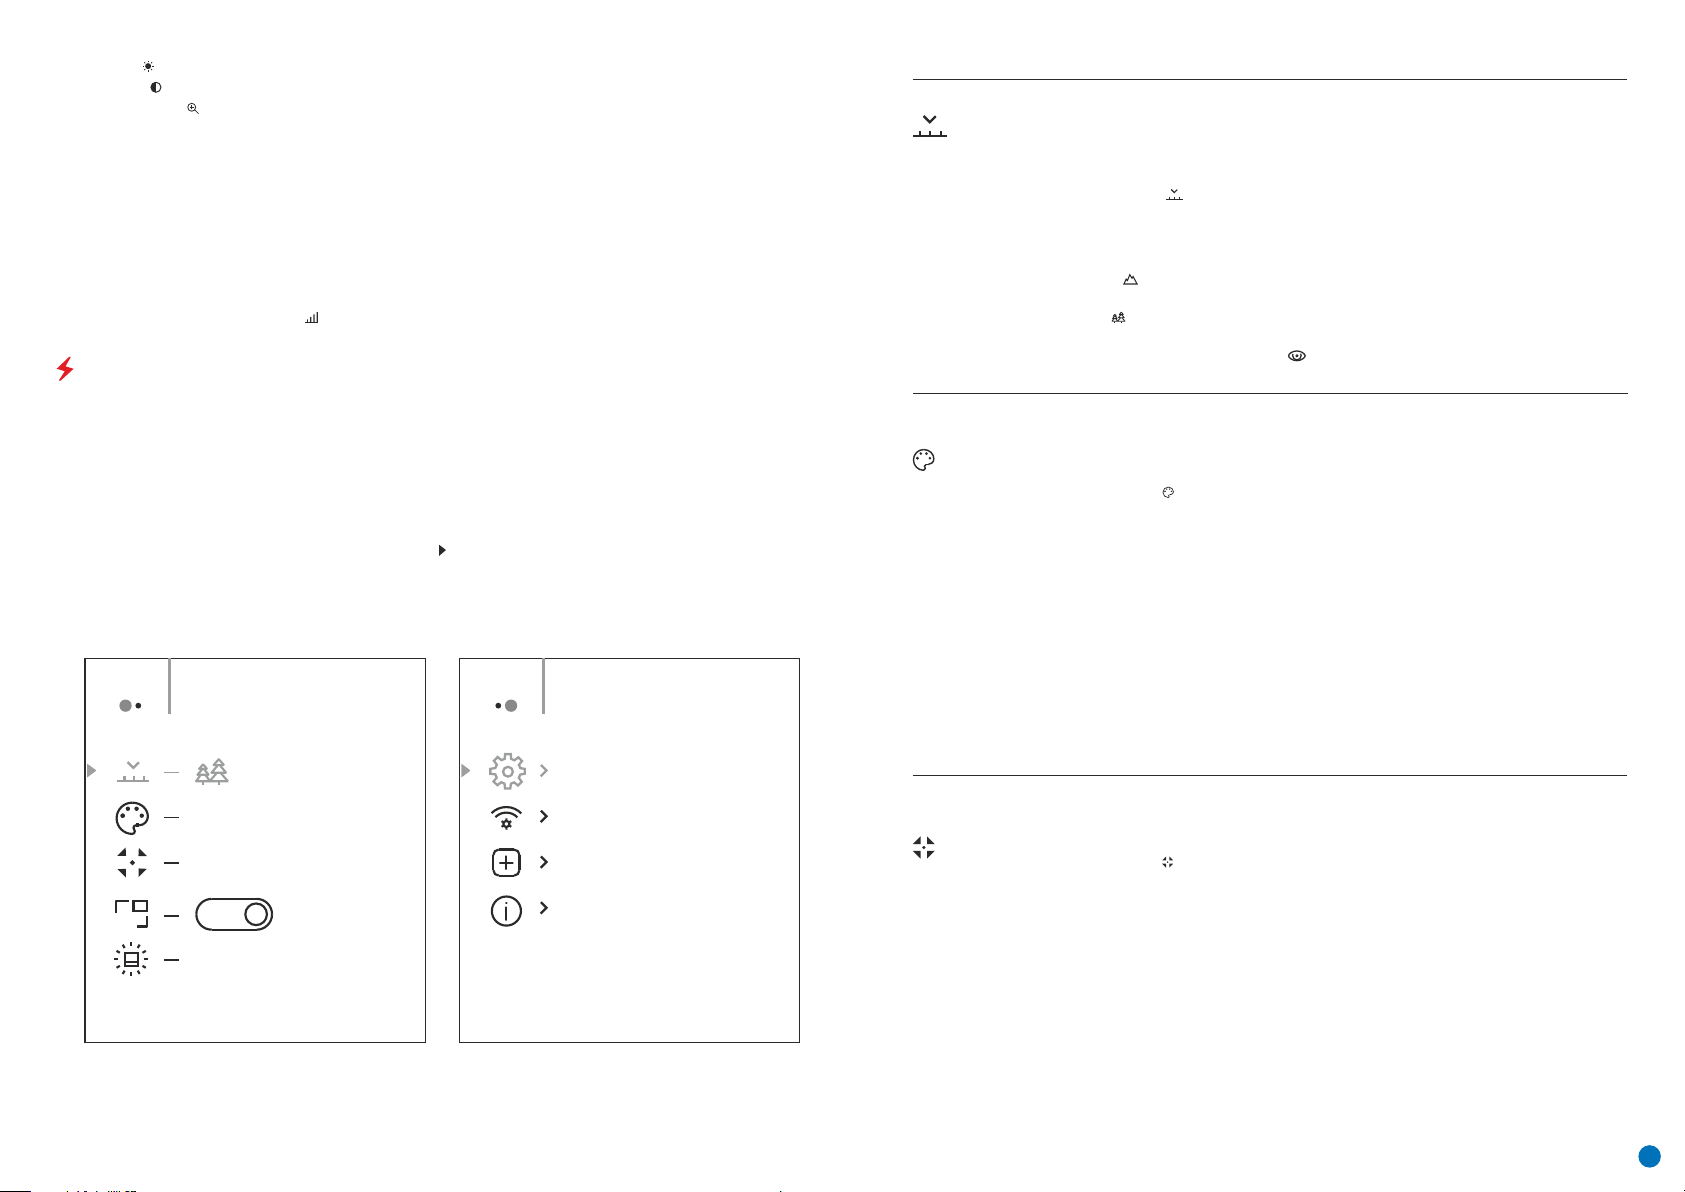
Яркость – нажатием кнопок Up (4) / Down (2) и изменяйте значение яркости дисплея от 00 до 20.
Контраст – нажатием кнопок Up (4) / Down (2) и изменяйте значение контраста изображения от 00 до 20.
Цифровой зум – нажатием кнопок Up (4) / Down (2) и изменяйте значение цифрового зума от 1,0 до 4,0.
Шаг плавного цифрового зума – 0,1.
Для выхода из меню нажмите и удерживайте кнопку Menu (3) либо
подождите 10 секунд для автоматического выбора.
Отображаемый первоначальный коэффициент плавного цифрового зума равен x1.0, если дискретный зум
не активен, х2.0, если дискретный зум равен 2х; х4.0, если дискретный зум равен 4х.
Примечания. Актуальное увеличение рассчитывается как произведение базового увеличения и
коэффициента плавного цифрового зума. Пример: базовое увеличение прибора 3,0х, коэффициент
плавного цифрового зума х1,7. Актуальное увеличение – 5,1х (3,0*1,7). При очередном включении прибора,
изображение на дисплей выводится со значениями яркости и контраста, сохраненными при предыдущем
выключении.
Стадиометрический дальномер – нажатием кнопок Up (4) / Down (2) изменяйте положение меток для
определения дистанции до наблюдаемого объекта (подробнее о дальномере в разделе 16).
ФУНКЦИИ ОСНОВНОГО МЕНЮ
џ Войдите в основное меню длительным нажатием кнопки Мenu (3).
џ Для перемещения по пунктам меню нажимайте кнопки Up (4) / Down (2).
џ Навигация по меню происходит циклично, при достижении последнего пункта первой вкладки
происходит переход к первому пункту второй вкладки.
џ Для входа в пункт меню кратко нажмите кнопку Menu (3).
џ Для выхода из меню нажмите и удерживайте кнопку Menu (3).
џ Автоматический выход из меню происходит после 10 секунд бездействия.
џ При выходе из меню местоположение курсора ( ) запоминается только в процессе одной рабочей
сессии (т.е. до выключения прибора). При очередном включении прибора и вызове меню курсор будет на
первом пункте меню.
Общий вид меню:
Вкладка 1 Вкладка 2
Menu General SettingMenu Mode
Состав и описание меню
Режим
Цветовые
палитры
Выбор режима наблюдения. Имеется три автоматических режима работы тепловизора.
Каждый из режимов включает в себя оптимальное сочетание параметров (яркость,
контраст, усиление и т.д.) для обеспечения наилучшего качества изображения в
конкретных условиях наблюдения.
џ Нажмите и удерживайте кнопку Мenu (3) для входа в меню.
џ Выберите раздел «Режим/Mode»
џ Кратко нажмите кнопку Мenu (3) для входа в меню.
џ Кнопками Up (4) / Down (2) выберите один из режимов, описанных ниже.
џ Кратко нажмите Menu (3) для подтверждения выбора.
Горы (Rocks) . Режим высокого контраста. Оптимален для наблюдения животных на
фоне камней, грунта в горной местности
Лес (Forest) . Режим низкого контраста. Оптимален для наблюдения животных на фоне
растительности
Распознавание (Identification mode) . Универсальный режим для использования в
различных условиях наблюдения.
Выбор цветовой палитры. Основной режим отображения наблюдаемого изображения "Hot White" (горячий белый). Пункт меню "Цветовые палитры/Color palettes" позволяет
выбрать альтернативную палитру:
џ Нажмите и удерживайте кнопку Мenu (3) для входа в меню.
џ Выберите раздел "Цветовые палитры»
џ Кратко нажмите кнопку Мenu (3) для входа в меню.
џ Кнопками Up (4) / Down (2) выберите одну из палитр, описанных ниже.
џ Кратко нажмите Menu (3) для подтверждения выбора.
Hot White. Черно-белая палитра (холодной температуре соответствует черный цвет, а
горячей температуре - белый цвет).
Hot Black. Черно-белая палитра (холодной температуре соответствует белый цвет, а
горячей температуре - черный цвет).
Hot Red. Горячий красный
Red Monochrome. Красный монохром
Rainbow. Радуга
Ultramarine. Ультрамарин
Violet. Фиолетовый
Sepia. Сепия
PIP
Hot White
Automatic
Off
10
Режим
калибровки
Выбор режима калибровки. Имеется три режима калибровки - ручной (manual),
полуавтоматический (semi-automatic) и автоматический (automatic).
џ Нажмите и удерживайте кнопку Мenu (3) для входа в меню.
џ Выберите раздел Режим калибровки/Calibration.
џ Кратко нажмите кнопку Мenu (3) для входа в подменю.
џ Кнопками Up (4) / Down (2) выберите один из режимов калибровки, описанных ниже.
џ Кратко нажмите Menu (3) для подтверждения выбора.
Автоматический/Automatic
В автоматическом режиме определение необходимости калибровки происходит
программно, запуск процесса калибровки осуществляется автоматически.
Полуавтоматический/Semi-automatic
Пользователь самостоятельно (по состоянию наблюдаемого изображения) определяет
необходимость калибровки.
Ручной/Manual
Ручная калибровка. Перед началом калибровки закройте крышку объектива.
44
Page 47
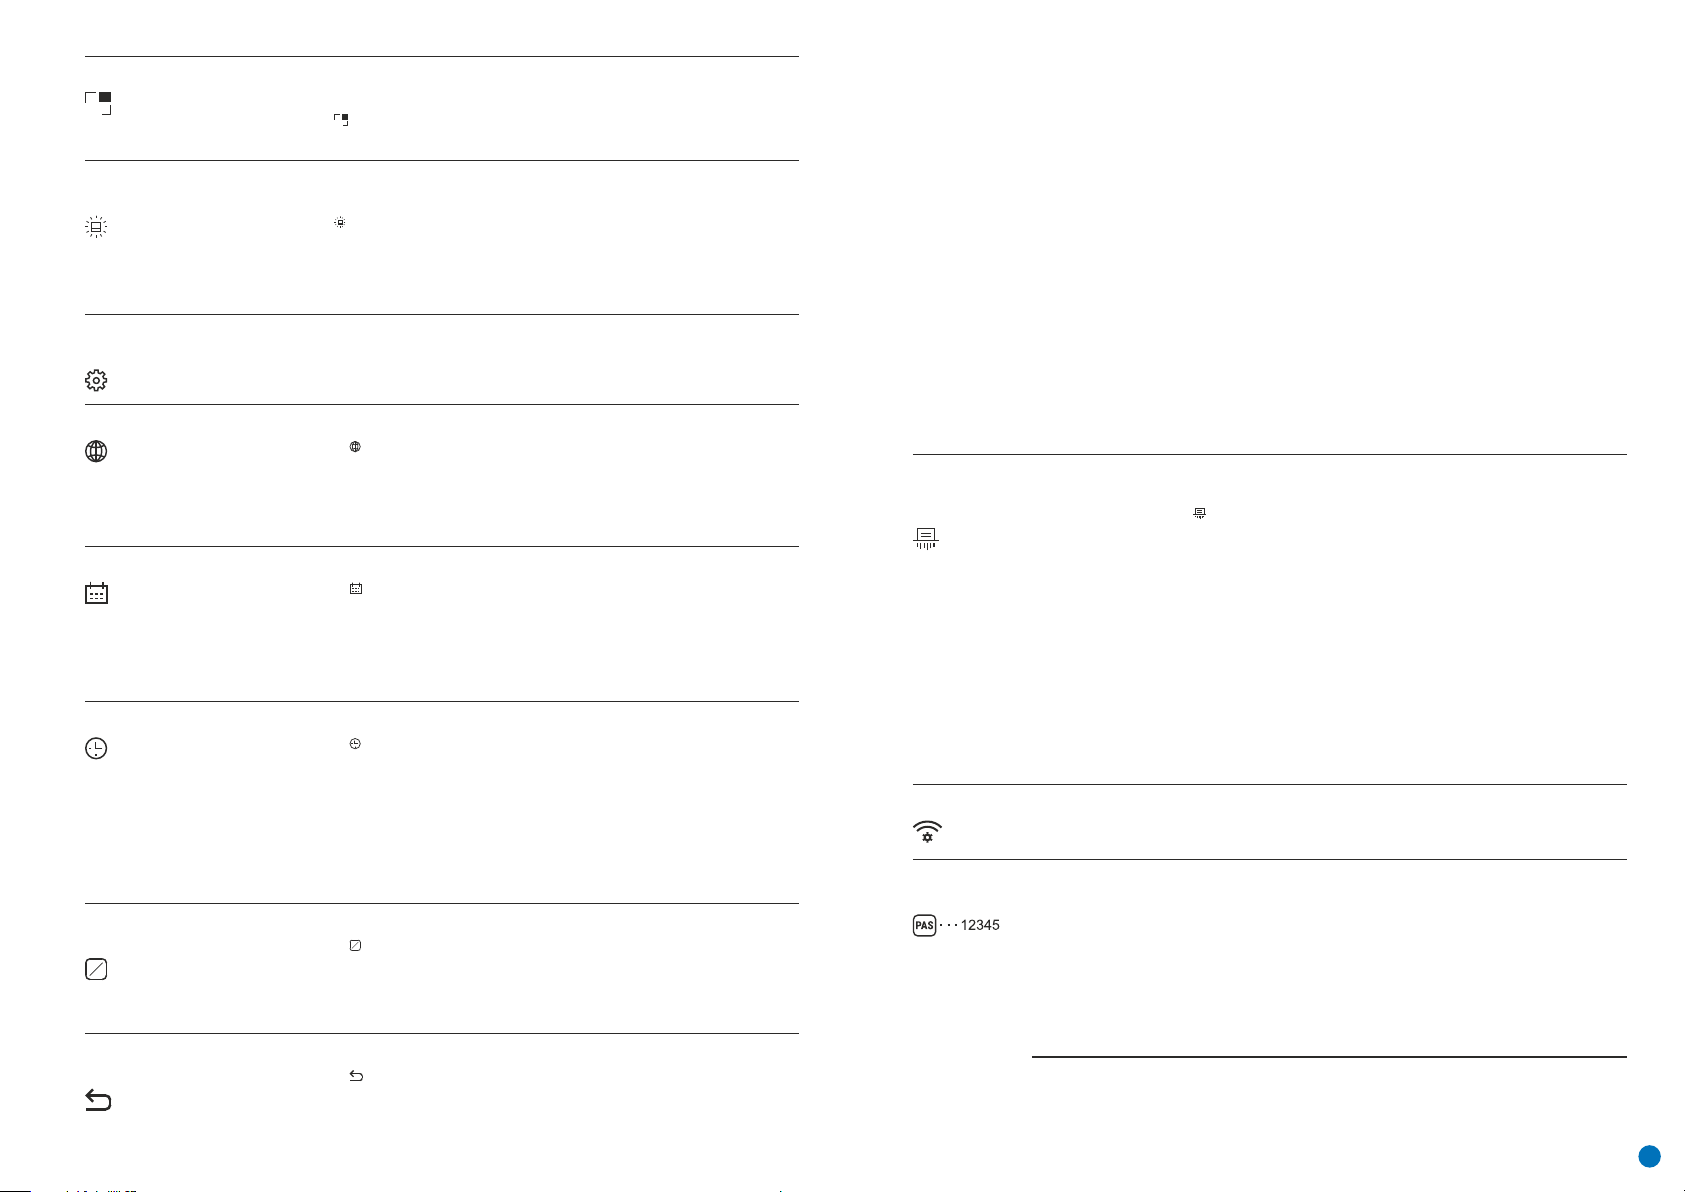
Режим PiP
PIP
Яркость
пиктограмм
Общие
настройки
Язык
Дата
Время
Единицы
измерения
M
Y
Настройки
по умолчанию
Выбор режима «Картинка в картинке»
џ Нажмите и удерживайте кнопку Мenu (3) для входа в меню.
џ Выберите раздел «Режим PiP».
џ Кратко нажмите кнопку Menu (3) для включения/выключения режима.
Регулировка яркости пиктограмм.Нажмите и удерживайте кнопку Мenu (3) для входа в
меню.
џ Выберите раздел «Яркость пиктограмм».
џ Кратко нажмите кнопку Мenu (3) для входа в подменю.
џ Кнопками Up (4) / Down (2) выберите уровень яркости пиктограмм.
џ Кратко нажмите кнопку Menu (3) для подтверждения выбора.
Пункт меню позволяет установить следующие настройки:
Выбор языка
џ Войдите в подменю "Язык" коротким нажатием кнопки Menu (3).
џ Кнопками Up (4) / Down (2) выберите один из доступных языков интерфейса:
английский, французский, немецкий, испанский, русский.
џ Подтвердите выбор кратким нажатием кнопки Menu (3).
џ Для сохранения выбора и выхода из подменю нажмите и удерживайте кнопку Мenu (3).
Настройка даты
џ Войдите в подменю "Дата " коротким нажатием кнопки Menu (3). Дата отображается в
формате дд/мм/гггг.
џ Кнопками Up (4) / Down (2) выберите нужное значение года, месяца и даты. Для
перемещения между разрядами кратко нажимайте кнопку Menu (3).
џ Для сохранения выбранной даты и выхода из подменю нажмите и удерживайте кнопку
Menu (3).
Настройка времени
џ Войдите в подменю «Время» коротким нажатием кнопки Menu (3).
џ Нажатием кнопок Up (4) / Down (2) выберите формат времени – 24 или PM/AM.
џ Для перехода к настройке значения часа нажмите кнопку Мenu (3).
џ Нажатием кнопок Up (4) / Down (2) выберите значение часа.
џ Для перехода к настройке значения минут нажмите кнопку Мenu (3).
џ Нажатием кнопок Up (4) / Down (2) выберите значение минут.
џ Для сохранения выбранного времени и выхода из подменю нажмите и удерживайте
кнопку Menu (3).
Выбор единицы измерения дальномера
џ Войдите в подменю "M/Y" коротким нажатием кнопки Menu (3).
џ Нажатием кнопок Up (4) / Down (2) выберите единицу измерения – метры или ярды,
нажмите кнопку Мenu (3).
џ Возврат в подменю произойдет автоматически.
Возврат к заводским настройкам
џ Войдите в подменю “Настройки по умолчанию” коротким нажатием кнопки Мenu (3).
џ Кнопками Up (4) / Down (2) выберите вариант «Да» для возврата к заводским
настройкам, или «Нет» для отмены действия.
PIP
M
Y
Форматирование карты
памяти
Настройка Wi-Fi
Настройка
пароля
Настройка
уровней
доступа
џ Подтвердите выбор кратким нажатием кнопки Мenu (3).
џ Если выбран вариант «Да», на дисплее появится сообщения “Вы хотите вернуться к
настройкам по умолчанию?” и варианты «Да» и «Нет». Выберите вариант «Да» для
форматирования карты памяти.
џ Если выбран вариант «Нет», осуществляется отказ от форматирования и возврат в
подменю.
Следующие настройки будут возвращены в первоначальное состояние до их изменения
пользователем:
Режим работы – video
Mode – forest (лес)
Режим калибровки – автоматический
Язык – английский
Wi-Fi – выключен (пароль по умолчанию)
Увеличение – исходное значение
PiP – выключен
Цветовая палитра – Hot White
Единица измерения – метры
Внимание: при возврате к заводским настройкам значения даты, времени,
пользовательская карта пикселей сохраняются.
Данный пункт позволяет осуществить форматирование Flash-карты (карты памяти)
прибора (удаление всех файлов с карты памяти).
џ Войдите в подменю «Форматирование карты памяти/Memory card formatting»
кратким нажатием кнопки Мenu (3).
џ Кнопками Up (4) / Down (2) выберите вариант «Да» для форматирования карты памяти,
или «Нет» для возврата в подменю.
џ Подтвердите выбор нажатием кнопки Мenu (3).
џ Если выбран вариант «Да», на дисплее появится сообщения “Отформатировать карту
памяти?” и варианты «Да» и «Нет». Выберите вариант «Да» для форматирования карты
памяти.
џ Cообщение «Форматирование карты памяти» означает, что осуществляется
форматирование.
џ Сообщение «Форматирование завершено» означает, что форматирование
завершено.
џ Если выбран вариант «Нет», осуществляется отказ от форматирования и возврат в
подменю.
Данный пункт позволяет настроить прибор для работы в сети Wi-Fi.
Установка пароля. Данный пункт позволяет настроить пароль доступа к прибору со
стороны внешнего устройства. Пароль используется при подключении внешнего
устройства (например, смартфона) к прибору.
џ Нажмите кнопку Мenu (3) для входа в подменю "Wi-Fi".
џ На дисплее появится пароль – по умолчанию “12345678”.
џ Кнопками Up (4) / Down (2) установите желаемый пароль (кнопка Up (4) - увеличение
значения, кнопка Down (2) – уменьшения значения). Для перемещения между разрядами
нажимайте кнопку Мenu (3).
џ Для сохранения пароля и выхода из подменю нажмите и удерживайте кнопку Menu (3).
Настройка уровней доступа
Данный подпункт позволяет настроить необходимый уровень доступа к своему прибору,
который получает приложение Stream Vision.
45
Page 48
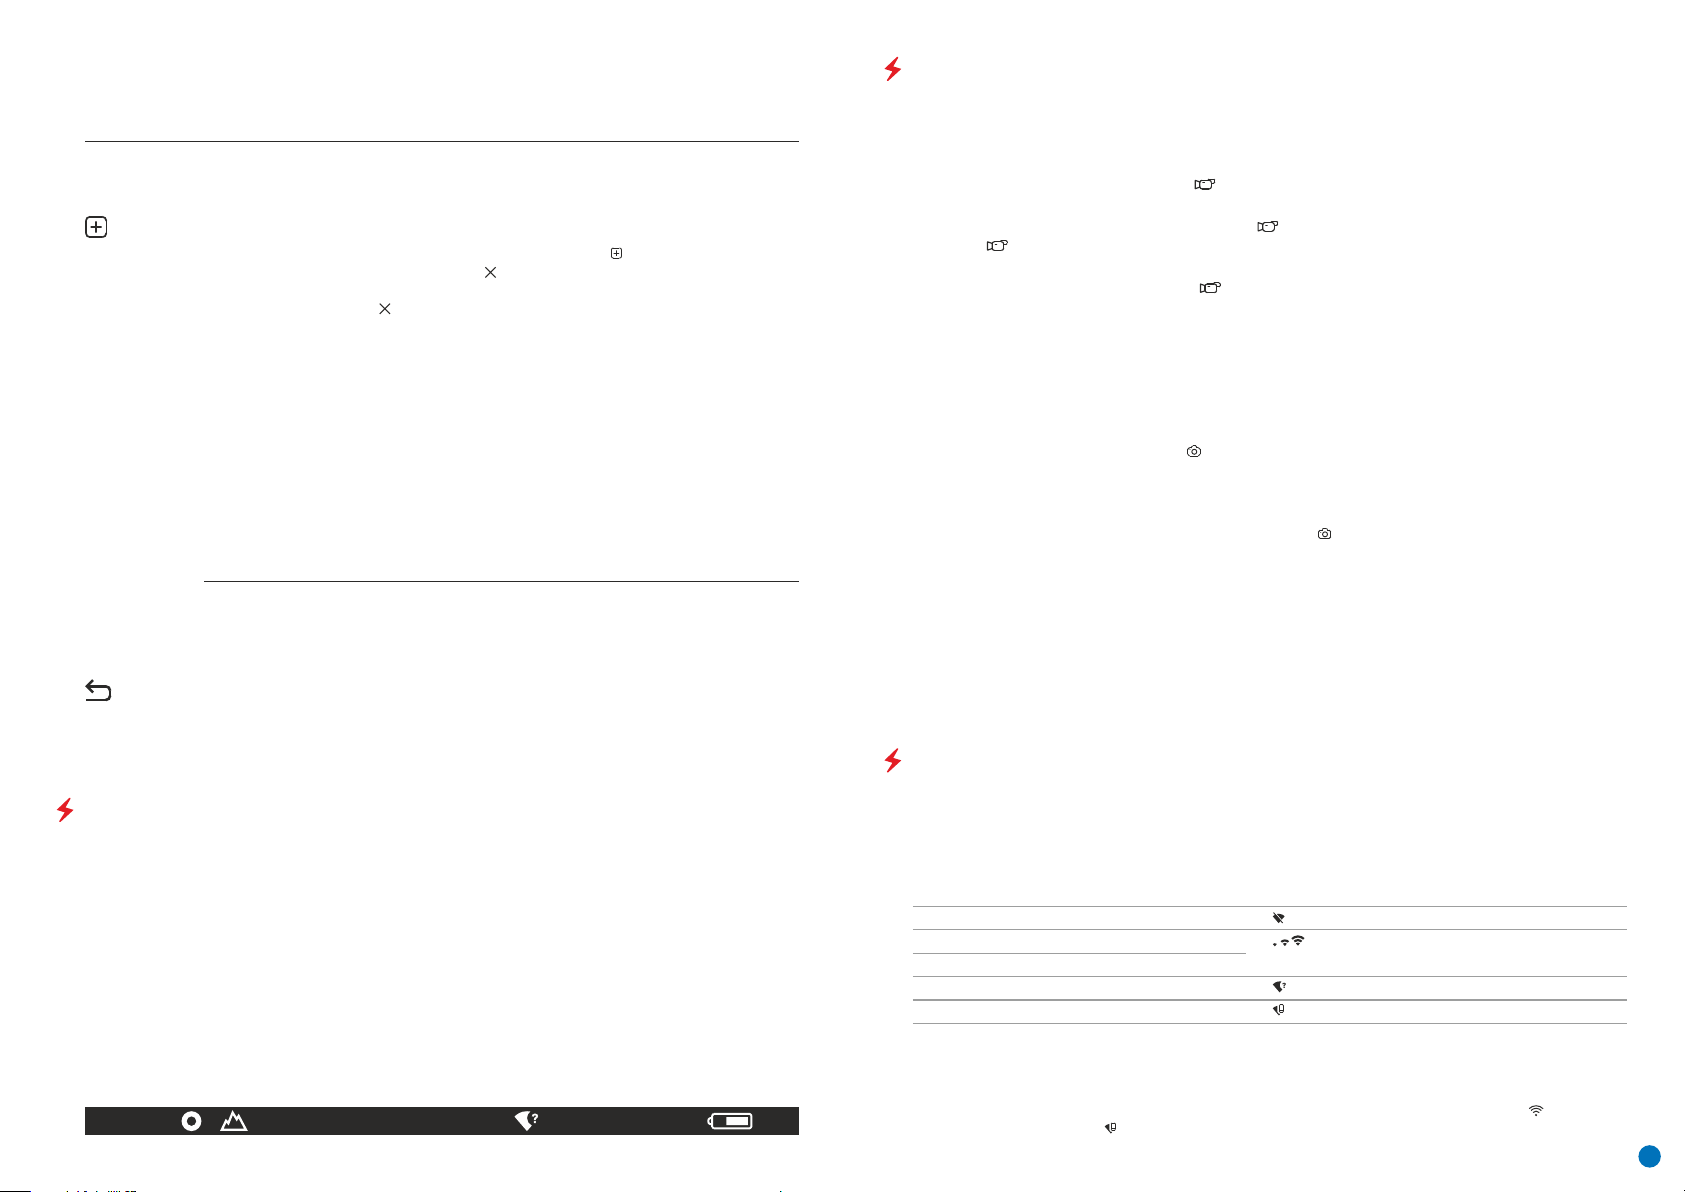
Уровень Хозяин. Пользователь из Stream Vision имеет полный доступ ко всем функциям
прибора.
Уровень Гость. Пользователь из Stream Vision имеет возможность только просматривать
видео с прибора в реальном времени.
Удаление
дефектных
пикселей
Во время эксплуатации прибора на сенсоре возможно появление дефектных (т.н.
“битых”) пикселей, т.е. ярких либо темных точек с постоянной яркостью, видимых на
изображении. Тепловизоры AXION предоставляют возможность удалить дефектные
пиксели на сенсоре программным способом, а также отменить удаление.
џ Нажатием кнопки Мenu (3) войдите в подменю.
џ Кратким нажатием кнопки Menu (3) выберите пиктограмму .
џ В левой части дисплея появится маркер .
џ В правой части дисплея появится “лупа” - увеличенное изображение в рамке с
неподвижным крестиком , необходима для облегчения поиска дефектного пикселя и
совмещения с ним маркера. стрелки направления горизонтального или вертикального
перемещения маркера с координатами по осям X и Y.
џ Кнопками Up (4) / Down (2) перемещайте маркер таким образом, чтобы совместить
центр маркера с дефектным пикселем.
џ Для переключения направления движения маркера с горизонтального на
вертикальное и наоборот кратко нажмите кнопку Мenu (3).
џ Кнопками Up (4) / Down (2) совместите дефектный пиксель с неподвижным крестиком
в рамке - пиксель должен исчезнуть.
џ Удалите дефектный пиксель кратким нажатием кнопки включения/калибровки ON (5).
џ В случае успешного удаления в рамке появится кратковременное сообщение “OK”.
џ Далее, перемещая маркер по дисплею, вы можете удалить следующий дефектный
пиксель.
џ Для выхода из функции «Удаление дефектных пикселей» нажмите и удерживайте
кнопку Menu (3).
Возврат к
заводской
“карте
Возврат всех ранее отключенных пользователем дефектных пикселей в исходное
состояние:
џ Нажатием кнопки Мenu (3) войдите в подменю.
џ Выберите пиктограмму и нажмите кнопку Мenu (3).
пикселей”
џ Выберите “Да”, если хотите вернуться к заводской карте пикселей, или "Нет", если не
хотите.
џ Подтвердите выбор нажатием кнопки Мenu (3).
Внимание! На дисплее тепловизора допускается 1-2 пикселя в виде ярких белых, темных
или цветных (синих, красных, зеленых) точек, которые не удаляются и дефектом не
являются.
СТАТУСНАЯ СТРОКА
Статусная строка располагается в нижней части дисплея и отображает информацию о состоянии работы
прибора, в том числе:
џ Режим наблюдения
џ Режим калибровки (в автоматическом режиме калибровки, когда до момента автоматической
калибровки остается 3 секунды, вместо пиктограммы калибровки отображается таймер с обратным
отсчетом).
џ Текущее полное увеличение
џ Подключение по Wi-Fi
џ Подключение по USB (если прибор подключен)
џ Цветовая палитра (отображается только при установленной цветовой палитре “Hot Black”)
џ Текущее время
џ Уровень разряда аккумуляторной батареи (если прибор питается от аккумуляторной батареи)
џ Индикатор питания от внешнего источника питания (если прибор питается от внешнего источника
питания)
џ
SA
Примечание: в процессе калибровки изображение “замирает” на дисплее на время калибровки.
11.0x 08:13PM
ВИДЕОЗАПИСЬ И ФОТОСЪЕМКА НАБЛЮДАЕМОГО ИЗОБРАЖЕНИЯ
Тепловизоры Axion имеют функцию видеозаписи и фотосъемки наблюдаемого изображения на
встроенную карту памяти. Перед использованием функций фото- и видеозаписи рекомендуется
настроить дату и время (см. соответствующие пункты меню).
Встроенное записывающее устройство работает в двух режимах:
Режим ВИДЕО. Видеозапись изображения
џ При включении прибор находится в режиме ВИДЕО.
џ В левом верхнем углу отображается пиктограмма и оставшееся время для записи (в формате чч : мм),
например 5:12.
џ Кратко нажмите кнопку Down/REC (2) для начала видеозаписи.
џ После начала видеозаписи пиктограмма исчезает , вместо нее появляется пиктограмма REC и таймер
записи в формате MM:SS (минуты : секунды);
џ Для того чтобы поставить видеозапись на паузу и далее возобновить запись, кратко нажимайте кнопку
Down/REC (2).
џ Для остановки видеозаписи нажмите и удерживайте кнопку Down/REC (2).
џ Видеофайлы сохраняются на встроенную карту памяти после выключения записи видео.
џ Для переключения между режимами (Video-> Photo-> Video…) нажмите и удерживайте кнопку Down/REC
(2).
Режим Photo. Фотосъемка изображения
џ Перейдите в режим PHOTO долгим нажатием кнопки Down/REC (2).
џ Кратко нажмите кнопку Down/REC (2) для того, чтобы сделать фотоснимок. Изображение замирает на 0,5
сек - файл фотоснимка сохраняется на встроенную карту памяти.
џ В левом верхнем углу дисплея отображается пиктограмма , “>100” означает, что прибор может сделать
более 100 фотоснимков. Если количество доступных фотоснимков менее 100, рядом с пиктограммой
отображается фактическое количество доступных фотографий (например, 98).
Примечания: Во время записи видео возможен вход в меню и работа в меню прибора. Записанные
видеоролики и фотографии сохраняются на встроенную карту памяти прибора в виде img_xxx.jpg (для
фото); video_xxx.mp4 (для видео). xxx – трехразрядный общий (счетчик файлов (для фото и видео).
Счетчик, используемый в именовании мультимедиа файлов, НЕ сбрасывается.
Внимание: Максимальная продолжительность записываемого видеофайла - семь минут. По истечении
этого времени видео записывается в новый файл. Количество файлов ограничено объемом встроенной
памяти прибора. Регулярно контролируйте объем свободной памяти встроенной карты памяти,
переносите отснятый материал на другие носители, освобождая место на карте памяти.
ФУНКЦИЯ WI-FI
Прибор имеет функцию беспроводной связи с внешними устройствами (компьютер, смартфон)
посредством Wi-Fi.
џ Включите модуль беспроводной связи долгим нажатием кнопки Up (4). Работа Wi-Fi отображается в
статусной строке следующим образом:
Статус подключения Индикация в строке статуса
Wi-Fi выключен
Wi-Fi включен пользователем
идет процесс включения Wi-Fi в приборе
Wi-Fi включен, подключение к прибору отсутствует
Wi-Fi включен, подключение к прибору установлено
џ Внешним устройством прибор опознается под именем «AXION_XXXX», где XXXX – последние четыре
цифры серийного номера».
џ После ввода пароля на внешнем устройстве (подробнее об установке пароля - в подразделе "Настройка
Wi-Fi" раздела "Функции основного меню" инструкции) и установки связи пиктограмма в статусной
строке прибора меняется на .
46
Page 49
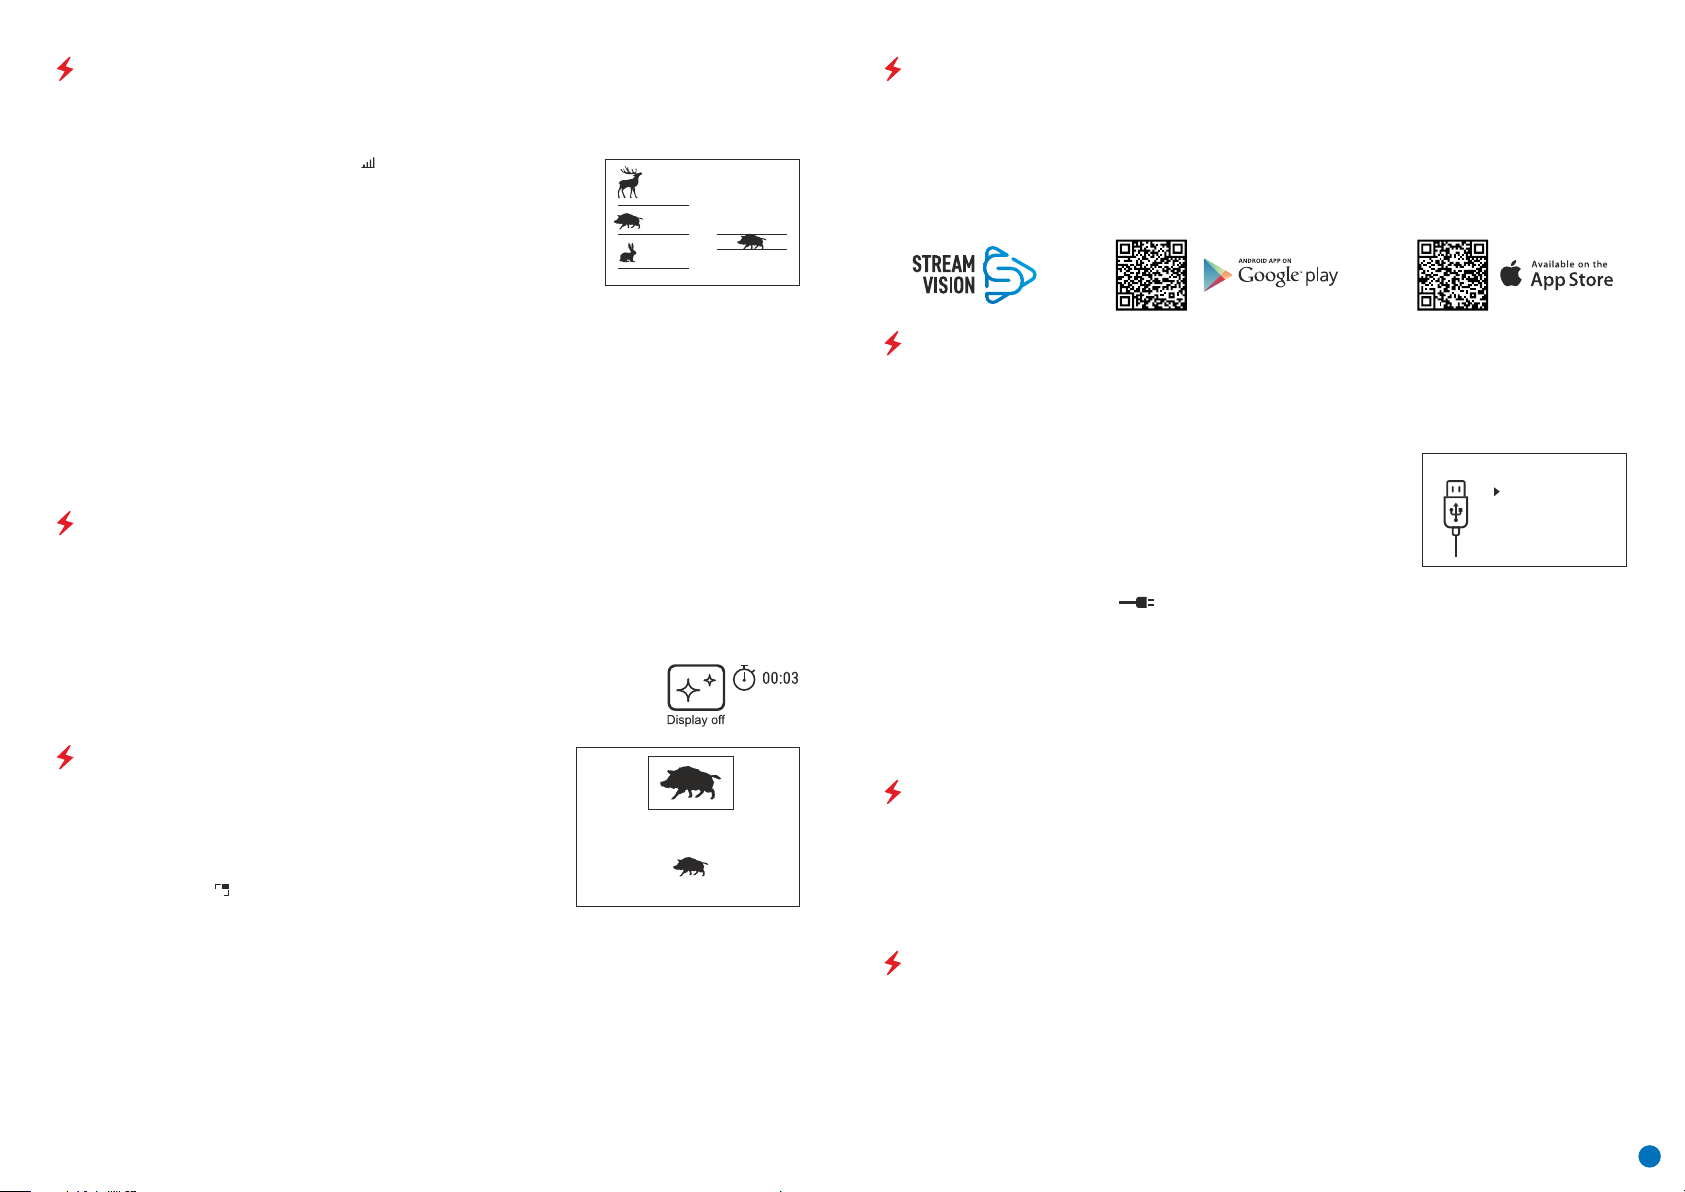
СТАДИОМЕТРИЧЕСКИЙ ДАЛЬНОМЕР
Тепловизоры оснащены стадиометрическим дальномером, который позволяет определить
ориентировочное расстояние до объекта, если известен его размер.
џ Для выбора функции стадиометрический дальномер кратко нажмите на
кнопку Мenu (3) и выберите пиктограмму .
џ На дисплее появятся штрихи для определения дистанции, пиктограммы
трех объектов и цифры определяемой дистанции для трех объектов.
Имеется три предустановленных значения для объектов:
Заяц – высота 0,3 м
Кабан – высота 0,7 м
160m
66m
28m
Олень – высота 1,7 м
џ Поместите нижний неподвижный курсор под объектом и кнопками навигации Up (4) /Down (2)
перемещайте верхний горизонтальный курсор относительно нижнего горизонтального неподвижного
курсора так, чтобы объект располагался непосредственно между курсорами. Одновременно с
перемещением происходит автоматический пересчет дальности до цели.
џ Если определение дистанции не происходит в течение 10 секунд, информация с дисплея исчезает.
џ Для выбора единицы измерения (метры или ярды) перейдите к соответствующему пункту меню.
џ Значение дальности перед выводом на дисплей округляется – для больших значений дальности до 5м,
для меньших - до 1 м.
џ Для выхода из режима дальномера кратко нажмите кнопку Menu (3) либо подождите 10 сек для
автоматического выхода.
ФУНКЦИЯ DISPLAY OFF
Данная функция отключает передачу изображения на дисплей, до минимума снижая яркость его
свечения. Это позволяет предотвратить случайную демаскировку. Прибор продолжает работать.
При использовании данной функции прибор переходит в режим ожидания, что позволяет при
необходимости быстро его включить.
џ Когда прибор включен, нажмите и удерживайте кнопку ON (5). Дисплей погаснет, появится сообщение
Display off.
џ Для включения дисплея кратко нажмите кнопку ON (5).
џ При удержании кнопки ON (5) на дисплее отображается сообщение “Display off”
џ с обратным отсчетом и прибор выключится.
ФУНКЦИЯ PiP
PiP (Picture in Picture – “картинка в картинке”) позволяет наблюдать в
отдельном «окне» увеличенное изображение с цифровым зумом
одновременно с основным изображением.
Для включения/отключения функции PiP:
џ Нажмите и удерживайте кнопку Мenu (3) для входа в основное меню.
џ Выберите раздел «Режим PiP».
џ Кратко нажмите Menu (3) для включения/выключения режима.
џ Нажмите и удерживайте кнопку Мenu (3) для выхода из основного меню.
џ Увеличенное изображение выводится на дисплей в отдельном окне, при этом используется значение
PIP
полного оптического увеличения.
џ Для изменения коэффициента увеличения в окне PiP кратко нажимайте кнопку Up (4).
џ Остальное изображение отображается со значением оптического увеличения, которое соответствует
значению коэффициента х1.0.
џ При включенном PiP вы можете управлять дискретным и плавным зумом. При этом изменение значения
полного оптического увеличения будет происходить только в отдельном окне.
џ При выключении PiP изображение выводится на дисплей со значением оптического увеличения,
которое было установлено для PiP режима.
6.9x
3.1x
STREAM VISION
Тепловизоры AXION поддерживают технологию Stream Vision, которая позволяет посредством Wi-Fi
транслировать изображение с тепловизора на Ваш смартфон либо планшет в режиме реального времени.
Подробные инструкции по работе Stream Vision Вы можете найти в отдельном буклете либо на сайте
www.pulsar-vision.com
Примечание: в конструкцию прибора заложена возможность обновления программного обеспечения.
Обновление возможно через приложение Stream Vision.
Для того чтобы скачать приложение Stream Vision, сканируйте QR коды:
ПОДКЛЮЧЕНИЕ USB
џ Подключите один конец кабеля USB к разъему microUSB (8) прибора, второй – к порту вашего
компьютера.
џ Включите прибор нажатием кнопки ON (5) (выключенный прибор компьютером не определяется).
џ Прибор определится компьютером автоматически, установка драйверов не требуется.
џ На дисплее появится два варианта подключения:
- Use as power (Использовать как питание)
- Use as memory card (Использовать как карту памяти).
џ Кнопками Up (4) / Down (2) выберите вариант подключения.
џ Кратко нажмите кнопку Menu (3) для подтверждения выбора.
USB connection
Use as power
Use as memory card
Use as power (Использовать как питание).
џ При выборе данного варианта компьютер используется прибором как внешнее питание. В строке
статуса появится пиктограмма . Прибор продолжает работать, все функции доступны.
џ Зарядка аккумуляторной батареи, установленной в приборе, не производится.
џ При отключении USB от прибора, подключенного в режиме Power, прибор продолжает работать от
аккумуляторной батареи при ее наличии и достаточном ее заряде.
Use as memory card (Использовать как карту памяти).
џ При выборе данного варианта прибор распознается компьютером как флеш-карта. Данный вариант
предназначен для работы с файлами, которые хранятся в памяти прибора, при этом функции прибора не
доступны, прибор выключается.
џ Если в момент подключения производилась запись видео, запись останавливается и сохраняется.
ТЕХНИЧЕСКИЙ ОСМОТР
Технический осмотр рекомендуется производить перед каждым использованием прибора. Проверьте:
џ Внешний вид прибора (трещины на корпусе не допускаются).
џ Состояние линз объектива и окуляра (трещины, жировые пятна, грязь и другие налеты не допускаются).
џ Состояние аккумуляторной батареи (должна быть заряжена) и электрических контактов (наличие солей
и окисления не допускаются).
џ Работоспособность органов управления.
ТЕХНИЧЕСКОЕ ОБСЛУЖИВАНИЕ
џ Техническое обслуживание проводится не реже двух раз в год и заключается в выполнении изложенных
ниже пунктов.
џ Хлопчатобумажной салфеткой очистите наружные поверхности металлических и пластмассовых
деталей от пыли и грязи. Допускается применение силиконовой смазки.
џ Очистите электрические контакты аккумуляторной батареи на приборе, используя нежирный
органический растворитель.
џ Осмотрите линзы окуляра и объектива. При необходимости удалите с линз пыль и песок (желательно
бесконтактным методом). Чистку наружных поверхностей оптики производите при помощи специально
предназначенных для этих целей средств.
47
Page 50
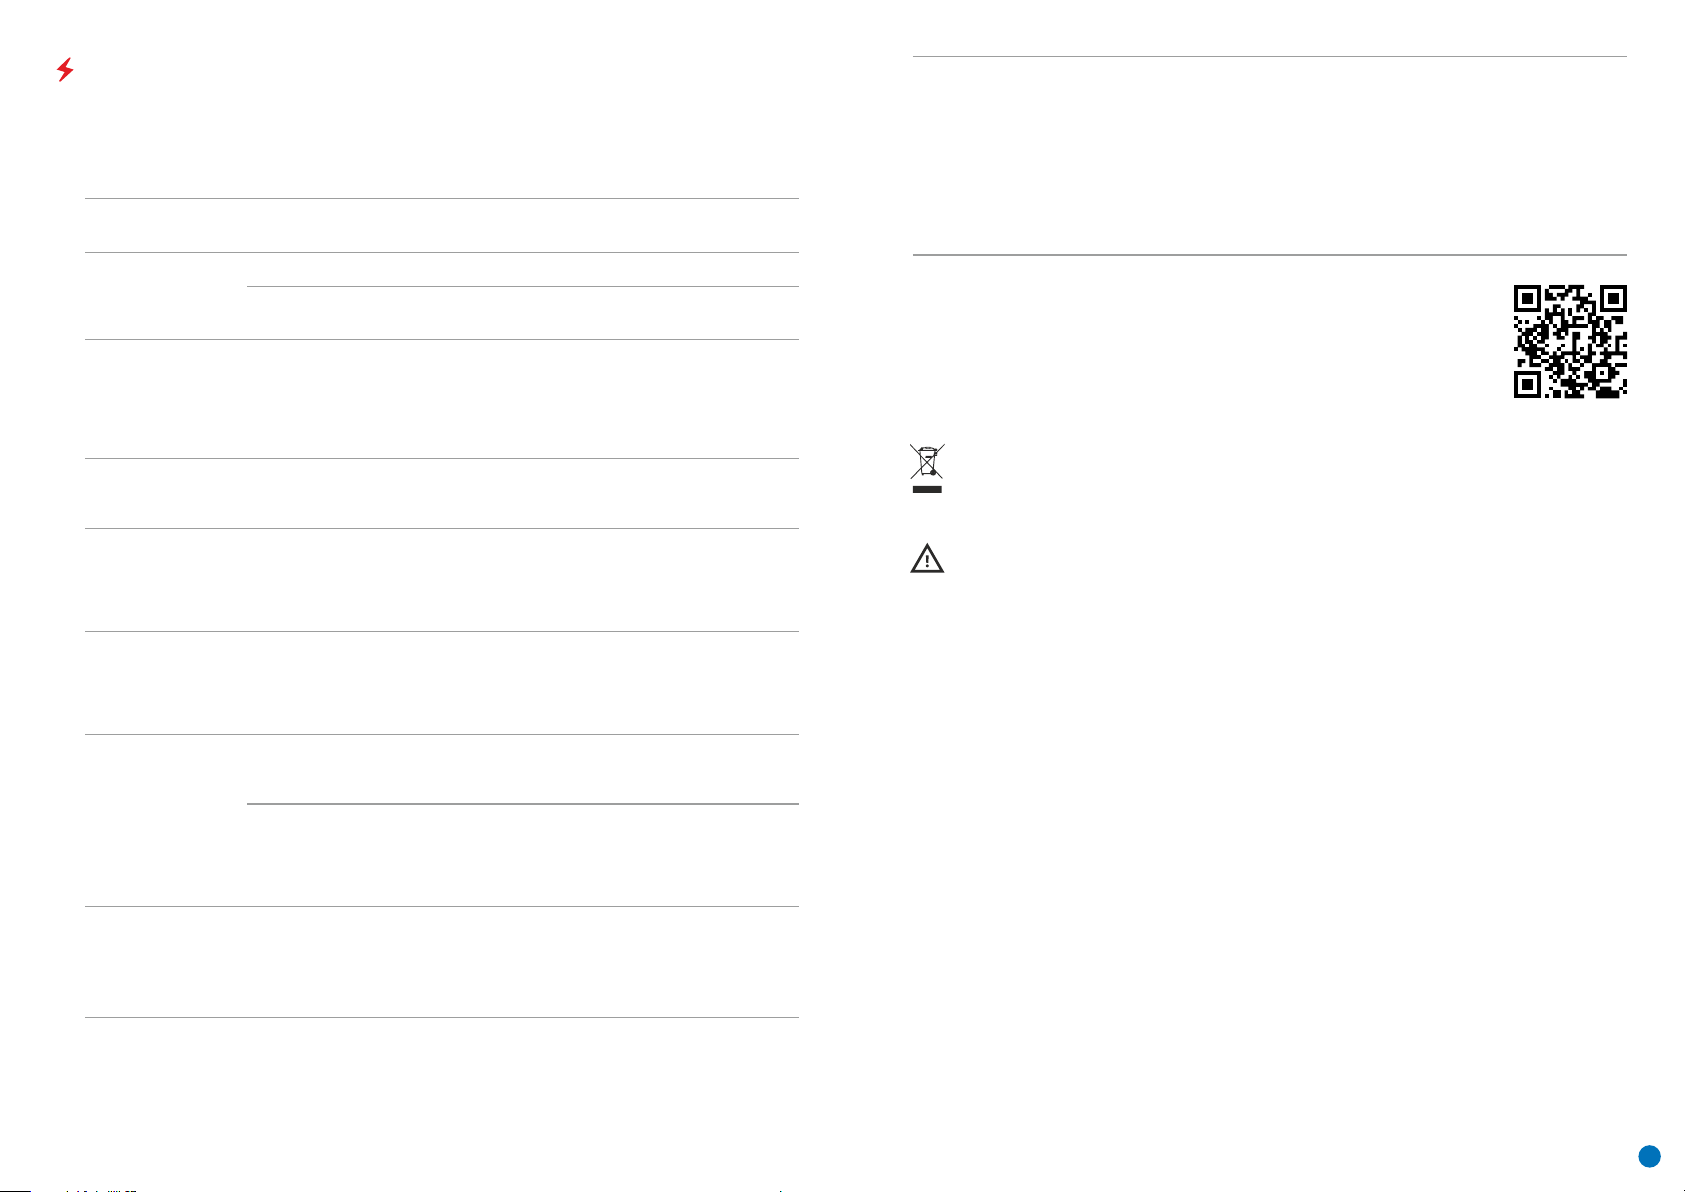
ВЫЯВЛЕНИЕ НЕИСПРАВНОСТЕЙ
В таблице приведен перечень проблем, которые могут возникнуть при эксплуатации прибора.
Произведите рекомендуемую проверку и исправление в порядке, указанном в таблице. При наличии
дефектов, не перечисленных в таблице, или при невозможности самостоятельно устранить дефект,
верните прибор на ремонт.
неисправность
Тепловизор не
включается.
возможная причина
Батарея полностью разрядилась.
исправление
Зарядите батарею.
Качество
изображения
окружающей среды
при использовании
прибора в условиях
пониженных
температур хуже,
чем в условиях
положительных
температур.
В условиях положительных температур объекты наблюдения (окружающая
среда, фон) за счет различной теплопроводности нагреваются по-разному, за
счет чего достигается высокий температурный контраст и соответственно
качество изображения, формируемое тепловизором, будет выше.
В условиях низких температур объекты наблюдения (фон), как правило,
охлаждаются до примерно одинаковых температур, за счет чего существенно
снижается температурный контраст, качество изображения (детализация)
ухудшается. Это особенность функционирования тепловизионных приборов.
Не работает от
внешнего источника
питания.
Изображение
нечеткое,
c вертикальными
полосами
и неравномерным
фоном.
Изображение
слишком
темное.
На дисплее
появились цветные
полосы либо
изображение
исчезло.
Низкое качество
изображения /
Уменьшение
дистанции
обнаружения.
Смартфон или
планшет не
подключается к
прибору.
Поврежден кабель USB.
Разряжен источник внешнего питания.
Необходима калибровка
Установлен низкий уровень яркости
или контраста.
В процессе эксплуатации на прибор
воздействовало статическое
напряжение.
Указанные проблемы могут возникать при наблюдении в сложных погодных
условиях (снег, дождь, туман и пр.).
Изменен пароль в приборе.
Прибор находится в зоне с большим
количеством сетей Wi-Fi, которые
могут создавать помехи.
Замените кабель USB.
Зарядите источник внешнего питания
(при необходимости).
Проведите калибровку изображения
согласно инструкциям раздела
8 “Эксплуатация”.
Отрегулируйте яркость или контраст.
После воздействия статического
напряжения прибор может
самостоятельно перезагрузиться либо
выключите и повторно включите
прибор.
Удалите сеть и подключитесь
повторно с вводом пароля,
записанного в приборе.
Для обеспечения стабильного
функционирования Wi-Fi переместите
прибор в зону с меньшим
количеством сетей Wi-Fi либо в зону,
где они отсутствуют.
По ссылке вы можете найти ответы на наиболее часто задаваемые вопросы о
тепловидении
https://www.pulsar-nv.com/glo/ru/podderzka/tchasto-zadavaemye-voprosy/91
Приоритет защиты окружающей среды!
Ваш прибор содержит ценные материалы, которые можно восстановить или переработать
Оставьте в местном пункте сбора отходов.
Внимание! Тепловизоры AXION требуют лицензии, если они экспортируются за пределы
Вашей страны.
Электромагнитная совместимость.
Данный продукт соответствует требованиям европейского стандарта EN 55032:2015, Класс А.
Внимание: эксплуатация данного продукта в жилой зоне может создавать радиопомехи.
Отсутствует или
прерывается
трансляция
сигнала через Wi-Fi.
Прибор находится вне зоны
уверенного приема сигнала Wi-Fi.
Между прибором и приемником
сигнала находятся препятствия
(бетонные стены, например).
Переместите прибор в зону прямой
видимости работы сигнала Wi-Fi.
48
Page 51

www.pulsar-vision.com @PulsarNightVision @pulsar.vision Pulsar Night Vision
 Loading...