

Page 1
CAL. VR42/VR43
Solar Chronograph
ENGLISH
l
Solar charging function
l
Power reserve indicator function
l
Energy depletion forewarning function
TIME/CALENDAR
l
24-hour, hour, minute and second hands
l
Date displayed in numerals
STOPWATCH
l
Two Stopwatch hands: second and minute hands
l
The stopwatch can measure up to 29 minutes and 59 seconds in one
second increments.
l
Split time measurement is available.
SOLAR FUNCTIONS
Page 2
English
English
32
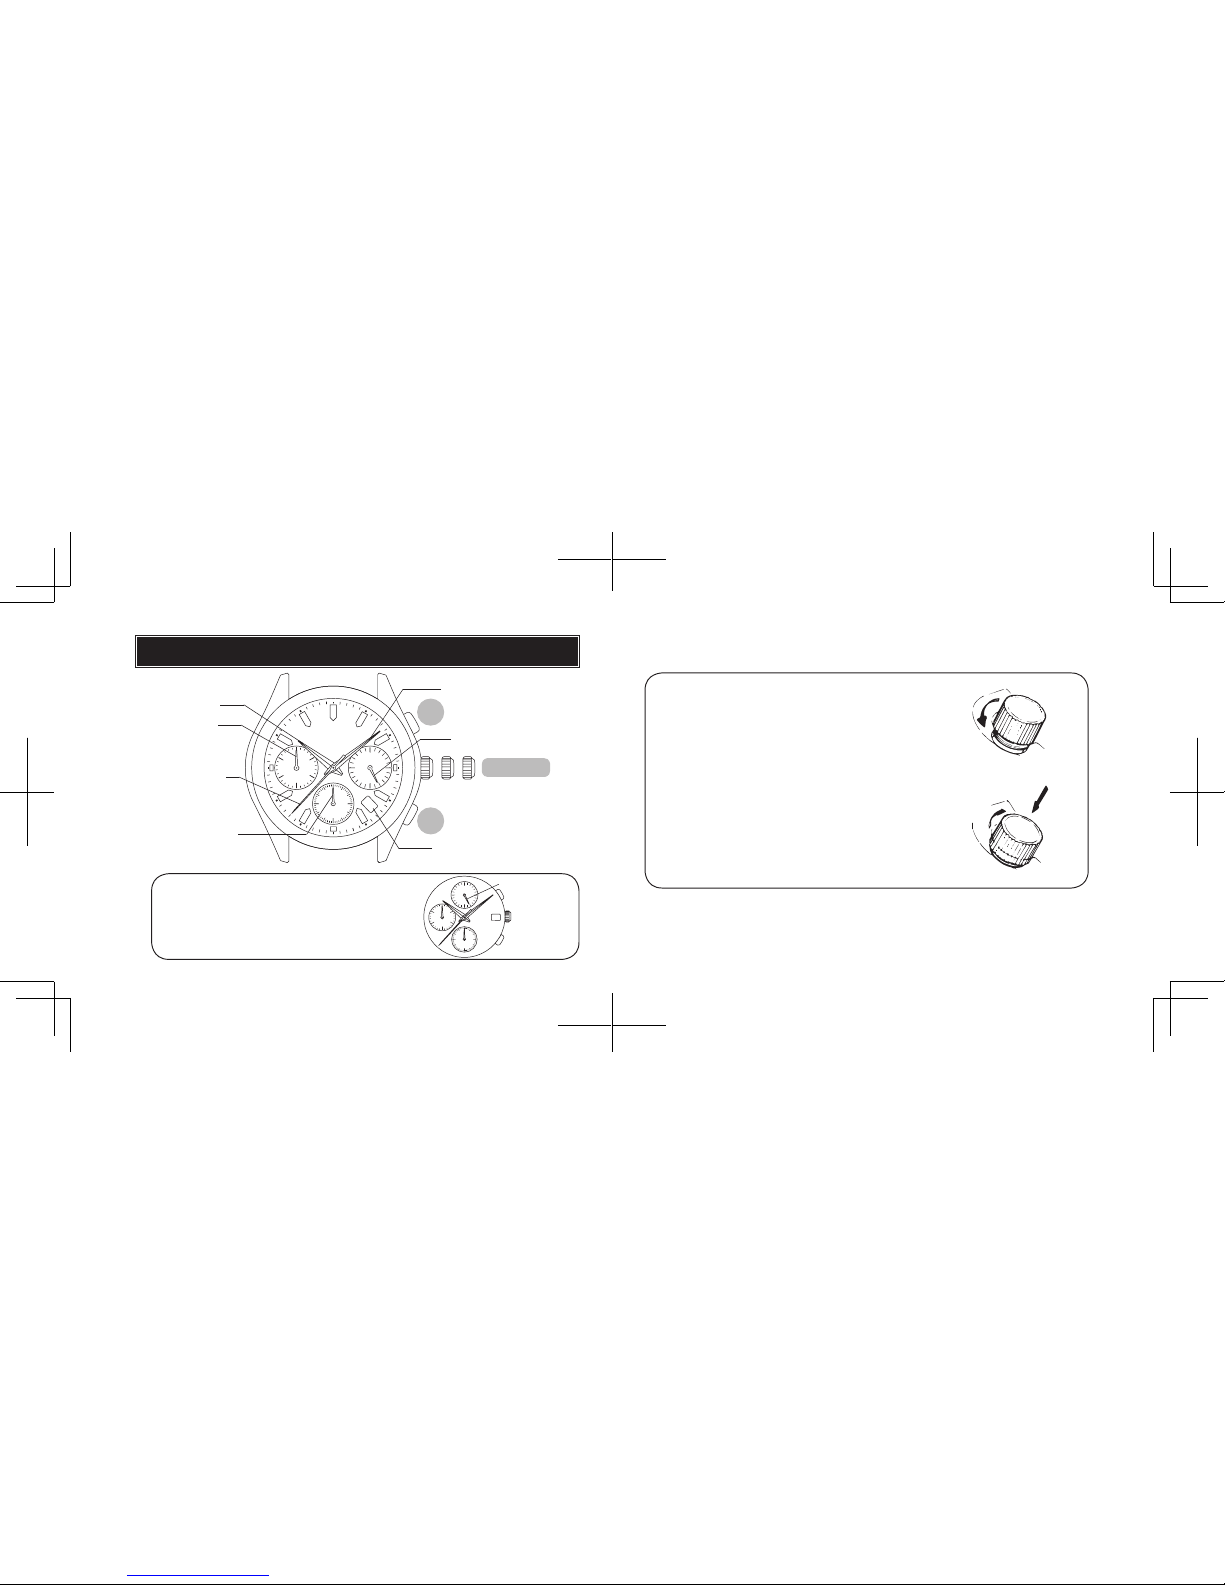
DISPLAY AND CROWN
a: Normal position
b: First click position
c: Second click position
Hour hand
STOP WATCH
Minute hand
Second hand
CROWN
Date
a b c
SCREW DOWN CROWN
[for models with screw down crown]
Locking the crown
1
Turn Crown counterclockwise until you no
longer feel the threads turning.
2
Crown can be pulled out.
1
Push Crown back in to normal position.
2
Turn Crown clockwise while pressing it
lightly until tight.
Unlocking the crown
Minute hand
STOP WATCH
Second hand
24-hour hand
30
20
10
6
24
VR43
60
153045
18
12
31
H
M
L
While the positi on of the 24-h our sub dial m ay differ
dependin g on the model, the m ethod of operation i s
the same.
24-hour hand
30
20
10
6
24
VR42
18
12
31
60
153045
H
M
L
A
B
Page 3
English
English
54
6
24
18
12
VR42
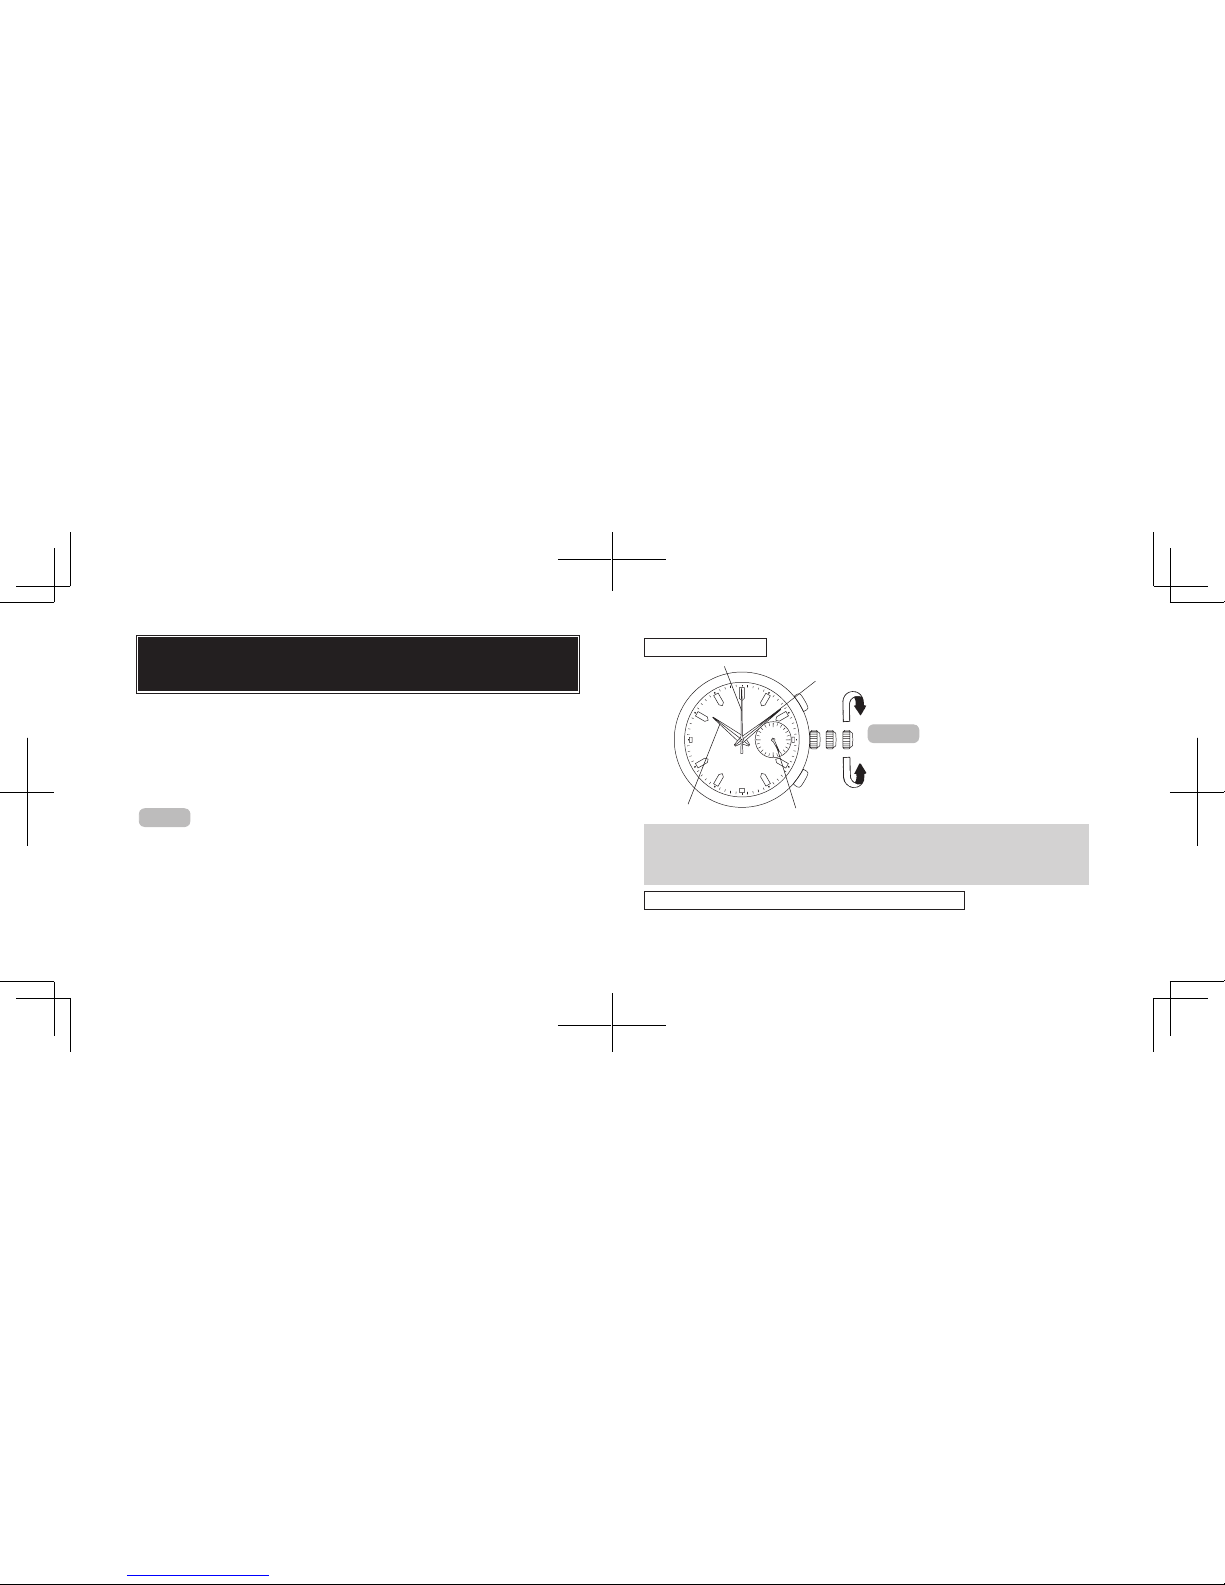
SETTING THE TIME AND
ADJUSTING THE STOPWATCH HAND POSITION
This watch is designed so that:
1) time setting and
2) stopwatch hand position adjustment
are both made with the crown at the second click position. Once the crown
is pulled out to the second click, be sure to make the above adjustments at
the same time.
CROWN
Pull out to second click when the second hand is at the 12 o’clock
position.
1) TIME SETTING
Hour hand
Minute hand
Second hand
CROWN
Turn to set the hour and
minute hands.
• The 24-h our hand move s correspond ingly with the hou r and minute ha nds.
• It is recommend ed that the hand s be set to the time a few mi nutes ahead of the
current time, taking into c onsideration the tim e required to adjust the STOPWATCH
hand position if necessary.
2) STOPWATCH HAND POSITION ADJUSTMENT
l
If the STOPWATCH hands are not in the “0” position, follow the
procedure below to set them to the “0” position.
24-hour hand
Page 4
English
English
76
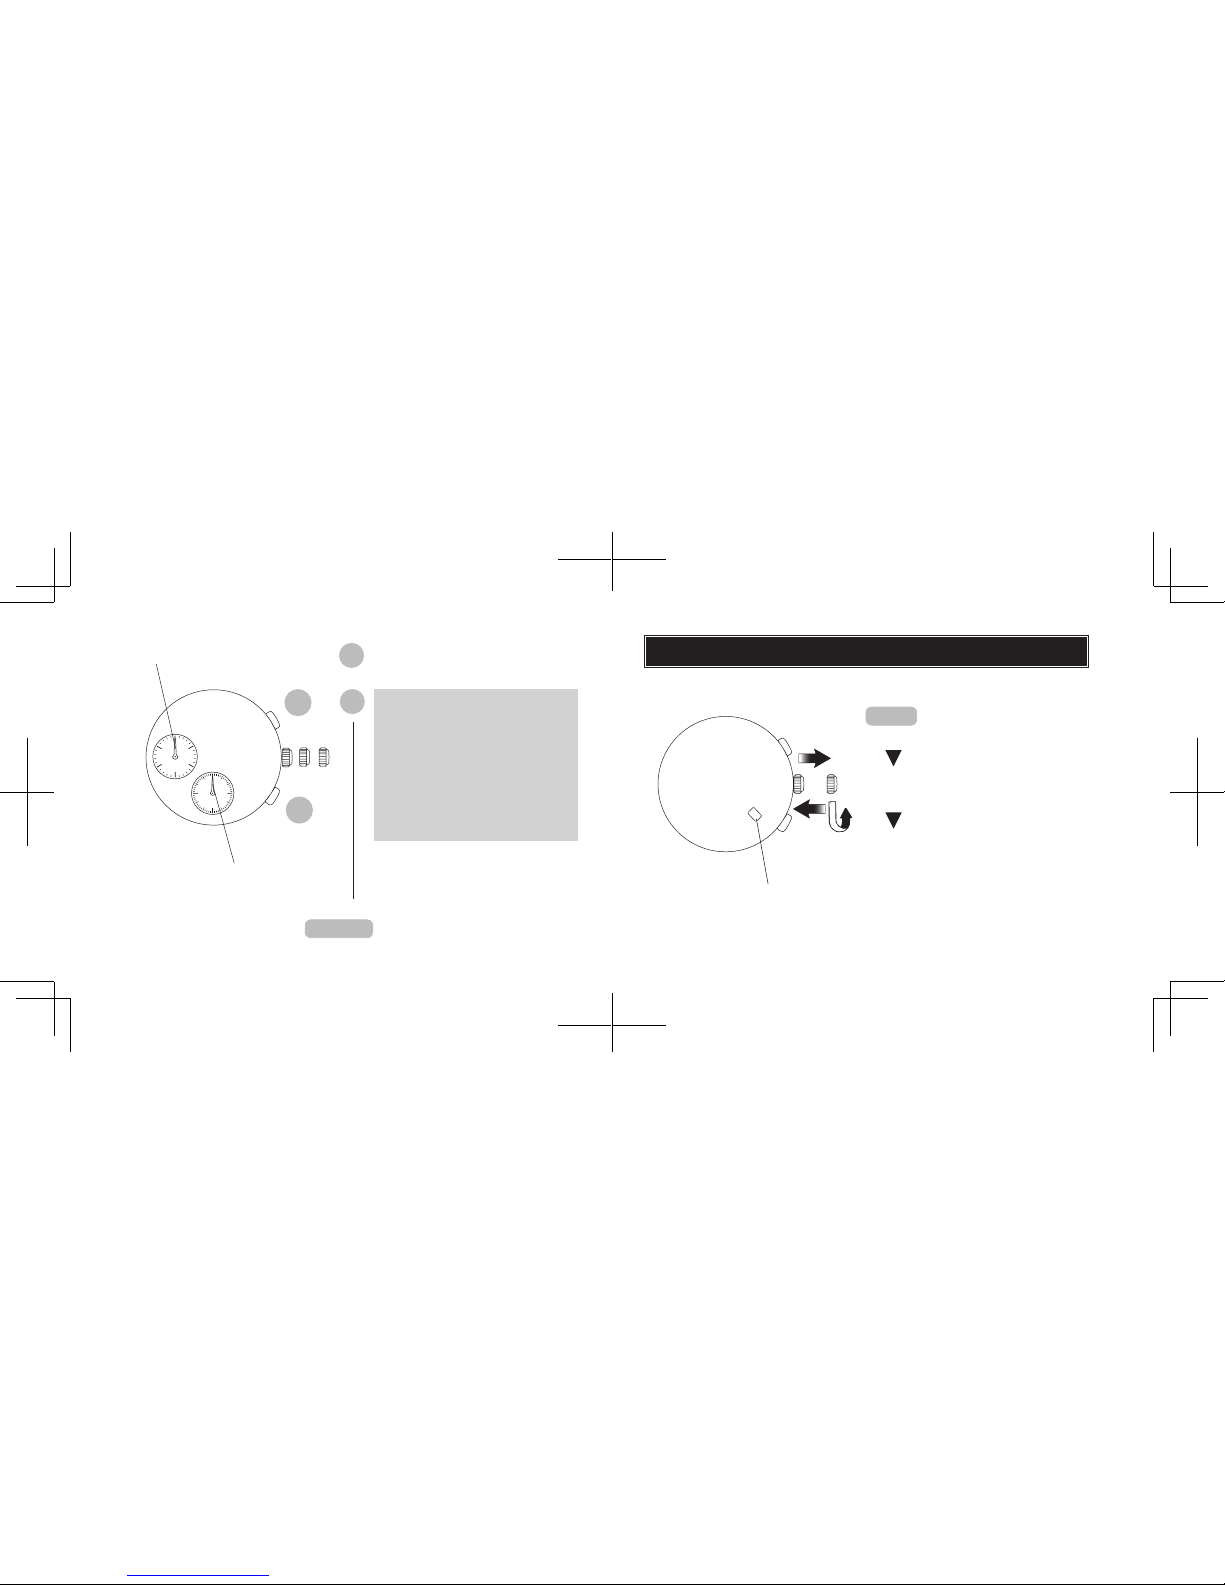
STOPWATCH Minute hand
STOPWATCH Second hand
A
B
Press repeatedly to set the
STOPWATCH hands to the “0’00’’”
position.
A
B
OR
• With each pressi ng of button A ,
the STOPWATCH second hand
advances by o ne second .
• With each pressi ng of button B,
the STOPWATCH second hand
moves back by o ne second .
• The STOPWATCH minute hand
moves correspo ndingly with th e
STOPWATCH second hand.
• The hands mov e quickly if butto n A
or B is kept pressed .
s
Push back in to normal position
in accordance with a time signal.
CROWN
SETTING THE DATE
CROWN
Pull out to rst click.
Turn counterclockwise until the
desired date appears.
Push back to the normal position.
l
Before setting the date, be sure to set the time.
30
20
10
60
153045
H
M
L
31
Date
Page 5

English
English
98
Measurement of two competitors
A
START
s
B
FINISH TIME
OF 1S T
COMPETITOR
s
A
s
2ND
COMPETITOR
FINISH ES
FINISH TIME
OF 2ND
COMPETITOR
B
RESET
B
Split time measurement
A
START
s
SPLIT
s
s
SPLIT R ELEA SE STOP RESET
s
B
A
B
B
STOPWATCH
l
The stopwatch can measure up to 29 minutes and 59 seconds in one second
increments.
l
When the measurement reaches 30 minutes, the stopwatch automatically
stops counting.
A
Start/Stop/Restart
B
Reset/Split/Split release
STOP WATCH
second hand
STOP WATCH
minute hand
30
20
10
60
153045
H
M
L
Standard measurement
A
START
s
STOP RESET
s
B
A
If the STOPWATCH hands do not return to the “0” position when the stopwatch
is reset to “0”, follow the procedure in “SETTING THE TIME AND ADJUSTING
THE STOPWATCH HAND POSITION”.
l
Before using the stopwatch, be sure to check that the crown is set at the normal
position and that the STOPWATCH hands are reset to the “0” position.
s
Page 6

English
English
1110
NOTES ON OPERATING THE WATCH
SETTING THE TIME AND ADJUSTING THE STOPWATCH HAND POSITION
l
When the stopwatch is or has been measuring or is stopped, if the crown
is pulled out to the second click, it will automatically reset the STOPWATCH
hands to “0”.
[TIME SETTING]
l
When setting the hour hand, be sure to check that AM/PM is correctly set.
The watch is designed so that the date changes once in 24 hours.
l
When setting the minute hand, first advance it 4 to 5 minutes ahead of the
desired time and then turn it back to the exact minute.
STOPWATCH
l
Restart and stop of the stopwatch can be repeated by pressing button A.
l
Measurement and release of split time can be repeated by pressing button B.
SETTING THE DATE
l
It is necessary to adjust the date at the end of February and 30-day months.
l
Do not set the date between 9:00 p.m. and 1:00 a.m., as the date may not
change properly.
HOW TO CHARGE AND START THE WATCH
When you start the watch or when the energy
in the rechargeable battery is reduced to an
extremely low level, charge it sufciently by exposing the watch to light.
30
20
10
6
24
VR42
18
12
31
60
15
30
45
H
M
L
NOTE
• It is not nec essary to charge the watch fully. It is im portant, however, to charge
the watch suffici ently, especia lly in case of in itial charge.
Page 7

English
English
1312
GUIDELINES FOR CHARGING TIME
Time required (approx.)
Illumination
(Lux)
Light source Environment
A
(Hours)
B
k
(Hours)C(Minutes)
700
Fluorescent lamp
Inside ofce - 24 108
3,000 30W 20 cm 83 6 27
10,000
Sunlight
Cloudy weather
25 2 8
100,000 Fine weather 3
12 minutes
1
<Ref eren ce> C onditi on A: Time require d for full c harge
Condit ion B: Tim e requir ed for steady oper ation
Condit ion C: Tim e requir ed for 1 day’s c harge
k The valu es in this col umn represent the ch arging times req uired until the sec ond
hand moves co nstantly at 1-second interv als after the watch sta rts operating with
the second hand moving at 2-second intervals.
The above table provides only general guidelines.
• Even if the watch is not c harged for the tim e specifie d in the colum n, the second
hand may temp orarily move at 1-second i ntervals. But it will soon resu me moving
at 2-seco nd intervals, and therefore, charge th e watch for more than the specifie d
period .
• When the watch is ful ly charged, it wi ll continue to o perate for about 4 m onths.
• When charging the watch, do not place it too close to a hot light source
such as a photoash light, spotlight or incandescent light as this can
greatly raise the watch temperature.
• When charging the watch by sunlight, do not leave it exposed to the sun
for a long time, on the dashboard of a car, etc.. as this can greatly raise
the watch temperature.
• Make sure the watch temperature does not exceed 50°C while charging,
to avoid damage to the parts inside.
CAUTION
Page 8

English
English
1514
POWER RESERVE INDICATOR
l
The STOPWATCH second hand can be used to check the power
reserve amount (continuous operating time).
l
Before checking, make sure that the stopwatch is reset (for resetting
the stopwatch, see " STOPWATCH").
B
Press for more than 2 seconds.
The STOPWATCH second hand is
set at the 30-second position, and
then will move to indicate the power
reserve amount for 3 seconds.
QUICK M OVEM ENT OF
STOP WATCH SECO ND
HAND
k
POWER
RESERVE
AMOUNT
Less than 30 d ays
Betwe en 30 and
90 day s
More th an 90 da ys
Low
(35 sec onds )
Middle
(40 sec onds )
High
(45 seconds)
The above table provides only general guidelines.
k The STOPWATCH second ha nd will autom atically return to the
0 second po sition after in dicating the p ower reserve am ount.
60
153045
H
M
L
STOP WATCH
second hand
60
15
30
45
H
M
L
60
15
30
45
H
M
L
60
15
30
45
H
M
L
Page 9

English
English
1716
ENERGY DEPLETION FOREWARNING FUNCTION
l
When the energy stored in the rechargeable battery is reduced to an
extremely low level, the second hand starts moving at 2-second intervals instead of the normal 1-second intervals.
l
In that case, recharge the watch as soon as possible by exposing it to
light. Otherwise, the watch may stop operating in about 1 day.
u
To prevent the energy depletion
• When you wear the watch, try not to keep it covered by your
clothes.
• When the watch is not in use, leave it in a bright place as long
as possible.
Make sure that the watch te mperature does not ex ceed 50 °C.
NOTES ON POWER SUPPLY
CAUTION
l
Never insert a conventional silver oxide battery in your watch
as it may explode, generate an intense heat or catch re. The
watch is designed not to operate even if the battery is installed
in it.
l
This watch is provided with a rechargeable battery for exclusive use
with the watch. Unlike conventional battery-powered watches, therefore, battery replacement is not necessary.
l
The solar cell is a clean energy source, having no adverse effect on the
natural environment.
Page 10

English
English
1918
TO PRESERVE THE QUALITY OF YOUR WATCH
WATER RESISTANCE
l
Non-water resistant
l
Water resistance (5 bar)*
If “WATER RESISTANT 5 BAR”
is inscribed on the case back,
your watch is designed and
manufactured to withstand up
to 5 bar and is suitable for swimming, yachting
and taking a shower.
If “WATER RESISTANT 10 BAR”,
“WATER RESISTANT 15 BAR” or
“WATER RESISTANT 20 BAR” is
inscribed on the case back, your
l
Water resistance (10 bar/15 bar/20
bar)*
watch is designed and manufactured to withstand
up to 10 bar/15 bar/20 bar and is suitable for taking
a bath, shallow diving, but not for scuba diving.
We recommend that you wear a PULSAR Diver’s
watch for scuba diving.
If “WATER RESISTANT” is not
inscribed on the case back, your
watch is not water resistant, and
care should be taken not to get
If “ W AT ER R E SI S TA NT ” i s
in s c ri b e d on t h e c ase b a ck,
yo u r wa t c h is de s i g ne d a n d
manufac tured to withst and u p
to 3 b ar, su ch as a c ci de nt a l
contac t with splashes of water or rain, but it
is not designed fo r swimming or diving.
l
Water resistance (3 bar)
it wet as water may damage the movement. If
the watch becomes wet, we suggest that you
have it checked by an AUTHORIZED PULSAR
DEALER or SERVICE CENTER.
* Before using the water resistance 5, 10, 15 or 20 bar watch in water, be sure the
crown is pushed in completely.
Do not operate the crown when the watch is wet or in water. If used in sea water,
rinse the watch in fresh water and dry it completely.
* When taking a shower with the water resistance 5 bar watch, or taking a bath with
the water resistance 10, 15 or 20 bar watch, be sure to observe the following:
• Do not operate the crown when the watch is wet.
• If the watch is left in warm water, a slight time loss or gain may be caused.
This condition, however, will be corrected when the watch returns to normal
temperature.
NOTE:
Pressure in bar is a test pressure and should not be considered as
corresponding to actual diving depth since swimming movement tends
to increase the pressure at a given depth. Care should also be taken on
diving into water.
TEMPERATURES
5
5
(122°F) may cause battery leakage
or shorten the battery life. Do
Your watch works with
stable accuracy within a
temperature range of 5°C
and 35°C (41°F and 95°F).
Temperatures over 50°C
not leave your watch in very low
temperatures below –5°C (+23°F)
for a long time since the cold may
cause a slight time loss or gain.
However, the above conditions will
be corrected when the watch returns
to normal temperature.
Page 11

English
20
MAGNETISM
Your wa tc h wil l be
adv ersel y af fe cted by
strong magnetism. Keep
it away from close co ntact
with magnetic objects.
Be careful not to expose
the watch to solvents,
mercury, cosmetic spray,
detergents, adhesives
or paints. Otherwise,
CHEMICALS
the case, bracelet, etc. may
become discolored, deteriorated or
damaged.
Light activities will not
affect your watch, but be
careful not to drop your
watch or hit it against
hard surfaces, as this
SHOCKS & VIBRATION
may cause damage.
To preven t pos sib le rustin g of
the case and brac elet caused by
dust, mo isture and pers pirati on,
wip e th em peri od ic ally wi th a
soft dr y cloth.
CARE OF CASE AND BRACELET
It is recommended that the
watch be checked once
every 2 to 3 years. Have
your watch checked by an
AUTHORIZED PULSAR
PERIODIC CHECK
DEALER or SER VICE CENTER to
ensure that the case, crown, buttons,
gasket and crystal seal remain intact.
PRECAUTION REGARDING
CASE BACK PROTECTIVE FILM
If your watch has a
protective film and/or a
sticker on the case back,
be sure to peel them off
before using your watch.
 Loading...