

Page 1

Table of Contents
Description
1. Technical Specifications 1
2. Identification Data 3
3. Location of Parts 4
4. Steering cum Ignition lock 5
5. Fuel Tank Cap 6
6. Speedometer Details 7
7. Speedometer Setting 10
8. Control Switches 12
9. Rear seat / Tool kit 14
10. Front Seat / Battery 15
11. Fitment of Front & Rear Seat 16
12. Daily Safety Checks 17
13. How to ride your Bike 18
14. Safe Riding Tips 22
15. Engine Oil 23
16. Wheels - Tube less Tyre 24
17. Battery 25
18. Engine Cooling System / Coolant 26
19. Periodic Maintenance Information 28
20. Brake Fluid 30
21. Periodic Maintenance & Lubrication Chart 31
22. Non Use Maintenance
Safety and Warning information :
Warning : This indicates that a potential
hazard or injury to you or other persons &
to the vehicle can happen, if advice
provided is not followed.
Caution : This indicates that a potential
hazard which could result in vehicle
da mag e, i f ad vic e pr ovide d is not
followed.
Notice:
The description and illustration in this booklet
are not to be taken as binding on the
manufacturers. The essential features of the
type described and illustrated herein remaining
unaltered. Bajaj Auto Limited reserves the
right to carry out at any moment without
being obliged to bring this booklet upto-date
& to do modifications on the vehicle, parts or
accessories a s may b e c on ve ni ent and
necessary.
Page 2

Technical Specifications
Engine : 4 Stroke, Single Cyl.
Bore x Stroke : 72.0 mm x 49.0 mm
Engine Displacement : 199.5 cc
Compression Ratio : 11 + 0.5 : 1
Idling Speed : 1400 + 100 RPM
Max. Net Power : 18 KW at 9750 RPM
Max. Net Torque : 18.3 Nm at 8000 RPM
Ignition System : 12V ,DC
FI System : Single Point Injection
into manifold - BOSCH
Spark Plug : 3 Nos
Spark Plug Gap : 0.7 ~ 0.9 mm
Transmission : 6 speed constant
mesh
Gear Shifting Pattern : 1 Down 5 Up
Engine Lubrication : Pressurized oil supply
Engine Cooling : Liquid cooling
Starting Aid : Electric starter
Front & Rear Brake : Disc Brake
Fuel Tank Capacity
Full : 13 liters
Dimensions :
Length : 1999 mm
Width : 765 mm
Height : 1114 mm
Wheel base : 1363 mm
Ground clearance : 157 mm
Tyre Size
Front : 100/80-17,52P tubeless
Rear : 130/70-17,61P tubeless
Tyre Pressure
Front : 1.75 kgf/cm (25 PSI)
Rear (Solo) : 2.00 kgf/cm (28 PSI)
Rear (with pillion) : 2.25 kgf/cm (32 PSI)
2
2
2
1
Page 3

Technical Specifications
Electrical System : 12 Volts DC
Head Lamp : Twin Projector
55W - Low Beam
65W - High Beam
Position Lamp : LED
Tail /Stop Lamp : LED
Side Indicator lamp : LED (4 nos)
Neutral Indicator : Green LED
Hi Beam Indicator : Blue LED
Turn Signal Indicator : Green LED
Speedometer Back Light : LCD , Amber
Fuel Level Indicator : LCD Bar
Low Oil Pr. Indicator : LED- Red
Malfunction Indicator : LED - Yellow
Coolant Temp. Indicator : LED - Red
Low Battery Indicator : LED - Red
Bajaj Logo : LED - Blue
Rev Indicator : LED - Yellow
Service Reminder : LCD
Side Stand Indicator : LCD
ABS Indicator : LED - Yellow
Rear No. Plate Lamp : LED
Horn : 12V DC
Battery : 12V , 8Ah VRLA
Vehicle Kerb Weight : 165 kg.
Gross Vehicle weight : 295 kg.
Max. Speed : 135 km/hr
Note :
• All dimensions are under UNLADEN condition.
• Above information is subject to change without
any notice.
2
Page 4

Identification Data
The Frame and Engine serial numbers are used to register the motorcycle. They are the unique
alpha-numeric codes to identify your particular vehicle from others of the same model and type.
Engine Number Location
On LH Side Crankcase Near Gear
Change Lever (Alpha-Numeric - 11 Digits)
Frame Number Location
On Seal Lock Mounting Bracket
(Alpha-Numeric - 17 Digits)
3
Page 5

Location of Parts
Grab
Handle
Rear
Number
Plate
Nitrox
Rear
Shock
Absorber
Pillion Seat Rider Seat
Front Brake
Lever
Digital Speedometer
Front Number
Plate
Front Fork
Rear Disc Brake
Rear Brake
Pedal
Front Disc Brake
4
Page 6

Steering cum Ignition Lock
Steering cum Ignition Lock :
It has three positions.
LOCK: Steering locked. Ignition OFF.
OFF: Steering unlock. Ignition OFF.
ON: Steering unlock. Ignition ON.
To Lock the Steering : To lock the steering,
turn the handle bar to the left side. Push &
release the key. Turn the key to “LOCK”
position and remove the key. Steering lock
can be done on left side only.
To Unlock the Steering : To unlock steering,
insert the key in steering cum ignition lock &
turn it clockwise to “OFF” or “ON” position.
Key : A common key is used for ‘Steering
cum Ignition lock’, ‘Fuel tank cap’ & ‘Rear
Seat’.
5
Page 7

Fuel Tank Cap / Fuel Tap
Fuel Tank Cap
Fuel Tank Cap
• To open the fuel tank cap, open the flap.
Insert the key in the lock and turn it
clockwise and lift fuel tank cap.
• ‘Fuel Tank Cap’ gets locked when pushed
back into place.
6
Page 8

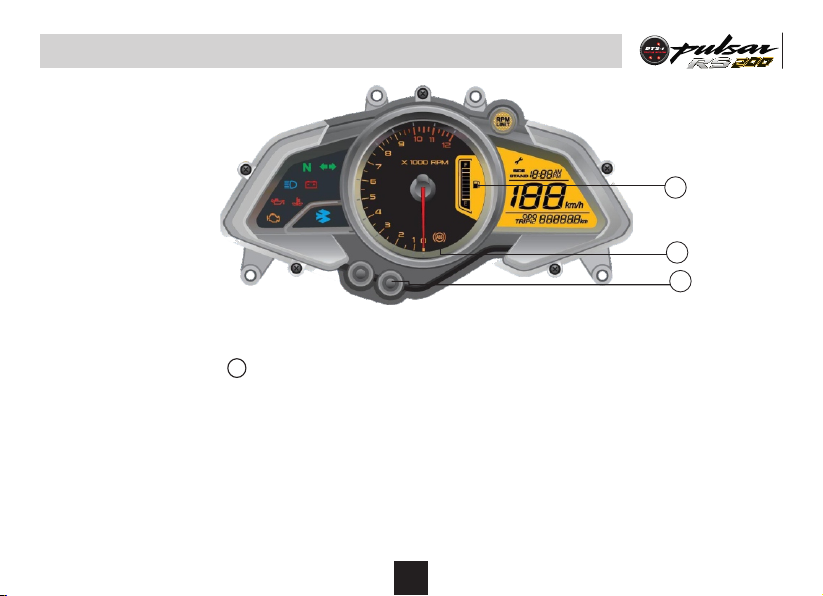
Speedometer Details
1
2
3
4
5
6
7
8
9
Speedometer display will work when, only both
Ignition switch & kill switch are in ‘ON’ position.
1. Fuel Level Indicator: It shows fuel level in fuel tank.
2. Tachometer Dial: It shows engine speed in RPM.
3. Turn Signal Indicator (LH & RH): When Turn signal
switch is turned to Left or Right, Turn pilot Indicator LH or RH will flash.
4. Neutral Indicator: When the transmission is in
Neutral, Neutral indicator will glow.
5. Hi Beam Indicator: When Headlight is ‘ON’ & Hi
beam is selected with engine running, Hi beam
indicator will glow.
6. Low Battery Indicator : It indicates battery needs
charging.
7. Malfunction Indicator ( ) :It blinks whenever any
abnormality is noticed in fuctioning of FI system
related componenets
8. Low Oil Pressure Indicator ( ) : It blinks when
engine oil pressure is low.
9. Coolant Temperature Indicator ( ) : It blinks when
engine coolant Temperature is more than 115
centigrade.
7
0
Page 9

Speedometer Details
Speedometer Details
10
11
12
13
14
15
16
17
M
S
18
10. Bajaj Logo : Bajaj logo flying ‘B’ continuously glows.
11. Mode Button : Mode button used for changing the
mode while selecting & setting Trip1, Trip2, ODO,
Clock & Service reminder.
12. Engine Over Rev Indicator : It glows when engine
RPM crosses 9500 RPM.
13. Service Reminder ( ): ‘Spanner’ symbol glows
when ODO meter reading reaches set Kms. for
service. This Icon will flash at -
st nd
1 : 450 km 2 : 4950 km,
rd th
3 : 9950 km, 4 : 14950 km
Side Stand Indicator will light.
and subsequently at each 5000 kms. Icon will
continue to glow till it is reset. This icon is to be
reset after service is carried out.
14. Side Stand Indicator : When side stand is ‘ON’ .
15. Digital Clock : It indicates time in HR : M (AM/PM)
16. Speedometer: Vehicle speed will be displayed in
digital form in Km / Hr.
17. Odometer : The Odometer shows the total distance
that the vehicle has covered. Odometer can't be
reset to ‘Zero’.
18. Trip Meter : Trip 1 & Trip 2 shows the distance
traveled since it was last reset to zero.
8
Page 10
Speedometer Details
Speedometer Details
21
M
19. Set Button : Set button used for setting Clock &
Service reminder.
20 ABS Indicator (Yellow) ( ) : With ignition switch
ABS
‘ON’ & Kill switch ‘ON’ the ABS indicator glows.
When vehicle speed is more than 10 km/hr the ABS
indicator goes off, if this indicator glows while vehicle
is running, it means there is problem in ABS unit.
21 Low Fuel Level Indicator : It blinks incase of low
fuel level (1 bar or less)
Note : After switching ‘ON’ the ignition switch & kill
switch, the following indications will remain ‘ON’ till
engine is started.
20
S
19
Coolant Temperature Indicator
Low Battery Indicator
Low Oil Pressure
Malfunction Indicator
Instructions :
Incase, Malfunction indicator / ABS indicator gets ‘ON’
during vehicle running, bring the vehicle to the nearest
BAL dealership for inspection / repair
ABS System
Always maintain a safe distance between you and
objects ahead.
9
Page 11

Speedometer Setting
Vehicle speed should always be reduced during extreme road
conditions. The braking distance for motorcycle equipped with an
anti-lock braking system may be longer than for those without it
on rough road conditions. During these conditions the vehicle
should be driven at reduced speeds.
When you apply front brake under conditions which may lock the
wheels, you feel a corresponding sensation (pulsation) in Front
brake lever. This is normal & it means your ABS is active.
Also it is recommended to use both front & rear brakes
simultaneously.
Always slow down when cornering. the anti-lock brake system
cannot prevent accidents resulting from excessive speeds
Service Reminder
TRIP1/2
1. Trip Meter Reset :
• Mode & Set push button is provided for selecting &
resetting ‘ODO/TRIP1/TRIP2’. LHS part of speedo
console.
1.
Press 'Mode' button
for less than 2 sec.
2.
Press 'Mode' button
for more than 15 sec.
Mode changes from
‘ODO/TRIP1/TRIP2’
Selected mode
‘TRIP1/TRIP2’ will get reset.
Other TRIP mode will
continue updating.
2. Service Reminder Reset ( ) :
• ‘Wrench’ symbol glows when ODO meter reading
reached to set Kms.
This icon will glow at-
st nd
1 : 450 Kms 2 : 4450 Kms
rd th
3 : 9450 Kms 4 : 14450Kms
& subsequently at each 5000 Kms.
Note : Engine & motorcycle speed should be zero.
10
Page 12

Speedometer Setting
TRIP1/2
Mode
Set
M
S
3. Clock Reset :
• Digital clock indicates time in HR & MM separated
by colon ‘:’
• It is a 12 hour clock.
• Initially ‘:’ will be blinking
• Clock setting is possible in TRIP 1 mode only.
11
1.
Press 'Mode' push button
for less than 2 sec.
2.
Press 'Mode' & 'Set'
push button together
for more than 2 sec.
3.
Press 'Mode' button for
less than 1 sec.
4.
Press 'Set' button for
less than 1 sec.
5.
Press 'Mode' & 'Set'
button together for
more than 2 sec.
6.
Clock set 'Mode' is
selected & no editing
is carried out for
more than 5 sec.
TRIP1 Mode selected
‘:’ stops blinking
Digits start blinking
Hour digits will
increase by one.
Minute digits will
increase. If Mode/Set
button is pressed
continuously then digits
will stop blinking.
Set value will be saved
Exit clock setting mode
Digits stop blinking
‘:’ start blinking
Auto exit without saving
set value.
Page 13

Control Switches
A
B
C
Left Handle Bar Switches
A. High/Low Switch : When headlight is ON,
High or Low beam can be selected with
this switch. Hi beam indicator light located
on Speedo console will light up when high
beam is selected.
: High Beam : Low beam
B. Turn Signal Switch : When the turn signal
knob is pushed to Left ( ) or Right ( )
respective indicator will start blinking, to
exit push the knob in & release.
D
C. Horn Button : ( ) Press button for
sounding horn.
D. Pass Switch : Press the switch to flash
the head light. It is used to give signal to
vehicles coming from opposite side while
overtaking.
12
Page 14

Control Switches
G
E
F
Right Handle Bar Switches
E. Head Light Switch : It has 3 positions.
F. Starter Button :
Starter button operates the electric starter
when cl ut ch lever is depressed with
transmission in any gear.
It is recommended to start the engine
with the transmission in neutral.
G. Engine Kill Switch :
The engine kill switch is for emergency
use. During emergency move the engine
kill switch to the ‘OFF’ ( ) position.
Speedometer display will work when both Ignition
switch & kill switch are in ‘ON’ position.
: All lamps 'OFF'.
: With engine running, Tail lamp,
Meter lamp, Pilot lamp/s, number
plate lamp will glow.
: With engine running, Head lamp,
Pilot lamp/s, Tail lamp ,Meter lamps
and number plate lamp will glow.
CAUTION : While starting ensure that
engine kill switch is in ON ( ) position.
Engine will not start if the kill switch
is in OFF position
13
Page 15

Rear Seat / Tool Kit
A
Tool Kit
Removal of Rear Seat
• Insert Key into lock (A)
• Turn the key clock wise.
• Pull front end of ‘Rear seat’
• Take out ‘Rear seat’
Tool Kit Location
• It is located below the ‘Rear seat’.
• 2 rubber straps are provided to hold the
tool kit.
CAUTION : Always ensure rubber strap
is fitted for securing tool kit.
14
Page 16

Front Seat / Battery
B
Battery
Removal of Front Seat
• First remove ‘Rear seat’.
• Remove ‘Front seat’ mounting bolts (B).
• Pull back rear end of ‘Front seat’.
• Take out ‘Front seat’.
Battery
• It is located below ‘Front seat’.
15
Page 17

Fitment of Front & Rear Seat
Front seat lug & bracket
C
A
F
H
E
D
B
Fitment of ‘Front Seat’
• Match the lugs of ‘Front seat’ (A) with
chassis bracket (B).
• Push ‘Front seat’ toward petrol tank.
• Match ‘Front seat’ rear brackets (C) with
the holes provided on chassis (D).
• Tighten the bolts (E).
I
G
Fitment of ‘Rear Seat’
• First make s ure ‘Front seat ’ is fitted
properly.
• Place ‘Rear seat’ in fitment location.
• Insert bracket (H) of seat into hook (I).
• Match the rod of ‘Front seat’ (F) with seat
lock (G).
• Press front portion of seat.
16
Page 18

Daily Safety Checks
Before riding motorcycle be sure to check
following items. Please give proper importance
to these checks and perform all of them
before riding motorcycle.
If any irregularities are found during these
checks, refer to the Maintenance chapter &
see your dealer for the action required to
return the motorcycle to a safe operating
condition.
Warning : Fail ure to perform th ese
checks every day before you ride, may
result in serio us da mage or severe
accident.
• En ou gh fu el fo r planned distance of
journey. No fuel leakage in fuel lines.
• Engine oil level (between upper and lower
level mark)
• Throttle cable play of 2 ~ 3 mm. Smooth
operation and positive return to closed
position,
• Bra k e Flu i d lev e l abo v e MIN m a rk
provided on reservior, applicable to disc
brake vehicle.
• Dr iv e C ha in sl ac k of 15 to 25 mm
adequately lubricated.
• Function of all lights & horn
• Clutch lever play - 2 to 3 mm
• Check Coolant level between MIN and
MAX mark in coolant reservoir tank.
• Smo oth s tee rin g mo v eme nt w ith out
restriction.
• Side stand return to its retracted position.
• Correct inflation pressure in both tyres
Adequate tyre tread depth - no cracks /
cuts.
• Correct rear viewing span adjustment of
mirror.
17
Page 19

How to Ride Your Bike
1. Starting The Engine :
• Turn ignition switch key to ‘ ’ position.
• Keep kill switch in ‘ ’ position.
• Confirm that transmission is in neutral /
press the clutch lever.
• Keep throttle completely closed, press
starter button,
• Release starter button as soon as engine
starts.
Caution : Do not operate the starter
continuously for more than 5 seconds
otherwise battery would get discharged.
Wait 15 sec. between each operation of the
starter which will facilitate battery to recover.
Note : The motorcycle is equipped with a starter
lockout switch. This switch ensures that engine
does not start if the transmission is in gear.
?
However, the engine can be started in any
gear if the clutch lever is pressed.
Note : Incase of battery discharged condition,
vehicle can be started by pushing it.
2. Shifting Gears :
• Close throttle & depress the clutch.
• Shift into next higher or lower gear.
• Open the throttle and release the clutch
lever slowly and simultaneously.
3. Moving Off :
• Check that side stand is up / retracted.
• Depress the clutch lever.
• Shift into 1 gear.
• Open the throttle and release the clutch
lever slowly and simultaneously.
• As the clutch starts to engage, open the
throttle a little more, giving the engine just
enough rpm to prevent it from stalling.
18
st
Page 20

How to Ride Your Bike
6
5
4
3
2
N
1
Gear shifting Lever
Gear shifting
pattern
Recommended Speed for Shifting Down
th th
From 6 to 5 Gear
th th
From 5 to 4 Gear
th rd
From 4 to 3 Gear
rd nd
From 3 to 2 Gear
nd st
From 2 to 1 Gear
54 km/h
45 km/h
35 km/h
25 km/h
15 km/h
Warning : When shifting down to lower
gear, do not shift at such high speed
that engine rpm jumps excessively. This
may cause engine damage, & rear wheel
may skid. Downshifting should be done
at speeds as recommended in table
above.
4. Braking :
• Close the throttle completely, leaving the
clutch engaged (except where shifting gears)
so that the engine braking will help slow
down the motorcycle.
• Shift down one gear at a time so that you
are in Neutral when you come to a complete
stop.
• When stopping, always apply both brakes at
the same time. De-clutch as necessary to
avoid engine stalling.
• Never lock the brakes, or it will cause the
tyres to skid. When cornering, use brakes
judiciously and do not de-clutch. Reduce
your speed before you get into the corner.
F o r e me r g en c y b ra k i ng , d i s re g ar d
downshifting, and concentrate on applying
brakes as hard as possible without skidding.
5. Stopping the Vehicle :
• Close the throttle completely.
• Shift the transmission into neutral.
• Bring the vehicle to complete stop.
• Turn the ignition switch off.
19
Page 21

How to Ride Your Bike
6. Parking the Vehicle :
Parking using side stand.
• Support the motorcycle on a firm level
surface with the side stand.
• Lock the steering on LHS.
CAUTION : Do not park on a soft or
steeply inclined surface or the motorcycle
may fall over.
7. Running IN
Proper running-in is important for better life &
trouble free performance of the vehicle.
• During first 2000 kms running-in period do
not exceed following speed limits.
Kms 1st 2nd 3rd 4th 5th 6th
0 - 1000 10 18 24 32 40 48
1000 - 2000 16 24 30 38 46 54
• Always keep the speed below the limits
mentioned in the table.
• Do not rev the engine excessively.
• Do not start moving or rev the engine
immediately after starting. Run the engine
for a minute at idle speed to give the oil a
chance to workup into the engine.
20
Page 22

How to Ride Your Bike
Fuel Saving Tips :
A well maintained vehicle and good driving
can contribute a lot to the saving of feul.
Following are a few simple fuel saving tips.
Good Riding Habits :
• Ride smoothly and steadily at a reasonable
speed.
• Avoid harsh braking.
• Change the gear judiciously according to
the speed and load requirement.
• Don’t overload the vehicle above the
specified payload.
• Use the accelerator judiciously.
• Cut off the engine if you want to stop for
more than two minutes.
How to check mileage (Fuel efficiency)
Best way to calculate mileage is by following
the full tank to full tank method.
• Fill way tank full up to small mouth (brim).
• Run the bike for say 100 km.
• Fill the tank full again in same fuel filling
station, preferably from same f u el
dispenser.
• Divide kilometers run / fuel quantity filled.
Ensure following maintenance points to get
optimum performance from your bike.
Fuel Check fuel lines & connections
for leakage.
Spark Plugs Inspect and clean spark plugs.
Adjust electrode gap. Replace
spark plugs as per P.M. Chart.
Air Filter Clean the air filter element
periodically. Replace as per
Periodic Maintenance Chart.
Engine Oil Check engine oil level. Always
use recommended grade and
quantity.
Brakes Ensure that the brakes are not
dragging / binding.
Clutch Ensure correct clutch lever
play.
Tyre Air Always maintain recommended
Pressure tyre pressure.
21
Page 23

Safe Riding Tips
Safe Riding Tips
• Always wear Helmet while riding. Your helmet should
conform to appropriate Safety standards.
• T h o r o u g h l y r e a d t h e
instructions given in this manual
and follow them carefully.
• Avoid unnecessary accessories
for the safety of both rider and
other motorists.
• Get familiar with and follow
traffic rules & regulations in your states as well as
general traffic signs.
• Familiarise yourself well with starting, acceleration and
braking of the vehicle.
• When applying the brakes, use both front & rear
brakes simultaneously. Applying only one brake may
cause the rider to loose control.
• Riding at proper speed and avoiding unnecessary
acceleration and braking are important not only for
safety and low fuel consumption, but also for long life
of the vehicle.
• During monsoon drive the vehicle more cautiously.
Remember vehicles skid more easily during light
showers.
• Drive cautiously. Start early & reach your destination
safely.
• Always carry vehicle registration & insurance papers,
and a valid driving licence with you.
• Avoid driving on loose sand or stones where vehicle
is likely to skid.
• Properly wrap-up loose clothes while riding to avoid
entangling in wheel or other objects on road.
• Always concentrate on Safe riding.
Rainy Season Care :
• It is suggested to customer to take appropriate care
in area of high rainfall area. Appropriate surface
preventive coat to avoid rusting on account of
adverse atmospheric conditions.
• Vehicle cleaning to be done with soft & clean wet
cloth to avoid scratches on painted parts.
• Clean & lubricate all the important parts as detailed in
a periodic maintenance chart.
• Do not apply direct water jet on painted, electrical /
electronic parts.
• Do not obstruct engine cooling by adding mud
protection sheet from front.
22
Page 24

Engine Oil
A
C
A : Oil Filler
Cap
B : Oil Level
Window
Engine Oil Level Checking :
• Check engine oil level every day in the morning.
Park vehicle perpendicular to the ground on level
surface as mentioned in page no. 21 (6.1)
• Check oil level through oil level window ‘B’.
• Always maintain engine oil level between upper
(C) and lower (D) mark provided on Clutch cover
RHS. Top up with specified grade of oil, if the oil
level is below lower level mark.
Engine Oil Capacity :
• Refill at servicing : 1200 ml.
• During engine overhaul : 1400 ml.
B
D
Recommended Engine Oil:
Model Recommended Grade
Pulsar SAE 20W50 API ‘SL’, or JASO ‘MA’
200 RS
• Engine oil replacement frequency : 1 service & then
every 5,000 Km.
Engine oil
st
• Engine oil level top-up frequency : Every 2500 km.
CAUTION :
• It is most important to adhere to
recommended grade & frequency of oil
change for the purpose of long life of
critical engine components. For details
refer periodic maintenance chart.
• Do not reuse drained oil.
• C ontact y o u r D e a l e r for prop e r
disposal of drained engine oil.
23
Page 25

Wheels - Tube Less Tyre
Wheel Puncture :
• Visit nearest known tubeless tyre repair
shop to remove puncture.
• Remove puncture by Filler or Plug method
only.
• Do not use patch me thod to rem ove
puncture of tubeless tyre.
Front Wheel
CAUTION : Tubeless tyres are fitted in this
motorcycle. The walls of the tyres in
contact with the wheel rim should not be
damaged in any way during fitment /
removal of tyre. The tyre side walls in
contact with wheel rim seals air.
Removing Front Wheel :
• Park vehicle perpendicular to the ground on
level surface as mentioned in page no. 21
(6.1)
• Remove speed sensor cable from case meter
assembly.
• Loosen front axle nut.
• Remove front wheel assembly from fork.
Tyre Pressure :
Keep appropriate tyre pressure as mentioned
below to increase life of the tyre & for better
fuel consumption.
Front 25 PSI
Pulsar RS 200 Rear (Solo) 28 PSI
Rear (with Pillion) 32 PSI
Note : Ensure tyres fitted comply with local
rules and regulations governing tyres.
24
Page 26

Battery
Battery : 12V - 8 Ah VRLA
• Battery is located below front seat.
Battery Features :
• No topping-up is required
• Reduced self discharge, Enhances safety.
• No vent tube open to atmosphere hence no
discharge of electrolyte through vent tube.
CAUTION : Do not drive / run vehicle in
battery disconnected condition. It may
lead to damage of electrical / electronic
components.
• Env ir onm ent car e must be t ak en to
dispose off the used battery.
• It is always recommended to hand over
the same to an Authorised battery / Bajaj
dealer for proper disposal.
• Whe n low b atte ry ic o n pop s-up o n
speedometer display, it is advised to get in
touch with Bajaj dealer & get it charged
immediately.
How to keep battery healthy ?
• Switch ‘Off’ ignition when engine is not
running.
• Ge t battery checked/ c ha rged du ri ng
periodic services.
• Do not press starter button for more than
5 sec. After 3 successive cranking, wait for
15-20 sec. for battery to recover.
• Do not add extra electrical accessories
such as - Remote, Bigger Horn, Musical
brake light etc. This will reduce life of
battery
• Disconnect battery +ve & -ve wires if
vehicle is to be stored for more than 2
weeks. This avoids self discharge.
25
Page 27

Engine Cooling System
Expansion
Tank
Radiator
Radiator Assembly
A
Cooling Fan
• Coolant is provided for cooling of engine.
• Water pump in the engine circulates the coolant
in cooling system.
• The pressure resulting from the heating of the
cooling system is regulated by a valve in radiator
cap (A).
• Heat expansion causes excess coolant to flow
into compensating coolant tank.
• When the temperature falls, this surplus coolant
is sucked back into the cooling system.
• Cooling fan is provided for cooling of coolant
circulated through radiator fins
Note :
Fan will start at temperature 98 C and stops at
0
92 C. This is normal condition and it indicates
that cooling system is functioning well
Warning : During motorcycle operation, the
coolant gets very hot & is under pressure.
Do not remove the radiator cap, ra dia tor hose
or other cooling system components when the
engine is hot.
Allow the engine & cooling system to cool
down. In case of exposure to hot coolant,
rinse immediately with lukewarm water.
0
26
Page 28

Coolant
Coolant level
inspection window
Warning : Coolant is poisonous and is a
health hazard.
Avoid skin, eye and clothing caontact
with coolant. If it gets into your eyes,
rinse immediately with water and contact
a doctor.
Wash affected skin areas immediately
with soap and water. If coolant is
s w a l l o w e d , c o n t a ct a d o c t o r
immediately. Change clothes that have
come into contact with coolants. Keep
coolant out of the reach of children
Max
Min
Coolant Specifications :
Antifreeze ready mix (Recommended BrandMotul : Moto cool expert,
Castrol : Radicool
Total coolant quantity : 1000 ml. (750~780 ml
in radiator & 220~230 ml expansion tank).
Coolant Top up
• Park vehicle perpendicular to the ground on
level surface by using side stand.
• Check coolant level in engine cold condition
only.
• Ensure coolant level is between Min & Max
mark.
• Always top up coolant through reservoir cap.
• Always replace coolant with recommended
brand only. (Radicool from Castrol, Moto
cool expert from Motul) or equivalent.
• Use nitrile rubber hand glows while draining
& topping up coolant.
• Do not top up coolant through radiator cap.
Where pre-mixed coolant is not available
coolant concentrate and distilled water
should be mixed separately in a clean jar in a
proportion of 1:1
27
Page 29

Periodic Maintenance Information
Spark Plug
• Rem o ve s p ark p l ugs b y usi ng pl u g
spanner.
• Clean the spark plugs.
• Adjust the gaps if incorrect by bending
outer electrode carefully.
Spark Plug Gap : 0.7 to 0.8 mm.
Spark Plug (2 Nos.) : BOSCH(UR6CE)
(LH ‘A’ + RH ‘B’)
(1 No. ) : BOSCH - YR5NEO
(Center ‘C’)
CA
0.7 to
0.8 mm
Drive Chain Slackness
• Chain slackness will have to be adjusted
whenever required.
• Std. Chain slackness 15 ~ 25 mm.
• Marking on chain adjusters should be
identically positioned on both sides.
28
Page 30

Periodic Maintenance Information
Drive
Chain
Cleaning
Drive chain must be cleaned & lubricated as
per periodic maintenance schedule.
Drive Chain (O-ring type)
• ‘O’ rings must always be kept wet for
best performance hence lubricate every
500 Km.
• O-ring chain lubrication can easily be
done by owners using Bajaj ‘Chain Lube
Spray Can’ available with Bajaj dealers,
or equivalent. Ensure that the lubricant
does not damage the rubber 'O' rings.
Drive
Chain
Lubrication
Method of O-ring Chain Lubrication :
• Park vehicle perpendicular to the ground on level
surface. Clean the chain by using lint free cloth (If
excessive mud / slush found approach Bajaj
Service Center for proper cleaning)
• Shake the can vigorously by holding vertically
upright till the noise of steel ball inside heard
uniformly.
• Hold spray can at the back of rear sprocket with
extension tube nose at 5~10 cm.
• Rotate the wheel in reverse direction & spray the
lube on middle portion of the chain up to full
length of the chain.
29
Page 31

Brake Fluid
Front
Brake
Fluid
Reservior
Front & Rear Brake Fluid Level
• Front brake fluid reservior is located on RH
side of Handle bar.
• Rear brake fluid reservior is located behind
RH pillion holder bracket.
• To check oil level, Park vehicle
perpendicular to the ground on level surface
with handle bar in straight ahead condition
• Always ensure that brake fluid level is above
‘MIN’ mark given on inspection Window.
Rear
Brake
Fluid
Reservior
Brake Fluid Replacement.
• Change the brake fluid of the front & rear
brake according to service schedule.
Use only DOT-3 ro DOT-4 brake fluid (from
sealed container) for top up & replacement.
30
Page 32

Periodic Maintenance & Lubrication Chart
Sr.
Operation
No.
Clean the vehicle with water wash & dry
1
completely
Engine oil & engine oil
2
filter*
Oil strainer
3
Spark plug
4
Air cleaner element & cover 'O' ring
5
6
In line fuel filter
7
Fuel pipe
8
Valve tappet clearance
Sealed drive chain cleaning & lubrication
9
RECOMMENDED FREQUENCY
1st
2nd
3rd
4th
5th
Servicing
Kms
500
750
9500
4500
~
~
5000
~
10000
14500
~
15000
19500
~
20000
6th
24500
~
25000
C,R R R R R R R R
CL CL CL CL CL
CL,C,A CL,A
R R
R R
C,R C,R
C,A C,A
CL,L,A CL,L CL,L CL,L CL,L CL,L CL,L CL,L
A A A A A A A
31
7th
29500
~
30000
Remarks
Ensure to prevent water entry in
Petrol tank, Silencer & electrical
parts.Use caustic free detergent for
washing.
SAE 20W50 "API SJ" Grade
Replace at every 5000kms. And
top-up at every 2500 Kms (If
required)..
Oil strainer cleaning at the time of
oil change.
C & A at 20000 kms. Replace
after 40000 kms.
Cleaning not required . replace
after every 20000 kms
Replace after evrey 20000 kms
Replace if required
Check & adjust at every 20000
kms
Customer to apply OKS chain lube
spray at every 500 kms
Page 33

Periodic Maintenance & Lubrication Chart
Sr.
Operation
No.
10
Air filter drain tube
11
Silencer drain hole cleaning
Brake pedal pivot pin Use recommended AP grease.
12
13
Brake lining or pad -Check wear indicator
14
Brake fluid level - top up / replace
Servicing
Kms
CL CL
CL CL CL CL CL CL CL
C,L,R C C,L,R C,L,R C,L,RC,L,R C,L,R C,L,R
C,R C,R C,R C,R R C,R C,R R
C,A,R C,A R
RECOMMENDED FREQUENCY
1st
500
750
~
2nd
4500
5000
3rd
9500
~
~
10000
4th
14500
~
15000
5th 6th
19500
~
20000
24500
~
25000
7th
29500
~
30000
Remarks
Clean at every 2000 kms
Replace brake shoes /brake
pad at every15000 Kms
Use recommended brake
fluid (DOT3/DOT4).
Disc brake assly -- Check functionality,
15
leakage or any other damage.
16
All cables & rear brake pedal -free play
Wiring harness & Battery connections-
17
routing, tie bands & clamps tightness.
C C C C
C,A C,A C,A C,A C,A C,A C,A C,A
C,A,T C,A,T C,A,T C,A,T C,A,TC,A,T C,A,T C,A,T
32
Page 34

Periodic Maintenance & Lubrication Chart
Sr.
Operation
No.
18
Steering play
Ignition switch barrel cleaning & handle bar
19
control switches contacts cleaning,
Steering stem bearing & Cap steering
20
bearing(Plastic)
Side stand pin
21
All fasteners tightness
22
General lubrication-Clutch lever, front brake
23
lever, kick lever.
24
Coolant level in expansion tank
RECOMMENDED FREQUENCY
Servicing
Kms
500
750
1st
~
2nd
4500
5000
3rd
9500
~
~
10000
4th
14500
~
15000
5th 6th
19500
~
20000
24500
~
25000
C,A C,A C,A C,A C,A C,A C,A C,A
C,CL C,CL C,CL C,CL C,CL C,CL C,CL C,CL
C,CL
C,CL C,CL C,CL C,CL C,CL C,CL C,CL
L,R L,R L,R L,R L,R L,R L,R L,R
CL,L CL,L CL,L CL,L
C,T C,T C,T C,T C,T C,T C,T C,T
L L L L L L L L
C,A C,A C,A C,A C,A C,A C,A C,A
33
7th
29500
~
30000
Remarks
Use recommended WD40
spray
Check & replace if damaged.
Use HP Lithon RR3 grease
for lubrication.
Use recommended AP
grease.
Use recommended AP
grease.
Use recommended ‘Ready
to use coolant’
Page 35

Periodic Maintenance & Lubrication Chart
Sr.
Operation
No.
25
Coolant hose damage/clamps/leakage
Radiator fins
26
Servicing
Kms
C C C C C C C
C C C C C C C
RECOMMENDED FREQUENCY
500
750
1st
~
2nd
4500
5000
3rd
9500
~
~
10000
4th
14500
~
15000
5th 6th
19500
~
20000
24500
~
25000
7th
29500
~
30000
Subsequent
* It is strongly recommended to use specified grade only , In case of any other engine oil of same specifications is
used the frequency would be every 5000 kms
C : Check, A : Adjust, CL : Clean, R : Replace, T : Tighten, L : Lubricate
Note: periodic parts / lubricants as per periodic maintenance & chart are mandatory & the same is chargeable to customer.
34
Page 36

Non-Use Maintenance
Non-use maintenance is necessary if a vehicle
remains off road for a longer duration (more
than 15 days**). The correct and careful nonuse maintenance carried out before storing
the vehicle will prevent the vehicle from
rusting and from such other non-operational
damages like fire hazards.
• Clean the entire vehicle thoroughly.
• Remove spark plug & put several drops of
engine oil into the cylinder. Kick engine
over slowly a few times to coat cylinder
wall with oil & install spark plug.
• Set the vehicle on a box or a stand so that
both wheels are raised off the ground.
• Spray oil on all unpainted metal surfaces to
prevent rusting. Avoid getting oil on rubber
parts or brake liners.
• Cover entire vehicle neatly. Make sure that
storage area is well ventilated & free from
any source of flames or spark.
• Fill 10% excess air pressure in both wheels.
• Do not apply oil on front brake disc, to
prevent rusting. If the front brake disc rusts
during storage, do not attempt to clean it
with s oa p water. The r us t will go of f
automatically during first few application of
brake.
** For Battery :
a. Remove battery and keep it on wooden
plank, in properly ventilated area.
b. Before taking the vehicle for use.
• G e t the bat t e r y r e c harged f r o m t h e
Authorised Service Center / Battery Dealer.
• A p p l y p et r o l e um j e l l y o n t e r mi n a l s .
(applicable to certain models).
Preparation for regular use after storage :
• Clean the vehicle
• Fit the battery after recharging.
• Make sure the spark plug is tight.
• Fill the fuel tank with fuel.
• Change the engine oil.
• Check all the points listed in the Daily Safety
Checks section.
• Ch eck and infla te t yres to pr oper tyre
pressure.
 Loading...