


QUANTUM
THERMAL IMAGING SCOPE
2-9
10-17
18-25
26-33
34-41
42-49
THERMAL IMAGING SCOPE QUANTUM
ТЕПЛОВИЗОР QUANTUM
THERMOVISEUR QUANTUM
WÄRMEBILDGERÄT QUANTUM
TÉRMOVISOR QUANTUM
TERMOVISORE QUANTUM
v.1012

2
3
*
Max. detection range of an object measuring 1.7x0.5 m
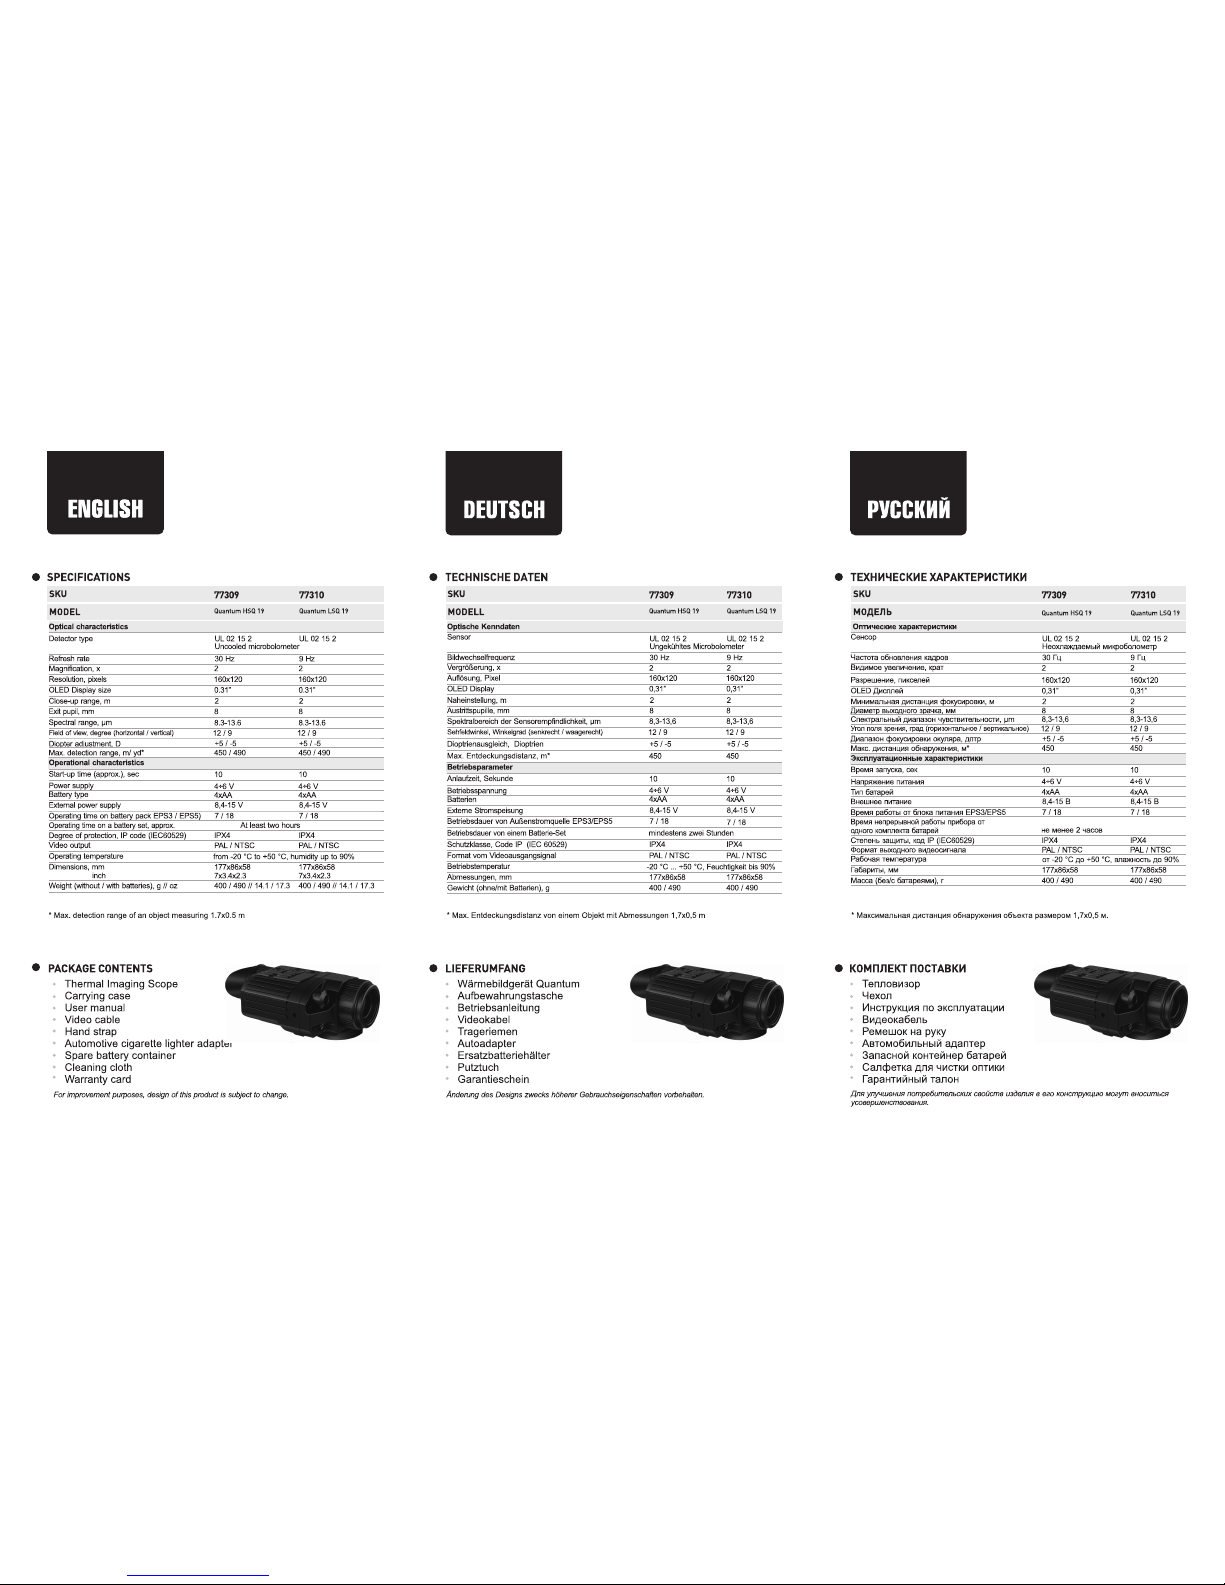
SKU
Optical characteristics
Detector type
Refresh rate
Magnification, x
Digital zoom, x
Resolution, pixels
OLED Display size
Close-up range, m
Exit pupil, mm
Spectral range, µm
Diopter adjustment, D
Max. detection range,
m/ yd*
Operational
characteristics
Start-up time (approx.), sec
Power supply
Battery type
External power supply
Operating time on battery
pack EPS3 / EPS5)
Operating time on a battery
set, approx.
Degree of protection, IP
code (IEC60529)
Video output
Operating temperature
Dimensions, mm
inch
Weight (without/with batteries),
g // oz
from -20 °С to +50 °С, humidity up to 90%
77302
UL 03 16 2
9 Hz
2
384x288
0.31”
2
7.7-13.2
+5/-5
900 / 985
8,4-15 V
IPХ4
UL 03 16 2
Uncooled microbolometer
30 Hz
2
384x288
0.31”
2
7.7-13.2
+5/-5
900 / 985
8,4-15 V
At least two hours
IPХ4
77301
UL 02 15 2
Uncooled microbolometer
30 Hz
n/a
160x120
0.31”
2
8.3-13.6
+5/-5
450 / 490
8,4-15 V
At least two hours
IPХ4
77307
Field of view, degree
- horizontal
- vertical
3
DESCRIPTION
Digital thermal imaging scopes Quantum based on IR sensor (uncooled
microbolometer) are represented by a number of models featuring
various resolution, magnification and lens diameter. The scopes are
designed for the use both in the nighttime and in the daylight in inclement
weather conditions (fog, smog, rain) to see through obstacles hindering
detection of targets (branches, tallgrass, thick bushes etc.). Unlike the
image intensifier tube based night vision devices, thermal imaging
scopes Quantum do not require an external source of light and are not
affected by bright light exposure.
Thermal imaging scopes Quantum have a wide range application
including night hunting, observation and terrain orientation, search and
rescue operations.
FEATURES
Detector size 384x288 or 160x120 pixels
Quality OLED display (640x480 pixels)
Magnification 2,1x/2,5x
2x digital zoom (384x288 models only)
High-aperture lens
Wide field of view
External power supply
Video output enabling recording
Modes “White hot” and “Black hot”
Ergonomic body
Two ¼” tripod mounts
2
SPECIFICATIONS:
MODEL
Quantum LD 38
Quantum HD 38
Quantum HS 19
77308
Quantum LS 19
UL 02 15 2
9 Hz
n/a
160x120
0.31”
2
8.3-13.6
+5/-5
450 / 490
8,4-15 V
IPХ4
2.1
2.1
2.5 2.5
8
8
8 8
10
10
10 10
4÷6 V
4xАА
4÷6 V
4xАА
4÷6 V
4xАА
4÷6 V
4xАА
9/20
9/20
9/20 9/20
PAL/NTSC
PAL/NTSC
PAL/NTSC PAL/NTSC
470/560//
16.6/19.7
470/560//
16.6/19.7
400/490//
14.1/17.3
400/490//
14.1/17.3
200x86x59
7.9x3.4x2.3
200x86x59
7.9x3.4x2.3
177x86x58
7x3.4x2.3
177x86x58
7x3.4x2.3
PRODUCT NAME LEGEND:
Example: Quantum HD 38
First letter:
“H” – refresh rate 30 Hz;
“L” – refresh rate 9 Hz.
Second letter:
“D” – detector size 384x288;
“S” – detector size 160x120.
Figure “38” or “19” stands for lens focal length - 38 mm or 19 mm
PACKAGE CONTENTS
For improvement purposes, design of this product is
subject to change.
Thermal Imaging Scope
Carrying case
User manual
Video cable
Hand strap
Automotive cigarette lighter adapter
Spare battery container
Cleaning cloth
Warranty card
1
14.414.4 12 12
10.810.8 9 9
5
5
4
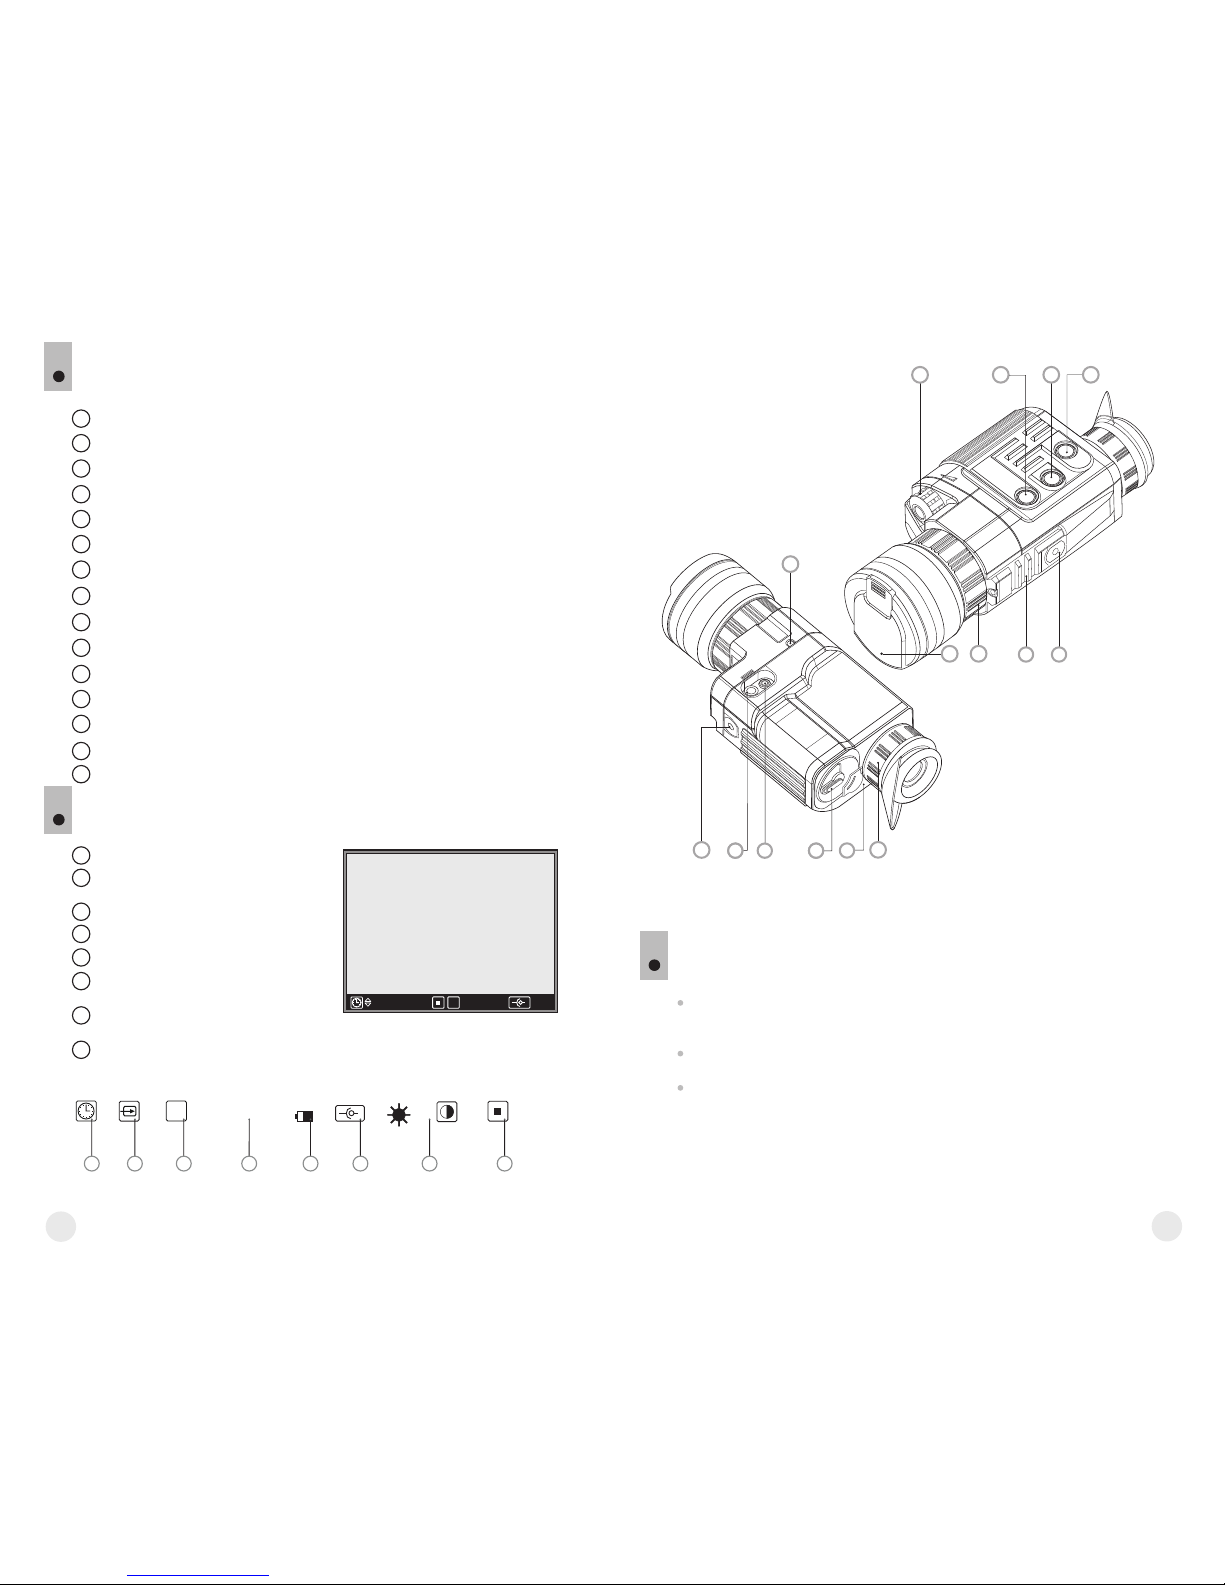
COMPONENTS AND CONTROL ELEMENTS
4
5
6
7
8
9
10
11
12
13
14
1
2
3
4
“ON” button
“CAL” button
“ZOOM/INVERT” button
Lens cap
Encoder
Ring for lens internal focusing
¼” tripod mount
Weaver mounting rail
Second ¼” tripod mount
External power supply jack
Video out
Battery compartment
Eyepiece
LED indicator
Clock
Low battery indicator
Indication for external power
supply
Brightness and contrast
adjustment
White hot / Black hot modes
Clock setup
2x digital zoom
A
Video output signal
selection
B
C
D
E
F
G
H
12
00 00
AM
x2
A B C D E F G H
24 16:12
x2
16:12
DATA PANEL ICONS
2
6
7
8
4
5
3
1
10
9
14
12
11
13
15
Lens cap storage hole
15
Turn the lever of the battery compartment (12) 90 degrees in “Open”
position and, pulling by the lug of the cover, remove the battery
container.
Install four AA batteries (or rechargeable batteries) observing polarity
shown on the battery container.
Insert the battery container into the battery compartment and turn the
lever 90 degrees clockwise. ‘
INSTALLATION OF BATTERIES
6
Note: to ensure long and reliable operation it is recommended that you use quality
rechargeable batteries with a capacity of at least 2500 mAh. Please do not use batteries of
different types or batteries with various charge levels.

6
7
After this adjustment no further dioptre adjustment should be required,
regardless of distance or other factors. Adjust image quality only with
the ring for lens internal focusing.
Press “ZOOM/INVERT”(3) to activate digital zoom (only in models
).
384x288
Keep “ZOOM/INVERT”(3) pressed for two seconds (in 160x120
models no waiting is needed) to activate colour inversion (functions
“Hot white” and “Hot black”).
When function “White hot ” is used, warm objects are represented in
shades of bright colour;
“Black hot ” represents objects in shades of dark colour.
Press “ON” (1) to switch off the unit.
Other functions
The menu includes two functions:
- Clock;
- Video output signal selection.
MENU
9
To enter the menu, keep the encoder (5) pressed until icon shows
up. Press the encoder shortly to confirm the function selected.
Rotate the encoder (5) to select time format (“24” or “AM/PM”)
(editable parameter is flashing).
To pass to minute/hour setup press the encoder (5). Rotate the
encoder to adjust minute/hour parameter.
To exit the menu, keep the encoder (5) pressed for two seconds.
Function “Clock”:
External power supply (AC/DC) is to be connected to “Power” (10)
jack located on the bottom side of the device.
Please note that the central pin of the power supply that you connect to
the “power” jack of the riflescope, must have marking “+”. The power
supply may have marking -
EXTERNAL POWER SUPPLY
7
Connection of an external power supply (icon shows up on the data panel)
automatically cuts off power supply from batteries.
External power supply DOES NOT charge the rechargeable batteries in the unit.
Attention! We suggest that you use battery packs EPS3 or EPS5 ensuring from 9 to 20
hours of operation.
The scope can be powered with an external DC power supply (2.1mm
pin) with stabilised voltage ranging from 8.4V to 15V (max. consumption
power 3W) or a 12V vehicle socket.
Press “ON” (1) to switch on the unit. Green LED indicator (14) will light
up. In case of low battery the LED will turn red and battery icon will start
flashing .
Do the calibration of image. Calibration levels background temperature
of the microbolometer and eliminates image flaws. To calibrate, press
“CAL” (2) without opening the lens cap. Image will freeze for 1-2
seconds, message “CALIBRATION” will show up on the data panel,
when the message disappears, calibration is completed.
OPERATION
8
Switching on and calibration
Open the lens cap (4) and fix it in the hole (15) in the bottom part of the
unit. Adjust the sharpness of the display icons by turning the eyepiece
ring (13).
To adjust display brightness, rotate the encoder (5). Brightness level
(from 1 to 20) will show up next to the brightness icon on the data
panel.
To adjust display contrast press the encoder (5) (icon will show up)
and rotate it. Contrast level (from 1 to 20) will show up next to the
contrast icon on the data panel.
Point the unit at a warm object located at a certain distance, 100
meters, for example.
Adjust the focus by turning the ring for lens internal focusing (6).
Focusing and image adjustment
Rotate the encoder (5) to select icon and press the encoder to
confirm.
Rotate the encoder (5) to select the required video output signal (PAL or
NTSC).
Press the encoder shortly to confirm.
To exit the menu, keep the encoder (5) pressed for two seconds or wait
10 seconds to enable automatic exit.
Function “Video output signal selection”:
USE OF THE VIDEO OUT JACK
10
“Video out” jack (11) is designed to connect external recording devices
and to transmit video signal to monitors, TV sets etc.

9
8
TROUBLESHOOTING
13
Listed below are some potential problems that may occur when using the
scope. Carry out the recommended checks and troubleshooting steps in
the order listed. Please note that the table does not list all of the possible
problem
possible cause corrective action
The unit will
not turn on.
The image is blurry, with
vertical stripes and uneven
background.
The image is too dark.
Batteries have been wrongly
installed.
Oxidized contact points in the
battery compartment due to
“leaky” batteries or contact
points becoming exposed to
a chemically reactive solution.
The batteries are fully
exhausted.
Calibration is to be done.
The lowest brightness level
is set.
Reinstall the batteries observing polarity.
Clean the battery compartment,
focusing on the contacts.
Install fresh batteries.
Do the calibration according to section
8 “OPERATION”
Adjust brightness by rotating the
encoder (5).
Select a suitable video output standard - PAL or NTSC (refer to section
9 “MENU”).
Use the included video cable to connect a peripheral device to the
“Video out” jack (11).
Switch on your thermal imaging scope – a peripheral device will show
the image seen through the scope.
Battery packs EPS3/EPS5 (SKU#79111/79112)
CVR640 video recorder (SKU#17044) and others.
ACCESSORIES
11
Using the Weaver mounting rail (8), you can attach various accessories to
the Quantum scopes, such as:
The ¼” tripod mounts from both sides of the scope are designed to have
the scope installed on a tripod or have a hand strap (included) attached.
CARE AND MAINTENANCE
12
The thermal imaging scopes have IPX4 degree of protection (protected
against splash water) but they are not intended for submersion into
water.
Attempts to disassemble or repair the scope will void the warranty!
Clean the scope's optical surfaces only if necessary, and use caution.
First, remove (by blowing with a blower brush or canned air) any dust or
sand particles. Then proceed to clean by using camera/lens cleaning
equipment approved for use with multicoated lenses. Do not pour the
solution directly onto the lens!
The scope can be used in operating temperatures ranging from
-20 °C to +50 °C. However, if it has been brought indoors from cold
temperatures, do not turn it on for three to four hours. This will prevent
external optical surfaces from fogging.
Always store the unit in its carrying case in a dry, well-ventilated space.
Remove the batteries if the scope is not going to be used for an
extended period (longer than one month).
Batteries shall not be exposed to excessive heat such as sunshine, fire
or the like.
problems. If the problem experienced with the scope is not listed, or if the
suggested action meant to correct it does not resolve the problem,
please contact the manufacturer.
The FPAs (focal plane arrays) by ULIS employed in Quantum thermal scopes feature high
quality but the manufacturer allows a certain amount of non-operating pixels. Such pixels
are not a defect and foreseen in regulations of the array manufacturer.
A non-operating pixel is defined as a black or luminous dot.
A cluster is defined as a group of several non-operating pixels adjacent by side or corner.
Central area A is defined as an area with a size of ¼ of the total length and width of the
image.
Peripheral area B is defined as part of the image excluding the central area.
For the 160x120 array (models Quantum HS19, LS19):
Not more than four non-operating pixels or one cluster consisting of not more than
four non-operating pixels are accepted in the central area.
Not more than nine non-operating pixels or one cluster consisting of not more than
nine non-operating pixels are accepted in the peripheral area.
For the 384x288 array (models Quantum HD38, LD38):
Four single non-operating pixels or not
more than two clusters consisting of
not more than two non-operating
pixels are accepted in the central area.
Ten single non-operating pixels or not
more than two clusters consisting of
not more than ten non-operating pixels
are accepted in the peripheral area.
A
B
10
11
*
Distance max. de la detection du object avec dimensions 1,7x0,5 m.
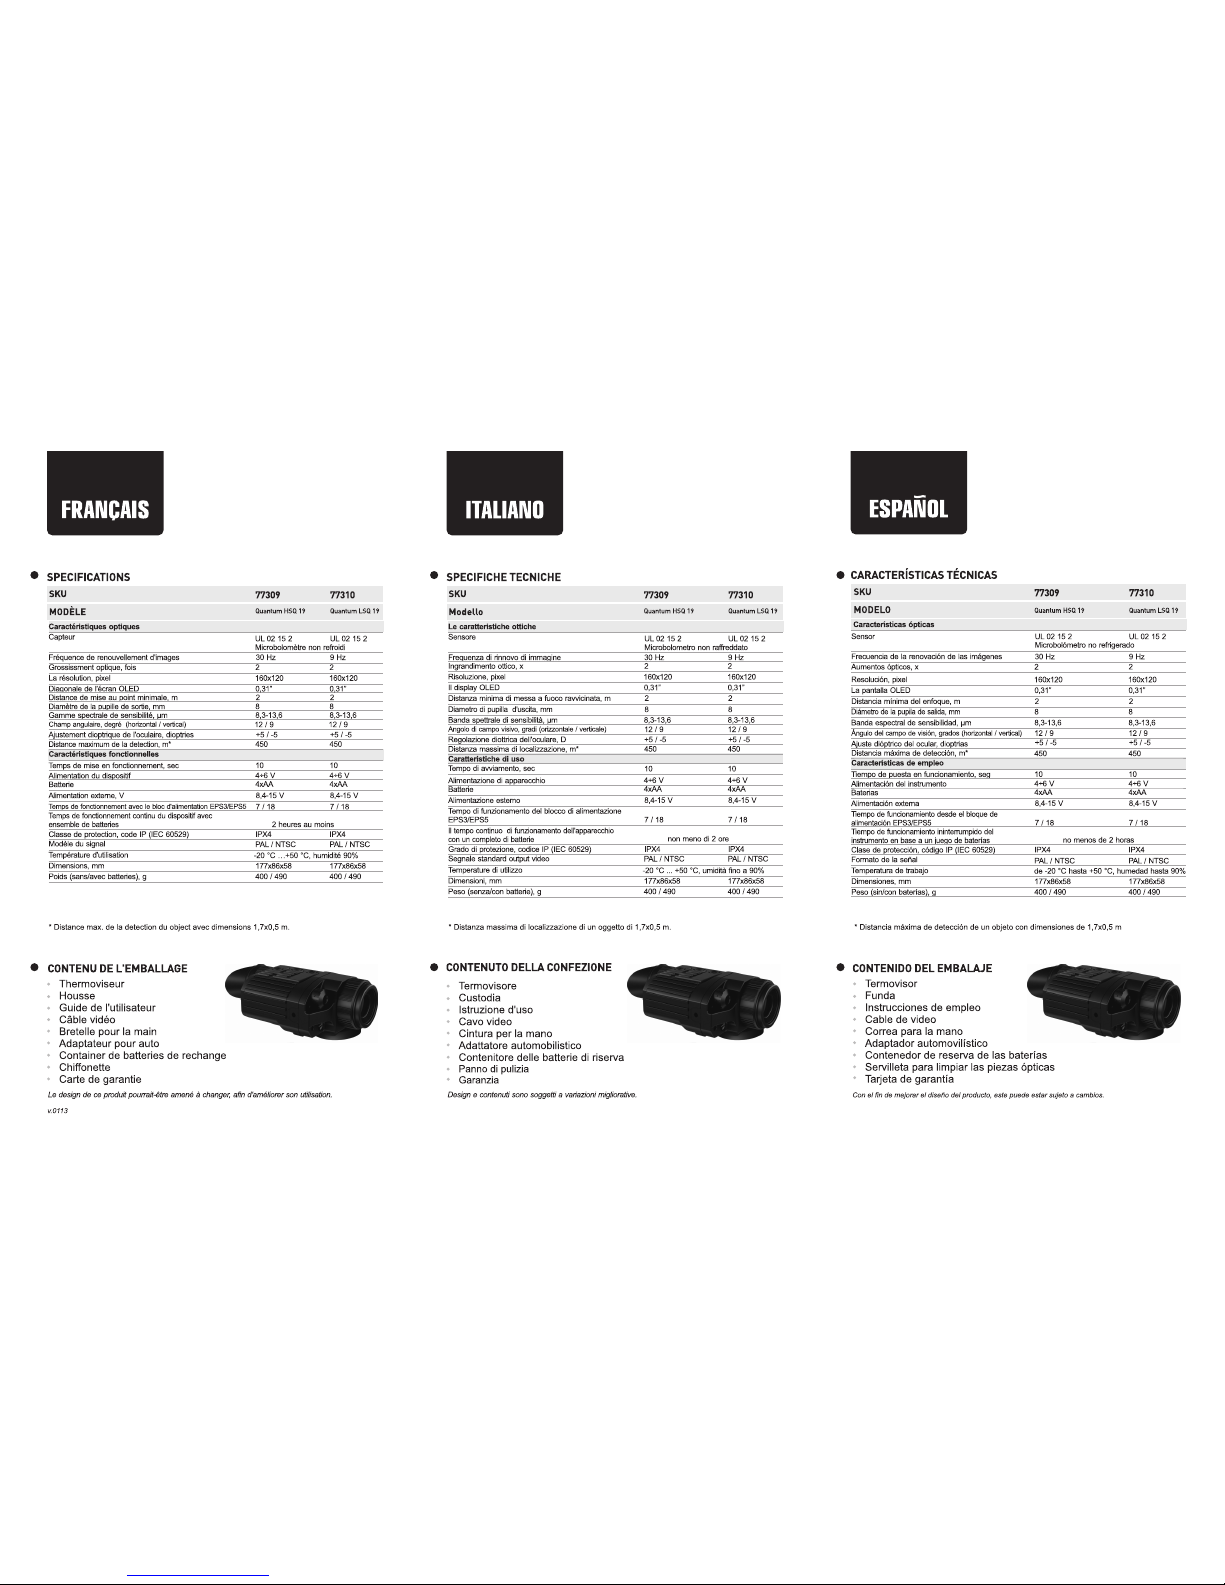
Caractéristiques optiques
Capteur
Fréquence de renouvellement
d'images
Grossissment optique, fois
Zoom numerique, fois
La résolution, lignes/mm
Diagonale de l'écran OLED
Distance de mise au point
minimale, m
Diamètre de la pupille de sortie,
mm
Gamme spectrale de
sensibilité, µm
Ajustement dioptrique de
l'oculaire, dioptries
Distance maximum de la
detection, m*
Caractéristiques fonctionnelles:
Temps de mise en
fonctionnement, sec
Alimentation externe, V
Temps de fonctionnement avec
le bloc d'alimentation EPS3/EPS5
Temps de fonctionnement continu
du dispositif avec ensemble de
batteries
Classe de protection, code IP
(IEC 60529)
Modèle du signal
Température d'utilisation
Dimensions, mm
Poids (sans/avec batteries), g
-20 °С …+50 °С, humidité 90%
9 Hz
2
384x288
0,31”
2
7,7-13,2
+5/-5
900
8,4-15 V
IPХ4
30 Hz
2
384x288
0,31”
2
7,7-13,2
+5/-5
900
8,4-15 V
2 heures au moins
IPХ4
30 Hz
n/a
160x120
0,31”
2
8,3-13,6
+5/-5
450
8,4-15 V
2 heures au moins
IPХ4
Champ angulaire, degré
- horizontal
- vertical
3
DESCRIPTION
Les thermoviseurs numériques de la série Quantum, conçus à la base
de la matrice IR (microbolomètre), sont représentés par des modèles qui
se diffèrent par: le pouvoir de résolution, la multiplicité et le diamètre de
l'objectif. Les dispositifs sont destinés à être utilisés pendant la nuit et
aux conditions de l'éclairage normal par mauvais temps (brouillard,
mauvaise visibilité, pluie). Aussi en présence d'obstacles rendant difficile
la détection de cible (branches, herbes hautes, buissons épais etc.). A la
différence des dispositifs de vision nocturne conçus à la base de
transformateurs électroniques-optiques, les monoculaires de
thermoviseurs Quantum ne nécessitent pas de source de lumière
externe et ne craignent pas l'exposition à la lumière.
Les thermoviseurs Quantum peuvent être utilisés au cours de la chasse
nocturne, de l'observation et de l'orientation sportive, ainsi que pendant
les opérations de reconnaissance et de sauvetage.
CARACTERISTIQUES SPECIFIQUES
Matrice 384x288/160x120
OLED afficheur (640x480)
Agrandissement 2,1x/2,5x
Zoom numérique 2x (uniquement pour la matrice 384x288)
Objectif à force lumineuse
Champ angulaire important
Alimentation externe
Sortie vidéo – possibilité d'écriture vidéo sur d'autres dispositifs
Régime «White hot» et «Black hot»
Corps ergonomique
Deux jacks 1/4" pour le montage sur un pied.
2
SPECIFICATIONS
9 Hz
n/a
160x120
0,31”
2
8,3-13,6
+5/-5
450
8,4-15 V
IPХ4
2,1
2,1
2,5 2,5
88 8 8
10
10
10 10
9/20
9/20
9/20 9/20
PAL/NTSCPAL/NTSC PAL/NTSC PAL/NTSC
470/560
470/560
400/490 400/490
200x86x59
200x86x59
177x86x58 177x86x58
Nom du dispositif, signification:
Par exemple, Quantum HD 38:
Première lettre:
«H» - fréquence de renouvellement d'images 30 Hz;
«L» - fréquence de renouvellement d'images 9 Hz;
Deuxième lettre:
«D» - taille de matrice 384x288;
«S» - taille de matrice 160x120.
Le chiffre «38» ou «19»: la distance focale de l'objectif de 38 mm ou de 19 mm.
CONTENU DE L'EMBALLAGE
Le design de ce produit pourrait-être amené à changer,
afin d'améliorer son utilisation.
Thermoviseur
Housse
Guide de l'utilisateur
Câble vidéo
Bretelle pour la main
Adaptateur pour auto
Container de batteries de rechange
Chiffonette
Carte de garantie
1
SKU
77302
77301
77307
MODÈLE
Quantum LD 38
Quantum HD 38
Quantum HS 19
77308
Quantum LS 19
UL 03 16 2
UL 03 16 2
Microbolomètre non refroidi
UL 02 15 2
Microbolomètre non refroidi
UL 02 15 2
Alimentation du dispositif
Batterie
4÷6 V
4xАА
4÷6 V
4xАА
4÷6 V
4xАА
4÷6 V
4xАА
14,414,4
12 12
10,810,8 9 9

5
13
12
PICTOGRAMMES DU PANNEAU D'AFFICHAGE
4
5
6
7
8
9
10
11
12
13
14
1
2
3
4
Bouton «ON»
Bouton «CAL»
Bouton «ZOOM/INVERT»
Couvercle de l'objectif
Encoder
Galet de focalisation interne de l'objectif
Jack 1/4" pour le montage sur un pied
Mécanisme de fixation Weaver
Deuxième jack 1/4" pour le montage sur un pied
Prise de courant d'alimentation externe
Sortie vidéo
Container de batteries
Oculaire
Indicateur à diode luminescente
Heure
Affichage de charge de batteries
Affichage de fonctionnement avec
la source d'alimentation externe
Réglage du niveau de brillance et
de contraste
Régimes “White hot/Black hot”
Régime d'ajustage de l'heure
Zoom numérique 2x
A
Commutation du signal vidéo
de sortie
B
C
D
E
F
G
H
12
00 00
AM
x2
A B C D E F G H
24 16:12
x2
16:12
ELEMENTS DU VISEUR ET ORGANES DE COMMANDE
Place pour fixer le couvercle de l'objectif
15
2
6
7
8
4
5
3
1
10
9
14
12
11
13
15
Tournez la poignée du couvercle de container de batteries (12) de 90°,
afin de mettre en position «Open» et sortez le container de batteries,
en tirant la languette qui est prévue sur le couvercle.
Mettez en place les quatre batteries de type AA (ou de l'accumulateur),
en respectant le marquage sur le container.
Mettez en place le container de batteries et tournez la poignée de 90°
dans le sens horaire.
MISE EN PLACE DES BATTERIES
6
Note: pour assurer un fonctionnement fiable et durable il est conseillé que vous utilisez des
piles rechargeables de qualité avec une capacité d'au moins 2500 mAh. Veuillez ne pas
utiliser de piles de différents types ou des piles avec des niveaux différents de charge.

14
15
Mettez le dispositif en service en appuyant sur le bouton «ON» (1). Le
LED vert (14) s'allume. En cas de décharge de batteries, la couleur de
LED change en couleur rouge et une icône “Batterie” commence à
clignoter .
Effectuez le calibrage de l'image. Le calibrage permet d'égaliser la
plage de températures du microbolomètre et d'éliminer les défauts de
l'image. Pour faire ceci, appuyez sur le bouton «CAL» (2), sans ouvrir
le couvercle de l'objectif.
Alors l'image s'immobilisera pendant 1-2 secondes, le mot
«CALIBRATION» s'affichera sur le panneau d'affichage, après que le
mot disparaît, le calibrage est réalisé.
UTILISATION
8
Mise en service et calibrage
Essayez d'obtenir la qualité optimale de l'image, tout en tournant le
galet de focalisation interne de l'objectif (6).
Une fois l'ajustage effectué, indépendamment de la distance et
d'autres conditions, il n'est plus nécessaire de tourner le galet
d'ajustage dioptrique précis (13). Il ne convient d'ajuster l'image que
moyennant l'utilisation du galet de focalisation interne de l'objectif (6).
Appuyer sur le bouton « ZOOM/INVERT» (3), afin de pouvoir activer le
zoom numérique (uniquement pour les modèles 384x288).
Pour activer l'inversion de couleur de l'image (fonctions «White hot» et
«Black hot»), appuyez sur le bouton «ZOOM/INVERT» (3) et le
maintenez appuyé pendant deux secondes (l attente n'est pas
nécessaire pour les modèles 160x120). L'utilisation de la fonction
«White hot» (blanc chaud) permet d'afficher les objets chauds en
couleurs plus claires;
«Black hot» (noire chaud) – les objets chauds s'affichent en nuances
plus foncées.
Pour éteindre le dispositif, appuyez sur le bouton «ON» (1).
'
Fonctions supplémentaires
Le menu comprend deux fonctions:
- Heures;
- Choix de signal vidéo de sortie.
MENU
9
Pour accéder au menu, appuyez sur l'encoder (5) et le maintenez
appuyé jusqu'à ce que le pictogramme ne s'affiche. Appuyez sur
l'encoder (5), afin de confirmer la fonction choisie.
Choisissez le format d'heures («24» ou «AM/PM» (le paramètre à
sélectionner clignote), à l'aide de la rotation de l'encoder.
Pour passer à l'ajustage du paramètre heure/minute, appuyez sur
l'encoder (5). Régler la valeur heure/minute à l'aide de la rotation de
l'encoder.
Pour quitter le menu, maintenez l'encoder (5) appuyé pendant deux
secondes.
Fonction «Heures»:
Une source extérieure d'alimentation (AC/DC) doit être raccordée au
port “Power” (14) qui se trouve sur le revers du panneau droit de
l'appareil.
Attention!
Dans la cheville de contact de l'alimentation raccordée au viseur le
contact central doit être “+”.
Le marquage possible sur la cheville de contact ou sur la source
d'alimentation -
+
ALIMENTATION EXTERIEURE
7
Lors du raccordement d'une source extérieure d'alimentation (sur le panneau d'affichage
apparaît une icône ) l'alimentation par piles est coupée.
Pendant le fonctionnement à l'aide d'une source extérieure d'alimentation la charge des
accumulateurs ne se produit pas!
Remarque: veuillez utiliser l'alimentateur externe EPS3 ou EPS5, qui permet
d'assurer le fonctionnement autonome d'une durée de 9 à 20 heures.
L'appareil peut fonctionner à l'aide d'une source extérieure d'alimentation
(prise mâle 2,1mm) ou d'un réseau d'automobile. La plage de la tension
d'entrée varie de 8,4V à 15V. L'énergie absorbée est moins 3 W.
Ouvrez le couvercle de l'objectif (4) et fixez-le l
dans le fond de l'appareil. Ajustez la netteté des pictogrammes, tout en
tournant l'anneau d'ajustage précis de l'oculaire (13).
Afin de pouvoir régler la brillance de l'afficheur, il faut tourner l'encoder
(5). Sur le panneau d'affichage s'affichera le degré de brillance
respectif (de 1 à 20), à coté de LED de brillance.
Appuyez sur l'encoder (5) (le pictogramme s'affiche), moyennant
la rotation de celui-ci réglez la contraste de l'afficheur. Le degré de
contraste respectif (de 1 à 20) s'affichera à coté de l'indicateur de
contraste sur le panneau d'affichage.
Choisissez l'objet d'observation fixe chaud, éloigné d'une certaine
distance, par exemple de 100 m.
dans 'ouverture (15)
Focalisation et ajustage de l'image
Choisissez dans le menu le pictogramme et appuyez sur l'encoder,
afin de confirmer le choix.
Choisissez le format voulu du signal vidéo (PAL ou NTSC) moyennant
la rotation de l'encoder (5).
Appuyez sur l'encoder (5), afin de confirmer le choix.
Fonction «Choix de signal vidéo de sortie»:
Pour quitter le menu: appuyez sur l'encoder et maintenez-le appuyé
pendant deux secondes. Soit attendez 10 secondes, l'achèvement sera
automatique.

Les matrices ULIS, utilisées dans les thérmoviseurs Quantum, sont caractérisées par une
haute qualité, tout de même, d'après l'avis de fabricant, une certaine quantité de pixels
inactifs peut être acceptable. La présence de ces pixels n'est pas considérée comme
défaut de fabrication, elle est acceptée conformément aux documents réglementaires du
fabricant de matrices.
Le pixel inactif se présente sous forme d'un point noir ou lumineux.
Cluster – un groupe comprenant quelques pixels adjacents.
Zone centrale A – zone, dont les dimensions constituent ¼ de la longueur et largeur totale
de l'image.
Zone périphérique B – une part de l'image en dehors de la zone centrale.
Pour la matrice 160x120 (modèles Quantum HS19, LS19):
Il est acceptable dans la zone centrale la présence de pixels inactifs d'une quantité
non supérieure à quatre, ou d'un cluster, comprenant quatre pixels inactifs au maximum;
Il est acceptable dans la zone périphérique la présence de pixels inactifs d'une
quantité ne dépassant pas neuf ou d'un cluster comprenant neuf pixels inactifs au
maximum.
Pour la matrice 3 84x 288 (m odè les
Quantum HD38, LD38):
Il est acceptable dans la zone centrale la
présence de quatre pixels inactifs
séparés ou de deux clusters ayant une
quantité de pixels inactifs ne dépassant
pas deux chacun;
Il es t a ccepta bl e dans la zon e
périphérique la présence de dix pixels
inactifs séparés ou de deux clusters au
maximum dont la quantité de pixels
inactifs ne peut pas être supérieure à
dix.
17
16
Bloc d'alimentation externe EPS3/EPS5.
Vidéorecorder CVR640 etc.
ACCESSOIRES
11
Le mécanisme de fixation de standard Weaver (8) permet de monter sur
le thermoviseur Quantum d'accessoires différents, tels que:
Des jacks de standard 1/4", prévus de deux cotés du corps, sont destinés
à être utilisés pour le montage du dispositif sur un pied et pour le
raccordement de la bretelle.
ENTRETIEN TECHNIQUE ET CONSERVATION
12
Le nettoyage extérieur des pièces optiques est effectué
soigneusement et en cas d'une vraie nécessité. D'abor enlevez avec
precaution (souffler ou secouer) la poussière et la boue de la surface
optique puis faites le nettoyage. Utilisez pour cela une serviette à coton
(ouate ou un petit baton de bois), des moyens speciaux destinés aux
lentilles avec le revetement multicouches. Ne versez pas de l'eau tout
droit sur la lentille!
Le viseur peut etre exploité dans une large étendue de températures
de -20 °C à +50 °C. Néanmois si l'appareil est apporté du froid dans un
local chaud ne le mettez pas en marche depuis 3-4 minutes.
Eviter la surchauffe des batteries par les rayons de soleil, flamme ou
sources de chaleur de ce type.
problème
cause probable solution
Le dispositif ne se met
pas en marche.
L'image est non distincte,
présence de bandes
verticales,fond irrégulier.
L'image est trop noire.
Mauvaise mise en place des
batteries.
Les contacts dans le container
sont oxydés – «écoulement»
des batteries ou présence d'un
liquide chimiquement actif sur
les contacts.
Décharge complète des
batteries.
Le calibrage est
nécessaire.
Niveau de brillance
insuffisant.
Mettre en place les
batteries en respectant
le marquage.
Nettoyer le container de
batteries, dénuder les contacts.
Mettre en place des batteries
chargées.
Effectuer le calibrage
de l'image, en se référant
aux instructions citées
au p.8 Utilisation.
Régler la brillance moyennant
la rotation du galet (5).
Choisissez dans le menu le format voulu du signal vidéo (PAL ou
NTSC).
Connectez le récepteur du signal vidéo au raccord de sortie vidéo (11)
à l'aide du câble vidéo fourni.
Mettre le thermoviseur en fonctionnement – l'image s'affichera sur le
dispositif externe.
UTILISATION DU PORT VIDEO OUT
10
Les dispositifs sont munis d'une sortie vidéo (11) qui permet de raccorder
des enregistreurs vidéo externes et d'afficher l'image sur l'afficheur.
Imager a un degré de protection IPX4 (protection contre la
pulvérisation d'eau), mais le viseur ne doit etre plongé dans l'eau.
Il est défendu de réparer et démonter le viseur sous garantie.
A
B
REVELATION DES DEFAUTS
13
Le tableau présente la liste des dérangements eventuels pouvant
apparaitre au cours de l'utilisation du viseur.

18
19
*
Max. Entdeckungsdistanz von einem Objekt mit Abmessungen 1,7x0,5 m
Optische Kenndaten
Sensor
Bildwechselfrequenz
Vergrößerung, x
Digitales Zoom, x
Auflösung, Pixel
OLED Display
Naheinstellung, m
Austrittspupille, mm
Spektralbereich der
Sensorempfindlichkeit, µm
Dioptrienausgleich,
Dioptrien
Max. Entdeckungsdistanz, m*
Betriebsparameter
Anlaufzeit, Sekunde
Externe Stromspeisung
Betriebsdauer von
Außenstromquelle EPS3/EPS5
Betriebsdauer von einem
Batterie-Set
Schutzklasse, Code IP
(IEC 60529)
Format vom
Videoausgangsignal
Betriebstemperatur
Abmessungen, mm
Gewicht (ohne/mit Batterien), g
-20 °С ... +50 °С, Feuchtigkeit bis 90%
9 Hz
2
384x288
0,31”
2
7,7-13,2
+5/-5
900
8,4-15 V
IPХ4
30 Hz
2
384x288
0,31”
2
7,7-13,2
+5/-5
900
8,4-15 V
mindestens zwei Stunden
IPХ4
30 Hz
n/a
160x120
0,31”
2
8,3-13,6
+5/-5
450
8,4-15 V
mindestens zwei Stunden
IPХ4
Sehfeldwinkel, Winkelgrad
- senkrecht
- waagerecht
3
BESCHREIBUNG
Im Grunde der Serie der digitalen Wärmebildgeräte Quantum liegt der
infrarote Sensor (Mikrobolometer). Die Modellreihe wird mit Geräten mit
unterschiedlichem Objektivlinsendurchmesser, Auflösungs- und
Vergrößerungsvermögen vertreten.
Die Geräte sind sowohl in der Nacht, als auch am Tag in extrem
schlechten Wetterbedingungen (bei Nebel, Dunst, Regen) anzuwenden,
auch wenn die Zielentdeckung durch objektive Hindernisse gestört wird
(Zweige, hohes Gras, dichtes Gebüsch usw.).
Die Wärmebildgeräte Quantum unterscheiden sich von denen mit der
Lichtverstärkerröhre dadurch, dass sie keine Zusatzbeleuchter
brauchen und gegen helles Licht widerstandsfähig sind.
Die Anwendungsbereiche der Geräte Quantum umfassen Nachtjagd,
Beobachtung, Orientierungslauf, Aufklärungs- und Rettungsdienst.
MERKMALE
Hochempfindlicher Sensor 384x288/160x120
OLED Display (640x480)
Vergrößerung 2,1x/2,5x
Digitales Zoom (nur die Modelle 384x288)
Lichtstarkes Objektiv
Großer Sehfeldwinkel
Externe Stromspeisung
Videoausgang, der die Aufnahme auf
Außeneinrichtungen ermöglicht
“White hot” und “Black hot” Betriebsmodi
Ergonomisch geformtes Gehäuse
Zwei Stativgewinde ¼”
2
TECHNISCHE DATEN
9 Hz
n/a
160x120
0,31”
2
8,3-13,6
+5/-5
450
8,4-15 V
IPХ4
2,1
2,1
2,5 2,5
8
8
8 8
10
10
10 10
9/20
9/20
9/20 9/20
PAL/NTSCPAL/NTSC PAL/NTSC PAL/NTSC
470/560
470/560
400/490 400/490
200x86x59
200x86x59
177x86x58 177x86x58
Benennungsentzifferung des Gerätes
Z.B., Quantum HD 38:
Der erste Buchstabe:
„H“ – Bildwechselfrequenz 30 Hz
„L“ – Bildwechselfrequenz 9 Hz
Der zweite Buchstabe:
„D“ – Matrixgröße 384x288;
„S“ – Matrixgröße 160x120.
Mit Ziffern „38“ oder „19“ wird die Objektivbrennweite (38 mm oder 19 mm) bezeichnet.
LIEFERUMFANG
Änderung des Designs zwecks höherer
Gebrauchseigenschaften vorbehalten.
Wärmebildgerät Quantum
Aufbewahrungstasche
Betriebsanleitung
Videokabel
Trageriemen
Autoadapter
Ersatzbatteriehalter
Putztuch
Garantieschein
1
SKU
77302
77301
77307
MODELL
Quantum LD 38
Quantum HD 38
Quantum HS 19
77308
Quantum LS 19
UL 03 16 2
UL 03 16 2
Ungekühltes Microbolometer
UL 02 15 2
Ungekühltes Microbolometer
UL 02 15 2
Betriebsspannung
Batterien
4÷6 V
4xАА
4÷6 V
4xАА
4÷6 V
4xАА
4÷6 V
4xАА
14,414,4
12 12
10,810,8 9 9

5
21
20
BESTANDTEILE UND STEUERORGANE DES GERÄTES
4
5
6
7
8
9
10
11
12
13
14
15
1
2
3
4
Taste „ON“
Taste „CAL“
Taste “ZOOM/INVERT”
Objektivschutzdeckel
Encoder
Rad der inneren Fokussierung des Objektivs
Stativgewinde ¼”
Weaver-Befestigung
Stativgewinde ¼”
Anschlußstelle der Außenstromspeisung
Videoausgang
Batteriebehälter
Okular
LED-Anzeige
Stelle zum Befestigen des Objektivschutzdeckel
Uhr
Anzeiger des
Batterieaufladungszustands
Betriebsanzeiger vom
Außenstromspeisung
Helligkeits- und
Kontrasteinstellung
Betriebsmodi “White hot / Black hot”
Uhrzeiteinstellung
Digitales Zoom 2x
A
Umschalten des
Ausgangsvideosignals PAL/NTSC
B
C
D
E
F
G
H
12
00 00
AM
x2
A B C D E F G H
24 16:12
x2
16:12
PIKTOGRAMME DER ANZEIGETAFEL:
2
6
7
8
4
5
3
1
10
9
14
12
11
13
15
Den Griff des Deckels (12) vom Batteriebehälter um 90 Grad drehen,
die P osi t i on „ Op e n “ er r e ich e n . D e n Vors p r u ng a m
Objektivschutzdeckel ziehen, den Batteriebehälter herausnehmen.
Vier AA-Batterien entsprechend einsetzen, die Markierung auf dem
Batteriebehälter beachten.
Den Batteriebehälter zurückeinlegen, den Griff um 90 Grad im
Uhrzeigersinn drehen.
EINLEGEN DER BATTERIE
6
Anmerkung: für einen langfristigen und stabilen Betriebs des Gerätes benutzen Sie AAAkkus mit Leistungskapazität nicht weniger als 2500 Miliamper pro Stunde.

22
23
Die externe Stromquelle (AC/DC) ist anzuschließen an die
Anschlussstelle “Power” (14), die sich im Hinterteil des Gerätes
befindet.
Achtung!
Im ans Gerät anzuschließenden Anschlußstecker muss der zentrale
Kontakt “+” sein. Mögliche Markierung am Stecker oder der
Stromquelle -
+
EXTERNE STROMSPEISUNG
7
Beim Anschluss einer äußeren Stromquelle ( ) wird die
Speisung von der den Batterien abgeschalten.
Während der Versorgung von der externen Stromquelle erfolgt kein Aufladen der
Batterien!
Anmerkung: Es ist empfehlenswert, Außenstromquellen EPS3 oder EPS5 zu
gebrauchen, diese garantieren von 9 bis zu 20 Stunden Alleinlauf.
es erscheint ein Piktogramm
Das Gerät kann von einer externen Stromquelle (Stecker 2,1mm) als
auch von einem Kraftfahrzeugsnetz gespeist werden. Das Intervall der
Ei n g angsspan n u n gen liegt zwisc h e n 8 , 4 V u n d 1 5V. Der
Leistungsverbrauch erreicht bis 3W.
Schalten Sie das Gerät ein, indem Sie die Taste „ON“ (1) drücken. Der
grüne Lichtanzeiger (14) springt an. Wenn die Batterie entladen ist,
leuchtet der Anzeiger rot und das Piktogramm “Batterie” beginnt zu
blinken.
Kalibrieren Sie das Bild. Das ermöglicht den Wärmegrad des
Mikrobolometers auszugleichen und Fehler der Abbildung zu
beheben. Dafür ist es, ohne den Objektivschutzdeckel abzunehmen,
die Taste „CAL“ (2) zu drücken.
Das Bild erstarrt für 1-2 Sekunden, auf der Informationstafel erscheint
die Aufschrift “CALIBRATION”, nachdem die Aufschrift verschwindet
ist, ist die Kalibration durchgeführt.
BETRIEB
8
Einschalten und Kalibrieren
Den Objektivschutzdeckel (4) aufklappen und ans Loch (15) im
unteren Teil des Gehäuses befestigen.
Das Rad des Dioptrienausgleiches (13) drehen, um die Bildschärfe der
Piktogramme einzustellen.
Um das Helligkeitsniveau des Displays zu optimieren, drehen Sie den
Encoder (5). Die erreichte Helligkeitsstufe (von 1 bis 20) wird neben
dem Helligkeitsanzeiger auf der Informationstafel abgespiegelt.
Um das kontrastreiche Bild auf dem Display zu erreichen, drücken Sie
den Encoder (5) (es erscheint ein Piktogramm ), und drehen Sie
ihn. Die entsprechende Kontraststufe (von 1 bis 20) wird neben dem
Kontrastanzeiger auf der Informationstafel gezeigt.
Wählen Sie einen unbeweglichen warmen Beobachtungsobjekt, der
100 Meter entfernt ist.
Bildfokussierung und –einstellung
Das Fokussierungsrad (6) drehend, erreichen Sie ein möglichst
scharfes Bild.
Nachdem alle Einstellungen durchgeführt wurden, brauchen Sie das
Dioptrienausgleichsrad (13) nicht mehr zu drehen, unabhängig von
Distanz und anderen Bedingungen.
Das Bild wird nur mittels des Rades der inneren Fokussierung (6)
eingestellt.
Das digitale Zoom (nur in Modellen 384x288) wird durch das Drücken
der Taste “ZOOM/INVERT”(3) aktiviert.
Um die Farbinversion des Bildes (Funktionen “White hot” und “Black
hot”) zu aktivieren, halten Sie die Taste “ZOOM/INVERT”(3) im Laufe
von zwei Sekunden (in Modellen 388x284 muss man nicht warten)
gedrückt.
Falls die Funktion “White hot” („Weiß heiß“) ein ist, werden warme
Objekte in helleren Farbtonen dargestellt;
Im Modus “Black hot” (Schwarz heiß) werden warme Objekte in
dunkleren Farbschattierungen gezeigt.
Um das Gerät auszuschalten, wählen Sie die Taste “ON” (1).
Nebenfunktionen
Das Menü enthält zwei Funktionen:
- Uhrzeit;
- Wahl des Videoausgangssignals.
MENÜ
9
Um ins Menü einzutreten, wählen und halten Sie den Encoder
gedrückt, bis das Piktogramm erscheint. Bestätigen Sie die Wahl
der Funktion, indem Sie den Encoder (5) drücken.
Die Wahl des Uhrzeitformats (“24” oder “AM/PM”) erfolgt durch das
Drehen des Encoders (5). (Der korrigierende Parameter blinkt).
Funktion „Uhrzeit“:
Wählen Sie im Menü das Sinnbild „Videoausgang“, der Encoder
soll danach gedrückt werden, um die Wahl der Funktion zu bestätigen.
Das gewünschte Format des Videosignals (PAL oder NTSC) wird
durch das Drehen des Encoders gewählt.
Der Encoder soll gedrückt werden, um alle Änderungen zu speichern.
Funktion „Format des Videosignals“:
Um das Menü zu verlassen, halten Sie den Encoder (5) zwei Sekunden
lang gedrückt oder warten Sie 10 Sekunden, damit es automatisch
gemacht wird.
Um mit Einstellung von Stunde / Minute anzufangen, drüсken Sie den
Encoder (5), indem Sie ihn drehen, erfolgt die Einstellung der
Kennwerte von Stunde / Minute.
Um das Menü zu verlassen, halten Sie den Encoder (5) zwei
Sekunden lang gedrückt oder warten Sie 10 Sekunden, damit es
automatisch gemacht wird.

25
24
Prüfung und Korrektur auf Art und Weise, wie es in der Tabelle angeführt
ist, durch. In der Tabelle sind nicht alle Probleme erwähnt, die entstehen
können. Wenn in der gegebenen Liste das Problem nicht erwähnt ist,
oder die erwähnte Maßnahme für die Beseitigung des Defektes kein
Ergebnis hat, teilen Sie darüber dem Hersteller mit.
problem
mögliche ursache beseitigung
Das Gerät kann nicht
eingeschaltet werden.
Da s B ild is t u ns cha rf
mi t se nkre chten Lin ien
verzerrt und der Hintergrund
ist ungleichmäßigem.
Das Bild ist zu dunkel.
Batterien sind falsch
eingelegt.
Die Kontakte im Batteriebehälter
sind oxidiert: die Batterie läuft oder
Kontakte wurden durch chemisch
aktive Flüssigkeit beschädigt.
Batterien sind leer.
Das Gerät soll kalibriert werden.
Die Helligkeit des Bildes ist auf
niedrigem Niveau.
Legen Sie Batterien der Markierung
entsprechend ein.
Reinigen Sie den Batteriebehälter
und Kontakte.
Legen Sie neue Batterien ein.
Führen Sie das Kalibrieren der
Abteilung „8. Betrieb“ entsprechend
durch.
Drehen Sie den Encoder (5), bis
das Bild genug hell ist.
Wählen Sie das Format des Videosignals (PAL/NTSC)
Mittels des Kabels aus dem Lieferumfang schließen Sie die Quelle des
Videosignals an die Anschlussstelle (11).
Schalten Sie das Wärmebildgerät ein, - auf der Außenanlage erscheint
ein Bild.
Externe Stromspeisung EPS3/EPS5;
Videorecorder CVR640 u.a.
ZUBEHÖR
11
Das Zubehör wird auf die Wärmebildgeräte Quantum mithilfe der
Befestigung des Weaver-Standards angebracht. Dazu gehören:
Das Quantum ist mit zwei Stativgewinde ¼“ ausgerüstet, das ermöglicht
das Gerät ans Stativ zu montieren oder das Trageriemen anzubringen.
VIDEOAUSGANG
10
Die Wärmebildgeräte sind mit dem Videoausgang (11) ausgerüstet,
damit die Außenanlagen für Videoaufnahme und Bilddarstellung auf dem
Bildschirm angeschlossen werden können.
Das Gerät hat Schutzklasse IPX4 (Schutz gegen Wasserübersprühung) aber tauchen Sie das Gerät ins Wasser nicht ein!
WARTUNG UND LAGERUNG
12
Es ist verboten das Gerät zu reparieren und zu demontieren!
Reinigen Sie die optischen Außenteile sehr vorsichtig und nur im Falle
der dringenden Notwendigkeit. Zuerst entfernen (wischen oder
abstäuben) Sie vorsichtig den Staub und Sand von der optischen
Oberfläche, dann reinigen. Benutzen Sie ein sauberes Baumwolltuch
(die Watte und Holzstab), die speziellen Mittel für die Linsen mit den
Vielfachschichten oder Spiritus. Gießen die Flüssigkeit direkt auf die
Linse nicht!
Das Gerät kann man bei dem breiten Temperaturbereich von Minus
20°C bis Plus 50 °C verwenden. Aber wenn das Gerät von der Kälte in
den warmen Raum getragen ist, schalten Sie es im Laufe von 3-4
Stunden nicht ein.
Lagern Sie das Gerät immer nur in der Aufbewahrungstasche, im
trockenen, gut gelüfteten Raum. Bei der Dauerlagerung (mehr als ein
Monat) ziehen Sie unbedingt die Batterien heraus.
Die in den Wärmesichtgeräten installierten ULIS Matrizen zeichnen sich durch hohe
Qualität aus, dabei ist eine gewisse Zahl der inaktiven Pixel zulässig. Das Vorkommen
solcher Pixel stellt kein Defekt dar und wird durch Normativakten des Herstellers geregelt.
Ein inaktiver Pixel ist ein schwarzer oder leuchtender Punkt.
Ein Cluster ist eine Gruppe einiger neben einander liegender Pixel.
Die zentrale A-Zone ist eine Zone, die ein Viertel der Gesamtlänge und –Breite des Bildes
groß ist.
Die peripherische В-Zone ist ein Teil der Abbildung ausschließlich der zentralen Zone.
Für die Matrix 160x120 (Quantum HS19, LS19 Modelle):
In der zentralen Zone sind nicht mehr als vier inaktive Pixel oder ein Cluster zulässig,
der nicht mehr als vier solche Pixel beinhaltet.
Die peripherische Zone soll nicht mehr als neun inaktive oder einen Cluster aus neun
solcher Pixel enthalten.
Für die Matrix 384x288 (Quantum HD38, LD38 Modelle):
In der zentralen Zone sind vier inaktive
Einzelpixel oder nicht mehr als zwei
Cluster aus zwei inaktiven Pixeln
zugelassen.
Die peripherische Zone kann nicht
mehr als zehn inaktive Einzelpixel oder
zwei Cluster aus zehn inaktiven Pixeln.
A
B
FEHLERBESEITIGUNG
13
In der Tabelle ist die Liste der möglichen Probleme, die bei dem Betrieb
des Gerätes entstehen können, aufgeführt. Führen Sie die empfohlene

26
27
*
Distancia máxima de detección de un objeto con dimensiones de 1,7x0,5 m
SKU
Características ópticas
Sensor
Frecuencia de la renovación
de las imágenes
Aumentos ópticos, x
Zoom digital, x
Resolución, línea/mm
La pantalla OLED
Distancia mínima del enfoque, m
Diámetro de la pupila de salida, mm
Banda espectral de
sensibilidad, µm
Ajuste dióptrico del ocular,
dioptrias
Distancia máxima de
detección, m*
Características de empleo
Tiempo de puesta en
funcionamiento, seg
Alimentación del instrumento
Baterias
Alimentación externa
Tiempo de funcionamiento
desde el bloque de alimentación
EPS3/EPS5
Tiempo de funcionamiento
ininterrumpido del instrumento
en base a un juego de baterías
Clase de protección, código
IP (IEC 60529)
Formato de la señal
Temperatura de trabajo
Dimensiones, mm
Peso (sin/con baterías), g
de -20 °С hasta +50 °С, humedad hasta 90%
77302
9 Hz
2
384x288
0,31”
2
7,7-13,2
14,4
+5/-5
900
8,4-15 V
IPХ4
30 Hz
2
384x288
0,31”
2
7,7-13,2
14,4
+5/-5
900
8,4-15 V
no menos de 2 horas
IPХ4
77301
30 Hz
n/a
160x120
0,31”
2
8,3-13,6
12
+5/-5
450
8,4-15 V
no menos de 2 horas
IPХ4
77307
Ángulo del campo de visión, grados
- horizontal
- vertical
3
DESCRIPCIÓN
Los termovisores digitales de la serie Quantum sobre la base de la
matriz infrarroja (IR) (microbolómetro) están representados por una
serie de modelos que se diferencian por su capacidad de resolución,
multiplicidad y diámetro del objetivo. Los instrumentos se destinan para
utilizarlos tanto de noche, como de día, con condiciones atmosféricas
complejas (nieble, smog, lluvia), así como también cuando existen
obstáculos que dificultan la detección del objetivo (ramas, hierva alta,
arbustos densos, etc.). A diferencia de los instrumentos de visión
nocturna sobre la base de convertidores electrónico-ópticos, los
monoculares termovisores Quantum no necesitan una fuente externa
de luz y no temen a las "sobreexposiciones".
Los termovisores Quantum pueden emplearse para llevar a cabo la
caza nocturna, la observación y orientación en el lugar, la realización de
operaciones de inteligencia y de salvamento.
PARTICULARIDADES DISTINTIVAS
Matriz 384x288/160x120
Monitor OLED (640x480)
Amplificación 2,1x/2,5x
Escala digital de ampliación 2x (solamente para 384x288)
Objetivo de alta luminosidad
Gran ángulo del campo de visión
Alimentación externa
Salida de video – posibilidad de grabación de video
sobre dispositivos ajenos
Regímenes “White hot ”y“Black hot ”
Armazón ergonómico
Dos asientos para el soporte ¼”
2
CARACTERÍSTICAS TÉCNICAS
MODELO
Quantum LD 38
Quantum HD 38
Quantum HS 19
77308
Quantum LS 19
9 Hz
n/a
160x120
0,31”
2
8,3-13,6
12
+5/-5
450
8,4-15 V
IPХ4
2,1
2,1
2,5 2,5
8
8
8 8
10,8 10,8
9 9
10
10
10 10
4÷6 V
4xАА
4÷6 V
4xАА
4÷6 V
4xАА
4÷6 V
4xАА
9/20
9/20
9/20 9/20
PAL/NTSCPAL/NTSC PAL/NTSC PAL/NTSC
470/560
470/560
400/490 400/490
200x86x59
200x86x59
177x86x58 177x86x58
Desciframiento de la denominación:
Por ejemplo, Quantum HD 38:
Primera letra:
“H” –frecuencia de la renovación de las imágenes 30 Hz;
“L”- frecuencia de la renovación de las imágenes 9 Hz.
Segunda letra:
“D” – tamaño de la matriz 384x288;
“S” - tamaño de la matriz 160x120.
Los dígitos “38” o “19” – distancia focal del objetivo - 38 mm o 19 mm
CONTENIDO DEL EMBALAJE
Con el fin de mejorar el diseño del producto, este puede estar sujeto a cambios.
Termovisor
Funda
Instrucciones de empleo
Cable de video
Correa para la mano
Adaptador automovilístico
Contenedor de reserva de las baterías
Servilleta para limpiar las piezas ópticas
Tarjeta de garantía
1
UL 03 16 2
UL 03 16 2
Microbolómetro no refrigerado
UL 02 15 2
Microbolómetro no refrigerado
UL 02 15 2

5
29
28
ELEMENTOS DEL VISOR Y ÓRGANOS DE MANDO
4
5
6
7
8
9
10
11
12
13
14
1
2
3
4
Botón “ON”
Botón “CAL”
Botón “ZOOM/INVERT”
Tapa del objetivo
Encoder
Rueda del enfocado interno del objetivo
Asiento para el soporte ¼”
Mecanismo de fijación Weaver
Segundo asiento para el soporte ¼”
Enchufe de alimentación externa
Salida de video
Contenedor de las baterías
Ocular
Indicador de diodos luminiscentes
Reloj
Indicación de la carga de las
baterías
Indicación del funcionamiento
desde una fuente externa de
alimentación.
Ajuste del nivel de brillo y
contraste
Regímenes “White hot/Black hot”
Régimen del ajuste del reloj
Escala digital de ampliación 2x
A
Conmutación de la señal video
de salida
B
C
D
E
F
G
H
24 16:12
x2
16:12
ÍCONOS DEL TABLERO DE INFORMACIÓN
12
00 00
AM
x2
A B C D E F G H
El sitio para fijar la tapa del objetivo
15
2
6
7
8
4
5
3
1
10
9
14
12
11
13
15
Gire la manilla de la tapa del contenedor de las baterías (12) en 90
grados a la posición “Open” y tirando el saliente de la tapa, extraiga el
contenedor de las baterías.
Coloque las cuatro baterías del tipo AA (y acumuladores) en
conformidad con la marcación que está sobre el contenedor.
Coloque el contenedor de las baterías en su lugar y gire la manilla en
90 grados en el sentido de las agujas del reloj.
INSTALACIÓN DE LAS BATERÍAS
6
Nota: para asegurar un funcionamiento correcto, duradero y estable, se recomienda el uso
de las baterías recargables de calidad del tipo doble A (AA) con una capacidad de no inferior
a 2500 mAh. No use las baterías de tipos diferentes o baterías con diferentes niveles de
carga.

30
31
Encienda el instrumento presionando el botón “ON” (1). Se encenderá
el diodo luminoso verde (14). En caso de que las baterías estén
descargadas, el color del diodo luminoso cambiará a rojo y el
pictograma “Batería” empieza a parpadear.
Lleve a cabo la calibración de la imagen. La calibración permite
equilibrar el fondo de temperaturas del microbolómetro y eliminar los
defectos de la imagen. Para hacerlo, sin abrir la tapa del objetivo,
presione el botón “CAL”(2). La imagen se detendrá por 1-2 segundos,
en el tablero de informaciones aparecerá la inscripción
“CALIBRATION”, después de que la inscripción desaparezca, la
calibración está realizada.
EMPLEO
8
Encendido y calibración
Girando la rueda del enfoque interno del objetivo (6), obtenga la mejor
calidad de la imagen.
Después de este ajuste, independientemente de la distancia y de las
otras condiciones, no hay necesidad de girar el anillo del ajuste
dióptrico (13). Ajuste la imagen solamente con la rueda del enfoque
interno del objetivo (6).
Para la activación de la escala digital de ampliación (solamente para
los modelos 384x288), presione el botón “ZOOM/INVERT” (3).
Para la activación de la inversión del color de la imagen (funciones
“White hot” y “Black hot”), mantenga presionado el botón
“ZOOM/INVERT” (3) en el curso de dos segundos (en los modelos
160x120 no hay que esperar). Al utilizar la función “White hot”
(blanco cálido) los objetos cálidos se representan con matices más
claros;
“Black hot” (negro cálido) – los objetos cálidos se representan con
matices más oscuros.
Para desconectar el instrumento, presione el botón “ON” (1).
Funciones adicionales
El menú incluye dos funciones:
- Reloj;
- Elección de la señal de video de salida.
МЕNÚ
9
Para pasar al menú, presione y mantenga presionado el encoder (5)
hasta la aparición del pictograma . Para la confirmación de la
función elegida, presione sobre el encoder (5).
Girando el encoder (5) elija el formato del tiempo (“24” o “AM/PM”) (el
parámetro que se redacta centellea).
Para pasar al ajuste de la hora/los minutos, presione sobre el encoder
(5). Girando el encoder (5), ajuste el valor de la hora/los minutos.
Para salir del menú, mantenga presionado el encoder (5) en el curso
de dos segundos.
La función "Reloj":
La fuente externa de alimentación (AC/DC) se debe conectar al
enchufe “Power” (14) que se encuentra en la parte posterior del panel
derecho del instrument
¡Atención!
En el enchufe de alimentación que se conecta al visor, el contacto
central debe ser “+”. Es posible la marcación en el enchufe o en la
fuente de alimentación - +
ALIMENTACIÓN EXTERNA
7
Al conectar una fuente externa de alimentación (en el tablero de información aparece un
pictograma , la alimentación desde las baterías/acumuladores se desconecta.
¡Durante el funcionamiento de una fuente externa de alimentación, no se lleva a cabo la
carga de los acumuladores!
Nota: recomendamos utilizar la fuente de alimentación externa EPS3 o EPS5, los
cuales aseguran un funcionamiento autónomo desde 9 hasta 20 horas.
El instrumento puede funcionar con una fuente externa de alimentación
(clavija 2,1mm) o de la red eléctrica de automóvil. La banda de tensiones
de entrada es desde 8,4 V hasta 15 V. La potencia consumida es de hasta
3 W.
Abra la tapa del objetivo (4) y fíjela al orificio (15) en la parte inferior del
dispositivo. Ajuste la nitidez de las pictogramas por medio de la
rotación del anillo de ajuste dióptrico del ocular (13).
Para regular el brillo de la pantalla, gire el encoder (5). El grado
correspondiente de brillo (desde 1 hasta 20) aparece junto con el
indicador de brillo en el tablero informativo.
Para ajustar el contraste de la pantalla, presione el encoder (5)
(aparecerá el pictograma ) y gírelo. El grado correspondiente de
contraste (desde 1 hasta 20) aparece junto con el indicador de
contraste en el tablero informativo.
Elija un objeto cálido inmóvil para la observación que esté alejado a
una cierta distancia, por ejemplo, 100 m.
Enfocado y ajuste de la imagen
Girando el encoder (5), e
encoder para confirmar la elección.
Girando el encoder (5) elija el formato necesario de la señal de video
(PAL o NTSC).
Presione sobre el encoder (5) para confirmar la elección.
Para salir del menú, mantenga presionado el encoder (5) en el curso
de dos segundos. O bien espere unos 10 segundos – la salida ocurrirá
automáticamente.
lija en el menú el pictograma y presione el
La función "Elección de la señal de video de salida":

33
32
LOCALIZACIÓN DE PROBLEMAS
13
En la tabla se exponen los posibles problemas que pueden surgir
durante la explotación del visor. Lleve a cabo la comprobación y la
corrección recomendadas de acuerdo al procedimiento indicado en la
tabla. Si en la lista indicada no estuviera expuesto un problema o la
acción indicada para la eliminación del desperfecto no da resultado,
comuniquelo al fabricante.
El bloque de alimentación externa EPS3/EPS5;
Grabador de video CVR640 y otros.
ACCESORIOS
11
Con ayuda del mecanismo de fijación de la norma Weaver (8), Ud. puede
colocar diferentes accesorios en los termovisores Quantum, tales como:
Los asientos de soporte de la norma ¼” desde ambos lados del cuerpo
están destinados para la instalación del instrumento al soporte y para la
unión de la correa.
Hay que llevar a cabo con mucho cuidado y solamente en caso de
necesidad evidente la limpieza exterior de las piezas ópticas. Para
comenzar, con cuidado elimine (quite o sople) el polvo y la arena de la
superficie óptica, después realice la limpieza. Utilice una servilleta
limpia de algodón (algodón o un palito de madera), con medios
especiales para los lentes con cubiertas poliestratificadas o con
alcohol. ¡No vierta el liquido directamente sobre los lentes!
El visor se puede utilizar dentro de un amplio rango de temperaturas
desde -20 °C hasta + 50 °C. Sin embargo, si el visor ha sido
introducido desde el frío a un local abrigado - no lo encienda en el
curso de 3 a 4 horas.
Siempre hay que conservar el visor solamente en el estuche, en un
local seco, con ventilación. Durante un almacenamiento prolongado,
extraiga las baterías.
MANTENIMIENTO Y ALMACENAMIENTO
12
falla
posible causa reparación
El instrumento
no se enciende.
La imagen no es nítida, con
bandas verticales y con un
fondo irregular.
La imagen es demasiado
oscura.
Las baterías están colocadas
incorrectamente.
Están oxidados los contactos en
el contenedor de las baterías "comenzaron a correr" las baterías
o sobre los contactos cayó un líquido
químico activo.
Las baterías están
completamente descargadas.
Es necesaria la calibración.
Está colocado el nivel inferior de
brillo.
Coloque las baterías en correspondencia
con la marcación.
Limpie el contenedor de las
baterías, limpie los contactos.
Coloque baterías cargadas.
Lleve a cabo la calibración de la
imagen de acuerdo con las
instrucciones del capítulo 8 Empleo.
Ajuste el brillo, girando el encoder (5).
En el menú elija el formato necesario de la señal de video de salida
(PAL o NTSC).
Con ayuda del cable de video que entra en juego, conecte la fuente de
la señal de salida al enchufe de la salida de video (11).
Conecte el termovisor – en el dispositivo externo aparecerá la imagen.
EL ENCHUFE VIDEOOUT
10
Los instrumentos estñan equipados con la salida de video (11) para la
conexión de los dispositivos externos de grabación de video y para la
salida de la imagen al monitor.
El termovisor tiene el clase de protección IPX4 (protección contra le
pulverización del agua) pero el visor no está destinado para ser
sumergido en el agua.
¡Se prohibe reparar o desarmar el visor cuando esta en periodo de
garantía!
Las matrices ULIS que se utilizan en los termovisores Quantum, se distinguen por su alta
calidad, pero el fabricante permite que en éstas haya cierta cantidad de de píceles que no
funcionan. La existencia de tales píxeles no es un defecto y se es regulado por los
documentos del fabricante de las matrices.
Un píxel que no funciona es un punto negro o brillante.
Un cláster es un grupo que se compone de varios píxeles que se adhieren unos a otros.
La zona central А – es una zona que posee dimensiones de ¼ de la longitud y anchura
totalesde la imagen.
Zona periférica В – es una parte de la imagen, a excepción de la zona central.
Para la matriz 160x120 (del modelo Quantum HS19, LS19):
En la zona central se permite no más de cuatro píxeles que no funcionen o un cláster
que se componga de no más de cuatro píxeles que no funcionen;
En la zona periférica – se permite que haya no más de de nueve píxeles que no
funcionen o un cláster que se componga de no más de nueve píxeles que no
funciones.
Para la matriz 384x288 (del modelo
Quantum HD38, LD38):
En la zona central se permite no más de
cuatro píxeles aislados que no funcionen
o no más de dos clásteres que se
compongan de no más de dos píxeles
que no funcionen.
En la zona periférica – se permite que
haya diez píxeles aislados que no
funcionen o de no más de dos clásteres
que se compongan de no más de diez
píxeles que no funciones
A
B

34
35
*
Distanza massima di localizzazione di un oggetto di 1,7x0,5 m.
Le caratteristiche ottiche
Sensore
Frequenza di rinnovo di
immagine
Ingrandimento ottico, x
Zoom digitale, x
Risoluzione, linee/mm
Il display OLED
Distanza minima di messa a
fuoco ravvicinata, m
Diametro di pupilla d'uscita, mm
Banda spettrale di
sensibilità, µm
Regolazione diottrica
dell'oculare, D
Distanza massima di
localizzazione, m*
Caratteristiche di uso
Tempo di avviamento, sec
Alimentazione esterno
Tempo di funzionamento del
blocco di alimentazione EPS3/
EPS5
Il tempo continuo di
funzionamento dell'apparecchio
con un completo di batterie
Grado di protezione, codice
IP (IEC 60529)
Segnale standard output video
Temperature di utilizzo
Dimensioni, mm
Peso (senza/con batterie), g
-20 °С ... +50 °С, umidità fino a 90%
9 Hz
2
384x288
0,31”
2
7,7-13,2
14,4
+5/-5
900
8,4-15 V
30 Hz
2
384x288
0,31”
2
7,7-13,2
14,4
+5/-5
900
8,4-15 V
non meno di 2 ore
30 Hz
n/a
160x120
0,31”
2
8,3-13,6
12
+5/-5
450
8,4-15 V
non meno di 2 ore
Angolo di campo visivo, gradi
- orizzontale
- verticale
3
DESCRIZIONE
I termovisori digitali della serie Quantum basati sulla matrice infrarossa
(di microbolometro) sono presentati da una serie di modelli che vengono
caratterizzati dalla capacità del potere risolvente, moltiplicità e diametro
dell'obiettivo. Gli apparecchi possono essere usati sia di notte che di
giorno nelle situazioni climatiche difficili (nebbia, smog, pioggia) e anche
se ci sono degli ostacoli che impediscono di individuare l'obiettivo (rami,
erba alta, cespuglio folto). A differenza dagli apparecchi di visione
notturna sulla base di convertitori elettro-ottici, i monoculari termovisivi
Quantum non hanno bisogno della fonte esterna della luce e non
temono delle esposizioni alla luce.
I termovisori Quantum possono essere usati durante la caccia notturna,
osservazione ed orientamento sul terreno, lo svolgimento delle
operazioni esproratori e di salvataggio.
ELEMENTI DISTINTIVI
Matrice 384x288/ 160x120
OLED display(640x480)
Magnificazione 2,1x/2,5x
Zoom digitale 2x (solo per 384x288)
Obiettivo di alta luminosità
Angolo di campo visivo grande
Alimentazione esterno
Video out – la possibilità di registrazione video
su dispositivo esterno
I regimi “White hot” e “Black hot”
Corpo ergonomico
Due jack per stativo ¼”
2
SPECIFICHE TECNICHE
9 Hz
n/a
160x120
0,31”
2
8,3-13,6
12
+5/-5
450
8,4-15 V
2,1
2,1
2,5 2,5
8
8
8 8
10,8 10,8
9 9
10
10
10 10
9/20
9/20
9/20 9/20
PAL/NTSCPAL/NTSC PAL/NTSC PAL/NTSC
470/560
470/560
400/490 400/490
200x86x59
200x86x59
177x86x58 177x86x58
Deciframento del titolo:
Per esempio, Quantum HD 38:
La prima lettera:
“H” - frequenza di rinnovamento degli immagini 30Hz;
“L” - frequenza di rinnovamento degli immagini, 9 Hz
La seconda lettera:
“D” - dimensione di matrice 384x288;
“S” - dimensione di matrice 160x120
Cifra “38” o “19” – distanza focale dell'obbiettivo 38 mm o 19 mm
CONTENUTO DELLA CONFEZIONE
Design e contenuti sono soggetti a variazioni
migliorative.
Termovisore
Custodia
Istruzione d'uso
Cavo video
Cintura per la mano
Аdattatore automobilistico
Contenitore delle batterie di riserva
Panno di pulizia
Garanzia
1
SKU
77302
77301
77307
Modello
Quantum LD 38
Quantum HD 38
Quantum HS 19
77308
Quantum LS 19
UL 03 16 2
UL 03 16 2
Microbolometro non raffreddato
UL 02 15 2
Microbolometro non raffreddato
UL 02 15 2
Alimentazione di apparecchio
Batterie
4÷6 V
4xАА
4÷6 V
4xАА
4÷6 V
4xАА
4÷6 V
4xАА
IPX4
IPX4
IPX4
IPX4

38
39
Per mettere in funzione l'apparecchio premere il tasto “ON” (1). Si
accenderà diodo luminoso verde (14). Se la batteria sarà scarica il
colore di diodo luminoso diventerà rosso e il pictogramma “Batteria”
lampeggia.
Fare la calibratura dell'immagine. La calibratura permette di
equalizzare il fondo termico ed eliminare i diffetti dell'immagine. Per
effettuare l'operazione, senza aprire il coperchio dell'obiettivo, premere
il tasto “CAL” (2). L'immagine si fermerà per 1-2 secondi, e sul
pannello informativo apparirà la scritta “CALIBRATION”, dopo la
scritta sparisce, calibratura è stata fatta.
ISTRUZIONI SULL'USO
8
Messa in funzione e calibratura
Girando la ruota di focalizzazione interna dell'obiettivo (6), cercate di
ottenere la qualità migliore dell'immagine
Dopo questa regolazione, indipendentemente dalla distanza ed altre
condizioni, non bisogna girare l'anello di sintonizzazione diottrica (13).
Regolare l'immagine solo con la ruota di focalizzazione interna
dell'obiettivo (6).
Per attivare lo zoom digitale (solo per i modelli 384x288) premere il
tasto “ZOOM/INVERT”(3).
Per attivare l'inversione del colore dell'immagine (funzioni “White
hot”e “Black hot”) trattenete premendo il tasto “ZOOM/INVERT”(3)
per 2 secondi (in modelli 160x120 non è necessario attendere). La
funzione “White hot” (bianco caldo) permette di riprodurre gli oggetti
caldi con la sfumatura più chiara, invece la funzione “Black hot” (nero
caldo) permette di riprodurre gli oggetti caldi con la sfumatura più
scura.
Per disattivare l'apparecchio premere il tasto “ON” (1).
Funzioni aggiuntive
Menu include 2 funzioni:
- Orologio;
- Scelta di video segnale di uscita.
MENU
9
Per entrare nel menu premere e trattenere l'encoder (5) fino ché non
apparisca il pictogramma . Per confermare la funzione scelta
premere l'encoder (5).
Ruotando l'encoder (5) scegliere il formato dell'ora (“24” o “AM/PM”).
Il parametro che deve essere cambiato lampeggierà.
Per regolare ora/minuti premere l'encoder (5). Girando l'encoder (5)
regolarizzare il significato di ora/minuti.
Per tornarsi nel MENU trattenete premendo l'encoder (5) per 2
secondi.
Funzione “Orologio”:
L'alimentatore esterno (AC/DC) deve essere collegato alla presa
“Power” (14), posizionata sul lato destro dell'apparecchio.
Si prega di collegare lo spinotto correttamente! Notare che il pin
centrale dell'alimentatore che si collega alla presa “Power” del
termovisore deve avere il segno “+”. L'alimentatore potrebbe avere il
simbolo - +
ALIMENTAZIONE ESTERNA
7
La connessione di un alimentatore esterno ( ) interrompe
automaticamente l'alimentazione mediante batterie.
L'alimentazione esterna NON RICARICA le batterie presenti nel termovisore!
Nota: consigliamo d'usare fonti d'alimentazione esterni EPS3 o EPS5, per assicurare
9-20 ore del funzionamento autonomo.
apparirà il pictogramma
Il apparecchio può essere alimentato con una sorgente elettrica esterna
DC (spina 2,1 mm), con voltaggio stabilizzato tra 8,4V e 15V (massimo
consumo 3W) o 12V da autoveicolo.
Aprire il coperchio dell'obbiettivo (4) e fissarlo al foro (15) nella parte
inferiore del dispositivo. Girando l'anello di sintonizzazione diottrica di
oculare (13), regolare l'incisività.
Per regolare la luminosità del display, girate l'encoder (5). Il livello
adeguato della luminosità (da 1 a 20) sarà dimostrato vicino
all'indicatore della luminosità sul pannello informativo.
Per regolare il contrasto del display, premere sull' encoder (5) (apparirà
il pictogramma ) e giratelo. Il livello adeguato del contrasto (da 1 a
20) sarà dimostrato vicino all'indicatore del contrasto sul pannello
informativo.
Scegliere a distanza di circa 100 m l'oggetto caldo (mite) fisso per
l'osservazione
Focalizzazione e regolazione dell'immagine
Girando l'encoder (5), n
l'encoder (5) per confermare la scelta.
Girando l'encoder (5) scegliere il formato necessario di video segnale
(PAL o NTSC).
Premere l'encoder (5) per confermare la scelta.
el menu scegliere il pictogramma e premere
Funzione “Scelta del video segnale di uscita”:
Per tornarsi nel MENU trattenete premendo l'encoder (5) per 2 secondi
oppure aspettate 10 secondi ed il ritorno nel menu sarà effettuato in
automatico.

5
37
36
COMPONENTI ED ELEMENTI DI CONTROLLO
4
5
6
7
8
9
10
11
12
13
14
1
2
3
4
Tasto “ON”
Tasto “CAL”
Tasto “ZOOM/INVERT”
Coperchio dell'obiettivo
Encoder
Ruota di focalizzazione interna dell'obiettivo
Jack per stativo ¼”
Meccanismo di fissamento Weaver
Il secondo jack per stativo ¼”
Spina di alimentazione esterna
Video out
Contenitore delle batterie
Oculare
Indicatore a diodi
Orologio
Indicazione di carica delle batterie
Indicazione di funzionamento dalla
sorgente esterna
Regolazione del livello di luminosità
e di contrasto
I regimi “White hot/Black hot”
Regime di regolazione di orologio
Zoom digitale 2x
A
Cambio di videosegnale di uscita
B
C
D
E
F
G
H
24 16:12
x2
16:12
PICTOGRAMMI DI PANELLO INFORMATIVO
12
00 00
AM
x2
A B C D E F G H
Posto per fissare il coperchio dell'obiettivo
15
2
6
7
8
4
5
3
1
10
9
14
12
11
13
15
Girare la leva del coperchio del contenitore delle batterie (12) di 90
gradi nella posizione “Open” e tirando lo spallamento del coperchio
estrarre il contenitore delle batterie.
Mettere 4 batterie tipo AA (o accumulatore) in conformità alla
marcatura sul contenitore.
Rimettere il contenitore delle batterie e girare la leva di 90 gradi in
senso orario.
INSERIMENTO DELLE BATTERIE
6
Nota bene: per essere sicuri che l'autonomia possa essere lunga ed affidabile, utilizzare
batterie ricaricabili con capacità di almeno 2500mAH. Non utilizzare batterie di diversi tipi o
con diversi livelli di carica.

41
40
eliminazine come per tabella indicata. Le verifiche indicate nella tabella
sono obbligatorie ai fini di rivelare le cause dei guasti durante l'uso dello
strumento; le azioni per coreggerli sono indicati ai fini di eliminarli. Se il
problema continua ad esistere, si raccommanda di rivolgerlo al
costruttore.
Alimentatore esterno EPS3/EPS5;
Videorecorder CVR640 ecc.
ACCESSORI
11
Usando il meccanismo di fissamentosecondo lo standart Weaver (8) si
può installare su termovisori Quantum gli accessori vari come;
I jack per stativo dello standart ¼” da entrambe le parti del corto servono
per l'installazione dell'apparecchio su stativo e per poter aggiungere la
cintura.
MANUTENZIONE E CONSERVAZIONE
12
Pulizia dei parti ottici esterni si fa con cautela e nel caso di necessità
evidenziale. Si rimuove (togliere oppure soffiare via) la sabbia e la
polvere. Si usa la stoffa di cotone o bastoncino di legno nonchè
soluzioni o alcohol adatto alle pulizie di lenti. Non porre liquido su lente.
Il termovisore funziona nell'ampia scala di temperatura - 20°C più
+50°C. Se pero' il termovisore si è esposto al freddo, non accenderlo
entro 3 o 4 ore. Se non si riesce a fissare facilmente il сannocchiale
(senza gioco, lungo la canna) sulla fucile o nel caso dei dubbi sul
fissaggio, si consigla di contattare l'officina d'armaiolo specializzata.
Si conserva lo strumento nell'astuccio; l'ambiente è secco, ben
ventilato. Non lasciare le batterie inserite se l'unità non deve essere
usata per un lungo periodo (un mese o più).
difetto (guasto)
causa possibile riparazione
L'apparecchio non si
accende.
L'immagine non è chiaro, con
le righe verticali e il fondo
irregolare.
L'immagine è troppo scuro.
Le batterie sono installate nel
modo sbagliato
Nel contenitore delle batterie i
contatti sono ossidati o sul contatti
c'è il liquido attivo chimicamente.
Le batterie sono scaricate
completamente.
E' necesario fare la calibratura
Il livello di luminosità è basso.
Mettere le batterie secondo la
marcatura.
Pulire il contenitore delle batterie,
pulire i contatti.
Mettere le batterie cariche.
Fare la calibratura dell'immagine
secondo le istruzioni del paragrafo
8 “Istruzioni sul uso”.
Regolare la luminosità girando
l’encoder (5).
Scegliere nel menu il formato necessario del videosegnale in uscita
(PAL o NTSC)
Con l'aiuto di video cavo ( che è presente nella nomenclatura della
fornitura) attaccate alla spina di video out (11) la fonte di video segnale.
Accendere il termovisore – sull' apparecchio esterno apparirà
l'immagine.
SPINA VIDEO OUT
10
Gli apparecchi hanno il video out (11) per poter attaccare i dispositivi
esterni di videoregistrazione e rispecchiare l'immagine nel monitor.
Il termovisore ha un grado di protezione IPX4 (protezione contro gli
spruzzi d'acqua) non è destinato per l'immersione nell'acqua.
La garanzia si perde se lo strumento viene riparato oppure smontato.
GUASTI EVENTUALI E MODO DI ELIMINARLI
13
La tabella sotto si elenca eventuali guasti durante l'uso del visore. Si
raccomanda di seguire esattamente la procedura di controllo e di
Le matrici ULIS che si usano nei termovisori Quantum si distinguono per la qualità alta, ma
il produttore concede la presenza in loro qualche pixel non lavorativo. La presenza di tali
pixel non è un difetto e si regola dai documenti normativi del produttore delle matrici.
Il pixel non lavorativo è un punto nero o luminescente.
Il cluster - è un gruppo di alcuni pixel che si affiancano uno all'altro.
La zona centrale A è la zona le misure della quale è ¼ dalla lunghezza e larghezza
generali dell'immagine.
La zone periferica B è una parte dell'immagine tranne la parte centrale.
Per la matrice 160x120 (modello Quantum HS19, LS19):
Nella zona centrale sono ammessi non più di quattro pixel non lavorativi o un cluster
che è composto da non più di quattro pixel non lavorativi;
Nella zona periferica sono ammessi non più di nove pixel non lavorativi o un cluster
che è composto da non più di nove pixel non lavorativi.
Per la matrice 384x288 (modello Quantum HD38, LD38):
Nella zona centrale sono ammessi i
quattro singoli pixel non lavorativi o non
più di due cluster che sono composti da
non più di due pixel non lavorativi;
Nella zona periferica sono ammessi i
dieci singoli pixel non lavorativi o non
più di due cluster che sono composti da
non più di dieci pixel non lavorativi.
A
B

42
43
*
Максимальная дистанция обнаружения объекта размером 1,7x0,5 м.
Оптические характеристики
Сенсор
Частота обновления кадров
Видимое увеличение, крат
Цифровой зум, крат
Разрешение, пикселей
OLED Дисплей
Минимальная дистанция
фокусировки, м
Диаметр выходного зрачка, мм
Спектральный диапазон
чувствительности, µm
Диапазон фокусировки
окуляра, дптр
Макс. дистанция
обнаружения, м*
Эксплуатационные
характеристики
Время запуска, сек
Внешнее питание
Время работы от блока
питания EPS3/EPS5
Время непрерывной работы
прибора от одного комплекта
батарей
Степень защиты, код IP
(IEC60529)
Формат выходного
видеосигнала
Рабочая температура
Габариты, мм
Масса (без/с батареями), г
от -20 °С до +50 °С, влажность до 90%
9 Гц
2
384x288
0,31”
2
+5/-5
900
8,4-15 В
IPХ4
30 Гц
2
384x288
0,31”
2
+5/-5
900
8,4-15 В
не менее 2 часов
IPХ4
30 Гц
нет
160x120
0,31”
2
+5/-5
450
8,4-15 В
не менее 2 часов
IPХ4
Угол поля зрения, град
- горизонтальное
- вертикальное
3
Цифровые тепловизоры серии Quantum на основе ИК-матрицы
(микроболометра) представлены рядом моделей, отличающихся
разрешающей способностью, кратностью и диаметром объектива.
Приборы предназначены для использования как ночью, так и днем в
сложных погодных условиях (туман, смог, дождь), а также при
наличии препятствий, затрудняющих обнаружение цели (ветки,
высокая трава, густой кустарник и т.п.). В отличие от приборов
ночного видения на базе электронно-оптических преобразователей, тепловизионные монокуляры Quantum не нуждаются во
внешнем источнике света и не боятся “засветок”.
Тепловизоры Quantum могут использоваться для ведения ночной
охоты, наблюдения и ориентирования на местности, проведения
разведывательных и спасательных операций.
Матрица 384x288/160x120
OLED дисплей (640x480)
Увеличение от 2,1/2.5x
Цифровой зум 2x (только 384x288)
Светосильный объектив
Большой угол поля зрения
Внешнее питание
Видеовыход – возможность видеозаписи
на сторонние устройства
Режимы “White hot ” и “Black hot ”
Эргономичный корпус
Два штативных гнезда ¼”
2
9 Гц
нет
160x120
0,31”
2
+5/-5
450
8,4-15 В
IPХ4
2,1
2,1
2,5 2,5
8
8
8 8
10
10
10 10
9/20
9/20
9/20 9/20
PAL/NTSC
PAL/NTSC
PAL/NTSC PAL/NTSC
470/560
470/560
400/490 400/490
200x86x59
200x86x59
177x86x58 177x86x58
Расшифровка названия:
Например, Quantum HD 38:
Первая буква:
“H” - частота обновления кадров 30Гц;
“L” - частота обновления кадров 9Гц.
Вторая буква:
“D” - размер матрицы 384x288;
“S” - размер матрицы 160x120.
Цифра “38” или “19” – фокусное расстояние объектива - 38 мм или 19 мм
Для улучшения потребительских свойств
изделия в его конструкцию могут вноситься
усовершенствования.
Тепловизор
Чехол
Инструкция по эксплуатации
Видеокабель
Ремешок на руку
Автомобильный адаптер
Запасной контейнер батарей
Салфетка для чистки оптики
Гарантийный талон
1
SKU
77302
77301
77307
Quantum LD 38
Quantum HD 38
Quantum HS 19
77308
Quantum LS 19
UL 03 16 2
UL 03 16 2
Неохлаждаемый
микроболометр
UL 02 15 2
Неохлаждаемый
микроболометр
UL 02 15 2
Напряжение питания
Тип батарей
4÷6 V
4xАА
4÷6 V
4xАА
4÷6 V
4xАА
4÷6 V
4xАА
7,7-13,27,7-13,2 8,3-13,6 8,3-13,6
14,414,4
12 12
10,810,8 9 9

5
45
44
4
5
6
7
8
9
10
11
12
13
14
15
1
2
3
4
Кнопка “ON”
Кнопка “CAL”
Кнопка “ZOOM/INVERT”
Крышка объектива
Энкодер
Колесо внутренней фокусировки объектива
Штативное гнездо ¼”
Механизм крепления Weaver
Второе штативное гнездо ¼”
Разъем внешнего питания
Видеовыход
Контейнер батарей
Окуляр
Светодиодный индикатор
Место для крепления крышки объектива
Часы
Индикация заряда батарей
Индикация работы от источника
внешнего питания.
Регулировка уровня яркости и
контраста
Режимы “White hot/Black hot”
Режим настройки часов
Цифровой зум 2x
A
Переключение выходного
видеосигнала
B
C
D
E
F
G
H
12
00 00
AM
x2
A B C D E F G
H
24 16:12
x2
16:12
2
6
7
8
4
5
3
1
10
9
14
12
11
13
15

46
47
Включите прибор нажатием кнопки “ON” (1). Загорится зеленый
светодиод (14). В случае разрядки батарей цвет светодиода
см е н и т с я на красный и пи к т о г р а м м а “Б а тарея” н а
информационной панели начнет мигать.
Произведите калибровку изображения. Калибровка позволяет
выровнять температурный фон микроболометра и устранить
недостатки изображения. Для этого, не открывая крышку
объектива, нажмите кнопку “CAL” (2). Изображение застынет на
1-2 секунды, на информационной панели появится надпись
“CALIBRATION”, после исчезновения надписи калибровка
произведена.
8
Включение и калибровка
Вращая колесо внутренней фокусировки объектива (6),
добейтесь наилучшего качества изображения.
После данной настройки, независимо от дистанции и других
условий, вращать кольцо диоптрийной подстройки (13) не
требуется. Настраивайте изображение только колесом
внутренней фокусировки объектива (6).
Дл я а к т ив а ци и ц иф р ов о го з у м а на ж ми т е к но пк у
“ZOOM/INVERT”(3).
Для активации инверсии цвета изображения (функции “White
hot” и “Black hot”) удерживайте кнопку “ZOOM/INVERT”(3)
нажатой в течение двух секунд (в моделях 160x120 ожидание не
требуется). При использовании функции “White hot” (белый
горячий) теплые объекты отображаются более светлыми
оттенками; “Black hot” (черный горячий) - теплые объекты
отображаются более темными оттенками.
Для выключения прибора нажмите кнопку “ON” (1).
Дополнительные функции
Меню включает две функции:
- Часы;
- Выбор выходного видеосигнала.
9
Для перехода в меню нажмите и удерживайте энкодер (5) до
появления пиктограммы . Для подтверждения выбранной
функции нажмите на энкодер (5).
Вращением энкодера (5) выберите формат времени (“24” или
“AM/PM”) (редактируемый параметр мигает).
Для перехода к настройке часа/минуты нажмите на энкодер (5).
Вращением энкодера (5) настройте значение часа/минуты.
Для выхода в меню удерживайте энкодер (5) нажатым в течение
двух секунд.
Функция “Часы”:
Откройте крышку объектива (4) и закрепите ее в отверстии (15) на
обратной стороне прибора. Настройте резкость пиктограмм на
информационной панели вращением кольца диоптрийной
подстройки окуляра (13).
Для регулировки яркости дисплея вращайте энкодер (5).
Соответствующая степень яркости (от 1 до 20) отобразится рядом
с индикатором яркости на информационной панели.
Для регулировки контраста дисплея нажмите на энкодер (5)
(появится пиктограмма ) и вращайте его. Соответствующая
степень контраста (от 1 до 20) отобразится рядом с индикатором
контраста на информационной панели.
Выберите неподвижный объект наблюдения, удаленный на
некотором расстоянии, например, 100 м.
Фокусировка и настройка изображения
Вращением энкодера (5) в
нажмите энкодер для подтверждения выбора.
Вращением энкодера (5) выберите необходимый формат
видеосигнала (PAL или NTSC).
Нажмите на энкодер (5) для подтверждения выбора.
ыберите в меню пиктограмму и
Функция “Выбор выходного видеосигнала”:
Для выхода из меню удерживайте энкодер (5) нажатым две секунды.
Либо подождите 10 секунд – выход произойдет автоматически.

49
48
Блок внешнего питания EPS3/EPS5
Видеорекордер CVR640 и др.
11
С помощью механизма крепления стандарта Weaver (8) Вы можете
установить на тепловизоры Quantum различные аксессуары, такие как:
Штативные гнезда стандарта ¼” с обеих сторон прибора предназначены для установки прибора на штатив и для присоединения
ремешка.
Наружную чистку оптических деталей производите очень
аккуратно и только в случае необходимости. Вначале осторожно
удалите (смахните или сдуйте) с оптической поверхности пыль и
песок, после осуществляйте чистку. Пользуйтесь чистой
хлопчатобумажной салфеткой (ватой и деревянной палочкой),
специальными средствами для линз с многослойными
покрытиями.
Прибор может эксплуатироваться в широком диапазоне
температур – от -20 °C ... до +50 °C. Если прибор
эксплуатировался на холоде и был внесен в теплое помещение,
не вынимайте его из чехла в течение не менее 2-3 часов - это
позволит предотвратить появление конденсата на внешних
оптических элементах.
Храните прибор только в чехле, в сухом, хорошо вентилируемом
помещении. При длительном хранении извлеките батареи.
12
неисправность
возможная причина исправление
Тепловизор
не включается.
Изображение н ечет кое,
c вертикальными полосами
и неравномерным фоном.
Изображение слишком
темное.
Батареи установлены
неправильно.
Окислены контакты в контейнере
батарей - "потекли" батареи
или на контакты попала
химически активная жидкость.
Батареи полностью
разрядились.
Необходима калибровка.
Установлен низкий уровень
яркости.
Установите батареи
в соответствии с маркировкой.
Очистите контейнер батарей,
зачистите контакты.
Установите новые
Проведите калибровку изображения
согласно инструкциям раздела
8 Эксплуатация.
Отрегулируйте яркость вращением
энкодера (5).
Тепловизор имеет степень защиты IPX4 (защита от брызг воды),
но не предназначен для погружения в воду.
Са м осто я тел ьно ремо н тиров ать и разбират ь п рибор
запрещается!
Матрицы ULIS, используемые в тепловизорах Quantum, отличаются высоким
качеством, но производителем в них допускается некоторое количество нерабочих
пикселей. Наличие таких пикселей не является дефектом и регулируется
нормативными документами производителя матриц.
Нерабочий пиксель представляет собой черную или светящуюся точку.
Кластер – группа, состоящая из нескольких примыкающих друг к другу пикселей.
Центральная зона А – зона, имеющая размеры ¼ от общей длины и ширины
изображения.
Периферийная зона В – часть изображения за исключением центральной зоны.
Для матрицы 160x120 (модели Quantum HS19, LS19):
В центральной зоне допускается наличие не более четырех нерабочих пикселей
или один кластер, состоящий из не более чем четырех нерабочих пикселей.
В периферийной зоне – допускается не более девяти нерабочих пикселей или
один кластер, состоящий из не более чем девяти нерабочих пикселей.
Дл я ма три цы 3 8 4x2 88 ( м од е ли
Quantum HD38, LD38):
В центральной зоне допускается
че тыр е од ино чны х не раб очи х
пик селя и л и н е б о л е е д вух
кластеров, состоящих из не более
чем двух нерабочих пикселей.
В периферийной зоне допускается
н а ли чи е д е ся ть од и но чн ых
нерабочих пикселей или не более
двух кластеров, состоящих из не
боле е че м дес яти нер абочи х
пикселей.
A
B
 Loading...