

Page 1
Page 2
Pulsar PB8I Power Bank
1-2
3-4
5-6
7-8
9-10
Chargeur portatif Pulsar PB8I
Batterie Pulsar PB8I Power Bank
La batería portátil Pulsar PB8I
Batteria portatile Pulsar PB8I
Внешний аккумулятор Pulsar PB8I
11-12
РУССКИЙ
Page 3
1
2
SAFETY MEASURES
When storing the battery for a long period it should be partially charged; the
battery should not be either fully charged or fully discharged.
Do not charge the battery immediately after bringing the battery from cold
environment into a warm one. Wait for 30-40 minutes for the battery to warm up.
Do not leave a battery unattended while charging.
Charge the battery at a temperature from 0 °C to +45 °C, otherwise batter's life will
decrease significantly.
Do not leave the battery connected to a computer for any longer than 24 hours
after full charge.
Do not expose the battery pack to high temperatures or to a naked flame.
Connection is not recommended of external devices with a power consumption
that exceeds permitted levels.
The battery is short-circuit protected. However, any situation that may cause
short-circuiting should be avoided.
Do not dismantle or deform the battery.
Do not drop or strike the battery.
When using the battery at below zero temperatures, battery's capacity decreases;
this is normal and is not a defect.
Do not use the battery at temperatures higher than those shown in the table – this
may reduce the battery's life.
Keep the battery out of reach of children.
5
Pulsar PB8I Power Bank
MicroUSB cable
User manual
Warranty card
DESCRIPTION
PACKAGE CONTENTS
The Pulsar PB8I Power Bank is designed to extend operating time of digital and
thermal Pulsar devices equipped with a microUSB port (Signal RT, Photon RT, Trail,
Helion, Digisight Ultra, Digiforce RT etc.)
CHARGING THE POWER BANK
To check charge level, press and hold down the button (2). Green LEDs on the
charge indicator show the charge level:
Number of LEDs glowing (1-5); Charge level (20-100%)
1-20% / 2-40% / 3-60% / 4-80% / 5-100%
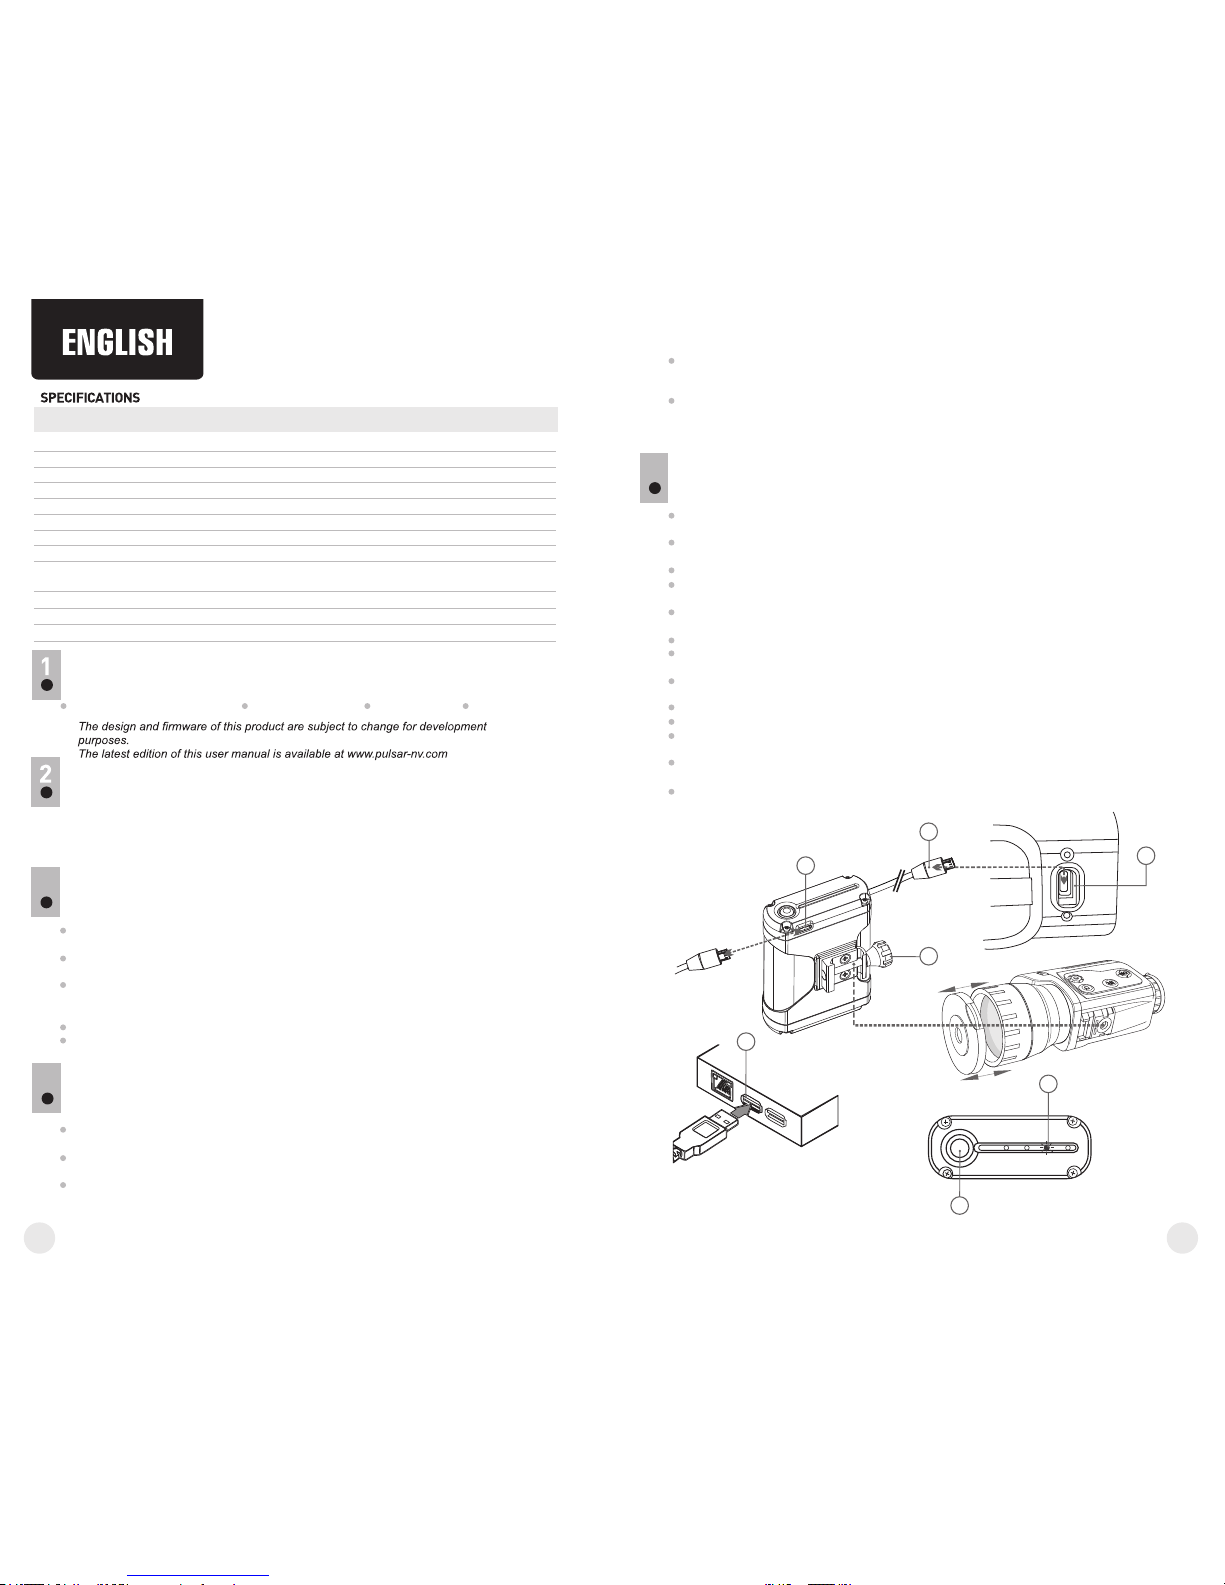
Connect the plug of the microUSB cable supplied to the Power Bank connector
(1) . Connect the other plug to the USB port (6) of your computer/laptop or USB
mains adapter.
The LEDs on the battery charge indicator (3) will light up.
As soon as the Power Bank charge level reaches 100%, all five LEDs will show
green.
3
USING THE POWER BANK WITH AN OPTICAL DEVICE
Connect the plug of the Power Bank microUSB cable (4) to the USB port (7) of your
optical device.
To turn the Power Bank on, briefly press the button (2). One LED will start blinking
– the Power bank will be in stand-by mode (for three minutes).
Turn the optical device on – the external power icon will appear in the status bar.
Power from the built-in batteries (or rechargeable) batteries will be turned off. The
LED indicator will stop blinking and go out.
4
SKU
79110
Type
Capacity, mAh
Charge voltage, V
Rated charge current, A
Rated voltage, V
Full charge time (hrs)
Full discharge time (I=250 mА)(at t=22 °С), hrs
Operating charge current, А
Charge/discharge temperature range
(relative humidity 60±5%)
Degree of protection, IP code (IEC60529)
Dimensions, mm / in.
Weight, kg / lbs.
Li-Ion
5000
5
1.5
5
approx. 6
approx. 20
≤ 2
0 … 45 °С / 32 °F... 113 °F
-20 … +45 °С / -4 °F... 113 °F
IPX7
30x75x80 / 1.2x2.9x3.1
0.2 / 7
If your optical device is equipped with a Weaver rail, you may mount the Power
Bank on it with a fastening mechanism. Secure the Battery Pack by turning the
knob (5) fully.
Once the optical device has been disconnected, the Power bank switches to
stand-by mode (with one LED blinking). You may reconnect your optical device
within three minutes.
5
1
4
3
2
6
7
Page 4

4
3
CARACTERISTIQUES TECHNIQUES
SKU
79110
Type
Capacité, mAh
Tension de charge V
Intensité nominale de charge, I
Tension nominale V
Durée de charge complète (heures)
Durée de décharge complète (I=250 mА)(à t=22 °С), (hrs)
Intensité de charge, A
Plage de températures de charge/décharge (HR 60 ± 5 %)
Degré de protection, code IP (CEI60529)
Dimensions, mm
Poids, kg
Li-Ion
5000
5
1,5
5
approx. 6
approx. 20
≤ 2
0 … 45 °С / -20 … +45 °С
IPX7
30x75x80
0,2
Chargeur portatif Pulsar PB8I
Câble MicroUSB
Manuel d'utilisation
Carte de garantie
DESCRIPTION
CONTENUS DE L'EMBALLAGE
Le Chargeur portatif PB8I est conçu pour prolonger la durée d'utilisation des
équipements numériques et thermiques Pulsar équipés d'un port microUSB
(Signal RT, Photon RT, Trail, Helion, Digisight Ultra, Digiforce RT etc.).
CHARGEMENT AVEC LE CHARGEUR PORTATIF
Pour vérifier le niveau de charge, appuyez sur et maintenez enfoncé le bouton (2).
Les voyants LED verts sur l'indicateur de charge indiquent le niveau de charge:
Nombre de voyants LED allumés (1-5); Niveau de charge (20-100%)
1-20% / 2-40% / 3-60% / 4-80% / 5-100%
Raccordez la fiche du câble microUSB fourni au connecteur (1) du Chargeur
portatif.
Raccordez l'autre fiche au port USB (6) de votre ordinateur/portable ou de votre
adaptateur secteur USB.
Les voyants LED sur l'indicateur de charge de batterie (3) s'allumeront.
Dés que le niveau de charge du Chargeur portatif atteint 100%, les cinq voyants
LED deviendront vert.
3
UTILISATION DU CHARGEUR PORTATIF AVEC UN APPAREIL OPTIQUE
Raccordez la fiche (4) du câble microUSB du Chargeur portatif au port USB (7)
de votre appareil optique.
Pour allumer le Chargeur portatif , appuyez rapidement sur le bouton (2). Un
voyant LED commencera à clignoter - le Chargeur portatif sera en mode veille
(pendant trois minutes).
Allumez l'appareil optique - l'icone d'alimentation extérieure apparaitra dans la
barre d'état L'alimentation à partir des piles incorporées (ou des batteries) sera
interrompue. Le voyant LED cessera de clignoter et s'éteindra.
4
MESURES DE SÉCURITÉ
Lorsque la batterie est stockée pendant une longue période, elle ne doit pas
être complètement chargée ou complètement déchargée.
Ne chargez pas immédiatement la batterie après l'avoir amenée depuis un
environnement froid vers un environnement chaud. Attendez 30-40 minutes pour
que la batterie se réchauffe.
Ne laissez pas une batterie sans surveillance pendant sa charge.
N'utilisez jamais un chargeur modifié ou endommagé.
Chargez le bloc batterie à une température entre 0 °C et +45 °C.
Sinon la durée de vie de la batterie diminuera considérablement.
Ne laissez pas le bloc batterie avec un chargeur connecté à l'ordinateur pendant
plus de 24 heures après une recharge complète.
N'exposez pas le bloc batterie à des températures élevées ou à une flamme nue.
N'immergez pas dans l'eau la batterie.
Ne connectez pas un appareil extérieur soutirant une intensité supérieure à
l'intensité maximum autorisée.
Le bloc batterie est protégé contre les court-circuits. Cependant, il faut éviter les
situations pouvant provoquer un court-circuit.
Ne démontez pas et ne déformez pas le bloc batterie.
Ne laissez pas tomber ou ne heurtez pas la batterie.
Lorsque vous utilisez la batterie avec des températures négatives, sa capacité
diminue, ceci est normal et n'est pas un défaut.
N'utilisez pas la batterie à des températures supérieures à celles indiquées dans
le tableau – ceci pourrait diminuer la durée de vie de la batterie.
Conservez la batterie hors de portée des enfants.
5
Si votre appareil optique est équipé d'un rail Weaver, vous pouvez monter le
Chargeur portatif sur celui-ci à l'aide d'une fixation. Fixez le Chargeur portatif
en tournant au maximum le bouton (5).
Une fois l'appareil optique débranché, le Chargeur portatif passe en mode veille
(avec un voyant LED clignotant). Vous pouvez rebrancher votre appareil optique
dans un délai de trois minutes.
La conception et le logiciel de ce produit peuvent être modifiés en vue du développement.
La dernière édition de ce manuel d'utilisation est disponible sur www.pulsar-nv.com.
5
1
4
3
2
6
7
Page 5

5
1
4
3
2
6
7
TECHNISCHE DATEN
SKU
79110
Typ
Kapazität, mAh
Ladespannung, V
Nennladestrom, A
Nennspannung, V
Vollständige Ladezeit (Stunden)
Vollständige Entladezeit (I=250 mА)(bei t=22 °С), (Stunden)
Betriebsladestrom, А
Lade-/Entladetemperaturbereich (relative Luftfeuchtigkeit 60 ± 5 %)
Schutzgrad, IP-Code (IEC60529)
Abmessungen, mm
Gewicht, kg
Li-Ion
5000
5
1,5
5
ca. 6
ca. 20
≤ 2
0 … 45 °С / -20 … +45 °С
IPX7
30x75x80
0,2
Pulsar PB8I Power Bank
MicroUSB-Kabel Benutzerhandbuch
Garantiekarte
BESCHREIBUNG
PACKUNGSINHALT
Mit der Pulsar PB8I Power Bank lässt sich die Betriebszeit von digitalen und
thermischen Pulsar-Geräten, die mit einem microUSB-Port ausgestattet sind,
verlängern (Signal RT, Photon RT, Trail, Helion, Digisight Ultra, Digiforce RT u.a.).
LADEN DER POWER BANK
Halten Sie die Taste (2) gedrückt, um den Ladezustand zu überprüfen. Die grünen
LEDs auf der Ladeanzeige zeigen den Ladezustand an:
Anzahl der leuchtenden LEDs (1-5); Ladezustand (20-100%)
1-20% / 2-40% / 3-60% / 4-80% / 5-100%
Stecken Sie den Stecker des mitgelie ferten microUSB-Ka bels in die
Anschlussbuchse der Power Bank (1)
Ve r bind e n Sie de n ande r en Ste c ker mi t d em USB - Port ( 6 ) Ihre s
Computers/Laptops oder USB-Netzadapters.
Die LEDs der Akkuladeanzeige (3) leuchten auf.
Sobald der Ladezustand der Power Bank 100 % erreicht, leuchten alle fünf LEDs
grün.
3
VERWENDUNG DER POWER BANK MIT EINEM OPTISCHEN GERÄT
Verbinden Sie den Stecker des microUSB-Kabels der Power Bank (4) mit dem
USB-Port (7) Ihres optischen Gerätes.
Drücken Sie zum Einschalten der Power Bank kurz auf die Taste (2). Eine LED
beginnt zu blinken – die Power Bank befindet sich im Standby-Modus (für drei
Minuten).
Schalten Sie das optische Gerät ein – das externe Einschaltsymbol wird in der
Statusleiste angezeigt. Die Stromversorgung durch die eingebauten Akkus (oder
wiederaufladbaren Akkus) wird ausgeschaltet. Die LED-Anzeige hört auf zu
blinken und erlischt.
4
6
SICHERHEITSHINWEISE
Bei andauernder Aufbewahrung soll die Batterie teilweise aufgeladen sein sie soll nicht völlig aufgeladen oder vollentladen sein.
Laden Sie nie die Batterie gleich auf, wenn sie von der Kälte in einen warmen
Raum gebracht wurde. Warten Sie 30-40 Minuten ab, bis sich die Batterie
aufwärmt.
Lassen Sie die Batterie aufsichtslos nie aufladen.
Wenden Sie das Ladegerät nicht an, wenn es geändert oder beschädigt wurde.
Das Aufladen der Batterie soll bei 0 °C … +45 °C erfolgen.
Sonst wird sich die Betriebsdauer der Batterie wesentlich senken.
Lassen Sie das Ladegerät nicht mehr als 24 Stunden nach der Vollladung an
Computer angeschlossen.
Halten Sie die Batterie vom Feuer und Quellen mit hoher Temperatur fern.
Tauchen Sie die Batterie ins Wasser nicht.
Es ist nicht empfehlenswert, fremde Anlagen mit höherem Strom, als es zulässig
ist, anzuschließen.
Die B atterie ist ku rzschlu ßf es t. Ver me iden Si e a be r die Kurzsc hl us s
provozierenden Situationen.
Es ist verboten, externe Stromversorgung auseinanderzunehmen und zu
deformieren.
Lassen Sie die Batterie nicht fallen oder schlagen.
Beim Betrieb bei Minustemperaturen sinkt die Kapazität der Batterie, das ist
normal und ist kein Defekt.
Wenden Sie die Batterie bei höheren Temperaturen, als es in der Tabelle
angegeben ist. Dies kann die Betriebsdauer der Batterie verringern.
Von den Kindern fernhalten.
5
Wenn Ihr optisches Gerät mit einer Weaver-Schiene ausgestattet ist, können Sie
die Power Bank mit einem Befestigungsmechanismus anbringen. Sichern Sie den
Akku, indem Sie den Knopf (5) vollständig drehen.
Sobald das optische Gerät getrennt wurde, schaltet die Power Bank in den
Standby-Modus (wobei eine LED blinkt). Sie können Ihr optisches Gerät innerhalb
von drei Minuten wieder anschließen.
5
Änderung des Designs zwecks höherer Gebrauchseigenschaften vorbehalten.und Software
Aktuelle Version der Betriebsanleitung finden Sie auf der Webseite www.pulsar-nv.com
Page 6

CARACTERÍSTICAS TÉCNICAS
SKU
79110
Tipo
Capacidad, mAh
Tensión de carga, V
Corriente nominal de carga, A
Tensión nominal, V
Tiempo hasta carga total (horas)
Tiempo hasta descarga total (I=250 mА)(a t=22 °С), (horas)
Corriente de carga en funcionamiento, A
Rango de temperatura de carga/descarga (humedad relativa 60±5%)
Grado de protección, código IP (IEC60529)
Dimensiones, mm
Peso, kg
Li-Ion
5000
5
1,5
5
aprox. 6
aprox. 20
≤ 2
0 … 45 °С / -20 … +45 °С
IPX7
30x75x80
0,2
Batería Pulsar PB8I
Cable microUSB
Manual de usuario
Tarjeta de garantía
DESCRIPCIÓN
CONTENIDO DEL EMBALAJE
La batería Pulsar PB8I se ha diseñado para prolongar el tiempo de funcionamiento
de los dispositivos digitales y térmicos Pulsar y cuenta con un puerto microUSB
(Signal RT, Photon RT, Trail, Helion, Digisight Ultra, Digiforce RT etc.).
CARGA DE LA BATERÍA
Para comprobar el nivel de carga, pulse y mantenga pulsado el botón (2). Las luces LED
verdes del indicador de carga mostrarán el nivel de carga:
Número de luces LED encendidas (1-5); Nivel de carga (20-100%)
1-20% / 2-40% / 3-60% / 4-80% / 5-100%
Conecte el extremo del cable microUSB suministrado al conector de la batería (1)
Conecte el otro extremo al puerto USB (6) de su ordenador/portátil o adaptador USB.
Las luces LED del indicador de cargar de batería (3) se encenderán.
En cuanto el nivel de carga de la batería llegue al 100%, las cinco LED se quedarán
verdes.
3
USO DE LA BATERÍA CON UN DISPOSITIVO ÓPTICO
Conecte el extremo del cable microUSB de la batería (4) al puerto USB (7) de su
dispositivo óptico.
Para encender la batería, presione brevemente el botón (2). Una luz LED
comenzará a parpadear y la batería se quedará en modo standby (durante tres
minutos).
Encienda el dispositivo óptico; el icono de alimentación externa se mostrará en la
barra de estado. La alimentación de las pilas integradas (o recargables) se
apagará. El indicador LED dejará de parpadear y se apagará.
4
1178
MEDIDAS DE SEGURIDAD:
Si la batería va a estar en desuso durante un periodo prolongado, la batería
no debe estar ni cargada del todo ni descargada del todo.
No cargue la batería inmediatamente después de que haya pasado de un entorno
frío a un entorno cálido. Espere unos 30-40 minutos hasta que la batería se
temple.
No deje la batería sin supervisión durante su carga.
No utilice nunca un cargador modificado o dañado.
Cargue la batería a una temperatura de entre 0 °C y +45 °C.
De lo contrario, la vida útil de la batería se reducirá de forma significativa.
No deje la batería con un cargador conectado al ordenador durante más de 24
horas después de una carga completa.
No exponga la batería a temperaturas altas ni a una llama viva.
No sumerja la batería en agua.
No conecte un dispositivo externo con un consumo de corriente que exceda los
niveles permitidos.
La batería está protegida frente a cortocircuitos. No obstante, debería evitarse
cualquier situación que pueda provocar un cortocircuito.
No desmonte ni deforme la Battery Pack.
No deje caer ni golpee la batería.
Cuando la batería se utiliza a temperaturas bajo cero, la capacidad de la batería
se reduce. Esto es algo normal y no se trata de un defecto.
No utilice la batería a temperaturas superiores a las mostradas en la tabla puesto
que eso podría acortar la vida útil de la batería.
Mantenga la batería fuera del alcance de los niños.
5
Si su dispositivo óptico cuenta con un riel de tipo Weaver, podrá colocar la batería
sobre él utilizando un mecanismo de fijación. Asegure la batería en su sitio
girando la rueda (5) por completo.
Una vez desconectado el dispositivo óptico, la batería pasará a modo standby
(con una LED intermitente). Podrá volver a conectar el dispositivo óptico al cabo
de tres minutos.
El diseño y el firmware de este producto están sujetos a modificaciones con fines de desarrollo.
Encontrará la última edición de este manual de usuario en: www.pulsar-nv.com
5
1
4
3
2
6
7
Page 7

SPECIFICHE TECNICHE
SKU
79110
Tipo
Capacità, mAh
Tensione di carica, V
Corrente di carica nominale, A
Tensione nominale, V
Tempo di ricarica completa, ore
Tempo di scarica completa (I=250 mА) (con t=22 °С), ore
Corrente di funzionamento in carica, А
Intervallo di temperatura in carica/scarica (umidità relativa 60±5%)
Grado di protezione, codice IP (IEC60529)
Dimensioni, mm
Peso, kg
Li-Ion
5000
5
1,5
5
ca. 6
ca. 20
≤ 2
0 … 45 °С / -20 … +45 °С
IPX7
30x75x80
0,2
Batteria portatile Pulsar PB8I
Cavo micro-USB
Manuale d'uso
Garanzia
DESCRIZIONE
CONTENUTO DELLA CONFEZIONE:
La batteria portatile Pulsar PB8I è stata ideata per prolungare la durata di
funzionamento dei dispositivi digitali e termici Pulsar dotati di porta micro-USB
(Signal RT, Photon RT, Trail, Helion, Digisight Ultra, Digiforce RT etc.).
RICARICA DELLA BATTERIA PORTATILE
Per verificare il livello di carica, premere e tenere premuto il pulsante (2). I LED
verdi presenti sull'indicatore di carica mostrano il livello di carica:
Numero di LED accesi (1-5); Livello di carica (20-100%):
1-20% / 2-40% / 3-60% / 4-80% / 5-100%
Collegare il connettore del cavo micro-USB fornito in dotazione alla batteria
portatile (1).
Collegare l'altro connettore alla porta USB (6) del computer/laptop o all'adattatore
di alimentazione USB.
I LED presenti sull'indicatore di carica della batteria (3) si accendono.
Quando il livello di carica della batteria portatile raggiunge il 100%, i cinque LED
diventano tutti verdi.
3
UTILIZZO DELLA BATTERIA PORTATILE CON UN DISPOSITIVO OTTICO
Collegare il connettore del cavo micro-USB della batteria portatile (4) alla porta
USB (7) del dispositivo ottico.
Per accendere la batteria portatile, premere brevemente il pulsante (2). Un LED
inizia a lampeggiare: la batteria portatile entra in modalità stand-by (per 3 minuti).
Accendere il dispositivo ottico: sulla barra di stato compare l'icona di
alimentazione esterna. L'alimentazione con le batterie integrate o ricaricabili
viene esclusa. L'indicatore LED smette di lampeggiare e si spegne.
4
9
11
10
MISURE DI SICUREZZA
Dopo un periodo di inutilizzo prolungato, evitare di caricare o scaricare
completamente la batteria.
Non caricare la batteria immediatamente dopo averla spostata da un ambiente
freddo a uno caldo. Attendere 30-40 minuti affinché la batteria si riscaldi.
Non lasciare la batteria incustodita durante la ricarica.
In nessun caso utilizzare un caricabatterie danneggiato o modificato.
Ricaricare il gruppo batteria ad una temperatura compresa tra 0 °C e +45 °C.
In caso contrario la durata della batteria si ridurrà sensibilmente.
Non lasciare il gruppo batteria con il caricabatterie collegato alla rete per più di 24
ore dopo una ricarica completa.
Non esporre il gruppo batteria ad alte temperature o a fiamme libere.
Non immergere la batteria in acqua.
Non connettere un dispositivo esterno che abbia un assorbimento di corrente
superiore ai livelli consentiti.
Il gruppo batteria è protetto contro i cortocircuiti. In ogni caso, evitare qualsiasi
situazione che possa provocare un cortocircuito.
Non smontare né deformare il gruppo batteria.
Non urtare né far cadere la batteria.
La capacità della batteria tende a diminuire in caso di utilizzo a temperature
inferiori a zero: non è un difetto, ma un fenomeno normale.
Per evitare di ridurre la durata della batteria, non utilizzarla a temperature
superiori a quelle riportate in tabella.
Tenere la batteria lontano dalla portata dei bambini.
5
Se il dispositivo ottico è dotato di binario Weaver, è possibile installarvi la batteria
portatile con un meccanismo di fissaggio. Fissare il gruppo batteria ruotando la
manopola (5) fino in fondo.
Una volta scollegato il dispositivo ottico, la batteria portatile passa in modalità
stand-by (con un LED lampeggiante). È possibile ricollegare il dispositivo ottico
entro 3 minuti.
Il design e il software di questo prodotto possono essere oggetto di modifiche in vista di
miglioramenti. L'edizione più recente del presente manuale d'uso è disponibile all'indirizzo
www.pulsar-nv.com
5
1
4
3
2
6
7
Page 8

5
1
4
3
2
6
7
ТЕХНИЧЕСКИЕ ХАРАКТЕРИСТИКИ
SKU
79110
Тип
Емкость, мАч
Напряжение заряда, В
Номинальный ток заряда, А
Номинальное напряжение, В
Время полного заряда, ч
Время полного разряда (I=250 мА)(при t=22 °С), час
Рабочий ток разряда, А
Температурный диапазон заряд / разряд, при отн.влажности 60±5%
Класс защиты, код IP (IEC60529)
Габариты, мм
Вес, кг
Li-Ion
5000
5
1,5
5
ок. 6
ок. 20
≤ 2
0 … 45 °С / -20 … +45 °С
IPX7
30x75x80
0,2
Внешний аккумулятор Pulsar PB8I
Кабель microUSB
Инструкция по эксплуатации
Гарантийный талон
ОПИСАНИЕ
КОМПЛЕКТ ПОСТАВКИ
Внешний аккумулятор Pulsar PB8I позволяет увеличить время автономной работы
цифровых и тепловизионных приборов Pulsar, оснащенных разъемом microUSB
(Signal RT, Photon RT, Trail, Helion, Digisight Ultra, Digiforce RT и др.).
ЗАРЯДКА АККУМУЛЯТОРА
Для проверки уровня заряда нажмите и удерживайте кнопку (2). Зеленые
светодиоды на индикаторе заряда (3) указывают уровень заряда:
Кол-во светящихся светодиодов (1-5); Уровень заряда (20-100%)
1-20% / 2-40% / 3-60% / 4-80% / 5-100%
Подключите штек ер кабеля mi cro USB (в к омплекте ) к ра зъему (1)
аккумулятора. Второй штекер - к разъему USB (6) Вашего компьютера или
сетевого адаптера USB.
На индикаторе заряда (3) загорятся светодиоды, отображающие уровень
заряда.
После того, как аккумулятор зарядится до 100%, все пять светодиодов будут
гореть зеленым.
3
ИСПОЛЬЗОВАНИЕ С ОПТИЧЕСКИМ ПРИБОРОМ:
Подключите штекер кабеля microUSB (4) аккумулятора к разъему USB (7)
Вашего оптического прибора.
Для включения аккумулятора кратко нажмите кнопку (2), начнет мигать один
светодиод - аккумулятор находится в режиме ожидания (в течение трех
минут).
Включите оптический прибор – в строке статуса появится пиктограмма
питания от внешего источника. Питание от встроенных батарей (или
аккумулятора) отключится. Светодиоды на индикаторе заряда перестанут
мигать и погаснут.
4
11
11
12
МЕРЫ ПРЕДОСТОРОЖНОСТИ
При длительном хранении аккумулятор должен быть частично
заряжен – не должен быть полностью заряжен или полностью
разряжен.
Не заряжайте аккумулятор непосредственно после его перемещения из
холодных условий в теплую обстановку. Подождите 30-40 минут пока
батарея нагреется.
Во время зарядки не оставляйте аккумулятор без присмотра.
Зарядка аккумулятора должна осуществляться при температуре воздуха 0
°C … +45 °C.
В противном случае ресурс аккумулятора существенно снизится.
Не оставляйте подключенный к компьютеру аккумулятор более 24 часов
после полной зарядки.
Не подвергайте аккумулятор воздействию высоких температур и открытого
огня.
Не рекомендуется подключать сторонние устройства с током потребления
больше допустимого.
Аккумулятор оснащен системой защиты от короткого замыкания. Однако
следует избегать ситуаций, которые могут привести к короткому замыканию.
Не разбирайте и не деформируйте аккумулятор.
Не подвергайте аккумулятор ударам и падению.
При использовании аккумулятора при отрицательных температурах емкость
аккумулятора уменьшается, это нормально и дефектом не является.
Не используйте аккумулятор при температурах, превышающих указанные в
таблице – это может сократить его ресурс.
Храните аккумулятор в месте, недоступном для детей.
5
Если Ваш оптический прибор оборудован планкой Weaver, Вы можете
установит ь н а н ее ак умулят ор с п омощь ю к реп ежного механ изм а.
Зафиксируйте аккумулятор, закрутив ручку (5) до упора.
После отключения оптического прибора аккумулятор переходит в режим
ожидания (мигает один светодиод). В течение трех минут Вы можете
повторно подключить оптический прибор.
Page 9

Page 10

 Loading...