

Page 1

User manual for Nova® sound level meters
Page 2

Pulsar Nova® sound level meter user manual
Page 2
The content of this manual, any illustrations, technical information and descriptions
within this document were correct at the time of going to print.
Pulsar Instruments Plc. reserves the right to make any changes necessary, without
notice, in line with the policy of continuing product development and improvement.
No part of this publication may be duplicated, reprinted, stored in a data processing
system or transmitted by electronic, mechanical, photographic or other means, or
recorded, translated, edited, abridged or expanded without the prior written consent of
Pulsar Instruments Plc.
No liability is accepted for any inaccuracies or omissions in this manual, although due
care has been taken to ensure that is it complete and accurate as possible.
Accessories supplied by Pulsar Instruments Plc. have been designed for use with the
instrumentation manufactured by Pulsar Instruments Plc.. No responsibility is accepted
for damage caused by the use of any other parts or accessories.
The Nova® is designed and manufactured in the United Kingdom by:
Pulsar Instruments Plc., The Evron Centre, John Street, Filey North Yorkshire, YO14
9DW, United Kingdom.
© Copyright : Pulsar Instruments Plc. 2016
Page 3

Pulsar Nova® sound level meter user manual
Page 3
The instructions in this user manual refer to the operation of Pulsar Instruments
plc Nova® sound level meters.
Some functions described in this manual are only available on some versions of
the Nova® sound level meters. Where functions are applicable to only some
instruments in the range, this will be clearly indicated in the text.
In this manual, “Nova®” is used as a general reference for the Nova® sound
level meters and “calibrator” is used as a general reference for an acoustic
calibrator.
This manual describes the recommended usage of the Nova®. Any warnings will
be indicated by the following warning symbol:
The additional information required for testing in accordance with IEC 61672 is provided
as a supplementary document, Nova® Sound Level Meters Technical Data Part B, which
is available for download at: http://www.pulsarinstruments.com/products/nova-support
This supplementary document forms part of this manual
It is not possible to change the way that the instrument measures through the
software or firmware. Any legal metrology aspects of the instrument cannot be
affected by any changes made in the instrument.
The Common Specifications section on page 44 defines which standards relate to
the different functions available in the instruments. Additional approvals and
certifications may apply to the instruments and these will be listed in the
Appendices.
More detailed explanations of the repeat measurement timers are available to download
from the Pulsar website at http://www.pulsarinstruments.com/products/nova-support
Quick Start Guides for the Nova® sound level meters can be downloaded from the Pulsar
website at http://www.pulsarinstruments.com/products/nova-support
Page 4

Pulsar Nova® sound level meter user manual
Page 4
Copyright © Pulsar Instruments plc 2010-2016 All rights reserved.
You may re-use this document/publication (not including the Pulsar Instruments plc logo
and other product logos) free of charge in any format for research, private study or
internal circulation within an organisation. You must re-use it accurately and you may
not use it in a misleading context.
You must not modify text, images or illustrations in any way. The material must be
acknowledged as Pulsar Instruments plc copyright and you must give the title of the
source document/publication.
Where any third party copyright material is identified you will need to obtain permission
from the copyright holders concerned.
Pulsar Instruments plc, the Pulsar Instruments plc Logo, Nova® and the Nova® Logo
are either registered trademarks or trademarks of Pulsar Instruments plc in the United
Kingdom and/or other countries. Microsoft and Windows are registered trademarks of
Microsoft, Inc. All other trademarks acknowledged.
In the interests of continuous product improvement, Pulsar Instruments plc reserves the
right to make changes to product specifications without notice.
To understand the latest updates that have been implemented into this product and to
download the most current version of this user manual, visit our website at
www.pulsarinstruments.com
Version 1.4 Nov 2016
Page 5

Pulsar Nova® sound level meter user manual
Page 5
User manual for Nova® sound level meters ....................................................... 1
About this manual .............................................................................................. 3
Copyright ........................................................................................................... 4
Trademarks ........................................................................................................ 4
Updates .............................................................................................................. 4
Preface ............................................................................................................... 8
Introduction ..................................................................................................... 11
Getting Started ................................................................................................. 12
Fitting the Preamplifier ..................................................................................... 13
Inserting the batteries ...................................................................................... 14
Keypad and Controls ........................................................................................ 15
Switch on ........................................................................................................ 15
Connectors ...................................................................................................... 16
Screen saver ................................................................................................... 17
Display ........................................................................................................... 17
Information Bar ............................................................................................... 18
View ............................................................................................................... 19
Measurement Display ....................................................................................... 19
Status Bar ........................................................................................................ 19
Soft Key Bar .................................................................................................... 19
Overload and Under-Range Indication ................................................................. 19
‘Bluescreen’ ..................................................................................................... 20
Calibration ...................................................................................................... 21
Getting to know your Nova® – features and capabilities .................................. 23
Colour Coding .................................................................................................. 23
Views ............................................................................................................. 23
Not Measuring ................................................................................................. 23
Measuring ....................................................................................................... 23
Review Mode ................................................................................................... 23
Information ..................................................................................................... 24
Sound Pressure Level ....................................................................................... 24
Leq................................................................................................................. 25
Dose............................................................................................................... 25
1:1 Octave Band .............................................................................................. 26
Ln .................................................................................................................. 26
Making a measurement .................................................................................... 27
Restarting A Measurement ................................................................................ 31
Configuring the sound level meter ................................................................... 32
Menus ............................................................................................................ 32
Main Menu ...................................................................................................... 32
Calibrate ......................................................................................................... 32
Set Clock ........................................................................................................ 32
Quick Settings ................................................................................................. 32
Review Stored Data .......................................................................................... 33
Clear Memory .................................................................................................. 33
Storage Options ............................................................................................... 33
Repeat Timer ................................................................................................... 33
Single Timer .................................................................................................... 33
Audio Note ...................................................................................................... 33
Page 6

Pulsar Nova® sound level meter user manual
Page 6
View Options ................................................................................................... 33
Time Weighting ................................................................................................ 33
Adjust Screen Brightness .................................................................................. 34
Language ........................................................................................................ 34
Display Mode ................................................................................................... 34
Advanced Options ............................................................................................ 34
Restore Factory Settings ................................................................................... 34
Information ..................................................................................................... 34
Advanced Setup Options Using AnalyzerPlus ........................................................ 35
Audio Note Enable/Disable ................................................................................ 35
Level Colours ................................................................................................... 35
Time History Rate ............................................................................................ 35
Audio Length ................................................................................................... 35
Ln’s Setup ....................................................................................................... 35
AC Output Settings ........................................................................................... 35
DC Output Settings .......................................................................................... 36
Memory Options ............................................................................................... 36
Pause/Back Erase ............................................................................................. 36
Time and Date Format ...................................................................................... 36
Features in more detail .................................................................................... 37
AnalyzerPlus .................................................................................................... 37
Audio Recording ............................................................................................... 37
Audio Note ...................................................................................................... 38
Timers ............................................................................................................ 38
Single Timer .................................................................................................... 38
Repeat Timer ................................................................................................... 38
Back Erase/Pause ............................................................................................. 38
Pause ............................................................................................................. 38
Back Erase ...................................................................................................... 39
Memory .......................................................................................................... 39
Restore Factory Settings ................................................................................... 39
Windshield ...................................................................................................... 39
Downloading Measurements ............................................................................ 40
Troubleshooting ............................................................................................... 40
Configuring the instrument from AnalyzerPlus ................................................. 42
Additional Information ..................................................................................... 43
Appendices ....................................................................................................... 44
IEC 61672 test data ......................................................................................... 44
Common Specifications ..................................................................................... 44
Views ............................................................................................................. 48
Sound Level View ............................................................................................. 48
Leq View ......................................................................................................... 48
1:1 Octave Band View ...................................................................................... 48
Ln View ........................................................................................................... 48
Dose View ....................................................................................................... 49
Stored Measurements ....................................................................................... 49
Sound Level View ............................................................................................. 49
Leq View ......................................................................................................... 49
Dose View ....................................................................................................... 49
1:1 Octave Band View ...................................................................................... 49
Ln View ........................................................................................................... 50
Menu / Quick Settings....................................................................................... 50
Page 7

Pulsar Nova® sound level meter user manual
Page 7
Electrical Outputs ............................................................................................. 50
AC Output ....................................................................................................... 50
AC Output Cables ............................................................................................. 51
DC Output ....................................................................................................... 51
DC Output Cables ............................................................................................. 51
Accessories ..................................................................................................... 51
General Accessories .......................................................................................... 51
Outdoor Measurement Kit ................................................................................. 51
Replacement Microphone Capsules ..................................................................... 51
Cables ............................................................................................................ 52
Microphone Extension Cables ............................................................................. 52
Input & Output Cables ...................................................................................... 52
NK:70 Random Incidence Adaptor ...................................................................... 52
Acoustic Calibrator Information ....................................................................... 53
Switching on the Calibrator ............................................................................... 53
Permanent ‘On’ Mode ....................................................................................... 53
Calibrating a Sound Level Meter ......................................................................... 53
Background Noise ............................................................................................ 54
Stabilisation .................................................................................................... 54
Changing the Battery ........................................................................................ 54
Battery type .................................................................................................... 55
Specifications .................................................................................................. 55
Technical Information ....................................................................................... 55
Free Field Correction ........................................................................................ 56
CE Certificate of Conformity ............................................................................. 57
Warranty .......................................................................................................... 58
Guarantee ........................................................................................................ 59
Index ............................................................................................................... 60
Pulsar Instruments Contact ............................................................................. 61
Page 8
Pulsar Nova® sound level meter user manual
Page 8
The Pulsar Nova is a powerful instrument providing excellent expansion capability and
has been designed to provide reliable, accurate measurements over a long period of
time.
This manual describes the procedure that should be followed to set up and operate the
Nova® sound level meter, as well as comprehensive technical information, using
optional accessories and troubleshooting.
This manual also contains the information regarding the Model 105 and Model 106
Acoustic Calibrators.
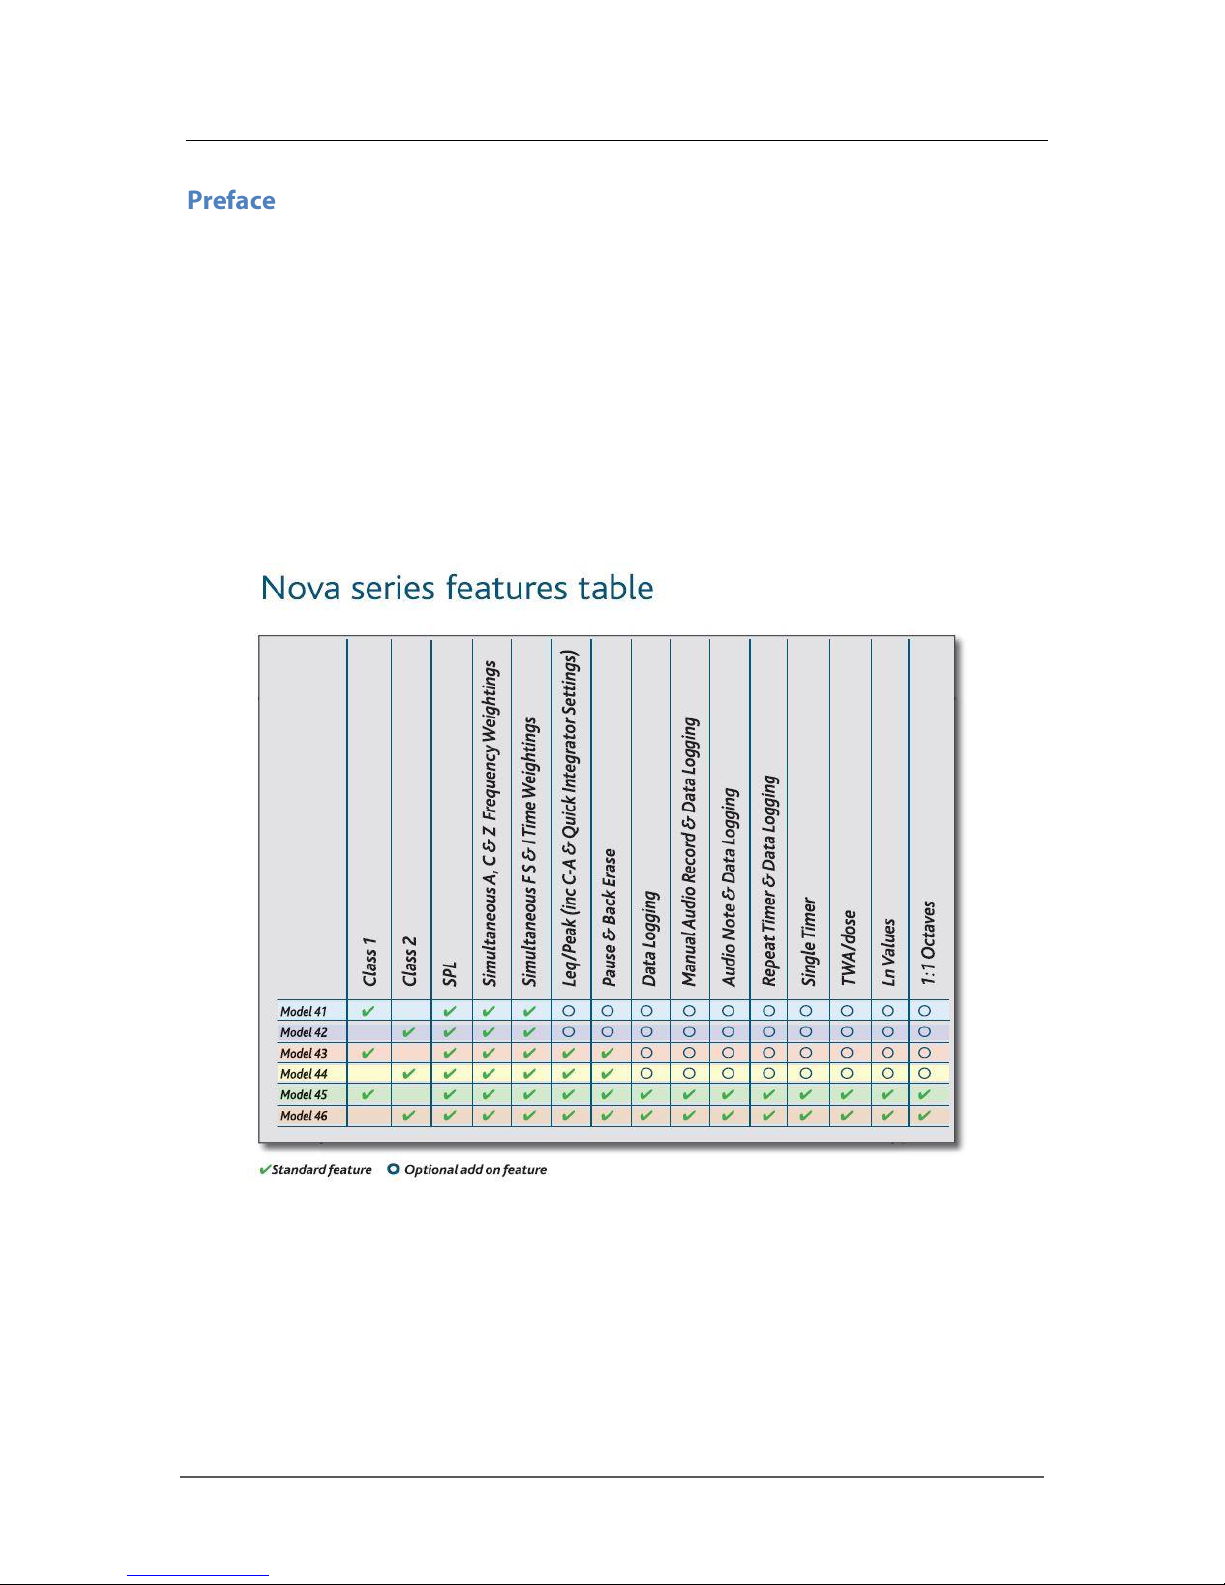
The different versions of the Nova® are:
The Nova® sound level meters meet the requirements for Class 1 and Class 2 of IEC
61672-1:2013 standard for Class 1 Group X or Class 2 Group X sound level meters as
appropriate.
The Nova® sound level meters also meet the requirements for Class 1 and Class 2
according to IEC 60651 and 60804 depending upon the version of the instrument. Please
refer to page 43 for full technical details of the Nova® sound level meters.
To meet the requirements of ANSI S1.4 for Random Incidence microphone response, an
NK:70 Random Incidence Adaptor should be used when making measurements. Please
refer to page 51 for details of the use of the NK:70 Random Incidence Adaptor.
Page 9
Pulsar Nova® sound level meter user manual
Page 9
Page 10
Pulsar Nova® sound level meter user manual
Page 10
Page 11

Pulsar Nova® sound level meter user manual
Page 11
The new Pulsar Nova® – the smartest sound level meter in the world for noise at work
measurements!
Robust
Easy to use
Compliant
Faster – Intuitive design
Stronger – Durable metal case
Longer – 30+ hour battery life
OLED high resolution anti-glare
screen
Full colour display
Soft touch keypad
4GB removable memory card
Data logging*
Audio recording*
* - Option on some models
One of the key aims of the Nova® instruments is to give you a sound level meter that is
as simple to use as possible whilst providing the very highest level of performance and
function.
You cannot forget to measure a specific function as they are all measured at the same
time and stored internally.
For example, if you have chosen the F (Fast) time weighting View Option, the Nova® will
still measure S (Slow) and I (Impulse) at the same time.
You can choose another time weighting View Option from the menu, and then see realtime data or review stored measurements using the new parameters.
This applies to all other noise parameters (excluding Dose).
The Nova® measures all the parameters of noise at the same time and the View Option
determines what is displayed.
By using the very latest in digital technology combined with 45 years’ experience in
designing sound level meters, we have given the Nova® a single measurement range
going all the way from 20dB(A) to 140dB(A) [143dBC peak] in a single span.
By doing this the problems of multi-ranges on older instruments have been eliminated.
Thus, there is no need for you to choose which range you may need for your
measurement, and there is almost no chance of the instrument overloading or underranging.
A clear, simple display of the information you need:
The display used on the Nova® is a high resolution colour OLED type. This gives a clear,
bright display that is easy to read in all light conditions as well as allowing us to use
colour to show specific functions and information. All the information that you need is
shown clearly on the screen with the most useful function, for example the Leq in the
Leq View, shown in large text. This makes it easy for you to see the information that is
important at a glance.
Page 12
Pulsar Nova® sound level meter user manual
Page 12
Your Nova® sound level meter has been shipped in reusable packaging that should be
retained for safe shipment when returning the instrument for calibration or servicing.
All Nova® meters come with the following standard accessories:
PA40 Microphone Preamplifier
Microphone capsule (attached to the preamplifier)
Wrist strap
6 x AA batteries
User Manual
Product CD (with AnalyzerPlus software and documentation)
USB download cable
Windshield
Keyring
You may have other accessories, depending on your package. Please check for damaged
or missing items before using your Nova®.
The preamplifier is connected by a rugged, high quality, self-latching push pull
connector.
Please note: Twisting or turning the preamplifier body may cause serious damage. The
microphone capsule is also delicate. Care needs to be taken when handling.
Damage to the microphone and the display caused by misuse is not covered by the
warranty for the instrument.
For more information on the warranty please see page 58.
Page 13

Pulsar Nova® sound level meter user manual
Page 13
Fitting the Preamplifier
To connect or remove the preamplifier, please follow the diagram:
When connecting the preamplifier, please take care to align the locking tab (and red
markings) on the preamplifier and instrument socket. Push the preamplifier connector
into the instrument socket to connect them.
Simply pull the knurled part of the connector towards the microphone to remove the
preamplifier again.
DO NOT ATTEMPT TO TWIST OR TURN THE PRE-AMPLIFIER!
Page 14
Pulsar Nova® sound level meter user manual
Page 14
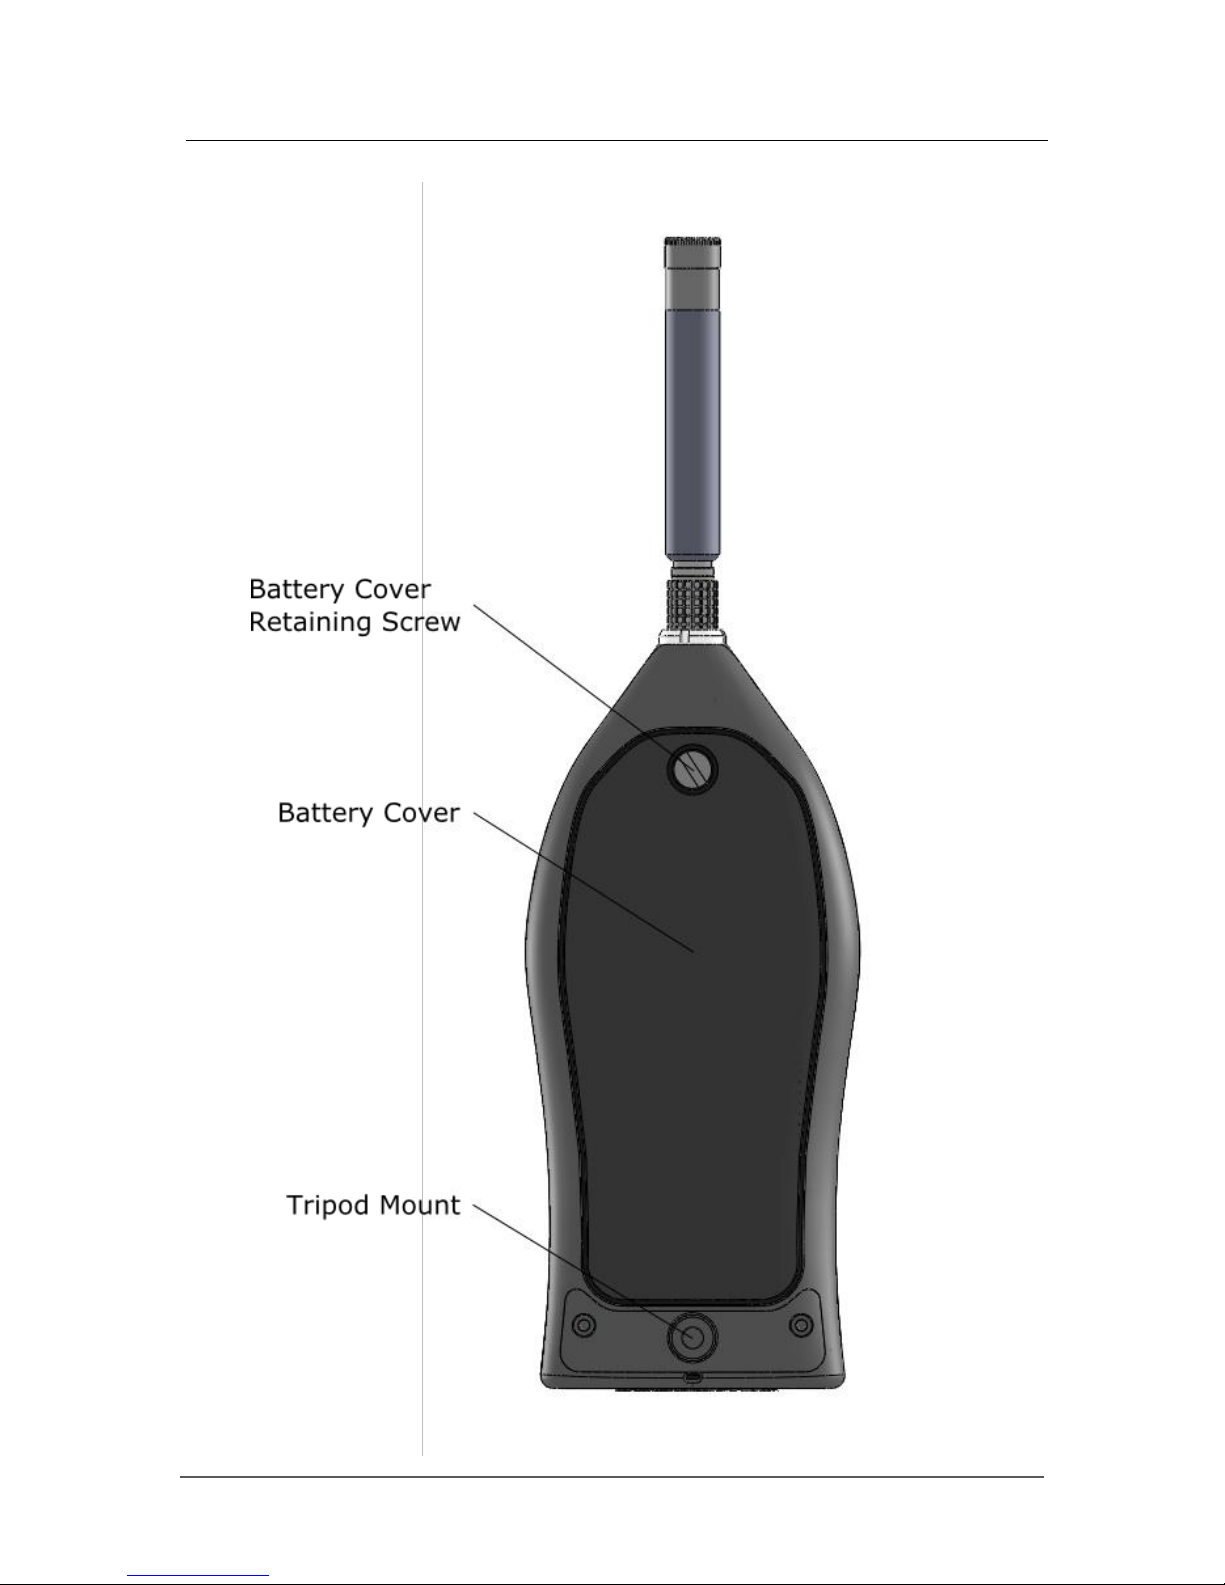
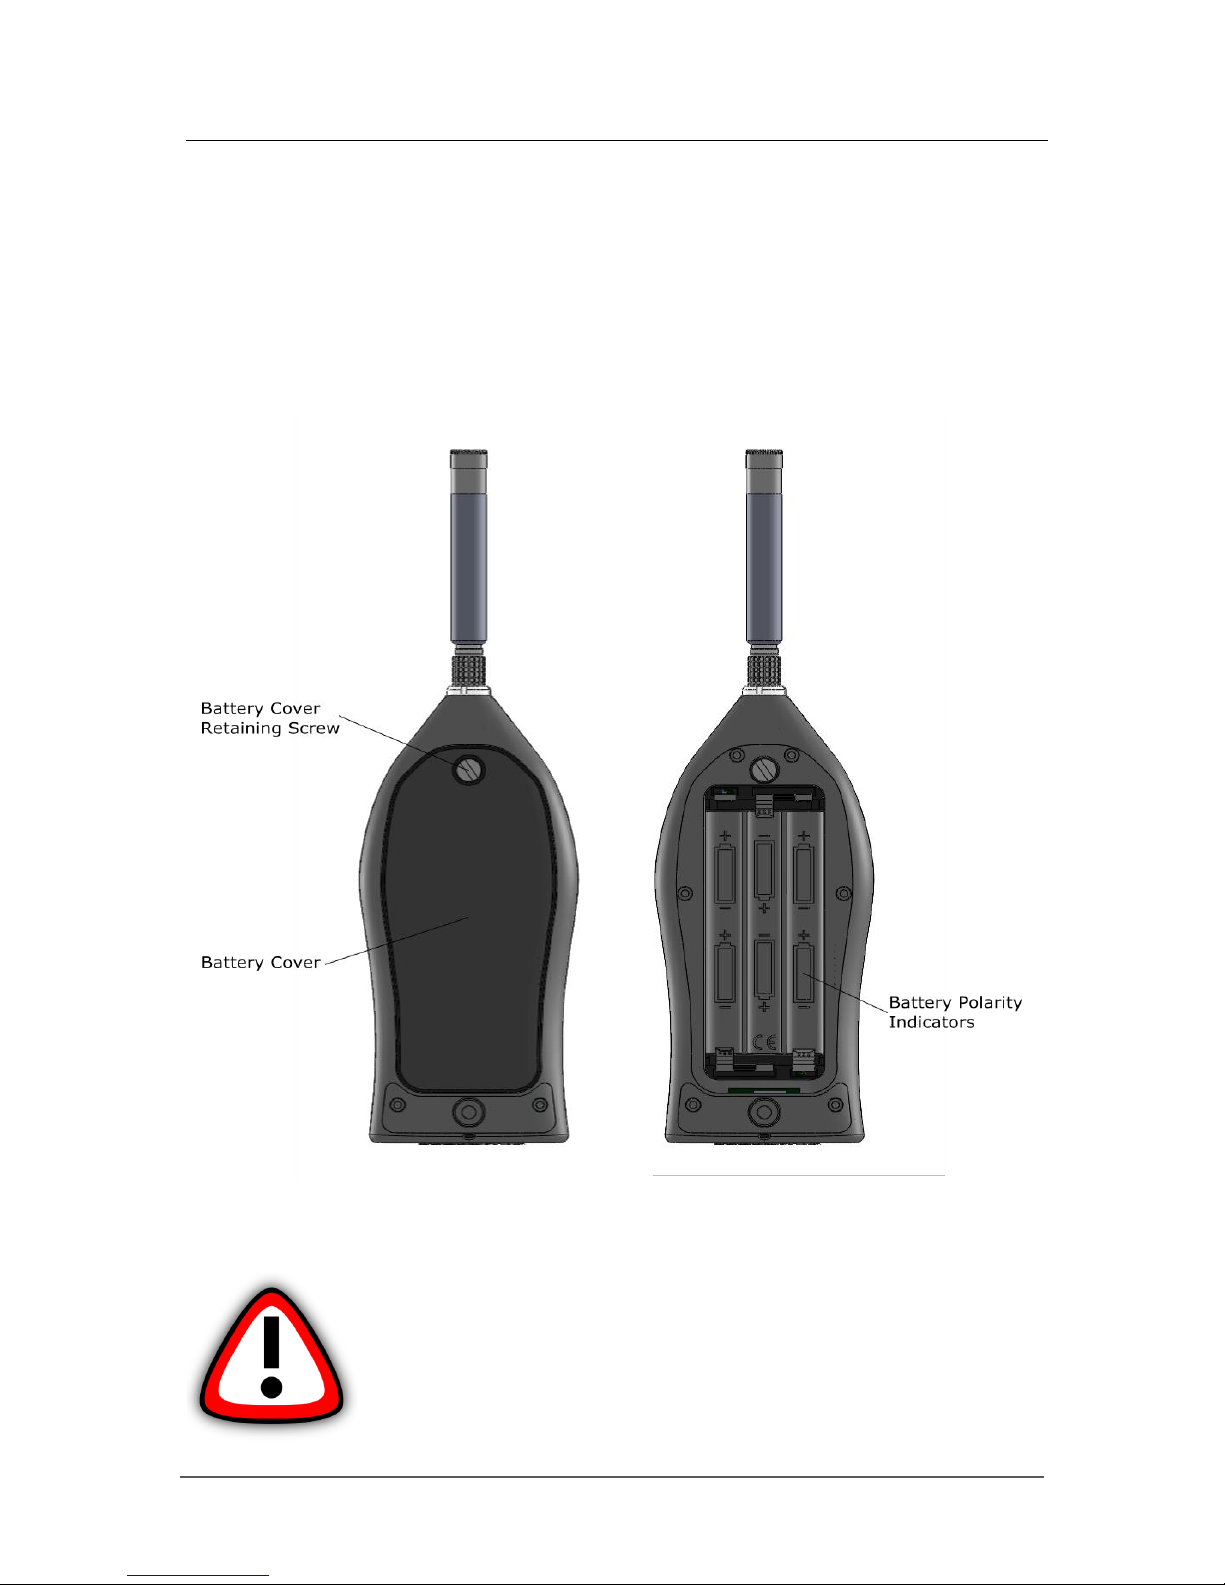
Inserting the batteries
Your Nova® is powered by 6 x AA batteries (also called MN1500 or LR6). We
recommend that you use alkaline, lithium or high quality rechargable batteries to give
the best performance.
Remove the battery cover by loosening the captive battery cover retaining screw (as
shown below). The included Pulsar Instruments keyring is designed exactly for this
purpose.
Please look carefully at the diagram inside the battery compartment that shows the
correct polarity. After inserting the batteries in the correct orientation, replace the cover
and tighten the battery cover retaining screw.
Whenever the instrument is not used for a long period of time,
remove the batteries to prevent damage from leakage.
Damage caused by leaking batteries is NOT covered by the
warranty.
Page 15
Pulsar Nova® sound level meter user manual
Page 15
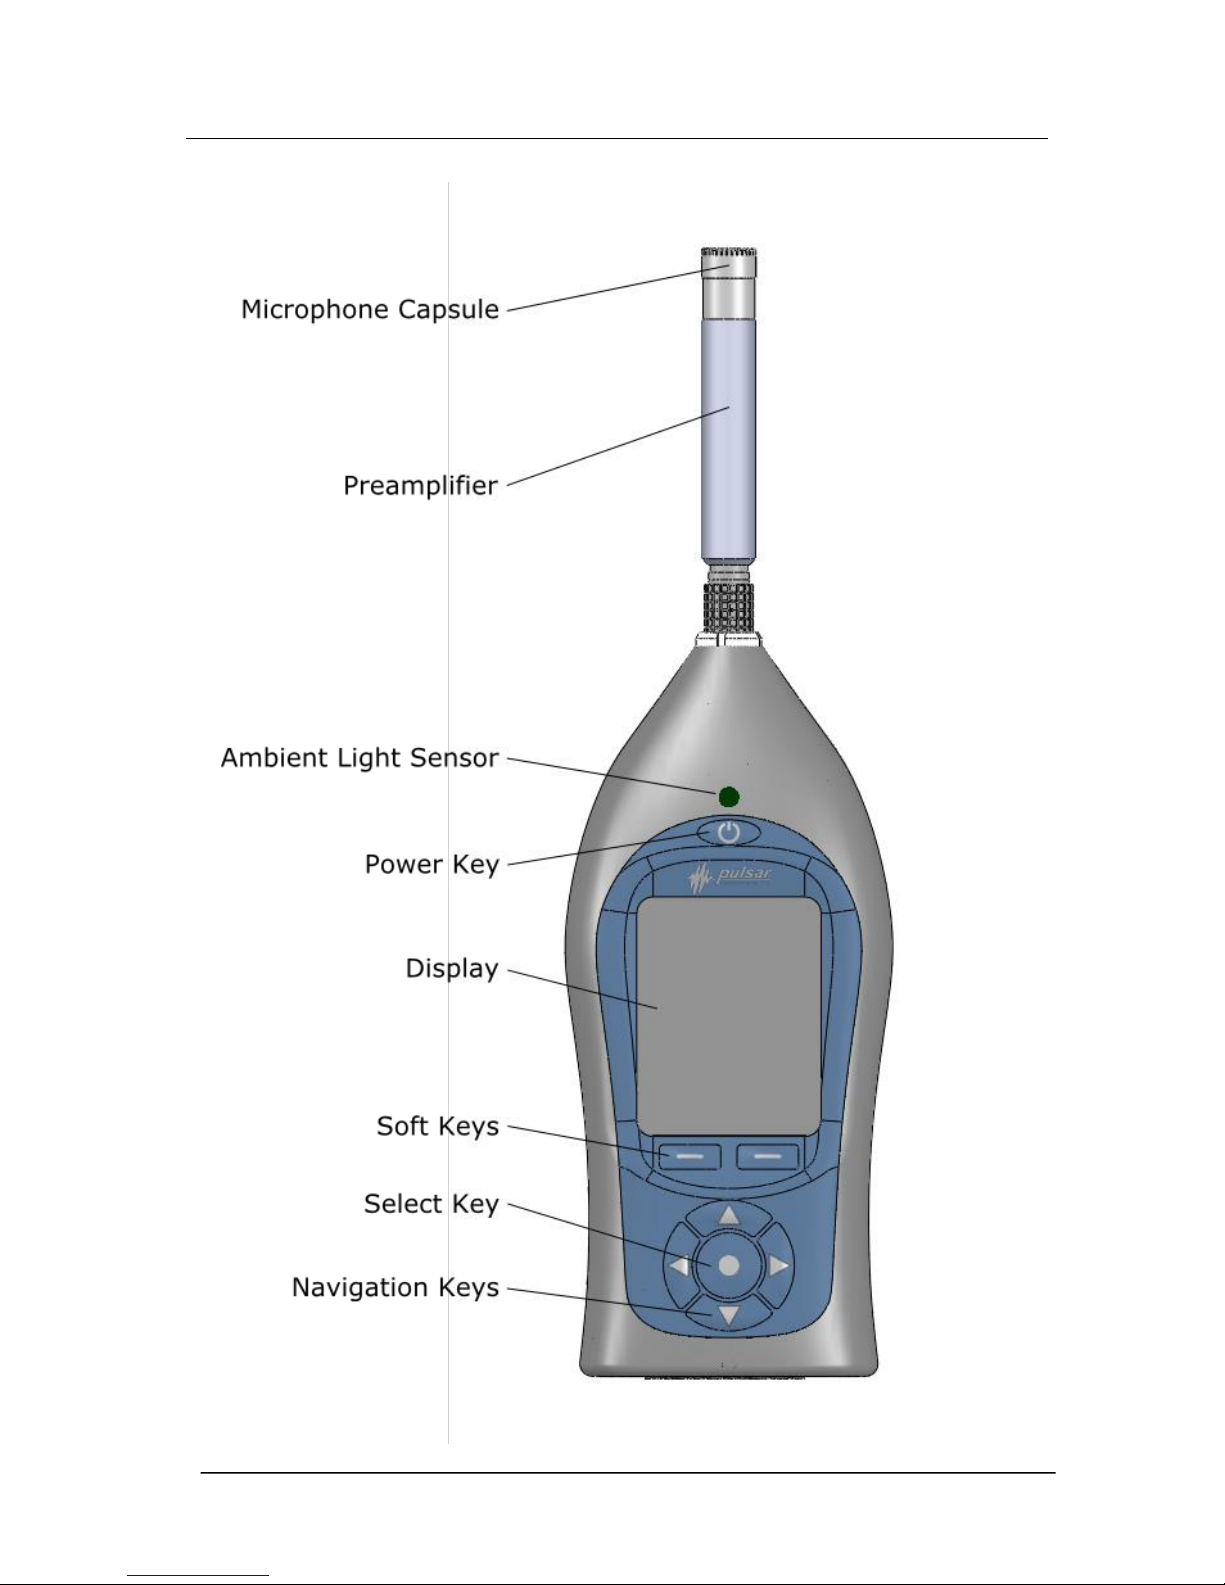
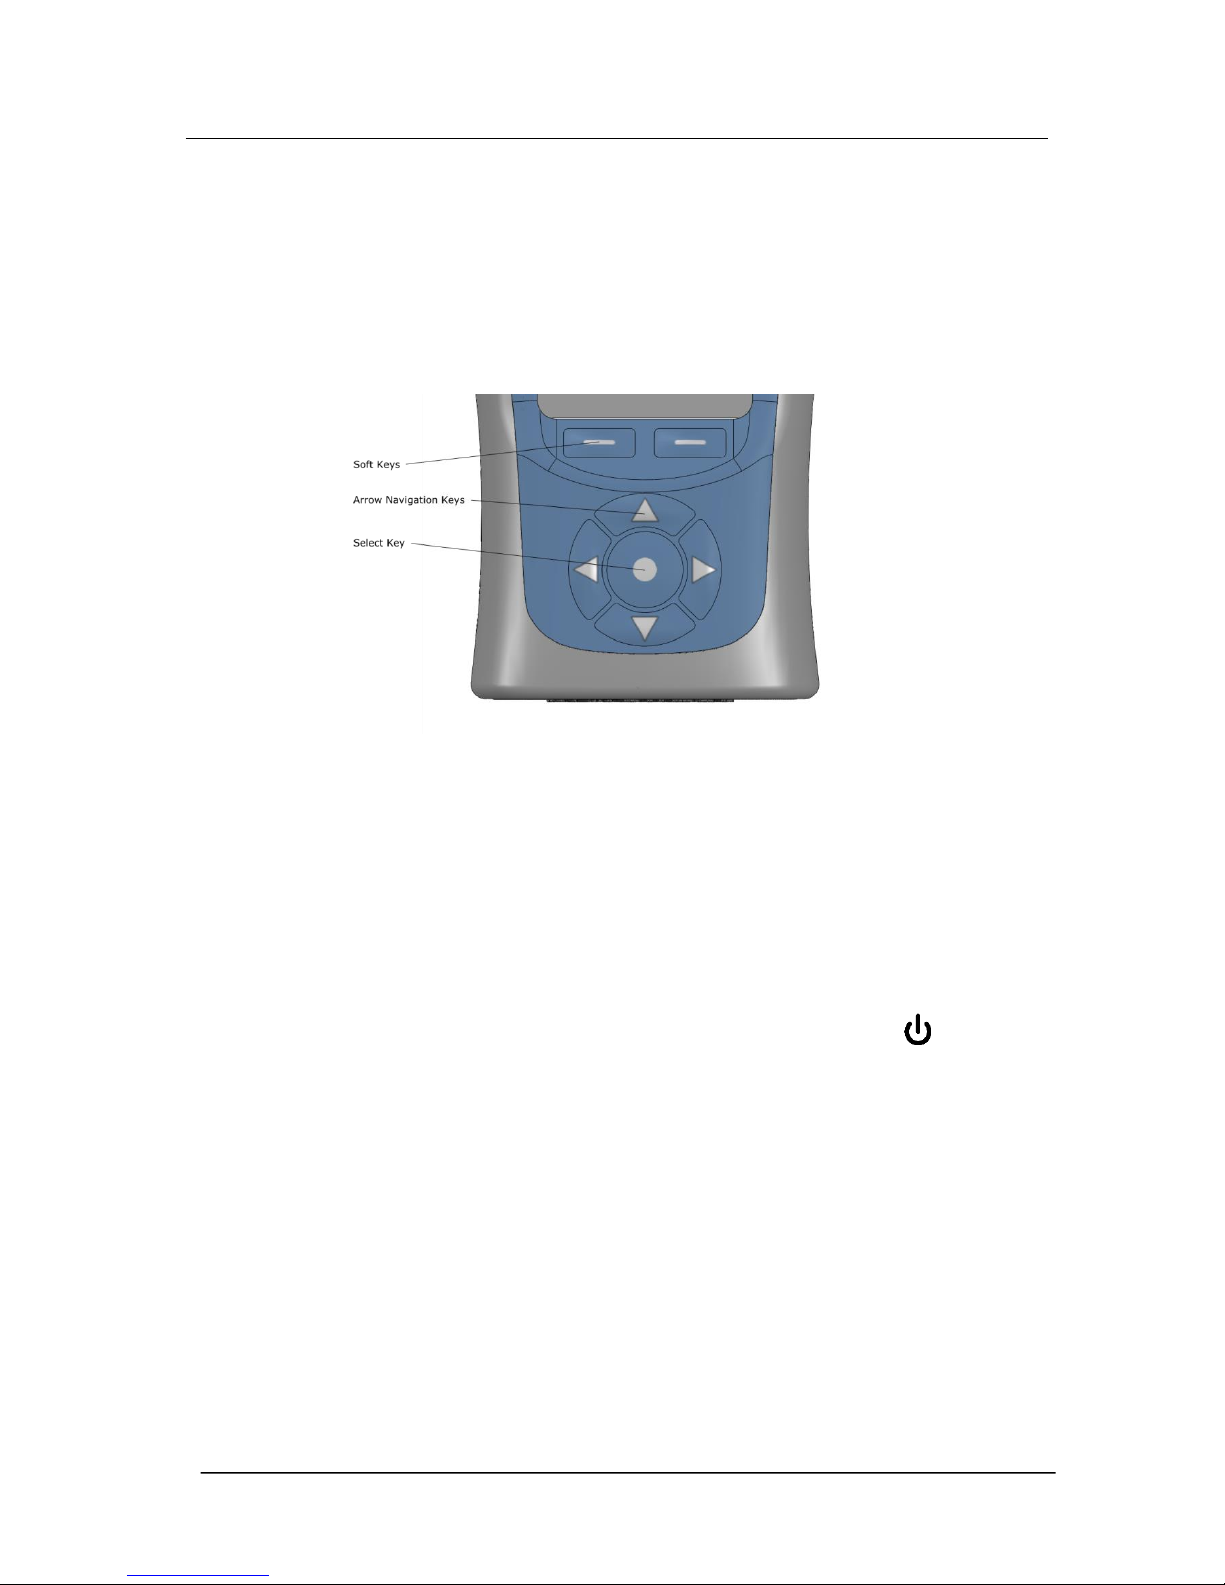
Keypad and Controls
The Nova® is controlled via the four arrow keys (up, down, left and right), the center
select button and two soft keys, which change in function depending upon the mode that
the instrument is in. The soft key function is shown above the button on the display.
The left and right keys move between the Views and the up and down keys move
between the pages of each View.
The ambient light sensor on the front of the instrument will illuminate the elastomer
keypad and adjust the brightness of the display automatically when the light level falls.
If the instrument has the pause function and it has been activated (described on page
33), the right soft key toggles between pause and stop. Press once to pause/back erase
(if enabled – see page 37) and twice to stop, or alternatively press and hold for three
seconds to stop.
Switch on
The instrument is switched on by pressing and releasing the power button on the top
of the keypad. After the boot screen, your Nova® will display the last View that was
used.
If the start-up screen flashes quickly when you press the power button, the batteries
have insufficient power to start and they must be changed.
Page 16
Pulsar Nova® sound level meter user manual
Page 16
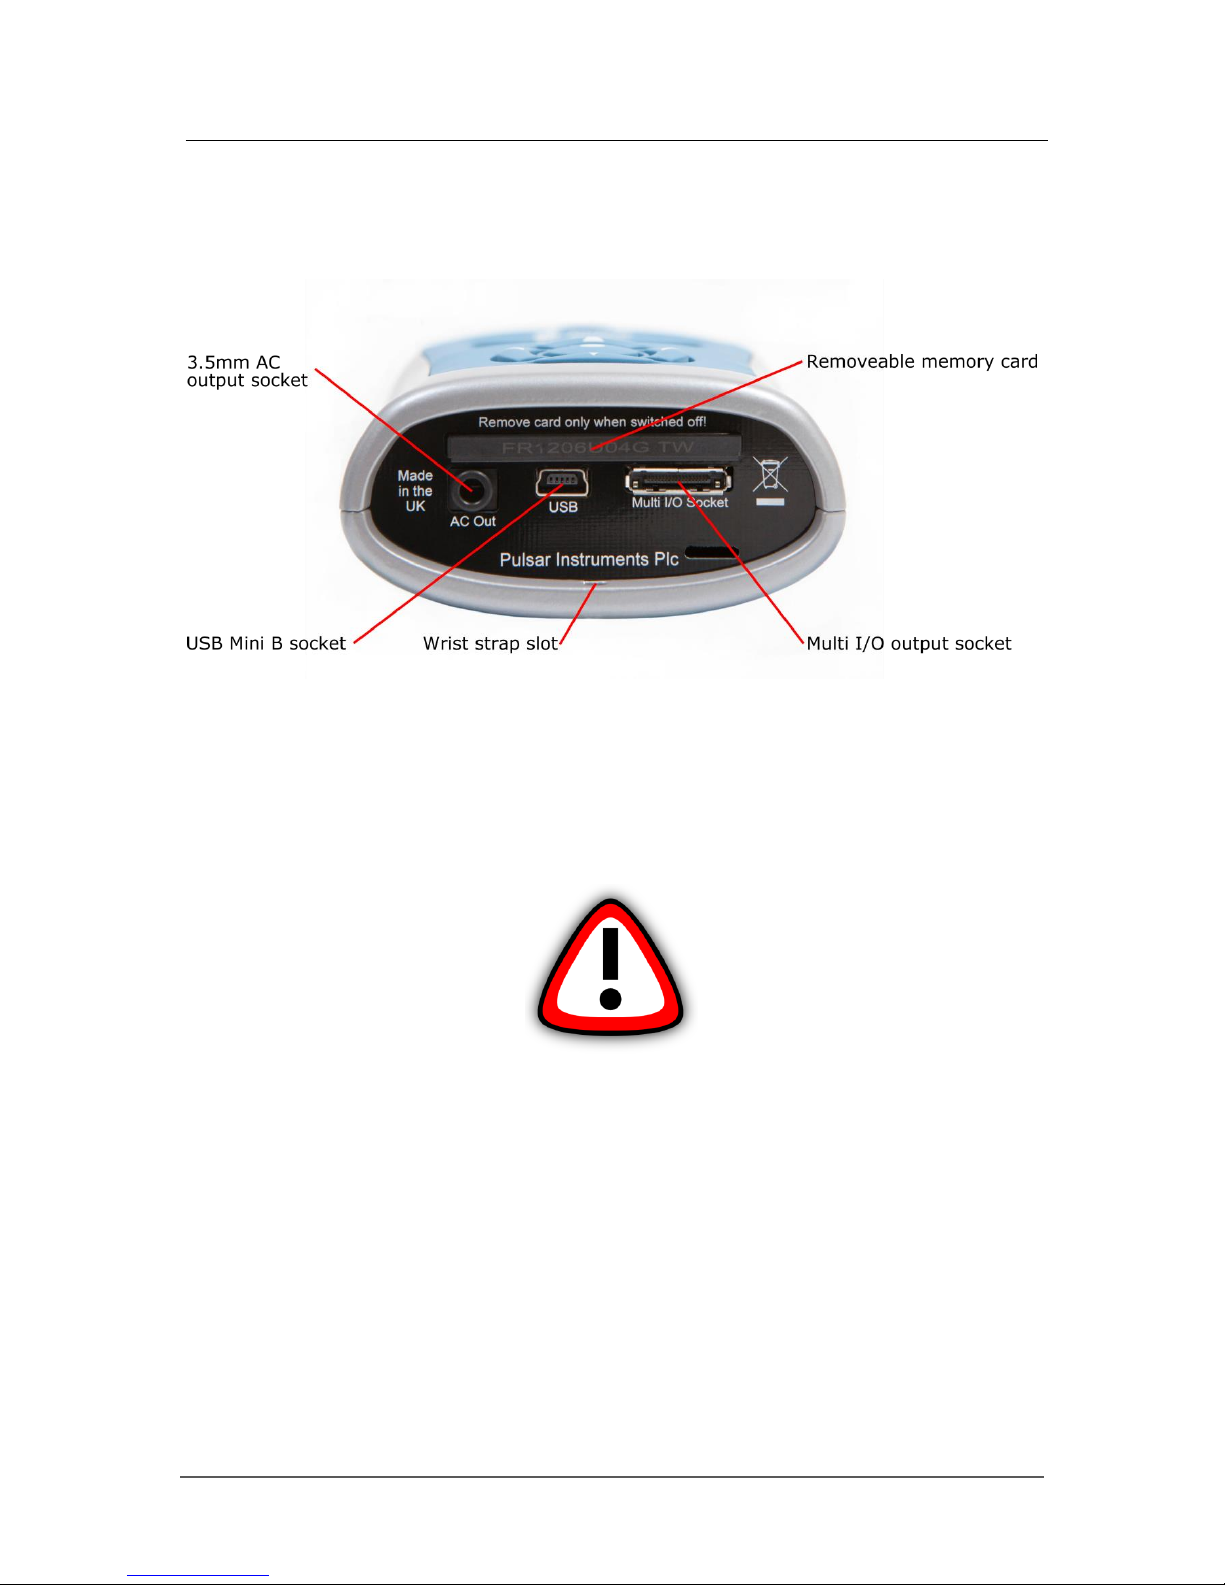
Connectors
The connectors used by the Nova® to communicate with a PC and AnalyzerPlus PC
software are at the bottom of the instrument under a protective cover.
The Nova® can be powered via the multi-pin connector on the bottom of the instrument.
The options are:
PSR171 - Nova® power input cable (2.1mm Power Jack, 2m long).
PSR176 - Nova® 12v Battery pack cable.
PSR190 - Nova® power input cable (2.1mm Power Jack, 2m long) and mains power
supply.
The Nova® can also be powered from the USB connector but only if there are no
batteries in the instrument. If the batteries are fitted they will still be discharged with
USB power present.
An AC output is available on the Nova® via the 3.5mm jack socket. The output is unweighted and the output level can be adjusted using the setup options in the
AnalyzerPlus software. It is used with the following cable:
PSR177 - Nova® AC output cable 3.5mm Mono to 3.5mm Stereo Jack 2m long.
The Multi I/O Interface Connector presents AC and DC outputs and can be used with the
following cables:
PSR174 - Nova® AC & DC Output 18way to 2 x Phono 1m long.
PSR185 - Nova® AC output cable 18 way to Phono 1m long.
See page 50 for details of the electrical outputs.
Page 17
Pulsar Nova® sound level meter user manual
Page 17
Screen saver
If no keys are pressed for 6 minutes the display will dim to preserve battery and screen
life and reduce power consumption. After 30 minutes with no key presses the display will
switch off completely and the keypad will flash every two seconds to show that the
instrument is powered. The screen dim and screen saver functions will occur during
measurements as well as when not measuring. Press any key to restore the display.
The time intervals for the screen dim and screen saver are configurable in AnalyzerPlus.
Display
The Nova® uses a high resolution colour OLED (organic light-emitting diode) screen to
show a clear and easy to read display of all the information you need.
Page 18
Pulsar Nova® sound level meter user manual
Page 18
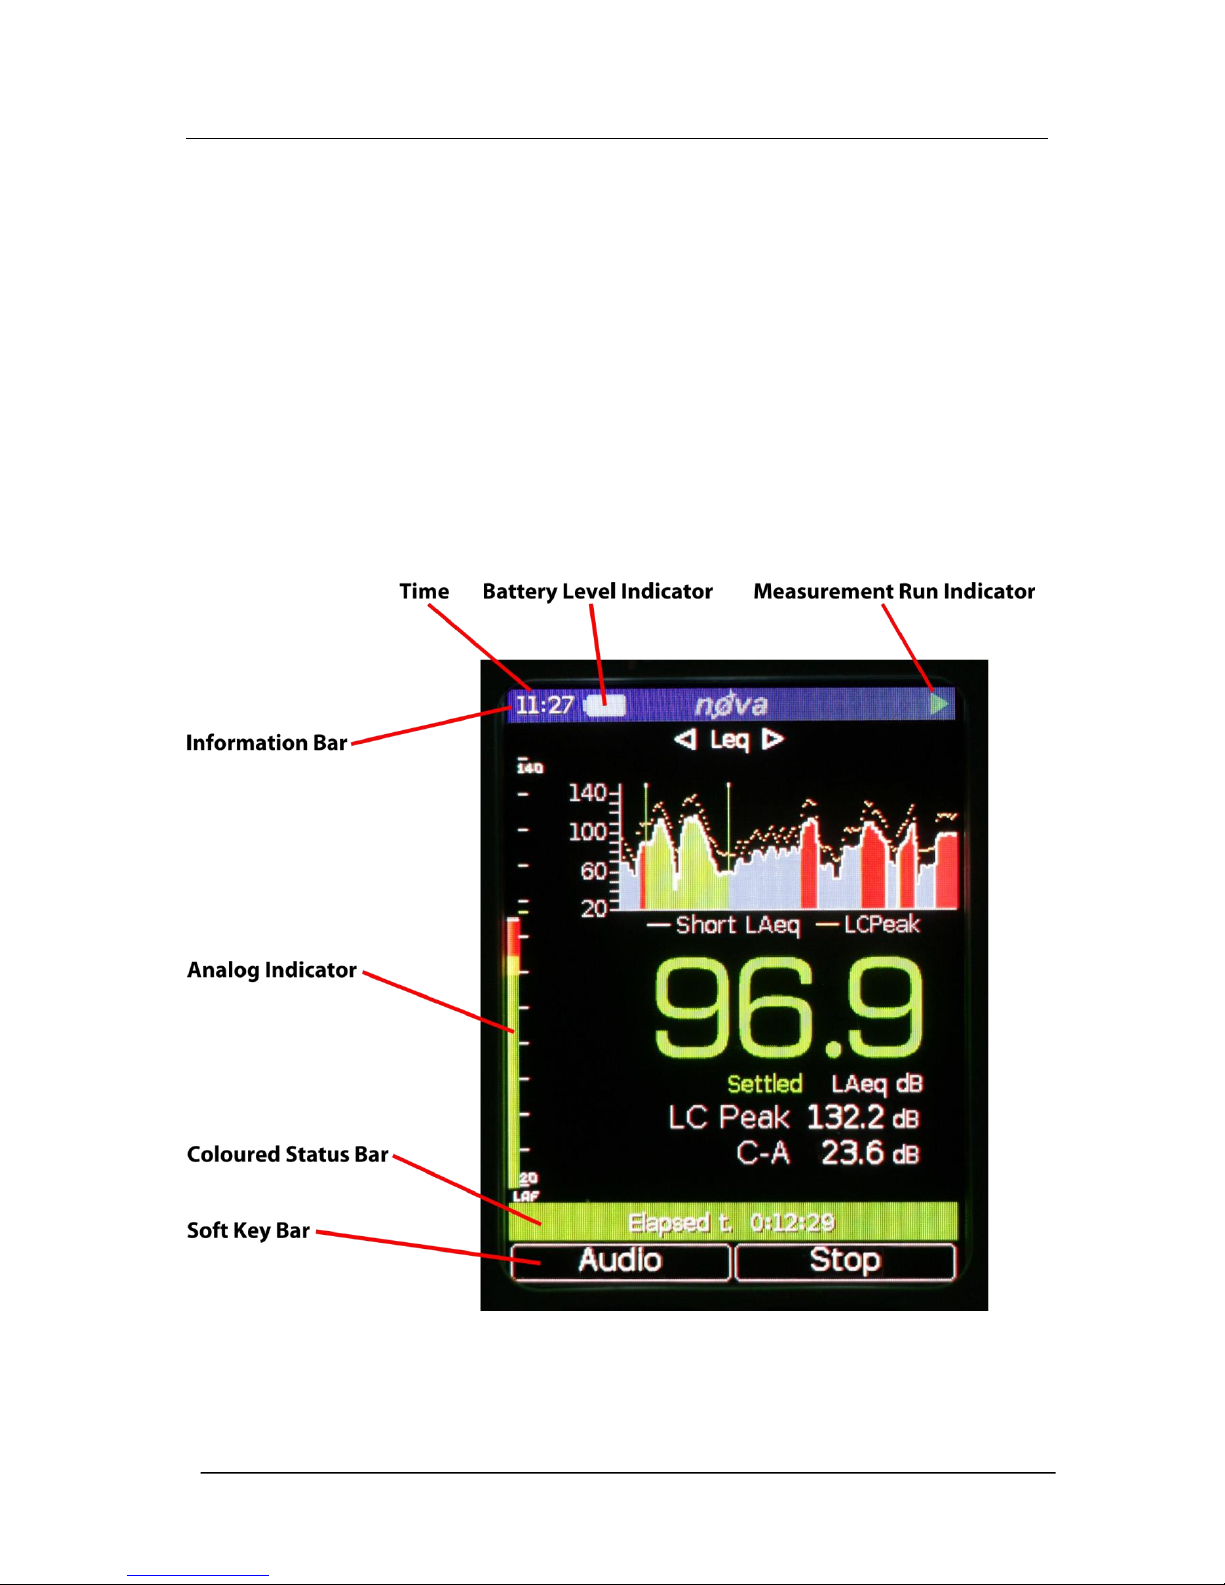
Information Bar
The information bar shows the battery level, if external power is connected and if the
Nova® is connected to a PC via the USB connector.
The status of the batteries is shown in the Battery Level Indicator. When
the batteries need replacing, the indicator will turn red and start to flash.
If the start-up screen flashes quickly when you press the power button,
the batteries have insufficient power to start and need changing.
When external power is being used to power the instrument this symbol
will show in the information bar.
When the instrument is connected to a PC via USB this symbol will show in
the information bar.
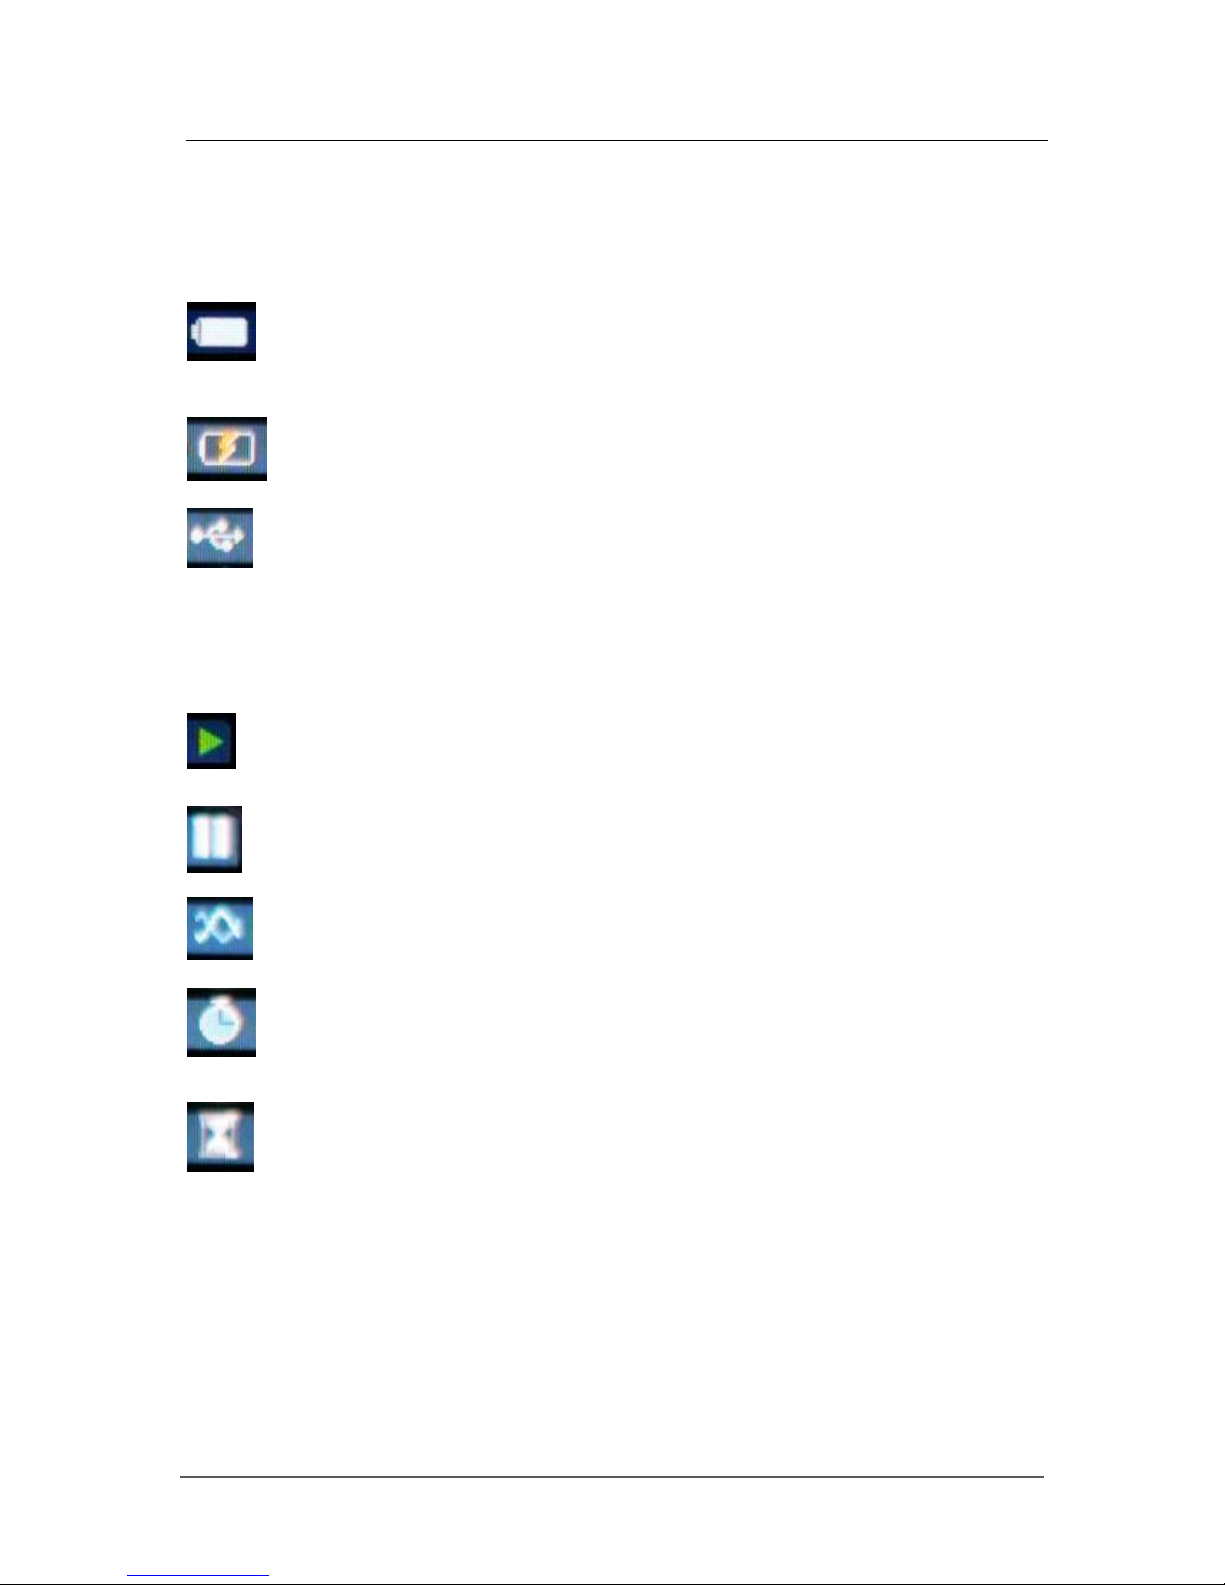
The information bar also shows icons when functions are active. Examples of the icons
are shown below:
The Play symbol is shown when the instrument is recording a
measurement.
The Pause symbol is shown when a measurment that is in progress has
been paused.
The Audio record symbol is shown when real audio is being recorded.
The Single timer symbol is shown when a Single timer has been set up in
the menu.
The Repeat timer symbol is shown when a Repeat timer has been set up in
the menu.
Page 19
Pulsar Nova® sound level meter user manual
Page 19
View
This text describes the current measurement view or which menu you are currently
looking at. Left and right arrows show that aditional views are available – use the left
and right navigation buttons to view them.
Measurement Display
The main part of the display shows the measurement functions. In addition, the display
features an Analog Bar on the left of the screen, which shows real time A-weighted
sound level. If more pages of information are available for the currently selected function
this will be shown at the bottom of the screen, ie 1 of 3 – use the up and down
navigation buttons to view them.
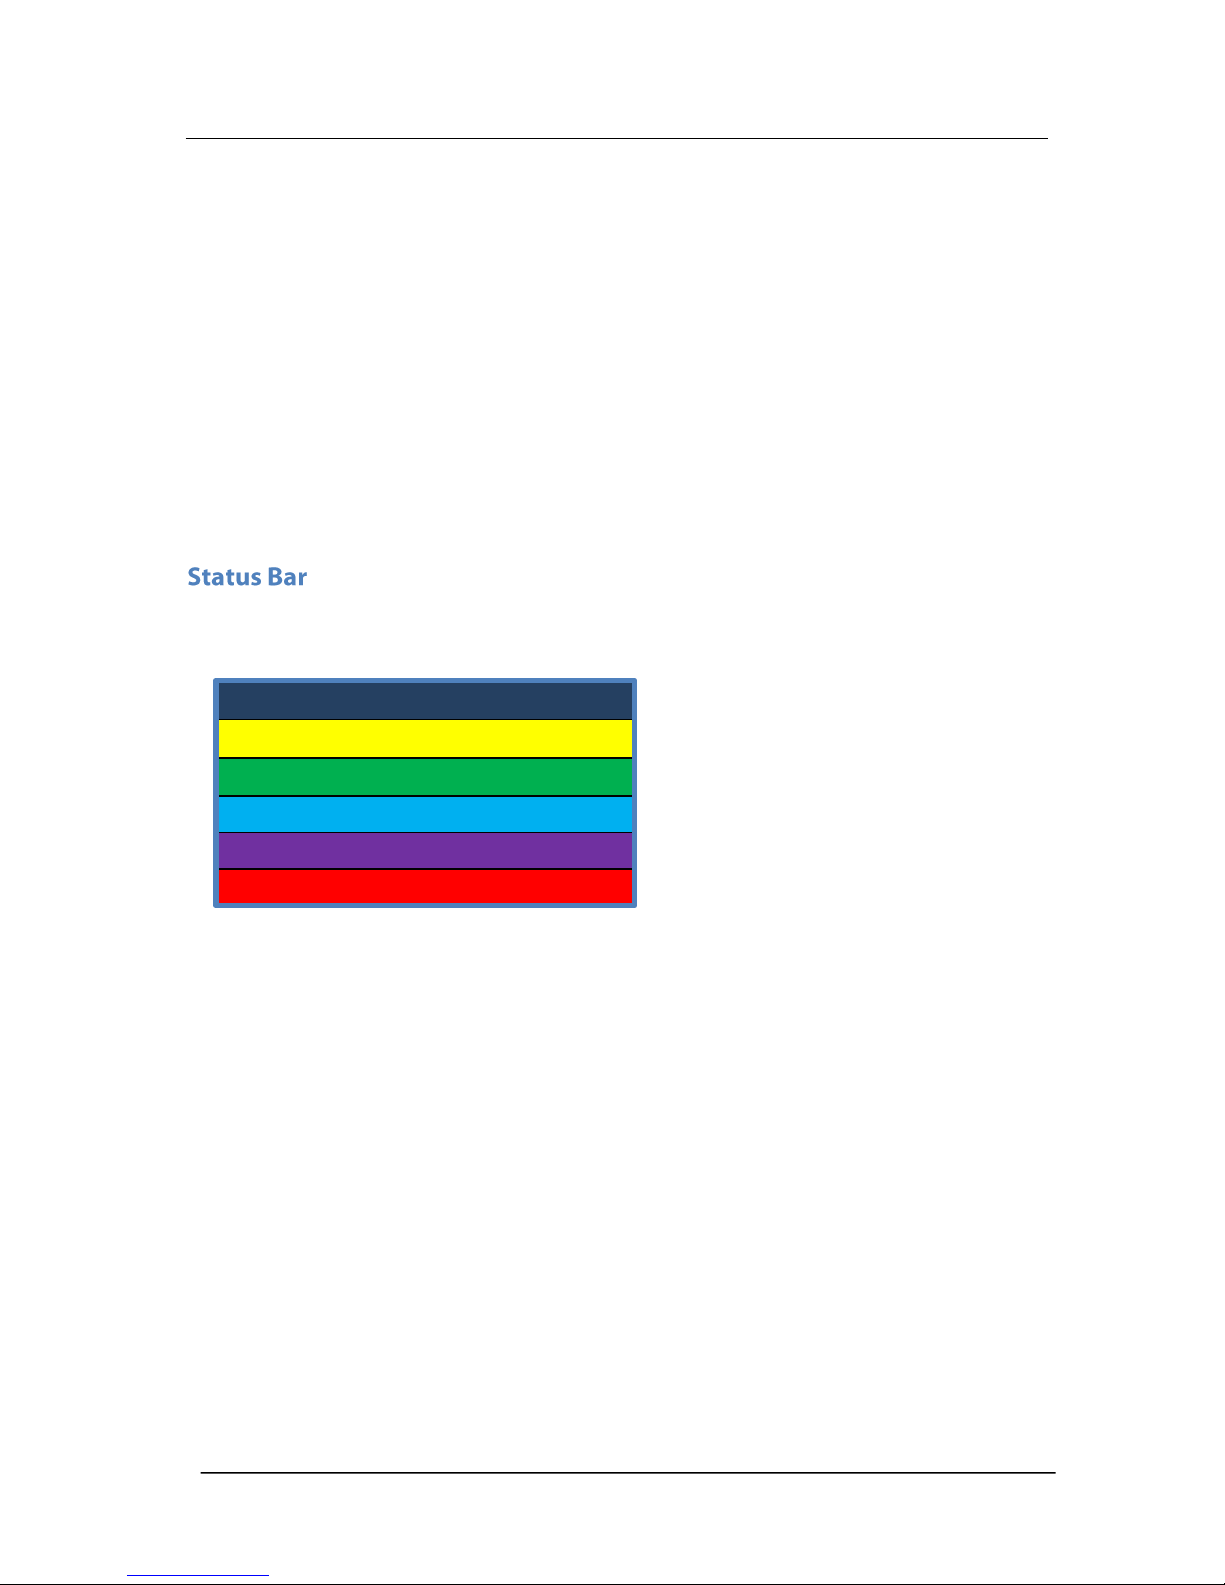
The Nova® uses a colour coded status bar at the bottom of the screen to help you
quickly identify what mode it is currently in.
When the Nova® is not measuring, the status bar shows the date and time. When it is
measuring, the display shows the elapsed time. In Review mode, it shows the
measurement number and the total number of measurements stored.
Soft Key Bar
The soft key bar shows the current operation of the two soft keys at the top of the
keypad. These change function based upon what you are doing at the time.
Overload and Under-Range Indication
Overload is indicated by the word 'overload' and Under-Range is indicated by the word
‘under range’ (in the chosen language) on the display.
On the Sound Level View and Leq View the indicators are situated beneath and to the
left of the large number. When a measurement is not in progress, the indicator is shown
for at least 1 second, so that very short transient overload or under-range conditions are
visible to the operator.
Dark Blue – Not measuring mode.
Yellow – Audio Note recording.
Green – Measuring mode.
Light Blue – Measurement paused.
Purple – Measurement review.
Red – Recording audio.
Page 20

Pulsar Nova® sound level meter user manual
Page 20
When a measurement is in progress, the overload indicator stays on until the
measurement is stopped or reset.
In some circumstances the overload and under range indicators will be shown
simultaneously. In this case the text will be abbreviated to save space.
Note: If any displayed decibel value on the Sound Level View or Leq View is below
14.0dB, the value will be replaced by dashes ('---'). These levels are typically below the
noise floor of the microphone capsule and so will only be encountered during electrical
testing.
‘Bluescreen’
Under rare circumstances, when the Nova® encounters a condition it cannot recover
from, a ‘bluescreen’ error message will show with an error code.
If this should happen to your Nova®, please make a note of the code so that the
engineers at Pulsar Instruments can diagnose your problem accurately.
After writing down the code, pressing the right key will clear the screen and the
instrument can be used as normal.
Page 21

Pulsar Nova® sound level meter user manual
Page 21
Calibration
As strongly recommended in all modes of use, any noise measuring instrument should
be calibrated before use and the Nova® sound level meter knows if you have calibrated
it before it takes the first measurement after turning it on. If you haven’t performed a
calibration when you press Start to commence your measurement it will go to the
Calibration screen. All noise measuring instruments should be calibrated before use
(measurement session), because the microphone is susceptible to minor damage from
even small knocks.
If you do not wish to calibrate your Nova® simply press Cancel and you will still be able
to take your measurement.
The calibration applies corrections (if needed) to ensure that your measurements are as
accurate as possible.
Calibration should also be carried out at the end of a measurement session to make sure
that nothing has happened to the instrument during the session.
To calibrate your Nova®, carefully push the microphone into the cavity at the end of the
calibrator. Ensure the microphone is fully inserted into the cavity and is past the ‘O’ ring
seals.
Ensure that the small pressure equalisatiuon hole next to the microphone cavity on the
calibrator is not blocked, as this could cause damage to the microphone.
Page 22

Pulsar Nova® sound level meter user manual
Page 22
Take care not to use a twisting motion when pushing the microphone into the calibrator,
as this is likely to cause damage to the preamplifier.
Press the power button on the end of the calibrator. Press the calibrate button in the
Nova® Menu.
The instrument will measure the sound level from the acoustic calibrator to determine if
it is within the required tolerance and levels. The calibration level must be stable to
within ±0.075dB for 5 consecutive seconds for the calibration to be successful.
When the calibration is completed, the Nova® will display the level along with the
correction or adjustment made.
The Nova® is preset with the correction values needed for Pulsar Instruments
microphone capsules, so no manual adjustment is required. The calibration level you
should expect is 93.7dB.
As specified in the International standards, only a Pulsar Instruments calibrator should
be used with the Nova®, as these have the appropriate correction factor for the
difference between the free field and pressure responses of the microphone.
The correction factor specified by another manufacturer may be very different and put
the subsequent measurements out of tolerance. Refer to page 53 for detailed operating
information for the Model 105 Class 1 and Model 106 Class 2 Acoustic Calibrators.
Page 23

Pulsar Nova® sound level meter user manual
Page 23
To check which capabilities are included in your Nova®, go into the Menu, go to
Advanced Options, Information and scroll down to Instrument Capabilities. This will list
all the available capabilities. Alternatively, a Feature Matrix is available on the Pulsar
Instruments website at http://www.pulsarinstruments.com/products/nova-support/
which lists the capabilities for all the Nova® models.
Colour Coding
The Nova® uses a colour coded status bar at the bottom of the screen to help you
quickly identify what mode it is in.
Views
The views are accessed by pressing the left and right control keys. The views are
available when the Nova® is measuring, not measuring or in review mode, but the
pages available in each mode will differ.
Not Measuring
When not measuring, the information shown is live, instantaneous values.
Measuring
When measuring, these live values are still shown, but you are also shown cumulative
overall values for the current measurement period.
Review Mode
In review mode, the values shown are the overall cumulative values for the
measurement.
Dark Blue – Not measuring mode.
Yellow – Audio Note recording.
Green – Measuring mode.
Light Blue – Measurement paused.
Purple – Measurement review.
Red – Recording audio.
Page 24
Pulsar Nova® sound level meter user manual
Page 24
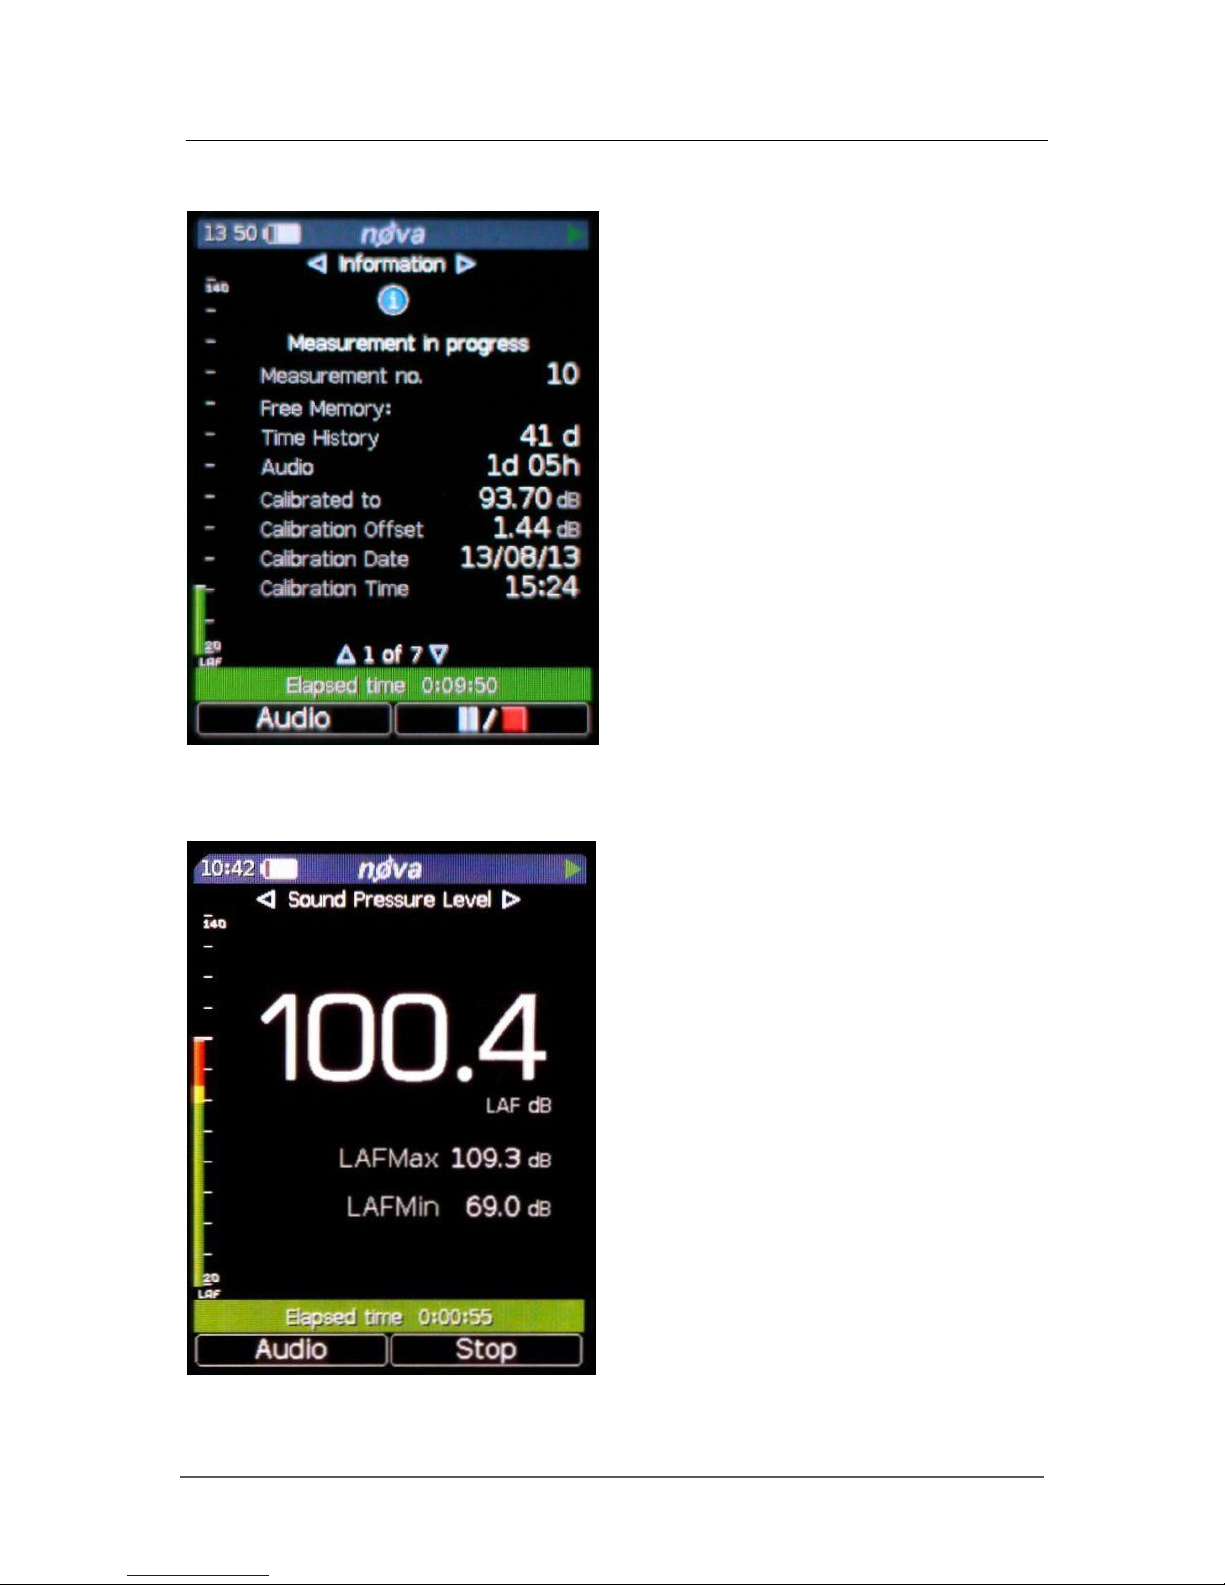
Information
Sound Pressure Level
This view shows the Sound Pressure
Level or SPL, with the maximum and
minimum sound level (Lmax and
Lmin) with a choice of A, C and Z
frequency weightings.
This shows the status of the
instrument including the calibration
data.
Press the down or up buttons to
view the various information
screens.
Page 25

Pulsar Nova® sound level meter user manual
Page 25
Leq
Dose
This view shows you the Leq, Peak,
and C-A values with a choice of A, C
and Z frequency weightings.
The C-A data can be used with the
HML method for selecting hearing
protection.
If the Time Weighting is set to
Impulse, the C-A function is replaced
by LAeq,I (also known as LAIeq).
When the instrument is set to the
German language, an additional
‘Taktmaximal’ page is also available.
The Dose View shows you a number
of different functions depending upon
the configuration of the Quick
Settings.
For the UK option, this View gives
you Leq, LEP,d, % Dose and
Estimated Dose along with the
Projected Exposure Calculator.
For the EU option, this View gives
you Leq, LEX,8, % Dose and
Estimated Dose along with the
Projected Exposure Calculator.
For all other options the Lavg, TWA,
% Dose and Estimated % Dose for
two integrators, in addition to ISO
(EU), will be shown according to the
setting you have chosen.
Two custom integrators can also be
used, configured in AnalyzerPlus.
When chosen, they will be shown in
addition to ISO (EU).
Page 26

Pulsar Nova® sound level meter user manual
Page 26
1:1 Octave Band
Ln
This view shows the noise levels
divided into Octave frequency
bands.
This can be used to aid in the
selection of hearing protection and
also for noise control applications.
The Ln view shows the statistical
or Ln values calculated during the
measurement.
The first seven Ln values are set
by default to commonly used
values and 8-14 are definable in
AnalyzerPlus.
Page 27

Pulsar Nova® sound level meter user manual
Page 27
The Nova® makes your noise measurements simple, it measures everything (model
dependent) all the time! You cannot forget to measure the right function as everything
is measured at the same time.
For example the Nova® measures Fast, Slow and Impulse time weightings all at the
same time. This applies to all other noise parameters (excluding Dose).
Press the Start softkey
Page 28

Pulsar Nova® sound level meter user manual
Page 28
The next screen you will see will be live data that the instrument is recording. The
pulsing green play symbol in the top right hand corner shows the instrument is acquiring
data. The exact screen will depend upon the features your instrument has and what
screen you were viewing before starting to record your measurement, but using the left
and right navigation keys you can loop around the following screens (dependent on your
instrument):
If your instrument has the Audio Note
feature and it has been enabled in the
menu option or AnalyzerPlus software,
then the Audio Note recording screen will
be the next screen you see.
Press Record to record a short Audio
Note describing the measurement you
are taking or the location for example.
Please refer to page 37 for more
information and features of Audio Note
recording.
If you do not want to record an Audio
Note for this measurement simply press
the Skip key.
If this is the first measurement you are
making you will be taken to the
Calibration screen.
It is good practice to Calibrate before
your first measurement and after your
last measurement in a session to ensure
the microphone has not been
inadvertently damaged.
Please see the Calibration section on
page 53 for more details.
Page 29

Pulsar Nova® sound level meter user manual
Page 29
Model 41 & Model 42
Information View
Sound Pressure Level View
Leq View
Dose View
Octave View
LN View
Model 43 & Model 44
Model 45 & Model
Page 30
Pulsar Nova® sound level meter user manual
Page 30
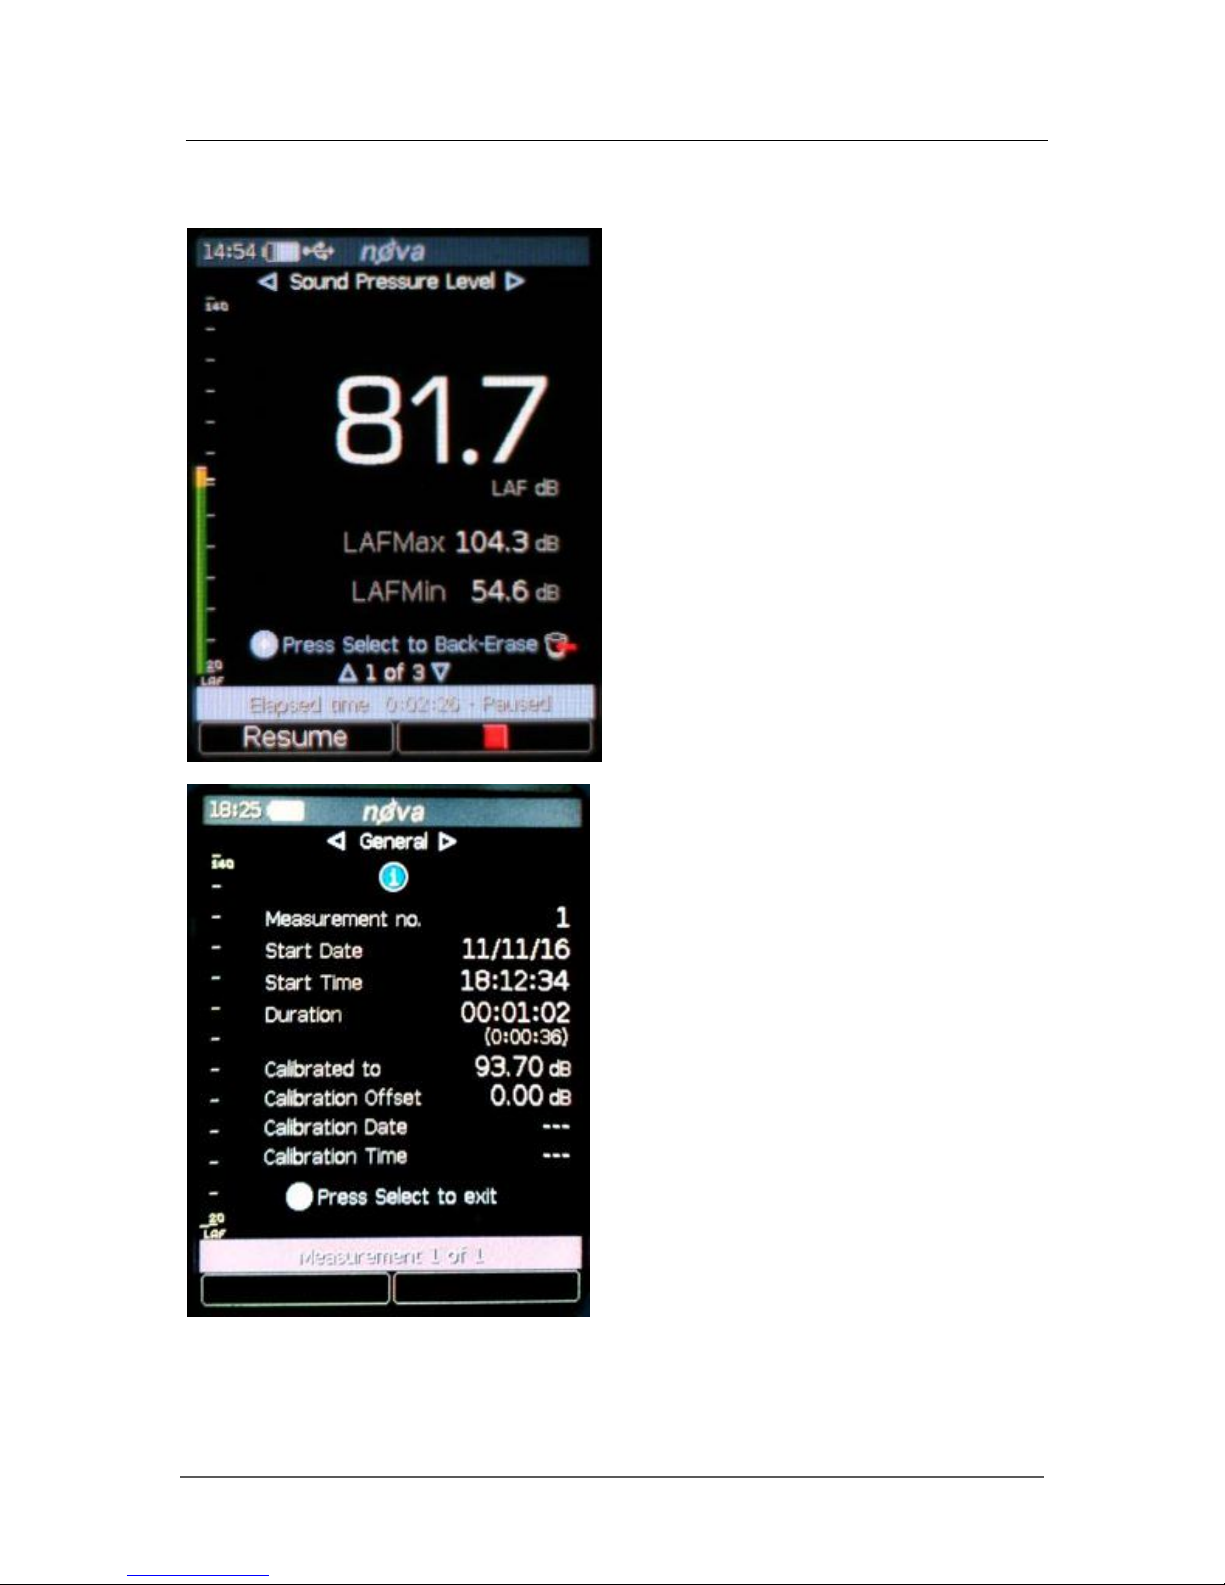
If your instrument has the Pause/Back
Erase feature the measurement can be
paused by pressing the Pause/Stop soft
key.
Press once to pause/back erase and twice
to stop, or alternatively press and hold
for three seconds to stop. (For Pause &
Back Erase, see page 38).
The Pause/Back Erase function is only
available if this has been enabled in the
AnalyzerPlus software.
To stop the measurement, press the Stop
key. The instrument will change from
measurement to review mode, and your
data is stored and ready to review and
download if your instrument has data
logging.
Select measurements by selecting Menu>
Review Stored Data. Select measurement
using the Up/Down buttons.
The duration of the measurement show
the complete duration including any pause
if available. The time in brackets show
actual measurement time excluding any
pause.
Page 31

Pulsar Nova® sound level meter user manual
Page 31
If you wish to restart a measurement at any time press and hold the center select button
for 2 seconds.
You will be promted to confirm that you want to restart the measurement, to do so press
the Restart softkey. If you do not want to restart the measurement press the Cancel
softkey.
If you restart a measurement all data for that measurment is lost and the measurement
starts again. It does not affect any measurements already stored.
In measurement review mode you can
review all the same screens as before
by using the navigation arrow buttons.
Press the center Select button when
you are finished reviewing your
measurement.
Stored measurements can be reviewed
at any time through the menu.
Page 32

Pulsar Nova® sound level meter user manual
Page 32
Menus
In the following menus, different options can be chosen on the Nova®. To activate a
function, press the ‘Select’ key to put a tick in the square box.
You can now use the up and down soft keys to select your setting. Your selection will be
saved once you press the ‘back’ soft key. In the menu pages, the Status Bar will display
information about your current settings and the option you have chosen.
The following chapter shows the navigation between the Menus and Pages, and the
options available. For more detailed information, please see the appendices.
Main Menu
Calibrate
Set clock
Quick settings
Review stored data
Clear memory
Storage options
View options
Advanced options
Calibrate
User Calibration is a very important process. Your Nova® sound level meter can be
calibrated at any time by selecting Calibrate from the menu. Please refer to page 53 for
full details.
Set Clock
Select Menu>Set Clock> and use the Left, Right, Up and Down keys to change the Time
and Date settings.
Quick Settings
UK
EU
OSHA HC and PEL
OSHA HC and ACGIH
MSHA HC and EC
Custom
The default is: UK.
Page 33

Pulsar Nova® sound level meter user manual
Page 33
Review Stored Data
Using the left and right keys moves between the different Views (see previous chapter
for details) and the up and down keys move between the Pages of each View. The status
bar will tell you which measurement you are looking at out of the total (for example
Measurement 4 of 9).
Clear Memory
Permanently deletes all stored measurements.
Storage Options
Repeat Timer
This sets the measurement time of repeated measurements. Setup options are Timer
On/Off and measurement time (1min, 2min, 5min, 10min, 15min, 30min, 1hr, Custom
or Day/Evening/Night).
The default is: Off, run time 10min.
Single Timer
This sets the measurement time of a single one-off measurement. Setup options are
Timer On/Off and measurement time (1min, 2min, 5min, 10min, 15min, 30min, 1hr,
Custom or Lden (day, evening, night)).
The default is: Off, run time 10min.
Audio Note
Audio Note can be enabled to allow an audio note to be made before every measurement
or disabled from within AnalyzerPlus.
The default is: On.
View Options
Time Weighting
This sets the Time Weighting that you use to view the measurements either in real time,
recording or review mode – remember the Nova® measures ALL the different Time
Weightings ALL the time. The view options are ‘F’ (Fast), ‘S’ (Slow) and ‘I’ (Impulse).
The default is: ‘F’ (Fast).
Page 34

Pulsar Nova® sound level meter user manual
Page 34
Adjust Screen Brightness
Screen brightness can be set to automatic mode, or set to a fixed brightness level.
The default is: Auto.
Language
The Nova® can be set to the following Languages: English, French, German, Spanish
and Italian. Some other languages are available to special order.
The default is: English.
Please note: when changing language, the instrument must be restarted for the change
to take effect.
Display Mode
The Nova® range has two Display Modes, Standard and Advanced. In Standard Mode
only the most common parameters required are displayed in real time, recording and
review mode – remember the Nova® measures ALL the different measurement
parameters ALL the time, this setting just affects what parameters are displayed on the
display. If a measurement has been made with the Nova® set in Standard mode, all the
parameters will still be available to download into AnalyzerPlus for review afterwards if
required. For a full list of what is displayed in each mode go to Stored Measurements on
page 48.
The default is: Standard display mode.
Advanced Options
Restore Factory Settings
Restores the instrument back to its original factory setup.
Information
The capabilities of the instrument, serial numbers of the instrument, microphone and
preamplifier along with details of the standards that the instrument meets are all
available to view in the Information menu.
The firmware version of the instrument is available on Information page 1. Selected by
Menu>Advanced Options>Information.
Page 35

Pulsar Nova® sound level meter user manual
Page 35
Advanced Setup Options Using AnalyzerPlus
All the setup options available in the instrument menus and some more advanced setup
options can be set up from the AnalyzerPlus software.
Audio Note Enable/Disable
Audio Note can be enabled so that you can make an audio note before every
measurement or disabled from within AnalyzerPlus.
The default is: On.
Level Colours
The level in dB where the analog bar down the left hand side of the display changes from
green to yellow and from yellow to red can be changed within AnalyzerPlus.
The default is: Yellow at 80dB, Red at 85dB.
Time History Rate
The time history rate can be selected from, 2 seconds, 1 second,1/2 second (500ms),1/4
second (250ms), 1/8 second (125ms), 1/16 second (62.5ms), 1/100 second (10ms)
within AnalyzerPlus.
The default is: 1 second.
Audio Length
The maximum length of audio recorded can be set of 2 minutes, 5 minutes, 10 minutes
or unlimited within AnalyzerPlus.
The default is: unlimited length.
Ln’s Setup
The first seven Ln values are set by default to commonly used values (L1, L5, L10, L50,
L90, L95 and L99) and 8-14 are definable in AnalyzerPlus.
AC Output Settings
The AC Output can be enabled or disabled, have +20dB gain added to it, or have its
range set to High Levels (70-140dB) or Low Levels (20-90dB) within AnalyzerPlus.
The defaults are: Disabled, +20dB Gain Off and High Levels (70-140dB).
Page 36

Pulsar Nova® sound level meter user manual
Page 36
DC Output Settings
The DC Output can be set to LAF, LCF, LZF, LAS, LCS, LZS, LAI, LCI OR LZI. There is
also the ability to set a V/dB Correction within AnalyzerPlus.
The defaults are: LAF and +5.96% V/dB Correction.
Memory Options
A Partition Editor in AnalyzerPlus allows the adjustment of the storage settings available
for Audio and Time History recording.
Pause/Back Erase
The Pause/Back Erase feature can be enabled or disabled within AnalyzerPlus. When
Pause is enabled the Back Erase feature is also enabled at the same time.
The defaults are: Pause Enabled and 5 seconds Back Erase length.
Time and Date Format
It is possible to change the Time and Date format to any of the following:
dd/mm/yy, mm/dd/yy, dd.mm.yy, dd-mm-yy, yy-mm-dd
hh:mm:ss, hh:mm:ss AM/PM
The defaults are: dd/mm/yy and hh:mm:ss.
Page 37

Pulsar Nova® sound level meter user manual
Page 37
Please note: from this chapter on, the manual describes capabilities which are available
on different models within the Nova® range.
If you are unsure which capabilities your Nova® has, you can check on the instrument
by looking at the Information page in the Advanced Options menu (page 3), or look at
the Features Matrix available on the Pulsar Instruments website:
http://www.pulsarinstruments.com/products/nova-support
AnalyzerPlus
All Nova® instruments are delivered with a copy of the AnalyzerPlus software which can
be used to configure the instrument (some options are only configurable within
AnalyzerPlus and not on the instrument – it will be made clear in the text where this is
the case).
AnalyzerPlus is also a powerful environment for storing, analysing and organising your
data, and produces reports for publication. Audio Note recordings and audio recordings
can only be played back through AnalyzerPlus.
Audio Recording
Audio Recording is started manually using the Audio soft key. This starts the Nova®
recording raw WAV data at a quality which can be set in the AnalyzerPlus software.
Pressing the audio key again stops the recording. There is no maximum duration of an
audio recording set by default, but it can be changed in AnalyzerPlus.
The audio recording includes a 10 second back buffer (on the Standard quality setting).
When triggering a recording manually, it is very difficult to record the beginning of a
sound that catches your attention.
The back buffer will cover the time it takes you to respond and press ‘record’. 10
seconds is the default duration, which can be changed in AnalyzerPlus also.
The Time History display turns green, the Status bar turns red and the Analog bar turns
blue when audio recording is running.
Starting and stopping audio recording during a measurement does not affect the noise
measurement data being recorded.
Page 38

Pulsar Nova® sound level meter user manual
Page 38
Audio Note
The Audio Note function allows you to record notes and information before a
measurement by simply speaking into the microphone. You can then play them back
later in the AnalyzerPlus software.
Please note, Audio Notes are recorded BEFORE the measurement starts and are for
spoken notes only, not for analysis of recorded sounds.
Timers
The single and repeat timers allow you to make precisely timed measurements over preset or custom defined durations, which are set on the instrument using the Storage
Options Menu.
Single Timer
The single timer allows you to set a precise time that a single measurement will run for
as soon as you start measuring. The Nova® can still be paused, stopped and started
manually when the single timer is active.
Repeat Timer
The repeat timer allows measurements to be stopped and started automatically over a
long period of time. The Nova® can still be paused, stopped and started manually when
the repeat timer is active.
The repeat timer is synchronised to the real time clock, so if you choose a 30 minute
duration the measurement will begin on the hour or at 30 minutes past. When the
measurement ends, a new one will begin and last for the next 30 minute interval.
If the Nova® is paused when an automatic timer begins, the new timed measurement
will also be paused.
Please note, after 5 minutes in Pause the Nova® will restart.
Back Erase/Pause
Pause
The Nova® sound level meters provide Pause and Back Erase function which can be
used during a measurement.
When the Pause function is enabled in the AnalyzerPlus software, the Stop button is
replaced by the Pause/Stop button. This also enables the Back Erase function, the
duration of which can also be set in the AnalyzerPlus software.
Page 39

Pulsar Nova® sound level meter user manual
Page 39
Back Erase
The Back Erase function allows a section of the measurement to be removed from the
data used to calculate the overall values.
An example of this would be if, during the measurement of cars on a road, a large truck
passed by the measurement location. If the intention was only to measure cars, the
truck can be excluded from the overall measurement data by pressing the Pause button
and then using the Back Erase to remove a preset section of noise.
The time that the pause button was pressed, along with the Back Erase duration, will be
excluded from the calculation of the overall noise values such as the Leq, Lmin, Lmax,
LPeak, and the 1:1 Octave Band overall values.
The duration of the Back Erase can be set to between 1 and 30 seconds using the
AnalyzerPlus software. If the Pause function is disabled, the Back Erase function is also
disabled.
Memory
The Nova® has a 4GB removable memory card. This is partitioned into two sections, one
to record time history and one for audio (Audio Note and audio recordings). The space
allocated to each can be configured in AnalyzerPlus.
The free space in the memory is shown in the General View as days or hours available
for both time history and audio. When either partition is full, the Nova® will overwrite
the oldest data in that partition.
To clear the memory and permanently delete all stored data, choose the ‘Clear Memory’
Menu page and follow the instructions on screen. Before permanently erasing the data,
you will be asked to press ‘OK’ to confirm.
Restore Factory Settings
This is in the Advanced Options Menu, and restores the Nova® to the default options for
all user-definable settings in the Menus, and clears the calibration offset. For settings
such as ‘language’ where there is no default, the Nova® will return to the option it was
shipped with.
Follow the instructions on the screen, and press ‘OK’ to confirm. This does not delete any
stored measurements.
Windshield
The Nova® can be used with a WS90 90mm foam windshield which will reduce the noise
levels generated by air turbulence over the microphone capsule.
It can also help protect the microphone capsule from dust and fluids which can affect the
performance of the instrument.
Page 40

Pulsar Nova® sound level meter user manual
Page 40
Before any measurements can be downloaded, the AnalyzerPlus software must be
installed on to a suitable PC.
Connect your Nova® to your PC using the supplied mini-B USB cable using the USB
connector under the removable rubber connector panel at the bottom of the instrument.
When the AnalyzerPlus software is run, it will automatically find the instrument plugged
in and look for completed measurements to download.
For further information on how to use the AnalyzerPlus software please refer to the
software help files/videos.
Please visit http://www.pulsarinstruments.com/products/nova-support for the latest
troubleshooting information.
This section contains information which may solve simple operational problems you may
encounter. If you are unable to solve the problem or experience any problems with the
assembly or operation of the instrument contact Pulsar Instruments Plc or your local
representative for further assistance.
Basic Operation
Symptom
Possible Cause
Possible Remedy
The instrument does not
switch on
The batteries are not fitted
Fit new batteries and
switch on
The batteries are flat or
very low
Fit new batteries and
switch on
The batteries are not
correctly fitted
Remove the batteries and
check the polarity of the
batteries
The instrument has become
corrupted
Contact your local
distributor or Pulsar
Instruments Plc
Calibration
Symptom
Possible Cause
Possible Remedy
The calibration fails: Too
Low
The Acoustic Calibrator is
not switched on
Switch on the Acoustic
Calibrator and retry
The Acoustic Calibrator is
not fitted correctly
Check that the Acoustic
Calibrator is fitted according
to the instructions supplied
The Preamplifer is not fitted
correctly
Refer to page 13 for details
of fitting the preamplifier
Page 41

Pulsar Nova® sound level meter user manual
Page 41
The microphone capsule is
loose or not fitted
Check that the microphone
capsule is tight and fitted
correctly
Calibration level set to a
different level
Set the calibration level to
the value provided by the
Acoustic Calibrator using the
AnalyzerPlus software
The Microphone may be
damaged
Contact Pulsar Instruments
Plc or your local
representative for
assistance
The calibration fails: Too
High
The Acoustic Calibrator is
set to a higher level than
the expected level
Set the Acoustic Calibrator
to the correct level if it has
more than one setting
The calibration fails:
Unstable
The background noise level
is within 15dB of the
calibration level
Move to a location where
the background noise level
is more than 15dB below
the calibration level
The Microphone may be
damaged
Contact your local
distributor or Pulsar
Instruments Plc
Measurements & Settings
Symptom
Possible Cause
Possible Remedy
The measurement stops
after a set time
The Single Measurement
timer has been set to a
preset value
Change the Single
Measurement timer
duration or disable it
The Single Measurement
timer has been set to a
user defined value
Change the Single
Measurement timer
duration or disable it
Page 42

Pulsar Nova® sound level meter user manual
Page 42
Connect the Nova® to your PC using the supplied mini-B USB cable using the USB
connector under the removable rubber connector panel at the bottom of the instrument.
When the AnalyzerPlus software is run, it will automatically find the instrument plugged
in and look for completed measurements to download. The popup download window can
be closed.
At the bottom of the main screen the Configure button next to the instrument details
will bring up the Instrument Settings pop-up window, where the relevant instrument
settings can be configured.
For further information on how to use the AnalyzerPlus software please refer to the
software help files/videos on our website www.pulsarinstruments.com under the
software tab for each of the Pulsar Nova® models.
Page 43

Pulsar Nova® sound level meter user manual
Page 43
Additional technical information on the Nova® can be found on the Pulsar Instruments
website.
Please visit http://www.pulsarinstruments.com/products/nova-support
for the latest tips, hints, help and videos.
Page 44

Pulsar Nova® sound level meter user manual
Page 44
IEC 61672 test data
Technical data for IEC 61672 testing is contained in the document which can be
downloaded from the Pulsar Instruments plc website.
Visit http://www.pulsarinstruments.com/products/nova-support to download the latest
information.
This chapter of the manual contains the overall specifications for the Nova® range of
sound level meters.
Refer to Part B document Appendix 4 for full details of approved equipment and
configuration options. Tested over the range 20 hz to 20kHz.
Common Specifications
Applicable Standards
IEC 61672-1:2013 Electroacoustics - Sound level meters –
Part 1: Specifications Class 1 or Class 2 Group X
Model 41
Model 42
Model 43
Model 44
Model 45
Model 46
IEC 60651:2001 Sound level meters Type 1 I or Type 2 I
Model 41
Model 42
Model 43
Model 44
Model 45
Model 46
IEC 60804:2000 Integrating-averaging sound level meters Type 1 or Type 2
Model 41 – only if option installed
Model 42 – only if option installed
Model 43
Model 44
Model 45
Model 46
IEC 61252:2002 Electroacoustics - Specifications for personal sound exposure meters
Personal Sound Exposure Meters
Model 41 – only if option installed
Model 42 – only if option installed
Model 43 – only if option installed
Model 44 – only if option installed
Model 45
Model 46
Page 45

Pulsar Nova® sound level meter user manual
Page 45
ANSI S1.4 -1983 Specifications for Sound Level Meters (R2006)
Model 41
Model 42
Model 43
Model 44
Model 45
Model 46
ANSI S1.43 - 1997 Specifications for Integrating-Averaging Sound Level Meters (R2007)
Model 41 – only if option installed
Model 42 – only if option installed
Model 43
Model 44
Model 45
Model 46
ANSI S1.25:1991 Specification for Personal Noise Dosimeters
Model 41 – only if option installed
Model 42 – only if option installed
Model 43 – only if option installed
Model 44 – only if option installed
Model 45
Model 46
1:1 Octave Band Filters to IEC 61260:2001 Electroacoustics - Octave-band and
fractional-octave-band filters & ANSI S1.11-2004 Octave-Band and Fractional-OctaveBand Analog and Digital Filters
Model 41 – only if option installed
Model 42 – only if option installed
Model 43 – only if option installed
Model 44 – only if option installed
Model 45
Model 46
Microphone: Class 1 Instruments: PM1 pre-polarized Free-field 1/2”
Class 2 Instruments: PM2 pre-polarized Free-field 1/2”
Microphone Preamplifier: PA40 Removable Preamplifier for Class 1 & Class 2
instruments
Total Measurement Range: 24dB to 140dB RMS Single Range
Noise Floor: <18dB(A) Class 1, <21dB(A) Class 2
Frequency Weightings: RMS: A, C, & Z (un-weighted) Measured Simultaneously
Peak: A, C, & Z (un-weighted) Measured Simultaneously
Time Weightings: ‘F’ (Fast), ‘S’ (Slow) & ‘I’ (Impulse) Measured
Simultaneously
Display: High resolution OLED (Organic Light Emitting Diode)
display with ambient light sensor & illuminated keypad
Page 46

Pulsar Nova® sound level meter user manual
Page 46
Display of: Measured parameters
Recalled Measurement Parameters (Data Logging Versions)
Battery Level & External Power Connection
Overload & Under Range
Time & Frequency Weighting
Elapsed Measurement Time
Instrument status
Memory: 4GB removable Compact Flash card
Time History Data Rates 10ms, 62.5ms, 125ms, 250ms, 1/2 sec, 1 sec, 2 sec (User
(Global settings): selectable via AnalyzerPlus software)
Audio Note Audio User selectable recording of audio voice notes before each
Recording: measurement for download to AnalyzerPlus software.
30 seconds per recording with audio files downloaded with
noise measurement information.
Size: 280mm x 80mm x 42mm with preamp and microphone
Weight: 440g without batteries
Batteries: 6 x AA
Battery life: Typically 30+ hours with Alkaline Batteries
Typically 50 hours with Lithium AA Non-Rechargeable
batteries
Note: Battery life is dependent upon the battery type and quality and screen brightness
External Power: 5v-15v via Multi I/O socket
Tripod Mount: 1/4” Whitworth socket
Connections: USB 2.0 Mini B to PC
Multi-pin IO for external power and AC & DC output
3.5mm Stereo Jack for AC output
Case Material: Rugged die cast aluminium with soft touch back & elastomer
keypad
Environmental:
Temperature: Operating: -10°C to +50°C
Temperature Storage: -20°C to +60°C
Humidity: Up to 95% RH Non Condensing
Electromagnetic Emmissions: EN 61326-1:2006
performance: Immunity: EN 61326-1:2006
Language options: English, French, German, Spanish and Italian.
Page 47

Pulsar Nova® sound level meter user manual
Page 47
Software Support: AnalyzerPlus Download, Configuration & Analysis software
as standard.
Compatible with Microsoft Windows XP, Vista, 7
(32bit & 64bit) & 8 (32bit & 64bit)
Page 48

Pulsar Nova® sound level meter user manual
Page 48
Views
Sound Level View
Sound Level: Lxy, x=A ,C ,Z; y= ‘F’ (Fast), ‘S’ (Slow) & ‘I’ (Impulse)
Maximum Sound Level: LxyMax where x=A ,C ,Z; y= ‘F’ (Fast), ‘S’ (Slow) & ‘I’
(Impulse)
Minimum Sound Level: LxyMin where x=A ,C ,Z; y= ‘F’ (Fast), ‘S’ (Slow) & ‘I’
(Impulse)
Measurement Run Time
Leq View
Lxeq where x = A, C, Z
LCPeak, LZPeak,
LCeq-LAeq,
LxE where x = A ,C, Z
LAeq,I (Also known as LAIeq,t) - replaces LCeq-LAeq when Impulse Time Weighting
is selected)
Graphical: Short LAeq, LCPeak
Measurement Run Time
Taktmaximal levels and integrated levels, and 3 and 5 seconds, ‘F’ (Fast) and ‘I’
(Impulse) time weighted (only displayed when set to German language)
1:1 Octave Band View
Graphical display of L
F
real time octave bands with the highest value for each band
(updated every 1/16 seconds) from 32Hz to 16kHz (16Hz 1:1 Octave Band stored for
display in the AnalyzerPlus software)
Graphical display of cumulative Leq for each octave band
Graphical display of cumulative LAeq for each octave band
Numeric display of Leq,1s real time octave bands (updated every 1 second)
Numeric display of cumulative Leq for each octave band
Numeric display of cumulative LAeq for each octave band
Measurement Run Time
Ln View
Measures and stores statistical values during measurements
Provides 7 Ln values to 0.1dB resolution
L1.0
L5.0
L10.0
L50.0
L90.0
L95.0
L99.0
Ln values are calculated using 1/16 second LAF samples by default. Sampling rate, time
weighting and frequency weighting can be changed in AnalyzerPlus.
Page 49

Pulsar Nova® sound level meter user manual
Page 49
Dose View
Integrator 1 Integrator 2 Integrator 3
Run Time Run Time Run Time
Leq1 Leq2 Leq3
LEP,d (Lex) TWA TWA
Dose % Dose % Dose %
Est Dose % Est Dose % Est Dose %
Configuration Configuration Configuration
Measurement Run Time
Stored Measurements
Sound Level View
Overall: Lxy Max where x = A, C, Z; y = ‘F’ (Fast), ‘S’ (Slow) & ‘I’ (Impulse) (9
items).
Time History: Lxy Max where x = A, C; y = ‘F’ (Fast), ‘S’ (Slow) & ‘I’ (Impulse) (6
items).
Time History: Lxy Min where x = A, C; y = ‘F’ (Fast), ‘S’ (Slow) & ‘I’ (Impulse) (6
items).
Measurement Run Time
Time & Date of Measurement Start
Time History data rate is user configurable in the global settings
Leq View
Overall: LCPeak, LZPeak. LAeq, LCeq, LZeq (5 items).
Time History: LAeq, LCeq, LZeq
Time History: LCPeak, LZPeak, LAPeak
Time History: LAeqI (also known as LAIeq,t)
Time History data rate is user configurable in the global settings
Measurement Run Time
Time & Date of Measurement Start
Dose View
Overall: LAeq2, LAeq3. (Lavg stored, TWA, % Dose & Est % Dose also available)
Time History: LAeq2, LAeq3
Time History data rate is user configurable in the global settings
Measurement Run Time
Time & Date of Measurement Start
Integrator 1 values are stored in the Leq module
1:1 Octave Band View
Overall Leq for each octave band
Overall LAeq for each octave band
Time History: Leq for each octave band. (10 items) stored at the Global data rate
(minimum duration of 1/16 seconds)
Page 50

Pulsar Nova® sound level meter user manual
Page 50
Measurement Run Time
Time & Date of Measurement Start
Ln View
7 Ln values for each measurement
Menu / Quick Settings
The Quick Settings available are:
UK: 3dB, No Threshold, No Time Weighting, Criterion Level of 85dB
EU: 3dB, No Threshold, No Time Weighting, Criterion Level of 85dB
OSHA HC & PEL
Integrator 2: 5dB, 80dB Threshold, Slow Time Weighting, 90dB Criterion Level
Integrator 3: 5dB, 90dB Threshold, Slow Time Weighting, 90dB Criterion Level
OSHA HC & ACGIH
Integrator 2: 5dB, 80dB Threshold, Slow Time Weighting, 90dB Criterion Level
Integrator 3: 3dB, No Threshold, Slow Time Weighting, 85dB Criterion Level
MSHA HC & EC
Integrator 2: 5dB, 80dB Threshold, Slow Time Weighting, 90dB Criterion Level
Integrator 3: 5dB, 90dB Threshold, Slow Time Weighting, 90dB Criterion Level
Custom
Custom settings defined by the AnalyzerPlus software
Electrical Outputs
AC Output
The AC Output is provided on the 3.5mm jack socket at the bottom of the instrument.
Do not use a Stereo Jack Plug in this socket. Only use a 3.5mm Mono Jack Plug.
The AC output has four settings: a combination of High or Low levels and a 0 or +20dB
amplifier.
Voltages and full scale levels are as follows:
High Levels (70-140dB):
0dB gain 1.3V pk-pk (450mV rms) at full scale 140dB
+20dB gain 1.7V pk-pk (600mV rms) at full scale 132dB
Low Levels (20-90dB):
0dB gain 400mV pk-pk (140mV rms) at full scale 90dB
+20dB gain 1.3V pk-pk (450mV rms) at full scale 90dB
The output is unweighted, i.e. Z-weighted.
Page 51

Pulsar Nova® sound level meter user manual
Page 51
AC Output Cables
The AC Output should be used with a PSR174, PSR177 or PSR185 Cable.
These cables are available from Pulsar Instruments plc or your local distributor. Do not
use any other cable with the Nova®. This may damage the instrument and invalidate
your warranty.
DC Output
The DC Output is provided on the 18 Pin Multi-IO socket at the bottom of the
instrument. The output is set to 25mV/dB with LAF updated 16 times per second.
DC Output Cables
The DC Output is available using a PSR174 Output Cable.
This cable is available from Pulsar Instruments plc or your local distributor. Do not use
any other cable with the Nova®. This may damage the instrument and invalidate your
warranty.
Accessories
The Nova® sound level meters can be used with a range of accessories. The most
commonly used accessories are listed below.
General Accessories
Model 105 – Class 1 Acoustic calibrator
OR
Model 106 – Class 2 Acoustic calibrator
K4 – Hard kit case
WS90 – Windshield
CP1 – Carry pouch for sound level meter and calibrator
TR1 – Tripod
Outdoor Measurement Kit
WK3 – Outdoor weatherproof kit with heavy duty outdoor microphone system
Replacement Microphone Capsules
PM1 – Class 1 ½” Electret condenser microphone capsule
PM2 – Class 2 ½” Electret condenser microphone capsule
Page 52

Pulsar Nova® sound level meter user manual
Page 52
Cables
The Nova® sound level meters can be used with a range of cables. The standard cables
are listed below.
Microphone Extension Cables
PSR202 - 2m long Microphone extension cable
PSR205 - 5m long Microphone extension cable
PSR210 - 10m long Microphone extension cable
Alternative lengths of microphone extension cable are available on request.
Input & Output Cables
PSR101 - 1m Mini-B to Type A USB cable
PSR171 - Nova® power input cable, 2.1mm power jack, 2m long
PSR174 - Nova® AC & DC output, 18 way to 2 x phono, 1m long
PSR176 - Nova® 12v Battery pack cable 2m long to tinned ends with inline fuse
PSR177 - Nova® AC output cable, 3.5mm mono to 3.5mm stereo jack, 2m long
PSR185 - Nova® AC output cable, 18 way to phono, 1m long
PSR190 - Nova® power input cable, 2.1mm power jack and mains power supply
(Please specify Country)
NK:70 Random Incidence Adaptor
The NK:70 Random Incidence Adaptor is designed to modify
the response of the microphone capsule from Free Field to
Random Incidence in order to comply with the requirements of
ANSI S1.4.
For instruments supplied for use outside of the USA, this
adaptor may not be supplied. For further details, please
contact your local representative.
To fit the NK:70 Random Incidence Adaptor, push the adaptor
over the microphone grill. Do not attempt to remove the
microphone grill as this may cause damage to the capsule.
To calibrate the instrument fitted with the microphone capsule,
remove the NK:70 Adaptor and follow the instructions supplied
with the instrument. Do Not attempt to calibrate the
instrument with the NK:70 fitted.
Page 53

Pulsar Nova® sound level meter user manual
Page 53
This chapter refers to the use of a Pulsar Instruments plc Model 105 or Model 106
Acoustic Calibrator.
Switching on the Calibrator
Press the Power Button on the end of the
Calibrator to switch the unit on. The
Indicator will illuminate to show that the
unit is operating. The calibrator will
automatically switch off after 5 minutes to
preserve battery power.
To switch off the calibrator manually,
press the power button again and the
indicator will extinguish to show that the
unit is switched off.
Permanent ‘On’ Mode
For some applications there may be a need to have the calibrator switched on
continuously. To allow for this, the calibrator can be turned on by pressing and holding
the power button for three seconds. Release the button and the indicator will flash to
show that the unit is in permanent ‘ON’ mode. Press the power button to switch off the
calibrator.
Calibrating a Sound Level Meter
Push the microphone of the sound level meter into the cavity at the end of the calibrator.
Ensure the microphone is fully inserted into the cavity and is past the ‘O’ ring seals.
The microphone should be parallel to the body of the calibrator. Also ensure that the
small bleed-hole next to the microphone cavity is not blocked as this could cause
damage to the microphone.
Page 54

Pulsar Nova® sound level meter user manual
Page 54
The Nova® sound level meter will automatically make adjustments for the level
produced by the acoustic calibrator and the microphone type fitted to the instrument.
Background Noise
In order for the calibrator to operate as intended, the ambient acoustic noise level
should be no greater than 80dBA.
Stabilisation
In order for the sound pressure level and frequency to stabilise after switching the
calibrator on when coupled to a microphone, a period of at least 3 seconds should be
allowed before performing a calibration.
Changing the Battery
The Model 105 or Model 106 acoustic calibrators use a single 9v alkaline battery. This
type of battery is known as 6F22 or NEDA 1604. It is also commonly known as PP3.
1. Unscrew the screw holding the battery cover on, using a coin or the keyring
provided
Page 55

Pulsar Nova® sound level meter user manual
Page 55
2. The battery, type 6F22 (PP3) can now be eased out of its holder and replaced.
The battery should be eased out terminal side first by pushing against the
spring at the other end.
Ensure that the battery is inserted with the correct polarity with the negative terminal at
the contact with the larger cut out.
Battery type
The battery should be an alkaline battery, not an ordinary dry cell. The battery is 9 volts
when new and will operate the calibrator down to 6.4 volts.
When the battery voltage is below 6.6 volts but above 6.4 volts, the power LED will flash
to indicate that the battery voltage is low. When the battery voltage is below 6.4 volts
the calibrator will not turn on.
A discharged battery may allow switch-on but will soon drop in voltage and indicate low
battery or switch off.
Specifications
Frequency 1kHz ± 1%
Sound Level 94dB re 20μPa
Standardisation Model 105 - IEC 60942:2003 Class 1
Model 106 - IEC 60942:2003 Class 2
Distortion Less than 2%
Operating Humidity 25 to 90% Relative Humidity
Operating Static Pressure 65kPa to 108kPa
Operating Temperature -10oC to +50oC
Storing Temperature -20oC to +60oC
Effective Volume 6.19 cm3 ± 0.2 cm
3
Cavity Diameter 0.525 inch
Battery 1 x 9v 6F22 (Neda 1604)
Battery Life Approx 15 Hours Continuous Use
Battery Voltage 9v Nominal (10v Max, 6.4v Min)
Weight With Battery 185g
Dimensions 135mm x Ø48mm
Technical Information
The normal mode of operation of the calibrator is with the unit switched on.
When the LED indicates the unit is switched on this produces the greatest radio
frequency emissions.
The calibrator continues to function after exposure to contact discharges up to 4kV and
air discharges up to 8kV, for both positive and negative voltages relative to earth
ground. The calibrator conforms to IEC 60942:2003 for a modulated root-mean-square
electromagnetic field strength of 10 V/m.
The maximum susceptibility to power and radio frequency fields is with the cavity facing
away from the emitter with the battery compartment facing the table, the antenna
polarisation horizontal and the calibrator switched on.
Page 56

Pulsar Nova® sound level meter user manual
Page 56
Free Field Correction
When calibrating a microphone which is to be used for free field measurements, a small
correction may be necessary to compensate for the difference between the microphone’s
free field response at ‘zero degrees’ or ‘head-on’ incidence and the pressure level
generated by the calibrator.
The correction is typically -0.3dB for ½ inch microphones (making the effective
calibration level 93.7dB).
Calibration corrections are listed below for the Pulsar Instruments plc ½” Capsules and
three microphone capsules commonly used in Calibration Laboratories:
Microphone Correction Values
Microphone Type Calibration Correction Effective Calibration Level
PM1 -0.3dB 93.7dB
PM2 -0.3dB 93.7dB
B&K 4134 0dB 94.0dB
B&K 4180 0dB 94.0dB
B&K 4192 0dB 94.0dB
Example:
An example of the procedure used to calculate the value for an PM1 microphone is
shown below :
Level = 94.0dB + Microphone Correction
Level = 94.0dB + ( -0.3dB)
Level = 93.7dB
Page 57

Pulsar Nova® sound level meter user manual
Page 57
Pulsar Instruments plc Filey UK
Manufacturer:
Pulsar Instruments Plc
The Evron Centre
John Street
Filey
North Yorkshire
YO14 9DW
United Kingdom
Tel: +44 1723 518011
Equipment Description
The following equipment manufactured after 1st January 2012:
Model 41 Sound Level Meter
Model 42 Sound Level Meter
Model 43 Sound Level Meter
Model 44 Sound Level Meter
Model 45 Sound Level Meter
Model 46 Sound Level Meter
Model 105 Acoustic Calibrator
Model 106 Acoustic Calibrator
Along with their standard accessories
According to EMC Directive 93/68/EEC meet the following standards:
EN 61326-1:2006
EMC : Generic emission standard for residential, commercial and light industrial
environments.
EN 61326-1:2006
EMC : Generic immunity standard for residential, commercial and light industrial
environments.
Dan Cartman
Chief Engineer Dated 1st August 2013
Page 58

Pulsar Nova® sound level meter user manual
Page 58
1. This document is a short summary of the full warranty document and is in
ordinary English; it is not a legal document.
2. The warranty covers any new acoustic measuring instrument manufactured by
Pulsar Instruments plc after 21st October 2011.
3. The warranty covers all faults, including parts and labour, on the instrument
resulting from manufacturing defects or accidental damage (except to the
microphone capsule or the display) for the period given in paragraph (5) below,
4. The warranty does exclude damage to an instrument caused by the use of any
accessories or components not specified or recommended by Pulsar Instruments
plc.
5. The initial period of the warranty is 2 (two) years or 104 weeks from the date of
purchase as a new instrument from Pulsar Instruments plc or their formally
approved distributors OR 126 weeks from the date the instrument passed its final
manufacturing inspection at Pulsar Instruments plc - whichever is the shorter.
6. Any rechargeable battery only has the battery manufacturer’s warranty (usually
one year) however there will be a reduced charge for replacing rechargeable
batteries during the annual “Routine Verification” process. (Commonly referred to
as “Annual calibration” and formally as IEC 61672 part 3 verification)
7. On completion of each routine verification by Pulsar Instruments plc, the
instrument will automatically be given an additional free 12 month warranty. It
follows that should the instrument be routinely verified by Pulsar Instruments plc
every year, the warranty is effectively continuous to a maximum of 7 (seven)
years from the date of purchase.
8. There will be a charge for IEC 61672 -3 routine verification and the price is
published in the Service Price List.
9. The customer is responsible for all shipping, duty and other charges relating to
the routine servicing and calibration of the instruments, except where the
instrument is deemed to be faulty due to manufacturing defects, when Pulsar
Instruments plc will cover the shipping, duty and other charges relating to the
repair of the instrument. Pulsar Instruments plc reserves the right to decline an
instrument under the warranty where there is clear evidence of tampering or
where no fault is found. In these cases, the customer will be liable for any
shipping, duties or charges.
10. Pulsar Instruments endeavours to ensure stocks of service components for a full
fifteen year period but of course cannot guarantee parts availablity as certain
components become obsolete or are discontinued.
11. If a sub-component becomes obsolete and/or stocks are depleted then Pulsar
Instruments will endeavour to facilitate a repair but may not be able offer the
same length of guarantee.
12. In the event of any dispute on the terms of the warranty Pulsar Instruments plc
will accept pendulum arbitration by the United Kingdom Institute of Acoustics Ltd.
13. The warranty does not in any way reduce any legal right of the buyer or user of
the sound level meter; it is in addition to all legal rights determined by the
European Union.
14. Pulsar Instruments plc reserves the right to amend or update these terms and
conditions without prior notice.
Page 59

Pulsar Nova® sound level meter user manual
Page 59
Pulsar Instruments Plc. also offer a 7-year guarantee on all their units manufactured
after 21st October 2011, providing that the instrument has undergone annual “Routine
Verification” as described in the relevant IEC standard. The guarantee covers all parts
and labour excepting only damage caused by the user.
Because of the unique fragility of microphones, only internal short or open circuits are
accepted as faults and not accident damage.
The guarantee requires the user to return the unit to their nearest authorised Pulsar
Instruments Plc. distributor/agent. This guarantee is in addition to any statutory rights in
your country.
Page 60

Pulsar Nova® sound level meter user manual
Page 60
1:1 Octave Band ....... 26
AC Output ................ 50
AC Output Cables ...... 51
Accessories .............. 51
Advanced Options ..... 34
AnalyzerPlus ............. 37
ANSI S1.25 .............. 45
ANSI S1.4 ................ 45
ANSI S1.43 .............. 45
Audio Note .... 33, 37, 38
Audio Recording ........ 37
AudioNote ................ 38
Back Buffer .............. 37
Back Erase ............... 39
Background Noise ..... 54
Batteries ............ 14, 46
Battery Cover ........... 14
C-A ......................... 25
Cables ..................... 52
Calibrate .................. 32
Calibration ............... 21
CE ........................... 57
Clear Memory ........... 33
Clock ....................... 32
Colour Coding ........... 23
Connections.............. 46
Connectors ............... 16
Criterion Level .......... 50
DC Output ................ 51
DC Output Cables ...... 51
Display .................... 17
Display Mode ............ 34
Dose ........................ 49
Dose % .................... 49
Electrical Outputs ...... 50
EMC ........................ 57
Environmental .......... 46
Est Dose % .............. 49
EU ........................... 50
External Power .......... 46
Fast ......................... 33
Free Field Correction .. 56
Frequency Weightings 45
General Accessories .. 51
Guarantee ................ 59
HML ........................ 25
IEC 60651:2001 ....... 44
IEC 60804:2000 ....... 44
IEC 61252:1993 ....... 44
IEC 61260 ................ 45
IEC 61672 test data .. 44
IEC 61672-1:2013 .... 44
Impulse ................... 33
Information Bar ........ 18
Information,
Capabilities,
Standards, Options 34
Input & Output Cables 52
Keypad .................... 15
LAeq ........................ 48
LAeq,I ................ 25, 48
LAIeq ...................... 25
LAIeq,t .................... 48
Language ............ 34, 46
LCeq........................ 48
LCPeak .................... 48
Leq ......................... 49
Ln ........................... 50
LxE ......................... 48
Lxeq ........................ 48
LZPeak .................... 48
Maximum ................. 48
Measurement Display 19
Memory .............. 39, 46
Microphone .............. 45
Microphone Extension
Cables .................. 52
Minimum .................. 48
MSHA ...................... 50
NK70 Random Incidence
Adaptor ................ 52
Noise Floor ............... 45
OSHA ...................... 50
OSHA HC ................. 32
Outdoor Measurement
Kit ........................ 51
Overload .................. 19
Pause ...................... 38
Preamplifier .............. 13
Quick Settings .......... 32
Quick Start ................. 3
Range ...................... 45
Repeat Timer ....... 33, 38
Replacement Microphone
Capsules ............... 51
Restarting A
Measurement ........ 31
Restore Factory Settings
........................... 39
Review Stored data ... 33
Screen Brightness ..... 34
Screen saver ............ 17
Set Clock ................. 32
Short LAeq ............... 48
Single Timer ........ 33, 38
Size......................... 46
Slow ........................ 33
Soft Key Bar ............. 19
Sound Level ............. 49
Status Bar ................ 19
Storage Options ........ 33
Stored Measurements 49
Taktmaximal ....... 25, 48
Threshold ................. 50
Time Weighting ........ 33
Time Weightings ....... 45
Tripod Mount ............ 46
TWA ........................ 49
UK .......................... 50
Under-Range ............ 19
USB ........................ 16
View ........................ 19
View options ............. 34
View Options ............ 33
Views ...................... 23
VoiceTag .................. 46
Warranty ................. 58
Weight ..................... 46
Windshield ............... 39
Page 61

Pulsar Nova® sound level meter user manual
Page 61
Pulsar Instruments Plc. also have approved distributors and agents in many countries
worldwide. For details of your local representative, please contact Pulsar Instruments
Plc. at the address below. Contact details for Pulsar authorised distributors and agents
are also available from the Internet Web site at the address shown below.
Registered Office, factory & commercial and customer contact
Pulsar Instruments Plc
The Evron Centre
John Street
Filey
North Yorkshire
YO14 9DW
Tel: +44 1723 518011
Fax: +44 1723 518043
E-Mail: sales@pulsarinstruments.com
Technical Support: support@pulsarinstruments.com
Websites:
UK site www.pulsarinstruments.co.uk
English Language www.pulsarinstruments.com
German Language www.pulsarinstruments.de
French Language www.pulsarinstruments.fr
Distributors www.pulsarinstruments.com/distributors
www.linkedin.com/company/pulsar-instruments-plc
Twitter: @PulsarMeters
 Loading...