

Page 1
Owner’s Operating Manual
TABLE OF CONTENTS:
I. Device structure
II. Basic functions
III. Operating Mode
IV. Predened Mode
V. Switching Off
VI. Protections
VII. Safety
VIII. Warranty
PULSAR NANO
Page 2

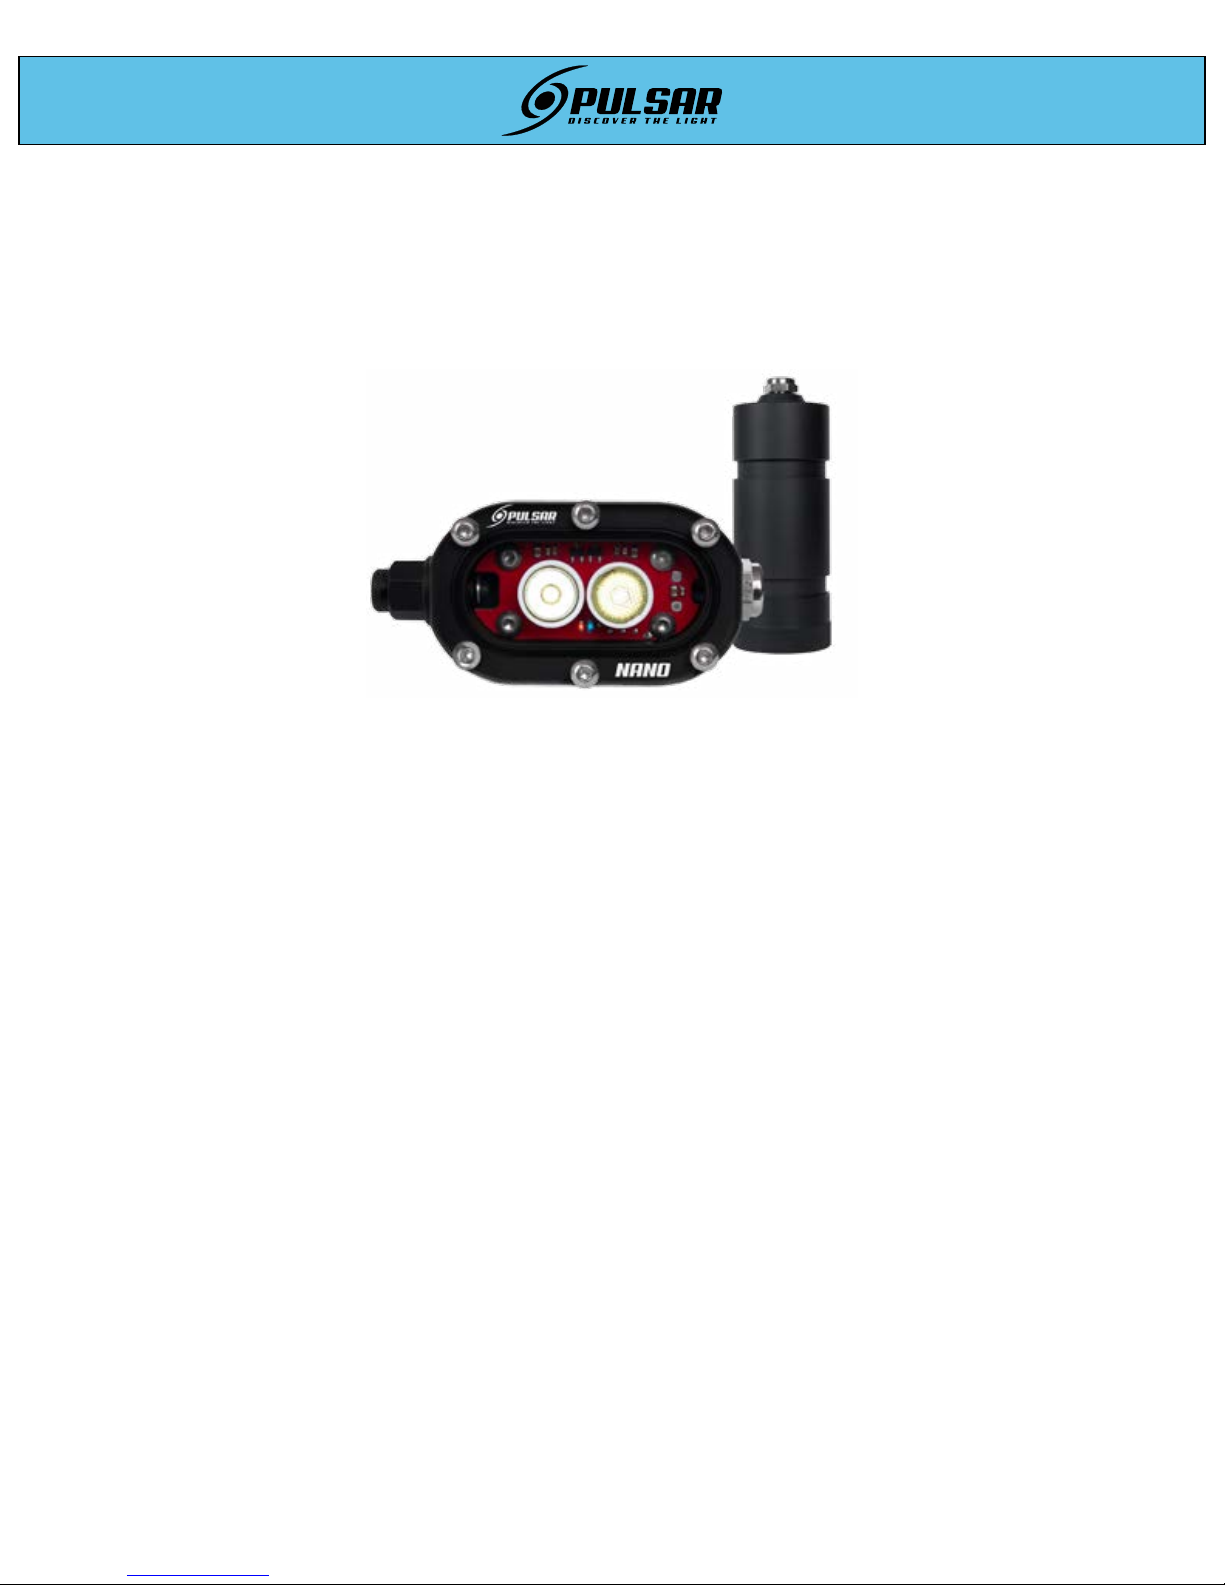
I Device Structure:
Your Pulsar NANO lamp consists of a lamp head with 1 button, battery box and a charger. The
operation of the headlamp is conducted by 1 button. Perfect for caving, climbing, biking, you can
mount your Nano on your helmet, on your bike, wear it with a headband or it can be handheld.
Your Nano has two high power LEDs with four brightness levels for each Led and a Predened
mode.
• LED A is an ambient light – using wide, smooth optics
• LED B is a spot light – a focused light suitable for illuminating distant objects
Each of the two power LEDs has 4 brightness levels from 1 - Low to 4 - Strongest. You can independently choose the level of brightness of each LED by pressing the button.
Nano also has a Predened mode, allowing you to choose between 5 combinations.
Your Nano has a battery level indicator bar, with 2 LEDs, one blue (indicates half and full charge of
the battery), and one red (indicates low battery).
Pulsar has a microprocessor, controlling:
• Battery protection
• Temperature control – controlled by 3 sensors (2 for each powered LED, 1 for the internal
temperature)
II Basic Functions:
When the headlamp is turned o, NO energy is consumed from the battery.
When you turn Pulsar Nano on, you have two modes: Operating Mode and Pre-
dened Mode with 5 combinations.
To wake the lamp up, you must push the button once and then the blue led will
illuminate for 6 seconds. During these 6 seconds, you can start operating with the
lamp. If there is no additional push, the lamp will go to sleep again.
While the blue light is on, you can choose from Operating mode (by single and double-quick pushes for LED A and B) and Predened mode (by 4 sequent quick pushes).
Battery bar indicator
When you put a battery in the box, you will be indicated of the battery level by blue
and red led.
If the battery is fully charged, the blue led will blink rapidly. If the battery has a mid-
dle charge, the blue led will blink 2 times per second (ve times). Red led will blink,
if the battery is at very low charge.
All LEDs maintain a constant light level during the whole battery life.
Note! We suggest always to use charged batteries!
Button
Spot LED
Ambient LED
Battery bar
Page 3

III Operating mode:
The button controls LED A and LED B. You can independently and simultaneously choose the brightness
level for each LED.
Single push activates LED A and double-click (no more than 0.5sec between) activates LED B.
Each LED has 4 brightness levels: 1 – low, 2 – middle, 3 – strong, 4 – strongest.
You change the brightness level for LED A by single pushes of the button with more than 0.5 seconds intervals. The brightness level for LED B is changed by double-clicks with more than 0.5 seconds intervals.
Note! If LED A and LED B work at level 4 simultaneously, this might exhaust the battery faster or cause
overheating of the headlamp and an automatic light output reduction.
If you want to switch o one of the LEDs, you need to rotate all the levels until you reach level 4, the next
will be – switched o.
IV. Predened Mode
You can enter this mode by 4 sequent pushes of the button.
Note! The interval between 2 pushes needs to be 0.5 of a second (approx.) in order to activate the functions.
After this you have 5 combinations that you can rotate by single pushes of the button.
• combo a: LED A=level 3, LED B = 0
• combo b: LED A = level 2, LED B = mode 2
• combo c: LED A & B = level 3
• combo d: LED A = level 1, LED B = level 2
• combo e: LED A = level 4, LED B = level 4
You can exit from the Predened mode by 4 sequent pushes or by switching o the whole lamp.
Page 4

IV. Predened Mode
Selecting brightness settings via the programming mode:
When you enter the Program Mode for the rst time, you have initially 5 empty settings that you can easily program according
to your specic needs and preferences and save the settings you have made.
These 5 settings correspond to the 5 red LEDs from the battery bar. (So, the red LEDs from the battery bar indicate the number
of the setting.)
How can I choose or change a setting?
You can change the settings from 1 to 5 by pressing the control buttons separately. Button 2 is for an ascending
change, while Button 1 is for a descending change.
How can I program a selected setting?
You have to press once Button 1 and Button 2 simultaneously. Then (the current setting indicator) the red LEDs from
the battery bar start to blink constantly to indicate that you can now program the setting. You can choose the level of
brightness for each power LED by pressing Button 1 for LED 1 and Button 2 for LED 2.
How can I save the settings I have made for the particular slot?
To save the setting, you have to press once Button 1 and Button 2 simultaneously.
The next time you enter the Program mode, the last used setting will be automatically activated.
In this mode, you can also check the battery level by pressing twice Button 1 and Button 2 simultaneously.
How can I exit the Program Mode?
By pressing BUT 1 and BUT 2 3 times (0.5 second interval) simultaneously or by pressing and holding for 1 second BUT 1 and BUT 2 simultaneously.
BUT 1 and BUT 2 simultaneously: 3 pushes (0.5 second interval) - enter Program Mode
BUT 1 / 2 - choosing ascending/descending setting slot
BUT 1 and BUT 2 simultaneously: 1 push - enter the chosen slot and ready to be programmed
BUT 1 / 2 - choosing the brightness level of each of the two powered LEDs
BUT 1 and BUT 2 simultaneously: 1 push - saves the setting
BUT 1 and BUT 2 simultaneously: 3 pushes (0.5 second interval) OR pressing and holding for 1 second - exit the Program Mode
V Switching Off:
You can turn Nano o from any mode by pressing and holding the button
for 4 seconds.
Page 5

VI. Protection
Your Pulsar NANO has several protections:
• Deep discharge protection – protects the battery from damage. When the voltage drops to 2.9 V, the
lamp automatically reduces the power to level one. You can still raise the level up to 2, but after several min-
utes, it will automatically drop to 1. When the battery is at the edge of full discharge, the lamp will turn o.
• Thermal protection – Pulsar NANO uses 3 thermo sensors, one on the main PCB and 2 for each of the
power LEDs. The system operates as it tracks constantly the temperature of the LEDs and the PCB, searching
for balance. When temperature raises, the processor decreases the light output by calculated percentage.
This process repeats until a stable temperature is measured.
VII. Safety
• Observe proper precautions when handling batteries. If lithium-ion batteries are misused they may
catch re or explode. Be sure to observe the following precautions:
- Never leave the battery charging when no one is around;
- Only use the supplied charger indoors;
- Do not short or disassemble the battery;
- Do not expose the battery to ame or excessive heat;
- Regularly check the battery casing for damage;
- Always disconnect the battery when not in use.
• Do not disassemble. Should the product break open as the result of an accident, disconnect the battery immediately. The warranty will be void, if the product has been opened at any time.
• Unplug immediately in the event of a malfunction. If you notice smoke or an unusual smell coming
from the product or from the AC adaptor, unplug the adaptor and/or disconnect the battery pack Immediately.
• Avoid looking directly into the light. The light output of the product can be extremely high. Shining
the light directly into your eyes or another person’s eyes could result in an injury.
• Keep away from children.
• Do not store empty batteries! 50% charged is good.
• Store battery in dry and cool place.
• Keep out of reach of children.
• Pulsar is not a Personal Protective Equipment (PPE).
• Always carry additional independent backup light source.
• Dispose of lithium and lithium-ion batteries at a battery recycling centre. They are accepted at battery-recycling centres.
VIII. WARRANTY
• All parts of the lighting system are guaranteed against faults in manufacture for a period of one year from
the purchase date. Except the charger.
• Limited Lifetime Warranty: After one year, if the product fails, we provide a Limited Lifetime Warranty for
free labor on repairs. You just have to pay for the parts needed.
Disclaimer: As the PULSAR products are constantly updated and improved, your device may have a slightly different appearance or modied functionality then presented in this manual.
Page 6

© 2017 Pulsar Lights www.pulsarlights.eu
sales@pulsarlight.eu
 Loading...