

Puck KEYSAFE User And Assembly Manual
User and assembly manual 3
Gebruikers- en montagehandleiding 18
Bedienungs- und Montageanleitung 33
Manuel de l’utilisateur et installation 48


3
Manual for the installer and
end user
Dear customer,
Thank you for purchasing the Puck
Keysafe. This manual contains all the
information needed to quickly familiarize
yourself with the product. We kindly
request you to go through this information
carefully, before you start to work with the
product.
This manual is intended for installers and
end users of the Puck Keysafe. This is the
original manual. Keep these instructions
safe!
For more information, please contact your
local Puck Dealer, which you can find on:
www.puck-keysafe.com.
Puck Keysafe
user and assembly manual
Contents
1 Introduction 4
1.1 Intended use 4
1.2 Symbols used 4
2 Main components 5
2.1 Fixings 6
2.2 Operating elements 6
3 Mounting 7
3.1 Mounting the Puck Keysafe 7
on a brick or concrete wall
3.2 Mounting the Puck Keysafe 11
on a door frame
4 Use 14
4.1 Opening the Puck Keysafe 14
4.2 Setting the code 15
5 Maintenance, environment 17
and disposal
6 Guarantee 17
4
User and assembly manual
1 Introduction
With Puck Keysafe you can store your
keys safely where you need them. The
Puck Keysafe has been SKG approved and
graded as **. The Puck Keysafe can be
accessed by entering a four-digit code.
The Puck Keysafe has two safeguards to
keep your secret code from third parties:
1. The Puck Keysafe is equipped with an
anti-reading cap. This cap makes it
more difficult for third parties to look
over your shoulder as you enter your
PIN.
2. When you open the Puck Keysafe, the
code does not remain, but switches to
another number combination.
1.1 Intended use
The Puck Keysafe is a key safe, designed
for you to store your house keys safely in
the home. The Puck Keysafe can be
opened using a four-digit code. You set
this code yourself. Make sure you know
the code before closing the key cabinet of
the Puck Keysafe. Do not share your code
with third parties.
The Puck Keysafe can be mounted on a
stone or concrete wall, or on a door by
means of a mounting bracket.
1.2 Used symbols
The following four marking conventions
are used in this manual:
attention
Attention! A note with
additional information to the user.
A note which alerts the user to potential
problems.
Puck Keysafe is certified
according to the assessment
directive SKG IKOB KE 470
with the classification of 2 stars. This
means that an unauthorised person needs
more than 3 minutes to break open the
safe.
5
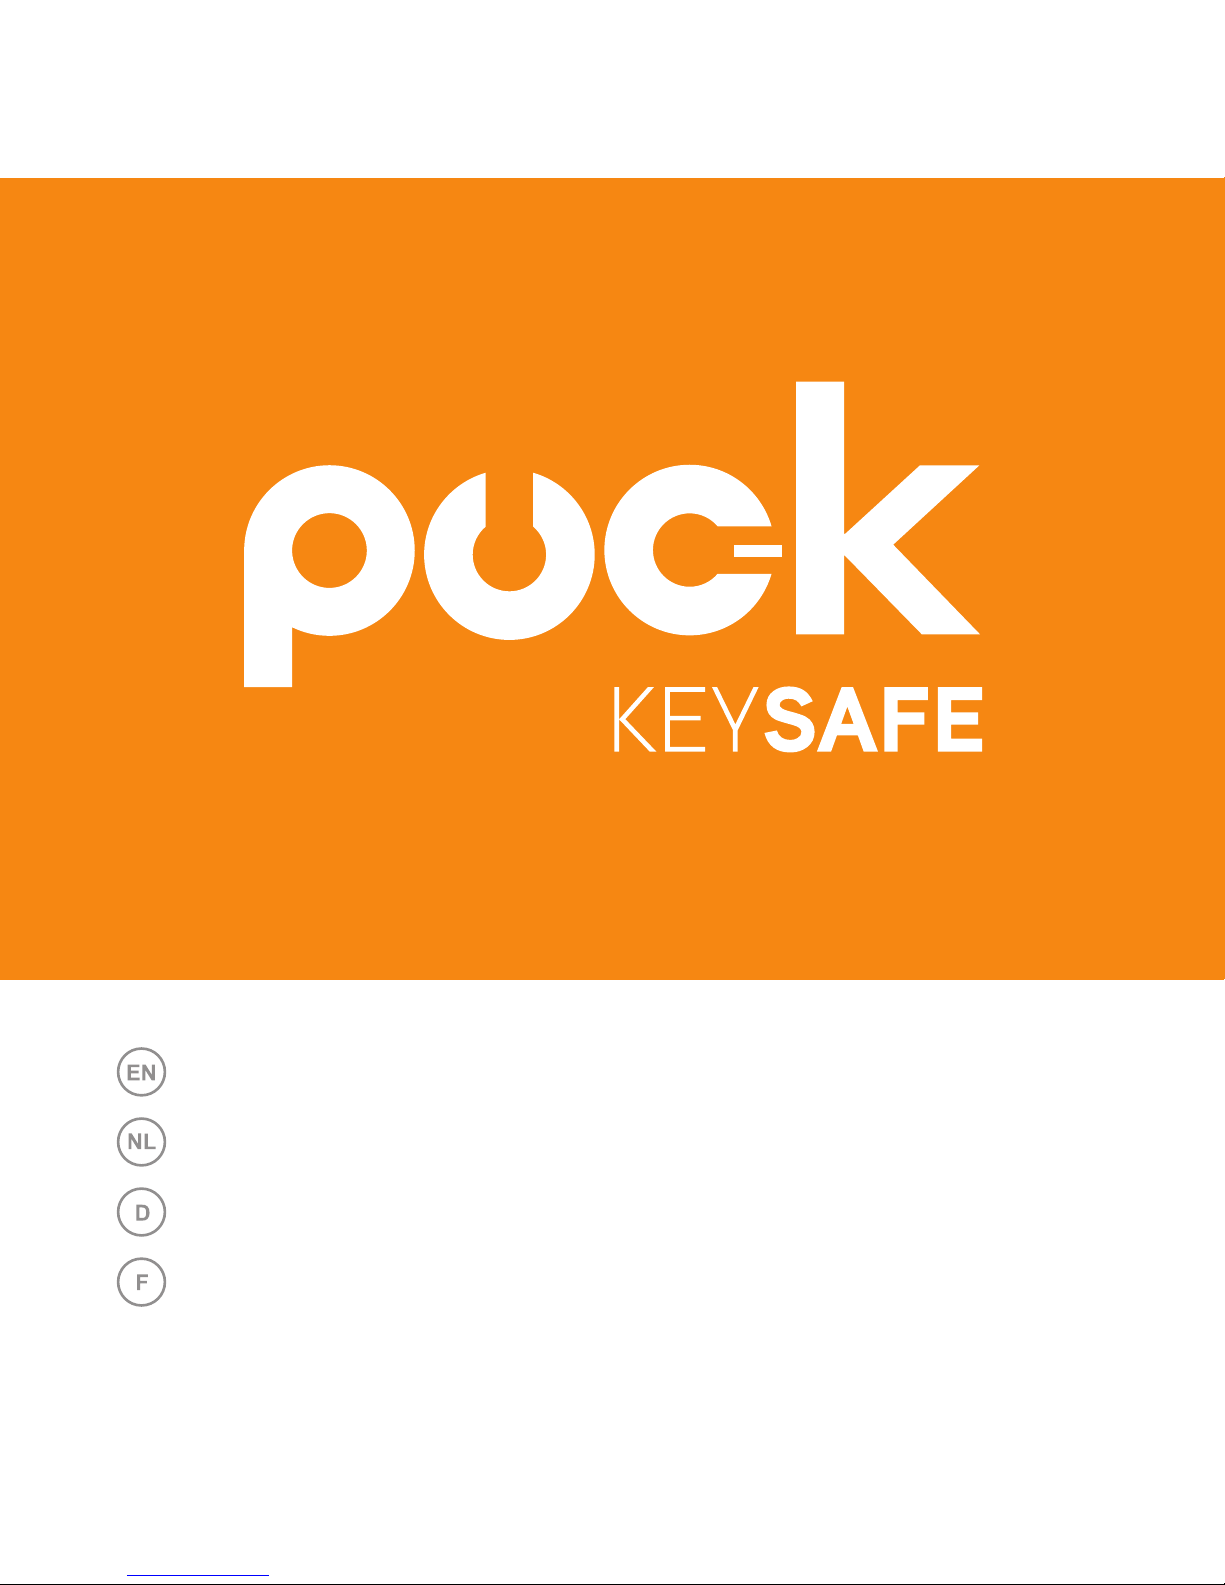
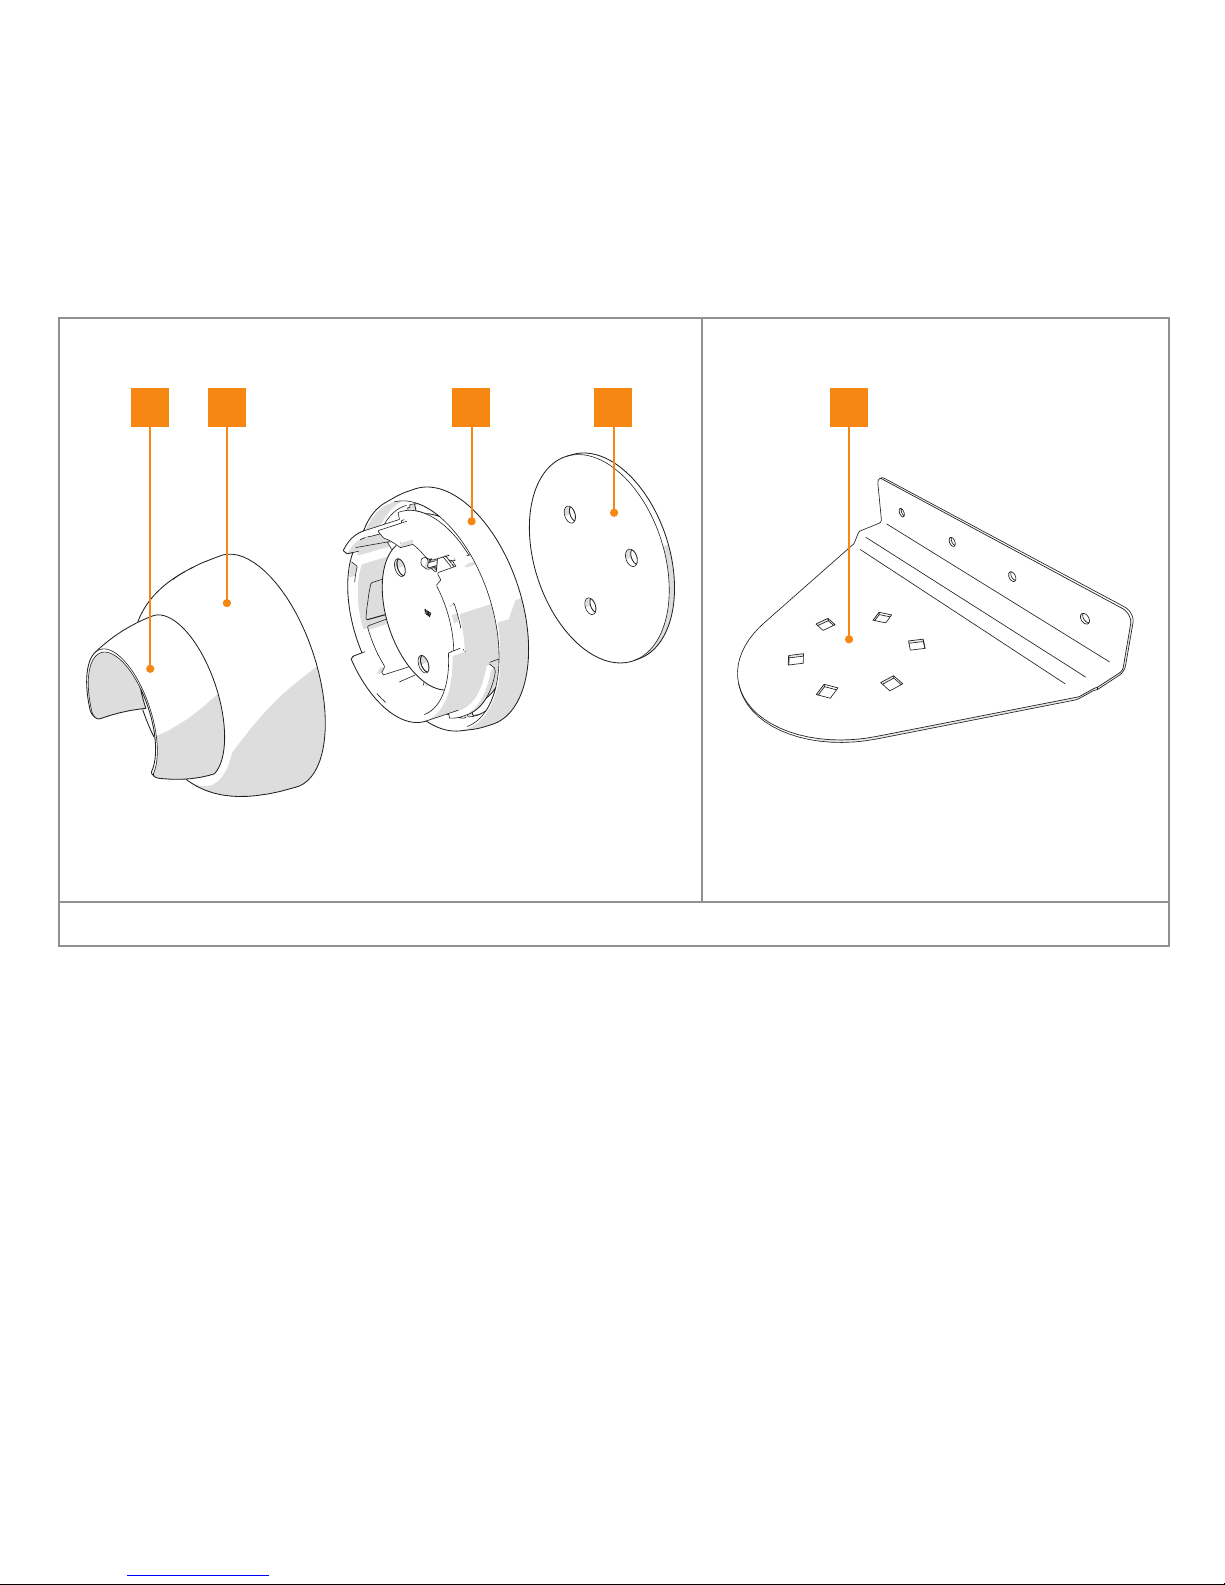
2 Main components
Figure 1. Main components
1. Anti-read cap
2. Cover
3. Key cabinet
4. Mounting plate
5. Mounting bracket (optional)
21 3 4 5
6
User and assembly manual
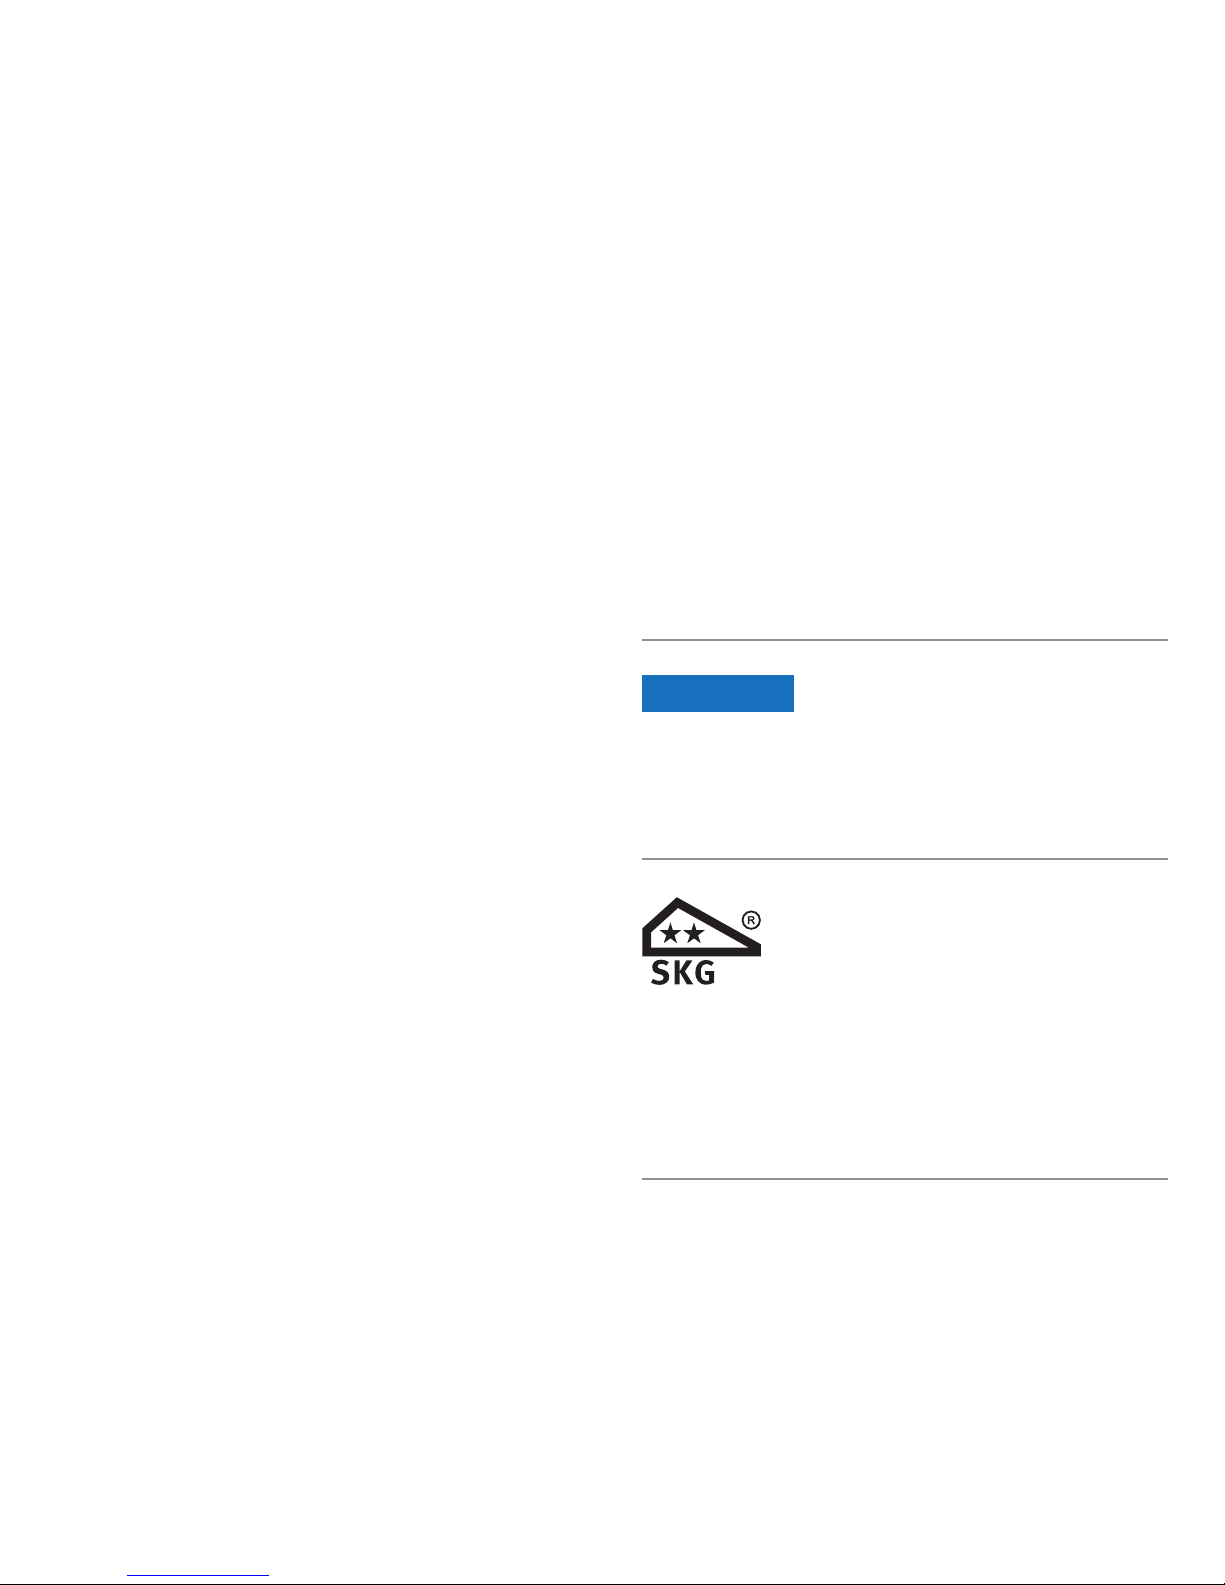
2.1 Fixings
Figure 2. Safe fixing
Figure 3. Fixing mounting bracket
1. Hexagon bolt M8 x 40 mm (3x)
2. Wall Anchor (3x)
3. Hex nut M6 (3x) (optional)
4. Wood screw (4.5 x 30 mm) (optional)
5. Coach bolt M6 x 25 mm (3x) (optional)
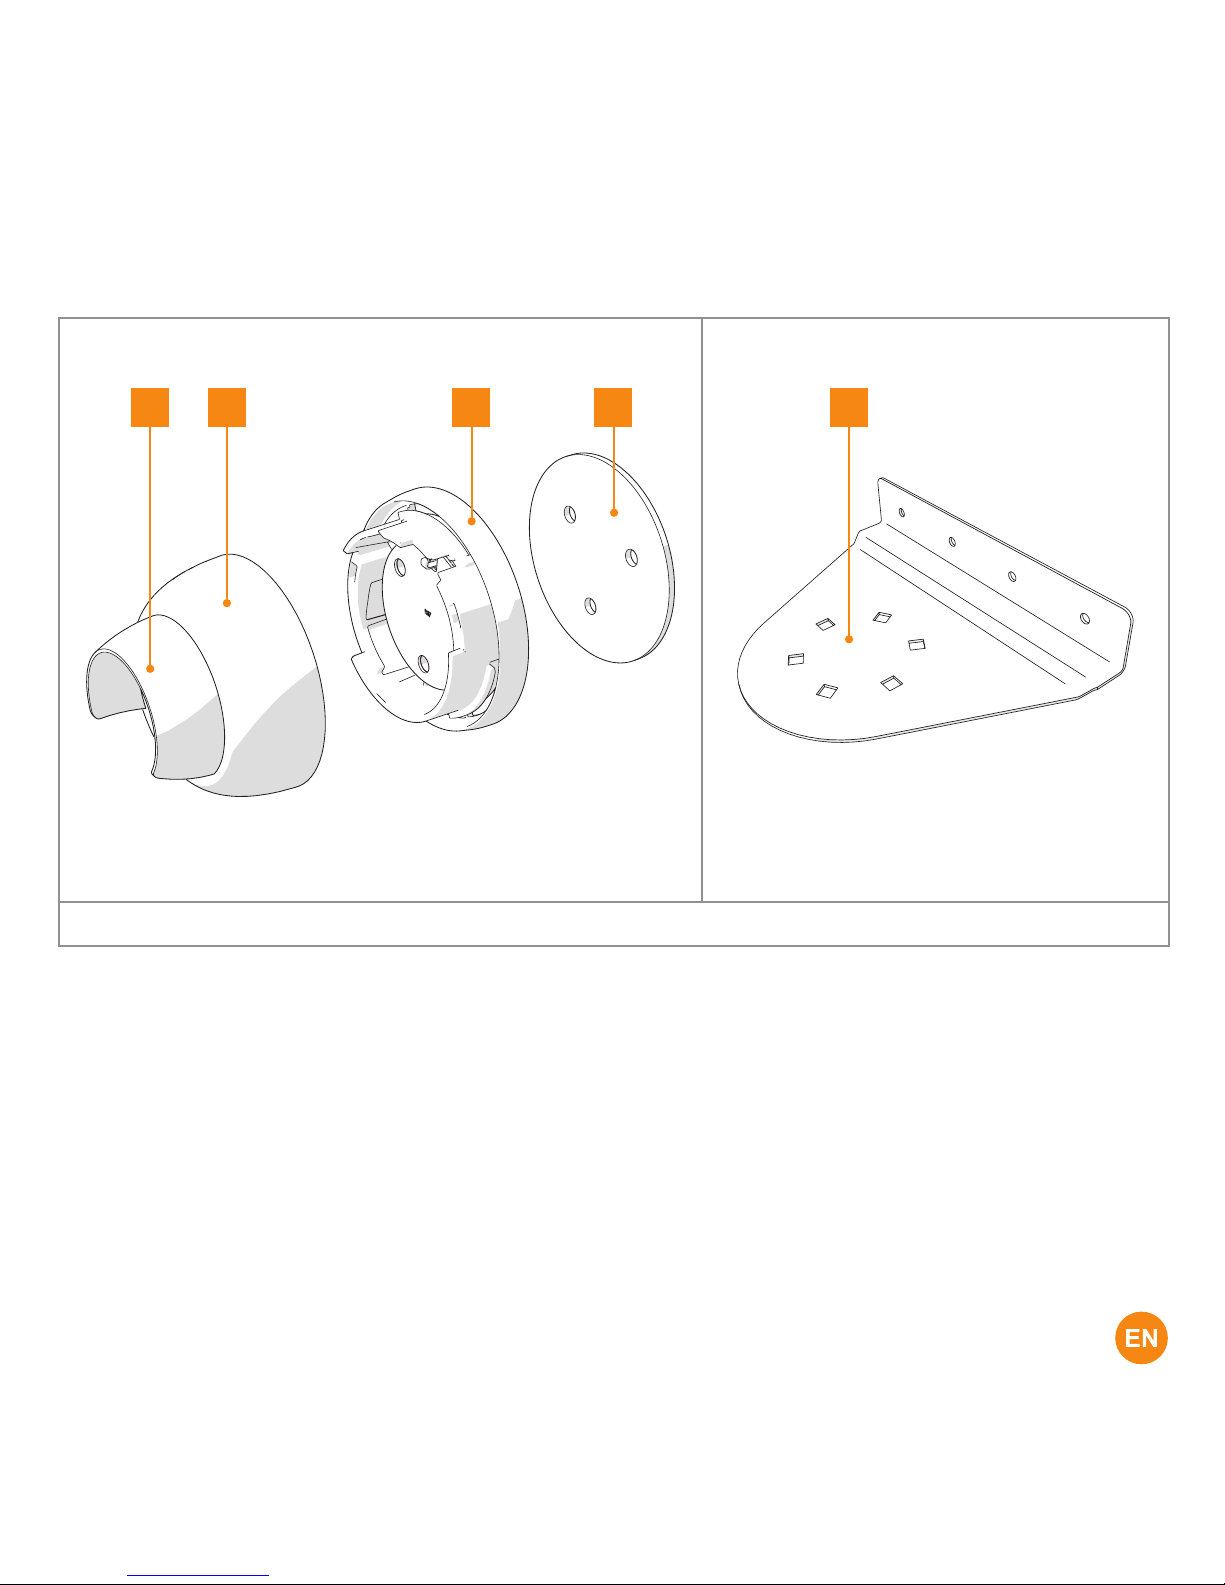
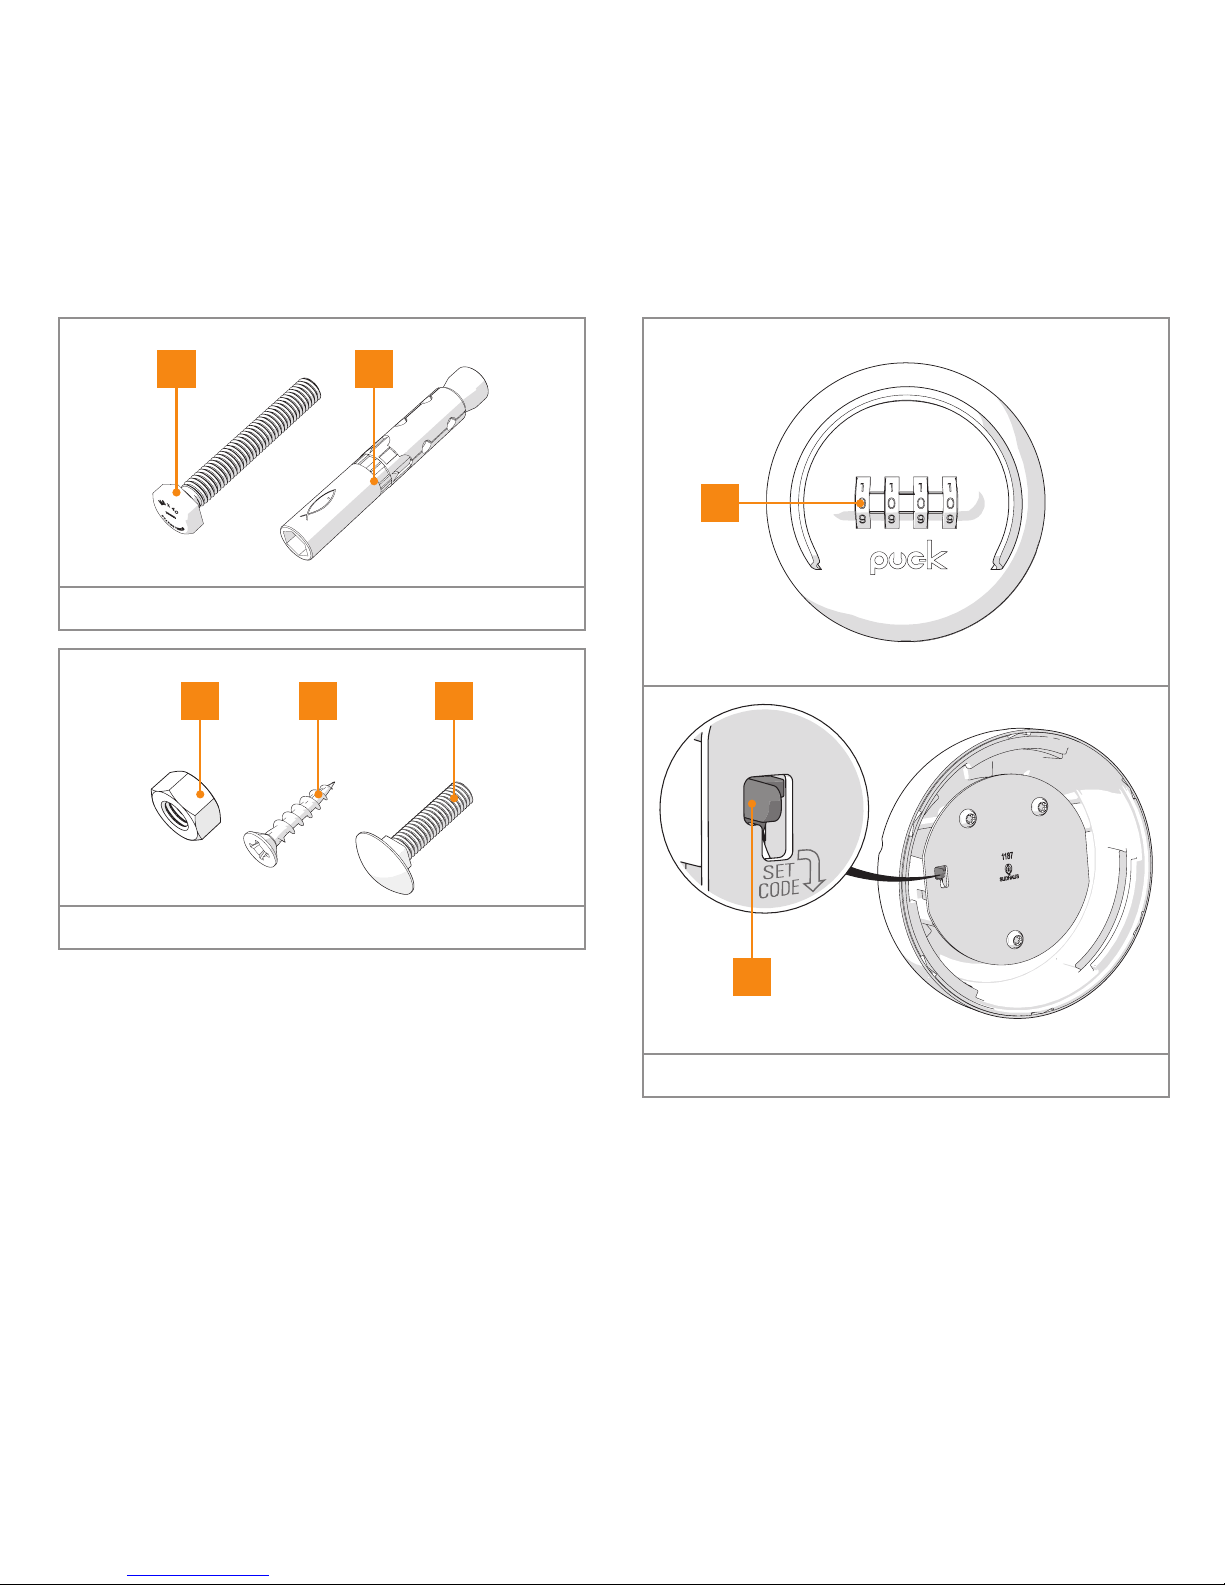
2.2 Operating elements
Figure 4. Operating elements
1. Figure Wheels
2. Code setting slider
1 2
1
2
4 53
7
3 Mounting
The Puck Keysafe can be mounted in two
ways:
1. Mounting on a brick or concrete wall.
2. Mounted on the frame of a door.
3.1 Mounting the Puck Keysafe on a
brick or concrete wall
attention
• Mounting should preferably be
performed by a qualified installer.
• The wall where the safe is to be
mounted must be flush.
• The wall must be made of brick or
concrete.
To mount the Puck Keysafe on a wall, do
the following:
1. Open the Puck Keysafe. The code is
factory preset to 0000.
• Using the number wheels enter the
code '0000'.
• Turn the lid anti-clockwise and then
pull it toward you.
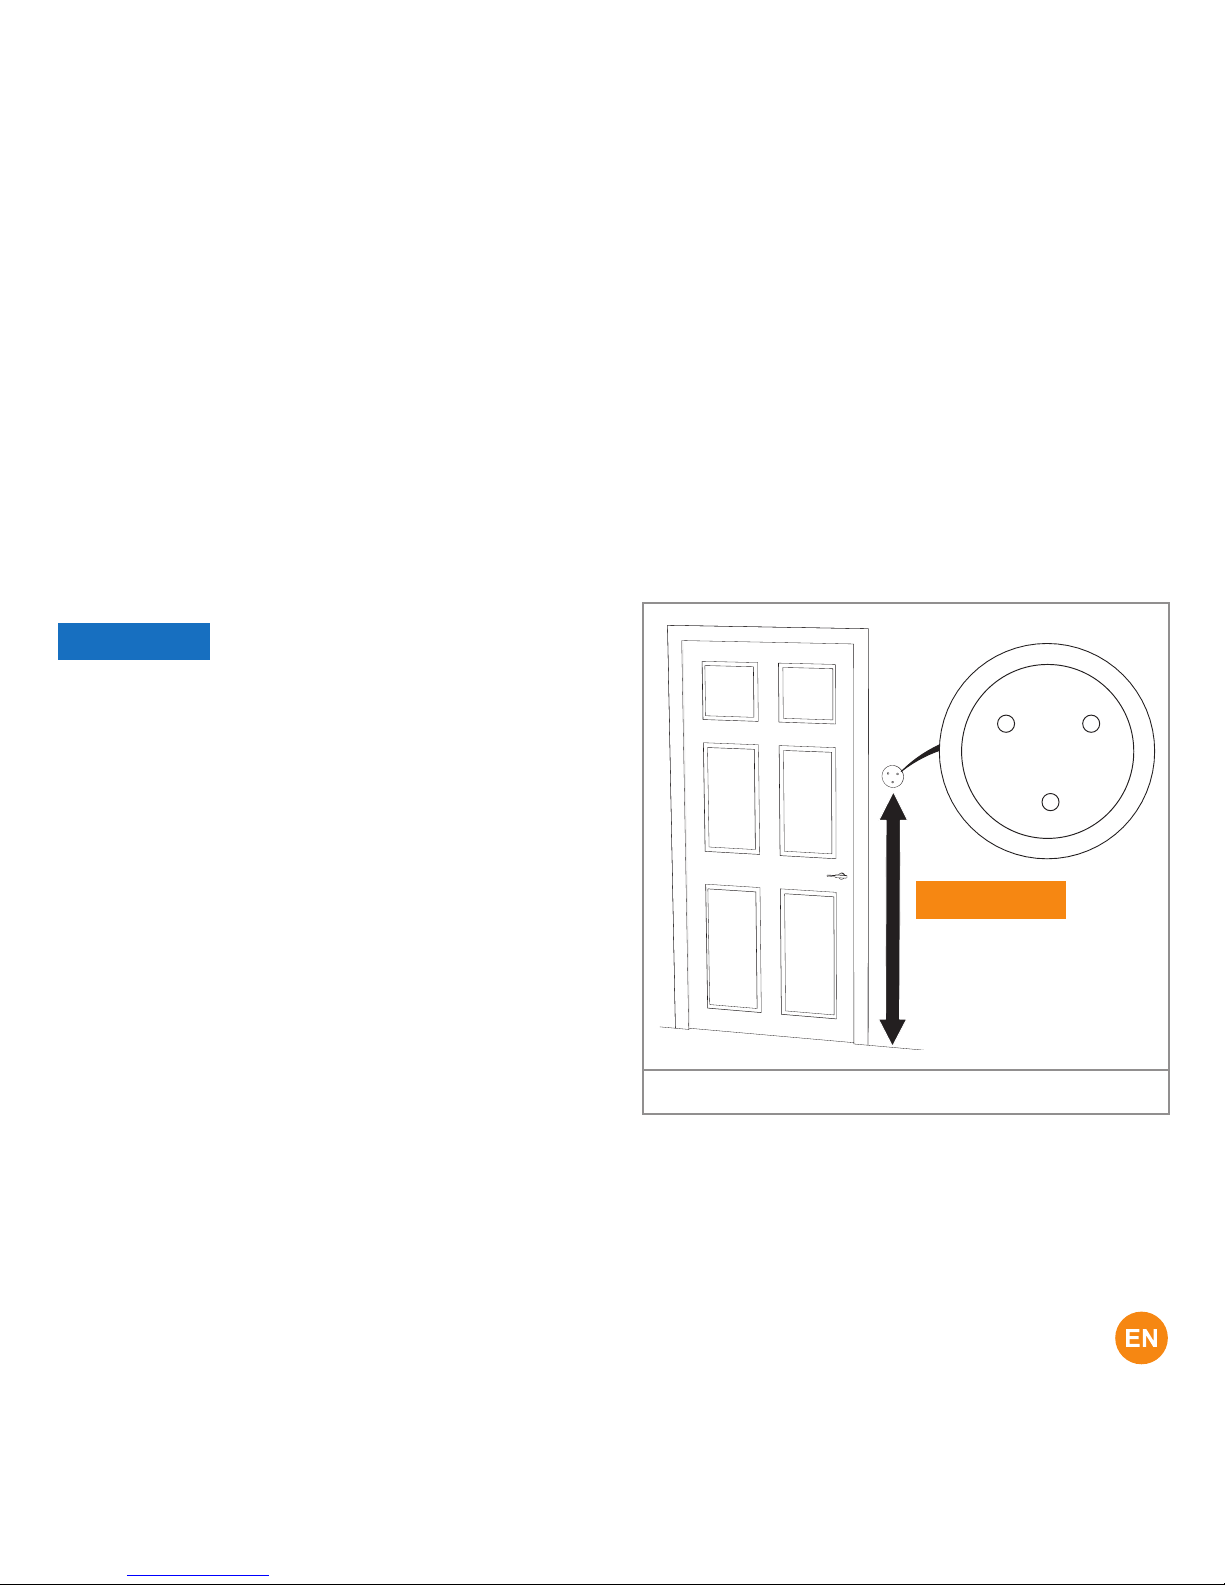
2. Determine where you want to mount
the Puck Keysafe. The height must be
120-150 cm.
3. Keep the mounting place to the desired
location so that two holes are facing up
and one hole is facing down.
Figure 5. Position the Puck Keysafe
120-150 cm
8
User and assembly manual
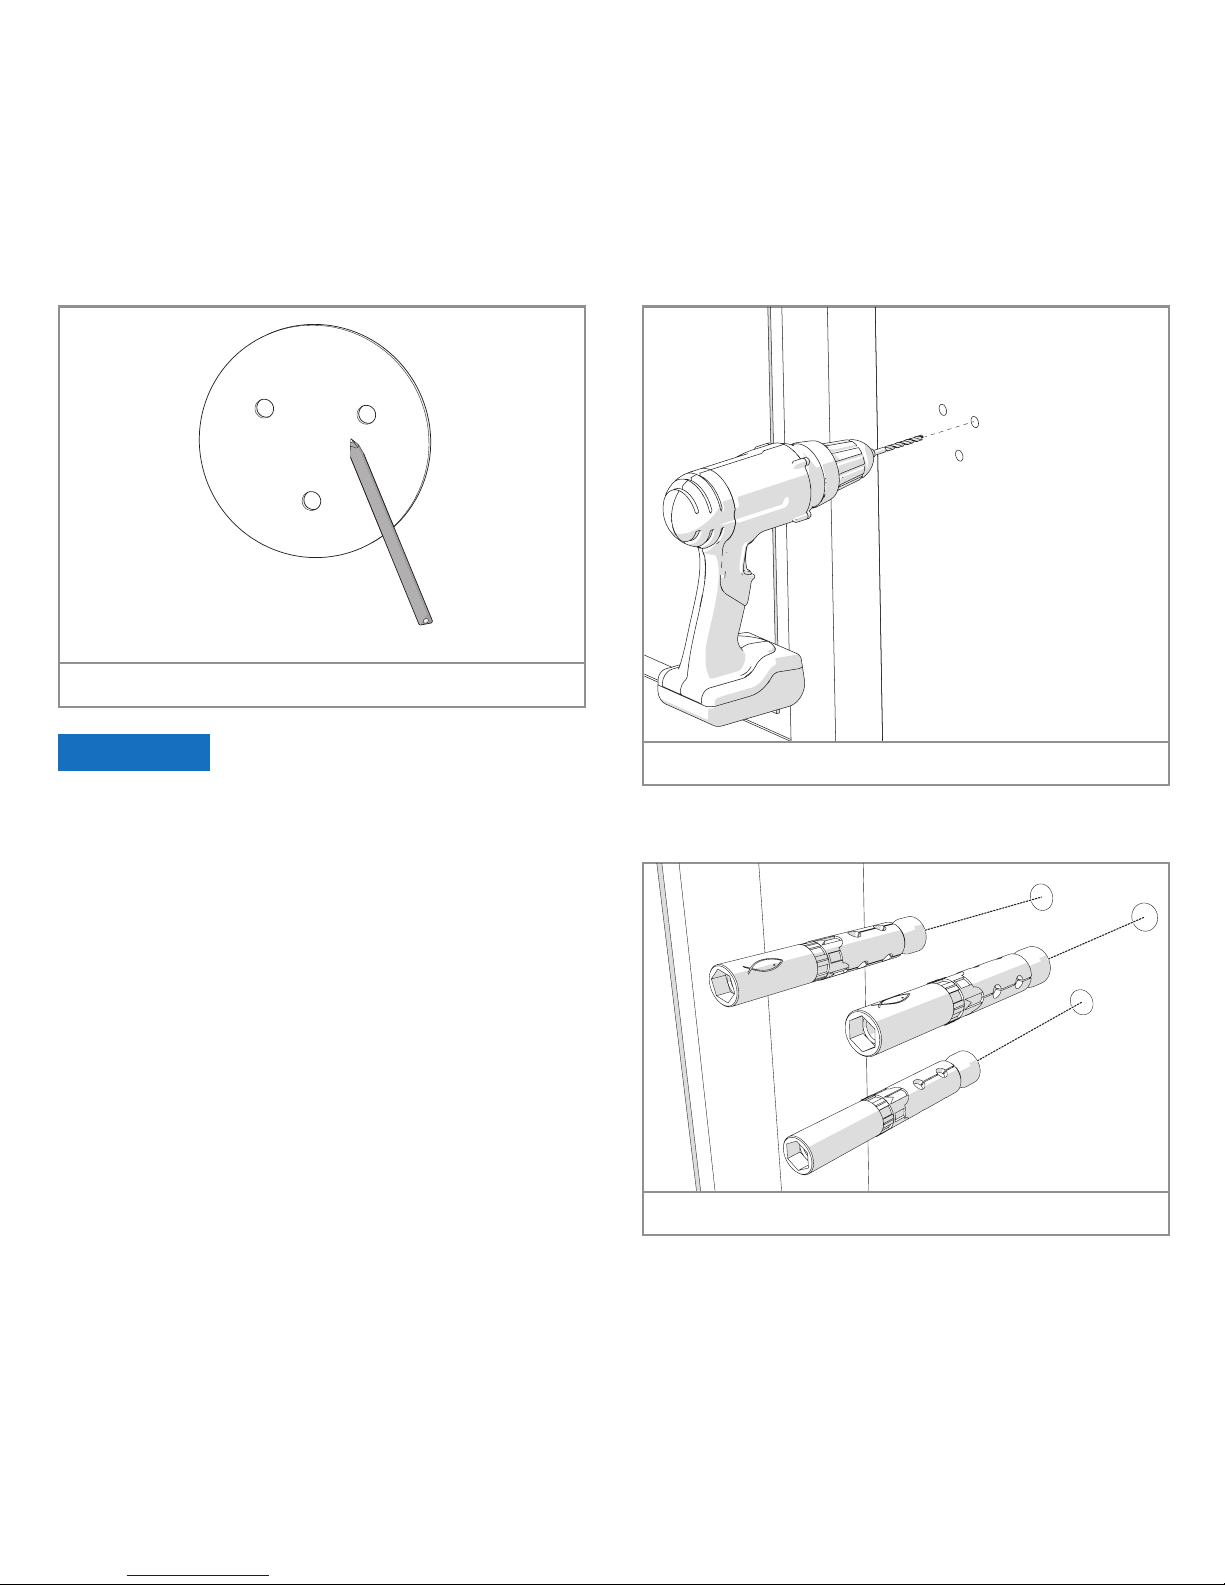
4. Mark the holes.
Figure 6. Mark the holes
attention
The holes cannot be drilled into the joints.
5. Drill three 12 mm holes 85 mm deep.
Figure 7. Drill the holes
6. Insert the wall anchors.
Figure 8. Insert the wall anchors

9
7. Activate the wall anchors by turning them with a hexagonal spanner.
Remember that when tightening the wall anchors will be pulled a few millimetres into
the wall.
Figure 9. Activate the wall anchors
8. Mount the key cabinet on the wall with the hexagonal bolts. Tighten the bolts by hand.
Figure 10. Mount the key cabinet on the wall
10
User and assembly manual
9. Change the code. For more information see paragraph 4.2.
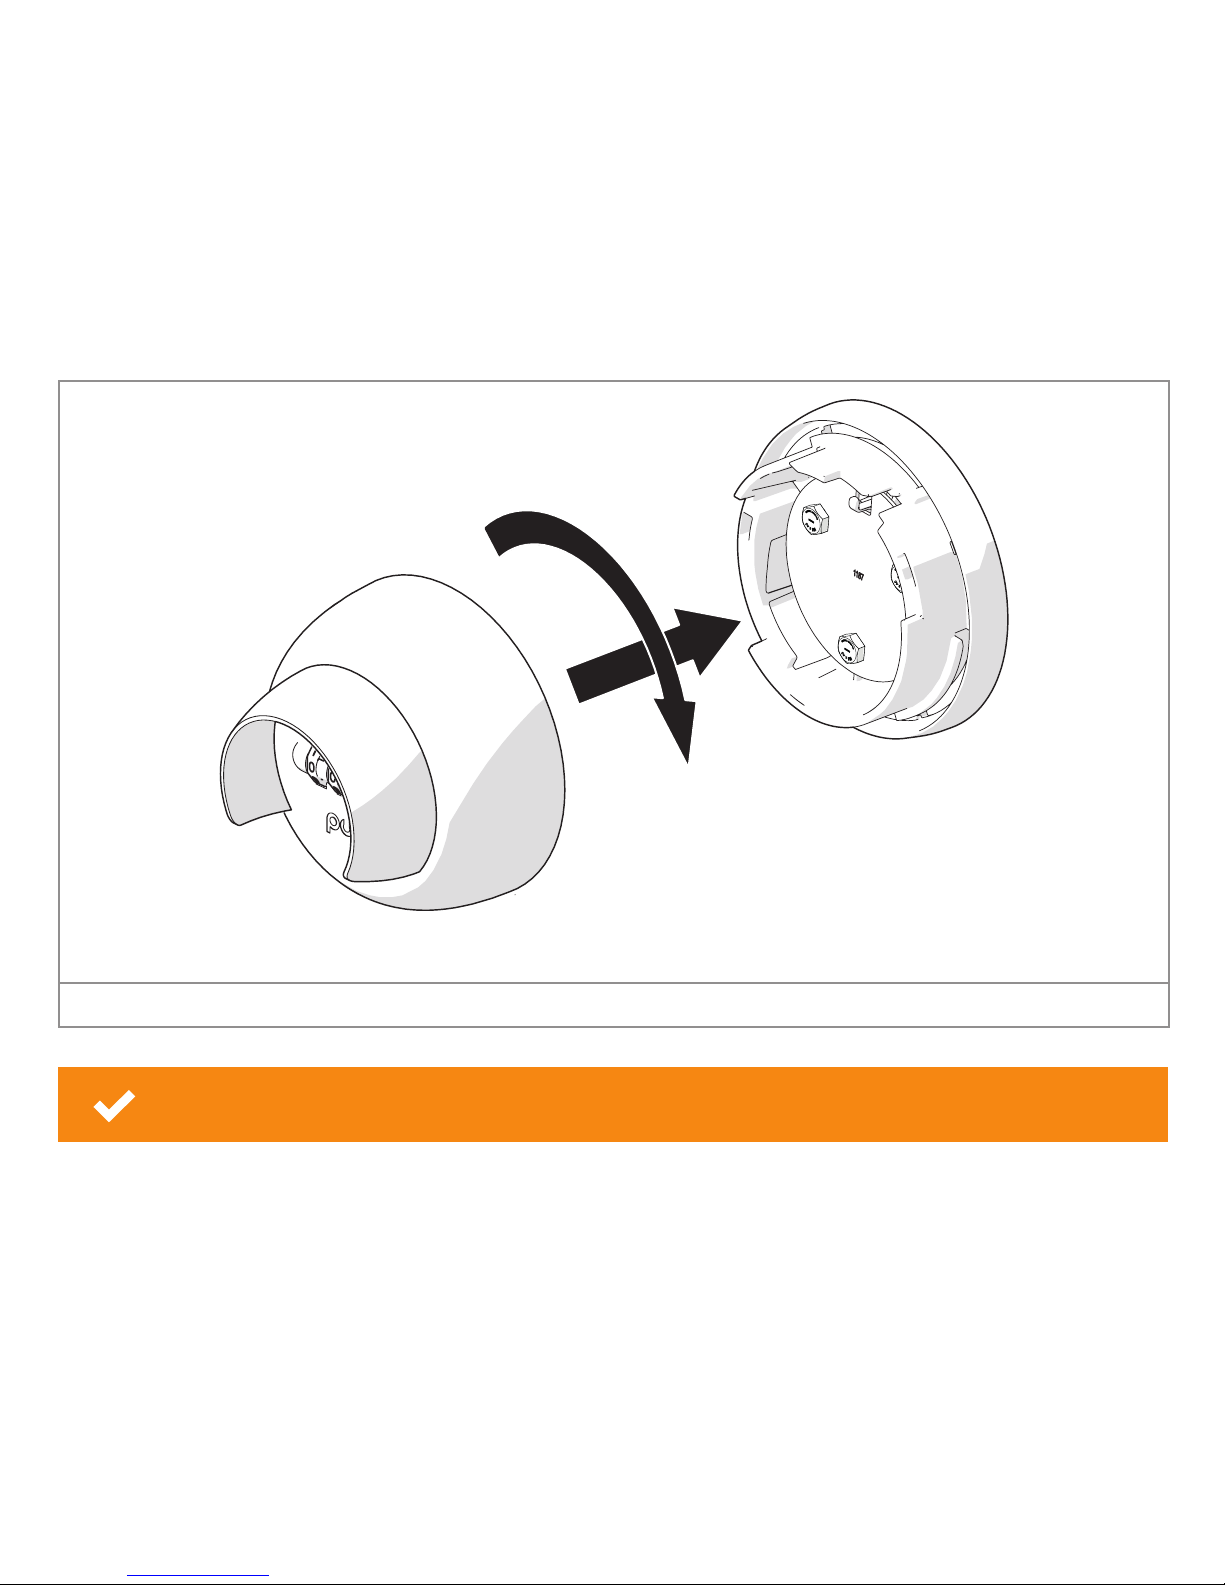
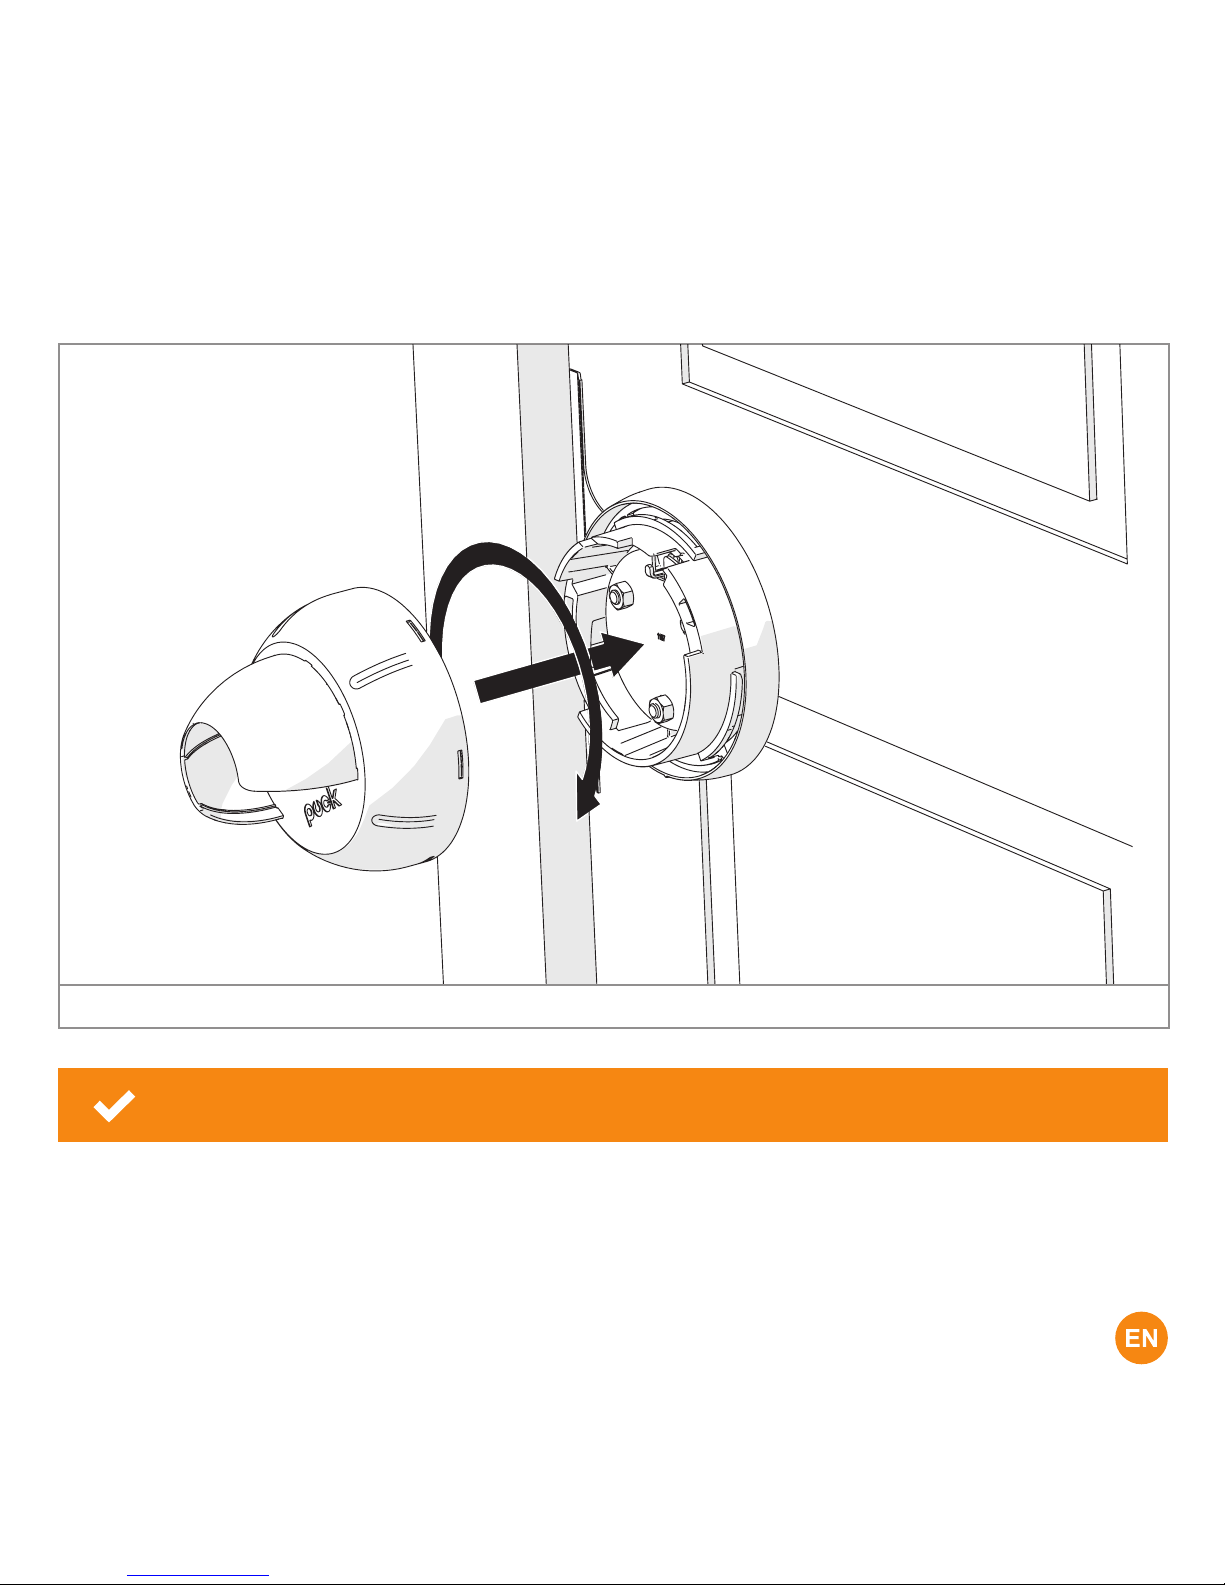
10. Place the cover. This is done by firstly sliding it over the key cabinet and then
turning it. You will hear a click.
Figure 11. Place the cover
Well done! You have completed the mounting.

11
3.2 Mounting the Puck Keysafe on a door frame
attention
Mounting should preferably be performed by a qualified installer.
To mount the Puck Keysafe on a door frame, do the following:
1. Open the Puck Keysafe. The code is factory preset to 0000.
• Using the number wheels enter the code '0000'.
• Turn the lid anti-clockwise and then pull it toward you.
2. Screw the key cabinet onto the mounting bracket.
Use the three bolts and the hex nuts.
Figure 12. Screw the key cabinet onto the mounting bracket
12
User and assembly manual
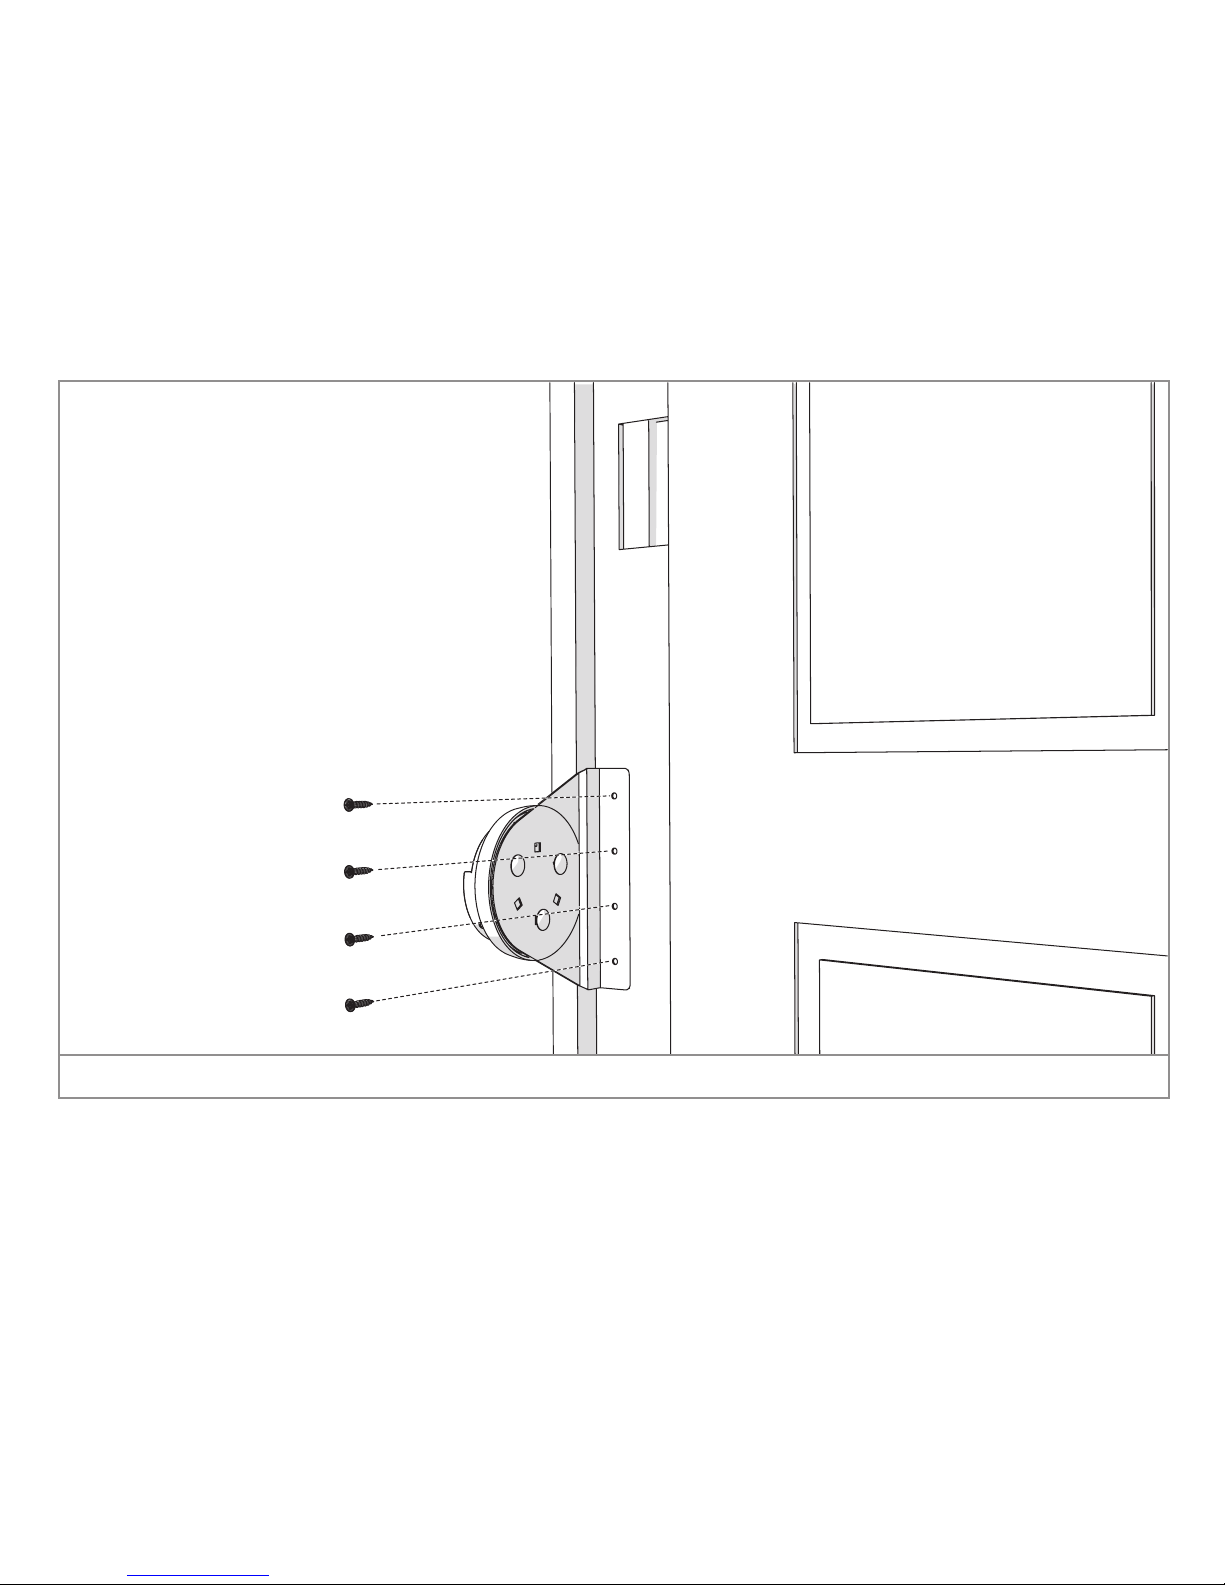
3. Open the door.
4. Screw the mounting bracket firmly on the frame on the side where the hinges are.
The height must be 120-150 cm.
Figure 13. Screw the mounting bracket onto the frame
5. Carefully check whether you can still close the door.
If not, stop the assembly, remove the wall bracket and contact your dealer.
13
6. Place the cover This is done by firstly sliding it over the key cabinet and then turning it.
You will hear a click.
Figure 14. Place the cover
Well done! You have completed the mounting.
14
User and assembly manual
4 Use
4.1 Open the Puck Keysafe
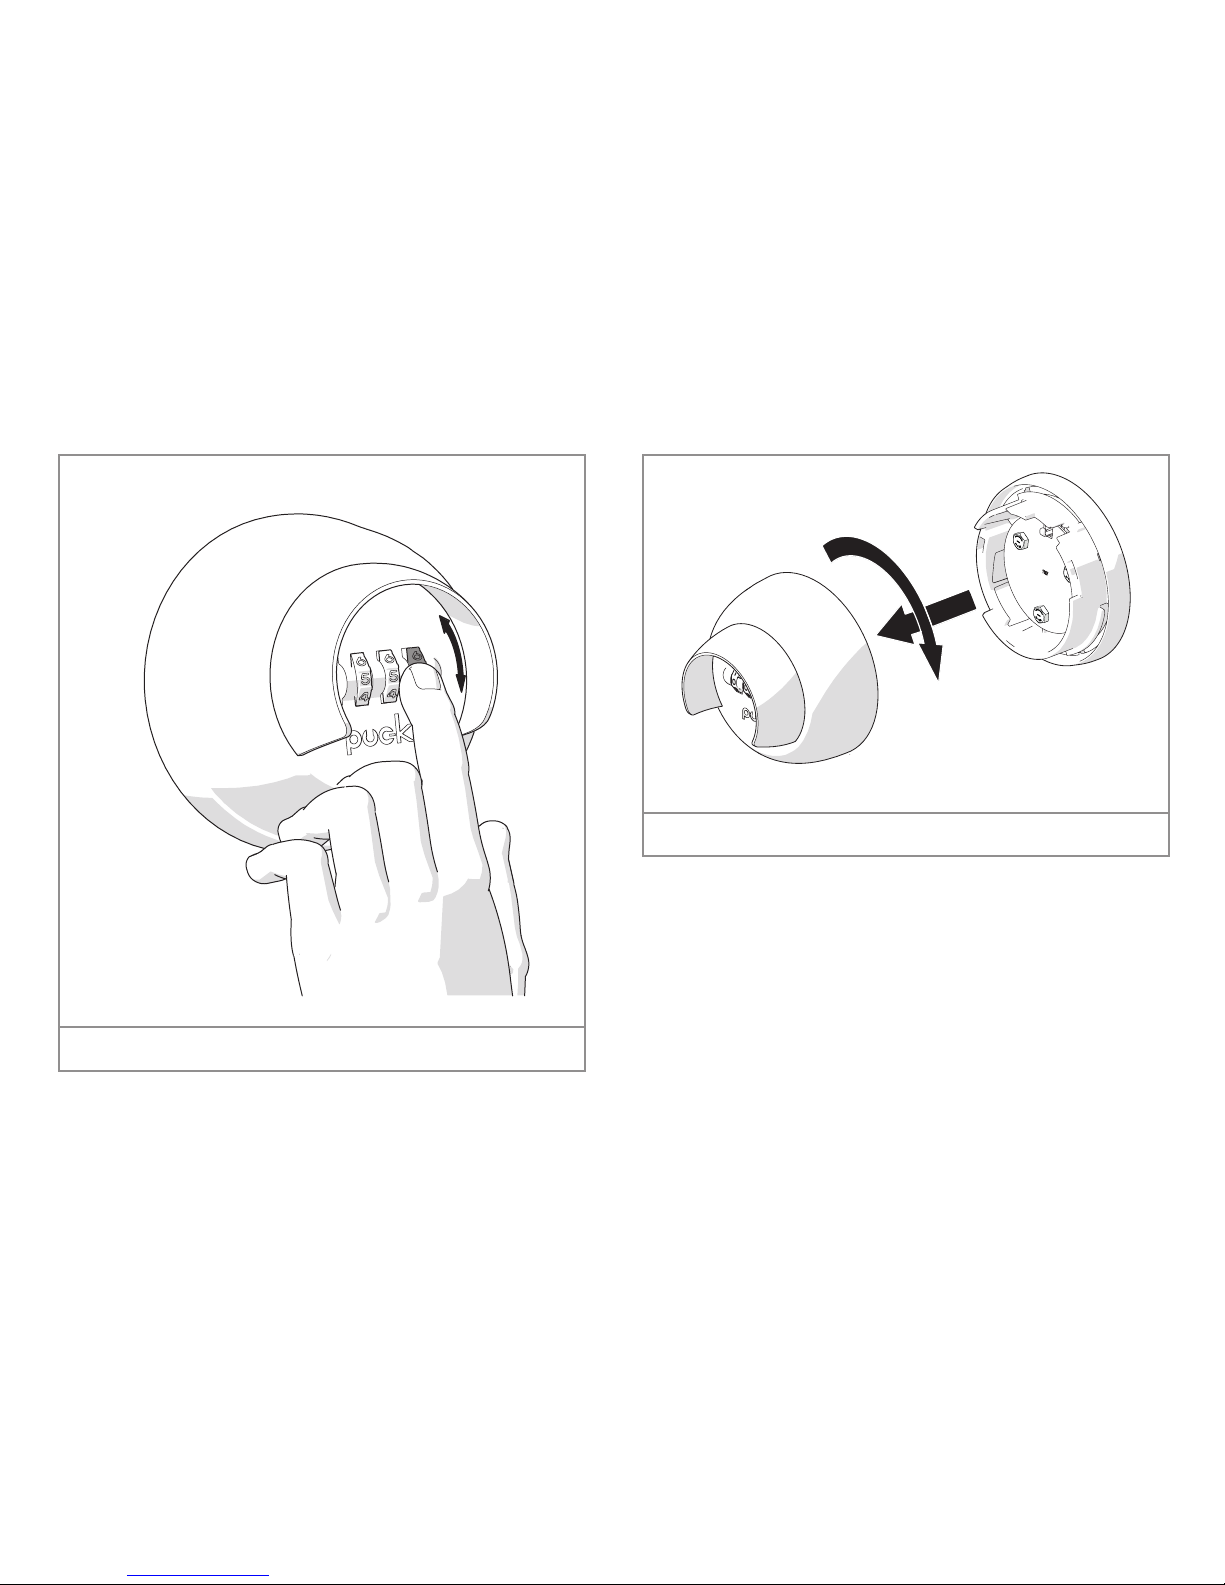
1. Enter the correct code, by turning the
number wheels.
Figure 15. Enter the correct code
2. Turn the cover anti-clockwise and
hold it.
3. Pull the cover towards you.
Figure 16. Remove the cover
15
tip
The key safe has two slots.
You can temporarily 'park' the cover there.
In this way, you have your hands free.
Figure 17. You can temporarily place the cover in the
two slots
4.2 Setting the code
tip
Change the code regularly.
To set the code, do the following:
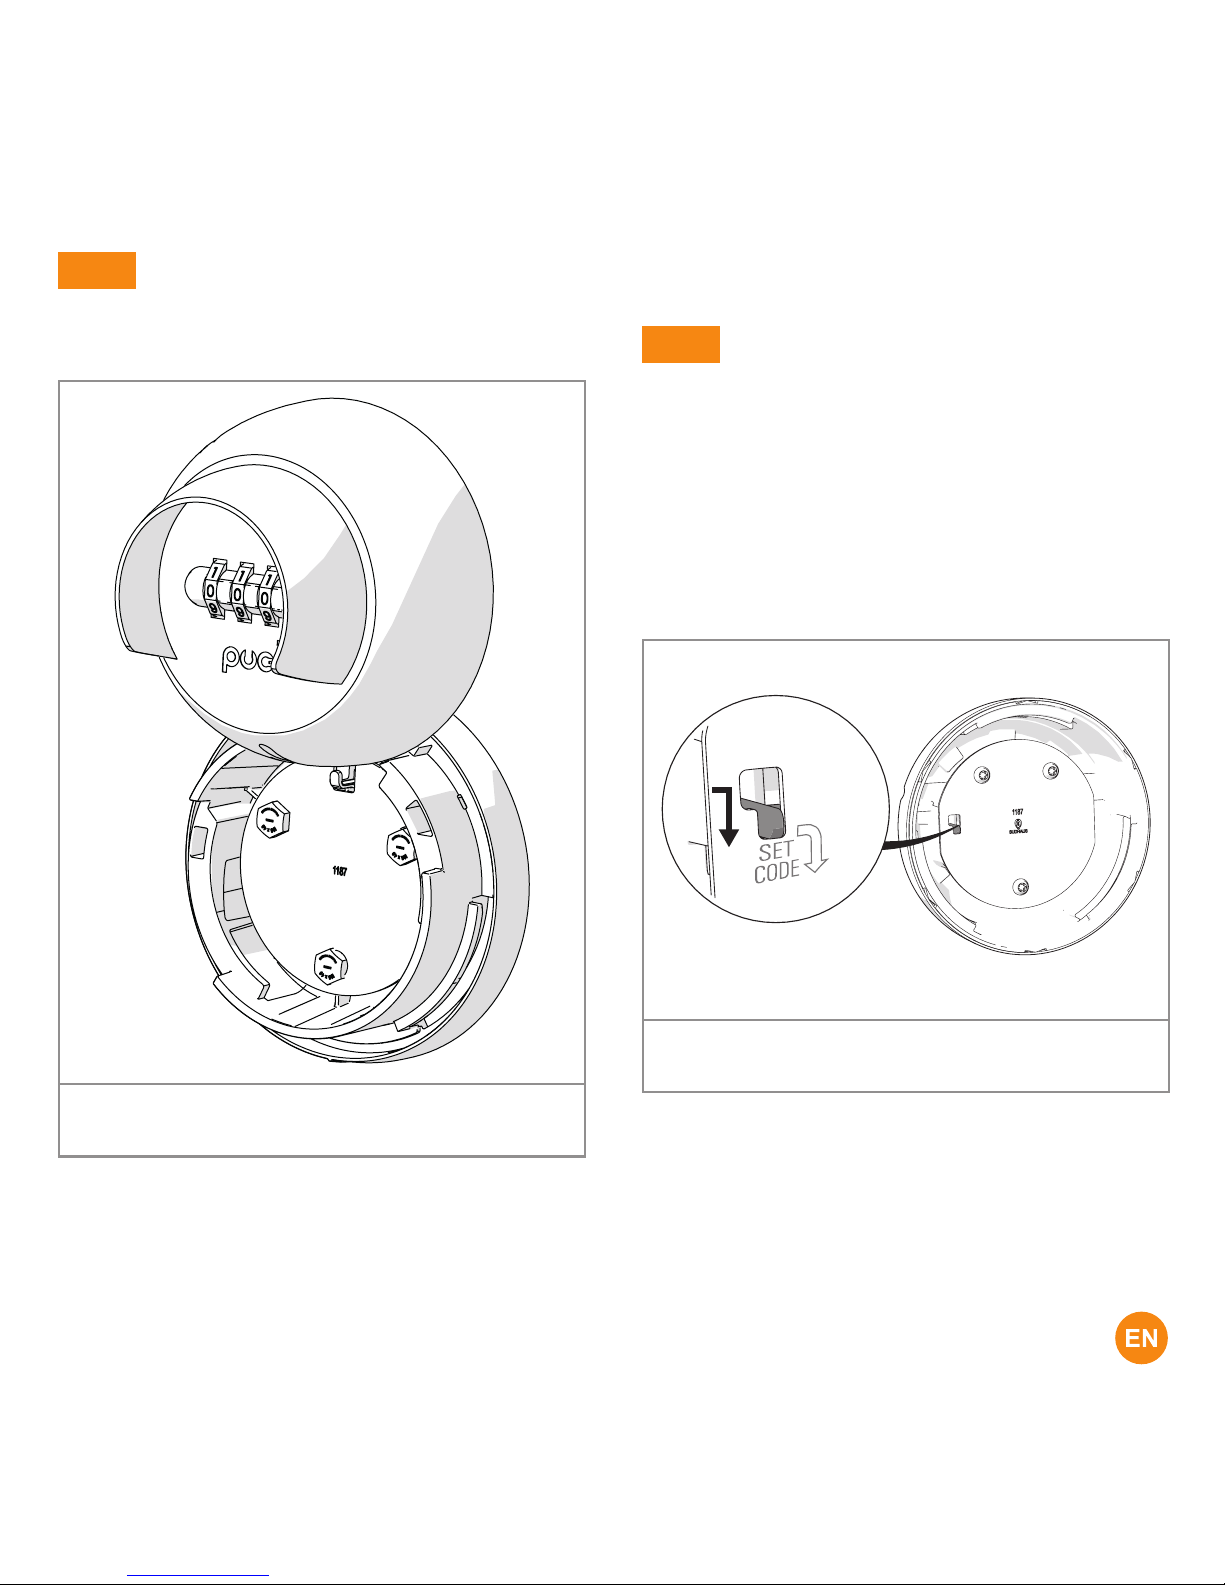
1. Remove the lid.
(see: Opening Puck Keysafe)
2. Re-enter the original opening code.
3. Set the code setting slider to the
position SET CODE.
Figure 18. Set the code setting slider to the position
SET CODE
16
User and assembly manual
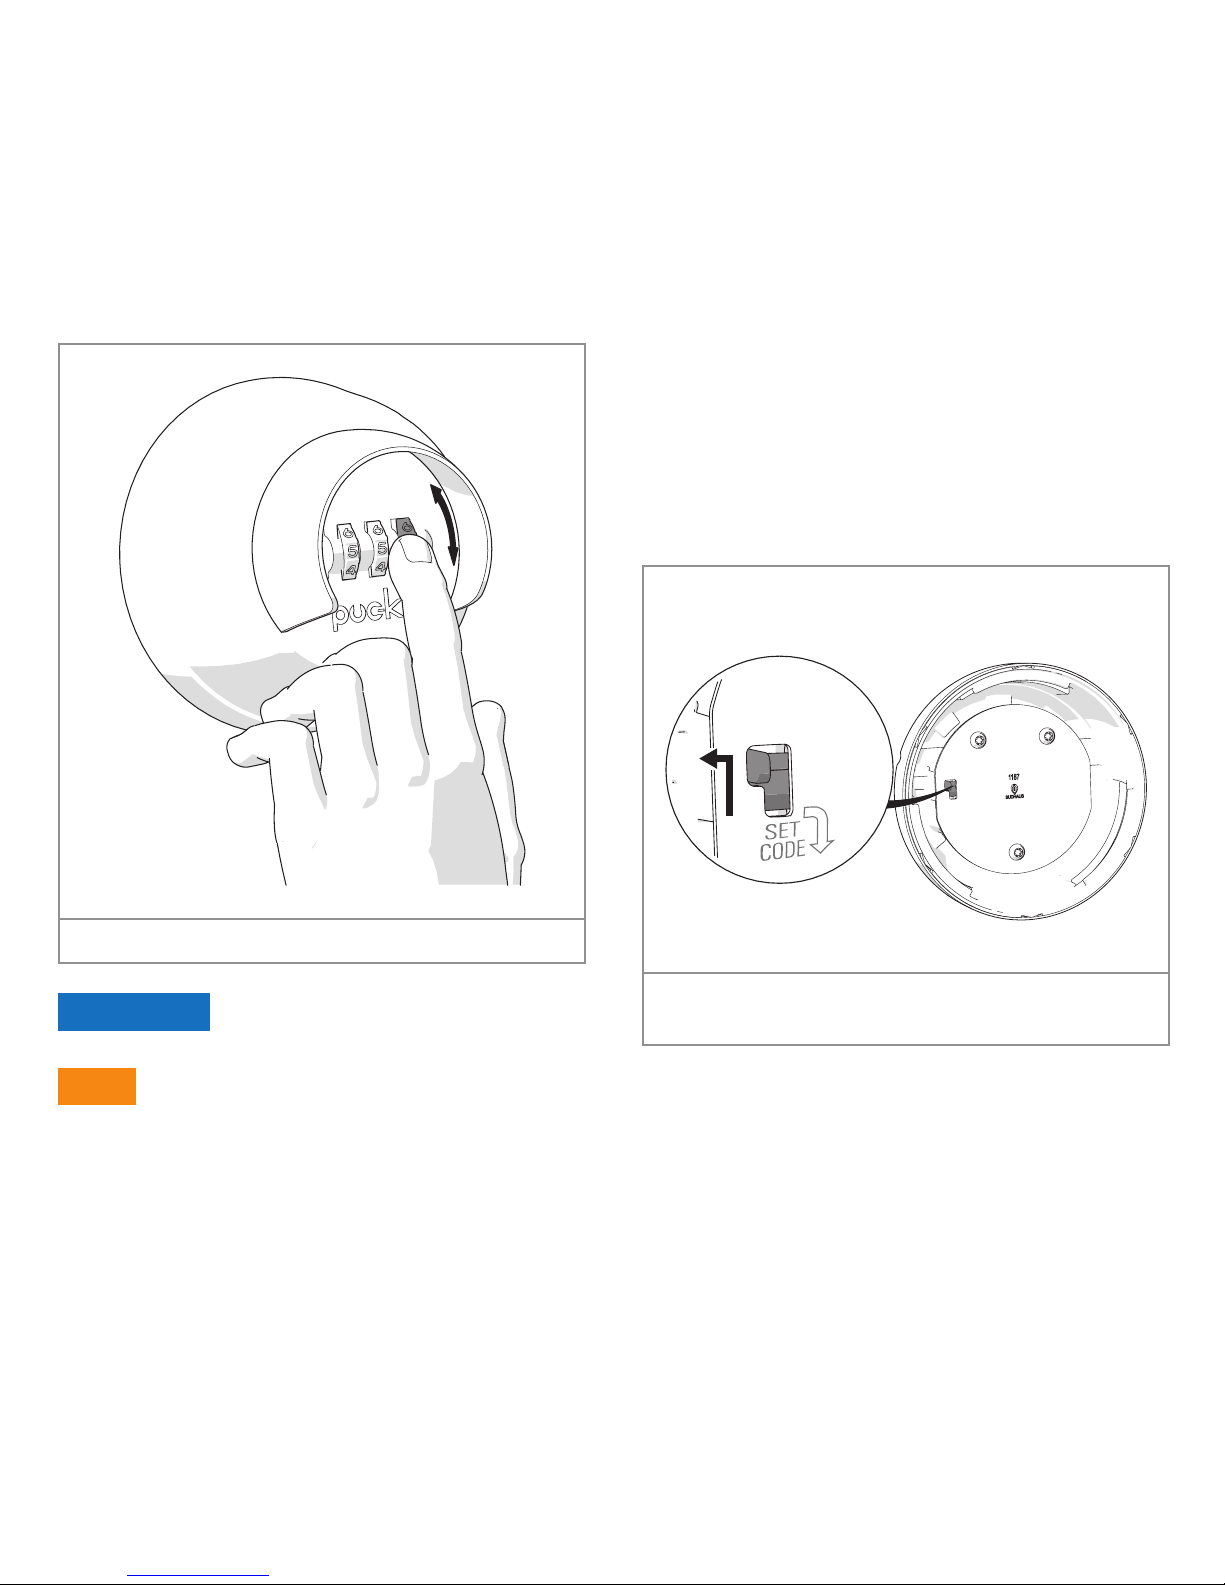
4. Rotate the number wheels to the code
you want to set.
Figure 19. Setting the code
attention
Don't forget the code.
tip
Choose a code that is difficult for
others to guess but easy for you to
remember.
5. Check if the code is set correctly. Set
the code setting slider back on the high
position.
6. Rotate one of the number wheels one
position. To make sure the code is set
correctly the code setting slider must
be fixed into its position.
Figure 20. Set the code setting slider back on the high
position
You have now set the code.
You can put the cover back again.
You can open the Puck Keysafe with the
code you just set.

17
5 Maintenance, environment and disposal
With normal use the Puck Keysafe is maintenance-free.
Please dispose of the product and packaging according to the local regulations.
6 Guarantee
We offer a 2 year guarantee on functionality for normal use in accordance with these
instructions.

Gebruikers- en montagehandleiding
18
Handleiding voor de installateur
en de eindgebruiker
Geachte klant,
Bedankt voor de aanschaf van de Puck
Keysafe. Deze handleiding bevat alle
benodigde informatie om snel vertrouwd te
raken met het product. Wij verzoeken u
vriendelijk om deze informatie zorgvuldig
door te nemen, alvorens met het product te
gaan werken.
Deze handleiding is bedoeld voor de
installateur en de eindgebruiker van de
Puck Keysafe. Dit is de oorspronkelijke
handleiding. Bewaar deze handleiding
goed!
Voor meer informatie kunt u contact
opnemen met met de Puck Dealer
in uw regio, zoals te vinden op
www.puck-keysafe.com.
Puck Keysafe gebruikers- en
montagehandleiding
Inhoud
1 Inleiding 19
1.1 Bedoeld gebruik 19
1.2 Gebruikte symbolen 19
2 Belangrijkste onderdelen 20
2.1 Bevestigingsmiddelen 21
2.2 Bedieningselementen 21
3 Montage 22
3.1 De Puck Keysafe monteren op
een stenen of betonnen muur 22
3.2 De Puck Keysafe monteren op
het kozijn van een deur 26
4 Gebruik 29
4.1 De Puck Keysafe openen 29
4.2 De code instellen 30
5 Onderhoud, milieu en afdanken 32
6 Garantie 32
19
1 Inleiding
Met de Puck Keysafe kunt u uw sleutel
veilig opbergen bij de plaats waar u hem
nodig heeft. De Puck Keysafe is SKG
gekeurd en heeft de kwalificatie **.
De Puck Keysafe kan geopend worden
door het invoeren van een viercijferige
code. De Puck Keysafe heeft twee
beveiligingen om uw code geheim te
houden voor derden:
1. De Puck Keysafe is voorzien van een
anti meeleeskap. Deze kap maakt het
voor derden moeilijker om over uw
schouder mee te kijken als u uw
pincode invoert.
2. Als u de Puck Keysafe opent, blijft de
code niet staan, maar wordt een andere
cijfercombinatie ingesteld.
1.1 Bedoeld gebruik
De Puck Keysafe is een sleutelkluis,
bedoeld om uw woningsleutels veilig op te
kunnen bergen bij de woning. De Puck
Keysafe kunt u openen met behulp van een
viercijferige code. Deze code kunt u zelf
instellen. Zorg dat u de code kent, voordat
u de Puck Keysafe sleutelkluis afsluit.
Deel uw code niet met derden.
De Puck Keysafe kan gemonteerd worden
op een stenen of betonnen muur of op een
deur met behulp van een montagebeugel.
1.2 Gebruikte symbolen
In deze gebruikershandleiding worden de
volgende markeerconventies gebruikt:
let op
Let op! Een opmerking met
aanvullende informatie voor de gebruiker.
Een opmerking maakt de gebruiker attent
op mogelijke problemen.
De Puck Keysafe is
gecertificeerd volgens de
beoordelingsrichtlijn van
SKG-IKOB KE 470 met de classificatie
2 sterren. Dit betekent dat een onbevoegde
meer dan 3 minuten nodig heeft om de
kluis open te breken.
Gebruikers- en montagehandleiding
20
2 Belangrijkste onderdelen
Figuur 1. Belangrijkste onderdelen
1. Anti meeleeskap
2. Deksel
3. Sleutelbak
4. Montageplaat
5. Montagebeugel (optioneel)
21 3 4 5
 Loading...