

Page 1
READY TO RIDE ASSEMBLY INSTRUCTIONS
Congratulations on your new PUBLIC Sprout kids bike. By following a few simple steps
your PUBLIC Sprout bike will be ready to go! Just a few points we’d like to mention
before you begin:
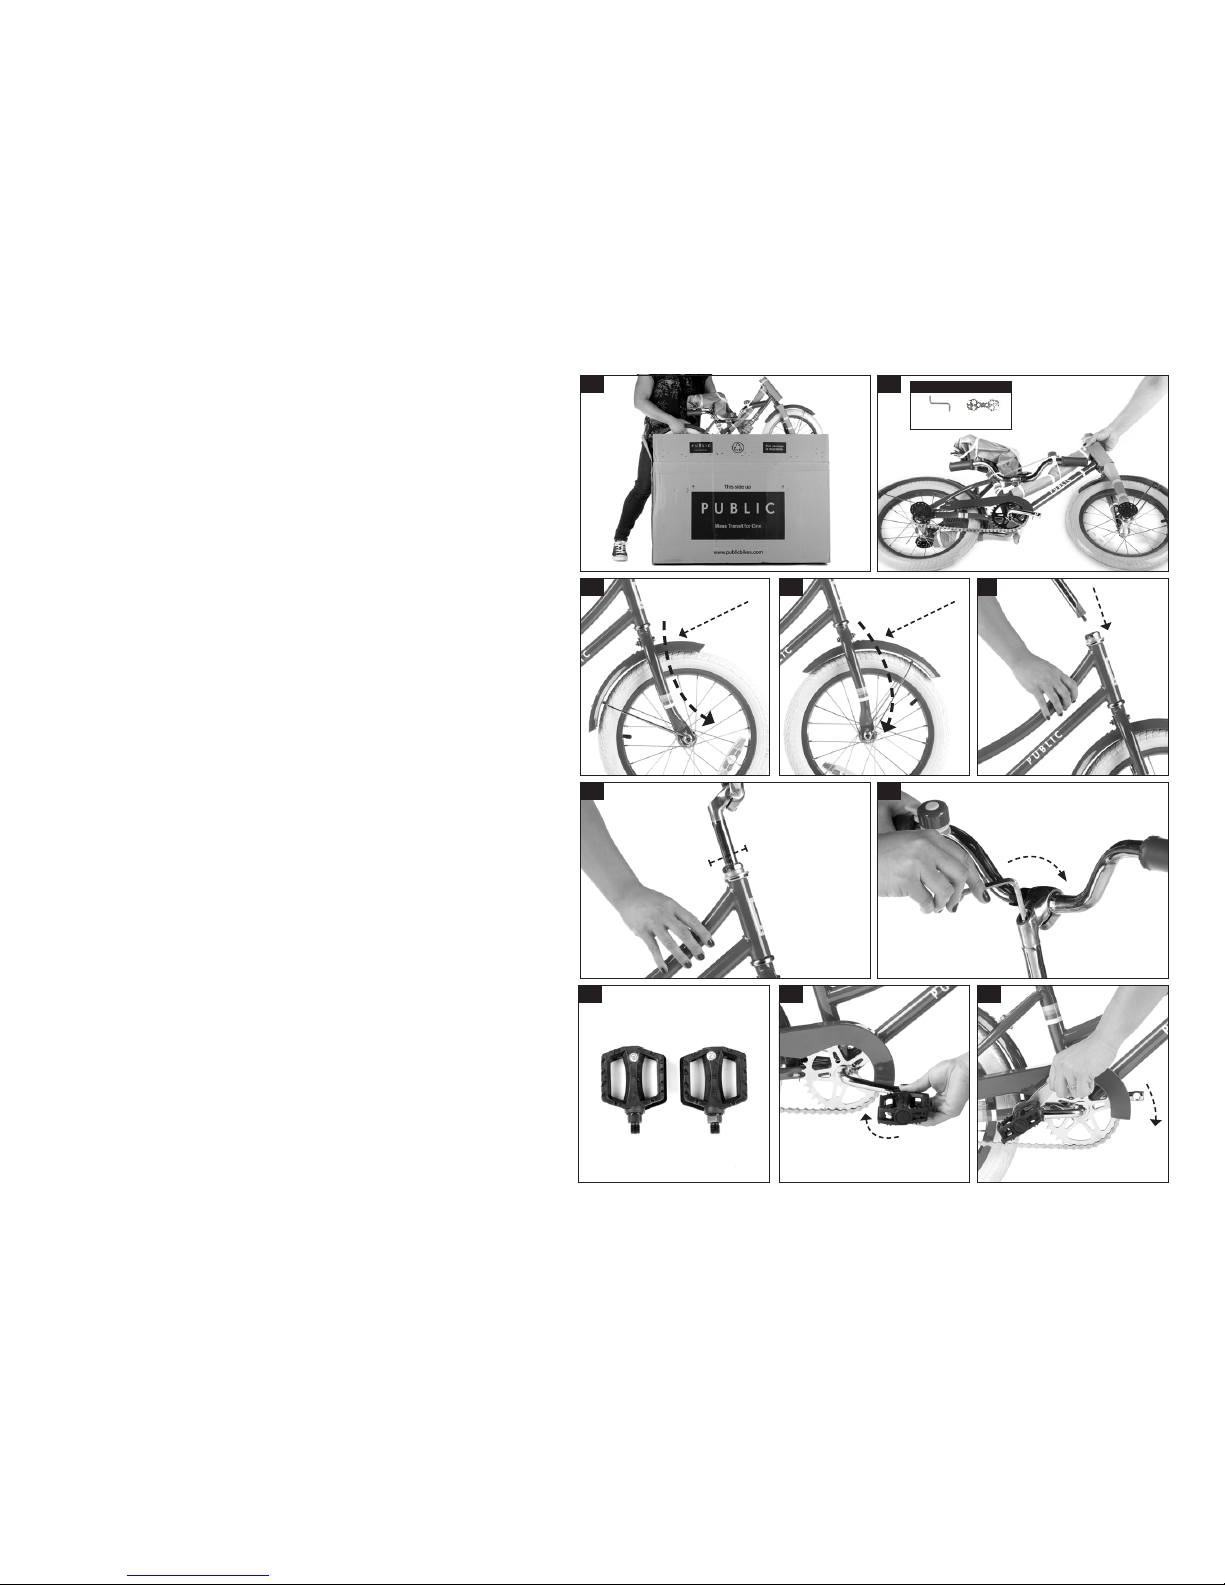
Step 1 – Unboxing
• Start by carefully removing bike from the box (Figure 1).
• Remove all packaging. Be careful to recycle all zip ties and plastic pieces, as these
may present a choking ha zard.
• Locate the hex (allen) wrench and 15mm box wrench inside the included small
parts box (Figure 2). Please set these aside for later use in bike assembly.
Step 2 – Inserting the stem and handlebars
• With the packaging removed let’s install the stem and handlebars into the fork.
First, make sure the fork is oriented in the correct direction, angled forward,
sloping away from the center of the bike (Figures 3 & 4).
• Now we are ready to install the stem and handlebars. Insert the stem into the fork
(Figure 5), aligning the handlebars so that they are perpendicular to the front wheel.
• Be aware the stem has a “minimum insertion line” marked on it (Figure 6). The stem
and bars should be inserted far enough into the fork of the bike that these lines are
not visible.
• With the handlebars set at the desired height, tighten the bolt on the top of
the stem (clockwise) with the hex wrench (Figure 7).
Step 3 – Installing the pedals
• Within the bike box there is a smaller box that includes a pair of pedals.
• Each pedal is marked “L” and “R” at the end of the pedal spindle (axle) (Figure 8A).
• The right pedal goes on the right side of the bike, the side with the chain guard.
• Take the right pedal in your hand and begin threading the right pedal into the right
crankarm by turning the pedal axle clockwise (Figure 8B). The pedal should freely
thread into the crankarm. If there is resistance you are likely threading the pedal in
the wrong direction and simply unthread, remove the pedal and try again.
• Once the pedal has been threaded in by hand, use the 15mm box wrench for final
tightening (Figure 8C).
• Nex t, take the left pedal and begin threading the left pedal into the lef t crankarm by
turning the pedal axle counterclockwise to tighten it. As with the right pedal, use the
15mm box wrench for final tightening.
www.publicbikes.com+ 1 888 450 0123
• This product is intended for
ages 4 - 6 years old (16”) and
5 – 8 year s old (20”)
• Always wear a helmet. Some
states require ride rs under 18
to wear a helmet. Please
check your local laws.
• Adult assembly required.
• Adult supervision is required
at all times. Never leave a
child unattended while riding.
• This product conforms to
CPSIA 2008, CPSC 1303,
16 and C FR 1512 saf ety
standards for children ages 3
and up, inc luding chemical
and mechanical testing.
• Not suitable for children under
36 months. Small parts may
present a choking hazard.
• Packaging material presents
a chok ing hazard, please
keep away from small children.
8B 8C
INCORRECT
Inside the small parts box
15mm box
wrench
hex (allen)
wrench
1
53
2
8A
6 7
4
MIN. INSERT
CORRECT
Page 2
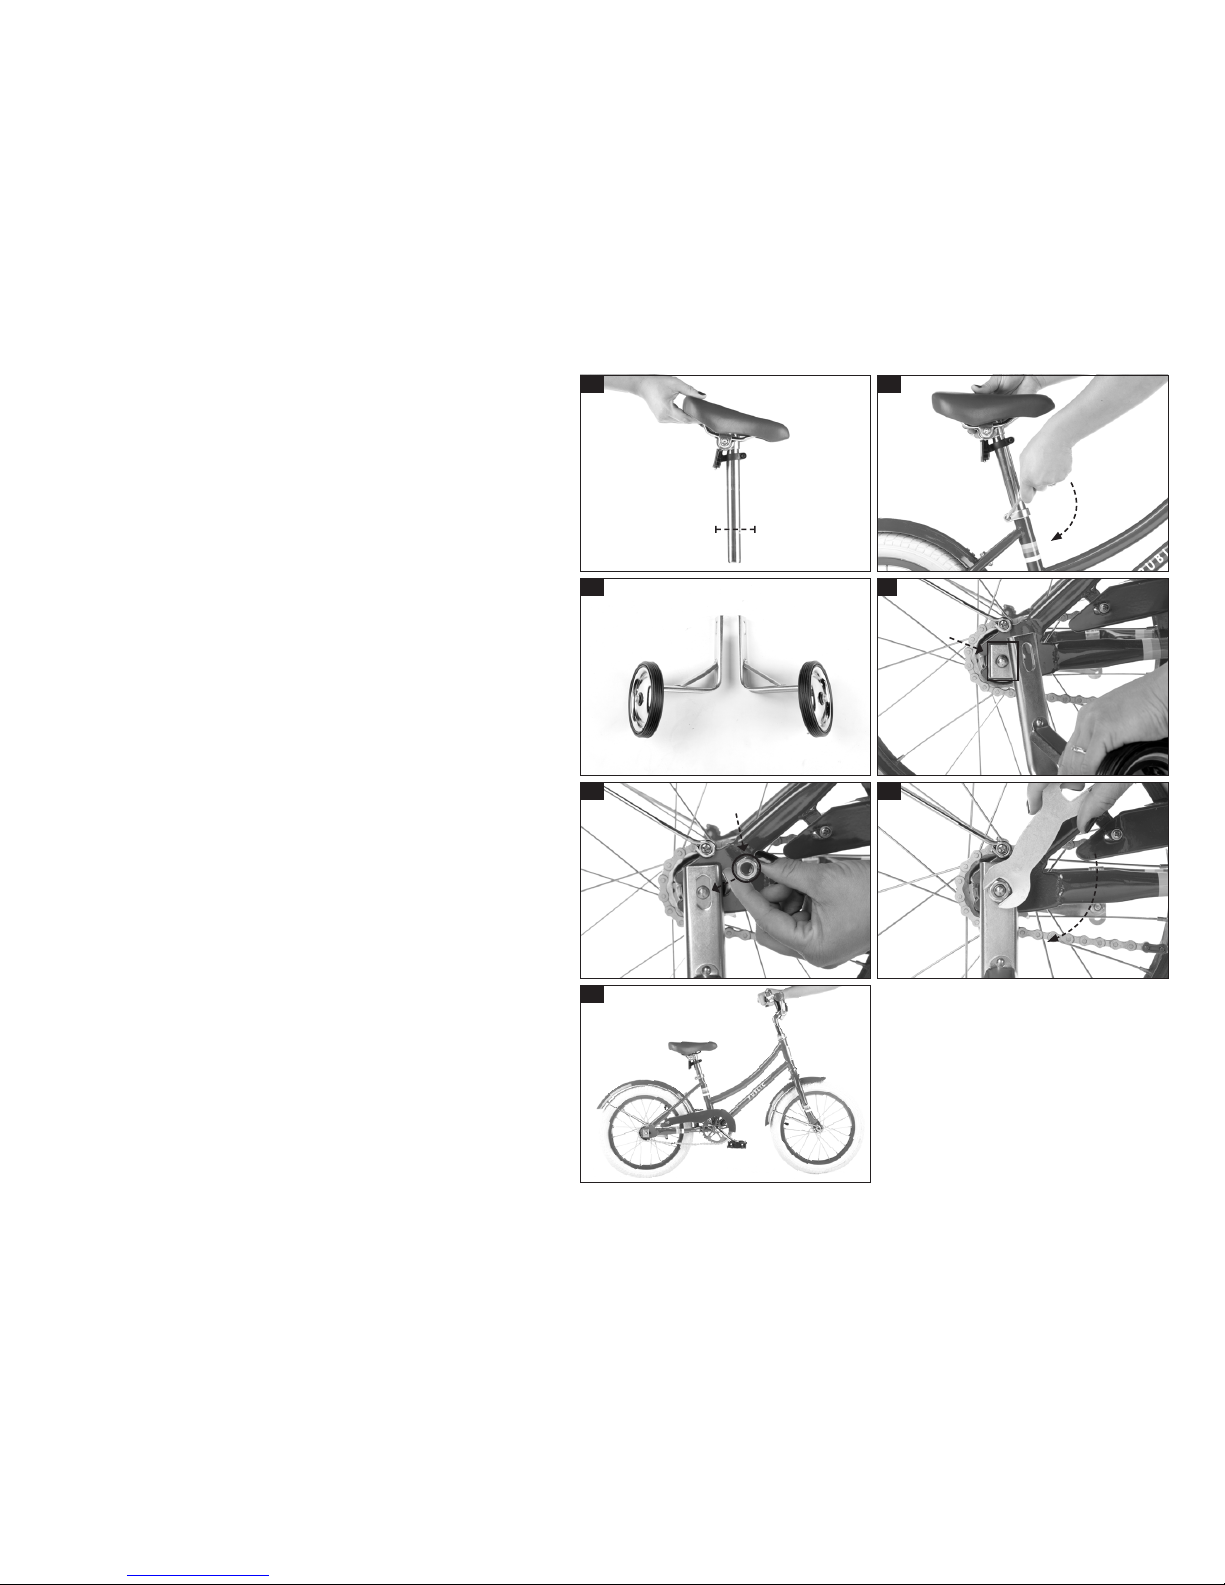
Step 4 – Adjust the seat height
• Like the stem, the seat post has a minimum insertion line (Figure 9). The seat
should always be low enough that the minimum insertion line is not visible. If you
need to raise the seat higher than the minimum inser tion line allows, contact us to
order a longer seat post.
• Loosen the seat post clamp bolt (counter-clockwise) using the included
hex wrench. Set the seat to the desired height and tighten the seat post clamp
(clockwise) (Figure 10).
Step 5 – Check tire inflation
• The tires should arrive already inflated. If they appear flat, please inflate before
riding, with no more than 20-30 PSI of pressure. Tires should be checked and
every couple of weeks.
• WARNING: DO NOT inflate with a gas station air hose or powered air compressor!
Over inflation will permanently damage tires. Only use a bicycle pump to inflate tires.
Step 6 – Optional: Training Wheels Installation
• For 16” wheel size bikes you may chose to install the included training wheels
(Figure 11). To install the training wheels, first loosen and remove the 15mm bolt
from the rear axle using the 15mm box wrench.
• Leave the square metal plate on the axle and put the training wheel on over top of
this square metal plate (Figure 12).
• Now reinstall the 15mm bolt (Figure 13) to hold the training
wheel in place, tightening the bolt snugly with the 15mm box wrench (Figure 14).
Step 7 – Ready to roll
• Congratulations! Your PUBLIC Sprout is ready to ride (Figure 15)!
Have Questions? Contact us
If you run into any problems or have any questions please give us a call at
+ 1 888 450 0123 10am to 6pm PST Monday – Friday, or send an email to
[email protected].
www.publicbikes.com+ 1 888 450 0123
MIN. INSERT
Squ are
Metal Plate
15mm bo lt
9
12
15
11
10
13 14
 Loading...