

Public Bike Owner's Manual And Assembly Manual

Bike Owner’s Manual and Assembly Guide
www.publicbikes.com
+1 888 450 0123
Ali Valentova
PUBLIC Employee: Operations

Letter from PUBLIC
Safety and Civility: Why a Red Bell Matters
Our bikes have been specifically designed for safe city riding. We’ve included features such as European style upright handlebars, tires with reflective strips, solid
brakes, and really strong steel frames. But these do not really make bicycling safe.
Nor does a helmet. The most important element is your own good sense and awareness, and the respect you give to conditions, and to the other brothers and sisters on
the road, and maybe our Federico Red Bell (see website to order). Why? It will help
you communicate to other riders and pedestrians with a pleasant tone. It is pretty. It
is a gentle reminder to converse with respect. It may be the antidote to road rage and
confrontation. It might remind us to smile. It is a symbol of civility.
We envisage a day when bicyclists and pedestrians and cars can co-exist with a little
more respect and civility. What if car drivers’ first thought when seeing someone on
a bike was, “How great, there is one less person in a car causing congestion on my
daily commute.” What if bicyclists’ first thought upon seeing cars crowding a street
was, “Too bad those people don’t have smart public transportation as an alternative
to their cars.” The 20th century has left most of us with cities that are not as friendly
to pedestrians and bicyclists as they are to cars. But this is all changing for the better,
and we are part of this movement in our own civil way.
Thanks for being part of PUBLIC.
Rob Forbes
Founder
This Bicycle Manual and Assembly Guide
are included to help make your PUBLIC
bicycle experience as simple and safe as
possible. A lot of it is written for the industry by the industry and it not so consumer
friendly. We also offer your some additional
assistance. Please call us at 1-888-450-
0123. We will always have someone on
hand to answer your call Monday–Friday
between 9AM and 5PM PST. You may also
find our website www.publicbikes.com
helpful with FAQ’s, assembly videos, and
more.
Like all bikes PUBLIC Bikes require routine maintanence. We recommend visiting
your local bike shop for a tune-up every 3-6
months depending on how often you ride.

1www.publicbikes.com
Contents
Tech 17
Wheels 17
Front Wheel Secondary Retention Devices 17
Removing and Installing Wheels 17
• Removing a Front Wheel 17
Brakes 18
Brake Controls and Features 19
How Brakes Work 19
Shifting Gears 20
How an Internal Gear Hub Drivetrain Works 20
How a Derailleur Works 21
Pedals 22
Tires and Tubes 22
Tires 22
Tire Valves 23
Service 24
Service Intervals 24
If Your Bicycle Sustains An Impact 25
Appendix A
Fastener Torque Specifications 26
Warranty 26
Call-Out Illustration 2
General Warning 3
A Special Note to Parents 3
Bicycle Assembly Steps 4
First 8
Bicycle Fit 8
Safety First 8
Mechanical Safety Check 8
First Ride 10
Safety 10
The Basics 10
Riding Safety 11
Off-road Safety 12
Wet Weather Riding 12
Night Riding 12
Changing Components or Adding Accessories 13
Fit 14
Standover Height 14
Diamond Frame Bicycles (D, V) 14
Step-through Frame Bicycles (M, C) 14
Seat Position 14
Handlebar Height and Angle 16
Control Position Adjustments 16
Brake Reach 16
2 +1 888 450 0123
Bicycle Owner’s Manual
MY2012 // Model Year 2012
Modified from BPSA 9th Edition, 2007
PUBLIC
www.publicbikes.com
1-888-450-0123
1
17
3
2
4
5
6
7
20
8
9
10
11 19
12
13
14
21
15
16
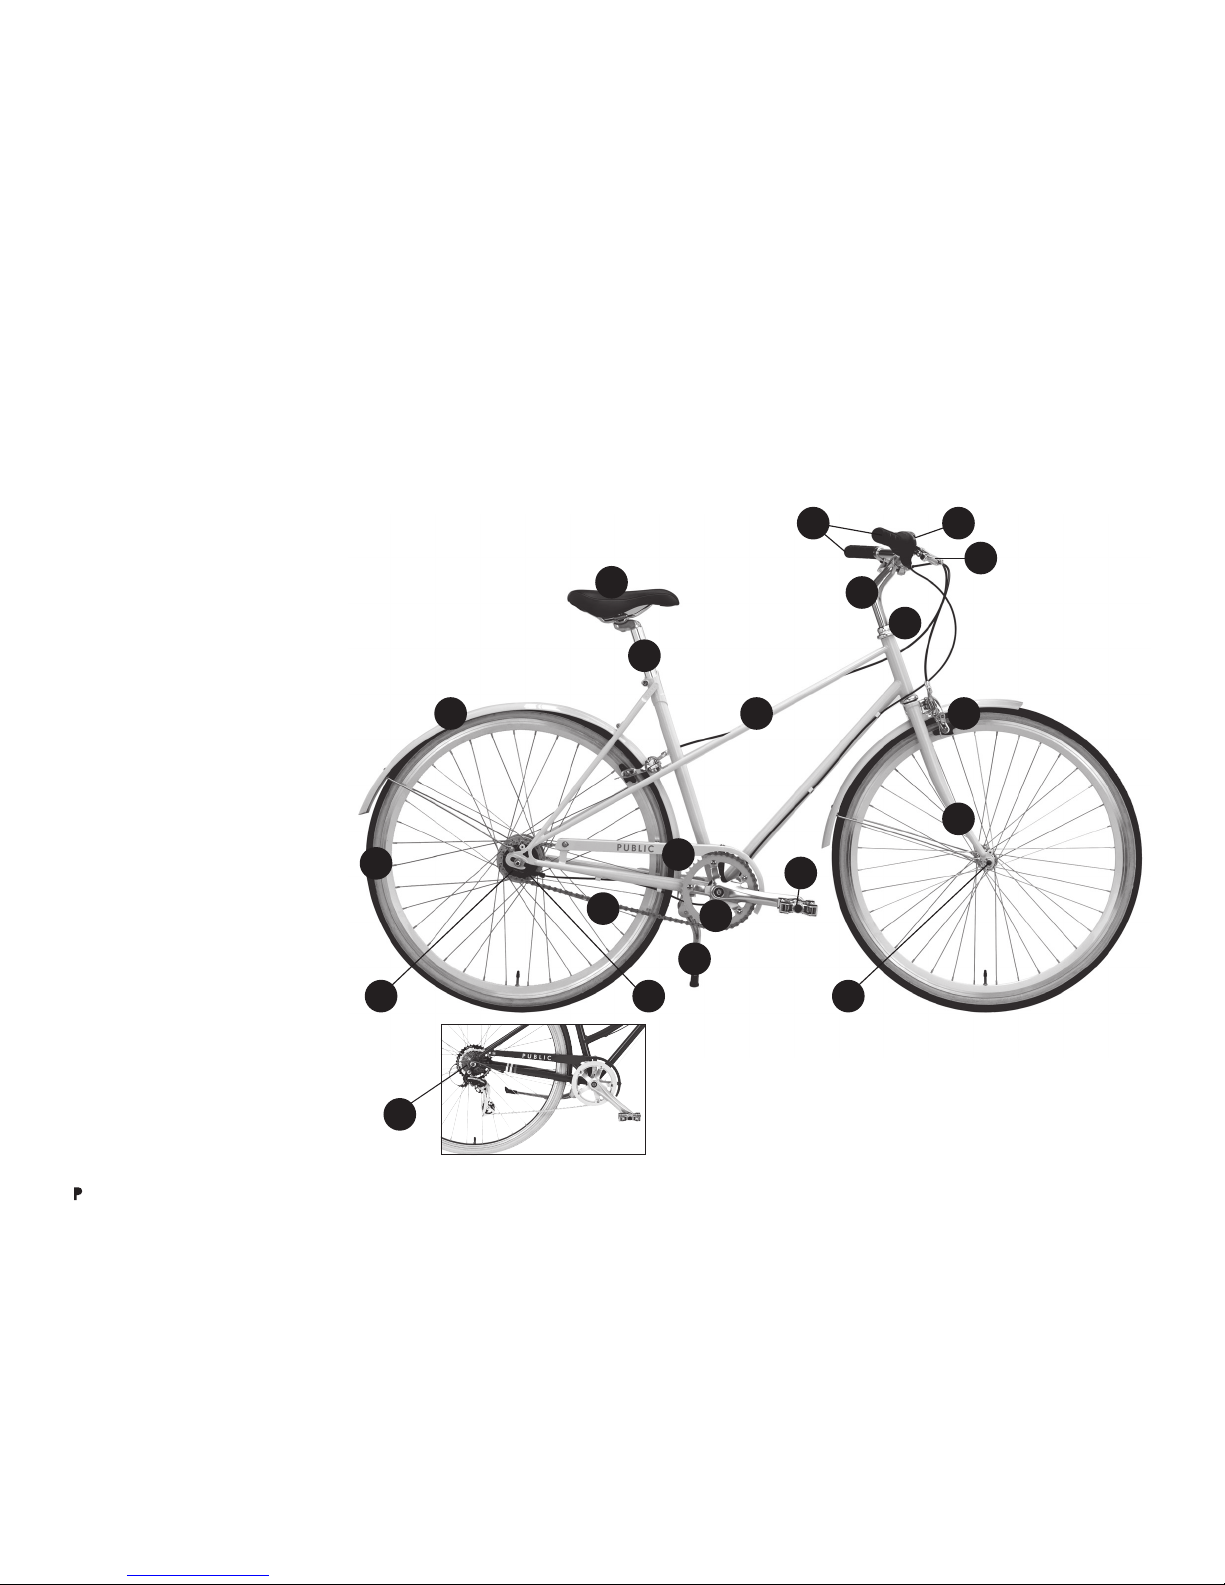
1. Wheel
2. Chain
3. Chainring
4. Pedal
5. Seat Post
6. Seat
7. Fender
8. Frame
9. Steerer Tube
10. Quill Stem
11. Handlebars
12. Brake Lever
13. Fork
14. Brakes
15. Kickstand
16. Chain Guard
17. Internal Hub
18. Derailleur
19. Gear Shifter
20. Sprocket
21. Dropouts
18

3www.publicbikes.com
This Manual contains many “Warnings”
and “Cautions” concerning the consequences of failing to maintain or inspect
your bicycle and failing to follow safe
urban cycling practices.
• The combination of the safety alert
symbol and the word WARNING indi-
cates a potentially hazardous situation,
which, if not avoided, could result in
serious injury or death.
• The combination of the safety alert
symbol and the word CAUTION indi-
cates a potentially hazardous situation,
which, if not avoided, may result in minor
or moderate injury. This notation may
also direct attention to unsafe practices.
Many of the “Warnings” and “Cautions”
say “you may lose control and fall.”
Because any fall can result in serious injury
or even death, we do not always repeat the
warning of possible injury or death.
It is impossible to anticipate every situation
or condition that can occur while riding.
Therefore, this Manual makes no representation about the safe use of the bicycle
under all conditions. There are risks
associated with the use of any bicycle that
cannot be predicted or avoided, and are
the sole responsibility of the rider.
A Special Note to Parents
As a parent or guardian, you are
IMPORTANT
This manual contains important safety,
performance and service information. Read
it before you take the first ride on your new
bicycle, and keep it for reference.
Additional safety, performance and service
information for specific components on
your bicycle, or for accessories such as
helmets or lights that you purchase, may
also be available. In case of a conflict
between the instructions in this manual
and information provided by the manufacturer, always follow the manufacturer’s
instructions.
If you have any questions or do not understand something, give PUBLIC a call or
consult with your local qualified bicycle
shop.
NOTE: This manual is not intended as
a comprehensive use, service, repair or
maintenance manual. Please see your
local bicycle shop for all service, repairs
or maintenance.
GENERAL WARNING
Like any sport, bicycling involves risk of
injury and damage. By choosing to ride a
bicycle, you assume the responsibility for
that risk. You will need to know—and to
practice—the rules of safe and responsible
urban riding and of proper use and maintenance, which can reduce risk of injury.
responsible for the activities and safety of
your minor child. Before permitting your
child ride the bicycle, you should read this
manual and review its warnings and the
bicycle’s functions and operating procedures with your child. Be aware that some
of your responsibilities include:
• Making sure that the bicycle is properly
fitted to the child.
• Checking that the bicycle is in good
repair and safe operating condition.
• Ensuring you and your child have
learned and understand how to safely
operate the bicycle, obey applicable
local motor vehicle, bicycle and traffic
laws, and common sense rules of safe
and responsible bicycling.
WARNING: Make sure that your
child always wears a CPSC approved
bicycle helmet when riding, and that
your child understands it is for bicycling
only and must be removed when not
riding. A bicycle helmet must not be
worn while playing or while not riding
a bicycle. Failure to follow this warning could compromise the helmet and
result in serious injury or death during
bicycle operation. Any helmet that was
worn during a collision with head impact
should be replaced, even if there is no
obvious damage to the helmet.
4 +1 888 450 0123
3
5a
2
4
5b
1
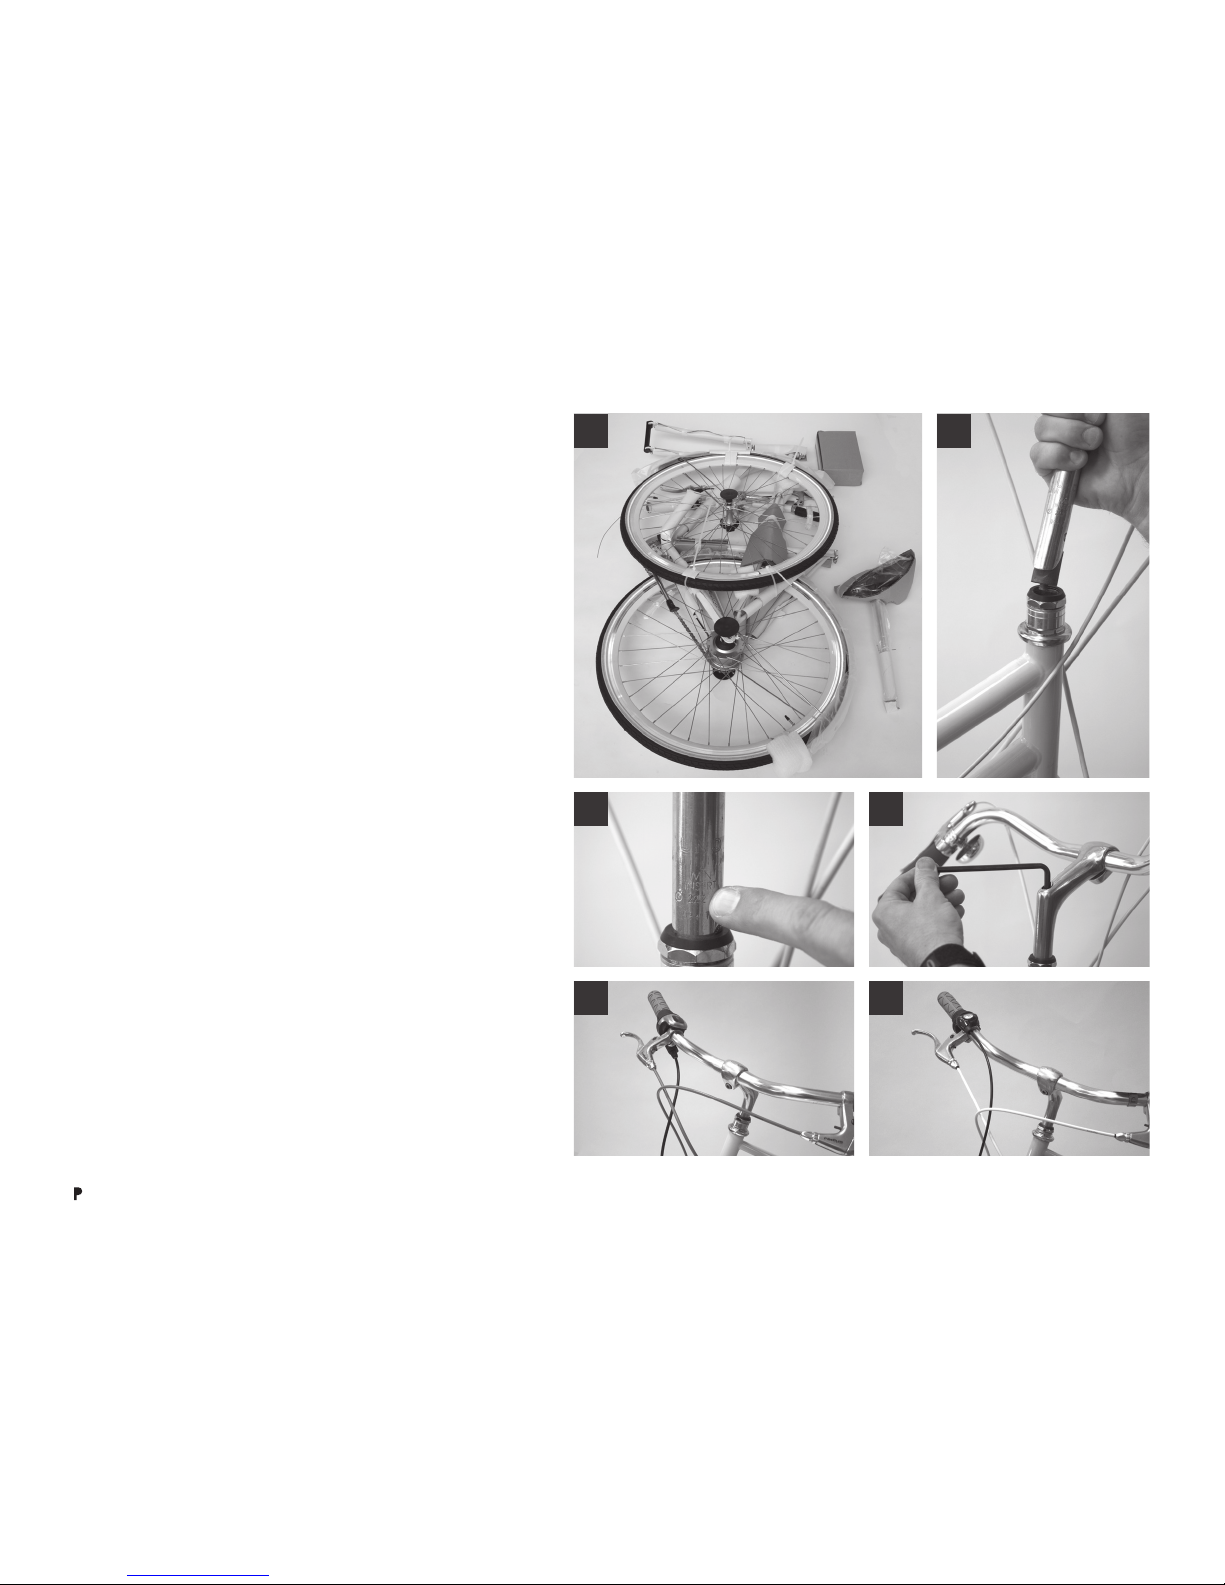
UNPACKAGING
• Open box, remove bicycle, seat and seatpost, and parts
box.
• Remove all packaging. Take care when cutting zip ties
to not scratch frame.
• Remove front wheel slowly, making sure to not bend
spokes or scratch rims or crank (
Figure 1).
STEM INSTALLATION
• Install stem of bicycle in fork by sliding quill of stem and
expander wedge into fork steerer tube (
Figure 2). Make
sure that the minimum insert line on stem is inserted fully
in fork and is NOT visible (Figure 3). Tighten stem bolt
with a 6mm hex Allen wrench (Figure 4).
• Make sure to have cable(s) routed properly to guarantee
TOOLS NEEDED:
Scissors or Box Cutter
6mm hex Allen wrench
5mm hex Allen wrench
4mm hex Allen wrench
15mm or adjustable
wrench
Philips head screwdriver
Flat head screwdriver
Bicycle Assembly Steps
Your PUBLIC bicycle comes directly to you 99% assembled.
The instructions will guide you through the additional steps
necessary to complete assembly. However, PUBLIC strongly
suggests having your bicycle assembled by a qualified bicycle
mechanic or bicycle shop. We feel everyone needs a good
local bicycle shop for follow-up service and maintenance as
well. To help you find a qualified bicycle shop in your area
give us a call at 1.888.450.0123 or email us at customer-
service@publicbikes.com.
5www.publicbikes.com
6
8
10
7
9
11
proper function. If cables are not routed properly, remove
stem and move cables until correct, then reinstall and
tighten stem.
NOTE: The 8-speed cable is attached from below (Figure
5a), the 3-speed and 7-speed cable is attached from above
(Figure 5b).
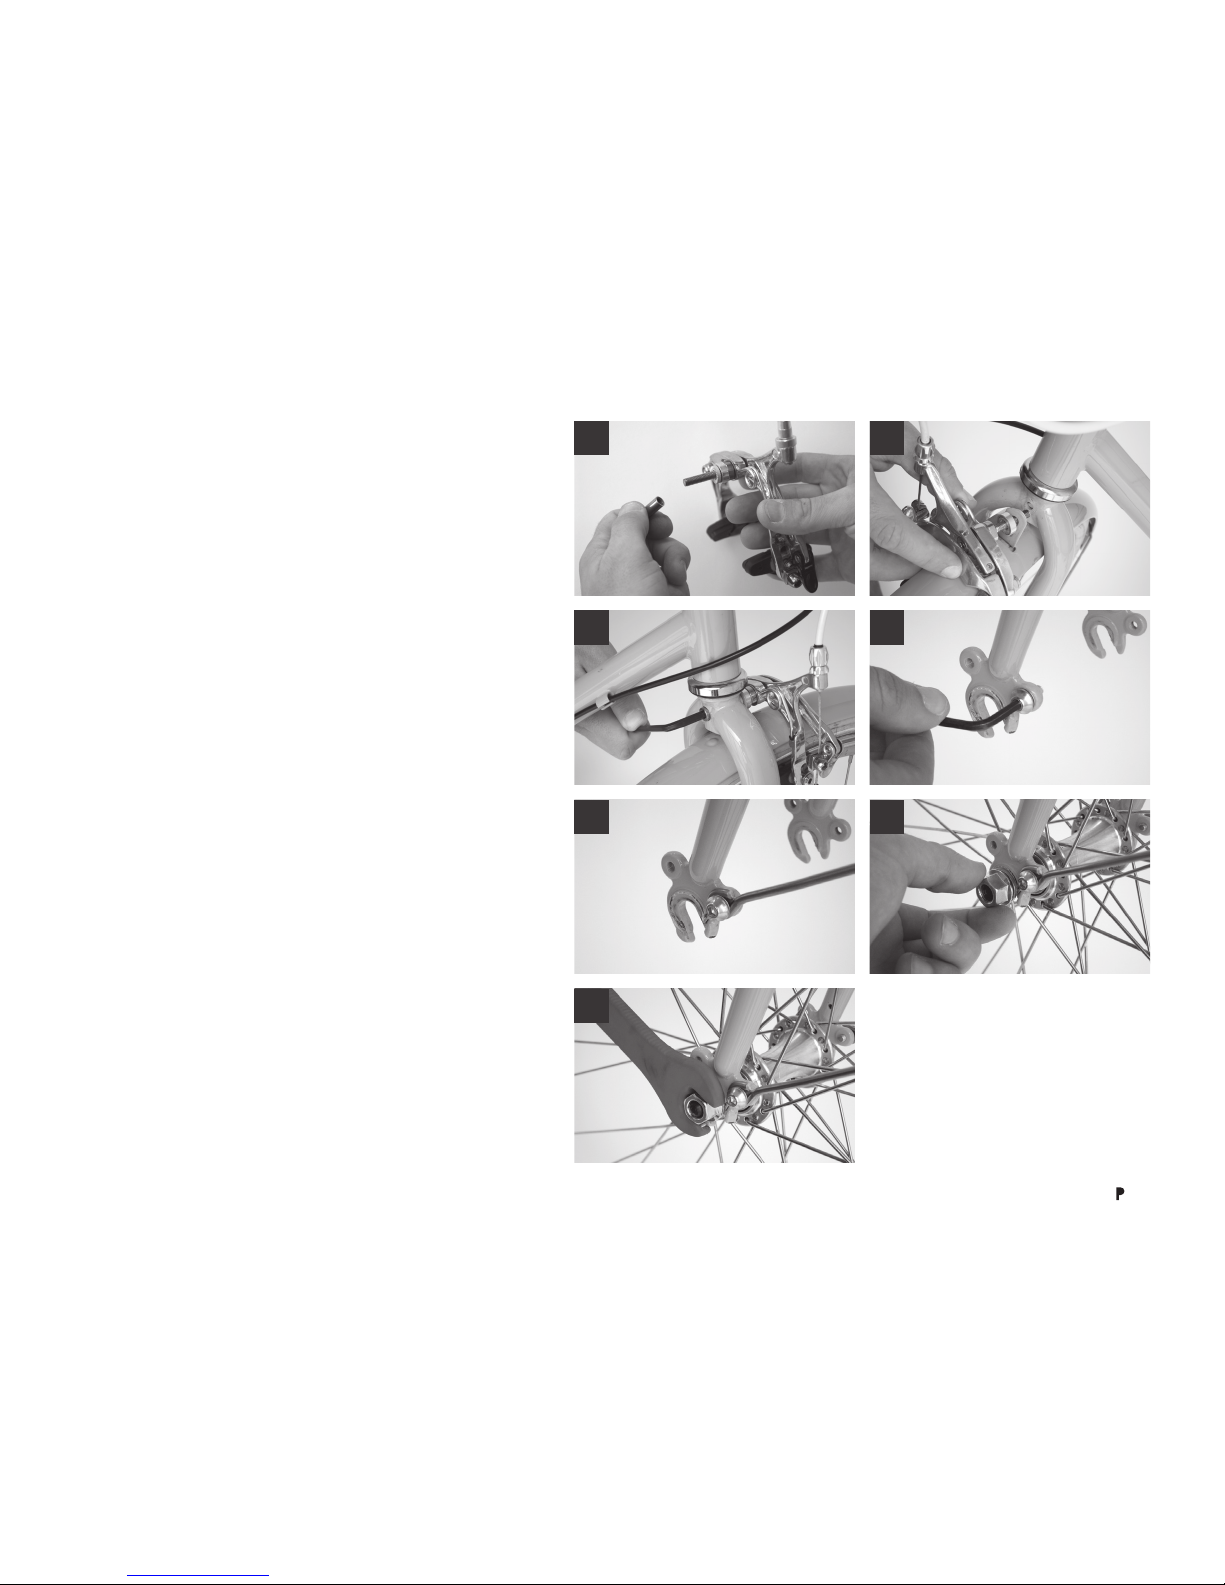
FRONT BRAKE/FENDER INSTALLATION
• Unthread nut from front brake mounting bolt. Remove all
spacers and washers (Figure 6).
• Assemble front brake and fender by sliding brake mounting
bolt with large smooth spacer thru the upper fender mount.
Install serrated washer, and slide thru fork front brake
mounting hole (Figure 7). Tighten nut down until lightly
tightened using a 5mm hex Allen wrench (Figure 8).
• Unthread bolts from fork dropout eyelets (Figure 9).
Slide bolts thru lower fender mounting strut holes, and
tighten bolts into fork dropout eyelets with a 4mm hex
Allen wrench (Figure 10).
FRONT WHEEL INSTALLATION
• In parts box, find front wheel axle mounting nuts and
washers.
• Read the sidewall of the tire to determine proper mounting direction of front wheel.
• Slide wheel into fork, placing fork dropouts onto front
wheel axle
(Figure 11).
• Install front wheel axle mounting nuts and washers, and
tighten using a 15mm or adjustable wrench
(Figure 12).
FRONT BRAKE ALIGNMENT
• Loosen front brake mounting nut on back of fork with a
5mm hex Allen wrench.
12

6 +1 888 450 0123
• With front wheel installed and tightened, squeeze front
brake and, at the same time, tighten the brake mounting nut. This aligns your front brake with the front wheel
(Figure 13).
REAR FENDER INSTALLATION
• The rear fender of your PUBLIC bike comes 75%
installed. To complete installation, first remove the
lower strut mounting bolts from rear dropout eyelets
(Figure 14).
• Slide bolts thru lower fender mounting strut holes, and
tighten bolts into rear dropout eyelets with a 4mm hex
Allen wrench
(Figure 15).
FOR 3-SPEED PUBLIC BIKES ONLY: REAR
CLICKBOX INSTALLATION
• Your 3-speed PUBLIC bike needs to have the shift
mechanism for the rear hub installed, otherwise it will
not work. This is an easy process.
• First, locate the push rod in the parts box
(Figure 16).
• Slide push rod into rear hub axle hole, pushing it in
until you feel it contact the internal gear mechanism
(Figure 17).
• Slide the clickbox onto the rear axle
(Figure 18).
• Tighten the clickbox onto hub by using a 5mm hex Allen
wrench to tighten the bolt located at the back of the
clickbox
(Figure 19).
PEDAL INSTALLATION
• Remove pedals from parts box. Check on the pedal axle
to determine which pedal is the right pedal and which
pedal is the left pedal. The right pedal will always be
marked with an “R” on the axle. This goes on the right
14
16
18
15
17
19
13

7www.publicbikes.com
side of the bike, the side with the chain.
• Using your hand, begin threading the right pedal into the
right crankarm by turning the pedal axle CLOCKWISE
(Figure 20). Once the pedal threads are engaged
(ensuring no cross-threading), use a 15mm or adjustable
wrench to tighten right pedal
(Figure 21).
• Using your hand, begin threading the left pedal into
the left crankarm by turning the pedal axle COUNTERCLOCKWISE
(Figure 22). Once the pedal threads are
engaged (ensuring no cross-threading), use a 15mm or
adjustable wrench to tighten left pedal.
SEAT AND SEATPOST INSTALLATION
• Using a 6mm hex Allen wrench, loosen seat clamp bolt
on bicycle
(Figure 23).
• Slide seatpost into seat tube of bicycle, making to ensure
that the minimum insertion line of seatpost is fully in seat
tube and is NOT visible
(Figure 24).
• Put seat at proper height and tighten seat clamp bolt on
bicycle using a 6mm hex Allen wrench.
REFLECTORS INSTALLATION
• Remove screw with screwdriver to open up plastic
bracket attachment of both the front and rear reflectors
(Figure 25).
• Mount the front white reflector on the center part of the
handlebars. Ensure reflector is facing out and straight
and tighten with screwdriver until snug
(Figure 26).
• Mount the rear red reflector on the seat post. Ensure
reflector is facing out and straight and tighten with a
screwdriver until snug
(Figure 27).
20
22
24
26
21
23
25
27
 Loading...