

SPM-622 Squad Power Manager
User Guide
Revision 7
PROTONEX TECHNOLOGY CORPORATION
Wholly- Owned Subsidiary OF BALLARD POWER SYSTEMS
A
NORTHBORO ROAD
153
OUTHBOROUGH, MA 01772-1034
S
508.490.9960 | F 508.490.8575
T
WWW.ptxnomad.com
IS A TRADEMARK OF PROTONEX TECHNOLOGY CORPORATION
PTX

Table of Contents
What’s A Power Manager? ................................................................................................ 4
Quick-Start ......................................................................................................................... 5
Connecting a Battery ..................................................................................................... 5
Powering a Radio ........................................................................................................... 6
Charging the Battery ...................................................................................................... 7
Adding Devices ............................................................................................................... 7
More Uses .......................................................................................................................... 7
Power From Vehicles, and Charging Vehicle Batteries .................................................. 7
Battery to Battery Charging ......................................................................................... 10
Making a Field UPS ...................................................................................................... 11
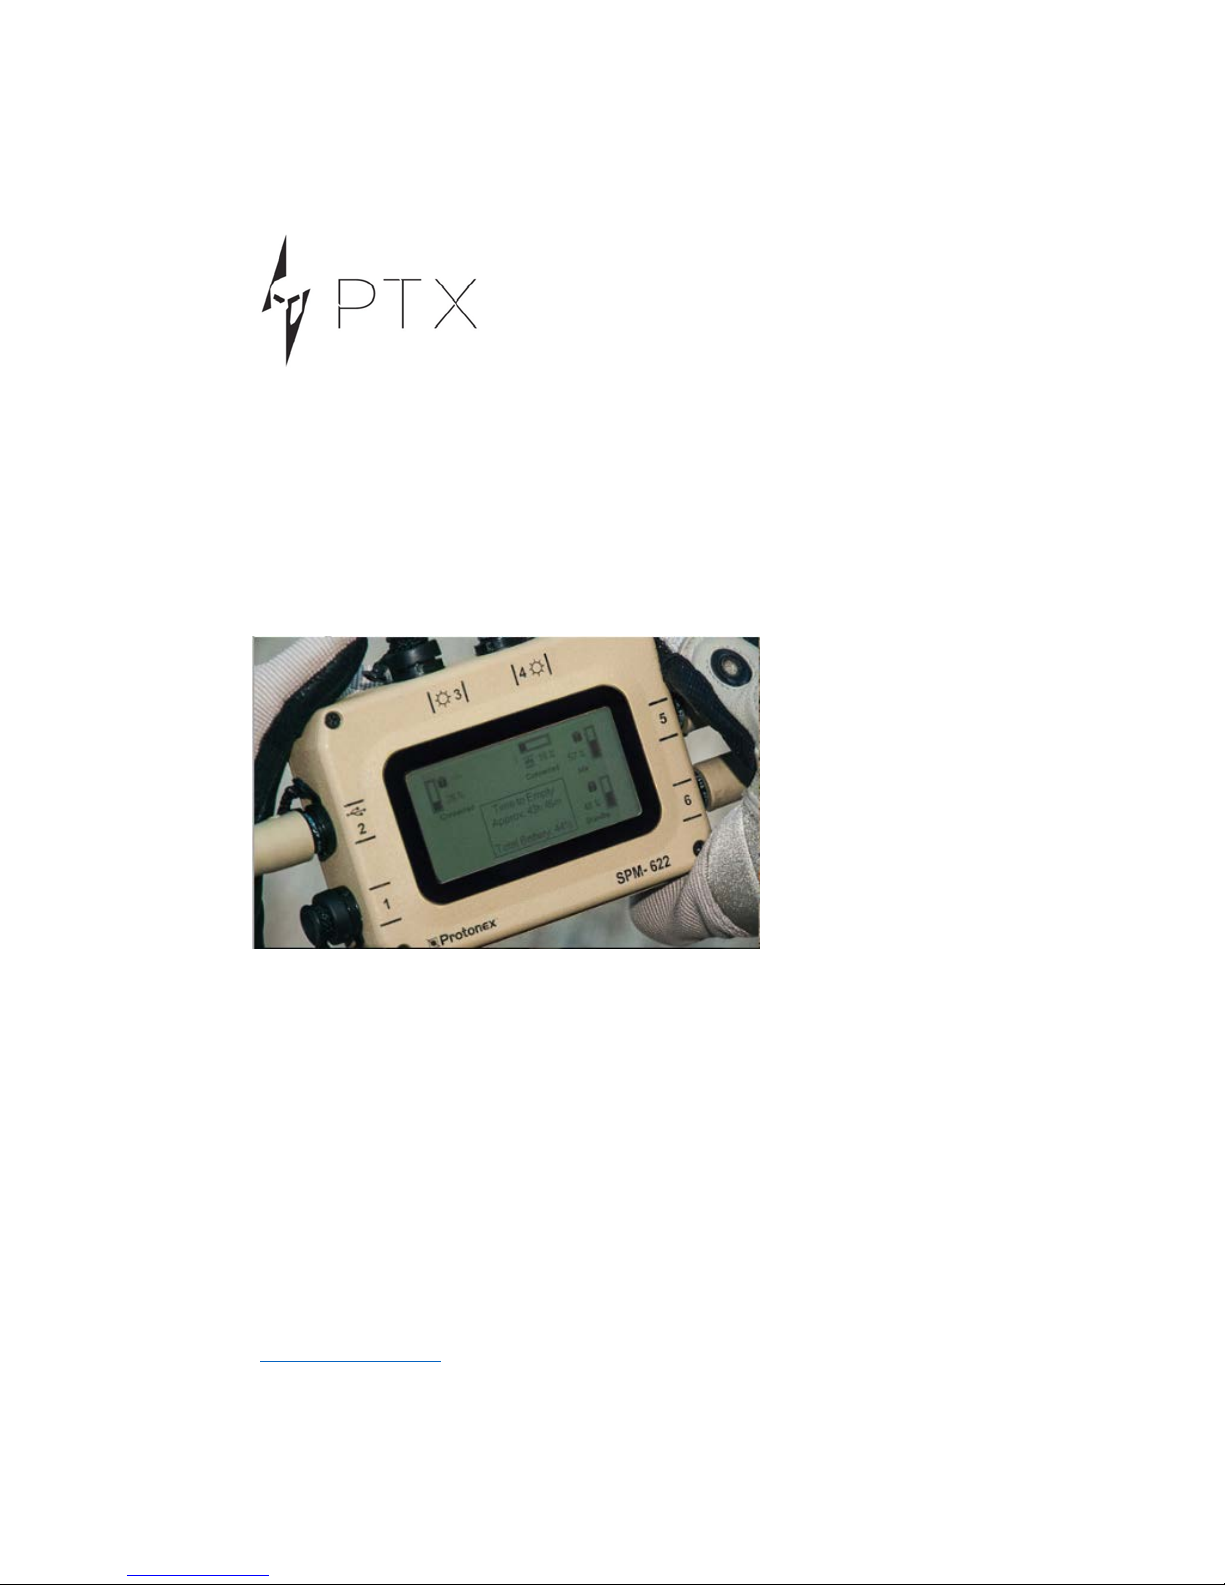
Using the Display and Keypad .......................................................................................... 13
The SPM-622 Screen .................................................................................................... 13
Port Information .......................................................................................................... 15
Configuration and Information .................................................................................... 19
Help Menu ................................................................................................................... 22
Manual Input Port Control ........................................................................................... 23
Data Logging ................................................................................................................ 24
Diagnostics ................................................................................................................... 24
Port Update Screen ...................................................................................................... 26
UI Map ......................................................................................................................... 28
Using Datalogging ............................................................................................................ 29
Upload A Log ................................................................................................................ 29
Data Logging Configuration ......................................................................................... 29
Resetting the Log ......................................................................................................... 30
The Real Time Clock ..................................................................................................... 30
SPM-622 Maintenance and Cleaning ............................................................................... 31
Before Each Mission .................................................................................................... 31
Periodic System Check ................................................................................................. 31
Battery Calibration ....................................................................................................... 31
Upgrading Firmware .................................................................................................... 32
Page 2 SPM-622 User Guide Rev 7

Cautions ........................................................................................................................... 37
Troubleshooting ............................................................................................................... 38
Contacting Protonex......................................................................................................... 39
SPM-622 User Guide Rev 6 Page 3
What’s A Power Manager?
Welcome to the world of intelligent power
management. What’s a power manager? Quite simply,
a power manager is a universal automatic charger and
power converter – it takes whatever energy sources
you have available, and powers or charges whatever
devices or batteries you have. That’s it! In one sense,
you could think of it as a Swiss army knife for power.
Some examples of things you could use your power manager to do:
• Charge a radio battery from a solar panel.
• Power a laptop from a car.
• Power a GPS device from an incompatible radio battery.
• Charge one battery from a different kind of battery.
• Scavenge power on the battlefield from a vehicle battery
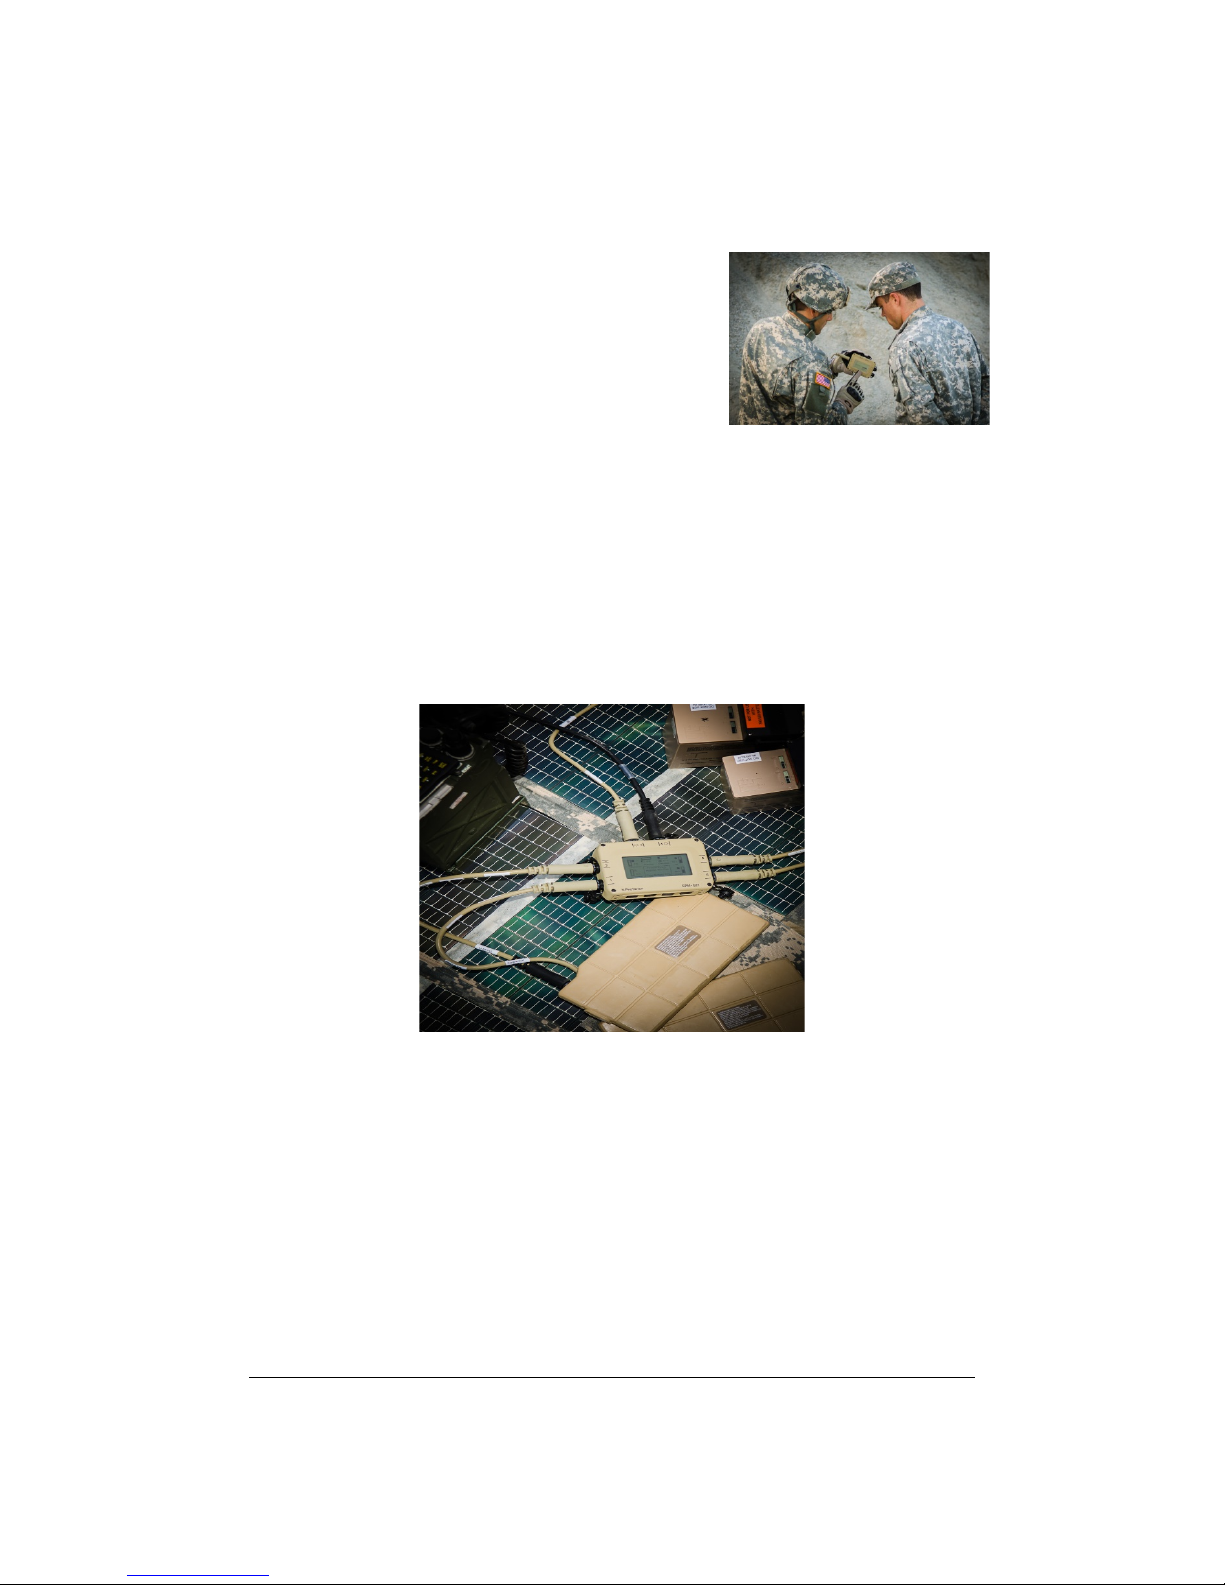
Because the power manager has six ports on it, you can do lots of the things above, and
other tasks like it, all at the same time. Here’s a photo of someone charging multiple
battery types from a solar panel:
So with that as an introduction, let’s get started.
Page 4 SPM-622 User Guide Rev 7

Quick-Start
There are a couple things to know that will help you get comfortable with the power
manager:
1. All cables fit all ports – you can plug any SPM cable that came in your kit into
any port on the SPM. There is a small red line on the side of each plug and each
socket – just line them up and push!
2. All cables are labeled at both ends: one end goes into the SPM, and the other
“business end” will be labeled to tell you what device it was designed for.
Please only use a cable for the piece of gear on the label – if you have
something to power and no cable, let us know: we have cables for almost
everything.
3. You can’t hurt it by making a mistake - The SPM will protect itself and your
equipment, and won’t allow you to damage anything by plugging it in “wrong.”
So when in doubt – plug it in!
4. If the SPM needs something different, it will tell you. Sometimes the SPM
needs a particular device to be plugged into a certain set of ports. If this is the
case, and you plug that device into a different port, nothing will be damaged.
The SPM will simply tell you on the front panel which ports you should plug
that device into – just unplug it and switch ports.
OK, with those simple guidelines, we’ll attach your first device: a battery.
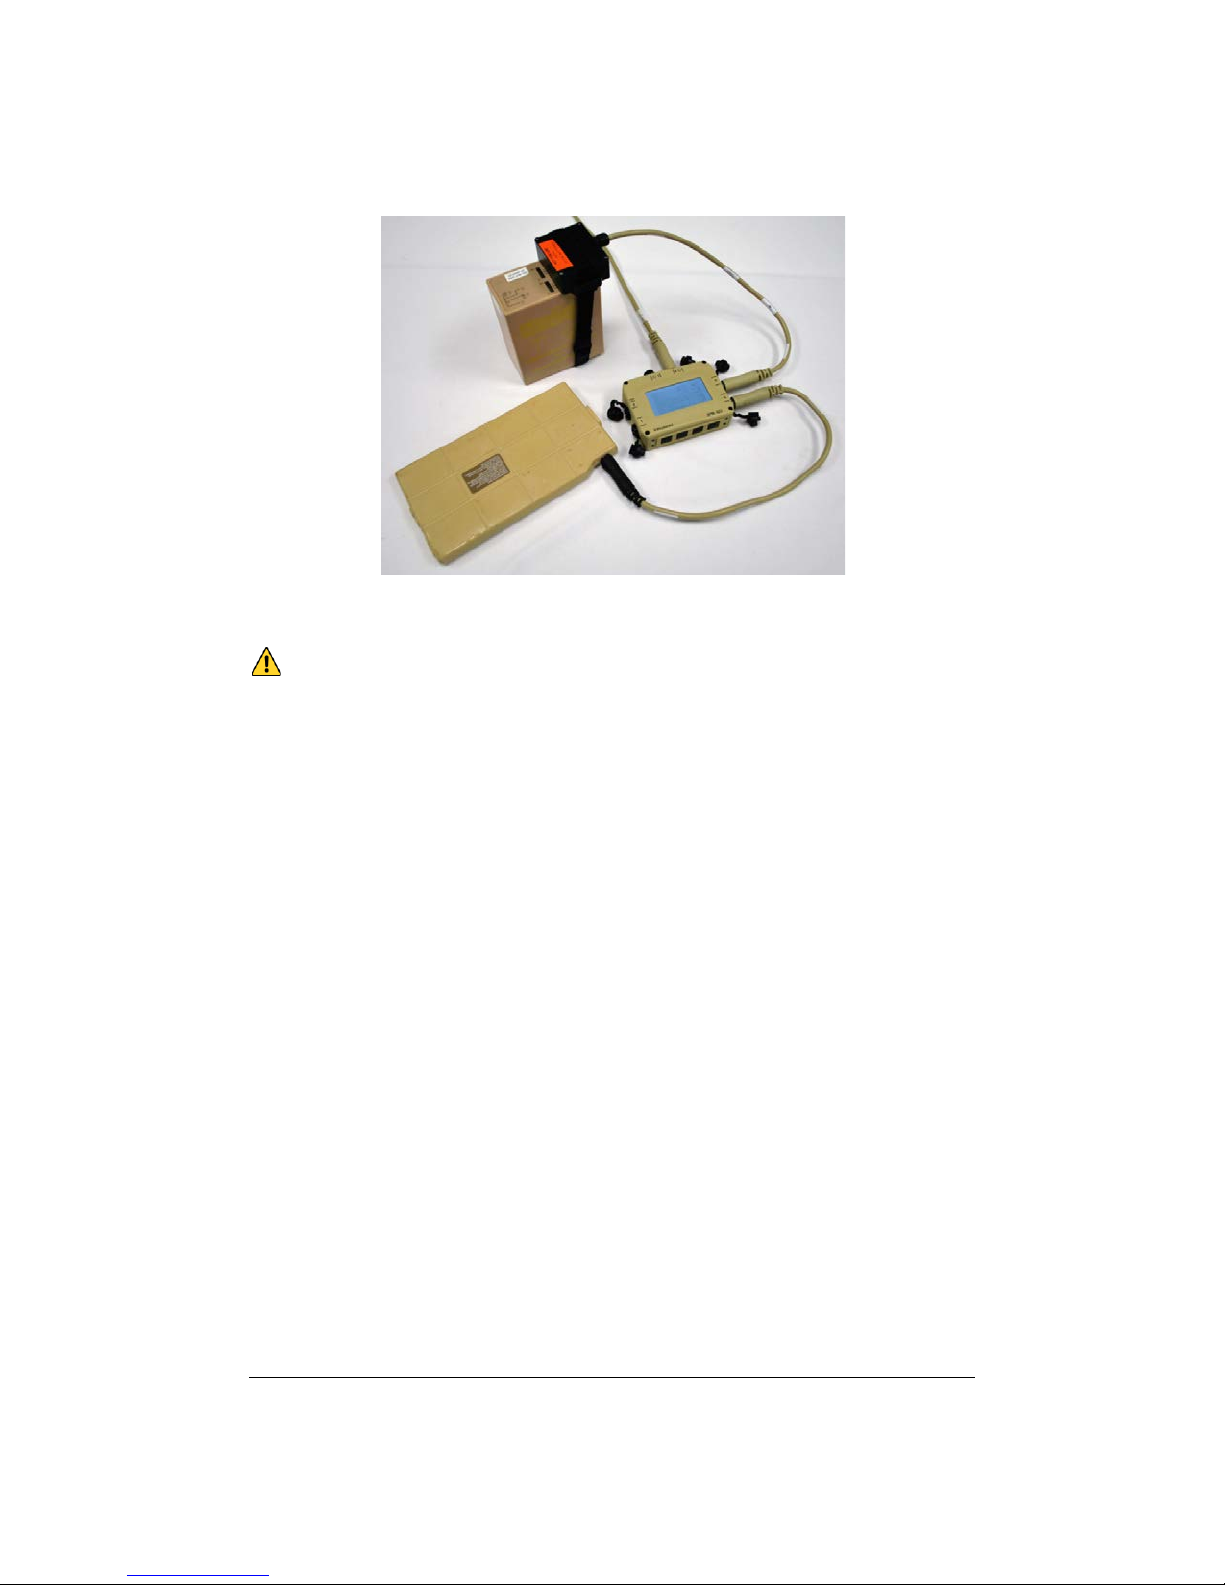
Connecting a Battery
Usually the first device you connect to the SPM will be a battery: sometimes a radio
battery, such as the BB-2590 (also known as the ASIP battery), or a smaller PRC-148 or
PRC-152 handheld battery. Sometimes a car or truck battery. Sometimes a conformal
wearable or other specialty battery – it doesn’t particularly matter, as long as you have
a cable in your kit that fits it.
The photo below shows a BB-2590 and a conformal wearable battery connected to a
power manager.
SPM-622 User Guide Rev 6 Page 5
When you connect a battery to the power manager, the power manager will turn on
(assuming the battery is not dead).
Caution: The conformal wearable battery cable has one black end and one tan end.
Always plug the black end into the battery, and the tan end into the SPM.
One detail specific to the BB-2590: the battery ships with a small sticker on the top,
covering several small metal pads. These pads let the SPM “talk” with the battery, which
lets it charge faster and show you more accurate information about it – so peel the
“SMBus” sticker off when you get a new battery
Powering a Radio
Now let’s add a radio, and power it from the battery you connected above:
1. Find the radio power cable in your SPM kit that matches your radio.
2. Connect the “business end” of the cable to the radio – this may mean twisting
it on, plugging it in, or removing a battery box, depending on the radio, but it
should be pretty obvious.
3. Plug the other end of the cable into the SPM.
4. Watch the SPM screen
In most cases, the SPM will display what model of radio you connected, and the radio
will come on (assuming its power switch is on). However, a couple other things could
happen:
• The SPM could tell you on the screen to use a different port. If it does, simply
unplug the radio and plug it into one of the suggested ports.
• If you have a big radio and a small battery, the SPM may tell you to plug in an
additional battery. For example, a handheld radio battery simply cannot power
a man-pack SatCom radio – but a couple of them working together can. If the
SPM prompts you to add another battery, simply find and connect another
battery (it does not need to be the same type as the first one), and the SPM will
use it to try to power the larger radio.
Page 6 SPM-622 User Guide Rev 7

Now you should have a battery powering a radio through the SPM – good start!
Charging the Battery
Now we want to add an energy source, so that the SPM can recharge the battery you
connected above (assuming it’s a rechargeable battery). Many kits include solar panels,
automotive (civilian and military), and AC wall adapters. Find the adapter easiest for you
to use (AC if you’re inside, solar if you’re outside, etc) and follow these simple steps:
1. Connect one end of the cable to the selected energy source. In the case of the
AC wall adapter (which looks like a laptop power supply), plug it into the wall.
In the case of a vehicle adapter, plug it into the cigarette lighter / accessory jack
or the NATO slave adapter jack on the vehicle. If solar, unfold the panel in
direct sunlight.
2. Connect the other end of the cable to the SPM, using ports 3 or 4. The sun
icons next to these ports indicate that the ports are optimized for bringing
energy into the power manager.
Once the SPM recognizes the cable and that power is present at the other end, you
should see it start to use that power:
• On the screen, the small arrows by each port will change to show that rather
than power coming out of the battery, power is now going into the battery
(assuming it’s rechargeable).
• Your radio should remain powered on.
Adding Devices
You can now add additional radios, computers, batteries and other devices, and charge
or power them as needed. Simply plug them into available ports. The SPM knows what
you’re plugging in, and it knows to “do the right thing”: Batteries are used to power
equipment, and are also charged if an energy source is connected. Energy sources are
used to power gear and charge batteries. Gear is powered from energy sources if they
are available, and batteries otherwise.
More Uses
This section shows additional uses for your SPM – experiment with them to see how the
power manager can reduce the amount of gear you need to carry and add flexibility to
your missions.
Power From Vehicles, and Charging Vehicle Batteries
A common use of the SPM is to charge radio batteries and power equipment from a
vehicle battery or power jack, but the SPM can also be used to recharge a dead vehicle
battery.
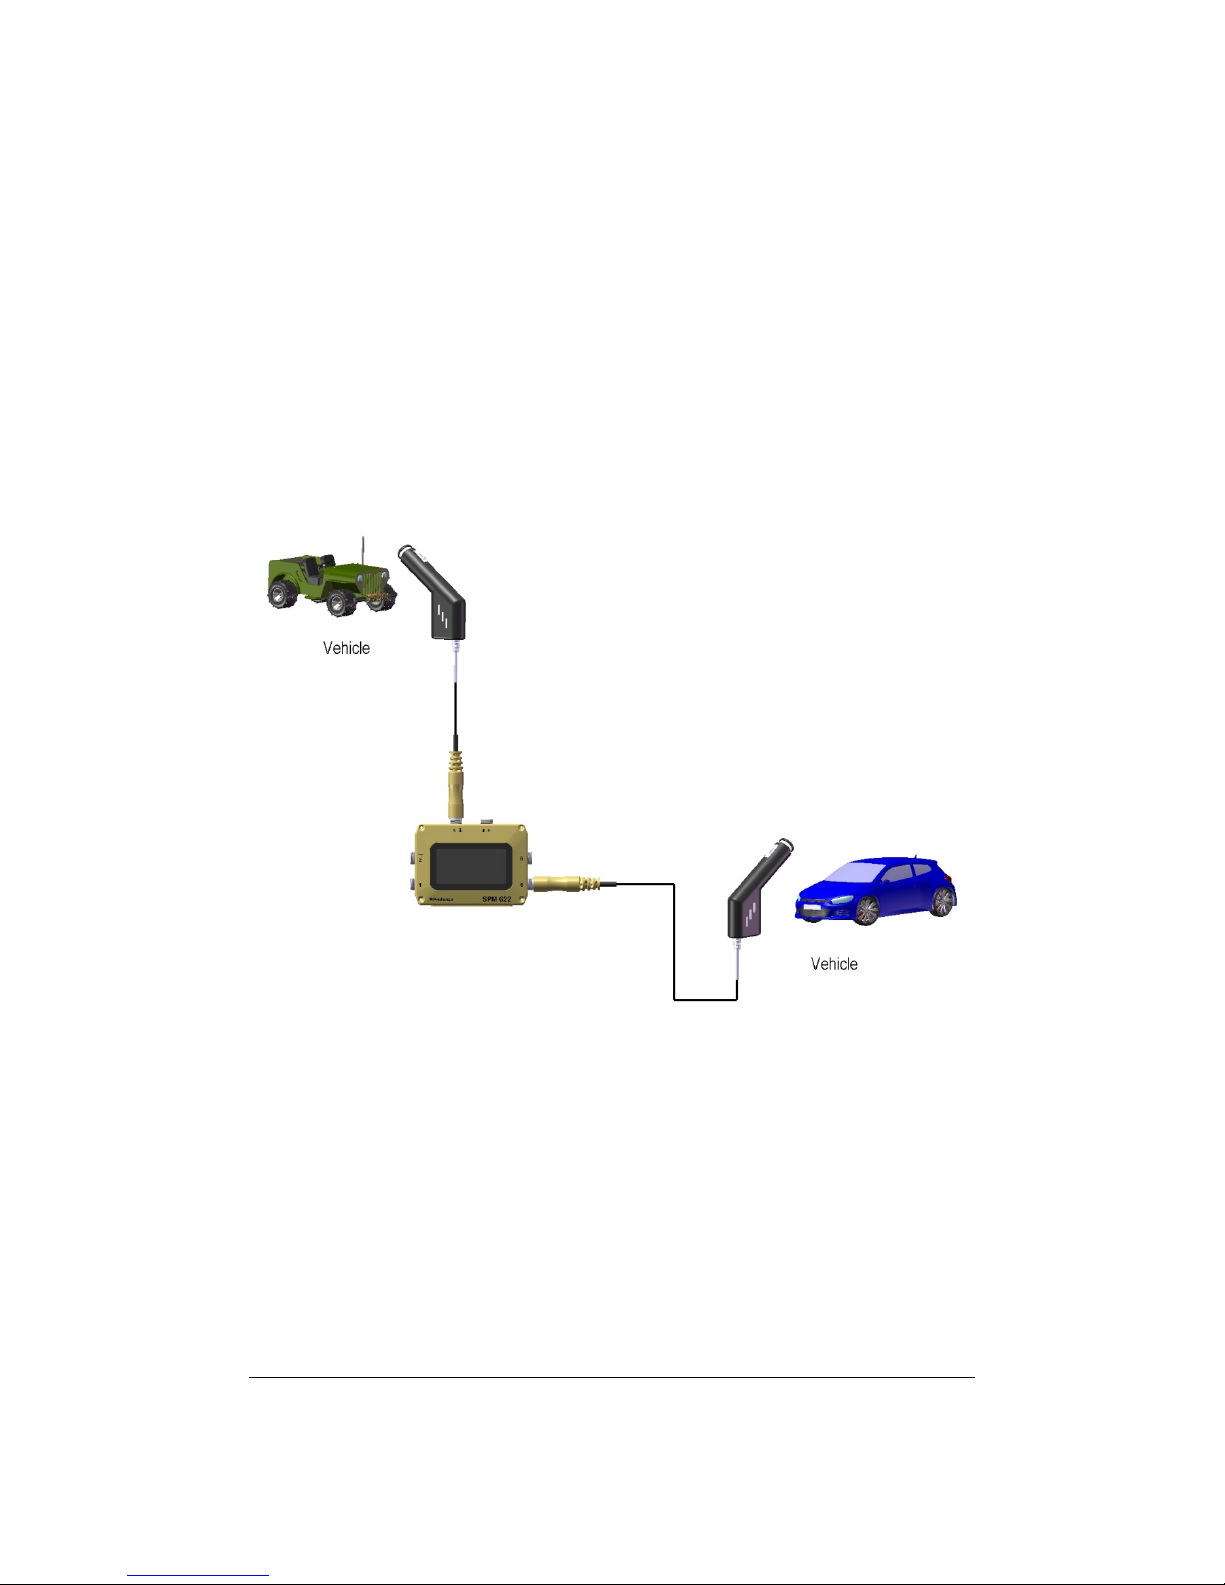
Which port you connect the vehicle to, tells the SPM what you want it to do.
SPM-622 User Guide Rev 6 Page 7
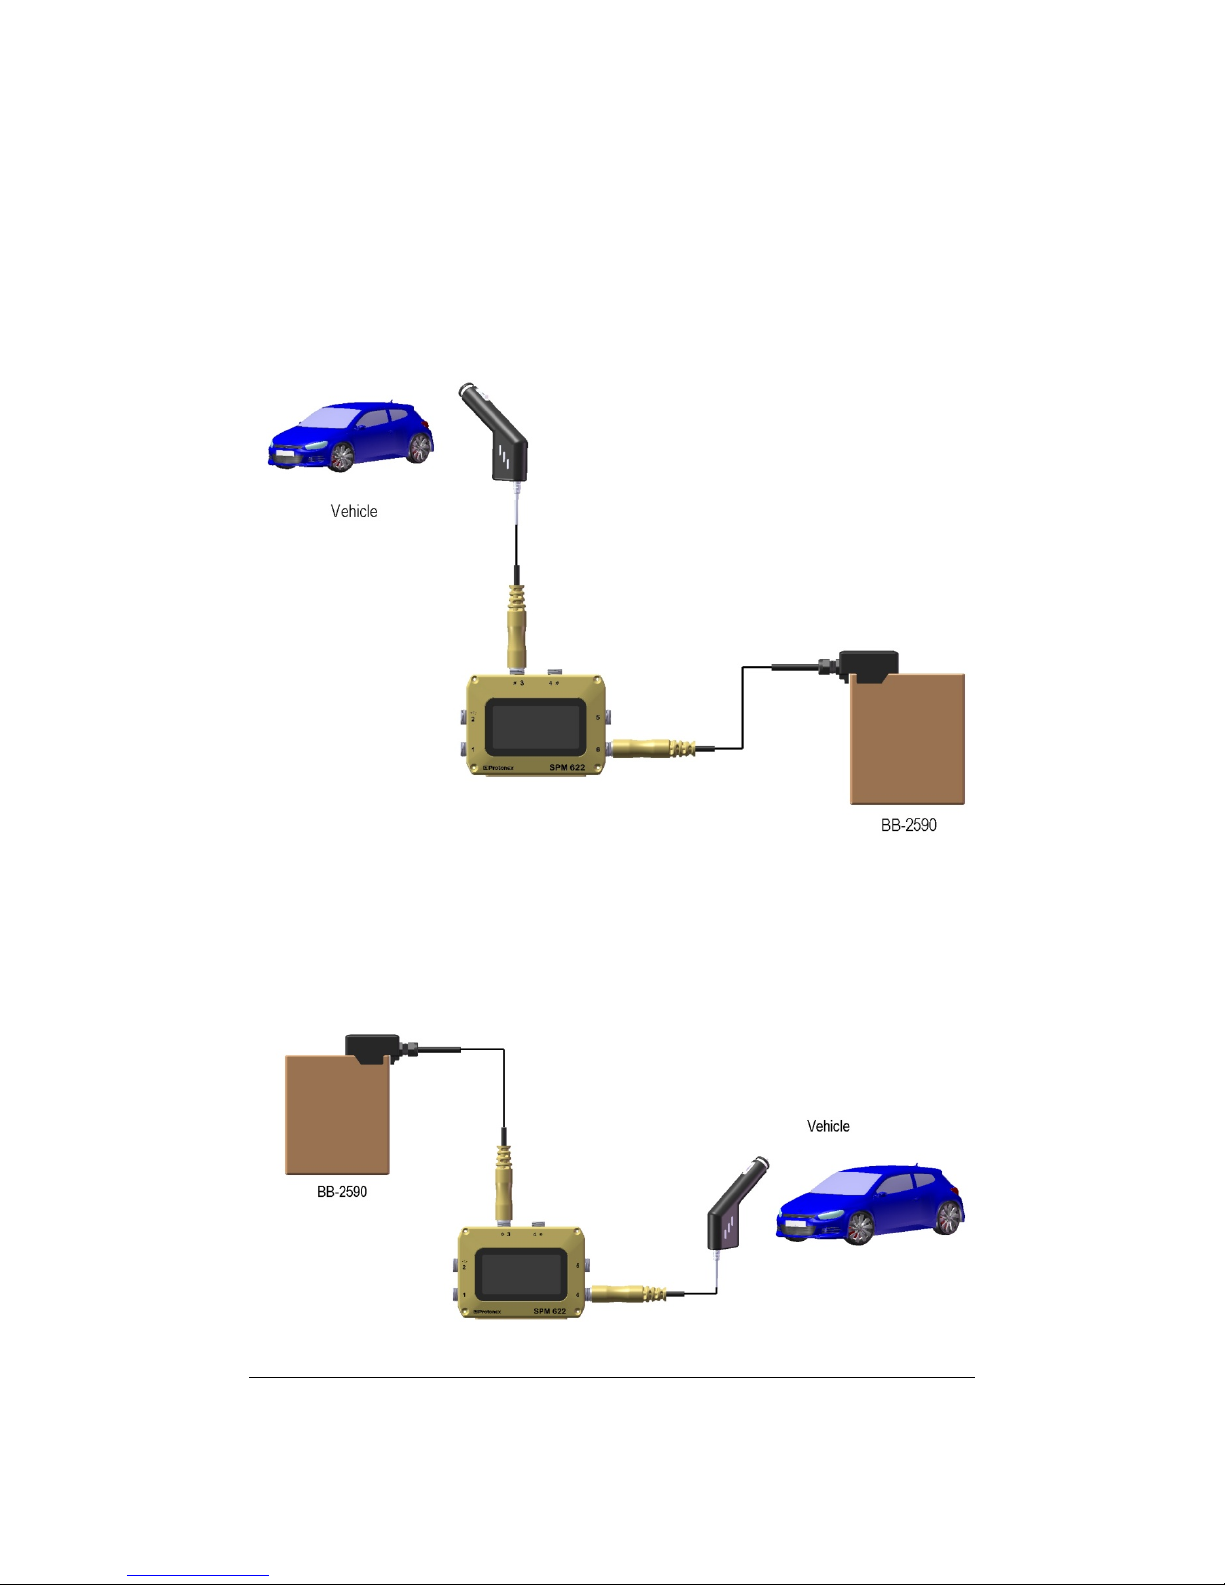
There is a simple rule: If you want to take power out of the vehicle, connect it to ports 3
or 4. If you want to put power into the vehicle, connect it to one of the other ports (1, 2,
5, or 6).
Here are two examples to show this:
In the example above, the SPM will charge the BB-2590 battery by drawing power out of
the car via the cigarette receptacle.
However, if you have a dead vehicle battery but charged radio batteries, you could
connect them like this:
Page 8 SPM-622 User Guide Rev 7
In this case, the SPM will charge the car’s battery from the BB-2590 battery – after a
couple hours the car should crank.
Note that in both cases above (and in all cases), when batteries are connected to both
Ports 3 or 4 and Ports 1, 2, 5, or 6, the SPM will pull energy out of the battery or
batteries connected to ports 3 or 4, and will push that energy into the battery or
batteries connected to other ports. The SPM assumes that the cigarette plug cable and
the NATO slave cable both connect to the connected car or truck batteries, and so it can
use them both for pulling power from the vehicle, and also for charging the vehicle
batteries.
Here are some other examples of when this can be useful:
In the example above, the car’s battery is being charged from the truck. In the example
below, the truck’s battery is being charged from solar.
SPM-622 User Guide Rev 6 Page 9
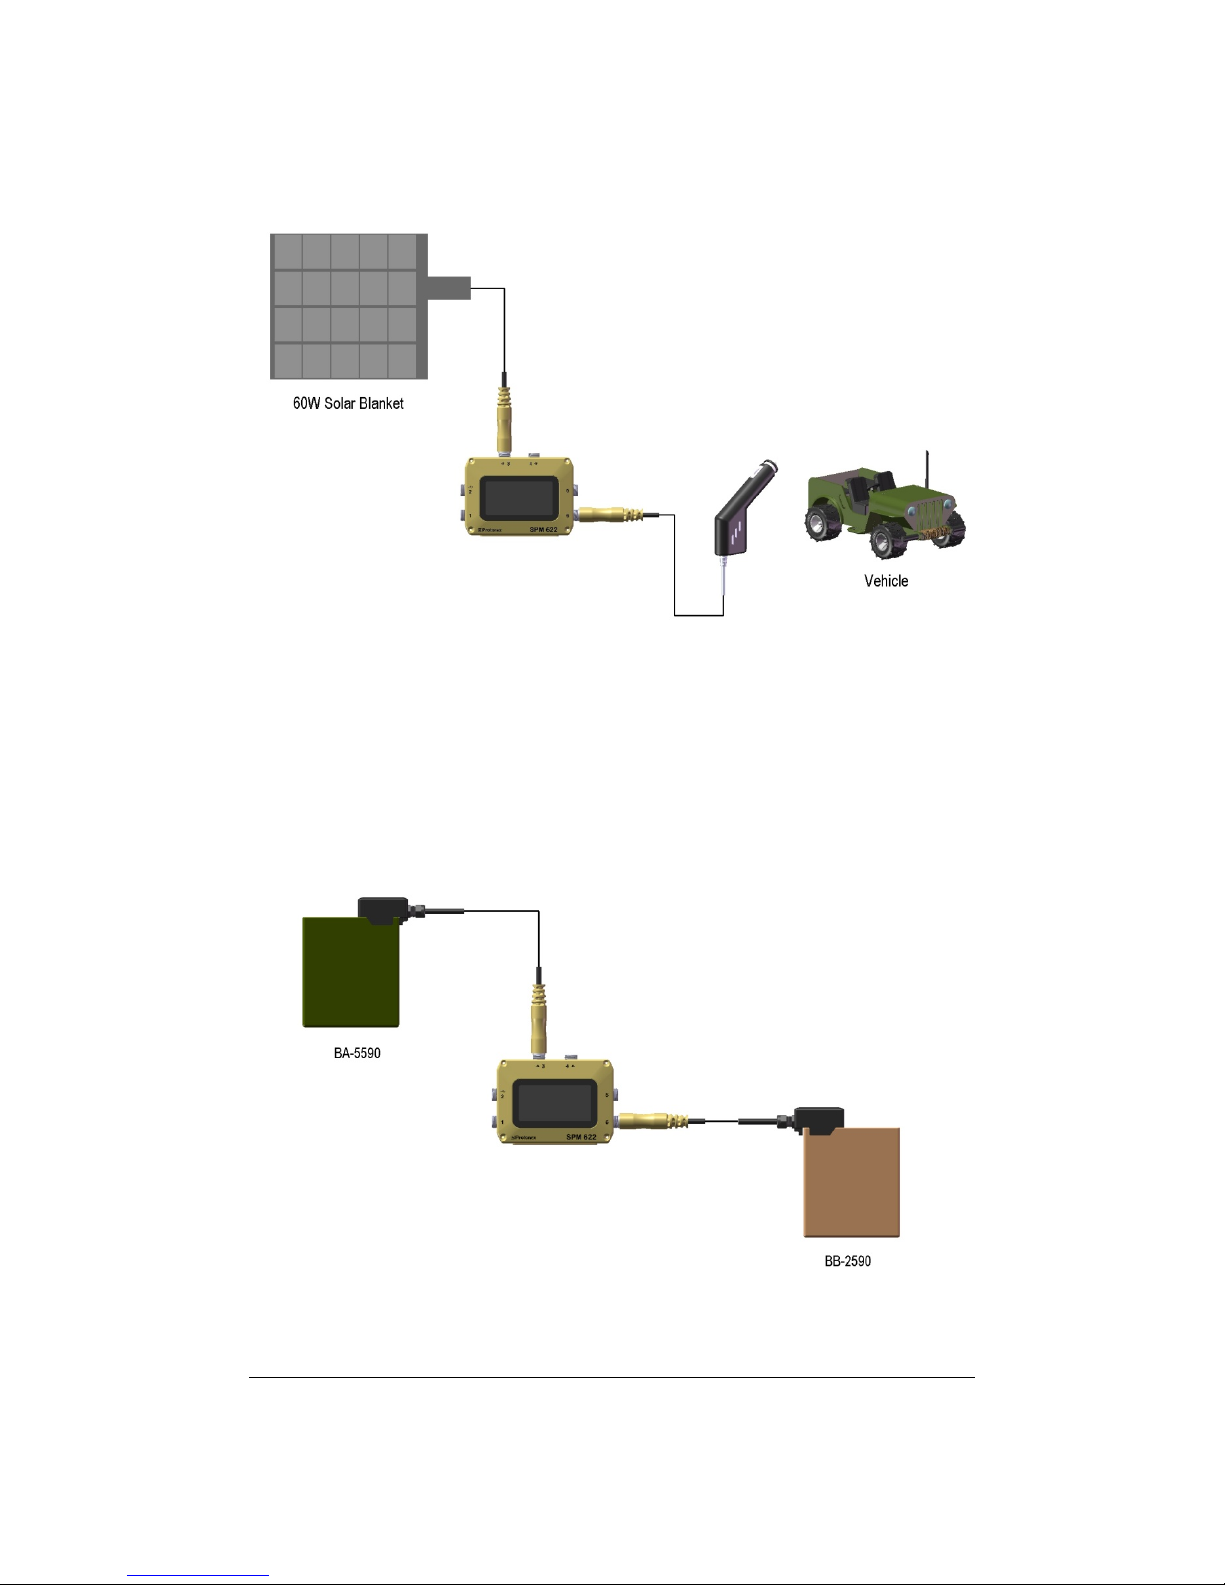
Battery to Battery Charging
Many of the examples in the automotive section above show “battery to battery
charging” – moving energy from one battery to another, to make it more useful. The
SPM can be used to easily shuttle energy between identical or different batteries, simply
by connecting the source battery (the one to pull energy from) into ports 3 or 4, and the
destination battery (the one to charge) into one of the other ports.
Here are some examples of when this might be useful:
Page 10 SPM-622 User Guide Rev 7
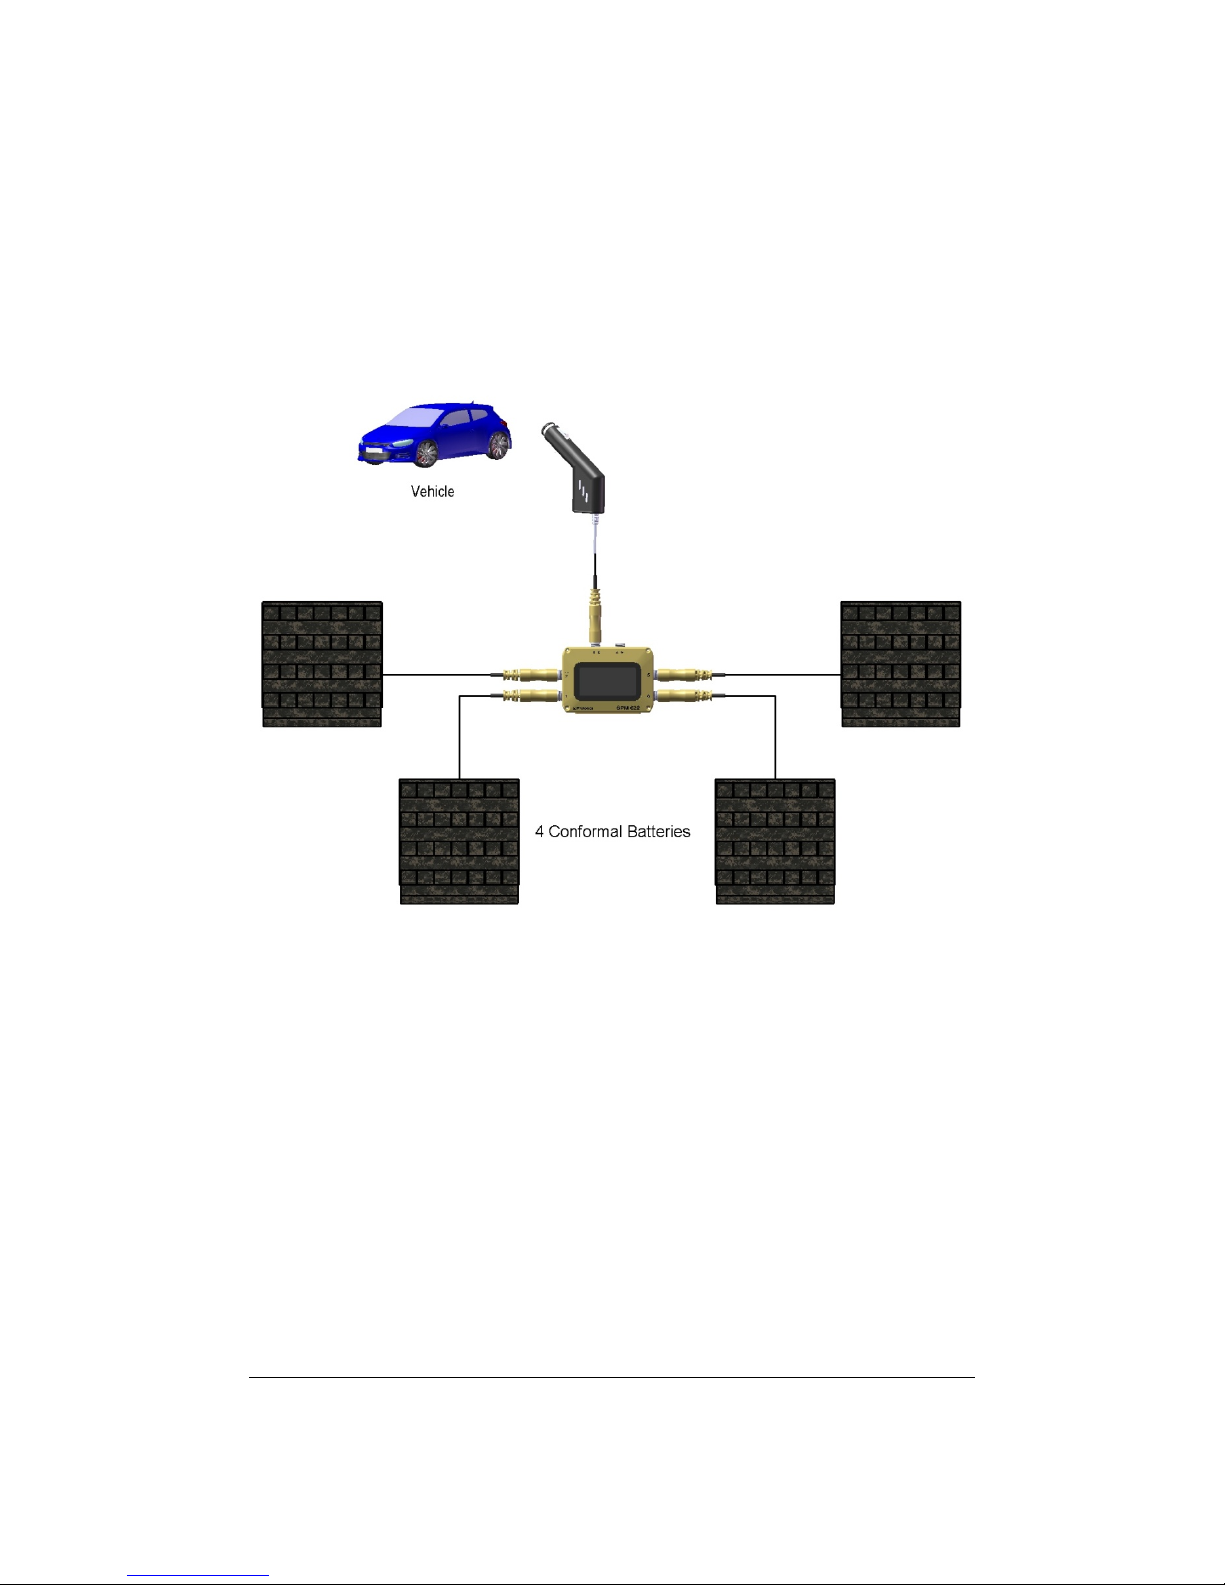
In the example above, a BB-5590 is charging a BB-2590. In the example below, a vehicle
is charging more than one battery.
Making a Field UPS
The SPM can act as an uninterruptible Power Supply (UPS), simply by connecting it to a
rechargeable battery, an AC wall input, and powering a device. The drawing below
shows how it can be used to provide uninterruptible power to a SatCom radio: As long
as AC power is available, the battery is kept fully charged by the power manager, and
the radio is powered from the AC power. If the AC power fails, the radio remains
powered, but now from the BB-2590 battery – the SPM automatically and instantly
switches the radio from being AC powered to being battery powered.
SPM-622 User Guide Rev 6 Page 11
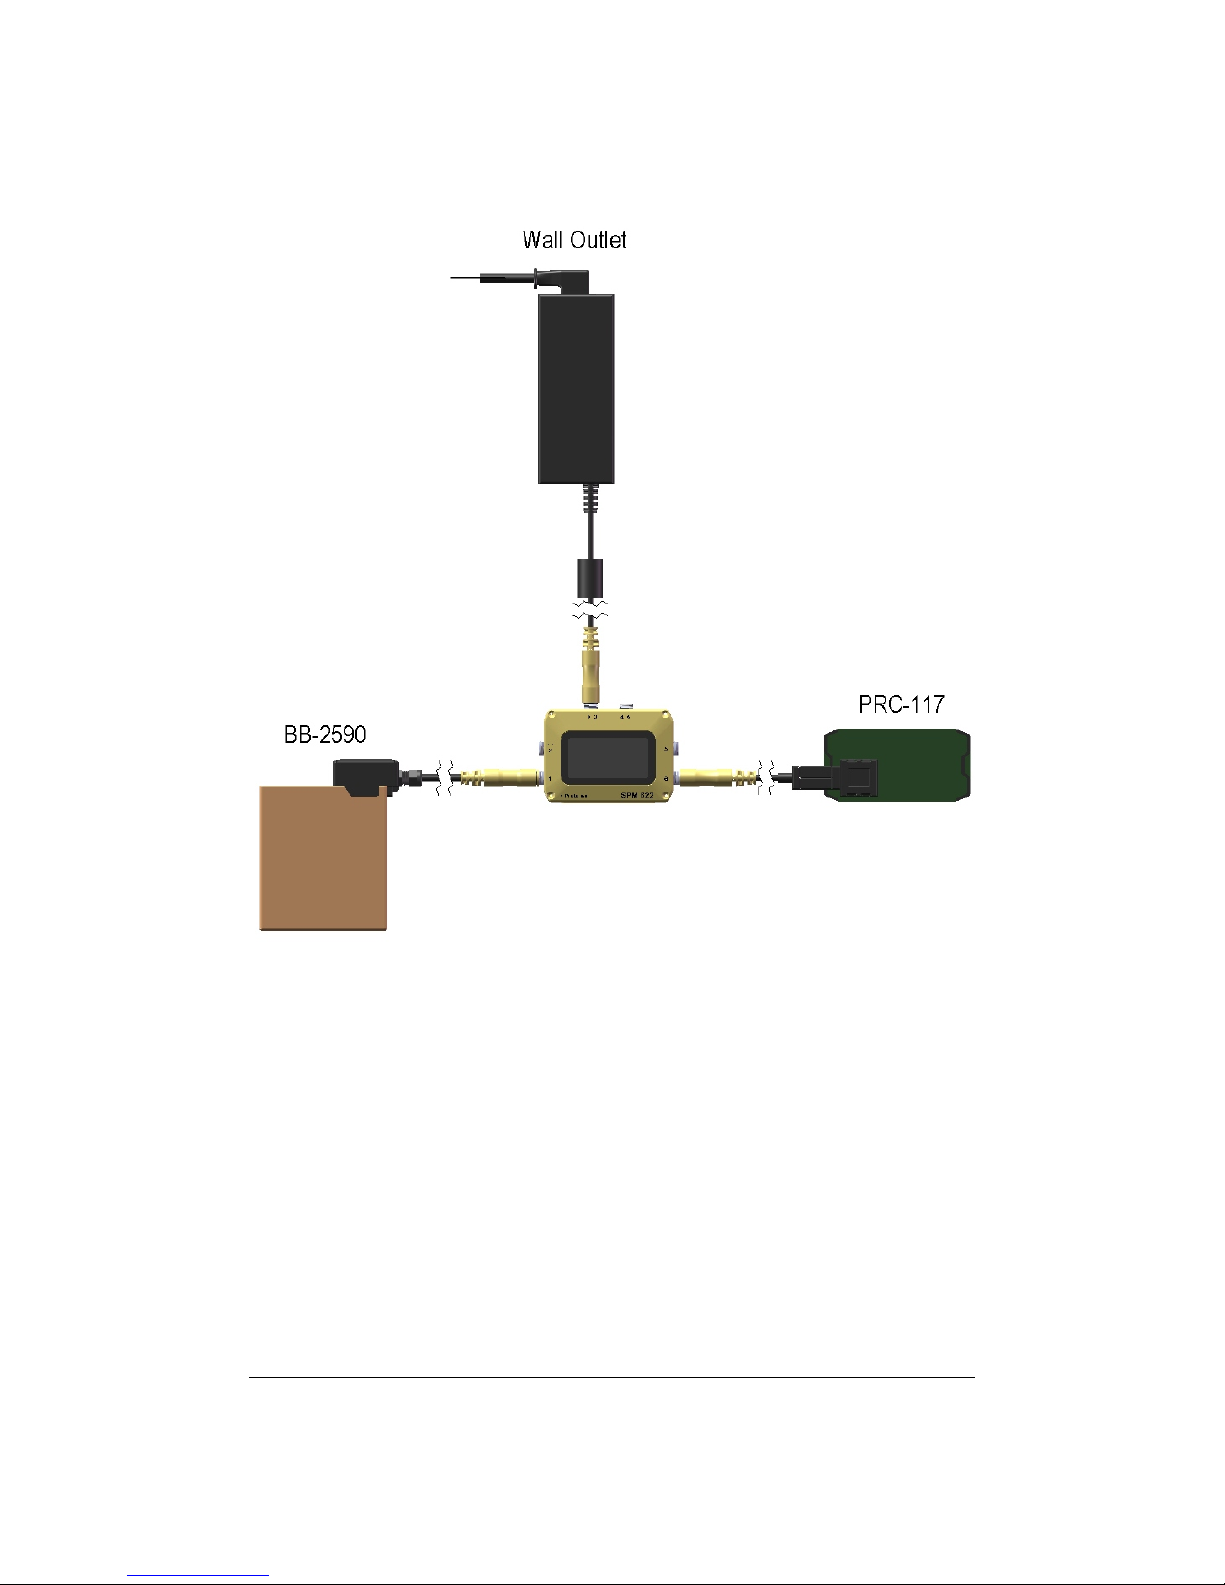
When AC power is restored, again the SPM instantly switches the radio back to AC
power, and also recharges the battery.
The SPM can support multiple batteries in this configuration if needed. Simply hook
them up and the SPM will figure out which one to use.
Page 12 SPM-622 User Guide Rev 7

Using the Display and Keypad
You can get additional power details, and also configure the SPM, using the keypad and
display.
The keypad has four buttons, shown below:
The right arrow, or “enter” button, lets you enter a menu, or select an option.
The left arrow, or “back” button, escapes a menu without making a selection.
The up and down arrows permit you to scroll through menus or through options for a
setting.
The SPM-622 Screen
Once you’ve connected a battery and the SPM has powered on, you will see the
following display:
The “Ver” number on the left side tells you the version of software that is installed on
your SPM. After a few seconds you will see the main display:
SPM-622 User Guide Rev 6 Page 13

information).
Here’s what it tells you:
A. Next to each port is a small bar-graph, an icon, an arrow, a percentage (or
wattage number), and a port status. These let you know lots of details about
whatever device is plugged into that port – we’ll go into how these can be
useful later.
B. The center of screen can display a number of different things depending on the
system configuration and situation:
a. If smart batteries (like a BB-2590 with the SMBus strip peeled off, or a
Conformal Wearable Battery) are attached to the power manager, the
center of the screen shows how much “Mission Time” is remaining.
This is the time before all the attached batteries are completely
drained. If a power source is attached and the batteries are charging,
it will tell you how long before they are all fully charged. It also shows
you the battery percentage remaining – again this is for all attached
smart batteries, so if one is full and another is empty, the total
percentage is 50%. If the mission time cannot be calculated, it is not
displayed.
b. If the system determines a more optimal configuration to power more
devices, it may display “-Warning- No ballast battery detected (See
help for more info) “, “-Note- Move Port X cable to Port Y to power
more devices” or “-Note- Swap Port X and Port Y to power more
devices”.
c. It may give you some informational/caution advice such as “-Note- No
available resources to power Port X”, “-Warning- Manual Input
Active” or “Caution: Case is Hot. Only touch with gloves”.
When you plug more devices into the
SPM, more icons will come on next to
the ports where things are connected.
Each time you plug in a device, the SPM
will tell you what you just plugged in as
well as a brief status update (see Port
Update Screen below for more
Page 14 SPM-622 User Guide Rev 7

Notice that when you plug anything into the SPM, it shows you for a few seconds on the
screen what you just connected. So if you plug a Dell laptop cable into Port 5, the
display shows “Port 5 Connected – Dell Laptop”, and then when the main screen comes
back, there is a laptop icon next to Port 5.
There are also four buttons along the bottom edge of the SPM-622. You can use these
buttons to get additional information and to customize the SPM-622 to your liking as
described next.
From the main screen press the right arrow once to enter the main menu. Here you will
see the following display:
Each entry can be used for the following:
• Port Information – See detailed information about each port and the device
connected to it.
• Configuration and Information – Monitor and change how your SPM operates.
• Help Menu – Get help on how to use your SPM.
• Manual Input Port Control – Control how ports 3 and 4 behave.
• Data Logging – Control how the SPM tracks usage information.
• Diagnostics – Show detailed technical information.
Note that for all menus, small arrows at the right hand side of the screen let you know if
there are additional choices off-screen. When this is the case, just use the up and down
arrow keys to scroll the display to see them.
Each of the main menu sections is detailed below.
Port Information
Select this menu item to get more detailed information about a particular port – often
for diagnosing a problem. After selecting this you will see this screen:
SPM-622 User Guide Rev 6 Page 15

You must then select the port of interest using the up and down buttons, and then the
Enter (right arrow) key. When you do, a screen similar to this will be displayed:
In the upper portion of the screen is a graph of power usage over time, along with the
maximum value (left) and current value (center) on the graph. Note that power flowing
out of the power manager is shown as a negative value and power flowing into the
power manager is shown as positive. The graph builds from left to right, and shows
increases and decreases in power.
In the lower right of the screen is a sub-menu, and at the lower left different values are
shown, depending upon which sub-menu item is selected.
• Device Info – This shows what device is plugged in, and whether it is connected
or not. If a battery is plugged into the port, the state of charge and whether it is
presently charging or discharging (or idle) is shown. If a piece of equipment or
an energy source is connected, the percentage of that device’s total power
capability is shown. If the device has any errors or warnings, they will be
displayed on the ‘Status’ line.
• Port Info – This shows the power, voltage, and current observed at the port, as
well as the temperature of the port’s circuitry inside the SPM. A Port Info
screen looks like this:
Page 16 SPM-622 User Guide Rev 7

• Smbus Info – If a smart battery is attached to this port, this section shows the
charging voltage and current being requested by the battery, the battery’s
internal temperature, and the battery’s estimate of its time to empty or time to
full (depending on if it is presently discharging or charging). An SMbus info
screen looks like this:
• Override – You can use this function to override a port from what the SPM
believes its function should be.
Warning! You can damage equipment or injure yourself using this
function – Use with caution, and only after reading the “Port Override”
section of this User Guide.
SPM-622 User Guide Rev 6 Page 17

An Override screen looks like this:
Press the right button one more time to acknowledge the caution message and you
will see:
Use the up or down button to increase or decrease the voltage supplied. You can set
the port to any voltage between 3 and 33 volts, and can also have the port function like
there is a battery attached. If you continue pressing up or down you will reach settings
to make the port charge and discharge several common military batteries. Note that you
should only select these batteries when one of them is in fact connected to the port.
When you have selected the voltage or battery you want, press the right button to save
it. You may reset the port to the default voltage as indicated by the connected cable by
locating the “Reset” value with the up and down button.
Note: the SPM will resume using the default value for the port if the cable is unplugged
or if power to the SPM is lost.
Page 18 SPM-622 User Guide Rev 7

Configuration and Information
If you select the Configuration and Information screen from the main menu, the SPM
will display the following screen:
Entering the System Configuration menu will cause this screen to be shown:
The Operation Mode has four behaviors that can be selected.
Normal: This is the default behavior mode. Your SPM operates fully automatically. In
this mode the SPM will transfer charge from any battery plugged into Ports 3 or 4 into
any rechargeable battery connected to Ports 1, 2, 5, or 6. When charging multiple
batteries, the SPM will attempt to charge the fullest battery first (so you’ll get a fully
charged battery soonest), then the next fullest, etc.
SPM-622 User Guide Rev 6 Page 19

No Battery Transfer: Select this mode when you do not want to transfer any power
from batteries that are plugged into ports 3 and 4 into batteries on any other ports.
They will still be used to run other devices normally.
Sequential Charge: Use this mode when you want to control which batteries are
charged first. The battery attached to port 1 will be charged fastest, 2 the next fastest
and so on with port 6 being the slowest.
Sequential and No Xfer: Selecting this options enables both of the previous two options,
No Battery Transfer and Sequential Charging.
Entering the Temperature Limits screen will display the following screen:
When in normal temperature mode, the SPM will regulate how much power it moves
so that the case temperature does not exceed 60 degrees Celsius. You can select high
temperature mode so that the case is allowed to get to 65 degrees Celsius so you can
move more power in hotter environments.
Warning! You should use gloves when holding a SPM that is enabled for high
temperature mode.
Use the Temperature units screen to select between Fahrenheit and Celsius
temperature units. Changing this selection does not affect operation.
Page 20 SPM-622 User Guide Rev 7

Entering the System Information screen will display the following screen:
This screen shows the firmware version running on the SPM, as well as the unit’s run
time (time since last power cycle), overall run-time, the number of times power has
been applied to the unit, the SPM’s serial number and the date last calibrated.
Entering the UI configuration screen will show the following screen:
Several aspects of the display can be configured to meet your preferences and mission
requirements.
• Backlight On/Off Time – By default the display backlight is on for 5 seconds. Use
this menu item to turn it on for from one to sixty seconds following the last
button push, or always on. Use the up and down arrows to select a value, and
then the right arrow to make that selection active.
• Backlight Brightness – use the up and down arrows to select a value, and then
the right arrow to make that selection active.
o Caution: The brighter you make the backlight the more power the
system will use while it is on.
• Contrast – use the up and down arrows to select a value, and then the right
arrow to make that selection active
Entering the Sleep Mode will display this screen:
SPM-622 User Guide Rev 6 Page 21

Use this function to power down all devices and enter a very low power mode of
operation. Wake up from this mode by pressing the right and left arrow buttons at the
same time.
This mode is typically used when the SPM is wired into a ruck or other system, and the
user wants to “turn everything off” without accessing each piece of equipment, or
unplugging the batteries buried inside the ruck.
When the SPM awakes from sleep mode, it restarts as if it were power cycled.
Help Menu
The Help Menu screen can be used to get a quick narrative on a variety of topics. The
topic list from the help screen looks like this:
Select the section that you would like to read about.
• Training Video Link
Page 22 SPM-622 User Guide Rev 7

Training Video Link - contains a
QR code that brings you to the
Protonex Support Website
• Warning, No Ballast Battery - For optimal operation, a compatible battery is
required to act as a ballast for the system. Without such a battery, the system
may be unstable. Usually batteries such as BB-2590s and conformals fill this
role, but there are many types of compatible batteries.
• Manual Input Port Control - This page allows you to tell the system exactly
which input port that you would like to pull power from. This setting will last
until the system is reset or you choose Automatic. You cannot power loads on
a port that has been overridden. You cannot damage the system by choosing
an incorrect port. Automatic: This is the default mode. It allows the system to
choose the best input source. Port 3: This tells the system to pull power from
port 3. If no device or a load device is attached instead, the system will do
nothing. Port 4: This tells the system to pull power from port 4. If no device or
a load device is attached instead, the system will do nothing. Port 3 and Port 4:
This tells the system to pull power from both ports 3 and 4 at the same time. If
the system cannot do this because they are incompatible, it will choose the
best one.
• How to Calibrate Battery Gauges - A battery gauge that needs calibrating may
not function completely as expected. Take the following steps to calibrate a
battery gauge: 1) Fully drain the battery 2) Fully charge the battery 3) Fully
drain the battery 4) Fully charge the battery The battery gauge should function
properly after the above steps have been taken. If this warning still appears
after calibration, replace the battery.
Manual Input Port Control
Using manual input port control allows the user to take control of port 3 and 4. If you
do not change this, the SPM will make decisions on how to use port 3 and 4.
Entering this mode will display the following screen:
SPM-622 User Guide Rev 6 Page 23

Automatic mode is the default. If you would like to select ports 3 or 4 to be input only
(and never move power out of the SPM) then use the up and down arrows to select
between: Input on 3 only, input on 4 only or input on 3 and 4.
Data Logging
Entering the data logging screen will display:
Use this screen to view how much of your log is used. You can also change the interval
at which the SPM logs information. Pressing Erase Log will delete everything in the log.
Diagnostics
The Diagnostics screen shows power, voltage, and current for each of the six ports
simultaneously. It also shows the active internal bus voltage of the system. Typically this
will be used when looking for a system power problem, under direction of Protonex
technical support personnel.
Entering the Diagnostic screen will show this:
Page 24 SPM-622 User Guide Rev 7
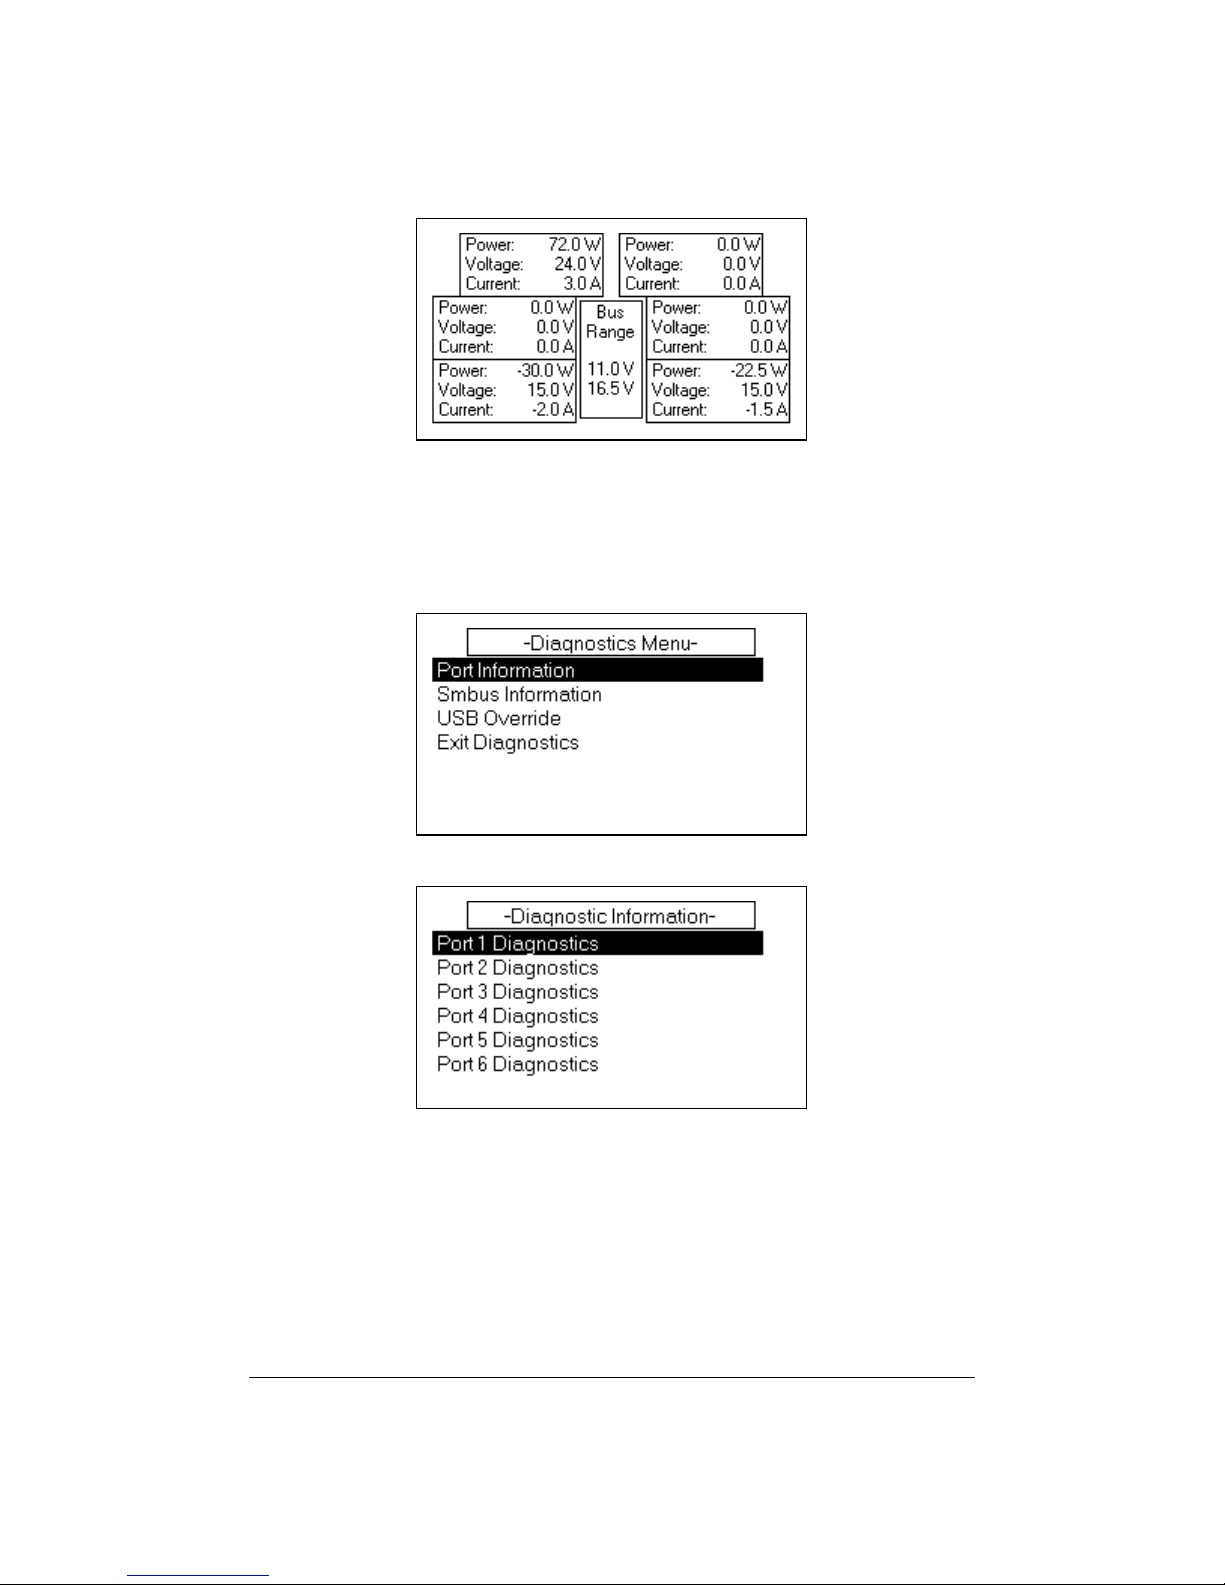
This screen shows you an overview of all the power, voltage and current at any one
point in time. If you would like to see more detail, press the right button and you will
see the following screen:
If you select Port Information, you will be brought to the port selection screen:
Selecting a port will bring you to a screen that displays the Intellicable information that
is in the cable attached to that port:
SPM-622 User Guide Rev 6 Page 25

By hitting the back key twice and selecting the Smbus Information option, you can then
choose the port and see the screen below:
If a SMbus battery is attached to the SPM live SMbus information will be displayed on
the screen.
The USB Override allows the user to manual enable, disable or reset the USB
connection.
Port Update Screen
Whenever a device is plugged in or removed, the port update screen will appear.
This screen will also appear whenever an important status change occurs on a port and
it will inform you of the change. Depending on what type of device is attached and
what is happening, a vast variety of information can be displayed. Below are some
Page 26 SPM-622 User Guide Rev 7

typical messages. It’s possible that more than one of them will appear on the screen at
once on different lines:
Errors: Over Voltage, Under Voltage, Over Current, Port Over Temp, Battery too Hot to
Use, Battery is bad, Incompatible Device
Warnings: Port Temp Warning, Battery Depleted, Battery too Hot to Charge, Battery too
Cold to Charge, Use P3 or P4, Use P1, 2, 5 or 6, Batt Gauge Uncalibrated, Insufficient
Power
Other: USB Capable, USB in Port 2 Only, Uart Capable, Charge Complete, Waiting for
Power, Output Override, Input Override
Informational: This device is for use with a different Power Manager, Reconnect
Attempt: X of Y, Reconnect Attempts Failed, See SPM Help Menu, Device Priority: X
Here are two typical warning screens:
SPM-622 User Guide Rev 6 Page 27

UI Map
Below is an image that shows how all of the UI screens are connected:
Main Menu
Port Information Port Selection
System
Configuration
System
Information
Configuration
and Information
UI Configuration
Training Video
Link
Warning, No
Ballast Battery
Manual Input
Port Control
Help Menu
How to Calibrate
Manual Input
Port Control
Battery Gauges
Protonex Contact
Information
Operation Mode
Temperature
Limits
Temperature
Units
Backlight On/Off
Time
Backlight
Brightness
ContrastSleep Mode
Data Logging
Diagnostics
Page 28 SPM-622 User Guide Rev 7
About the SPM
622
View Logging
Information
Change Interval
Erase Log
Diagnostics
Menu
Port Information Port Selection
Smbus
Information
Port Selection
USB Override

Using Datalogging
Ever wonder how much energy you actually use during a mission, and which devices are
the “power hogs”? The SPM-622 Datalogging capability allows you to zero in on how
you are using energy. From this information you can better control how much power
you use, and also plan better to carry just the energy you need.
The SPM records information to an internal “datalog” every few seconds. You can then
upload this data to a laptop or PC at some later time, and analyze (typically in Excel or
another spreadsheet) how you used power.
The information recorded includes:
• What devices are plugged into what ports on the SPM.
• The voltage, average current and maximum current at each port.
• If a battery is attached, the state of charge and temperature of that battery.
• Any error states.
• A real-time-stamp that includes the date and time of the entry.
The log is kept in a “nonvolatile” memory in the SPM – that is it does not disappear
when power is lost. The memory is large enough to store weeks of usage information.
Upload A Log
To upload a datalog, you must have a USB data cable for your SPM – this is not the cable
which powers phones or cameras from the SPM, but rather a cable that plugs into Port 2
on the SPM, and has a male USB connector to plug directly into a laptop or computer.
Some kits include this cable, but if yours does not, data cables are available on the
Protonex website (www.protonex.com/shop
Alternatively you can use a laptop power cable that also has a data port, like the 2A00172-01 Toughbook cable.
) - (Protonex p/n 004-126 or 005-408).
To download a log, follow this procedure:
1. Assure the Protonex Datalog Reader software is installed on your PC or laptop –
if not, obtain and install the software.
2. Connect a battery or other power source to your SPM to power it up – do not
use Port 2.
3. Connect your data cable from Port 2 on the SPM to your laptop or PC. The
laptop should recognize the power manager USB device automatically.
4. Start the Datalog Reader software.
5. Under Help there is a document, complete with images, to walk you through
how to download a datalog.
Data Logging Configuration
Data logging occurs automatically, but you can change how it operates to better suit
your needs. You can:
- View the logging information including if the log is active or disabled and how
much space is used
SPM-622 User Guide Rev 6 Page 29

- Change the logging interval
- Erase the log
Resetting the Log
If you want to log and quantify the energy used during a particular mission or exercise,
you should clear the SPM’s log just before the mission. This way when you upload the
log, it will contain only the data of interest.
To reset the SPM’s log, follow this procedure:
1. Go to the Main Menu
2. Go to Data Logging
3. Go to Erase log
4. Go to “Erase Entire Log” and hit enter.
The Real Time Clock
When you look at a SPM-622 data log, you will notice that each entry has a time-stamp.
The time for this is set at the factory, and uses Zulu time. It should remain accurate to
within a few seconds each year, but should you want to reset it, you can do this using
the Datalog reader application. The application shows you the PC’s clock (local time
zone), but it is recommended that you put Zulu time into the SPM.
Page 30 SPM-622 User Guide Rev 7

SPM-622 Maintenance and Cleaning
The power manager does not require special calibration or maintenance, but it should
be treated as you would any other piece of electronic equipment.
Before Each Mission
Prior to each mission, visually inspect the SPM and each cable and adapter you plan to
use. If they are dirty, wipe them with a clean damp cloth. Dirt in connectors can be
washed out with fresh water – allow the connectors to dry thoroughly before use.
If any cables are frayed, broken, have bent pins, or exposed conductors, discard them.
Insert each of the rubber dust caps snugly into the corresponding SPM port. If dust caps
are missing, return your SPM for repair.
Periodic System Check
The system should be checked for full functionality prior to a deployment, and
periodically during use. To check the system, you will need a charged battery and the
system. Follow this procedure:
1. Connect the battery to the SPM, and verify that the SPM comes on and that the
battery is properly recognized.
2. Plug in each cable in your kit, and assure that the SPM recognizes the cable,
and that it does not report any errors.
3. Clean any cable or component that is excessively dirty.
4. Replace any cable that is frayed, broken, has bent pins, or is not recognized by
the SPM.
Battery Calibration
Occasionally the SPM will report that an attached battery needs calibration. This is
actually a report from the battery itself, indicating that it can no longer accurately
estimate its remaining state of charge. Failing to calibrate a battery will result in the
reported percentage of battery remaining to become more and more inaccurate,
resulting in faulty information being displayed on the screen, and potentially acted
upon. Because of this, it is important to calibrate a battery that is reporting in an out-ofcalibration state.
Calibrating a battery is very simple: just run it all the way down, and then recharge it. An
easy way to run down the battery is to leave it connected to the power manager and
some piece of operating equipment while you sleep. Once the power manager turns off
(because the battery is dead), simply connect an energy source (AC or vehicle, for
example) to the SPM, and the battery will be recharged.
Sometimes a battery that is seriously out of calibration will require two dischargecharge cycles to recalibrate it, although typically only one cycle is required.
SPM-622 User Guide Rev 6 Page 31

Upgrading Firmware
Protonex issues one to two firmware releases each year for the SPM-622. Most of these
releases add some new capabilities – usually for fairly unusual or specific missions. It’s
highly recommended to update the firmware when new firmware is made available.
Here’s how to upgrade the firmware in your SPM:
WARNING – During the upgrading, DO NOT unplug any cables, this may
cause damage to the SPM-622.
1. Before you start, you’ll need four things (besides the SPM):
a. An SPM data upload/download cable (Protonex p/n 004-126 or 005-
408). Alternatively you can use a laptop power cable that also has a
data port, like the 2A-00172-01 Toughbook cable. This cable connects
Port 2 of the SPM to a USB port on a laptop or desktop Windows
computer, and is how the SPM gets the firmware.
b. The SPM “System Loader” Windows application. You’ll need to install
this software on the computer that you’ll be using to do the upgrade.
You can request this application on the Protonex website.
c. The hex image of the firmware you want to put on the SPM. You can
request this image on the Protonex website if it was not given to you.
d. A charged battery and cable with which to power the SPM.
2. Install the Protonex “System Loader” application software.
a. Double click on the “System Loader.exe” file
b. The user Account control menu will pop up, click yes.
c. The Welcome to Protonex System Loader Setup Wizard will appears,
click on next.
d. Click on “I agree” on the Welcome to Protonex. System Loader setup
wizard.
e. When the “Check the components you want to install and uncheck the
components” window appears, uncheck the M300 FTDI-USB-to-Serial
and Start menu Shortcuts and click on Next.
f. The Destination Folder window appears next, click on “Install” if you
accept the directory location.
g. Click the “Finish” button when you see the “Completing the Protonex
System Loader Setup Wizard”.
h. You should see the “System Loader” icon on your desktop.
3. Now plug the SPM into the battery and power it up, using any port other than
#2.
4. Connect the SPM to your computer using Port 2 and the data cable from Step
1a. Make sure nothing else is plugged into your SPM.
5. Run the “System Loader” application on the PC.
Page 32 SPM-622 User Guide Rev 7

6. Using the pull-down, select the COM port that your SPM is connected to – the
application should tell you which one (COM4 below):
7. Now select the firmware image you want to load to your SPM, using the “. . .”
button at the right. If you are given both an “App” and a “Boot” image, use the
“App” one:
8. Click the “Upgrade” button. You should see the progress bar at the top of the
System Loader move to the right, and status messages scroll across the bottom.
WARNING – During the upgr ad ing, D O NOT unplug any ca ble s, t hi s
may cause damage to the SPM-622.
9. At the end of the upgrade process, which should take about 45 seconds, the
SPM-622 will reset, and will come up using the new firmware.
10. That’s it! Unplug your stuff and try out your new capabilities!
Firmware Upgrading Figures:
Figure 1. Step 2A
Figure 2. Step 2C
SPM-622 User Guide Rev 6 Page 33

Figure 3. Step 2E
Figure 4. Step 2F
Page 34 SPM-622 User Guide Rev 7

Figure 5. Step 4
Figure 6. Step 6
Figure 7. Step 7
SPM-622 User Guide Rev 6 Page 35

Figure 8. Step 9
Page 36 SPM-622 User Guide Rev 7

Cautions
The SPM-622 may become warm during operation. The harder the SPM-622 needs to
work, the warmer it may get. If the SPM-622 becomes hotter than 50 degrees C (122
degrees F), the following message will be displayed on the main screen:
“Caution: Case is Hot. Only touch with gloves”.
If the SPM-622 becomes too warm, the SPM will slow down charging batteries or may
turn off loads so it does not become too hot.
SPM-622 User Guide Rev 6 Page 37

Troubleshooting
Here are some of the more common problems associated with the SPM, and how to
solve them:
• My SPM won’t come on.
o Is a battery connected?
o Is the battery charged and operational? Try powering something else
with it.
o If the battery is dead, is another energy source like AC or a vehicle also
connected?
o If you’re using a conformal battery, is the black end of the cable
plugged into the battery?
• I can’t power my laptop from a solar panel
o Do you also have a battery connected to the SPM? The power
manager needs a battery to stabilize solar operation, and thus will
only power very low-power devices when using solar without a battery
also connected.
o Is the connected battery dead? Be sure there is plenty of sun and
charge it. The SPM will wait until the battery is about 5% charged to
turn on equipment.
o Is the solar panel unfolded, and placed in direct sunlight? Solar will not
work in even light shade. The blanket does not store energy (you can’t
put it in the sun during the day, and then plug it into an SPM at night).
• I have a battery and solar blanket connected, but my SPM shows that the solar
blanket is providing very little power.
o Is the battery fully charged? The solar blanket can’t provide energy if
there’s nowhere to put it.
o Is the solar blanket in full sun, and aimed at the sun?
o Is the battery rechargeable, and using a recharging cable?
• I can’t power my laptop and radio from my conformal or radio battery.
o Many laptops require more power than a small battery can provide –
try adding an additional battery in another SPM port or an energy
source like solar or a vehicle into Ports 3 or 4.
• My radio doesn’t come on, even though I think I have enough power for it.
o Radios require far more power to transmit than to receive. The SPM
knows the power needs of most radios, including what they need to
transmit. If there is not enough power available for all connected
radios to transmit at the same time, the SPM will power off one or
more of them, and indicate “Insufficient Power” or “Add Another
Battery” on the screen. This is to let you know that you don’t have
enough power for your mission, rather than having you find out midmission when you try to transmit on multiple radios, and have the
system die because the battery can’t keep up. Add another battery to
the SPM (even a little one) and the radio(s) should come on.
Page 38 SPM-622 User Guide Rev 7

Contacting Protonex
If you need technical assistance, or to order replacement or additional cables or
adapters for your SPM, please contact us via e-mail or telephone:
Web: http://www.protonex.com/support
E-mail: support@protonex.com
Telephone: 508-490-9960 x200
We are open from 8AM to 5PM, Eastern Time, USA.
SPM-622 User Guide Rev 6 Page 39
 Loading...