

Page 1
user guide
Print to Mail
™
Accessory
4200/4300
4250/4350
english
Part No. PTM-163
2329 Circadian Way
Santa Rosa, CA 95407
866-667-2861
Rev. 1/06
front cover of book 2/13/06 2:12 PM Page 1
Page 2

Pr
int to Mail
Accessory
User Guide
™
PTM 4200/4300/4250/4350
40 Helpful Hints EN
Helpful Hints
1
2
3
4
5
6
7
Please remember to save the box and box packaging that your
Print to MailTM was shipped in.
We suggest that you set up, test, and become comfortable with
your Print to MailTM machine before your first “live” operation.
Follow the directions on page 17 of the User Guide on how to orient
the Print to MailTM forms in your printer.
Before placing the forms in the printer, fan all four sides of the stack
of forms.
Download and install the PCL6 driver for your printer from
www.HP.com. When printing, remember to use the rotate option of
the HP PCL6 printer driver, as described on page 19 of the User Guide.
Use caution when removing froms from the output tray of your
Print to MailTM. The output tray is connected to a safety sensor and if
you lift the tray too high, the sensor will lose contact with the otput
tray, causing the Print to MailTM to stop processing forms. You can
modify the output tray to accept more forms by extending the tray
catch or removing the tray catch altogether for a non-stop operation.
Please see page 13 of the User Guide.
Use only Print to MailTM certified forms and remember to rotate your
stock of forms to use the oldest forms first. Make sure to store any
unused forms from an open package in the storage bags that are
included in the form box.
Any questions, please contact our Tech support at 866-667-2861
INSIDE OF BOOK 2/13/06 4:31 PM Page 1
Page 3

Copyright Information
All Rights Reserved.
Reproduction, adaptation, or
translation without prior written
permission is prohibited, except
as allowed under the copyright
laws.
Part number: PTM-163
First Edition, June
2001
Warran ty
The information contained in
this document is subject to
change without notice.
We make no warranty
any kind with respect
to this information.
SPECIFICALLY DISCLAIM
THE IMPLIED WARRANTY OF
MERCHANTABILITY AND
FITNESS FOR A PARTICULAR
PURPOSE.
shall not be
liable for any direct, indirect,
incidental, consequential, or
other damage alleged in
connection with the furnishing or
use of this information.
WE
We
Last Revised, January 2006
EN 39
This page intentionally left blank
INSIDE OF BOOK 2/13/06 4:31 PM Page 2
Page 4
38 B Service and Support EN
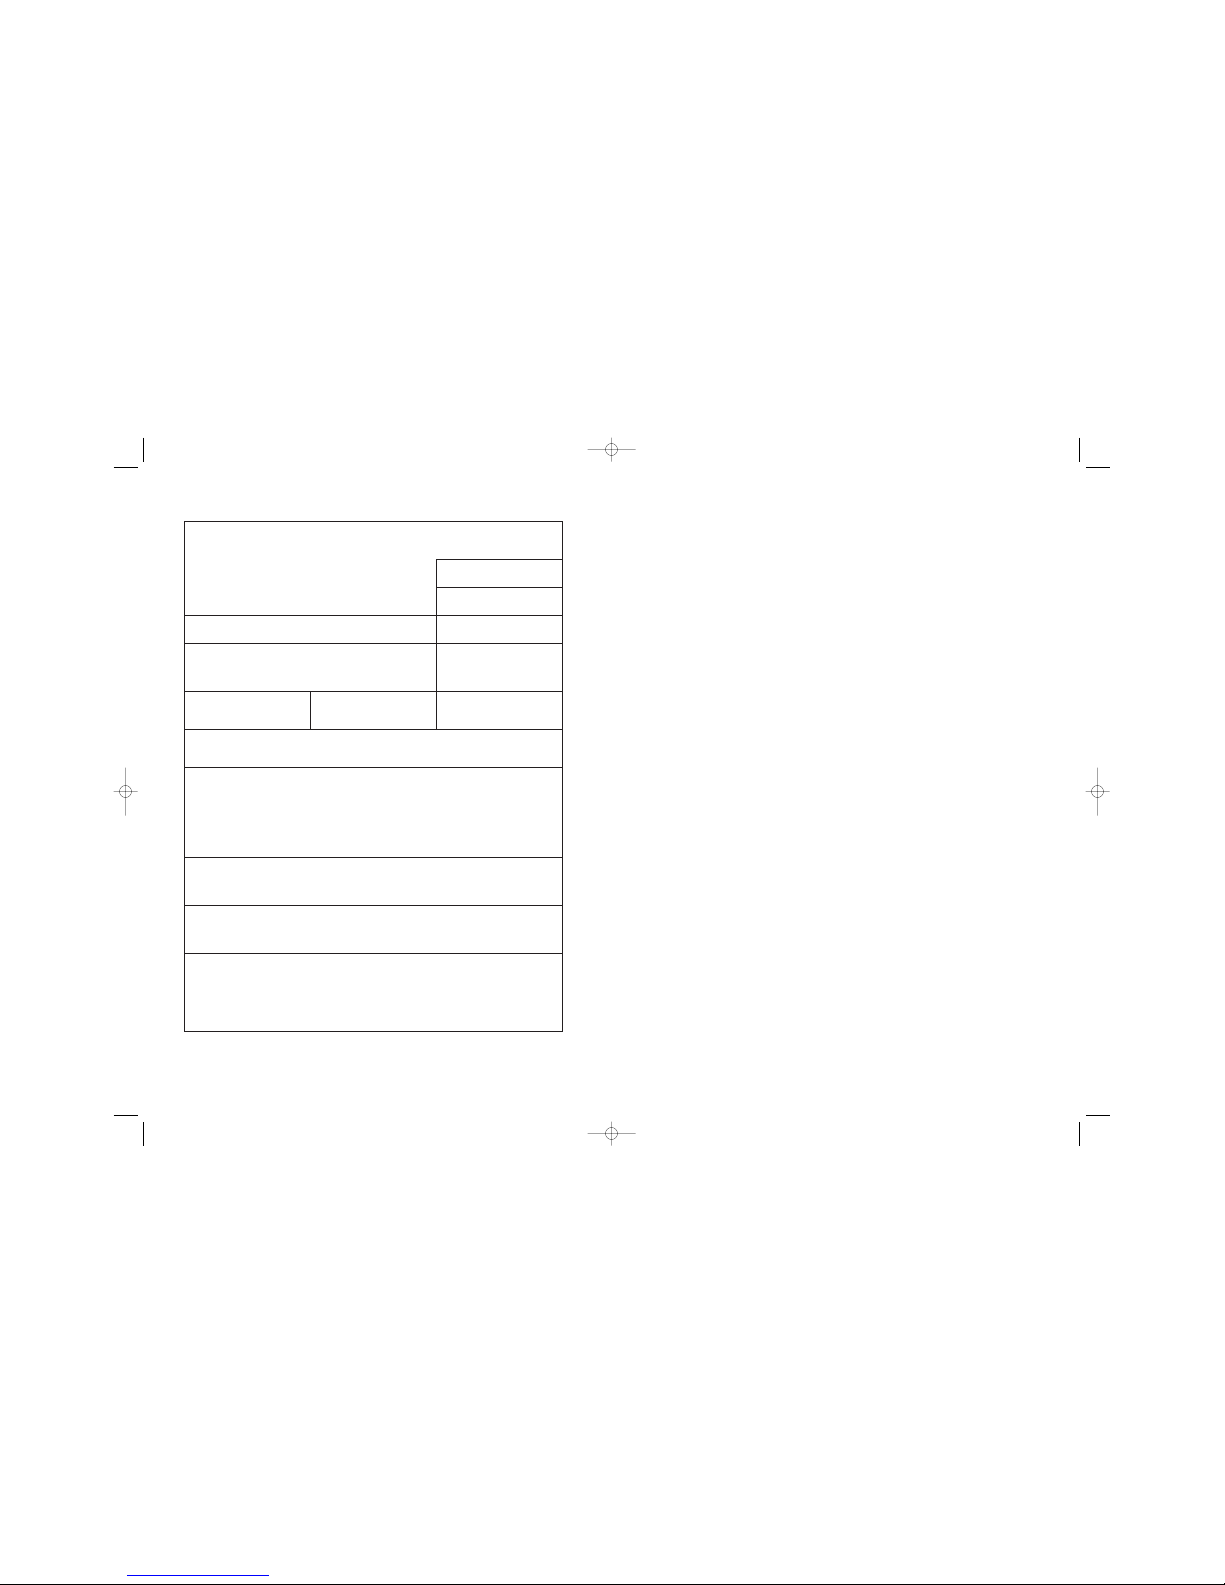
Service information form
Who is returning the equipment?
Person to contact:
Date:
Phone:
Alternate contact: Phone:
Return shipping Address: Special shipping instructions:
What is being sent?: Model number: Serial number:
Please attach any relevant printouts or samples when returning equipment.
Do not ship accessories that are not required to complete the repair (manuals, cleaning supplies, etc.).
What needs to be done?
1. Describe the conditions of the failure. (What was the failure? What were you doing when the failure
occurred? What software were you running? Is the failure repeatable?)
2. If the failure is intermittent, how much time elapses between failures?
3. Service order n
umber (this is the number given to you by the service center representative):
4. Additional comments:
EN 3
Table of Contents
1 Automating the mailing process
The Print to Mail™ system . . . . . . . . . . . . . . . . . . . . . . . . . . . . . . . . . . . . . . . . . . . . . 5
2 Setup
Checking the contents. . . . . . . . . . . . . . . . . . . . . . . . . . . . . . . . . . . . . . . . . . . . . . . . . 6
Identifying parts. . . . . . . . . . . . . . . . . . . . . . . . . . . . . . . . . . . . . . . . . . . . . . . . . . . . . . 7
Installing the accessory. . . . . . . . . . . . . . . . . . . . . . . . . . . . . . . . . . . . . . . . . . . . . . . . 8
Preparing the printer. . . . . . . . . . . . . . . . . . . . . . . . . . . . . . . . . . . . . . . . . . . . . . . 8
Attaching the Print to Mail™ accessory to the printer . . . . . . .
. . . . . . . . . . . .
8
Installing the fold-chutes. . . . . . . . . . . . . . . . . . . . . . . . . . . . . . . . . . . . . . . . . . . 12
Installing the output bin. . . . . . . . . . . . . . . . . . . . . . . . . . . . . . . . . . . . . . . . . . . . 13
Turning on the accessory and configuring the printer . . . . . . . . . . . . . . . . . . . . . 14
Safety . . . . . . . . . . . . . . . . . . . . . . . . . . . . . . . . . . . . . . . . . . . . . . . . . . . . . . . . . . . . 15
3 Using the accessory
Printing on Print to Mail forms . . . . . . . . . . . . . . . . . . . . . . . . . . . . . . . . . . . . . . . 16
Form layout. . . . . . . . . . . . . . . . . . . . . . . . . . . . . . . . . . . . . . . . . . . . . . . . . . . . . 16
Setting the Print to Mail™ accessory . . . . . . . . 17
Setting fold-stops . . . . . . . . . . . . . . . . . . . . . . . . . . . . . . . . . . . . . . . . . . . . . . . . 18
Software settings . . . . . . . . . . . . . . . . . . . . . . . . . . . . . . . . . . . . . . . . . . . . . . . . 19
Working with the printer. . . . . . . . . . . . . . . . . . . . . . . . . . . . . . . . . . . . . . . . . . . . . . . 20
Large mailings . . . . . . . . . . . . . . . . . . . . . . . . . . . . . . . . . . . . . . . . . . . . . . . . . . 20
4 Troubleshooting and Maintenance
Solving setup problems. . . . . . . . . . . . . . . . . . . . . . . . . . . . . . . . . . . . . . . . . . . . . . . 21
Solving printing and folding problems . . . . . . . . . . . . . . . . . . . . . . . . . . . . . . . . . . . . 23
Jams . . . . . . . . . . . . . . . . . . . . . . . . . . . . . . . . . . . . . . . . . . . . . . . . . . . . . . . . . . . . . 26
Clearing jams . . . . . . . . . . . . . . . . . . . . . . . . . . . . . . . . . . . . . . . . . . . . . . . . . . . 27
Error Codes . . . . . . . . . . . . . . . . . . . . . . . . . . . . . . . . . . . . . . . . . . . . . . . . . . . . 29
Resetting the accessory . . . . . . . . . . . . . . . . . . . . . . . . . . . . . . . . . . . . . . . . . . . 30
Interpreting the event log . . . . . . . . . . . . . . . . . . . . . . . . . . . . . . . . . . . . . . . . . . 30
Cleaning the accessory. . . . . . . . . . . . . . . . . . . . . . . . . . . . . . . . . . . . . . . . . . . . . . . 31
Covers . . . . . . . . . . . . . . . . . . . . . . . . . . . . . . . . . . . . . . . . . . . . . . . . . . . . . . . . 31
Rollers. . . . . . . . . . . . . . . . . . . . . . . . . . . . . . . . . . . . . . . . . . . . . . . . . . . . . . . . . 31
. . . . . . . . . . . . . . . . . . . . . . . . . . . .
™
INSIDE OF BOOK 2/13/06 4:31 PM Page 3
Page 5

4
EN
A Specifications
Print to Mail™ Accessory . . . . . . . . . . . . . . . . . . . . . .
33
Regulatory information . . . . . . . . . . . . . . . . . . . . . . . . . . . . . . . . . . . . . . . . . . . . . . . 35
FCC regulations . . . . . . . . . . . . . . . . . . . . . . . . . . . . . . . . . . . . . . . . . . . . . . . . . 35
B Service and Support
Warranty information. . . . . . . . . . . . . . . . . . . . . . . . . . . . . . . . . . . . . . . . . . . . . . . . . 36
Limited warranty statement . . . . . . . . . . . . . . . . . . . . . . . . . . . . . . . . . . . . . . . 36
Repair and Service . . . . . . . . . . . . . . . . . . . . . . . . . . . . . . . . . . . . . . . . . . . . . . . . . . 37
Repackaging guidelines . . . . . . . . . . . . . . . . . . . . . . . . . . . . . . . . . . . . . . . . . . . 37
Service information form. . . . . . . . . . . . . . . . . . . . . . . . . . . . . . . . . . . . . . . . . . . 38
Customer Care service and support . . .. . . . . . . . . . . . . . . . . . . . . . . . . . . . . . . . . . . 39
. . . . . . . . . . . . . . . . . . . . . . .
37 B Service and Support
EN
Repair and Service
In the event your Print to Mail™ accessory requires service, repair or
replacement service is available.
1. Contact Customer Service to secure a Service Order (SO) number. The SO
number is required to insure prompt processing. Please provide the Model and
Serial Number listed on the back of your unit when requesting the SO number.
2. Advance Replacement service is available. When a replacement unit is
required, a unit can be shipped within 24 hours, whenever possible. Under
normal circumstances, units sent in for repair will be shipped back within a
maximum of 8 working days.
3. Replacement units are covered by the balance of the orginal purchase
warranty, or 90 days, whichever is longer. Repairs are warranted for 90 days.
4. Extended Warranty and Service Agreements are available. Contact your
representative for details.
5. A flat rate is charged for repairs or replacement of units out of warranty.
Repackaging Guidelines
1. When shipping units back, please include your name, return address, and
phone number, as well as payment or purchase order for repair/replacement
charges, plus freight charges over and above the standard UPS rate. Units not
so accompanied will not be processed. (A service Information Form is included
on the next page of this manual.) Be sure to mark the service order number
clearly on the shipping label or the outside of the carton.
2. To avoid additional damage due to shipping, please use the orginal foamlined box to return your unit.
3. Units will be shipped prepaid (continental US only), utilizing standard United
Parcel Service (UPS). In the event you wish other than standard UPS, the
additional cost over and above standard UPS rate will then be charged to the
customer.
4. Please address all inquiries regarding the Print to Mail™ equipment and
forms to:
PTM Document Systems
2329 Circadian Way
Santa Rosa, CA 95407
866-667-2861 ext. 6348
INSIDE OF BOOK 2/13/06 4:31 PM Page 4
Page 6

ENWarranty information
36
B
Service and Support
Warranty information
Print to Mail™ accessory
SIX MONTH LIMITED WARRANTY
Limited warranty statement
1. For a period of six (6) months from date of purchase, any repairs necessary
because of defects in material or workmanship, will be made without charge.
2. Note that abusive wear and tear, damage caused by accident, disaster,
misuse, unauthorized modifications and unauthorized service are not covered.
Charges may be made in such cases.
3. No other warranty, express or implied, shall be applicable to this equipment.
The operator/owner will be responsible for any loss, incovenience, expense or
other incidental or consequential damages occasioned by the product.
4. This warranty applies to the orginal purchaser only, and is not transferable
with the title to the equipment, without written authorization.
EN The Print to Mail™ system 5
1
Automating the mailing
process
The Print to Mail™ system
The Print to Mail™ system combines HP LaserJet 4200/4300/4250/4350
series monochrome printers with a powerful set of tools to help you
automate routine office mailings. Many mailing tasks can be set up
and completed quickly by inserting Print to Mail™ forms in the printer,
check to insure that the Print to Mail™ Accessory is
engaged and selecting “print” in your software program. To
complete your end-to-end solution, you might want to combine
additional elements in the system. These solutions can help you
automatically reformat your forms, print postage on your mail,
print checks, and much more.
Save time and money by:
automating monthly invoice and payment functions.
managing your own payroll mailings (checks, statements, tax
forms).
sending reminders and statements to customers on a regular
basis.
distributing confidential reports, such as customer information,
PIN numbers, or test results.
sending small promotional pieces, such as coupons and offers.
automating grade report processes.
INSIDE OF BOOK 2/13/06 4:31 PM Page 5
Page 7
ENChecking the contents
6
2
Setup
Checking the contents
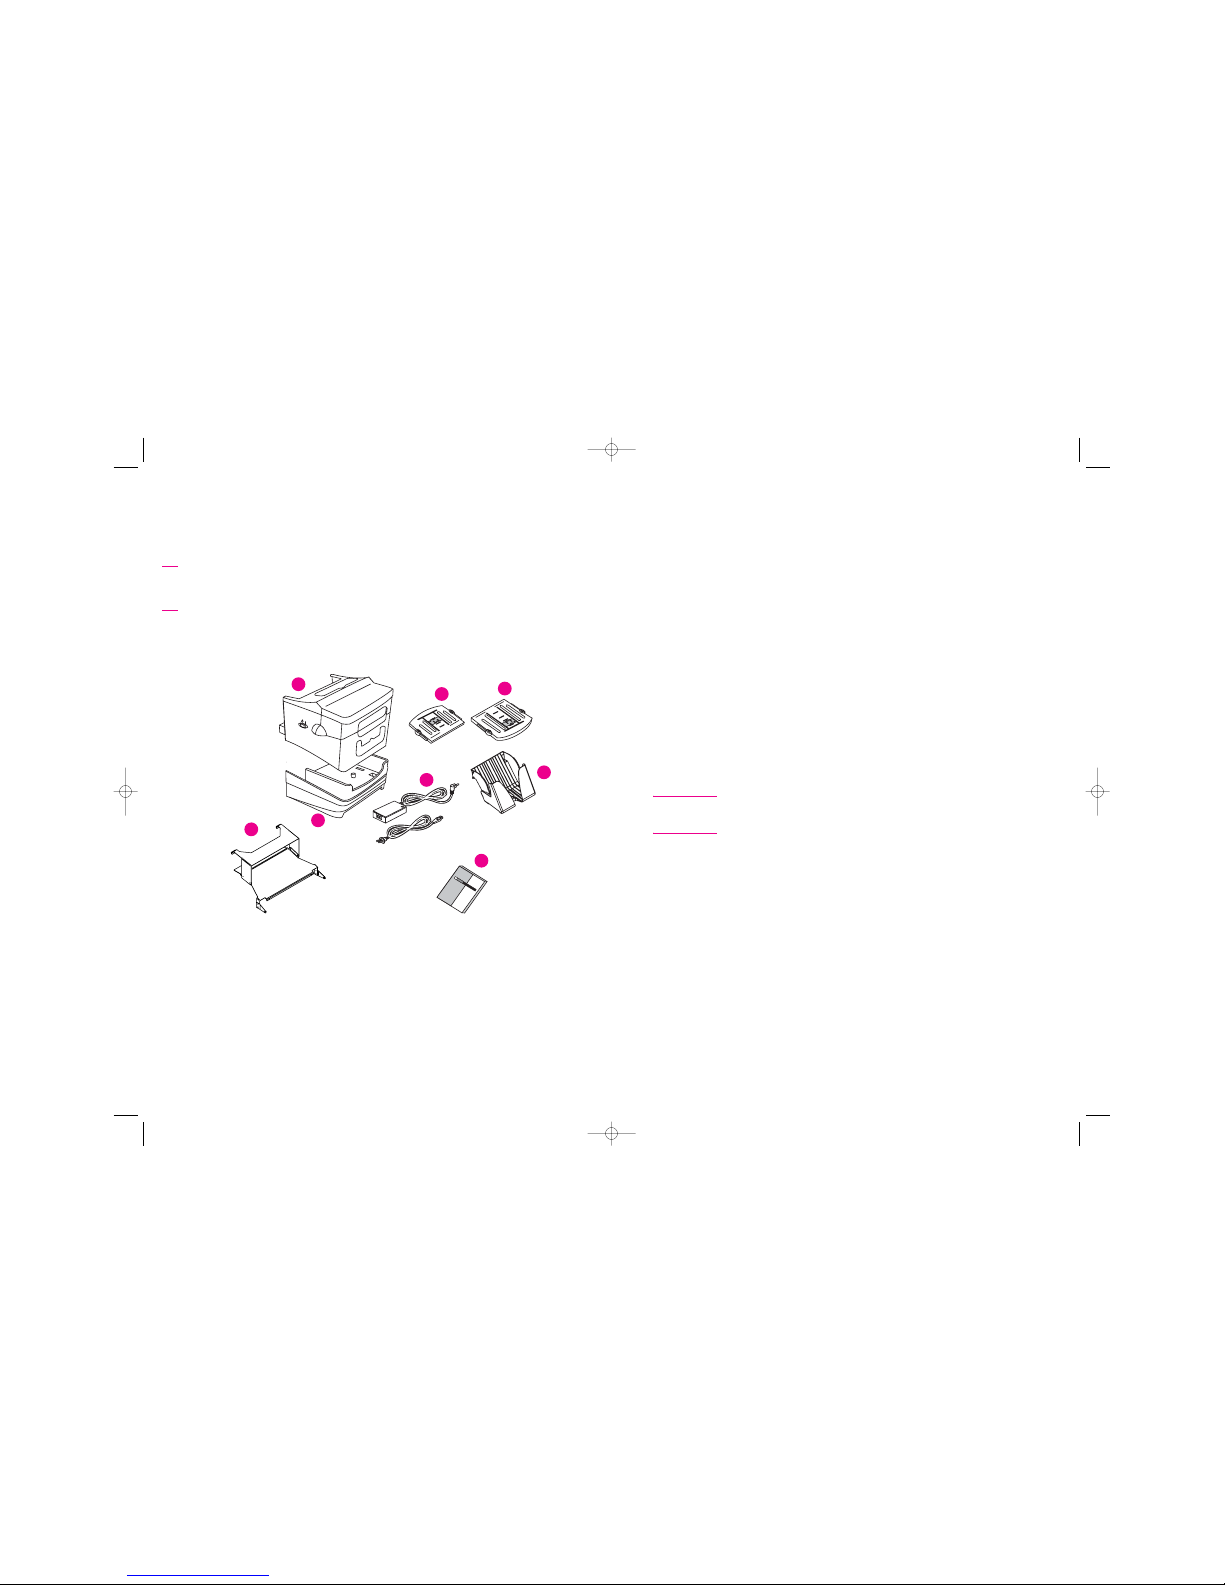
The graphic below illustrates the contents of the box:
Figure 1. Print to Mail™ accessory contents of the box
HP
LaserJ
et
Print
to
Mail
Accessory
1 Print to Mail™
8 Ramp
2 Upper fold-chute
7
3 Lower fold-chute
4 Power cables
5 Output bin
Reversible base (cutout cover
taped to bottom)
6 User guide
1
2
3
5
4
8
7
6
Save this box and packing contents for future use. Shipping the Print to Mail™
Accessory in a box other than the one provided may cause damage not covered
under warranty or service contract. You may be required to purchase a new box to
ship the unit for repair.
EN Regulatory information 35
Regulatory information
FCC regulations
This device complies with Part 15 of the FCC rules.
These limits are designed to provide reasonable protection against
harmful interference in a residential installation. This equipment
generates, uses, and can radiate radio frequency energy, and if not
installed and used in accordance with the instructions, may cause
harmful interference to radio communications. However, there is no
guarantee that interference will not occur in a particular installation. If
this equipment does cause harmful interference to radio or television
reception, which can be determined by turning the equipment off and
on, the user is encouraged to try to correct the interference by one or
more of the following measures:
Reorient or relocate the receiving antenna.
Increase separation between equipment and receiver.
Connect equipment to an outlet on a circuit different from that on
which the receiver is located.
Consult your dealer or an experienced radio/TV technician.
Note
Any changes or modifications to the Print to Mail™ accessory not
•
•
•
•
expressly approved could void the user's authority to operate the equipment.
INSIDE OF BOOK 2/13/06 4:31 PM Page 6
Page 8
34 A Specifications EN
Electrical
Power consumption (average, in watts) Folding: 32
Standby: less than 1
Minimum recommended circuit capacity 100 to 127 volts,
less than 1.5 amps
220 to 240 volts,
less than 1.2 amps
Power requirements (acceptable line voltage) 100 to 127 volts, 50/60 Hz
220 to 240 volts, 50/60 Hz
Operating environment
Temperature 10 to 32 degrees Celsius
(50 to 91 degrees Fahrenheit)
Relative humidity 20 to 80 percent
Media
Forms
24 to 29 lb (90 to 109 g/m
2
)
Paper
20 to 24 lb (75 to 90 g/m
2
)
7
2 Setup
EN
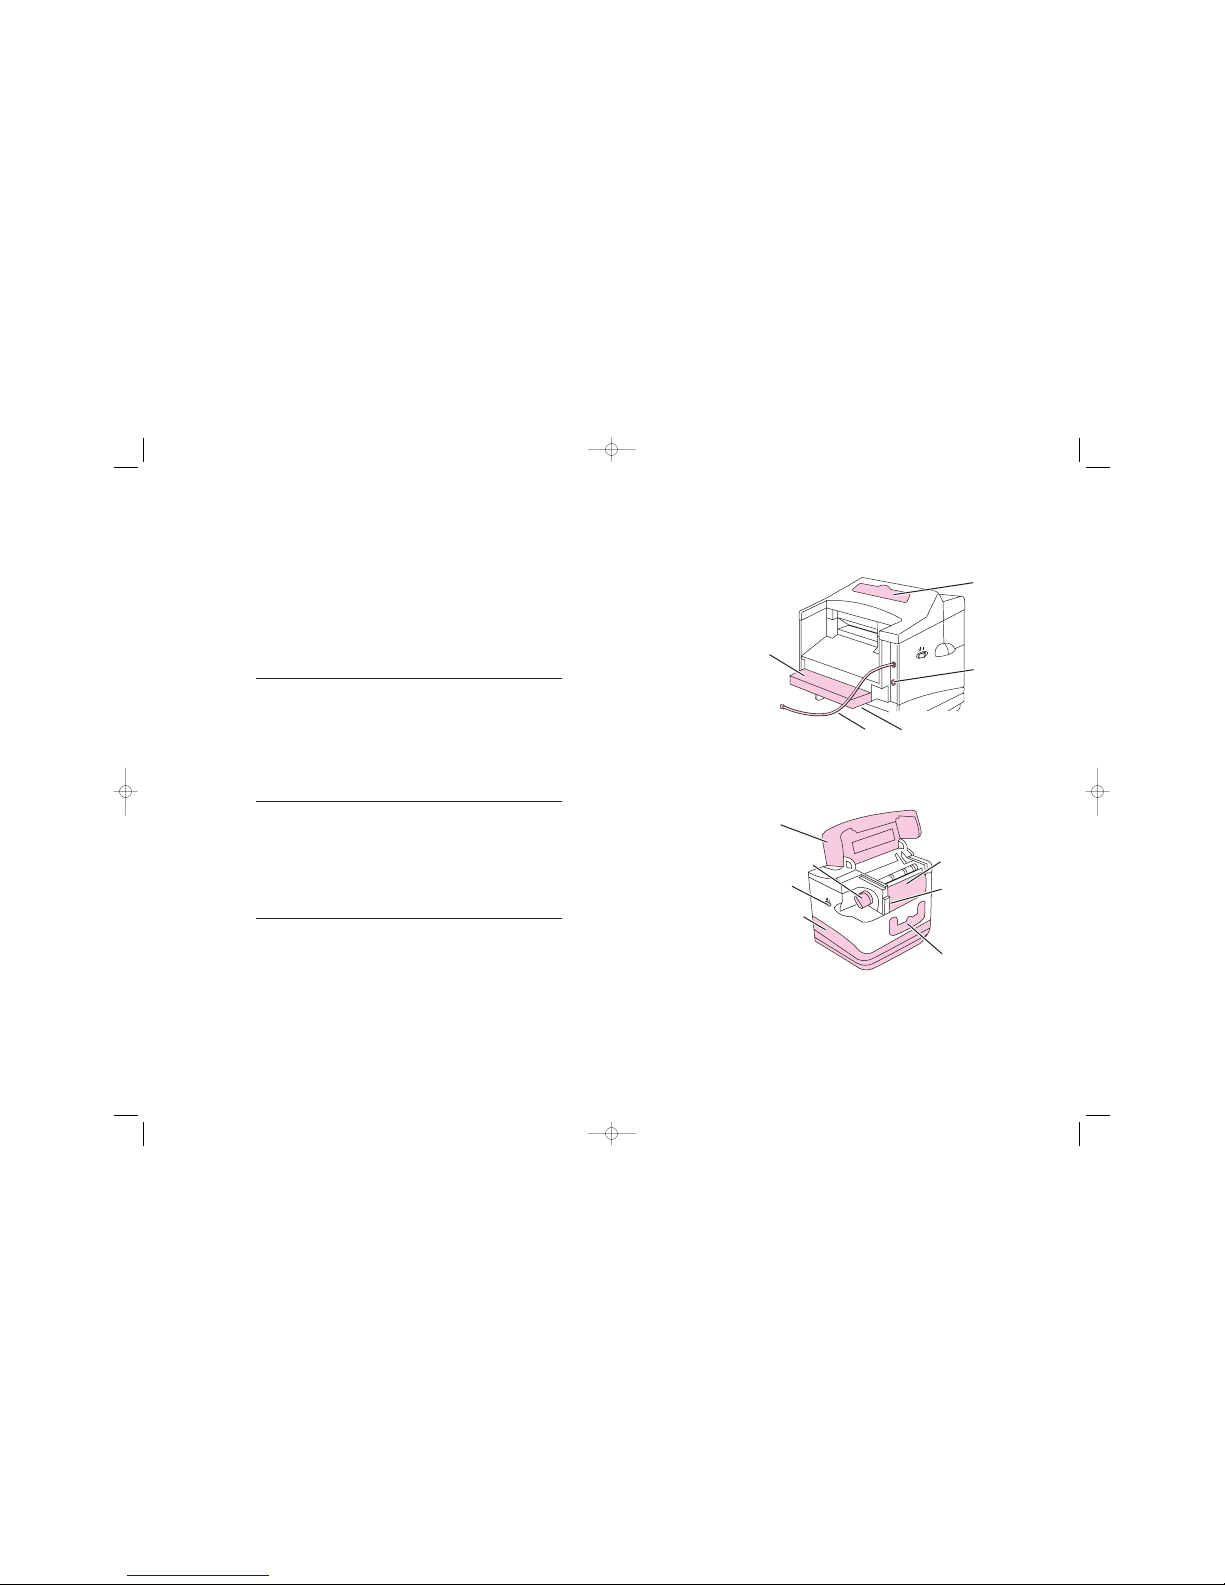
Identifying parts
Before you begin to set up the Print to Mail™ accessory,
identify the following parts of the accessory:
Figure 2. Front view
Figure 3. Rear view
bottom of the alignment guide)
Accessory interface cable (Jetlink)
Alignment
Alignment tips (on the
Power
connector
guide
Upper
fold-chute
slot
Output-bin slot
Lower fold-chute slot
Reversible base
Power switch
Top cover
Jam-clearing knob
Serial number plate
(inside output-bin slot)
INSIDE OF BOOK 2/13/06 4:31 PM Page 7
Page 9
ENInstalling the accessory
8
Installing the accessory
Preparing the printer
Attaching the Print to Mail™ accessory
to the printer
The printer, by itself, measures 42.7 cm (16.8 inches) from front to
rear. To attach the Print to Mail™ accessor y, allow for an
additional 55.2 cm (21.75 inches) at the rear of the printer.
1 Turn off the printer.
2 At the rear of the printer, remove the dust cover, if installed (this
may not be necessary as not all printers have dust covers). From
the rear of the paper tray, grasp the dust cover on both sides and
pull it straight back, away from the printer.
3 Remove the two duplexer tabs, if installed, from the rear of the
printer by first gently pulling the bottoms of the tabs straight back,
and then rotating them up and away from the printer.
Note If a duplexer accessory is installed on the printer, it must be removed
to install the Print to Mail™ accessory.
EN Print to Mail™ Accessory 33
A
Specifications
Print to Mail™ Accessory
Physical
Height—(When used with:)
HP LaserJet 4200, 4300, 4250, 4350
(n) (tn)
34.6 cm (13.6 inches)
46.7 cm (18.4 inches)
Width 39.4 cm (15.5 inches)
Depth with output bin retracted 48.3 cm (19 inches)
Weight, approximate 12.7 kg (28 lbs)
-
55.2 cm (21.75 inches)
Depth with output bin extended -
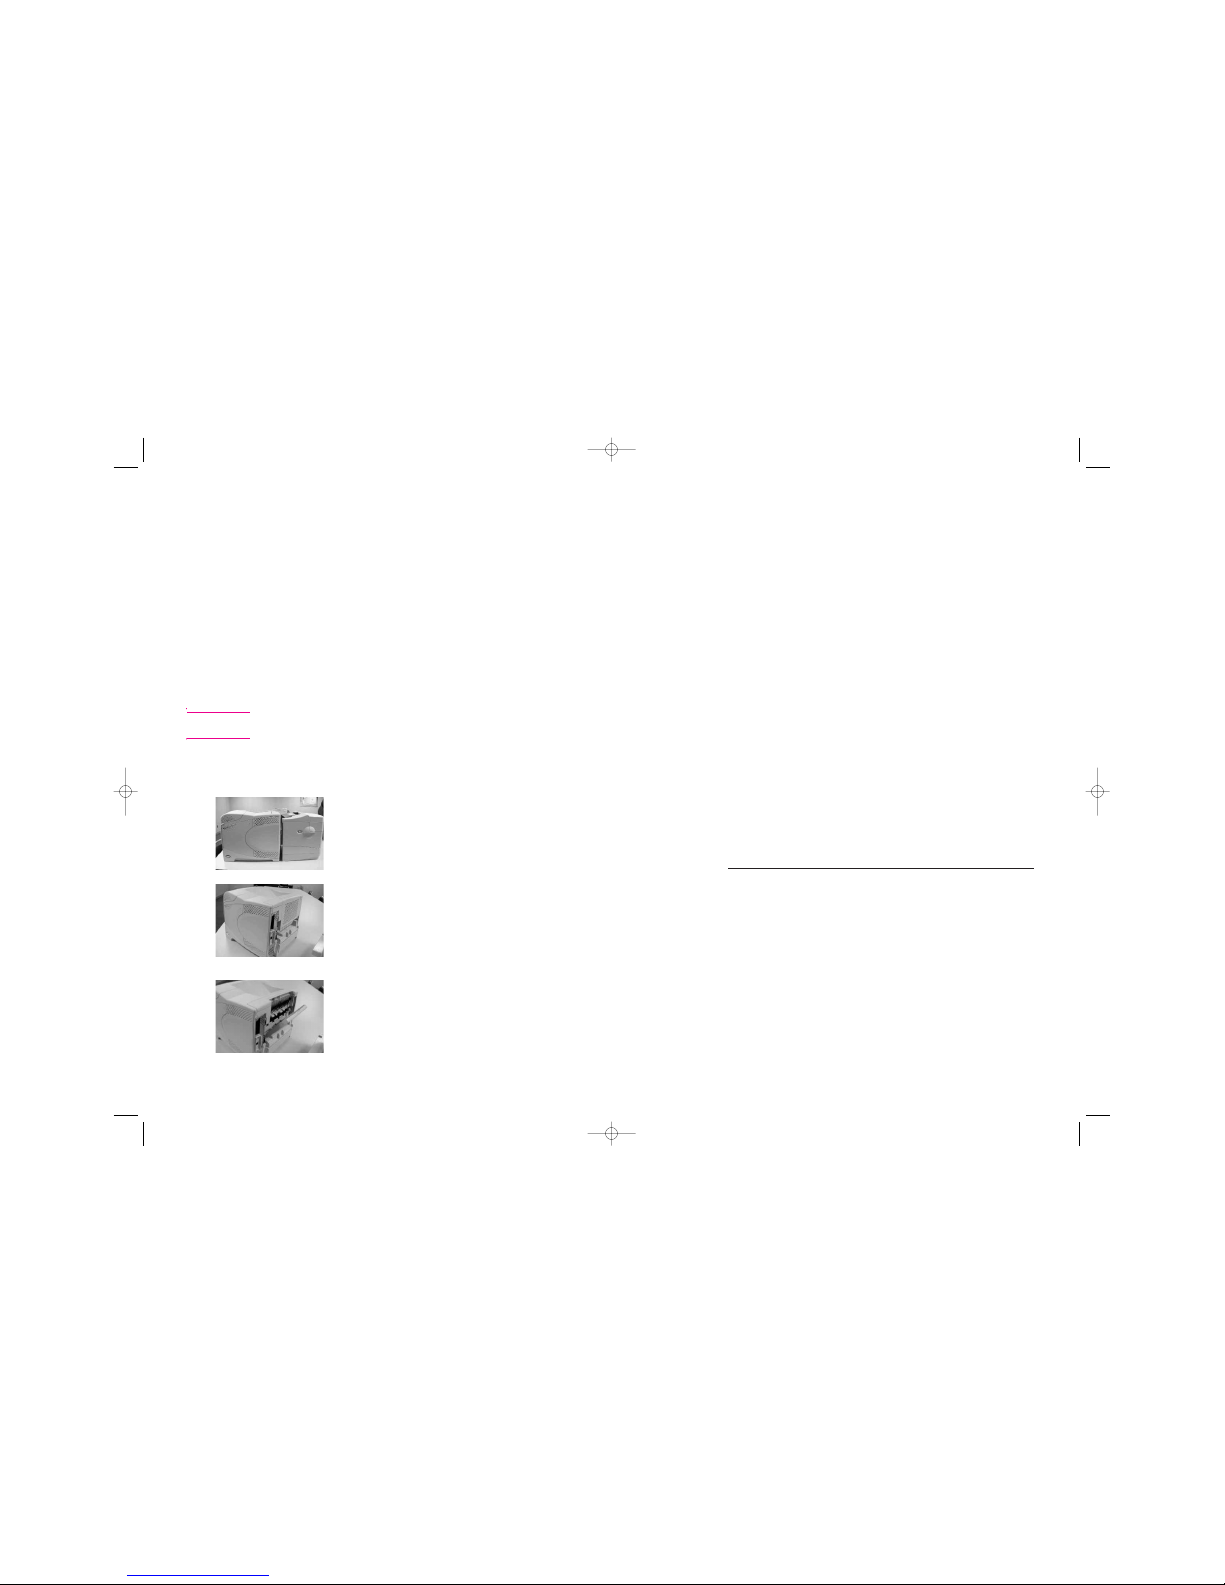
When finished, the printer and accessory should
look like this. Notice the gap between the units to
allow for paper movement and electrical
connections.
Mating of the PTM to the printer requires the
removal of several items from the back of the HP
printer. Removal is simple and requires no tools.
Care should be taken to ensure the plastic parts
are not damaged during removal.
-The back feed door
-2 covers for the feed tray
First, remove the rear door. The door drops down
and is hinged.
INSIDE OF BOOK 2/13/06 4:31 PM Page 8
Page 10
32 4 Troubleshooting and Maintenance EN
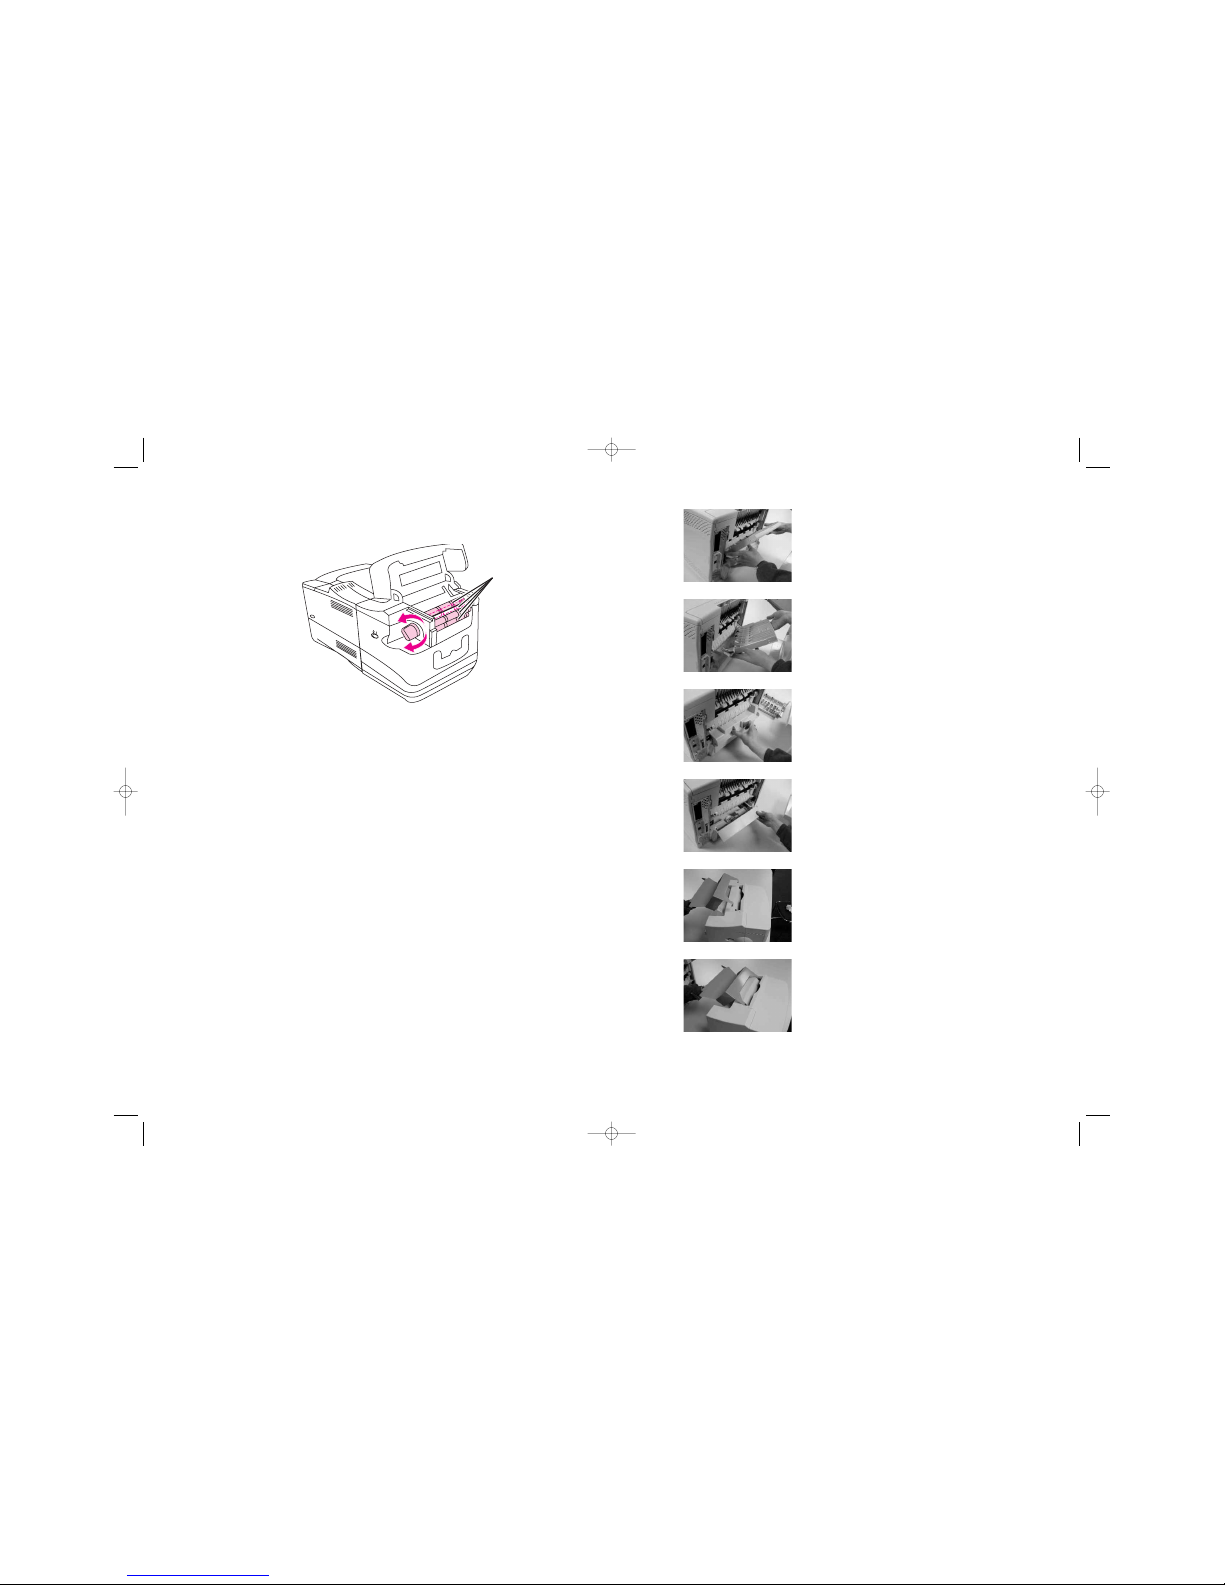
3 Open the top cover of the accessory and locate the four rollers
and the jam-clearing knob inside the accessory.
Figure 15. Locating the four rollers
4 Lightly dampen a lint-free cloth with soapy water and wipe clean
the exposed surfaces of the rollers, including the black roller
bands.
5 Keep the cloth and your hands free of the rollers and turn the jam-
clearing knob to expose more of the surfaces of the four rollers.
6 Repeat step 5 until the rollers and black roller bands are clean.
7 Lightly dampen a lint-free cloth with plain water and wipe clean
the exposed surfaces of the four rollers and black roller bands.
8 Allow the rollers and black roller bands to completely air-dry
before proceeding to step 9.
9 Close the cover, replace the fold-chutes and output bin, and plug
the power cords for both the accessory and the printer into their
power outlets.
Four rollers
9 2 SetupEN
The hinged door has finger access and can be
pressed together to allow the door to be removed.
Place one hand on each side of the door and
compress the hinges together.
CAUTION: Do not force the door. If it can’t be
removed easily, there may be an obstruction.
Slide one side of the door out of the printer first.
Then gently remove the door.
Place the removed door in a safe place for future
use.
Next we will remove the paper feed tray dust
cover.
Simply grasp the cover in the center and pull out.
Your PTM comes with a gray metal adapter ramp
to allow it to dock with the HP4XXX printer.
The adapter ramp is designed with mounting
hooks to easily hang on the PTM.
The hooks of the adapter should slip easily into
the top chute opening of the PTM.
CAUTION: The upper fold chute must be removed
prior to attaching the adapter ramp.
Gently lower the adapter ramp until it sits firmly in
place on the PTM.
The pivoting feed tray cover is also easily
removed.
Lift the right side out of the snap.
This allows the left side to slip out of the pivot
hole in the paper tray.
Store the pivoting tray cover with the rear door
and dust cover in a safe place for future use.
INSIDE OF BOOK 2/13/06 4:31 PM Page 9
Page 11
EN
Installing the accessory 10
EN Cleaning the accessory 31
Cleaning the accessory
Cleaning is limited to two accessory parts: covers and rollers.
Covers
Clean the outside covers monthly or as necessary.
To clean the covers
Clean the outside of the accessory by wiping the covers with a waterdampened cloth.
Rollers
Clean all four rollers monthly or as necessary.
To clean the rollers
1 Turn off power and then unplug the power cords from their power
outlets for both the accessory and the printer.
2 Remo
3 As the rollers accumulate stray toner and paper dust, clean them
with a soapy, water-dampened, lint-free cloth.
ve the output bin and both fold-chutes.
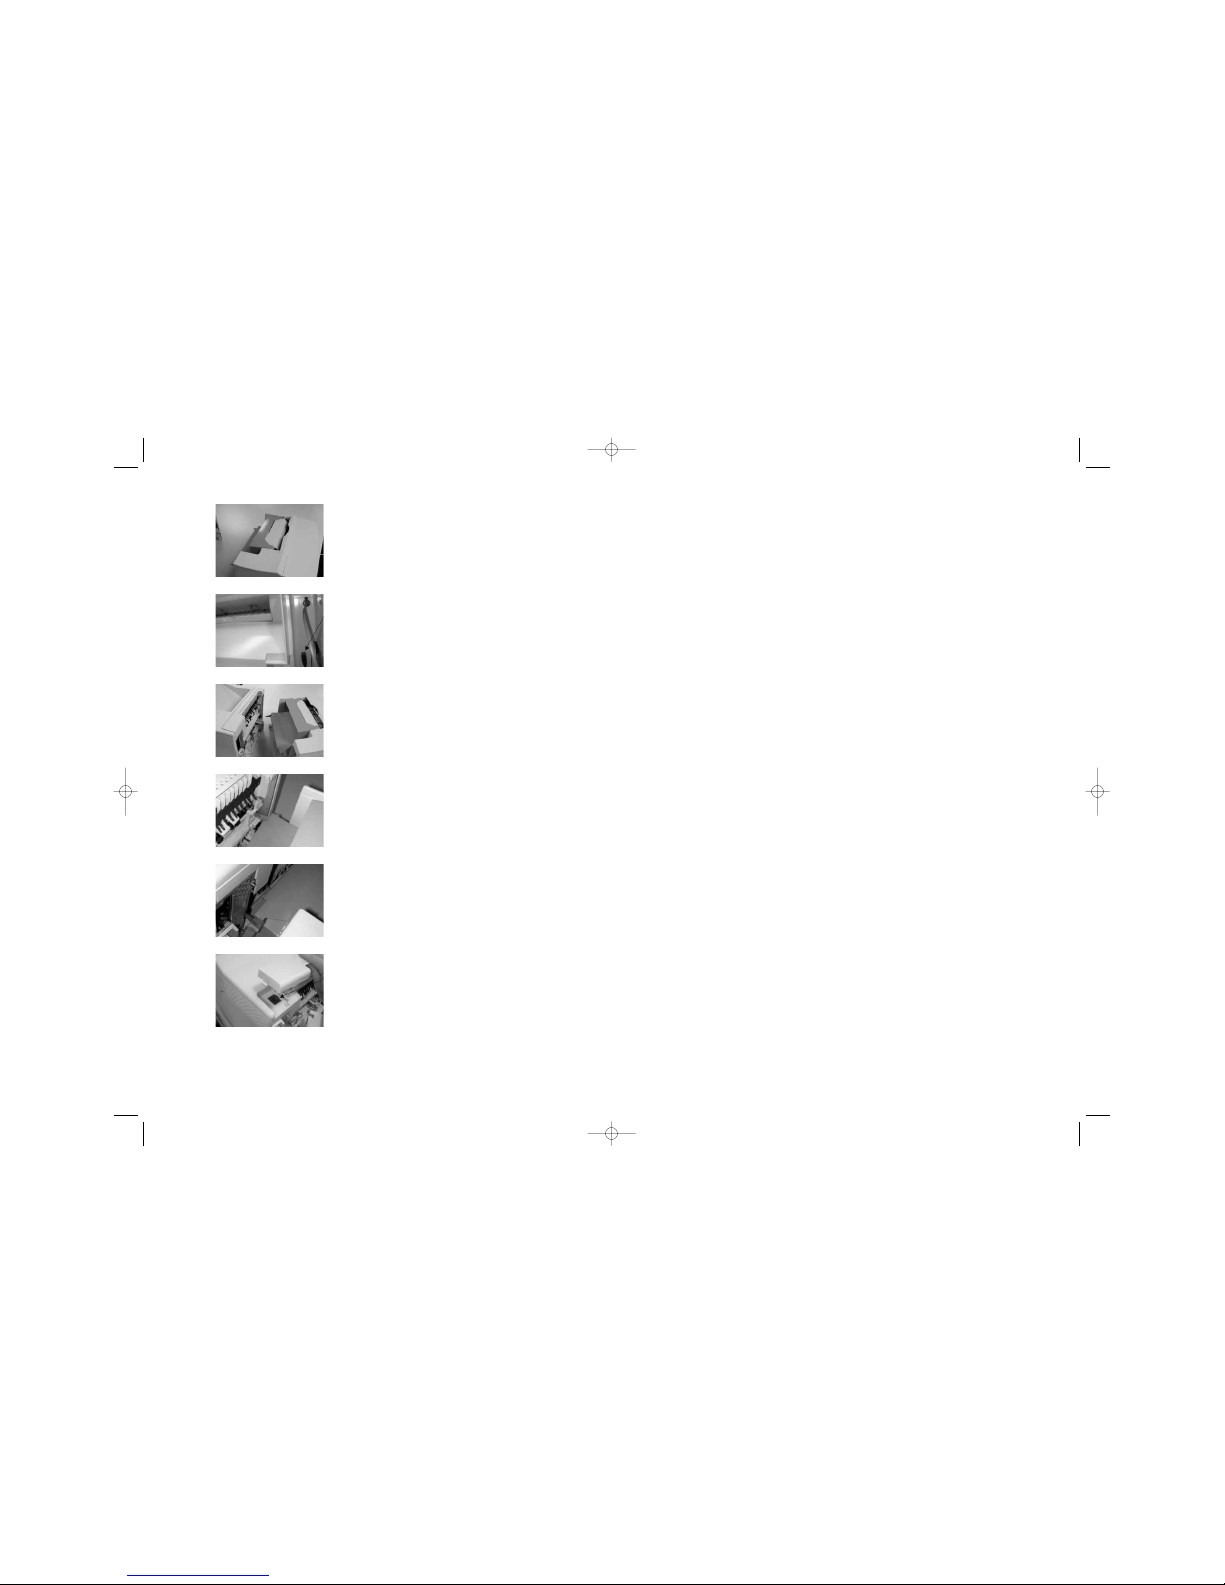
Refer to the picture to see proper orientation of
the adapter ramp after assembly.
Once the adapter ramp is properly attached, the
upper fold chute can be easily inserted.
Prior to docking the PTM with the printer, make
sure the power supply plug is firmly connected to
the power jack in the back of the unit.
Remove the cover from the top of the printer as
shown and store it for future use.
With the cover off, you will see a black connector.
The adapter ramp has two spring tabs that
engage the printer. Be careful not to damage or
bend the spring tabs. They are critical for positioning the PTM with the printer.
These spring tabs will
be used to mate the PTM to the printer.
Slide the PTM at an angle toward the printer with
the right side going in first.
The right spring tab will slide inside the printer
chassis into the opening in the printer where the
rear door was removed.
Be careful not to catch the spring tab on the printer
side cover causing the spring tab to bend outward.
Once the right spring tab is in place, continue sliding the PTM toward the printer.
Guide the left spring tab into the matching slot on the
left side of the printer chassis. You may have to bend
the ear in slightly to clear the side of the printer chassis.
Be careful not to bend the spring tab in too much.
This will cause the PTM to be loose and not properly dock with the printer.
INSIDE OF BOOK 2/13/06 4:31 PM Page 10
Page 12
30 4 Troubleshooting and Maintenance EN
Resetting the accessory
After clearing a jam, reset the accessory using one of these three
methods:
Remove and reinstall the upper fold-chute.
Remove and reinstall the output bin.
Set the accessory power switch to "standby" (" "), and then back
to the "on" ("I") position.
11
2 Setup
EN
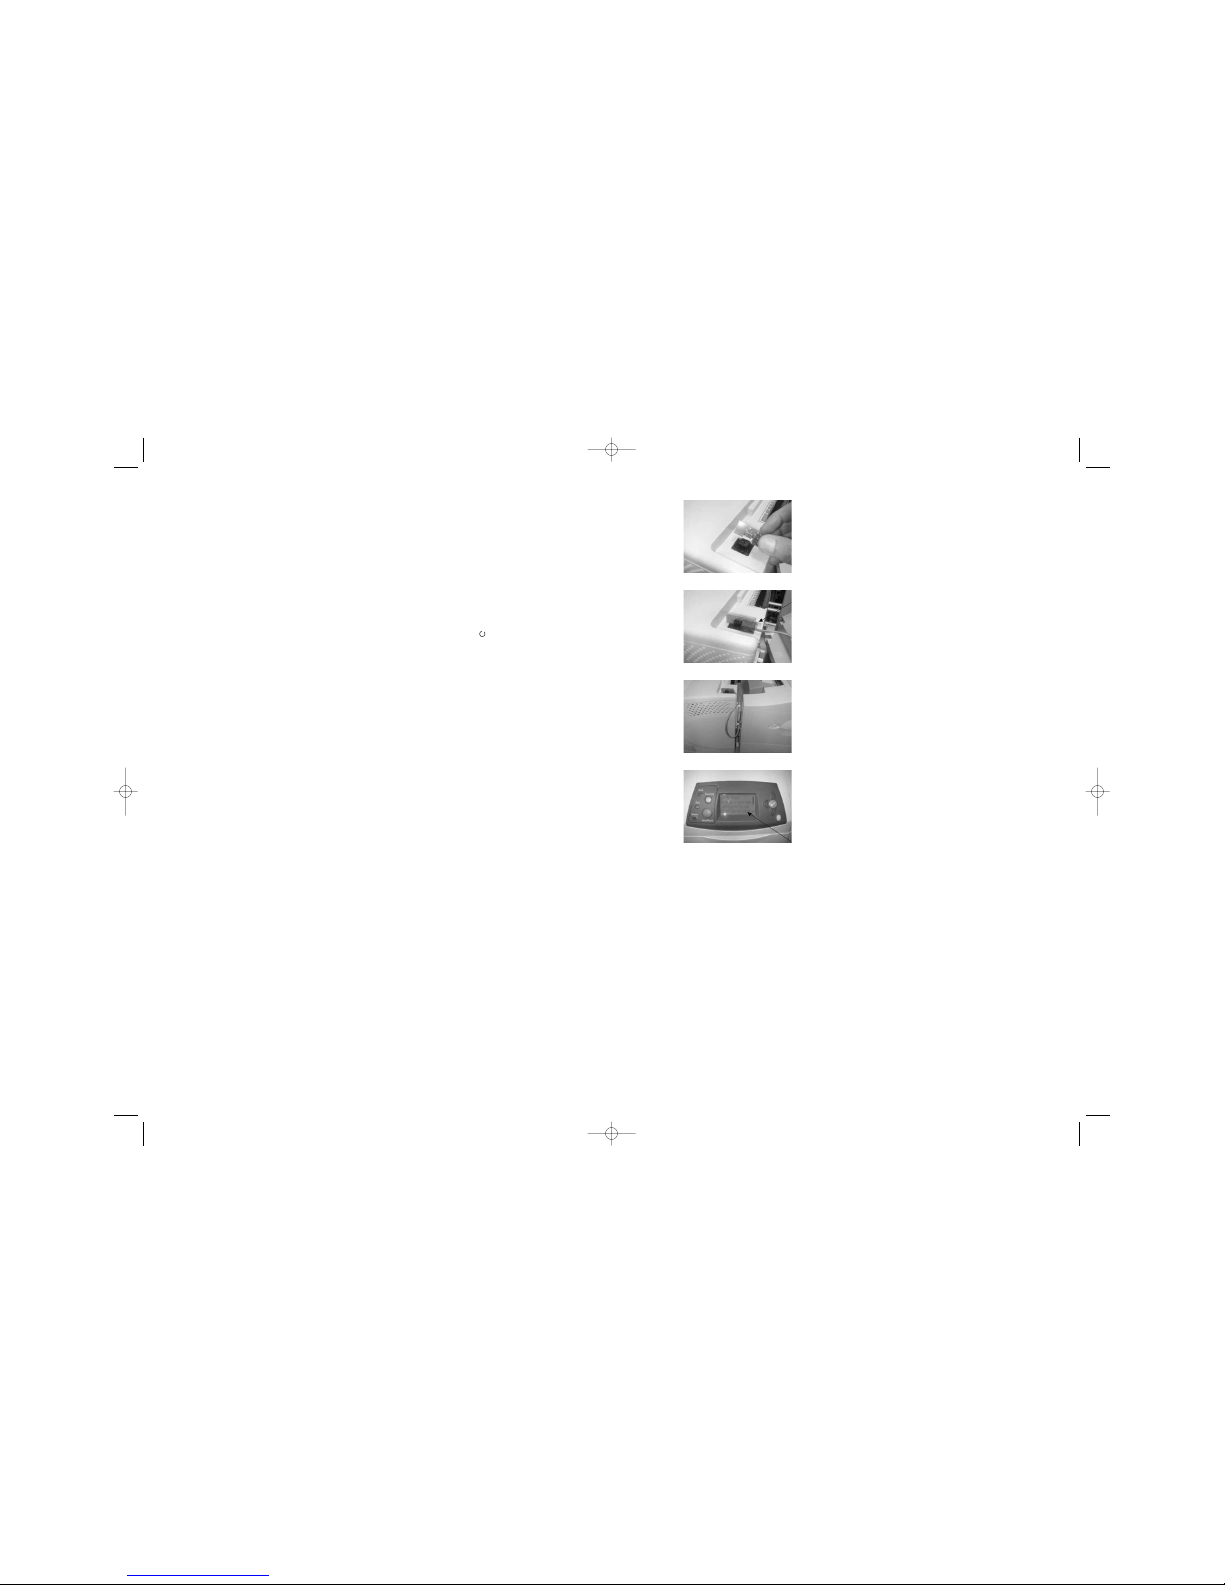
Leave the protective rubber band on the adapter board.
This ensures that the adapter board is set correctly.
Attach the Jetlink adapter board to the black connector on the top of the printer.
Press gently to ensure a good connection, but not
hard enough to cause damage to the connector or
Jetlink connector board.
Once connected it should appear as shown.
Turn off your printer and turn it back on so that the
printer can recognize the PTM is attached and
ready.
You should hear the motor in the PTM4300 activate briefly, letting you know the unit is ready.
If the PTM jams or stops running, the printer
should recognize the problem and stop printing. If
it doesn’t recognize the problem, push the
“Pause/Resume” button on the front display panel
of the printer to stop the print job.
Follow the instructions on the printer display to
clear the jam and resume your print job.
If the PTM is not attached properly, the printer display will not guide you through the appropriate
steps to clear the PTM. In that case, refer to your
Users Guide for jam clearing instructions.
Once you have docked the PTM with the printer,
the unit should be approximately I” away from
the printer, with the adapter ramp firmly in place
against the diffuser of the printer and the Jetlink
cable plugged into the connector on the top of the
printer.
Your PTM is now ready to operate.
INSIDE OF BOOK 2/13/06 4:31 PM Page 11
Page 13
EN
Installing the accessory
12
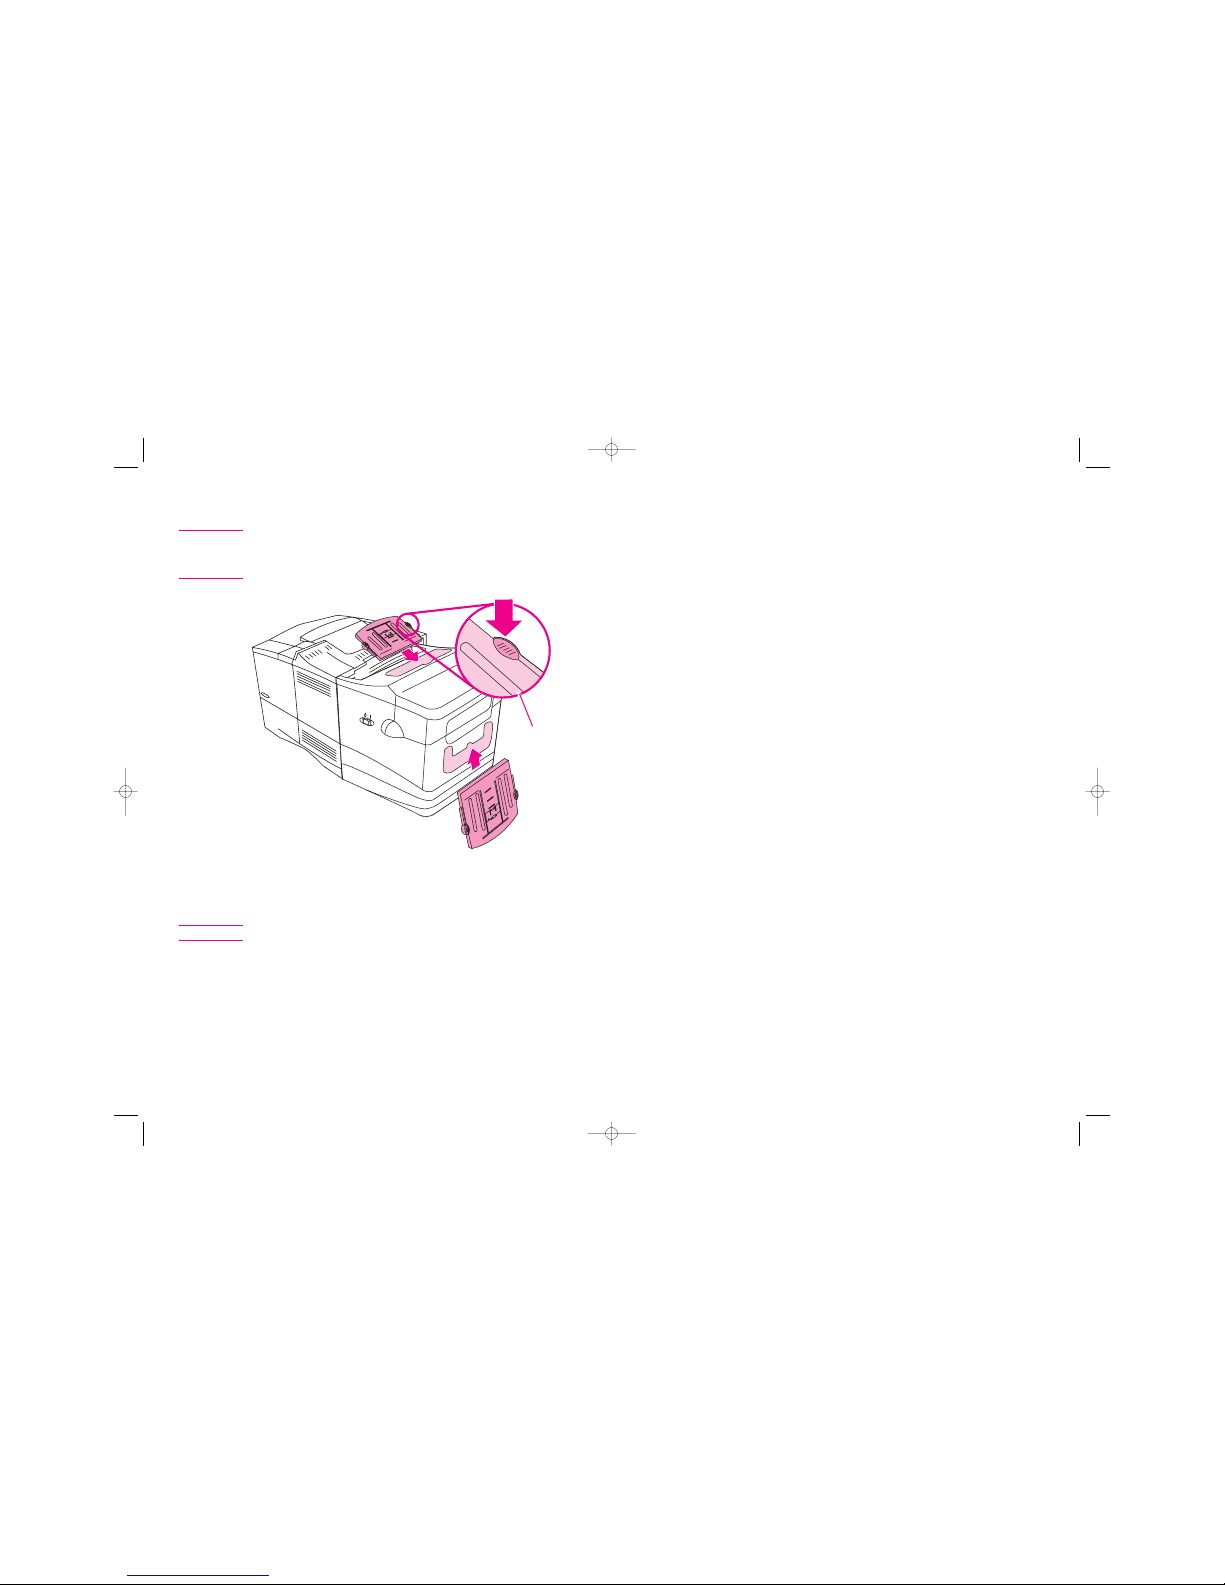
Installing the fold-chutes
Note Fold-stop settings (for different paper sizes and different f olds) can only
be changed when the fold-chutes are removed from the accessory. F or
information about changing fold-stop settings, see
"Setting fold-stops"
in Chapter 3.
Figure 8. Installing fold-chutes
1 Insert the upper fold-chute (the smaller fold-chute with numerical
stop identifiers) into the chute guide with the labels facing up.
Note The top cover must be closed to install or remove the upper fold-chute.
2 Gently push the fold-chute into the guide until the thumb tabs lock
with an audible
"click." When locked in place, fold-chutes cannot
be pulled out without pressing the thumb tabs.
3 Install the lower fold-chute (the larger fold-chute with alphabetic
stop identifiers) in the same manner, with the labels facing up.
Thumb
tab
EN Error Codes 29
Error Codes
If a Jam occurs, the printer will stop printing and display a “13.20.00,
JAM INSIDE REAR DOOR” error. Press the “?” and follow the
directions to remove the paper.
PLEASE NOTE: The rear door has been removed from the printer, check
for and remove the paper between the printer and the Print to MailTM. Open
the top cover of the printer, remove the toner cartridge, check and remove
any forms in the feed path of the printer. Replace the toner cartridge and
close the top cover.
The printer will now check the Print to MailTM. If a “65.12.01. OUTPUT
DEVICE CONDITION” error is displayed, press the “?” button and follow
the directions. Make sure to remove the top fold chute, lift the top cover,
check and remove any forms in the paper path of the Print to MailTM
machine. Close the top cover and insert the top fold chute.
“CLEARING PAPER PATH” will display on the printer and the printer may
purge one sheet. Remove the sheet and the printer will continue the print
operation where it left off, including reprinting the forms that were removed
from the printer and the Print to MailTM machine.
INSIDE OF BOOK 2/13/06 4:31 PM Page 12
Page 14
28 4 Troubleshooting and Maintenance EN
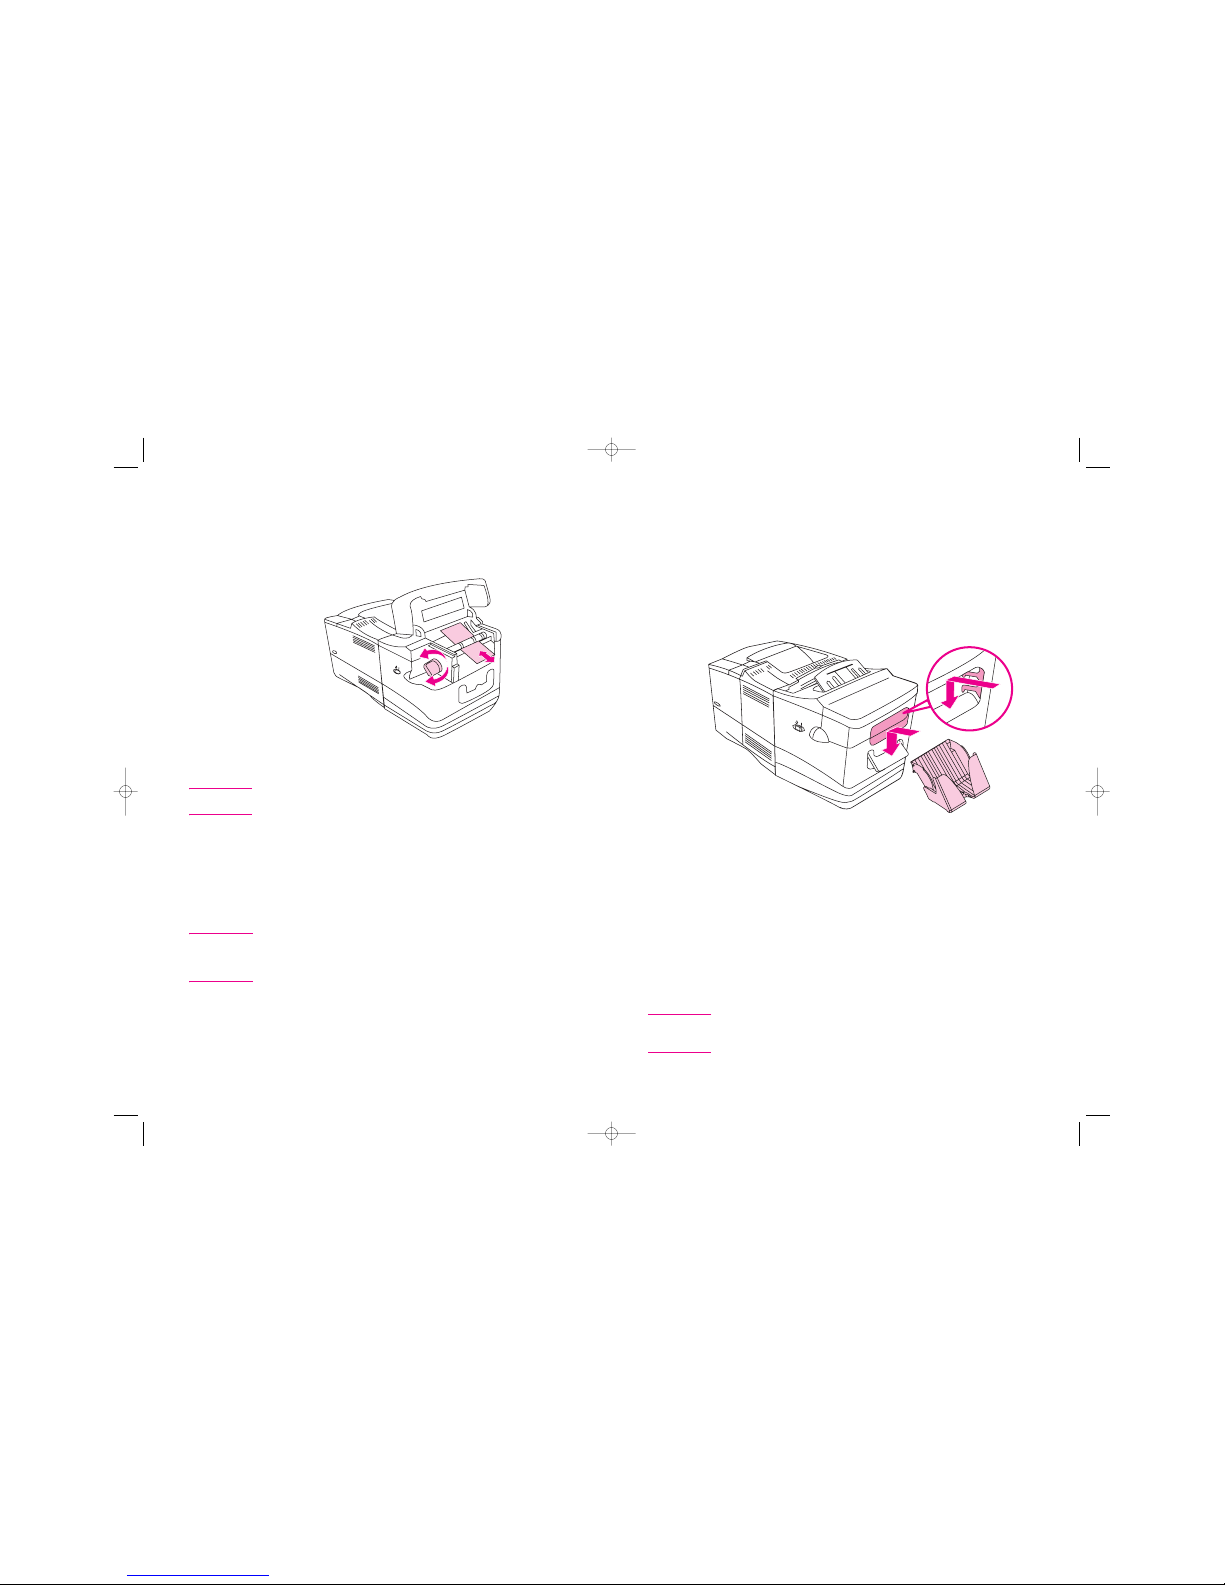
5 Locate the jam-clearing knob at the end of the upper roller and
rotate the knob in either direction with one hand while pulling the
jammed media out with the other hand, if necessary.
Figure 13. Rotating the jam-clearing knob
Note Avoid ripping media from the accessory. Rotate the knob in the direction
of least resistance.
6 Close the top cover.
7 Check the fold-chutes to make sure that they are clear of media
and that the correct settings are still in place.
8 Replace both fold-chutes and the output bin.
9 Press the power switch to the "on" ("I") position.
Note Depending on the nature of the accessory jam, the printer might stop
immediately. If it does, a jam condition might have occurred in the
printer. The paper path jam in the printer must be cleared before
operation can resume.
13 2 Setup
EN
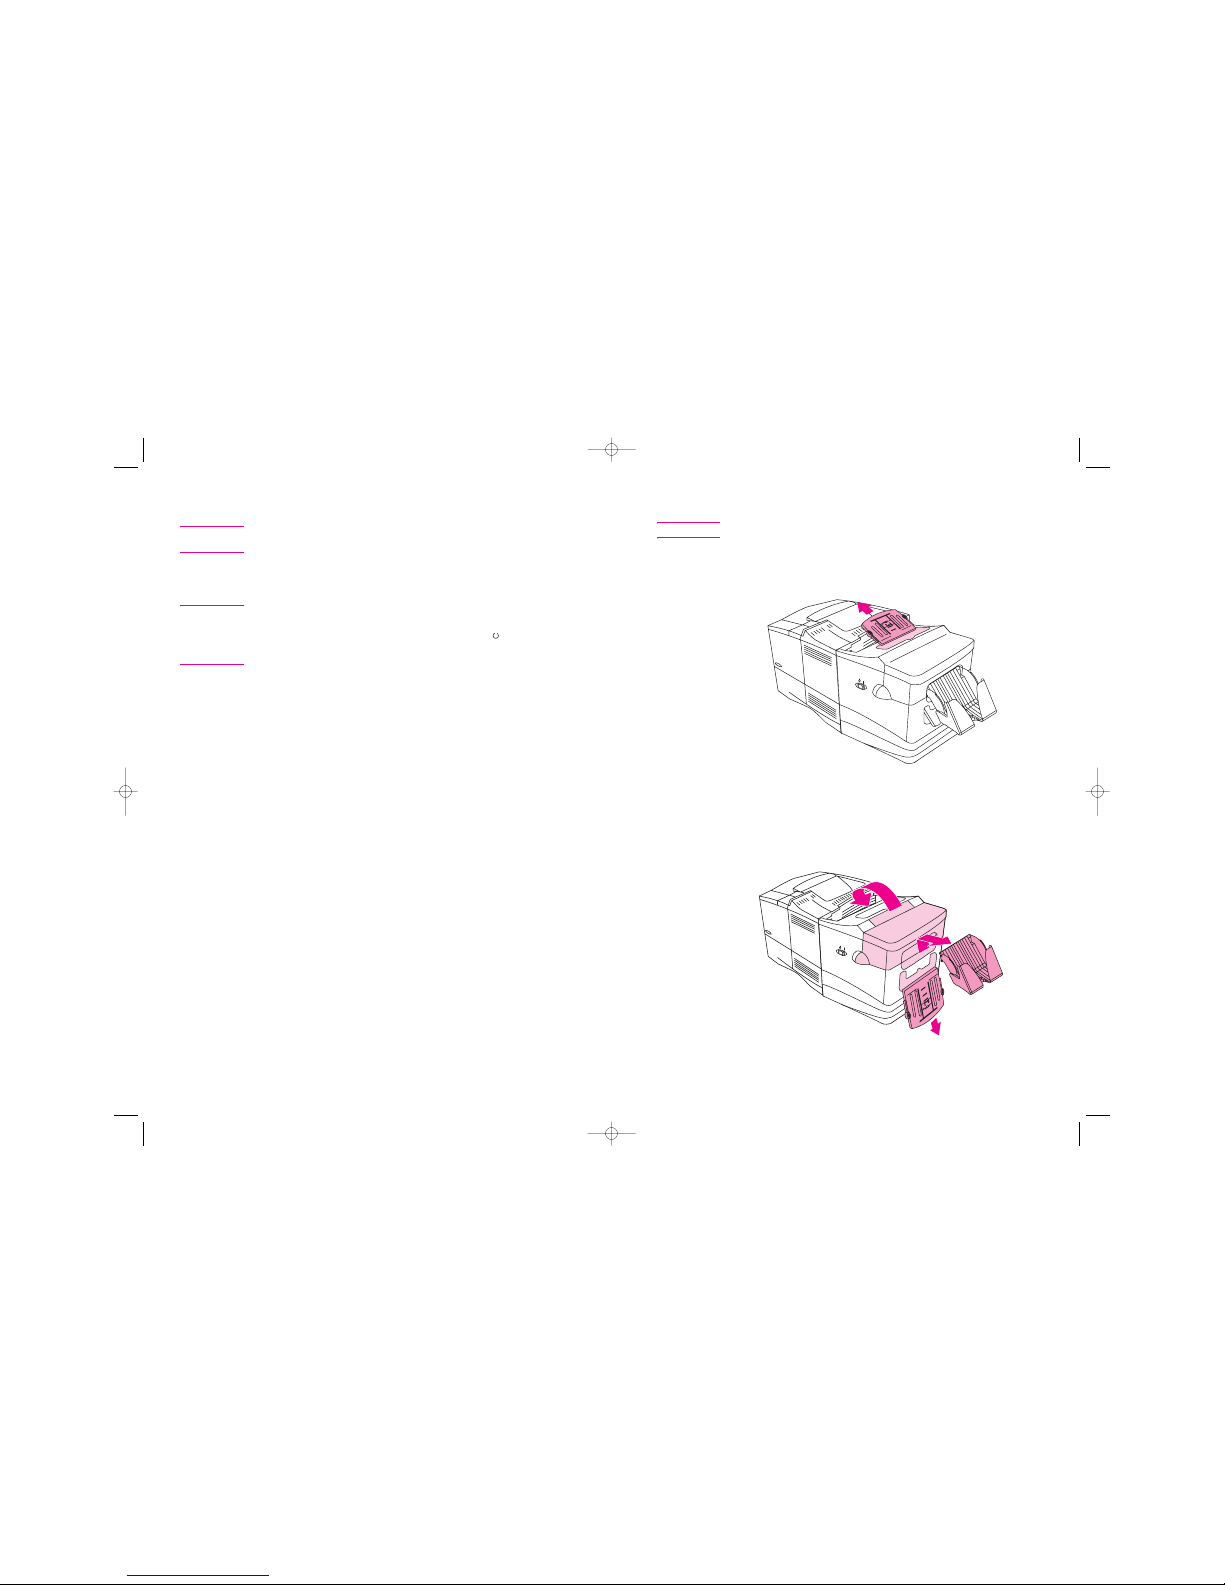
Installing the output bin
The output bin must be installed and seated correctly before the
accessory will operate.
1 Locate two notches on each side, just inside the opening at the
rear of the accessory.
2 Also locate two tabs on each side of the output bin.
3 Insert the output bin into the opening, first sliding the tabs all the
way into the notches, and then lowering the output bin into place.
Figure 9.
Installing the output bin
Adjusting the output bin
The output bin has two settings:
Retracted, the output bin works well for letter-size media.
Extended, the output bin works well for legal-size media.
Simply slide the bottom of the output bin to the retracted or extended
position.
The bottom of the output bin can be removed to allow folded media to
fall into a separate container. For information about using a separate
container, see “Large mailings” in Chapter 3.
The output bin must be set in the proper slots for the Accessory to
operate. Take special care when removing forms from the tray. Do
not push on the bin. This will cause the Accessory to cease operation.
Note
INSIDE OF BOOK 2/13/06 4:31 PM Page 13
Page 15
EN
Installing the accessory 14
Turning on the accessory and configuring the printer
Note The accessory will not operate if either the upper fold-chute or the
output bin is removed.
1 Plug the power supply into an appropriate power outlet.
2 Press the power switch to "I" to turn on power to the accessory.
Note The accessory does not start until paper exits the printer and enters
the accessory. When the accessory is plugged into a power source,
there will always be power to the accessory interface ( is " standby"
mode). For the accessory to operate, the power switch must be placed
in the
If you disconnect the Print to Mail
TM
machine from the printer to print
applications other than Print to Mail
TM
, you must follow the above steps
when you connect the Print to MailTM back up to the printer.
"on" ("I") position.
3
4
5
6
7
8
9
10
11
12
13
14
Turn on power to the printer.
After the printer has gone through its initializing sequence, it will
display “READY”
On the printer, push the green check button once.
Push the down arrow button, located under the check button, three
times until “CONFIGURE DEVICE” is highlighted.
Push the check button once.
“PRINTING will be highlighted, push the check button once.
Push the down arrown button three times until
”PAPER DESTINATION” is highlighted.
Push the check button once.
Push the down arrow button once until “STACKER BIN” is highlighted.
push the check button.
Push the left arrow three times until “READY” is displayed.
You have now configured the Print to Mail
TM
to communicate
properly with the HP 4XXX printer.
" "
EN Jams 27
Clearing jams
Note Do not turn off power to the printer. All print job information will be lost.
1 Press the thumb tabs to remove the upper fold-chute. Do not
attempt to open the top cover until the upper fold-chute is
removed.
Figure 11. Removing the upper fold-chute
2 Open the top cover of the accessory.
3 Remove the output bin.
4 Press the thumb tabs to remove the lower fold-chute.
Figure 12. Opening the top cover
INSIDE OF BOOK 2/13/06 4:31 PM Page 14
Page 16

26 4 Troubleshooting and Maintenance EN 15 2 SetupEN
Safety
Several safety precautions are built into the Print to Mail™
accessory. For the protection of the operator, power to the accessory
motor is stopped under the following conditions:
when a jam occurs
when the output bin is overfilled
when the output bin is removed
when the upper fold-chute is removed
WARNING! To ensure continued operation of the Print to Mail™
accessory, as well as to ensure operator safety, follow these important
safety tips:
Never block the flow of forms between the printer and the
accessory.
Never manually feed forms into the accessory.
Never attempt to operate the accessory with one or both of the
fold-chutes removed.
Never attempt to adjust fold-stop settings without first removing
the fold-chutes from the accessory.
Never use media that does not meet the specifications of the
accessory.
Never place hands near accessory openings when operating the
accessory.
Never allow loose objects (for example, jewelry) near the
accessory during operation.
The last set of numbers (xx.xx.XX) show the error code (such as a jam or operation
malfunction). The specific error codes for the Print to Mail™ device are:
01 = The form did not arrive at the Print to Mail™entry chute but the printer
said a sheet was being delivered.
02 = The form was stuck at entry chute or stayed in the entry chute too long.
03 = The form was inside the Print to Mail™too long, and/or did not arrive at
the exit chute in time.
INSIDE OF BOOK 2/13/06 4:31 PM Page 15
Page 17
EN
Printing on Print to Mail™ forms 16
3
Using the accessory
Printing on Print to Mail™ forms
Before you use the Print to Mail™ accessory, make sure
that you have successfully:
installed the Print to Mail™ accessory.
installed the software, if needed.
Form layout
To make the Print to Mail™ accessory work with the
software programs you use, you might have to manipulate the
placement of information.
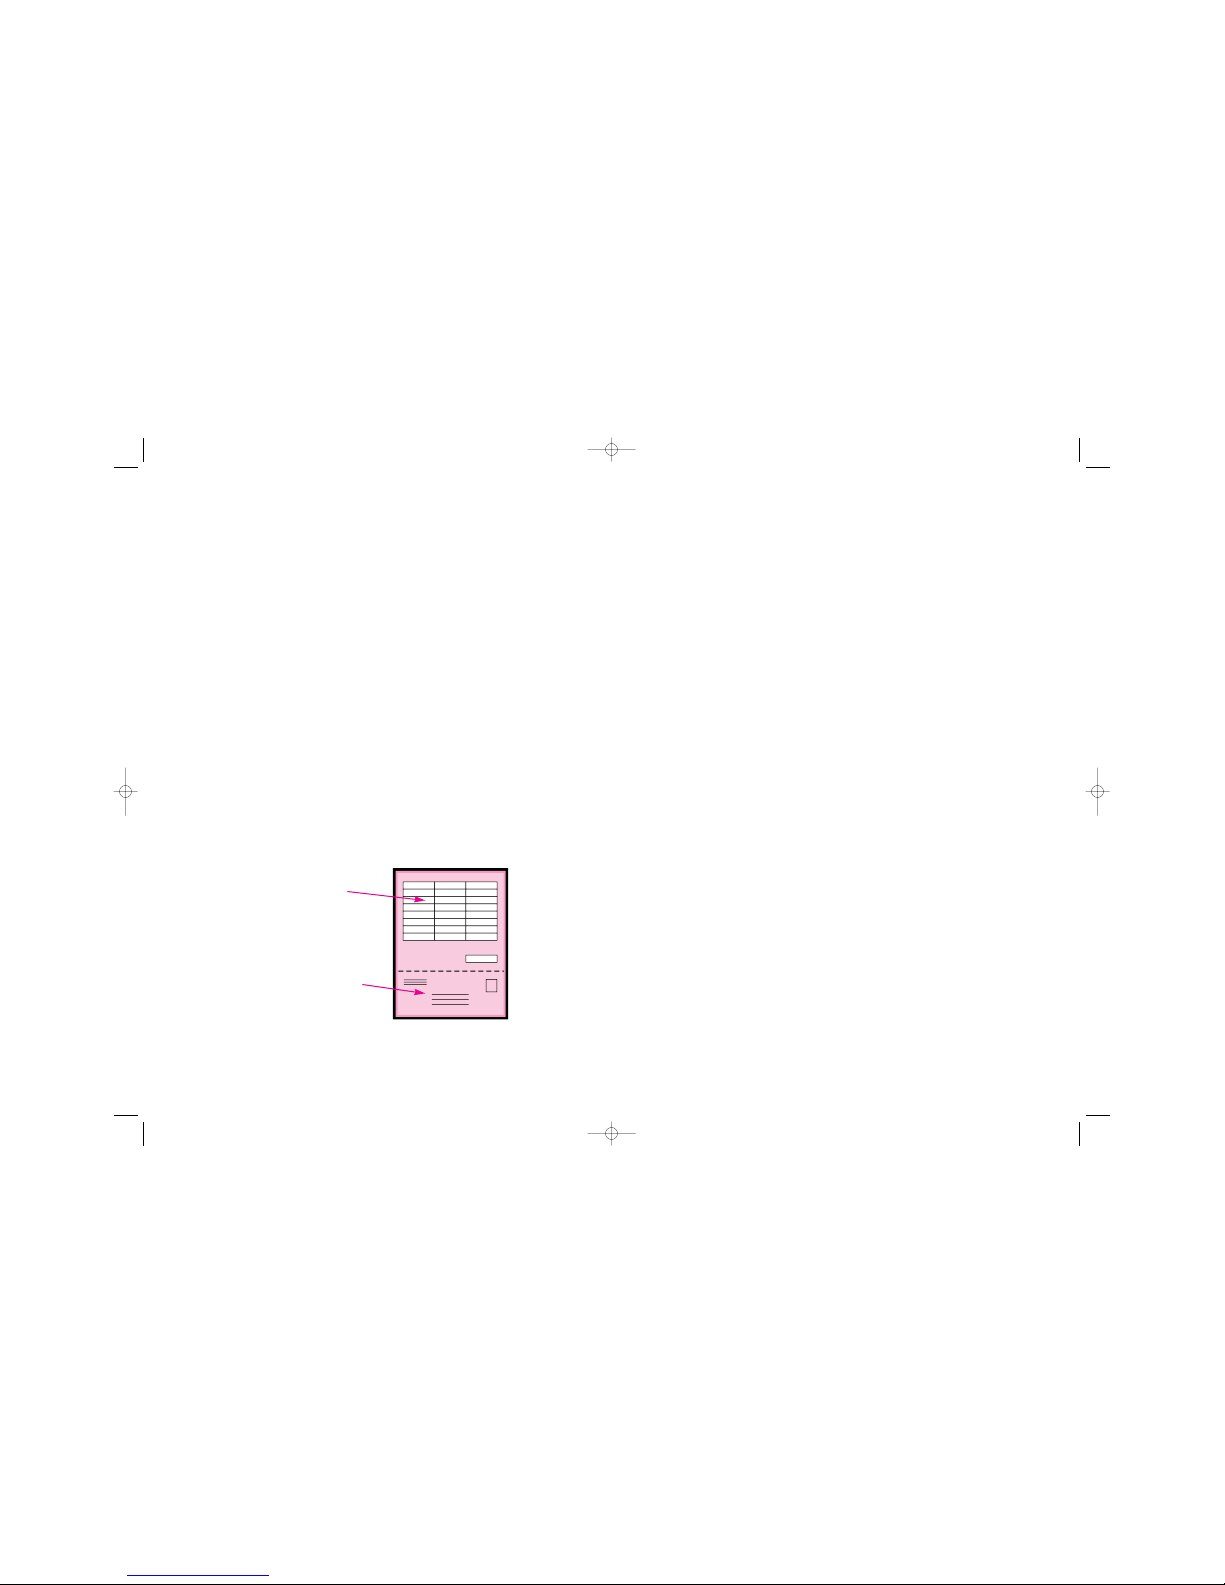
There are two parts to Print to Mail™ f
orm
s:
Print area -information other than address information should
appear in the print area (for example, invoice information).
Address area - "to": and "from": addresses appear here.
Print area
Address area
EN Solving printing and folding problems 25
Error Codes
HP Error Code format and definition
Error codes are display as three sets of numbers separated by a decimal point
(xx.xx.xx). Each set represents a different area. The following will label each set,
and define common codes:
The first set (XX.xx.xx) is the Class, or Type of error or malfunction:
66 (66.xx.xx) - indicates that an unrecoverable device error has occurred at the
printer, such as the Jetlink communications have failed. In most cases the
printer and the devices have to be reset so that the Jetlink communications can
be re-established. To do so, follow these steps:
1. Turn off the devices (completely remove power)
2. Turn off the printer and allow the printer to shut down
3. Turn on the devices and let them initialize
4. Turn on the printer
13 (13.xx.xx) - indicates that a recoverable device error (such as a jam) has
occurred. The corrective action(s) will be described or displayed on the printer
screen.
The first number in the second set (xx.Xx.xx) indicates which device in the Jetlink
chain experienced the error:
0 = The Printer had the error
1 = The Print to Mail™ Attachment had the error
The second number in the second set (xx.xX.xx) indicates what kind of device
experienced the error:
0 = PHC (printer)
1 = INPUTDEVICE (a paper feeder, for example)
2 = OUTPUTDEVICE (Print to Mail™ in this case)
3 = OTHER TYPE OF DEVICE
INSIDE OF BOOK 2/13/06 4:31 PM Page 16
Page 18
EN
Setting the HP Print to Mail™ accessory
18
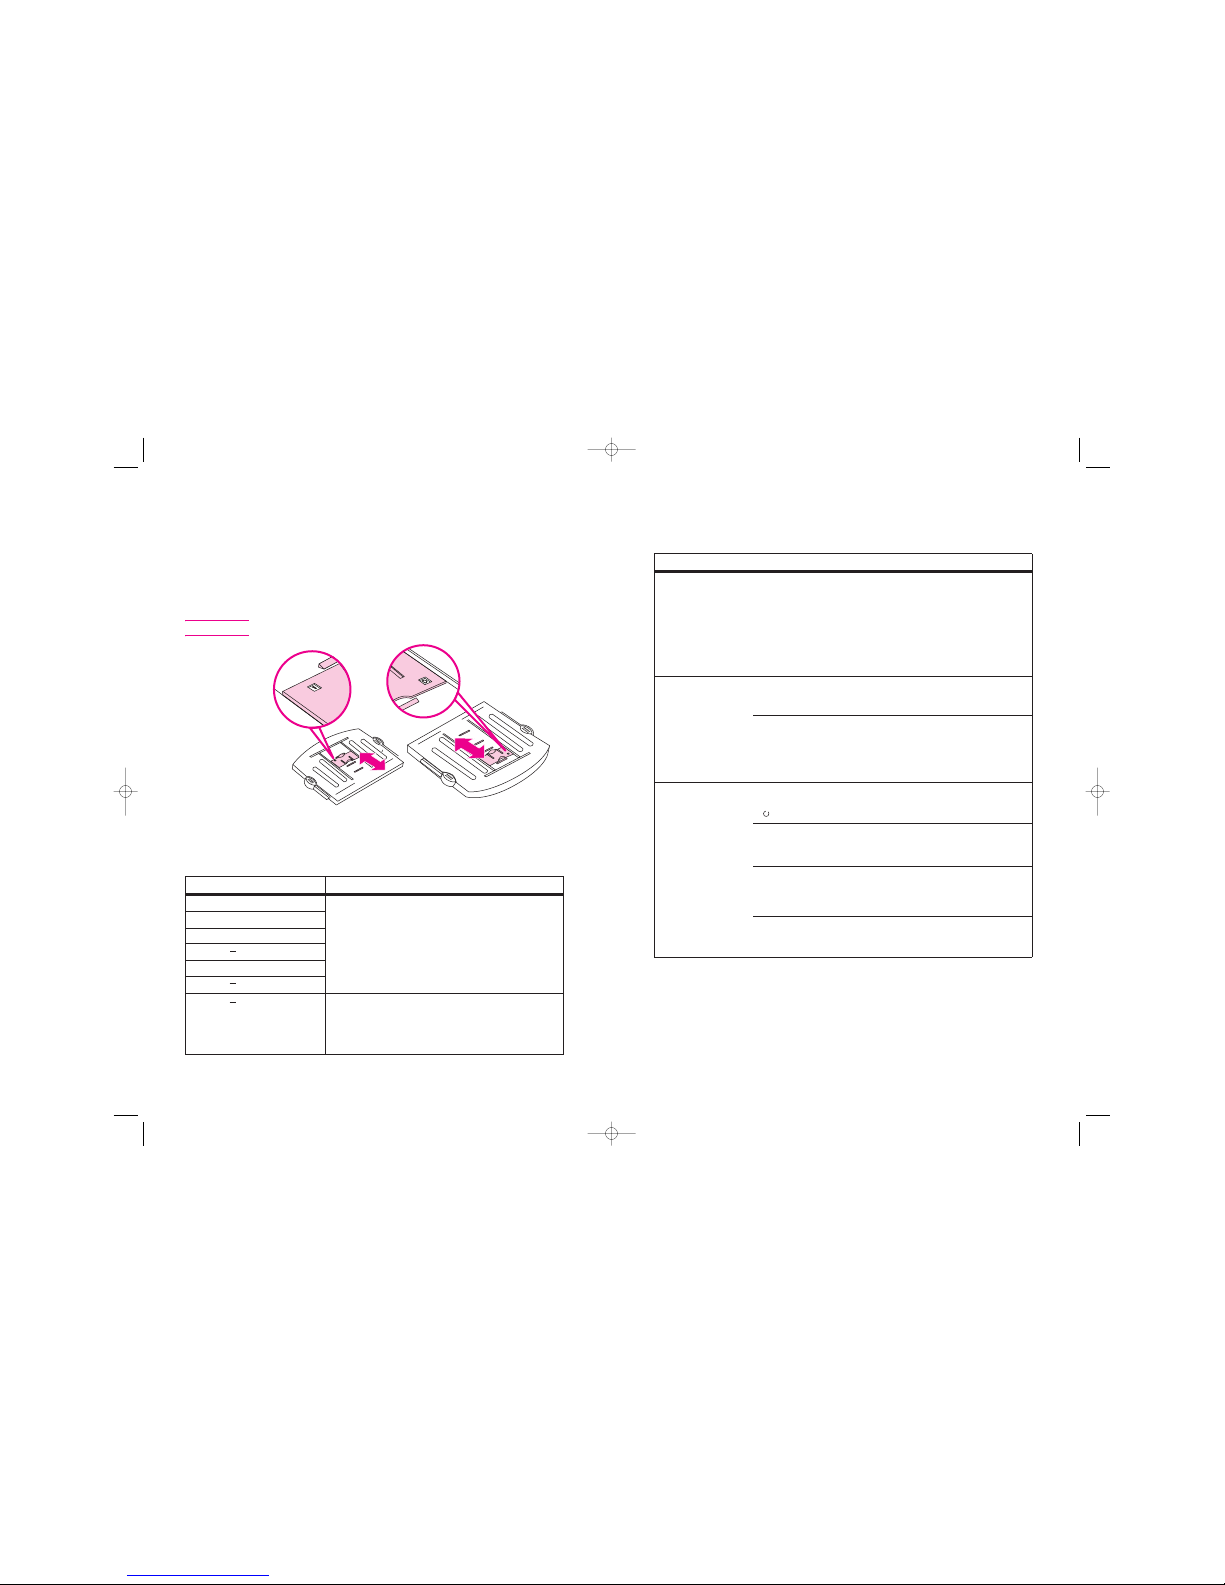
Setting fold-stops
1 Remove the f old-chute by pressing the thumb tabs to release the
fold-chute and sliding the fold-chutes out of the chute guides.
2 Squeeze the fold-stop between your thumb and index finger to lift
the locking end of the fold-stop.
3 Slide the fold-stop to the setting you want; settings are visible
through the window on the fold-stop.
Note The fold-stop must lock firmly in place at the selected setting.
Figure 10. Setting the fold-stops
Fold-chutes
Fold-stops
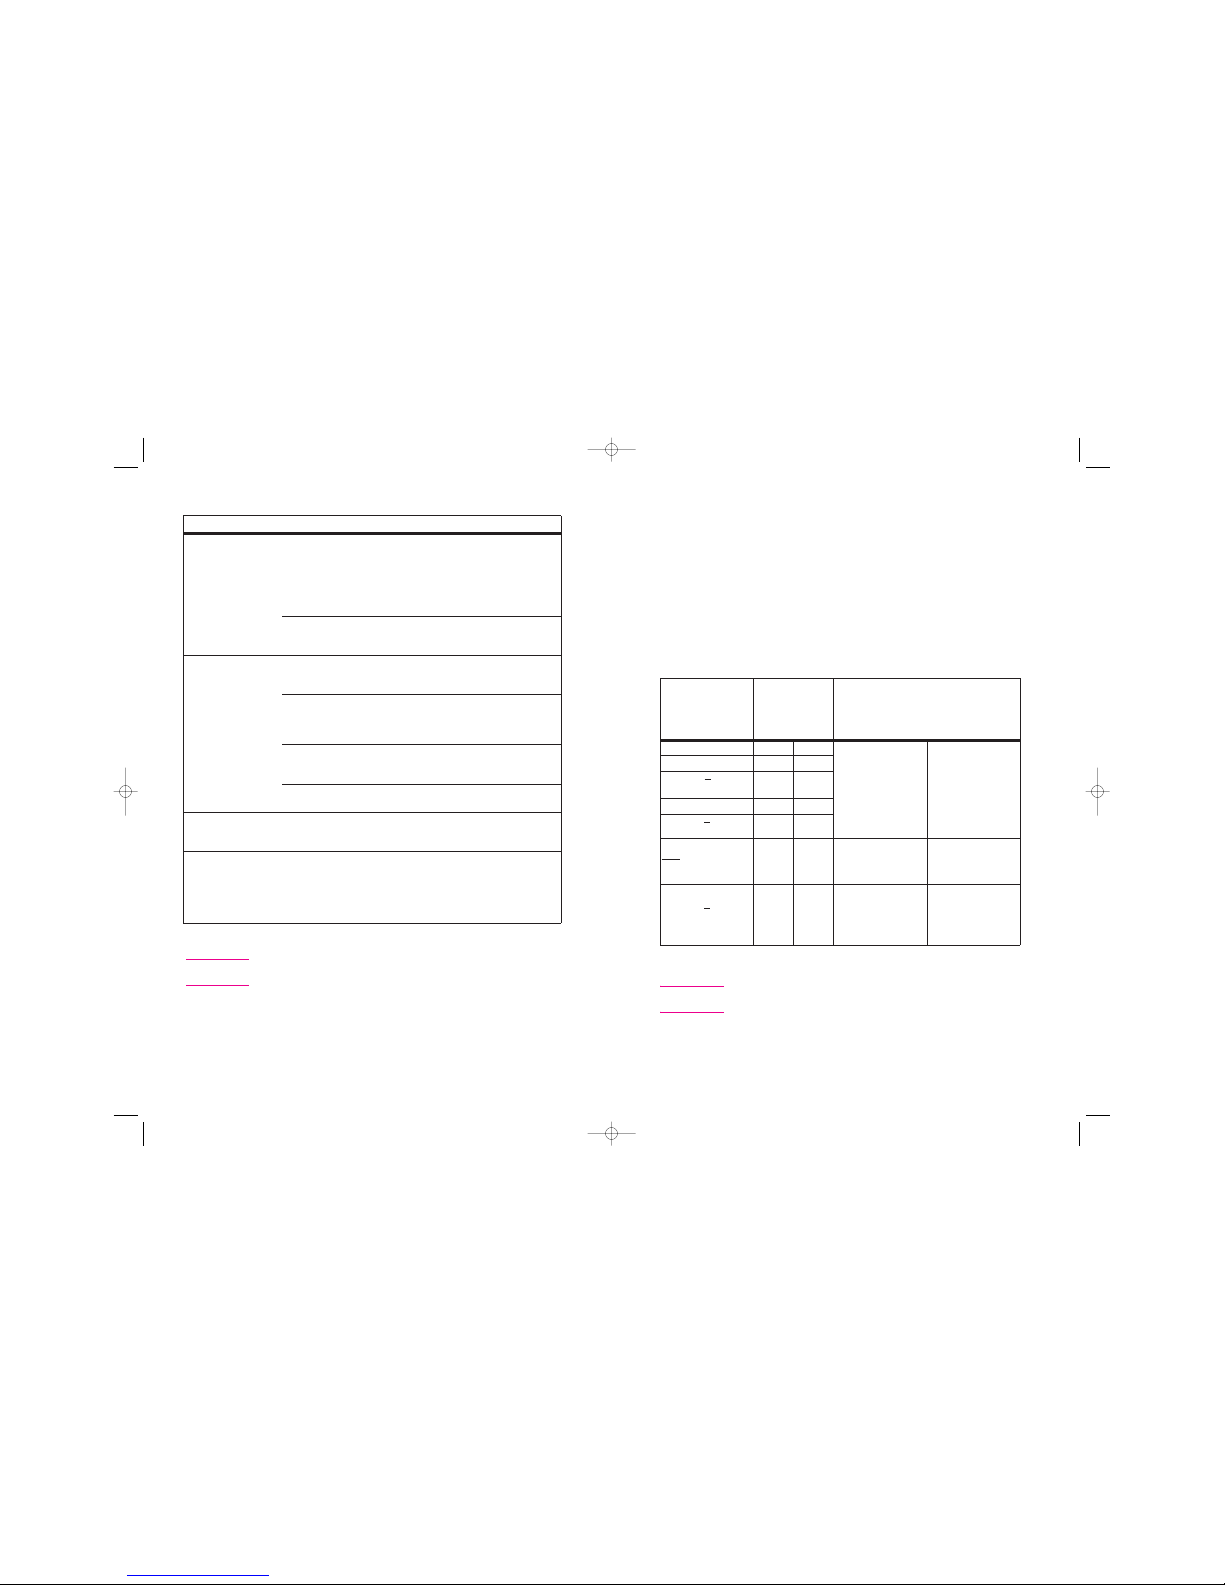
Table 2. Software settings
Print to Mail form Step 3, Software settings. HP PCL6 Printer Driver
Letter size 4B
1 Click File, click Print, and then click Properties.
2 Click the Basics tab.
3 Under Orientation, select Portrait and Rotated.
Letter-size check 4B
Letter size extended image 3A
Legal size 2C
Legal size extended image 1B
Legal size easy-open 4D 1 Click File, click Print, and then click Properties.
2 Click the Basics tab.
3 Under Orientation, select Portrait and make sure that
Rotated is NOT selected.
Letter-size "C" Fold 4D
EN Solving printing and folding problems 23
Solving printing and folding problems
Table 4. Solving printing and folding problems
Problem Cause Solution
Printer is unable to
create forms that work
correctly with the
accessory.
The margins or working
space are set up incorrectly.
See the documentation that came with
your custom software program for
instructions about how to develop your
own templates
Address area printed
inside form and
secure data outside
Form is not oriented
correctly in the paper tray.
See table 1, "Fold-stop settings and
Form
orientation," in Chapter 3 to orient
forms correctly.
Software settings are
incorrect.
See "Software settings" in Chapter 3 for
correct settings. Rotate image.
Accessory will not
accept printed forms.
The power switch on the
accessory is set to “standby”
(" ").
Set the power switch on the accessory
to "on" ("I"). (Red Showing)
No form or incorrect form
is present in the printer.
See Appendix A and table 1, "Fold-stop
settings and form orientation," in
Chapter 3 for information about media.
The fold-chutes and output
bin are either not installed or
installed incorrectly.
See "Installing the fold-chutes" and
“Installing the output bin” in Chapter 2 to
install the fold-chutes and the output
bin.
The top cover is open. Close the top cover.
INSIDE OF BOOK 2/13/06 4:31 PM Page 17
Page 19
24 4 Troubleshooting and Maintenance EN
Form doesn't fold
correctly.
The fold-stop settings are
incorrect.
See table 1 "Fold-stop settings and
form orientation," in Chapter 3 to set
the fold-stops. Fold-stop settings must
be completely visible through the foldstop windows. Fold-stops must be
seated firmly against the fold-stop
ridges.
Forms are not oriented
correctly in paper tray.
See table 1 "Fold-stop settings and
form orientation," in Chapter 3 to orient
forms correctly.
See table 1 "Fold-stop settings and
form orientation," in Chapter 3 to orient
forms correctly.
Form doesn't seal
correctly.
Forms are not oriented
correctly in paper tray.
The wrong form is loaded in
the tray.
See table 1 "Fold-stop settings and
form orientation," in Chapter 3 to
choose the right form and to orient
forms correctly.
Toner or paper dust has
accumulated on rollers in
the accessory.
See
Forms not stored correctly. Use new package of forms. Store open,
unused forms in self-seal bag.
"Cleaning the accessory" later in
this chapter to clean the rollers.
Media doesn't stack
correctly in the output
bin.
The output bin is set
incorrectly.
See "Adjusting the output bin" in
Chapter 2 to set the output bin correctly.
Cannot detach the
accessory from the
printer.
Alignment tips on the bottom
of the alignment guide hold
the accessory in place.
To separate the accessory from the
printer, pull the accessory firmly and
steadily away from the printer. Do not
attempt to jerk the printer and
accessory apart. Also, be careful not to
stretch the cables.
Table 4. Solving printing and folding problems
Problem Cause Solution
Note The Print to Mail™ accessory requires a specific glue pattern. Check to
ensure that your forms are Print to Mail™ compliant.
17
3 Using the accessory
EN
Setting the Print to Mail™ accessory
To use the Print to Mail™ accessory, complete the
following steps:
1 Set the fold-stops for proper form size and fold you want to print
(see table 1 for the correct fold-stop)
2 Load forms into the tray you want to use (see table 1 for
orientation instructions).
3 Check the print settings in the software (see table 2 for details
about software settings).
*Availability of media might be limited.
Note For letter-size plain paper, use fold-stop settings 4 and B. For legal-
sized plain paper, use fold-stop settings 2 and C.
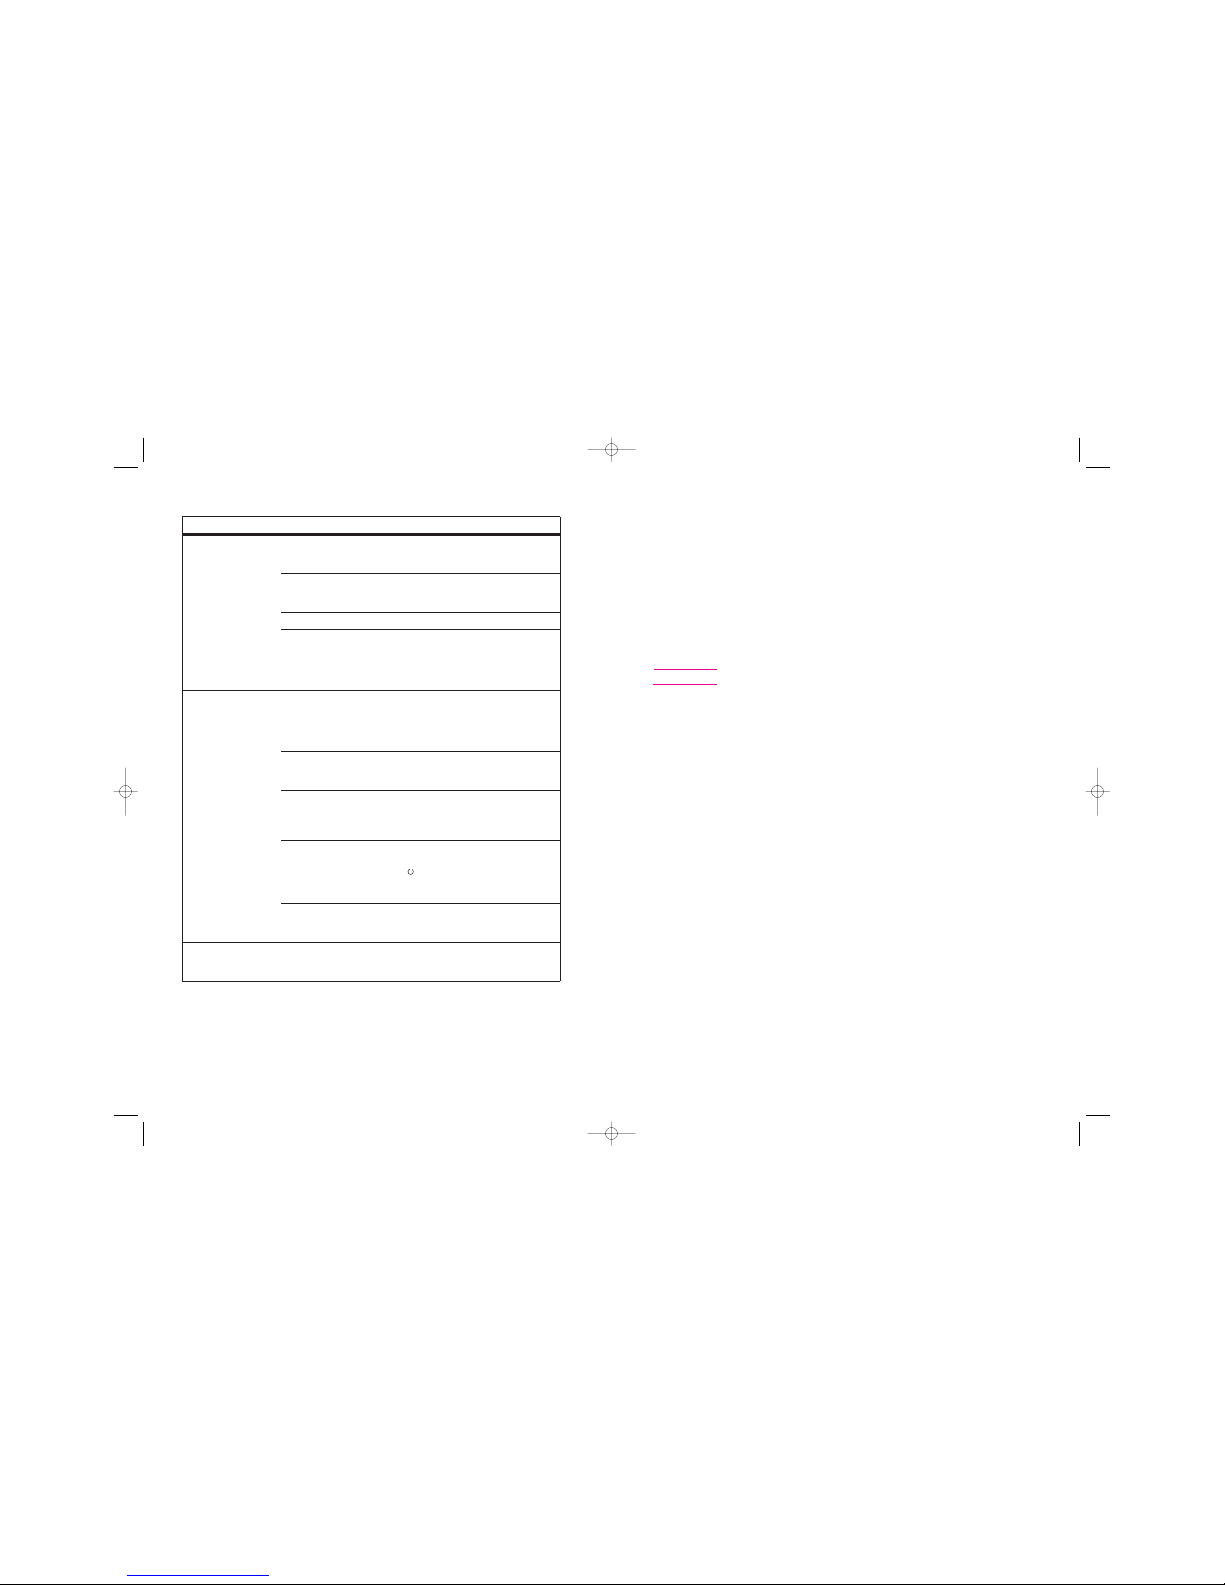
Table 1. Fold-stop settings and form orientation
Print to Mail Form
Step 1 Step 2
Fold-stop settings Form orientation
Upper
chute
Lower
chute
Tray 1
(manual feed tray) Trays 2 and 3
Letter size 4B, Z-fold 4 B
Printed opening
instructions facing
down and away from
the printer
Printed opening
instructions facing up
and towards the
printer
Letter size check 4B, Z-fold
4B
3A
Legal size 2C, Z-fold 2 C
Legal size
extended Z
image 1B
1B
Legal size easyopen 4D*
4D
Printed opening
instructions facing up,
narrow part of the
media away from the
printer
Printed opening
instructions facing
down, narrow part of
the media towards
the printer
Letter size
extended Z
image 3A*
4D
Letter size "C" Fold 4D
Note: C folds do not work
in-line with HP printer
For folding forms only.
Printed opening
instructions face
up and towards
the printer.
Printed opening
instructions face
down and away
from the printer.
INSIDE OF BOOK 2/13/06 4:31 PM Page 18
Page 20
22 4 Troubleshooting and Maintenance EN
Accessory will not
attach to rear of printer.
The paper tray dust cover or
duplexer tabs were not
removed.
See "Preparing the printer" in Chapter2
to make sure the printer will accept the
accessory.
Cables are routed
incorrectly.
See "Attaching the Print to Mail™
accessory to the printer" in
Chapter2 reroute the cables.
Cables are tangled. Untangle cables from the paper tray.
You are not pushing hard
enough.
See "Attaching the Print to Mail™
accessory to the printer" in
Chapter2 to make sure the accessory is
aligned correctly, and use a firm push to
attach the accessory.
Printer doesn't
recognize the
accessory.
The accessory is not
plugged into a power
source.
Make sure the power supply is plugged
into the accessory and the power
source. Set the power switch on the
accessory to "on" ("I") first and then turn
on the printer.
The accessory interface
cable is not plugged in.
See "Attaching the Print to Mail™
accessory to the printer" in
Chapter2 to install the interface cable.
The fold-chutes and output
bin are either not installed or
installed incorrectly.
See "Installing the fold-chutes" and
"Installing the output bin" in Chapter 2 to
install the fold-chutes and the output
bin.
The printer and accessory
were not turned on in the
correct sequence.
Turn off the printer and set the power
switch on the accessory to "standby"
(" "). Set the power switch on the
accessory to "on" ("I") first and then turn
on the printer.
The printer is an older-
model HP LaserJet 4000
printer.
The accessory does not communicate
with a some older models of the HP
LaserJet 4000 printer.
Paper tray does not
open.
Cables are routed
incorrectly.
See "Attaching the Print to Mail™
accessory to the printer" in
Chapter2 to reroute the cables.
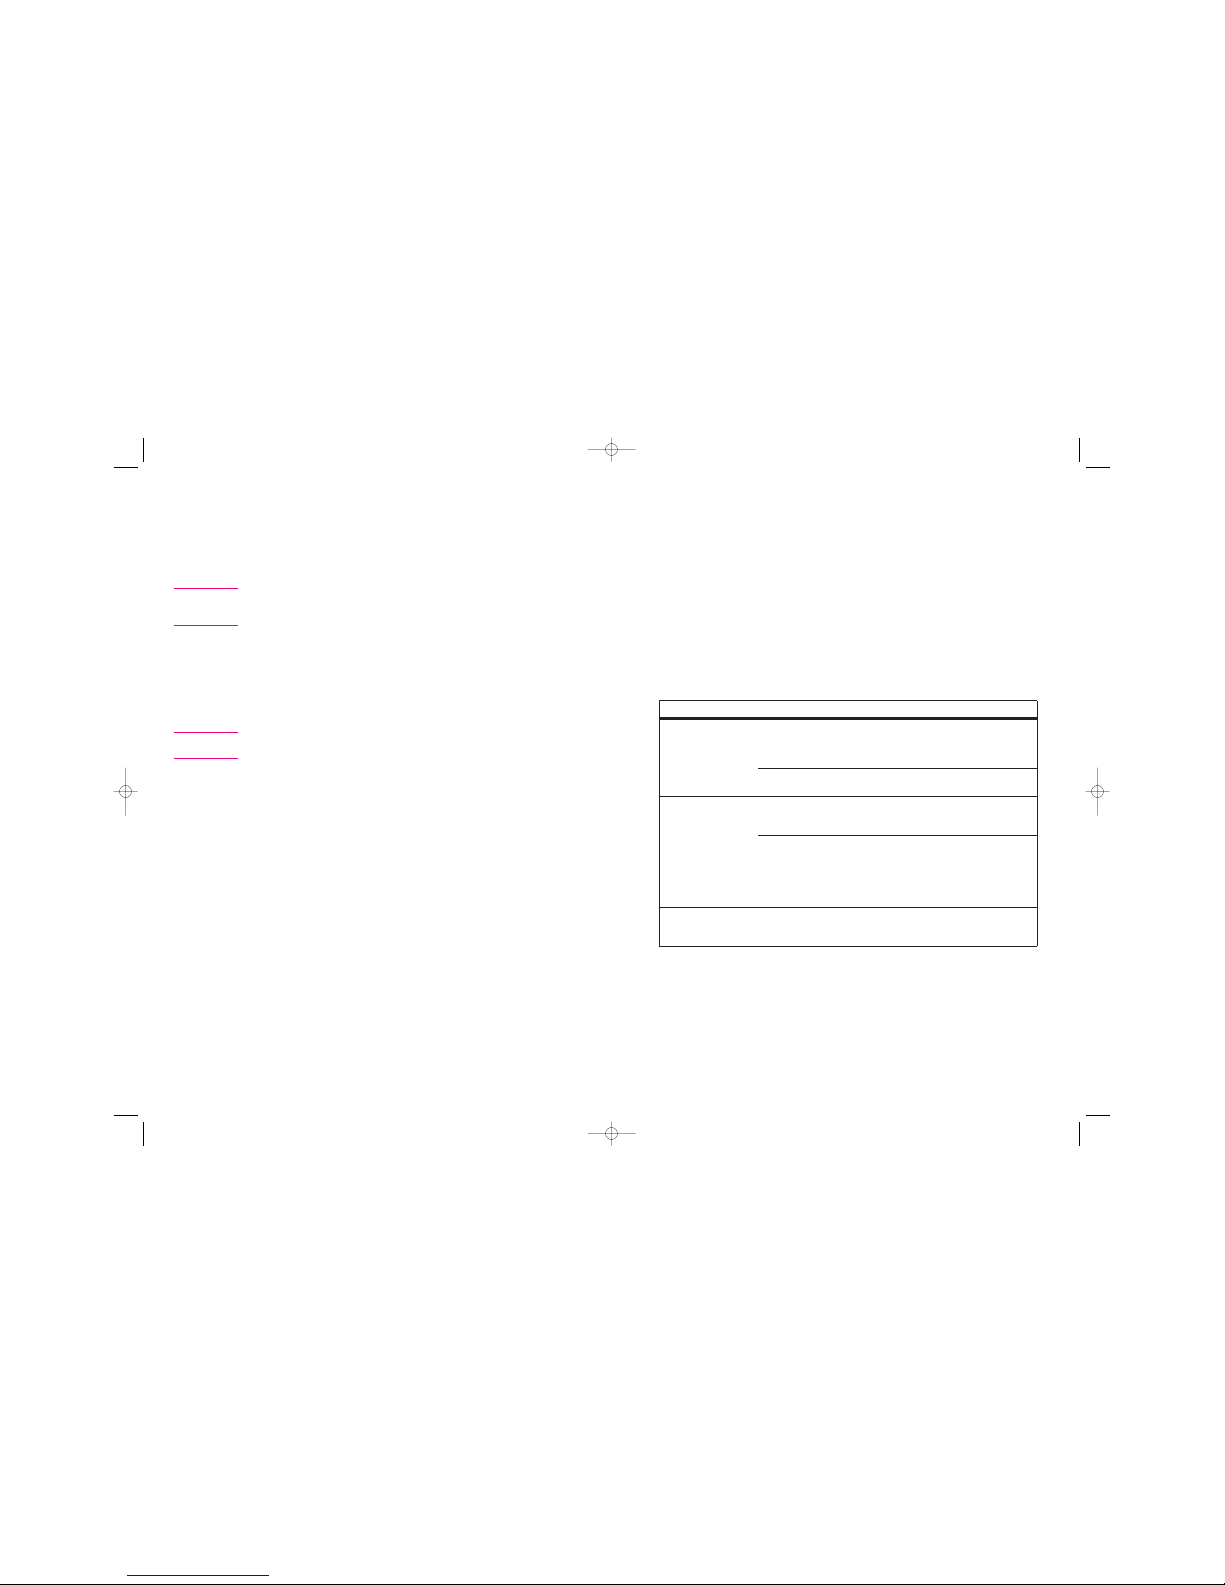
Table 3. Solving setup problems
Problem Cause Solution
19
3 Using the accessory
EN
Software settings
To print documents
1
23Click File, click Print, and then click Properties.
Click the Finishing tab.
Check "Rotate by 180 Degrees" as appropriate for the
specific form. See table 2, "Software settings" to determine
the correct Portrait and Rotated settings.
Note For other printer jobs, check printer settings before printing.
4
From the PCL6 HP printer driver.
INSIDE OF BOOK 2/13/06 4:31 PM Page 19
Page 21
EN
Working with the printer
20
Working with the printer
Note In continuous operation, the HP LaserJet 4XXX series printer might
slow after printing 30 to 60 sheets. This is normal behavior; the
Print to Mail™ accessory adjusts to the printer's output.
Send a print job to the printer. As forms are printed and sent to the rear
output, the accessory senses that forms are present, takes the forms
from the rear output, and completes the fold for which it was set.
Print to Mail™ forms are folded, sealed and then sent to the output bin.
Plain paper is only folded and sent to the output bin.
Remove the folded items from the output bin when it is full.
Note Remove folded forms often to prevent an output-bin-full shutdown (also
see “Large mailings,” below).
Large mailings
During large mailings, the output bin can become full often. To
prevent an output-bin-full shutdown, carefully remove the extendable
piece of the output bin. Depending on the placement of the printer
and accessory, a shallow tray, a box, or a mail bag may be placed
below the output bin to catch the folded forms.
Once the Print to Mail™ accessory is installed and turned on,
the fold-stops are set, the fold-chutes are in place,
and the printer input tray is loaded, the accessory is ready
to use.
EN Solving setup problems 21
4
Troubleshooting and
Maintenance
Solving setup problems
Table 3. Solving setup problems
Problem Cause Solution
Accessory doesn't
match up to the printer.
The reversible base is not
oriented correctly.
See "Attaching the Print to Mail™
accessory to the printer" in
chapter 2 to reposition the reversible
base.
The input tray configuration
may not be supported.
Reposition the reversible base or
remove unsupported input accessories.
Printer cable is too
short.
Cable not routed through
cable cutout in the reversible
base.
See "Attaching the Print to Mail™
accessory to the printer" in
chapter 2 to reroute the cable.
The printer or accessory is
not close enough to the
computer.
Move the printer or accessory closer to
the computer.
-or-
Reposition the printer or accessory.
-or-
Purchase a longer cable.
A hole is exposed in the
upper, right side of the
reversible base.
The cable cutout cover is
not installed.
See "Attaching the Print to Mail™
accessory to the printer" in
chapter 2 to install the cutout cover.
INSIDE OF BOOK 2/13/06 4:31 PM Page 20
 Loading...