

Page 1

Maxi-Dry
®
Installation Instructions:
Coat all threads with Anti-Seize lubricant to prevent galling, before connecting Maxi-Dry
any other threaded pipe or tting.
DISASSEMBLY INSTRUCTIONS REASSEMBLY INSTRUCTIONS
WARNING: BEFORE DISASSEMBLY OF THESE
COMPONENTS, ALL LINE PRESSURE MUST BE RELIEVED.
®
to
COUPLER
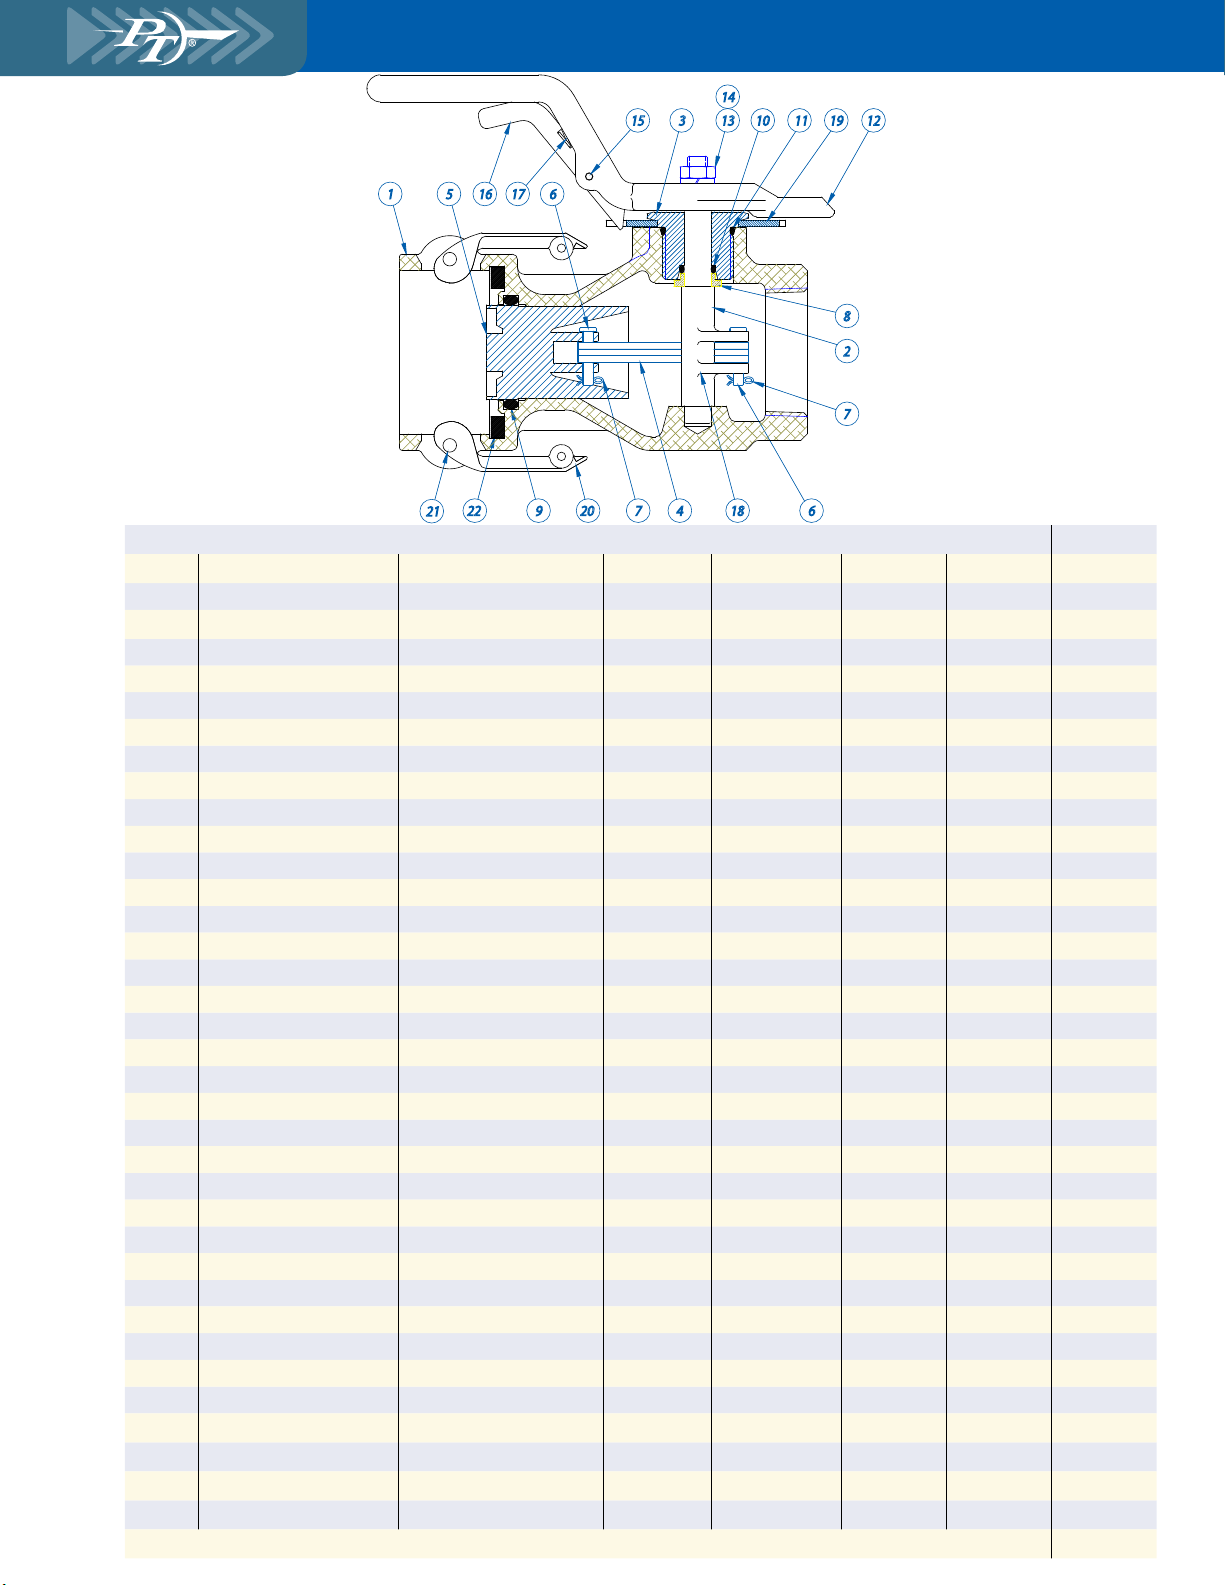
1. Remove coupler assembly from line.
2. Close coupler.
3. Remove cotter Pin (7) and Pin (6) from Stem (2).
Note: It may not be possible to remove the Pin
completely from the Stem. When this happens, remove
Pin enough so that the Linkage (4) can be removed from
the Stem.
4. Remove Handle Nut (13), Lockwasher (14), and Handle
(12), from Stem.
5. Unscrew Bushing (3) from Body (1) and remove from
Stem.
6. Remove Stem (2) along with Stem O-Ring (10) and
O-Ring Retainer. (8)
7. Using a soft object, such as a piece of wood or plastic,
push Poppet (5) along with the LInkage (4) out of the
coupler end of the Body.
8. Remove Cotter Pin (7), Poppet Pin (6), and Linkage (4),
from the Poppet. Note: Relationship of the LInkage to
the Poppet.
9. Remove Coupler Gasket (22) from Body.
10. Remove Poppet O-Ring (9) from Body. Note: It is
almost impossible to remove the Poppet O-Ring without
destroying it.
11. Remove Stem O-Ring (10) from Stem.
12. Remove O-Ring Retainer (8) from Stem.
13. Remove Bushing O-Ring (11) from Bushing.
14. Inspect Cam Arms (20) for excessive wear and replace
if worn. Do not remove Cam Pins (21) unless new pins
are to be installed.
15. Clean all parts and inspect for damage and/or excessive
wear. If damage or excessive wear is encountered,
the defective parts should be replaced with new
replacements.
COUPLER
1. Make sure all parts are clean before reassembling
2. Lightly lubricate the new Poppet O-ring (9) and install
in the Body (1)
NOTE: Teon® Encapsulated O-Rings may be easier to
install if they are rst heated in hot water.
3. Install the Link Assembly (4) onto the Poppet (5) with
one Poppet Pin (6) and Cotter Pin (7)
NOTE: The long arm of the Link is installed on the
Poppet. Orientation is such that the short arm of the
Link is extending upward when looking into the face
of the Poppet and the PT logo is at the nine o’clock
position.
4. Install Poppet/Link subassembly into Body. The PT
logo on the face of the Poppet should be in line with the
threaded Stem opening. Gently push the Poppet into
the Body. On 3” assemblies the PT logo is 90° from the
Stem opening.
5. Place a Poppet Pin (6) in the pin holes in the Stem (2).
Disregard for 3” assemblies.
6. Install the O-Ring Retainer (8) on the Stem.
NOTE: Large Diameter rst. Not used on 3” Assembly
7. Lightly lubricate a new Stem O-Ring (10), and install on
Stem.
8. Install Stem in Body making sure the Poppet Linkage
(4) is below the Stem when viwing into the threaded end
of the Body and the threaded Stem opening is at three
o’clock.
9. Lightly lubricate the Bushing O-ring (11) and install on
the Bushing (3).
10. Place the Bushing (3) over the Stem and screw into the
Body until tight.
11. Turn the Stem to align the holes so that the linkage can
be attached. On 3” assemblies make sure the Stem (2)
goes throught the Stem Cam (18). Rotate the Stem and
Stem Cam clockwise until it stops.
12. Install the Poppet Pin (6) through the Linkage and
secure with a Cotter Pin (7). Rotate the Stem and Stem
Cam clockwise until it stops.
13. Install the Handle (12, Nut (13), and Lockwasher (14),
making sure proper orientation is maintained.
NOTE: When the coupler is shut, the Handle should
protrude over the coupler end of the Body. The stop tab
on the Handle should be resting between the Body tab
and the Handle Latch (15).
14. Install new Coupler Gasket (22) in Body recess.
Toll-Free: (800) 654-0320 • Toll-Free Fax: (800) 828-2649 • info@ptcoupling.com • www.ptcoupling.com
Page 2
Maxi-Dry
®
1 5
15 3
17 6
131410 11 191612
8
2
7
22
21
9 20 7 4
18 6
Coupler Part Numbers
Item # Description Material Quantity MD15D MD20D MD30D MD40D
1 Body Aluminum A356.0-T6 1 40001501 40000201 40000301 40000343
1 Body 316 SS 1 44001501P 44000201P 44000301P 4000343P
2 Stem 17-4 PH SS 1 44001502 44000202 44000302 44000302
3 Bushing 303 SS 1 44001503L 44000203L 44000303L 44000303L
4 Link 304 SS 1 44001504 44000204 44000304 44000304
5 Poppet 316 SS 1 44001505 44000205 44000305 44000305
6 Poppet Pin 304 SS 2 44001506 44000206 44000306 44000306
7 Cotter Pin SS 2 44000207 44000207 44000307 44000307
8 O-Ring Retainer 303 SS 1 44001508 44000208 N/A N/A
9 O-Ring Poppet Buna-N 1 40001509 40000209 40000309 40000309
9 Viton® 1 44001517 44000217 40000311 40000311V1
9 Teon® Encap. Viton 1 44001518 44000218 40000312 N/A
9 EPDM 1 44001551 44000251 44000350 N/A
10 O-Ring, Stem Buna-N 1 40001510 40000210 40000310 40000310
10 Viton® 1 44001519 44000219 40000313 40000313V1
10 Teon® Encap. Viton 1 44001520 44000220 40000314 N/A
10 EPDM 1 44001552 44000252 44000352 N/A
11 O-Ring, Bushing Buna-N 1 40001511 40000211 40000211 40000211
11 Viton® 1 44001521 44000221 44000221 44000221V
11 Teon® Encap. Viton 1 44001522 44000222 44000222 N/A
11 EPDM 1 44001553 44000253 44000253 N/A
12 Handle 316 SS 1 44001512L 44000212L 44000312L 44000312L
13 Handle Nut SS 1 44001513 44000213 44000313 44000313
14 Handle Lock Washer SS 1 44001514 44000214 44000314 44000314
15 Lever Pin SS SS 1 44000227 44000227 44000239 44000239
16 226 Lever SS 316 SS 1 44000226 44000226 44000226 44000226
17 Lever Spring SS SS 1 44000228 44000228 44000228 44000228
18 Stem Cam 3” & 4” only 316 SS 1 NA N/A 44000311 44000311
19 Stop Plate SS 2 44001525 4400225 44000225 4400225
20 HBS Cam Arm SS 2 5001520 5001520 5001530 5001530
21 SS PIN 304 SS 2 5301020 5301020 5301030 5301030
22 Gasket Buna-Fuel Resistant 1 5500220F 5500225 5500240F 5500240F
22 Gasket Viton® 1 5500820 5500825 5500840 5500840
22 Gasket Teon® Encap. Viton 1 5503220 5503025 5503240 N/A
22 Gasket EPDM 1 5502620 5502625 5502640 N/A
*Recommended Spare Parts
Toll-Free: (800) 654-0320 • Toll-Free Fax: (800) 828-2649 • info@ptcoupling.com • www.ptcoupling.com
 Loading...