

Page 1
Page 2

150M Wireless N ADSL2+ Router
- 1 -
TABLE OF CONTENTS
CHAPTER 1 PRODUCT OVERVIEW ................................................................ - 4 -
1.1 PRODUCT FEATURES ........................................................................................... - 5 -
1.2 PACKAGE CONTENTS ........................................................................................... - 6 -
CHAPTER 2 HARDWARE DESCRIPTION....................................................... - 7 -
2.1 PANEL LAYOUT ................................................................................................... - 7 -
2.1.1 Front Panel ............................................................................................ - 7 -
2.1.2 Back Panel ............................................................................................. - 9 -
2.2 HARDWARE CONNECTION ................................................................................... - 9 -
CHAPTER 3 FAST CONFIGURATION ........................................................... - 11 -
3.1 CONFIGURING THE COMPUTER .......................................................................... - 11 -
3.2 LOGGING ON TO YOUR ROUTER THROUGH WEB BROWSER ................................ - 14 -
3.3 FAST INTERNET ACCESS .................................................................................... - 17 -
CHAPTER 4 ADVANCED SETTINGS ............................................................. - 25 -
4.1 DEVICE INFORMATION ...................................................................................... - 26 -
4.2 ADVANCED SETUP ............................................................................................. - 29 -
4.2.1 Connection mode ................................................................................. - 30 -
4.2.2 WAN service ....................................................................................... - 33 -
4.2.3 LAN .................................................................................................... - 53 -
4.2.4 DHCP setting ....................................................................................... - 54 -
4.2.5 NAT .................................................................................................... - 56 -
4.2.6 Port Triggering .................................................................................... - 60 -
4.2.7 DMZ Host ........................................................................................... - 63 -
4.2.8 Security ............................................................................................... - 64 -
Page 3

150M Wireless N ADSL2+ Router
- 2 -
4.2.9 Time Restriction .................................................................................. - 68 -
4.2.10 Quality of Service .............................................................................. - 70 -
4.2.11 Routing ................................................................ .............................. - 72 -
4.2.12 DNS ................................................................................................... - 75 -
4.2.13 DSL ................................................................................................... - 77 -
4.2.14 UPnP ................................................................................................. - 78 -
4.2.15 Interface Grouping ............................................................................. - 79 -
4.2.16 Multicast ............................................................................................ - 82 -
4.3 WIRELESS SETTING ........................................................................................... - 83 -
4.3.1 Basic Setting ........................................................................................ - 83 -
4.3.2 Security Setting ................................................................................... - 86 -
4.3.3 MAC Filter .......................................................................................... - 87 -
4.3.4 Wireless Bridge ................................................................................... - 91 -
4.3.5 Station Info .......................................................................................... - 93 -
4.4 DIAGNOSTICS .................................................................................................... - 94 -
4.5 MANAGEMENT .................................................................................................. - 96 -
4.5.1 Settings ................................................................................................ - 96 -
4.5.2 System log ......................................................................................... - 100 -
4.5.3 TR-069 client ..................................................................................... - 101 -
4.5.4 Internet Time ..................................................................................... - 104 -
4.5.5 Access Control .................................................................................. - 105 -
4.5.6 Update Software ................................................................................ - 109 -
4.5.7 Reboot ............................................................................................... - 110 -
4.6 EXIT ................................................................................................................ - 111 -
4.7 BACK TO WIZARD ........................................................................................... - 111 -
APPENDIX 1 ...................................................................................................... - 113 -
Page 4

150M Wireless N ADSL2+ Router
- 3 -
1. SETTING THE IP OF YOUR PC MANUALLY .......................................................... - 113 -
2. PC DIAL-UP ....................................................................................................... - 114 -
APPENDIX 2 ...................................................................................................... - 119 -
1. TROUBLESHOOTING .......................................................................................... - 119 -
2. VERIFYING THE CONNECTION ........................................................................... - 120 -
3. FAQ .................................................................................................................. - 122 -
4. VPI/VCI LIST .................................................................................................... - 126 -
APPENDIX 3: REGULATORY INFORMATION .......................................... - 131 -
Page 5

150M Wireless N ADSL2+ Router
- 4 -
Chapter 1 Product Overview
Note: This user guide applies to W150D products. W150D is equipped
with 1 antenna and the maximum wireless rate it can reach is 150Mbps.
Thanks for purchasing this W150D ADSL2/2+ router! It is an easy-to
install gateway device which provides easy-to-operate configuration
interface to free you from complicated configurations. Thus, it can help
you to access Internet through some simple configurations.
W150D, an IEEE802.11n-compliant, easy to use, power saving,
ADSL2+ router with an up to 150Mbps Wireless transmission rate, is
integrated with ADSL2+ Modem, wireless router, switch and wired
router all in one. The wireless transmission rate and coverage it
provides is 3 times of that of a common 54Mbps product, thus freeing
you from surplus and complicated cable distribution.
It mainly uses ADSL (telephone line) access way to share the Internet
with multiple computers through wired or wireless connection without
being connected to other devices. With super compatibility, it can also
share Internet access with multiple computers when its WAN port is
connected via a network cable.
WPA, WPA2 and WPS encryption methods, etc are supported on the
device to guarantee the security of your wireless network; IPTV set-top
box access is supported to enable the reception of digital TV signal and
surfing online to be proceeded simultaneously; An English Web
management interface and TR-069 remote management methods are
supported for easier management.
Page 6

150M Wireless N ADSL2+ Router
- 5 -
In a word, with fast wireless speed and large coverage, W150D is the
best choice for families, student dorms and small-sized enterprises, etc
to access Internet wirelessly.
1.1 Product Features
Complies with IEEE802.11b/g/n, IEEE802.3, IEEE802.3u, ADSL,
ADSL2, ADSL2+ standards etc
Up to 150Mbps Wireless transmission rate which is 3 times of that
of a common 54Mbps product
6000V lightning-proof design, adaptable to lightning-intensive
area
Compatible with mainstream DSLAM equipment, strong
adaptability
Strong driving capability with up to 6.5Km transmission distance
Integrates ADSL2+ Modem, wireless router, switch and wired
router all in one
Up to 24Mbps downstream rate and 1Mbps upstream rate
Provides one RJ11 port and one voice splitter
Provides 4 LAN ports and the fourth LAN port can be used as a
WAN port
Supports ADSL(telephone line) and LAN(network cable)access
ways
Supports Firewall to prevent hacker attacks
Supports WPA and the latest WPA2 encryption methods and
security authentication agreement
Page 7

150M Wireless N ADSL2+ Router
- 6 -
Supports Bridge, PPPoE, PPPoA, dynamic IP and static IP, etc
broadband access methods etc
Supports IPTV access, LAN2/iTV;
Supports automatic selection of wireless channel
Supports FDM to enable telephoning, faxing and surfing activities
to proceed simultaneously without mutual interference
Supports backup and simultaneous save of multiple configuration
files to meet different network needs
Supports local Web management for overall network management
Supports easy Web based installation to enable fast and easy
configuration of parameters
1.2 Package Contents
Unpack the package and check the following items.
One ADSL2/2+ router
One Power Adapter
One Voice Splitter
One RJ45 network Cable
Two RJ11 Telephone Lines
One Quick Installation Guide
One CD-ROM
If any of the above listed items is missing or damaged, please contact
your PTCL reseller for immediate replacement.
Page 8
150M Wireless N ADSL2+ Router
- 7 -
Chapter 2 Hardware Description
2.1 Panel Layout
2.1.1 Front Panel
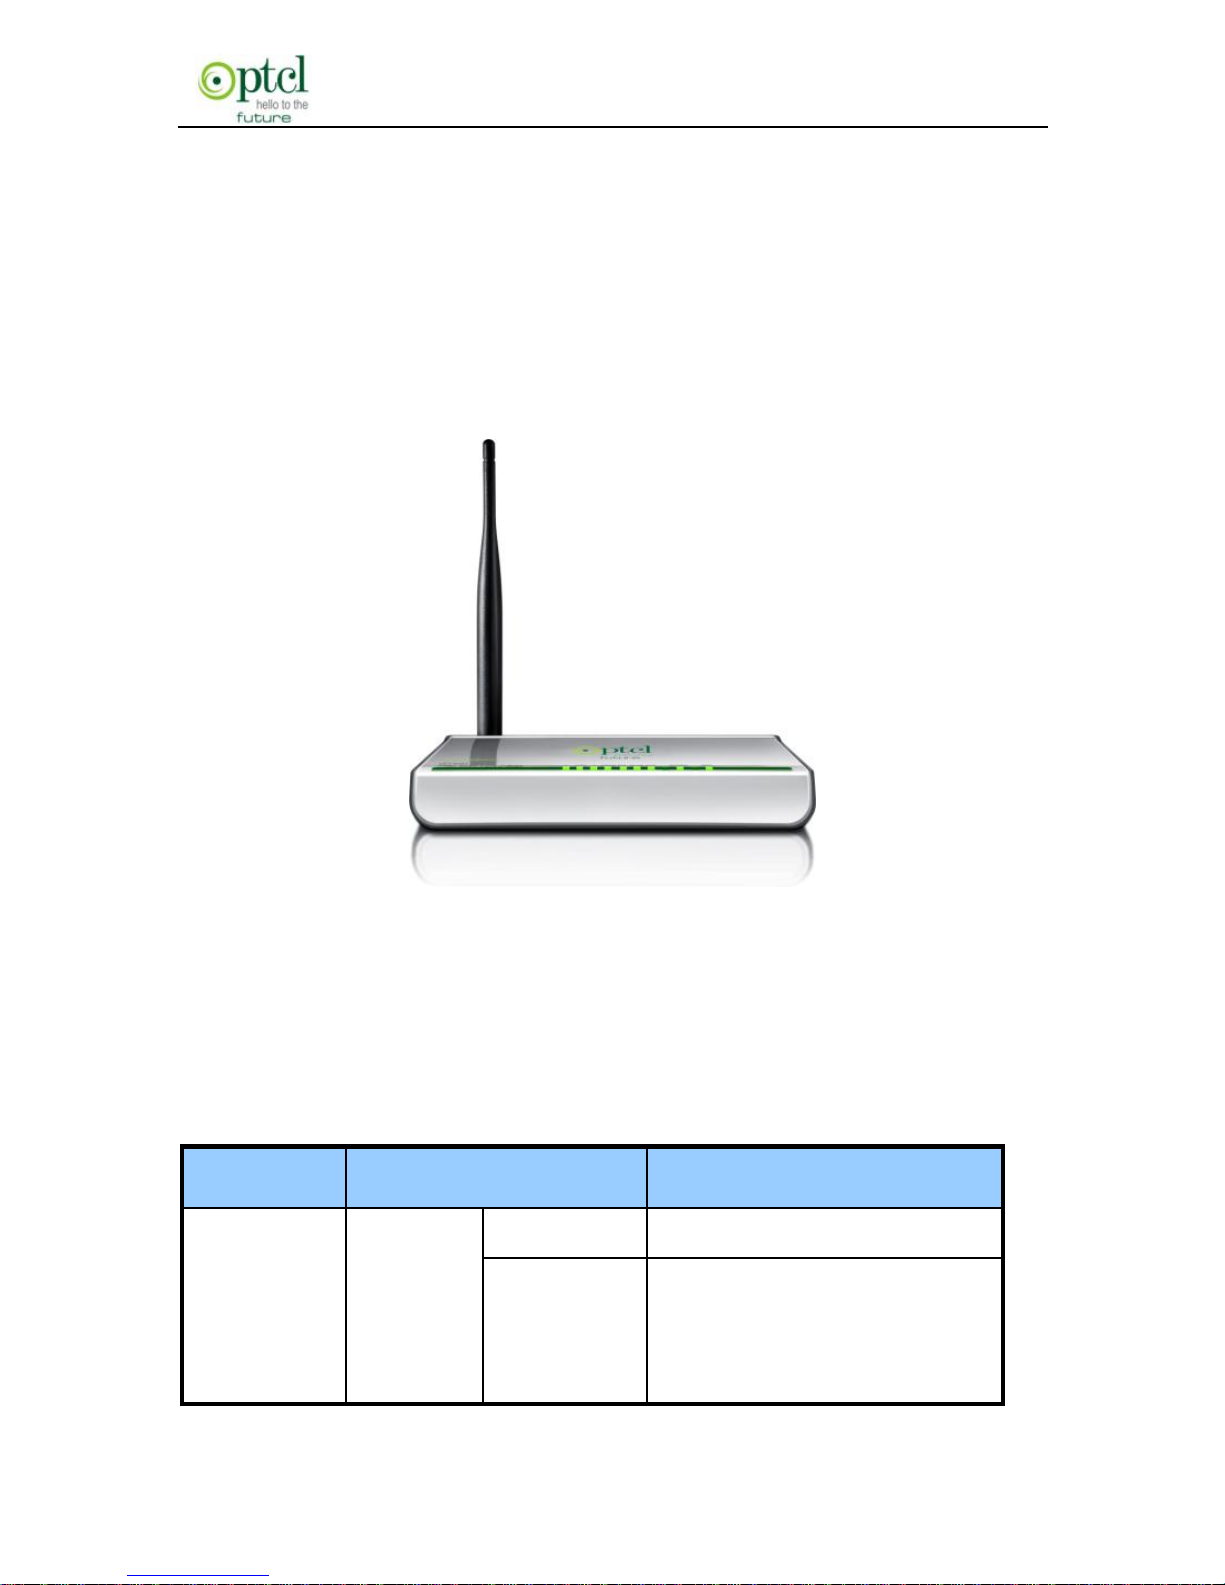
W150D’s Front Panel
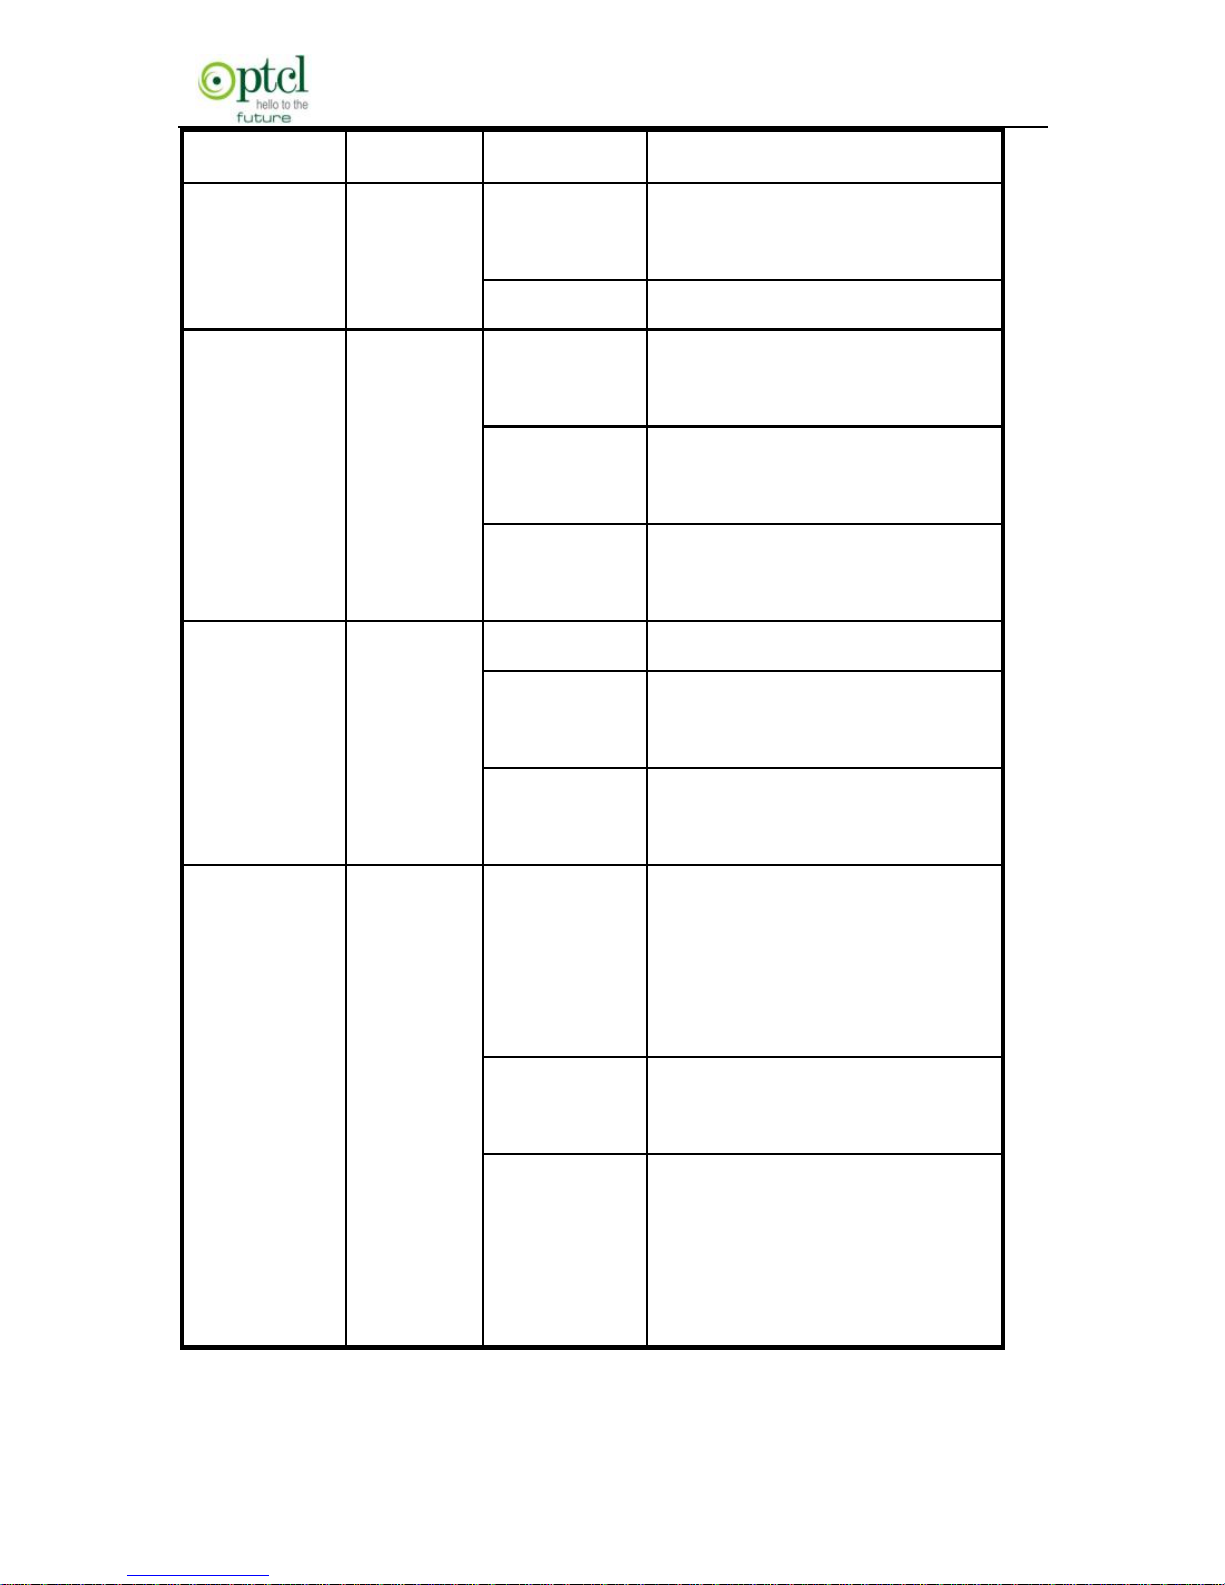
There are 9 LED indicators on the front panel of W150D. You can judge
whether the device is in correct working condition by checking the
status of the indicators. The meanings of the indicators are described
as follows:
LED
Color
Status Description
Power
Green
Always On
The device has power
OFF
The device has no power
or power adapter is
damaged
Page 9
150M Wireless N ADSL2+ Router
- 8 -
SYS
Green
Flashing
System functions correctly
WLAN
Green
Flashing
Packets are being
transferred
Off
Wireless is disabled
ADSL
Green
Slow
Flashing
ADSL Link has not been
established
Fast
Flashing
ADSL Link is being
established
Always On
ADSL Link has already
been established
LAN
1/2/3/4
Green
Off
Unconnected
Flashing
Packets are being
transferred
Always On
The router has been
connected to the computer
WPS
Green
ON
Terminal WPS is
successfully connected
and the LED lights off in 2
minutes
Flashing
WLAN terminal is
connecting WPS
Off
No WLAN terminal WPS
connection is present or
terminal WPS connection
exceeds 2 minutes
Page 10
150M Wireless N ADSL2+ Router
- 9 -
2.1.2 Back Panel
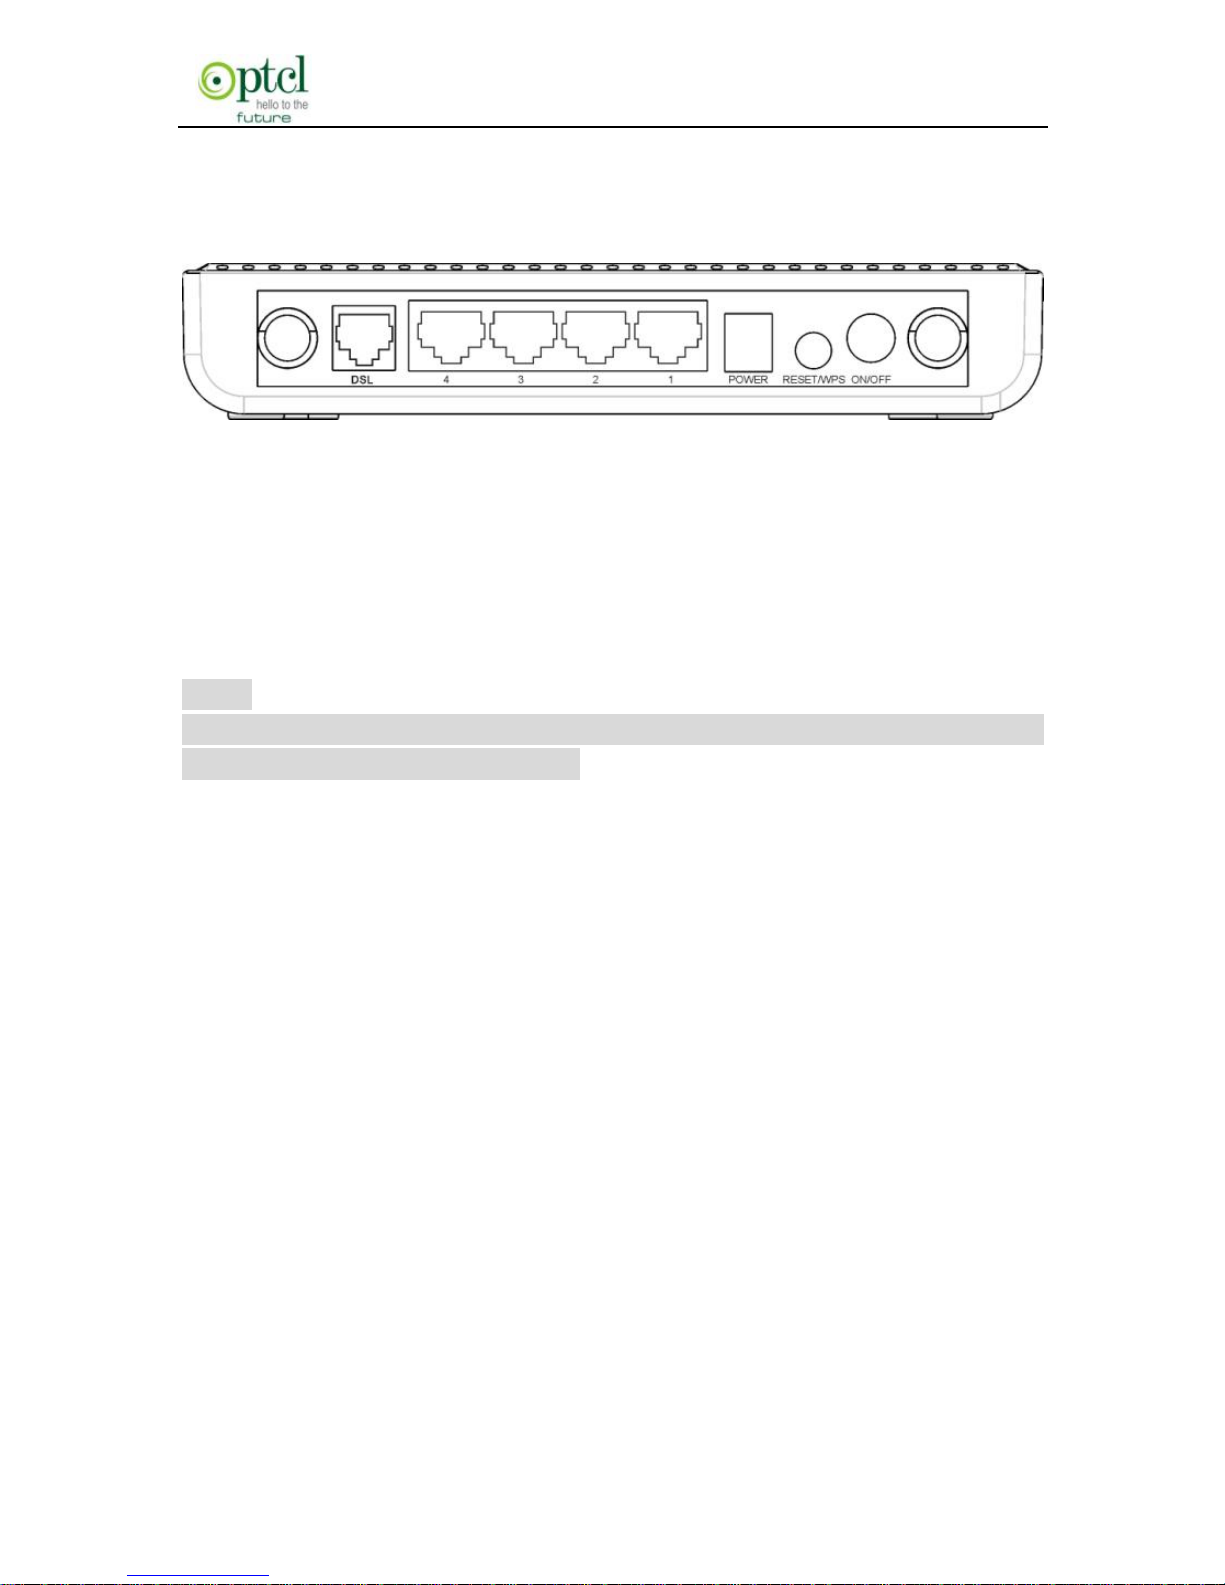
W150D’s Back Panel
ON/OFF: Power Switch. Press it in to turn on the power and press it out
to turn off the power.
WPS/RESET:Hold and press it for 1 second to connect WPS, and 7
seconds to bring all settings back to factory defaults.
Note:
Please use the supplied power adapter, for use of an unmatched power
adapter may damage the device.
LAN:LAN network cable interface. It is used to connect Hub, Switch, or
computer in a LAN.
(LAN2 port can also be used to connect IPTV Set-top box to enable
watching TV and online surfing at the same time. When the access way
is changed into community broadband, LAN4 can be used as the
wireless Router’s WAN port.)
DSL: RJ11 interface for telephone line connection (It does not function
when the device is configured to use Ethernet uplink mode as access
mode).
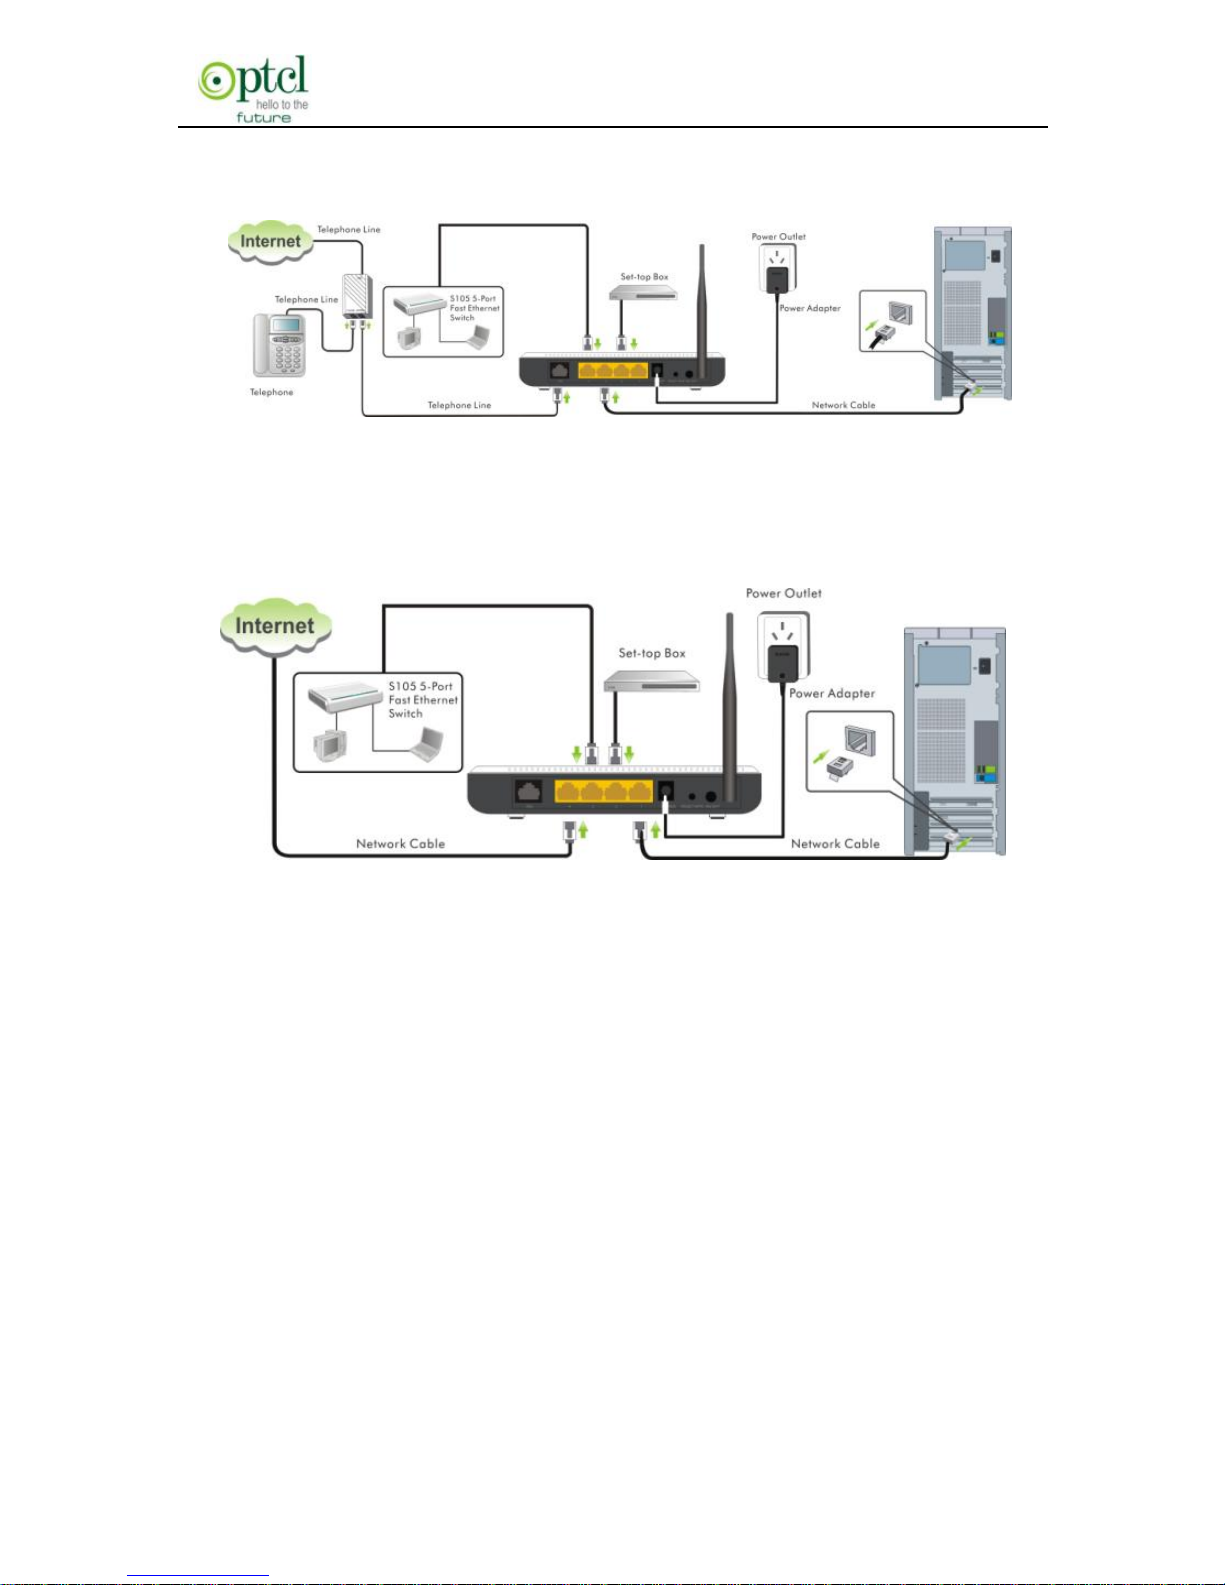
2.2 Hardware Connection
Follow the diagram below to connect your network devices when
Page 11
150M Wireless N ADSL2+ Router
- 10 -
using DSL uplink access mode (through telephone line).
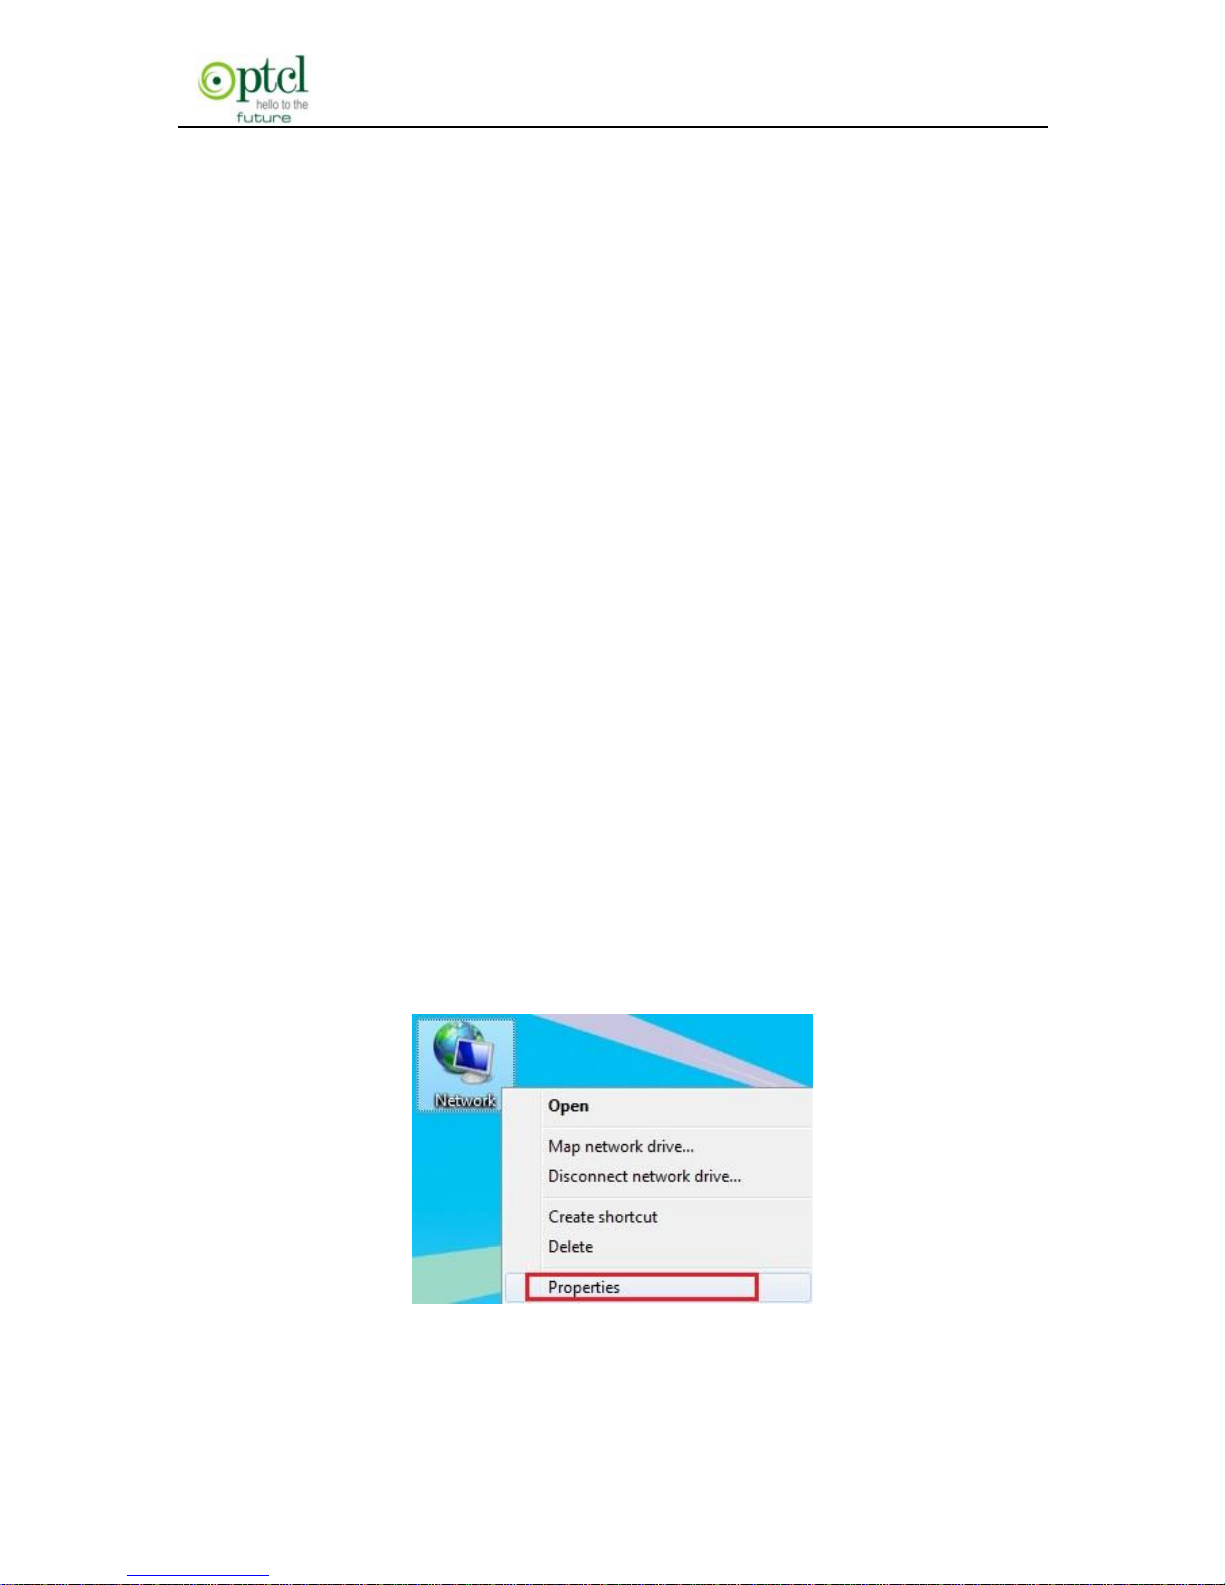
Follow the diagram below to connect your network devices when
using Ethernet uplink access mode (through network cable).
Page 12
150M Wireless N ADSL2+ Router
- 11 -
Chapter 3 Fast configuration
Since we are using computer to access Internet, we need to first
configure the computer and then log on to router’s management
interface (WEB UI) to configure the router through the configured
computer.
3.1 Configuring the computer
The procedures of the example below (taken under Windows 7)
instructs you in configuring your PC.
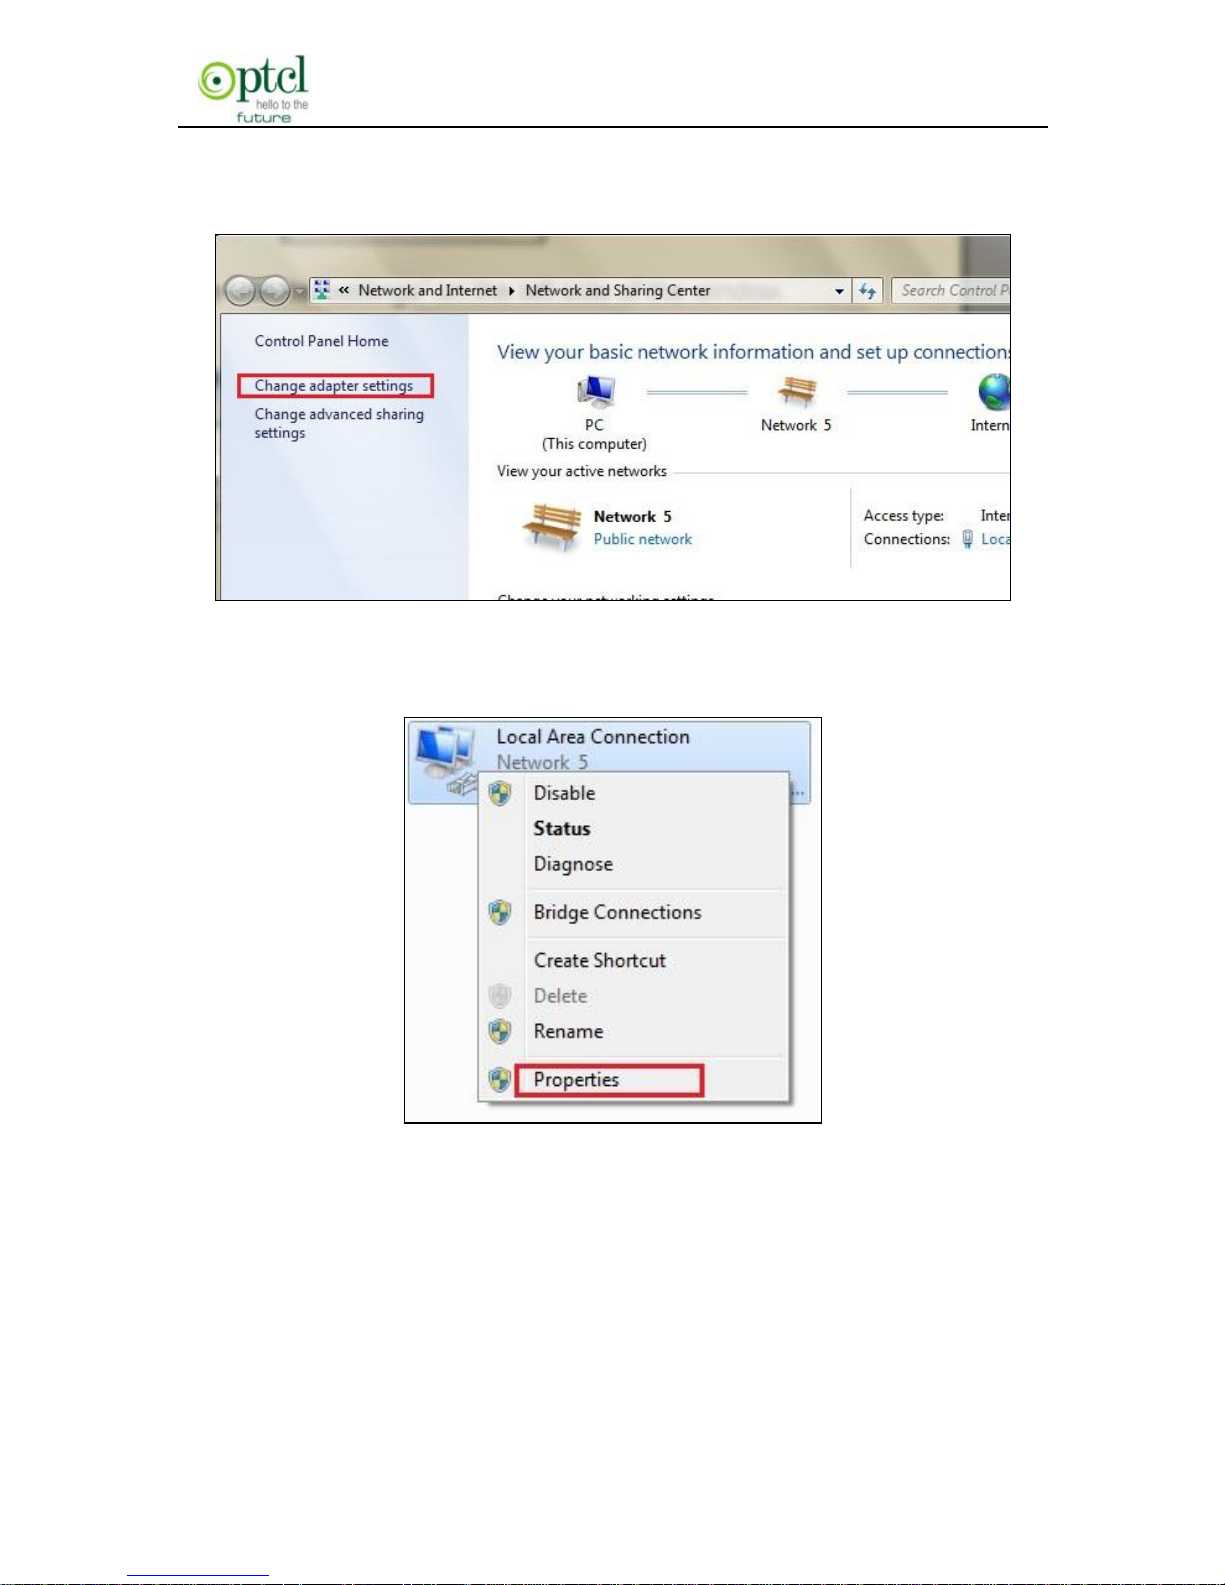
1. Click the ―Network‖ icon on your computer’s desktop, select
―Properties‖ in the appearing menu and then click‖ Open Network
and Sharing Center‖.
Page 13
150M Wireless N ADSL2+ Router
- 12 -
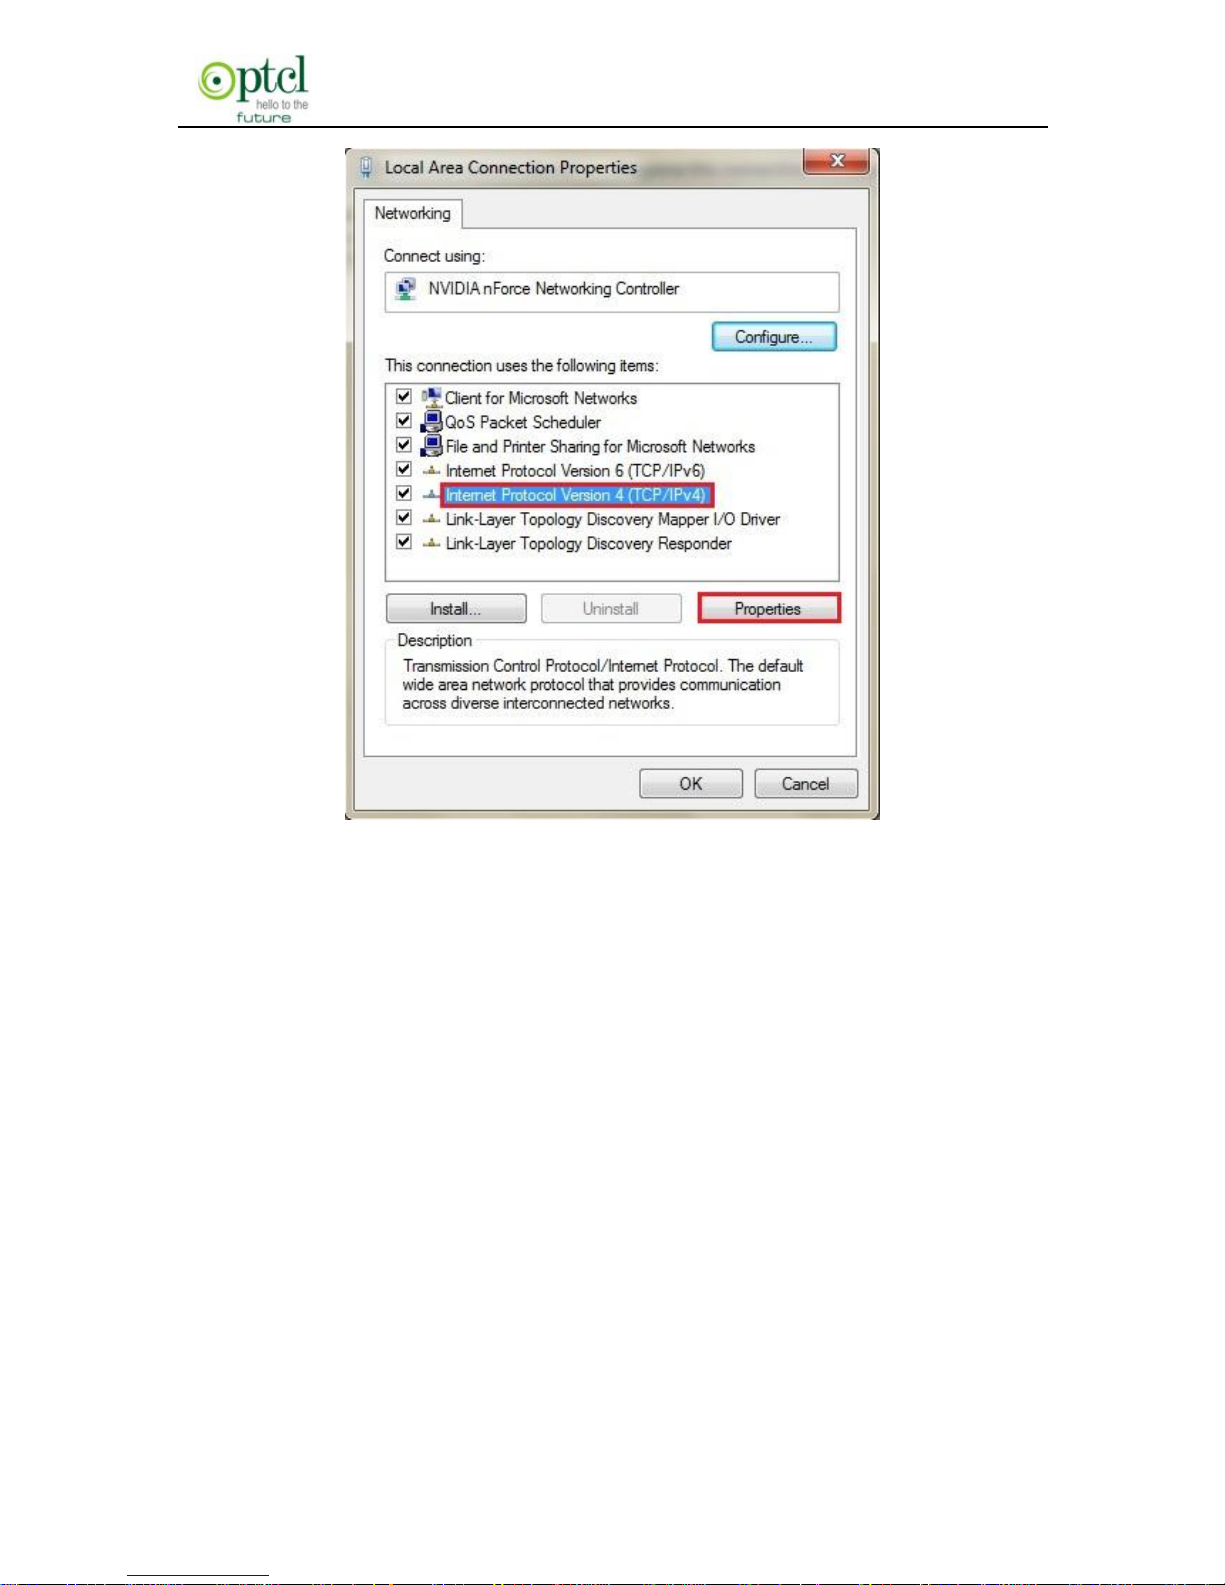
2. Click ―Change adapter settings‖ on the left side of the window.
3. Right click ―Local Area Connection‖ and select ―Properties‖.
4. Select‖ Internet Protocol Version 4(TCP/IPv4)‖and then click
―Properties‖.
Page 14
150M Wireless N ADSL2+ Router
- 13 -
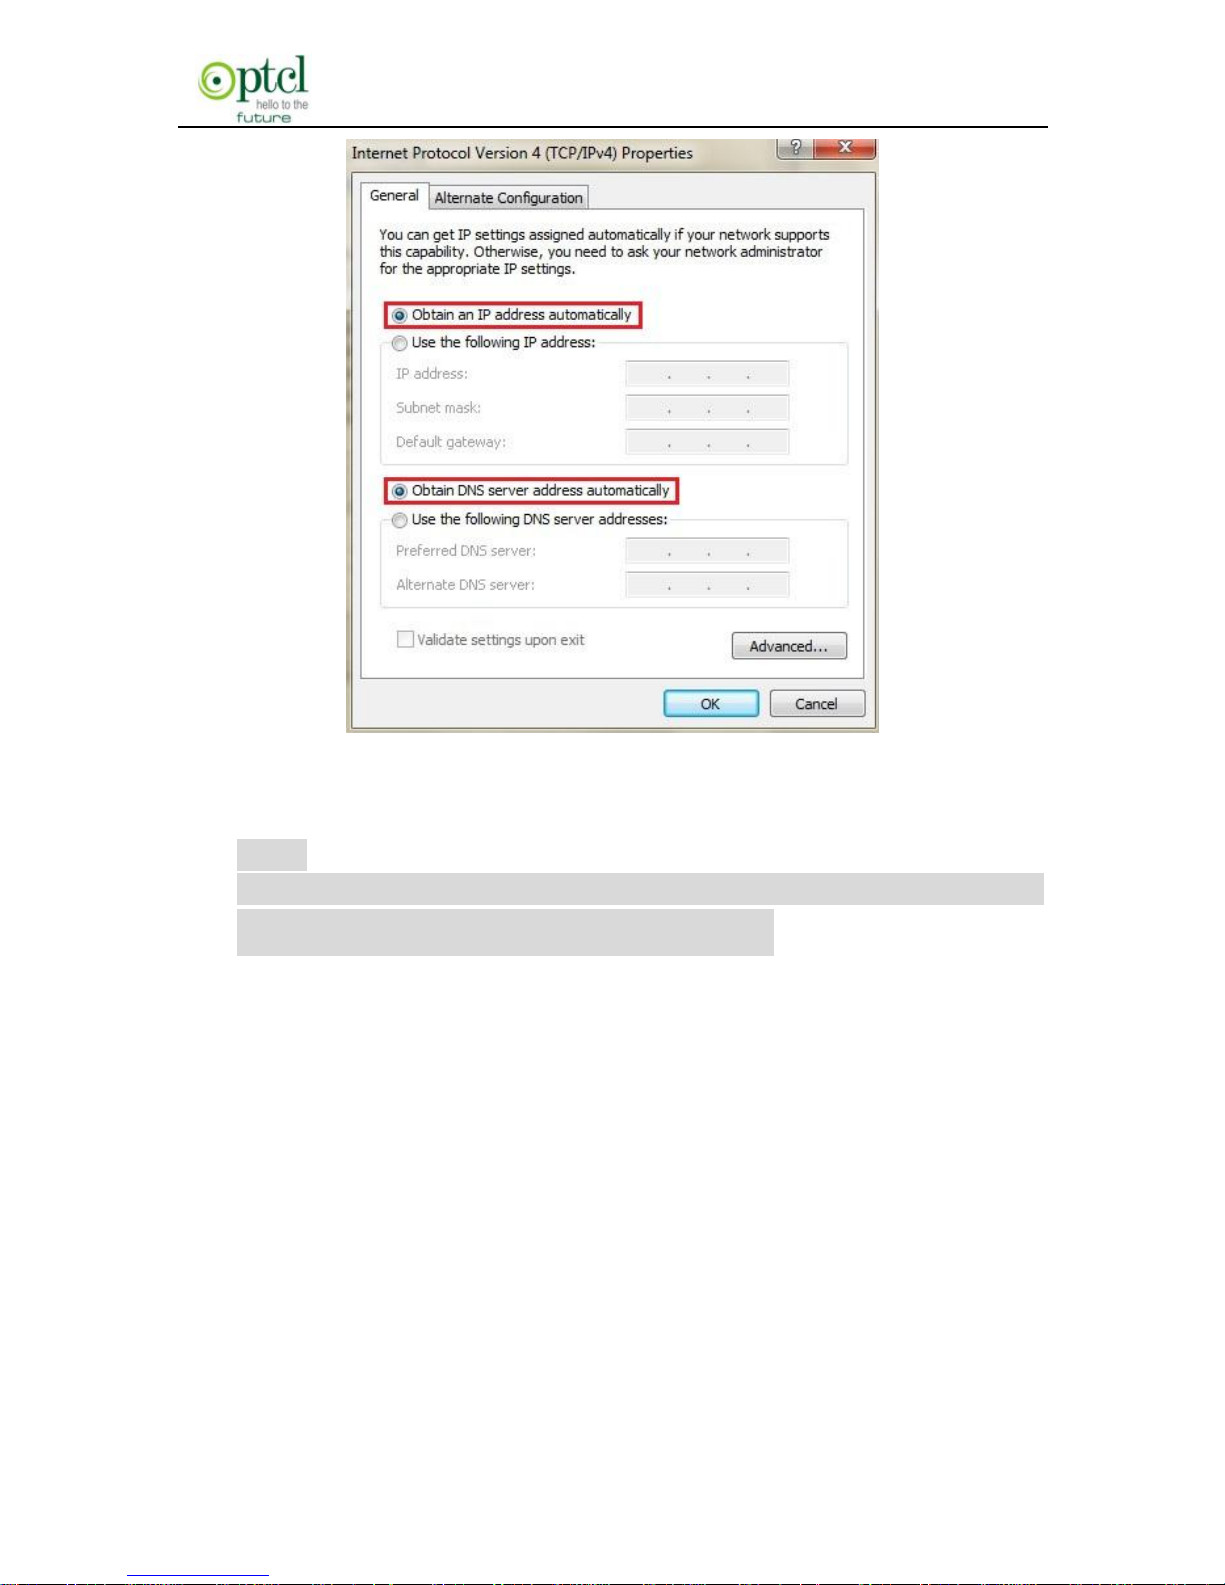
5. Select ―Obtain an IP address automatically‖ and ―Obtain DNS
server address automatically‖. Click ―OK‖ to save the
configurations.
Page 15
150M Wireless N ADSL2+ Router
- 14 -
Note:
Certainly you can set your IP manually, for detailed
information please refer to appendix 1 :
3.2 Logging on to your router through Web browser
Before entering the web browser, you need to verify the connectivity
between the router and your computer.
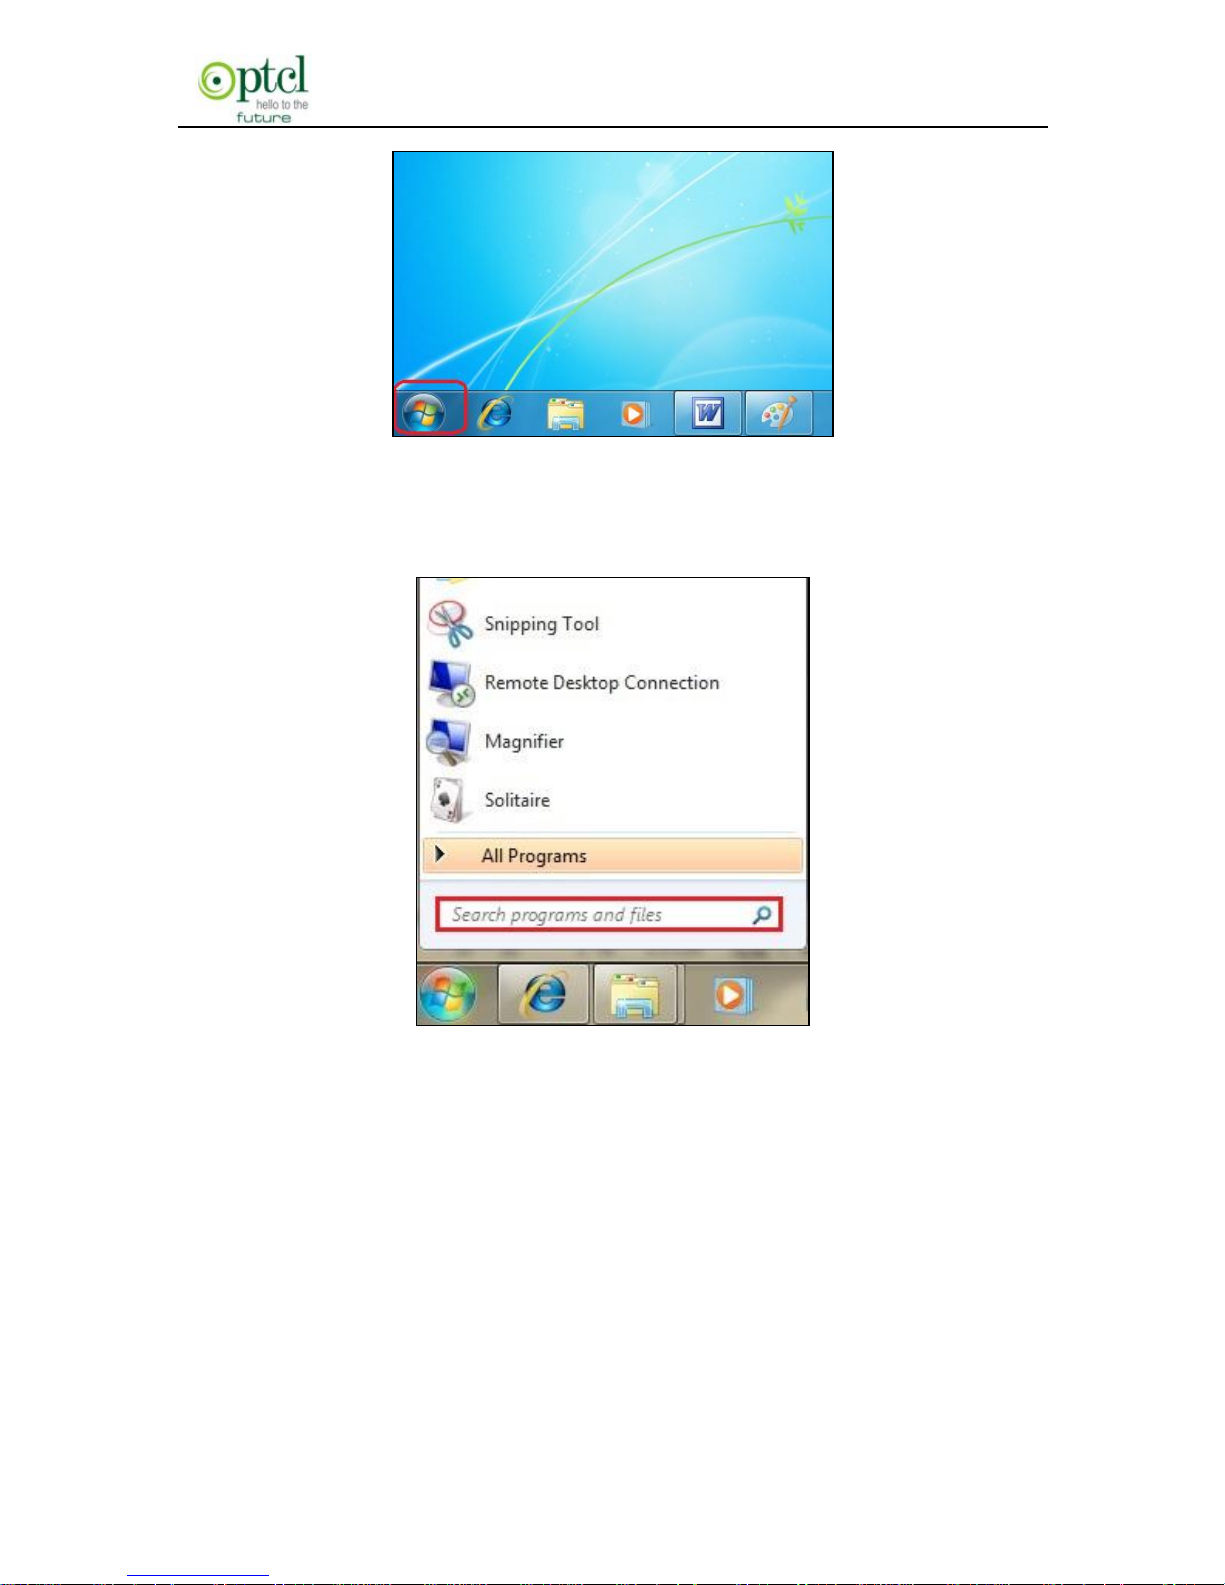
First, click the start menu on the lower left corner of your computer
desktop.
Page 16
150M Wireless N ADSL2+ Router
- 15 -
Then, input ―cmd‖ in the search programs and file texts box and press
―enter‖.
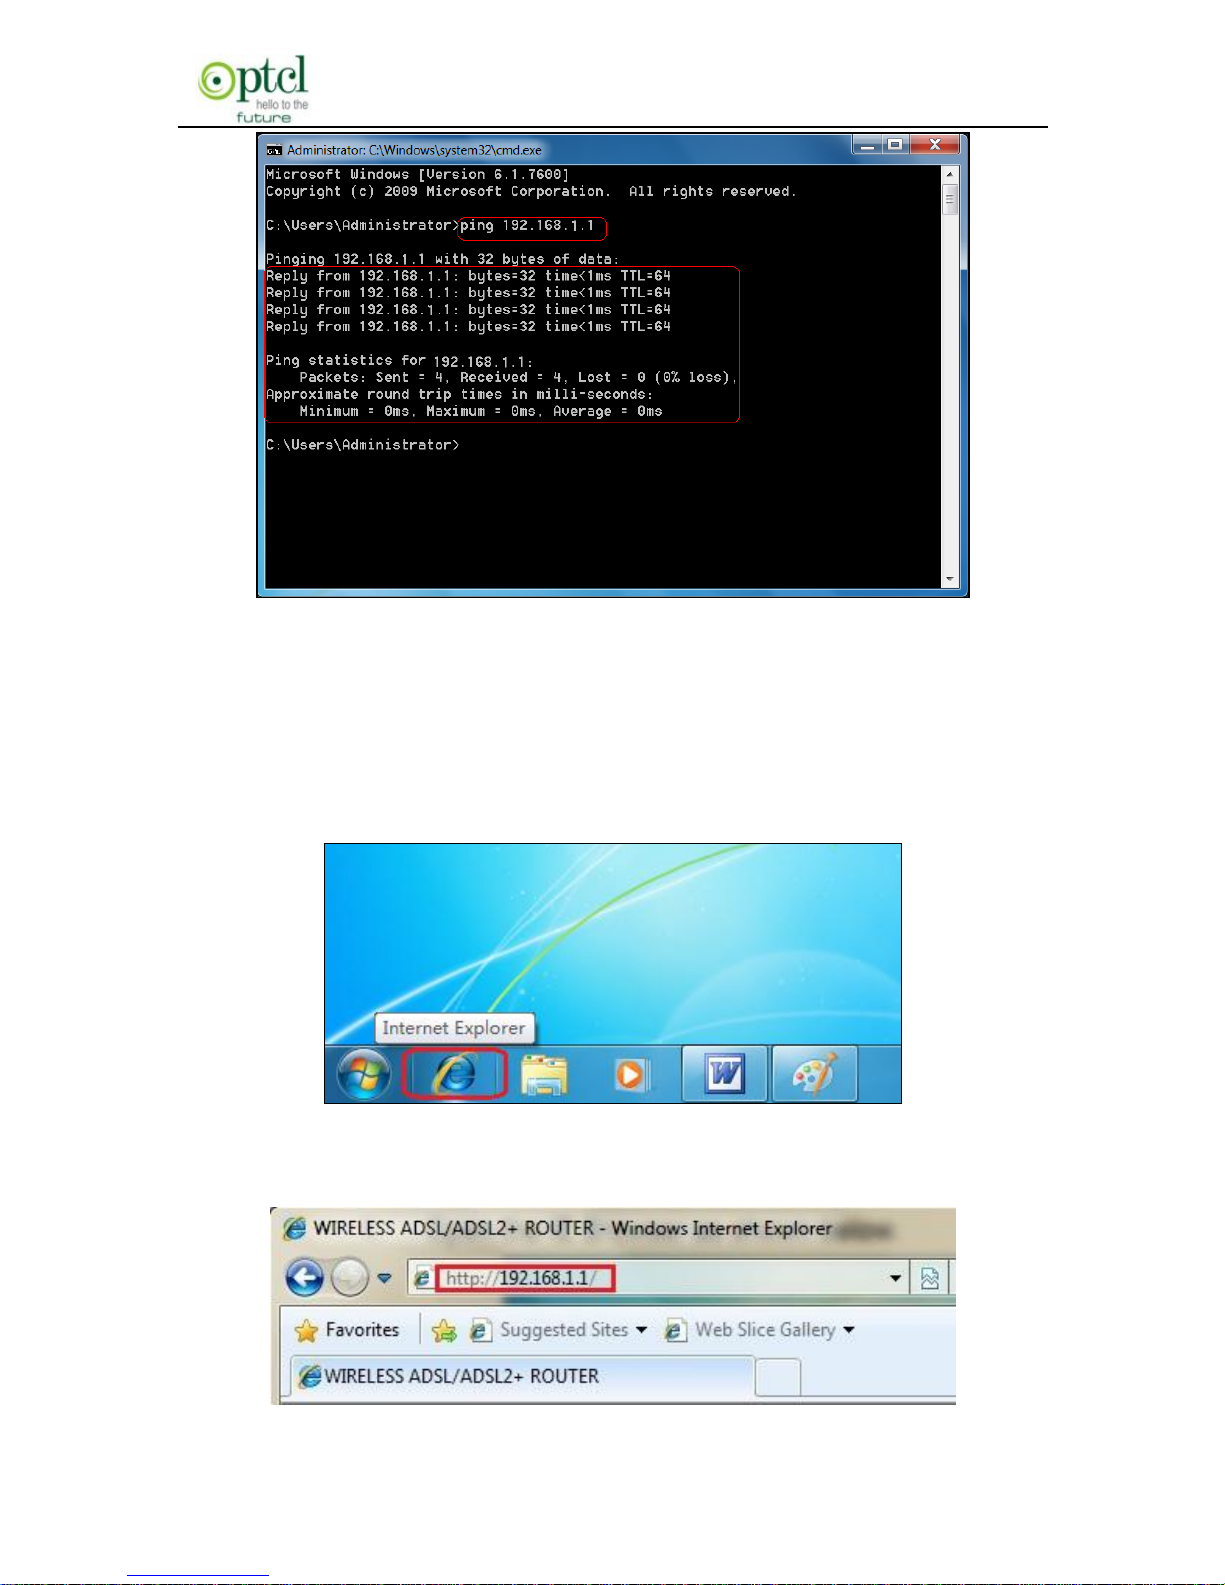
Finally, Open the dos window and enter ―ping 192.168.1.1‖, and press
Enter. If the screen displays the following results, it indicates your
computer has already been connected to the router.
Page 17
150M Wireless N ADSL2+ Router
- 16 -
Now the direct link between your computer and the router has been
successfully established, which means you can log on to the router’s
web-based utility.
1. Open the IE Browser as shown below.
2. Input http://192.168.1.1 in the address field and press ―Enter‖.
Page 18
150M Wireless N ADSL2+ Router
- 17 -
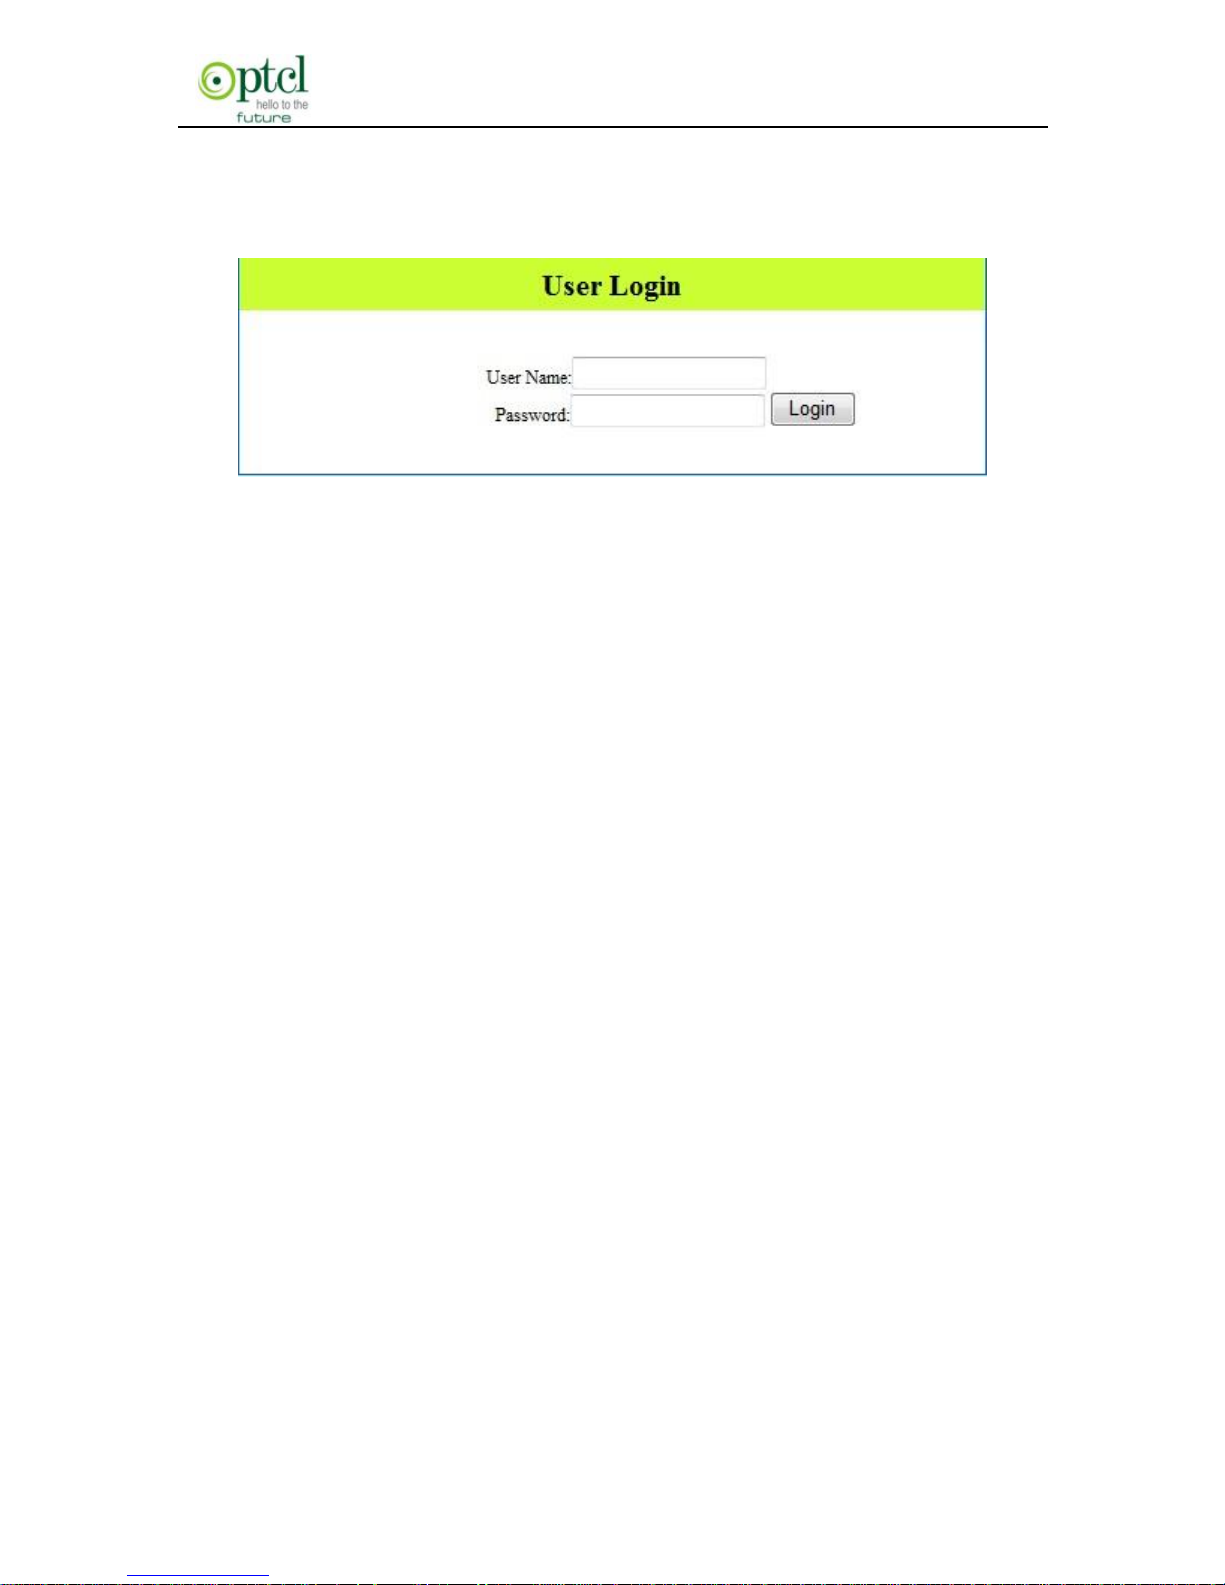
3. Enter the router’s login screen and login password dialog will pop
up. The default password is admin, as shown below:
4. Input ―admin‖ in the Password field on the appearing page and
click ―OK‖.
3.3 Fast Internet Access
In previous section, we have explained how to log on to the router and
in the following; we are going to illustrate how to configure the router
quickly to let your PC access Internet.
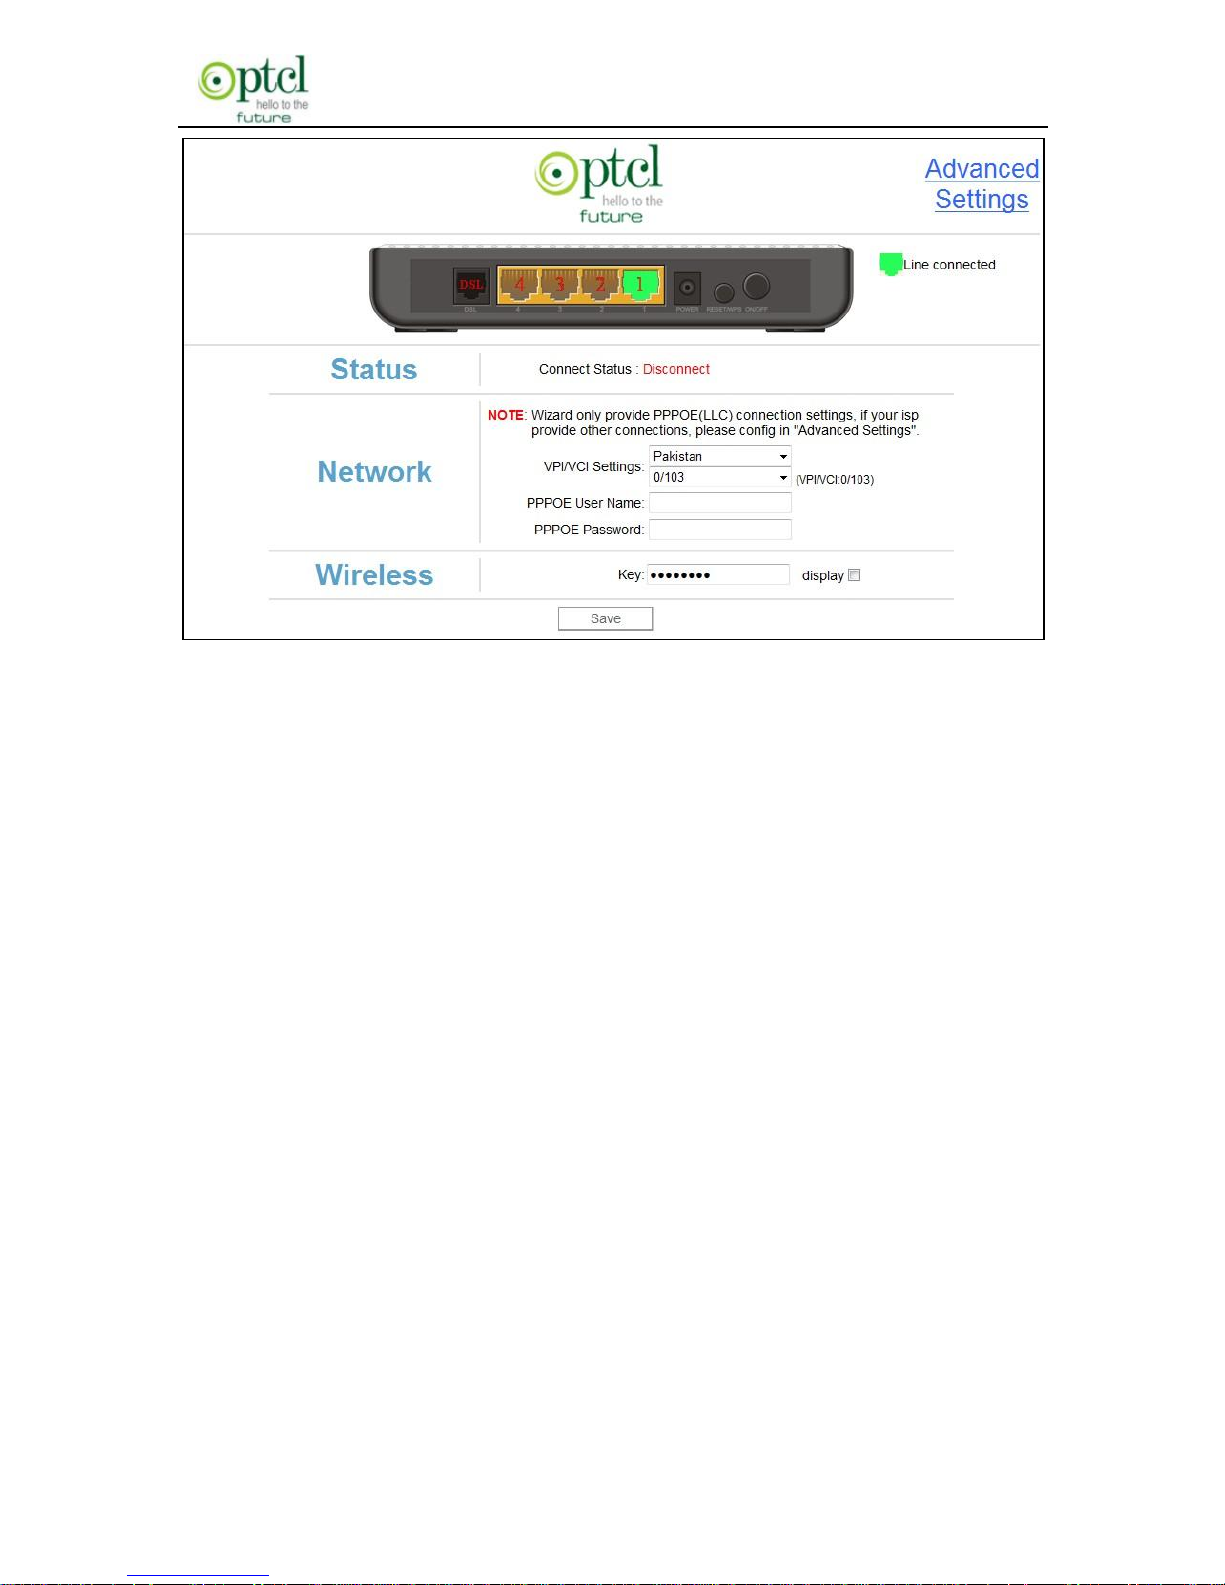
Now check whether you have the screen below, if not, please re-log on
to the router’s management interface.
Page 19
150M Wireless N ADSL2+ Router
- 18 -
There are two Connection modes available. However, Wizard only
provide DSL Uplink mode. The Ethernet Uplink mode can be configured
in ―Advanced Settings‖.
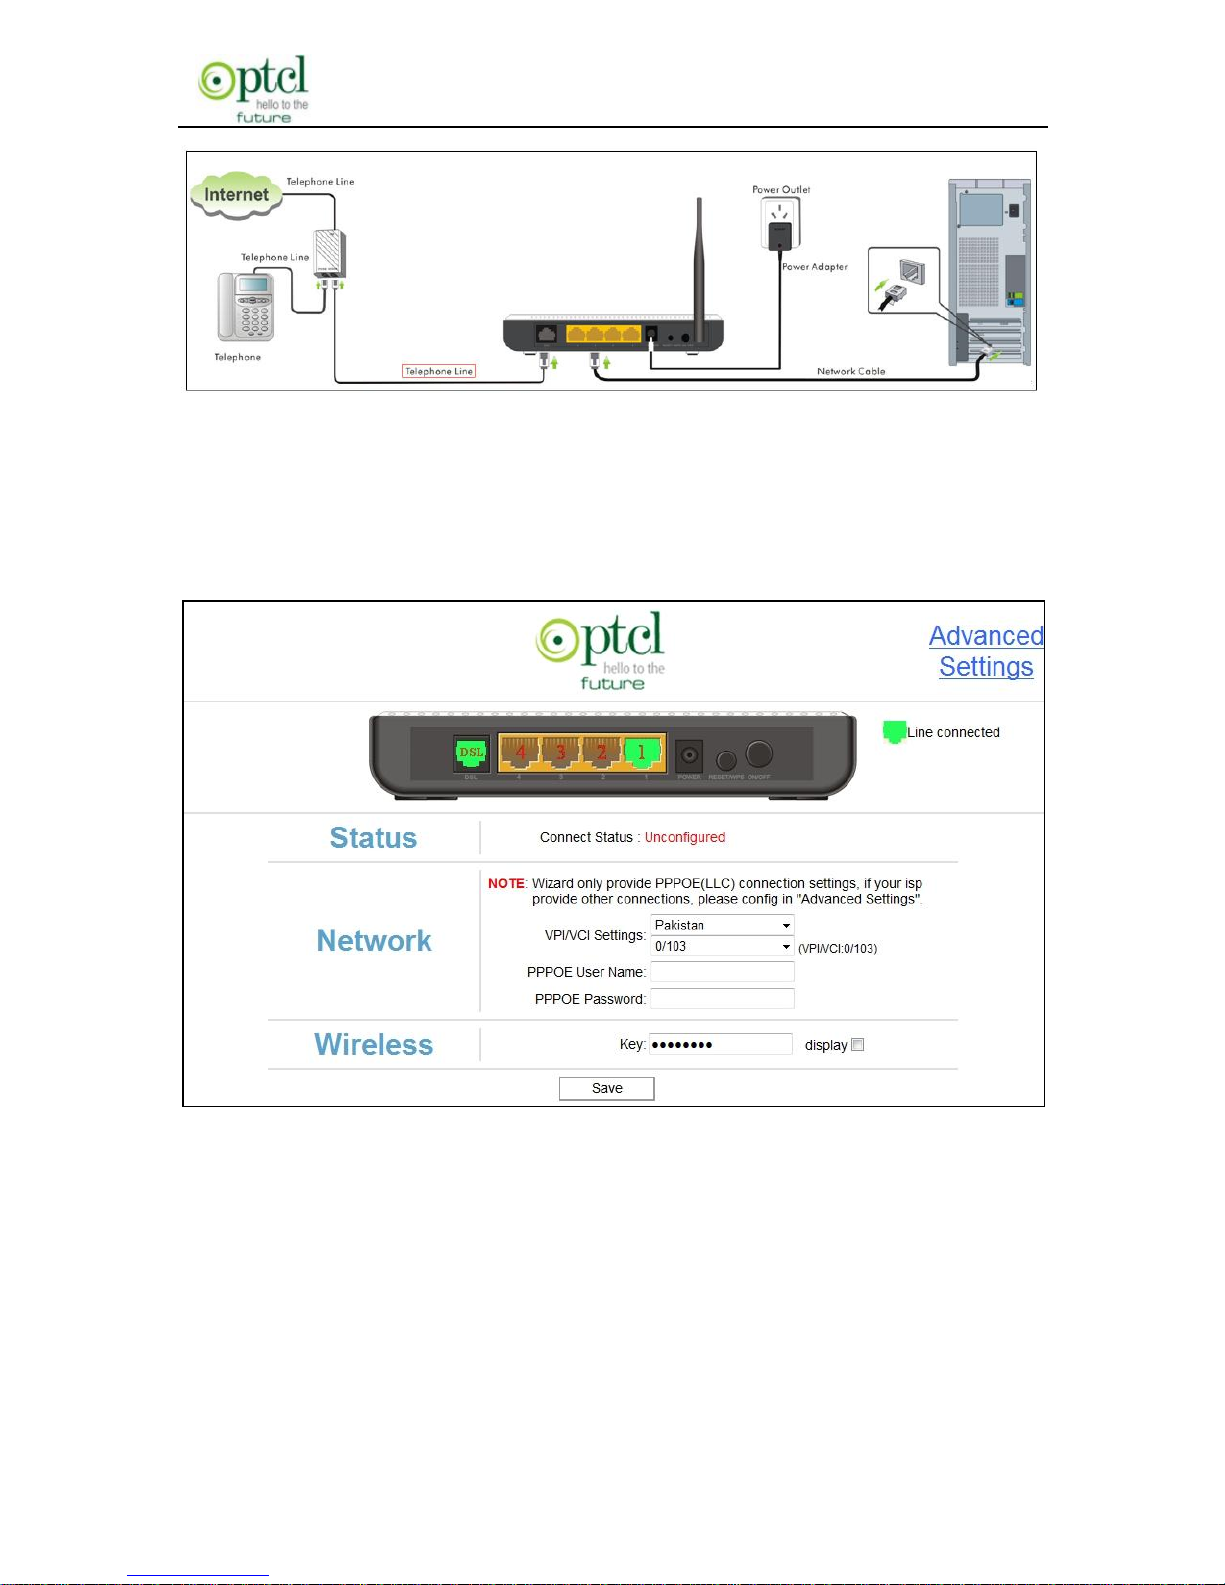
DSL Uplink: Select this mode, if you are using a telephone line to
directly connect to router’s DSL port and then connect the router to your
PC (Internet---telephone line—router---network cable---PC).
Ethernet Uplink: Select this mode, if you are using a network cable to
directly connect to router and then connect the router to your PC
(Internet---network cable—router---network cable---PC).
Diagram of DSL Uplink mode (Internet access through telephone line)
is shown below:
Page 20
150M Wireless N ADSL2+ Router
- 19 -
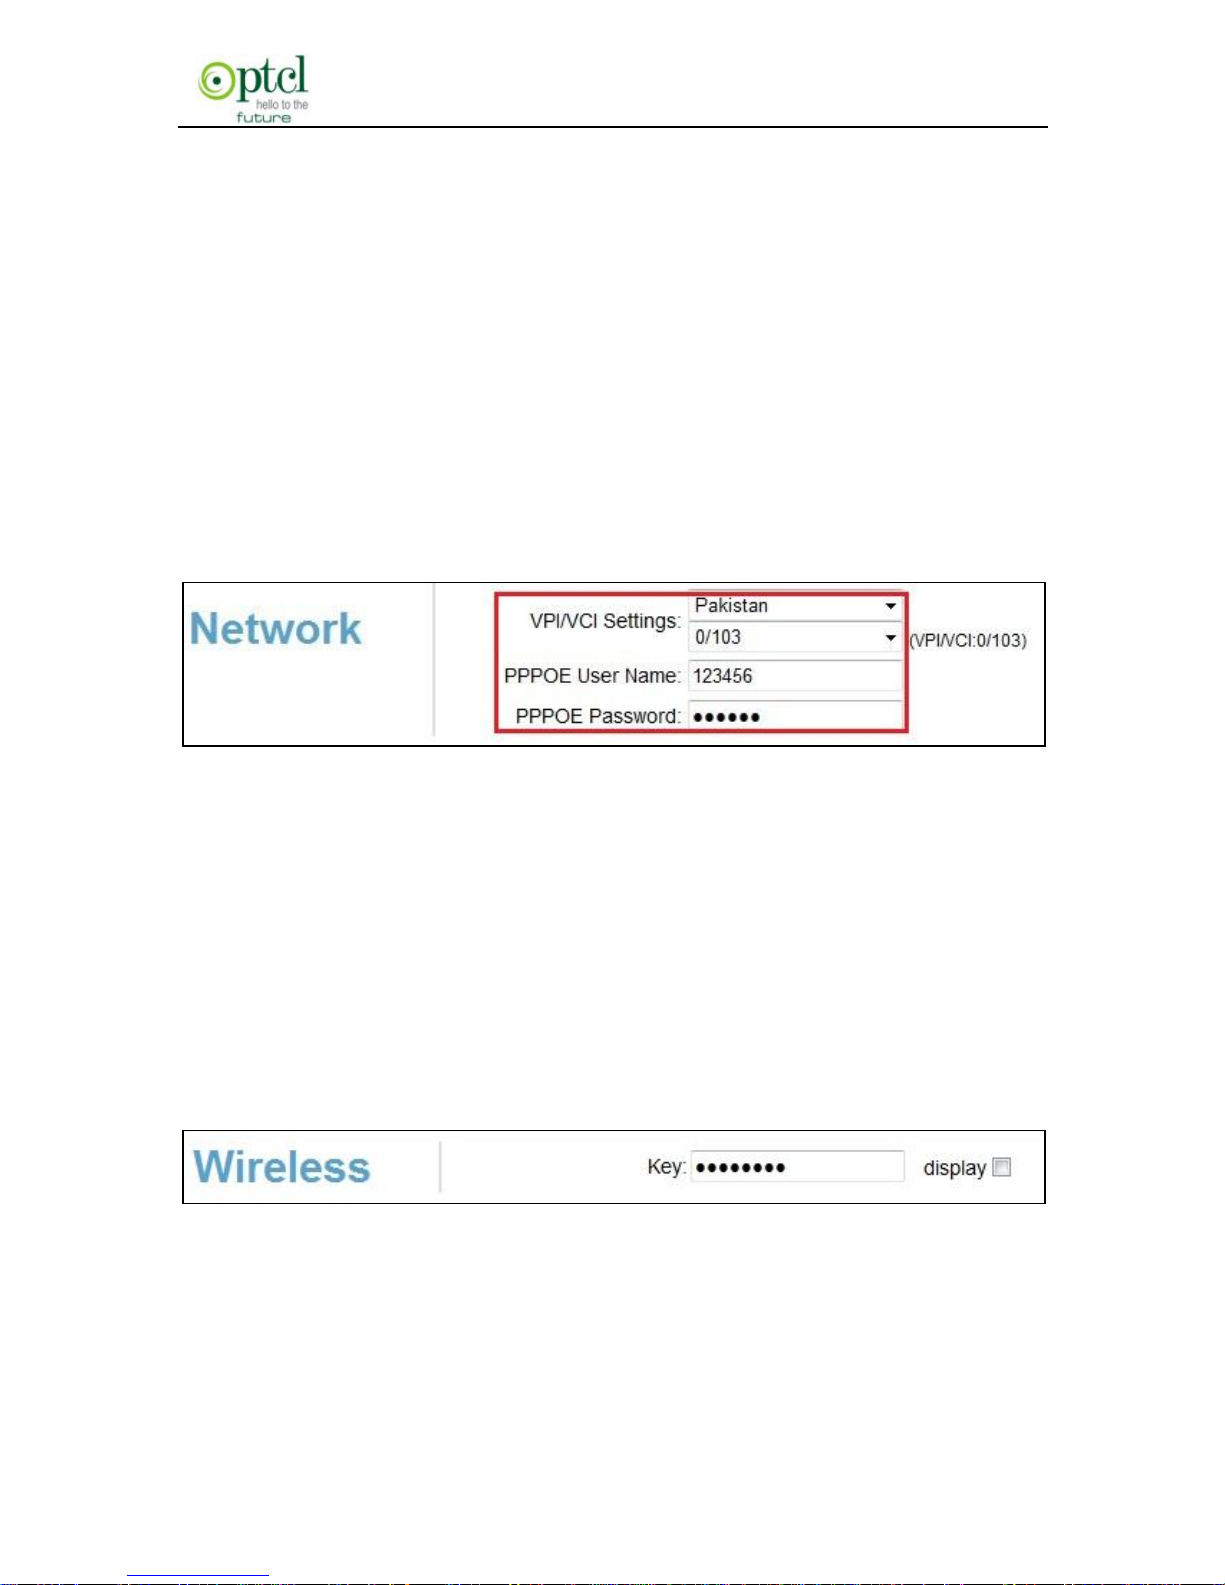
For Internet access via DSL uplink mode (through telephone line), there
are 3 options available under ―Network‖: 1. VPI/VCI Settings, 2. PPPOE
User name, 3. PPPOE Password.
VPI/VCI Settings: This option is mainly for distinguishing various areas
and operators that have different VPI/VCI values. To make it convenient
for its users, this device has integrated some main VPI/VCI values. You
only need to select your area and operator and the router will
automatically offer a correspondingly matched VPI/VCI value of your
Page 21
150M Wireless N ADSL2+ Router
- 20 -
local area.
PPPOE User name: the user name provided by your ISP; used
together with password to authenticate the user.
PPPOE Password: the password provided by your ISP; used together
with user name to authenticate the user.
For example: User A obtains a user name and a password, which are
respectively 123456 and 123456, from ISP for ADSL broadband, so
he/she needs to input the parameters as below:
Note: For the sake of security, password input on Web UI is shown in
encryption code.
Wireless function is supported by this product, so you still have to
configure wireless parameters. Please read the following:
Easy-to-install-----Wireless network configuration (as shown
below)
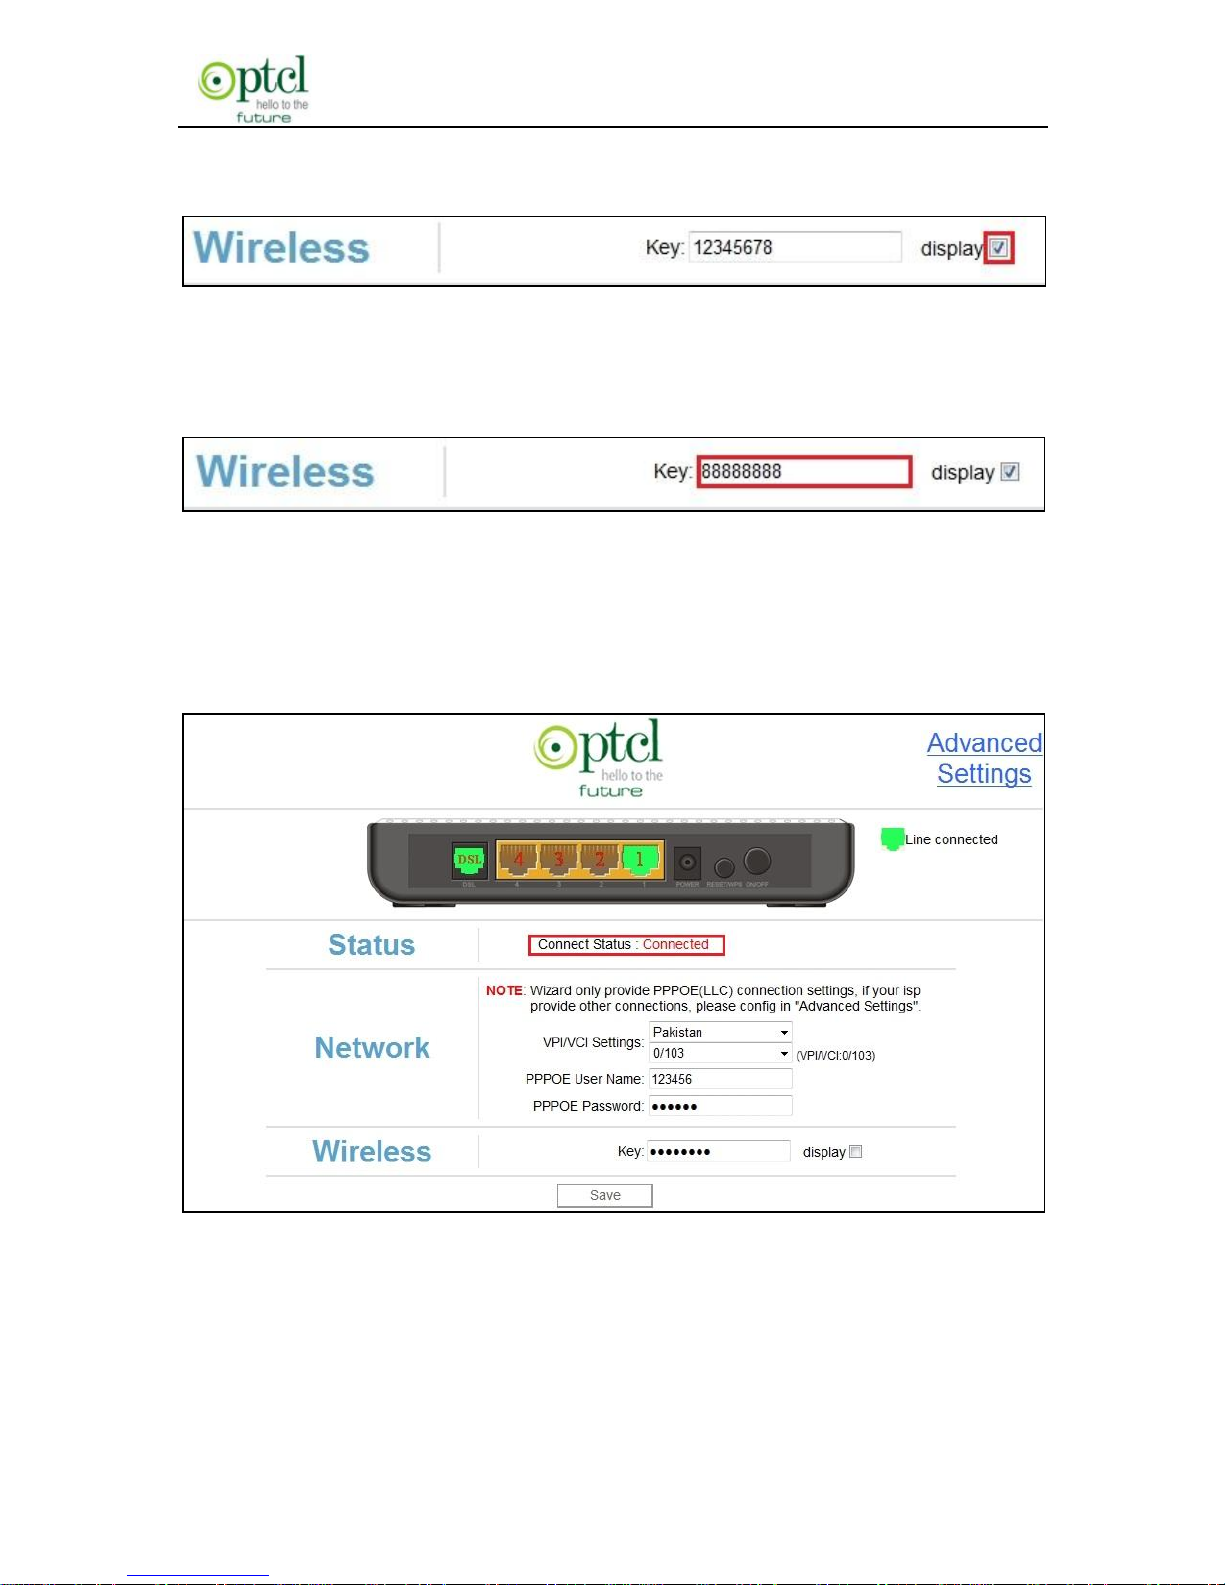
There is only one option to configure for the wireless part:
Key:Allows you to enter a password; only the users who know your
password can be connected to your wireless network. The default key
Page 22
150M Wireless N ADSL2+ Router
- 21 -
is 12345678, you can check the button to show its character value.
For example: if you want to set the password as 88888888, follow the
configurations as shown in the figure below:
And then click ―OK‖ to save the settings. Congratulations! You can
access Internet now when the following screen appears as below (the
Status displays ―Connected‖.)
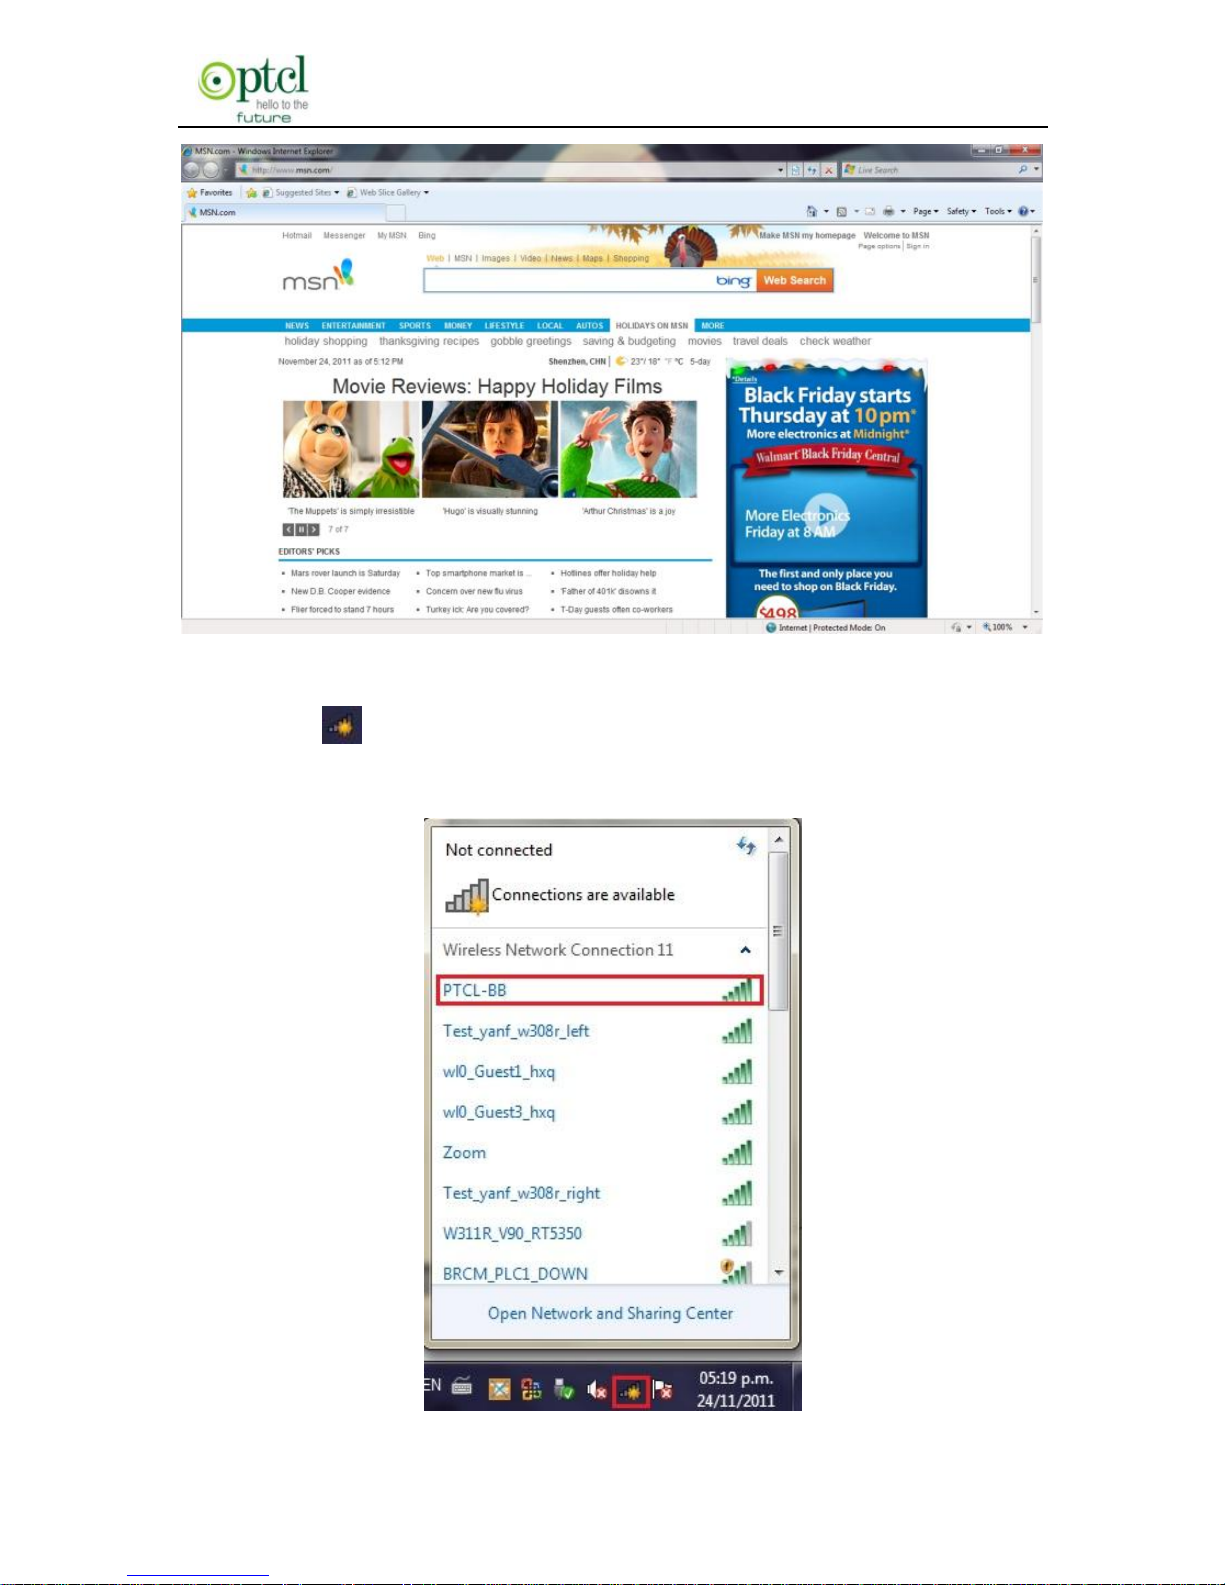
Launch a web browser, enter www.msn.com in the address field and
Internet access will be successful.
Page 23
150M Wireless N ADSL2+ Router
- 22 -
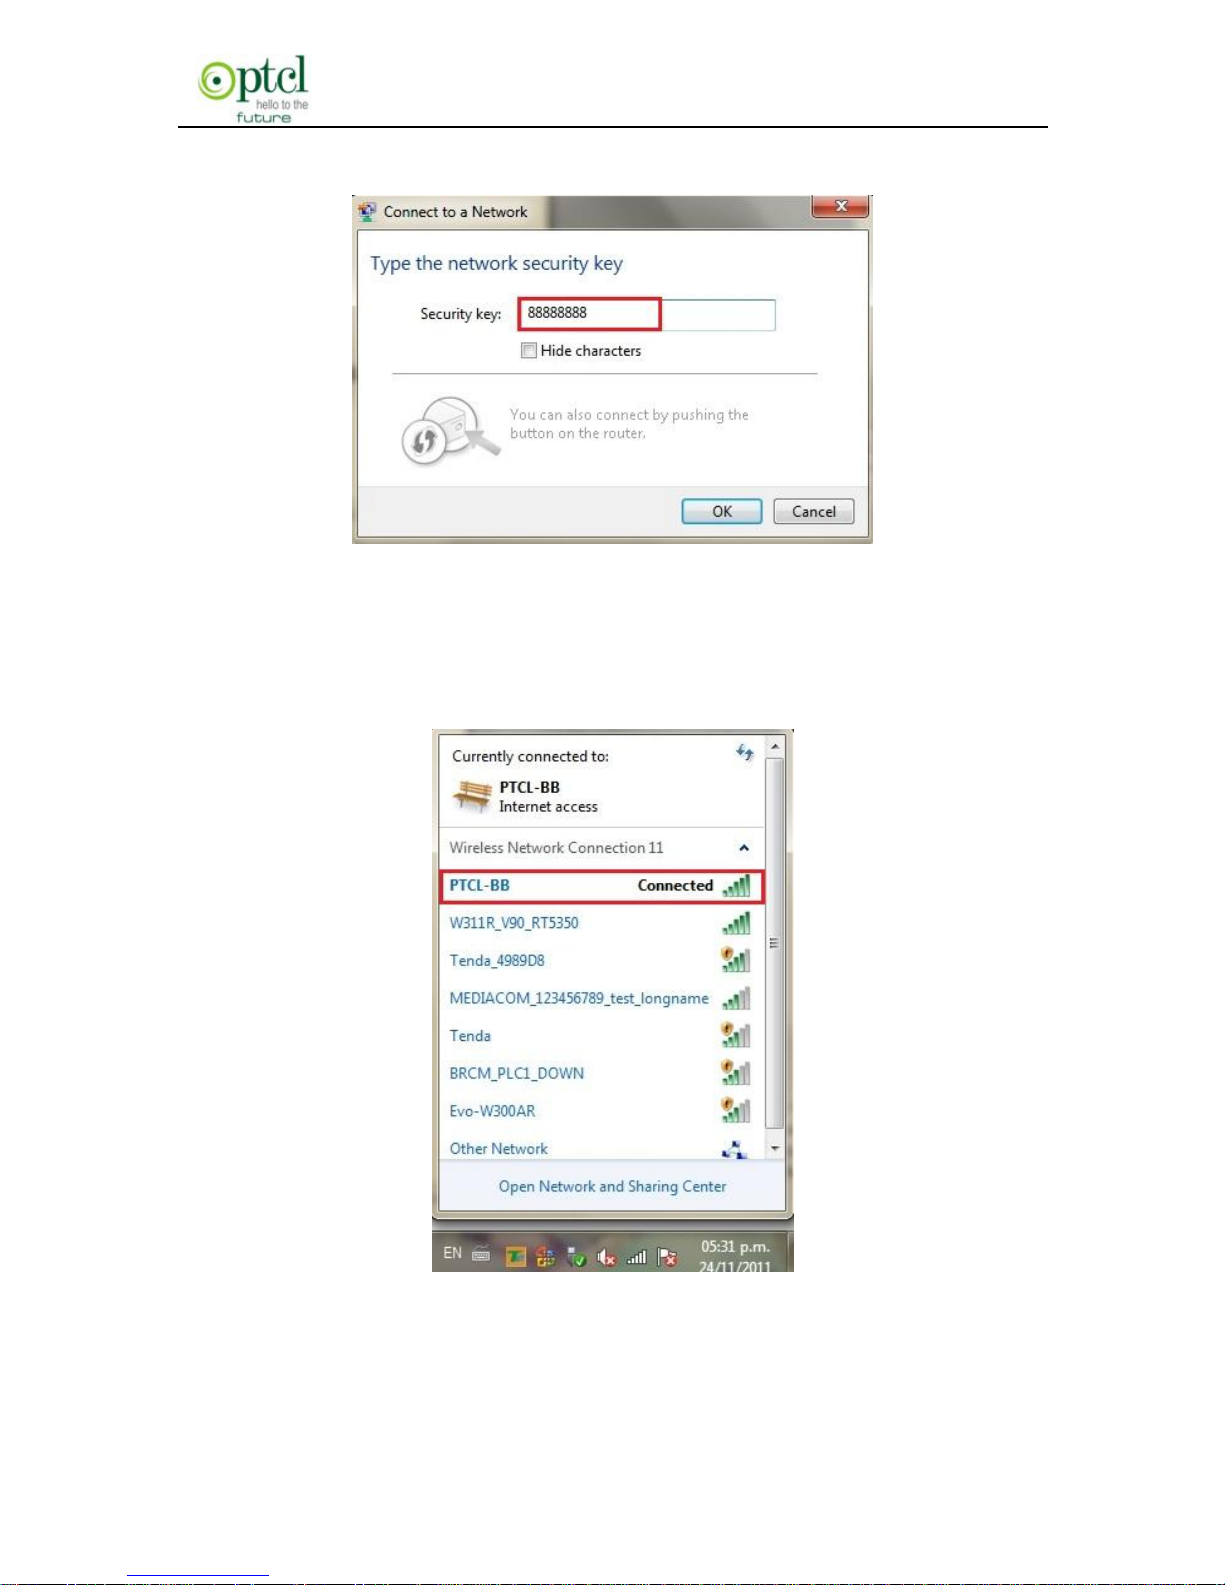
Now, try to use a wireless network adapter to search ―PTCL-BB‖:
First, click (network adapter connection icon) to search wireless
signals as shown in the figure below:
Page 24
150M Wireless N ADSL2+ Router
- 23 -
Then click ―PTCL-BB‖ select ―Connect‖ to go to the dialogue box below:
Enter the key: 88888888 and click ―OK‖; system will automatically
connects with your wireless network in a while.
The product includes wireless feature. If you have a wireless adapter
Page 25

150M Wireless N ADSL2+ Router
- 24 -
and wish to access the Internet via the adapter, you need to set the
wireless parameters. You can refer to ―Easy-to-install-----Wireless
network configuration‖ in previous section of this user guide.
Advanced settings provide you more powerful functions such as filter,
QoS and port range forwarding. Continue to read the ―Advanced
Settings‖ section below if necessary.
Page 26
150M Wireless N ADSL2+ Router
- 25 -
Chapter 4 Advanced Settings
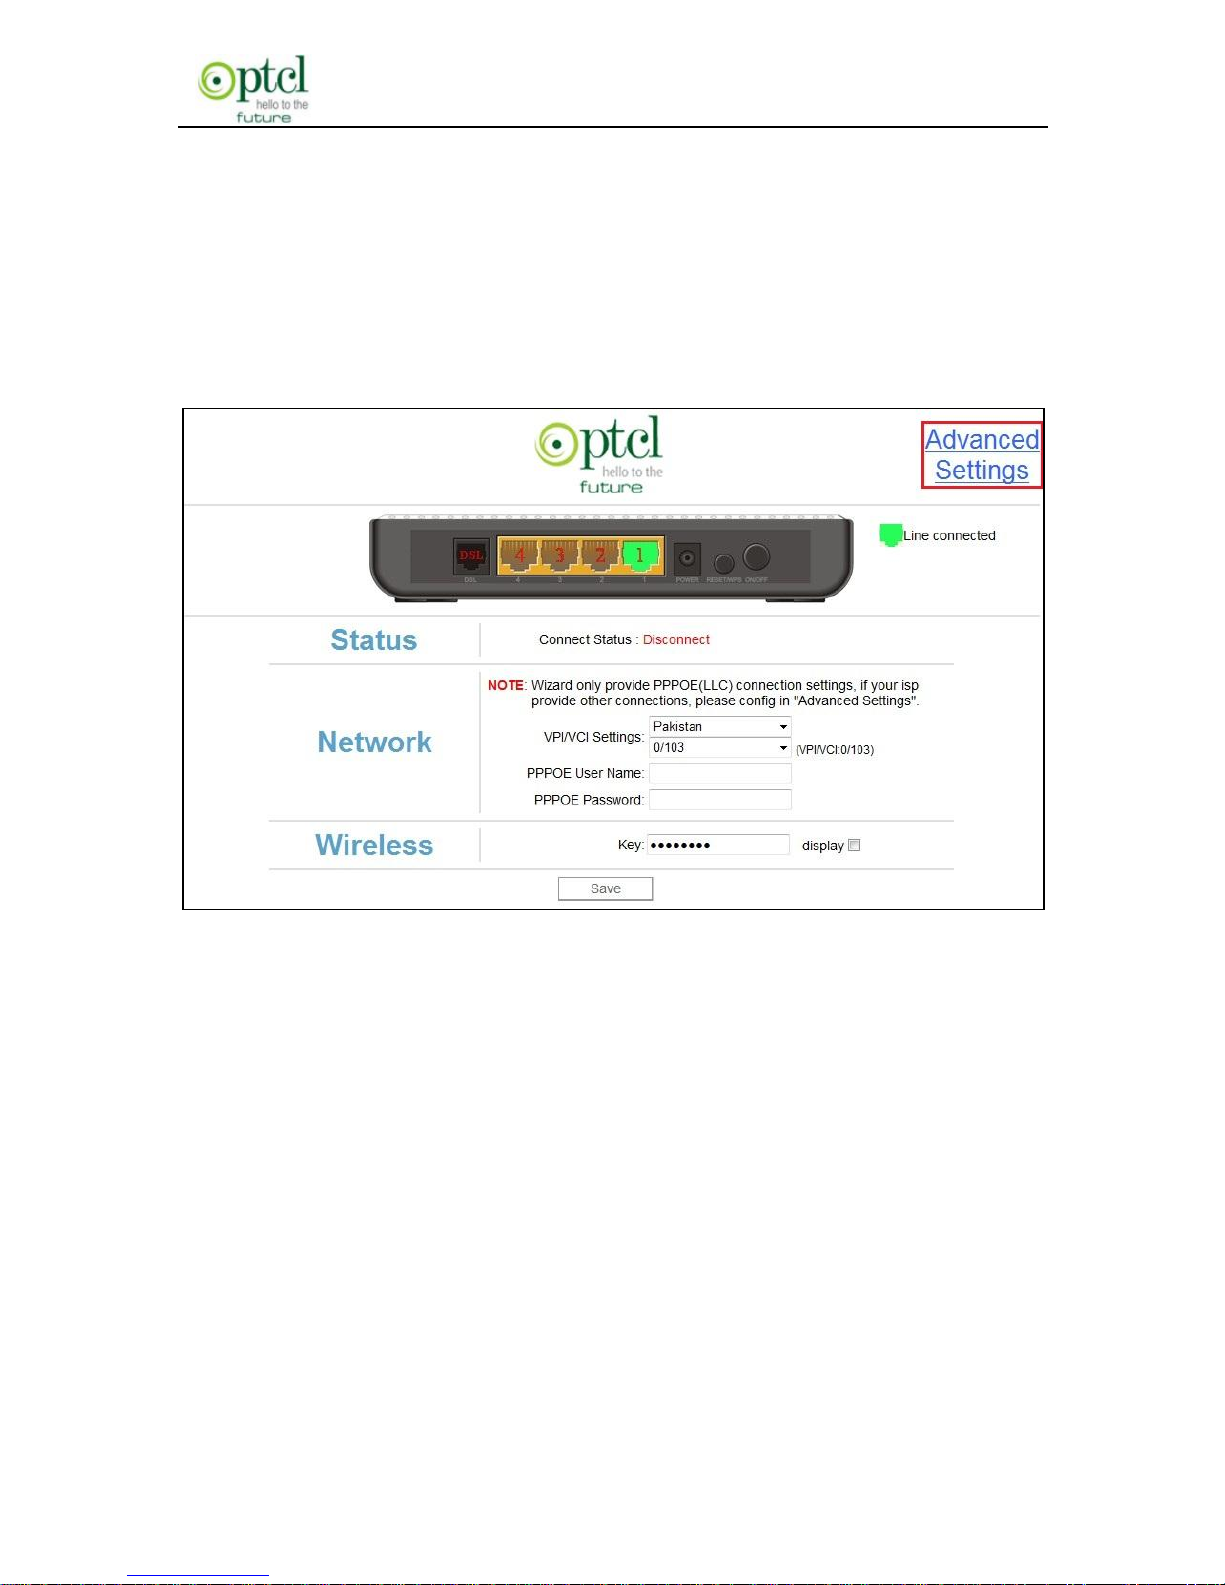
Enter the setup wizard screen below and then click ―Advanced
Settings‖ on the right top corner as shown in the figure below:
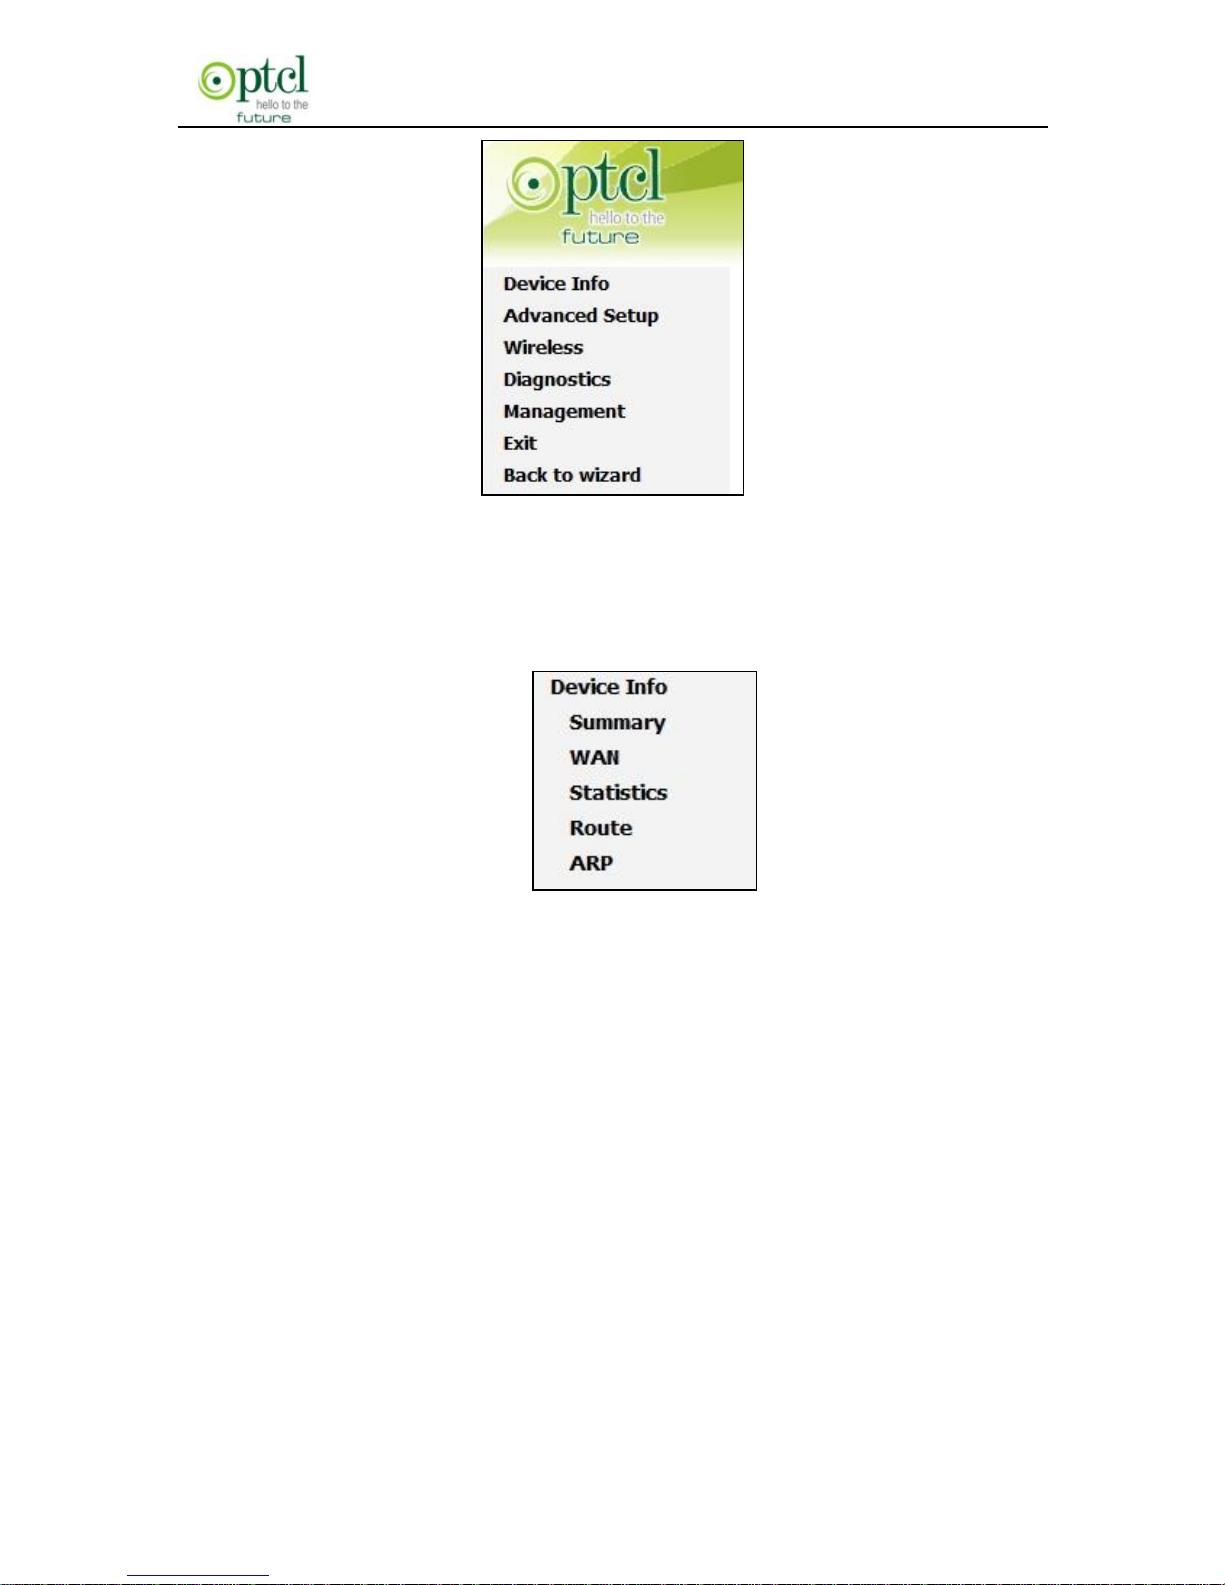
After you enter the advanced settings screen, you can set the advanced
settings for the router to satisfy your requirements. There are seven
main menus on this screen: Device Info, Advanced Setup, Wireless,
Diagnostics, Management, Exit and Back to wizard as shown in the
below picture.
Page 27
150M Wireless N ADSL2+ Router
- 26 -
4.1 Device Information
There are five submenus: Summary, WAN, Statistics, Route and ARP.
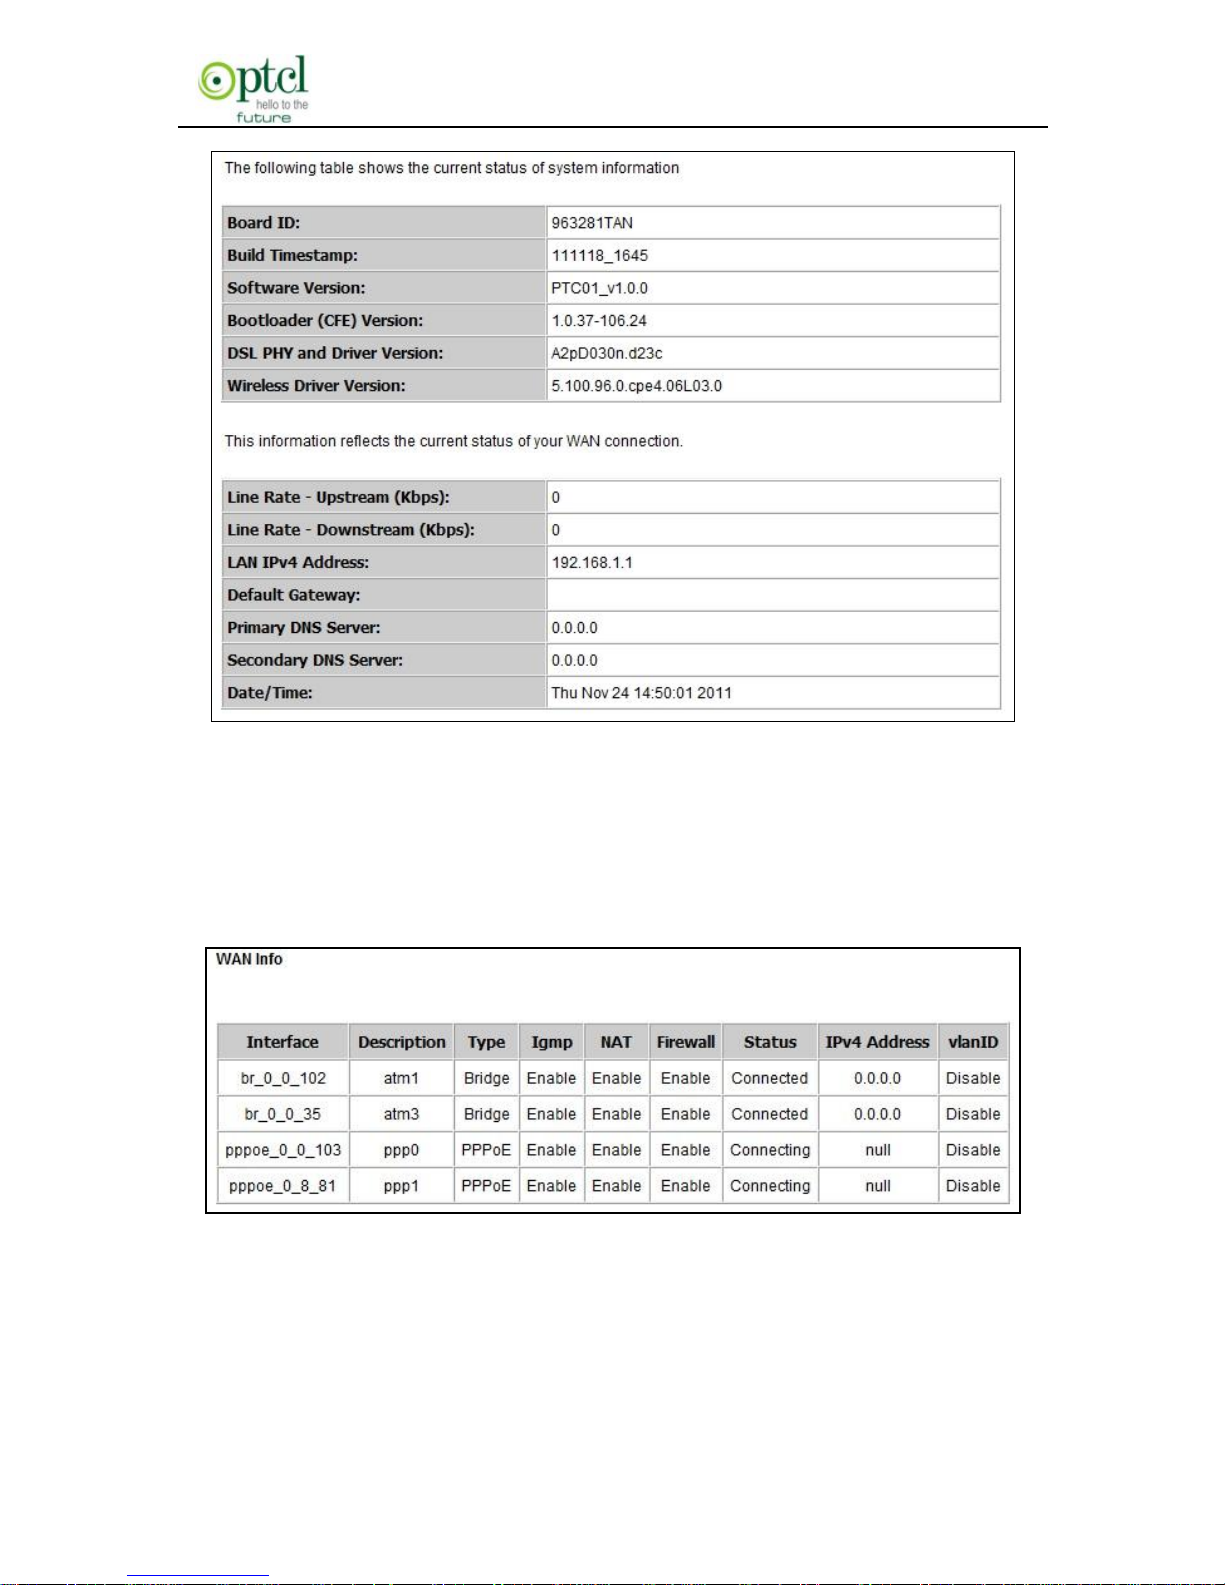
Summary: It displays system information,current status of WAN
connection and Wireless as shown in the figure below:
Page 28
150M Wireless N ADSL2+ Router
- 27 -
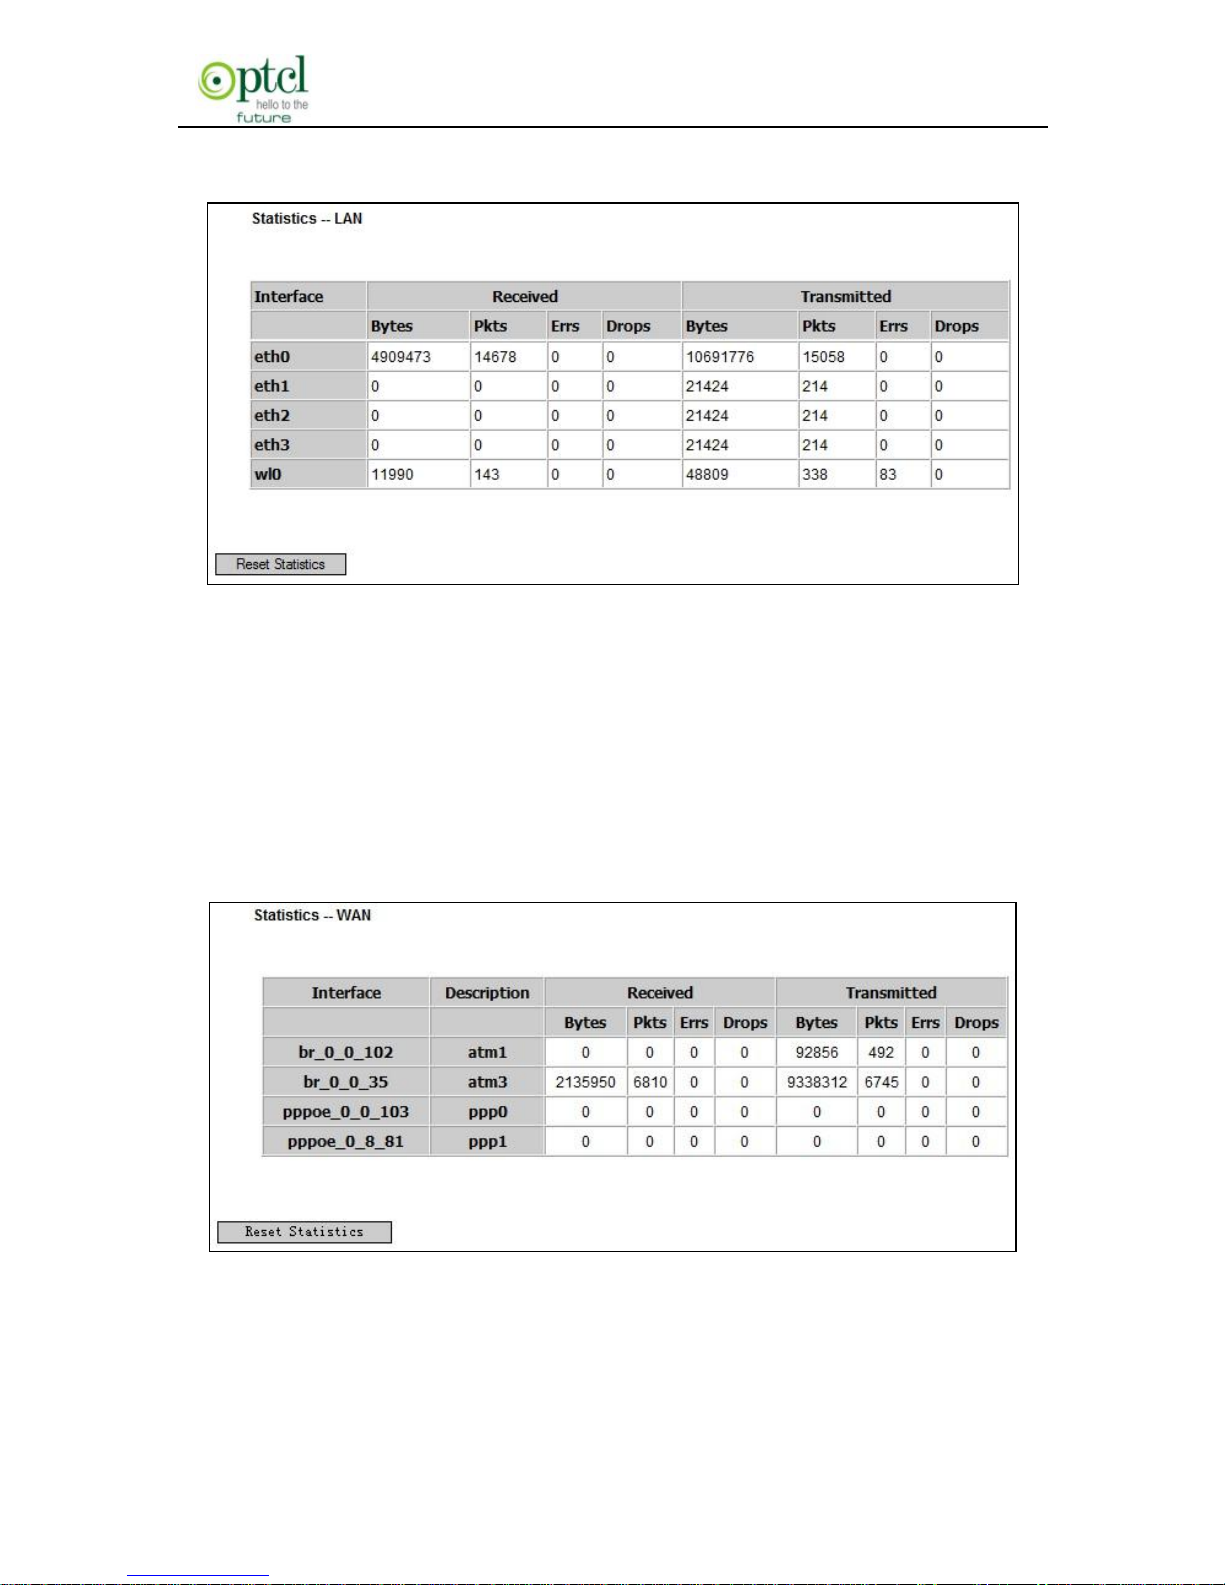
WAN: Click this menu to display the WAN information of this routing
modem: Interface, Description, Type, Igmp, NAT, Firewall, Status, IPv4
Address and vlanID as shown in the figure below:
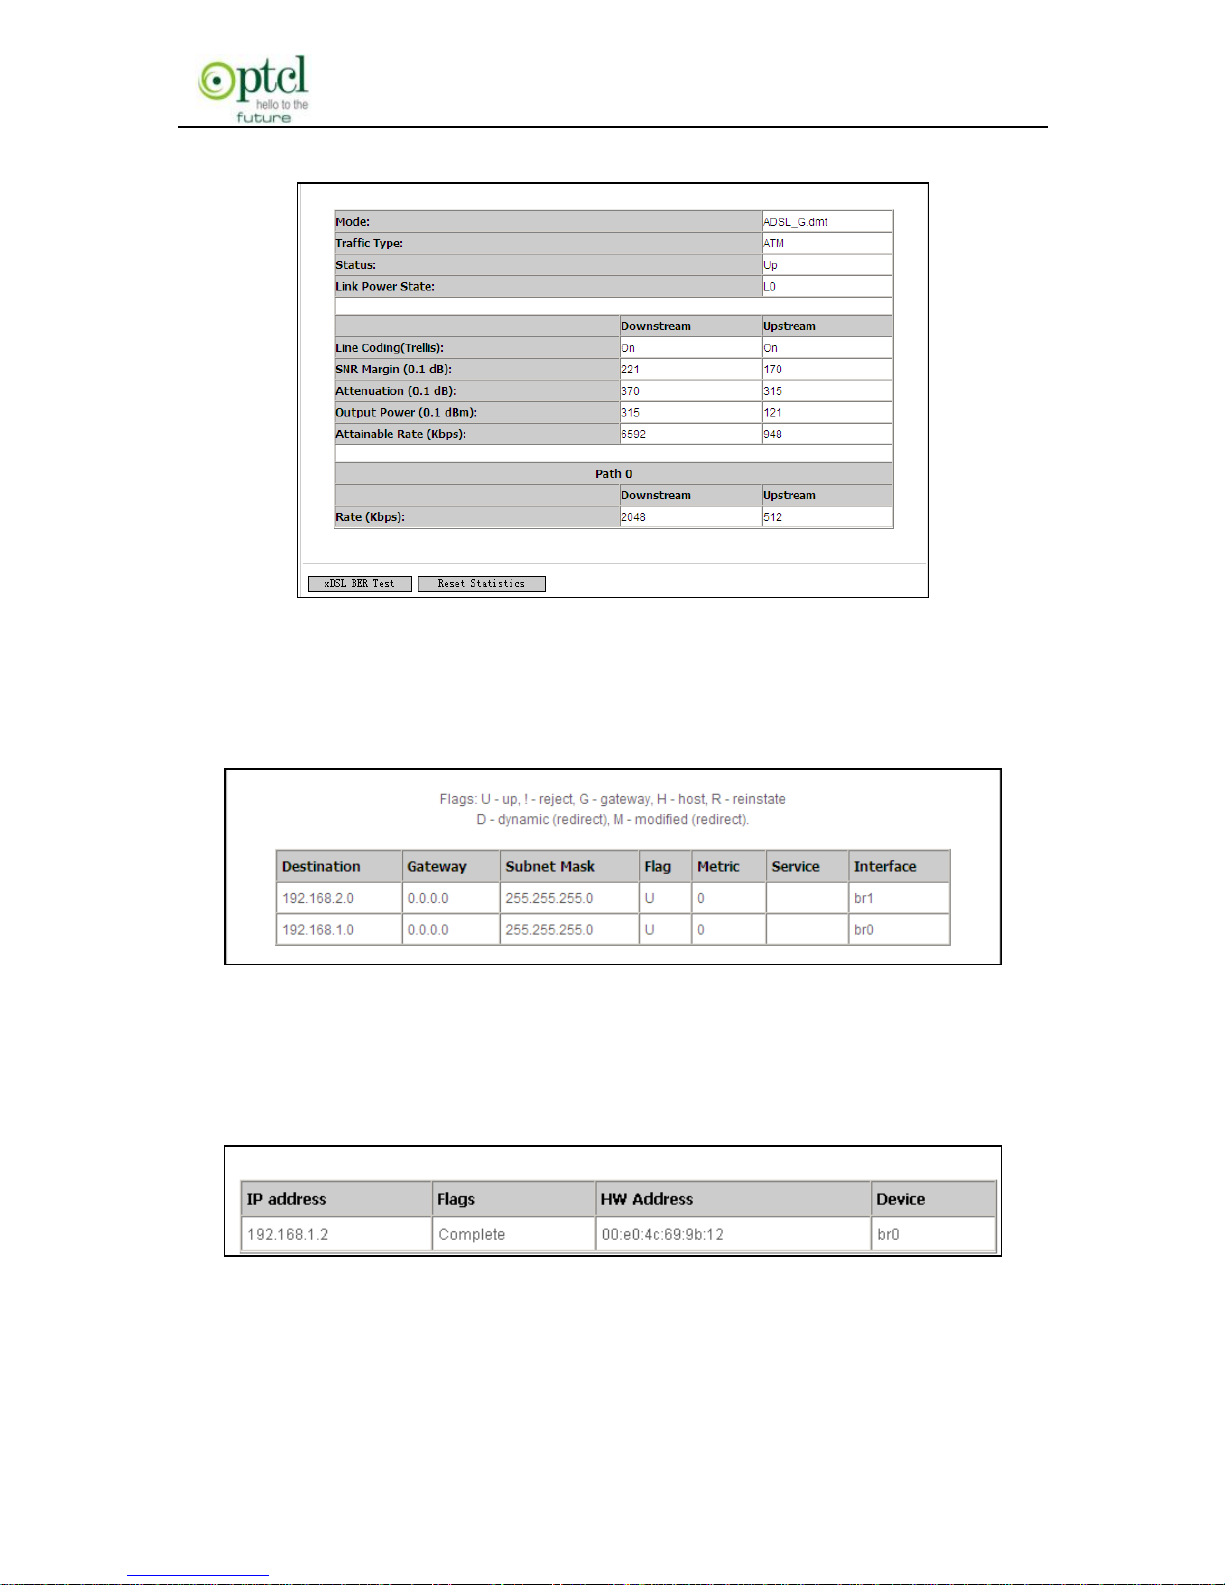
Statistics: It gathers the received and transmitted packets on
LAN/WAN ports.
Statistics—LAN: It displays the received and transmitted packets of
Page 29
150M Wireless N ADSL2+ Router
- 28 -
the device’s LAN ports as shown in the figure below:
Note: eth0, eth1 and eth2 are respectively port1, 2 and 3 of the device;
and wl0 is a wireless port.
Statistics—WAN: It displays the received and transmitted packets of
the device’s WAN port as shown in the figure below:
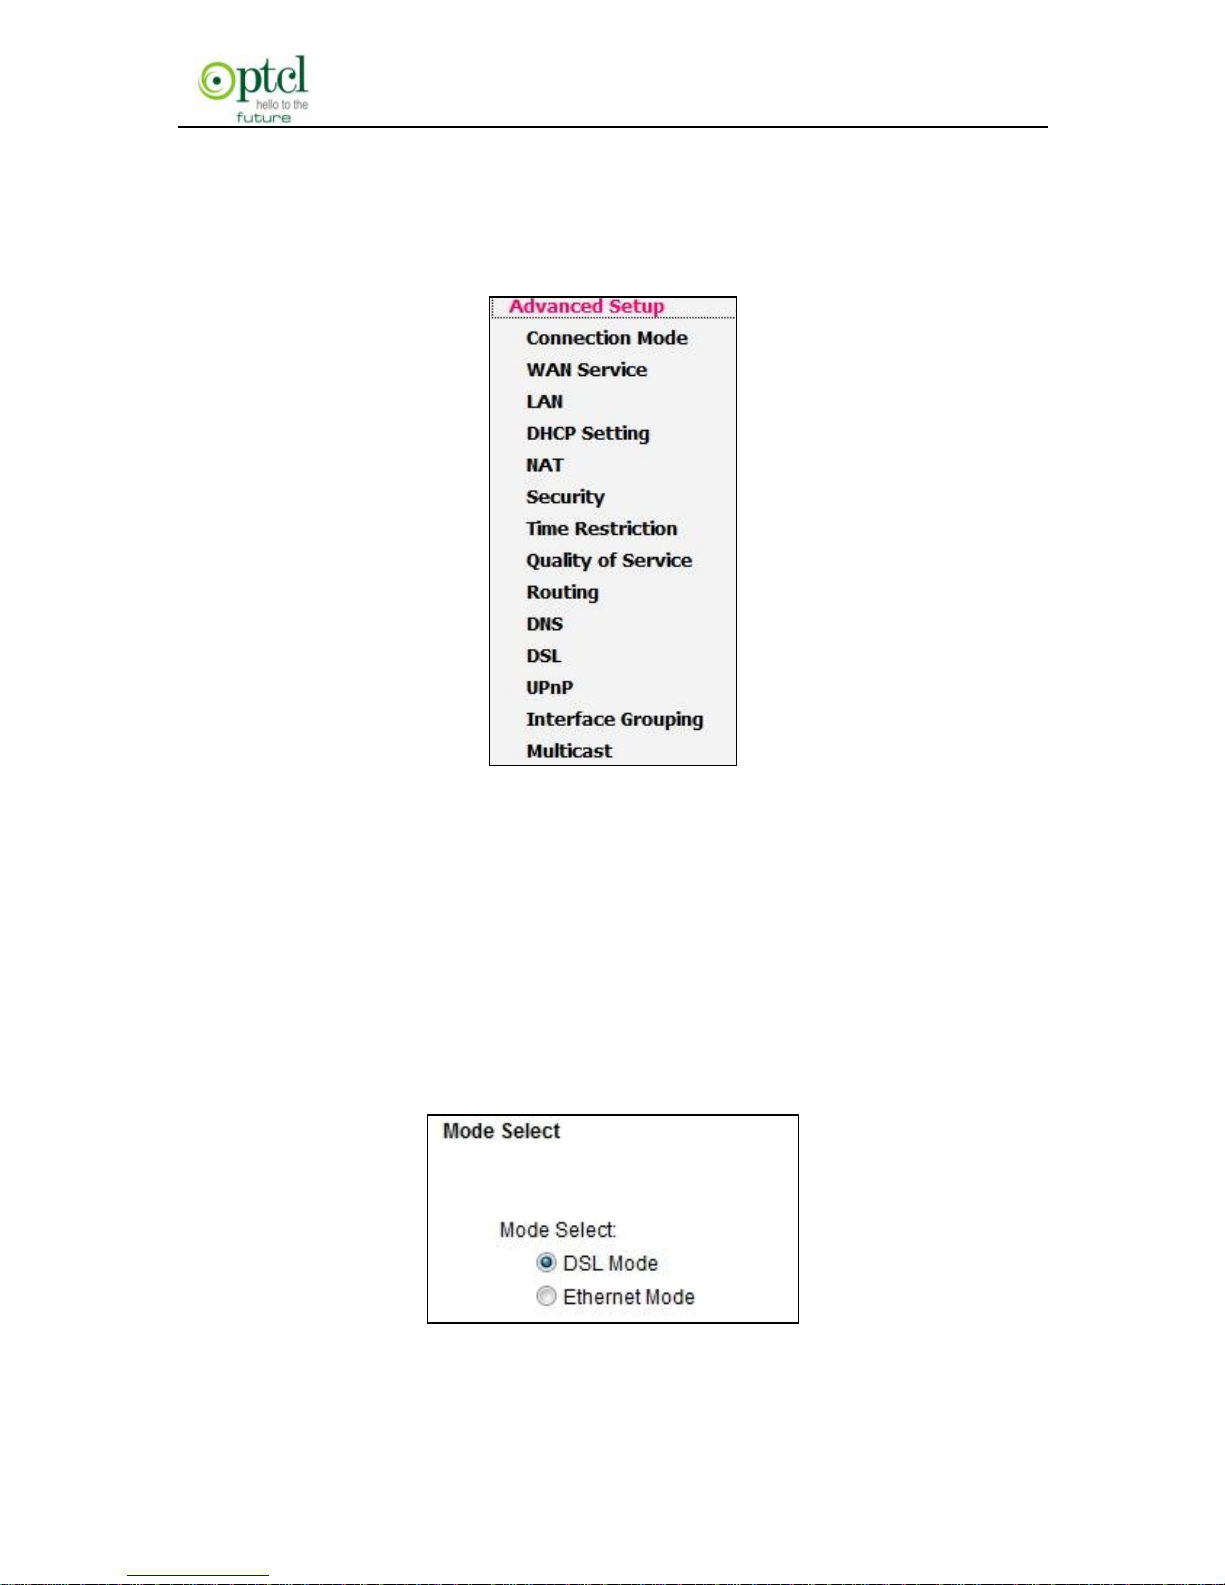
Statistics-xDSL: It displays statistic information of ADSL connection
including mode, traffic type, status and other ADSL parameters as
Page 30
150M Wireless N ADSL2+ Router
- 29 -
shown in the below figure:
Route: displays routing table of the device as shown in the figure
below:
ARP: displays the device’s LAN ports, IP and MAC addresses of the
PCs that are wirelessly connected as shown in the figure below:
4.2 Advanced Setup
Advanced Setup: Consists of 14 submenus including Connection
Page 31
150M Wireless N ADSL2+ Router
- 30 -
Mode / WAN Service / LAN / DHCP Setting / NAT / Security / Time
Restriction / Quality of Service / Routing / DNS / DSL / UpnP / Interface
Grouping and Multicast as shown in the figure below:
4.2.1 Connection mode
Connection Mode
This router supports two connection modes: DSL mode and Ethernet
mode. Select DSL mode, if you access Internet through telephone line
and Ethernet mode through network cable. By default, system is in DSL
mode.
To enter the connection mode interface, click ―Advanced
Page 32
150M Wireless N ADSL2+ Router
- 31 -
Setup‖---―Connection Mode‖. Select a proper connection mode and
then click the ―Apply‖ button.
1. In DSL mode, you are required to configure parameters for ATM
interface.
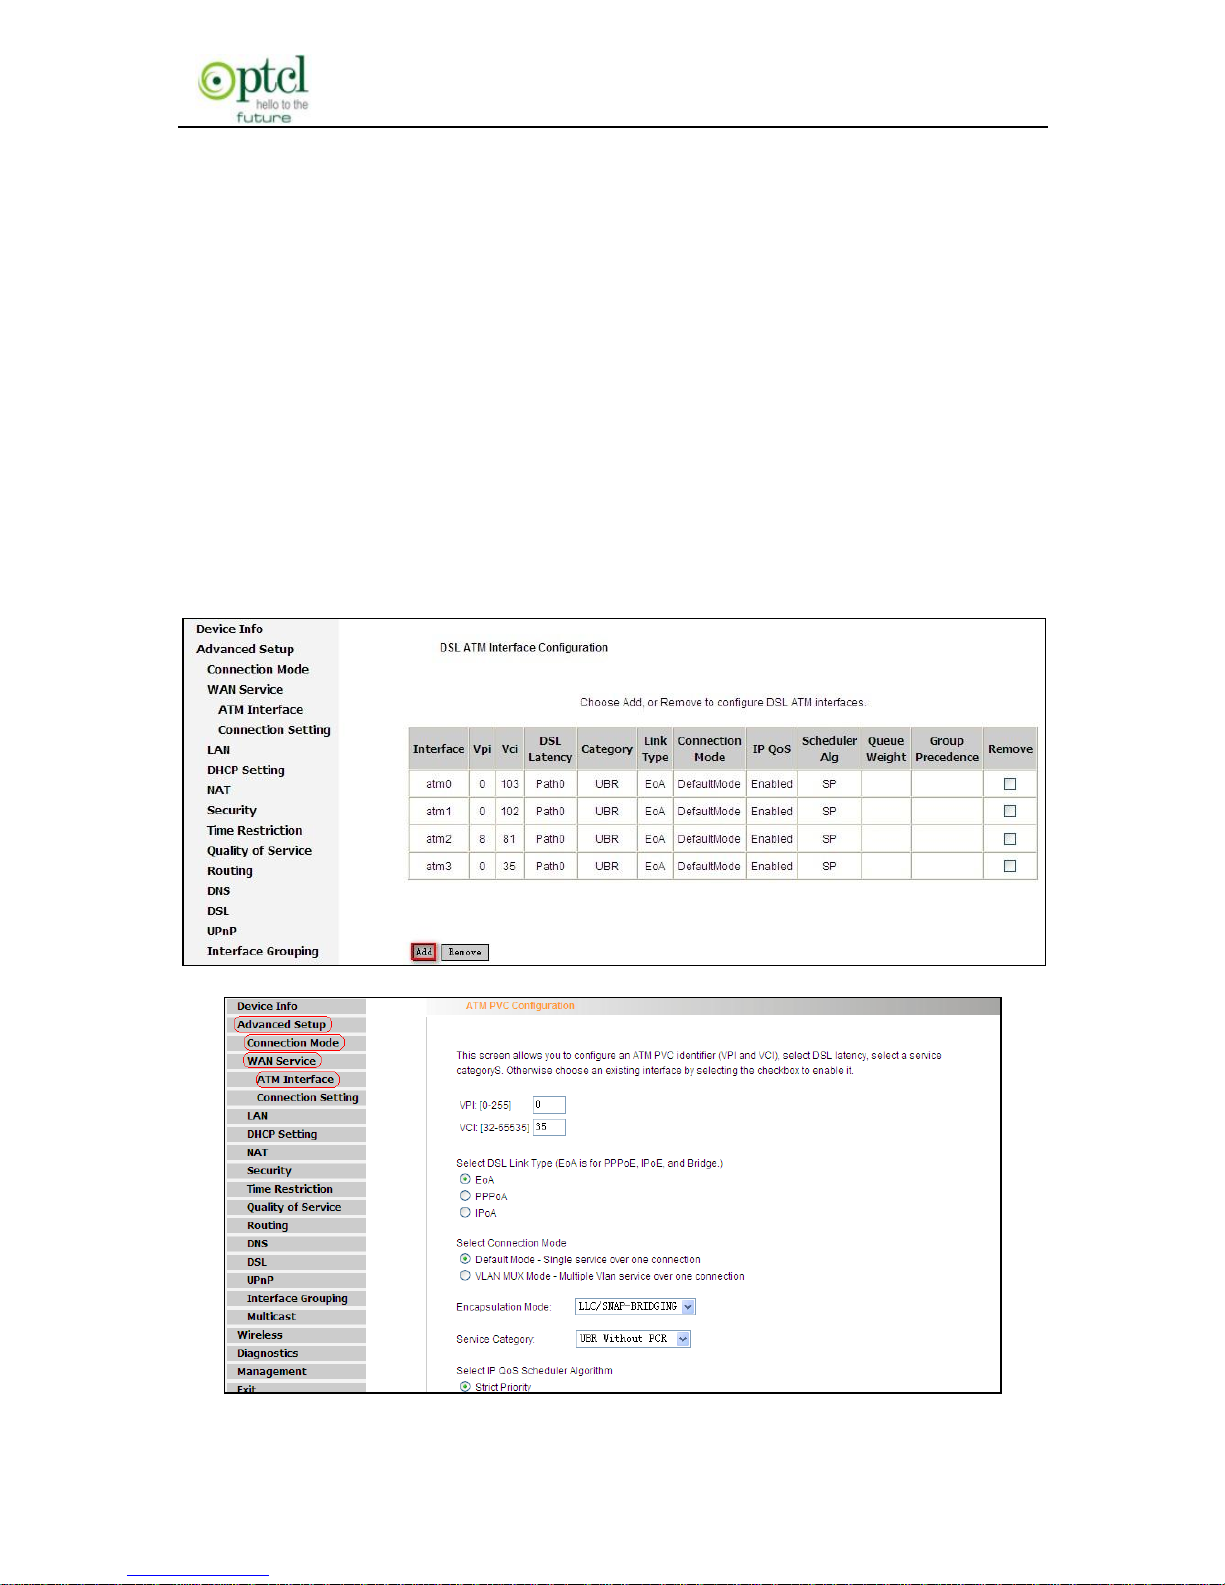
To enter the ATM Interface page, click ―Advanced Setup‖---―Connection
Mode‖ (Select DSL mode and click ―Apply‖)--- ―WAN Service‖---ATM
Interface.
Out router has provided four default vpi/vci settings: 0/103, 0/102, 8/81,
0/35.If you need to use other vpi/vci, please click ―Add‖ to configure the
relevant parameters.
Page 33
150M Wireless N ADSL2+ Router
- 32 -
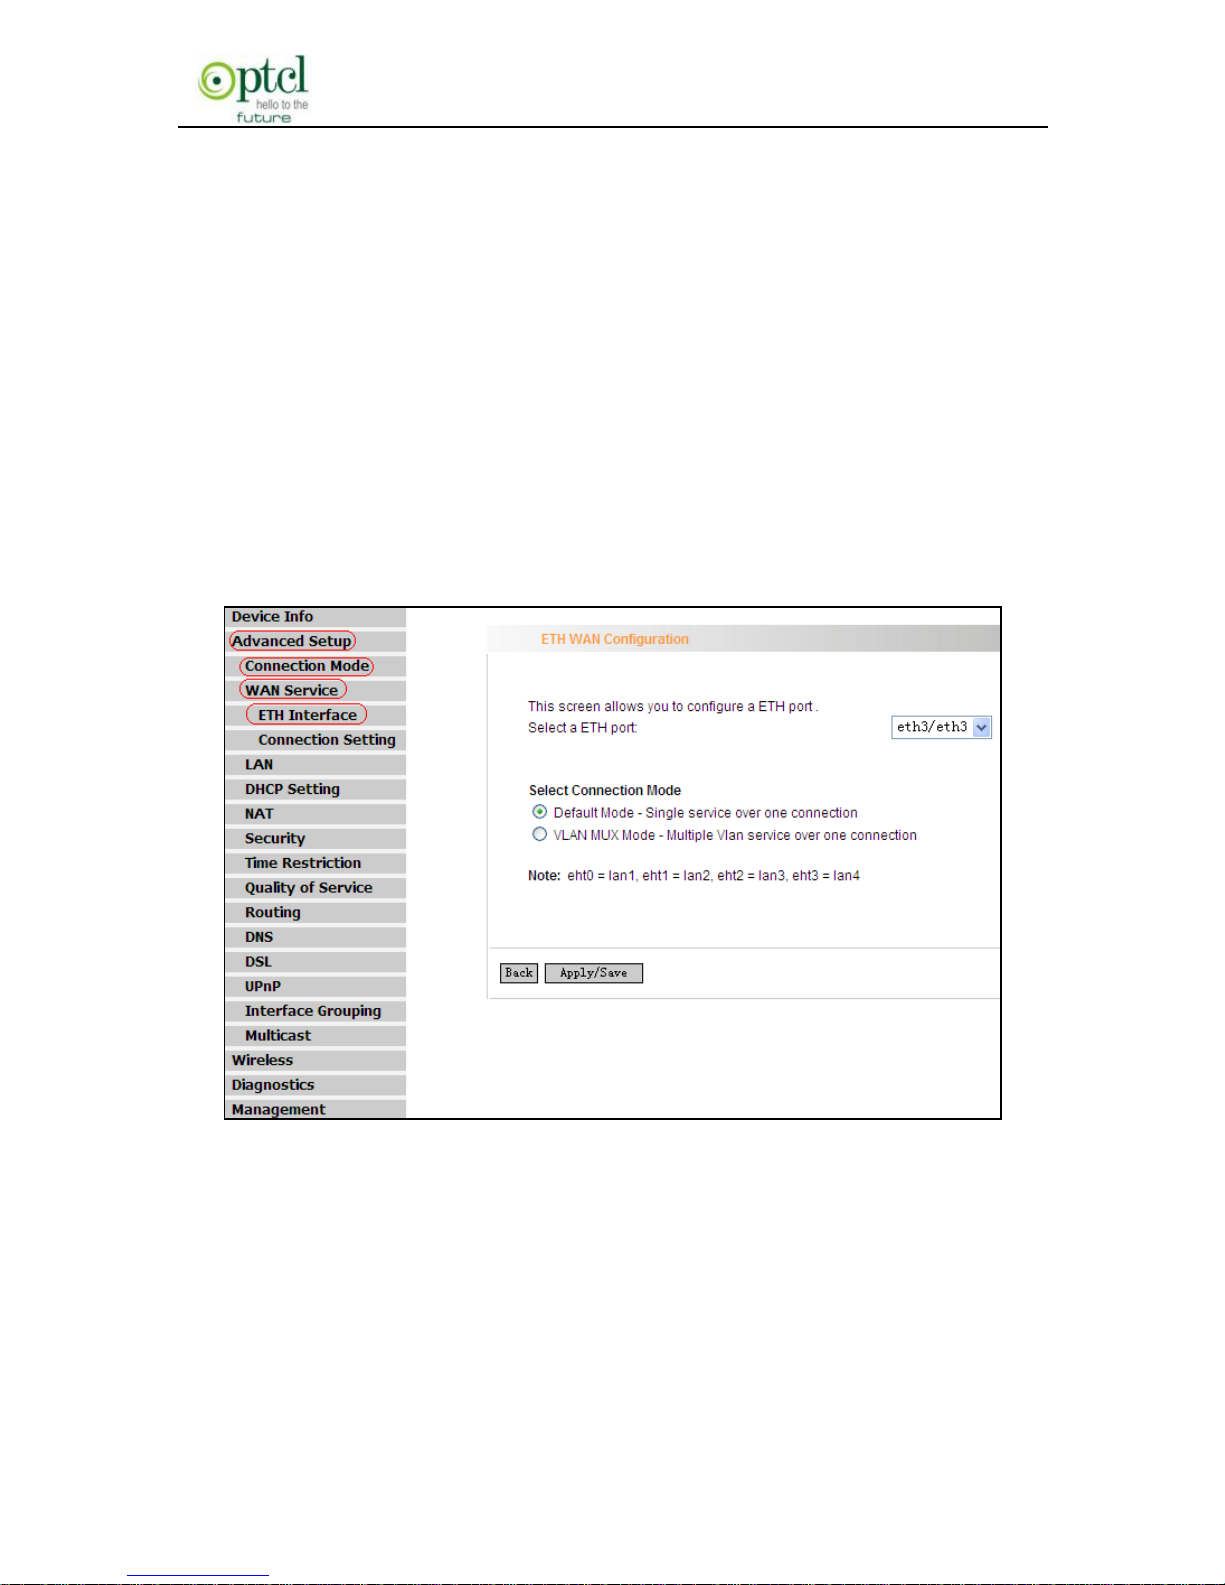
On this page, you can configure VPI and VCI values (consult your local
ISP if you are not clear). For other options, keep the defaults and click
the ―Apply/Save‖ button.
2. In Ethernet modes, you are required to configure parameters for
Ethernet interface.
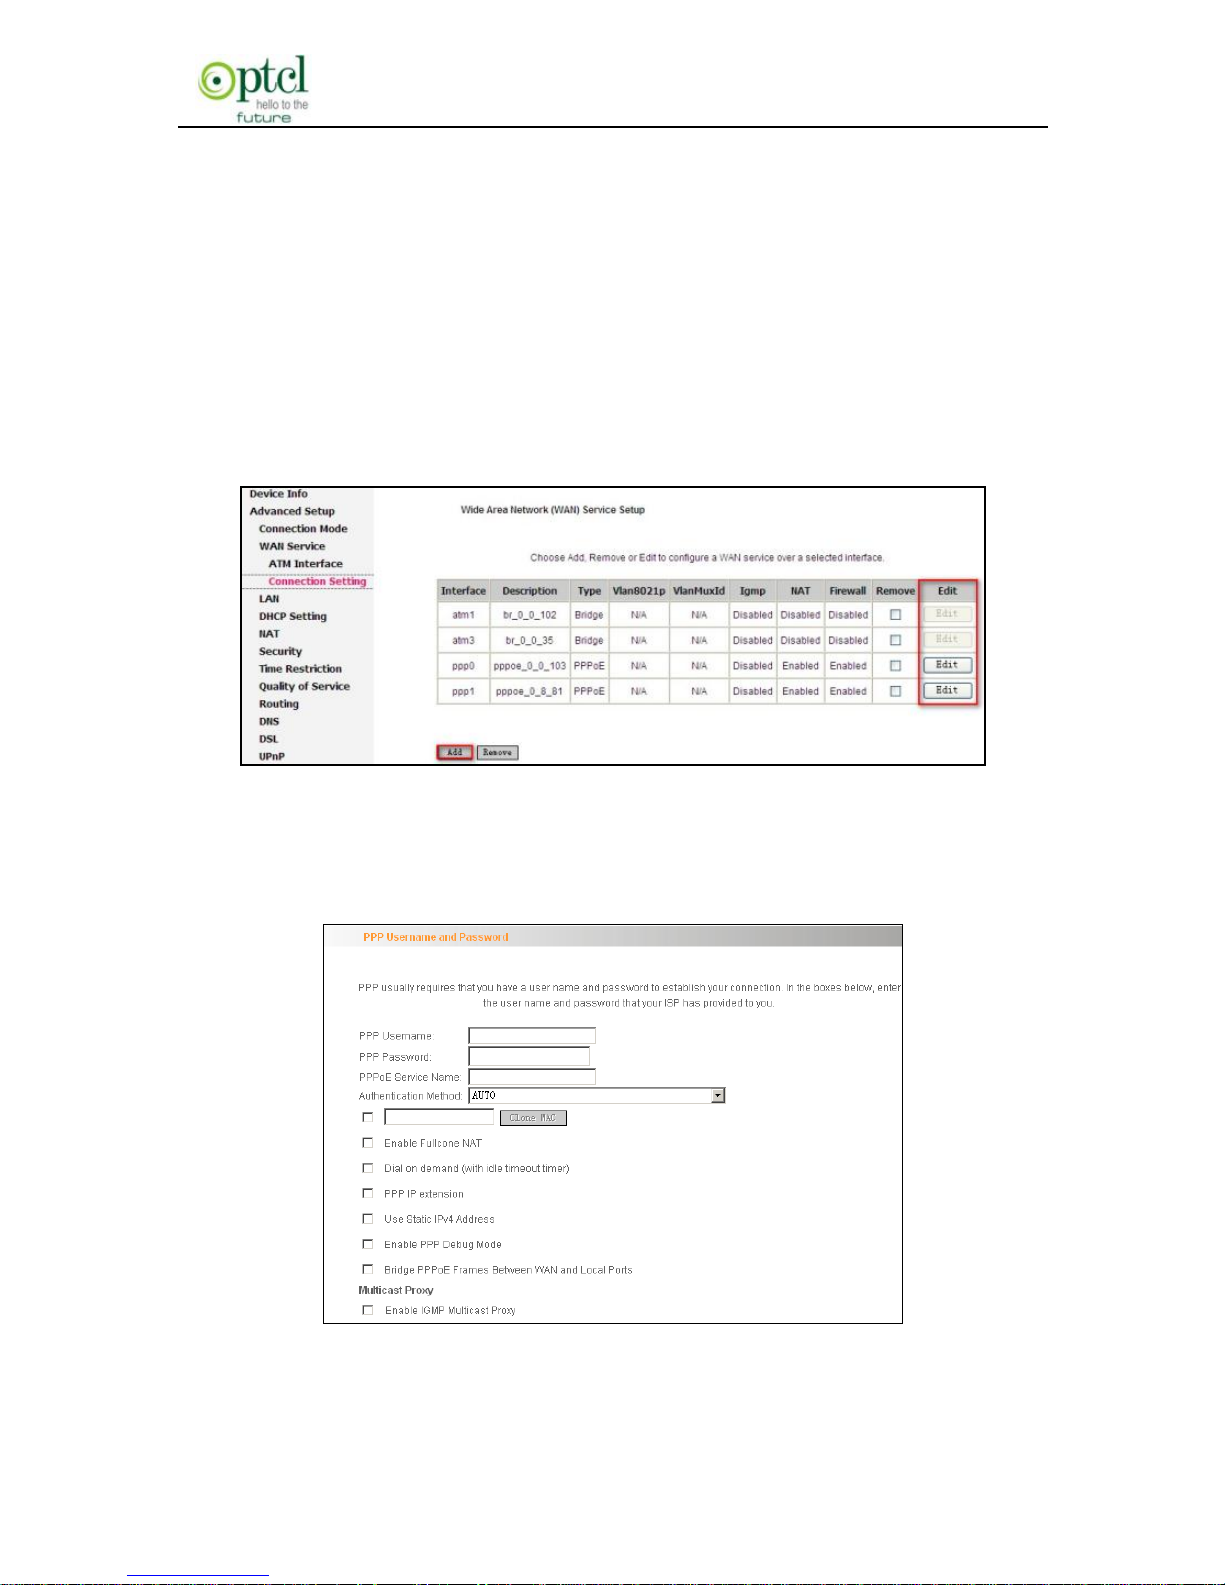
To enter the ETH Interface page, click ―Advanced Setup‖---―Connection
Mode‖ (Select Ethernet mode and click ―Apply‖)--- ―WAN
Service‖---―ETH Interface‖. And then click the ―Add‖ button to configure
relevant parameters.
The Ethernet interface configured on this page is used as a WAN port.
You can select Only one LAN interface to function as a WAN port. Once
you finish, click the ―Apply/Save‖ button.
Page 34
150M Wireless N ADSL2+ Router
- 33 -
4.2.2 WAN service
1. WAN Configuration in DSL Mode
PPP over Ethernet (PPPoE)
Click ―Advanced Setup‖—―Connection mode‖ (Select DSL mode and
click ―Apply‖) ---―WAN Service‖---―ATM Interface‖ (refer to 4.3 for
configuring the ATM interface) ---―Connection Setting‖ to enter WAN
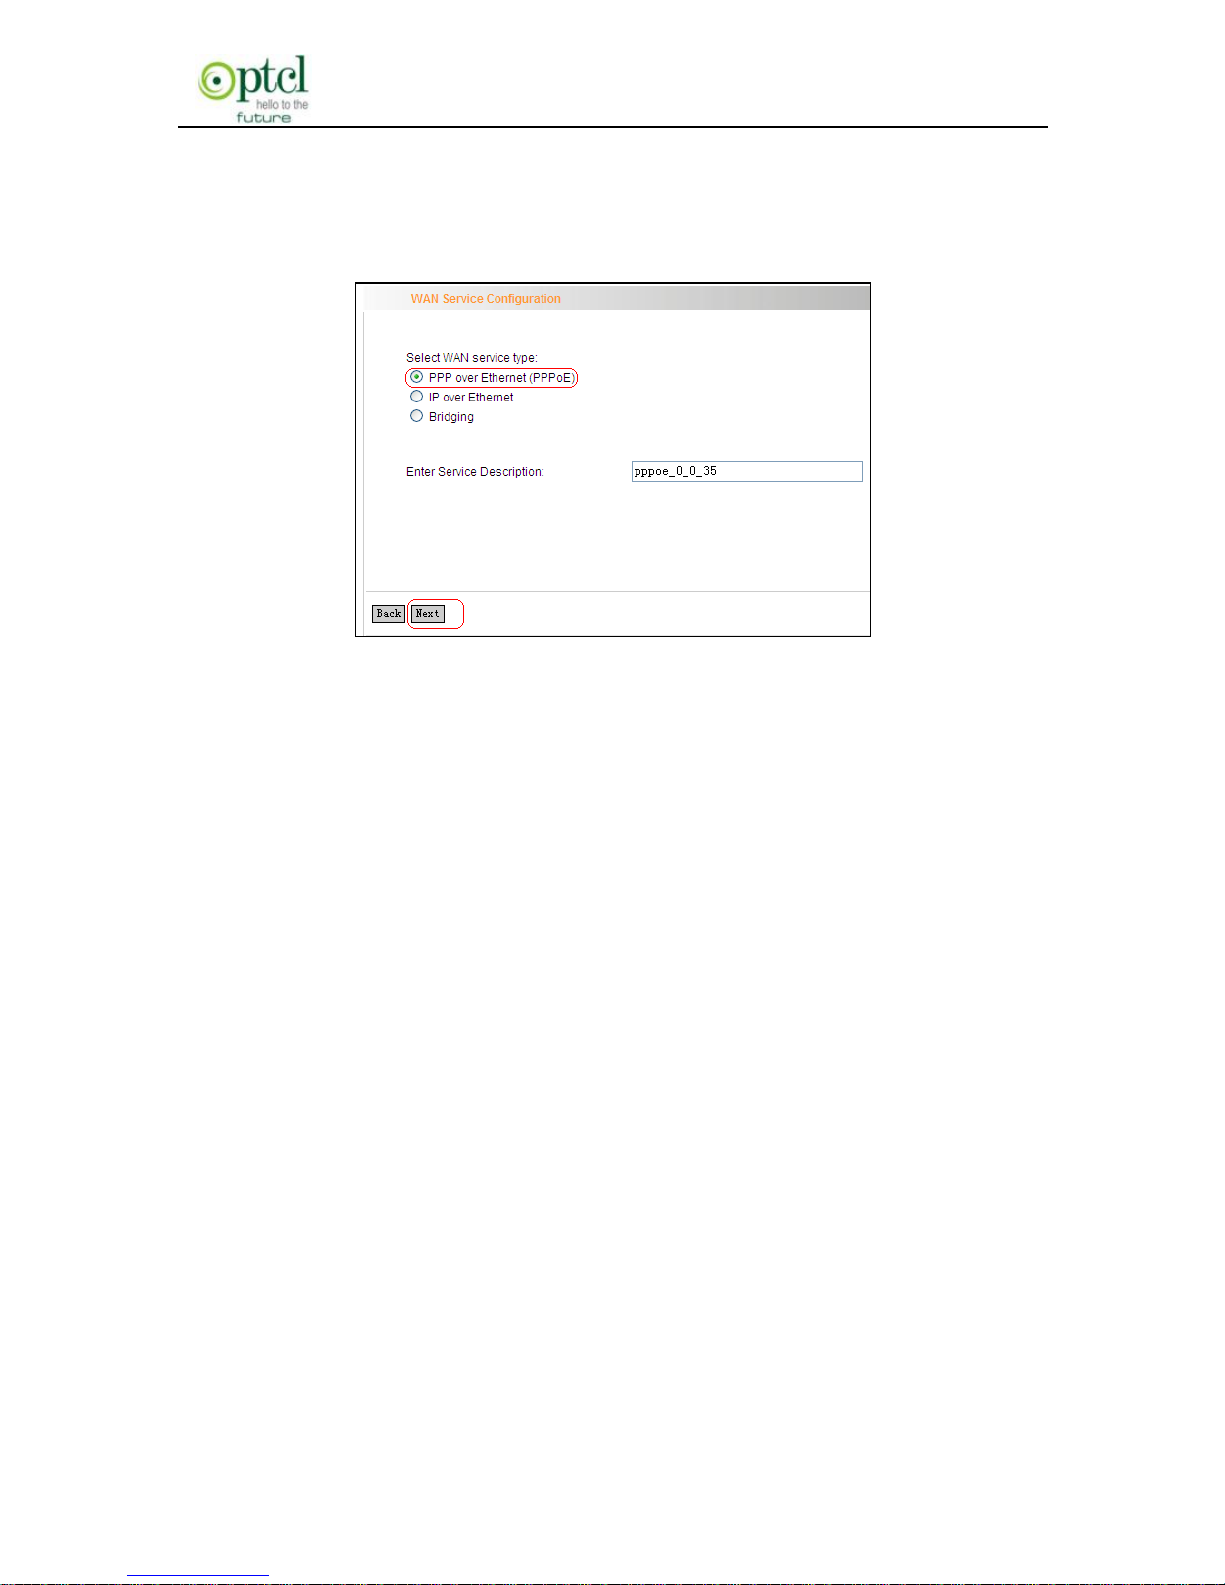
service setup interface (page1).
Page 1
You can click the ―Edit‖ button to revise the PPPOE settings on page 2
or click the ―Add‖ button to select a WAN service type on page 3 below.
Page 2
Page 35
150M Wireless N ADSL2+ Router
- 34 -
Select PPP over Ethernet (PPPoE), modify the service description if
necessary and then click ―Next‖ on page 2 to enter the page below
(page 3):
Page 3
PPP User Name: User name for PPPoE dialup. It is provided by
your ISP.
PPP Password: The password provided by your ISP for PPPoE
dialup.
PPPoE Service Name: it is provided by your ISP. Do not fill it in if
you don’t have it; otherwise PPPoE dialup may fail.
Authentication Method: it is used by ISP to verify its clients
during PPPoE dialup. Select ―Auto‖ if you are not sure about it.
Clone MAC:This feature clones the MAC address of the PC that
is currently entering the router’s management page to work as the
WAN MAC address of the router.
Dial on Demand: Automatically connects or disconnects Internet
according to the use of the network. It is recommended when your
ISP limits network use time.
Page 36
150M Wireless N ADSL2+ Router
- 35 -
PPP IP extension: The IP addresses of all packets including
management packets that egress WAN port will be converted to
the WAN port’s IP address once this feature is enabled.
Enable PPP Debug Mode: This feature can be enabled only
when supported by your ISP.
Bridge PPPoE Frames Between WAN and Local Ports:PPPoE
dialup frame initiated by LAN port will directly egress WAN port
without being modified if this feature is enabled.
Multicast Proxy: Router enables multicast proxy server if this
feature is enabled.
Enter the PPP user name and PPP Password provided by your ISP. For
other options, keep the default values if you are not clear about them,
and then click the ―Next‖ button to display the following screen (page 4):
Page 4
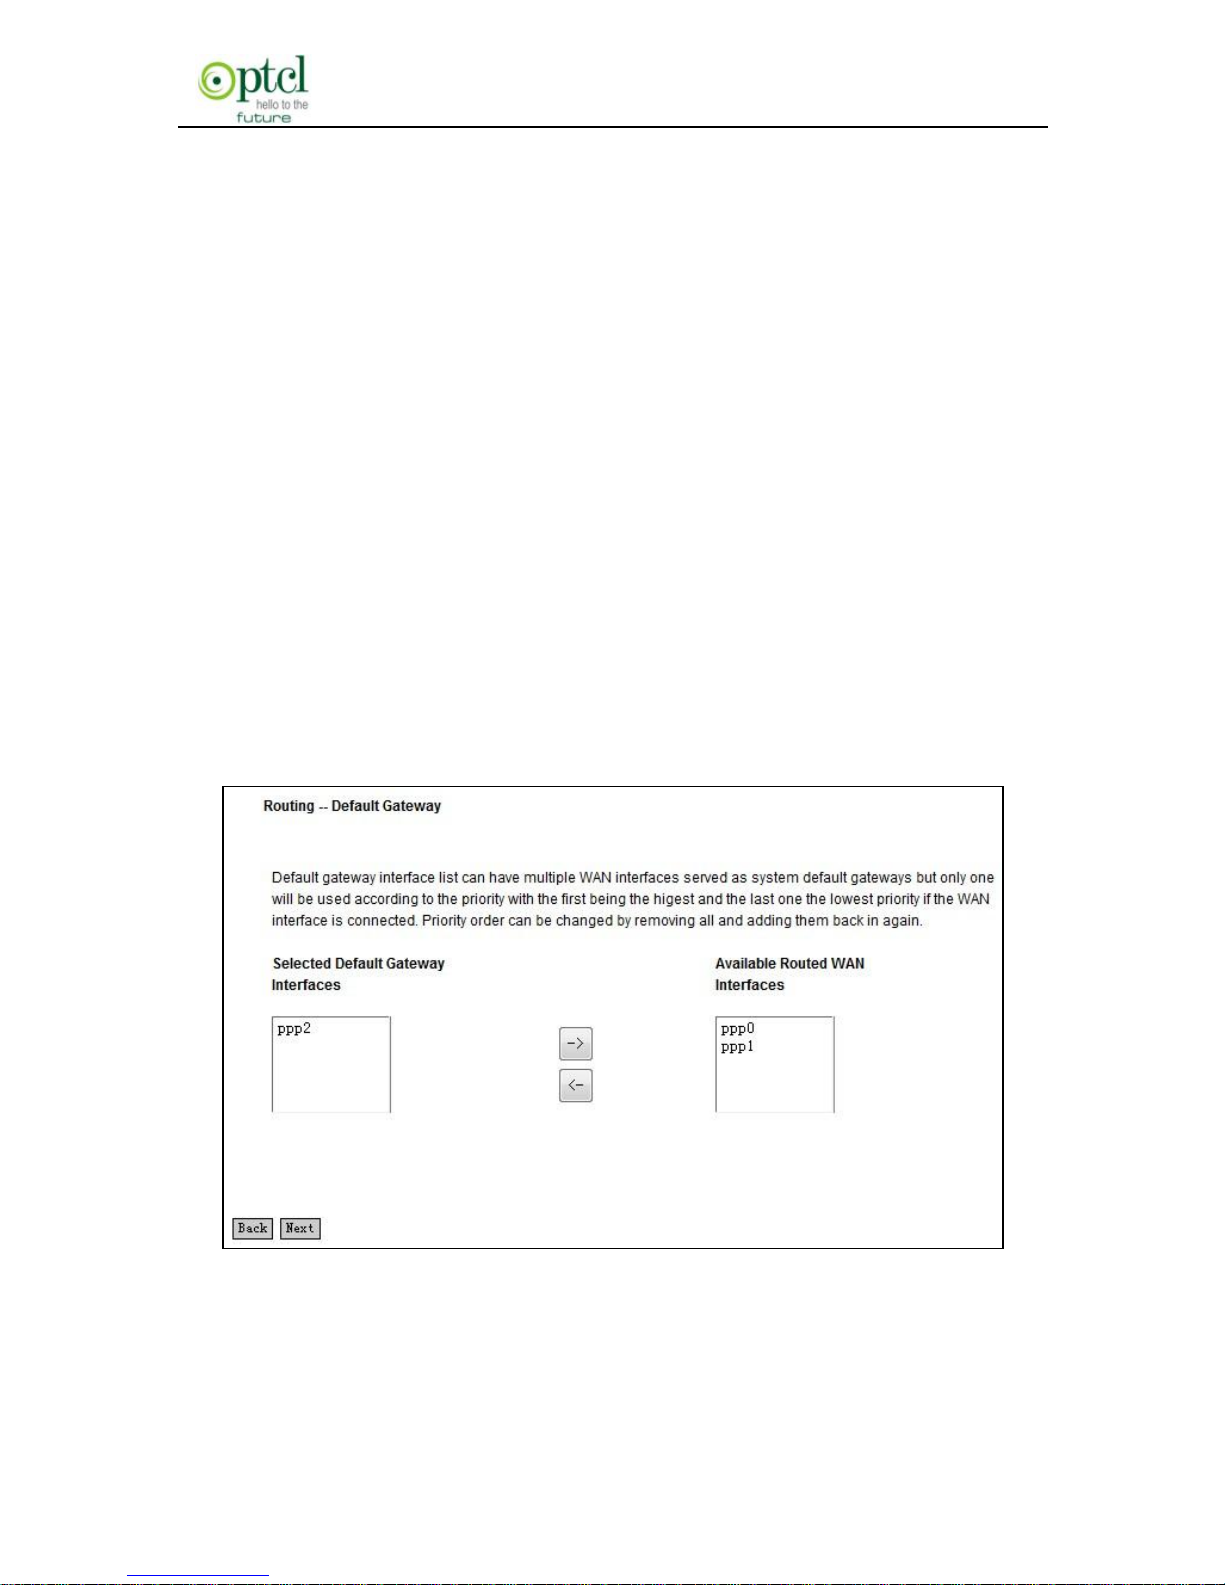
This page allows you to configure the gateway address for WAN
connection. We recommend you to keep the default values and click
Page 37
150M Wireless N ADSL2+ Router
- 36 -
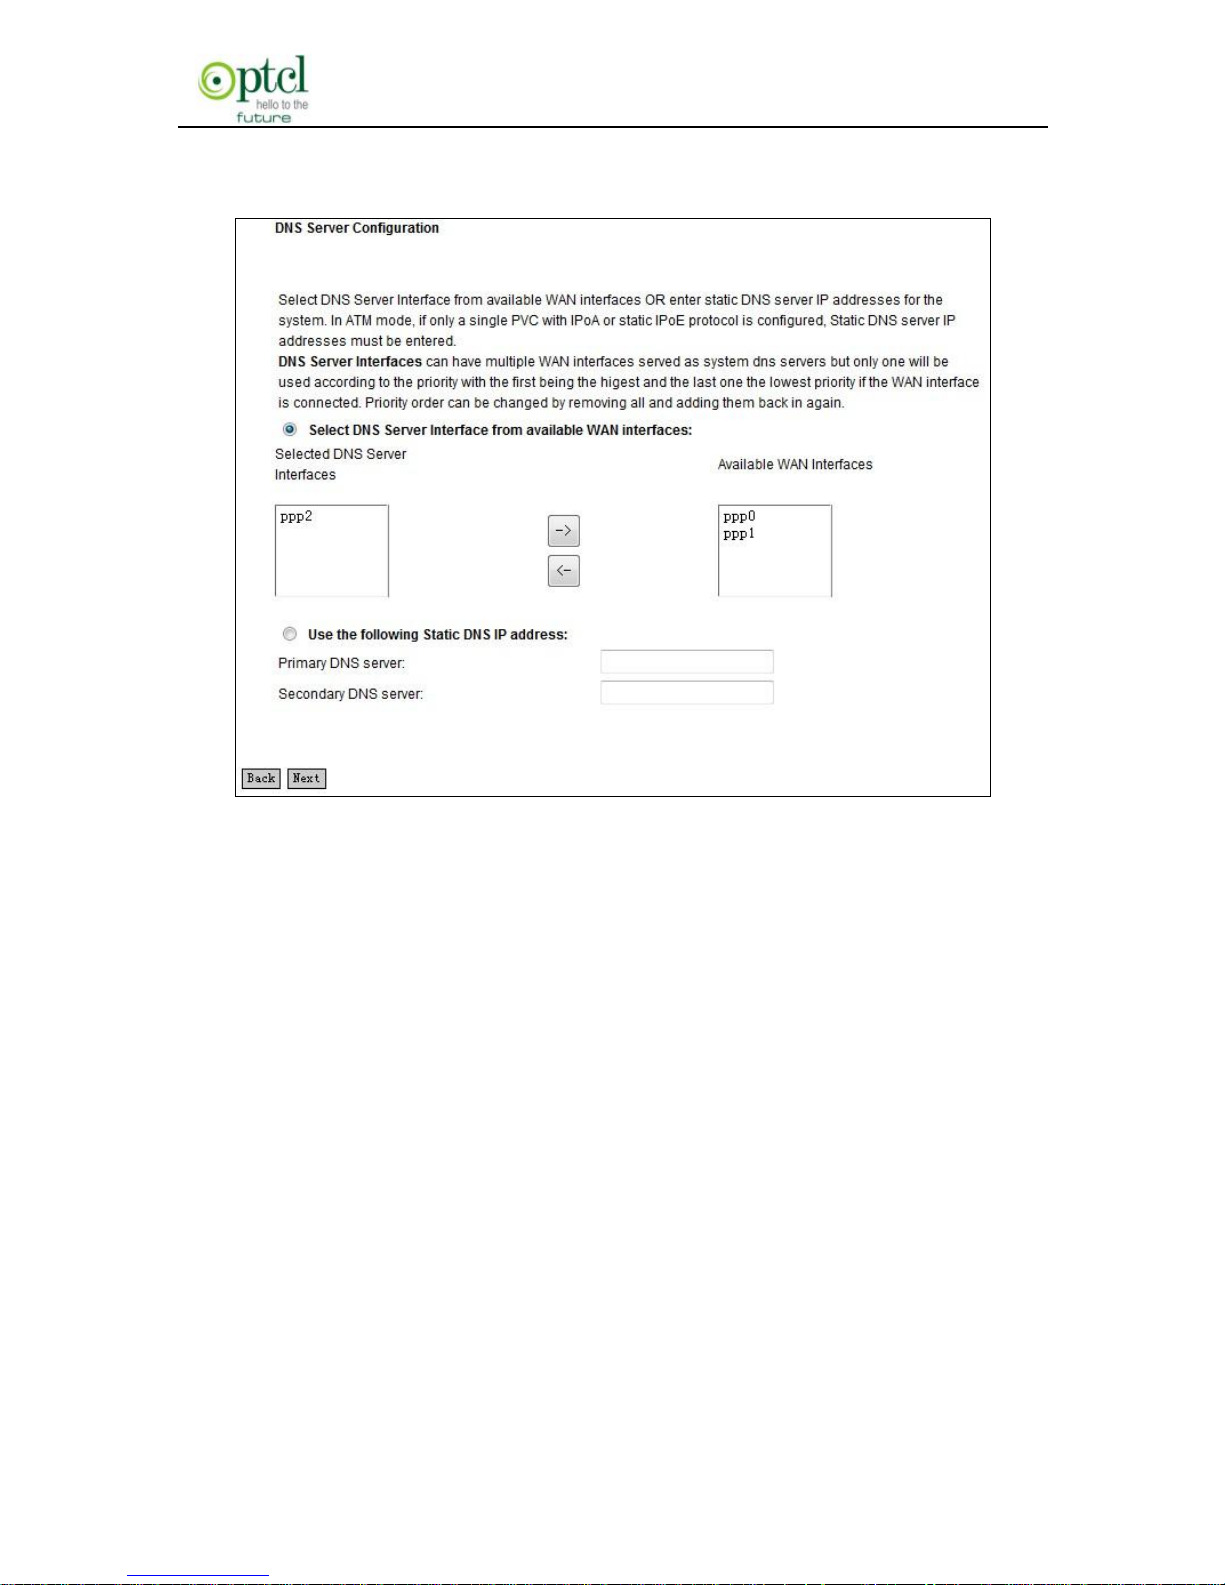
the ―Next‖ button on page 4 to enter the following page (page 5):
page 5
This page allows you to configure the DNS server’s IP address for the
WAN port. We recommend you to keep the default values if you are not
clear about it and click the ―Next‖ button (on page 5) to enter the
following page (page 6):
Page 38
150M Wireless N ADSL2+ Router
- 37 -
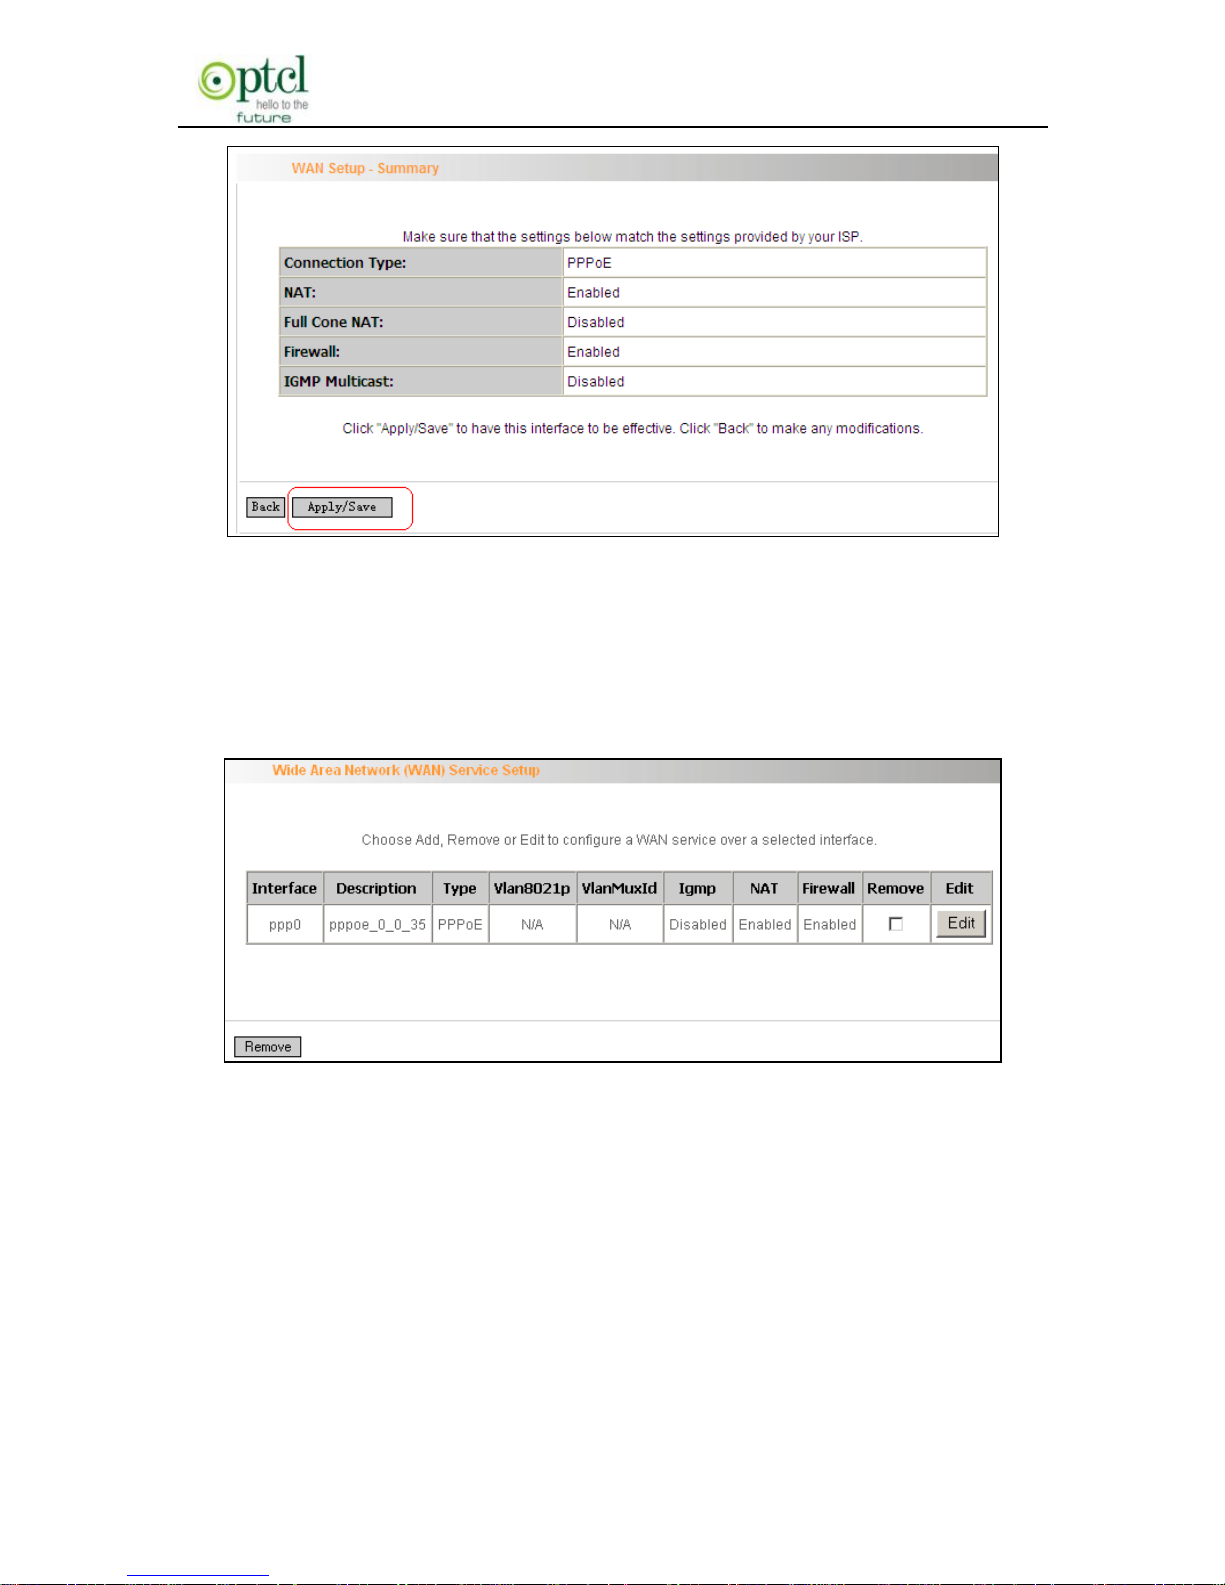
Page 6
This page displays the configuration information. After confirmation,
please click ―Apply/Save‖ to save it.
You can access Internet once PPPoE dialup succeeds.
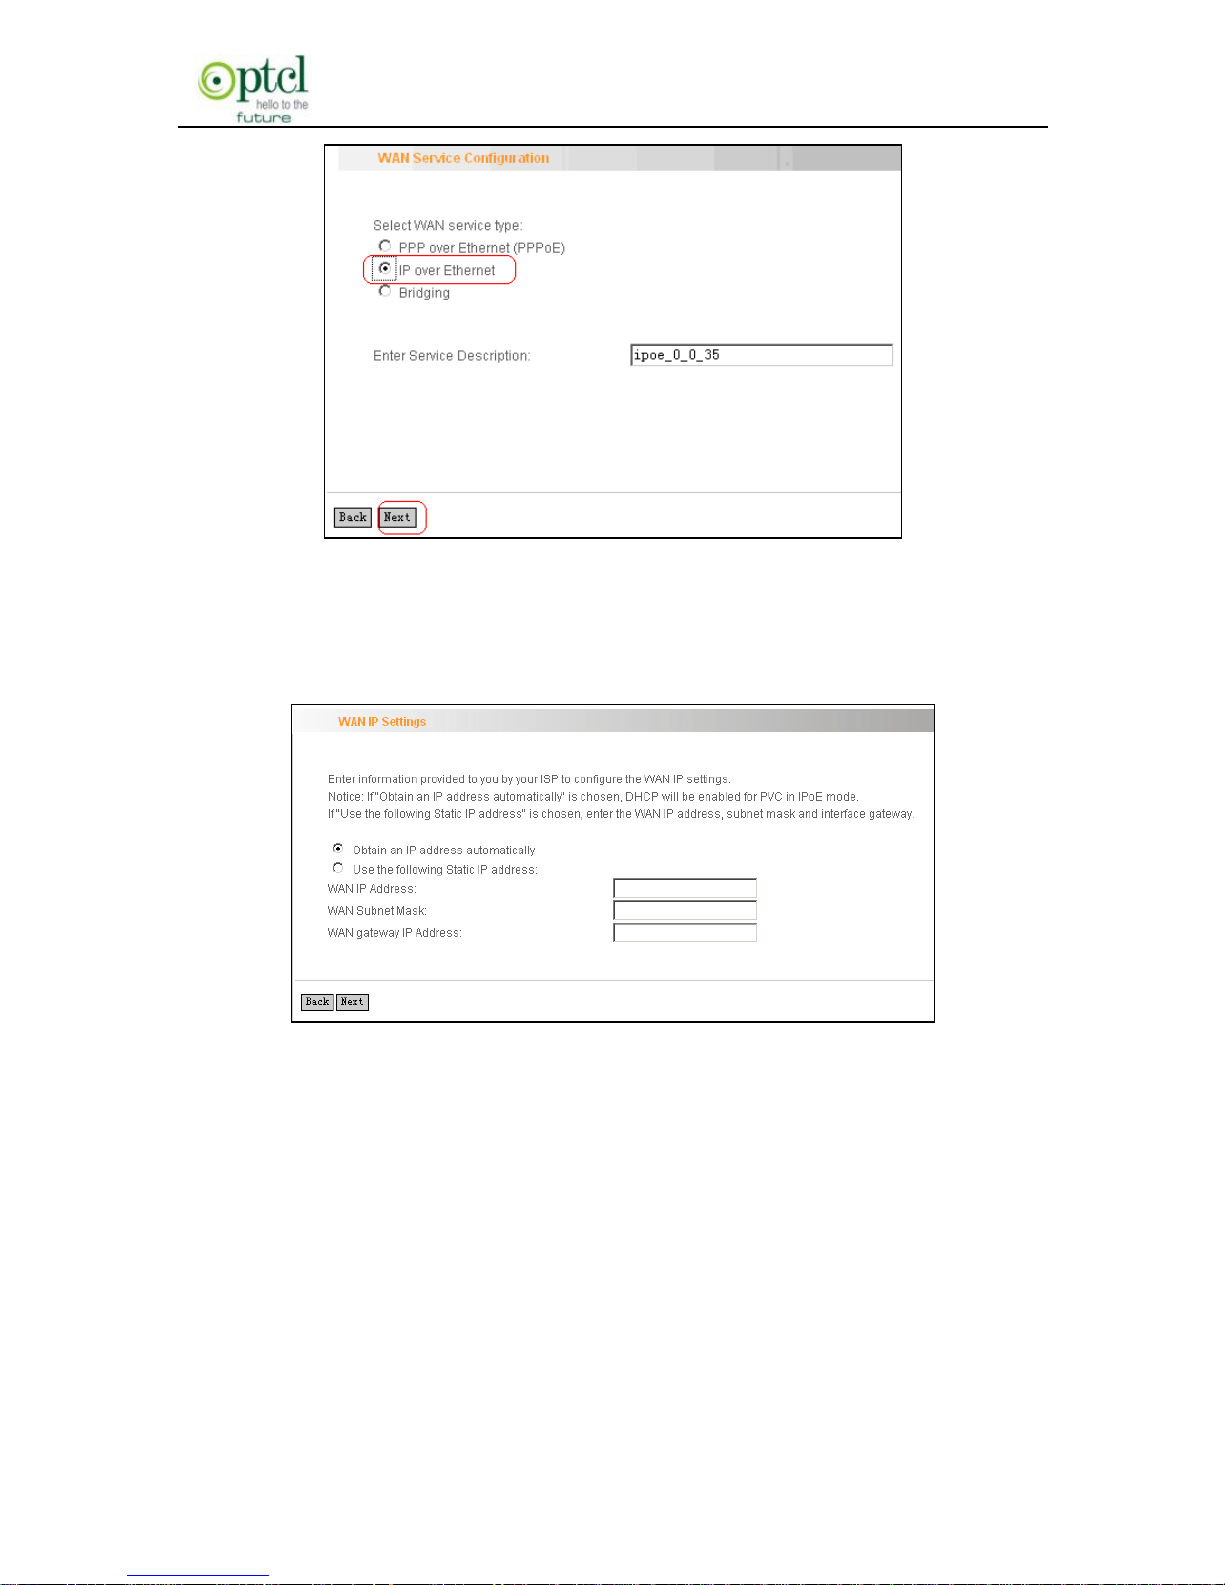
IP over Ethernet
When your ISP provides you an IP address or tells you that you only
need to configure your PC to obtain an IP address automatically to
access Internet, you need to select IP over Ethernet(IPoE)as the WAN
service type.
Page 39
150M Wireless N ADSL2+ Router
- 38 -
Modify the service description if necessary and then click the ―Next‖
button:
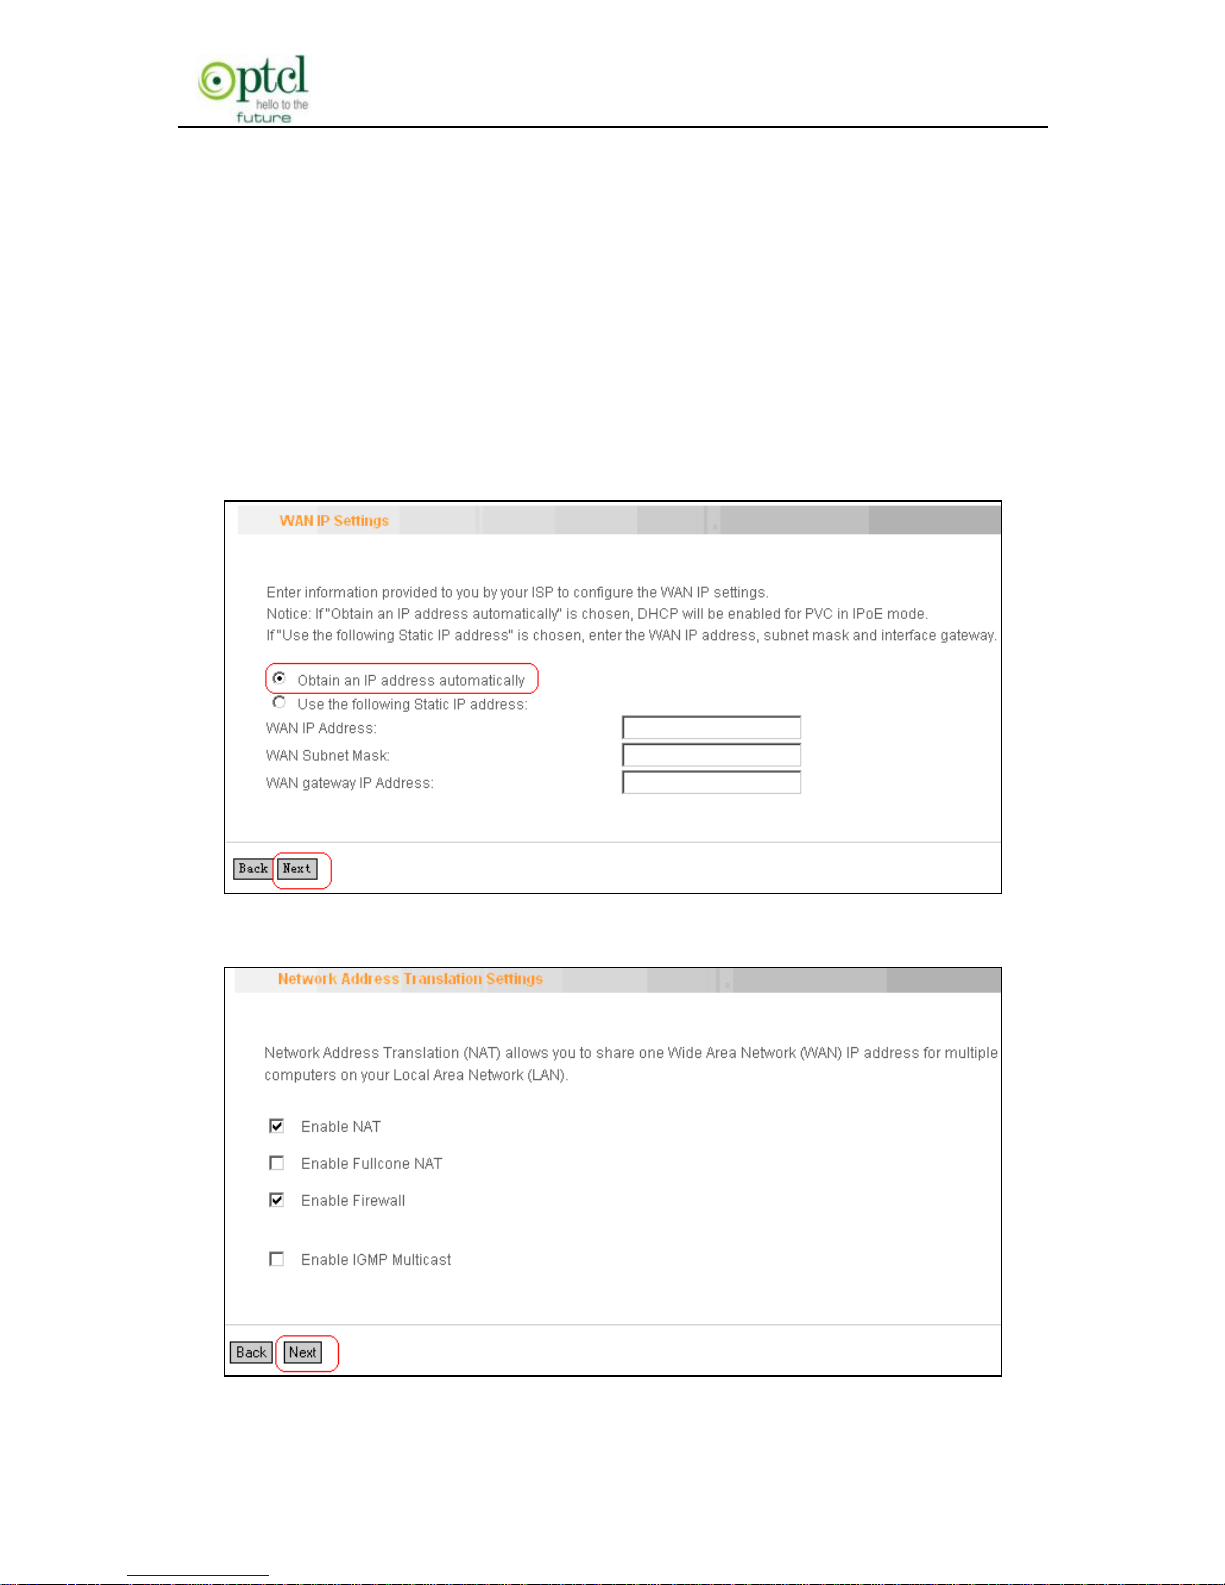
Obtain an IP address automatically: WAN port will automatically
obtain an IP address for accessing Internet from the ISP, if this
feature is selected.
Use the following Static IP address: select this feature if your ISP
provides you an IP address.
WAN IP Address: the IP address provided by your ISP for
accessing Internet.
Page 40
150M Wireless N ADSL2+ Router
- 39 -
WAN Subnet Mask: the subnet mask address provided by your
ISP for accessing Internet.
WAN gateway IP Address: the gateway IP address provided by
your ISP for accessing Internet.
Enter the IP/ subnet mask/gateway IP address provided by your ISP or
select ―Obtain an IP address automatically‖ and click the ―Next‖ button
(on page 1) to enter page 2 below:
Page 1
Page 41
150M Wireless N ADSL2+ Router
- 40 -
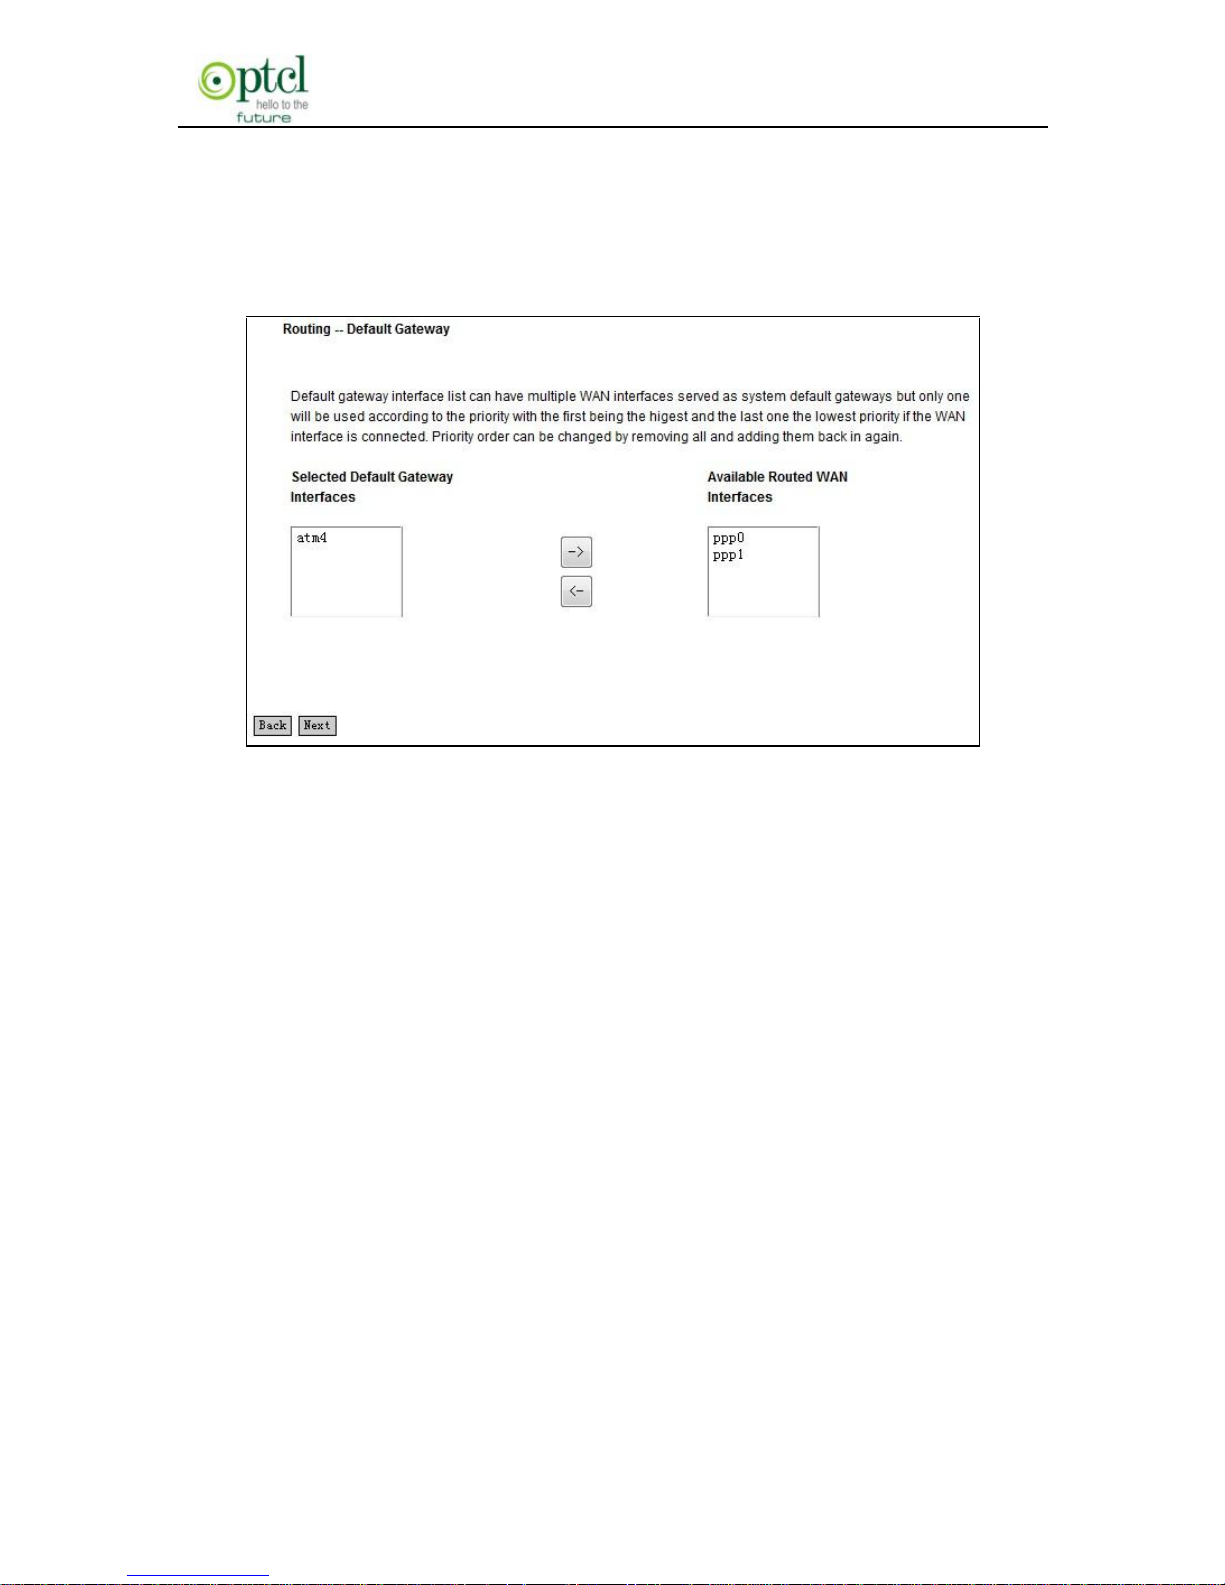
Page 2
We recommend you to keep the default settings unchanged and click
the ―Next‖ button (on page 2) to enter the screen (page 3) below:
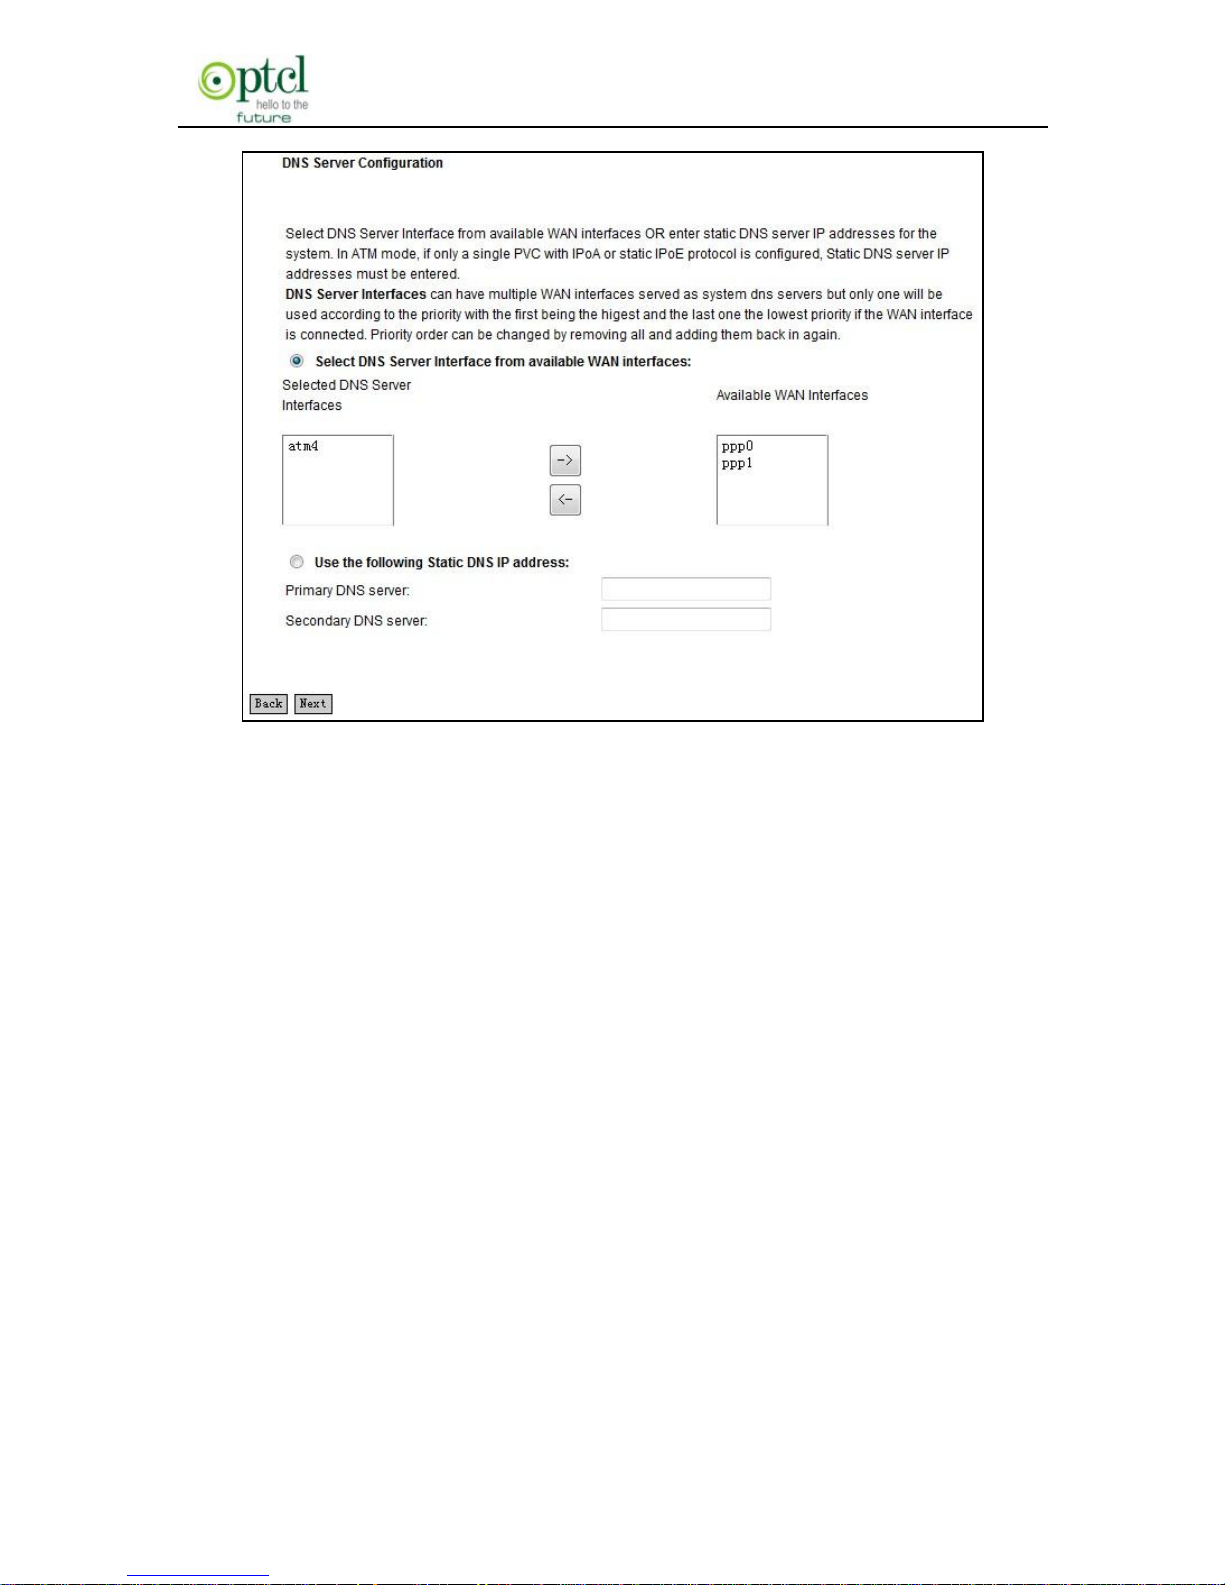
Page 3
This page allows you to configure the gateway address for WAN
connection. We recommend you to keep the default values and click
the ―Next‖ button (on page 3) to enter the following page (page 4):
Page 42
150M Wireless N ADSL2+ Router
- 41 -
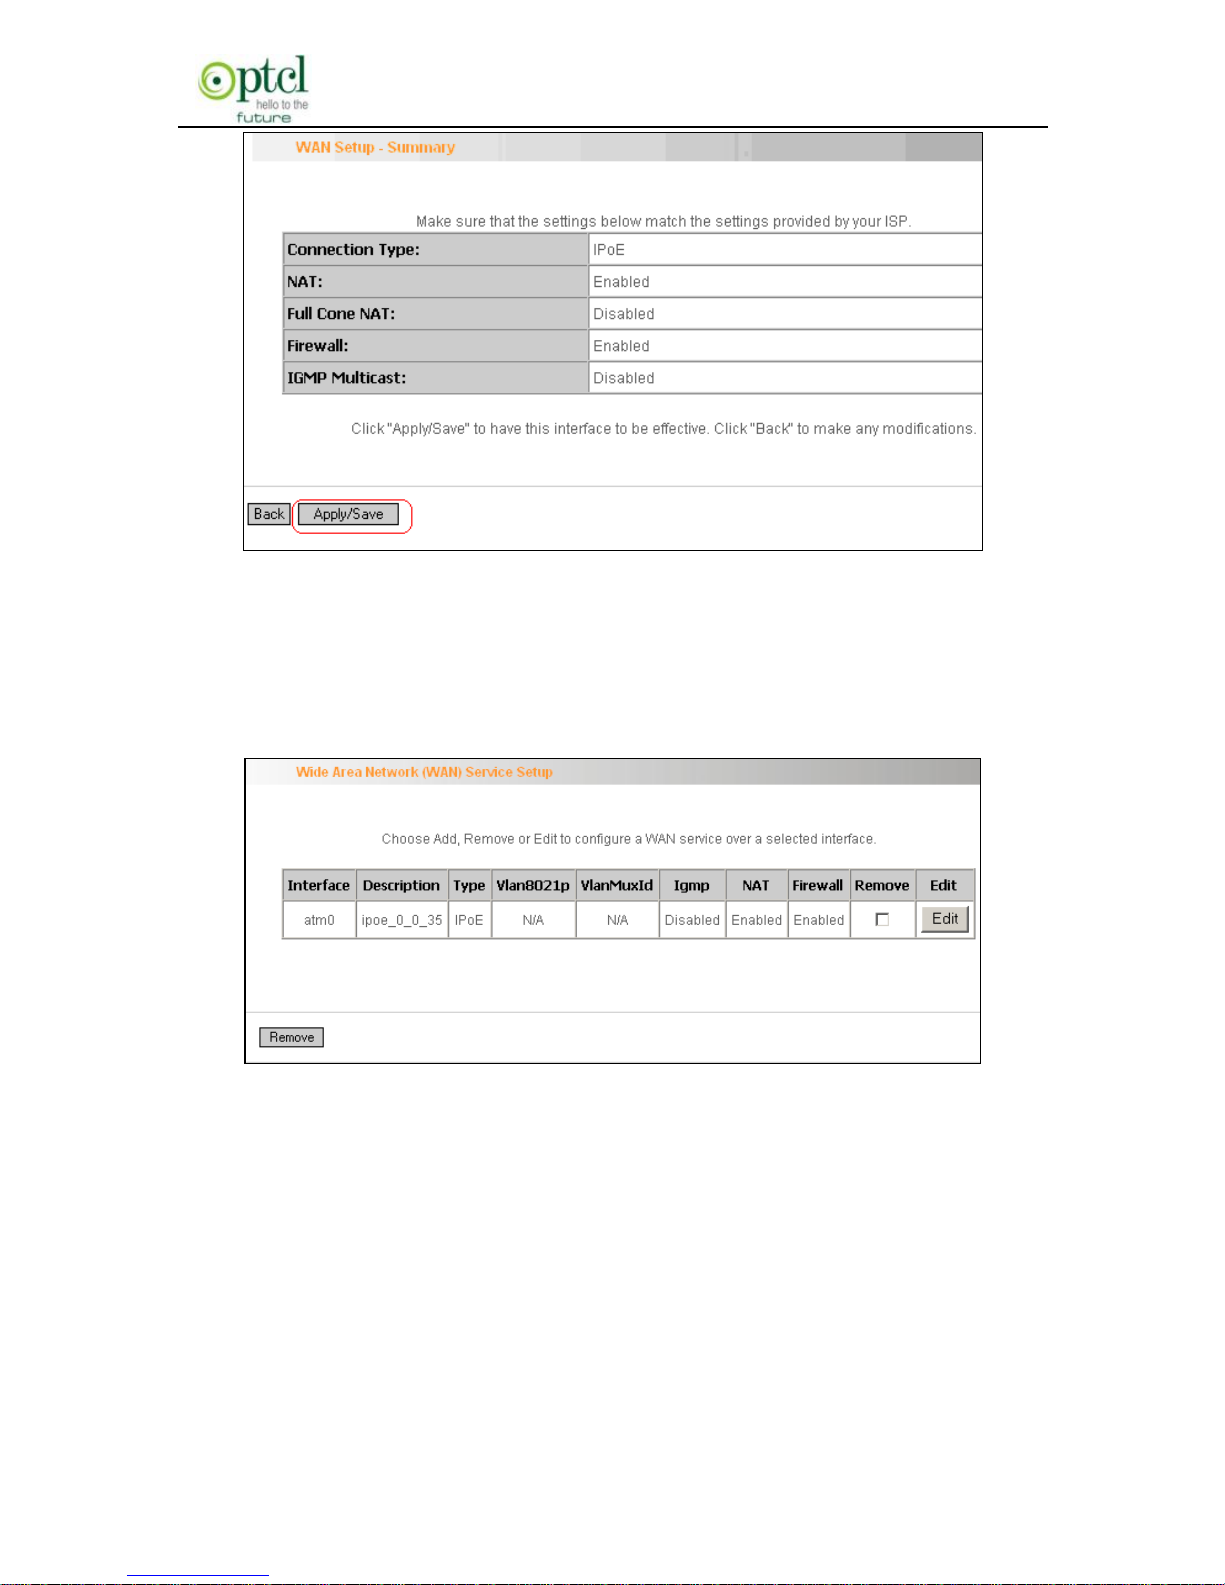
Page 4
This page allows you to configure the DNS server’s IP address for the
WAN port. We recommend you to keep the default values if you are not
clear about it and click the ―Next‖ button (on page 4) to enter the
following page (page 5):
Page 43
150M Wireless N ADSL2+ Router
- 42 -
Page 5
This page displays the configuration information. After confirmation,
please click ―Apply/Save‖ to save it.
You can access Internet once the configured connection succeeds.
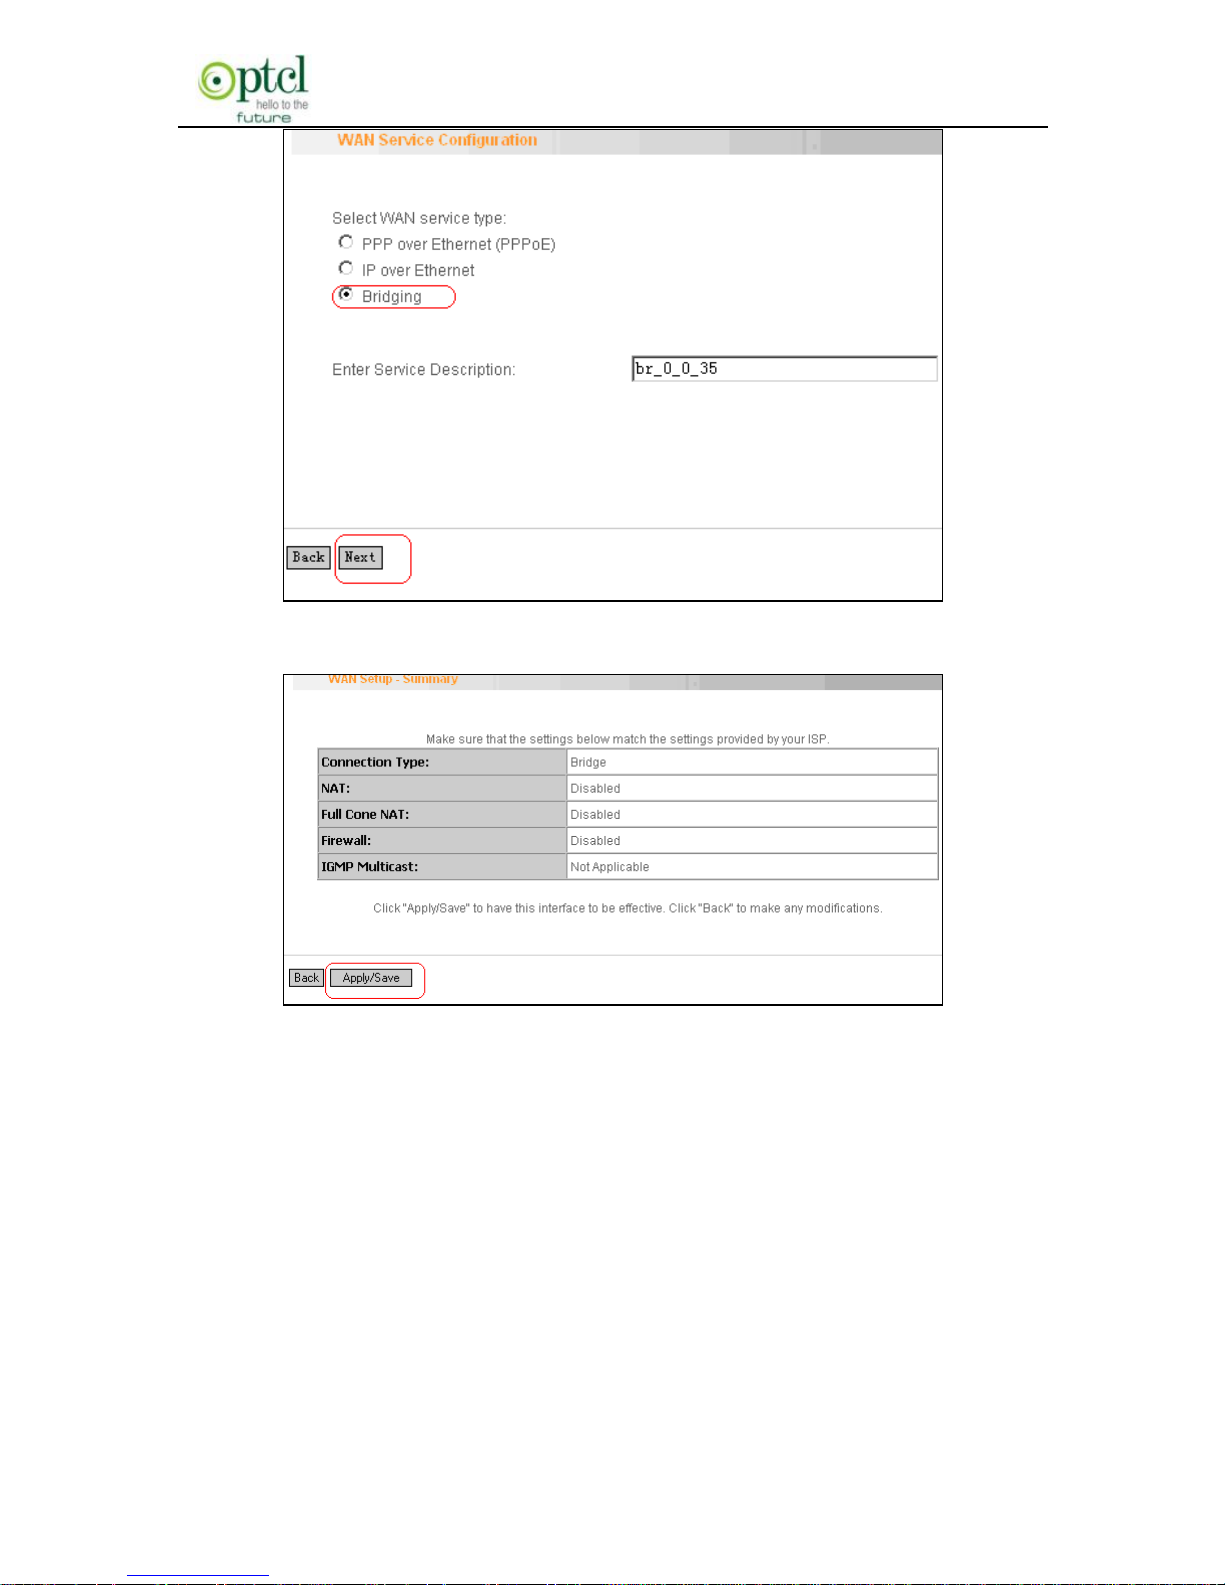
Bridging
If you want to use your PC or other devices to execute dialup or you
don't want to share your broadband service with other users, you can
first configure your router’s WAN service type as bridging and then use
your PC or other devices for dialup connection.
Page 44
150M Wireless N ADSL2+ Router
- 43 -
Modify the service description if necessary and then click ―Next‖.
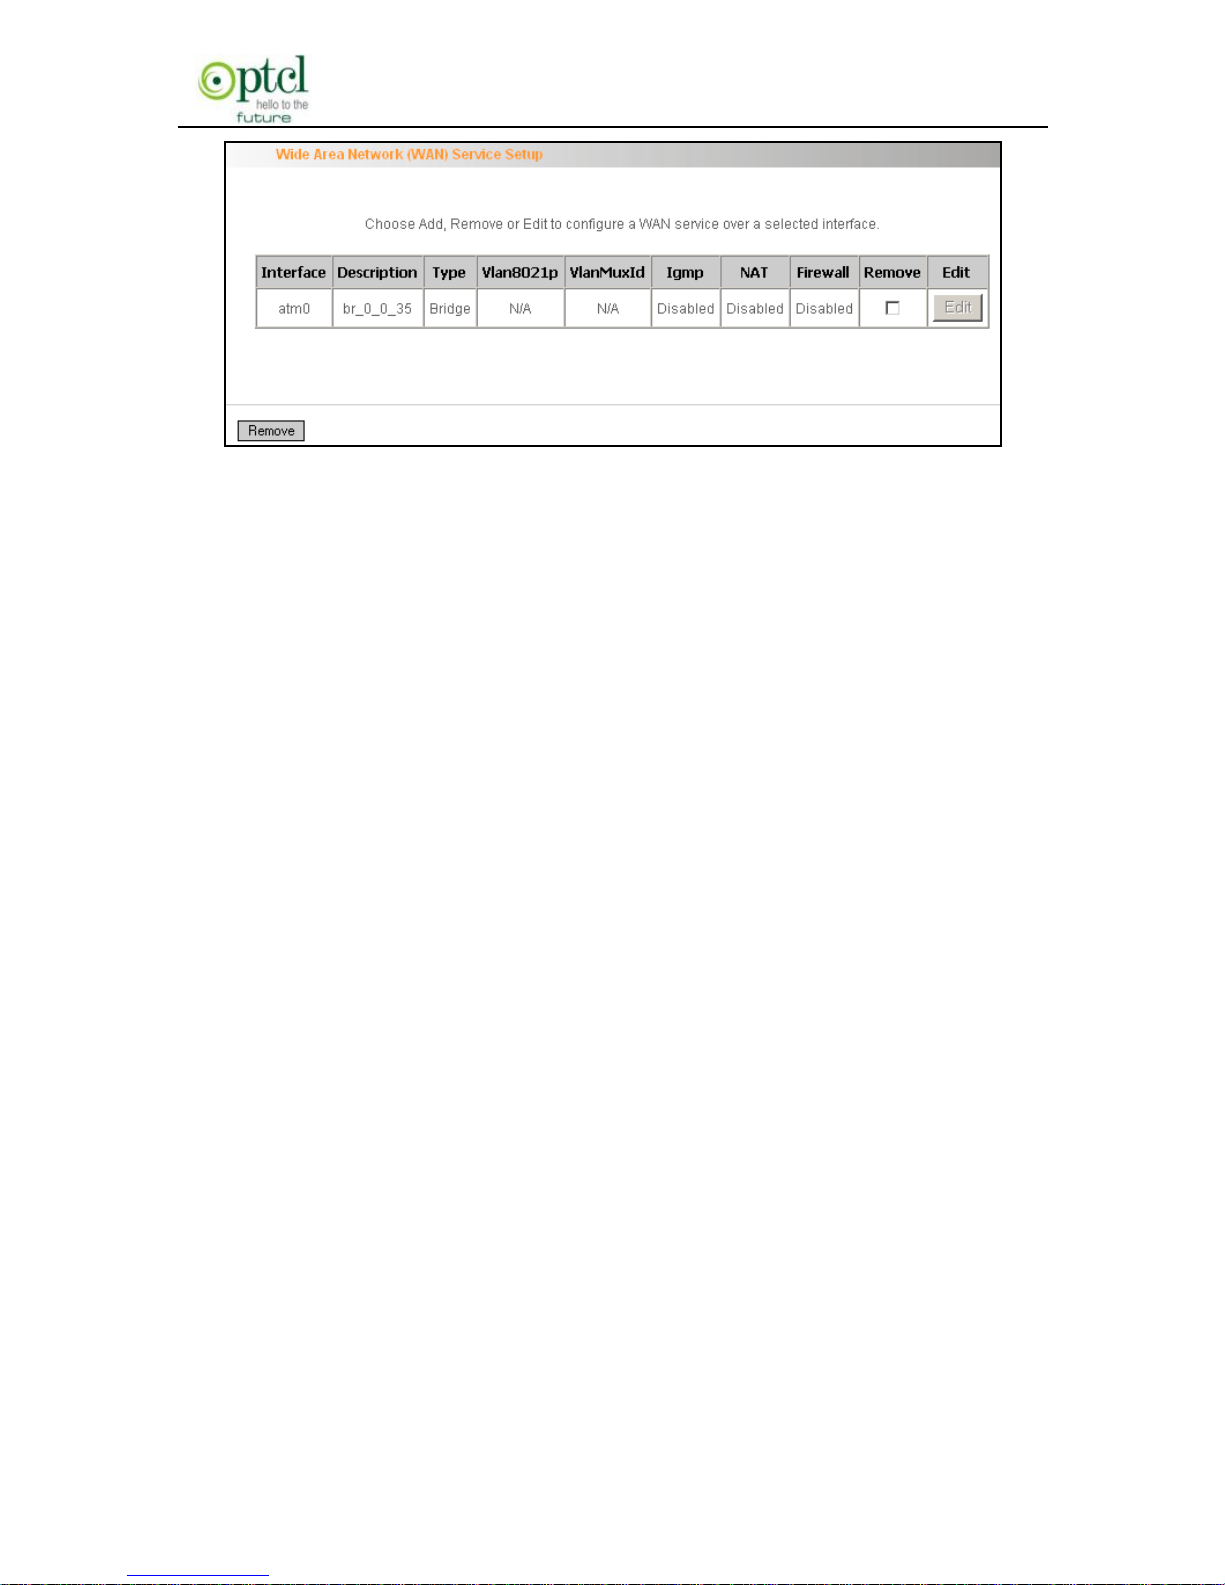
This page displays the configuration information. After confirmation,
please click ―Apply/Save‖ to save it.
Page 45
150M Wireless N ADSL2+ Router
- 44 -
After successful configurations, use your PC or other devices to dialup
and then you can access Internet.
Note: When you need to configure several WAN connections (multiple
PVCs), first configure the needed number of ATM interfaces and then
follow the above corresponding configuration procedures.
2. WAN Configuration in Ethernet Mode
In Ethernet mode, system supports PPP over Ethernet (PPPoE) and IP
over Ethernet (IPoE).
PPP over Ethernet (PPPoE)
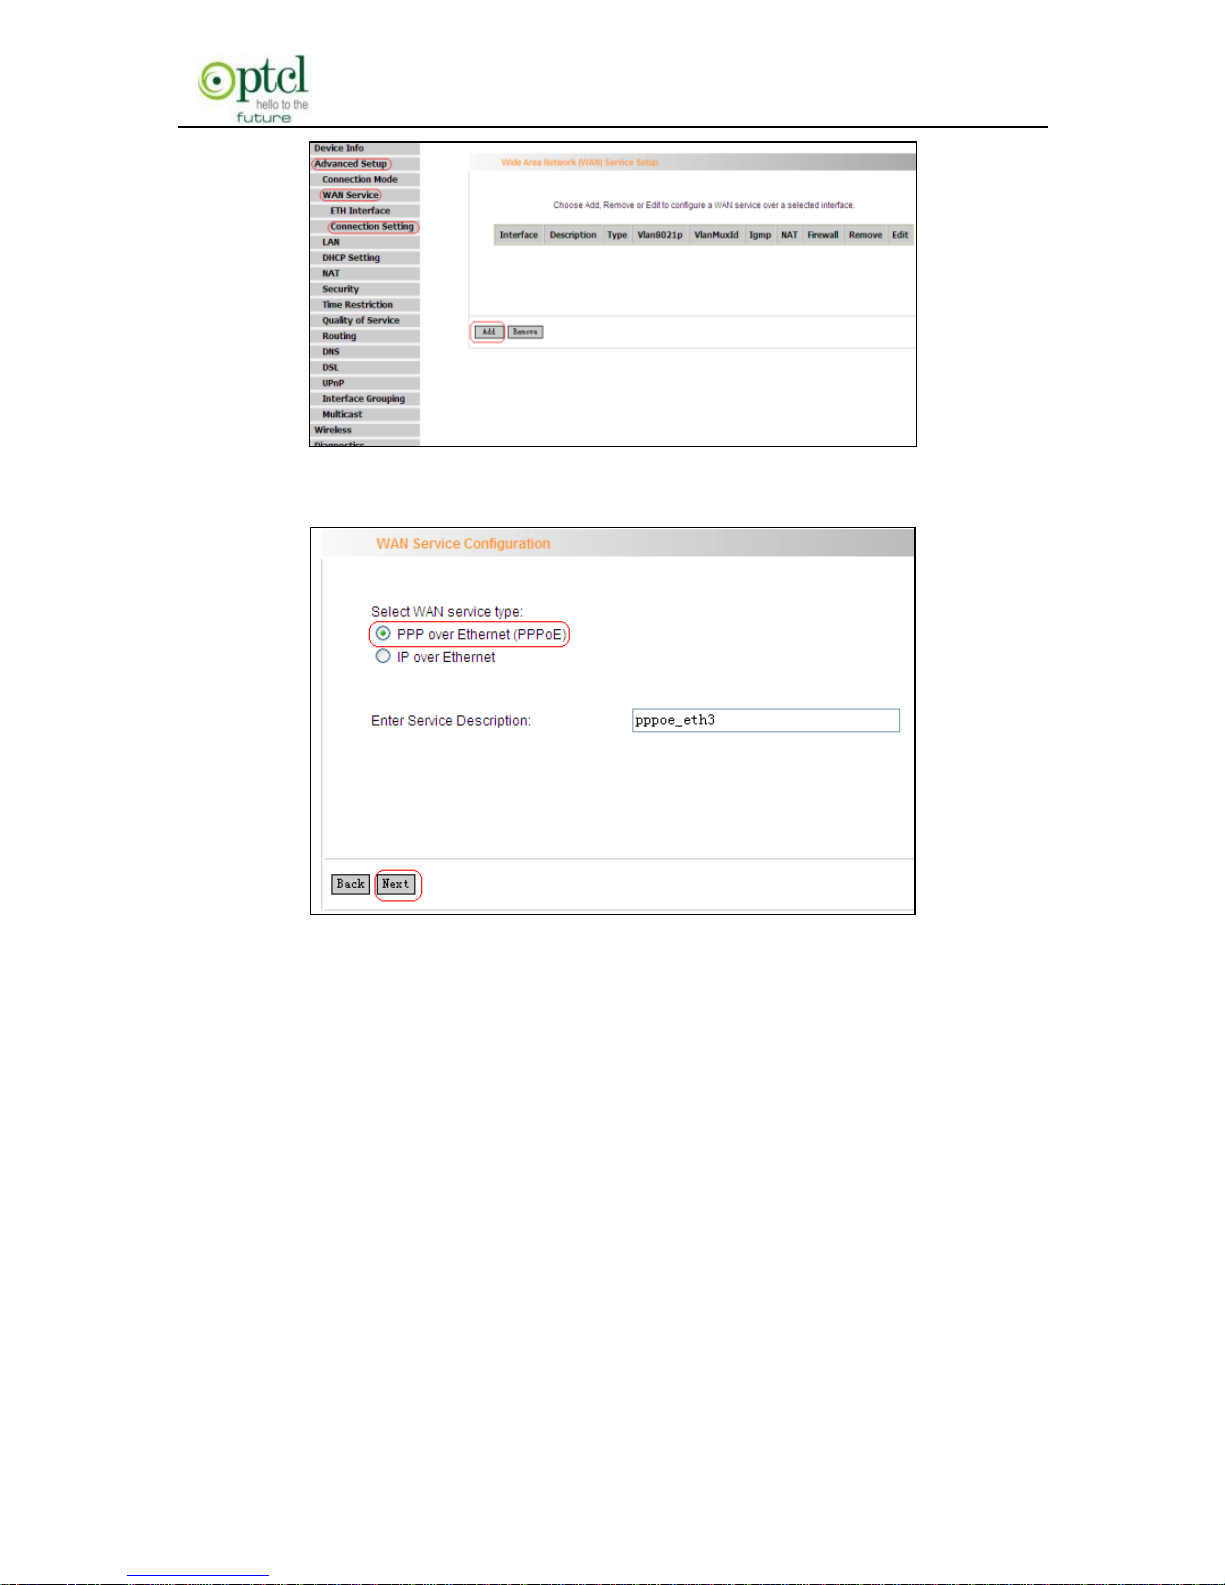
Click ―Advanced Setup‖—―WAN Service‖ –―Connection Setting‖ to enter
WAN service setup interface (page 1) and then click the ―Add‖ button to
go to page 2 and select a proper WAN service type.
Page 46
150M Wireless N ADSL2+ Router
- 45 -
Page 1
Page 2
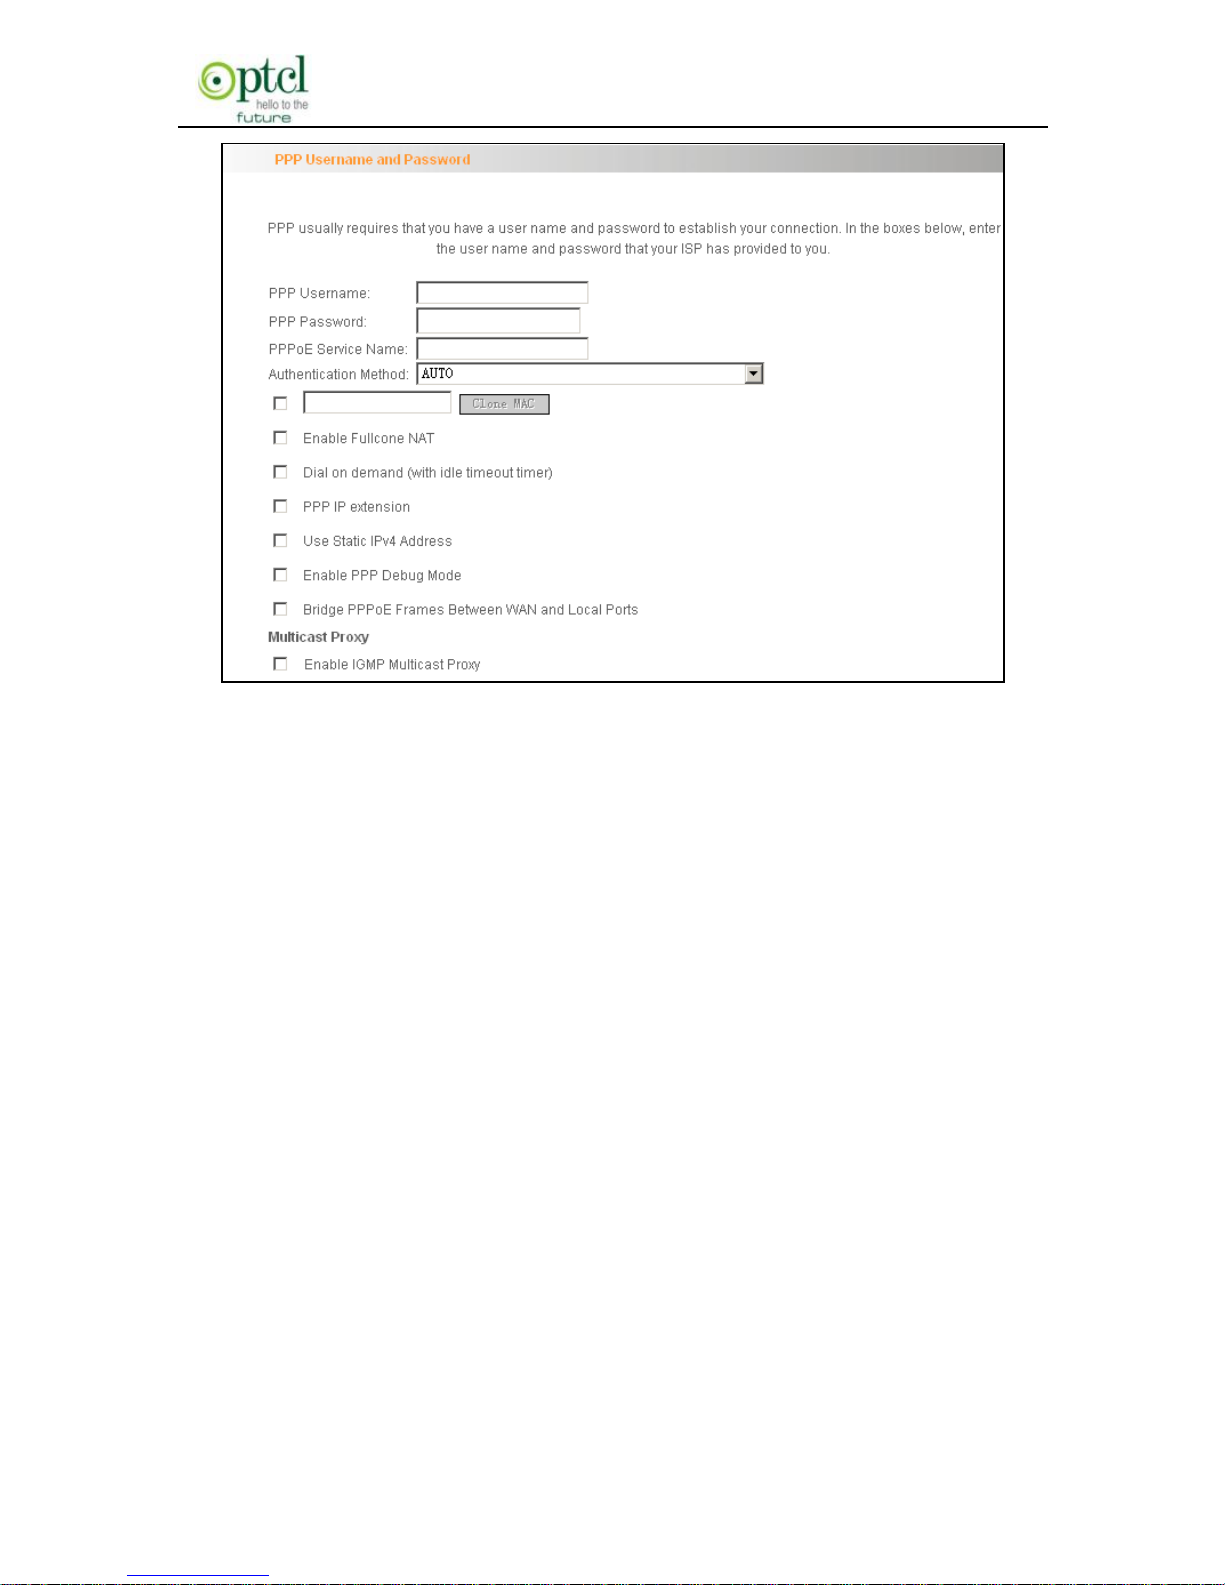
Select PPP over Ethernet (PPPoE) on page 2, modify the service
description if necessary and then click ―Next‖ to enter page 3:
Page 47
150M Wireless N ADSL2+ Router
- 46 -
Page 3
PPP User Name: User name for PPPoE dialup. It is provided by
your ISP.
PPP Password: The password provided by your ISP for PPPoE
dialup.
PPPoE Service Name: it is provided by your ISP. Do not fill it in if
you don’t have it; otherwise PPPoE dialup may fail
Authentication Method: it is used by ISP to verify its clients
during PPPoE dialup. Select ―Auto‖ if you are not sure about it.
Clone MAC:This feature clones the MAC address of the PC that
is currently entering the router’s management page to work as the
WAN MAC address of the router. Configure it when your ISP
requires a fixed MAC for your Internet access.
Dial on Demand: Automatically connects or disconnects Internet
according to the use of the network. It is recommended when your
Page 48
150M Wireless N ADSL2+ Router
- 47 -
ISP limits network use time. This feature can help you to save the
Internet fee.
PPP IP extension: The IP addresses of all packets including
management packets that egress WAN port will be converted to
the WAN port’s IP address once this feature is enabled.
Enable PPP Debug Mode: This feature can be enabled only
when supported by your ISP.
Bridge PPPoE Frames Between WAN and Local Ports:PPPoE
dialup frame initiated by LAN port will directly egress WAN port
without being modified if this feature is enabled.
Multicast Proxy: Router enables multicast proxy server if this
feature is enabled.
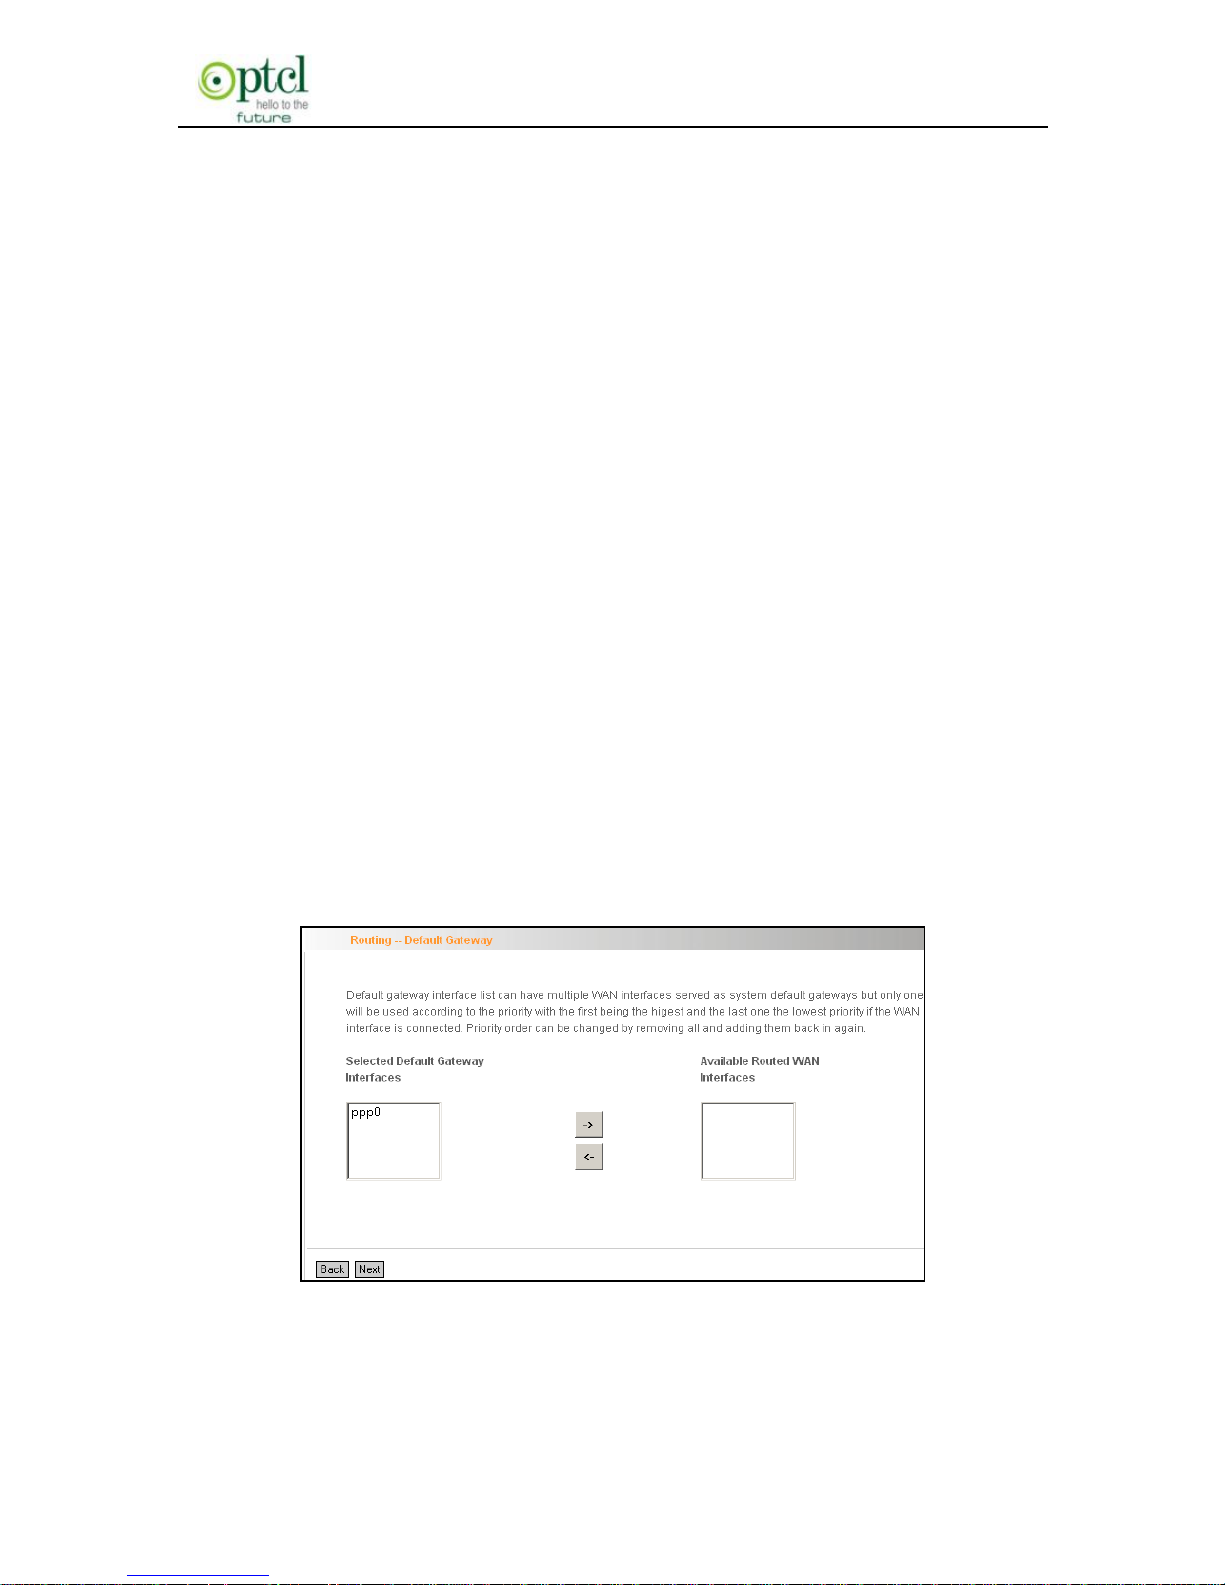
Enter the PPP user name and PPP Password provided by your ISP. For
other options, keep the default values if you are not clear about them,
and then click the ―Next‖ button to display the following screen:
This page allows you to configure the gateway address for the WAN
connection. We recommend you to keep the default values and click
Page 49
150M Wireless N ADSL2+ Router
- 48 -
the ―Next‖ button to enter the following page:
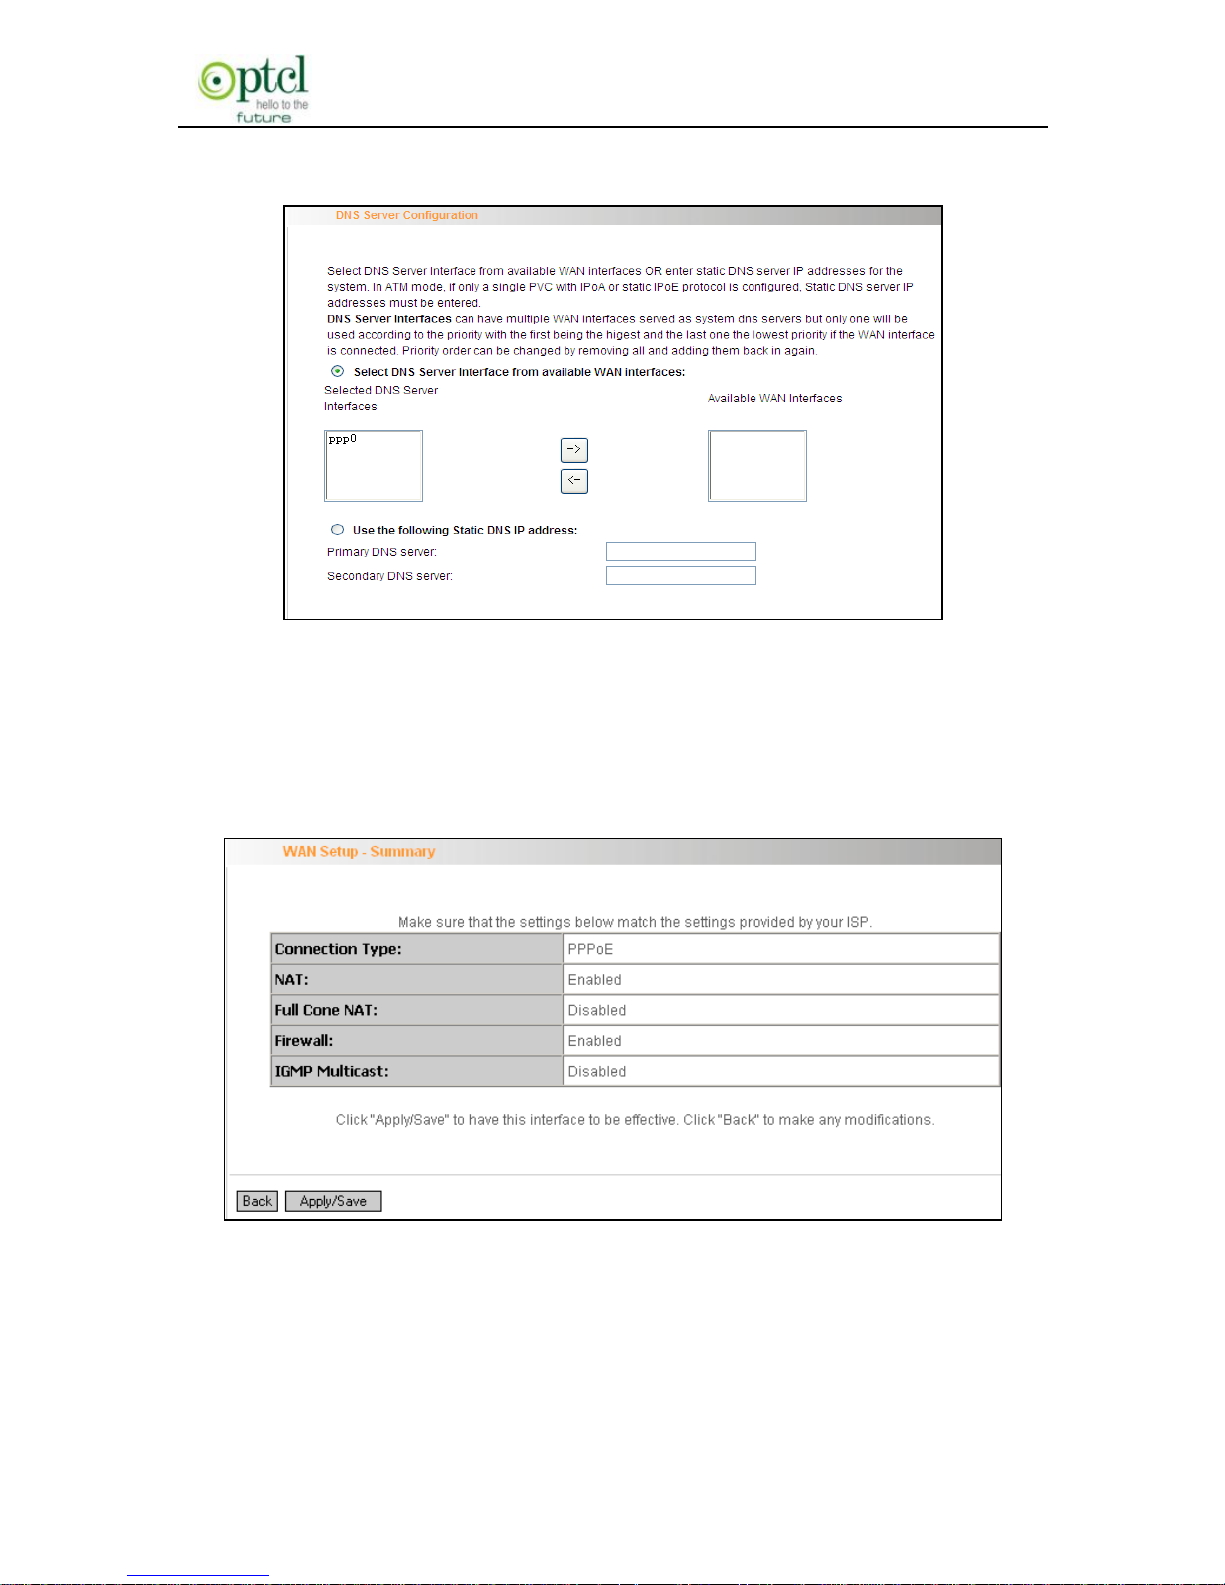
This page allows you to configure the DNS server’s IP address for the
WAN port. We recommend you to keep the default values if you are not
clear about it and click the ―Next‖ button to enter the following page:
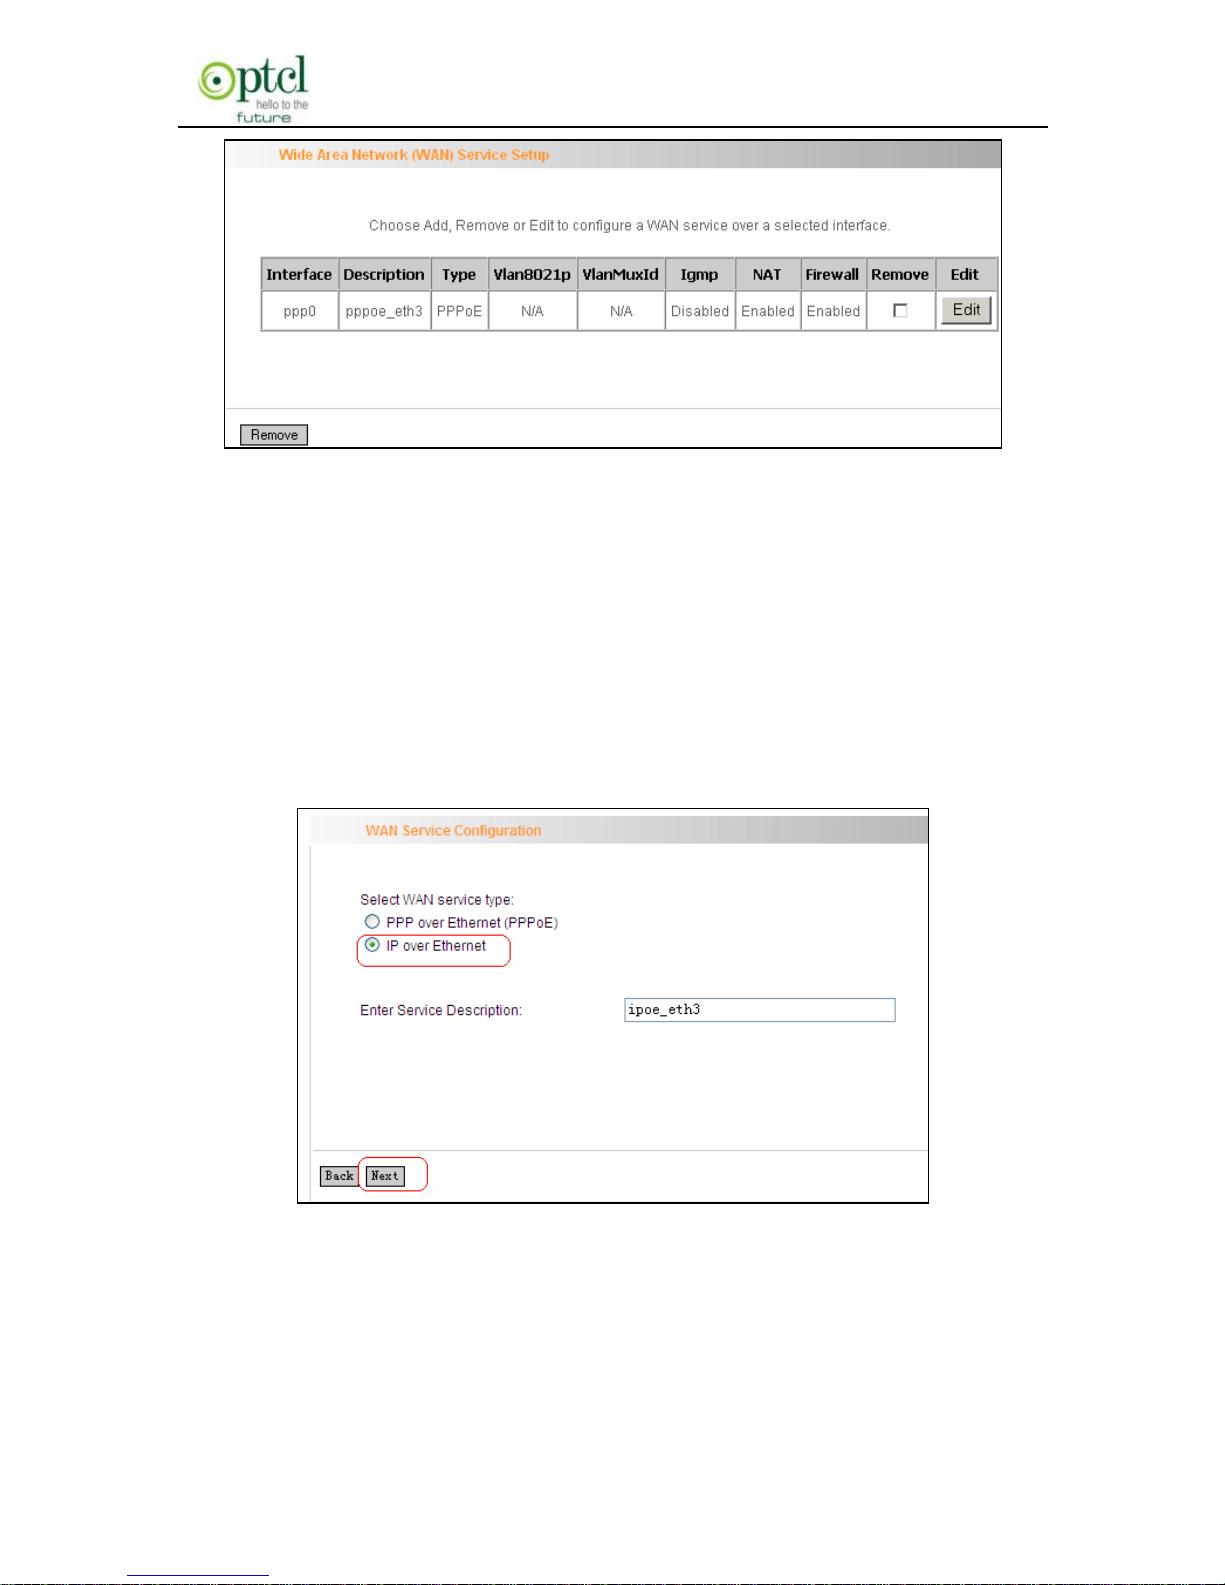
This page displays the configuration information. After confirmation,
please click ―Apply/Save‖ to save it.
Page 50
150M Wireless N ADSL2+ Router
- 49 -
You can access Internet once PPPoE dialup succeeds.
IP over Ethernet
When your ISP provides you an IP address or tells you that you only
need to configure your PC to obtain an IP address automatically to
access Internet, you need to select IP over Ethernet(IPoE)as the WAN
service type.
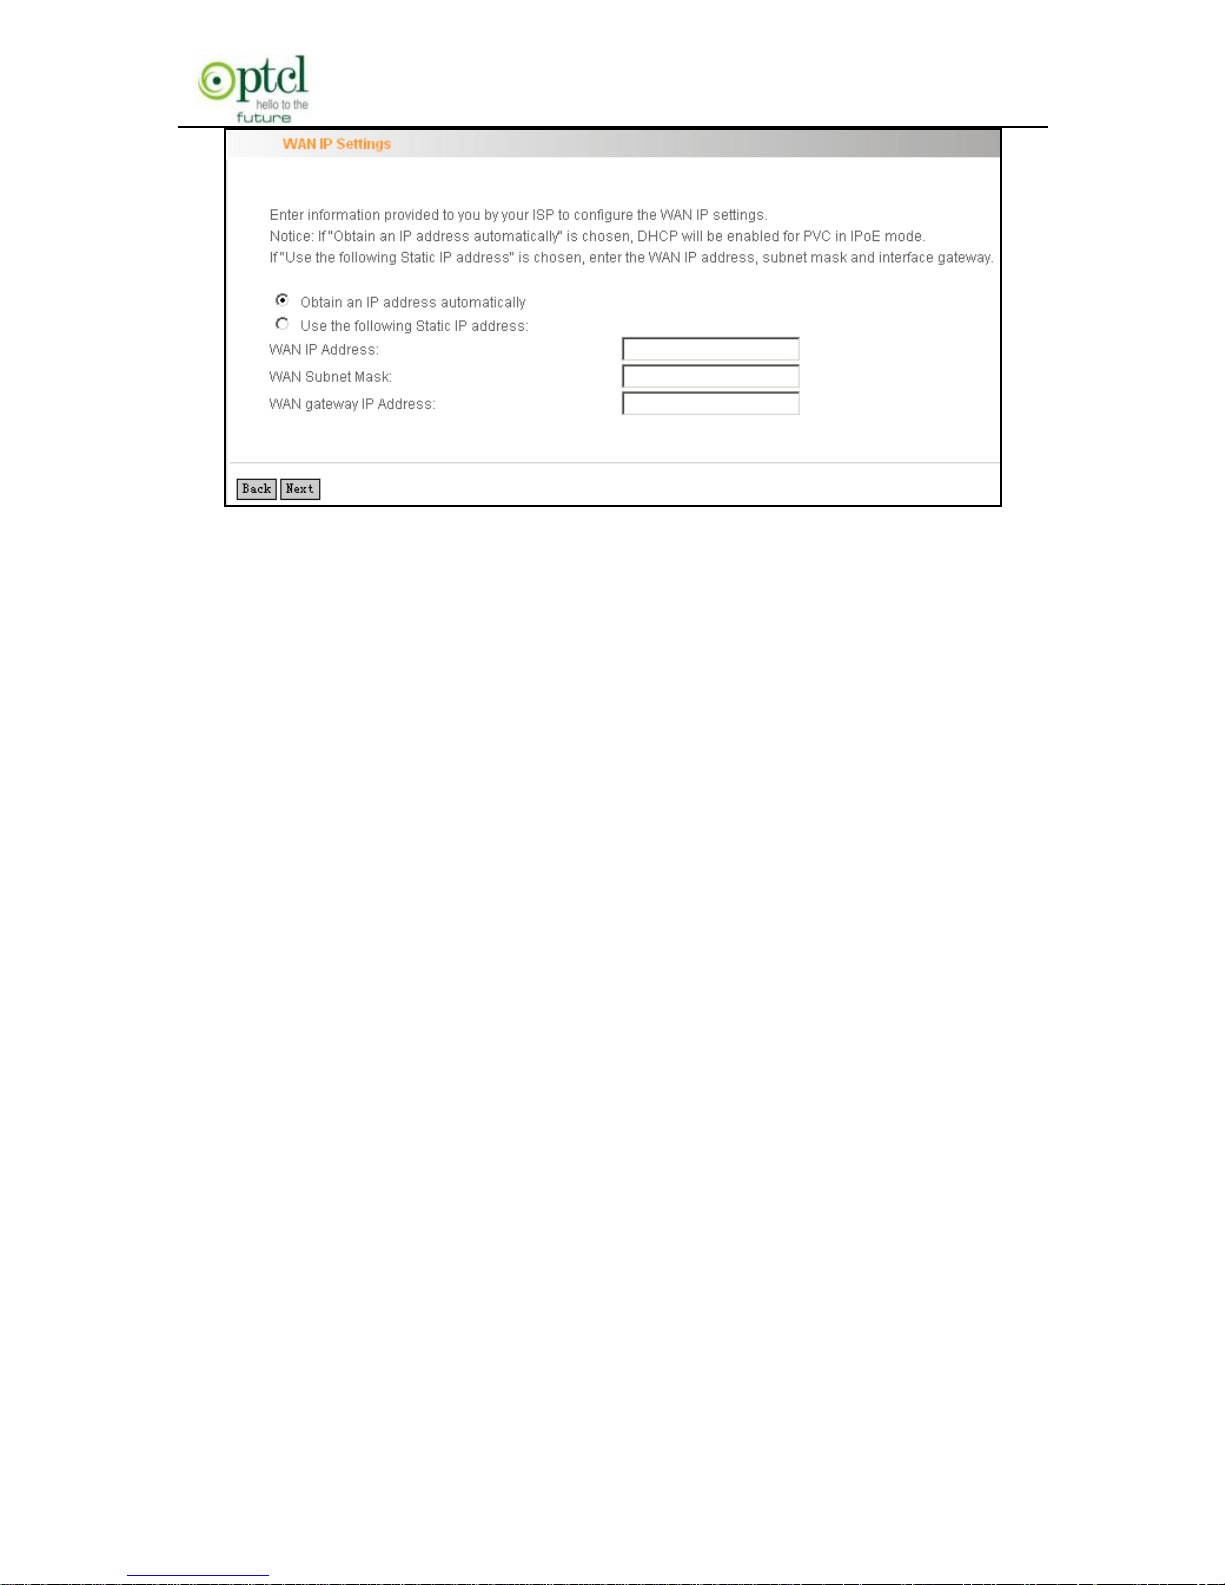
Modify the service description if necessary and then click the ―Next‖
button:
Page 51
150M Wireless N ADSL2+ Router
- 50 -
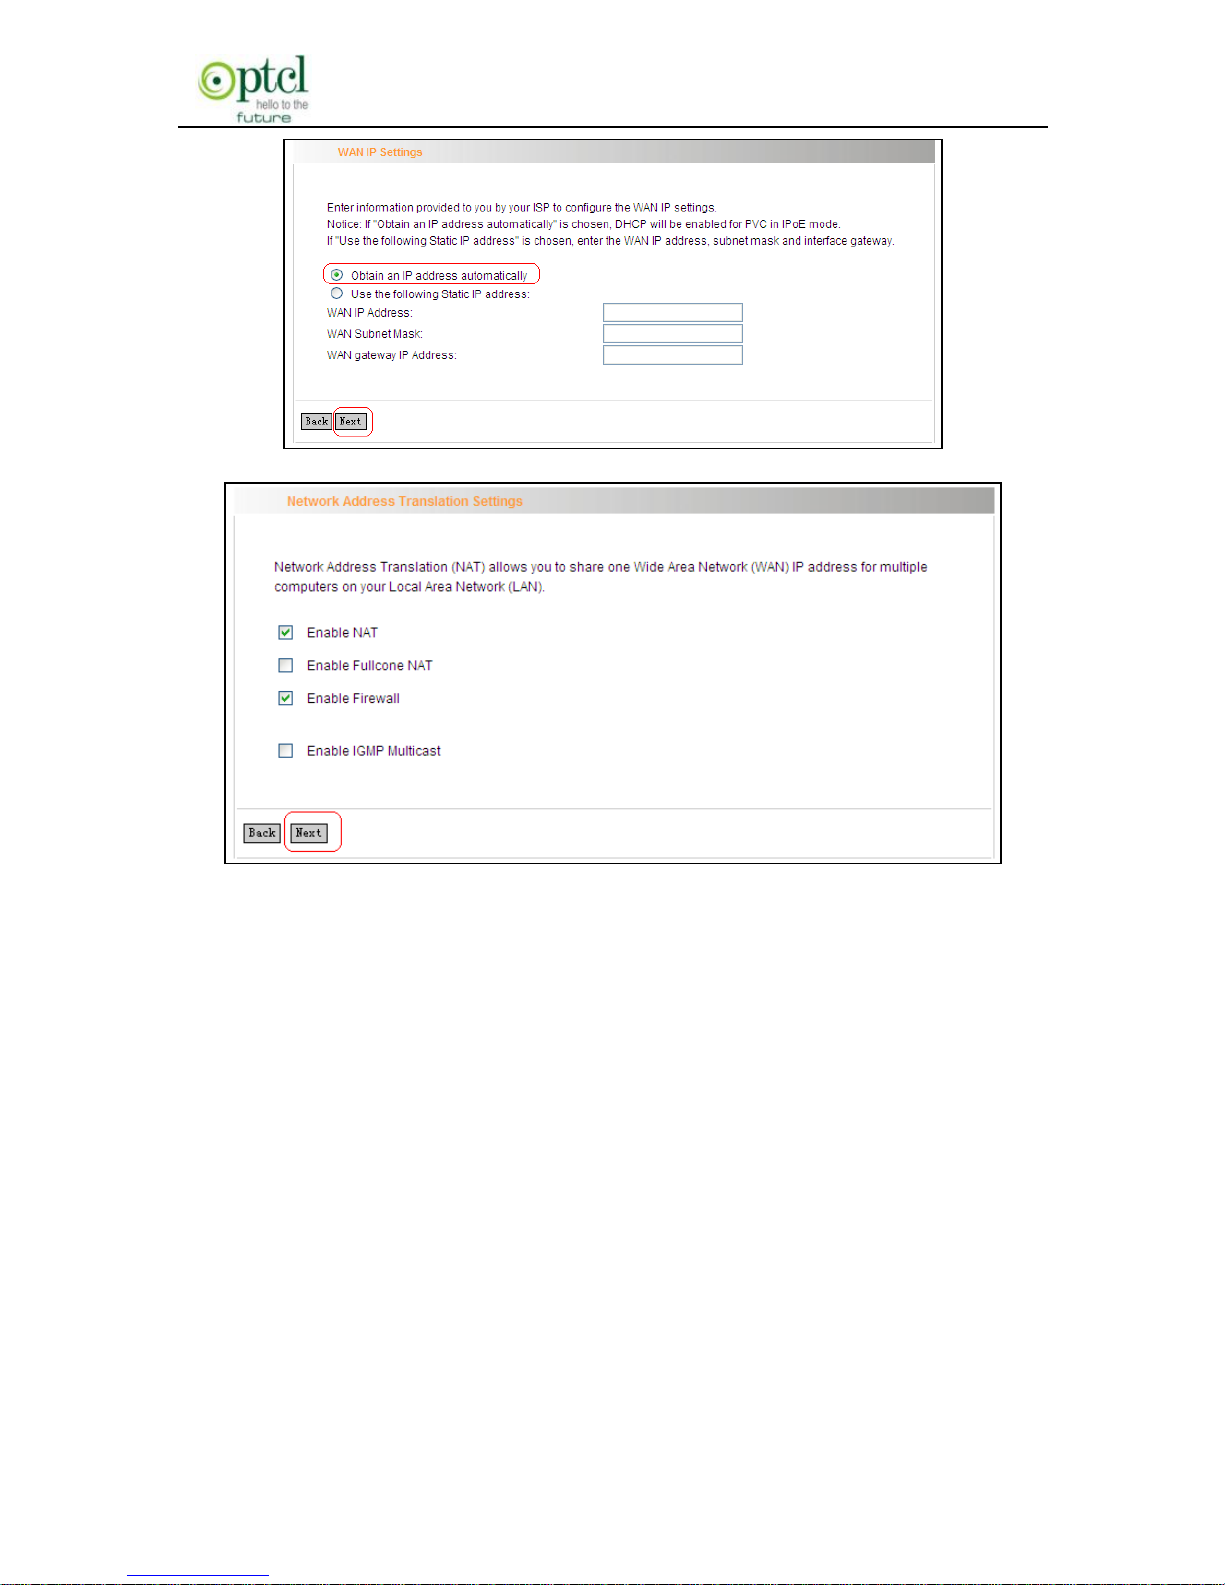
Obtain an IP address automatically: WAN port will automatically
obtain an IP address for accessing Internet from the ISP, if this
feature is selected.
Use the following Static IP address: select this feature if your
ISP provides you an IP address.
WAN IP Address: the IP address provided by your ISP for
accessing Internet.
WAN Subnet Mask: the subnet mask address provided by your
ISP for accessing Internet.
WAN gateway IP Address: the gateway IP address provided by
your ISP for accessing Internet.
Enter the IP/ subnet mask/gateway IP address provided by your ISP or
select ―Obtain an IP address automatically‖ and click the ―Next‖ button:
Page 52
150M Wireless N ADSL2+ Router
- 51 -
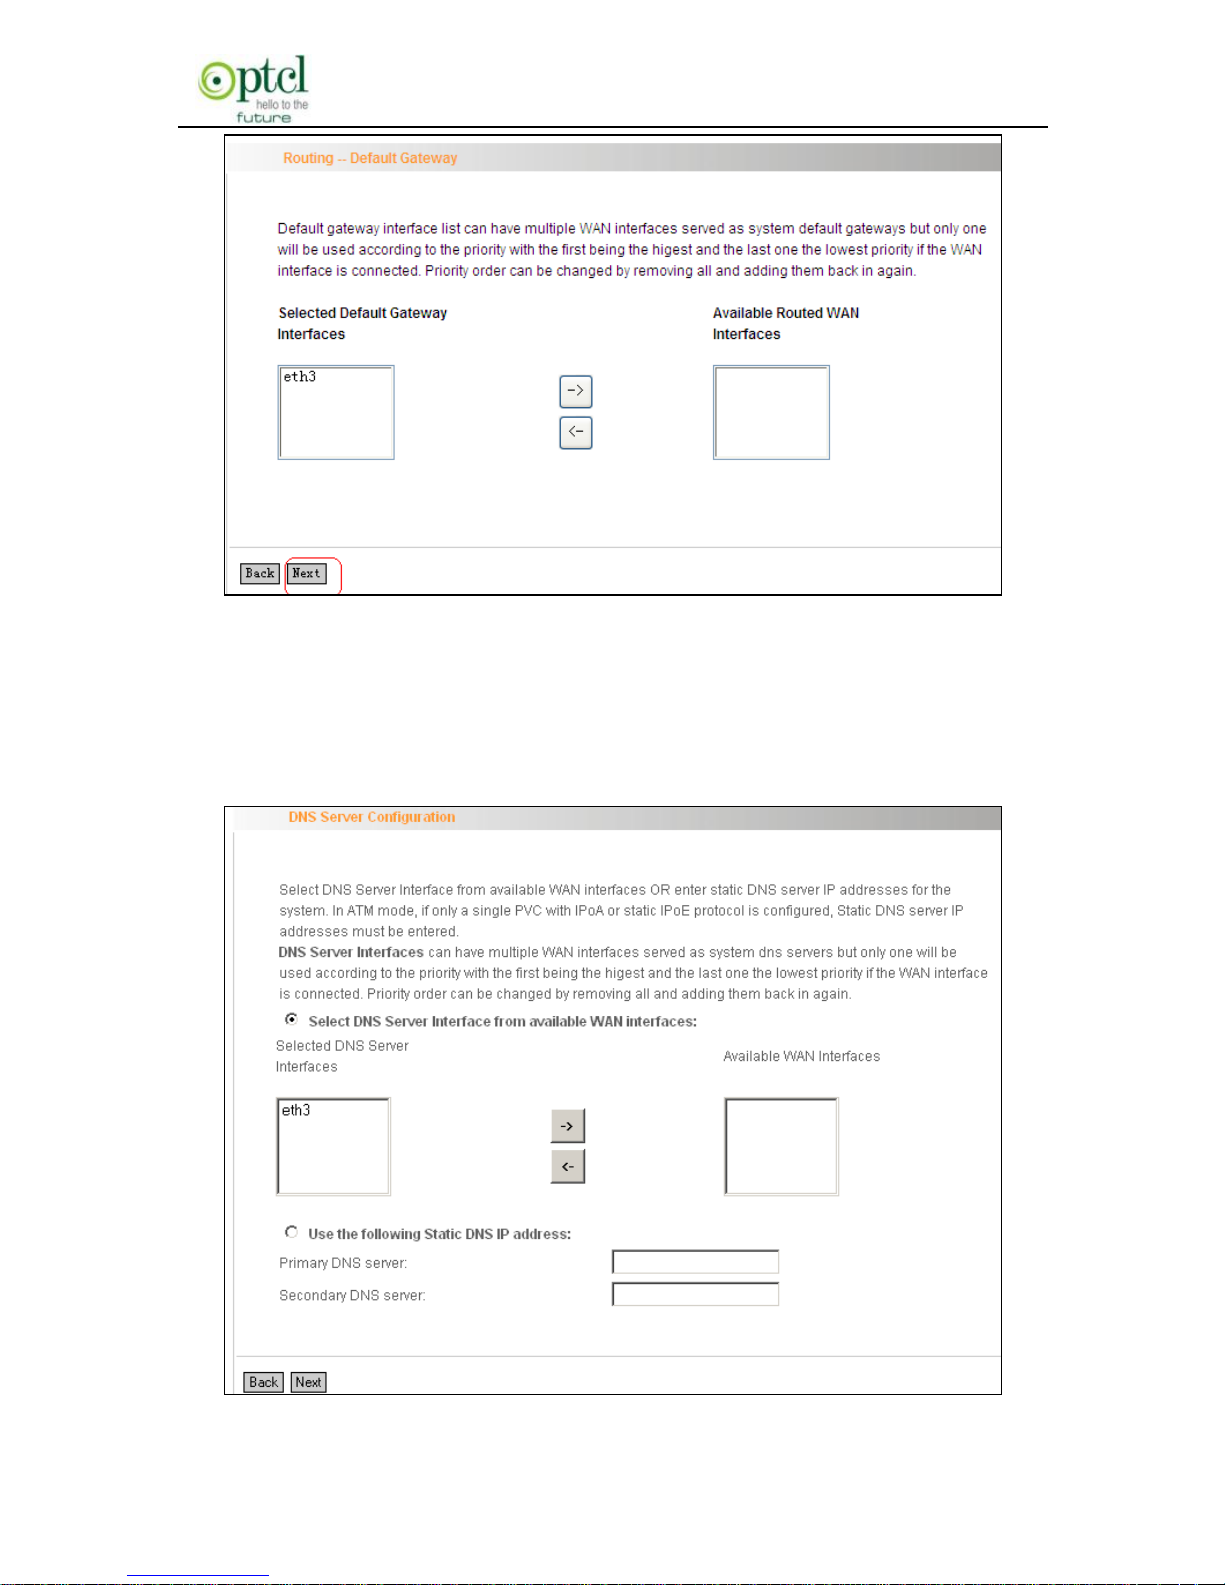
We recommend you to keep the default settings unchanged and click
the ―Next‖ button:
Page 53
150M Wireless N ADSL2+ Router
- 52 -
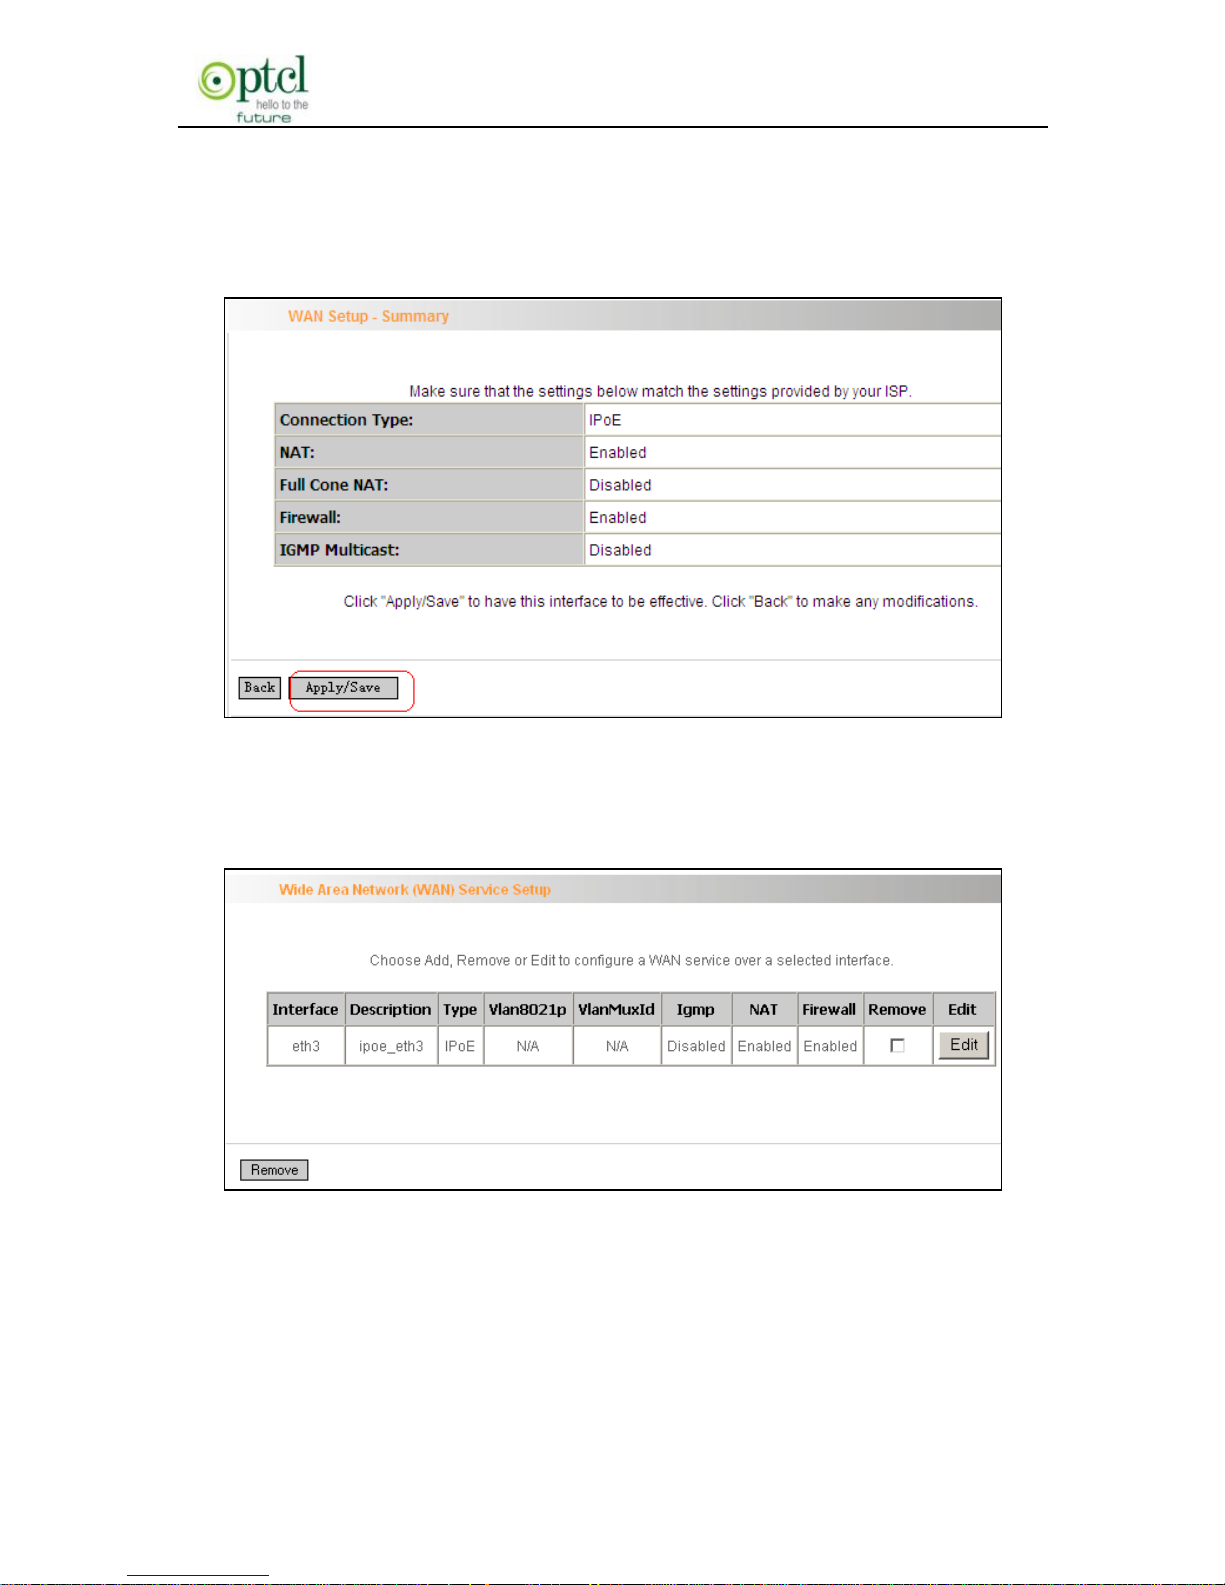
This page allows you to configure the gateway address for WAN
connection. We recommend you to keep the default values and click
the ―Next‖ button:
Page 54
150M Wireless N ADSL2+ Router
- 53 -
This page allows you to configure the DNS server’s IP address for the
WAN port. We recommend you to keep the default values if you are not
clear about it and click the ―Next‖ button:
This page displays the configuration information. After confirmation,
please click ―Apply/Save‖ to save it.
You can access Internet once the configured connection succeeds.
4.2.3 LAN
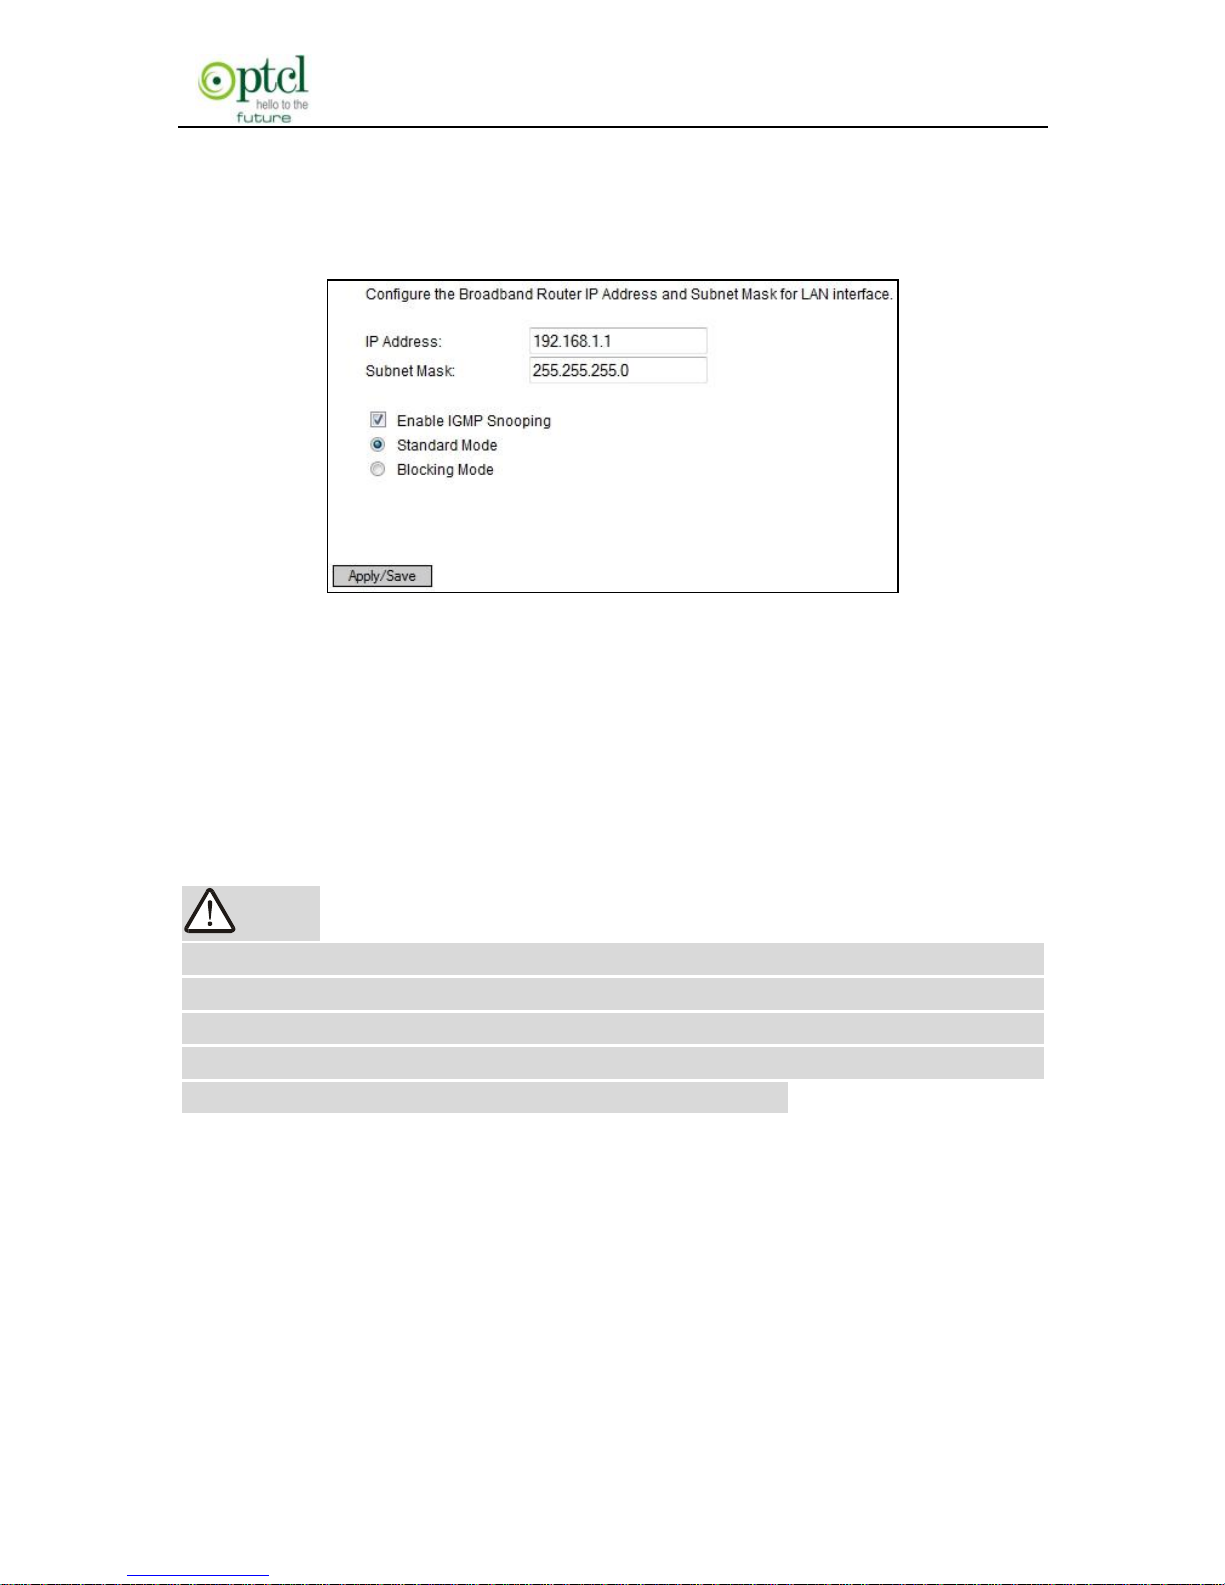
You can change the IP address of the LAN port to match the
Page 55
150M Wireless N ADSL2+ Router
- 54 -
requirement of the practical network environment.
To enter the screen below, click ―Advanced Setup‖--―LAN‖.
IP Address: It is the Router’s LAN IP address. The default IP
address is 192.168.1.1.
Subnet Mask: It is the Router’s LAN subnet mask. You can
modify it according to your needs.
Enable IGMP Snooping: Check/uncheck to enable/disable the
IGMP Snooping.
Note:
If you have changed the LAN IP address, then you must
re-configure your PC’s IP address to log on to the router’s
Web-based management interface, and the default gateway of all
computers that connect to the router’s LAN ports have to be set to
the new IP address for normal Internet access.
4.2.4 DHCP setting
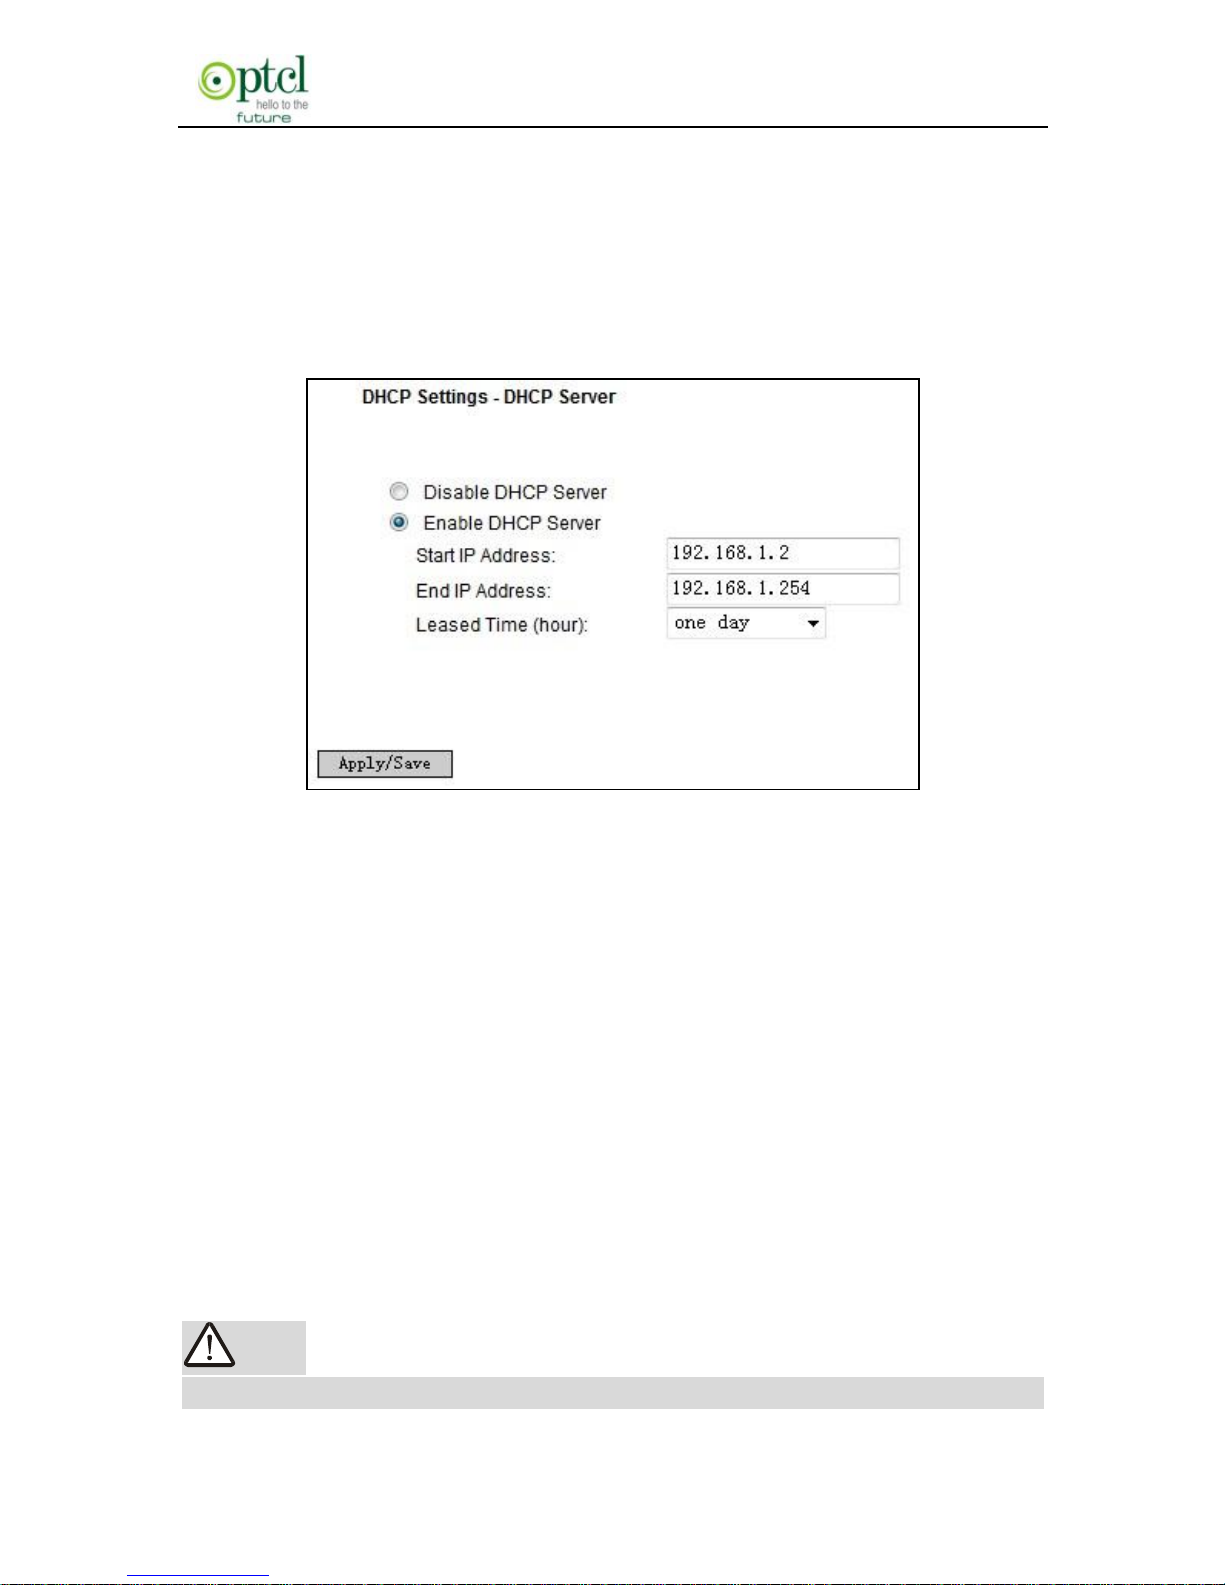
DHCP Server
This router enables DHCP server function by default. DHCP refers to
Dynamic Host Control Protocol. With an internal DHCP server, the
Router can automatically configure the IP addresses, subnet mask,
Page 56
150M Wireless N ADSL2+ Router
- 55 -
gateway and DNS server, etc for the computers that connect to the
router’s LAN ports and are configured to obtain an IP address
automatically. Therefore it reduces the inconvenience and trouble in
manually configuring IP address and other network parameters for
multiple computers in LAN.
Enable/ Disable DHCP Server: Click the corresponding button to
enable/ disable the DHCP Server.
Start IP: The point from which DHCP server starts IP address
distribution.
End IP: The point where DHCP server ends IP address
distribution.
Lease Time: It indicates the valid time of the dynamic IP address
which is distributed to the client’s host computer by DHCP server.
During this time, the server will not distribute the IP address to any
other host computer.
Note:
To use the Router’s DHCP server function, you must set the
Page 57
150M Wireless N ADSL2+ Router
- 56 -
TCP/IP protocol of the computers in LAN to “Obtain an IP address
automatically”.
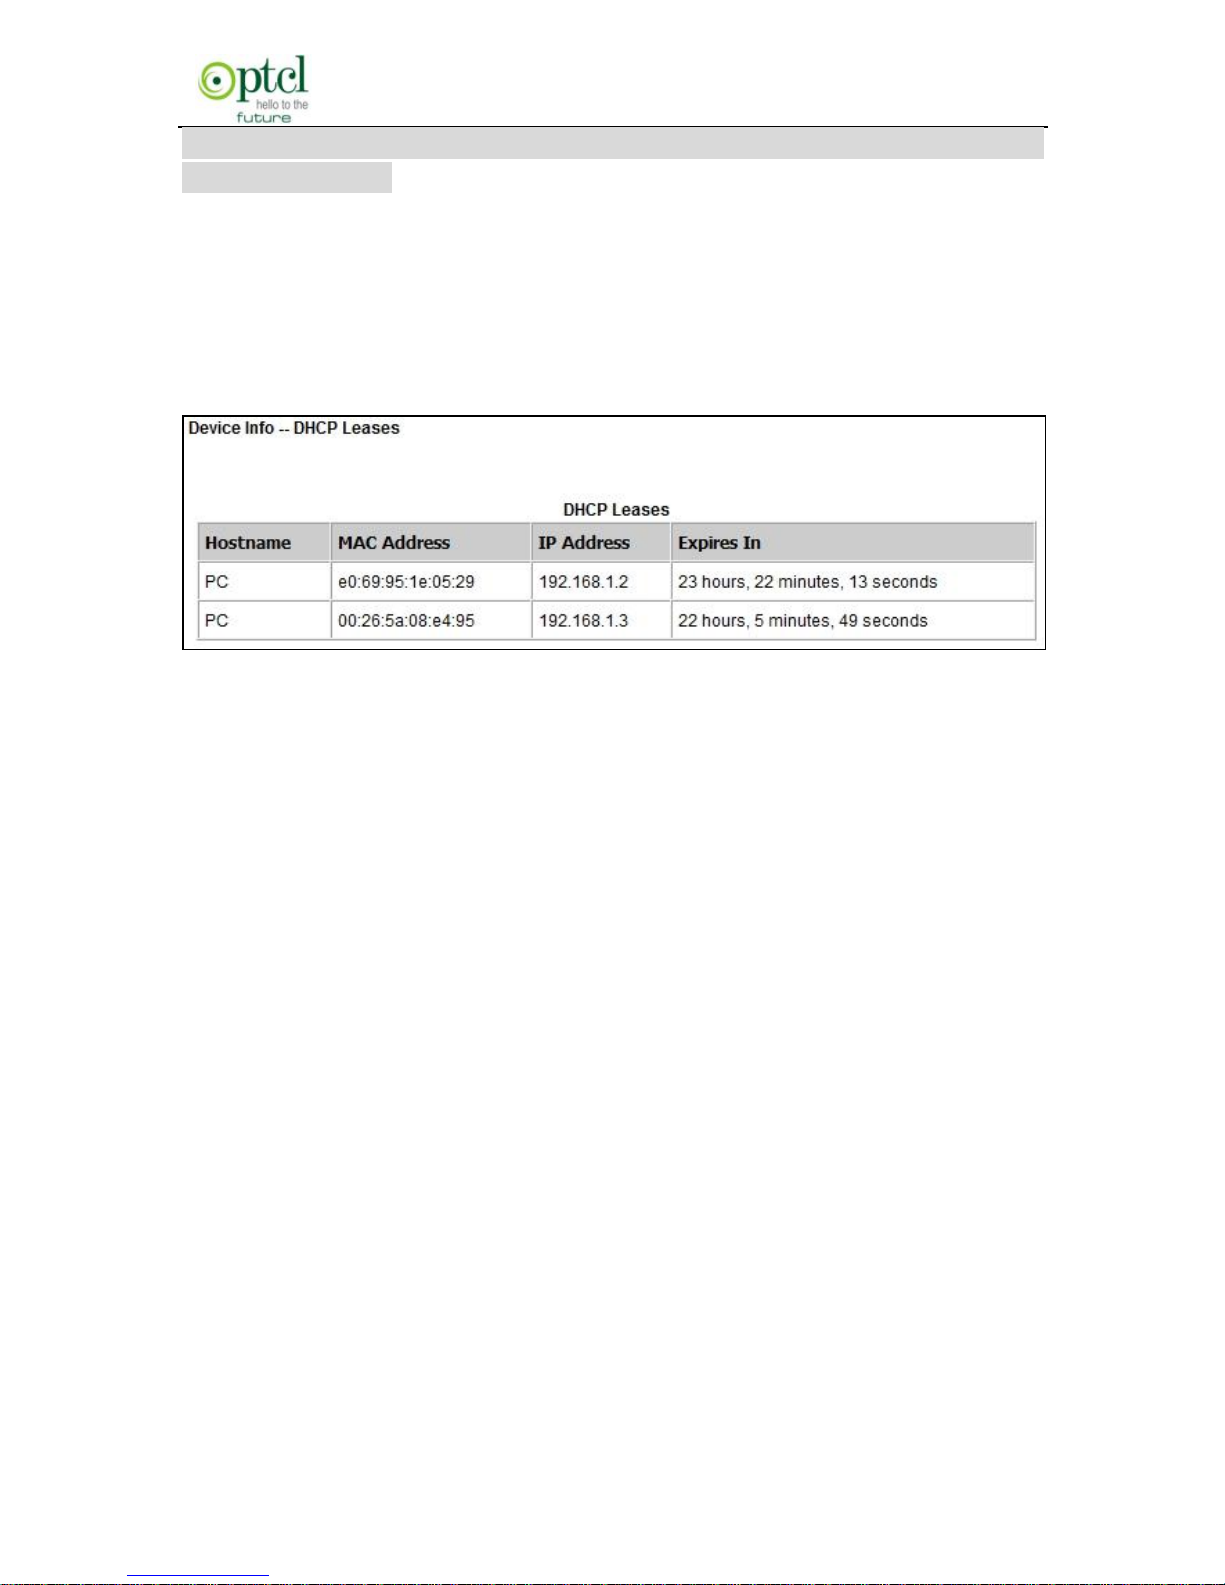
DHCP client
This page displays DHCP client’s information such as host name, MAC
address, IP address, and lease time.
Hostname: The name of a PC or a network device that has
successfully obtained an IP address from the DHCP server.
MAC Address: The MAC address of a PC or a network device
that has successfully obtained an IP address from the DHCP
server.
IP Address: The IP address distributed by DHCP server.
Expires In: This item displays the leftover lease time.
4.2.5 NAT
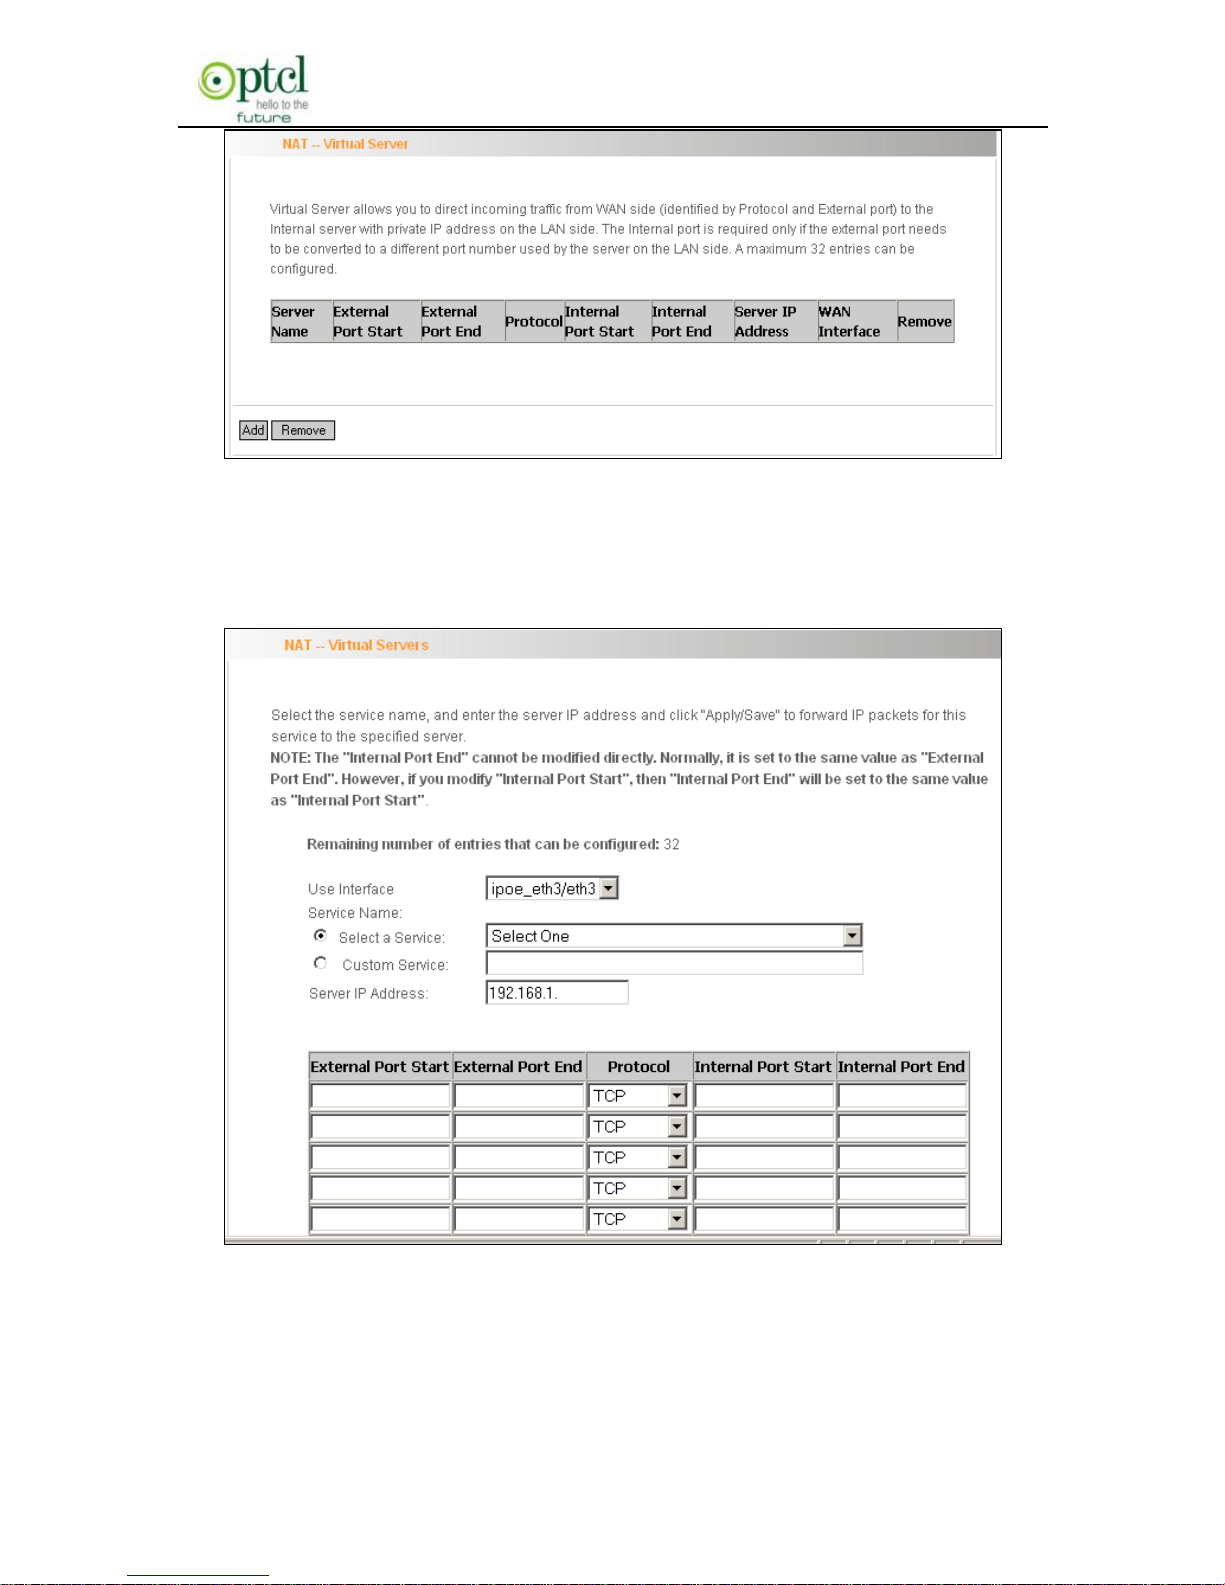
Virtual Server
When you create a server such as a Web server, FTP server or game
server in your router’s LAN side, you can let Internet users access the
created server through the router’s WAN IP address by configuring
virtual server.
Page 58
150M Wireless N ADSL2+ Router
- 57 -
To enter virtual server interface, click ―NAT‖-> ―Virtual Server‖. And then
click the ―Add‖ button to add rules for accessing the server.
Use Interface: It indicates which WAN connection the configured
rules are to be applied to. When there is only one configured WAN
connection available, system will select it automatically.
Page 59

150M Wireless N ADSL2+ Router
- 58 -
Service Name: There are two options available: (1) Select a
Service: allows you to select an existing service from the
drop-down list box. (2) Custom Service: allows you to define a
service yourself.
Server IP Address: The IP address of the server created on LAN
side.
External Port Start/ External Port End: The port range through
which Internet users access the router’s LAN side server.
Protocol: There are 3 options: TCP, UDP and TCP/UDP. We
recommend you to select TCP/UDP if you are not sure about
which protocol to choose.
Internal Port Start/ Internal Port End: The port range used by
the created server on router’s LAN side.
Note: When UPNP function is enabled on the router and on some
application programs on the computer that is connected to the router’s
LAN port, the virtual server page will display: UPNP interface is being
used.
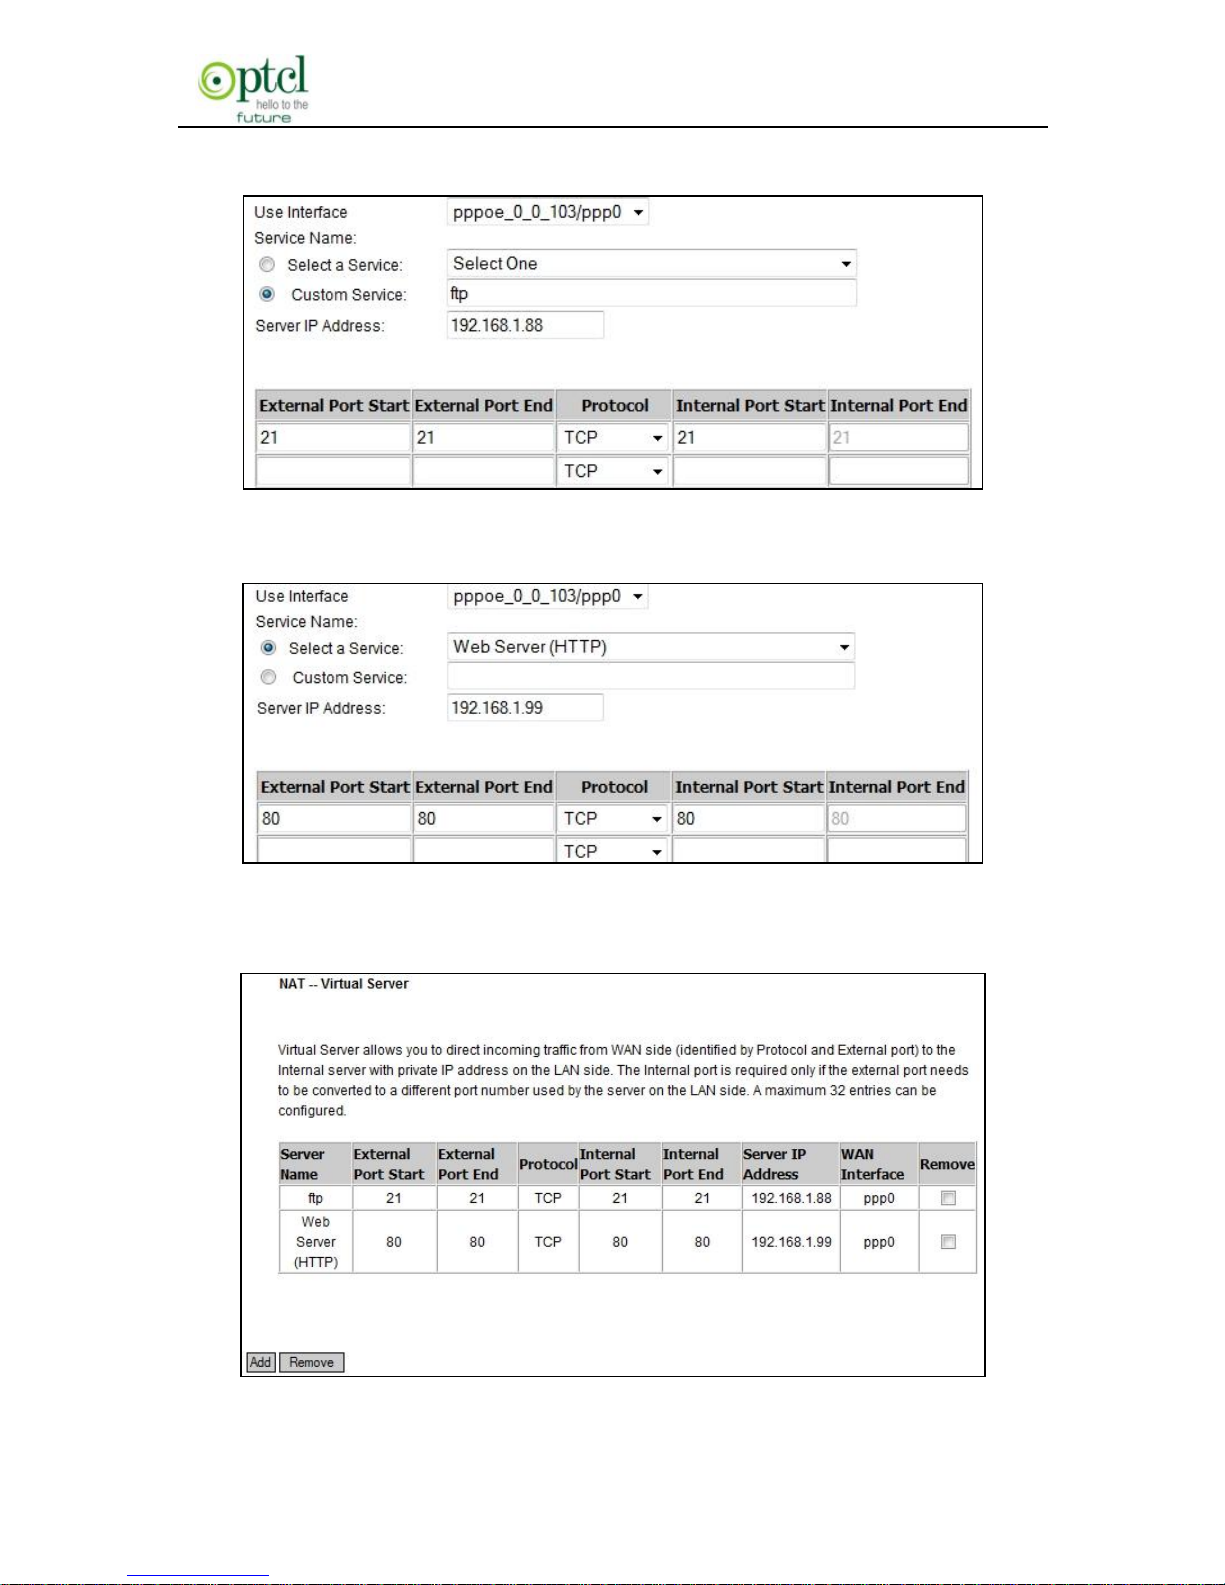
For example: You have created 2 servers on the router’s LAN side: (1)
FTP server (Port: 21) for transferring files is at the IP address of
192.168.1.88 (2) Web server (port: 80) is at the IP address of
192.168.1.99. And you want your Internet friends to access your FTP
and Web servers respectively via port: 21 and port: 80. For
configurations, follow the instructions below:
1. Configuring FTP server:
Click ―NAT‖-> ―Virtual Server‖ to enter the virtual server interface. And
then click the ―Add‖ button to configure the following page (refer to the
Page 60
150M Wireless N ADSL2+ Router
- 59 -
parameters that are configured on the page):
2. Configuring Web server
The screen appears as below after the above configuration is finished:
Page 61
150M Wireless N ADSL2+ Router
- 60 -
Supposing that the IP address of PPP0 is 183.37.227.201, then the
Internet user only needs to enter ftp://183.37.227.201 or http:
//183.37.227.201 in Web browser address field to respectively access
your FTP or Web server.
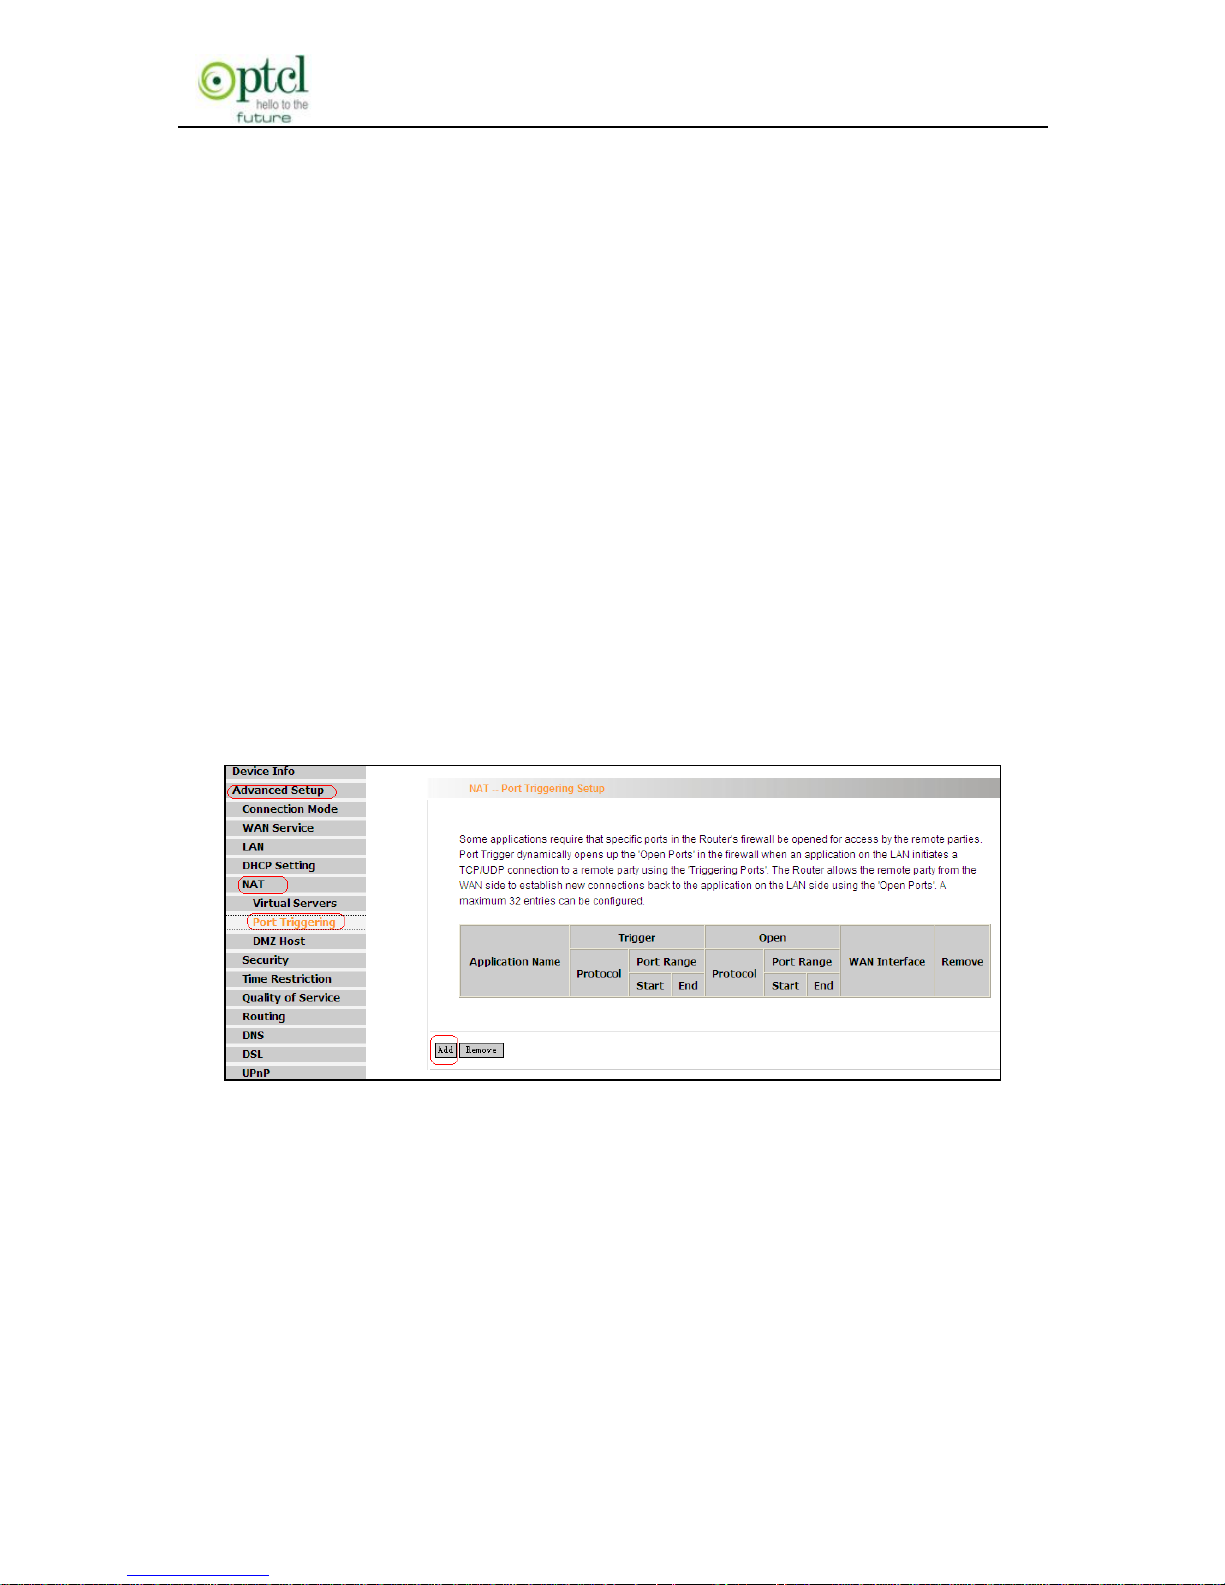
4.2.6 Port Triggering
Some application programs or network business (such as network
game, video conference, etc) can not work with simple NAT router due
to the isolation caused by router’s built-in firewall. Therefore, proper
configuration is needed. When application program initiates a
connection toward the triggering port, all correspondingly open ports
will be enabled to implement successful connection and service.
Click ―Advanced Setup‖―NAT‖―Port Triggering‖ to enter the port
triggering interface and then click the ―Add‖ button to add rules.
Page 62
150M Wireless N ADSL2+ Router
- 61 -
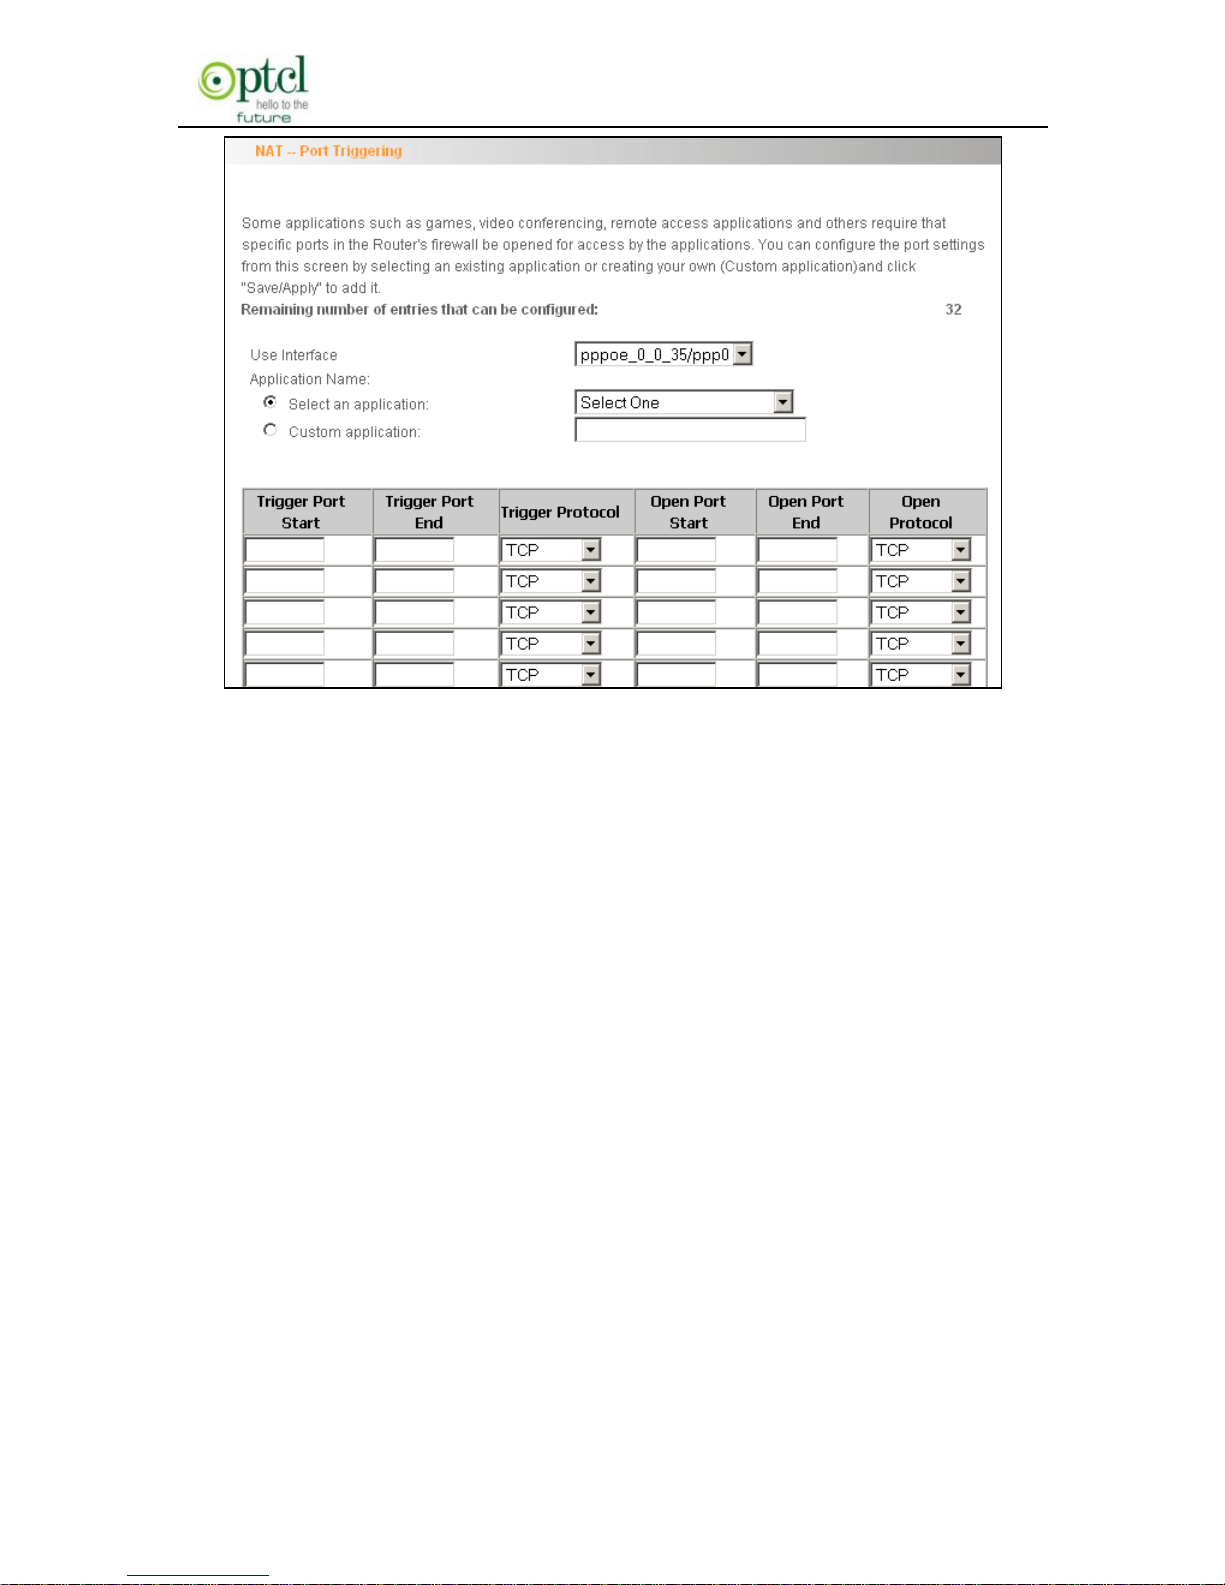
Use Interface: It indicates which WAN connection the configured
rules are to be applied to. When there is only one configured WAN
connection available, system will select it automatically.
Application Name: There are two options available:
(1) Select an application: allows you to select an existing application
from the drop-down list box.
(2) Custom application: allows you to define an application
yourself.
Trigger Port Start/ Trigger Port End: The port range for
application programs to initiate connections.
Trigger Protocol: There are 3 options: TCP, UDP and TCP/UDP.
We recommend you to select TCP/UDP if you are not sure about
which protocol to choose.
Open Port Start/ Open Port End: the port range that will be
Page 63
150M Wireless N ADSL2+ Router
- 62 -
automatically enabled by the built-in firewall when connections
initiated by application programs succeed.
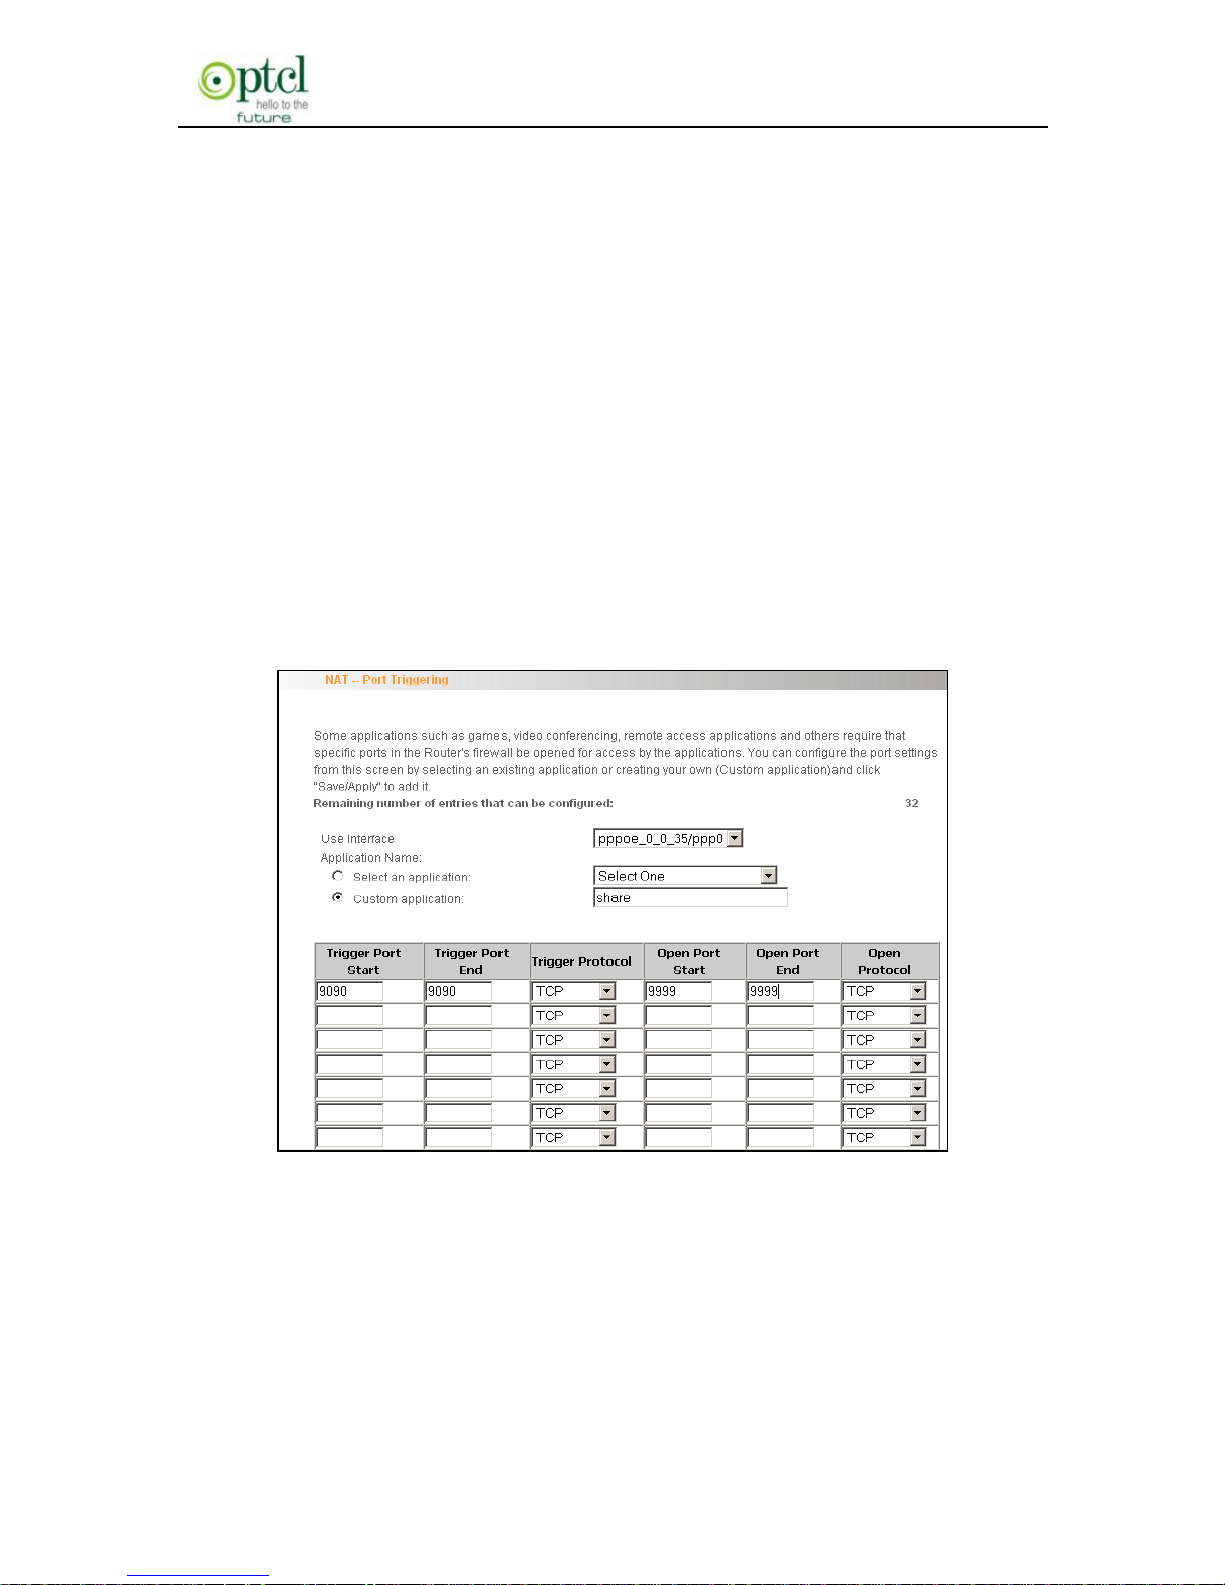
For example: You have created a server on router’s LAN side that can
automatically download material from Internet (via port: 9090) and
share its data with other users. And you want Internet users to
download data from your server (via port: 9999). For configurations,
follow the instructions below:
To enter the port triggering interface, click ―Advanced Setup‖
―NAT‖―Port Triggering‖, and then click the ―Add‖ button to configure
the page below (Refer to the parameters configured on the page
below):
When your server initiates a connection toward the server on Internet
via port: 9090, the router’s firewall will automatically open port: 9999 to
let Internet users access your server to download data via this port:
9999.
Page 64
150M Wireless N ADSL2+ Router
- 63 -
4.2.7 DMZ Host
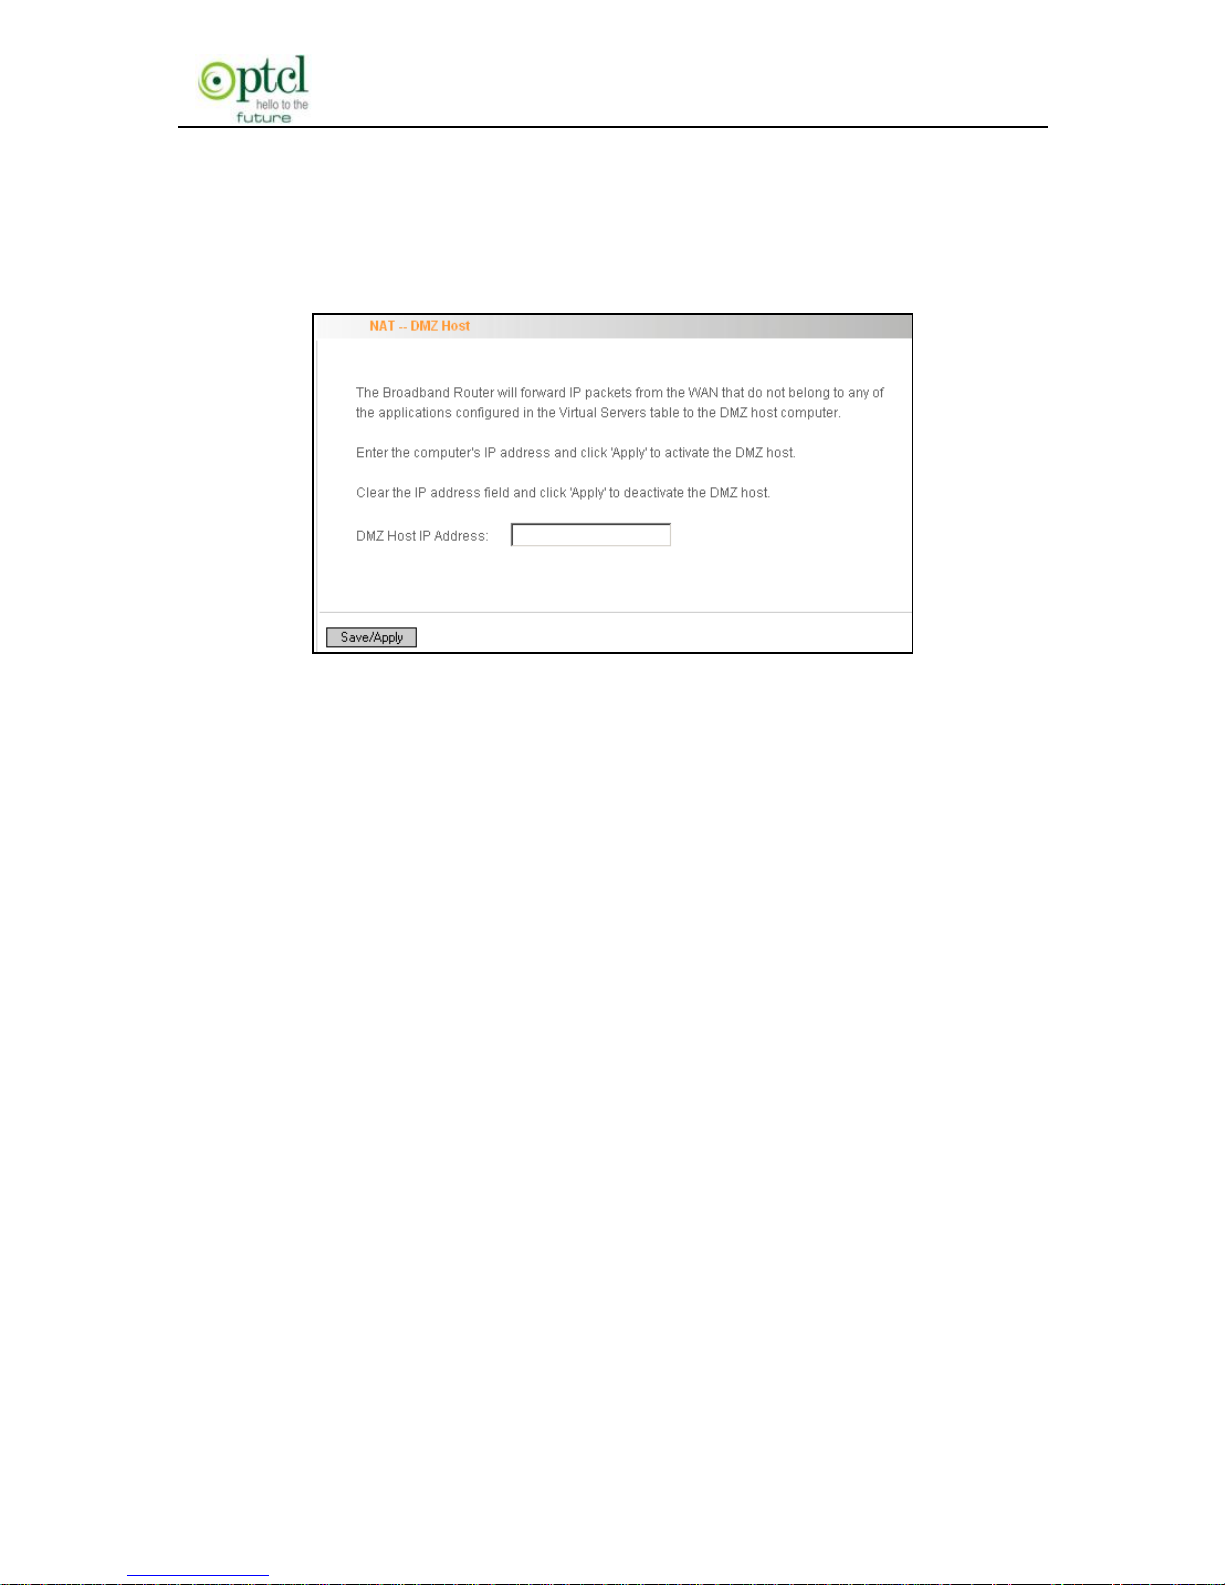
Once a PC on a LAN is set as a DMZ host, it can implement network
communication with Internet without limit.
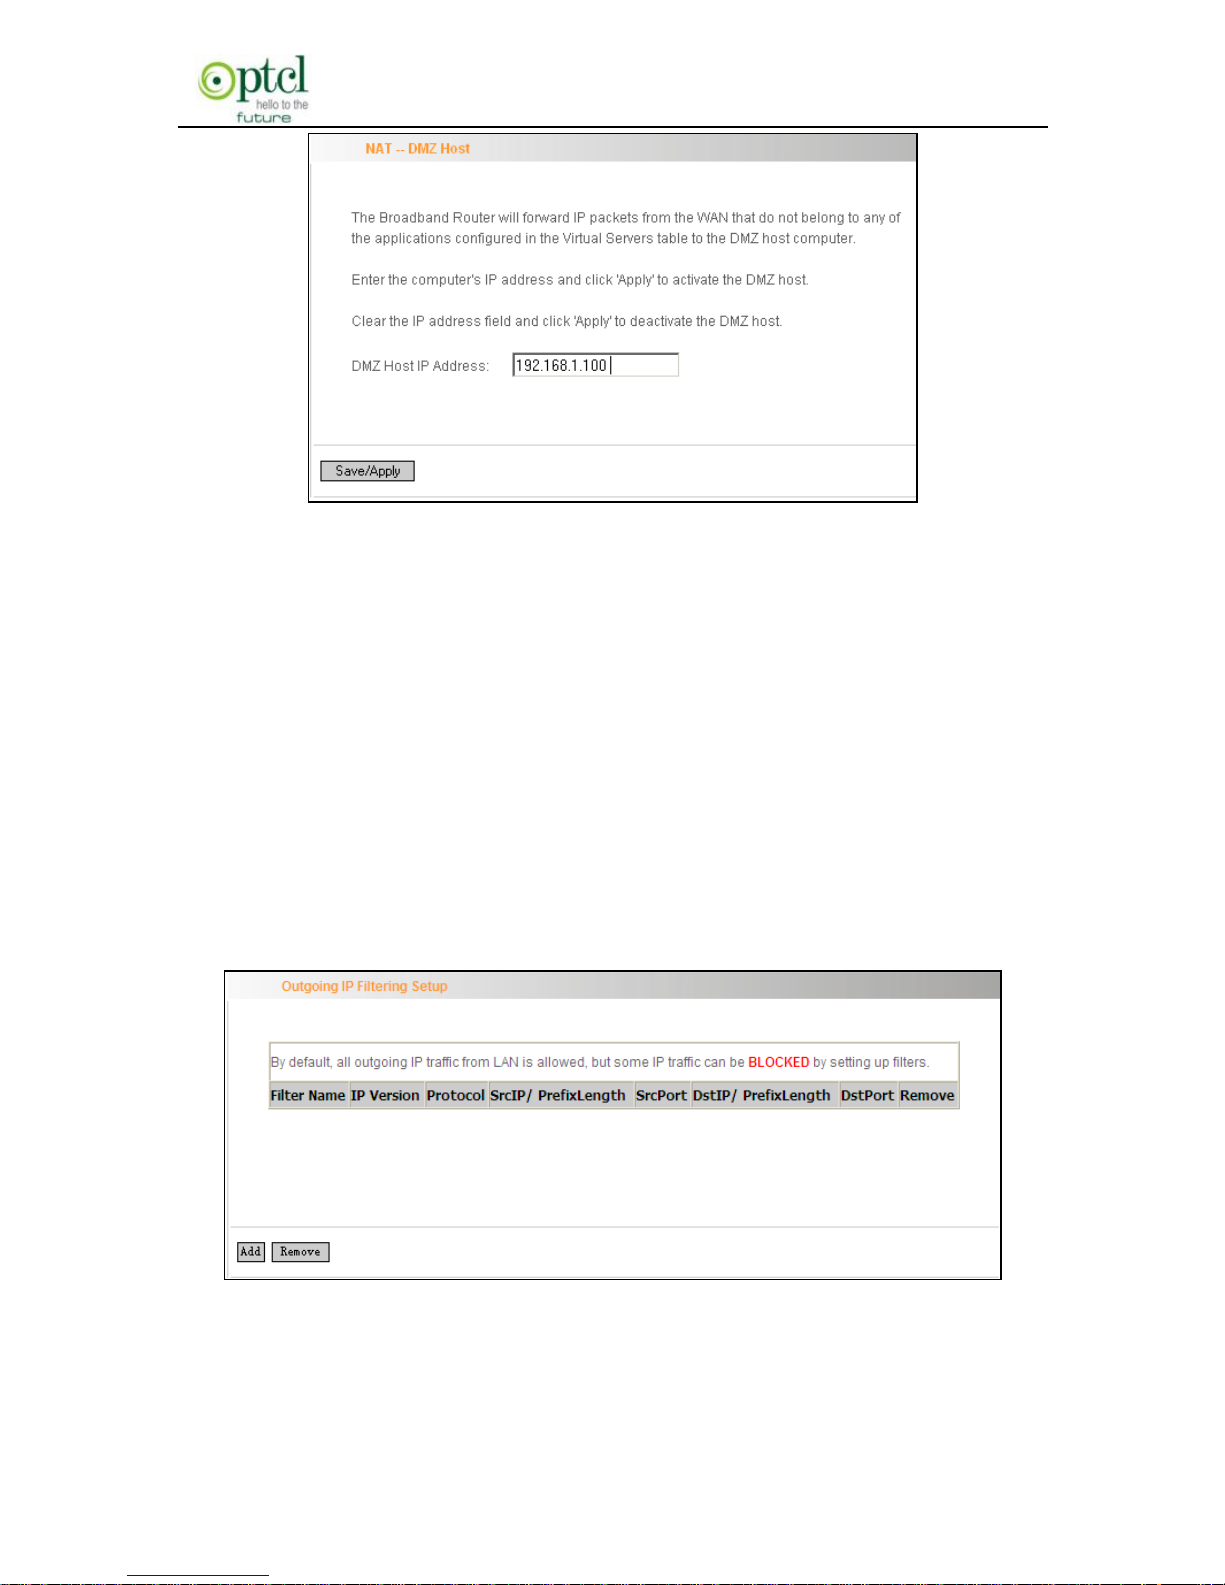
DMZ Host IP Address: the IP address of a PC to be set as a DMZ
host. DMZ host must be connected to the router’s LAN port.
Note: The router’s firewall can not have effect on the DMZ host once it
is enabled. So network security problem may occur. Thus we
recommend you to enable this function only when necessary and delete
the corresponding settings as soon as you are not using it.
For example: If you want the PC at the IP address of 192.168.1.100
from your router’s LAN side to be shared by Internet users for data and
other resources. For configurations, follow the instructions below:
Click ―Advanced Setup‖----―NAT‖---―DMZ Host‖ to configure the page
below:
Page 65
150M Wireless N ADSL2+ Router
- 64 -
Supposing that the router’s WAN IP address is 183.37.227.201, then
the Internet user only needs to enter http://183.37.227.201 in Web
browser address field to access your Web server.
4.2.8 Security
IP Filter
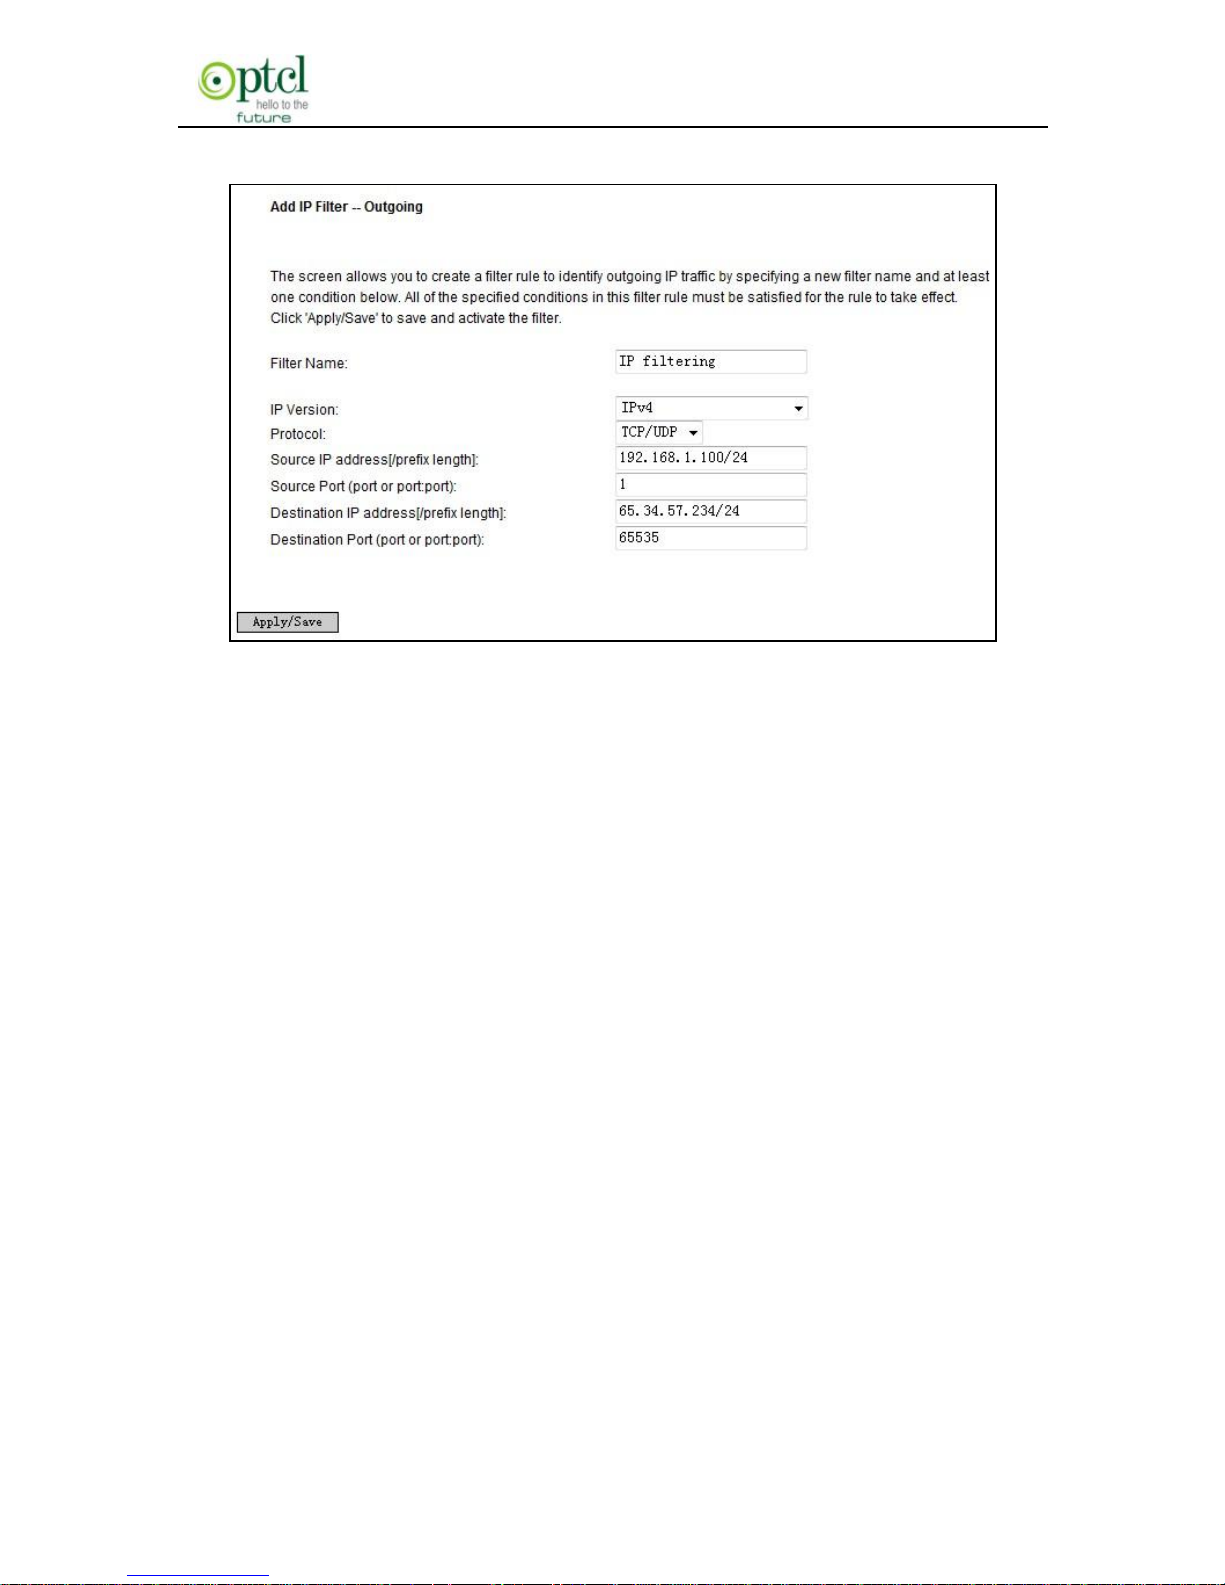
IP filter function can block LAN PCs from communicating with Internet
PCs by preventing specific IP addresses from accessing external
network through router via specific a port number or range.
1) Click ―Advanced Setup‖ → ―Security‖ → ―IP Filtering‖ to display the
page above and then click the ―Add‖ button to enter the page
Page 66
150M Wireless N ADSL2+ Router
- 65 -
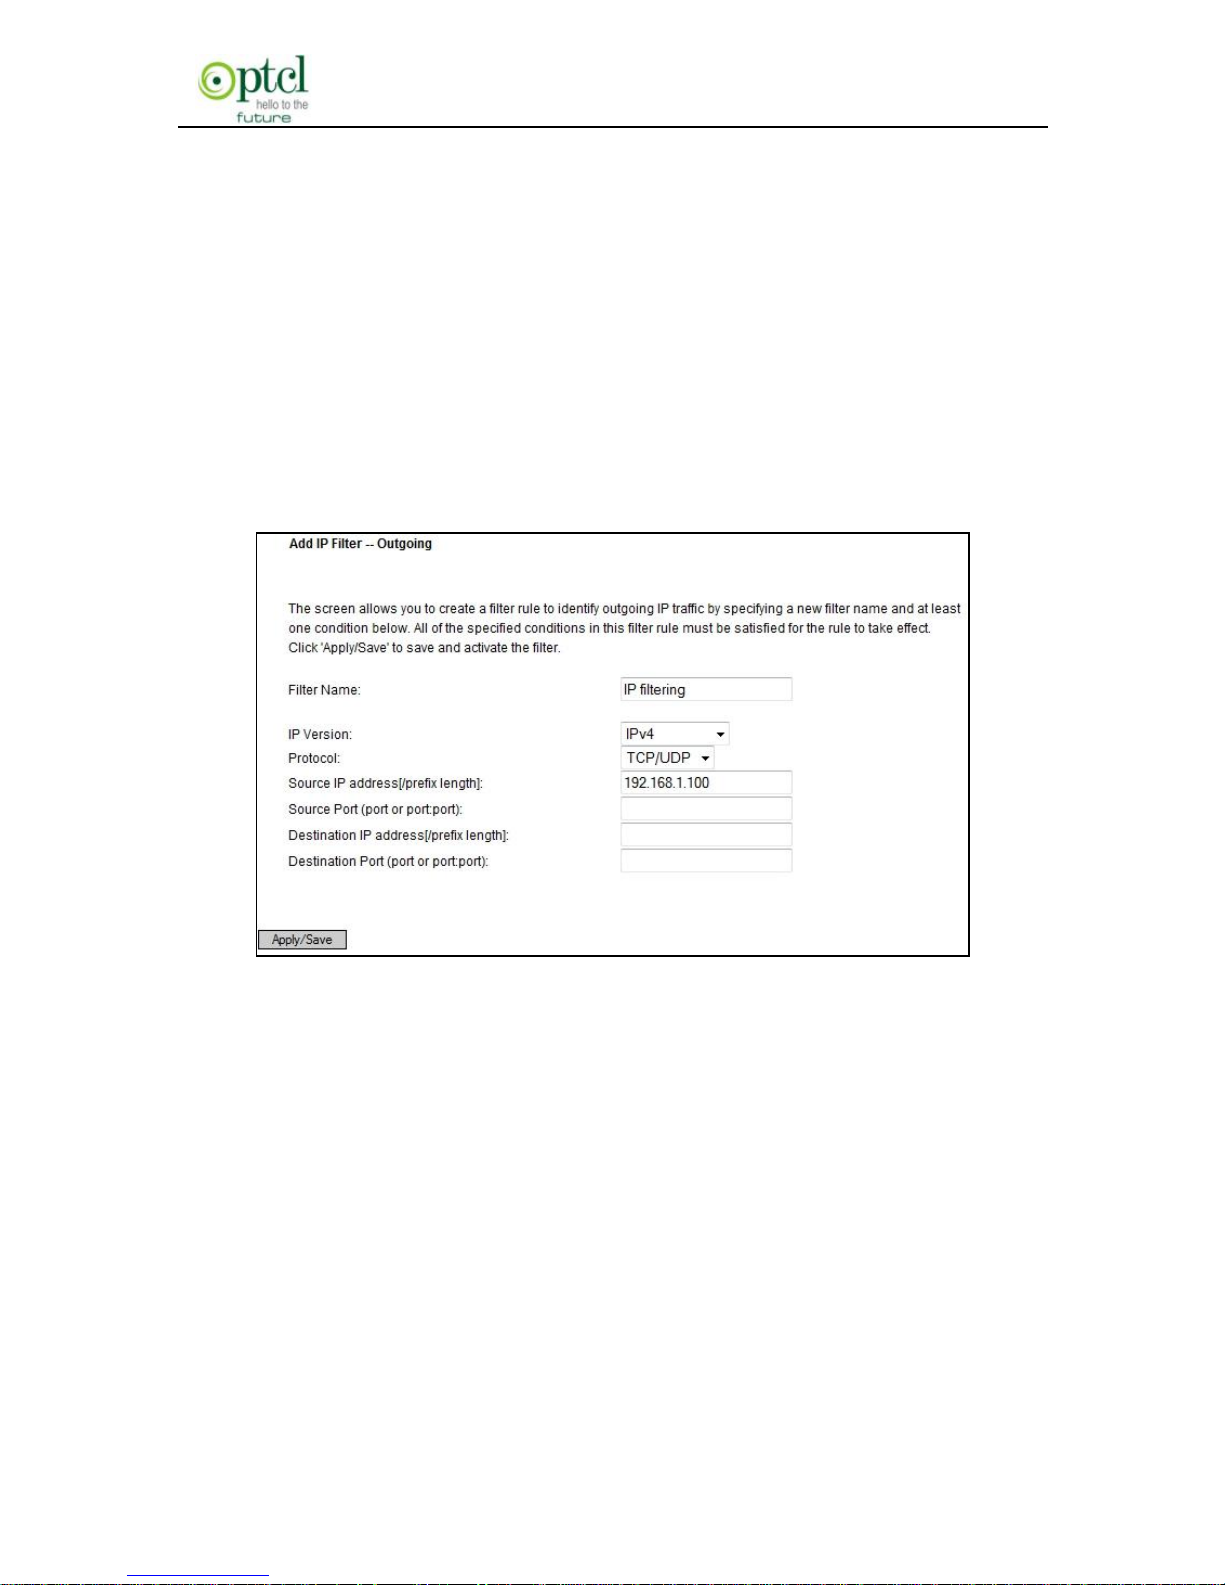
below to add filtering rules.
Filter Name: Enter the defined filtering name.
IP Version: Only Ipv4 is provided.
Protocol: TCP/UDP; TCP; UDP; ICMP available for your option.
Source IP address [/prefix length]: Enter the LAN IP address to be
filtered.
Source Port (port or port:port): The port number or range used by
LAN PCs in accessing Internet .
Destination IP address [/prefix length]: The external network IP
address to be accessed by LAN PC.
Destination Port: The port number or range used by LAN PCs in
accessing external network.
Note:
Packets filtered in this function are transferred from LAN to WAN.
If you are not familiar with all parameters to be configured, you
can just configure some of them and keep the left unchanged. And
Page 67
150M Wireless N ADSL2+ Router
- 66 -
the filtering function can also be implemented.
For example:
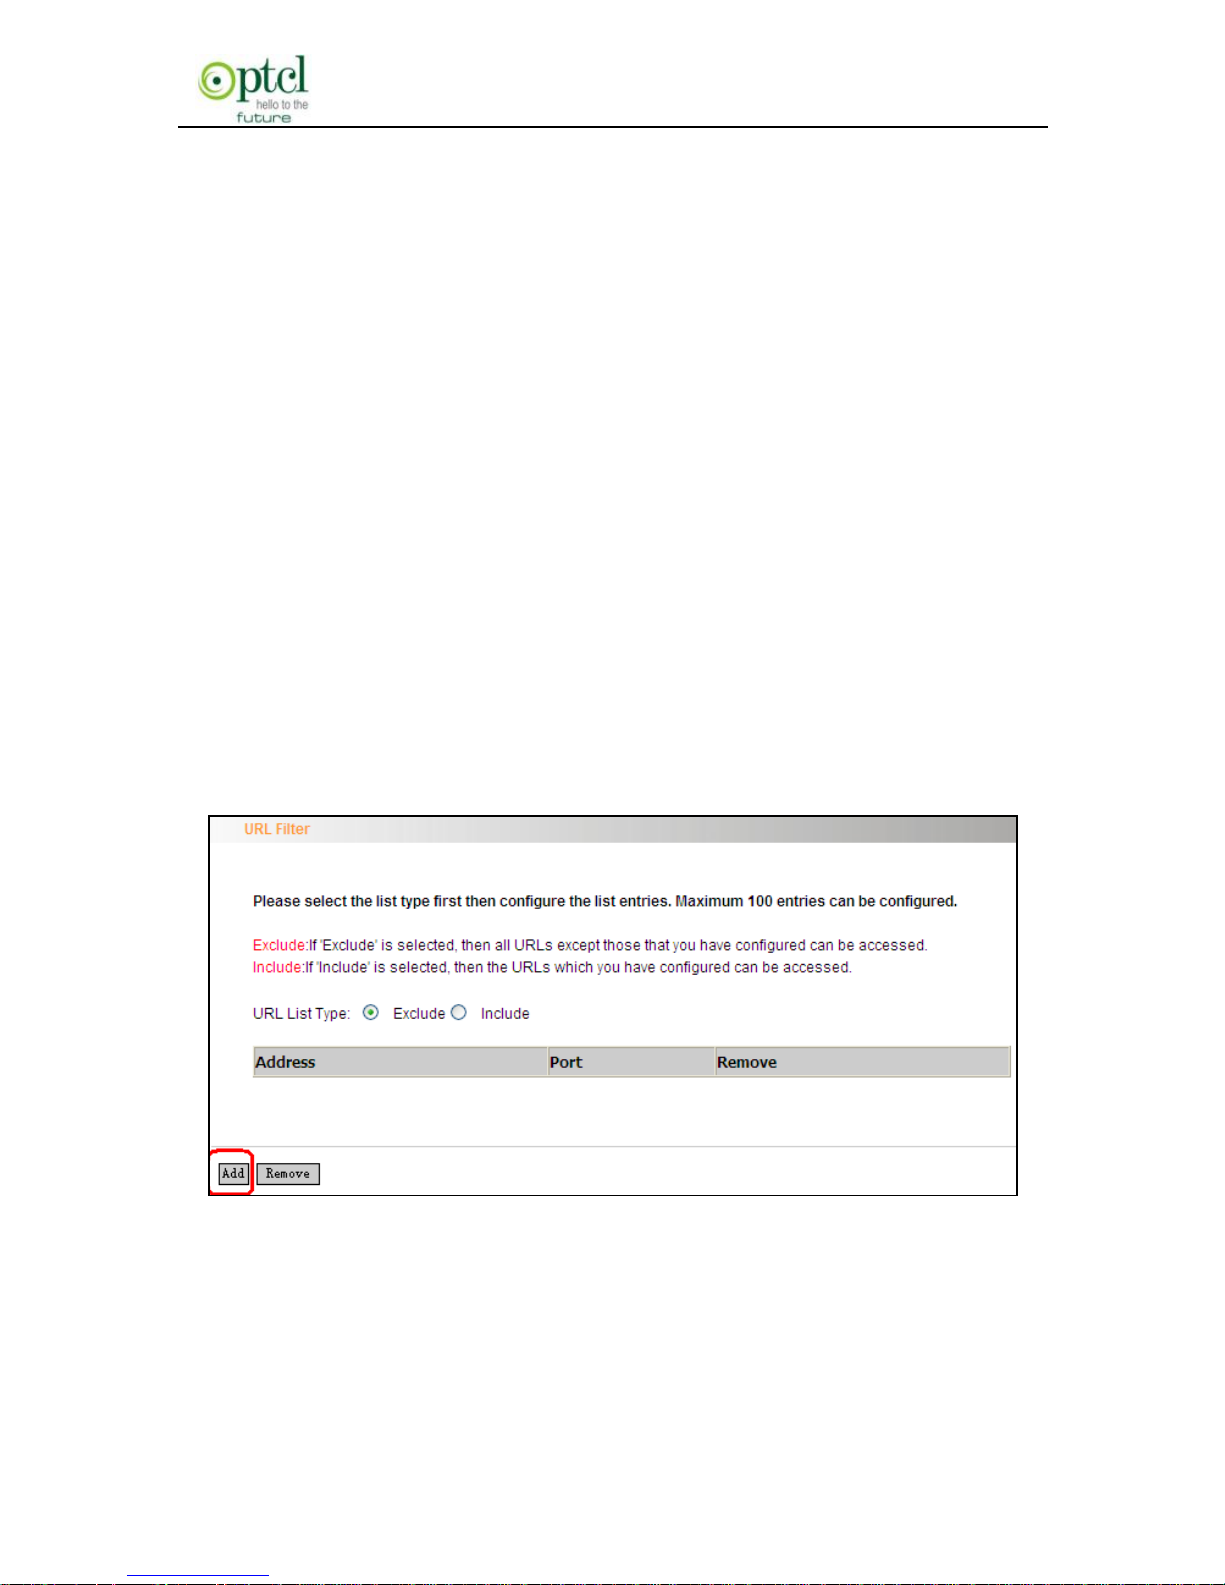
If you want to filter the PC at the IP address of 192.168.1.100 and make
it unable to access Internet. Then follow the instructions below:
First, click ―Advanced Setup‖ → ―Security‖ → ―IP Filtering‖ to enter the
IP filtering setup page and then click the ―Add‖ button to enter the page
below to configure needed parameters as below:
And then click the ―Apply/Save‖ button to save your setting.
Note:
Principle of using ―IP Filter‖ funciton to prohibit BT download:
when you use BT software to download data, it needs to send
request for connectting ―seed‖ server, and when this request
passes the router, the router’s IP Filter function will hold it up and
ignore the request so that BT fails to connect the server and
download will be aborted.
Page 68
150M Wireless N ADSL2+ Router
- 67 -
The ports that BT ―seed‖ server frequently uses are in the range of
6900-8100 such as 6969,8000 and 7373. So we can block this
port range by creating proper rules to stop BT software from
connecting the server. However, some Non-BT ―seed‖ servers are
also using port 8080, thus, in order not to affect other servers, we
must divide the port range of 6900-8100 to be blocked into 2
groups: 6900-8079 and 8081-8100 .
The protocols that BT uses is TCP/UDP, so we need to block both
of them.
URL Filter
URL filter function blocks all LAN PCs from accessing specific domain
names on Internet. It rejects all requests to access the specific
domains.
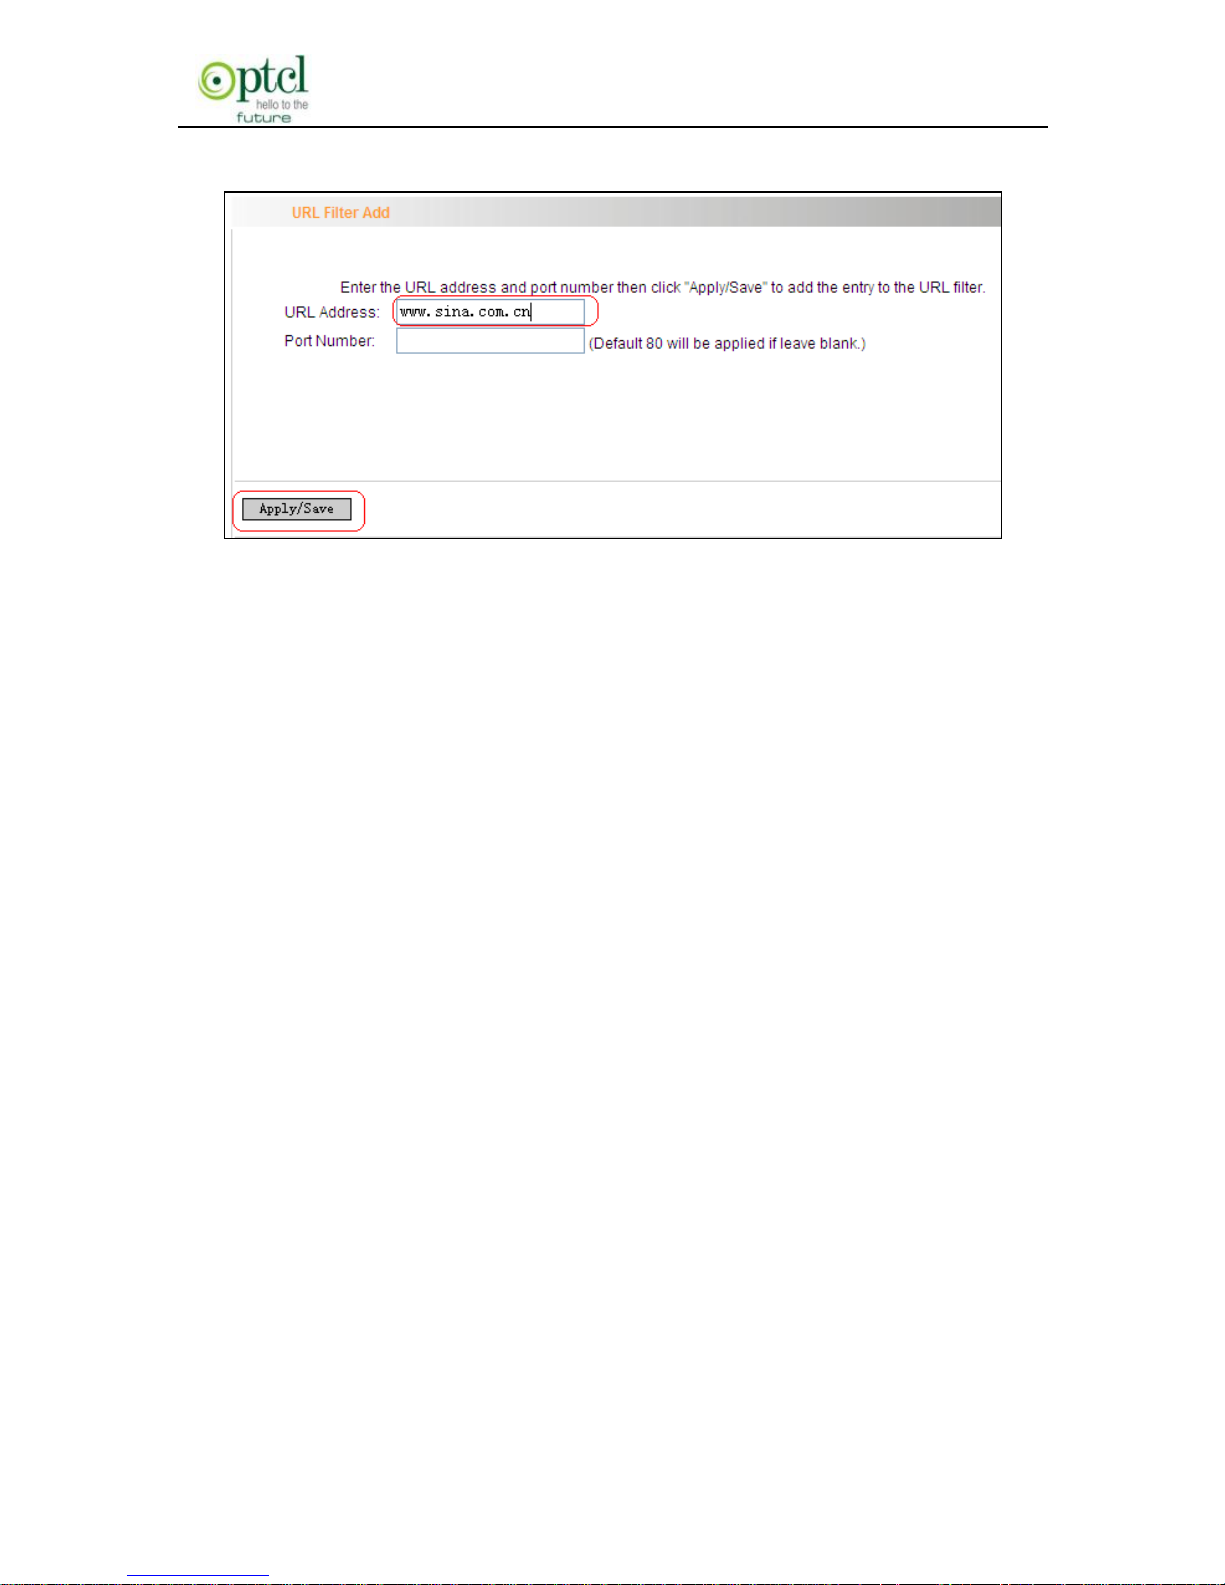
For example: If you want to prevent all LAN PCs from accessing
www.sina.com.cn, then follow the instructions below:
Click ―Advanced Setup‖―Security‖―URL Filter‖ to the page above
and then click the ―Add‖ there to enter the page below to configure
Page 69
150M Wireless N ADSL2+ Router
- 68 -
needed parameters:
URL Address: Enter the domain name that rejects LAN PCs access.
Port Number: The port used by Web server, 80 by default.
Then click the ―Apply/Save‖ button to save your settings. And all LAN
PCs can not access www.sina.com.cn.
Note: After you have added the URL filter rule, if you previously
accessed this URL, then you need to reboot the router and delete your
PC’s cache to activate the function. However, you can access the
deleted URL without rebooting the router after you delete a filter rule.
4.2.9 Time Restriction
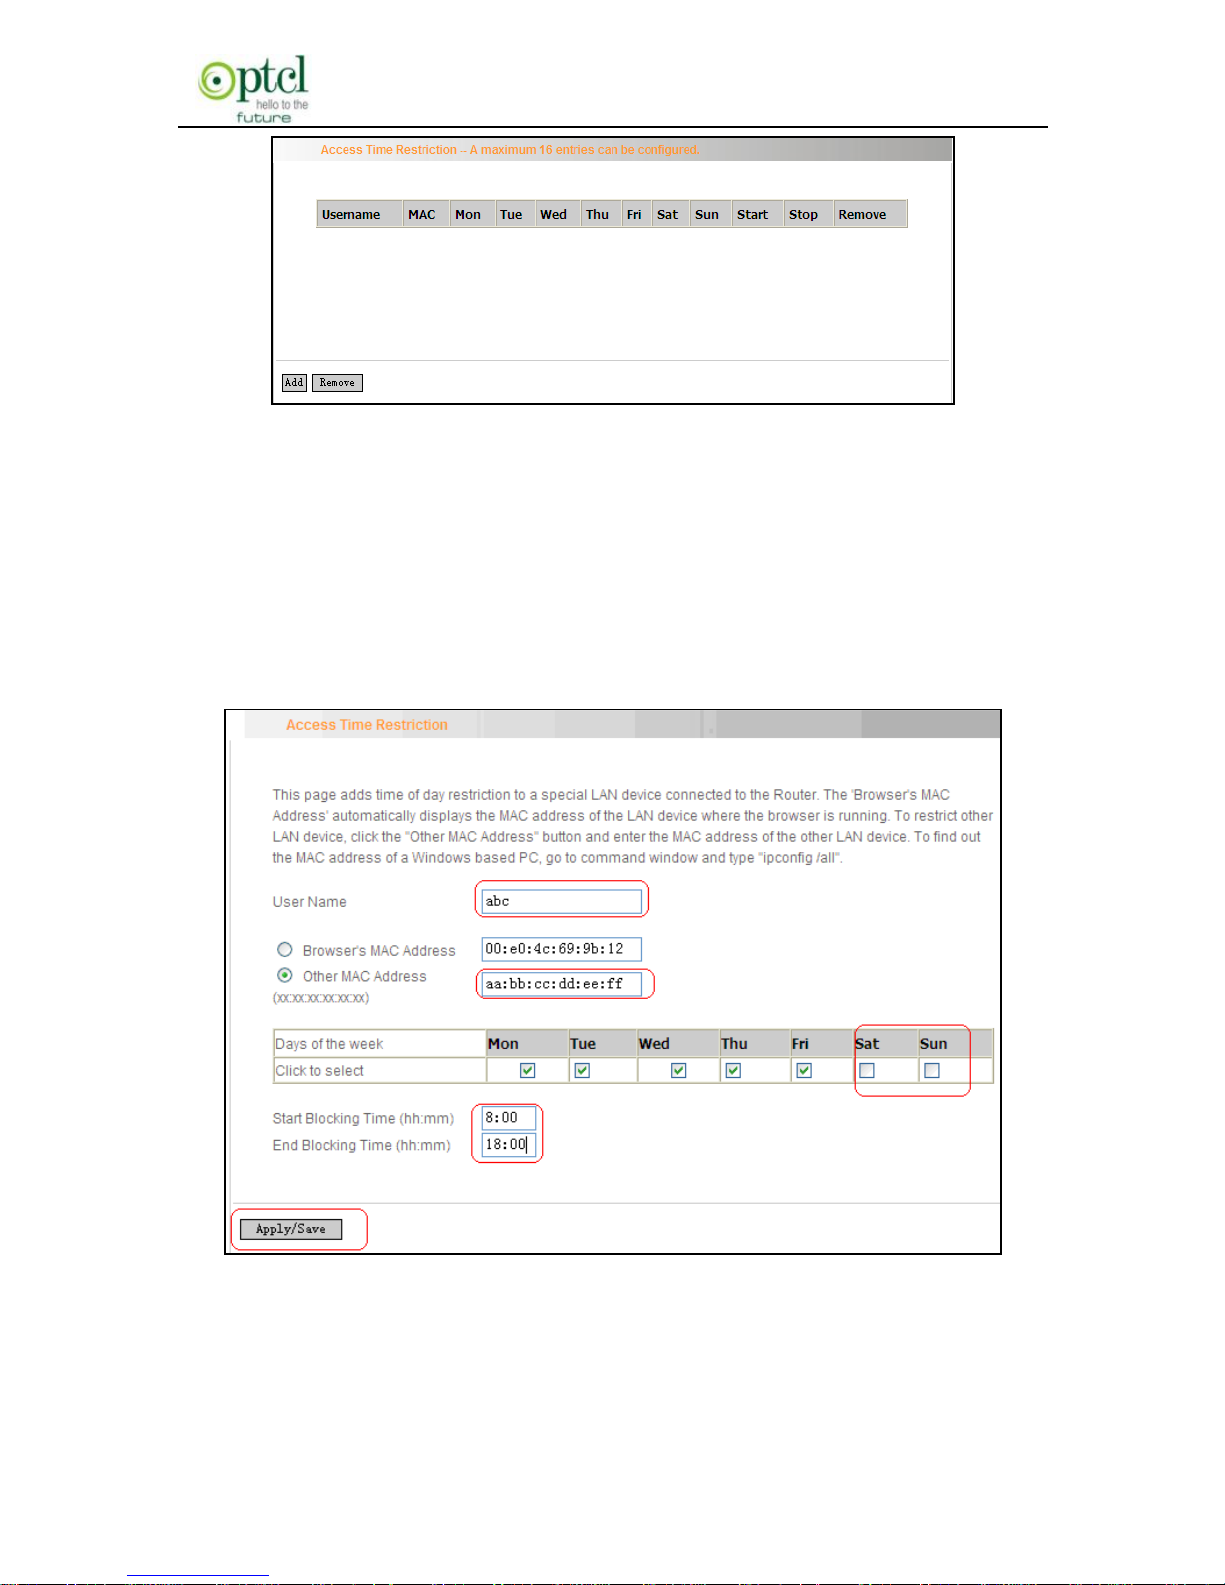
This function can restrict PCs or other network devices that are
connected to the router’s LAN ports to a specific Internet access time.
Page 70
150M Wireless N ADSL2+ Router
- 69 -
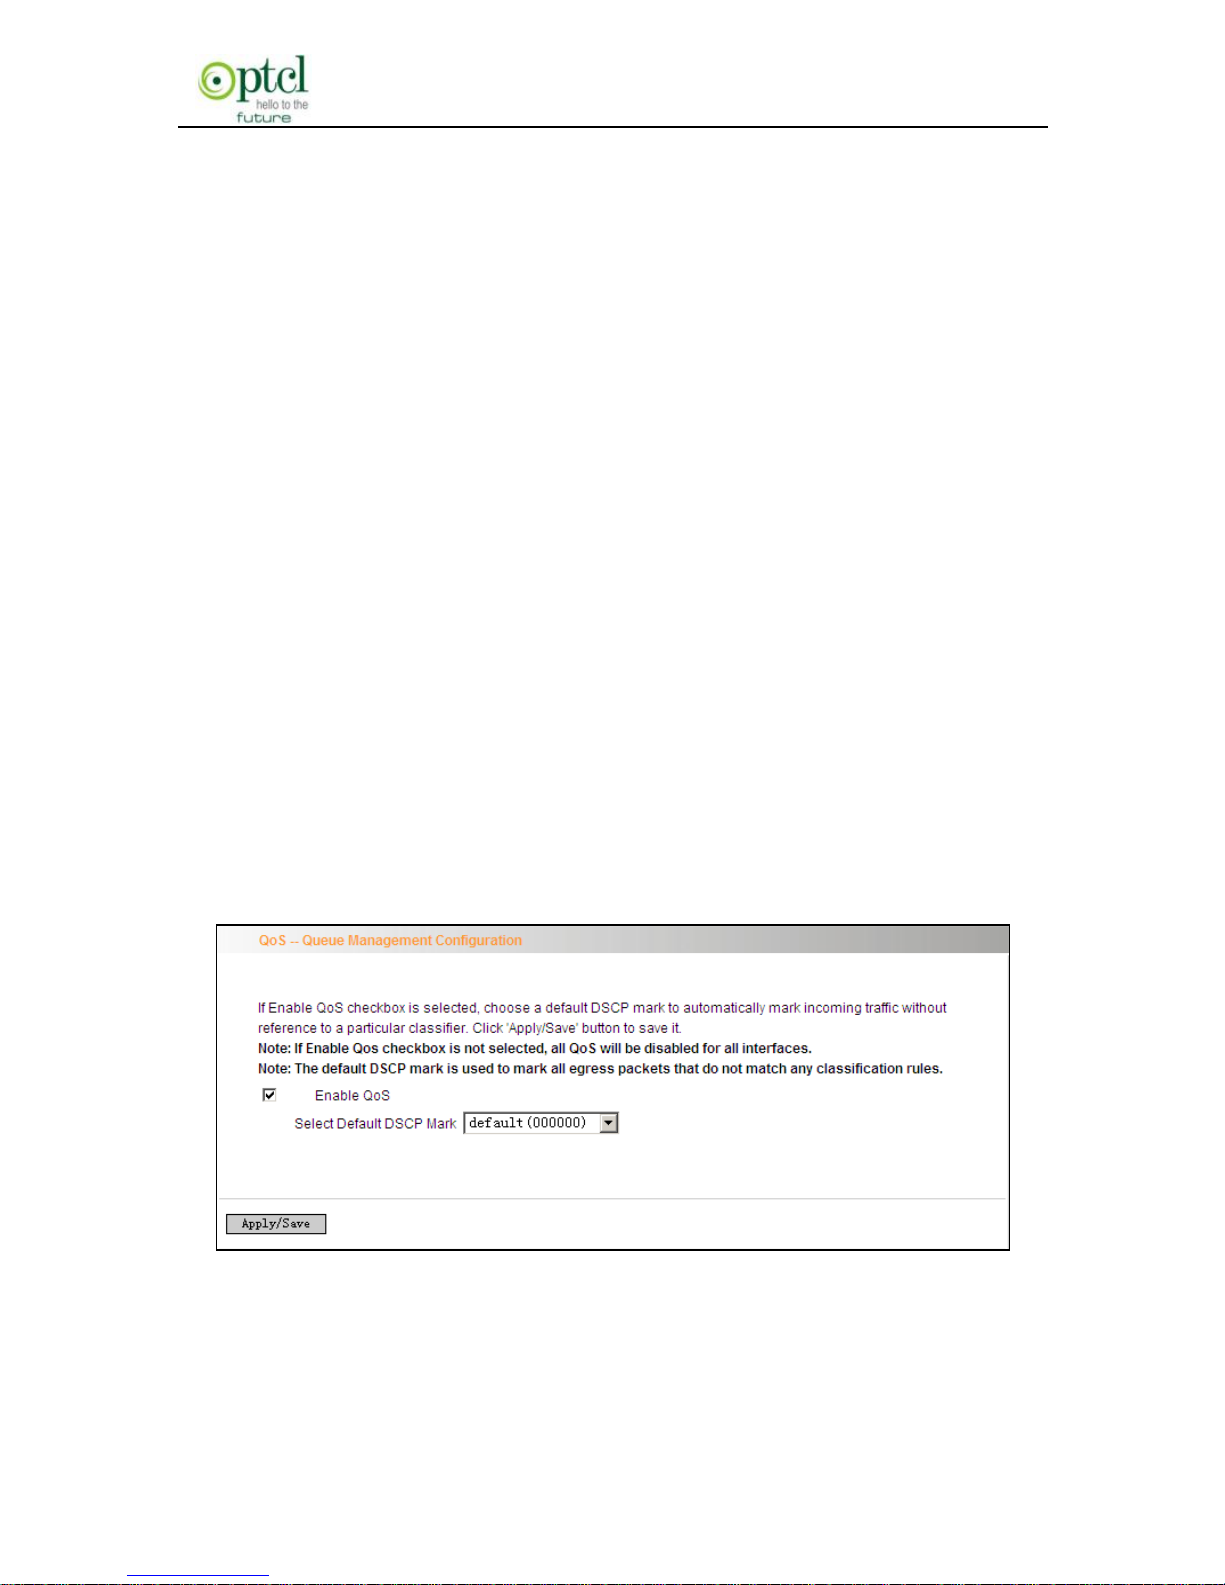
For example: If you want the PC at the MAC address of
aa:bb:cc:dd:ee:ff to access Internet on Saturday and Sunday only, then
follow the instructions below:
Click ―Advanced Setup‖―Security‖ ―Time Restriction‖ to enter the
screen above and then click the ―Add‖ button there to enter the screen
below to configure needed parameters:
User Name: Enter the defined user name by you.
Browser's MAC Address: The MAC address of the PC that is
currently accessing the router’s management interface; it is
Page 71
150M Wireless N ADSL2+ Router
- 70 -
automatically added by system.
Other MAC Address: The MAC address whose Internet access
time you want to restrict. Enter it manually.
Start Blocking Time (hh:mm) / End Blocking Time
(hh:mm): The time range during which Internet access is
blocked.
After configuration is finished, click the ―Apply/Save‖ button and the
MAC address of aa:bb:cc:dd:ee:ff can only access Internet on Saturday
and Sunday.
4.2.10 Quality of Service
Quality of service is the ability to provide different priority to different
applications, users, or data flows, or to guarantee a certain level of
performance to a data flow.
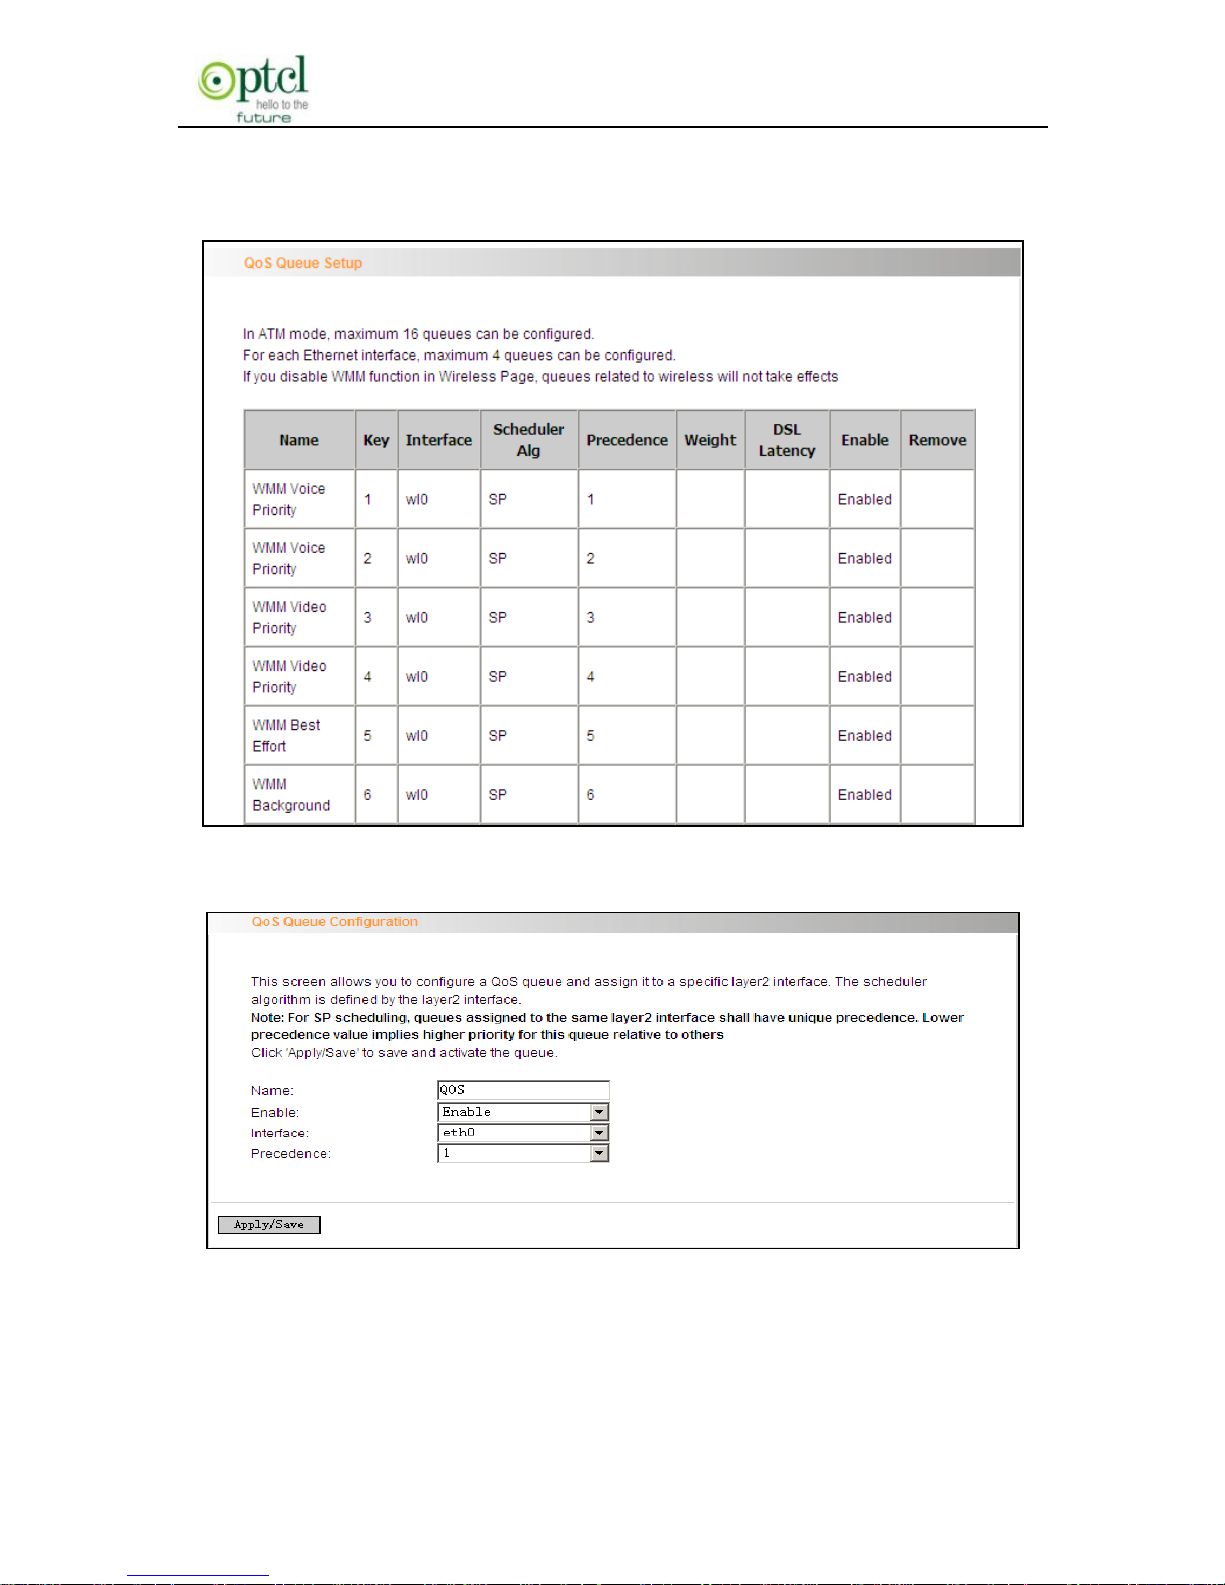
Select the ―Advanced Setup‖ ―Quality of Service‖ menu to enter the
following screen.
Select the ―Enable QoS‖ Checkbox, and select Default DSCP Mark
Value, then, Click 'Save/Apply' to save and activate the rule.
Queue Configuration
Page 72
150M Wireless N ADSL2+ Router
- 71 -
Click ―Advanced Setup‖-> ―Quality of Service‖-> ―Queue config‖ to
display the configured QoS rule.
Click ―Add‖ to enter the following screen to add rules.
Name: The name of the configured rule.
Enable: Enable/Disable the rule.
Page 73
150M Wireless N ADSL2+ Router
- 72 -
Interface: The interface that needs to configure priority. Precedence:
Set a priority for the selected interface.
Click ―Save/Apply‖ to save the settings.
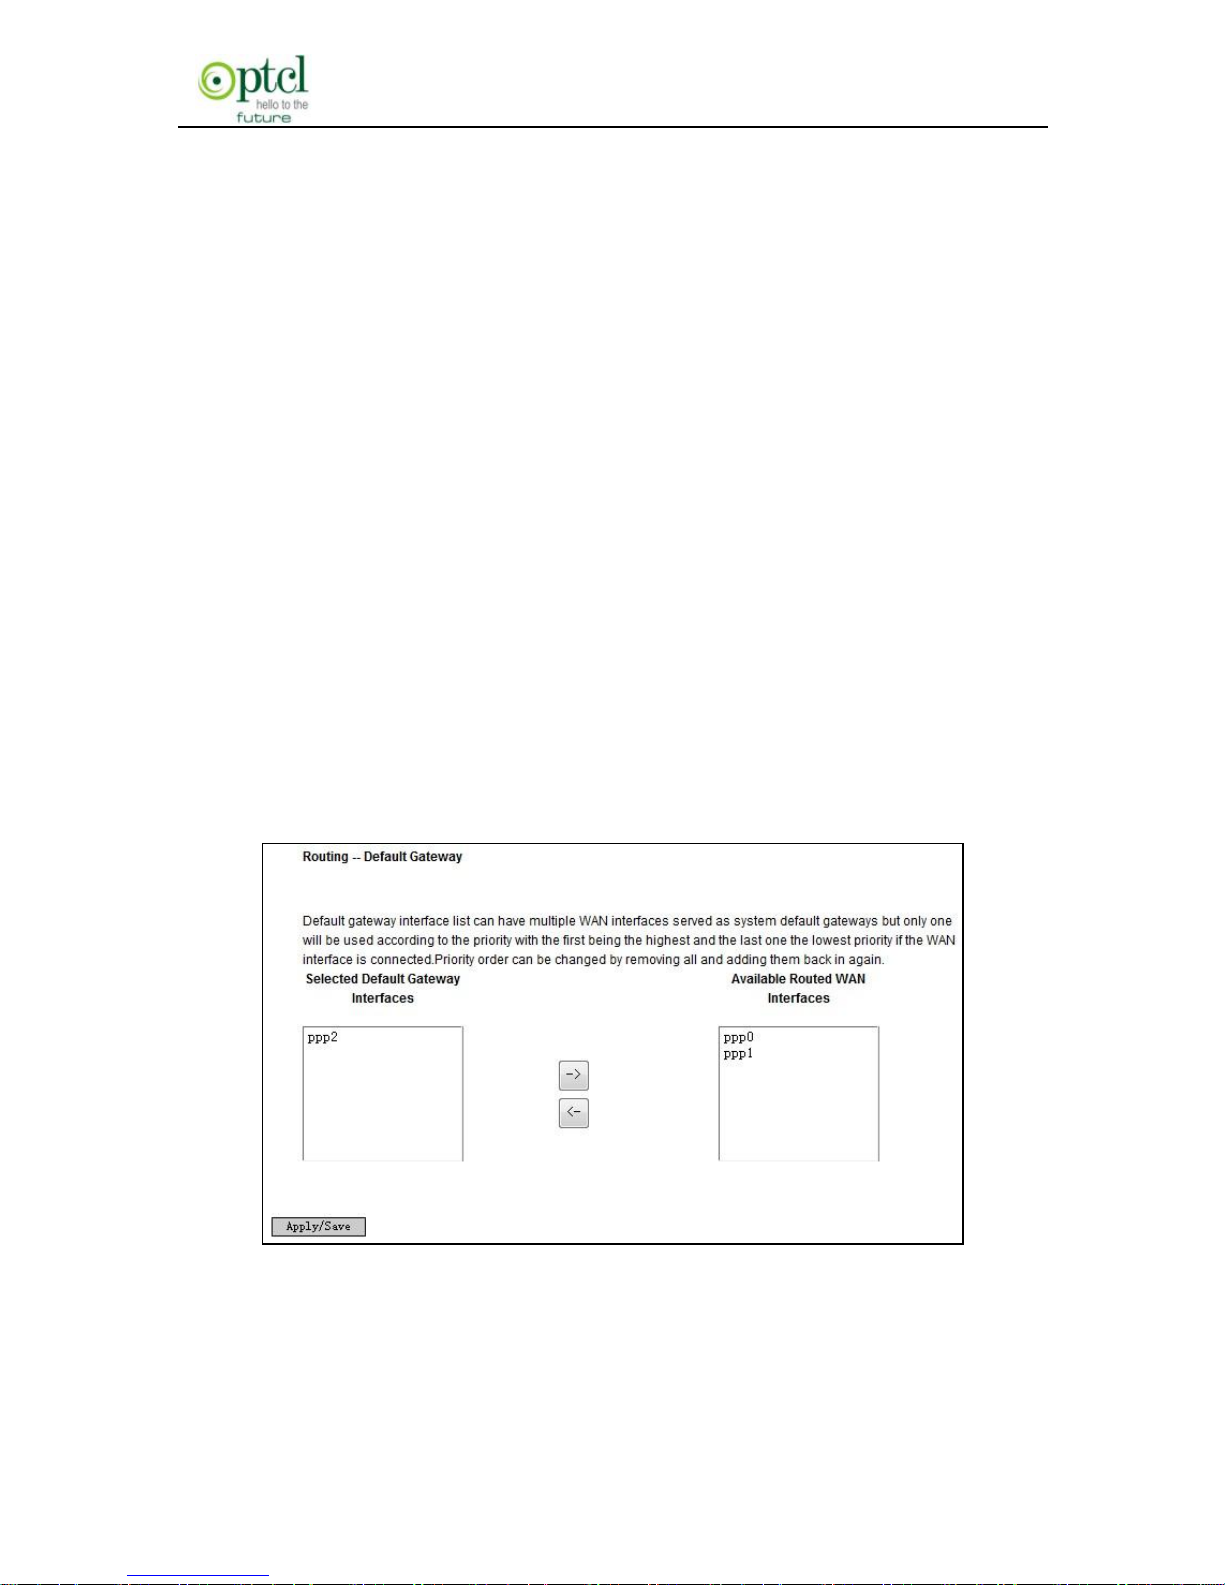
4.2.11 Routing
Default Gateway
Gateway is the path for sending packets when your computer is
communicating with computers on other networks. When there are
multiple WAN connections, the gateway must be specified, otherwise,
your computer may not be able to communicate with computers on
other networks. When there’s only one WAN connection, just keep the
default settings.
Click ―Advanced Setup‖-> ―Routing‖-> ―Default Gateway‖ to enter the
screen below.
Available Routed WAN Interfaces:Current existed WAN connection.
Selected Default Gateway Interfaces:WAN connection has already
been selected as the gateway.
Page 74
150M Wireless N ADSL2+ Router
- 73 -
Select the WAN connection that you want to set as the gateway and
click ―Apply/Save‖ to save the settings. The settings will be effective
after the system reboot.
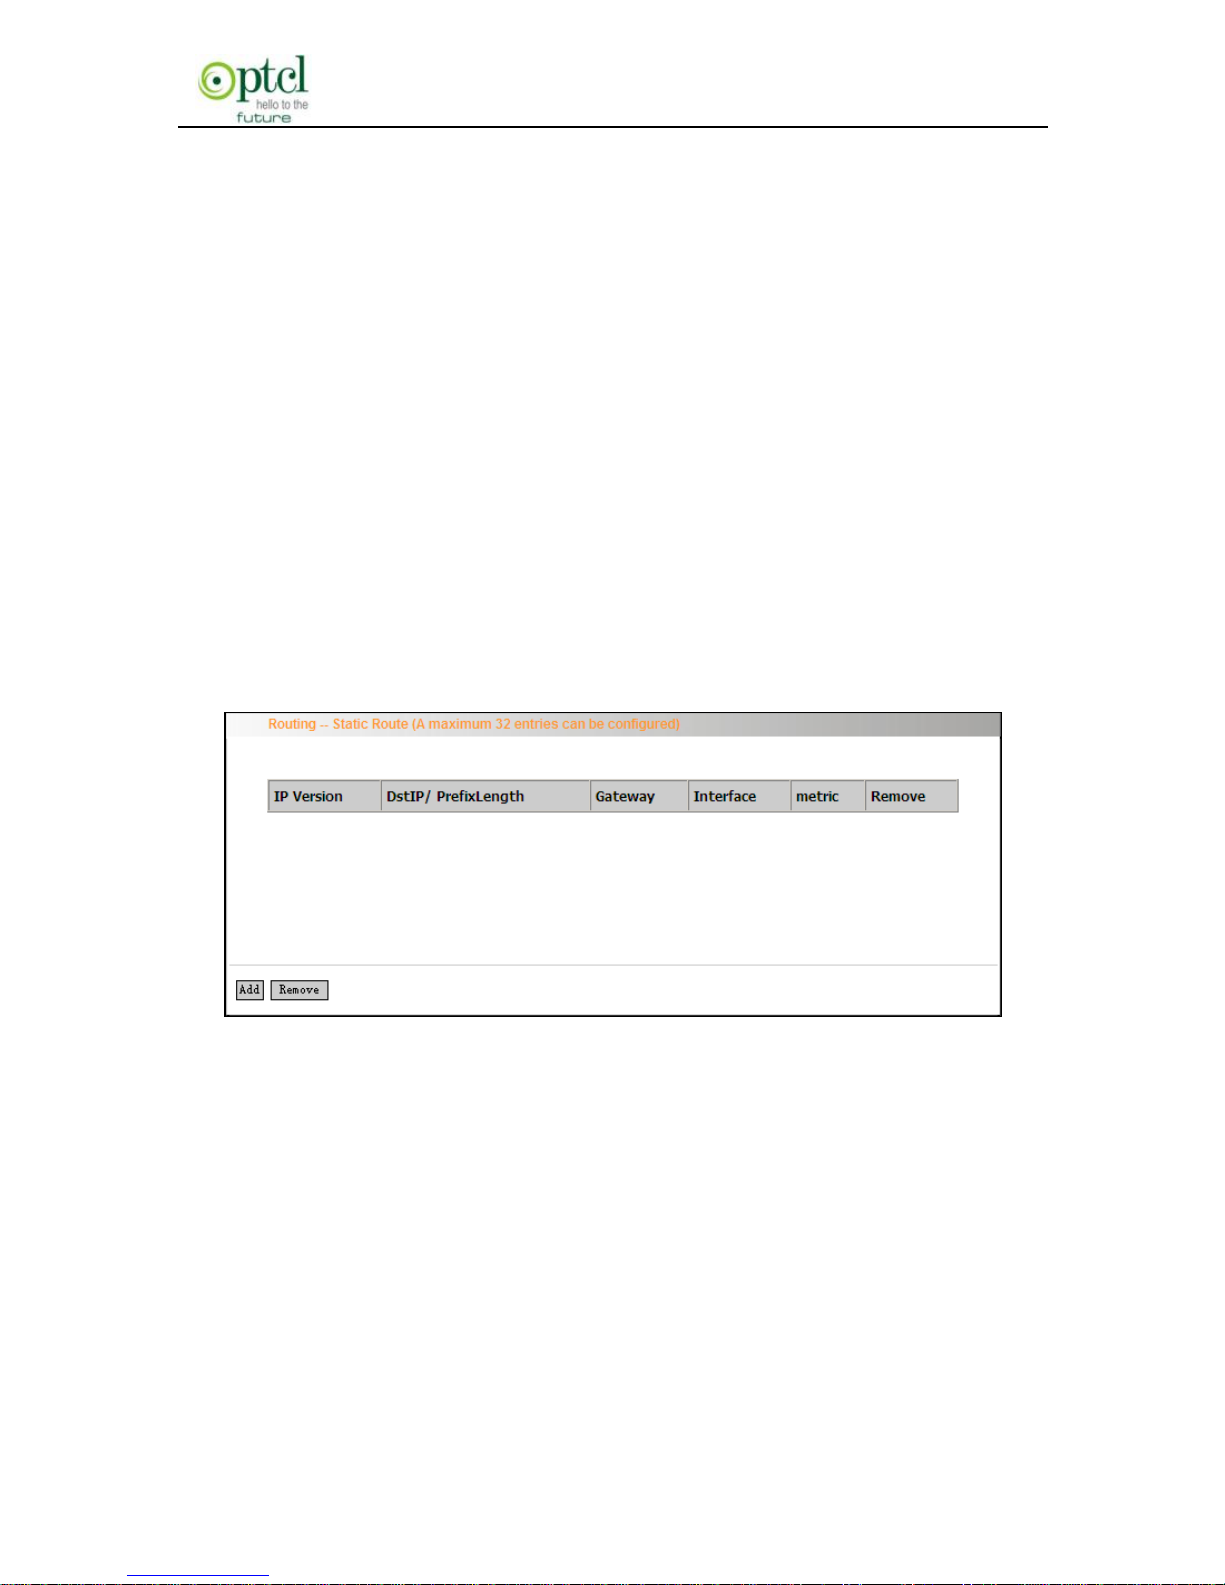
Static Route
Static Route is a special route. When you use proper static routing in
networks, you can reduce routing selection problems and the
forwarding rate of the data packets. IP address, subnet mask and
gateway can be set to specify a routing item. Destination IP address
and subnet mask can be used to specify an object network/ host. Then
the Router will send the packets to the specific object network/ host.
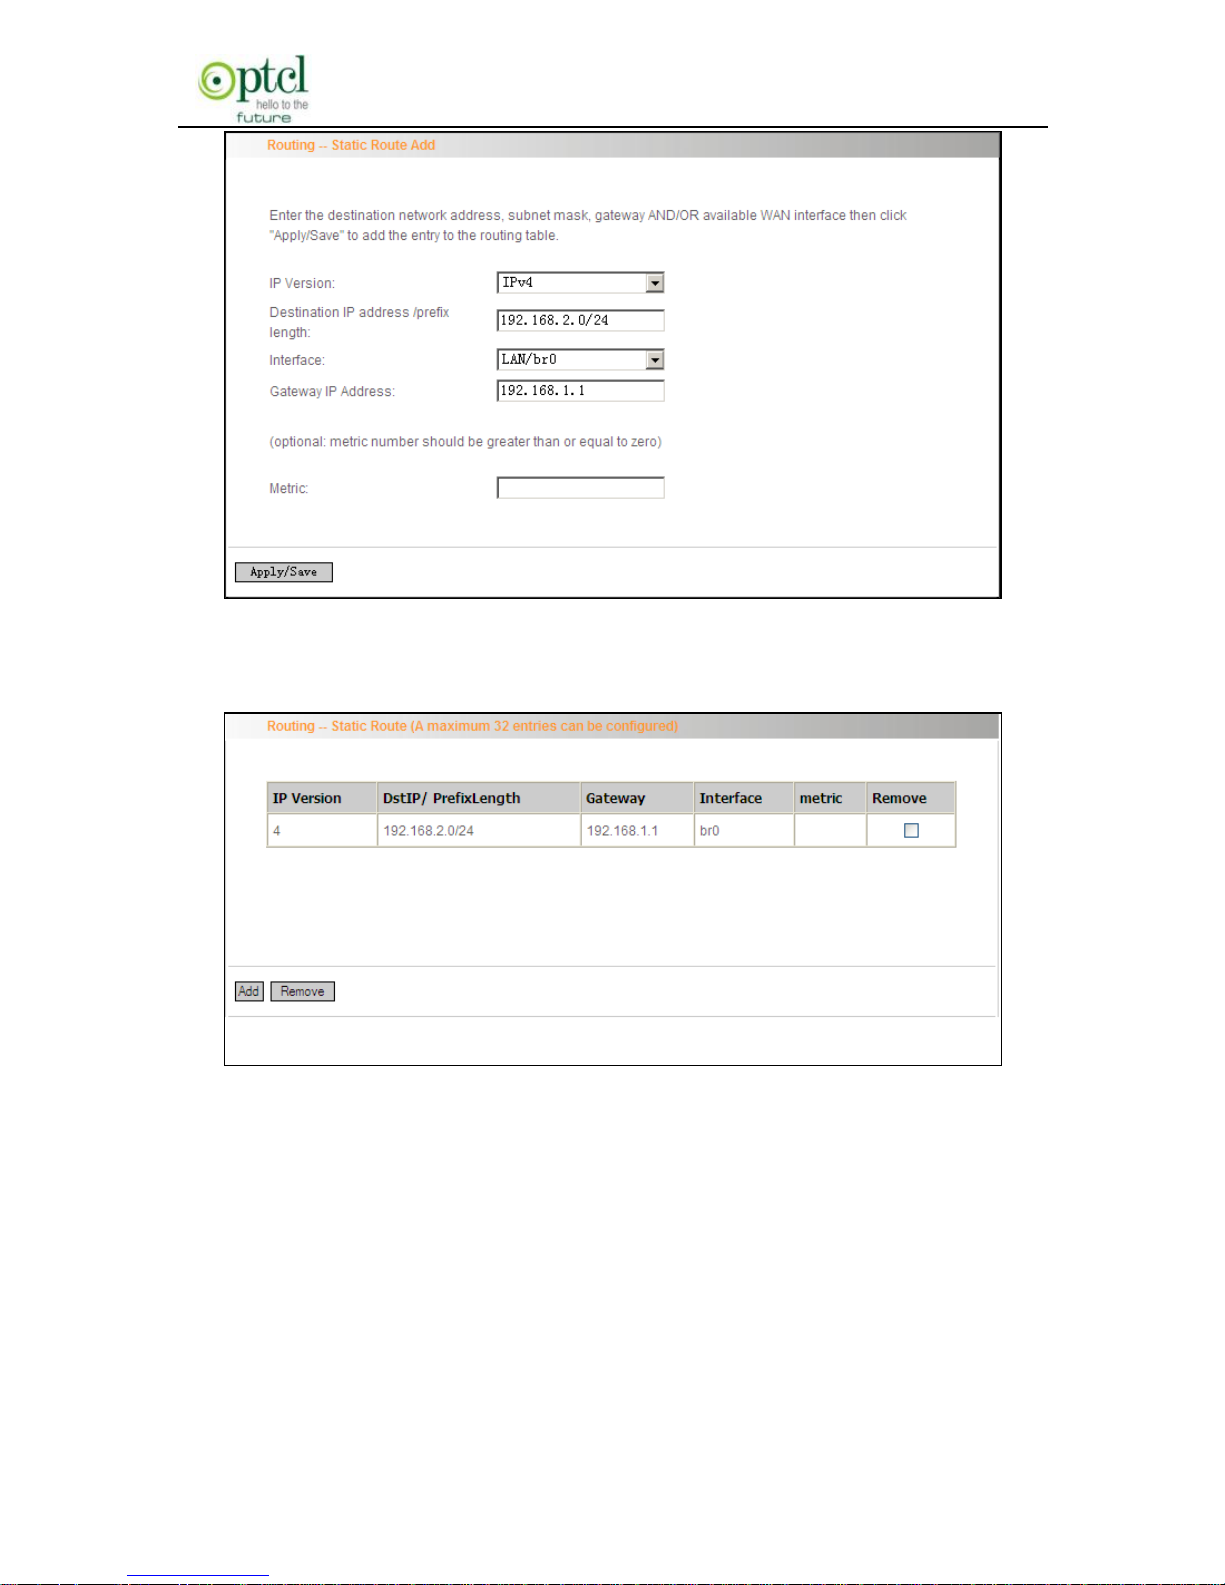
Click ―Add‖ to enter the screen below.
Page 75
150M Wireless N ADSL2+ Router
- 74 -
Click ―Apply/Save‖ to display the current configured static route
information.
IP version: It is used to indicate that the IP belongs to IPv4.
Destination IP address/prefix length: to identify the destination IP
address or network that the data is sending to. Prefix length
together with the destination IP address are used to identify the
destination network.
Interface: the interface the data is sending to
Page 76
150M Wireless N ADSL2+ Router
- 75 -
Gateway IP address: the IP address of the router or host the data
packets are sending to.
Metric: the number of the routers that the data packets go through
(optional).
Apply /Save:Complete the settings.
Note:
Destination IP address can not be at the same net segment with
the IP addresses of the router’s WAN or LAN port.
We recommend using the default settings if there’s no special
requirement, for inappropriate or incorrect route setting would
cause network malfunction.
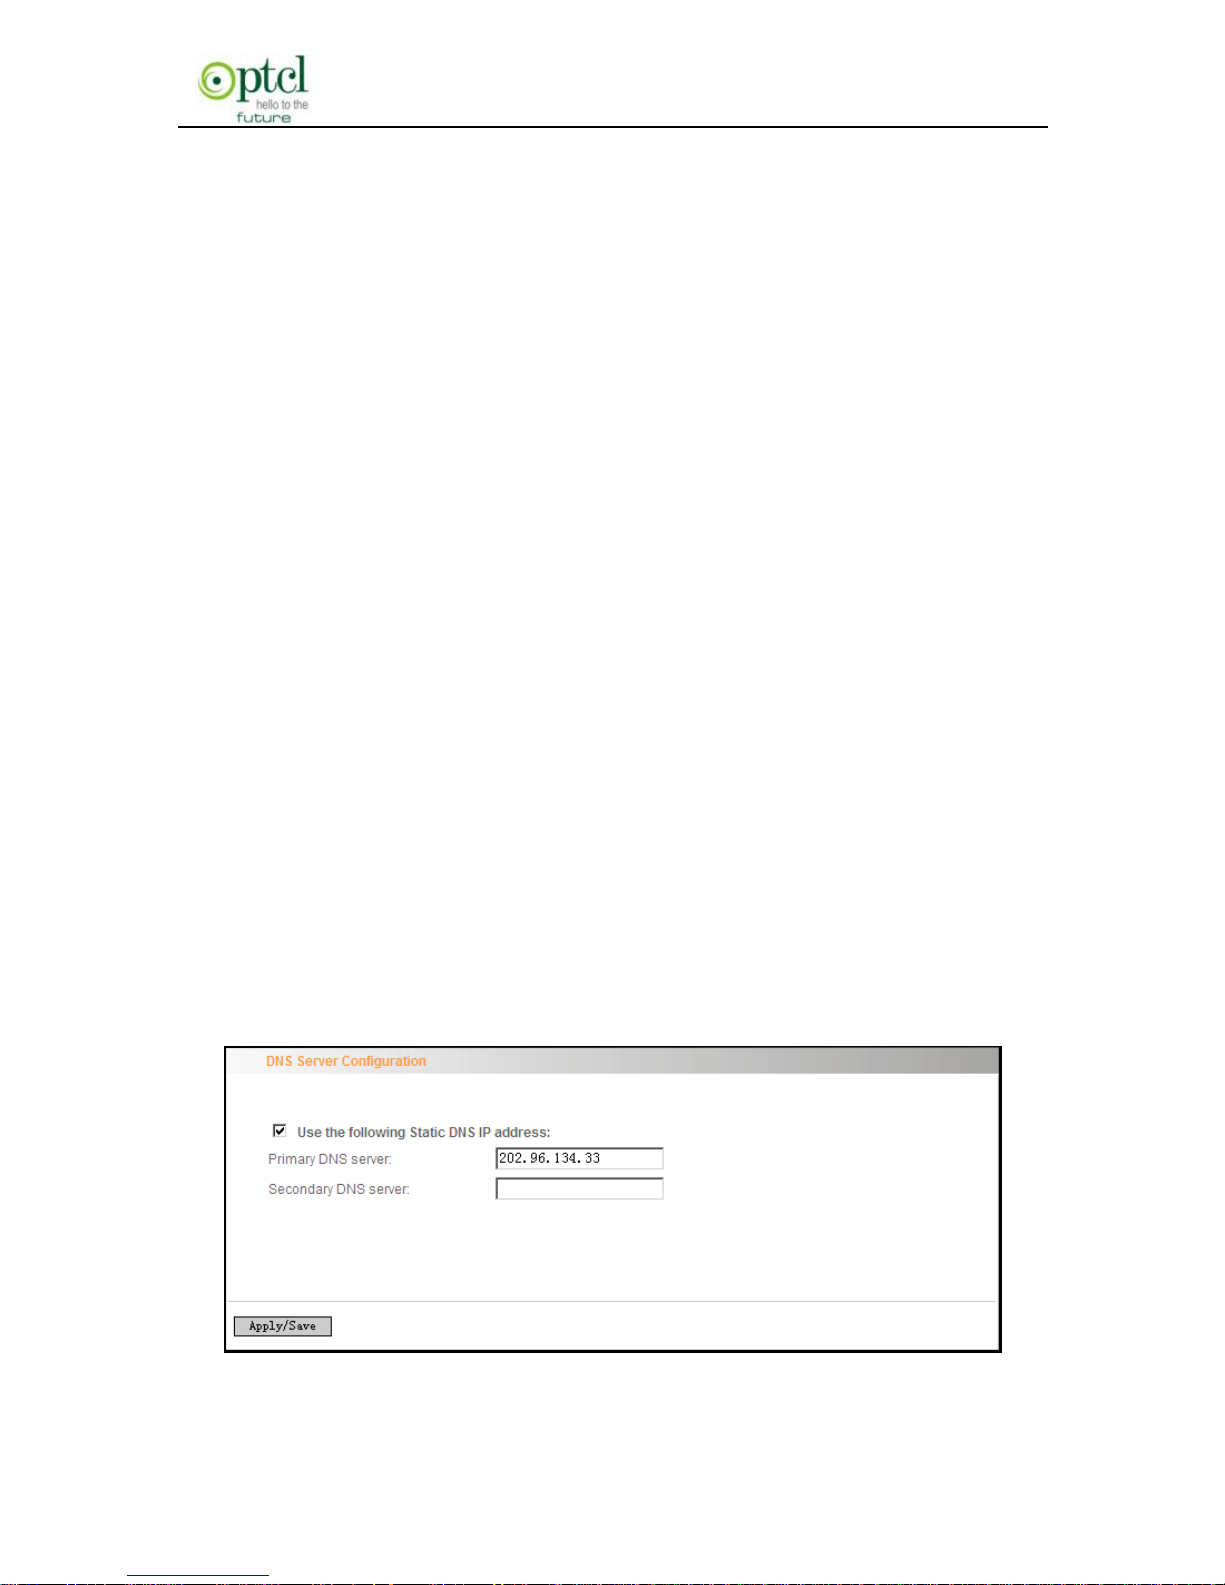
4.2.12 DNS
DNS server
DNS server is used to map the domain name and it can be
automatically obtained when you connect to the ISP or it can also be
manually configured.
Page 77

150M Wireless N ADSL2+ Router
- 76 -
After entering the DNS server IP address, click ―Apply/Save‖ to save
the settings.
Note:
After saving the settings, you need to reboot the router to bring the
new configuration into effect.
Please keep the default settings if there’s no special requirement
for incorrect DNS settings will cause the LAN computer to be
unable to access the Internet via the domain name.
DDNS
If your server is set up on the router’s LAN side, and the router’s WAN
IP address is changeable. When users on the Internet want to visit the
server via the domain name, but the domain name can not be
translated as the router’s WAN IP, which will cause visit failure.
However, DDNS will request the corresponding ISP to update the
domain name and IP address when WAN IP is changed. When the
WAN IP address is updated, users on the Internet can still successfully
visit the server.
This router supports three DDNS providers: www.dyndns.org,
www.3322.org, www.tzo.com
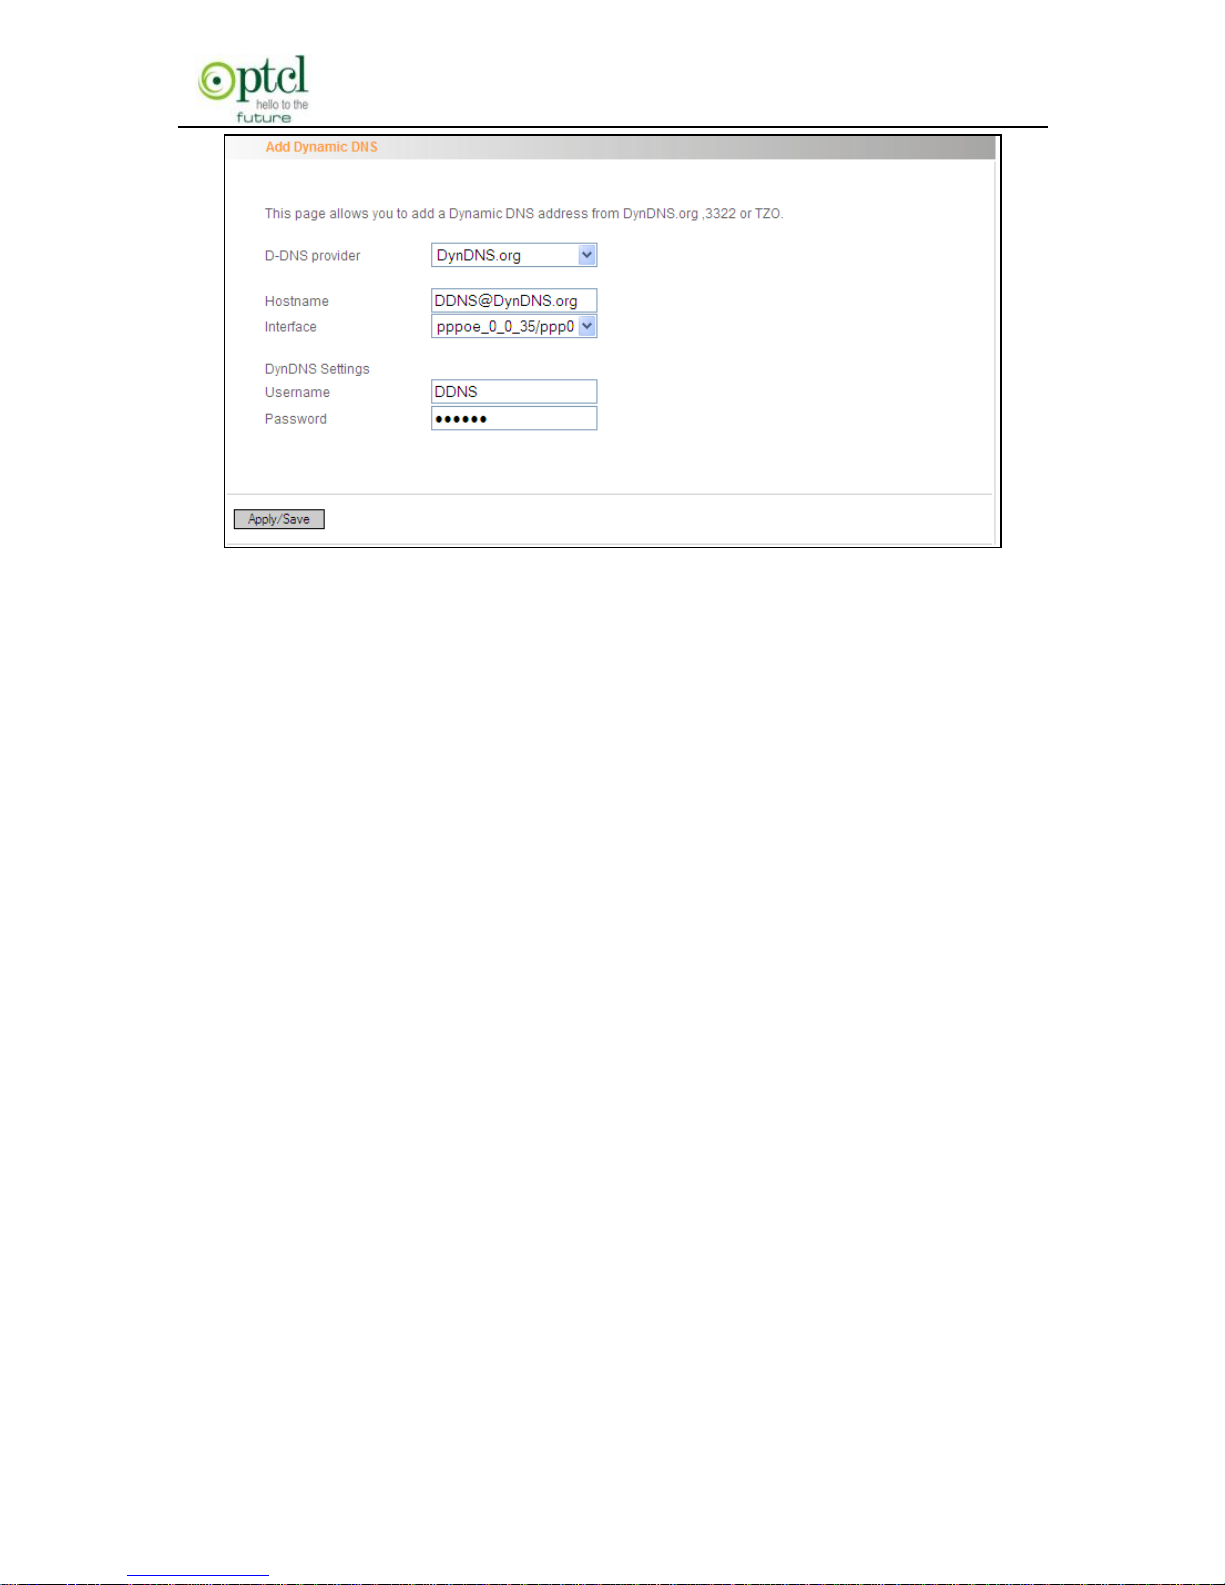
Select ―Advanced Setup‖ ->―DNS‖ -> ―Dynamic DNS‖, and click the
―Add‖ button to add a rule.
Page 78
150M Wireless N ADSL2+ Router
- 77 -
Dynamic DNS Provider: Select your DDNS provider.
Hostname: The domain name registered at the corresponding DDNS
website.
Interface: WAN connection interface
Username: Enter the username that you use to register from the DDNS
provider
Password: Enter the password that you use to register from the DDNS
provider
Click ―Apply/Save‖ to save the settings.
4.2.13 DSL
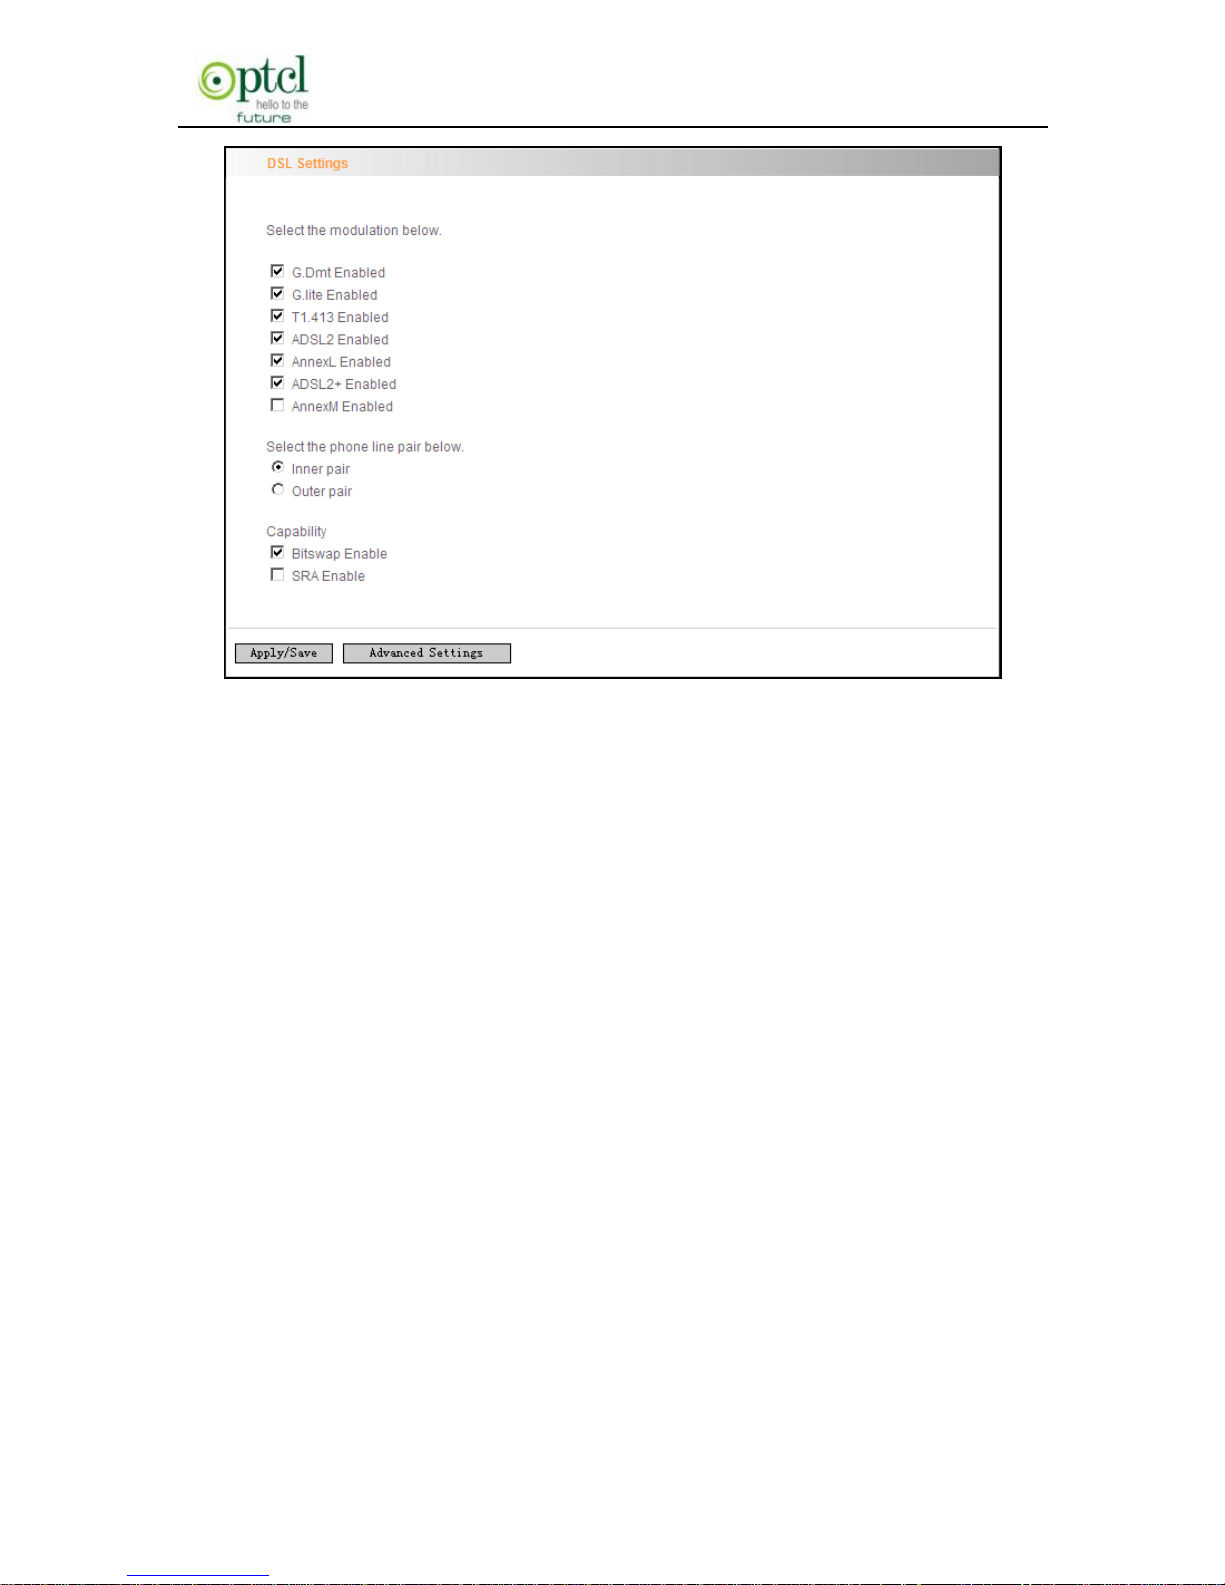
To be applicable for different environments, DSL advanced setting
screen provides multiple ASDL modulation modes for users to choose
from.
Page 79
150M Wireless N ADSL2+ Router
- 78 -
Click the checkbox to enable corresponding modulation modes, and
then click ―Apply/Save‖ to complete the settings.
Note: If you are not familiar with the ADSL modulation modes, please
use the default settings.
4.2.14 UPnP
With UPnP (Universal Plug and Play) function, the host in LAN can
request the Router to carry specific port forwarding, thus the external
host can access the internal host for resources. For example, the MSN
Messenger under Windows XP and Windows Me can utilize UPnP in
video and audio communication, thus the function restricted by NAT can
restore its normal use. Enable UPnP to help support applications that
would not otherwise work behind a Router. Both UPnP Internet
Gateway Device and NAT Traversal are supported.
Page 80
150M Wireless N ADSL2+ Router
- 79 -
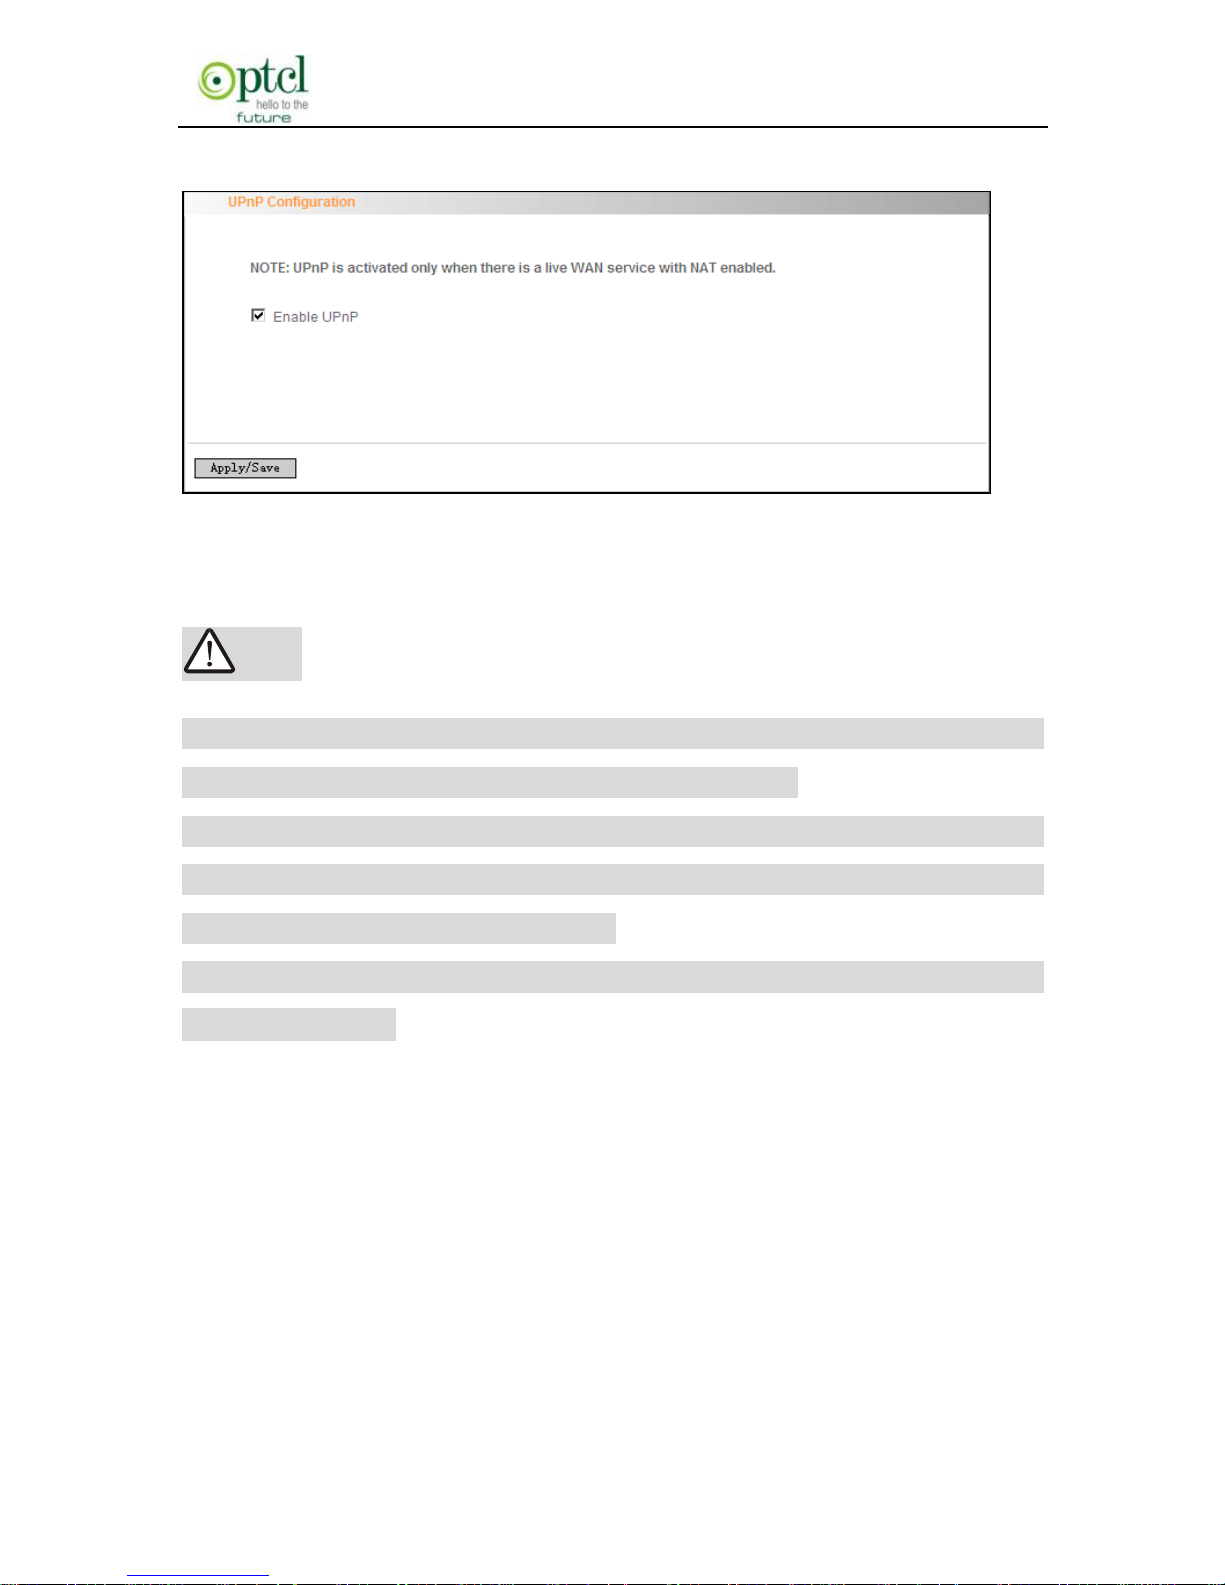
Select ―Enable UPnP‖ and then click ―Apply/Save‖ to save the settings.
Note:
1. Because the security of current UPnP version has not been
guaranteed, please close it when you don’t need it.
2. Only the application programs that support UPnP protocol can use
this function. MSN Messenger may need to be supported by Operating
Systems such as Windows XP/ ME.
3. UPnP function needs the support from Operating Systems such as
Windows XP/ME.
4.2.15 Interface Grouping
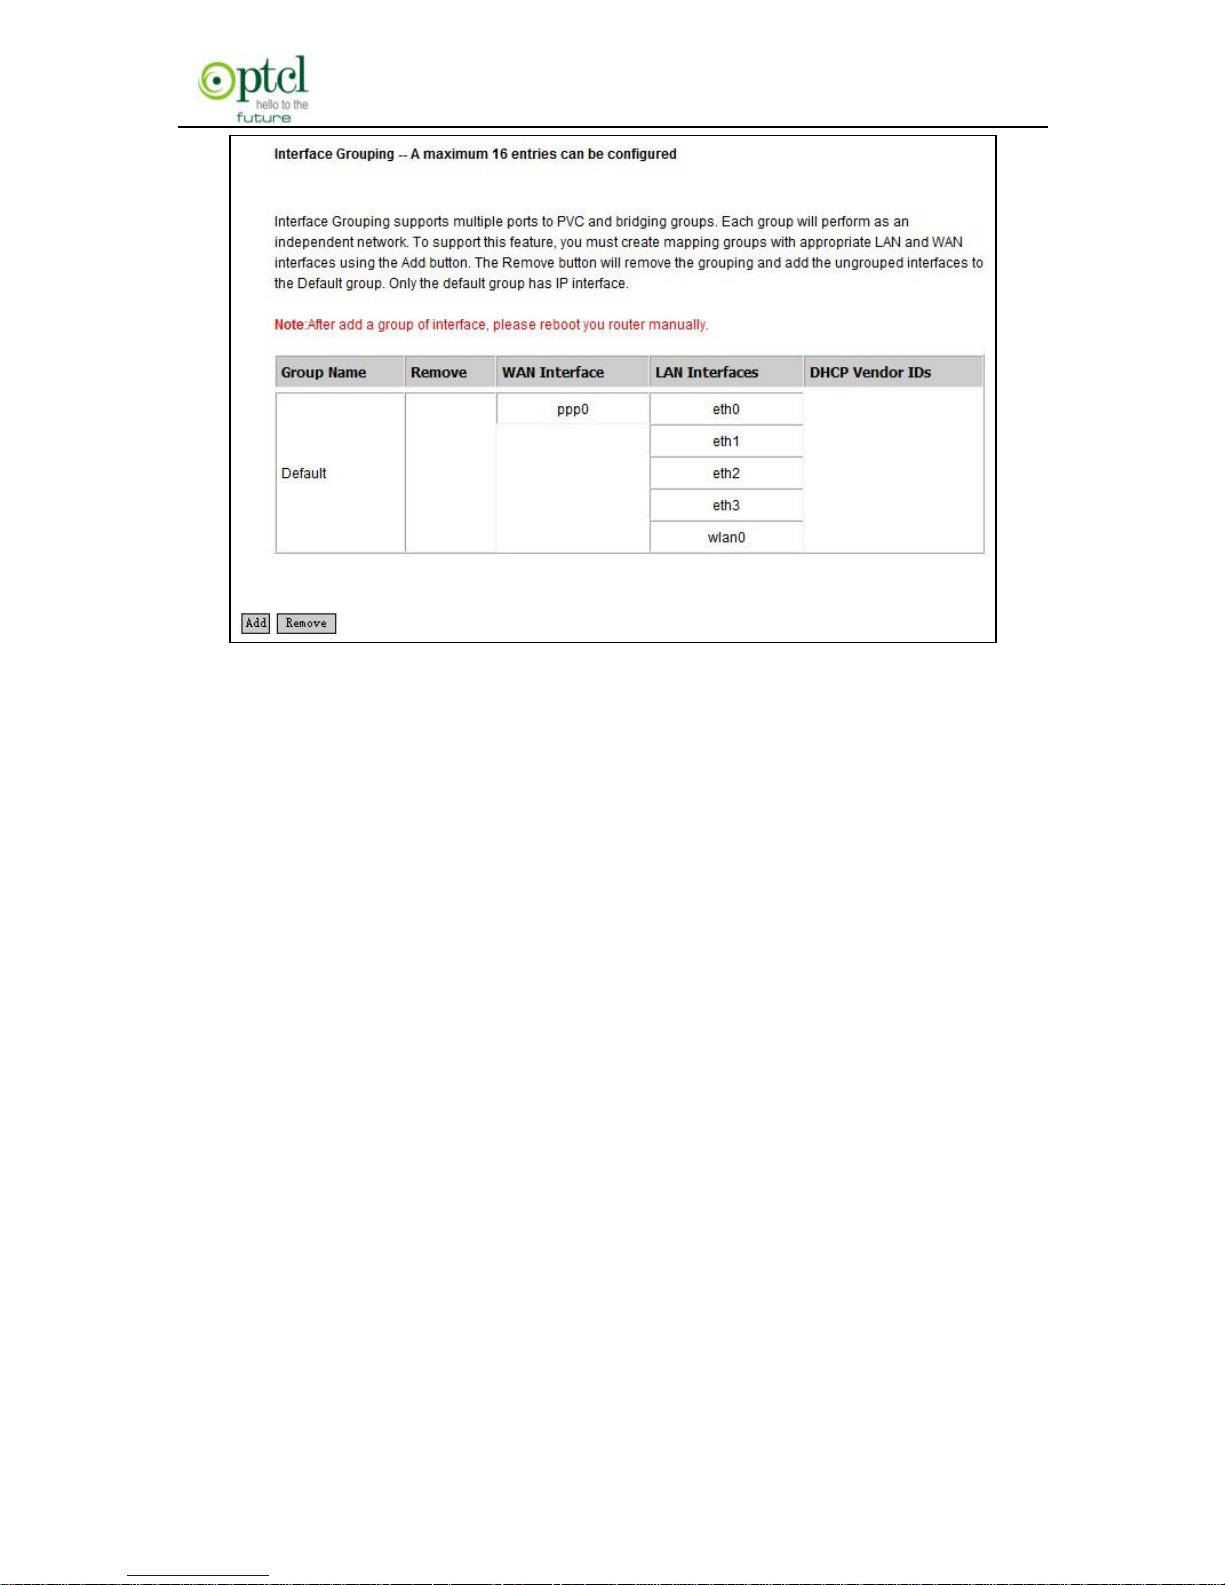
If your ADSL line supports multi-WAN connection(there are multiple
groups of PPPOE or other access modes),and you wish some LAN
ports of your router(or the wireless network) to solely share one of the
WAN ports, then you may fulfill this function by configuring the interface
grouping.
Page 81
150M Wireless N ADSL2+ Router
- 80 -
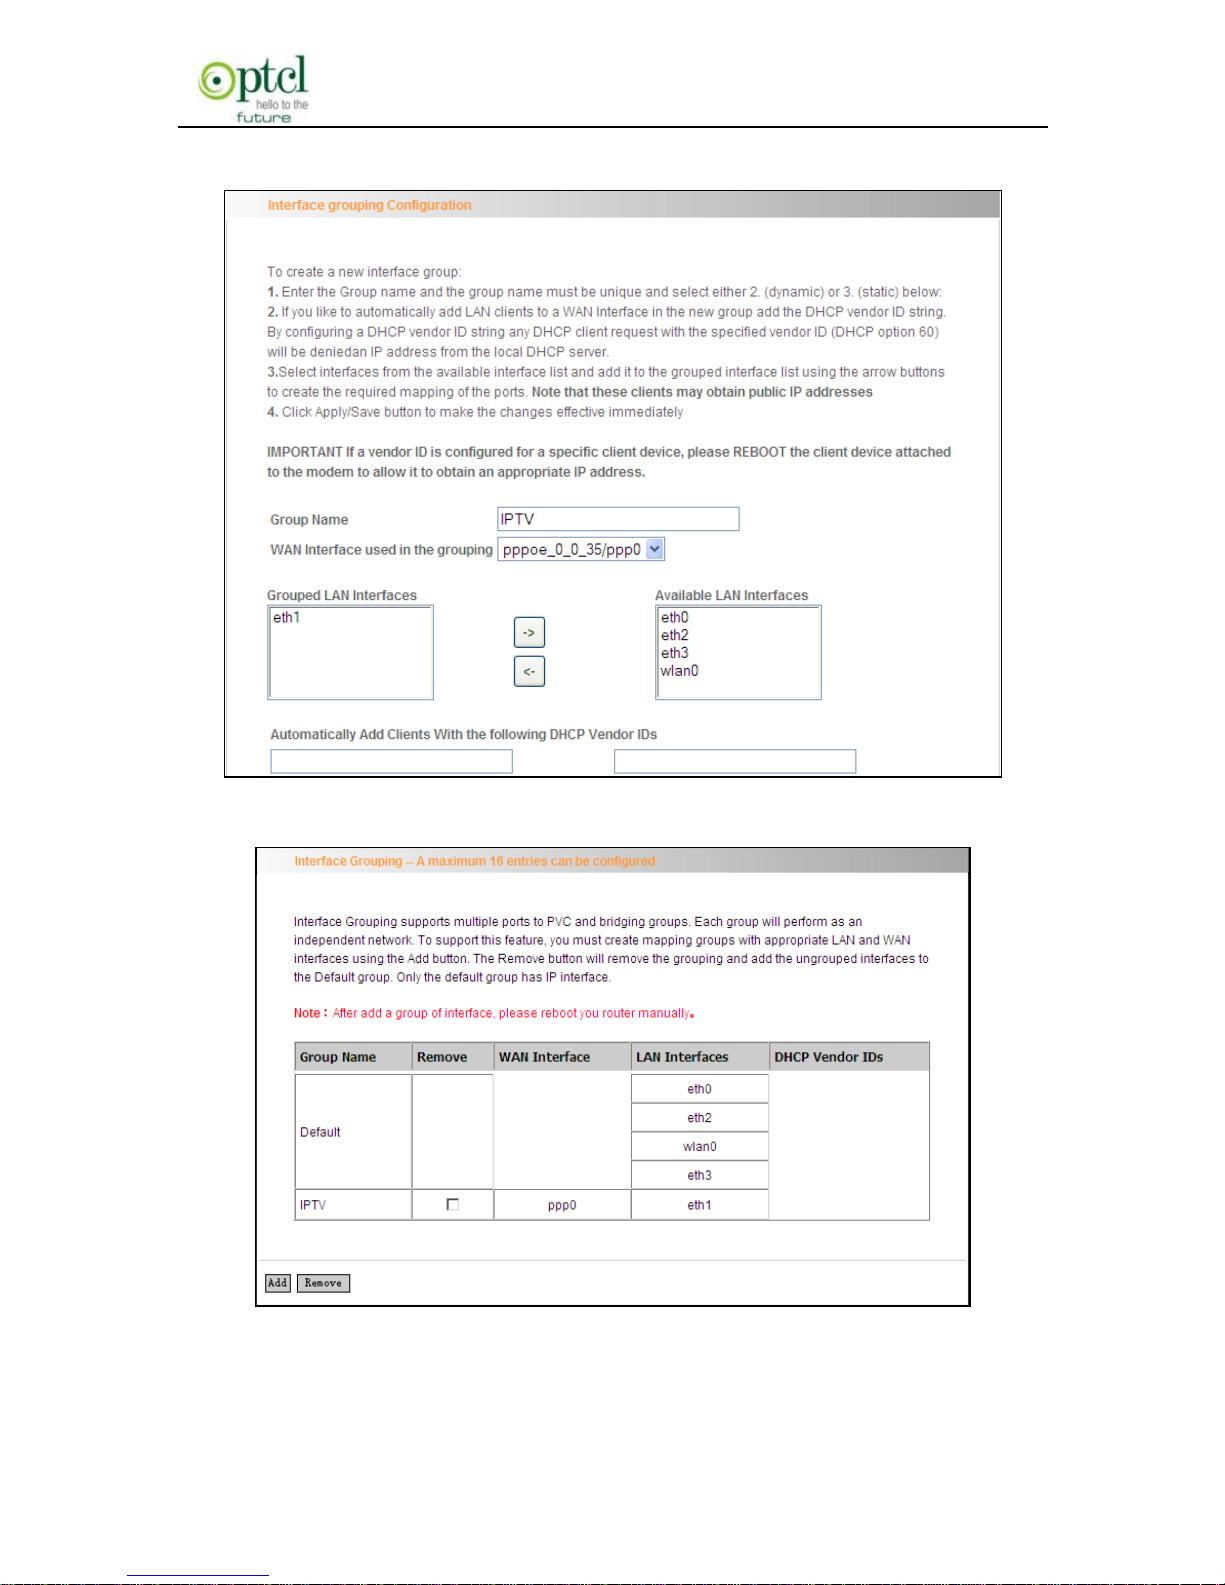
Group Name:The name of the configuration rule.
WAN Interface used in the grouping: WAN connection that
needs to be grouped.
Available LAN Interfaces: Interfaces that can be grouped.
Grouped LAN Interfaces: LAN interface that needs to connect
with specified WAN interface
Example:
Your ADSL line supports two groups of PVC; the PVC that used to
transmit network data is ppp0 and the PVC that used to transmit IPTV
data is atm1.and you wish your router’s LAN2 port is particularly used
for IPTV and the IPTV data will not be sent to other ports.
The configurations are as follows:
Configure two groups of PVC: ppp0 and atm1 (for the configuration
steps, please refer to the chapter for WAN configuration).
Click ―Advanced Setup‖ -> ―Interface Grouping‖ to enter the screen
Page 82
150M Wireless N ADSL2+ Router
- 81 -
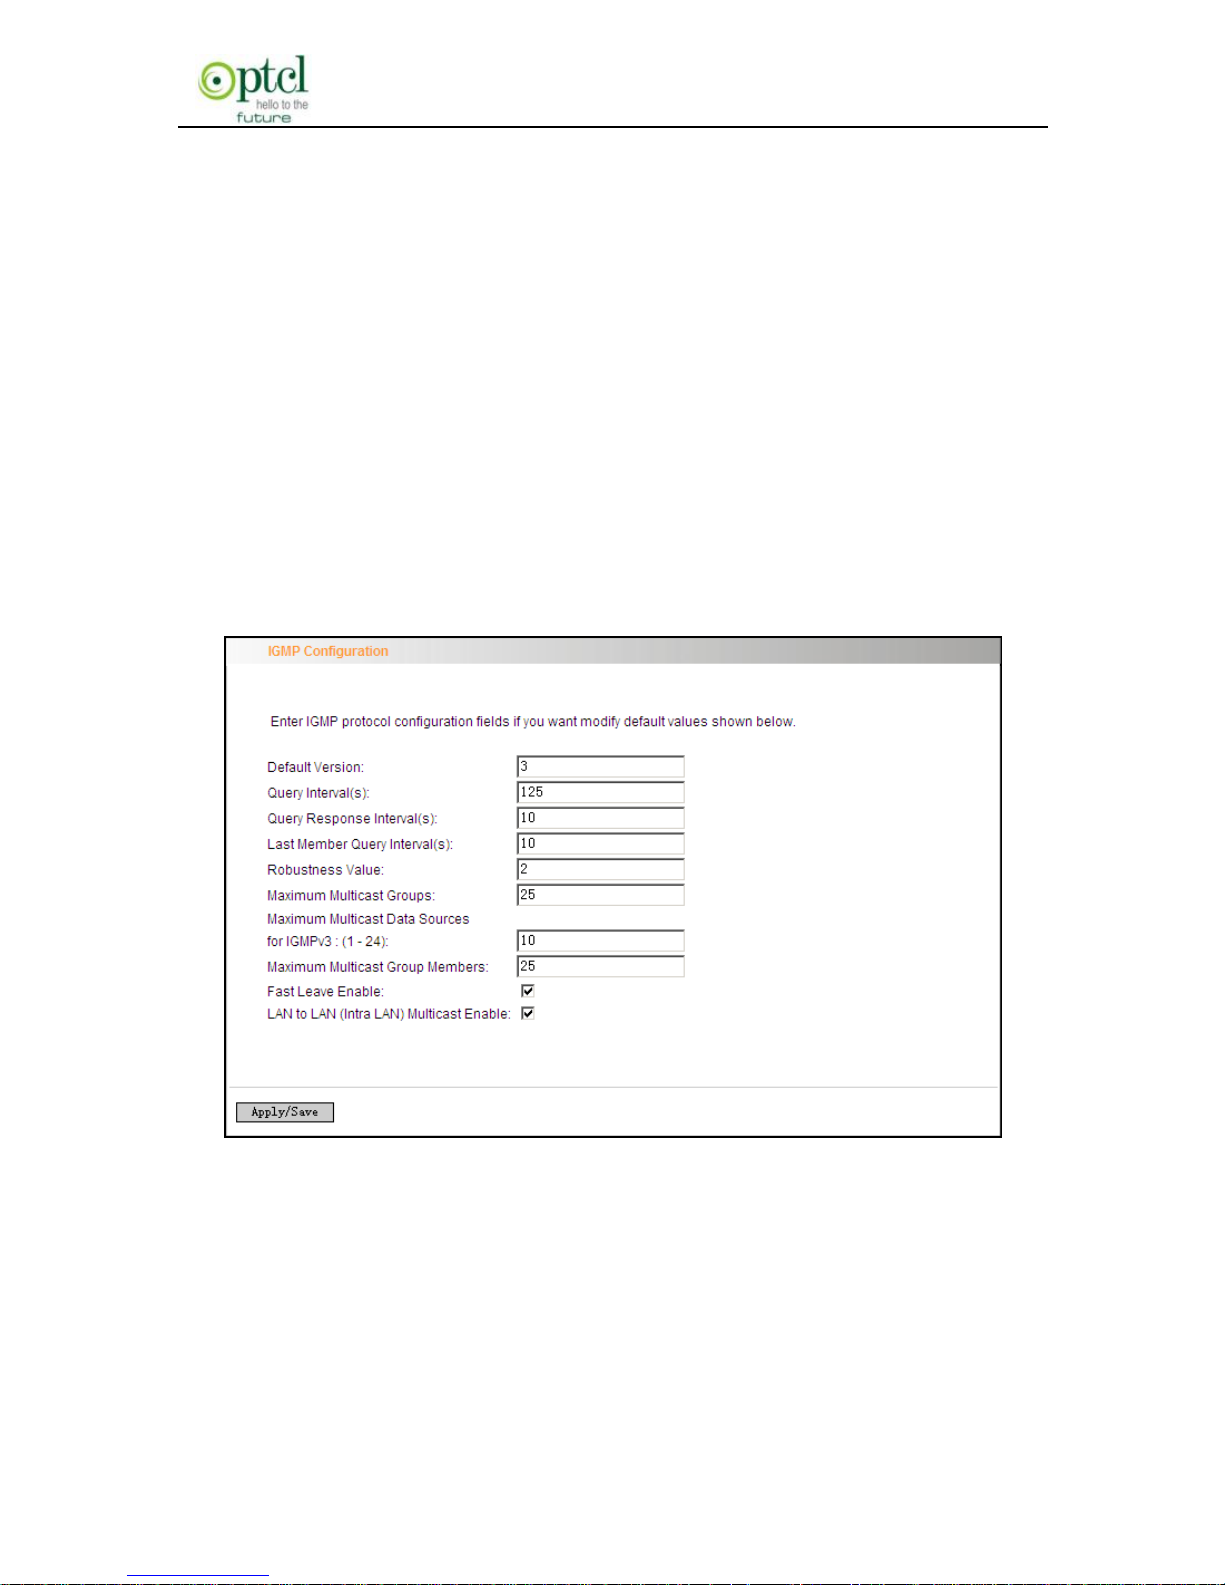
below, and click ―Add‖ to configure the IPTV grouping parameters.
Click ―Save/Apply‖ to save the settings.
Note:
After completing the settings, reboot the router to bring the router
Page 83
150M Wireless N ADSL2+ Router
- 82 -
settings into effect.
After setting the interface grouping, the gateway IP address the default
grouping uses is 192.168.1.1, and then the second grouping uses
192.168.2.1 as the gateway IP address, and the others follow
by analogy.
4.2.16 Multicast
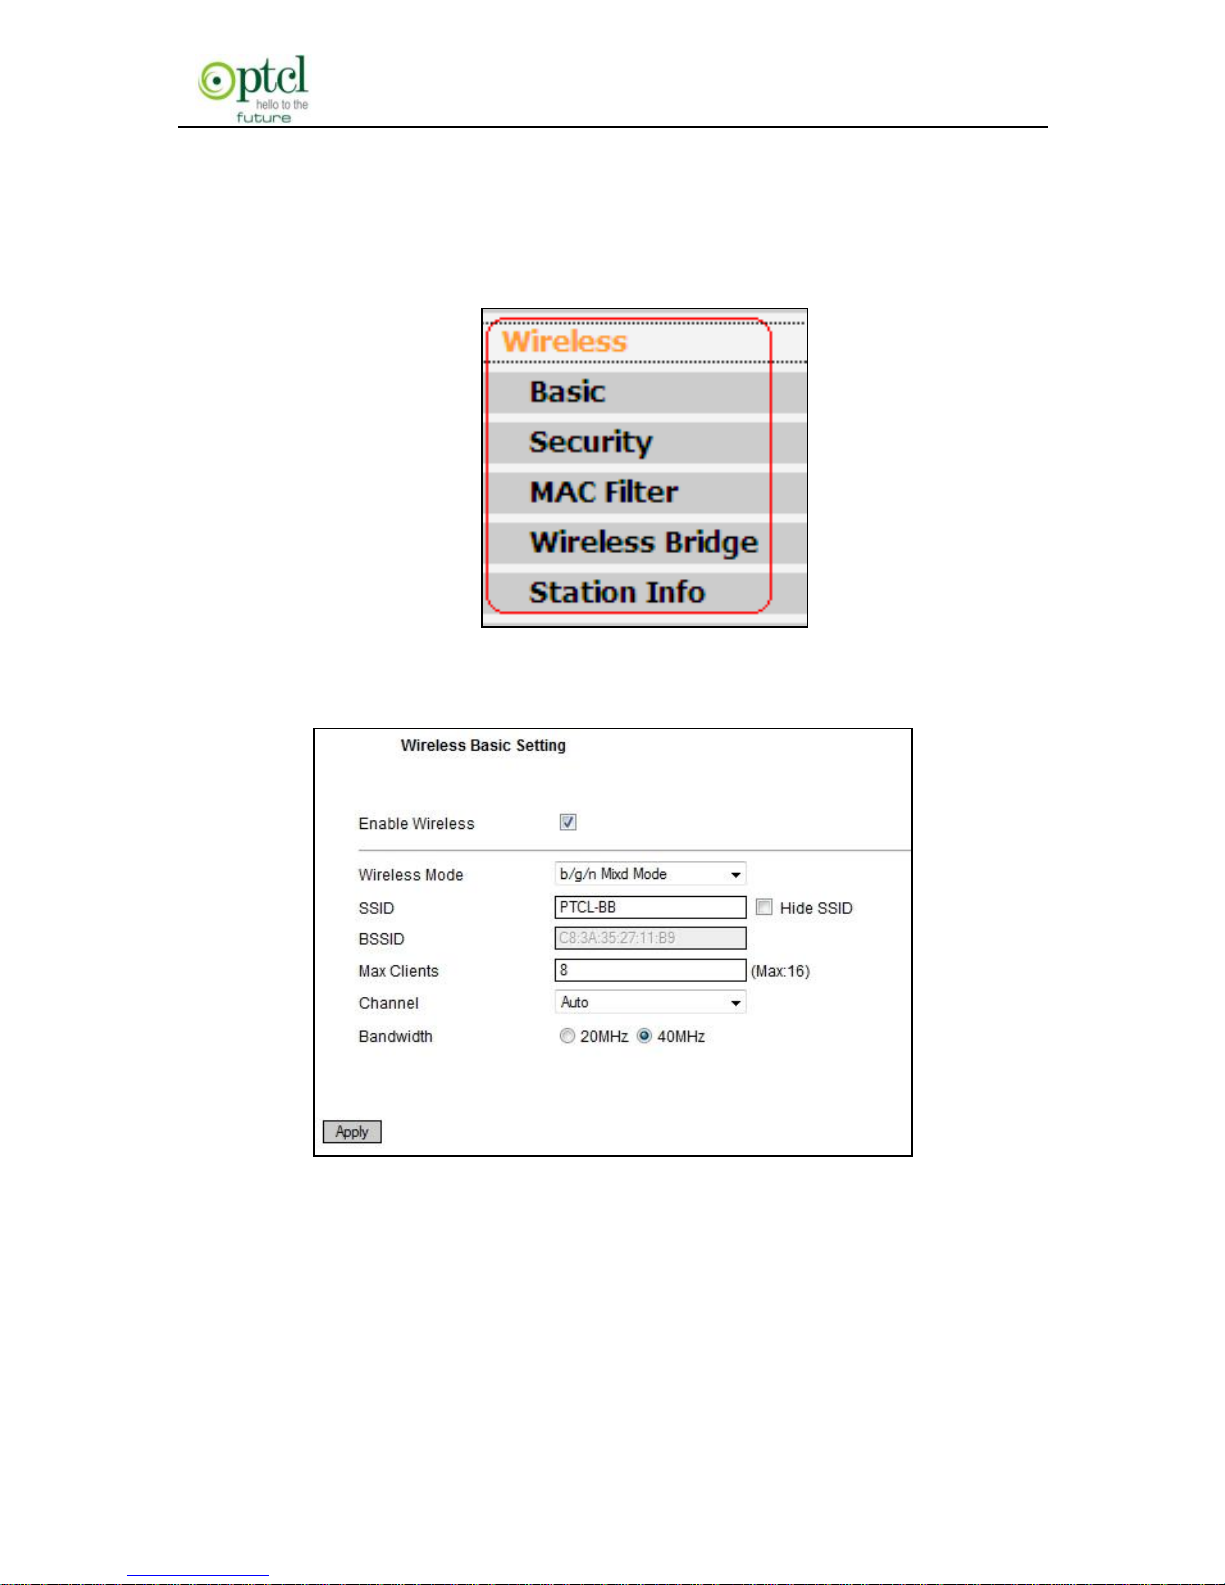
IGMP Configuration
Click ―Advanced Setup‖-> ―Multicast‖ to enter the IGMP Configuration
screen.
You can configure IGMP parameters on this screen, if you are not clear
about the IGMP, we recommend using the default configuration.
If you want to modify the configured parameters, please make sure
whether the router’s IGMP feature is enabled.
Page 84
150M Wireless N ADSL2+ Router
- 83 -
4.3 Wireless Setting
Wireless function includes ―Basic‖, ―Security‖, ―MAC Filter‖, ―Wireless
Bridge‖ and ―Station Info‖.
4.3.1 Basic Setting
Enable Wireless: check/uncheck to enable/disable the wireless
function.
Wireless Mode:
b/g/n Mixed Mode: By default, system is in this mode. So your
network adapter can connect to this router’s wireless network no
Page 85

150M Wireless N ADSL2+ Router
- 84 -
matter which standard it complies with: 802.11b, 802.11g or
802.11n. (Different wireless network standards have different
maximum transmission rates: 802.11b mode is at 11Mbps,
802.11g mode at 54 Mbps and 802.11n mode at 150Mbps.
b/g Mixed Mode: If this mode is selected, then wireless adapters
in use must support 802.11b or 802.11g mode.
g Mode:If this mode is selected, then wireless adapters in use
must support 802.11g mode.
SSID: the name of wireless network. It can divide a wireless LAN
into several sub-networks that requires different identity
authentication, and allows itself to be scanned by other wireless
devices through broadcast. The name displayed in ―View available
wireless networks‖ under Windows is a SSID.
Hide SSID: If you don’t want wireless network to be searched by
other users via SSID name, then you’d better prohibit SSID
broadcast. As a result, your wireless network will not appear in the
searched wireless network list but it is still available, you only need
to manually add it to the list.
BSSID:BSS is a special Ad-hoc LAN application. A wireless network
consists of, at least, an AP that is connected to wired network
and several wireless work stations, which is called BSS (Basic
Service Set).
A group of PCs with the same BBS name can establish a group, and
this BBS name is called BSSID. In a small wireless LAN environment,
Page 86

150M Wireless N ADSL2+ Router
- 85 -
there is only one AP and all clients share the same BSSID which is
usually the MAC address of the AP.
Max Clients: The max number of wireless clients that are allowed
to be connected to the wireless network, 8 by default. You can
modify it manually(The Max number is 8).
Channel: wireless signal needs to be transferred through a
certain channel. If two transmission signals are using the same
channel, then mutual interference will be caused to decrease
communication efficiency. There are 13 channels (1 to 13) for
your option. Thus, to avoid interferences, you are recommended
to choose the channel that is different from that of another SSID. If
you select ―Auto‖, then system will automatically choose a channel
with relatively less interference for your wireless network.
Bandwidth: The bandwidth here refers to wireless signal’s
frequency width which only functions in b/g/n Mixed wireless mode.
It works in 11n mode only. 802.11n supports 20MHz and
20MHZ/40MHz channels .Previous standard adopts the 20MHZ
bandwidth while 802.11n adopts 20MHZ/40MHz bandwidth. The
usable channel bandwidth provided by 40MHz channel is over two
times that of two 802.11 carry-over channels. 802.11n standard
supports 20MHz and 40MHz channels, and the 40MHz channel
combined by two adjoining and carry-over 20MHz channels is the
widest channel. Certainly you can use the 20MHz channel instead
according to your needs.
Page 87
150M Wireless N ADSL2+ Router
- 86 -
4.3.2 Security Setting
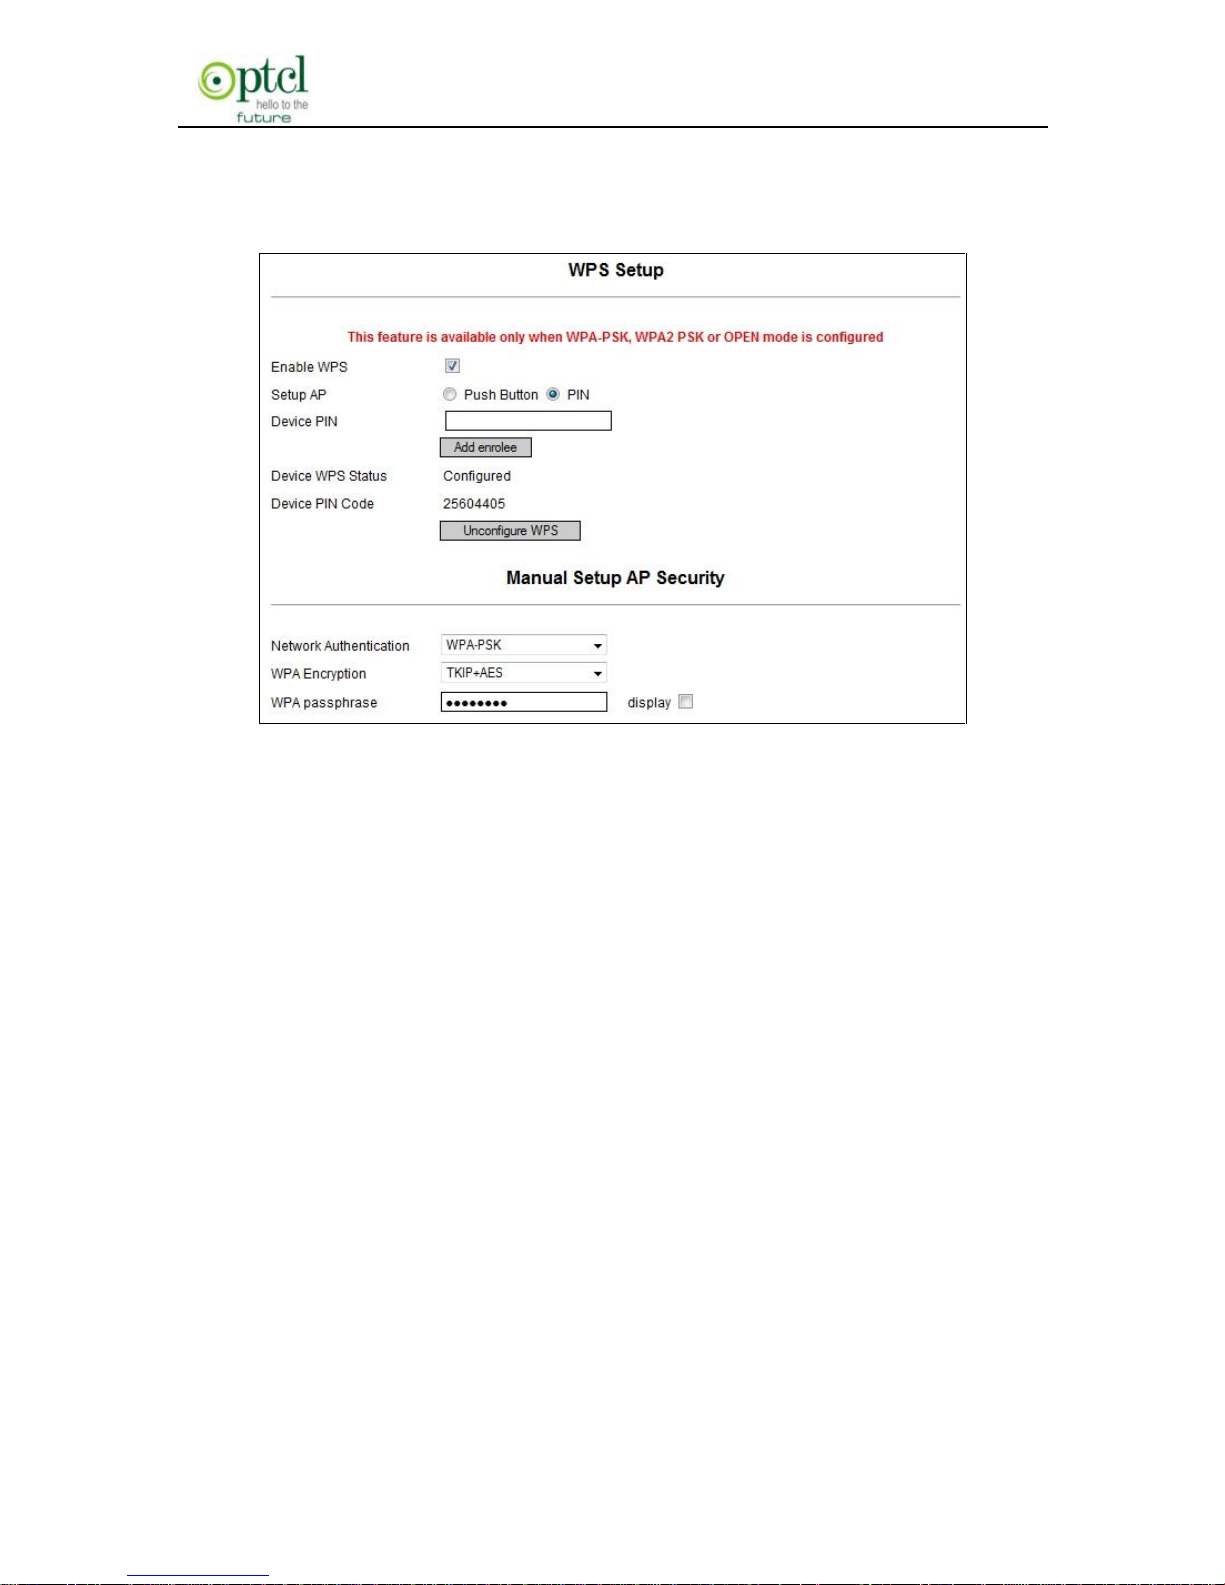
WPS Setup: Wi-Fi protected setting (WPS) can create encrypted
connection between wireless network clients and the router simply
and quickly. Without selecting an encryption mode and configuring
a key, you only need to enter the correct PIN code or select the
―Push Button‖(press the WPS button on the router’s back panel) to
easily configure WPS. Instructions for operation are described
below:
Push Button: Press the WPS button for about 1 second and the
WPS LED will keep flashing for about 2 minutes, which indicates
the function is enabled. During this time, wireless client can
enable WPS/PBC for authentication negotiation; if negotiation
succeeds, then the WPS LED keeps ―always on‖. A wireless client
Page 88
150M Wireless N ADSL2+ Router
- 87 -
is successfully connected.
PIN: To use PIN, you must know wireless client’s PIN code and
input it in its text box, then save this configuraton.Meanwhile, use
the same PIN code in the client for connection.
Enable WPS: check/uncheck to enable/disable the WPS function. It is
enabled by default.
Note: The WPS feature only functions with wireless
network available.
Network Authentication: To secure your wireless network, system
provides several authentication modes:
Open: you can select ―no encryption‖ or WEP(64 bits/128 bits)as
encryption algorithm.
Shared: you can select WEP 64 bits/ WEP 128 bits as encryption
algorithm.
WPA-PSK: you can select AES, TKIP or TKIP+AES as encryption
algorithm.
WPA2-PSK: you can select AES, TKIP or TKIP+AES as encryption
algorithm.
Mixed WPA/ WPA2-PSK: you can select AES, TKIP or TKIP+AES as
encryption algorithm.
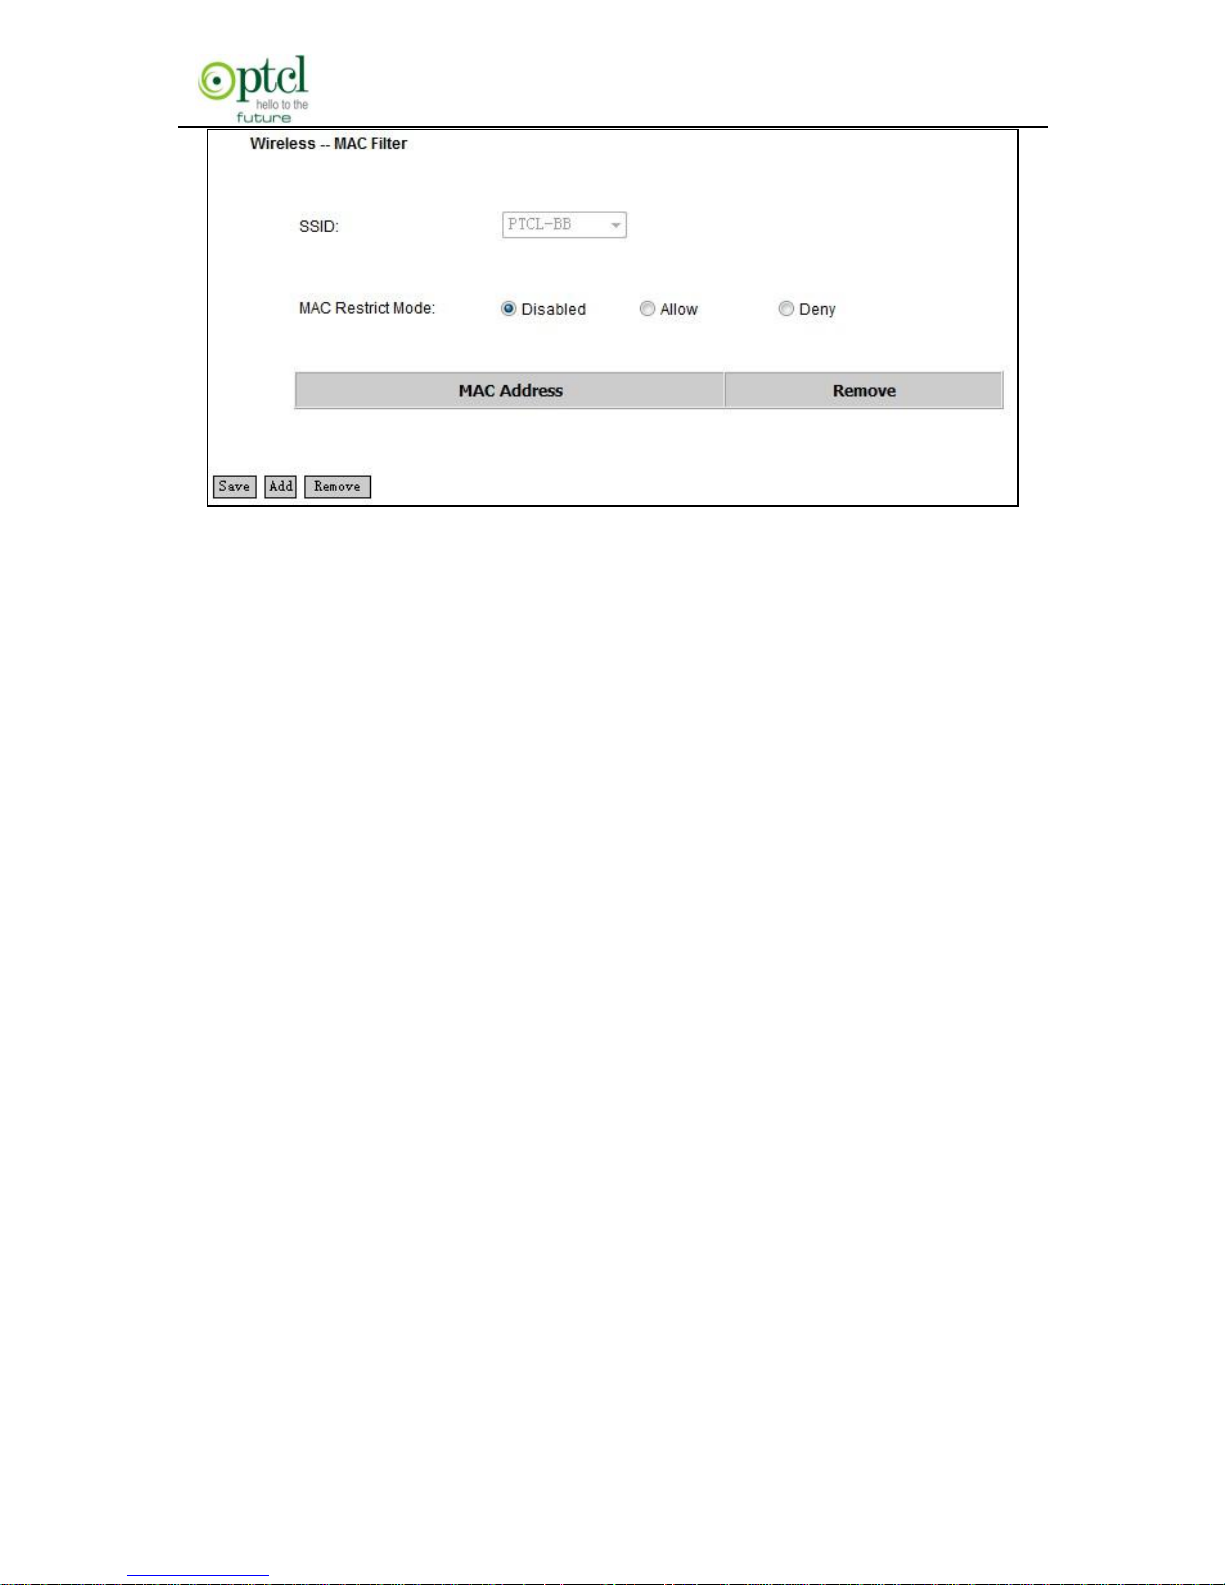
4.3.3 MAC Filter
MAC address filter can allow or refuse specific clients to access your
wireless network, see the screen below:
Page 89
150M Wireless N ADSL2+ Router
- 88 -
“Disabled”: Select it to disable MAC filter function.
“Allow”: only allows clients in the MAC address list to access your
wireless network.
“Deny”: only prohibits clients in the MAC address list from accessing
your wireless network.
Add: to add a MAC address, click the ―Add‖ button.
To delete an added MAC address, first check the ―Remove‖ box behind
the MAC address in list and then click the ―Remove‖ button.
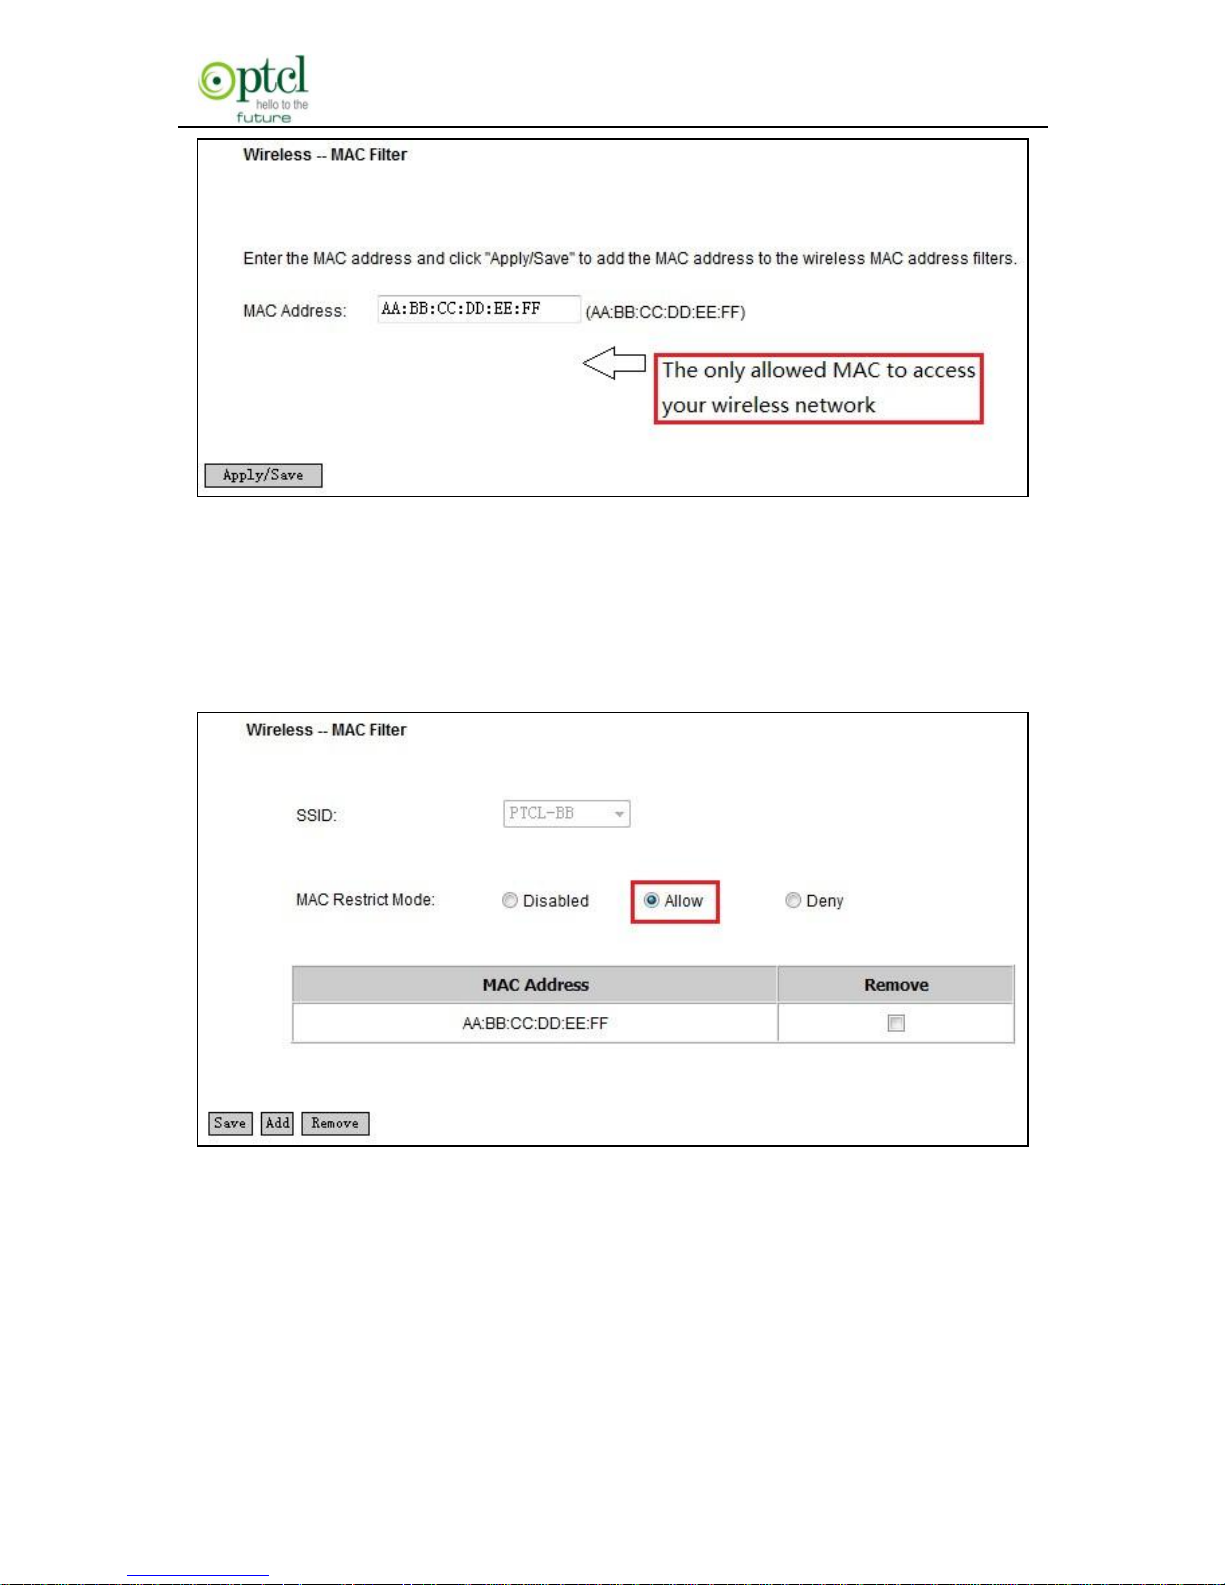
Example 1: If you want to allow the PC with MAC address of
AA:BB:CC:DD:EE:FF only to access your wireless network, then follow
the instructions below:
Click the ―Add‖ button in the above screen to enter the page below and
enter the MAC address AA:BB:CC:DD:EE:FF in the text box as shown
in the below figure:
Page 90
150M Wireless N ADSL2+ Router
- 89 -
And then click the ―Apply/Save‖ button on the above screen to save the
parameter.
Select ―Allow‖ on the page below:
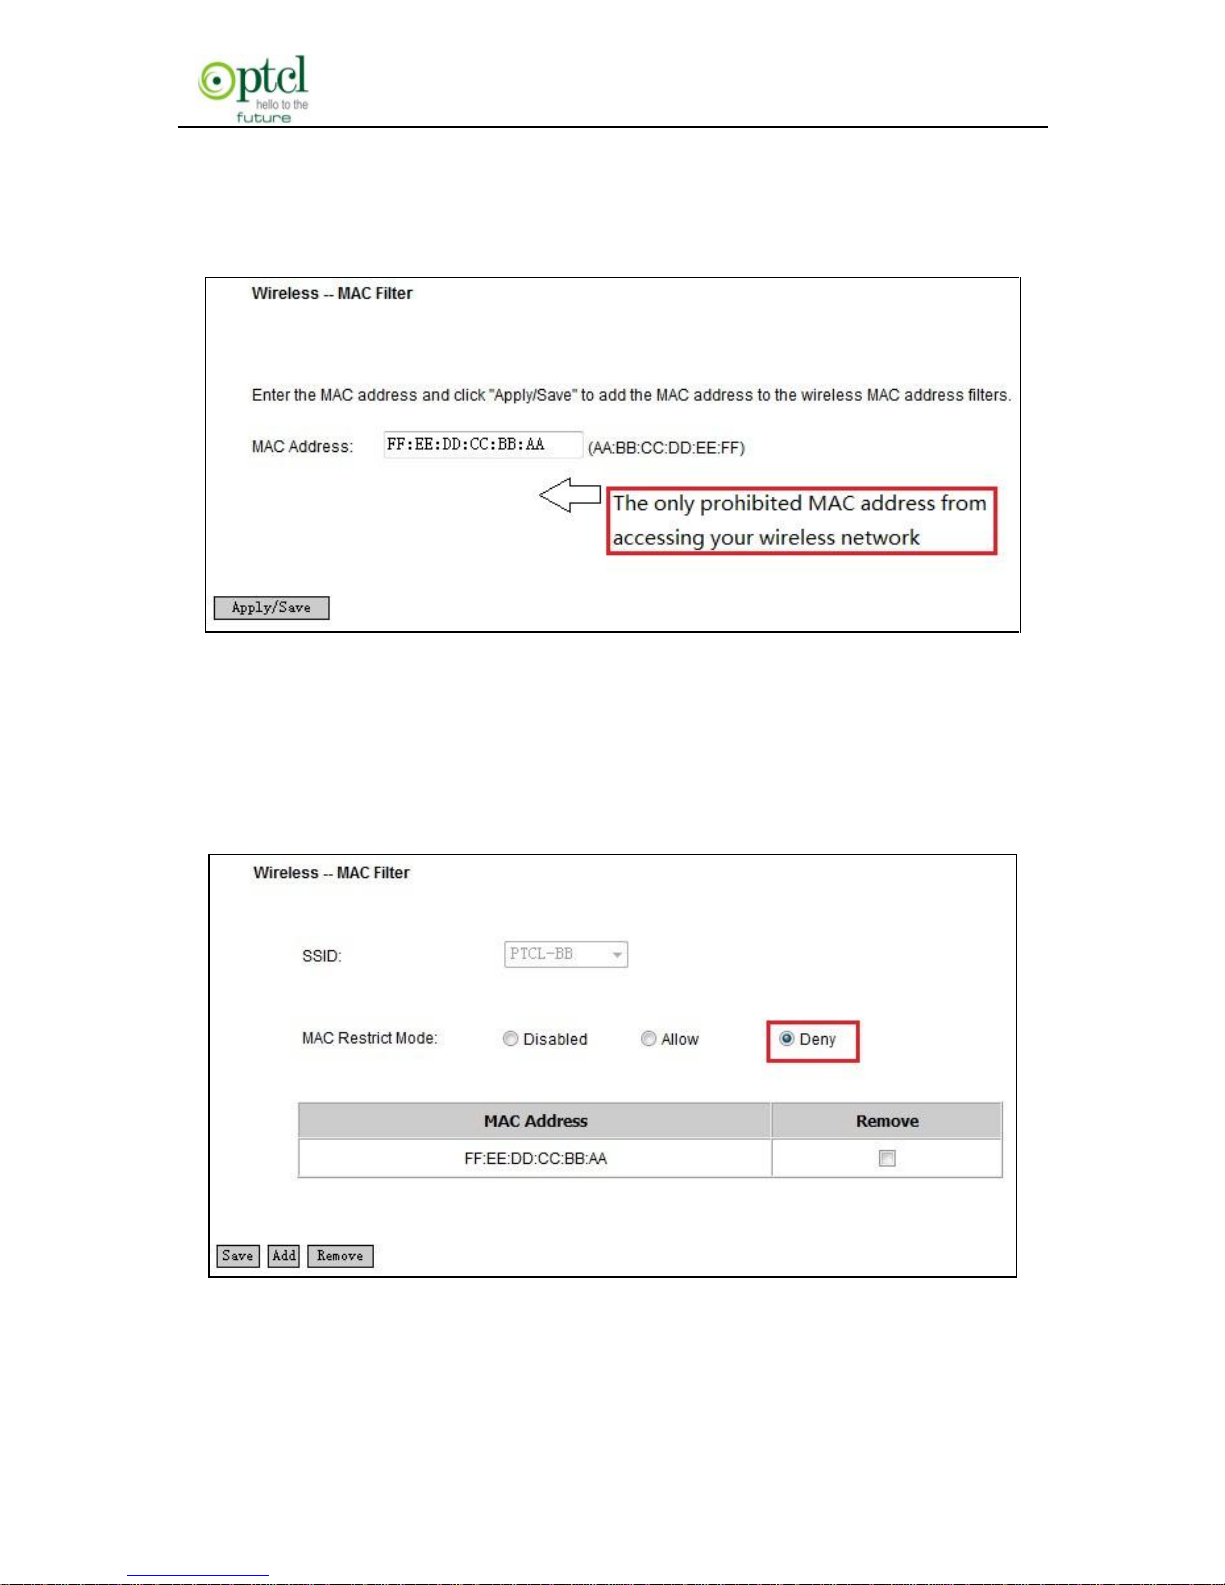
Example 2: If you want to prohibit the PC with MAC address of
FF:EE:DD:CC:BB:AA only from accessing your wireless network, then
follow the instructions below:
1. Enter the Wireless--MAC filter page and click the ―Add‖ button to
Page 91
150M Wireless N ADSL2+ Router
- 90 -
enter the page below and enter the MAC address
FF:EE:DD:CC:BB:AA in the text box as shown in the below figure:
And then click the ―Apply/Save‖ button on the above screen to save the
paramter.
2. Select ―Deny‖ on the page below:
Page 92
150M Wireless N ADSL2+ Router
- 91 -
4.3.4 Wireless Bridge
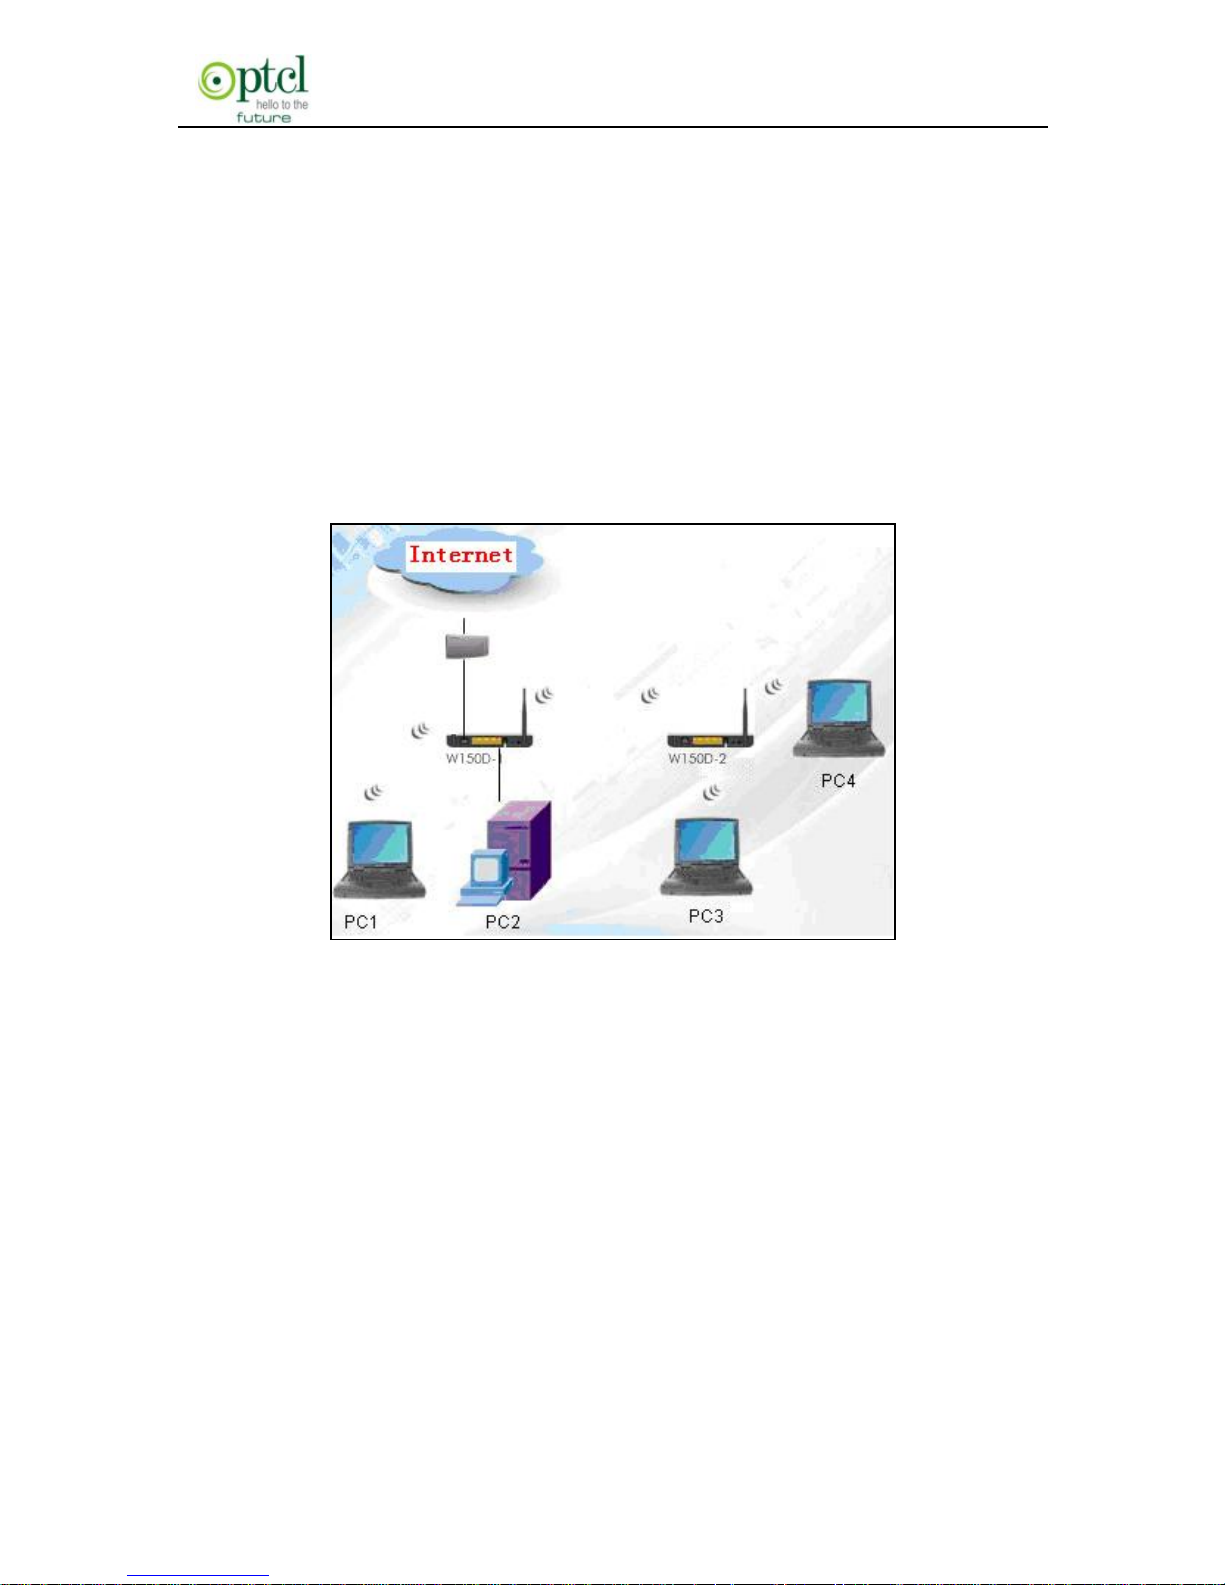
Wireless Distribution System is used to extend the existing wireless
signal coverage. Wireless bridge includes 2 modes:
1. Access point (Once it is selected, the AP function will be enabled
while wireless bridge function will be reserved. And wireless base
station will establish bridge with the AP in the meantime. Namely, you
can establish communication with wireless base station through a
wireless network adapter) as shown in the figure below:
In the above figure, 2 W150Ds are used to enlarge wireless signal
coverage. W150D-2 is configured as a wireless access point to
establish a wireless bridge with W150D-1. In the meantime, the AP
function reserved in W150D-2 enables PC3 and PC4 to communicate
with W150D-2 and access Internet through wireless network adapters.
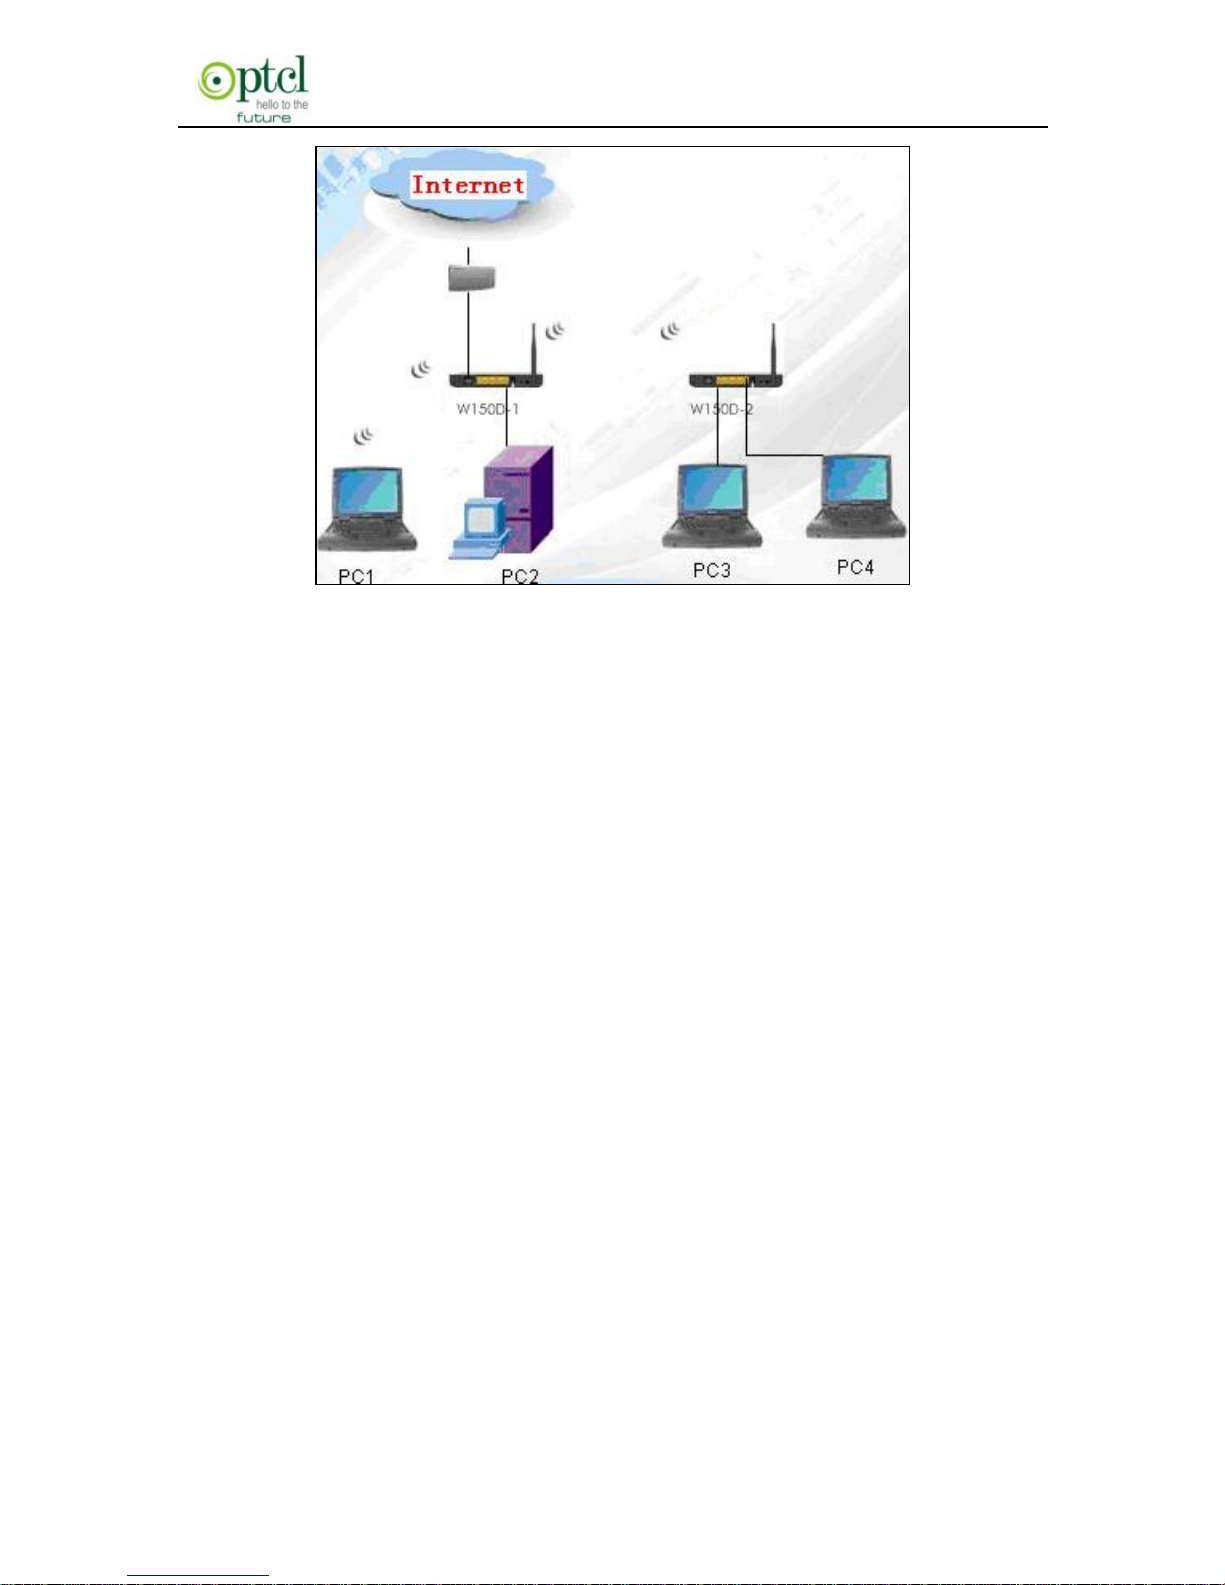
2. Wireless bridge (Here in this mode, wireless is used as pure bridge
only with no more AP function to connect and communicate with remote
devices. Namely, your PC can only be connected to the device via
wired media instead of communicating with the device through wireless
network adapter.) see the figure below:
Page 93
150M Wireless N ADSL2+ Router
- 92 -
In the above figure, 2 W150Ds are used to enlarge wireless signal
coverage. W150D-2 is configured as a wireless bridge to establish a
wireless bridge with W150D-1. W150D-2, here, does not have the AP
function, thus, PC3 and PC4 can communicate with W150D-2 and
access Internet only through wired network adapters instead of wireless
ones.
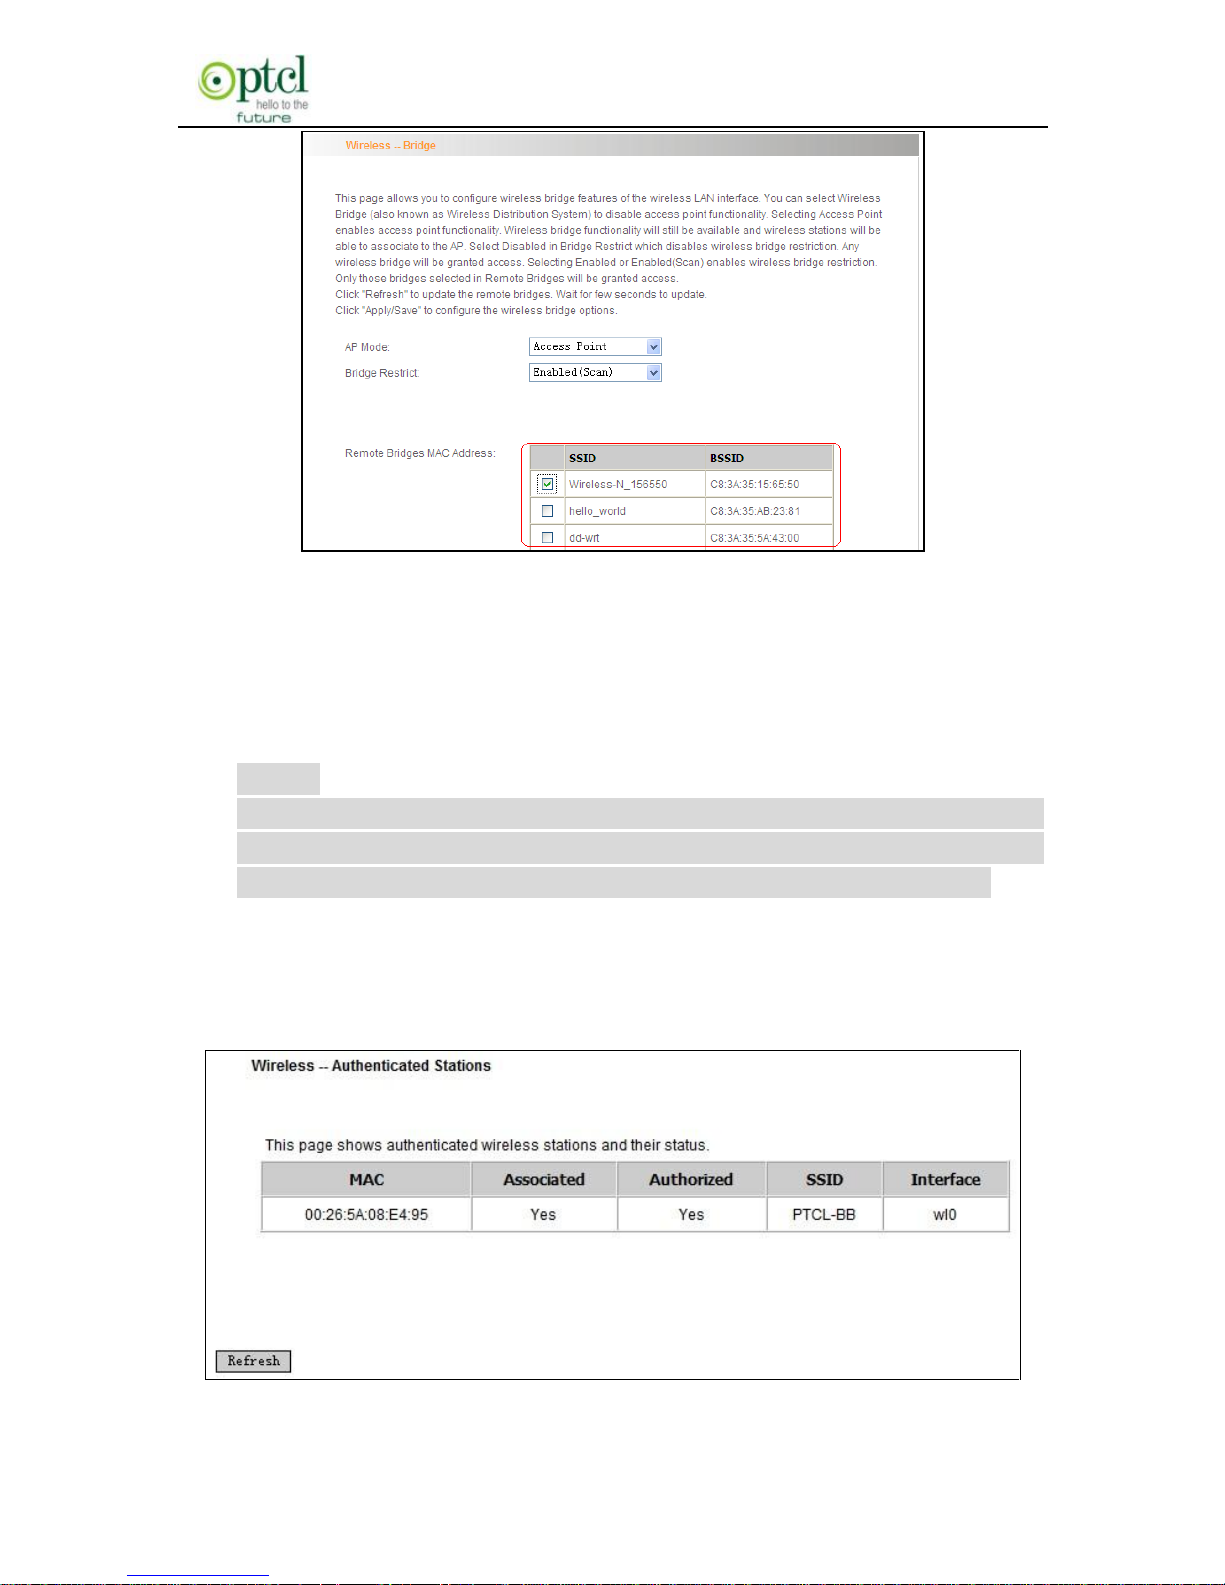
Bridge Restrict:there are 3 options available: Enabled, Enabled (Scan)
and Disabled.
Enabled: Select it to enable wireless bridge function. You need to know
the MAC address of a remote bridge and enter it manually. 4 MAC
addresses of remote bridges can be saved to simultaneously establish
bridges with 4 APs.
Enabled (Scan): Select it to enable wireless bridge function. In the
meantime, system will automatically scan MAC addresses of
available wireless devices. See the figure below:
Page 94
150M Wireless N ADSL2+ Router
- 93 -
You only need to check the wireless network that you want to bridge
with and click the ―Apply/Save‖ button. And system will automatically
establish wireless bridge with the remote device for you.
Disabled: To disable wireless bridge function, select this option.
Note:
To use the wireless bridge function, both devices must support the
function. Besides, SSID, channel, encryption method and key of
one device must be set to the same value of its link partner’s.
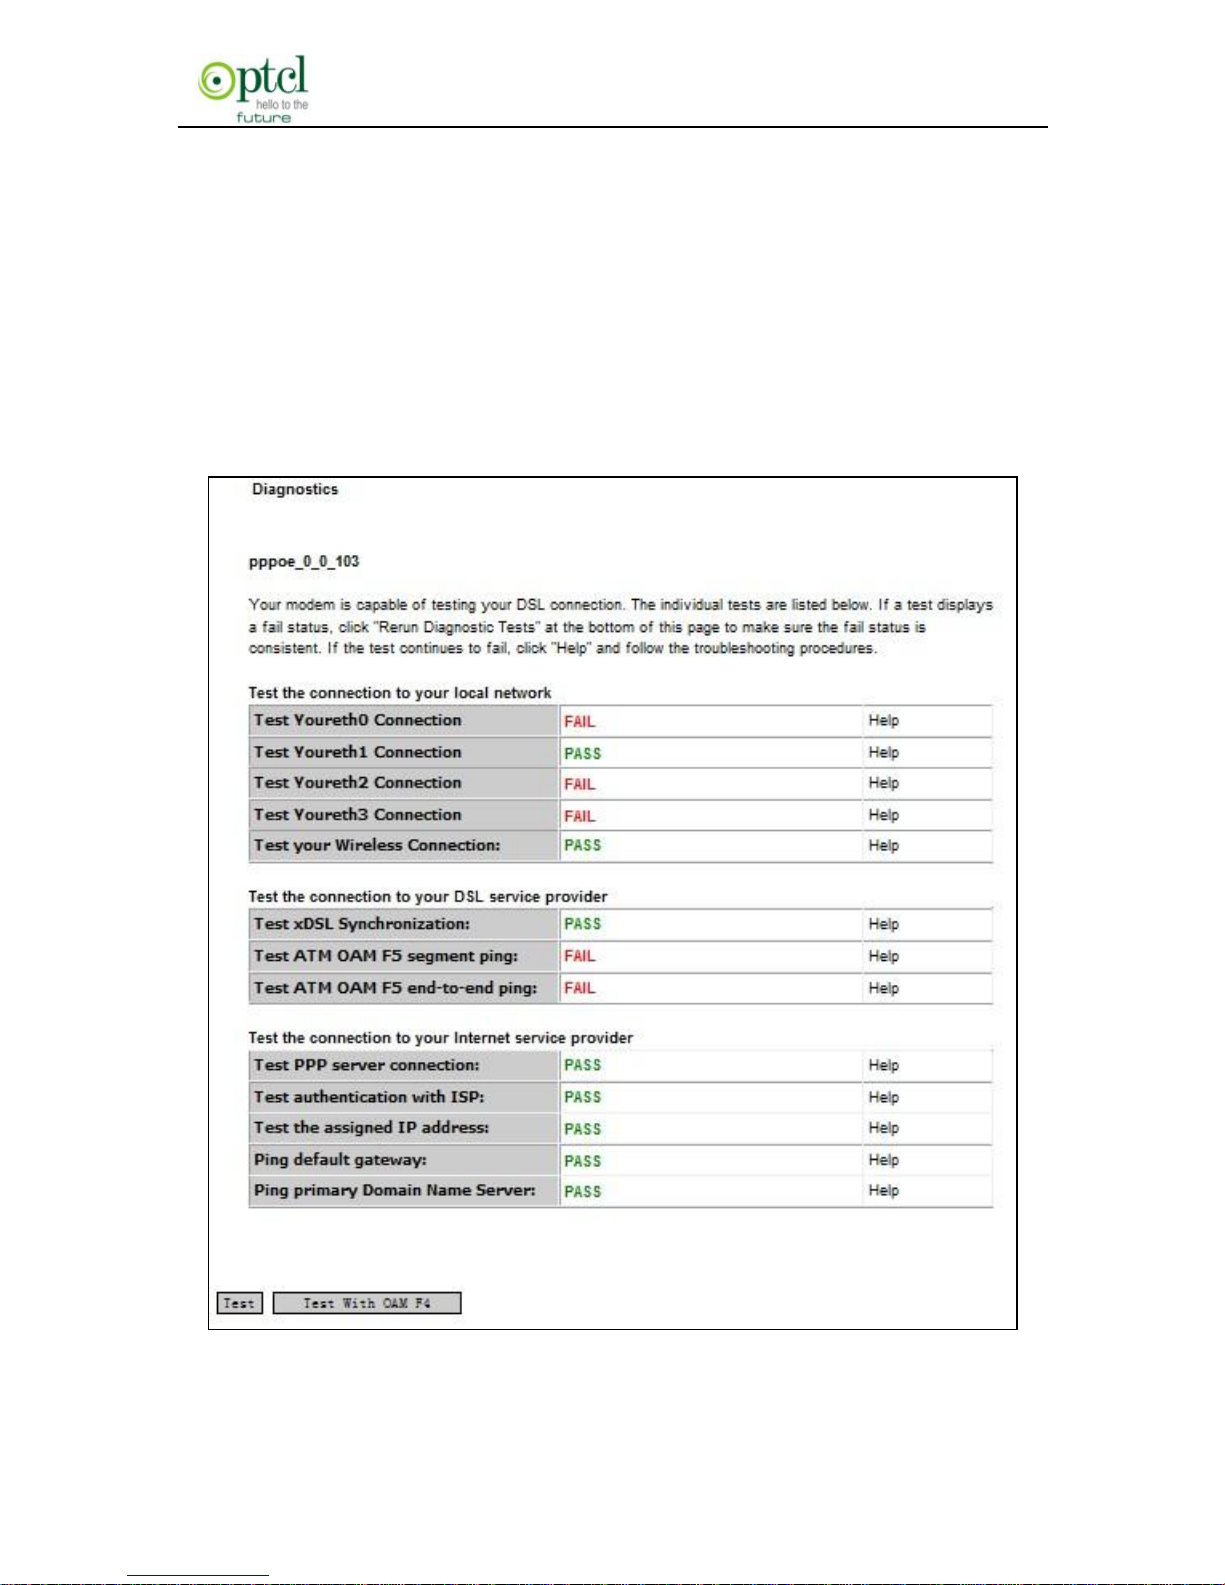
4.3.5 Station Info
This page shows authenticated wireless stations and their status.
Page 95
150M Wireless N ADSL2+ Router
- 94 -
4.4 Diagnostics
Through the Diagnostics function, you can check connection status of
the router’s interfaces. When a connection is successfully established,
its status displays a ―PASS‖, otherwise it displays a ―FAIL‖ click ". To
enter the page below, click the ―Diagnostics‖ tab on the left navigation
menu column:
Page 96

150M Wireless N ADSL2+ Router
- 95 -
If you are not clear about the test result, please click ―Help‖ for more
details.
Page 97
150M Wireless N ADSL2+ Router
- 96 -
4.5 Management
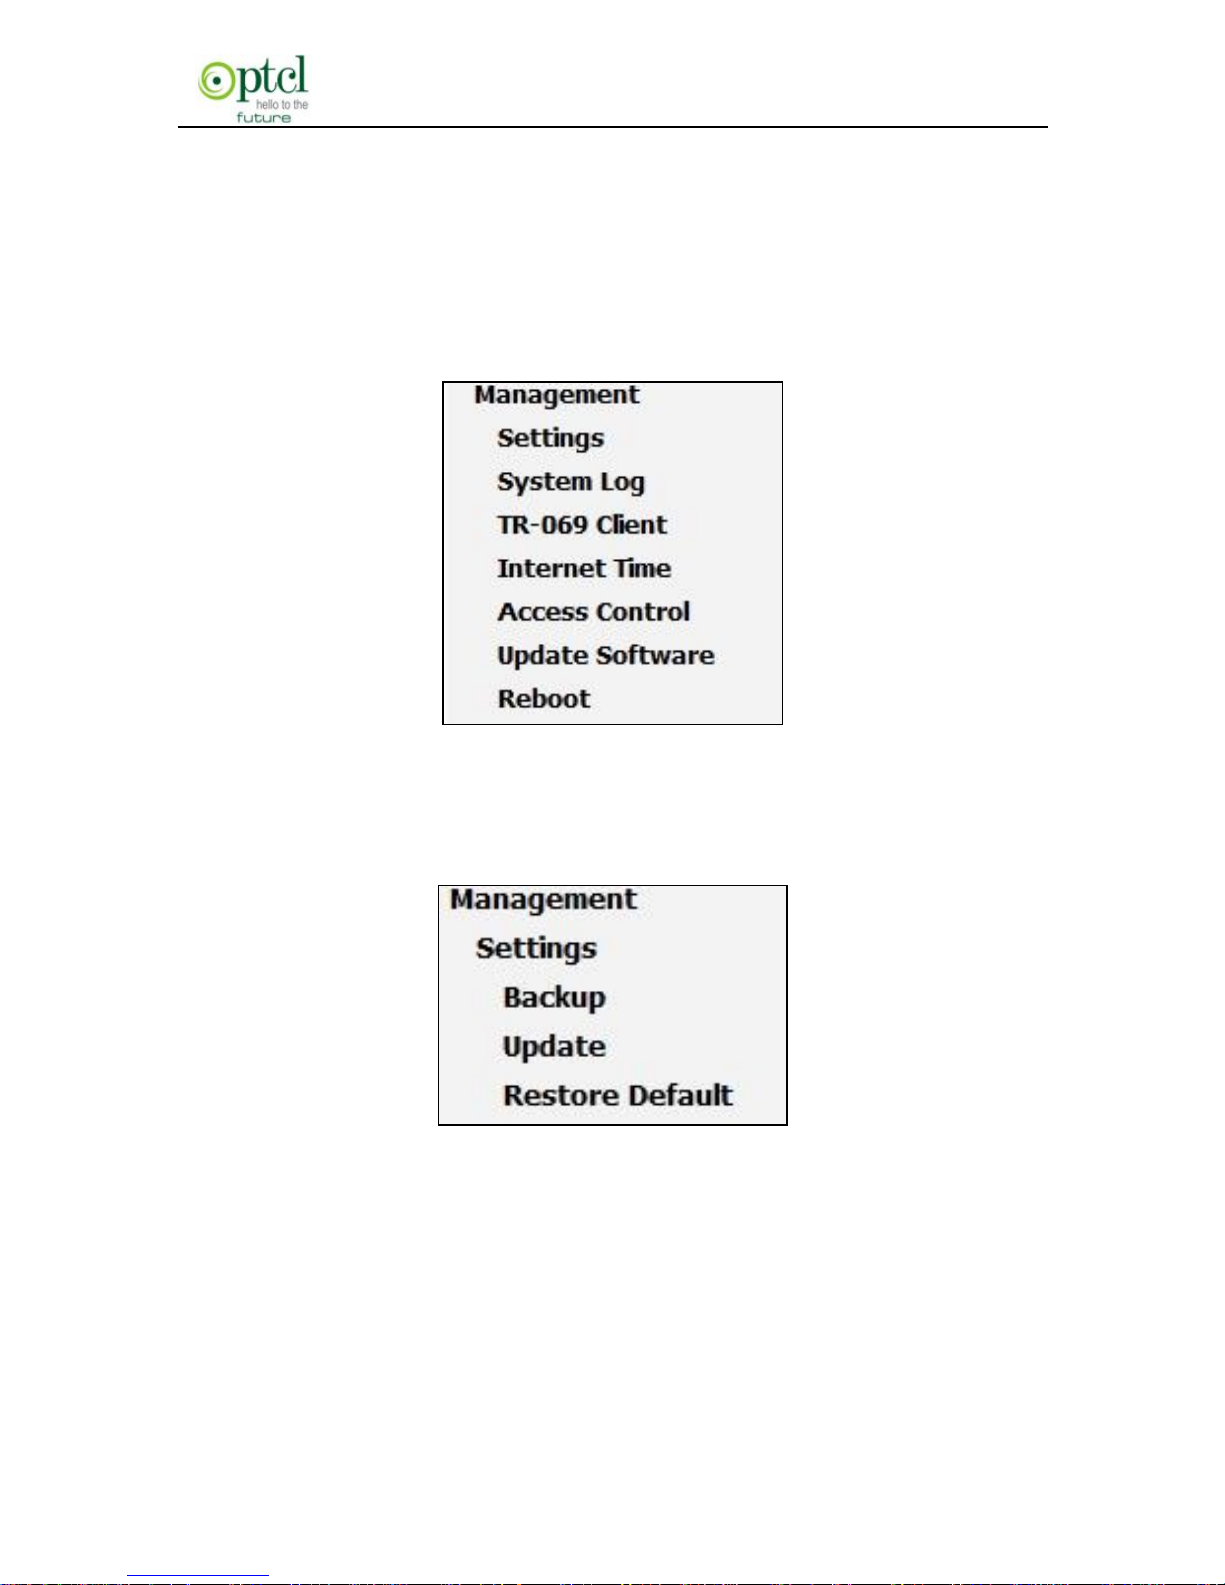
Management settings include: system log, TR-069 client, Internet time,
access control, backup, update, restore default,update software and
reboot, as shown in the picture below.
4.5.1 Settings
Backup
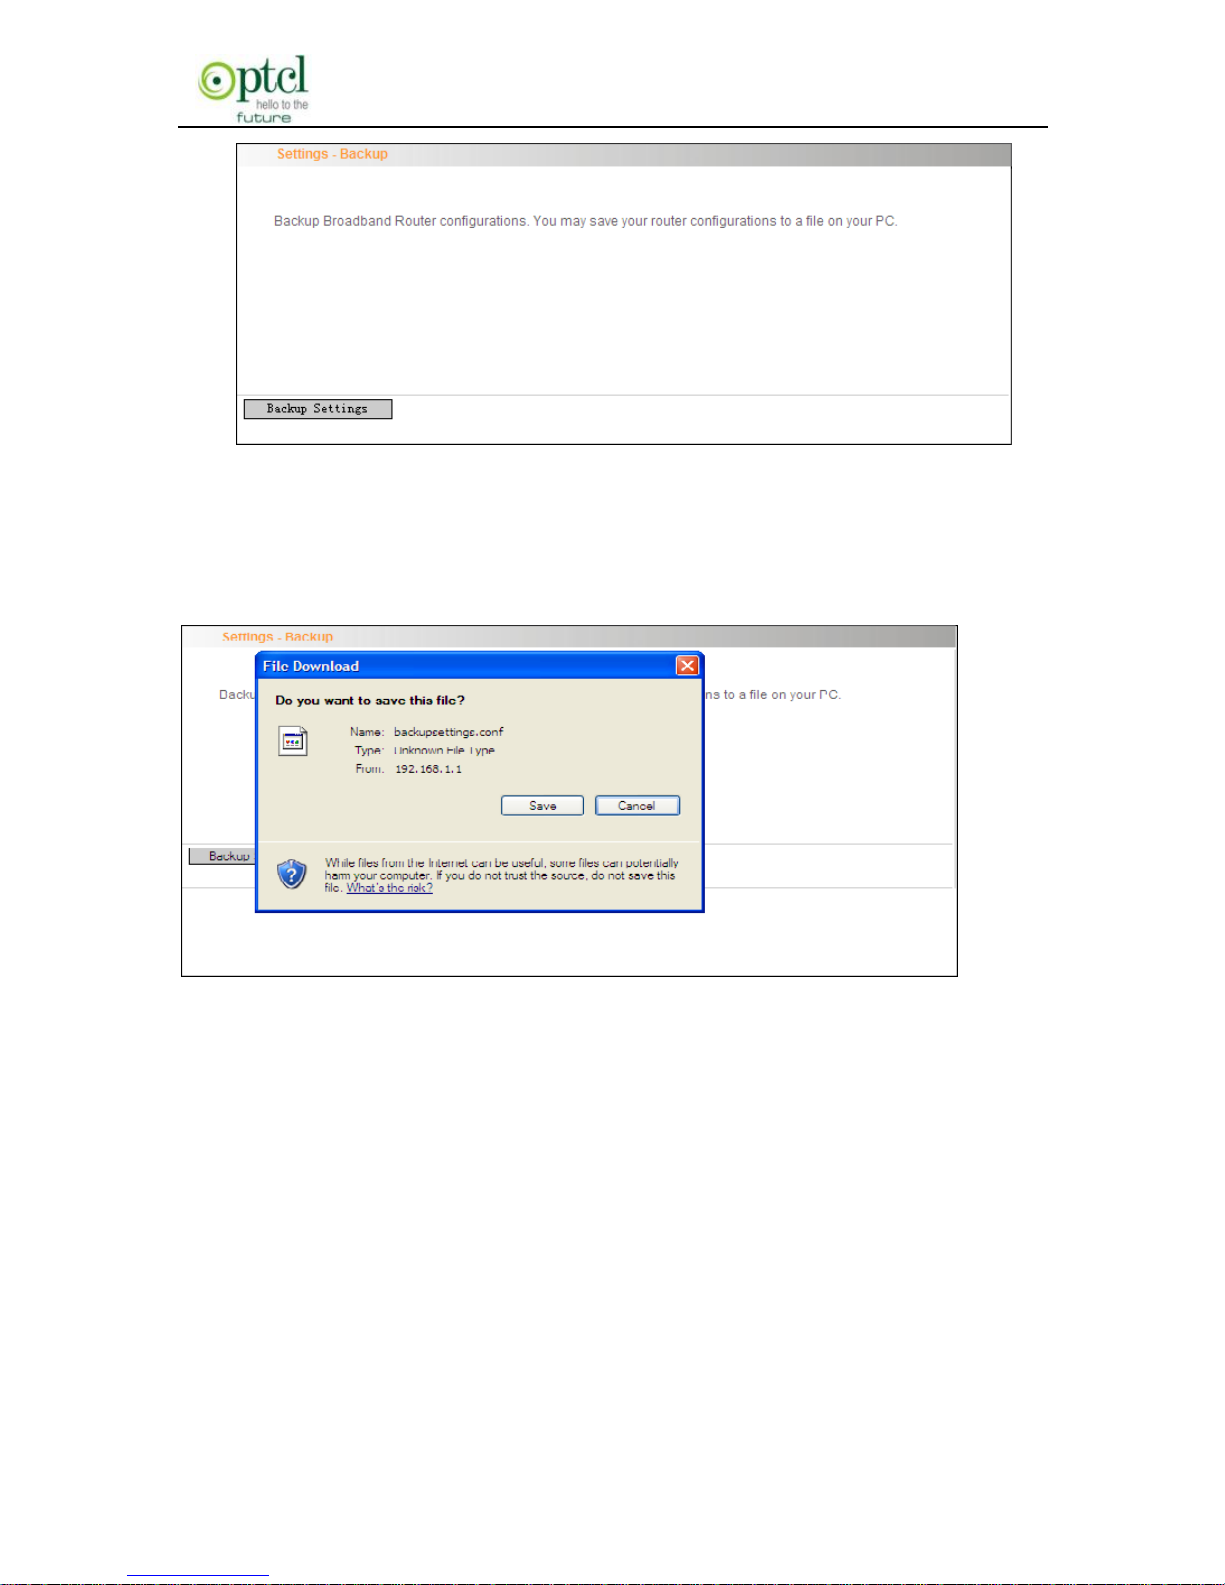
With backup settings, you can back up your router’s configuration. The
steps are as follows:
1. Click ―Backup‖ to enter the ―Settings—Backup‖ screen.
Page 98
150M Wireless N ADSL2+ Router
- 97 -
2. Click the ―Backup settings‖ button, and click ―Save‖ on the appearing
―File Download‖ dialog to export the router’s configuration file.
Update
This function enables you to import the previous backup file with ease.
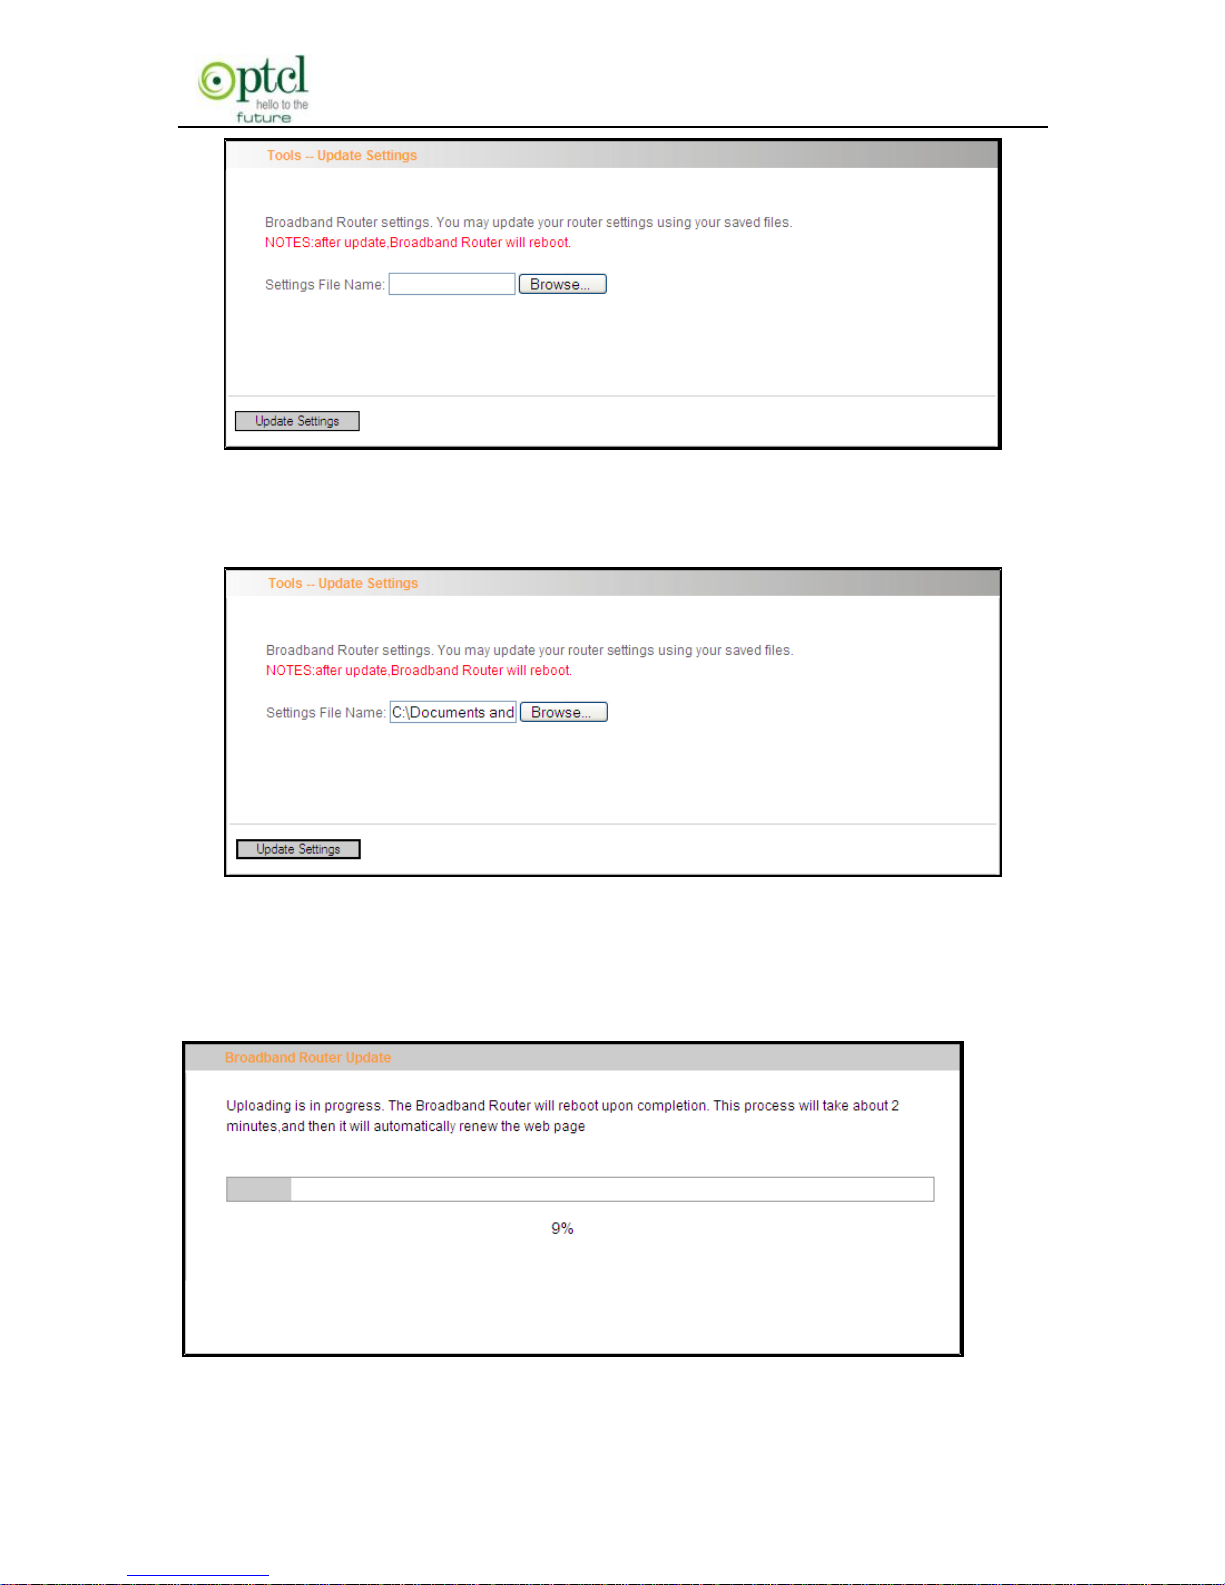
The steps are as follows:
1. Click the ―Update‖ menu to display the ―Tools—Update Settings‖
screen.
Page 99
150M Wireless N ADSL2+ Router
- 98 -
2. Click ―Browse‖ to select the file you want to import.
3. Click ―Update settings‖ to import the configuration and the device will
reboot.
Page 100
150M Wireless N ADSL2+ Router
- 99 -
Restore Default
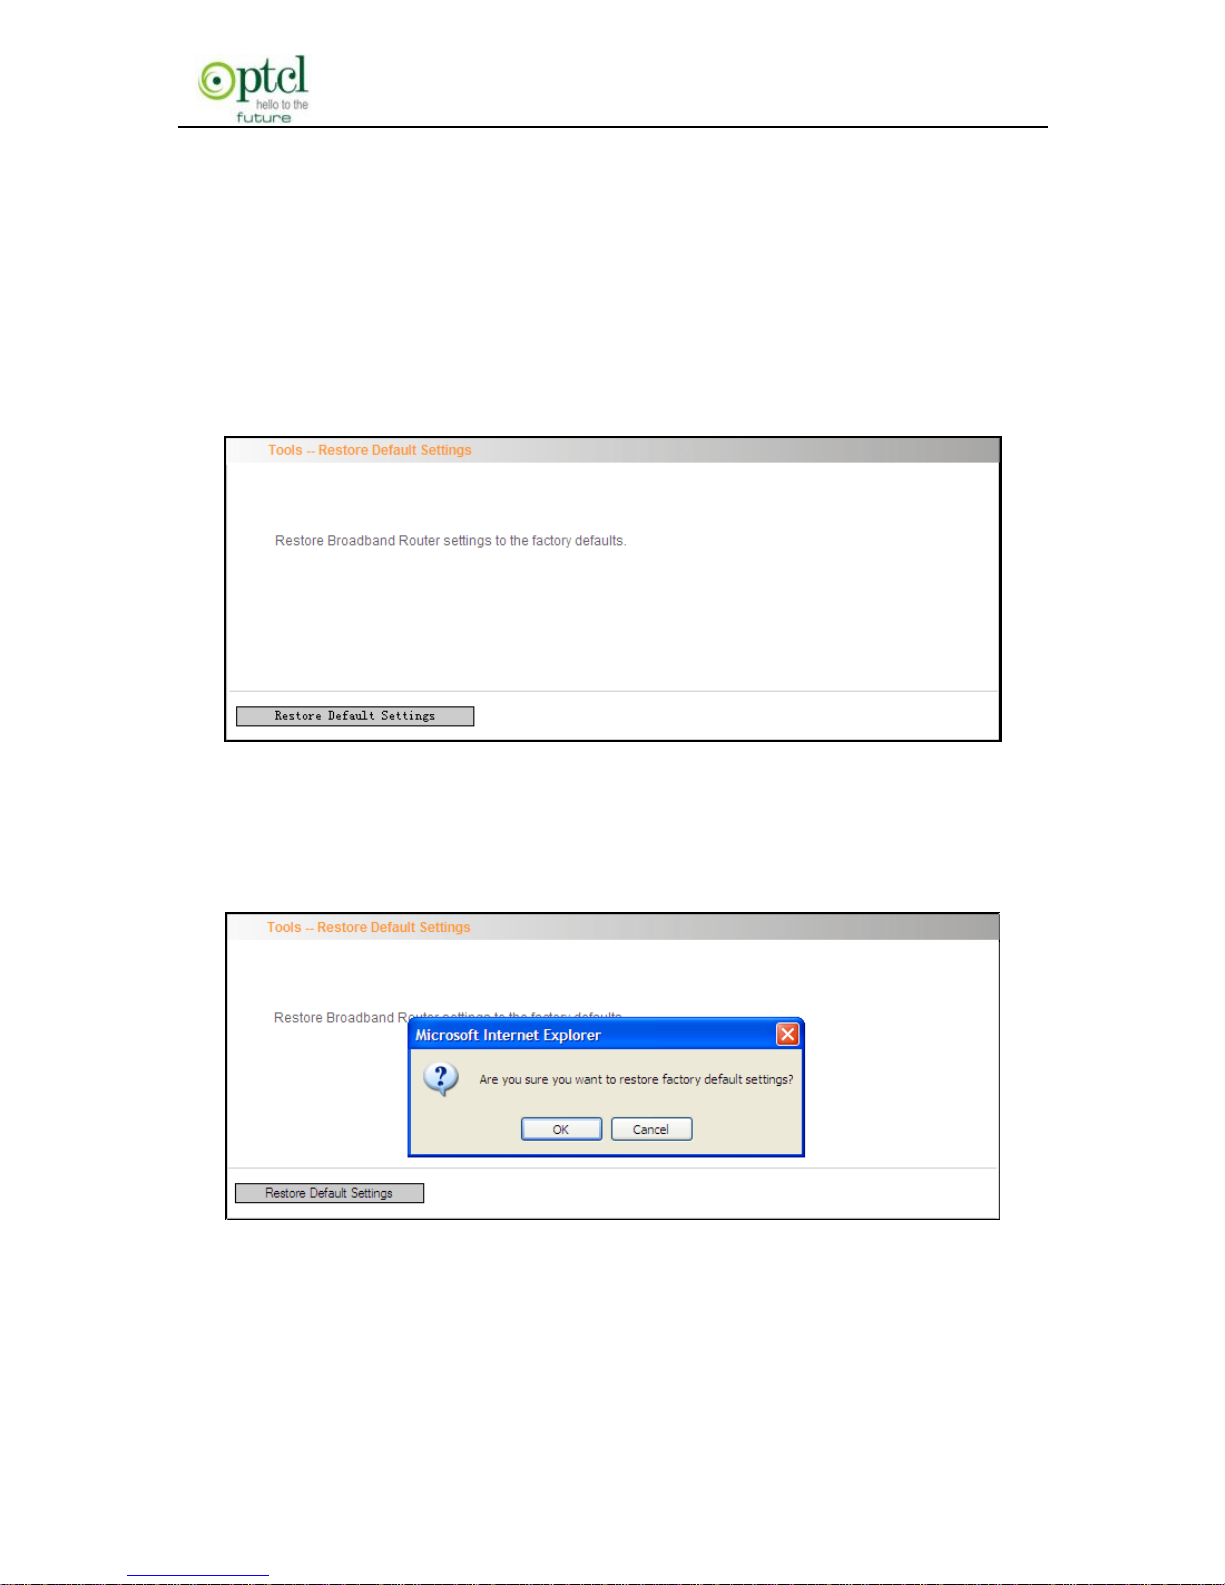
If you have made some illegal operation on the device, you will be
unable to access the Internet. This feature enables you to restore the
device to factory default settings.
1. Click ―Restore Default‖ to display the ―Tools -- Restore Default
Settings‖ screen.
2. Click the Restore Default Settings button, and click ―Ok‖ on the
appearing dialog.
3. After clicking ―Ok‖, you will see the procedure bars.
 Loading...