

PTCCTV Technology MDR10x1, MDR10x2, MDR10x5, MDR30x1, MDR30x5 User Manual

SD Video Recorder 1 -
SD Video Recorder
User’s Manual
Thank you for using our Mobile DVR. This manual is applicable for MDR10x1, MDR10x2,
MDR10x5, MDR30x1 and MDR30x5 series. Please read this User’s Manual carefully to
ensure that you can use the device correctly and safely. The contents of this manual are
subject to be changed without notice.
SD Video Recorder 2 -
Important notice:
1. Please read over all cautions.
2. Please keep this manual for reference in the future.
3. Please notice all warning information.
4. Please strictly follow the instructions in this manual while operating.
5. Please NEVER put this device under the place which is easily poured by water.
6. Please do NOT use abrasive chemicals, cleaning solvents or strong detergents to clean
the device. Wipe the device with a soft and dry cloth.
7. Please do NOT get the gate of airiness heat exchange closed.
8. Please leave the device far away from hot and high temperature environment.
9. Install the device with the accessories coming with it.
10. Please take care when moving the device, make sure of security, and avoid being
damaged by dropping from high place.
11. Call for qualified maintenance man to repair when needed.
12. The device can only be installed horizontally. Installed vertically or out of the horizontal
could hurt person or damage the device or/and its parts.
Warning
This device is NOT of waterproof; to prevent it from any accident of fire or
electric shock, please do NOT put any container with water on the device or
nearby. Do not expose the device to moisture, or extreme temperatures.
This lightning flash with
arrow symbol within an
equilateral triangle is
intended to alert users
that there might be
uninsulated dangerous
voltage which may cause
electric shock to person
when the cover of
device is opened.
To prevent from the risk of
electric shock, do NOT
remove top cover or back
cover. There is NO
user-serviceable part
inside. Ask for service from
qualified maintenance man.
The exclamation point within
an equilateral triangle is
intended to alert users the
important operating and
maintenance(servicing)
instructions in this manual.
CAUTION
RISK OF ELECTRIC SHOCK
DO NOT OPEN

SD Video Recorder 3 -
1.Main Features ............................................................................................................................... 4
2. Overall description ...................................................................................................................... 5
2.1 Front Panel .................................................................................................. 5
2.2 Rear panel .................................................................................................. 6
2.3 Remote ....................................................................................................... 7
3. Using the recorder ....................................................................................................................... 8
Step 1:Prepare the SD card .............................................................................. 8
Step 2, Connect camera. .................................................................................... 9
Step 3, Connect to power supply ......................................................................... 9
Step 4, format the SD card ............................................................................... 10
Step 5, Choose recording quality ....................................................................... 10
Step 6, start recording ..................................................................................... 11
4.Operations .................................................................................................................................. 13
4.1 Play back the files on SD card ..................................................................... 13
4.2 Manage the power ..................................................................................... 15
5.Appendix, cables ........................................................................................................................ 18
5.1 Power supply ............................................................................................. 18
5.2 AV cables .................................................................................................. 18
5.3 Signal cables ............................................................................................. 20
6. Specification ............................................................................................................................... 21
7. List of Standard Accessories ..................................................................................................... 23

SD Video Recorder 4 -
1.Main Features
Video And Audio
H.264 High Profile video compression, real time recording( 25 fps(PAL) / 30 fps(NTSC) for
each channel. Frame rate adjustable for each channel.
AAC(Advanced Audio Compression) for audio.
D1 resolution for each channel, which means each channel support
704x576(PAL)/704x480(NTSC).
Support 4 channel video and 4 channel audio recording;
Power Input
Support from +8V DC to +32VDC. Applicable for vehicles with +12V or +24V battery.
When the power input connects in reverse polarity, the auto-protect function can
prevent the recorder and battery from damage.
The recorder provides each camera with stable +12V DC power; DVR can detect the
short cut on power circuit.
Can use ignition to control the power.
Recording mode
Continuous record.
Start recording automatically when the DVR is turned on.
Support schedule recording.
Support alarm recording.
Speed and Vehicle status recording
Record vehicle speed and car id with audio and video.
Support 6 sensors, can be connected to brake, return, right turn, left turn light etc.
Over-speed alarm.
SD card plug and play
Support plug and play for SD card when not recording and playing.
Note: If you remove the SD card while recording or playing, it might cause the damage of
the file on SD card. While recording or playing, the yellow light on the front panel will be
on. So please stop recording or playing until the yellow light is off if you need to remove
the SD card.
Multiple player supported
You can use the following player to play back the record file.
VLC media player(version1.0.0 or above);
Storm player(Version 2009 or above)
Winamp(Version 5.531 or above)
SD Video Recorder 5 -
2. Overall description
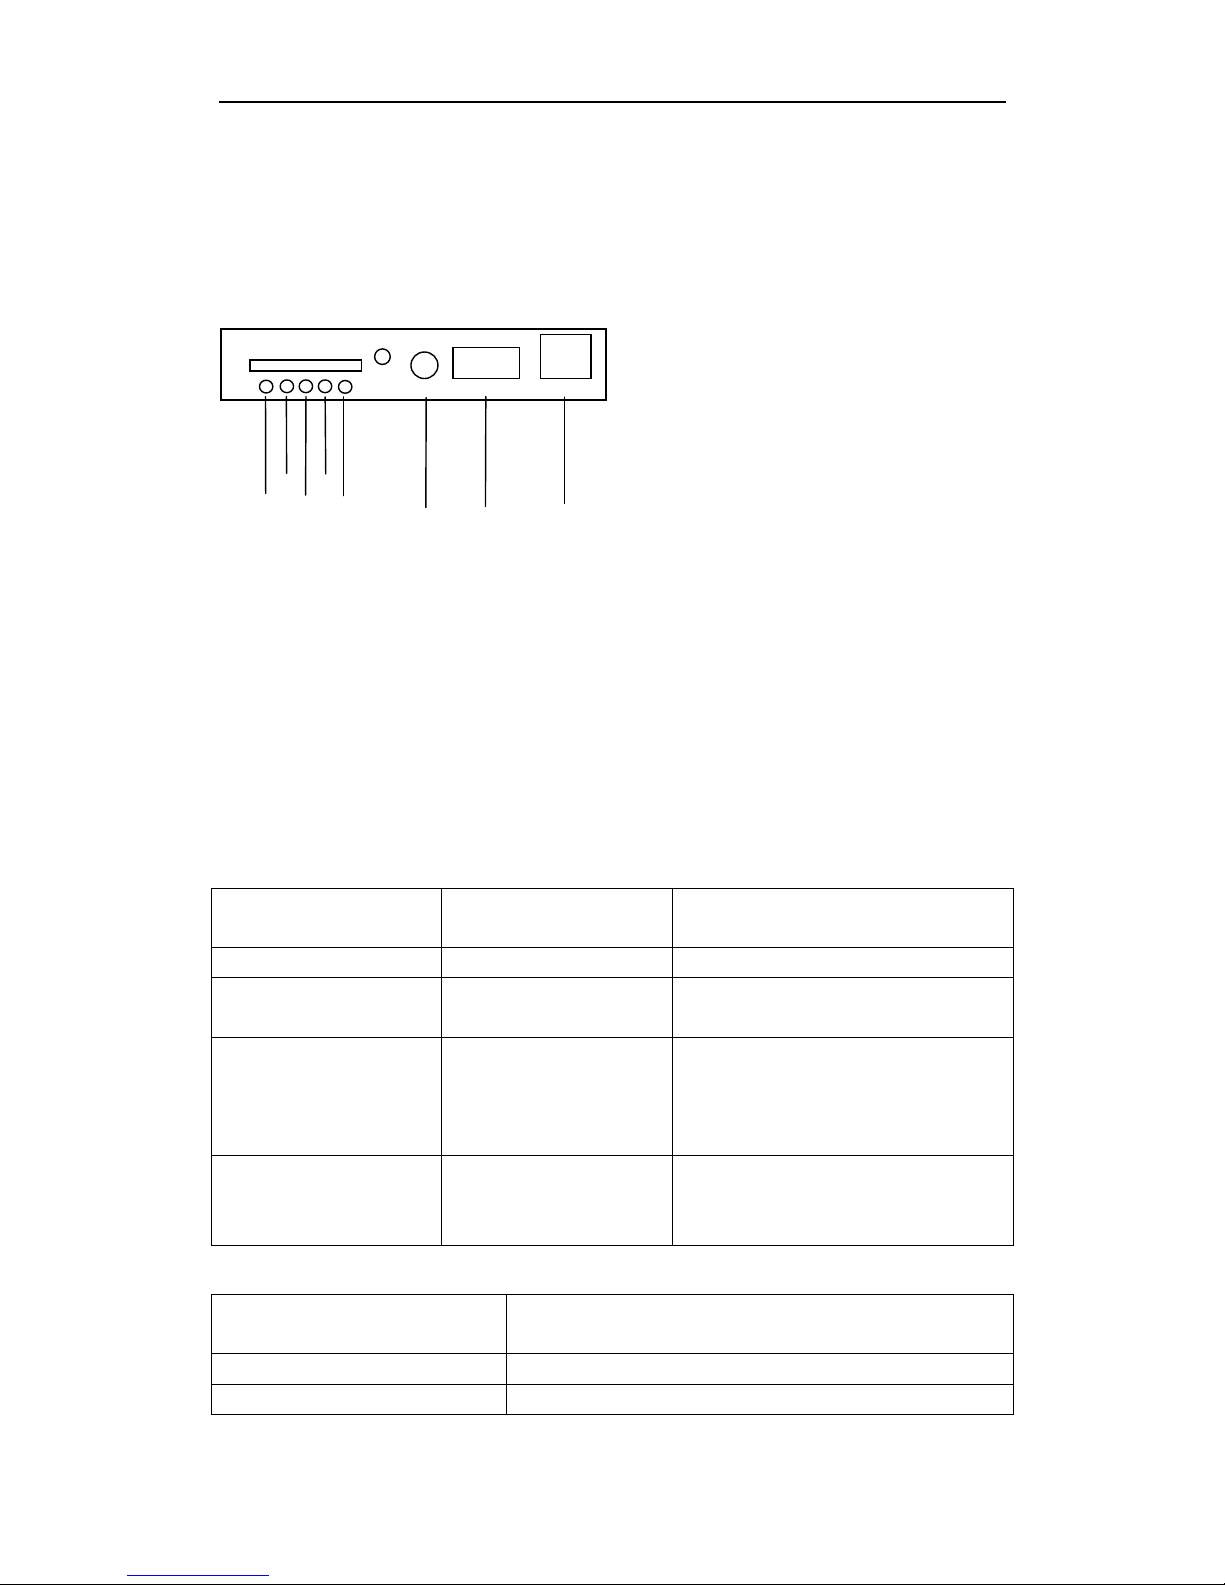
2.1 Front Panel
①:Power light.
②:Run light.
③:Alarm light.
④:SD present light.
⑤:System light.
⑥:External IR connector.
⑦:USB 2.0 port.
⑧:Lan port.
Get to know the status of Mobile DVR by the
indication of PWR light and RUN light:
PWR
RUN
Description
Always On
Blinking
DVR is turned on and running.
Blinking with RUN by
turns
Blinking with PWR by
turns
Ignition is not enabled and DVR is
turned off.
Blinking together with
RUN
Blinking together with
PWR
Ignition is not enabled and DVR is
running. The DVR will be turned off
when it reached the “Ignition Power
Off Delay” time.
Blinking
Off
The DVR is turned off. It will restart if
POWER button is pressed on the
remote.
Alarm light(yellow)
Description
On
Alarm indication, such as overspeed.
Off
No alarm.
NET
PWR
RUN
ALARM
SD
SYS
USB 2.0
① ② ③
④
⑤
⑥
⑦
⑧
5
1
EX_IR
SD Video Recorder 6 -
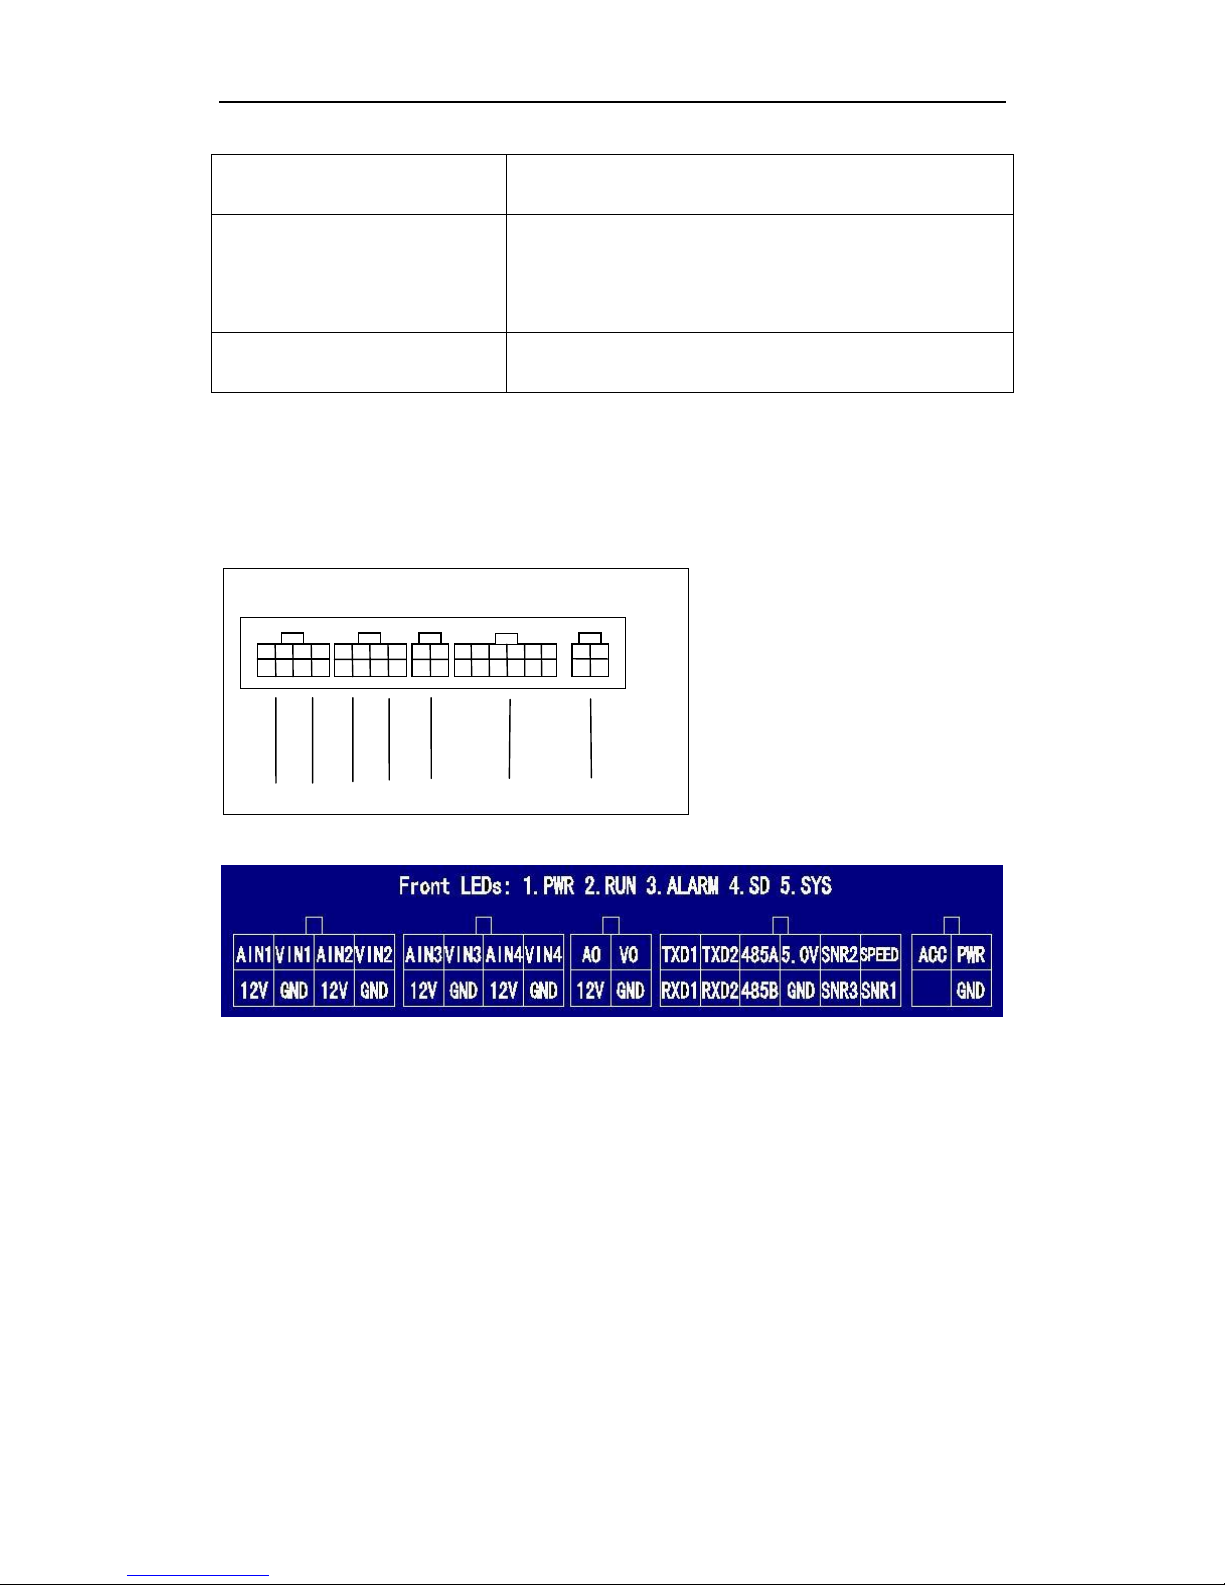
2.2 Rear panel
①:AV input 1(including audio input 1, video input 1 and power for camera 1)
②:AV input 2(including audio input 1, video input 1 and power for camera 2)
③:AV input 3(including audio input 1, video input 1 and power for camera 3)
④:AV input 4(including audio input 1, video input 1 and power for camera 4)
⑤:AV ouput(including audio output, video output and power)
⑥:1 speed sensor, 3 sensors, 2 RS232 port, 1 RS485 port and one 5V DC output.
⑦:Power for the recorder and ACC input.
System light(yellow)
Description
On
In recording. Don’t remove the SD card in this status.
Please press “stop” on the remote to stop recording if
you need remove the SD card. Removing SD card in this
status might cause the damage on the record file.
Off
Recorder is not in recording mode. You can remove the
SD card.
①
② ③ ④
⑤ ⑥ ⑦
SD Video Recorder 7 -
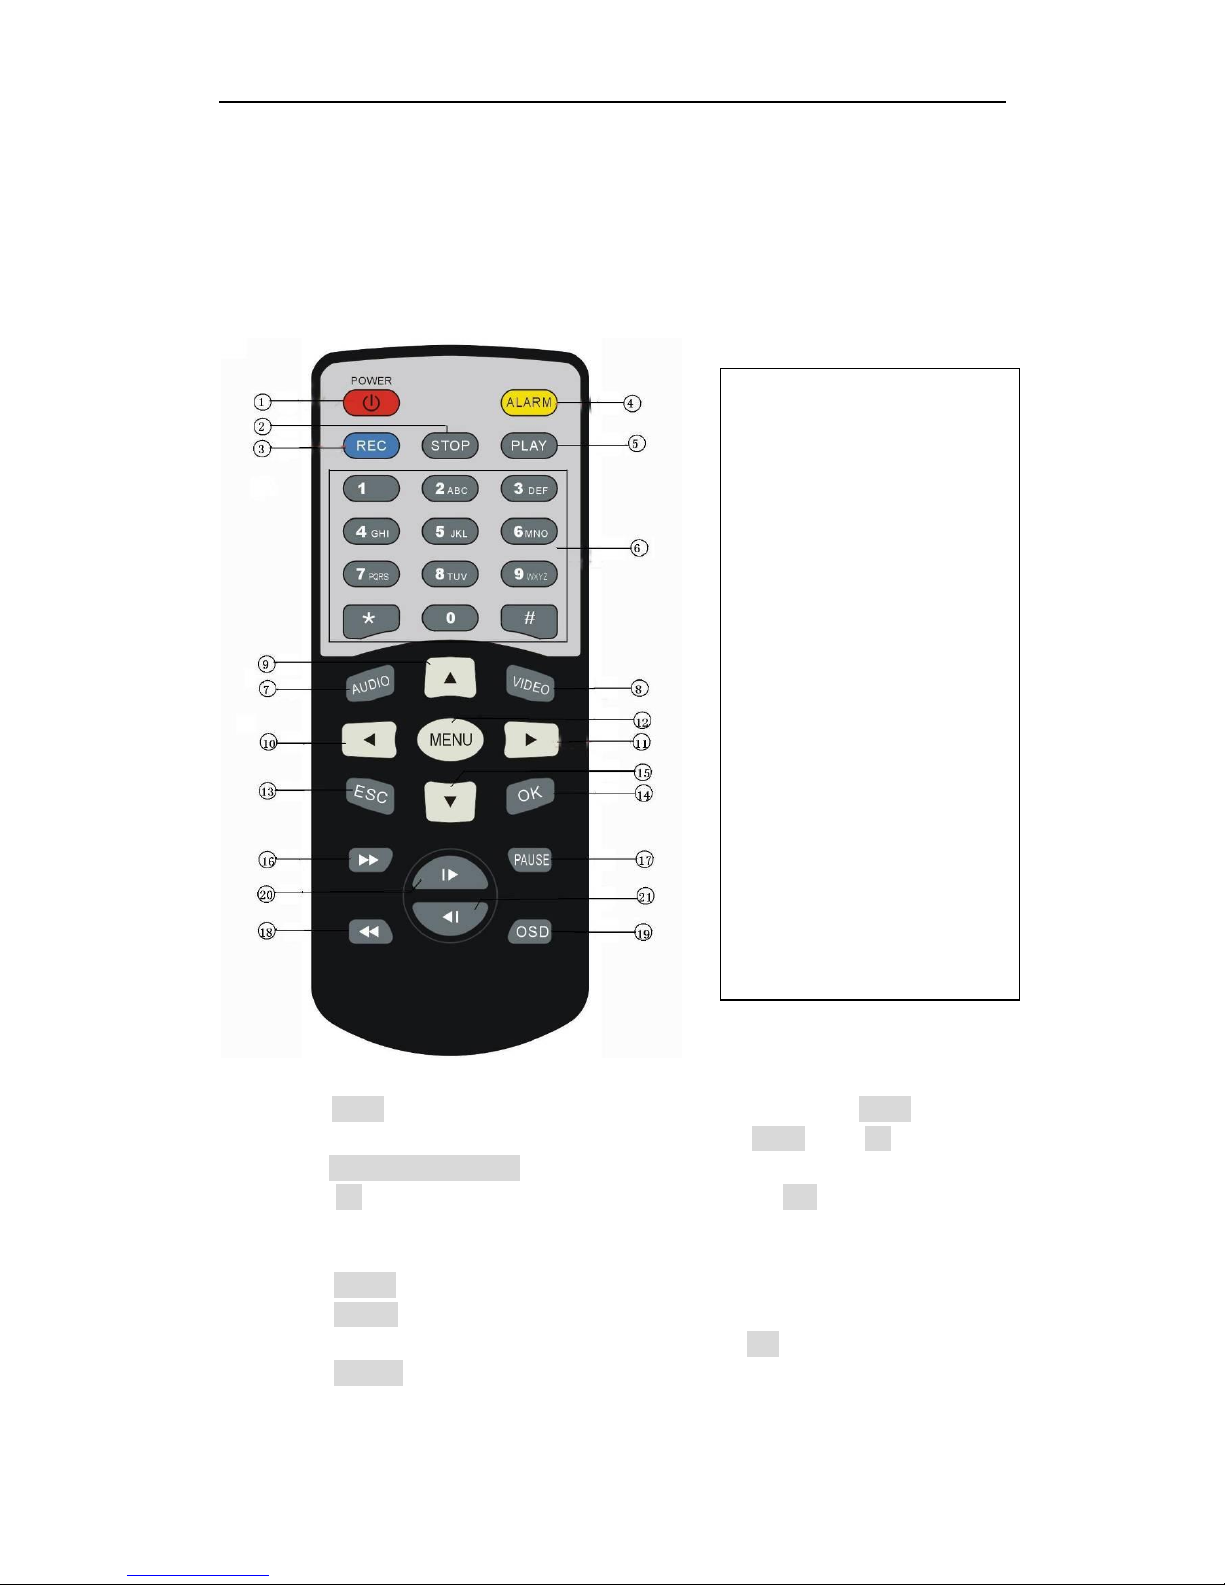
2.3 Remote
How to use the remote:
(1)Press <MENU> to enter main menu or sub menu. You can also use <MENU> to select
among different value in the submenu. You can also use <MENU> as <OK>;
(2)Press <Up/Down/Left/Right> button to move between the different menu item;
(3)Press <OK> to save and exit the current menu. Press <ESC> to cancel and exit
thecurrent menu. If you modify something in the menu, recorder will prompt a window to
ask you to save or cancel your modification;
(4)Press <VIDEO> to toggle among different video channel;
(5)Press <AUDIO> to toggle among different audio channel;
(6)To delete character in the edit control, you can press <Left>;
(7)Press <POWER> for a while to turn on/off the recorder;
1. Power
2. Stop
3. Record
4. Alarm
5. Play
6. Numbers
7. Audio
8. Video
9. Up
10. Left
11. Right
12. Menu
13. ESC
14. OK
15. Down
16. Fast Forward
17. Pause/Step
18. Fast Backward
19. OSD
20. Next
21. Previous
 Loading...