

Page 1

Innovative Measurement Electronics
WS1V
Weighing Scale
Set Up Manual
Rev. 7.8.30
Page 2

Thank you for purchasing a PT Electronic Digital Scale. In order to use the
scale properly, please read this Manual carefully before use. If you have a
problem concerning the scale, please contact your supplier.
PT regularly updates and issues new information regarding products, the
most up-to-date information and additional detailed information is located on
the PT web site.
www.pt-global.com
Page 3

WS1V Set Up Manual Rev. 7.8.30gll
1 TABLE OF CONTENTS
1 TABLE OF CONTENTS .................................................................................................................... 1
2 BEFORE USING THE SCALE .......................................................................................................... 2
3 PREPARING TO USE THE SCALE .................................................................................................. 3
4 FEATURES AND SPECIFICATIONS ................................................................................................ 4
4.1 Features: ................................................................................................................................ 4
4.2 Specifications: ........................................................................................................................ 4
4.3 Product Package: ................................................................................................................... 4
4.4 Power Consumption: .............................................................................................................. 4
4.5 Selectable Weight Units and Piece Unit: ................................................................................ 5
4.6 Error Messages: ..................................................................................................................... 5
5 DISPLAY AND KEYS ........................................................................................................................ 6
5.1 Display ................................................................................................................................... 6
5.2 Keys and Their Functions ....................................................................................................... 6
6 BASIC OPERATION ......................................................................................................................... 7
6.1 Switching the scale on / Re-zeroing ...................................................................................... 7
6.2 Selecting the desired unit ....................................................................................................... 7
6.3 Using TARE to deduct the weight of the container ................................................................. 7
6.4 Animal weighing hold function ............................................................................................... 7
7 SERVICE MODE ACCESS ................................................................................................................ 8
7.1 Service Mode Access ............................................................................................................. 8
7.2 Service Mode Exit ................................................................................................................... 8
7.3 Capacity Configuration ................................................................................................ 9
7.4 Weight Calibration ...................................................................................................... 12
7.5 Function Settings ........................................................................................................ 13
7.6 Environment Settings ............................................................................................... 14
7.7 Buzzer type .................................................................................................................. 16
7.8 Span calibration .............................................................................................................. 17
7.9 Gravity Compensation .......................................................................................................... 18
8 USER FUNCTIONS ......................................................................................................................... 19
8.1 Auto Power off and Backlight Settings .................................................................................. 19
8.2 Hold Function Setting .......................................................................................................... 20
9 SEGMENT DISPLAY CHARACTERS ............................................................................................. 22
Page 1
Page 4

WS1V Set Up Manual Rev. 7.8.30gll
2 BEFORE USING THE SCALE
Thank you for purchasing a PT Electronic Digital Scale. In order to use the scale
properly, please read this Set Up Manual carefully before use. If you have a
problem concerning the scale, please contact your supplier.
1. Please keep scale in a cool and dry place. Do not store at high temperatures.
2. Do not allow any liquids to come into or contact with the scale. If this happens, wipe the
scale dry with a cloth.
3. Avoid objects impacting with the scale. Do not drop loads onto the scale or subject the
weigh pan to any strong shock loads.
4. The load placed on the weigh pan must not exceed the maximum weighing capacity of the
scale.
5. If the scale is not going to be used for some time, please clean it and store it in a plastic
bag in dry conditions. A desiccant sachet may be included to prevent moisture build up.
6. Do not mix different types of dry battery or mix used dry batteries with new dry batteries.
Page 2
Page 5

WS1V Set Up Manual Rev. 7.8.30gll
3 PREPARING TO USE THE SCALE
• For accurate weight readings locate the scale on a firm level surface free from vibrations.
• Avoid operating the scale in direct sunlight or drafts of any kind.
• Remove any weight that might be on the weigh pan before the scale is switched on and
avoid leaving weight on the pan for long periods of time.
• Once the scale has been switched on, it will go through a LCD display test and then re-
zero to be ready for use.
• For best accuracy switch the scale on for 15~20 minutes before use.
• Please note when symbol appears on the screen, the batteries need to be recharged.
• All goods weighed should be placed in the centre of the weigh pan for accurate weighing.
The overall dimensions of the goods being weighed should not exceed the dimension of
the weigh pan.
Page 3
Page 6
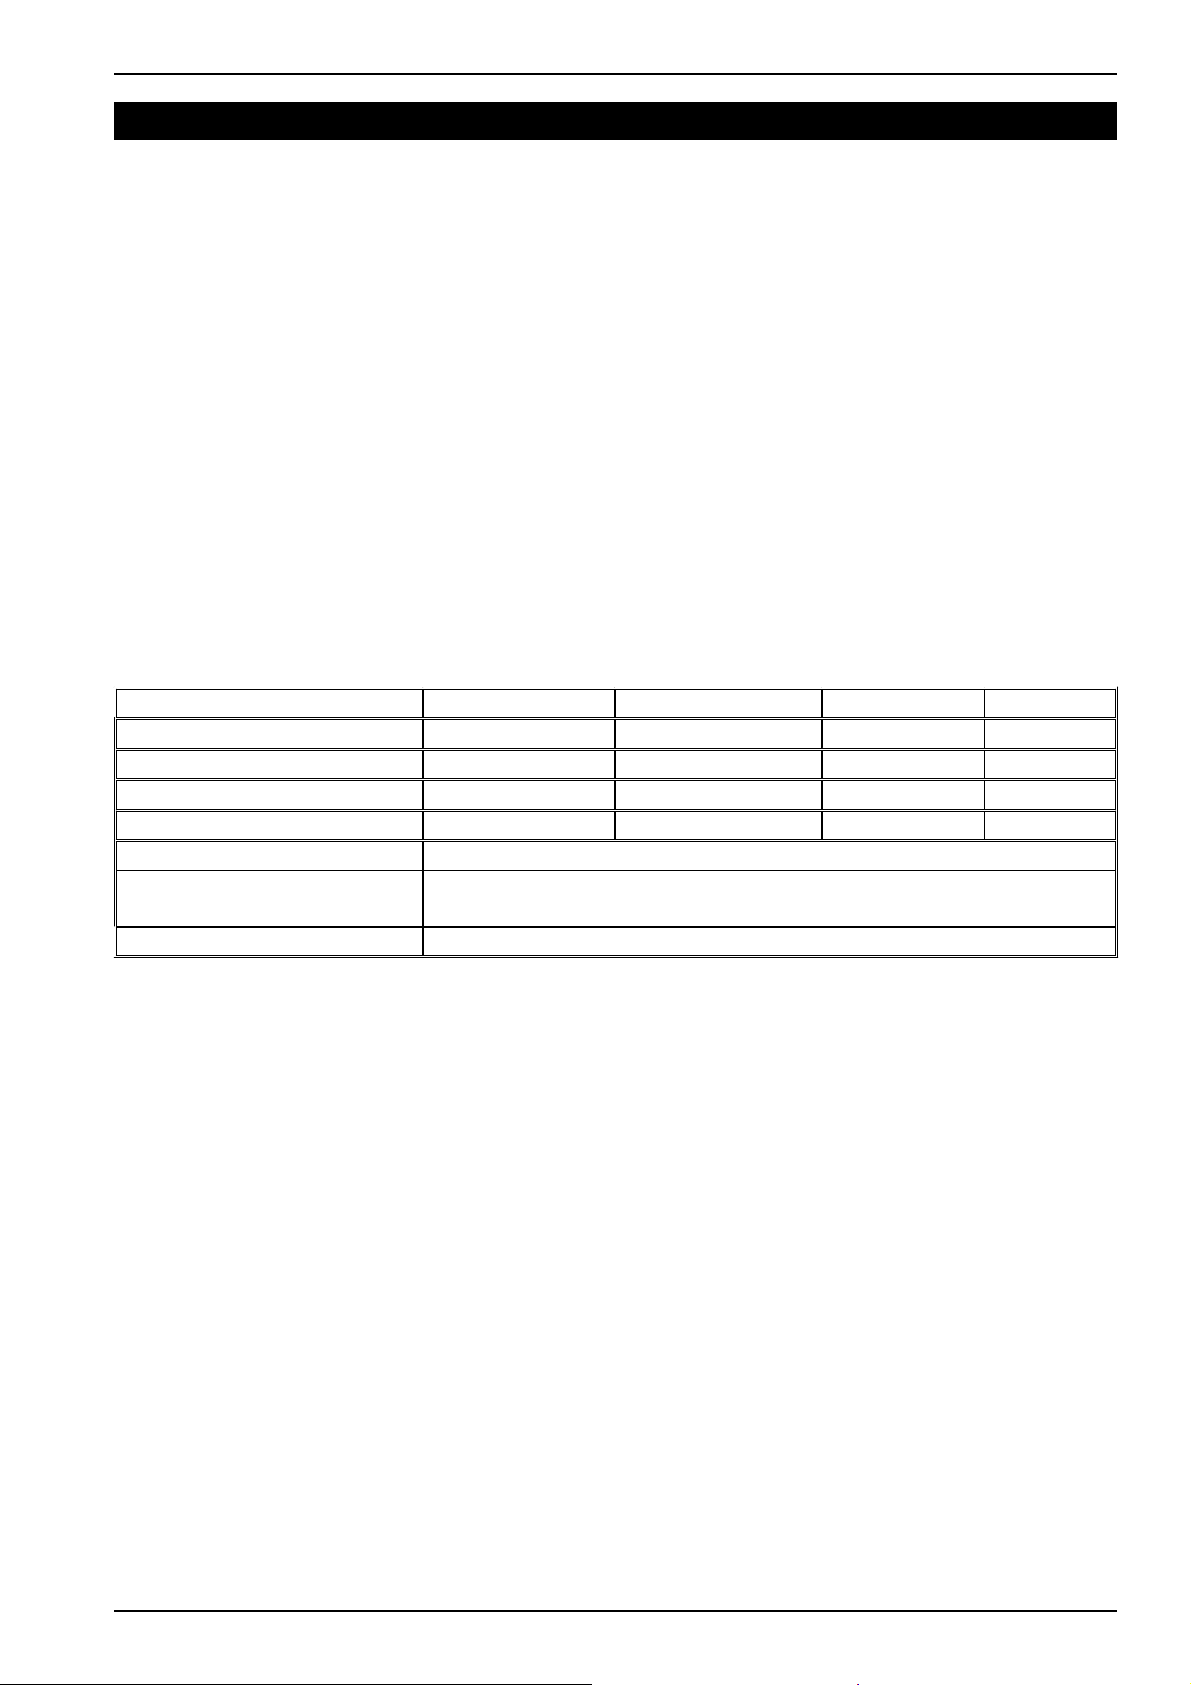
4 FEATURES AND SPECIFICATIONS
4.1 Features:
●
Multi-function operation: Fast weighing operation; Full range tare; Auto power-off;
Weight hold feature.
●
Dual-weighing units: kilogram (kg) and pound (lb).
●
User-friendly design: Auto calibration; Large LCD display; Gravity compensation; Low
battery warning indicator; Double over-load protection.
●
Dual-power source: The power source can either be from AC / DC adaptor or the
internal rechargeable battery pack.
●
Stainless steel weigh pan
●
LED display backlight
4.2 Specifications:
WS1V Set Up Manual Rev. 7.8.30gll
Model Capacity Division Resolution Min. Cap.
WS1V-30 30kg 10g 1/3000 200g
WS1V-60 60kg 20g 1/3000 400g
WS1V-150 150kg 50g 1/3000 1kg
WS1V-300 300kg 100g 1/3000 2kg
Operating Temperature
Power Source
Weight pan Size
4.3 Product Package:
●
Scale 1 off
●
AC adapter 1 off
●
User manual 1 off
●
Please contact to your supplier, if any of the items described above are missing.
●
A rechargeable battery pack is included in the product package and is fitted in the
scale.
0°C ~ 40°C (32°F ~ 104°F)
6v DC internal rechargable battery or AC mains adaptor 1000ma
DC 9V Centre +
300 x 350 mm (< 150kg), 570 x 900mm (150kg and 300kg)
4.4 Power Consumption:
The internal rechargeable battery will operate the scale for around 170 hours. This reduces to
around 88 hours when the backlight is used extensively. The scale will operate fro a further
10 hours after the low battery warning comes on. Recharge using a mains powered adaptor
with a charge voltage of 9vDC 1000ma. The DC plug is centre positive.
Page 4
Page 7
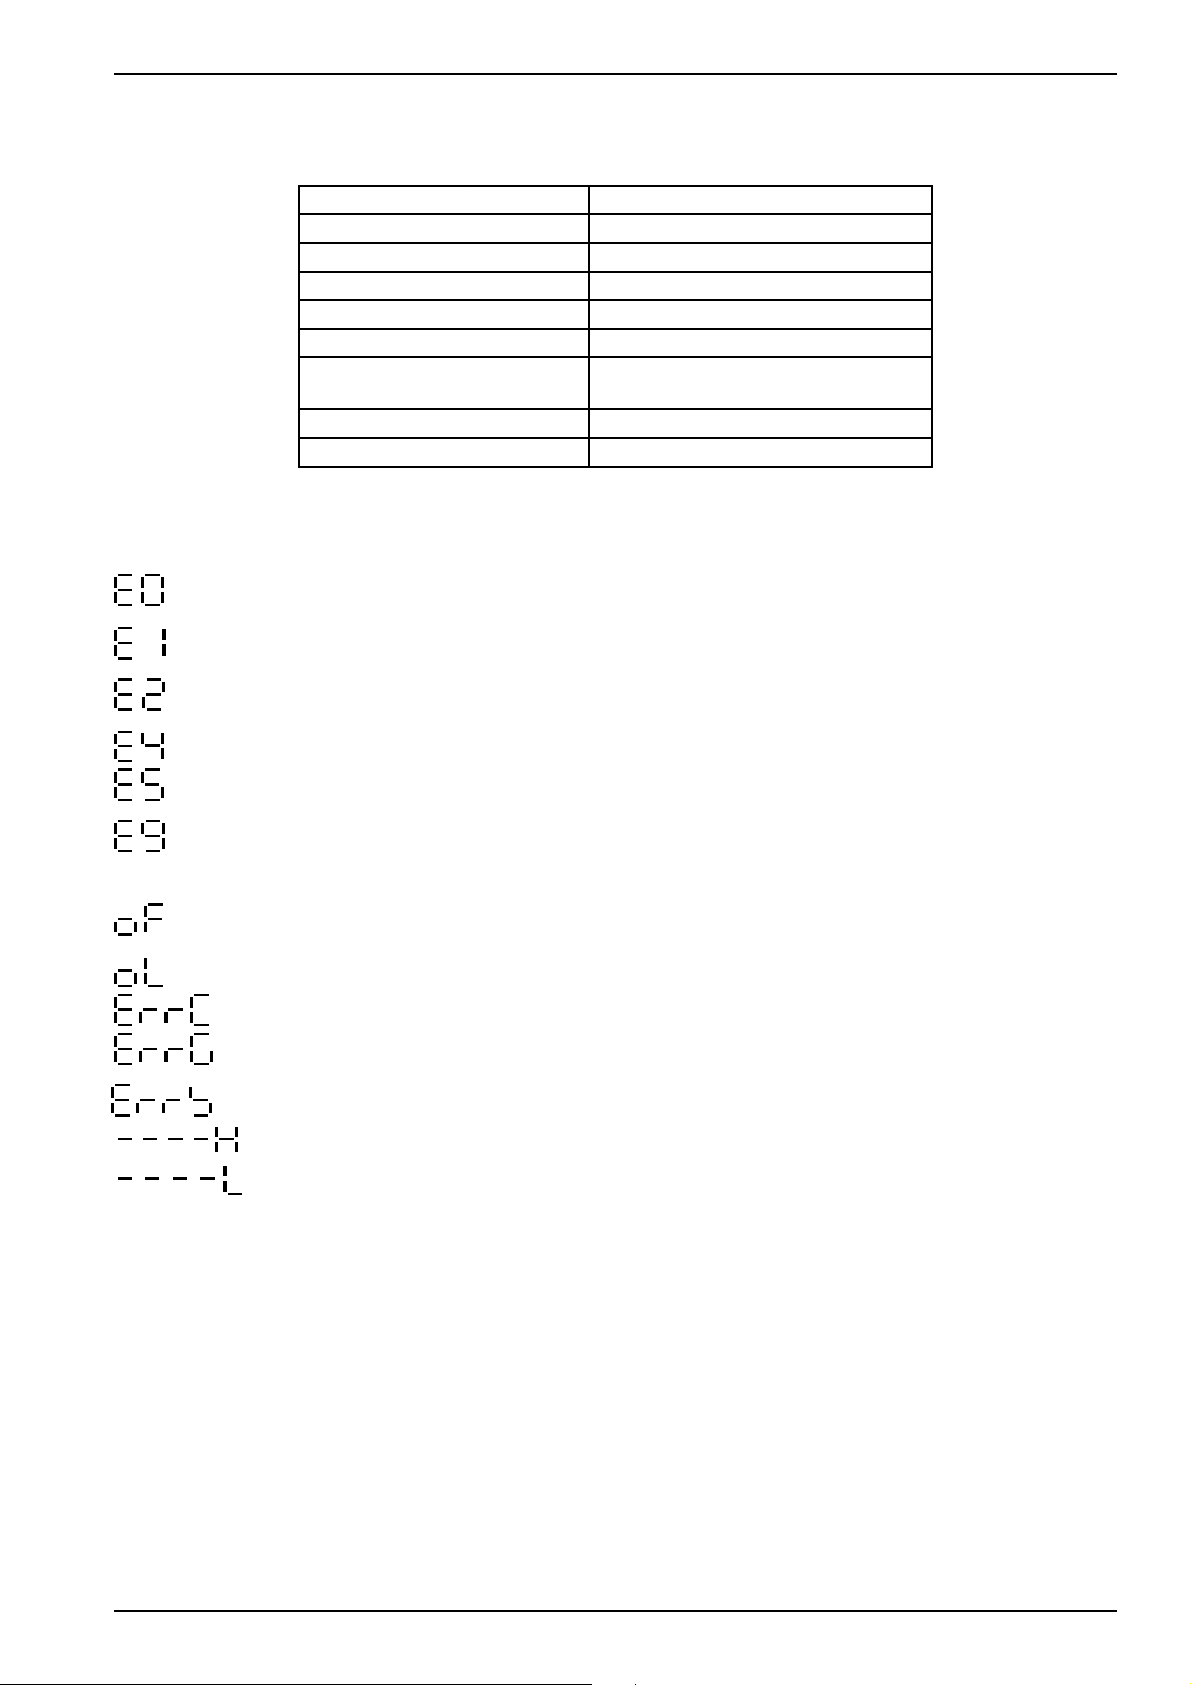
WS1V Set Up Manual Rev. 7.8.30gll
4.5 Selectable Weight Units and Piece Unit:
Kilogram (kg) 1 g = 0.001 kg
Gram (g) 1 g = 1 g
Pound (lb) 1 g = 0.002204623 lb
Pound/Ounce (lb, oz) 1 g = 0.03527396 oz
Ounce (oz) 1 g = 0.03527396 oz
Grain (GN) 1 g = 15.432358 GN
(dwt) 1 g = 0.6430149 dwt
Carat (ct) 1 g = 5 ct
Piece (pcs)
4.6 Error Messages:
⇒
The EEPROM memory is not working correctly.
⇒
⇒
⇒
⇒
⇒
Zero is higher than the zero range when switching the scale on. Calibrate the scale
Zero is lower than the zero range when switching the scale on.
⇒
A/D value is unstable.
⇒
A/D value is less than -31250. Faulty circuit board, damaged loadcell
A/D IC malfunction (cannot read A/D value). The load cell may not be connected to
the scale correctly.
A/D value is higher than +31250.
The weight of the object is over the maximum capacity + 9 divisions.
⇒
After calibration the displayed resolution is greater than the internal resolution.
⇒
The gravity value is outside the range 9.772 ~ 9.829.
⇒ Error setting.
⇒
The weight value is greater than the zero range, when re-zeroing the scale.
⇒ The weight value is below the zero range, when re-zeroing the scale.
Page 5
Page 8
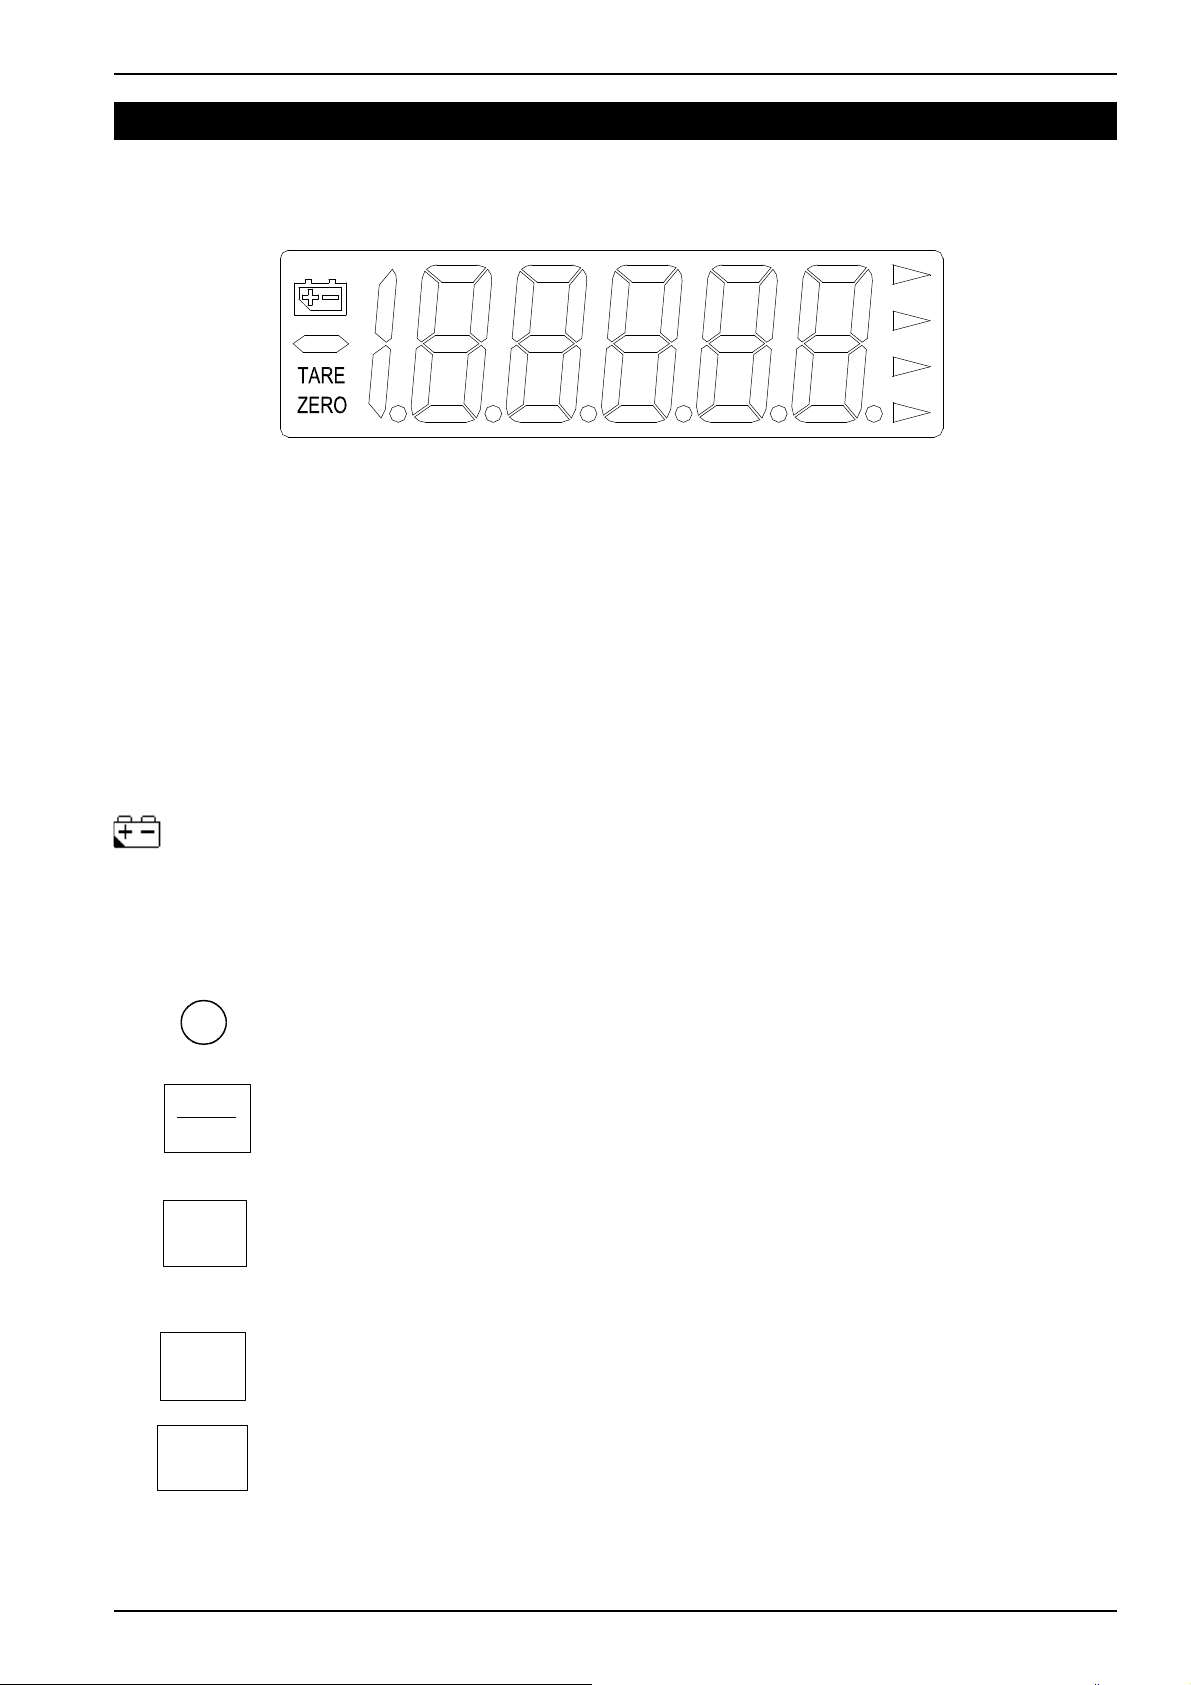
WS1V Set Up Manual Rev. 7.8.30gll
5 DISPLAY AND KEYS
5.1 Display
1
2
TARE 1 : “Tare” indication.
ZERO 2 : “Zero” indication.
► 3 : Kilogram (g), the 1st unit indication.
3
4
5
6
► 4 : Pound (lb), the 2
nd
unit indication.
► 5 : None.
► 6 : Hold mode indication.
:
“Low Battery” indication.
5.2 Keys and Their Functions
OFF
ON
ZERO
: The key to switch the scale off.
:
ON/ZERO
key. When the scale is off, press the key to switch it on. When
the scale is switched on, with the weigh pan empty, if the display is not
showing zero, press this key to zero (balance) the scale.
Zero range: ± 2% of full scale (Standard, OIML & NTEP model).
TARE
:
TARE
key. Press the key to deduct the weight of the container.
UNITS
HOLD
●
:
UNITS
:
HOLD
weighing Mode.
The
TARE
key is not functional when the weight value shown on the
display is negative or over the full scale capacity.
key. Press the key to select the desired weight units.
key. Used to shift between normal weighing mode and Animal
Page 6
Page 9
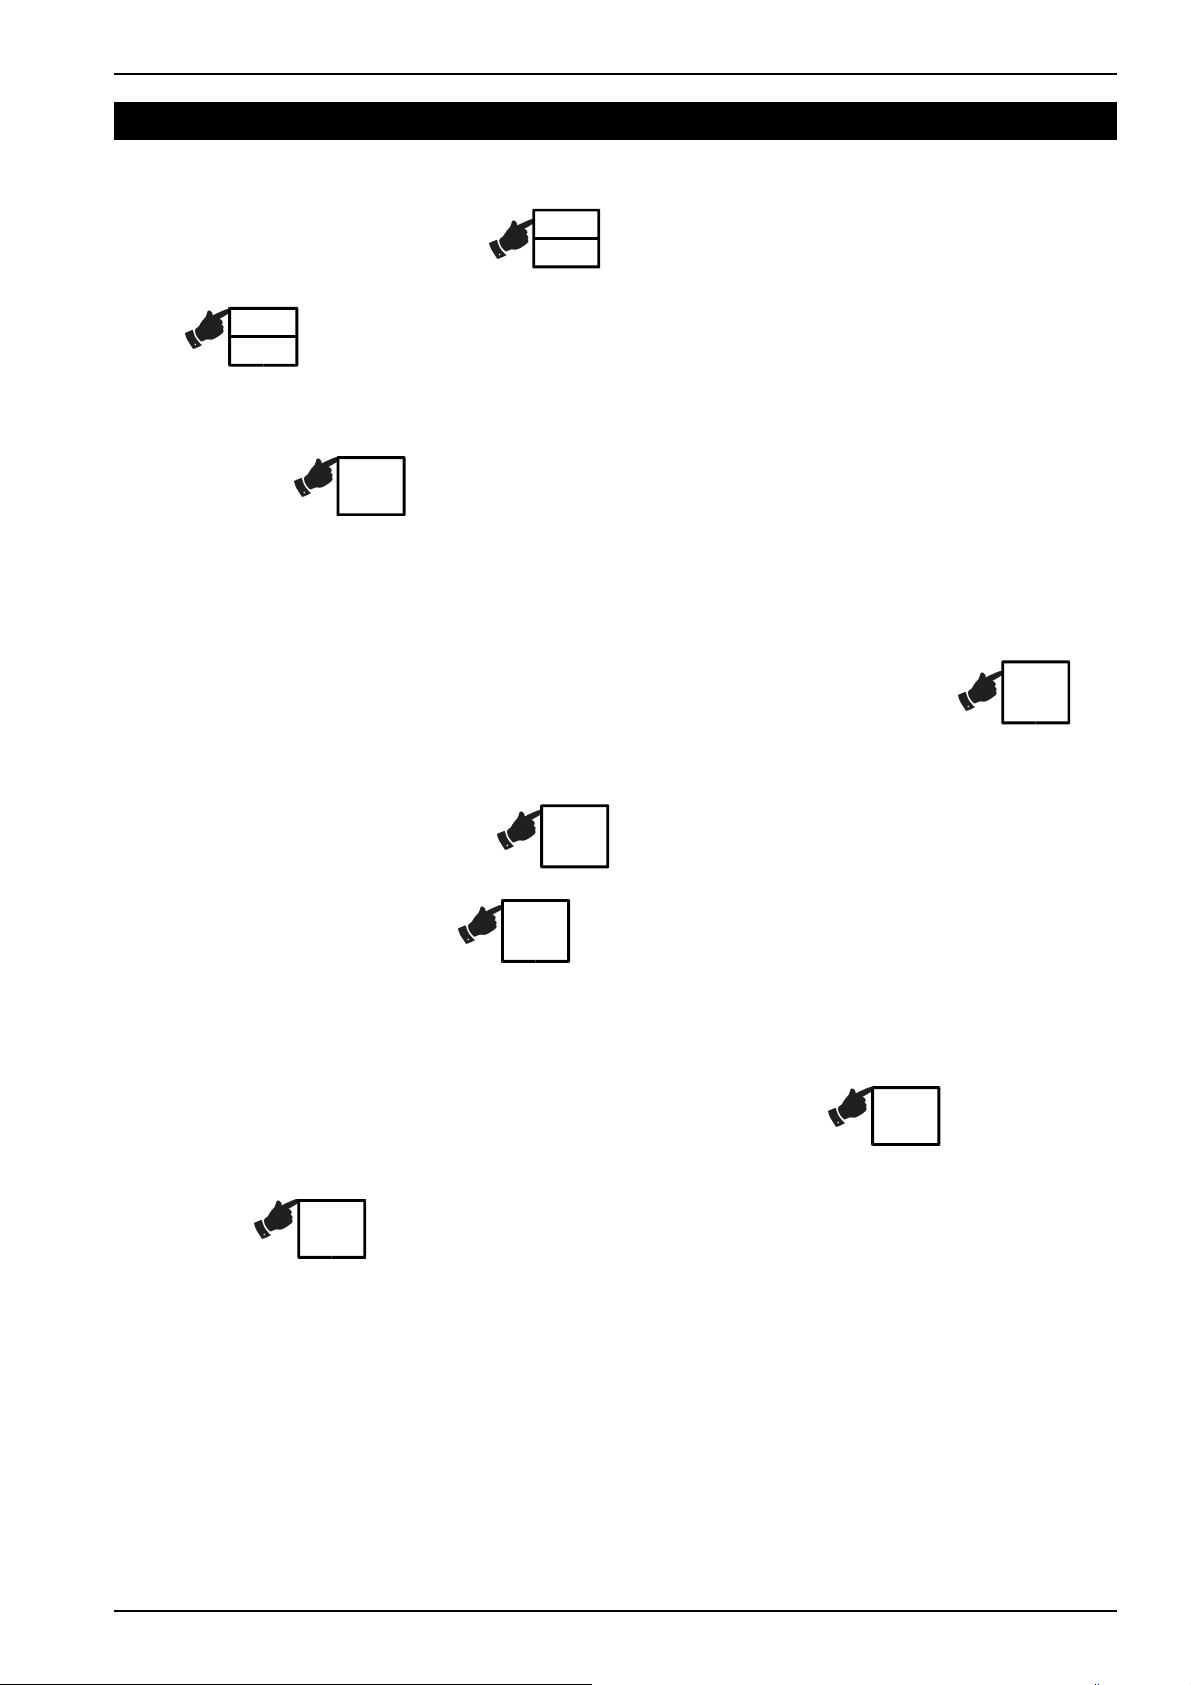
WS1V Set Up Manual Rev. 7.8.30gll
6 BASIC OPERATION
6.1 Switching the scale on / Re-zeroing
1. When the scale is off, press key to turn the scale on.
ON
ZERO
2. When the scale is on and without any object placed on the weigh pan, press
ON
key to obtain a zero reading. The 2
ZERO
nd
”◄” indication points to the word ZERO
in the left hand side of the display.
6.2 Selecting the desired unit
1. Press the
UNITS
key to select kilogram (kg), pound (lb) or pcs, the ” ►” indication
will point to the selected unit in the right hand side of the display.
2. After power off, the scale will remember the active units. When the scale is powered on
again, it displays the previous active units.
6.3 Using TARE to deduct the weight of the container
1. Place the container on the weigh pan. After the reading stabilizes, press key
TARE
to deduct the weight value of the container. The tare annunciator will display.
2. Place the object in the container, the scale will show the net weight value of the object.
3. Remove the container and weighing object, and the display shows the negative weight
value of the container. Press key to clear the weight value of the container,
TARE
and the first ”◄” indication pointing to the word TARE goes off.
4. Tare continuously (Press key, when weight is added or deducted on the
TARE
weigh pan so the next amount added or removed can be weighed).
5. Tare value = The full capacity (The scale can be tared continuously to the full capacity).
6.4 Animal weighing hold function
1. When the scale is in normal weighing mode press the Press key to switch
HOLD
the scale to the Animal Weighing Hold mode. The ”►” indication pointing to the word
HOLD will come on.
2. Press key again to return to the normal weighing mode. The ”►” indication
HOLD
pointing to the word HOLD will come on.
The scale will automatically exit the hold function when the weight on the weigh pan is under
10e. The ”►” HOLD indicator will come on when the weight on the weigh pan is over 10e
and the stability conditions set in the HOLD 4 parameters are met.
Page 7
Page 10
WS1V Set Up Manual Rev. 7.8.30gll
7 SERVICE MODE ACCESS
7.1 Service Mode Access
Set the jumper SWA1 on the main board to the ADJ position (switch to the left) (EEPROM
UNLOCKED). Remove the battery cover and the battery, the jumper switch is mounted on the
main circuit board accessed through a cutout at the top right of the battery compartment. With
the Scale OFF press and hold the
ON
/ZERO
key. Release the
ON
/ZERO
TARE
key, followed by momentarily pressing the
key first and then release the
TARE
key as soon as
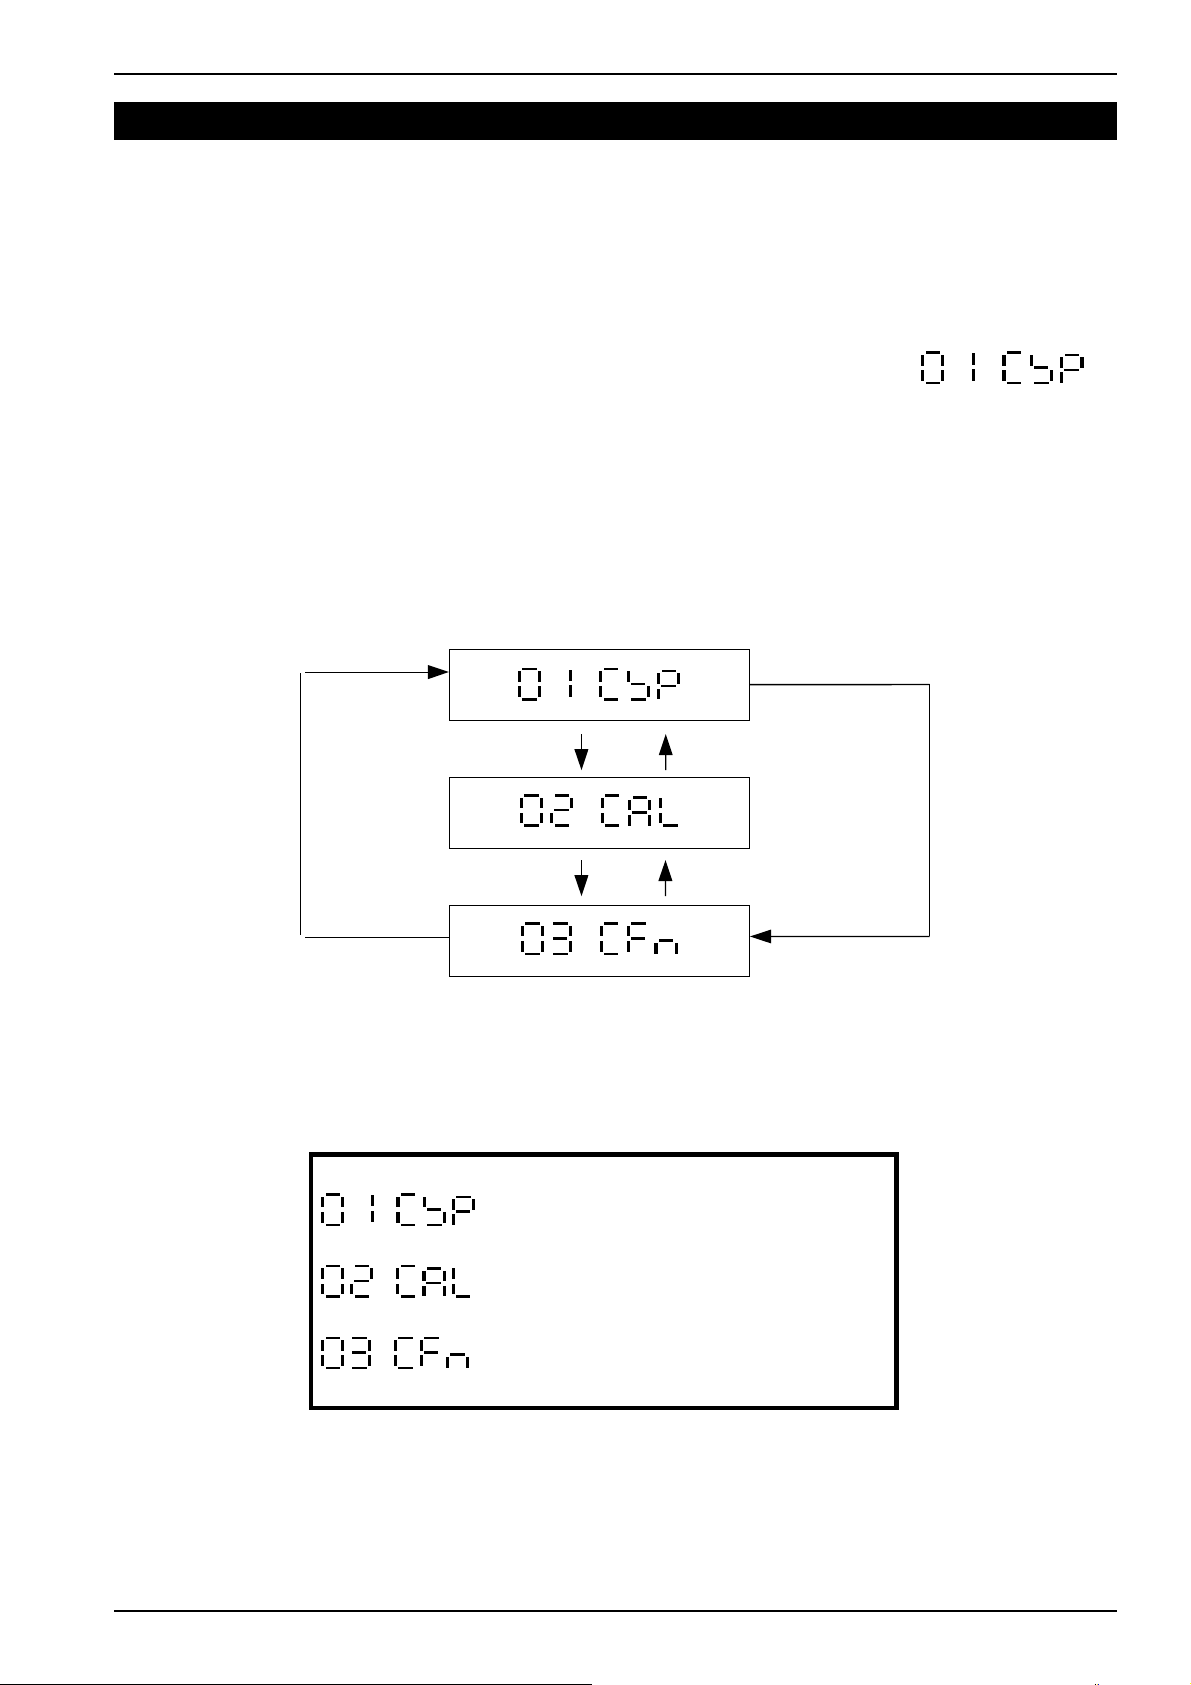
the display starts. The scale will enter the service mode; the display shows
.
7.2 Service Mode Exit
Set the SWA1 jumper back to the LOCK position when service configuration is completed.
The scale will automatically exit the Service Mode if the SWA1 jumper is set to its LOCK
position during calibration. It may be necessary to restart the scale.
Press the
UNITS
key
Press the
ON/ZERO
key
Press the
UNITS
key
Press the
ON/ZERO
key
Press the
UNITS
key
Press the
ON/ZERO
key
⇒ Capacity Configuration
⇒ Weight Calibration
⇒ Function Settings
Page 8
Page 11
WS1V Set Up Manual Rev. 7.8.30gll
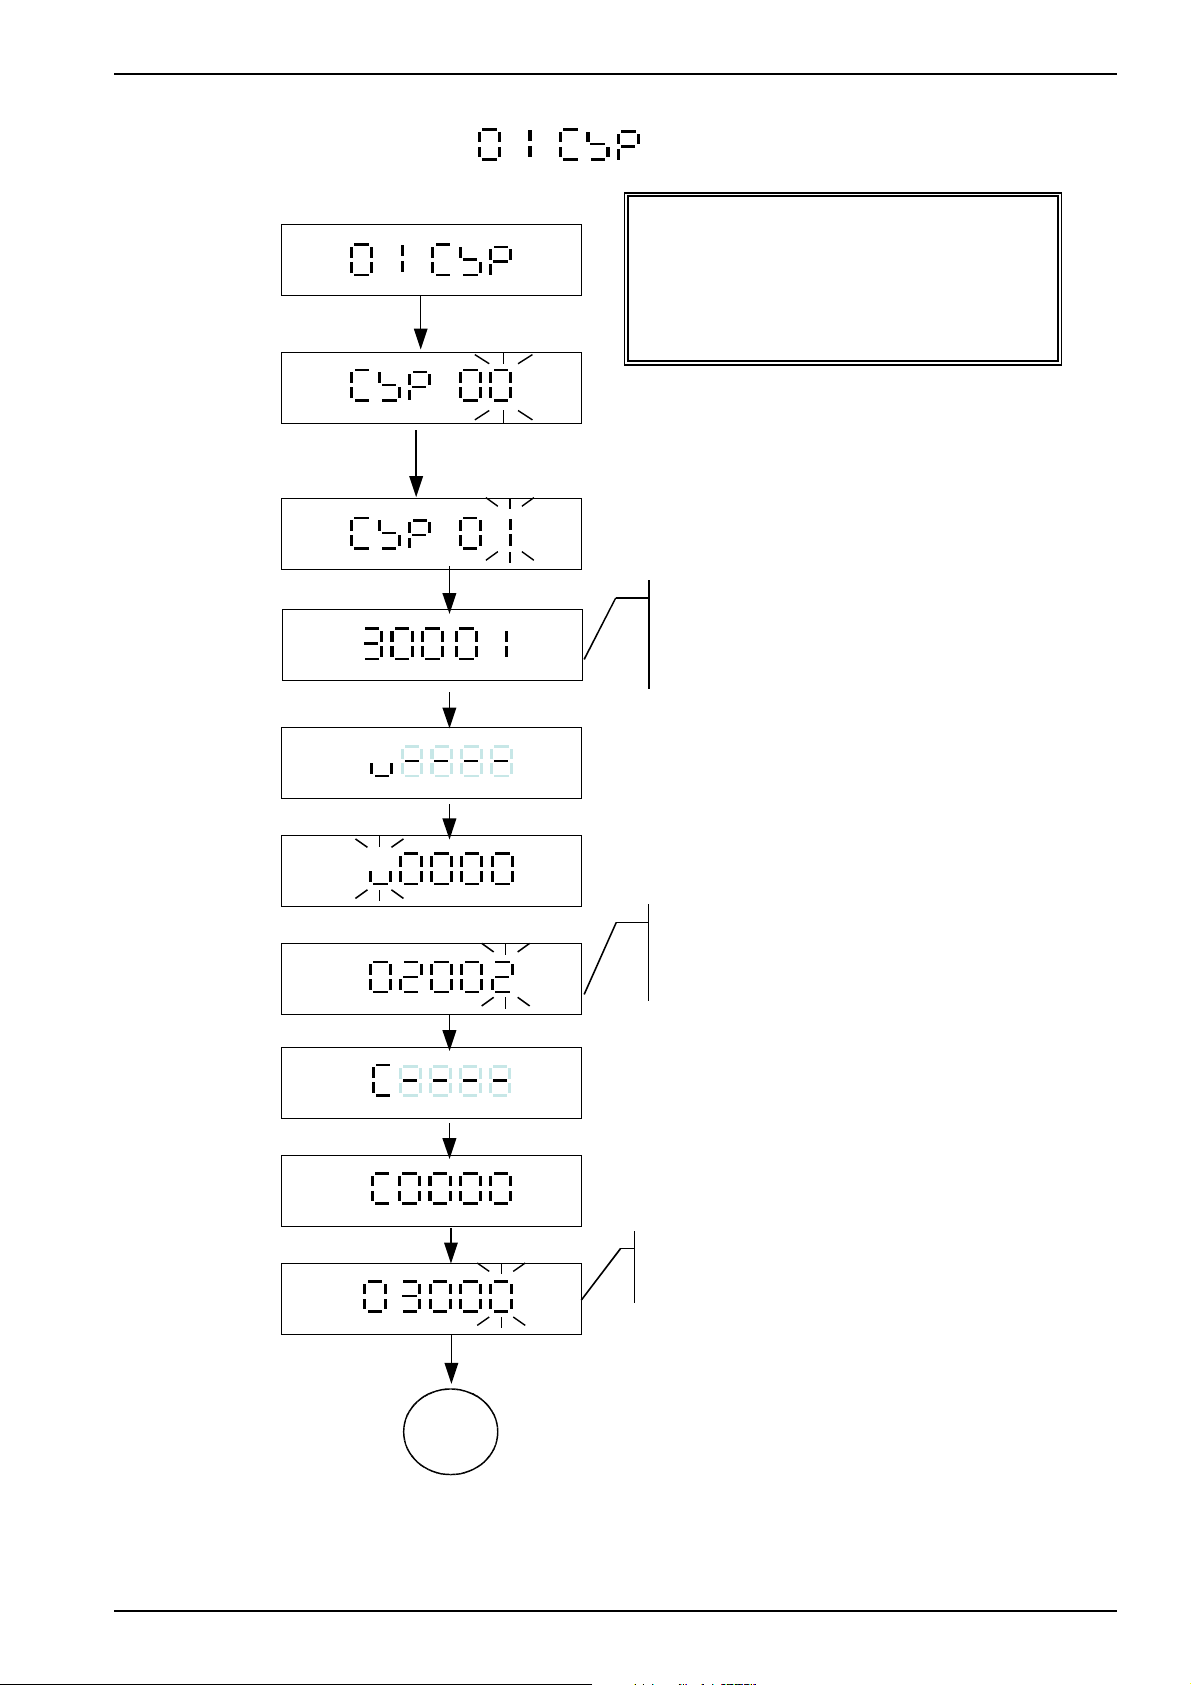
7.3 Capacity Configuration
Press the
Press the
TARE
►
TARE
key
key
.
ON/ZERO ⇒ Increment digit (from 0 to 9)
TARE ⇒ Confirm / enter key
HOLD ⇒ Move the cursor to the right
Input the parameter “01” to
enter the capacity
configuration
The display shows the maximum capacity
+ 1 division and the weight unit set last
time for 2 seconds.
Weight unit or piece unit
setting
Refer to “Note 1”
Press
TARE
key
Enter the maximum
capacity
Refer to “Note 2”
Press the
TARE
key
Example:
Two weight units “kg” & “lb”, with “kg” as
the units used for weight calibration.
Example:
03000 ⇒ 300.0 kg
NEXT
PAGE
Page 9
Page 12
Refer to “Note 3”
WS1V Set Up Manual Rev. 7.8.30gll
Press the
►
TARE
key
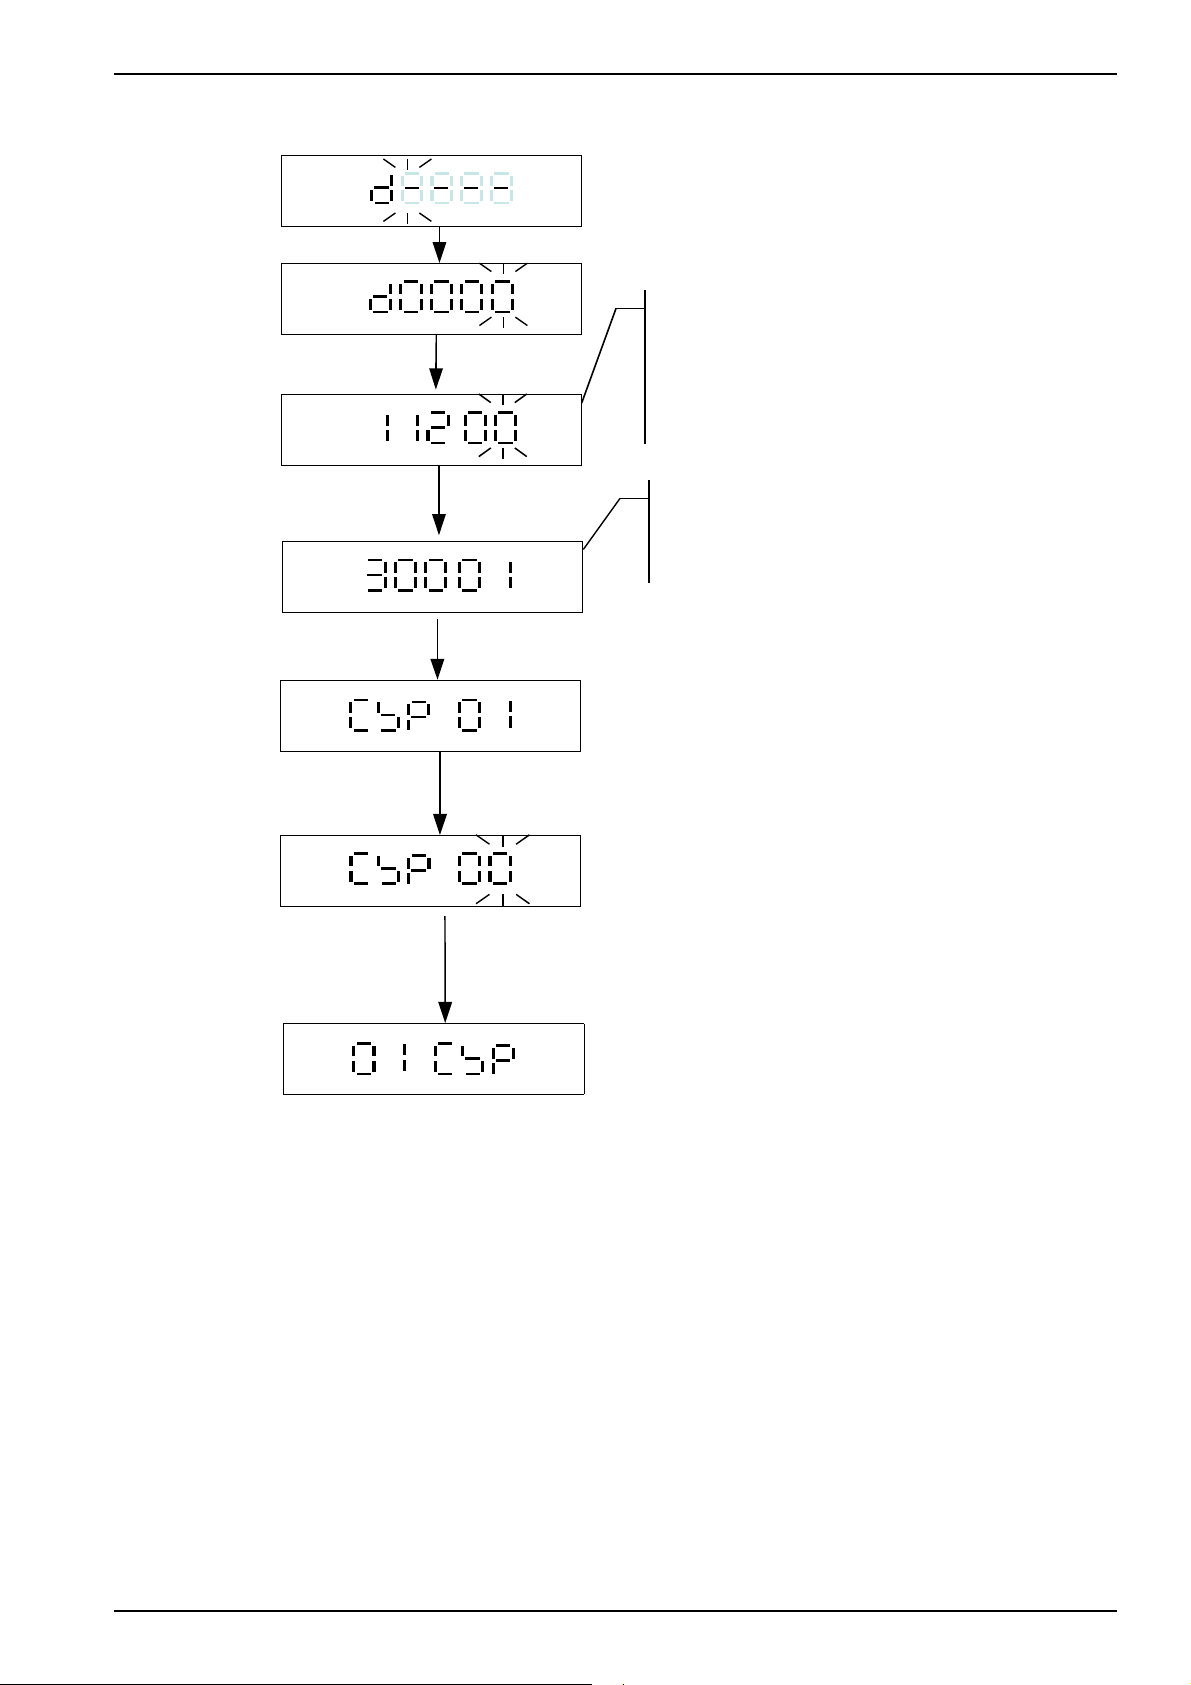
Input the parameter “00”
.
Example:
1 ⇒ Division size
1 ⇒ The number of decimal places
2 ⇒ range setting
(divided at 1/2 of the full scale)
The display shows the max. capacity of
the scale + minimum division and the
unit weight for 2 seconds.
Press the
TARE
key to
complete the capacity
configuration
Page 10
Page 13
WS1V Set Up Manual Rev. 7.8.30gll
NOTE 1
The users can set up the different weight units in various orders according to their
preference, and the amount of the chosen weight units can be up to 4.
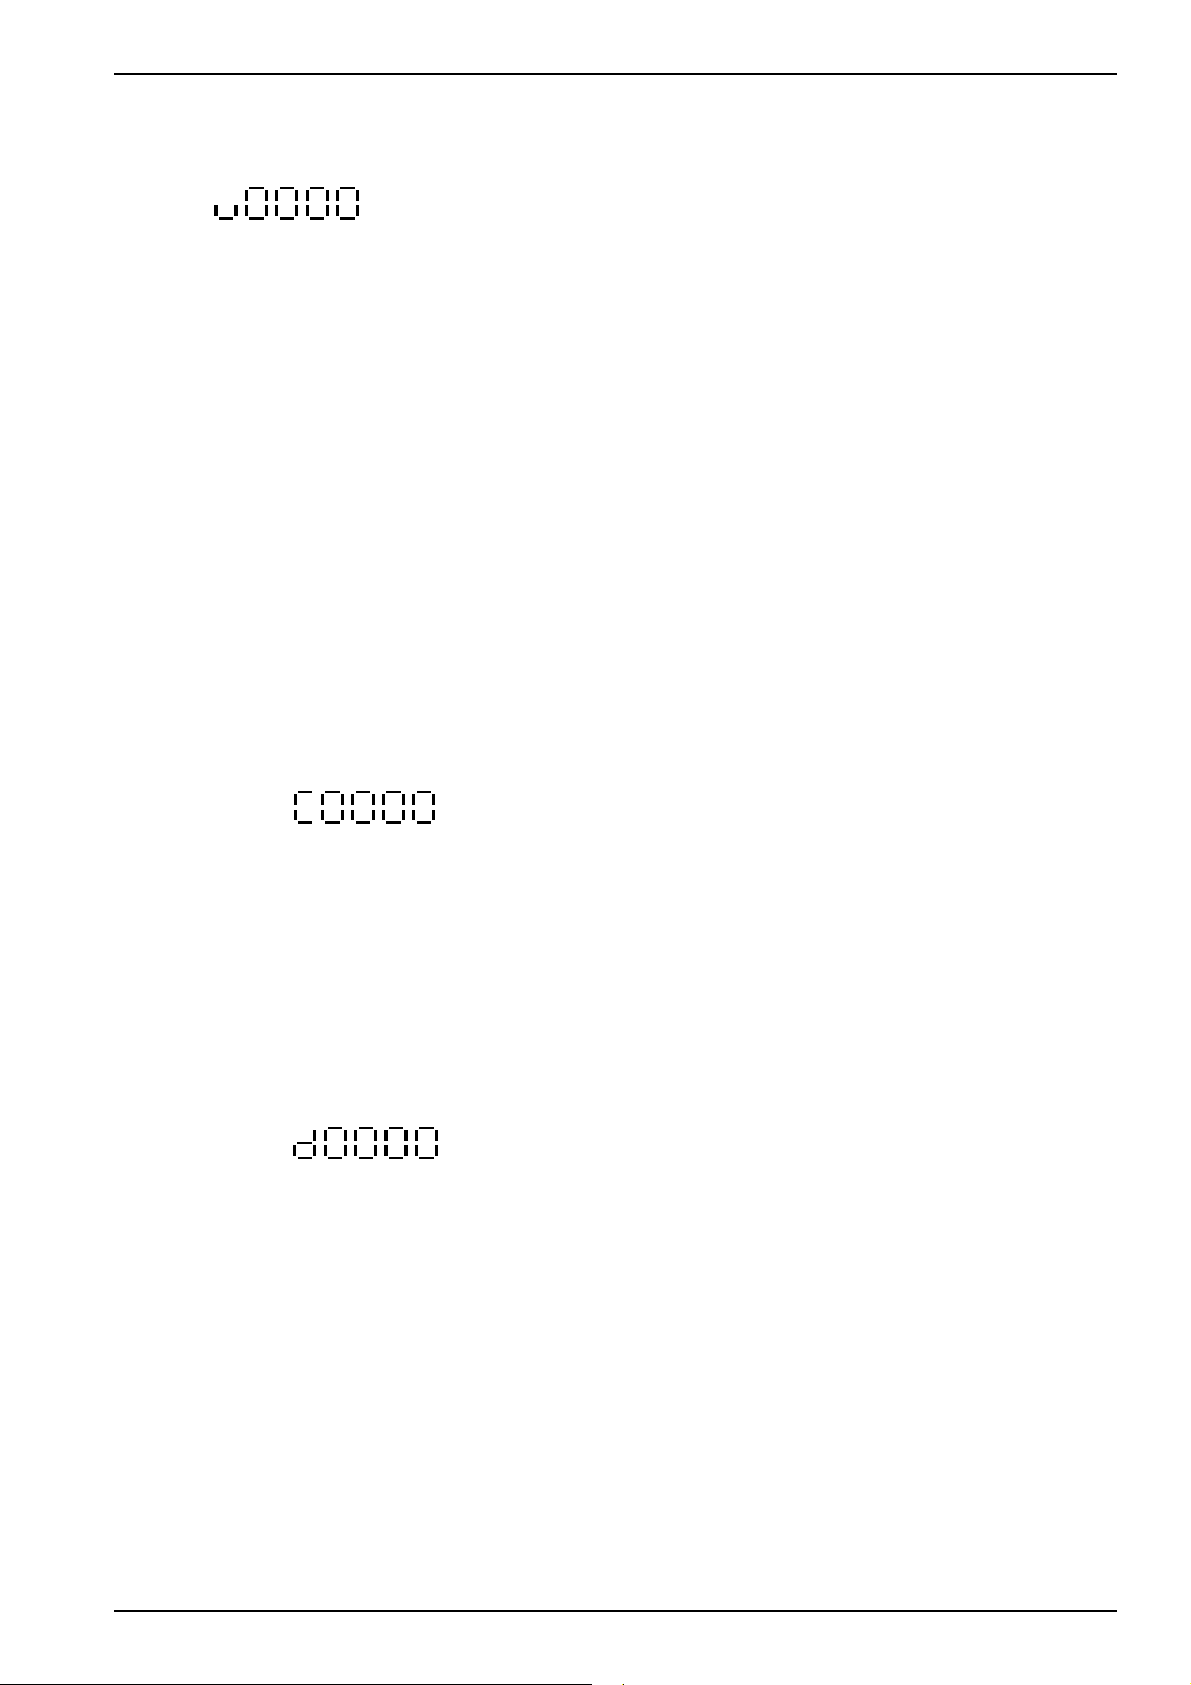
(a) (b) ( c ) (d ) (e)
(a) ⇒ The first weight unit (only “kg” or “g” are available to choose from). Select either 0 or 1.
(b) ⇒ The second weight unit (select one of the parameters listed below).
(c) ⇒ The third weight unit (select one of the parameters listed below).
(e) ⇒ The amount of the weight units selected (select one of parameters 1 ~ 4).
Available units:
0 ⇒ kg 2 ⇒ lb 5 ⇒ oz
1 ⇒ g 4 ⇒ lb / oz
Hint:
When the first unit is set to lb, the second unit will be kg or g.
For example:
Select two weight units, kg and lb, with kg as the calibration weight unit. The Calibration
weight unit is entered first. In this example enter 02002
NOTE 2
Enter the maximum capacity of the scale, total 5 digits
(f) (g) ( h ) ( i) ( j )
For example:
30.000 kg ⇒ Key in 30000
300.0 kg ⇒ Key in 03000
NOTE 3
Set the division size and decimal point position to determine the display resolution
(k) (l ) ( m )
(k) ⇒ Division size (select 1, 2, or 5)
(l) ⇒ The number of decimal places (0 ~ 5)
For example:
60.000 kg ⇒ enter 3
300.0 kg ⇒ enter 1
(m) ⇒ range setting (select one of parameters 0, 1, or 2)
For example:
0 &1 ⇒ full range, 2 ⇒ dual range(divided at 1/2 of the full scale)
Page 11
Page 14
WS1V Set Up Manual Rev. 7.8.30gll
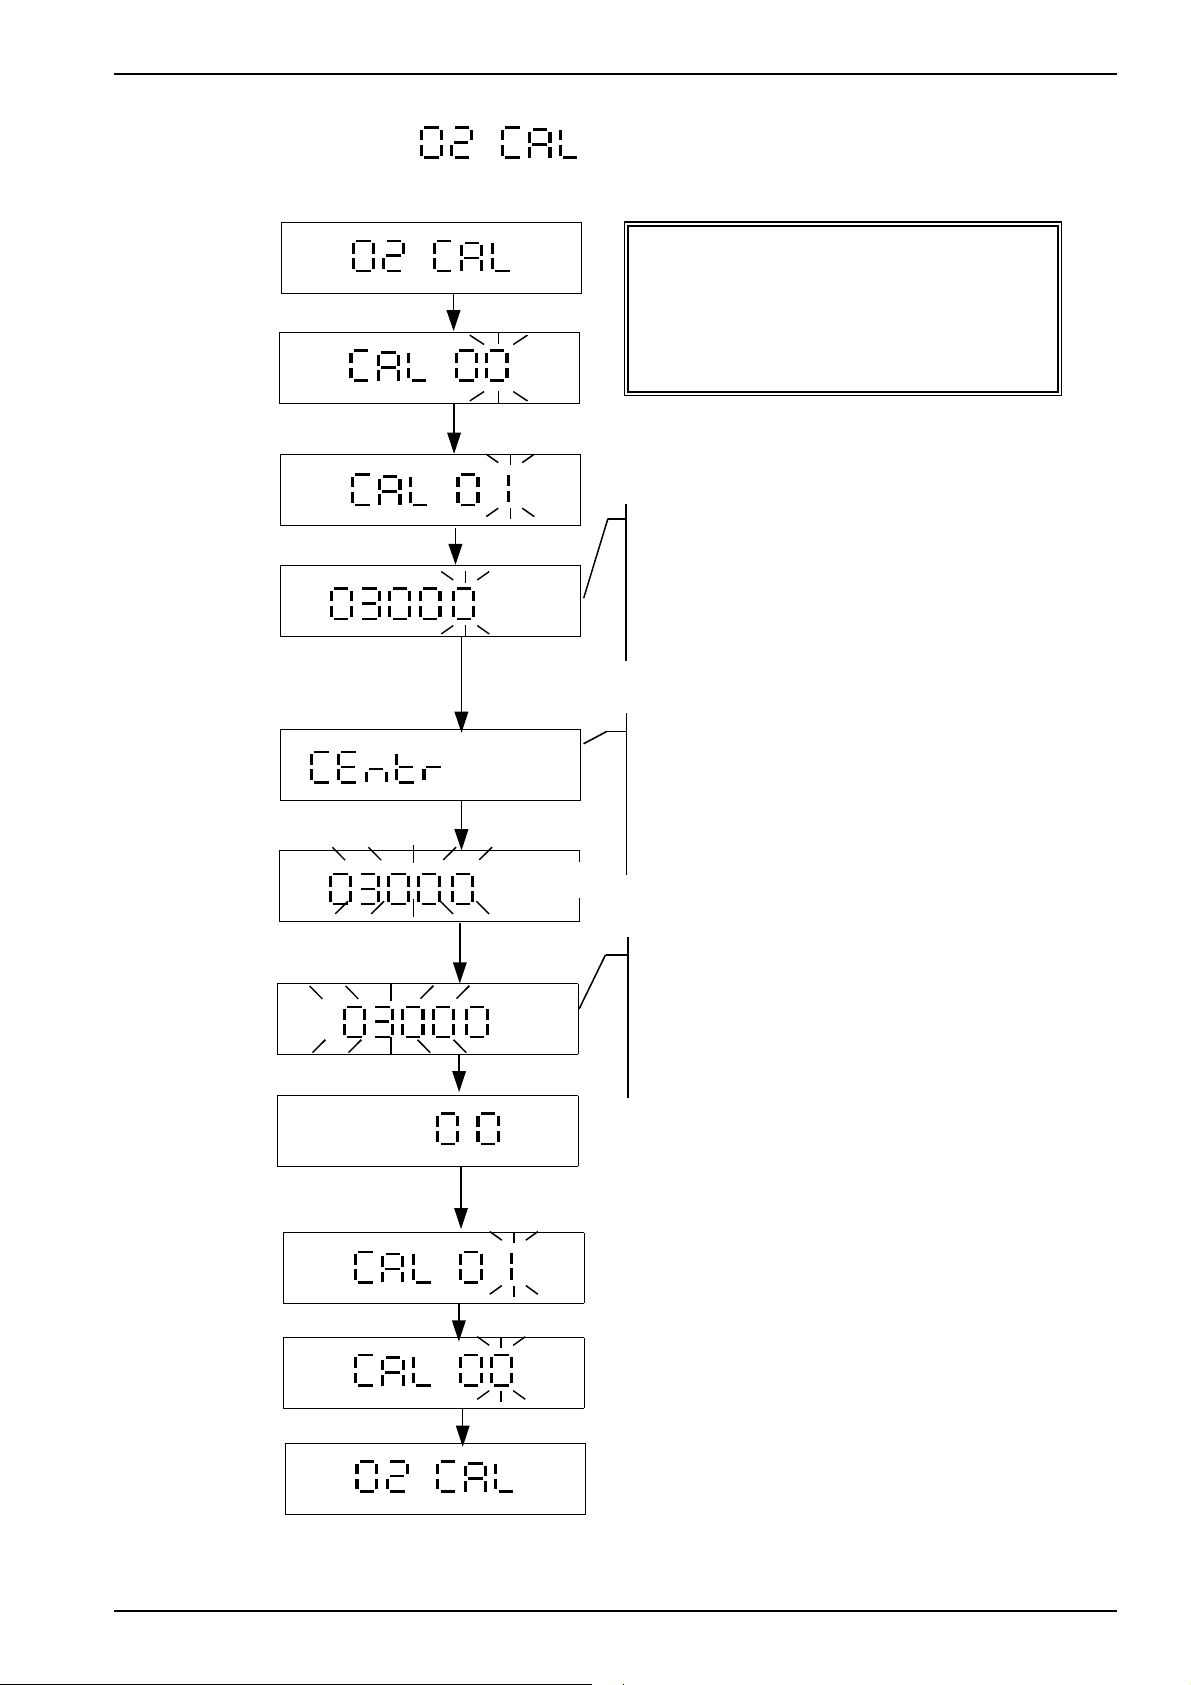
7.4 Weight Calibration
Press the
TARE
key
Input the parameter “01”
Press the
TARE
key
.
Unload the weigh pan
Press the
TARE
key
►
ON/ZERO ⇒ Increment digit (from 0 to 9)
TARE ⇒ Confirm / enter key
HOLD ⇒ Move the cursor to the right
The display shows the calibration weight
value and the weight unit set at the first
position.
The calibration weight value can be
changed to match the weights available
When stable
Place full load (300kg in this
example) on the weigh pan
then press the
TARE
key
Remove the weight from the
weigh pan and press any key
to exit the setting.
Input the parameter “00”
►
When the weight reading is stable the
display shows the calibration weight value.
The scale copies and saves the local
gravity value automatically.
►
.
The scale shows the calibration weight
►
.
►
.
value.
The buzzer sounds “beep, beep, beep”
when the weight reading is stable.
Press the
TARE
complete the
calibration
key to
Page 12
Page 15
WS1V Set Up Manual Rev. 7.8.30gll
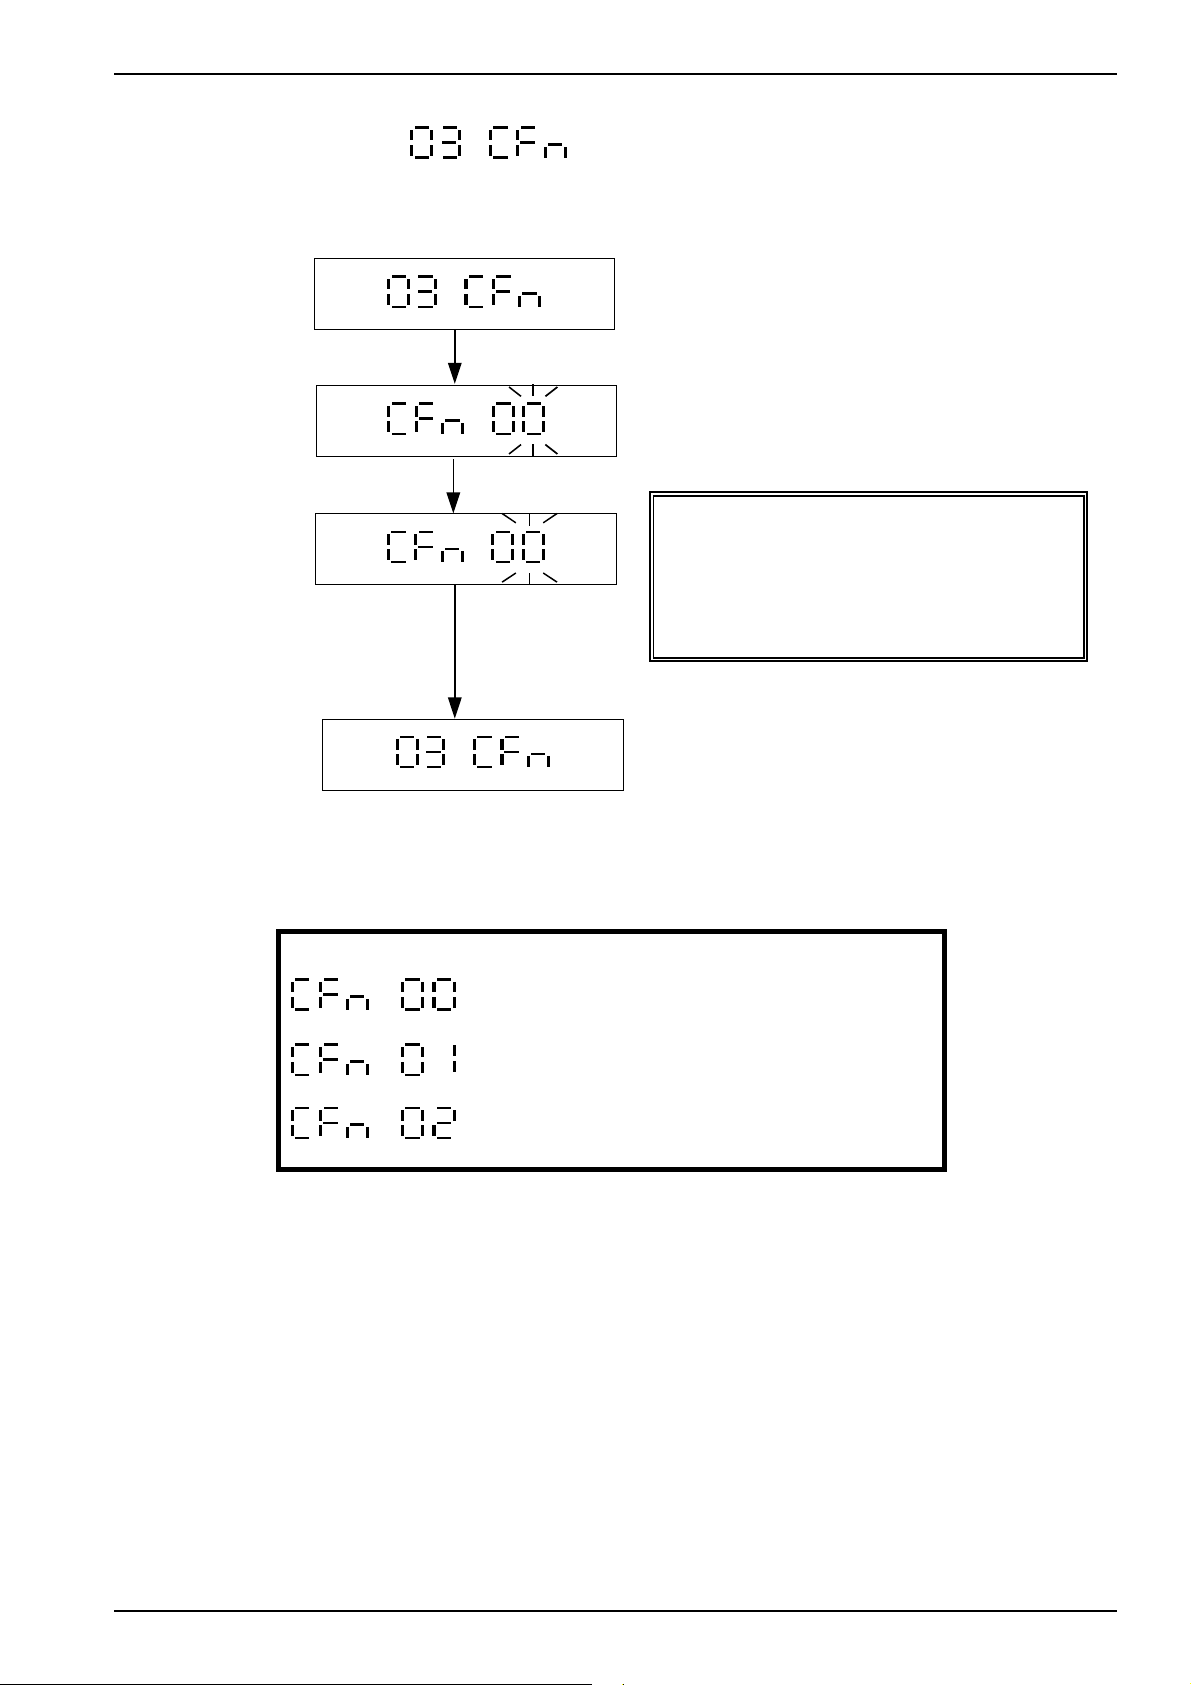
7.5 Function Settings
Press the
TARE
key
Input a parameter 00, 01, or
02.
After inputting “00”,
Press the
TARE
key
to return to the upper level
ON/ZERO ⇒ Increment digit (from 0 to 9)
TARE ⇒ Confirm / enter key
HOLD ⇒ Move the cursor to the right
⇒
⇒
⇒
Return to the upper menu level
Environment settings
Buzzer type
Page 13
Page 16
WS1V Set Up Manual Rev. 7.8.30gll
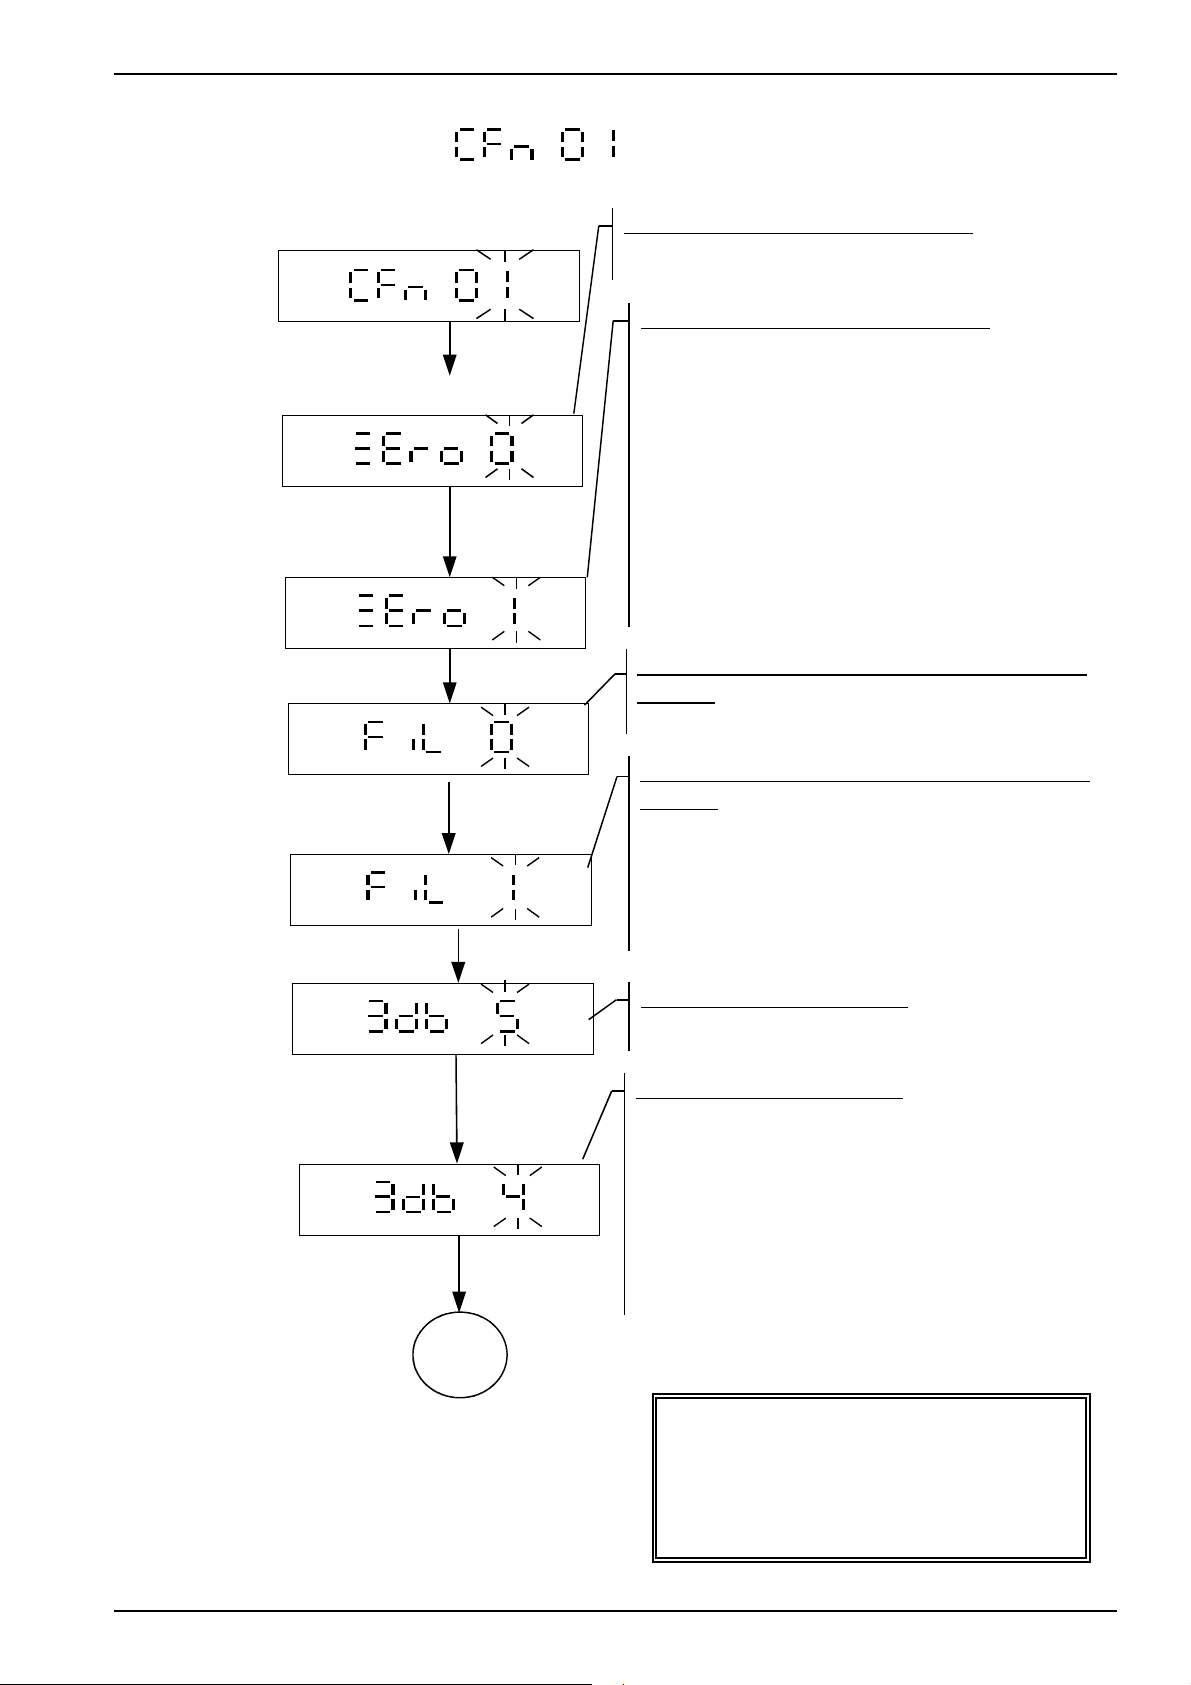
7.6 Environment Settings
Press the
TARE
key
Use the
ON/ZERO
key
to input a parameter
Returning to zero point setting
Displays the current setting
Returning to zero point setting
Using the
ON/ZERO
or
UNITS
keys to input a
parameter
Default setting = 0
0 ⇒ show all 5 ⇒ cover 5 d
1 ⇒ cover 1 d 6 ⇒ cover 6 d
2 ⇒ cover 2 d 7 ⇒ cover 7 d
3 ⇒ cover 3 d 8 ⇒ cover 8 d
4 ⇒ cover 4 d 9 ⇒ cover 9 d
The function is active when the weight
value is over
1/3 of full capacity
Press the
Use the
TARE
ON/ZERO
key
key
to input a parameter
Press the
Use the
TARE
ON/ZERO
key
key
to input a parameter
Digital switch &stable range parameter
setting
Displays the current setting
Digital switch &stable range parameter
setting
Using
ON/ZERO
or
UNITS
to input a parameter
Default setting = 0
Parameter 0 ~ 9 ,
The greater the figure, the more stable the
displayed weight will be
Filter parameter setting
Displays the current setting
Filter parameter setting
Using
ON/ZERO or UNITS
keys to input a
parameter
Default setting = 5
Parameter 0 ~ 9,
NEXT
PAGE
The greater the figure, the faster the filter
will react. Consequently, the weight may be
ON/ZERO ⇒ Increment digit (from 0 to 9)
TARE ⇒ Confirm / enter key
HOLD ⇒ Move the cursor to the right
Page 14
Page 17
WS1V Set Up Manual Rev. 7.8.30gll
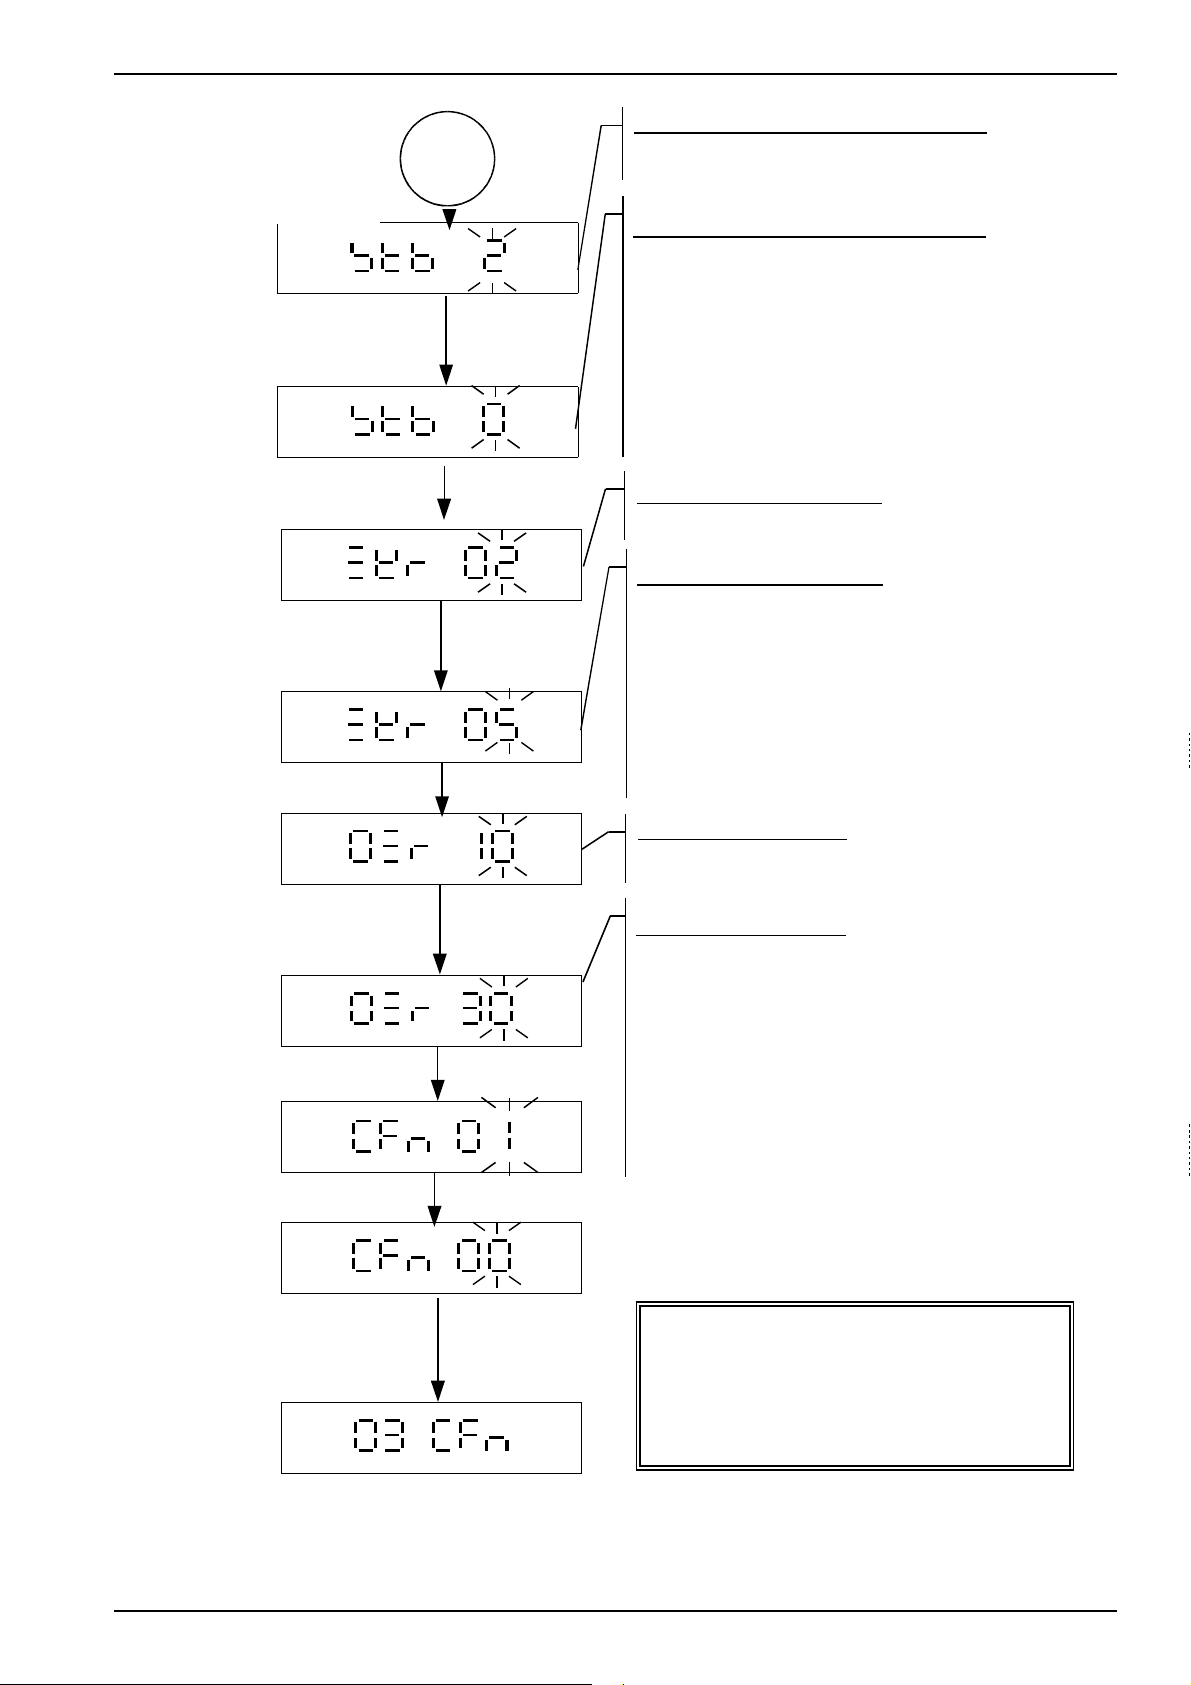
Stable range parameter setting
Cont.
The display shows the current setting.
Press the
Use the
TARE
ON/ZERO
key
key
to input a parameter
Press the
Use the
TARE
ON/ZERO
key
key
to input a parameter
Press the
TARE
key
Stable range parameter setting
Use
ON/ZERO
or
UNITS
to input a parameter
Default setting = 1
0 ⇒ No limitation
1 ⇒ Less than 1/4 division/sec
2 ⇒ Less than 1/2 division/sec
3 ⇒ Less than 2/3 division/sec
4 ⇒ Less than 1 division/sec
Re-zero range setting
The display shows the current setting
Re-zero range setting
Use
ON/ZERO
or
UNITS
to input a parameter
Default setting = 02
00 ⇒ No limitation
01 ⇒ ±1%
02 ⇒ ±2%
15 ⇒ ±15%
Use the
ON/ZERO
key
to input a parameter
Press the
TARE
key
Key in the parameter “00”
Press the
TARE
key
Zero range setting
The display shows the current setting
Zero range setting
Use
ON/ZERO
or
UNITS
to input a parameter
Default setting = 20
00 ⇒ No limitation
01 ⇒ ±1%
02 ⇒ ±2%
50 ⇒ ±50%
ON/ZERO ⇒ Increment digit (from 0 to 9)
TARE ⇒ Confirm / enter key
HOLD ⇒ Move the cursor to the right
Page 15
Page 18
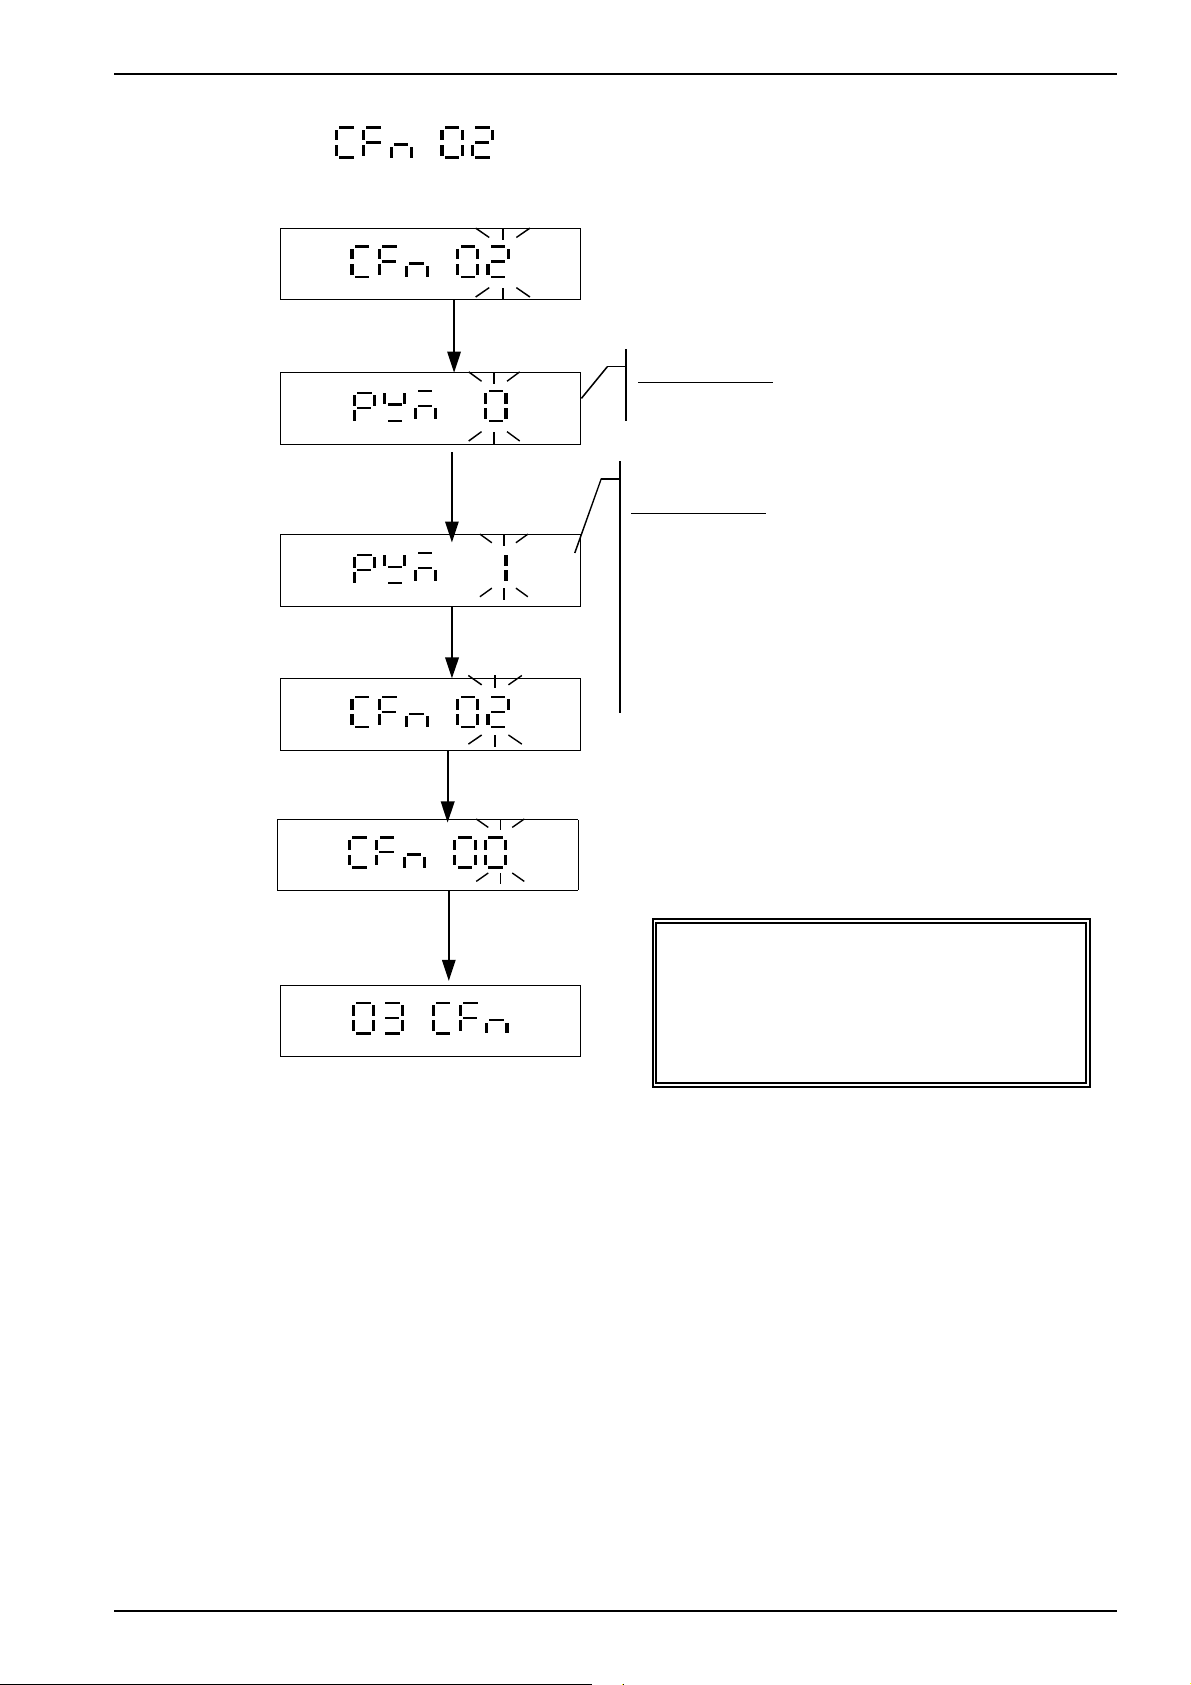
WS1V Set Up Manual Rev. 7.8.30gll
7.7 Buzzer type
Press the
Use the
TARE
ON/ZERO
key
key to key
in a parameter
Press the
TARE
key
Key in the parameter “00”
Buzzer type
The display shows the current setting
Buzzer type
Use
ON/ZERO
or
UNITS
key to key in the a
parameters
0 ⇒ Pulse signal (AC buzzer, PT-134OP,
4KHz)
1 ⇒ Continuous signal (DC buzzer, UIC-
4201)
Press the
TARE
key
ON/ZERO ⇒ Increment digit (from 0 to 9)
TARE ⇒ Confirm / enter key
HOLD ⇒ Move the cursor to the right
Page 16
Page 19
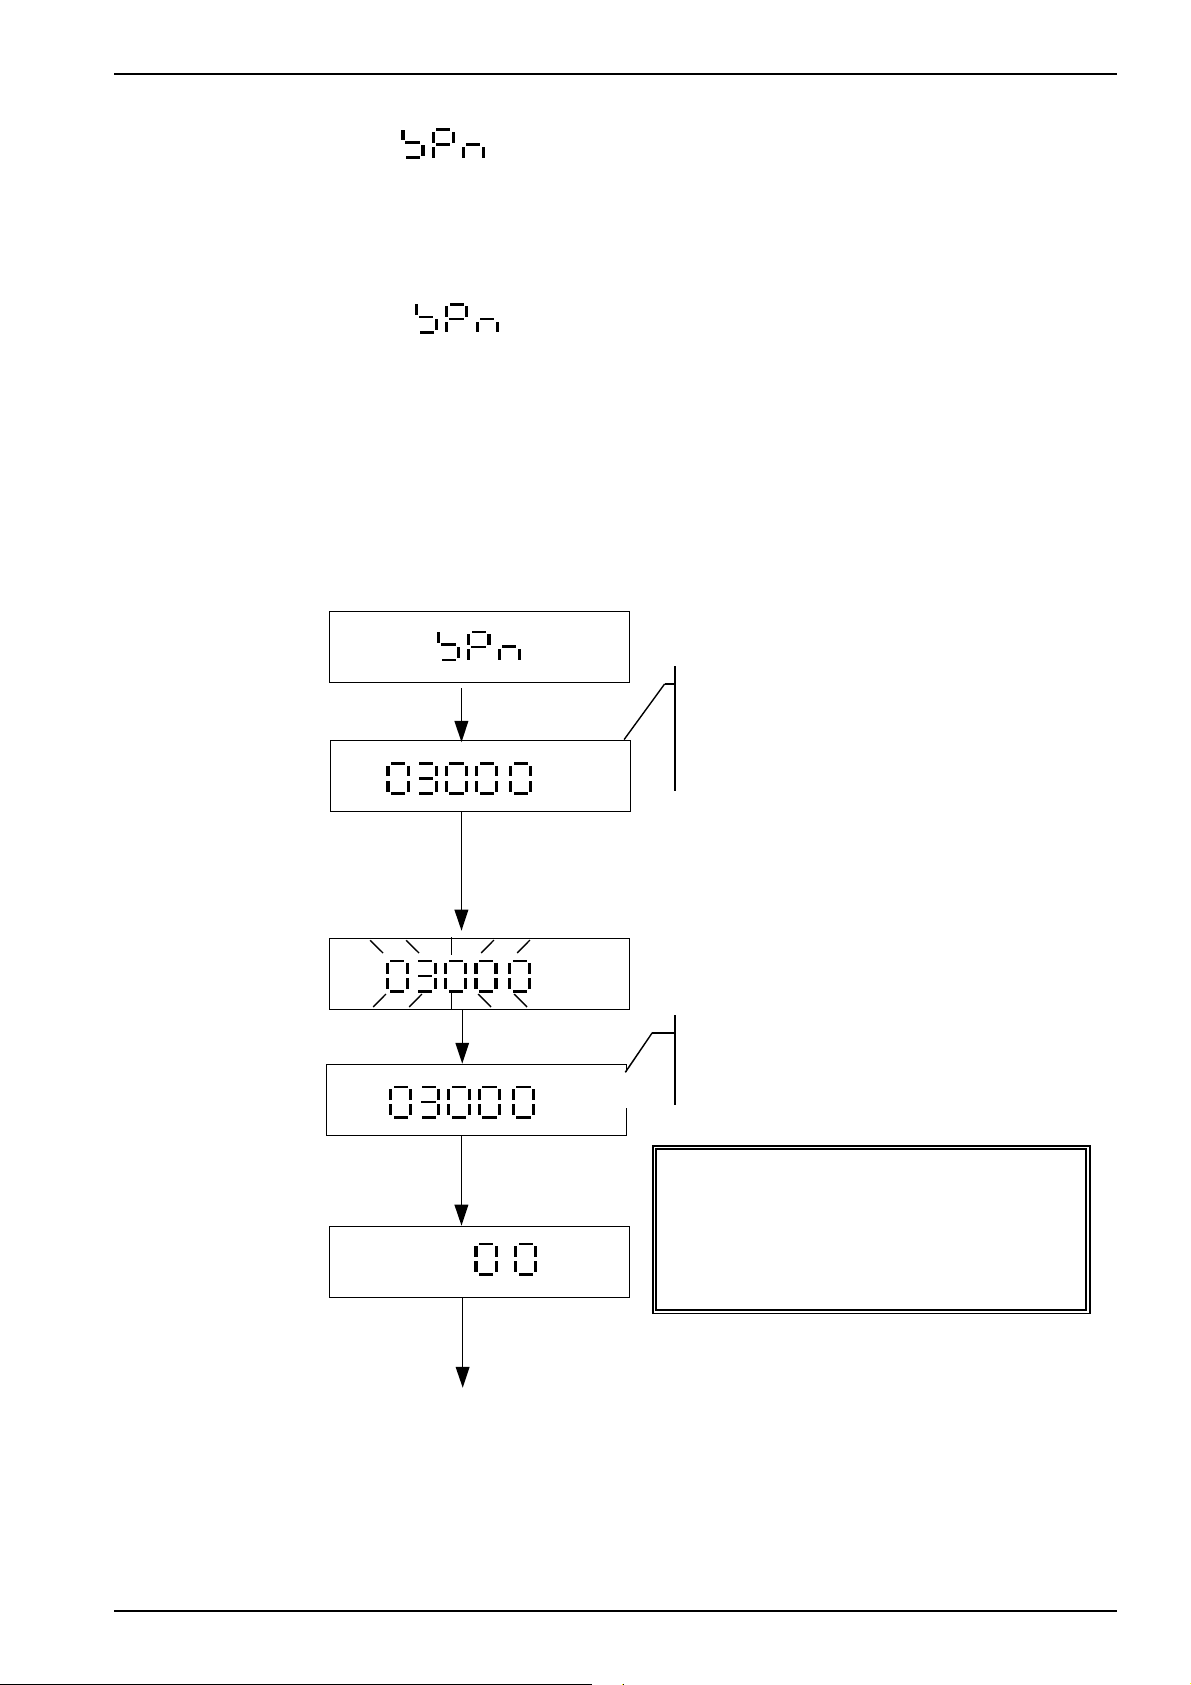
WS1V Set Up Manual Rev. 7.8.30gll
7.8 Span calibration
●
Set the jumper SWA1 on the main board to the ADJ position (EEPROM
UNLOCKED). Press the
the display shows
●
Set the jumper SWA1 back to the LOCK position, after completing the
ON
.
/ZERO
key to enter the SPAN calibration mode;
calibration.
●
If the jumper SWA1 is set back to the LOCK position during calibration, the
scale exits the service mode automatically.
Press the
Place a load on the weigh pan
according to the weight value
show on the display,
then press
the
TARE
TARE
key
key
.
Detect and save zero point in EEPROM
►
automatically.
.
►
.
►
Remove the load from the
weigh pan.
.
Set the jumper SWA1 to the LOCK position.
The scale returns to the weighing mode.
.
ON/ZERO ⇒ Increment digit (from 0 to 9)
TARE ⇒ Confirm / enter key
►
HOLD ⇒ Move the cursor to the right
The calibration data is saved in the
EEPROM
Page 17
Page 20
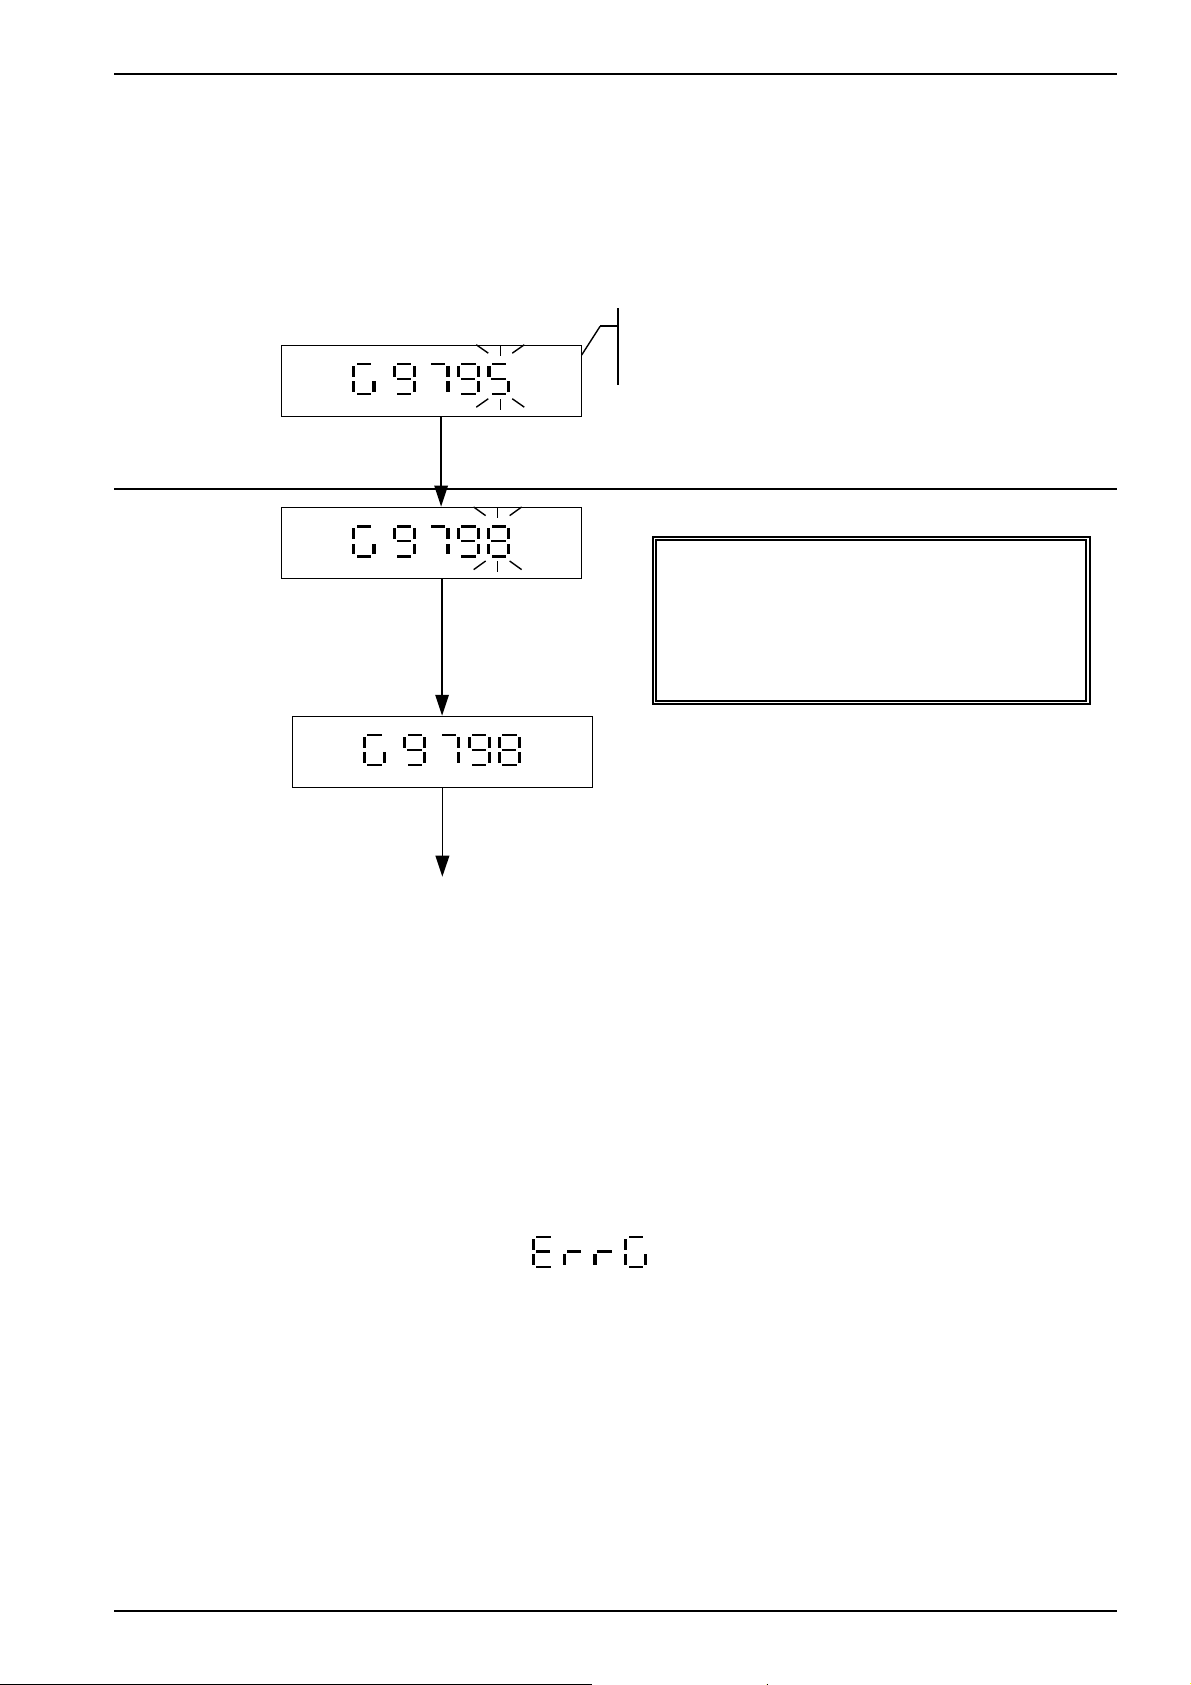
WS1V Set Up Manual Rev. 7.8.30gll
7.9 Gravity Compensation
Set the jumper SWA1 on the main board to the ADJ position. Press the
key to switch on the scale, and press the
ON
/ZERO
key again before the display
resets back to zero. The scale enters the gravity compensation mode.
The display shows the current
.
Key in the local gravity
value
.
Press the
TARE
key
The display shows and saves
the entered gravity value in
the EEPROM.
compensation value
ON/ZERO ⇒ Increment digit (from 0 to 9)
TARE ⇒ Confirm / enter key
HOLD ⇒ Move the cursor to the right
ON
/ZERO
.
Set the jumper SWA1 to the LOCK position
The scale returns to the weighing mode
The gravity value must lie between those at the Equator and the Polar
Regions.
Gravity value at the equator GE = 9.7803184558 m/sec2
Gravity value at the polar region GP = 9.8321772792 m/sec
Auckland: 9.806m/sec
The display shows error message
2
, when the gravity value is NOT within the
range (9.829 > gravity >9.772).
2
Page 18
Page 21
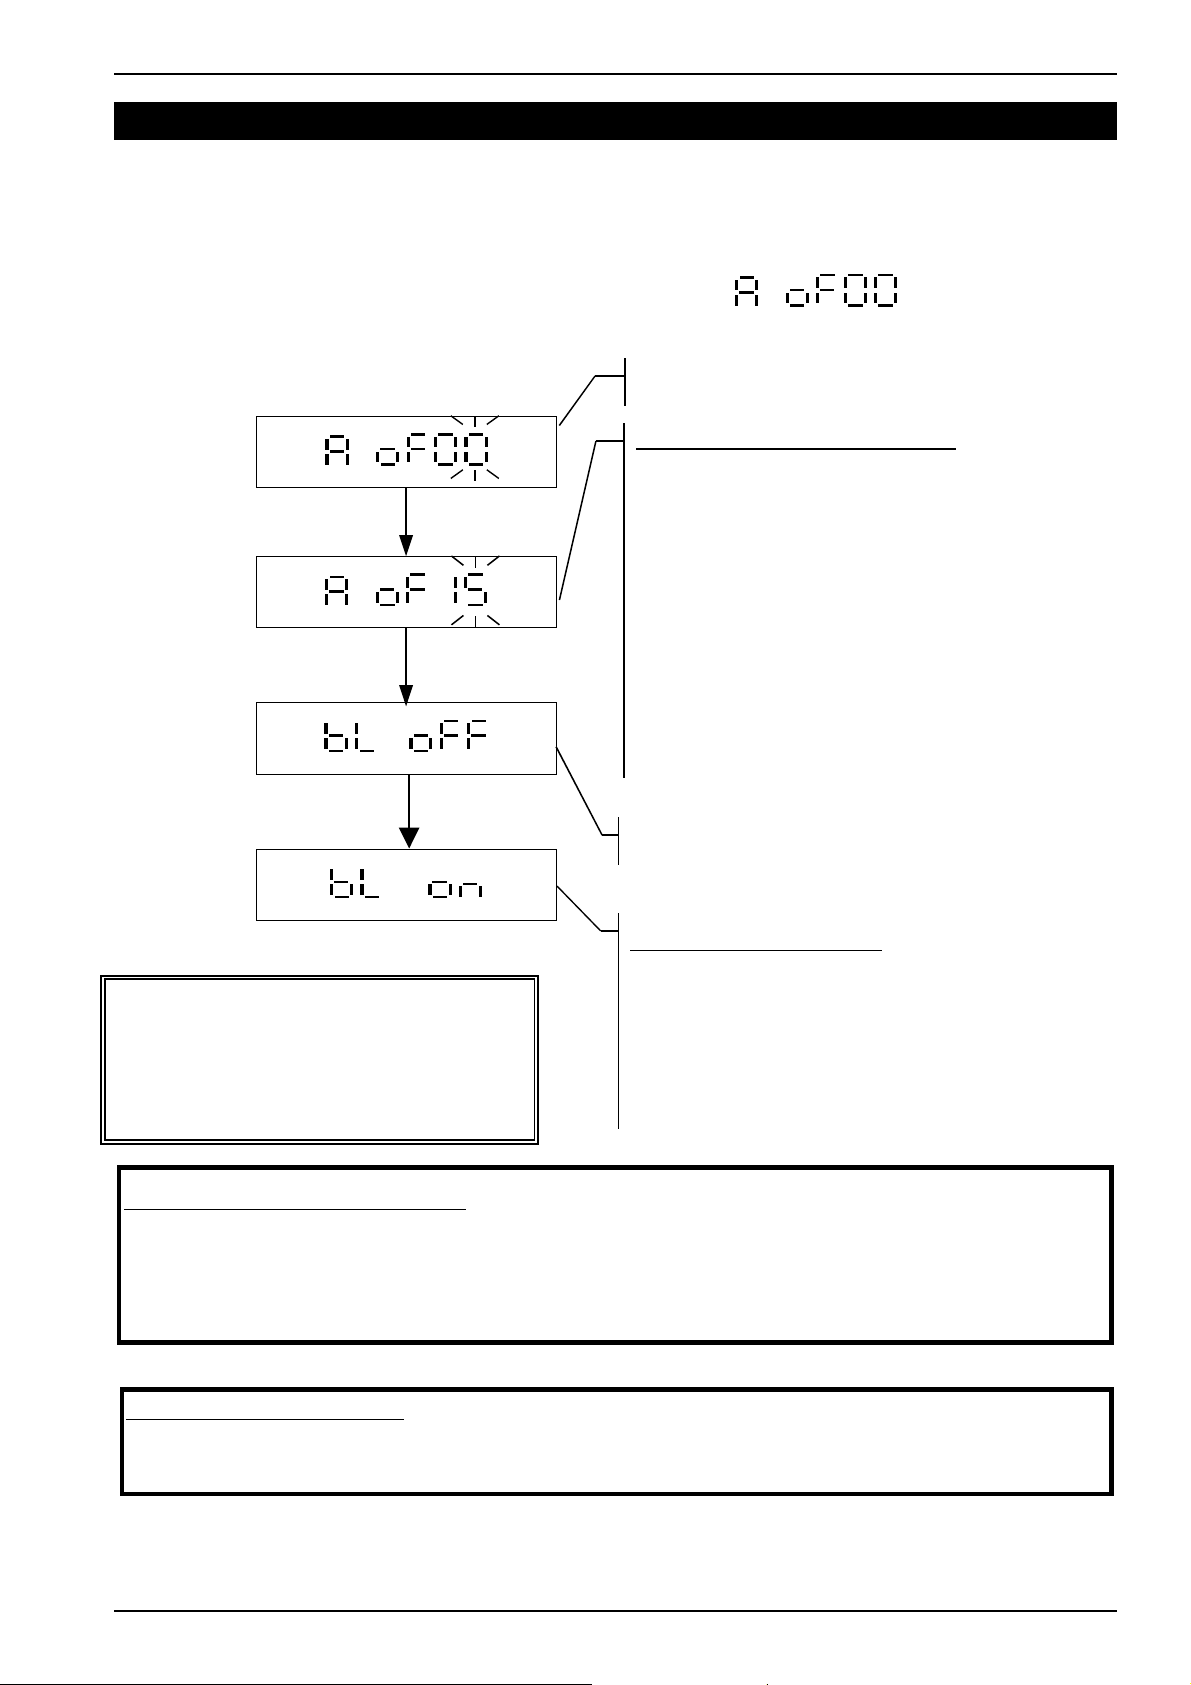
WS1V Set Up Manual Rev. 7.8.30gll
Auto power off timer setting
8 USER FUNCTIONS
8.1 Auto Power off and Backlight Settings
Switch on the scale; press the
ON
/ZERO
key and then the
the advanced functions mode. The display shows
Auto power-off setting
Use the
ON/ZERO
key to
enter a parameter
Press the
Use the
TARE
ON/ZERO
key
key to
enter a parameter
The display shows the current setting
Press
ON/ZERO
parameter.
0 ⇒ No auto power-off
1 ⇒ When the scale is idle for 1 minute, the
scale automatically switches off
2 ⇒ When the scale is idle for 2 minutes, the
scale automatically switches off
19 ⇒ When the scale is idle for 19 minutes,
the scale automatically switches off
The display shows the current setting
or
UNITS
HOLD
key to enter
keys to enter a
Auto backlight setting
ON/ZERO ⇒ Increment digit (from 0 to 9)
TARE ⇒ Confirm / enter key
HOLD ⇒ Move the cursor to the right
Use the
UNITS
ON/ZERO
keyPress
keys.
on ⇒ Auto Backlight on
ON/ZERO
or
off ⇒ Auto Back light off
Automatic Power-off Function
When the weight on weigh pan is less than 10d or remains steady for the set time, the scale
will automatically switch off.
•
Automatic power-off is not functional, when using an ac adaptor as the power source.
Therefore, auto power-off is
ONLY
active, when using dry batteries as the power source.
Auto Backlight Function
When the weight is over 10d, the backlight is on. After the weight is stable for 10 seconds or
when the scale returns to zero, the backlight switches off.
Page 19
Page 22
WS1V Set Up Manual Rev. 7.8.30gll
8.2 Hold Function Setting
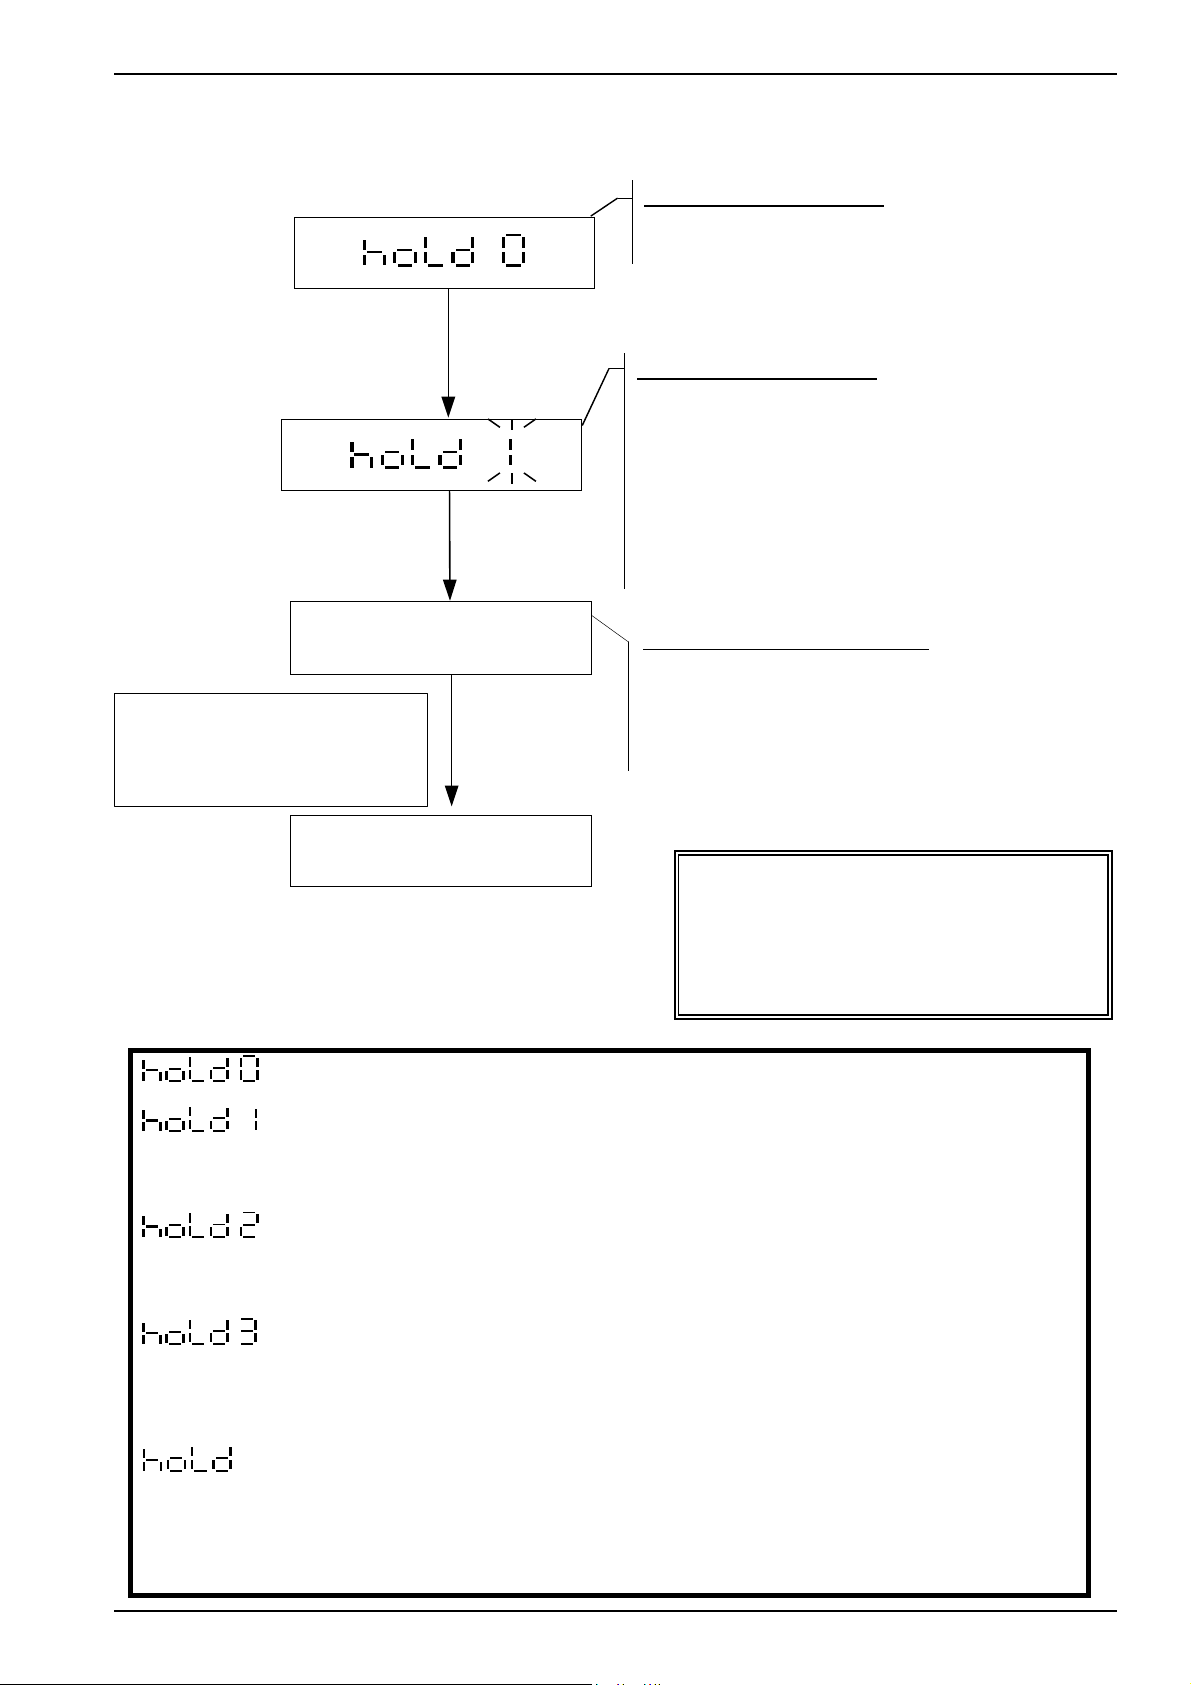
Hold function setting
LCD displays the last current setting
Use the
ON/ZERO
key to
enter a parameter
Press the
TARE
key
complete or to advance to
HOLD 4 Parameters
00000
Press the TARE key to
complete entry and return
to weighing mode
Back to weighing mode
to
Hold function setting
Use
ON/ZERO
key to key in the a parameters
Default setting = 0
0 ⇒ Hold function disabled
1 ⇒ “Peak hold” mode
2 ⇒ “Stable hold 1” mode
3 ⇒ “Stable hold 2” mode
4 ⇒ “Animal Weighing” mode
Hold 4 Parameter Setting
If
HOLD 4
is selected, refer to Note 4 to key
in the Parameters
ON/ZERO ⇒ Increment digit (from 0 to 9)
TARE ⇒ Confirm / enter key
HOLD ⇒ Move the cursor to the right
= Hold function disabled.
=
“Peak hold” mode
(active when the weight on the platter is over 10d.)
The scale shows the maximum weight value detected from the continuously changing
weight values. Press any key to exit the hold function.
=
“Stable hold 1” mode
(active when the weight on the platter is over 10d)
When the scale becomes stable, the display shows the current weight value. Press any
key to exit the hold function.
=
“Stable hold 2” mode
After the scale is stable, the display shows the current weight value. Re-zero the scale to
exit the hold function.
4
=
“Animal Weighing” mode
(active when the weight on the platter is over
10d)
Refer to NOTE 4 to key in the stabilisation range and the timer parameters. When the
scale becomes stable, the display locks on the current weight value. The scale will
unlock and exit the hold function when the weight is below 10d or the scale is rezero'd.
Page 20
Page 23

WS1V Set Up Manual Rev. 7.8.30gll
NOTE 4
HOLD 4
parameter setting (Animal Weighing Mode)
0 0 0 0 0
(a) (b) (c) (d) (e)
(a) Stabilisation Timer. This value selects the period of stability before holding the
reading. The smaller the number the quicker it will hold. Options 0 – 4
0: 0.5 second
1: 1 second
2: 2 seconds (Default Setting)
3: 4 seconds
4: 8 Seconds
(b) (c) (d) (e) Dynamic stabilisation range setting 0 – 100% (default is 5%)
This parameter sets how much motion is treated as stable. The wider the range
set the more motion can be accepted but the accuracy and repeatability is
compromised.
Example
30015.
: to set the stabilisation timer as 4 seconds and the range as 1.5%, key in
Page 21
Page 24
WS1V Set Up Manual Rev. 7.8.30gll
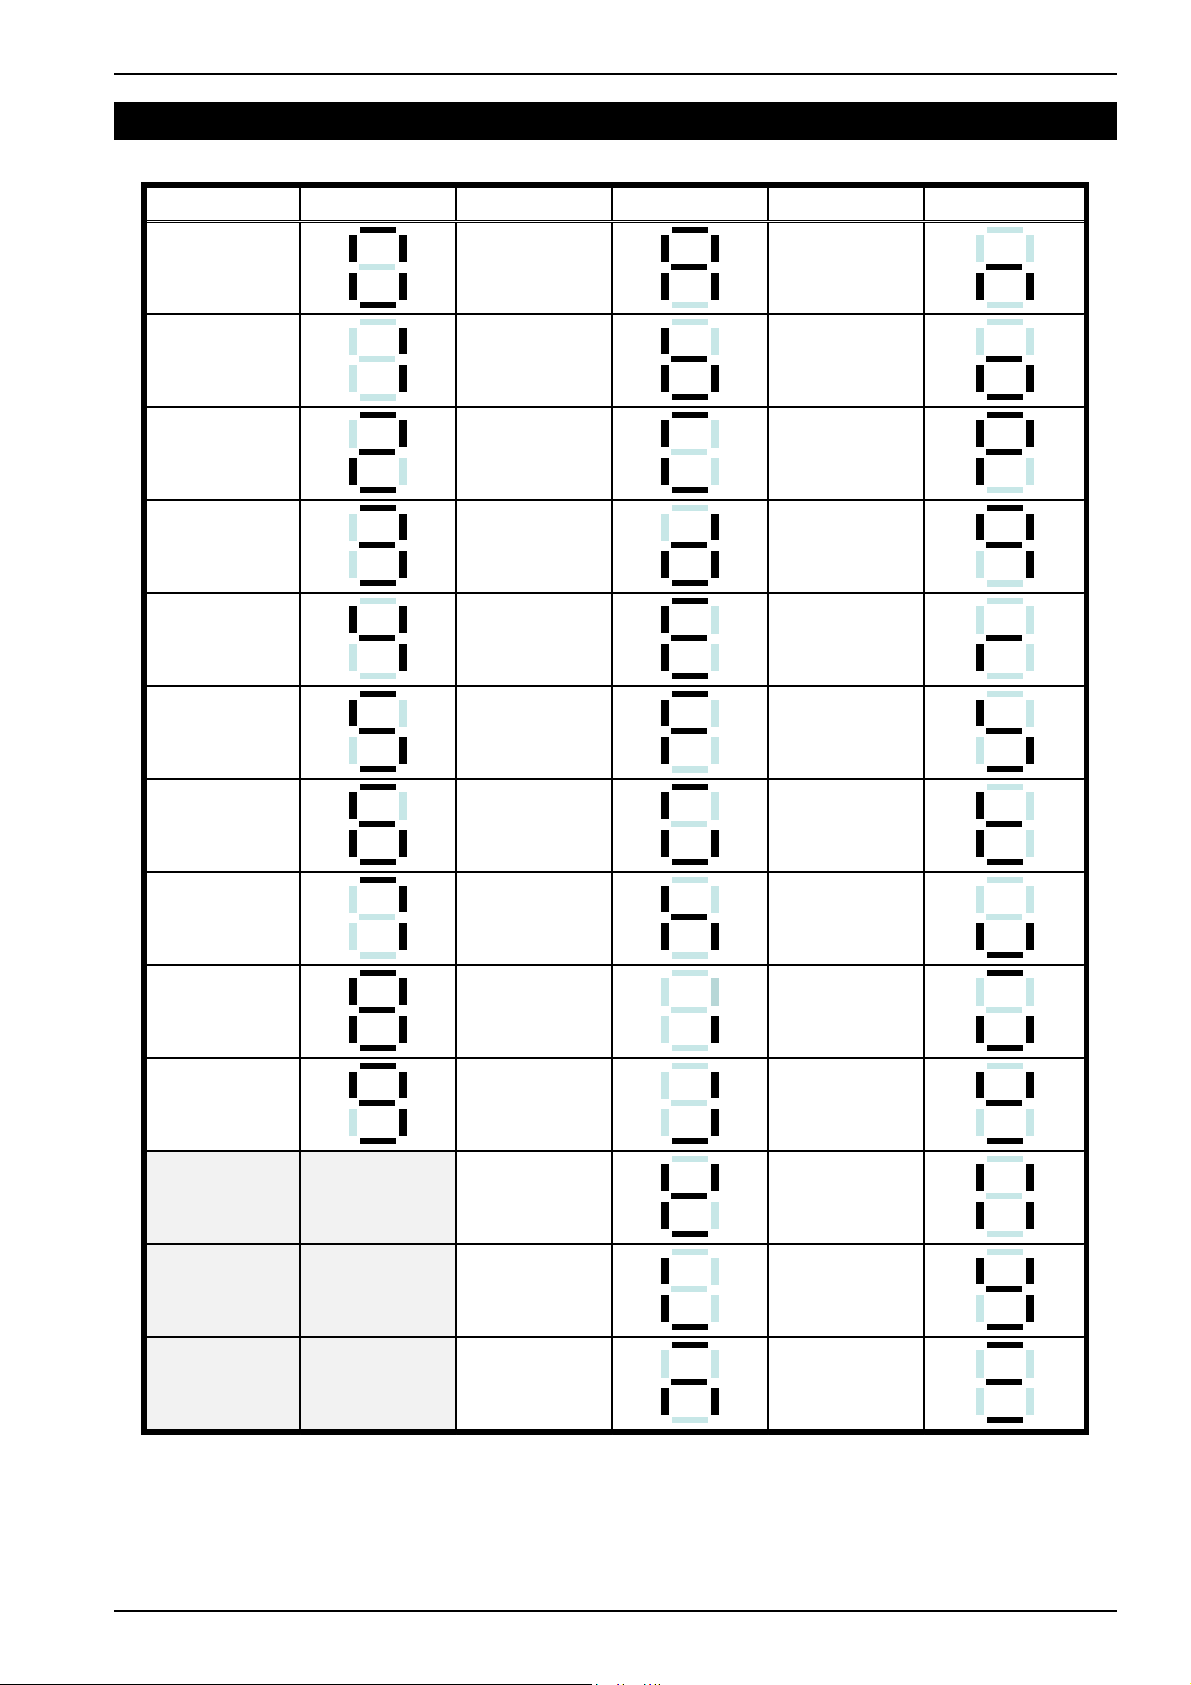
9 SEGMENT DISPLAY CHARACTERS
Digit Display Character Display Character Display
0 A N
1 B O
2 C P
3 D Q
4 E R
5 F S
6 G T
7 H U
8 I V
9 J W
K X
L Y
M Z
Page 22
 Loading...