

Page 1

Page 2

Copyright
All Rights Reserved. No part of this document may be copied,
reproduced, republished, uploaded, posted, transmitted,
distributed, stored in or introduced into a retrieval system in
any form, or by any means (electronic, mechanical,
photocopying, recording or otherwise) whatsoever without
prior written permission of PT Ltd.
Disclaimer
PT Ltd reserves the right to make changes to the products
contained in this manual in order to improve design,
performance or reliability.
The information in this manual is believed to be accurate in all
respects at the time of publication, but is subject to change
without notice. PT Ltd assumes no responsibility for any errors
or omissions and disclaims responsibility for any consequences
resulting from the use of the information provided herein.
SPECIAL NOTE
Trade Use of the PT200 Series
This manual may occasionally make reference to Trade Use
settings of the PT200 Series.
Some individual settings may not be legal for trade use.
Please check regulations with the appropriate Weights and
Measures Authority.
Page 3

Quick Start Manual Rev 1.0
Table of Contents
1. INTRODUCTION............................................................2
1.1. Approvals (for trade versions only)........................2
1.2. Manuals .................................................................2
2. SHIPPING CONTENTS .................................................2
3. SPECIFICATIONS .........................................................3
4. WARNINGS ...................................................................4
4.1. General ..................................................................4
4.2. Configuration Issues ..............................................4
5. INSTALLATION .............................................................4
5.1. Electrical Safety .....................................................5
5.2. Panel Mount Template...........................................5
5.3. Special Function Key .............................................5
5.4. opto-LINK...............................................................6
6. CONNECTIONS.............................................................7
6.1. Cable Connections ................................................7
6.2. DC Power (DC PWR + , DC PWR –)....................7
6.3. Load Cell Connection ............................................7
6.4. Auxiliary Connections ............................................9
6.5. Connecting Shields..............................................13
6.6. Regulatory Sealing Requirements.......................14
7. INSTRUMENT SETUP.................................................15
7.1. Calibration Counter..............................................15
7.2. opto-LINK.............................................................15
7.3. Access Full Setup ................................................16
7.4. Access Safe Setup ..............................................16
7.5. Exit Full or Safe Setup .........................................16
7.6. Settings................................................................16
8. ERROR MESSAGES...................................................24
8.1. Weighing Errors ...................................................24
8.2. Setup and Calibration Errors ...............................25
8.3. Diagnostic Errors .................................................26
003R-620-100
Page 1
Page 4
Quick Start Manual Rev 1.0
1. Introduction
This manual contains information on the installation, calibration
and setup of the instrument.
1.1. Approvals (for trade versions only)
• NSC approval (4000 divisions at 0.8µV/division).
• NMI approval (4000 divisions at 0.8µV/division).
•
C-tick approved and CE approved.
1.2. Manuals
For more information on this instrument refer to the
Reference Manual, Quick Start Manual or
Communications Manual.
2. Shipping Contents
The following table identifies the items shipped with the
indicator. Please check that your packing box contains the
specified items.
Shipped Items Other Items (Optional)
Indicator
•
Operator Manual
•
Quick Start Manual
•
Trade Label (plastic)
•
Panel Mount Template
•
Function Key Overlay Stickers
•
opto-LINK Cable
•
Power Supply
•
Desk Mount with Battery
•
Compartment
U Bracket
•
Page 2
003R-620-100
Page 5
Quick Start Manual Rev 1.0
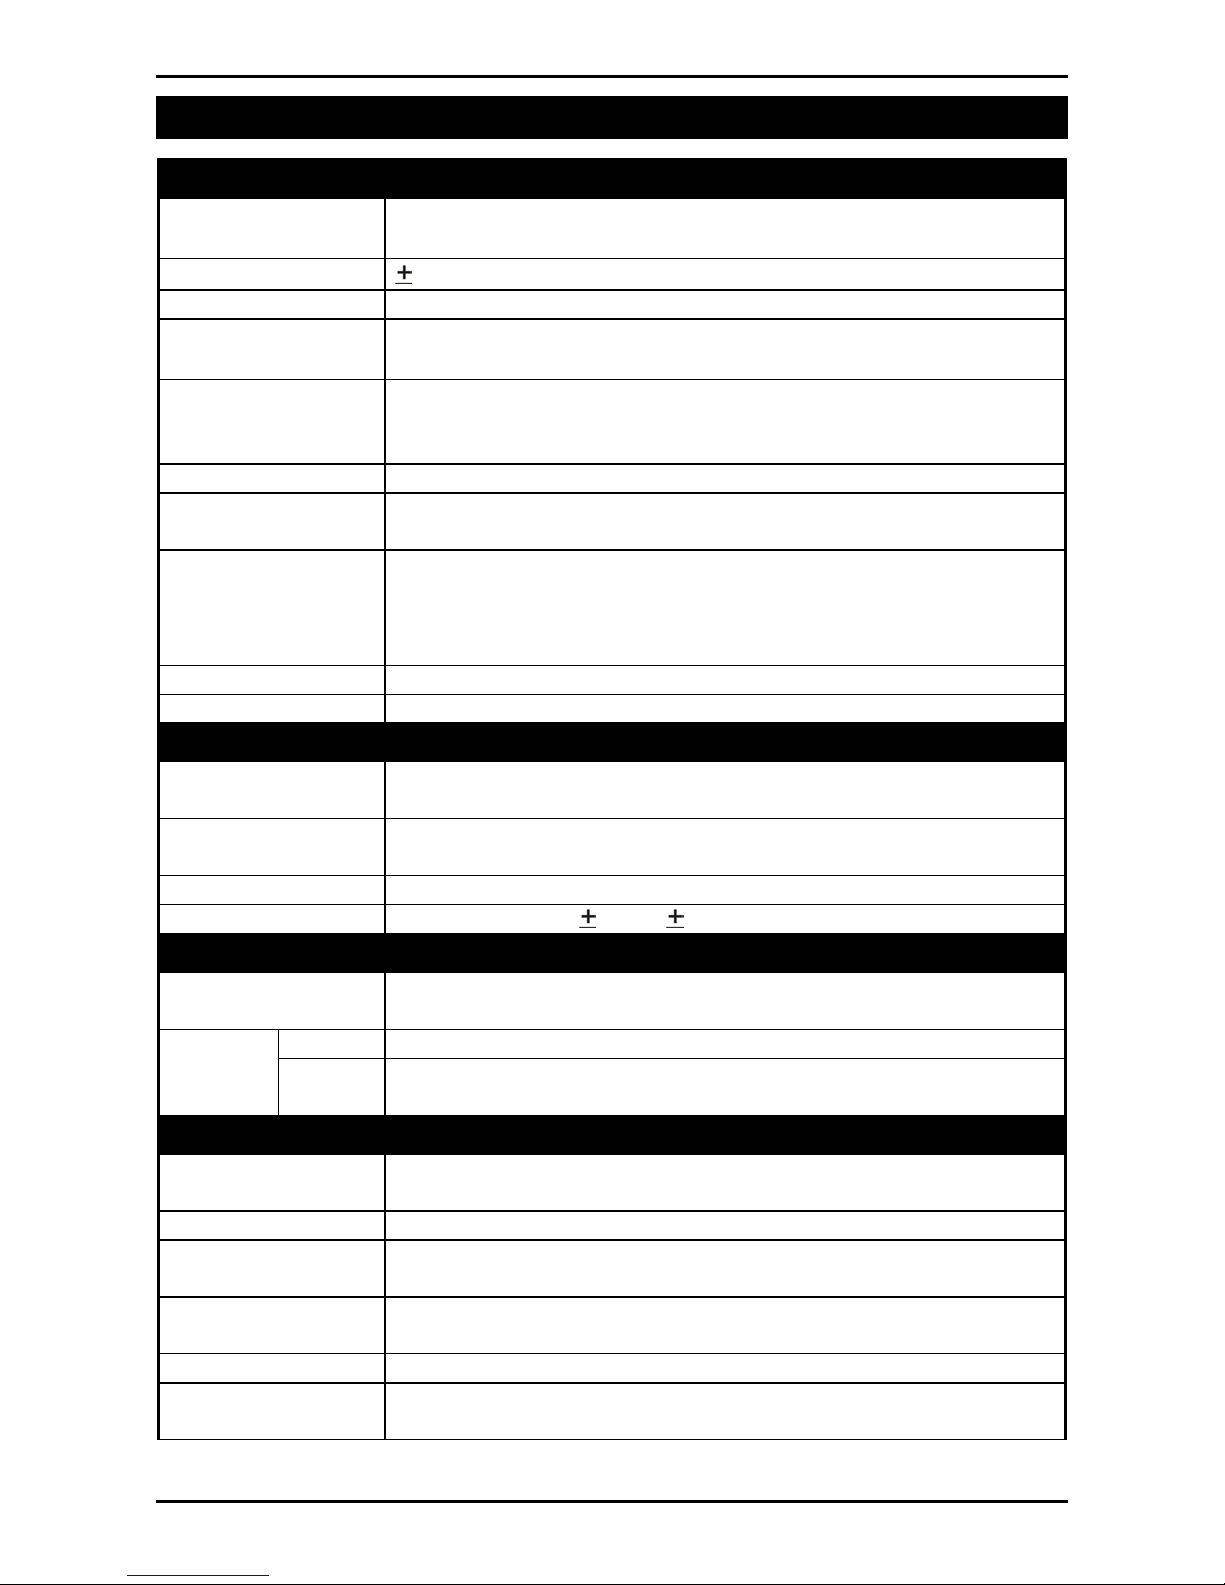
3. Specifications
Performance
Resolution
Zero Cancellation
Span Adjustment 0.1mV/V to 3.0mV/V full scale
Stability/Drift
Excitation 5 volts for up to 4 x 350 or 8 x 700 ohm load cells (4-wire
A/D Type 24bit Sigma Delta with 8,388,608 internal counts
A/D Conversion
Rate
Operating
Environment
Case Materials ABS, Silicon Rubber, Nylon, Acrylic (no halogen used)
Packing Weights Basic Indicator: 0.34kg
Up to 30,000 divisions, minimum of 0.25µV/division, 20
updates/second (Trade 4000 divisions at 0.8µV/division)
2.0mV/V
Zero: < 0.1µV/°C (+ 8ppm of deadload max)
Span < 8 ppm/°C, Linearity < 20ppm, Noise < 0.2µVp-p
or 6-wire plus shield)
Maximum total load cell resistance: 1,000 ohms
20Hz with FIR filtering > 80dB
Temperature: –10 to +50°C ambient
Humidity: <90% non-condensing
Storage: –20 to +50°C ambient
IP55 when panel mounted
Digital
Display LED Backlit LCD with six 20mm high digits with units and
annunciators
Setup and
Full digital with visual prompting in plain messages
Calibration
Digital Filter Sliding window average from 0.1 to 4.0 seconds
Zero Range Adjustable from 2% to 20% of full capacity
Power Input
Standard Power
Input
12 to 24VDC (2.5 VA max) - ON/OFF key with memory
feature
Variants AC AC Plug pack: 110/240VAC 50/60Hz in 12VDC 0.5A out
Battery 4 x AA batteries (Alkaline or rechargeable NiMH, NiCad,
etc.)
Features
opto-LINK Data
Coupling
Infra-red Connector for optional opto-LINK PC cable (to
RS-232 PC port)
Correction Five point linearity correction
Outputs RS-232 automatic transmit, network or printer outputs.
Transmission rate: 2400, 4800 or 9600 baud
Assignable
Function Key
Unit switching, counting, manual hold, peak hold, live
weight and totalising
Drive Outputs 2 isolated transistor drive outputs (300mA total at 50VDC)
Battery Backed
Clock Calendar
Battery life 10 years minimum
003R-620-100
Page 3
Page 6

Quick Start Manual Rev 1.0
4. Warnings
4.1. General
• Indicator not to be subject to shock, excessive vibration or
extremes of temperature (before or after installation).
• Inputs are protected against electrical interference, but
excessive levels of electro-magnetic radiation and RFI may
affect the accuracy and stability.
• For full EMC or for RFI immunity, termination of cable shields
and correct earthing of the instrument is essential.
• Indicator and load cell cable are sensitive to excessive
electrical noise. Install well away from any power or
switching circuits.
4.2. Configuration Issues
•
Configuration and calibration can be performed from the front
panel, using digital setup. When Full Setup is used, all menu
items are accessible and care must be taken to ensure no
accidental changes are made to calibration and trade
settings.
• Enter a passcode to prevent unauthorised or accidental
tampering. If the passcode is lost, the manufacturer should
be contacted for further advice.
5. Installation
The following steps are required to set up the indicator.
• Inspect indicator to ensure good condition.
• Use connection diagrams to wire up load cell, power and
auxiliary cables as required.
• Use the drill hole template provided for hole locations.
• Connect Power to indicator and press <POWER> key to turn
the instrument On.
• Refer to the Instrument Setup section page 15 for information
on configuring and calibrating the instrument.
•
To turn instrument Off press and hold <POWER> key for
three seconds (until display blanks).
Page 4
003R-620-100
Page 7

Quick Start Manual Rev 1.0
5.1. Electrical Safety
• For your protection all mains electrical hardware must be
rated for environmental conditions of use.
• Pluggable equipment must be installed near an easily
accessible power socket outlet.
•
To avoid the possibility of electric shock or damage to the
instrument, always switch off or isolate the instrument from
the power supply before maintenance is carried out.
5.2. Panel Mount Template
Use the panel mount template for drill hole locations. The
template indicates positions for the two 4mm mounting screws
through the panel. Also displayed on the template is the
position of the rectangular hole that should be cut to allow for
the connection of cables. The drilling template supplied with
the indicator allows for front or rear machining of the panel.
5.3. Special Function Key
•
The Special Function Key on the instrument ships as a blank
key.
• If any of the special functions are to be used on the indicator
it is important that the matching function key overlay sticker
(supplied) is applied to the keypad.
• Ensure keypad is clean and dry before affixing sticker.
003R-620-100
Page 5
Page 8
Quick Start Manual Rev 1.0
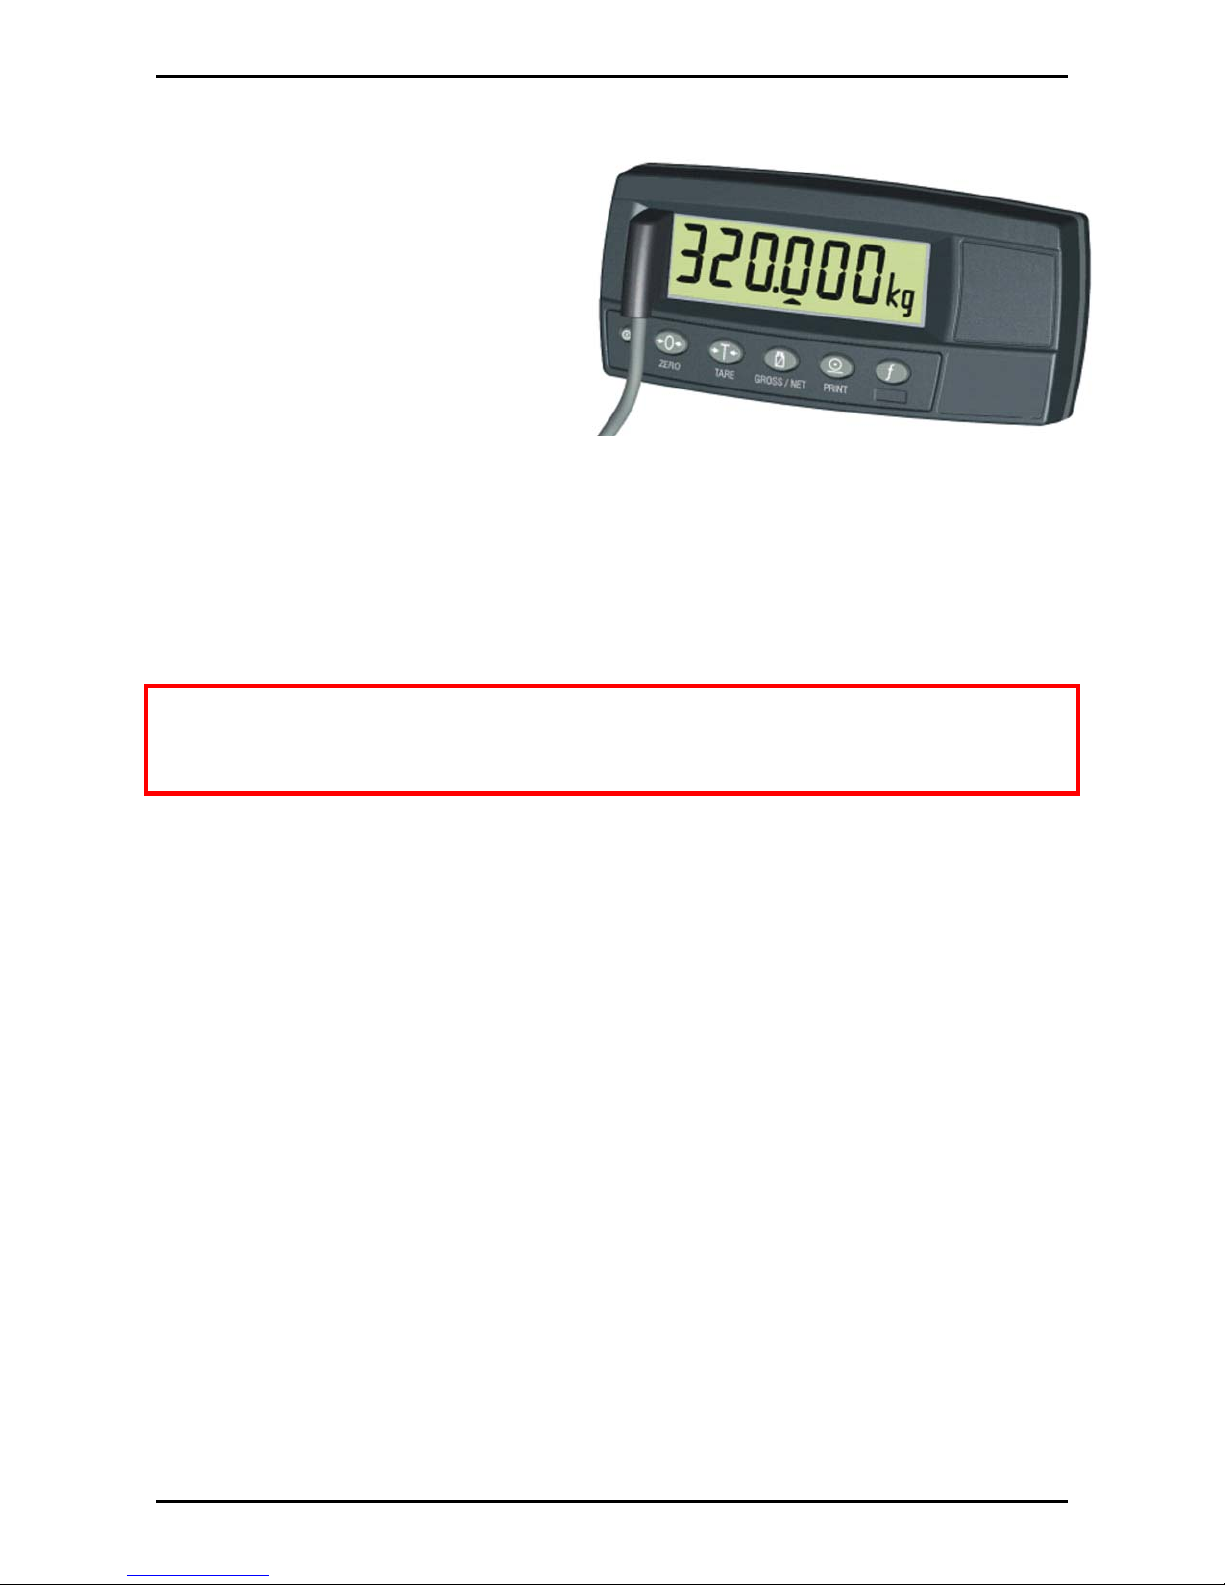
5.4. opto-LINK
The optional opto-LINK
cable can be used to
transfer setup and
calibration information
from a PC (eg. to be
stored for later use and/or
transferred to other
instruments). It can also
be used to download software upgrades to the instrument
from a PC.
Attach the opto-LINK cable to the PC using the DB9 connector.
•
Attach the opto-LINK head to the left side of the instrument
•
display using the permanent magnet located within the head of
the opto-LINK.
WARNING: The opto-LINK head contains a strong magnet and care
should be taken with its proximity to electronic media (eg. credit
cards, floppy disks, etc.) and/or other electronic instrumentation.
5.4.1. opto-LINK Activation
A long press of the
<GROSS/NET>
infrared communications On/Off.
When the opto-LINK has been (enabled) the following will occur:
The instrument briefly displays the prompt
•
The editing annunciators (ie. GRP, ITM, etc.) will flash for up to
•
five minutes while the instrument searches for activity. During
this period, the instrument also disables the RS-232
communications.
•
Activity Located:
If the instrument is
activity, the editing annunciators will continue to flash during the
key will toggle the opto-LINK
rin-L
successful
.
in locating
entire period of communications.
•
No Activity Located:
opto-LINK will be disabled and the editing annunciators will stop
flashing. The instrument will also revert back to the normal
RS-232 communications (ie. the SERIAL:TYPE setting will be reactivated).
Page 6
If the instrument
fails
to locate activity, the
003R-620-100
Page 9
Quick Start Manual Rev 1.0
6. Connections
6.1. Cable Connections
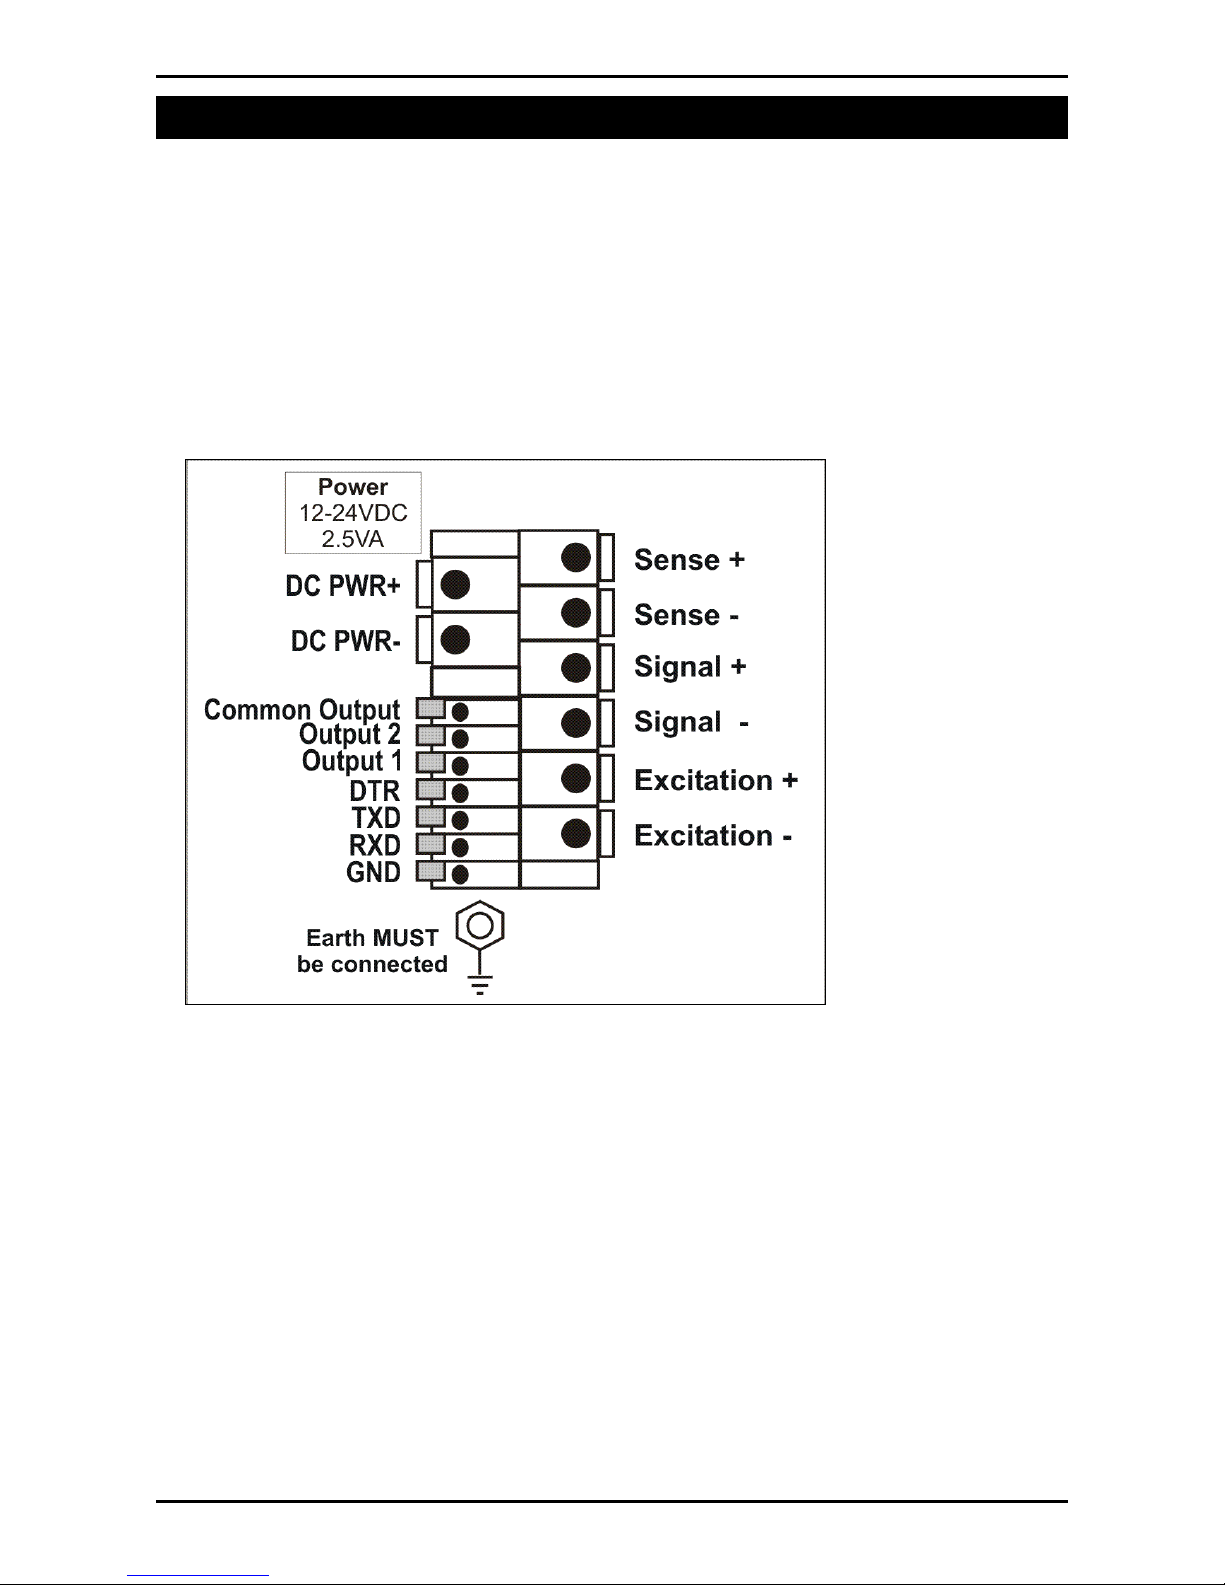
• All cable connections are made to the rear of the instrument
using screwless terminals.
• Wires must be stripped of insulation by at least 10mm.
• To install, depress the orange lever beside the terminal
required and push wire into the hole. Release the lever and
pull gently on the wire to ensure it is securely trapped in the
terminal.
6.2. DC Power (DC PWR + , DC PWR –)
• The DC supply need not be regulated, provided that it is free
of excessive electrical noise and sudden transients.
•
The instrument can be operated from a high quality plugpack as long as there is sufficient capacity to drive both it
and the load cells.
6.3. Load Cell Connection
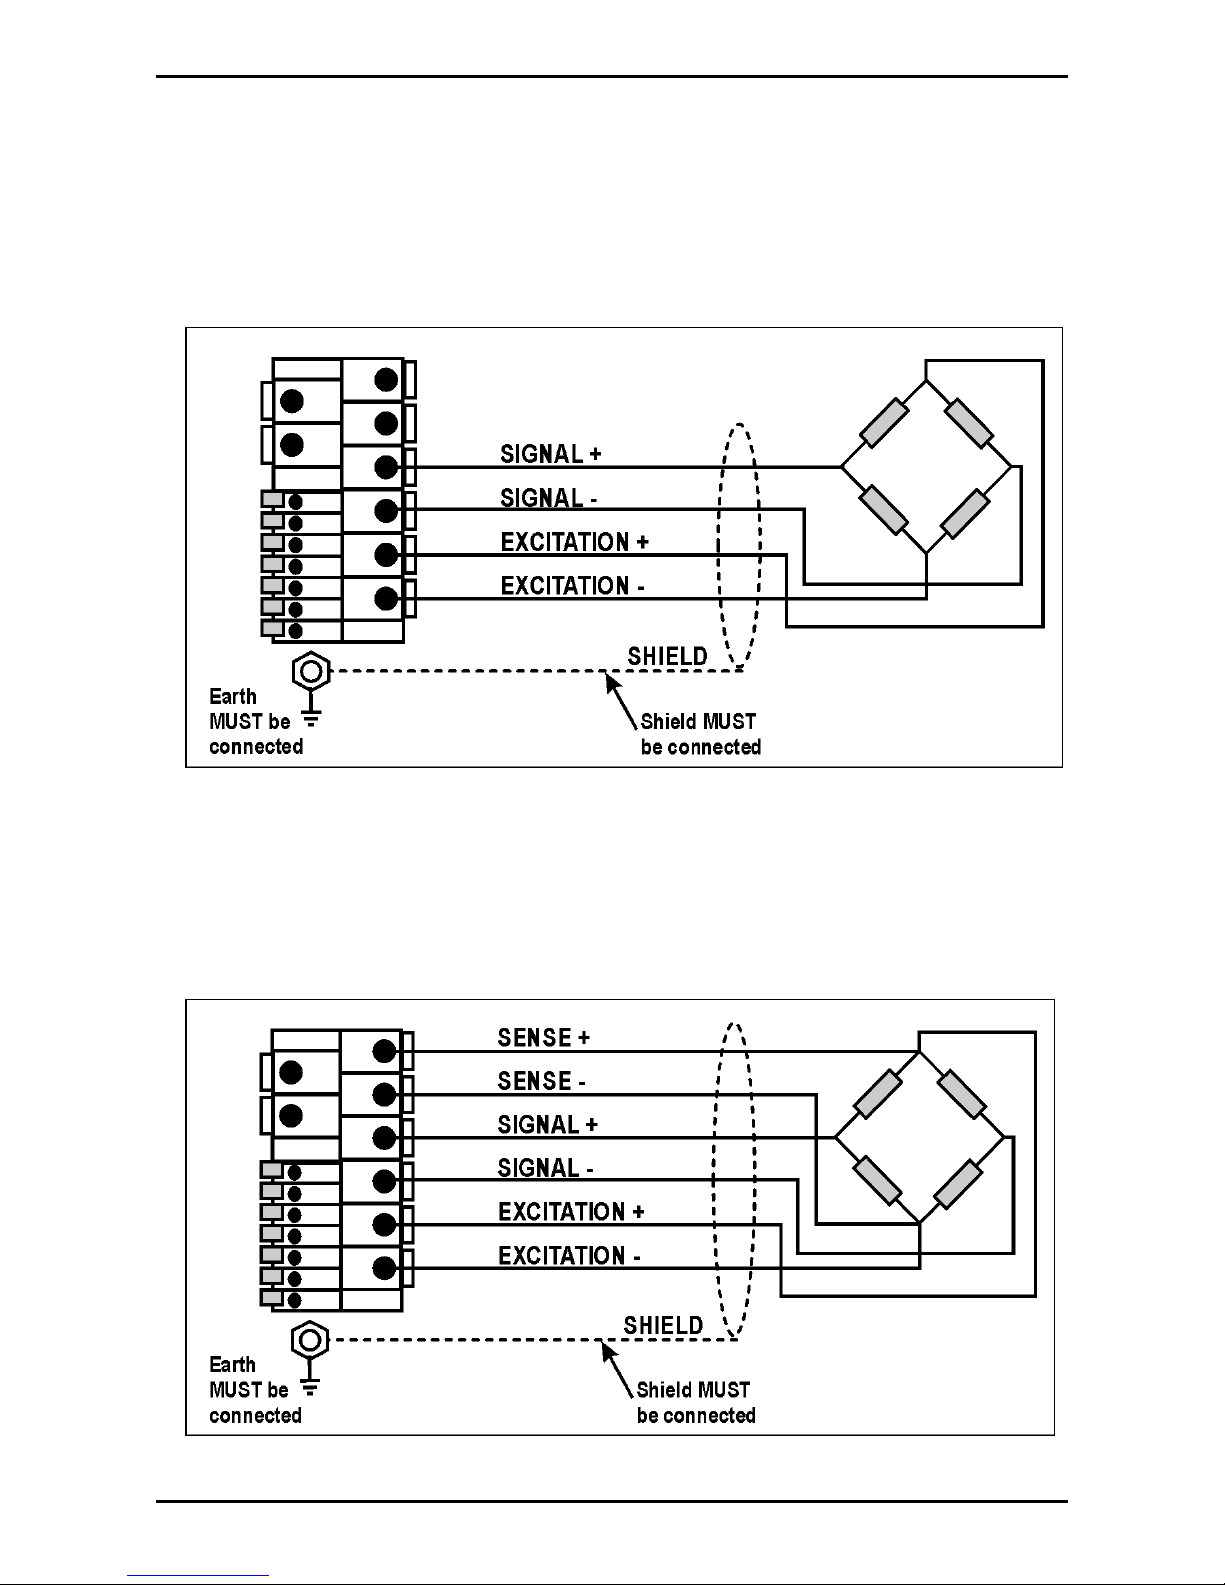
The instrument may be connected for either 4-wire or 6-wire
operation. For more information, refer to BUILD:CABLE
setting page 17.
003R-620-100
Page 7
Page 10
Quick Start Manual Rev 1.0
6.3.1. 4-Wire Connection
The minimum connectivity requirements are the connection of
four wires (ie. Excitation + and – along with Signal + and –).
The BUILD:CABLE option must be set to 4 to allow for 4-wire
connection.
6.3.2. 6-Wire Connection
The excitation and signal lines are connected the same as for
a 4-wire installation.
The BUILD:CABLE option must be set to 6 (the default) to
allow for 6-wire connection.
Page 8
003R-620-100
Page 11
Quick Start Manual Rev 1.0
6.4. Auxiliary Connections
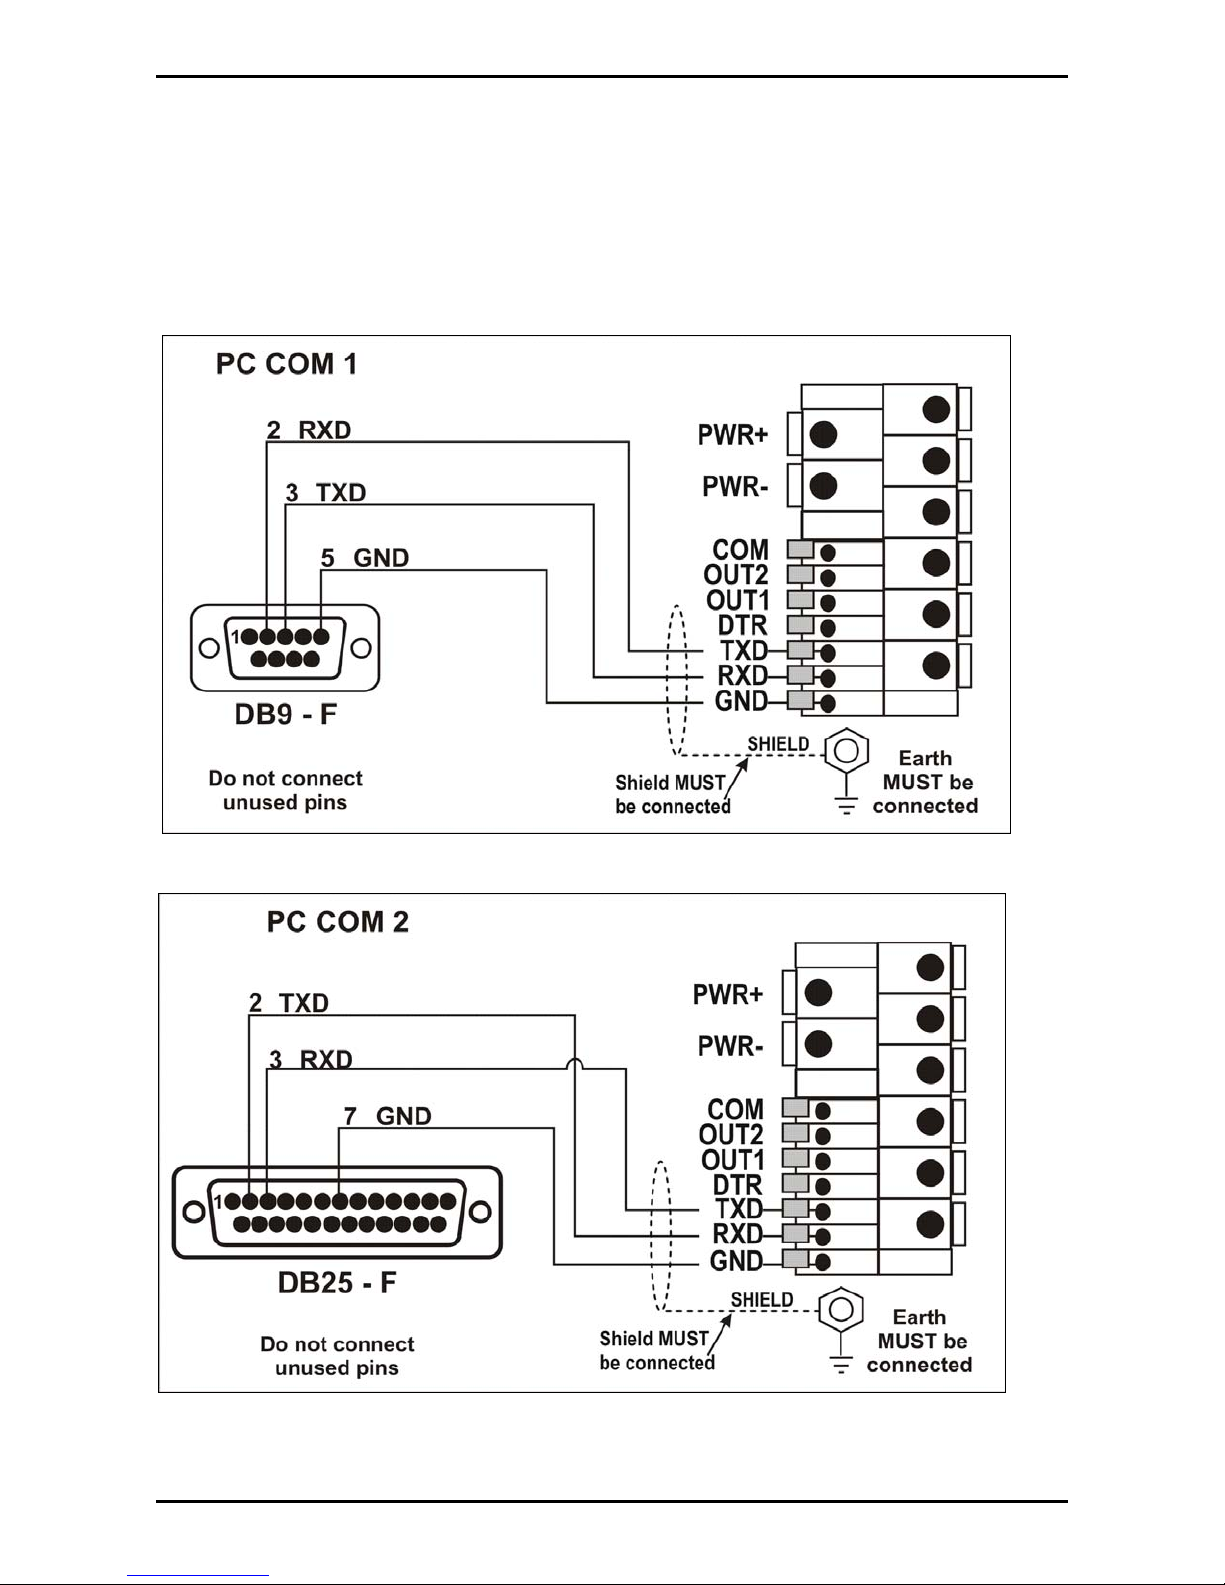
This section provides diagrams to illustrate the terminal
connections.
6.4.1. Direct Personal Computer Link (RXD, TXD, GND)
RS-232 - Instrument to PC using COM Port (DB9)
RS-232 - Instrument to PC using COM Port (DB25)
003R-620-100
Page 9
Page 12
Quick Start Manual Rev 1.0
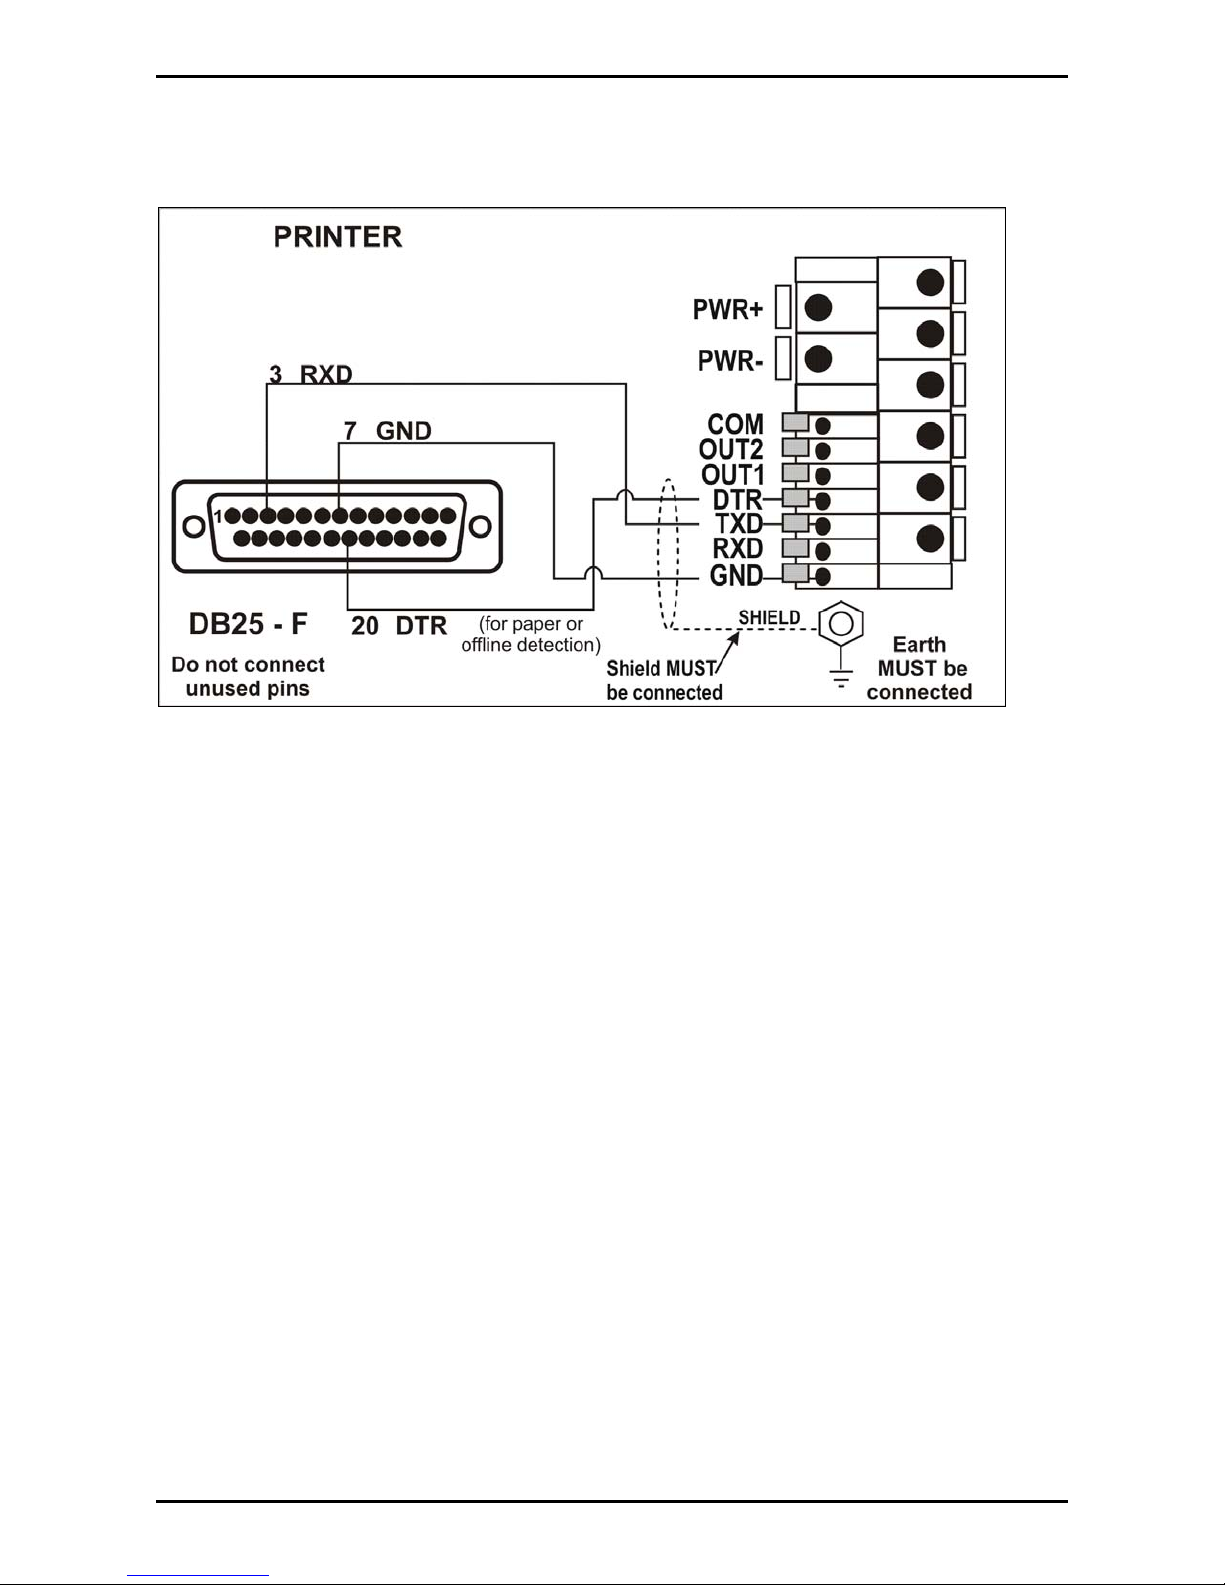
6.4.2. Printer Connections (RXD/TXD, GND and DTR)
RS-232 – Instrument to Printer (DB25)
6.4.3. Remote Display (TXD, GND)
• Connect TXD to RXD and GND to GND on the remote
display.
Page 10
003R-620-100
Page 13
Quick Start Manual Rev 1.0
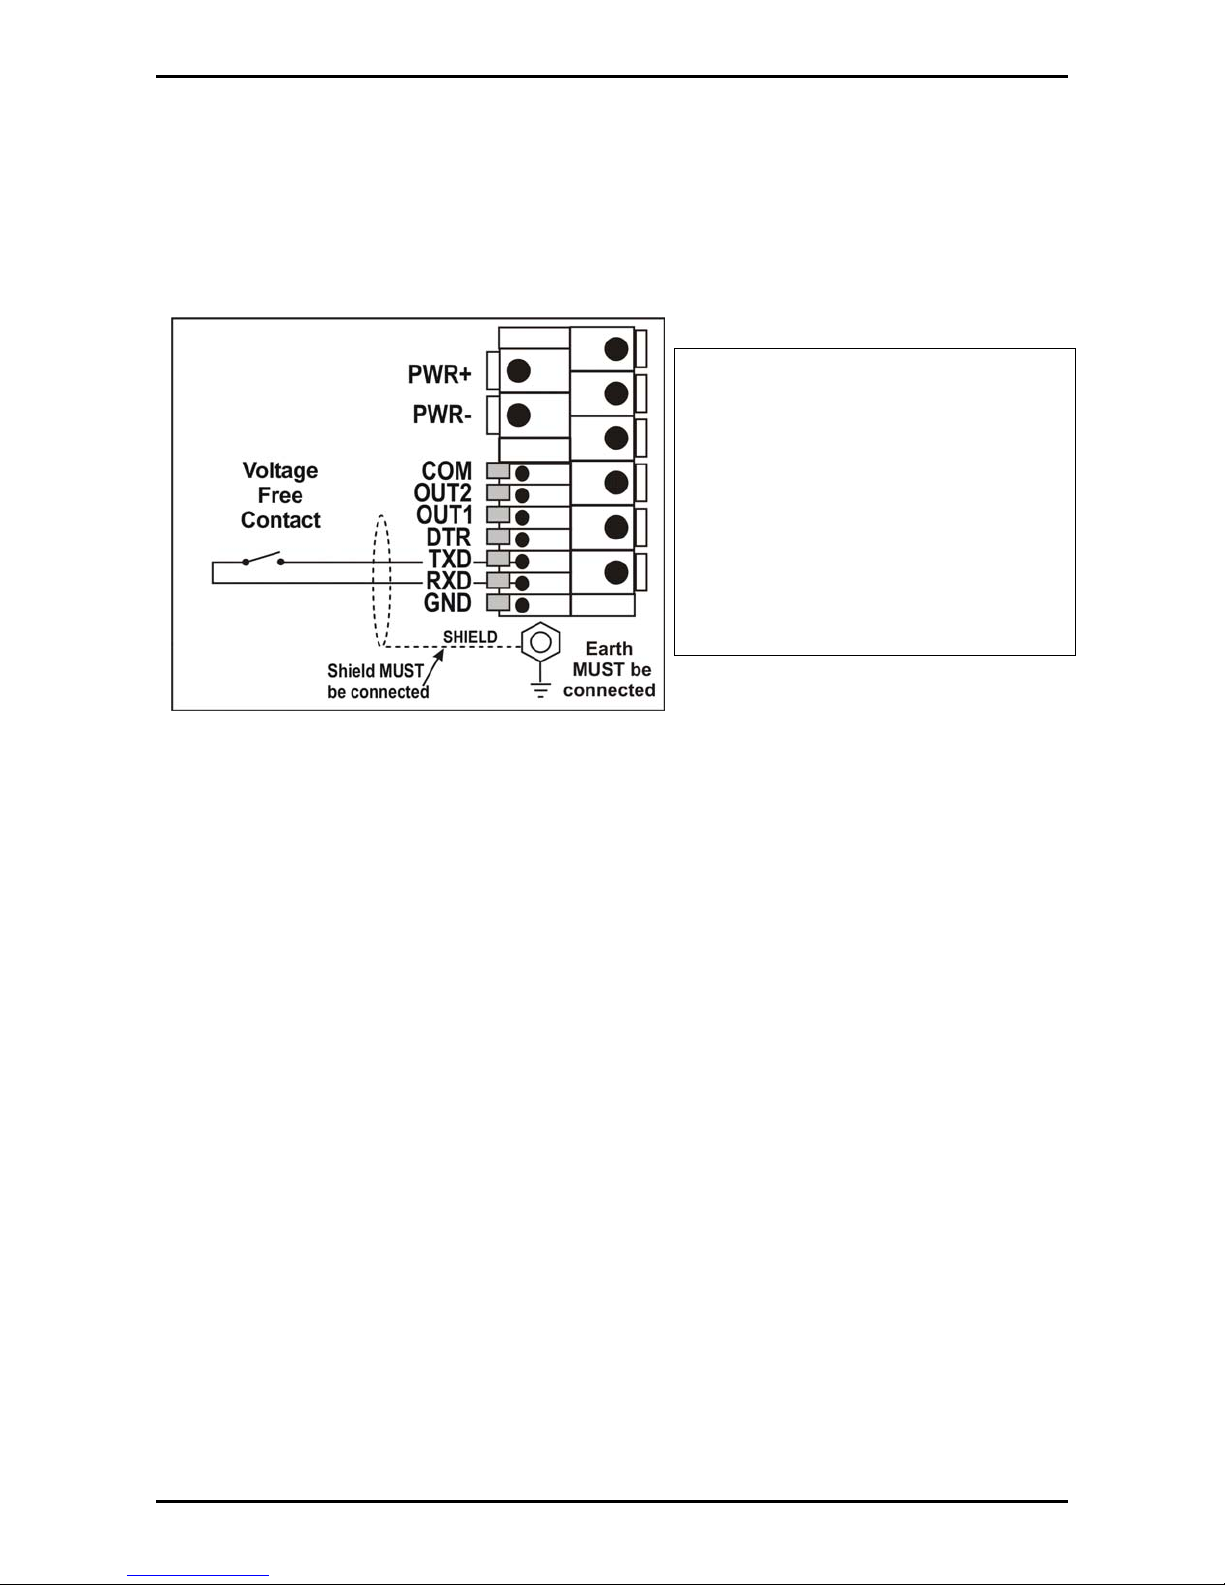
6.4.4. Remote Input
• The indicator requires a voltage free contact between TXD
and RXD to enable the remote input (ie. SPEC:REM.FN).
Note: The remote input will not function when in setup or
when using the opto-LINK.
WARNING
The remote input is a
voltage free contact (eg.
button, mechanical
relay). Connection of
any active circuitry may
damage the instrument.
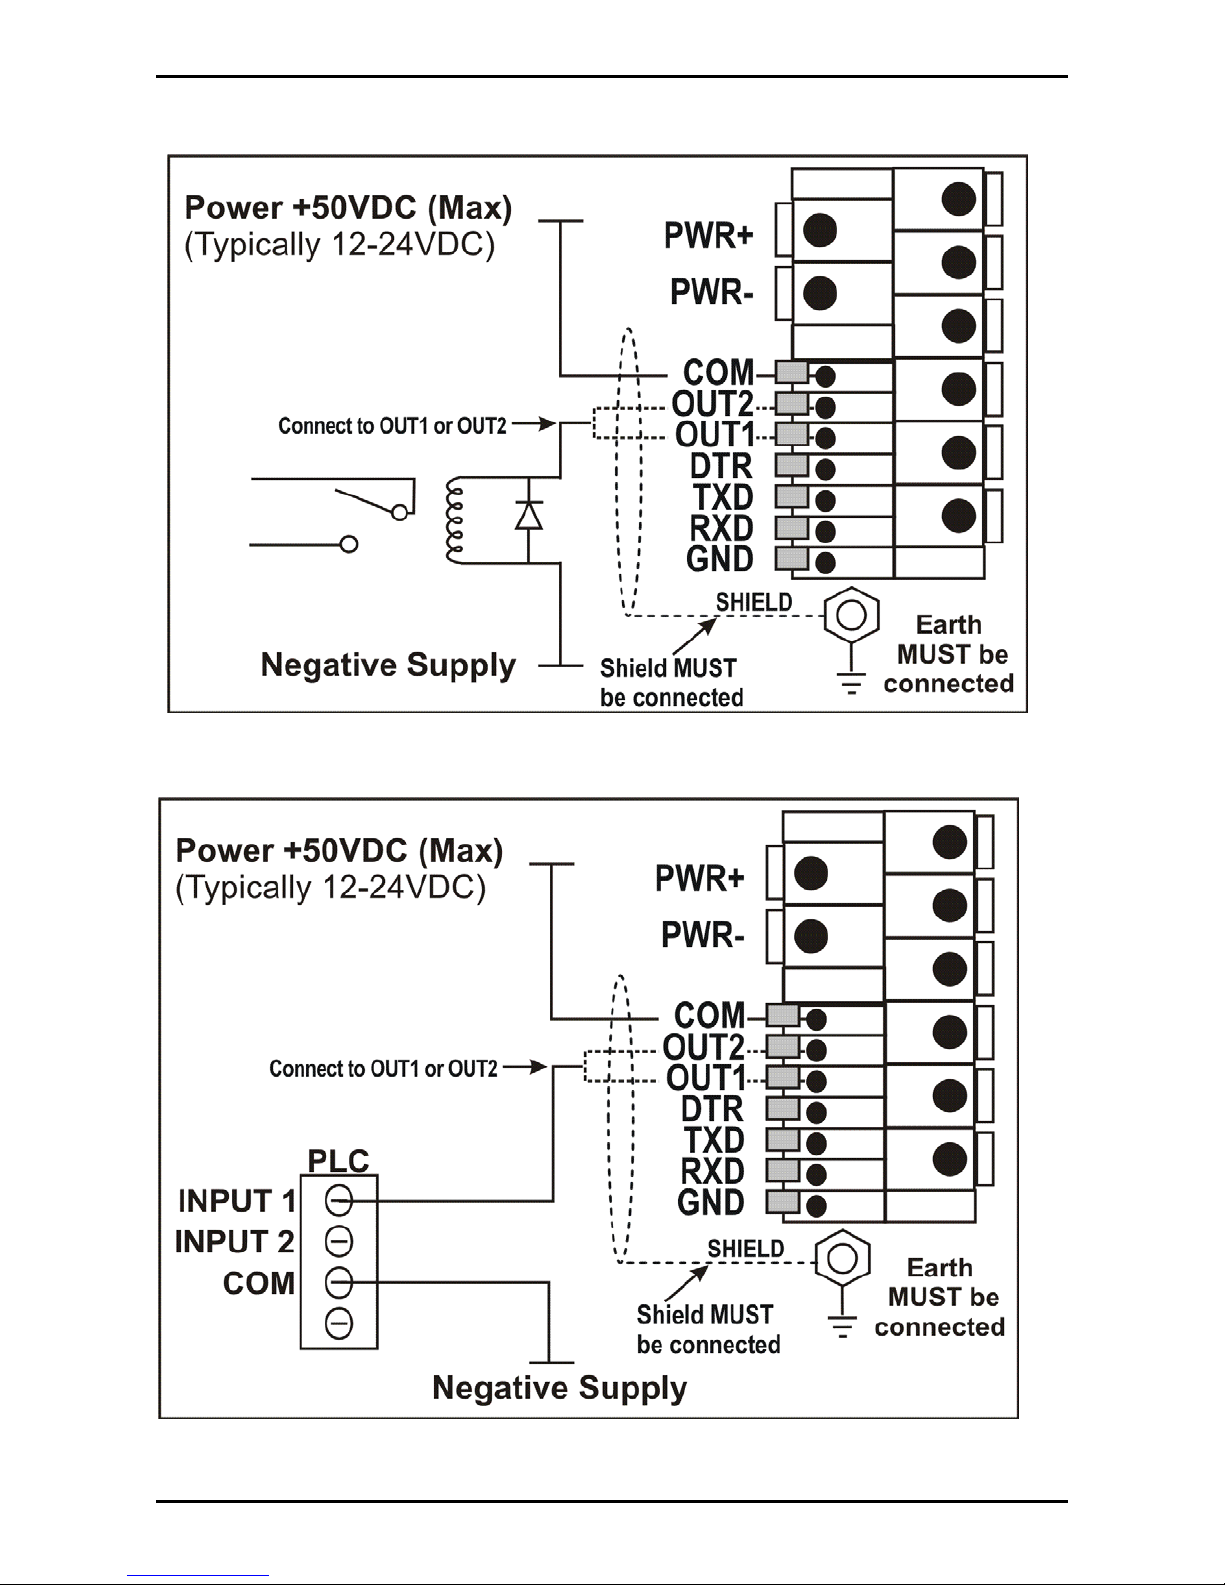
6.4.5. Outputs
• Output drivers for the instrument are isolated open emitter
transistor drives that are capable of driving up to a total of
300mA.
• This configuration allows for the direct connection of the
instrument outputs to most types of PLC.
• The voltage applied to the COM terminal appears on the
output lines (ie. OUT1 and OUT2) when the outputs are
active (eg. to connect to a PLC connect +24V to the common
terminal). The outputs can then be connected directly to
PLC inputs so when the outputs are active the PLC will see a
24V signal.
• To drive external loads (eg. relays), connect the relay coil
positive supply to the output common and the output line
directly to one side of the relay coil.
• Connect the other end of the relay coil to the negative supply.
It is recommended that fly-back diodes or transient
suppressors be fitted across relay coils to limit switching
noise.
003R-620-100
Page 11
Page 14
Quick Start Manual Rev 1.0
Outputs to Drive Relay
Outputs to Drive PLC
Page 12
003R-620-100
Page 15
Quick Start Manual Rev 1.0
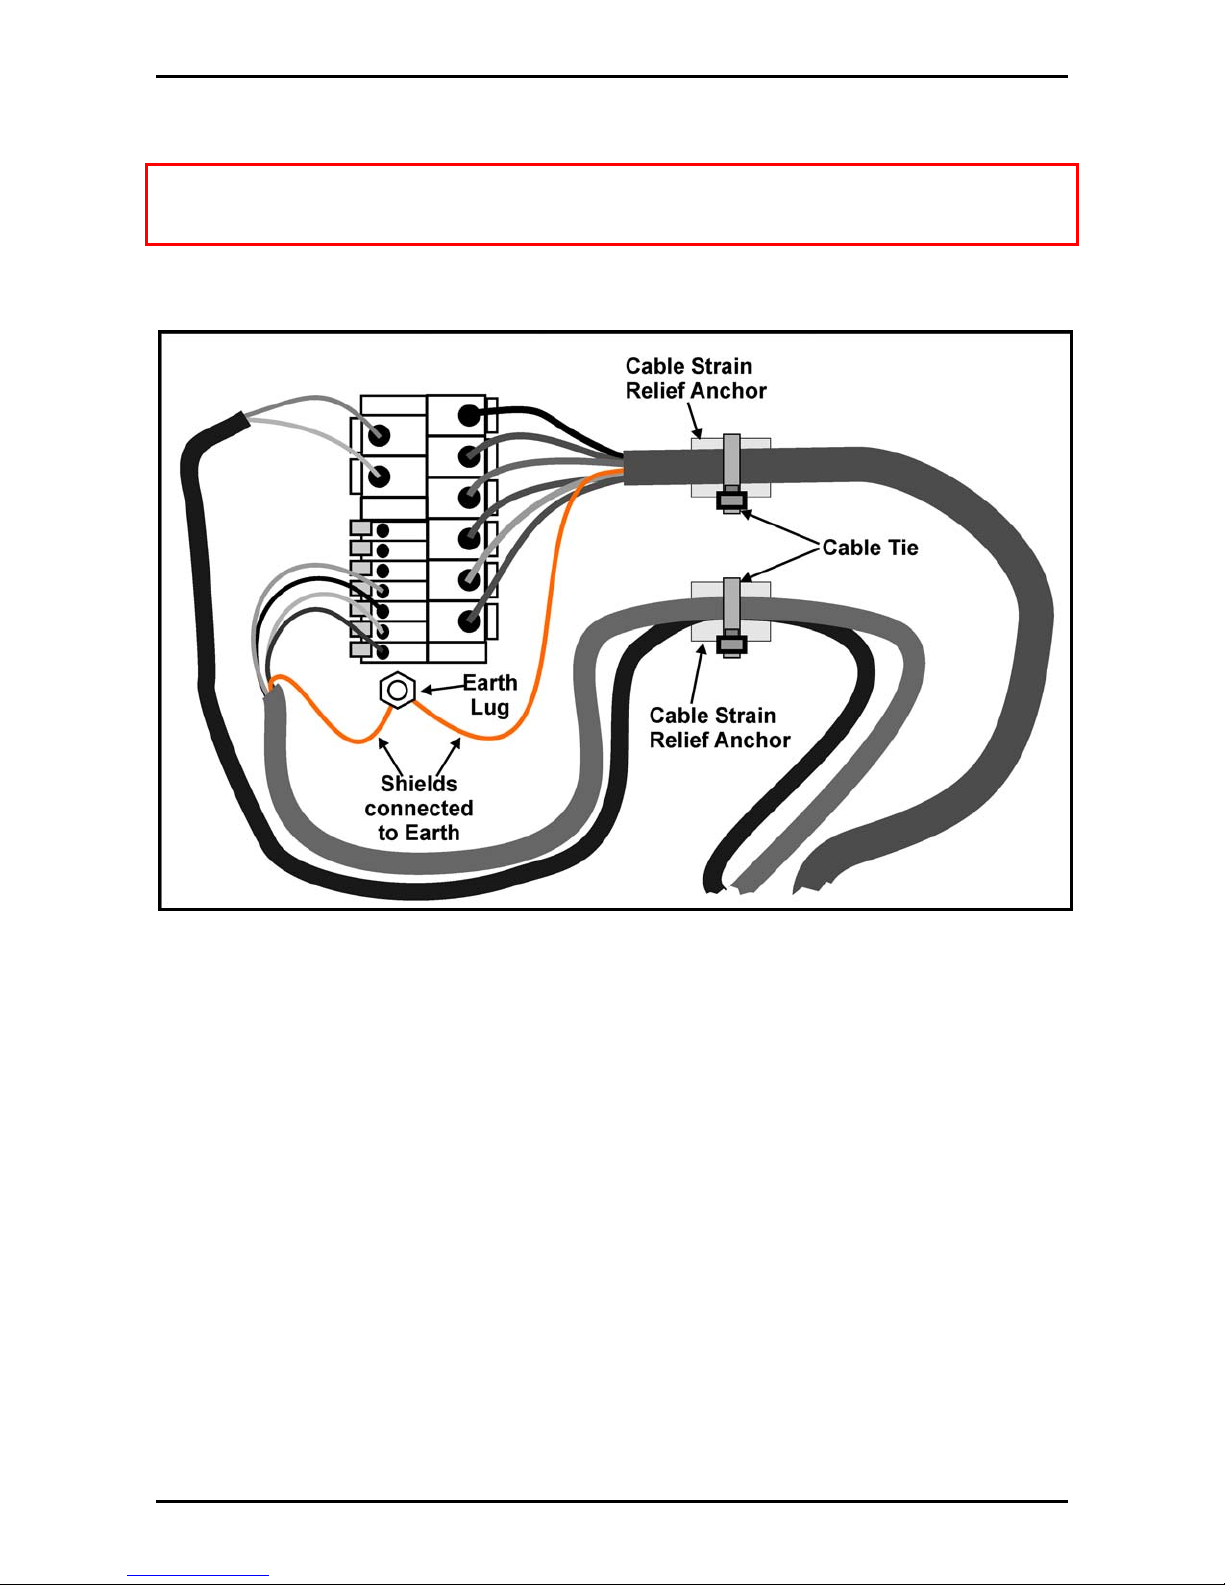
6.5. Connecting Shields
To obtain full EMC or for RFI immunity, cable shields MUST
be connected to the earth lug on the rear of the instrument.
This figure shows the connecting cables restrained using cable
ties fastened around the cable strain relief anchors.
6.5.1. Cable Shield Connection and Earthing
• Care should be taken when connecting shields to maximise
EMC or RFI immunity and minimise earth loops and crosstalk (interference) between instruments.
• For full EMC or for RFI immunity, termination of the cable
shields at the earth lug is very important. The earth lug of
the instrument must be separately connected to ground
potential via a reliable link.
• The instrument should only be connected to earth via a single
reliable link to avoid earth loops.
• Where each instrument is separately earthed, interconnecting
cable shields should be connected at one end only.
•
Caution: Some load cells connect the cable shield directly to
the load cell (and therefore the scale base). Connection of
the load cell cable shield in this situation may be site specific.
003R-620-100
Page 13
Page 16
Quick Start Manual Rev 1.0
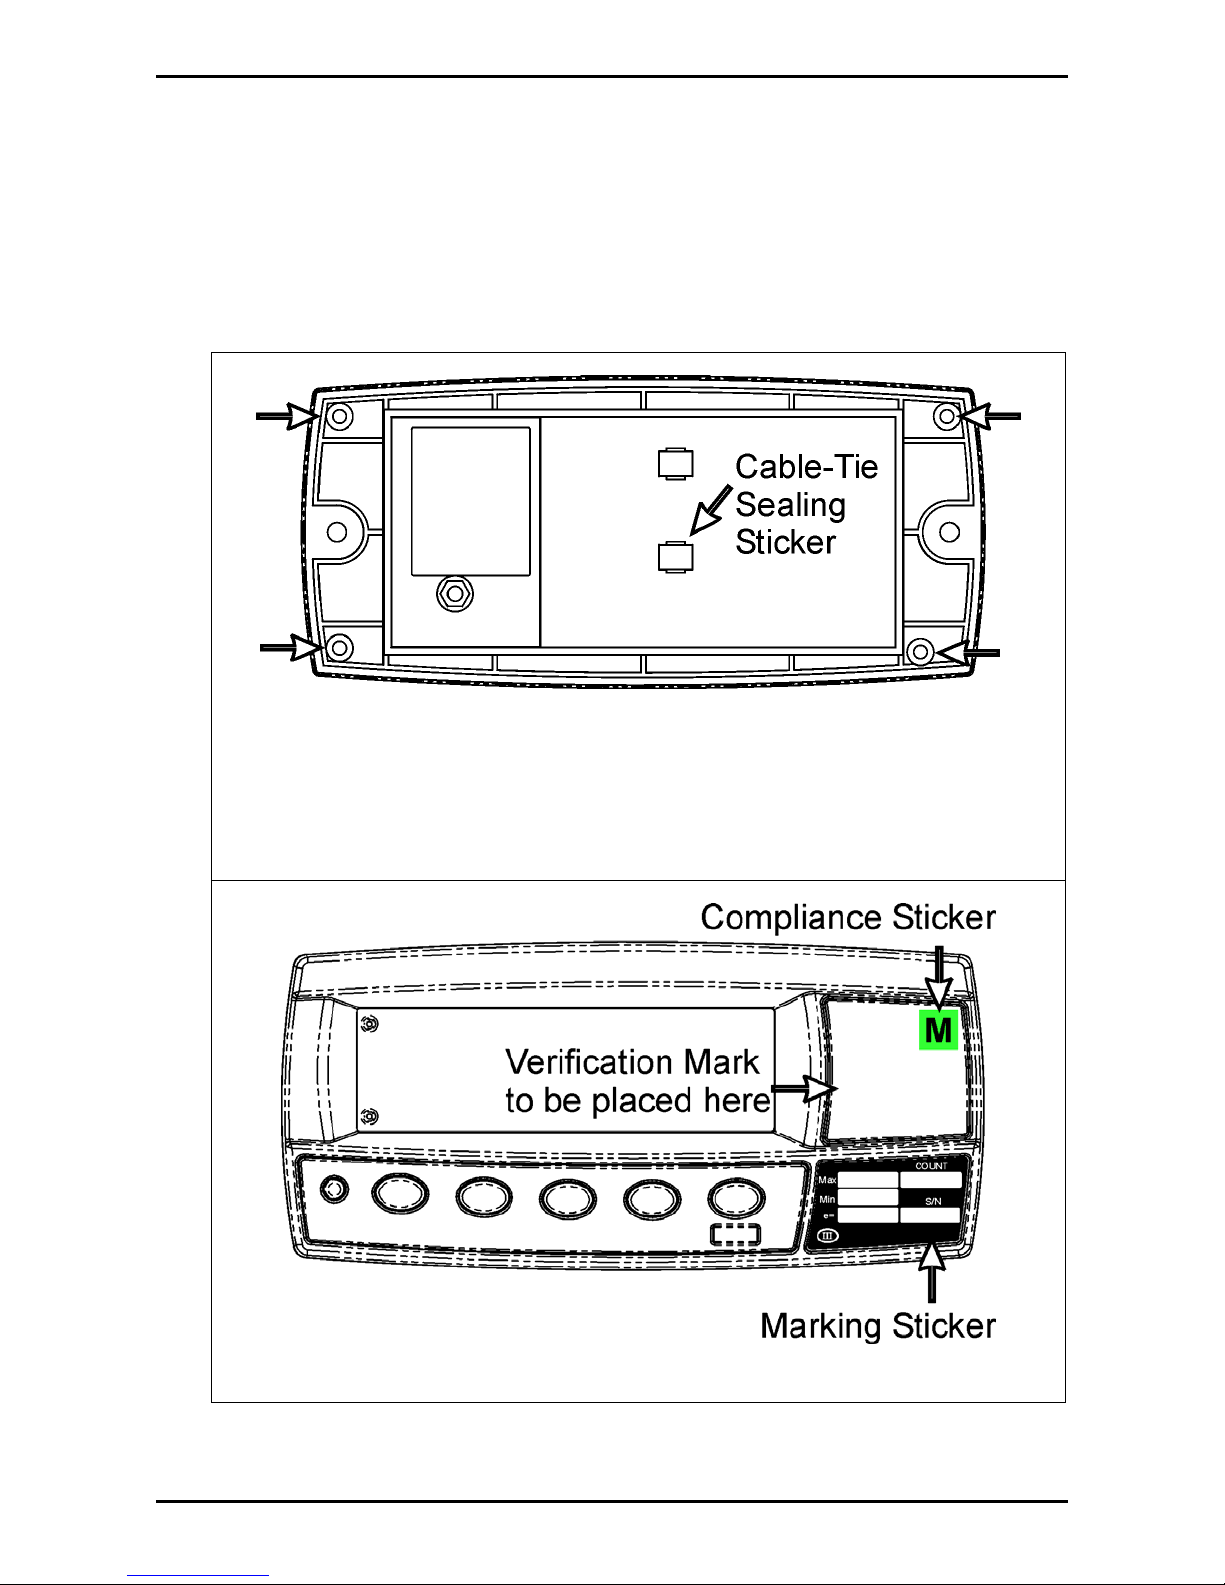
6.6. Regulatory Sealing Requirements
To comply with regulatory sealing requirements for each
instrument, (ie. to ensure instruments are not accidentally or
deliberately tampered with), it is important that proper sealing
procedures be adhered to.
6.6.1. Sealing
Affix sealing stickers to the rear of the instrument, over
one or more screws in the locations indicated.
Also affix a sealing sticker over the load cell cable where
the cable-tie strain relief is attached, as indicated.
Affix stickers in the locations indicated.
Page 14
003R-620-100
Page 17
Quick Start Manual Rev 1.0
7. Instrument Setup
7.1. Calibration Counter
The built-in calibration counter(s) monitor the number of times
trade critical settings are altered. Refer to Trade Critical
Settings below for more information and to the OPTION:USE
setting page17.
The table below describes when the counter(s) will increment.
Industrial or OIML: The Calibration Counter increments
when trade critical settings are changed. An example of the
counter is C.00019.
NTEP: Two counters display.
The Calibration Counter increments when trade critical
settings in the Calibration (CAL) menu are changed. An
example of the counter is C.00010.
The Configuration Counter increments when other trade
critical settings (ie. not in the CAL menu) are changed. An
example of the counter is F.00009.
7.1.1. Trade Critical Settings
Trade critical settings can affect calibration and/or legal for
trade performance. In this document the ⊗ symbol indicates
the setting is trade critical. Each time a trade critical setting is
altered, the calibration counter will be incremented by one.
7.2. opto-LINK
For information on setting up using the opto-LINK cable refer
to opto-LINK page 6.
003R-620-100
Page 15
Page 18
Quick Start Manual Rev 1.0
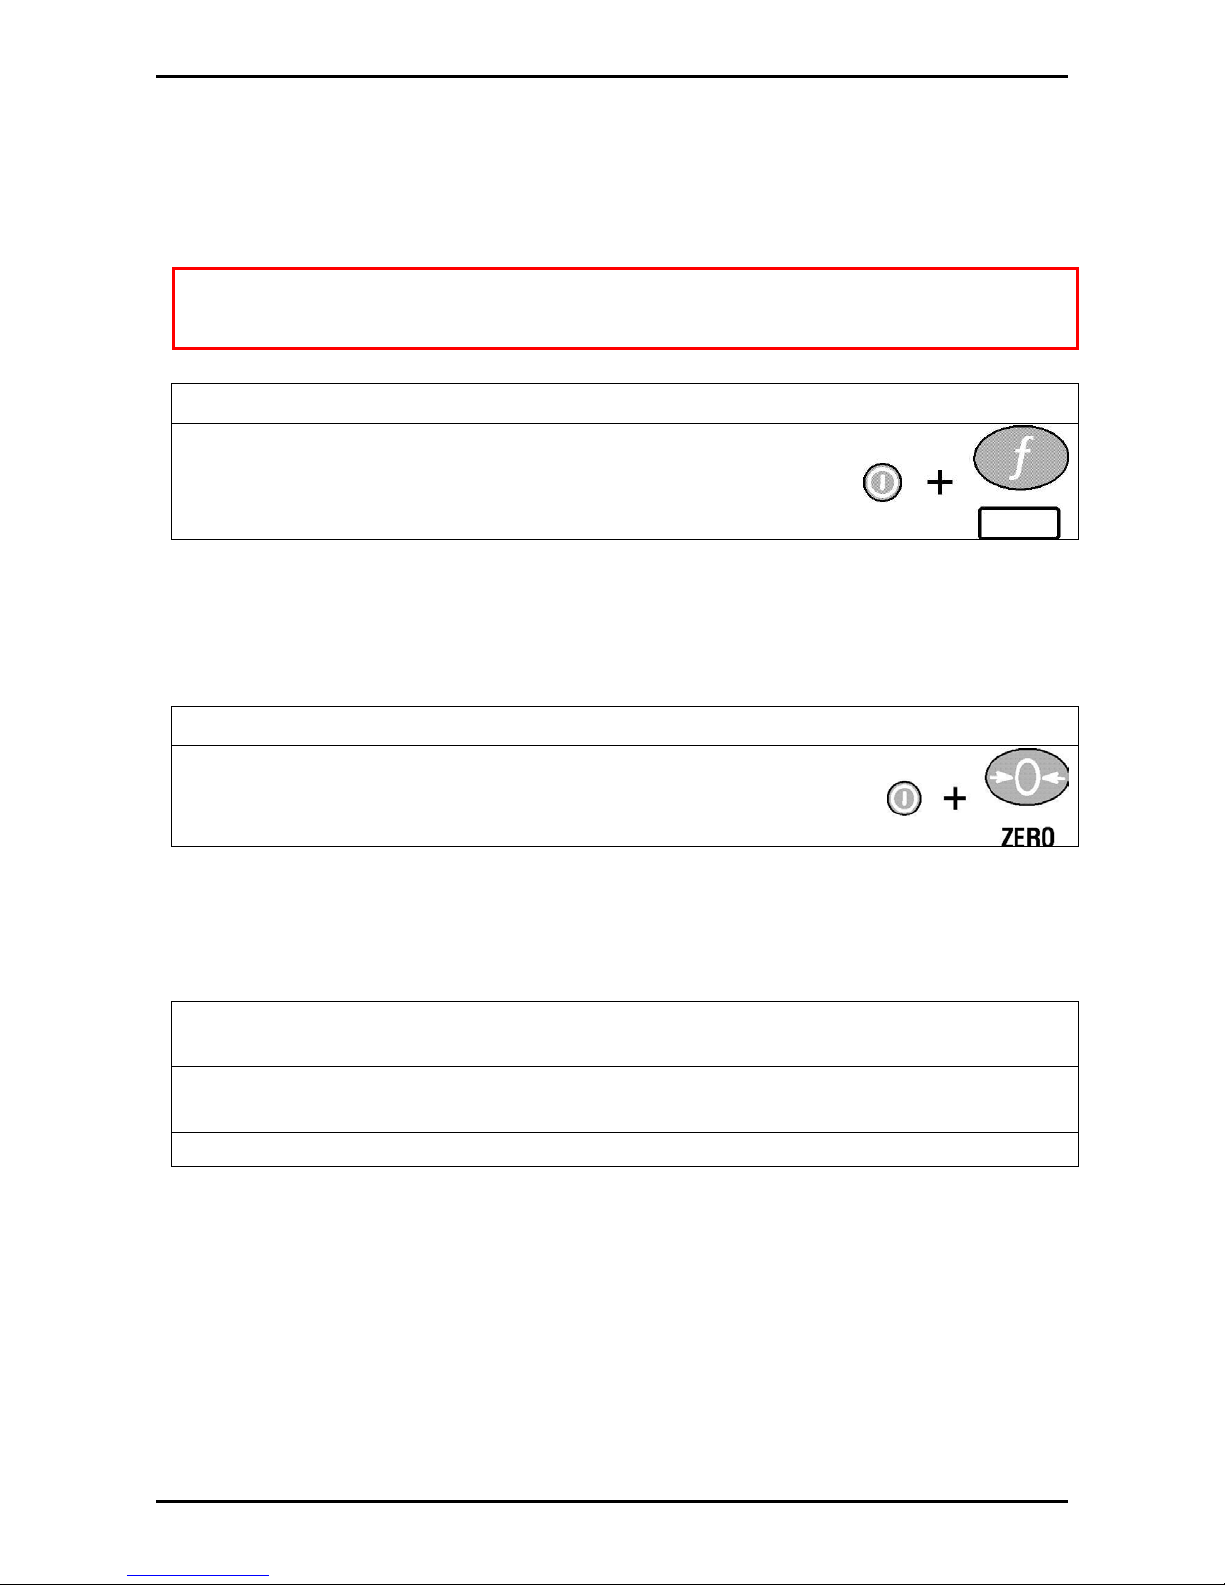
7.3. Access Full Setup
Full Setup provides access to configure and calibrate the
instrument. All items in all menus will be enabled in Full
Setup.
WARNING: Care should be taken to avoid inadvertently
altering the Build or Calibration settings.
• Ensure the instrument is on.
Press and hold the
•
<FUNCTION>
<POWER>
keys together for two seconds.
and
7.4. Access Safe Setup
Safe Setup restricts access to the trade critical settings
(marked with ⊗).
• Ensure the instrument is on.
Press and hold the
•
<POWER>
keys together for two seconds.
and
<ZERO>
7.5. Exit Full or Safe Setup
To save settings, exit setup and return to the normal weighing
mode use one of the following methods:
•
Method 1:
for two seconds.
•
Method 2:
seconds.
•
Method 3:
Select
Press
Press
<POWER>
<POWER>
- End -
and
and
from the menus.
<FUNCTION>
<ZERO>
together for two
keys together
Warning: If the power is interrupted while in setup (ie. by
disconnecting the power cable or pressing the <POWER>
key), unsaved settings will be lost.
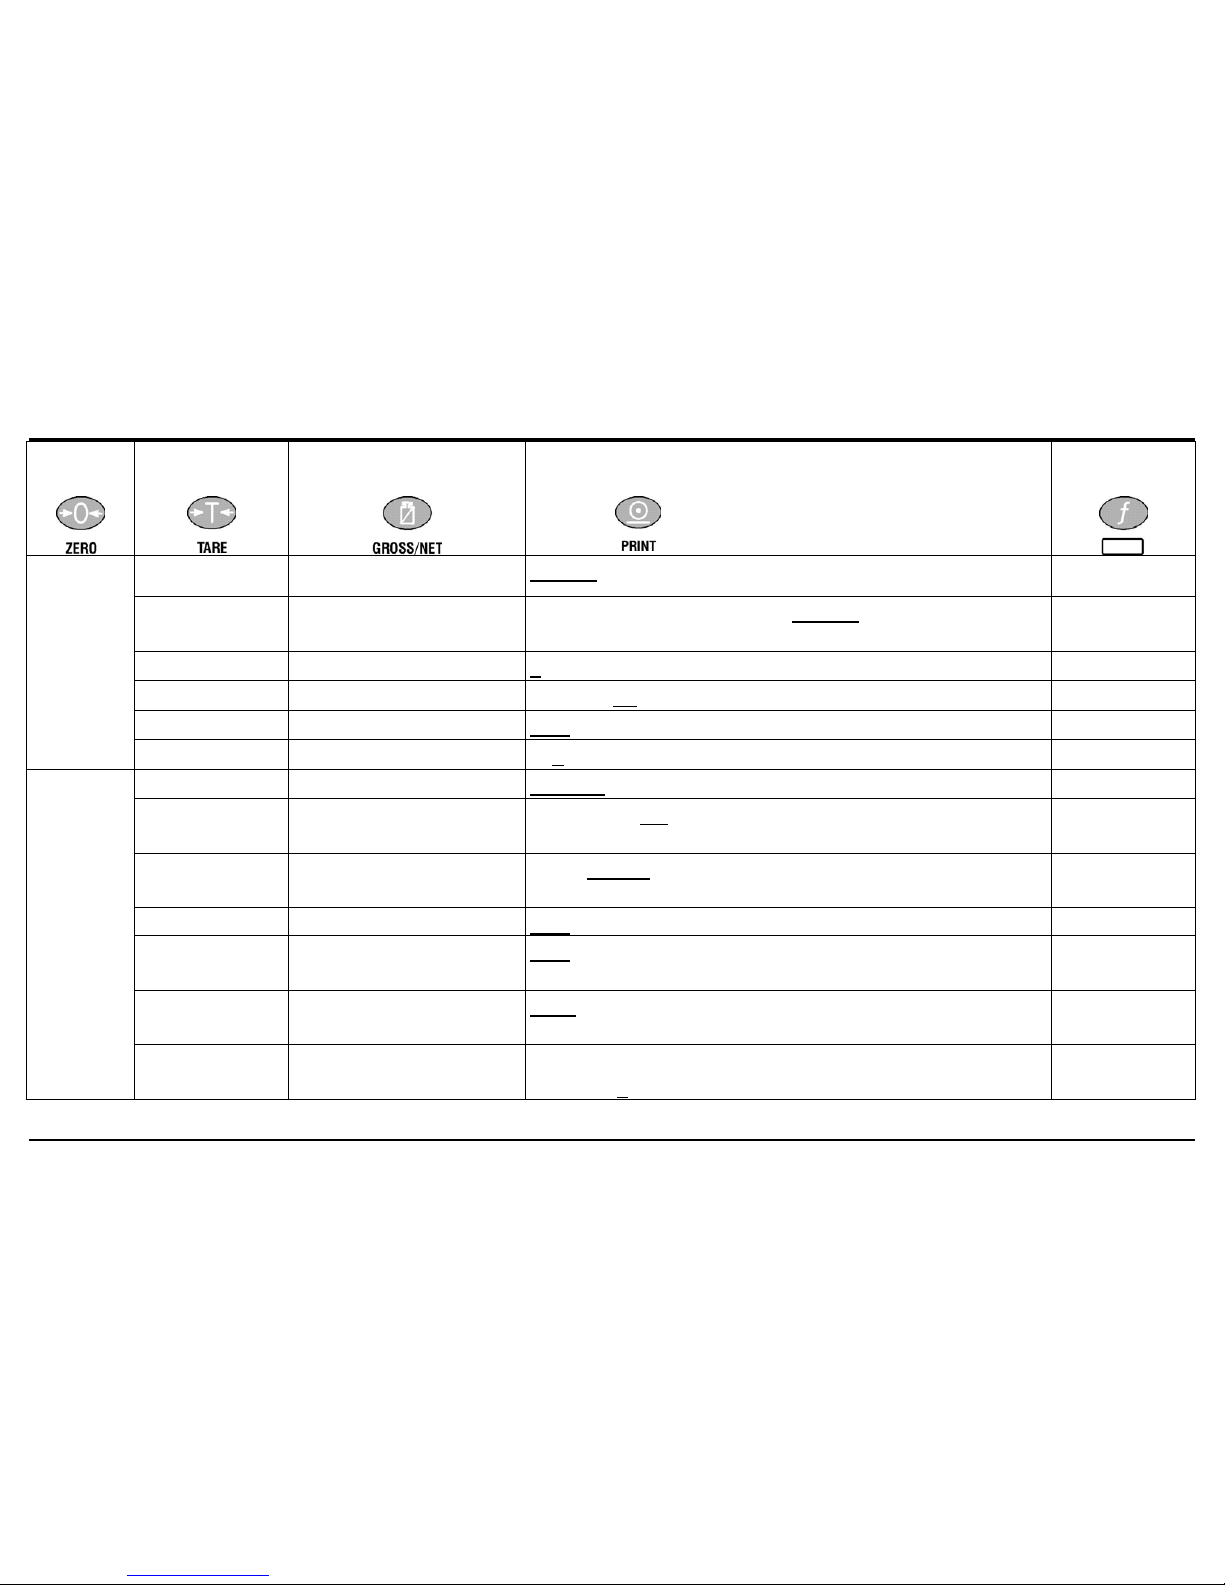
7.6. Settings
The following tables identify the settings available for the
instrument.
Page 16
003R-620-100
Page 19
Quick Start Manual Rev 1.0
003R-620-100
Page 17
GROUP
(GRP)
ITEM
(ITM)
SELECT
(SEL)
EDIT
(EDT)
Underline = Defaults
OK
BUILD
DP⊗
Decimal Point Position 000000, 00000.0, 0000.00, 000.000, 00.0000, 0.00000 Accept
CAP⊗
Maximum Capacity 000100 to 999999 Default = 003000
<SEL> changes position, <EDT> changes digit.
Accept
RES⊗
Resolution (Count-By) 1, 2, 5, 10, 20, 50, 100 Accept
UNITS⊗
Weighed Units none, g, kg, lb, t Accept
HI.RES⊗
Resolution x 10 Mode OFF, ON Accept
CABLE⊗
4-Wire or 6-Wire 4, 6 Accept
OPTION
USE⊗
Scale Use INDUST, OIML, NTEP Accept
FILTER Reading Average
(time in seconds)
none, 0.2, 0.5, 1.0, 2.0, 3.0, 4.0 Accept
MOTION⊗
Motion Detection OFF, 0.5-1.0, 1.0-1.0
Default = 0.5 Graduations per Second
Accept
INIT.Z Initial Zero on Startup OFF, ON Accept
Z.TRAC⊗
Zero Tracking
Sensitivity
OFF,
SLOW (0.5 grads/sec),
FAST
(10 grads/sec)
Accept
Z.RANGE⊗
Zero Operating Range -2_ 2, -1_ 3, -20_20
Default = -2_ 2 (–2% to +2%)
Accept
Z.BAND⊗
Zero 'Dead' Band <SEL>
changes position,
<EDT>
changes digit.
Default = 0
Accept
Page 20
Quick Start Manual Rev 1.0
Page 18
003R-620-100
GROUP
(GRP)
ITEM
(ITM)
SELECT
(SEL)
EDIT
(EDT)
Underline = Defaults
OK
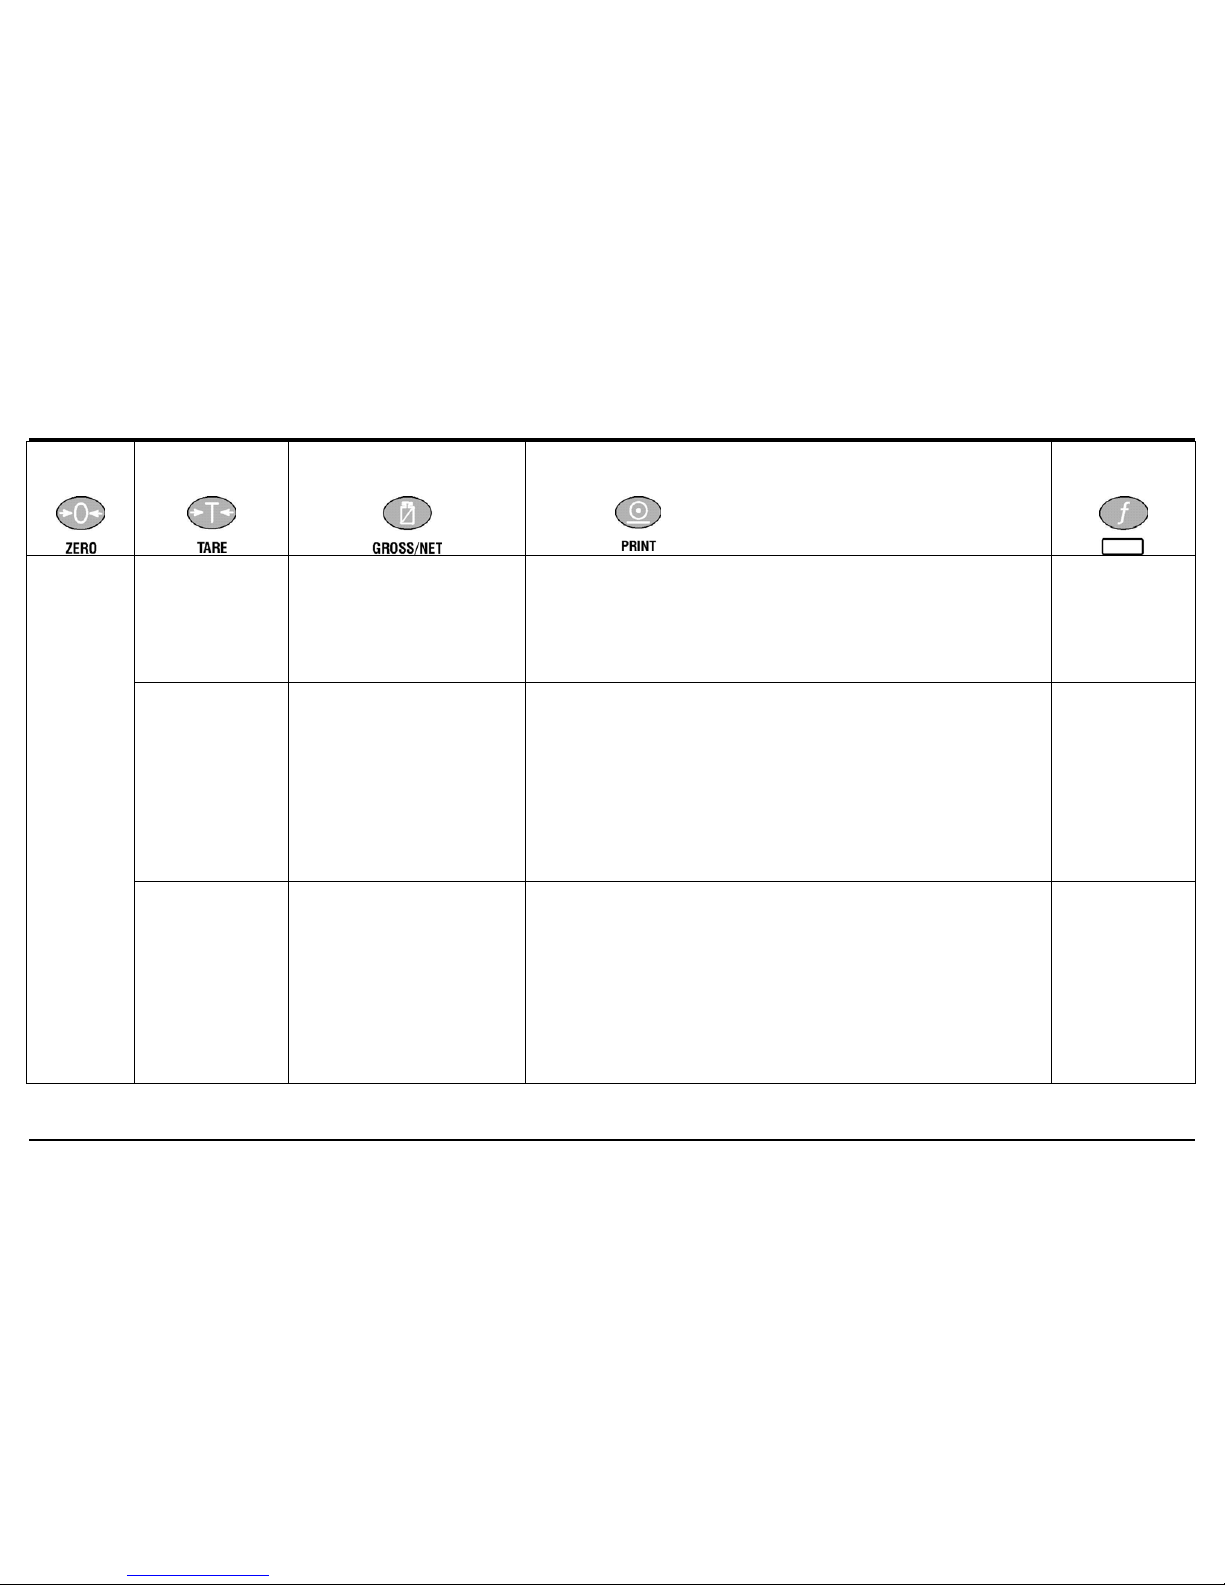
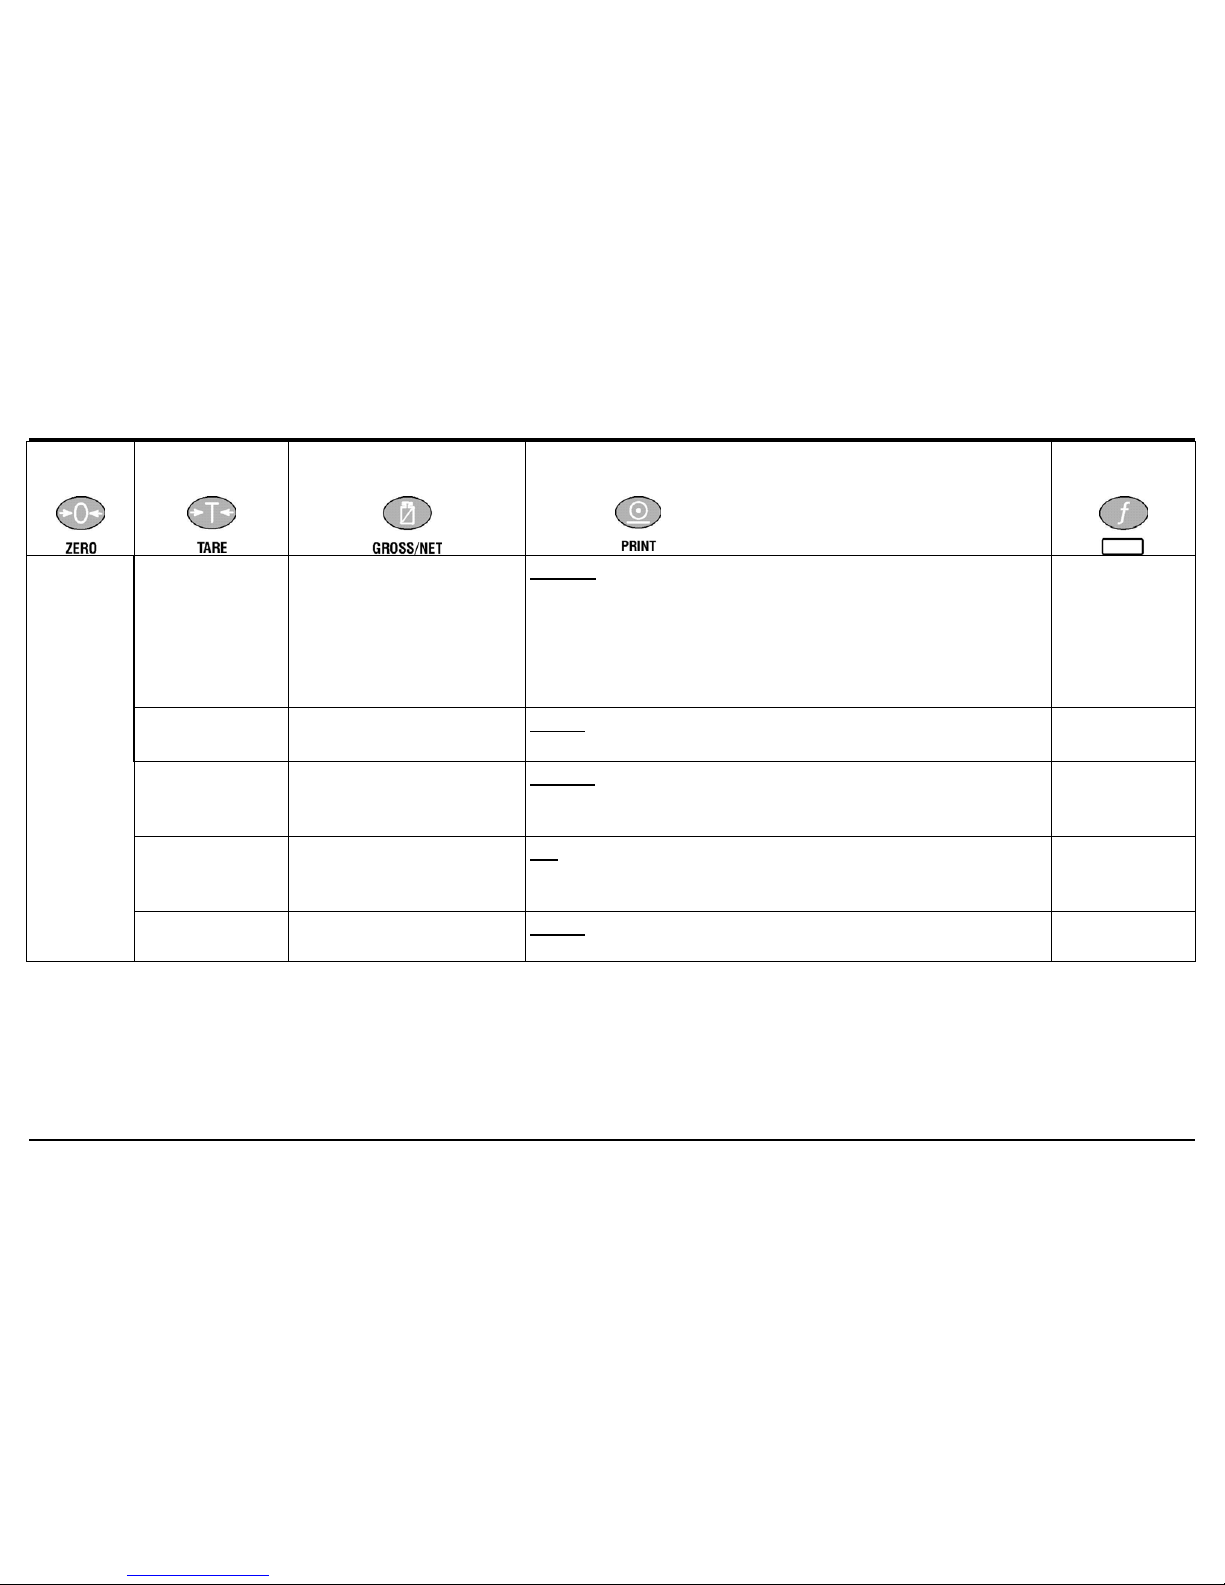
CAL
ZERO⊗
Zero Calibration
Routine
Set between zero and full
scale
(Current weight displays)
<SEL>
key to start. Current weight displays.
Remove all weight.
<SEL>, <EDT>
or
<OK>
starts routine (
Z.in P
displays).
<ITM>
key to exit,
<SEL>, <EDT>
or
<OK>
to repeat routine.
SPAN⊗
Span Calibration
Routine
Set between zero and full
scale
(Current weight displays)
<SEL>
key to start. Current weight displays.
Add test weight.
<SEL>
or
<OK>
to show calibration weight value.
Set correct weight.
<SEL>
changes position,
<EDT>
changes digit.
<ITM>
or
<OK>
starts routine (
S.in P
displays).
<ITM>
key to exit,
<SEL>, <EDT>
or
<OK>
to re-edit
calibration weight and repeat routine.
ED.LIN⊗
Edit Linearisation
Points
Set between zero and full
scale
L1. - - -
Select
Linearisation point 1 to 5
(
L1, L2, L3, L4, L5
).
(Approx. % of full scale)
<SEL>
to step through list of points.
<OK>
to change selected point or
<ITM>
to exit.
After
<OK>
current weight displays.
Add test weight.
<OK>
to enter corrected weight.
<SEL>
changes position,
<EDT>
changes digit.
<OK>
starts routine (
L.in P
displays).
<ITM>
key to exit,
<OK>
to repeat routine.
Page 21
Quick Start Manual Rev 1.0
003R-620-100
Page 19
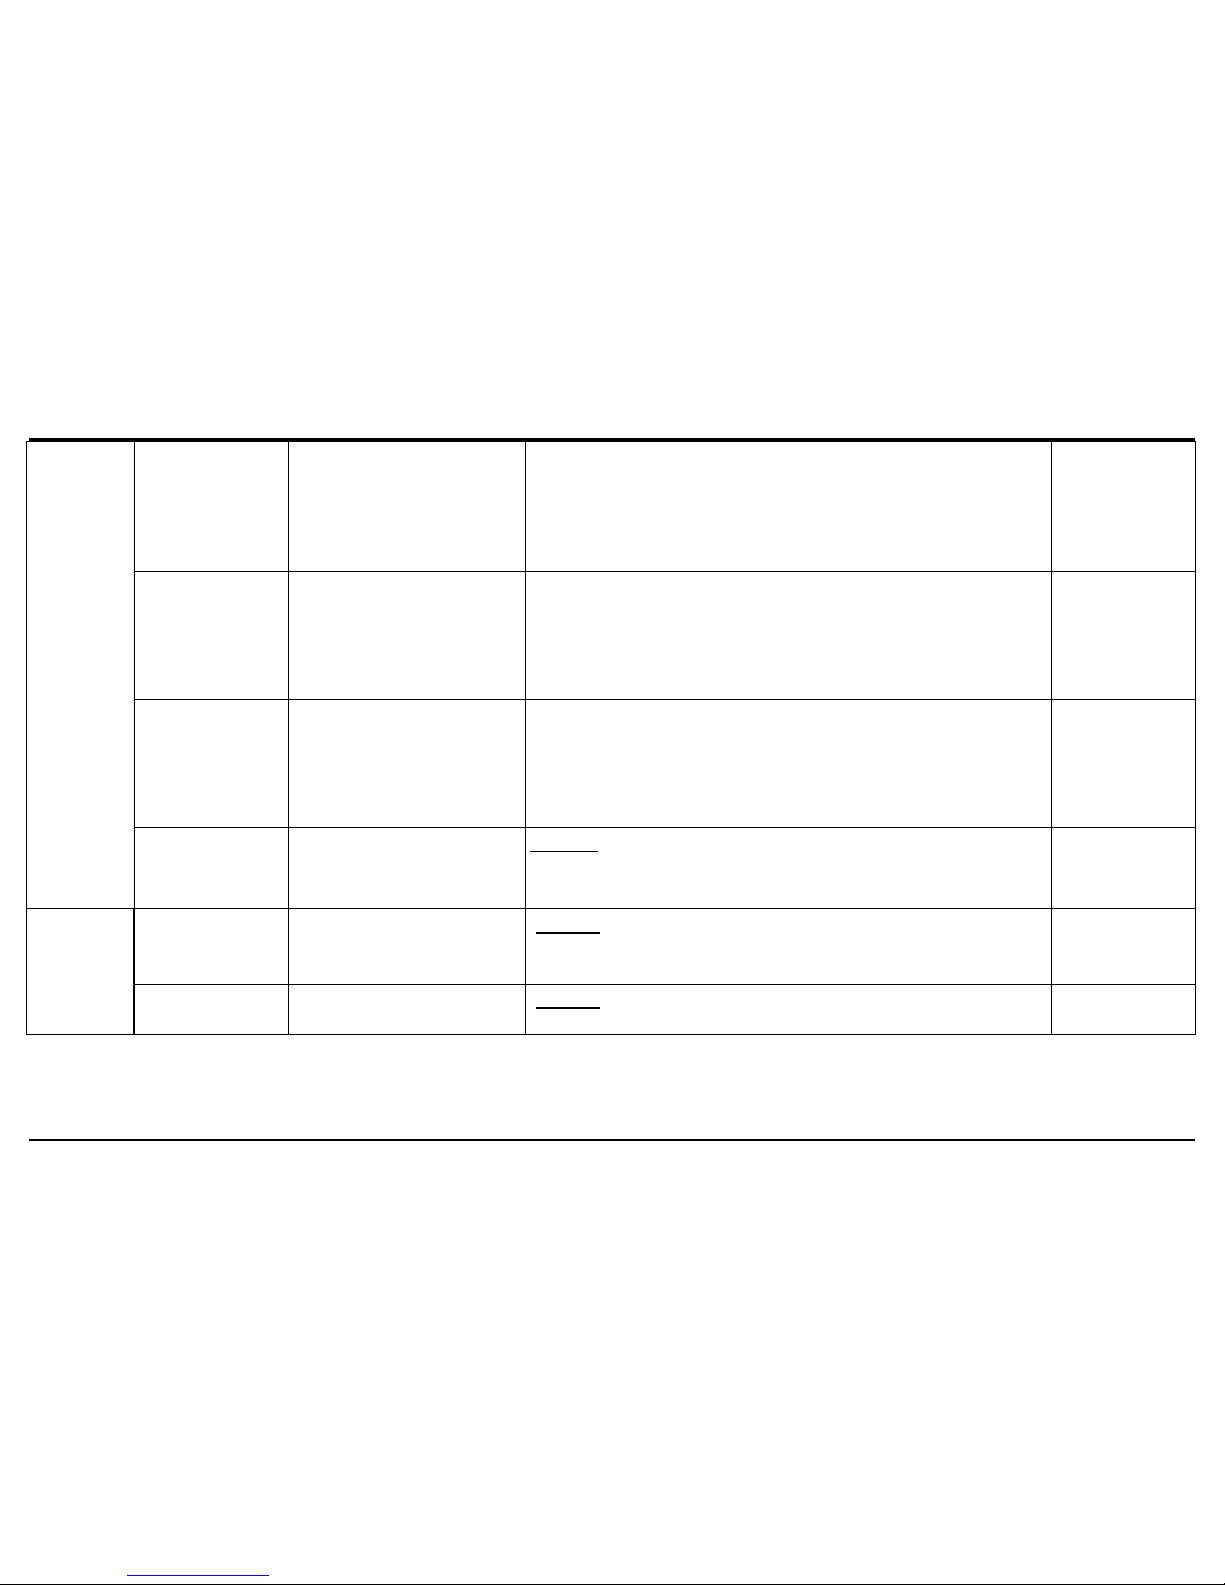
CAL
(ctd)
CLR.LIN⊗
Clear Linearisation
Points
L1. - - -
Select
Linearisation point 1 to 5
(
L1, L2, L3, L4, L5
)
<SEL>
to step through list of points.
<OK>
to select point to clear or
<ITM>
to exit.
After
<OK>
press
<ITM>
to choose
Cont. Y
(Yes) or
Cont. N
(No).
<ITM>
to return to
CLR.LIN
.
DIR.ZER⊗
Direct Zero Calibration
(Current weight displays)
<OK>
key to start. Current weight displays.
<OK>
to enter direct zero setting (in mV/V).
<SEL>
changes position,
<EDT>
changes digit.
<OK>
key to store new zero calibration.
<ITM>
to exit or
<OK>
to repeat operation.
DIR.SPN⊗
Direct Span Calibration
(Current weight displays)
<OK>
key to start. Current weight displays.
<OK>
to enter direct span setting (in mV/V).
<SEL>
changes position,
<EDT>
changes digit.
<OK>
key to store new span calibration.
<ITM>
to exit or
<OK>
to repeat operation.
FAC.CAL⊗
Factory Calibration
Cont. N (No)
Cont. Y
(Yes)
Cont. N
Warning
: Choosing
Cont. Y
will restore default factory
calibration in
BUILD
and
CAL
menus.
Accept
SPEC SAFE.PC Safe Setup Passcode
(
000000
no passcode). Set up to 6 digit passcode.
<SEL>
changes position,
<EDT>
changes digit.
Activated only when
FULL.PC
is also set.
Accept
FULL.PC Full Setup Passcode
(
000000
no passcode). Set up to 6 digit passcode.
<SEL>
changes position,
<EDT>
changes digit.
Accept
Page 22
Quick Start Manual Rev 1.0
Page 20
003R-620-100
GROUP
(GRP)
ITEM
(ITM)
SELECT
(SEL)
EDIT
(EDT)
Underline = Defaults
OK
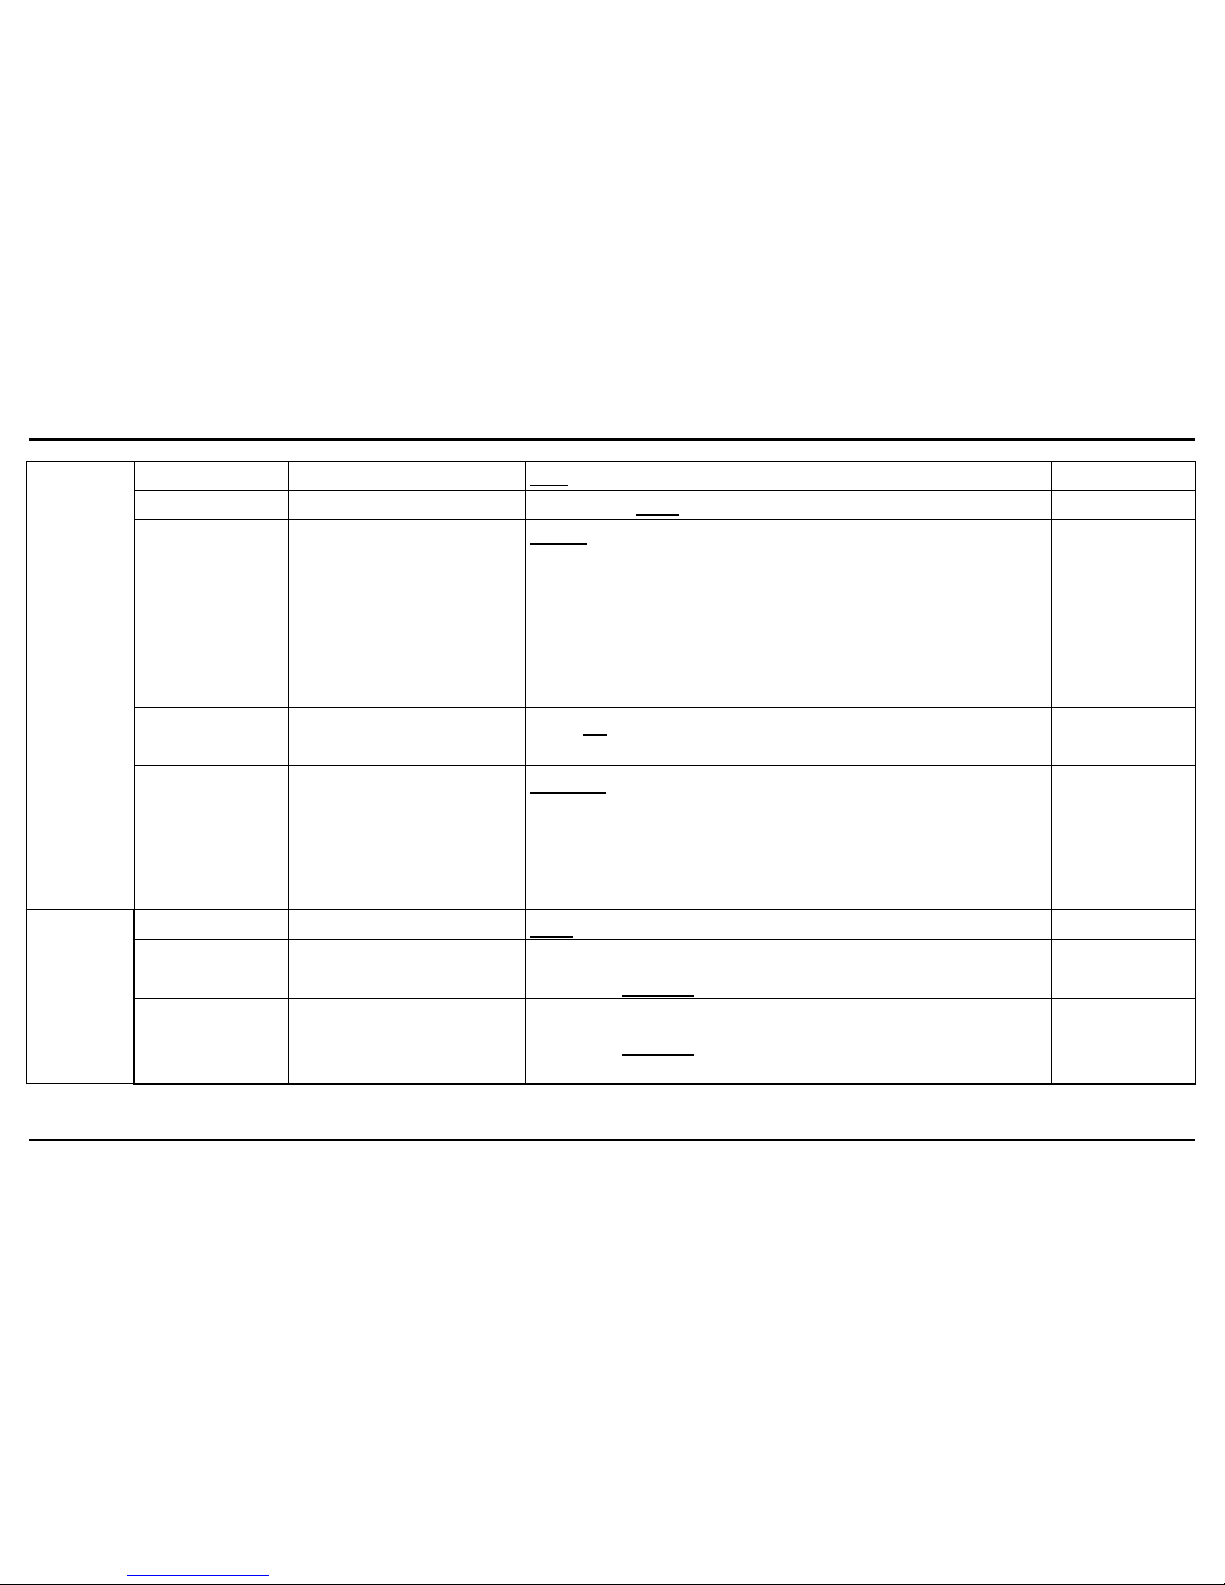
SPEC
(ctd)
KEY.LOC Front Panel Key
Locking
P12345
(P for Power key.
Other keys numbered from
the left, ie. Zero=1.)
P12345
Character indicates key is unlocked.
(–) Dash indicates key is locked.
<SEL>
changes position,
<EDT>
changes digit.
Accept
KEY.FN <FUNCTION> Key
Setting
NONE, TEST, COUNT, UNITS, HOLD, PEAK.H, LIVE.WT,
SHOW.T
Accept
AUT.OFF Auto Power Off /
Battery Operation
NEVER, 1, 5, 10
(time in minutes)
Default = Never powers off automatically
(Battery: powers down after 30 minutes)
Accept
B.LIGHT Backlight Operation
ON, OFF
(Automatically turns indicator off after 10 seconds of
inactivity)
Accept
REM.FN Remote Function
NONE, KEY1 to KEY5, BLANK
(Activated only when SERIAL:TYPE is set to KEY)
Accept
Page 23
Quick Start Manual Rev 1.0
003R-620-100
Page 21
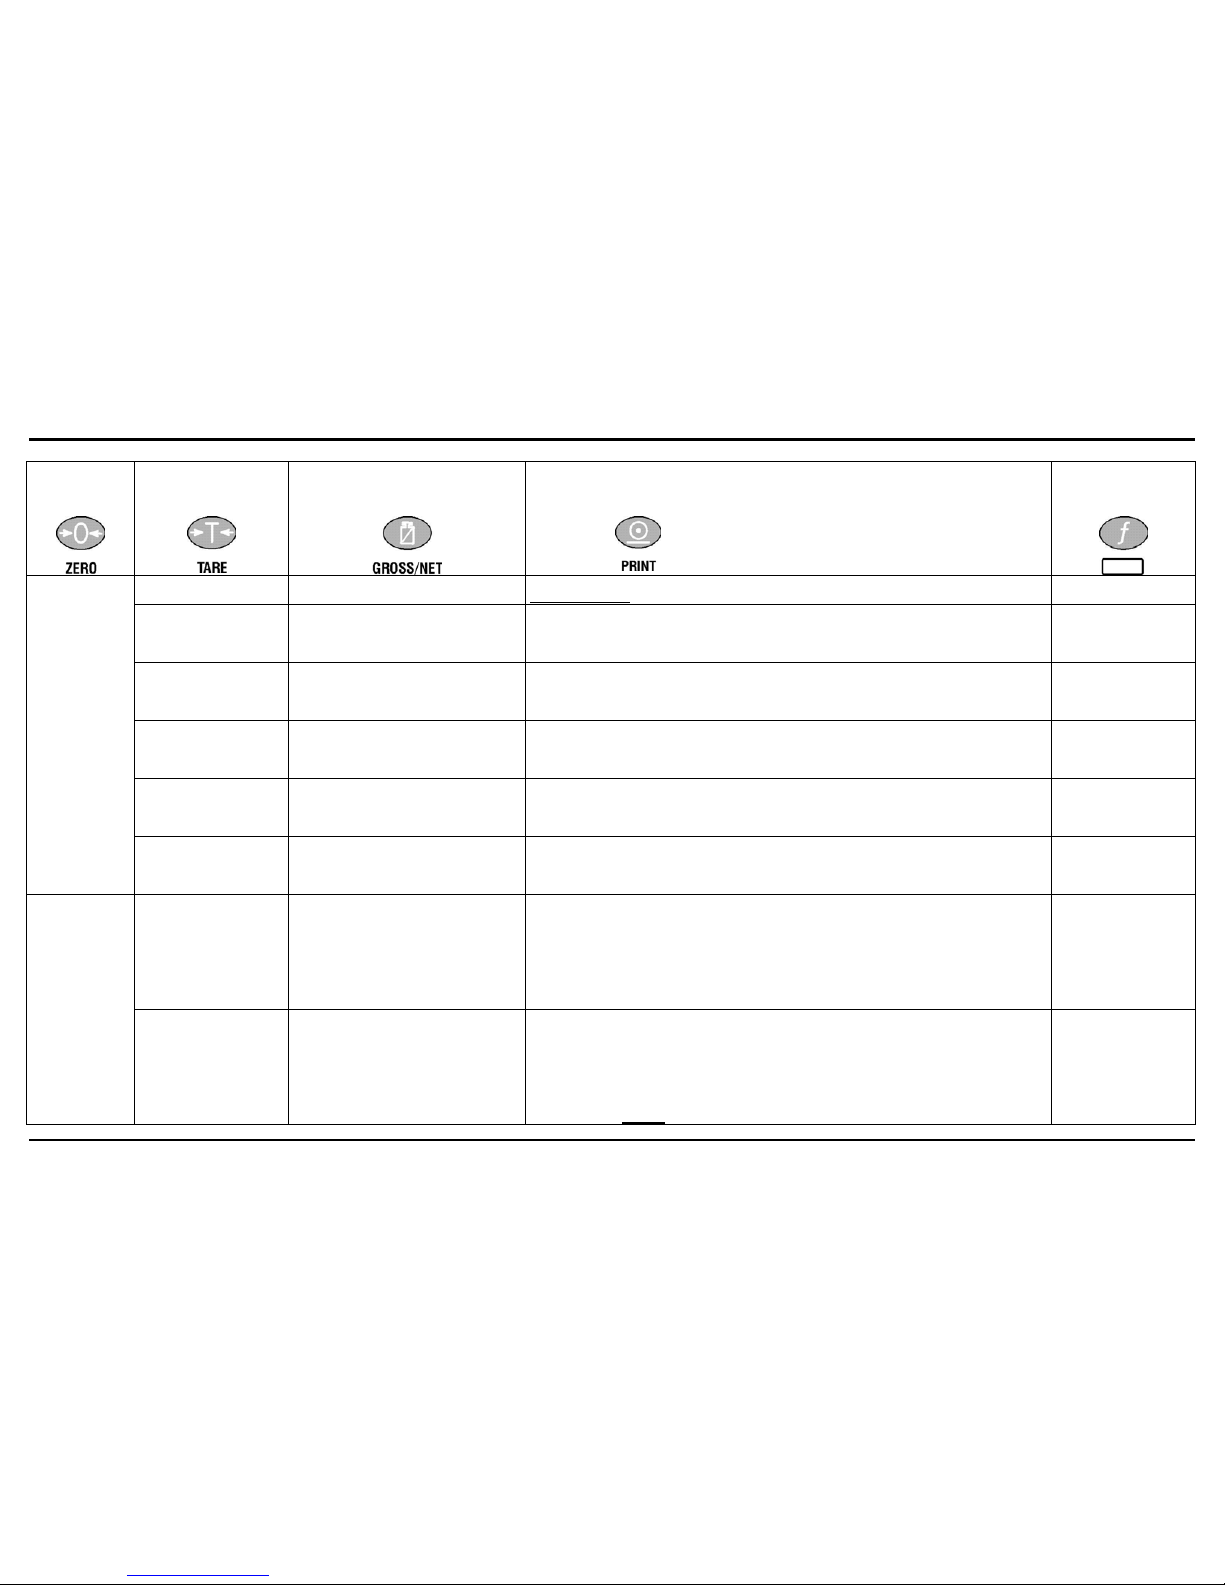
SERIAL TYPE Serial Output Type
NET, AUTO.1, AUTO.2, PRINT, MASTER, KEY
Accept
BAUD Serial Baud Rate
2400, 4800, 9600
Accept
BITS Serial Format Options
Position 1: Parity
Position 2: Data Bits
Position 3: Stop Bits
Position 4: DTR
Handshake
N 8 1 -
(Default Serial Format Options)
<SEL>
changes position,
<EDT>
changes digit.
Parity: N
None, O Odd, E Even
Data Bits: 7
or 8 data bits
Stop Bits:
1 or 2 stop bits
DTR: (-
) DTR disabled or d DTR enabled
Accept
ADDRES Instrument Address
01 to 31
<SEL> changes position, <EDT> changes digit.
Accept
RST.CON⊗
Reset Printed
Consecutive Numbers
to 1
Cont. N (No)
Cont. Y
(Yes)
Cont. N
<ITM>
to choose
Cont. Y
(Yes) or
Cont. N
(No)
Accept
SET.PTS SRC Weight Source
OFF
, GROSS, DISP (Displayed)
Accept
TARG.HI Target for Overweight
Setpoint 1 (Output 1)
-99999
to
999999
Default = 000000
Accept
TARG.LO Target for
Underweight
Setpoint 2 (Output 2)
-99999 to 999999
Default = 000000
Accept
Page 24
Quick Start Manual Rev 1.0
Page 22
003R-620-100
GROUP
(GRP)
ITEM
(ITM)
SELECT
(SEL)
EDIT
(EDT)
Underline = Defaults
OK
CLOC FORMAT Date Format Setting
dd.mm.yy
or mm.dd.yy
Accept
YEAR Year Setting
2000 to 2099
<SEL> changes position, <EDT> changes digit.
Accept
MONTH Month Setting
01 to 12
<SEL> changes position, <EDT> changes digit.
Accept
DAY Day Setting
01
to
31
<SEL> changes position, <EDT> changes digit.
Accept
HOUR Hour Setting
00 to 23
<SEL> changes position, <EDT> changes digit.
Accept
MINUTE Minute Setting
00 to 59
<SEL>
changes position,
<EDT>
changes digit.
Accept
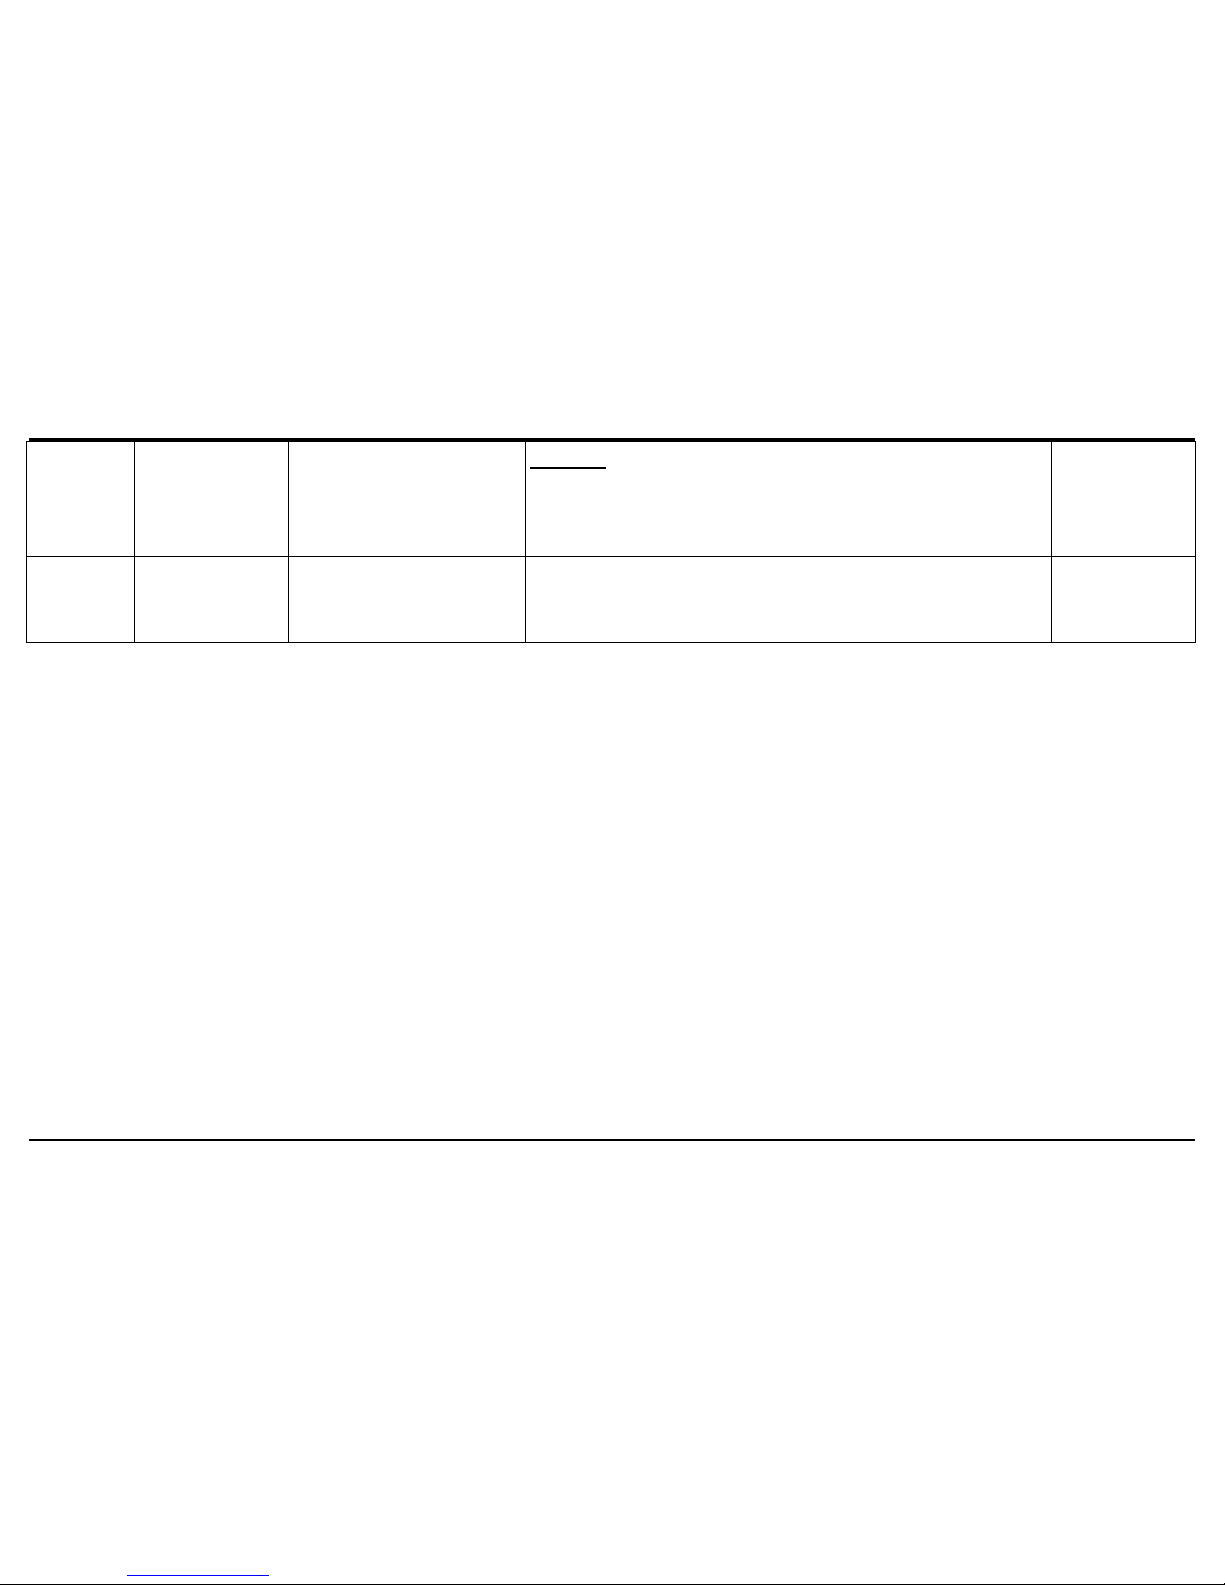
TEST SCALE Scale Base Test
Display
Display reads in milliVolts-per-Volt
(factory calibrated to 0.1%)
Verify the correct load cell capacity and/or load cell
wiring is used. Remove weight from scale.
FRC.OUT Force Outputs
<EDT>
advances through outputs
(ie. ON.1 and ON.2)
<OK> turns outputs off and exits test.
Default = OFF
Page 25
Quick Start Manual Rev 1.0
003R-620-100
Page 23
FACTRY DEFLT Restore Factory
Defaults
Cont. N (No)
Cont. Y (Yes)
Cont. N
Warning:
Choosing
Cont. Y
will clear all stored data
except BUILD and CAL menus.
Accept
- END - EXIT SETUP Save settings and
return to normal
weighing mode
Accept
Page 26
Quick Start Manual Rev 1.0
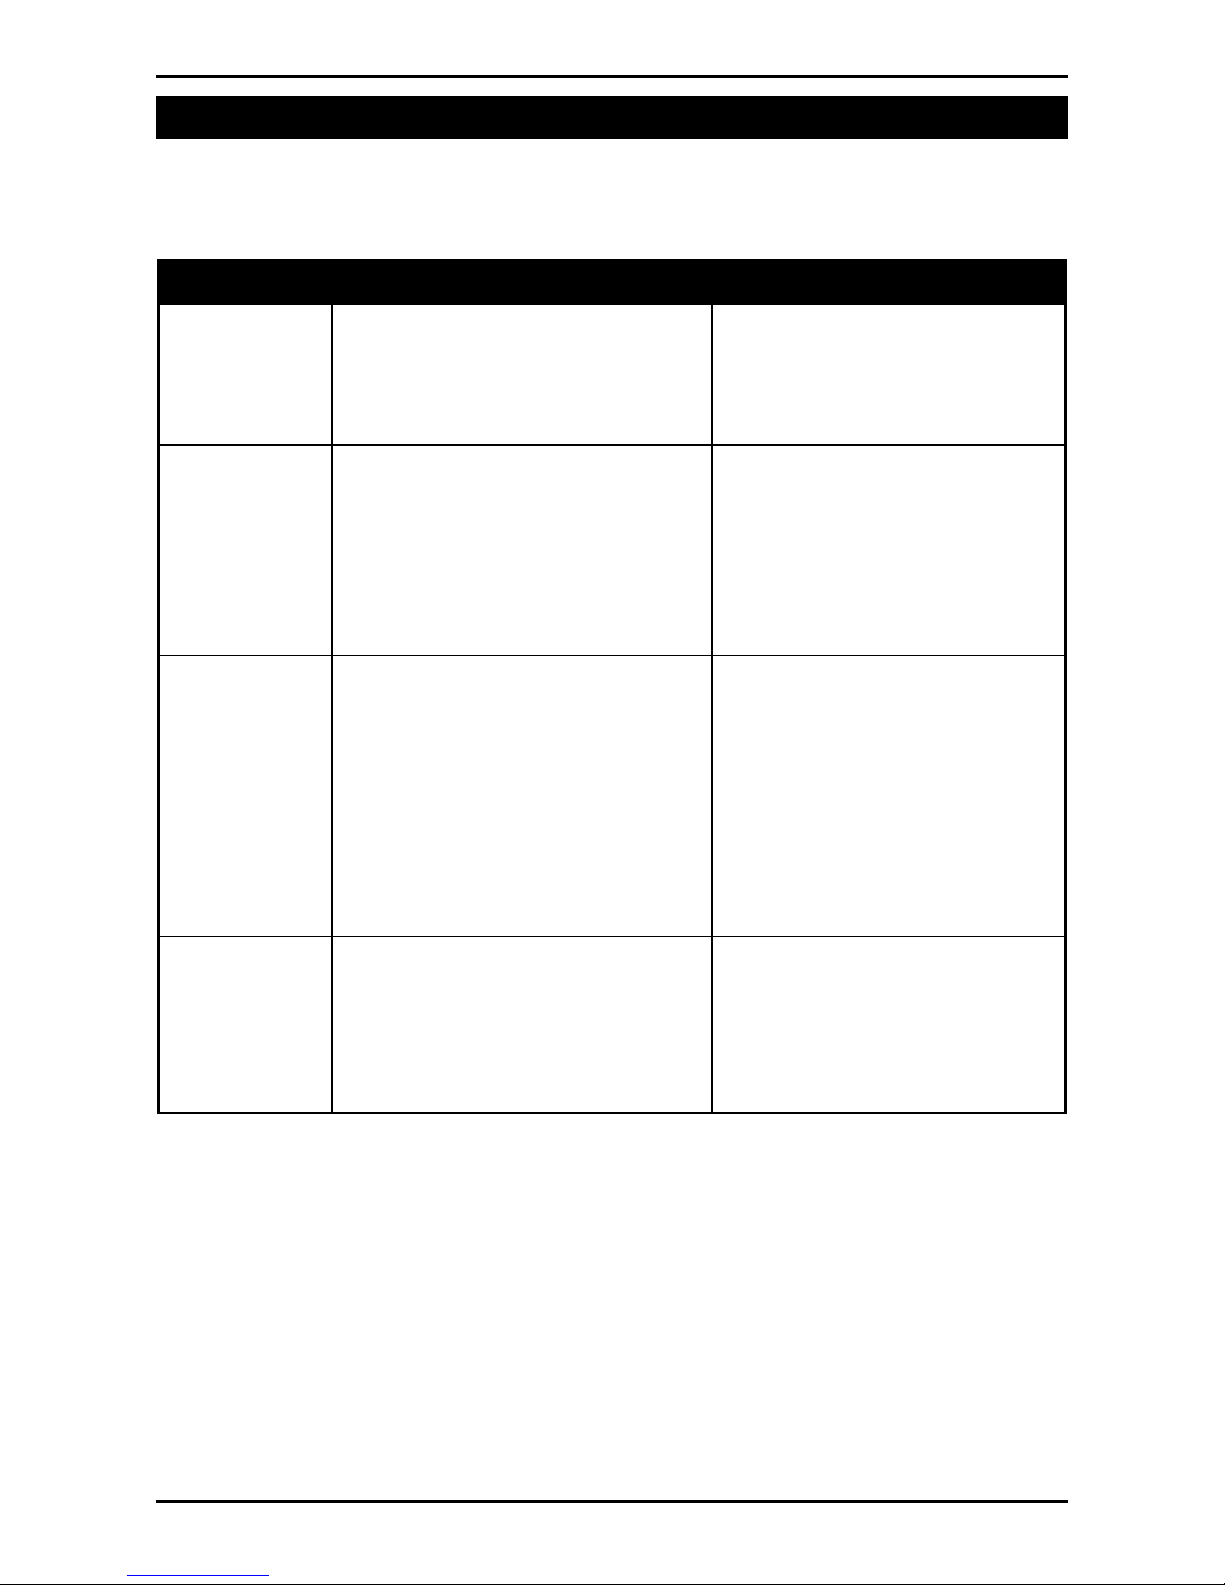
8. Error Messages
8.1. Weighing Errors
• Check Setup = This item can be checked on site by service
personnel
Error Description Resolution
(U - - - - -) The weight is below the
minimum allowable
weight reading.
(O - - - - -) The weight is above the
maximum allowable
weight reading.
Warning - overloading
may damage mechanical
scale elements.
(ZERO)
(ERROR)
The weight reading is
beyond the limit set for
Zero operation. The
operation of the <ZERO>
key is limited in the setup
during installation. The
indicator cannot be
Increase the weight or
decrease the minimum
allowable weight
reading.
Check the condition of
load cell connections.
Check for damaged
load cell.
Increase the Zero
Range (Z.RANGE) or
use the <TARE> key
instead.
(STABLE)
(ERROR)
Zeroed at this weight.
Scale motion has
prevented a <ZERO>,
<TARE> or <PRINT>
operation from occurring
on command.
Try the operation again
once the scale is
stable.
Page 24
003R-620-100
Page 27
Quick Start Manual Rev 1.0
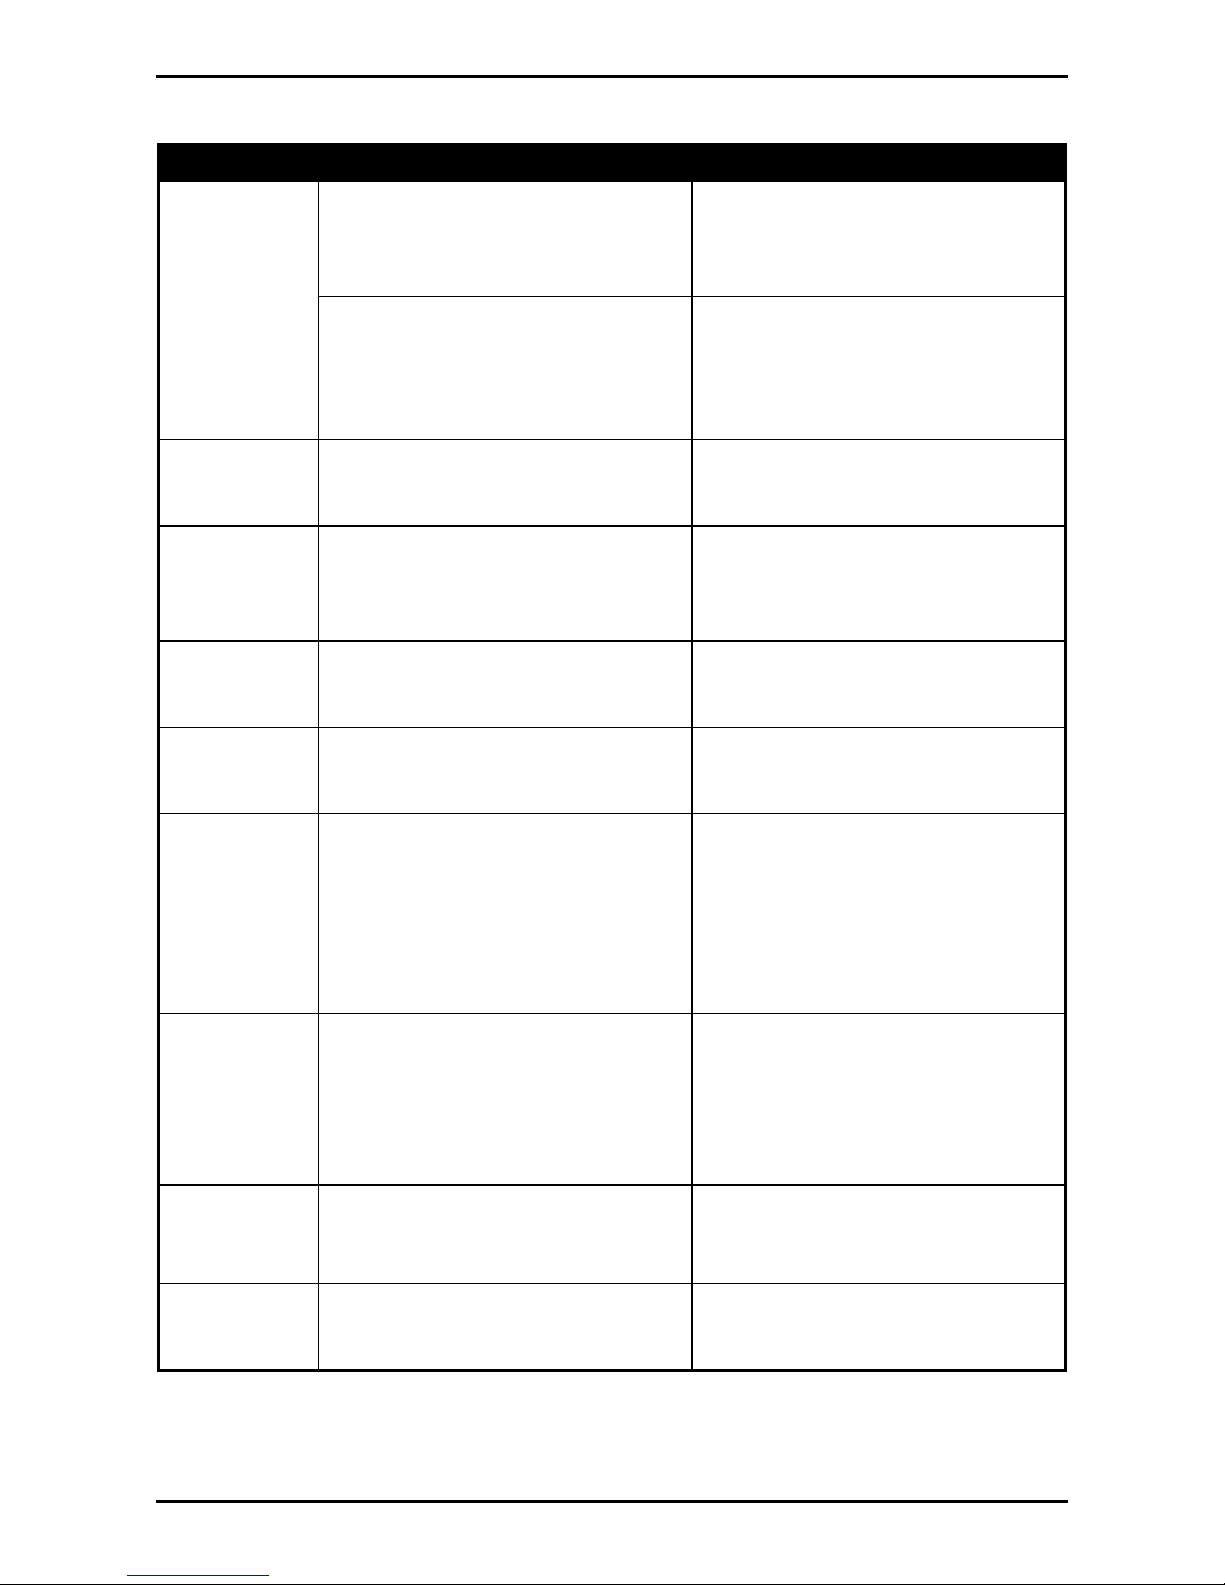
8.2. Setup and Calibration Errors
Error Description Resolution
(ENTRY)
(DENIED)
The instrument may be in
Safe Setup and an item that
Access Full Setup to edit
the item.
needs Full Setup has been
selected for editing.
When accessing setup,
more than three attempts
have been made with the
incorrect passcode.
Turn the instrument off.
When the instrument is
turned back on, enter the
correct passcode to access
setup.
(LIN.PT)
(LO)
(PT.TOO)
(CLOSE)
(RES)
(LO)
An attempt has been made
to place a linearisation point
below zero.
An attempt has been made
to place a calibration point
too close to an existing
calibration point.
The scale build is
configured for less than 100
Incorrect linearisation point
entered (must be between
zero and full scale).
Re-enter the calibration
point. Points must be
spaced by at least 2% of full
scale from each other.
Check the resolution (count-
by) and capacity settings.
graduations.
(RES)
(HIGH)
The scale build is
configured for more
Check the resolution (count-
by) and capacity settings.
than 30,000 graduations.
(SPAN)
(LO)
The load cell signal range
(span) is too small for these
settings.
Incorrect span weight
entered (must be between
zero and full scale). Scale
wiring incorrect. Wrong load
cell capacity (too large).
Wrong or no calibration
weight added to scale.
(SPAN)
(HI)
The load cell signal range
(span) is too large for these
settings.
Incorrect span weight
entered (must be between
zero and full scale). Scale
wiring incorrect. Load cell
capacity too small for
application.
(ZERO)
(LO)
An attempt has been made
to calibrate zero below
Scale wiring incorrect.
-2mV/V.
(ZERO)
(HI)
An attempt has been made
to calibrate zero above
+2mV/V.
Remove all weight from
scale. Scale wiring
incorrect.
003R-620-100
Page 25
Page 28
Quick Start Manual Rev 1.0
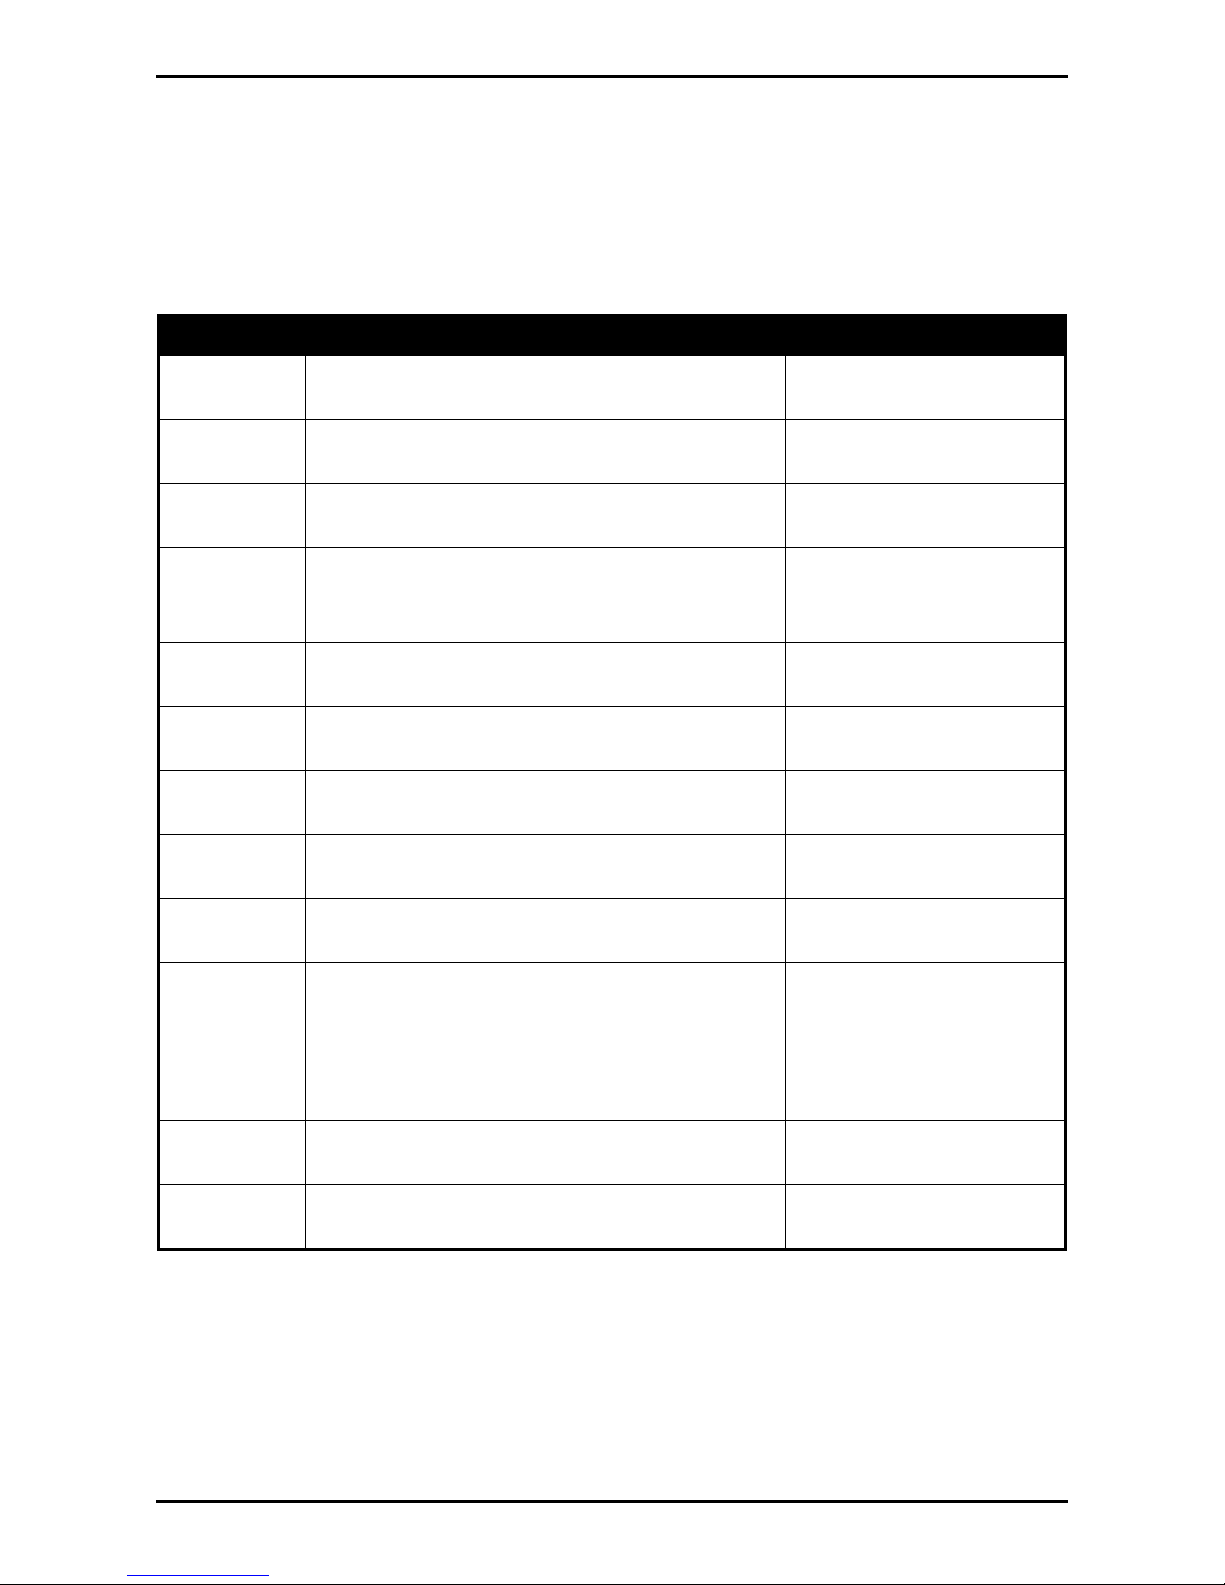
8.3. Diagnostic Errors
• Check: This item can be checked on site by service
personnel.
• Return for Service: The instrument must be returned to the
manufacturer for factory service.
Error Description Resolution
(E0001) The power supply voltage is too
Check supply
low.
(E0002) The power supply voltage is too
high.
(E0010) The temperature is outside of
Check scale /
cables
Check location
allowable limits.
(E0020) Scale build is incorrect. The
Fix up scale build
number of graduations has been
set too low or too high.
(E0100) The digital setup information has
Re-enter setup
been lost.
(E0200) The calibration information has
Re-calibrate
been lost.
(E0300) All setup information has been lost Enter setup and
calibrate
(E0400) The factory information has been
Return for Service
lost.
(E0800) The EEPROM memory storage
Return for Service
chip has failed
(E2000) ADC Out of Range Error. This
may be caused from a broken
load cell cable.
Check
BUILD:CABLE
setting. Check
load cell cable,
wiring, etc.
(E4000) The battery backed RAM data has
Re-enter setup
lost data.
(E8000) The FLASH program memory is
Return for Service
incorrect
The E type error messages are additive. For example if instrument is
running off batteries and the temperature drops, the battery voltage may
be too low. The resulting error messages will be E0011 (0001 + 0010).
The numbers add in hexadecimal as follows:
1 - 2 - 3 - 4 - 5 - 6 - 7 - 8 - 9 - A - B - C - D - E - F
(For example, 2 + 4 = 6, or 4 + 8 = C)
Page 26
003R-620-100
Page 29

Notes:
Quick Start Manual Rev 1.0
003R-620-100
Page 27
Page 30

Notes:
Quick Start Manual Rev 1.0
Page 28
003R-620-100
Page 31

Notes:
Page 32

 Loading...