

Page 1

WORKABOUT PRO S
Hand-Held Computer
Quick Reference Guide
June 23, 2006 PN 8100004.A
ISO 9001 Certified
Quality Management System
Page 2

© Copyright 2006 by Psion Teklogix Inc., Mississauga, Ontario, Canada
This document and the information it contains is the property of Psion
Teklogix Inc., is issued in strict confidence, and is not to be reproduced or
copied, in whole or in part, except for the sole purpose of promoting the sale
of Psion Teklogix manufactured goods and services. Furthermore, this document is not to be used as a basis for design, manufacture, or sub-contract, or
in any manner detrimental to the interests of Psion Teklogix Inc.
All trademarks are the property of their respective holders.
Page 3

Return-To-Factory Warranty
Psion Teklogix provides a return to factory warranty on this product for a
period of twelve (12) months in accordance with the Statement of Limited
Warranty and Limitation of Liability provided at www.psionteklogix.com/
warranty. (If you are not already a member of Teknet and you attempt to view
this warranty, you will be asked to register. As a member of Teknet, you’ll
have access to helpful information about your Psion Teklogix products at no
charge to you.) In some regions, this warranty may exceed this period. Please
contact your local Psion Teklogix office for details. For a list of offices, refer
to “Support Services & Worldwide Offices” on page 28. The warranty on
Psion Teklogix manufactured equipment does not extend to any product that
has been tampered with, altered, or repaired by any person other than an
employee of an authorized Psion Teklogix service organization. See Psion
Teklogix terms and conditions of sale for full details.
Important: Psion Teklogix warranties take effect on the date of shipment.
Service
Psion Teklogix provides a complete range of product support services to its
customers. For helpful information about accessing our services, please refer
to the WORKABOUT PRO C, M-E & S Hand-Held Computer Regulatory &
Warranty Guide, PN 8000084.
Disclaimer
Every effort has been made to make this material complete, accurate, and upto-date. In addition, changes are periodically added to the information herein;
these changes will be incorporated into new editions of the publication.
Psion Teklogix Inc. reserves the right to make improvements and/or changes
in the product(s) and/or the program(s) described in this document without
notice, and shall not be responsible for any damages, including but not limited to consequential damages, caused by reliance on the material presented,
including but not limited to typographical errors.
Page 4

Page 5

Table Of Contents
1. Basic Preparation . . . . . . . . . . . . . . . . . . . . . . . . . . . . . . . . . 3
1.1 Charging The Battery . . . . . . . . . . . . . . . . . . . . . . . . . . 3
1.2 Installing The Battery. . . . . . . . . . . . . . . . . . . . . . . . . . 4
1.3 Switching The Unit On. . . . . . . . . . . . . . . . . . . . . . . . . 4
1.4 Switching The Unit Off (Suspend). . . . . . . . . . . . . . . . 4
2. Getting To Know The WORKABOUT PRO S. . . . . . . . . . . 5
2.1 Features. . . . . . . . . . . . . . . . . . . . . . . . . . . . . . . . . . . . . 5
2.2 The Keyboard . . . . . . . . . . . . . . . . . . . . . . . . . . . . . . . . 7
2.2.1 Modifier Keys . . . . . . . . . . . . . . . . . . . . . . . . . . 8
2.2.2 The Keys . . . . . . . . . . . . . . . . . . . . . . . . . . . . . . 9
2.2.3 Adjusting The Keypad Backlight. . . . . . . . . . . . 10
2.3 The Display . . . . . . . . . . . . . . . . . . . . . . . . . . . . . . . . . 11
2.3.2 Calibrating The Touchscreen . . . . . . . . . . . . . . . 12
2.4 Indicators . . . . . . . . . . . . . . . . . . . . . . . . . . . . . . . . . . . 13
2.4.1 The LED . . . . . . . . . . . . . . . . . . . . . . . . . . . . . . . 13
2.4.2 Onscreen Indicators . . . . . . . . . . . . . . . . . . . . . . 14
2.4.3 Audio Indicators . . . . . . . . . . . . . . . . . . . . . . . . . 16
3. Navigating In Windows CE . . . . . . . . . . . . . . . . . . . . . . . . . 17
3.1 Navigating A Touchscreen . . . . . . . . . . . . . . . . . . . . . . 17
3.2 Navigating Using The Keyboard . . . . . . . . . . . . . . . . . 17
3.3 The Startup Desktop . . . . . . . . . . . . . . . . . . . . . . . . . . . 18
3.3.1 Accessing Desktop Icons . . . . . . . . . . . . . . . . . . 19
3.3.2 The Taskbar . . . . . . . . . . . . . . . . . . . . . . . . . . . . 19
3.4 The Start Menu . . . . . . . . . . . . . . . . . . . . . . . . . . . . . . . 20
Psion Teklogix WORKABOUT PRO S Hand-Held Computer Quick Reference Guide 1
Page 6

3.5 Using A Dialog Box . . . . . . . . . . . . . . . . . . . . . . . . . . . 25
4. General Maintenance. . . . . . . . . . . . . . . . . . . . . . . . . . . . . . . 27
4.1 Caring For The Touchscreen . . . . . . . . . . . . . . . . . . . . 27
4.2 Cleaning The WORKABOUT PRO S . . . . . . . . . . . . . 27
5. Support Services & Worldwide Offices . . . . . . . . . . . . . . . . 28
2 Psion Teklogix WORKABOUT PRO S Hand-Held Computer Quick Reference Guide
Page 7

Thank you for choosing the WORKABOUT PRO. You’ve purchased a flexible hand-held computer with a wide range of options
that make configuring and upgrading the unit fast and easy, enabling
you to meet your changing needs now and in the future.
1. Basic Preparation
Thank you for choosing the WORKABOUT PRO.You’ve purchased
a hand-held with a wide range of options to help you tailor the unit to
meet your exact requirements now and in the future.
Your WORKABOUT will provide many years of productive use.
Important:
All approval and safety information is outlined in the
‘WORKABOUT PRO C, M-E & S Regulatory & Warranty
Guide’, PN 8000084. It is important that you review all
safety guidelines before charging a battery or operating
a scanner.
This quick start guide provides basic information on the operation
and features of the Psion Teklogix WORKABOUT PRO S HandHeld Computer. For more detailed information, refer to the WORK-
ABOUT PRO M-E, C & S Hand-Held Computer User Manual or the
documentation supplied with the application you are using.
Typically, WORKABOUT PRO S hand-helds are configured at the
factory and arrive ready for use.
1.1 Charging The Battery
Batteries shipped from the factory are not charged. They must be
fully charged prior to use. Full capacity may not be reached until at
least 5 full charge/discharge cycles have been performed.
Keep in mind also that, along with the main battery, the WORKABOUT PRO S is equipped with an internal, backup battery that preserves data stored on the unit while the main battery is swapped.
Important:
Psion Teklogix WORKABOUT PRO S Hand-Held Computer Quick Reference Guide 3
The backup battery is trickle charged from the main battery.
To maximize battery life, avoid excessive discharging and
Page 8

recharging of the backup battery by keeping the main
battery fully charged.
IF YOU ARE POWERING UP A NEW UNIT, a warning
message may appear on the screen indicating that the
backup battery capacity is low. To recharge the backup battery, you must fully charge the WORKABOUT PRO with
the main battery installed in the unit. An overnight charge is
recommended.
1.2 Installing The Battery
• Turn the fasteners at the base of the battery cover counterclockwise to unlock the cover and remove it. The top of the
stylus is shaped to help you loosen the fasteners.
• Insert the charged battery. Replace the battery cover, and turn
the fasteners at the base of the battery cover clockwise to lock
the battery in place.
Note: If you are using a docking station, you can insert an
uncharged battery, dock the unit and switch it on.
1.3 Switching The Unit On
• Press and hold down the [ENTER/ON] key for at least
one second to switch the unit on.
• When the LED flashes green, release [ENTER/ON].
The startup desktop is displayed.
Note: If the unit was already in use – the unit may be off (suspend
state) – pressing [ENTER/ON] ‘wakes’ the unit from this
state. The screen in which you were working prior to the suspend state is displayed.
1.4 Switching The Unit Off (Suspend)
• Press the [FN/BLUE] key, and then press [ENTER/ON] to
switch off the WORKABOUT PRO S.
4 Psion Teklogix WORKABOUT PRO S Hand-Held Computer Quick Reference Guide
Page 9
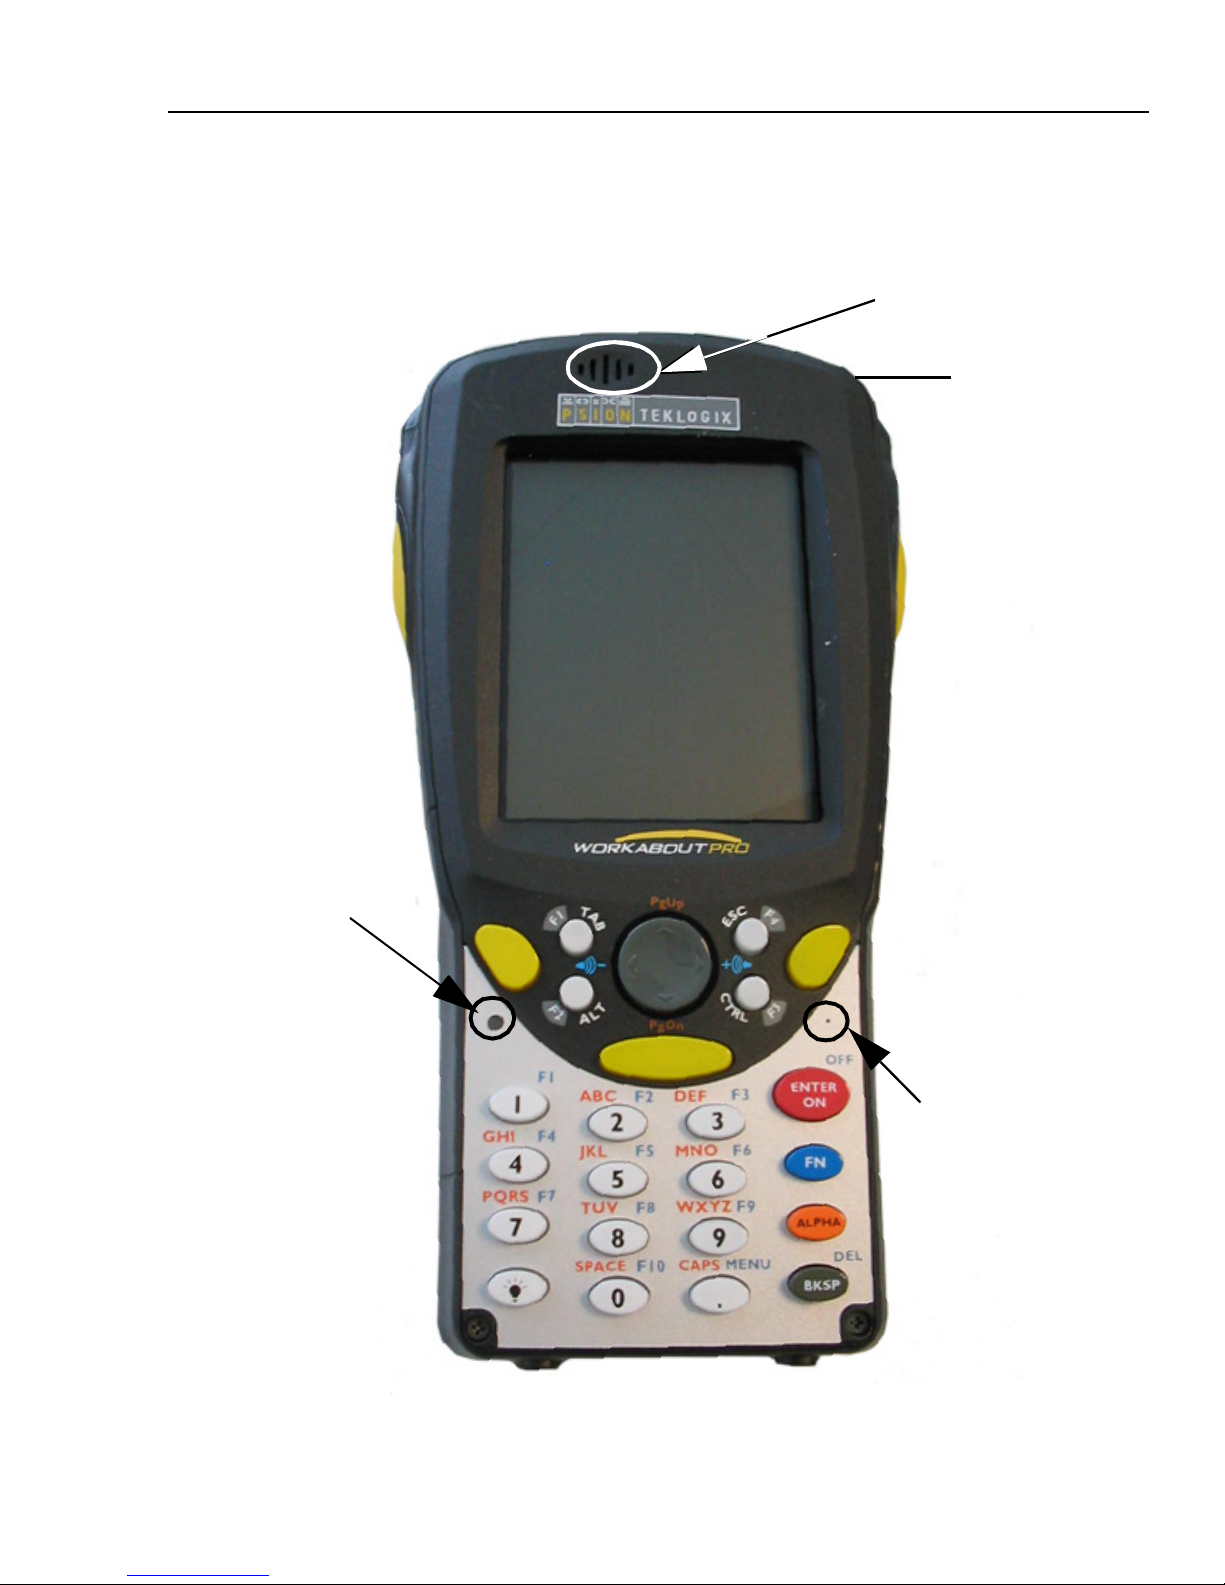
2. Getting To Know The WORKABOUT PRO S
2.1 Features
Speaker
Stylus
(pointing tool)
LED
(Light Emitting
Diode)
Microphone
Psion Teklogix WORKABOUT PRO S Hand-Held Computer Quick Reference Guide 5
Page 10
Battery Cover
Fasteners
WORKABOUT PRO S
Battery Cover
BACK
Back Cover -
optional scanner
module fits here
End Cap
WORKABOUT PRO S -
BOTTOM
Tether Port
Low Insertion
Force (LIF) Port
Audio Jack
6 Psion Teklogix WORKABOUT PRO S Hand-Held Computer Quick Reference Guide
Page 11

2.2 The Keyboard
Scan Keys
Display
Backlight Key
Scan Keys
Arrow Keys
FN/Blue Key
Psion Teklogix WORKABOUT PRO S Hand-Held Computer Quick Reference Guide 7
ALPHA/
Orange Key
Page 12

The keyboard is equipped with a set of standard keys along with a
[ALPHA/ORANGE] and a [FN/BLUE] modifier key to provide
access to additional keys and system functions. These extra keys are
colour coded in orange and blue print above the standard keys.
2.2.1 Modifier Keys
The [CTRL], [ALT], [ALPHA/ORANGE] and [FN/BLUE] keys are
modifier keys. Pressing a modifier key changes the function of the
next key pressed. For example, alpha keys are displayed in orange
print above the numeric key [1]. Pressing the [ALPHA/ORANGE]
key followed by the [1] key displays the letter a rather than the
number 1.
The [CTRL] and [ALT] keys operate much like a desktop keyboard
except that they are not chorded – two keys cannot be held down
simultaneously. The modifier key must be pressed first followed by
the key whose function you want modified.
Activating Modifier Keys
When a modifier key is pressed once, the modifier key icon displays the
key in lowercase letters in the taskbar. For example, pressing [CTRL]
once displays ctrl key in the taskbar. Once the next key is pressed, the
modifier key becomes inactive and disappears from the taskbar.
Locking Modifier Keys
When a modifier key is pressed twice, it is ‘locked’ on. A ‘locked’
modifier key icon displays the key in uppercase letters in the taskbar.
For example, pressing the [FN/BLUE] key twice locks it on – it is
displayed as BLUE KEY in the taskbar at the bottom of the screen. The
locked modifier key remains active until it is pressed a third time to
unlock or turn it off.
8 Psion Teklogix WORKABOUT PRO S Hand-Held Computer Quick Reference Guide
Page 13

2.2.2 The Keys
The [ALPHA] Key
Used to access the alpha characters displayed in orange
print above numeric keys [1] through [9].
The [CAPS] Key
Used to display uppercase alpha characters. Press [ALPHA/
ORANGE] [.] to activate this key.
The Arrow Keys
Contained in the round disk-shaped key at the top of the keyboard.
Moves the cursor around the screen – up, down, left and right.
The [BKSP/DEL] Key
Moves the cursor one character to the left, erasing the incorrectly
entered key stroke.
[DEL] key ([FN/BLUE] [BKSP]) erases the character at the cur-
sor position.
The [CTRL] And [ALT] Key
Modify the function of the next key pressed and are application
dependent.
The [TAB] Key
Usually moves the cursor to the next field to the right or down-
ward. Pressing [ALPHA/ORANGE] [TAB] move the cursor
backward.
The [ESC] Key
Generally used as a keyboard shortcut to close the current menu,
dialog box or activity and return to the previous one.
Psion Teklogix WORKABOUT PRO S Hand-Held Computer Quick Reference Guide 9
Page 14

The [SPACE] Key
Inserts a blank space between characters. In a Windows dialog
box, the [SPACE] key enables (√) or disables a checkbox. This
key is accessed by pressing [ALPHA/ORANGE] followed by the
numeric key [0].
The [SCAN] Keys
Activate the scanner beam while pressed. For units without inter-
nal scanners, these keys are inoperable.
The Function Keys – [F1] to [F4]
These keys are not directly accessible from the keyboard – press
[FN/BLUE] followed by the appropriate numeric key to access a
function key. These keys are provided to support user applications that require [F] keys.
2.2.3 Adjusting The Keypad Backlight
To adjust the intensity of the keypad backlight and the conditions
under which this backlight is activated
•In the Control Panel, choose the Keyboard icon.
Note: Access may be restricted to supervisory use.
10 Psion Teklogix WORKABOUT PRO S Hand-Held Computer Quick Reference Guide
Page 15

•In the Keyboard Properties dialog box, open the
Backlight tab.
Adjusts light intensity.
Determines the duration
of time that the keyboard
backlight stays on when
unit is not in use.
2.3 The Display
The display backlight can be adjusted to improve visibility in varied
light conditions.
2.3.1 Adjusting The Backlight
To adjust the display backlight manually:
•Press the Backlight key [ ] to cycle through from light to
darkest, and then back to lightest.
To set the range of the backlight:
• Choose the Display icon in the Control Panel.
• Choose the Backlight tab.
Note: Adjustments may be restricted to supervisory use only.
Psion Teklogix WORKABOUT PRO S Hand-Held Computer Quick Reference Guide 11
Page 16

Adjusts the light intensity of the
backlight.
Sets duration of time the backlight
stays on at the configured intensity
when the unit is not in use.
Sets duration of time the backlight
stays on at half the configured
intensity when the unit is not in use.
2.3.2 Calibrating The Touchscreen
Note: This function may be restricted to supervisory use.
If the touchscreen has never been calibrated or if the stylus pointer is
not accurate when you tap on an item:
•In the Control Panel, choose the Stylus icon, select the
Calibration tab, and then tap on the Recalibrate button.
• Follow the onscreen directions to calibrate the display.
12 Psion Teklogix WORKABOUT PRO S Hand-Held Computer Quick Reference Guide
Page 17

2.4 Indicators
The WORKABOUT PRO S uses an LED (Light Emitting Diode),
onscreen messages and audio tones as indicators.
2.4.1 The LED
A single, two-coloured LED is located on the left side of the unit,
just above the [1] key. When you press [ENTER/ON], the LED
flashes green to indicate that the unit has been powered up. The LED
table below outlines the behaviour of the LED while the unit is
docked in a charger.
Keep in mind that the application running on the WORKABOUT
PRO S can dictate how the LED operates. Review the documentation provided with the application to determine LED behaviour.
LED Behaviour Indication
Solid Green Charge complete.
Blinking Green Charge in progress.
Solid red Temperature outside charge range.
Blinking red Battery is not charging. Battery fault.
Psion Teklogix WORKABOUT PRO S Hand-Held Computer Quick Reference Guide 13
Page 18

2.4.2 Onscreen Indicators
The taskbar at the bottom of the screen displays a variety of system
status indicators.
The taskbar changes dynamically, and only those icons that are
applicable are displayed. Double-tapping on an icon displays the
associated dialog box.
Windows® Start Button
You can display the Start Menu by tapping on the Windows® Start
button in the taskbar.
Modifier Key Indicators
[CTRL], [ALT], [FN/BLUE] and [ALPHA/ORANGE] are modifier
keys that have onscreen indicators to show when a key is active or
locked. If a modifier key is pressed once to activate it, the key is displayed in the taskbar in lowercase characters.
14 Psion Teklogix WORKABOUT PRO S Hand-Held Computer Quick Reference Guide
Page 19

If a modifier key is pressed twice, it is ‘locked on’ and the onscreen
n
indicator is displayed in uppercase letters in the taskbar.
Battery Gauge
Battery icons are a visual indication of the remaining battery power.
If the unit is using external AC power, an AC icon is displayed.
Full 75% 50% 25% Empty AC Connectio
Battery Charge
The battery charge icon is displayed in the taskbar when the handheld battery is being charged.
LIF and USB Devices
When a device such as a docking station or a charger is connected to
the USB (tether) port or the LIF (Low Insertion Force) port and is
activated, an associated icon appears in the taskbar.
New device connected: LIF Port New device connected: USB Port
Security Level
Security levels can be set to limit access and prevent inadvertent
changes to application settings.
Psion Teklogix WORKABOUT PRO S Hand-Held Computer Quick Reference Guide 15
Page 20

Bluetooth Radio
This icon indicates that a Bluetooth radio is operating in your unit.
2.4.3 Audio Indicators
The audio speaker provides a variety of sounds and can be configured to emit a sound under various conditions. Refer to ‘Volume
Adjustment’ in the ‘WORKABOUT PRO Hand-Held Computer
User Manual’ for details.
Note: The volume can also be adjusted using the Volume & Sound
Properties dialog box in the Control Panel.
Adjusting The Speaker Volume
The volume keys are located to the left and right of the arrow key
and are used to adjust the volume emitted from your unit.
The increase volume key is labelled with a plus symbol and the
decrease volume key is labelled with a minus sign .
To adjust the speaker volume:
• Press the [FN/BLUE] key twice to lock it ‘on’.
• Press the [RIGHT] arrow key to increase the volume or the
[LEFT] arrow key to decrease the volume.
• Press the [FN/BLUE] key again to ‘unlock’ it.
16 Psion Teklogix WORKABOUT PRO S Hand-Held Computer Quick Reference Guide
Page 21

3. Navigating In Windows CE
On the WORKABOUT PRO S, the ‘point and click’ action associated with a desktop computer mouse is accomplished by tapping a
stylus on the touchscreen. In addition, every ‘point and click’ action,
an equivalent keyboard shortcut is also available.
3.1 Navigating A Touchscreen
All WORKABOUT PRO S units are equipped with a touchscreen
and a stylus.
To prevent damage to the touchscreen, use only the stylus provided –
never use a screw driver or other sharp objects.
To open a file, launch an applet or open a folder:
• Tap the stylus on the appropriate icon.
Note: If the touchscreen is not registering your screen taps accu-
rately,
it may need recalibration. Refer to “Calibrating The Touchscreen” on page 12.
3.2 Navigating Using The Keyboard
You can also use the keyboard to choose icons and navigate dialog
boxes, display the desktop, and so on.
Unlike a desktop computer, the WORKABOUT PRO S does not
support key chording (pressing two keys at the same time). You must
press one key followed by the next in sequence.
Psion Teklogix WORKABOUT PRO S Hand-Held Computer Quick Reference Guide 17
Page 22

Operation Key or Key Combination
Switch between applications [ALT] [TAB]
Open task manager screen [ALT] [ESC]
Move cursor Arrow keys
Open file, folder or icon [ENTER]
Exit & Save [ENTER]
Close/Exit & Do Not Save [ESC]
Navigate Dialog Boxes Next field: [TAB]
Move cursor up: [ALHPA/ORANGE][TAB]
Display next ‘tab’: [CTRL] [TAB]
Select Radio Button/
Press Button
Go to Start Menu [FN/BLUE][.]
[SPACE] ([ALPHA/ORANGE] [0])
3.3 The Startup Desktop
When the unit boots up, the startup desktop is displayed. Applications stored in the Startup folder start up immediately. The Startup
folder is located in: \Windows\Startup and \Flash Disk\Startup.
18 Psion Teklogix WORKABOUT PRO S Hand-Held Computer Quick Reference Guide
Page 23

3.3.1 Accessing Desktop Icons
• Double-tap on the icon to open a window or, in the case of an
application icon, launch an application.
3.3.2 The Taskbar
A taskbar at the bottom of the screen displays icons through which
you can view the security level and battery capacity. A unit equipped
with a Bluetooth radio displays the appropriate icon in the taskbar. A
hand-held attached to a charger, cradle or docking station displays
the associated icon, and so on.
The taskbar also displays active modifier keys – [ALT], [CTRL],
[ALPHA/ORANGE] and [FN/BLUE]. Keys that have been locked
“on” are displayed in uppercase letters.
Using The Taskbar
• Tap on an icon to display the associated dialog box. For example, tapping on the battery icon displays the Power Properties
dialog box that indicates the current battery capacity.
Psion Teklogix WORKABOUT PRO S Hand-Held Computer Quick Reference Guide 19
Page 24

3.4 The Start Menu
The Start Menu lists operations you can access and work with. It is
available from the startup desktop or from within any application.
To display the menu:
• Tap on the Windows Start button in the taskbar. Tap on the
item in the menu with which you want to work.
Note: If your touchscreen is disabled, press [BLUE] [.].
The Desktop
Choosing Desktop from the Start Menu displays the desktop.
Security Settings
To assign a security level:
• Choose Security from the Start Menu.
20 Psion Teklogix WORKABOUT PRO S Hand-Held Computer Quick Reference Guide
Page 25

• Select a security level from the dialog box, and type the
appropriate password.
To change the password:
Note: Keep in mind that this is the same password as that assigned
through the Password control panel applet.
• Choose a security level, and enter the existing password in
the Password field.
• Choose the Set Password button.
In the Password Properties dialog box:
• Type the new password in the Password text box, and retype
the new password in the Confirm Password text box.
Programs
Programs displays a sub-menu of options with which you can work
to access applications.
Psion Teklogix WORKABOUT PRO S Hand-Held Computer Quick Reference Guide 21
Page 26

Shortcuts
This menu provides access to task shortcuts:
The System Tray
Allows keyboard access to the icons in the taskbar at the bottom of
the screen. The taskbar displays indicators such as a battery capacity
gauge. These indicators are attached to dialog boxes that provide
additional information.
• Choose System Tray from the Shortcuts menu.
When System Tray is chosen, the taskbar icons become accessible.
To display the dialog box attached to an icon:
• Use the [LEFT] and [RIGHT] arrow keys to highlight the
icon with which you want to work.
• Press [ENTER/ON] to display the associated dialog box.
Cycle Tasks
Used to cycle through active applications (providing the Task Manager is not open). To cycle to the next active task:
• Tap on Cycle Tasks in the Shortcuts menu.
22 Psion Teklogix WORKABOUT PRO S Hand-Held Computer Quick Reference Guide
Page 27

The Task Manager
Used to switch to another task or to end an active task. To display the
task manager window:
• Tap on Ta sk Ma nager in the Shortcuts menu.
Settings
Tapping on Settings displays a sub-menu of options with which you
can access the Control Panel applets, configure your radio
(Network and Dial-up Connections) and customize the Taskbar and
Start Menu.
Psion Teklogix WORKABOUT PRO S Hand-Held Computer Quick Reference Guide 23
Page 28

Help
Tapping on Help provides access to a list of descriptive files that
outline the basics of Windows CE .NET.
Run
Choosing the Run option displays a dialog box in which you can
enter the name of the program, folder or document you want to open.
24 Psion Teklogix WORKABOUT PRO S Hand-Held Computer Quick Reference Guide
Page 29

Shutdown
Tapping on Shutdown displays options for a shutdown.
Suspends the unit immediately –
equivalent to turning the unit off.
Resets the unit, leaving all saved files and
(registry) settings intact. Unsaved data is lost.
Resets the unit. Files stored outside of
permanent memory are lost.
Note: This menu varies depending on the security level. At User
level, the Shutdown sub-menu is replaced with a single
option: Suspend. A sub-menu is not available.
Teklogix security level provides another option: Bootloader. This
option behaves like cold-reset, except that the unit launches Bootloader rather than Windows CE .NET.
3.5 Using A Dialog Box
Dropdown
Menu
Tabs
Radio Button
Textbox
Checkbox
Psion Teklogix WORKABOUT PRO S Hand-Held Computer Quick Reference Guide 25
Button
Page 30

Note: Tap the stylus on a dialog box element to select or deselect it,
display a dropdown menu and so on. To use the keyboard,
refer to “Navigating Using The Keyboard” on page 17.
Dialog boxes like the samples in this section contain one or more of
the following elements:
Tab: Tabs separate different elements of a dialog box. Tap the stylus
on the tab with which you want to work.
Textbox: A textbox requires that you type information. Tap on the
textbox you want to work with to highlight it, and then type the
appropriate information.
Dropdown: This type of menu is identified by up and down arrows
next to the dropdown menu to indicate that additional options are
available. Tap on the menu to highlight it, and tap on the arrows
attached to the menu to cycle through the options.
Checkbox: This box allows you to select or deselect an option. To
select (√) or deselect a checkbox, tap the stylus in the checkbox.
Radio buttons: These buttons allow you to choose from a number
of options. For example, in the sample screen under section 3.5 on
page 25, you can choose to Obtain an IP address via DHCP or
Specify an IP address. Tap on a radio button to activate the option
next to it.
Buttons: This type of button allows you to Save, Delete and so on,
the options you’ve chosen in a dialog box. Tap on the button you
want to execute.
Saving Your Choices: Once you’ve made all your changes, tap on
the OK button to save your changes and exit the window.
Note: If an item in a dialog box is displayed in grey text, the item is
not currently available.
26 Psion Teklogix WORKABOUT PRO S Hand-Held Computer Quick Reference Guide
Page 31

4. General Maintenance
4.1 Caring For The Touchscreen
The touchscreen can be permanently damaged by harsh chemicals and
is susceptible to abrasions and scratches. Using sharp objects on the
touchscreen can scratch or cut the plastic or crack the internal conductive coating. Protect the touchscreen from the following chemicals:
• mustard, ketchup,
• sodium hydroxide,
• concentrated caustic solutions,
• benzyl alcohol, and
• concentrated acids.
If touchscreens are used in harsh environments, apply disposable
screen protectors to dramatically extend the life of the touchscreen.
4.2 Cleaning The WORKABOUT PRO S
Important: Do not immerse the unit in water. Dampen a soft cloth with
mild detergent to wipe the unit clean.
•Use only mild detergent or soapy water to clean the unit.
• Avoid abrasive cleaners, solvents or strong chemicals. The
plastic case is susceptible to harsh chemicals. The plastic is
partially soluble in oils, mineral spirits and gasoline. The
plastic slowly decomposes in strong alkaline solutions.
• To clean ink marks from the keypad and touchscreen, use
isopropyl alcohol.
Psion Teklogix WORKABOUT PRO S Hand-Held Computer Quick Reference Guide 27
Page 32

5. Support Services & Worldwide Offices
Psion Teklogix provides a complete range of product support services to its customers worldwide. These services include technical
support and product repairs.
To locate the service address and phone number nearest to you, refer
to the WORKABOUT PRO C, M-E & S Hand-Held Computer Regu-
latory & Warranty Guide, PN 8000084, or visit our website:
www.psionteklogix.com
28 Psion Teklogix WORKABOUT PRO S Hand-Held Computer Quick Reference Guide
 Loading...