


5
Regulatory Draft
ACCESSORIES
ACCESSORIES 5
5.1 Pistol Grips............................................................133
5.1.1 Removing the Trigger Cover............................................133
5.1.2 Attaching the Pistol Grip..............................................133
5.2 Carrying and Protective Accessories.............................................134
5.2.1 Attaching the Hand Strap - Model ST6025....................................135
5.22 Protective Carrying Case - Model ST6090....................................137
5.2.3 Hard Shell Holster - Model ST6055........................................137
5.3 Power Adaptor Options.....................................................137
5.3.1 Snap Modules ....................................................137
5.3.2 AC Wall Adaptor - Model ST1050-1 ........................................138
5.3.3 Vehicle Power Outlet Adaptor - Model ST3113..................................139
5.4 Chargers and Docking Stations: General Information...................................140
5.4.1 Important Charger Safety Instructions......................................140
5.4.2 Charging the Battery................................................140
5.4.3 Installation—Chargers and Docking Stations...................................140
5.4.4 Operator Controls..................................................140
5.4.5 Power Consumption Considerations.......................................141
5.5 Desktop Docking Stations - Models ST4002 and ST4003.................................141
5.5.1 Charging a Battery Installed in Omnii.......................................142
5.5.2 Indicators.......................................................143
5.5.3 Operation.......................................................143
5.5.3.1 Charging the Omnii Battery.......................................143
5.5.3.2 Charging the Spare Battery.......................................143
5.5.4 Cleaning the Desktop Docking Station......................................143
5.5.5 Troubleshooting...................................................144
5.5.5.1 Docking station does not seem to power on..............................144
5.5.5.2 Omnii charge indicator LED stays off..................................144
5.5.5.3 Omnii charge indicator LED is red....................................144
5.5.5.4 Spare battery LED is red with a battery installed...........................144
5.5.5.5 Spare battery LED does not turn on when a battery is installed..................144
5.6 Quad Docking Station – Model No. ST4004.........................................145
5.6.1 Operator Controls..................................................145
5.6.2 Indicators.......................................................145
5.6.3 Quad Docking Station Operation .........................................145
5.6.3.1 Charging the Omnii Battery.......................................145
5.6.3.2 Installation.................................................145
5.6.3.3 Connecting to the Ethernet Network .................................146
5.6.4 Cleaning the ST4004................................................146
5.6.5 Troubleshooting...................................................146
5.6.5.1 Omnii Charge Indicator LED Stays Off.................................146
5.6.5.2 Power LED Does Not Light Up.....................................146
5.6.5.3 Omnii Charge LED Flashes Yellow...................................146
5.6.5.4 Omnii Charge Indicator LED Flashes Red...............................147
5.6.5.5 Powered Adaptor LED Stays Off....................................147
Psion Omnii Hand-Held Computer User Manual
131

5.7 Vehicle Cradles - Models ST1000 and ST1002........................................147
Regulatory Draft
5.7.1 Vehicle Cradle Mounting Recommendations ..................................148
5.7.2 Wiring Guidelines ..................................................149
5.7.3 Using the Vehicle Cradle..............................................149
5.7.4 Maintaining the Vehicle Cradle...........................................149
5.7.5 Powered Vehicle Cradle Installation in High Voltage Vehicles.........................149
5.7.5.1 Extreme Wet Environments.......................................149
5.7.6 Powered Cradle Installation............................................150
5.7.7 Wiring Vehicle Power to the Cradle........................................150
5.8 Battery Charger (6-Slot) - Model ST3006..........................................151
5.8.1 Installation......................................................151
5.8.2 Operator Controls..................................................151
5.8.3 Charge Indicators..................................................152
5.8.4 Charging Batteries..................................................152
5.8.5 Troubleshooting...................................................152
5.8.5.1 Improper Battery Storage........................................152
5.8.5.2 Power LED Does Not Light Up.....................................152
5.8.5.3 Indicator Does Not Light When Battery Installed ..........................152
132
Psion Omnii Hand-Held Computer User Manual

5.1 Pistol Grips
Regulatory Draft
There are a number of pistol grips available to you depending on the type of back cover and scanner/imager installed in your hand-held. Refer to Table 5.1 for a list of pistol grip model numbers and the types of
back covers and scanners/imagers with which they are compatible.
Table 5.1 Pistol Grip Model Numbers
Pistol Grip Description Model Number
Pistol Grip Standard Pod Kit ST6000
Pistol Grip Standard Back A Kit ST6100
Pistol Grip Standard Back B Kit ST6400
5.1.1 Removing the Trigger Cover
Before installing the pistol grip, you need to remove the trigger cover.
Using a flathead screwdriver, gently and carefully pry the trigger cover off the hand-held.
Figure 5.1 Removing the Trigger Cover
Chapter 5: Accessories
Pistol Grips
5.1.2 Attaching the Pistol Grip
Note: Prior to installation, make sure the trigger mechanism is securely snapped into the pistol
The pistol grip is attached to the back of Omnii using the four threaded inserts in the upper part of the
Omnii casing (see Figure 5.2). Four M3x6 Phillips head screws are provided.
• Position the pistol grip so that it fits snugly over the back of the unit and the holes in the pistol grip are
• Using a Phillips screwdriver, tighten the screws to a torque of 3 lbs-in (3kgf-cm) to secure the pistol grip
grip body and that the trigger operates properly.
aligned with the threaded inserts on the back of the hand-held.
in place.
Psion Omnii Hand-Held Computer User Manual
133

Chapter 5: Accessories
Regulatory Draft
Carrying and Protective Accessories
Figure 5.2 Attaching the Pistol Grip
5.2 Carrying and Protective Accessories
Note: Omnii Hand-Held Computer is a body worn device, and to maintain compliance with the FCC
RF exposure guidelines, use a Psion approved carrying case. Use of non-approved accessories
may violate FCC RF exposure guidelines.
There are a variety of carrying and protective accessories to help the operator work safely and comfortably
with Omnii.
Attaching Carrying Accessories
If your Omnii is not fitted with a hand strap, you can install it using the carrying accessory kit supplied.
You’ll need:
• A Phillips head screwdriver.
Important: Do not use adhesives such as Loctite to secure screws on carrying
Table 5.2 Accessories Model Numbers
Wrist Strap ST6040
Hand Strap ST6025
Soft Shell Holster ST6050
Hard Shell Holster ST6055
Fork lift H olst e r ST 6 0 51
Carrying Case ST6090
accessories.These chemicals may damage the plastic casing.
Accessory Model Number
134
Psion Omnii Hand-Held Computer User Manual
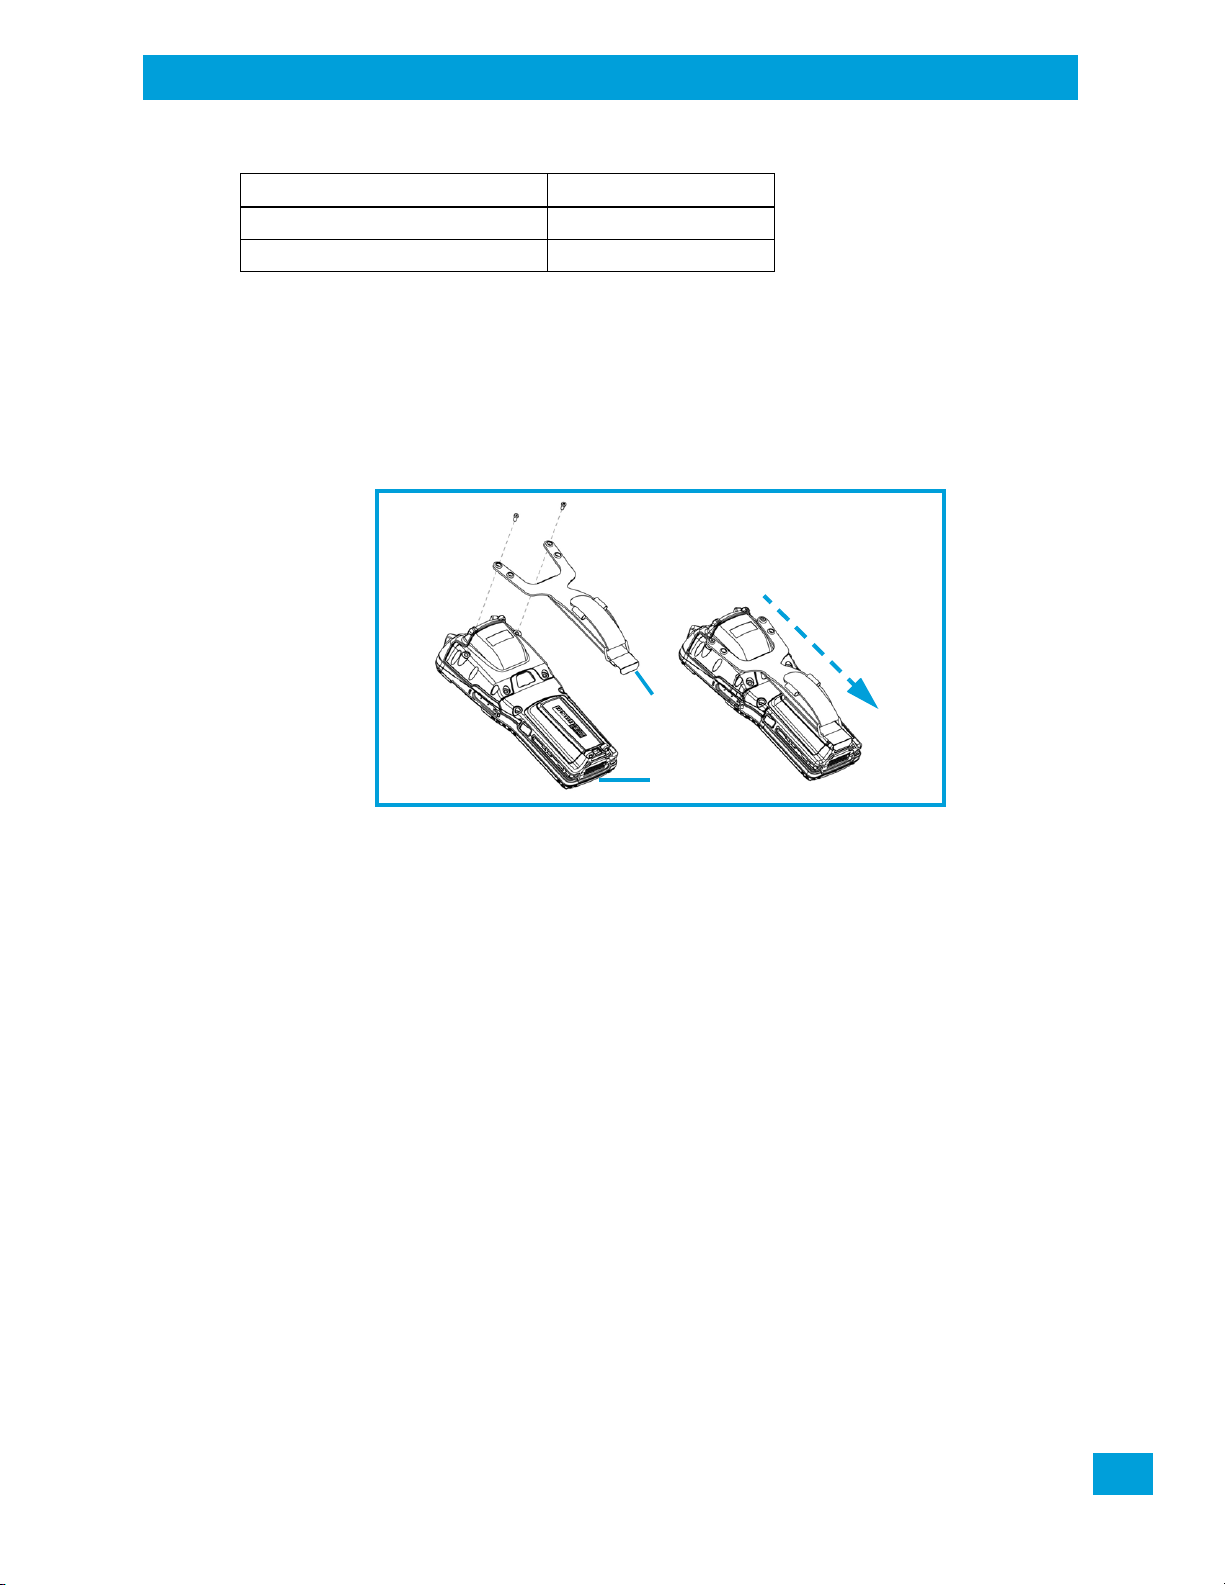
Table 5.2 Accessories Model Numbers
Regulatory Draft
Accessory Model Number
Pouch ST6091
Screen Protector ST6112
5.2.1 Attaching the Hand Strap - Model ST6025
• Attach the strap to the two threaded inserts located at the back of the hand-held near the top of the
unit (see Figure 5.3), using the two Phillips head screws provided with this accessory.
• Stretch the handstrap toward the base of the hand-held, and hook the clip at the bottom of the
handstrap into the slot near the base of the battery pack.
Figure 5.3 Attaching the Hand Strap
Attaching the Hand Strap - Model ST6025
Chapter 5: Accessories
Clip
F
Hand Strap Slot
Installation
• To lock the in place, insert the retaining clip in the slot at the bottom of the Omnii HandHeld Computer. (Figure 5.5)
Psion Omnii Hand-Held Computer User Manual
135

5.2.2 Protective Carrying Case - Model ST6090
Regulatory Draft
A carrying case is available for Omnii to shield the unit from damage. It is equipped with a soft plastic
window to protect the unit display and keyboard. A variety of cases are available, depending on the type of
end-cap attached to your unit.
5.2.3 Hard Shell Holster - Model ST6055
A hard shell holster can be used to hang Omnii with a pistol grip from your waist.
• Feed your belt through the top panel of the holster, and adjust the belt as needed.
• If using the leg tie-down strap, wrap it around your leg and snap the buckle closed. Adjust the tightness
of the strap for security and comfort.
• Place Omnii into the holster with the grip extending back through the custom opening.
Figure 5.8 Hard Shell Holster
Protective Carrying Case - Model ST6090
Chapter 5: Accessories
5.3 Power Adaptor Options
The following adaptors can be ordered for your Omnii:
Tab l e 5 . 3 Powe r A da p to r s
Adaptor Description Model Number
AC Wall Adaptor ST1050-1
Vehicle Power Outlet Adaptor ST3113
Snap Module – Power/Charger Only ST4000
Snap Module – USB Host/Client plus Power/Charger ST4001
Snap Module – DE9M powered serial plus Charger ST4005
5.3.1 Snap Modules
The Snap Module is a mobile power adaptor for Omnii. The Snap Module is compatible with the AC wall
adaptor (Model ST1050-1) and the Vehicle Power Outlet Adaptor (Model ST3113)
Three types of Snap Modules are available:
• Model ST4000 (Charger only variant): powers and charges the hand-held.
• Model ST4001 (USB Host/Client variant): powers and charges the hand-held. It provides communications via USB 1.1/2.0 Host and USB 2.0 Client connectors and provides a DC IN port. When attached to
Omnii, it allows ActiveSync or Windows Mobile Device Center connectivity with your PC, and the use of
a USB device such as a USB memory key or supported USB scanner.
Psion Omnii Hand-Held Computer User Manual
137

Chapter 5: Accessories
Regulatory Draft
AC Wall Adaptor - Model ST1050-1
• Model ST4005 (DE9M Serial variant): provides a powered DE9M serial connector. It powers and
charges Omnii, and provides serial communications to tethered devices. The DE9M connector is
capable of speeds up to 115,200 bps. Pin 9 is reserved for 5V power out and is defaulted to off. To
enable power to this port, in your Omnii desktop, go to Control Panel>Scanners, which opens the
Scanner Settings menus. In the Ports menu, select on for the Power parameter under the COM6 port.
Figure 5.9 Snap Module Models and Installation
ST4000 (Charger)
Side Rail
ST4001 (USB Host/Client)
Hand Strap Slot
ST4005 (DE9M Serial)
To attach the adaptor to Omnii:
• Make sure that the adaptor connector and Omnii docking connector are free of dust or any other
debris before connecting them.
• A slot in the side rail on each side of the hand-held accommodates the locking clips of the adaptor. To
attach the adaptor, align it with the base of the hand-held and gently slide up until the locking clips
snap into place (Refer to Figure 5.9).
• To remove the adaptor, press down on the base of the clip arms to release them from the Omnii side
rails and slide the adaptor off.
Note: If you are using a hand strap, there is no need to remove it before installing the
Snap Module, since the Omnii hand strap slot will still be accessible.
5.3.2 AC Wall Adaptor - Model ST1050-1
The AC wall adaptor available for your docking station or Snap Module allows you to operate your handheld using AC power while charging the battery inserted in the unit.
Adaptor plugs suitable for use in the following regions are shipped with the AC wall adaptor: United Kingdom, Australia, Europe and North America.
Locking Clip
DC IN Port
138
Psion Omnii Hand-Held Computer User Manual
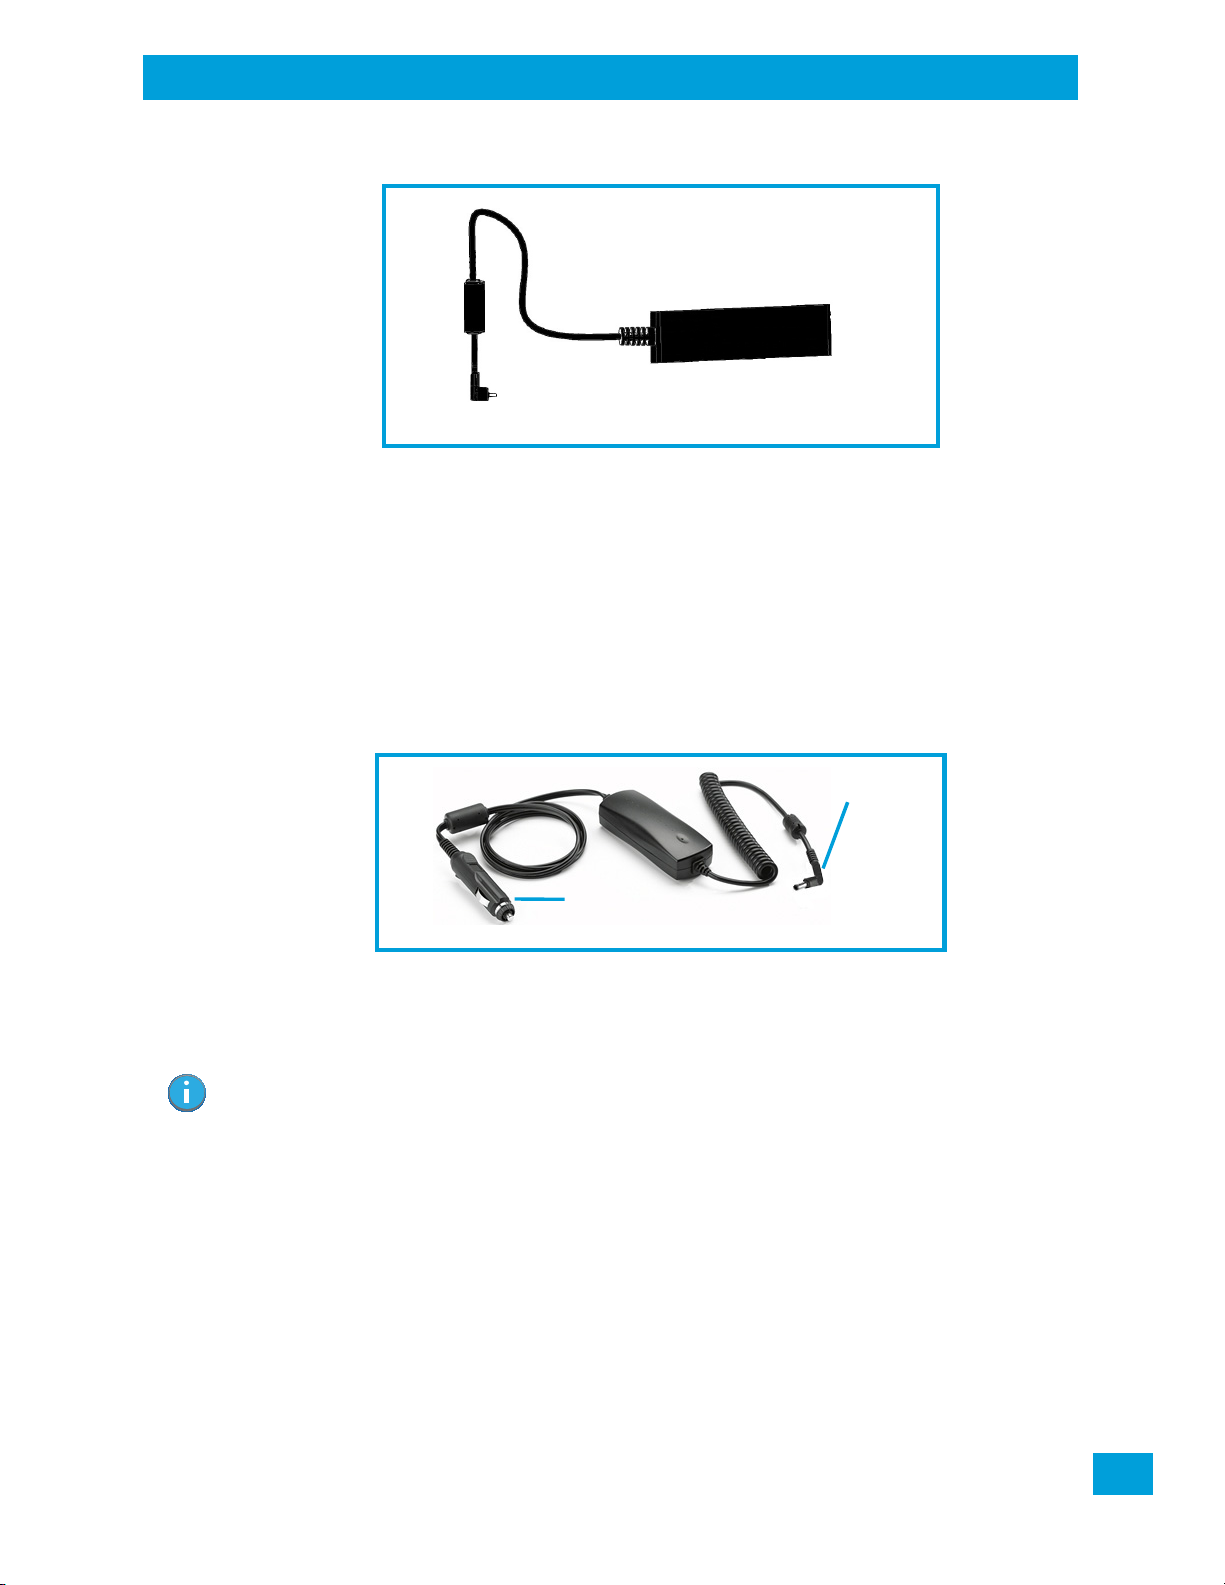
Figure 5.10 AC Wall Adaptor Plugs
Universal AC Power Supply
DC Power Plug
DC Power Plug
Adaptor Plug
Regulatory Draft
• Choose the adaptor plug that is suitable for use in your country. Slide the adaptor plug into the Universal AC power supply, snapping it into place. These two pieces, coupled together, are referred to as an
AC wall adaptor.
• Insert the DC plug into the docking station or Snap Module jack.
• Plug the pronged end into an AC outlet.
5.3.3 Vehicle Power Outlet Adaptor - Model ST3113
The Vehicle Power Outlet Adaptor allows you to power your hand-held and recharge your battery using
power drawn from your vehicle’s automotive power outlet when used in conjunction with a Snap Module.
Vehicle Power Outlet Adaptor - Model ST3113
Chapter 5: Accessories
Fig u re 5.1 1 Vehi cle Power Outle t Adaptor
• Attach the USB Adaptor to the base of the hand-held. Refer to “Snap Modules” on page 137 if you
require further details.
• Insert the DC power plug on the Vehicle Power Outlet Adaptor into the DC IN port on the USB adaptor.
• Insert the Vehicle Power Outlet Adaptor plug into automotive power outlet in your vehicle.
Note: Battery charging continues whether the hand-held is switched on or off.
Psion Omnii Hand-Held Computer User Manual
139

Chapter 5: Accessories
Regulatory Draft
Chargers and Docking Stations: General Information
5.4 Chargers and Docking Stations: General Information
5.4.1 Important Charger Safety Instructions
Important: Before charging a battery with a desktop docking station, it is critical that you
review the safety guidelines in the Omnii Hand-Held Computer Regulatory & Warranty Guide (PN 8000191).
5.4.2 Charging the Battery
Omnii Hand-Held Computer operates with a lithium-ion battery pack, Model ST3000. Preparing the unit for
operation requires that the battery pack be charged and installed in the hand-held.
Batteries shipped from the factory are charged to approximately 40% of capacity. Lithium-ion battery
packs must be fully charged before use. These batteries can be charged with a variety of chargers and
docking stations. Currently the following are available:
• The Snap Module is a mobile adaptor for Omnii. Three models are available—see “Snap Modules” on
page 137.
• The AC Wall Adaptor operates as an AC power source and also charges the battery installed in the
unit—see “AC Wall Adaptor - Model ST1050-1” on page 138.
• The Vehicle Power Outlet Adaptor powers Omnii and recharges the battery using power drawn from
your vehicle’s automotive power outlet—see “Vehicle Power Outlet Adaptor - Model ST3113” on
page 139.
• The Desktop Docking Stations operate as both chargers and docking stations. Operating as a charger,
both the battery installed in Omnii and a spare battery can be charged. Priority is given to charging the
hand-held's battery. See “Desktop Docking Stations - Models ST4002 and ST4003” on page 141.
Normally it takes 3 to 4 hours to charge a battery. The Omnii intelligent charging system protects the
battery from over-charging by terminating the charge process when the battery is at maximum capacity.
Table 5.4 Omnii Internal Battery Charging Times
% Charge Completed During Sleep Mode While Operating
100% 4 hrs. 8 hrs.
75% 2 hrs. 6 hrs.
140
Important: To avoid damaging the battery, chargers will not begin the charge process until
the battery temperature is between 0°C to 45°C (32°F to 113°F).
5.4.3 Installation—Chargers and Docking Stations
When installing a charger or docking station, consider the following guidelines.
• Keep chargers and docking stations away from excessive dirt, dust and contaminants.
• Chargers will not charge batteries outside an ambient temperature range of 0°C to 40°C (32°F to
104°F). It is recommended that the charger or docking station be operated at room temperature—between 18°C and 25°C (64°F to 77°F) for maximum performance.
After unpacking your unit:
• Visually inspect the charger for possible damage.
• Install the IEC power cord and apply power.
5.4.4 Operator Controls
Omnii docking stations and chargers have no operator controls.
Psion Omnii Hand-Held Computer User Manual
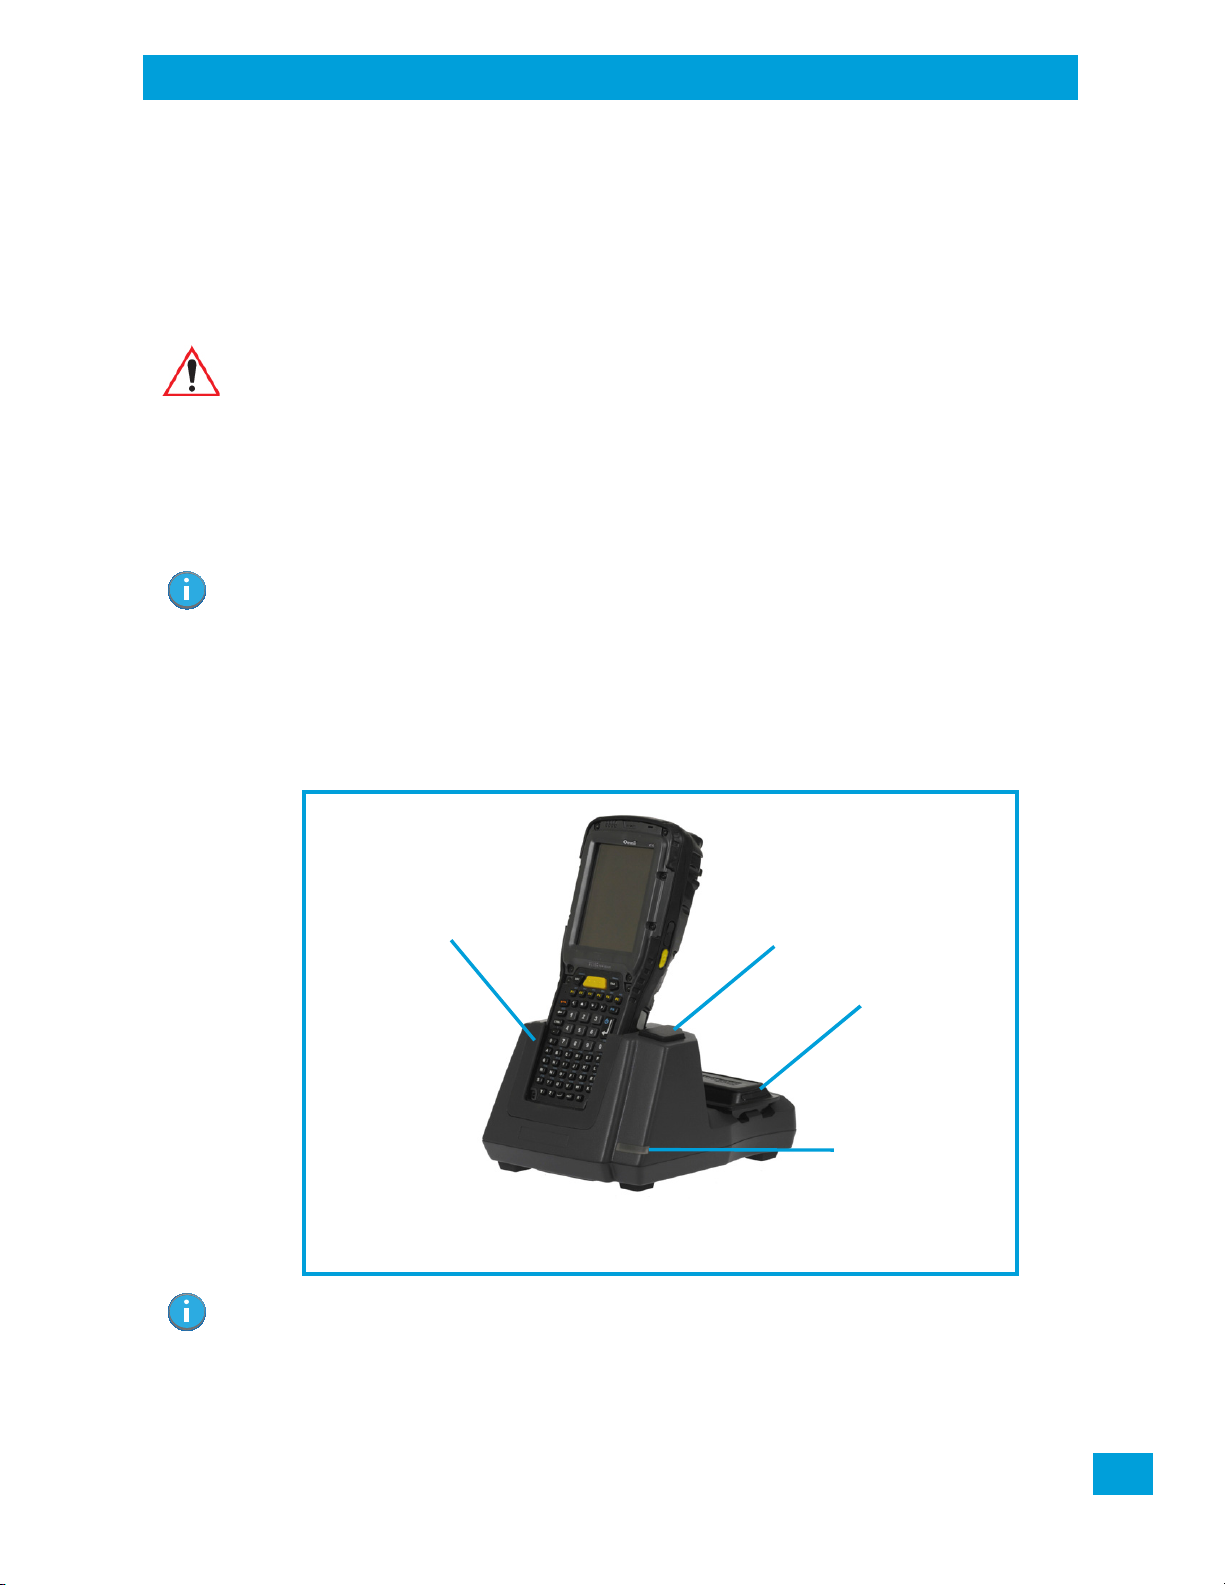
Power Consumption Considerations
Omnii Charge Well
LED
(Indicates charge status of
a spare battery inserted
in the rear charge well of
the docking station.)
Release Button
Spare Battery
Regulatory Draft
5.4.5 Power Consumption Considerations
Check to ensure the mains circuit supplying chargers and/or docking stations is adequate for the load, especially if several chargers and docking stations are being powered from the same circuit.
5.5 Desktop Docking Stations - Models ST4002 and ST4003
Omnii can be inserted into two desktop docking stations which are designed to charge the battery installed
in the hand-held along with a spare battery pack: Models ST4002 and ST4003.
Chapter 5: Accessories
Important: These docking stations can only be used to charge Psion approved lithium-ion
The ST4002 and ST4003 desktop docking stations feature:
• Fast charging of the internal battery.
• Fast charging of the spare battery pack.
• A Host USB port to connect peripherals such as a printer, keyboard, etc.
• A Client USB port to connect the docking station to a PC.
Note: The ST4002 desktop dock can be upgraded to include the DE9M and RJ45 interfaces by
The ST4003 desktop docking station additionally provides:
• A DE9M serial port (unpowered) and an RJ45 10Base-T Ethernet interface. Both these interfaces are
Figure 5.12 Desktop Docking Station - Models ST4002 and ST4003
batteries.
using the ST4100 Xmod (Expansion Module).
compatible with the USB to Ethernet/serial drivers included in Omnii (see Figure 5.13 on page 142).
Note: The desktop docking station is shipped with its own quick start guide (ST4002 and ST4003
The desktop docking station storage temperature is -30°C to +60°C (-22°F to 140°F). Operating temperature and humidity are: 5 - 95% non-condensing and 0°C to 40°C (32°F to 104°F).
Desktop Docking Stations Quick Start Guide, PN 8000203). It is critical that it be reviewed for
additional information and updates.
Psion Omnii Hand-Held Computer User Manual
141
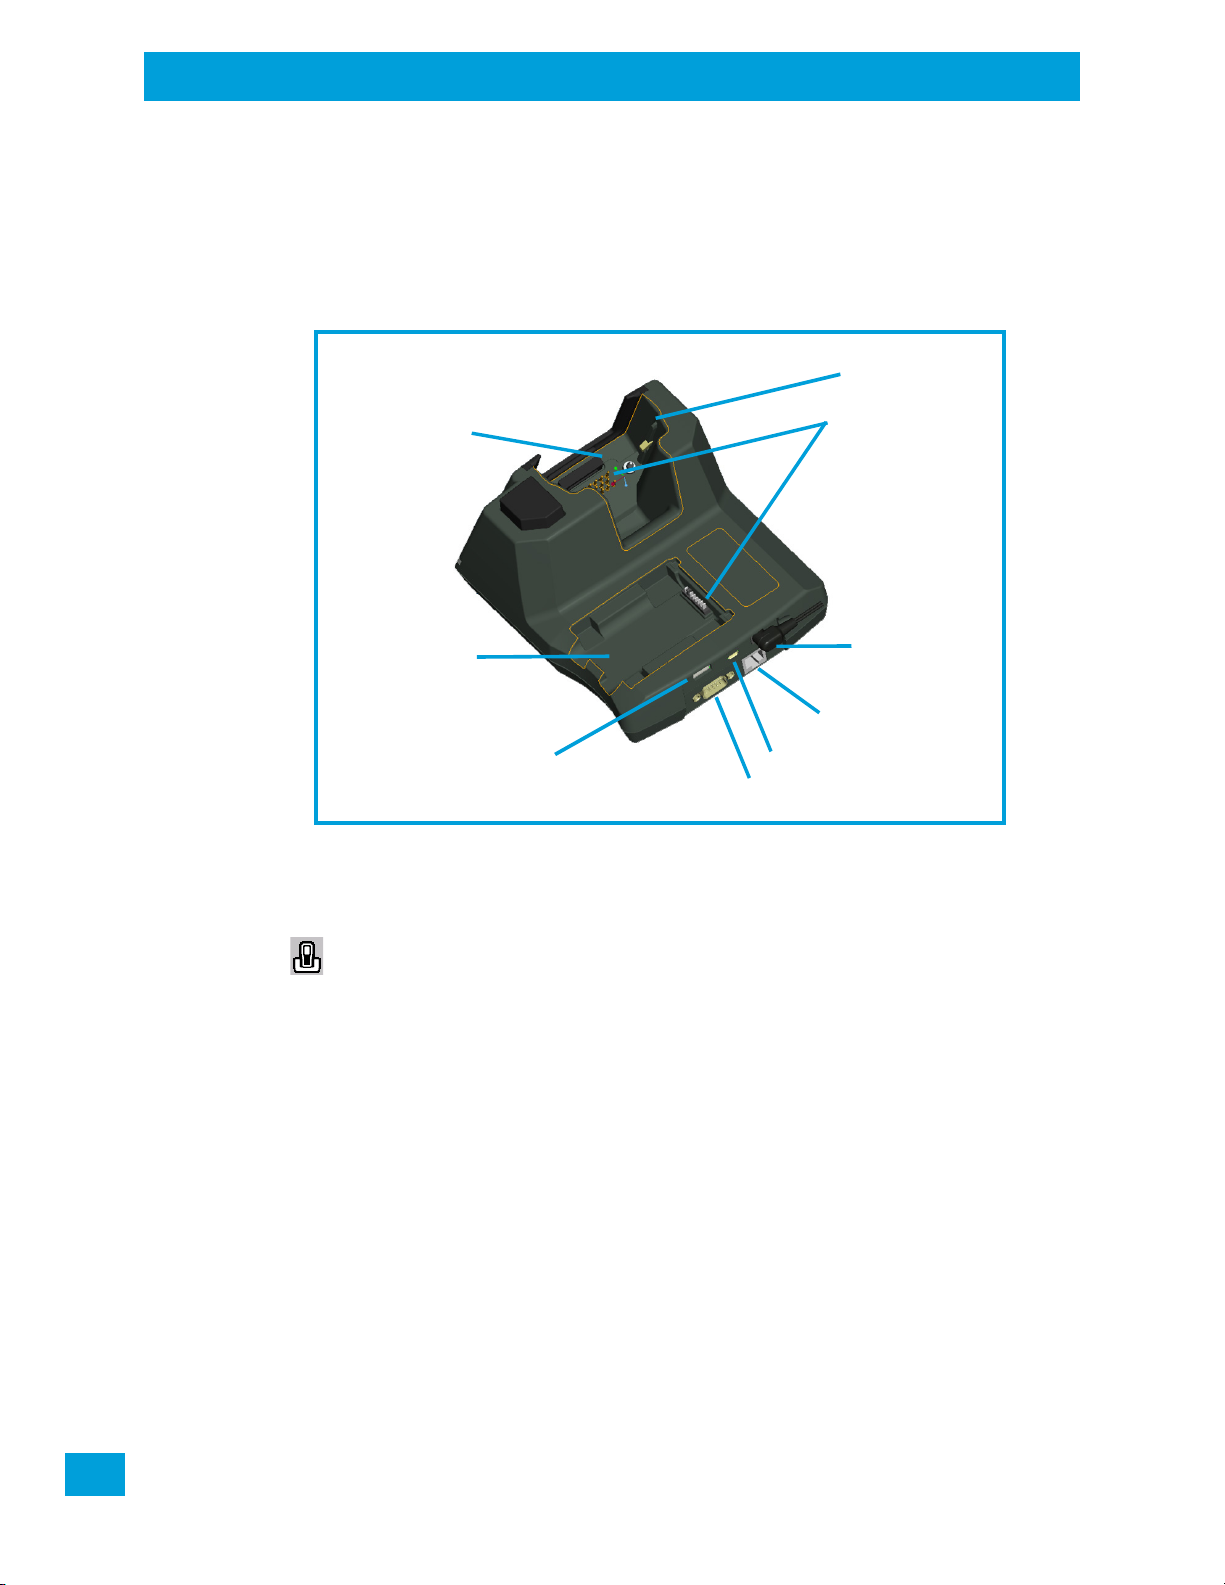
Chapter 5: Accessories
Charge Well
DC IN Port
Spare Battery
Host USB Port
Client USB Port
RJ45 Ethernet Port
DE9M Serial Port
Connector Pins
Locking Arm
Charge Well
Omnii
Regulatory Draft
Charging a Battery Installed in Omnii
The desktop docking station uses careful charge algorithms designed to maximize battery life while ensuring the shortest possible charge time. The charger supports proprietary Psion Smart Batteries and handles
a range of voltages and charge algorithms. See “Battery Details” on page 21 for more information regarding
battery capacity, charge times and battery life. See “Charging the Spare Battery” on page 143 for spare
battery charge information.
Figure 5.13 Back of ST4003 Desktop Docking Station
5.5.1 Charging a Battery Installed in Omnii
• Insert the DC power cable to the DC IN port on the desktop docking station. Plug the pronged end of
the cable into an AC outlet.
•Slide the hand-held into the docking station, making certain that the hand-held is securely
seated on the docking station connector pins and engages the locking arms of the docking
station. When the Omnii is switched on, a message is displayed briefly on the screen indicating
that the unit is properly installed in the station and the docking station icon is displayed in the
taskbar.
The LED on Omnii lights up indicating that the unit has external power and battery charging will begin. It is
safe to leave the unit in the desktop docking station while it is not in use—the battery will not be overcharged.
142
Psion Omnii Hand-Held Computer User Manual
5.5.2 Indicators
Regulatory Draft
The front-mounted LED on the desktop docking station indicates the spare battery charge status. The LED
on Omnii is active even when the hand-held is inserted in a docking station (and in suspend mode) so that
the charge status of the battery can be detected easily.
Table 5.5 Docking Station Battery Charge LED Behaviour
Charge LED Behaviour Function
OFF No battery detected.
Solid Green Battery charging complete.
Flashing Green Charge in progress.
Flashing Yellow Battery is not charging due to out-of-temperature conditions.
Solid Red Unable to read battery or non Psion battery.
5.5.3 Operation
5.5.3.1 Charging the Omnii Battery
The desktop docking station supplies DC power to enable the Omnii internal fast charger.
When installed in the dock, the Omnii battery charge LED will illuminate to indicate the unit has external
power and can charge the internal battery. Omnii charge indication follows the same convention as the
charger's spare battery indicator (Figure 5.12 on page 141).
Chapter 5: Accessories
Indicators
Note: Battery charging continues whether Omnii is switched on or off.
5.5.3.2 Charging the Spare Battery
Important: Do not store spare batteries in a charger for more than 72 hours. Doing so may
• Install the battery in the battery charge well (rear slot of the desktop docking station). Place the
battery contacts down to mate with the connector, and pivot the battery into place in the battery
charge well.
• The desktop docking station spare battery LED lights up immediately. During charge the LED will be
flashing green.
• When the battery has finished charging, the LED turns solid green.
• The charge stops when the battery is fully charged and the LED remains green.
A full charge will take 3 to 4 hours for a 5000 mAh battery.
damage the battery or reduce its charge capacity.
5.5.4 Cleaning the Desktop Docking Station
Important: Do not immerse the unit in water. Dampen a soft cloth with mild detergent to wipe
• Use only mild detergent or soapy water on a slightly damp cloth to clean the desktop docking station.
Avoid abrasive cleaners, solvents or strong chemicals for cleaning. The plastic case is susceptible to
harsh chemicals. The plastic is partially soluble in oils, mineral spirits and gasoline. The plastic slowly
decomposes in strong alkaline solutions.
• To clean ink marks from the label, use isopropyl alcohol.
the unit clean.
Psion Omnii Hand-Held Computer User Manual
143

Chapter 5: Accessories
Regulatory Draft
Troubleshooting
5.5.5 Troubleshooting
The indicators, applications, and drivers required to use and monitor the desktop docking station as a dock
(as opposed to a charger) are installed on Omnii—no applications are present on the docking station itself.
5.5.5.1 Docking station does not seem to power on.
• When first connected to the DC power supply, the charger LED should flash a sequence of red, yellow,
and green.
• If not, the charger is defective and requires service.
5.5.5.2 Omnii charge indicator LED stays off.
When Omnii is docked into a powered desktop docking station and its charge indicator LED stays off, there
could be a problem with the hand-held or with the docking station. Use a hand-held with a properly functioning charge indicator to isolate the problem.
5.5.5.3 Omnii charge indicator LED is red.
If the Omnii charge indicator is red when the hand-held is docked:
• Remove Omnii and disconnect the adaptor DC power cable.
• Wait at least 20 seconds, and then plug the cable in again.
• If the Omnii indicator still shows a fault, the hand-held requires service.
5.5.5.4 Spare battery LED is red with a battery installed.
• Try inserting a battery that is known to be working with another charger.
• If the charge slot LED continues to show red with the known working battery, the charger is defective
and requires service.
• Your Psion battery and desktop docking station are carefully designed for safety and capacity performance in accordance with IEEE 1725. If the battery or charger are not Psion approved products, or the
safety mechanism is faulty, the spare charge slot LED or the Omnii LED will display red.
5.5.5.5 Spare battery LED does not turn on when a battery is installed.
• Inspect the charge slot contacts for damage (are they bent, flattened, twisted or broken?).
• Reinstall the battery and check that it is fully seated in the slot.
• Try inserting a battery that you know to be working into the charger slot.
• Disconnect and reconnect the DC adaptor, and check that the spare battery LED indicator flashes at
power-up.
• If the charge slot fails to charge the known working battery, it is defective and requires service.
144
Psion Omnii Hand-Held Computer User Manual
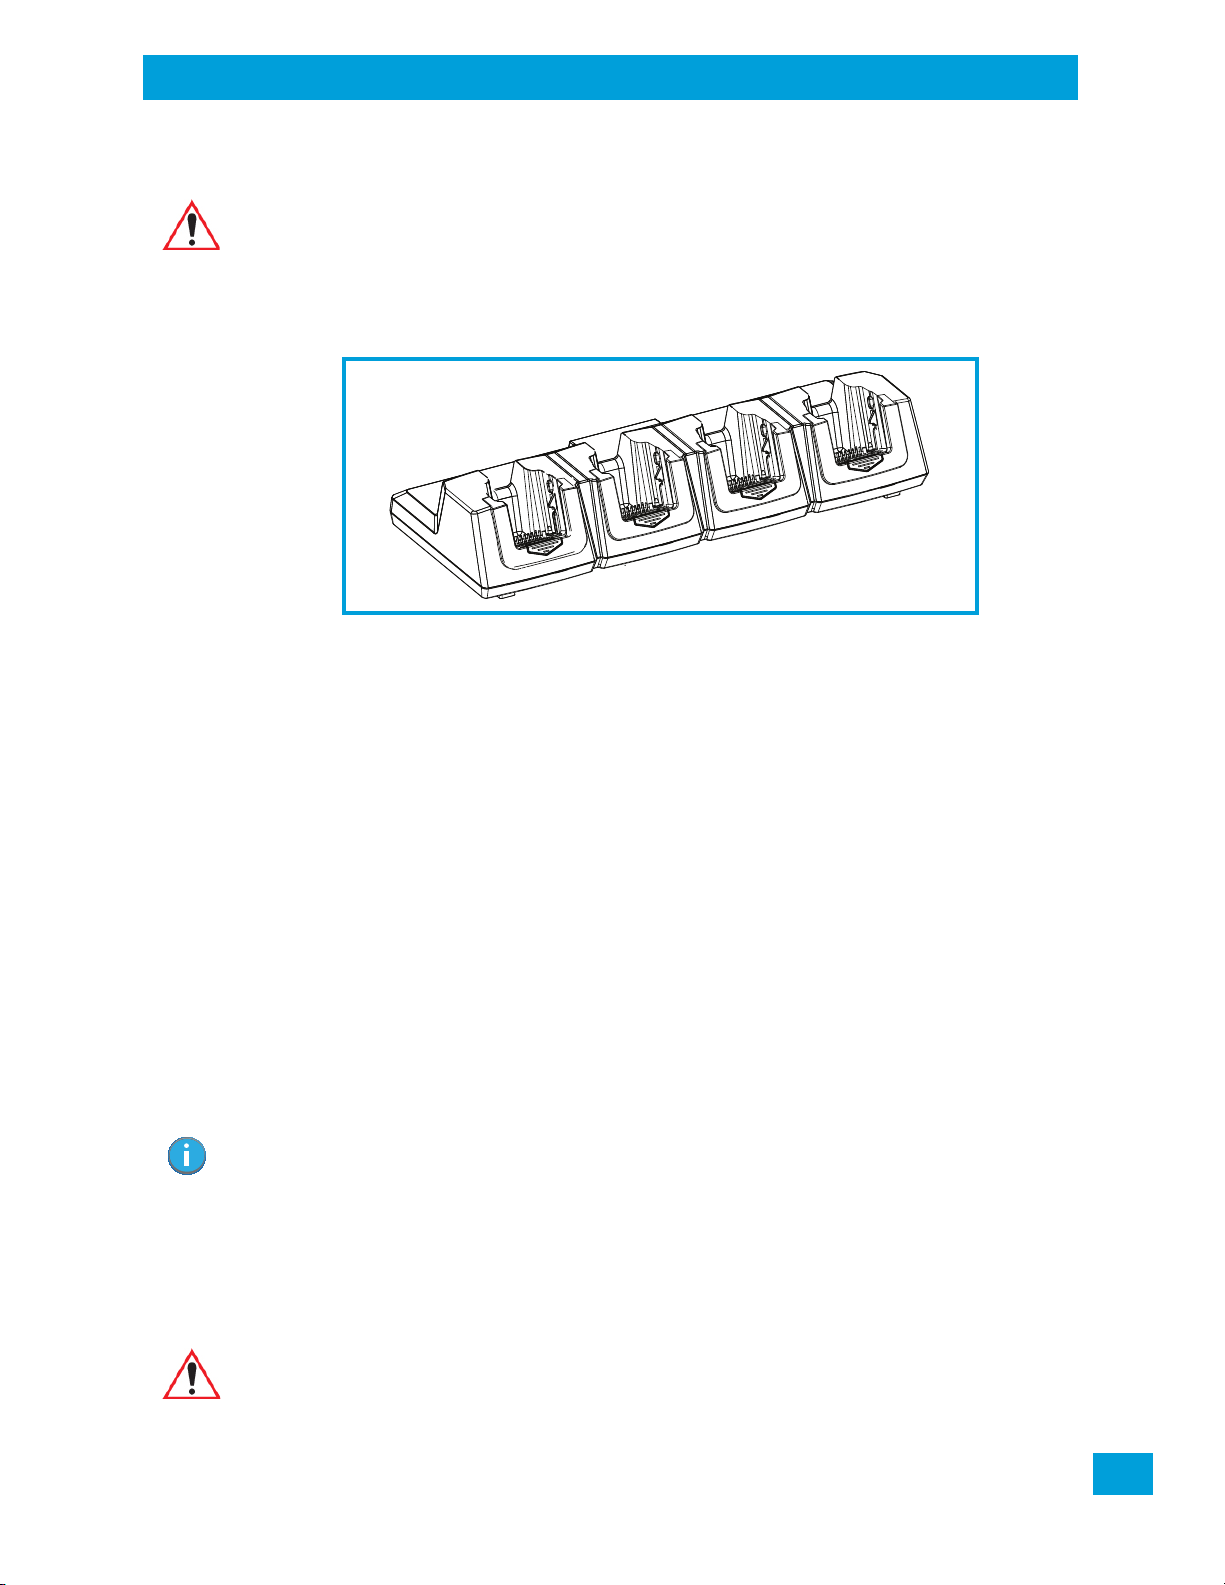
5.6 Quad Docking Station – Model No. ST4004
Regulatory Draft
Quad Docking Station – Model No. ST4004
Chapter 5: Accessories
Important: The quad docking station is shipped with its own quick start guide—Omnii ST4004
Figure 5.14 Quad Docking Station – Model No. ST4004
The ST4004 Quad Docking Station is designed to accept up to four Omnii hand-held computers. The
docking station powers the units and their internal battery charger. The docking station also connects up to
four of the hand-held computers to a 10/100 Base-T Ethernet network and allows for Ethernet data transfer.
Quad Docking Station Quick Start Guide’ (PN 8000222). It is critical that it be
reviewed for additional information and updates.
5.6.1 Operator Controls
The ST4004 has no operator controls or power switch.
5.6.2 Indicators
The quad docking station is equipped with a Power Indicator LED.
5.6.3 Quad Docking Station Operation
5.6.3.1 Charging the Omnii Battery
• Insert the DC power plug into the ST4004 rear DC input receptacle.
The ST4004 supplies DC power to enable the Omnii internal fast charger. Normally, a full charge of the
battery will take from 3 to 4 hours.
• Insert up to four Omnii computers into the docking station charge wells, pressing down gently but
firmly to seat them securely.
• During the charge, the Omnii LED slow flashes green.
• When the battery capacity reaches 95%, the LED turns solid green.
Note: Battery charging continues whether Omnii is switched on or off.
5.6.3.2 Installation
Place the charger in an area that is free from excessive dirt, dust and contaminants. The ambient temperature must be in the range 0° C and 40° C (32° F to 104° F). The docking station will not charge batteries
outside of this temperature range. For maximum performance, it is recommended that the charger be operated at room temperature—a temperature range between 18°C to 25°C (64°F to 77°F).
Important: Use IEC-320 C13 power cords approved by Psion, with the ground pin connected
to a proper earth-grounded receptacle. Check with a qualified electrician if you are
uncertain of your receptacle grounding.
Psion Omnii Hand-Held Computer User Manual
145
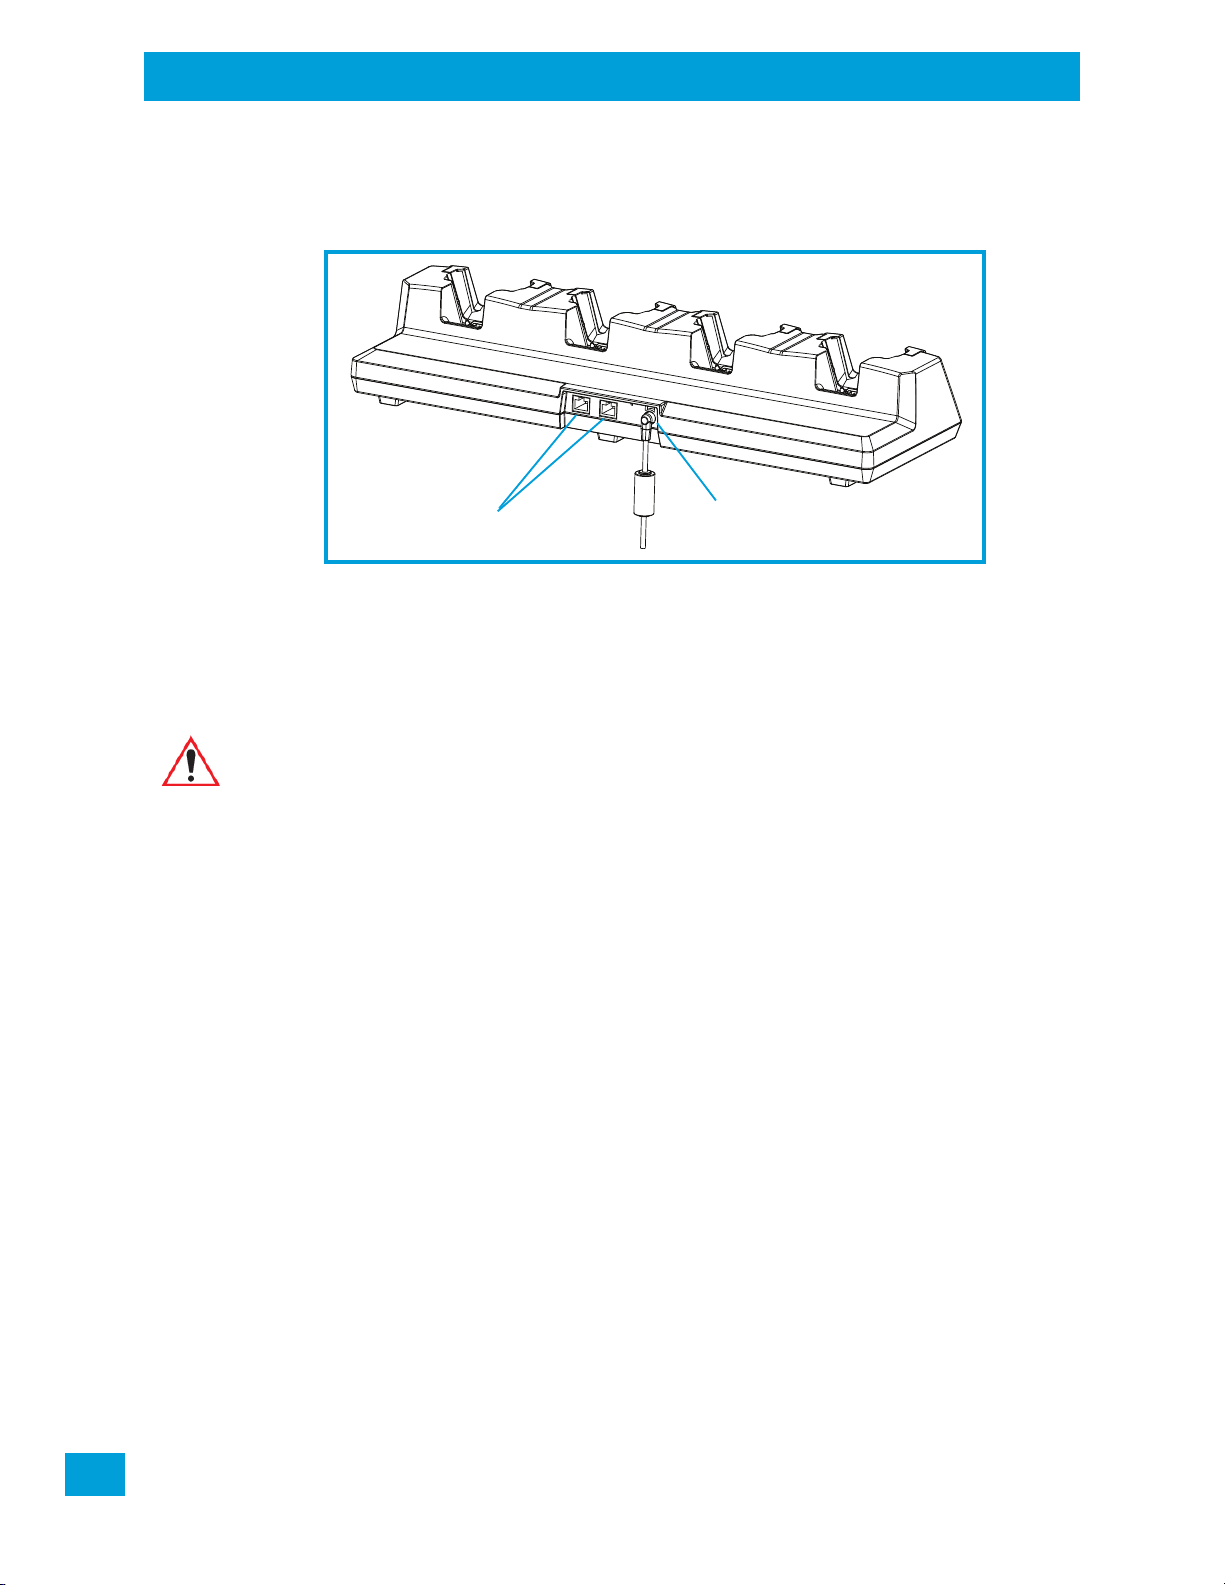
Chapter 5: Accessories
RJ45 Ethernet ports
DC In connector
Regulatory Draft
Cleaning the ST4004
5.6.3.3 Connecting to the Ethernet Network
Figure 5.15 ST4004 Quad Docking Station Rear View
Network Access
Omnii automatically detects insertion into the docking station and loads the appropriate drivers to communicate with the network.
5.6.4 Cleaning the ST4004
Important: Do not immerse the unit in water. Dampen a soft cloth with mild detergent to wipe
• Use only mild detergent or soapy water on a slightly damp cloth to clean the ST4004. Avoid abrasive
cleaners, solvents or strong chemicals for cleaning. The plastic case is susceptible to harsh chemicals.
The plastic is partially soluble in oils, mineral spirits and gasoline. The plastic slowly decomposes in
strong alkaline solutions.
• To clean ink marks from the label, use isopropyl alcohol.
the unit clean.
5.6.5 Troubleshooting
5.6.5.1 Omnii Charge Indicator LED Stays Off
When Omnii is docked in a powered ST4004 and the hand-held charge indicator LED stays off, there may
be a problem with Omnii or with the docking station. Use an Omnii with a properly functioning charge indicator to isolate the problem.
5.6.5.2 Power LED Does Not Light Up
• Remove all Omnii units, and unplug the docking station.
• Connect another device to the mains outlet to ensure there is power.
• Remove the IEC mains power cable from the charger, and check it for damage.
• Reconnect the mains cable in the charger and mains outlet.
5.6.5.3 Omnii Charge LED Flashes Yellow
A flashing yellow Omnii charge LED (the left-most LED on the hand-held) indicates that the battery is not
within the allowable charging temperature range – 0° C and 40° C (32° F to 104° F). Allow the battery to
come to an acceptable range before reinserting Omnii in the docking station.
146
Psion Omnii Hand-Held Computer User Manual

5.6.5.4 Omnii Charge Indicator LED Flashes Red
Regulatory Draft
If the Omnii charge indicator flashes red when Omnii is in any of the four sites, the quad dock cannot read
the battery or it is not a Psion battery.
• Remove the computers and disconnect the adaptor DC power cable.
• Wait at least 20 seconds, and then plug the cable in again.
• If the Omnii indicator still shows a fault, Omnii requires service.
5.6.5.5 Powered Adaptor LED Stays Off
• Check the AC cable. Replace with the same type if the cable is suspect.
• If the adaptor LED stays OFF, the adaptor is defective and requires service.
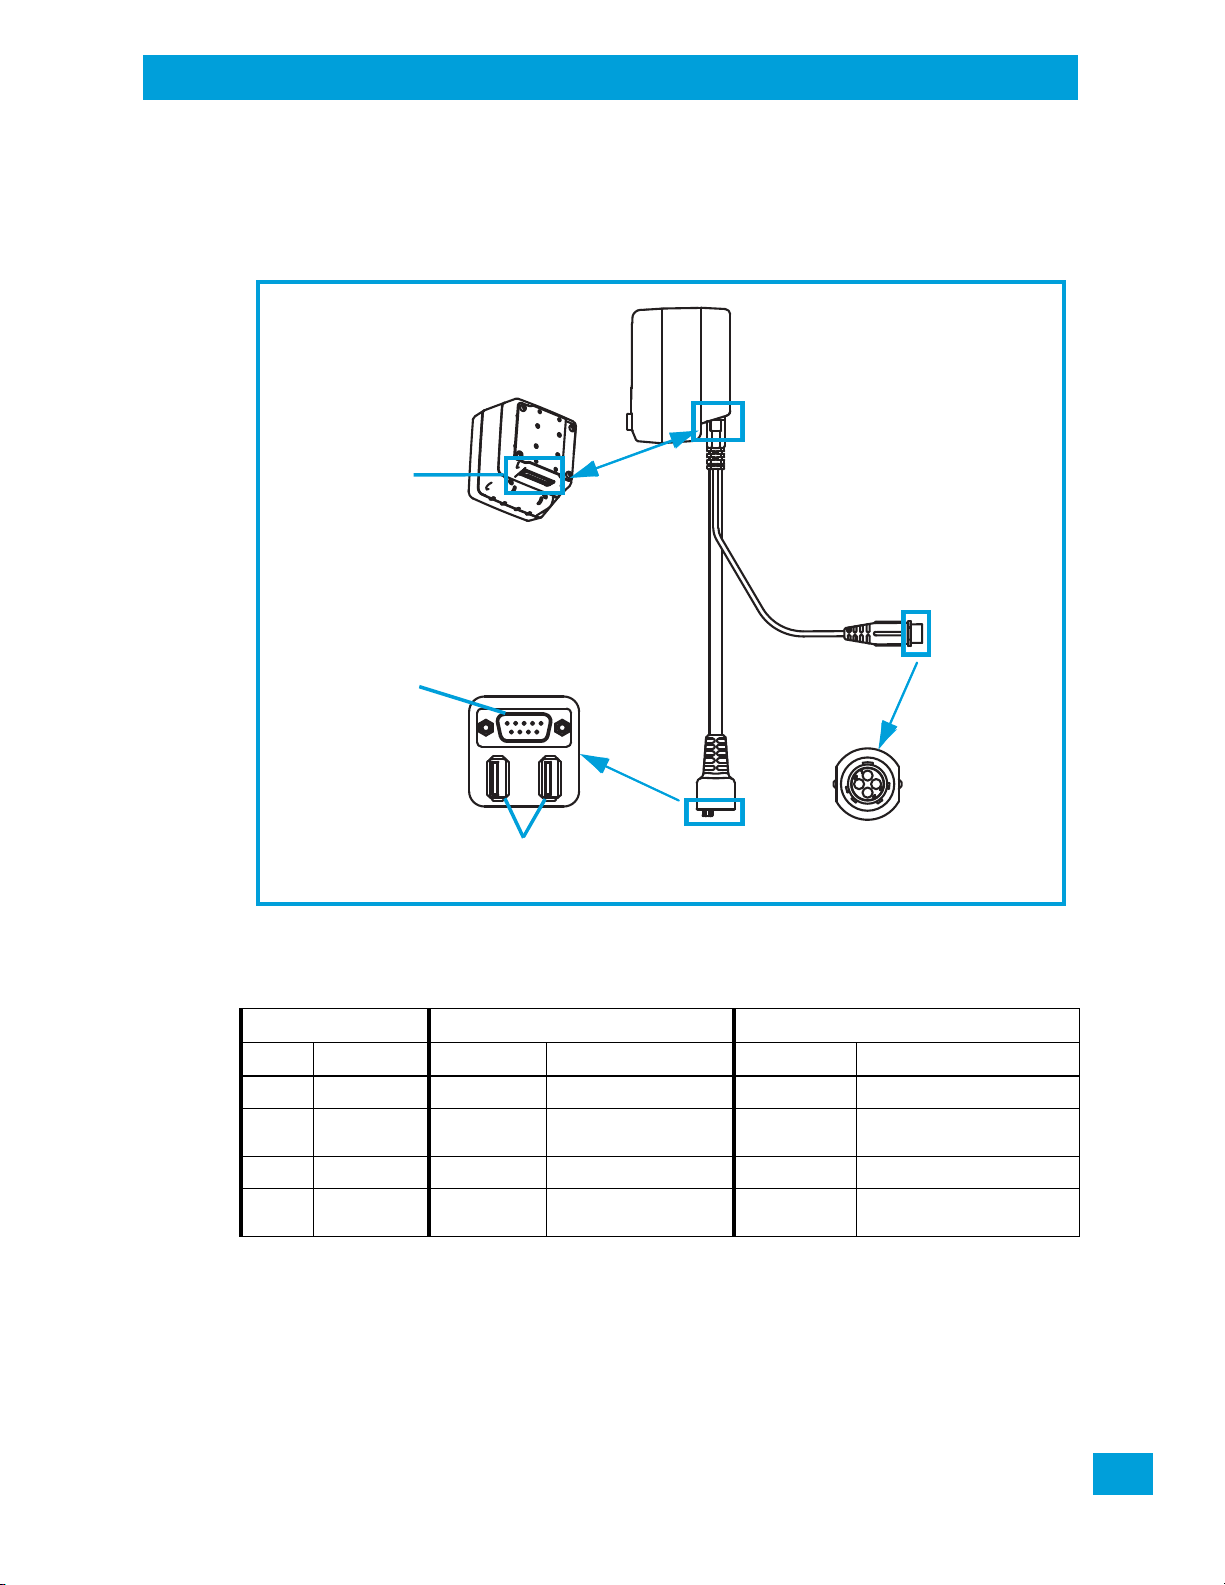
5.7 Vehicle Cradles - Models ST1000 and ST1002
The Omnii vehicle cradles are highly ruggedized, single station docks. Although they provide quick insertion
and removal, the cradles hold Omnii securely even when operated in high vibration environments (such as
vehicles not equipped with suspensions).
The Omnii vehicle cradle is available in two models:
• Model ST1000 - Unpowered cradle.
• Model ST1002 - Powered cradle with commnications ports. A DE9M serial port (powered) and two USB
Host interfaces.
Vehicle Cradles - Models ST1000 and ST1002
Chapter 5: Accessories
Figure 5.16 Front and Back of ST1002 with Omnii
Psion also supplies a range of standard mounts for the hand-held vehicle cradles, and the Omnii vehicle
cradles are compatible with all of them.
Psion Omnii Hand-Held Computer User Manual
147

Chapter 5: Accessories
MT3326 Bracket
MT3325 Arm
ST1002 Cradle
(powered)
Omnii
Regulatory Draft
Vehicle Cradle Mounting Recommendations
5.7.1 Vehicle Cradle Mounting Recommendations
Warning: Before mounting a vehicle cradle in a vehicle, there are a number of operator
Pedestal mounts are recommended for all fixed mount locations because they offer optimal operator
access. In addition, for safety reasons, only pedestal mounts with fully locking joints should be used in vehicles. Always adjust the pedestal for the optimum viewing angle, and securely tighten the hex and wing
screws.
The most effective way to mount the vehicle cradle is to use the MT3326 or MT3327 brackets with the
MT3324 (short arm) or MT3325 (standard arm) kit, using one of the following bases to secure the vehicle
cradle/arm assembly to the vehicle:
• VESA Plate - MT3501.
• Circular Plate - MT3502.
• Clamp Base (two sizes) - MT3505 and MT3507.
• Rail Base (two sizes) - MT3509 and MT3510.
Figure 5.17 MT3325 Standard Arm Kit with Omnii Vehicle Cradle
safety issues that require careful attention. An improperly mounted cradle may
result in one or more of the following: operator injury, operator visibility obstruction, operator distraction and/or poor ease of egress for the operator. Psion
strongly recommends that you seek professional mounting advice from the
vehicle manufacturer.
Cable routing within a vehicle cab also requires careful consideration, especially
for devices with loose cables. If you are unable to obtain suitable advice, contact
Psion for assistance. Note also that for better protection, the equipment should
be mounted inside the vehicle roll cage.
To accommodate the service loop of the connector cable, leave a 4" clearance at the bottom of the cradle.
Leave a 7" (minimum) clearance at the top of the cradle to allow easy removal of the hand-held. Refer to
the detailed assembly instructions that are packaged with the cradle when selecting a mounting location
(Omnii Vehicle Cradles Quick Start Guide PN 8000221).
148
Psion Omnii Hand-Held Computer User Manual

5.7.2 Wiring Guidelines
Regulatory Draft
Before installing the cables between the cradle and other devices, consider the following:
• Ensure that drilling holes will not damage the vehicle or its wiring.
• Protect cable runs from pinching, overheating and physical damage.
• Use grommets to protect cables that pass through metal.
• Use plastic straps and tie-downs to secure cables and connectors in their desired location, away from
areas where they may get snagged or pulled.
• Keep cables away from heat sources, grease, battery acid and other potential hazards.
• Keep cables away from control pedals and other moving parts that may damage the cables or interfere
with the operation of the vehicle.
5.7.3 Using the Vehicle Cradle
If your Omnii is equipped with a cover, this accessory needs to be removed before installing the unit in a vehicle cradle. There is no need to remove handstraps or pistol grips from the unit.
• Slide Omnii into the cradle, and press firmly downward until it locks into place. On a vehicle, it’s a good
idea to pull up on Omnii to be certain that it is secure.
• To remove Omnii, press firmly on one of the knobs on either side of the cradle until it releases. You do
not need to press both knobs.
5.7.4 Maintaining the Vehicle Cradle
Two latches in the cradle hold Omnii firmly in place. Although these latches are designed for at least
100,000 insertion and removal cycles, they will wear over time and will no longer lock Omnii securely in the
cradle. For replacement parts and instructions contact Psion. Partial disassembly is required.
Chapter 5: Accessories
Wiring Guidelines
5.7.5 Powered Vehicle Cradle Installation in High Voltage Vehicles
Warning: Voltages exceeding 30VDC are considered hazardous. Installation of powered
Due to the hazardous voltages present on these vehicles, it is necessary to ensure that the powered cradle
power supply cable connector is not accessible to the vehicle operator, and does not get exposed to water
or other liquids. Exposing an accessible power connector to water or other liquids could create a haz-
ardous situation resulting in serious injury or death. Avoiding this hazard can be accomplished in the following way.
• Use the PS1300 or PS1350 pre-regulator.
• Ensure the power connector is wrapped securely with a waterproof electrical tape and installed in a
dry location on the vehicle, away from the vehicle operator’s reach (perhaps under a vehicle dash or in
a sealed housing).
• Cover the power connector with a waterproof heat shrink material (see Section 5.7.5.1: “Extreme Wet
Environments” for additional details).
All other installation requirements outlined in this document should also be followed for High Voltage vehicles to insure safe installation and operation of the powered cradle.
cradles in vehicles that operate above 30VDC require special consideration, as
listed below.
5.7.5.1 Extreme Wet Environments
For extreme wet environments, or environments where it is difficult to restrict vehicle operator access to
the power connector, Psion offers a waterproof heat shrink kit (P/N 1030022). The kit contains 3 pieces of
waterproof, high shrink ratio heat shrink tubing which can be used to encapsulate the entire connector assembly. If using this kit, please ensure that you order sufficient material to cover installation and service, remembering that heat shrink is one-time use, and must be replaced if it is removed from the connector for
any reason.
Psion Omnii Hand-Held Computer User Manual
149

Chapter 5: Accessories
Regulatory Draft
Powered Cradle Installation
5.7.6 Powered Cradle Installation
The powered cradle option is designed to allow Omnii to be powered by a vehicle battery. The battery installed in Omnii is also recharged by the vehicle battery. This option accepts DC power sources over the
range 12V to 24V, voltages above that require the use of the preregulator (Model No. PS1350).
Warning: Applying a voltage greater than that specified, or reversing polarity, may result in
The Omnii vehicle cradle can be ordered with the powered cradle option installed, or it can be retrofitted
later at an authorized Psion service depot.
The Omnii charging LED (see “Battery Charge Status LED” on page 28) indicates that external power is
available, and it also indicates the charging status of the internal battery.
permanent damage to the cradle power option and will void the product warranty.
5.7.7 Wiring Vehicle Power to the Cradle
An optional 1.8 meter (6 foot) extension power cable (P/N 13985-301 with motion detect or 13985-302) is
available for your powered vehicle cradle. This cable should be wired to a filtered, fused (maximum 10A) accessory supply on the vehicle. The power cradle draws no more than 4A (less if the accessory supply is
greater than 12V). Any additional wiring, connectors or disconnects used should be rated for at least 10A.
Note: When connecting P/N 13985-301 (Screen Blanking version), ensure that the screen blanking
wires (clearly labelled) and the power wires (red/black leads) are reliably secured away from
each other, or are separated with reliably secured certified insulation. A minimum 2.8mm
distance, or 0.4mm distance through insulation, is required for the separation.
The red lead of the power cable attaches to the positive vehicle supply. The black lead connects to the negative supply—this should be connected to a proper terminal block and not to the vehicle body. The power
cradle is fully isolated and can be used with both negative and positive chassis vehicles.
You may have the option of connecting power before or after the ‘key’ switch. It is preferable to wire the
power cradle after the key switch—that is, it cannot be turned on without the key on. However, if the operator switches the key off repeatedly for long periods during a shift, it may make more sense to wire the
cradle before the switch.
Keep in mind that Omnii will continue to operate with or without vehicle power as long as its battery has
sufficient charge. If an unfused power source must be used, a fuse assembly (P/N 19440-300) must be
added to the extension power cable (the fuse and instructions are supplied with the cable). Use only a 10A
slow blow UL approved fuse in the fuse assembly.
150
Psion Omnii Hand-Held Computer User Manual

5.8 Battery Charger (6-Slot) - Model ST3006
Regulatory Draft
The ST3006 is designed to charge up to six Omnii lithium-ion batteries at one time.
Battery Charger (6-Slot) - Model ST3006
Chapter 5: Accessories
Important: Keep in mind when ordering a charger, you must also order an IEC-320 C13 power
Figure 5.18 ST3006 Battery Charger
5.8.1 Installation
The charger can be wall mounted using the wall mount kit (MT2031) or it can be operated on a flat surface.
Install the charger in an area that is free from excessive dirt, dust and contaminants. The ambient temperature must be in the range 5°C to 39°C (41°F to 102°F). The charger will not charge batteries outside of this
temperature range. For maximum performance, it is recommended that the charger be operated at room
temperature—a temperature range between 18°C to 25°C (64°F to 77°F).
The charger can consume up to 6 A at 120 VAC, 3A at 240 VAC. Check to ensure the mains circuit supplying
the charger is adequate for this loading (especially if several chargers are being powered from the same
circuit). After unpacking the unit:
• Visually check the charger for damage.
• Install the IEC power cord and apply power.
cord separately.
Important: Use IEC-320 C13 power cords approved by Psion, with the ground pin connected
to a proper earth-grounded receptacle. Check with a qualified electrician if you are
uncertain of your receptacle grounding.
All charge indicators flash momentarily at power up to indicate that the charger is ready for operation.
If you choose to wall mount the charger, detailed installation instructions are included in the Omnii 6-Slot
Battery Charger ST3006 Quick Start Guide (PN 8000204) included with the charger kit. Be sure to locate
the charger in an area where there is no risk of injury to persons walking in the vicinity.
5.8.2 Operator Controls
The gang charger does not have operator controls or a power switch. There is no dedicated indicator light
to show that the charger is powered, but the charge slot LEDs will light.
Psion Omnii Hand-Held Computer User Manual
151

5.8.3 Charge Indicators
Regulatory Draft
Each battery charge slot is equipped with four LEDs to indicate the charge status of the battery. When the
Omnii batteries are inserted in the charger, the colour and behaviour of the LEDs associated with the
charge wells in use indicate the status of the charge.
Table 5.6 Charge Status Indicator LEDs
Charge LED Behaviour Function
OFF No battery detected.
Solid Green Battery charging complete. Each LED represents 25% battery capacity.
Flashing Green Charge in progress. Each LED represents 25% battery capacity.
Flashing Yellow Battery is not charging due to out-of-temperature conditions.
Solid Red Unable to read battery or non Psion battery.
5.8.4 Charging Batteries
• Install the battery with the battery contacts facing the charger. Slide the battery between the guide
rails until it lightly latches in place.
The 4-LED bar for the battery bay shows 25% charger per LED. A flashing green LED shows charging is
under way. The LED directly below the slot in which a battery is inserted lights up immediately. If the
battery temperature is outside 5°C to 39°C (41°F to 102°F), the LED flashes yellow until the temperature is
acceptable. A fully discharged battery will normally take from 3 to 4 hours to charge. At full capacity, it
turns solid green.
When the battery is fully charged, the charger stops applying power; the battery cannot be overcharged if
left in the charger slot.
Chapter 5: Accessories
Charge Indicators
5.8.5 Troubleshooting
5.8.5.1 Improper Battery Storage
Storing batteries in the gang charger for extended periods (more than a week or two) is not recommended.
Lithium-ion batteries lose capacity if they are maintained at full charge for long periods of time. See the
battery handling recommendations in “The Battery” on page 14.
5.8.5.2 Power LED Does Not Light Up
• Remove all batteries, and unplug the charger.
• Connect another device to the mains outlet to ensure there is power.
• Remove the IEC mains power cable from the charger, and check it for damage.
• Reconnect the mains cable in the charger and mains outlet.
5.8.5.3 Indicator Does Not Light When Battery Installed
• Remove the battery, and clean the contacts on the battery and the charge slot.
• Reinstall the battery, and check that it is fully seated in the slot.
• Inspect the charge slot contacts for damage (are they bent, flattened, twisted or broken).
• Try inserting a battery that you know to be working in the charger slot.
• Reconnect the mains power cable, and check that the slot indicator flashes at power up.
Psion Omnii Hand-Held Computer User Manual
152

A
Regulatory Draft
APPENDIX: PORT PINOUTS
APort Pinouts
A.1 Omnii Docking Connector ...................................................A-3
A.2 Snap Modules Connectors...................................................A-4
A.3 Cable Connectors for Vehicle Cradle Model ST1002....................................A-5
A.4 Omnii Battery Contacts.....................................................A-6
Psion Omnii Hand-Held Computer User Manual
A-1

Regulatory Draft

A.1 Omnii Docking Connector
Regulatory Draft
The docking interface on the base of Omnii is custom-designed to dock with a device via an array of springmounted pins.
The following are the pin assignments of the interface.
Table A.1 Docking Connector Pinout
Pin # Signal Pin # Signal
1 GROUND 11 USB_OTG_P
2DC_IN 12 USB_OTG_M
3DOCK_LOW_PWR 13 CHARGE_IN
4GROUND 14 GROUND
5 USB_OTG_VBUS 15 DC_IN
6CHARGE_IN 16 UART_RX
7GROUND 17 GROUND
8DC_IN 18 UART_TX
9USBH_P 19 CHARGE_DATA
10 USBH_M 20 GROUND
Appendix A: Port Pinouts
Omnii Docking Connector
Psion Omnii Hand-Held Computer User Manual
A-3

Appendix A: Port Pinouts
ST4001
ST4005
USB Type A connector
USB Micro B connector
(USB host)
(USB device/ActiveSync)
Powered DE9M serial port
Regulatory Draft
Snap Modules Connectors
A.2 Snap Modules Connectors
• Model ST4000 (Charger only variant): power and charge.
• Model ST4001 (USB Host/Client variant): power, charge, communications via USB 1.1/2.0 Host and
USB 2.0 Client connectors, DC IN port.
• Model ST4005 (DE9M Serial variant): powered DE9M serial connector, power, charge, serial communications. Pin 9 is reserved for 5V 1A max power out and is defaulted to off.
The following are the pin assignments of the interfaces.
Table A.2 Snap Modules Connectors Pinout
ST4001 ST4005
USB Micro B Connector USB Type A Connector DE9M Serial Connector
Pin # Signal Pin # Signal Pin # Signal
1VCC 1VBus 1 DCD
2D- 2D- 2 RXD
3D+ 3D+ 3 TXD
4 ID 4GROUND 4 DTR
5 GROUND 5 SHIELD 5 GROUND
6SHIELD 6 DSR
7RTS
8CTS
95Vdc 1A power out
A-4
Psion Omnii Hand-Held Computer User Manual
Cable Connectors for Vehicle Cradle Model ST1002
44-pin connector
CA3001 Vehicle Cradle Power and
Communications Cable
ST1002 Vehicle Cradle
USB Type A connectors
(USB host)
DE9M serial port
Power connector
Regulatory Draft
A.3 Cable Connectors for Vehicle Cradle Model ST1002
The ST1002 Vehicle Cradle has a 44-pin connector that allows connection with either the CA3001 Vehicle
Cradle Power and Communications Cable (DE9M serial port, 2 USB Host interfaces, and power cable) or the
power-only CA3000 Vehicle Cradle Power Cable. For installation details, see “Powered Cradle Installation”
on page 150.
Appendix A: Port Pinouts
The following are the pin assignments of the interfaces.
Table A.3 CA3001 Vehicle Cradle Cable Connectors Pinout
USB Type A DE9M Serial Power
Pin # Signal Pin # Signal Pin # Signal
1VBus 1 VIN 1 VIN (11.5 to 30Vdc)
2 D- 2 GND (not chassis
3 D+ 3 MOTION DETECT 3 MOTION DETECT
4 DGROUND 4 MOTION DETECT
ground)
RETURN (not ground)
2 GND (not chassis ground)
4 MOTION DETECT RETURN
(not ground)
Psion Omnii Hand-Held Computer User Manual
A-5
Appendix A: Port Pinouts
7 6 5 4 3 2
1
Regulatory Draft
Omnii Battery Contacts
A.4 Omnii Battery Contacts
Figure A.1 Battery Contact Pinout
Table A.4 Battery Contact Pinout
Pin # Signal Name Description
1 BATT-RAW Positive lead of battery.
- Plastic Rip - provides mechanical polarity.
2 BATT-RAW Positive lead of battery.
3BATT-CLK SMBus data clock.
4 BATT-ID 0 Ω to NEG.
5 BATT-DATA SMBus bi-directional data line.
6 GND Negative lead of battery.
7 GND Negative lead of battery.
A-6
Psion Omnii Hand-Held Computer User Manual

APPENDIX: IMAGER &
Regulatory Draft
B
BImager & Came ra Se ttings
B.1 Required Applets.........................................................B-3
B.2 Presets ..............................................................B-3
B.2.1 Predefined Presets .................................................B-3
B.2.2 Barcode Predefined Presets (Barcoding Menu).................................B-3
B.2.2.1 Barcode Decoding Symbology Predefined Presets.........................B-4
B.2.2.2 Barcode Decoding Camera Predefined Presets...........................B-4
B.2.3 Image Capture Predefined Presets (Imaging Menu)..............................B-4
B.3 Using the Imagers Applet....................................................B-5
B.3.1 Configuring the Image Capture Presets (Imaging Menu) ...........................B-5
B.3.1.1 Selecting a Camera............................................B-5
B.3.1.2 Setting the Active Preset........................................B-5
B.3.1.3 Viewing a Preset.............................................B-6
B.3.1.4 Creating a Custom Preset........................................B-6
B.3.1.5 Modifying a Custom Preset.......................................B-6
B.3.1.6 Removing a Custom Preset.......................................B-7
B.3.2 Configuring the Barcode Decoding Camera Presets (Barcoding Menu)...................B-7
B.3.2.1 Selecting a Camera............................................B-8
B.3.2.2 Setting the Active Preset........................................B-8
B.3.2.3 Viewing a Preset.............................................B-8
B.3.2.4 Creating a Custom Preset........................................B-9
B.3.2.5 Modifying a Custom Preset.......................................B-9
B.3.2.6 Removing a Custom Preset......................................B-10
B.3.3 Configuring the Barcode Decoding Symbologies (Barcoding Menu)....................B-10
B.3.3.1 Setting the Active Preset........................................B-11
B.3.3.2 Viewing a Preset.............................................B-11
B.3.3.3 Creating a Custom Preset........................................B-11
B.3.3.4 Modifying a Custom Preset......................................B-12
B.3.3.5 Removing a Custom Preset......................................B-13
B.3.4 Barcoding Menu – Configuring Symbologies..................................B-13
B.3.5 Filter Menu – Manipulating Barcode Data ...................................B-13
B.3.5.1 Modifying a Barcode Setting.....................................B-13
B.3.6 Translation Menu – Configuring Rules .....................................B-14
B.3.7 Advanced Menu..................................................B-15
B.3.7.1 File Locations for Captured Images.................................B-15
B.3.7.2 Configuring Triggers..........................................B-15
B.4 Barcode Symbologies.....................................................B-16
B.4.1 Imager Barcode Symbologies..........................................B-17
B.4.2 Color Camera Barcode Symbologies......................................B-18
CAMERA SETTINGS
Psion Omnii Hand-Held Computer User Manual
B-1

Regulatory Draft

The Imagers applet is used to create, modify, delete, and activate imager settings. The principal uses of the
Regulatory Draft
application are to decode barcodes and to capture images. This imager services application is used for
cameras and imagers to configure linear (1D), stacked linear, matrix (true 2D) and postal barcodes. A Dem-
onstration Application is provided to demonstrate how the imager works. Refer to “Demo” on page 37 for
details.
B.1 Required Applets
In order to configure imaging, the Manage Triggers applet must be present in the Control Panel, along with
the Imagers applet.
Note: The Imagers icon is only displayed when the appropriate imager is installed in your Omnii. If
there is an imager installed but this icon is not present, additional software (ICS) may need
to be installed.
To enable a newly-installed imager, press and hold down the [FN] key and the
[ENTER/Power] key simultaneously for a minimum of three seconds.
B.2 Presets
There are two methods that can be used to configure an imager using the Imagers applet:
• Use a predefined preset.
• Create a custom preset based on a predefined preset.
Appendix B: Imager & Camera Settings
Required Applets
Important: It is strongly recommended that a predefined preset is used whenever
A preset is a group of exposure and image correction settings. Each preset configures the imager for a specific purpose such as barcode decoding or image capture.
Presets also allow easier and faster configuration of the imager after power-on or resume from suspend.
The predefined presets are generic and satisfy most user requirements. A custom preset can be created for
a specific user application, such as: include only specified barcodes, read only a specified number of barcodes or for reading unusual media.
Every preset belongs to a preset type. The following preset types are available:
• Imaging for photo capture.
• Imaging for barcode decoding.
• Symbology selection.
At any time, only one preset of each type can be designated as the user-selected active preset.
possible. Each predefined preset contains a coherent group of settings
that are known to work together in the intended environment. In
almost all situations, at least one of the predefined presets results in
a satisfactory outcome.
B.2.1 Predefined Presets
Predefined presets are built into the imaging software and cannot be changed. The predefined presets
allow you to use the imager to perform specified tasks without having to understand and set numerous variables. In almost all cases these predefined presets are sufficient.
B.2.2 Barcode Predefined Presets (Barcoding Menu)
These presets encompass the majority of the most popular barcodes and their subtypes. The barcode decoding symbology predefined presets define which barcodes can be decoded. The barcode decoding
camera predefined presets determine how the barcode images are captured.
Psion Omnii Hand-Held Computer User Manual
B-3

Appendix B: Imager & Camera Settings
Regulatory Draft
Image Capture Predefined Presets (Imaging Menu)
B.2.2.1 Barcode Decoding Symbology Predefined Presets
The following presets select groups of similar barcodes for decoding.
Note: It is recommended that the default preset be used whenever possible.
My Default
This preset uses the Symbology Settings menu to define the preset. For details about the Symbology Settings menu, refer to “Barcoding Menu – Configuring Symbologies” on page B-13.
Factory D e f a u l t
This preset enables the decoding of frequently used barcodes.
All
This preset enables the decoding of all barcodes that the imager can decode.
Linear
This preset enables the decoding of all the 1D symbologies that the imager can decode.
Linear and PDF417
This preset enables the decoding of all the 1D and PDF symbologies that the imager can decode.
Matrix
This preset enables the decoding of all 2D symbologies that the imager can decode.
Postal
This preset enables the decoding of all the postal symbologies that the imager can decode.
B.2.2.2 Barcode Decoding Camera Predefined Presets
The following presets enable successful barcode image capture in almost all conditions.
Note: It is recommended that the default preset be used whenever possible.
Default
This preset works in a wide range of conditions. It is optimized for a normal office lighting (about 300 Lux).
Low Light
This preset is designed for very dark conditions such as inside a warehouse where the lights are kept low, or
inside an unlit truck. This preset increases either the exposure time or the gain.
Low Power
This preset minimizes the use of the flash so as to conserve the battery power on the hand-held.
Glossy Surface
This preset minimizes the use of the flash so as to reduce reflection. This preset is used to read barcodes
that are behind glass, or inside the plastic window of an envelope.
B.2.3 Image Capture Predefined Presets (Imaging Menu)
The following presets enable successful image capture in almost all conditions.
Note: It is recommended that the default preset be used whenever possible.
Default
This preset works in a wide range of conditions. It is optimized for a normal office lighting (about 300 Lux).
B-4
Psion Omnii Hand-Held Computer User Manual

Motion
Regulatory Draft
This preset uses a shorter exposure time so as to freeze motion.
Low Light Near
This preset is designed for dark conditions, it uses a longer exposure time and includes the flash.
B.3 Using the Imagers Applet
B.3.1 Configuring the Image Capture Presets (Imaging Menu)
To configure the image capture presets, open the dialog box as follows:
•Tap on Start>Settings>Control Panel.
•Tap on the Imagers icon, and if it’s not already selected, tap on the Imaging tab.
The following screen is displayed.
Figure B.1 Imaging Menu
Appendix B: Imager & Camera Settings
Using the Imagers Applet
This window lists all the presets, both predefined and custom. Presets are identified as follows:
• Predefined presets are marked as ‘R’ read-only.
• Custom presets are marked as ‘RW’ read and write.
• One preset—either predefined or custom—is marked as ‘A’ active.
B.3.1.1 Selecting a Camera
To sele c t a ca me ra:
•Tap on the Camera Presets drop-down menu to view the camera options.
•Choose a camera—specifically, Front I mage r which is located at the top of the unit.
B.3.1.2 Setting the Active Preset
An active preset has an A to the right. To set an active preset:
• Highlight the preset, and tap on the Activate button.
Psion Omnii Hand-Held Computer User Manual
B-5

Appendix B: Imager & Camera Settings
Regulatory Draft
Configuring the Image Capture Presets (Imaging Menu)
B.3.1.3 Viewing a Preset
To view the parameter settings in a preset:
• Highlight a preset, and double-tap on the View button.
The associated preset window is displayed.
• Tap on the + sign to expand the lists so that you can view the parameter settings.
B.3.1.4 Creating a Custom Preset
A new custom preset is created by modifying a preset—either a predefined preset or an existing custom
preset. To create a custom preset:
• Highlight a preset, and tap on the Add button.
A screen like the sample below is displayed.
• Type the name of the new preset in the dialog box.
•Tap on OK to save your changes.
The preset list is displayed; the new custom preset appears at the end of the list. It is marked as read and
write.
B.3.1.5 Modifying a Custom Preset
The parameter values in a custom preset can be modified. It is recommended that very few changes be
made to a custom preset. To ensure that it will work reliably, it should be as close as possible to the original
predefined preset. To change a parameter value:
• Highlight the custom preset, and double-tap on the Edit button.
B-6
Psion Omnii Hand-Held Computer User Manual

Configuring the Barcode Decoding Camera Presets (Barcoding Menu)
Regulatory Draft
•Tap on the + symbols to expand the lists so that you can view the parameter settings.
• Scroll through the parameter list until you reach the parameter that you want to change.
• For a parameter that can take a range of values:
- Highlight the parameter, and then press the [SPACE] key or double-click on the parameter.
- An associated dialog box containing the valid range of values for the parameter and the current
setting like the sample screen following is displayed.
Appendix B: Imager & Camera Settings
- Type a value in the field provided.
• For a parameter that toggles between two values such as on or off and enabled or disabled:
- Highlight the parameter and then press the [SPACE] key, or double-click on the parameter. Either
method toggles between the two available values.
• When you’ve completed your edits, tap on OK.
The parameter list is displayed; the new value for the changed parameter is shown.
•Tap on OK to exit to the preset list and save the changes.
B.3.1.6 Removing a Custom Preset
• Highlight the custom preset you want to delete, and tap on the Remove button.
A window is displayed warning you that you are about to remove a preset.
•Tap on Ye s to remove the preset or No to cancel the operation.
B.3.2 Configuring the Barcode Decoding Camera Presets (Barcoding Menu)
To configure the barcode decoding camera presets:
•Tap on Start>Settings>Control Panel>Imagers.
•Tap on the Barcoding tab.
Psion Omnii Hand-Held Computer User Manual
B-7

Appendix B: Imager & Camera Settings
Regulatory Draft
Configuring the Barcode Decoding Camera Presets (Barcoding Menu)
Figure B.2 Camera Presets
Note: The top portion of the window displays the barcode decoding camera presets.
This window lists all the presets, both predefined and the custom. Presets are identified as follows:
• Predefined presets are marked as read-only. For a description, review “Predefined Presets” on page B-
3.
• Predefined presets are marked as ‘R’ read-only.
• Custom presets are marked as ‘RW’ read and write.
• One preset—either predefined or custom—is marked as ‘A’ active.
B.3.2.1 Selecting a Camera
To sel e c t a c a m e ra:
• Tap on the Camera Presets drop-down menu to view the camera options.
•Choose a camera—specifically, Front I m ager which is located at the top of the unit.
B.3.2.2 Setting the Active Preset
An active preset has an A to the right; in Figure B.3 on page B-11, the active preset is Default. To set an
active preset:
• Highlight the preset, and tap on the Activate button.
B.3.2.3 Viewing a Preset
To view the parameter settings in a preset:
• Highlight a preset, and double-tap on the View button.
The associated preset window is displayed.
B-8
Psion Omnii Hand-Held Computer User Manual

•Tap on the + sign to expand one of the lists so that you can view the parameter settings.
Regulatory Draft
B.3.2.4 Creating a Custom Preset
A new custom preset is created by modifying a preset—either a predefined preset or an existing custom
preset. To create a custom preset:
• Highlight a preset, and tap on the Add button.
A screen like the sample following is displayed.
Configuring the Barcode Decoding Camera Presets (Barcoding Menu)
Appendix B: Imager & Camera Settings
•Type the name of the new preset in the dialog box.
•Tap on OK to save your changes.
The preset list is displayed; the new custom preset appears at the end of the list. It is marked as read and
write.
B.3.2.5 Modifying a Custom Preset
The parameter values in a custom preset can be modified. It is recommended that very few changes be
made to a custom preset. To ensure that it will work reliably, it should be as close as possible to the original
predefined preset. To change a parameter value:
• Highlight the custom preset, and double-tap on the Edit button.
Psion Omnii Hand-Held Computer User Manual
B-9

Appendix B: Imager & Camera Settings
Regulatory Draft
Configuring the Barcode Decoding Symbologies (Barcoding Menu)
• Tap on the + symbols to expand the lists and view the parameter settings.
• Scroll through the parameter list until you reach the parameter that you want to change.
• For a parameter that can take a range of values:
- Highlight the parameter, and then press the [SPACE] key or double-click the parameter.
- An associated dialog box containing the valid range of values for the parameter and the current
setting like the sample screen following is displayed.
- Type a value in the field provided.
• For a parameter that toggles between two values such as on or off and enabled or disabled:
- Highlight the parameter and then press the [SPACE] key, or double-click on the parameter. Either
method toggles between the two available values.
• When you’ve completed your edits, tap on OK.
The parameter list is displayed; the new value for the changed parameter is shown.
•Tap on OK to exit to the preset list and save the changes.
B.3.2.6 Removing a Custom Preset
• Highlight the custom preset you want to delete, and tap on the Remove button.
A window is displayed warning you that you are about to remove a preset.
•Tap on Ye s to remove the preset or No to cancel the operation.
B.3.3 Configuring the Barcode Decoding Symbologies (Barcoding Menu)
To configure the barcode decoding camera presets:
•Tap on Start>Settings>Control Panel>Imagers.
• Tap on the Barcoding tab.
B-10
Psion Omnii Hand-Held Computer User Manual

Configuring the Barcode Decoding Symbologies (Barcoding Menu)
Regulatory Draft
Figure B.3 Viewing Barcode Decoding Symbologies
Note: The bottom portion of the window displays the barcode decoding barcode presets.
Appendix B: Imager & Camera Settings
B.3.3.1 Setting the Active Preset
An active preset has an A to the right; in Figure B.3 on page 11, the active preset is Default. To set an active
preset:
• Highlight the preset, and tap on the Activate button.
B.3.3.2 Viewing a Preset
To view the parameter settings in a preset:
• Highlight a preset, and double-tap on the View button.
The associated preset window is displayed.
• Tap on the + sign to expand one of the lists so that you can view the parameter settings.
B.3.3.3 Creating a Custom Preset
A new custom preset is created by modifying a preset—either a predefined preset or an existing custom
preset. To create a custom preset:
• Highlight a preset, and tap on the Add button.
A screen like the sample following is displayed.
Psion Omnii Hand-Held Computer User Manual
B-11

Appendix B: Imager & Camera Settings
Regulatory Draft
Configuring the Barcode Decoding Symbologies (Barcoding Menu)
• Type the name of the new preset in the dialog box.
•Tap on OK to save your changes.
The preset list is displayed; the new custom preset appears at the end of the list. It is marked as read and
write.
B.3.3.4 Modifying a Custom Preset
The parameter values in a custom preset can be modified. It is recommended that very few changes be
made to a custom preset. To ensure that it will work reliably, it should be as close as possible to the original
predefined preset. To change a parameter value:
• Highlight the custom preset, and double-tap on the Edit button.
B-12
• Tap on the + symbols to expand the lists and view the parameter settings.
• Scroll through the parameter list until you reach the parameter that you want to change.
• For a parameter that can take a range of values:
- Highlight the parameter, and then press the [SPACE] key or double-click the parameter.
- An associated dialog box containing the valid range of values for the parameter and the current
setting like the sample screen following is displayed.
- Type a value in the field provided.
• For a parameter that toggles between two values such as on or off and enabled or disabled:
- Highlight the parameter and then press the [SPACE] key, or double-click on the parameter. Either
method toggles between the two available values.
• When you’ve completed your edits, tap on OK.
The parameter list is displayed; the new value for the changed parameter is shown.
•Tap on OK to exit to the preset list and save the changes.
Psion Omnii Hand-Held Computer User Manual

B.3.3.5 Removing a Custom Preset
Regulatory Draft
• Highlight the custom preset you want to delete, and tap on the Remove button.
A window is displayed warning you that you are about to remove a preset.
•Tap on Ye s to remove the preset or No to cancel the operation.
B.3.4 Barcoding Menu – Configuring Symbologies
To view the Symbology Settings options:
•Tap on the Barcoding tab, highlight All and then double-tap the View button.
To edit a default preset, you must first activate it:
•Tap on My Default, and tap on the Activate button – an A appears to the right of My Default.
Once the preset is activated, you can enable or disable the barcodes the imager will read.
• Highlight My Default in the Barcoding tab.
• Double-tap on the Edit button.
None of the other barcode decoding predefined presets are changed.
B.3.4.1 Symbology Settings
Note: For descriptions of the barcode symbologies, review “Barcode Symbologies” on page B-
16.
Appendix B: Imager & Camera Settings
Barcoding Menu – Configuring Symbologies
B.3.5 Filter Menu – Manipulating Barcode Data
To configure rules for manipulating barcode data:
•Tap on Start>Settings>Control Panel.
•Tap on the Imagers icon, and then tap on the Filter tab.
B.3.5.1 Modifying a Barcode Setting
The rules for manipulating data from selected barcode symbologies can be modified. To change the settings for a symbology:
•Tap on the + symbols to expand the lists and view the parameter settings.
• Scroll through the parameter list until you reach the parameter that you want to change.
• For a parameter that can take a range of values:
- Highlight the parameter, and then press the [SPACE] key or double-click the parameter.
- An associated dialog box containing the valid range of values for the parameter and the current
setting like the sample screen following is displayed.
Psion Omnii Hand-Held Computer User Manual
B-13

Appendix B: Imager & Camera Settings
Regulatory Draft
Translation Menu – Configuring Rules
- Type a value in the field provided.
• For a parameter that takes a single character:
- Highlight the parameter and then press the [SPACE] key, or double-click the parameter. The following screen is displayed:
• When you’ve completed your edits, tap on OK.
B.3.6 Translation Menu – Configuring Rules
Translation rules enable the automatic processing of barcode data. Up to 10 cases can be defined, each consisting of up to 10 sequential rules.
Note: Changes made to the translations configuration using the Scanner Control Panel program
are synchronized with changes made here. Changes made in either place affect both
translation tables.
•Tap on Start>Settings>Control Panel.
• Tap on the Imagers icon, and then tap on the Translations tab.
For instructions on adding, editing, and removing translation rules, refer to “Translations” on page 102.
B-14
Psion Omnii Hand-Held Computer User Manual

B.3.7 Advanced Menu
Regulatory Draft
B.3.7.1 File Locations for Captured Images
To configure the location for saved images, open the dialog box as follows:
•Tap on Start>Settings>Control Panel.
•Tap on the Imagers icon, and then tap on the Advanced tab.
Appendix B: Imager & Camera Settings
Advanced Menu
To define the location where imager files will be stored:
•Tap on the File Location button.
• Type the file Name, choose the Folder and file Typ e.
• Choose the Location in which your files will be saved.
• When you have completed all the changes, tap on the Save button.
B.3.7.2 Configuring Triggers
Viewing the Trigger Configuration
The trigger on Omnii is configured using the Manage Triggers applet. The Imagers applet provides a short-
cut to the Manage Triggers applet.
•In the Advanced tab, tap on the Trigger Control button.
• To view all the triggers and the hardware devices that are configured to use them, tap in the checkbox
next to Show all modules.
Psion Omnii Hand-Held Computer User Manual
B-15

Appendix B: Imager & Camera Settings
Regulatory Draft
Barcode Symbologies
Adding, Editing and Removing Triggers
For instruction about adding, editing and removing triggers, refer to “Manage Triggers” on page 81.
B.4 Barcode Symbologies
There are two sets of barcode symbologies, one for Imager and one for Color Camera. To display the barcodes available:
•In the Imager & Camera Settings screen, go to the Barcoding tab.
•In the Camera Presets: drop-down menu at the top of the Imager & Camera Settings screen, choose
Imager or Color Camera depending on which set of barcodes you want to work with.
• Go to the Barcode Presets.
B-16
Psion Omnii Hand-Held Computer User Manual

•Tap on an Barcode Preset to display the barcode symbologies.
Regulatory Draft
Appendix B: Imager & Camera Settings
Imager Barcode Symbologies
B.4.1 Imager Barcode Symbologies
The barcode symbologies for the Imager are listed in this section.
Tab l e B .1
Imager Barcode Symbologies
All 1D With Strong Recovery Enabled
Code 39
Code 128
EAN 13
EAN 8
UPC-E
UPC-A
UPC/EAN Sharing Settings
Code 93 (disabled)
MSI Plessey (disabled)
Psion Omnii Hand-Held Computer User Manual
B-17

Appendix B: Imager & Camera Settings
Regulatory Draft
Color Camera Barcode Symbologies
Table B .1
Imager Barcode Symbologies
Code 11 (disabled)
Interleaved 2 of 5 (disabled)
Matrix 2 of 5 (disabled)
Discrete 2 f 5 (disabled)
Telepen (disabled)
Gs1 DataBar (disabled)
TLC-39 (disabled)
2D PDF-417
2D micro PDF-417
CodaBlock F (disabled)
CodaBlock A (disabled)
2D Data Matrix
2D QR Code
2D Maxicode (disabled)
2D Aztec (disabled)
Postal: PlanNET (disabled)
Postal: PostNET (disabled)
Postal: China (disabled)
Postal: Japanese (disabled)
Postal: Kix (disabled)
Postal: Royal (disabled)
Gs1
B-18
B.4.2 Color Camera Barcode Symbologies
The barcode symbologies for the Color Camera are listed in this section.
Table B . 2
Color Camera Barcode Symbologies
All 1D With Strong Recovery Enabled
Code 39
Code 128
EAN 13
EAN 8
UPC-E
UPC-A
Code 93 (disabled)
Codabar
Interleaved 2 of 5 (disabled)
Gs1 DataBar (disabled)
Psion Omnii Hand-Held Computer User Manual

Tab l e B . 2
Regulatory Draft
Color Camera Barcode Symbologies
Gs1 Composite
2D PDF-417
2D micro PDF-417
2D Data Matrix
2D QR Code
2D Maxicode (disabled)
2D Aztec (disabled)
Postal: PlanNET (disabled)
Postal: PostNET (disabled)
Postal: Australia (disabled)
Postal: Canadian (disabled)
Postal: Japanese (disabled)
Postal: Kix (disabled)
Postal: Korean (disabled)
Postal: Royal (disabled)
Appendix B: Imager & Camera Settings
Color Camera Barcode Symbologies
Psion Omnii Hand-Held Computer User Manual
B-19

Regulatory Draft

APPENDIX: SCANNER
Regulatory Draft
C
CScanner Setti ngs
C.1 Barcode Settings.........................................................C-3
C.1.1 Scanner Options...................................................C-3
C.1.2 Restoring Default Settings.............................................C-3
C.2 Decoded (Internal) Scanners...................................................4
C.2.1 Options.........................................................5
C.2.2 Decoded (Internal) Advanced Options.......................................5
C.2.3 Decoded (Internal) Data Options..........................................6
C.3 Decoded (HHP)...........................................................7
C.4 Decoded (Intermec ISCP).....................................................7
C.4.1 Decoded (ISCP) Options ...............................................7
C.4.2 Decoded (ISCP) Advanced Options.........................................8
C.5 Non-Decoded Scanners......................................................9
C.5.1 Options........................................................ 10
SETTINGS
Psion Omnii Hand-Held Computer User Manual
C-1

Regulatory Draft

C.1 Barcode Settings
Regulatory Draft
The Scanners icon in the Control Panel provides dialog boxes in which you can tailor barcode scanner configurations and choose the barcodes your scanner will recognize.
The parameters are preset with the default settings of the decoded scanner installed in the unit. For a
listing of available scanners and their specifications, please refer to Chapter E: “Omnii Specifications”.
Appendix C: Scanner Settings
Barcode Settings
Important: To enable a newly-installed scanner, press and hold down the [FN] key and the
[ENTER/Power] key simultaneously for a minimum of three seconds.
For information on configuring the Options, Translations, and Ports settings, see
“Scanners” on page 98.
C.1.1 Scanner Options
The drop-down menu to the right of the Scanner option allows you to choose configurations for one of the
following scanner types, depending on what is installed in/on your hand-held: Decoded (internal), Decoded
(HHP), Decoded (Intermec ISCP, and Non-decoded Scanners.
The symbologies listed change to reflect the scanner you choose and the barcodes it supports. Always
defer to your barcode scanner’s programming manual when in doubt about the availability or settings for
any parameter.
Note: Your Omnii comes preconfigured from the factory for internal scanner types. The type of
Important: To improve the decode speed and performance, enable (set to ‘on’) only those
Keep in mind that some barcode types are only available when an internal imaging scanner is installed. All
internal scanners can be configured using these dialog boxes.
C.1.2 Restoring Default Settings
If you want to restore the factory defaults after making changes, the defaults can be applied to a selected
parameter, sub-tree of parameters, or all scanner parameters.
• Press and hold on a symbology (e.g., Code 128) to display a pop up a menu.
scanner installed can be determined from the System icon in the Control Panel, under the
System Properties tab.
codes that are required by the application.
Psion Omnii Hand-Held Computer User Manual
C-3

Appendix C: Scanner Settings
Regulatory Draft
Decoded (Internal) Scanners
•Choose Default subtree to reset only the parameters in the symbology you selected, or choose
Default all settings to reset all scanner parameters to default settings.
To reset a single parameter to its default setting:
• Press and hold on the parameter you want to reset.
C-4
•Choose Default parameter to reset the parameter to the default setting.
C.2 Decoded (Internal) Scanners
• Tap on the Scanner drop-down menu, and choose Decoded (internal).
Psion Omnii Hand-Held Computer User Manual

C.2.1 Options
Regulatory Draft
Note: Some options are available only for specific scanners. Refer to the option names in this sec-
tion for scanner model identification.
Dot Time (msec)
The value selected for Dot Time (msec) determines (in milliseconds) how long the targeting dot remains on
before the scanner switches to a normal scan sweep. When you double-tap on this parameter, a dialog box
is displayed in which you can enter a value of 0 msec, 200 msec or 400 msec. A value of 0 (zero) disables
the target dot.
Laser On Time
The value assigned to this parameter determines how long the laser will remain on when the scan button or
trigger is pressed.
Double-tapping on this parameter displays a dialog box in which you can enter a value between 5 and 99.
The value is measured in tenths of seconds.
C.2.2 Decoded (Internal) Advanced Options
Scan Mode
You can set the method of scanning by setting this parameter to Scan beam only, Aim with Scan: 1 trigger
pull, Aim with Scan: 2 trigger pulls, Aim with Scan on trigger release, and Continuous Scan Mode. Default is
Scan beam only.
Appendix C: Scanner Settings
Options
Aim Duration
This parameter determines the total time the aiming pattern appears before the scanner laser begins
sweeping. When you double-tap on this parameter, a dialog box is displayed in which you can enter a value
from 0 to 30 (0 to 3 sec.). A value of 0 (zero) disables the aiming-dot.
Minimum Cancel Time
The value assigned to this parameter determines the time delay before the scanner is turned off, once the
scanner trigger or button is released. This gives the scanner a minimum amount of time to complete its
current decode before the scan is cancelled when you quickly trigger on/off.
Power Mode
This parameter is a power-saving option. Tapping on it displays a screen listing two power mode options:
Continuous Power and Low Power.
In Continuous Power mode, the scanner is always on, waiting for a trigger pull or serial communication.
In Low Power mode, the scanner is in a standby state, drawing minimal power until a trigger pull or serial
communication wakes it. Keep in mind that while this option is more suitable for battery powered applications, there will be a slight delay while the scanner powers up to scan a barcode.
Low Power Timeout
To extend laser life, you can select the time the scanner remains active following a successful decode. The
scanner wakes from low power mode when a barcode is scanned—a successful decode restores normal
flashing.
This is only used if the unit’s Trigger Mode has been changed to Continuous On. If the unit is used in a fixed
mount this parameter might be used, but not if the unit is used as a hand-held.
When you double-tap on this parameter, a dialog box is displayed in which you can choose a value of 30
sec., 1 min., 2 min. or 3 min.
Note: This parameter is only used if the Trigger Mode has been set to Continuous On and Omnii is
Parameter Scanning
Setting this parameter to on enables decoding of parameter barcodes.
mounted in a fixed position; otherwise, ‘Low Power Timeout’ is not used.
Psion Omnii Hand-Held Computer User Manual
C-5

Appendix C: Scanner Settings
Regulatory Draft
Decoded (Internal) Data Options
Linear Security Level
This parameter allows you to select the security level appropriate for your barcode quality. There are four
levels of decode security for linear code types (e.g., Code 39, Interleaved 2 of 5). Higher security levels
should be selected for decreasing levels of barcode quality. As security levels increase, the scanner’s
decode speed decreases.
Double-tapping on this parameter displays a dialog box in which you can enter a value from 1 to 4.
Linear security level 1 specifies that the following code types must be successfully read twice before being
decoded:
Linear security level 2 specifies that all types of codes must be successfully read twice before being de-
coded.
Linear security level 3 specifies that code types other than the following must be successfully read twice
before being decoded. The following codes must be read three times:
Code Type Length
Codabar All
MSI Plessey 4 or less
D 5 of 5 8 or less
I 2 of 5 8 or less
Code Type Length
MSI Plessey 4 or less
D 2 of 5 8 or less
I 2 of 5 8 or less
Linear security level 4 requires that all code types be successfully read three times before being decoded.
Bi-Direction Redundancy
Note: This parameter is only valid if a “Linear Security Level” is enabled.
When this parameter is enabled, a barcode must be successfully scanned in both directions (forward and reverse) before being decoded.
C.2.3 Decoded (Internal) Data Options
Transmit Code ID Char
A code ID character identifies the scanned barcode type. In addition to any single character prefix already
selected, the code ID character is inserted between the prefix and the decoded symbol.
When you double-tap on this parameter, a dialog box is displayed in which you can choose a transmit code:
None, AIM or Symbol.
Scan Data Format
This parameter allows you to change the scan data transmission format.
Double-tapping on Scan Data Format displays the following options from which you can choose a data
format: data (as-is), data [S1], data [S2], data [S1][S2], [P] data, [P] data [S1], [P] data [S2] and
[P] data [S1][S2].
Prefix [P], Suffix [S1] and Suffix [S2]
A prefix and/or one or two suffixes may be appended to scan data for use in data editing. When you doubletap on these parameters, dialog boxes are displayed in which you can enter a value from 0 to 255.
C-6
Psion Omnii Hand-Held Computer User Manual

Appendix C: Scanner Settings
Regulatory Draft
Delete Char Set ECIs
Setting this parameter to on enables the scanner to delete any escape sequences representing Character
Set ECIs (Extended Channel Interpretations [also known as GLIs]) from its buffer before transmission.
When this parameter is enabled, the scanner transmits data from PDF417 and MicroPDF417 barcodes containing Character Set ECIs, even when the ECI Protocol is disabled.
ECI Decoder
Setting this parameter to on enables the scanner to interpret any Extended Channel Interpretations (ECIs)
supported by the scanner. This parameter has no effect on symbols that were not encoded using ECIs.
If this parameter is set to off and a symbol that was encoded using an ECI escape is scanned, the scanner
transmits the ECI escape followed by the uninterpreted data.
The barcode symbologies for the scanner are listed in Table C.1.
Tab l e C . 1
Decoded (Internal) Barcode Symbologies
Code 39 UPC/EAN Shared Settings
Trioptic Code (disabled) Code 93 (disabled)
Code 128 Codabar (disabled)
EAN 13 MSI Plessey (disabled)
EAN 8 Interleaved 2 of 5 (disabled)
UPC-A Discrete 2 f 5 (disabled)
UPC-E Gs1 DataBar (disabled)
Decoded (HHP)
C.3 Decoded (HHP)
To configure imagers, please see Appendix B: “Imager & Camera Settings”.
C.4 Decoded (Intermec ISCP)
•Tap on the Scanner drop-down menu, and choose Decoded (Intermec ISCP).
C.4.1 Decoded (ISCP) Options
Laser On Time
The value assigned to this parameter determines how long the laser will remain on when the scan button or
trigger is pressed.
Psion Omnii Hand-Held Computer User Manual
C-7

Appendix C: Scanner Settings
Regulatory Draft
Decoded (ISCP) Advanced Options
Double-tapping on this parameter displays a dialog box in which you can enter a value between 1 and 10
seconds.
C.4.2 Decoded (ISCP) Advanced Options
Continuous Scan Mode
Setting this parameter to on keeps the laser on and continuously decoding as long as the scanner button is
pressed and held down.
Minimum Cancel Time
The value assigned to this parameter determines the time delay before the scanner is turned off, once the
scanner trigger or button is released. This gives the scanner a minimum amount of time to complete its
current decode before the scan is cancelled when you quickly trigger on/off.
Low Power Timeout
To extend laser life, you can select the time the scanner remains active following a successful decode. The
scanner wakes from low power mode when a barcode is scanned—a successful decode restores normal
flashing.
When you double-tap on this parameter, a dialog box is displayed in which you can choose a value of 30 sec,
1 min, 2 min, or 3 min.
Note: This parameter is only used if the Trigger Mode has been set to Continuous On and the unit
is mounted in a fixed position; otherwise, ‘Low Power Timeout’ is not used.
Parameter Scanning
Setting this parameter to Enabled allows decoding of parameter barcodes.
Same Read Validate
The data is only transmitted after repeated reads give the same result. The value assigned at this parameter determines the number of reads required, from 0 to 10 times.
Same Read Timeout
Prevents the same barcode from being read more than once. The value assigned determines after what
time period the scanner will timeout, from 0 to 2550 msec.
Diff Read Timeout
Prevents unwanted reading of other barcodes on the same label. The value assigned determines after what
time period the scanner will timeout, from 0 to 2550 msec.
Add AIM ID Prefix
The AIM ID (Association for Automatic Identification and Mobility) is an international barcode identifier.
When this parameter is enabled, the AIM ID is inserted at the beginning of the decoded barcode.
C-8
Psion Omnii Hand-Held Computer User Manual

The barcode symbologies for the scanner are listed in Table C.2.
Regulatory Draft
Tab l e C . 2
Decoded (Intermec ISCP) Barcode Symbologies
Code 39 TLC-39 (disabled)
Code 128 2D PDF-417
EAN 13 2D micro PDF-417
EAN 8 Discrete 2 of 5 (disabled)
UPC-A Telepen (disabled)
UPC-E Gs1 DataBar (disabled)
UPC/EAN Shared Settings Composite
Code 93 (disabled) TLC-39 (disabled)
Codabar (disabled) PDF-417
MSI Plessey (disabled) micro PDF-417 (disabled)
Code 11 (disabled) CodaBlock F (disabled)
Interleaved 2 of 5 (disabled) CodaBlock A (disabled)
Matrix 2 of 5 (disabled)
Appendix C: Scanner Settings
Non-Decoded Scanners
C.5 Non-Decoded Scanners
Figure C.1 Non-Decoded Scanner Options
•Tap on the Scanner drop-down menu, and choose Non-decoded.
All the available barcode symbologies for this type of scanner can be selected in this tab.
A ‘plus’ sign (+) to the left of the menu item indicates that a sub-menu of parameters is attached.
•Tap on the + sign to display the sub-menu.
• To change a parameter value, double-tap on the parameter. If you need to type a value, a dialog box is
displayed in which you can type a new value. If you need to change a yes or no value, double-tapping
on the parameter toggles between yes and no.
If you’re using the keyboard:
• Highlight the barcode you want to work with, and press the [RIGHT] arrow key to display the sub-menu.
• Use the [UP] and [DOWN] arrow keys to highlight a parameter.
• To change a parameter value, press [SPACE] or the [RIGHT] arrow key. If a field requires text entry, a
text box is displayed in which you can enter the appropriate value.
Psion Omnii Hand-Held Computer User Manual
C-9

Appendix C: Scanner Settings
Regulatory Draft
Options
C.5.1 Options
• Tap on the + sign next to Options to display these parameters.
Dot Time (msec)
The value selected for “Dot Time (msec)” determines (in milliseconds) how long the targeting dot remains
on before the scanner switches to a normal scan sweep. When you double-tap on this parameter, a dialog
box is displayed in which you can enter a value from 0 to 3000. A value of 0 (zero) disables the target dot.
Short Code
When enabled, this parameter allows scanning of short I 2 of 5 barcodes (2 characters). When disabled,
these short barcodes are rejected.
Enabling “Short Code” may reduce the robustness of the decoding since the hand-held must decode more
potential barcodes; it is therefore not recommended for general-purpose barcodes with 4 or more characters.
Veri fy
The value entered for this parameter determines the number of correct additional decodes required after
the initial decode, prior to a barcode being accepted. Higher values significantly increase the time it takes
to decode a barcode but also improve the reliability of the decoded barcode.
Security
This parameter controls the tolerance for decoding edge-to-edge barcodes (Code 93, Code 128, UPC/EAN).
Lower values have a lower tolerance for misreads, but they also increase the time it takes to decode the
barcode. The default value of 30 is generally a good compromise setting.
The barcode symbologies for the scanner are listed in Table C.3.
Table C . 3
Non-Decoded Barcode Symbologies
Code 39 Code 93 (disabled)
Code 128 Code 11 (disabled)
EAN 13 Interleaved 2 of 5 (disabled)
EAN 8 MSI Plessey (disabled)
UPC-A Discrete 2 of 5 (disabled)
UPC-E IATA 2 of 5 (disabled)
Codabar (disabled)
C-10
Psion Omnii Hand-Held Computer User Manual

INTERNAL IMAGER &
Regulatory Draft
D
SCANNER
SPECIFICATIONS
DInternal Imager & Scanner Specifications
D.1 SE955 Scanner..........................................................D-3
D.1.1 SE955 Decode Zones................................................D-3
D.2 SE1223LR - Long Range (Decoded) Scanner........................................ D-4
D.2.1 SE 1223LR Decode Zone ............................................. D-4
D.3 SE1224HP - High Performance Scanner ...........................................D-5
D.3.1 SE1224HP Decode Zones..............................................D-5
D.4 SE1524ER – Extended Range Scanner ........................................... D-6
D.4.1 SE1524ER Decode Zones............................................. D-6
D.5 EV15 Imager ...........................................................D-7
D.5.1 EV15 Imager Decode Zone.............................................D-7
D.6 EA11 Decoded 2D Imager................................................... D-8
D.6.1 EA11 Typical Reading Distances......................................... D-8
D.7 EA20X Imager......................................................... D-9
D.7.1 EA20X Typical Reading Distances........................................ D-9
D.8 HHP 5080 Imager/Decoder.................................................D-10
D.8.1 HHP 5080 Working Range............................................D-10
Psion Omnii Hand-Held Computer User Manual
D-1

Regulatory Draft

This appendix lists specifications for the following internal scanners. For a current list of model numbers
Regulatory Draft
and descriptions for Omnii scanner pod and back cover kits, please contact your Psion representative or go
to http://www.psion.com/us/products/handheld/omniit10_accessories.htm.
D.1 SE955 Scanner
Parameter SE955
Configuration Decoded
Scan Rate 104 (± 12) scans/sec (bidirectional)
Scan Angle 47º± 3º default / 35º ± 3º reduced
Voltage 3.0 -3.6 V ± 10 %;
Ambient Light: 10,000 ft. candles
Laser Safety IEC 60825
Electrical Safety UL 60950, EN/IEC 60950
EMI/RFI FCC Part 15 Class B, EN 55024/CISPR 22, AS 3548, VCCI
Environmental RoHS Compliant
Appendix D: Internal Imager & Scanner Specifications
SE955 Scanner
5 V± 10%
D.1.1 SE955 Decode Zones
Psion Omnii Hand-Held Computer User Manual
D-3

Appendix D: Internal Imager & Scanner Specifications
Regulatory Draft
SE1223LR - Long Range (Decoded) Scanner
D.2 SE1223LR - Long Range (Decoded) Scanner
Parameter SE1223LR
Light Source Visible Laser Diode 650 nm
Scan Rate 35 (± 5) scans/sec (bi-directional)
Scan Angle 23º ± 2º
Scan Patterns Linear
Minimum Print Contrast Minimum 40% absolute dark/light reflectance measured at 650 nm.
Symbologies Supported UPC/EAN, Code 128, Code 39, Code 93, I 2 of 5, Discrete 2 of 5, Codabar,
Programmable Parameters Laser On Time, Aim Duration, Power Mode, Trigger Mode, Bi-directional
Ambient Light Artificial: 450 ft. candles (4,844 Lux).
Power Input Voltage: 5.0 VDC ± 10%
Laser Classification Intended for use in CDRH Class II and IEC Class 2 devices
Electrical Safety UL, VDE, and CUL recognized component laser
Environmental RoHS-compliant
MSI, UCC/EAN 128, TriOptic Code 39.
Redundancy, Symbology types/lengths, Data formatting, Serial Parameters,
Beeper Tone.
Sunlight: 8,000 ft. candles (86,112 Lux).
Input Current: 115 mA typical
Standby Current: 70 μA max.
D.2.1 SE 1223LR Decode Zone
Table D.1
Minimum Range
Mil Size
10 11 2 24 5
15 7.5 1 39 8
20 7.5 1 48 10
40 10 2 90 19
55 10 2 120 24
70 reflective 48 200 40
100 reflective 60 240 48
High quality symbols in normal room light.
Inches
4,844 Lux to 86,112 Lux
Width of Field
Inches
Maximum
Range
Inches
Width of Field
Inches
D-4
Psion Omnii Hand-Held Computer User Manual

D.3 SE1224HP - High Performance Scanner
Regulatory Draft
Parameter SE1224HP
Type La s e r Cla s s 2
Light Source Visible Laser Diode 650 nm
Scan Rate 35 (± 5) scans/sec (bi-directional)
Scan Angle/Field of View 42º (typical), 30º (narrow)
Scan Patterns Linear
Minimum Print Contrast Minimum 25% absolute dark/light reflectance measured at 650 nm.
Symbologies UPC/EAN, Code 128, UCC/EAN 128, RSS, Code 39, Code 93, I 2 of 5, Dis-
crete 2 of 5, Codabar, MSI.
Programmable Parameters Laser On Time, Aim Duration, Power Mode, Trigger Mode, Bi-directional
Redundancy, Symbology types/lengths, Data formatting.
Ambient Light Artificial: 450 ft. candles (4844 Lux).
Sunlight: 8000 ft. candles (86112 Lux).
Laser Output Power (peak) 1.35 mW
Appendix D: Internal Imager & Scanner Specifications
SE1224HP - High Performance Scanner
D.3.1 SE1224HP Decode Zones
Psion Omnii Hand-Held Computer User Manual
D-5

Appendix D: Internal Imager & Scanner Specifications
Regulatory Draft
SE1524ER – Extended Range Scanner
D.4 SE1524ER – Extended Range Scanner
Parameter Specification
Type Laser Class 2
Light Source Visible Laser Diode 650 nm
Scan Rate 35 (±5) scans/sec (bi-directional).
Scan Angle/Field of View 13.5° ±0.7°
Scan Patterns Linear
Minimum Print Contrast Minimum 25% absolute dark/light reflectance measured at 650 nm.
Symbologies UPC/EAN, Code 128, UCC.EAN128, RSS, Code 39, Code 93, I 2 of 5, Discrete
Programmable Parameters Laser On Time, Aim Duration, Power Mode, Trigger Mode, Bi-directional
Ambient Light Artificial: 450 ft. candles (4,844 Lux)
Laser Output Power (peak) 1.26 mW
2 of 5, Codabar, MSI.
Redundancy, Symbology types/lengths, Data formatting.
Sunlight: 4,000 ft. candles (86,112 Lux).
D.4.1 SE1524ER Decode Zones
SE1524ER Decode Zone A (Short Range, Small Codes)
D-6
Psion Omnii Hand-Held Computer User Manual

SE1524ER Decode Zone B (Long Range, Large Codes)
Regulatory Draft
D.5 EV15 Imager
Appendix D: Internal Imager & Scanner Specifications
EV15 Imager
Parameter Specification
Light Source 617 nm highly visible LED
Scan Angle 40º
Minimum Print Contrast Minimum 25%
Minimum X. Dimension 0.1 mm (4 mils)
Reading Distance Up to 90 cm (35 in)
Symbologies UPC (E&A), EAN, RSS, Code 39, Code 128, UCC/EAN 128, ISBN, ISBT, Inter-
Ambient Light Works in any lighting conditions, from 0 to 100,000 lux
D.5.1 EV15 Imager Decode Zone
0 Lux to 100,000 Lux
Minimum Range
Mil Size
52.5 7
10 3 14
UPC 2 14.5
20 2.5 22
40 3 35.5
High quality symbols in normal room light.
leaved, Matrix, Industrial and Standard 2 of 5, Codabar, Code 93/93i, Code 11,
MSI, Plessey, Telepen, PDF417, Micro PDF417
Maximum Range
Inches
Inches
Psion Omnii Hand-Held Computer User Manual
D-7

Appendix D: Internal Imager & Scanner Specifications
Regulatory Draft
EA11 Decoded 2D Imager
D.6 EA11 Decoded 2D Imager
Parameter Specification
Scan Rate 2D mode: 56 images/s auto adaptive
Linear Emulation Mode 200 scans/s auto adaptive
Scan Angle 38.9° (horizontal), 25.4° (vertical)
Optical Resolution 752 (H) x 480 (V) pixels, 256 gray levels
Print Contrast down to 25%
Versions Standard range and high density
Symbologies - 1D
Symbologies - 2D
Voltage (optics) 3.3V -5% / +10% (typical values)
Operating Current 170mA - 310mA (lighting condition dependent)
Power Saving Mode 2mA
Ambient Light Works in any lighting conditions, from 0 to 100,000 lux
Regulatory Approvals UL, VDE certified, RoHS compliant
EAN/UPC, GS1 Databar (limited expanded & omni-directional), RSS, Code 39, Code
128, UCC/EAN 128, ISBN, ISBT, Interleaved/Matrix/ Industrial and Standard 2 of 5,
Codabar, Code 93/93i, Code 11, MSI, Plessey, Telepen, postal codes (Australian Post,
BPO, Canada Post, Dutch Post, Japan Post, PostNet, Sweden Post)
Data Matrix, PDF417, Micro PDF 417, Codablock Maxicode, QR, Aztec GS1 composite
codes
D.6.1 EA11 Typical Reading Distances
D-8
Psion Omnii Hand-Held Computer User Manual

D.7 EA20X Imager
Regulatory Draft
Parameter Specification
Light Source 617nm highly visible LED, 650nm laser framing/aiming
Scan Rate 2D mode: 60 images/s auto adaptive
Linear Emulation Mode 200 scans/s auto adaptive
Scan Angle 26.0° (horizontal), 16.8° (vertical)
Framing Angles 25.0° (horizontal), 16.0° (vertical)
Optical Resolution 752 (H) x 480 (V) pixels, 256 gray levels
Print Contrast down to 30% on 1D, 35% on 2D
Minimum Resolution 1D symbologies 0.15 mm (6 mil), Stacked (PDF417) 0.17 (6.6 mil) and 2D matrix 0.18 (7mil)
Symbologies - 1D
Symbologies - 2D
Voltage 3.3V± 5%
Operating Current 410mA @ 3.3V scanning with power save
Power Saving Mode 7mA
Ambient Light From 0 to 100,000 lux
Regulatory Approvals UL, cUL, VDE certified, RoHS compliant, Class 2 Laser
Appendix D: Internal Imager & Scanner Specifications
EAN/UPC, GS1 Databar (limited expanded & omni-directional), RSS, Code 39, Code 128,
UCC/EAN 128, ISBN, ISBT, Interleaved/Matrix/ Industrial and Standard 2 of 5, Codabar,
Code 93/93i, Code 11, MSI, Plessey, Telepen, postal codes (Australian Post, BPO, Canada
Post, Dutch Post, Japan Post, PostNet, Sweden Post)
Data Matrix, PDF417, Micro PDF 417, Codablock Maxicode, QR, Aztec GS1 composite codes
EA20X Imager
D.7.1 EA20X Typical Reading Distances
Psion Omnii Hand-Held Computer User Manual
D-9

Appendix D: Internal Imager & Scanner Specifications
Regulatory Draft
HHP 5080 Imager/Decoder
D.8 HHP 5080 Imager/Decoder
Parameter Specification
Foca l P o int - SR
Foca l P o int - SF
Image Sensor 752 x 480 CMOS sensor
Motion Tolerance 4 inches per second
Rotational Sensitivity 360°
Viewing Angle ±40°
Ambient Light Total darkness to 100,000 lux (full sunlight)
Illumination LEDs 626 nm ± 30 nm
Aiming LEDs: 526 nm ± 30 nm
Input Voltage - Imager
Input Voltage - HHP 5080
Current Draw - Imager
Current Draw - HHP 5080
Symbologies:
2 Dimensional
Linear
Postal
7 inches (17.8 cm) from lens plate
4.5 inches (11.4 cm) from lens plate
Laser: 650 nm ± 10 nm
3.3 VDC ± 5% (23°C)
3.0 VDC to 5.5 VDC (23°C)
Max. Operating Current: 100 mA; Standby Current: 100 μA
Average Current (Interlaced Mode): 510 mA; Standby Current: 120 μA ;
Peak: 600 mA
PDF417, MicroPDF417, MaxiCode, Data Matrix, QR Code, Aztec, Aztec
Mesa, Code 49, UCC Composite
Code 39, Code 128, Codabar, UPC, EAN, Interleaved 2 of 5, Reduced
Space Symbology, Code 93, Codablock
Postnet (US), Planet Code, BPO 4 State, Canadian Post, Japanese Post,
KIX (Netherlands) Post
D.8.1 HHP 5080 Working Range
Data is characterized at 23°C (73.4°F) and 0 lux ambient light.
Symbology Size (mil) Near Far
SR
Linear 8.3 (.020cm) 3.5 in. (8.9cm) 7.6 in. (19.3cm)
PDF417 10 (.025cm) 3.1 in. (7.9cm) 9 in. (22.9cm)
UPC 13 (.033cm) 2.1 in. (5.3cm) 13.2 in. (33.5cm)
Data Matrix 15 (.038cm) 2.3 in. (5.8cm) 10.2 in. (25.9cm)
QR 15 (.038cm) 3.1 in. (7.9cm) 8.8 in. (22.4cm)
MaxiCode 35 (.089cm) 2.0 in. (5.1cm) 13.0 in. (33cm)
SF
PDF417 6.6 (.017cm) 2.8 in. (7.1cm) 6 in. (15.2cm)
Linear 7.5 (.019cm) 2.5 in. (6.4cm) 6.5 in. (16.5cm)
Data Matrix 12.5 (.021cm) 3.4 in. (8.6cm) 5.7 in. (14.5cm)
QR 8.3 (.021cm) 3.4 in. (8.6cm) 5.4 in. (13.7cm)
Linear 10 Linear 2.2 in. (5.6cm) 7.6 in. (19.3cm)
UPC 13 (.033cm) 2.0 in. (5.1cm) 8.9 in. (22.6cm)
D-10
Psion Omnii Hand-Held Computer User Manual

APPENDIX: OMNII
Regulatory Draft
E
EOmnii Specifications
E.1 The Omnii Hand-Held Computer (Model 7545).......................................E-3
E.1.1 Hardware.......................................................E-3
E.1.2 Approvals.......................................................E-4
E.2 Lithium-ion Smart Battery 5000 mAh (ST3000)......................................E-5
E.3 Wireless Radios..........................................................E-6
E.3.1 Cinterion MC75i GSM/GPRS/EDGE Radio ....................................E-6
E.3.2 Cinterion PH8-P GSM/GPRS/EDGE Radio...................................E7
E.3.3 802.11a/b/g/n Radio.................................................E-9
E.3.4 Bluetooth Radio..................................................E-10
SPECIFICATIONS
Psion Omnii Hand-Held Computer User Manual
E-1

Regulatory Draft

E.1 The Omnii Hand-Held Computer (Model 7545)
Regulatory Draft
Note: Performance specifications are nominal and subject to change without notice.
E.1.1 Hardware
Physical Dimensions
• Overall: 100 mm width x 42 mm depth x 230 mm length (3.9 in x 1.6 in x 9 in).
• Keypad area: 75 mm width x 32 mm depth (2.9 in x 1.3 in).
Weight
• With battery pack, EV15 imager, and high impact display 760 g (26.8 oz.)
The Omnii Hand-Held Computer (Model 7545)
Appendix E: Omnii Specifications
Processor and Memory
• Texas Instruments
• RAM: 256 MB RAM.
• Flash Memory: configurable from 512 MB to 16 GB.
User Interface
• Colour Touch Display: 9.4 cm (3.7 in.) diagonal.
• Keyboards: Backlit, high durability hard-capped keys.
• Indicators And Controls: Four multi-colour LEDs indicate the status of the battery, application,
• Side Buttons: Volume, Scan, Enter, Vertical Scroll.
• Audio: High volume beeper: 95 dBA
• Vibration: You can set Omnii to vibrate as a result of a successful or unsuccessful
Power Management
• Rated Voltage: 5 VDC
• Rated Current: 3 A.
• Battery Pack: lithium-ion 5000 mAh capacity with 9-hour life under normal operating conditions (for
battery specifications, see “Lithium-ion Smart Battery 5000 mAh (ST3000)” on page E-5).
• Advanced Smart Battery with gas gauge.
• 3 power source options: Runs off battery, AC power, or automotive power supplies.
• Backup power: 5 minutes.
®
OMAP3® Processor 800 MHz
VGA/QVGA, 480 x 640 resolution.
High visibility version: superior sunlight visibility.
High Impact version: withstands 1.25 Joule impact.
Large selection of both alpha and numeric formats. For a list of currently
available keyboard configurations, see the Keyboard and Keypads Kits
list in the Accessories chapter.
radio, and scanner.
Integrated Microphone/Speaker.
Optional PTT Speaker.
Walkie-talkie style Push-to-Talk: VoIP over Wi-Fi
barcode scan.
Communication
• Expansion Ports: MicroSD slot for Flash expansion.
• Multiple Internal Multi-Function Expansion Interfaces with:
- 3v3 TTL serial
- USB host
- GPIO
• SIM Card slot.
Psion Omnii Hand-Held Computer User Manual
E-3

Appendix E: Omnii Specifications
Regulatory Draft
Approvals
Camera
The optional camera has the following features:
• Colour.
• 3 Megapixel.
• Autofocus.
• Manual digital 4x zoom.
• 2xLED flash.
• Video capable (optional with or without PTT speaker).
Environmental
• Standard Operating Temperature: -20°C to +50°C (-4°F to 122°F)
• Storage Temperature: -40°C to +60°C (-40°F to 140°F)
• Rain And Dust Resistance: IEC 60529, classification IP65.
• Humidity: 5% - 95% RH non-condensing
• ESD: +/- 8 kV contact, +/- 15 kV air discharge.
• Omnii RT15 Drop Durability: 1.5 m (5 ft.), 26 drops to polished concrete (powered on, with accesso-
• Omnii XT15 Drop Durability: 1.7 m (5.6 ft.), 26 drops to polished concrete (powered on, with accesso-
Long exposure to temperatures below -40°C (-40°F) may damage the
screen and main battery. Prolonged exposure to temperatures above
+60°C (+140°F) will damage the main battery, and temperatures above
+70°C (+158°F) may damage the unit.
ries); multiple 1.8 m (6 ft.) drops to polished concrete.
ries); multiple 2.0 m (6.5 ft.) drops to polished concrete.
E.1.2 Approvals
• Safety: IEC 60950-1
• EMC: FCC Part 15 Class B
• Laser: IEC 60825-1 Ed. 2.0, Class 1, Class 2
• Bluetooth:2.0
• RF: Bluetooth and 802.11a/b/g/n: EN300 328, Part 15.247
• RoHS compliant: EU Directive 2002/95/EC
EN 55022
EN 55024
EN 301 489
FDA 21 CFR 1040.10
1040.11 Class I, Class II
E-4
Psion Omnii Hand-Held Computer User Manual

Lithium-ion Smart Battery 5000 mAh (ST3000)
Regulatory Draft
E.2 Lithium-ion Smart Battery 5000 mAh (ST3000)
For safety instructions, please see “Lithium-ion Battery Safety Precautions” in the Omnii Hand-Held Computer Regulatory & Warranty Guide (PN 8000191).
Parameter Specification
Model Number ST3000
Chemistry lithium-ion (Li-Ion)
Capacity 5000 mAh nominal at 1000 mA discharge 20°C to 3.0 V (min)
Battery Life 9 hours, under normal operating conditions.
Voltage 3.7 V nominal (3.0 V min. to 4.2 V max.)
Cell Configuration 2 P1S (2 parallel connected cells)
Max. Charge Voltage 4.2 V +/- 1%
Appendix E: Omnii Specifications
Recommended Charge
Termination Timeout
Charge Temperature 0°C to +40°C (32°F to +104°F)
Discharge Temperature -20°C to +50°C (-4°F to +122°F)
Storage Temperature -20°C to +50°C (-4°F to +122 ºF). Storage at elevated temperatures
Cycle Life 300 cycles minimum with no degradation below 70% of nominal
5.0 hr - charging must stop.
not recommended.
25°C (77 ºF)—recommended storage temperature.
capacity based on 0.5C charge / 0.5C discharge rates (to 3.0 V) @
23°C (73.4 ºF).
Psion Omnii Hand-Held Computer User Manual
E-5

Appendix E: Omnii Specifications
Regulatory Draft
Wireless Radios
E.3 Wireless Radios
E.3.1 Cinterion MC75i GSM/GPRS/EDGE Radio
Parameter Specification
Manufacturer Cinterion, Model MC75i
Form Factor Quad-Band GSM 850/900/1800/1900 MHz
EDGE (E-GPRS) multi-slot class 12
GPRS multi-slot class 12
GSM release 99
Output Power Class 4 (2 W) for EGSM850
Control via AT
Commands
Supply Voltage Range 3.2 to 4.3 V
EDGE Data Transmission EDGE class 12: max 236.8 kbps (downlink)
GPRS Data Transmission GPRS class 12
CSD Data Transmission Up to 14.4 kbps, V.110
SMS Point-to-point MO and MT
Voice Triple-rate codec for HR, FR, and EFR
Interfaces Hirose U.FL-R-SMT 50 ohm antenna connector
Class 4 (2 W) for EGSM900
Class 1 (1 W) for GSM1800
Class 1 (1 W) for GSM1900
Hayes, 3GPP TS 27.007 and 27.005
Mobile station class B
Modulation and coding scheme MCS 1-9
Mobile station class B
PBCCH support
Coding schemes CS 1-4
Non-transparent mode
Text and PDU mode
Adaptive multi-rate AMR
Basic hands-free operation
Echo cancellation
Noise reduction
Antenna solder pad
Molex 80-pin board-to-board connector:
Power supply
Audio: 2x analog, 1x digital
Serial interface (ITU-T V.24 protocol)
SIM card interface 3 V, 1.8 V
E-6
Psion Omnii Hand-Held Computer User Manual

E.3.2 Cinterion PH8-P GSM/GPRS/EDGE Radio
Regulatory Draft
Tab l e E . 1
Feature Specifications
General
Frequency bands GSM/GPRS/EDGE: Quad band, 850/900/1800/1900MHz
GSM class Small MS
Output power (according to
Release 99)
HSPA features
3GPP Release 6, 7 DL 14.4Mbps, UL 5.7Mbps
UMTS features
3GPP Release 4 PS data rate - 384 kbps DL / 384 kbps UL
GSM/GPRS/EGPRS features
Data transfer GPRS:
SMS Point-to-point MT and MO
GPS features
Protocol NMEA
Modes Assisted GPS (control plane AGPS, E911)
General Power saving modes
Software
AT commands Hayes, 3GPP TS 27.007 and 27.005, and proprietary Cinterion Wireless
UMTS/HSPA+: Five band, 800/850/AWS/1900/2100MHz
Class 4 (+33dBm ±2dB) for EGSM850
Class 4 (+33dBm ±2dB) for EGSM900
Class 1 (+30dBm ±2dB) for GSM1800
Class 1 (+30dBm ±2dB) for GSM1900
Class E2 (+27dBm ± 3dB) for GSM 850 8-PSK
Class E2 (+27dBm ± 3dB) for GSM 900 8-PSK
Class E2 (+26dBm +3 /-4dB) for GSM 1800 8-PSK
Class E2 (+26dBm +3 /-4dB) for GSM 1900 8-PSK
Class 3 (+24dBm +1/-3dB) for UMTS 2100, WCDMA FDD Bd I
Class 3 (+24dBm +1/-3dB) for UMTS 1900,WCDMA FDD Bd II
Class 3 (+24dBm +1/-3dB) for UMTS AWS, WCDMA FDD Bd IV
Class 3 (+24dBm +1/-3dB) for UMTS 850, WCDMA FDD Bd V
Class 3 (+24dBm +1/-3dB) for UMTS 800, WCDMA FDD Bd VI
UE CAT. [1-6], 11, 12 supported
Compressed mode (CM) supported according to 3GPP TS25.212
CS data rate - 64 kbps DL / 64 kbps UL
• Multislot Class 10
• Full PBCCH support
• Mobile Station Class B
• Coding Scheme 1 - 4
EGPRS:
• Multislot Class 10
• EDGE E2 power class for 8 PSK
• Downlink coding schemes - CS 1-4, MCS 1-9
• Uplink coding schemes - CS 1-4, MCS 1-9
• SRB loopback and test mode B
• 8-bit, 11-bit RACH
• PBCCH support
• 1 phase/2 phase access procedures
• Link adaptation and IR
• NACC, extended UL TBF
• Mobile Station Class B
CSD:
• V.110, RLP, non-transparent
• 14.4kbps
• USSD
GPS tracking in parallel to 2G/3G diversity operation
Modules commands
Appendix E: Omnii Specifications
Cinterion PH8-P GSM/GPRS/EDGE Radio
Psion Omnii Hand-Held Computer User Manual
E-7

Appendix E: Omnii Specifications
Regulatory Draft
Cinterion PH8-P GSM/GPRS/EDGE Radio
Table E .1
Feature Specifications
SIM Application Toolkit SAT
Release 99
Audio Audio speech codecs
Interfaces
Antenna 50Ohms. Main GSM/UMTS antenna, UMTS diversity antenna, GPS antenna
USB USB 2.0 High Speed (480Mbit/s) device interface
UICC interface Supported chip cards: UICC/SIM/USIM 3V, 1.8V
Special features
Phonebook SIM and phone
Antenna SAIC (Single Antenna Interference Cancellation) / DARP (Downlink
SIM Application Toolkit SAT Release 99
GSM: AMR, EFR, FR, HR
3GPP: AMR
Speakerphone operation, echo cancellation, noise suppression
(active/passive)
Advanced Receiver Performance)
RX diversity type 3i
E-8
Psion Omnii Hand-Held Computer User Manual

Appendix E: Omnii Specifications
Regulatory Draft
802.11a/b/g/n Radio
E.3.3 802.11a/b/g/n Radio
Parameter Sub-parameter Specification
Manufacturer Murata, Model LBEH1Z9PFC
Form Factor Embedded surface mount module, 11.4 x 9.4 mm
Antenna Port 802.11b/g/n U.FL jack. Non-diversity.
Antenna Type 802.11b/g/n PCB substrate patch antenna. Covers 2400-2484 MHz @ <2.5:1 VSWR
Antenna Gain 802.11b/g/n 1.9 dBi
Transmit Power 802.11b +18 dBm typical, +19.5 dBm max
* This is a combo module containing both Wi-Fi 802.11a/b/g/n and
Bluetooth V2.1+EDR radio
Multiplexed between 802.11b/g/n (2.4GHz) and Bluetooth radio
802.11a/n U.FL jack. Non-diversity.
802.11a/n PCB substrate patch antenna. Covers 5150-5860 MHz @ <2.5:1 VSWR
802.11a/n 1.9 dBi
802.11g +13 dBm typical, +14.5 dBm max
802.11a +12 dBm typical, +13.5 dBm max
802.11n (2.4 GHz) +12 dBm typical, +13.5 dBm max
802.11n (5 GHz) +12 dBm typical, +13.5 dBm max
Frequency Range 802.11b/g/n 2400-2483.5 MHz
802.11a/n 5150-5350 MHz, 5480-5720 MHz and 5725-5845 MHz
Channels 802.11b/g/n 1 to 14.
802.11a/n 36, 40, 44, 48, 52, 56, 60, 64
RX Sensitivity 802.11b -78 dBm @ 11 Mbps
802.11g -67 dBm @ 54 Mbps
802.11a -67 dBm @ 54 Mbps
802.11n (2.4 GHz) -66 dBm @ 65 Mbps
802.11n (5 GHz) -66 dBm @ 65 Mbps
Data Rates 802.11b 1,2,5.5,11 Mbps
802.11a/g 6,9,12,18,24,36,48,54 Mbps
802.11n 6.5,13,19.5,26,39,52,58.5,65 Mbps
EVM 802.11b 32% max
Up to 14 channels (depending on country).
Only 3 channels are non-overlapping.
100, 104, 108, 112, 116, 120, 124, 128, 132, 136, 140
149, 153, 157, 161, 165
Up to 24 channels (depending on country).
All channels are non-overlapping.
Bluetooth
Coexistence
E-9
Psion Omnii Hand-Held Computer User Manual
802.11g -26 dB max
802.11a -26 dB max
802.11n (2.4 GHz) -29 dB max
802.11n (5 GHz) -29 dB max
TI Wilink6 proprietary WiFi-BT co-existent scheme.

Appendix E: Omnii Specifications
Regulatory Draft
Bluetooth Radio
E.3.4 Bluetooth Radio
Parameter Specification
Manufacturer Murata, Model LBEH1Z9PFC
Form Factor Embedded surface mount module, 11.4 x 9.4 mm
Antenna Port U.FL jack (shared with Wi-Fi 802.11b/g/n radio)
Antenna Type PCB substrate patch antenna. Covers 2400-2484 MHz @ <2.5:1 VSWR
Antenna Gain 1.9 dBi
Transmit Power 6.5 dBm typical, 8.5 dBm max
Frequency Range 2.400-2.4835 GHz
Channels 79
RX Sensitivity -90 dBm typical, -70 dBm max
Data Rates V1.2=732.2 kbps and 57.6 kbps asymmetric, 433.9 kbps symmetric
802.11 Coexistence TI Wilink6 proprietary WiFi-BT co-existent scheme.
* This is a combo module containing both Wi-Fi 802.11a/b/g/n and Bluetooth
V2.1+EDR radio
V2.0=2 & 3 Mbps
E-10
Psion Omnii Hand-Held Computer User Manual

APPENDIX: WIRELESS
Regulatory Draft
F
WIDE AREA NETWORK
(WWAN) SETTINGS
FWireless Wide Area Network (WWAN) Settings
F.1 Wireless WAN...........................................................F-3
F.1.1 Taskbar Icons.....................................................F-3
F.1.2 Establishing a Connection.............................................F-3
F.1.2.1 Disconnecting From a Network.....................................F-4
F.1.2.2 Shutting Down the Wireless WAN User Interface ..........................F-5
F.1.3 Advanced Information ...............................................F-5
F.1.3.1 Entering a PIN Number.........................................F-5
F.1.3.2 Error States................................................F-5
F.1.4 Tools Menu......................................................F-6
F.1.4.1 Data Configuration............................................F-6
F.1.4.2 Security Configuration..........................................F-9
F.1.4.3 Network Configuration..........................................F-9
F.1.4.4 Driver Mode Configuration......................................F-10
F.1.4.5 Modem Information ...........................................F-11
F.1.4.6 User Interface...............................................F-11
F.1.5 SMS Menu...................................................... F-12
F.1.5.1 New.................................................... F-12
F.1.5.2 Inbox...................................................F-12
F.1.5.3 Outbox.................................................. F-13
F.1.5.4 SMS Configuration........................................... F-13
F.1.6 Voice......................................................... F-13
F.2 Power Mode ..........................................................F-13
Psion Omnii Hand-Held Computer User Manual
F-1

Regulatory Draft

F.1 Wireless WAN
Regulatory Draft
The Omnii is available with one of the following Wireless WAN (WWAN) radio options: the MC75i
GSM/GPRS/EDGE and Cinterion PH8-P GSM/GPRS/EDGE. An Omnii Hand-Held Computer equipped with a
GSM/GPRS radio has wide area networking capabilities. With either of these radios and a SIM card, you can
wirelessly transfer data, and you use the Omnii voice option to place phone calls.
F.1 .1 Ta s k b a r I c o n s
Wireless WAN icons in the taskbar indicate the status of your wide area network connection. Note that
these icons are only visible when a GSM/GPRS radio is installed in the computer, and the interface
is enabled.
The following taskbar icons are used:
•G - GSM/GPRS
•E - GSM/EDGE
User interaction is required (e.g. the user is required to enter a PIN).
A non-recoverable (fatal) error has occurred.
The modem status is unknown or the modem is not connected to any network (the signal strength is 0%).
The modem has found a network, and the signal strength is between 1% and 20%.
Appendix F: Wireless Wide Area Network (WWAN) Settings
Wireless WAN
The modem has found a network, and the signal strength is between 21% and 40%.
The modem has found a network, and the signal strength is between 41% and 60%.
The modem has found a network, and the signal strength is between 61% and 80%.
The modem has found a network, and the signal strength is between 81% and 100%.
Once the modem detects that a packet data service is available, a letter is added to the signal strength icon
indicating the kind of packet data service. Keep in mind that the signal strength icon is displayed without a
letter if packet data service is not available, or if it is available but not yet initialized.
For ex a m p l e :
The modem has found a network, the signal strength is between 41% and 60%, and GSM/GPRS packet
service is available.
The signal strength icon is replaced by a connection indicator icon when a packet data connection is
started:
A GPRS packet data connection is active.
In addition to the signal strength or connection indicator a second icon may be shown.
A new SMS (Short Message Service) message has arrived.
The dialer icon is displayed when the Voice option is available (SIM card and GPRS radio are installed).
When you have an active call, this icon flashes yellow, and then green.
F.1.2 Establishing a Connection
To display the main Wireless WAN dialog box:
• Double-tap on the Wireless WAN icon in the taskbar.
If the icon is not visible in the taskbar, the radio interface has been shut down or the modem has been removed:
•In the Control Panel, choose the Wireless WAN icon.
Psion Omnii Hand-Held Computer User Manual
F-3

Appendix F: Wireless Wide Area Network (WWAN) Settings
Regulatory Draft
Establishing a Connection
The main Wireless WAN dialog box is displayed.
Figure F.1 Establishing a Connection
Note: If you are prompted to enter a PIN, refer to“Entering a PIN Number” on page F-5 for details.
When “Ready to connect” is displayed in the Status field, the Connect Data button is enabled.
• Tap on the Connect Data button.
The progress of the connection is tracked in the Status field.
•Connecting.
• PPP link to modem active.
• Authenticating user.
• User authenticated.
•Connected.
Note: Keep in mind that these states may be displayed fairly quickly if the progress of the connec-
tion is rapid.
When the connection state reaches PPP link to modem active, the taskbar icon changes to indicate an
active connection. The Connect Data button changes to Disconnect.
F.1.2.1 Disconnecting From a Network
To disconnect from the network:
• Tap the stylus on the Disconnect button, and then on OK.
When the computer’s network connection is severed, the Status field displays “Ready to connect”.
The signal strength is displayed in the main Wireless WAN screen, even while a connection is active. The Rx
bytes and Tx bytes fields estimate the amount of data transmitted and received, respectively.
F-4
Psion Omnii Hand-Held Computer User Manual

Appendix F: Wireless Wide Area Network (WWAN) Settings
Regulatory Draft
F.1.2.2 Shutting Down the Wireless WAN User Interface
While it is not usual to shut down the GSM/GPRS user interface, you can accomplish this by tapping on the
File menu and choosing the Exit command at the bottom of the main Wireless WAN dialog box.
Note: Once you’ve shut down the user interface, you can only enable the radio by opening the Con-
trol Panel and tapping on the Wireless WAN icon to display the Wireless WAN dialog box.
F.1.3 Advanced Information
In most cases, when a GSM/GPRS radio and SIM are installed in your computer, setup is automatic. Follow
the steps outlined under the heading “Establishing a Connection” on page F-3 to make a connection. The information in this section is for advanced setup purposes.
F.1.3.1 Entering a PIN Number
If a PIN is required, a PIN entry dialog box is displayed.
• Type your PIN, and press [ENTER].
Note: If you exceed the number of allowable attempts, a PUK entry window is brought to the fore-
ground. You’ll need to enter a new PIN number.
Once the correct PIN or PUK is entered or if none was required, the modem is instructed to perform a GSM
network registration followed by a GPRS attach. The main Wireless WAN dialog box reflects the progress of
the initialization.
• Searching for modem.
• Initializing modem.
•SIM is ready.
• Searching for network.
•Registered on network.
• Searching for GPRS.
• Ready to connect.
If the modem loses the connection to the GSM network, the following states are repeated: Searching for
network, Registered on network, Searching for packet data, and Ready to connect.
Advanced Information
F.1 . 3 . 2 E r r o r S t a t e s
The following temporary error states (i.e., these states may disappear without interaction) may be displayed:
• Emergency calls only.
The modem has found a network but is not allowed to register (e.g. no roaming agreement between
networks). The modem keeps searching for another network.
• No network found.
A network is not currently available. The modem continues searching for a network.
• Packet data not available.
The current network does not support a packet data service.
• Packet data not allowed.
The modem is not allowed to use the packet data service on the current network (e.g. no GPRS
roaming agreement between network; a roaming agreement for voice may still be in place). It is also
possible that you do not have a subscription for GPRS at all.
The remaining error states are permanent:
• SIM is missing.
The SIM card is missing. After the SIM has been inserted a warm boot may be required.
• SIM failure.
The SIM card is permanently disabled (e.g. because the wrong PUK has been entered too many times).
A new SIM is needed.
• Modem failure.
Psion Omnii Hand-Held Computer User Manual
F-5

Appendix F: Wireless Wide Area Network (WWAN) Settings
Regulatory Draft
Tools Menu
The modem did not respond to commands as expected. If a warm boot does not clear this condition,
the modem may need to be replaced.
•NDIS error.
An internal software error has occurred. If a warm boot does not clear this condition, Psion technical
support may need to investigate further.
F.1 . 4 To ol s M e n u
The Tools menu in the main Wireless WAN dialog box offers some additional, advanced setup features.
F.1.4.1 Data Configuration
Enable Automatic Connect
If the Enable automatic connect checkbox is checked (unchecked by default), the Wireless WAN user interface will attempt to establish a GPRS connection whenever GPRS is available (e.g. after resume from
suspend without further user interaction).
To activate the automatic connection mode:
• Tap on the OK button.
While automatic connection mode is enabled, the Connect Data button in the main Wireless LAN dialog box
changes to Disable Auto. To close the currently active connection (if any) and disable the automatic connection mode:
•Tap on Disable Auto.
F-6
Psion Omnii Hand-Held Computer User Manual

Appendix F: Wireless Wide Area Network (WWAN) Settings
Regulatory Draft
To o l s M en u
Important: Automatic connection mode should not be used if applications other than the
Use Virtual Serial Port
If Use virtual serial port is enabled, packet data connections are established through the virtual serial port
of the WWAN driver rather than through the WWAN driver directly. This checkbox should only be checked if
certain third-party VPN (Virtual Private Network) clients are used that do not work correctly otherwise. The
default setting is disabled (unchecked).
Note: The connection setup takes longer through the virtual serial port.
Enable Automatic Configuration
In most cases, the data connection is configured automatically and no user interaction is required. This is
true even if multiple SIM cards from different operators are used with the same device. The connection parameters are adjusted automatically when a new SIM card is detected (this may require a warm boot). The
connection parameters are retrieved from a database.
Manual configuration should be necessary only if:
• One or more parameters in the database are incorrect or a new operator is not yet in the database.
(The database should be corrected for subsequent software releases.)
• An operator has assigned individual GPRS user names and passwords.
• A very large site has its own APN. Such connections always have to be configured manually.
• A customer has subscribed for a static IP address. By definition this must be configured manually.
• An operator may use a different APN for certain groups of customers. Since the automatic configuration can configure only one APN per operator such connections have to be configured manually.
Wireless WAN user interface (e.g. Connection Manager) are expected to open and
close connections.
If the automatic connection mode is enabled and another application closes the
GPRS connection, the WWAN user interface will immediately try to re-establish
the connection.
Profiles
In the following section, all the parameters that need to be configured for a connection (such as APN, user
name, password, DNS server addresses etc.) are referred to as a ‘profile’. Every profile is identified by an arbitrary, unique name. The profile named Default is special in that it is always present and can neither be
edited nor deleted. The Default profile uses parameters from a built-in database. The home network (the
network that issued the SIM) is used for the database look-up. While there can be many configured profiles,
only one profile can be active at any time.
If connection profiles are configured manually, the Enable automatic configuration checkbox should nor-
mally be unchecked.
In one particular use case, manually configured profiles may be combined with automatic configuration. If
multiple SIM cards are used with the same device, each SIM card being from a different operator and some
or all of them requiring a manually set up profile, automatic configuration may be used to automatically
pick the correct manually configured profile for each SIM card. For this to work, each profile must be configured while the corresponding SIM card is inserted in the device and initialized (i.e. the status is at least
Searching for network).
The Select profile: drop-down list in the data configuration profile selects to which profile a subsequent
action applies. A profile named Default is always present and contains the current parameters from the da-
tabase. The following actions are available:
Show
The parameters for the selected profile are displayed when you tap the stylus on this button. For the
Default profile, the publicly known password is shown—otherwise, the password is hidden.
Psion Omnii Hand-Held Computer User Manual
F-7

Appendix F: Wireless Wide Area Network (WWAN) Settings
Regulatory Draft
Tools Menu
Edit
The parameters of the selected profile can be edited when you choose the Edit button. Keep in mind that
you cannot edit the Default profile.
Delete
The selected profile is deleted. You cannot delete the Default profile.
Activate
When this button is chosen, the selected profile becomes the active profile. Activation is possible only if the
Enable automatic configuration: checkbox is unchecked.
New
Tapping on the New button allows you to create a new profile.
Figure F.2 Creating a New Profile
The name of the newly created profile must be different from all existing profiles. Also, the name cannot be
Default. When the New Data Profile dialog box is opened, a proposal for a unique name is filled in the corresponding entry field. If a manually configured profile has a secret password and unauthorized access to the
device is a concern even after the SIM PIN has been entered, the password should not be entered in the
New Data Profile dialog box and the Prompt user for password checkbox should be checked instead. In this
case, you will be prompted for the password each time a connection is initiated (the Connect Data button in
the main Wireless WAN dialog box is selected). If Force PAP authentication (Password Authentication Proto-
col) is enabled, a simple authentication protocol is used to authenticate a user to a remote access server or
Internet Service Provider.
Reset
The Reset button in the New Profile and Edit Profile dialog boxes resets all entry fields to the values they
had when the dialog box was opened.
F-8
Psion Omnii Hand-Held Computer User Manual

Advanced IP
Regulatory Draft
Figure F.3 Assigning IP Information
The Advanced IP button in the Show Profile and Edit Profile dialog boxes opens another dialog box that
allows you to configure a static IP address as well providing DNS and WINS fields so that you can specify
DNS and WINS resolvers.
F.1.4.2 Security Configuration
Appendix F: Wireless Wide Area Network (WWAN) Settings
To o l s M en u
The Security Configuration dialog box is accessed through the Too l s menu. The Security Configuration
dialog box allows you to enable, disable and change the PIN. You will need the current PIN to make any of
these changes. The PIN must be enabled in order to be changed. (If the PIN is disabled, the New PIN entry
field is greyed out.)
Note: Keep in mind that some network operators do not allow the SIM PIN to be disabled. A new
PIN must consist of 4 to 8 numeric digits.
The Require PIN on resume checkbox is independent of the aforementioned settings. By default, this check-
box is unchecked. While this option remains unchecked, any PIN entered on startup or through the Security
Configuration dialog box and submitted successfully to the modem is stored in memory for as long as the
device is not rebooted. This stored PIN is then used without further user interaction whenever the modem
requires a PIN (such as resume after suspend or modem removal). The stored PIN is also automatically
entered in the Current PIN text box whenever the Security Configuration dialog box is called up.
If unauthorized access to the device is a concern, the Require PIN on resume checkbox should be checked.
In this case, the PIN is not stored; whenever a PIN is required, you will be prompted to enter an appropriate
value.
F.1.4.3 Network Configuration
In the main Wireless WAN window:
•Tap on the Tools menu, and choose Network.
Psion Omnii Hand-Held Computer User Manual
F-9

Appendix F: Wireless Wide Area Network (WWAN) Settings
Regulatory Draft
Tools Menu
By default the GSM radio modem automatically chooses from the available and allowed networks (allowed
networks are the home network and all other networks with which the home network has a roaming agreement). You may find there are some situations in which you want to override this default behaviour. For example, you may want to disable roaming if you find yourself in a border area where the home network is not
available but a foreign roaming partner is available. Abroad, you may find that an available network does
not have GPRS roaming agreements. In this case, you’ll need to manually select the network which you
know to support GPRS roaming.
Automatic network selection is enabled or disabled by checking or unchecking Enable automatic network
select in the Network dialog box. When automatic network selection is disabled, you must select a network
manually.
Available networks can also be viewed without changing any settings. Scanning for available networks is a
lengthy operation—a progress bar is shown while the scan is active. For every network that is found, the
network name, country, status and numeric network identifier (MCC/MNC, Mobile Country Code followed by
the Mobile Network Code) is displayed.
Note: Your home network operator will need to let you know which other networks have roaming
agreements. Even when a network is listed with an ‘Available’ status, it does not necessarily
follow that it can be used or that the roaming agreement covers GPRS.
A status of ‘Forbidden’ indicates that the network cannot be used. If you choose a network
that is not covered by a roaming agreement, the status in the main WWAN dialog box
changes to ‘Emergency calls only’, ‘No network found’, ‘GPRS not available’ or ‘GPRS not
allowed’.
F.1.4.4 Driver Mode Configuration
By default, the Wireless WAN driver is enabled (the Enable driver checkbox is checked). The driver must be
disabled in order to use the modem for anything other than GPRS (e.g. dial-up data, fax, or in order to manually submit AT commands to the modem for development, testing, approvals, etc.). If the Enable driver
checkbox is not checked, the driver is shut down as soon as the OK button in the Driver Mode dialog box is
chosen.
If, on the other hand, the Wireless WAN driver is not running and the Enable driver checkbox is checked, the
Wireless WAN driver is started as soon the Driver Mode dialog box is closed using the OK button.
Note: When the driver is not running, no network status or signal strength can be displayed.
Since all currently supported GSM modems are automatically detected, the Enable automatic port detec-
tion checkbox should always be checked. If this checkbox is not checked, a serial port can be selected man-
ually. This experimental feature allows the driver to be used with an internal GSM modem that was not
F-10
Psion Omnii Hand-Held Computer User Manual

recognized by the automatic detection or an external GSM modem connected to a serial port of the compu-
Regulatory Draft
ter through USB or through Bluetooth. An external modem connected to a serial port must support 115.2
kbit/s, 8bit, no parity and hardware flow control.
F.1 . 4 . 5 M o d e m I n f o r m at i o n
The fields in this dialog box cannot be edited, they only display information about the computer’s modem. If
the network operator has not programmed a user’s phone number into his SIM, the Phone: field remains
empty. If the main menu shows an error status, at least partial modem information may be available.
Appendix F: Wireless Wide Area Network (WWAN) Settings
To o l s M en u
F.1.4.6 User Interface
Ta sk b ar
Choosing Ta s kb a r displays a dialog box in which you can determine which Wireless WAN icons will be displayed in the taskbar.
Psion Omnii Hand-Held Computer User Manual
F-11

Appendix F: Wireless Wide Area Network (WWAN) Settings
Regulatory Draft
SMS Menu
Sounds
Tapping on the Sounds option displays a dialog box in which you can customize which sounds your Omnii
will emit and when these sounds will be played.
F.1 . 5 S M S M e n u
SMS (Short Message Service) functions are accessed through the SMS menu. For modems that support a
SIM card, the SIM initialization typically takes longer than the network initialization, resulting in a noticeable delay before the SMS functions become available.
F. 1 . 5 . 1 N e w
Tapping on the New button opens a dialog for sending a new SMS message. The recipient's phone number
(to be entered in the To : field) can consist of the digits 0 through 9, as well as the * and # characters, optionally preceded by one + character, indicating an international number (i.e. the country code follows immediately after the + character).
By checking the Store message in Outbox field a new message can be stored in the Outbox before being
sent. If no storage space is available, or the modem does not support the storage of outgoing messages,
then this checkbox is disabled.
F. 1 . 5 . 2 I n b o x
Tapping on the Inbox button opens the list of received messages. Reading 50 messages, for example, from
the SIM can take about 30 seconds. By default the list of messages is sorted with the most recently received message first. The list can be sorted by any other column by clicking on the corresponding column
heading. Clicking the same column heading twice reverses the sort order. Tapping on any letter or digit
moves the highlight to the next message whose address begins with that letter or number.
F-12
Psion Omnii Hand-Held Computer User Manual

Note: The date and time formats can be changed through the Region and Language menu in Con-
Regulatory Draft
trol Panel. For a new date or time format to take effect the Inbox has to be closed and reopened.
The Open button opens the selected message in a new window such that the entire message can be read including the original formatting (line breaks are replaced by spaces in the Inbox message list). Pressing the
Reply button opens the new message dialog as described above, except the destination phone number is
filled in already.
F. 1 . 5 . 3 O u t b o x
Tapping on the Outbox button opens the list of sent messages. Otherwise the Outbox behaves exactly as
the Inbox described above. The date and time when a message was sent is not available for GSM modems.
F.1 . 5 . 4 S M S C o n f i g u r a t i o n
Tapping on the SMS Configuration button opens the SMS configuration dialog. The SMS Centre address
follows the same rules as the recipient's phone number in the New message dialog. The message validity
period parameter is sent to the SMS Centre with each message sent subsequently and instructs the SMS
Centre on how long it should attempt to deliver the message to the recipient (the SMS Centre may impose
an upper limit on the validity period regardless of the setting).
Note: Only certain discrete validity period values can be sent and thus the validity period is
rounded to the nearest allowed value. The next time the SMS configuration dialog is opened
the rounded value is shown.
Appendix F: Wireless Wide Area Network (WWAN) Settings
Voice
The user interface tries to keep the SMS storage location available for a new incoming message if the
Delete oldest message when full checkbox is checked. In this case, when a new message arrives and the
SMS storage becomes full, the oldest received message is deleted. If any string is entered as the ‘Message
Suppression Prefix’, then messages beginning with that string will not be shown in either the Inbox or
Outbox. In this way messages intended for another application running on the same device can be hidden
from the user, as long as those messages begin with the string configured here.
F. 1 . 6 V o i c e
The Voice tab is described in detail under “Voice Communication” on page 17.
F. 2 Pow er M o d e
The power mode of the modem is controlled through the Power menu in the Control Panel (not through the
Wireless WAN user interface). See “WWAN Power Mode” on page 88.
For PC Card and CF Card modems, the settings are found under the Card Slots tab. If the checkbox for a
modem is unchecked, no power is applied to the modem and no driver is loaded (neither the serial port
driver nor the Wireless WAN driver). If the checkbox is checked, power is applied to the modem and the
drivers are loaded when the computer is turned on. Power is removed from the modem when the computer
enters suspend mode.
Psion Omnii Hand-Held Computer User Manual
F-13

Regulatory Draft

APPENDIX: WIRELESS
Regulatory Draft
G
GWireles s Zero Conf ig Settin gs
G.1 Wireless Information ......................................................G-3
G.1.1 Wireless Statistics..................................................G-3
G.1.2 Wireless Information ............................................... G-4
G.2 Assigning An IP Address................................................... G-6
G.2.1 Name Server.................................................... G-6
G.3 Advanced Features .......................................................G-7
G.3.1 Rearranging Preferred Networks.........................................G-7
G.3.2 Deleting A Preferred Network...........................................G-7
G.3.3 Changing Network Properties...........................................G-7
ZERO CONFIG SETTINGS
Psion Omnii Hand-Held Computer User Manual
G-1

Regulatory Draft

G.1 Wireless Information
Regulatory Draft
Wireless Zero Config, the Windows native supplicant, can be used to configure the radio. To ensure that
Wireless Zero Config is activated, refer to “Wi-Fi Config: Advanced” on page 128.
•Tap on Start>Settings>Network and Dial-up Connections.
• Choose the radio icon representing the radio you want to set up—in the sample screen in Figure G.4,
this is labelled as SDIO86861
Appendix G: Wireless Zero Config Settings
Wireless Information
Figure G.4 802.11 Wireless LAN Settings Window
G.1.1 Wireless Statistics
When you choose the Wireless LAN icon, an 802.11 Wireless LAN Settings window is displayed. This tab
lists your radio statistics. Choosing the Zero button resets the statistics of the last four items—Packets IN,
Packets OUT, IN errors and OUT errors.
Psion Omnii Hand-Held Computer User Manual
G-3

Appendix G: Wireless Zero Config Settings
Regulatory Draft
Wireless Information
Figure G.5 Wireless Statistics
G.1.2 Wireless Information
This tab displays existing networks to which you can connect, and it allows you to add a new network or
modify the settings for an existing network.
• Configure button: To change the settings in an existing network, highlight the network you want to
modify, and tap on the Configure button to display the Wireless Properties dialog box.
• Connect button: To force connection to a specific, existing network, highlight the network to which you
want Omnii to connect, and tap on the Connect button.
Figure G.6 Wireless Information
This tab lists available networks—any access points that are broadcasting an SSID, and it lists preferred networks—networks that you have configured. Since access points are generally secure, they will most likely
not be listed here. By default, Omnii attempts to connect to preferred networks. This behaviour can be
changed by enabling Automatically connect to non-preferred networks in the Advanced dialog box (see
Fig u re G.9) .
• To add a new configuration, tap on the Add New button. A blank Wireless Properties dialog box is
displayed.
G-4
Psion Omnii Hand-Held Computer User Manual

Appendix G: Wireless Zero Config Settings
Regulatory Draft
Wireless Properties
Figure G.7 Wireless Properties
• Type the appropriate SSID (Service Set Identifier) in the Network name (SSID): dialog box. The
Network name field can contain a maximum of 32 characters. The name assigned here is listed as a
preferred network.
Wireless Information
Important: Keep in mind that Omnii will only communicate with access points that are config-
• Ad Hoc And Infrastructure: If you are using an Infrastructure network—one in which the hand-helds
• Encryption: WEP (Wired-Equivalent Privacy) encryption prevents others from accidentally accessing
• Authentication: 802.11 supports several subtypes of network authentication services: Open, Shared,
• Network Key: This text box is used to specify a 5 or 13 ASCII character sequence or an equivalent 10 or
ured with the same SSID.
must pass data through an access point—leave the checkbox next to This is an ad hoc network blank.
If you are using an Ad Hoc network—a network in which the hand-helds pass data directly to other Ad
Hoc devices without an access point—add a checkmark in the checkbox next to This is an ad hoc
network to enable Ad Hoc.
your network. If you are not using encryption, you can choose Disabled from the drop-down encryption
menu. Otherwise, leave this field as is.
AES (Advanced Encryption Standard) is a standard for protecting data through encryption. AES supports key sizes of 128 bits, 192 bits and 256 bits and will serve as a replacement for the Data Encryption
Standard (DES), which has a key size of 56 bits. In addition to the increased security that comes with
larger key sizes, the AES algorithm is a symmetrical block cipher that can encrypt (encipher) and
decrypt (decipher) information.
WPA, and WPA-PSK. Under Open authentication, any wireless station can request authentication. The
station that needs to authenticate with another wireless station sends an authentication management
frame that contains the identity of the sending station. The receiving station then sends back a frame
that indicates whether it recognizes the identity of the sending station.
Under Shared authentication, each wireless station is assumed to have received a secret shared key
over a secure channel that is independent from the 802.11 wireless network communications channel.
Under WPA and WPA-PSK authentication, the use of 802.1x authentication is required. For wireless net-
works without a Remote Authentication Dial-In User Service (RADIUS) infrastructure, WPA supports
the use of a preshared key. For wireless networks with a RADIUS infrastructure, Extensible Authentication Protocol (EAP) and RADIUS is supported.
26 Hexadecimal digit sequence that matches the active WEP key on the access point.
To assign a Network key, highlight The key is provided automatically, and uncheck the checkbox to
disable this option.
Psion Omnii Hand-Held Computer User Manual
G-5

Appendix G: Wireless Zero Config Settings
Regulatory Draft
Assigning An IP Address
Figure G.8 Network Key and Key Index
• Key Index: This field is used to identify the WEP key.
Enter a value from 1 to 4.
• Enable 802.1x authentication: 802.1X is the IEEE standard that offers additional security for local
area networks. It provides authentication for user devices attached to an Ethernet network, whether
wired or wireless. A security protocol packet such as TLS or MD5 encapsulated in an EAP is used in
conjunction with the 802.1X standard to authenticate users at the MAC layer. Available EAPs are listed
in the drop-down menu next to the EAP option.
To activate 802.1X, highlight 802.1x authentication, and check the checkbox.
• EAP Type (Extensible Authentication Protocol): This drop-down menu lists the EAP types available
on your system. The items in this drop-down menu will vary depending on your network setup. Keep in
mind also that some authentication protocols require that you select a Certificate. By selecting the
Properties button, you will be able to select a Certificate. “Certificates” on page 63 provides a website
that outlines how to create certificates for your network.
• Saving and exiting the radio setup: Once you’ve completed the configuration, press [ENTER], or tap
on OK.
The connection you created will be listed in the Wireless Information tab as a preferred network. The
radio will search for the SSID and compare the WEP and authentication information you specified. If
there is a match between the hand-held settings and the access point settings, the hand-held will communicate on the network through the access point.
G-6
G.2 Assigning An IP Address
If your network is not using a DHCP server, you will need to assign an IP address. Refer to “IP Address” on
page 126 for details about assigning an IP address.
G.2.1 Name Server
Refer to “Name Server” on page 128 for details about this option.
Psion Omnii Hand-Held Computer User Manual

G.3 Advanced Features
Regulatory Draft
To disp l a y the Advanced Wireless Settings dialog box:
•Tap on the Advanced button in the Wireless Information tab. (Refer to Figure G.6.)
This window lists the available preferred networks.
Figure G.9 Advanced Wireless Settings
Appendix G: Wireless Zero Config Settings
Advanced Features
G.3.1 Rearranging Preferred Networks
Omnii attempts to connect with the networks listed in this dialog box in sequence, beginning at the top of
the list. If you need to rearrange this list of networks—move networks up and down in the list:
• Tap in the Networks List, and highlight the network that you want to move up or down in the list.
• To move the highlighted item in the list upward or downward, tap on the Up or Down button.
G.3.2 Deleting A Preferred Network
To delete a network from this list:
•In the preferred networks list, highlight the network you want to remove.
•Tap on the Delete button.
G.3.3 Changing Network Properties
To change the properties of an existing preferred network:
• Highlight the network that you want to modify.
•Tap on the Properties button.
• Make any necessary changes in the Wireless Properties dialog box, and press [ENTER] to save the
changes.
Psion Omnii Hand-Held Computer User Manual
G-7

Regulatory Draft

Numbers
Regulatory Draft
1D internal scanner 32, 33
2D imager 33
36-key keyboard
alpha keys, accessing 26
uppercase letters, creating 26
7545 M odel See Omnii E-3
802.11a/b/g/n radio E-9
802.11b/g radio
configuring 121–129
A
accessories
carrying case 137
desktop docking stations 141
Ethernet cable 146
hand strap 134, 135
holster, hard shell 137
pistol grip 133
quad docking station 145
vehicle cradle 147
AC Wall adaptor 138
Administrator Password (PsionVU settings) 93
AGPS (Assisted Global Positioning System) 70
Aim Duration C-5
aiming dot, duration of C-5, C-10
All
Predefined preset B-4
ALT Key 23
appearance (display colour scheme) 65
appending to barcodes
characters 101
App Launch Keys 53
approvals, Omnii (including scanner) E- 4
arrow keys
moving the cursor 23
audio indicators
adjusting volume 30
description of beep conditions 30
B
background, choosing for Desktop 96
background image (display scheme) 65
backlight
display 66
intensity 26
Backspace (DEL Key) 23
backup Profile (Total Recall)
creating 111
restoring 113
viewing 113
Bad Scan Vibrates 102
barcode
appending to 101
decodes required C-10
decoding edge-to-edge C-10
Decoding symbology predefined presets B-3
displaying type of barcode 101
parameters 99, C-3
INDEX
Security C- 10
Tra n s l a t i o n tab 102
barcode reader
integrated scanner, operation of 31
bar code symbologies
color camera D17, D18
imager D17
battery 21
Advanced dialog box 87
Battery Health dialog box 88
Built-in Devices dialog box 88
capacity dialog box 85
charger safety instructions 140
charging 14, 21, 140
charging with desktop docking station 143
contact pinout A- 6
estimated battery backup time 87
installing 14
power saving suspend dialog box 86
replacing 14
specifications E-5
ST3006 6-slot battery charger 151–152
Suspend Threshold dialog box 87
swap time 21
taskbar icon 29
Baud, port replicator 105
beeper
adjusting volume 30
description of beep conditions 30
Bi-Direction Redundancy C-6
Bluetooth radio
devices, pairing 57
GPRS setup 60
ISM band 54
radio configuration 54–63
setup 54
specifications E-10
Bo
ot to BooSt 16
Bright For (backlight) 66
C
cable diagrams A- 1
calibrating touchscreen 26, 109
Call Lists 117
Call Management 119
camera
specifications E-4
camera, using 90
camera settings 71
case, carrying 137
chargers 140
desktop docking station 141
indicators 143
installing at a site 140
operation 143
operator controls 140
safety instructions 140
Snap Modules 137
ST4004 operator controls 145
ST4004 quad docking station 145
troubleshooting 146
Cinterion
MC75i GSM/GPRS/EDGE radio specifications E-6
INDEX
Psion Omnii Hand-Held Computer User Manual
I
 Loading...