

Page 1

EP10 Hand-Held Computer
(Model Number 7515)
Windows Embedded 6.5
User Manual
April 5, 2011 Part No. 8000227.A
ISO 9001 Certified
Quality Management System
Page 2

© Copyright 2011 by Psion Inc., Mississauga, Ontario
2100 Meadowvale Boulevard, Mississauga, Ontario, Canada L5N 7J9
http:\\www.psionteklogix.com
This document and the information it contains is the property of Psion Inc., is issued in strict
confidence, and is not to be reproduced or copied, in whole or in part, except for the sole
purpose of promoting the sale of Psion manufactured goods and services. Furthermore, this
document is not to be used as a basis for design, manufacture, or sub-contract, or in any
manner detrimental to the interests of Psion Teklogix Inc.
Disclaimer
Every effort has been made to make this material complete, accurate, and up-to-date. In addition, changes are periodically added to the information herein; these changes will be incorporated into new editions of the publication. Psion Inc. reserves the right to make
improvements and/or changes in the product(s) and/or the program(s) described in this document without notice, and shall not be responsible for any damages, including but not
limited to consequential damages, caused by reliance on the material presented, including
but not limited to typographical errors.
Psion, Psion Teklogix , and EP10 a re trademarks of Psion I nc.
Wind ows® and the Windows Log o are trademarks or register ed trademarks of Microso ft
Corporation in the United States and/or other count ri es.
The Bluetooth word mark and logos ar e owned by Bluetooth SIG, Inc. and any use of such
marks by Psion Inc. is under lice nse.
All trademarks and trade names are the property of their respective holders.
This user manual supports Model Numbers:
• 7515U with FCC ID: GM37515UA and IC: 2739D-7515UA
• 7515C with FCC ID: GM37515CA
• 7515 with FCC ID: GM37515UB and IC: 2739D-7515UB
Page 3

TABLE OF CONTENTS
Preliminary Draft
Chapter 1: Introduction
1.1 About This Manual......................................................................3
1.2 Text Conventions........................................................................4
1.3 EP10 Hand-Held Features ...............................................................4
1.3.1 The EP10 Hand-Held............................................................ 6
Chapter 2: Getting to Know the EP10
2.1 Features of the EP10 Hand-Held........................................................11
2.2 The Battery.............................................................................12
2.2.1 Battery Safety..................................................................13
2.2.2 Removing the Battery Pack.....................................................13
2.2.3 Battery Swap Time.............................................................13
2.2.4 Charging the Battery ...........................................................13
2.3 The Keyboard ..........................................................................15
2.3.1 EP10 QWERTY Keyboard .....................................................15
2.3.2 Locking the Keyboard..........................................................16
2.3.3 Modifier Keys..................................................................16
2.3.4 The Keys.......................................................................17
2.3.5 The Keypad Backlight..........................................................19
2.4 The Display.............................................................................19
2.4.1 Setting the Backlight Intensity & Duration......................................19
2.4.2 Adjusting the Backlight using the Keyboard. . ..................................19
2.4.3 Aligning (Calibrating) the Touchscreen.........................................20
2.4.4 Screen Orientation..............................................................21
2.5 EP10 Indicators.........................................................................21
2.5.1 LEDs...........................................................................21
2.6 Audio Indicators........................................................................22
2.6.1 Adjusting Speaker Volume.....................................................22
2.7 Monitoring the Battery and Maximizing Run Time......................................23
2.7.1 Storing Batteries................................................................23
2.8 Uploading Data in a Docking Station ...................................................24
2.9 Bluetooth Radio ........................................................................24
EP10 Hand-Held (Windows Embedded 6.5) User Manual i
Page 4

Contents
Preliminary Draft
2.9.1 Pairing a Bluetooth Headset ...................................................25
2.10 Inserting the microSD and SIM Card ...................................................25
2.10.1 Inserting the Cards .............................................................26
2.11 The Camera ............................................................................26
2.12 General Maintenance ...................................................................26
2.12.1 Caring for the Touchscreen.....................................................26
2.12.2 Cleaning the EP10..............................................................27
Chapter 3: Using Windows Embedded 6.5
3.1 Navigating in Windows Embedded 6.5 and Applications................................31
3.1.1 Navigating using a Touchscreen and Stylus.....................................31
3.2 Windows Embedded 6.5 Desktop – Today Screen.......................................31
3.2.1 Windows Embedded 6.5 Navigation Bar .......................................32
3.2.2 Today’s Date, Clock and Alarm................................................34
3.2.3 Ownership Information.........................................................36
3.2.4 E-mail Notification.............................................................37
3.2.5 Task Notification...............................................................37
3.2.6 Calendar of Upcoming Appointments . .........................................40
3.3 Start Menu..............................................................................43
3.3.1 Customising the Start Menu....................................................43
3.4 Managing Files and Folders.............................................................44
3.4.1 Creating a New Folder .........................................................45
3.4.2 Renaming a File................................................................45
3.4.3 Copying a File..................................................................45
3.4.4 Deleting a File..................................................................46
3.5 Using Menus ...........................................................................46
3.5.1 Pop-Up Menus .................................................................46
3.6 The Softkey Bar ........................................................................47
3.7 Programs – Using Applications .........................................................49
3.8 Settings.................................................................................50
3.9 Help....................................................................................51
3.10 Entering Text ...........................................................................52
3.10.1 Soft Keyboard..................................................................52
3.10.2 The Transcriber ................................................................53
3.10.3 Block Recognizer and Letter Recognizer .......................................54
Chapter 4: Programs
4.1 Programs ...............................................................................59
ii EP10 Hand-Held (Windows Embedded 6.5) User Manual
Page 5

Contents
Preliminary Draft
4.2 Games..................................................................................59
4.3 ActiveSync® ...........................................................................59
4.3.1 Synchronization................................................................59
4.4 Calculator ..............................................................................60
4.5 Demo Scanner..........................................................................60
4.6 Office Mobile...........................................................................60
4.6.1 Excel Mobile...................................................................60
4.6.2 OneNote Mobile ...............................................................61
4.6.3 Word Mobile...................................................................67
4.6.4 PowerPoint Mobile.............................................................68
4.7 File Explorer............................................................................69
4.8 Getting Started..........................................................................69
4.9 PTSI Imager Demo.....................................................................69
4.10 Internet Sharing.........................................................................70
4.10.1 Creating an Internet Connection ................................................70
4.10.2 Using Internet Sharing..........................................................70
4.11 Notes...................................................................................71
4.11.1 Creating a Note.................................................................71
4.11.2 Converting Handwritten Notes to Text. . ........................................72
4.11.3 Renaming a Note...............................................................74
4.11.4 Recording Notes ...............................................................74
4.11.5 Synchronizing a Note...........................................................75
4.12 Pictures & Videos.......................................................................75
4.12.1 Using the Camera ..............................................................75
4.12.2 Moving Photos to the EP10.....................................................77
4.12.3 Opening a Photo................................................................77
4.12.4 Deleting a Photo................................................................78
4.12.5 Editing a Photo.................................................................78
4.12.6 Creating a Slide Show..........................................................78
4.12.7 Using the Video Recorder ......................................................79
4.13 Remote Desktop Mobile................................................................80
4.13.1 Connecting to a Terminal Server ...............................................81
4.13.2 Disconnecting without Ending a Session........................................81
4.13.3 Ending a Session ...............................................................81
4.14 Search..................................................................................82
4.15 Task Manager...........................................................................82
4.16 Tasks ...................................................................................82
EP10 Hand-Held (Windows Embedded 6.5) User Manual iii
Page 6

Contents
Preliminary Draft
4.17 Internet Explorer........................................................................82
4.18 Messaging..............................................................................84
4.19 Windows Media ........................................................................87
Chapter 5: Settings
5.1 Settings.................................................................................95
5.2 Personal Settings .......................................................................95
5.3 App Launch Keys.......................................................................95
5.4 Buttons Icon............................................................................98
5.5 Input...................................................................................107
5.6 Lock...................................................................................113
5.7 Menus.................................................................................114
5.8 Owner Information ....................................................................115
5.9 Phone .................................................................................116
5.10 Sound & Notifications .................................................................116
5.11 Today Screen ..........................................................................118
5.12 System Tab Settings ...................................................................119
5.13 About. . . ...............................................................................119
5.14 About Device . .........................................................................120
4.17.1 Browsing Web Sites............................................................83
4.18.1 Folders.........................................................................84
4.18.2 Synchronizing E-mail with Outlook ............................................84
4.18.3 Changing Synchronization Settings.............................................86
5.4.1 Up/Down Control ..............................................................98
5.4.2 Sequence ......................................................................99
5.4.3 One Shots ......................................................................99
5.4.4 Keyboard Macro Keys ........................................................101
5.4.5 Unicode Mapping .............................................................102
5.4.6 Scancode Remapping..........................................................103
5.4.7 Lock Sequence................................................................106
5.5.1 Input Method Tab . . ...........................................................108
5.5.2 Options–Additional Choices...................................................112
5.7.1 Start Menu Tab................................................................114
5.10.1 Sounds ........................................................................117
5.10.2 Notifications ..................................................................117
5.11.1 Appearance ...................................................................118
5.11.2 Items..........................................................................118
iv EP10 Hand-Held (Windows Embedded 6.5) User Manual
Page 7

Contents
Preliminary Draft
5.15 Backlight ..............................................................................120
5.15.1 Battery Power.................................................................120
5.15.2 External Power................................................................121
5.15.3 Intensity.......................................................................121
5.16 Certificates ............................................................................122
5.16.1 Choosing a Certificate .........................................................124
5.17 Clock & Alarms .......................................................................124
5.18 Customer Feedback....................................................................124
5.19 Encryption.............................................................................125
5.20 Error Reporting........................................................................126
5.21 GPS (Global Positioning System)......................................................127
5.22 GPS (Global Positioning System) Settings .............................................128
5.23 Manage Triggers.......................................................................133
5.23.1 Trigger Mappings .............................................................134
5.24 Managed Programs ....................................................................137
5.25 Memory ...............................................................................137
5.25.1 Main Tab......................................................................138
5.25.2 Storage Card ..................................................................138
5.26 Power Icon ............................................................................138
5.26.1 Battery Tab....................................................................139
5.26.2 Advanced Tab.................................................................139
5.26.3 Battery Details ................................................................140
5.26.4 Built-In Devices...............................................................141
5.26.5 Card Slots ....................................................................141
5.26.6 Suspend Threshold and Estimated Battery Backup.............................142
5.26.7 Suspend Mode ................................................................143
5.27 Regional Settings......................................................................143
5.28 Remove Programs.....................................................................144
5.29 Screen Icon............................................................................144
5.30 Task Manager..........................................................................145
5.31 Teklogix Error Handling Service.......................................................147
5.31.1 ErrorLogInfo..................................................................147
5.31.2 NetLog........................................................................148
5.32 Teklogix Imagers Settings .............................................................149
5.33 Scanner Settings.......................................................................150
5.33.1 Bar Code Settings – The Scanner Menu .......................................151
5.33.2 Options Tab...................................................................152
EP10 Hand-Held (Windows Embedded 6.5) User Manual v
Page 8

Contents
Preliminary Draft
5.33.3 Translations Tab ..............................................................154
5.33.4 Ports Tab......................................................................157
5.34 Total Recall. . . .........................................................................160
5.34.1 Creating a Backup Profile .....................................................161
5.34.2 Restoring a Profile ............................................................164
5.35 TweakIT...............................................................................164
5.35.1 Advanced Interface And Network .............................................165
5.35.2 Advanced Services Settings ...................................................166
5.35.3 Radio Features ................................................................167
5.35.4 User System Setting...........................................................168
5.35.5 Registry Editor................................................................169
5.36 Windows Update ......................................................................169
5.37 Connections Tab.......................................................................169
5.37.1 Navigation Bar Hotkeys.......................................................170
5.38 Beam..................................................................................172
5.39 Bluetooth Setup........................................................................172
5.39.1 The Devices Tab ..............................................................173
5.39.2 Bluetooth Mode...............................................................176
5.39.3 Bluetooth COM Ports.........................................................177
5.39.4 Outgoing Port.................................................................178
5.39.5 Services.......................................................................178
5.39.6 Active Connections............................................................179
5.39.7 About Tab. . . ..................................................................180
5.39.8 The Bluetooth GPRS Phone...................................................180
5.40 Connection Properties .................................................................182
5.40.1 Port Settings...................................................................183
5.40.2 Call Options...................................................................184
5.41 Connections – Connecting to the Internet ..............................................184
5.41.1 Modem Connection Setup.....................................................185
5.42 Wireless Manager Icon ................................................................189
5.42.1 Flight Mode – Disabling Wireless Components................................189
5.42.2 Setting Up a Network Card....................................................190
5.42.3 Network Adaptor Cards .......................................................190
5.42.4 Changing Network Card Settings..............................................192
5.42.5 VPN Connection Setup........................................................192
5.42.6 Managing an Existing Connection.............................................193
5.42.7 Selecting a Network...........................................................194
5.42.8 Proxy Server Setup . ...........................................................195
vi EP10 Hand-Held (Windows Embedded 6.5) User Manual
Page 9

Contents
Preliminary Draft
5.43 Wireless Statistics......................................................................197
5.44 Wireless WAN ........................................................................197
5.44.1 Softkey Bar Icons .............................................................197
5.44.2 Establishing a Connection.....................................................198
5.44.3 Disconnecting from a Network ................................................199
5.44.4 Advanced Information.........................................................199
5.44.5 Tools Menu ...................................................................201
5.44.6 SMS Menu....................................................................209
5.45 Windows Update ......................................................................213
Chapter 6: Peripheral Devices & Accessories
6.1 Carrying Accessories ..................................................................219
6.1.1 The Hand Strap with Tether – Model No. RV6021 ............................219
6.1.2 Attaching the Tether – Model No. RV6020. . ..................................221
6.1.3 Carrying Pouch................................................................222
6.2 The Battery............................................................................222
6.3 Adaptor Cable Options ................................................................223
6.4 Chargers and Docking Stations.........................................................223
6.4.1 Important Safety Instructions..................................................223
6.4.2 Installation: Chargers and Docking Stations ...................................224
6.4.3 Power Consumption Considerations...........................................225
6.5 Desktop Docking Station – Model No. RV4000........................................225
6.5.1 Operator Controls .............................................................226
6.5.2 Indicators .....................................................................226
6.5.3 Operation .....................................................................226
6.5.4 Cleaning the RV4000 .........................................................228
6.5.5 Troubleshooting .. . ...........................................................229
6.6 Quad Docking Station – Model No. RV4004...........................................230
6.6.1 Operator Controls .............................................................230
6.6.2 Indicators .....................................................................230
6.6.3 Quad Dock Operation .........................................................231
6.6.4 Cleaning the RV4004 .........................................................232
6.6.5 Troubleshooting...............................................................233
6.7 Quad Charger – Model No. RV3004 ...................................................233
6.7.1 Charging the EP10 Battery ....................................................233
6.7.2 Installation....................................................................233
6.7.3 Operator Controls .............................................................234
6.7.4 Charge Indicators..............................................................234
EP10 Hand-Held (Windows Embedded 6.5) User Manual vii
Page 10

Contents
Preliminary Draft
6.7.5 Charging Batteries.............................................................235
6.7.6 Troubleshooting...............................................................235
6.8 Snap Modules .........................................................................236
6.9 AC Wall Adaptor – Model No. PS1050-G1 ............................................237
6.10 Vehicle Power Outlet Adaptor – Model No. RV3050...................................237
6.11 The Non-Powered Vehicle Cradle – Model No. RV1000 ...............................238
6.11.1 Important Instructions.........................................................239
6.11.2 Vehicle Cradle Operation......................................................239
6.11.3 Vehicle Cradle Mounting Recommendations ..................................240
6.11.4 Cleaning the RV1000 Vehicle Cradle. .. .......................................242
6.12 The Powered Vehicle Cradle – Model No. RV1005 . .. .................................242
6.12.1 RV1005 Vehicle Cradle Mounting Recommendations .........................244
6.12.2 Cable Arrangement............................................................245
6.12.3 Electrical Requirements.......................................................245
6.12.4 USB and Serial Connections...................................................247
6.12.5 Using the Vehicle Cradle......................................................248
6.12.6 Maintaining the Vehicle Cradle................................................248
6.13 EA11 Imager ..........................................................................249
6.13.1 Operating Two Dimensional (2D) Imagers ....................................249
6.14 Bluetooth Peripherals ..................................................................250
6.15 Digital Camera ........................................................................251
Chapter 7: Specifications
7.1 EP10 Specifications – Model No. 7515................................................255
7.1.1 Hardware......................................................................255
7.1.2 Software ......................................................................256
7.1.3 Wireless Communication......................................................256
7.1.4 Power Management ...........................................................257
7.1.5 Expansion Slot................................................................257
7.1.6 Bar Code Application .........................................................257
7.1.7 Digital Camera................................................................257
7.1.8 Voice Over IP (VOIP).........................................................257
7.1.9 Accessories...................................................................257
7.1.10 Approvals.....................................................................258
7.1.11 Environmental Specifications..................................................258
7.2 Radio Specifications...................................................................259
7.2.1 Murata 802.11 a/b/g/n Direct Sequence Spread Spectrum Radio...............259
7.2.2 Murata Bluetooth Radio.......................................................260
viii EP10 Hand-Held (Windows Embedded 6.5) User Manual
Page 11

Contents
Preliminary Draft
7.2.3 Sierra Wireless MC5728V.....................................................261
7.2.4 Cinterion PH8 GSM/GPRS/EDGE Radio .....................................263
7.3 Lithium-Ion 3600 mAh Battery Specifications .. .......................................265
7.4 Internal Imager ........................................................................267
7.4.1 EA11 Decoded 2D Imager ....................................................267
Appendix A: Wireless Wide Area Network (WWAN)
A.1 Wireless WAN........................................................................ A-1
A.1.1 Taskbar Icons ................................................................ A-1
A.1.2 Establishing a Connection.................................................... A-2
A.1.3 Advanced Information........................................................ A-4
A.1.4 Tools Menu .................................................................. A-6
A.1.5 SMS Menu.................................................................. A-15
A.1.6 Voice........................................................................A-16
A.2 Power Mode.........................................................................A-17
Appendix B: Port Pinouts
B.1 Dock Port Pinout......................................................................B-1
B.2 Battery Contact Pinout.................................................................B-2
Appendix C: Bar Codes Settings
C.1 Scanner Menu .........................................................................C-1
C.2 Decoded (Internal) Scanner............................................................C-2
C.2.1 Options – Decoded (Internal) Scanner.........................................C-2
C.2.2 Advanced Options – Decoded (Internal).......................................C-3
C.2.3 Decoded (Internal) 2D Scanning Options......................................C-5
C.2.4 Data Options — Decoded (Internal) Scanner ..................................C-5
C.2.5 Code 39.......................................................................C-6
C.2.6 Code 128......................................................................C-9
C.2.7 EAN 13 ..................................................................... C-10
C.2.8 EAN 8 ...................................................................... C-10
C.2.9 UPC A...................................................................... C-11
C.2.10 UPC E...................................................................... C-11
C.2.11 UPC/EAN Shared Settings.................................................. C-12
C.2.12 Code 93 .................................................................... C-13
C.2.13 Codabar .................................................................... C-14
C.2.14 MSI Plessey ................................................................ C-14
C.2.15 Interleaved 2 of 5........................................................... C-16
C.2.16 Discrete 2 of 5.............................................................. C-16
EP10 Hand-Held (Windows Embedded 6.5) User Manual ix
Page 12

C.2.17 RSS Code .................................................................. C-17
Preliminary Draft
C.2.18 Composite.................................................................. C-18
C.2.19 PDF-417.................................................................... C-18
C.2.20 Micro PDF-417............................................................. C-19
C.3 Decoded............................................................................. C-20
C.3.1 Options – Decoded Scanner ................................................. C-20
C.3.2 Advanced Options – Decoded Scanner ...................................... C-20
C.3.3 Code 39 ..................................................................... C-21
C.3.4 Code 128.................................................................... C-23
C.3.5 EAN 13 ..................................................................... C-24
C.3.6 EAN 8 ...................................................................... C-25
C.3.7 UPCA....................................................................... C-25
C.3.8 UPC E ...................................................................... C-26
C.3.9 UPC/EAN Shared .......................................................... C-26
C.3.10 Code 93 .................................................................... C-27
C.3.11 Codabar .................................................................... C-28
C.3.12 MSI Plessey ................................................................ C-29
C.3.13 Code 11 .................................................................... C-30
C.3.14 Interleaved 2 of 5........................................................... C-30
C.3.15 Matrix 2 of 5................................................................ C-31
C.3.16 Discrete 2 of 5.............................................................. C-32
C.3.17 Telepen..................................................................... C-32
C.3.18 RSS Code (Reduced Space Symbology) .................................... C-33
C.3.19 Composite.................................................................. C-34
C.3.20 TLC-39..................................................................... C-34
C.3.21 PDF-417.................................................................... C-35
C.3.22 Micro PDF-417............................................................. C-35
C.3.23 Codablock.................................................................. C-36
C.4 Imager............................................................................... C-37
C.4.1 Options – Imager............................................................ C-37
C.4.2 Code 39 Settings ............................................................ C-38
C.4.3 Code 128 Settings ........................................................... C-38
C.4.4 EAN 13 ..................................................................... C-38
C.4.5 EAN 8 ...................................................................... C-39
C.4.6 UPC A ...................................................................... C-39
C.4.7 UPC E ...................................................................... C-40
C.4.8 Code 93 ..................................................................... C-40
C.4.9 Codabar .................................................................... C-40
C.4.10 Interleaved 2 of 5........................................................... C-40
x EP10 Hand-Held (Windows Embedded 6.5) User Manual
Page 13

Contents
Preliminary Draft
C.4.11 RSS Code (Reduced Space Symbology) .................................... C-41
C.4.12 Composite.................................................................. C-41
C.4.13 PDF-417.................................................................... C-41
C.4.14 Micro PDF-417............................................................. C-42
C.4.15 2D Data Matrix............................................................. C-42
C.4.16 2D QR Code................................................................ C-43
C.4.17 2D Maxicode ............................................................... C-43
C.4.18 2D Aztec ................................................................... C-43
C.4.19 Postal: PlaNET ............................................................. C-44
C.4.20 Postal: PostNET............................................................ C-44
C.4.21 Postal: Australian........................................................... C-44
C.4.22 Postal: Japanese ............................................................ C-44
C.4.23 Postal: Korean.............................................................. C-45
C.4.24 Postal: Royal ............................................................... C-45
C.4.25 Postal: Kix.................................................................. C-45
C.4.26 Postal: Canadian............................................................ C-46
Appendix D: Teklogix Imagers Applet
D.1 Required Applets ..................................................................... D-1
D.2 Presets ............................................................................... D-1
D.2.1 Predefined Presets............................................................ D-2
D.2.2 Bar Code Predefined Presets.................................................. D-2
D.2.3 Bar Code Decoding Camera Predefined Presets............................... D-3
D.2.4 Image Capture Predefined Presets ............................................ D-4
D.3 Using The Teklogix Imagers Applet .................................................. D-4
D.3.1 Configuring The Image Capture Presets ...................................... D-4
D.3.2 Selecting A Camera.......................................................... D-5
D.3.3 Setting The Active Preset..................................................... D-5
D.3.4 Viewing A Preset............................................................. D-6
D.3.5 Creating A Custom Preset.................................................... D-6
D.3.6 Modifying A Custom Preset.................................................. D-7
D.3.7 Removing A Custom Preset .................................................. D-9
D.4 Configuring The Bar Code Decoding Camera Presets................................. D-9
D.4.1 Selecting A Camera.........................................................D-10
D.4.2 Setting The Active Preset....................................................D-10
D.4.3 Viewing A Preset............................................................ D-10
D.4.4 Creating A Custom Preset...................................................D-11
D.4.5 Modifying A Custom Preset................................................. D-12
D.4.6 Removing A Custom Preset ................................................. D-13
EP10 Hand-Held (Windows Embedded 6.5) User Manual xi
Page 14

Contents
Preliminary Draft
D.4.7 Configuring The Bar Code Decoding Symbologies..........................D-13
D.4.8 Setting The Active Preset.................................................... D-14
D.4.9 Viewing A Preset............................................................ D-14
D.4.10 Creating A Custom Preset...................................................D-15
D.4.11 Modifying A Custom Preset................................................. D-16
D.4.12 Removing A Custom Preset ................................................. D-17
D.4.13 Configuring Symbologies in the Teklogix Imagers Applet...................D-17
D.4.14 Filter Tab – Manipulating Bar Code Data.................................... D-18
D.4.15 Translation Tab – Configuring Rules ........................................D-20
D.4.16 Advanced Tab............................................................... D-20
D.5 Teklogix Scanners Applet............................................................D-22
xii EP10 Hand-Held (Windows Embedded 6.5) User Manual
Page 15

INTRODUCTION 1
Preliminary Draft
1.1 About This Manual ....................................3
1.2 Text Conventions .....................................4
1.3 EP10 Hand-Held Features................................4
1.3.1 The EP10 Hand-Held..............................6
EP10 Hand-Held (Windows Embedded 6.5) User Manual 1
Page 16

Preliminary Draft
Page 17

1.1 About This Manual
Preliminary Draft
This manual describes how to configure, operate and maintain the EP10 Hand-Held Computer (Model Number 7515).
Chapter 1: Introduction
provides a basic overview of the EP10 Hand-Held.
Chapter 2: Basic Checkout
describes the steps required to get the EP10 ready for operation
Chapter 2: Getting to Know the EP10
describes the features and outlines how to charge and maintain the battery. This
chapter also provides information about indicators, microSD and SIM card
installation along with general EP10 maintenance.
Chapter 3: Using Windows Embedded 6.5
describes the Microsoft® Windows Embedded 6.5 Today screen and how to use
it. This chapter also outlines basics like moving around a window, displaying
menus, and so on.
Chapter 4: Programs
provides a description of the Windows Embedded 6.5 Programs options and
how to use them.
Chapter 1: Introduction
About This Manual
Chapter 5: Settings
provides details about Windows Embedded 6.5 Settings options and how to use
them.
Chapter 6: Peripheral Devices & Accessories
describes the peripherals and accessories available for your EP10.
Chapter 7: Specifications
details radio, imager and battery specifications.
Appendix A: Wireless Wide Area Network (WWAN)
provides details about Wireless WAN radio.
Appendix B: Port Pinouts
describes port pinouts.
Appendix C: Bar Codes Settings
describes the bar codes supported by the imager available for the EP10.
Appendix D: Teklogix Imagers Applet
describes the Teklogix Imagers applet and outlines how to use it.
EP10 Hand-Held (Windows Embedded 6.5) User Manual 3
Page 18

Chapter 1: Introduction
Preliminary Draft
Text Co nv e n t ions
1.2 Text Conventions
Note: Notes highlight additional helpful information.
Important: These statements provide particularly important instructions or addi-
tional information that is critical to the operation of the equipment.
Warning: These statements provide critical information that may prevent physical
injury, equipment damage or data loss.
1.3 EP10 Hand-Held Features
Important: For all safety, regulatory and warranty information, refer to the ‘EP10
Hand-Held Regulatory & Warranty Guide’, PN 8000235.
For a complete list of EP10 Hand-Held features, physical attributes and
approvals, refer to Chapter 7,“Specifications”.
The EP10 is a personal digital assistant operates with the Windows Embedded 6.5 operating
system with a phone option. This EP10 is intended for use in commercial and light industrial
applications with a focus on real time wireless data transactions. All possible bar code input
methodologies are supported by one of a variety of scanners available. Optimization for specific operational environments is supported with a wide range of peripheral options and
carrying accessories.
Model
• EP10 Hand-Held – Model Number 7515
Platform
• AM3715 Processor
• 800 MHz (ARM Cortex A8)
• On-board RAM: 256 MB SDRAM
• On-board ROM: 2 GB Flash
Operating System
• Microsoft Windows Embedded 6.5
4 EP10 Hand-Held (Windows Embedded 6.5) User Manual
Page 19

User Interface
Preliminary Draft
• Display (Backlit)
- 3.7 in. VGA portrait mode
- Backlight feature 165 cd/m2 output
- Sunlight readable with integrated touchscreen
- Colour 480 x 640 graphic TFT
- Passive stylus or finger operation
• Audio
- Built-in 85db mono speaker
- microphone
- receiver
• Keyboard (Backlit)
-QWERTY
- High reliability keypad ultra-white backlight
- Ergon
• Camera
- 3.2 Mega Pixel Colour
- Auto Focus
- Dual LED Flash
- Video capture capability
omically enhanced for ambidextrous one-hand operation
Chapter 1: Introduction
EP10 Hand-Held Features
Wireless Communication
• On-board IEEE 802.11a/b/g/n
• Bluetooth v2.1 radio (CCX V4 Certified)
• UMTS 3.5G HSPA + CDMA EV-DO Rev A radio options
• Integrated 5 band Antenna, supports both voice and data
• SiRF starIV GPS
Note: 802.11a/b/g/n and Bluetooth are available simultaneously.
EP10 Hand-Held (Windows Embedded 6.5) User Manual 5
Page 20
Chapter 1: Introduction
Preliminary Draft
The EP10 Hand-Held
Enhanced Features
• Accelerometer
• Digital Compass
• Gyroscope
• Light Sensor
• Proximity Sensor
Expansion Slot
• One microSD slot
VOIP (Voice Over IP)
• Push-to-talk
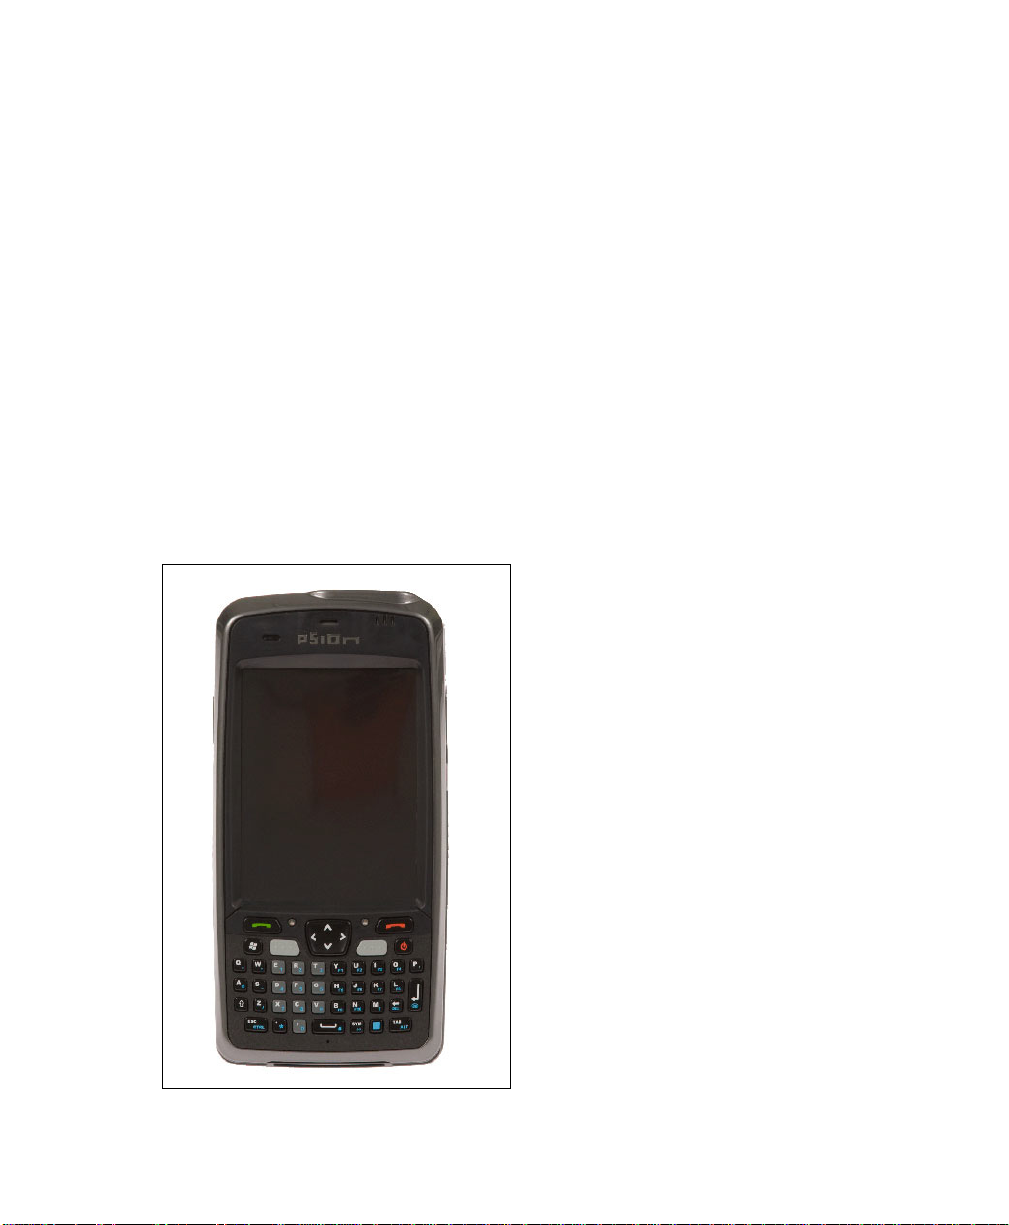
1.3.1 The EP10 Hand-Held
Figure 1.1 EP10 Hand-Held – QWERTY
6 EP10 Hand-Held (Windows Embedded 6.5) User Manual
Page 21

Chapter 1: Introduction
Key
End
Key
Send
Preliminary Draft
The EP10 Hand-Held
Figure 1.2 Phone Keys
Note: Refer to “Sending & Ending Phone Calls using the Phone Keypad” on page 33 for
details about these keys.
EP10 Hand-Held (Windows Embedded 6.5) User Manual 7
Page 22

Preliminary Draft
Page 23

GETTING TO KNOW THE EP10 2
Preliminary Draft
2.1 Features of the EP10 Hand-Held............................11
2.2 The Battery.......................................12
2.2.1 Battery Safety ................................13
2.2.2 Removing the Battery Pack .........................13
2.2.3 Battery Swap Time..............................13
2.2.4 Charging the Battery.............................13
2.2.4.1 Chargers and Docking Stations...................14
2.3 The Keyboard......................................15
2.3.1 EP10 QWERTY Keyboard. .........................15
2.3.2 Locking the Keyboard............................16
2.3.3 Modifier Keys ................................16
2.3.3.1 Activating Modifier Keys & the Shift-State Indicator.......16
2.3.3.2 Locking Modifier Keys.......................17
2.3.4 The Keys...................................17
2.3.5 The Keypad Backlight............................19
2.4 The Display.......................................19
2.4.1 Setting the Backlight Intensity & Duration .................19
2.4.2 Adjusting the Backlight using the Keyboard.................19
2.4.3 Aligning (Calibrating) the Touchscreen...................20
2.4.4 Screen Orientation..............................21
2.5 EP10 Indicators.....................................21
2.5.1 LEDs.....................................21
2.6 Audio Indicators....................................22
2.7 Monitoring the Battery and Maximizing Run Time..................23
2.7.1 Storing Batteries...............................23
2.8 Uploading Data in a Docking Station .........................24
2.9 Bluetooth Radio ....................................24
2.9.1 Pairing a Bluetooth Headset.........................25
2.10 Inserting the microSD and SIM Card.........................25
EP10 Hand-Held (Windows Embedded 6.5) User Manual 9
Page 24

2.10.1 Inserting the Cards..............................26
Preliminary Draft
2.11 The Camera ......................................26
2.12 General Maintenance..................................26
2.12.1 Caring for the Touchscreen .........................26
2.12.2 Cleaning the EP10..............................27
10 EP10 Hand-Held (Windows Embedded 6.5) User Manual
Page 25

2.1 Features of the EP10 Hand-Held
Receiver
3 Light Emitting Diodes
RIGHT SIDE
Enter Button
Vertical Scroll
LEFT SIDE
Scan Button
Volume Button
TOP
Scanner/Imager
Button
Microphone
Light Sensor
(LEDs)
Preliminary Draft
Page 26
Chapter 2: Getting to Know the EP10
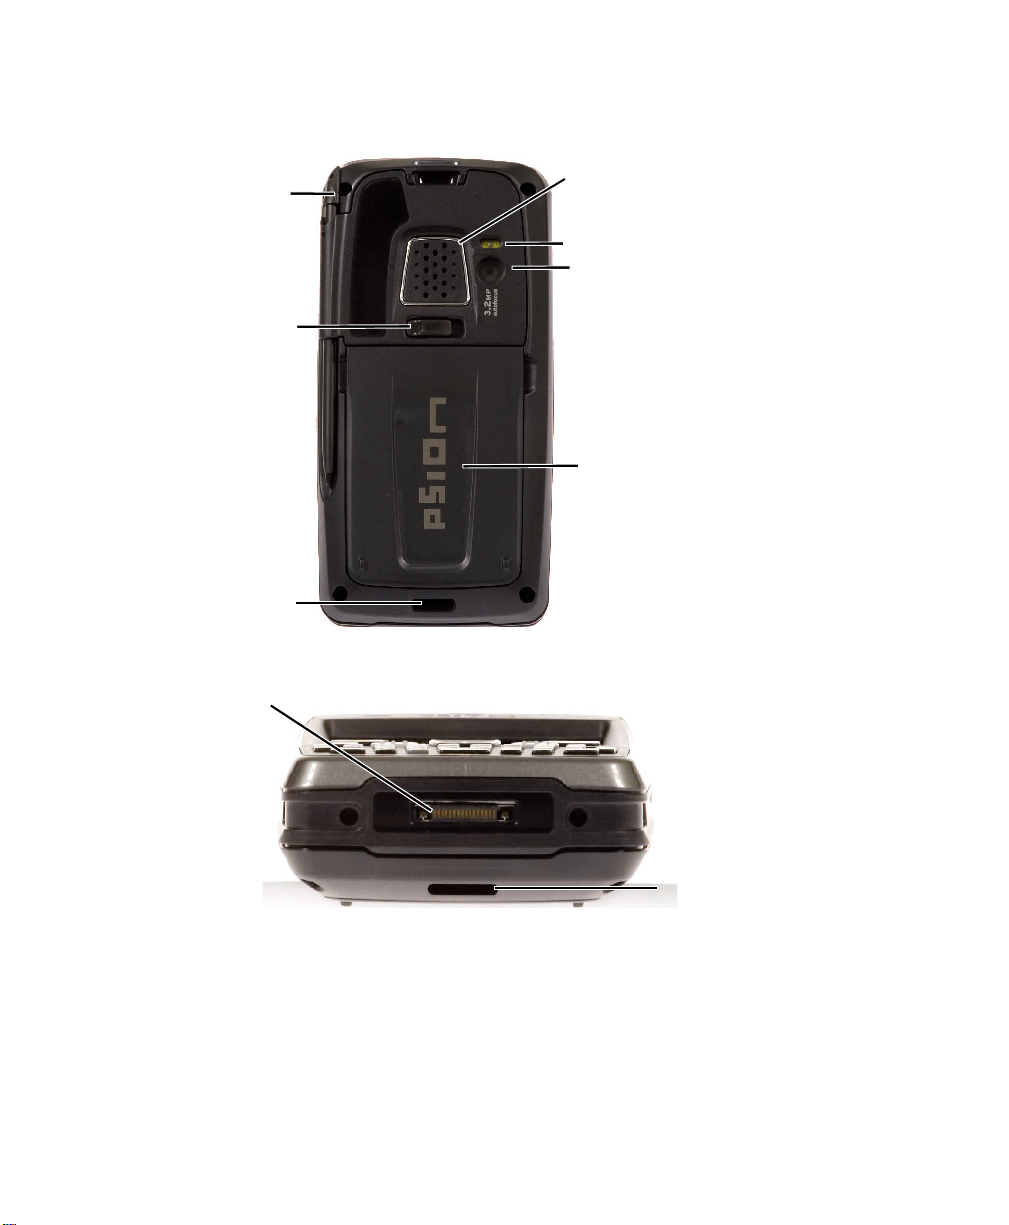
Speaker
Hand Strap
Battery Latch
Stylus
Camera
Battery &
Anchor
SIM/microSD Card
Compartments
Flash
Docking Port/
USB On-The-Go
Hand Strap
Anchor
Preliminary Draft
The Battery
Figure 2.1 Back of EP10
Figure 2.2 Ports
2.2 The Battery
The EP10 operates with a 3600 mAh, Lithium-Ion battery pack, Model No. RV3010.
Preparing the EP10 for operation requires that a battery pack be charged and installed in
the EP10.
12 EP10 Hand-Held (Windows Embedded 6.5) User Manual
Page 27

2.2.1 Battery Safety
Preliminary Draft
Important: Before attempting to install, use or charge the battery pack, it is critical that
you review and follow the important safety guidelines in the quick reference guide entitled ‘EP10 Hand-Held Regulatory & Warranty Guide’,
PN 8000235.
2.2.2 Removing the Battery Pack
Important: Always shut down the EP10 before removing the battery. To safely remove the
battery, press and hold down the Power button until the ‘Shutdown’ screen is
displayed. Choose ‘Shutdown’ and tap on OK.
Keep in mind also that all EP10s are equipped with internal super-capacitors
that will save the current data for up to 5 minutes while the battery
is swapped.
Refer to “Preparing the EP10 for Operation” on page 13 for more details about removing
and installing the battery.
2.2.3 Battery Swap Time
Chapter 2: Getting to Know the EP10
Battery Safety
Assuming the default power saving parameters and battery reserve level have not been altered, battery swap time is approximately 5 minutes – you will not lose data if the battery is
replaced within this time frame.
To protect data, the safest place to store data is on a microSD memory card or externally to
the device on a USB memory stick or on a PC.
The Suspend Threshold feature allows you to determine the battery capacity at which the
EP10 will be shut down. If left at the default value, Maximum Operating Time, the EP10 will
run until the battery is completely empty; the RAM is only backed up for a short period of
time. If you choose Maximum Backup Time, the EP10 shuts off with more energy left in the
battery so RAM can be backed up for a longer period of time.
(Refer to “Suspend Threshold and Estimated Battery Backup” on page 142 for details about
reserving battery power for data backup purposes.)
2.2.4 Charging the Battery
Batteries shipped from the factory are charged to approximately 40% of capacity. They must
be fully charged prior to use.
EP10 Hand-Held (Windows Embedded 6.5) User Manual 13
Page 28

Chapter 2: Getting to Know the EP10
Preliminary Draft
Charging the Battery
Note: Do not leave a spare battery to charge for more than 72 hours. Charging for more
than 72 hours may damage the battery or lead to charge capacity reduction.
Important: If the battery is overheated (>60° C) or if the battery capacity is very low
(<100 mAh), the unit will not switch on when the Power key is pressed.
Under the above conditions, when AC power is applied, the EP10 will still
refuse to power up; instead, a yellow LED will begin blinking and until the
battery is replaced, or in the case of low battery capacity, the battery is
charged to an acceptable level, the EP10 will not switch on.
Keep in mind also that, along with the battery, the EP10 is equipped with internal, supercapacitors that preserves data stored on the EP10 for a short period of time while the battery
is swapped.
2.2.4.1 Chargers and Docking Stations
Important: FOR DETAILED INFORMATION about chargers and docking stations,
refer to Chapter 6: “Peripheral Devices & Accessories” beginning on
page 215.
Lithium-Ion battery packs must be charged before use. These batteries can be charged with a
variety of chargers and docking stations. These include:
• AC wall adaptor (Model No. R3055) operates as an AC power source and when
plugged in, also charges the battery installed in the EP10. (see page 237)
• Desktop Docking Station (Model No. RV4000) operates as both a charger and a docking
station. Operating as a charger, both the battery installed in the EP10 and a spare battery
can be charged simultaneously. (see page 225)
• Quad Docking Station (Model No. RV4004) can charge the battery of up to four EP10s
inserted in the docking station. (see page 230)
• Quad Battery Charger (Model No. RV3004) can charge up to four batteries inserted in
the charger (see TBD)
• USB & Charger Snap Module (Model No. RV4001) allows you to connect a Mini-B
USB cable and a power cable to the EP10. (see TBD)
• DE9 RS232 & charger Snap Module (Model No. V4002) provides an RS232 connection and charge power to the EP10. (see TBD)
14 EP10 Hand-Held (Windows Embedded 6.5) User Manual
Page 29
Note: Refer to “Monitoring the Battery and Maximizing Run Time” on page 23 for addi-
Preliminary Draft
tional information about the battery.
Important: To avoid damaging the battery, chargers will not begin the charge process
until the battery temperature is between 0°C to 40°C (32°F to 104°F).
2.3 The Keyboard
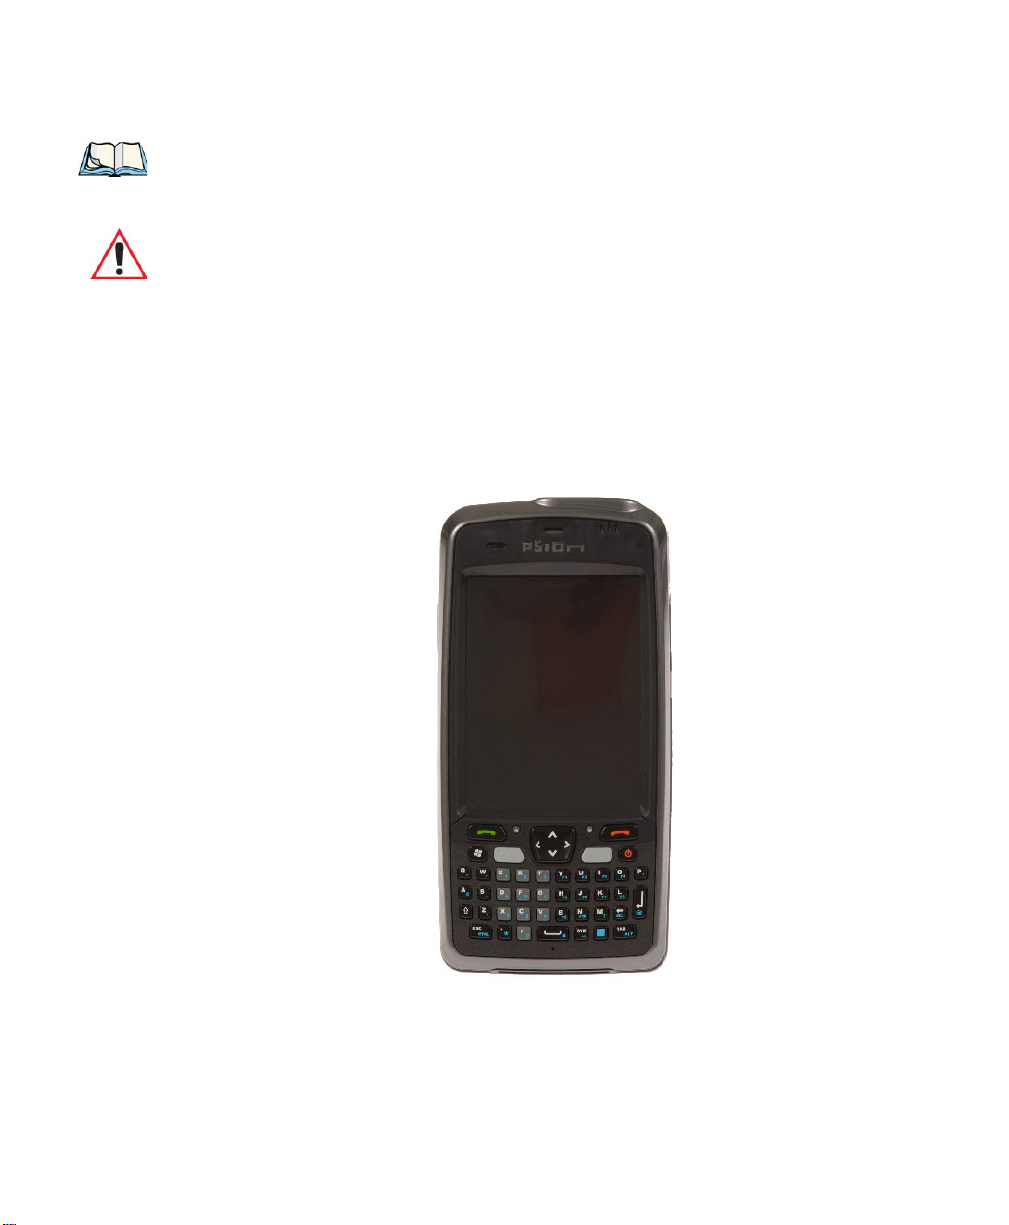
2.3.1 EP10 QWERTY Keyboard
The EP10 is available with a QWERTY keyboard with [Send] and [End] phone keys.
Figure 2.3 QWERTY Keyboard with P hone K eys
Chapter 2: Getting to Know the EP10
The Keyboard
Most of the keys on these keyboards operate much like a desktop computer. Where a key or
key function is not consistent with the PC keyboard, the differences are noted.
The [BLUE] modifier key provide access to additional keys and system functions. These
functions are colour coded in blue print above the keyboard keys.
EP10 Hand-Held (Windows Embedded 6.5) User Manual 15
Page 30

Chapter 2: Getting to Know the EP10
Preliminary Draft
Locking the Keyboard
Note: Almost all keys can be reprogrammed to suit your requirements.
2.3.2 Locking the Keyboard
You can lock the keyboard to prevent accidental key presses. To set up the locking/unlocking key sequence:
• Tap on Start>Settings>Buttons. Tap on the right arrow icon in the bottom-right
corner of the screen to scroll to the Lock Sequence tab.
Refer to “Lock Sequence” on page 106 for details about setting up this function.
2.3.3 Modifier Keys
The [SHIFT], [CTRL], [ALT], and [BLUE] keys are modifier keys. Pressing a modifier key
changes the function of the next key pressed. For example, on a QWERTY keyboard, the
‘@’ symbol is printed in blue on the [A] key. Pressing the [BLUE] key, a modifier key, followed by the [A] key displays the ‘@’ symbol rather than the letter A.
The [SHIFT], [CTRL] and [ALT] keys operate much like a desktop keyboard except that
they are not chorded (two keys held down simultaneously). The modifier key must be
pressed first followed by the key whose function you want modified.
Note: Keep in mind that the [ALT] and [CTRL] keys are only available on key-
pads that are not equipped with phone keys. You can, however, access the [CTRL]
key using the onscreen, soft keyboard.
2.3.3.1 Activating Modifier Keys & the Shift-State Indicator
When a modifier key is pressed, it is represented in the shift-state indicator icon in the
softkey bar at the bottom of the screen, making it easier to determine whether or not a modifier key is active. If the shift-state indicator icon is not visible (you can only see the soft
keyboard icon), you may need to take a few steps to display the shift-state indicator icon.
• Tap on Start>Settings followed by the Buttons icon.
• Tap on the One Shots tab at the bottom of the screen.
• Tap in the check box next to Show modifier key state to display the shift-state
indicator icon.
16 EP10 Hand-Held (Windows Embedded 6.5) User Manual
Page 31

Figure 2.4 Shift-State Indicator Icon
Soft Keyboard Icon
Shift-State Indicator Icon
replaces Soft Keyboard Icon
Preliminary Draft
2.3.3.2 Locking Modifier Keys
Note: The locking behaviour of the modifier keys can be changed so that, for example,
pressing a modifier key once will lock the key ‘on’. Refer to “One Shots” on page 99
for details. Note too that by default, the [ORANGE] key is locked ‘on’ when pressed
only once.
Chapter 2: Getting to Know the EP10
The Keys
When a modifier key is locked ‘on’, it will remain active until it is pressed again to unlock
or turn it off.
To help you identify when a modifier key is locked ‘on’, the key is represented in the shiftstate indicator icon with a black frame around it.
Figure 2.5 Shift-State Indicator Icon – Locked Modifier Key
Once a modifier key is unlocked or turned off, it is no longer displayed in the shift-state indicator icon.
2.3.4 The Keys
The [SHIFT] Key
The [SHIFT] key is used to display uppercase alpha characters and provide access to the
symbols above the numeric keys. You can lock this key ‘on’ so that when you press an alpha
EP10 Hand-Held (Windows Embedded 6.5) User Manual 17
Page 32

Chapter 2: Getting to Know the EP10
Preliminary Draft
The Keys
key, an upper case character is displayed. When you press a numeric key, the associated
symbol on the numeric key is displayed on the screen.
If you press the [SHIFT] key twice, it is locked ‘on’ essentially acting as a [CAPS] key, displaying uppercase characters. In this state, if you type a numeric key, the number rather than
the symbol above it is displayed. Press [SHIFT] again to turn the [CAPS] function off.
The Arrow Keys
The Arrow keys are located near the top of the keyboard. The arrow keys move the cursor
around the screen–up, down, left and right. The cursor is the flashing box or underline character that indicates where the next character you type will appear.
The [BKSP/DEL] Key
The [BKSP] key (sometimes referred to as destructive backspace) moves the cursor one
character to the left, erasing the incorrectly entered key stroke.
The [DEL] key ([BLUE] [BKSP]) erases the character at the cursor position.
The [ALT] and [CTRL] Keys
The [ALT] and [CTRL] keys modify the function of the next key pressed and are application
dependent.
The [TAB] Key
Typically, the [TAB] key moves the cursor to the next field to the right or downward.
The [ESC] Key
Generally, this key is used as a keyboard shortcut to close the current menu, dialog box or
activity and return to the previous one.
The [SPACE] Key
Pressing this key inserts a blank space between characters. In a Windows dialog box, pressing the [SPACE] key enables or disables a checkbox.
The [SCAN] Keys
The EP10 is equipped with two [SCAN] keys located on the keyboard just below the display
along with [SCAN] buttons situated on the left and right sides of the hand-held. [SCAN]
keys activate the scanner beam. For units that do not have internal scanners, these keys can
be remapped to serve other functions.
18 EP10 Hand-Held (Windows Embedded 6.5) User Manual
Page 33

The Function Keys–[F1] to [F10]
Preliminary Draft
Function keys [F1] to [F10] perform special, custom-defined functions. These keys are accessed by pressing [BLUE] followed by numeric keys [1] to [10]. They can be used with the
Windows Mobile 6.5 operating system or another application.
The Macro Keys
While macro keys are not physically stamped on the keyboard, up to 12 macro functions can
be added using the Scancode Remapping function. Refer to “Scancode Remapping” on
page 103 for details about mapping keys.
For details about creating a macro, refer to “Keyboard Macro Keys” on page 101.
2.3.5 The Keypad Backlight
The intensity of the keypad backlight can be configured using the Backlight icon accessed
by tapping on Start>Settings. Refer to “Backlight” on page 120 for details about this option.
2.4 The Display
EP10s are equipped with display backlighting to improve character visibility in low light
conditions. The backlight switches on when a key is pressed or the screen is tapped.
Chapter 2: Getting to Know the EP10
The Keypad Backlight
2.4.1 Setting the Backlight Intensity & Duration
To set the backlight intensity and the duration of time that the backlight will remain on,
you’ll need to choose the Backlight icon.
• Tap on Start>Settings and then, tap on System tab>Backlight icon.
Refer to “Backlight” on page 120 for details.
2.4.2 Adjusting the Backlight using the Keyboard
The display backlight can be adjusted using a keyboard key sequence. The key sequence
varies depending on the type of keyboard:
•For alphanumeric keyboards, lock the [ORANGE] key ‘on’. Press [ESC] until a satis-
factory brightness level is attained.(TBD)
EP10 Hand-Held (Windows Embedded 6.5) User Manual 19
Page 34

Chapter 2: Getting to Know the EP10
Preliminary Draft
Aligning (Calibrating) the Touchscreen
Important: Keep in mind that this sequence cycles the display backlight up to full bright-
ness and once reached, begins to dim the backlight until the display fades to
black – nothing is visible. At this point, you’ll need to continue pressing these
keys until the display brightens up to a usable level.
2.4.3 Aligning (Calibrating) the Touchscreen
If your touchscreen has never been aligned (calibrated) or if you find that the stylus pointer
is not accurate when you tap on an item, follow the steps below.
• Tap on Start>Settings. Tap on the System tab to display the Screen icon.
• Tap on the Screen icon to display the Alignment tab.
20 EP10 Hand-Held (Windows Embedded 6.5) User Manual
Page 35

• Tap on the Align Screen button, and follow the directions on the screen to align (cali-
Preliminary Draft
brate) the screen.
Note: This window provides two additional tabs: ClearType and Text Size. Tapping on the
ClearType tab allows you to enable the ClearType option to smooth screen font
appearance. The Text Size tab allows you to increase or decrease the size of the font
displayed on the screen.
2.4.4 Screen Orientation
In addition to screen calibration, the Screen icon allows you to determine how your screen
will be oriented – portrait or landscape (right- or left-handed).
• Tap on Start>Settings>System tab.
• Tap on the Screen icon.
•In the General tab, tap on the orientation that best suits the way in which you use
your EP10.
2.5 EP10 Indicators
The EP10 uses LEDs (Light Emitting Diodes), onscreen messages and audio tones to
indicate the various conditions of the EP10, the batteries, the scans and so on.
Chapter 2: Getting to Know the EP10
Screen Orientation
2.5.1 LEDs
Three LEDs are located on the upper-right side of the EP10, just above the display. When
you press the Power button, the LED flashes yellow to indicate that the EP10 has been
powered up. The LED table following outlines the behaviour of the LED while the EP10 is
docked in a charger.
Keep in mind that the application running on the EP10 can dictate how the application LED
operates. Review the documentation provided with your application to determine
LED behaviour.
Table 2.1 Function of EP10 LEDs
LED Function
Green Charge LED
(left-most LED)
Charge indicator. See the table below for descriptions of Charge
LED behaviour.
EP10 Hand-Held (Windows Embedded 6.5) User Manual 21
Page 36

Chapter 2: Getting to Know the EP10
Preliminary Draft
Audio Indicators
Table 2.1 Function of EP1 0 LEDs
LED Function
Yellow Application LED
(centre LED)
Blue Radio Power LED
(right-most LED)
Application LED. This LEDs behaviour is application dependent.
Radio power indicator.
If the EP10 is attached to an external power supply, the charge LED (the left-most LED) reflects the battery charge status.
Table 2.2 EP10 Charge LED Behaviour
LED Behaviour Charge Status
Solid Green Charge complete
Slow Blinking Green (LED off
longer than on)
Long Blinking Green (LED on
longer than off)
Fast Blinking Green (LED
switches on and off rapidly)
Charge in progress. Battery charged to less than 80% capacity.
Battery charged to greater than 80% capacity.
Charge failure. (Defective battery or battery outside temperature range (0° C to 50° C))
Note: When the Power button is pressed, the yellow LED will flash to let you know that the
hand-held is powered up. At this point, you can go ahead and release the Power
button.
2.6 Audio Indicators
The audio speaker provides a variety of sounds when a key is pressed, a keyboard character
is rejected, scan input is accepted or rejected, an operator’s entry does not match in a match
field or the battery is low. To specify how you want your EP10 to respond under various
conditions, refer to “Sounds” on page 117.
2.6.1 Adjusting Speaker Volume
The Vo l um e button is located on the left side of the EP10, just above the Scan button. It is a
rocker button; pressing the top half of the button increases volume while pressing the bottom
half of the button decreases it.
22 EP10 Hand-Held (Windows Embedded 6.5) User Manual
Page 37

Monitoring the Battery and Maximizing Run Time
Preliminary Draft
Chapter 2: Getting to Know the EP10
2.7 Monitoring the Battery and Maximizing Run Time
Note: When the battery is at 50% capacity, a ‘low battery’ warning is displayed. When the
battery is at about 10% capacity, a ‘very low battery’ notification bubble appears.
As Lithium-Ion batteries age, their capacity decreases gradually, and they are generally considered depleted after approximately 2 years of use (less than 60% of original capacity
remaining). Keep in mind however that heavy usage or operating the EP10 at temperature
extremes will shorten the battery life.
Lithium-Ion batteries do not require conditioning cycles and the EP10 battery system (including chargers) requires no user interaction to maintain peak performance.
To maximize the run time of your batteries, consider the following:
• The display backlight is a large drain on the battery. Try to keep its brightness as low
as possible.
• The EP10 is ‘event’ driven – that is, when it is not in use, the EP10 reverts to sleep
mode (even when it appears to be running), saving battery power. Events include a key
press, touchscreen taps and scan triggers. Power consumption is reduced if you avoid
unnecessary events, and allow the EP10 to sleep as much as possible.
• The battery is a ‘smart battery’ with built-in intelligence.
Tapping on the Power icon under Start>Settings>System tab displays a dialog box that pro-
vides detailed information about the battery status of the battery installed in your EP10.
• When the EP10 is switched off, it goes into a low-power, suspend state but continues to
draw a small amount of power from the battery. This should not be an issue unless the
EP10 is left in suspend state for more than a week – for long-term storage, the battery
should be removed.
2.7.1 Storing Batteries
Long term battery storage is not recommended. If storage is necessary:
• Always try to use a ‘first-in first-out’ approach to minimize storage time.
• Lithium-Ion batteries age much faster at elevated temperatures. Store batteries at temperatures between 0° C and 20° C.
• Always charge batteries to at least 40 to 60% before storing them. Batteries can be
damaged by an over-discharge phenomenon that occurs when an empty battery is stored
for a long period of time such that the cell voltage drops below a lower limit.
• To minimize storage degradation, recharge stored batteries to 40 to 60% every 4 or 6
months to prevent over-discharge damage.
EP10 Hand-Held (Windows Embedded 6.5) User Manual 23
Page 38

Chapter 2: Getting to Know the EP10
Preliminary Draft
Uploading Data in a Docking Station
• A ‘never used’ Lithium-Ion battery that has been stored for 3 years may have limited or
no useful life remaining once put into service. Think of batteries as perishable goods.
2.8 Uploading Data in a Docking Station
Important: Review the documentation provided with the user application installed in
your EP10 before performing data uploads.
The desktop docking station and quad docking station are typically used to upload transaction data to a server computer when a radio link is not available.
Note: Refer to “Chargers and Docking Stations” on page 223 for more details.
The desktop docking station can complete batch uploads to a Client USB connected PC or
server. An optional 10/100baseT Ethernet module is also available.
Unlike the desktop docking station, the quad docking station supports only TCP/IP connections to a PC or server through a 10/100baseT Ethernet connection.
When an EP10 is properly inserted in a docking station, a dock icon is displayed in
the navigation bar at the top of the screen. The EP10 also detects the presence of the
Ethernet network.
2.9 Bluetooth Radio
Note: Integrated Bluetooth radios are standard on EP10 units. Keep in mind also that
Bluetooth is available simultaneously with WAN and 802.11g on a single EP10.
The EP10 is equipped with an on-board Bluetooth radio. This type of radio enables short
range data communication between devices. The Bluetooth also provides the capability to
use a Bluetooth-enabled cellular phone as a data modem, exchanging information with other
Bluetooth devices. Refer to “The Bluetooth GPRS Phone” on page 180 for setup details.
24 EP10 Hand-Held (Windows Embedded 6.5) User Manual
Page 39

2.9.1 Pairing a Bluetooth Headset
Preliminary Draft
Note: Headset pairing information is also available in the Getting Started Centre in the
Today screen on your EP10.
Before pairing a headset or any other Bluetooth device with your EP10, make certain that
the Bluetooth device power is enabled; it is enabled by default. If, for some reason, it has
been disabled:
• Tap on Start>Settings>System tab and then, tap on the Power icon to display the
Power dialog box.
• Tap on the Built-in Devices tab, and tap in the checkbox next to Enable Bluetooth.
• Next, tap on Start>Settings>Connections tab>Bluetooth icon.
• Tap on the Mode tab, and check Turn on Bluetooth. Tap OK.
• Turn your headset on and place it within a few feet of your EP10.
• If needed, set your headset to visible so that the EP10 can detect it and establish a
connection.
Most headsets are in pairing mode by default. If this is not the case, follow the headset manufacturer’s instructions to place the headset in pairing mode.
• Tap on Start>Settings>Connections tab>Bluetooth icon.
•In the Devices tab, tap Add new device. Wait for the EP10 to scan for devices.
• Choose the headset device from the list and tap on Next.
If the headset has authentication enabled, the EP10 then prompts you to provide a passcode.
Chapter 2: Getting to Know the EP10
Pairing a Bluetooth Headset
• Type the passcode (or PIN – Personal Identification Number), and then tap on Next.
The EP10 then displays a list of services. Choose the Hands Free service. (If you are at-
tempting to pair another device, choose it from this list.)
•With Hands Free checked (enabled), tap Finish. The headset is now paired.
2.10 Inserting the microSD and SIM Card
There are two card holders available in the battery compartment of the EP10 – the lower
holder is provided for a microSD (micro Secure Digital) and the upper holder is for a SIM
(Subscriber Identity Module) card.
The microSD cards provide additional non-volatile memory to your EP10. SIM cards
provide access to the voice option, the Internet, and so on.
EP10 Hand-Held (Windows Embedded 6.5) User Manual 25
Page 40

Chapter 2: Getting to Know the EP10
Preliminary Draft
Inserting the Cards
2.10.1 Inserting the Cards
• Switch off the EP10 – press and hold down the Power key, and when the Shutdown
screen is displayed, choose Shutdown and tap on OK.
• Slide the battery latch to the right to unlock the battery, and remove it.
• Pull the SD door down as the arrow icon on the door indicates.(TBD)
• Orient the microSD or SIM card according to the legend stamped into the plastic. the
SD and SIM doors have guides or rails into which you can slide the card
• For microSD, slide the card into the guides in the microSD door on the left-hand
slot.(TBD)
• For SIM cards, slide the card in the right-hand slot.(TBD)
• Slide the protective door back into place, and snap it shut.
2.11 The Camera
A built-in digital camera is available for the EP10. This option allows you snap still photographs or create short video clips. The Pictures & Videos applet is used to access and
configure the camera. For more details about the camera, refer to “Pictures & Videos” on
page 75.
2.12 General Maintenance
2.12.1 Caring for the Touchscreen
The top of the touchscreen is a thin, flexible polyester plastic sheet with a conductive
coating on the inside. The polyester can be permanently damaged by harsh chemicals and is
susceptible to abrasions and scratches. Using sharp objects on the touchscreen can scratch or
cut the plastic, or crack the internal conductive coating.
The chemicals listed below must not come into contact with the touchscreen:
• sodium hydroxide,
• concentrated caustic solutions,
• benzyl alcohol, and
• concentrated acids.
If the touchscreen is used in harsh environments, consider applying a disposable screen protector (model number CH6110TBD). These covers reduce the clarity of the display slightly
but will dramatically extend the useful life of the touchscreen. When they become scratched
and abraded, they are easily removed and replaced.
26 EP10 Hand-Held (Windows Embedded 6.5) User Manual
Page 41

2.12.2 Cleaning the EP10
Preliminary Draft
Important: Do not immerse the EP10 in water. Dampen a soft cloth with mild detergent
to wipe the unit clean.
• Use only mild detergent or soapy water to clean the EP10 unit.
• Avoid abrasive cleaners, solvents or strong chemicals for cleaning. The plastic case is
susceptible to harsh chemicals. The plastic is partially soluble in oils, mineral spirits and
gasoline. The plastic slowly decomposes in strong alkaline solutions.
• To clean ink marks from the keypad or touchscreen, use isopropyl alcohol.
Chapter 2: Getting to Know the EP10
Cleaning the EP10
EP10 Hand-Held (Windows Embedded 6.5) User Manual 27
Page 42

Preliminary Draft
Page 43

USING WINDOWS EMBEDDED 6.5 3
Preliminary Draft
3.1 Navigating in Windows Embedded 6.5 and Applications...............31
3.1.1 Navigating using a Touchscreen and Stylus.................31
3.2 Windows Embedded 6.5 Desktop – Today Screen...................31
3.2.1 Windows Embedded 6.5 Navigation Bar ..................32
3.2.2 Today’s Date, Clock and Alarm.......................34
3.2.3 Ownership Information............................36
3.2.4 E-mail Notification..............................37
3.2.5 Task Notification...............................37
3.2.6 Calendar of Upcoming Appointments . . ..................40
3.2.6.1 Creating and Editing Appointments.................40
3.2.6.2 Adding Reminders .........................41
3.2.6.3 Using Categories ..........................42
3.2.6.4 Deleting Appointments .......................43
3.3 Start Menu.......................................43
3.3.1 Customising the Start Menu.........................43
3.4 Managing Files and Folders..............................44
3.4.1 Creating a New Folder............................45
3.4.2 Renaming a File ...............................45
3.4.3 Copying a File . ...............................45
3.4.4 Deleting a File................................46
3.5 Using Menus......................................46
3.5.1 Pop-Up Menus................................46
3.6 The Softkey Bar ....................................47
3.7 Programs – Using Applications ............................49
3.8 Settings.........................................50
3.9 Help...........................................51
3.10 Entering Text.....................................52
3.10.1 Soft Keyboard................................52
3.10.2 The Transcriber...............................53
EP10 Hand-Held (Windows Embedded 6.5) User Manual 29
Page 44

3.10.3 Block Recognizer and Letter Recognizer ..................54
Preliminary Draft
30 EP10 Hand-Held (Windows Embedded 6.5) User Manual
Page 45

Navigating in Windows Embedded 6.5 and Applications
Calendar-Upcoming
Appointments
Battery Charge State
Today’s Date
E-mail Notification
Tasks T o Complete
Connectivity Indicator
Volume Control
Start Button
Navigation Bar
Softkey Bar
Clock
Phone Settings
Phone Softkey
WiFi & Bluetooth
Getting Started
Ownership
Preliminary Draft
Chapter 3: Using Windows Embedded 6.5
3.1 Navigating in Windows Embedded 6.5 and Applications
Graphic user interfaces like Windows Embedded 6.5 for portable devices or desktop
Windows (2000, XP, etc.) utilize ‘point and click’ navigation. On the EP10, this is accomplished using a touchscreen and stylus rather than a mouse.
3.1.1 Navigating using a Touchscreen and Stylus
Note: If the touchscreen is not registering your screen taps accurately, it may need recali-
bration. Refer to “Aligning (Calibrating) the Touchscreen” on page 20.
A touchscreen is a standard feature on all EP10s. Each is equipped with a stylus – a pointing
tool – stored in a slot at the bottom of the unit.
• Use the stylus to tap on the appropriate icon to open files and folders, launch applications and programs, make selections, and so on.
3.2 Windows Embedded 6.5 Desktop – Today Screen
Keep in mind that if your EP10 is running Windows Embedded 6.5, the Today screen will
offer Phone connectivity in the Navigation Bar at the top of the screen and a Phone softkey
in the Softkey Bar at the bottom of the screen.
EP10 Hand-Held (Windows Embedded 6.5) User Manual 31
Page 46

Chapter 3: Using Windows Embedded 6.5
Start Button
Connectivity
Battery Capacity
Volume Control
Hotkeys
Phone Settings
Navigation Bar
Preliminary Draft
Windows Embedded 6.5 Navigation Bar
The Today screen displays all your important information – tasks, unread e-mails and up-
coming appointments – all in one place. The Start menu provides access to everything else
you’ll need.
3.2.1 Windows Embedded 6.5 Navigation Bar
The navigation bar along the top of the screen provides icons that, when tapped, open their
associated programs. If you’re unit is equipped with Windows Embedded 6.5, you’ll be see a
Phone hotkey for quick access to phone settings.
Note: When a peripheral is attached to the docking/usb port of the EP10, an associated
icon is displayed briefly in the navigation bar to indicate that the EP10 has recognized the connection.
Start Button
Tapping on the Start button displays the Start menu.
32 EP10 Hand-Held (Windows Embedded 6.5) User Manual
Page 47

Chapter 3: Using Windows Embedded 6.5
Preliminary Draft
Windows Embedded 6.5 Navigation Bar
Connectivity
The Connectivity hotkey provides a shortcut to the Connections tab in the Settings
window. This tab provides access to Bluetooth, network, network card and internet
connection setups.
Phone Settings
If your EP10 is running Windows Embedded 6.5, it is equipped with a phone option. An
EP10 in which a SIM card and radio are installed can access phone settings along with the
Wireless Manager from this pop-up bubble. Any active connections are also listed here.
Volume Control
Tapping on this icon displays a sliding tab that allows you to adjust the speaker volume or
turn the speaker on and off.
EP10 Hand-Held (Windows Embedded 6.5) User Manual 33
Page 48

Chapter 3: Using Windows Embedded 6.5
Phone
Dialer Volume
Volume
Speaker
Preliminary Draft
Today’s Date, Clock and Alarm
Two volume adjustments are provided – one for the speaker volume and the other for the
phone dialer volume.
Battery Capacity
Tapping on the Battery hotkey displays the Battery tab allowing you to view the remaining
battery capacity in the battery.
3.2.2 Today’s Date, Clock and Alarm
This option displays the current date. If you need to adjust the date or set an alarm:
•In the Today screen, tap on today’s date.
34 EP10 Hand-Held (Windows Embedded 6.5) User Manual
Page 49

Chapter 3: Using Windows Embedded 6.5
Preliminary Draft
The Clock & Alarms screen is displayed.
• Tap on the drop-down menu arrows to set the GMT, time and date.
An option to set the date and time for a visiting time zone is also available.
To set an alarm:
• Tap on the Alarms tab.
Today’s Date, Clock and Alarm
You can set a maximum of three alarms.
• Tap in the checkbox to enable an alarm.
• Tap the day on which you want the alarm to go off – Sunday through Saturday.
EP10 Hand-Held (Windows Embedded 6.5) User Manual 35
Page 50

Chapter 3: Using Windows Embedded 6.5
Time Field
Preliminary Draft
Ownership Information
• Tap on the time to display the clock.
• To set the time, in the time field below the clock, tap on the hour to highlight it, and
type the hour at which you want the alarm to ring. To set the minutes, highlight the min-
utes, and type the appropriate minutes, or
You can also assign the alarm activation time using the clock graphic. Position the stylus
on the hour hand of the clock, and drag it to the correct hour. Do the same for the
minute hand.
• Tap on OK to save your changes.
Note: Tapping on the ‘More’ tab displays a dialog box in which you can choose to ‘Dis-
play the clock on the title bar in all programs’.
3.2.3 Ownership Information
This option allows you to add your personal information to the EP10. Some of this information will be displayed in the desktop Today screen.
36 EP10 Hand-Held (Windows Embedded 6.5) User Manual
Page 51

Chapter 3: Using Windows Embedded 6.5
Preliminary Draft
• Tap on Owner, listed in the Today screen as Tap here to set owner information to
display a screen in which you can type information.
• Type your name, company name, address, telephone number and e-mail address.
Note: You can type information using the EP10 keyboard, or you can tap on the soft key-
board icon in the bottom right corner of the softkey bar to display an onscreen
keyboard.
E-mail Notification
The Ownership screen has two additional tabs–Notes where you can add any pertinent, additional information and Options where you can specify whether you want the desktop to
display your ‘identification’ information or your ‘note’ information.
3.2.4 E-mail Notification
If you have any e-mail, it will be indicated in the Tod ay desktop screen. To view your e-mail,
tap on the E-mail notification option represented by an icon in the shape of an envelope.
Refer to “Messaging” on page 84 for details about setting up your Inbox.
3.2.5 Task Notification
Tasks lets you create lists of entries representing your responsibilities, upcoming projects,
and so on. If you’ve assigned any tasks, this option lets you know how many active tasks
you have.
Note: You can synchronize the Task Notification option using ActiveSync so that any tasks
are displayed on your EP10 as well as your PC. Refer to “Synchronization” on
page 59 for details.
EP10 Hand-Held (Windows Embedded 6.5) User Manual 37
Page 52

Chapter 3: Using Windows Embedded 6.5
Preliminary Draft
Task Notification
• Tap on the Ta sk s option to display a list of tasks.
Creating a Task
• Tap in the field labelled Tap here to add a new task. The text is replaced with a blink-
ing cursor. If you prefer to type the task using the soft keyboard, tap on the soft keyboard
icon in the softkey bar.
• Type your task description.
• Tap anywhere in the blank part of the screen, or press the Power button to add the task to
your list.
Editing a Task
• Tap on a task in the task list to highlight it. Tap Edit in the softkey bar at the bottom of
the screen to display a detailed task screen where you can define task characteristics.
38 EP10 Hand-Held (Windows Embedded 6.5) User Manual
Page 53

Chapter 3: Using Windows Embedded 6.5
Preliminary Draft
Figure 3.1 Task Details Screen
Task Notification
Each of the nine items in this screen, when tapped, displays a drop-down menu where you
can choose from a list of options.
• Once you’ve completed all the appropriate fields, tap on OK to save your changes.
Note: You can also tap on the Notes tab to add additional information about the task your
are defining.
The task will be listed in the Today screen as an Active Task.
Deleting a Task
• Press and hold the stylus on a task until a pop-up menu is displayed.
• Tap on Delete Task.
Marking a Task as Completed
•In the Tasks list, tap the checkbox next to the items that are completed.
Sorting Tasks
•In the Tasks list, tap on the Menu option in the lower-right corner of softkey bar, and
tap on Sort By.
You can choose from Status, Priority, Subject, Start Date or Due Date. The tasks are ar-
ranged in the list according to the criterion you chose.
Limiting the Tasks Displayed in the Task Screen
• Tap on Menu in the lower-right corner of softkey bar, and tap on Filter.
EP10 Hand-Held (Windows Embedded 6.5) User Manual 39
Page 54

Chapter 3: Using Windows Embedded 6.5
Preliminary Draft
Calendar of Upcoming Appointments
You can choose All Tasks, Recently Viewed, No Categories, Active Tasks, or Completed
Tasks. The tasks are displayed on the screen according to the preference you chose.
3.2.6 Calendar of Upcoming Appointments
This option is used to map out all your upcoming appointments, meetings and so on in the
weeks, months and years ahead.
Note: You can synchronize the Calendar using ActiveSync so that any meetings, appoint-
ments and so on are displayed on your EP10 Today screen as well as on your PC.
Refer to “Synchronization” on page 59 for details.
• Tap on the Upcoming Appointments option in the Today screen, or tap on
Start>Calendar to display the calendar.
The default calendar displays an Agenda of appointments for the week, divided into days.
You can choose to leave the calendar as is, or you can tap on the Day softkey to reflect the
Week, Month or Year.
3.2.6.1 Creating and Editing Appointments
•In the Calendar screen, tap on Menu in the softkey bar, and then tap on
New Appointment.
40 EP10 Hand-Held (Windows Embedded 6.5) User Manual
Page 55

Chapter 3: Using Windows Embedded 6.5
Preliminary Draft
Calendar of Upcoming Appointments
Figure 3.2 Appointment Detail S creen
•In the Subject field, name the appointment.
• Complete the remaining fields to reflect your appointment details.
Note: Refer to “Adding Reminders” on page 41 for details about reminders. Refer
to“Using Categories” on page 42 for information about this option.
• Tap on OK to save your changes and close the screen.
3.2.6.2 Adding Reminders
If you want to be reminded in advance of an appointment:
•In the Reminder field, choose Remind me from the drop-down menu.
• In the second Reminder field, tap on the number in the field to display a drop-down
menu where you can define a numeric value of 1, 5, 10, 15, 30. Tap on minute(s) to
display a drop-down menu from which you can choose the time unit for your reminder –
minute(s), hour(s), day(s) or week(s).
•Tap OK to finish. You are returned to the view you were in before adding the reminder.
EP10 Hand-Held (Windows Embedded 6.5) User Manual 41
Page 56

Chapter 3: Using Windows Embedded 6.5
Preliminary Draft
Calendar of Upcoming Appointments
• Tap the appointment in the Calendar screen to display it in a summary screen. The
reminder is indicated by the small, bell icon.
3.2.6.3 Using Categories
Categories help you organize and track the different types of data you keep on your EP10.
To assign an appointment to a category:
• Tap on an appointment in the To da y screen. In the Calendar screen, tap on the
appointment again.
• Tap the Categories field to display the Categories screen.
• Tap in the checkbox next to the category to which you want to assign the appointment.
•Tap OK. Your appointment is assigned to the category or categories you chose.
42 EP10 Hand-Held (Windows Embedded 6.5) User Manual
Page 57

Note: You can create a new category by tapping on New in the softkey bar at the bottom of
Most recently
command centre
Windows Mobile
Navigation Bar
used programs
Start Button
Custom-chosen
programs
Preliminary Draft
the screen.
3.2.6.4 Deleting Appointments
• Tap and hold the stylus on the appointment you want to delete.
• Tap on Delete Appointment in the pop-up menu.
3.3 Start Menu
To display the Start menu:
• Tap on the Start button in the upper-left corner of the Navigation Bar.
Chapter 3: Using Windows Embedded 6.5
Start Menu
• Tap on the Start menu item with which you want to work.
3.3.1 Customising the Start Menu
You can choose the items you want to appear in the Start menu – items you use most often.
EP10 Hand-Held (Windows Embedded 6.5) User Manual 43
Page 58

Chapter 3: Using Windows Embedded 6.5
Preliminary Draft
Managing Files and Folders
• Tap on Start>Settings.
•In the Personal tab, tap on the Menus icon.
• Tap the checkboxes next to the items you would like to appear in your Start menu.
When you’ve completed your selections, tap on OK.
3.4 Managing Files and Folders
Windows Embedded 6.5 files are stored in folders and sub-folders that are accessible with
File Explorer. You can open, save, rename, copy and paste files in the same manner as you
would on any desktop PC.
44 EP10 Hand-Held (Windows Embedded 6.5) User Manual
Page 59

• Tap on Start>Programs>File Explorer.
Files stored
here automa-
Tap to display sorting options
Tap to mov e
back one level
Tap to display ad ditional
storage/files
tically
Preliminary Draft
3.4.1 Creating a New Folder
•Tap Start>Programs>File Explorer.
•Tap Menu>New Folder in the softkey bar at the bottom of the screen.
• Use the EP10 keyboard or the soft keyboard to assign a name to the folder.
Chapter 3: Using Windows Embedded 6.5
Creating a New Folder
3.4.2 Renaming a File
• Press and hold the stylus on the file you want to rename. A ring of dots is displayed followed by a pop-up menu.
•Tap Rename. The file name is highlighted. Type a new name.
3.4.3 Copying a File
• Press and hold the stylus on the file you want to copy. A ring of dots is displayed followed by a pop-up menu.
• Tap on Copy in the pop-up menu.
• Navigate to the location where you want to copy the file.
• Press and hold the stylus in a blank area of the screen—away from other icons—until a
pop-up menu is displayed.
• Tap Paste to copy the file to the new location.
EP10 Hand-Held (Windows Embedded 6.5) User Manual 45
Page 60

Chapter 3: Using Windows Embedded 6.5
Softkey Bar Menu
Preliminary Draft
Deleting a File
3.4.4 Deleting a File
• Press and hold the stylus on the file or folder you want to delete until a pop-up menu
is displayed.
•Tap Delete to remove the file.
3.5 Using Menus
In Windows Embedded 6.5, the menu is located in the softkey bar at the bottom of the
screen.
To execute a command:
• Tap on Menu to display the commands associated with it, and then tap on the command
you want to execute.
3.5.1 Pop-Up Menus
Pop-up menus are available in many screens and programs. They offer quick access to a
group of useful commands in addition to those available in the menu bar. To display a popup menu:
46 EP10 Hand-Held (Windows Embedded 6.5) User Manual
Page 61

• Gently press and hold the stylus on the screen. A ring of dots is displayed on the screen
Softkey Bar
Softkeys
Soft keyboard icon
Soft keyboard
Preliminary Draft
followed by a pop-up menu.
• Tap on the command you want to execute.
3.6 The Softkey Bar
The EP10 is equipped with a softkey bar at the bottom of the screen. It displays softkeys that
allow you to access menus and commands. It also displays the soft keyboard icon.
Chapter 3: Using Windows Embedded 6.5
The Softkey Bar
Softkeys
Tapping on a softkey displays information associated with the softkey–for example, in the
sample screen above, the Menu softkey displays the commands associated with Word
Mobile. The Vie w softkey lets you to tailor how the Word document will be displayed.
EP10 Hand-Held (Windows Embedded 6.5) User Manual 47
Page 62

Chapter 3: Using Windows Embedded 6.5
Shift-state indicator icon
Preliminary Draft
The Softkey Bar
The Soft Keyboard Icon
Tapping on the soft keyboard icon displays an onscreen keyboard you can use as an alterna-
tive to the EP10 keyboard.
Shift-State Indicator Icon
The softkey bar can also display the shift-state indicator icon. This icon indicates active
modifier keys–[SHIFT], [ALT], [CTRL], [ORANGE] and [BLUE].
• Tap on Start>Settings>Buttons>One Shots. Tap in the checkbox next to Show modi-
fier key state, to replace the soft keyboard icon with the shift-state indicator icon.
When a modifier key is pressed, it is displayed in the shift-state indicator icon. In the
example above, the [ORANGE] key was activated.
To distinguish a ‘locked’ modifier key – a key that has been locked ‘on’ – from a modifier
key that is only active until the next key is pressed, ‘locked’ keys are encircled in a black
frame in the shift-state indicator icon. Refer to “Activating Modifier Keys & the Shift-State
Indicator” on page 16 for details.
Note: You can still access the soft keyboard while the shift-state indicator icon is displayed.
Tapping on this icon displays the soft keyboard. Tapping on the shift-state indicator
icon again removes the soft keyboard.
48 EP10 Hand-Held (Windows Embedded 6.5) User Manual
Page 63

3.7 Programs – Using Applications
Preliminary Draft
•Tap Start>Programs to display the programs installed on your EP10.
Figure 3.3 Program Screen Icons
Opening an Application
• Tap on a Program icon to launch the associated program.
Chapter 3: Using Windows Embedded 6.5
Programs – Using Applications
Minimizing an Application
• Tap on the X button in the upper-right corner of an application screen to minimize
the application.
Note: Although it looks like a Close button, this button does not close the application–it
only minimizes it.
EP10 Hand-Held (Windows Embedded 6.5) User Manual 49
Page 64

Chapter 3: Using Windows Embedded 6.5
Preliminary Draft
Settings
Opening, Closing and Switching Applications
• Tap on Start>Settings. Tap on the System tab and then the Task Man a g e r icon – the
Task Manager screen is opened.
The Task Manager screen lists all running tasks (applications). This applet provides a
number of options to manage your opened applications.
• End Task: To shut down an application, highlight the program in the list, and tap on
the End Task softkey in the taskbar at the bottom of the screen.
• End All Tasks: To shut down all applications, tap on the Menu softkey, and choose
End All Tasks.
• Switch To: To make an application listed in this screen active, highlight the application,
and tap on Menu>Switch To.
For additional information about the Task Manager, refer to “Task Manager” on page 145.
3.8 Settings
•Tap Start>Settings to display the setting options for your EP10.
50 EP10 Hand-Held (Windows Embedded 6.5) User Manual
Page 65

Figure 3.4 Settings Icons
Preliminary Draft
Settings are divided into three tabs – Personal, System and Connections. Refer to Chapter 5:
“Settings” for details about the options available to you.
3.9 Help
Tapping on the Help option displays a screen of help topics that are content-specific; if for
example, the Today screen is displayed and you tap on Start>Help, the help screen will
provide topics about the To da y screen. You can perform a help content search by tapping on
the Contents or Search softkeys. Keep in mind that help is not always available.
Chapter 3: Using Windows Embedded 6.5
Help
EP10 Hand-Held (Windows Embedded 6.5) User Manual 51
Page 66

Chapter 3: Using Windows Embedded 6.5
Soft Keyboard
Soft Keyboard Icon
Preliminary Draft
Entering Text
3.10 Entering Text
Note: For additional information about tailoring text entry using the soft keyboard, the
transcriber, the block recognizer and the letter recognizer, refer to “Input” on
page 107.
You can enter text using either the soft keyboard or the EP10 keyboard. You can also use the
Transcriber to handwrite information directly on the touchscreen using your stylus.
• Open an existing document or create a new one– tap Start>Office Mobile>Word
Mobile and tap on New in the softkey bar to create a new document.
If you’re using the EP10 keyboard to enter text, there are no special steps. Just begin typing
– the text, spaces, etc. will appear in the document.
3.10.1 Soft Keyboard
The soft keyboard is laid out just like the keypad on a PC keyboard. By tapping the stylus on
letters and modifier keys like the [SHIFT] key, you can enter text in a document.
If the soft keyboard is not already displayed:
• Tap on the soft keyboard icon in the softkey bar.
• Tap on the keys in the soft keyboard to enter text in your document.
To switch to a numeric keyboard:
• Tap on the 123 key in the upper-left corner of the soft keyboard.
52 EP10 Hand-Held (Windows Embedded 6.5) User Manual
• Tap on this key again to return to the standard keyboard.
Page 67

3.10.2 The Transcriber
T ranscriber Icon
Preliminary Draft
To access the Transcriber, with your document opened:
• Tap on the arrow next to the keyboard icon, and choose Transcriber from the popup menu.
• Review the introductory screen. It provides some shortcut symbols you can draw on
your screen to work with the Transcriber.
• When you’ve finished reading the introductory screen, tap OK.
The Transcriber menu and icon bars are displayed at the bottom of the document.
Figure 3.5 Transcribe r Screen
Chapter 3: Using Windows Embedded 6.5
The Transcriber
• Use your stylus to write a few words anywhere on the screen.
After a few seconds, your words are recognized (or not) and are transcribed into typed text.
Note: Character recognition is more successful if you write using large letters.
Editing Text within the Transcriber
With your document open, make certain that you are in transcriber mode–the Transcriber
icon should be displayed in the lower-right corner of the softkey bar.
• Double-tap to select a word or triple-tap to select a paragraph, or
Draw a line through the text you want to select and wait a few seconds until the Transcriber highlights the text.
• Once the text is highlighted, write the new text that is to replace the highlighted information, or
EP10 Hand-Held (Windows Embedded 6.5) User Manual 53
Page 68

Chapter 3: Using Windows Embedded 6.5
Recognizer Icon Bar
Input Pa nel
Input Icon
Preliminary Draft
Block Recognizer and Letter Recognizer
Press and hold the stylus on the selected text to display a pop-up menu. Choose Cut,
Copy, Paste or Clear (delete).
Note: You can also use the softkey bar tools or the shortcuts listed in the introductory
screen to help you edit a document within the Transcriber.
3.10.3 Block Recognizer and Letter Recognizer
While the Transcriber attempts to recognize natural handwriting and transcribe it, Block
Recognizer and Letter Recognizer attempt to teach you how to conform your handwriting to
what the EP10 can recognize.
Block Recognizer
• Open a document, and tap on the arrow next to the input icon. Choose
Block Recognizer.
There are two points to remember when using Block Recognizer. First, limit your writing to
the Block Recognizer input panel–do not write in the body of the document. Second, write
only uppercase letters with your stylus.
• Tap on the ? icon in the Recognizer Icon Bar to display the Character Recognizer
screen. This screen provides a visual demonstration of how to enter letters that will be
recognized. Tap on a character in the soft keyboard for a demonstration of how to form
a recognizable letter.
•In the Block Recognizer panel, write letters to the left (abc) and numbers to the right
(123) on the input panel. Remember to write using uppercase letters–they will be
printed on the screen as lowercase unless you follow the step below to create an uppercase letter.
54 EP10 Hand-Held (Windows Embedded 6.5) User Manual
Page 69

Chapter 3: Using Windows Embedded 6.5
Recognizer Icon Bar
Input Panel
Input Icon
Preliminary Draft
Block Recognizer and Letter Recognizer
• To create an uppercase character, draw a line straight up the ‘abc’ panel.
• Use the Recognizer Icon Bar to move around the screen, add spaces, special characters,
and so on.
Letter Recognizer
• Open a document, and tap on the arrow next to the input icon. Choose
Letter Recognizer.
There are two points to remember when using Letter Recognizer. First, limit your writing to
the Letter Recognizer Input Panel–do not write in the body of the document. Second, write
only lowercase letters with your stylus.
• Tap on the ? icon in the Recognizer Icon Bar to display the Character Recognizer
screen. This screen provides a visual demonstration of how to enter letters that will be
recognized. Tap on a character in the soft keyboard for a demonstration of how to form
a recognizable letter.
• To create an uppercase character, write a lowercase letter on the left side (ABC) of the
input panel.
• To create a lowercase character, write a lowercase letter in the middle (abc) of the
input panel.
• Write numbers on the right side (123) of the input panel.
EP10 Hand-Held (Windows Embedded 6.5) User Manual 55
Page 70

Preliminary Draft
Page 71

PROGRAMS 4
Preliminary Draft
4.1 Programs........................................59
4.2 Games .........................................59
4.3 ActiveSync®......................................59
4.3.1 Synchronization ...............................59
4.4 Calculator........................................60
4.5 Demo Scanner.....................................60
4.6 Office Mobile......................................60
4.6.1 Excel Mobile.................................60
4.6.1.1 Workbook Components .......................61
4.6.2 OneNote Mobile...............................61
4.6.3 Word Mobile.................................67
4.6.3.1 Data Entry Modes..........................68
4.6.3.2 Sharing Documents with your PC .................68
4.6.4 PowerPoint Mobile..............................68
4.7 File Explorer......................................69
4.8 Getting Started.....................................69
4.9 PTSI Imager Demo...................................69
4.10 Internet Sharing....................................70
4.10.1 Creating an Internet Connection ......................70
4.10.2 Using Internet Sharing...........................70
4.11 Notes .........................................71
4.11.1 Creating a Note...............................71
4.11.2 Converting Handwritten Notes to Text...................72
4.11.3 Renaming a Note..............................74
4.11.4 Recording Notes...............................74
4.11.5 Synchronizing a Note............................75
4.12 Pictures & Videos...................................75
4.12.1 Using the Camera..............................75
4.12.2 Moving Photos to the EP10.........................77
EP10 Hand-Held (Windows Embedded 6.5) User Manual 57
Page 72

4.12.3 Opening a Photo...............................77
Preliminary Draft
4.12.4 Deleting a Photo...............................78
4.12.5 Editing a Photo................................78
4.12.6 Creating a Slide Show............................78
4.12.7 Using the Video Recorder..........................79
4.13 Remote Desktop Mobile................................80
4.13.1 Connecting to a Terminal Server. . .....................81
4.13.2 Disconnecting without Ending a Session ..................81
4.13.3 Ending a Session...............................81
4.14 Search .........................................82
4.15 Task Manager .....................................82
4.16 Tasks..........................................82
4.17 Internet Explorer....................................82
4.17.1 Browsing Web Sites.............................83
4.18 Messaging.......................................84
4.18.1 Folders....................................84
4.18.2 Synchronizing E-mail with Outlook.....................84
4.18.3 Changing Synchronization Settings.....................86
4.19 Windows Media....................................87
58 EP10 Hand-Held (Windows Embedded 6.5) User Manual
Page 73

4.1 Programs
Preliminary Draft
The Programs menu provides access to all the applications available on your EP10.
• Tap on Start>Programs to display this screen.
Tapping on an icon in this screen launches the associated applet.
Figure 4.1 Programs Tabs
Chapter 4: Programs
Programs
4.2 Games
Your EP10 is equipped with a few standard games – Bubble Breaker and Solitaire – should
you feel the need to pass the time.
4.3 ActiveSync®
For PCs using the Microsoft Windows XP operating system, ActiveSync® – Microsoft PC
connectivity software – can be used to connect the EP10 to PCs running this software. By
connecting the EP10 to a PC through your desktop docking station and running ActiveSync
on the PC, you can view EP10 files, drag and drop files between the EP10 and the PC,
connect to the Internet, and so on.
4.3.1 Synchronization
For details about synchronizing your PC with you EP10, visit the following Microsoft internet site:
http://www.microsoft.com/windowsmobile/activesync/default.mspx
EP10 Hand-Held (Windows Embedded 6.5) User Manual 59
Page 74

Chapter 4: Programs
Preliminary Draft
Calculator
4.4 Calculator
Tapping on Start>Programs>Calculator displays a standard calculator.
• Use your stylus to tap the calculator buttons.
4.5 Demo Scanner
The Demo Scanner icon is used to test how the EP10 reads and writes bar codes. The Demo
Scanner dialog box contains buttons at the bottom of the dialog box that allow you to Scan,
Reset or change bar code Setting.
4.6 Office Mobile
This icon contains the following abridged Microsoft programs: Excel Mobile, OneNote
Mobile, PowerPoint Mobile and Word Mobile. Keep in mind that if Office Mobile is listed
in your Start menu, this icon will not be displayed in the Programs window.
4.6.1 Excel Mobile
Excel Mobile is an abridged version of Microsoft Excel, an electronic spreadsheet program.
If you’re familiar the Excel application on your PC, you’ll be able to navigate Excel Mobile.
In addition to providing the tools to manipulate text and numeric values like statistics, percentages, using formulas that perform calculations, and so on, this program can also include
graphics such as pie charts.
Excel Mobile allows you to copy Excel workbooks from your PC onto your EP10 and
update them while you’re away from your desk.
• Tap on Start>Programs>Office Mobile>Excel Mobile.
If Office Mobile is listed in your Start menu, tap on Start>Office Mobile and then tap on
Excel Mobile.
• If a list of workbooks is displayed rather than a new sheet, you’ll need to create a new
workbook. To create a workbook:
•In Excel Mobile, tap the Menu>File>New.
60 EP10 Hand-Held (Windows Embedded 6.5) User Manual
Page 75

4.6.1.1 Workbook Components
Formula drop-down menu
Sheet1 drop-down menu
Selected cell
Cell
Entry bar
Columns
Address of selected text
Rows
Status bar
Toolbar
Menu bar
Preliminary Draft
• If the toolbar is not visible, tap on the View>Toolbar.
You can enter data, work with rows and columns and create formulas as you would when
working with Excel on your PC.
Using Excel Mobile Help
Chapter 4: Programs
OneNote Mobile
If you need help using this application, you can review the instructions in the associated help
files. To display Excel Mobile help files:
• Launch the Excel Mobile program.
• Tap on Sta rt>Help, and review the instructions provided.
4.6.2 OneNote Mobile
You can use OneNote Mobile to take notes wherever you are and then synchronize your
notes with a notebook section in the OneNote version on your PC. For example, you can:
• Snap pictures of business cards on your EP10 and then bring them into OneNote on your
PC.
• Create short text notes and voice recordings on your EP10 to remind you about important meetings, ideas, etc. and synchronize them with your notes.
• Prepare information in OneNote on your PC and then transfer it to your EP10 where it
will be available to you wherever you and your EP10 go.
EP10 Hand-Held (Windows Embedded 6.5) User Manual 61
Page 76

Chapter 4: Programs
Preliminary Draft
OneNote Mobile
Important: Remember that you must have Microsoft Office OneNote 2007 and the latest
Setting Up A Partnership
• Start Office OneNote and ActiveSync on your PC
• Connect the EP10 to your PC; you can use a USB cable or a Bluetooth connection.
When a connection is established between the EP10 and your PC, ActiveSync displays a
New Partnership screen.
version of ActiveSync installed on your PC before you can set up a partnership between your EP10 and your PC.
ActiveSync can be installed from the Getting Started CD included with your
EP10. Refer to “The Getting Started CD” on page 15 for details.
• Choose Standard partnership, and tap on Next.
• To share information between OneNote Mobile and Office OneNote 2007 on your PC,
tap Synchronize with this desktop computer, and then tap on Next.
• Tap on Finish to begin the partnership between the EP10 and the PC. Now you’ll be
able to pass notes back and forth between your PC and your EP10.
Creating A Note
•If Office Mobile is listed in your Start menu, tap on Start>Office Mobile>OneNote
Mobile icon.
62 EP10 Hand-Held (Windows Embedded 6.5) User Manual
Page 77

If this is not the case, tap on Start>Programs>Office Mobile icon. Tap on the
Preliminary Draft
OneNote Mobile icon.
• Tap on New to create a note page. Begin typing.
Chapter 4: Programs
OneNote Mobile
• When you complete your note, tap on Done.
Note: Remember that you can tap on the Menu softkey to Undo typing, add Formats (Bold,
Italic, Underline, Strikethrough), include Lists (Numbered, Bulleted, Clear)
EP10 Hand-Held (Windows Embedded 6.5) User Manual 63
Page 78

Chapter 4: Programs
Preliminary Draft
OneNote Mobile
Using the OneNote Menu
Tapping on Menu displays a list of options to help you work with the OneNote Mobile
applet.
• Undo, Redo, Cut, Copy and Paste: These commands operate in the same way as they
• Format: Tapping on this command lists the formatting options you can apply to your
• Take Picture: When you tap on this option, the EP10 switches to camera mode so that
do in any Windows Office application.
note: Bold, Italic, Underline, Strikethrough and Clear All.
you can snap a picture to include in your note.
64 EP10 Hand-Held (Windows Embedded 6.5) User Manual
Page 79

Chapter 4: Programs
Preliminary Draft
OneNote Mobile
Press [ENTER/Power] to snap a photo that is automatically inserted into your note.
• Insert Picture: Tapping on this command automatically displays your My Pictures
folder where you can tap on an existing picture to insert it into your note.
EP10 Hand-Held (Windows Embedded 6.5) User Manual 65
Page 80

Chapter 4: Programs
Record
Stop
Save
Play
Cancel
Preliminary Draft
OneNote Mobile
• Insert Recording: When you tap on this command, a recording panel is displayed.
Tap on the Record button to record your message.
Tap on Sto p when you’ve completed your message.
Tap on Play to listen to your voice message.
To discard your message, tap on X – the Cancel button.
To save your message, tap on OK. An audio icon is displayed in your note. You can tap
on it to listen to your message.
Synchronizing EP10 One Note With PC OneNote
• Connect the EP10 to your PC using either a USB cable or Bluetooth.
When the connection is complete, take one of the following steps:
66 EP10 Hand-Held (Windows Embedded 6.5) User Manual
Page 81

•In Microsoft ActiveSync on your PC, choose Sync.
Preliminary Draft
or
On your EP10, tap on Start>ActiveSync, and then tap on Sync.
During synchronization, the notes you created on your EP10 are copied to a new Office
OneNote 2007 notebook called OneNote Mobile on your PC. When synchronization is
done, you can drag the transferred notes into any other sections and other notebooks on your
PC.
Note: If you prefer to synchronize EP10 notes automatically, you can set up ActiveSync so
that synchronization is continuous or occurs on a schedule. In ActiveSync on your
PC, in the Tools menu, tap Options, and then tap on the Schedule tab.
4.6.3 Word Mobile
If you’ve used Microsoft Word on your Mac or PC, Word Mobile will be familiar to you.
Keep in mind however that Wor d Mobile is designed for a small screen and limited memory.
Note: Keep in mind also that a Word document created on your PC can lose key format-
ting features such as styles and tables if you make changes to it on your EP10.
• Tap on Start>Programs>Office Mobile>Word Mobile.
If Office Mobile is listed in your Start menu, tap on Start>Office Mobile and then tap on
Wor d Mobile.
If you’ve already create a Wo rd document, it will be listed in the Word Mobile window.
Chapter 4: Programs
Word Mobile
• Tap on New in the softkey bar to create a new Word document.
EP10 Hand-Held (Windows Embedded 6.5) User Manual 67
Page 82

Chapter 4: Programs
Preliminary Draft
PowerPoint Mobile
Using Word Mobile Help
If you need help using this application, you can review the instructions in the associated help
files. To display Word Mobile help files:
• Launch the Word Mobile program.
• Tap on Start>Help, and review the instructions provided.
4.6.3.1 Data Entry Modes
In addition to the soft keyboard, you can enter text using Block Recognizer, Letter Recognizer or Transcriber. Refer to “Entering Text” on page 52 for details.
You can also use the EP10 keyboard for data entry.
4.6.3.2 Sharing Documents with your PC
Documents created on a PC are recognized by your EP10. However, some formatting is lost
when a Word document is converted to a Word Mobile document. This loss also occurs
when you open a .doc file and change it on the EP10.
Important: To avoid problems, you can work on copies of .doc files. In addition, keep in
mind that you can use the Terminal Services Client program to log onto a
desktop PC that is also running Terminal Services, and then you can use
any program on your PC, including Microsoft Word (rather than Word
Mobile). Refer to “Remote Desktop Mobile” on page 80 for details.
4.6.4 PowerPoint Mobile
PowerPoint Mobile works just like the desktop version that may be installed on your PC. To
launch this program on your EP10:
• Tap on Start>Programs>Office Mobile>PowerPoint Mobile.
If Office Mobile is listed in your Start menu, tap on Start>Office Mobile and then tap on
PowerPoint Mobile.
Using PowerPoint Mobile Help
If you need help using this application, you can review the instructions in the associated help
files. To display PowerPoint help files:
• Launch the PowerPoint Mobile program as described above.
• Tap on Start>Help, and review the instructions provided.
68 EP10 Hand-Held (Windows Embedded 6.5) User Manual
Page 83

4.7 File Explorer
Preliminary Draft
Windows Embedded 6.5 files are stored in folders and sub-folders that are accessible
through File Explorer. You can open, save, rename, copy and paste files in the same manner
as you would on any desktop PC.
Important: Refer to “Managing Files and Folders” on page 44 for details about this
program.
4.8 Getting Started
For information about the Getting Started applet, refer to “The Getting Started Centre ??” on
page 19.
4.9 PTSI Imager Demo
Note: This icon is only available when an HHP 5000 imager is installed in your EP10.
To run a demonstration of the Teklogix Imager applet features:
• Tap on Start>Programs>PTSI Imager icon.
Chapter 4: Programs
File Explorer
Important: For details about this applet, refer to Appendix D: “Teklogix Imagers
Applet”.
EP10 Hand-Held (Windows Embedded 6.5) User Manual 69
Page 84

Chapter 4: Programs
Preliminary Draft
Internet Sharing
4.10 Internet Sharing
This option allows you to use your EP10 to connect your PC to the Internet. Before you can
use Internet Sharing, you must make certain that you have established a data connection on
your EP10.
4.10.1 Creating an Internet Connection
Follow the steps in this section only if you have not already setup an Internet connection.
You’ll need the following information before you begin:
From your cellular service provider: data connectivity information, access point name and
PAP/CHAP security settings.
From your Internet service provider (ISP) or wireless service provider: access point name
and password and any additional security information.
For a GPRS, 1xRTT or dialup connection:
• Tap on Start>Settings>Connections tab. Tap on the Connections icon.
• Under My Work Network, tap Add a new modem connection.
• Type a name for the connection, and choose Cellular Line (GPRS), or for 1xRTT connections, choose Cellular Line. Tap on Next.
• Type the phone number or access point name provided by your service provider, and
tap Next.
• Type the credentials supplied by your service provider, and tap Finish.
4.10.2 Using Internet Sharing
• Make certain that your data connect is running, and that you can access the Internet
from the EP10.
If you are using a USB cable to connect to your PC, you will need to disable the ActiveSync
USB connection.
• On your PC, open the ActiveSync window, and tap on File>Connection Settings.
•Disable Allow USB connection by tapping in the checkbox to the left of this option.
• Connect the EP10 to your PC using Bluetooth or a USB cable.
• On your EP10, tap Start>Programs>Internet Sharing.
• Choose the PC Connection type – USB or Bluetooth.
• Choose the network connection that the EP10 should use to connect to the Internet.
70 EP10 Hand-Held (Windows Embedded 6.5) User Manual
Page 85

•Tap Connect. It takes approximately 30 seconds to establish a connection. (If you are
Preliminary Draft
prompted to turn on Bluetooth, tap Ye s .)
If your are using a Bluetooth connection, execute the following steps on your PC:
•Tap Start>Control Panel>Network Connections.
• Right-click on Bluetooth Network Connections, and click on View Bluetooth
Network Devices.
• If the EP10 is listed as a Network Access Point, choose Connect. If it is not listed,
choose Create a new connection and use the New Connection Wizard to add the EP10
to the list.
4.11 Notes
The Notes application is an electronic notepad you can use to jot down your ideas quickly.
You can enter text using the soft keyboard, the EP10 keyboard, or you can write on the
screen using your stylus. You can also record a message.
Notes can also be shared through e-mail and synchronization with your PC.
• Tap on Start>Programs>Notes to launch this application.
• If a blank Note like the sample screen here is not displayed, tap on New in the softkey
bar.
Chapter 4: Programs
Notes
4.11.1 Creating a Note
• Choose an entry mode for your note.
EP10 Hand-Held (Windows Embedded 6.5) User Manual 71
Page 86

Chapter 4: Programs
Preliminary Draft
Converting Handwritten Notes to Text
To enter text with the soft keyboard, the Transcriber, the Block or the Letter Recognizer, tap
the stylus on the arrow to the right on the soft keyboard icon to choose your text
input method.
To use your stylus to handwrite on the screen, tap on the pen icon .
Important: Refer to “Entering Text” on page 52 for text entry details.
• Compose your note using the method you’ve chosen.
• Tap on OK when you’re done.
Your note is automatically saved. The file name is the first line of the note if you used the
keyboard–otherwise, it’s named Note1, Note2 and so on.
4.11.2 Converting Handwritten Notes to Text
When you use the pen tool, you can write notes in your own handwriting and keep them as
is, if you like. You can also teach the EP10 to recognize your handwriting and convert it into
printed text.
To convert handwriting into text:
• Tap on the pen tool and compose a note using your stylus.
• Tap on Menu>Tools>Recognize.
72 EP10 Hand-Held (Windows Embedded 6.5) User Manual
Page 87

Converting Handwritten Notes to Text
Preliminary Draft
Chapter 4: Programs
The text in the note is converted from handwritten to printed text.
Note: To convert only a specific portion of your handwritten note into printed type, tap
the stylus just before the first letter of the text, pause for a second, and then drag
your stylus across the text you want to select. Then, tap on Tools>Recognize to
convert only the highlighted text.
Failed Conversions
The Recognize tool sometimes gets the conversion wrong. If some words are not
converted properly:
• Press and hold the stylus on the incorrectly converted word.
• In the pop-up menu, choose Alternative to display a list of possible alternatives to the
incorrectly converted word. Your handwritten version is displayed along the top of
the menu.
Figure 4.2 Incorrect Conversions
EP10 Hand-Held (Windows Embedded 6.5) User Manual 73
Page 88

Chapter 4: Programs
Record
Stop
Play
Progress
Indicator
Skip to beginning
Skip to e n d
Volume
Preliminary Draft
Renaming a Note
• Tap on the correct word in the list.
• If the correct word is not listed, as is the case in the sample screen above, tap on the soft
keyboard icon to display the soft keyboard, and type the correct word.
4.11.3 Renaming a Note
• Press and hold the stylus on the file name in the Notes screen that you want to rename.
In the pop-up menu, choose Rename/Move, or
Tap the file name to select it, and tap on Menu>Rename/Move.
•In the Name field, type the new name, and tap OK.
4.11.4 Recording Notes
It’s sometimes easier to record a note than to write it down just to make certain that you’ve
captured an idea before it drifts away. To make an audio recording:
• Tap on New to open a fresh note.
• Tap on Menu>View Recording Toolbar.
• Tap on the Record button–a beep alerts you that your device is now ready to record.
• Begin speaking into the microphone on the EP10, or move the EP10 to within a few feet
74 EP10 Hand-Held (Windows Embedded 6.5) User Manual
of the source of the sound you want to record.
• Tap on the Stop button when you’ve completed your recording.
• Tap on OK to save the note.
Page 89

A speaker icon is displayed in the note indicating the presence of a recording within
Preliminary Draft
the note.
• To play the recorded note, tap on the speaker icon.
4.11.5 Synchronizing a Note
Like Tasks, Contacts and so on, the Notes program can be synchronized with Outlook on
your PC. In this way, all notes, recordings and drawings created in the Notes program are
copied to your PC and can be edited in Outlook’s Notes module.
Chapter 4: Programs
Synchronizing a Note
• To review the steps required to synchronize a note, with a Note page opened, tap on
Start>Help.
Follow the steps in the EP10 help file to synchronize your note.
4.12 Pictures & Videos
The Pictures & Videos applet allows you to snap photographs and record video footage. It is
also a photo and video viewing program.
Important: The Pictures & Videos program can only display .bmp or .jpg formats.
Photos in other formats will need to be converted on your PC before they
are transferred to the EP10.
4.12.1 Using the Camera
• Tap on Start>Programs>Pictures & Videos.
EP10 Hand-Held (Windows Embedded 6.5) User Manual 75
Page 90

Chapter 4: Programs
Photo File Icon
Indicates the camera
is active.
Tapping on this softkey
displays thumbnails of
photos stored on the EP10.
Preliminary Draft
Using the Camera
Keep in mind that if there are no pictures stored on your EP10 as yet, you’ll only see the
Camera icon in this screen.
• Tap on the Camera icon to activate the camera.
The screen will display the image your camera is pointed at. (The camera is built into the
back of the EP10.)
• Frame the image in the EP10 screen. Press [ENTER/Power] to snap the photograph.
Photo Menu
When the camera is activated, tapping on Menu displays a set of commands to help you
modify how your camera operates, the quality of the photos it takes, and so on. You can also
76 EP10 Hand-Held (Windows Embedded 6.5) User Manual
use this menu to activate the video recorder rather than the still camera.
Page 91

Note: ‘Video’ is a toggle command. When the still camera is activated, ‘Video’ is available
Preliminary Draft
in this menu. When the video recorder is activated, ‘Still’ (camera) is available in
this menu.
4.12.2 Moving Photos to the EP10
• Connect your device to your PC with ActiveSync.
• On your PC, using Windows Explorer (right-click My Computer and click on Explorer),
drag photos from their folder to the Mobile Device>My Pictures folder.
Chapter 4: Programs
Moving Photos to the EP10
4.12.3 Opening a Photo
• To open a photo, tap on Start>Programs>Pictures & Videos. You’ll see a thumbnail
of your photos.
EP10 Hand-Held (Windows Embedded 6.5) User Manual 77
Page 92

Chapter 4: Programs
Preliminary Draft
Deleting a Photo
• Tap on a thumbnail to open the photo.
Note: If you’ve stored your photos on a storage card, you’ll need to tap on the storage card
icon to display your photos.
4.12.4 Deleting a Photo
• Press and hold the stylus on the thumbnail photo you want to delete to display a pop-up
menu. Tap on Delete.
• Confirm your choice when prompted.
4.12.5 Editing a Photo
• Tap a thumbnail photo to open it.
• Tap on Menu>Edit.
The Rotate command is now displayed in the softkey bar. Additional editing tools are now
listed in the Menu.
4.12.6 Creating a Slide Show
To view a slide show:
• Tap on the Menu>Play Slide Show.
The slide show begins–in slide show mode, photos are displayed for about five seconds, one
after the other.
78 EP10 Hand-Held (Windows Embedded 6.5) User Manual
Page 93

• To display the slide show tool bar, tap anywhere on the photo.
Flip View
Play
Pause Previous
Next
Close
Preliminary Draft
4.12.7 Using the Video Recorder
• Tap on the Camera icon.
Chapter 4: Programs
Using the Video Recorder
EP10 Hand-Held (Windows Embedded 6.5) User Manual 79
Page 94

Chapter 4: Programs
Video Recorder Icon
Indicates that video
is active.
Preliminary Draft
Remote Desktop Mobile
• In the bottom-right corner of the camera screen, tap on Menu>Video.
• Press [ENTER/Power] to begin recording.
• To end the video, press [ENTER/Power] again, or tap on the Stop softkey.
Note: When the ‘Video’ recorder is activated, a Menu is available to tailor the operation of
the recorder, the quality of the recording, and so on.
4.13 Remote Desktop Mobile
This program allows you to log onto a Windows Terminal Server and run the desktop programs from the server on your EP10.
80 EP10 Hand-Held (Windows Embedded 6.5) User Manual
Page 95

4.13.1 Connecting to a Terminal Server
Preliminary Draft
• Tap on Start>Programs>Remote Desktop Mobile
•In the Server dialog box, type the Terminal Server name or TCP/IP address, or
choose a server from the drop-down menu.
• Tap on Connect.
•In the Remote Desktop Connection window, type your user name, password, and
domain (if required). Tap on OK.
4.13.2 Disconnecting without Ending a Session
Important: These commands are accessed from the Start menu in the Terminal Serv-
ices screen used to access the PC’s commands. Do NOT use the Start menu
on your EP10.
•In the Remote Desktop Connection window, tap on Start>Shutdown.
• Tap on Disconnect>OK
4.13.3 Ending a Session
•In the Terminal Services Client screen, tap on Start>Shutdown.
• Tap on Log Off>OK.
Connecting to a Terminal Server
Chapter 4: Programs
EP10 Hand-Held (Windows Embedded 6.5) User Manual 81
Page 96

Chapter 4: Programs
Preliminary Draft
Search
4.14 Search
•Tap Start>Programs, and then tap on the Search icon.
•In the Search for field, type the item for which you’re looking.
• To narrow your search, tap on the Type drop-down menu and choose from a list of preexisting programs. To search through all files, leave this option at All Data.
4.15 Task Manager
Refer to “Task Manager” on page 145 for details about this applet.
4.16 Tasks
This program helps you stay ahead of your schedule by managing your tasks, appointments,
and so on. For details about Tasks, refer to “Task Notification” on page 37.
4.17 Internet Explorer
Note: Internet Explorer is available from the Start menu by default. If you prefer it only be
accessed from the Programs window, tap on Start>Settings, tap on the Menus icon
and uncheck Internet Explorer.
82 EP10 Hand-Held (Windows Embedded 6.5) User Manual
Page 97

You can connect to Internet Explorer in two ways: by connecting the EP10 directly to the In-
Preliminary Draft
ternet or by connecting through your PC while the EP10 is attached via ActiveSync (see
“ActiveSync®” on page 59).
4.17.1 Browsing Web Sites
There is little difference between the standard Internet Explorer found on your PC and that
found on your EP10, sometimes referred to as Pocket Internet Explorer. You can enter
URLs, set a ‘home page’, turn images on and off, e-mail links to friends, and so on.
To go to a web site:
• Connect your EP10 to the Internet. (If you’re not certain how to do this, tap on
Start>Internet Explorer to display a blank window. Next, tap on Start>Help and
follow the steps listed.)
• Tap on Start>Programs>Internet Explorer to open Internet Explorer.
If Internet Explorer is listed in the Start menu rather in the Program screen, tap
on Start>Internet Explorer.
• Tap on the address bar – the field near the top of the screen where URLs are entered – to
highlight the current URL.
• Type a new URL in the address bar.
Tapping on the softkeys in the softkey bar at the bottom of the screen display Internet Ex-
plorer commands like those you find on your PC.
Chapter 4: Programs
Browsing Web Sites
EP10 Hand-Held (Windows Embedded 6.5) User Manual 83
Page 98

Chapter 4: Programs
Preliminary Draft
Messaging
4.18 Messaging
Note: Messaging is available from the Start menu by default. If you prefer it only be
accessed from the Programs window, tap on Start>Settings, tap on the Menus icon
and uncheck Messaging.
The Messaging program is used to send and receive e-mail on your EP10. To send and
receive e-mail, you’ll need to synchronize your PC or connect to a Post Office Protocol 3
(POP3) or Internet Message Access Protocol 4 (IMAP4) mail server.
For each of these methods, you need to set up an e-mail account with one exception –
Outlook e-mail accounts are set up by default.
4.18.1 Folders
If you use an Outlook e-mail account, messages in the Inbox folder in Outlook are automatically synchronized with your EP10. You can use ActiveSync on your PC to synchronize
additional folders. The folders and messages you move are mirrored on the server.
For POP3 accounts, if you move e-mail messages to a folder you create, the link between
the messages on the EP10 and the copies on the mail server are broken. When you next connect, the mail server will recognize that the messages are missing from the EP10 Inbox
folder and delete them from the server, preventing duplication of messages. Keep in mind
however that you will not have further access to messages that you moved to folders from
anywhere except with the EP10.
For IMAP4 accounts, the folders you create and the messages you move are reflected on the
server, making messages available any time whether you connect to your mail server from
your EP10 or your PC.
4.18.2 Synchronizing E-mail with Outlook
By synchronizing the EP10 Messaging program with Outlook on your PC, your e-mail is
available on both the EP10 and on your PC.
Note: Synchronizing e-mail does not require that the EP10 have an independent connec-
tion to the Internet.
84 EP10 Hand-Held (Windows Embedded 6.5) User Manual
Page 99

Synchronizing E-mail with Outlook
Preliminary Draft
• In ActiveSync on your PC, tap on To ol s> Optio ns in the tool bar at the top of the screen.
• Make certain that a check mark is displayed in the checkbox next to E-mail. Tap on OK.
Once you check E-mail for synchronization, Outlook e-mail messages are synchronized as
part of the general synchronization process. The next time you synchronize with ActiveSync, the e-mail in Outlook on your PC will be transferred to the Messaging program on
your EP10.
Chapter 4: Programs
EP10 Hand-Held (Windows Embedded 6.5) User Manual 85
Page 100

Chapter 4: Programs
Preliminary Draft
Changing Synchronization Settings
4.18.3 Changing Synchronization Settings
• In ActiveSync on your PC, double-tap the E-mail item in the Sync Options tab.
• Tap on the Select Folder button.
• Add a checkmark next to the folders in this screen that you want to synchronize with
your EP10, and tap on OK.
The E-mail Synchronization screen is displayed again.
• If you want to accept file attachments, add a check mark next to Include file attach-
ments. To limit the size, tap on Only if smaller than, and specify a size in the KB box.
• Tap on OK.
86 EP10 Hand-Held (Windows Embedded 6.5) User Manual
 Loading...