

Psion 7505BTMC75, 7505BTSDCMMC75, 7505BTSDCMCF10, 7505BTSDCMHC25, LBMA46LCS2169 User Manual
...Page 1
Chapter 5: Settings
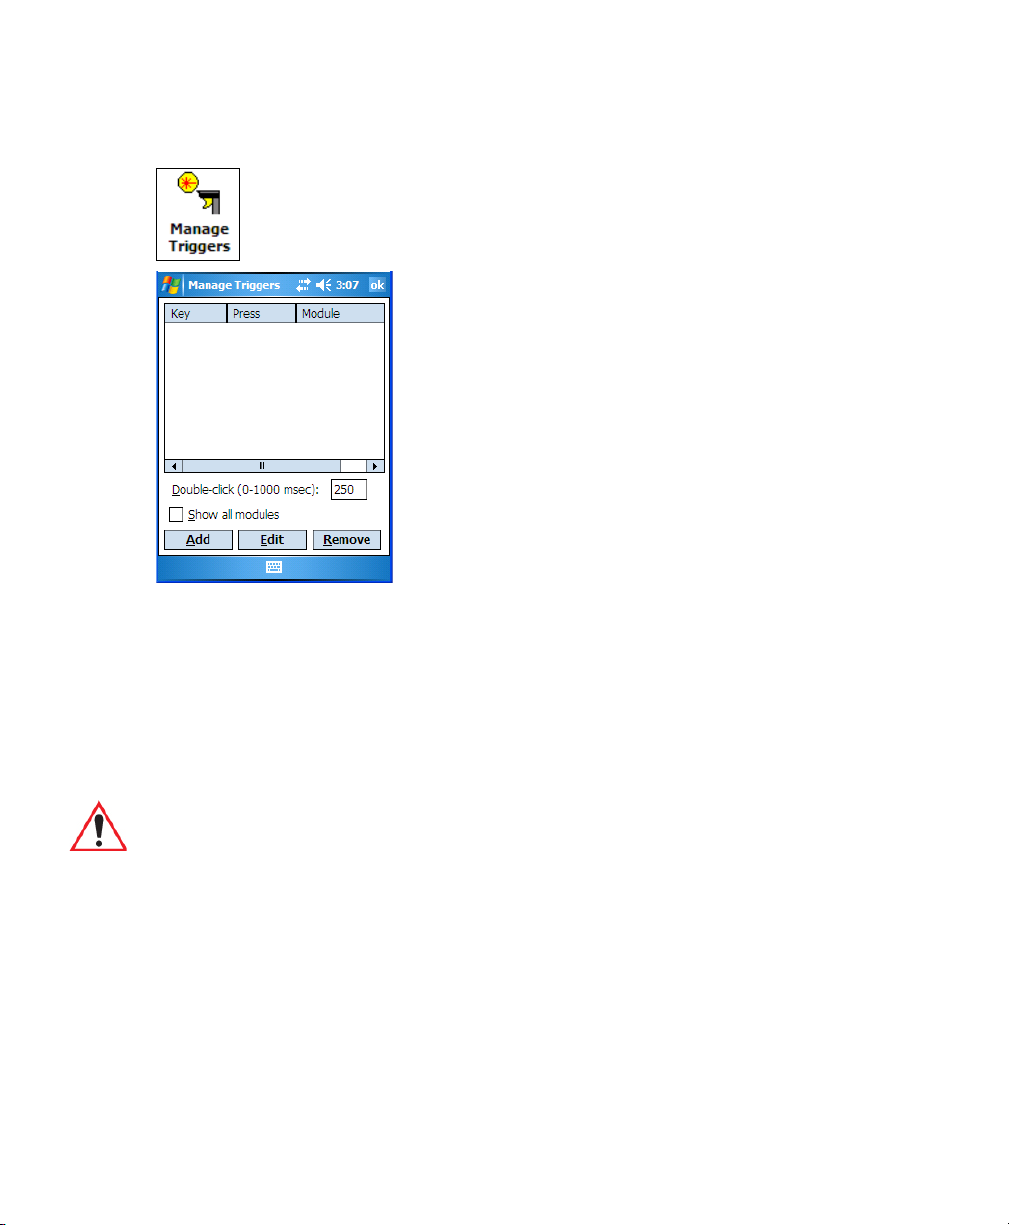
Manage Triggers
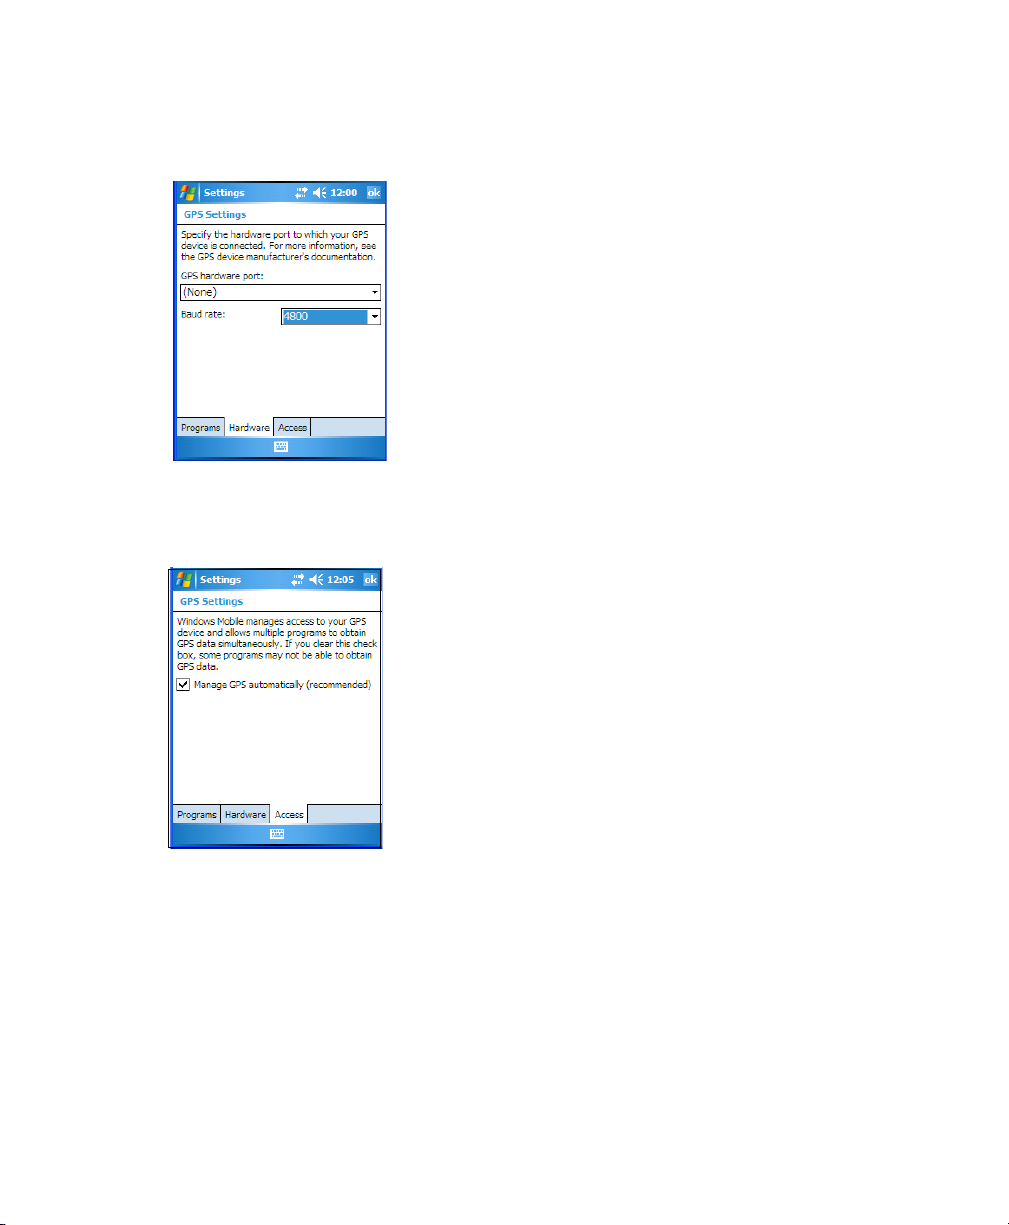
• Tap on the Hardware tab, and choose a GPS hardware port and the appropriate Baud
rate.
Windows Mobile 6 automatically manages access to the GPS receiver. However, some programs may not work with automatic configuration. If this is the case:
• Tap on the Access tab, and disable Manage GPS automatically (recommended).
You can go to www.microsoft.com/pocketstreets if a map-viewing program is not included
with your PDA, and copy the file to your PDA.
5.22 Manage Triggers
Manage Triggers allows you to configure how bar code scanners and other devices such as
RFID readers are triggered. You can configure the trigger ID for each trigger button for both
single- and double-click, and the double-click time.
iKôn Rugged PDA (Windows Mobile 6) User Manual 117
Page 2
Chapter 5: Settings
Trigger Mappings
• Tap on Start>Settings>System tab>Manage Triggers icon.
5.22.1 Trigger Mappings
A trigger mapping is an association between a particular key on the keyboard and a driver or
application, the module(s)– sometimes referred to as “trigger consumer(s)”–of the trigger
source. Along with keyboard keys, trigger sources can also be grip triggers, external hardware triggers or software-based. When the specified key is pressed, the trigger consumer
(for example, a decoded scanner) is sent a message.
Important: It is not possible to have two or more identical mappings—for example [F1]
cannot be mapped to the Non-Decoded Scanner twice—even if the trigger
type is different.
A keyboard key that is used as a trigger source will no longer generate key
data or perform its normal function. For example, if the space button is used
as a trigger source, it will not be able to send space characters to
applications.
Double-Click
When a key is pressed and released, then pressed again within the configured time (between
0 to 1000 milliseconds), a double-click occurs. See also “Trigger Press Type” on page 120.
118 iKôn Rugged PDA (Windows Mobile 6) User Manual
Page 3
Chapter 5: Settings
Trigger Mappings
Show All Modules
By default, the trigger mapping list only shows active mappings. Mappings for drivers or
applications that are not currently active are not normally displayed. By checking this
checkbox, all mappings, both active and inactive, are displayed.
Add
Tapping this button brings up the Add mapping dialog (see below), so that you can add new
trigger mappings.
Edit
Tapping this button brings up the Edit mapping dialog, so that you can edit existing trigger
mappings.
Remove
Tapping this button removes an existing mapping.
OK
The OK button in the top right of the Manage Triggers screen saves all changes made. If the
[ESC] key is pressed, all changes made will be discarded.
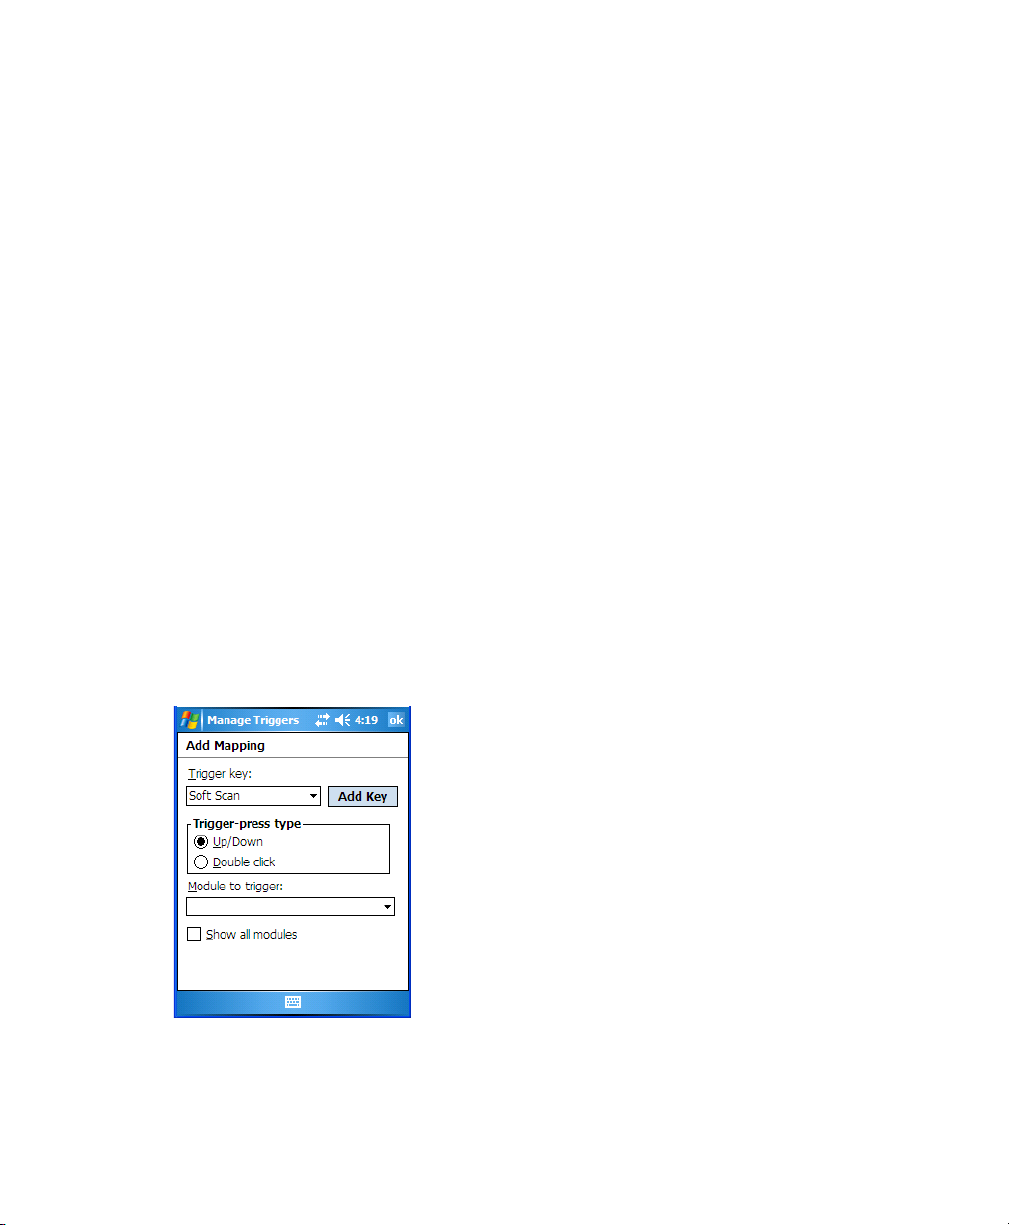
5.22.1.1 Add And Edit Trigger Mapping
• Tap on Add to add a new trigger map, or tap on Edit to edit an existing trigger map.
Trig ger Ke y
This dropdown list allows you to specify the source of the trigger events, such as the Grip
Trigger, Left Scan, etc., for the trigger module selected.
iKôn Rugged PDA (Windows Mobile 6) User Manual 119
Page 4
Chapter 5: Settings
Trigger Mappings
Note: It is possible to map the same source to different modules (trigger consumers—for
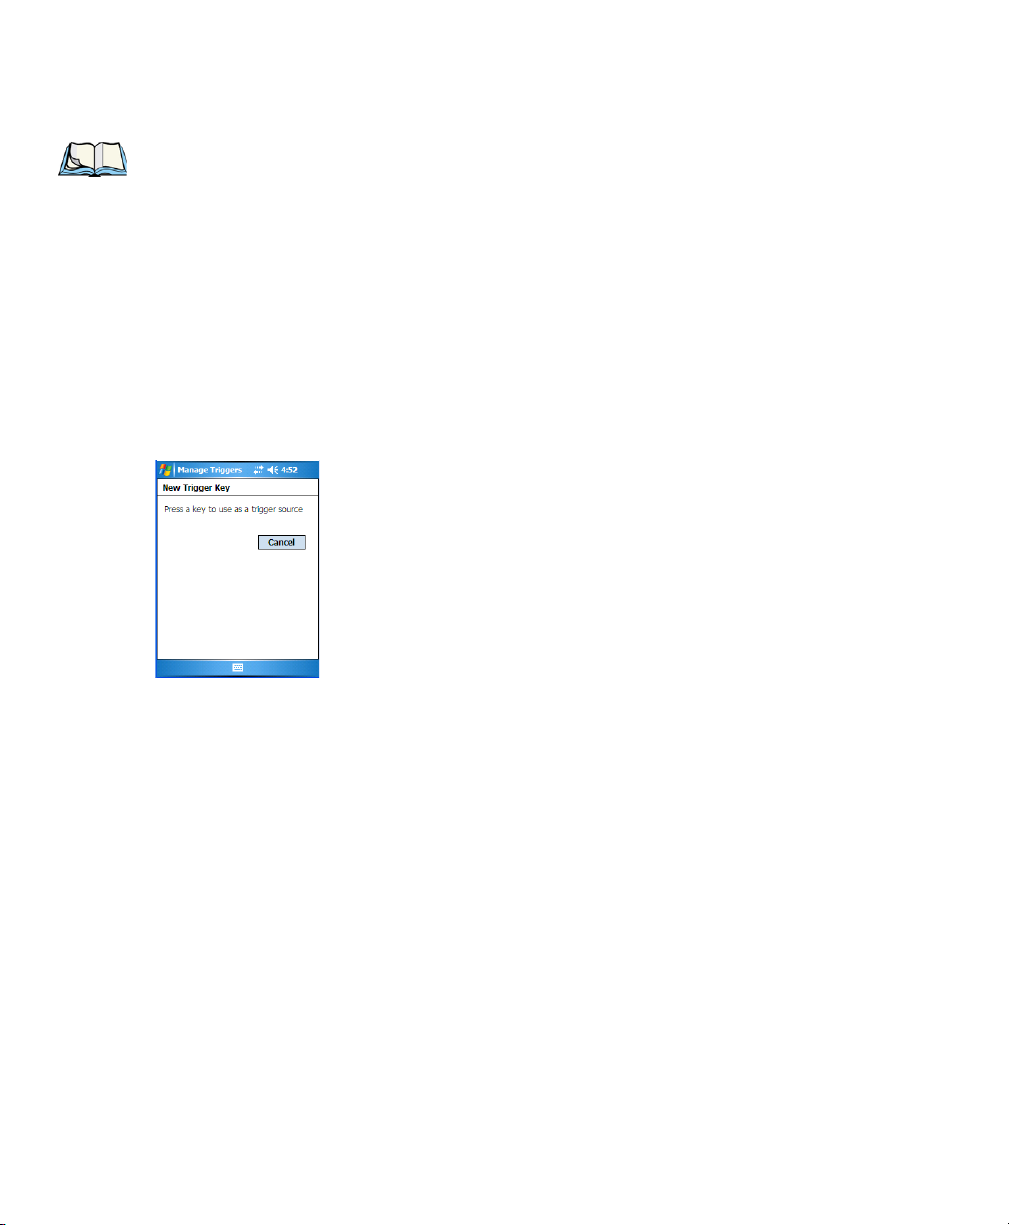
Add Key
Only existing trigger sources are shown in the Source combo-box. To add a new source to
this list, tap on the Add Key button. A dialog box pops up, allowing you to select the keyboard key to use as a trigger source.
example, to both the Imager and Non-Decoded Scanner. If so, both devices/operations will occur simultaneously. This is not recommended in most cases, especially
with devices such as Imagers or RFID Readers.
It is also possible to map different sources to the same module (trigger consumer)—for example, two different trigger keys can be mapped to the RFID File
System.
Trigger Press Type
You can enable either an Up/Down or Double Click response to a trigger press. Normally,
when a trigger (keyboard key, etc.) is pressed and released, a “trigger down” event is sent to
the “owner”—that is, the application receiving the trigger press information—followed by a
“trigger up”. If Double Click is chosen in this menu, when the trigger is pressed, released,
and then pressed again, a “double-click” event will occur. If a mapping with the Up/down
type has also been configured for the same source, it will only receive the first set of trigger
events.
Module To Trigger
This identifies the driver or application receiving the trigger presses.
Show All Modules
By default, inactive owners are not shown. By checking this checkbox, all owners, both
active and inactive, are displayed.
120 iKôn Rugged PDA (Windows Mobile 6) User Manual
Page 5
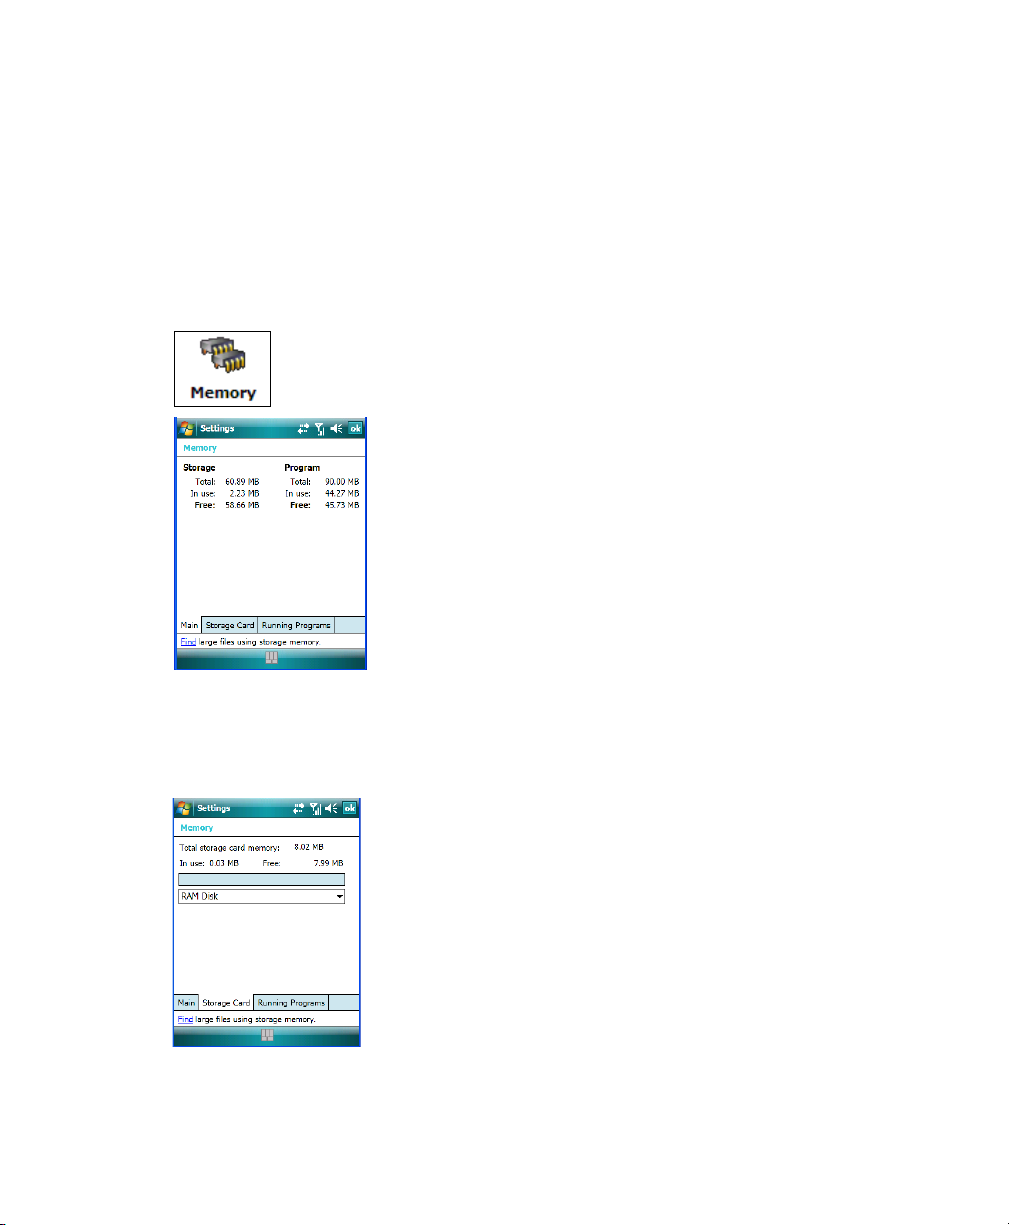
5.23 Memory
This applet allows you to view memory use, storage card memory allocation, and it allows
you to manage opened programs. To display the options for this applet:
• Tap on Start>Settings. Tap on the System tab followed by the Memory icon.
5.23.1 Main Tab
Chapter 5: Settings
Memory
This tab lists the memory allocated for file and data storage and for program storage.
5.23.2 Storage Card
The Storage Card screen indicates the total storage card or RAM disk memory along with
the amount in use.
iKôn Rugged PDA (Windows Mobile 6) User Manual 121
Page 6
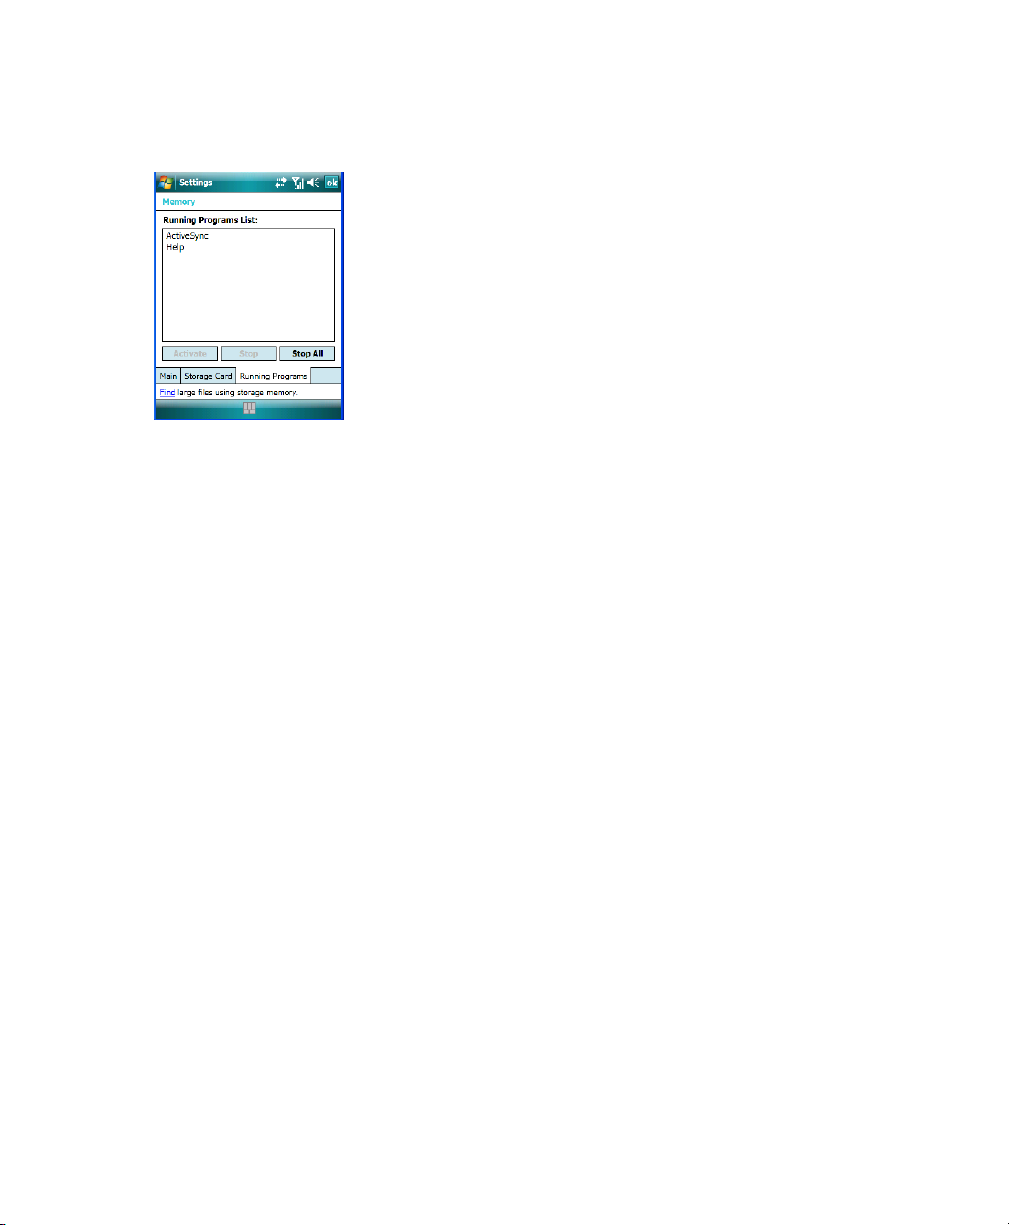
Chapter 5: Settings
Running Programs
5.23.3 Running Programs
Running Programs behaves like the task manager found on your desktop PC, allowing you
to activate or stop any running programs.
• Highlight an application(s).
• To end an application, tap on the Stop button. Tap on Stop All if you want to shut down
all running applications, or
To activate an application, tap on the Activate button.
5.24 Power Icon
This icon allows you to view and manage battery use.
• Tap on Start>Settings. Tap on the System tab followed by the Power icon.
122 iKôn Rugged PDA (Windows Mobile 6) User Manual
Page 7
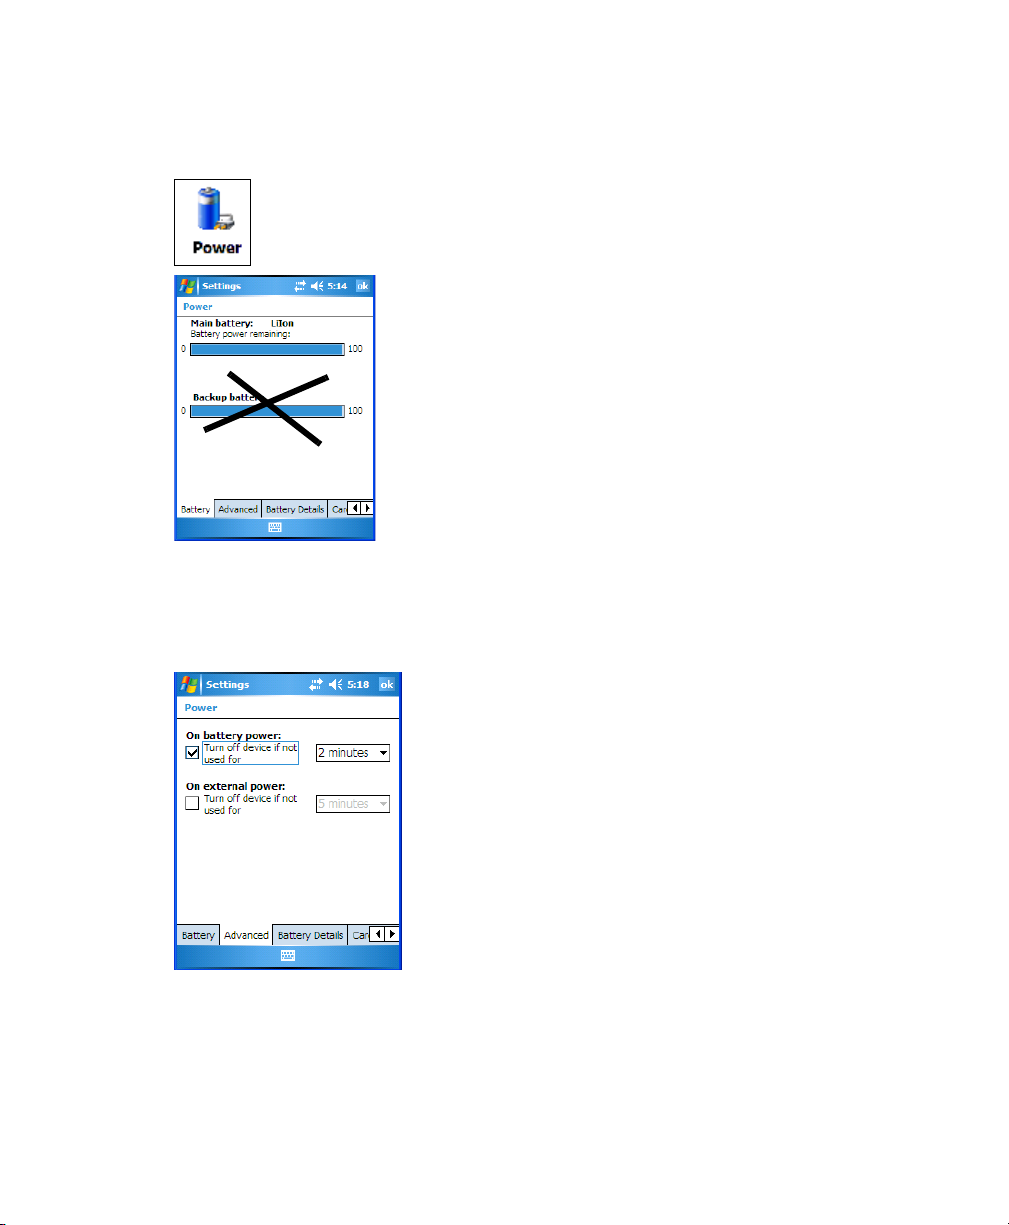
5.24.1 Battery Tab
This tab allows you to view the remaining battery capacity of the battery.
5.24.2 Advanced Tab
Chapter 5: Settings
Battery Tab
The Advanced tab allows you to manage battery consumption.
On Battery Power
When the iKôn PDA is operating on battery power, this option allows you to determine how
long the unit will remain on when it is not in use.
iKôn Rugged PDA (Windows Mobile 6) User Manual 123
Page 8
Chapter 5: Settings
Battery Details
• Tap in the checkbox to the left of On battery power to enable this option. Tap in the
dropdown menu to choose the number of minutes your unit can remain idle before it
shuts down.
On External Power
When the PDA is drawing external rather than battery power, this option allows you to determine the number of minutes the unit will remain on when not
in use.
• Tap in the checkbox to the left of On external power to enable this option. Tap in the
dropdown menu to choose the number of minutes your unit can remain idle before it
shuts down.
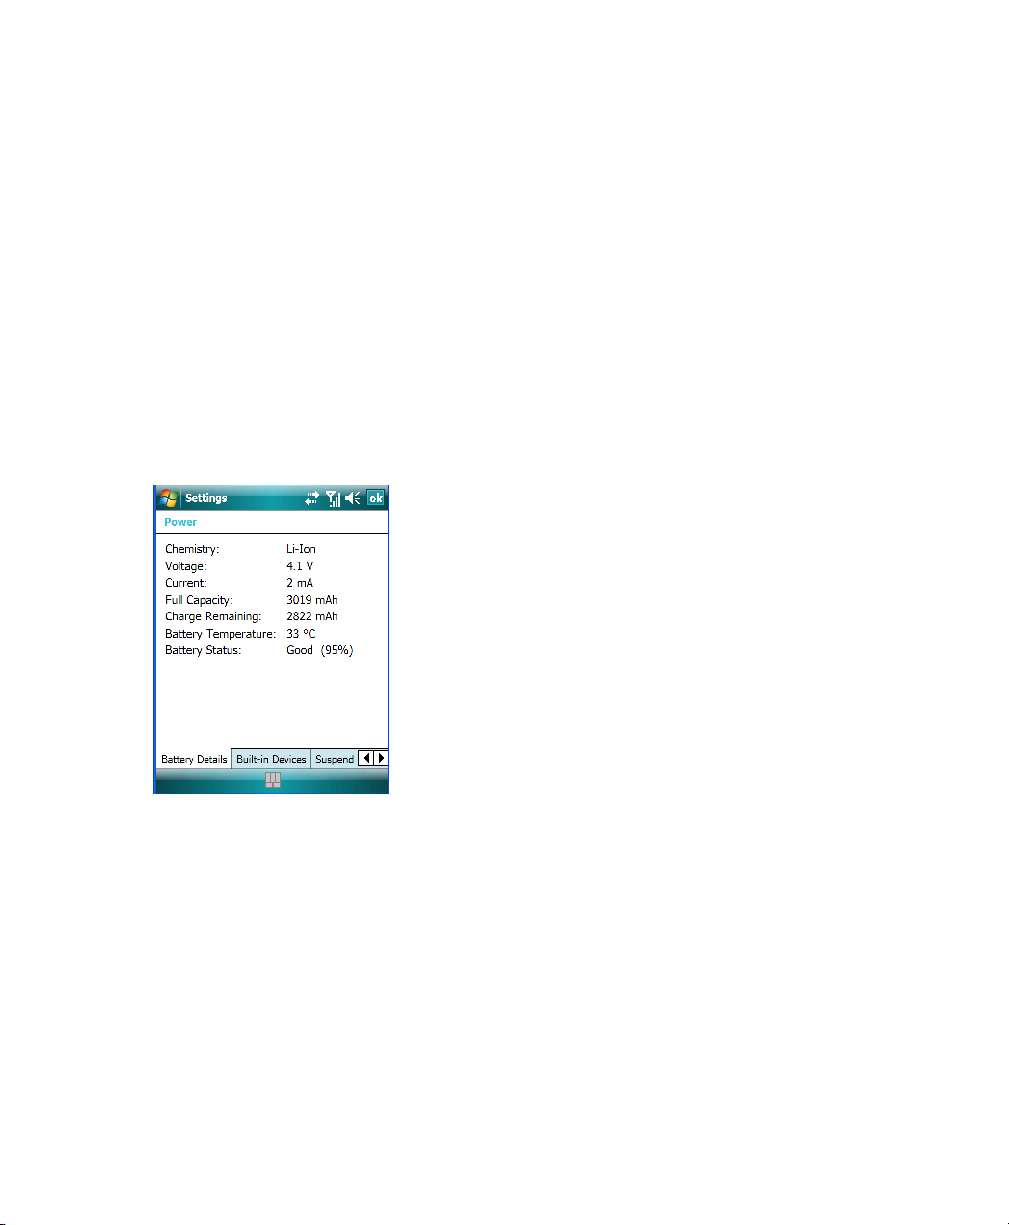
5.24.3 Battery Details
This tab lists the specifications and battery capacity status of the battery installed in the iKôn
PDA. This is a view-only screen.
124 iKôn Rugged PDA (Windows Mobile 6) User Manual
Page 9
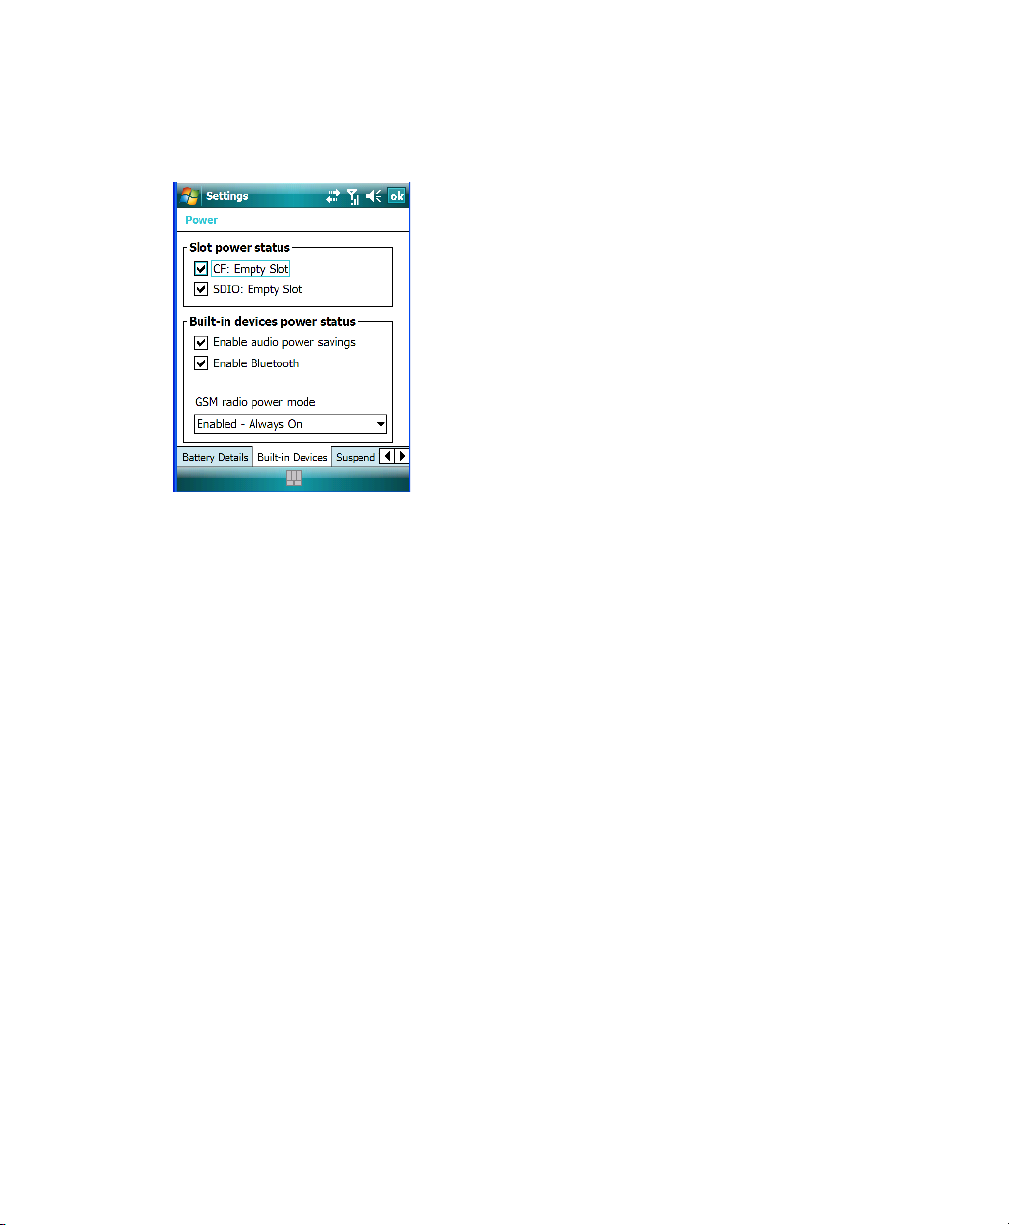
5.24.4 Built-In Devices
Slot Power Status
When you enable one or more of the card slots listed, power is supplied to the enabled
slot(s).
Built-In Devices Power Status
Chapter 5: Settings
Built-In Devices
This section of the dialog box allows you to enable (provide power) to the device(s) installed
in your unit. Keep in mind that the content of this screen varies depending on the devices installed in your PDA. Tapping on OK activates your selections.
iKôn Rugged PDA (Windows Mobile 6) User Manual 125
Page 10
Chapter 5: Settings
Suspend Threshold
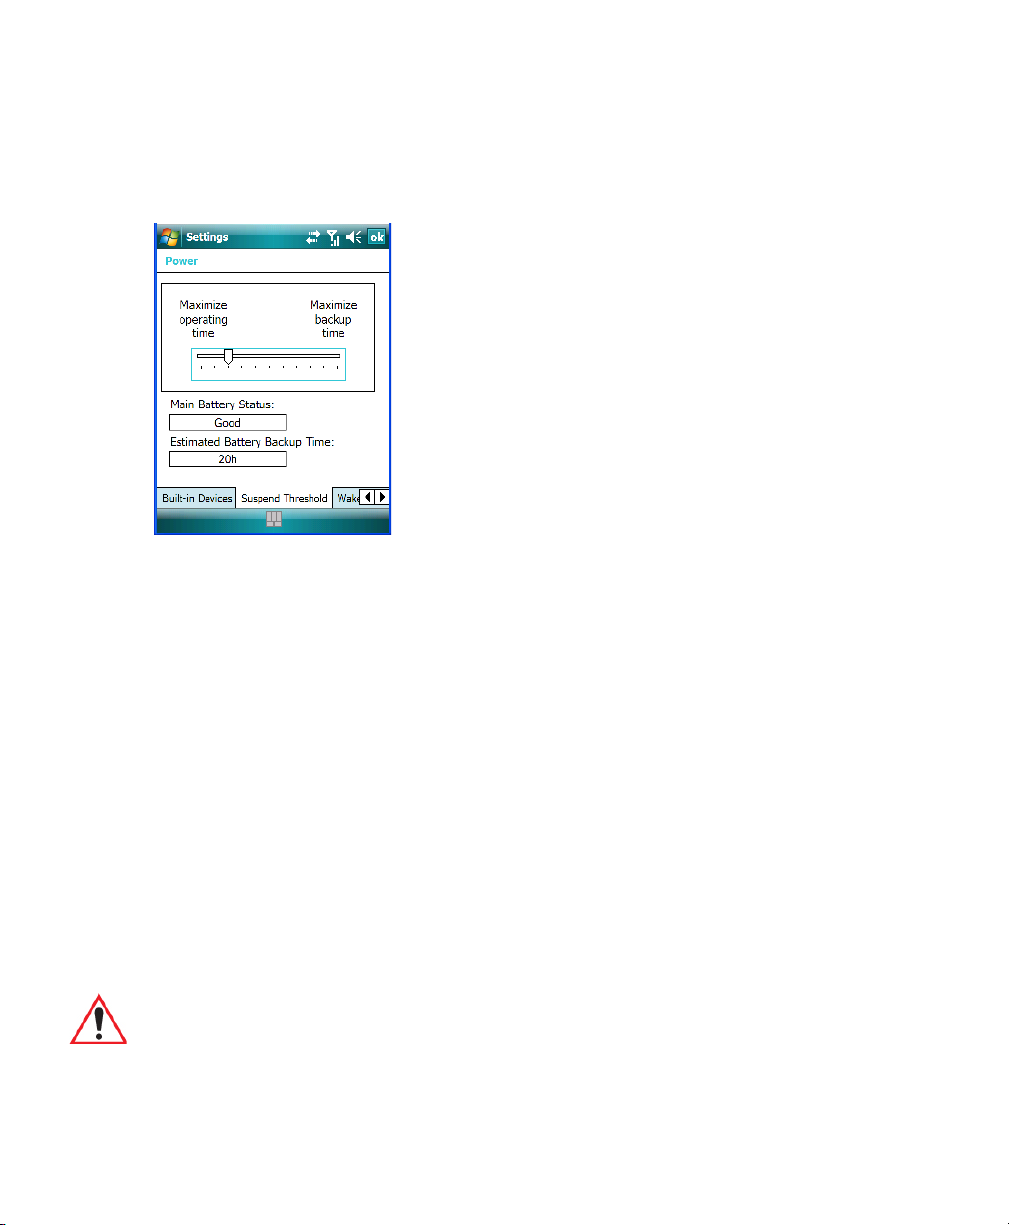
5.24.5 Suspend Threshold
This applet allows you to determine the amount of battery power that you want to reserve in
the battery to protect the data stored in the iKôn PDA.
5.24.5.1 Suspend Threshold And Estimated Battery Backup
The Estimated Battery Backup is the amount of battery power that is reserved to protect data
until a charged battery can be installed in the PDA. When the battery capacity is depleted up
to the Estimated Battery Backup reserve specified in the Suspend Threshold tab, the PDA
shuts off automatically and uses the reserve power to preserve the data stored on the iKôn
PDA. Once the PDA shuts down, it cannot be switched on until a fresh battery is installed,
or the unit is inserted in a docking station or cradle.
•Slide the Suspend Threshold button to the right to increase the battery capacity
reserved for backup purposes. Data will be preserved to a maximum of 124 hours.
•Slide the Suspend Threshold button to the left to decrease the power reserved for
backup purposes; this increases the PDA’s operating time – the amount of time the PDA
will operate before shutting down – but reduces the power reserved for backup purposes
to a minimum of 24 hours.
Internal super-capacitors will protect the data stored in the iKôn PDA while the battery is
swapped for a fully charged one.
Important: Once the battery is removed, the super-capacitors will preserve the data
stored on the iKôn PDA for approximately 5 minutes. It is critical that you
install a charged battery before this time elapses.
126 iKôn Rugged PDA (Windows Mobile 6) User Manual
Page 11
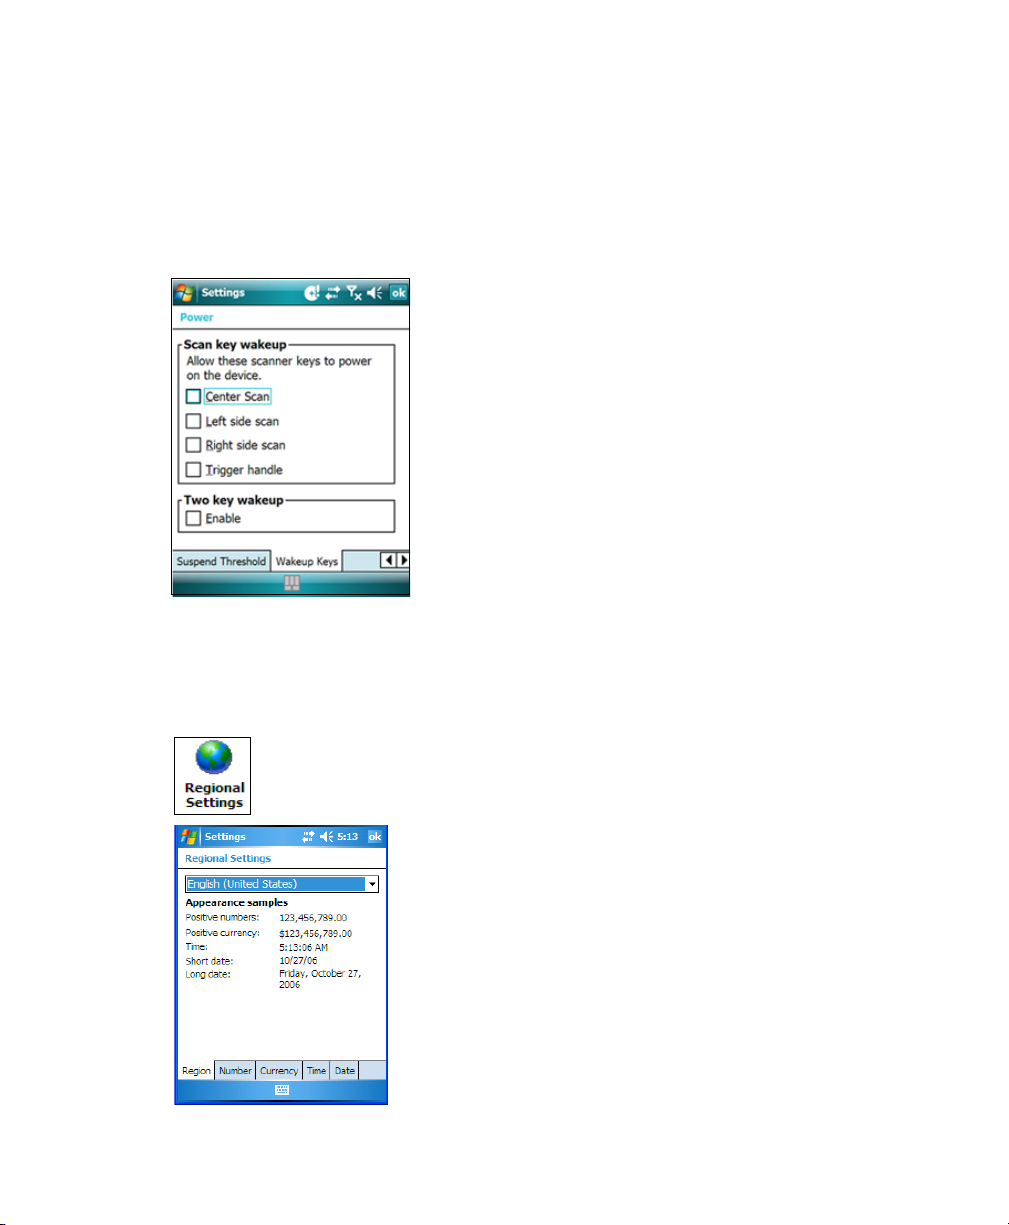
5.24.6 Wakeup Keys Tab
This option allows you to define which key can be pressed to wake the PDA from a suspend
state.
If the Two key wakeup option is checked, the operator will need to press two keys ?? –
[FN/BLUE][ENTER] – to switch the PDA on.
5.25 Regional Settings
To display the Regional Settings screen, tap on Start>Sett ings, and then tap on the System
tab followed by the Regional Settings icon.
Chapter 5: Settings
Wakeup Keys Tab
iKôn Rugged PDA (Windows Mobile 6) User Manual 127
Page 12
Chapter 5: Settings
Remove Programs
• Tap on the dropdown menu to choose your language and region.
Once you’ve selected a language and region, you may need to adjust the way numbers, currency, the time and the date appear in your iKôn PDA.
• Tap on the tab associated with each of the items and choose how each item will be displayed on your iKôn PDA.
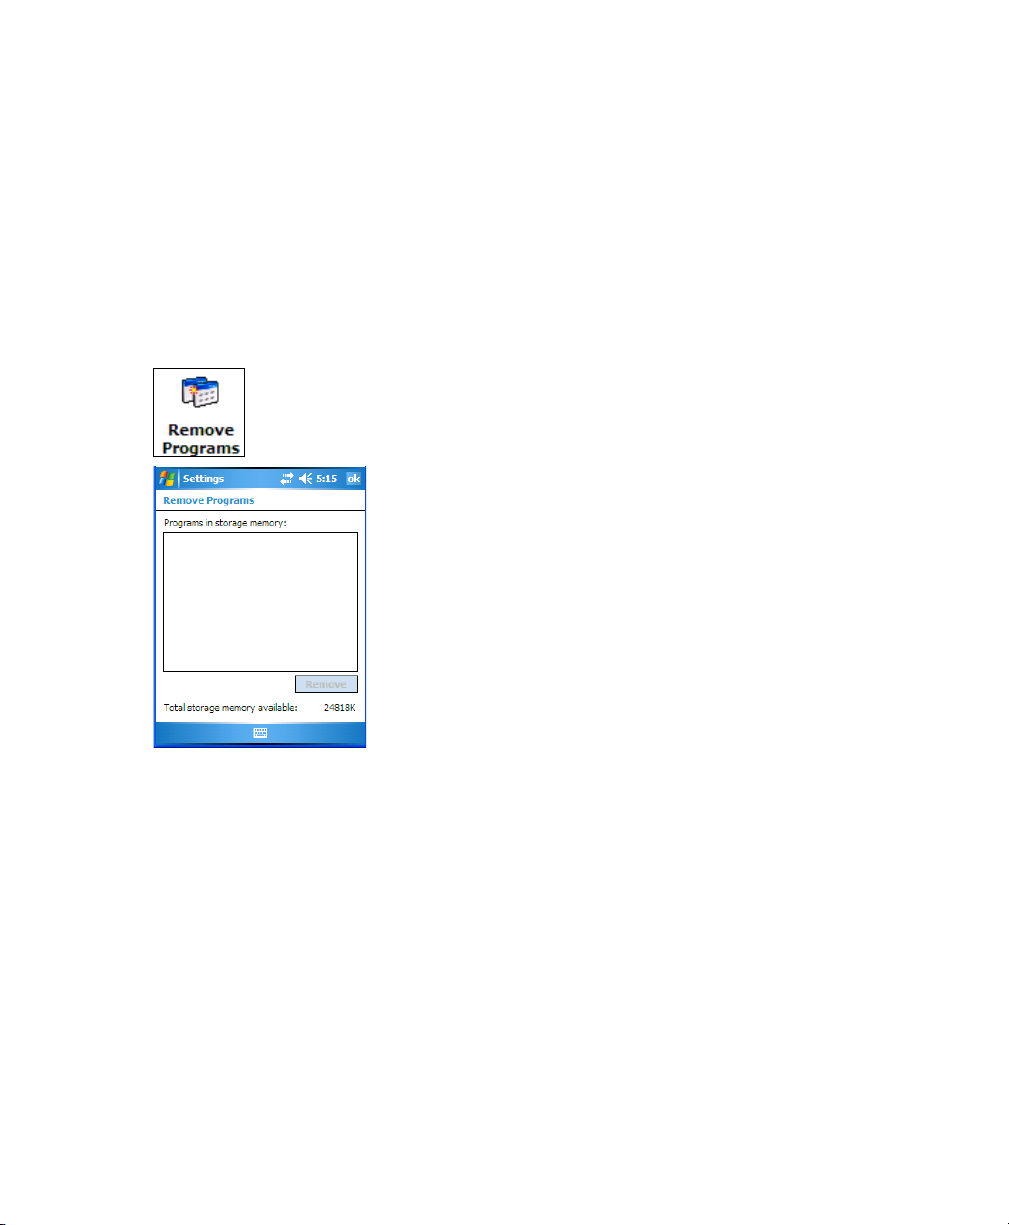
5.26 Remove Programs
• Tap on Start>Settings. Tap on the System tab followed by the Remove Program icon.
Tapping on the Remove Programs icon displays a screen listing the programs that can be
removed from your unit.
• To remove a program, highlight it and then click on the Remove button.
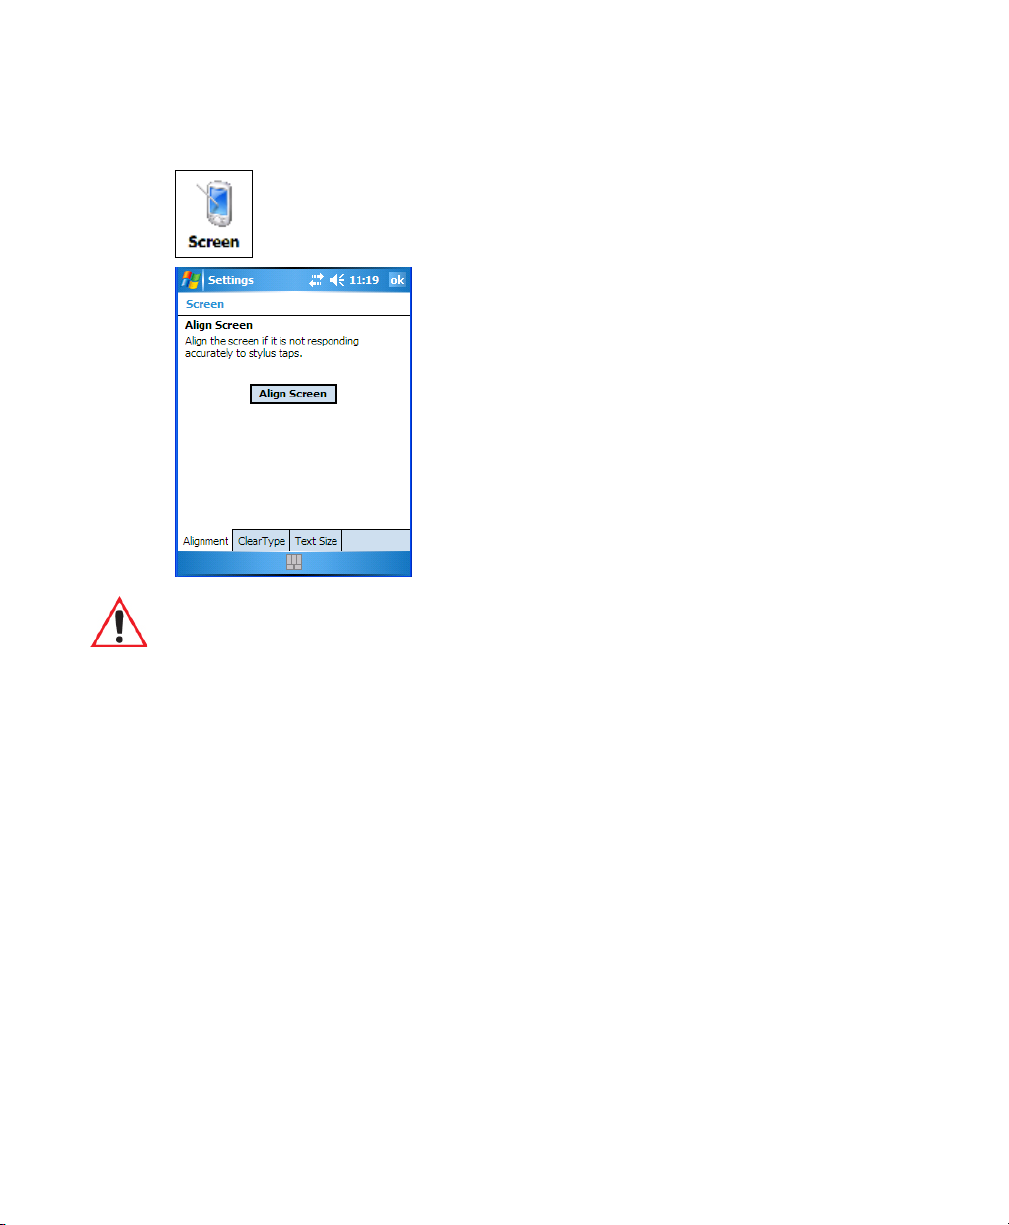
5.27 Screen Icon
This icon allows you to align (calibrate) your touchscreen, turn ClearType on and off and
adjust the size of the text displayed on the iKôn PDA screen.
128 iKôn Rugged PDA (Windows Mobile 6) User Manual
Page 13
Chapter 5: Settings
Scanner Settings
•Tap Start>Settings. Tap on the System tab, and then tap on the Screen icon.
Important: Refer to “Aligning (Calibrating) The Touchscreen” on page 14 for details
about this option.
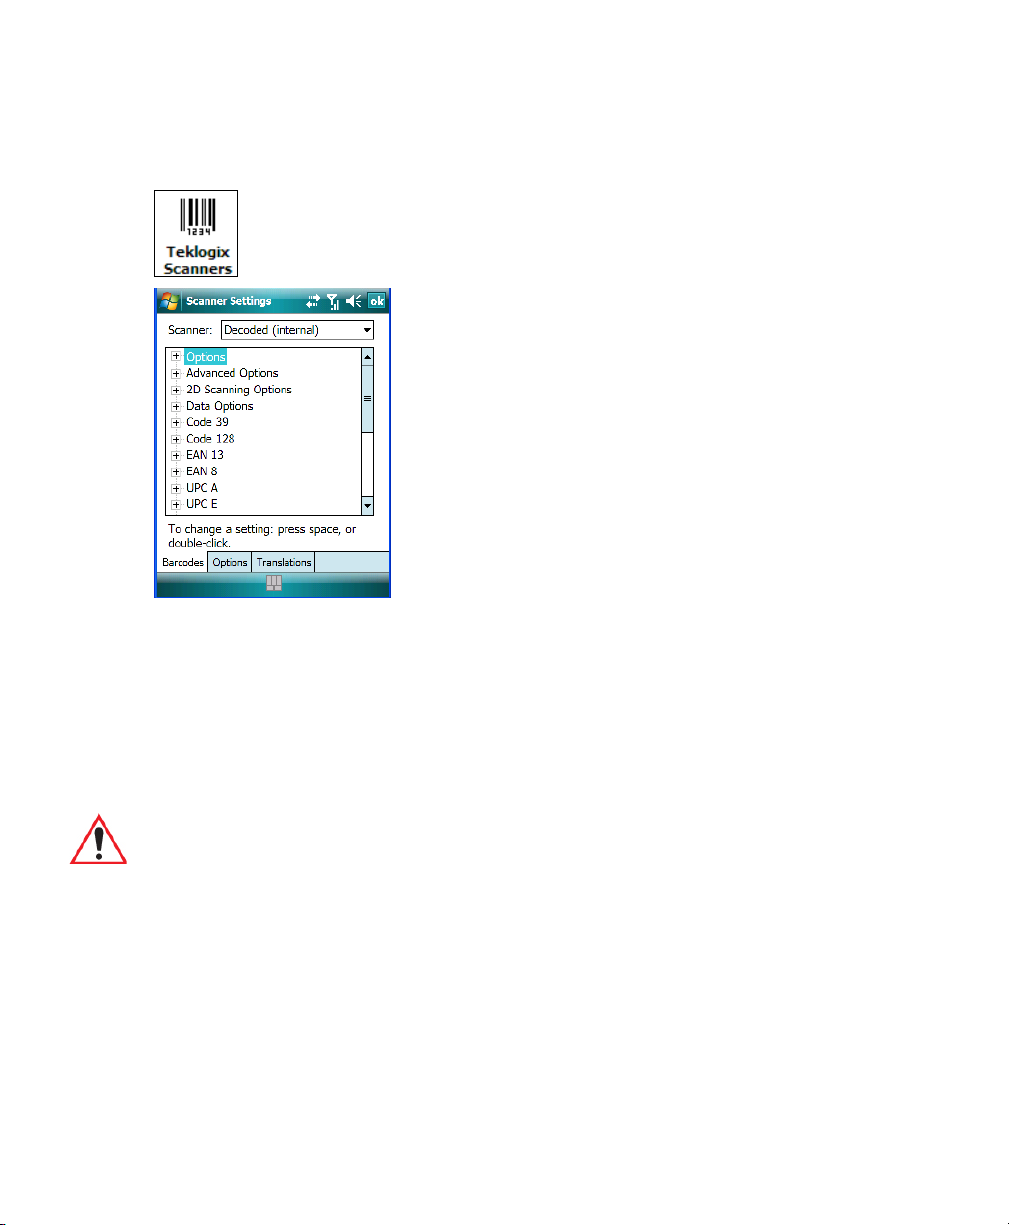
5.28 Scanner Settings
The Teklogix Scanners icon in the Settings menu provides access to dialog boxes
in which you can tailor bar code options and choose the bar codes your scanner
will recognize.
iKôn Rugged PDA (Windows Mobile 6) User Manual 129
Page 14
Chapter 5: Settings
Scanner Settings
• Tap on Start>Settings, and then tap on the System tab followed by the Tek lo g ix
Scanner Menu
Scanner icon.
The dropdown menu to the right of the Scanner option allows you to choose from one of the
following scanner types used with your PDA: Decoded (internal), Decoded (HHP),
Decoded (Intermec ISCP) and Imager.
The symbologies listed change to reflect the scanner you choose and the bar codes it
supports.
Important: To improve the decode speed and performance, enable only those codes that
are required by the application.
Keep in mind that some bar code types are only available when an internal imaging scanner
is installed. All internal scanners can be configured using the Barcode dialog boxes.
130 iKôn Rugged PDA (Windows Mobile 6) User Manual
Page 15
5.28.1 Decoded (Internal) Scanners
5.28.1.1 Options–Decoded (Internal) Scanner
Dot Time (msec)
The value selected for “Dot Time (msec)” determines (in milliseconds) how long the targeting dot remains on before the scanner switches to a normal scan sweep. When you doubletap on this parameter, a dialog box is displayed in which you can enter a value of 0 msec,
200 msec or 400 msec. A value of 0 (zero) disables the target dot.
Chapter 5: Settings
Decoded (Internal) Scanners
Options–Decoded (Internal) Scanner
Aim Duration
This parameter determines the total time the aiming pattern appears before the scanner laser
begins sweeping. When you double-tap on this parameter, a dialog box is displayed in which
you can enter a value from 0 to 30 (0 to 3 sec.). A value of 0 (zero) disables the aiming-dot.
Laser On Time
The value assigned to this parameter determines how long the laser will remain on when the
scan button or trigger is pressed.
Double-tapping on this parameter displays a dialog box in which you can enter a value
between 5 and 99, each number representing 0.1.
iKôn Rugged PDA (Windows Mobile 6) User Manual 131
Page 16

Chapter 5: Settings
Decoded (Internal) Scanners
Decoded (Internal) Advanced Options
5.28.1.2 Decoded (Internal) Advanced Options
Continuous Scan Mode
Setting this parameter to ‘on’ keeps the laser on and continuously decoding as long as the
scanner button is pressed and held down.
Minimum Cancel Time
The value assigned to this parameter determines the time delay before the scanner is turned
off, once the scanner trigger or button is released. This gives the scanner a minimum amount
of time to complete its current decode before the scan is cancelled when the user quickly
triggers on/off.
Low Power Timeout
To extend laser life, you can select the length of time the scanner remains active following a
successful decode. The scanner wakes from low power mode when a bar code is scanned – a
successful decode restores normal blinking.
When you double-tap on this parameter, a dialog box is displayed in which you can choose a
value of 30 sec, 1 min, 2 min or 3 min.
Note: This parameter is only used if the Trigger Mode has been set to Continuous On and
the PDA is mounted in a fixed position; otherwise, ‘Low Power Timeout’ is not used.
Parameter Scanning
Setting this parameter to on enables decoding of parameter bar codes.
Linear Security Level
This parameter allows you to select the security level appropriate for your bar code quality.
There are four levels of decode security for linear code types (e.g., Code 39, Interleaved 2 of
5). Higher security levels should be selected for decreasing levels of bar code quality. As se-
curity levels increase, the scanner’s decode speed decreases.
Double-tapping on this parameter displays a dialog box in which you can enter a value from
1 to 4.
“Linear security level 1” specifies that the following code types must be successfully read
twice before being decoded:
Code Type Length
Codabar All
132 iKôn Rugged PDA (Windows Mobile 6) User Manual
Page 17
Chapter 5: Settings
Decoded (Internal) 2D Scanning Options
MSI Plessey 4 or less
D 5 of 5 8 or less
I 2 of 5 8 or less
Decoded (Internal) Scanners
“Linear security level 2” specifies that all types of codes must be successfully read twice
before being decoded.
“Linear security level 3” specifies that code types other than the following must be successfully read twice before being decoded. The following codes must be read three times:
Code Type Length
MSI Plessey 4 or less
D 2 of 5 8 or less
I 2 of 5 8 or less
“Linear security level 4” requires that all code types be successfully read three times before
being decoded.
Bi-Direction Redundancy
Note: This parameter is only valid if a “Linear Security Level” is enabled.
When this parameter is enabled, a bar code must be successfully scanned in both directions
(forward and reverse) before being decoded.
5.28.1.3 Decoded (Internal) 2D Scanning Options
Scanning Mode
When you double-tap on this parameter, a dialog box is displayed in which you can choose
one of the following scanning modes: Smart Raster, Always Raster, Programmable Raster,
Slab Pattern, Cyclone Pattern or Semi-Omni Pattern.
Raster Height And Raster Expand Rate
These parameter determine the laser pattern’s height and rate of expansion.
iKôn Rugged PDA (Windows Mobile 6) User Manual 133
Page 18

Chapter 5: Settings
Decoded (Internal) Scanners
Data Options–Decoded (Internal) Scanner
Note: These parameters are only used when either Programmable Raster or
Always Raster is assigned to the “2D Scanning Mode” parameter. “2D Raster
Height” and “2D Raster Expand Rate” are intended
for very specific applications and are usually not required for normal scanning
purposes.
Double-tapping on this parameter displays a dialog box in which you can enter a value from
1 to 15.
5.28.1.4 Data Options–Decoded (Internal) Scanner
Transmit Code ID Char
A code ID character identifies the scanned bar code type. In addition to any single character
prefix already selected, the code ID character is inserted between the prefix and the decoded
symbol.
When you double-tap on this parameter, a dialog box is displayed in which you can choose a
transmit code: None, AIM or Symbol.
Scan Data Format
This parameter allows you to change the scan data transmission format. Double-tapping on
“Scan Data Format” displays the following options from which you can choose a data
format: data (as-is), data [S1], data [S2], data [S1][S2], [P] data, [P] data [S1], [P] data [S2]
and [P] data [S1][S2].
Prefix [P], Suffix [S1] And Suffix [S2]
A prefix and/or one or two suffixes may be appended to scan data for use in data editing.
When you double-tap on these parameters, a dialog box is displayed in which you can enter
a value from 0 to 255.
Delete Char Set ECIs
Setting this parameter to on enables the scanner to delete any escape sequences representing
Character Set ECIs – Extended Channel Interpretations (also known as GLIs) from its buffer
before transmission.
When this parameter is enabled, the scanner transmits data from PDF417 and MicroPDF417
bar codes containing Character Set ECIs, even when the ECI Protocol is disabled.
134 iKôn Rugged PDA (Windows Mobile 6) User Manual
Page 19

ECI Decoder
Setting this parameter to on enables the scanner to interpret any Extended Channel Interpretations (ECIs) supported by the scanner. This parameter has no effect on symbols that were
not encoded using ECIs.
If this parameter is set to off and a symbol that was encoded using an ECI escape is scanned,
the scanner transmits the ECI escape followed by the uninterpreted data.
5.28.1.5 Code 39
Enabled
Setting this parameter to on enables “Code 39”.
Enable Trioptic Code 39
Note: “Trioptic Code 39” and “Full ASCII” should not be enabled simultaneously. The
scanner does not automatically discriminate between these two symbologies.
Trioptic Code 39 symbols always contain six characters. Setting this parameter to on allows
this type of symbology to be recognized.
Chapter 5: Settings
Decoded (Internal) Scanners
Code 39
Convert To Code 32
Note: “Code 39” must be enabled in order for this parameter to function.
Setting this parameter to on allows the scanner to convert the bar code from “Code 39” to
“Code 32”.
Code 32 Prefix
Note: “Convert to Code 32” must be enabled in order for this parameter to function.
When this parameter is enabled, the prefix character “A” is added to all “Code 32” bar
codes.
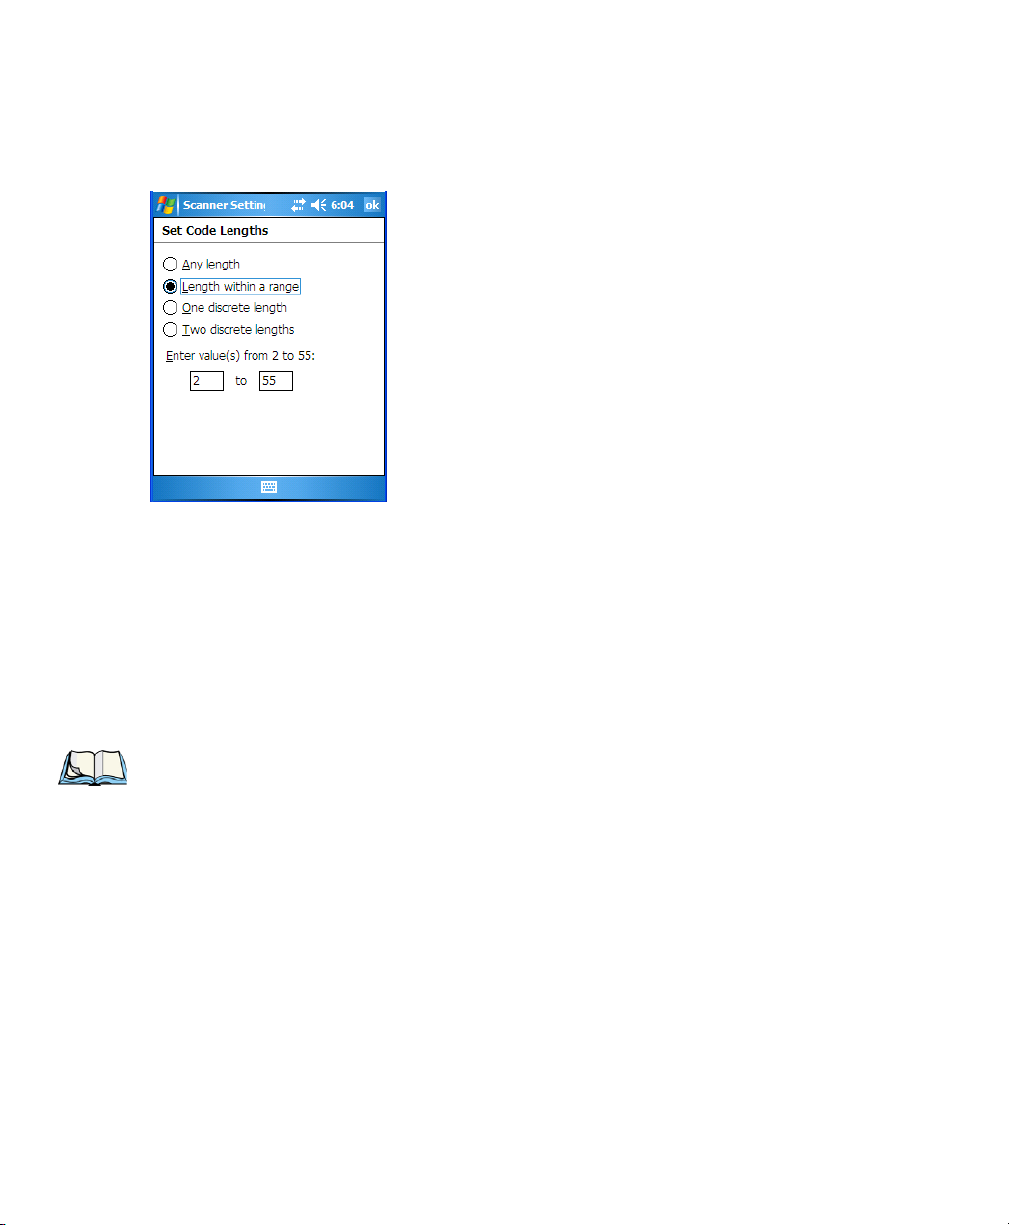
Set Length L1 And Set Length L2
Lengths for “Code 39” can be set for Any length, Length within a range, One discrete length
or Two discrete lengths. The length of a code refers to the number of characters (i.e., human
readable characters), including check digit(s).
iKôn Rugged PDA (Windows Mobile 6) User Manual 135
Page 20
Chapter 5: Settings
Decoded (Internal) Scanners
Double-tapping on this parameter displays a dialog box labelled Set Code Lengths where
you can define the code length that will be decoded by your scanner.
Choosing One discrete length allows you to decode only those codes containing a selected
length. Choosing Two discrete lengths allows you to decode only those codes containing two
selected lengths. Length within a range allows you to decode a code type within a specified
range from 1 to 55.
Check Digit Verification
When this parameter is enabled (set to on), the integrity of a “Code 39” symbol is checked to
ensure that it complies with specified algorithms.
Note: Only those “Code 39” symbols that include a Mod 43 check digit are decoded when
this parameter is enabled.
Transmit Check Digit
If the check digit is to be transmitted with the data, this parameter must to enabled.
Full ASCII
If this parameter is enabled, the characters +, %, and / are used as escape characters. The
combination of an escape character and the next character is converted to an equivalent
ASCII character.
Decode Performance
If this parameter is enabled, one of three decode levels can be chosen in the “Decode Performance Level” parameter.
136 iKôn Rugged PDA (Windows Mobile 6) User Manual
Page 21

Decode Perf. Level
This parameter provides three levels of decode performance or “aggressiveness” for Code
39 symbols. Increasing the performance level reduces the amount of required bar code orientation – this is useful when scanning very long and/or truncated bar codes. Keep in mind
that increased levels reduce decode security.
When you double-tap on this parameter, a dialog box is displayed in which you can enter a
decode performance level of between 1 and 3.
5.28.1.6 Field Size/Chars
Field Size
The field size is the length of the field after the first character is stripped and
the prefix and suffix characters are added. If the field size is non-zero, only
bar codes of that length are passed through.
Prefix Char
This character, if non-zero, is added before a successfully decoded bar code. Press the key
you want to insert in the dialog box attached to this parameter. The ASCII/Unicode key
value of the keypress is displayed.
Chapter 5: Settings
Decoded (Internal) Scanners
Field Size/Chars
Suffix Char
This character, if non-zero, is added after a successfully decoded bar code. Press the key you
want to insert in the dialog box attached to this parameter. The ASCII/Unicode key value of
the keypress is displayed.
Strip Leading
This parameter determines the number of characters that will be removed from the beginning of the bar code before the prefix character is added.
Note: For Code 39 bar codes, the “AIAG Strip” is performed before the “Strip Leading”.
Strip Trailing
The value entered in this parameter determines the number of characters that will be
removed from the end of the bar code before the suffix character is added.
iKôn Rugged PDA (Windows Mobile 6) User Manual 137
Page 22

Chapter 5: Settings
Decoded (Internal) Scanners
Code 128
5.28.1.7 Code 128
Enabled
Set this parameter to on to enable “Code 128”.
Enable GS1-128/GS1 US
Previously UPC/EAN and UCC, these types of bar codes include group separators and start
codes.
Enable ISBT 128
To successfully scan this variation, “Enable ISBT 128” must be set to on.
Decode Performance
If this parameter is set to on, one of three decode levels assigned to the “Decode Performance Level” parameter can be selected.
Decode Perf. Level
This parameter provides three levels of decode performance or “aggressiveness” for Code
128 symbols. Increasing the performance level reduces the amount of required bar code orientation – this is useful when scanning very long and/or truncated bar codes. Keep in mind
that increased levels reduce decode security.
When you double-tap on this parameter, a dialog box is displayed in which you can enter a
decode performance level of between 1 and 3.
Field Size/Char
Refer to page 137 for details.
5.28.1.8 EAN 13
Enabled
Set this parameter to on to enable “EAN 13”.
5.28.1.9 Prefix/Suffix
Prefix Char
This character, if non-zero, is added before a successfully decoded bar code. Press the key
you want to insert in the dialog box attached to this parameter. The ASCII/Unicode key
value of the keypress is displayed.
138 iKôn Rugged PDA (Windows Mobile 6) User Manual
Page 23

Suffix Char
This character, if non-zero, is added after a successfully decoded bar code. Press the key you
want to insert in the dialog box attached to this parameter. The ASCII/Unicode key value of
the keypress is displayed.
Strip Leading
This parameter determines the number of characters that will be removed from the beginning of the bar code before the prefix character is added.
Note: The appended character is treated as any other keyboard character.
Strip Trailing
The value entered in this parameter determines the number of characters that will be
removed from the end of the bar code before the suffix character is added.
5.28.1.10EAN 8
Enabled
Chapter 5: Settings
Decoded (Internal) Scanners
EAN 8
For example, if [BKSP] is pressed, the usual action for that key
is performed.
Set this parameter to on to enable “EAN 8”.
EAN-8 Zero Extend
When this parameter is enabled, five leading zeros are added to decoded EAN-8 symbols,
making them compatible in format to EAN-13 symbols. Disabling this parameter returns
EAN-8 symbols to their normal format.
Prefix/Suffix
Refer to page 137 for details.
5.28.1.11UPC A
Enabled
Set this parameter to on to enable “UPC A”.
UPC-A, Check Digit
If you enable this parameter, the check digit is included with the decoded bar
code data.
iKôn Rugged PDA (Windows Mobile 6) User Manual 139
Page 24

Chapter 5: Settings
Decoded (Internal) Scanners
UPC E
UPC-A, Preamble
When you double-tap on this parameter, a dialog box is displayed where you can choose one
of three options for lead-in characters for UPC-A symbols transmitted to the host device:
System Char – system character transmitted with the data, Country code and System Char –
both the country code (“0” for USA) and system character are transmitted with the data or
None – no preamble is transmitted. The lead-in characters are considered part of the symbol.
Prefix/Suffix Chars
Refer to page 137 for details.
5.28.1.12UPC E
Enabled UPC-E
Set this parameter to on to allow “UPC E” bar code scans.
Enabled UPC-E1
Set this parameter to on to allow “UPC-E1” (zero suppressed) bar code scans.
UPC-E And UPC-E1 Check Digit
If you enable one or both of these parameters, a check digit is included with the decoded bar
code data.
UPC-E And UPC-E1 Preamble
When you double-tap on one of these parameters, a dialog box is displayed where you can
choose one of three options for lead-in characters for UPC-E and UPC-E1 symbols transmitted to the host device: System Char – system character transmitted with the data, Country
code and System Char – both the country code (“0” for USA) and system character are
transmitted with the data or None – no preamble is transmitted. The lead-in characters are
considered part of the symbol.
Conv. UPC-E To UPC-A
This parameter converts UPC-E (zero suppressed) decoded data to UPC-A format before
transmission. After conversion, data follows UPC-A format and is affected by UPC-A programming selections (e.g., Preamble, Check Digit).
Conv. UPC-E1 To UPC-A
This parameter converts UPC-E1 (zero suppressed) decoded data to UPC-A format before
transmission. After conversion, data follows UPC-A format and is affected by UPC-A programming selections (e.g., Preamble, Check Digit).
140 iKôn Rugged PDA (Windows Mobile 6) User Manual
Page 25

Prefix/Suffix
Refer to page 137 for details.
5.28.1.13UPC/EAN Shared Settings
The parameters you set here are a shared across all available UPC and EAN
bar codes.
Enable Bookland EAN
Setting this parameter to on allows your scanner to recognize “Bookland EAN”
bar codes.
Supplementals
'Supplementals” are additionally appended characters (2 or 5).
Double-tapping this parameter displays a list of options. If Ignore is chosen, UPC/EAN is
decoded and the supplemental characters are ignored. If Decode is chosen, UPC/EAN
symbols are decoded with supplementals. Autodiscriminate works in conjunction with the
Supp. Redundancy parameter.
Supp. Redundancy
With Autodiscriminate selected in the Supplementals parameter, “Supp. Redundancy”
adjusts the number of times a symbol without supplementals is decoded before transmission.
When you double-tap on this parameter, a dialog box is displayed in which you can enter a
value between 2 and 20. A value of 5 or above is recommended when Autodiscriminate is
selected and you are decoding a mix of UPC/EAN symbols with and without supplementals.
Chapter 5: Settings
Decoded (Internal) Scanners
UPC/EAN Shared Settings
Security Level
This parameter controls the tolerance for decoding edge-to-edge UPC/EAN bar codes.
Double-tapping on this parameter displays a dialog box in which you can choose a level
from 0 to 3. Lower values have a lower tolerance for misreads, but they also increase the
time it takes to decode the bar code.
Linear Decode
“Linear Decode” applies to code types containing two adjacent blocks (e.g., UPC-A, EAN8, EAN-13). When enabled (set to on), a bar code is transmitted only when both the left and
right blocks are successfully decoded within one laser scan. This option should be enabled
when bar codes are in proximity to each other.
iKôn Rugged PDA (Windows Mobile 6) User Manual 141
Page 26

Chapter 5: Settings
Decoded (Internal) Scanners
Code 93
2D UPC Half Block Stitching
Setting this parameter to on enables “UPC Half Block Stitching” for the SE 3223 omnidirectional engine only.
5.28.1.14Code 93
Enabled
Set this parameter to on to enable “Code 93” or off to disable it.
Set Length L1 And Set Length L2
Lengths for “Code 93” can be set for Any length, Length within a range, One discrete length
or Two discrete lengths. The length of a code refers to the number of characters (i.e., human
readable characters), including check digit(s).
Double-tapping on this parameter displays a dialog box labelled Set Code Lengths where
you can define the code length that will be recognized by your scanner.
Choosing One discrete length allows you to decode only those codes containing a selected
length. Choosing Two discrete lengths allows you to decode only those codes containing two
selected lengths. Length within a range allows you to decode a code type within a specified
range from 4 to 55.
Field Size/Char
Refer to page 137 for details.
5.28.1.15Codabar
Enabled
Set this parameter to on to enable “Codabar” or off to disable it.
Set Length L1 And Set Length L2
Lengths for “Codabar” can be set for Any length, Length within a range, One discrete length
or Two discrete lengths. The length of a code refers to the number of characters (i.e., human
readable characters), including check digit(s).
Double-tapping on this parameter displays a dialog box labelled Set Code Lengths where
you can define the code length that will be recognized by your scanner.
Choosing One discrete length allows you to decode only those codes containing a selected
length. Choosing Two discrete lengths allows you to decode only those codes containing
two selected lengths. Length within a range allows you to decode a code type within a specified range from 5 to 55.
142 iKôn Rugged PDA (Windows Mobile 6) User Manual
Page 27

CLSI Editing
When enabled, this parameter strips the start and stop characters
and inserts a space after the first, fifth, and tenth characters of a 14-character Codabar
symbol.
Note: Symbol length does not include start and stop characters.
NOTIS Editing
When enabled, this parameter strips the start and stop characters from decoded Codabar
symbol.
Field Size/Char
Refer to page 137 for details.
5.28.1.16MSI Plessey
Enabled
Set this parameter to on to enable “MSI Plessey”.
Chapter 5: Settings
Decoded (Internal) Scanners
MSI Plessey
Set Length L1 And Set Length L2
Lengths for “MSI Plessey” can be set for Any length, Length within a range, One discrete
length or Two discrete lengths. The length of a code refers to the number of characters (i.e.,
human readable characters), including check digit(s).
Double-tapping on this parameter displays a dialog box labelled Set Code Lengths where
you can define the code length that will be recognized by your scanner.
Choosing One discrete length allows you to decode only those codes containing a selected
length. Choosing Two discrete lengths allows you to decode only those codes containing two
selected lengths. Length within a range allows you to decode a code type within a specified
range from 6 to 55.
Check Digits
Double-tapping on this parameter displays a dialog box in which you can choose One or
Two check digit(s).
If this parameter is set to One, it is assumed that the last digit is a check digit. If “Check
Digits” is set to Two, it is assumed that the last two digits are check digits.
iKôn Rugged PDA (Windows Mobile 6) User Manual 143
Page 28

Chapter 5: Settings
Decoded (Internal) Scanners
Interleaved 2 of 5
Note: If Two check digits is selected, an MSI Plessey “Check Digit Algorithm: must also be
selected. See below for details.
Transmit Check Digit
If this parameter is enabled, the check digit is included with the bar
code data.
Check Digit Algorithm
When the Two MSI Ple s s e y check digits option is selected, an additional verification is required to ensure integrity. Double-tapping on this parameter displays a dialog box n which
you can choose the algorithm to be used: MOD 10/MOD 11 or MOD 10/MOD 10.
Field Size/Char
Refer to page 137 for details.
5.28.1.17Interleaved 2 of 5
Enabled
Set this parameter to on to enable “Interleaved 2 of 5”.
Set Length L1 And Set Length L2
Lengths for “Interleaved 2 of 5” can be set for Any length, Length within a range, One discrete length or Two discrete lengths. The length of a code refers to the number of characters
(i.e., human readable characters), including check digit(s).
Double-tapping on this parameter displays a dialog box labelled Set Code Lengths where
you can define the code length that will be recognized by your scanner.
Choosing One discrete length allows you to decode only those codes containing a selected
length. Choosing Two discrete lengths allows you to decode only those codes containing two
selected lengths. Length within a range allows you to decode a code type within a specified
range from 4 to 14.
Check Digit Verification
When enabled, this parameter checks the integrity of an I 2 of 5 symbol to
ensure it complies with a specified algorithm – either USS (Uniform Symbology Specification) or OPCC (Optical Product Code Council).
Transmit Check Digit
If this parameter is enabled, the check digit is included with the bar code data.
144 iKôn Rugged PDA (Windows Mobile 6) User Manual
Page 29

Convert To EAN 13
If this parameter is enabled, the I 2 of 5 bar code is converted to EAN 13.
Field Size/Char
Refer to page 137 for details.
5.28.1.18Discrete 2 of 5
Enabled
Set this parameter to on to enable “Discrete 2 of 5”.
Set Length L1 And Set Length L2
Lengths for “Discrete 2 of 5” can be set for Any length, Length within a range, One discrete
length or Two discrete lengths. The length of a code refers to the number of characters (i.e.,
human readable characters), including check digit(s).
Double-tapping on this parameter displays a dialog box labelled Set Code Lengths where
you can define the code length that will be recognized by your scanner.
Choosing One discrete length allows you to decode only those codes containing a selected
length. Choosing Two discrete lengths allows you to decode only those codes containing two
selected lengths. Length within a range allows you to decode a code type within a specified
range from 1 to 12.
Chapter 5: Settings
Decoded (Internal) Scanners
Discrete 2 of 5
Field Size/Char
Refer to page 137 for details.
5.28.1.19RSS Code
Enable
Setting this parameter to on enables “2D RSS Code” scanning capability.
Enable RSS-14 (Reduced Space Symbology)
RSS-14 code can be either purely linear or split in half with one half stacked on top of the
other half. Stacking the code reduces the bar code length, and providing the nominal height
of the code is maintained, it can be omni-directionally scanned.
Enable RSS Limited
“RSS-Limited” is restricted, in that it can only encode 14 digit GTINs (global trade item
number) that begin with either a 0 or a 1. It is not stackable and is not designed to be read
omni-directionally.
iKôn Rugged PDA (Windows Mobile 6) User Manual 145
Page 30

Chapter 5: Settings
Decoded (Internal) Scanners
Composite
Enable RSS Expanded
“RSS Expanded” uses the same application identifiers as UCC/EAN-128 codes but it can be
split into sections and stacked several rows high, reducing the length of the symbol, while
increasing the capacity of data that can be stored. “RSS Expanded” code can be omni-directionally scanned.
Field Size/Char
Refer to page 137 for details.
5.28.1.20Composite
Important: To successfully read this type of bar code, the two types of
A composite symbol includes multi-row 2D components making it compatible with linear
and area CCD scanners along with linear and rastering laser scanners.
The options available for this parameter represent multi-level components of a composite
symbol.
symbologies included in a composite bar code must be enabled.
In addition, “Center Bar Code Only” must be disabled.
Enable CC-C And Enable CC-AB
To activate these components, set these parameters to on.
Enable TLC-39
This composite component integrates MicroPDF417 with the linear code. Setting this parameter to on enables this parameter.
5.28.1.21PDF-417
Enable
Setting this parameter to on enables PDF-417 two dimensional (2D) coding.
Field Size/Char
Refer to page 137 for details.
146 iKôn Rugged PDA (Windows Mobile 6) User Manual
Page 31

5.28.1.22Micro PDF-417
Enable
Setting this parameter to on enables “Micro PDF-417” bar code scanning. Micro PDF-417 is
a multi-row symbology that is useful for applications requiring greater area efficiency but
lower data capacity than PDF-417.
Code 128 Emulation
When this parameter is enabled, the scanner transmits data from certain Micro PDF-417
symbols as if it was encoded in Code 128 symbols.
If Code 128 Emulation is enabled, the following Micro PDF-417 symbols are transmitted
with one of the following prefixes:
]C1 if the first codeword is 903-907, 912, 914, 915
]C2 if the first codeword is 908 or 909
]C0 if the first codeword is 910 or 911
If Code 128 Emulation is set to off, the Micro PDF-417 symbols are transmitted with one of
the following prefixes:
]L3 if the first codeword is 903-907, 912, 914, 915
Chapter 5: Settings
Decoded (Internal) Scanners
Micro PDF-417
]L4 if the first codeword is 908 or 909
]L5 if the first codeword is 910 or 911
Field Size/Char
Refer to page 137 for details.
iKôn Rugged PDA (Windows Mobile 6) User Manual 147
Page 32

Chapter 5: Settings
Decoded
5.28.2 Decoded
• Tap on the Scanner dropdown menu, and choose Decoded (Intermec ISCP).
5.28.2.1 Options–Decoded Scanner
Laser On Time
The value assigned to this parameter determines how long the laser will remain on when the
scan button or trigger is pressed.
Double-tapping on this parameter displays a dialog box in which you can enter a value
between 1 and 10 seconds.
5.28.2.2 Advanced Options–Decoded Scanner
Continuous Scan Mode
Setting this parameter to ‘on’ keeps the laser on and continuously decoding as long as the
scanner button is pressed and held down.
Minimum Cancel Time
The value assigned to this parameter determines the time delay before the scanner is turned
off, once the scanner trigger or button is released. This gives the scanner a minimum amount
of time to complete its current decode before the scan is cancelled when the user quickly
triggers on/off.
148 iKôn Rugged PDA (Windows Mobile 6) User Manual
Page 33

Chapter 5: Settings
Decoded
Low Power Timeout
To extend laser life, you can select the length of time the scanner remains active following a
successful decode. The scanner wakes from low power mode when a bar code is scanned – a
successful decode restores normal blinking.
When you double-tap on this parameter, a dialog box is displayed in which you can choose a
value of 30 sec, 1 min, 2 min or 3 min.
Note: This parameter is only used if the Trigger Mode has been set to Continuous On and
the PDA is mounted in a fixed position; otherwise, ‘Low Power Timeout’ is not used.
Parameter Scanning
Setting this parameter to Enabled allows decoding of parameter bar codes.
Same Read Validate
The data is only transmitted after repeated reads give the same result. The
value assigned at this parameter determines the number of reads required, from
0 to 10 times.
Same Read Timeout
Prevents the same bar code from being read more than once. The value assigned determines
after what time period the scanner will timeout, from 0 to 2550 msec.
Diff Read Timeout
Prevents unwanted reading of other bar codes on the same label. The value assigned determines after what time period the scanner will timeout, from 0 to 2550 msec.
5.28.2.3 Code 39
Enable
Setting this parameter to on enables “Code 39”.
Full ASCII
If this parameter is enabled, the characters +, %, and / are used as escape
characters. The combination of an escape character and the next character
is converted to an equivalent ASCII character.
Reading Range
Determines the reading distance from which a bar code can be successfully scanned. The
default setting, Extended, allows for increased reading distance.
iKôn Rugged PDA (Windows Mobile 6) User Manual 149
Page 34

Chapter 5: Settings
Decoded
Start/Stop Transmit
Setting this parameter to on enables the transmission of start and stop characters, which are
usually not transmitted. Code 39 can start and end with either a * or a $ character (see also
next parameter Accepted Start Char).
Accepted Start Char
This parameter allows the user the option of using one of the two start/stop characters or
both ($ char, * char, $ and * char).
Check Digit Verification
Uses the specified algorithm of the option you've chosen to ensure the integrity of the
symbol data before transmitting. If the data does not contain that algorithm, the data is not
transmitted. The available options are: Disabled, MOD 43 Check, French CIP, or Italian CIP.
Note: French CIP (French pharmaceutical) is only used with bar codes containing 7
Transmit Check Digit
characters.
Italian CIP (Italian pharmaceutical) is also known as Code 32. It is transmitted as a
standard Code 39 if checksum is not validated.
If the check digit is to be transmitted with the data, this parameter must be enabled.
Minimum Length
Minimum lengths for the bar code can be set from 0 to 255. The length of a code refers to
the number of characters (i.e., human readable characters), including
check digit(s).
Field Size/Char
Refer to page 137 for details.
5.28.2.4 Code 128
Enable
Setting this parameter to on enables “Code 128”.
GS1-128
“GS1-128” is the GS1 implementation of the Code 128 barcode specification. The former
correct name was UCC/EAN-128.
150 iKôn Rugged PDA (Windows Mobile 6) User Manual
Page 35

Chapter 5: Settings
Decoded
GS1-128 Identifier
“GS1-128 Identifier” allows the AIM ID " ]C1" for EAN 128 to be transmitted or removed.
By default, this identifier is transmitted if EAN 128 is enabled.
GTIN Compliant
GTIN (global trade item number) processing transmits EAN 128 as the 14-character
EAN/UCC GTIN. To use GTIN processing, you must activate the EAN 128 symbology.
Important: When EAN 128 and GTIN processing are both activated, it is not possible to
read normal EAN 128 Codes.
FNC1 Conversion
“FNC1 Conversion” allows the embedded FNC1 character to be converted to another character for applications that cannot use the default <GS> Group Separator or hex (1d).
Double-tapping on this option displays a dialog box listing the allowable range – 0 to 255.
Enable ISBT 128
To successfully scan this type of bar code (International Society of Blood Transfusion), this
option must be set to on. If you enable this type of bar code, Code 128/EAN 128 is deactivated to avoid any confusion.
ISBT Concat Transmit
The codes are not concatenated by default. You need to choose one of the options provided
for this parameter to send concatenated code. Choosing Only Concatenated Codes transmits
only concatenated codes—single codes will not be transmitted. Choosing Concatenated or
Single transmits single codes or concatenated codes. If only one code of a pair is read, that
code will be transmitted as a single code. If both codes in a pair are detected, they will be
concatenated provided that ISBT Concat Any Pair (see below) is enabled.
ISBT Concat Any Pair
Enabling this parameter causes all code pairs that can be, to be concatenated even if they do
not comply with Section 4.1 of the “ISBT 128 Bar Code Symbology and Application Specification for Labeling of Whole Blood and Blood Components” (June 2000, Version 1.2.1).
Reading Range
Determines the reading distance from which a bar code can be successfully scanned. The
default setting Extended, allows for increased reading distance.
iKôn Rugged PDA (Windows Mobile 6) User Manual 151
Page 36

Chapter 5: Settings
Decoded
Check Digit Verification
The available options for this parameter are Disabled or French CIP. This parameter uses the
specified algorithm of the option you've chosen to ensure the integrity of the symbol data
before transmitting. If the data does not contain that algorithm, the data is not transmitted.
Note: French CIP (French pharmaceutical) is only used with bar codes containing 7
characters.
Minimum Length
Minimum lengths for the bar code can be set from 0 to 255. The length of a code refers to
the number of characters (i.e., human readable characters), including
check digit(s).
Field Size/Char
Refer to page 137 for details.
5.28.2.5 EAN 13
Enabled
Set this parameter to on to enable “EAN 13”.
ISBN Conversion
When this parameter (International Standard Book Number) is enabled, the first 3 characters
(‘978’) are ignored and the checksum (0.9, ‘X’) is calculated on the remaining characters.
Transmit Check Digit
If the check digit is to be transmitted with the data, this parameter must be enabled.
Prefix/Suffix
Refer to page 137 for details.
5.28.2.6 EAN 8
Enabled
Set this parameter to on to enable “EAN 8”.
Transmit Check Digit
If the check digit is to be transmitted with the data, this parameter must be enabled.
152 iKôn Rugged PDA (Windows Mobile 6) User Manual
Page 37

Convert To EAN 13
If this parameter is enabled, an EAN 8 bar code is converted to EAN 13.
Prefix/Suffix
Refer to page 137 for details.
5.28.2.7 UPCA
Enabled
Set this parameter to on to enable “UPC A” bar code scanning recognition.
Transmit Check Digit
If the check digit is to be transmitted with the data, this parameter must be enabled.
Transmit Number System
If this parameter is enabled, the number system digit is transmitted with the decoded bar
code data.
Convert To EAN 13
If this parameter is enabled, a UPC A bar code is converted to EAN 13.
Chapter 5: Settings
Decoded
Prefix/Suffix
Refer to page 137 for details.
5.28.2.8 UPC E
Enabled
Set this parameter to on to enable “UPC E”.
Enable UPC-E1
Set this parameter to on to allow “UPC-E1” (zero suppressed) bar code scans.
Transmit Check Digit
If the check digit is to be transmitted with the data, this parameter must be enabled.
Transmit Number System
If this parameter is enabled, the number system digit is transmitted with the decoded bar
code data.
iKôn Rugged PDA (Windows Mobile 6) User Manual 153
Page 38

Chapter 5: Settings
Decoded
Convert To UPC-A
This parameter converts UPC E (zero suppressed) decoded data to UPC A format before
transmission. After conversion, data follows UPC A format and is affected by UPC A programming selections (e.g. Check Digit).
Prefix/Suffix
Refer to page 137 for details.
5.28.2.9 UPC/EAN Shared
The setting assigned to the “Addendum” parameter associated with this option is shared
across all UPC and EAN bar codes.
Addendum
An addendum is a separate bar code, supplementary to the main bar code.
This parameter provides two options: Not Required but Transmitted if Read or Required and
Transmitted.
• Double-tap on Addendum to display a dialog box listing your options.
• Highlight an item, and tap on OK.
When “Addendum” is set to Not Required but Transmitted if Read, the scanner searches for
an addendum and if one exists, appends it to the main bar code. When the parameter is set to
Required and Transmitted, the scanner does not accept the main bar code without an
addendum.
Addendum Add-on 2 And Addendum Add-on 5
Enabling these parameters sets the length of the addendum bar code to either 2 or
5 characters.
GTIN Compliant
GTIN (global trade item number) processing transmits EAN 128 as the 14-character
EAN/UCC GTIN. To use GTIN processing, you must activate the EAN 128 symbology.
Important: When EAN 128 and GTIN processing are both activated, it is not possible to
read normal EAN 128 Codes.
154 iKôn Rugged PDA (Windows Mobile 6) User Manual
Page 39

Reading Range
This parameter determines the reading distance from which a bar code can be successfully
scanned. The default setting, Extended, allows for increased
reading distance.
5.28.2.10Code 93
Enabled
Set this parameter to on to enable “Code 93”.
Minimum Length
Minimum lengths for the bar code can be set from 0 to 255. The length of a code refers to
the number of characters (i.e., human readable characters), including
check digit(s).
Field Size/Char
Refer to page 137 for details.
5.28.2.11Codabar
Enabled
Chapter 5: Settings
Decoded
Set this parameter to on to enable “Codabar”.
Start/Stop Transmit
Codabar can use the following sets of characters as start and stop characters:
a, b, c, d
A, B, C, D
a, b, c, d, /, t, n, *, e
DC1, DC2, DC3, DC4
Thus, when a set is chosen, the first and last digits of a Codabar message must be one of
those characters and the body of the message should not contain these characters. Setting
this parameter to Not Transmitted strips the start and stop characters from this bar code.
CLSI Library System
When enabled, spaces are inserted after characters 1, 5, 10 in the 14-character label (used in
the USA by libraries using the CLSI system).
iKôn Rugged PDA (Windows Mobile 6) User Manual 155
Page 40

Chapter 5: Settings
Decoded
Check Digit Verification
When enabled, this parameter checks the integrity of a symbol to ensure it complies with a
specified algorithm – either USS (Uniform Symbology Specification) or OPCC (Optical
Product Code Council).
Transmit Check Digit
If the check digit is to be transmitted with the data, this parameter must be enabled.
Set Length L1, Set Length L2, And Set Length L3
Lengths for “Codabar” can be set from 0 to 255. The length of a code refers to the number of
characters (i.e., human readable characters), including check digit(s).
Double-tapping on these parameters displays dialog boxes where you can define the code
length that will be recognized by your scanner.
Length Mode
You can choose to set L1 as Minimum Length or L1,L2,L3 as Fixed Length.
Field Size/Char
Refer to page 137 for details.
5.28.2.12MSI Plessey
Enabled
Set this parameter to on to enable “MSI”.
Enable Plessy
Set this parameter to on to enable “Plessy”.
Check Digit Verification
The available options for this parameter are MOD 10 Check and Double MOD 10 Check.
This parameter uses the specified algorithm of the option you've chosen to ensure the integrity of the symbol data before transmitting. If the data does not contain that algorithm, the
data is not transmitted.
Transmit Check Digit
If the check digit is to be transmitted with the data, this parameter must be enabled.
156 iKôn Rugged PDA (Windows Mobile 6) User Manual
Page 41

Plessy Transmit Check Digit
If the check digit is to be transmitted with the Plessy data, this parameter must
be enabled.
Minimum Length
Minimum lengths for the bar code can be set from 0 to 255. The length of a code refers to
the number of characters (i.e., human readable characters), including
check digit(s).
Plessy Minimum Length
Minimum lengths for the Plessy bar code can be set from 0 to 255. The length of a code
refers to the number of characters (i.e., human readable characters), including
check digit(s).
Field Size/Char
Refer to page 137 for details.
5.28.2.13Code 11
Enabled
Chapter 5: Settings
Decoded
Set this parameter to on to enable “Code 11”.
Check Digit Verification
The available options for this parameter are MOD 10 Check and Double MOD 10
Check.This parameter uses the specified algorithm of the option you've chosen to ensure the
integrity of the symbol data before transmitting. If the data does not contain that algorithm,
the data is not transmitted.
Transmit Check Digit
If the check digit is to be transmitted with the data, this parameter must be enabled.
Minimum Length
Minimum lengths for the bar code can be set from 0 to 255. The length of a code refers to
the number of characters (i.e., human readable characters), including
check digit(s).
Field Size/Char
Refer to page 137 for details.
iKôn Rugged PDA (Windows Mobile 6) User Manual 157
Page 42

Chapter 5: Settings
Decoded
5.28.2.14Interleaved 2 of 5
Enabled
Set this parameter to on to enable “Interleaved 2 of 5”.
Reading Range
This parameter determines the reading distance from which a bar code can be successfully
scanned. The default setting, Extended, allows for increased
reading distance.
Check Digit Verification
The available options for this parameter are Disabled, MOD 10 Check and French CIP.
“Check Digit Verification” uses the specified algorithm of the option you've chosen to
ensure the integrity of the symbol data before transmitting. If the data does not contain that
algorithm, the data is not transmitted.
Note: French CIP (French pharmaceutical) is only used with bar codes containing 7
characters.
Transmit Check Digit
If the check digit is to be transmitted with the data, this parameter must be enabled.
Set Length L1, Set Length L2, And Set Length L3
Lengths for “Interleaved 2 of 5” can be set from 0 to 255. The length of a code
refers to the number of characters (i.e., human readable characters), including
check digit(s).
Double-tapping on these parameters displays dialog boxes where you can define the code
length that will be recognized by your scanner.
Length Mode
You can chose to set L1 as Minimum Length or L1,L2,L3 as Fixed Length.
Field Size/Char
Refer to page 137 for details.
5.28.2.15Matrix 2 of 5
Enabled
Set this parameter to on to enable “Matrix 2 of 5”.
158 iKôn Rugged PDA (Windows Mobile 6) User Manual
Page 43

Minimum Length
Minimum lengths for the bar code can be set from 0 to 255. The length of a code refers to
the number of characters (i.e., human readable characters), including
check digit(s).
Field Size/Char
Refer to page 137 for details.
5.28.2.16Discrete 2 of 5
Enabled
Set this parameter to on to enable “Discrete 2 of 5”.
Standard 2 of 5 Format
This parameter allows you to choose a standard format – either Identicon (6 start/stop bars)
or Computer Identics (4 start/stop bars).
Check Digit Verification
The available options for this parameter are Disabled and MOD 10 Check. “Check Digit
Verification” uses the specified algorithm of the option you've chosen to ensure the integrity
of the symbol data before transmitting. If the data does not contain that algorithm, the data is
not transmitted.
Chapter 5: Settings
Decoded
Transmit Check Digit
If the check digit is to be transmitted with the data, this parameter must be enabled.
Set Length L1, Set Length L2, And Set Length L3
Lengths for “Discrete 2 of 5” can be set from 0 to 255. The length of a code refers to the
number of characters (i.e., human readable characters), including check digit(s).
Double-tapping on these parameters displays dialog boxes where you can define the code
length that will be recognized by your scanner.
Length Mode
You can chose to set L1 as Minimum Length or L1,L2,L3 as Fixed Length.
Field Size/Char
Refer to page 137 for details.
iKôn Rugged PDA (Windows Mobile 6) User Manual 159
Page 44

Chapter 5: Settings
Decoded
5.28.2.17Telepen
Enabled
Set this parameter to on to enable “Telepen”.
Format
This parameter allows you to set the bar code character format to either ASCII
or Numeric.
Minimum Length
Minimum lengths for the bar code can be set from 0 to 255. The length of a code refers to
the number of characters (i.e., human readable characters), including
check digit(s).
Field Size/Char
Refer to page 137 for details.
5.28.2.18RSS Code (Reduced Space Symbology)
Enable
Setting this parameter to on enables “RSS Code” scanning capability.
Enable RSS-14
RSS-14 code can be either purely linear or split in half with one half stacked on top of the
other half. Stacking the code reduces the bar code length, and providing the nominal height
of the code is maintained, it can be omni-directionally scanned.
Enable RSS Limited
“RSS-Limited” is restricted, in that it can only encode 14 digit GTINs (global trade item
number) that begin with either a 0 or a 1. It is not stackable and is not designed to be read
omni-directionally.
Enable RSS Expanded
“RSS Expanded” uses the same application identifiers as UCC/EAN-128 codes but they can
be split into sections and stacked several rows high, reducing the length of the symbol, while
increasing the capacity of data that can be stored. “RSS Expanded” code can be omni-directionally scanned.
160 iKôn Rugged PDA (Windows Mobile 6) User Manual
Page 45

Field Size/Char
Refer to “Field Size” on page 137 for details.
5.28.2.19PDF-417
Enabled
Set this parameter to on to enable “PDF-417”.
Field Size/Char
Refer to “Field Size” on page 137 for details.
5.28.2.20Micro PDF-417
Enabled
Set this parameter to on to enable “Micro PDF-417”.
Code 128 Emulation
When this parameter is enabled, the scanner transmits data from certain Micro PDF-417
symbols as if it was encoded in Code 128 symbols.
If Code 128 Emulation is enabled, the following Micro PDF-417 symbols are transmitted
with one of the following prefixes:
Chapter 5: Settings
Decoded
]C1if the first codeword is 903-907, 912, 914, 915
]C2if the first codeword is 908 or 909
]C0if the first codeword is 910 or 911
If Code 128 Emulation is set to off, the Micro PDF-417 symbols are transmitted with one of
the following prefixes:
]L3if the first codeword is 903-907, 912, 914, 915
]L4if the first codeword is 908 or 909
]L5if the first codeword is 910 or 911
Field Size/Char
Refer to “Field Size” on page 137 for details.
5.28.2.21Codablock
Enable Codablock A
Set this parameter to on to enable “Codablock type A”.
iKôn Rugged PDA (Windows Mobile 6) User Manual 161
Page 46

Chapter 5: Settings
Imager
Enable Codablock F
Set this parameter to on to enable “Codablock type F”.
Field Size/Char
Refer to “Field Size” on page 137 for details.
5.28.3 Imager
• Tap on the Scanner dropdown menu, and choose Imager.
5.28.3.1 Options–Imager
Tek Im ag er Enable d
Setting this option to on enables the imager installed in your PDA.
Continuous Scan Mode
Setting this parameter to on keeps image capture active and continuously decoding as long
as the scanner button is pressed and held down.
Center Bar Code Only
Note: This parameter must be disabled when reading Composite bar codes.
When more than one bar code is visible in a single snap shot, this parameter allows you to
specify that only the centre image within the imager framing marker be read. When this pa-
162 iKôn Rugged PDA (Windows Mobile 6) User Manual
Page 47

Chapter 5: Settings
Imager
rameter is set to on, the target dot is pointed at the centre image and only that image is
returned.
Max Number Barcodes
This parameter specifies the maximum number of bar codes the imager will attempt to
decode in an image. A maximum of 6 bar codes can be decoded at one time.
Barcodes Must Decode
This parameter specifies the minimum number of bar codes that the imager must decode in
order to report success.
Note: This number must be less than the number of bar codes assigned to
“Max Number Barcodes”. The driver validates and reassigns the value
if necessary.
Window Width
“Window Width” determines the width of the captured image in pixels.
Note: The driver will validate and reassign the value assigned to this parameter, if neces-
sary; the driver will also use the Window Width value to horizontally center the
image in the field of view.
Window Height
This parameter determines the height of the captured image in pixels.
Note: The driver will validate and reassign the value assigned to this parameter, if neces-
sary; the driver will also use “Window Height” value to vertically center the image
in the field of view.
Dot Time (msec)
The value selected for “Dot Time (msec)” determines (in milliseconds) how long the targeting dot remains on before the scanner begins capturing images. When you double-tap on this
parameter, a dialog box is displayed in which you can enter a value of between 0 and 3000.
A value of 0 disables the target dot.
5.28.3.2 Advanced Options – Imager
Important: Do not adjust the advanced options without first consulting Psion Teklogix
technical support.
iKôn Rugged PDA (Windows Mobile 6) User Manual 163
Page 48

Chapter 5: Settings
Imager
Factory Defaults On Reboot
The value assigned to this parameter determines whether or not the driver will restore the
factory defaults to the imager device on the next reboot.
Note: The driver will default the imager device on a ‘clean’ reset, regardless of the value of
Min Scan Duration
This parameter defines the minimum amount of time in seconds that the imager will scan
when the trigger is pressed and held down without successful decode.
Note: The actual scan duration when the trigger is pressed relies on the value assigned to
Captures Per HW Trigger
The value assigned to this parameter determines the number of captures the imager device
will take while the imager's internal hardware trigger is held down.
Note: This parameter, together with “Min Scan Duration”, determines the actual scan
this parameter.
Captures Per HW Trigger, below.
duration. When the scan trigger is pressed and held down, the driver starts a timer
based on the value of “Min Scan Duration” and also sends a command to emulate
the hardware trigger. When completed, if the time has not yet expired, it will send
another command to the imager device, forcing the imager to flash again using the
value assigned to “Captures Per HW Trigger”.
Auto Exposure
Important: This parameter value should only be changed by qualified Psion Teklogix
personnel. It should be left at the default value – ‘on’.
Setting this parameter to on allows the imager to make automatic gain, integration and illumination adjustments based on ambient light before capturing the bar code. If the
adjustment is insufficient, further adjustments are made automatically before another image
is captured.
164 iKôn Rugged PDA (Windows Mobile 6) User Manual
Page 49

Chapter 5: Settings
Imager
Fast Converge
Note: “Auto Exposure” must be set to ‘on’ in order for this parameter
to function.
Keep in mind that while this parameter can improve imager performance, “Fast
Converge” increases battery power consumption.
Setting this parameter to on speeds the “Auto Exposure” process. It allows the imager to
rapidly snap a number of bar code capture attempts while finding ideal values for gain, integration and illumination.
Max Gain, Max Integration And Max Illumination
Important: These parameter values should only be changed by qualified Psion Teklogix
personnel.
These parameters represent internal values used by the 2D imager. The “Auto Exposure” parameter automatically adjusts the “Max Gain”, “Max Integration” and “Max Illumination”
parameters to produce the best bar code read. Keep in mind that “Auto Exposure” must be
set to on in order for these parameter values to be automatically adjusted.
Double-tapping on any of these parameters displays an associated dialog box in which an allowable range is displayed: Max Gain – 357 to 7920, Max Integration – 0 to 65535, Max
Illumination – 0 to 7.
Decoder Timeout
The decoder is a set of algorithms that examine the image and attempt to find the bar codes,
and then turn the pixels into data that the computer can use—this process takes time. “Decoder Timeout” limits the amount of time the decoder will spend attempting to decode an
image, and forces it to stop and grab a new image, which will probably be easier to decode.
Note: When decoding multiple bar codes in one image, the value assigned to ‘Decoder Tim-
eout’ should be increased to 200ms/extra bar code after the first.
Adaptive Windowing
“Adaptive Windowing” is an advanced technique used to speed up bar code recognition in
certain applications. This parameter automatically reduces the size of the window to the
user-programmed window size when it successfully decodes (which reduces decode time
the next time it is used), but increases it to the full size window (1280x1024 for SX5303) on
a failed decode.
iKôn Rugged PDA (Windows Mobile 6) User Manual 165
Page 50

Chapter 5: Settings
Imager
Note: This feature assumes that you have reached an understanding about how the device
operates in your application, and that, after a learning period, operators will get
used to using the imager in one particular way. It also assumes that a trained operator will usually only have near miss scenarios.
Constant Illumination
“Constant Illumination” is used to reduce the intrusiveness of the device’s illumination on
the observer. Instead of the illumination turning on and off every time the device attempts a
decode (2-4 times per second), the illumination stays on from the time the trigger is pulled
until a decode is successful. This feature is useful in low light environments, since it will
also reduce the distraction that the illumination can have on nearby coworkers.
5.28.3.3 Code 39 Settings
Enabled
Set this parameter to on to enable “Code 39”.
Field Size/Char
Refer to “Field Size” on page 137 for details.
5.28.3.4 Code 128 Settings
Enabled
Set this parameter to on to enable “Code 128”.
Field Size/Char
Refer to “Field Size” on page 137 for details.
5.28.3.5 EAN 13
Enabled
Set this parameter to on to enable “EAN 13”.
Addendum
An addendum is a separate bar code, supplementary to the main bar code.
This parameter provides three options: Disabled, Optional and Required. Depending on the
value chosen for this parameter, an addendum is recognized
or ignored.
• Double-tap on Addendum to display a dialog box listing your options.
166 iKôn Rugged PDA (Windows Mobile 6) User Manual
Page 51

• Highlight an item, and tap on OK.
When “Addendum” is set to Disabled, the scanner does not recognize an addendum. If this
parameter is set to Optional, the scanner searches for
an addendum and if one exists, appends it to the main bar code. When the
parameter is set to Required, the scanner does not accept the main bar code without an
addendum.
Note: Setting “Addendum” to ‘Optional’ reduces performance. It should only be chosen if
Prefix/Suffix
Refer to page 137 for details.
5.28.3.6 EAN 8
Enabled
Set this parameter to on to enable “EAN 8”.
Addendum
Refer to page 154.
Chapter 5: Settings
Imager
at least some of the bar codes being read have addendums.
Prefix/Suffix
Refer to page 137 for details.
5.28.3.7 UPC A
Enabled
Set this parameter to on to enable “UPC A”.
Addendum
Refer to page 154.
Prefix/Suffix
Refer to page 137 for details.
5.28.3.8 UPC E
Enabled
Set this parameter to on to enable “UPC E”.
iKôn Rugged PDA (Windows Mobile 6) User Manual 167
Page 52

Chapter 5: Settings
Imager
Addendum
Refer to page 154.
Prefix/Suffix
Refer to page 137 for details.
5.28.3.9 Code 93
Enabled
Set this parameter to on to enable “Code 93”.
Field Size/Char
Refer to “Field Size” on page 137 for details.
5.28.3.10Codabar
Enabled
Set this parameter to on to enable “Codabar”.
Field Size/Char
Refer to “Field Size” on page 137 for details.
5.28.3.11Interleaved 2 of 5
Enabled
Set this parameter to on to enable “Interleaved 2 of 5”.
Field Size/Char
Refer to “Field Size” on page 137 for details.
5.28.3.12RSS Code (Reduced Space Symbology)
Enable
Setting this parameter to on enables “RSS Code” scanning capability.
Field Size/Char
Refer to “Field Size” on page 137 for details.
168 iKôn Rugged PDA (Windows Mobile 6) User Manual
Page 53

5.28.3.13Composite
Important: To successfully read this type of bar code, the two types of
symbologies included in a composite bar code must be enabled.
Enabled
Set this parameter to on to enable “Composite” bar codes.
5.28.3.14PDF-417
Enable
Setting this parameter to on enables PDF-417 two dimensional (2D) coding.
Field Size/Char
Refer to “Field Size” on page 137 for details.
5.28.3.15Micro PDF-417
Enable
Setting this parameter to on enables “Micro PDF-417” bar code scanning. Micro PDF-417 is
a multi-row symbology that is useful for applications requiring greater area efficiency but
lower data capacity than PDF-417.
Chapter 5: Settings
Imager
Field Size/Char
Refer to “Field Size” on page 137 for details.
5.28.3.162D Data Matrix
Enable
Set this parameter to on to enable “Data Matrix”.
Field Size/Char
Refer to “Field Size” on page 137 for details.
5.28.3.172D QR Code
Enabled
Set this parameter to on to enable “2D QR Code”.
iKôn Rugged PDA (Windows Mobile 6) User Manual 169
Page 54

Chapter 5: Settings
Imager
Field Size/Char
Refer to page 137 for details.
5.28.3.182D Maxicode
Enabled
Set this parameter to on to enable “2D Maxicode”.
Field Size/Char
Refer to “Field Size” on page 137 for details.
5.28.3.192D Aztec
Enabled
Set this parameter to on to enable “Aztec”.
Field Size/Char
Refer to “Field Size” on page 137 for details.
5.28.3.20Postal: PlaNET
Enabled
Set this parameter to on to enable “Postal: PlaNET”.
Field Size/Char
Refer to “Field Size” on page 137 for details.
5.28.3.21Postal: PostNET
Enabled
Set this parameter to on to enable “Postal: PostNET”.
Field Size/Char
Refer to “Field Size” on page 137 for details.
5.28.3.22Postal: Australian
Enabled
Set this parameter to on to enable “Postal: Australian”.
170 iKôn Rugged PDA (Windows Mobile 6) User Manual
Page 55

Field Size/Char
Refer to “Field Size” on page 137 for details.
5.28.3.23Postal: Japanese
Enabled
Set this parameter to on to enable “Postal: Japanese”.
Field Size/Char
Refer to “Field Size” on page 137 for details.
5.28.3.24Postal: Korean
Enabled
Set this parameter to on to enable “Postal: Korean”.
Field Size/Char
Refer to “Field Size” on page 137 for details.
5.28.3.25Postal: Royal
Chapter 5: Settings
Imager
Enabled
Set this parameter to on to enable “Postal: Royal”.
Field Size/Char
Refer to “Field Size” on page 137 for details.
iKôn Rugged PDA (Windows Mobile 6) User Manual 171
Page 56

Chapter 5: Settings
Options Tab
5.28.4 Options Tab
This tab allows you to tailor the double-click parameters and the display options associated
with your scanner.
5.28.4.1 Double Click Parameters
Click
Time (msec)
This parameter controls the maximum gap time (in milliseconds) for a double-click. If the
time between the first and second clicks of the scanner trigger is within this time, it is considered a double-click. The allowable range is 0 to 1000. A value of zero disables this
feature.
A double-click produces different results depending on whether or not a value is assigned in
the “Click Data” parameter. When a value is not assigned for the “Click Data”, double-clicking the scanner trigger overrides the target dot delay set in the “Dot Time” parameter and
initiates a normal scan sweep. If a value is assigned for the “Click Data” parameter, doubleclicking the scanner trigger inserts the “Click Data” value rather than initiating a scan.
Click Data
For both integrated and external scanners, this parameter determines which character is sent
to the application installed in your PDA following a double-click. A dialog box appears,
asking that you press the key you want to insert. The ASCII/Unicode key value of the keypress is displayed.
172 iKôn Rugged PDA (Windows Mobile 6) User Manual
Page 57

5.28.4.2 Display Parameters
Scan Result
When this parameter is enabled, the type of bar code and the result of the scan appear on the
screen. Note that this information is only displayed after a successful decode and is visible
only while the scanner trigger is pressed. When the trigger is released, this information is
cleared from the screen.
Scan Indicator
When this parameter is enabled, the laser warning logo appears on the display whenever the
scanner is activated.
Scan Result Time (sec)
The value assigned to the “Scan Result Time (sec)” parameter determines how long the scan
results of a successful scan are displayed on the screen. Time is measured in seconds, and a
value of “0” (zero) disables the parameter. When you choose this option, a dialog box
appears where you can enter a value.
Note: To remove the scan result from the screen before the “Result Time” has expired,
point the scanner away from the bar code and press the trigger.
Chapter 5: Settings
Options Tab
Good Scan Beep And Bad Scan Beep
These parameters determine whether or not the PDA emits an audible scanner ‘beep’ when a
good (successful) scan or a bad (unsuccessful) scan is performed. Set these parameters to
either on to enable the beeper or off to disable it.
Soft Scan Timeout
This parameter is used by the SDK “Scan” function (soft-scan: starting a scan session via the
SDK function, instead of a physical user trigger press). The value assigned to this parameter
determines the soft-scan timeout from 1 to 10 sec. (default is 3 sec.).
Scan Log File
If this parameter is enabled, the input barcode and the modified/translated output bar code
are logged in the file \Flash Disk\ScanLog.txt. Keep in mind that if the “Scan Log File” is
enabled, there is a slight performance effect when performing multiple scans since the log
file is written to persistent storage.
iKôn Rugged PDA (Windows Mobile 6) User Manual 173
Page 58

Chapter 5: Settings
Translations Tab
5.28.5 Translations Tab
The Translations tab allows you to define up to 10 cases, each consisting of up to 10 rules in
sequential order. Only one case will be applied to a bar code and a case will only be applied
if all rules specified in the case are successful – if a rule within a case fails, the entire case
fails.
• In the Translation tab, tap on the Case # to create rules.
174 iKôn Rugged PDA (Windows Mobile 6) User Manual
Page 59

Chapter 5: Settings
Tr a n sla t ion s Tab
• Tap on the No rule dropdown menu to display the rules.
When you choose a rule, an associated screen is displayed in which you can define the rule.
5.28.5.1 Case Rules
The case rules are defined as follows:
• No rule – ignored.
• Match at index – matches the match string at a specified index.
• Match and replace at index – matches the match string at a specified index and
replaces/changes it.
• Replace at index – replaces/changes unspecified data in a given range.
• Add barcode prefix/suffix – adds a global prefix or suffix.
iKôn Rugged PDA (Windows Mobile 6) User Manual 175
Page 60

Chapter 5: Settings
Total Recall
• Verify barcode size – verifies the bar code size. This rule should generally be assigned
first, before creating subsequent rules.
• Search and replace – replaces all instances of the match string. (Note that this rule
cannot fail.)
Warning: Keep in mind that the effects of previously applied rules must be taken into
account when creating subsequent rules. For example, if the bar code size is
important, it should be checked before any rules that might change the size
are applied.
Translation information about the status of each case/rule is displayed in the scan log file
(see “Scan Log File” on page 173) when enabled. This is useful if a case fails, and you are
trying to determine why a rule is failing.
5.29 Total Recall
Total Recall is a Psion Teklogix utility developed to back up/restore applications and
settings.
Note: In Windows Mobile 6, the registry and installed programs are stored in the Flash
file system and are not lost on reset.However, in special cases where Psion Teklogix
personnel find it necessary to perform a clean start, this will reset not only the registry settings to factory defaults, but will also erase any files or applications stored
or installed on the built-in Flash file system, including any Total Recall profiles.
This is why any data that needs to be protected must be stored on a SD/MMC card
or externally to the device on a USB memory stick or on a PC.
176 iKôn Rugged PDA (Windows Mobile 6) User Manual
Page 61

Chapter 5: Settings
Creating A Backup Profile
• Tap on Start>Settings. Tap on the Total Recall icon.
In the dropdown menu, you can choose: Create Backup Profile, Restore Selected Profile,
View Selected Profile Data, and Delete Selected Profile. Keep in mind that until a profile is
created, only one option is available–Create Backup Profile.
5.29.1 Creating A Backup Profile
• Tap on the Next button to begin the process.
Profile Information
This dialog box lists the possible storage destinations for the profile file.
• To begin, type a name for the profile in the field labelled Profile Name.
iKôn Rugged PDA (Windows Mobile 6) User Manual 177
Page 62

Chapter 5: Settings
Creating A Backup Profile
• Next, choose the Profile Type you want to create:
• For this device only – creates a backup that is manually restored by the operator.
• AutoRestore for this device only – creates a profile that automatically restores itself fol-
lowing a cold start.
• AutoRestore for this and other devices – creates a profile that automatically restores
after resuming from a clean start, but it will not contain the touchscreen calibration
coordinates or the Wireless radio settings.
• Finally, choose a Profile Location – The location for the profile is either \Flash Disk or
\SD-MMC Card.
• Tap on the Next button to display the next dialog box, Add Files.
Add Files
By default, All Files is selected so that all installed or copied files, database entries, and the
Registry will be saved. You can, however, limit the backup to databases, the registry and/or
Selected Files.
• Tap on the Next button to view your selections.
178 iKôn Rugged PDA (Windows Mobile 6) User Manual
Page 63

Chapter 5: Settings
Creating A Backup Profile
View Selections
Depending on what you have selected for inclusion in your profile, you can view a list of all
files, selected files, databases, and/or the registry.
• If you’re satisfied with the items in the profile, tap on Next.
Performing The Backup
• Tap on Backup to begin the process and create a profile.
When the backup is finished, a dialog box is presented stating that the backup has been com-
pleted successfully.
• Tap on Finish to exit Total Recall.
iKôn Rugged PDA (Windows Mobile 6) User Manual 179
Page 64

Chapter 5: Settings
Restoring A Profile
5.29.2 Restoring A Profile
To manually restore a profile:
• Choose Restore Selected Profile from the dropdown menu, and choose the Profile
Name you want to restore.
• In the next screen, tap on Restore to restore your profile.
5.30 Connections Tab
This tab is used to setup connections using Bluetooth, 802.11 radios, and you can also set up
Wireless WAN connections.
The Wireless WAN icon is only visible when Windows Mobile 6 Classic is installed in your
iKôn PDA.
180 iKôn Rugged PDA (Windows Mobile 6) User Manual
Page 65

Chapter 5: Settings
Connections Tab
• Tap on Start>Settings>Connections tab to display your connection options.
Navigation Bar
Tap on these connectivity hotkeys
to display Notification Bubbles
Notification Bubble
Navigation Bar Connectivity Hotkeys
Some of the connectivity icons in the Navigation Bar along the top of the screen are hotkeys
that offer shortcuts to connection setups. Tapping on a hotkey displays a bubble that provides information about your connections and provides a shortcut to the Wireless Manager
applet where you can set up your connections.
iKôn Rugged PDA (Windows Mobile 6) User Manual 181
Page 66

Chapter 5: Settings
Beam
Automatic Network Detection
If a wireless network is available when you switch on your unit, a notification bubble may
appear letting you know which networks have been found. You can choose a network from
here.
Tapping on Connect in the softkey bar at the bottom of the screen will automatically connect
to a network that’s already been set up. Tapping on Settings in the network bubble will
launch the Wireless Manager applet.
If you prefer not see this notification bubble, you can tap on the Menu button in the softkey
bar, and choose not to display the notification bubble.
5.31 Beam
If your unit is equipped with an IrDA end-cap, tapping on Start>Settings and then tapping
on the Connections tab followed by the Beam icon allows you to enable Receive all incom-
ing beams so that your unit can accept incoming data from other IrDA devices.
5.32 Bluetooth Setup
Bluetooth is a global standard for wireless connectivity for digital devices and is intended
for Personal Area Networks (PAN). The technology is based on a short-range radio link that
operates in the ISM band at 2.4 GHz. When two Bluetooth-equipped devices come within a
10 meter range of each other, they can establish a connection. Because Bluetooth utilizes a
radio-based link, it does not require a line-of-sight connection in order to communicate.
• Tap on Start>Settings. Next, tap on the Connection tab followed by the Bluetooth
icon.
182 iKôn Rugged PDA (Windows Mobile 6) User Manual
Page 67

5.32.1 The Devices Tab
This tab allows you to scan for other Bluetooth enabled devices, and it allows you to pair
devices.
Note: You may need to enable your Bluetooth radio before you begin. Refer to “Bluetooth
Mode” on page 185 for details.
To add a new device:
• Tap on Add new device....
The iKôn PDA scans for a Bluetooth device within a 10 meter range. Any Bluetooth devices
within range appear in the Bluetooth list box
Chapter 5: Settings
The Devices Tab
iKôn Rugged PDA (Windows Mobile 6) User Manual 183
Page 68

Chapter 5: Settings
The Devices Tab
• Highlight the device you want to add. Tap on Next.
• Type your Passcode. Tap on Next.
•In the Display Name screen, edit the name of the device. This is optional.
• Tap on Finish.
Note: To connect to a Bluetooth-equipped device that’s already been added, tap on the item
in Bluetooth list box.
5.32.1.1 Pairing A Device
If you intend to pair devices (a headset, for example), power on and bring the device within
10 meters of the PDA before proceeding with the discovery process described below.
Important: Follow the steps under “Pairing A Bluetooth Headset Or Other Bluetooth
Devices” on page 45 to pair a Bluetooth device with your PDA.
184 iKôn Rugged PDA (Windows Mobile 6) User Manual
Page 69

5.32.2 Bluetooth Mode
•Tap Start>Settings. Tap on the Connections tab>Bluetooth icon and then tap on the
Mode tab.
When Turn on Bluetooth is enabled (a checkmark is displayed in the checkbox), Bluetooth
features are available. If this option is disabled, you cannot send or receive information
using Bluetooth.
When Make this device visible to other devices is enabled, other Bluetooth devices within
range (approximately 10 meters) can detect your iKôn PDA and can establish a bond or use
a Bluetooth service. Note that other devices can detect your unit whether or not a bond has
been created.
Chapter 5: Settings
Bluetooth Mode
5.32.3 Bluetooth COM Ports
iKôn Rugged PDA (Windows Mobile 6) User Manual 185
Page 70

Chapter 5: Settings
Outgoing Port
New Incoming Port
The Bluetooth COM Ports dialog box allows you to assign a COM port number. If a port
number has not been assigned, tapping on New Incoming Port allows you to choose a COM
port number. If a port number already exists that you’d like to change, tap and hold the
stylus on Incoming Port (COM #) to display a pop-up menu. Choose Edit and assign a new
COM port number.
New Outgoing Port
When you pair the iKôn PDA with another device, New Outgoing Port is listed in this
dialog box. Tapping on this option allows you to assign an outgoing COM port number.
• To work with an existing COM port number, tap and hold the stylus on an existing port
To assign a new port number, make certain that your iKôn PDA is connected to the other
device via Bluetooth.
• In the COM Ports tab, tap on New Outgoing Port.
• Choose a COM port number from the list.
Note: If a port cannot be created, the number you’ve chosen is already in use. Choose a dif-
ferent port number.
5.32.4 Outgoing Port
Outgoing Port acts as a serial port that can be used to connect to a list of Bluetooth devices
(one at a time). This tab allows you to assign and enable an outgoing port and choose the
device with which you want to communicate from the list. You can also tailor the behaviour
186 iKôn Rugged PDA (Windows Mobile 6) User Manual
Page 71

of your PDA so that you are prompted to choose the device with which you want to
communicate.
5.32.5 Active Connections List
This tab displays the currently active Bluetooth connections, listing the device name(s). The
type of link is also included with the device name(s). Keep in mind that the information
listed in this tab is ‘view only’; it cannot be edited.
Chapter 5: Settings
Active Connections List
5.32.6 About Tab
The About tab displays information about the Bluetooth module, such as the manufacturer
name, local address and version. Like the Active tab, this information cannot be edited.
iKôn Rugged PDA (Windows Mobile 6) User Manual 187
Page 72

Chapter 5: Settings
The Bluetooth GPRS Phone
5.32.7 The Bluetooth GPRS Phone
Once you’ve completed the Bluetooth settings, you can go ahead and set up communication
through your Bluetooth-equipped phone.
Before you begin, make certain that the Bluetooth phone is turned on, that the Bluetooth
radios in your iKôn PDA and phone are enabled (turned on), and that the PDA and phone
are within 10 metres of each other. Both should be discoverable.
1. Tap on Start>Settings and then tap on the Connections tab.
2. Tap on the Connections icon. Tap on Add a new modem connection.
3. Type a name for the connection.
4. Tap on the Select a modem dropdown menu, and choose Bluetooth. Tap on Next.
5. Make certain that the phone is discoverable. Some phones also need to be pairable
in order to accept a bonding request. Refer to your phone documentation for additional information.
6. If the phone appears in the My Connections list, skip to step 12.
7. In the list, tap the phone and then tap on the Next button.
8. In the PIN screen, type a personal identification number (PIN)–you can enter up to
16 characters.
9. Enter the same PIN on the phone.
10. If you wish, you can edit the name of the phone in the Name field.
11. Tap on the Finish button.
12. In the My Connections list, tap on the phone and then on Next.
13. Enter the dial-up phone number for this connection, and tap on Next.
188 iKôn Rugged PDA (Windows Mobile 6) User Manual
Page 73

Connections – Connecting To The Internet
14. In the User name, Password and Domain fields, enter the logon information for this
connection, and tap on Finish.
You can begin using the Bluetooth phone connection, for example, to send and receive email, browse the Internet with Internet Explorer, and so on.
5.33 Connections – Connecting To The Internet
To activate a connection, make certain that any necessary equipment is installed in your
PDA such as a radio.
You’ll need the following information from your ISP to make an internet connection: ISP
server phone number, user name and password.
1. Tap Start>Settings, and then tap on the Connections tab.
Chapter 5: Settings
2. Tap on the Connections icon.
3. Under My ISP, tap on Add a new modem connection.
Note: In the Connections window the Ta sk s tab is used to create new connections and man-
age existing ones. The Advanced tab allows you to choose a network. If you need to
change these settings, contact your ISP or network administrator before making
changes.
iKôn Rugged PDA (Windows Mobile 6) User Manual 189
Page 74

Chapter 5: Settings
Modem Connection Setup
4. In the Select a modem dropdown menu, choose a modem connection. If you
haven’t already created a modem connection, refer to “Modem Connection Setup”
on page 190.
5. To connect to the Internet, launch the program you want to use. For example, launch
Internet Explorer on your iKôn PDA to browse the Internet. Your PDA automatically connects.
Note: To set up a network card or wireless network connection to your ISP, add a new con-
nection under My Work Network.
5.33.1 Modem Connection Setup
Before you begin, you’ll need the following information from your ISP or network administrator: telephone number, user name, password, domain name and TCP/IP settings.
If your iKôn PDA does not have access to a mobile phone network, insert a modem card in
the unit.
1. Tap Start>Settings. Tap on the Connections tab followed by the Connections icon.
2. To create a new connection in either My ISP or My Work Network, tap on Add a
new modem connection.
3. In the Make New Connection screen, type a name for the connection.
4. In the dropdown menu below Select a modem, tap on your modem type.
Note: If your modem is not listed in the dropdown menu, choose Hayes Compatible on
COM1.
190 iKôn Rugged PDA (Windows Mobile 6) User Manual
Page 75

Chapter 5: Settings
Modem Connection Setup
5. Tap on the Next button.
6. In the next screen, enter the phone number exactly as you want it dialed. If, for
example, you need to dial 9 for an outside line, enter 9 at the beginning of the phone
number.
7. Tap on the Next button.
8. Type the User Name, Password and Domain Name as provided by your ISP or
network administrator.
iKôn Rugged PDA (Windows Mobile 6) User Manual 191
Page 76

Chapter 5: Settings
Modem Connection Setup
Note: Generally, you will not need to change any of the Advanced settings.
For information about the Advanced settings, refer to“Advanced Modem Settings”
Changes to Advanced settings are only required in the following instances:
To change the baud rate settings, dialing string commands or credit
card options.
To change port settings.
To enter TCP/IP settings because the server to which you are connecting does not
dynamically assign addresses.
9. Tap on the Finish button.
If you need to edit the Advanced settings, refer to “Advanced Modem Settings” in the next
section.
5.33.1.1 Advanced Modem Settings
TCP/IP Settings Tab
If your server assigns IP addresses dynamically, you will not need to change these settings.
If you need to make changes, contact your ISP or network administrator for addresses.
192 iKôn Rugged PDA (Windows Mobile 6) User Manual
Page 77

Chapter 5: Settings
Wireless Power Icon
Server Settings Tab
If your server assigns IP addresses dynamically, you will not need to change these settings.
Servers requiring assigned IP addresses may also need a way to map computer names to IP
addresses. The iKôn PDA supports a variety of name resolution options: DNS, Alt DNS,
WINS and Alt WINS.
Your ISP or network administrator can determine which name resolution you need, and can
also provide the server address. In addition, you will want to ask if alternate addresses are
available. An alternate address may allow you to connect when the primary server is not
available.
5.34 Wireless Power Icon
While you can access network card settings through the Wi-Fi icon, and you can access
Bluetooth settings through the Bluetooth icon, and for units that support it, GSM/GPRS con-
nections, the Wireless Power icon acts as a connection manager, providing access to all
these types of network connections.
Note: The Wireless Manager icon, as the name implies, also provides connection manage-
ment. However, if you need to disable all connections (Flight Mode), the Wireless
Manager icon will not be available. The Wireless Power icon, on the other hand, is
always visible even when you disable all network connections.
iKôn Rugged PDA (Windows Mobile 6) User Manual 193
Page 78

Chapter 5: Settings
Flight Mode – Disabling Wireless Components
Important: The ‘Wireless Power’ option provides detailed Help files to assist you in
setting up your PDA. Help is available from the Connections tab–not from
within the Wireless Power dialog box.
To access Wireless Power help files, tap on Start>Settings>Connections tab.
Tap on Start>Settings>Help.
• Tap on Start>Settings>Connections tab>Wireless Power icon.
5.34.1 Flight Mode – Disabling Wireless Components
To disable all wireless components when, for example, you are taking your PDA onto a
plane where wireless connections need to be shut down:
• Tap on the Disable All button.
To enable wireless components:
• Tap on Enable All.
To disable a particular radio connection rather than all connections:
• Highlight an Available (enabled) radio listed in this dialog box, and then tap on the
Disable button.
194 iKôn Rugged PDA (Windows Mobile 6) User Manual
Page 79

5.34.2 Setting Up A Network Card
Network (802.11) cards are used to connect to a network so that you can browse the Internet,
download e-mail and so on. You can connect to an existing network or you can set up a new
connection on your iKôn PDA.
Important: The iKôn PDA is equipped with context sensitive Help Files. If you find
that you’re unsure how to proceed with a network connection at any point
during setup, tap on the question mark icon in the navigation bar at the top
of the screen.
5.34.3 Network Adaptor Cards
Important: For 802.11b/g (Summit) CF card adaptor setup details, refer to “Setting Up
A 802.11b/g Radio–Summit Client Utility” on page 15.
When the network card is inserted in your unit for the first time, the Network Settings screen
is displayed automatically so that you can configure the card. If it does not appear, or if you
want to change settings:
• Tap on Start>Settings>Connections tab.
• Tap on the Network Adapters icon.
Chapter 5: Settings
Setting Up A Network Card
iKôn Rugged PDA (Windows Mobile 6) User Manual 195
Page 80

Chapter 5: Settings
Changing Network Card Settings
• If you need to specify server information, double-tap on the appropriate adaptor, and
then tap on the IP Address and/or Name Servers tab.
Note: Because most networks use DHCP, you should not need to change these settings
unless instructed to do so by your network administrator.
• If necessary, use a network cable to connect the network card to your network. Refer to
the documentation shipped with your network card for details.
• To activate the connection, launch the desired program (e.g., Internet Explorer). The
iKôn PDA will connect automatically.
5.34.4 Changing Network Card Settings
• If you use your network card in two locations like work and home, you’ll need to
change the network to which the network card connects.
• Tap on Start>Settings>Connections tab>Network Cards icon.
•In the Configure Network Adapters dialog box, tap on the dropdown menu below My
network card connects to, choose either The Internet or Work.
5.34.5 VPN Connection Setup
A VPN connection provides a secure connection to servers through the Internet.
Before you begin, you need the following information from your network administrator:
password, domain name, TCP/IP settings and a host name or IP address of the VPN server.
• Tap on Start>Settings. Tap on the Connections tab followed by the Connections icon.
• Under My Work Network, tap on Add a new VPN server connection.
•In the Name field, type a name for this connection.
196 iKôn Rugged PDA (Windows Mobile 6) User Manual
Page 81

Managing An Existing Connection
Chapter 5: Settings
• In Host name/IP, type the VPN server name or IP address.
• Tap on the VPN type radio button next to the type of authentication for your iKôn PDA:
IPSec/L2TP or PPTP. Your network administrator will let you know which option
applies to your unit.
• Tap on Next.
• Choose the type of authentication in this screen. If you choose A pre-shared key, type
the key provided by your network administrator.
• Tap on Next.
• Type your user name, password and domain name. If a domain name was not provided to you, try the connection without entering a domain name.
Note: Normally, you will not need to change any advanced settings. You will need to make
changes only under only the following circumstances:
The server to which you are connecting does not dynamically assign addresses, and
TCP/IP settings need to be entered.
Server DNS or WINS settings need to be changed.
If you need to edit the Advanced settings, refer to “Advanced Modem Settings” on page 192
for details about this tab.
• Tap on Finish.
• Launch a program like Internet Explorer to activate the connection. The VPN connection will start automatically.
5.34.6 Managing An Existing Connection
Once you’ve defined a connection, a new option appears in the first Connections screen–
Manage existing connections.
5.34.6.1 Editing A Connection
• Tap on Settings>Connections tab. Tap on the Connections icon.
iKôn Rugged PDA (Windows Mobile 6) User Manual 197
Page 82

Chapter 5: Settings
Managing An Existing Connection
• Tap on Manage existing connections.
Tap h er e
• To launch a connection from this screen, press and hold the stylus on the connection you
want to activate. Choose Connect from the pop-up menu.
• To delete a connection, press and hold the stylus on the connection you want to delete.
Choose Delete from the pop-up menu.
Note: You can also create a new connection by tapping on the New button. To make changes
to the settings for this connection, tap on Edit.
5.34.6.2 Changing A Connection Setting Name
Your iKôn PDA has two sets of connection settings: My ISP and My Work Network. If you
want to change one or both of these options to something more familiar to you, follow these
steps.
• Tap on Start>Settings. Tap on the Connections tab followed by the Connections icon.
• Under My Work Network or My ISP, tap on Manage existing connections.
198 iKôn Rugged PDA (Windows Mobile 6) User Manual
Page 83

• Tap on the General tab.
• Type the name you prefer in the field below Enter a name for these settings.
• Tap on OK.
5.34.7 Selecting A Network
Chapter 5: Settings
Selecting A Network
Important: Normally, you will not need to change these settings. Contact your ISP or
network administrator before making any changes.
Private networks are used for work-related activities. Internet networks are used for home
connection to your ISP. The My Work Network settings are used for private network connec-
tions (corporate networks), while My ISP settings are used for Internet network connections.
When you use programs such as Internet Explorer, your iKôn PDA automatically connects
using private network settings under My Work Network or Internet settings under My ISP,
depending on specifications. You can determine how your iKôn PDA connects.
•Tap Start>Settings. Tap on the Connections tab followed by the Connections icon.
iKôn Rugged PDA (Windows Mobile 6) User Manual 199
Page 84

Chapter 5: Settings
Proxy Server Setup
• Tap on the Advanced tab.
• Tap on Select Networks.
• In the appropriate lists, choose My ISP or My Work Network.
5.34.8 Proxy Server Setup
Note: If you are connected to your ISP or private network during synchronization, the
iKôn PDA will download the appropriate settings during synchronization from your
PC. If these settings are not on your PC, or if they need to be changed, you’ll need
to set up the proxy server connection manually.
To set up the proxy server connection manually, you’ll need the following information:
proxy server name, server type, port, type of Socks protocol used and the user name and
password.
•Tap Start>Settings. Tap on the Connections tab followed by the Connections icon.
200 iKôn Rugged PDA (Windows Mobile 6) User Manual
Page 85

Chapter 5: Settings
Proxy Server Setup
• Under My Work Network, tap on Set up my proxy server.
• Add a checkmark next to This network connects to the Internet and This network
uses a proxy server to connect to the Internet.
•In the Proxy server field, type the proxy server name.
• Tap on OK to save your changes.
Note: If you need to change advanced settings such as a port number or proxy server type,
you’ll need to tap on the Advanced button rather than tapping on OK. Advanced
settings are described in “Changing Advanced Proxy Server Settings” on page 201.
5.34.8.1 Changing Advanced Proxy Server Settings
• To change advanced settings such as the port number or proxy server type, tap on the
Advanced button.
iKôn Rugged PDA (Windows Mobile 6) User Manual 201
Page 86

Chapter 5: Settings
Wireless Statistics
• Tap on the proxy type you want to change. For the appropriate server type, type the
proxy server name and port.
• Tap on OK.
5.35 Wireless Statistics
• Tap on Start>Settings>Connections tab>Wireless Statistics icon to display the com-
munication statistics of your wireless connection along with the radio card name, MAC
address, driver version and NDIS Compliance information.
• Tap on the Zero button to reset the statistics.
5.36 Wireless WAN (Windows Mobile 6 Classic Only)
The Wire WAN icon is visible for iKôn PDAs running Windows Mobile 6 Classic. A PDA
equipped with a GSM/GPRS, CDMA/1xRTT or UMTS radio has wide area networking
data transfer capabilities.
5.36.1 Softkey Bar Icons
Wireless WAN icons in the softkey bar indicate the status of your wide area network connection. Note that these icons are only visible when a GSM/GPRS, CDMA/1xRTT or
UMTS radio is installed in the unit, and the interface is enabled.
The letter in the signal strength icon (G for GSM/GPRS, U for UMTS and X for
CDMA/1xRTT) indicates that a packet data service is available and initialized. Keep in
mind that the signal strength icon is displayed without a letter if packet data service is not
available or if it is available but not yet initialized.
User interaction is required (e.g. the user is required to enter a PIN).
A non-recoverable (fatal) error has occurred.
GSM/GPRS Status Indicators
Signal strength is between 1% and 20%.
Signal strength is between 21% and 40%.
Signal strength is between 41% and 60%.
Signal strength is between 61% and 80%.
202 iKôn Rugged PDA (Windows Mobile 6) User Manual
Page 87

Signal strength is between 81% and 100%.
A GPRS packet data connection is active.
CDMA/1xRTT
Signal strength is between 1% and 20%.
Signal strength is between 21% and 40%.
Signal strength is between 41% and 60%.
Signal strength is between 61% and 80%.
Signal strength is between 81% and 100%.
A CDMA/1xRTT packet data connection is active.
5.36.2 Establishing A Connection
• Tap on Start>Settings. Tap on the System tab followed by the Wireless WAN icon.
Chapter 5: Settings
Establishing A Connection
Note: If you are prompted to enter a PIN, refer to “Entering A PIN” on page 204
for details.
The Status field indicates when the unit is ready to connect–the Connect Data button is
enabled.
• Tap on the Connect Data button.
The progress of the connection is tracked in the Status field.
iKôn Rugged PDA (Windows Mobile 6) User Manual 203
Page 88

Chapter 5: Settings
Disconnecting From A Network
• PPP link to modem active
• Authenticating user
• User authenticated
• Connected
Note: Keep in mind that these states may be displayed fairly quickly if the progress of the
connection is rapid.
When the connection state reaches PPP link to modem active, the softkey bar icon changes
to indicate an active connection. The Connect Data button changes, displaying Disconnect.
5.36.3 Disconnecting From A Network
To disconnect from the network:
• Tap on the Disconnect button, and then on OK.
When the iKôn PDA network connection is severed, the Status field displays Ready to
Connect.
A unit equipped with a GSM/GPRS expansion board displays the signal strength in the main
Wireless WAN screen, even while a connection is active. Units equipped with certain other
modems (e.g. Sierra Wireless UMTS and CDMA modems, Novatel UMTS modems) do not
display the signal strength while a connection is active.The Rx bytes and Tx bytes fields esti-
mate the amount of data transmitted and received, respectively.
5.36.3.1 Shutting Down The Wireless WAN User Interface
While it is not usual to shut down the GSM/GPRS user interface, you can accomplish this
by tapping on the File menu and choosing the Exit command in the Wireless WAN screen.
Note: Once you’ve shut down the user interface, you can only enable the radio by tapping
on the Wireless WAN icon to display the dialog box.
5.36.4 Advanced Information
In most cases, when a GSM/GPRS radio and SIM are installed in your PDA, setup is automatic. Follow the steps outlined under the heading “Establishing A Connection” on
page 203 to make a connection. The information in this section is for advanced setup
purposes.
5.36.4.1 Entering A PIN
If a PIN is required, a PIN entry dialog box is displayed.
204 iKôn Rugged PDA (Windows Mobile 6) User Manual
Page 89

Chapter 5: Settings
Advanced Information
• Type your PIN, and press [ENTER].
Note: If you exceed the number of allowable attempts, a PUK entry window is brought to
the foreground. You’ll need to enter a new PIN number.
Once the correct PIN or PUK is entered or if none was required, the modem is instructed to
perform a GSM network registration followed by a GPRS attach. The main Wireless WAN
dialog box reflects the progress of the initialization.
• Searching for modem
• Initializing modem
•SIM is ready
• Searching for network
• Registered on network
• Searching for packet data
• Ready to connect
If the modem loses the connection to the GSM network, the following states are repeated:
Searching for network, Registered on network, Searching for packet data and Ready to
connect.
5.36.4.2 Error States
The following temporary error states–states that may disappear without interaction– may be
displayed:
• Emergency calls only
The modem has found a network but is not allowed to register (e.g. no roaming agreement
between networks). The modem keeps searching for another network.
• No network found
A network is not currently available. The modem continues searching for a network.
• Packet data not available
The current network does not support packet data.
• Packet data not allowed
The modem is not allowed to use packet data on the current network (e.g. no packet data
roaming agreement between network; a roaming agreement for voice may still be in place).
It is also possible that you do not have a subscription for packet data at all.
The remaining error states are permanent:
iKôn Rugged PDA (Windows Mobile 6) User Manual 205
Page 90

Chapter 5: Settings
Tool s M e n u
•SIM is missing
The SIM card is missing. After the SIM has been inserted a reset may be required.
• SIM failure
The SIM card is permanently disabled (e.g. because the wrong PUK has been entered too
many times). A new SIM is needed.
• Modem failure
The modem did not respond to commands as expected. If a reset does not clear this condition, the modem may need to be replaced.
• NDIS error
An internal software error has occurred. If a reset does not clear this condition, Psion Teklogix technical support may need to investigate further.
5.36.5 Tools Menu
The Tools menu in the main Wireless WAN dialog box offers some additional, advanced
setup features.
5.36.5.1 Data Connection Configuration
Enable Automatic Connect
If the Enable automatic connect checkbox is checked (unchecked by default), the Wireless
WAN user interface will attempt to establish a packet data connection whenever packet data
is available (e.g. after resume from suspend without further user interaction).
To activate the automatic connection mode:
206 iKôn Rugged PDA (Windows Mobile 6) User Manual
Page 91

Chapter 5: Settings
Tools Menu
• Tap on the OK button.
While automatic connection mode is enabled, the Connect Data button in the main Wireless
LAN dialog box changes to Disable Auto.
To close the currently active connection (if any) and disable the automatic connection mode:
• Tap on Disable Auto.
Important: Automatic connection mode should not be used if applications other than
the Wireless WAN user interface (e.g. Connection Manager) are expected to
open and close connections.
If the automatic connection mode is enabled and another application closes
the packet data connection, the WWAN user interface will immediately try
to re-establish the connection.
Use Virtual Serial Port
If Use virtual serial port is enabled, packet data connections are established through the
virtual serial port of the WWAN driver rather than through the WWAN driver directly. This
checkbox should only be checked if certain third-party VPN (Virtual Private Network)
clients are used that do not work correctly otherwise. The default setting is disabled
(unchecked).
Note: The connection setup takes longer through the virtual serial port.
Enable Automatic Configuration
In most cases, the data connection is configured automatically and no user interaction is required. This is true even if multiple SIM cards from different operators are used with the
same device. The connection parameters are adjusted automatically when a new SIM card is
detected (this may require a reset). The connection parameters are retrieved from a database.
Manual configuration should be necessary only if:
• One or more parameters in the database are incorrect or a new operator is not yet in the
database. (The database should be corrected for subsequent software releases.)
• An operator has assigned individual packet data user names and passwords.
• A very large site has their own APN. Such connections always have to be configured
manually.
• A customer has subscribed for a static IP address. By definition this must be configured
manually.
iKôn Rugged PDA (Windows Mobile 6) User Manual 207
Page 92

Chapter 5: Settings
Tool s M e n u
Important: For CDMA/1xRTT, automatic configuration is not available – connec-
In the following section, all the parameters that need to be configured for a connection (such
as APN, user name, password, DNS server addresses etc.) are referred to as a profile. Every
profile is identified by an arbitrary, unique name. The profile named Default is special in
that it is always present and can neither be edited nor deleted. (A sample dialog box is presented on the page following.) The Default profile uses parameters from a built-in database.
The home network (the network that issued the SIM) is used for the database look-up. While
there can be many configured profiles, only one profile can be active at any time.
If connection profiles are configured manually then the Enable automatic configuration:
checkbox should normally be unchecked.
In one particular use case, manually configured profiles may be combined with automatic
configuration. If multiple SIM cards are used with the same device, each SIM card being
from a different operator and some or all of them requiring a manually set up profile, automatic configuration may be used to automatically pick the correct manually configured
profile for each SIM card. For this to work each profile has to be configured while the corresponding SIM card is inserted in the device and initialized (i.e. the status is at least SIM is
ready).
tions must be configured manually. Under APN, the packet service access
number must be entered (typically “#777”).
The Select profile drop-down list in the data configuration profile selects which profile a
subsequent action applies to. A profile named Default is always present and contains the
current parameters from the database. The following actions are available:
• Show – The parameters for the selected profile are displayed when you tap on this
button. For the Default profile, the publicly known password is shown – otherwise, the
password is hidden.
• Edit – The parameters of the selected profile can be edited when you choose the Edit
button. Keep in mind that you cannot edit the Default profile.
• Delete – The selected profile is deleted. You cannot delete the Default profile.
• Activate – When this button is chosen, the selected profile is made the active profile.
Activation is possible only if the Enable automatic configuration: checkbox is
unchecked.
208 iKôn Rugged PDA (Windows Mobile 6) User Manual
Page 93

Chapter 5: Settings
Tools Menu
• New – Tapping on the New button allows you to create a new profile.
The name of the newly created profile must be different from all existing profiles. Also, the
name cannot be Default. When the New Data Profile dialog box is opened, a proposal for a
unique name is filled in the corresponding entry field. If a manually configured profile has a
secret password and unauthorized access to the device is a concern even after the SIM PIN
has been entered, the password should not be entered in the New Data Profile dialog box
and the Prompt user for password checkbox should be checked instead. In this case, you will
be prompted for the password each time a connection is initiated (the Connect Data button
in the main Wireless WAN dialog box is selected).
• Reset – The Reset button in the New Profile and Edit Profile dialog boxes resets all
entry fields to the values they had when the dialog box was opened.
iKôn Rugged PDA (Windows Mobile 6) User Manual 209
Page 94

Chapter 5: Settings
Tool s M e n u
• Advanced IP – The Advanced IP button in the Show Profile and Edit Profile dialog
boxes opens another dialog box that allows you to configure a static IP address as well
as the IP addresses for the primary and secondary DNS and WINS resolvers.
5.36.5.2 Security Configuration
The Security Configuration dialog box is called up through the Tools menu.
Note: Security configuration is not available with CDMA modems.
The Security Configuration dialog box allows you to enable, disable and change the PIN.
You will need the current PIN to make any of these changes. The PIN must be enabled in
order to be changed. (If the PIN is disabled, the New PIN entry field is greyed out.)
Note: Keep in mind that some network operators do not allow the SIM PIN to be dis-
abled. A new PIN must consist of 4 to 8 numeric digits.
The Require PIN on resume checkbox is independent of the aforementioned settings. By de-
fault, this checkbox is unchecked. While the checkbox remains unchecked, any PIN entered
on startup or through the Security Configuration dialog box and submitted successfully to
the modem is stored in memory for as long as the device is not rebooted. This stored PIN is
then used without further user interaction whenever the modem requires a PIN (such as
resume after suspend or modem removal). The stored PIN is also automatically entered in
the Current PIN text box whenever the Security Configuration dialog box is called up.
210 iKôn Rugged PDA (Windows Mobile 6) User Manual
Page 95

If unauthorized access to the device is a concern, the Require PIN on resume checkbox
should be checked. In this case, you will be prompted whenever a PIN is required and the
PIN is not stored.
5.36.5.3 Network Configuration
Note: Network configuration is not available with CDMA modems.
In the main Wireless WAN screen:
• Tap on the Too ls menu, and choose Network.
By default the GSM radio modem automatically chooses from the available and allowed
networks (allowed networks are the home network and all other networks with which the
home network has a roaming agreement). You may find there are some situations in which
you want to override this default behaviour. For example, you may want to disable roaming
if you find yourself in a border area where the home network is not available but a foreign
roaming partner is available. Abroad, you may find that an available network does not have
packet data roaming agreements. In this case, you’ll need to manually select the network
which you know to support packet data roaming.
Automatic network selection is enabled or disabled by checking or unchecking Enable auto-
matic network select in the Network dialog box. When automatic network selection is
disabled, you must select a network manually.
Available networks can also be viewed without changing any settings. Scanning for available networks is a lengthy operation – a progress bar is shown while the scan is active. For
every network that is found, the network name, country, status and numeric network identifier (MCC/MNC, Mobile Country Code followed by the Mobile Network Code) is
displayed.
Chapter 5: Settings
Tools Menu
Note: Your home network operator will need to let you know which other networks have
roaming agreements. Even when a network is listed with an ‘Available’ status, it
does not necessarily follow that it can be used or that the roaming agreement covers packet data.
A status of ‘Forbidden’ indicates that the network cannot be used. If you choose a
network that is not covered by a roaming agreement, the status in the main WWAN
dialog box changes to ‘Emergency calls only’, ‘No network found’, ‘GPRS not
available’ or ‘GPRS not allowed’.
iKôn Rugged PDA (Windows Mobile 6) User Manual 211
Page 96

Chapter 5: Settings
Tool s M e n u
5.36.5.4 Driver Mode Configuration
By default, the Wireless WAN driver is enabled (the Enable driver checkbox is checked).
The driver must be disabled in order to access the modem directly (e.g. dial-up data, fax, or
in order to manually submit AT commands to the modem for development, testing, approvals, etc.). In most cases, the Virtual WWAN serial port can be used and it is not necessary to
disable the WWAN driver. If the Enable driver checkbox is not checked, the driver is shut
down as soon as the OK button in the Driver Mode dialog box tapped.
If, on the other hand, the Wireless WAN driver is not running and the Enable driver check-
box is checked, the Wireless WAN driver is started as soon the Driver Mode dialog box is
closed using the OK button.
Note: When the driver is not running, no network status or signal strength can be
displayed.
Since all currently supported modems are automatically detected, the Enable automatic port
detection checkbox should always be checked. If this checkbox is not checked, a serial port
can be selected manually. This experimental feature allows the driver to be used with an internal GSM modem that was not recognized by the automatic detection or an external GSM
modem connected to a serial port of the computer through USB or through Bluetooth. An
external modem connected to a serial port must support 115.2kbit/s, 8bit, no parity and hardware flow control.
5.36.5.5 Modem Information
The fields in this dialog box cannot be edited – they only display information about the iKôn
PDA modem. If the network operator has not programmed a user’s phone number into the
212 iKôn Rugged PDA (Windows Mobile 6) User Manual
Page 97

Chapter 5: Settings
Tools Menu
SIM, the Phone field remains empty. The modem serial number is called IMEI for GSM
modems and ESN for CDMA modems.
The SIM ID is sometimes referred to as the ICC ID (International Charge Card Identifier).
Not all modems support the retrieval of the SIM ID. In particular, the Novatel Merlin UMTS
modems and the Option Globetrotter modems do not support SIM ID retrieval.
If the main menu shows an error status, at least partial modem information may
be available.
Modem Power Modes
The power mode of the modem is controlled through the Power icon rather than through the
Wireless WAN user interface.
To adjust PC Card and CF card modems settings:
• Tap on Start>Settings, and then tap on the System tab followed by the Power icon.
• Tap on the Built-in Devices tab.
If the checkbox for a modem is unchecked, power is not applied to the modem and a driver
is not loaded (neither the serial port driver nor the Wireless WAN driver). If the checkbox is
checked, power is applied to the modem and the drivers are loaded when the PDA is turned
on. Power is removed from the modem when the iKôn PDA enters suspend mode.
To enable a modem module that is built into the unit:
• Tap on Start>Settings, and then tap on the System tab followed by the Power icon.
For a modem module that is built into the iKôn PDA, the settings can be found under the
Built-in Devices tab. In this case, one of the following power modes can be selected:
• Disabled – No power is applied to the modem and no driver is loaded.
• Enabled – Off in Suspend
Power is applied to the modem and the drivers are loaded when the PDA is turned on. Power
is removed from the modem when the terminal enters suspend mode.
• Enabled – Always On
When the iKôn PDA enters suspend mode, the modem remains powered indefinitely.
• Enabled – Keep on for 5 min
• Enabled – Keep on for 15 min
• Enabled – Keep on for 30 min
• Enabled – Keep on for 1 hour
• Enabled – Keep on for 2 hours
iKôn Rugged PDA (Windows Mobile 6) User Manual 213
Page 98

Chapter 5: Settings
SMS Menu
When the PDA enters suspend mode, the modem remains powered. If the iKôn PDA is not
turned on again during the configured time, the unit briefly wakes up from suspend mode,
shuts down the modem, and enters suspend mode again. The default mode is Enabled Keep on for 1 hour.
At the cost of a slightly increased power consumption in suspend mode, the modes where
the modem remains powered during suspend mode have several advantages. When the PDA
wakes from suspend mode, the modem is ready immediately; modem or network initialization is not required. A packet data session can thus remain active during suspend mode. In
these modes, the modem is also able to wake up the PDA if the network status changes, or
there is a new incoming SMS.
5.36.6 SMS Menu
SMS functions are accessed through the SMS menu. For modems that support a SIM card,
the SIM initialization typically takes longer than the network initialization, resulting in a noticeable delay before the SMS functions become available.
214 iKôn Rugged PDA (Windows Mobile 6) User Manual
Page 99

5.36.6.1 New SMS
Tapping on New opens a dialog box for sending a new SMS message. The recipient's phone
number (to be entered in the To field) can consist of the digits 0 through 9, as well as the *
and # characters, optionally preceded by one + character, indicating an international number
(i.e. the country code follows immediately after the + character).
By checking the Store message in Outbox field, a new message can be stored in the Outbox
before being sent. If no storage space is available or the modem does not support the storage
of outgoing messages, this checkbox is disabled.
Chapter 5: Settings
SMS Menu
5.36.6.2 Inbox
Tapping on Inbox opens the list of received messages. Reading 50 messages, for example,
from the SIM can take about 30 seconds. By default the list of messages is sorted with the
iKôn Rugged PDA (Windows Mobile 6) User Manual 215
Page 100

Chapter 5: Settings
SMS Menu
most recently received message first. The list can be sorted by any other column by clicking
on the corresponding column heading.
Clicking the same column heading twice reverses the sort order. Pressing any letter or digit
moves the highlight to the next message whose address begins with that letter or number.
Note: The date and time formats can be changed through the Regional Settings in the Con-
trol Panel. For a new date or time format to take effect, the Inbox has to be closed
and re-opened.
The Open button opens the selected message in a new window such that the entire message
can be read including the original formatting (line breaks are replaced by spaces in the Inbox
message list). Pressing the Reply button opens the new message dialog as described above,
except the destination phone number is already filled in. Pressing the Delete button erases
the message.
5.36.6.3 Outbox
Tapping on Outbox opens a list of sent messages. Otherwise the Outbox behaves exactly as
the Inbox described above. The date and time when a message was sent is not available for
GSM modems.
216 iKôn Rugged PDA (Windows Mobile 6) User Manual
 Loading...