

Page 1
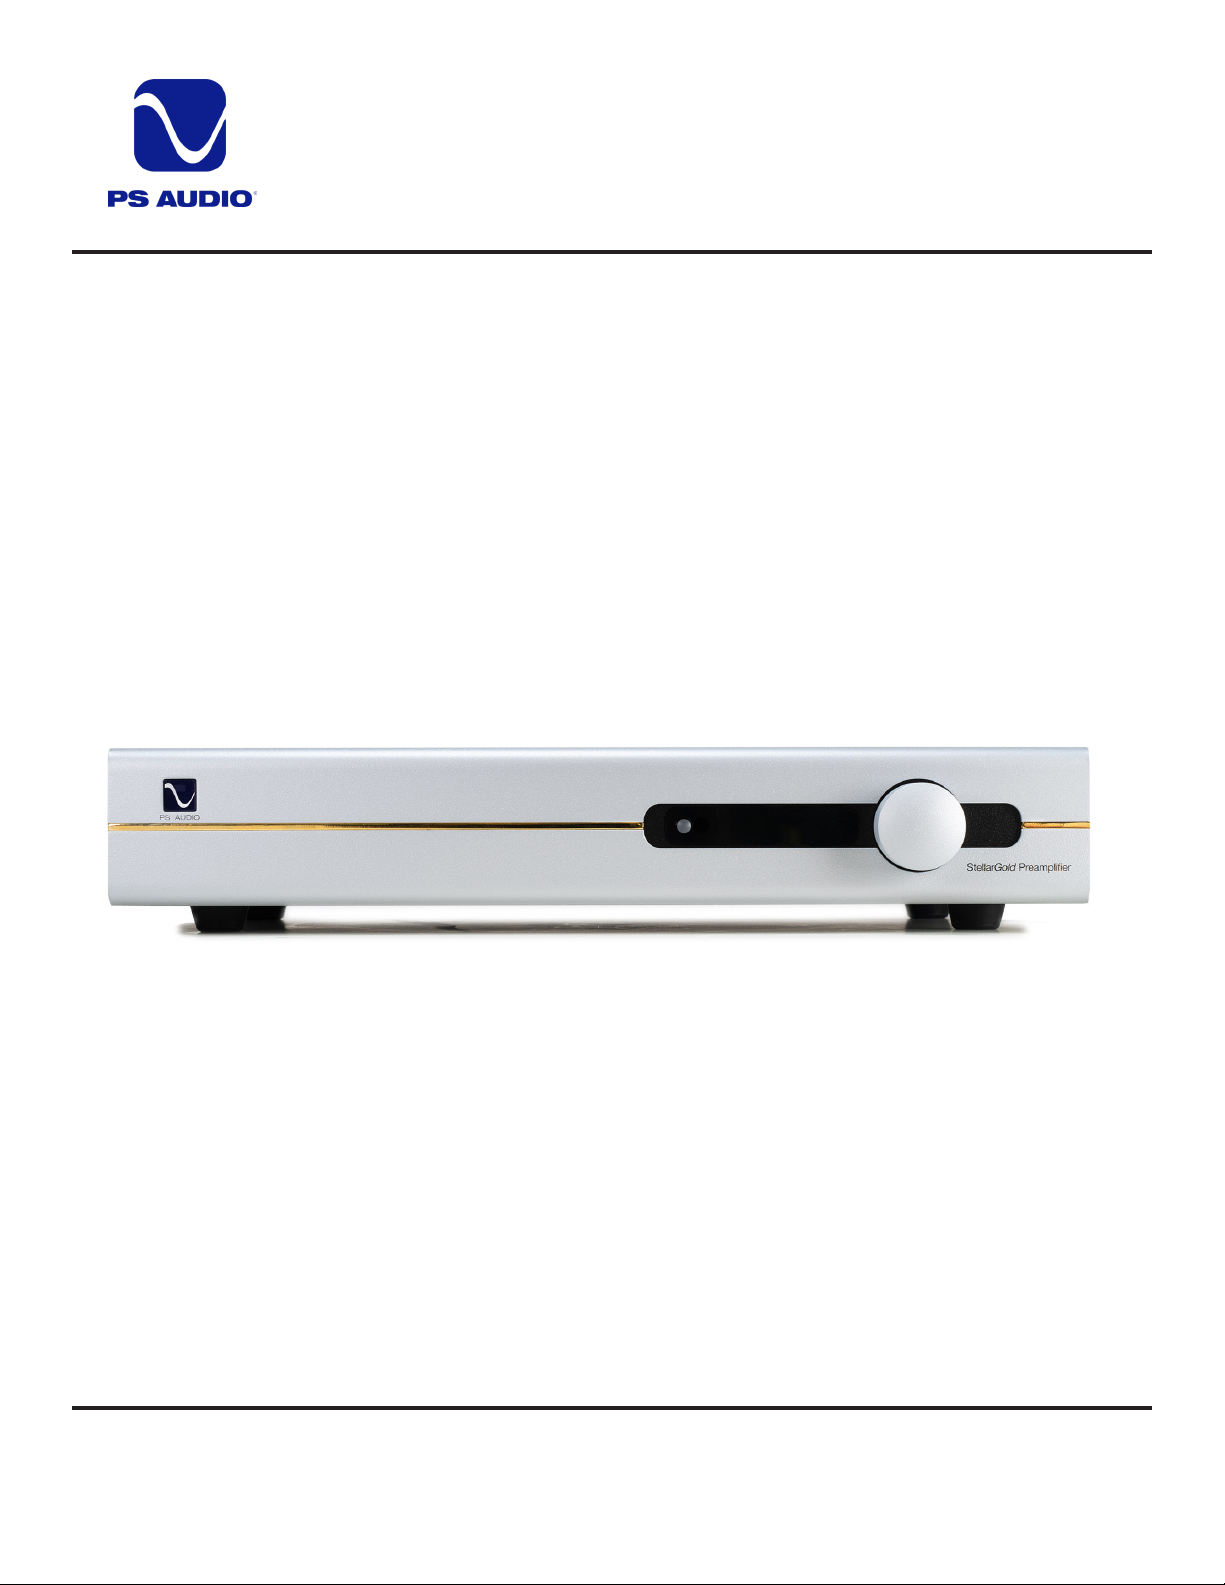
Owner’s Reference
Instructions for Use
Owner’s Reference Stellar
Gold
Preamplier
Stellar
PS Audio® Inc. 800-PSAUDIO 4865 Sterling Drive Boulder, Colorado 80301
©2023 PS Audio Inc. All rights reserved.
TM
Gold
Preamplier
Page 2

Owner’s Reference
Safety Instructions
Owner’s Reference Stellar
Read these instructions
Gold
Preamplier
Heed all warnings
Follow all instructions
WARNING. TO REDUCE THE RISK OF FIRE OR ELECTRICAL SHOCK, DO NOT EXPOSE THIS APPARATUS TO RAIN OR
MOISTURE.
Clean only with a dry cloth. For the Piano Finish Top refer to the instructions on page 8 of the Quick Start Guide.
Do not place ammable material on top of or beneath the component.
All PS Audio components require adequate ventilation at all times during operation. Rack mounting is acceptable
where appropriate.
Do not remove or bypass the ground pin on the end of the AC cord. If the provided plug does not t into your
outlet, consult an electrician for replacement of the obsolete outlet.
Protect the power cord from being walked on or pinched particularly at plugs, convenience receptacles, and the
point where they exit from the apparatus. Unplug this apparatus during lightning storms or when unused for
long periods of time.
When making connections to this or any other component, make sure all components are o. Turn o all systems’
power before connecting the PS Audio component to any other component. Make sure all cable terminations are
of the highest quality.
THERE ARE NO USER-SERVICEABLE PARTS INSIDE ANY PS AUDIO PRODUCT. REFER ALL SERVICING TO QUALIFIED
SERVICE PERSONNEL
NOTE: This equipment has been tested and found to comply with the limits for a Class B digital device, pursuant
to part 15 of the FCC Rules. These limits are designed to provide reasonable protection against harmful
interference in a residential installation. This equipment generates, uses and can radiate radio frequency energy
and, if not installed and used in accordance with the instructions, may cause harmful interference to radio
communications. However, there is no guarantee that interference will not occur in a particular installation. If
this equipment does cause harmful interference to radio or television reception, which can be determined by
turning the equipment o and on, the user is encouraged to try to correct the interference by one or more of the
following measures:
—Reorient or relocate the receiving antenna.
—Increase the separation between the equipment and receiver.
—Connect the equipment into an outlet on a circuit dierent from that to which the receiver is connected.
—Consult the dealer or an experienced radio/TV technician for help.
Modications not expressly approved by the manufacturer could void the user's authority to operate the
equipment under FCC rules.
Please contact your authorized dealer, distributor, or PS Audio if you have any questions not addressed in this
reference manual.
PS Audio
Inc., its subsidiaries, and authorized agents.
Rev. A2
®
is a registered trademark of PS Audio International Inc., and is restricted for use by PS Audio International,
PS Audio® Inc. 800-PSAUDIO 4865 Sterling Drive Boulder, Colorado 80301
©2023 PS Audio Inc. All rights reserved.
Page 3
Introduction
Welcome
Owner’s Reference Stellar
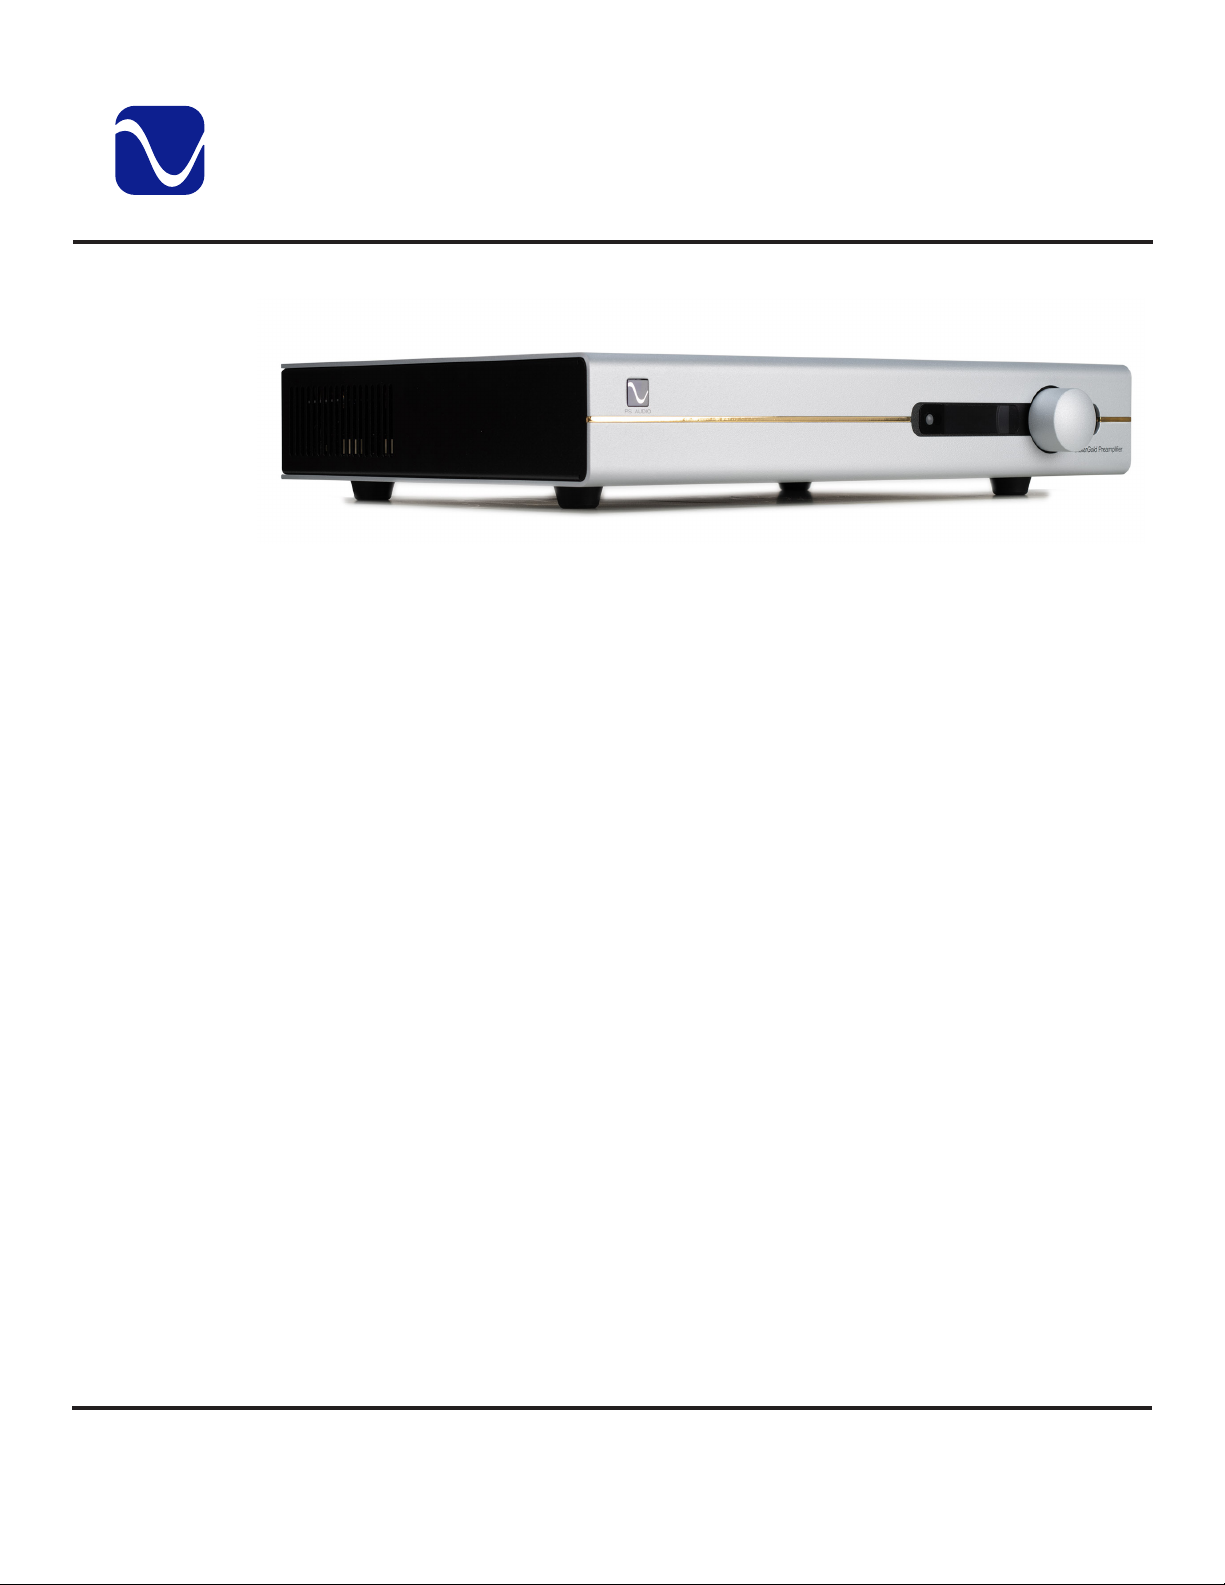
The PS Audio Stellar
The Stellar
enjoying extremely high slew rate, high bandwidth, low distortion signal handling capabilities that
honor the music.
Based on a combination of JFET and BJT devices along with hand-selected purist components,
the musical signal is delivered without the interference of capacitors in the signal path. Each
amplification stage is based on a minimal global feedback design that achieves its low distortion
status through careful balancing and high current design choices.
Gold
Gold
Preamplifier is an aordable state-of-the-art Preamp.
Preamplifier features two hand crafted discrete audio amplification stages, both
Gold
Preamplier
Its high current class A output stage is more than capable of driving long cable lengths without
compromise so that your power amplifier enjoy all the benefits Stellar
oer.
Nearly as important in this level of Preamp is its power supply. Here, Stellar
the performance enhancement aorded by multiple two-stage linear power regulators for both
the analog and digital sections. Feeding these ultra low noise 2-stage regulators is an oversized
toroidal power transformer with separate windings for analog and digital.
The PS Audio Stellar
who cares about the sonic qualities aorded their systems. We believe this new instrument will
further our company's quest to bring audio excellence to the world and will provide years of
musical ecstasy.
Gold
Preamp represents a major step up in performance for any music lover
Gold
Preamplifier has to
Gold
Preamp enjoys
PS Audio® Inc. 800-PSAUDIO 4865 Sterling Drive Boulder, Colorado 80301
©2023 PS Audio Inc. All rights reserved.
iiiiii
Page 4

Table Of Contents
Owner’s Reference Stellar
Quick Start Guide
Unpacking 1
Connections 2-3
Power Up 3
Product Registration 4
Main Display 5
Operating Guide
Front Panel Controls 6
Mode Switch 6
Restart 6
Volume 6
Input Selection 6
Main Menu: Balance 6-7
Main Menu: Coupling 7
Main Menu: Versions 7
Main Menu: Sub-Menus 8
Audio Sub-Menu: Input Trim 8
Audio Sub-Menu: DAC Input 8-9
Audio Sub-Menu: Phono Input 9
Audio Sub-Menu: RCA 2 Fixed Volume 9
Audio Sub-Menu: Max Volume 9
System Sub-Menu: Backlight 10
System Sub-Menu: Trigger Timeout 10
System Sub-Menu: IR Enable 10
System Sub-Menu: Firmware Update 10-11
System Sub-Menu: Factory Reset 11
Remote Control 12
Gold
Preamplier
Reference
Product Specifications 13-14
Menu Flow Chart 15-17
Warranty Information 18-19
Service Information 20
Special thanks to Hi-Fi Family member Brian Woodard for his contributions to this manual.
PS Audio® Inc. 800-PSAUDIO 4865 Sterling Drive Boulder, Colorado 80301
©2023 PS Audio Inc. All rights reserved.
iv
Page 5
Quick Start Guide
Unpacking
Owner’s Reference Stellar
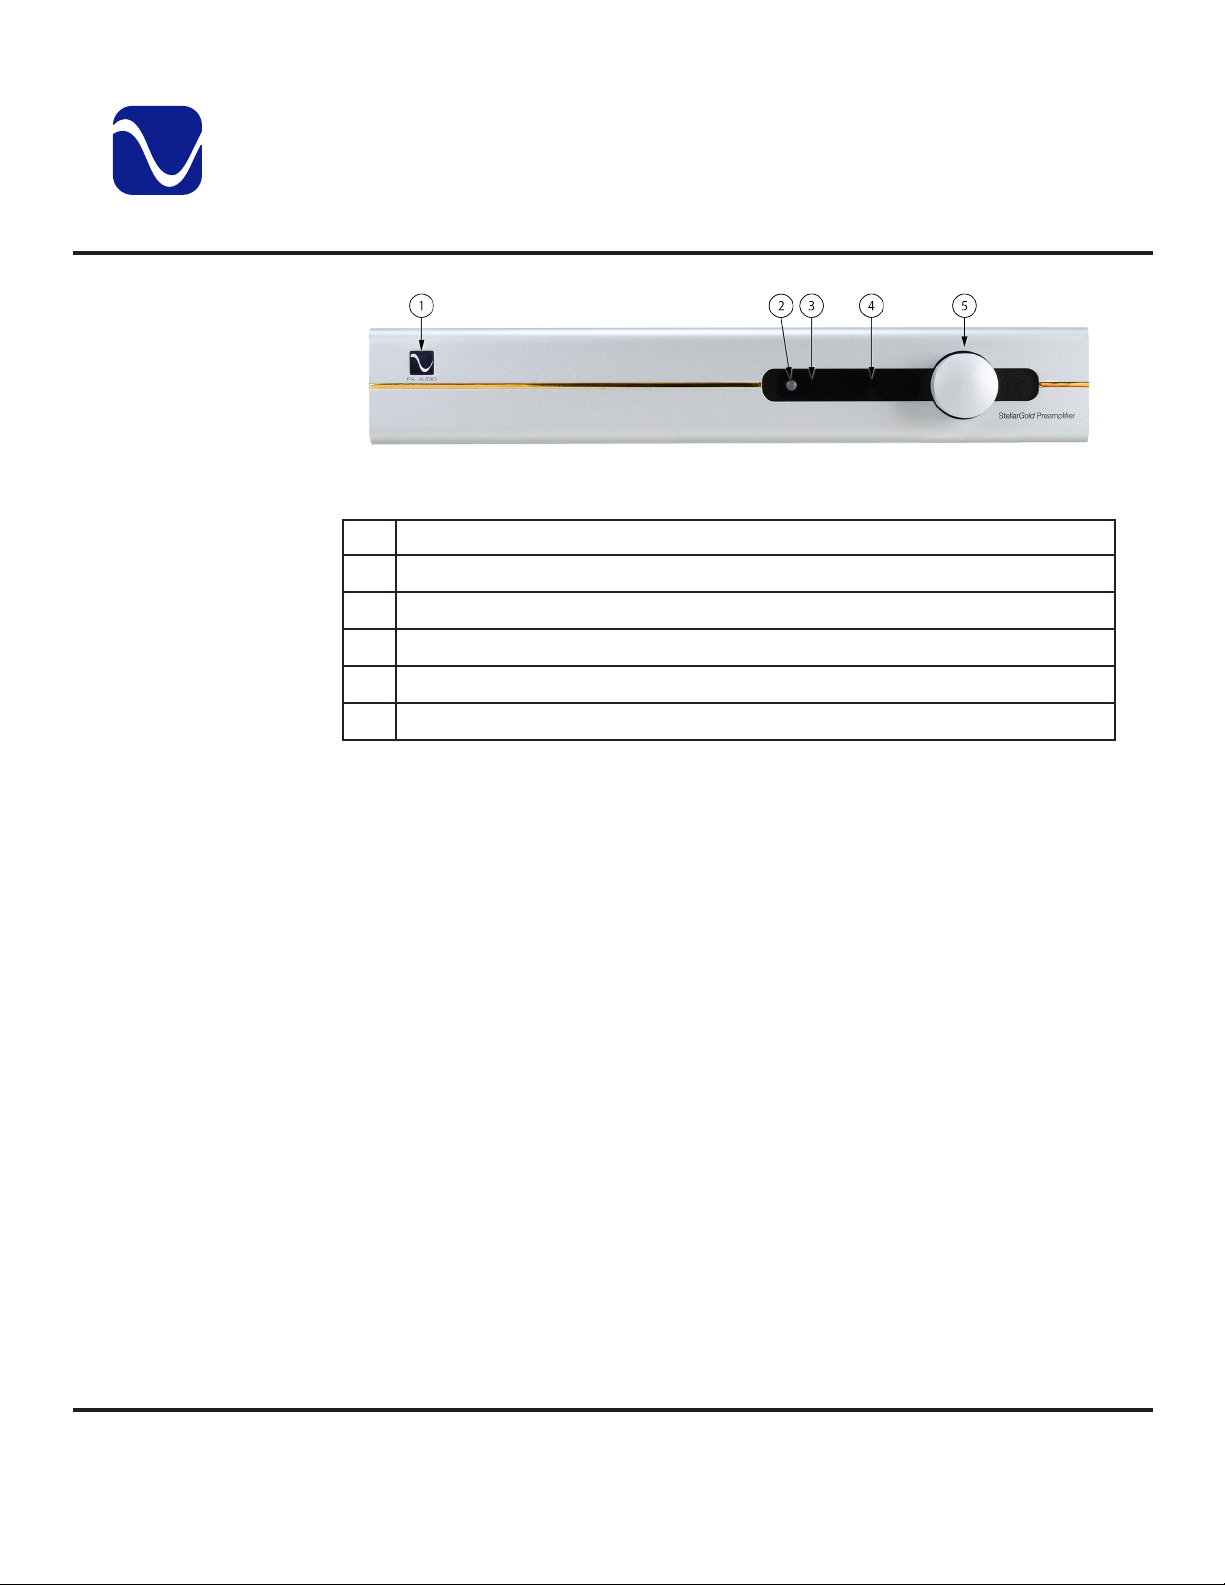
Figure 1: Front Panel Controls
Description
Ready/Operational mode switch
1
Menu button
2
Remote infrared receiver
3
Display
4
Volume control
5
The following items are included with the StellarGold Preamplifier:
Gold
Preamplier
• Power Cord
• Stellar Remote
• This Owner’s Reference
Carefully unpack the unit and place it in the chosen location. Care should be taken to keep it
away from power amplifiers or large, potentially hum-inducing products.
Referring to Figure 1 and the table, the remote infrared receiver (3) is located to the right of the
menu button. A direct line of sight with the receiver helps when using the remote.
PS Audio® Inc. 800-PSAUDIO 4865 Sterling Drive Boulder, Colorado 80301
©2023 PS Audio Inc. All rights reserved.
1
Page 6
Quick Start Guide
2
Connections
Owner’s Reference Stellar
2
1 3
14 22212016 191817
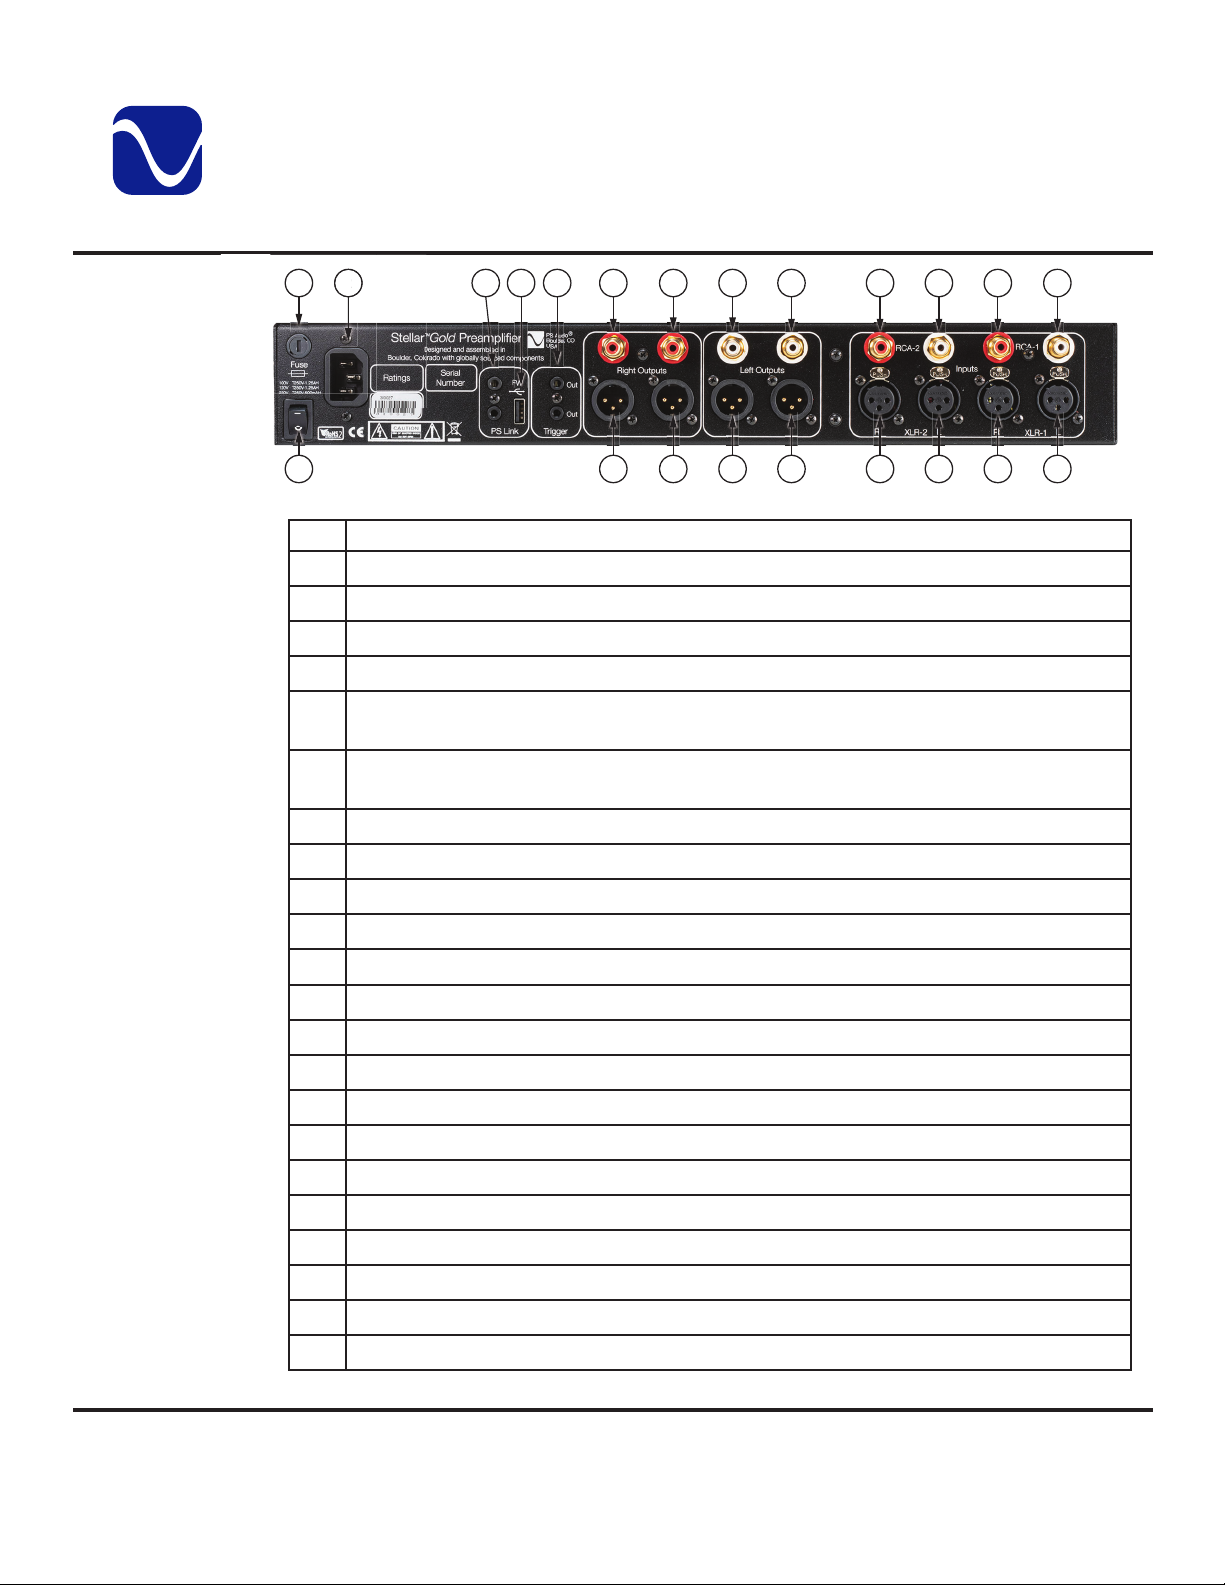
Item Description
1 Fuse holder (refer to panel legend for fuse type).
2 Line cord receptacle.
3 PS Link connectors (support future advanced features).
4 Firmware update thumb drive connector.
5 Trigger outputs (connect to power amplifier trigger input to control amplifier power
with front panel standby button).
6 Right channel single-ended analog output #2 (outputs #1 and #2 carry the same
signal).
15
Figure 2: Rear Panel Ports
8654
Gold
Preamplier
1311 121097
7 Right channel single-ended analog output #1.
8 Left channel single-ended analog output #2.
9 Left channel single-ended analog output #1.
10 Right channel single-ended analog input #2 (stereo inputs are individually selectable).
11 Left channel single-ended analog input #2.
12 Right channel single-ended analog input #1.
13 Left channel single-ended analog input #1.
14 Main power switch.
15 Right channel balanced analog output #2 (outputs #1 and #2 carry the same signal).
16 Right channel balanced analog output #1.
17 Left channel balanced analog output #2.
18 Left channel balanced analog output #1.
19 Right channel balanced analog input #2.
20 Right channel balanced analog input #1.
21 Left channel balanced analog input #2.
22 Left channel balanced analog input #1.
PS Audio® Inc. 800-PSAUDIO 4865 Sterling Drive Boulder, Colorado 80301
2
©2023 PS Audio Inc. All rights reserved.
Page 7

Quick Start Guide
Connections
(Continued)
Owner’s Reference Stellar
Referring to Figure 2, connect the desired components to your Stellar
follows:
Connect inputs to your analog sources using the appropriate connections. There are four stereo
analog inputs, which are accessible via the balanced XLR inputs (19–22) and two single-ended
RCA connectors (10–13). Connect your sources to the appropriate inputs.
Connect outputs to your power amplifier (or other line-level component) using the appropriate
connections. The Stellar
connector delivers a single-ended output for compatible power
amplifiers while the XLR connector delivers a balanced signal to compatible inputs. Both can be
connected at the same time, allowing one to drive a power amplifier and the other, a subwoofer
or headphone amplifier, for example.
Please be advised that the XLR output has twice the output voltage as the RCA output. Typically
this results in 6dB louder sound through units connected via the XLR input. Care should be
taken to match levels accordingly.
Connect the AC cable into the receptacle (2) in back and plug the unit into your Power Plant or
into the wall. While the supplied cord is of good quality, it is recommended that you replace it
with a high-end power cord for optimum performance. It is also recommended that you connect
your new StellarGold Preamplifier to one of PS Audio's award-winning AC power products such
as the P12, P15, or P20 Power Plants.
Gold
Preamplifier features two output types: RCA and XLR. The RCA
Gold
Gold
Preamplier
Preamplifier as
Power Up
Optionally, connect power amps to trigger ports (5). There are two trigger ports on the rear
panel. Each of the two trigger jacks outputs a +12V signal to connected equipment when the
Stellar
Gold
Preamplifier front panel standby button (1) is activated. The +12V signal will stop
when the Preamplifier is in standby mode. These trigger outputs are typically used to switch on/
o compatible power amplifiers when the Stellar
Once everything is connected, it si time to power up the Stellar
panel main power switch (14), to the ON position. We recommend the master power switch be
left in the On position and AC power continue to be supplied even when the preamplifier is not in
use. Use the front panel standby/operate mode switch (1) instead of the main power switch. This
keeps power on to critical circuitry thereby avoiding the stabilizing warmup period and additional
wear on components due to power cycling.
PS Audio® Inc. 800-PSAUDIO 4865 Sterling Drive Boulder, Colorado 80301
Gold
Preamplifier is active.
Gold
Preamplifier. Move the rear
3
©2023 PS Audio Inc. All rights reserved.
Page 8

Quick Start Guide
Product
Registration
Owner’s Reference Stellar
To register your new Stellar
Using any web browser, go to www.psaudio.com, click Support and select Product Registration
from the menu. When you have completed the registration process, go to the Registrations
page. The link to this page ( ) is located at the top right hand corner of the website after you
are logged in. Click the link then select Product Registrations in the left hand column.
If you do not have web access, you may register via mail or phone. Notification of software
upgrades to this product are available only to registered owners via the website and email.
Gold
Preamplifier, look on the back panel and note the serial number.
Gold
Preamplier
PS Audio® Inc. 800-PSAUDIO 4865 Sterling Drive Boulder, Colorado 80301
©2023 PS Audio Inc. All rights reserved.
4
Page 9
Quick Start Guide
Main Display
Owner’s Reference Stellar
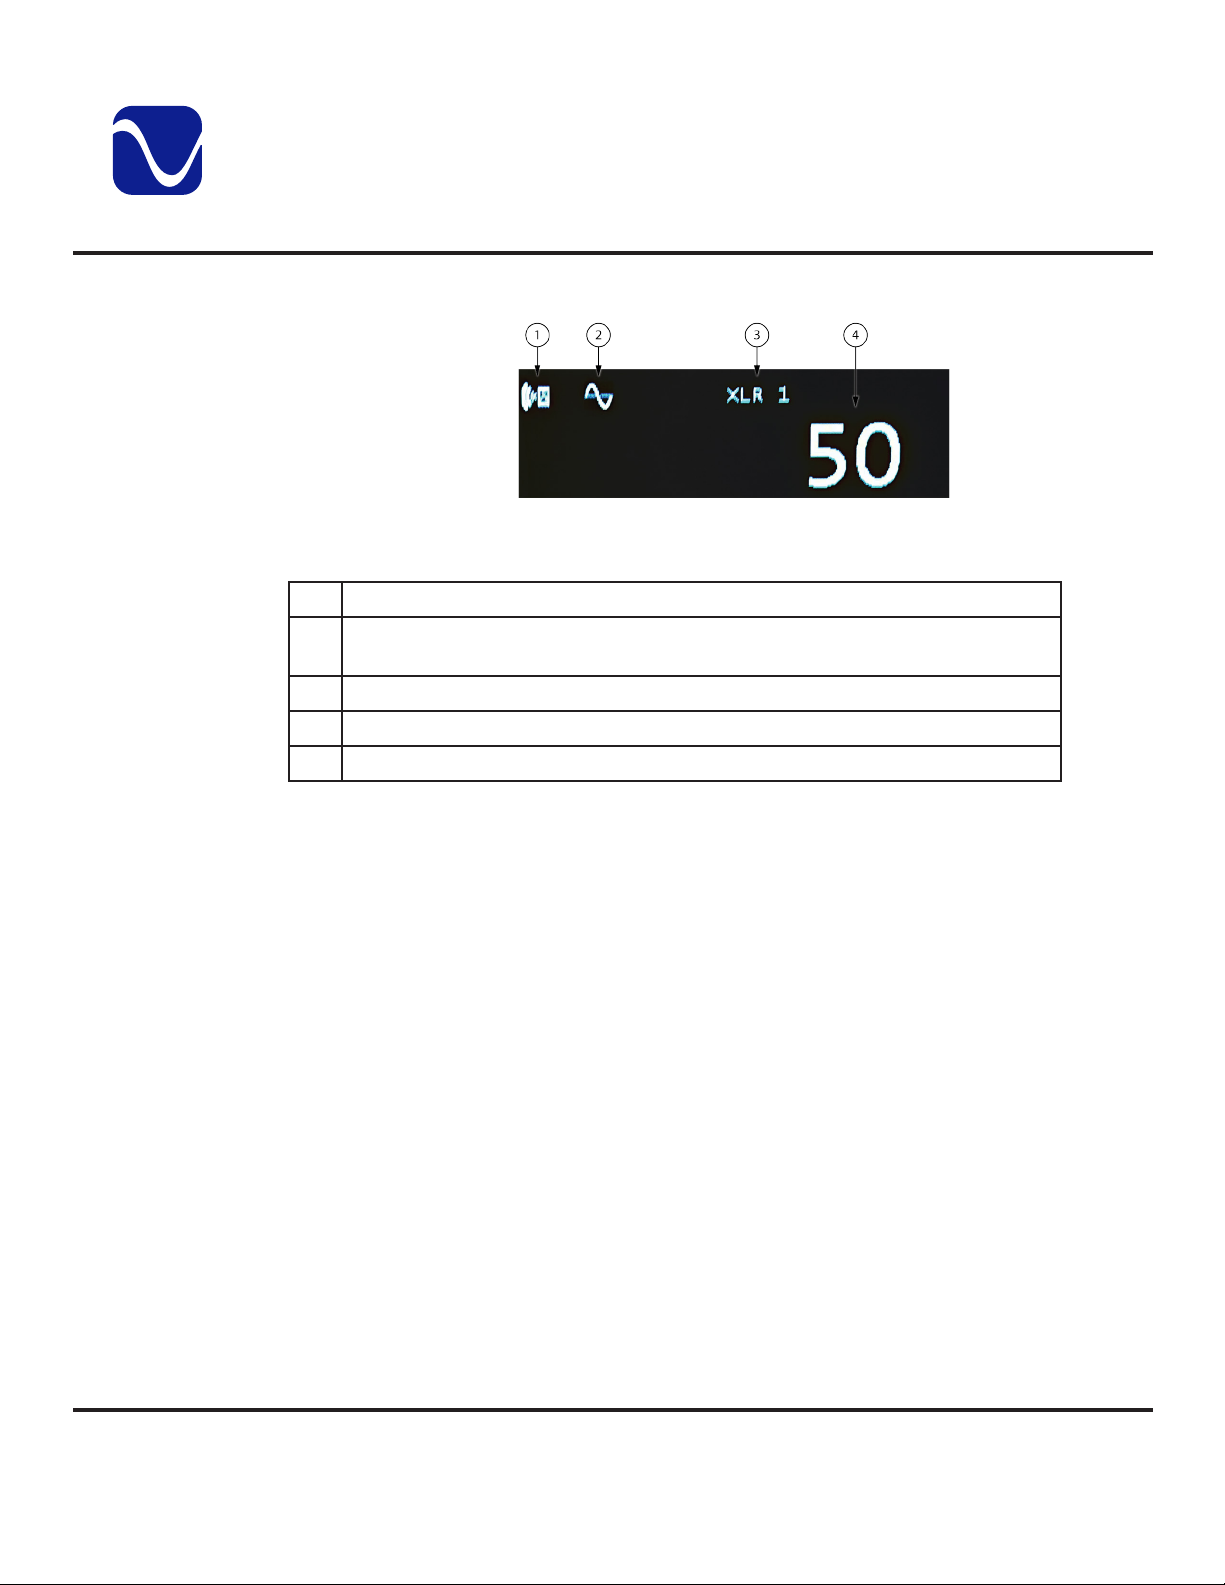
When powered on, “PS Audio” appears followed by the main display as shown in
Figure 3.
Gold
Figure 3: Main Display
Description
1
Balance indicator. When visible, waves indicate to which side of zero center
the balance is oset.
2
AC coupling indicator. When vsisble, AC coupling is selected.
3
Currently selected input
4
Current volume level
Preamplier
Menu System
As shown in Figure 3, the main display shows the currently selected input (3) and the volume
level (4). If the balance setting is oset to either side of zero center, the balance indicator (1)
appears with a wave graphic indicating which side of center the balance is oset. Likewise, if AC
coupling is currently selected, the AC coupling indicator (2) appears.
The input selection can be changed by pressing the menu button. Repeated presses scroll
through the four options:
1. XLR 1
2. XLR 2
3. RCA 1
4. RCA 2
The selected input is active the instant the indicator changes. Pressing and holding the menu
button or adjusting the volume restores the main display. If no further action occurs after 15
seconds, the main display returns.
To enter the menu system, press and hold the menu button until the display changes. Repeated
pressing scrolls through the menu items while turning the volume knob adjusts the setting. Most
changes take eect immediately.
For detailed operating instructions, see the Operating Guide (pages 6–15).
PS Audio® Inc. 800-PSAUDIO 4865 Sterling Drive Boulder, Colorado 80301
©2023 PS Audio Inc. All rights reserved.
5
Page 10
Operating Guide
Front Panel
Controls
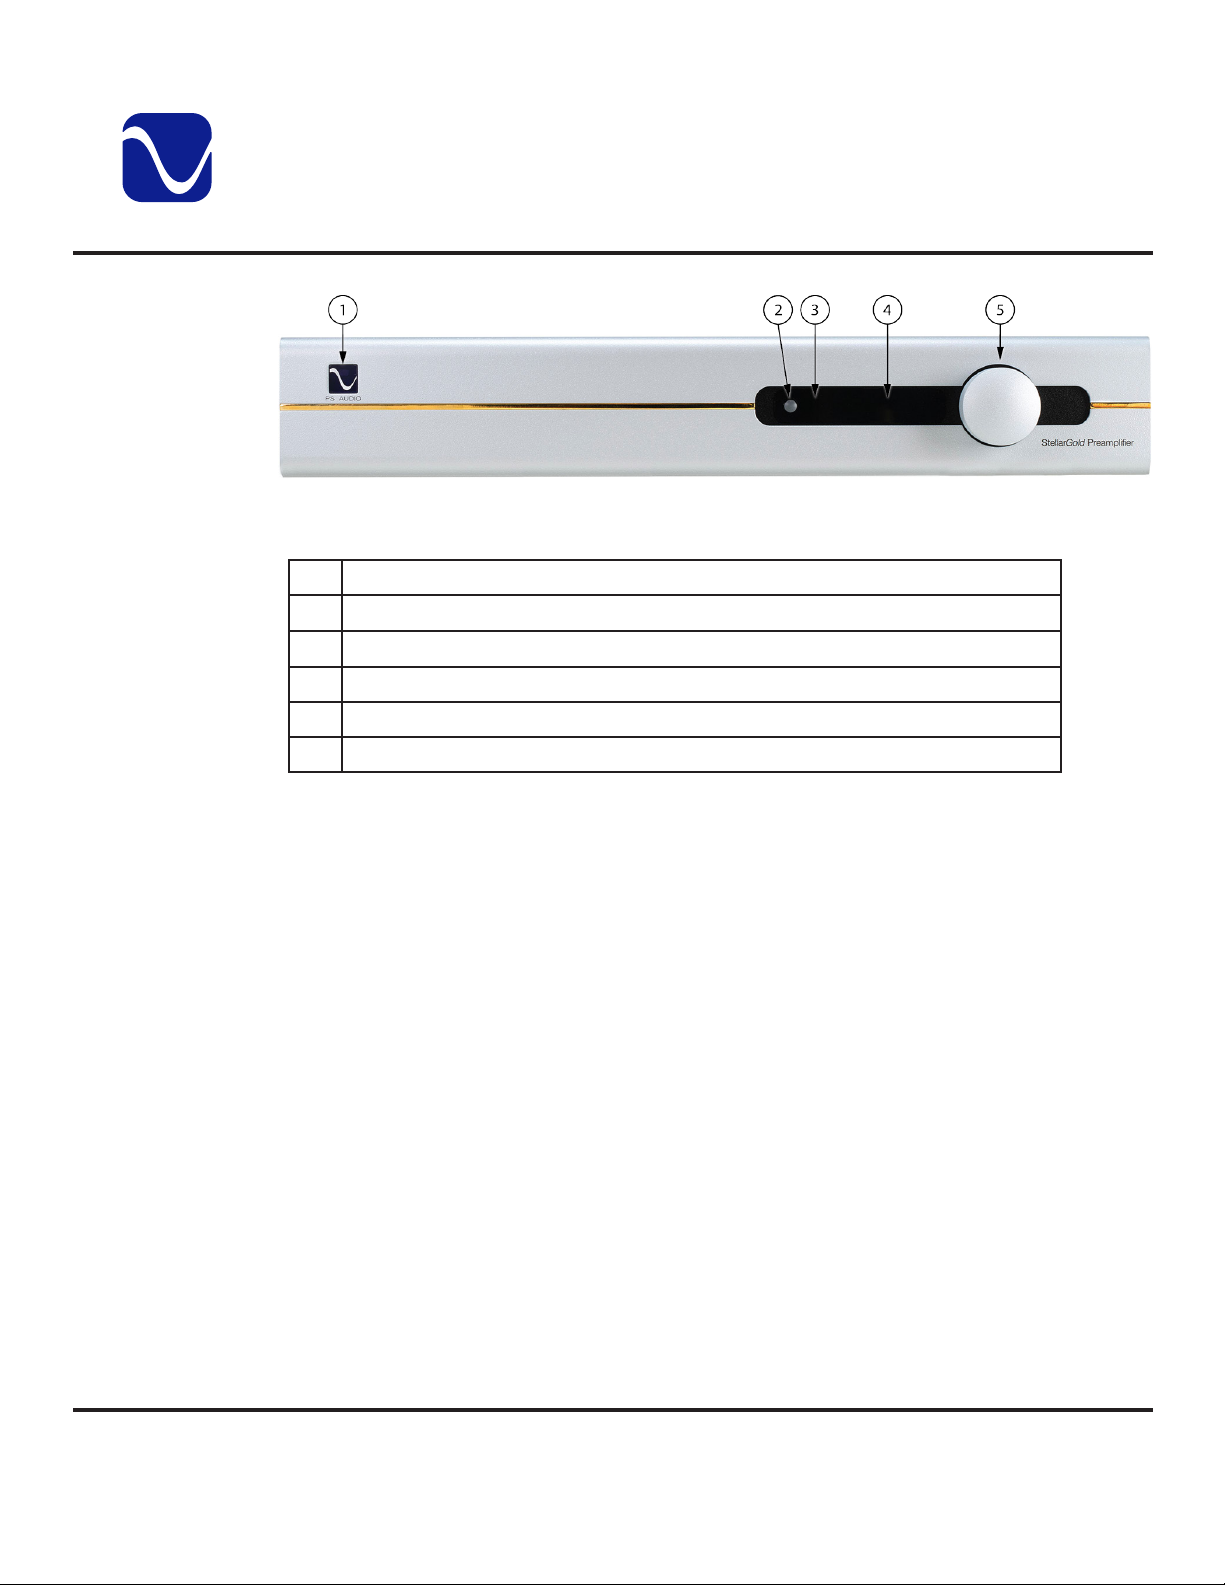
Figure 4: Front Panel Controls
1 Ready/Operational mode button
2 Menu button
3 Remote infrared receiver
4 Display
5 Volume control
Description
Owner’s Reference Stellar
Gold
Preamplier
Mode Button
Restart
Volume
Input Selection
The Ready/Operational mode button (1) controls whether the StellarGold Preamplifier is in
Operational mode (illuminated) or Ready (dark) mode. The Ready mode is designed to keep
power on to critical internal circuitry, including power supply capacitors, thermally sensitive
semiconductors and integrated circuits.
Press the button to select ready or operational mode. In Ready mode, the display and outputs
are turned o, but all critical internal circuitry remains active.
If you wish to conserve energy consumed by Stellar
panel power switch. Using this rear panel switch will remove power from critical components. In
order to gain maximum performance levels, you will need to turn the power on at least 1 hour before
use.
Should the preamp need to be rebooted, use the rear panel power switch to power cycle the unit. It's
best to wait 30 seconds before powering back on.
The volume level is shown on the display panel (4). Turn the volume control knob (5) right or left
to adjust the volume level. The displayed level ranges from 0 to 100.
To select an input, execute a quick press of the menu button (2) to the left of the display.
Continue pressing until you land on the input you want (RCA 1 or 2, XLR 1 or 2). Alternatively,
you can use the remote.
Gold
Preamp, it will be necessary to use the rear
Menus
The Stellar
PS Audio® Inc. 800-PSAUDIO 4865 Sterling Drive Boulder, Colorado 80301
Gold
Preamp features a menu display system that is accessible using the menu
©2023 PS Audio Inc. All rights reserved.
6
Page 11
Operating Guide
Main Menu
Balance
Owner’s Reference Stellar
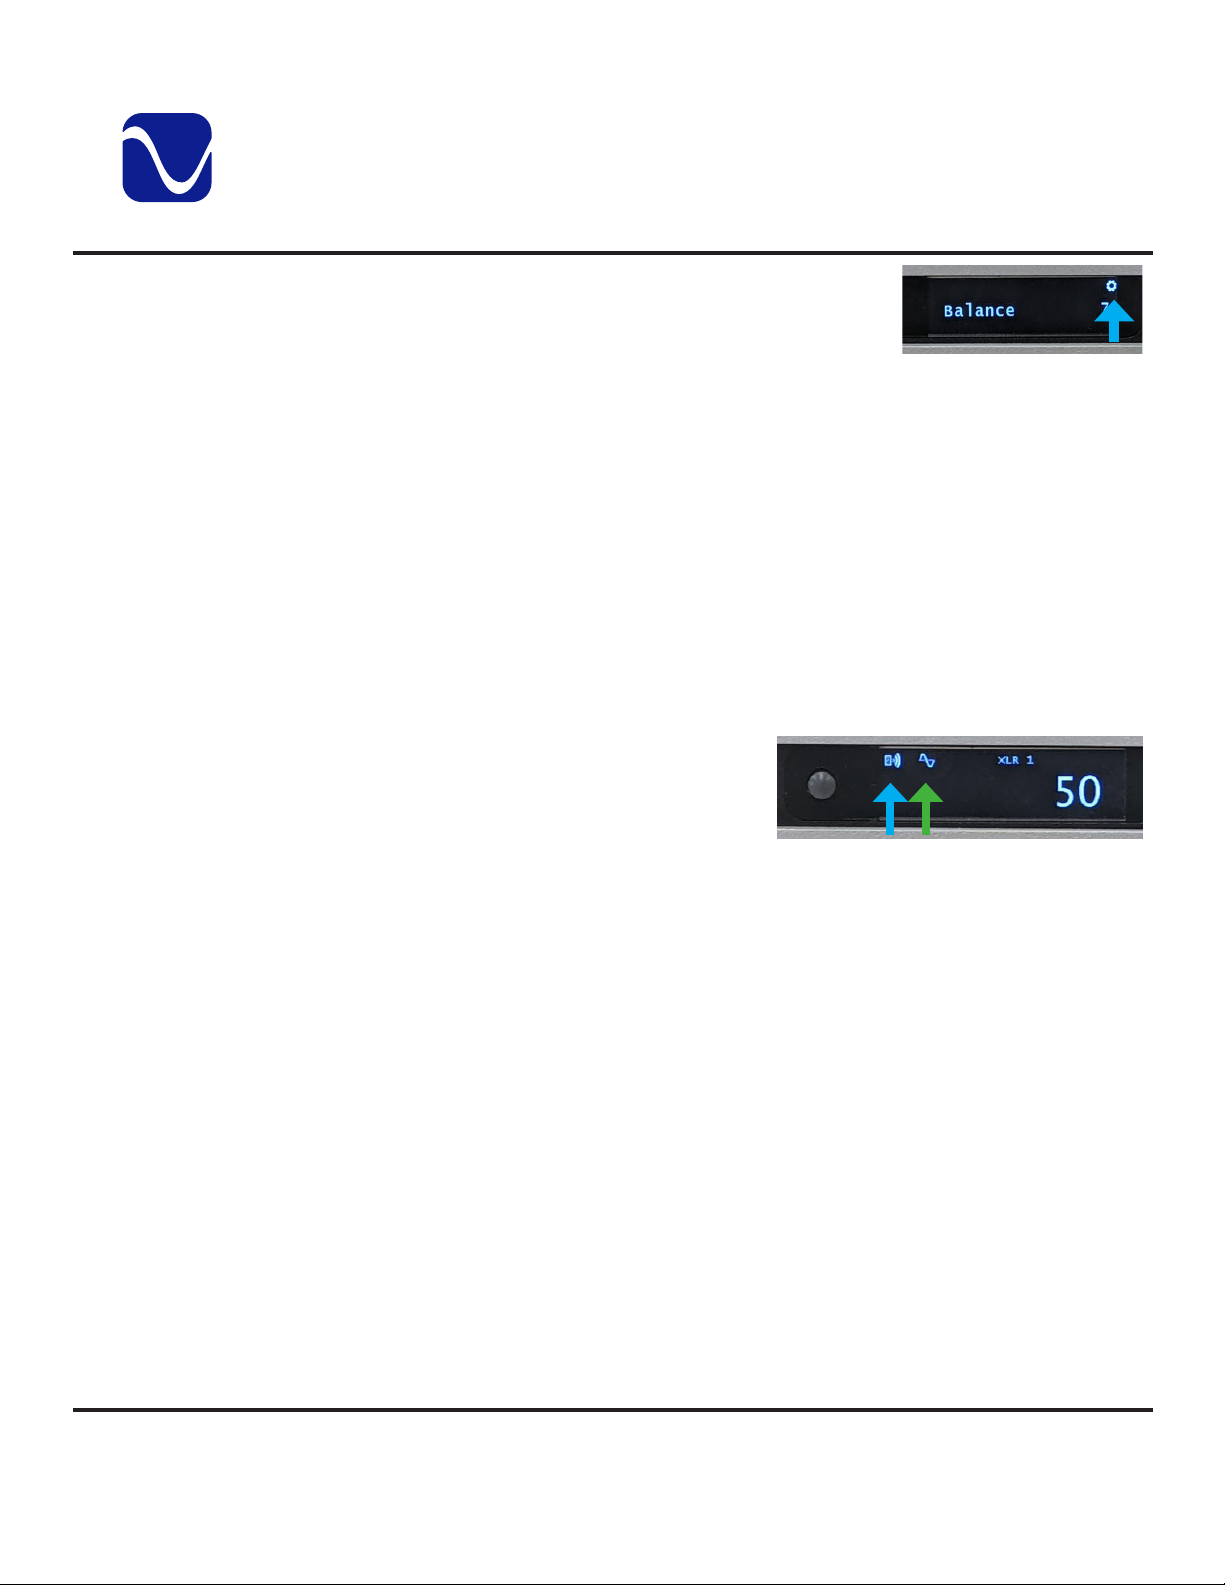
button (2). To access the menu, execute a long press of the menu
button. A gear icon (see arrow) will appear in the upper right corner
showing that you are in the Settings menu.
Once in the menus, a long press of the menu button (holding for more than two seconds) will
also exit the menus and return the unit to the Home screen. The menu screen will also time out
after 15 seconds of inactivity. Note that changes to settings are typically saved in real time as the
changes are made.
To scroll through menu items, press the menu button once in the menus. To change an item's
values, use the volume knob. The main menu has the below features.
• Balance
• Coupling
• Versions (informational only)
• Audio (sub-menu)
• System (sub-menu)
The Balance feature allows you to adjust the center location of the stereo image. Turn the knob
to the left to reduce the gain of the right channel, thus making the image come more from the left
channel. Turn the knob right to reduce the gain of the
left channel, thus making the image come more from
the right channel. The balance steps are each 1/4dB
and the range is 48 steps each way for a maximum
shift of 12dB.
Gold
Preamplier
Coupling
Versions
Sub-Menus
If the balance setting is oset to either side of zero center, the balance indicator (blue arrow)
appears with a wave graphic indicating which side of center the balance is oset
Use the volume knob to select AC coupled or DC coupled. A sine wave icon will appear on the
home screen when AC is selected (see green arrow).
When set to AC, a capacitor in the signal path will block any DC voltage that might be coming
from the source equipment. This mode is generally more compatible with various equipment, but
the capacitor will add some coloring to the sound. When the coupling mode is set to DC, this
capacitor is bypassed, so any DC that is coming from the source equipment will get passed (and
amplified) by the preamp. If you are experiencing any ticks or pops when changing inputs (or
other times) try the AC coupled mode. Otherwise, we recommend the DC coupled mode for best
sound quality.
This menu display shows the versions of the Stellar
need to contact our customer service team for help with your unit, please have this information
ready.
There are 2 sub-menus that can be accessed from the main menu. They are:
• Audio
• System
PS Audio® Inc. 800-PSAUDIO 4865 Sterling Drive Boulder, Colorado 80301
Gold
Preamp's operating firmware. If you
©2023 PS Audio Inc. All rights reserved.
7
Page 12

Operating Guide
Audio Sub-Menu
Owner’s Reference Stellar
Click the menu button twice to enter a sub-menu. Do a quick press of the menu button to click
through sub-menu items. If you need to go back one level to the previous menu, do two quick
presses of the menu button.
The Audio sub-menu allows you to change the below:
• Input Names (sub-menu)
• Input Trim (sub-menu)
• DAC Input
• Phono Input
• RCA 2 Fixed Vol
• Max Volume
Input Names (sub-menu)
The Input Names sub-menu setting allows renaming the four input connections from a preset list
of common names to aid in identifying the connected source. Foilow these steps to assign the
names BLU RAY, CD, DVD, PHONO, SACD or STREAMER:
1. Double-click the menu button to enter the name list.
2. Turn the knob to locate the desired input. Press the menu button to select.
3. Turn the knob to select the desired name. Press the menu button to select.
4. Turn the knob to select OK or Cancel. Press the menu button to confirm or cancel.
5. Double-click the menu button to return to the main settings menu.
Gold
Preamplier
Input Trim (sub-menu)
The Input Trim sub-menu setting allows trimming the volume level of each input to provide a
consistent level between input sources. It is best to start by observing the level of your most
used or favorite source and then trimming the other source levels to match. Follow these steps
to adjust input levels:
1. Double-click the menu button to enter the input list.
2. Turn the knob to locate the desired input. Press the menu button to select.
3. Turn the knob left or right to set the level. Changes take eect immediately.
4. Double-click the menu button to return to the main settings menu.
DAC Input
The DAC Input sub-menu setting optionally identifies which input is connected to your DAC.
When set, the Stellar
IR remote control code is received, saving you the step of first selecting the DAC input. Follow
these steps to identify the input:
1. Turn the knob to select “O” or the desired input to identify.
PS Audio® Inc. 800-PSAUDIO 4865 Sterling Drive Boulder, Colorado 80301
Gold
Preamplifier automatically switches to that input whenever a valid DAC
©2023 PS Audio Inc. All rights reserved.
8
Page 13

Operating Guide
Owner’s Reference Stellar
2. Press the button to select.
3. Double-click the menu button to return to the main settings menu.
Phono Input
The Phono Input sub-menu setting, like the previous setting, optionally identifies which input is
connected to your phono stage. When set, the Stellar
that input whenever a valid phono stage IR remote control code is received, saving you the step
of first selecting the PHONO input. Follow these steps to identify the input:
1. Turn the knob to select “O” or the desired input to identify.
2. Press the button to select.
3. Double-click the menu button to return to the main settings menu.
RCA 2 Fixed Volume
The RCA 2 Fixed Volume sub-menu setting allows fixing the volume setting of the RCA 2 input.
This feature allows connecting a source to RCA 2 that has its own volume control or other
conditions where a constant volume level is desired. Options are “O” (disabled) or 1–100.
Follow these steps to set the volume level:
Gold
Preamplifier automatically switches to
Gold
Preamplier
System SubMenu
1. Turn the knob to select “O” or the desired volume level.
2. Press the button to select.
3. Double-click the menu button to return to the main settings menu.
Max Volume
The Max Volume sub-menu setting sets the upper limit of the main volume control. Use the
volume knob to set the max volume (1-100). Set to 100 to disable this feature. This value is
ignored if the Fixed Volume setting is enabled. Follow these steps to set the volume level:
1. Turn the knob to select “100” or the desired maximum volume level.
2. Press the button to select.
3. Double-click the menu button to return to the main settings menu.
The System sub-menu allows setting various control parameters. The sub-menu is entered by
double-clicking the menu button which presents the following settings:
• Backlight
• Trigger Timeout
• IR Enable
• Firmware Update (sub-menu)
• Factory Reset (sub-menu)
PS Audio® Inc. 800-PSAUDIO 4865 Sterling Drive Boulder, Colorado 80301
©2023 PS Audio Inc. All rights reserved.
9
Page 14

Operating Guide
Owner’s Reference Stellar
Backlight
The Backlight sub-menu setting allows adjusting the brightness of both the Standby mode
switch (1) and the Display (4) to compliment the room lighting. Options range from 1–10 with 10
being brightest. Follow these steps to set the brightness:
1. Turn the knob to select the desired brightness level.
2. Press the button to select.
3. Double-click the menu button to return to the main settings menu.
Trigger Timeout
The Trigger Timeout sub-menu setting permits adding a delay to the trigger output signal to
adjust the time between placing the StellarGold Preamplifier in Operational mode and when a
power amplifier connected to the trigger output is signaled to power up. The delay can be set to
one of “O”, “0s”, “5s”, “10s”, “20s”, “30s”, “45s” or “1m”. Follow these steps to set the delay:
1. Turn the knob to select “O” or the desired delay time.
2. Press the button to select.
3. Double-click the menu button to return to the main settings menu.
Gold
Preamplier
IR Enable
The IR Enable sub-menu setting can be used to prevent the remote control from interfering
with other remote-controlled components in your system. Turn the knob to select one of the
following:
• O: disables the remote control function eliminating all interference.
• IR1: The default setting. Use this if no interference is experienced.
• IR2: Selects alternate code set. Use this if the Stellar remote aects other components.
When you change this setting, you also need to change it on the remote. To do so, press and
hold the Light Bulb button (bottom of the remote) and the circular O button (top center of the
remote) at the same time. If the remote backlight flashes white once, you are now on IR1. If it
flashes white twice, you are now on IR2.
Firmware Update (sub-menu)
This feature allows you to select from multiple rmware loads on a USB thumb drive. It provides a faster
and easier method of upgrading and downgrading new rmware for A/B style testing.
Preparing the USB thumb drive
PS Audio® Inc. 800-PSAUDIO 4865 Sterling Drive Boulder, Colorado 80301
©2023 PS Audio Inc. All rights reserved.
10
Page 15

Operating Guide
Owner’s Reference Stellar
• You can have as many les on the USB thumb drive as you want, but only the rst ve valid les for
the device are displayed.
• The les must be named stellar_pre_v#.#.#.bin. For example, stellar_pre_v2.4.1.bin.
• You can have other bin les for other products on this thumb drive (for example, stellar_dac_
v2.1.2.bin). Only les that start with "stellar_pre_" will be loaded by the Stellar
WARNING: In the past, you would update a unit by copying an "image.bin" le to the thumb drive. This
method still works to automatically update a unit after a reboot (you do not need to go through the
menus to use the image.bin le). The image.bin le takes precedence over the stellar_bin_xxx.bin les. It
is recommended to NOT have an image.bin le on the thumb drive if you are using the stellar_pre_xxx.
bin les and the System | FW Update method to update les.
Upgrading/ Downgrading
• Plug the USB thumb drive into the unit in USB-A slot on the back panel marked FW.
• Enter the menus and go to System | FW Update.
• The les will display on the screen in alphabetical order.
• Scroll up or down to highlight the le you want to load.
• Press the menu button to select the le.
• A progress screen will display. The update process will initialize and then a progress indicator in
percentage complete will display.
• Once complete, the progress screen will indicate the unit is resetting.
• The unit will reset. The Logo LED will blink rapidly as the unit is being programmed.
Gold
Gold
Preamplier
Preamp.
Notes
• If you select the same version that is already loaded, the upgrade will be skipped and the Logo LED
will not blink. The unit will still reset.
• If there is an error, the error will be displayed.
- If you have problems with loading rmware, you can contact PS Audio customer
support with the error you see.
- Press the menu button to exit from the error screen
• You can exit the FW Update screen using a long press of the menu button.
Factory Reset (sub-menu)
The Factory Reset sub-menu setting returns all menu items to their original factory settings.
Note
: Any custom settings performed since the last Facory Reset, or first use, will be lost.
1. Double-click the menu button to start the reset process.
2. Turn the knob to select “Reset”.
3. Press the menu button to begin.
After a few seconds, the preamplifier automatically restarts at the main menu with restored
factory settings.
PS Audio® Inc. 800-PSAUDIO 4865 Sterling Drive Boulder, Colorado 80301
©2023 PS Audio Inc. All rights reserved.
11
Page 16
Operating Guide
Remote
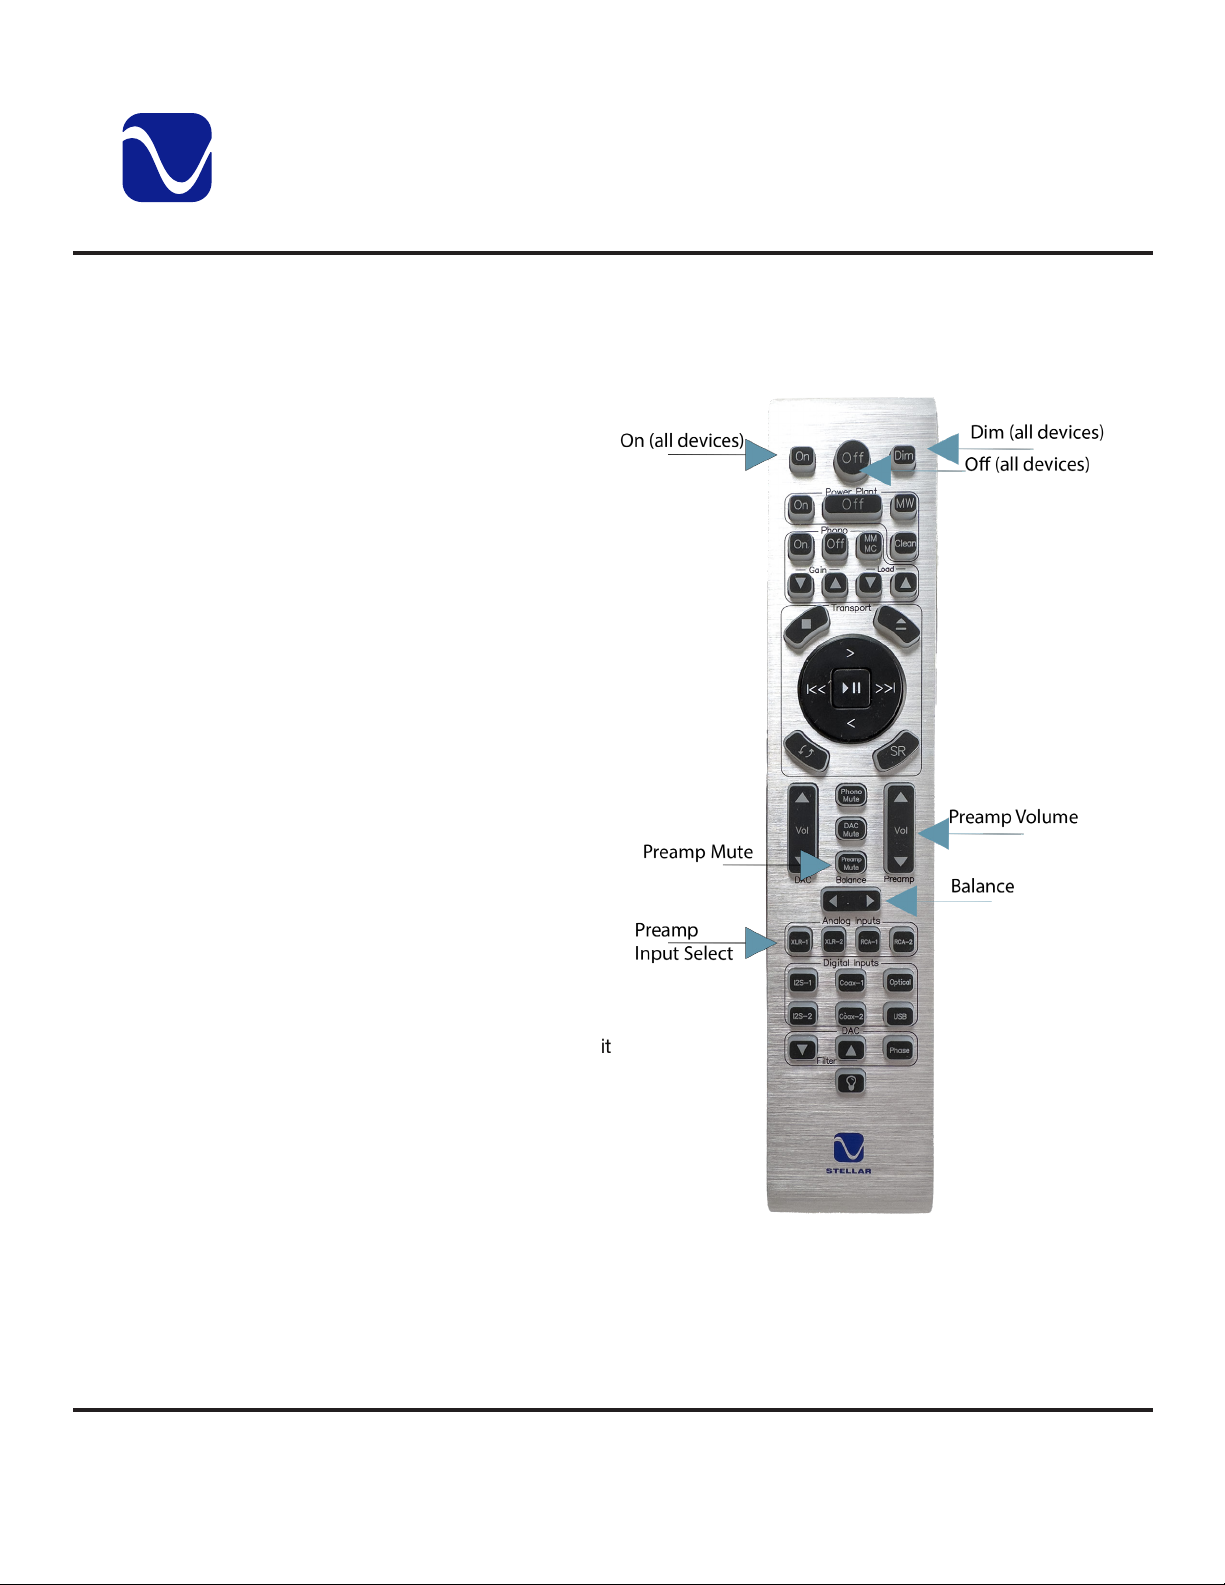
Your Stellar
with a full-function remote control.
In addition to operating your
Stellar
works with all Stellar products and
most functions will translate to the
PerfectWave line.
Remote Code Settings:
Your Stellar
with a default code set. If your
remote is interfering with other
devices, you can switch to the
second code set.To do so, press
and hold the Light Bulb button
(bottom of the remote) and the
circular O button (top center of
the remote) at the same time. If
the remote backlight flashes white
once, you are now on IR1. If it
flashes white twice, you are now on
IR2.
Gold
Preamp comes
Gold
Preamp, this remote
Gold
Preamp comes
Owner’s Reference Stellar
Gold
Preamplier
You will also need to update the
unit. See Firmware Update section
of this manual for instructions.
Button Guide:
• On: Takes the Preamp out of
Ready (Idle) mode and puts it in
Operational mode. In addition, it
undoes the Dim function.
• O: Puts the Preamp in Ready
(idle) mode.
• Dim: Dims the logo button and
turns o the screen and control
navigation backlight. Press On
to undo it.
• Analog Inputs: Lets you select
the desired input.
PS Audio® Inc. 800-PSAUDIO 4865 Sterling Drive Boulder, Colorado 80301
©2023 PS Audio Inc. All rights reserved.
12
Page 17
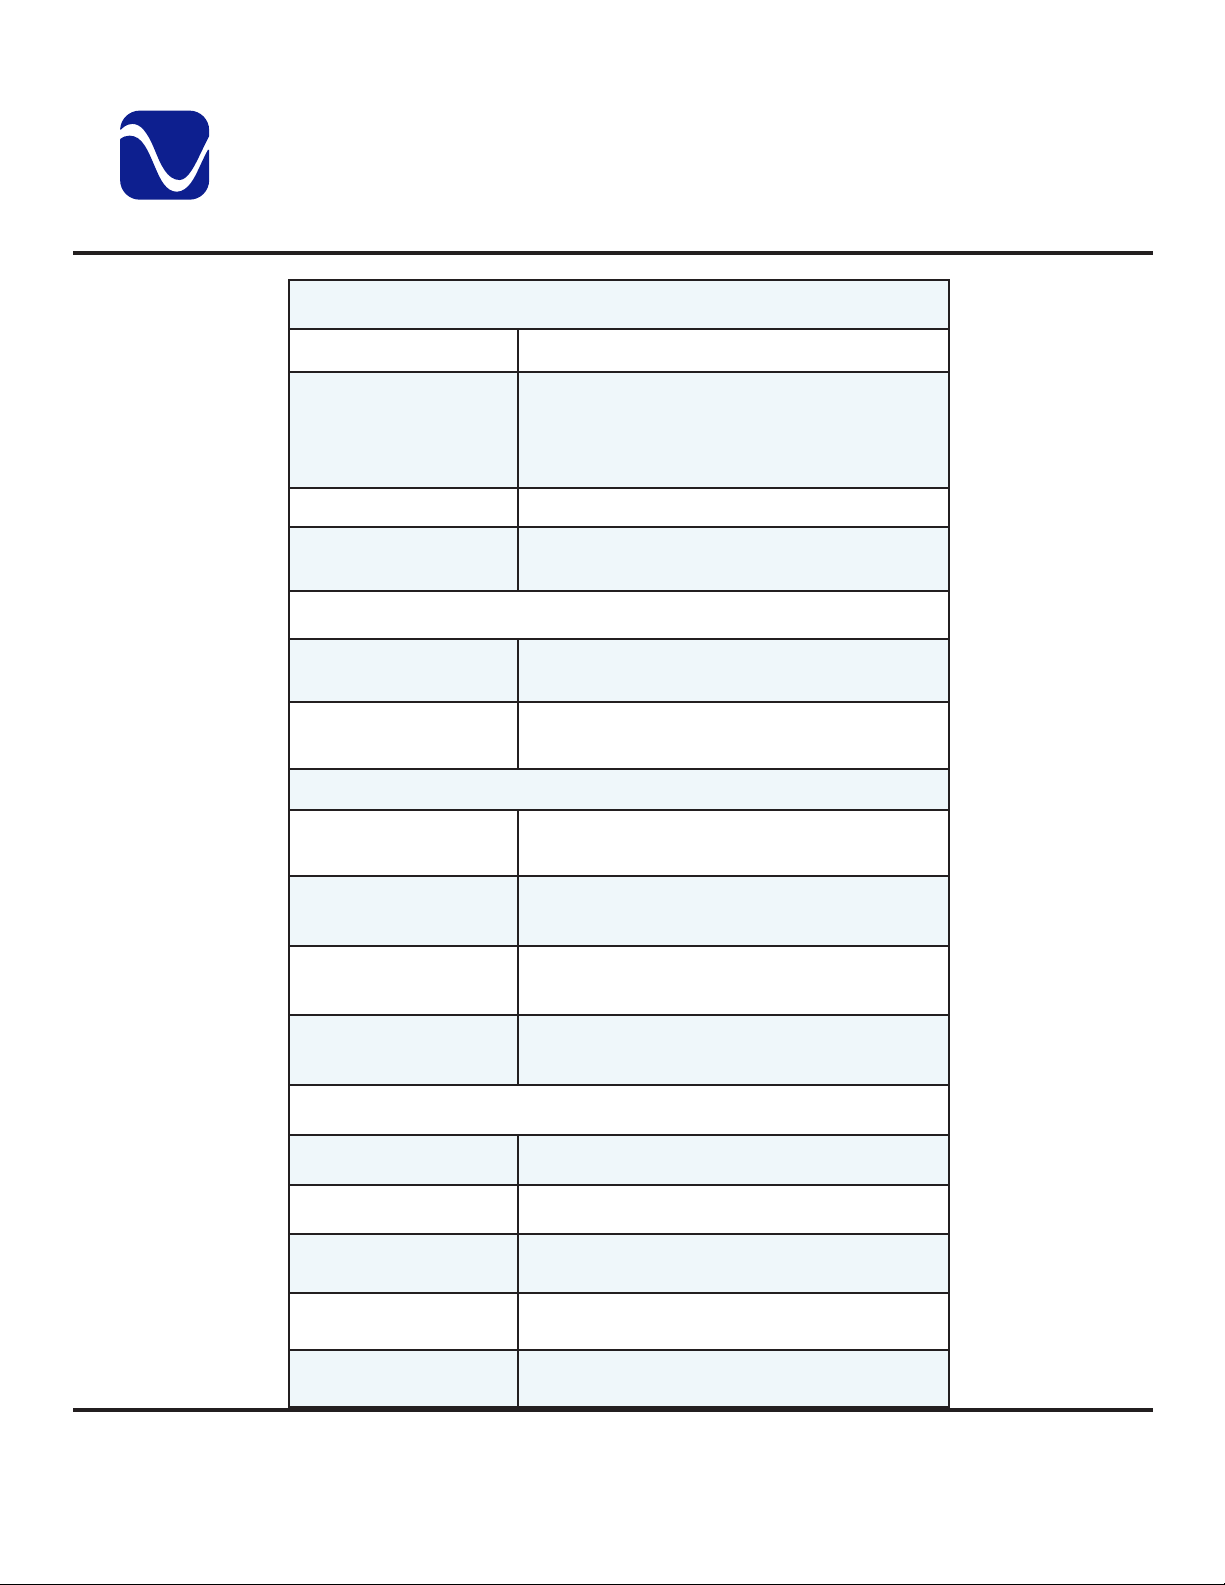
Reference
Product
Specications
Owner’s Reference Stellar
Physical:
Unit Weight 24.1 lbs or 10.9 kg
Unit Dimensions 17"W x 3.3"H x 13"D (with knob, without
knob 12"D)
[43.18 cm x 8.38 cm x 33.02 (with knob,
without 30.48 cm)]
Shipping Weight 27.6 lbs or 12.5 kg
Shipping Dimensions 22"W x 8"H x 17"D
[55.88 cm x 20.32 cm x 43.18 cm]
Power Requirements:
Input Power Model specic 100VAC, 120VAC, or
230VAC 50 or 60Hz
Power Consumption
15W
Connectors:
Gold
Preamplier
Audio Inputs RCA / Single-Ended: 2 pair
XLR / Balanced: 2 pair
Audio Outputs RCA / Single-Ended: 2 pair
XLR / Balanced: 2 pair
Trigger Output 2
USB For USB rmware update only
Performance:
Max Gain 12.6dB
Frequency Response 15Hz-150kHz, +/- 0.1dB
Input Impendance
Bandwidth 5Hz-500kHz, -3dB
THD < .0002% @ 1kHz, 1VRMS input
50K Ω RCA / Single-Ended
100K Ω XLR / Balanced
PS Audio® Inc. 800-PSAUDIO 4865 Sterling Drive Boulder, Colorado 80301
©2023 PS Audio Inc. All rights reserved.
13
Page 18
Reference
Owner’s Reference Stellar
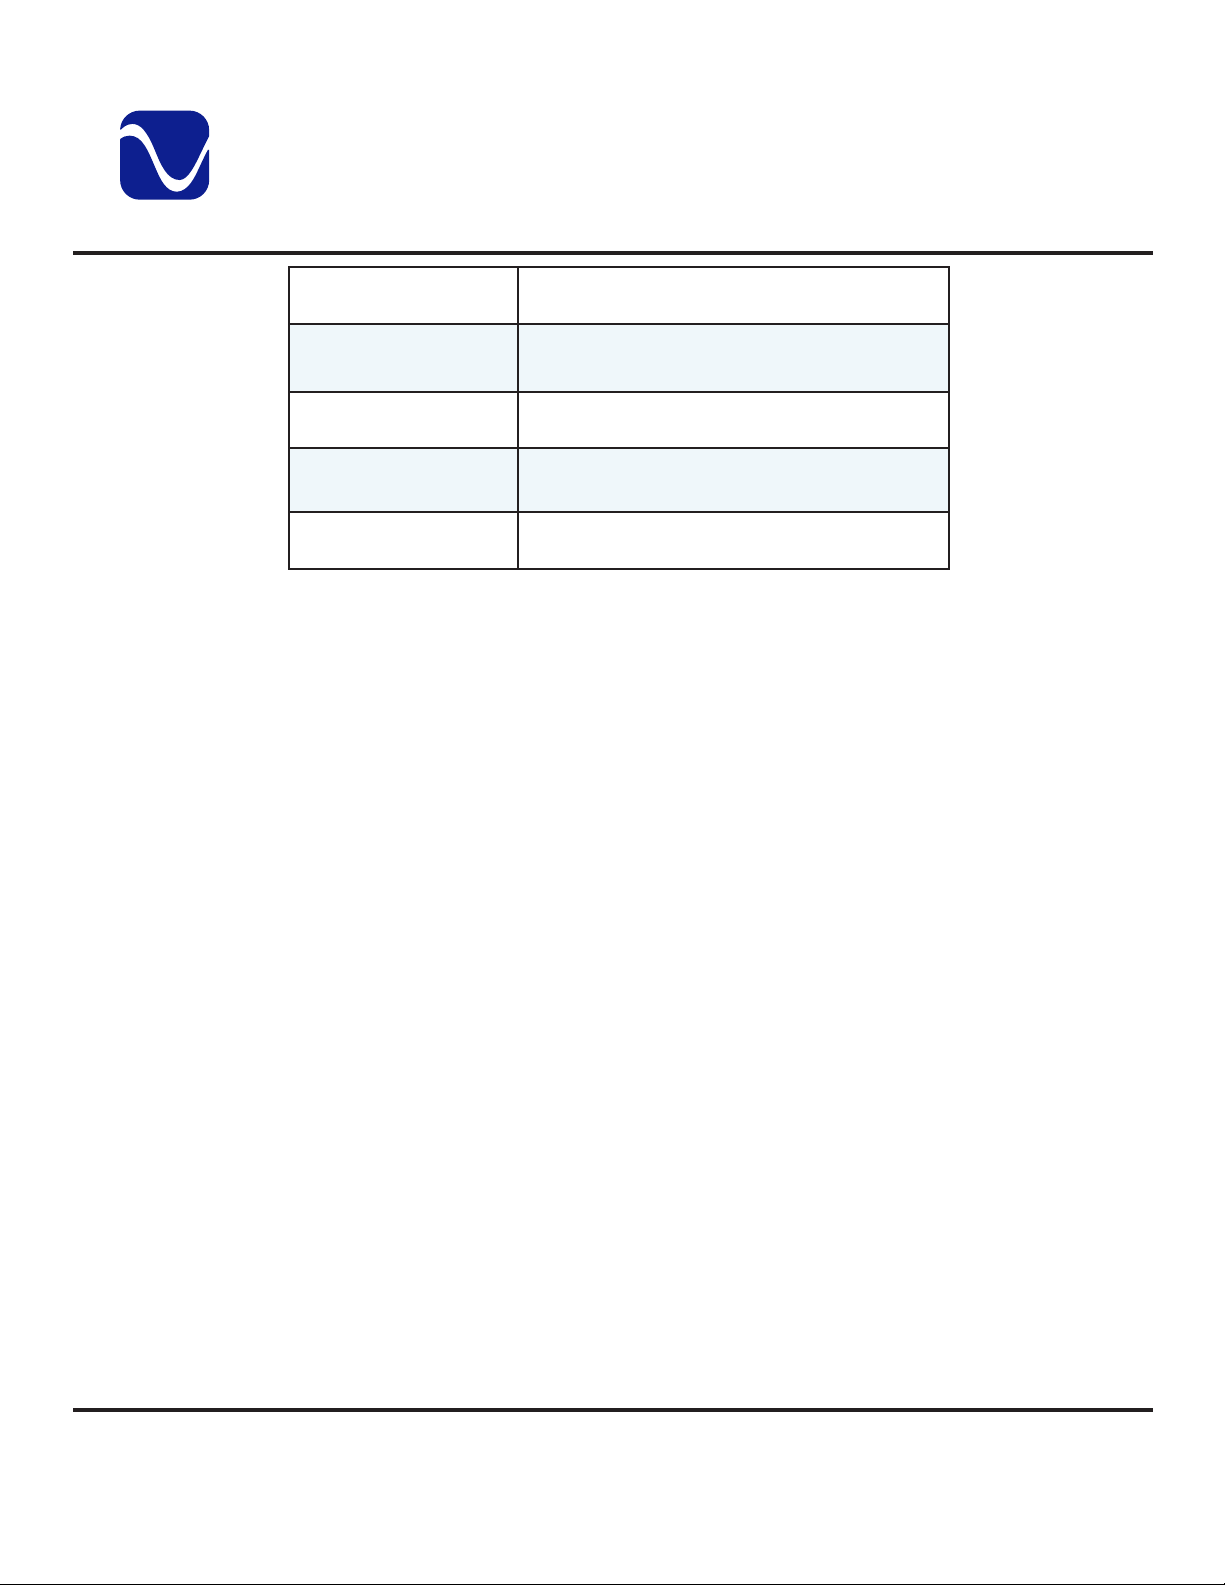
THD+N < .0003% @ 1kHz, 1VRMS input
IMD
Crosstalk
Output level 10VRMS Single-ended / 20VRMS Balanced
Output Impedence 100 ohm
.0005% @ 1VRMS input, CCIF, 20kHz
mean, 1kHz dierence
-115dB, One channel driven
@ 1% THD+N
Gold
Preamplier
PS Audio® Inc. 800-PSAUDIO 4865 Sterling Drive Boulder, Colorado 80301
©2023 PS Audio Inc. All rights reserved.
14
Page 19
Reference
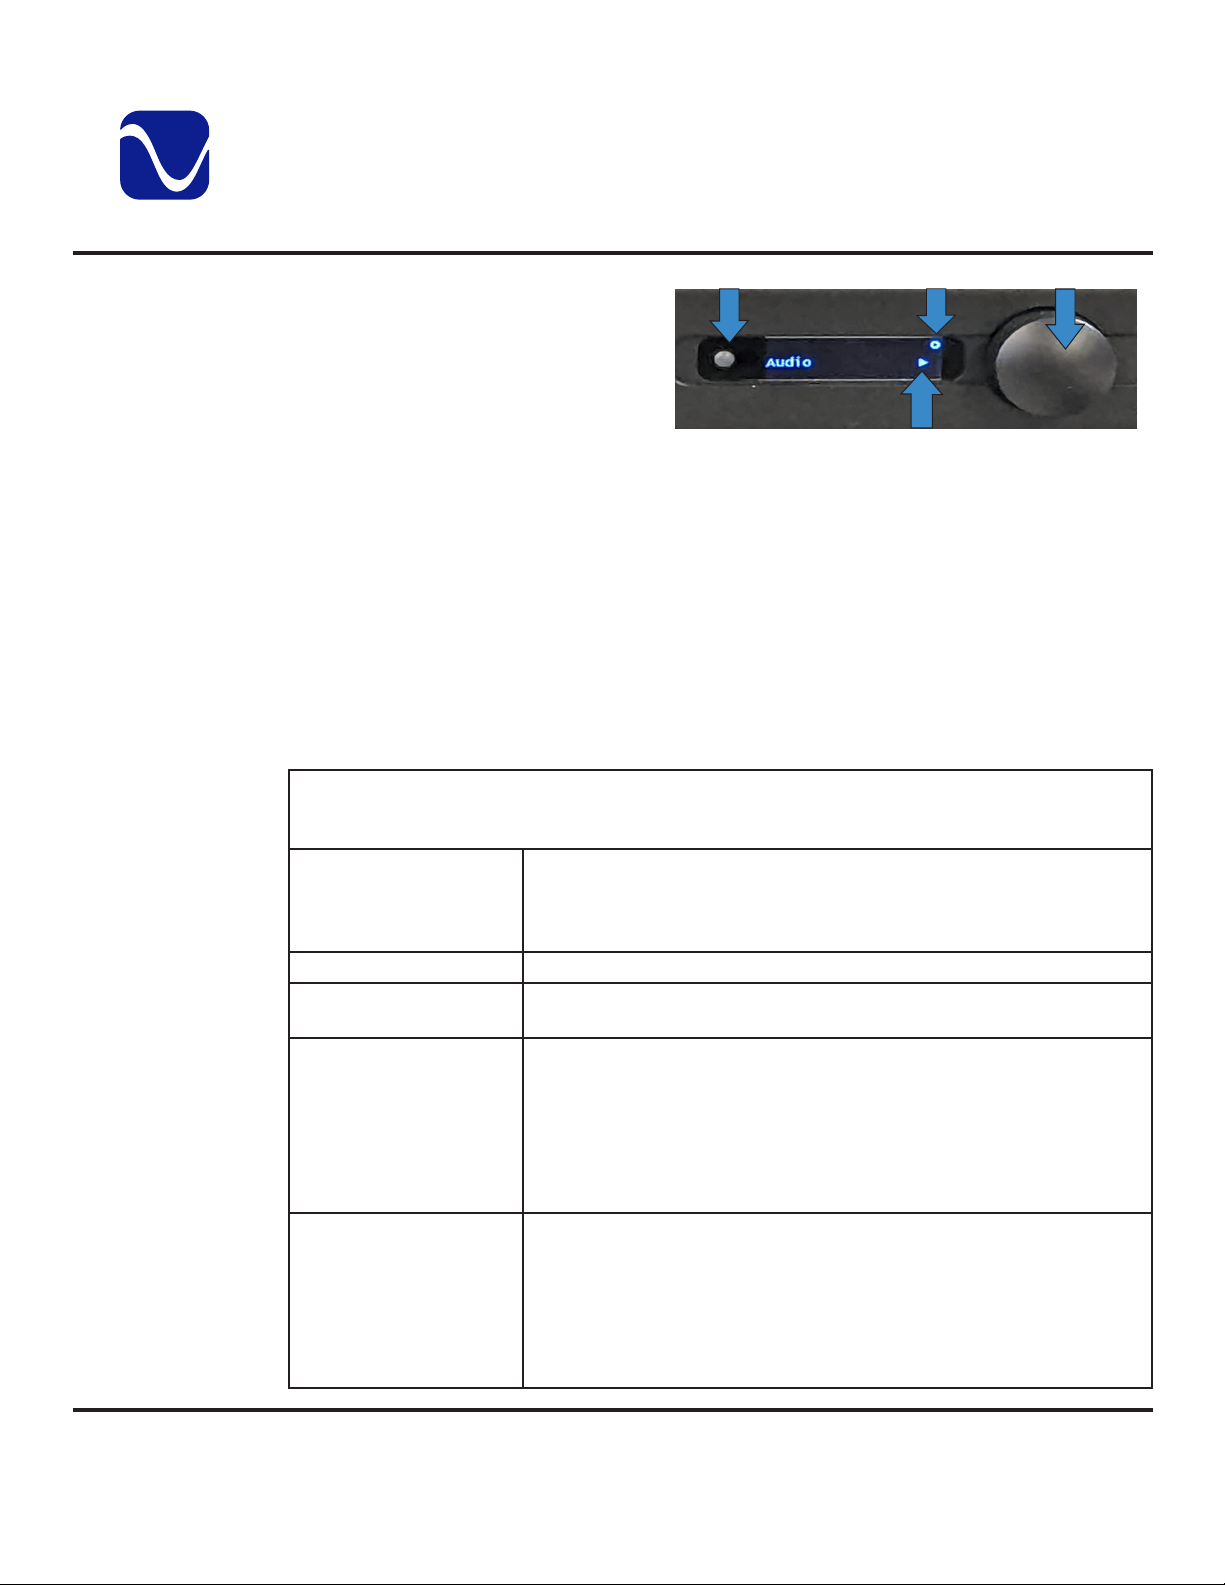
Menu Charts
Top Level
Menu
Owner’s Reference Stellar
Navigating the Menus:
• To enter the menus, do a long press
of the menu button. A gear icon will
appear in the right corner of the screen
to show you are in the menus. Do
another long press to leave the menus.
Note:
Menus time out after 15 seconds of
inactivity.
• Scroll through menu and sub menu
items using one press of the menu button. Use the volume knob to change values for specic items.
• Unless otherwise specied, scrolling to your choice and leaving it on the screen updates your
settings.
• Menu items with sub-menus are indicated by a right arrow. Press the menu button twice to enter
them.
• Two quick presses of the menu button take you back one menu level. For example, if you are in the
Audio sub-menu and press the menu button twice, you will return to the top level menu.
Note
: You do not enter the menus to change the input. Instead, do a quick press of the menu button.
Continue pressing until you land on the input you want (RCA 1 or 2, XLR 1 or 2). Alternatively, you can
use the remote.
Press the menu button once to scroll through menu and sub-menu items. Use the volume knob to
Balance • Turn knob left to reduce the gain of the right channel, thus making
the image come more from the left channel.
• Turn the knob right to reduce the gain of the left channel, thus
making the image come more from the right channel.
Coupling Turn knob to select AC or DC coupling.
Versions
(Informational Only)
Audio (Sub-Menu) Hit menu button twice to access the below settings:
System (Sub-Menu) Hit menu button twice to enter this sub-menu and access the below
Turn knob to scroll through the operating rmware versions.
• Input names
• Input Trim
• DAC Input
• Phono Input
• RCA2 Fixed Volume
• Max Volume
settings:
• Backlight
• Trigger Timeout
• IR Enable
• Firmware Update (sub-menu)
• Factory Reset (sub-menu)
Menu Button
Top Level Menu
change menu item values.
In Menu Icon
Indicates Sub-Menu Item
Gold
Preamplier
Volume Knob
PS Audio® Inc. 800-PSAUDIO 4865 Sterling Drive Boulder, Colorado 80301
©2023 PS Audio Inc. All rights reserved.
15
Page 20
Reference
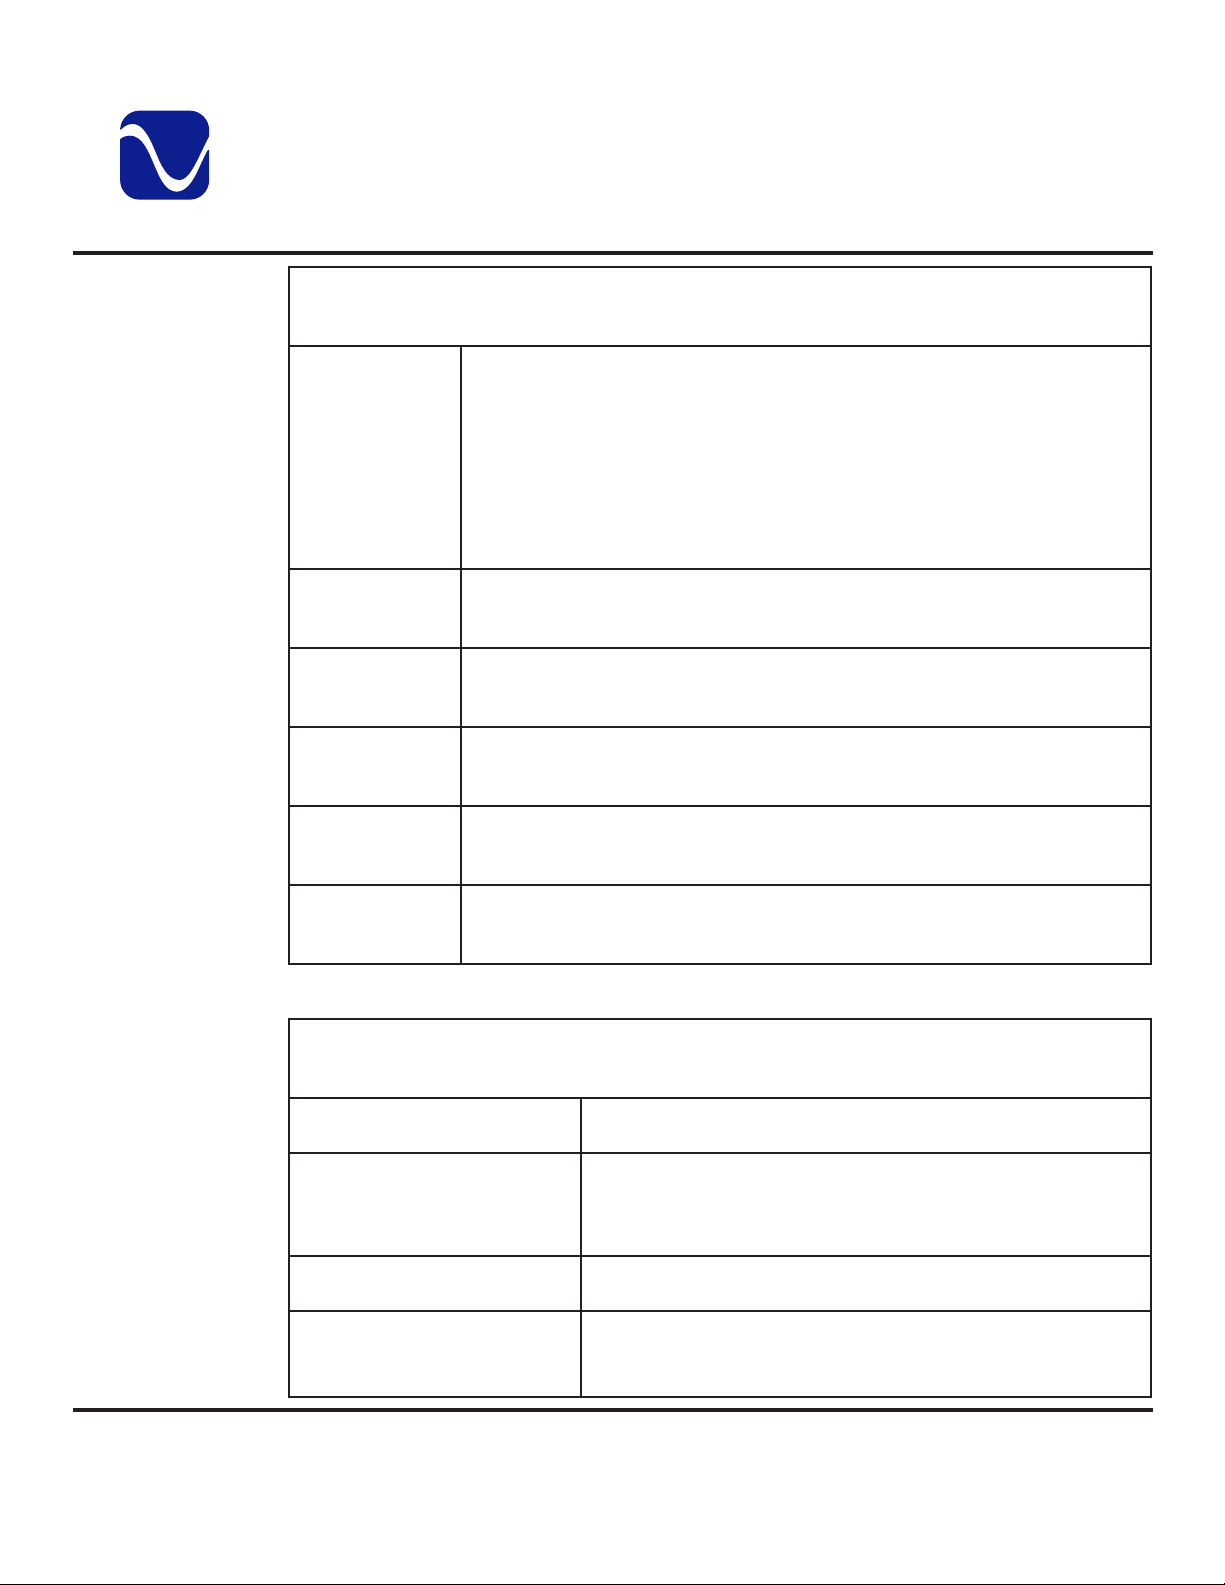
Audio
Sub-Menu
Owner’s Reference Stellar
Audio Sub-Menu
From the main menu, nd Audio then press the menu button twice to enter the Audio sub-menu. Hit
the menu button once to scroll through the sub-menu options.
Input Names (SubMenu)
Input Trim • Use the volume knob to highlight the input you would like to trim.
DAC Input Use the volume knob to nd the input your DAC is attached to. Now when you
Phono Input Use the volume knob to nd the input your Phono is attached to. Now when you
RCA2 Fixed
Volume
• Hit the menu button twice to enter Input Names.
• Use volume knob to scroll through inputs and highlight the input you want
to change.
• Once the name is highlighted, hit the menu button once.
• Use the volume knob to scroll through the naming options.
• Once the name you want is highlighted, hit the menu button once to select
it.
• A pop up will appear and ask "Rename....?" Hit the menu button to select OK
or use the volume knob to highlight Cancel rst if you change your mind.
• Hit the menu button once to select it.
• Turn the volume knob right to add dBs and left to lower dBs.
hit buttons relating to the DAC on your remote, the Preamp will automatically
switch to that input.
hit buttons relating to the Phono on your remote, the Preamp will automatically
switch to that input.
Use the volume knob to select a xed volume (1-100) for RCA2. To disable this
feature, scroll to 0 or o.
Gold
Preamplier
System
Sub-Menu
Max Volume Use the volume knob to select a max volume (1-100). If undesired, select 100 to
disable.
System Sub-Menu
From the main menu, nd System then press the menu button twice to enter the System sub-menu.
Hit the menu button once to scroll through the sub-menu options.
Backlight Use the volume knob to select a brightness setting for the display
and logo button. Options are 1-10, where 10 is the brightest.
Trigger Timeout
(delay output to other devices
for short period after StellarGold
Preamp activated)
IR Enable Use the volume knob to select O (no remote works), IR1 (default)
Firmware Update (sub-menu) This is a multi-step process. Please see the Firmware Update
PS Audio® Inc. 800-PSAUDIO 4865 Sterling Drive Boulder, Colorado 80301
Use the volume knob to select O, 0s, 5s, 10s, 20s, 30s, 45s or 1
minute for trigger timeout. Select o to disable.
or IR2 (if remote is interfering with other devices).
section of this manual for instructions.
©2023 PS Audio Inc. All rights reserved.
16
Page 21

Reference
System
Sub-Menu
Continued
Owner’s Reference Stellar
Factory Reset (sub-menu) • Hit the menu button twice to select factory reset.
• A pop up will appear and ask "Factory Reset System?" To
continue with the reset, use the volume knob to highlight
Reset and press the menu button. If you changed your mind,
leave Exit highlighted and hit the menu button.
• After hitting the menu button, there will be a about a 5
second delay and then your Preamp will automatically switch
o and then back on.
Gold
Preamplier
PS Audio® Inc. 800-PSAUDIO 4865 Sterling Drive Boulder, Colorado 80301
©2023 PS Audio Inc. All rights reserved.
17
Page 22

Warranty
Registering
Coverage
Owner’s Reference Stellar
Product registration
By registering your product, you are validating the start date of your limited
warranty. This limited warranty is in eect for 3 years from the date the unit was
first purchased from PS Audio or its dealers and agents. If you do not register
your product within 30 days of service, a copy of your purchase receipt from an
authorized PS Audio dealer may be used as proof of purchase to establish the
warranty start date. If no proof of purchase from an authorized PS audio dealer
or registration is provided, the production date of the product will be used to
determine the warranty start date. You can register your product online, by phone,
by mail, or by email.
What this warranty covers
This warranty covers defects in material and workmanship for products purchased
from PS Audio or its authorized dealers and agents. In the event your product
fails, your sole remedy under this limited warranty shall be to return the product
to PS Audio or an authorized PS Audio repair center. At the option of PS Audio,
the product will be repaired without charge for parts or labor, replaced, or the
purchase price refunded through the original point of purchase.
Gold
Preamplier
Shipping
Not Covered
Shipping
You are responsible to pay for the safe and proper shipment of the warrantied
product to PS Audio or its authorized repair center. Under this limited warranty,
PS Audio or its authorized repair center will pay the cost of returning the repaired
or replacement product to you.
What this warranty does not cover
This warranty does not cover damage due to:
• Accidents, carelessness, improper transportation, misuse, neglect, or abuse
• Failure to follow the operating instructions that are provided by PS Audio in
the Owner’s Reference Manual (available for download at www.psaudio.com)
• Use in any manner inconsistent with PS Audio’s operating instructions
(available for download at www.psaudio.com)
• Lack of routine maintenance
• Connection to an improper voltage supply
• Alterations or modifications to the unit
• Improper or unauthorized repair, including repairs not authorized by PS Audio
or a PS Audio authorized repair center
PS Audio® Inc. 800-PSAUDIO 4865 Sterling Drive Boulder, Colorado 80301
©2023 PS Audio Inc. All rights reserved.
18
Page 23

Warranty
Limitations
Owner’s Reference Stellar
• Fire, lightning, flood, “Acts of God,” or other contingencies beyond the control
of PS Audio
• Products purchased through an unauthorized source (if you have questions as
to whether or not a dealer is authorized, please contact customer support at
www.psaudio.com
• Products with a factory-applied serial number that has in any way been altered,
defaced, or removed
Limitations under this warranty
In no event will PS Audio’s liability to you exceed the original purchase price of
your unit. This warranty does not cover the cost of custom installation, customer
instruction, setup adjustments, or signal reception problems. Consequential and
incidental damages are not covered under this warranty. However, some states
do not allow the exclusion or limitation of incidental or consequential damages, so
this limitation or exclusion may not apply to you. In the event that your warrantied
product cannot be repaired, PS Audio will either replace or refund the cost of the
unit. We reserve the right to replace any out-of-stock, discontinued, or limited
edition products with a comparable product. Discontinued products may not be
available for warranty
Gold
Preamplier
Warranty Transfer
Warranty transfer
This warranty is for the benefit of the original purchaser of the product. The warranty
may be transferred to a subsequent purchaser during the 3 year warranty period.
To do this, you must contact PS Audio directly to set up a transfer of warranty
registration.
PS Audio® Inc. 800-PSAUDIO 4865 Sterling Drive Boulder, Colorado 80301
©2023 PS Audio Inc. All rights reserved.
19
Page 24

Service
If you require
service in North
America
Obtain an RMA
number
Use original
packing
Owner’s Reference Stellar
Warranty Service within North America
Please contact PS Audio customer support for service assistance, help with
locating an authorized PS Audio repair center, help with the operation of a product,
or for more information.
Obtaining an RMA#
In order to receive warranty service, you must first obtain a Return Merchandise
Authorization Number (RMA#) prior to returning any item. Please contact PS Audio
or an authorized PS Audio repair center to receive an RMA#. The RMA# must be
on all returned items. If it is not clearly marked, PS Audio will return the package
back to you, freight collect.
Packaging and Shipping
Original packaging should be used for the safe transit of your PS Audio unit to
the repair center. If you do not have the original packaging, PS Audio can sell and
ship replacement packaging to you. You are responsible for the cost of shipping
the product to a PS Audio authorized repair center. You should insure the product
for its full retail cost, in the event it gets lost or damaged in transit. PS Audio is
not responsible for damage incurred during the transit of products sent to us.
Shipping your product in non-PS Audio packaging may void this warranty. PS
Audio reserves the right to charge you for new factory packaging to return your
product after a repair.
Gold
Preamplier
State law
If you are
outside the US
State Law
This warranty gives you specific legal rights. You may also have other rights, which
vary from state to state.
International Warranty Service
PS Audio has authorized distribution in many countries of the world. In each
country, the authorized importing distributor has accepted the responsibility for
warranty of the products sold by that distributor. Warranty service should be
obtained where the product was purchased.
Changes to Our Products
PS Audio reserves the right to modify the design of any product without obligation
to purchasers of previously manufactured products, and to change the prices or
specifications of any products without notice or obligation to any person.
PS Audio® Inc. 800-PSAUDIO 4865 Sterling Drive Boulder, Colorado 80301
20
©2023 PS Audio Inc. All rights reserved.
Page 25

Notes
Owner’s Reference Stellar
Gold
Preamplier
PS Audio® Inc. 800-PSAUDIO 4865 Sterling Drive Boulder, Colorado 80301
©2023 PS Audio Inc. All rights reserved.
21
Page 26

Notes
Owner’s Reference Stellar
Gold
Preamplier
PS Audio® Inc. 800-PSAUDIO 4865 Sterling Drive Boulder, Colorado 80301
©2023 PS Audio Inc. All rights reserved.
22
Page 27

Notes
Owner’s Reference Stellar
Gold
Preamplier
PS Audio® Inc. 800-PSAUDIO 4865 Sterling Drive Boulder, Colorado 80301
©2023 PS Audio Inc. All rights reserved.
23
Page 28

Quick Start Guide
Owner’s Reference Stellar
Gold
Thanks for being a part
Preamplier
of the PS Audio Family
At PS Audio, we’re family.
Not just a family that runs in bloodlines, but in frequencies.
Because while we may not all share the same genes here, we are all related by
a passion, nay, obsession with listening to the music we love at the highest,
most breathtaking quality possible.
And in our minds, that makes us kin.
In fact, we believe that every nutty, hertz counting audiophile out there is part
of our tribe.
That’s how we’ve built our company over the last 50 years - with the kind of
care and respect that you give to your family.
PS Audio® Inc. 800-PSAUDIO 4865 Sterling Drive Boulder, Colorado 80301
24
©2023 PS Audio Inc. All rights reserved.
 Loading...