

Page 1
®
Owner’s Reference
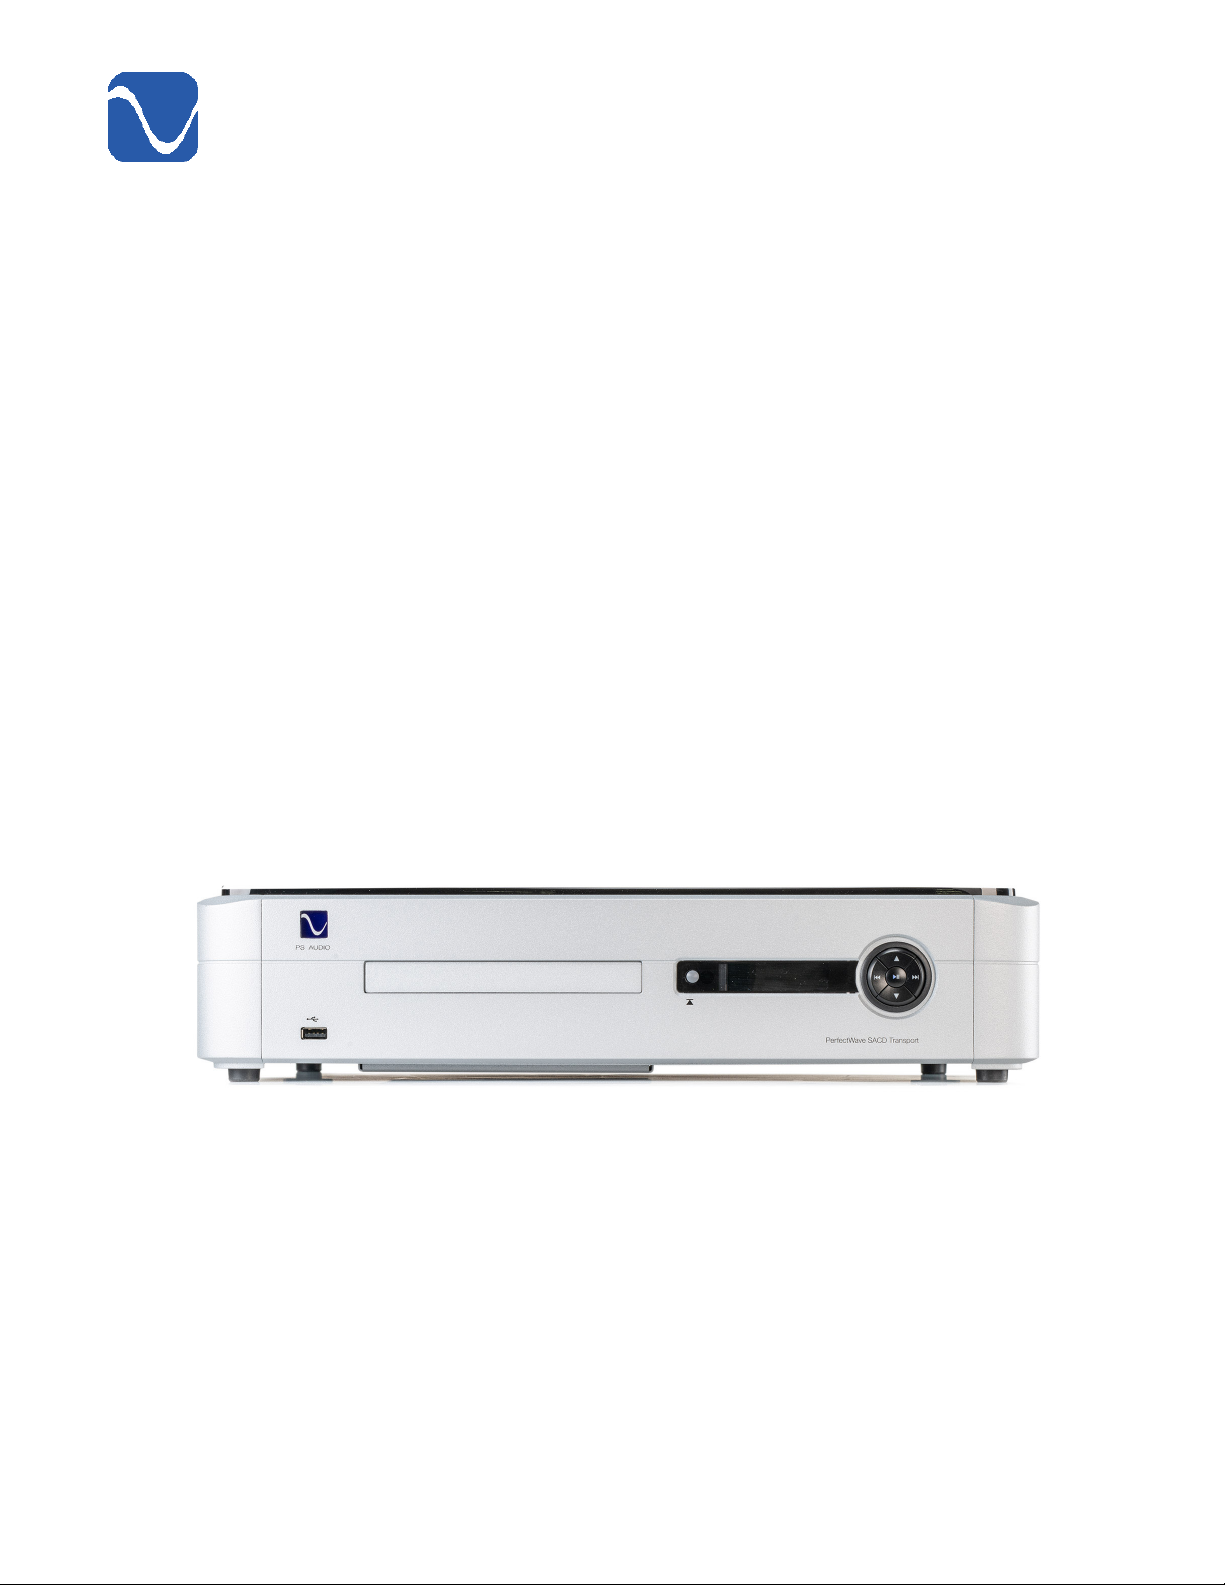
PERFECTWAVE
SACD TRANSPORT
PS Audio® Inc. 800-PSAUDIO 4865 Sterling Drive Boulder, Colorado 80301
Page 2

®
Table of Contents
Getting Data Out of the PST 7
I2S is the Preferred Delivery Method 7
Playback from a USB Drive 7
Placement of the PST 7
Digital outputs 7
HDMI for I2S 8
Unpacking the unit 8
Registering Your PerfectWave SACD Transport 8
PST Output Options 8
I2S Sources 9
Coax and XLR Connections 10
Powering the PST 11
Idle Mode 12
Operating the PST 12
Front panel controls 12
Open/Close/Menu Access Button 12
The Display 13
The Front Panel Control Ring 13
For Disc Playback 13
Playing from a USB Drive 15
Menu Features 15
Exiting the Menus 15
System sub-menu 16
PS Audio® Inc. 800-PSAUDIO 4865 Sterling Drive Boulder, Colorado 80301
Page 3

Table of Contents
Network sub-menu 18
Using the Remote Control 20
On/O 20
Display Dim 20
Emergency eject of a stuck disc 21
Upgrading the Firmware 22
Care of the PST 22
Specications 23
Product registration 24
Warranty transfer 25
Warranty service within North America 26
Obtaining An RMA# 26
Packaging and Shipping 26
International warranty service 26
PS Audio® Inc. 800-PSAUDIO 4865 Sterling Drive Boulder, Colorado 80301
Page 4

®
Safety Information
READ AND FOLLOW ALL INSTRUCTIONS
HEED ALL WARNINGS
WARNING: TO REDUCE THE RISK OF FIRE OR ELECTRICAL SHOCK, DO NOT EXPOSE THIS
APPARATUS TO RAIN OR MOISTURE. OBJECTS FILLED WITH LIQUIDS, SUCH AS VASES,
SHOULD NOT BE PLACED ON THE APPARATUS. THIS APPARATUS MUST BE CONNECTED
TO A MAINS SOCKET OUTLET WITH A PROTECTIVE EARTH CONNECTION.
Clean only with a dry cloth. Do not place ammable material on top of or beneath the unit.
PS Audio® products are passively cooled components that require adequate ventilation at all
times during operation.
Do not remove or bypass the ground pin on the end of the AC cord. All PS Audio® products
ship with a grounding-type plug. If the provided plug does not t into your outlet, consult an
electrician for replacement of the obsolete outlet.
Protect the power cord from being walked on or pinched, particularly at plugs, convenience
receptacles, and the point where they exit from the apparatus. Unplug this apparatus during
lightning storms.
When making connections to this or any other component, make sure all components are
powered o. Turn o all systems’ power before connecting the PS Audio® component to any
other component. Make sure all cable terminations are of the highest quality.
THERE ARE NO USER-SERVICEABLE PARTS INSIDE THIS PS AUDIO PRODUCT. REFER ALL
SERVICE NEEDS TO QUALIFIED SERVICE PERSONNEL.
Please contact your authorized dealer, distributor, or PS Audio® directly if you have any
questions or concerns that are not addressed in this reference manual.
PS Audio®, the sine wave logo, and PerfectWave® are registered trademarks of PS Audio, Inc.,
and are restricted for use by PS Audio, Inc., its subsidiaries, and authorized agents. Stellar™,
Power Plant™, MultiWave™, CleanWave™, and Gain Cell™ are trademarks of PS Audio, Inc.
This product was designed and assembled in Boulder, Colorado with globally sourced
components.
Contains FCC ID: 2AC7Z-ESP32WROVER(B/E).
© 2020 PS Audio, Inc. All rights reserved. Rev C.
PS Audio® Inc. 800-PSAUDIO 4865 Sterling Drive Boulder, Colorado 80301
Page 5
Introduction
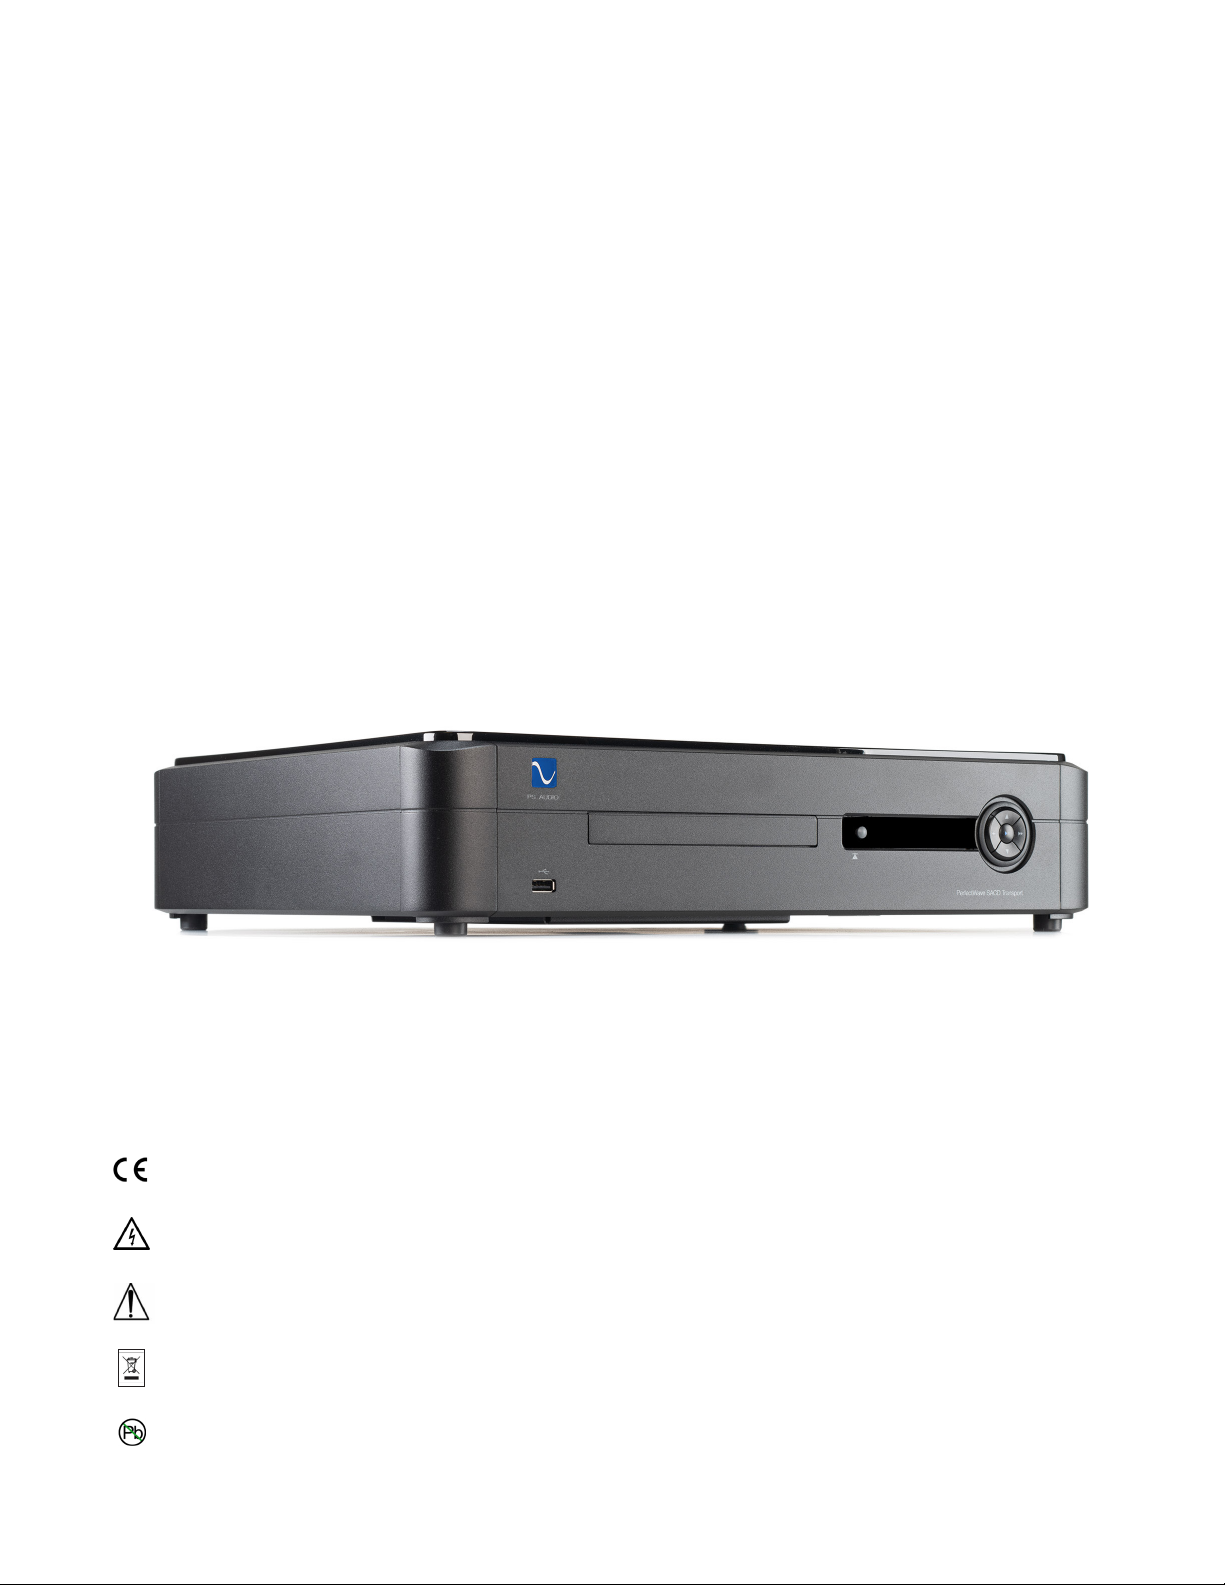
Thank you for your purchase of the PS Audio PerfectWave SACD Transport.
Universal Disc Player
The PerfectWave SACD Transport (PST) is PS Audio’s most advanced universal disc transport
and is capable of playing stereo audio from most types of optical discs, including SACD,
CD, CD-R, CD-RWandDVD-R*/-RW*/+R*/+RW*(*Audiodatale only). It can also playMP3/
WMA/AAC (~48kHz/320kbps) WAV/FLAC/AIFF(~192kHz/24-bit) DSD (~5.6mHz) and ALAC
(~96kHz/24-bit)lesfromdiscsorfromitsUSBinput.
Symbols Found on the PerfectWave SACD Transport
Indicates compliance with European Union Legislation for relevant safety (Low Voltage Directive 2014/35/EU)
and EMC (EMC Directive 2014/30/EU) requirements.
Is intended to tell the user that parts inside the product are a risk of electric shock to persons.
Is intended to tell the user that important operating and servicing instructions are in the papers with the appliance.
Signies that the instrument complies with European Union Waste Electrical and Electronic Equipment Directive.
Indicates that the unit is in compliance with the European Union Reduction of Hazardous Substances Directive.
PS Audio® Inc. 800-PSAUDIO 4865 Sterling Drive Boulder, Colorado 80301
Page 6

®
Operating Manual
Easy Operation
The
PS Audio PerfectWave SACD Transport (PST)
the included remote control. Be aware that many of the front panel buttons are multi-function
innatureandwillperformdierentfunctionsaccordingtowhethertheyarepushedwithashort
press or a long press. The functions are explained in detail later in the manual.
Unique Architecture
At the heart of the PST is PS Audio’s Digital Lens. Invented in 1993 by PS Audio founder Paul
McGowan and chief engineer, Bob Stadtherr. The Digital Lens electrically isolates the mechanical
transport/laser mechanism from the unit’s digital output stage, reducing jitter and timing artifacts,
and focuses the audio data into a single bit-perfect and timing-accurate stream to your DAC.
Galvanically Isolated Output Stage
The PST also incorporates a newly-developed galvanically isolated output stage. This feeds
the output of the all-new drive mechanism to the transport’s Digital Lens with a design that
completely eliminates noise or ground contamination. The sonic results represent new levels of
imagespecicity,opennessandeortlessnessofmusicalreproduction.Neverbeforehavewe
experienced noise levels this low, a seemingly velvet blackness that must be experienced to be
understood.
oerssimpleoperationfromitsfrontpanelor
Proprietary Digital Lens Technology
In digital audio, timing is everything. Jitter, noise, and a lack of isolation all have major impacts
onsoundquality,especiallyaectinglower-resolutionmediasuchasCD.ThePST’slatest-generation Digital Lens technology solves timing, noise and isolation problems through a unique
combination of buer memory and FPGA (Field-Programmable Gate Array)-based digital
processing.
Plays the DSD Layer on SACD
PS Audio’s engineering team has incorporated a host of additional advancements into the
PerfectWave SACD Transport. The PST features a new Memory Player transport with an im-
provedDigitalLensbuer.Separatepowersuppliesareemployedthroughoutthecircuit.In
addition, the PerfectWave SACD Transport requires no setup – just connect it to a DAC and
press Play.
The PST is able to play the DSD layer of SACD discs when used with a compatible DAC such as
the PS Audio DirectStream series DACs, or a component with a built-in DAC like the PS Audio
Stellar Strata.
With the PST and a compatible DAC or audio component, listeners can now enjoy the highest level of
DSD audio reproduction from SACD discs, and superior CD playback. Through our advanced interface,
pure DSD is streamed to, and processed in, the same reference quality DAC used by mastering
engineerslikeGusSkinas,CookieMarencoandSteveHomantonameafew.ThePSTwillplayback
pure DSD only through DACs employing PS Audio’s I2S protocols.
66
PS Audio® Inc. 800-PSAUDIO 4865 Sterling Drive Boulder, Colorado 80301
Page 7

Operating Manual
Getting Data Out of the PST
There are a number of ways to get digital audio data out of the PST: via the S/PDIF, AES/EBU or
I2S outputs. I2S is the preferred method if you have a PS Audio DAC or any manufacturer’s DAC
that can receive it.
Note that all of the PST’s outputs are active at all times. There is no need to select which output
is operational. If desired, multiple outputs can be connected to multiple DACs.
I2S is the Preferred Delivery Method
Standard digital outputs require three separate internal clocks along with the raw music data
and combine them into one stream to the DAC. This mashup of music and clocks causes the
audiotosoundatandharshcomparedtolisteningviaI2S.
I2Soersamuch better wayofdeliveringthe music. Bytransferringtheclocks and dataon
separate wires within the HDMI cable, the audible results are impressive. Simply use any
high-quality HDMI cable between the PST and a compatible DAC and the data will be transferred
perfectly.Thequalityofthecablecanhaveasignicanteectonthesoundquality.Experiment.
A growing number of DACs and devices are adopting the PS Audio I2S over HDMI standard for
digital audio transmission because of its superior audio quality.
Playback from a USB Drive
ThePST can also play les froma USB drive that is plugged into its front panel USB port.
Sub-foldersarenotsupportedandonlylesintherootdirectoryareplayed.
Simple Front Panel Interface
The PST features a simple, straightforward front panel control interface featuring an Open/
Close button and control ring, which operate in conjunction with the front panel display.
Placement of the PST
A good location for the PST is in a cabinet or on a shelf at an easily accessible height.
The IR (infrared) receiver for the remote control is located to the left of the front panel display. A
direct line of sight will help to ensure the PST’s IR sensor operates properly.
Digital outputs
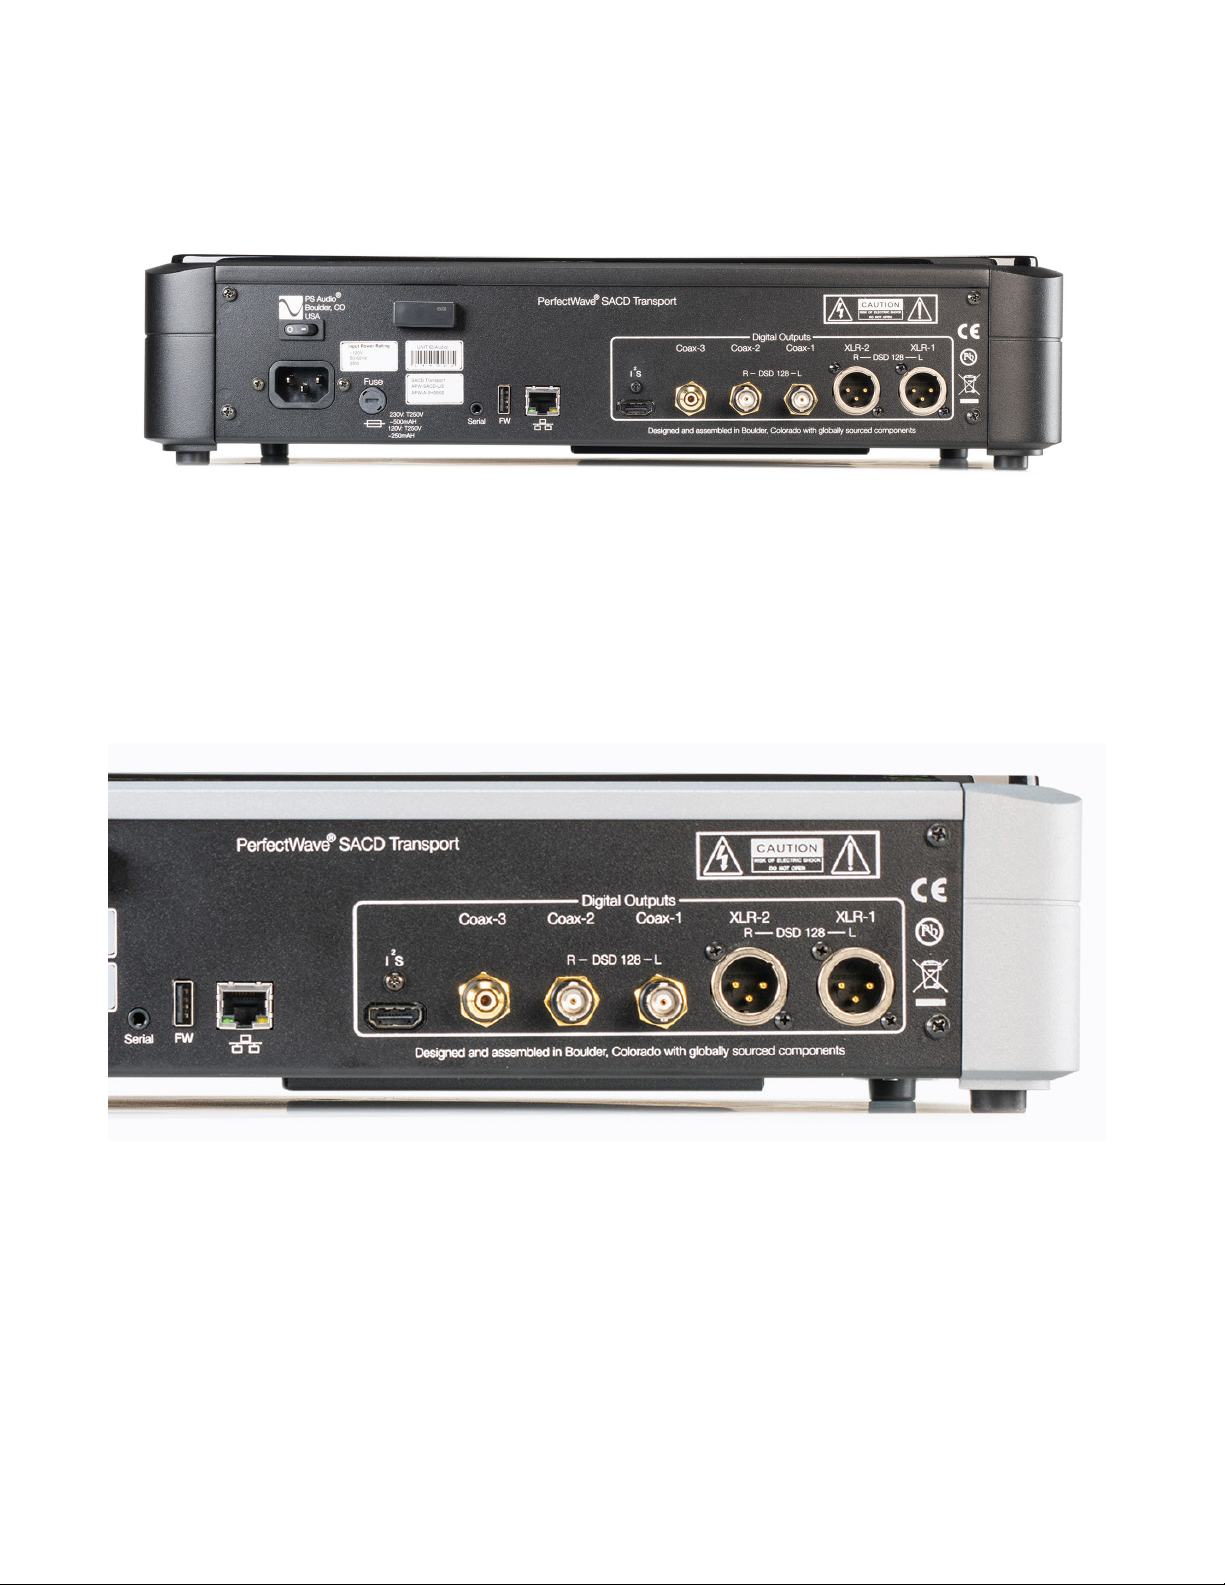
ThePSToersmultipledigitaloutputchoicesincluding:XLR,BNC,RCAcoax,andI2S (HDMI).
Alloutputsarecapableofdeliveringhigh-denitiondigitalaudiosignals.
The PST’s I2S connector transfers I2S digital audio through the use of an HDMI cable. This data
link can only be used with another compatible component and will not work in other HDMI
equipment as the I2S format does not comply with the HDMI standards. The HDMI connector
and cable were chosen to carry the I2S signal because of their superior high-speed data
PS Audio® Inc. 800-PSAUDIO 4865 Sterling Drive Boulder, Colorado 80301 77
Page 8

®
Operating Manual
transmission capabilities for multiple clocks and data lines. PS Audio publishes its I2S standard
and it has been adopted by multiple other manufacturers as well.
The PST can deliver the locked DSD layer of an SACD disc to compatible PS Audio DACs and
integratedampliers,suchastheDirectStreamDAC,StellarGainCellPreamplierandStellar
Strataintegratedamplier.FuturePSAudioDACsmayalsohavethesamecapabilities.
HDMI for I2S
The DSD layer on an SACD may only be played through the PST’s I2Soutput.DSDlesonthe
USB drive or burned to a DVD may be played on any output.
Unpacking the unit
Carefully unpack the PST. Use the included cotton gloves to remove the unit and place it in the
chosen location.
Thepianoblacktopcoverhasaprotectiveplasticlm.Removethis.
Connect the PST to your digital sources using the appropriate connections.
Connect the AC cable into the receptacle in back and plug the unit into your PS Audio Power
Plant, other power conditioner or into the wall.
Registering Your PerfectWave SACD Transport
PS Audio products come from the factory with a three-year warranty. Please register your
new PST. Registration takes just a few minutes, assures that you will be informed about future
upgrades, keeps track of your serial number and allows us to maintain the highest standards of
product quality of any company.
To register your new unit, look on the back panel of your PST and note the serial number. Then
go to www.psaudio.com and click on Register Products.
Once you have completed the registration process, you can then go to the PS Audio website
and look at the My Registered Products page. The link to this page is located at the top right
hand corner of the website once you are logged in. If you do not have web access, you may
registerthe unit via mail or phone.Noticationof software upgrades tothis product will be
available only to owners who registered via the web and email.
PST Output Options
The PST has multiple output options, including I2S through an HDMI connector, AES/EBU
through the XLR balanced connector, and S/PDIF through the RCA and BNC coax connectors.
The stereo digital outputs of the PST can be transferred through three types of connections.
88
PS Audio® Inc. 800-PSAUDIO 4865 Sterling Drive Boulder, Colorado 80301
Page 9
Operating Manual
I2S Sources
PS Audio’s recommended connection to DACs is through its I2S protocol. I2S delivers the best
sonic experience by separately transmitting data and clocks over an HDMI cable. A growing
number of high-end audio DACs have adopted PS Audio’s I2Sstandard,whichwefreelyoer
and support to the high-end audio manufacturing community. The PST is compatible with all
properly implemented DACs that are compatible with our published protocols.
Although an HDMI cable is used for the I2S connections, it’s important to note that I2S data is
not HDMI data, and the PST’s I2S output should not be connected to the HDMI input on a DAC
or receiver. The HDMI connector and cabling are used only to deliver audio via I2S.
Connect a high-quality HDMI cable between the PST’s I2S output to a compatible DAC’s I2S (via
HDMI)input.Note:thequalityandlengthoftheHDMIcablehavesignicantimpactsonaudio
performance. The shorter the cable, the better the sound. We recommend using a ½-meter
length, if possible. Longer cables will work, but make certain you install the highest-quality
HDMI cable possible within your budget.
PS Audio® Inc. 800-PSAUDIO 4865 Sterling Drive Boulder, Colorado 80301 99
Page 10

®
Operating Manual
Users can select what comes out of this output when an SACD is played. The choices are:
SACD (DSD), Stereo downsampled from the stereo SACD layer (PCM), or Red Book audio
(PCM). The PST does not play multi-channel discs.
The pure DSD output on an SACD disc’s master layer is available only through the I2S output. If
that connection is not present, the PST will default to playing the SACD’s CD layer.
Non I2S compatible DACs will not reproduce the DSD layer of SACD in order to protect copyright
restrictions and restrict illegal copying of the master layer.
If desired, it is possible to toggle through an SACD’s DSD layer and its CD layer if the appropriate
and compatible I2S connection has been established. This can be selected via the Menu item:
Layer.
Coax and XLR Connections
XLR
If an I2S input is not available on your connected DAC, PS Audio recommends XLR as the
next-best connection. The XLR outputs provide a balanced digital output stream containing a
combined version of the musical data and multiple clocks.
Using a high-quality XLR data cable, connect either of the PST’s XLR outputs to the corresponding
input of your DAC.
Two XLR connectors are provided for compatibility with DACs that use two cables for double-rate
DSD. See section on System sub-menu: DoP Mode. If this mode is not enabled, both XLR
connectors output the same signal.
RCA or BNC (Coax)
Many DACs rely upon a coaxial digital connection to receive data. Digital audio transferred over
a single RCA or BNC coaxial cable is in the S/PDIF format (Sony/Philips Digital Interface), which
combines digital audio with multiple clocks on a single cable.
Using a high-quality RCA (or BNC) cable optimized for data transmission, connect the PST’s RCA
or BNC output to your DAC’s RCA or BNC input. Two XLR connectors are provided for compatibility
with DACs that use two cables for double-rate DSD. See section on System sub-menu: DoP Mode.
If this mode is not enabled, both XLR connectors output the same signal.
Connecting to a network
The PST connects to your home network using Wi-Fi or a standard Ethernet jack to receive
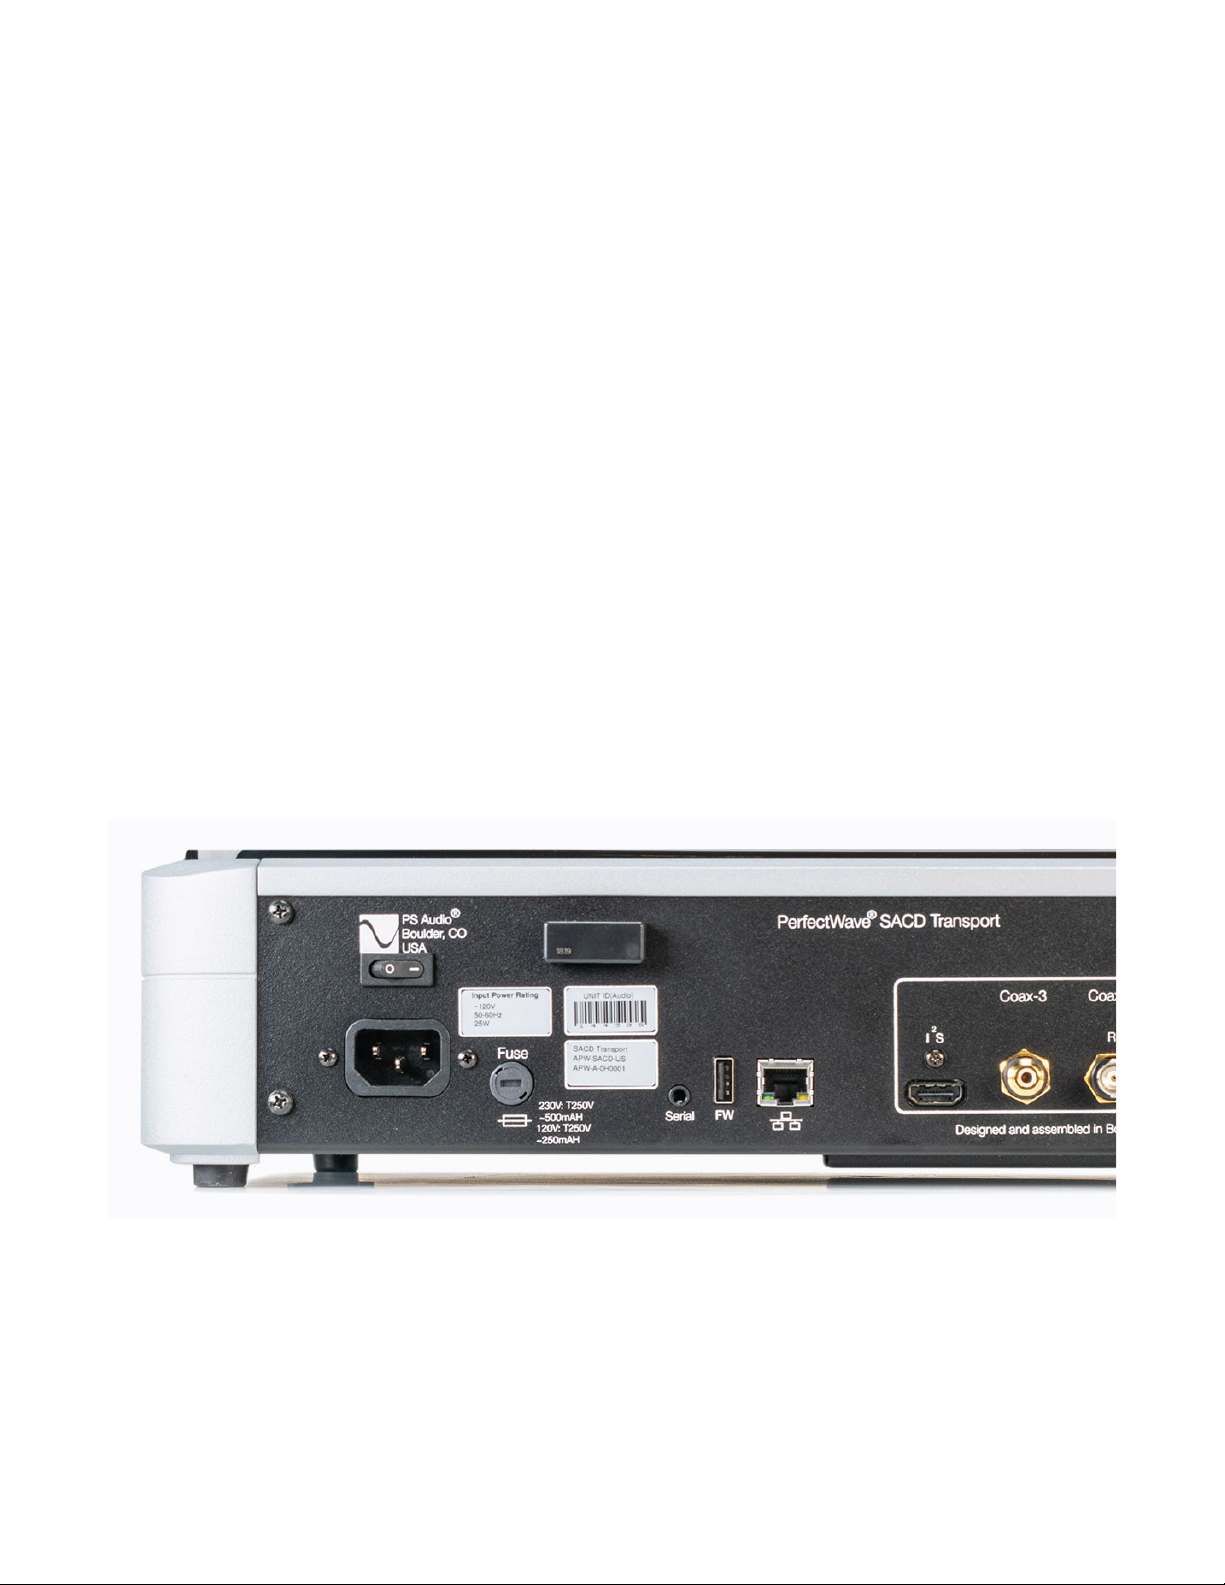
rmwareupdates.EitherenableWi-FiorconnecttheEthernetjacktoyourhomenetwork.We
recommend using a CAT5 or CAT6 cable for upgrades. In addition, in order to make sure your
PST is fully compliant with international regulations, please install the included ferrite noise
suppressor onto the Ethernet cable, around the end of the cable closest to the unit.
1010
PS Audio® Inc. 800-PSAUDIO 4865 Sterling Drive Boulder, Colorado 80301
Page 11
Operating Manual
Note: It is not necessary to enable Wi-Fi or connect the Ethernet for normal playback operation
of the PST.
The network connection should be to an internet-connected router or through a wireless
Ethernet bridge connected to a router. The PST’s internet connection via the network cable will
beautomaticthroughanyDHCP-enablednetwork.Mostinternetsetupsinthehomeoroce
are DHCP-enabled, and connection should take place within a very short period of time.
Youcanlookonthefrontpaneldisplayforvericationofconnection.Whenyouareconnected
to the internet and the PST is powered up Ethernet icon will be displayed on the icon bar at the
top of the screen. If the network is not connected, no icon will appear in the icon bar.
The PST can also receivefactory rmware updates via its network connection, should they
become available. In addition, the PST has a built-in Wi-Fi antenna, which can be used to
receivefactory-suppliednetworkrmwareupdates.
Powering the PST
Once all the digital audio and network connections are made, use a high-quality AC cable to
connect the PST to an AC wall outlet or AC outlet of a power conditioner. The supplied AC
power cord will work but upgrading to a high-end power cord, as well as the use of a PS Audio
PowerPlantACRegenerator,willoersonicbenets.
PS Audio produces an entire line of high-quality power cables that are generally accepted
as being some of the best in the industry. Whatever you choose, make sure it honors the
music.
Turn the AC power switch on the rear of the PST to the ON position. The power switch is
located above the AC inlet as you face the rear panel.
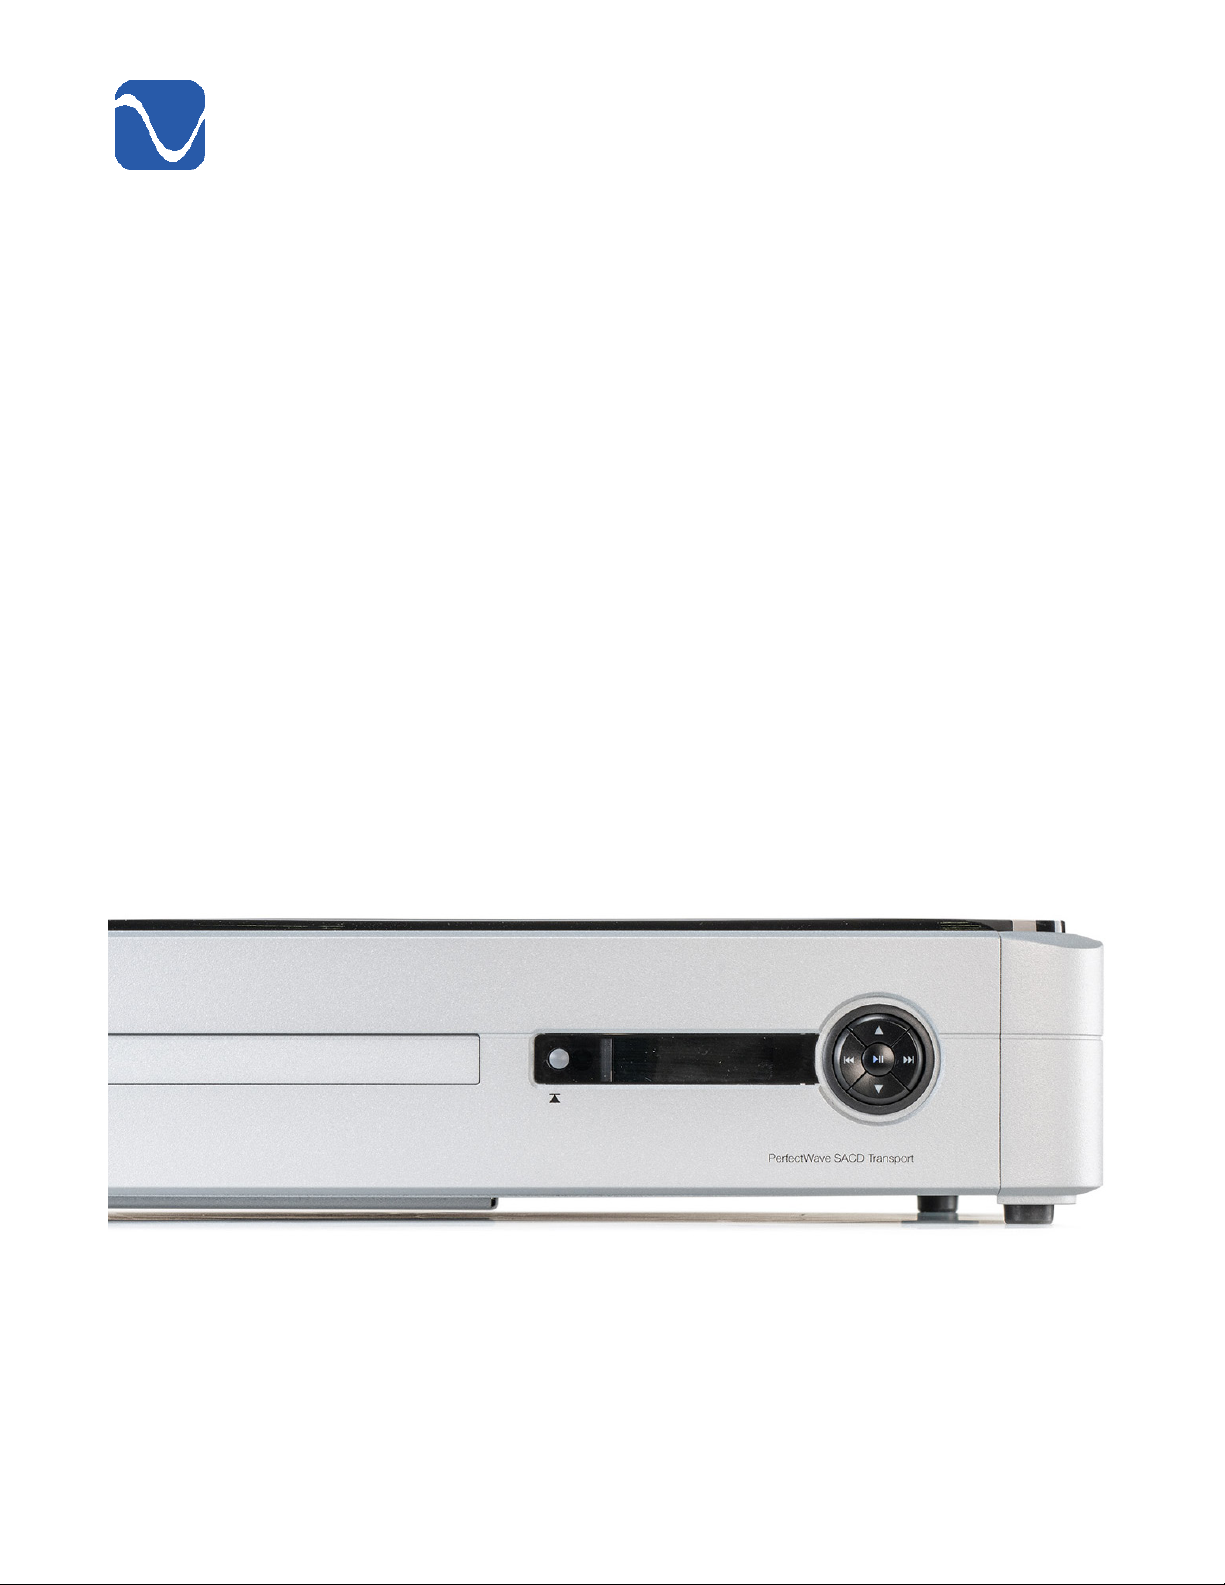
The PS Audio logo button, located on the upper left hand corner of the unit, is the Idle/Operation
PS Audio® Inc. 800-PSAUDIO 4865 Sterling Drive Boulder, Colorado 80301 1111
Page 12
®
Operating Manual
Mode control for the PST. This control has two modes: Idle Mode and Operational Mode.
Idle Mode is designed to keep power on to critical internal circuitry including power supply
capacitors, thermally sensitive semiconductors and integrated circuits.
Idle Mode
The master power switch on the rear panel should remain on at all times. When your connected
equipment is not in use, the PST can be placed in Idle mode. Putting your unit in Idle mode will
deactivate all of its output relays.
Idle mode can be activated/deactivated by pressing the PS Audio logo button, located on the
upper-left hand corner of the PST front panel. When the logo button is not lit, the PST is in Idle
mode.Idlemodecanalsobeactivated/deactivatedbypressingtheOn/Obuttonsatthetop
of the remote.
CAUTION: Activate Idle mode before powering down your unit using the rear panel master
power switch.
Operating the PST
Front panel controls
All functions of the PST can be accessed via the Open/Close/Menu Access button, front panel
control ring and menu display.
Open/Close/Menu Access Button
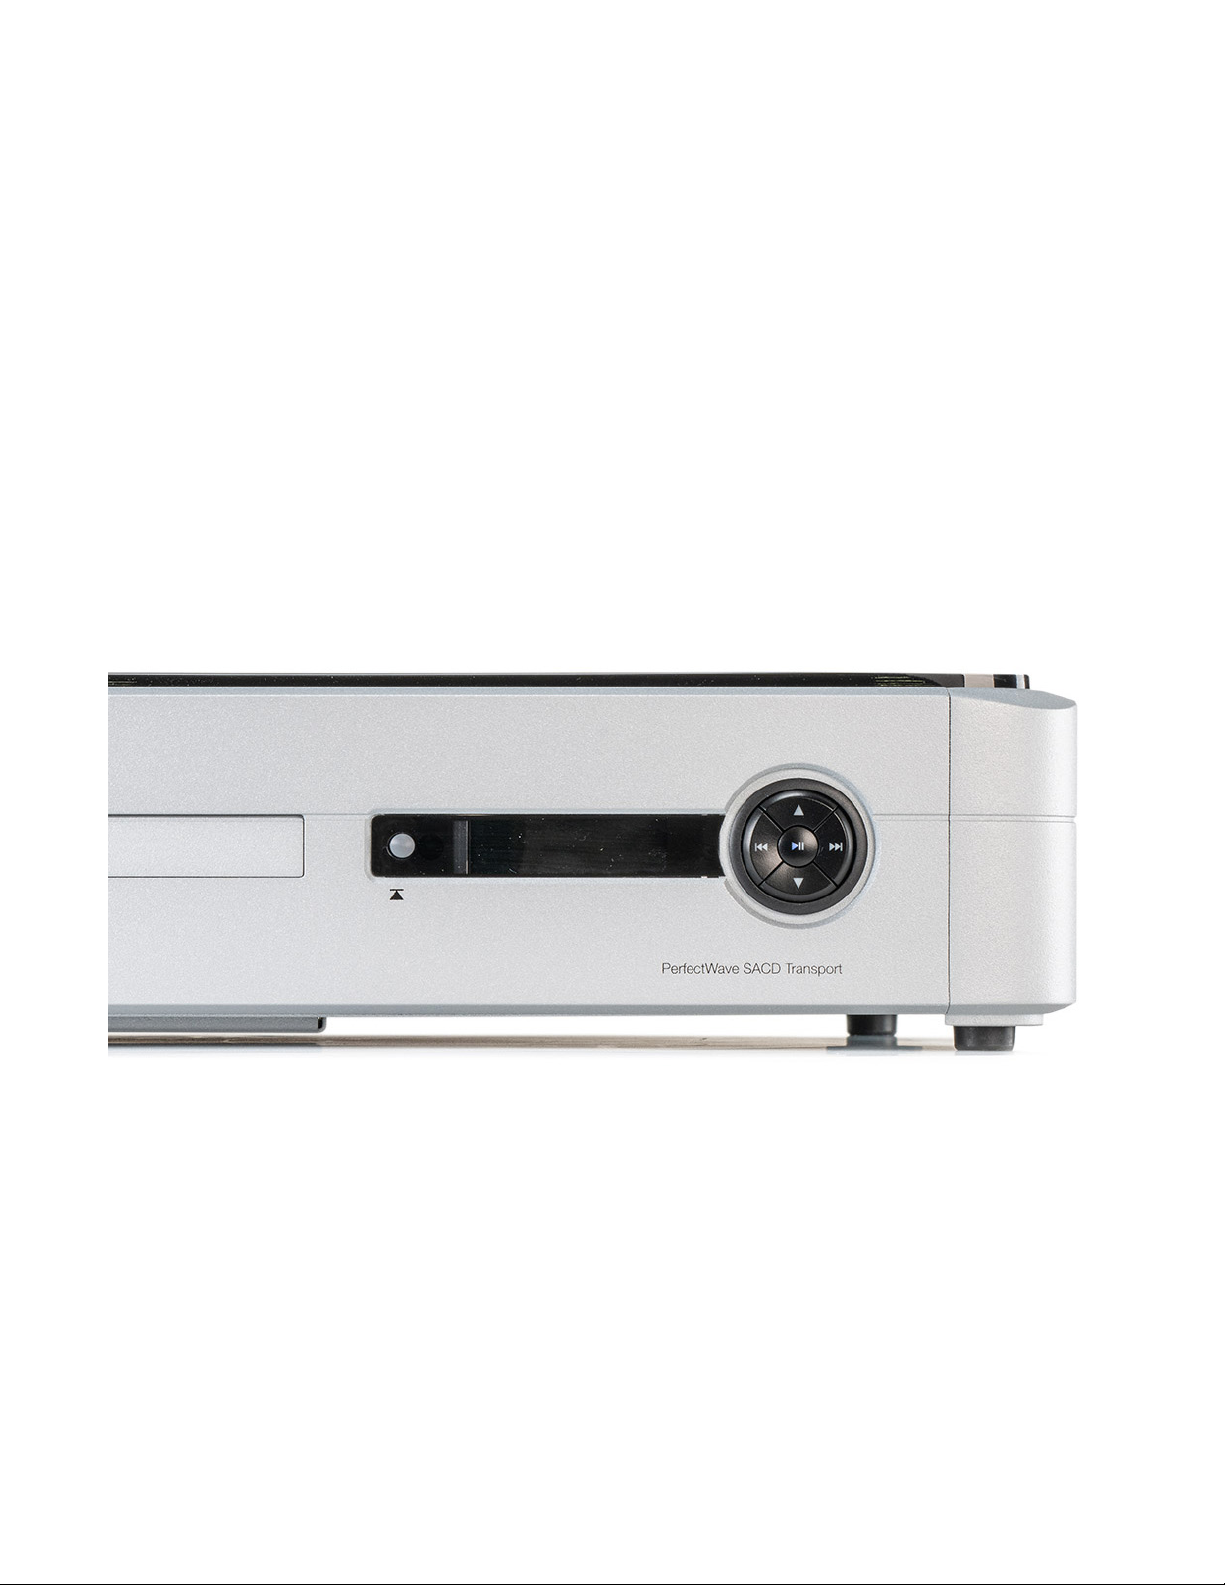
The Open/Close/Menu Access button is the round black button to the left of the display. It is
used to open and close the disc loading tray. Press it to open the tray and press it again to close
the disc tray. You can also press gently on the front of the tray itself to close it. Holding down
the button will access the Menu display.
1212
PS Audio® Inc. 800-PSAUDIO 4865 Sterling Drive Boulder, Colorado 80301
Page 13
Operating Manual
The Display
The front panel display will show various information according to the function selected,
including track number and duration, elapsed time, disc type and other information.
• By default, the display shows the track number and remaining time of the currently playing
track.
• To display the elapsed time of the currently playing track, long press the up arrow navigation
button on the control ring.
• To ensure it is set to the correct mode (remaining or elapsed), this may be done while a track
is playing.
• Once selected, the remaining/ elapsed time mode will not change unless the unit is powered
ointheback.
The Front Panel Control Ring
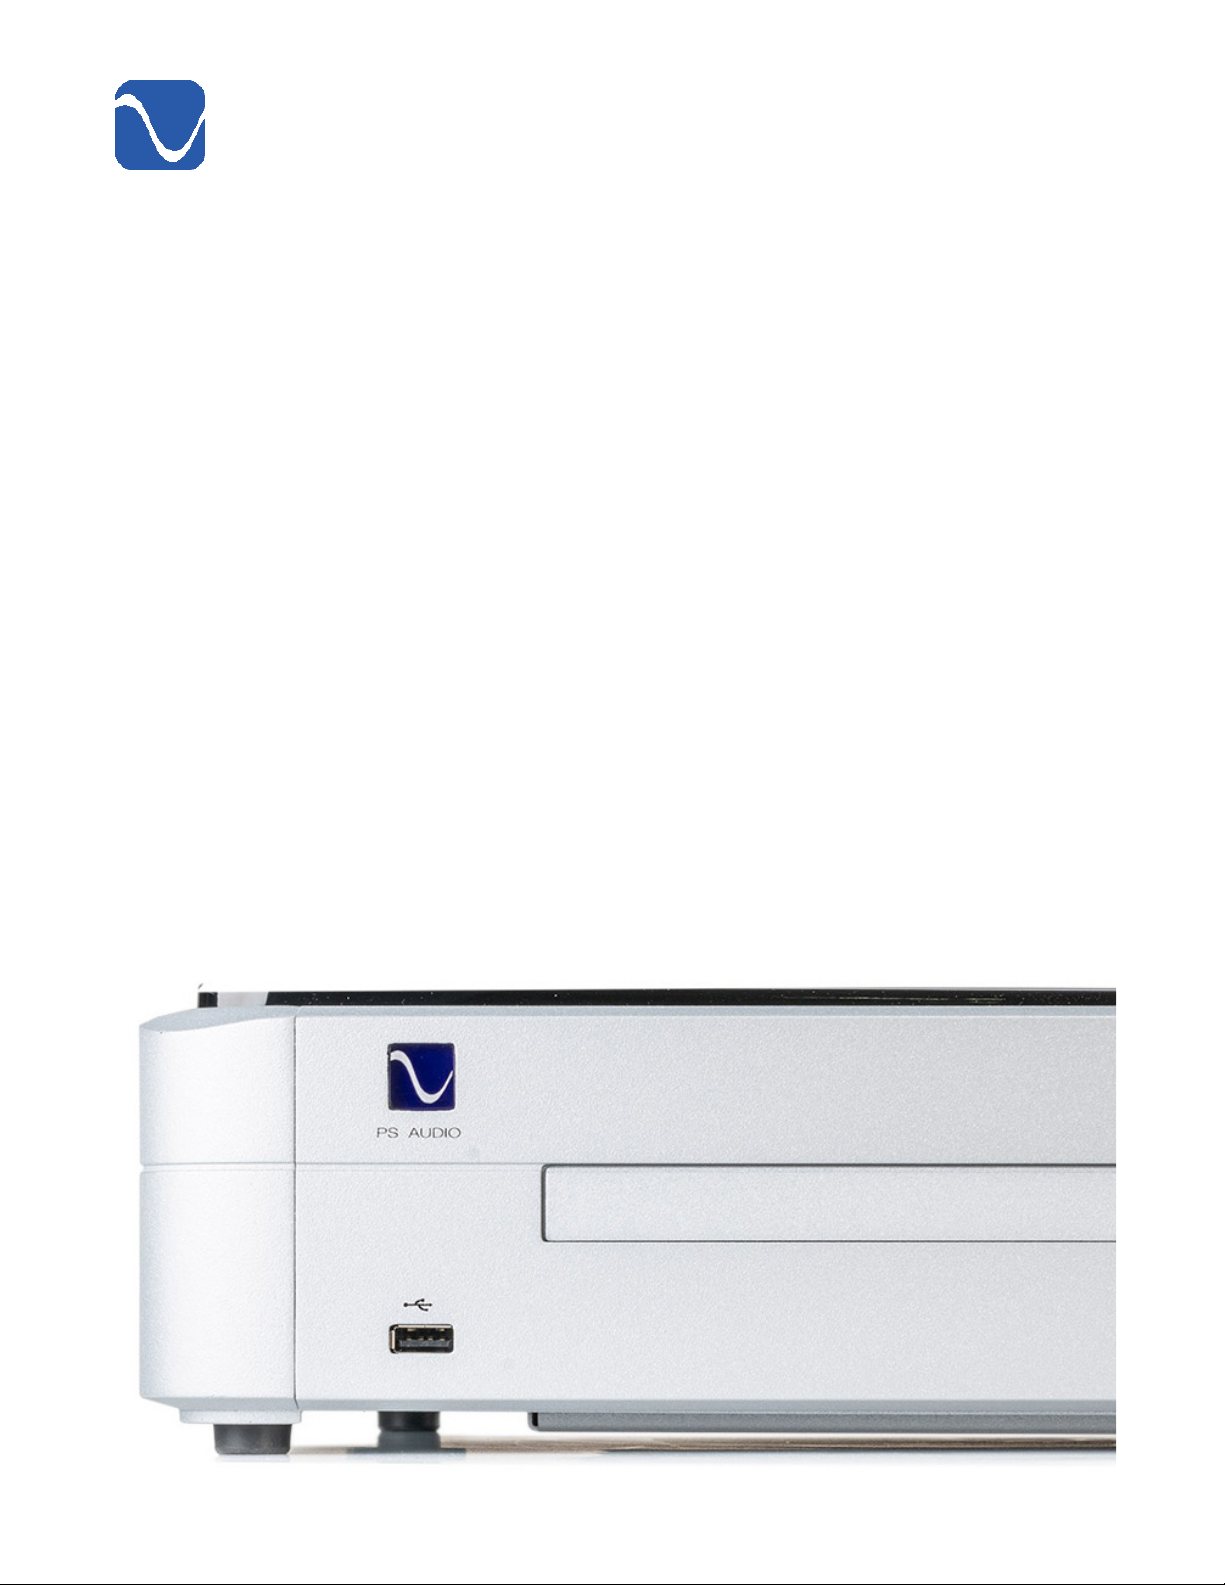
The ve buttons on the controlring can have dierentfunctions depending on whether the
button is given a short press or a long press.
For Disc Playback
Center:
• A short press will begin play of the selected source.
• If a disc is playing, another short press will pause the disc.
• A long press will stop disc playback.
• Thedierencebetweenpauseandstopisthatpausewillhaltatthecurrenttrackandtimeand
the SACD drive will continue to spin. Pressing stop will return to the beginning of track 1 and
the SACD drive will spin down and stop.
PS Audio® Inc. 800-PSAUDIO 4865 Sterling Drive Boulder, Colorado 80301 1313
Page 14
®
Operating Manual
Left:
• A short press will skip backwards to the previous track.
• Ontherstpress,itwillskipbacktothebeginningofthecurrenttrack.
• Ifpressedwithintherstthreesecondsofatrack,itwillskipbacktotheprevioustrack.
Right:
• A short press will skip to the next track.
Up:
• While a track is playing, a short press will cause the player to enter fast-forward mode,
scanning through the track at approximately ten times the normal playing speed.
• Pressing the Up key again or any key will bring the PST out of fast forward mode and the
disc will go back to playing normally.
• A long press (more than two seconds) on the Up button will toggle the time display to show
either remaining time (counting down) or elapsed time (counting up). The default is remaining
time.
Down:
• While a track is playing, a short press will cause the player to enter fast-rewind mode,
scanning backward through the track at approximately ten times the normal playing speed.
• Pressing the Down key again or any other key will bring the PST out of fast rewind mode and
the disc will go back to playing normally.
• A long press (more than two seconds) on the Down button will toggle the time display
to be either remaining time (counting down) or elapsed time (counting up). The default is
remaining time.
1414
PS Audio® Inc. 800-PSAUDIO 4865 Sterling Drive Boulder, Colorado 80301
Page 15

Operating Manual
Playing from a USB Drive
The front panel USB input on the PST is available for small music collections stored on USB
drives. Simply plug in a USB stick and its contents can be accessed and played back through
the PST using the same controls on the front panel or the remote control that would be used for
disc playback. The tracks on the USB drive can be navigated via the front-panel controls or the
remotecontrol.ThePSTsupportsthesameleformatsforUSBandDVDdiscs.Sub-folders
arenotsupportedandonlylesintherootdirectoryareplayed.
Note that while this front-panel input is a convenient way to access a limited amount of music – for
example, playing demo tracks from a friend’s collection or at an audio show – it is necessary to
scroll through the tracks one by one, which can be time-consuming. As such, this input should be
viewed more as a courtesy port than a primary means of connecting music.
Menu
The PST features a menu display system that is accessible using the small selector button
andcontrolring.It’sagoodideatofamiliarizeyourselfwiththedierentfunctionsinthePST’s
menu. To access the menu, simply press and hold the menu button to the left of the display. A
gear icon will appear in the upper right corner showing that you are in the Settings menu.
To scroll through the available menu options, use the left and right arrow buttons on the
control ring.
To scroll through the available options for a menu item, use the control ring up and
down buttons.
Exiting the Menus
Executing a long press of the menu button (holding for more than two seconds) or the center
Play/Pause button will exit the menus and return the unit to the Home screen. The menus
will also timeout after seven seconds. Note that some settings (such as repeat) take eect
immediately,whileothersettingswillnottakeeectuntilanalselectionismadeandyouexit
the menus (such as selecting Source).
Menu Features
Repeat:Togglesbetweeno,repeatsong(Single)andrepeatalbum(All).
PS Audio® Inc. 800-PSAUDIO 4865 Sterling Drive Boulder, Colorado 80301 1515
Page 16
®
Operating Manual
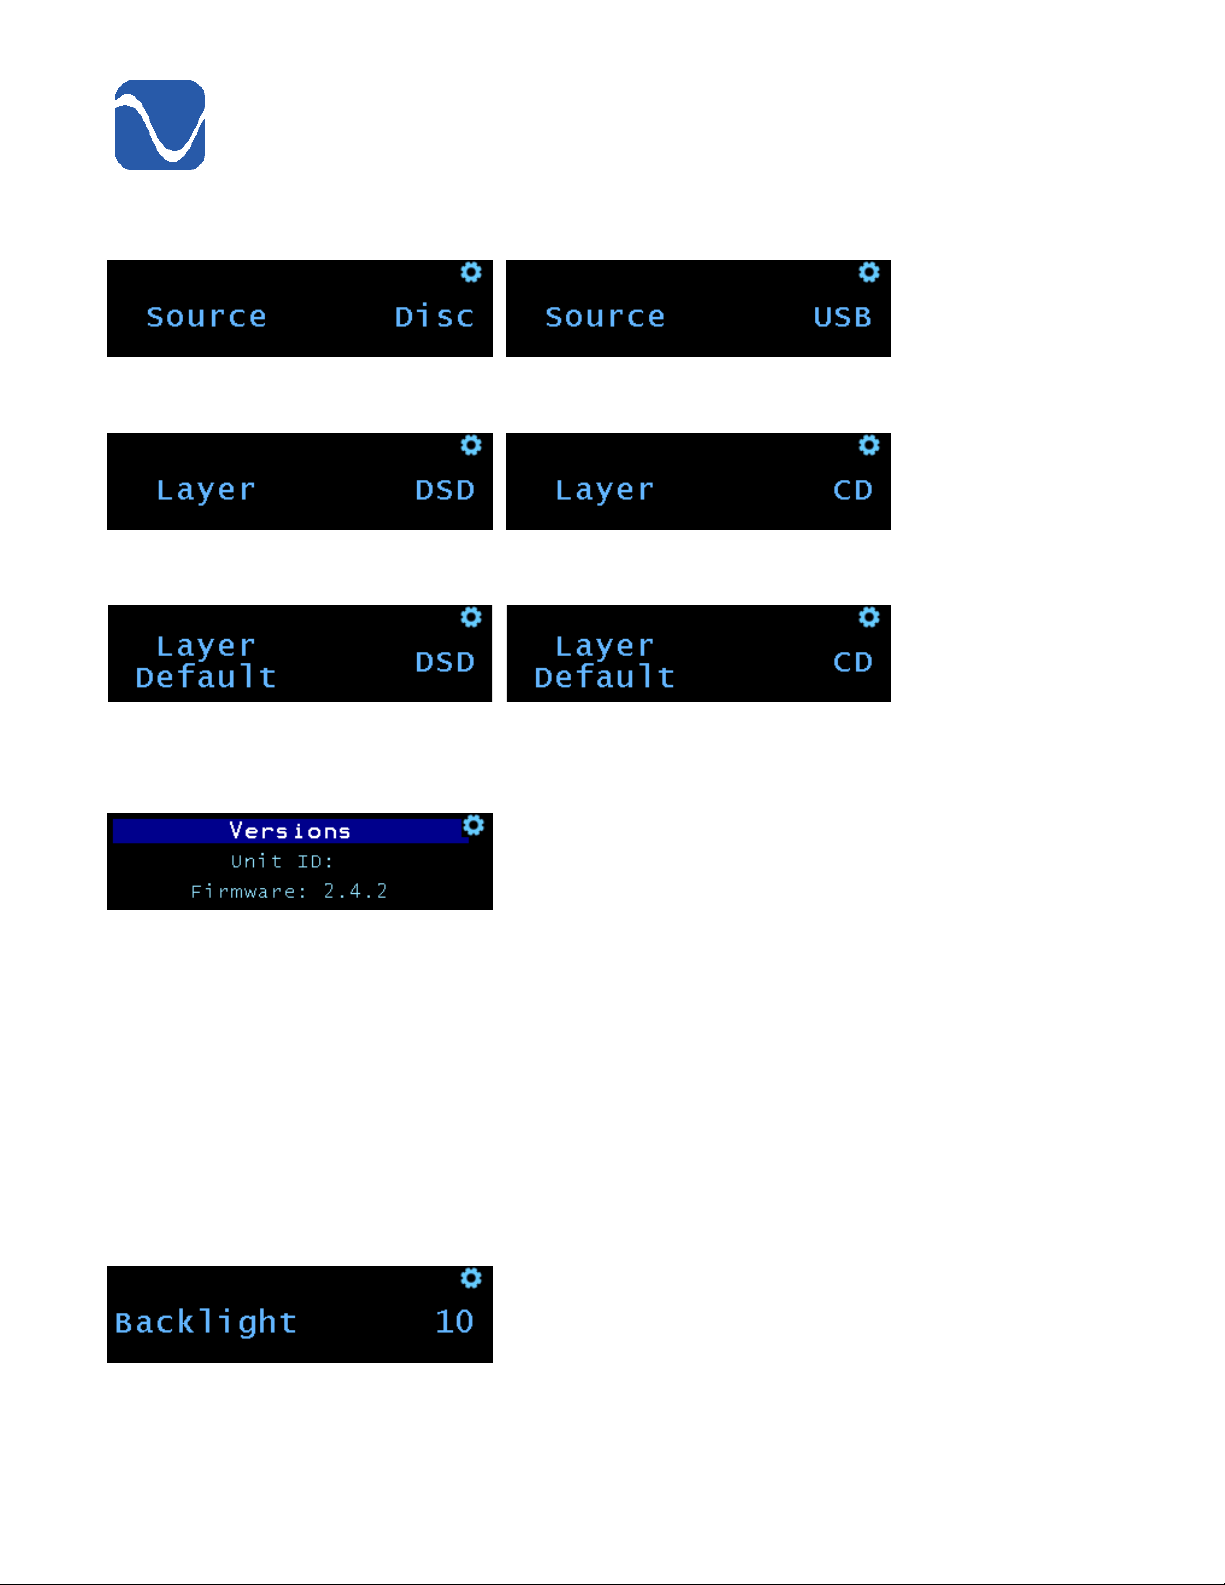
Source: Toggles between disc or USB source.
Layer: Toggles between DSD and CD layer on SACDs.
Layer Default: Sets the default layer (DSD or CD) for new SACDs.
Versions:ThismenudisplayshowstheversionsofthePST’srmware.Ifyouneedtocontact
our customer service team for help with your unit, please have this information ready.
More Settings
There are additional, less frequently used features in the Settings sub-menus. The features are divided
into two groups: System, and Network. Sub-menus are displayed on the screen with a triangle
pointing to the right. To enter these sub-menus, use the navigation keys until the desired sub-menu is
displayed, then double-press the menu button or single press the center Play/Pause button to go into
the sub-menu.
System sub-menu
Backlight: The brightness of the display can be adjusted. The range is from 1 to 10.
1616
PS Audio® Inc. 800-PSAUDIO 4865 Sterling Drive Boulder, Colorado 80301
Page 17
Operating Manual
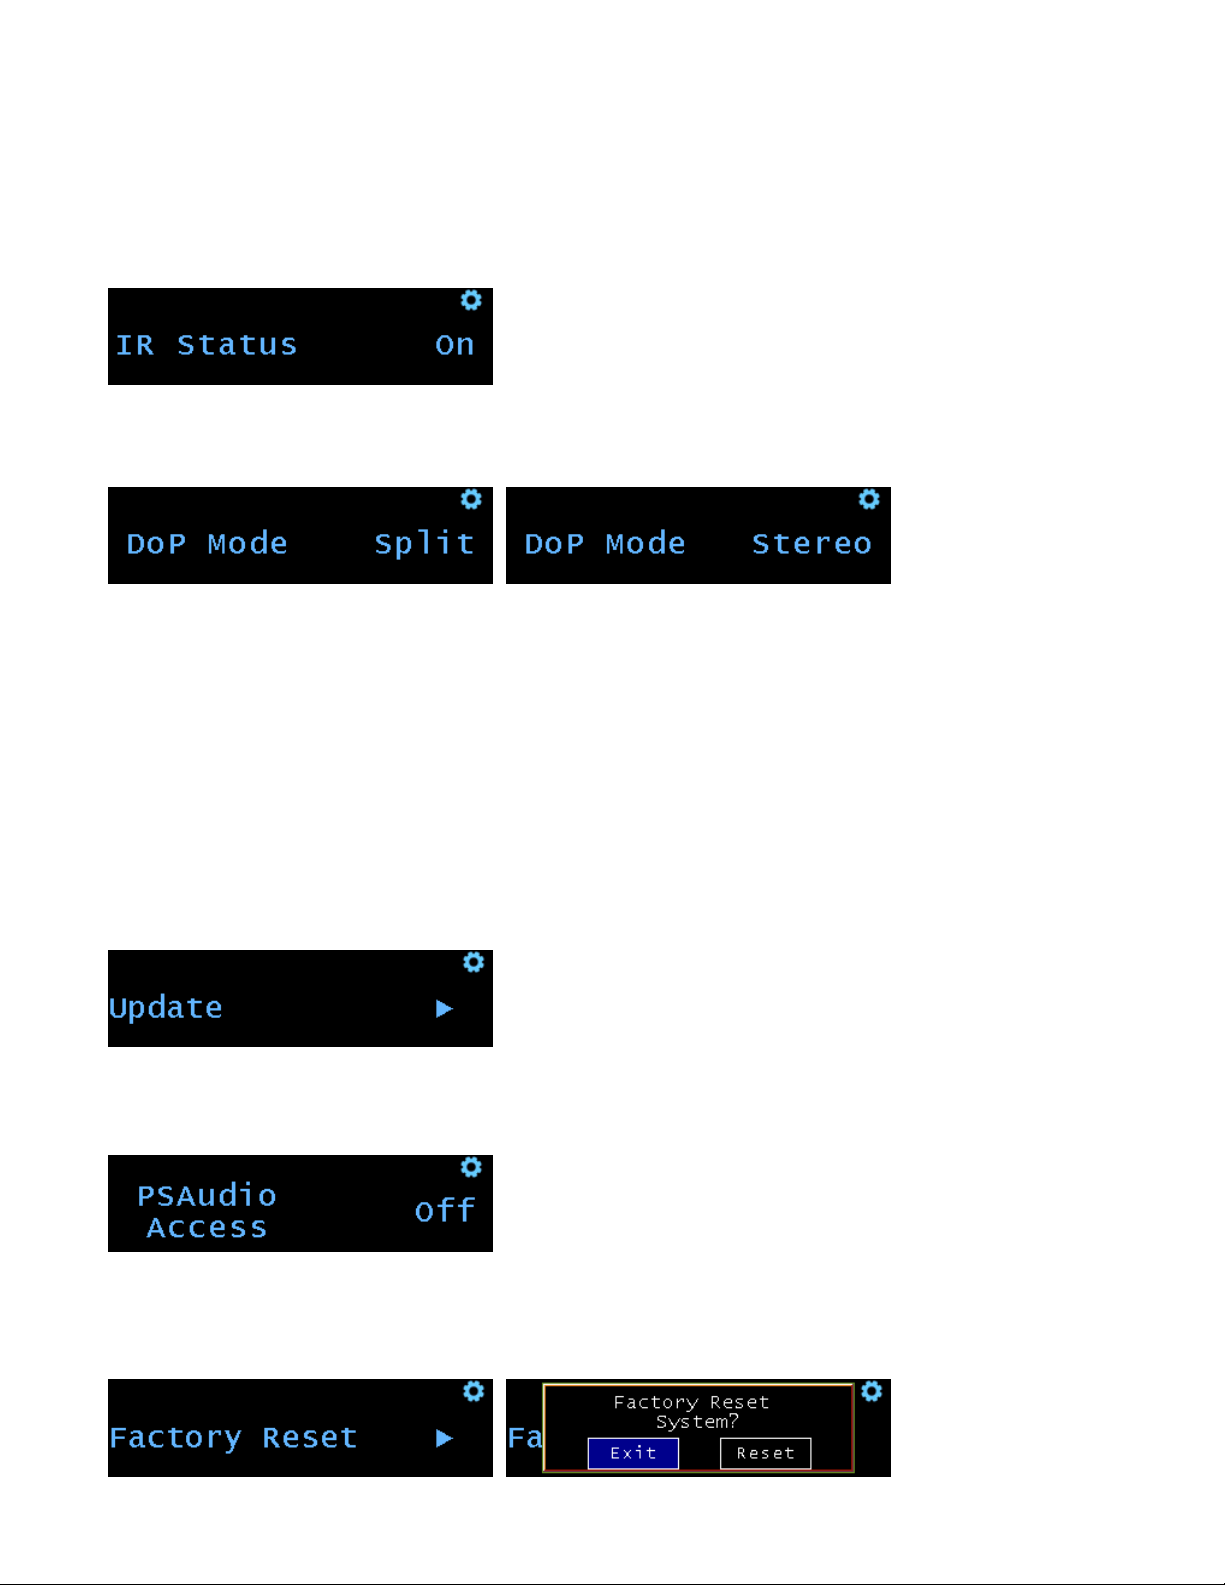
IR Status: Enables and disables the IR. This may be useful if you have a remote for other
devices that causes the PST to perform unwanted operations.
DoP Mode:ThisfeaturedetermineshowdoublerateDSD(DSD128)leswillbesentoverthe
Coax and XLR outputs. The options are Split and Stereo. Split is the default.
In “Stereo” mode, the DSD128 signal is encoded into a 352.8KHz PCM frame. The same signal
is sent to all Coax and XLR connectors. However some DACs are not capable of decoding
352.8KHz frames. In “Split” mode, each channel (L and R) is encoded separately in a 176.4KHz
PCM frame. The Left channel will be sent to the the “L” connectors and the Right channel will
be sent to the “R” connectors. The Coax-3 output is always in stereo mode.
The DSD layer of an SACD will only be output on the I2Soutputconnector.DSDfromdatales
will output natively on the I2S output connector and in DoP format on the Coax and XLR output
connectors.
Update:Checkforarmwareupdate.Thermwarewillbedownloadedoveryournetworkso
the unit will need to be connected to the internet via Ethernet or Wi-Fi.
PSAudio Access: Turns on the ability for PS Audio to remotely access a unit over the Ethernet
or Wi-Fi connection to debug issues.
Factory Reset:Thisfeatureallowsyoutoresetallofthecongurationsettingsbacktowhat
they were when the PST was shipped from the factory. Any custom settings, Wi-Fi networks, or
any other settings you have made will be erased.
PS Audio® Inc. 800-PSAUDIO 4865 Sterling Drive Boulder, Colorado 80301 1717
Page 18
®
Operating Manual
Network sub-menu
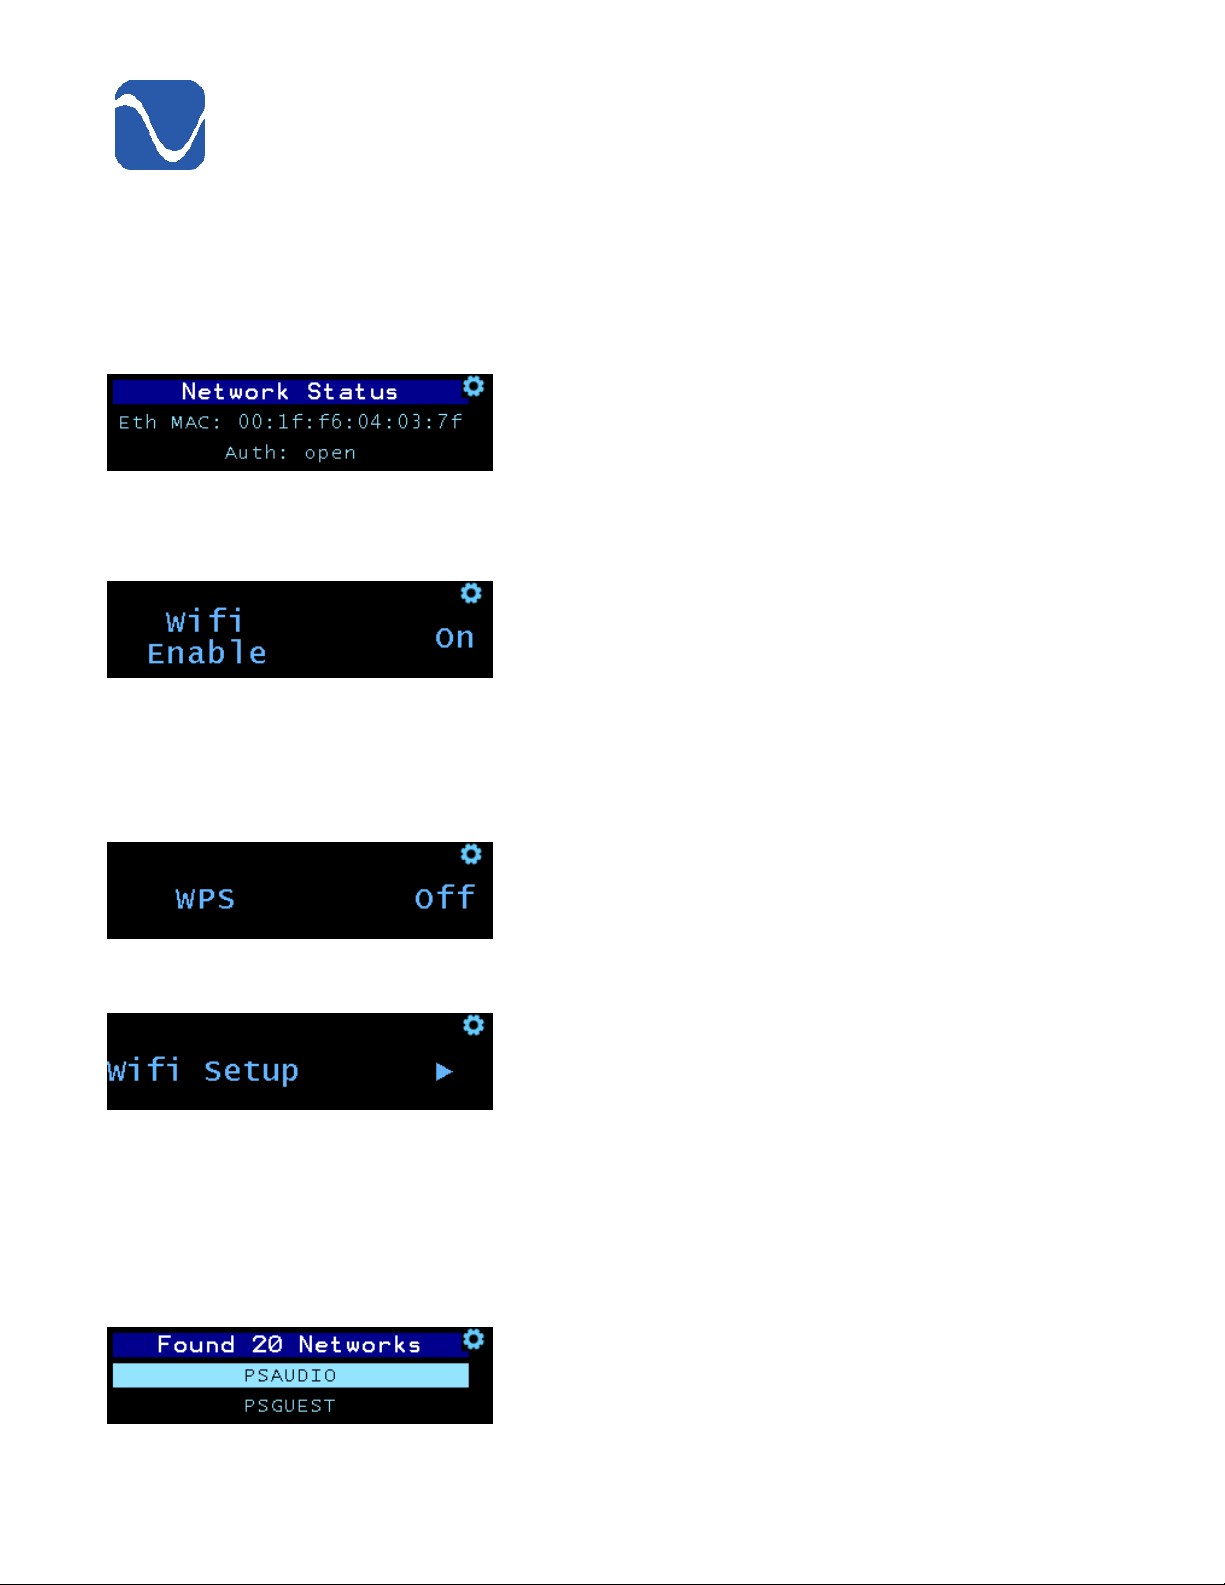
Network Status: This menu item will show you information about your network connection,
including Wired/Wi-Fi, IP address, and connection status. This menu is information only; there
are no settings.
Wi-Fi Enable: This feature allows you to enable/disable the wireless (Wi-Fi) functionality. (Not
available in Japan).
WPS:ThisfeatureisforusingWPS(Wi-FiProtectedSetup)tocongureyourPSTwithyour
network without the need to enter passwords. Use this menu to activate the WPS feature, then
press the corresponding WPS button on your router. Your PST will then be connected to your
Wi-Fi network automatically.
Wi-Fi Setup
The Wi-Fi Setup wizard is used to manually setup a Wi-Fi network connection. During the Wi-Fi
setup process, you will see the following screens:
Network Select: Select your Wi-Fi router from the drop down menu using the Up or Down
arrow keys to select the correct AP (access point). Press the menu select button or center Play/
Pause button to choose the AP.
1818
PS Audio® Inc. 800-PSAUDIO 4865 Sterling Drive Boulder, Colorado 80301
Page 19
Operating Manual
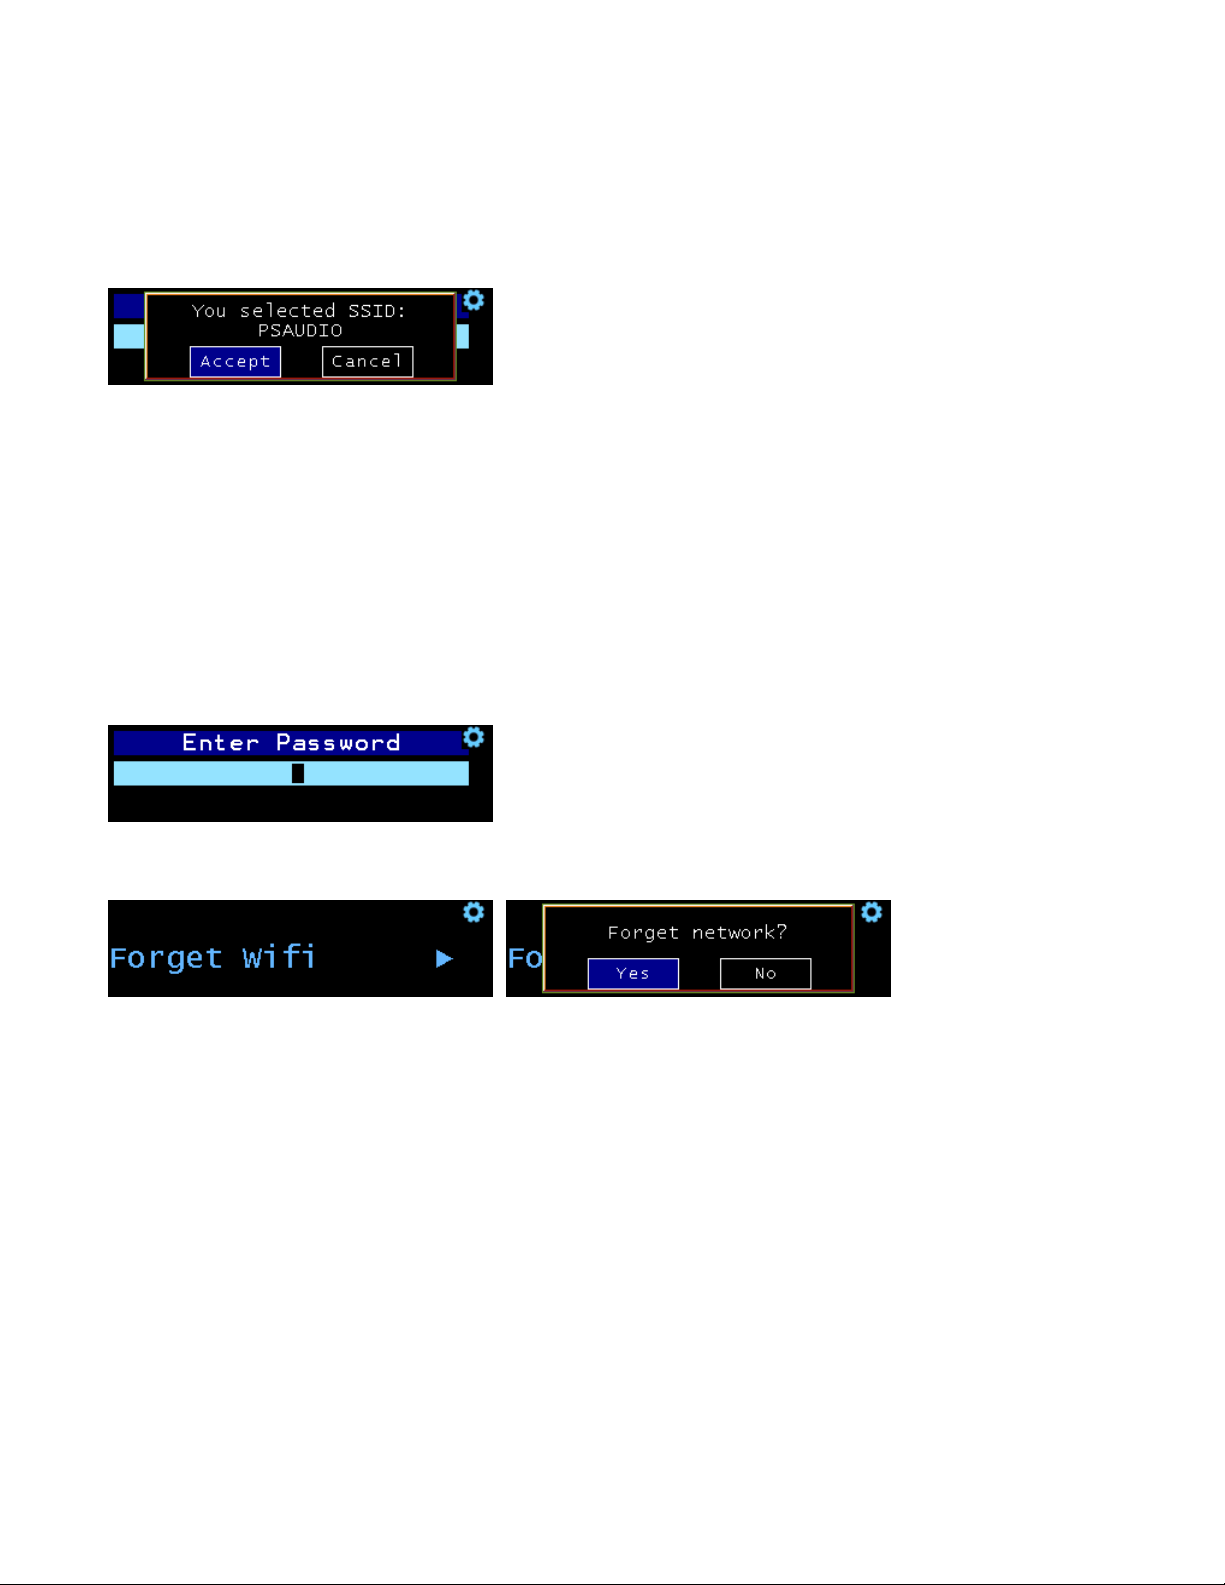
SSID Accept:AvailablenetworkresourcesareidentiedbytheirSSID.Usethecontrolringto
Accept or Cancel the AP SSID selection.
Password Screen: Press the Up or Down arrow keys to scroll through the characters. If you
press and hold the Up or Down arrow key, the PST will scroll quickly through the characters.
Press the menu select, the center Play/Pause button, or the Right key to select the character
and enter the next character. Double-press the menu select button or use the Left arrow key to
backup one character. Once the last character is entered long press the menu select button or
long press the center Play/Pause button to save the password. The PST will connect to your
access point (router). The characters are arranged by capital letters, lower case letters number
1-9, then 0. The character after the 0 is a space character. The remaining characters are special
characters(!,@,#,etc...).Itmaybefastertondthenumbercharactersbygoingbackwards
from the A.
Forget Wi-Fi:AllowsyoutodeletethecurrentWi-Ficonguration.
PS Audio® Inc. 800-PSAUDIO 4865 Sterling Drive Boulder, Colorado 80301 1919
Page 20
®
Operating Manual
Using the Remote Control
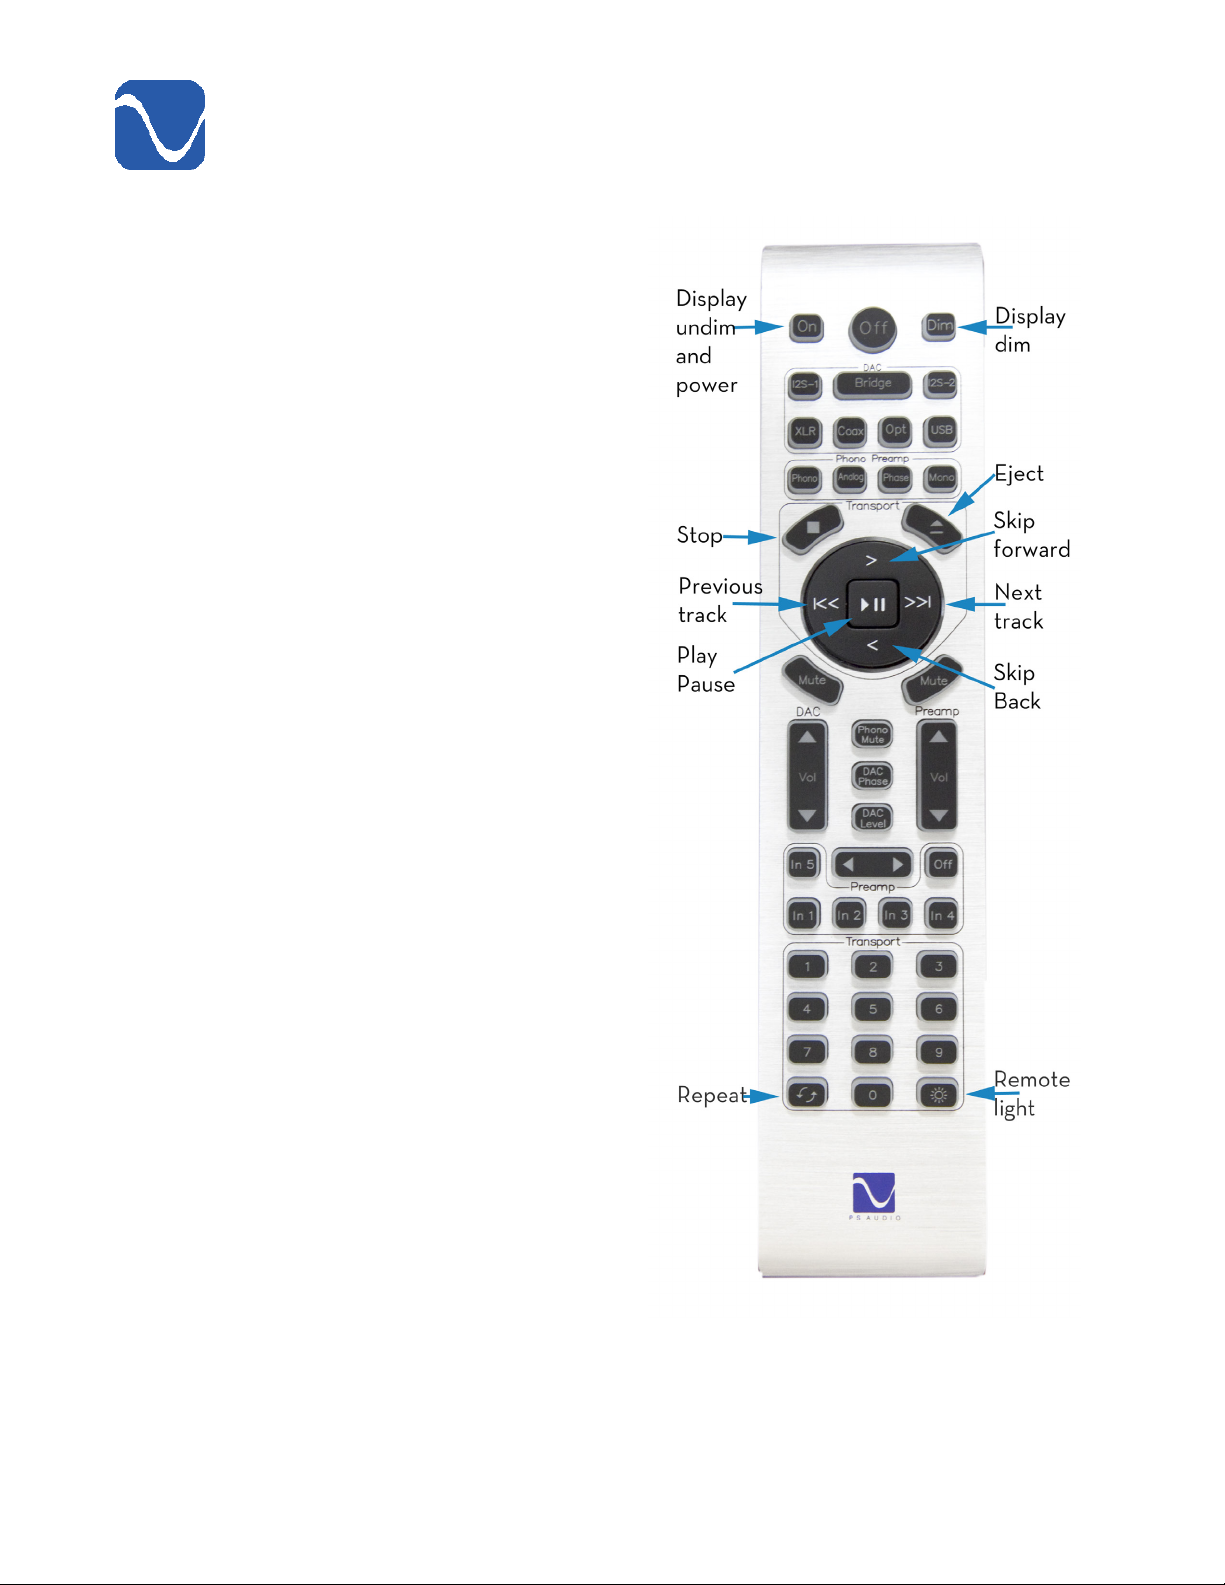
Your PS Audio PerfectWave SACD Transport is
supplied with a full-function remote control. In
addition to operating the PST, the remote can
also control compatible PS Audio components
such as the Stellar Strata Integrated Amplier,
StellarGainCellPreamplier, DirectStreamDAC,
BHKSignaturePreamplierand other PS Audio
products.
The operation of the PST’s remote control
is intuitive, with standard icons and controls
corresponding to familiar functions such as Play/
Pause, Stop, Next Track, Previous Track, direct
track number access and so on.
The remote comes supplied with two AAA
batteries. Please remove the back cover and
insert the batteries in the correct orientation.
On/O
Usethe“O”buttontoputtheunitinIdlemode.
Use the “On” button to return it to the operating
mode.
Display Dim
Pressing the “Dim” button will turn o the
display and all the indicators on your PST.
Any time you press any button on your remote
control, the PST will wake up and reactivate
the display and indicators for 7 seconds. After
7 seconds with no button activity, the display
will go dark again. Pressing the “On” button will
restore the PST display to normal operation.
2020
PS Audio® Inc. 800-PSAUDIO 4865 Sterling Drive Boulder, Colorado 80301
Page 21
Operating Manual
Emergency eject of a stuck disc
I
ntheunlikelyeventthatadiscgetsstuckinthePST,therstthingtotryisarebootofthe
unit.Turnothemainrearpanelpowerswitch.Wait10seconds,thenturntheswitchback
on. Once the PST has initialized, use the front panel Open/Close/Menu Access button or the
Open/Close button on the remote control to open the drawer and remove the disc.
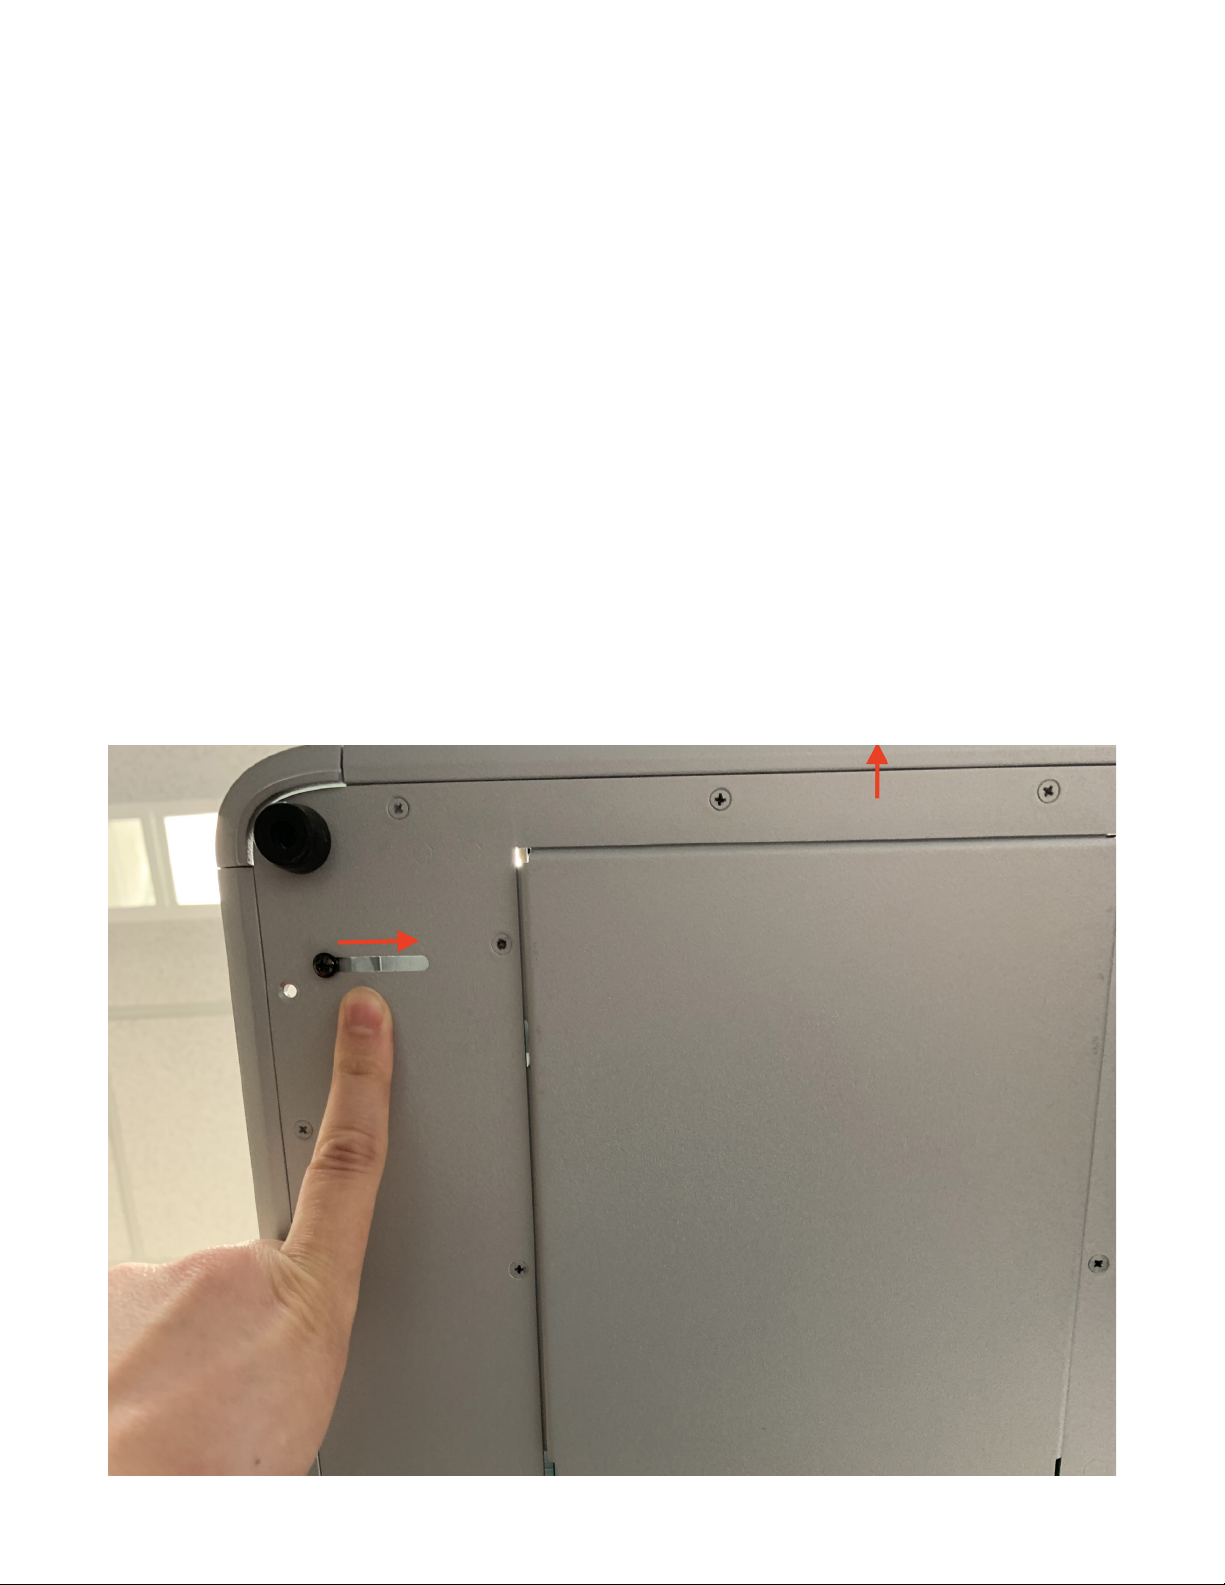
If the reboot doesn’t work, an emergency procedure is available.
Important note: do not tilt the PST backwards, as this may cause the disc to fall out of the tray and
get stuck in the back of the drive. This can not only damage the disc, but could also potentially jam
thedriveandmakeitdicultorimpossibletoopenthetray.Ifpossible,havesomeonehelphold
the unit straight so that the bottom of the unit can be accessed from below.
On the bottom panel of the PST, there is a screw. While facing the bottom of the unit, use your
hand/ngersto slide the screwalong the slot fromleft to right (towardsthe center of the unit).
This will engage the release mechanism, manually sliding the disc door open so the disc can be
retrieved. If the screw is tight and cannot be moved, use a screwdriver to loosen the screw slightly
so the mechanism can be slid along the slot. Do not completely unscrew.
Slide left to right
Front of unit
PS Audio® Inc. 800-PSAUDIO 4865 Sterling Drive Boulder, Colorado 80301 2121
Page 22

®
Operating Manual
Upgrading the Firmware
AttimesPSAudiomayintroducermwareupdatesthatupgradethefunctionalityofthePerfectWave
SACD Transport. This is done through the network, or manually with a USB drive.
TocheckforthecurrentrmwareversionofyourunitgotoMenuandscrolldowntotheVersions
menu.Compare the version number to thelatest rmwareavailable on the PSAudio-Resourc-
es-Downloads section of www.psaudio.com. If you need the latest version, you can download the
rmwareupdateatnocharge.
Afterdownloadingtheles,transferthem to a blank USBstick. Then place the stick in the rear
panelUSBslotofthePSTlabeledFW.Turnotherearpanelpowerswitch,waitfor10seconds
and then turn the power switch to the On position, which will reboot the PST. The front panel logo
(Ready)lightwillbeginblinking,indicatingthatthenewrmwareisbeinginstalled.
DO NOT SHUT OFF THE POWER OR DO ANYTHING ELSE WHILE THE UPDATE PROCESS IS
TAKING PLACE. BE PATIENT AND WAIT UNTIL THE LOGO LIGHT STOPS BLINKING.
Once the light stops blinking, keep the power to the PST on until it has fully initialized and is ready
for operation again. Then, remove the USB stick and then, once again using the rear panel power
switch, power cycle the PST.
Care of the PST
The PS Audio PerfectWave SACD Transport is constructed from durable and attractive materials.
However, should minor scratches occur in the top cover, they can be removed with any high-quality
automotive scratch removal product such as Kit’s Scratch Out or the appropriate Meguiar’s
products.Automotive nishingpolishandwaxcanbothbeusedonthetopplatetobringouta
beautiful luster.
2222
PS Audio® Inc. 800-PSAUDIO 4865 Sterling Drive Boulder, Colorado 80301
Page 23

Operating Manual
Specications
Physical
Unit Weight 22 lbs [9.97 kg]
Unit Dimensions 14” x 17” x 4” [ 36cm x 43cm x 10cm]
Shipping Weight 31 lbs [14 kg]
Shipping Dimensions 20.5”x 24” x 10” [52cm x 61cm x 25cm]
Power requirements
InputPower Modelspecic 100VAC,120VAC,or230VAC50or60Hz
Fuses 100V: 2.0A Time delay, H rated: 2.0AT(H)
120V: 1.6A Time delay, H rated: 1.06T(H)
230V: 1.0A Time delay, H rated: 1.0AT(H)
Power Consumption 30W
Optical discs SACD/CD/CD-R/CD-RW/
DVD-R*/-RW*/+R*/+RW*
(*Audiodataleonly)
USBDrive USBFlashDrivewithaudioles
File Format MP3/WMA/AAC (~48kHz/320bps)
WAV/FLAC/AIFF (~192kHz/24bit)
ALAC (~96kHz/24bit)
DSD (~5.6MHz)
Outputs
I2S 1 I2S output for PCM and DSD (raw)
Coax 1 output for PCM and DoP
BNC 2 output for PCM and DoP
Use in tandem for Double-rate DoP
XLR Balanced 2 output for PCM and DoP
Use in tandem for Double-rate DoP
RJ45 and WIFI
Ethernet and WIFI for over-the-air code update
PS Audio® Inc. 800-PSAUDIO 4865 Sterling Drive Boulder, Colorado 80301 2323
Page 24

®
Warranty Information
Product registration
By registering your product, you are validating the start date of your limited warranty. This
limitedwarrantyisineectfor3yearsfromthedatetheunitwasrstpurchasedfromPSAudio
or its dealers and agents. If you do not register your product within 30 days of service, a copy
of your purchase receipt from an authorized PS Audio dealer may be used as proof of purchase
to establish the warranty start date. If no proof of purchase from an authorized PS audio dealer
or registration is provided, the production date of the product will be used to determine the
warranty start date. You can register your product online, by phone, by mail, or by email.
What this warranty covers
This warranty covers defects in material and workmanship for products purchased from PS
Audio or its authorized dealers and agents. In the event your product fails, your sole remedy
under this limited warranty shall be to return the product to PS Audio or an authorized PS Audio
repair center. At the option of PS Audio, the product will be repaired without charge for parts or
labor, replaced, or the purchase price refunded through the original point of purchase.
Shipping
You are responsible to pay for the safe and proper shipment of the warrantied product to PS
Audio or its authorized repair center. Under this limited warranty, PS Audio or its authorized
repair center will pay the cost of returning the repaired or replacement product to you.
What this warranty does not cover
This warranty does not cover damage due to:
• Accidents, carelessness, improper transportation, misuse, neglect, or abuse
• Failure to follow the operating instructions that are provided by PS Audio in the Owner’s
Reference Manual (available for download at www.psaudio.com)
• Use in any manner inconsistent with PS Audio’s operating instructions (available for download
at www.psaudio.com)
• Lack of routine maintenance
• Connection to an improper voltage supply
• Alterationsormodicationstotheunit
• Improper or unauthorized repair, including repairs not authorized by PS Audio or a PS Audio
authorized repair center
• Fire,lightning,ood,“ActsofGod,”orothercontingenciesbeyondthecontrolofPSAudio
• Products purchased through an unauthorized source (if you have questions as to whether or
not a dealer is authorized, please contact customer support at www.psaudio.com
• Products with a factory-applied serial number that has in any way been altered, defaced, or
removed
Limitations under this warranty
In no event will PS Audio’s liability to you exceed the original purchase price of your unit. This
warranty does not cover the cost of custom installation, customer instruction, setup adjustments,
or signal reception problems. Consequential and incidental damages are not covered under
2424
PS Audio® Inc. 800-PSAUDIO 4865 Sterling Drive Boulder, Colorado 80301
Page 25

Warranty Information
this warranty. However, some states do not allow the exclusion or limitation of incidental or
consequential damages, so this limitation or exclusion may not apply to you. In the event that
your warrantied product cannot be repaired, PS Audio will either replace or refund the cost
of the unit. We reserve the right to replace any out-of-stock, discontinued, or limited edition
products with a comparable product. Discontinued products may not be available for warranty
Warranty transfer
Thiswarrantyisforthebenetoftheoriginalpurchaseroftheproduct.Thewarrantymaybe
transferred to a subsequent purchaser during the 3 year warranty period. To do this, you must
contact PS Audio directly to set up a transfer of warranty registration.
PS Audio® Inc. 800-PSAUDIO 4865 Sterling Drive Boulder, Colorado 80301 2525
Page 26

®
Service
Warranty service within North America
Please contact PS Audio customer support for service assistance, help with locating an
authorized PS Audio repair center, help with the operation of a product, or for more information.
Obtaining An RMA#
Inordertoreceivewarrantyservice,youmustrstobtainaReturnMerchandiseAuthorization
Number (RMA#) prior to returning any item. Please contact PS Audio or an authorized PS Audio
repair center to receive an RMA#. The RMA# must be on all returned items. If it is not clearly
marked, PS Audio will return the package back to you, freight collect.
Packaging and Shipping
Original packaging should be used for the safe transit of your PS Audio unit to the repair center.
If you do not have the original packaging, PS Audio can sell and ship replacement packaging
to you. You are responsible for the cost of shipping the product to a PS Audio authorized repair
center. You should insure the product for its full retail cost, in the event it gets lost or damaged
in transit. PS Audio is not responsible for damage incurred during the transit of products sent
to us. Shipping your product in non-PS Audio packaging may void this warranty. PS Audio
reserves the right to charge you for new factory packaging to return your product after a repair.
State Law
Thiswarrantygivesyouspeciclegalrights.Youmayalsohaveotherrights,whichvaryfrom
state to state.
International warranty service
PS Audio has authorized distribution in many countries of the world. In each country, the
authorized importing distributor has accepted the responsibility for warranty of the products
sold by that distributor. Warranty service should be obtained where the product was purchased.
Changes to our products
PS Audio reserves the right to modify the design of any product without obligation to purchasers
ofpreviouslymanufacturedproducts,andtochangethepricesorspecicationsofanyproducts
without notice or obligation to any person.
2626
PS Audio® Inc. 800-PSAUDIO 4865 Sterling Drive Boulder, Colorado 80301
Page 27

Your Serial
Number
Your Purchase
Information
Date of Purchase
Your Product
PS Audio® Inc. 800-PSAUDIO 4865 Sterling Drive Boulder, Colorado 80301 2727
Page 28

Thanks for being a part
of the PS Audio Family
At PS Audio, we’re family.
Not just a family that runs in bloodlines, but in frequencies.
Because while we may not all share the same genes here, we are all related by
a passion, nay, obsession with listening to the music we love at the highest,
most breathtaking quality possible.
And in our minds, that makes us kin.
In fact, we believe that every nutty, hertz counting audiophile out there is part
of our tribe.
That’s how we’ve built our company over the last 50 years - with the kind of
care and respect that you give to your family.
PS Audio® Inc. 800-PSAUDIO 4865 Sterling Drive Boulder, Colorado 80301
 Loading...