

Page 1
Owner’s Reference
Instructions for Use
Owner’s Reference DirectStream DAC MK2
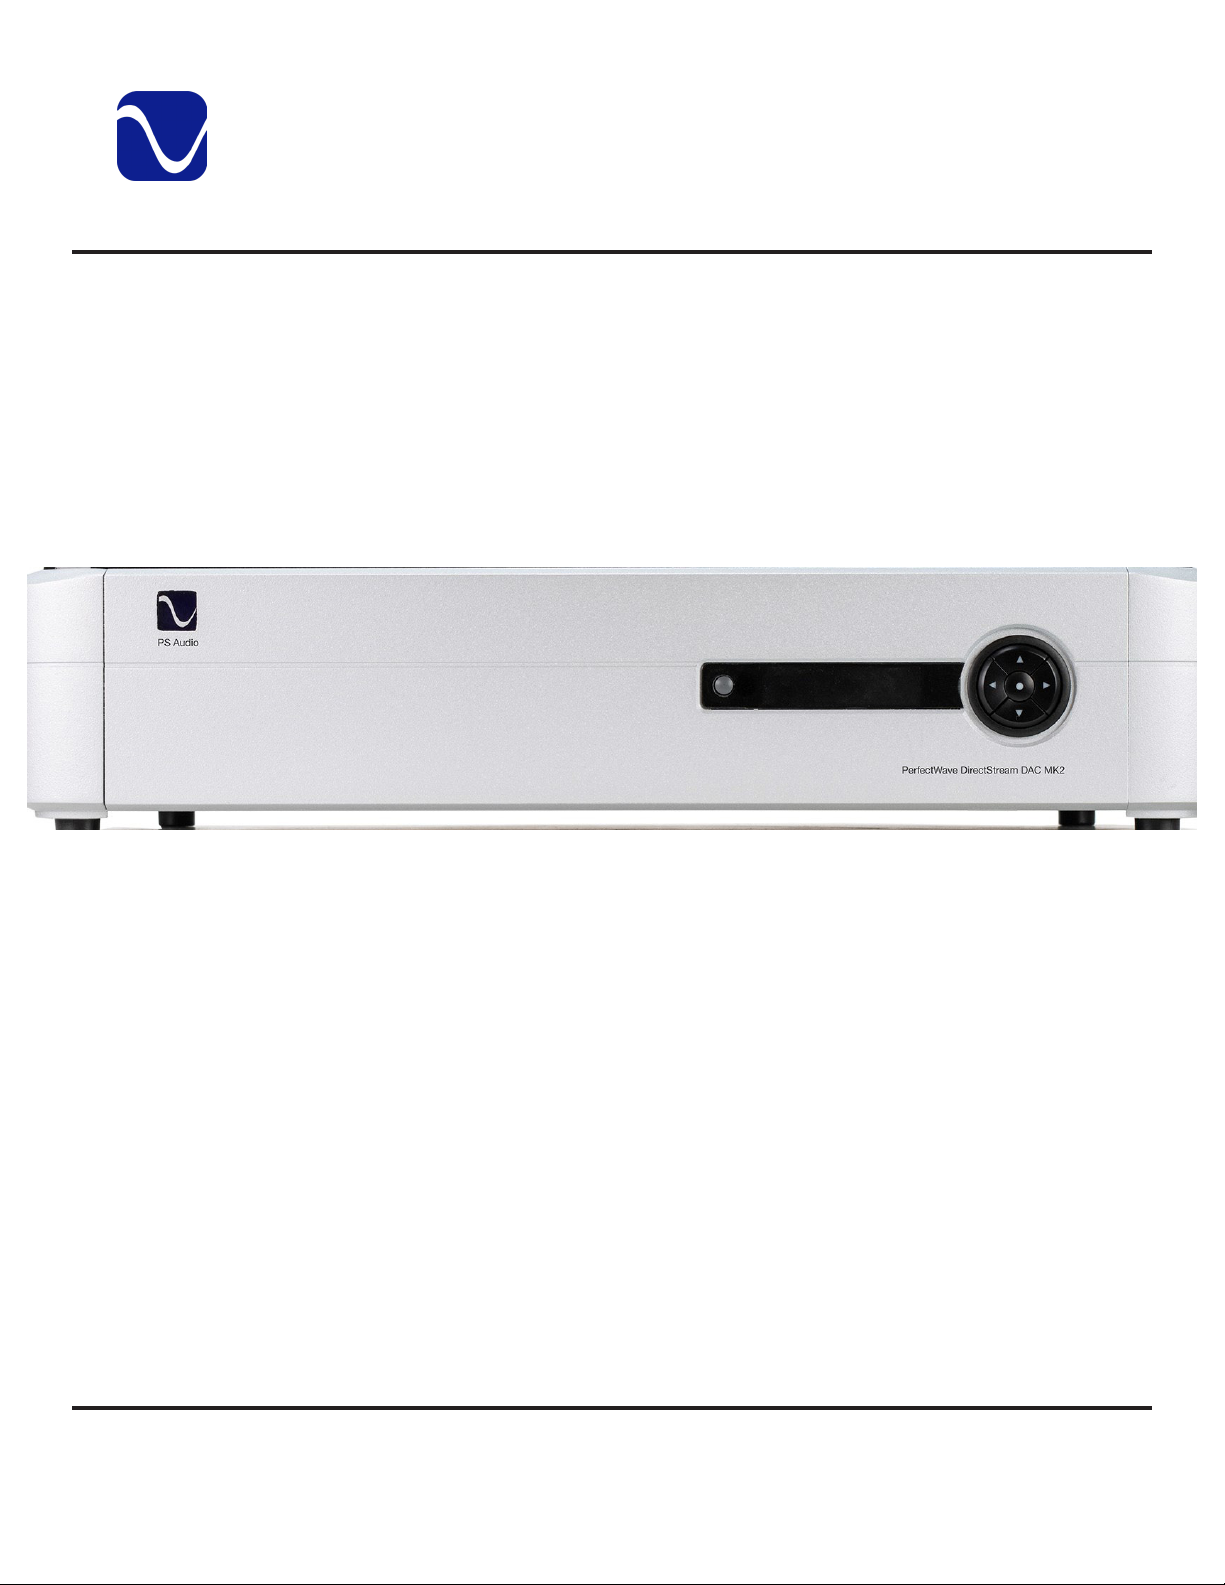
PerfectWave DirectStream DAC MK2
PS Audio® Inc. 800-PSAUDIO 4865 Sterling Drive Boulder, Colorado 80301
©2014 PS Audio Inc. All rights reserved.
Page 2

Table Of Contents
Owner’s Reference DirectStream DAC MK2
Safety Instructions i
DirectStream MK2 Overview ii
Why DSD? iii
Installation Considerations 1
Unpacking and Connections 2
Connecting DirectStream 2
Connecting the Output 3
Enable SConnect 4-5
Control and Operation 6
Front Panel Idle Button 6
Main Display and Menu 6-7
Inputs 7
Main Menu: Balance 8
Main menu: Phase 8
Main Menu: Pre-Emphasis 9
Main Menu: Version 9
Main Menu: Sub-Menus 9
Sub-Menu: Audio Input 10
Sub-Menu: Audio Output 11-13
Sub-Menu: System 13-14
Sub-Menu: Network 16
Remote Control 17
Trouble Shooting 18
Specifications 19-20
Menu Operations 21-23
Product registration 24
Warranty 25
Service 26
PS Audio® Inc. 800-PSAUDIO 4865 Sterling Drive Boulder, Colorado 80301
©2022 PS Audio Inc. All rights reserved.
Page 3

Introduction
Owner’s Reference DirectStream DAC MK2
Important Safety
Instructions
Heed all warnings
Follow all instructions
WARNING. TO REDUCE THE RISK OF FIRE OR ELECTRICAL SHOCK, DO NOT EXPOSE THIS
APPARATUS TO RAIN OR MOISTURE.
Clean only with a dry cloth. For the Piano Finish Top refer to the instructions on page 8 of the
Quick Start Guide.
Do not place ammable material on top of or beneath the component.
All PS Audio components require adequate ventilation at all times during operation. Rack
mounting is acceptable where appropriate.
Do not remove or bypass the ground pin on the end of the AC cord unless absolutely necessary
to reduce hum from ground loops of connected equipment. This may cause RFI (radio frequency
interference) to be induced into your playback setup. Removing or bypassing the ground pin on
any electrical component is potentially dangerous and should be avoided for safety reasons. A
polarized plug has two blades, one wider than the other. A grounding type plug has two blades
and a third grounding prong. All PS products ship with a grounding type plug. If the provided
plug does not t into your outlet, consult an electrician for replacement of the obsolete outlet.
Protect the power cord from being walked on or pinched particularly at plugs, convenience
receptacles, and the point where they exit from the apparatus. Unplug this apparatus during
lightning storms or when unused for long periods of time.
Read these instructions
When making connections to this or any other component, make sure all components are o. Turn
o all systems’ power before connecting the PS Audio component to any other component. Make
sure all cable terminations are of the highest quality.
THERE ARE NO USER-SERVICEABLE PARTS INSIDE ANY PS AUDIO PRODUCT. REFER ALL
SERVICING TO QUALIFIED SERVICE PERSONNEL
This device contains FCC ID: 2AC7Z-ESP32WROVER(B/E).
Please contact your authorized dealer, distributor, or PS Audio if you have any questions not
addressed in this reference manual.
This product is manufactured in the United States of America. PS Audio
restricted for use by PS Audio International, Inc., its subsidiaries, and authorized agents.
Rev. E
PS Audio® Inc. 800-PSAUDIO 4865 Sterling Drive Boulder, Colorado 80301
®
is a registered trademark of PS Audio International Inc., and is
i
©2022 PS Audio Inc. All rights reserved.
Page 4
Introduction
Owner’s Reference DirectStream DAC MK2
Welcome
DirectStream MK2
Overview
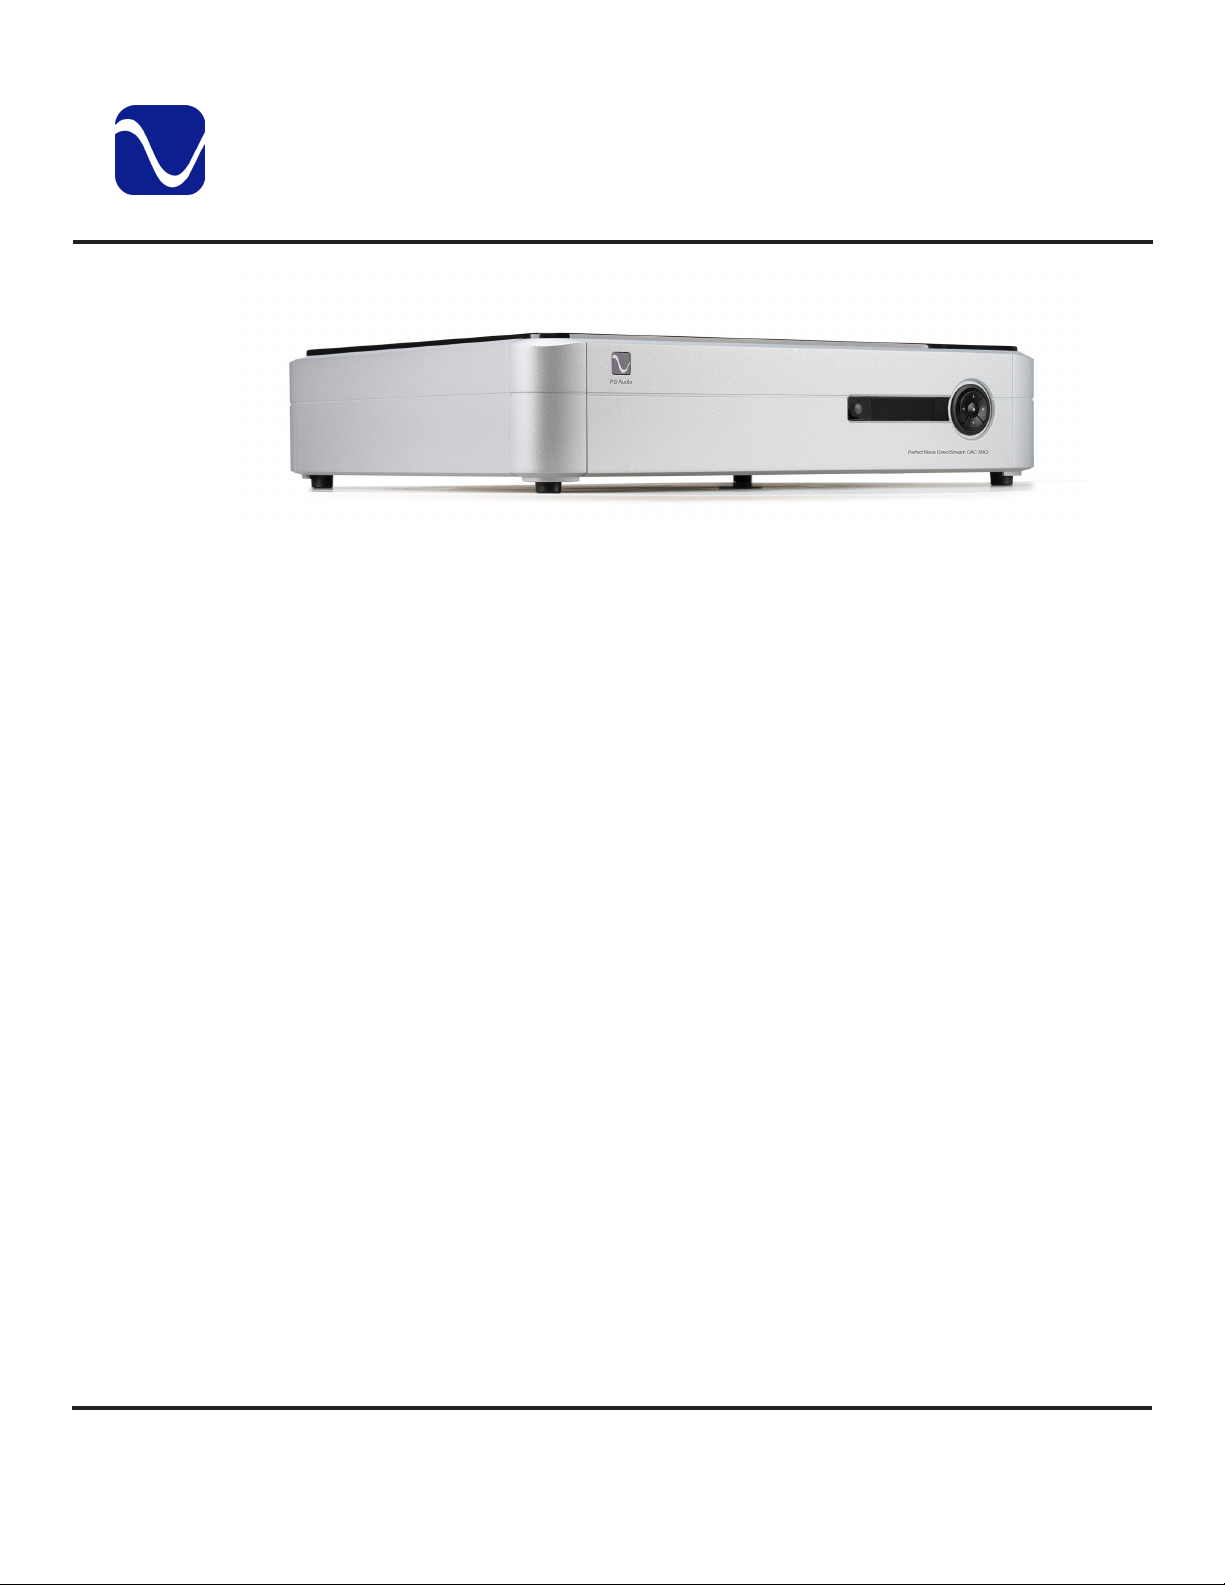
The PS Audio PerfectWave™ DirectStream Digital to Analog Converter (DAC) MK2 is a
state-of-the-art DAC that replaces its predecessor, the PerfectWave DirectStream DAC.
Since its ground breaking introduction 8 years ago, the PerfectWave DirectStream DAC has
stood alone as one of the most remarkable DACs ever built. We are excited to share with the
world the next generation of this technological wonder, the PerfectWave DirectStream DAC
MK2.
Unlike the vast majority of high-end DACs based on o-the-shelf IC technology,
DirectStream MK2 is handwritten, discrete, galvanically isolated, perfection-based
conversion that uncovers all the missing information hiding in your digital audio media.
CDs, streaming audio, high-resolution PCM or DSD based media are all expertly
upsampled in the DirectStream MK2 to twenty times DSD rate and output as pure analog
directly into your amplier or preamplier.
There has never been a better sounding DAC anywhere close to the price of DirectStream
MK2. The ground breaking DirectStream DAC was the rst choice of thousands of critical
listeners worldwide, and now, with the introduction of the MK2, that legacy will continue.
DirectStream MK2 features a unique architecture inside. From its galvanically isolated
digital inputs to its galvanically isolated output stage, DirectStream MK2 has been hand
written and hand designed by Ted Smith.
DirectStream MK2 has two FPGAs (Field Programmable Gate Array) as the core processors
and no o-the-shelf DAC chips are used in the design.
Each input on the DirectStream MK2 is galvanically isolated, which means there are no
physical connections between the noisy digital source and the sensitive DAC. Power
supplies that power noisy inputs are galvanically isolated from the rest of the system.
Galvanic isolation aids in the reduction jitter and unwanted audio artifacts.
PS Audio® Inc. 800-PSAUDIO 4865 Sterling Drive Boulder, Colorado 80301
©2022 PS Audio Inc. All rights reserved.
ii
Page 5

Introduction
Owner’s Reference DirectStream DAC MK2
DirectStream MK2 is less sensitive to the vagaries of input source types and their level
of jitter than most DACs made. Remarkably low jitter sensitivity is one of the hallmarks of
this design and is accomplished by not using classic edge transition detection techniques
used on the digital input data. Instead, a proprietary method of extremely fast sample-andrecognize technology is employed that reduces dependency on cables, jitter and the quality
of the incoming data source.
Once the data from the selected digital audio source has been inputted, it is upsampled to
twenty times the standard DSD rate of 2.8MHz before any processing takes place. After
processing, all input data is converted to quad rate DSD (11.2896MHz) and outputted
through a passively ltered analog section consisting primarily of a high-quality audio output
transformer. Elimination of the classic active analog output stage, with all its diculties
running at these high frequencies, has been implemented with a high quality passive audio
transformer.
Why DSD?
DirectStream MK2 is entirely DSD based, even for PCM inputs. DSD was chosen as the
core engine for this instrument for a number of compelling reasons:
• DSD is simple to convert to analog: just low pass lter it.
• DSD is inherently linear: it’s hard to build a PCM DAC that always takes
the same sized step in the output for any possible unit increment of the
representative PCM voltage value. The best PCM technology for linearity is
arguably a resistor ladder, then all steps are at least positive for a positive
change in the input, but making resistors that are accurate to one part in 216 is
hard and to one part in 220 is very hard. DSD doesn’t need anywhere near this
level of component matching.
• DSD soft clips when overdriven, more like magnetic tape: signals which exceed
the nominal full scale value only get slightly compressed if at all. With PCM
you either have at tops which induce extra energy at the squared o edges or,
worse, you can have wrap around, which is very audible.
• All bits in a DSD stream have the same weight: a single bit error anywhere is
barely measurable let alone audible. Some bits in PCM carry a lot of weight and
would make a very loud pop if changed. PCM needs more error recovery to
keep to a given signal to noise ratio (S/N) with a slightly corrupted digital signal.
• Ironically, most sanely priced PCM players actually use DAC chips that utilize
a sigma-delta modulator (DSD) to get a DSD-like signal anyway. Similarly,
many (most) A/Ds are sigma-delta based. The typical PCM path is analog ->
DSD -> PCM -> disc -> PCM -> DSD -> analog. The DSD path can skip the
conversions to PCM. Those conversions can’t be perfect and artifacts of the
PS Audio® Inc. 800-PSAUDIO 4865 Sterling Drive Boulder, Colorado 80301
©2022 PS Audio Inc. All rights reserved.
iii
Page 6

Introduction
Owner’s Reference DirectStream DAC MK2
steep anti-aliasing lter or the reconstruction lter aren’t considered benign by
many.
• DirectStream MK2 handles the PCM conversion from XLR/EBU, S/PDIF, Optical,
I2S and USB without recovering a clock, by simply watching for the edges and
making decisions about what they mean in context. The result is that any jitter
present on the input is lost entirely in the FPGA. There is no dierence in Optical
or I2S because the output clock’s rate only depends on the long term average
rate of the inputs not on any edge or other local feature.
The DSD
engine is its
heart
Full headroom
with room to
spare
The heart of DirectStream MK2 is the DSD engine itself. Regardless of input format,
whether PCM or DSD, all data are upsampled to 30 bits running at 20 times the standard
DSD rate and then back down again to double rate DSD for noise shaping.
The internal volume control keeps complete precision: every bit in the input aects the
output of the DAC for any volume level. Except for the sigma-delta modulation process
itself there is no rounding, dither or other trimming, not to 24 bits, not to 32 bits, not to
48 bits, but rather a full 50. The incoming PCM signal is 30 bits from the upsampling lter
and the volume control is 20 bits wide so all 50 bits of the output are used throughout the
sigma-delta conversion, requiring more than 50 bits of precision.
DSD only requires a nominal 20 bit signal to noise ratio, this design utilizes a minimum width
of 24 bits with wide lter coecients and 144dB S/N. Use of full precision everywhere and
many guard bits in the IIR lters and the sigma-delta modulator help maintain our goal of
perfecting the audio output.
While some designs may run out of headroom or approach saturation levels, depending on
the source material, the new design opts for an extra top bit everywhere in the digital path
coupled with an extra 6 dB of head room in the analog path beyond the 6 dB of headroom
that SACD uses. The top bit keeps PCM from saturating, even if that PCM was not
properly bandwidth limited in the initial recording process.
The output of the DSD engine is fed directly into the output stage, based on high speed
video ampliers and a passive output transformer.
Most output schemes for DSD modulators are active low pass lters, covering the required
120dB S/N ratio from 10Hz to 220MHz and have a number of design challenges and
problems associated with even the best designs.
If the analog processing isn’t linear and doesn’t have a very wide bandwidth, it will
modulate the high frequency noise that’s inherent in DSD back into the audio band. That
modulation will not result in just low level noise. In practice it will be aliased back into the
audible band with serious sonic consequences. To maintain low noise and linearity, the
design incorporates both high speed symmetrical video amps and a passive output lter.
PS Audio® Inc. 800-PSAUDIO 4865 Sterling Drive Boulder, Colorado 80301
©2022 PS Audio Inc. All rights reserved.
iv
Page 7

Introduction
Owner’s Reference DirectStream DAC MK2
The rst challenge in such a design is the output switch that generates the nal 1’s and 0’s
of the modulator.
A very clean switch that hooks up the positive rail with a 1 and the negative rail with a 0 is
essential. If it has too much resistance, if the resistance is dierent at the positive end than
the negative end, if the resistance changes from time to time, … the result will not be as
clean as it needs to be. For 120dB S/N the switch resistance has to be quite consistent.
Another design requirement is consistent and fast switching time.
If the switch is too slow it won’t keep up with the 5.6MHz signal used in this instrument. If the
switch doesn’t react in consistent times it will introduce jitter. Use of traditional CMOS gates
adds a lot of jitter as do cross-coupled totem-poled bipolar transistors. Instead, DirectStream
MK2 relies on high speed dierential video amps, which are essentially class A switches, have
their outputs either near the top rail or near the bottom power supply rail (without ever
saturating) and provide a very clean DSD switch.
For the all important low pass ltering requirements an active lter adds self noise even if it
is eectively lowering incoming noise. A unique and eective solution to this problem is a
passive lter. The design uses a carefully crafted high bandwidth audio transformer at the
output of the instrument for both galvanic isolation from the outside world as well as low
pass ltering.
The PerfectWave DirectStream MK2 DAC represents a signicant departure in the design
and execution of PS Audio’s products. We believe this new instrument will help further our
industry, music and the faithful reproduction of music around the world.
PS Audio® Inc. 800-PSAUDIO 4865 Sterling Drive Boulder, Colorado 80301
©2022 PS Audio Inc. All rights reserved.
v
Page 8

Getting Started
Owner’s Reference DirectStream DAC MK2
Installation
Considerations
Digital Inputs
Available
A good location for DirectStream MK2 is in a cabinet or on a shelf at an easily accessible
height. Care should be taken to keep it away from power ampliers or large, potentially
hum-inducing products. The IR (infrared) receiver for the remote is located to the left of the
Touch Screen. A direct line of sight will help with DirectStream MK2's IR sensor, which has
been greatly improved from its predecessor, the DirectStream.
DirectStream MK2 and the PerfectWave SACD Transport were designed to stack on top of each
other if they are not placed on separate shelves. To do this, remove the feet from the unit you
wish to place on top of the stack. Carefully place the top unit so it rests on the bottom unit.
You will note that the bottom of the corners of each PerfectWave piece is specially designed to
mate with the top corners of another PerfectWave.
DirectStream MK2 oers multiple digital input choices including: two XLR (XLR/EBU), RCA
and Optical (S/PDIF), USB as well as two I2S. All inputs, including USB, are capable of
accepting high-denition digital audio signals. The Optical input is capable of 96kHz, 24
bit audio. XLR/EBU up to 352.8kHz PCM and up to DoP128. I2S handles up to 705.6 kHz
PCM and up to DSD256. USB is capable of handling up to 705.6 kHz PCM and up to
DSD256.
DirectStream MK2 uses an HDMI cable to transfer I2S data. This data can only be used with
another compatible component, such as the PerfectWave SACD transport, and will not work
in other HDMI equipment as the I2S format incorporated does not comply with the HDMI
standards. PS Audio freely publishes its I2S standard and it has been adopted by multiple other
manufacturers as well.
DoP
Power Cables
DoP (DSD over PCM) is a standard allowing single rate DSD to travel over S/PDIF (the
RCA, and XLR digital inputs are S/PDIF compatible) as well as over USB and I2S. It is
not currently possible to send DSD directly over S/PDIF and the DSD les must rst be
converted to DoP standards to travel this route.
It is possible to send DSD les (without conversion to DoP) over DirectStream MK2's I2S inputs
as well as USB. Most programs, such as Roon, Audirvana, JRiver Media Center and Foobar
2000, will automatically convert DSD les to the DoP standards on the y if the appropriate
checkbox has been enabled. There are no sonic penalties for conversion to DoP as the raw
DSD data is unaected by the process.
Your new PS Audio DAC is supplied with a removable AC Power cord. While the supplied cord
is of good quality, it is recommended that you replace it with one of PS Audio’s matching
PerfectWave AC power cords for optimum performance. It is also recommended that you
connect your new DirectStream MK2 to one of PS Audio’s award-winning AC power products
such as the P12, P15 or P20 Power Plants.
PS Audio® Inc. 800-PSAUDIO 4865 Sterling Drive Boulder, Colorado 80301
1
©2022 PS Audio Inc. All rights reserved.
Page 9
Quick Start Guide
Owner’s Reference DirectStream DAC MK2
Unpacking and
Connections
Register the Unit
Connecting Inputs
• Carefully unpack the unit and place in the chosen location.
• The piano black top cover has a protective plastic lm. Remove this lm.
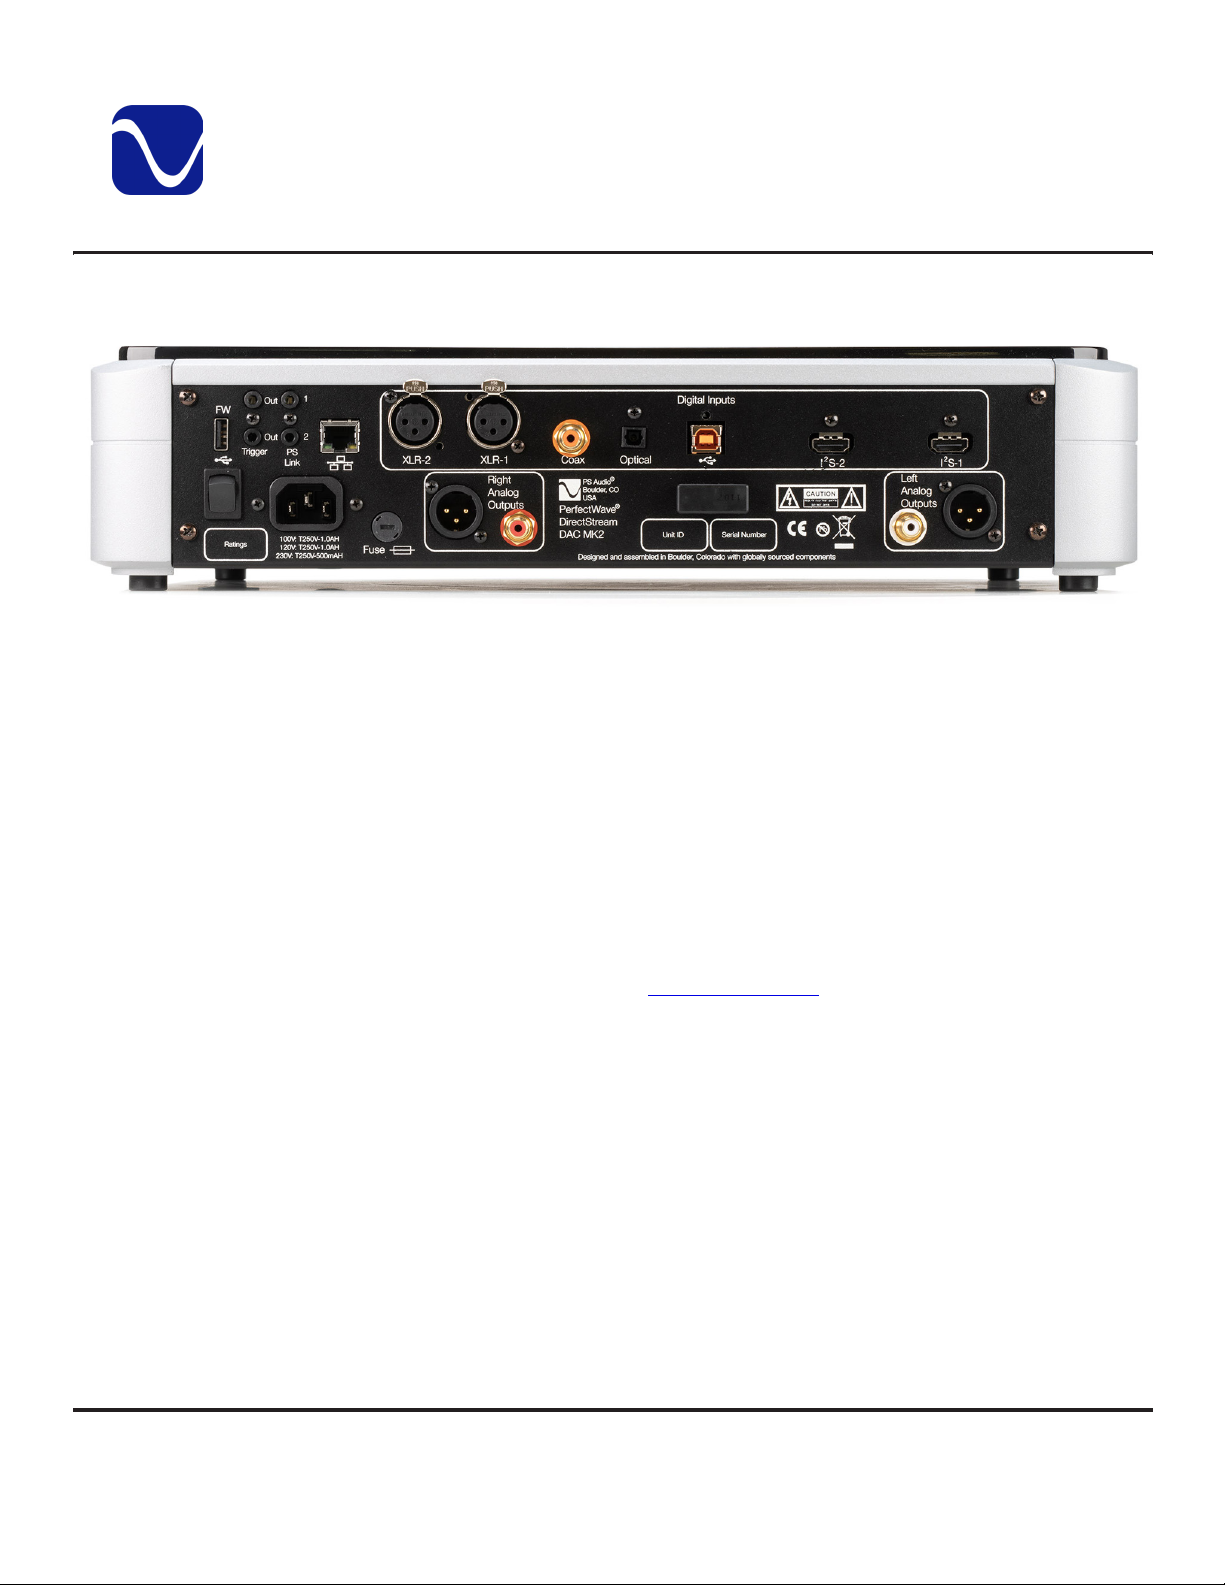
• Connect DirectStream MK2 to your digital sources using the appropriate connections.
• Connect the AC cable into the receptacle in back and plug the unit into your Power
Plant or into the wall.
PS Audio products come from the factory with a 3-year warranty. Please register your
new DirectStream MK2. Registration takes just a few minutes, helps us inform you about
future upgrades, keeps track of your serial number and allows us to maintain the highest
standards of product quality of any company.
To register your new unit, look on the back panel of DirectStream MK2 and note the serial
number. Using any web browser, go to www.psaudio.com and click on Register Products.
Once you have completed the registration process, you can go to the PS website and look at
the My Registered Products page. The link to this page is located at the top right hand corner
of the website once you are logged in. If you do not have web access, you may register the
unit via mail or phone. Notication of software upgrades to this product will be available only
to registered owners via the web and email.
There are multiple methods of connecting the digital inputs of DirectStream MK2: Through the
S/PDIF based Optical, Coax, and XLR inputs, USB-B, and I2S. S/PDIF is a serial digital interface
available as an optical source (Optical), coaxial source (RCA) or balanced source (XLR/EBU XLR).
Connect to your digital sources with any of these cable types.
USB-B is the preferred method of connection for a direct-to-computer connection and
DirectStream MK2 is capable of processing up to 705.6kHz 24 bit PCM data as well as DSD 64
through DSD256. Connect DirectStream MK2 to your computer using a well regarded USB-B
PS Audio® Inc. 800-PSAUDIO 4865 Sterling Drive Boulder, Colorado 80301
©2022 PS Audio Inc. All rights reserved.
2
Page 10

Quick Start Guide
Owner’s Reference DirectStream DAC MK2
cable and make sure to set the output of your computer to the highest 24 bit standard. Once
connected, your computer should automatically install DirectStream MK2 as a new device
if you have a Mac. If you have a Windows operating system, you will need to download the
DirectStream Extended Resolution driver from our website and install it on your Windows
computer.
I2S Input
USB-B Input
Auto Select Input
Connecting the
Output
I2S is available through several manufacturers as well PS Audio equipment, such as the
PerfectWave SACD Transport. I2S is a parallel data connection with separate clocks and data
and transferred via an HDMI cable. I2S will typically provide a better performance standard
than USB or any serial data stream such as S/PDIF or XLR/EBU.
You can connect one or all seven inputs at the same time. For instance, you can connect the
USB-B input to your computer and the coax input to your CD player. Then you can simply
choose which one to listen to from the front panel (or the remote) that selects the input. If
you are using USB-B, make sure both the computer and DirectStream MK2 are connected and
powered up. USB-B also requires a driver to operate properly. Mac computers running OSX
have the driver built in. Windows based computers require the PS Audio Extended Resolution
USB driver to be installed. Download the driver from our website https://www.psaudio.com/
downloads/; DirectStream MK2 will show up under Device Manager as PS Audio Extended
Resolution USB.
DirectStream MK2 features an auto select input. Using the front panel menu system (or the
remote), choose either the specic input you wish or the Auto Select feature. When in the Auto
Select mode, DirectStream MK2 will automatically select the active input.
DirectStream MK2 is designed to drive a power amplier directly or as another input on a
preamplier. The outputs of DirectStream MK2 are high-performance, high current outputs
that can drive long lengths of interconnect cable without degradation.
DirectStream MK2 has two types of analog outputs, balanced XLR or single ended RCA.
We do not recommend using both outputs at the same time. Be aware that most
ampliers and preampliers will produce 6dB higher level with the balanced outputs relative
to the single ended outputs. If you are using both outputs be advised they will be at
dierent levels. Our preference for connection to a power amplier or preamplier is through
the balanced XLR outputs of DirectStream MK2.
RCA or single ended outputs will be the typical outputs as many preampliers, surround
processors receivers, integrated ampliers and power ampliers have only this standard
type of input.
Plug either the RCA or the XLR outputs of DirectStream MK2 into a line level input on the
preamp, integrated, amplier or subwoofer. Do NOT plug the output of DirectStream MK2
into a phono or equalized input of any type.
PS Audio® Inc. 800-PSAUDIO 4865 Sterling Drive Boulder, Colorado 80301
©2022 PS Audio Inc. All rights reserved.
3
Page 11
Quick Start Guide
Owner’s Reference DirectStream DAC MK2
Enable SConnect
What is SConnect?
SConnect allows the DirectStream DAC MK2 and the PS Audio AirLens to exchange volume
information. If you have a streaming app, such as Roon or Tidal Connect, and are streaming
music to the DirectStream MK2, you can change the volume on your phone and this will
update the volume on the DirectStream MK2. Likewise, if you update the volume on the
DirectStream MK2 , this will be reected on your streaming app.
Check Firmware
Before enabling SConnect, make sure the DirectStream MK2 rmware has been updated to
version 3.2.0 or above and that the AirLens rmware has been updated to version 3.0.0 or
above. To get the latest rmware, go to support>downloads on the PS Audio website. For
instructions, refer to the Firmware Update Instructions.pdf le included with each update.
Enabling SConnect
• Check rmware version and update as needed. (See above.)
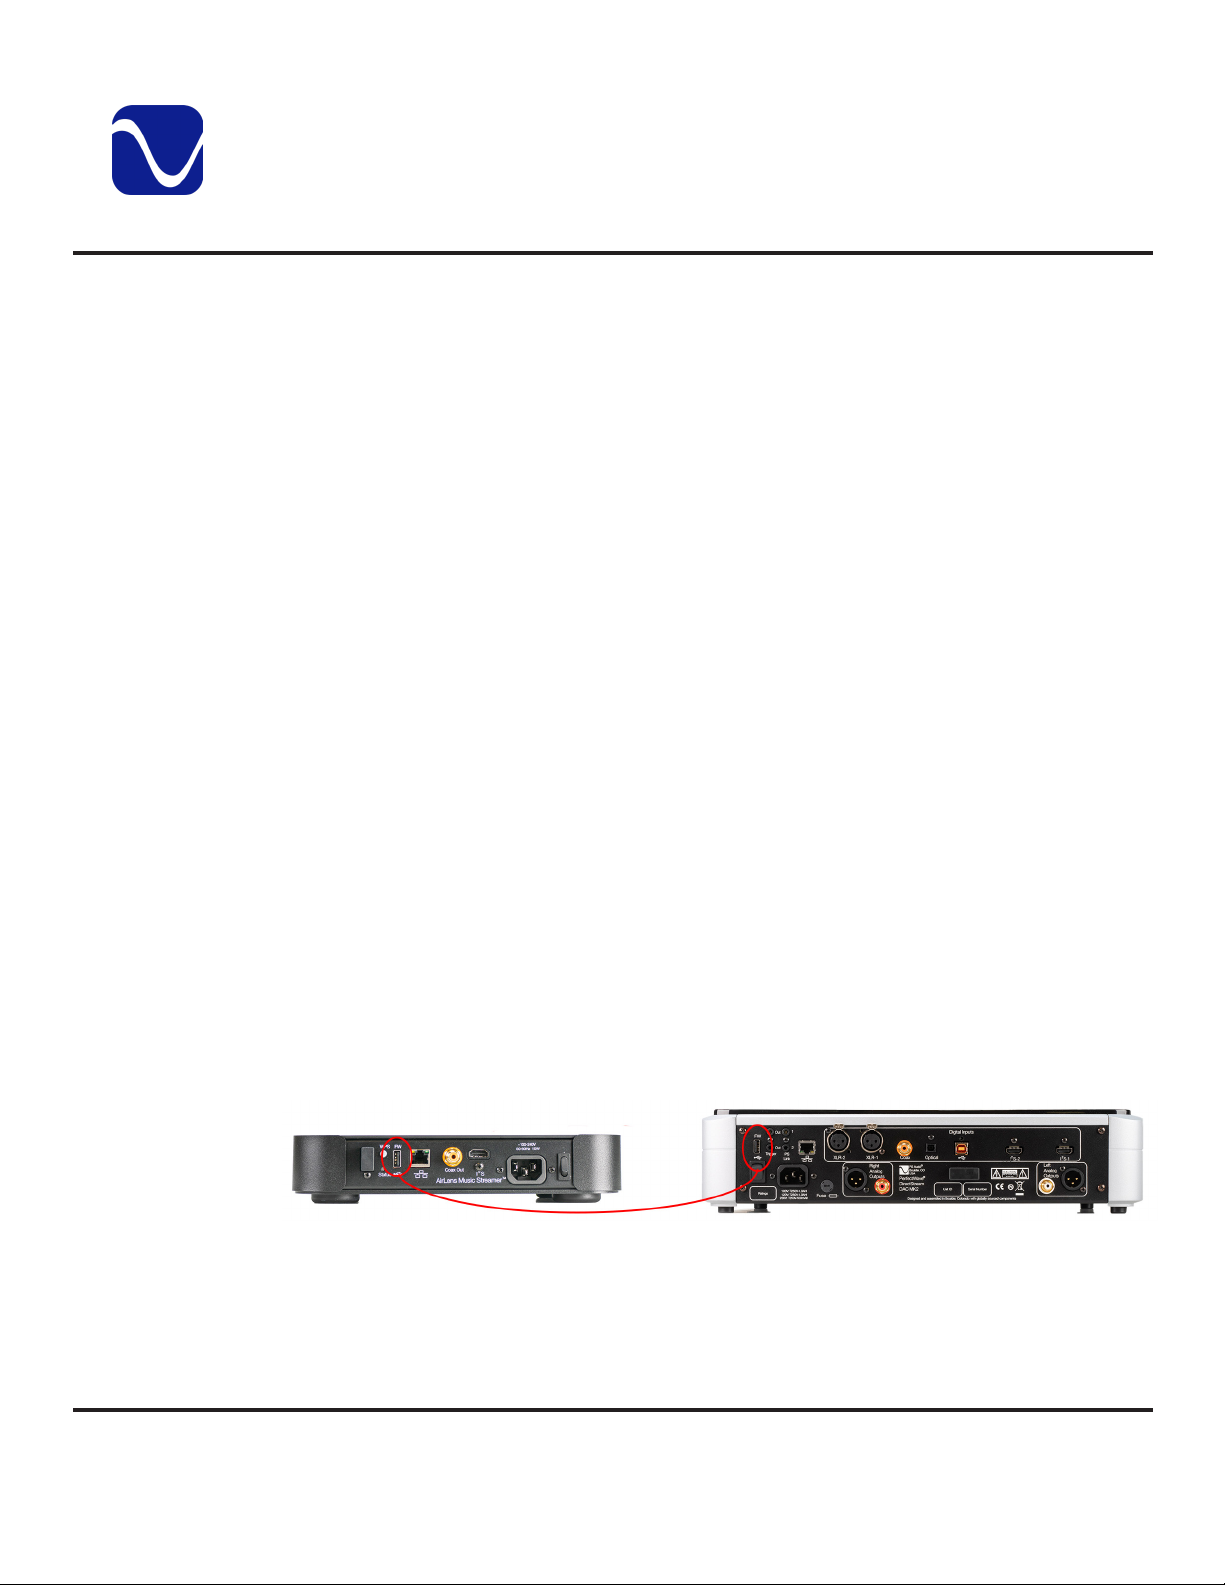
• Leave the DirectStream MK2 powered on. Turn o the AirLens using the rear power
switch. Once the AirLens is powered o, plug the I2S cable between the AirLens and the
DirectStream MK2. (You may have already completed this step during initial setup.)
the AirLens once all cables are attached.
• Using a USB Type-A to Type-A cable, connect the AirLens to the DirectStream MK2 via the
Note
: If the DirectStream MK2 is turned o, make sure to turn it on before turning on
USB-A FW ports. This is the same port you use to plug in a thumb drive. The correct cable
can be purchased from PS Audio.
WARNING: Do NOT use this cable to plug the DirectStream MK2 into a computer host
as this may damage the USB port on the DirectStream MK2 or the host computer.
• If the DirectStream MK2 was turned o, turn it back on rst. Then power on the AirLens.
• The AirLens will come up normally. The DirectStream MK2 will discover which input the
AirLens is plugged into.
PS Audio® Inc. 800-PSAUDIO 4865 Sterling Drive Boulder, Colorado 80301
©2022 PS Audio Inc. All rights reserved.
4
Page 12

Quick Start Guide
Owner’s Reference DirectStream DAC MK2
• If the I2S input with the AirLens is selected, then the SConnect icon, , will appear in the
icon bar on the DirectStream MK2.
- If you switch inputs, the SConnect icon will disappear, indicating the SConnect
connection is not active.
- If you remove the I2S cable or USB cable, the SConnect icon will disappear, indicating
the SConnect connection is not active.
Please note the below when using SConnect:
• SConnect only sends volume info to the DirectStream MK2. It cannot be used to send
volume info to a Preamp connected to the DirectStream MK2.
• If the DirectStream MK2 is in Fixed Volume mode, this feature will not work. (When Fixed
Volume is selected, the volume on the DAC cannot be changed). Dierent streaming apps
handle this dierently:
- Roon removes the option to change the volume.
- Spotify, Tidal and most other streaming apps will attempt to change the volume, but
it will fail and the volume will return to whatever it was.
• If the volume on the streaming app is set to 0, the DirectStream MK2 will also go to 0,
putting the unit on Mute. Changing the volume on the app or on the DirectStream MK2
will increase the volume, taking the DAC o Mute.
• If the DirectStream MK2 is put on Mute, music will stop playing but the volume on the app
will not change and the app will not indicate the DirectStream MK2 is in Mute. Changing
volume on the app will update the DirectStream MK2 and it will come out of Mute.
• There is a protection feature when increasing volume from an app. To prevent large spikes
in volume that may damage equipment, the DirectStream MK2 will limit a single increase
in volume to 20 volume ticks. At lower volumes (below 40), this is equivalent to 20 dB. At
higher volumes this is equivalent to 10 dB.
- For example, if the volume is at 10 and the user suddenly slides the volume on Roon
or Spotify to 50, the DirectStream MK2 will limit the volume increase to 30 (the original
10 plus 20).
- The app may show 50 for a moment, but will then reset to the current volume on the
DAC.
- Higher volume can be selected on the app by continuing to increase the volume.
Note
designed to prevent inadvertent sudden increases in volume, but will not interfere
with using volume control in a normal way.
PS Audio® Inc. 800-PSAUDIO 4865 Sterling Drive Boulder, Colorado 80301
: To prevent this, you can increase the volume at a slower pace. This feature is
©2022 PS Audio Inc. All rights reserved.
5
Page 13
Quick Start Guide
Owner’s Reference DirectStream DAC MK2
Power On
Setup Guide
Turn the AC power switch in the rear of DirectStream MK2 to the ON position. The power
switch is located just above the AC inlet. PS Audio will ash across the display.
The setup guide will then ask you questions to help you congure the unit. Use the left and
right arrow on the control ring to highlight your answer and the center button on the control
ring to select it. Please note the below:
• If you select No to the question "Do you have a preamp?", xed volume is disabled
and the default volume will be set to 35. The main display will show the volume.
• If you select Yes to the question "Do you have a preamp?", xed volume will be set to
100 and the main display will show the sample rate.
- If this was not your intention, you can cancel it on the second screen. The second
screen informs you that the xed volume will be set to 100. You can choose OK or
Cancel. Simply highlight and select Cancel if you don't want to set a xed volume.
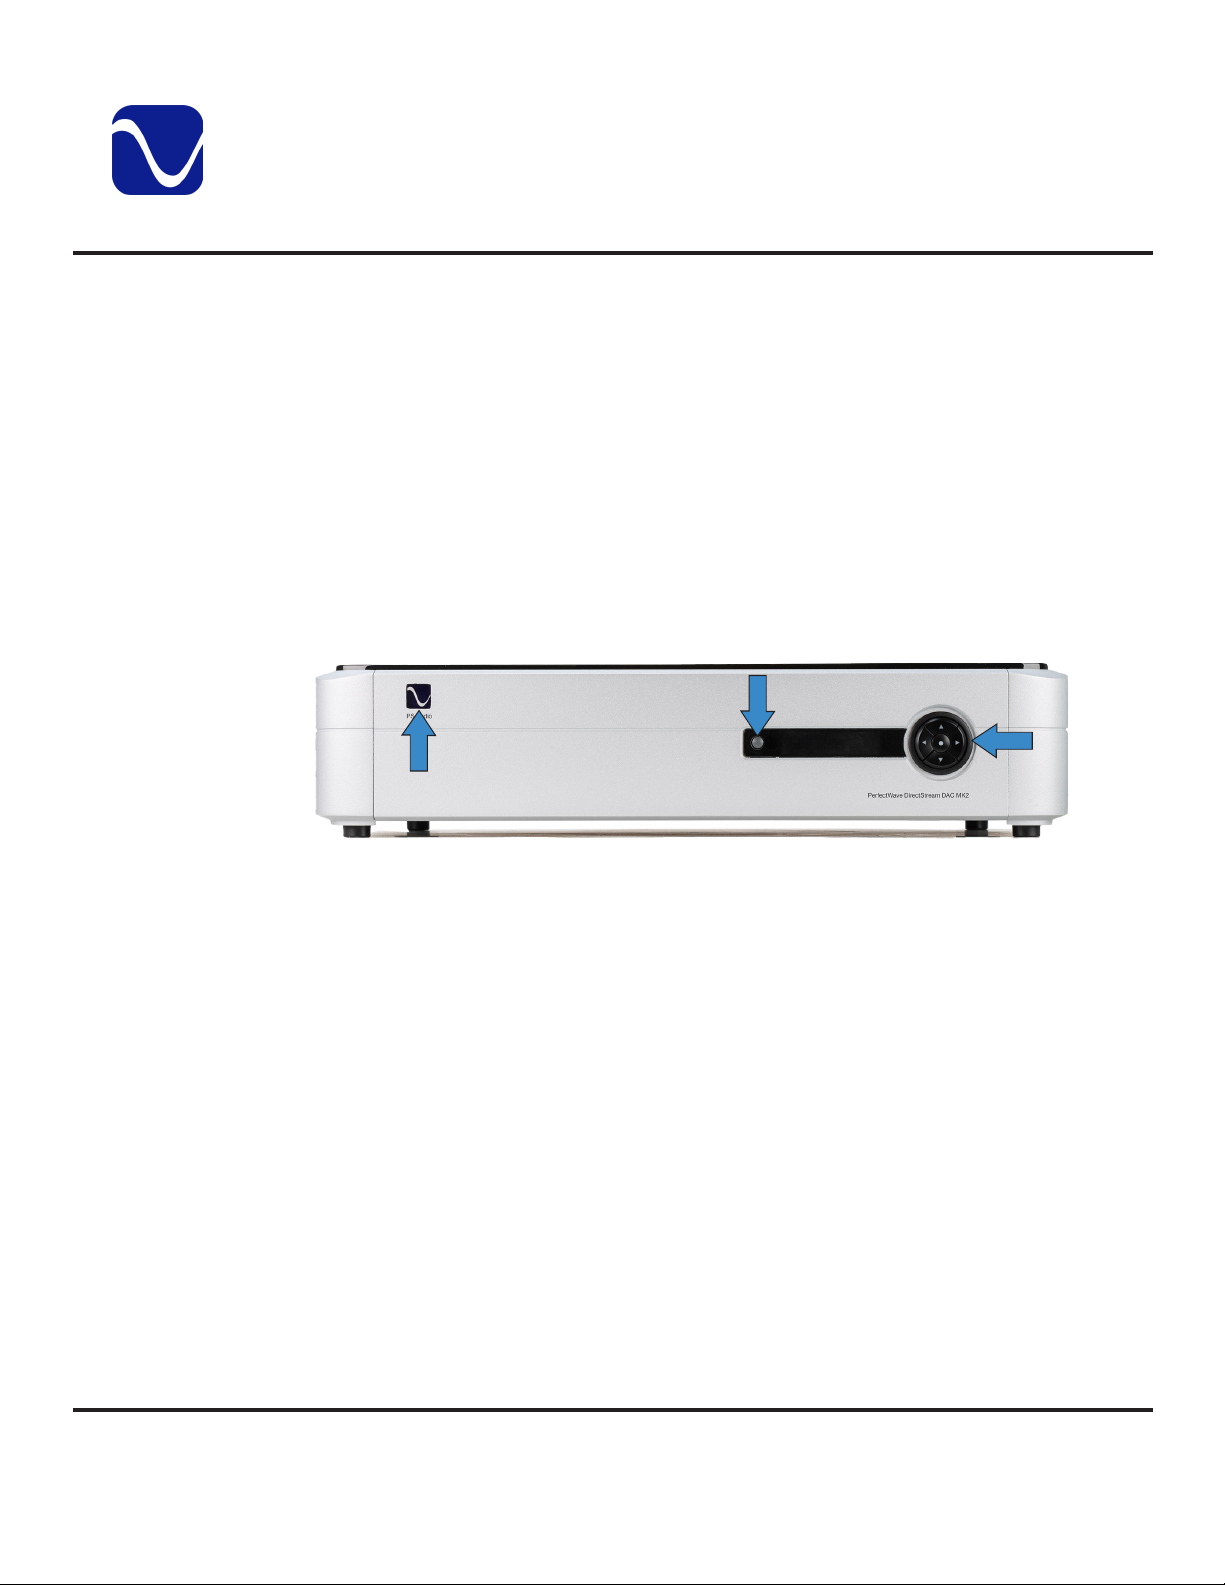
Menu Button
Ready/Operation Mode Control
Control
Ring
Front Panel Idle
Button
To reboot use the
rear switch
Main display
The front panel PS logo button, located on the upper left hand corner of the unit, is the Ready/
Operation Mode control for DirectStream MK2. This control has two modes: Ready Mode and
Operational Mode. Ready Mode (Idle) is designed to keep power on to critical internal circuitry,
including power supply capacitors, thermally sensitive semiconductors and integrated circuits.
Press this front panel button to activate the Ready Mode or to place DirectStream MK2 in
Operational Mode. When pressed to activate the Ready Mode, the display as well as the
outputs are turned o, but all the unit’s critical internal circuitry remains active.
If you wish to conserve energy consumed by DirectStream MK2 it will be necessary to use
the rear panel power switch. Using this rear panel switch will remove power from critical
components. In order to gain maximum performance levels, you will need to turn DirectStream’s
power on at least 1 hour before use.
Should DirectStream MK2 need to be rebooted, use the rear panel power switch to power
cycle the instrument. It's best to wait 30 seconds before powering back on.
Information on Main Display:
• Depending on how your DAC was congured during the setup guide, the main display
PS Audio® Inc. 800-PSAUDIO 4865 Sterling Drive Boulder, Colorado 80301
©2022 PS Audio Inc. All rights reserved.
6
Page 14
Quick Start Guide
Owner’s Reference DirectStream DAC MK2
will either show the volume (if you said no to using a preamp) or the sample rate (if you
said yes to using a preamp).
Note
: In addition to volume and sample rate, input can also be the main display. Please see the
section on Display Mode in the System Sub-Menu for more on this and other display
options.
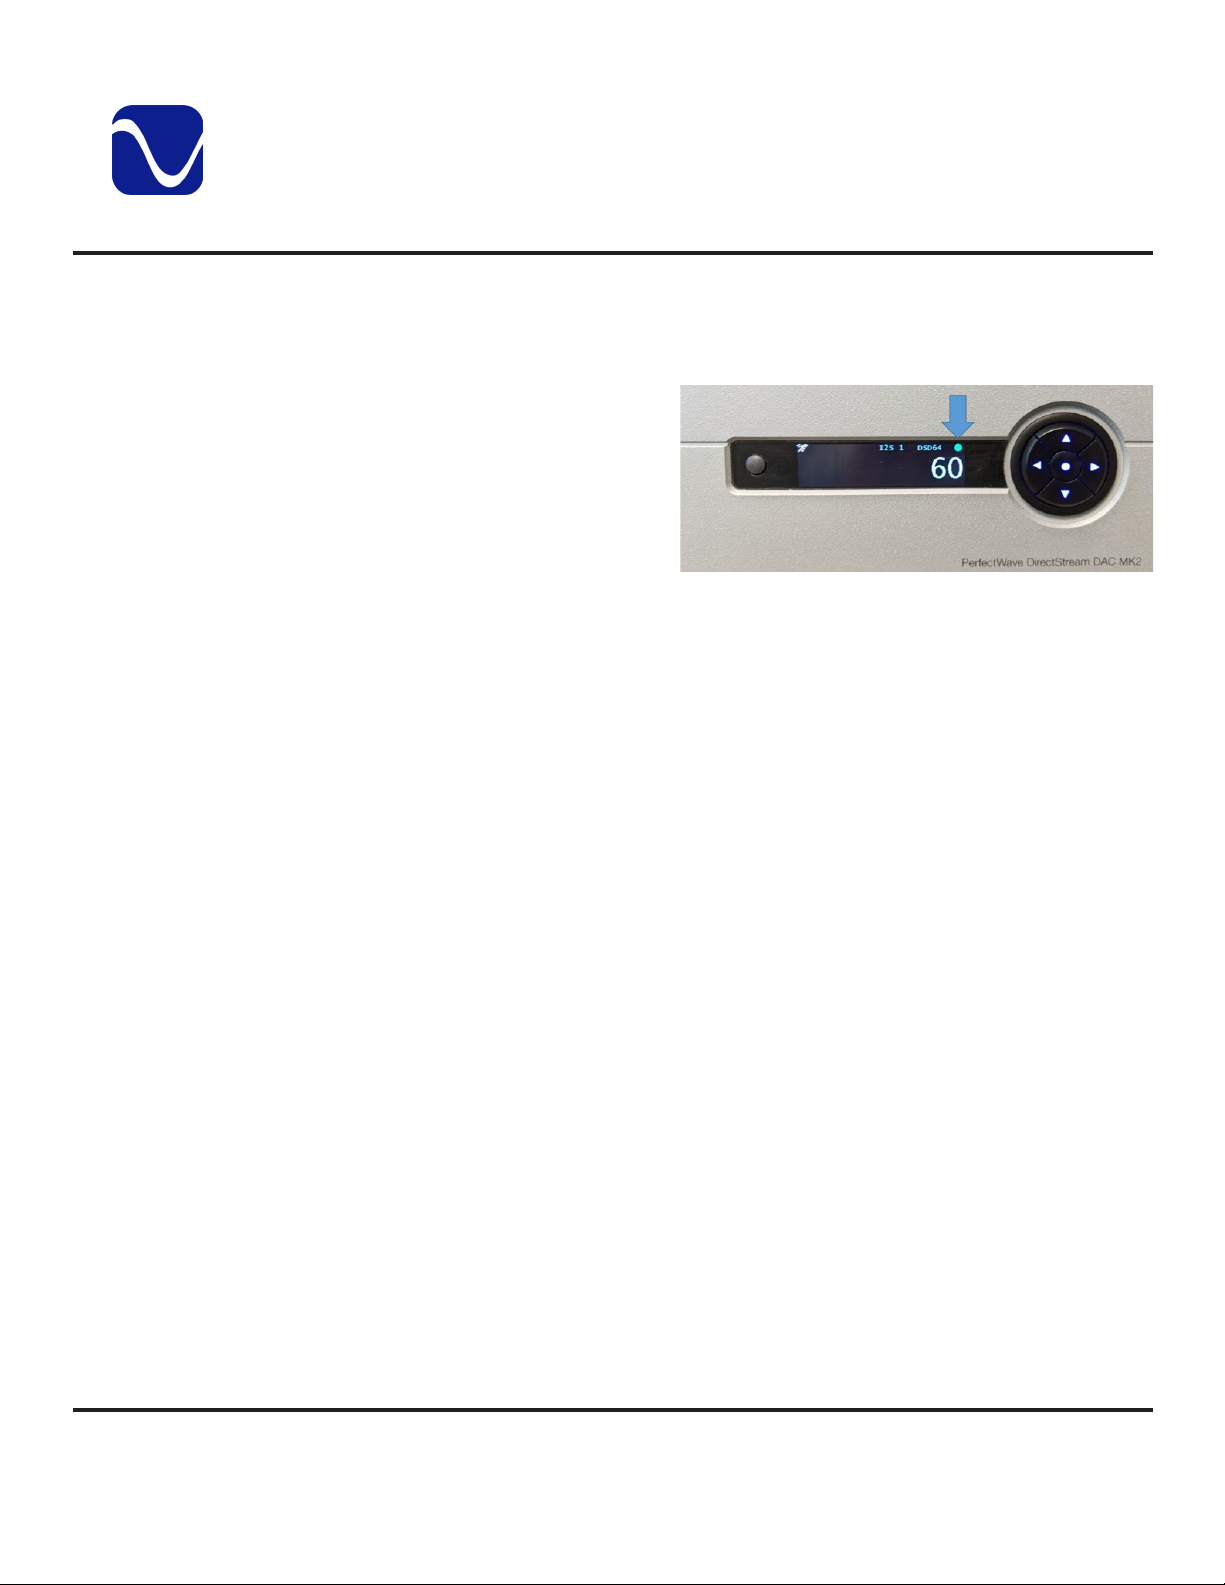
• The red or green dot in the corner
indicates whether the current input is
connected. A green dot indicates the
connection is good.
- For USB, a green dot indicates that a
USB cable is connected to a USB host.
A red light indicates that there's no
connection to a USB host.
- For S/PDIF and Optical, a green dot means there's an active signal on that input with a
valid sampling rate.
- For I2S, a green dot means there's a PS Audio I2S source connected with a valid signal.
• When certain menu options are selected, small icons will appear on the main display.
Please note that the example above has volume as the main display.
Inputs
Volume
Mute
Menu System
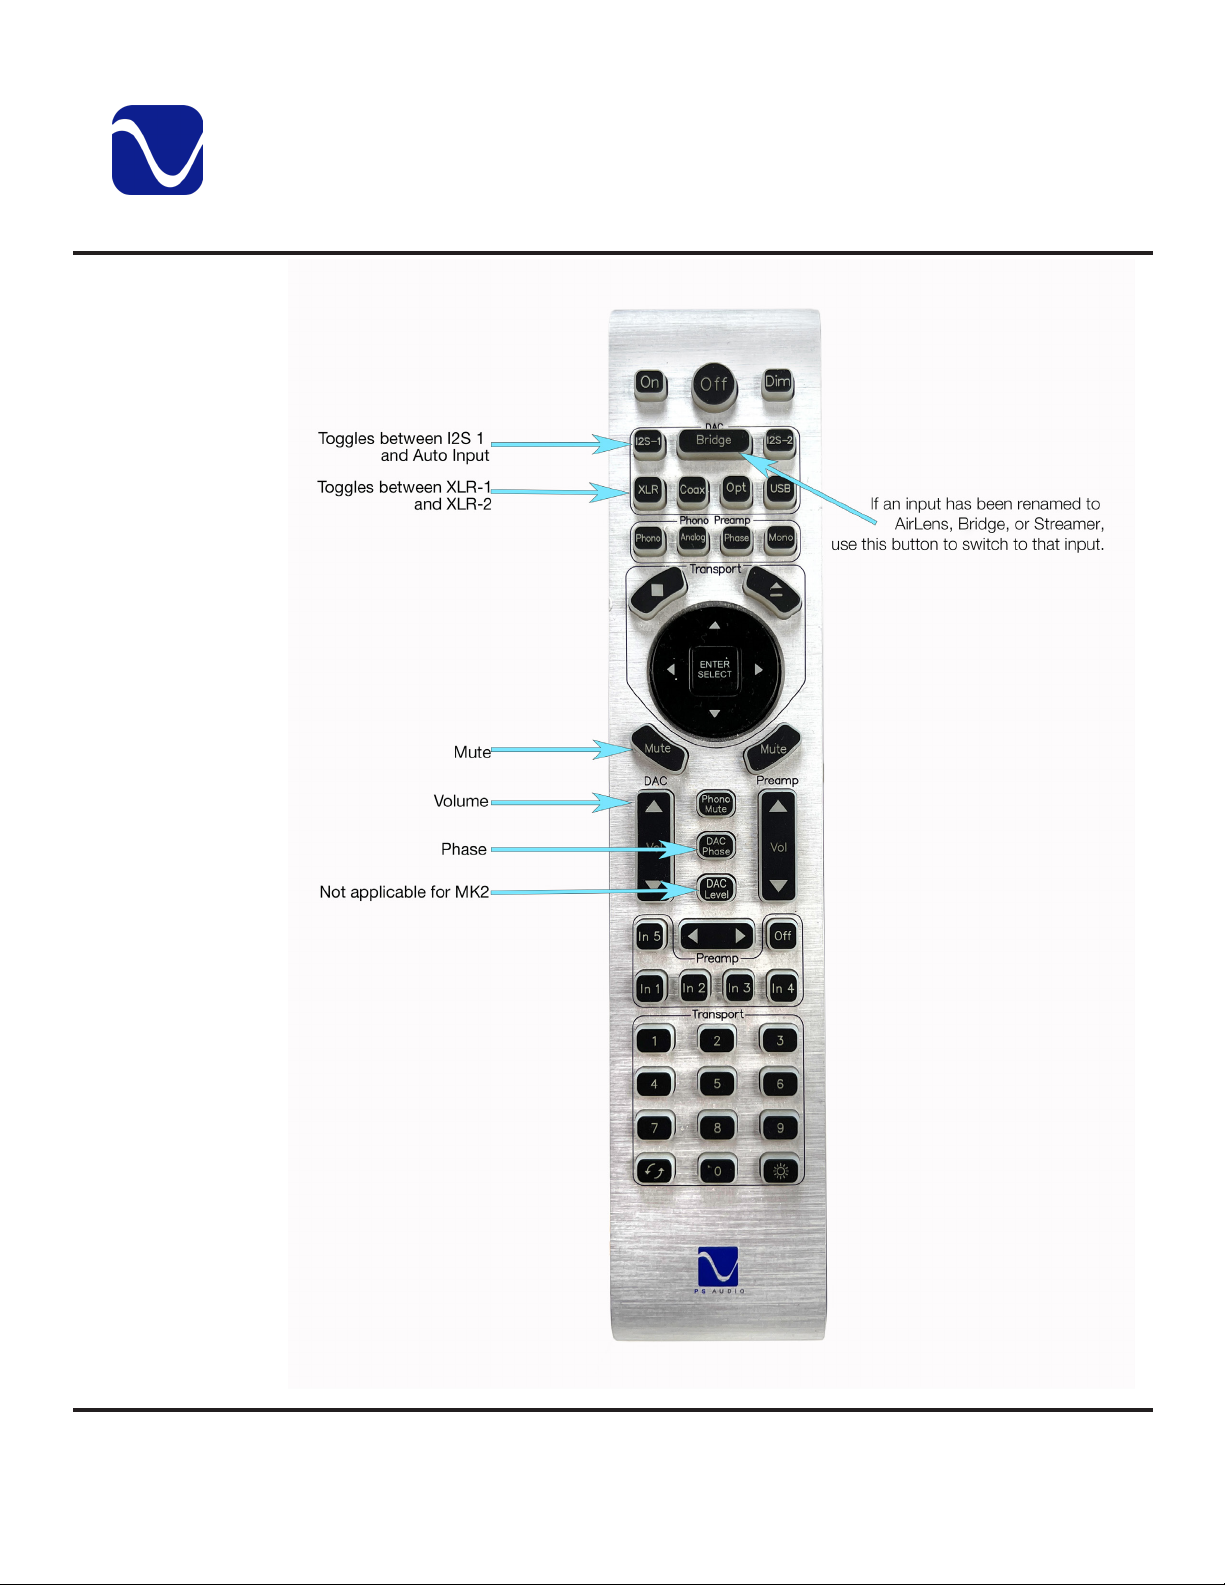
To change the input, press the right or left arrow keys on the control ring. Once you reach
the desired input, stop scrolling to select it. You can also use the remote to select the
desired input. The changes take eect immediately.
Note
: If input is not the main display, the initial press will display the current input for 5
seconds. Subsequent presses (before 5 seconds elapse) change the input. Pressing the
control ring's center button returns you to the volume control menu.
By default, the unit comes up at volume 35. To change the volume, press the up and down
arrow keys. Once you reach the desired volume, stop scrolling to select it. If xed volume
has been selected, you will not be able to change the volume.
Note
: If volume is not the main display, the initial press will display the current volume for 5
seconds. Subsequent presses (before 5 seconds elapse) change the volume.
A quick press of the Menu button toggles mute on or o. (You will hear a soft click.) If the
main display is set to volume or sample rate, “MUTE” will appear in big letters. If you are on
input, a smaller "MUTE" will appear in red on the top right corner of the screen.
To enter and exit the menu system, simply press and hold the menu button to the left of the
display for two seconds. A gear icon will appear in the upper right corner showing that you
are in the Settings menu.
Note
: The menus will also time out after fteen seconds.
PS Audio® Inc. 800-PSAUDIO 4865 Sterling Drive Boulder, Colorado 80301
©2022 PS Audio Inc. All rights reserved.
7
Page 15

Operating Manual
Owner’s Reference DirectStream DAC MK2
Navigating the
Menu System
Main Menu
Features
Main Menu:
Balance
To navigate the menu system:
• Use the left and right arrow keys to scroll through menu items.
• Use the up and down arrows to change an item's values. Note that changes to settings
are typically saved in real time as the changes are made.
• To enter sub-menus, press the center button on the control ring.
• When in a sub-menu, press the center button twice to go back one menu level. When
in the main menu, this action will return you to the main display.
• A long press of the menu button from anywhere in the menus will return you to the main
display.
The main menu has the below features.
• Balance
• Phase
• Pre-emphasis
• Versions (informational only)
• Audio Input (sub-menu)
• Audio Output (sub-menu)
• System (sub-menu)
• Network (sub-menu)
Main Menu:
Phase
The Balance feature allows you to adjust the center location of the stereo image. Press
down on the control ring to reduce the gain of the right channel, thus making the image
come more from the left channel, and vice-versa. The balance steps are each 1/4dB and
the range is 48 steps each way for a maximum shift of 12dB.
When the balance is set to anything other than the center position, there will be an icon on
the Home screen to indicate this state.
The phase feature allows you to invert the signal from the digital inputs. This can be useful
when listening to certain source material that may have inverted absolute polarity. Use up or
down buttons on the control ring to change the absolute polarity of the signal from “Norm”
PS Audio® Inc. 800-PSAUDIO 4865 Sterling Drive Boulder, Colorado 80301
8
©2022 PS Audio Inc. All rights reserved.
Page 16
Main Menu:
Pre-emphasis
Operating Manual
Owner’s Reference DirectStream DAC MK2
(Normal) to “Inv” (Inverted).
Note
: Some listeners are more sensitive to absolute polarity than others.
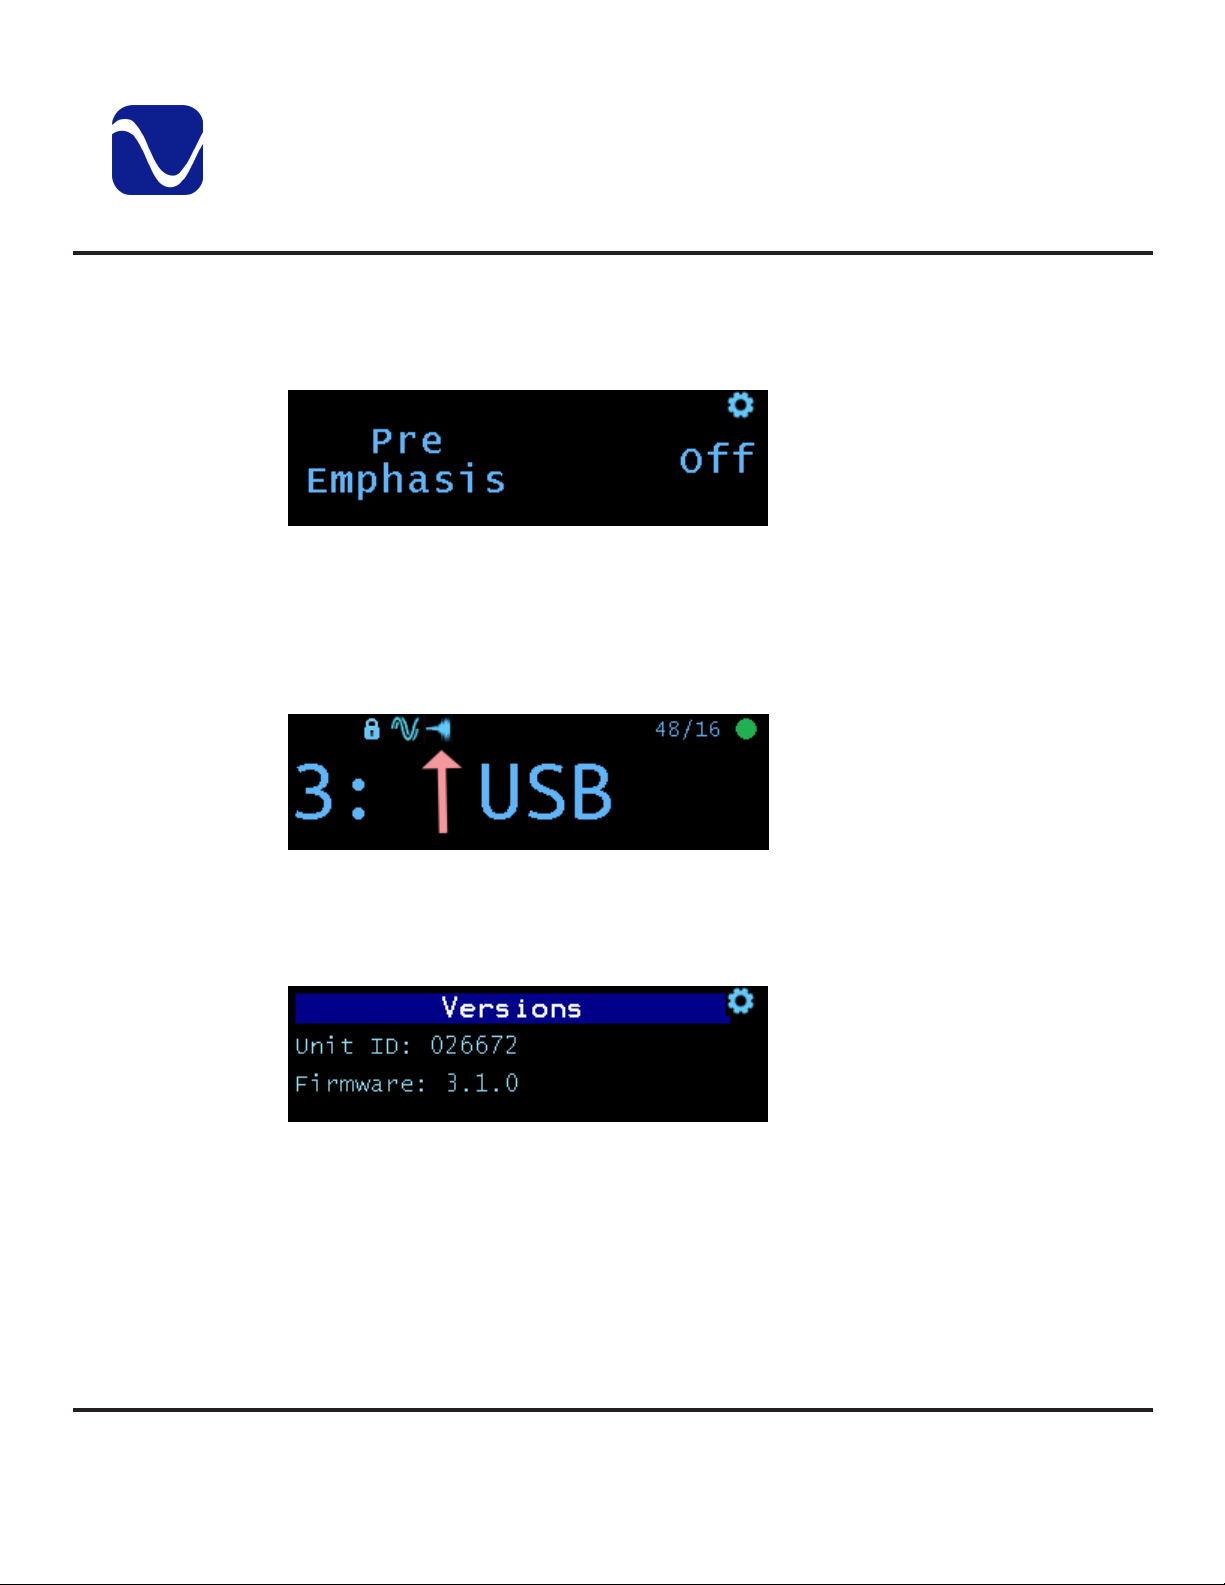
Some Compact Discs were recorded with pre-emphasis in order to improve the
performance at high frequencies. If you are playing a track that was recorded with preemphasis, you can engage the de-emphasis lter using the pre-emphasis option.
Use up and down arrows to set to On, O or Auto. On engages the de-emphasis lter and
O disables it. Auto automatically detects tracks with pre-emphasis and then engages deemphasis (this only works on Coax and Optical inputs). The default is Auto.
Main Menu:
Versions
Main Menu:
Access
Sub-Menus
The icon for pre-emphasis (see above arrow) means de-emphasis is active. When on auto,
this allows you to see if pre-emphasis has been detected and de-emphasis is active.
The Versions menu display is informational only and shows the rmware version of the
unit. Use the up and down arrow to scroll through all the items. If you need to contact our
customer service team for help with your unit, please have this information ready.
There are 4 sub-menus that can be accessed from the main menu. They are:
• Audio Input
• Audio Output
• System
• Network (for PS Audio use only)
PS Audio® Inc. 800-PSAUDIO 4865 Sterling Drive Boulder, Colorado 80301
©2022 PS Audio Inc. All rights reserved.
9
Page 17
Sub-Menu:
Audio Input
Operating Manual
Owner’s Reference DirectStream DAC MK2
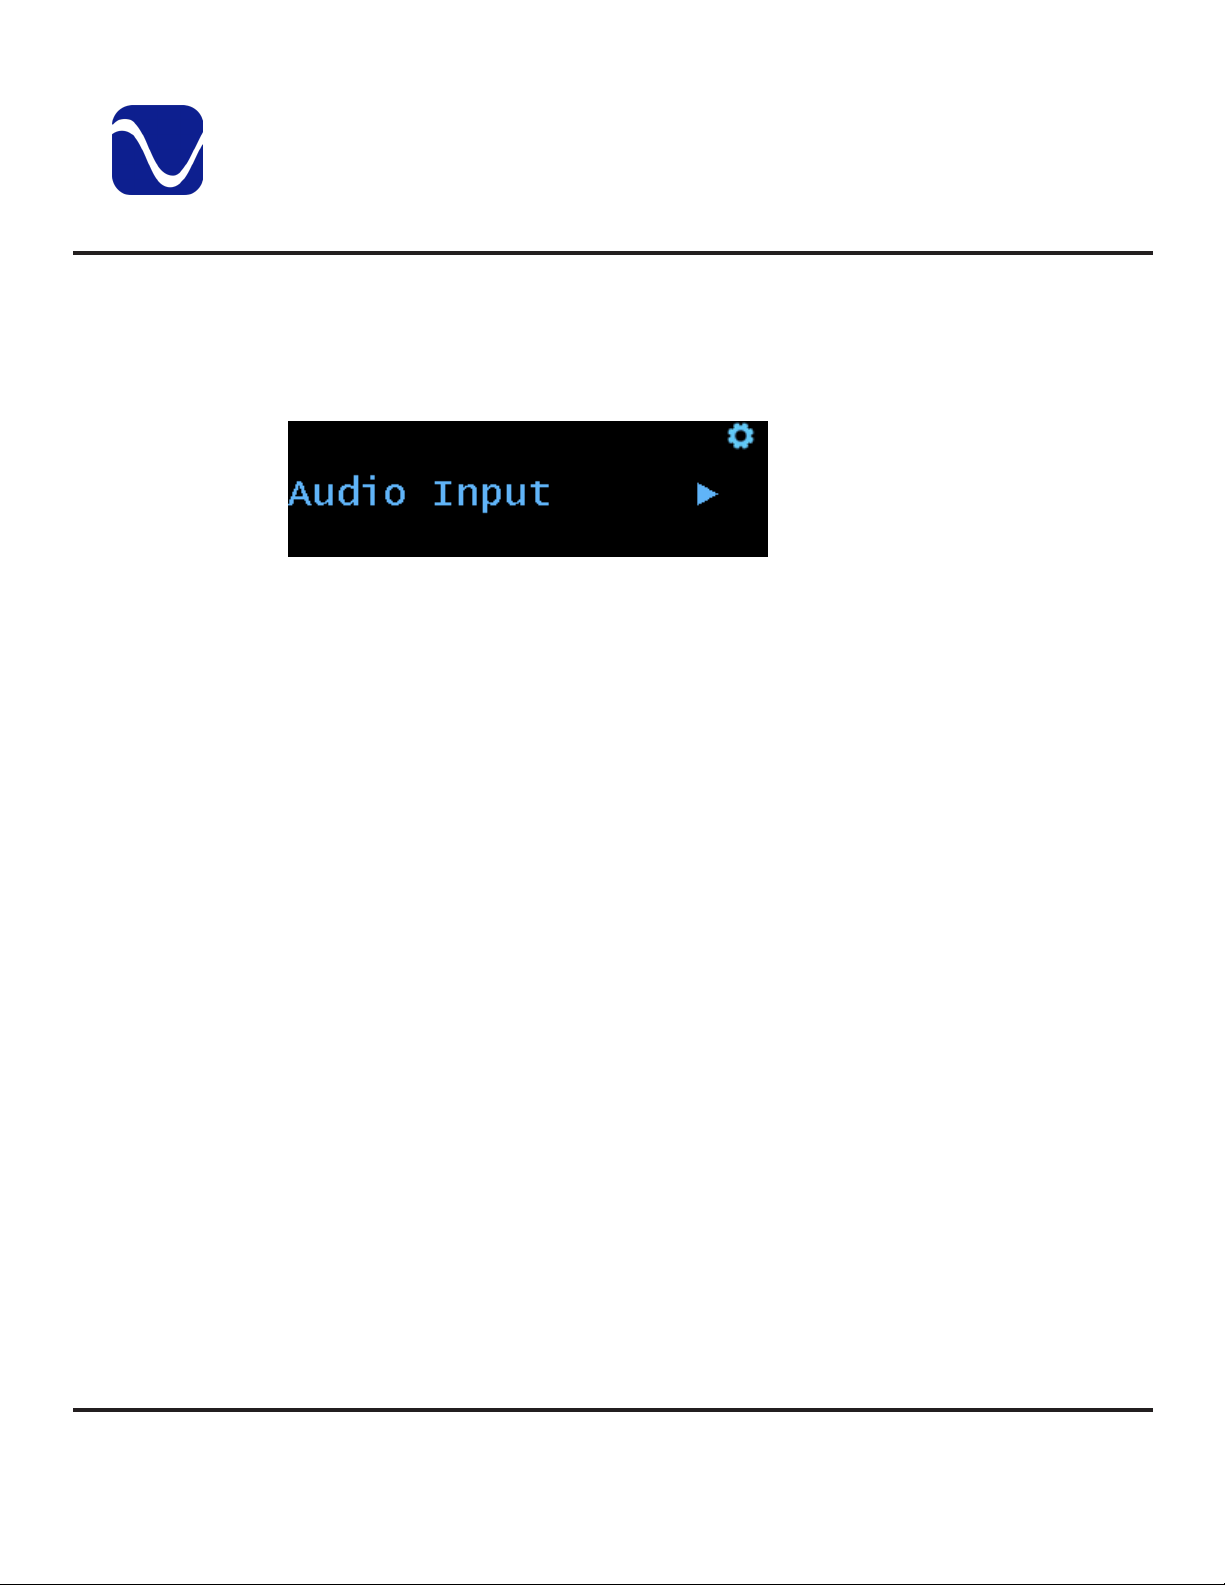
Menu items with sub-menus are indicated by a right arrow. Press the center button on the
control ring to enter them. To go back one menu level, press the center button twice. For
example, from the audio input sub-menu press the center button twice to go back to the
main menu.
The Audio Input sub-menu allows you to change the below:
• Auto Power (sub-menu)
• Input Names (sub-menu)
• Transport Input
• Ground Lift (sub-menu)
• I2S Polarity (sub-menu)
Auto Power (sub-menu)
The auto power feature allows you to select whether the inputs on your DirectStream DAC
always have power on or if the inputs power o when not in use.
Press the center button to enter this sub-menu. Use the down and up arrows to highlight
the input. Use the center button on the control ring to change from "on" (input always
powered on) to "auto" (input powered o when not in use).
Note
: If you select Auto mode from the Input menu, the DAC will not detect any input that has
Auto Power set to Auto because that input will be powered down. Instead, you will need to
manually select the input.
Input Names (sub-menu)
This feature allows you to rename the inputs (I2S 1, I2S 2, USB, Optical, Coax, XLR1, XLR
2) using a preset list with items like Bridge, CD, DVD, PC, Phono, etc. This is a sub-menu,
so click on the center button to enter it. To use this feature:
• Use the up and down arrows until you land on the input you want to rename. Press the
center button to select it.
• Use the up and down arrows until you land on the name you want. Press the center
button to select it.
• A pop up will appear to ask if you want to rename it. Click the center button to choose
PS Audio® Inc. 800-PSAUDIO 4865 Sterling Drive Boulder, Colorado 80301
©2022 PS Audio Inc. All rights reserved.
10
Page 18

Operating Manual
Owner’s Reference DirectStream DAC MK2
okay or use the right arrow to navigate to cancel rst if you change your mind.
• The input has now been renamed.
Transport Input
Use the Up and Down arrows to select the input you are using for the PS Audio Transport.
Once selected whenever you press Play, Pause, Open or Close on the remote, the DAC
will automatically switch to the input you specied. If you don't have a Transport or don't
want to use this feature, select O.
Ground Lift (sub-menu)
This allows the user to select Input Ground Lifts for each input (excluding the Optical).
Ground lifts reduce or eliminate ground-related noise arising from ground loops in audio
cables. This opens the connection between the DSD MK 2 ground and the shielding
conductor of the audio cables, leaving those cables grounded only at their opposite end.
Click on the center button to enter this sub-menu. Highlight the input you want to modify
using the up and down arrows. Then press the center control ring button to change
selection to grounded or lifted.
Sub-Menu:
Audio Output
I2S Polarity (sub-menu)
This feature allows you to invert the pins on the I2S cable. This is valuable if you need to
switch the pins so that the DAC works with a 3rd party source that does not adhere to PS
Audio's HDMI/I2S standard.
Use the center button on the control ring to change from Normal to Inverted on the below:
• I2S1 Data & L/R
• I2S1 DSD Channel
• I2S2 Data & L/R
• I2S2 DSD Channel
The Audio Output sub-menu allows you to adjust the below:
• Fixed Volume
• Max Volume
PS Audio® Inc. 800-PSAUDIO 4865 Sterling Drive Boulder, Colorado 80301
©2022 PS Audio Inc. All rights reserved.
11
Page 19

Operating Manual
Owner’s Reference DirectStream DAC MK2
• Ground Lift
• Shell Lift
• RCA Balance
Fixed Volume
The Fixed Volume feature allows you to set the volume at a xed value so that it cannot
be changed. This is useful when feeding the DSD MK2 into a pre-amplier. When Fixed
Volume is enabled, a Lock icon appears on the icon bar of the main display. The volume
up/ down keys will no longer function. All inputs are aected by the Fixed Volume setting.
The Fixed Volume setting is saved and restored on power downs.
Use the up/ down arrow keys to set the xed volume you desire. Hold the up/ down arrow
keys to scroll through the volume settings quickly. To disable Fixed Volume, set it to 0 or
OFF.
Max Volume
Setting this value limits the maximum volume when using the up volume control. This value
is ignored by the Fixed Volume setting.
Use the up/ down arrow keys to set the max volume you desire. Set to 100 to disable this
feature.
Ground Lift
Ground lifts reduce or eliminate ground-related noise arising from ground loops in audio
cables. This opens the connection between the DSD MK 2 ground and the shielding
conductor of the audio cables, leaving those cables grounded only at their opposite end.
Set to Lifted to enable the output Ground Lift. Set to Grounded to disable the output
Ground Lift. The default is Grounded.
Shell Lift
Select to lift the XLR balanced outputs shield or shell.
This typically will sound a little better lifted in most systems. However, some interconnects
have a shield that’s only connected on the source end. Systems with these interconnects
may need to tie the shield or XLR ground to the system ground to drain o any RFI that the
cable’s shield picks up.
Set to Lifted to enable the XLR Shell Lift. Set to Grounded to disable the XLR Shell Lift. The
PS Audio® Inc. 800-PSAUDIO 4865 Sterling Drive Boulder, Colorado 80301
©2022 PS Audio Inc. All rights reserved.
12
Page 20
Sub-Menu:
System
Operating Manual
Owner’s Reference DirectStream DAC MK2
default is Grounded.
RCA Balanced
This option connects the shield/ground reference of the RCA connection to either the
ground as expected or to the other side of the output transformer making a balanced
connection. The DSD Mk II will make sure that the grounds of the output are lifted when the
RCA is balanced to not interfere with the balanced signal. Not every unbalanced input on a
preamp or an amp can accept a 4VRMS input, but for those that do this could be useful for
systems that don’t have enough gain.
Set to On to select RCA Balanced. Set to O to select RCA Unbalanced. The default is O.
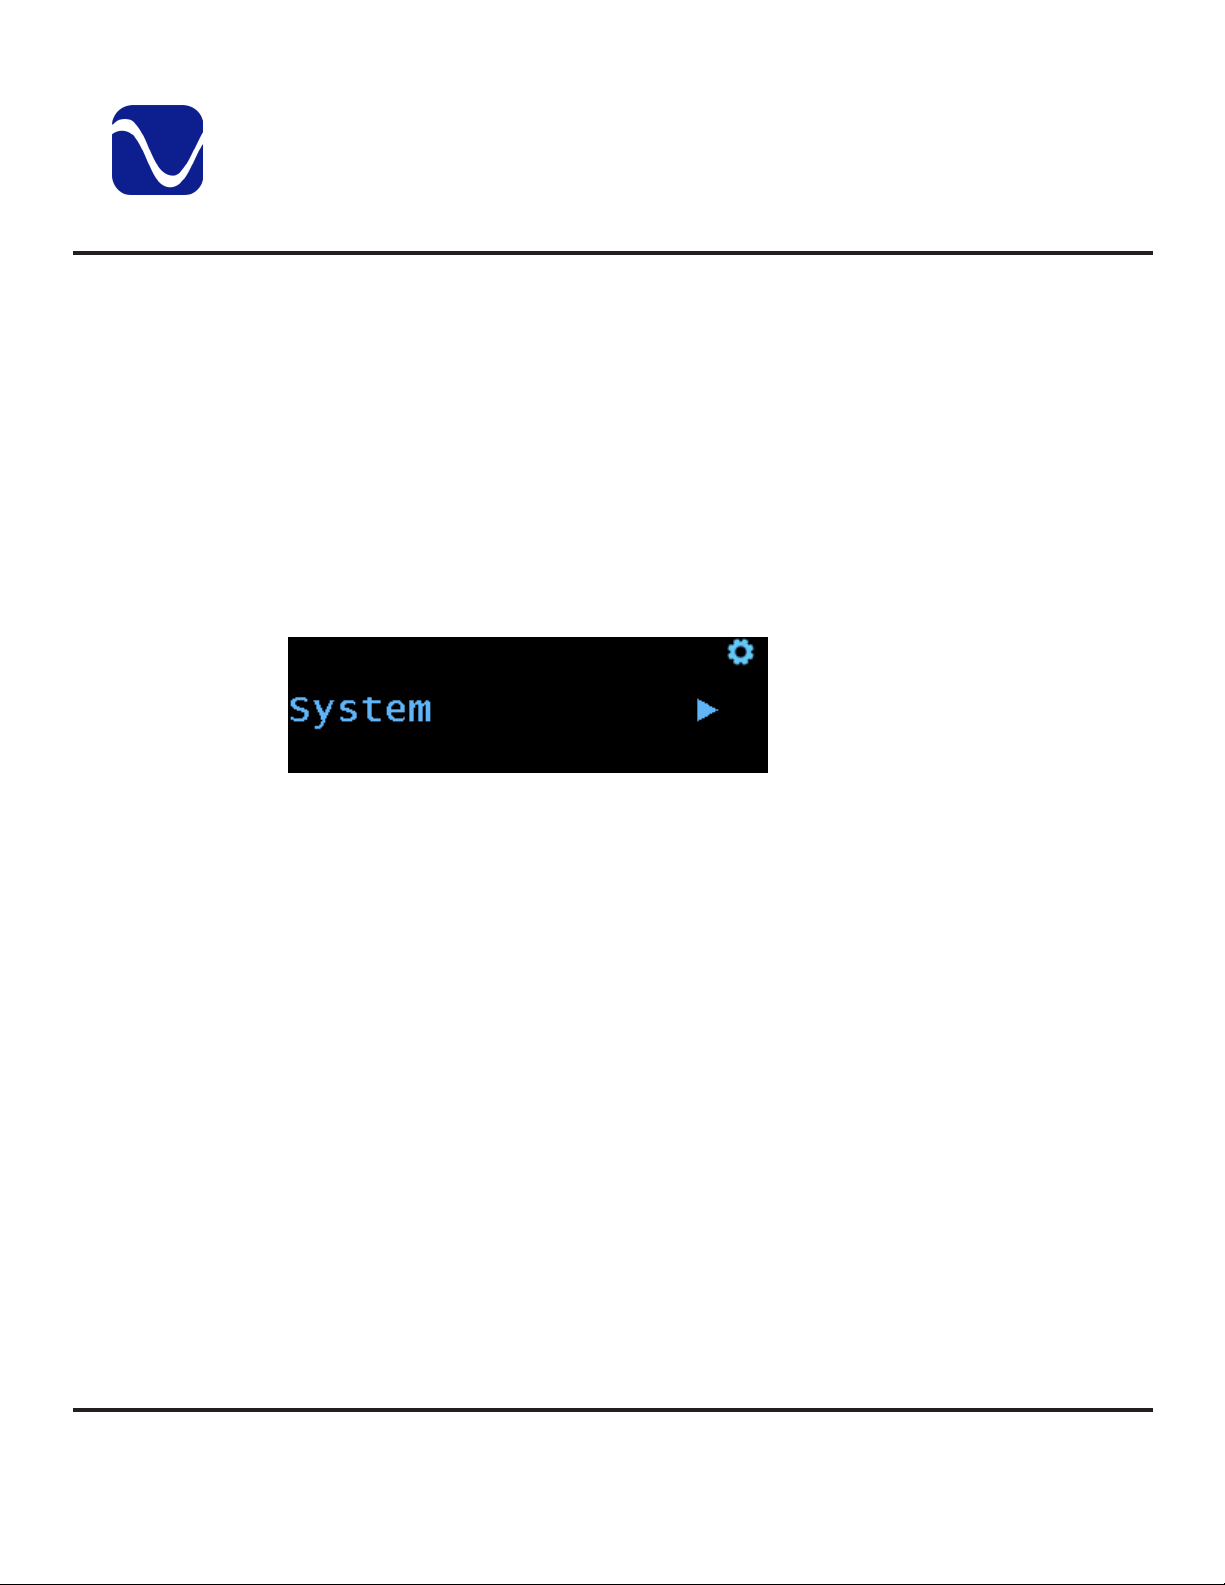
The system sub-menu allows you to adjust the below:
• Backlight
• Display Mode
• Trigger Timeout
• IR Enable
• FW Update (sub-menu)
• Factory Reset (sub-menu)
Backlight
The brightness of the display and logo button can be adjusted to suit your room lighting
any your tastes. Use the up and down arrow to select a brightness from 1 (dimmest) to 10
(brightest).
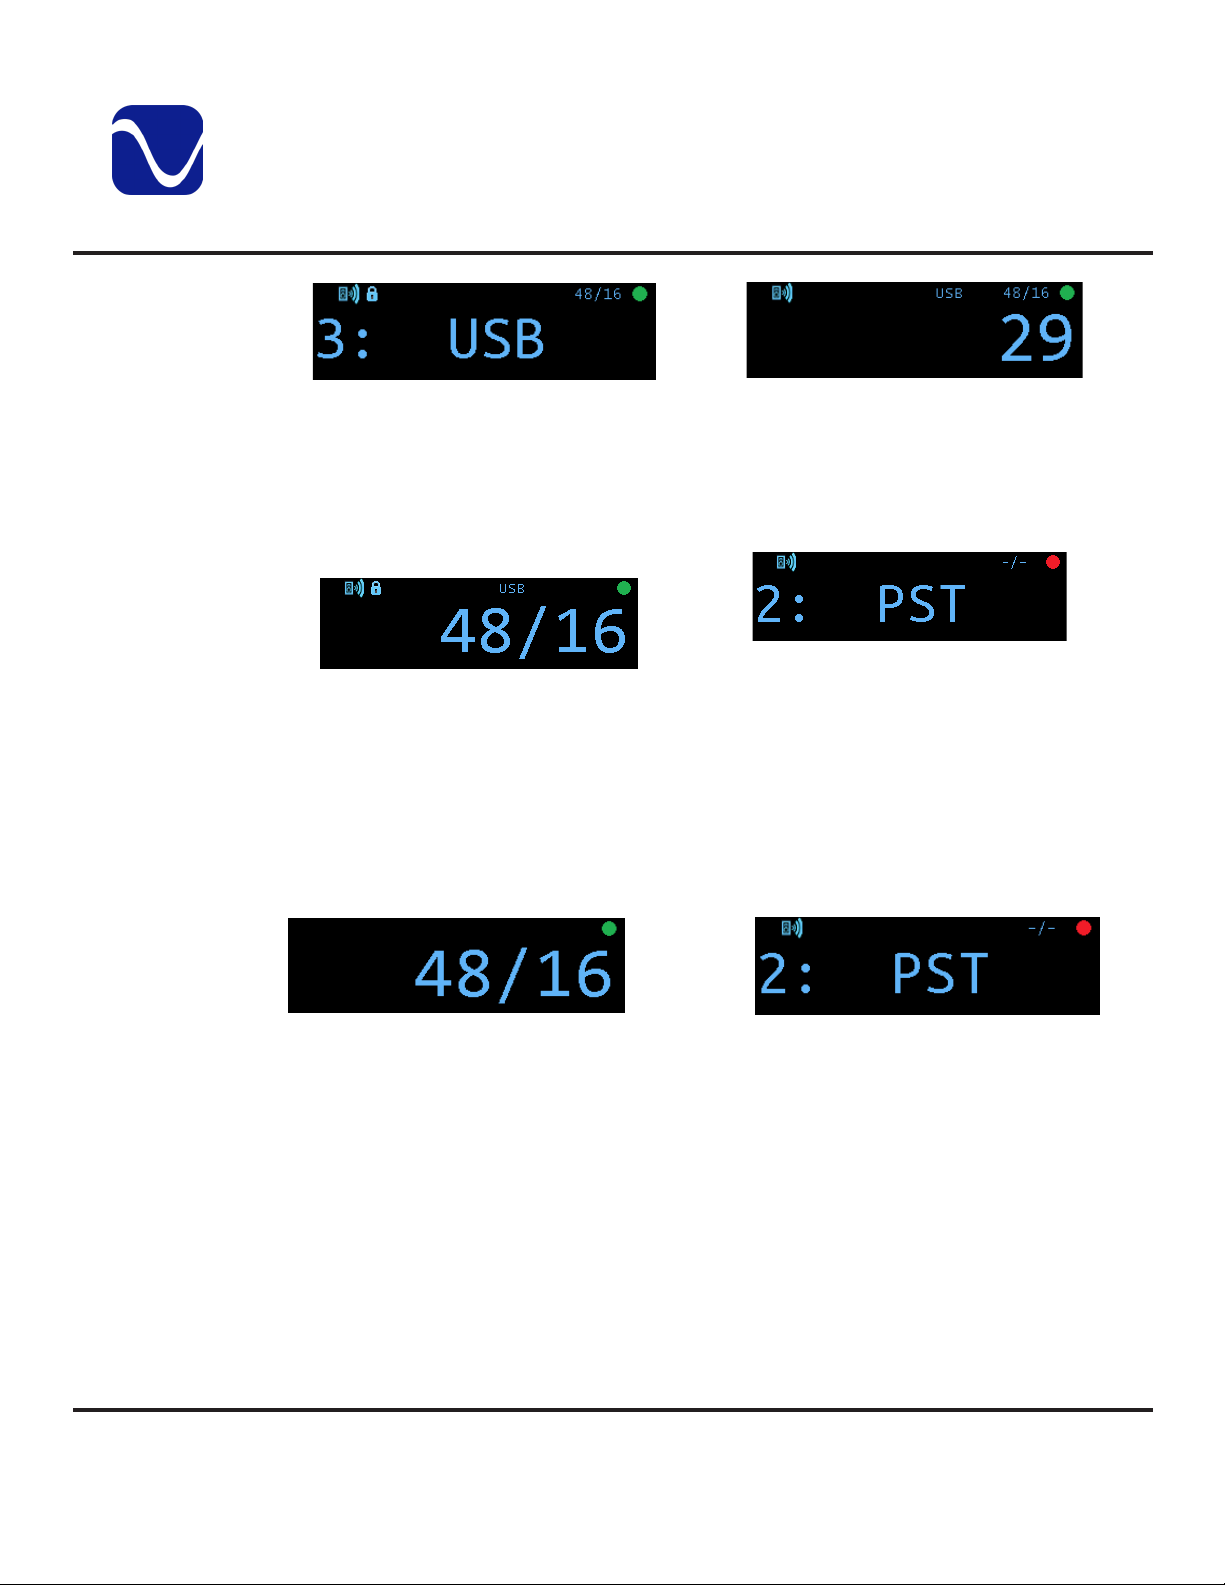
Display Mode
This menu provides three options for the main display: auto, sample rate and minimal. The
auto function varies depending on whether or not fixed volume is on. (As a reminder, if you
indicated you were using a preamp during set up, fixed volume is automatically turned on.)
• Auto: When fixed volume is on, this shows the input on the main display. If fixed volume
is off, this shows the volume on the main display. Both will display small icons when
certain menu options are selected.
PS Audio® Inc. 800-PSAUDIO 4865 Sterling Drive Boulder, Colorado 80301
©2022 PS Audio Inc. All rights reserved.
13
Page 21
Operating Manual
Owner’s Reference DirectStream DAC MK2
Auto: Displays input when fixed volume is on. Auto: Displays volume when fixed volume is o.
• Sample Rate: This option shows the current sample rate on the main display. Small
icons will be displayed when certain menu options are selected. If the input selected
is not connected - indicated by the red dot in the corner of the screen - the screen will
show the current input instead.
Sample Rate: Displays sample rate if input's good. Sample Rate: Displays input if connection's bad.
Note
: It's common for the FPGA to take a second or two to detect the sample rate when
it changes. What may look like delayed reporting is normal. It is a result of detecting and
reporting the correct sample rate.
• Minimal: Provided the connection is good, this option shows the sample rate without
any icons. If the connection is not good, it will show the input with icons.
Min: Shows sample rate (no icons) when input's good. Min: Shows input and icons if connection's bad.
Trigger Timeout
This feature allows the trigger output to be delayed a period of time after the DirectStream
DAC Mk2 is activated. You can adjust the time it takes for any other units plugged into the
trigger output of the DAC to turn on once the DAC is powered up. The time delay can be
adjusted in increments from 0 to 60 seconds using the up and down arrows on the control
ring.
IR Enable
There are 3 options - O, IR1, and IR2. If you are using a Stellar remote with this product and
PS Audio® Inc. 800-PSAUDIO 4865 Sterling Drive Boulder, Colorado 80301
©2022 PS Audio Inc. All rights reserved.
14
Page 22

Operating Manual
Owner’s Reference DirectStream DAC MK2
experience interference with your other devices when using the remote, you can change this
setting. Both the unit and the remote will need to be updated when you make changes.
• O: This makes it so that no remote works with the DAC.
• IR1: This is the default setting. If you are not experiencing interference with your other
devices, leave this setting.
• IR2: This changes the remote to a dierent code set. If your Stellar remote is interfering
with other devices, for example, turning o your television, change to this setting.
When changing this option, the Stellar remote will also need to be updated. To do so, press
the Light Bulb button (bottom of the remote) and the circular O button (top center of the
remote) at the same time. If the remote backlight ashes white once, you are on IR1. If it
ashes white twice, you are on IR2.
Note
: If using the PerfectWave remote, leave this on IR1.
FW Update (sub-menu)
This feature allows you to select from multiple rmware loads on a USB thumb drive. It
provides a faster and easier method of upgrading and downgrading new rmware for A/B
style testing.
Preparing the USB thumb drive
• You can have as many les on the USB thumb drive as you want, but only the rst ve
valid les for the device are displayed.
• The les must be named dsdmk2_v#.#.#.bin. For example, dsdmk2_v2.4.1.bin.
• You can have other bin les for other products on this thumb drive (for example, stellar_
pre_v2.1.2.bin). Only les that start with "dsdmk2_" will be loaded by the DirectStream
DAC Mk2.
WARNING: In the past, you would update a unit by copying an "image.bin" le to the
thumb drive. This method still works to automatically update a unit after a reboot (you
do not need to go through the menus to use the image.bin le). The image.bin le takes
precedence over the dsdmk2_bin_xxx.bin les. It is recommended to NOT have an image.
bin le on the thumb drive if you are using the dsdmk2_xxx.bin les and the System | FW
Update method to update les.
Upgrading/ Downgrading
• Plug the USB thumb drive into the unit in USB-A slot on the back panel marked FW.
• Enter the menus and go to System | FW Update. Press the center button to enter the
sub-menu.
• The les will display on the screen in alphabetical order.
• Scroll up or down to highlight the le you want to load.
• Press the center button to select the le.
PS Audio® Inc. 800-PSAUDIO 4865 Sterling Drive Boulder, Colorado 80301
©2022 PS Audio Inc. All rights reserved.
15
Page 23

Operating Manual
Owner’s Reference DirectStream DAC MK2
• A progress screen will display. The update process will initialize and then a progress
indicator in percentage complete will display.
• Once complete, the progress screen will indicate the unit is resetting.
• The unit will reset. The Logo LED will blink rapidly as the unit is being programmed.
• Note that if you select the same version that is already loaded, the upgrade will be
skipped and the Logo LED will not blink. The unit will still reset.
• If there is an error, the error will be displayed.
- If you have problems with loading rmware, you can contact PS Audio customer
support with the error you see.
- Press the center button to exit from the error screen
• You can exit the FW Update screen using the right/ left arrows or long pressing the
menu button.
Factory Reset (sub-menu)
This feature allows you to reset all of the conguration settings back to what they were
when the DirectStream MK2 was shipped from the factory. Any custom input names, trim
levels, Wi-Fi networks, or any other settings you have made will be erased. Press the center
button on the control ring to enter this sub-menu and follow the prompts.
Sub-Menu:
Network
The Network sub-menu is for PS Audio internal use.
PS Audio® Inc. 800-PSAUDIO 4865 Sterling Drive Boulder, Colorado 80301
©2022 PS Audio Inc. All rights reserved.
16
Page 24
Remote Control
Operating Manual
Owner’s Reference DirectStream DAC MK2
PS Audio® Inc. 800-PSAUDIO 4865 Sterling Drive Boulder, Colorado 80301
©2022 PS Audio Inc. All rights reserved.
17
Page 25
Troubleshooting
Owner’s Reference DirectStream DAC MK2
USB not
connecting
USB – DirectStream MK2 not recognized, or no sound via USB
To play music from your computer into the DirectStream MK2 via USB you must have a
driver installed that communicates with the DirectStream. On a Mac computer with OSX or
Monterey the drivers are already available and the unit should be automatically recognized.
You can then go and choose the PS Audio USB driver to play to by going to System
Preferences->Sound and select the PS Audio PerfectWave. You can also go to Applications>Utilities->Audio Midi and select the driver as well as set the same rate.
On Windows the drivers are not yet available for automatic recognition. You will need to
download the PS Audio High Resolution USB driver which can be downloaded from our
website.
You can also contact our support sta via email or phone or simply go to
www.psaudio.com and click on the Downloads page for the download. You must then unzip
the driver and install it on your Windows machine. Once installed, Windows will recognize the
DirectStream MK2 and allow you to select it for playback from any program on your computer.
If you are unable to obtain sound via USB on a Windows based device it is most likely the
result of a partial or incorrect driver installation.
You may have also experienced a pop-up window asking you to provide the correct driver.
In any of these cases the remedy is quite simple. Remove the device and force Windows to
reinstall the driver and the device.
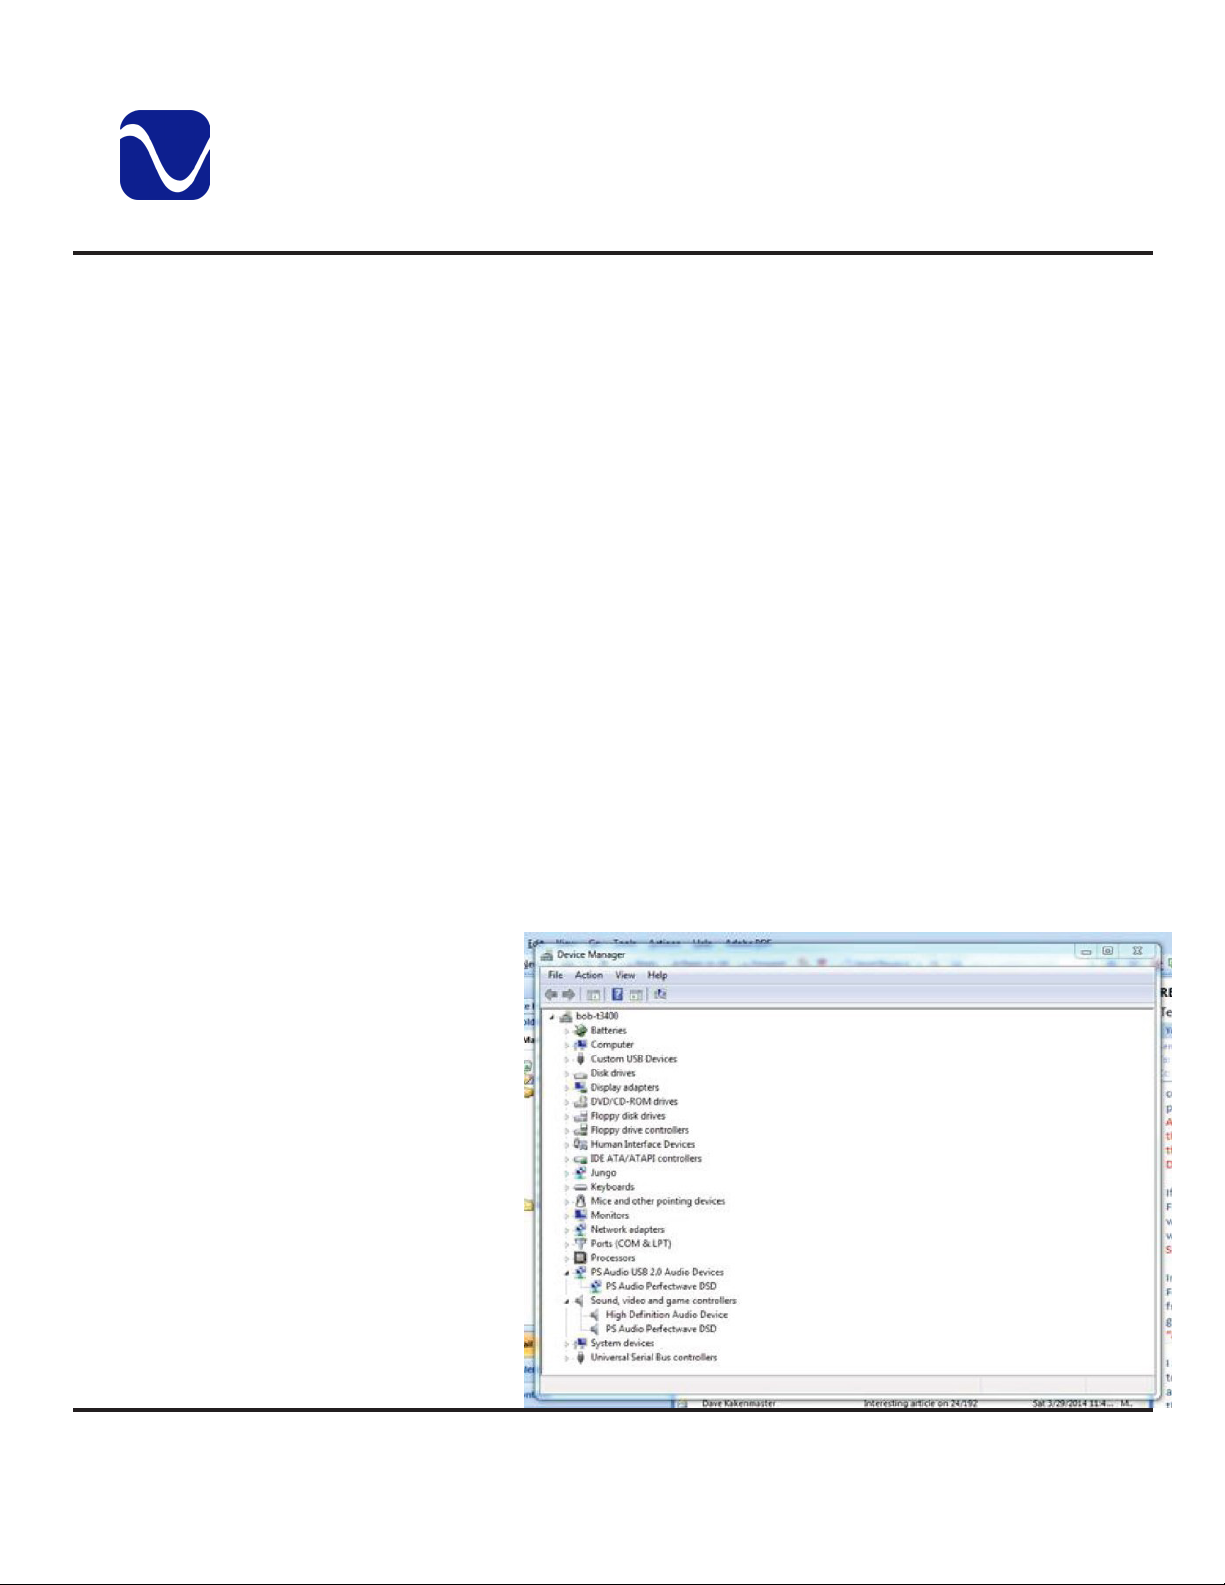
DirectStream MK2
will show up under
device manager as “PS
Audio High Resolution
DAC” The entry under
“Sound video and
game controllers” is the
USB1.0 fallback driver.
PS Audio® Inc. 800-PSAUDIO 4865 Sterling Drive Boulder, Colorado 80301
©2022 PS Audio Inc. All rights reserved.
18
Page 26

Reference
Owner’s Reference DirectStream DAC MK2
DirectStream DAC MK2 Specifications
Physical:
Unit Weight 21 lbs [9.53 kg]
Unit Dimensions 14” x 17” x 4” [ 36cm x 43cm x 10cm]
Shipping Weight 30 lbs [13.6 kg]
Shipping Dimensions 20.5”x 24” x 10” [52cm x 61cm x 25cm]
Power Requirements:
Input Power Model specic 100VAC, 120VAC, or 230VAC 50 or 60Hz
Power Consumption 25W
Digital Audio Inputs
I2S (2), Coax, XLR Balanced (2), Optical, USB
Sample Rates
Optical (TOSLink): PCM 16 and 24 bits at 44.1kHz, 48kHz,
88.2kHz and 96kHz
S/PDIF (Coax and XLR): PCM 16 and 24 bits at 44.1kHz,
48kHz, 88.2kHz, 96kHz, 176.4kHz and 192kHz; DoP64
Dual XLR: PCM 16 and 24 bits at 44.1kHz, 48kHz, 88.2kHz,
96kHz, 176.4kHz, 192kHz and 352.8kHz; DoP64 and
DoP128
I2S: PCM 16 and 24 bits at 44.1kHz, 48kHz, 88.2kHz,
96kHz, 176.4kHz, 192kHz, 352.8kHz, and 705.6; DoP64,
DoP128, DoP256, DSD64, DSD128, and DSD256
USB: PCM 16 and 24 bits at 44.1kHz, 48kHz, 88.2kHz,
96kHz, 176.4kHz, 192kHz, 352.8kHz, and 705.6; DoP64,
DoP128, DoP256, DSD64, DSD128, and DSD256.
Analog Audio Output:
Connector RCA single ended or balanced, XLR balanced
Output level high, maximum 4 VRMS Balanced
2 VRMS Single Ended
Output Impedance <100Ω/<200Ω
Frequency Response 20-20KHz +/- 0.25dB
THD+N @ 1KHz (full scale) <0.1%
Output Stage Passive audio transformer, fed by high current, high speed
analog amps producing double rate DSD.
PS Audio® Inc. 800-PSAUDIO 4865 Sterling Drive Boulder, Colorado 80301
©2022 PS Audio Inc. All rights reserved.
19
Page 27

Reference
Owner’s Reference DirectStream DAC MK2
Data Handling:
Format PCM or DSD
Sample Rate (PCM) 44.1kHz, 48.0kHz, 88.2kHz, 96.0kHz, 176.4kHz, 192kHz,
352.8kHz; 705.6kHz
Word Length (PCM) 16b, 18b, 20b, 24b
Data Rate (DSD) Standard (2.8MHz) or Double (5.6MHz) DoP as well as raw
DSD on I2S and USB inputs
Input Jitter Reduction eectively 100%, residual immeasurable. No input PLLs, FLLs.
Input Processing 225.792MHz
Signal Processing 56.448MHz
Synchronous Upsampling, All
Inputs
Digital Processing S/N ratio Upsampling > 210dB, volume control and Sigma Delta
Digital Volume Control Zero loss of precision
Analog Conversion method low pass lter DSD256 (quad rate DSD: single bit DSD at
I2S Digital Input:
Connector HDMI
Format PCM or DSD. DoP on all inputs as well as raw DSD on I2S
USB Digital Input:
Connector USB “B” Type
Format PCM, DoP v1.1 (DSD over PCM), or Native DSD
Transfer mode Asynchronous
56.448MHz for 48k, 96k or 192k; 11.2896MHz for all others
Modulator: > 330dB
11.2896MHz)
inputs
PS Audio® Inc. 800-PSAUDIO 4865 Sterling Drive Boulder, Colorado 80301
©2022 PS Audio Inc. All rights reserved.
20
Page 28
Reference
Owner’s Reference DirectStream DAC MK2
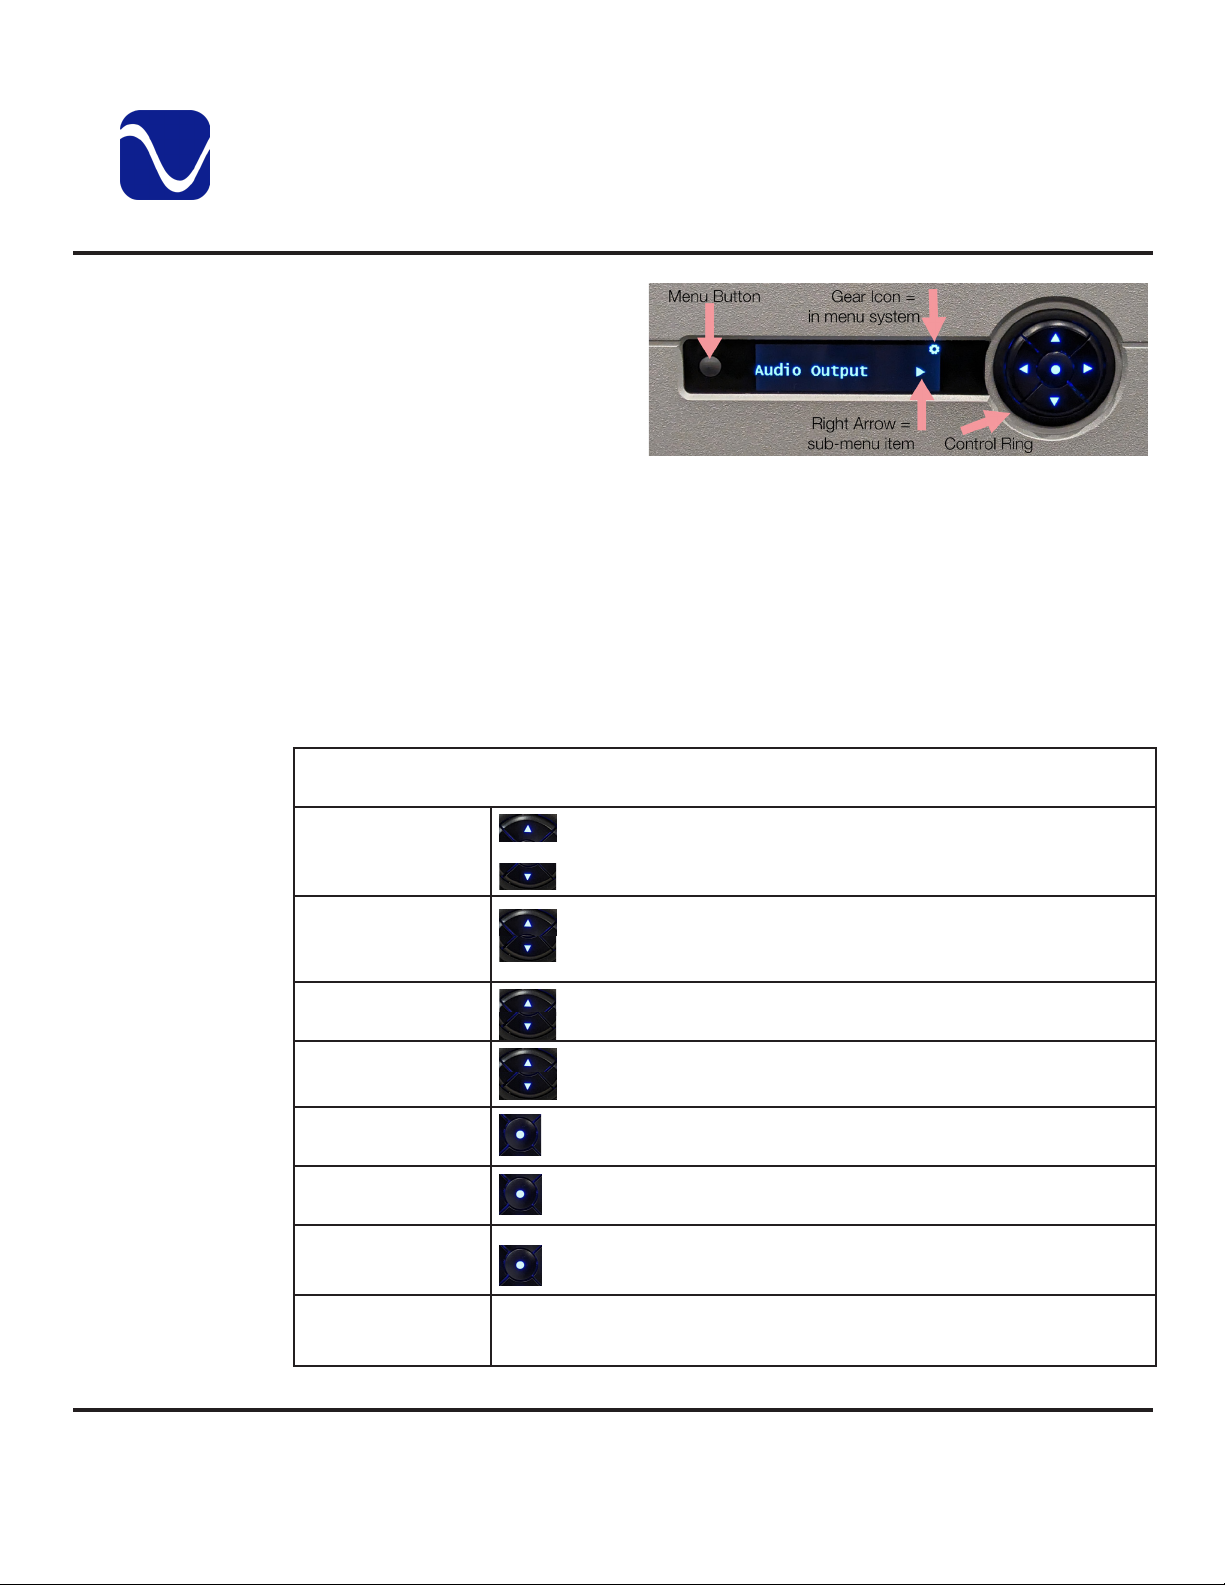
Navigating Menus
Main Menu
Navigating Menu System:
• To enter the menus, do a long
press of the menu button. A gear
icon will appear in the right corner
of the screen to show you are in the
menus. Do another long press to
leave the menus. Note: Menus time
out after 15 seconds of inactivity.
• Scroll through menu and submenu items using the right and left arrows. Use the up and down arrows to change values for
specic items.
• Unless otherwise specied, scrolling to your choice and leaving it on the screen updates
your settings.
• Menu items with sub-menus are indicated by a right arrow. Press the center button on the
control ring to enter them.
• Two quick presses of the center button take you back one menu level. For example, if you are
in the Audio sub-menu and press the center button twice, you will return to the main menu.
Main Menu
Balance
Reduce the gain of the left channel.
Reduce the gain of the right channel.
Phase
Scroll to change absolute polarity from "Norm" (Normal) to "Inv"
(Inverted).
Pre-Emphasis
Scroll between auto, on, and o.
Versions
(informational only)
Audio Input
(sub-menu) Enter menu (see more in Audio Input Sub-Menu).
Audio Output
(sub-menu)
System (sub-menu)
Network (for PS
Audio use only)
PS Audio® Inc. 800-PSAUDIO 4865 Sterling Drive Boulder, Colorado 80301
Scroll to see unit id, rmware, and FPGA versions.
Enter menu (see more in Audio Output Sub-Menu).
Enter menu (see more in System Sub-Menu).
This sub-menu is for internal PS Audio use.
©2022 PS Audio Inc. All rights reserved.
21
Page 29
Reference
Owner’s Reference DirectStream DAC MK2
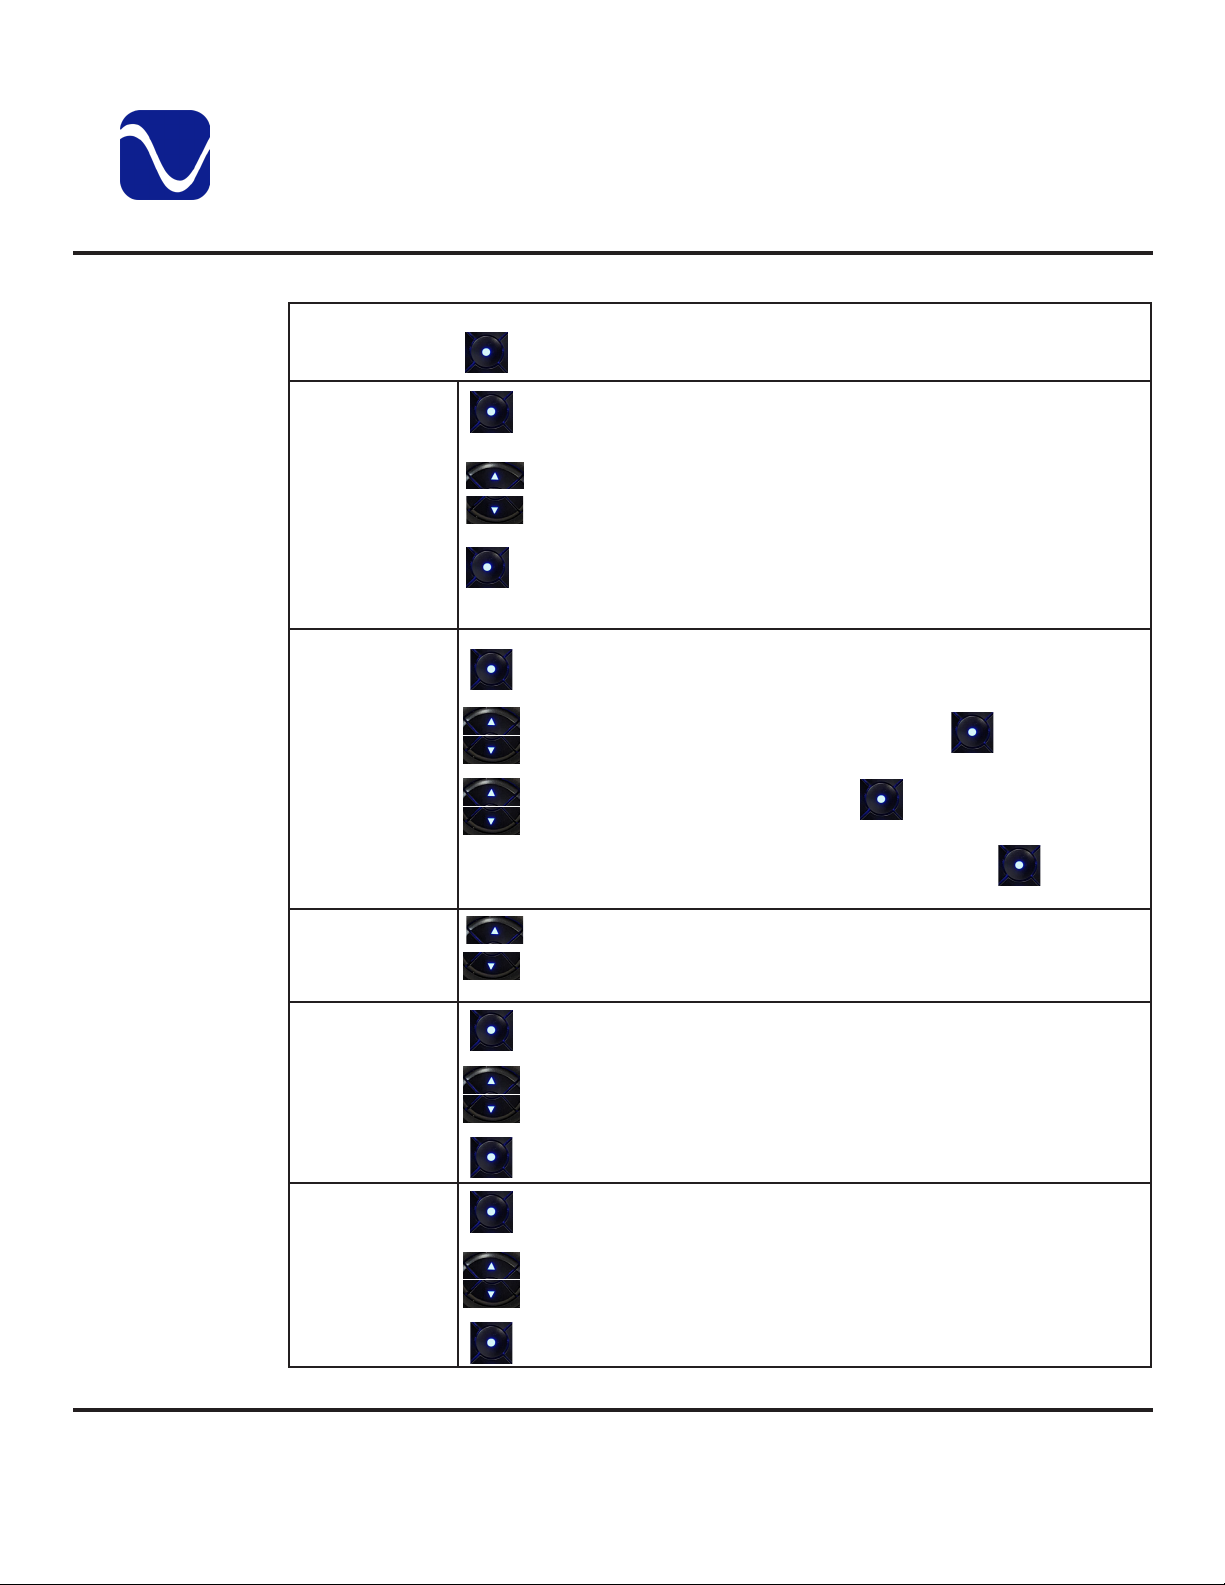
Audio Input
Sub-Menu
Press to enter the Audio Input Sub-Menu from the main menu.
Auto Power
(sub-menu)
Input Names
(sub-menu)
Transport Input
Audio Input Sub-Menu
Enter Auto Power sub-menu.
Highlight the input you want to change.
Toggle between "On" for always on and "Auto" for powered o when
not in use.
Enter Input Name sub-menu.
Highlight the input you want to rename. Press to select it.
Highlight the name you want. Press to select it.
A pop up will appear to ask if you want to rename it. Press to select
okay.
Select the input you are using for the PS Audio Transport. Select O
if you don't have a transport or don't want to use this feature.
Ground Lift
(sub-menu)
I2S Polarity (submenu)
PS Audio® Inc. 800-PSAUDIO 4865 Sterling Drive Boulder, Colorado 80301
Enter Ground Lift sub-menu.
Highlight the input you want to modify.
Change between grounded and lifted.
Enter I2S Polarity sub-menu.
Highlight the I2S signal you want to change.
Change between Normal and Inverted.
©2022 PS Audio Inc. All rights reserved.
22
Page 30
Reference
Owner’s Reference DirectStream DAC MK2
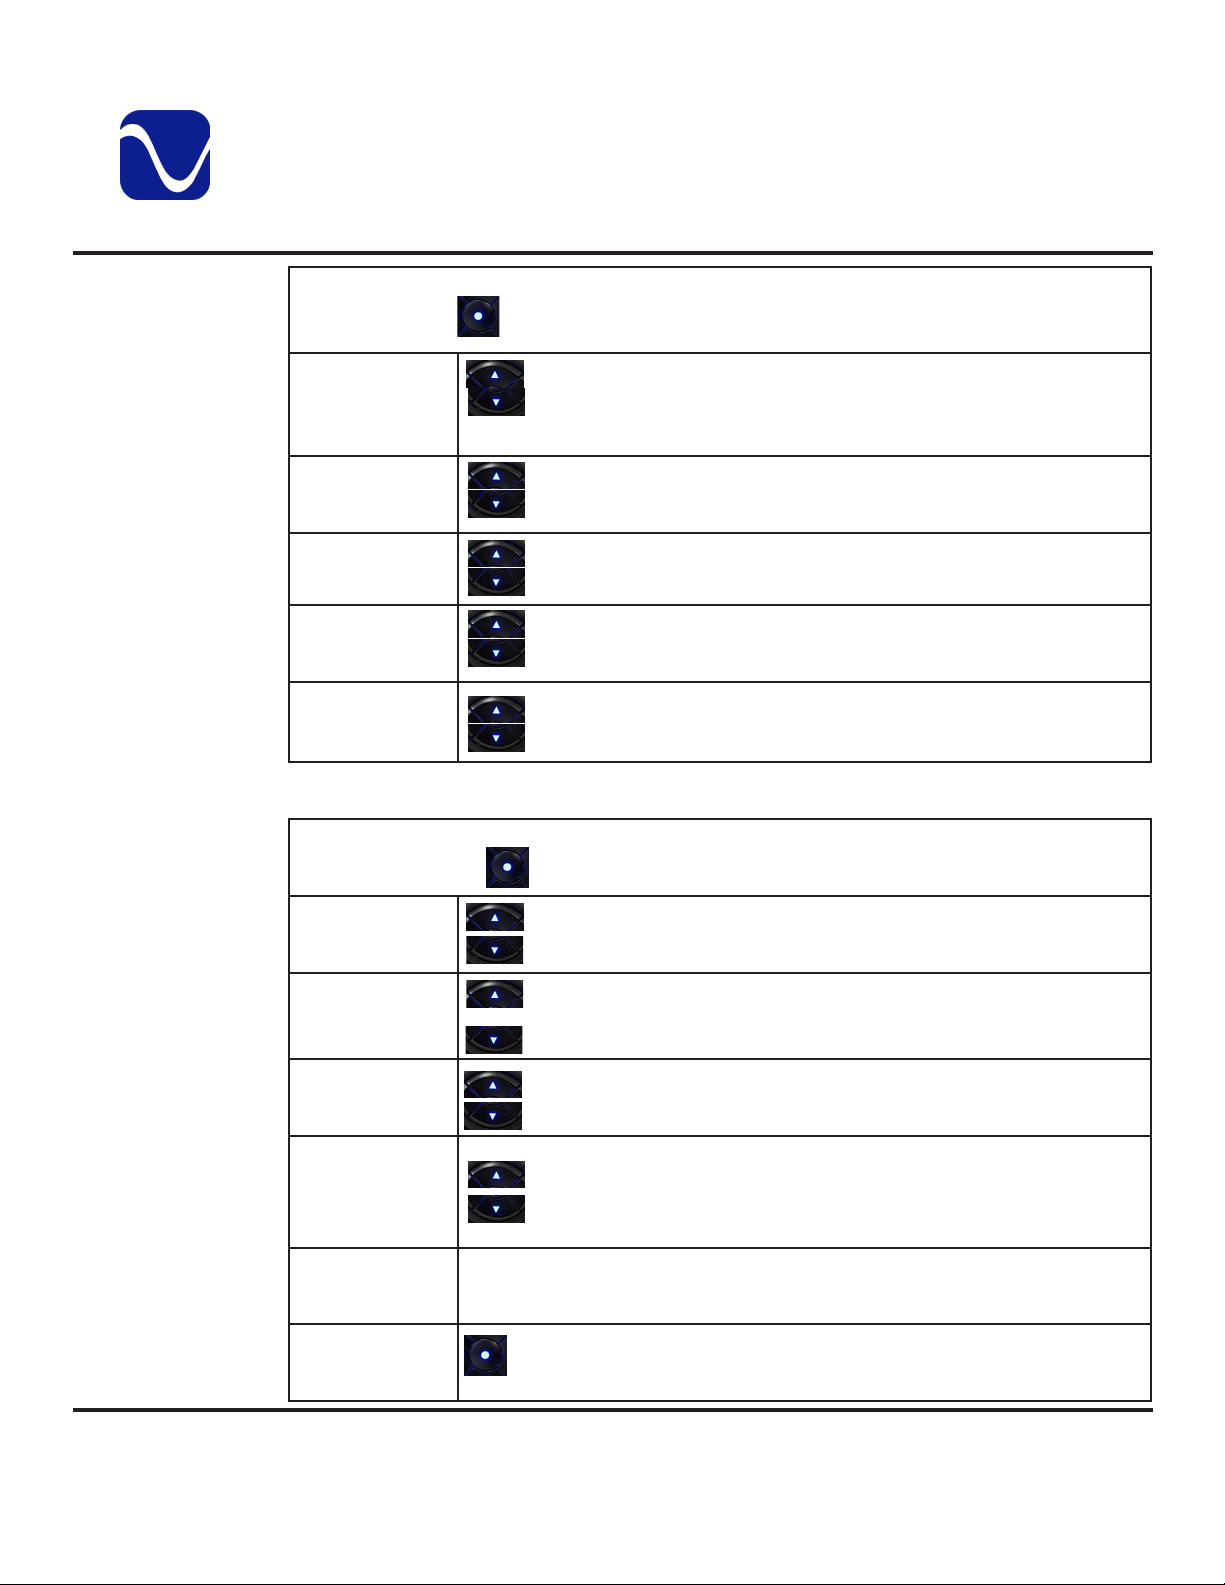
Audio Output
Sub-Menu
System
Sub-Menu
Audio Output Sub-Menu
Press to enter the Audio Output sub-menu from the main menu.
Fixed Volume
Max Volume Select the xed volume for the unit. Set to 100 to disable
Ground Lift Select Lifted to enable the output Ground Lift. Set to Grounded to
Shell Lift Select Lifted to enable the XLR shell lift. Set to grounded to disable
RCA Balance
Press to enter the System Sub-Menu from the main menu.
Backlight
If desired, select the xed volume for the unit. Hold the up or
down arrow to quickly move through the volume settings. To
disable this feature, set to 0 or OFF.
this feature.
disable the output Ground Lift.
the XLR shell lift.
Select on to set RCA Balanced. Select O to select RCA unbalanced.
System Sub-Menu
Scroll to select 1-10. 10 is brightest.
Display Mode
Trigger Timeout Delay trigger output for 0s, 5s, 10s, 20s, 30s, 45s, or 1 minute after
IR Enable Select O (no remote will work), IR1, or IR2. Leave on IR1 if
FW Update (submenu)
Factory Reset
(sub-menu)
PS Audio® Inc. 800-PSAUDIO 4865 Sterling Drive Boulder, Colorado 80301
Select Auto, Sample Rate, or Minimal (Sample Rate, no icons) for
the Main Display.
the DAC is powered up.
using the PerfectWave remote. Change to IR2 if you are
experiencing interference with other equipement when using the
Stellar remote. (See IR enable section for remote instructions.)
This is a multi-step process. See section on System/Firmware Update for
instructions.
Enter factory reset. Use right arrow to select reset and press it again.
©2022 PS Audio Inc. All rights reserved.
23
Page 31

Warranty
Owner’s Reference DirectStream DAC MK2
Registering
Coverage
Shipping
Product registration
By registering your product, you are validating the start date of your limited
warranty. This limited warranty is in eect for 3 years from the date the unit was
first purchased from PS Audio or its dealers and agents. If you do not register
your product within 30 days of service, a copy of your purchase receipt from an
authorized PS Audio dealer may be used as proof of purchase to establish the
warranty start date. If no proof of purchase from an authorized PS audio dealer
or registration is provided, the production date of the product will be used to
determine the warranty start date. You can register your product online, by phone,
by mail, or by email.
What this warranty covers
This warranty covers defects in material and workmanship for products purchased
from PS Audio or its authorized dealers and agents. In the event your product
fails, your sole remedy under this limited warranty shall be to return the product
to PS Audio or an authorized PS Audio repair center. At the option of PS Audio,
the product will be repaired without charge for parts or labor, replaced, or the
purchase price refunded through the original point of purchase.
Shipping
You are responsible to pay for the safe and proper shipment of the warrantied
product to PS Audio or its authorized repair center. Under this limited warranty,
PS Audio or its authorized repair center will pay the cost of returning the repaired
or replacement product to you.
Not Covered
What this warranty does not cover
This warranty does not cover damage due to:
• Accidents, carelessness, improper transportation, misuse, neglect, or abuse
• Failure to follow the operating instructions that are provided by PS Audio in
the Owner’s Reference Manual (available for download at www.psaudio.com)
• Use in any manner inconsistent with PS Audio’s operating instructions
(available for download at www.psaudio.com)
• Lack of routine maintenance
• Connection to an improper voltage supply
• Alterations or modifications to the unit
• Improper or unauthorized repair, including repairs not authorized by PS Audio
or a PS Audio authorized repair center
PS Audio® Inc. 800-PSAUDIO 4865 Sterling Drive Boulder, Colorado 80301
24
©2022 PS Audio Inc. All rights reserved.
Page 32

Warranty
Owner’s Reference DirectStream DAC MK2
• Fire, lightning, flood, “Acts of God,” or other contingencies beyond the control
of PS Audio
• Products purchased through an unauthorized source (if you have questions as
to whether or not a dealer is authorized, please contact customer support at
www.psaudio.com
• Products with a factory-applied serial number that has in any way been altered,
defaced, or removed
Limitations
Warranty Transfer
Limitations under this warranty
In no event will PS Audio’s liability to you exceed the original purchase price of
your unit. This warranty does not cover the cost of custom installation, customer
instruction, setup adjustments, or signal reception problems. Consequential and
incidental damages are not covered under this warranty. However, some states
do not allow the exclusion or limitation of incidental or consequential damages, so
this limitation or exclusion may not apply to you. In the event that your warrantied
product cannot be repaired, PS Audio will either replace or refund the cost of the
unit. We reserve the right to replace any out-of-stock, discontinued, or limited
edition products with a comparable product. Discontinued products may not be
available for warranty
Warranty transfer
This warranty is for the benefit of the original purchaser of the product. The warranty
may be transferred to a subsequent purchaser during the 3 year warranty period.
To do this, you must contact PS Audio directly to set up a transfer of warranty
registration.
PS Audio® Inc. 800-PSAUDIO 4865 Sterling Drive Boulder, Colorado 80301
©2022 PS Audio Inc. All rights reserved.
25
Page 33

Service
Owner’s Reference DirectStream DAC MK2
If you require
service in North
America
Obtain an RMA
number
Use original
packing
Warranty Service within North America
Please contact PS Audio customer support for service assistance, help with
locating an authorized PS Audio repair center, help with the operation of a product,
or for more information.
Obtaining an RMA#
In order to receive warranty service, you must first obtain a Return Merchandise
Authorization Number (RMA#) prior to returning any item. Please contact PS Audio
or an authorized PS Audio repair center to receive an RMA#. The RMA# must be
on all returned items. If it is not clearly marked, PS Audio will return the package
back to you, freight collect.
Packaging and Shipping
Original packaging should be used for the safe transit of your PS Audio unit to
the repair center. If you do not have the original packaging, PS Audio can sell and
ship replacement packaging to you. You are responsible for the cost of shipping
the product to a PS Audio authorized repair center. You should insure the product
for its full retail cost, in the event it gets lost or damaged in transit. PS Audio is
not responsible for damage incurred during the transit of products sent to us.
Shipping your product in non-PS Audio packaging may void this warranty. PS
Audio reserves the right to charge you for new factory packaging to return your
product after a repair.
State law
If you are
outside the US
State Law
This warranty gives you specific legal rights. You may also have other rights, which
vary from state to state.
International Warranty Service
PS Audio has authorized distribution in many countries of the world. In each
country, the authorized importing distributor has accepted the responsibility for
warranty of the products sold by that distributor. Warranty service should be
obtained where the product was purchased.
Changes to Our Products
PS Audio reserves the right to modify the design of any product without obligation
to purchasers of previously manufactured products, and to change the prices or
specifications of any products without notice or obligation to any person.
PS Audio® Inc. 800-PSAUDIO 4865 Sterling Drive Boulder, Colorado 80301
26
©2022PS Audio Inc. All rights reserved.
Page 34

Notes
Owner’s Reference DirectStream DAC MK2
PS Audio® Inc. 800-PSAUDIO 4865 Sterling Drive Boulder, Colorado 80301
©2022 PS Audio Inc. All rights reserved.
27
Page 35

Notes
Owner’s Reference DirectStream DAC MK2
PS Audio® Inc. 800-PSAUDIO 4865 Sterling Drive Boulder, Colorado 80301
©2022 PS Audio Inc. All rights reserved.
28
Page 36

Thanks for being a part
of the PS Audio Family
At PS Audio, we’re family.
Not just a family that runs in bloodlines, but in frequencies.
Because while we may not all share the same genes here, we are all related by
a passion, nay, obsession with listening to the music we love at the highest,
most breathtaking quality possible.
And in our minds, that makes us kin.
In fact, we believe that every nutty, hertz counting audiophile out there is part
of our tribe.
That’s how we’ve built our company over the last 50 years - with the kind of
care and respect that you give to your family.
 Loading...