

Page 1
®
Owner’s Reference
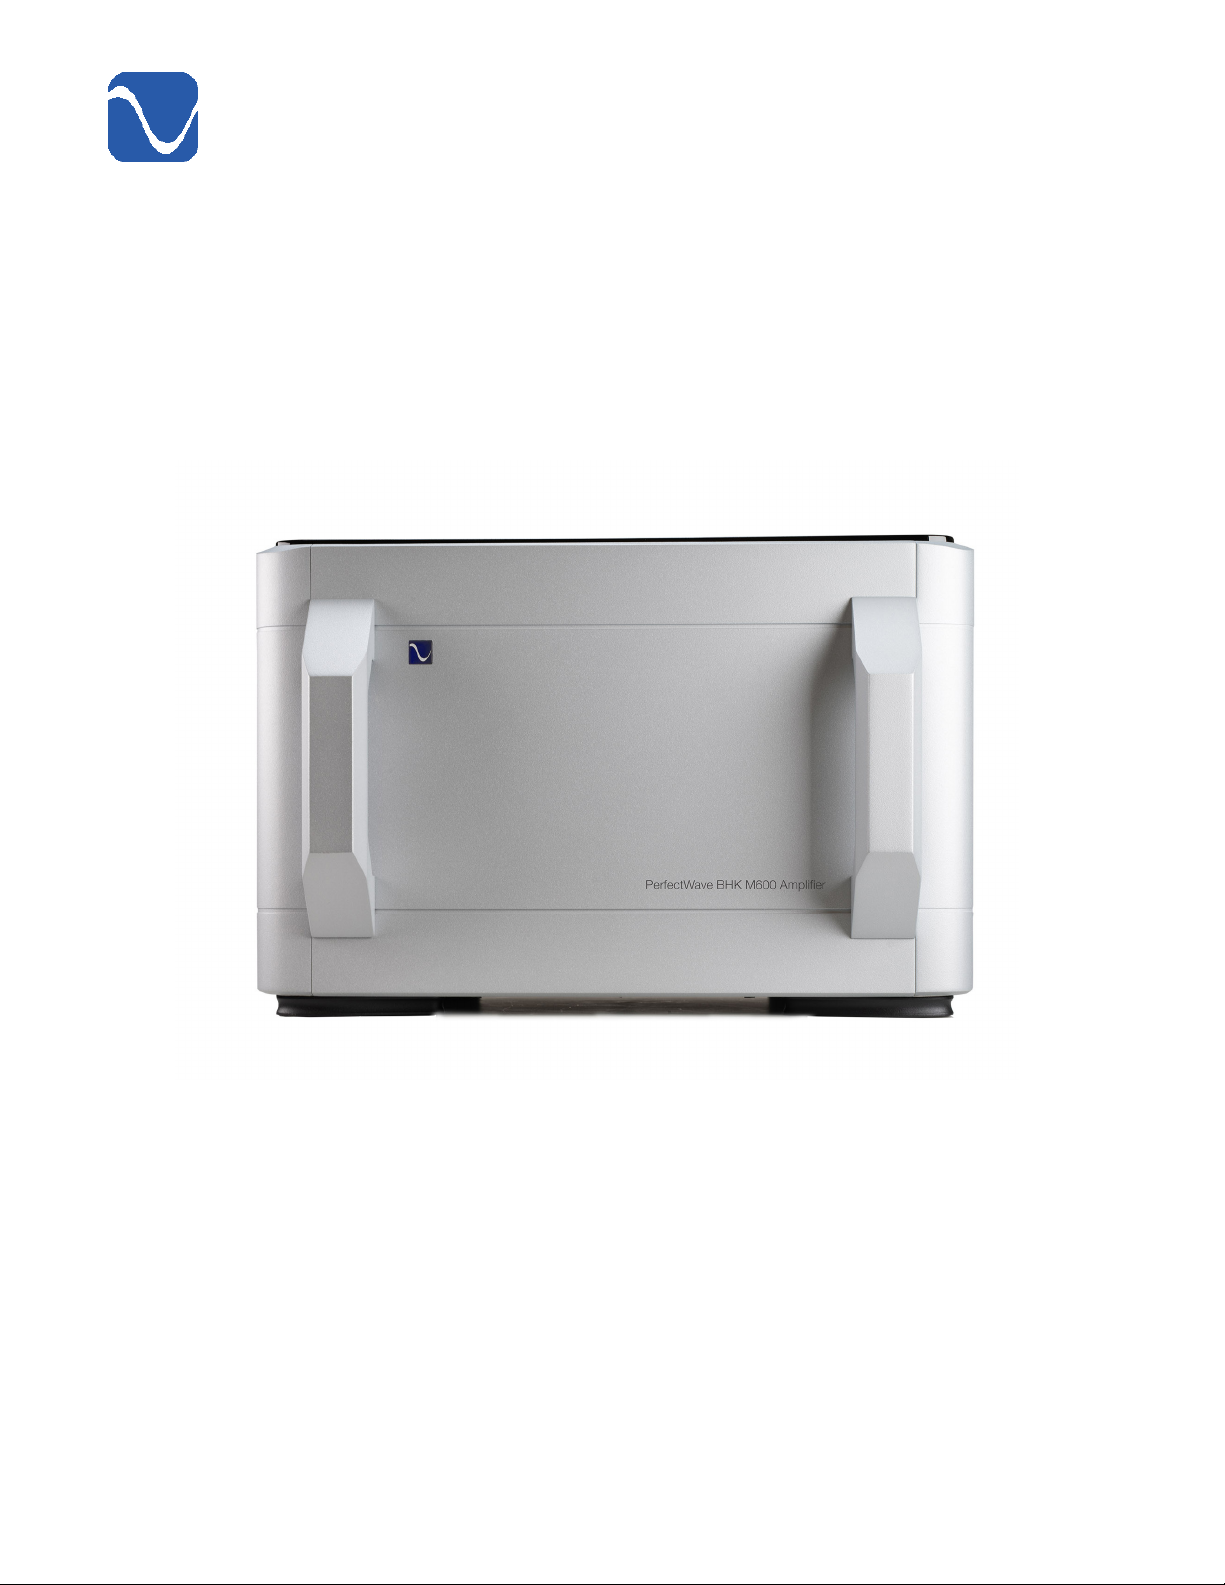
PERFECTWAVE
BHK M600 AMPLIFIER
PS Audio® Inc. 4865 Sterling Drive Boulder, Colorado 80301 800-PSAUDIO
Page 2

®
Safety Information
READ AND FOLLOW ALL INSTRUCTIONS
HEED ALL WARNINGS
WARNING: TO REDUCE THE RISK OF FIRE OR ELECTRICAL SHOCK, DO NOT EXPOSE THIS APPARATUS
TO RAIN OR MOISTURE. OBJECTS FILLED WITH LIQUIDS, SUCH AS VASES, SHOULD NOT BE PLACED
ON THE APPARATUS. THIS APPARATUS MUST BE CONNECTED TO A MAINS SOCKET OUTLET WITH A
PROTECTIVE EARTH CONNECTION.
CAUTION!! The BHK M600 is heavy (120 pounds). Please use proper lifting aids and techniques when
lifting. Two person lift recommended.
Clean only with a dry cloth. Do not place ammable material on top of or beneath the unit.
PS Audio® products are passively cooled components that require adequate ventilation at all times
during operation.
Do not remove or bypass the ground pin on the end of the AC cord. All PS Audio® products ship with
a grounding-type plug. If the provided plug does not t into your outlet, consult an electrician for
replacement of the obsolete outlet.
Protect the power cord from being walked on or pinched, particularly at the plug locations,
convenience receptacles, and the point where they exit from the apparatus. Unplug this apparatus
during lightning storms.
When making connections to this or any other component, make sure all components are powered
o. Turn o all systems’ power before connecting the PS Audio® component to any other component.
Make sure all cable terminations are of the highest quality.
Touching uninsulated terminals or wiring may result in an unpleasant sensation.
Vacuum Tubes can be serviced by removing the access panel on the back of the unit. DO NOT
REMOVE TOP COVER. THERE ARE NO USER-SERVICEABLE PARTS INSIDE THIS PS AUDIO PRODUCT.
REFER ALL SERVICE NEEDS TO QUALIFIED SERVICE PERSONNEL.
Please contact your authorized dealer, distributor, or PS Audio® directly if you have any questions or
concerns that are not addressed in this reference manual.
PS Audio®, the sine wave logo, and PerfectWave® are registered trademarks of PS Audio, Inc., and are
restricted for use by PS Audio, Inc., its subsidiaries, and authorized agents. Stellar™, Power Plant™,
MultiWave™, CleanWave™, and Gain Cell™ are trademarks of PS Audio, Inc.
This product was designed and assembled in Boulder, Colorado with globally sourced components.
NOTE: This equipment has been tested and found to comply with the limits for a Class B digital
PS Audio® Inc. 4865 Sterling Drive Boulder, Colorado 80301 800-PSAUDIO
Page 3

Safety Information
device, pursu-ant to part 15 of the FCC Rules. These limits are designed to provide reasonable
protection against harmful in-terference in a residential installation. This equipment generates,
uses and can radiate radio frequency energy and, if not installed and used in accordance with
the instructions, may cause harmful interference to radio communications. However, there is no
guarantee that interference will not occur in a particular installation. If this equipment does cause
harmful interference to radio or television reception, which can be determined by turning the
equipment o and on, the user is encouraged to try to correct the interference by one or more of the
following measures:
—Reorient or relocate the receiving antenna.
—Increase the separation between the equipment and receiver.
—Connect the equipment into an outlet on a circuit dierent from that to which the receiver is
connected.
—Consult the dealer or an experienced radio/TV technician for help.
Modications not expressly approved by the manufacturer could void the user’s authority to operate
the equipment under FCC rules.
© 2022 PS Audio, Inc. All rights reserved. Rev I.
PS Audio® Inc. 4865 Sterling Drive Boulder, Colorado 80301 800-PSAUDIO
Page 4
®
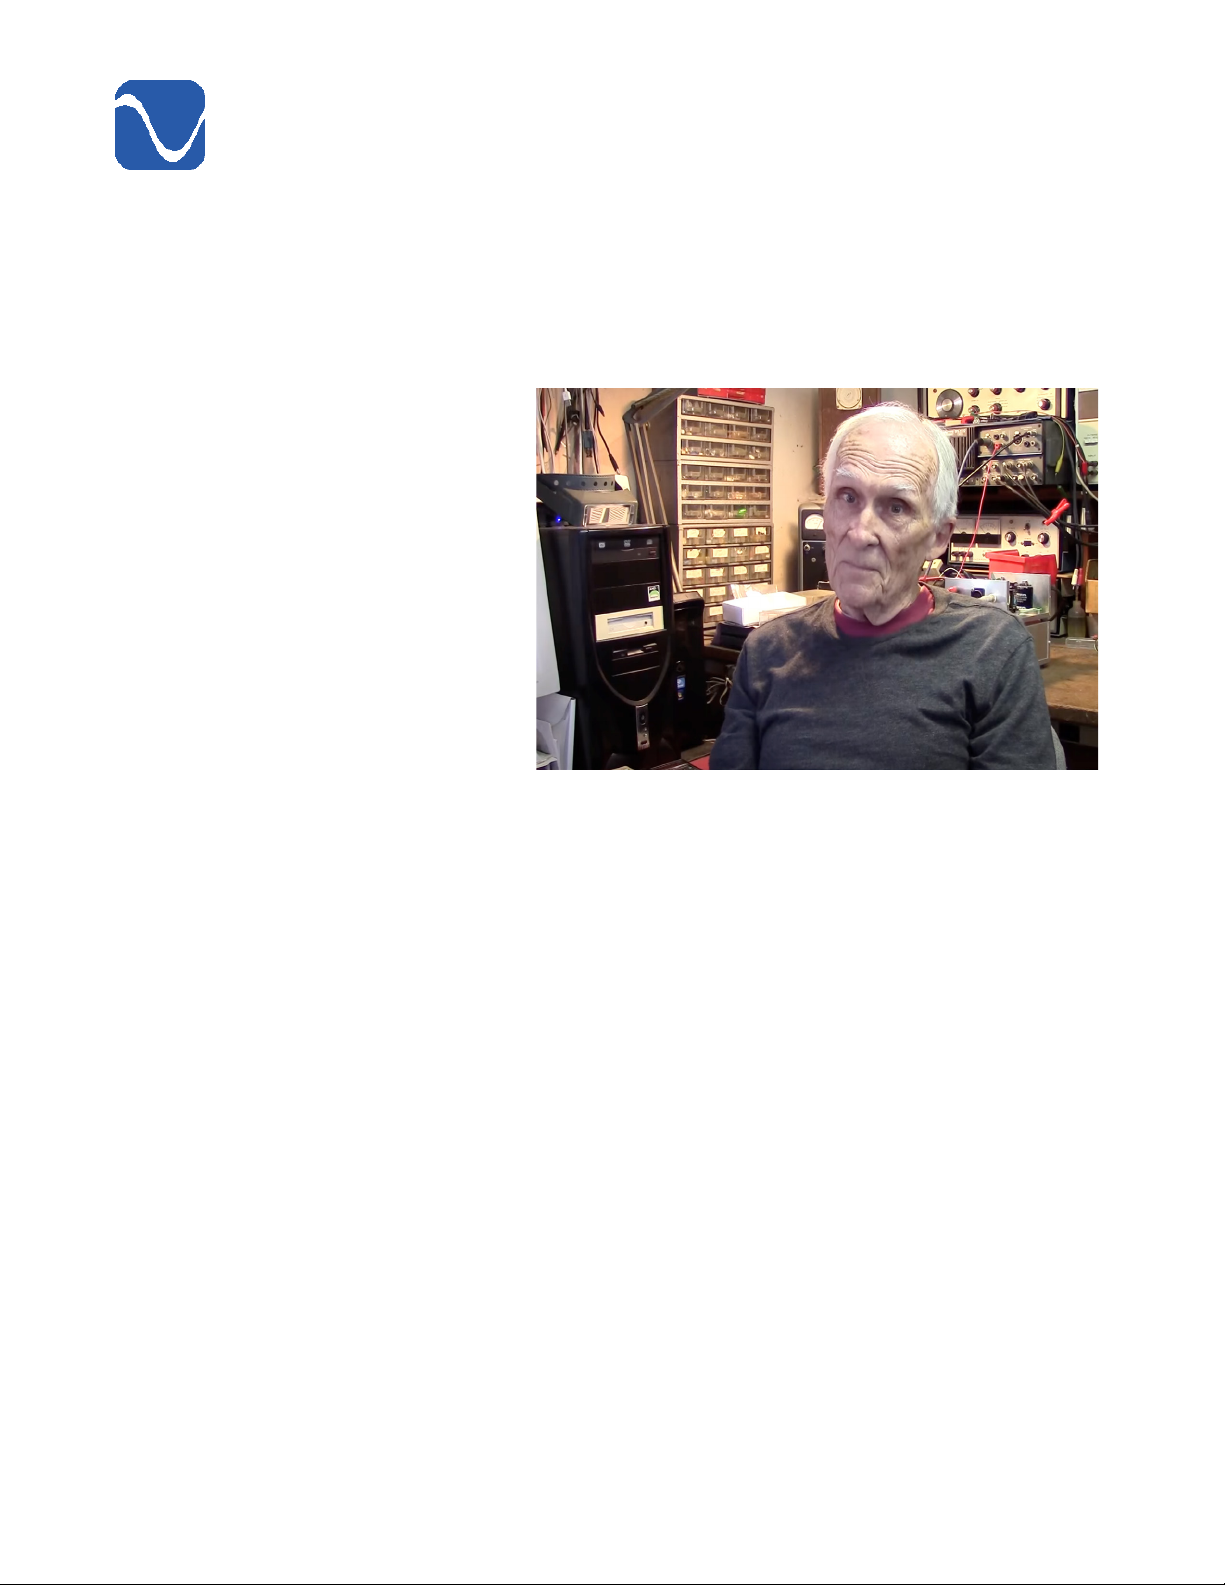
Bascom H. King: BHK Series Creator
To say Bascom H. King was one of a kind is an understatement. He was a treasure.
The man who became one of the great pioneers and innovators in audio got his rst taste of audio
engineering in junior high school. Smitten with electricity and motors, he took a class that was half
electricity and half radio. Once the radio half kicked in, he was hooked. By high school, Bascom was
stealing radios from the dump and
making his own ampliers.
Bascom went on to get his degree in
electronic engineering and crafted
products for some of the biggest names
in audio. In addition to creating PS
Audio’s top-of-the-line BHK Signature
series and other electronics, Bascom
designed some of the nest audio
equipment in the world for renowned
companies like Constellation Audio,
Marantz, Conrad Johnson, and Innity.
Not only did Bascom contribute to
advancements in amplier technology,
he was able to capture that unmeasurable yet immediately identiable part of music he called the
essence or vibe – the feel of the music. Working from the at-home laboratory his wife built for him, he
poured his heart, his soul, and his half-century of experience into every product he designed.
Bascom was a co-worker, an inspiration, a mentor, and a friend. He exuded peace, demanded
perfection, and thought creatively. The engineers at PS Audio are privileged to have worked with him
over the years. While saddened by his death in May 2022, we know his passion, his creativity and his
lifelong pursuit of perfect amplication will live on in his work.
PS Audio® Inc. 4865 Sterling Drive Boulder, Colorado 80301 800-PSAUDIO
Page 5

®
Table of Contents
Introduction 6
The Basics
Read This BEFORE your BHK 600 Ampliers Arrive 8
Unboxing and Location – “They’re HERE!” 9
Switches, Plugs and Amplier Hook Up 10
Ready - Set - Play 12
What’s Next? 13
Beyond the Basics
Equipment Burn-In aka “Break-In” 14
Leaving Your BHK 600 In Idle Mode 15
Amplier Location and Cables 15
Switches and Inputs on the Back of the Amplier 16
Powered Subwoofers: CAUTION! 18
Understanding the PS Audio Logo Front Panel Switch and Light 18
Tubes 19
User Accessible Fuses on the Back Panel 21
Reference Section
Replacing Electronic Tubes 22
Power Conditioners 23
If You Hear Hums 24
BHK Signature 600 Mono Specications 26
PS Audio® Inc. 4865 Sterling Drive Boulder, Colorado 80301 800-PSAUDIO
Page 6

®
Introduction
Introduction
Thank you for purchasing the BHK 600 power amplier. We are justly proud of the work done by our
legendary friend and mentor Bascom King, as well as our team of engineers, to create this wonderful
amplier.
Introduction and Welcome From Your Guide – Peter Rudy
My name is Peter Rudy, and I wrote this guide. I even volunteered. But I wanted a fresh, new
approach. My family at PS Audio agreed and so our journey begins.
My love for high delity equipment began in grade school. I built my own speaker cabinets with
wood pilfered from my father’s workshop and used my mother’s berglass curtains in the garage for
grill cloth. In Boston for college in the 70’s, I still remember riding the MTA subway home with my rst
high-end audio purchase proudly on my lap: a massive box containing a new Thorens turntable.
More than 30 years ago, I became friends with Paul McGowan and Arnie Nudell. It was fate, truly.
Paul and Arnie were starting the Genesis loud speaker company in Vail, Colorado, and I became their
business lawyer. Our friendship was baptism under re: a few weeks after meeting, Paul, Terri, and
Arnie headed o to the Consumer Electronics Show in Las Vegas. A day later, I got a frantic call from
Paul in Vegas: they had left all the remotes for ALL the audio equipment in a box, still sitting in the
Vail oce. My task: break into their oce, get the remotes and y to Las Vegas. And that is not even
the most colorful story of our decades of friendship!
I still serve as general counsel for PS Audio. And help out with projects. Like this guide.
But cool stories do not qualify me to write a guide on a sophisticated state of the art audio amplier.
I think my being an audio equipment “consumer” is my best qualication. I know the joys and
frustration of opening a new equipment purchase and thinking: where do I begin? Hence, my
philosophy for a guide to help consumers, like me.
This is not your father’s equipment manual. No one read them – and for good reason: they were
boring, dull, and lifeless. We know there is a dierent approach. As goofy as it might sound, I want
the joy and satisfaction of owning this amplier to start from the moment the boxes arrive. And I
am going to be your guide in this exciting journey that has not been attempted before. I am not
an engineer, but like you, a buyer, owner and lover of high-delity equipment. And like you, I have
thrown dozens of unread manuals back into the box. Those manuals were written by engineers, or
worse, by public relations people. That will not do for this memorable amplier.
My goal is to help you set it up quickly and enjoy the heck out of it. So, please read along. I can
guarantee this guide will be unlike any other audio manual you tossed aside and failed to read.
Let me be your guide. My guidance for your introduction and setup of your amplier is in three
sections. First, the Basics to get your BHK ampliers playing music with a minimum of reading.
Second, we go Beyond the Basics to share our knowledge and suggestions in more detail and with
66
PS Audio® Inc. 4865 Sterling Drive Boulder, Colorado 80301 800-PSAUDIO
Page 7

Introduction
more explanation. Lastly, the Reference section provides the amplier’s specications, plus troubleshooting, maintenance and warranty information.
About our guidance. We acknowledge that there are a myriad of opinions on setting up high-end
music equipment. We also believe there is no universal “best” setup, just as there is no universal best
wine. Yet, we have found tried-and-true suggestions, call them conventional wisdom, that really do
work well. That is the focus of our guide.
When you have your BHK 600 ampliers up and running and making fabulous music, we have done
our job. Some of you will leave your BHK ampliers set up as we suggest here. Some will make
changes with cables, location, tubes and who knows what else. We welcome that. All avors are
welcome here. Our goal is for you to achieve the music system that sounds the best for you.
PS Audio® Inc. 4865 Sterling Drive Boulder, Colorado 80301 800-PSAUDIO 77
Page 8

®
The Basics
The Basics
Read This BEFORE your BHK 600 Ampliers Arrive
You are thinking, it’s an amplier; what do I need to think about (or plan for) before it arrives? Your
BHK 600’s are not just any ampliers. Let’s talk a bit about weight, size, power and location. We
believe some pre-planning will pay o in enabling you to set up the ampliers more quickly, in your
enjoyment, and most of all, in your ampliers’ eortless ability to play music.
• Power Requirements: For North America, a 15-amp electric circuit is generally more than
adequate for your audio equipment. Paul uses a dedicated 15 amp circuit to feed his P20s
powering the BHK 600 and loves them. The BHK 600 (as well as the P20 Power Plant) is 20-amp
capable for those that have that available.
• Voltage Options: Each amplier comes factory set for your country: 100 volts (Japan), 120
volts (North America) or 230 volts (Europe, Eurasia, Australia, New Zealand and rest of the
world). These voltages are factory set and cannot be changed by the user.
• Power Cords: Quality power cords matter. The stock power cords we include are generic,
six-foot-long grounded power cords to get you up and playing. We encourage you to invest
in high-quality power cords of the proper length for your amplier placement (the cords do
not need to be the same length). The mains power input on the rear of the BHK 600 uses a
standard IEC C14 connector for all countries.
• Amplier Location: While an often-debated subject by audiophiles, we nd the best location
for ampliers is near your speakers, such as between the speakers, behind them or o to
either side. The purpose is to keep speaker cables as short as practical. We nd this leads to
the best sound and far fewer sonic issues.
• Surface Placement: The ampliers must rest on a solid surface, such as wood, stone or
an engineered solid surface. They can NOT be placed on rugs or carpet. We nd the use of
amplier stands are great; this is discussed in detail in the Beyond the Basics section. However,
stands are not required.
• Ventilation: The BHK 600 needs ventilation on all sides, at all times. We strongly recommend
that the ampliers be placed in a free-standing location, such as on the oor or on an amp
stand. Open equipment racks may be appropriate if the rack can handle the weight, and the
shelf upon which the amp sits is open on all four sides as well as having ve to six inches of
open space above the amplier.
• Help with Installation: Did we mention the BHK 600 is heavy? Unpacking and moving a BHK
600 amplier is at least a two-person task. Line up a friend (or two) to assist for the set-up day.
Each shipping box is 24” by 24” by 17” tall and weighs 120 lbs./55 kg. Each amplier weighs
108 lbs./49 kg.
If you still have questions, don’t worry. First, read the Beyond the Basics section. I spend more time
discussing these topics. If you still have unanswered questions, then give us as call. As James Taylor is
fond of saying: that’s why we are here.
88
PS Audio® Inc. 4865 Sterling Drive Boulder, Colorado 80301 800-PSAUDIO
Page 9

The Basics
Unboxing and Location – “They’re HERE!”
Congratulations, your two cardboard “crates” have arrived! My goal now is to help you get the
ampliers unpacked, placed in a great spot, set up, connected and playing music quickly and safely.
This section could be called the “If you read anything, please read this” section. It’s just the most
important items, without much u or explanation. As they say: Just the facts, ma’am.
I am sure many of you will have questions about our recommendations in this section. Fantastic,
think about them, then read on to the following section. The Beyond the Basics section expands and
explains each of the sections below.
Let’s get to work. I will be the guide and you can do the heavy lifting!
Moving Them
Each cardboard-box “crate” weighs 120 pounds/55 kgs. The engineered custom cardboard crates
are designed to protect the amplier and make it sort of easy for you to remove the amplier. They
include a pop-up handle on top and recessed wheels on the bottom. The wheels and handle are
for moving the box short distances, say, from your front door to the area of your listening room. The
wheels are NOT for stairs. Two people are needed to lift the boxes on stairs.
Unboxing
The easiest way to learn about unboxing is by watching my “Unboxing the BHK 600” video on PS
Audio’s YouTube channel. We not only discuss how to remove the packing and the amplier, but we
also talk about many of the basics of set-up. Unboxing instructions were also sent via e-mail after you
purchased your BHK.
• In a nutshell: rst, wheel the crate to a place adjacent to where the amplier will live. The
packaging comes o in layers and the sides fold down. What will remain is the amplier sitting
on top of its bottom foam cradle.
• The amplier has four handles, two on the front and two on the back. WITH TWO PEOPLE,
use the four handles to lift the amplier o the cradle and, if you planned correctly, go the
short distance onto the oor or amplier stand where it will “live.”
Tip: SAVE the packing crates and all inserts. You’ll need them if you ever need to
send the amplier for service.
• Let us repeat: this is not a one-person job.
• If the amplier was delivered in cold weather, let it come to room temperature before going
further.
Tubes
Your BHK 600 ships with its three vacuum tubes installed. There are two E88CC/6922 signal tubes and
one 6CA4/EZ81 rectier tube. You do not need to install or adjust the tubes.
PS Audio® Inc. 4865 Sterling Drive Boulder, Colorado 80301 800-PSAUDIO 99
Page 10
®
The Basics
Location
Conventional hi- wisdom states that power ampliers should be placed relatively near the
loudspeakers. We agree that this provides the best sound.
• We believe short speaker cables and longer interconnects sound best. This advice comes
from our preference for the use of relatively short speaker cables and longer, if necessary,
interconnects from the ampliers to your preamplier, DAC or source equipment.
• You should not place the amplier directly on carpet, rugs or a soft surface. The amplier
should have air circulation on the bottom.
• Top Tip: Amplier stands are great. The stand needs to be at least 18 inches/46 cm
wide by 15 inches/38 cm deep and support 108 pounds/49 kg.
• Quick Fix: Use a piece of MDF or heavy-duty plywood placed on the carpet. Home
Depot, Lowes, and other home centers and lumber yards have precut 2-foot by 2-foot
squares of MDF and plywood “project” panels. Get at least ½-inch/12 mm thick or
preferably ¾-inch/19 mm panels.
• Ventilation: We do not recommend placing the ampliers inside a cabinet due to possible
issues with inadequate ventilation. The amplier needs several inches of clearance on all
sides, including 5 to 6 inches of free space on the top. Open equipment “racks” may be
suitable if they can handle the weight and provide open space on ALL sides for ventilation.
• Nothing should ever be placed on top of the BHK 600.
Switches, Plugs and Amplier Hook Up
PS Audio Front Panel Logo/Switch
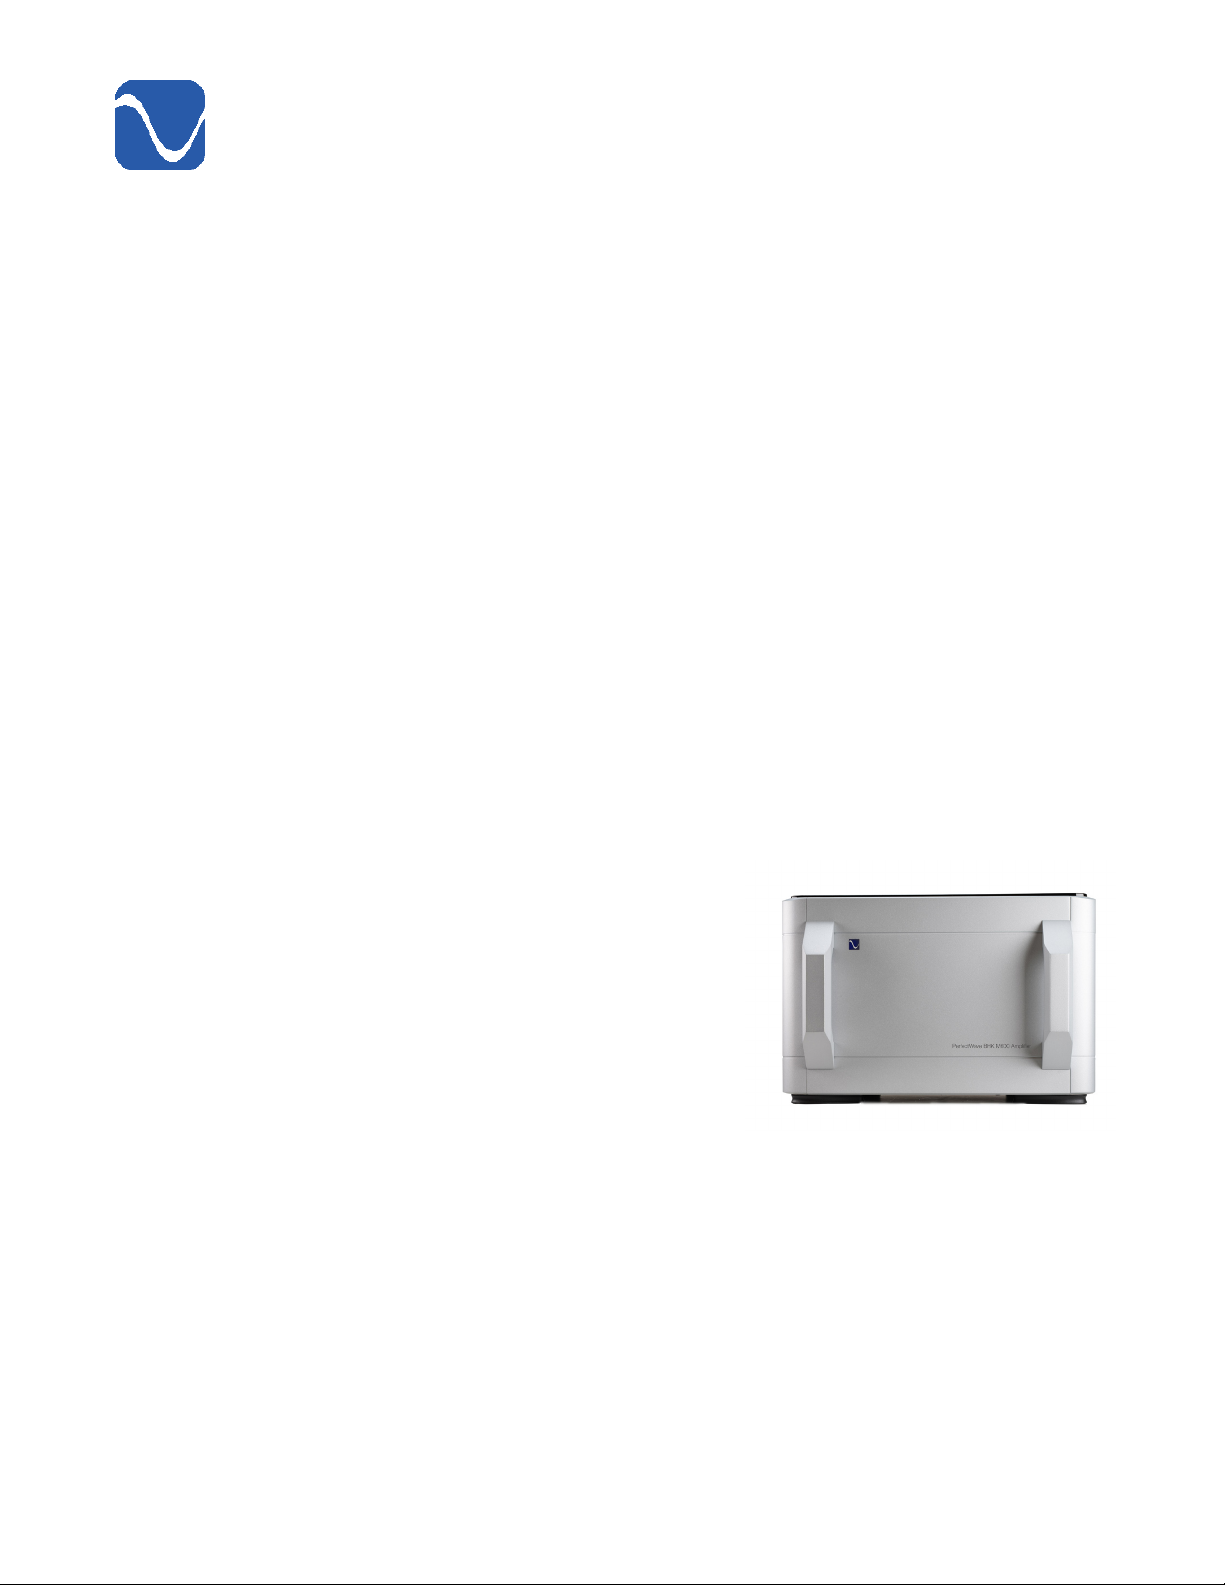
• The PS Audio front panel logo is also a switch.
The lighted logo switch on the front serves several
functions, from switching the mode from Idle to Play
and back, as well as for diagnostics.
• After turning the master power switch
(located at the back of the amplier) on, the
logo will blink two times. When the amplier
is rst turned on, the light blinks a couple
times and shuts OFF. The amplier will then
be in Idle mode. The speakers are muted and
a small amount of electricity keeps the electronics optimized. We recommend you
leave your amplier in Idle mode when not playing music.
• Pressing the PS Audio logo button while the amplier is in Idle mode to put
the amplier into Play mode: When you press the logo button while the amplier
is in Idle mode, the logo light will ash for 30 - 45 seconds during warm-up, the
tubes and all electronics will be fully powered. When the logo turns solid blue, the
amplier is in Play mode.
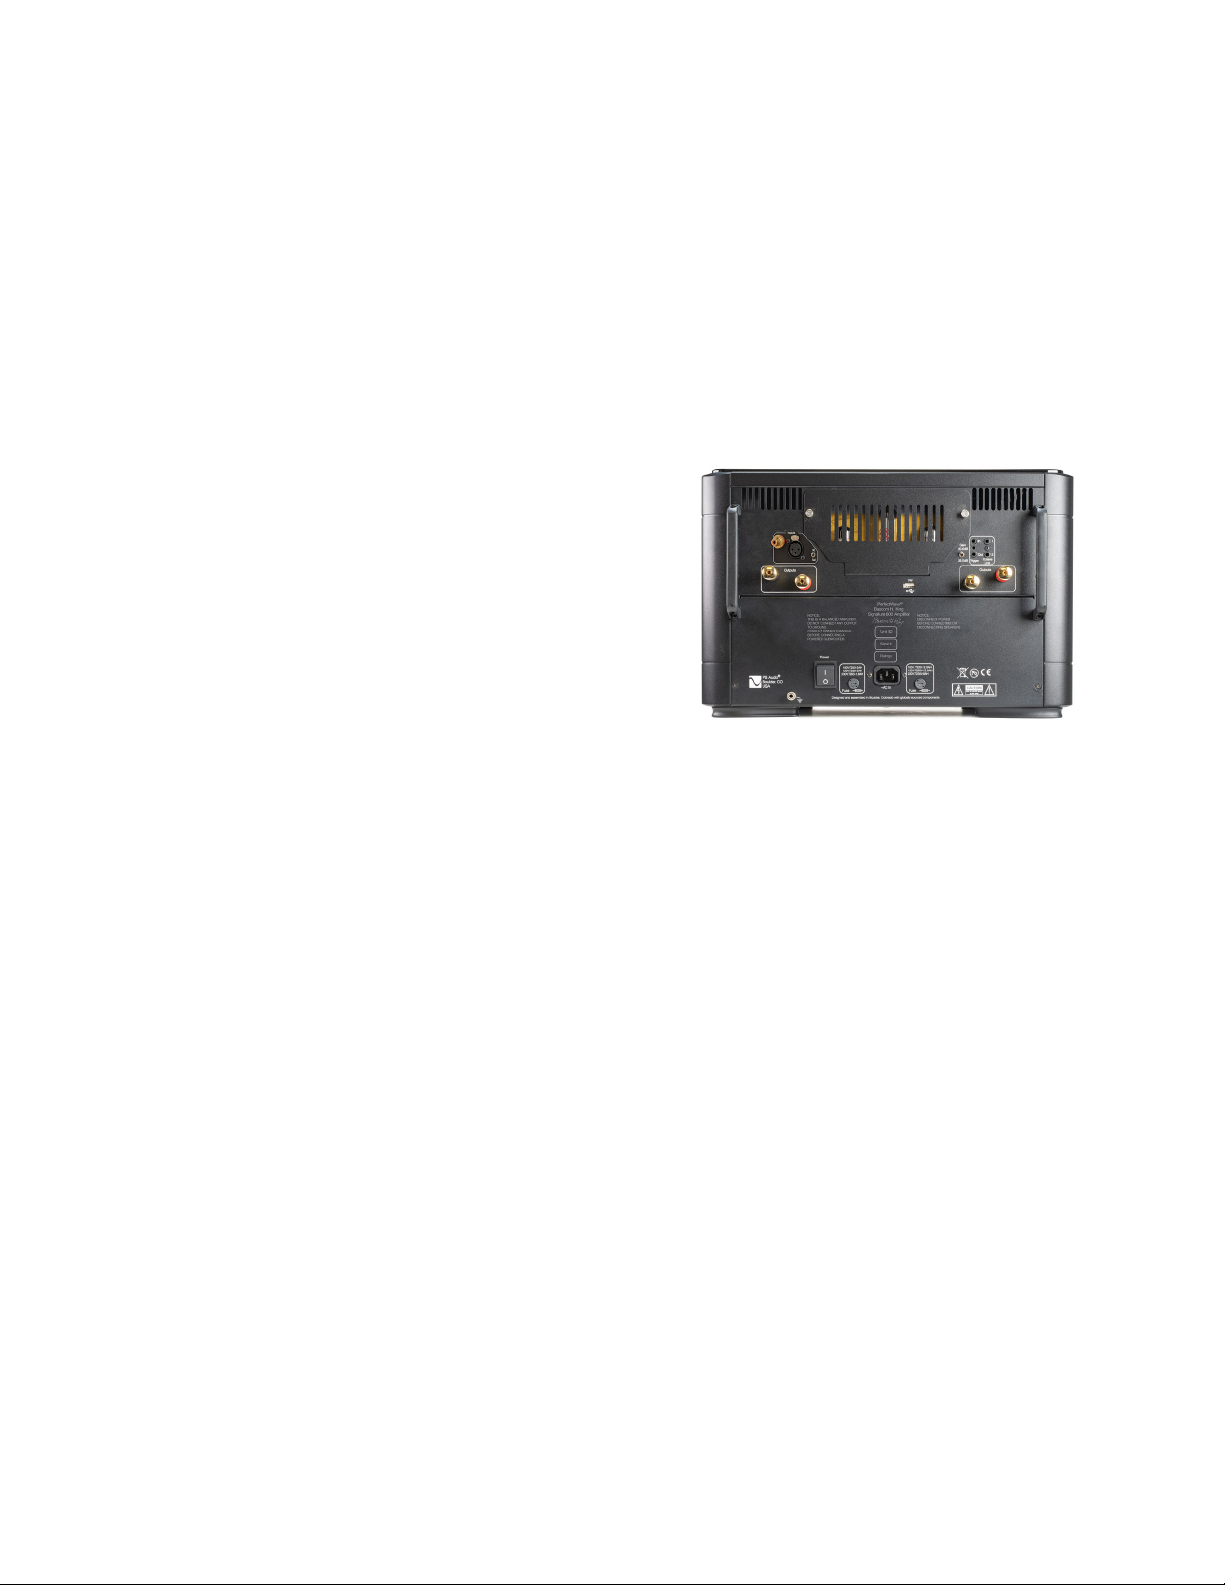
Switches and Plugs on the Back of the Amplier
• Power Switch: During set up, make sure the master power switch on the back of the Amp is
1010
PS Audio® Inc. 4865 Sterling Drive Boulder, Colorado 80301 800-PSAUDIO
Page 11
The Basics
set to O (“O”) and the amp is unplugged. This master power switch turns the amplier fully
o and on.
• Gain Switch: On the right side of the back panel, set the tiny Gain switch to 26.0 db. This
is the best initial setting for almost everyone and further explanation is in the Detailed
Discussion section. However, you will not hurt anything if the switch is set to 30.5 db.
• Input Selection Switch: Next to the XLR and RCA/single ended inputs is another tiny switch.
Set the switch to the type of input you are using: BAL for XLR balanced cables or SE for RCA
single-ended unbalanced cables.
• Trigger Input: Trigger input and output
jacks are provided. These will allow you to
remotely turn the BHK on and o, most likely
from another device, such as a preamplier.
Instructions are provided in the Beyond the
Basics Section.
• PS Link Input: This is reserved for a future
product. I would love to tell you about it but
would be disowned by PS Audio for disclosing.
• Firmware “FW” USB Connector: This connector
will be used if PS Audio issues a rmware
upgrade. Do not use it for any other reason.
• Ground Binding Post: On the lower left of the back panel is a grounding post with a “Ground”
symbol. Few of you will ever need or use this. It’s used only in limited and specic situations,
such as for certain powered subwoofers discussed below.
Hooking Up the Ampliers
• Binding Posts: The BHK 600 has two sets of identical binding posts. Choose either set, or you
may use both sets for bi-wiring your speakers. Do not use a wrench - hand-tighten only.
• Hooking up Speaker Cables: We prefer quality banana plugs or heavy-duty spade connectors
to connect your speaker wires to the binding posts on the amplier. Spade terminals must
be ¼-inch or 6.35 mm in diameter. The binding posts will also lock onto a banana plug.
With banana plugs, loosen the binding post all the way to the left, insert the plug and then
hand-tighten the binding post to the right. This will lock the banana plug. Up to 12-gauge (4
mm) bare wire may also be used.
• Powered Subwoofers: CAUTION. Certain powered subwoofers, such as models from REL,
instruct you to use wires with direct connections from their subwoofer to the speaker posts of
your audio amplier(s). (In many if not most cases, subwoofers will be connected to the rest
of the system via a line output from the preamplier or A/V preamp/processor.) They have
a cable assembly that includes a wire for right signal, one for left signal and a wire marked:
Ground or Common. The BHK 600 is a fully-balanced amplier and none of its binding posts
are “ground” or common. Do NOT connect a ground wire from a powered subwoofer to any
BHK speaker terminal! The small Ground binding post on the lower left of the BHK 600’s back
panel should be used. PLEASE make sure you read the more detailed information on this in
the Beyond the Basics section.
PS Audio® Inc. 4865 Sterling Drive Boulder, Colorado 80301 800-PSAUDIO 1111
Page 12

®
• Interconnects: We believe the best sound comes from using balanced XLR type interconnects
to the ampliers from your source equipment. Single-ended RCA interconnects can be used
and can sound wonderful, however. Do not hook up interconnects to both the balanced and
single-ended inputs! Only one set or the other can be used. Set the tiny BAL/SE switch to the
type of input cable you are using: BAL for XLR cables and SE for RCA single-ended cables.
• Power Cable: After the speaker cables and interconnects are installed, with the master Power
switch still in the OFF position, now plug in your power cables. We suggest you rst plug
the power cables into the amplier and then into your wall outlet, PS Audio Power Plant or
power conditioner. Note: we caution the use of a third-party power conditioner, due to the
power demands of the BHK 600, which may be greater than a power conditioner can handle.
Therefore, we suggest you use no power conditioner during the initial setup.
Ready - Set - Play
• One Last Check:
• Double-check that your speaker cables and binding posts are tight and not touching,
either at the amplier end or at your speakers. Check that your interconnects are fully
inserted on both ends.
The Basics
• Let’s Turn It On.
• Press the master Power switch on the back of the amplier to ON to go into Idle mode.
• The front-panel PS Audio logo slowly blinks twice; then it will go o. All good.
The amplier is now in Idle mode. Idle mode used to be called “standby” but for
legal reasons, remember, I never used the word “standby.” In Idle mode, electronic
circuits in the amplier are powered but the tubes are NOT powered. The speaker
outputs are muted.
• Press the PS Audio front panel logo button to go from Idle into Play.
• The logo light should BLINK slowly for 30 - 45 seconds. The BHK 600 will then
come out of Idle Mode and its microprocessor will do a bunch of things: the
amplier will automatically check all of the internal power supply voltages. If all is
well, full power will be sent to all circuits and the vacuum tubes for warm-up. You
should see them start to glow from the back panel.
• After 45 seconds, the slow-blinking logo light turns SOLID blue.
• Cleared for takeo. Play some music. Enjoy.
• Heaven forbid you should not see a solid blue light, or you see a fast blinking
blue light: this means a fault has occurred. It could be simple or not. Don’t worry,
we cover this in the Beyond the Basics section next.
• Leave it ON or OFF?
We recommend leaving your BHK 600s in the Idle mode between music-listening sessions.
Press the PS Logo button once while in Play mode (solid blue light) and the blue light will go
o. You are now in Idle mode: the electronic circuits are kept optimized, the tubes are turned
o to save wear and the speaker outputs are o. Idle mode uses about 75 watts of power for
each amplier. If you push the master Power switch to the o position, this will completely
1212
PS Audio® Inc. 4865 Sterling Drive Boulder, Colorado 80301 800-PSAUDIO
Page 13

The Basics
turn o the ampliers and cut o all power.
What’s Next?
If you just want to sit, enjoy and not read more technical talk for a while, I will not be oended. My
mission is accomplished if you are having fun listening to your BHK 600s making music. But...
When you have time or if you have questions, then by all means, continue with my guide and read
the next section, Beyond the Basics.
PS Audio® Inc. 4865 Sterling Drive Boulder, Colorado 80301 800-PSAUDIO 1313
Page 14

®
Beyond the Basics
Beyond the Basics
I am glad you are back. I am hoping that you are sitting in your listening chair, your favorite music is
playing from your new BHK 600s and you have a smile on your face. As my English wife would say:
you should be pretty chued with yourself. And you should. I could joke and say the heavy lifting is
over, but that would be unfair since it was you (and a friend!) who were wrestling your ampliers in
place.
Beyond the Basics, Section Two of my guide has two purposes. Some of you are interested in a
more detailed discussion of the nuances of setup and use, plus more details on the amplier and
the reason behind our recommendations. Others are here because I did not fully answer your setup
question or situation in Section One. I hope the details in this section will help by diving deeper into
the setup.
Section Two assumes you have read Section One. Here, we want to talk about meatier stu, not
repeat the basic info on the number of ashing lights and so on. Let’s jump in.
Equipment Burn-In aka “Break-In”
Most people tend to use the terms burn-in and break-in interchangeably. Burn-in more appropriately
applies to electronic or electrical items, like capacitors and tubes, while break-in tends to apply to
mechanical items, like loudspeakers, switches or auto brake pads. We are shocked by the emotions
that this discussion can raise. But it’s not worth raising your blood pressure here.
The burn-in of sophisticated audio components is not a myth, and it does make an improvement
in sound quality. For ampliers like the BHK 600, it is nothing to worry about and occurs naturally
from use. Burn-in refers to the additional time needed for the hundreds of precision electronic parts,
especially capacitors and tubes, to perform at their best. We know your BHK 600 will sound great out
of the box, but we believe the sound will be even better after a hundred or more hours of “on” time.
For power ampliers, the burn-in process is easy: just leave your BHK 600 in Idle mode after listening.
In Idle mode, the reduced current is keeping the many electronic components optimized. A special
burn-in after initial set up is not required for your amplier. In fact, playing music at moderate levels
is the best burn in there is. Just realize that in the rst 24 hours particularly and then during the next
100 – 200 hours, there will be continued improvement in sound quality.
Why in the “rst 24 hours particularly?” The vacuum tubes. All electronic tubes, including the ones
in the BHK 600, need some burn-in time. We nd that the burn-in time for tubes is quicker than for
other components. Tubes “improve” and mellow the most during your rst 24 hours of use. For that
reason, if you wish, you can speed up the burn-in of the BHK 600 tubes by leaving your BHK in the
Play (not Idle) mode, (with tubes powered up and the PS Audio logo light solid blue), for the rst 24
hours or so of ownership. Of course, you can play music to your hearts content during this time. Or
not.
1414
PS Audio® Inc. 4865 Sterling Drive Boulder, Colorado 80301 800-PSAUDIO
Page 15

Beyond the Basics
Leaving Your BHK 600 In Idle Mode
What about the leaving the BHK 600 in Play mode all the time? We do not recommend continuously
leaving your BHK 600 in Play mode. There is no real sonic need for it. It puts more wear on the
vacuum tubes than necessary and uses much more power. The overall cost far exceeds the benet.
We suggest you leave your BHK 600 in Idle mode when you are not playing music. Then, at the start
of a listening session, put your BHK 600s into Play mode, sort out your vinyl and turntable, or DAC/
streamer, and get a favorite beverage. By that time, both the vacuum tubes and you should be happy
and ready to listen.
Amplier Location and Cables
Speaker Cable Length
The location you choose for your BHK 600 ampliers in reference to your speakers and room is an
important decision, not just because of dealing with the weight of moving them around. We nd
that the best physical location for a power amplier is the one that lets you use the shortest speaker
cable. By “short” we mean six feet or less. Our favorite setup is for the BHK 600 power ampliers to
be sitting low on the oor, either between your main speakers or behind or o to one side. And your
source equipment should ideally be adjacent to your listening position. Then use long balanced
interconnects to connect your source equipment and preamp. This allows for the use of short speaker
cables and in our opinion, provides the best sound. By “long,” we mean that the XLR cables can be as
long as needed.
Preference for XLR Balanced Interconnect Cables
But what about the trade o between shorter speaker cables and longer interconnect cables? This
is where our preference for XLR (balanced) cables comes into play. We clearly nd that long XLR
balanced cables have virtually no impact on sound quality. A balanced circuit provides 6 dB more
gain than a comparable single-ended circuit. Long XLR lengths do not have the propensity to pick up
noise and interference from your surroundings and from adjacent power cables. In our sound rooms,
it’s not unusual to have 40-foot XLR interconnects, which perform awlessly. I doubt that could ever
work with single-ended RCA interconnects.
• Some basics of XLR balanced cables. We have found that dierent balanced interconnects
have far less impact on the sound than speaker, power or RCA interconnects. Since recording
studios and musicians use only XLR type cables, quality cables are easily available.
• Top Tip: Manufacturers of XLR cables refer to one specic type of cable as “star quad”
conguration. I recommend not using star quad. Instead, use a regular or standard
conguration. Star quad refers to how the individual signal wires in the cable are twisted
together. Star quad-congured XLR cables were made to reduce noise, but nothing comes
without a price. They often roll o the high frequencies, especially as they get longer. Star
quad cables were made for use on stages and for live performances, where noise and
interference from lights and dozens (if not hundreds) of other cables are an issue. Not an issue
in your home, I hope! We recommend non- star quad, standard XLR cables in a home music
environment to avoid roll o of high frequencies.
PS Audio® Inc. 4865 Sterling Drive Boulder, Colorado 80301 800-PSAUDIO 1515
Page 16

®
Beyond the Basics
Ventilation – Happiness is a Warm, But Not Hot, Amplier
Without a doubt, the best environment for a BHK-600 is out in the open, on the oor or an amplier
stand, next to or behind the speaker to which it powers. Putting your BHK 600‘s into cabinets or
built-ins is not recommended due to heat, circulation, weight, and accessibility. That said, equipment
racks, with open sides may work, if there is 5 to 6 inches of clearance above the amplier.
Types of Surfaces to Place the Ampliers On
The BHK 600 needs to sit on a hard surface: a hardwood, cement, or stone oor, or a rigid amplier
stand. It cannot sit on a rug or carpet. We like amplier stands, for some reasons that you may not
have thought of. The base of the stand protects the amp from scuing feet and bumping vacuum
cleaners. It also insures lots of airow under the amplier. At a minimum, the stand should measure
18 by 16 inches and several inches larger would be safer. Check and ensure the stand can support at
least 110 pounds – NOT MANY DO.
A quick temporary x: You can place the ampliers on a ¾ inch thick piece of MDF or plywood,
about 18 by 16 inches or larger. Your local home center or lumber yard has precut squares of MDF
and plywood panels, usually in 2-foot squares. Use the 2-foot squares as is or have the home center
cut them to size if you like. Many a power amp at hi- shows have been placed on these cheap and
cheerful “stands.”
Amplier Feet
Generally, we nd that the use of isolation devices under our equipment is sonically benecial.
However, our experience shows that power ampliers show less sonic improvement versus the
benet to DACs, preamps, CD players and especially turntables. In other words, isolation feet are
certainly not necessary to get full enjoyment from the BHK 600.
Switches and Inputs on the Back of the Amplier
Master Power Switch
The rear master Power switch turns the amplier on, but not fully on. It puts the amplier, after a
short warm up, into Idle mode. Whenever you change speaker cables, interconnects and especially
tubes, you must power the amplier o with master Power switch (and unplug the amplier for good
measure).
• When the master Power switch is turned on, the amplier boots up, like a computer. The PS
Audio logo on the front will blink slowly for a few seconds. Then, the logo light should turn
OFF, and the amplier will be in low power Idle mode.
• Again, we recommend leaving the power switch ON and the amplier in Idle when not in
use.
Gain Switch
On the right side of the back panel, we placed a gain selection switch that allows you to select either
26.0 dB or 30.5 dB of gain. As noted in the Basics section, we recommend that you initially set the
Gain switch to 26.0 dB. It’s the best setting for the lowest noise and should be used unless you have a
situation that requires the higher, 30.5 dB gain setting.
1616
PS Audio® Inc. 4865 Sterling Drive Boulder, Colorado 80301 800-PSAUDIO
Page 17

Beyond the Basics
• Some situations that may require use of the higher 30.5 dB setting include: low-sensitivity
speakers, the use of a passive preamplier or the use of single-ended interconnects to the
BHK 600.
• Sensitivity refers to how much volume a speaker delivers for each watt of power fed
into the speaker. A low-sensitivity speaker requires more power to produce the same level
of sound as a high-sensitivity speaker. Sensitivity, measure in dB (the higher the number,
the more sensitive the speaker), has no relation to quality, size or cost. It’s a function of the
speaker design.
• Passive preampliers do not add any gain to the signal, like a regular preamplier
does. They usually act as a passive volume control.
• Using single-ended RCA interconnects to connect your preamp or source to the input
of the BHK 600 provides 6 dB less signal gain than you would get from using balanced XLR
cables. It’s not a function of quality, but of electronic design. You will have no choice but to
use RCA single-ended interconnects if your preamplier or source has only single-ended
output connectors.
• Recommendation for single-ended interconnects: Initially, try the 26.0 dB setting. If you nd
that the BHK 600 does not provide adequate music volume at moderate settings from your
preamp/source, simply switch to the higher 30.5 dB setting. By moderate settings, we mean
that your preamp or source should be somewhere in the middle of its volume control range
for normal listening levels.
• If you are simply curious and want to experiment between the two gain settings, you will not
hurt anything.
Input Selection Switch.
Next to the XLR and RCA/single-ended inputs is a tiny switch. Set the switch to the type of input
cable you are using, “XLR” for XLR/balanced, or “SE” for singled-ended/unbalanced cables. Only use
one type of input cable at any time. The unused input connector should be left unused. The input
selection switch helps to reduce noise and improves the performance of the amplier by grounding/
shorting out the unused input connector. That way, the unused connector cannot pick up and
introduce RF or other noise into the amplier.
Trigger Input
Trigger input and output jacks are provided. They use standard 3.5 mm plugs and will allow you to
remotely turn the BHK 600 on and o, most likely from another device, such as a preamplier. The
input accepts a standard trigger voltage between 5 and 12 volts.
• For the trigger to turn on the BHK 600, the master power switch must be left in the “ON”
position. This will put the amplier into Idle mode.
• When a trigger voltage is sent to the BHK 600, the amplier will come out of Idle mode, turn
on fully, unmute the speakers and go into Play mode. The amplier will go through the same
start-up routine as if you pressed the PS Audio front panel logo switch: The logo light will ash
slowly for 45 seconds, the amplier will provide full power to all circuits, power the tubes and
when warm up is complete, the logo will be solid blue and the speakers will be unmuted.
• Removing the trigger voltage to the BHK 600 will place the amplier back into Idle mode.
Again, it will be the same as if you pressed PS logo switch: the logo light turns o and mutes
PS Audio® Inc. 4865 Sterling Drive Boulder, Colorado 80301 800-PSAUDIO 1717
Page 18

®
Beyond the Basics
the speakers.
• The Trigger output connector is provided so you can daisy chain two BHK ampliers
together. Typically, the trigger cable from a preamplier would go to the closest BHK 600
amplier’s trigger input. A connecting trigger cable would then go from the output of the rst
BHK 600 to the input of the second BHK 600. When connected in this manner, both ampliers
will come out of Idle mode and go into Play when the trigger voltage is applied to one.
Powered Subwoofers: CAUTION!
Read this section before hooking up a powered subwoofer to your BHK 600.
Certain powered subwoofers, such as models from REL, instruct you to use a three-wire connection
from their subwoofer to the speaker posts of the main audio amplier. They have a cable that
includes a wire for a right signal, one for the left signal and a third wire marked Ground or Common.
CAUTION! The BHK 600 is a fully balanced amplier and none of its speaker binding posts are
“ground” or “common.” Do NOT connect the Ground or Common wire from a powered subwoofer to
any BHK speaker terminal.
REL describes how to hook up its subwoofers to a fully balanced power amplier. REL even has
YouTube video describing the process. With a balanced amplier, such as the BHK 600, REL suggests
ONLY connecting the left signal wire to the RED terminal on the left amplier and the right signal
wire to RED terminal on the right amplier – and NOT connecting the ground or common wire to any
speaker terminal. REL says that will work in almost all cases, but if hum is encountered, you should
connect the black ground or common wire to a ground point on the amplier. For subwoofers that
require separate grounding, we have provided a small ground binding post on the lower section of
the BHK 600 back panel. This ground post can be used with spade terminals, banana jacks and bare
wire.
Understanding the PS Audio Logo Front Panel Switch and Light
Most of this was covered in the Basics section. Let’s go over a few important points that indicate the
diagnostic functions of the front-panel logo light.
• When the master Power switch is turned from OFF to ON - the logo switch blinks twice and
then turns o. The two ashes indicate the initial power-up phase. Watch t to ensure the logo
light turns OFF. The BHK 600 is now in Idle mode and the speakers are muted.
• When you press the PS Audio logo switch while in Idle mode, the logo light will blink slowly
for 30 - 45 seconds. A lot is happening with the microprocessor in the amplier at this time.
A check of the power supply voltages occurs, while full current is applied to the tubes and
transistor circuits.
• At the end of the 30 - 45 seconds, the PS Audio logo should be solid blue.
Solid blue means the amplier is ready to play. This means the amplier has passed all
diagnostic tests, the speakers are unmuted and we are ready to play music.
• A fast ashing light indicates fault mode. A fast-ashing blue logo indicates that the
diagnostic system has found a problem, and the amplier has gone into its protective fault
1818
PS Audio® Inc. 4865 Sterling Drive Boulder, Colorado 80301 800-PSAUDIO
Page 19

Beyond the Basics
mode. Often, turning o the master Power switch, waiting a minute, and then turning the
amplier back on into Idle and Play will clear the fault.
• Causes of faults include: short circuit protection for the speaker terminals (for example,
if the cables for the black and red terminals are touching) or for the amp operating
into too low of an impedance; exceeding the amplier’s wattage rating; encountering
excessive heat; or the presence of DC on the speaker outputs.
• If the amplier tries to turn on and returns to protection mode, check all of the
aforementioned possibilities and correct the problem before trying again.
• Potential Causes and Fixes of Fault Mode
• Speaker cables. Loose, touching or defective soldering on a spade terminal/
banana jack at the amplier OR at your speakers will cause a fault.
• Interconnects are not fully seated. Test the XLR connectors by pulling back
gently on the connector (never the cable). Visually observe or feel that RCA
connectors are fully inserted, both at the amplier and at your source equipment/
preamplier.
• You could have an over- or under-voltage condition with your mains (AC)
power.
• Possibly, a vacuum tube was jarred a bit loose in transport. By simply removing
the tube cover, you should be able to see if the tubes are fully inserted and no pins
are exposed.
• Use the process of elimination. First, remove all cables from the amplier except
for the power cord. If the fault mode remains with nothing connected, check both
fuses located at the rear of the unit.
• If the fault mode clears with no cables connected to the BHK 600, then reinsert
speaker and interconnect cables one at a time, until the defective cable or unit
puts the BHK 600 into protection mode. Then you will have isolated the source of
the problem.
• In the unlikely event none of these remedies work, call your dealer or PS Audio,
for help.
Tubes
Your BHK ships with three vacuum tubes already installed. You do not need to install any tubes.
The two outside tubes are a hand-matched pair of input signal tubes. They are E88CC/6922 Genalex
Gold Lion current production tubes. We will call these AUDIO tubes. They buer the audio signal
entering the amplier. These small-signal audio tubes should last at least one but more likely two or
more years. If you choose to leave the BHK in Play mode, with the tubes constantly powered on, the
tubes will have a shorter life. These tubes have been selected after extensive listening and computer
evaluation of many dierent brands of tubes.
The larger, middle tube is a rectier tube. It is a 6CA4/EZ81 New Old Stock (NOS) tube made in East
Germany during the 1970s and 1980s.This tube converts AC (alternating current) power to DC (direct
current), the type of current required by the BHK 600. The use of a rectier tube is one of the many
PS Audio® Inc. 4865 Sterling Drive Boulder, Colorado 80301 800-PSAUDIO 1919
Page 20

®
Beyond the Basics
aspects of the BHK 600 where Bascom King and our engineers chose the best-sounding technology
for the task. This tube is a high-quality NOS tube, chosen for its superior performance. It will not
need to be changed for many years/thousands of hours of use. We do not believe that swapping this
rectier tube for another tube (NOS or otherwise) will yield any improvement.
All tubes have a limited life-span. If used just a few hours a day, they can go for many years without
replacement. This is especially true of the rectier tube, which will most likely last seven to 10 or more
years. Therefore, the following discussion on tube life will apply to the two audio signal tubes.
The sonic characteristics of audio tubes will change over time. When an audio tube is new, some
hours of burn-in will lead to the tube sounding its best. Once burned in, these tubes will perform
beautifully and will be at their peak performance. With extended use, the performance of audio tubes
will decrease slightly. When the audio tubes are in need of replacement, the sound quality of the BHK
600 will be slightly diminished. A simple change of the audio tubes will restore the performance.
Routine changing of the two audio tubes in each amplier is recommended every one to two
years. Replacement matched pairs of tubes are available from PS Audio as well as from numerous
online tube retailers. When you change the audio tubes, change the two tubes in both ampliers.
A matched quad of tubes would be best to make sure the two channels perform identically. At a
minimum, the tubes in each amplier should be matched. Tube matching means that each tube is
evaluated and matched with a tube with very similar electrical characteristics.
Tube Rolling
Tube rolling simply means swapping out the audio signal tubes with a dierent brand of tube
to change the sound. Perhaps the “rolling” part of the term came about because the tubes are
round and they roll. We expect some of you will want to do some tube rolling. If so, we have some
suggestions:
• Wait until after your BHK-600 is both fully burned-in and you are comfortable with its sonic
performance and operation. New Old Stock (NOS) tubes, or dierent tube brands, may change
the sonic signature of an amplier but will not correct an electrical or acoustical problem.
• Tube rolling involves comparing the varying sound qualities of each tube. We believe that
your comparison should be to a known high-quality sound: the tubes we have selected for
use in the BHK 600.
• The E88CC/6922 audio signal tubes can be substituted with type 6DJ8, 7DJ8 or 7308 tubes.
• The 6CA4/EZ81 rectier tube, should not be substituted with another type.
• More information on tube rolling is found in the Reference section.
Replacing Tubes
Detailed instructions for replacing the tubes are provided in the Reference section. Please note the
following cautions:
• Your amplier must be fully turned o using the master Power switch. We would encourage
you to also unplug the amplier.
• Let the amplier cool down. The two tube panel access screws can get hot.
• High voltage is present for a time in the tube compartment EVEN AFTER that amplier is
2020
PS Audio® Inc. 4865 Sterling Drive Boulder, Colorado 80301 800-PSAUDIO
Page 21
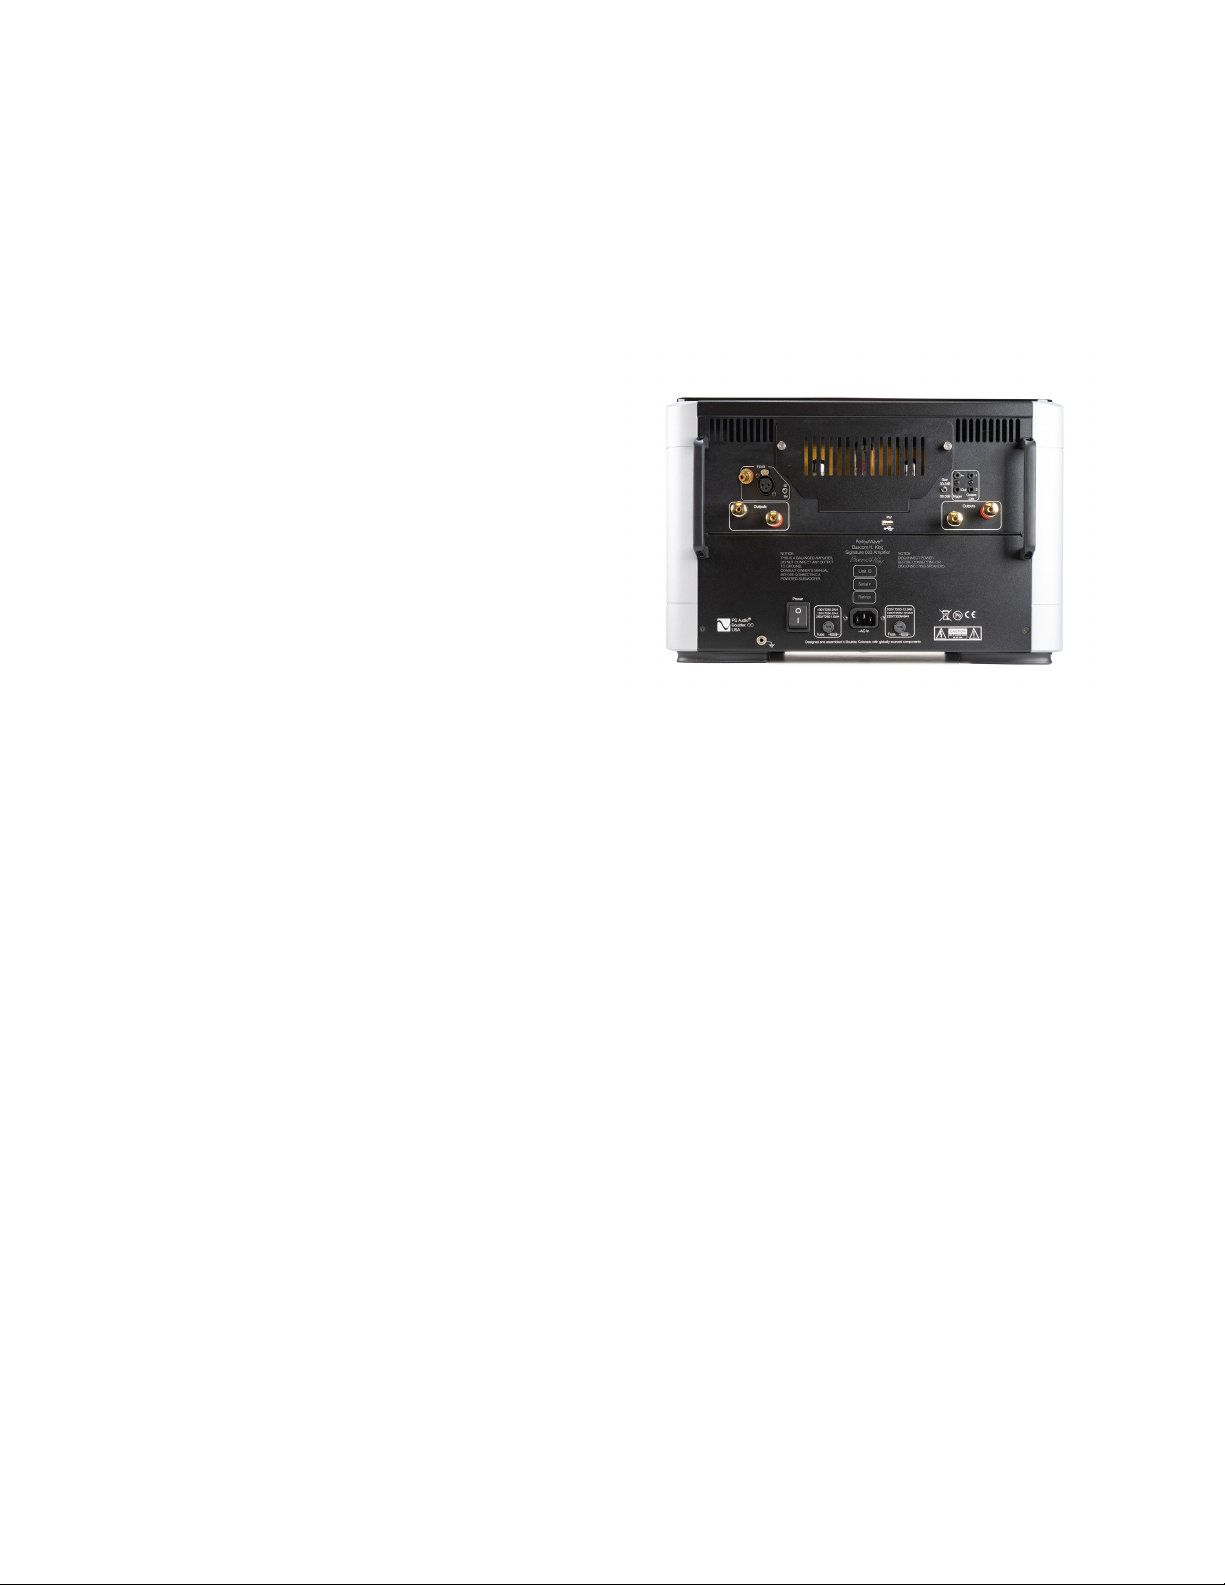
turned o. The bright red LED in the compartment will go OUT when voltage is dissipated and
it’s safe to change the tubes.
User Accessible Fuses on the Back Panel
The BHK 600 has two user-accessible fuses on
the back panel. These are AC input fuses for
the two power transformers in the amplier.
The smaller fuse passes power to the vacuum
tube power supply and the larger fuse passes
power to the power output stage transformer.
If you need to replace a fuse, my best advice is
to contact PS Audio and we will help you out.
If you decide to purchase them on your own,
note that the fuse ratings are printed on the
back panel. In purchasing replacements, use the
entire rating and size description applicable for
your country.
• You may not be familiar with term “H Rated.” This refers to fuses with a high breaking
capacity. It is dierent from a “H Category” fuse. H Rated, high-breaking-capacity fuses are
specically tailored for high-current, high-transient inrush conditions, such as those found in
your BHK 600s.
Beyond the Basics
Fuse Specications:
For 100-volt AC Countries (Japan)
1 –T250V-2AH (2-amp time-lag, H-rated, 250VAC, size 5 x 20 mm)
1 – T250V-12.5AH (12.5-amp time-lag, H-rated, 250VAC, size 5 x 20 mm
For 120-volt AC Countries (North America)
1 – T250V-2AH (2-amp time-lag, H-rated, 250VAC, size 5 x 20 mm)
1 – T250V-12.5AH (12.5-amp time-lag, H-rated, 250VAC, size 5 x 20 mm)
For 230-volt AC Countries (EU, Eurasia, Australia, NZ, and the rest of the world)
1 – T250V-1.6AH (1.6-amp time-lag, H-rated, 250VAC, size 5 x 20 mm)
1 – T250V-8AH (8-amp time-lag, H-rated, 250VAC, size 5 x 20 mm)
PS Audio® Inc. 4865 Sterling Drive Boulder, Colorado 80301 800-PSAUDIO 2121
Page 22
®
Reference
Reference Section
Replacing Electronic Tubes
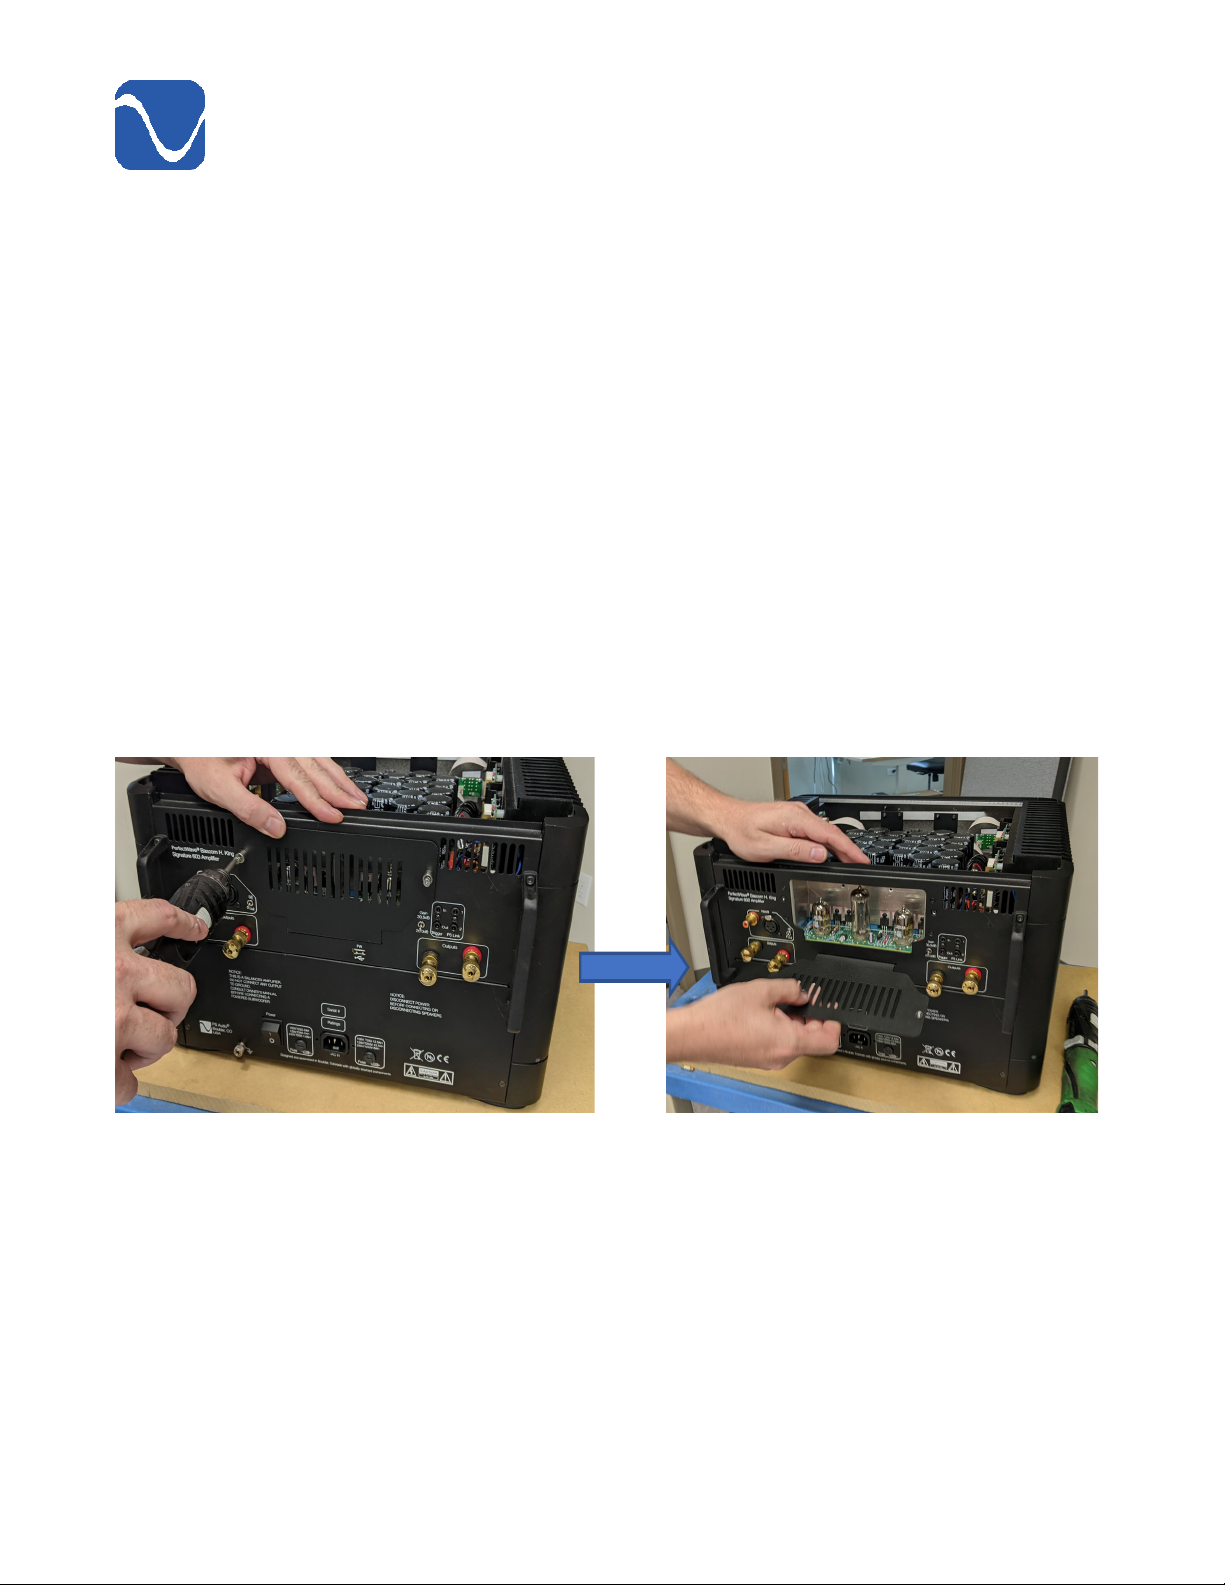
As discussed in the previous section, your BHK 600 has three electronic tubes. They are accessible in
the tube compartment on the back panel. The left and right tubes are signal input tubes. The middle,
larger tube is a rectier tube.
Changing/replacing and trying out dierent tubes involves the removing and replacing the left and
right signal input tubes. The rectier tube, in the middle, should last for thousands of hours.
CAUTION/WARNING: Turn o the main AC power to the BHK by BOTH unplugging the power cord
from your AC source and turning o the main power switch on the rear panel to OFF.
CAUTION/WARNING: WAIT 30 minutes after using the BHK before you change tubes due to heat and
the presence of high voltage (which needs time to dissipate).
• Carefully unscrew the two screws that hold the tube cover plate on the rear panel. They are
captive and will stay attached to the cover.
CAUTION/WARNING: BEFORE PROCEEDING FURTHER: the RED LED in the tube compartment must be
o. If the LED is lit, wait for it to go out. The LED when lit indicates the presence of high voltage.
2222
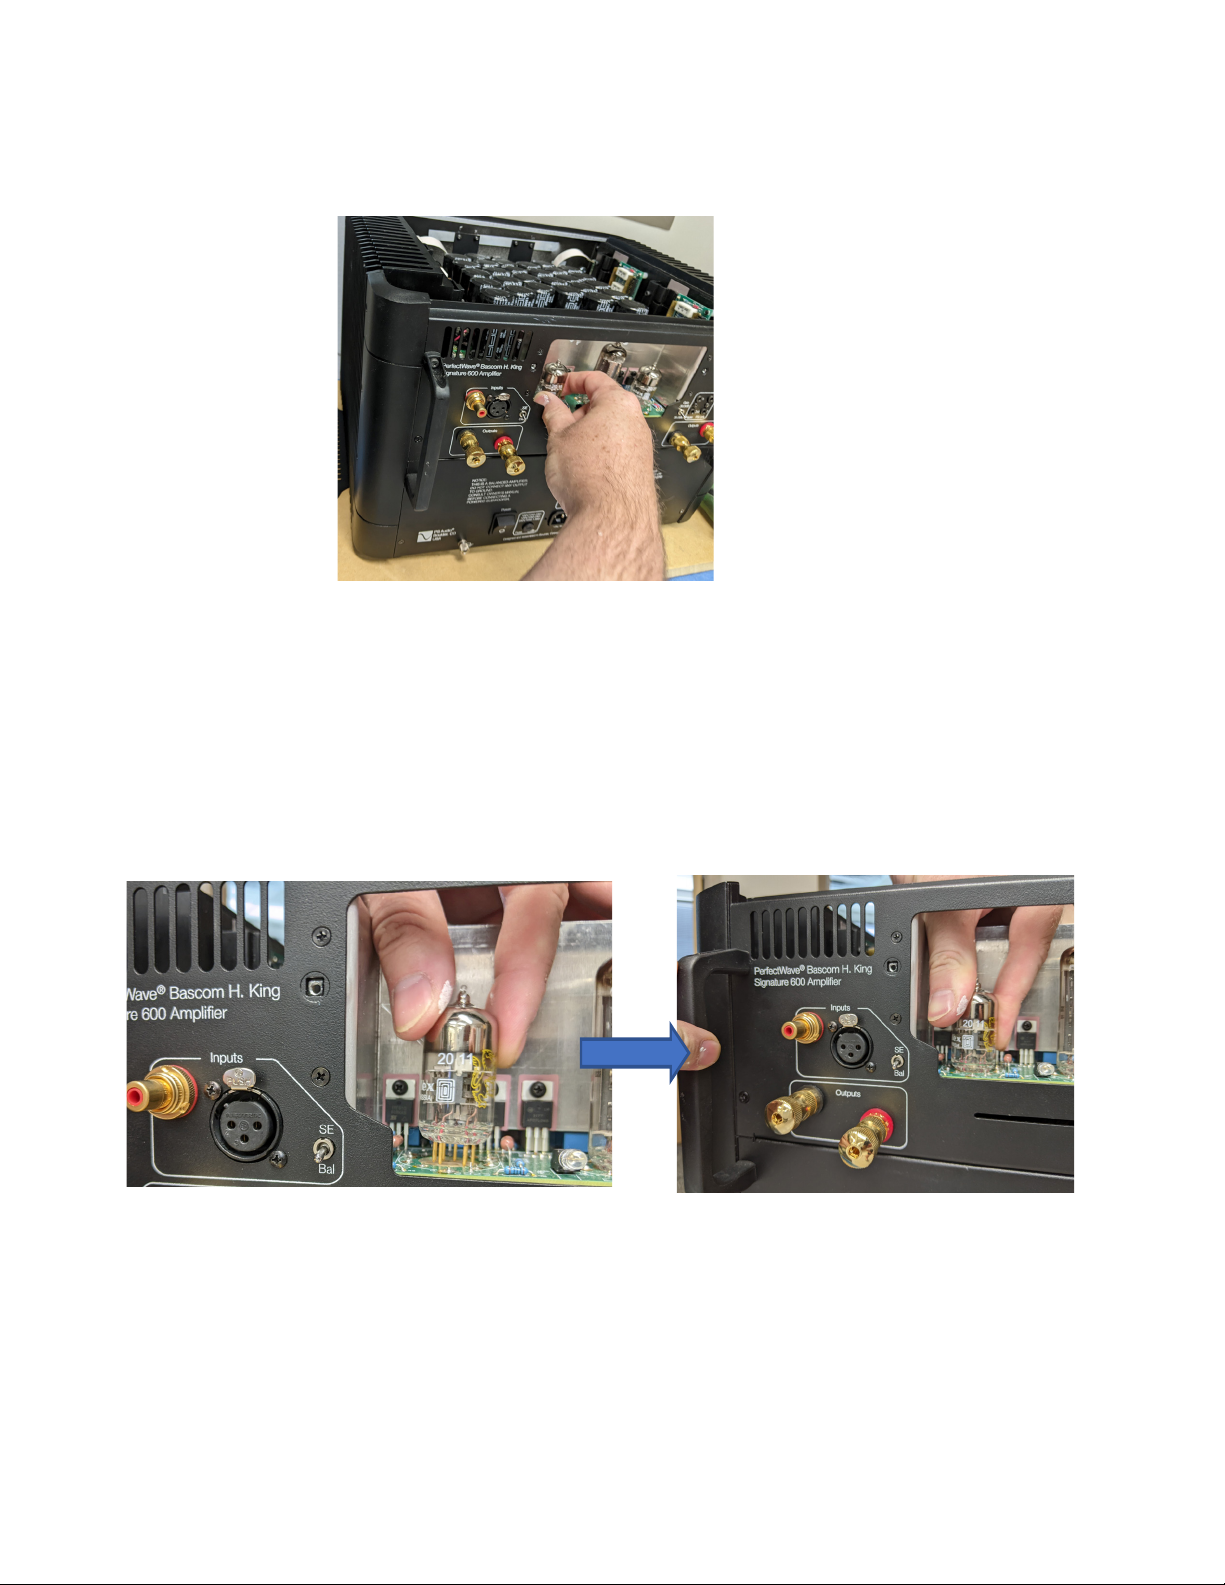
• Carefully remove the tube by holding the base between your thumb and forenger. Then
rock it slightly side to side while pulling upwards. The high-quality tube sockets grip tightly. It
will take a bit of tugging and slight rocking to pull it out. Take your time. (See picture on next
page.)
PS Audio® Inc. 4865 Sterling Drive Boulder, Colorado 80301 800-PSAUDIO
Page 23
Reference
• Place the new tube into the tube socket. CAUTION: Make sure the orientation of the pins is
correct. There is an obvious break in the circular array of pins that matches the socket they
are going into. In other words, you will see a gap in spacing of the pins on the tube that will
match a gap in spacing of the pin holes in the socket. Place the tube on top of the socket,
checking to see that each tube pin is tting into a hole in the socket. Press downwards on the
tube to fully seat it in the socket. There should be no gap between the bottom of the tube and
the socket.
CAUTION/WARNING: REPLACE THE TUBE COVER and re-install the two cover plate screws. The tube
cover plate must be installed before turning on the amplier.
Power Conditioners
Most power conditioners restrict the power and increase impedance going into the BHK 600 and
should be avoided. Some, like the PS Audio P20 AC regenerator, do the opposite, by lowering
impedance and unleashing more power than available from the wall. Some other power conditioners
are parallel designs and can be used without degradation, sometimes to great benet. However,
do not assume they will better the amplier’s performance. As always, use your ears as a guide. If it
PS Audio® Inc. 4865 Sterling Drive Boulder, Colorado 80301 800-PSAUDIO 2323
Page 24

®
Reference
doesn’t sound better, it’s best to avoid them.
If You Hear Hums
If there is hum coming from your loudspeakers, it may be coming from your preamplier, or it may
be the result of an interaction between the components in your system and the BHK 600. This type of
electrical interaction is known as a ground loop.
The rst step to determine where the hum is coming from is to place the BHK 600 in standby and
remove the input connection from the preamplier. Turn the amp back on and see if there is a hum.
Chances are good there will not be. If the hum is a low frequency soft sound, see if its level goes up
and down with the preamp volume control. If it does, the problem is in the preamplier. If not, it may
be in your connecting cables. Try a dierent set. If the hum becomes a sharper buzz, it is most likely a
ground loop.
The easiest way to gure out where ground loop problems lie is by the process of elimination. You
need to determine where the hum or buzz is coming from within your system.
If the hum/buzz goes away when you remove the input cables to the power amp, your next step will
be to reconnect the amp and move further down the chain. It is important to do this in the correct
order and take the time to perform the test in a methodical step-by-step manner.
If you have a preamp or processor that is feeding the power amp, your next step would be to
disconnect all inputs to the preamplier or processor. Once these are disconnected and the preamp
or processor is connected only to the power amplier, turn the system on and again, listen for hum.
Should the hum now appear, it is a problem with your preamp or processor or their interaction with
the power amp. Before returning the preamp or processor to the manufacturer, try using a cheater
plug, also known as a grounding adapter, to break a ground loop. Cheater plugs are simple devices
that convert a three prong AC plug into a two prong AC plug and in the act of converting three
prongs to two prongs, they disconnect the ground from the wall socket. Try one of these on the
preamp rst, then the power amp, or both.
CAUTION/WARNING: Cheater plugs to be used only for troubleshooting. Do not leave your
equipment connected permanently with cheater plugs and without using a proper safety ground.
The use of cheater plugs violates electrical codes. If in doubt, don’t use them.
If you determine that there is still no hum present when the preamp, processor or receiver is
connected with no inputs, then selectively begin plugging in your various inputs (other components
like turntables, phono stages, CD players and so on) one at a time. After each connection, check for
hum until you discover the humming culprit. Use the same method described above to remove the
ground on the oending piece of kit.
Surround processors and any device that is connected to a television cable or satellite dish can cause
a loud buzz and should always be suspect. If, by the process of elimination described above, you
2424
PS Audio® Inc. 4865 Sterling Drive Boulder, Colorado 80301 800-PSAUDIO
Page 25

Reference
determine a component like a cable TV box is causing the hum/buzz to occur, it may be necessary
to isolate the cable connection (CATV) with an isolation transformer, such as the PS Audio Hum
Zero. You can also nd isolators at most A/V equipment dealers and online. It’s sometimes called a
“matching transformer.” The matching transformer will be placed between the cable TV cord and the
cable box, TV or processor.
Just remember, take the system down to its simplest level of connection. Find a way to hook the
system up with as many pieces of the system not connected as possible. Keep it simple and get it to
the point where the hum’s gone. Then start adding back components one at a time until the hum
returns.
PS Audio® Inc. 4865 Sterling Drive Boulder, Colorado 80301 800-PSAUDIO 2525
Page 26

®
BHK Signature 600 Mono Specications
Unit Weight 108 lbs. [49 kg]
Unit Dimensions 17.1”x11.2”x14” (chassis only); 17.5″ deep including
Shipping Weight 120 lbs. [55 kg]
Color Options Black
Voltage Options
Factory set only
Mains Power Inputs IEC C14
Tube Compliment Signal Tubes: Genalex Gold Lion 6922/E88CC, current
Reference
connectors and handles.
Silver
Japan 100V
North America 120V
Europe/Asia/Australia/New Zealand 230V
production, matched pair, Russia (two)
Rectier Tube: RFT 6CA4/EZ81, New Old Stock, East Germany,
1970s and 1980s (one)
Fuse Compliments All
Countries
Fuse Compliment
Mains
Accessories Included US (NEMA 5-15P) (North America, Japan, Asia)
Audio Inputs RCA (Unbalanced)
Speaker Outputs Gold-plated copper binding posts (2 pair)
Other DC Trigger Input with pass through
Warranty Three years parts and labor on unit
4 – 10A Fast Acting 5x20mm type F250V10AL
100 VAC Countries
1 – 2 amp time-lapse H-rated 5x20mm
1 – 12.5 amp time-lapse H-rated 5x20mm
120 VAC Countries
1 – 2 amp time-lapse H-rated 5x20mm
1 – 12.5 amp time-lapse H-rated 5x20mm
230 VAC Countries
1 – 1.6 amp time-lapse H-rated 5x20mm
1 – 8 amp time-lapse H-rated 5x20mm
Schuko (CEE7/7) (Europe)
UK (BS 1363) (UK, Asia)
XLR (Balanced)
3.5 mm 5 - 15VDC
One year on vacuum tubes
2626
PS Audio® Inc. 4865 Sterling Drive Boulder, Colorado 80301 800-PSAUDIO
Page 27

Reference
Power Consumption
@Idle 75 Watts
@Play 225 Watts
@Rated power 8Ω 950 Watts
@Rated power 4Ω 1500 Watts
Signal
Gain 26.0dB/30.5dB +/-0.5dB selectable
Sensitivity for rated output power of
600 watts into 8Ω
Noise 100Hz-20KHz <-100dBV
Input impedance Single Ended 100KΩ
Output Impedance 50Hz, 2.8VRMS <70mΩ (20-20KHz)
Frequency Response @2.8VRMS
Distortion
3.5V/2.1V
Balanced 200KΩ
10Hz – 20KHz +/- 0.1dB
10Hz – 100KHz +0.1/-3.0dB
1KHz, 1W/8Ω <0.002%
20-20KHz, 1W/8Ω <0.01%
1KHz, 200W/8Ω < 0.01% (120VAC mains input)
1KHz, 400W/4Ω < 0.02% (120VAC mains input)
Output Power Both channels driven, 21°C*, 120vac mains,
1kHz, 1% THD
8Ω 600W minimum
4Ω 1000W minimum
2Ω Stable for musical transients
* operation at higher temperature will aect long term output capabilities
PS Audio® Inc. 4865 Sterling Drive Boulder, Colorado 80301 800-PSAUDIO 2727
Page 28

®
Warranty Information
Product Registration
By registering your product, you are validating the start date of your limited warranty. This limited
warranty is in eect for 3 years from the date the unit was rst purchased from PS Audio or its
dealers and agents. If you do not register your product within 30 days of service, a copy of your
purchase receipt from an authorized PS Audio dealer may be used as proof of purchase to establish
the warranty start date. If no proof of purchase from an authorized PS audio dealer or registration is
provided, the production date of the product will be used to determine the warranty start date. You
can register your product Online, by phone, by mail, or by email.
What This Warranty Covers
This warranty covers defects in material and workmanship for products purchased from PS Audio or
its authorized dealers and agents. In the event your product fails, your sole remedy under this limited
warranty shall be to return the product to PS Audio or an authorized PS Audio repair center. At the
option of PS Audio, the product will be repaired without charge for parts or labor, replaced, or the
purchase price refunded through the original point of purchase.
Shipping
You are responsible to pay for the safe and proper shipment of the warrantied product to PS Audio or
its authorized repair center. Under this limited warranty, PS Audio or its authorized repair center will
pay the cost of returning the repaired or replacement product to you.
What This Warranty Does Not Cover
This warranty does not cover damage due to:
• Accidents, carelessness, improper transportation, misuse, neglect, or abuse
• Failure to follow the operating instructions that are provided by PS Audio in the Owner’s
Reference Manual (available for download at www.psaudio.com)
• Use in any manner inconsistent with PS Audio’s operating instructions (available for download at
www.psaudio.com)
• Lack of routine maintenance
• Connection to an improper voltage supply
• Alterations or modications to the unit
• Improper or unauthorized repair, including repairs not authorized by PS Audio or a PS Audio
authorized repair center
• Fire, lightning, ood, “Acts of God,” or other contingencies beyond the control of PS Audio
products purchased through an unauthorized source (if you have questions as to whether or not
a dealer is authorized, please contact customer support at www.psaudio.com
• Products with a factory-applied serial number that has in any way been altered, defaced, or
removed
Limitations Under This Warranty
In no event will PS Audio’s liability to you exceed the original purchase price of your unit. This
warranty does not cover the cost of custom installation, customer instruction, setup adjustments,
or signal reception problems. Consequential and incidental damages are not covered under
this warranty. However, some states do not allow the exclusion or limitation of incidental or
2828
PS Audio® Inc. 4865 Sterling Drive Boulder, Colorado 80301 800-PSAUDIO
Page 29

Warranty Information
consequential damages, so this limitation or exclusion may not apply to you. In the event that your
warrantied product cannot be repaired, PS Audio will either replace or refund the cost of the unit.
We reserve the right to replace any out-of-stock, discontinued, or limited-edition products with a
comparable product. Discontinued products may not be available for warranty
Warranty Transfer
This warranty is for the benet of the original purchaser of the product. The warranty may be
transferred to a subsequent purchaser during the three year warranty period. To do this, you must
contact PS Audio directly to set up a transfer of warranty registration.
PS Audio® Inc. 4865 Sterling Drive Boulder, Colorado 80301 800-PSAUDIO 2929
Page 30

®
Service
Warranty Service Within North America
Please contact PS Audio customer support for service assistance, help with locating an authorized PS
Audio repair center, help with the operation of a product, or for more information.
Obtaining An RMA Number
In order to receive warranty service, you must rst obtain a Return Merchandise Authorization
Number (RMA#) prior to returning any item. Please contact PS Audio or an authorized PS Audio repair
center to receive an RMA number. The RMA number must be on all returned items. If it is not clearly
marked, PS Audio will return the package back to you, freight collect.
Packaging and Shipping
Original packaging should be used for the safe transit of your PS Audio unit to the repair center. If
you do not have the original packaging, PS Audio can sell and ship replacement packaging to you.
You are responsible for the cost of shipping the product to a PS Audio authorized repair center. You
should insure the product for its full retail cost, in the event it gets lost or damaged in transit. PS
Audio is not responsible for damage incurred during the transit of products sent to us. Shipping your
product in non-PS Audio packaging may void this warranty. PS Audio reserves the right to charge
you for new factory packaging to return your product after a repair.
State Law
This warranty gives you specic legal rights. You may also have other rights, which vary from state to
state.
International Warranty Service
PS Audio has authorized distribution in many countries of the world. In each country, the authorized
importing distributor has accepted the responsibility for warranty of the products sold by that
distributor. Warranty service should be obtained where the product was purchased.
Changes to Our Products
PS Audio reserves the right to modify the design of any product without obligation to purchasers
of previously manufactured products, and to change the prices or specications of any products
without notice or obligation to any person.
3030
PS Audio® Inc. 4865 Sterling Drive Boulder, Colorado 80301 800-PSAUDIO
Page 31

Your Serial
Number
Your Purchase
Information
Date of Purchase
Your Product
PS Audio® Inc. 4865 Sterling Drive Boulder, Colorado 80301 800-PSAUDIO 3131
Page 32

Thanks for being a part of
the PS Audio Family
At PS Audio, we’re family.
Not just a family that runs in bloodlines, but in frequencies.
Because while we may not all share the same genes here, we are all related by a
passion, nay, obsession with listening to the music we love at the highest, most
breathtaking quality possible.
And in our minds, that makes us kin.
In fact, we believe that every nutty, Hertz-counting audiophile out there is part of
our tribe.
That’s how we’ve built our company over the last 50 years - with the kind of care and
respect that you give to your family.
PS Audio® Inc. 4865 Sterling Drive Boulder, Colorado 80301 800-PSAUDIO
 Loading...