

Page 1
Owner’s Reference
Page 2

Table of Contents
Aspen® FR30
Safety Information 2
Introduction
Thank You
Contact Information
A Message From The Design Engineer
Getting Started
Included with the Aspen FR30
Unpacking Instructions
Conguring Speaker Feet
Speaker Accessories
Assembly and Jumper / Input Wiring
Operation Guide
Basic speaker setup and placement
Rear panel controls
Specications
Warranty 14-15
Registering Your Product
What This Warranty Covers
Shipping
What This Warranty Does Not Cover
Limitations Under This Warranty
Warranty Transfer
4-9
4-5
6-7
8-9
10-12
10-11
12
13
14
14
14
14
15
15
3
3
3
3
4
7
Service Information 16
Warranty Service Within North America
International Warranty Service
Changes To Our Products
Your Product
1
16
16
16
17
Page 3

Safety Information
Aspen® FR30
Important Safety
Instructions
READ AND FOLLOW ALL INSTRUCTIONS
HEED ALL WARNINGS
MAGNETIC FIELD
As with most loudspeakers, the FR-30 uses strong magnets in the drivers. People with
implanted medical devices should use caution around the speaker. Magnetic elds of 5G
can be present up to 18” (50 cm) from certain parts of the speaker.
CAUTION HEAVY OBJECT
Lifting can cause muscle strain or back injury.
DO NOT EXPOSE THIS APPARATUS TO RAIN OR MOISTURE. OBJECTS FILLED WITH
LIQUIDS, SUCH AS VASES, SHOULD NOT BE PLACED ON THE APPARATUS.
Clean only with a dry cloth. Do not place ammable material on top of or beneath the unit.
Turn o all systems’ power before connecting the PS Audio® component to any other
component. Make sure all cable terminations are of the highest quality.
THERE ARE NO USER-SERVICEABLE PARTS INSIDE THIS PS AUDIO PRODUCT.
REFER ALL SERVICE NEEDS TO QUALIFIED SERVICE PERSONNEL.
Please contact your authorized dealer, distributor, or PS Audio® directly if you have any
questions or concerns that are not addressed in this reference manual. PS Audio®, the
sine wave logo, and PerfectWave® are registered trademarks of PS Audio, Inc., and are
restricted for use by PS Audio, Inc., its subsidiaries, and authorized agents. Stellar™,
Power Plant™, MultiWave™, CleanWave™, and Gain Cell™ are trademarks of PS Audio,
Inc.
This product was designed in Boulder, Colorado.
© 2022 PS Audio, Inc. All rights reserved. Rev C
2
Page 4

Introduction
Aspen® FR30
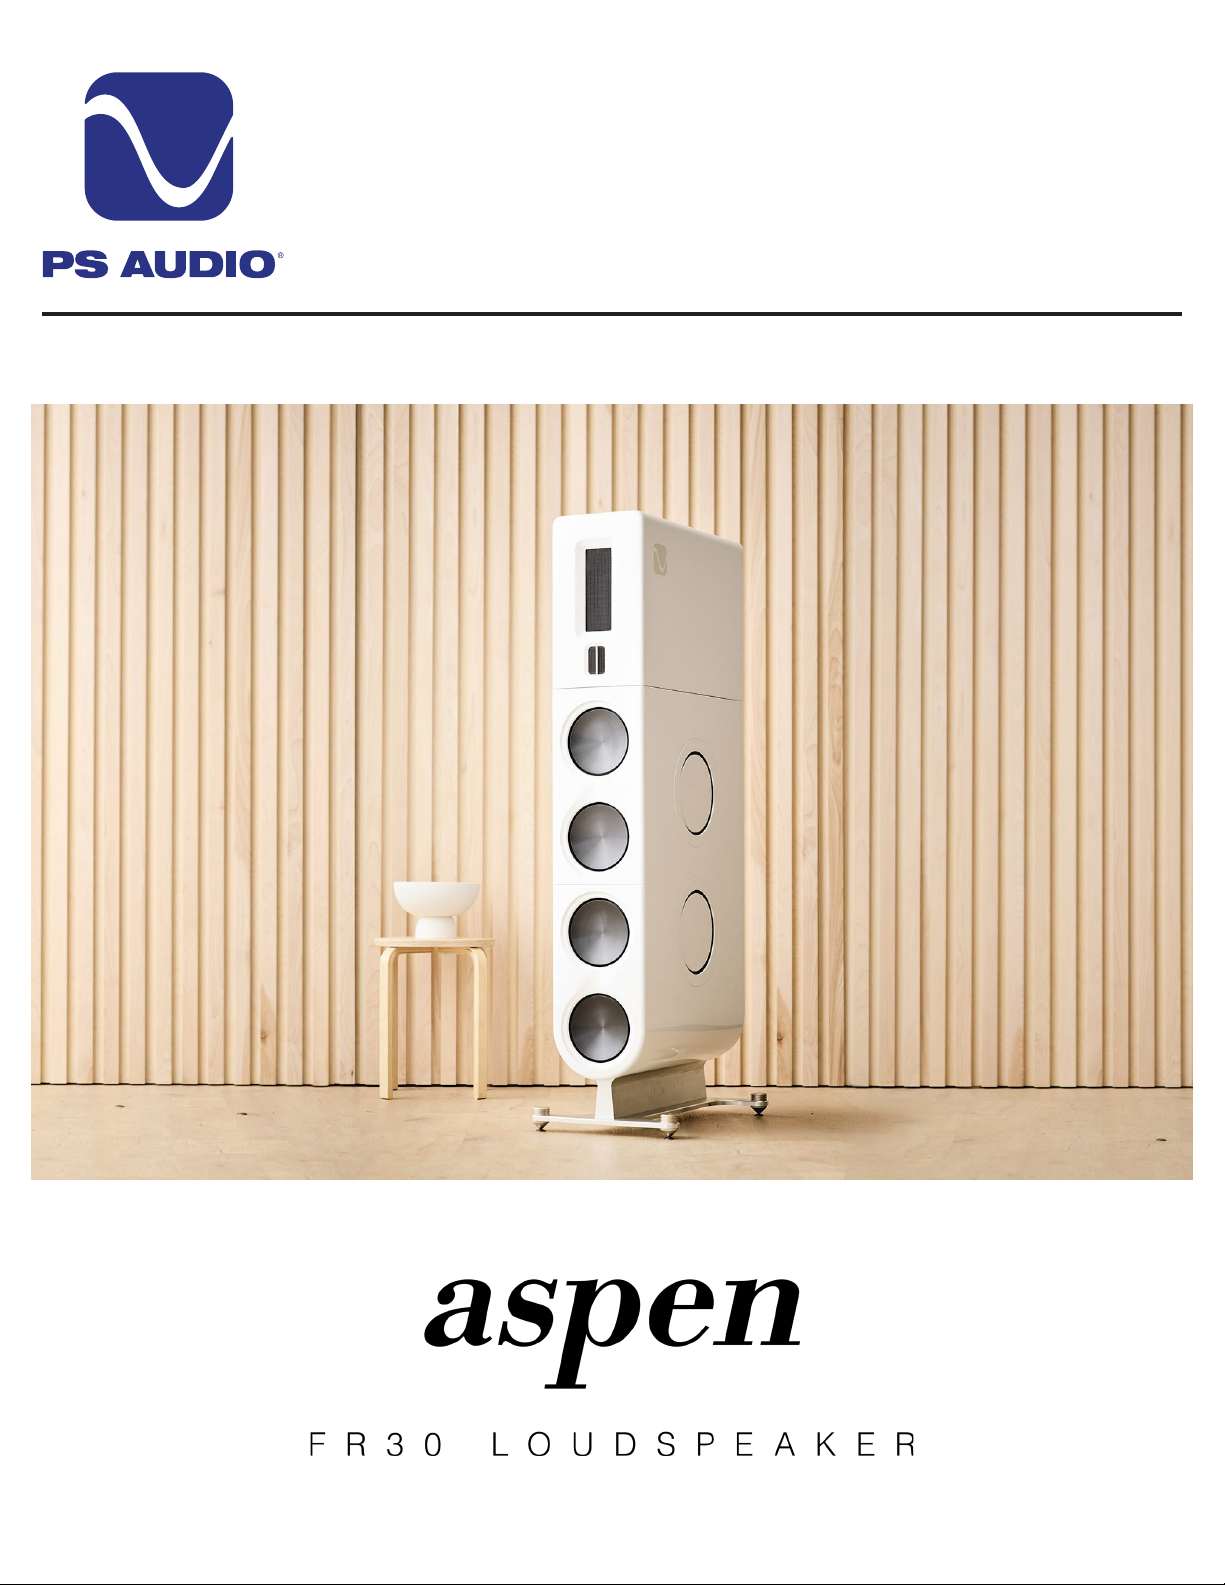
Thank You Thank you for your purchase of the PS Audio Aspen FR30 Loudspeaker. This is your
comprehensive Operator’s Guide, intended to provide a full overview of the Aspen FR30’s
functions and capabilities. It is our intention to provide you with full details about the
Aspen FR30 and to answer any and all questions you may have. If you have additional
questions or concerns that are not addressed in this guide, please contact us and we will
be happy to assist you.
Contact
Information
A Message From
The Design
Engineer
PS Audio, Inc.
4865 Sterling Drive
Boulder, CO 80301
1 (800) PSAUDIO
[email protected]
www.psaudio.com
After nearly 50 years in business and many years in development, I am proud to present
the Aspen Series FR30 Loudspeaker. A large but clean, modern, and elegantly slim
3-way tower speaker that is our modern take on our favorite planar magnetic hybrid
loudspeakers of the past. The clarity and detail of the most modern reference loudspeaker
design with an ease and musicality and power that you’d expect from PS Audio.
It incorporates much of what we have collectively learned as a company about design
and manufacturing in pursuit of our ultimate sonic vision to oer a complete end-to-end
system. On a personal level, it has been a dream project to put all I’ve learned throughout
my career into a reference product for your musical enjoyment.
Chris Brunhaver
Senior Speaker Design Engineer
3
Page 5

Getting Started
Aspen® FR30
Included with the
Aspen FR30
Unpacking
Instructions
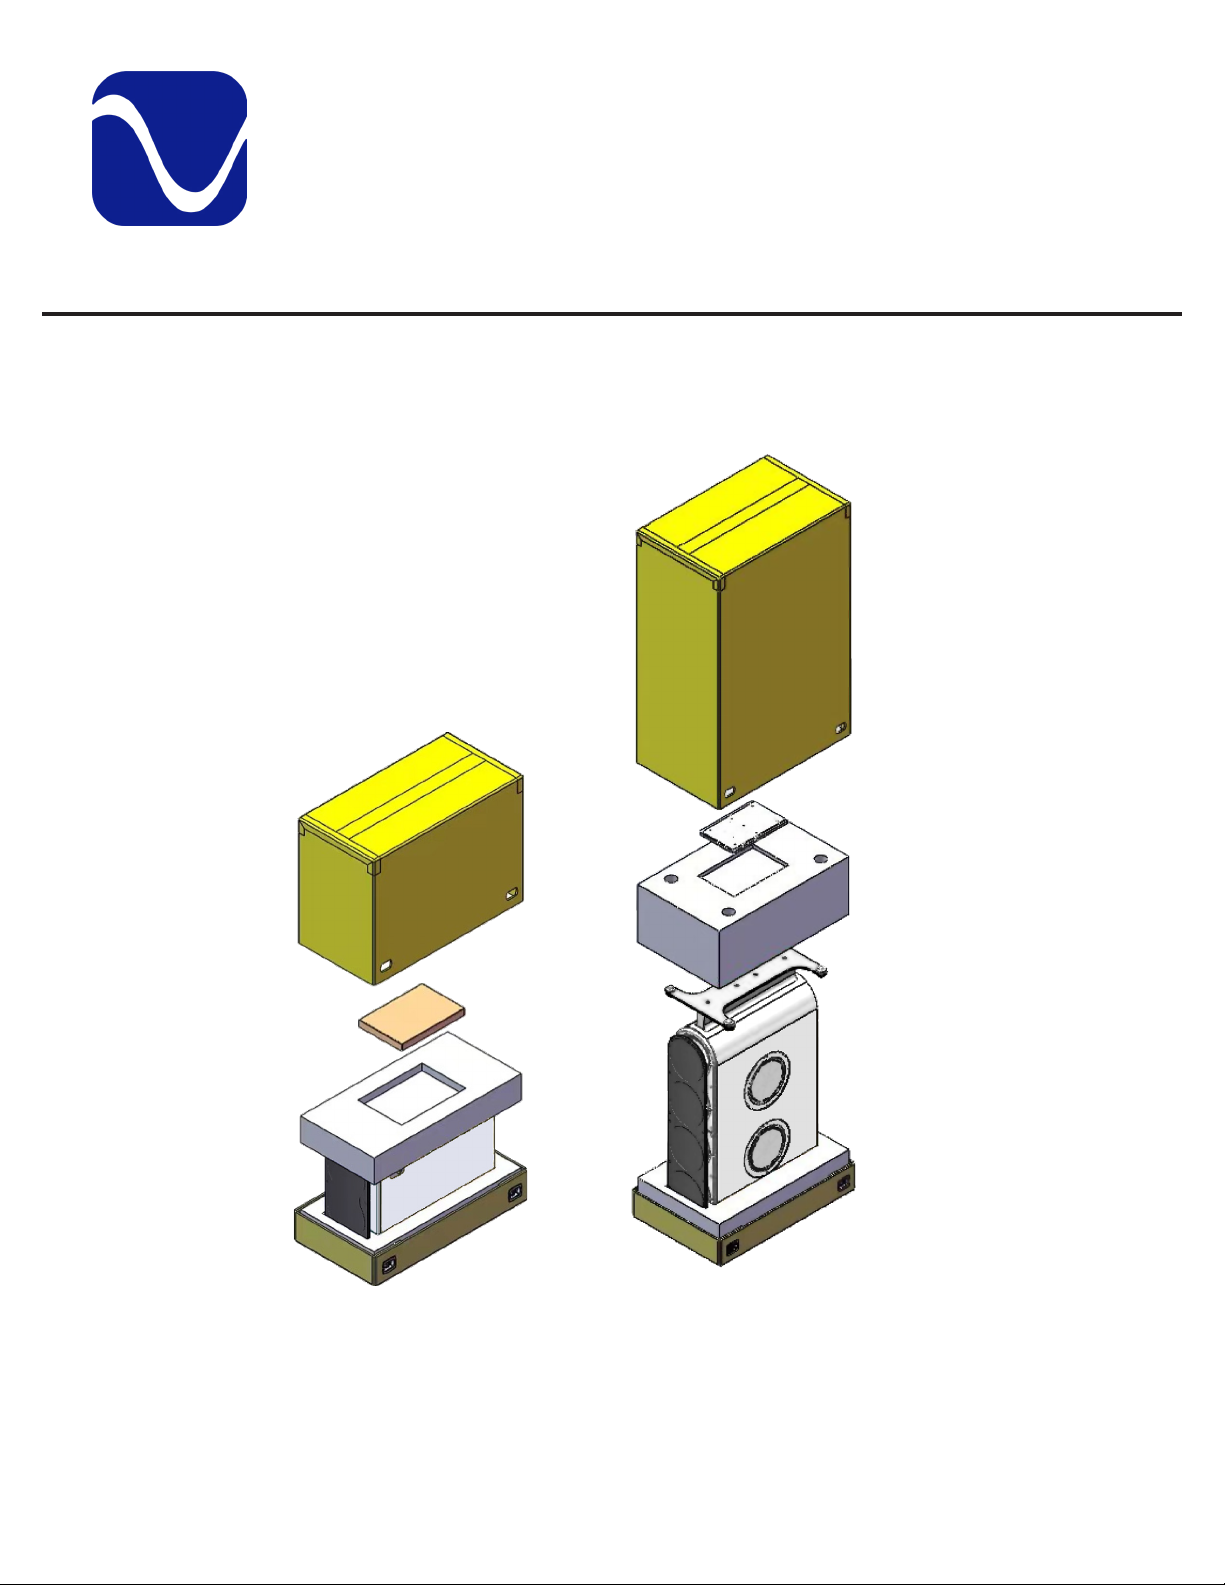
Upper box:
Upper speaker enclosure in cloth bag
Cloth magnetic grille
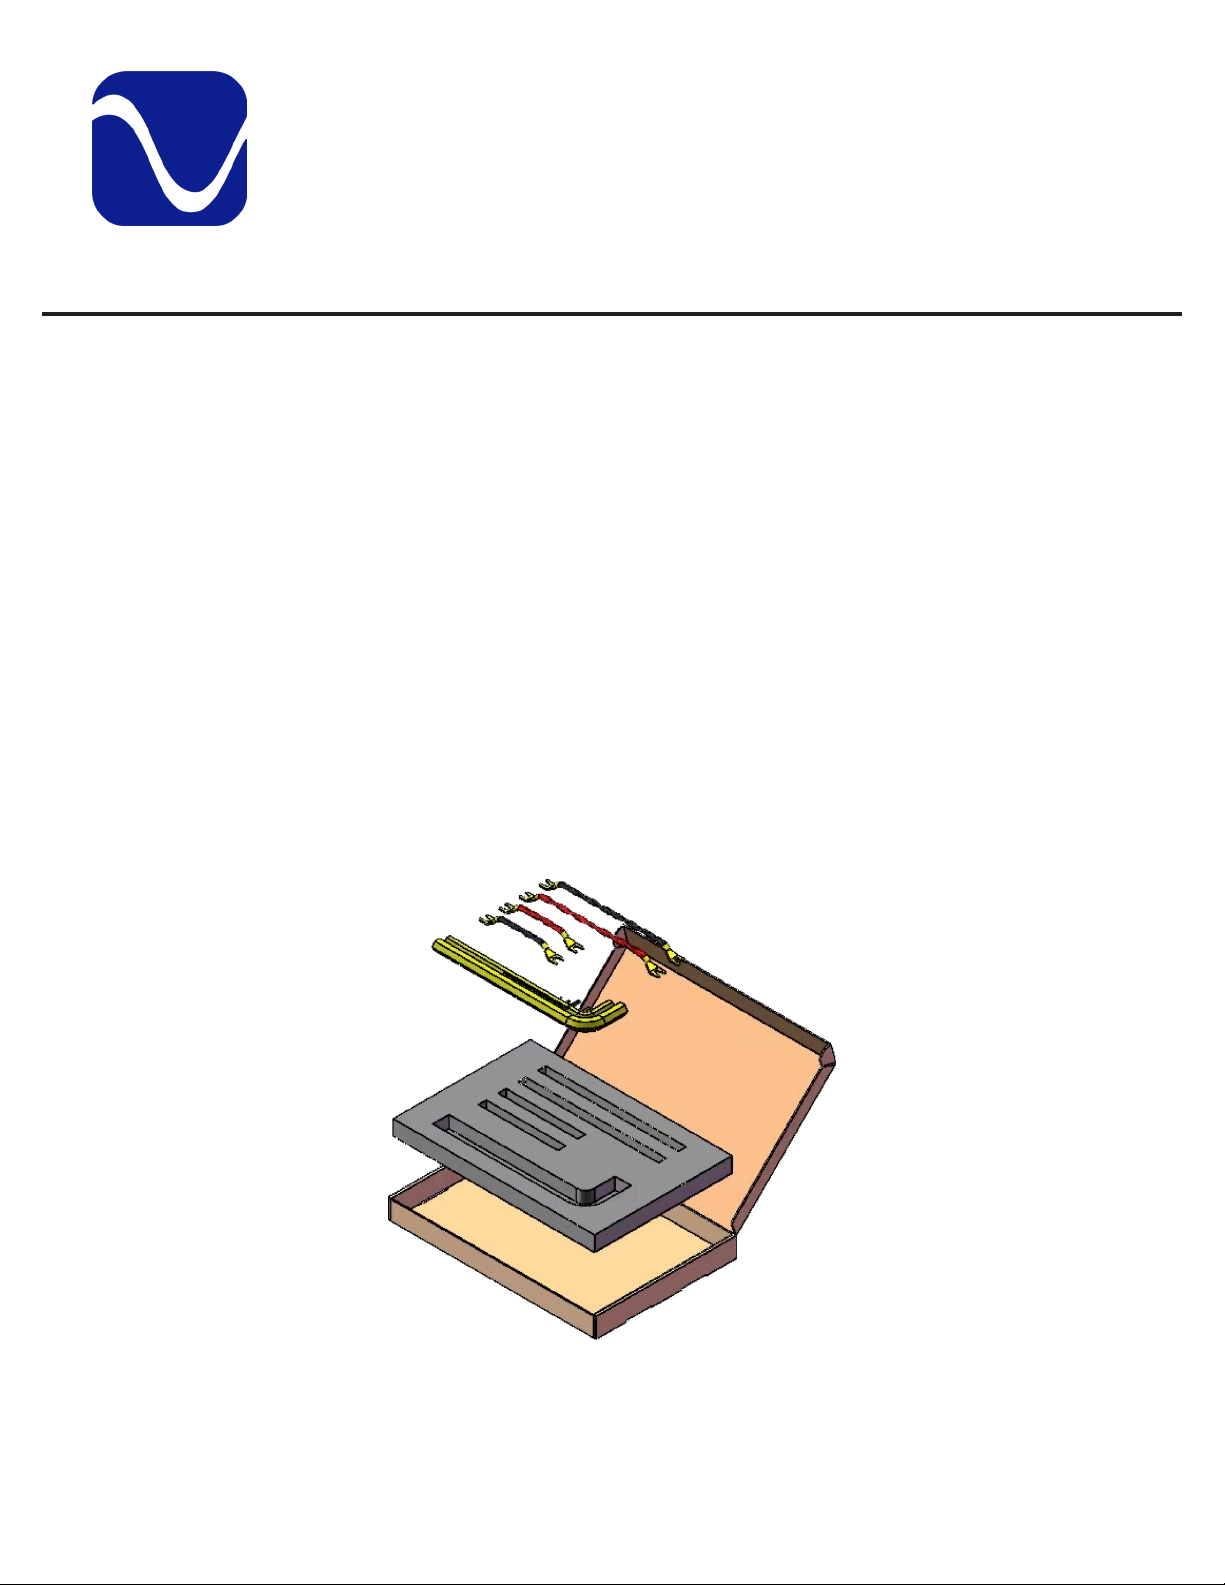
Accessory box – this product manual, jumpers (for connecting the upper and lower
cabinets and conguring the inputs for mono or bi-wiring), tool kit (allen wrenches
for all of the metric socket head screws used throughout).
Lower box:
Lower speaker enclosure in cloth bag
Cloth magnetic grille
Threaded carpet sliders for ease of positioning the speaker during setup
The packaging cartons are held together by four plastic packaging clips around the base
of the box.
To open the clips, squeeze the to vertical ribs and pull outwards and upwards.
Completely remove the clips from the box.
4
Page 6
Getting Started
Aspen® FR30
Unpacking
Instructions,
Continued
From there, lift the top of each carton upwards and remove.
Note: The cloth bags covering each speaker box are not shown.
5
Page 7
Getting Started
Aspen® FR30
Conguring
Speaker Feet
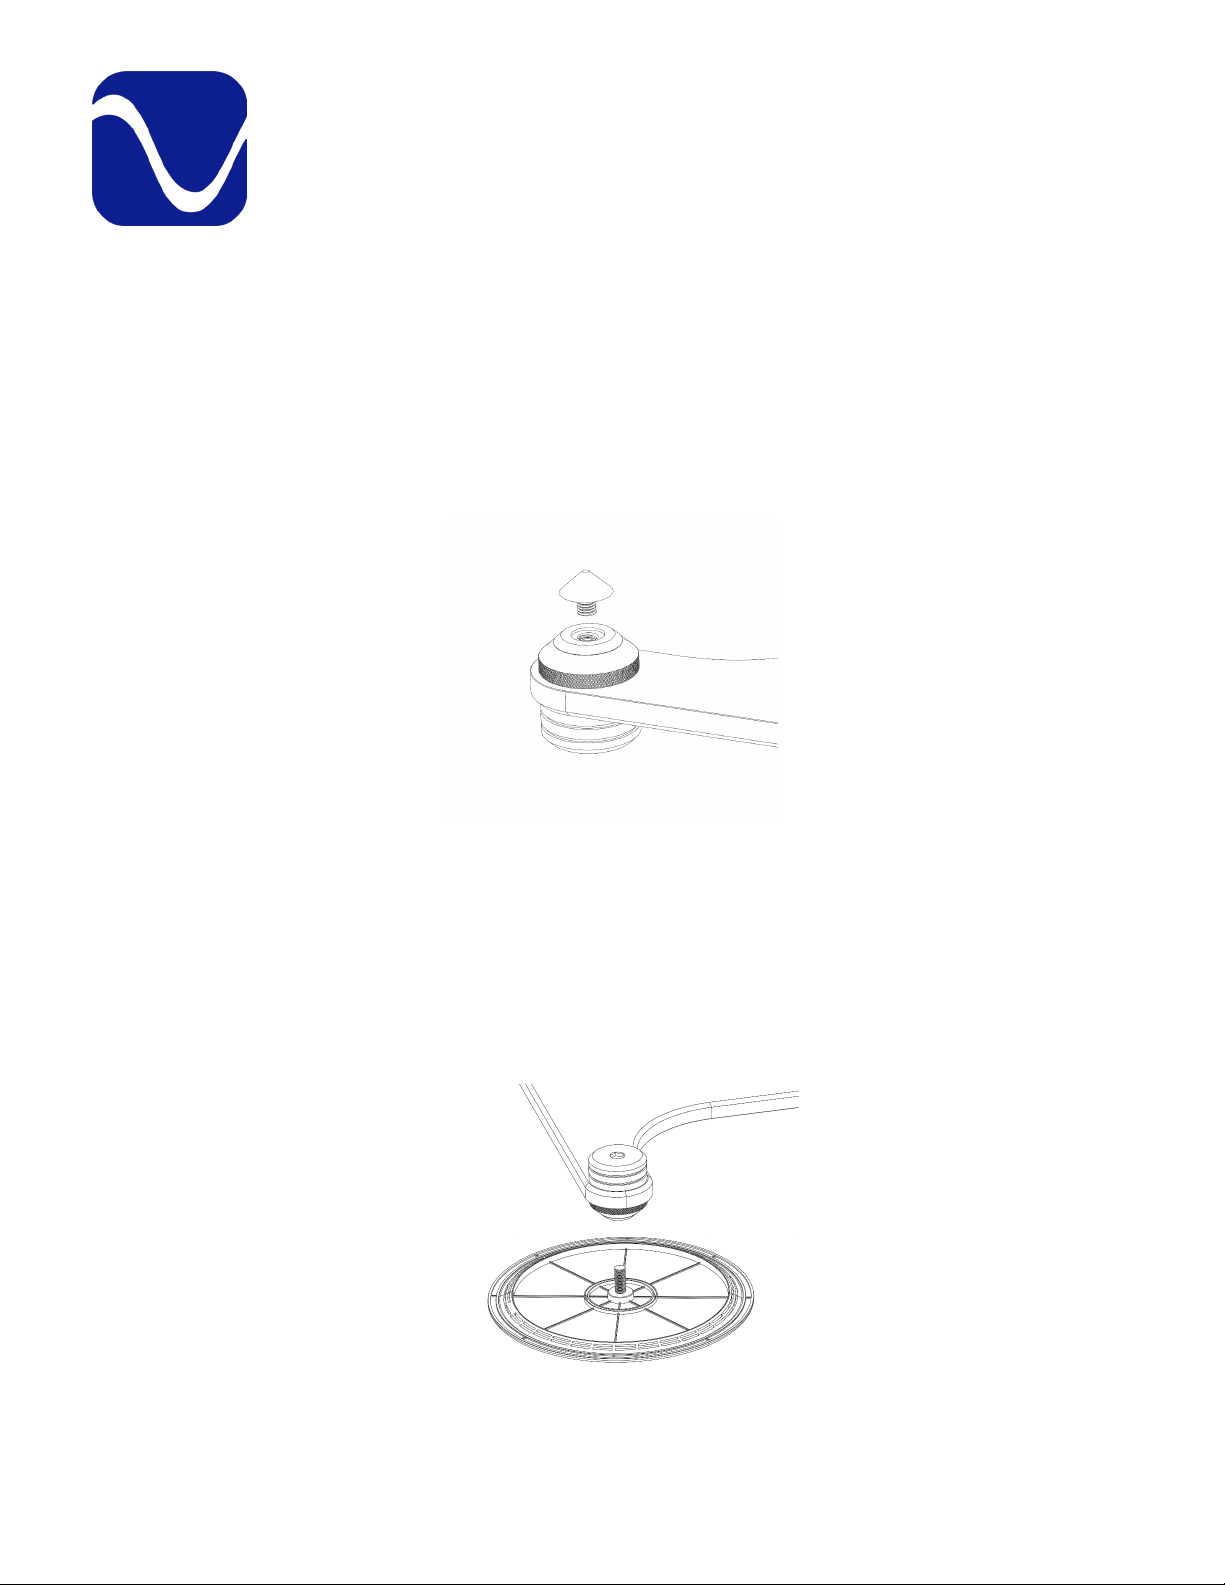
For hard oors – twist to remove bottom 0.375” spiked tip from feet to expose the black
plastic disc underneath.
Note: For carpeted oors – spiked tips should be removed only after standing
bottom speaker cabinet up.
The foam covering the metal base of the bottom speaker enclosure can be placed
immediately to the side and used as a fulcrum to tilt and rotate the speaker onto its
spiked feet.
The bottom .375” spiked tips can then be removed and the included black carpet sliders
(located in the foam packaging covering the metal base of the speaker) can be screwed
into place.
This way, the speaker can be easily slid around during initial listening and setup. When
the nal speaker location is determined, replace carpet sliders with the spiked tips for
best performance.
6
Page 8
Getting Started
Aspen® FR30
Conguring
Speaker Feet,
Continued
Speaker
Accessories
These are leveling feet as well. Loosen the top gap of the foot and adjust the bottom
spiked foot until the speaker is level, and then tighten the top cap into place to lock them
in position.
Aftermarket isolation feet can also be used with a compatible M8 X 1.25 thread to screw
into the aluminum base plate.
Please open the accessory box located inside the upper speaker packaging. This box
includes this manual, jumpers (for connecting the upper and lower speaker enclosures
and conguring single/bi-wiring operation) and a set of high-quality allen wrenches for
tightening or replacing speaker components.
7
Page 9
Getting Started
Aspen® FR30
Assembling Upper
and Lower Speaker
Enclosures
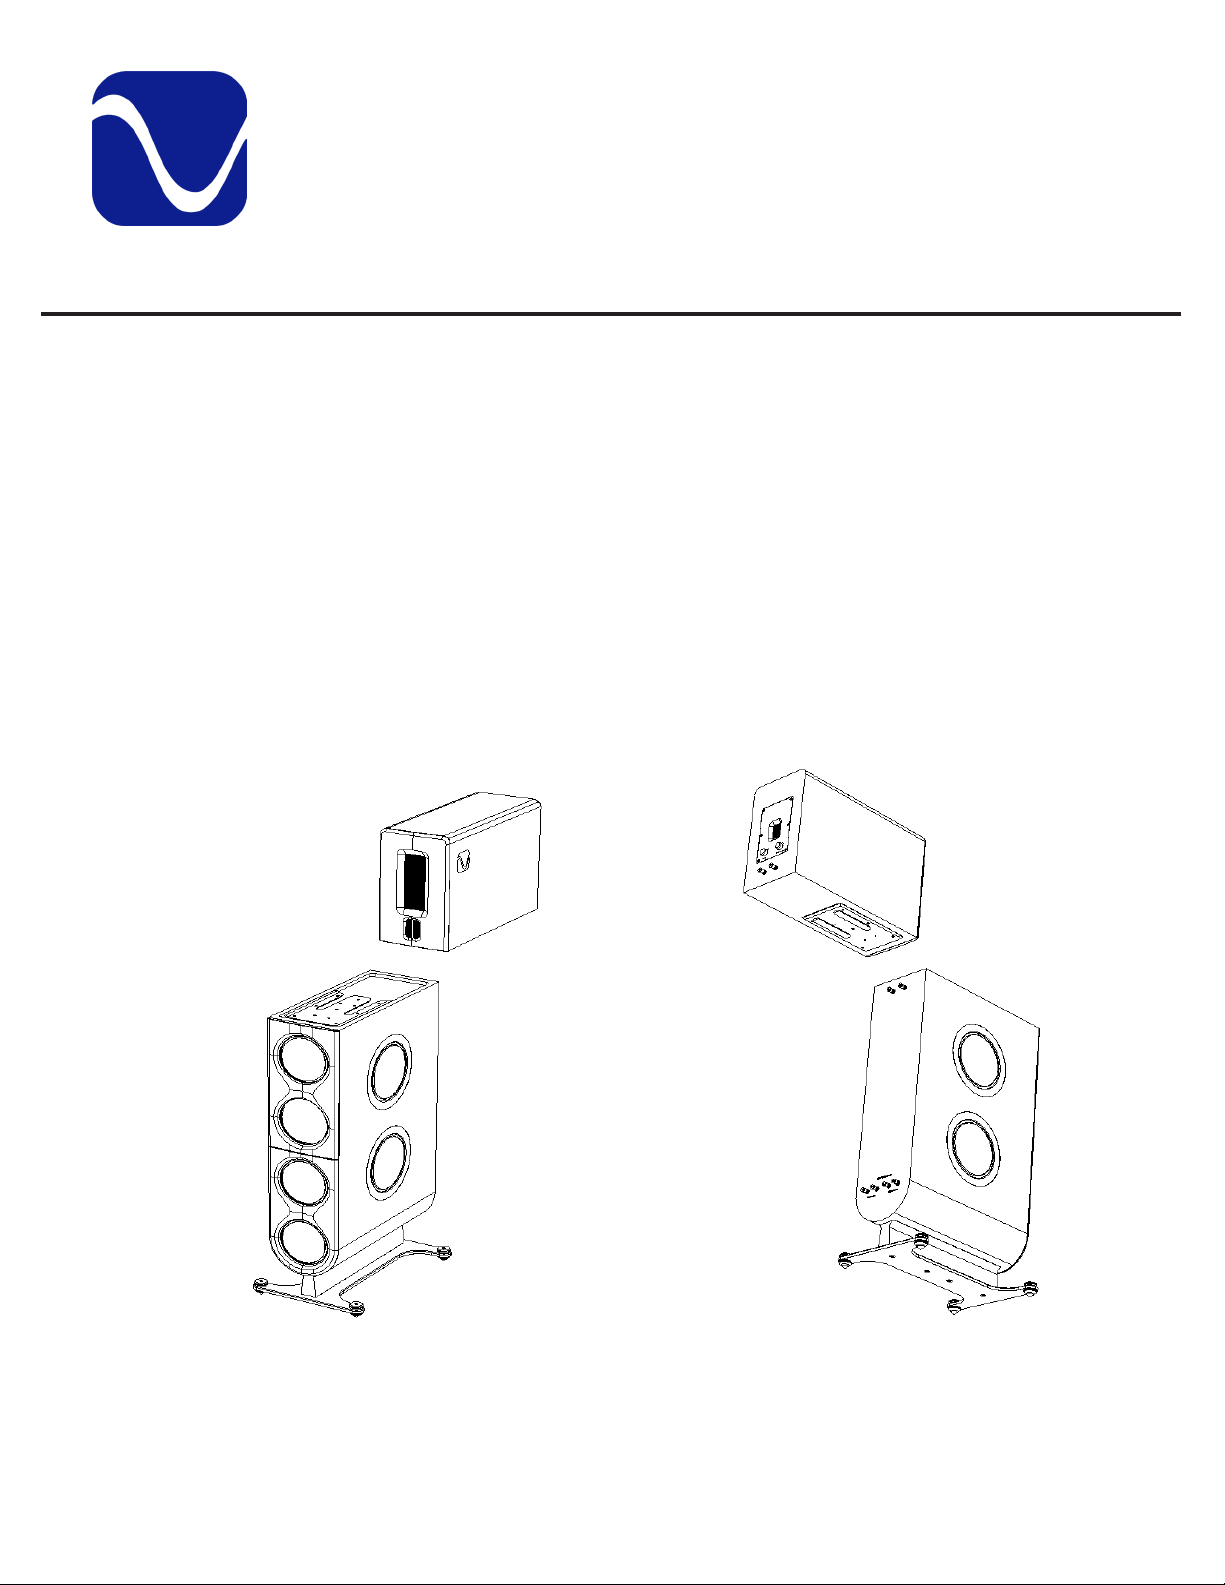
The Aspen FR30 features a two piece enclosure for optimal acoustic and mechanical
performance and ease of installation. The cabinets are combined with a sliding
mechanism and held in place with spring loaded bearings.
To assemble, simple place the upper enclosure midway back on the lower enclsure, then
slide it forward until you hear a small “click”.
Electrical connections are covered in the next section.
To dissasemble, reverse the process.
8
Page 10
Getting Started
Aspen® FR30
Jumper / Input
Wiring
(bi-amp, bi-wiring)
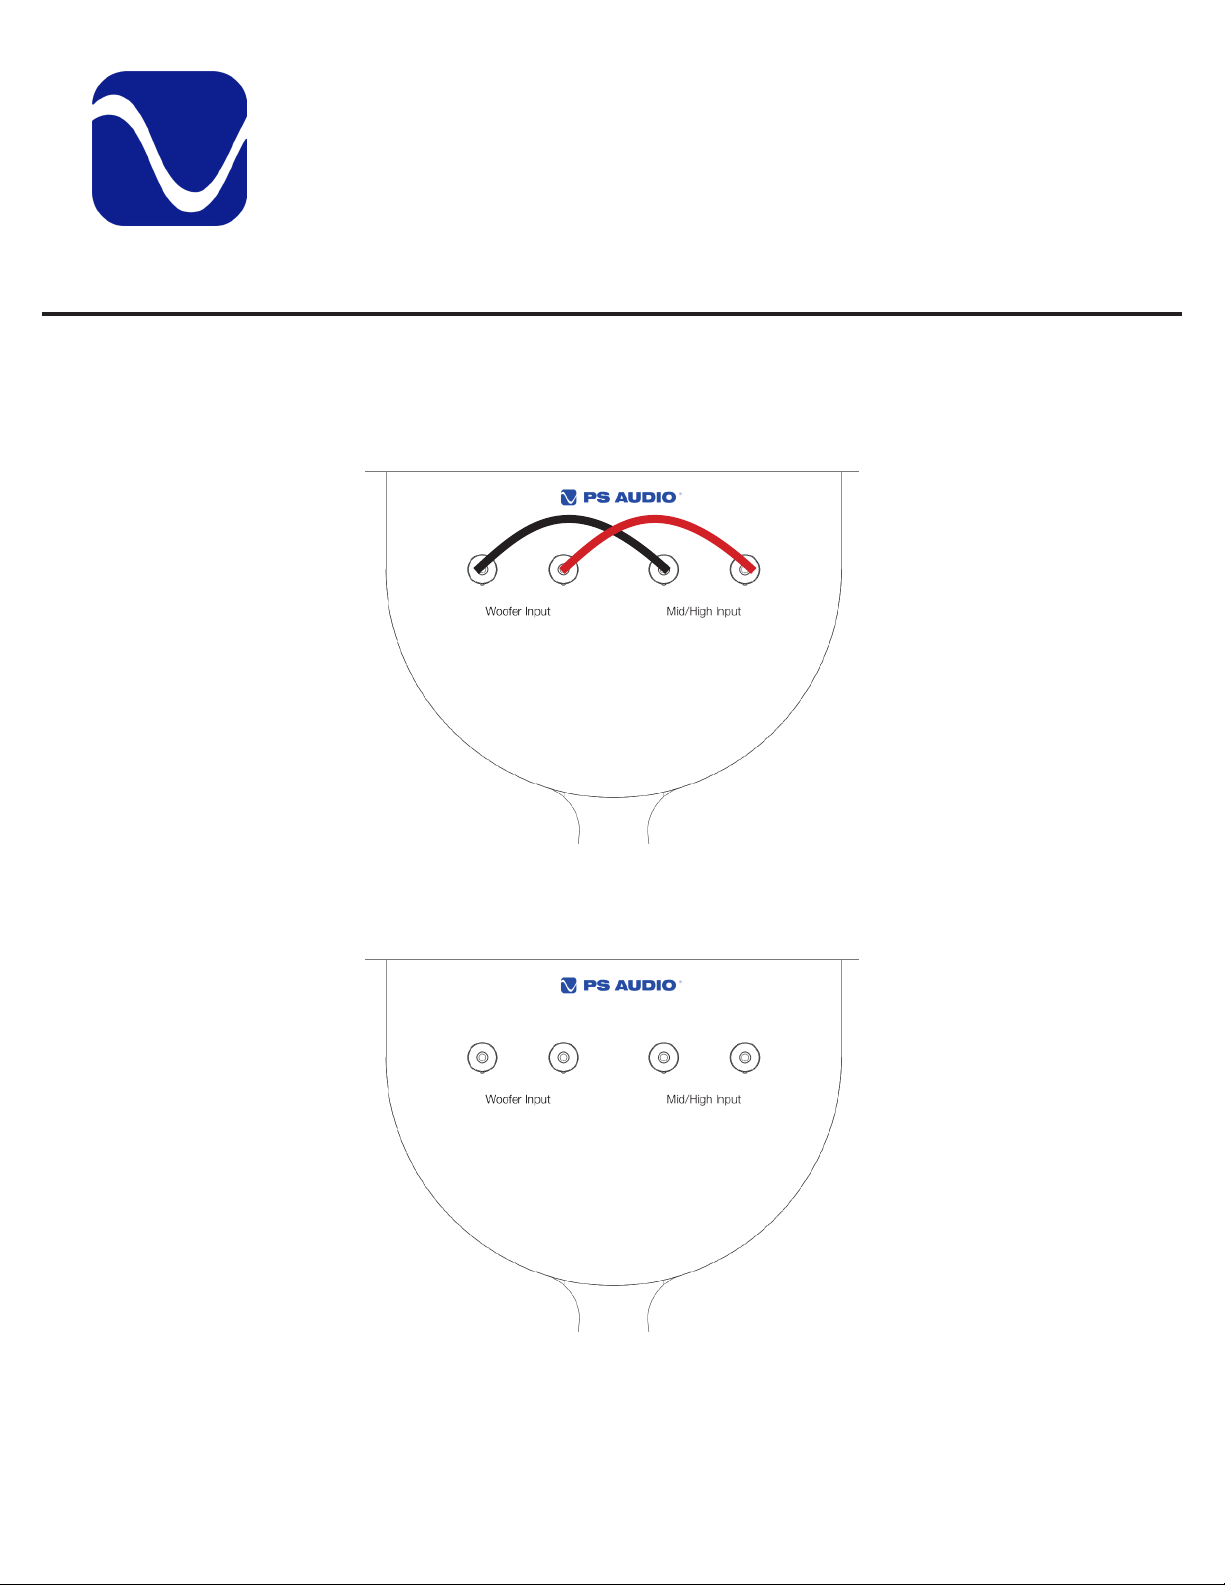
The FR30 comes with four input terminals as shown. For single wiring/amping, connect
the set of longer jumpers from the accessory box to parallel wire the black and red
terminals sets together (black to black and red to red) as shown below. Connect a single
amplier to the left set of terminals.
For bi-wiring/bi-amping do not connect the jumpers (as seen below).
The short set of jumpers is used to connect the upper enclosure to the bottom enclosure
(black to black, red to red).
Note: If using banana plugs, remove red and black plugs from binding posts.
9
Page 11

Operation Guide
Aspen® FR30
Basic Setup
and Placement
Loudspeakers and rooms work together as a system and, to get the best performance,
great care in setup is important to optimize the listening experience.
Some helpful tools include a tape measure (or laser measurement tool), pen/paper to note
the distances and listening impressions, and some demo music.
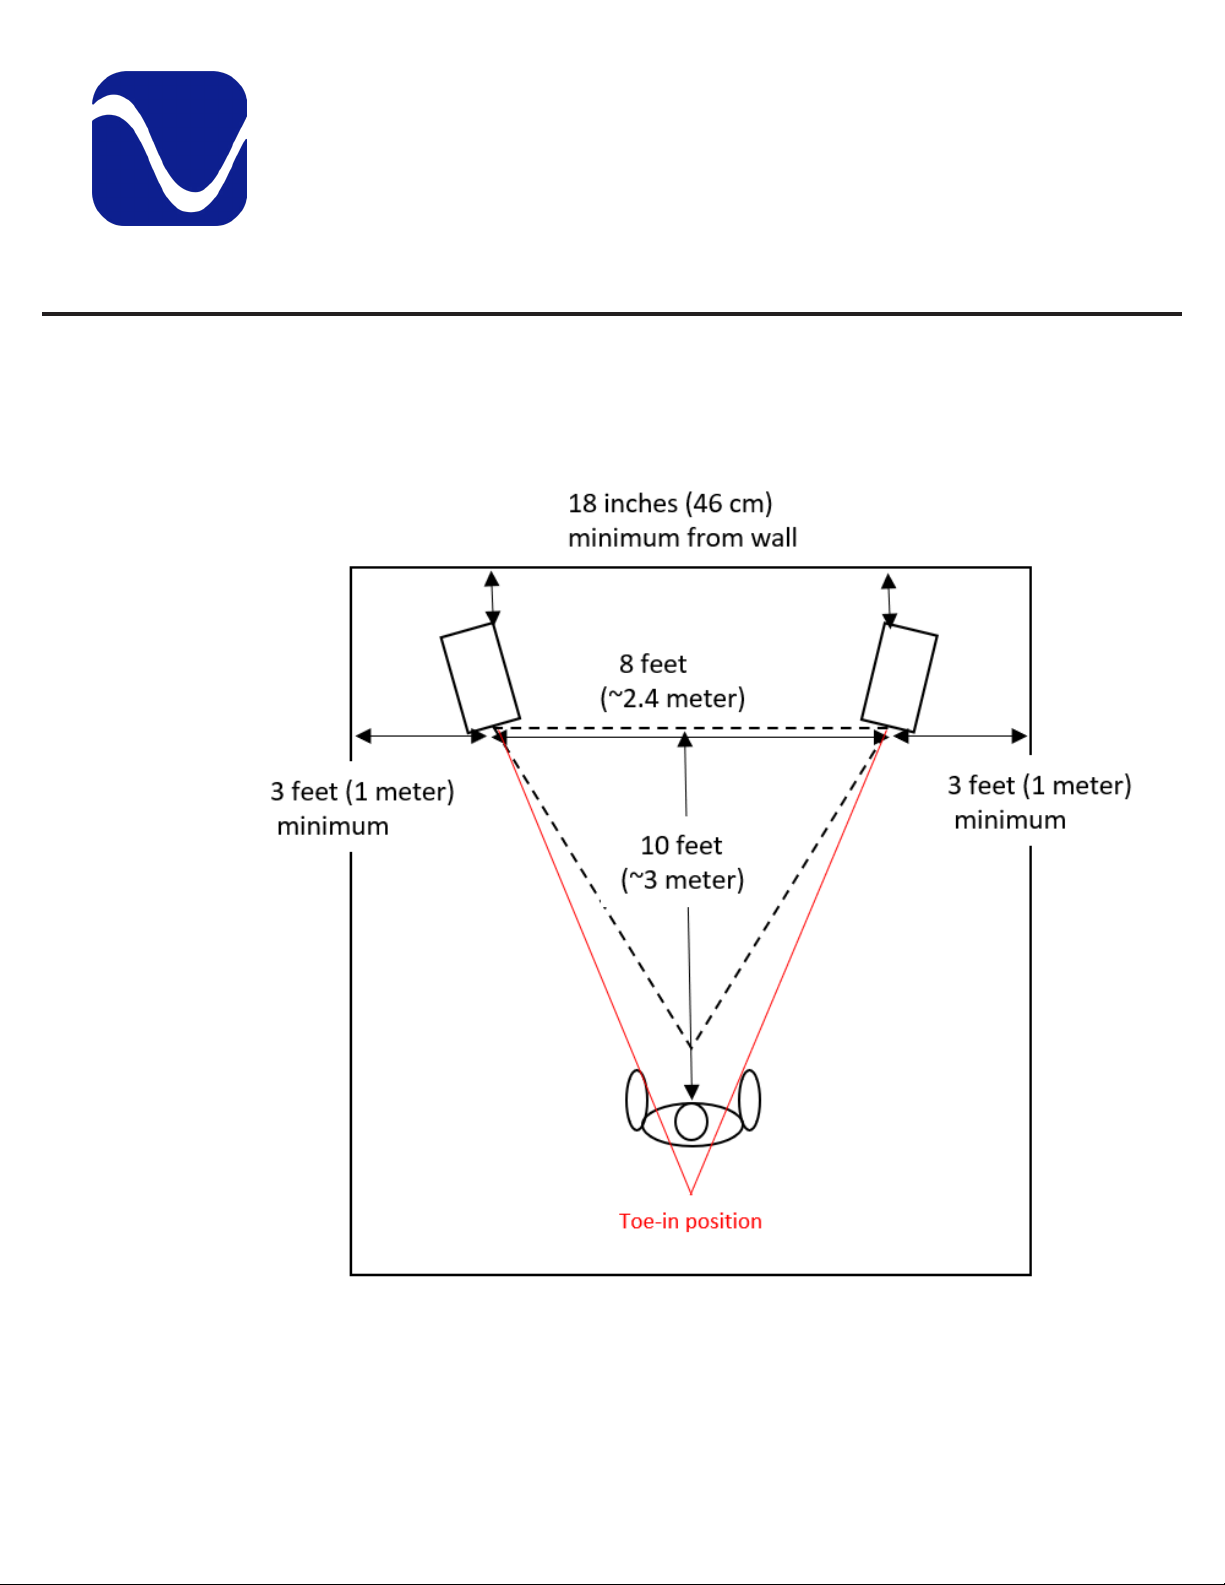
Distances to sidewalls/front wall:
One of the most important aspects of speaker placement is distance from boundaries. In
particular, best performance is typically found when the speaker is a minimum of 3 ft from
the side wall and placed symmetrically (or very close to that) from sidewall boundaries.
This distance minimizes early reections o the wall from interfering with the tonality of the
sound coming directly from the speaker.
Distance from the front wall (if in a dedicated space where the speaker can be placed out
into the room somewhat) should be chosen through listening but, in general, should start
around 18 inches from the front wall. From there, listen to acoustic/vocal music with good
bass and percussion and gradually inch the speakers away from the wall, assessing the
sound as you go. (You want to make sure that the lower range voice and bass instruments
are the most natural sounding and balanced with the midrange.) Keep inching both
speakers into the room until the current position sounds worse than the previous position.
Then move them back to the previous position where the tonal balance was the most
natural.
Speaker width and toe-in:
In general, your listening position should be about 20% outside of an equilateral triangle
formed by the width of the speakers (+/- 30 degrees from center). For instance, if the
listening position is 10 ft (~3 m) from the speakers, a starting width for the speakers
should be ~8 ft (~2.4 m).
Placing the speakers closer together gives a bit less “width” to the sonic image but can
give a stronger phantom center image and more warmth and bloom in the low midrange.
The speakers should be toed-in a little, aimed at a point in space about 3 ft behind the
listening position. (See diagram on the next page.)
Further pointing of the speakers towards the listening position will increase “focus” and the
level of the extreme treble at the expense of the spaciousness and “width” (perception of
sound coming from outside the width of the speakers).
10
Page 12
Placement Diagram
Operation Guide
Aspen® FR30
11
Page 13
Rear Panel Controls
Operation Guide
Aspen® FR30
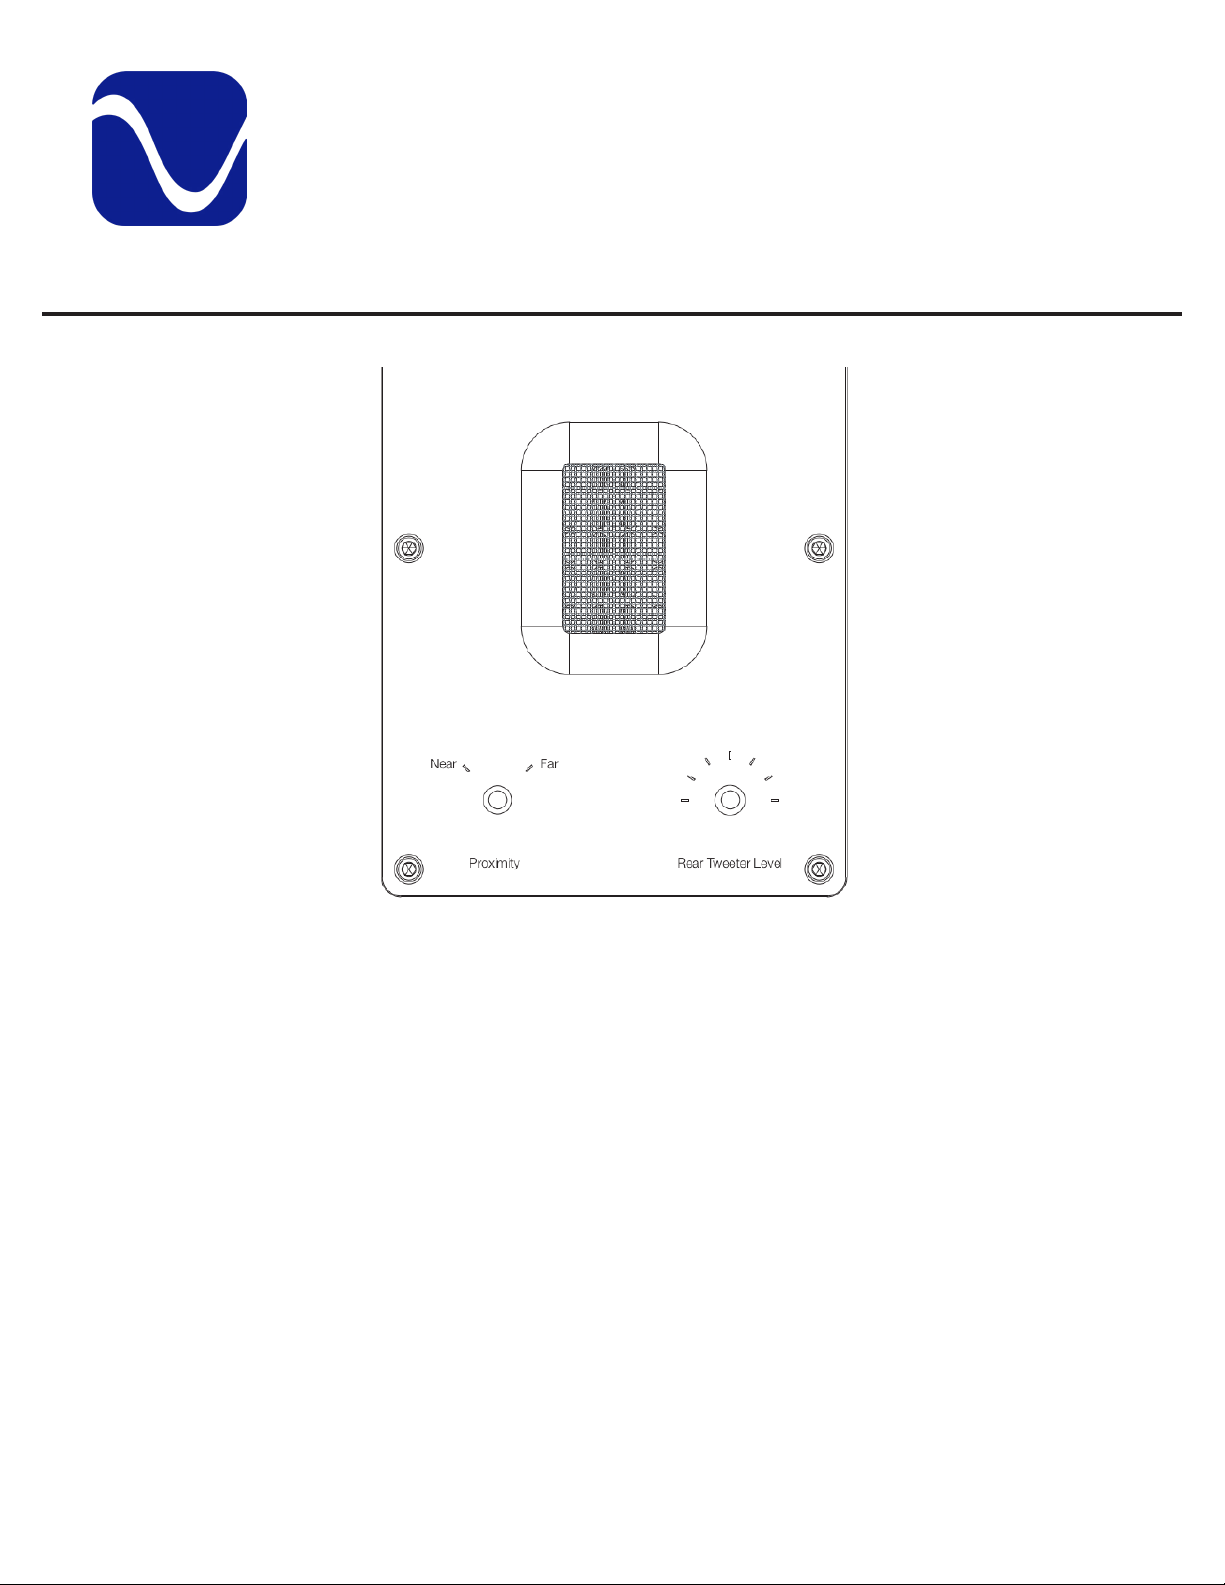
When looking at the rear of the speaker, there are two knobs. The knob on the left should
be set to “far” unless the speaker is <2ft from two nearby boundaries and the sound is
too “chesty”, “thick” or “full” in the low midrange. Then the left knob can be set to the
“near” position, which raises the level of the midrange and tweeter to compensate for this
boundary reinforcement from the nearby walls.
The knob on the right is rear tweeter level. Adjust this “to taste”. The extreme treble of
most rooms can lack some “air” and spaciousness, particularly in large rooms or those
with a lot of furnishings that are acoustically absorptive in nature (drapes/curtains, thick
carpets etc.). There is no “right” or “wrong” setting, just the one that you prefer with this
control. You have ve settings from “o” to dierent levels of “on,” which adds additional
treble output from the rear of the speaker to slightly change the tonal balance in-room,
without aecting the direct sound of the speaker.
12
Page 14

Specications
Aspen® FR30
Aspen FR30
Specications
Color Options Pearl White, Sable Black
Enclosure Type Two piece – Sealed upper cabinet mid-tweeter
module, Passive radiator lower cabinet (4 10” side-
ring passive radiators)
High Frequency Transducer 2 x 2.5” planar magnetic with Teonex diaphragm
Mid Frequency Transducer 10” planar magnetic with Teonex diaphragm
Low Frequency Transducer 4 x 8” woofers, cast frame, aluminum cone, 12lb
advanced magnet structure
Crossover Frequency 400 Hz, 2500 Hz – Linkwitz-Riley 4th order
acoustic
Sensitivity (2.83V @ 1M) 88 dB
Nominal Impedance 4 ohm (3.2 ohm minimum impedance).
Recommended Amplier Power 100-600W
13
Frequency Response 23Hz-20kHz (-6dB) half space
20 Hz (-6dB) in-room
Dimensions (HxWxD) 60.5” x 16” x 25.75” with base (10” width not
including base)
Net Weight 230 lbs (104.5 kg)
Page 15

Warranty Information
Aspen® FR30
Registering Your
Product
What This Warranty
Covers
Shipping You are responsible to pay for the safe and proper shipment of the warrantied product
By registering your product, you are validating the start date of your limited warranty. This
limited warranty is in eect for 3 years from the date the unit was rst purchased from
PS Audio or its dealers and agents. If you do not register your product within 30 days
of service, a copy of your purchase receipt from an authorized PS Audio dealer may be
used as proof of purchase to establish the warranty start date. If no proof of purchase
from an authorized PS audio dealer or registration is provided, the production date of the
product will be used to determine the warranty start date. You can register your product
online, by phone, by mail, or by email.
This warranty covers defects in material and workmanship for products purchased from
PS Audio or its authorized dealers and agents. In the event your product fails, your sole
remedy under this limited warranty shall be to return the product to PS Audio or an
authorized PS Audio repair center. At the option of PS Audio, the product will be repaired
without charge for parts or labor, replaced, or the purchase price refunded through the
original point of purchase.
to PS Audio or its authorized repair center. Under this limited warranty, PS Audio or its
authorized repair center will pay the cost of returning the repaired or replacement product
to you.
What This Warranty
Does Not Cover
This warranty does not cover damage due to:
• Accidents, carelessness, improper transportation, misuse, neglect, or abuse
• Failure to follow the operating instructions that are provided by PS Audio in the
Owner’s Reference Manual (available for download at www.psaudio.com)
• Use in any manner inconsistent with PS Audio’s operating instructions (available for
download at www.psaudio.com)
• Lack of routine maintenance
• Connection to an improper voltage supply
• Alterations or modications to the unit
• Improper or unauthorized repair, including repairs not authorized by PS Audio or a PS
Audio authorized repair center
• Fire, lightning, ood, “Acts of God,” or other contingencies beyond the control of PS
Audio
• Products purchased through an unauthorized source (if you have questions as to
whether or not a dealer is authorized, please contact customer support at www.
psaudio.com)
• Products with a factory-applied serial number that has in any way been altered,
defaced, or removed
14
Page 16

Warranty Information
Aspen® FR30
Limitations Under
This Warranty
Warranty Transfer This warranty is for the benet of the original purchaser of the product. The warranty may
In no event will PS Audio’s liability to you exceed the origianl purchase price of your unit.
This warranty does not cover the cost of custom installation, customer instruction, setup
adjustments, or signal reception problems. Consequential and incidental damages are
not covered under this warranty. However, some states do not allow the exclusion or
limitation of incidental or consequential damages, so this limitation or exclusion may not
apply to you. In the event that your warrantied product cannot be repaired, PS Audio will
either replace or refund the cost of the unit. We reserve the right to replace any out-ofstock, discontinued, or limited edition products with a comparable product. Discontinued
products may not be available for warranty replacement.
be trasferred to a subsequent purchaser during the 3 year warranty period. To do this,
you must contact PS Audio directly to set up a transfer of warranty registration.
15
Page 17

Service Information
Aspen® FR30
Warranty Service
Within North
America
Please contact PS Audio customer support for service assistance, help with locating
an authorized PS Audio repair center, help with the operation of a product, or for more
information.
Obtaining An RMA#
In order to receive warranty service, you must rst obtain a Return Merchandise
Authorization Number (RMA#) prior to returning any item. Please contact PS Audio or
an authorized PS Audio repair center to receive an RMA#. The RMA# must be on all
returned items. If it is not clearly marked, PS Audio will return the package back to you,
freight collect.
Packaging and Shipping
Original packaging should be used for the safe transit of your PS Audio unit to the repair
center. If you do not have the original packaging, PS Audio can sell and ship replacement
packaging to you. You are responsible for the cost of shipping the product to a PS Audio
authorized repair center. You should insure the product for its full retail cost, in the event
it gets lost or damaged in transit. PS Audio is not responsible for damage incurred during
the transit of products sent to us. Shipping your product in non-PS Audio packaging may
void this warranty. PS Audio reserves the right to charge you for new factory packaging to
return your product after a repair.
International
Warranty Service
Changes To Our
Products
State Law
This warranty gives you specic legal rights. You may also have other rights, which vary
from state to state.
PS Audio has authorized distribution in many countries of the world. In each country,
the authorized importing distributor has accepted the responsibility for warranty of the
products sold by that distributor. Warranty service should be obtained where the product
was purchased.
PS Audio reserves the right to modify the design of any product without obligation
to purchasers of previously manufactured products, and to change the prices or
specications of any products without notice or obligation to any person.
16
Page 18

Your Serial
Number
Your Purchase
Information
Date of Purchase
Your Product
Your Product
Aspen® FR30
17
Page 19

Notes
®®
Aspen® FR30
Page 20

Thanks for being a part
of the PS Audio Family
At PS Audio, we’re family.
Not just a family that runs in bloodlines, but in frequencies.
Because while we may not all share the same genes here, we are all related by
a passion, nay, obsession with listening to the music we love at the highest,
most breathtaking quality possible.
And in our minds, that makes us kin.
In fact, we believe that every nutty, hertz counting audiophile out there is part
of our tribe.
That’s how we’ve built our company over the last 50 years - with the kind of
care and respect that you give to your family.
PS Audio® Inc. 800-PSAUDIO 4865 Sterling Drive Boulder, Colorado 80301
 Loading...