

Page 1
RT9200-01 Rev B Page 1
The Prytime Medical™ STAAR (Simulation Trainer for Arterial Access
and REBOA) Assemble, Disassemble & Troubleshooting Instructions
A. Introduction
Thank you for using the Prytime Medical™ STAAR (Simulation Trainer for Arterial Access and REBOA) . For additional
information and product updates see www.prytimemedical.com/product/staar.
B. Assembly of the STAAR
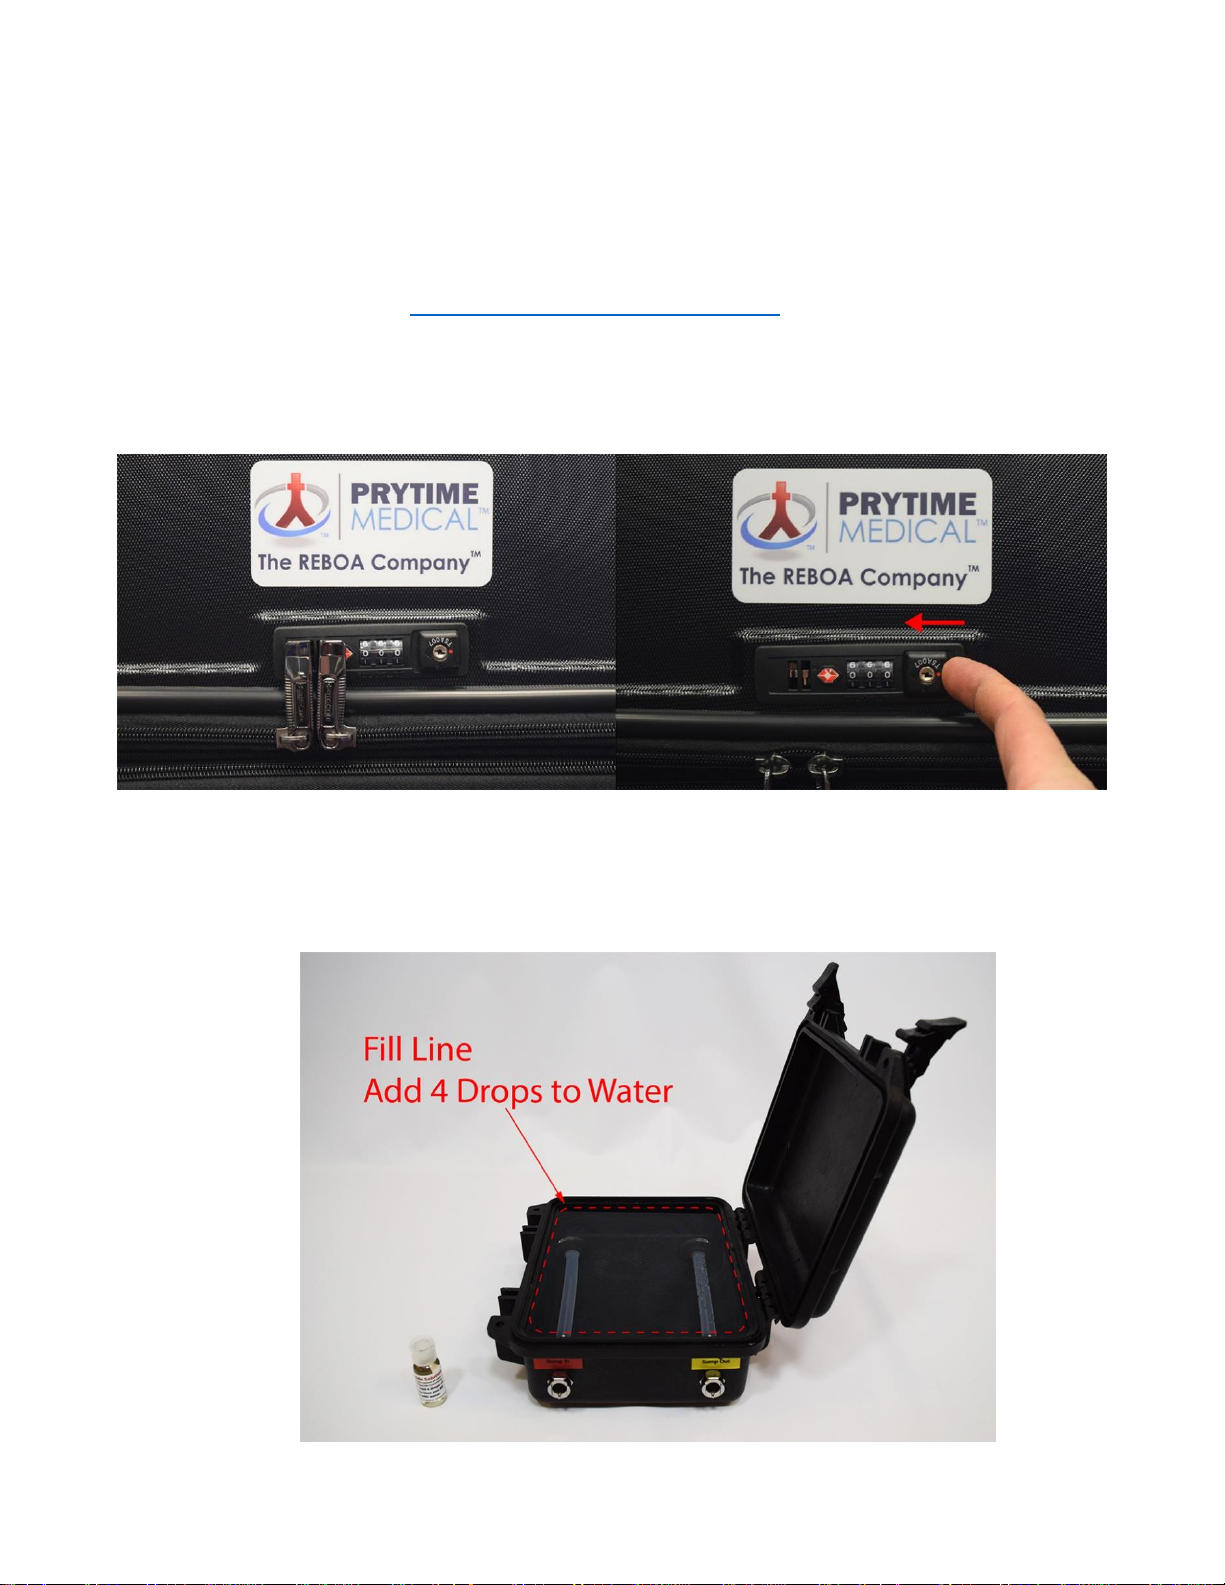
Open the case containing the STAAR components by turning the combination to ‘000’ and then pressing the zipper-
release button in towards the combination dials.
1. Unzip the case and remove the body model, hoses, tablet, sump reservoir case, pump case, pressure infusion
bag, pressure transducer and all cables.
2. Fill the sump with water. For each fill, add 4 drops of the included algaecide solution to the water. Note: The
algaecide is effective for approximately one week. Weekly changing of water with addition of solution is
recommended.
Page 2
RT9200-01 Rev B Page 2
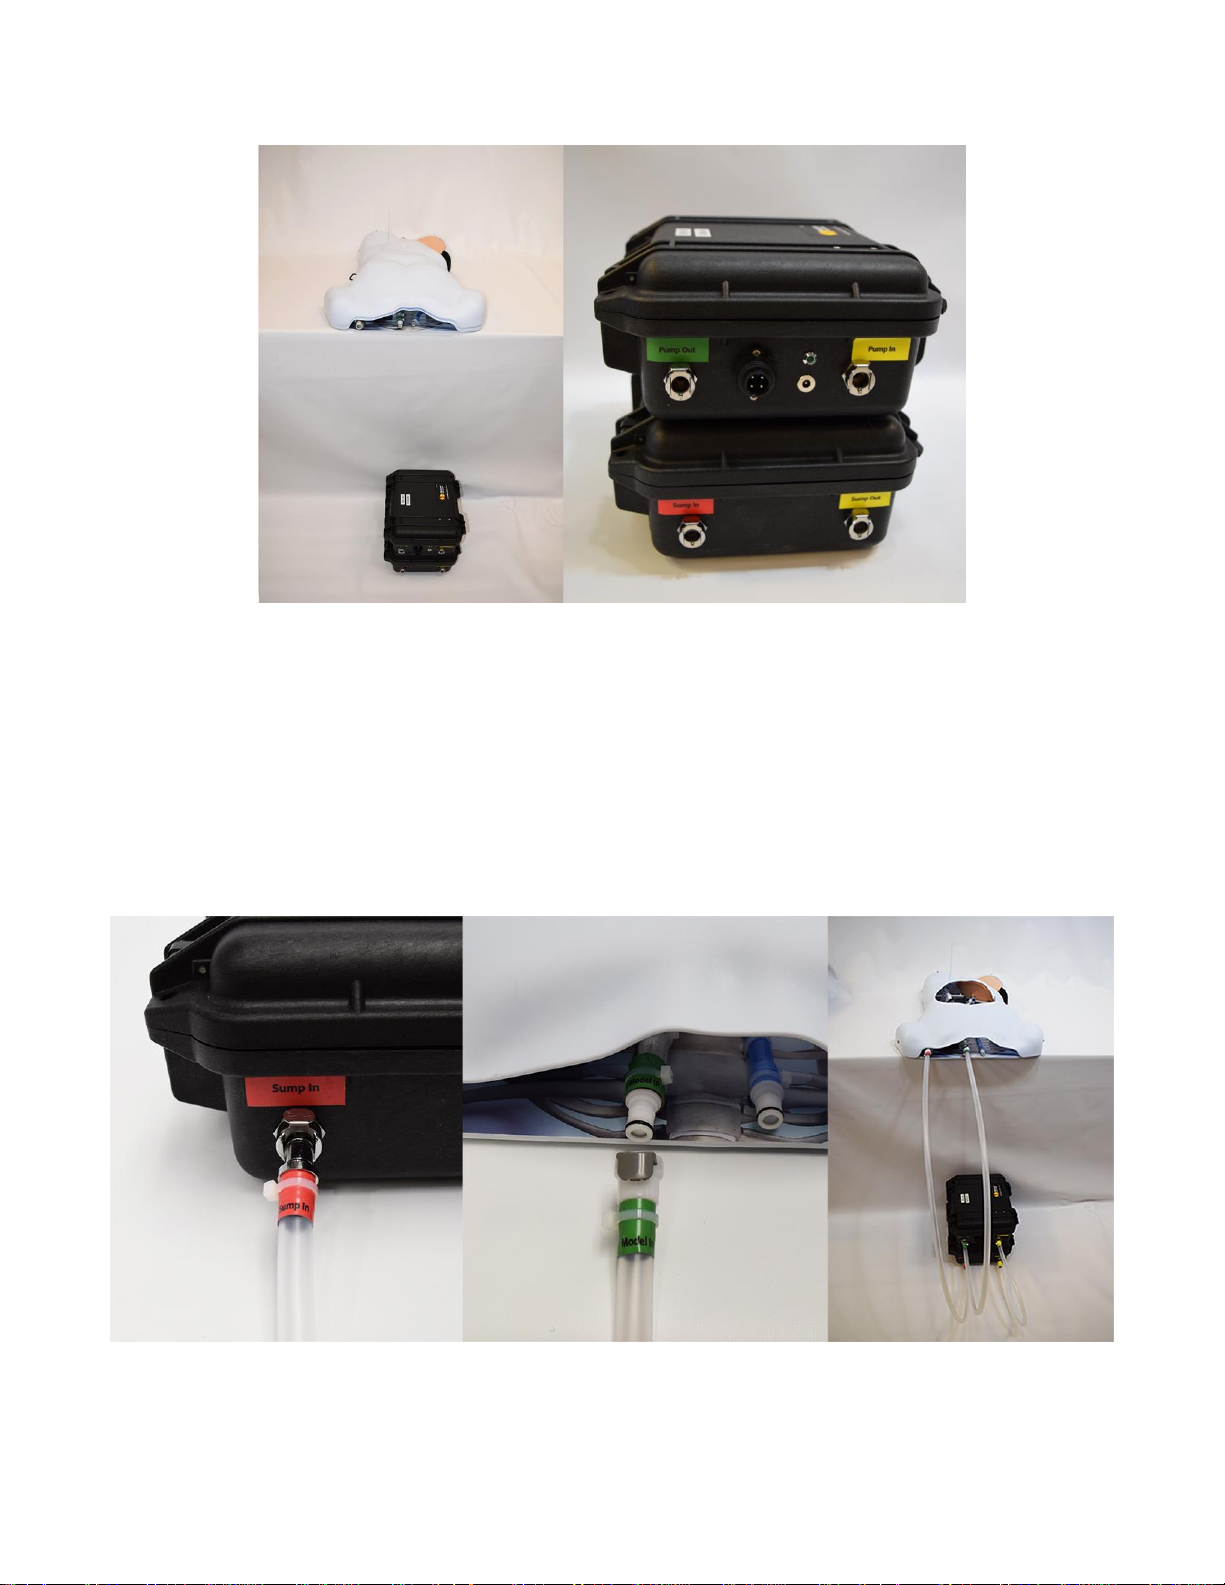
3. Place the sump on the floor and stack the pump on top of the sump. Place the body model on a flat tabletop or
similar surface nearby the pump and sump.
Note: The STAAR has a simulated circulatory system with pressure presets that are designed with the intention that
the sump and pump are to be placed on the floor and the simulator body is to be placed at table height. If the pump
and sump are placed even with the body, the preset pressures will not be accurate.
4. Connect the tubing to the pump, sump and body. There are three tubes with red, green and yellow labels.
Connect the corresponding colors of plugs to sockets, ensuring that metal plugs fit into metal sockets and plastic
plugs fit into plastic sockets.
Page 3
RT9200-01 Rev B Page 3
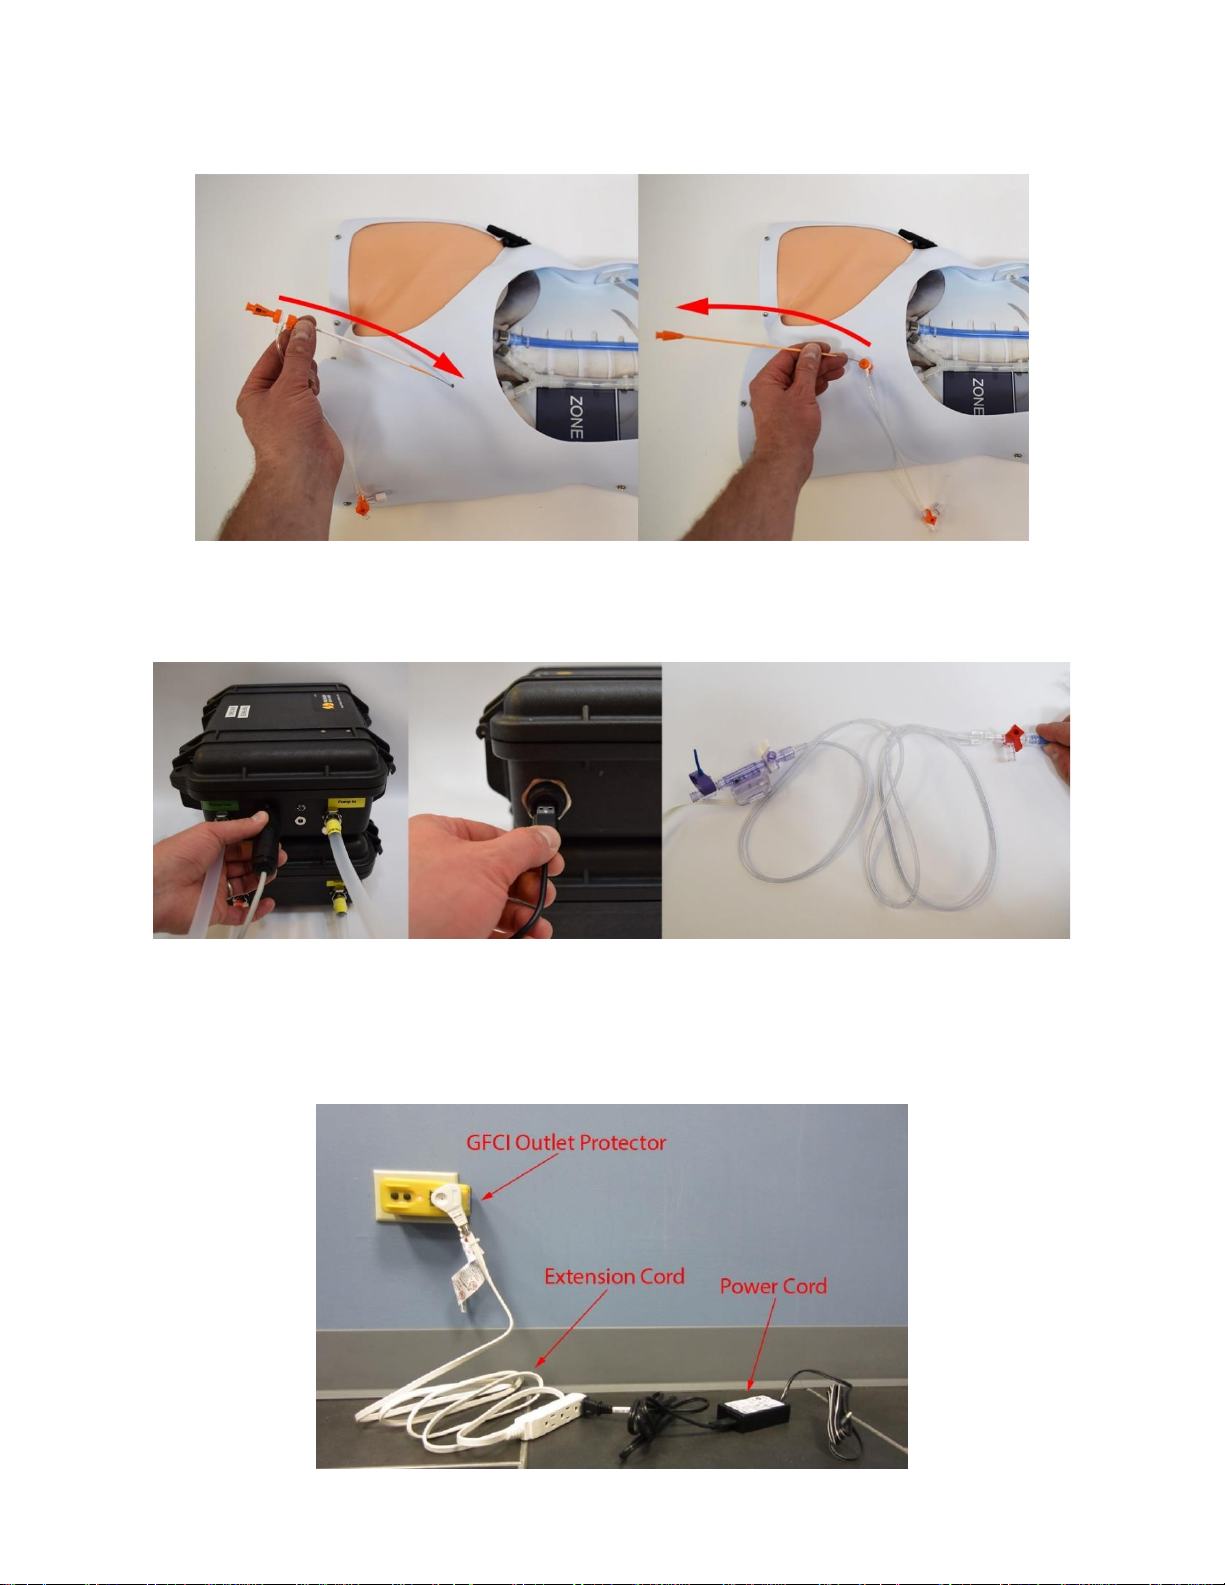
5. Prepare an introducer sheath by fully inserting the dilator into sheath until a click is heard. Insert the introducer
sheath into the left side of the body model by sliding the dilator/introducer sheath combo over the pre-installed
guidewire until its hub is flush with the body model. Remove the guidewire and dilator.
6. Attach the blood pressure monitoring cable and USB cable to the pump. Attach the blood pressure monitoring
transducer’s extension line to the ER-REBOA™ Catheter’s ART line stopcock.
7. Plug the GFCI outlet protector into an outlet. If needed, plug an extension cord into the GFCI outlet. Plug the
power cord into either the extension cord or directly into the GFCI outlet protector. If outside of the US, plug
power cord into the included power adapter.
Page 4
RT9200-01 Rev B Page 4
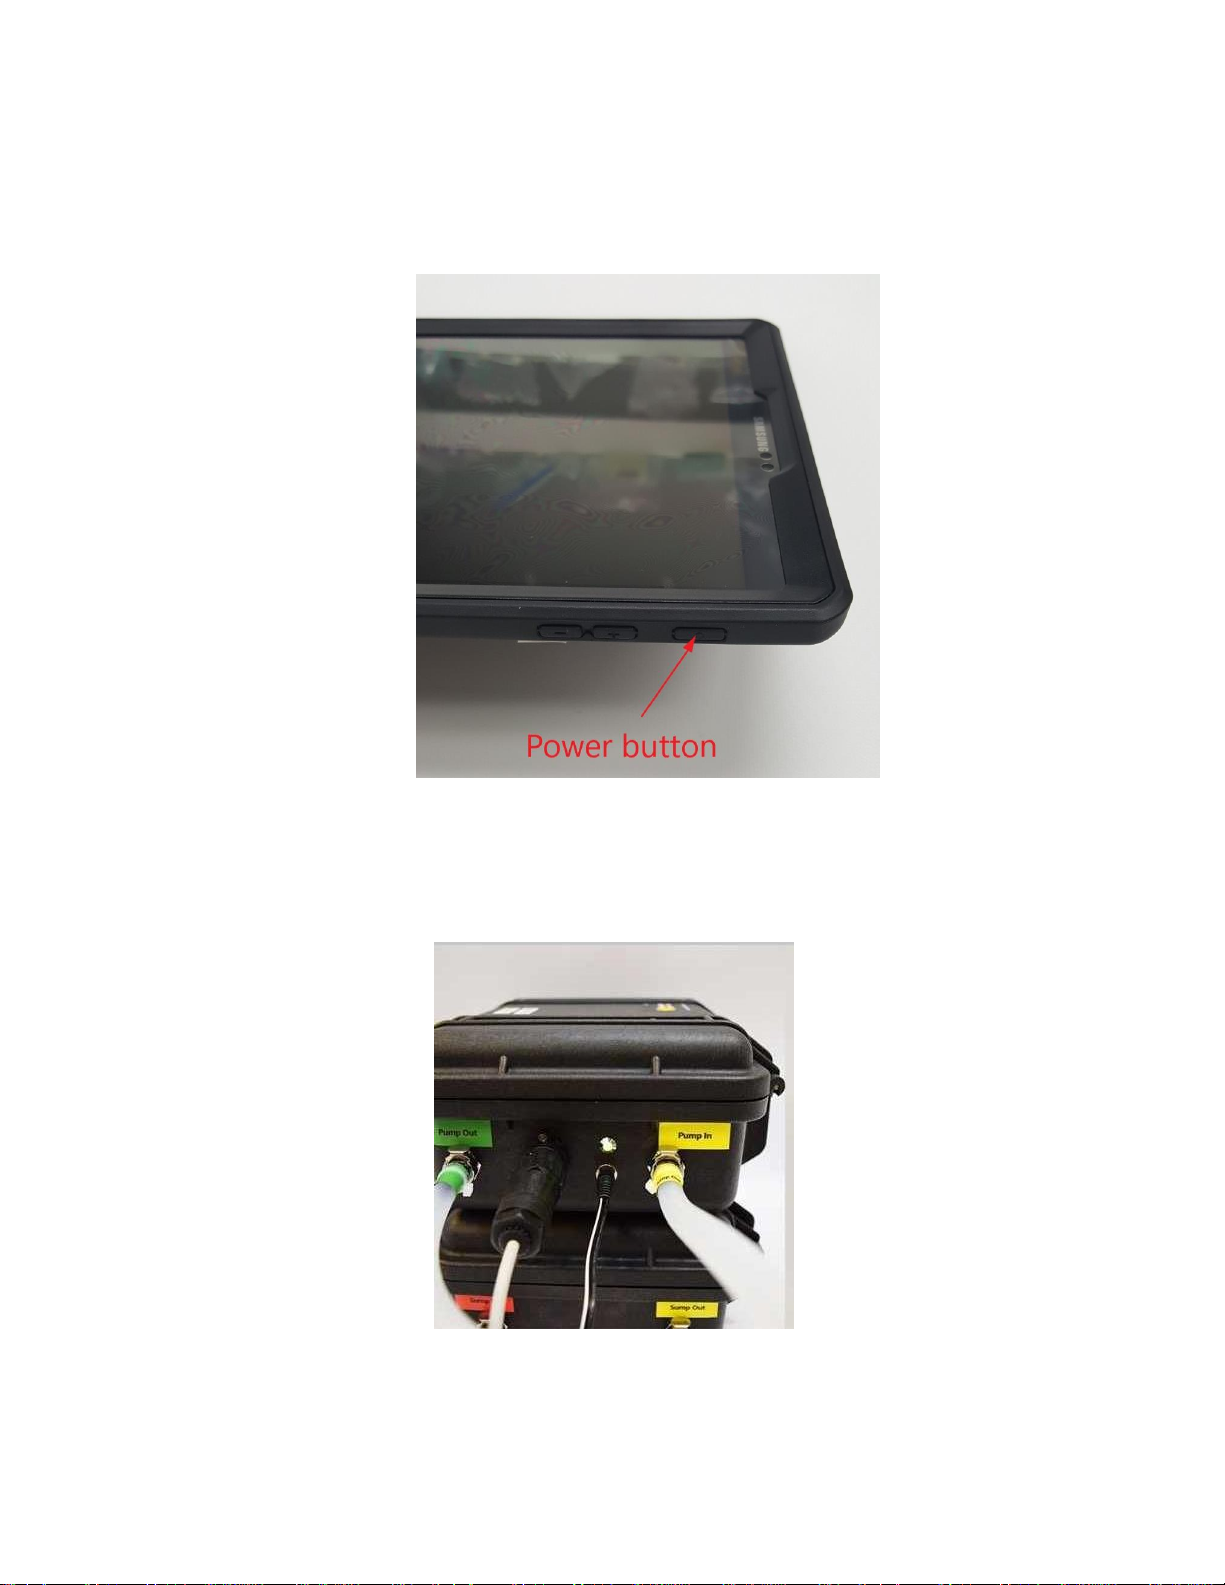
8. Power on the tablet using the power button at the top right corner of the tablet and allow adequate time for the
tablet to power on until the home screen is displayed.
Note: You do not need to open the Prytime application. It will automatically start when the pump is powered
on. If the application is open, turn it off before proceeding to the next step by pressing the “Close App” button
on the front of the tablet.
9. Plug the tablet into the USB cable attached to the pump.
10. Plug the power supply into the pump. The green light on the outside of the pump will light up and the
application on the tablet will automatically launch and the pressure reading will scroll across the screen.
Page 5
RT9200-01 Rev B Page 5
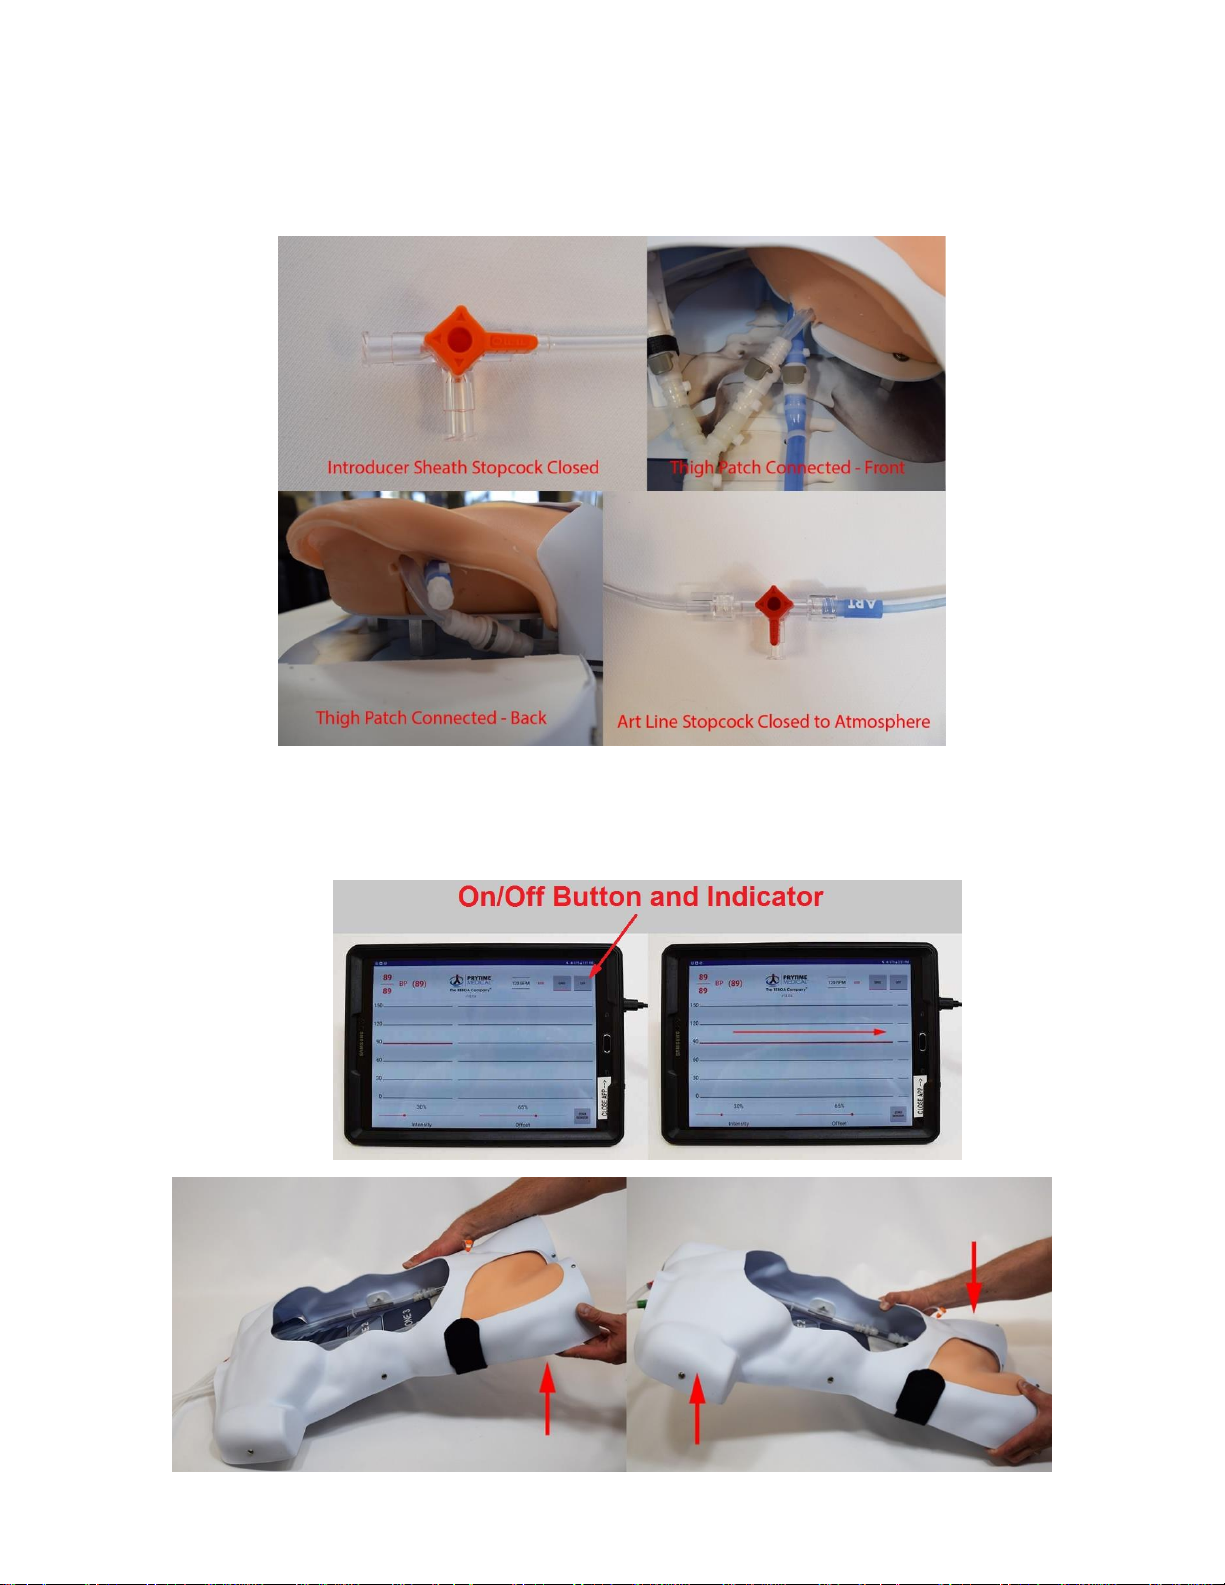
11. Before activating the pump circulatory flow, ensure that any potential leak points are closed off by checking the
following:
• Ensure the introducer sheath’s side arm’s stopcock is closed.
• Ensure that the thigh patch is connected to the tubing with the body model in both the front and back.
• Ensure The ER-REBOA™ Catheter’s ART line stopcock is closed to the atmosphere.
12. Once all potential leak points have been checked, activate the pump circulatory flow by pressing the On/Off
Button and Indicator on the top right corner of the application window. Purge air from the tubing by lifting the
model back and forth. This will give the air within the tubing a path to escape.
Page 6
RT9200-01 Rev B Page 6
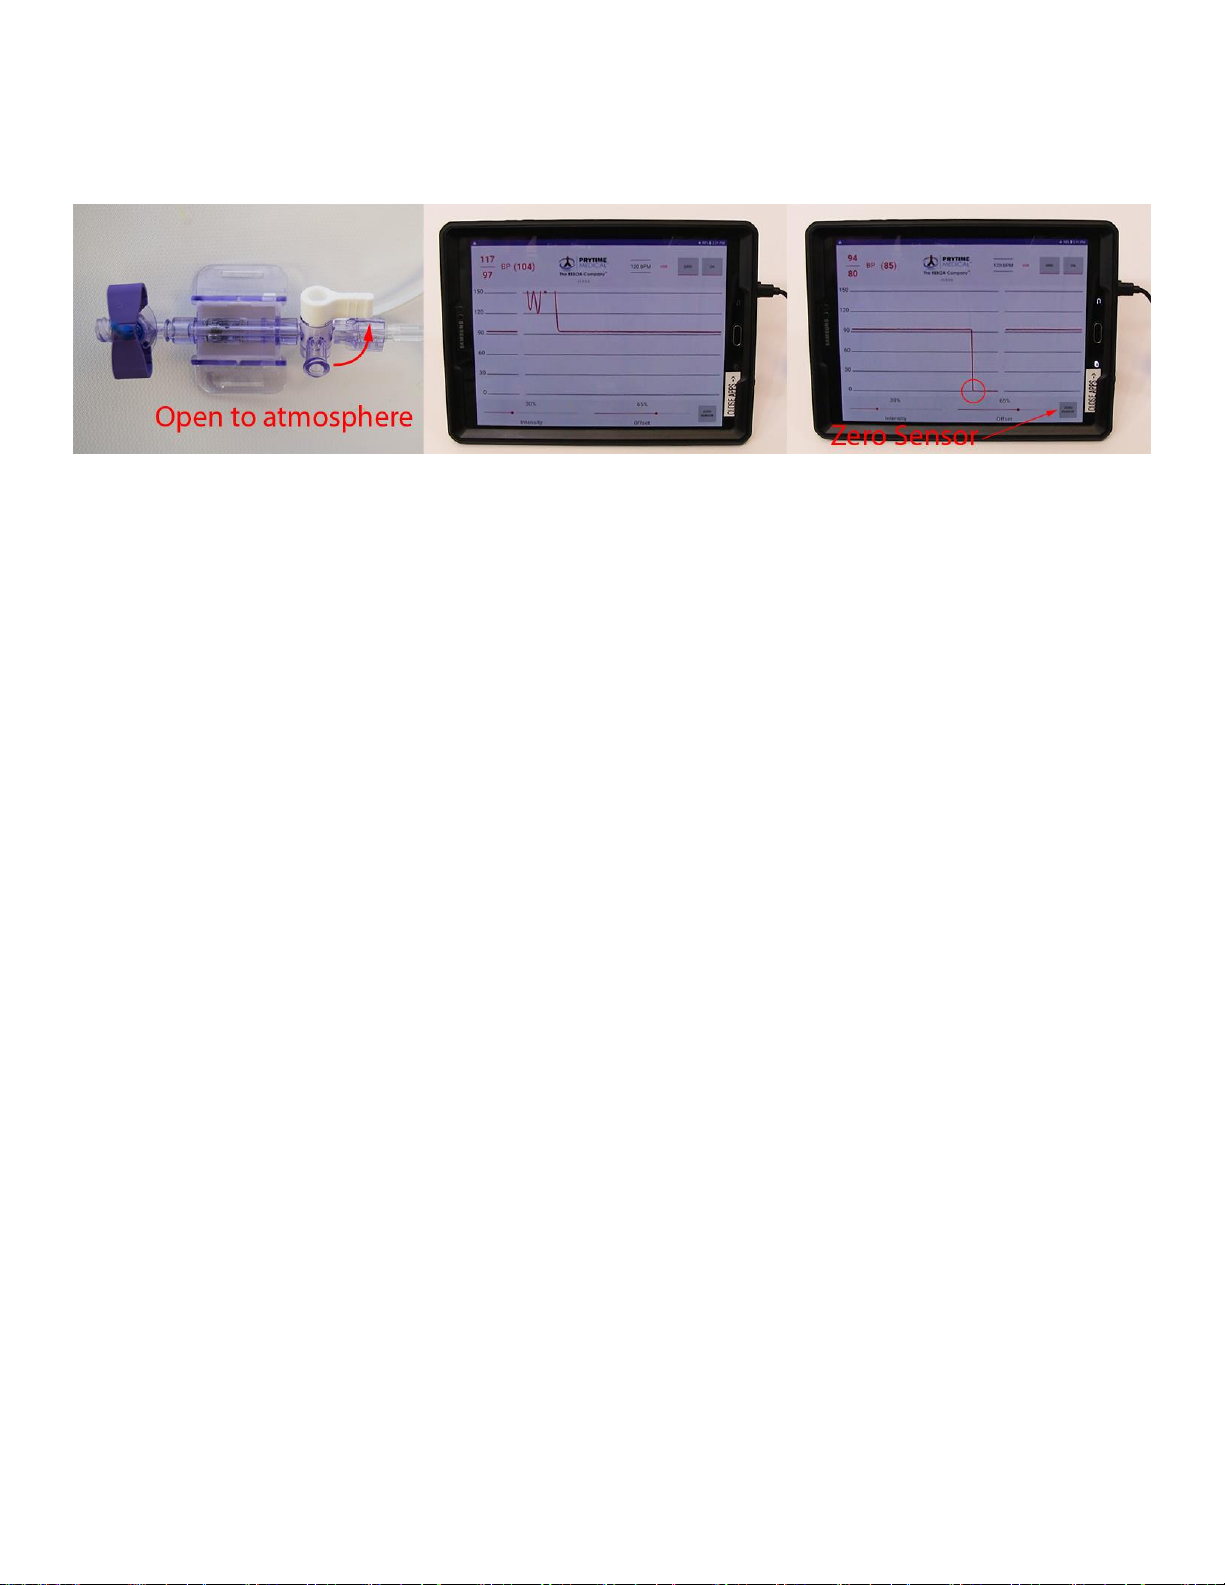
13. Open the stopcock on the transducer so the sensor is open to atmosphere. The pressure reading will go flat on
the screen. Flush the ART line tubing completely with saline or water. Touch the “ZERO SENSOR” button on the
screen and the flat pressure reading will reposition to the zero line on the screen. Turn the transducer stopcock
so that it is closed to atmosphere and the reading will now be calibrated.
14. When the catheter is inserted, balloon not inflated, the systolic pressure of the model should be approximately
60-80 mmHg with the ideal pressure being 80mmHg. The two sliding bars on the display screen labeled
“Intensity” and “Offset” can be used to adjust this pressure by varying the operation of the pump. “Intensity”
controls the degree of pulsatory pattern flow. “Offset” controls a smooth flow from the pump that is combined
with the pulsatory pattern. Together, the “intensity” and “Offset” allow a great deal of flexibility in simulation of
systolic and diastolic blood pressure combinations.
Your STAAR is now assembled and ready for use with the demo ER-REBOA™ Catheter.
Consult the Quick Reference Guide for steps for inserting the demo ER-REBOA™ Catheter.
Page 7
RT9200-01 Rev B Page 7
For Arterial Access Training:
1. To perform access on the thigh patch (right side of model), set up the vena cava. Obtain the pressure infusion
bag with bladder and extension line. Fill the bladder approximately half full with water. You may want to add a
small amount of food coloring (included) to distinguish vein and artery sticks.
Note: Colored water may stain clothing.
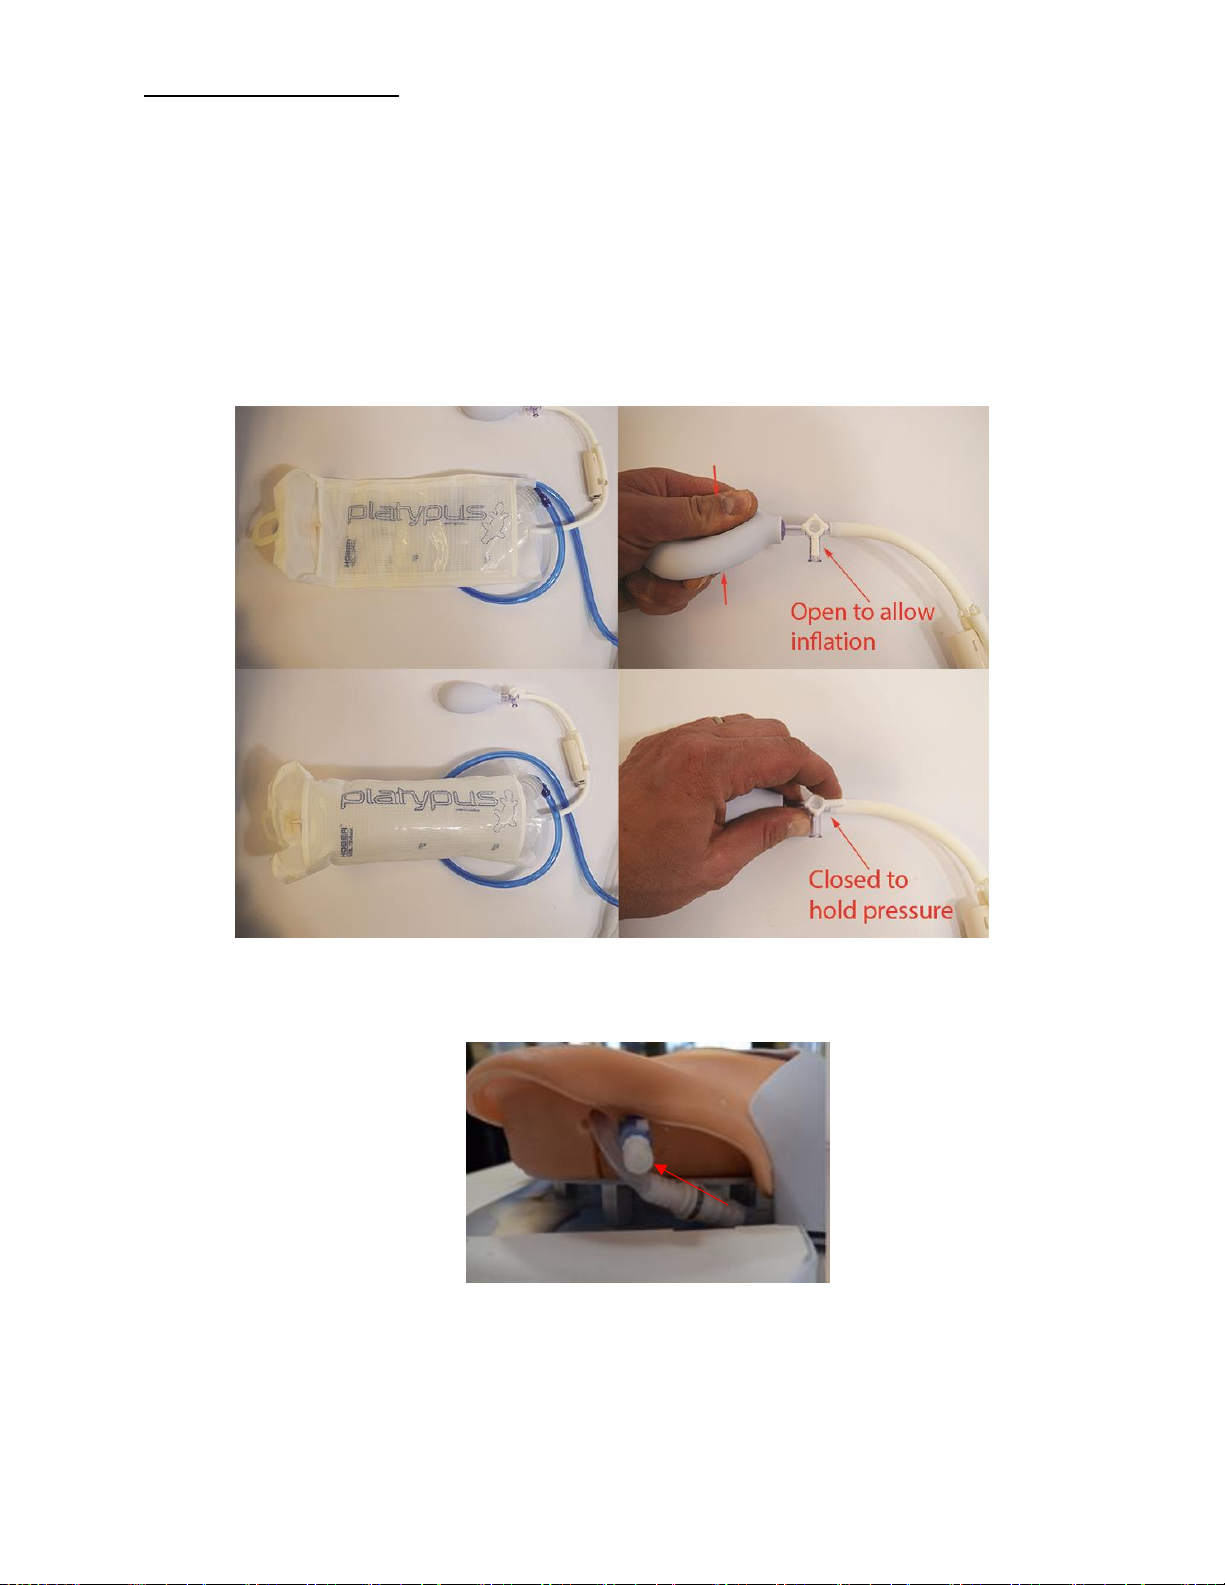
2. Attach the extension line to the vena cava located in the body model. Ensure the stopcock on the pressure
infusion bag is positioned to allow air to be pumped into the bag. Squeeze the inflation bulb to inflate the bag
until adequate pressure is obtained. Close the stopcock to hold pressure in the bag.
Note: The pressure infusion bag represents venous pressure so an approximate pressure of 10-15 mmHg should
be estimated. Do not over inflate the infusion bag.
3. You will need to purge the vena cava of air. Ensure the clip on the blue extension line is disengaged. Lift the leg
hinge that covers the thigh patch so it exposes the back of the thigh patch. Carefully unscrew the cap on the
blue tubing to purge the air, then replace the cap once air is released.
Note: Because the pressure infusion bag is now pressurized, water will be forced out of the end of the cap.
Purge air until you are confident it is cleared from the tube. You may lift the model to facilitate air purging. If
ultrasound will be used for access training, to improve visibility, apply ultrasound jelly in and around the tubing
in the thigh patch.
Your STAAR is set up for access training.
Cap
Page 8

RT9200-01 Rev B Page 8
C. Disassembly of the STAAR
1. To disassemble the STAAR, begin by turning off the pump.
2. To drain water out of the model, open a pathway in the tubing by either:
a. Opening the introducer sheath’s sidearm stopcock.
b. Disconnecting the blood pressure monitoring extension line while the ER-REBOA catheter remains in the
model.
3. If you are using the vena cava, open the stopcock on the pressure infusion bag and allow adequate time for the
bag to deflate. Disconnect the blue vena cava tube from the extension line.
Note: The water in the vena cava will not have a reservoir to easily drain into, be prepared for a small amount
of water come out of the tube.
4. Tilt the model to facilitate drainage. Hold until as much of the water has left the model as possible. When the
model is drained, unplug the green “MODEL IN” and red “MODEL OUT” tubes and connect them to each other.
5. Turn on the pump circulatory flow and while the pump is running, disconnect the “SUMP OUT” yellow tube from
the sump. Note: This will allow the pump to run dry while pumping water into the sump. Allow the pump to
run dry for approximately 10-30 seconds. Turn off the pump and disconnect the green “MODEL OUT” tubing
from the pump. Open the sump and drain the remaining water in the tubing into the sump.
6. Empty the sump and return the algaecide solution bottle into the sump case.
7. Disconnect the power supply, pressure monitoring cable and USB cable from the pump.
8. Unplug the GFCI outlet protector, the extension cord and power supply.
9. Replace the tubing into the body model’s cavity.
10. Disconnect the USB cable from the tablet and power down the tablet.
11. Replace all components, support equipment, accessories and/or kits into the transport case and to their
respective places.
12. Ensure the case can close and be zipped up for storage.
Note: There is a second zipper that allows the case to expand if needed. If desired, press the zippers into the
securing mechanism on the front of the case.
Page 9

RT9200-01 Rev B Page 9
D. Troubleshooting
1. If the pump case light will not turn on. The green light on the pump case indicates power is being supplied. If the
green light is not on, check the following to ensure power is getting to the pump:
• The power supply is securely connected. There is a plug that attaches to the back of the power supply’s block.
Ensure that plug is firmly in place. Unplug and re-plug as needed.
• Ensure the plug to the GFCI outlet protector is securely attached the wall outlet and the extension cord is
securely attached to the GFCI outlet protector. Unplug and re-plug as needed.
• Ensure that the GFCI outlet protector has not been “tripped”. The GFCI outlet protector is designed to cut
power if there is potential power overload. Reset the GFCI outlet by pressing the RESET button.
• If you have already checked power is getting to the pump and the green light has still not come on, please
contact STAAR support for assistance.
2. If the pump won’t turn on. If the green light of the pump case is on but the pump circulatory flow will not turn
on, please check the following:
• Ensure the software is responding. If the pressure reading is not scrolling across the screen, the software is not
responding. Close the software by pressing the application button (there is a label attached to the front of the
tablet indicating “CLOSE APP →”) and close out the Prytime application.
Note: Every time you power on the pump, the application will automatically start. If multiple instances of the
Prytime application are running at the same time, the applications will stop responding.
• Once you have verified the Prytime application has been closed out, unplug power to the pump for
approximately 3-5 seconds and then plug the pump back in. The application will start up immediately and the
pressure readings will scroll across the screen. Press the On/Off Button and Indicator to start the pump.
• Ensure the USB cable is securely attached to the pump and the tablet. Unplug and re-plug as needed.
• You can test and use the pump without the tablet by unlatching and opening the pump case and pressing the
small black “ON” button on the circuit board located on the inside of the lid. If this turns on the pump but the
Prytime application does not start, please contact STAAR support for assistance.
3. The pressure readings are inaccurate. If the pressure reading is too high or low, ensure the sensor has been
zeroed out properly. Perform the steps outlined in the setup instruction to zero out the sensor.
Note: Every time the application is closed out and launched again, the sensor must be re-zeroed. Perform the
zeroing process as often as is needed.
• If the pressure reading jumps sporadically, or has an exceptionally high or low reading, this may be due to a bad
connection between the cable and the pump or between the transducer and the cable. Unplug and re-plug the
cable to the pump and the transducer to the cable as needed.
• Ensure the sliding bars on the software are in the desired location. The default settings are Intensity at 30% and
Offset at 65%. If the settings are greater/less than these defaults, they will change the pressure reading and
may simply need to be returned to the defaults to correct the problem.
Note: Every time the application is closed out and launched again, Intensity and Offset will return to default
settings.
• If the pump and sump are at the same level as the model, the pressures will be off and can be adjusted using the
Intensity and Offset settings. The model is designed to be approximately at table level while the pump and
sump are designed to rest on the floor.
• Verify there are no obvious signs of damage to the catheter or the arterial line port at the tip of the catheter. If
there are signs of damage, replace catheter.
• Replace pressure monitoring extension tubing as needed, available in Maintenance/Repair Kit (SIM422).
• If pressure readings remain inaccurate after attempting to resolve using the instructions already listed, please
contact STAAR support for assistance.
Page 10

RT9200-01 Rev B Page 10
4. Pressure reading is zero. Ensure pump is on and circulatory flow is occurring. Flush arterial line to ensure there is
a continuous fluid column without air bubbles from the tip of the catheter, through all connecting tubing, to the
pressure transducer.
5. The tubing is beginning to leak water. If the leak occurs at a connection point between tubing and a fitting, it may
mean that the securement may have come loose. Use a zip-tie in the Repair Kit to tighten down the connection
point.
• If the tubing has a tear or hole in it, it can be repaired by turning off and draining the model, then applying a
small amount of Sil-Poxy from the repair kit. Allow at least 30 mins for the Sil-Poxy to cure (suggested cure time
is 4-6 hours).
6. A plug is leaking water. If the plug leaks water, stop the pump and disengage the connection. Inspect the o-ring
on the plug for damage. Replace damaged o-rings with new o-rings found in the Repair Kit.
7. Air is being pumped into the model. This may also be attributed to a faulty o-ring. Stop the pump and disconnect
the tubing. Inspect the o-ring and replace as needed. Check fill level in the sump, add additional water as
necessary to cover the water inlets.
8. Tablet is low on charge/discharged. Tablet does not charge while the system is operating, use the included
charging cable to connect the micro USB cord to a power outlet. A fully charged tablet will run the system for
approximately 10 hours.
9. Ultrasound with access training. When using the thigh patch under ultrasound, anticipate needing to manipulate
depth and gain to satisfactory level of visualization.
If additional help or technical support is needed, please contact a STARR technician at 303-456-7620 or
[email protected].
 Loading...