

Proximus Forum IPhone 5010, Forum IPhone 5020, 5025, Forum IPhone 5040, Forum IPhone 5030 User Manual

Forum™ 500 Forum™ 5000
Forum IPhone 5010/5020/5025/5030/5040
User Guide

Welcome to Proximus
Thank you very much for choosing this Proximus product. Our product meets
the strictest requirements with regard to design and quality.
Forum IPhone 5010/5020/5025/5030/5040
This User Guide will show you how to use your Forum IPhone 5010,
IPhone 5020, Forum IPhone 5025, Forum IPhone 5030 or
Forum
IPhone 5040 and answer all your major questions. If you need further
Forum
support or information, please consult your system administrator or your
Proximus dealer.
Internet:
www.proximus.be/pabx
Forum™ 5000 and Forum™ 500
This user guide applies to the Forum™ 5000 and Forum™ 500 product
families.
● The Forum™ 500 product family comprises the Forum™ 523/524,
Forum™
● The Forum™ 5000 product family comprises the Forum™ 5500,
Forum™
systems.
If individual features differ on the systems, a reference is made in this user
guide.
525/526 and Forum™ 550/560 communications systems.
5004, Forum™ 5008 and Forum™ 5012 communications
We hope you enjoy using your Forum IPhone.

Contents
Forum IPhone 50xx SIP System Telephones . . . . . . . . . . . . 9
About this Manual . . . . . . . . . . . . . . . . . . . . . . . . . . . . . . . . . . . . . . . . . . . 12
Using Your Telephone. . . . . . . . . . . . . . . . . . . . . . . . . . . . . . . . . . . . . . . . . 13
Safety Precautions. . . . . . . . . . . . . . . . . . . . . . . . . . . . . . . . . . . . . . . . . . . . . . . . 13
Installation Site. . . . . . . . . . . . . . . . . . . . . . . . . . . . . . . . . . . . . . . . . . . . . . . . . . . 14
Cleaning . . . . . . . . . . . . . . . . . . . . . . . . . . . . . . . . . . . . . . . . . . . . . . . . . . . . . . . . . 14
Installing the Telephone . . . . . . . . . . . . . . . . . . . . . . . . . . . . . 15
Scope of Delivery . . . . . . . . . . . . . . . . . . . . . . . . . . . . . . . . . . . . . . . . . . . . 15
Connecting a Handset or Headset. . . . . . . . . . . . . . . . . . . . . . . . . . . . . . 16
Handset . . . . . . . . . . . . . . . . . . . . . . . . . . . . . . . . . . . . . . . . . . . . . . . . . . . . . . . . . . 16
Headset (optional) . . . . . . . . . . . . . . . . . . . . . . . . . . . . . . . . . . . . . . . . . . . . . . . . .17
Desk Installation. . . . . . . . . . . . . . . . . . . . . . . . . . . . . . . . . . . . . . . . . . . . . 18
Inserting the Key Card for Labelling the Keys . . . . . . . . . . . . . . . . . . 20
Forum IPhone 5010 . . . . . . . . . . . . . . . . . . . . . . . . . . . . . . . . . . . . . . . . . . . . . . 20
Forum IPhone 5020 . . . . . . . . . . . . . . . . . . . . . . . . . . . . . . . . . . . . . . . . . . . . . . 21
Connecting to the Network . . . . . . . . . . . . . . . . . . . . . . . . . . . . . . . . . . . 22
Direct or Shared Network Connection. . . . . . . . . . . . . . . . . . . . . . . . . . . . . . 22
Direct Network Connection. . . . . . . . . . . . . . . . . . . . . . . . . . . . . . . . . . . . . . . . 23
Shared Network Connection. . . . . . . . . . . . . . . . . . . . . . . . . . . . . . . . . . . . . . . 24
Connecting to Power. . . . . . . . . . . . . . . . . . . . . . . . . . . . . . . . . . . . . . . . . . . . . . 24
Power Adapter . . . . . . . . . . . . . . . . . . . . . . . . . . . . . . . . . . . . . . . . . . . . . . . . . . . 24
Inline Power . . . . . . . . . . . . . . . . . . . . . . . . . . . . . . . . . . . . . . . . . . . . . . . . . . . . . . 24
Installing Expansion Modules . . . . . . . . . . . . . . . . . . . . . . . . 25
Scope of Delivery . . . . . . . . . . . . . . . . . . . . . . . . . . . . . . . . . . . . . . . . . . . .25
Hardware Features. . . . . . . . . . . . . . . . . . . . . . . . . . . . . . . . . . . . . . . . . . . 27
Installation . . . . . . . . . . . . . . . . . . . . . . . . . . . . . . . . . . . . . . . . . . . . . . . . . .29
Connecting the Expansion Module to Your Phone. . . . . . . . . . . . . . . . . . . 29
Attaching the Stand . . . . . . . . . . . . . . . . . . . . . . . . . . . . . . . . . . . . . . . . . . . . . . 31
Inserting the Key Card (Forum 500(0) Keypad Paper FIP 5020/5025/
5030/5040) . . . . . . . . . . . . . . . . . . . . . . . . . . . . . . . . . . . . . . . . . . . . . . . . . . . . 33
Attaching Multiple Expansion Modules . . . . . . . . . . . . . . . . . . . . . . . . . . . . . 34
1

Installing the Detachable Magnetic Keyboard . . . . . . . . . .37
Safety Precautions . . . . . . . . . . . . . . . . . . . . . . . . . . . . . . . . . . . . . . . . . . 37
Scope of Delivery . . . . . . . . . . . . . . . . . . . . . . . . . . . . . . . . . . . . . . . . . . . 38
Hardware Features . . . . . . . . . . . . . . . . . . . . . . . . . . . . . . . . . . . . . . . . . . 39
Installation . . . . . . . . . . . . . . . . . . . . . . . . . . . . . . . . . . . . . . . . . . . . . . . . . 39
Option A – Magnet-Only Connection. . . . . . . . . . . . . . . . . . . . . . . . . . . . . . 40
Option B – Reinforced Connection . . . . . . . . . . . . . . . . . . . . . . . . . . . . . . . . .42
Wall Installation. . . . . . . . . . . . . . . . . . . . . . . . . . . . . . . . . . . . 45
Scope of Delivery . . . . . . . . . . . . . . . . . . . . . . . . . . . . . . . . . . . . . . . . . . . 45
Hardware Features . . . . . . . . . . . . . . . . . . . . . . . . . . . . . . . . . . . . . . . . . . 46
Direct Wall Mount Installation . . . . . . . . . . . . . . . . . . . . . . . . . . . . . . . . 46
Telco Wall Plate Installation . . . . . . . . . . . . . . . . . . . . . . . . . . . . . . . . . . 51
Dismounting the Phone . . . . . . . . . . . . . . . . . . . . . . . . . . . . . . . . . . . . . . 56
Feature Overview . . . . . . . . . . . . . . . . . . . . . . . . . . . . . . . . . . 58
Configuration and Programming . . . . . . . . . . . . . . . . . . . . . . . . . . . . . . 58
Key Assignments . . . . . . . . . . . . . . . . . . . . . . . . . . . . . . . . . . . . . . . . . . . . 59
Key Functions. . . . . . . . . . . . . . . . . . . . . . . . . . . . . . . . . . . . . . . . . . . . . . . 64
Keypad . . . . . . . . . . . . . . . . . . . . . . . . . . . . . . . . . . . . . . . . . . . . . . . . . . . . . . . . . . .64
Trunk Keys . . . . . . . . . . . . . . . . . . . . . . . . . . . . . . . . . . . . . . . . . . . . . . . . . . . . . . . .64
Programmable Keys . . . . . . . . . . . . . . . . . . . . . . . . . . . . . . . . . . . . . . . . . . . . . . .65
Loudspeaker Key, Loudspeaker/Headset Key . . . . . . . . . . . . . . . . . . . . . . .69
Mute Key. . . . . . . . . . . . . . . . . . . . . . . . . . . . . . . . . . . . . . . . . . . . . . . . . . . . . . . . . .69
Volume Control Keys . . . . . . . . . . . . . . . . . . . . . . . . . . . . . . . . . . . . . . . . . . . . . .70
Redial Key . . . . . . . . . . . . . . . . . . . . . . . . . . . . . . . . . . . . . . . . . . . . . . . . . . . . . . . .70
Caller List Key. . . . . . . . . . . . . . . . . . . . . . . . . . . . . . . . . . . . . . . . . . . . . . . . . . . . .70
Phone Book Key. . . . . . . . . . . . . . . . . . . . . . . . . . . . . . . . . . . . . . . . . . . . . . . . . . . 71
Hold Key. . . . . . . . . . . . . . . . . . . . . . . . . . . . . . . . . . . . . . . . . . . . . . . . . . . . . . . . . . 71
R-Key, Enquiry-Key . . . . . . . . . . . . . . . . . . . . . . . . . . . . . . . . . . . . . . . . . . . . . . . 71
Conference Key . . . . . . . . . . . . . . . . . . . . . . . . . . . . . . . . . . . . . . . . . . . . . . . . . . . 71
Goodbye Key. . . . . . . . . . . . . . . . . . . . . . . . . . . . . . . . . . . . . . . . . . . . . . . . . . . . . . 72
Navigation Keys/Select Key . . . . . . . . . . . . . . . . . . . . . . . . . . . . . . . . . . . . . . . 72
Options Key. . . . . . . . . . . . . . . . . . . . . . . . . . . . . . . . . . . . . . . . . . . . . . . . . . . . . . . 72
The Locking of the Telephone Interface. . . . . . . . . . . . . . . . . . . . . . . . . . . . . 72
2

Display Contents. . . . . . . . . . . . . . . . . . . . . . . . . . . . . . . . . . . . . . . . . . . . . 73
Display Language, Date and Time Display . . . . . . . . . . . . . . . . . . . . . . . . . 75
Display Symbols. . . . . . . . . . . . . . . . . . . . . . . . . . . . . . . . . . . . . . . . . . . . . . . . . . 75
LED Display on the TopSoftkeys . . . . . . . . . . . . . . . . . . . . . . . . . . . . . . . . . . . 76
Forum IPhone 5040: Operating the Touch Screen . . . . . . . . . . . . . . . 77
“Idle display” Screen . . . . . . . . . . . . . . . . . . . . . . . . . . . . . . . . . . . . . . . . . . . . . . 78
“Line selection” Screen. . . . . . . . . . . . . . . . . . . . . . . . . . . . . . . . . . . . . . . . . . . . 79
“Multiple calls” Screen . . . . . . . . . . . . . . . . . . . . . . . . . . . . . . . . . . . . . . . . . . . . 80
“Call details” Screen . . . . . . . . . . . . . . . . . . . . . . . . . . . . . . . . . . . . . . . . . . . . . . 81
Message Waiting Lamp . . . . . . . . . . . . . . . . . . . . . . . . . . . . . . . . . . . . . . .82
Menus. . . . . . . . . . . . . . . . . . . . . . . . . . . . . . . . . . . . . . . . . . . . . . . . . . . . . . .83
Status Menu . . . . . . . . . . . . . . . . . . . . . . . . . . . . . . . . . . . . . . . . . . . . . . . . . . . . . . 83
Main Menu. . . . . . . . . . . . . . . . . . . . . . . . . . . . . . . . . . . . . . . . . . . . . . . . . . . . . . . . 83
Device Menu. . . . . . . . . . . . . . . . . . . . . . . . . . . . . . . . . . . . . . . . . . . . . . . . . . . . . . 83
Using Menus. . . . . . . . . . . . . . . . . . . . . . . . . . . . . . . . . . . . . . . . . . . . . . . . . . . . . . 83
Entering Text and Numerals. . . . . . . . . . . . . . . . . . . . . . . . . . . . . . . . . . .87
Using Expansion Modules . . . . . . . . . . . . . . . . . . . . . . . . . . . . . . . . . . . . 88
Using a Headset. . . . . . . . . . . . . . . . . . . . . . . . . . . . . . . . . . . . . . . . . . . . . 88
Code-number Procedures . . . . . . . . . . . . . . . . . . . . . . . . . . . . . . . . . . . . 89
Commissioning . . . . . . . . . . . . . . . . . . . . . . . . . . . . . . . . . . . . . 90
Configuration on the Web Console . . . . . . . . . . . . . . . . . . . . . . . . . . . . 90
MAC Address . . . . . . . . . . . . . . . . . . . . . . . . . . . . . . . . . . . . . . . . . . . . . . . . . . . . . 91
Internet Address. . . . . . . . . . . . . . . . . . . . . . . . . . . . . . . . . . . . . . . . . . . . . . . . . . 92
Notes and Recommendations . . . . . . . . . . . . . . . . . . . . . . . . . . . . . . . . . . . . . 93
Configuring the Telephone. . . . . . . . . . . . . . . . . . . . . . . . . . . 94
Settings on the Web Console . . . . . . . . . . . . . . . . . . . . . . . . . . . . . . . . . 94
Setting the Font Colour for the Idle Display . . . . . . . . . . . . . . . . . . . . . . . . 96
Picture ID Server. . . . . . . . . . . . . . . . . . . . . . . . . . . . . . . . . . . . . . . . . . . . . . . . . . 96
Local Telephone Settings . . . . . . . . . . . . . . . . . . . . . . . . . . . . . . . . . . . . .97
Listening to Ring Tones. . . . . . . . . . . . . . . . . . . . . . . . . . . . . . . . . . . . . . . . . . . . 97
Setting the Audio Mode . . . . . . . . . . . . . . . . . . . . . . . . . . . . . . . . . . . . . . . . . . . 97
Setting the Headset Type . . . . . . . . . . . . . . . . . . . . . . . . . . . . . . . . . . . . . . . . . 98
Setting the Headset Microphone Volume. . . . . . . . . . . . . . . . . . . . . . . . . . . 98
Setting a Bluetooth Headset . . . . . . . . . . . . . . . . . . . . . . . . . . . . . . . . . . . . . . 98
3

Enabling and Disabling Bluetooth Functionality . . . . . . . . . . . . . . . . . . . .99
Pairing a Bluetooth Headset . . . . . . . . . . . . . . . . . . . . . . . . . . . . . . . . . . . . . . .99
Unpairing a Bluetooth Headset . . . . . . . . . . . . . . . . . . . . . . . . . . . . . . . . . . 100
Connecting to a Different Paired Bluetooth Headset . . . . . . . . . . . . . . 100
Setting the Display . . . . . . . . . . . . . . . . . . . . . . . . . . . . . . . . . . . . . . . . . . . . . . 100
Administration Tasks . . . . . . . . . . . . . . . . . . . . . . . . . . . . . . . . . . . . . . . 101
Retrieving Status Information. . . . . . . . . . . . . . . . . . . . . . . . . . . . . . . . . . . . .101
Restarting the Telephone . . . . . . . . . . . . . . . . . . . . . . . . . . . . . . . . . . . . . . . . 102
Restoring Factory Settings. . . . . . . . . . . . . . . . . . . . . . . . . . . . . . . . . . . . . . . 102
SIP System Telephone Password . . . . . . . . . . . . . . . . . . . . . . . . . . . . . . . . . 103
Programming Keys . . . . . . . . . . . . . . . . . . . . . . . . . . . . . . . . 104
Trunk Keys. . . . . . . . . . . . . . . . . . . . . . . . . . . . . . . . . . . . . . . . . . . . . . . . . 106
Feature Keys . . . . . . . . . . . . . . . . . . . . . . . . . . . . . . . . . . . . . . . . . . . . . . . 106
Brief Description of Programmable Feature Keys . . . . . . . . . . . . . . . . . 107
Stacking or Linking Functions. . . . . . . . . . . . . . . . . . . . . . . . . . . . . . . . . . . . .112
Special Feature Keys. . . . . . . . . . . . . . . . . . . . . . . . . . . . . . . . . . . . . . . . .113
Busy Keys. . . . . . . . . . . . . . . . . . . . . . . . . . . . . . . . . . . . . . . . . . . . . . . . . . . . . . . . 113
Status Keys . . . . . . . . . . . . . . . . . . . . . . . . . . . . . . . . . . . . . . . . . . . . . . . . . . . . . .114
Destination keys . . . . . . . . . . . . . . . . . . . . . . . . . . . . . . . . . . . . . . . . . . . 114
Direct-call Keys . . . . . . . . . . . . . . . . . . . . . . . . . . . . . . . . . . . . . . . . . . . . 114
XML Keys . . . . . . . . . . . . . . . . . . . . . . . . . . . . . . . . . . . . . . . . . . . . . . . . . . 115
Telephoning . . . . . . . . . . . . . . . . . . . . . . . . . . . . . . . . . . . . . . . .116
General Functions . . . . . . . . . . . . . . . . . . . . . . . . . . . . . . . . . . . . . . . . . . 116
Assignment of Internal and External Call Numbers . . . . . . . . . . . . . . . .116
Blocked/Unblocked Call Numbers . . . . . . . . . . . . . . . . . . . . . . . . . . . . . . . . 117
Transmission of Call Numbers. . . . . . . . . . . . . . . . . . . . . . . . . . . . . . . . . . . . . 117
Call for a Virtual Number (TeleSecretary). . . . . . . . . . . . . . . . . . . . . . . . . .118
Calls in the Call Waiting Queue . . . . . . . . . . . . . . . . . . . . . . . . . . . . . . . . . . .118
Automatic Dialling . . . . . . . . . . . . . . . . . . . . . . . . . . . . . . . . . . . . . . . . . . . . . . . 119
Accepting a Call During Automatic Dialling . . . . . . . . . . . . . . . . . . . . . . . .119
Automatic Dialling for a Different Terminal . . . . . . . . . . . . . . . . . . . . . . . .119
Duration Display . . . . . . . . . . . . . . . . . . . . . . . . . . . . . . . . . . . . . . . . . . . . . . . . . 119
Telephone Lock . . . . . . . . . . . . . . . . . . . . . . . . . . . . . . . . . . . . . . . . . . . . . . . . . .119
Least Cost Routing (LCR) . . . . . . . . . . . . . . . . . . . . . . . . . . . . . . . . . . . . . . . . 120
Forwarding Calls . . . . . . . . . . . . . . . . . . . . . . . . . . . . . . . . . . . . . . . . . . . . . . . . 120
4

VoIP / SIP Connections . . . . . . . . . . . . . . . . . . . . . . . . . . . . . . . . . . . . . . . . . . 122
Status Menu Before and During a Call . . . . . . . . . . . . . . . . . . . . . . . . . . . . 123
Status Menus . . . . . . . . . . . . . . . . . . . . . . . . . . . . . . . . . . . . . . . . . . . . . . .123
“Selection” Status Menu in the Idle State. . . . . . . . . . . . . . . . . . . . . . . . . . 123
“Conversation” Status Menu . . . . . . . . . . . . . . . . . . . . . . . . . . . . . . . . . . . . . 125
“Calling...” Status Menu . . . . . . . . . . . . . . . . . . . . . . . . . . . . . . . . . . . . . . . . . . 125
“Busy” Status Menu . . . . . . . . . . . . . . . . . . . . . . . . . . . . . . . . . . . . . . . . . . . . . 125
“Call waiting” Status Menu . . . . . . . . . . . . . . . . . . . . . . . . . . . . . . . . . . . . . . 126
“Call” Status Menu . . . . . . . . . . . . . . . . . . . . . . . . . . . . . . . . . . . . . . . . . . . . . . 126
“Subscr (Subscriber) on hold” Status Menu . . . . . . . . . . . . . . . . . . . . . . . 126
“Conference” Status Menu . . . . . . . . . . . . . . . . . . . . . . . . . . . . . . . . . . . . . . 127
Making External/Internal Calls. . . . . . . . . . . . . . . . . . . . . . . . . . . . . . . 127
Establishing a Connection . . . . . . . . . . . . . . . . . . . . . . . . . . . . . . . . . . . . . . . . 127
Manual or Automatic Line Seizure . . . . . . . . . . . . . . . . . . . . . . . . . . . . . . . . 127
Making an External Call . . . . . . . . . . . . . . . . . . . . . . . . . . . . . . . . . . . . . . . . . . 128
Making an Internal Call. . . . . . . . . . . . . . . . . . . . . . . . . . . . . . . . . . . . . . . . . . . 129
Using Destination Keys to Make Calls . . . . . . . . . . . . . . . . . . . . . . . . . . . . . 130
Redialling . . . . . . . . . . . . . . . . . . . . . . . . . . . . . . . . . . . . . . . . . . . . . . . . . . . . . . . 131
Call Waiting with an Internal Subscriber . . . . . . . . . . . . . . . . . . . . . . . . . . 132
Using Routes to Make Calls . . . . . . . . . . . . . . . . . . . . . . . . . . . . . . . . . . . . . . 133
Busy Display for Bundles (Trunk Groups) and Routes . . . . . . . . . . . . . . 134
Ending Calls . . . . . . . . . . . . . . . . . . . . . . . . . . . . . . . . . . . . . . . . . . . . . . . . . . . . . 134
Accepting Calls . . . . . . . . . . . . . . . . . . . . . . . . . . . . . . . . . . . . . . . . . . . . .134
Normal Call . . . . . . . . . . . . . . . . . . . . . . . . . . . . . . . . . . . . . . . . . . . . . . . . . . . . . 134
VIP Call . . . . . . . . . . . . . . . . . . . . . . . . . . . . . . . . . . . . . . . . . . . . . . . . . . . . . . . . . 135
Automatic Call Connection . . . . . . . . . . . . . . . . . . . . . . . . . . . . . . . . . . . . . . . 135
Calls During a Conversation . . . . . . . . . . . . . . . . . . . . . . . . . . . . . . . . . . . . . . 136
Enquiry, Toggling, Transfer and Conference . . . . . . . . . . . . . . . . . . . .138
Enquiry/Toggling with the R-key . . . . . . . . . . . . . . . . . . . . . . . . . . . . . . . . 138
Enquiry/Toggling Using Another Trunk Key . . . . . . . . . . . . . . . . . . . . . . . 139
Enquiry/Toggling Using the Navigation Key
(Forum IPhone 5025/5030). . . . . . . . . . . . . . . . . . . . . . . . . . . . . . . . . . . . .140
Enquiries/Toggling via the Touch Screen (Forum IPhone 5040). . . . 141
Transferring to Another Internal/External Subscriber. . . . . . . . . . . . . . 141
IInternal/External Three-Party Conference . . . . . . . . . . . . . . . . . . . . . . . 143
Special Calls/Conversations . . . . . . . . . . . . . . . . . . . . . . . . . . . . . . . . 144
Missed Calls . . . . . . . . . . . . . . . . . . . . . . . . . . . . . . . . . . . . . . . . . . . . . . . . . . . . . 144
Baby Call. . . . . . . . . . . . . . . . . . . . . . . . . . . . . . . . . . . . . . . . . . . . . . . . . . . . . . . . 145
5

Parking Calls. . . . . . . . . . . . . . . . . . . . . . . . . . . . . . . . . . . . . . . . . . . . . . . . . . . . 145
Leaving and Answering a Call-back Request. . . . . . . . . . . . . . . . . . . . . . 146
Voicebox Queries. . . . . . . . . . . . . . . . . . . . . . . . . . . . . . . . . . . . . . . . . . . . . . . . . 147
Announcements (with and without Intercom). . . . . . . . . . . . . . . . . . . . . 148
Caller History . . . . . . . . . . . . . . . . . . . . . . . . . . . . . . . . . . . . . . . . . . . . . . . . . . . .151
Call Recording. . . . . . . . . . . . . . . . . . . . . . . . . . . . . . . . . . . . . . . . . . . . . . . . . . . .153
Automatic Call Recording . . . . . . . . . . . . . . . . . . . . . . . . . . . . . . . . . . . . . . . .155
Connections with Booking Numbers. . . . . . . . . . . . . . . . . . . . . . . . . . . . . . 156
Doorbell, Door Opener . . . . . . . . . . . . . . . . . . . . . . . . . . . . . . . . . . . . . . . . . . 158
Entrance Intercom Calls . . . . . . . . . . . . . . . . . . . . . . . . . . . . . . . . . . . . . . . . . 160
Displaying Camera Images. . . . . . . . . . . . . . . . . . . . . . . . . . . . . . . . . . . . . . . .161
Substitution. . . . . . . . . . . . . . . . . . . . . . . . . . . . . . . . . . . . . . . . . . . . . . . . . . . . . .163
Calling via Direct-call Keys. . . . . . . . . . . . . . . . . . . . . . . . . . . . . . . . . . . . . . . 164
Using Feature Keys . . . . . . . . . . . . . . . . . . . . . . . . . . . . . . . . . . . . . . . . . 164
Using Busy Keys. . . . . . . . . . . . . . . . . . . . . . . . . . . . . . . . . . . . . . . . . . . . 165
Using the Busy Key “Call Number” . . . . . . . . . . . . . . . . . . . . . . . . . . . . . . . 165
Using the Busy Key “Device” . . . . . . . . . . . . . . . . . . . . . . . . . . . . . . . . . . . . . 166
Hot Desking: Your Telephone Goes Wherever Your Desk Is. . . . . . 167
Telephone Book . . . . . . . . . . . . . . . . . . . . . . . . . . . . . . . . . . . . 171
Making Calls from the Telephone Book . . . . . . . . . . . . . . . . . . . . . . . .171
Speed-Dialling . . . . . . . . . . . . . . . . . . . . . . . . . . . . . . . . . . . . . . . . . . . . 172
Menus at Your SIP System Telephone . . . . . . . . . . . . . . . . .173
Main Menu . . . . . . . . . . . . . . . . . . . . . . . . . . . . . . . . . . . . . . . . . . . . . . . . . 173
“Calls” Menu Group. . . . . . . . . . . . . . . . . . . . . . . . . . . . . . . . . . . . . . . . . . . . . . . 174
“Call forwarding” Menu Group . . . . . . . . . . . . . . . . . . . . . . . . . . . . . . . . . . . .181
“Messages” Menu Group . . . . . . . . . . . . . . . . . . . . . . . . . . . . . . . . . . . . . . . . . .183
“Phone settings” Menu Group. . . . . . . . . . . . . . . . . . . . . . . . . . . . . . . . . . . . .187
“Protection” Menu Group . . . . . . . . . . . . . . . . . . . . . . . . . . . . . . . . . . . . . . . . 188
“Connections” Menu Group . . . . . . . . . . . . . . . . . . . . . . . . . . . . . . . . . . . . . . 190
“Phone book” Menu Group. . . . . . . . . . . . . . . . . . . . . . . . . . . . . . . . . . . . . . . 195
“Applications” Menu Group . . . . . . . . . . . . . . . . . . . . . . . . . . . . . . . . . . . . . . 196
“Central settings” Menu Group . . . . . . . . . . . . . . . . . . . . . . . . . . . . . . . . . . . .197
Device Menu Overview. . . . . . . . . . . . . . . . . . . . . . . . . . . . . . . . . . . . . . 198
6

Appendix . . . . . . . . . . . . . . . . . . . . . . . . . . . . . . . . . . . . . . . . . 201
Accessories . . . . . . . . . . . . . . . . . . . . . . . . . . . . . . . . . . . . . . . . . . . . . . . . 201
Technical Data . . . . . . . . . . . . . . . . . . . . . . . . . . . . . . . . . . . . . . . . . . . . . 201
Environmental Information . . . . . . . . . . . . . . . . . . . . . . . . . . . . . . . . . 206
Index . . . . . . . . . . . . . . . . . . . . . . . . . . . . . . . . . . . . . . . . . . . . . 207
Support. . . . . . . . . . . . . . . . . . . . . . . . . . . . . . . . . . . . . . . . . . . 213
7

8

Forum IPhone 50xx SIP System Telephones
The Forum IPhone 50xx telephones are Voice over IP (VoIP) telephones in
accordance with the internationally standardised SIP standard (Session
Initiation Protocol). They are operated as
connected to the Forum
allow you a comforable use of the communications system’s features.
The Forum IPhone 50xx product family consists of the telephones:
● Forum IPhone 5010
● Forum IPhone 5020
● Forum IPhone 5025
● Forum IPhone 5030
● Forum IPhone 5040
The models differ primarily regarding the display size and number of
programmable keys (feature keys). These keys are configured using the
500 / Forum 5000 communications system and offer access to
Forum
individually configurable system functions such as e.g. configuring call
forwarding, executing speed dialling, displaying a busy lamp field or accessing
the phone book of Forum
500 / Forum 5000 communications system and
500 / Forum 5000 communications system.
SIP system telephones when
The Forum IPhone 50xx SIP system telephones have a sleek and modern
industrial design with remarkable HD wideband audio and an enhanced
speakerphone and superior audio processing to achieve richer and clearer
hands free conversations. In addition, all models feature a highly compact
desktop footprint and cutting-edge eco-friendly features. The telephone
models offer a range of phones with a breadth of features such as color
graphical displays, GigE Ethernet ports and headset support, as well as an
extensive array of accessories including; expansion modules, detachable
keyboard and wall mount.
Forum IPhone 50xx SIP System Telephones 9

Models of the Forum IPhone 50xx product family
Forum IPhone 5010
● 2.75" 128x48 pixels graphical display
● Up to 2 lines with dedicated trunk
keys
● 3 programmable keys
● Wideband handset and speakerphone
● 2 Ethernet ports (10/100 BaseT)
with hardware based switch
● Compact footprint
Forum IPhone 5020
● 3.4" 128x48 pixels graphical backlit
display
● 2 dedicated trunk keys with LED,
further trunk keys can be
programmed
● 8 Programmable keys with LED
● Wideband handset and speakerphone
● 2 dual GigE Ethernet Ports
● DHSG/EHS headset and expansion
Module support
10 Forum IPhone 50xx SIP System Telephones

Forum IPhone 5025
● Large color 3.5" 320x240 pixels
QVGA LCD display
● 2 dedicated trunk keys with LED,
further trunk keys can be
programmed
● 5 programmable TopSoftkeys with
LED that can be customized to access
up to a total of 20 functions
● 3 programmable (resp. 4 context-
sensitive) Softkeys without LED that
can be customized to access up to a
total of 18 functions
● Magnetic Keyboard Interface
● Wideband handset and speakerphone
● 2 GigE Ethernet Ports
● DHSG/EHS headset support and
expansion module support
Forum IPhone 5030
● Large color 4.3" 480x270 pixels LCD
display
● 2 dedicated trunk keys with LED,
further trunk keys can be
programmed
● 11 programmable TopSoftkeys with
LED that can be customized to access
up to a total of 22 functions
● 4 programmable (resp. 5 context-
sensitive) Softkeys without LED that
can be customized to access up to a
total of 20 functions
● Magnetic Keyboard Interface
● Wideband handset and speakerphone
● 2 GigE Ethernet Ports
● DHSG/EHS headset support and
expansion module support
Forum IPhone 50xx SIP System Telephones 11

About this Manual
Forum IPhone 5040
● 7” 800x480 pixels color LCD touch-
screen display
● 2 dedicated trunk keys with LED,
further trunk keys can be
programmed
● 12 programmable TopSoftkeys
without LED that can be customized
to access up to a total of 48 functions
● 5 programmable (resp. 6 context-
sensitive) Softkeys without LED that
can be customized to access up to a
total of 25 functions
● Wideband handset and speakerphone
● 2 GigE Ethernet Ports
● USB and Bluetooth headset support
and expansion module support
About this Manual
This manual describes how to use the Forum IPhone 5010/5020/5025/
5030/5040 SIP system telephones which are connected to a Forum
5000 communications system.
Forum
Additional documentation
Please also make use of the other documentation which was provided with
the parts of your communications system. This documentation is located on
the Forum
500 / Forum 5000 product CD.
You need authorisation
Most of the features mentioned in this user guide are only available to you if
you have the appropriate authorisation. This will be set up by your system
administrator when configuring the user groups of the communications
system. If you are unable to use a particular feature or have any questions,
consult your system administrator.
12 Forum IPhone 50xx SIP System Telephones
500 /

Using Your Telephone
Using Your Telephone
Safety Precautions
WARNING! Do not open the telephone or the connected accessories, as
this could lead to you touching live parts.
Note: Repairs must only be carried out by authorised Proximus service
personnel.
● Keep fluids and chemicals away from the telephone and its accessories.
Please note:For power, use only the plug-in power supply unit with the part
no. 90046892 (sold separately) to connect the telephone to a
power source.
● Do not use AC adapter plugs that show visible damage (e. g. cracks in the
housing).
● Connected headsets must conform with the standard DIN EN 60 950-1,
Point 6.2 (“Safety of information technology equipment including elec
trical business equipment”).
Please contact your customer consultant if you require further information
about the connectable headsets, adapters and adapter cables.
● Use a shielded Cat5 Ethernet cable (STP cable, Shielded Twisted Pair
cable) to connect the SIP system telephones to a Local Area Network
(LAN).
● The phone must be connected only to indoor routed PoE or Ethernet
wiring.
● Make sure that no one can trip over the telephone cables.
-
Forum IPhone 50xx SIP System Telephones 13

Using Your Telephone
Installation Site
Only operate the SIP system telephones indoors. The ambient temperature
must not exceed
0 °C to 40 °C (+32 to 104 °F).
Do not install the telephone or its accessories
● near water, moisture or in damp locations;
● near sources of heat or in direct sunlight;
● in unventilated rooms;
● near devices that generate strong magnetic fields, electrical devices, fluo-
rescent lamps, computers, radios or television sets;
● in dusty places or places subjected to vibrations, shocks or extreme
temperature fluctuations.
Place the telephones on a non-slip surface. The surface finish of your
furniture may affect the telephone’s pedestals, softening them and causing
them to leave undesirable marks on your furniture.
Cleaning
Simply wipe your telephone and connected expansion modules with an
antistatic or slightly damp cloth. Never use a dry cloth or a cleaning agent.
14 Forum IPhone 50xx SIP System Telephones

Scope of Delivery
Installing the Telephone
Scope of Delivery
When you unpack your phone, you should ensure that you have all of the
following items. If any part is missing, contact the supplier of your phone.
Telephone Handset Handset Cord
Two-Angle Stand Key Cards and Plastic
Cover
(Forum IPhone 5010 /
Forum IPhone 5020)
Note: Additional accessories are available for your phone (not
included, see also the chapter
Installing the Telephone 15
Accessories on page 201).
Regulatory /
Safety Insert
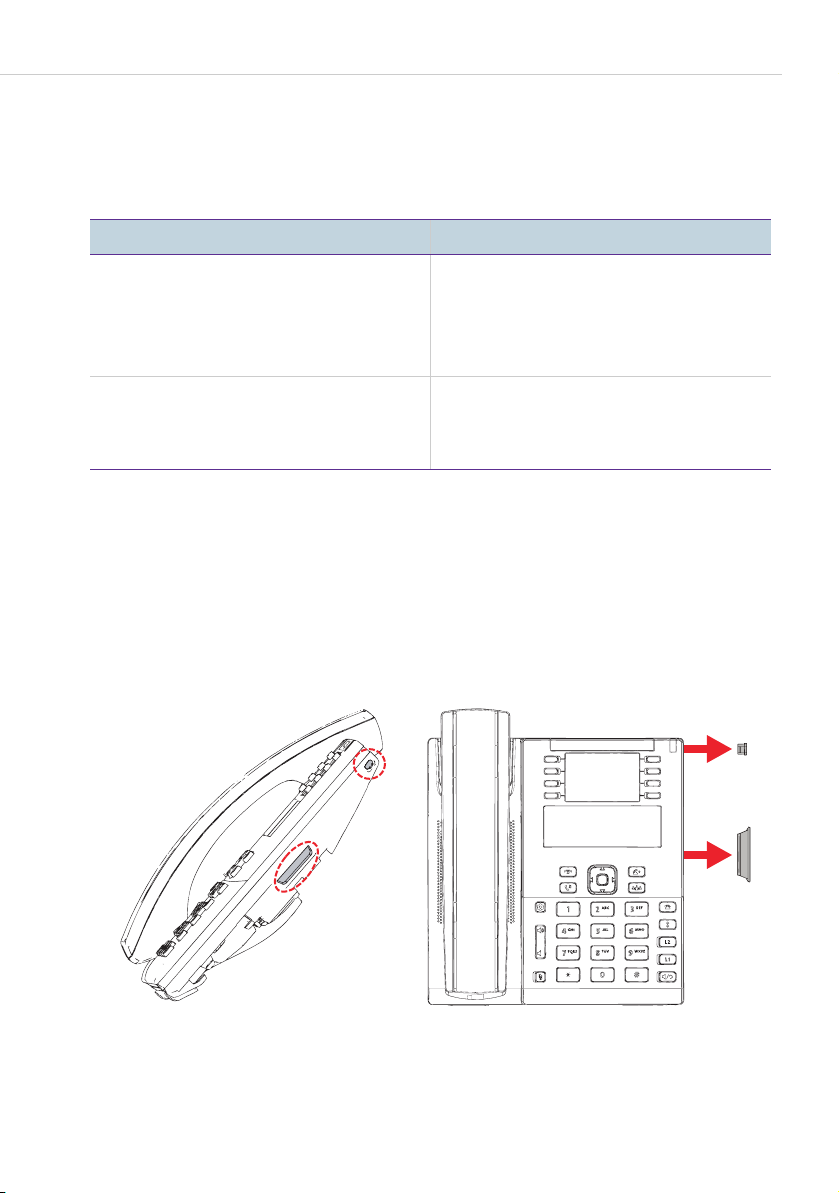
Connecting a Handset or Headset
Connecting a Handset or Headset
Handset
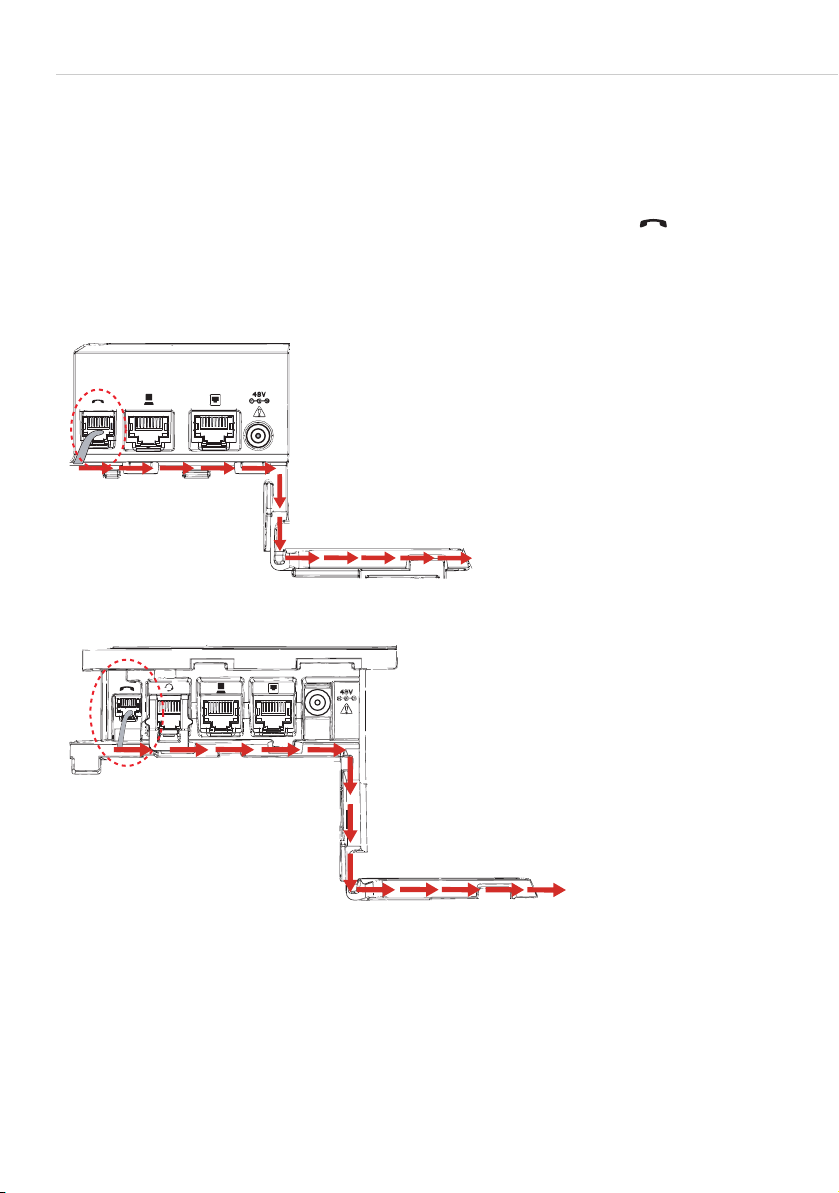
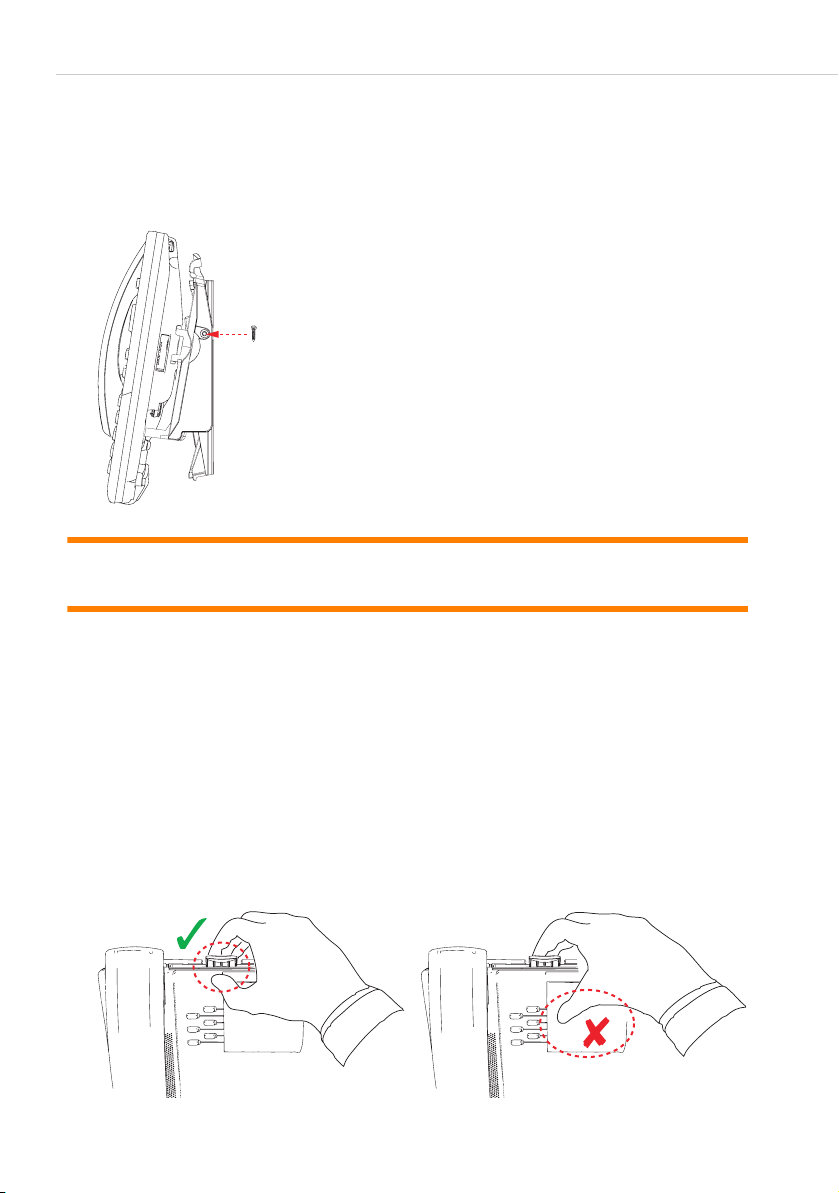
Turn the phone over and locate the handset jack marked with the symbol.
Insert one end of handset cord into the jack until it clicks into place. Then route
the handset cord through the groove (see the following illustrations). Attach
the handset to the other end of the handset cord.
Jacks on the back of the phone (Forum IPhone 5010)
Jacks on the back of the phone (Forum IPhone 5020)
16 Installing the Telephone

Connecting a Handset or Headset
Jacks on the back of the phone (Forum IPhone 5025 / Forum IPhone 5030)
Jacks on the back of the phone (Forum IPhone 5040)
Headset (optional)
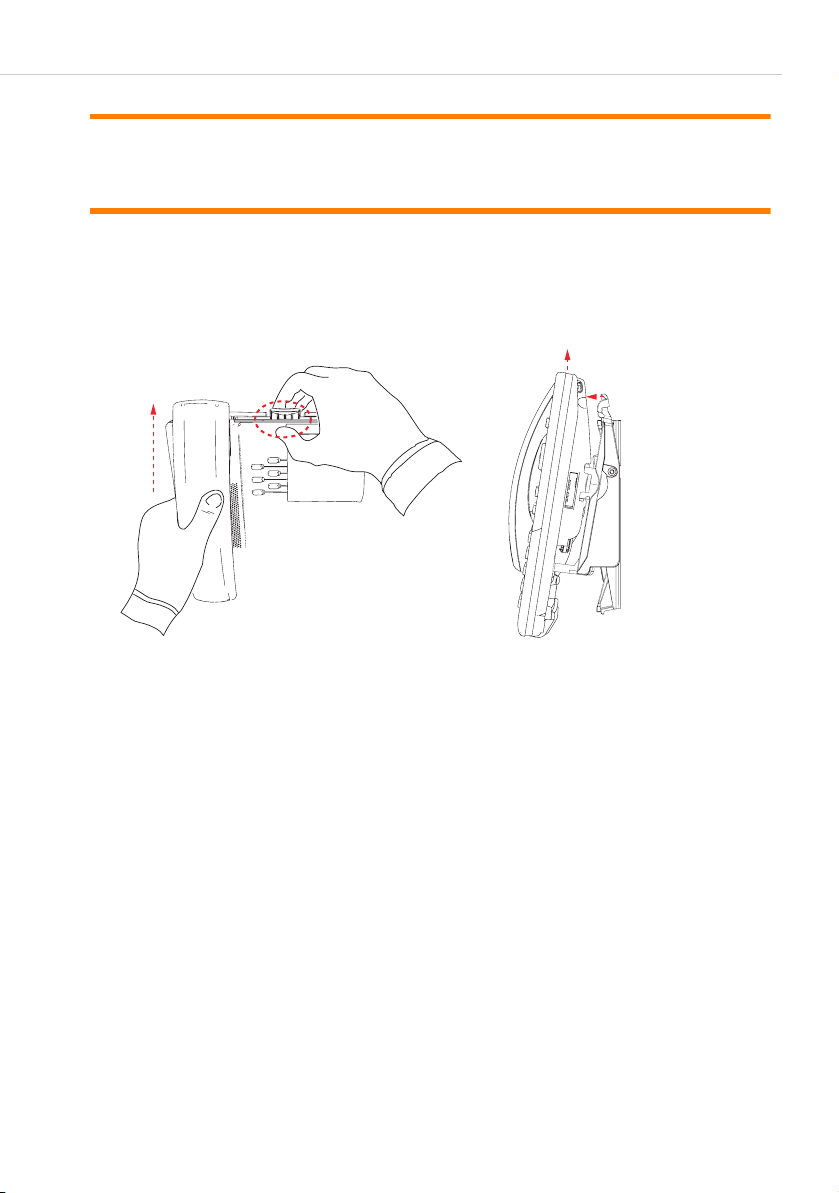
The SIP system telephones offer the possibility to connect a headset
(Exception: Forum
Please note:The headset port is for headset use only. Plugging any other
Forum IPhone 5020/5025/5030
Turn the phone over and locate the headset jack marked with the symbol. If
you have a headset with an RJ9/RJ22 4-pin connector, insert the headset
cord into the jack until it clicks into place (see illustrations
the phone (Forum IPhone 5020) on page 16 and Jacks on the back of the
phone (Forum IPhone 5025 / Forum IPhone 5030) on page 17). Then route
the headset cord through the groove.
If you have a DHSG/EHS headset with an RJ45 6-pin or 8-pin connector,
remove the plastic headset jack adapter and then insert the cord into the jack
Installing the Telephone 17
IPhone 5010).
devices into this port may cause damage to the phone and will
void your warranty.
Jacks on the back of

Desk Installation
until it clicks into place (see illustration Pull to remove headset jack adaptor
on page 18).
Pull to remove headset jack adaptor
Forum IPhone 5040
Turn the phone over and locate the headset jack marked with the symbol.
Then route the headset cord through the groove (see illustration Jacks on the
back of the phone (Forum IPhone 5040) on page 17).
Desk Installation
For desk installation of the SIP system telephones Forum IPhone 5010/
5020/5025/5030/5040
back of the phone above the various ports. Two viewing angles are available
allowing users to personalize their phone viewing preference.
a reversible stand is included that attaches to the
Forum IPhone 5010/5020/5025/
5030
Forum IPhone 5040 ● 30° low angle
1. Locate the stand insertion area on the back of the phone (above the
various ports).
2. Carefully insert the stand into the insertion area and slide the stand
towards the right until it snaps in place.
Note: The orientation of the stand determines the viewing angle. If the
bottom of the stand is installed facing the top of the phone the
viewing angle will be 35° or 30°. If the bottom of the stand is
installed facing the bottom of the phone the viewing angle will
be 55° or 60°.
18 Installing the Telephone
● 35° low angle
● 55° high angle
● 60° high angle

35° / 30°
Desk Installation
55° / 60°
Installing the Telephone 19

Inserting the Key Card for Labelling the Keys
Inserting the Key Card for Labelling
the Keys
The key card provided is for labelling the programmable keys on the SIP
system telephones Forum
You can label the paper key card manually or print it via the web console of
the Forum
Te l e p h o n y > Devices > System phones menu). For further information
please refer to the online help topic entitled “Printing Label Strips”.
500 / Forum 5000 communications system (in the Configurator,
Forum IPhone 5010
The optional key card contains label identification spaces for the
programmable keys.
3
1. Remove the key card plate from the front panel.
IPhone 5010 and Forum IPhone 5020.
A: Key card plate
B: Key card plate removed
2. Insert the paper key card into the programmable key card slot on the front
panel of the telephone using the indentation of the plastic for alignment.
20 Installing the Telephone

Inserting the Key Card for Labelling the Keys
3. Place the plastic cover over the paper key card ensuring the plastic cover
tabs are inserted into their respective slots.
A: Tab insertion slots
B: Plastic cover tabs
4. Press the plastic cover down firmly to even out and secure the plastic
cover to the phone.
Forum IPhone 5020
The key card contains label identification spaces for the 8 programmable keys.
1. Insert the paper key card into the programmable key card slot on the front
panel of the telephone using the indentation of the plastic for alignment.
A: Paper key card
2. Place the plastic cover over the paper key card ensuring the plastic cover
tabs are inserted into their respective slots.
Installing the Telephone 21

Connecting to the Network
A: Tab insertion slots
B: Plastic cover tabs
3. Press the plastic cover down firmly to even out and secure the plastic
cover to the phone.
Connecting to the Network
A SIP system telephone Forum IPhone 5010/5020/5025/5030/5040 can
be set up to share a network connection with another network device. Power
can be provided by the power adapter (sold separately), by an 802.3af
compliant network power source, or with a PoE inline power injector.
Notes
1. The SIP system telephones are is designed for indoor use only and for
ambient temperatures at
2. The phones must be connected only to indoor routed PoE or Ethernet
wiring.
0 °C to 40 °C (+32 to 104 °F).
Direct or Shared Network Connection
The SIP system telephone Forum IPhone 5010/5020/5025/5030/5040
can be set up as a direct network connection to the Ethernet wall jack or as a
shared network connection as a pass-through if connecting the phone to a
computer or another network device.
22 Installing the Telephone

Connecting to the Network
Legend
A Connection to other network device
B Connection to the network
C Power adapter connection
D Ethernet cables
E Network jack (if inline power provided, do not install the power adapter)
F Other network devices
G Power adapter
Direct Network Connection
Located on the back of the phone are two fully switched 10/100/1000 Mbps
Ethernet cable ports (Forum
with the
provide power to your phone (if required). See chapter Connecting to Power
on page 24 for more information.
Installing the Telephone 23
symbol is used to connect the phone to the network, as well as
IPhone 5010: 10/100 Mbps). The port marked

Connecting to the Network
Shared Network Connection
To connect a network device (such as a computer) to the phone, connect an
Ethernet cable into the network port on the back of the phone marked with
the
jack on the network device for which you are sharing the network connection.
Notes
1. The PC jack on the SIP system telephone does not supply inline power
2. All Ethernet cables used must be minimum Category 5/5e straight-
symbol. Plug the other end of the Ethernet cable into the network
onto other network devices.
through cables.
Connecting to Power
Power Adapter
Use the power adapter (sold separately) with your phone and plug your
phone into a power source.
Please note:For power, use only the plug-in power supply unit with the part
no. 90046892 (sold separately) to connect the telephone to a
power source.
Inline Power
If your network provides 802.3af compliant inline power, the phone is
powered through the network.
1. On the back of your phone, connect an Ethernet cable into the network
port marked with the
2. Plug the other end of the Ethernet cable directly into the network jack on
the wall.
24 Installing the Telephone
symbol.
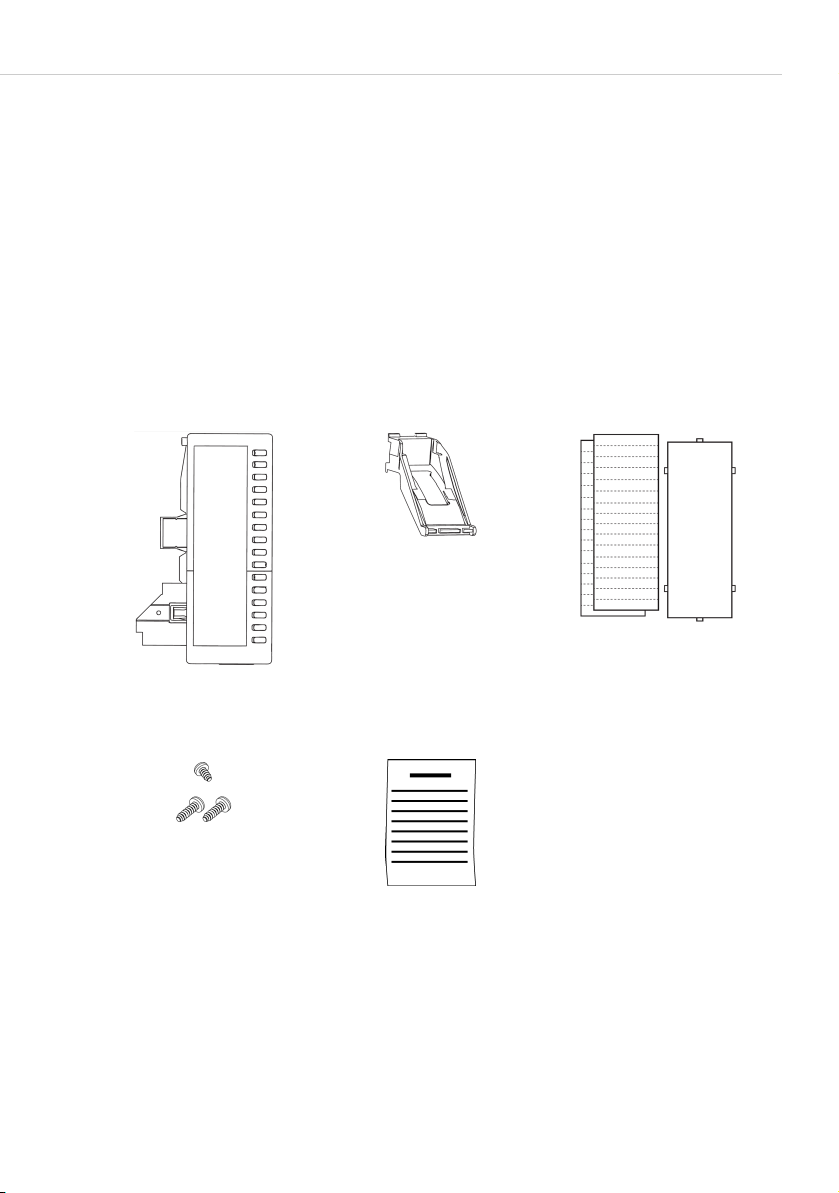
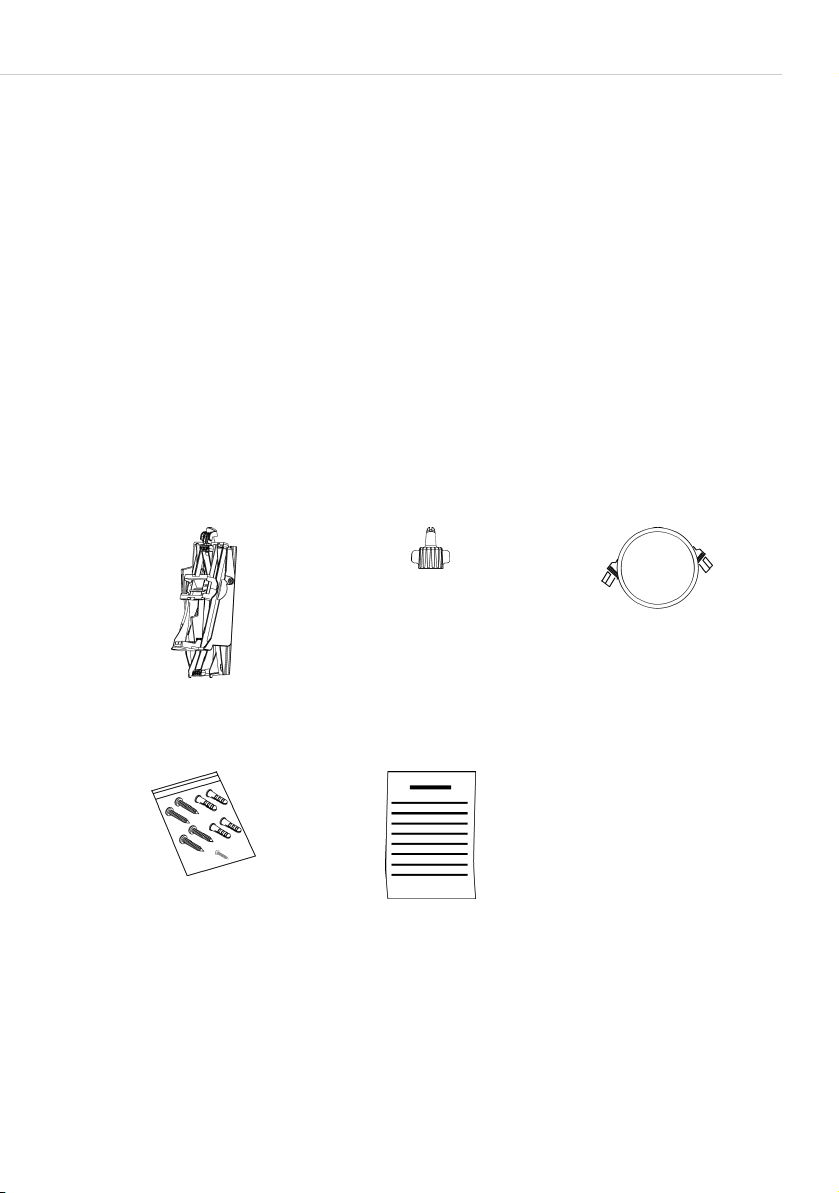
Scope of Delivery
Installing Expansion Modules
Scope of Delivery
When you unpack the Expansion Module package (Forum 500(0) Keypad
Paper FIP 5020/5025/5030/5040 or Forum
5025/5030/5040), you should ensure that you have all of the following
items. If any part is missing, contact the supplier of your phone.
Forum 500(0) Keypad Paper FIP 5020/5025/5030/5040
500(0) Keypad Display FIP
Expansion Module Two-Angle Stand Key Cards and
Plastic Cover
1 x 6mm Screw
2 x 8mm Screw
Installing Expansion Modules 25
Regulatory/Safety
Insert

Scope of Delivery
Forum 500(0) Keypad Display FIP 5025/5030/5040
Expansion Module Two-Angle Stand
1 x 6mm Screw
Regulatory/Safety Insert
2 x 8mm Screw
26 Installing Expansion Modules
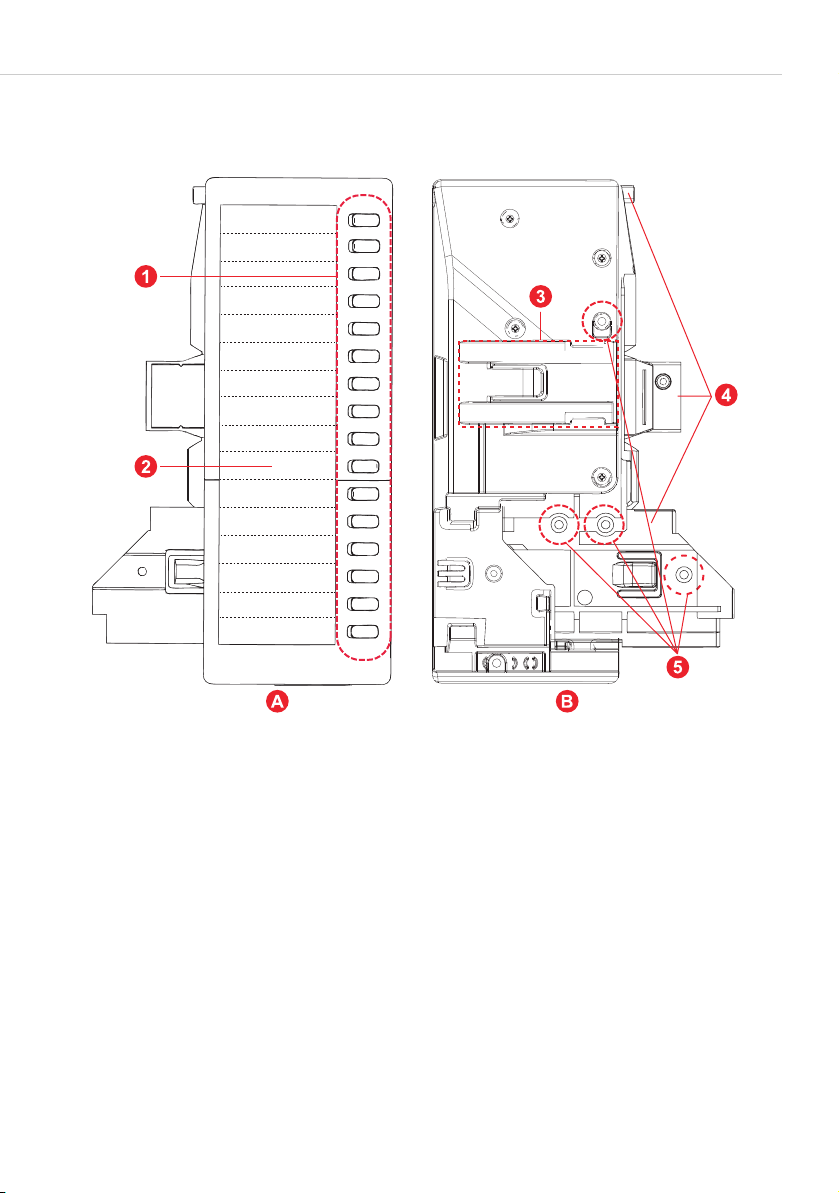
Hardware Features
A B
D
C
Hardware Features
Forum 500(0) Keypad Paper FIP 5020/5025/5030/5040
A: Front View, B: Back View
Legend
1 Programmable Keys
2 Key Card and Cover
3 Stand Insertion Area
4 Connector Plate
5 Screw Insertion Holes
Installing Expansion Modules 27
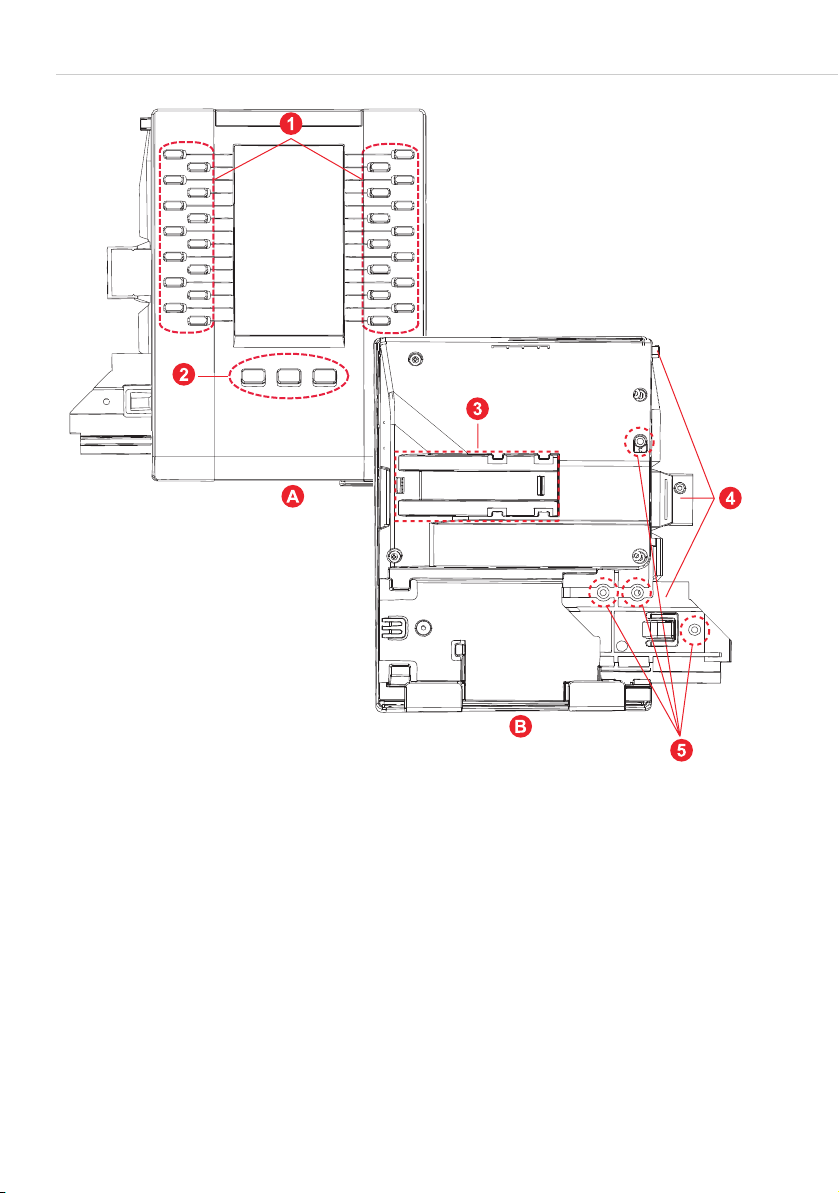
Hardware Features
A B
D
Forum 500(0) Keypad Display FIP 5025/5030/5040
A: Front View, B: Back View
Legend
1 Programmable Keys
2 Level Keys
3 Stand Insertion Area
4 Connector Plate
5 Screw Insertion Holes
28 Installing Expansion Modules
Installation
Installation
The Expansion Modules connect to the right side of your SIP system telephone
via the connector plate.
Expansion Module … can be connceted to
Forum 500(0) Keypad Paper
5020/5025/5030/5040
FIP
Forum 500(0) Keypad Display
5025/5030/5040
FIP
● Forum IPhone 5020
● Forum IPhone 5025
● Forum IPhone 5030
● Forum IPhone 5040
● Forum IPhone 5025
● Forum IPhone 5030
● Forum IPhone 5040
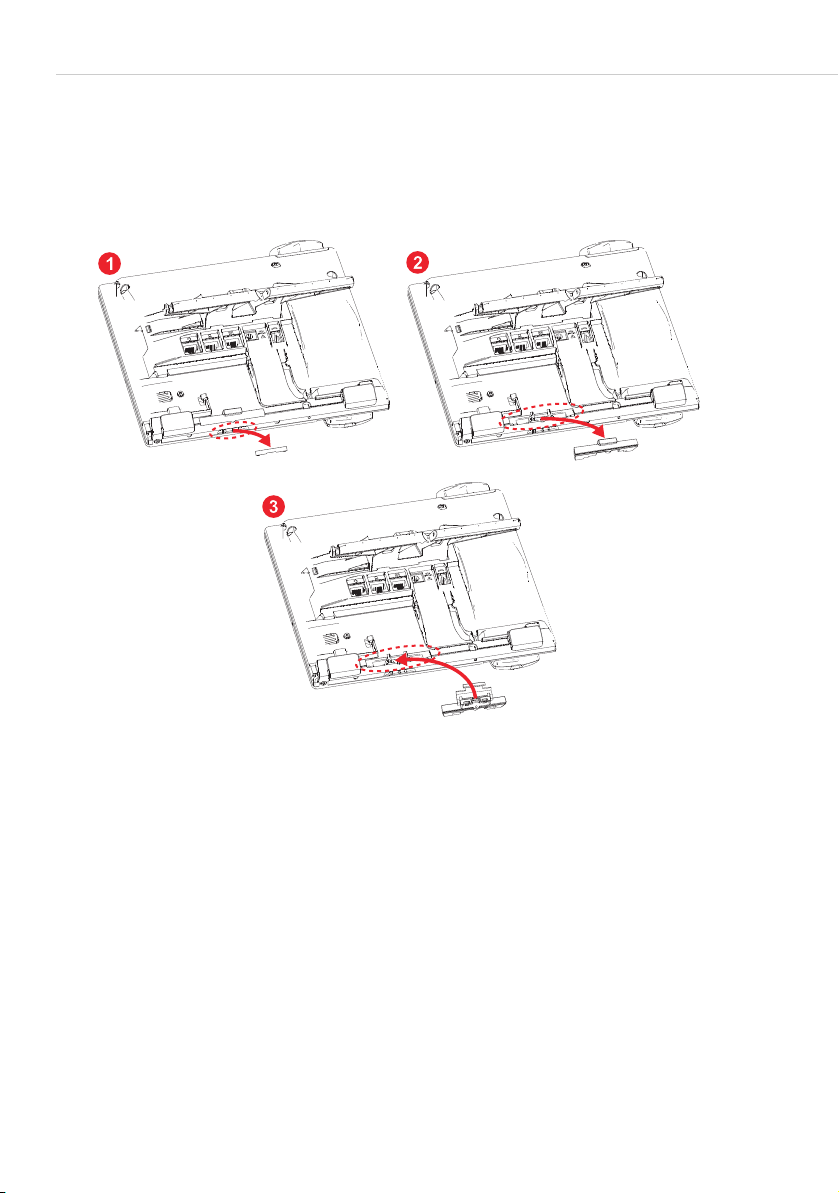
Connecting the Expansion Module to Your Phone
Use the following procedure to connect the Forum 500(0) Keypad Paper FIP
5020/5025/5030/5040 or Forum
5030/5040 Expansion Module to your IP phone:
1. Remove the two connector plate insertion area rubber caps on the right
side of the phone.
500(0) Keypad Display FIP 5025/
2. Turn your phone over so that the back of the phone is facing you.
3. Turn your Expansion Module over so that the back of the module is facing
you.
Installing Expansion Modules 29

Installation
4. If connecting the module to a Forum IPhone 5020, using a #2 Philips head
screwdriver, insert the two 8mm screws in the holes labelled B and C and
proceed to Step 5.
or
If connecting the module to a Forum IPhone 5025/5030/5040 extend
the connector plate by gently pulling the connector plate to the right and
using a #2 Philips head screwdriver, screw in the two 8mm screws in the
holes labelled A and C.
Forum 500(0) Keypad Paper FIP 5020/5025/5030/5040
Forum 500(0) Keypad Display FIP 5025/5030/5040
30 Installing Expansion Modules

Installation
5. Connect the Expansion Module to your phone using the connector plate as
indicated in the illustration below.
Example: Forum 500(0) Keypad Display FIP 5025/5030/5040 and
Forum IPhone 5030
6. Using a #2 Philips head screwdriver, screw in the 6mm screw into the hole
labelled D.
Attaching the Stand
1. Locate the stand insertion area on the back of the Expansion Module.
2. Carefully insert the stand into the insertion area and slide the stand
towards the right until it snaps in place.
Note: The orientation of the stand determines the viewing angle. If the
bottom of the stand is installed facing the top of the module the
viewing angle will be 35°
5030) or 30° (Forum
is installed facing the bottom of the module the viewing angle
will be 55°
Installing Expansion Modules 31
(Forum IPhone 5010/5020/5025/5030) or 60°
(Forum IPhone 5010/5020/5025/
IPhone 5040). If the bottom of the stand

Installation
(Forum IPhone 5040). The orientation of the module’s stand
must match the orientation of the phone’s stand.
55° / 60°
35° / 30°
Forum 500(0) Keypad Paper FIP 5020/5025/5030/5040
55° / 60°
35° / 30°
Forum 500(0) Keypad Display FIP 5025/5030/5040
32 Installing Expansion Modules

Installation
3. Turn over both units so that they are sitting face up on the desk with the
Expansion Module sitting flush against the right side of the phone.
Inserting the Key Card (Forum 500(0) Keypad Paper FIP 5020/5025/5030/5040)
The key card contains label identification spaces for the 16 programmable
keys.
1. Insert the paper key card into the programmable key card slot on the front
panel of the Expansion Module using the indentation of the plastic for
alignment.
2. Place the plastic cover over the paper key card ensuring the plastic cover
tabs are inserted into their respective slots.
A: Paper Key Card
B: Tab Insertion Slots
C: Plastic Cover Tabs
3. Press the plastic cover down firmly to even out and secure the plastic
cover to the Expansion Module.
Installing Expansion Modules 33

Installation
Note: You can label the paper key card manually or print it via the web
console of the Forum
system (in the
phones
menu). For further information please refer to the
500 / Forum 5000 communications
Configurator, Te l e p h o n y > Devices > System
online help topic entitled “Printing Label Strips”.
Attaching Multiple Expansion Modules
Up to a total of three Expansion Modules can be daisy-chained to your SIP
system telephone:
● The Forum 500(0) Keypad Paper FIP 5020/5025/5030/5040 provide
additional 48
● The Forum 500(0) Keypad Display FIP 5025/5030/5040 provide a total
programmable keys (three modules with three pages of
of 252
programmable keys each) then.
28
Use the following procedure to connect additional Expansion Modules to your
SIP system telephone:
1. Remove the two connector plate insertion area rubber caps on the right
side of the Expansion Module that is connected to the phone.
2. Turn your phone and connected Expansion Module over so that the back is
facing you.
3. Turn your additional Expansion Module(s) over so that the back of the
module(s) is/are facing you.
4. Connect the additional Expansion Module(s) to your initial Expansion
Module using the connector plate(s) as indicated in the illustration below.
programmable keys then.
34 Installing Expansion Modules

Installation
Connecting multiple Forum 500(0) Keypad Paper FIP 5020/5025/
5030/5040 Expansion Modules
Installing Expansion Modules 35

Installation
Connecting multiple Forum 500(0) Keypad D isplay FIP 5025/5 030/
5040 Expansion Modules
5. Using a #2 Philips head screwdriver, screw in the 6mm screw(s) into the
hole(s) labelled D.
36 Installing Expansion Modules

Safety Precautions
Installing the Detachable Magnetic Keyboard
The Forum 500(0) Keyboard Azerty FIP 5025/5030 magnetically connected
keyboard provides a full keyboard for a more natural typing inter face.
Forum 500(0) Keyboard Azerty FIP 5025/5030 features
● Magnetically connects to phone (i. e. no cables required)
● Powered by the Forum IPhone 5025/5030 (i. e. no batteries required)
Safety Precautions
This product contains neodymium rare earth magnets. Neodymium magnets
are extremely strong and therefore special care is required when handling the
500(0) Keyboard Azerty FIP 5025/5030 detachable magnetic
Forum
keyboard. Please read the following safety information before using the
500(0) Keyboard Azerty FIP 5025/5030 keyboard.
Forum
WARNING! Children should not be allowed to handle this product. Along
with the magnets this product contains small parts that may
pose a chocking hazard and should never be swallowed or
inserted into any part of the body. Seek immediate medical
attention if the magnets or any other parts of this product are
swallowed or inhaled.
WARNING! The strong magnetic fields of the magnets contained in this
product can damage magnetic media such as floppy disks,
credit cards, cassette tapes, videotapes, and similar items.
They can also damage televisions, VCRs, computer and CRT
monitors, and other electronics. Do not place the product
near any of these items.
Installing the Detachable Magnetic Keyboard 37

Scope of Delivery
WARNING! Never allow the neodymium magnets contained in this
product near a person with a pacemaker or similar medical
device. The strong magnetic fields of the magnet can affect
the operation of such devices
CAUTION! Neodymium magnets will lose their magnetic properties if
heated above 80° C (175° F).
CAUTION! Neodymium magnets should never be burned as burning
them will create toxic fumes.
Scope of Delivery
The scope of delivery of the Forum 500(0) Keyboard Azerty FIP 5025/5030
detachable magnetic keyboard includes:
Forum 500(0) Keyboard Azerty
FIP 5025/5030 Magnetic Keyboard
2.6 x 6mm Screw Regulatory/Safety Insert
38 Installing the Detachable Magnetic Keyboard
Phone-to-Keyboard
Magnetic Connector

Hardware Features
Legend
1 Keybo ard
2 Connection Pins
3 Connection Status LED
4 Navigation Keys
5 Locking Bar
6 Screw Lock Holes
7 Neodymium Magnets
Hardware Features
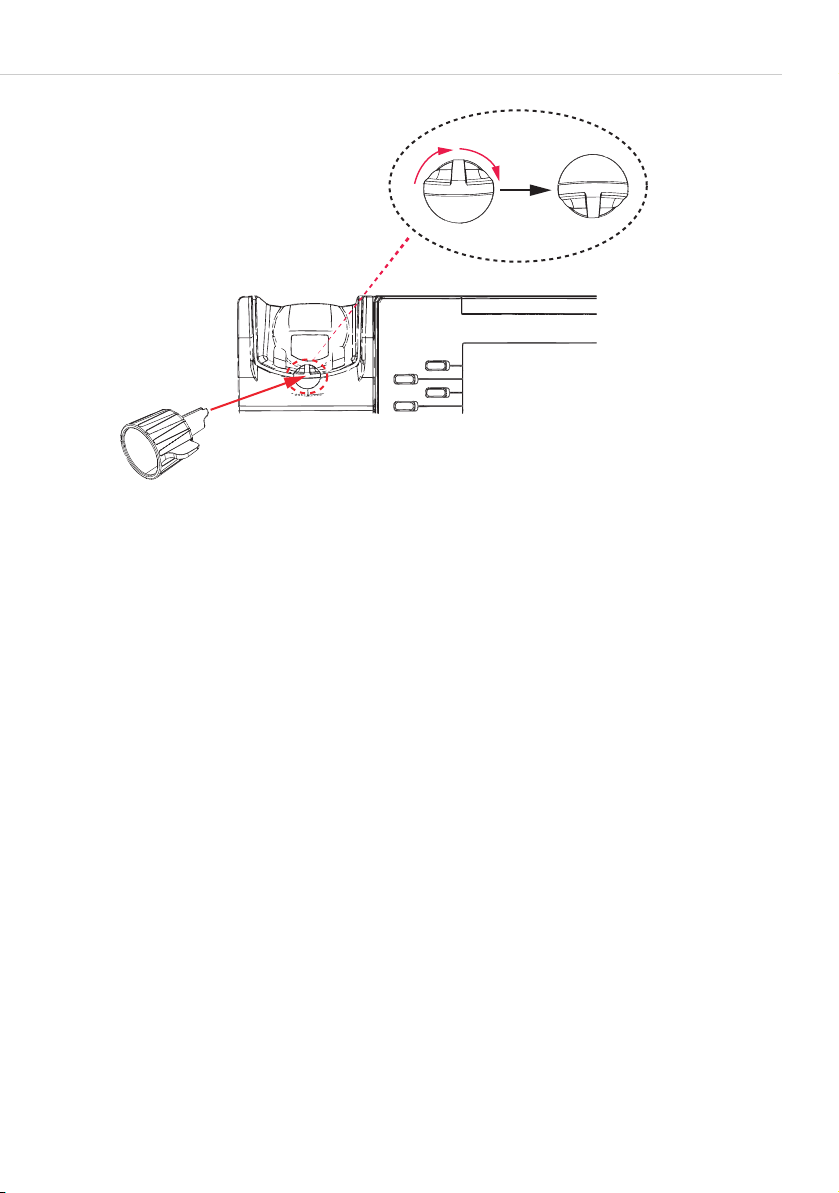
Installation
Yo u ca n in sta ll th e Fo r um 500(0) Keyboard Azerty FIP 5025/5030
detachable magnetic keyboard by simply using the strength of the magnets to
quickly attach and detach the keyboard to your phone when required or you
can utilize the locking bar on the phone-to-keyboard magnetic connector and
included screw to attach the keyboard to the phone in a more secure manner.
To s ta r t u si n g t he F or u m 500(0) Keyboard Azerty FIP 5025/5030 keyboard
you must first install the phone-to-keyboard magnetic connector.
1. On the bottom of the phone, locate and remove the plastic cover
protecting the contact area.
Installing the Detachable Magnetic Keyboard 39
Installation
2. On the back of the phone, locate and remove the rubber cap covering the
connection magnet insertion area.
3. Insert the phone-to-keyboard magnetic connector into the area left vacant
by the removal of the rubber cap.
Note: The magnetic connector should be installed with the visible
surfaces of neodymium magnets facing towards the bottom of
the phone.
Option A – Magnet-Only Connection
Follow the procedures below if you plan on using the keyboard infrequently
and/or want to be able to quickly store the keyboard away when not in use:
1. Swing the locking bar of the magnetic connector towards the phone so it
rests on back of the phone.
40 Installing the Detachable Magnetic Keyboard

Installation
2. Position your phone back on your desk and slide the keyboard towards the
magnetic connector until the keyboard snaps into place.
TM
IPhone
Forum
Notes:
– When the keyboard is connected the phone automatically detects the
keyboard and the connection status LED on the keyboard will light up
green indicating it is ready to be used.
– The phone must be on for it to recognize the keyboard.
– If the LED does not light up or if the keyboard is not functioning correctly,
detach the keyboard, reattach ensuring the keyboard’s connection pins are
touching the contact area on the phone, and wait 30
seconds, the LED does not light up, detach the keyboard and try again.
30
seconds. If after
Installing the Detachable Magnetic Keyboard 41

Installation
M
T
IPhone
Forum
Option B – Reinforced Connection
Follow the procedures below if you plan on using the keyboard frequently
and/or prefer a more reinforced/secure connection between the phone and
the keyboard.
1. Swing the locking bar of the magnetic connector towards the front of the
phone until it clicks in place.
2. Position your phone back on your desk and, with the bottom of the phone
slightly raised, slide the keyboard connection pins in between the base of
the phone and the locking bar. The locking bar must snap into the
keyboard audibly.
42 Installing the Detachable Magnetic Keyboard

Installation
ForumTM IPhone
Notes:
– When the keyboard is connected the phone automatically detects the
keyboard and the connection status LED on the keyboard will light up
green indicating it is ready to be used.
– The phone must be on for it to recognize the keyboard.
– If the LED does not light up or if the keyboard is not functioning correctly,
detach the keyboard, reattach ensuring the keyboard’s connection pins are
touching the contact area on the phone, and wait 30 seconds. If after
seconds, the LED does not light up, detach the keyboard and try again.
30
3. While the keyboard is in place, insert the provided screw into the magnetic
connector’s screw lock holes and fasten using a Philips-head screwdriver.
Installing the Detachable Magnetic Keyboard 43

Installation
Note: The locking bar and screw is not designed to permanently secure the
keyboard to the phone. It is used to simply reinforce the connection so that
the keyboard does not become accidently dislodged by a light impact. With
the locking bar and screw in place, the keyboard can still be knocked loose
if the impact is hard enough.
4. Position your phone back on your desk and ensure the connection status
LED on the keyboard is lit green.
M
T
IPhone
Forum
44 Installing the Detachable Magnetic Keyboard
Scope of Delivery
Wall Installation
The SIP system telephones Forum IPhone 5010/5020/5025/5030 can be
mounted to a wall using the Forum
(optional accessory). The wall mount kit allows you to easily and securely
mount your phone in one of two ways:
● Directly to the wall
● On top of an existing telco wall plate
Scope of Delivery
The scope of delivery of the Forum 500(0) Wall m ounting ki t FIP 50xx
includes:
500(0) Wall mounting kit FIP 50xx
Wall Mount Base and
Connector
Wall Mount Screw Set Regulatory/
Wall Installation 45
Handset Hook
Rotating Tool
Safety Insert
Category 5e
Ethernet Cable

Hardware Features
Hardware Features
Wall Mount Co n necto r Wall Mount Base
Legend
1 Release Lever
2 Anti-Theft Screw Lock Hole
3 Direct Wall Mount Holes
4 Telco Wall Plate Support
Direct Wall Mount Installation
To mount your phone directly to the wall:
1. Separate the Wall Mount Connector from the Wall Mount Base by pulling
the Release Lever (on the Wall Mount Connector) in and pulling the Wall
Mount Connector up.
46 Wall Installation

Direct Wall Mount Installation
2. Locate the wall mount insertion area on the back of the phone (above the
various ports).
3. Carefully insert the Wall Mount Connector into the insertion area of your
phone and slide the Wall Mount Connector towards the right until it snaps
in place.
4. Turn over your phone and locate the handset hook found in the handset
cradle.
Wall Installation 47

Direct Wall Mount Installation
5. Using the handset hook rotating tool, rotate the handset hook 180° as
illustrated in the figure below.
ForumTM IPhone
The handset hook is now in the correct position ensuring that your phone’s
handset securely stays on hook when the phone is mounted to the wall.
6. The orientation of the Wall Mount Base determines the viewing angle of
the phone. Use the degree markings (A) on the Wall Mount Base to select
the viewing angle. Position the Wall Mount Base with the desired angle
facing up, and using the provided screws, attach the Wall Mount Base to
the wall.
48 Wall Installation

Direct Wall Mount Installation
Note: Depending on the wall type, you may need to use wall anchors.
Wall anchors are included with your Forum
mounting kit FIP
50xx.
500(0) Wall
7. On the back of your phone, connect the provided Ethernet cable into the
network port marked with
. Plug the other end of the Ethernet cable
directly into the network jack on the wall.
8. Gently slide the Wall Mount Connector attached to your phone into the
Wall Mount Base until it snaps into place. Use the figure below as a
guideline (viewed from the right side).
Wall Installation 49

Direct Wall Mount Installation
10° Orientation
20° Orientation
9. (Optional) Insert the locking screw into the Screw Lock Hole located on the
right side of the Wall Mount Connector and gently tighten using a Philipshead screwdriver to secure the Wall Mount Connector to the Wall Mount
Base.
50 Wall Installation

Telco Wall Plate Installation
WARNING! Tighten the screw until snug but do not over tighten. Over-
tightening may cause damage to the screw lock hole.
10.If required, place the handset into your phone’s handset cradle.
Telco Wall Plate Installation
To mount your phone on top of an existing telco wall plate:
1. Separate the Wall Mount Connector from the Wall Mount Base by pulling
the Release Lever (on the Wall Mount Connector) in and pulling the Wall
Mount Connector up.
Wall Installation 51

Telco Wall Plate Installation
2. Locate the wall mount insertion area on the back of the phone (above the
various ports).
3. Carefully insert the Wall Mount Connector into the insertion area of your
phone and slide the Wall Mount Connector towards the right until it snaps
in place.
4. Turn over your phone and locate the handset hook found in the handset
cradle.
5. Using the handset hook rotating tool, rotate the handset hook 180° as
illustrated in the figure below.
52 Wall Installation
Telco Wall Plate Installation
ForumTM IPhone
The handset hook is now in the correct position ensuring that your phone’s
handset securely stays on hook when the phone is mounted to the wall.
6. If possible, loosen the screws from the existing telco wall plate enough so
that the Wall Mount Base is able to slide in place. Or: Remove the screws
from the existing telco wall plate entirely and replace with a set of the
provided screws. Ensure that the screws are loose enough so that the Wall
Mount Base is able to slide in place.
Note: Depending on the wall type, you may need to use wall anchors.
Wall anchors are included with your Forum
mounting kit FIP
50xx.
500(0) Wall
The orientation of the Wall Mount Base determines the viewing angle of
the phone. Use the degree markings (A) on the Wall Mount Base to select
the viewing angle. Overlay the Wall Mount Base on top of the telco wall
plate with the desired angle facing up, and pull down to secure the Wall
Mount Base in place.
Wall Installation 53

Telco Wall Plate Installation
A: Degree Markings
B: Telco Wall Plate
C: Overlay and Pull Down
D: Wall Mount Base Secured to Telco Wall Plate
Note: If necessary, tighten the screws to firmly lock the Wall Mount
Base in place.
54 Wall Installation

Telco Wall Plate Installation
7. On the back of your phone, connect the provided Ethernet cable into the
network port marked with
directly into the network jack on the wall.
8. Gently slide the Wall Mount Connector attached to your phone into the
Wall Mount Base until it snaps into place. Use the figure below as a
guideline (viewed from the right side).
. Plug the other end of the Ethernet cable
10° Orientation
20° Orientation
Wall Installation 55
Dismounting the Phone
9. (Optional) Insert the locking screw into the Screw Lock Hole located on the
right side of the Wall Mount Connector and gently tighten using a Philipshead screwdriver to secure the Wall Mount Connector to the Wall Mount
Base.
WARNING! Tighten the screw until snug but do not over tighten. Over-
tightening may cause damage to the screw lock hole.
10.If required, place the handset into your phone’s handset cradle.
Dismounting the Phone
To dismount the installed phone from the wall mount:
1. Locate and place your fingers on the Release Lever (on the Wall Mount
Connector) and with your thumb on the top front of the phone press the
Release Lever firmly towards you.
56 Wall Installation
Dismounting the Phone
WARNING! Do not press or apply any pressure on the phone’s LCD
display. Doing so may crack or otherwise irrevocably damage
the display.
2. With the Release Lever pressed, using your other hand, gently slide the
phone in an upward motion until the phone and Wall Mount Connector are
detached from the Wall Mount Base.
Wall Installation 57

Configuration and Programming
Feature Overview
Configuration and Programming
Using the web console
The SIP system telephones are configured on the web console of the
500 / Forum 5000 communications system. This is where the
Forum
telephone functions are programmed.
Settings on the telephone
Some functions (e. g. ring tone settings, display settings) are configured
directly on the telephone.
For information on these topics, please refer to the following chapters:
● Configuring the Telephone starting on page 94
● Programming Keys starting on page 104
● Menus at Your SIP System Telephone on page 173
58 Feature Overview

Key Assignments
Key Assignments
ForumTM IPhone
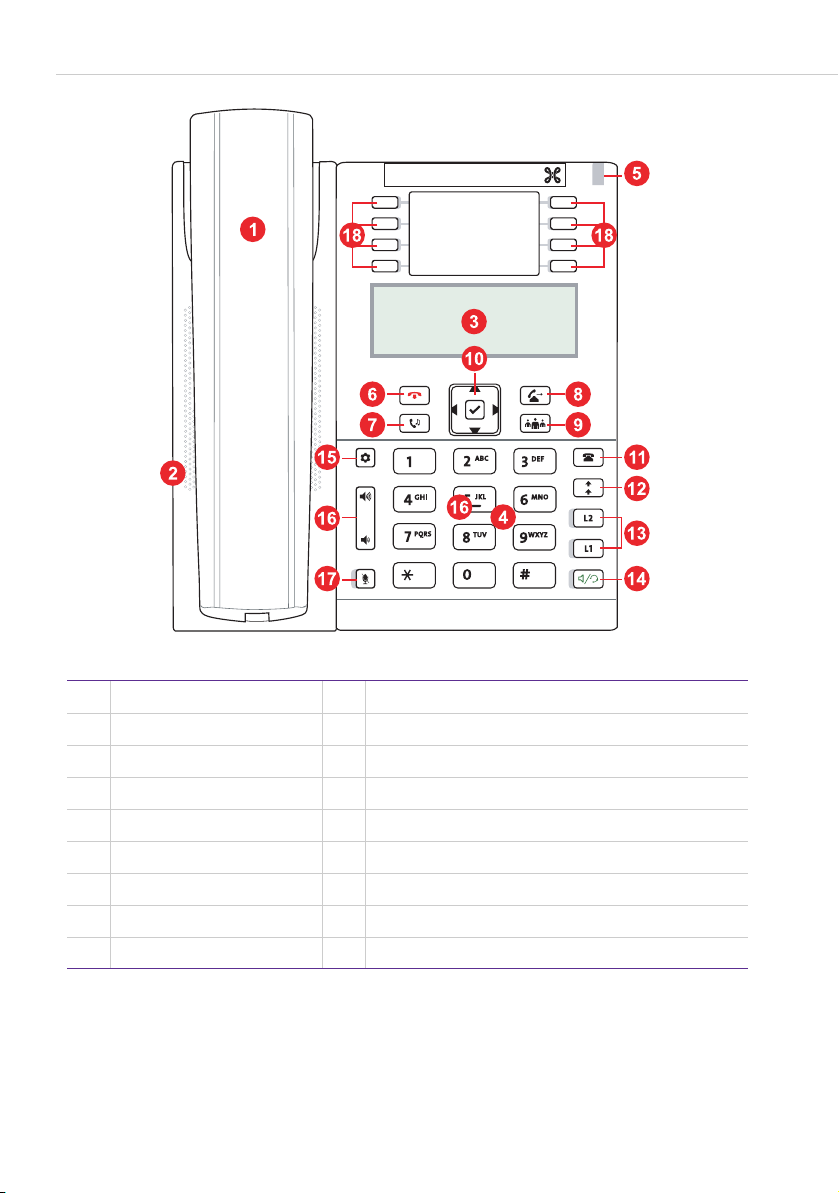
Forum IPhone 5010
1 Handset 8 Goodbye key
2 High quality speakerphone 9 Mute key (with LED)
3 Display 10 Volu me cont ro l keys
4 Key pad 11 Loudspeaker key (with LE D)
5 Message waiting lamp 12 Navigation keys/Select key
6 Tr u n k ke ys (w ith LED) 13 Options key
7 Hold key 14 Programmable keys (without LED)
Feature Overview 59
Key Assignments
ForumTM IPhone
Forum IPhone 5020
1 Handset 10 Navigation keys/Select key
2 High quality speakerphone 11 Caller list key
3 Display 12 Redial key
4 Key pad 13 Trunk ke y s (w ith LED)
5 Message waiting lamp 14 Loudspeaker/headset key (with LED)
6 Goodbye key 15 Options key
7 Hold key 16 Vo lum e co ntrol keys
8 R-key 17 Mute key (with LED)
9 Conference key 18 Programmable keys (with LED)
60 Feature Overview
ForumTM IPhone
Key Assignments
Forum IPhone 5025
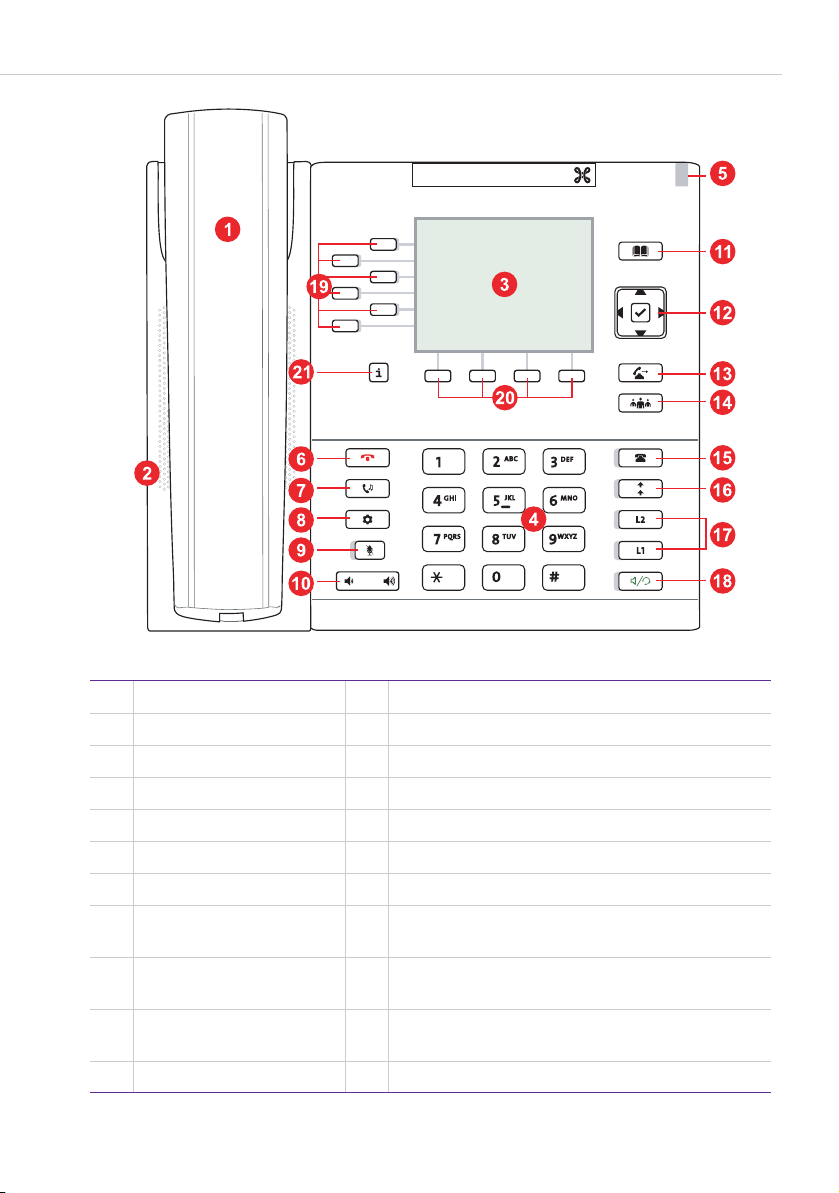
1 Handset 12 Navigation keys/Select key
2 High quality speakerphone 13 R-key
3 Display 14 Conference key
4 Key pad 15 Caller list key (with LED)
5 Message waiting lamp 16 Redial key (with LED)
6 Goodbye key 17 Tr unk ke y s ( w i th LED)
7 Hold key 18 Loudspeaker/headset key (with LED)
8 Options key 19 Programmable keys with LED (TopSoftkeys) and
Level key (bottom key)
9 Mute key (with LED) 20 Programmable keys without LED (Softkeys) and
Level Key (right key) or context-sensitive Softkeys
10 Volu me cont ro l keys 21 Info key (on the Forum 500 / Forum 5000
communications system without function)
11 Phone book key
Feature Overview 61

Key Assignments
ForumTM IPhone
Forum IPhone 5030
1 Handset 10 Volu me cont ro l keys
2 High quality speakerphone 11 Caller list key (with LED)
3 Display 12 Redial key (with LED)
4 Key pad 13 Trunk ke y s (w ith LED)
5 Message waiting lamp 14 Loudspeaker/headset key (with LED)
6 Goodbye key 15 Navigation keys/Select key
7 Hold key 16 Programmable keys with LED (TopSoftkeys) and
Level key (bottom right)
8 Options key 17 Programmable keys without LED (Softkeys) and
Level key (right key) or context-sensitive Softkeys
9 Mute key (with LED) 18 Info key (on the Forum 500 / Forum 5000
communications system without function)
62 Feature Overview

Key Assignments
Forum IPhone 5040
1 Handset 9 Mute key (with LED)
2 High quality speakerphone 10 Volu me con trol key s
3 Touchscreen display 11 Caller list key (with LED)
4 Key pad 12 Redial key (with LED)
5 Message waiting lamp 13 Trunk keys (with LED)
6 Goodbye key 14 Loudspeaker/headset key (with LED)
7 Hold key 15
8 Options key 16 Programmable keys (Softkeys) and Level key
Programmable keys (TopSoftkeys)
(right key) or context-sensitive Softkeys
Feature Overview 63

Key Functions
Key Functions
Keypad
The keypad is for dialling call numbers or entering text (see also the
chapter Entering Text and Numerals on page 87).
Trunk Keys
/ Each SIP system telephone provides two fixed trunk keys with
LED. On the Forum IPhone 5020/5025/5030/5040, further trunk keys can
be configured on the telephone’s programmable keys (see the chapter
Programmable Keys on page 65).
The trunk key 1 is occupied by your internal call number. Your internal call
number is assigned to an external call number where you can be reached
when being called from an external number. If you wish to make a call, lifting
the handset seizes the key (and the trunk line); you can immediately dial an
internal or external number (depending on the system setting). To call via a
certain trunk key (e.
g. ), first press the key and then dial the call number.
It is possible to assign several external call numbers to a trunk key. A system
setting makes it also possible to have your internal number assigned to other
telephones as well. Calls will then be signalled to other telephones
simultaneously.
Key LED
The key LED indicates different states.
The trunk key is free. The LED of the keys L1 or L2 is off
(softkey display for an additional
trunk key on the
IPhone 5025/5030/5040:
Forum
)
You are receiving a call. The LED of the keys L1 or L2 flashes
(softkey display for an additional
trunk key on the
IPhone 5025/5030/5040:
Forum
)
64 Feature Overview

Key Functions
You have seized the key. The LED of the keys L1 or L2 lights up
(softkey display for an additional
trunk key on the
IPhone 5025/5030/5040:
Forum
)
You have put a subscriber on hold. The LED of the keys L1 or L2 flashes
(softkey display for an additional
trunk key on the
IPhone 5025/5030/5040:
Forum
)
Information for the system administrator
● You configure the internal call number of a SIP system telephone in the
Configurator > Telephony > Devices > VoIP phones menu. The internal
call number that you enter there will be assigned to the trunk
key 1 of the
telephone.
● The assignment of external call numbers is done in the Configurator >
Te l e p h o n y
> Call distribution menu.
Programmable Keys
The SIP system telephones provide a number of free programmable keys.
Each programmable key can be programmed as a further trunk key
(exception: Forum
feature key. The number of programmable keys depends on the telephone
model:
Te l e p h o n e Programmable keys
Forum IPhone 5010 3 without LED, below the display
Forum IPhone 5020 8 with LED, on top of the display
Forum IPhone 5025 ● 5 TopSoftkeys with LED, next to the display,
Feature Overview 65
IPhone 5010) or as destination key, direct-call key or
programmable in 4 levels,
sum: 20 TopSoftkeys
● 3 Softkeys without LED, below the display,
programmable in 6 levels,
sum: 18 Softkeys

Key Functions
Te l e p h o n e Programmable keys
Forum IPhone 5030 ● 11 TopSoftkeys with LED, next to the display,
programmable in 2 levels,
sum: 22 TopSoftkeys
● 4 Softkeys without LED, below the display,
programmable in5 levels,
sum: 20 Softkeys
Forum IPhone 5040 ● 12 TopSoftkeys on the top part of the display,
programmable in 4 levels,
sum: 48 TopSoftkeys
● 5 Softkeys in the bottom part of the display,
programmable in 5 levels,
sum: 25 Softkeys
P1 to P3: Programmable keys on the Forum IPhone 5010
P1 to P8: Programmable keys on the Forum IPhone 5020
66 Feature Overview

Programmable keys on the Forum IPhone 5025
T1 to T5: TopSoftkeys (with LED)
S1 to S3: Softkeys (without LED)
A: Switch key level (e. g. from level 1 to level 2)
Key Functions
Programmable keys on the Forum IPhone 5030
T1 to T11: TopSoftkeys (with LED)
S1 to S4: Softkeys (without LED)
A: Swich key level (e. g. from level 1 to level 2)
Feature Overview 67

Key Functions
Programmable keys on the Forum IPhone 5040
T1 to T12: TopSoftkeys
S1 to S5: Softkeys
A: Swich key level (e. g. from level 1 to level 2)
Notes
● The dots on the level keys (A) indicate the number of available levels and
the currently selected level.
● The Softkeys S1 to S3 (Forum IPhone 5025), S1 to S4
(Forum
IPhone 5030), S1 to S5 (Forum IPhone 5040) also serve to the
execute context-sensitive commands that are displayed during operation.
Some programmable keys are preset with important functions that are
required to operate the telephone with the Forum
500 / Forum 5000
communications system:
Te l e p h o n e Preset keys
Forum IPhone 5010 P1: Missed calls
P2: Redial
P3: R-key
Forum IPhone 5020 P1: Missed calls
P2: Status menu
P5: Phone book
Forum IPhone 5025 T1 (level 1): Status menu
Forum IPhone 5030 T1 (level 1): Status menu
T7 (level 1): Phone book
T11 (level 1): R-key
68 Feature Overview

Key Functions
Te l e p h o n e Preset keys
Forum IPhone 5040 T1 (level 1): Status menu
T7 (level 1): Phone book
T12 (level 1): R-key
For more information, please refer to the chapter Programming Keys starting
on page 104.
Key LED
Depending on the function programmed the respective state is signalled via
an illuminated LED (feature is activated, e.
LED (event programmed occurs, e.
when there are new missed calls).
g. the Missed calls feature key LED flashes
g. the Call protection) or a flashing
Loudspeaker Key, Loudspeaker/Headset Key
(Forum IPhone 5010)
(Forum IPhone 5020/5025/5030/5040)
Activates the loudspeaker (before dialling a call number or during a call) and
enables to accept a call without without picking up the handset. For
information on operating the key see chapter
page 97.
Setting the Audio Mode on
Key LED
The LED is on when the loudspeaker is switched on.
Mute Key
to deactivate the microphone during a call. The person you are speaking
with will not be able to hear you. Press it once again to switch the microphone
back on.
Key LED
The LED of the key is on when the microphone is deactivated.
Feature Overview 69

Key Functions
Vol um e Contro l Key s
Adjust the volume for the handset, ringer and speaker.
Key layout on the Forum IPhone 5010
Key layout on the Forum IPhone 5020
Key layout on the Forum IPhone 5025/5030/5040
The volume control keys enable the following functions.
● They adjust the handset volume when making a call via the handset.
● They adjust the volume of the headphones of a headset.
● They adjust the volume of the ringer tone during a call.
● They adjust the volume of the loudspeaker during open-listening/hands-
free mode.
This setting is stored immediately and will be active for all future calls.
Redial Key
(Forum IPhone 5010) / (Forum IPhone 5020/5025/5030/
5040): redials previously dialled numbers.
Key LED
On the Forum IPhone 5025/5030/5040 the key LED s without a function.
This is also the case if you configure the
key with L ED.
Redial feature on a programmable
Caller List Key
(Forum IPhone 5010) / (Forum IPhone 5020/5025/5030/
5040): opens the list of missed calls (see page 175).
Key LED
On the Forum IPhone 5025/5030/5040 the LED of the caller list key
flashes if you have received new missed calls.
70 Feature Overview

Key Functions
Phone Book Key
opens the Forum 500 / Forum 5000 communications system’s
telephone book (only available on the Forum IPhone 5025). See also the
chapter
Telephone Book starting on page 171.
Hold Key
puts the current call on hold. Press this key once again to retrieve the call
on hold.
Please note:Via this key, a call is put on hold locally in the device not in the
communications system. The connection to the subscriber is
separated if you initiate an enquiry call. If neccessary,
programme a
Description of Programmable Feature Keys starting on
page 107). This enables you the comfortable use of functions
that require to put a subscriber on hold or you use the Hold
meny entry in the status menu (see also the chapter
sation” Status Menu starting on page 125).
Hold feature key (see the chapter Brief
“Conver-
R-Key, Enquiry-Key
(Forum IPhone 5010) / (Forum IPhone 5020/5025): to initiate
and end an enquiry call. After you have ended an enquiry call, switch back to
the call being held with this key.
Notes
● On the Forum IPhone 5010, the R-key function is preset on the program-
mable key .
● On the Forum IPhone 5030, the R-key function is preset on the program-
mable key T11 .
● On the Forum IPhone 5040, the R-key function is preset on the program-
mable key T12 .
Conference Key
(Forum IPhone 5020/5025): initiates a 3-party conference with the
current subcriber and the subscriber on hold when you are in an enquiry call
Feature Overview 71

Key Functions
Goodbye Key
ends an active call or exits an open menu page without saving any
changes made.
Navigation Keys/Select Key
(Forum IPhone 5010/5020/5025/5030): to navigate within the
user interface of your telephone. By pressing the select key , you
confirm a setting and/or execute various actions (e. g. dialling a call
number that you have selected in the redial list).
Options Key
accesses the device menu which allows settings for the telephone (see
also page 83).
The Locking of the Telephone Interface
The system administrator can lock your telephone’s interface via a setting for
your user group. All keys of your telephone no longer function aside from a
few exceptions (e.
g. the number keys and the trunk key 1).
● You can then make calls with your telephone but no system functionality
can be configured.
● If the system administrator has authorised you to do so, you can also set
the time group of the communications system (see also
“Central settings” Menu Group on page 197). If your user group authorisation changes according to the time group, then it is possible that the
interface lock of your telephone will be cancelled.
Please consult your system administrator if you have any questions about
your authorisations.
Information for the system administrator
Administer authorisation of which keys are functional on the system
telephone and which keys are locked over the
manager
72 Feature Overview
> User groups menu.
Configurator > User
the chapter
Display Contents
Display Contents
The display shows information on the current connection state or lists and
menu texts. In the idle state, you see:
● your programmed user name and (on the Forum IPhone 5025/5030/
5040 SIP system telephones) your internal call number,
● the current time and date (data are transferred by the Forum 500 /
5000 communications system),
Forum
● symbols and status indications (if applicable).
L1 Administrator
3-May-15 12:45
Idle state on the Forum IPhone 5010/5020
A: User name, date and time
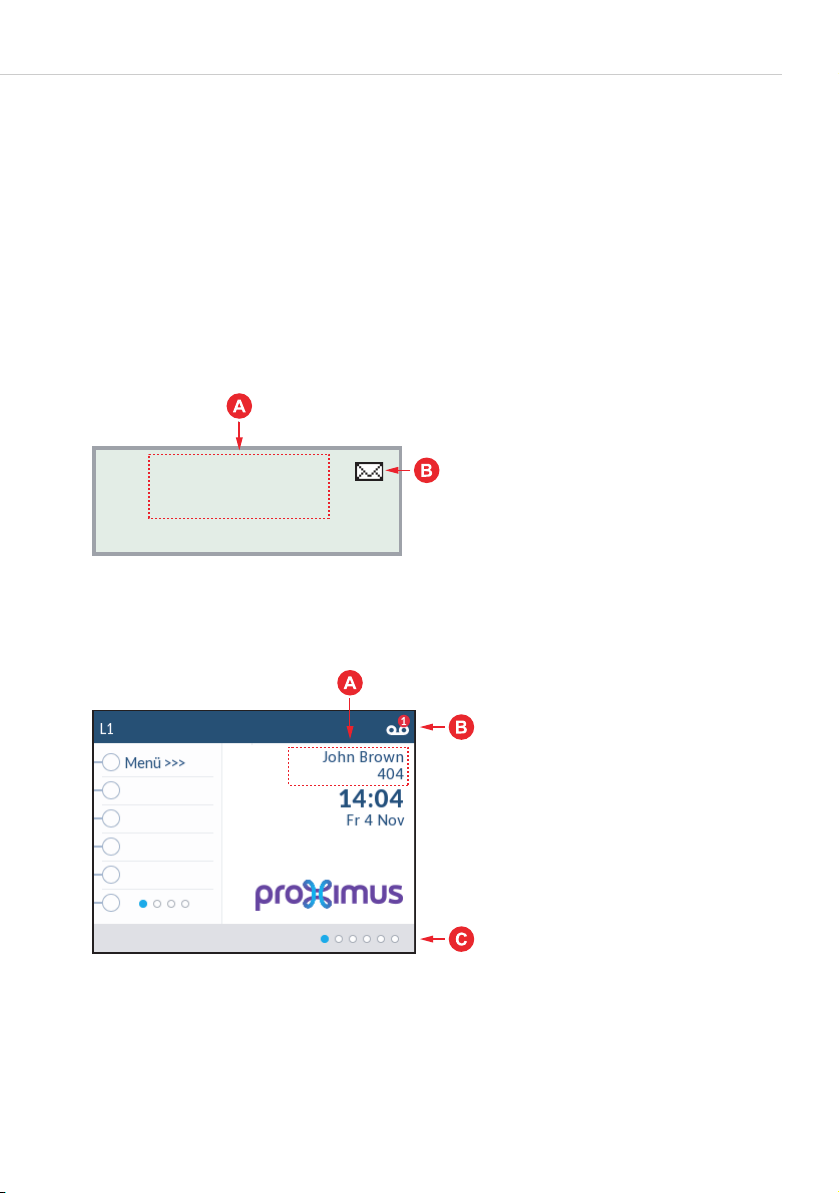
B: Status indications
Idle state on the Forum IPhone 5025
A: User name and internal call number
B: Status indications
C: Softkey line
Feature Overview 73

Display Contents
Idle state on the Forum IPhone 5030
A: User name and internal call number
B: Status indications
C: Softkey line
Idle state on the Forum IPhone 5040
A: User name and internal call number
B: Status indications
C: Softkey line
74 Feature Overview
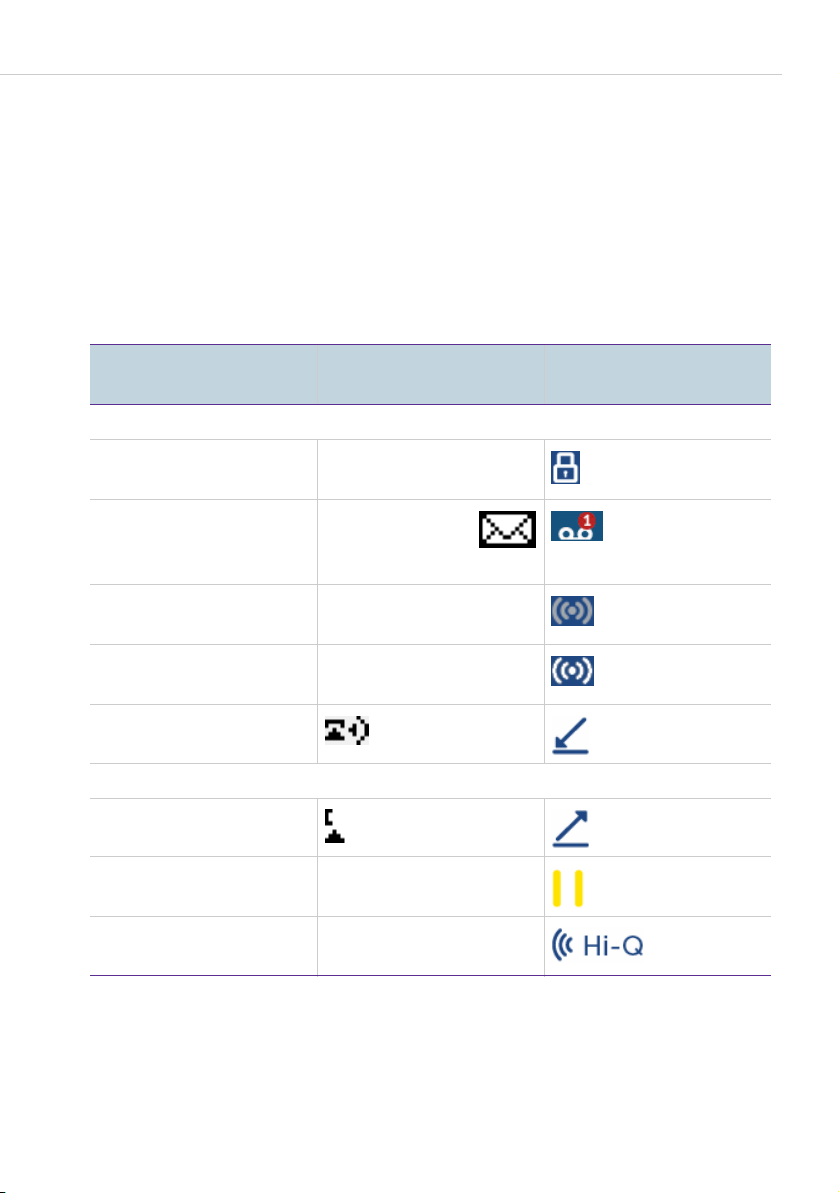
Display Contents
Display Language, Date and Time Display
The display language and the display of date and time on the telephone are
configured via the web console of the Forum
communications system (see the chapter
page 94).
500 / Forum 5000
Settings on the Web Console on
Display Symbols
The following symbols/status indications may appear on the display:
Symbol Forum IPhone
5010/5020
Idle state
Telephone lock is
activated
New voicebox message 1 Message
Bluetooth functionality
is enabled
Bluetooth connection
exists
Incoming call
Connection state
Outgoing call
Subscriber on hold (not displayed)
Hi-Q audio connection
established
(not displayed)
or
n Messages
(no Bluetooth support)
(no Bluetooth support)
Hi – Q
Forum IPhone
5025/5030/5040
Feature Overview 75
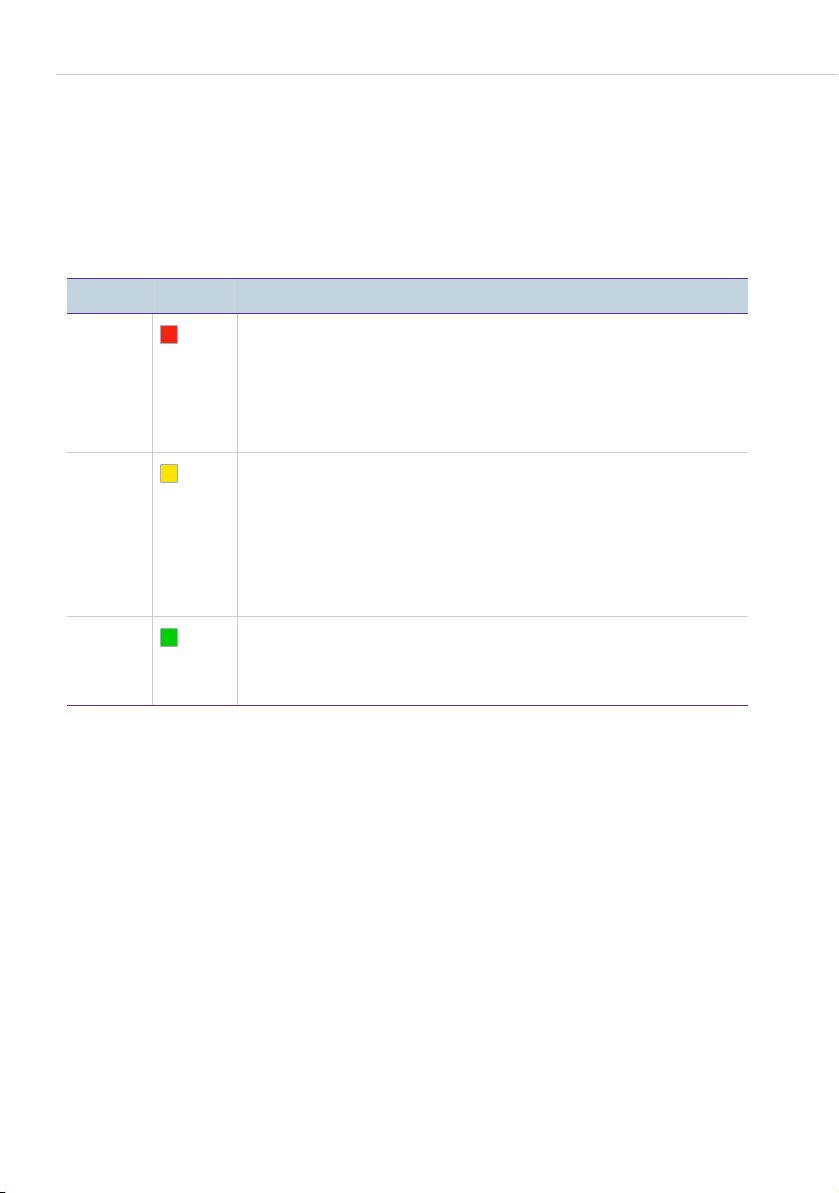
Display Contents
LED Display on the TopSoftkeys
Unlike the Forum IPhone 5040 SIP system telephone, the TopSoftkeys on the
IPhone 5025/5030 SIP system telephones have LEDs that display the
Forum
current status of a programmed function or the occupied state of a line. The
colours of the TopSoftkeys shown on the display or the LED status have the
following meanings:
LED Display Meanings
Lights
up red
● Displayed on a trunk key or a busy key: The call
number programmed on this key is busy.
● Displayed on a function key: The programmed
function is activated (e. g. Call protection is turned
on).
Flashes
red
● Displayed on a trunk key or a busy key: The call
number programmed on this key is currently being
called.
● Displayed on a function key with notification function:
There are new notifications (e. g. new Voicemail
message or Missed calls).
Off ● Displayed on a trunk key or a busy key: The call
number programmed on this key is free.
● Displayed on a function key: not available
76 Feature Overview

Forum IPhone 5040: Operating the Touch Screen
Forum IPhone 5040: Operating the
To u c h S cree n
The LCD touch screen is used to navigate the user interface.
Idle mode and connection state: Swipe left or right in the area of
TopSoftkeys to move between the key levels of the TopSoftkeys.
By swiping left or right in the area to the right next to the
TopSoftkeys you change:
● Between the “Idle display” screen and the “Line selection”
screen in idle mode
● Between the “Call details”, “Multiple calls” and “Line selection”
screens in connection state
By swiping up or down in the area to the right next to the
TopSoftkeys you scroll:
● Through the trunk keys that have been set up on your telephone
on the “Line selection” screen (possible in idle mode and
connection state)
● Between several contacts (subscribers), with which you are
currently connected
state on the “Multiple calls” screen
via different trunk keys in connection
To select a trunk key, a subscriber or any other element, simply
press the element on the screen.
Feature Overview 77

Forum IPhone 5040: Operating the Touch Screen
“Idle display” Screen
Range Possible actions
A: display when idle Swipe left:
Call up the “Line selection” screen,
page 79
see
B: TopSoftkeys Swipe left or right:
Switch key level
Press TopSoftkey:
Execute programmed function
C: Softkeys and level key Press softkey:
Execute programmed function
Press level key:
Switch key level to call up further
programmed softkeys
78 Feature Overview

Forum IPhone 5040: Operating the Touch Screen
“Line selection” Screen
Range Possible actions
A: Configured trunk keys Swipe left in connection state:
● Call up the “Multiple calls” screen,
see page 80
(if several connections exist)
or
● Call up the “Call details” screen,
see page 81
(if there is one connection only)
Swipe right in idle or connection
:
state
Call up “Idle display” screen, see
page 78
Swipe up or down:
Scroll through the list of trunk keys
Press the trunk key:
Seize a line (the selected line is highlighted in colour)
Feature Overview 79

Forum IPhone 5040: Operating the Touch Screen
Range Possible actions
B: TopSoftkeys Swipe left or right:
Switch key level
Press TopSoftkey:
Execute programmed function
C: Softkeys Press softkey:
Execute context-dependent function
“Multiple calls” Screen
The “Multiple calls” screen is displayed only if you are connected with multiple
parties at the same time via
2).
key
different trunk keys (e. g. trunk key 1 and trunk
Range Possible actions
A: List of current parties Swipe left:
Call up the “Call details” screen, see
page 81
Swipe right:
Call up the “Line selection” screen,
page 79
see
80 Feature Overview

Forum IPhone 5040: Operating the Touch Screen
Range Possible actions
Swipe up or down:
Scroll through list of current parties
Press entry:
Change to this party (the active party
is highlighted in colour)
B: TopSoftkeys Swipe left or right:
Switch key level
Press TopSoftkey:
Execute programmed function
C: Softkeys and level key Press softkey:
Execute context-dependent function
Press level key:
Switch key level to call up further
programmed softkeys
“Call details” Screen
The “Call details” screen is displayed only if at least one call is being signalled
(call status) or if you are connected with at least one party (connection state).
Feature Overview 81

Message Waiting Lamp
Range Possible actions
A: Call details about the
current party
B: TopSoftkeys Swipe left or right:
C: Softkeys and level key Press softkey:
Swipe right:
● Call up the “Multiple calls” screen,
see page 80
(if several connections via
different trunk keys exist)
or
● Call up the “Line selection”
screen, see page 79
(if there is one connection only)
Swipe up or down:
Scroll through list of current parties
Switch key level
Press TopSoftkey:
Execute programmed function
Execute context-dependent function
Press level key:
Switch key level to call up further
programmed softkeys
Message Waiting Lamp
The message waiting lamp is located on the right top of your telephone. The
LED flashes in the following situations:
● You are receiving a call.
● New voicebox messages await you.
82 Feature Overview

Menus
Menus
Your SIP system telephone provides different menus to configure and use the
500 / Forum 5000 communications system’s features.
Forum
Status Menu
The status menu provides operation features that fit to the current situation
g. menu when the called subscriber is busy). To use this menu, you have to
(e.
programme a
of Programmable Feature Keys on page 107). For a description of the
available status menu entries see the chapter Telephoning starting on
page 116.
Main Menu
The main menu collects all features that can be used with the Forum 500 /
5000 communications system. It contains also all status menu entries.
Forum
To access the main menu, you have to programme either a
key or a
when the telephone is in the idle state (see the chapter
Programmable Feature Keys on page 107). Please refer to the chapter Main
Menu starting on page 173 for information on the main menu features.
Status menu feature key (see also the chapter Brief Description
Main menu feature
Status menu feature key which also allows to access the main menu
Brief Description of
Device Menu
Your telephone also has a local device menu. This menu is primarily for
configuring the telephone (display settings, audio settings, etc.). Please read
the chapter
functions.
Local Telephone Settings starting on page 97 on the menu
Using Menus
The operation of the menus depends on the SIP system telephone type you
are using.
Feature Overview 83

Menus
Forum IPhone 5010/5020/5025/5030
You can use the navigation keys/select key. The display on the
Forum IPhone 5010/5020 indicates the actions that are currentlay
available and which navigation key must be used to execute them
(example:
Enter to execute the current function. On the
Forum IPhone 5025/5030 the softkeys below the display indicate additional
context-sensitive commands which you use alternatively.
Action Forum IPhone
5010/5020
Status menu and Main menu
Open status menu Press the Status menu
feature key.
Open main menu Press the Main menu
feature key.
or:
Press the Status menu
feature key in the idle
state and select the
Main menu menu entry.
Close status menu or
Press . Press .
main menu (see also the
note on
page 86)
Scroll menu Press (previous menu
entry).
Press (next menu
entry).
Switch back one menu
Press . Press .
level
Forum IPhone
5025/5030
Press the Status menu
feature key.
Press the Main menu
feature key.
or:
Press the Status menu
feature key in the idle
state and select the
Main menu menu entry.
Press (previous menu
entry).
Press (next menu
entry).
or:
Press Esc softkey.
Select/activate
displayed menu entry or
option
Press .
or:
Press .
Press .
or:
Press .
or:
Press Ok softkey.
84 Feature Overview

Menus
Action Forum IPhone
5010/5020
Forum IPhone
5025/5030
Device menu
Open device menu Press . Press .
Close device menu (see
also the note on
page 86)
Select menu on the top
menu level
Scroll selected menu Press (previous menu
Switch back one menu
Press .
or:
Press .
Press (previous
menu).
Press (next menu).
drücken
or:
Press Quit softkey.
Press (previous
menu).
Press (next menu).
Press (previous menu
entry).
Press (next menu
entry).
entry).
Press (next menu
entry).
Press . Press Cancel softkey.
level
Select/activate
displayed menu entry or
option
Press .
or:
Press .
Press .
or:
Press Select softkey.
Forum IPhone 5040
Am Forum IPhone 5040 bedienen Sie die am Touchscreen-Display
angezeigten Menüs und kontext-sensitiven Befehle, indem Sie auf das
jeweilige Element am Display drücken.
Action Forum IPhone 5040
Status menu and Main menu
Open status menu Press the Status menu feature key.
Open main menu Press the Main menu feature key.
or:
Press the Status menu feature key in
the idle state and select the
menu entry.
menu
Feature Overview 85
Main

Menus
Action Forum IPhone 5040
Close status menu or main menu (see
also the note on
page 86)
Press .
Scroll menu Swipe up or down via the display
Switch back one menu level Press Esc softkey.
Select/activate displayed menu
entry or option
Press the screen element
or:
Press (if shown)
Device menu
Open device menu Press .
Close device menu (see also the note
page 86)
on
Press
or:
Press Quit softkey.
Select/activate displayed menu
Press the screen element
entry or option
Scroll selected menu Swipe up or down via the display
Switch back one menu level Press Cancel softkey.
Note: If you close the main menu or the device menu by pressing the
key, changes that have not been saved are lost!
Automatic hiding of menus
An open menu is automatically closed after 60 seconds if you do not make
any additional entries. The idle display appears again. Changes that have not
been saved are lost.
Status menu and main menu legend
● Two dots following a menu entry mean: After selecting the menu entry a
sub-menu is opened in which you can select options or make entries.
● A “+” sign to the left of the name of a feature indicates that it is activated
and a “-” sign that it is deactivated.
86 Feature Overview

Entering Text and Numerals
Entering Text and Numerals
● In an input line (e. g. for a call number) you can make entries/changes
straight away. The cursor indicates the position at which the input or
deletion is made.
● In input lines for text, the numerical keypad automatically switches to the
entry of letters.
● Inputs are always made to the immediate left of the cursor position.
● Mistaken entries are always deleted to the immediate left of the cursor
position:
– on the Forum IPhone 5010/5020 with the navigation key,
– on the on the Forum IPhone 5025/5030 with the Delete softkey
below the display,
– on the Forum IPhone 5040 with the softkey on the on-screen
keyboard.
● If numerical inputs are longer than the display field, the digits disappear
off the display to the left. You can display the digits that were previously
not visible again by moving the cursor to the left. The digits on the right
will then disappear from the display field. Press the Navigation key
(Forum IPhone 5025/5030) or the softkey on the on-screen
keyboard (Forum IPhone 5040).
● Switching character input mode: Press the ABC/abc/123 softkey
(Forum
keyboard (Forum
IPhone 5025/5030) or the abc/123 softkey on the on-screen
IPhone 5040).
Note: For a comfortable typing on the Forum IPhone 5025/5030, you
can use the detachable keyboard Forum
Azerty FIP
5025/5030 which is available as an accessory. For
500(0) Keyboard
information on connecting this accessory see the chapter
Installing the Detachable Magnetic Keyboard starting on
page 37.
Feature Overview 87

Using Expansion Modules
Using Expansion Modules
With expansion modules, you can extend your telephone with additional free
programmable keys. Keys of an expansion modules are configured on the web
console in the same manner as the telephone‘s programmable keys (see also
chapter
The following equipment combinations are possible:
Expansion module … … with the features connectable to a …
Programming Keys starting on page 104).
Forum 500(0)
Keypad Paper FIP
5020/5025/5030/
5040
● 16 Tasten keys with
LED indicator
● Labelling on label strips
● Forum IPhone 5020
● Forum IPhone 5025
● Forum IPhone 5030
● Forum IPhone 5040
Forum 500(0)
Keypad Display FIP
5025/5030/5040
● 28 Tasten keys with
LED indicator
● 3 keys with LED indicator
● Forum IPhone 5025
● Forum IPhone 5030
● Forum IPhone 5040
to shift levels; enables
programming of 84
storage locations on
each expansion module
● Labelling of the keys
over the display; each
key is assigned to a
display line
The Forum IPhone 5010 does not support connecting expansion modules.
Using a Headset
You can use a headset with your telephone alternative to or in combination
with the handset:
● For information on connecting a headset see the chapter Connecting a
Handset or Headset starting on page 16.
● For information on headset configuration see the chapters Setting the
Headset Type on page 98 and Setting the Audio Mode on page 97.
88 Feature Overview

Code-number Procedures
Code-number Procedures
Many features can be set by entering code-number procedures. Code-number
input is intended primarily for analogue telephones in your system. The codenumber procedures can also be used on your SIP system telephones. These
are described in the “Forum
guide (supplied with the system). You can also view a current online overview
of codes in the
Configurator > Systeminfo > Codes menu.
500 / Forum 5000 – Standard Terminals” user
Feature Overview 89

Configuration on the Web Console
Commissioning
SIP system telephones are configured via the Web console of the
500 / Forum 5000 communications system. This chapter is for the
Forum
system administrator of the communications system.
Configuration on the Web Console
Log in to the web console as a user with administrator rights.
1. Open a web browser. Enter the IP address of the communications system
into the “Address” input field. The default address is:
“http://192.168.99.254/”
2. User name, Password: Enter your user name and your password. The
default access data for the system are:
User: Administrator
Password: [no existing password]
3. Confirm via Login.
4. Open the Configurator > Telephony > Devices > VoIP phones menu.
5. In order to configure a new or to modify an already configured VoIP
terminal:
– Click above the table of VoIP telephones on the New button
– or click, in the table column Ph.No., on the corresponding entry.
A new dialogue opens.
90 Commissioning
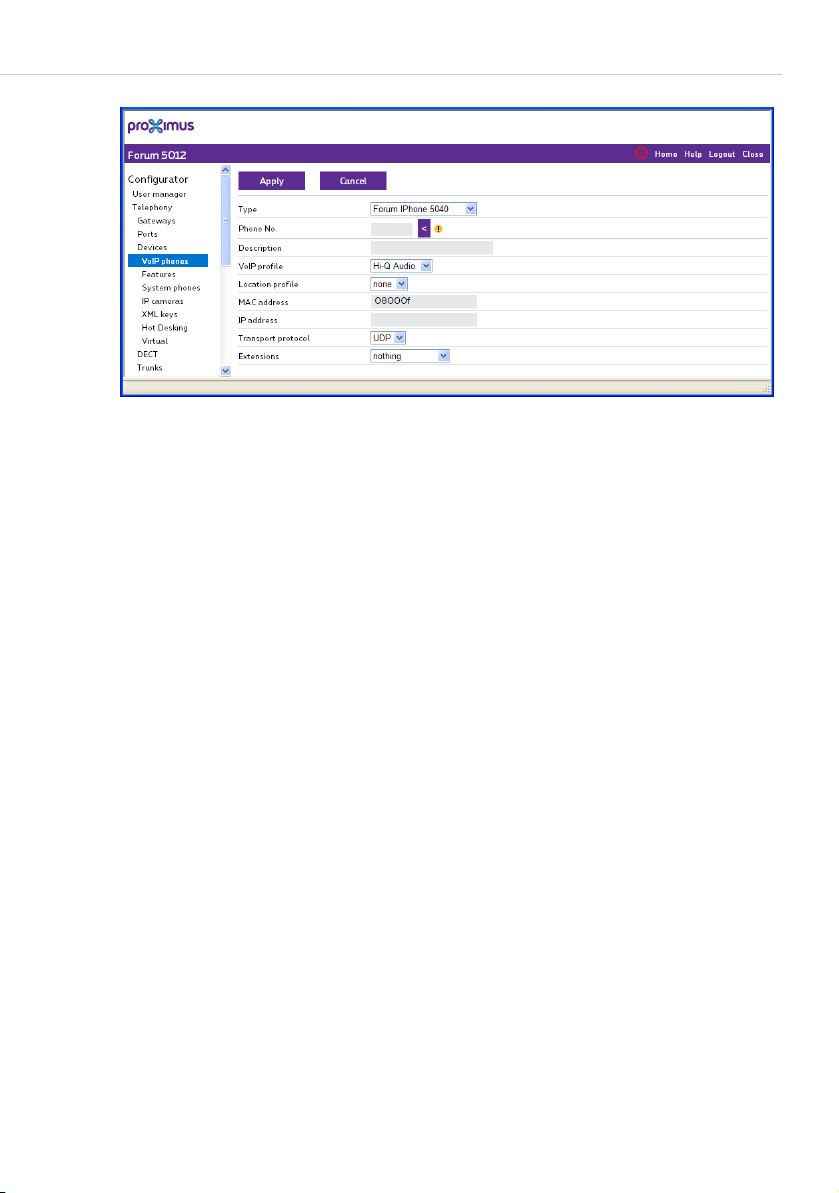
Configuration on the Web Console
6. Enter the data into the form. For entering the data, mind the information in
the online help. You open the context sensitive online help with the
command in the top navigation bar.
Please also refer to the information given in the chapters MAC Address on
page 91 and Internet Address on page 92.
7. Confirm your entries with Apply.
8. Assign the SIP system telephone’s call number to a user (in the User
manager
tions for the “Guests” user group and it may not be possible to make
external calls with the SIP system telephone.
9. Connect the SIP system telephone to the network (see also the chapter
Connecting to the Network on page 22.
The SIP system telephone starts. Messages visible on the telephone’s display
will inform you about the start procedure’s progress.
> User menu). Otherwise, your telephone is given the authorisa-
Help
Please note:Do not disconnect the telephone from the network during
start-up!
MAC Address
When configuring the SIP system telephone, you may decide to enter or not to
enter the MAC address of the device (e.
address at hand).
Commissioning 91
g. because you may not have the MAC

Configuration on the Web Console
Commissioning with configured MAC address
You will find the MAC address on the label attached to the back of the SIP
system telephone. If you configure the SIP system telephone with it’s MAC
address, the device is ready for use after starting up.
Commissioning without entering the MAC address
To configure the SIP system telephone without entering a MAC address, you
must set the DHCP mode to
for all devices (
MAC only and all SIP system devices
mode in the
In the VoIP p h on e s dialogue, a part of the MAC address is already set. You do
not need to remove the preset value if you configure the SIP system
telephone without MAC address.
When configuring the SIP system telephone without MAC address, it is
necessary to perform a one-time login procedure after the device is started.
1. Enter the call number of the SIP system telephone. Confirm the input
with (Forum IPhone 5010/5020/5025/5030) or with
(Forum IPhone 5040).
2. Enter the user PIN. The default PIN for a user on the Forum 500 /
Forum
with (Forum IPhone 5010/5020/5025/5030) or with
(Forum IPhone 5040).
The SIP system telephone restarts to apply the configured call number.
All setting) or for all SIP system telephones (with configured
Configurator > Network > DHCP menu.
5000 communications system is “0000”. Confirm the input
Dynamic and static address assignment, either
setting). You can change the DHCP
Internet Address
When operating the DHCP server in the Static address assignment mode,
you need to enter an IP address when configuring a SIP system telephone.
This IP address is then automatically entered into the list of the DHCP entries
that is managed by the communications system. This configuration is
recommended to prevent conflicts when putting the SIP system telephones
into service.
If you operate the DHCP server in the Dynamic and static address
assignment
will automatically be assigned an IP address by the DHCP server when
92 Commissioning
mode, entering an IP address is optional. In this case, the terminal

Configuration on the Web Console
started. This may mean – depending on the DHCP configuration – the IP
telephone cannot be started.
Notes and Recommendations
● You can pre-configure the SIP system telephones, i. e. before the devices
are connected.
● If you want to use one or more expansion modules on a SIP system tele-
phone, you should configure these when doing the first-time configuration
Configurator > Telephony > Devices > VoIP phones menu. This
in the
prevents the need for subsequent configuration changes.
● On the Forum 523/524, Forum 525/526 and Forum 550/560 communi-
cations systems, the SIP system telephones will download firmware
updates from a public FTP server. If applicable, you may need to allow
access to this FTP server from your company LAN, in order to obtain the
latest firmware for your SIP system telephones.
● On the Forum 5004/5008/5012 communications system, the firmware
for the SIP system telephones is included in the firmware addons. You can
load the current firmware addons in the
Components
● On the Forum 5500 communications system, the firmware for the SIP
menu.
system telephones is included in the system software.
● When configuring SIP system telephones, you should check for system
warnings. You can open a list of system warning by clicking the warning
symbol in the top menu bar.
Configurator > System >
Commissioning 93

Settings on the Web Console
Configuring the Telephone
Settings on the Web Console
Basic settings of your SIP system telephone (e. g. display language, time
zone) are set on the web console of the Forum
communications system in the
System phones
The configuration of your telephone is either done by the system
administrator or by yourself. In order to enable the telephone configuration
for you, the system administrator must assign a service profile to your user
group with the
Te l e p h o n y > Devices > System phones menu.
The following settings are possible:
● selecting the display language
● setting of country-specific tones (e. g. dial tone)
● time settings for the display
● settings for automatic call answering
These settings are also possible via the main menu, see the Calls > Auto
Call Answer.
● setting of notification tones
These settings are also possible via the main menu, see the Phone
settings
● Setting the font colour on the idle display (only possible on the telephones
Forum
Colour for the Idle Display on page 96)
● Setting the backlight during periods of inactivity
Tip: You can set after how many seconds the backlight is to be dimmed
(Option
the Display on page 100.
menu.
Change or Change-Peronal authorisation for the
menu on page 180.
> Message ring tone menu on page 188.
IPhone 5025/5030/5040, see the chapter Setting the Font
Brightness timer) via the terminals menu, see the chapter Setting
Configurator > Telephony > Devices >
500 / Forum 5000
94 Configuring the Telephone

Settings on the Web Console
A: Changing telephone configuration
B: Applying changed configuration to the telephone
Proceed as follows:
1. On the System phones status page, select the desired telephone via the
Search input field.
2. Click on Change.
A new dialogue opens.
3. This is where you set the desired functions. To do so, use the information
given in the online help. You open the context-sensitive online help via the
Help command in the upper menu bar.
4. Click on Apply to save the configuration.
The dialogue is closed.
5. On the System phones status page, click on Apply.
The settings are now transferred to the telephone.
Note: If necessary for service purposes, a manual restart of a SIP
system telephone can be initiated using the
calls taking place are disconnected if the system is restarted.
Configuring the Telephone 95
Restart button. Any

Settings on the Web Console
Setting the Font Colour for the Idle Display
You can load an individual background image in the communications system
that will be used on all connected Forum
system telephones (in the
If a rather dark background image is loaded, the text information shown on
the display may be hard to read. In this case you can change the font colour (in
Configurator, Te l e p h o n y > Devices > System phones menu). The font
the
colours
The modified font colour is used in the telephone’s idle mode for the display
area, where the name
The function keys shown on the display are not changed in any way and still
appear in their pre-set blue font colour.
blue (default), white and black are available for selection.
Configurator, System > Components menu).
/ call number of the user and date / time are displayed.
IPhone 5025/5030/5040 SIP
Picture ID Server
The Forum IPhone 5025/5030/5040 SIP system telephones can show a
picture of the caller on the display (for incoming and outgoing calls). To do so,
there must be an image of the caller saved on the communications system.
● Images can be saved on a picture ID server with Forum 525/526,
550/560 and Forum 523/524 type communications systems. The
Forum
address of the Picture ID server is configured in the
System
● An alternative to the picture ID server is saving the images to the phone
book on a Forum
tions system (Configurator > Phone book menu). A separate image can be
saved for each phone number in a phone book entry (office call number,
mobile number, private call number).
Please consult the communications system online help for information on the
configuration and file format of the images.
> Common menu).
5004/5008/5012 or Forum 5500 type communica-
Configurator >
96 Configuring the Telephone

Local Telephone Settings
Local Telephone Settings
For information on navigation in the device menu, please refer to the chapter
Using Menus on page 83. Press the key to open the device menu.
Listening to Ring Tones
You can listen to the ring tones that can be set on the device. Ring tones are
set via the main menu, see the
page 187.
1. In the device menu. select the following entry:
– Forum IPhone 5010/5020: Preferences > Tones > Ring Tone
– Forum IPhone 5025/5030/5040: Audio > Ring Tones
2. Navigate through the ring tone list; in doing so the ring tones are played.
Silent corresponds to the “0” value, this means ring tone signalling is off.
Setting the Audio Mode
Telephone calls can be conducted using the handset, a headset or via the
loudspeaker. You can set the following combinations for headset operation on
Forum IPhone 5020/5025/5030/5040.
a
Phone settings > Ring tone menu on
Note: The audio mode setting is irrelevant for a Forum IPhone 5010
because this modell has no headset jack.
1. In the device menu. select the following entry:
– Forum IPhone 5020: Options List menu, selectPreferences > Set
> Audio Mode
Audio
– Forum IPhone 5025/5030/5040: Options List menu, select Audio >
Audio Mode
2. Select the desired setting.
– Speaker: This is the default setting. Telephone calls are conducted using
the handset or the loudspeaker (hands-free operation).
– Headset: Select this setting if you wish to conduct calls via the handset
and via the headset. A call can be transferred from the handset to the
headset by pressing
up the handset.
Configuring the Telephone 97
. To transfer from the headset to the handset, pick

Local Telephone Settings
– Speaker/Headset: Incoming calls are first taken via the loudspeaker
when the
speaker to the headset and vice versa during a call. You can continue the
call at anytime using the handset by picking up the handset.
– Headset/Speaker: Incoming calls are first taken via the headset when
the
loudspeaker and vice versa during a call. You can continue the call at
anytime using the handset by picking up the handset.
key is pressed. Use the key to switch from the loud-
key is pressed. Use the key to switch from the headset to the
Setting the Headset Type
Various headset types are supported by the Forum IPhone 5020/5025/
SIP system telephones.
5030
Note: The Forum IPhone 5010 has no headset jack.
1. In the device menu. select the following entry:
– Forum IPhone 5020: Preferences > Set Audio > DHSG
– Forum IPhone 5025/5030: Audio > Headset > DHSG
2. Select the desired headset type.
Setting the Headset Microphone Volume
1. In the device menu. select the following entry:
– Forum IPhone 5020: Preferences > Set Audio > Headset Mic Vol.
– Forum IPhone 5025/5030/5040: Audio > Headset > Headset Mic
Vol
2. Select the desired volume.
Setting a Bluetooth Headset
The Forum IPhone 5040 supports the use of a Bluetooth headset as an
alternate headset device.
Note: When the default Speaker audio mode is being used, if Blue-
tooth is enabled and a Bluetooth headset is paired, the phone
automatically switches the audio mode to
(see also the chapter entitled Setting the Audio Mode on
page 97).
98 Configuring the Telephone
Headset/Speaker
 Loading...