

Page 1
User manual
Note:
– OSD options and pictures shown in this document may differ slightly from your
product.
– Changes to this manual may be made without notice.
LCD Multimedia Projector
Model:
M1010X
M1020W
Manufacture:
Address:1250,E 223rd Ste 114, Carson,
CA 90745
PROXIMA DISPLAYS INC.
Page 2
2
Safety operation guideline
Safety instructions
This document and your projector employ certain symbols to illustrate how to use your projector
safely. They are described below: Please get yourself familiar with them before going through this
document.
Warning
Ignoring messages indicated by this symbol may lead to personal injuries
or deaths due to human errors.
Note
Ignoring messages indicated by this symbol may lead to personal injuries
or property damage.
High voltage inside with risks of electric shock.
Please read this manual carefully before installing and operating your
projector.
Your projector comes with a lot of convenient features and functions. You may make the most
of these features and keep your projector in good working conditions by using it correctly.
Invalid operation of your projector may not only shorten its life cycle but also may lead to
product failure, re, or other incidents.
In case of any operation abnormality, refer to this manual to check your operation and
connections and try solutions given in the “Troubleshooting” section at end of this manual. If
the problem persists, call your dealer or our service center.
Your projector’s lamp is a consumable and will get dimmer after long-term use. It’s normal
for an older lamp to be dimmer than a newer one. Please power on and off your projector
by strictly following steps given in “Power on your projector” and “Power off your projector”
section of this manual. Execute regular maintenance and cleaning according to instructions
set forth in “Maintaining and cleaning your projector” section of this manual. Fail to do so may
shorten life cycle of your projector and its lamps sharply or even damage your projector and
its lamps before long.
Note: DO NOT remove the casing (or back
cover) as this may result in electric shock.
Users shall not execute any maintenance
work on components within your projector
except replacing lamps. Call qualied
maintenance personnel in case of any
maintenance requirements.
Note
Danger of electric shock
DO NOT open this.
High voltage inside with risks of
electric shock.
Operation and maintenance tips
about these components.
Page 3
3
Safety operation guideline
Notes
Warning
Safety precautions:
●GROUND your projector.
●Lens of your projector projects strong light. DO NOT look at the light beam directly. You
may get your eyesight hurt. This is especially the case with children.
●Unplug the AC power plug if your projector will not be used for long time.
●
subject the power cord to any object. DO NOT place your projector in locations where its
power cord may become damaged by treading by passersby.
●Disconnect the power plug before cleaning your projector. DO NOT apply liquid or sprays to
your projector. DO NOT wipe your projector with wet cloth.
●Please follow warnings and instructions given in labels attached to your projector. Unplug
your projector when your projector is exposed to thunderstorm weather, is unmanned, or not
in use for long periods to prevent damage caused by lightning and power surges.
●DO NOT use accessories without recommendation by the manufacturer as it may result in
potential risks.
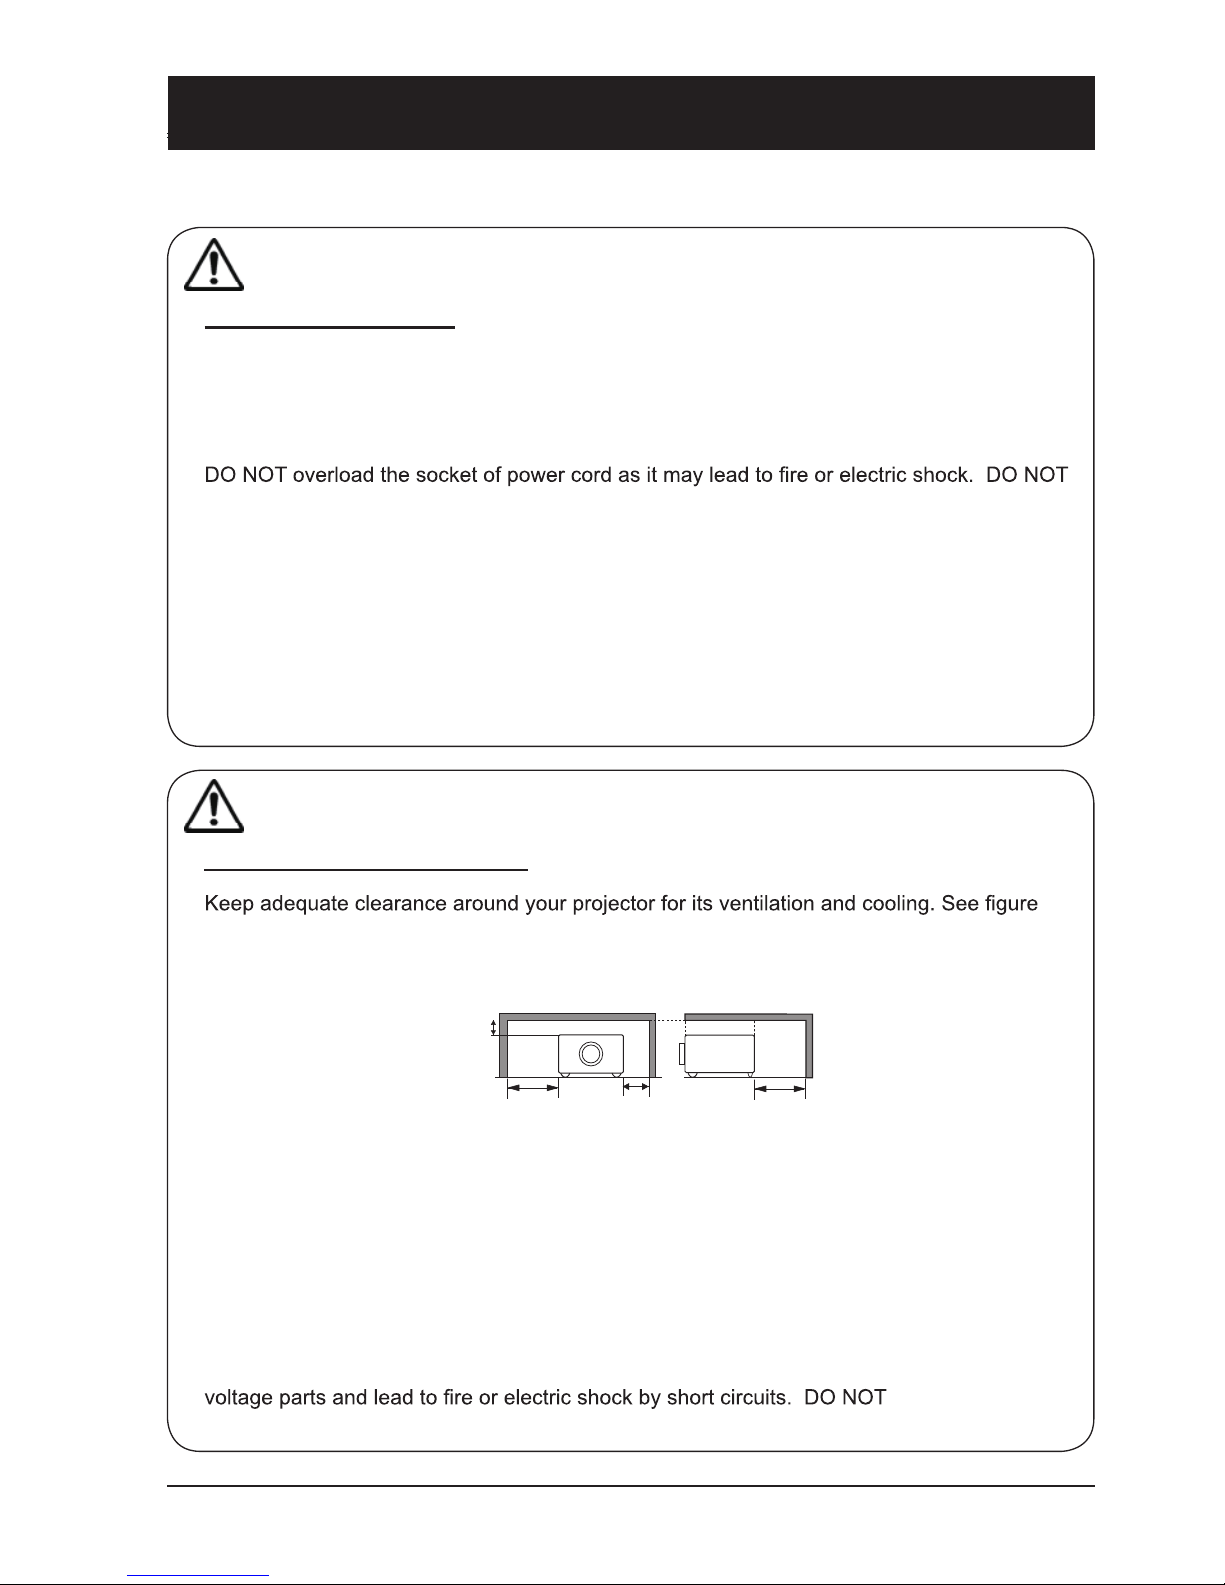
Warning
Precautions on air outlet:
●
below for the least clearance requirements. The least clearance is a MUST when your projector is placed within a cabinet or other closed environment.
0.7’(20cm)
1.5’(50cm)
3’(1m)
3’(1m)
Sides and bottom Rear
●DO NOT cover the air outlet of your projector. Poor ventilation not only shorten life cycle of
your projector but also may lead to risks.
●Slots and openings at rear and bottom of your projector are designed for ventilation. Keep
your projector from overheated to ensure its steady operation.
●DO NOT cover the air outlet with cloth or other objects. DO NOT place your projector on the
surface of bed, sofa, carpets, or similar object as this may block the air outlets at its bottom.
●DO NOT place your projector in closed environment, e.g. a bookcase, unless it is well venti-
lated.
● Keep any matter from falling in your projector through the air outlets as they may touch high
splash liquid to
your projector.
The French version of this page refer to page 70
Page 4
4
Safe operation guideline
Note
Precautions on location of your projector:
●Place your projector in a proper location or it may result in re.
●DO NOT expose your projector in rain or high humidity environments or it may result in re
or electric shock. DO NOT your projector near water or splashing water. DO NOT place any
water container, e.g. ower vase, atop your projector.
●DO NOT place your projector in environments of soot, moisture or smoke, e.g. your kitchen,
or it may lead to product failure or accidents. Your projector may be damaged by contact with
oil or chemicals.
●DO NOT place your projector near exhaust pipe or air conditioning equipment.
●DO NOT place your projector near radiator or heating pipes.
●DO NOT place your projector atop unstable truck, rack, or table. It may fall of the surface and
lead to personal injuries and property damages. Please use cart or rack recommended by the
manufacturer or included with your product. Please follow steps given in installation guideline
included with the wall and ceiling mount racks for installation. Use installation components
approved by the manufacturer.
●Be careful when moving your projector with cart. Abrupt stops, pushing too hard and rugged
surfaces may topple your projector and the cart together.
Page 5
5
Safe operation guideline
Note:
Precautions on using your projector:
●DO NOT project the same image for long time as residual images may be left in the panel.
This is a property of LCD panel.
●Use power as indicated in tags attached to your projector. If you have doubts over available
power type, consult your dealer or local power company rst.
●DO NOT open or remove the casing for maintenance as this may lead to electric shock or
other damages. Call qualied maintenance personnel in case of any maintenance require-
ments.
– In case of the following, unplug the power cord and call qualied maintenance personnel
for service immediately:
a. Damaged or broken power cord or plug
b. Liquid splashed in your projector
c. Your projector exposed to rain or water
d. If your projector fails to work as expected by following operation instructions, adjust it ac-
cording to given instructions. Other invalid operations may damage your projector, which
requires the technician to spend more time before returning it back to normal.
e. The projector falls off to ground or its casing is damaged.
f. In case of any abnormal change in your projector during its use, then maintenance ser-
vices would be required.
●In case components replacement is required, make sure the replacements have been ap-
proved by the manufacturer and features the same with the one being replaced. Use of
unauthorized parts may lead to re, electric shock or personal injury.
●After the completion of maintenance or repair work, get the maintenance personnel to run
routine safety check to ensure your projector’s safety operation status.
Page 6
6
Safe operation guideline
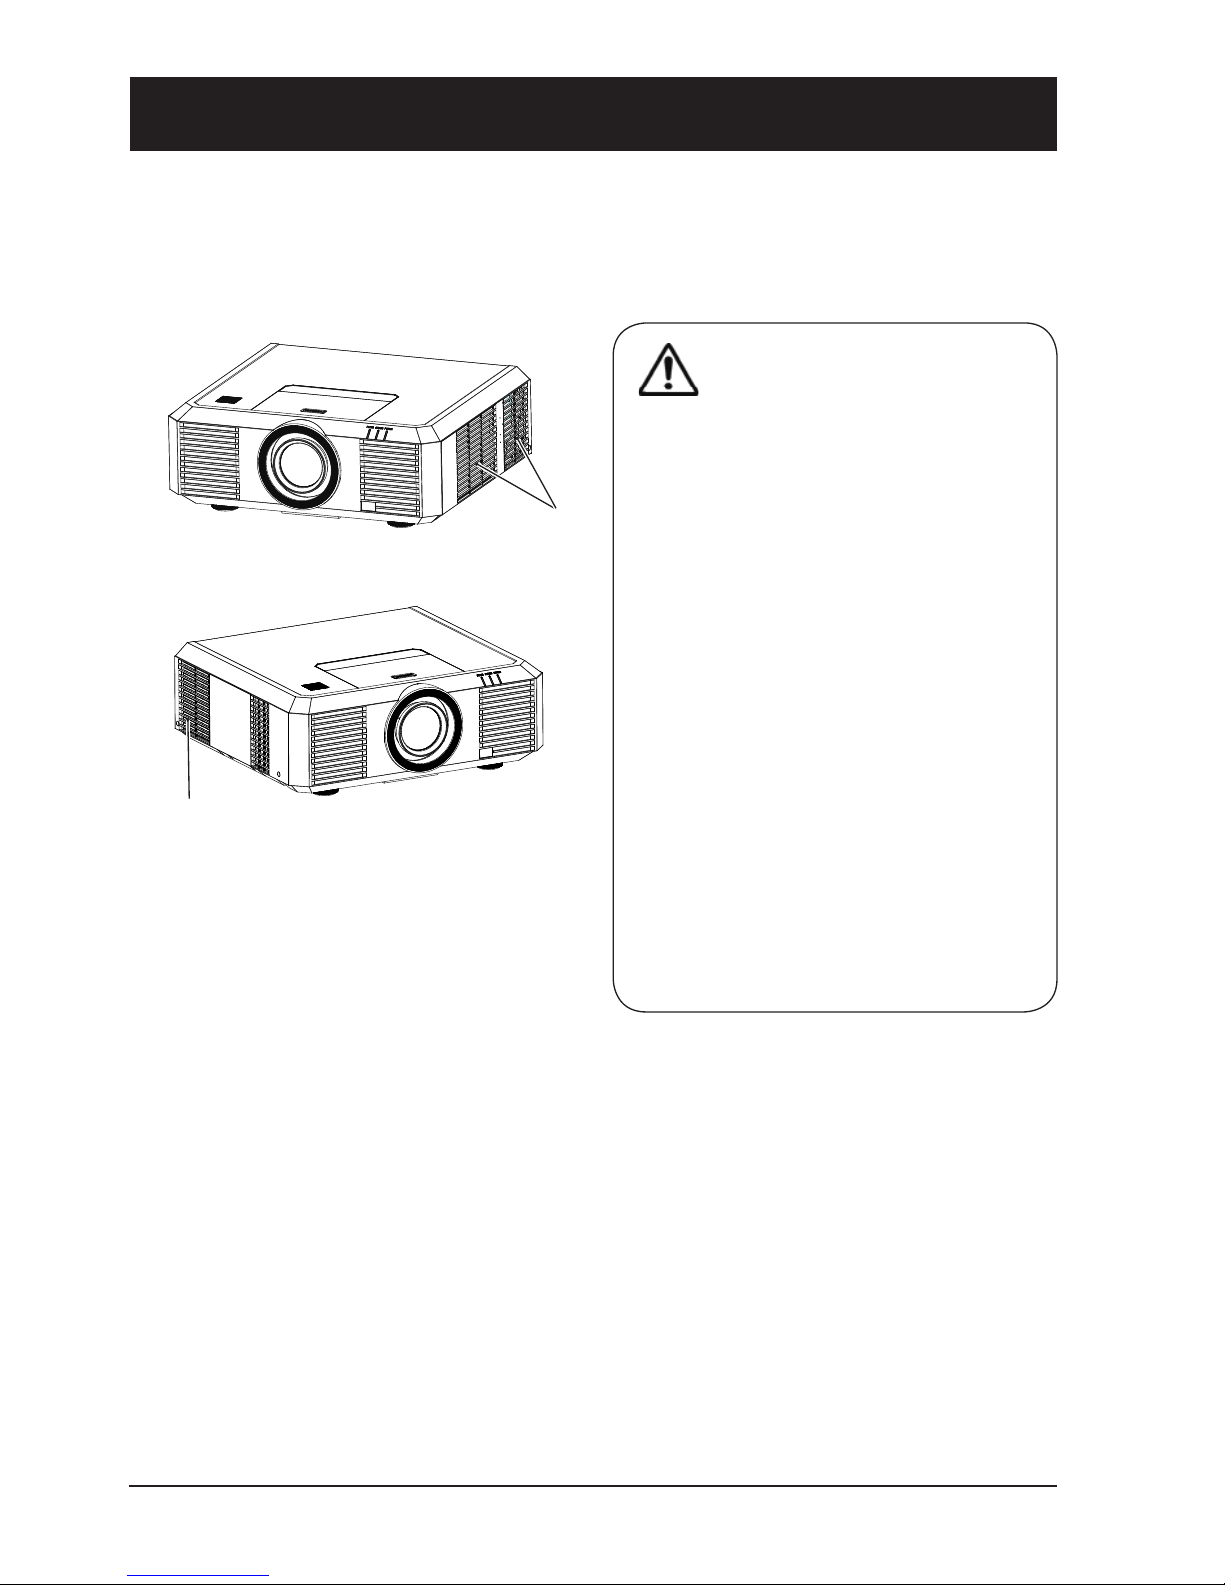
Air ventilation
Openings in the casing are designed for ventilation and overheating prevention. DO NOT block or
cover these openings to keep your projector in normal operation and from overheating.
Air outlet
Note
Heat exhaust at the air outlet Keep the
following in mind when using or installing
your projector:
– DO NOT place ammable materials or
sprayers near your projector.
– Keep the air outlet one meter away
from other objects.
– DO NOT touch the area close to the air
outlet especially the metal components,
e.g. screws. This area and parts will get
very hot once your projector starts operating.
– DO NOT place any object atop your
projector. They may not only be dam-
aged but also lead to re after being
overheated.
Cooling fans are designed for cooling
your projector. Fan speed is auto adjusted
subject to internal temperature of your
projector.
Air outlet
(for heat exhaust)
Page 7
7
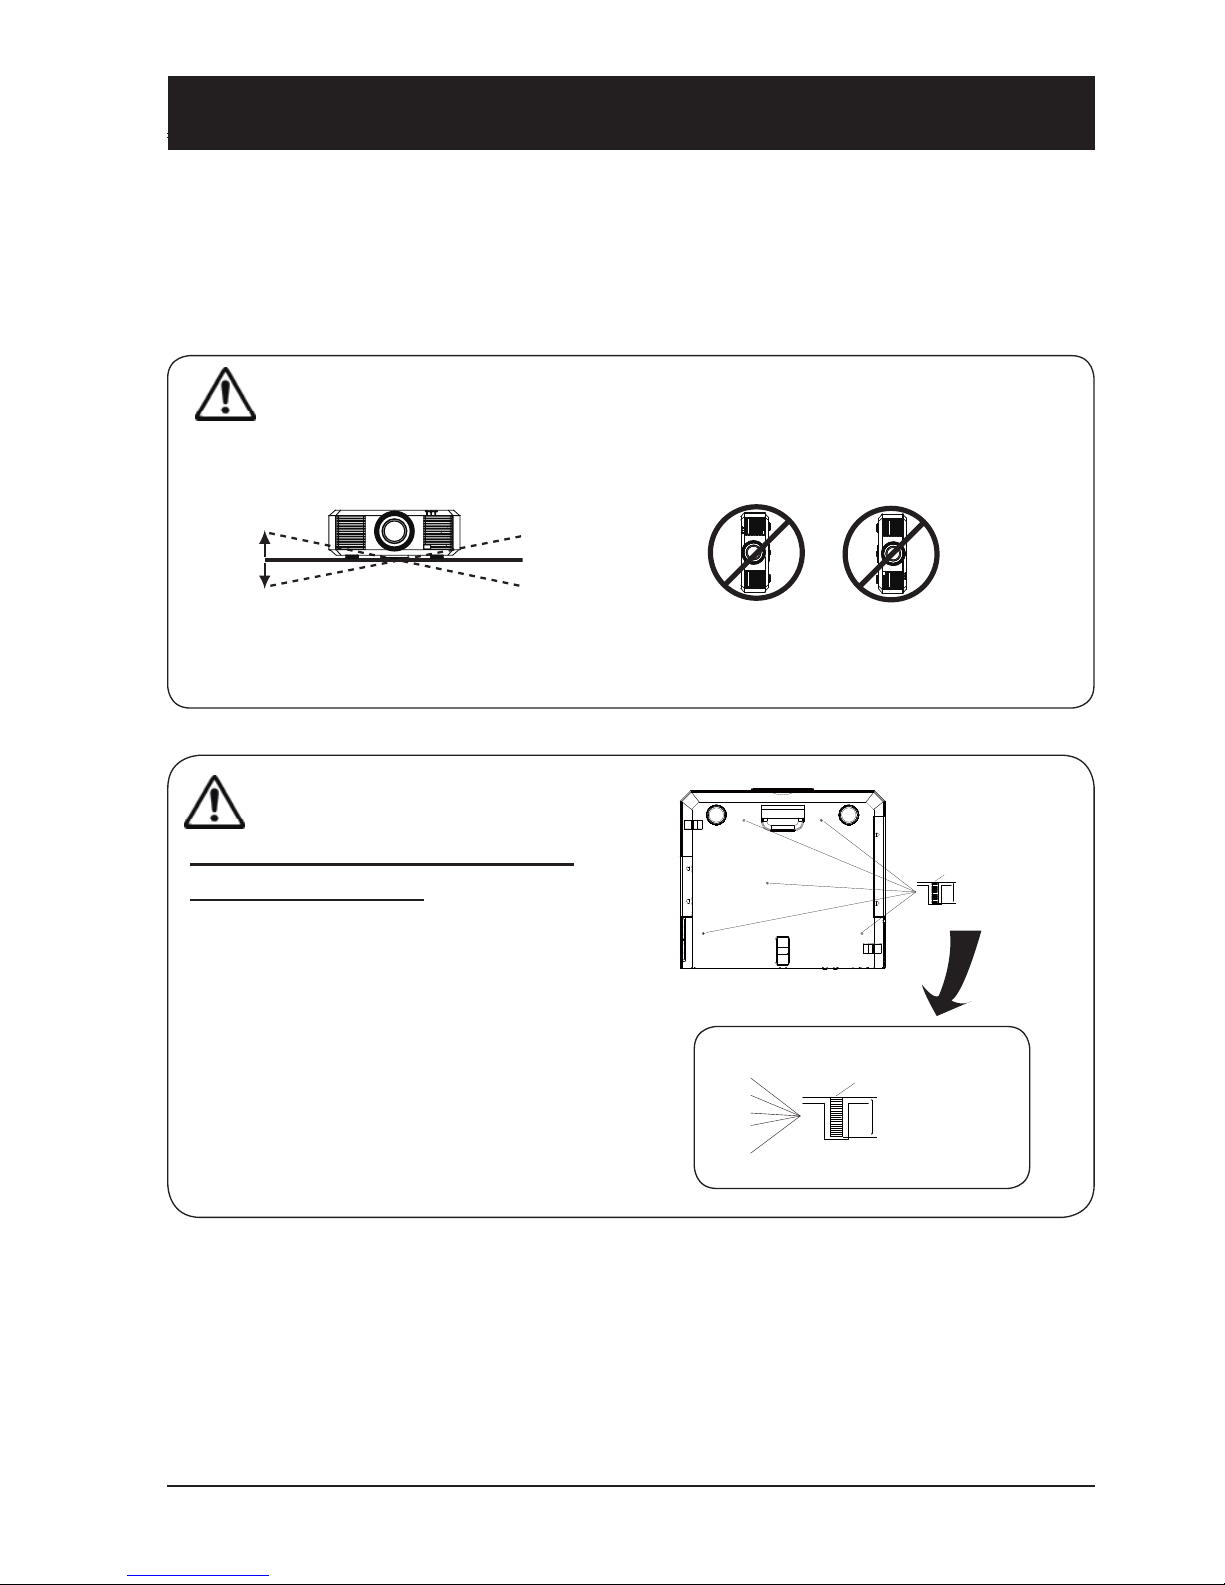
Place your projector correctly
Use your projector at specied location in correct way. Invalid projector location may shorten lifecycle of lamps or even lead to severe incidents or re. Your projector may project upward or down-
ward at location perpendicular to the horizon. When installing your projector inclined downward,
place it in a bottom up position.
DO NOT install your projector in ways as illustrated below.
DO NOT place your projector as
illustrated above.
DO NOT tilt your projector
more than 20 degrees.
20
0
20
0
Note:
● Enable the “Ceiling” function if ip over screen is required.
Safety operation guideline
Note:
Precautions on ceiling mount
racket installation:
●Get qualied technician to install the ceiling
mount racket.
●Warranty of your projector does not cover
hazards and damage caused by using ceiling mount rackets provided by unauthorized
dealers.
●Remove the ceiling mount racket when it is
not in use.
●Apply torque driver instead of power driver or
impact driver in your projector.
M6x10
10mm
M6x10
10mm
Torque: 1.40 Newton.m
Page 8
8
Safety operation guideline
Note:
Precautions on moving or shipping your projector:
●DO NOT drop or impact your projector as it may get damaged or failed in operation.
●Please employ proper container for movement.
●Prohibit express or other shipping service provider personnel from shipping your projector
with improper boxes. Your projector may become damaged. Please consult your dealers
for shipping your projector by express or other shipping service providers.
●Place your projector in box only after it has been fully cooled down.
Moving your projector:
When moving your projector close its adjustment legs as they may damage the lens and casing.
Keep your projector in suitable box when it is not to be used for a long time.
Page 9
9
Safety operation guideline
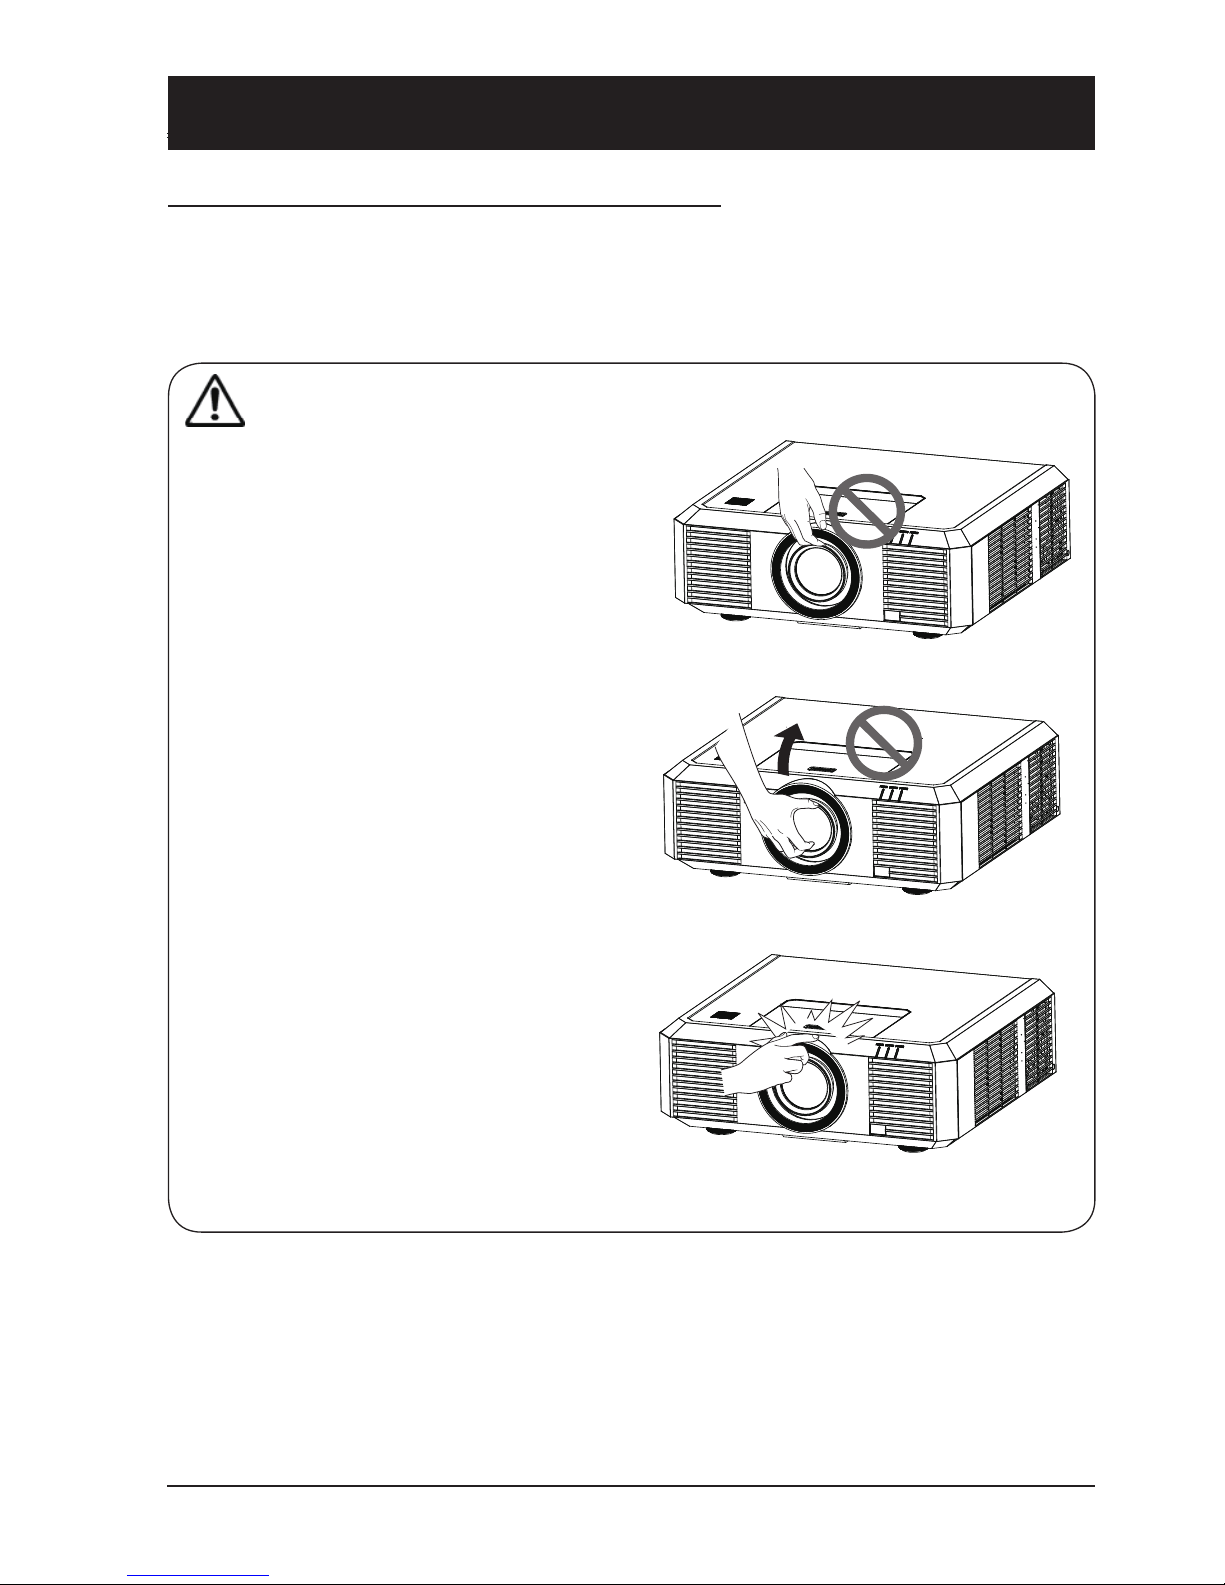
Note:
Lens or your projector is electric powered.
Precautions on using your projector:
●DO NOT touch the lens when it is turning
as your ngers may get hurt.
●DO NOT let children touch the lens.
Precautions on dealing with your projector:
DO NOT lift or move your projector by holding the lens or projecting decoration ring as it may damage the lens and your projector.
Be careful when handling your projector. DO NOT drop it, subject it to external forces, or place objects atop it.
DO NOT hold the lens or area around it.
Page 10
10
Table of contents
Safety operation guideline ...........................2
Overview
Name and function of individual component
of your projector .........................................12
Front/top ...................................................12
Rear ..........................................................13
Terminal ....................................................14
Remote controller .....................................15
Remote controller operation range ...........16
Install battery of remote controller ............17
Installation ...................................................18
Lens installation ........................................18
Lens movement adjustment......................19
Set up your projector ................................20
Connect the AC power cord ......................21
Connection to equipment ..........................22
Connection to computer............................22
Connect to video equipment .....................22
Connection to audio equipment ................23
Operation
Basic operation...........................................25
Power on your projector............................25
Power off your projector ...........................26
Zoom /focus function ................................27
Lens movement adjustment......................27
Auto setup function ...................................27
Adjustment pad .........................................28
Keystone adjustment ................................28
Menu item overview ..................................29
How to use the OSD .................................30
Menu operation .........................................30
Remote controller operation .....................31
Input signal source (computer) .................32
Input source selection (VGA / RGBHV) .33
Input source selection (HDMI / DVI) .........33
System selection.......................................34
Auto PC Adjusting .....................................35
Manual computer adjustment ...................36
Image mode selection ..............................37
Image Adjust .............................................38
Screen size adjustment ............................39
Input signal source (VIDEO signal) ...........40
Image mode selection...............................42
Image Adjust .............................................43
Screen size adjustment ............................44
Setting .........................................................45
Language ..................................................45
OSD Setting ..............................................45
Auto Setup ................................................46
Keystone ...................................................47
Blue Back..................................................47
Display ......................................................47
Logo screen ..............................................48
Ceiling mount ............................................48
Rear ..........................................................49
Remote Control.........................................49
Power Management..................................49
On Start ....................................................50
Standby Mode...........................................50
Closed Caption .........................................50
Lamp Control ............................................50
Test Pattern...............................................50
Security .....................................................51
Cooling Fast..............................................51
High Land .................................................52
Filter counter .............................................52
Warning Log .............................................52
Factory Default .........................................52
IRIS ...........................................................52
Information ..................................................53
Maintenance
Regular maintenance .................................55
Status light indicator .................................55
Clean the lens ...........................................56
Clean casing of your projector ..................56
...........................................56
..............................57
Lamp replacement ....................................57
Appendix
Appendix .....................................................60
Troubleshooting ........................................60
Light indicator status .................................63
Compatible computer screen ....................64
...............................65
Description on network
control operation
Description on network control
operation .....................................................67
Network control operation .........................67
Page 11

Overview
This chapter presents names and
functions of individual component.
Page 12
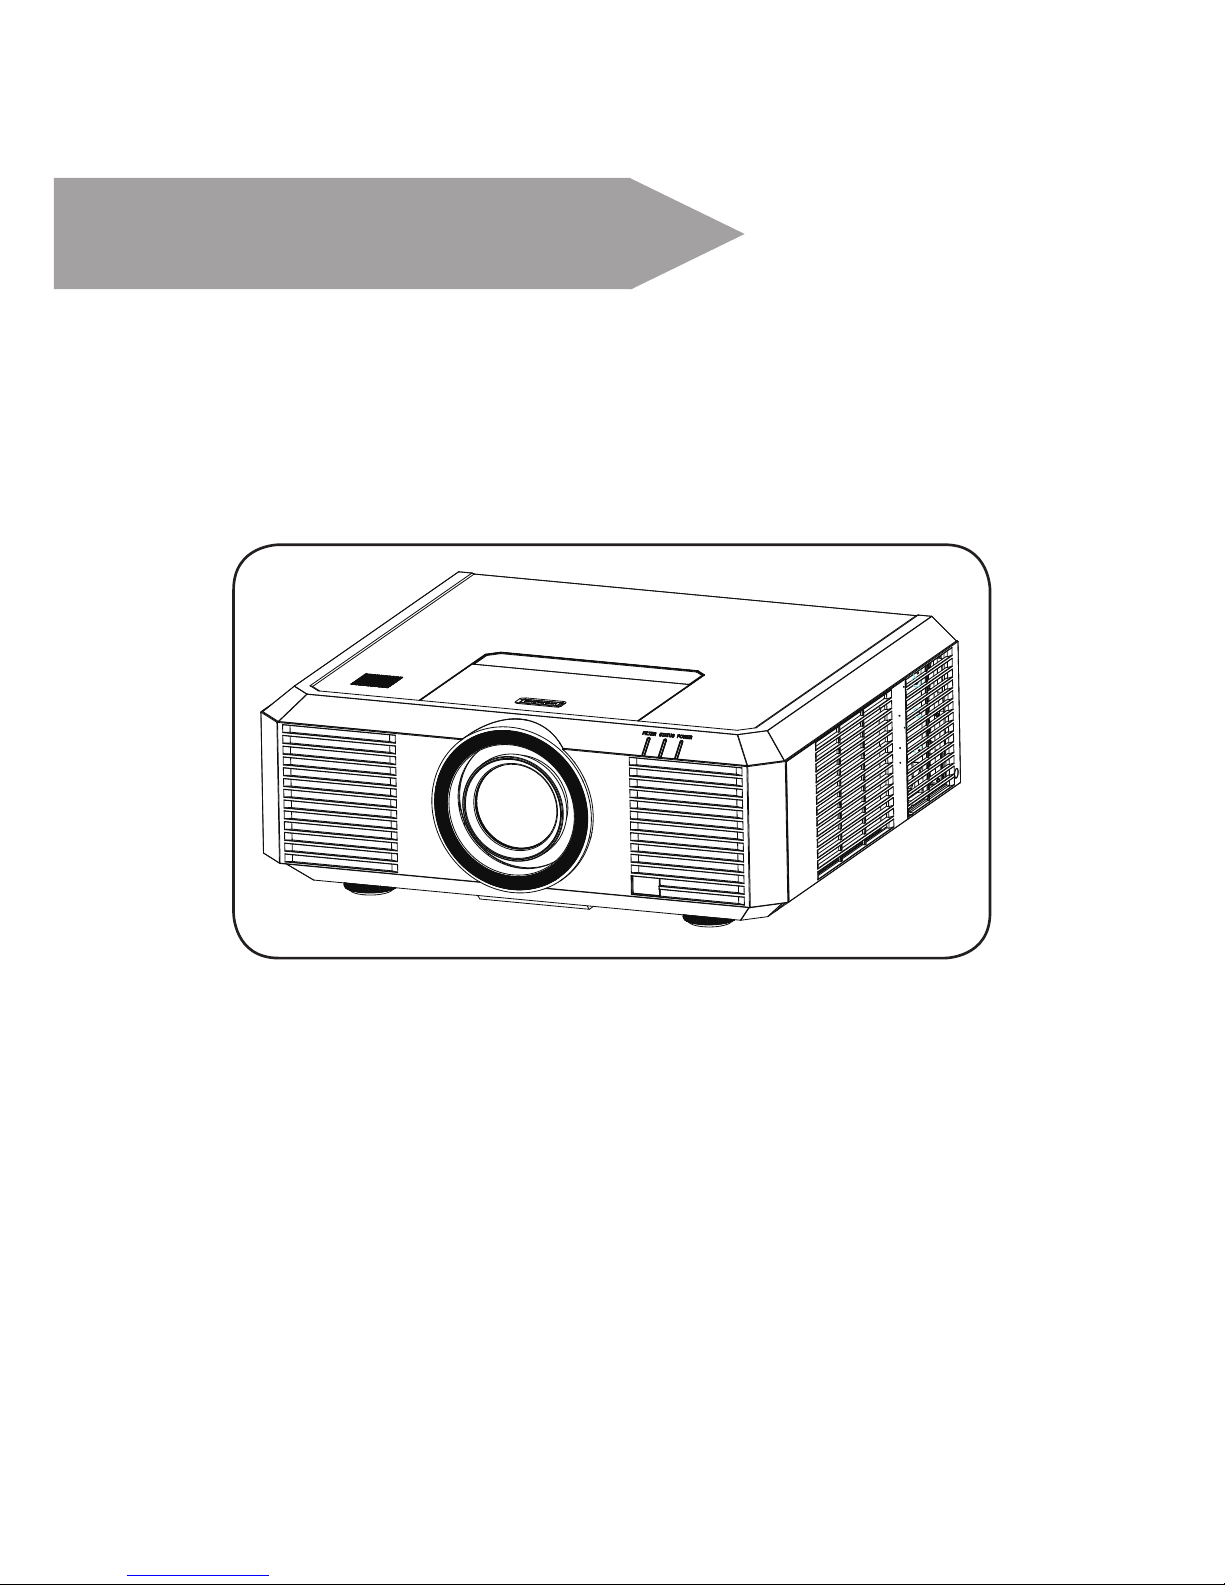
12
Name and function of individual component of
your projector
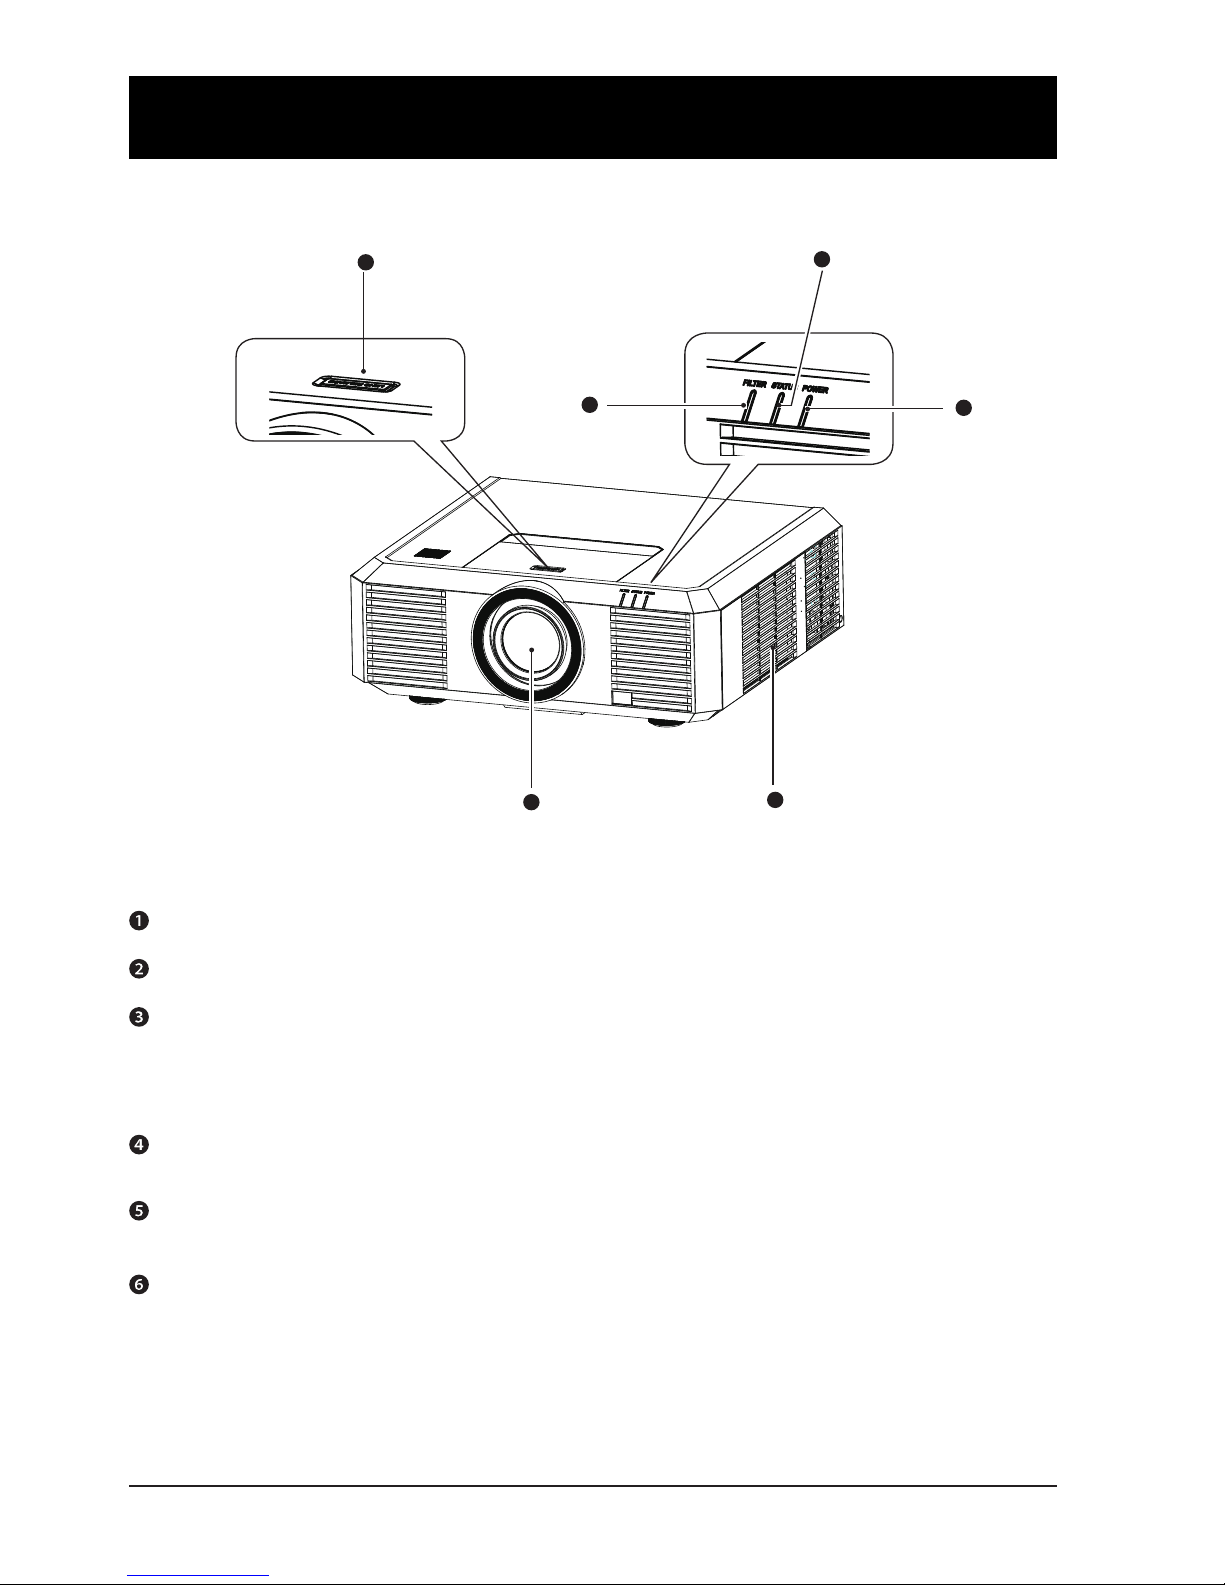
Front/top
Projection lens
Air outlet with lter
POWER light indicator
– The power light indicator turns steady red when your projector is in standby mode
– It turns steady green when your projector is in normal operation
– It ashes green when your projector is in power control mode (standby) mode
STATUS light indicator
It ashes red when internal temperature of your projector is out of operation range
FILTER light indicator
It turns red when the lter needs be replaced
Lens release button
1
2
3
4
5
6
Page 13
13
Name and function of individual component of
your projector
Rear
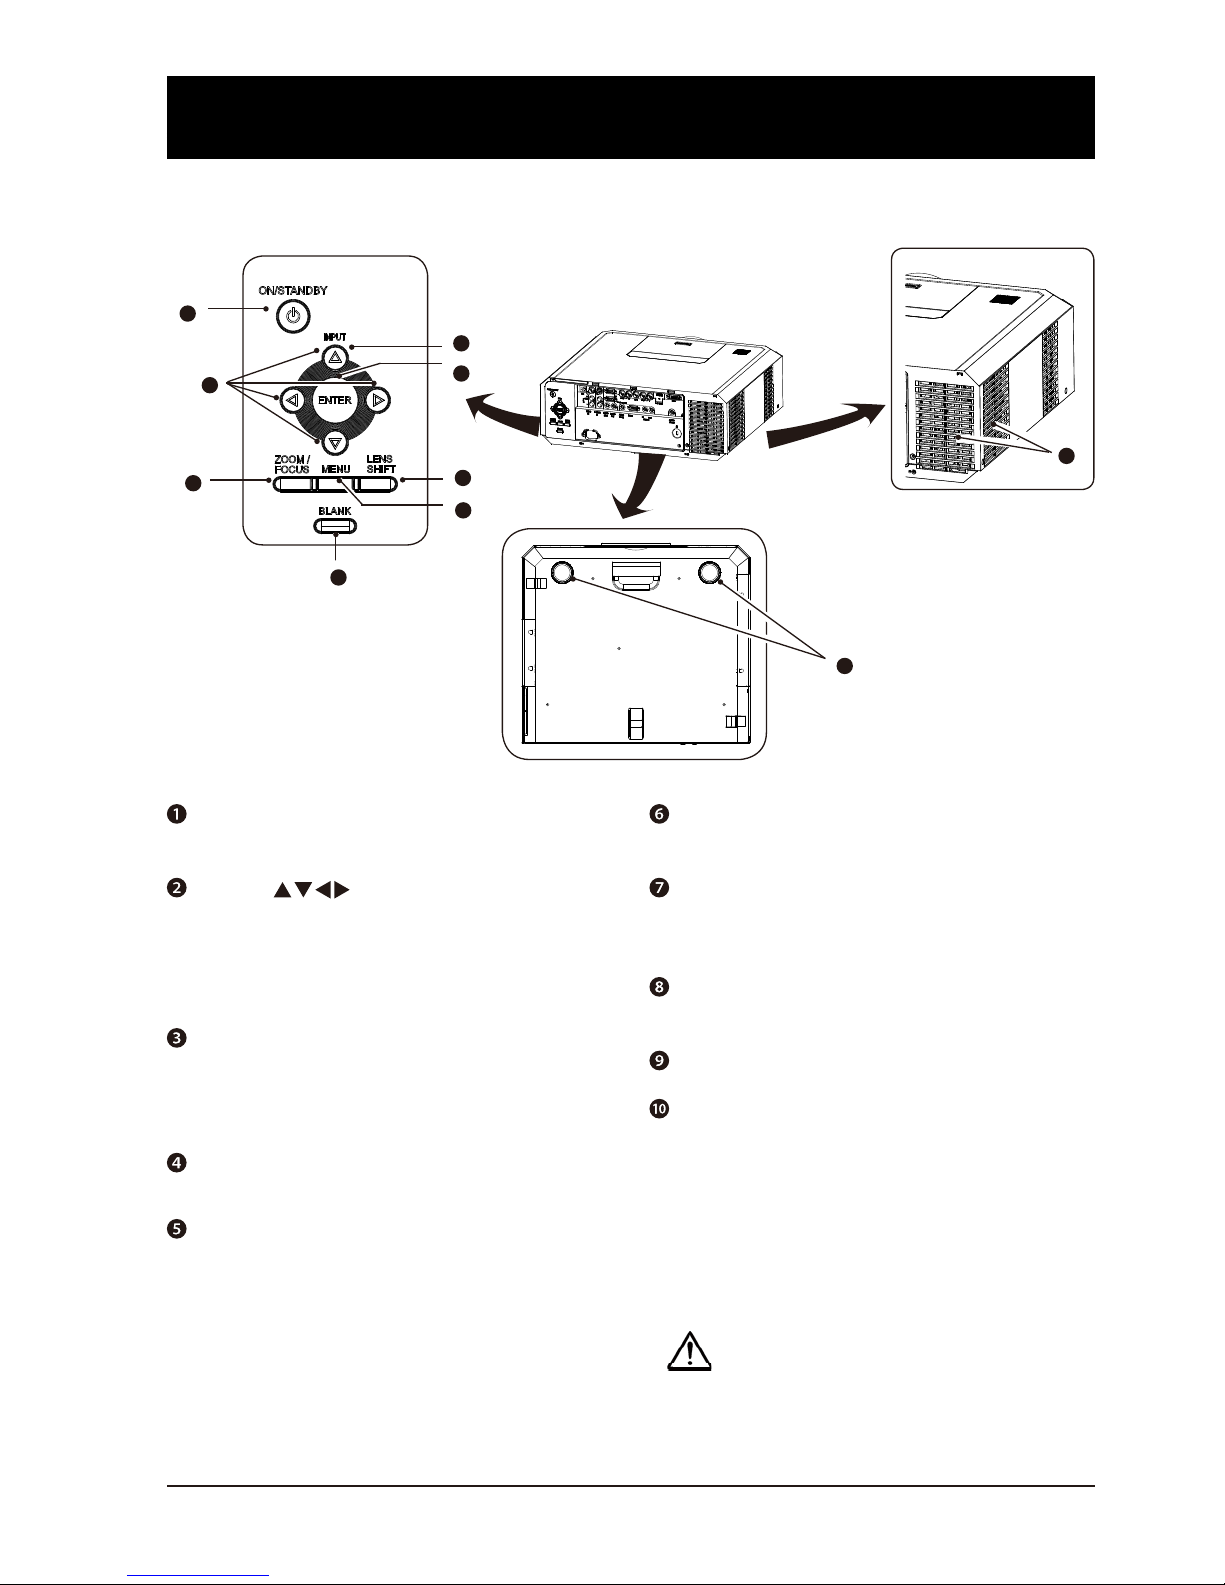
ON/SRAND-BY key
Power on or off your projector
Arrow key
– Select items or adjust values in the
OSD menu.
– Select display area in digital zoom+
mode
ZOOM/FOCUS key
– Enter the optical zoom adjustment
mode
– Enter the focus adjustment mode
BLANK key
Dark out screen images temporarily
MENU key
Open or close the OSD menu
LENS SHIFT key
Enter the lens moving mode
ENTER/GEOMETRY key
Enter the OSD menu or select options in
a menu
INPUT key
Select source of input
Air outlet
Adjustment pad
Note:
Air outlet emits hot air. DO NOT place heat
sensitive objects near it.
1
3
4
5
6
10
9
7
8
141.7
VOL- VOL+
AUDIOAUDIO
IN2
AUDIO
IN1
AUDIO
OUT
S-VIDEOVIDEO R/CINR/C
OUT
RS-232C
DVI-D
P/PR
MONITOR OUT
VGA
IN
G/Y B/PB H/HV V
2
VGA
Page 14
14
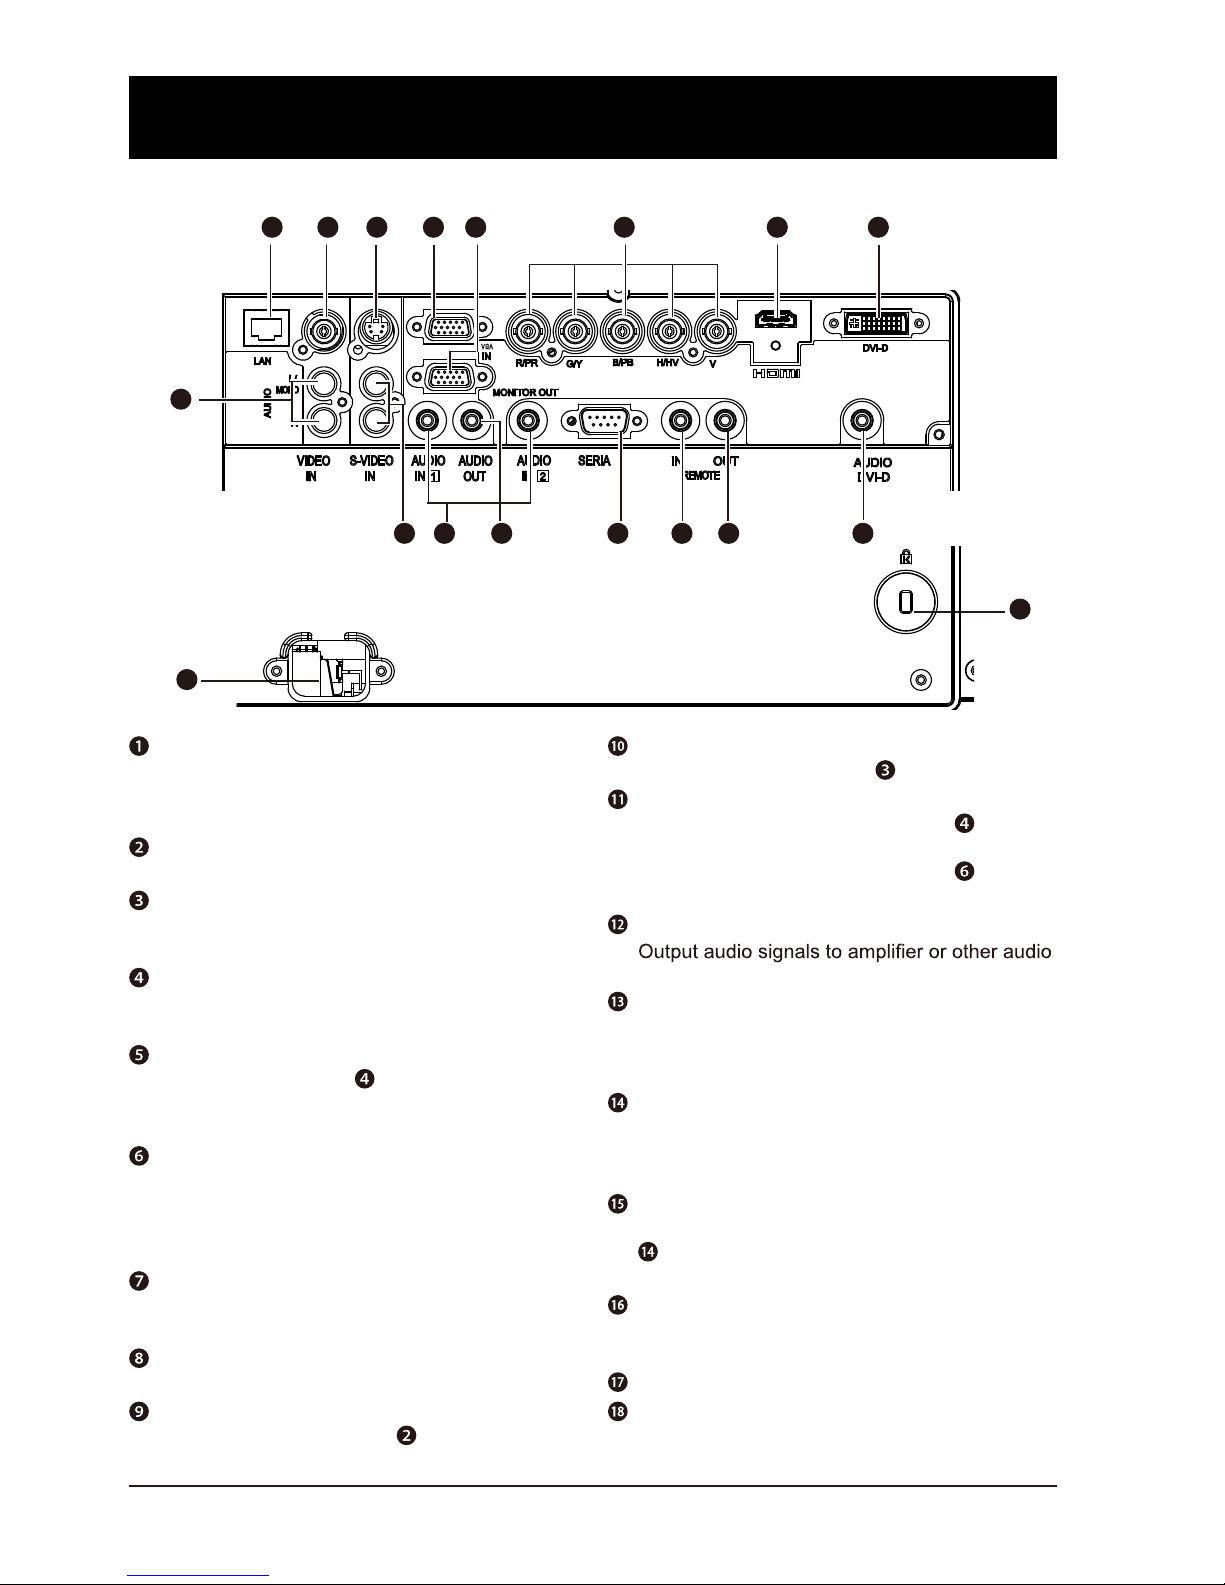
Terminal
LAN port
Connect network cable to this port for controlling and operating your projector with land
network.
VIDEO IN port
Connect video output signal to this port.
S-VIDEO IN port
Connect S-VIDEO output signal of video
device to this port.
COMPUTER IN port
Connect output signal from computer to this
port.
MONITOR OUT port
Transmit signals from to other displays
when your projector is acting as a display
output.
R(PR)/G(Y)/B(PB)/H(HV)/V
– Connect RGBHV format (5-core) signals to
R/G/B/HS/VS port respectively.
– Connect component signals to Y, Pr, Pb port
respectively.
HDMI port
Connect HDMI digital output signals to this
port.
DVI-D IN(HDCP) port
Connect DVI digital output signals to this port.
AUDIO port
Connect audio signal from to this port.
MONO(L/R) port
Connect audio signal from to this port.
AUDIO IN1/AUDIO IN2 port
– Connect audio signals for device to AU-
DIO IN1
– Connect audio signals for device to AU-
DIO IN2
AUDIO OUT port
equipment.
SERIAL port
Connect serial cable to this port when using
RS232 device to control or operate your
projector.
REMOTE IN port
Connect wired remote controller to this port
when the former is used. Connection of a wired
remote controller will disable the wireless one.
REMOTE OUT port
Transmit wired remote controller signals of
to another projector when a wired remote
controller is used.
AUDIO/DVI-D port
Connect audio signals of DVI equipment to
this port.
Anti burglary bar
Power cord connector
1
9
18
17
2 3 4 5 6 7 8
10 11 12 13 14 15 16
Name and function of individual component of
your projector
VGA
L
Page 15
15
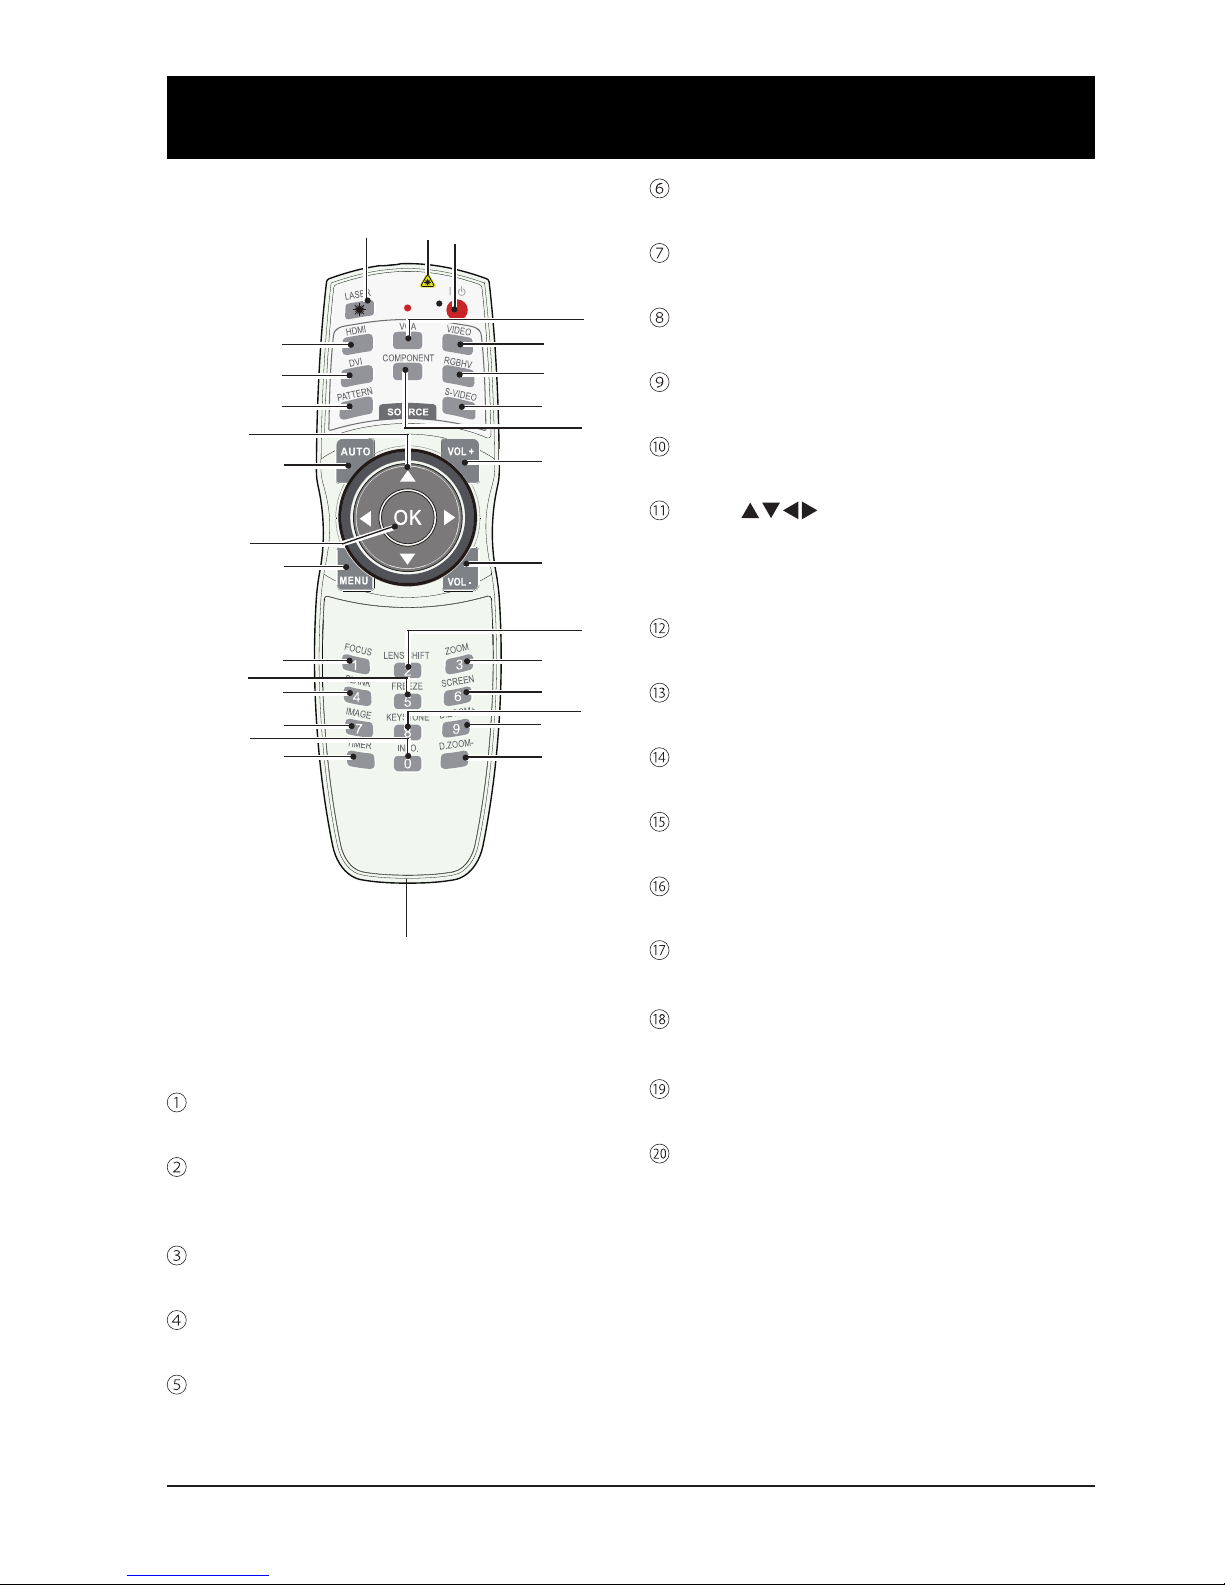
* Laser light emission opening: Press the LASER
key during presentation to use the remote controller as laser pointer. Do not look direct into the
laser light emission opening or point it to human
body as this may result in personal injuries.
POWER key
Power on or off your projector.
LASER key
Press the LASER key during presentation to
use the remote controller as laser pen
HDMI key
Select HDMI input source
DVI key
Select DVI input source
PATTERN key
Select built-in test pattern of your system.
VGA key
Select VGA input source
VIDEO key
Select VIDEO input source
RGBHV key
Select RGBHV input source
S-VIDEO key
Select S-VIDEO input source
COMPONENT key
Select Component input source
Arrow key
– Select items or adjust values in the OSD
menu.
– Select display area in digital zoom+ mode
AUTO key
Enter auto adjustment mode
OK key
Enter the OSD menu or select options in it
MENU key
Open or close the OSD menu
VOLUME + key
Increase volume
VOLUME - key
Decrease volume
FOCUS key
Enter the focus adjustment mode
BLANK key
Dark out screen images temporarily
IMAGE key
Select image mode
TIMER key
Select the timer function
Remote controller
Name and function of individual component of
your projector
⑨
⑩
①
⑤
⑦
⑥
⑧
②
!
③
④
①
11
①
12
①
13
①
14
①
17
①
22
①
18
①
19
①
24
①
20
①
29
①
15
①
16
①
21
①
25
①
26
①
23
①
27
①
28
Page 16
16
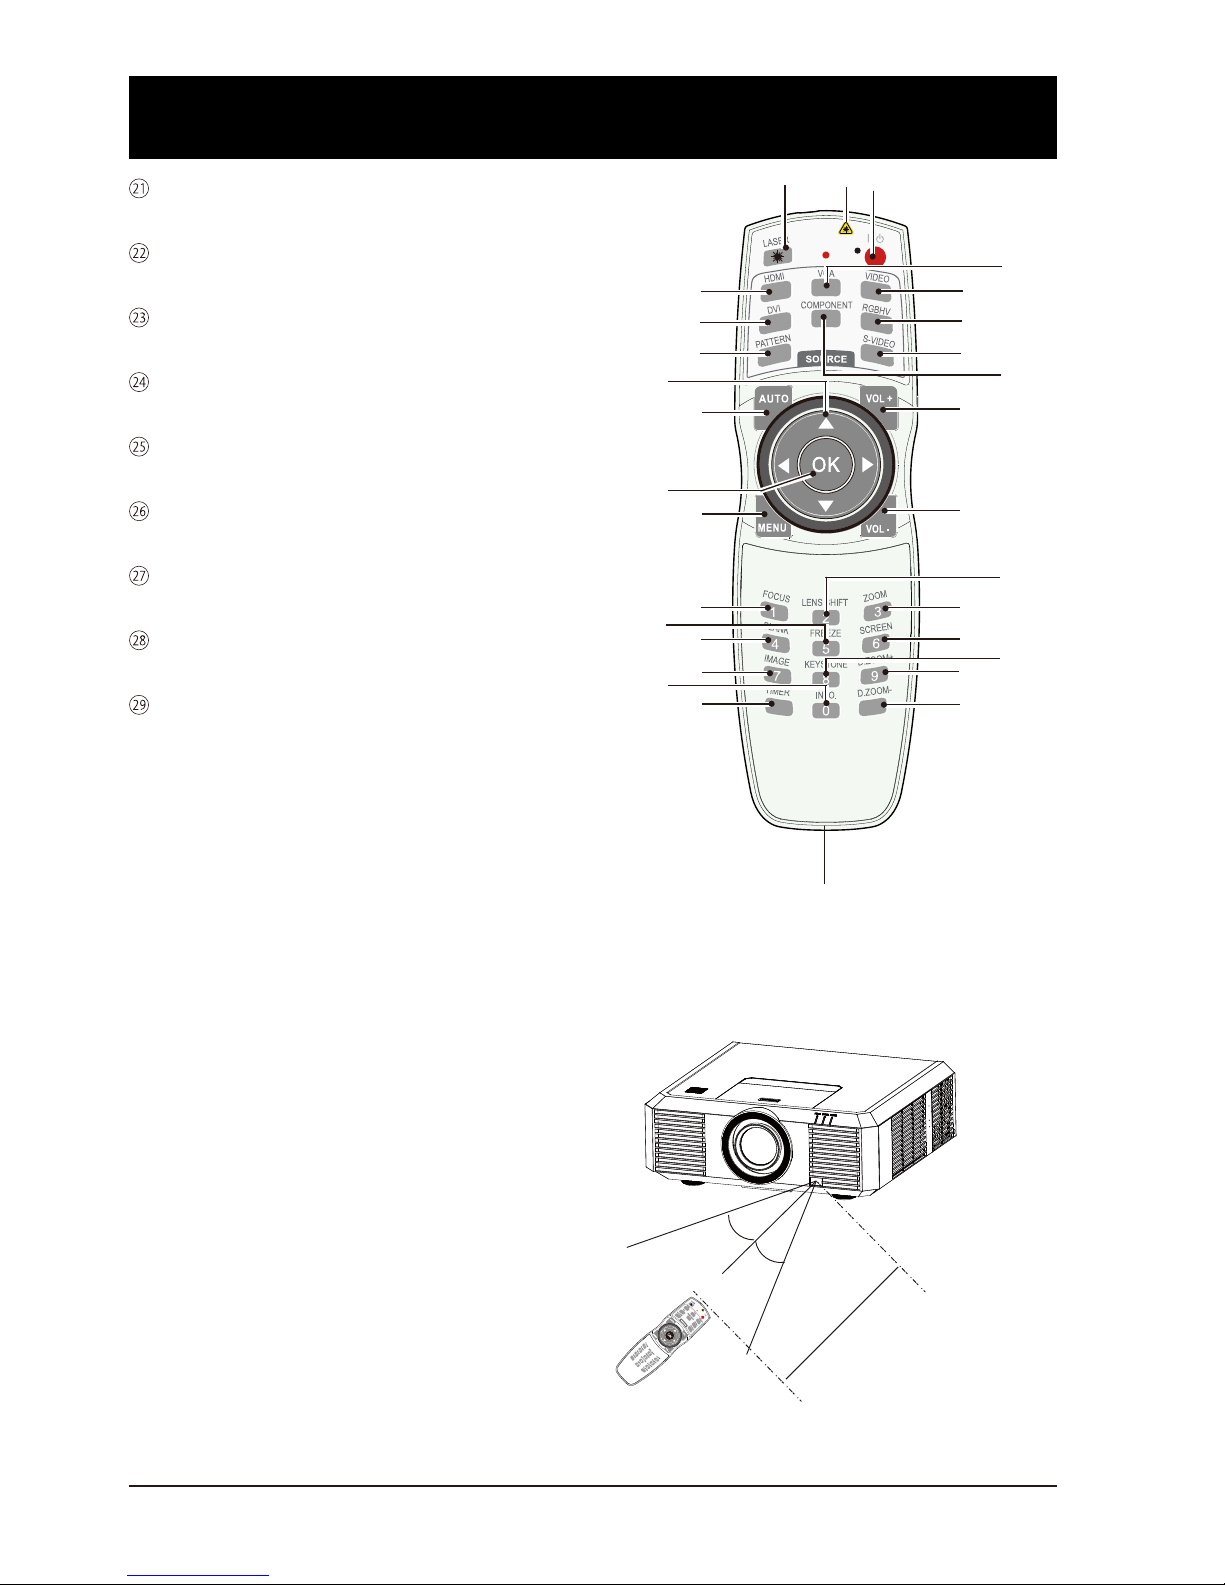
LENS SHIFT key
Enter the lens moving mode
FREEZE key
Freeze projected images
KEYSTONE key
Keystone calibration
INFO. key
Display current image data of your projector
ZOOM key
Enter the zooming mode
SCREEN key
Select scree size
D.ZOOM+ key
Zoom in projected image
D.ZOOM- key
Zoom out projected image
Wired remote controller output port
Connect cable of wired remote controller to this
port when the latter is used for operating your
projector
30°
30°
5m
Remote controller operation
range
Point your remote controller to the IR receiver
of your projector
Maximum operation range of your remote controller is an area of radius 5 meters and arc 60°
in front of and behind your projector
Name and function of individual component of
your projector
⑨
⑩
①
⑤
⑦
⑥
⑧
②
!
③
④
①
11
①
12
①
13
①
14
①
17
①
22
①
18
①
19
①
24
①
20
①
29
①
15
①
16
①
21
①
25
①
26
①
23
①
27
①
28
Page 17
17
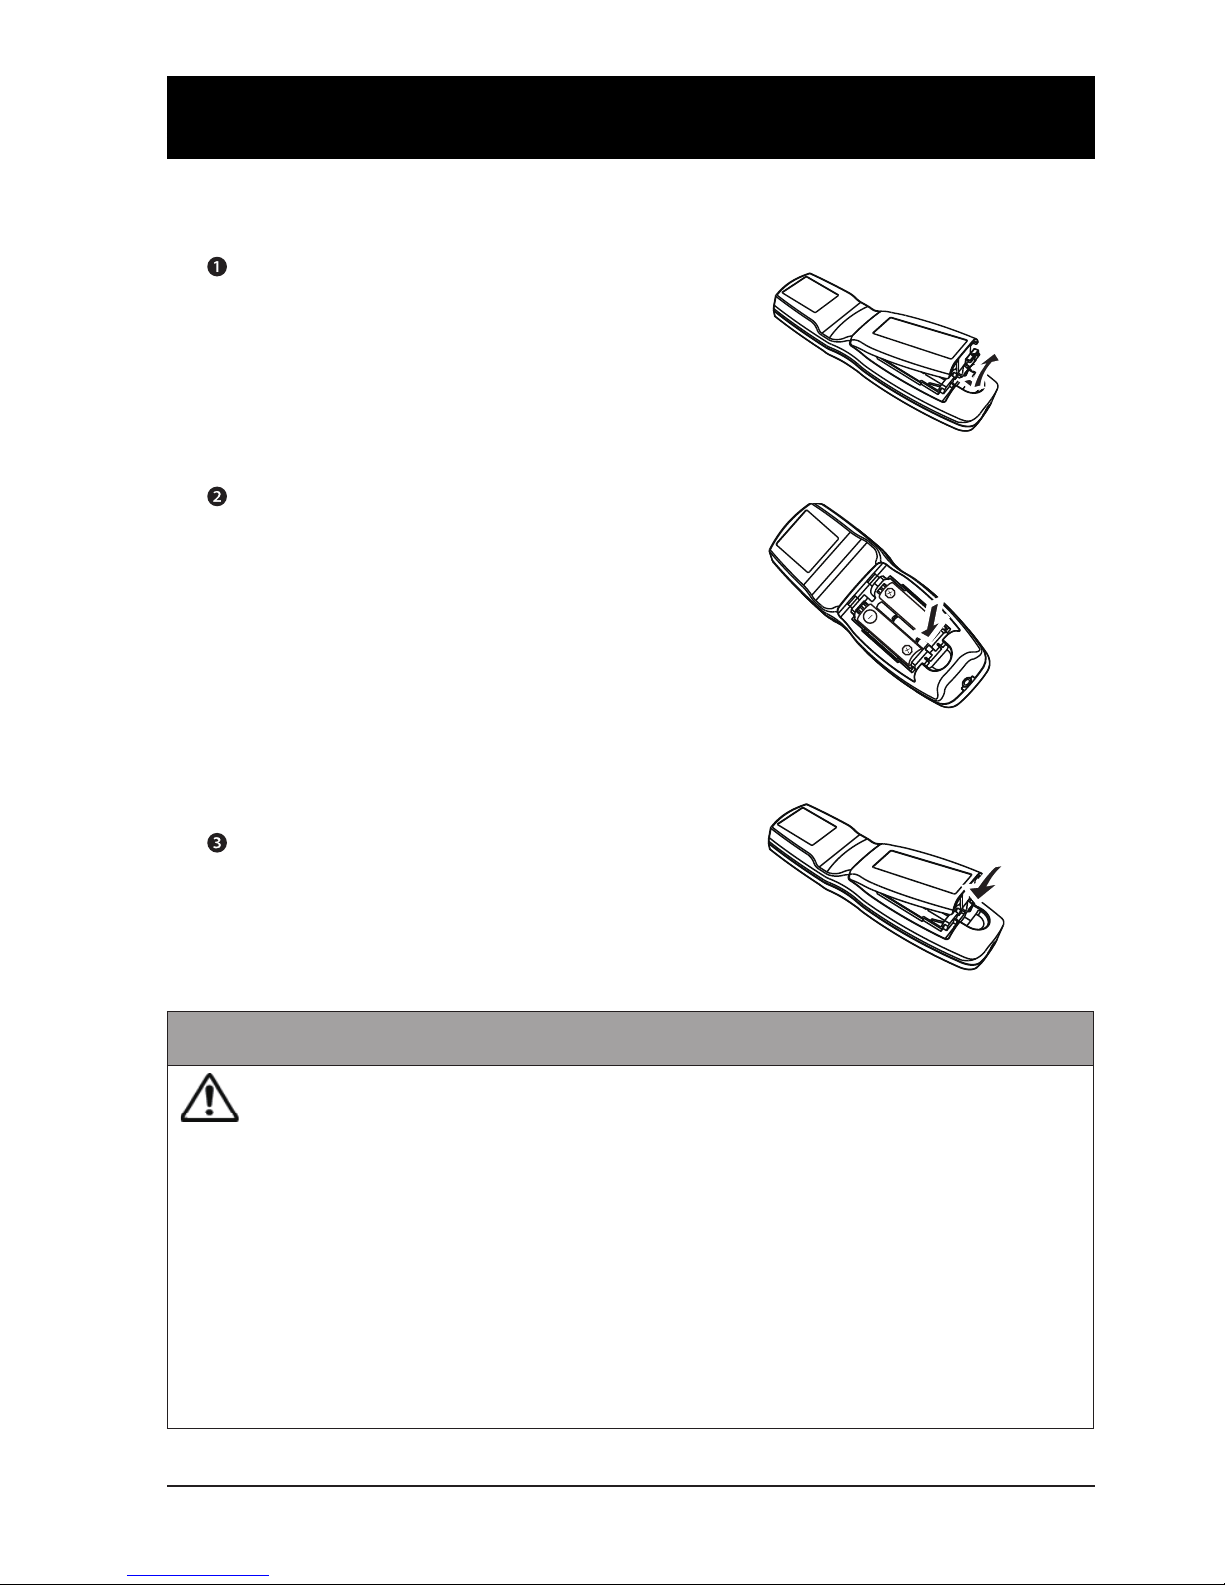
Open the battery
compartment cover.
Insert a new battery in it.
Two AA batteries
Place your battery with its anode
and cathode (+ and -) in correct
direction. Keep both poles in
good connection to the contacts
within the compartment.
Replace the cover.
Install battery of remote controller
Name and function of individual component of
your projector
Please follow the following rules for safety operation:
●
Use 2 AA or LR6 alkaline batteries.
●
Replace both batteries at the same time.
●
Do not mix new and old batteries in one pair.
●
Keep your remote controller away from water or other liquids.
●
Do not expose your remote controller to environments with high humidity or temperature.
●
Do not drop your remote controller.
●
In case of any battery solution leaking in the compartment, clear it thoroughly before
placing new batteries in it.
●
Using battery of types other than what specied I this manual may lead to risks of
explosion.
●
Please dispose your old battery by following instructions given in tag of the battery or
local regulations.
Page 18
18
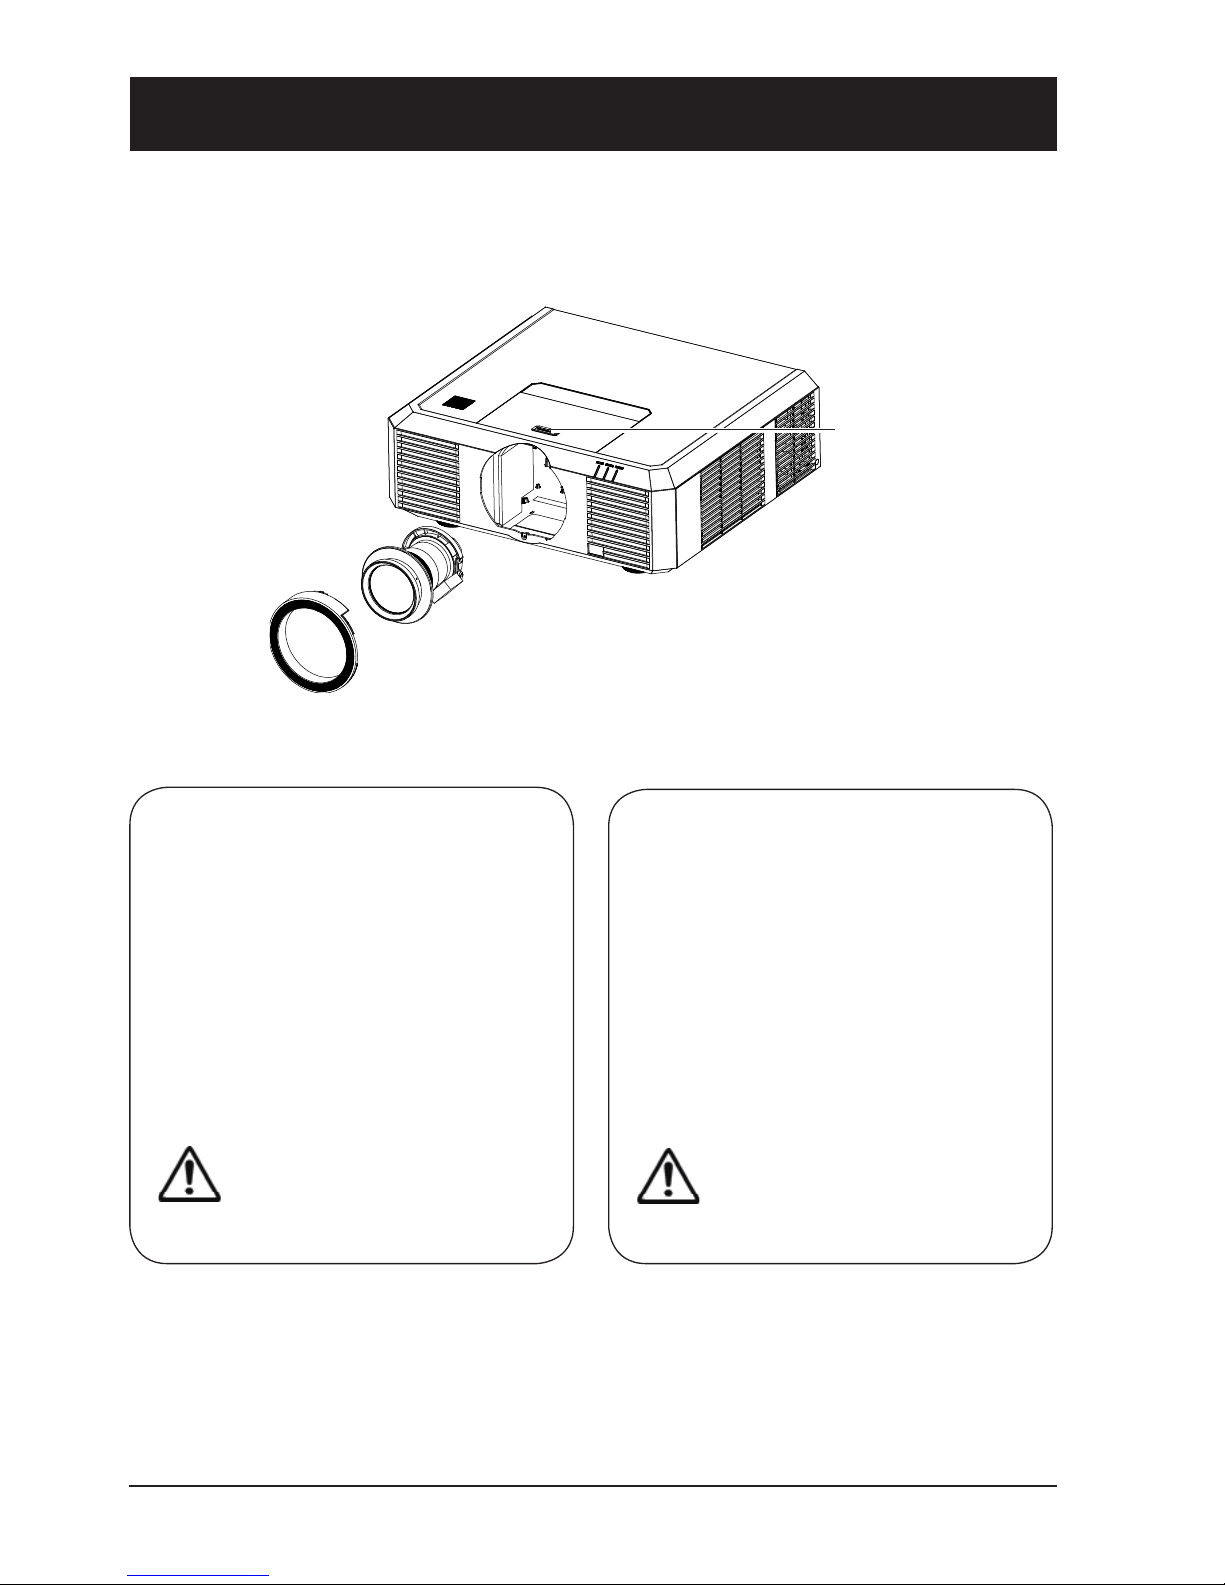
Remove the lens
1 Center the lens with its movement func-
tion.
2 Power off your projector and unplug the
AC power cord.
3 Turn it counterclockwise and remove its
decoration ring.
4 Press and hold the lens release button
at top of the casing. Turn it counterclockwise until it sticks, and then pull it out of
your projector gently.
Installing lens
1 Turn the lens counterclockwise and
remove its decoration ring.
2 Align the red market on your lens and
your projector and insert the lens in the
latter.
3 Turn the lens clockwise slowly until you
hear a click. Make sure the lens is fully
inserted in your projector.
4 Turn the lens clockwise and replace its
decoration ring.
Installation
Lens installation
Please follow steps given below to install lens after its replacement or when optional ones are
employed. Please consult your dealers for details on optional lenses.
Lens release
button
Note:
Be careful in removing the lens.
Do not drop it.
Note:
Do not press and hold the lens
release button when installing it.
●
Do not touch or remove any other component except the lens and parts related to it.
Otherwise, you may experience product failure, electric shock, re, or other incidents.
●
Make sure model of the lens is compatible with your projector before installing it.
●
For details on lens and its installation, please call local dealers.
Page 19
19
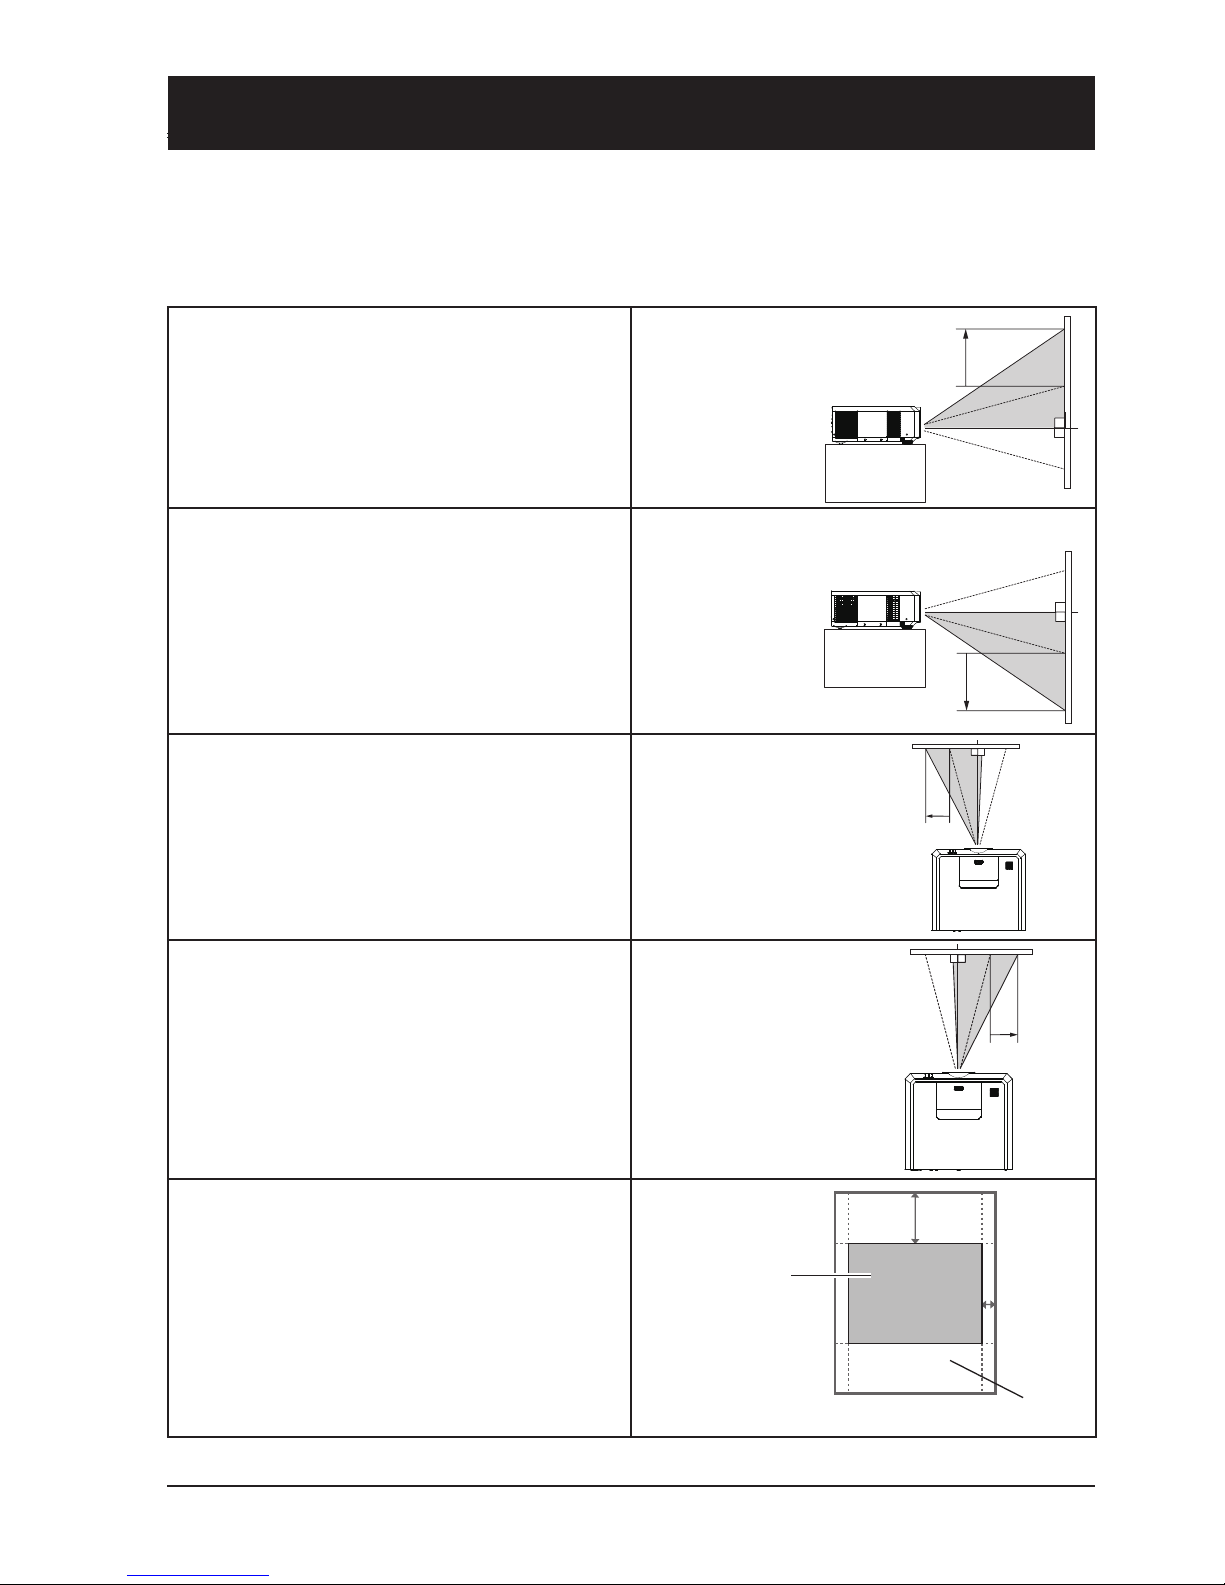
The projection location of your image may be
moved upward a distance up to 50% of the
length of the image.
Move lens to it top
position
The projection location of your image may be
moved downward a distance up to 50% of the
length of the image.
Move lens to it
bottom position
The projection location of your image may be
moved leftward a distance up to 10% of the
width of the image.
Move lens to it
leftmost position
The projection location of your image may be
moved rightward a distance up to 10% of the
width of the image.
Move lens to it
rightmost position
Scope of lens movement adjustment
50%
10%
Center
the lens
Movement range
Installation
Lens movement adjustment
The electric lens movement function may adjust your lens in all four directions.
This function enables easy image position adjustment.
Page 20

20
Set up your projector
● Ambient brightness may affect your projection image quality. For the optimal image effect, it is
recommended to control brightness in your environment.
● Values shown in gure below are approximates only. They may differ from the actual ones.
16:10
Screen size Setup distance
Diag. (X) Width
Height Shortest Longest
30" 64.0 40.4 80.9 132.1
100" 215.4 134.6 280.0 451.5
150" 323.1 201.9 422.2 679.6
200" 430.8 269.2 564.5 907.7
300" 646.2 403.9 848.9 1364.0
Installation
300"
609.6x457.2cm
200"
406.4x304.8cm
150"
304.8x228.6cm
100"
203.2x152.4cm
30"
64.0x45.7cm
76.8cm
266.5cm
402.0cm
537.4cm
808.3cm
4:3
Screen size Setup distance
Diag. (X) Width
Height Shortest Longest
30" 64.0 45.7 76.8 125.6
100" 203.2 152.4 266.5 429.8
150" 304.8 228.6 402.0 647.1
200" 406.4 304.8 537.4 864.3
300" 609.6 457.2 808.3 1298.9
Unit: cm
Unit: cm
Page 21
21
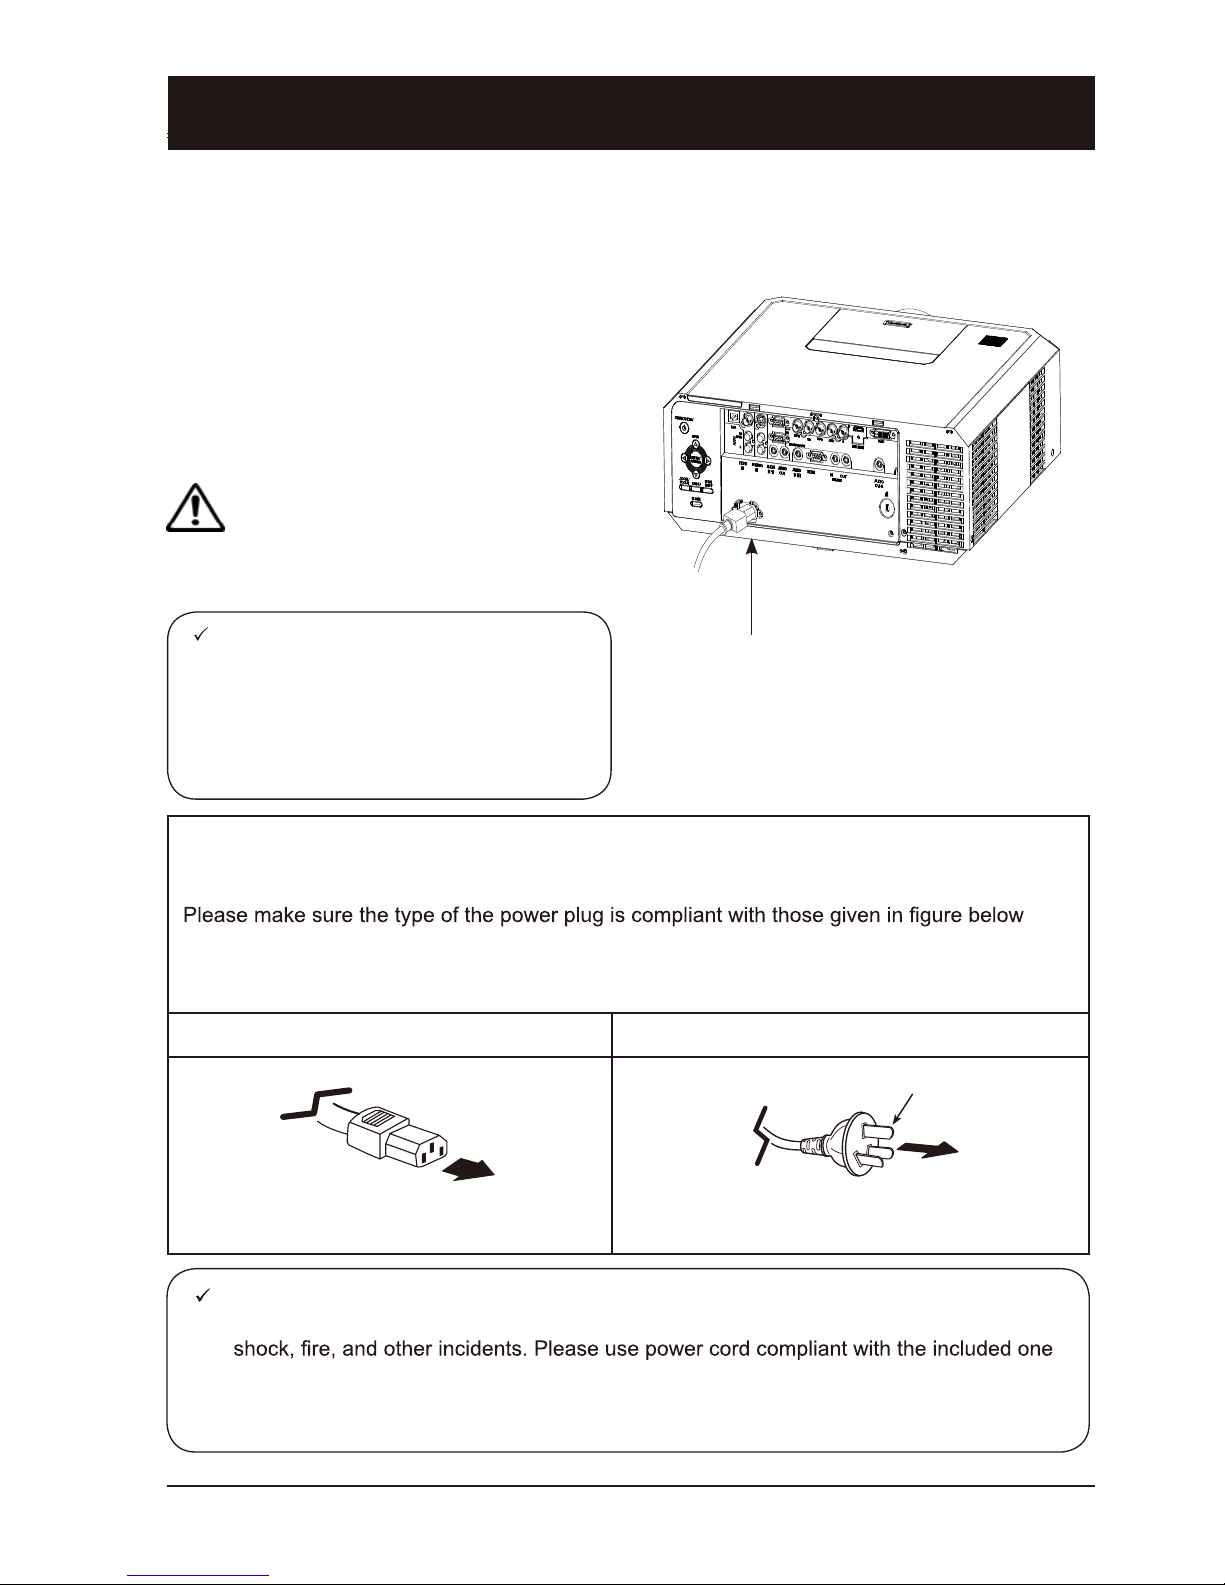
Precautions on power cord
Your AC power cord should meet regulations of the country/district where your projector is
used.
.
Make sure you are using a valid AC power cord.
In case the included AC power cord does not comply with the AC power socket in your location, call your dealer for replacement.
The projector side Connect to the AC power socket
Connect to power cord connector of
your projector
Connect to AC power socket
Grounding end
Installation
Connect the AC power cord
Standard voltage employed by your projector is AC 100-240V. It adapts to different input voltage
automatically. Your projector employs 2-phase power cord with neutral ground wire.
Do not use any other type of power cords or you
may face the risks of electric shock. In case you
have any doubt on type of power cord you are
using, please call authorized dealer or service
center for help. Before powering on your projector, get all external equipment connected in
advance.
Keep your AC power socket close to your
projector for easy plugging and unplugging.
Note:
Note:
● Use of invalid power cord may hamper product performance or even lead to electric
to ensure product performance and operation safety.
● The frequently used wires are: AC power cord, VGA wire, audio wire, video wire, and
RS232 control cable.
Connect included AC power
cord to your projector.
Note:
For safety reasons, unplug the AC power cord when your projector is not in
use. Your projector will consume a small
amount of power when it is connected to
AC grid power and in standby mode.
VGA
Page 22

22
Wires for connection:
● VGA wire ● DVI wire*
● BNC wire* ● HDMI wire*
(* This wire is optional. )
Wires for connection:
● S terminal wire* ● VIDEO wire*
● BNC wire*
(* This wire is optional.)
Connection to computer
Connect to video equipment
Unplug power cord of your projector and all external equipment before connecting any wire to them.
Connection to equipment
Ports on your projector Connection
wire
Equipment
DVI-D(HDCP) DVI wire
HDMI
HDMI wire
R(PR) / G(Y) /
B(PB) / H(HV) / V
BNC wire
COMPUTER IN
COMPUTER OUT
VGA wire
RS232C
RS232
control cable
Ports on your projector Connection wire Equipment
S-VIDEO IN S-VIDEO wire
VIDEO IN VIDEO wire
R(PR) / G(Y) /
B(PB) / H(HV) / V
BNC wire
Lors du branchement de câble, débrancher la câble du courant
du projecteur et d’autres appareils extérieurs.
Page 23

23
Wires for connection:
●
Audio wire*
(* This wire is optional.)
Connection to audio equipment
Unplug power cord of your projector and all external equipment before connecting
any wire to them.
Connection to equipment
Ports on your projector Connection wire
Equipment
MONO L/R Audio wire
AUDIO IN Audio wire
AUDIO IN / OUT
Audio wire
AUDIO DVI-D
REMOTE IN/OUT Audio wire
Page 24

Operation
This chapter introduces you to basic
operation of your projector.
Page 25

25
Basic operation
Power on your projector
1. Connect all external equipment to your projector (e.g. computer or camera) before powering it on.
2. Connect AC power cord of your projector to an AC power socket. The Power light indicator turns
on in red.
3. Press the Power key on the rear control panel or the remote controller.
The Power light indicator lights in green and the cooling fan starts running.
4. If your projector is password protected, the password dialog box displays. Enter your password as
instructed below.
Enter password (PIN)
Press arrow key to select a number, press arrow key to enter it and move the cursor. The
number you typed is displayed as “ ”. To edit number you have entered, press key to move the
cursor to the number you want to change, press arrow key to select the correct one.
Repeat this step to type in a 3-digit number.
Move the cursor to OK after you have typed
the 3-diit number. Press the ENTER key and
now you are ready to use your projector.
If the password is invalid, the password displayed as “
” will be in red. Please try again
with a valid one.
Note :
● In case the “Logo Select” option is set
to OFF, then no welcome image will
display in screen.
● You can do nothing but powering off
your projector during the welcome
image is displaying.
What is a password (PIN)?
A password (PIN) is an ID code for identifying people with knowledge about it to operate your projector. A password (PIN) setting may help preventing your projector from
unauthorized use.
You password (PIN) code is a 3-digit number. To find out more about protecting your
projector with a password (PIN), please refer to the PIN Code Lock function in the
Setup menu on Page 48 for details.
Precautions on password (PIN) operation
)NIP( drowssap tcerroc tuohtiw rotcejorp detcetorp )NIP( drowssap a nepo tonnac uoY
Please set up a new password (PIN) and keep your operation manual in safe place.
In case the password (PIN) is lost or forgotten, call your dealer or service center.
Power key
Power key
141.7
VOL- VOL+
AUDIOAUDIO
IN2
AUDIO
IN1
AUDIO
OUT
S-VIDEOVIDEO R/CINR/C
OUT
RS-232C
DVI-D
P/PR
MONITOR OUT
VGA
IN
G/Y B/PB H/HV V
VGA
Page 26

26
Power off your projector
Power key
Power
key
141.7
VOL- VOL+
AUDIOAUDIO
IN2
AUDIO
IN1
AUDIO
OUT
S-VIDEOVIDEO R/CINR/C
OUT
RS-232C
DVI-D
P/PR
MONITOR OUT
VGA
IN
G/Y B/PB H/HV V
1. Press the power key at the rear control
panel or the remote controller, the “Power
off?” message displays. Message.
2. Press the power key again in 4 seconds
after the “Power off?” message prompted
to you. The POWER light indicator ashes
red while the cooling fan continues running.
(You may set up noise level and speed of
the fan.) Unplug the power cord until the
fan stops running. Failure to do so may
shorten life cycle of your projector or lead
to power on failures or operation abnormalities.
3. The POWER light indicator stops ashing
once the projector has been cooled down to
ready for power on again.
To maintain the life cycle of the lamp,
power off your projector after it has
been on for at least ve minutes.
Do not use your projector without
stop. as it may hurt the life cycle of
your lamp. Power off your projector at
least once every 24 hours and have
it idle for an hour.
Power off?
“Power off?” message disappears
in 4 seconds.
Note:
● If the “On Start” option is set to “On” your projector will power on once it is connected to an AC
power socket.
● Speed of the cooling fan varies with internal temperature of your projector.
● Do not place your projector in any box before it is fully cooled down.
● In case the POWER light indicator flashes or turns red, refer to the “Light indicator status” for
instructions.
● The POWER light indicator flashes when the lamp is cooling down. Do not power on your
projector at this time. Power on your projector only after the POWER light indicator turns red.
● Unplug the power cord after your projector has been turned off. The fan stops running now.
● The POWER light indicator turns red when your projector is ready for power on again. It takes
less time to restart your projector after it was powered off in the standard power off procedure
than that of the non-standard one.
Basic operation
Page 27

27
Zoom /focus function
1. Press the ZOOM / FOCUS key on the
rear control panel or remote controller for
zooming and focusing.
2. Press arrow key
to zoom in and out.
Press arrow key
to change focus of
image. Default adjustment speed is set
to FAST. You may press the ENTER key,
select STEP for speed fine-tuning.
Lens movement adjustment
1. Press the LENS SHIFT on the rear control
panel or remote controller to adjust position of the lens. Default adjustment speed
is set to FAST. You may press the ENTER
key, select STEP for speed fine-tuning.
2. Movement of the lens is shown on the
screen. Press arrow key
to move
the screen to desired location without any
image distortion. Range of screen movement - Upward or downward from the lens
movement axis: 60% for XGA model and
50% for WXGA model. Leftward or rightward: 10%.
3. Press and hold the LENS SHIFT key on
the rear control panel or remote controller
for 5 seconds to home it to the center
position.
Auto setup function
Press the AUTO key on your remote controller
(the function is now enabled) to auto execute
settings given in the Auto Setup menu (including Auto Searching, Auto PC Adjusting, and
Auto Keystone).
Zoom / focus
Lens movement
设置
1/5
设置
设置
1/5
Auto Searching
开
Auto PC Adjusting
开
Auto Keystone
开
ZOOM
FOCUS
FAST
SELECT : ENTER
LENS
SHIFT
FAST
SELECT : ENTER
Note:
This arrow key displays in black when the
lens is not moved. It turns red once the
lens is moved for adjustment.
Basic operation
Auto setup
key
LENS SHIFT
key
FOCUS key
ZOOM
key
INPUT
key
ZOOM/FOCUS
key
LENS SHIFT
key
141.7
VOL- VOL+
AUDIOAUDIO
IN2
AUDIO
IN1
AUDIO
OUT
S-VIDEOVIDEO R/CINR/C
OUT
RS-232C
DVI-D
P/PR
MONITOR OUT
VGA
IN
G/Y B/PB H/HV V
Auto Setup
Setup
Auto Setup
Auto Searching
Auto PC Adjusting
Auto Keystone
open
open
open
Page 28

28
Adjustment pad
Keystone adjustment
Adjustable
pad
You may use the adjustment leg to raise your projector up to 5.0 degree.
Turn the pad to tilt your projector to desired height.
To raise your projector, turn both pads clockwise.
To lower down your projector or close the pad, turn
both pads counterclockwise.
You may use the auto setup function to adjust your
projector’s keystone distortion or do this with the
remote controller or OSD menu manually.
You may adjust keystone distortion of image in your projector with the H/V and Corner keystone adjustment.
Follow steps below to adjust keystone distortion of projected image manually.
Press the KEYSTONE key on your remote controller. The
keystone adjustment dialog box displays, press arrow key
to adjust keystone distortion. You may save your
settings for keystone adjustment.
H/V keystone
adjustment
Press arrow key
to narrow upper
part of the image
Press arrow key
to narrow lower
part of the image
Press arrow
key to reduce
height to the left.
Press arrow key
to reduce height
to the right.
Corner keystone adjustment
Press arrow key
to adjust
keystone distortion
at the upper left
corner
Press arrow key
to adjust keystone distortion
at the upper right
corner
Press arrow key
to adjust
keystone distortion at the lower
right corner
Press arrow key
to adjust
keystone distortion at the lower
left corner
Keystone adjustment
● The arrow key looks white when there is no keystone adjustment in existence.
● The arrow key indicating the adjustment direction turns red.
● The arrow key disappears when the maximum adjustment limit reaches.
● The keystone adjustment will be canceled if you press the keystone adjustment key when it is
displaying.
● The adjustable range is subject to source of signal input.
Keystone
adjustment
key
Basic operation
Page 29

29
Menu item overview
Main menu
Submenu
设置
PC Adjust
Phase 16
Total Dots 0
Horizontal position 0
Vertical position 0
Clamp function 1
Display area H 0
Dispaly area V 1
Reset
Mode free
Save
① ② ③ ④
⑤
⑥ ⑦ ⑧ ⑨
PC Adjust menu
Select PC Adjust, Phase, Total Dots, Horizontal and Vertical position, Clamp function,
Display area H, and Display area V to align each parameter with VGA input signal format.
OSD
For computer input, the available image size setup options are Normal, True, Wide, Full,
Custom, and Digital Zoom +/-. For video input, the available image size setup options
for XGA model are: Normal, Wide, or Custom and Normal, Full, Wide, and Custom for
WXGA model.
Image Select menu
Available options in the Image Select menu are: Dynamic, Normal, Cinema, Blackboard
(Green), Colorboard, or User Image.
Image Adjust menu
For computer input the computer screen adjustment options are: Contrast, Brightness,
Color Temp., White Balance (Red/Green/Blue), Sharpness, Gamma
For video input the computer screen adjustment options are: Contrast, Brightness,
Color, Tint, White Balance (Red/Green/Blue), Sharpness, Gamma, Noise reduction,
Progressive.
Input menu
You may select one input from this menu including: HDMI, DVI, VGA , Component,
S-Video, VIDEO, RGBHV.
Sound menu
You may adjust volume of or mute the sound here.
Setup menu
You may set up operation of your projector here.
Network menu
Network function menu
Message menu
Display information about your projector here.
Basic operation
Auto PC Adjust
Page 30

30
Main menu
Submenu
设置
PC Adjust
Auto PC Adjust
Phase 16
Total Dots 0
Horizontal Position 0
Vertical Position 0
Clamp function 1
Dispaly area H 0
Display area V 1
Reset
Mode free
Store
How to use the OSD
Menu operation
1. Press the MENU key on the rear control
panel or remote controller and the OSD
displays.
2. Press arrow
keyto act on or select one
main menu item. Press arrow
key or OK
key to enter a submenu.
3. Press arrow
key to select desired sub-
menu, then press OK key or arrow
keyto
set up or enter an option.
4. Press arrow
key to select settings
or navigate options, then press OK key to
act on the item and exit.
5. Press arrow
key to return to mainmenu.
Press the MENU key on remote controller
to exit the OSD.
Arrow
key
OK key
Menu key
VOL- VOL+
AUDIO
IN2
AUDIO
IN1
AUDIO
OUT
S-VIDEOVIDEO RS-232C
P/PR
MONITOR OUT
VGA
IN
G/Y B/PB
Menu key
OK key
Arrow
key
Basic operation
Page 31

31
Remote controller operation
Use your remote controller for common operations.
Screen size selection key (SCREEN)
Press the SCREEN key on remote controller to
select desired screen size mode.
Digital Zoom key (D.ZOOM+/-)
Press the D.ZOOM+/- key on remote controller
to enter the Digital Zoom mode.
Volume +/- key (VOLUME +/-)
Increase or decrease volume.
Timer key (TIMER)
Press the TIMER key on remote controller.
A timer animation (00:00) displays and starts
timing in format of (00:00-59:59).
Press the TIMER key again to stop timing.
Press the TIMER key again to disable the timing function.
02
:
02
Timer display
Freeze key (FREEZE)
Press the FREEZE key on remote controller to freeze image on the screen. Press the
FREEZE key or any key to cancel the freeze
function.
Blank key(BLANK)
Press the BLANK key on remote controller;
a blank screen displays to replace existing
image. Press the BLANK key or any other key
to restore the image.
Press the BLANK to toggle switch your screen
as shown below:
BLANK → Normal → BLANK → Normal → ......
Volume +/key
Screen size
selection key
Zoom key
Timer
key
Blank
key
Freeze key
The BLANK screen disappears if no
keys are pressed in 4 seconds.
Blank Image
BLANK
Basic operation
Page 32

32
Input signal source (computer)
Basic operation
Press the INPUT key on the control panel to select one of the following input: VGA , RGBHV ,
HDMI or DVI. Alternatively, you may press the VGA , RGBHV , HDMI, DVI key on remote controller to select individual source directly.
Menu operation
1 Press the MENU key on remote controller and the OSD displays. Press arrow
key, select
the input icon, press arrow key
or OK key to enter the Input menu.
2 Press arrow
selection.
141.7
VOL- VOL+
AUDIOAUDIO
IN2
AUDIO
IN1
AUDIO
OUT
S-VIDEOVIDEO R/CINR/C
OUT
RS-232C
DVI-D
P/PR
MONITOR OUT
VGA
IN
G/Y B/PB H/HV V
INPUT-
key
OK key
VGA key
HDMI key
RGBHV
key
OK key
DVI key
设置
输入源
HDMI 1
DVI
VGA
COMPONENT
S-VIDEO
VIDEO
RGBHV
系统(信号格式) Auto
Input menu
Note:
If the Input Search option in the Auto Setup function is set to On, your projector will search
for input signals automatically.
Page 33

33
VGA
RGBHV
HDMI
DVI
Select input VGA if a PC is connected to
the VGAIN port with a VGA cable.
Select input HDMI if a device is connected to
the HDMI terminal with a HDMI cable.
Select input DVI if a device is connected to the
DVI terminal with a DVI cable.
Select input RGBHV if a PC is connected to
the BNC terminal with a BNCx5 cable.
Input signal source (computer)
Input source selection (VGA / RGBHV)
Input source selection (HDMI / DVI)
Note:
If the Input Search option in the Auto Setup function is set to On, your projector will search
for input signals automatically.
Page 34

34
Input signal source (computer)
System selection
.tamrof langis fo serocs tceted yam noitcnuf tnemtsujda retupmoc otua dna metsys gninnacs ehT
If a PC is selected as the source of input, your projector will detect and adapt to its signal format
automatically. Correct image can be displayed without any setup operation.
Your projector will display one of the following:
Auto
-----
If your projector failed to identify
signals not shown in the signals
format table, the “Auto” message
will display in the System Signal
Format menu. The Auto PC Adjusting function will make necessary adjustment to your projector
to project valid images. If images
are displayed incorrectly, adjust it
manually.
No PC signals detected Check the
connection between PC and your
projector.
设置
输入源
HDMI 1
DVI
VGA
COMPONENT
S-VIDEO
VIDEOZ
RGBHV
系统(信号格式) Auto
VGA system menu
The selected system displays in the
PC system menu.
Select the computer system manually.
1 Press the MENU key on remote controller
and the OSD displays. Press arrow
key
to point to the Input symbol, press arrow
key
or OK and the Input menu displays.
2 Press arrow
key to select System Sig-
nal Format, then press OK key.
3 Press arrow
key to select desired sys-
tem signal format, then press OK key to
Note:
Your projector may save data generated by the Auto PC Adjusting
function.
Note:
The computer system menu will be disabled once HDMI or DVI has been selected.
Page 35

35
Input signal source (computer)
Auto PC Adjusting
The Auto PC Adjusting function may get Total Dots, Horizontal and Vertical position, Display area H,
and Display area V aligned with computer input.
Auto PC Adjusting
1 Press the MENU key on remote controller
and the OSD displays. Press arrow
key
to select PC adjustment symbol. Press arrow
key
or OK and the PC adjust menu dis-
plays.
2 Press arrow
key to point to Auto PC
choice.
Note:
● Total Dots, Horizontal and Vertical position of certain computers may be fully adjusted by
the Auto PC Adjusting function. In case the post-adjustment image still looks incorrect,
adjust it again manually.
● The Auto PC Adjusting function will be disabled once 480i, 575i, 480p, 575p, 720p, 1035i
or 1080i has been selected in the PC system menu.
设置
PC Adjusting
Auto PC Adjusting
Phase 16
Total Dots 0
Horizontal Position 0
Vertical Position 0
Clamp function 1
Display area H 0
Dispaly area V 1
初始画面
Mode free
Store
设置
PC Adjus
Auto PC Adjusting
Page 36

36
Manual computer adjustment
The scan system of your projector may fail to detect signal format used by certain computers as
they opted some special signal format. The manual computer adjustment function of your projector
enables you to adjust individual parameter to align with most special signal format. Your projector
comes with up to storage area to keep parameters manually adjusted by you. You may save preferred settings for certain computers as desired.
1 Press MENU key on the remote controller and the OSD displays. Press
key to select PC
adjustment symbol, press arrow key
2 Press key to select items for adjustment, press
adjustment dialog box prompts. Press key to adjust settings.
Fine Sync.
key to
adjust Total Dots.
Total Dots.
Press arrow
key to align number of dots in a
horizontal cycle with the computer image.
Horizontal position
Press arrow
key to adjust horizontal position of
image.
Vertical position
Press arrow
key to adjust vertical position of
image.
Clamp function
Press arrow
key to select Clamp. Try this function
to remove black strips in image.
Display area H
Press arrow
key to adjust horizontal projection
area of your projector.
Display area V
Press arrow
key to adjust vertical projection area
of your projector.
Reset
Select Reset, then press OK key to reset adjustments
to its initial status.
Mode free
Select Mode free to delete saved data, press arrow
Save
To save adjustments you have made, select Save, press arrow
selection. Select one from mode 1-5, then press OK key.
设置
PC Adjusting
Auto PC Adjusting
Phase 16
Total Dots 0
Horizontal position 0
Vertical position 0
Clamp function 1
Display area H 0
Display area V 1
Reset
Mode free
Save
设置
PC Adjusting
Auto PC Adjusting
Phase 16
Total Dots 0
Horizontal position 0
Vertical position 0
Clamp function 1
Display area H 0
Display area V 1
Reset
Mode free
Save
Note:
● The Fine Sync, Total Dots and Clamp function will be disabled if 480i, 576i, 480p, 576p,
720p, 1035i or 1080i has been selected in the system menu.
Input signal source (computer)
Page 37

37
Image mode selection
Direct operation
Press the Image Select key on remote controller to select desired image mode.
Menu operation
1 Press the MENU key on remote controller and the OSD displays. Press key select image
mode icon , press arrow key
2 Press arrow
Dynamic
An image mode suitable for viewing in bright
room.
Normal
The default mode of your projector.
Cinema
Enriched grayscale for viewing movies.
Blackboard (Green)
An image mode designed for displaying on a
blackboard (Green). It boosts quality of image projected on blackboard (Green). This is
designed for a board in green rather than black
as indicated by its name.
Colorboard
A image mode suitable for image projecting on
surface of wall in red, blue, yellow or green.
User Image
Default image mode set by users in the Image
Adjust menu.
设置
Dynamic
Normal
Cinema
Blackboard(Green)
Colorboard Red
User Image
Image Mode
设置
Dynamic
Normal
Cinema
Blackboard(Green)
Colorboard 红
User Image
Image Mode
Input signal source (computer)
Page 38

38
Image Adjust
1 Press the MENU key on remote controller and the OSD displays. Press key to select the
Screen Adjust icon, press
2 Press arrow key to select item for adjustment, press arrow
selection. The adjustment dialog box prompts. Press arrow key to adjust settings.
设置
Contrast 32
Brightness 32
Color Temp warm
Red 32
Green 32
Blue 32
Sharpen 8
Gamma 8
Image Adjust
设置
Contrast 32
Brightness 32
Color Temp 自然
Red 32
Green 32
Blue 32
Sharpen 8
Gamma 8
Image Adjust
Contrast
Press arrow
key to decrease contrast, press
arrow
key to increase contrast.
Brightness
Press arrow
key to decrease brightness,
press arrow
key to increase brightness
Color Temp.
Press arrow
key to select desired color
temperature (cold, warm, Mid.)
Red
Press arrow
key to lighten red tint and key
to darken it.
Green
Press arrow
key to lighten green tint and
key to darken it.
Blue
Press arrow
key to lighten blue tint and
key to darken it.
Sharpen
Press arrow
key to soften image and to
sharpen it.
Gamma
Press arrow
key to adjust gray scale for
better contrast balance.
Input signal source (computer)
Page 39

39
Screen size adjustment
Your projector comes with screen size adjustment function for you to display desired image size.
1 Press the MENU key on remote controller and the OSD displays. Press arrow
key to se-
lect Screen icon, press
2 Press arrow
Normal
This function keeps aspect ratio of the projected
image consistent with its input source.
True
Display image in its original size. If the original size of a image is greater than screen
image of your projector (XGA:1024x768/
WXGA:1280x800), the latter enters the Image
Display Area Selection mode. Press
key to select image display area. The arrow key
turns red during adjusting. It disappears when
the adjustment limit is reached.
Wide screen
Provide image in aspect ratio of 16:9 by expanding image width proportionally.
Full screen
Project screen in full screen.
Custom
Adjust screen aspect ratio and position manually. Press key in customization area and
Custom options display. Press key to select
desired items.
Horizontal ratio / Vertical ratio: Adjust horizontal
and vertical screen ratio.
Horizontal / Vertical: The aspect ratio option will
be disabled when the horizontal and vertical
screen ratio is set to On. The vertical ratio
option dims and appears unavailable. Adjust the
horizontal ratio and the screen size is adjusted
according to the aspect ratio.
Horizontal position / Vertical position: Adjust
horizontal / vertical position of image.
Global: Save adjustment ratio applicable with all
input. Point to Global and press OK to display
设置
Normal
True
Wide screen
Full screen
Custom
Digital Zoom +
Digital Zoom -
Screen
your ratio settings. The saved ratio will be used
when Custom is selected by user.
Reset: Reset your adjustments to its initial
status. Point to Reset and press OK to display
Digital Zoom +
Select Zoom +. The OSD is replaced by the
Digital Zoom + message. Press OK key to
zoom in.
Press arrow
key to span the image.
This function is available only when the image
is of size greater than the screen.
Digital Zoom –
Select Zoom –. The OSD is replaced by the
Digital Zoom – message. Press OK key to
zoom out.
Press any key, except the OK one, to exit the
Digital Zoom mode.
To reset to original screen size, select Screen
size in the Screen Size Adjustment menu, select Input again in the Input menu, or press OK
key to adjust its size back.
Note:
● Your projector does not support resolution greater than 1920x1200. For computer display of res-
olution greater than 1920x1200, downgrade it before connecting to your projector.
●
● Option True, Full Screen, and Digital Zoom will be unavailable if no signals is detected in the PC
system menu.
Input signal source (computer)
Page 40

40
Input signal source (VIDEO signal)
Basic operation
Press the INPUT key on control panel to select Component, S-Video, or VIDEO. Press COMPONENT, S-VIDEO or VIDEO key on remote controller to select individual item directly.
Menu operation
1 Press the MENU key on remote controller
and the OSD displays. Press
key to
point to the Input icon, press arrow key
or OK to access the Input menu.
2 Press
key to select Component,
S-Video, or VIDEO, then press OK key to
select input source.
VOL- VOL+
AUDIOAUDIO
IN2
AUDIO
IN1
AUDIO
OUT
S-VIDEOVIDEO R/CINR/C
OUT
RS-232C
DVI-D
P/PR
MONITOR OUT
VGA
IN
G/Y B/PB H/HV V
INPUT-
key
OK key
Component
VIDEO
S-VIDEO
OK key
设置
Input icon
HDMI 1
DVI
VGA
Component
S-VIDEO
VIDEO
RGBHV
系统(信号格式) Auto
Input Select menu
Component
VIDEO
S-VIDEO
Select Component when a video signal
source is connected to the Y, Cb/Pb, Cr/Pr
port with a VGA cable.
Select S-Video when video signal is connected to the S-Video port.
Select Video when video signal is connected
to the video port.
Page 41

41
Video system selection
1 Press the MENU key on remote controller and the OSD displays. Press key to point to the
Input icon, press or OK to conrm your selection.
2 Press key to select Component, VIDEO, or S-Video, and then press OK key.
3 Press key to select system, and then press OK key. Press key to select desired signal
format, and then press OK key.
VIDEO or S-Video
Auto
Your projector may auto detect the input video system and adjust to the optimum status.
For PAL-M or PAL-N video system, select the
system manually.
PAL/SECAM/NTSC/NTSC4.43/PAL-M/
PAL-N
If image cannot be displayed correctly, you
may need to select one from PAL, SECAM,
NTSC, NTSC 4.43, PAL-M and PAL-N for
playing.
VIDEO system menu (VIDEO or S-VIDEO)
VIDEO system menu (component)
Input signal source (VIDEO signal)
设置
输入源
Auto
PAL
SECAM
NTSC
NTSC4.43
PAL - M
PAL - N
系统(信号格式)
视频
设置
输入源
Auto
PAL
SECAM
NTSC
NTSC4.43
PAL - M
PAL - N
系统(信号格式)
视频
设置
Auto
1080i
1035i
720p
576p
480p
576p
480i
输入源
系统(信号格式)
色差分量
设置
Auto
1080i
1035i
720p
576p
480p
576p
480i
输入源
系统(信号格式)
色差分量
Component
Auto
Your projector may auto detect the input
component video signal and adjust to the
optimum status.
Component video signal format
If image cannot be displayed correctly, you
may need to select one signal format from
480i, 576i, 480p, 576p, 720p, 1035i and
1080i.
Page 42

42
Image mode selection
1 Press the MENU key on remote controller and the OSD displays. Press key to select the
Image icon, press
then press OK key.
2 Press
key to point to desired item, then press OK key.
Input signal source (VIDEO signal)
设置
Dynamic
Normal
Cinema
Blackboard(Green)
Colorboard Red
User Image
Image mode
Dynamic An image mode suitable for viewing in bright rooms.
Normal The default image mode of your projector.
Cinema Vivid image mode
Blackboard
(Green)
Improve quality of image projected on blackboard (Green).
(This is designed for a board in green rather than black as indicated by
its name.)
Colorboard
A image mode suitable for image projecting on the surface of a wall in
red, blue, yellow or green.
User Image Image mode set by users in the Image Adjust menu.
Page 43

43
Input signal source (VIDEO signal)
Image Adjust
1 Press the MENU key on remote controller and the OSD displays. Press key to select the
Image Adjust icon, press
2 Press key to point to desired item, press
3 Press key to adjust settings, then press OK key; or press key to adjust settings in the
popup adjustment menu.
设置
Image Adjust
Contrast 32
Brightness 32
Saturation
32
Tint 32
Red 32
Green 32
Blue 32
Sharpness 8
Gamma 8
Noise Reduction open
Progressive L1
Contrast Press arrow key to decrease contrast and key to increase it.
Brightness
Press arrow
key to decrease brightness, press arrow key to increase
it.
Saturation Press arrow key key to decrease saturation and key to increase it.
Tint Press arrow key to adjust image to desired tint.
White balance
(Red)
Press arrow
key to lighten the red color and key to darken it.
White balance
(Green)
Press arrow
key to lighten green tint and key to darken it.
White balance
(Blue)
Press arrow
key to lighten the blue color and key to darken it.
Sharpness Press arrow key to soften image and to sharpen it.
Gamma Press arrow key to adjust gray scale for better contrast balance.
Noise
Reduction
Select Noise Reduction to cut snow interference to your screen for even
smoother and clearer image.
Progressive
Display lined video signal as stepped image. You may select one of the
following according to type of signal:
Off ......................Disable the function
L1.......................Project dynamic image
L2.......................Project still image
Quality image..... For movie viewing This function enables your projector to
treat image for high quality representation with less image
distortion.
Page 44

44
Maintain
screen ratio of
input signal
Select this function to maintain the aspect ratio of the projected image
consistent with its input source.
Wide screen
Provide image in aspect ratio of 16:9 by expanding image width proportionally.
Custom Adjust screen aspect ratio and position manually.
Press
key in customization area and Custom options display. Press
key to select desired items.
Horizontal ratio/vertical ratio: Adjust horizontal and vertical screen ratio.
The aspect ratio option will be disabled when the horizontal and vertical screen ratio is set to On. The vertical ratio option dims and appears
unavailable. Adjust the horizontal ratio and the screen size is adjusted
according to the aspect ratio.
Horizontal / Vertical position: Adjust horizontal /vertical position of image.
Global: Save adjustment ratio applicable with all input. Point to Global
your ratio settings. The saved ratio will be used when Custom is selected
by user.
Reset: Reset your adjustments to its initial status. Point to Reset and
reset.
Input signal source (VIDEO signal)
Screen size adjustment
Your projector comes with screen size adjustment function for you to display desired image size.
1. Press the MENU key on remote controller and the OSD displays. Press arrow
key to se-
lect Screen icon, press
2. Press arrow
设置
Screen
Maintain screen ratio of input signal
Wide screen
Custom
Screen
key
Note:
● If no signals was detected, the Auto setting will be accepted automatically and the adjust-
ment popup menu disappears.
● Adjustment range of the horizontal /vertical position ratio and position varies with input
signal.
Page 45

45
Language
Select the Setting menu to set up other functions of your projector.
1. Press the MENU key on remote controller and the OSD displays. Press
key to select Set-
ting, press
or OK to enter the submenu.
2. Press arrow
key to point to desired item, press arrow key -
tion.
3. Press arrow
r selection.
Menu Position
Select this option to change position of OSD.
Point to Menu Position and press ENTER key.
Press the ENTER key to change OSD position in
sequence as shown below:
Upper left → upper right → center →
lower left → Lower right → upper left →
.....
Translucency
Change translucency of OSD menu. Press
key to select Off, High, Medium, or Low.
Background Color
Change background color of the OSD menu.
Press
key to select color in code 0~6.
Setting
设置
Setting
1 / 3
Language English
OSD Setting
Auto Setup
Keystone
Blue Back open
Display
open
Logo Screen
Ceiling mount Close
Rear Close
Remote Control
Power Management Ready
⑩
⑪
①
⑤
⑦
⑥
⑧
②
③
④
⑨
Your projector comes with multiple language support. You may select desired one from
them.
OSD Setting
Press key to point to the Setting menu, press OK key or key.
设置
Setting
Menu Position
Translucency Close
Background Color 0
OSD Setting
Page 46

46
Auto Setup
Setting
设置
Setting
Input Search Open
Auto PC Adjusting Open
Auto Keystone Open
Auto Setup
Press the AUTO key on your remote controller to execute functions including Auto Searching, Auto PC
Adjusting, and Auto Keystone. These function settings may convert according to steps shown below:
Input Search
Select this function to auto detect input signal.
Stop searching after valid signal was found.
Press
key to select the following options:
Off .......... Disable the input search function.
On .......... Enable the input search function. This
function detects input signals automatically and stops searching after any
successful detection.
Auto PC Adjusting
On .......... Press the AUTO key on remote con-
troller to enable the Auto PC Adjusting
function.
Off .......... Disable the Auto PC Adjusting function.
Auto Keystone
Off ..........Disable the Auto Keystone function.
Auto ....... Execute auto keystone adjustment ac-
cording to inclination of your projector.
Manual ... Press the AUTO key on remote control-
ler to enable this function.
Note:
– Your projector detects only the input source you selected last time.
– Press the INPUT key on the control panel during input source searching, then the latter stops and the input
signal you used last time will be selected.
– You cannot disable Input Search and Auto PC Adjusting concurrently.
– Fine Sync, Total Dots, Horizontal and Vertical position of certain computers may be fully adjusted by the Auto
PC Adjusting function. In case the post-adjustment image still looks incorrect, adjust it again manually.
Page 47

47
Keystone
Setting
设置
Setting
Keystone Save
H/V Keystone
Corner Keystone
Keystone
Keystone............... store/reset
H/V Keystone........ Press
key to adjust vertical and horizontal
keystone.
Corner Keystone... Press
key to
adjust keystone at four
corners of the screen. The
four corners are looped in
sequence shown below:
Upper left → Upper right
→ Lower right → Lower
left→ ...
Press
key to adjust
keystone at upper left corner,
key to adjust key-
stone at upper right corner,
key to adjust keystone
at lower right corner,
key to adjust keystone at
lower left corner.
Select this function to save or reset keystone adjustment of projection after your projector is disconnected from AC power. Press arrow
key to navigate available options.
Blue Back
Display
Set default background color of your projector when no signals are detected, Press arrow key
to navigate available options.
On ..........Enable blue projection background color.
Off ..........Disable blue projection background color.
Select this function to display the Logo screen (including a countdown timer) when power on your
projector.
On ..........Display the logo screen when power on.
Off ..........Do not display the logo screen when power on.
Page 48

48
Setting
Logo screen
Logo (including Logo and Logo PIN Code lock
setup) You may use this function to select Logo
screen, Logo PIN Code lock, change power on
password, and set up default logo screen.
Logo Select
Select this to set up the logo screen when power
on your projector:
Default ... Display factory default logo screen.
Off .......... Power on without logo screen.
Logo PIN Code lock
This function helps preventing unauthorized personnel from changing the Logo screen.
Off .......... The Logo screen may be changed
with the Logo menu.
On .......... You may not alter the logo screen
without the Logo PIN Code.
To change the logo screen password protection, press ENTER key, and the Logo PIN Code
change popup dialog box prompts. Follow steps
below to enter a logo screen password.
Press arrow
key to select a number, press arrow key to enter it and move the cursor. The num-
ber you typed is displayed as “
”. To edit number you have entered, press key to move the cursor to
the number you want to change, press arrow key to select the correct one.
Repeat this step to type in a 3-digit number.
Move the cursor to OK after you have typed the 3-diit number. Press ENTER key.
If the password is invalid, the password displayed as “
” will be in red. Please try again with a valid
one.
After you have entered valid logo screen PIN code, you may press
key to toggle switch Off and On.
Logo PIN Code change
You may change the Logo PIN Code to any 3-digit number you like. Press ENTER key to select Logo
PIN Code change. The Logo PIN Code change dialog box prompts, press arrow key to give a valid
new code. The New Logo PIN Code dialog box prompts. Set up a new Logo PIN Code, check contents
contained in the dialog box, select Yes and the new password is set now.
Please remember your new password and keep it safe. You cannot change the Logo PIN Code again if
you forgot the password you have set.
设置
Setting
Logo Select Default
Logo PIN Code lock Close
Logo PIN Code Change
Logo screen
Note:
After changing the Logo PIN Code to a new
.efas ti peek dna ti rebmemer esaelp ,rebmun
The Logo PIN Code cannot be changed
.nettogrof ro tsol si drowssap wen eht fi niaga
Ceiling mount
Select this function for ceiling mounted your projector.
ON .........The projector is in an upside down position.
Auto .......The projector auto detect normal or upside down position.
Off ..........The projector is in up straight position.
Page 49

49
Power Management
Rear
Remote Control
To reduce power consumption and maintain life cycle of lamp, the power management function will turn
off the projection lamp after your projector has been idle for a period of time. Available options are:
Ready ......... The lamp
turns on again if an input signal is connected or any key on the rear panel and remote
controller is pressed during this period of time.
Power off .... The projector shut down after the lamp is fully cooled down.
Off ............... Disable the power management function.
Timer .......... Once the input signal is interrupted and no keys has been pressed for 30 seconds after-
wards, the “No signal” message displays in the timer. The timer counts down until the
lamp turns off. Press arrow key to set up the timer in range of 1~30 minutes.
Ready countdown ..... Set up the interval from ready mode change to standby (0 to 30 minutes) au-
tomatically. A setting of zero minute keeps your projector from auto transition.
Press the Power key to change your projector from ready to standby mode and
any other key to power it on.
side of projection screen.
Remote Control
Select this function to prevent one remote controller from interfering multiple projectors.
Your projector comes with 10 remote controller
code (0-9) with default code at “0”.
Your projector and the remote controller must
be paired with the same code. For example: For
a projector set to be operated by code 7, then
the remote controller for controlling it needs be
set to code 7 as well.
Change code of your projector:
Select Remote Control in the Setup menu.
Change code on remote controller:
Press and hold the OK key and one of the number key for 5 seconds to set the code to that
number. The code is set successfully when the
Note:
Factory default for standby time: 5 minutes. Count down for ready mode: 0 minutes.
Note:
● No control operation is available if your
projector and the remote controller is in different remote control code. You may have
to change the remote control code on both
devices to pair with each other in case like
this.
● The remote control code will be reset if
battery of the remote controller is removed
for long time.
设置
Setting
Remote Control
Sensor for the remote controller
Remote Control
Lamp
Sensor for the remote controller
Set up the sensor when operating your projector
with remote controller.
Front ......Select the front sensor.
Rear .......Select the rear sensor.
Both .......Select the front and rear sensors.
Setting
Page 50

50
Closed Caption
Closed Caption is program’s sound track or the screen display version of other messages. If
closed caption is contained in the input signal, you may enable this function and change channels.
Press arrow
key to select OFF, CC1, CC2, CC3 or CC4.
You may change color of text to white if the original color in Closed Caption looks unclear.
Select this function to test your projector with
built-in signal.
Note:
The Closed Caption option is available only in conditions listed below:
● The input signal is of NTSC video or S-video format.
● Your projector has selected NTSC or Auto in its video system options.
● Closed Caption icon It dims when this function in unavailable.
● The Closed Caption will be suppressed by OSD and Timer display.
Lamp Control Test Pattern
On Start
Standby Mode
Set this option to On to power on your projector automatically when it is connected to an AC power
source.
Select this function when operating your projector through network.
ECO ....... Select ECO mode when your projector is operated not through network. The Network,
RS232C and MONITOR OUT function will be disabled once your projector is powered off in
ECO mode.
Normal ... Power the network function after your projector is powered off. You may power on and off
your projector via network.
设置
Setting2/3
On Start open
Standby Mode ECO
Closed caption
Lamp Control
Test Pattern 12
Security
Cooling Fast Close
High Land Close
Filter Counter
Warning Log
Factory Default
⑬
⑭
⑮
⑫
⑱
⑲
㉑
⑯
⑰
⑳
㉒
Setting
Select this function to change screen brightness.
Standard ..................... Normal brightness
Energy saving mode ... Keep screen less bright
to reduce power consumption and extend
lamp life cycle.
Page 51

51
Security
Cooling Fast
Security: This option provides Key Lock and
PIN Code Lock to ensure your projector’s
operation safety.
Key Lock
Select this function to lock the control panel or
remote controller keypad to prevent unauthorized
personnel from operating your projector.
Select Key Lock, press arrow key to select
desired item.
Off ...............Go without lock.
Projector ..... Lock the control panel operation.
Unlock with remote controller.
Remote controller ...... Lock the remote con-
troller operation Unlock
with the control panel.
If your control panel becomes locked and no
remote controller is available (e.g. no remote
controller is with you or it is out of work) to unlock
it, contact your dealer or service center.
PIN Code Lock
This function helps preventing unauthorized personnel from operating your projector and provides the
following options:
Off ..........Without locking
On ..........A password is required every time your projector is powered on.
You have to provide the old password if you want to change the PIN Code Lock settings or its code. The
factory default PIN Code Lock is “111”. To change the logo screen password protection, press ENTER
key, and the Logo PIN Code change popup dialog box prompts.
Enter the code
Press arrow
key to select a number, press arrow key to enter it and move the cursor. The number you typed is displayed as “ ”. To edit number you have entered, press key to move the cursor to
the number you want to change, press arrow key to select the correct one.
Repeat this step to type in a 3-digit number.
Move the cursor to OK after you have typed the 3-diit number. Press the ENTER key and now you are
ready to use your projector.
If the password is invalid, the password displayed as “
” will be in red. Please try again with a valid
one.
Logo PIN Code change
You may change the Logo PIN Code to any 3-digit number you like. Press ENTER key to select Logo
PIN Code change. The Logo PIN Code change dialog box prompts, press arrow key to give a valid
new code. The New Logo PIN Code dialog box prompts. Start setting up a new Logo PIN Code.
设置
Setting
Key Lock
PIN Code Lock Close
Logo PIN Code change
Security
Note:
Please note down your new password and
keep it safe after changing to a new one.
You cannot power on your projector without
the password.
After your projector is powered off, the cooling fan may operate in ways outlined below:
Off ..........Run in normal way.
On ..........Run in speed faster than that of normal with louder noise and shorter cooling time.
Setting
Page 52

52
设置
设置
3 / 3
IRIS on
㉓
Select this function to change image contrast.
On .......... Enable IRIS function for better image
contrast.
Off .......... Disable IRIS function.
IRIS
This function keeps abnormal operation of your
projector during its use for troubleshooting. It
contains the latest 9 warning messages in time
sequence.
This function resets all your settings to Factory Default except the user Logo screen, PIN Code
Note:
Records contained in the log will be erased
after a Factory Default reset.
Warning Log
Factory Default
设置
Setting
Filter counter 1hour
Timer 200hour
Reaet the filter counter
Filter counter
Timer: Filter cleaning cycle.
after is has been cleaned.
Note:
Set this function to On when your projector is in use in environment of altitude above 1400 meter.
Filter counter
You may set up fan control function in the Setting menu. Set up fan speed according to the altitude
your projector is operating.
Off .......... Normal speed Set this function to Off when your projector is in use in environment of low
altitude.
On .......... The fan runs at speed faster than that of the Off mode. Set this function to On when your
projector is in use in environment of high altitude, as its cooling effect gets lower.
High Land
Setting
Page 53

53
Information
Select this function to detect projection image signal and operation status of your projector.
Press arrow
key to select the Message icon. The Information menu displays.
See below for messages shown in the menu.
设置
Information
Input Video
Auto
H-sync.Freq.
- - - - KHz
V-sync.Freq
- - - - Hz
Screen
Maintain screen ratio of input signal
Language English
Lamp mode
Lamp counter 0 H
Power management close
5 Min
Key Lock
①
⑤
⑦
⑥
⑧
②
③
④
⑨
Input Display selected input and current signal format.
H- sync. Freq.
Display horizontal frequency of input signal in unit of KHz. Show “---KHz”
when no signals are in existence.
V- sync. Freq.
Display vertical frequency of input signal in unit of Hz. Show “---Hz”
when no signals are in existence. The frequency (Hz) doubles in case of
progressive display.
Screen Display selected screen mode.
Language Display language in use.
Lamp mode Display selected lamp mode.
Lamp counter Display time of the lamp in service.
Power
management
Display selected power management mode.
Key Lock Display Off, Remote controller or Projector.
Page 54

Maintenance
This chapter describes the regular
maintenance procedure of your projector to
ensure its optimal operation status for long.
Page 55

55
Regular maintenance
Status light indicator
The status light indicator shows status of projector protection function. Check status and POWER
light indicator for good maintenance operation.
Note
Unplug the AC power cord in case of any abnormality as it may lead to re or electric
shock.
The projector turns off and the status light indicator
ashes
red.
Your projector powers off and the status light indicator turns red.
Your projector powers off automatically to protect components within it when it is overheated. The
POWER light indicator ashes when your projector is cooling down. Press the standby key to
power your projector on again when it is cooled down to normal operation temperature.
Check the following:
– Is adequate clearance provided for your projector’s ventilation? Check the installation status
and any air outlet block.
– Is your projector installed at location close to outlet of air conditioning equipment? Keep your
projector away from air outlet of air conditioning equipment.
– Is the lter in clean condition? Please clean the lter regularly.
The status light indicator turns red and your projector powers off to protect its internal components
whenever an abnormality is detected. Unplug the AC power cord and connect again. Restart your
projector and run checkup routine. If the problem persists, unplug the AC power cord and call your
service center for checkup and maintenance.
Status light indicator
Flashing red
Note:
The POWER light indicator stops ashing when
your projector’s internal temperature cooled
down to normal and it is powered on again.
The status light
indicator turns red
Page 56

56
Regular maintenance
Clean your projector when it is contaminated by foreign matter or its display effects are getting
worse.
Note
Unplug the AC power cord before any cleaning operation.
Note:
Do not operate your projector after its lter is removed. Dust may attach to the lens
assembly and deteriorate image quality.
Do not insert any small object in the air outlet. It may fail your projector.
Clean the lens
Wipe the lens with clean cloth dampened with
non-abrasive camera lens cleaner or clean it
with lens cleaning paper or air blower.
Do not over apply cleaner to the lens. Abrasive
cleaner, solution, or other rough chemical may
scratch the lens.
Clear the lter
The lter is designed to keep dust from enter-
ing in your projector, which may lead to dusts
accumulated on surface of internal components.
Clogged lter may reduce cooling fan effects,
which, in turn, will overheat your projector and
shorten its life cycle. Clean the lter immediately
whenever the Filter Warning icon displays.
Please follow these steps to clean your lter:
1 Power off your projector and unplug from AC
power source.
2 Remove the lter.
3 Gently clean it with a brush.
4 Replace the lter. Make sure it has been fully inserted.
Clean casing of your projector
Wipe the casing surface with clean and soft cloth.
Gently wipe the casing with clean and soft cloth
dampened with small amount of neutral detergent
to remove heavy dirt. Do not over apply cleaner to
the casing. Abrasive cleaner, solution, or other rough
chemical may scratch the casing surface.
Place your projector in proper container after use to
protect it from dirt and dust and being scratched.
Filter racket
Filter Counter
Air inlet grid
Page 57

57
Regular maintenance
1 Press MENU key and the OSD displays.
Press arrow
key to select Setup menu,
press arrow
key or OK.
2 Press arrow
key to select "Filter Count-
er", press arrow
key or OK. Press arrow
message displays. Select Yes to proceed.
3 In another popup dialog box, select Yes to
Recommendations
Please do not use your projector at place of
dust and smoke. This may affects image qual-
ity. Using your projector in place of dust and
smoke may lead to piling dusts on lens, LCD
panel, and lens components within it. In case
like this, call your dealer or service center for
correct cleaning.
Note:
cleaning or replacement.
设置
Setting
Filter counter 1hour
Timer 200 hour
Reset the Filter counter
Filter counter
Lamp replacement
The lamp replacement icon displays when its
use life dues. Please replace it with a new one
of the same model immediately.
The lamp replacement icon
Lamp replacement
Note
Do not replace the lamp after it went dark as it may be broken. Always assume the
lamp of a ceiling mount your projector is broken when replacing it. Stand beside the
lamp cover instead of below it. Remove the lamp cover gently. Small piece of glass
debris may fall off when opening the lamp cover. Consult with a doctor immediately
if there is any glass debris fell in your eyes or mouth.
Note
Let your projector cool for at least 45 minutes before opening the lamp cover, as
temperature within your projector is high.
Note
Replace the lamp with a new one of the same model just in case. Do not drop or
touch the lamp! It may break and lead to personal injuries.
Page 58

58
Precautions on lamp operation
Your projector employs high voltage lamp, which requires careful and correct operation.
Fail to do so may lead to accidents, personal injuries, or fire.
● Life cycle of lamp varies with environment it is in service. Life cycle of lamp varies. That is,
some lamps may last longer than their counterparts.
● If your projector prompts you to replace lamp (by showing a lamp replacing icon) then re-
place it with a new one after powering it off and it is fully cooled down. (Please replace lamp
by strictly following steps given in this manual.)
If you keep on using the lamp after being prompted to replace it then you are exposed to
greater risks of lamp explosion.
● Lamp may explode due to external impact and shock. Risks of explosion vary with projector
and use environment and status of the lamp.
In case of lamp explosion, take the following safety measures:
Disconnect your projector from power source immediately in case of lamp explosion. Call
authorized service center to inspect your projector and replace lamp. Make a thorough inspection to ensure every piece of debris after explosion has been removed. Remove every piece
of debris after explosion. No one else may inspect the internal of your projector except those
authorized and well trained technician who also are familiar with its maintenance. Or we shall
not be held liable for the consequences.
Regular maintenance
Follow steps below to replace the lamp:
1. Power off your projector and unplug the AC power cord. Let it cool down for at least 45 minutes.
2. Open the lamp cover after removing screws holding the cover.
3. Remove all 3 screws xing the lamp. Remove the lamp by holding its handle.
4. Replace with a new lamp and tighten all 3 screws. Make sure the lamp has been installed
correctly. Close the lamp cover and tighten the screw.
5. Connect your projector to an AC power source and power it on.
Page 59

Appendix
Page 60

60
Appendix
Troubleshooting Solution
Power on failure – Plug the power cord of your projector in an AC socket.
– Make sure the POWER light indicator turns red.
– Restart your projector until the POWER light indicator turns red. It
indicates your projector is ready for power on again.
– Check the lamp.
– Do not lock the Key Lock function of your projector.
Logo screen display
failure
– Make sure the Off and Countdown Off is selected in the Display
function.
The Logo screen differs
from the standard
settings.
– Make sure you did not select User or Off in the Logo Screen.
Input signal switch (or do
not switch) automatically.
– Make sure you have correctly set up the Input Search function.
Press INPUT key during
power on and a non-input
mode icon displays.
– This is a lter or lamp replacement alerts.
A non-input or lamp mode
icon displays.
– This is a lter replacement alerts.
Image looks fuzzy – Adjust focus of your projector.
– Provide proper projection distance.
– The projection lens requires cleaning.
– Moving your projector from a colder environment to a hotter one
may result in condensing on the lens. If this is the case, wait
until the condensing water evaporated before powering on your
projector.
Image mirror reected
Image turns upside down
– Check the Ceiling and Rear settings.
– Check the Ceiling settings.
Image looks dim – Check for contrast and brightness settings.
– Check for correct image mode settings
– Check for lamp brightness settings.
– Check for lamp replacement alert. The lamp replacement alert
suggests the lamp is reaching the end of its life cycle.
Please replace it with a new one of the same model immediately.
Troubleshooting
Check the following before calling your dealer or service center:
Page 61

61
Appendix
No image displays – Check for the connection between your projector and computer or
image equipment.
– Check for correct input signal from computer. Connection with
certain notebook computer may mandate changes to its display
output settings. See the user manual included with the computer
for details on settings.
– It takes about 30 seconds for your projector to show the rst
image.
– Check for mode of signal, color system, image system, or
computer system.
– Make sure the ambient temperature is within given range
(41˚F–95˚F; 5˚C–35˚C).
– Image does not display in BLANK mode. The BLANK key or other
keys on the remote controller.
Abnormal color – Check for mode of signal, color system, image system, or
computer system.
– Make sure Blackboard mode is not selected in Image Select.
Some operations are
invisible
– Check the display function.
Auto PC Adjusting
function failure
– Check input signal. Auto PC Adjusting function in unavailable in
480p, 576p, 720p, 480i, 576i, 1080i or 1080p mode.
Settings do not save after
power off
– Make sure you have selected Store after settings adjustment.
Certain settings do not keep without selecting Store.
Power management
failure
– In case of Freeze or Blank operation, the power management
function does not work.
Auto Setting does not
work
– Make sure it is not set to "Off" in each setup menu.
– Make sure "On" is not set in Ceiling function.
Image distorted or
disappeared
– Check and revise the PC Adj. menu or Screen menu.
A password prompt
displays after power on
– You have set up the Logo PIN Code lock function
Remote controller does
not work
– Check the battery.
– Make sure there is no obstacles stand in between your projector
and the remote controller.
– Make sure the remote controller is not too far away from your
projector. The maximum operation range is 5m.
– Make sure the remote controller and your projector are paired with
the same remote control codes.
– Remove the key lock of the remote controller in the Setup menu.
Page 62

62
Appendix
Light indicator turns on or – Check status of your projector according to the light indicator
status.
Exclamation mark
displays
– Invalid operation, please operate your projector correctly.
Control panel does not
function
– Remove key lock on control panel in the Safety option of the Setup
menu.
Cannot remove the Logo
Select password, Key
Lock, and PIN Code lock
– Please call your dealer or service center.
– Make sure your projector is correctly connected to external equipment.
– Make sure all devices have plugged in an AC power source and have been powered on.
– If your projector fails to project image of the connected computer, restart the computer.
.
Warning:
Avertissement :
Your projector employs high voltage power for operation. Do not open its casing.
La haute tension est utilisée pour la marche de ce projecteur. Interdire d’ouvrir le coffret
du projecteur.
If the problem persists, call your dealer or service center. Along with model number of your
projector and a description to your problem. You will be advised on getting our services.
S’il existait encore du problème en respectant les modes d’opération au-dessus, merci de
contacter au vendeur ou au centre de service.
Merci de nous dire la modèle et le problème et nous vous aiderons à régler ce problème.
Page 63

63
Light indicator status
Check light indicator to learn status of your projector.
Light indicator
Status of your projector
POWER STATUS FILTER
Your projector is in Off status (without AC power supply).
Your projector is in standby status. Press Standby key to turn it on.
Your projector is in normal status.
It is ready for standby or the lamp is cooling. You may power on your
projector only after the lamp is fully cooled and the POWER light
indicator stops ashing.
Your projector is in Ready mode.
Your projector detects abnormal situation and cannot power on. Unplug the AC power cord and connect it again before powering on your
projector. If it powers off again, please unplug the cord and call your
dealer or service center for maintenance or inspection. Do not let it
continue operating as this may lead to electric shock or re.
Your projector detects lamp abnormality and cools down.
Your projector detects lamp abnormality and switches into standby
mode.
Your projector cannot power on, as its internal temperature is too
high. You may power it on after it is fully cooled, temperature backs to
normal, and the POWER light indicator turns red.
You may power is fully cooled with temperature backs to normal.
The lamp cover is not fully closed, the lter cover is not fully closed,
and the lens is not correctly installed.
The lter requires cleaning
......Green ......Red ......Turns on ......Off
......Flashing
.....Flashing green ......Flashing red
Appendix
Page 64

64
Compatible computer screen
Your projector is designed to accept every analog computer signal below DCLK 160MHz and
digital computer signal below DCLK 140MHz.
See table below for details on resolution and relevant frequency.
Input
Signal
format
Resolution
Frequency
(Hz)
PC
VGA
640x480 60
640x480 68
640x480 72
640x480 75
640x480 85
SVGA
800x600 56
800x600 60
800x600 72
800x600 75
800x600 85
MAC 16 832x624 75
XGA
1024x768 60
1024x768 70
1024x768 75
1024x768 85
MXGA 1152x864 75Hz
WXGA
1280x768 60
1280x768 75
1280x768 85
1280x800 60
1280x800 75
1280x800 85
1366x768 60
QVGA
1280x960 60
1280x960 85
SXGA
1280x1024 60
1280x1024 75
1280x1024 85
SXGA+
1400x1050 60
1400x1050 75
UXGA 1600x1200 60
WSXGA+ 1680x1050 60
WUXGA 1920X1200 60
Component
480i 720x480i 60
576i 720x576i 50
483p 720x483p 60
576p 720x576p 50
720p 1280x720 50
720p 1280x720 60
1080i 1920x1080i 50
1080i 1920X1080i 60
Input
Signal
format
Resolution
Frequency
(Hz)
HDMI
VGA
640x480 60
640x480 68
640x480 72
640x480 75
640x480 85
SVGA
800x600 56
800x600 60
800x600 72
800x600 75
800x600 85
MAC 16 832x624 75
XGA
1024x768 60
1024x768 70
1024x768 75
1024x768 85
XGA+ 1152x864 75
WXGA
1280x768 60
1280x768 75
1280x768 85
1280x800 60
1280x800 75
1280x800 85
1366x768 60
QVGA
1280x960 60
1280x960 85
SXGA
1280x1024 60
1280x1024 75
1280x1024 85
SXGA+
1400x1050 60
1400x1050 75
UXGA 1600x1200 60
WSXGA+ 1680x1050 60
WUSGA+ 1920X1200 60
Video/S-video
NTSC NTSC -
PAL PA L -
SECAM SECAM -
Note:
Changes to this manual may be made
without notice.
Appendix
Page 65

65
VGA IN / MONITIOR OUT Terminal (D-sub 15)
5
1
2
34
10
9 678
15
14
13
1112
1 Red (Input/output) 9 -----
2 Green(Input/output) 10 Grounding (eld synchronizing)
3 Blue(Input/output) 11 Grounding
4 ----- 12 DDC data
5
Grounding
(line synchronizing)
13
Horizontal synchronizing
(compound sync.)input/output
6 Grounding(red) 14
Vertical synchronizing input/
output
7 Grounding(green) 15 DDC Clock
8 Grounding(blue)
SERIAL Terminal(D-SUB 9)
1 ----- 6 -----
2 RXD 7 -----
3 TXD 8 -----
4 ----- 9 -----
5 GND
LAN Terminal
8 76 5 4 3 21
1 TX + 5 -----
2 TX - 6 -----
3 ----- 7 RX +
4 ----- 8 RX -
HDMI Terminal (HDMI Type A 19)
1
246
8
9 7 5 3
10
12141618
19
17 15 13 11
1 TMDS Data2+ 11 TMDS Clock Shield
2 TMDS Date2 Shield 12 TMDS Clock-
3 TMDS Date2- 13 CEC
4 TMDS Date1+ 14 Reserved (N.C. on device)
5 TMDS Date1 Shield 15 SCL
6 TMDS Date1- 16 SDA
7 TMDS Date0+ 17 DDC/CEC Ground
8 TMDS Date0 Shield 18 +5V Power
9 TMDS Date0- 19 Hot Plug Detect
10 TMDS Clock+
DVI Terminal (DVI-D,24)
1 TMDS Date 2- 13 -----
2 TMDS Date 2+ 14 +5V Power
3 TMDS Date 2 Shield 15 Ground (for +5V)
4 ----- 16 Hot Plug Detect
5 ----- 17 TMDS Data 0-
6 DDC Clock 18 TMDS Data 0+
7 DDC Date 19 TMDS Date 0 Shield
8 ----- 20 -----
9 TMDS Date 1- 21 -----
10 TMDS Date 1+ 22 TMDS Clock Shield
11 TMDS Date 1 Shield 23 TMDS Clock +
12 ----- 24 TMDS Clock -
Terminal conguration
Appendix
Page 66

Description on
network control
operation
Page 67

67
Network control operation
Function: This function is designed to remote control computer in the same LAN.
Preparation
1 Required equipment: Projector, connection, network cable
2 Connection:
Connect your projector to a router or switch in the LAN with normal or jumper network
cable. In case a normal network cable failed to connect successfully, use a jumper cable
instead.
3
powered on.
Operation steps
1 Power on your projector.
2 Acquire the IP address, with DHCP set to on and auto IP allocation set to On. (You
may set DHCP to Off and set up IP address manually if you are somehow familiar with
networking.)
3 Enter the network setup menu
(1) Press MENU key on remote
controller or top of the control panel,
press
key to select network
icon.
(2) Press ENTER key or
key and the
network menu displays.
(3) Press
key select network
settings and press ENTER to
(4) Press key to set DHCP On and
(5) Press key to select OK, press
ENTER to wait until the “Please
wait..” message disappears.
Description on network control operation
设置
network
network setup
network setup state
设置
network
network setup
network setuo state
YES NO
LAN network setup
DHCP close
IP Address 192 . 168 . 1 . 100
Subnet 255 . 255 . 255 . 0
Gateway 192 . 168 . 1 . 1
DNS 192 . 168 . 1 . 1
Page 68

68
Description on network control operation
right for interface:
Network control settings:
Change network setting parameter
4. In the network menu, select network setting status, press OK, check network IP address.
5. Open a browser program, e.g. IE, on any computer in the LAN. Enter the IP address you just
6. Set up options in the page including home page, network control settings, projector status
and control, reminder email settings and safety settings.
Page 69

69
Description on network control operation
Projector status and control:
Check projector’s current status and
change its settings.
Reminder email settings:
Set up your email address to get
reminder email in case of projector
failure.
Safety settings:
Users may change login password.
(Default value is without password.)
Page 70

Aver ssement
A en on pour la sécurité:
Brancher le projecteur à la terre
Interdire de fixer le regard sur l’objec
f du projecteur pour éviter la nuisance sur les yeux
entraînée par la lumière forte. Il interdit surtout les enfants de fixer les yeux sur les faiseaux.
Si le projecteur n’était pas u
lisé pour longtemps, débrancher la prise de la source
Interdire de faire surcharger la prise ou la câble de courant électrique pour éviter l’incendie.
Interdire de poser des objets sur la câble de courant et d’arranger le projecte
ur à l’endroit où
la câble risque d’être foulée du pied de sorte de causer du dommage.
Avant de ne
oyer le projecteur, débrancher le prise de courant. Interdire d’employer le
détergent liquide ou vaporisé ou d’u
liser le chiffon humide pour le ne oyage.
Respecter les aver
ssements et les explica ons sur les é que es. Débrancher le projecteur
lors du temps de la foudre, de l’abscence de surveillance et de la mise de côté du projecteur
pour éviter le domma
ge entraîné par la foudre et la fluctua
on de tension électrique.
Interdire d’u
liser les pièces de rechange qui ne sont pas recommandées par le fabricant
pour éviter le danger.
●
●
●
●
●
●
●
Aver ssement
A en on sur le trou d’aéra on
Laisser de l’espace au haut, aux côtés et au derrière du projecteur pour le refroidissement et
la radia
on. Dans le plan suivant, les distances minimum sont indiquées. Si le projecteur
était posé dans l’armoire ou d’autres endroits pareils, il faut assurer les distances minimum.
Haut et côté Derrière
Interdire de couvrir le trou d’aéra
on. La mauvaise radia on raccourcira la durée de service
et causera du danger.
Les rainures et les troux du derrière et du côté servent à la radia
on pour éviter la
surchauffe de l’appareil et assurer la marche stable du projecteur.
Interdire de me
re du chiffon ou d’autres objets sur les troux d’aéra on et de poser le
projecteur sur le lit, le sofa, le tapis ou d’autres surfaces pareilles pour éviter de boucher les
troux d’aéra
on.
Interdire de poser le projecteur dans un endroit scellé comme
la bibliothèque, sauf s’il y
avait une bonne radia
on.
Interdire de la tombée de toutes sortes d’objets dans le projecteur à travers les troux
d’aéra
on pour éviter l’incendie ou le choc électrique causé par le contact du point de
tension dangereux ou le court-circuit. Interdire l’éclaboussure de la liquide sur le projecteur.
●
●
●
●
●
●
70
0.7’(20cm)
1.5’(50cm)
3’(1m)
3’(1m)
 Loading...