

Page 1

PLEASE READ
We are in no way responsible for the
contents of the manual. We do not guarantee
its accuracy and we do not make any claim
of copyright. The copyright remains the
property of their respective owners.
Visit the site to read the latest projector
news and reviews, read and comment on
projector specifications, download user
manuals and much more.
Page 2

Model DP5100
USER’S GUIDE
Page 3

Warranty
Limitation of
Warranties
FCC
Statement
Proxima Corporation warrants that the Proxima® Desktop Projector™
product manufactured by Proxima is free from defects in materials and
workmanship under normal use during the Warranty Period. The Warranty
Period commences on the day of purchase by the end–user. The Warranty
Period is one year. The Desktop Projector lamps are not covered by this
Warranty.
The end–user’s sales receipt or invoice showing the date of purchase of the
product and the name of the Reseller is proof of date of purchase. The
Warranty extends only to the original purchaser and is not transferable.
During the Warranty Period, Proxima will, at no additional charge, repair or
replace defective parts or at the option of Proxima, replace the entire unit.
This limited Warranty does not extend to any Proxima product that has been
damaged or been rendered defective (a) as a result of accident, misuse or other
abuse; (b) by the use of parts not manufactured or sold by Proxima; (c) by
modification of the product; or (d) as a result of servicing by non–authorized
personnel.
The foregoing Warranty is expressly in lieu of any other expressed or implied
warranties, including, without limitation, warranties of merchantability or
fitness for a particular purpose. To the extent not prohibited by law, all
statutory warranties are hereby waived and excluded from this Warranty.
Proxima expressly disclaims all warranties not stated in this Limited Warranty.
Warning: This equipment generates, uses and can radiate radio frequency
energy and, if not installed and used in accordance with the instruction
manual, may cause interference to radio communications. It has been tested
and found to comply with limits for a Class “A” computing device pursuant
to Subpart B of Part 15 of the FCC Rules, which are designed to provide
reasonable protection against such interference when operated in a commercial environment. Operation of this equipment in a residential area is likely to
cause interference in which case the user, at his own expense, will be required
to take whatever measures may be necessary to correct the interference.
Trademarks,
Patents, and
Copyright
Proxima is a registered trademark of Proxima Corporation. Desktop Projector
and trade dress are trademarks of Proxima Corporation. IBM is a registered
trademark of International Business Machines Corporation. Macintosh is a
registered trademark of Apple Computer, Inc. Other trademarks are the
property of their respective owners. U.S. and foreign patents are pending.
© Copyright 1995 Proxima Corporation. All rights reserved. Specifications
are subject to change without notice.
7/95
Page 4

Contents
Chapter 1
Introducing the
Proxima
Desktop
Projector™
Chapter 2
Detailed Setup
Introduction .................................................................... 1–1
What’s in the Box?...........................................................1–2
®
Quick Setup Desktop Computers .................................... 1–3
Quick Setup Laptop and Notebooks ............................... 1–4
Your Proxima Desktop Projector ..................................... 2–1
Setting up the Projector ................................................... 2–2
Connecting the Desktop Projector ..................................2–3
COMPUTER (RGB)............................................... 2–4
VIDEO IN............................................................... 2–6
S–VHS ..................................................................... 2–7
COMPUTER AUDIO IN....................................... 2–7
AUDIO IN ..............................................................2–8
AUDIO System........................................................ 2–9
Powering Up ................................................................... 2–9
Applying Power to the Projector .............................. 2–9
Turning On/Off the Lamp..................................... 2–10
Projecting the Image ...................................................... 2–11
Image Size ..............................................................2–11
Image Sizing and Focusing ..................................... 2–12
Keystoning .............................................................2–12
Chapter 3
Using the
Desktop
Projector
The Control Panel ........................................................... 3–1
Control Panel Keys .......................................................... 3–2
STANDBY/ON Key ................................................3–2
INPUT Key ............................................................. 3–2
ZOOM Key .............................................................3–2
FOCUS Key............................................................. 3–2
Control Panel Indicators.................................................. 3–3
TEMP Indicator....................................................... 3–3
LAMP Indicator ....................................................... 3–4
ON Indicator ...........................................................3–4
Page 5

Remote Control............................................................... 3–5
STANDBY/ON Key ................................................3–6
RESET Key .............................................................. 3–6
CALL Key ................................................................3–6
INPUT SELECT Keys............................................. 3–6
ZOOM Key ............................................................. 3–7
FOCUS Key............................................................. 3–7
MENU Keys ............................................................ 3–7
VOLUME Keys ....................................................... 3–8
MUTE Key .............................................................. 3–8
CHANGE Keys ....................................................... 3–8
BLUE BACK Key .................................................... 3–8
LIGHT Key (on side of remote control) .................. 3–8
Menus ............................................................................. 3–9
Displaying the Menu................................................ 3–9
Selecting and Changing Settins ................................ 3–9
Saving Changes ........................................................ 3–9
Computer (RGB) Video Menu .............................. 3–10
Video Menu ........................................................... 3–11
Chapter 4
Maintenance
Chapter 5
Troubleshooting
Lens Cleaning ..................................................................4–1
General Maintenance....................................................... 4–2
Replacing the Lamp ................................................. 4–2
Cleaning the Air Filter.............................................. 4–3
Changing the Remote Control’s Batteries ................ 4–5
Temperature Extremes ............................................. 4–5
Troubleshooting Chart .................................................... 5–1
Where to Get Help .......................................................... 5–4
Appendix A
Specifications
Appendix B
Accessories & Replacement Parts
Index
Page 6
Chapter 1
Introducing
the Proxima
Desktop
Projector
Chapter 1 • Introducing the Proxima
®
Desktop Projector
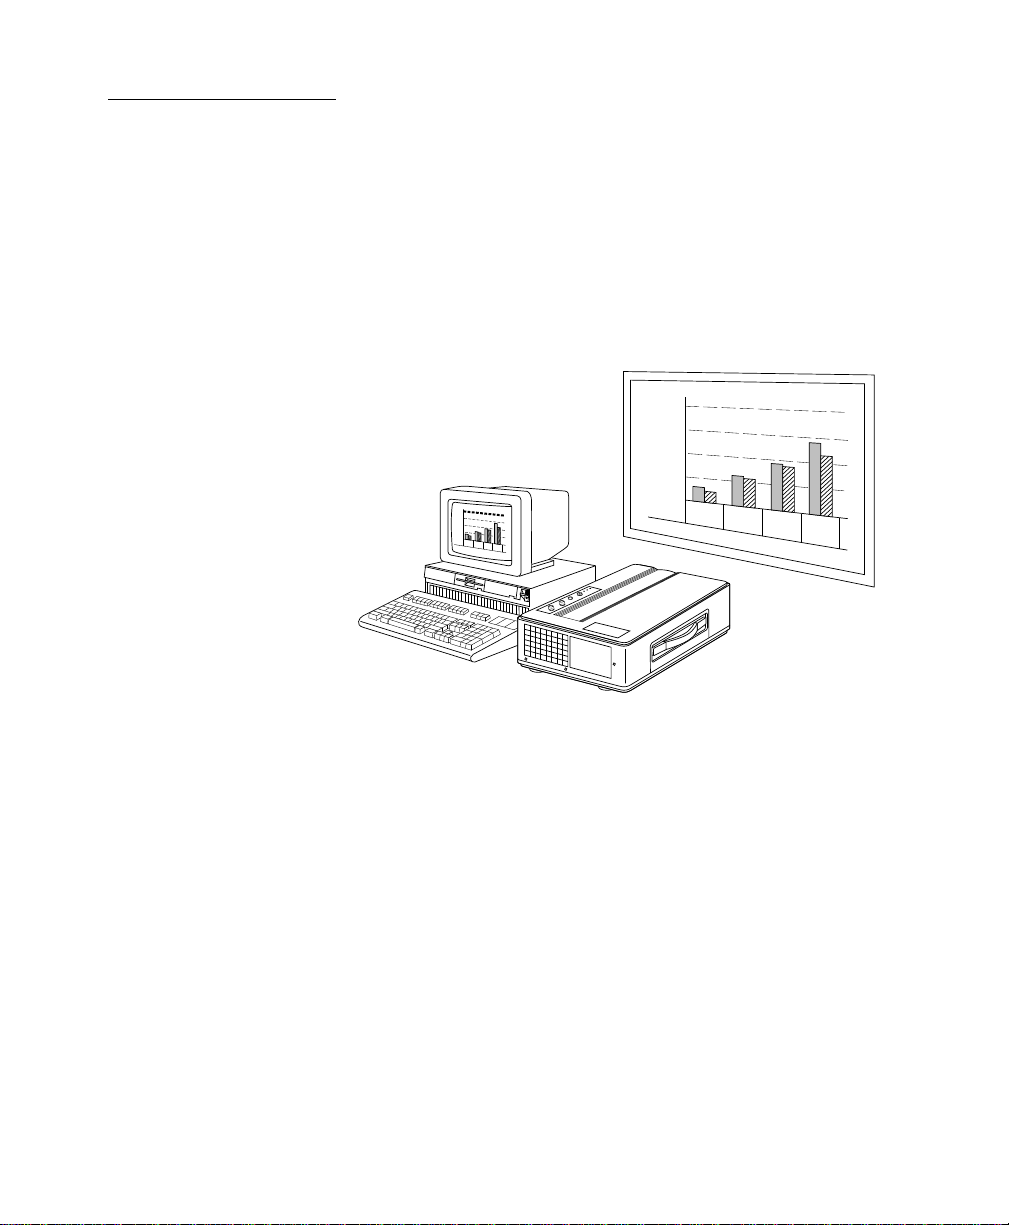
The Proxima® Desktop Projector™ Model DP5100 is a portable,
color data and video LCD desktop projection product that makes
sharing data and presenting information as easy as connecting
your computer to your monitor.
800
600
400
200
800
600
400
200
0
APR
MAY
JUN
JUL
TEMP
LAMP
ON
STANDBY
/ON
INPUT
W
ZOOM
T
NF
FOCUS
0
APR
MAY
JUN
JUL
Figure 1-1
The Proxima Desktop Projector DP5100 in use
User’s Guide • 1–1
Page 7
Chapter 1 • Introducing the Proxima
®
Desktop Projector
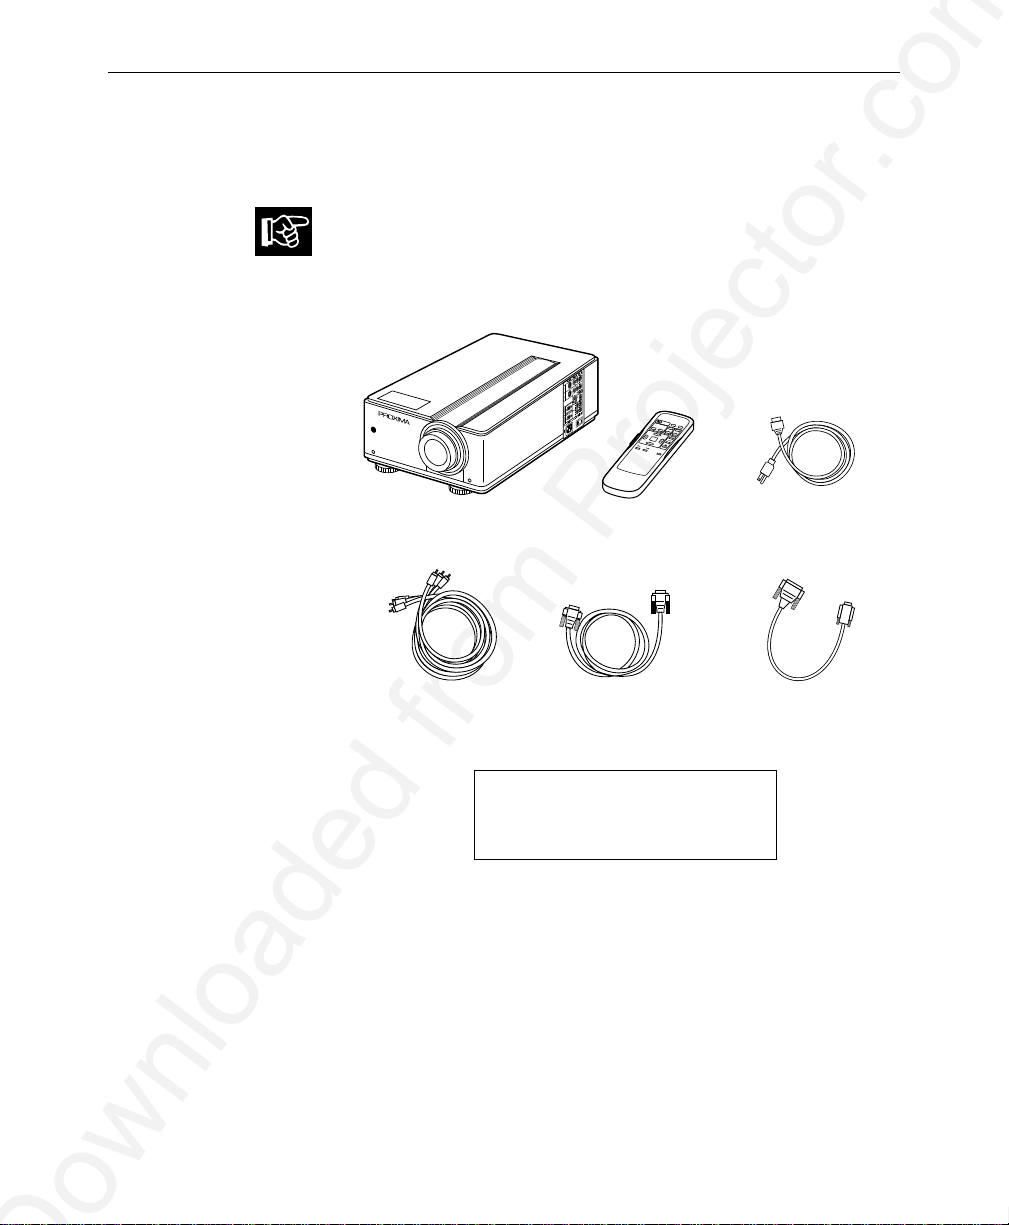
What’s in the
Box?
After you’ve opened the box and removed the Desktop Projector,
make sure you have all the items shown in Figure 1-2.
CAUTION! The Desktop Projector 5100 should be treated
like any other precision optical instrument. Handle it carefully.
STANDBY
/ON
RESET
VIDEO
CALL
1/2
VIDEO
TINPUT
1/2
RGB
F
FOCUSZOOMRGB
W
N
MENU
VOL
MENU
VOL
MENU
MUTE
CHANGE
H
V
BLUE
BACK
Proxima Desktop
Projector
Composite
audio/video cable
Remote control
VGA video cable
Power cord
Macintosh video
cable adaptor
1–2 • User’s Guide
Also included but not shown:
• (2) AA alkaline batteries
• User's Guide
• Product Registration Card
Figure 1-2
Items included with the Desktop Projector 5100
Page 8

Chapter 1 • Introducing the Proxima
®
Desktop Projector
Quick Setup:
Desktop
Computers
Macintosh Video
Cable Adaptor
Here are the steps you follow to connect your PC or Macintosh to
the projector (to connect to a laptop or notebook computer,
follow the instructions on the next page). Each step is described in
detail in Chapter 2.
1. Place the projector on a solid, flat surface, at a right angle
(perpendicular) to the projection screen, parallel to the floor.
2. Remove the lens cover.
3. Turn off the computer, the monitor, and the projector.
4. Unplug the monitor cable from the video monitor port on
your computer.
5. If you are using a Macintosh,
a) Connect the Macintosh video cable adaptor (supplied with
the projector) to either end of the DP5100 VGA video
cable.
b) Plug the other end of the Macintosh video cable adaptor
into the Macintosh’s video output (monitor) port. Skip
ahead to step 7.
VGA video cable
1
2
RGB
6. To connect to a PC, plug one end of the DP5100 VGA video
cable into the computer’s video output (monitor) port.
7. Plug the other end of the DP5100 VGA video cable into the
projector’s COMPUTER (RGB) 1 or 2 port.
8. To connect additional video and audio sources to the
projector, see pages 2-6 through 2-9.
9. Turn on the projector, then turn on your computer and
monitor.
User’s Guide • 1–3
Page 9

Chapter 1 • Introducing the Proxima
®
Desktop Projector
Quick Setup:
Laptop and
Notebooks
To connect the projector to your laptop or notebook computer,
follow these instructions. Each step is described in detail in
Chapter 2.
1. Place the projector on a solid, flat surface, at a right angle
(perpendicular) to the projection screen, parallel to the floor.
2. Remove the lens cover.
3. Turn off the computer and the projector.
4. If you have a PC laptop, skip ahead to step 5. To connect to a
Macintosh laptop, you will use two additional cables:
a) Plug the laptop video adaptor cable (supplied with the
laptop) into the laptop.
b) Connect one end of the Macintosh video cable adaptor
(supplied with the projector) to the laptop video adaptor
cable.
c) Connect the other end of the Macintosh video cable
adapter to either end of the DP5100 VGA video cable.
Skip ahead to step 6.
1–4 • User’s Guide
5. To connect to a PC laptop, plug one end of the DP5100
VGA video cable into the computer’s video output (monitor)
port.
6. Plug the other end of the DP5100 VGA video cable into the
projector’s COMPUTER (RGB) 1 or 2 port.
7. To connect additional video and audio sources to the projector, turn to pages 2-6 through 2-9.
8. Turn on the projector, then turn on your computer.
Page 10
Chapter 2
3
FOCUS
N F
ZOOM
W
T
INPUT
STANDBY
/ON
ON
LAMP
TEMP
TINPUT
STANDBY
/ON
W
VIDEO
RGB
MENU
VOL
F
RESET
CALL
N
FOCUSZOOMRGB
1/2
VIDEO
1/2
MENU
MENU
H
CHANGE
BLUE
BACK
V
VOL
MUTE
4
5
1
2
10
6
7
8
9
Detailed
Setup
Chapter 2 • Detailed Setup
Your Proxima
Desktop
Projector
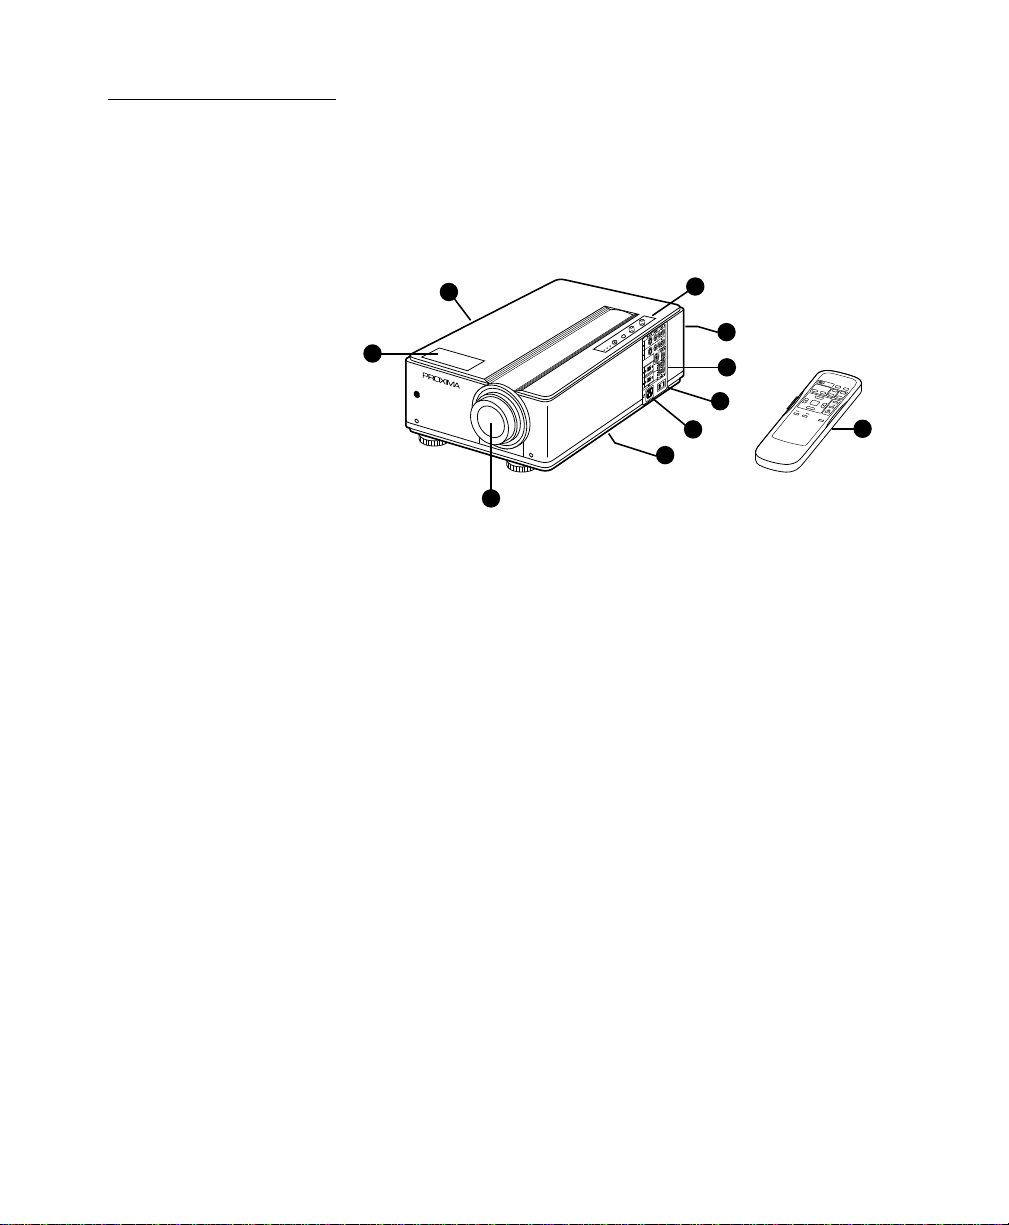
Before you begin, examine the components of the projector.
Figure 2-1
The Proxima Desktop Projector and Remote Control
(1) Control panel
(2) Air exhaust (at rear)
(3) Connector panel
(4) AC power switch
(5) Power cord receptacle
(6) Air intake filter (on bottom)
(7) Projection lens assembly
(8) Internal speaker
(9) Handle
(10) Remote control
User’s Guide • 2–1
Page 11
Chapter 2 • Detailed Setup
Setting up the
Projector
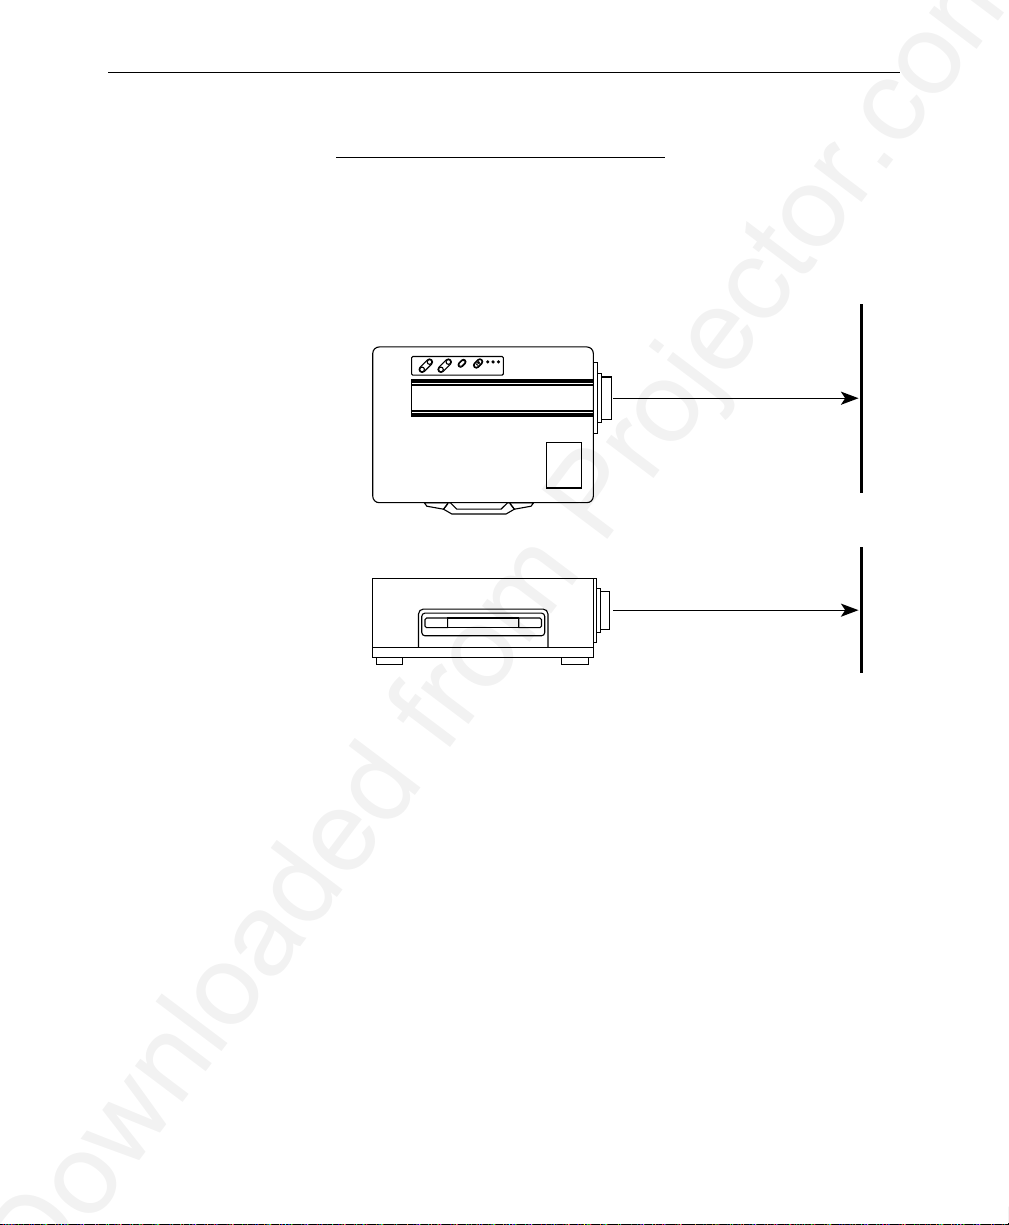
Setting Up the Projector
1. Place the projector on a solid, flat surface. The projector
should be located at a right angle (perpendicular) to the
projection screen and parallel to the floor.
W
NF
INPUT
TEMP
ON
FOCUS
Figure 2-2
Positioning the Desktop Projector, top view and side view
LAMP
ZOOM
/ON
STANDBY
T
Projection Screen
2–2 • User’s Guide
Note: If you're using a media cart, make sure the wheels are
locked to prevent it from moving.
2. Remove the lens cover.
Page 12
Chapter 2 • Detailed Setup
Connecting
the projector
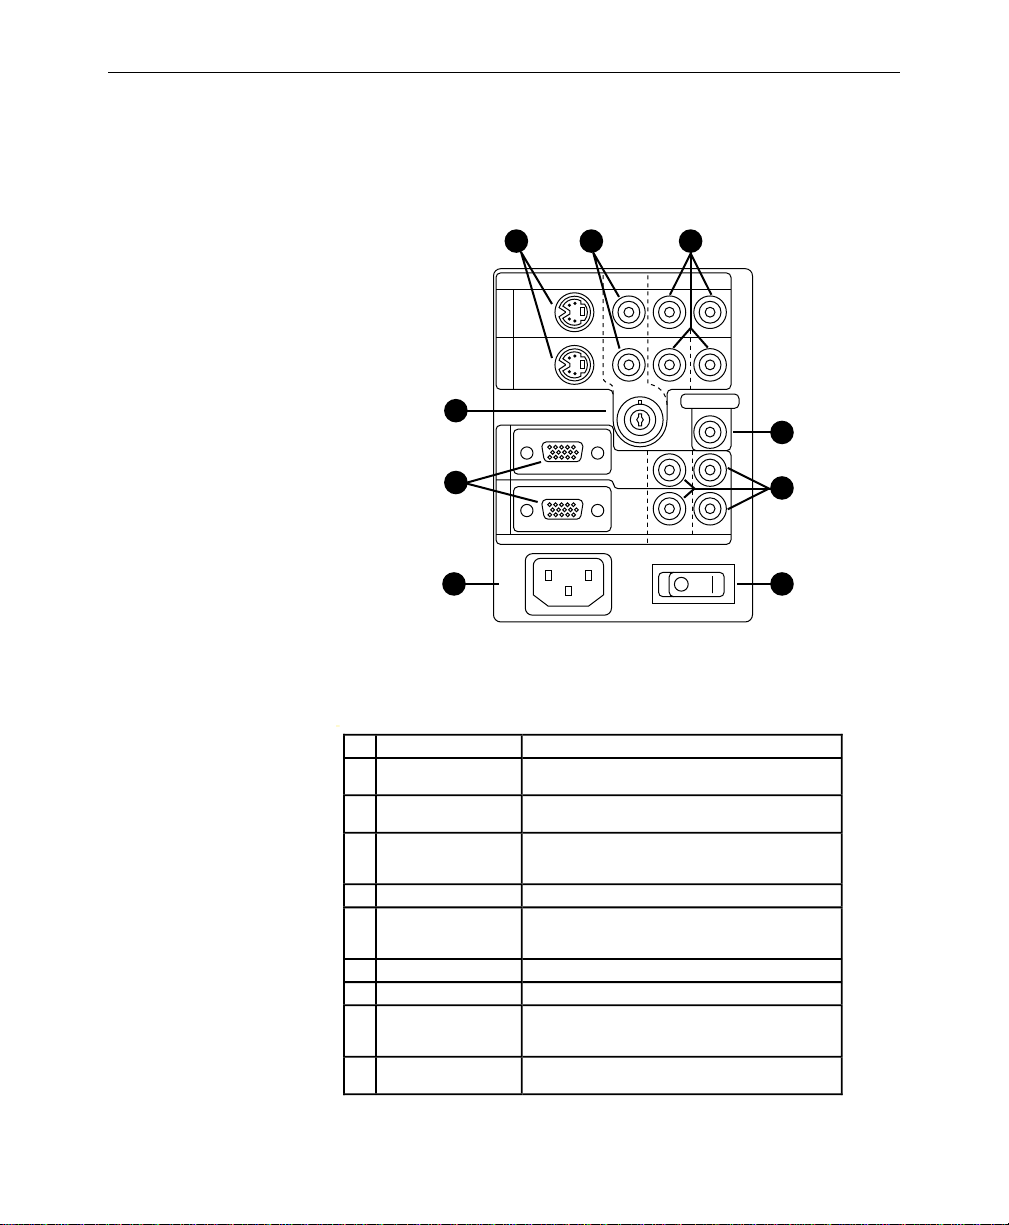
Take a moment to look at the projector's rear connector panel.
1
1
2
9
1
8
2
AC
IN
Figure 2-3
The Connector Panel
S–VIDEO VIDEO AUDIOLR
32
CONTROL
AUDIORGB
LR
4
5
67
Item Description
1 S-Video inputs Input from S-VHS or S-video
2 Video inputs NTSC/PAL input from VCRs,
3 Audio inputs
(from video
sources)
4 Control Not used
5 Computer
(RGB) Audio
inputs
6 ON/OFF switch Main power ON/OFF switch
7 Power jack Input power connector
8 RGB
(Computer)
Video inputs
9 Video input -
BNC
source
laserdisc players, and camcorders
Left and right inputs from VCR or
other audio source, or amplified or
wireless microphone
Left and right inputs from
computer audio source, or
amplified or wireless microphone
Connects computer video sources
to the projector
BNC-style connector for NTSC/PAL
input; Video 2 input source only
User’s Guide • 2–3
Page 13
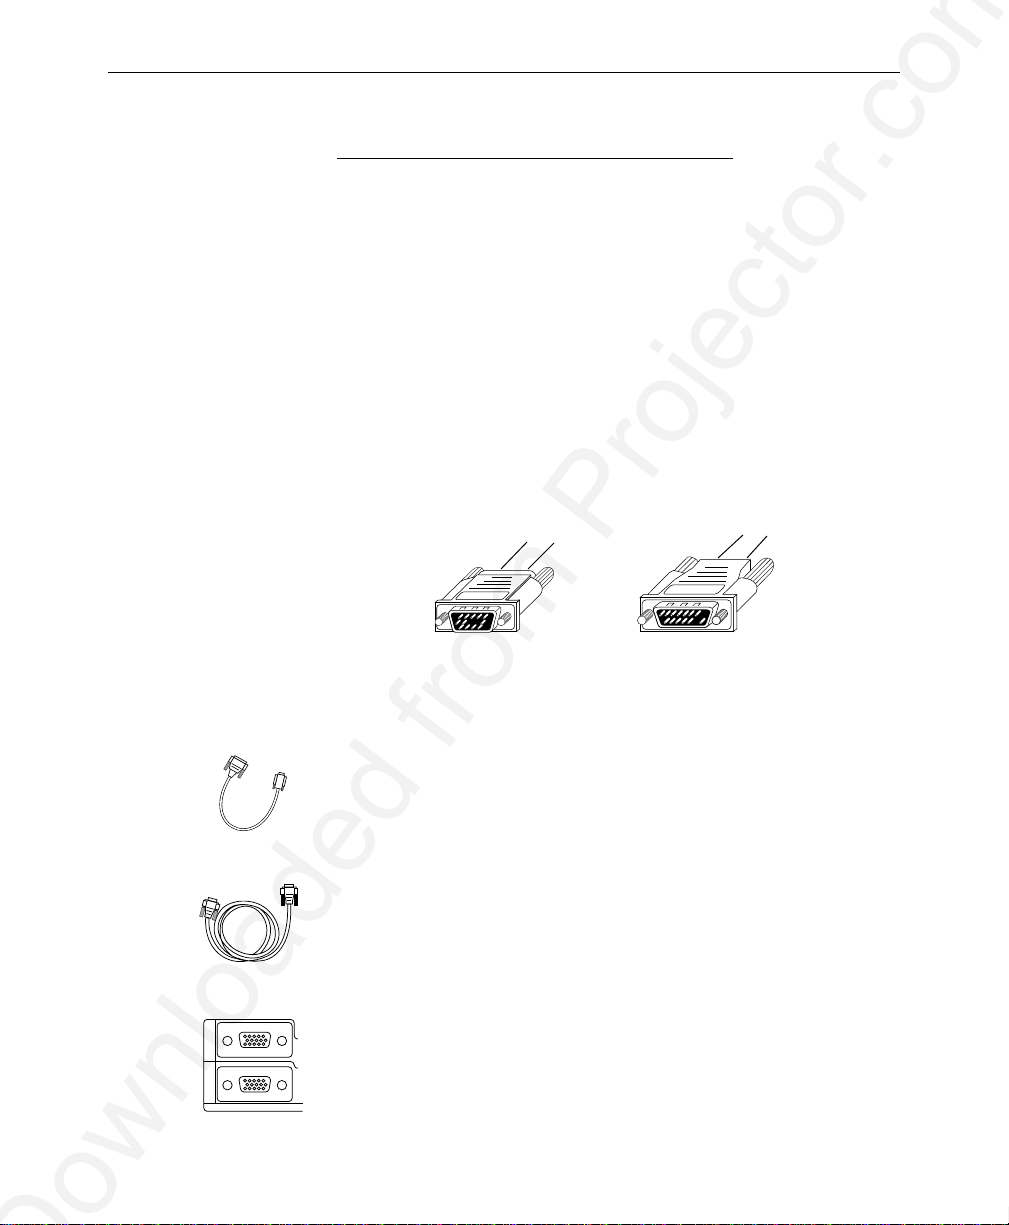
Chapter 2 • Detailed Setup
Connecting to your Computer
You use the VGA video cable to connect your computer to the
DP5100.
Note: If you want to connect your monitor to the computer
while the projector is hooked up, you must order the optional
distribution amplifier. See Appendix B for information.
Desktop Computers
If you are using a desktop computer, regardless whether it’s a PC
or a Macintosh, the process of connecting it to the projector is the
same. Use the VGA video cable (and the Macintosh video cable
adaptor as necessary).
Macintosh Video
Cable Adaptor
VGA video cable
1
2
RGB
2–4 • User’s Guide
Figure 2-4
MacintoshVGA
VGA and Macintosh connectors
1. Turn off power to the computer, monitor, and the projector.
2. Unplug your monitor cable from your computer’s video
monitor port.
3. To connect to a Macintosh, plug one end of the Macintosh
video cable adaptor into the Macintosh’s video output
(monitor) port. Connect the other end of the Macintosh video
cable adaptor to either end of the DP5100 VGA video cable.
Skip ahead to step 5.
4. To connect to a PC, plug one end of the DP5100 VGA video
cable into the computer's video output (monitor) port.
5. Plug the other end of the DP5100 VGA video cable into the
projector's COMPUTER (RGB) 1 or 2 port.
Page 14
Chapter 2 • Detailed Setup
COMPUTER
/VGA
Figure 2-5
Computer video connections
Notebooks/Laptops
1. Turn off power to the computer and the projector.
2. If you are using a Macintosh laptop,
FOCUS
N F
T
ZOOM
W
INPUT
/ON
STANDBY
ON
LAMP
TEMP
Macintosh Video
Cable Adaptor
VGA video cable
1
2
RGB
a) Plug the laptop video adaptor cable (supplied with the
laptop) into the laptop.
b) Connect one end of the Macintosh video cable adaptor
(supplied with the projector) to the laptop video adaptor
cable.
c) Connect the other end of the Mac video cable adaptor to
one end of the DP5100 VGA video cable. Skip to step 4.
3. To connect to a PC laptop, plug one end of the DP5100 VGA
video cable into the computer's video output (monitor) port.
4. Plug the other end of the DP5100 VGA video cable into the
projector's COMPUTER (RGB) 1 or 2 port.
Note: If you can’t project an image at the same time that the
laptop displays an image, see your laptop's manuals for instructions on switching between the internal screen and the video port.
User’s Guide • 2–5
Page 15

Chapter 2 • Detailed Setup
Special Configurations
If your computer has an internal monitor but does not have
external video capabilities (Macintosh SEs and certain
PowerBooks), you need a video adapter card in order to attach to
the Desktop Projector. Setup for a third-party adapter is identical
to the procedures outlined in the section titled Desktop Computers.
Contact your dealer, Proxima Customer Service, or a third-party
supplier for information on video adapters.
Connecting Audio from the Computer
The RGB (COMPUTER) AUDIO IN ports allow audio input
from two separate computers or microphones.
1. Insert the mini jack end of a computer audio cable (not
supplied; call your dealer for information) into the AUDIO
OUT port of a Macintosh or the sound card of a PC.
AUDIOLR
2. Insert the RCA jacks at the other end of the computer audio
cable into the projector’s left and right RGB (COMPUTER)
AUDIO ports.
2–6 • User’s Guide
Connecting Video from a VCR
The Desktop Projector 5100 can project video from NTSC or
PAL sources (VCRs, laserdisc players, and camcorders).
Page 16
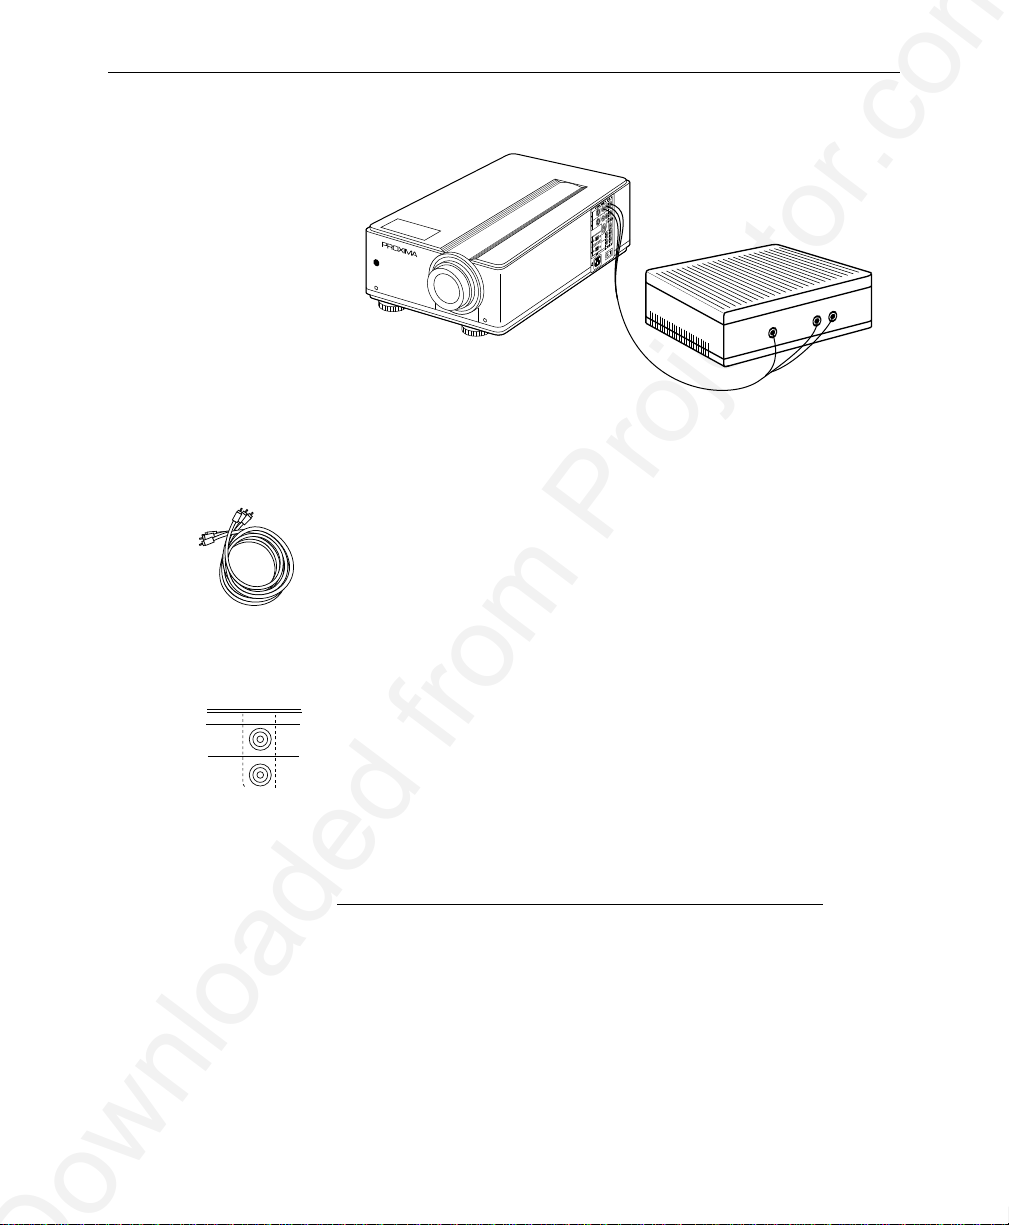
Composite
audio/video cable
Chapter 2 • Detailed Setup
AUDIO OUT
VIDEO RECORDER – VCR
VIDEO OUT
Figure 2-6
The Desktop Projector connected to a video source
To connect an NTSC or PAL source to your projector:
1. The composite audio/video cable is made up of 3 cables with
yellow, red, and white RCA plugs. Insert the yellow RCA plug
into the circular port on your camcorder, laserdisc player, or
VCR marked VIDEO OUT, TO MONITOR, or something
similar.
S–VIDEO VIDEO L
2. Insert the other yellow RCA plug into the projector's VIDEO
1 or 2 port.
The red and white cables are for audio input from the video
source. Refer to the section Connecting audio from a VCR.
Connecting to S–VHS Video Sources
The Desktop Projector 5100 can project video from an
S–VHS or S–Video source.
User’s Guide • 2–7
Page 17

Chapter 2 • Detailed Setup
1. Connect one end of your S-Video (Y-C) cable (optional) to the
port on the video source marked VIDEO OUT, TO
MONITOR, or something similar. The cable has identical
S–VIDEO
1
round 4-pin connectors on either end.
2. Connect the other end of the cable to the projector's port
2
labelled S-VIDEO 1 or 2.
Connecting Audio from a VCR
The DP5100 has left and right stereo ports for audio inputs from
two separate VCRs, laserdisc players, and other video equipment.
Connecting a Video Audio Source
The composite audio/video cable is made up of 3 cables with
yellow, red, and white RCA plugs.
AUDIOLR
2–8 • User’s Guide
1. Insert a white RCA plug into your video source’s left AUDIO
OUT port. Insert the other white RCA plug into the projector's left AUDIO port (top right corner of connector panel).
2. Insert a red RCA plug into your video source’s right AUDIO
OUT port. Insert the other red RCA plug into the projector's
right AUDIO port.
Note: Although all four AUDIO IN and COMPUTER (RGB)
AUDIO IN ports can be connected simultaneously, only one is
active at a time. Audio will be active for the video source you have
selected.
Connecting a Monaural Source
If you have a monaural source that you want to play through the
projector’s speaker, connect it to the left AUDIO port.
Page 18

Chapter 2 • Detailed Setup
Connecting a Microphone
When you need to address a large audience while projecting an
NTSC, PAL, or S-VHS video image with no accompanying
audio, plug an amplified or wireless microphone equipped with a
line level output (maximum level of 1 volt, peak-to-peak) into the
left AUDIO port that corresponds to the input port you are
projecting the video through.
To address a large audience while projecting a computer image,
connect the source to the projector’s left and right RGB
(COMPUTER) AUDIO ports that correspond to the input port
you are projecting the computer video through.
If your microphone’s amplifier has only one output, use a
standard RCA cable to connect it to the projector’s left AUDIO
IN or left RGB (COMPUTER) AUDIO IN port.
AUDIO System
Powering Up
The DP5100 contains an internal sound system consisting of an
amplifier and a high-fidelity speaker. A separate audio system
must be used for external speakers or a sound system.
The projector must be turned on before you turn on your
computer, so that the computer properly senses the projector’s
display during its boot-up sequence.
User’s Guide • 2–9
Page 19

Chapter 2 • Detailed Setup
Turning on the Projector
On the connector panel there is a power jack and a power switch.
Figure 2-7
Power jack and AC POWER switch
To turn on the projector:
1. Plug the power cord into the projector's power jack on the
connector panel.
2. Make sure that the air intake on the bottom
and exhaust grill on the rear of the projector
are not clogged or blocked. Never operate the
projector if these grills are clogged or
obstructed.
TEMP
LAMP
ON
2–10 • User’s Guide
3. Connect the power cord to a properly
grounded wall outlet.
4. Move the AC POWER switch to the ON
position. The ON indicator on the control
panel will glow orange. If it does not glow
orange, refer to Chapter 5, Troubleshooting.
Turning On/Off the Lamp
Press the STANDBY/ON button on the projector
or the remote control. The ON indicator blinks
green during lamp start-up and then glows green;
the fan comes on immediately.
The Control Panel
STANDBY
/ON
INPUT
W
ZOOM
T
NF
FOCUS
Figure 2-8
Page 20

Chapter 2 • Detailed Setup
Press the STANDBY/ON button on the projector or the remote
control again to turn off the lamp. The ON indicator blinks
orange during lamp cool-down. After about a minute, the fan
shuts down and the ON indicator glows orange.
Note: Turning the lamp off does not cut power to the
projector. You must move the AC POWER switch to the OFF
position to completely turn off the projector.
Projecting
the Image
Image Size
The size of the projected image varies according to the distance
from the projector to the projection screen and the setting of the
zoom lens. The next table shows the minimum and maximum
projected image size (measured diagonally) based on the distance
from the projector to the screen.
Projection
Distance (feet)
3 ft (.9 m) 17" (43.1 cm) 27" (68.6 cm)
5 ft (1.5 m) 29" (73.6 cm) 44" (111.7 cm)
10 ft (3.0 m) 57" (144.8 cm) 89" (226.1 cm)
15 ft (4.5 m) 86" (218.4 cm) 133" (337.8 cm)
20 ft (6.0 m) 114" (289.6 cm) 178" (452.1 cm)
25 ft (7.5 m) 143" (363.2 cm) 222" (563.9 cm)
30 ft (9.0 m) 171" (434.3 cm) 267" (678.2 cm)
35 ft (10.5 m) 200" (508 cm) 311" (789.9 cm)
40 ft (12.0 m) 229" (581.7 cm) 356" (904.2 cm)
Minimum screen size
(inches diagonal)
Maximum screen
size (inches
diagonal)
User’s Guide • 2–11
Page 21

Chapter 2 • Detailed Setup
Figure 2-9
Maximum diagonal measurement of projected image when
the projector is 40’ (12.1 m) from the projection screen
Image Sizing and Focusing
150"/381 cm
356" (904.2 cm)
2–12 • User’s Guide
1. Adjust the picture size using the ZOOM buttons on the
control panel or remote control. The picture becomes wider
by pressing W, and telescopic by pressing T.
Note: Pressing the BLUE BACK button on the remote
control shows a bright blue background so you can clearly see
the edges.
2. Adjust the focus using the FOCUS buttons.
a) Press the FOCUS button. An on-screen display appears.
b) Using the FOCUS button, adjust the focus so that the
image is clear.
3. Turn on the power to all connected equipment.
Page 22

Chapter 2 • Detailed Setup
Keystoning
The normal projected image will have a rectangular shape.
Keystoning is when the projected image becomes trapezoidal.
Normal Image
Normal image
Figure 2-10
Normal vs. keystoned images
Keystoned Image
Keystoned image
Keystoning occurs when the lens of the projector is not perpendicular to the projection screen (the vertical plane) or when it is
not parallel to the floor (the horizontal plane). Keystoning also
occurs when the projector is tilted sideways.
To correct keystoning, make sure that the projector is at a right
angle to the screen in the horizontal plane. The projector is
properly aligned if the top and bottom of the projected image are
equal in length and parallel to the floor.
W
NF
INPUT
TEMP
ON
LAMP
FOCUS
ZOOM
/ON
STANDBY
T
Projection Screen
Figure 2-11
Positioning the Desktop Projector
User’s Guide • 2–13
Page 23

Chapter 2 • Detailed Setup
The DP5100 is designed to minimize this effect while projecting
images high enough for the entire audience to view. An 8.8
o
correction for keystoning is built into the projector. Use the
adjustable feet to raise and lower the front of the projector.
Figure 2-12
Adjusting the keystoning by rotating the feet
2–14 • User’s Guide
Page 24

Chapter 3
Using the
Desktop
Projector
Chapter 3 • Using the Desktop Projector
This chapter describes each of the keys on the control panel and
the remote control. It also explains the various projector settings
and how to change them.
Control Panel
Keys
TEMP
LAMP
ON
STANDBY
/ON
INPUT
W
ZOOM
T
NF
FOCUS
The figure in the margin shows the control panel for the
DP5100.
STANDBY/ON Key
The STANDBY/ON key toggles the projection lamp on and off.
• STANDBY - Everything is on except the lamp and the fan.
• ON - The projector is in the projection mode.
INPUT Key
The INPUT key selects the input source. Each time this button is
pressed, the input source is changed in sequence as shown below:
VIDEO1 VIDEO2 RGB1 RGB2
ZOOM Key
Figure 3-1
The DP5100 control
panel
The ZOOM key adjusts picture size.
• W: Picture becomes wider.
• T: Picture becomes telescopic (smaller).
User’s Guide • 3–1
Page 25

Chapter 3 • Using the Desktop Projector
FOCUS Key
The focus key adjusts the screen focus:
• N: Near
• F: Far
Control Panel
Indicators
Three multi-function indicator lights on the projector's control
panel indicate the projector's current operating condition.
Figure 3-2
Control Panel Indicator lights
TEMP Indicator
The TEMP indicator light glows red in the unlikely event that the
projector reaches an over-temperature condition. A thermostat
will switch off power to the lamp until the projector cools.
CAUTION! DO NOT TURN OFF THE PROJECTOR!
The power must remain on so the fans can cool the projector.
3–2 • User’s Guide
If an overtemperature condition occurs, perform the following
checks while the projector cools:
o
• Verify that the room temperature is below 80
F (27o C).
• Clear the intake grill and exhaust vent of any obstruction.
Page 26

Chapter 3 • Using the Desktop Projector
• Check the filter element. Clean or replace it if necessary. For
more information, please refer to Chapter 4, Maintenance.
• Check the rear exhaust vent. If the projector has reached an
overtemperature condition and the fan is working, you
should feel a strong rush of hot air from the vent. If the fan
is not working, the projector needs service.
After the projector returns to its normal operating temperature,
the TEMP indicator will go out. To turn the lamp back on, first
turn the power switch off and on again, then press the
STANDBY/ON key on the Control panel.
Note: The remote’s STANDBY/ON key won’t work after an
overtemperature condition until the power ON/OFF switch is
cycled and the lamp is turned on from the Control panel.
LAMP Indicator
The LAMP indicator is a two-function display.
• The LAMP indicator blinks red if the air filter is detached.
• The LAMP indicator blinks red if the lamp is defective.
ON Indicator
The ON indicator is a four-function display.
• It glows orange in Standby Mode.
• It blinks green during lamp start-up.
• It glows green during projector operation.
• It blinks orange during lamp cool-down.
User’s Guide • 3–3
Page 27

Chapter 3 • Using the Desktop Projector
Remote
Control
The remote control is the primary control for the projector. It
contains all the key functions available on the Control Panel, and
performs additional functions not available on the Control Panel.
The remote control can be used up to 16 feet from the front of
the projector and within 30° to the left and right of the projector.
VIDEO
1/2
STANDBY
/ON
1/2
MENU
MENU
MENU
RESET CALL
TINPUT
WVIDEO RGB
F
FOCUSZOOMRGB
N
VOL
VOL
MUTE
3–4 • User’s Guide
H
Figure 3-3
Remote control keys
CHANGE
V
BLUE
BACK
Note: For best results, aim the remote at the projector's front
edge. Never obstruct the red infrared receiver eye located on the
front of the projector.
Page 28

Chapter 3 • Using the Desktop Projector
STANDBY/ON Key
The STANDBY/ON key toggles the projection lamp on and off.
• STANDBY - everything is on except the lamp and the fan.
• ON - The projector is in the projection mode.
RESET Key
The first time you turn the projector on, the factory settings are in
effect.
If you change any of these settings, then want to recall all of the
factory settings, press the RESET key.
CALL Key
The CALL key overlays a small image that identifies the current
input source.
INPUT SELECT Keys
There are two INPUT SELECT keys:
• VIDEO 1/2 allows you to select the video input mode and
toggle between the two computer sources.
• RGB 1/2 allows you to select the computer input mode and
toggle between the two computer sources.
User’s Guide • 3–5
Page 29

Chapter 3 • Using the Desktop Projector
ZOOM Key
The ZOOM key adjusts picture size.
• W: Picture becomes wider.
• T: Picture becomes telescopic (smaller).
FOCUS Key
The FOCUS key adjusts the screen focus.
• N: Near
• F: Far
MENU Keys
3–6 • User’s Guide
MENU
MENU
MENU
Figure 3-4
Menu keys
These four keys allow you to access and modify the DP5100
settings. Settings are viewed in the Menu Window, which appears
in the center of the projected image when your press the MENU
up or down keys.
In these menus, the up and down keys select the menu item, and
the right and left arrow keys adjust the setting.
Page 30

Chapter 3 • Using the Desktop Projector
VOLUME Keys
The VOLUME keys on the remote control are used to adjust the
audio level of the projector’s internal speaker. Press the up or
down key to increase or decrease the speaker’s audio level.
MUTE Key
Use the Mute key to momentarily shut down audio ouput from
the DP5100. Pressing MUTE again toggles the sound back on.
CHANGE Keys
The CHANGE keys control the image inversion feature.
• The H key flips the projected image horizontally, for rear
projection.
• The V key flips the projected image vertically, for ceilingmounted projectors.
BLUE BACK Key
The BLUE BACK key turns on and off a bright blue background.
This background is helpful during setup, when you are
positioning the projected image on the projection screen.
LIGHT Key (on side of remote control)
Press the LIGHT key to use the remote control in a dark place. It
illuminates the remote control buttons.
User’s Guide • 3–7
Page 31

Chapter 3 • Using the Desktop Projector
Menus Pressing the up or down MENU key brings the Menu Window to
the center of the projected image. The menus show the current
settings for the projector.
Displaying the Menu
Press the up or down MENU key once to display the menu. You
use these menus to adjust the projector’s image settings. The
menus vary depending on the current video source.
Selecting and Changing Settings
To move to and change a setting:
1. Use the up and down menu keys to move to the setting that
you wish to change.
2. Use the right and left arrow keys to change the setting.
3–8 • User’s Guide
Note: The active setting (the one that you can change) is
displayed in bright green. Inactive settings are indicated in blue.
Saving Changes
Any modifications you make to the projector settings are
automatically saved.
Page 32

Chapter 3 • Using the Desktop Projector
RGB (COMPUTER) Menu
RGB1
BRIGHT
CONTR
V POSI
H POSI
H PHASE
H SIZE
Figure 3-5
Menu for computer video
BRIGHT
:
20
:
110
:
0
:
400
The BRIGHT (Brightness) setting increases and decreases the
intensity level of the projected image. Press the right arrow key to
increase the brightness; press the left arrow key to decrease the
brightness.
CONTR
The CONTR (Contrast) setting is used to adjust the contrast in
the projected image. Press the right arrow key to increase contrast
and the left arrow key to decrease the contrast.
V POSI
The V POSI setting is used to adjust the vertical position of the
projected image. Press the right arrow key to move the image up;
press the left arrow key to move the image down.
User’s Guide • 3–9
Page 33

Chapter 3 • Using the Desktop Projector
H POSI
The H POSI setting is used to adjust the horizontal position of
the projected image. Press the right arrow key to move the image
left; the left key moves the image right.
H PHASE
Adjust the H PHASE setting if you see uneven horizontal
features, streaks, or shimmering in a computer video image. This
setting is similar to a sync (synchronization) adjustment on other
products. Press the left or right arrow key until the image
stabilizes.
H SIZE
The H SIZE setting adjusts the width of the computer display.
This is similar to the frequency adjustment on other products--use
it to adjust a jittery or banded image. Press the left or right arrow
keys to adjust the image.
3–10 • User’s Guide
Video Menu
VIDEO1
BRIGHT
TINT
COLOR
CONTR
SHARP
Figure 3-6
Levels menu for NTSC/PAL and S–VHS video
Page 34

Chapter 3 • Using the Desktop Projector
BRIGHT
The BRIGHT (Brightness) setting increases and decreases the
intensity level of the projected image. Press the right arrow key to
increase the brightness, or the left arrow key to decrease the
brightness.
TINT
The TINT setting adjusts the red or green color balance for
NTSC/PAL video or S-video sources. Use the left and right arrow
keys to adjust the color signal balance.
COLOR
The COLOR setting adjusts the intensity of the colors for NTSC/
PAL video or S-video sources. Use the left and right arrow keys to
adjust the color intensity.
CONTR
The CONTR (Contrast) setting is used to adjust the contrast in
the projected image. Press the right arrow key to increase the
contrast and the left arrow key to decrease the contrast.
SHARP
The SHARP setting adjusts the sharpness of NTSC/PAL video or
S-video sources. Use the left and right arrow keys to adjust the
softness or sharpness of the display.
User’s Guide • 3–11
Page 35

Chapter 4
Maintenance
Chapter 4 • Maintenance
There is very little involved with the care and maintenance of
your DP5100. However, common sense and periodic maintenance will ensure top performance.
The lamp, lenses, mirrors, and LCD panels have been carefully
aligned at the factory to give you the clearest, brightest image
possible. However, physical abuse can cause misalignment or
damage to the optical elements. Take appropriate care in use and
handling.
CAUTION! The DP5100 contains sensitive circuitry and
optics. Protect it from potential fluid spills.
Lens Cleaning
From time to time, you’ll need to clean the optics on the lens.
1. Take a piece of lens tissue and form it into a loose swab. Wet it
with lens cleaning fluid or denatured alcohol and gently move
it over the lens surface.
CAUTION! Never use acetone to clean the lens—it can
remove the paint from the metal around the lens or the mirror
mount, and leave a residue on the glass surface.
2. Take another part of the lens tissue not touched by your bare
fingers and repeat the process, going over the lens in another
direction.
CAUTION! NEVER look directly into the lens when the
lamp is on. The brightness can damage your eyes. To check for
smudges, look at the lens from an angle.
3. Repeat steps 1 and 2 until no smudges or particles can be seen
when the lens is illuminated by a strong light. If the lens is
extremely dirty, it may be necessary to use several pieces of lens
tissue. Use water if denatured alcohol is unavailable.
User’s Guide • 4–1
Page 36

Chapter 4 • Maintenance
General
Maintenance
Replacing the Lamp
1. Turn off the projector.
2. Unplug the projector’s power cord from the wall socket and
remove the power cord from the projector’s power receptacle.
3. Unscrew the screw located on the right side of the rear panel
and remove the service door.
Figure 4-1
Removing the service door
4. Unscrew the two service door retaining screws (they will not
come out of the service door).
4–2 • User’s Guide
Figure 4-2
Unscrewing the service door retaining screws
Page 37

Chapter 4 • Maintenance
CAUTION! The lamp module gets very hot during operation.
Use appropriate care when changing lamps. Make sure that the
lamp module has cooled for at least 3 to 5 minutes.
5. Grasp the handle located on the rear of the lamp module and
firmly pull the lamp module straight out.
Figure 4-3
Removing the lamp module
6. Replace the old lamp module with a new lamp module, carefully aligning the power pins on the bottom and pressing
firmly into place. When it is properly placed, a small alignment mark etched on the projector chassis will be visible below
the lamp module.
7. Screw the two lamp module retaining screws down flush.
8. Replace the service door and screw it into place.
9. Replace the power cord.
Cleaning the Air Filter
You should change or clean the air intake filter after every 100
operating hours to maintain proper cooling. This filter is located
on the bottom of the projector, under the grill.
User’s Guide • 4–3
Page 38

Chapter 4 • Maintenance
1. Disconnect all cables/cords from the projector.
2. Set the projector on its side, connector panel down.
3. Remove both screws on the filter cover.
4–4 • User’s Guide
Figure 4-4
Removing the screws on the air filter cover
4. Press up on the air filter cover tab to release the cover latch as
you pull the grill assembly out (see Figure 4-5).
Figure 4-5
Removing the air intake filter grill
Page 39

Chapter 4 • Maintenance
5. Clean the air filter using a vacuum cleaner after you have
disassembled it. If dirt is still present, wipe the air filter with a
cloth moistened with water, then wipe it with a dry cloth.
Figure 4-6
The components of the air filter
6. Reassemble and re-install the air filter.
Changing the Remote Control’s Batteries
To install or change the two AA alkaline batteries in the remote
control unit:
1. Locate the battery compartment at the lower rear of the case.
Slide the cover off of the battery compartment.
User’s Guide • 4–5
Page 40

Chapter 4 • Maintenance
2. Remove the old batteries and replace them with new ones.
Figure 4-7
Installing batteries
3. Replace the cover on the battery compartment.
Temperature Extremes
Align the batteries in the proper direction.
4–6 • User’s Guide
The projector should not be stored in excess of 140o F (60o C).
The ideal operating temperature is below 80
o
F (27oC).
If the projector has been exposed to extremely low temperatures,
allow it to warm up before you use it.
Page 41

Chapter 5
Troubleshooting
Problem Likely Cause Possible Solution(s)
No image projected at
all
No video image
projected
No computer image
projected
LAMP indicator
glowing red
Displayed image not
square (keystoned)
Projected image out
of focus
Projected image
larger than screen
Projected image
smaller than screen
Image off-center H or V POSI adjusted
No power to projector Turn power ON
Lamp not on Turn lamp ON
OVERTEMP indication Allow projector to cool;
Video source(s) Check video source(s)
Loose/improper cabling Check and secure
Laptop external video
port not turned on
Loose cable Check and secure cable
No power to computer Turn on computer
Input source selection is
incorrect
Burned out lamp Replace lamp
Projector not placed at
proper angle to
projection screen
Projector not horizontal Level projector
Projection lens not
focused
Zoom lens not adjusted
properly
Zoom lens not adjusted
properly
incorrectly
Compatibility problems Verify projector is image
Misalignment or damage
to optical elements
Chapter 5 • Troubleshooting
Check AC cord
Check power to
electrical outlet
turn projector OFF,
then ON
(composite or S-VHS)
for power ON and
proper operation
cabling between video
source(s) and
projector
Refer to your Laptop
documentation
connections
Select the correct input
Adjust relative positions
of projector and
screen
Adjust projection lens
focus
Adjust the zoom lens
Adjust the zoom lens
Adjust H and/or V POSI;
if image will not
center, check for
compatibility problems
compatible with one of
the standards listed in
Appendix A:
Specifications
Projector requires
servicing
User’s Guide • 5–1
Page 42

Chapter 5 • Troubleshooting
Problem Likely Cause Possible Solution(s)
Streaks on monitor Video cable plugged
Faint screen Low intensity Adjust BRIGHT
Jittery, fuzzy letters Out of sync Adjust H PHASE setting
Cannot get entire
image on screen;
scrambled image
“Shimmering” colors H PHASE or BRIGHT
Colors weak in video
mode (NTSC, PAL,
or S-VHS)
Getting excess white
or washout in TV
video mode (NTSC,
PAL, or S-VHS)
No audio Audio source(s) Check audio source(s) for
TEMP indication Air vent(s) clogged Allow projector to cool;
Remote Control
doesn’t work
into computer is
upside-down
Compatibility problems Verify projector is image
setting out of
adjustment
Weak video signal Check for faulty video
COLOR setting may be
too low
CONTRAST setting is
too high
Loose, improper cabling Check and secure cabling
Internal fan failure Allow projector to cool
Batteries upside-down
or old
Projector’s IR receiver
window blocked
Out of range Move within 16' and
Check and re-set cable
connections
(brightness) and CONTR
(contrast) settings
compatible with one of
the standards listed in
Appendix A
Adjust H PHASE or
BRIGHT (brightness)
settings
source, bad connection,
or frayed cable
Adjust COLOR setting
Adjust CONTR (contrast)
setting, then adjust
BRIGHT (brightness)
setting
power ON and proper
operation
between audio source(s)
and projector
clear obstructions from
vents
Clean and replace filters
as necessary
Check for fan and blower
operation; service if
necessary
Check battery placement
or replace with new
batteries
Remove object
obstructing red IR
receiver on front of
projector
within a 30o angle from
the front on the
projector.
5–2 • User’s Guide
Page 43

Chapter 5 • Troubleshooting
Where to Get
Help
If you need help:
1. Check the Troubleshooting Chart.
2. Call your dealer’s technical support line and explain your
problem.
3. Call Proxima at:
U.S.A. and Canada:
(619) 457–5500
Press 1 for Customer Service.
(619) 457-8542 (Fax)
Outside U.S.A. and Canada:
(619) 457–5500
Press 1 for Customer Service.
(619) 622-0173 (Fax)
Europe:
+31-43-358 5200
+31-43-358 5201 (Fax)
User’s Guide • 5–3
Page 44

Chapter 5 • Troubleshooting
Returns
If the Desktop Projector or any of its accessories are determined to
be defective:
1. Contact Proxima Customer Service to request a Return
Material Authorization (RMA) number.
2. Send the defective unit with the RMA number clearly marked
on the outside of the shipping box, freight prepaid, to:
U.S.A. and Canada:
Proxima Corporation
RMA # ___________
9440 Carroll Park Drive
San Diego, CA 92121
Europe:
Proxima Corporation
RMA # ___________
Horsterweg 24
6191 RX Beek
The Netherlands
5–4 • User’s Guide
3. Pack the projector in its original box for safe shipment. If you
no longer have the original shipping materials, contact
Proxima Customer Service for packaging.
Page 45

Appendix A • Specifications
Appendix A
Specifications
Proxima Desktop Projector 5100
Projector Type Portable Multimedia Projector
Computer
Compatibility
Video Compatibility NTSC, PAL
Connectors RGB: Two DB-15s (VGA connectors)
LCD Panels 3 polysilicon active-matrix TFT (Thin-Film Transistor)
Resolution 640 x 480 pixels
Number of Colors 16.7 million colors
Response Time 30 - 50 milliseconds (typical)
Contrast Ratio 200:1 (typical)
Brightness 300 ANSI lumens
Lamp 250 watt metal-halide
Dimensions 12.6” W x 18.2” L x 6.7” H
Weight 23.1 lbs (10.5 kg)
Projection Distance 3’ (1 m) to infinity (limited only by ambient light)
Screen Image Size 35” (88.9 cm) to unlimited diagonal
Lens F3.0–3.8 (46.5–74.4 mm), 1:1.6 power zoom, power
Keystone
Correction
Audio Single speaker, top facing
Power Requirements 100-30 VAC, 50/60 Hz
Storage Temp.
Humidity Tolerance 10% to 85% non-condensing
Approvals FCC Class A, Cul, UL
Warranty One year parts and labor. No warranty on lamp.
PC compatibles (VGA, VESA 640 x 480 @ 72 Hz)
Apple Macintosh II, Quadra, Centris, Performa,
PowerBook, and Power Macintosh
Video: Two female RCA composites
Two 4-pin Mini DIN S-Video (Y/C)
One BNC connector
Audio: Two sets of female RCA jacks for
32.0 cm W x 46.1 cm L x 16.9 cm H
Normal at +8.8o projection angle
3 watt amplifier
Four sets of stereo inputs (Audio follows video):
Note: COMPUTER (RGB) AUDIO IN and AUDIO IN may be
-4o F to 140o F (-20o C to 60o C)
COMPUTER AUDIO IN
Two female RCA jacks for VIDEO AUDIO IN
focus
RGB (COMPUTER) AUDIO IN – 2 sets
AUDIO IN (for video sources) – 2 sets
used as microphone inputs w/th line level signals
User’s Guide • A–1
Page 46

Appendix B • Accessories & Replacement Parts
Appendix B
Accessories &
Replacement
Parts
Proxima Desktop Projector 5100
Accessory Description Part No.
Desktop Projector™
Soft Carrying Case
Desktop Projector
Hard Carrying Case
Interface Kit Connects Mac SE or SE/30
Interface Kit Connects Mac Classic to
RCA Cable Male RCA connects DP5100
BNC to RCA Cable Connects Desktop Projector
Computer-grade
Surge Protector
Distribution Amplifier
(VGA)
Distribution Amplifier
(Macintosh)
Accomodates the DP5100
and accessories
Accomodates the DP5100
and accessories
to Desktop Projector
Desktop Projector
to male RCA video source
to a video source w/ a BNC
connector
Protects projector and other
attached equipment from
power surges and spikes.
North America use only.
Comes with $10,000
equipment guarantee.
Connects both the projector
and the monitor to the
computer (VGA)
Connects both the projector
and the monitor to the
Macintosh
A296
A295
A33
A35
C400-6
C468-6
S100
A51-1 (120V)
A51-2 (220V)
A51-3 (120V)
A51-4 (220V)
User’s Guide • B–1
Page 47

Appendix B • Accessories & Replacement Parts
Replacement Parts Part No.
Air Filter 260-00028
VGA Video Cable 900-95006
Macintosh Video Cable Adaptor 900-95101
Composite Video/Audio Cable 900-94908
Metal Halide Lamp 160-00072
Power Cord: British ?
Power Cord: European ?
Power Cord: Italian ?
Power Cord: North American 901-01510
Lens Cap 280-00009
Remote Control 080-00714-1
You can order accessories and replacement parts through your
local dealer or by contacting Proxima at the following numbers:
B–2 • User’s Guide
U.S.A. and Canada:
(619) 457–5500
Press 1 for Customer Service.
(619) 457–8542 (Fax)
Outside U.S.A. and Canada:
(619) 457–5500
Press 1 for Customer Service.
(619) 622–0173 (Fax)
Europe:
+31-43-650 248
+31-43-649 220 (Fax)
Page 48

Index
A
adjusting the image 3-9
brightness 3-9
color 3-11
contrast 3-9
H-POSI 3-10
streaks and shimmering 3-10
sharpness 3-11
tint 3-11
V-POSI 3-9
accessories B-1
air filter 4-3
applying power to the projector 2-10
arrow keys, remote control 3-6
audio
connecting from VCR or laserdisc 2-8
connecting from computer 2-6
connecting to a microphone 2-9
B
batteries, remote control 4-6
BLUE BACK key 3-7
brightness, adjusting 3-9
BRIGHTNESS setting 3-9, 3-10
lamps 4-2
cleaning
air filter 4-3
lens 4-1
color, adjusting 3-11
COLOR setting 3-11
Connector panel 2-3
connecting hardware
desktop computers 2-4
laptop computers 2-5
microphones 2-9
notebook computers 2-5
connecting audio
from computer 2-6
from VCR or laserdisc 2-8
connecting video from VCR 2-6
CONTRAST setting 3-11
Control panel 3-1
D
Desktop Projector
components 1-2
positioning 2-2, 2-13
projection distance 2-11
turning on 2-10
C
CALL key 3-5
CHANGE key 3-7
Changing
air filters 4-3
batteries 4-6
E
external speakers 2-9
external stereo system 2-9
Page 49

F
L
FOCUS key 2-12, 3-2, 3-6
focusing the image 2-12
H
horizontal image adjustment 3-10
H PHASE setting 3-10
H POSI setting 3-10
I
INPUT key 3-1
INPUT SELECT key 3-5
image size 2-11
K
keys
ARROW keys (MENU) 3-6
BLUE BACK key 3-7
CALL key 3-5
CHANGE key 3-7
FOCUS key 3-6
INPUT key 3-1
INPUT SELECT key 3-5
LIGHT key 3-7
MENU keys 3-6
MUTE key 3-7
RESET key 3-5
STANDBY/ON key 3-1
VOLUME keys 3-7
ZOOM key 3-1, 3-6
Keystoning 2-13
LAMP light 3-3
lamp
replacing 4-2
turning on 2-10
laptop computers 2-5
laserdisc, connecting video from 2-6
lens 4-1
LIGHT key 3-7
lights (indicator)
TEMP 3-2
LAMP 3-3
ON 3-3
M
Macintosh video cable adaptor 1-2, 2-4
MENU key 3-6
menus
COMPUTER (RGB) video menu 3-9
changing settings on 3-8
saving changes on 3-8
Video menu 3-10
microphone 2-9
MUTE key
3-7
N
notebook computers 2-5
O
ON light 3-3
OVERTEMP light 3-2
Page 50

P
ports, input and output 2-3
positioning the projector 2-2
problems 5-1
laptops 2-5
overheating 2-5
projector, see Desktop Projector
PowerBooks 2-6
R
remote control 3-4
RESET key 3-5
replacement parts B-2
replacing
batteries 4-6
lamp 4-2
filter 4-3
troubleshooting 5-1
turning the lamp on/off 2-10
V
VCRs
connecting audio from 2-8
connecting video from 2-6
vertical image adjustment 3-9
VGA video cable 1-2, 2-4
video
connecting from the computer 2-4, 2-5
connecting from VCR/laserdisc 2-6
volume, adjusting 3-7
VOLUME keys 3-7
V POSI setting 3-9
W
warning lights 3-2
S
S-VHS 2-7
setting up the projector 2-4, 2-5
SHARP setting 3-11
speakers, external 2-9
specifications A-1
STANDBY/ON key 2-10, 3-5
streaks on the image (H PHASE) 3-10
T
Technical Support 5-3
TEMP light 3-2
tint, adjusting 3-10
TINT setting 3-11
Z
ZOOM key 3-1, 3-6
Page 51

PLEASE READ
We are in no way responsible for the
contents of the manual. We do not guarantee
its accuracy and we do not make any claim
of copyright. The copyright remains the
property of their respective owners.
Visit the site to read the latest projector
news and reviews, read and comment on
projector specifications, download user
manuals and much more.
 Loading...