

Page 1
DIGITAL THERMOSTAT USER MANUAL ver 1.3
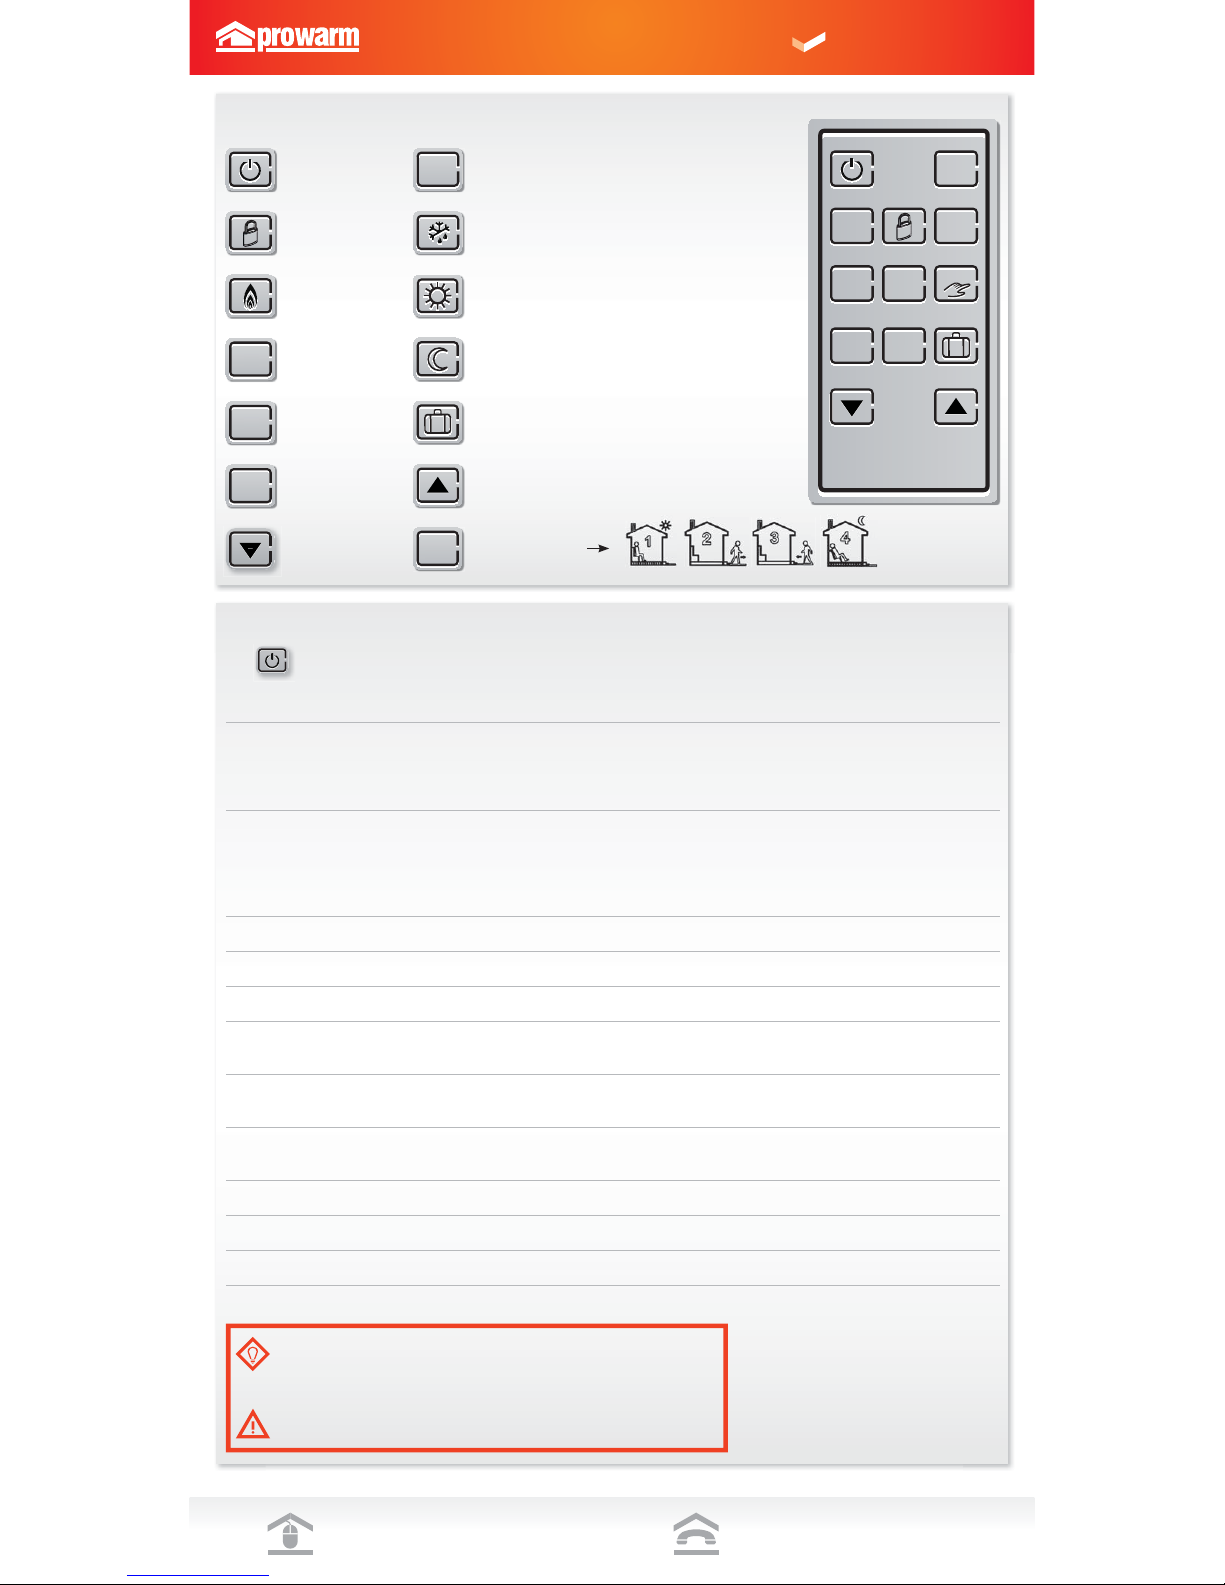
LCD Symbols
Turning on/off the
thermostat
Temporary temperature
The buttons are locked
The program number
Heating is turned on
Comfort temperature
mode
Room temperature
Economy temperature
mode
Floor temperature
Vacation temperature
mode
Automatic mode,
executes the
programmed schedules
Frost protection
activated
Decrease
Increase
O/RIDE
O/RIDE
Program
1,2,3,4
Program
1,2,3,4
+
AUTO
AUTO
RT
FT
FT
–
General Settings
Press buttton to Turn on/off the thermostat. When thermostat is turned off, the LCD will only display current temperature reading. When the thermostat is turned off,
press and hold button M for 3 seconds to bring up a confi guration menu. In this mode, press button M to select different features’ setting.
Menu # Features description Features Explanation Adjustment (press up or down button to adjust)
01 Model (Model Selection) This thermostat is a combination model allowing you to choose between
3 different models. A, AF and F model. A model: air only, with built in
sensor AF model: air & fl oor, with both built in and remote sensor F
model: fl oor only, with remote sensor
A, AF, F
02 Sd (switching differential) The numbers of degree difference before switching. The default is 1°C
which means the thermostat will switch the heating on 0.5°C below the
set temperature and will turn it off 0.5°C above the set temperature. With
a 2°C differential, the heating will switch on 1°C below the set temperature
and will switch off 1°C above the set temperature.
1 = 1 degree(default), 2 =2 degrees
03 ATC (air temp calibrate) This is to calibrate air temperature if required. -1 = decrease 1 degree, 1 = increase 1 degree...
04 FTC (fl oor temp calibrate) This is to calibrate fl oor temperature if required. -1 = decrease 1 degree, 1 = increase 1 degree...
05 Maximum fl oor temperature This is to protect the fl oor surface by limit the fl oor temp. (AF model only) 5s, 10s, 15s, 20s (default), 25s, 30s.
06 TR-AF (AF model only)
(TR=Temperature readout)
This gives option to choose to show air temperature,fl oor temperature or
to show both fl oor & air in interval.
A=to show air temperature, F=to show fl oor
temperature, A-F = to show both in 5 second intervals
07 MAXFT (set maximum
fl oor temp in AF model)
This is to protect the fl oor surface. 40 degree (default)
08 Clock format This is to set the backlight turning-on time. User can also set the backlight
always on or off.
30 seconds (default) On= always on, OFF= always off
09 TF (temperature format) This alows users to select between °C or °F. °C or °F.
10 Clock 12/24-hour clock system selection 24 (default), 12- hour or 24-hour clock system
11 FP (Frost protection) This is to avoid room temperature goes below 5°C on= activated, off= deactivated
12 SC (setpoint confi guration) This allows user to select between 2 sets of default programmed set points. “4” means the 4 programmes will have 4 independent set
temperatures. Each set temperature can be different to the
others. program 3 ; set temperature in program 2 equals
the set temperature in program 4; If set temp in program
1 is changed, set temp in program 3temp in program 2 is
changed, set temp in program 4 will be changed will be
changed automatically to the same set temp as program 1.
If set automatically to the same set temp as program 2.
Please Note: one of the following error messages will appear if one of these problems occur:
LO - This error means that the room or fl oor temperature is below 0°C
HI - This error means that the room or fl oor temperature is greater than 50°C
If the fl oor sensor is short-circuit or broken, the LCD will display “ERR” and the thermostat
will cut off output.
This product should be installed by a qualifi ed electrician.
www.prowarm.com
support
0843 770 4597
Optional Remote
Controller Buttons
Optional Remote Controller
(Remote control model only)
1. Turn on/off thermostat
2. Confi rm setting
3. Program button
4. Lock or unlock buttons
5. Menu (in OFF mode)
6. Set Day
7. Set time
8. Auto / Manual selection
9. View fl oor temp (AF model only)
10. Cancel override
11. Vacation mode
12. Decrease the set value
13. Increase the set value
–
+
FT
FT
R
un
S
chedul
e
Run
Schedule
DAY
DAY
TIME
TIME
ENTER
PRO
G
PROG
auto
auto
MENU
MENU
1.
3.
6.
9.
12.
2.
5.
8.
11.
13.
4.
7.
10.
SEE OVERLEAF FOR FURTHER SETTING UP INFORMATION
Page 2
86mm
mm68
mm94
mm05
Rear View
13mm
28 mm
94m
m
Side View
Program your thermostat
1. Press and hold button M for 5 seconds until “PROG” is shown with the Day
fl ashing. Use up or down button adjust the day
(hold up or down button for 5 seconds to set all days the same).
2. Press button M to bring up the program 1. Use up or down button
to set the start time (default 07:00). (Hold up or down button to
change by 15 minutes each time.)
3. Press button M again and use up or down button to set the desired temperature
to be maintained for program 1.
(default 22°C)
4. Press button M to bring up the program 2. Use up
or down button to set the start time (default 09:30). (Hold up
or down button to change by 15 minutes each time.)
5. Press button M again and use up or down button to set the desired temperature
to be maintained for program 2. (default 16°C)
6. Press button M to bring up the program 3. Use up
or down button to set the start time (default 16:30).
(Hold up or down button to change by 15 minutes each time.)
7. Press button M again and use up or down button to set the desired temperature
to be maintained for program 3.
(default 22°C)
8. Press button M to bring up the program 4. Use up or down
button to set the start time (default 22:30).
(Hold up or down button to change by 15 minutes each time.)
9. Press button M again and use up or down button to set the desired temperature
to be maintained for program 4.(default 16°C)
10. Press button M to accept and exit.
Please Note: It is faster to program the same schedule for the entire week and then to adjust the exceptional days. To erase program 2 and 3 for Saturday and Sunday,see below,
In step 1, select Saturday or Sunday. In step 4, instead of using up or down button , using button
will erase the time.(--:--).
In step 6, instead of using up or down button , using button
will erase the time.(--:--).
Set the
Time and Day
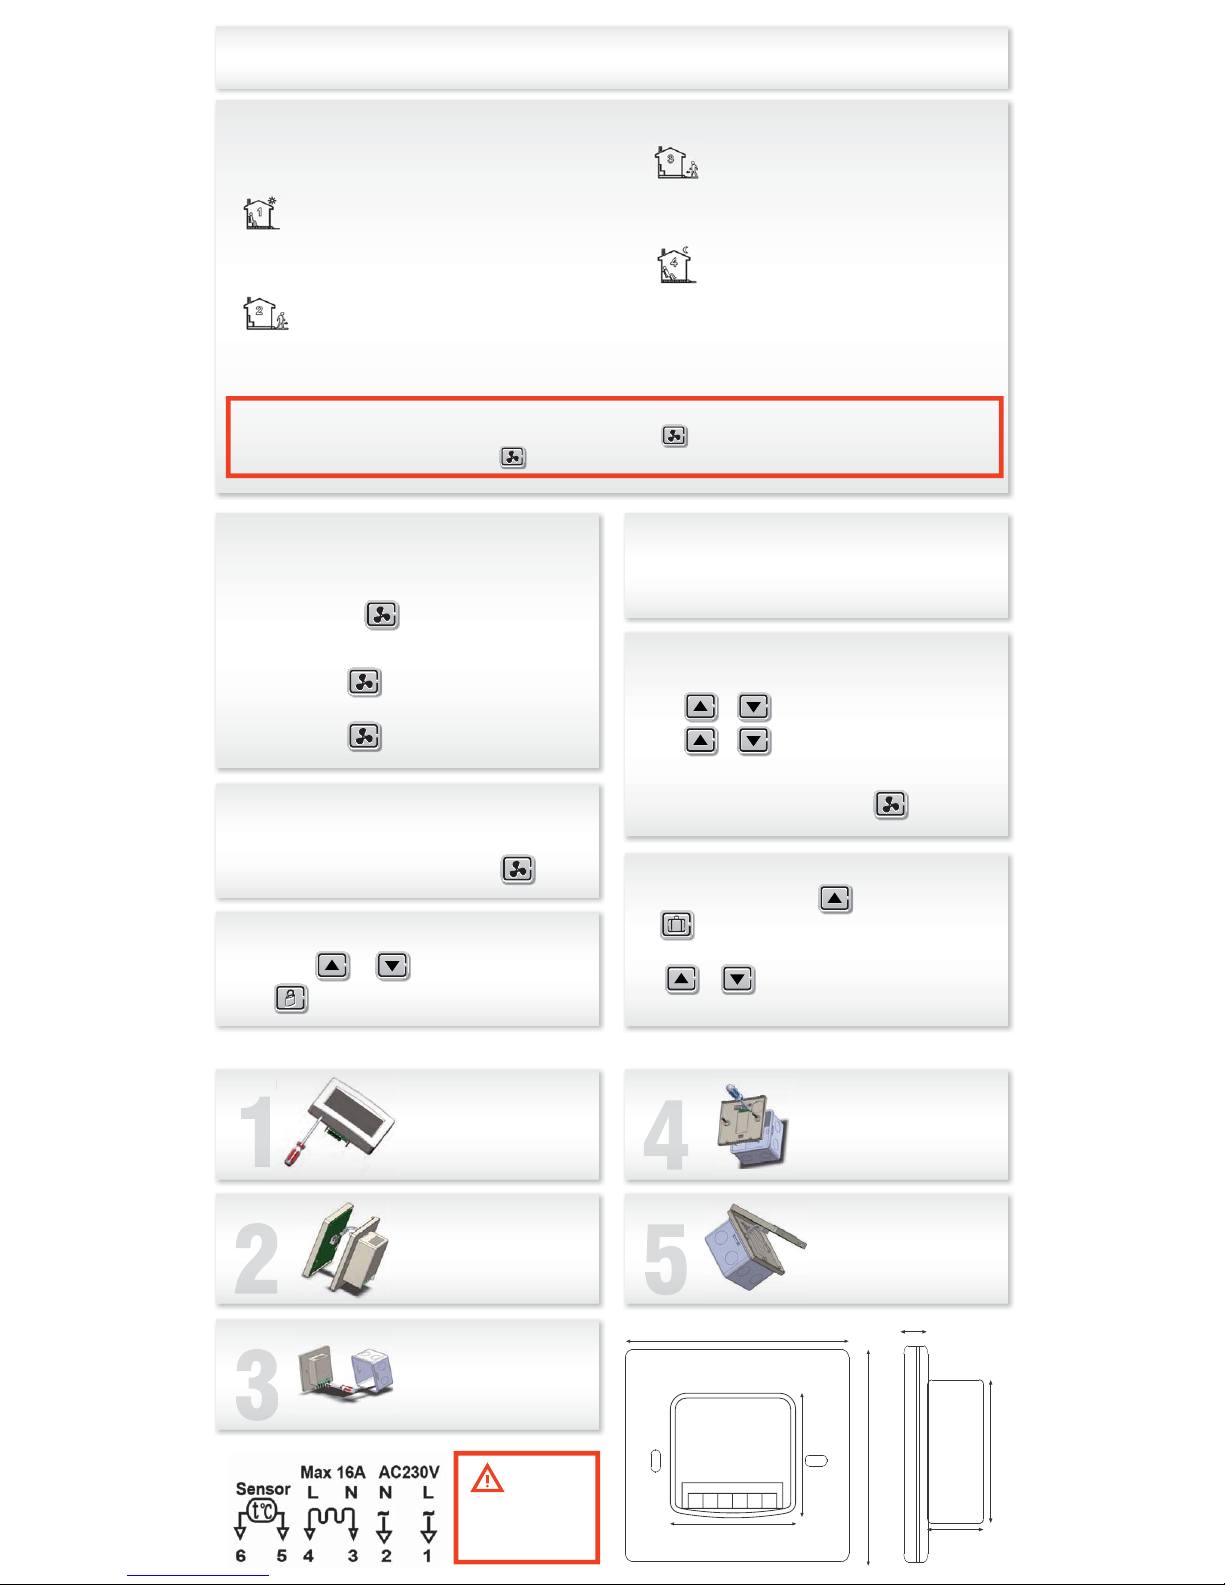
Installation & Wiring
This thermostat is fi tted with a real time clock. It
is essential that the clock time and day are set
accurately if you require your programmed events
to start on time. Follow the easy steps below.
Step 1. Press the button
and the time will fl ash
Step 2. Use up or down button to change the time
(Hold up or down button to change by 15 minutes each time.)
Step 3. Press button
again, the day of the week will fl ash
Step 4. Use up or down button to change the day of the week
Step 5. Press button
again to accept and exit
Resetting factory defaults
Your thermostat has the ability to reset all settings to the factory defaults. If you
are certain you want to do this: In standby mode
(when thermostat is turned off), press and hold button M and
for 5
seconds until “RESET” is shown for 5 seconds on LCD.
Lock the buttons
Press and hold the + and – buttons for 3 seconds until you see a
lock icon appearing, to unlock, repeat the steps above.
View fl oor temperature
If thermostat is set in AF model, and set to show air temperature only, press
and hold the down button for 3 seconds, fl oor temperature will show and it will
automatically revert back to air temperature in 5 seconds.
Carefully separate the front half of
the thermostat from the back plate
by placing a small fl at head terminal
driver into the slots on the bottom face
of the thermostat.
STEP 1
1
STEP 1
Carefully unplug the ribbon
connector which is plugged in to
the front half of the thermostat
STEP 1
Place the thermostat front half
somewhere safe Terminate the
thermostat as shown in the diagrams
below
STEP 1
Screw the thermostat back plate on to
the back box
STEP 1
Re-connect the thermostat ribbon
cable and clip the two halves together
Dimensions
This product should be
installed by a qualifi ed
electrician.
Wiring Diagram
Auto / Manual
Mode
Press button M to select Auto/Manual mode. In Manual mode, the thermostat maintains a constant set temperature manually set by the user.
In Auto mode, the thermostat executes the pre-programmed schedules. To adjust these schedules, follow the easy steps below.
Temporary temperature override
To temporary override the current set temperature,
1. Press + or – button once, the set temperature starts fl ashing
2. Press
+
or – button again to adjust the set temperature
3. Wait for 5 seconds to confi rm the setting with “OVERRIDE” shown on LCD
Now your thermostat will maintain the new set temperature until the next setpoint.
To cancel the override setting, press and hold button
for 5 seconds
until “OVERRIDE” disappear.
Vacation mode
To set vacation mode press and hold the + button for 3 seconds
until
appears. Use same procedure to exit this mode.
Vacation mode will maintain a set temperature(default 10°C) all the time.
Press
+
or – button to change the set point and wait for
5 seconds to accept and exit.
 Loading...