

Page 1
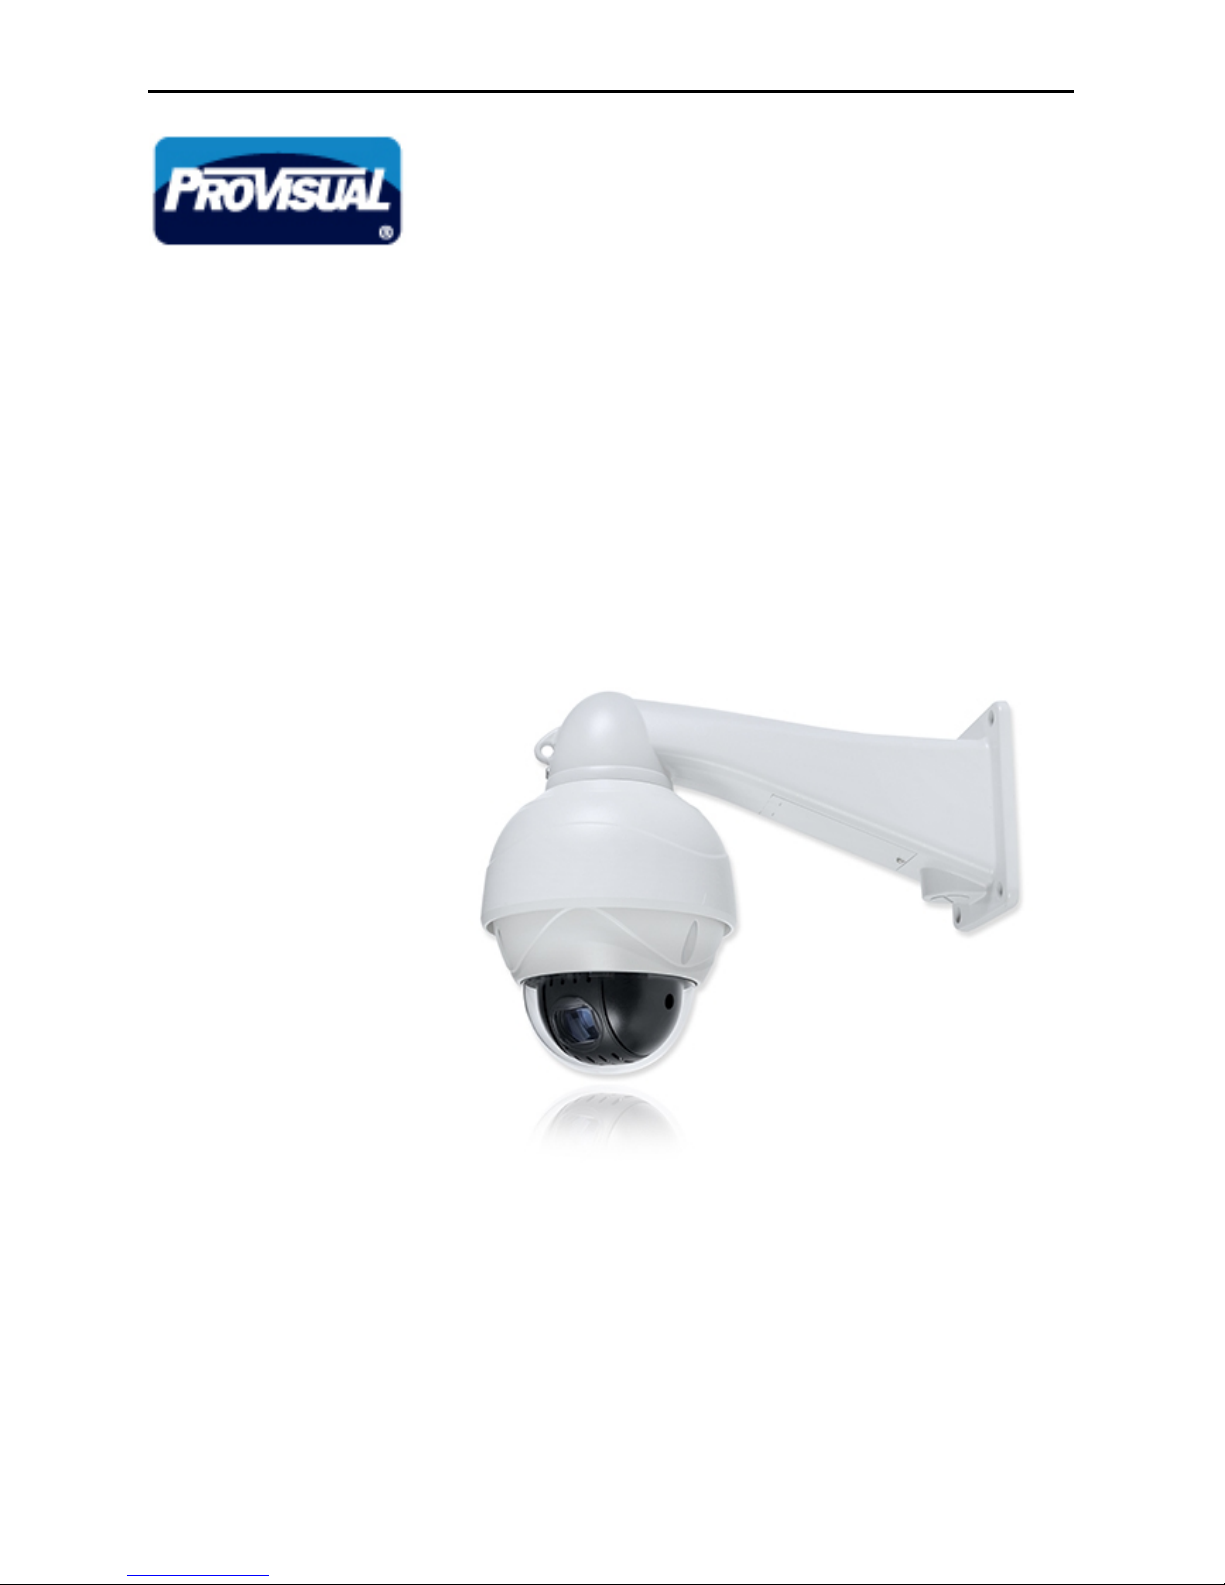
1 12X Mini PTZ
Issue: 1.1
User’s Manual
Model: ptz-9700 (12X PTZ HD-SD)
Page 2

2 12X Mini PTZ
Issue: 1.1
Contents
Warnings and Cautions ..........................................................................................................................................3
FCC Compliance statement ....................................................................................................................................5
CE Compliance statement ......................................................................................................................................5
1. Overview .............................................................................................................................................................6
1.1 Features ............................................................................................................................................................6
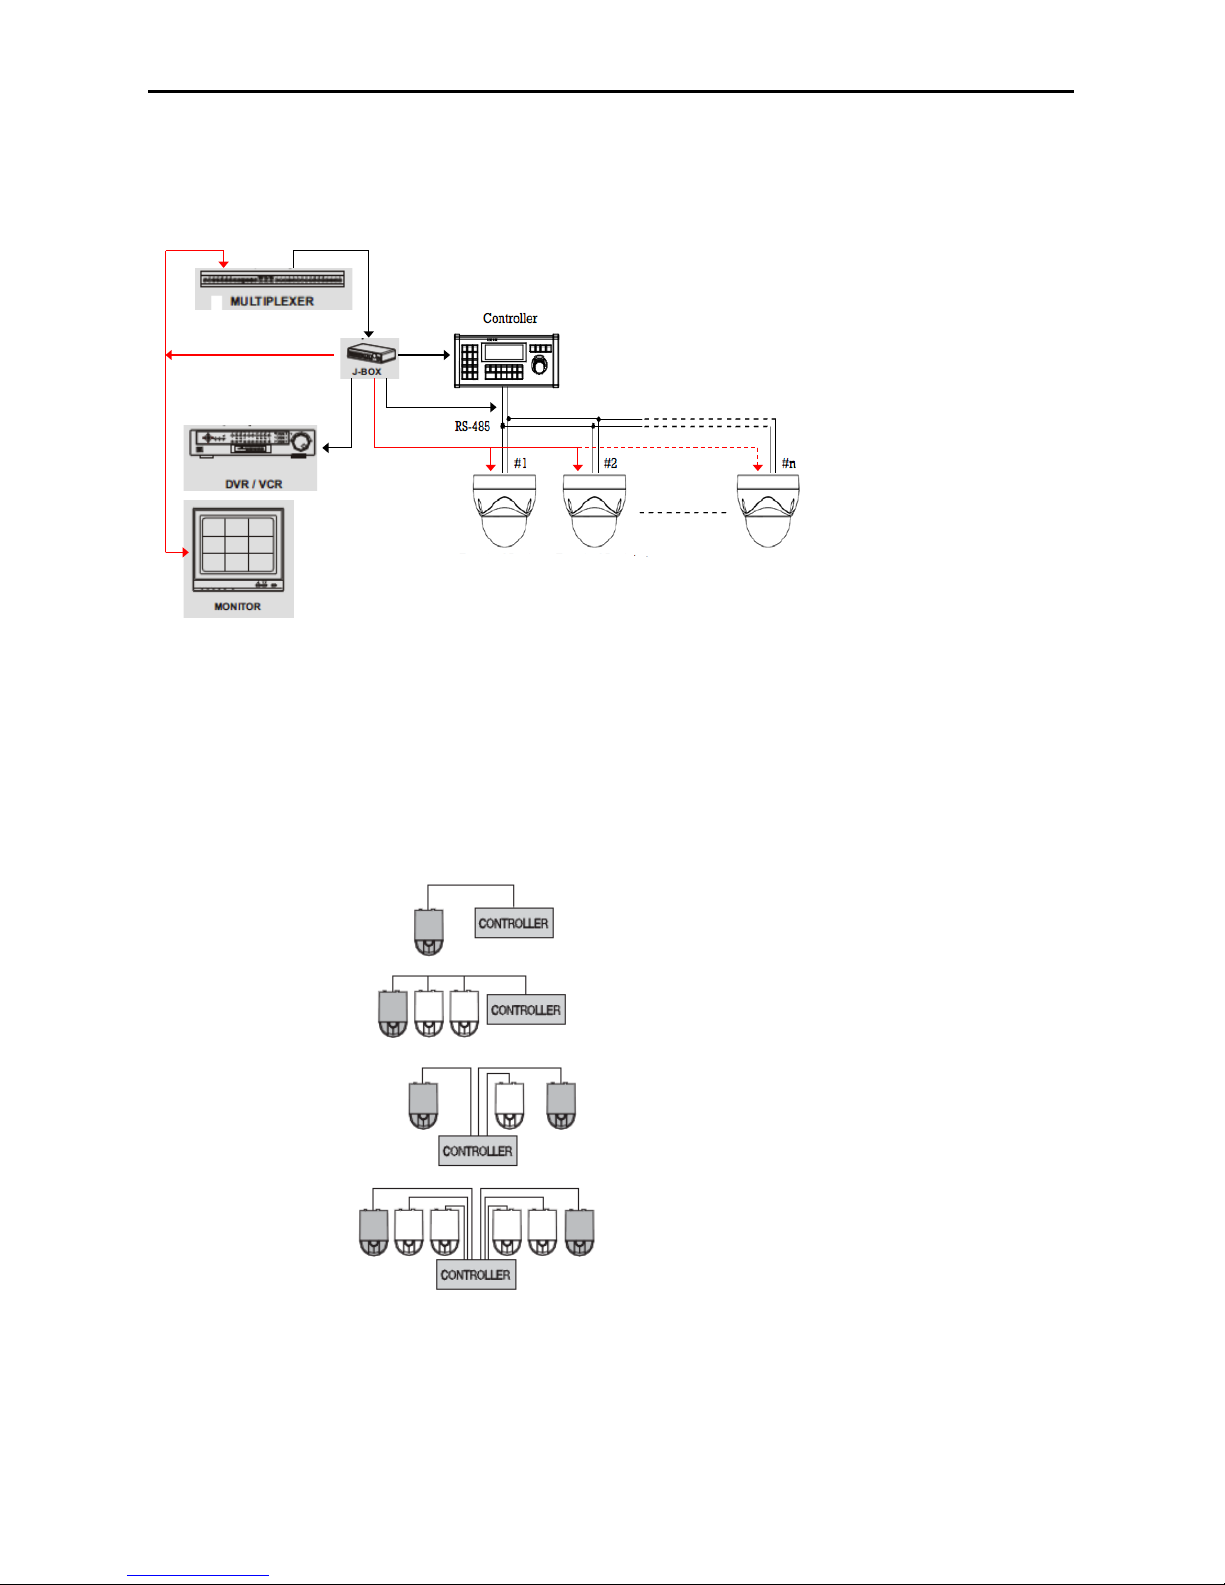
1.2 System Configuration ........................................................................................................................................7
1.3 Termination Settings .........................................................................................................................................7
2. Installation and Connection .................................................................................................................................8
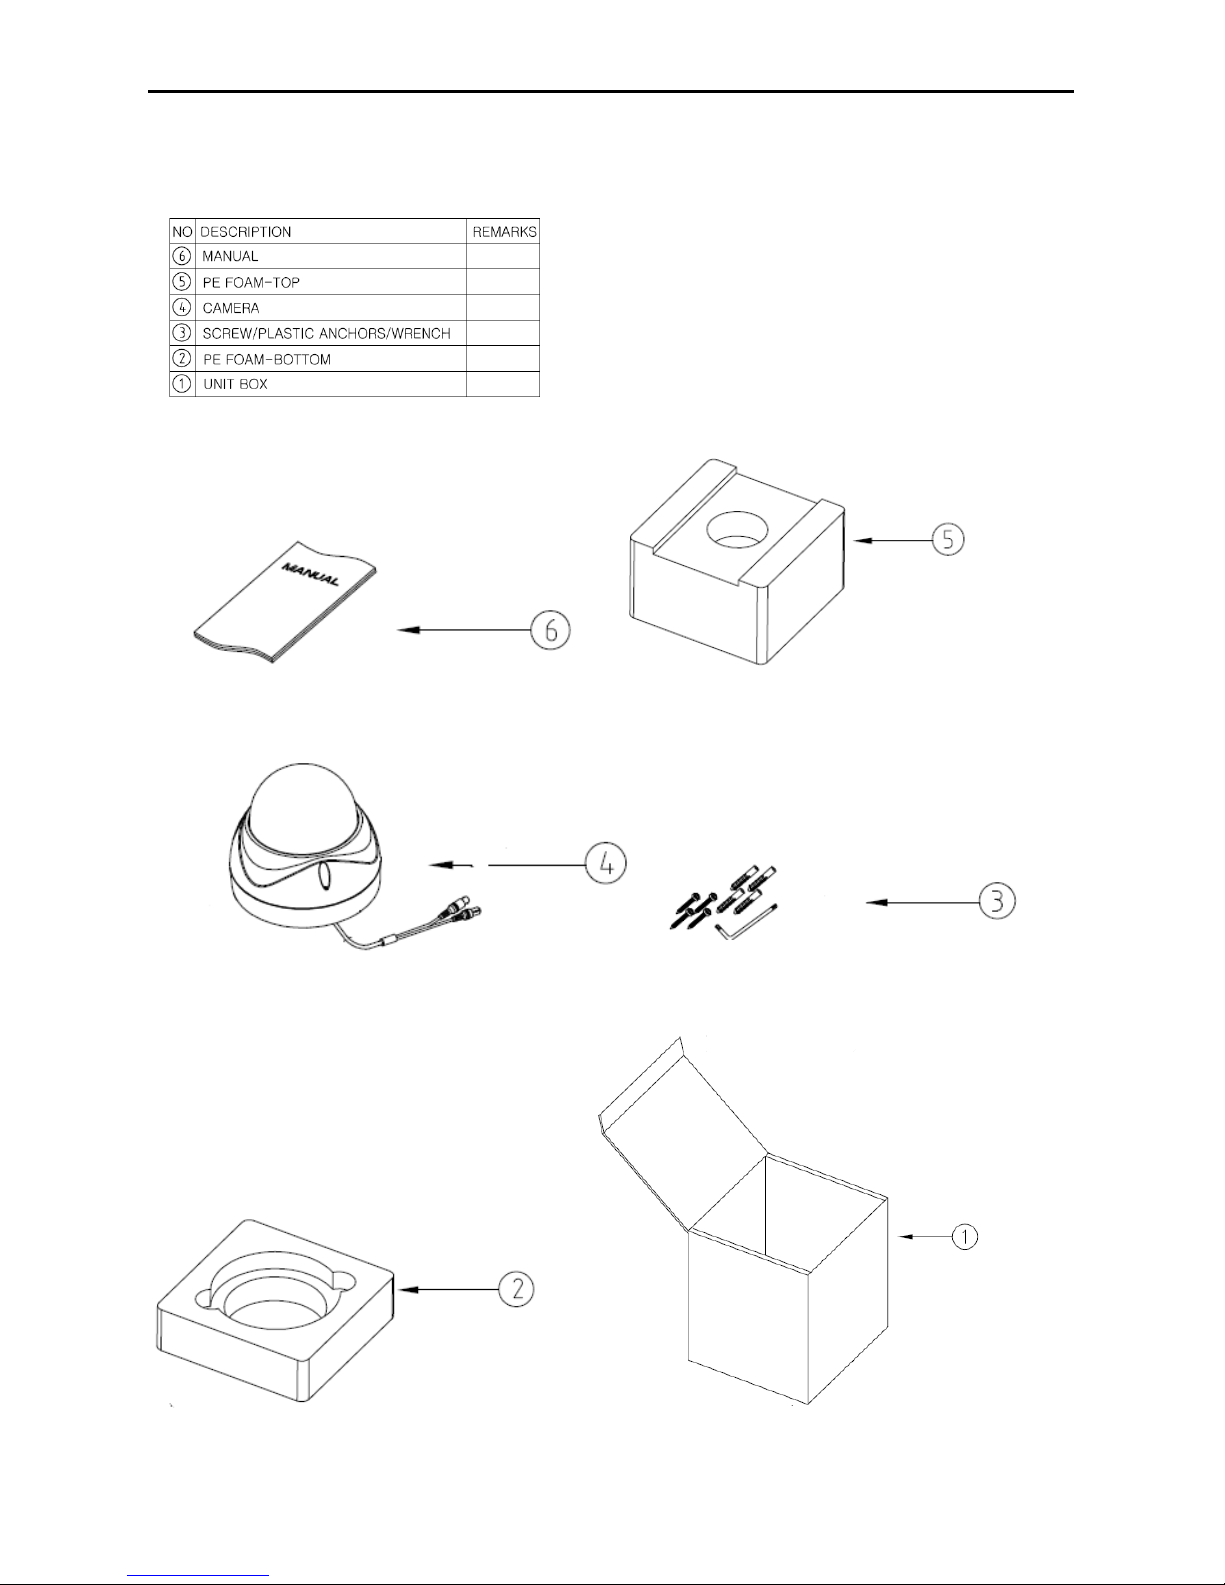
2.1 Package Contents.............................................................................................................................................8
2.2 Base Installation ................................................................................................................................................9
2.3 Connection Interface and Wiring cables .........................................................................................................10
2.4 Setting Dome Camera ....................................................................................................................................10
3. Program and Operation ....................................................................................................................................12
3.1 Getting Started ................................................................................................................................................14
3.2 Main Menu ......................................................................................................................................................16
3.3 System Setup Menu ........................................................................................................................................16
3.4 Display Setup Menu ........................................................................................................................................19
3.5 Camera Setup Menu .......................................................................................................................................23
3.6 Dome Motion Menu .........................................................................................................................................27
3.7 Preset Menu ....................................................................................................................................................31
3.8 Pattern Menu ..................................................................................................................................................32
3.9 Tour Menu .......................................................................................................................................................33
3.10 Auto Scan Menu ...........................................................................................................................................34
3.11 Alarm Menu ...................................................................................................................................................35
4. Troubleshooting ................................................................................................................................................36
5 Specifications .....................................................................................................................................................37
5.1 General Specifications ....................................................................................................................................37
5.2 Dimensions .....................................................................................................................................................38
Page 3

3 12X Mini PTZ
Issue: 1.1
Warning and Caution
If you fail to read this information and handle the product incorrectly, death or serious injury may occur.
*Precaution
Safety
-----------------------------------------------------------------------------------------------------------------
Should any liquid or soil object fall into the dome, unplug the dome and have it checked by the qualified
personnel before operating it any further.
Unplug the dome from the wall outlet if it is not going to be used for s everal days or more. To disconnec t the
cord, pull it out by the plug. Never pull the cord itself.
Allow adequate air circulation to prevent internal heat build-up. Do not place the dome on surfaces (rugs,
blanket, etc.) or near other materials (curtains, draperies) that m ay block the ventilation holes, may block the
ventilation holes.
Height and vertical linearity controls located at the rear panel are for special adjustments by qualified personnel
only.
Install-----------------------------------------------------------------------------------------------------------------
Do not install the dome in an extrem ely hot or humid place or in a place subj ect to exc essive dust, m echanical
vibration.
The dome was designed to be waterproof. Exposure to rain or water may damage the unit.
Cleaning--------------------------------------------------------------------------------------------------------------
Clean the dome with a slightly damp soft cloth. Use a mild household detergent. Never use strong s olvents
such as thinner or benzene as they might damage the finish of the unit.
Retain the original carton and packing materials for safe transport of this unit in the future.
Page 4

4 12X Mini PTZ
Issue: 1.1
Important Safeguards
Read this manual carefully.
Keep these instructions.
Heed all warnings.
Follow all instructions.
Do not use this dome near water or much moisture.
Clean only with dry cloth.
Do not block any ventilation opening. Install in accordance with the manufacturer’s instructions.
Do not install near any heat sources such as radiators, heat r egisters, stoves, or other apparatus (including
amplifiers) that pr oduce heat. A polarized plug has two blades with one wider than the other. A grounding type
plug has two blades and a third grounding prong. The wide blade or the third plug is provided for your safety. If
the provided plug does not fit into your outlet, consult an electrician for replacement of the obsolete outlet.
Protect the power cord form being walk ed on or pinched partic ularly at plugs, c onvenience rec eptacles, and t he
point where they exit from the apparatus.
Only use attachments/accessories specified by the manufacturer.
Unplug this dome during lightning storms or when unused for long periods of time
Refer all servicing to qualified service personnel. Servicing is required when the apparatus has been damaged
in any way, such as power-supply cord or plug is damaged, liquid has been spilled or objects have fallen into the
apparatus, the apparatus has been exposed to rain or moisture, does not operate normally, or has been
dropped.
CAUTION – These servicing instruc tions are for us e by qualified service personnel only. To reduce the risk
of electric shock, do not perform any servicing other than what contained in the operating instructions unless
you are qualified to do so.
Use certified/listed power supply transformer only.
Do not defeat the safety purpose of the polarized or grounding-type plug.
Never move Pan/Tilt by hands. It may causes serious damage to the camera.
The unit should be installed by the trained
Always stop using when the product emits smoke or abnormal heat.
Never install the product in area exposed to water, oil or gas.
Never install the product on a ceiling that cannot hold its weight.
Never touch the power cord with wet hands.
Clean only with dry cloth.
Never install the product in extreme high or low temperature.
Never drop hit strongly nor vibrate the product.
Never expose the product to direct sunlight or severe ray.
Never touch the front glass of the product.
Never install the product in areas exposed to rain or water
Page 5
5 12X Mini PTZ
Issue: 1.1
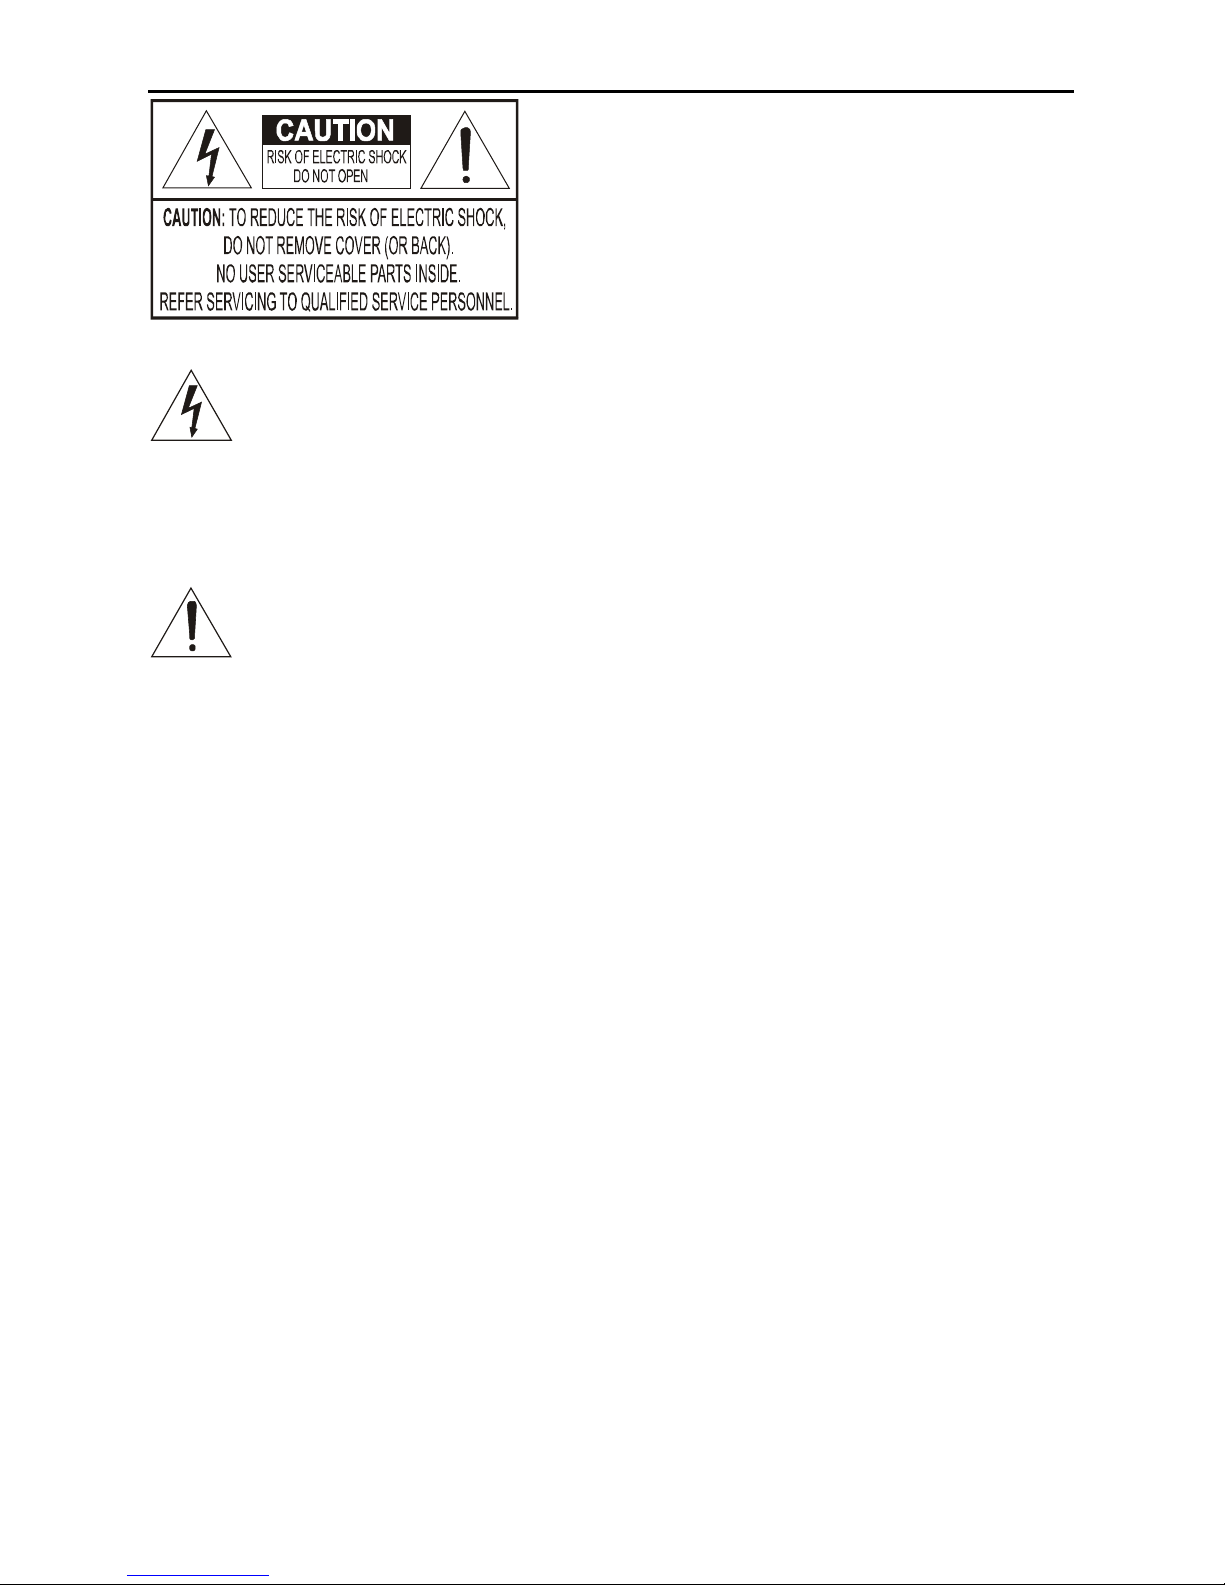
This symbol is intended to alert the user to the presence of un-insulated “dangerous voltage” within the
product’s enclosure that may be of sufficient magnitude to constitute a risk of electric shock to persons.
This symbol is intended to alert the user to the presence of important operating and maintenance (ser vicing)
instructions in the literature accompanying the appliance
FCC Compliance statement-----------------------------------------------------------------------------------------This Equipment has been tested and f ound to comply with the limits for a class A digital device, pursuant to par t
15 of the FCC rules. These lim its are designed to provide reasonable protection against harmful interf erence
when the equipment is operated in a commercial environment. This equipment generates, uses, and can
radiate radio frequency energy and, if not installed and used in accordance with the instruction manual, may
cause harmful interf erenc e to radio communications. Operation of this equipment in a residential area is lik ely to
cause harmful interference in which case the user will be required to correct the interference at his expense.
Caution: Changes or modifications not ex pressly approved by the party responsible for com pliance could void
the user’s authority to operate the equipment.
THIS CLASS A DIGITAL APPARATUS COMPLIES WITH CANADIAN ICES-003.
CET APPAREIL NUMERIQUE DE LA CLASSE A EST CONFORME A LA NORME NMB-003 DU CANADA.
CE Compliance statement-------------------------------------------------------------------------------------------Warning: This is a class A product. In a domestic environment this product m ay cause radio interference in
which case the user may be required to take adequate measures.
Page 6

6 12X Mini PTZ
Issue: 1.1
1. Overview
1.1 Feature
The PTZ Dome s hall be quickly to install and be able to offer the s ervices des cribed in this doc um ent by way of
an interface unit.
Its mechanical architecture is des igned to ensure adequate mechanical attachment to the wall of a dwelling.
Details shall be provided as to how the PTZ Dome is to be installed.
A building block for any surveillance/security system is composed of PTZ domes and C ontrollers. Extensible
and flexible configuration promotes remote control functions for various external switching devices such as
multiplexers and DVRs
- Autofocus, High Resolution Integrated Color Camera
- 120X Zoom (12X Optical, 10X Digital )
- WDR (Wide Dynamic Range)
- BLC / HSBLC
- DNR (Digital Noise Reduction)
- Day & Night (Auto / BW / Color)
- Pan 360° Endless Rotation
- Tilt 180° Vector scan available
- 210 Preset Positions (except Short-cut command)
- 8 Auto Scan
- 8 Pattern
- 8 Tours consist of Presets, Patterns and Scans
- 4 Alarm Input (Off / NC / NO) and 1 Alarm Output(Off/NC/NO)
- User programmable setting(Preset, Auto scan, Pattern, Tour, Home Function, Alarm Action, etc)
- Programmable PTZ Speed: Proportional to Zoom
- Multi-language OSD Support
- Private Mask Zone Support
- Standard protocol including Pelco-D/P
- Up to 99 Camera ID
- RS-485 Receiver
- AC 24V Only
Page 7
7 12X Mini PTZ
Issue: 1.1
1.2 System Configuration
Video
Video
Video
1.3 Termination Settings [SW303: Refer to 2.4 Dome Camera Settings]
To prevent mal-function or the attenuation of communication signals between the camera and controller, the
items (marked with gray color) at the end of line must be set up with the termination settings.
Page 8
8 12X Mini PTZ
Issue: 1.1
2. Installation and Connection
2.1 Package Contents
Page 9
9 12X Mini PTZ
Issue: 1.1
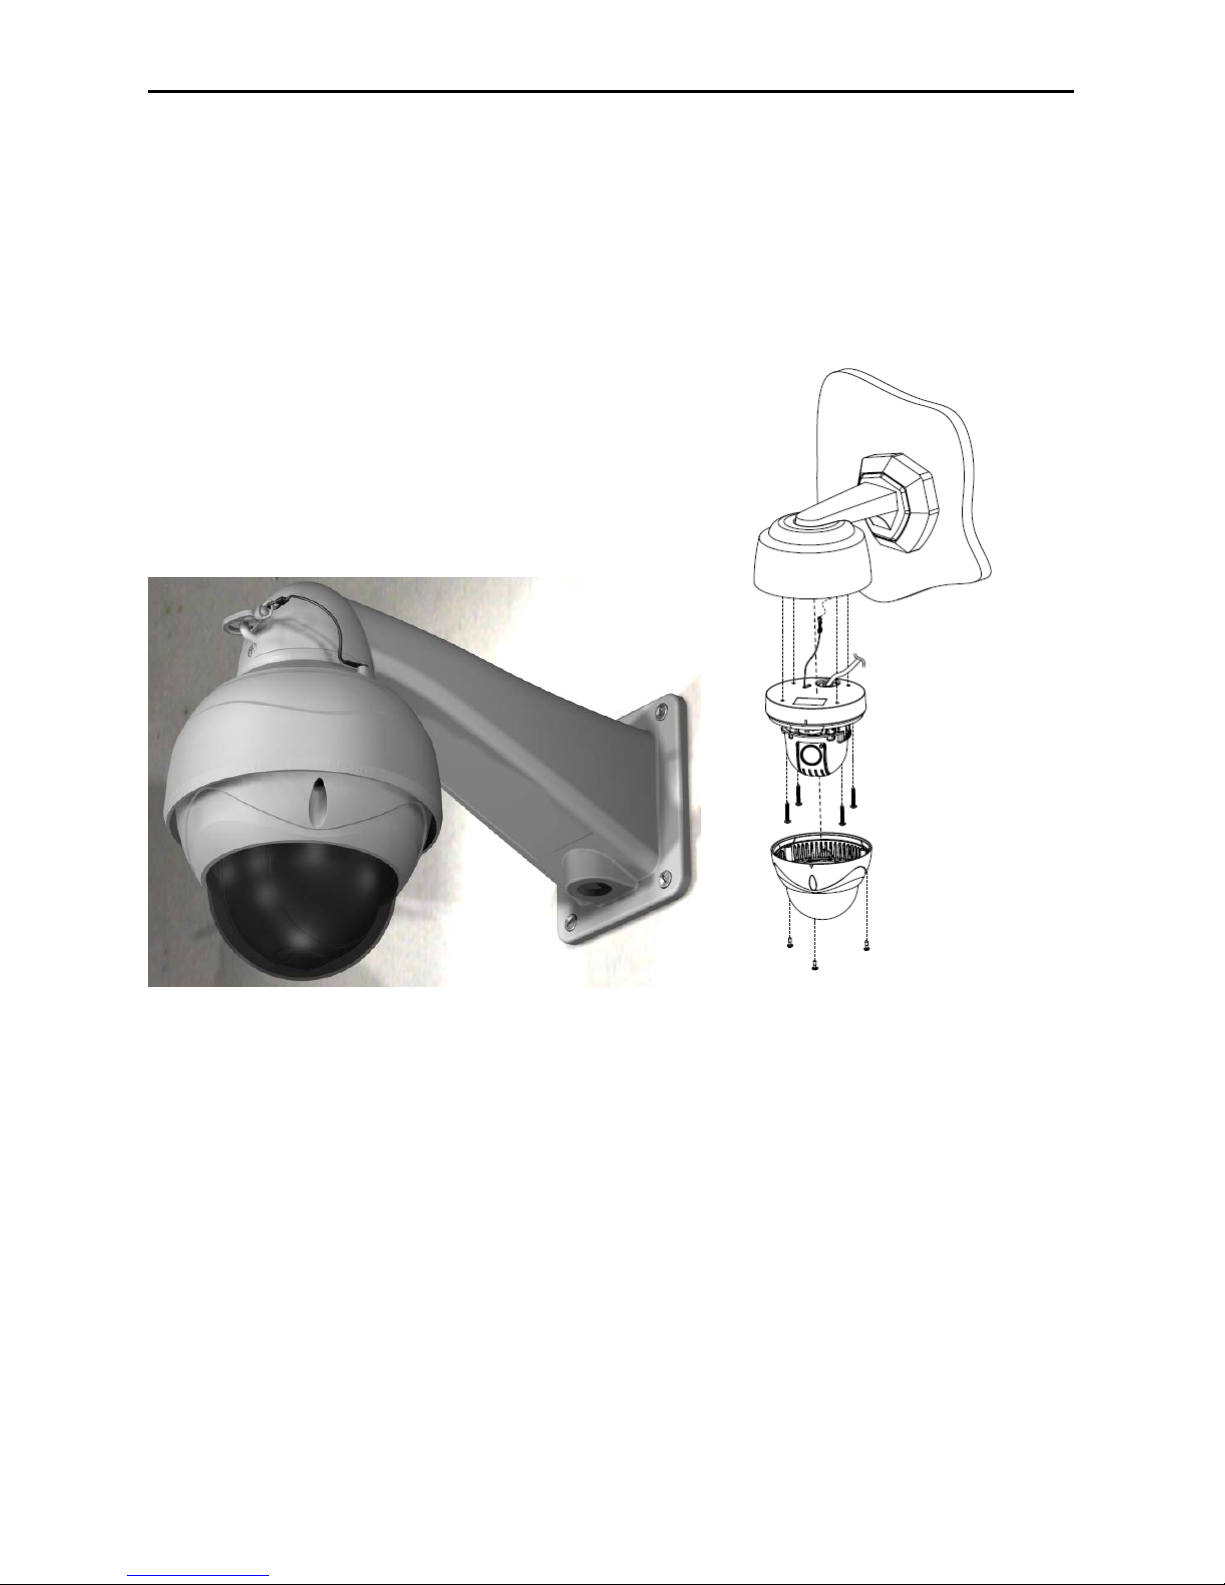
2.2 Base Installation
- Mak e holes for mounting and cable hole in the ceiling place to which the dome cam era is installed using the
template sheet.
- Extract the cable through the (cable) hole and connect the connector of terminal block .in the dome
- Fix the dome base firmly with supplied mounting screws (4)
- Lock the housing cover with torx screws (4)
Page 10
10 12X Mini PTZ
Issue: 1.1
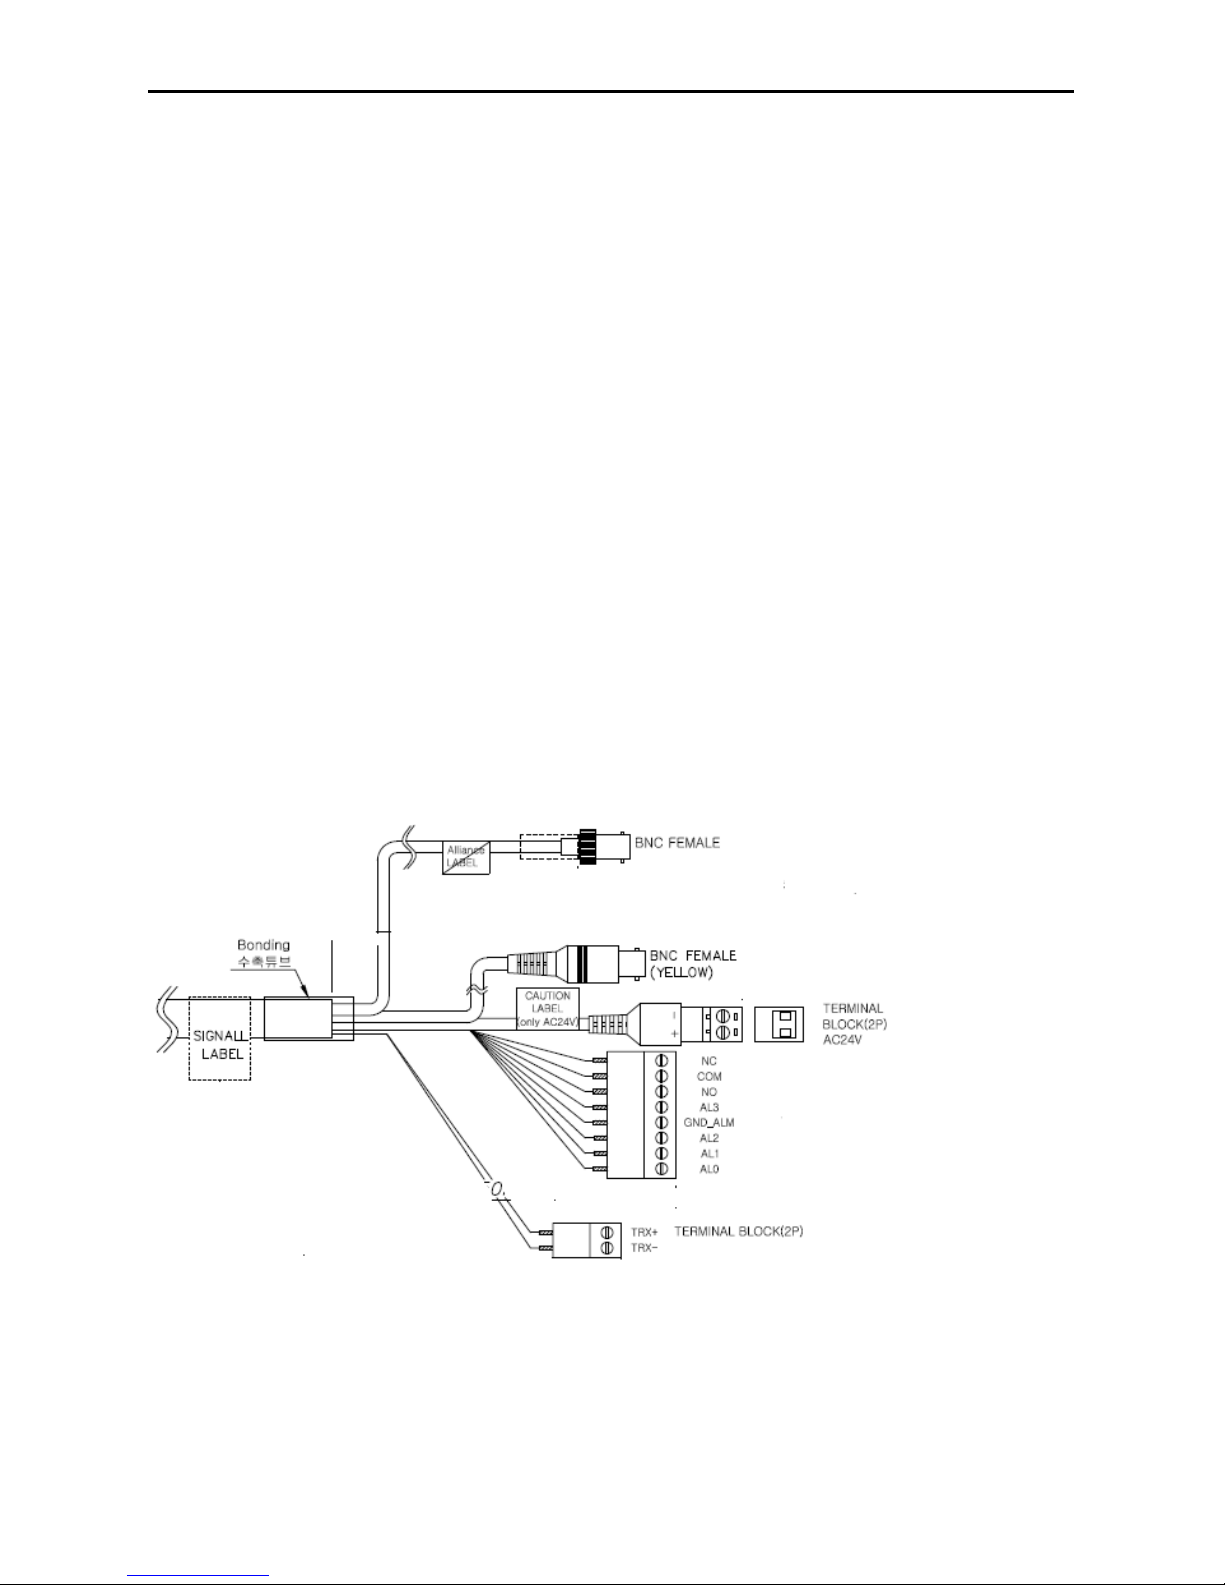
2.3 Connection Interface and Wiring cables
*Caution
Do not connect the power cable until all other connections have been completed.
After removing the protection sheet (PE form), supply the power to the dome camera.
2.3.1 Connecting the RS-485 lines
The dome camer a can be controlled rem otely by an external device or control system such as a controller
using RS-485 half duplexer (RS-485 Connection). A repeater is recommended to extend over 1 Km.
2.3.2 Connecting Video Jack
Connect the video Jack (BNC connector) to the monitor or video input of the DVR. (Video for HDcctv)
Connect the video Jack (Yellow BNC connector) to the monitor or video input of the DVR for checking only.
(Video for Analog composite)
2.3.3 Connecting Alarms
Alarm In: You can use external devices to trigger the dome camera to react to events
Mechanical or electrical switches can be wired to the AI and Ground pins
Alarm Out: The dom e camera can activate external devices such as buzzer. Connect the device to NO (or
NC) and COM pins.
2.3.4 Connecting the power
Connect the power jack of AC24V adaptor to the dome camera.
2.4 Setting Dome Camera
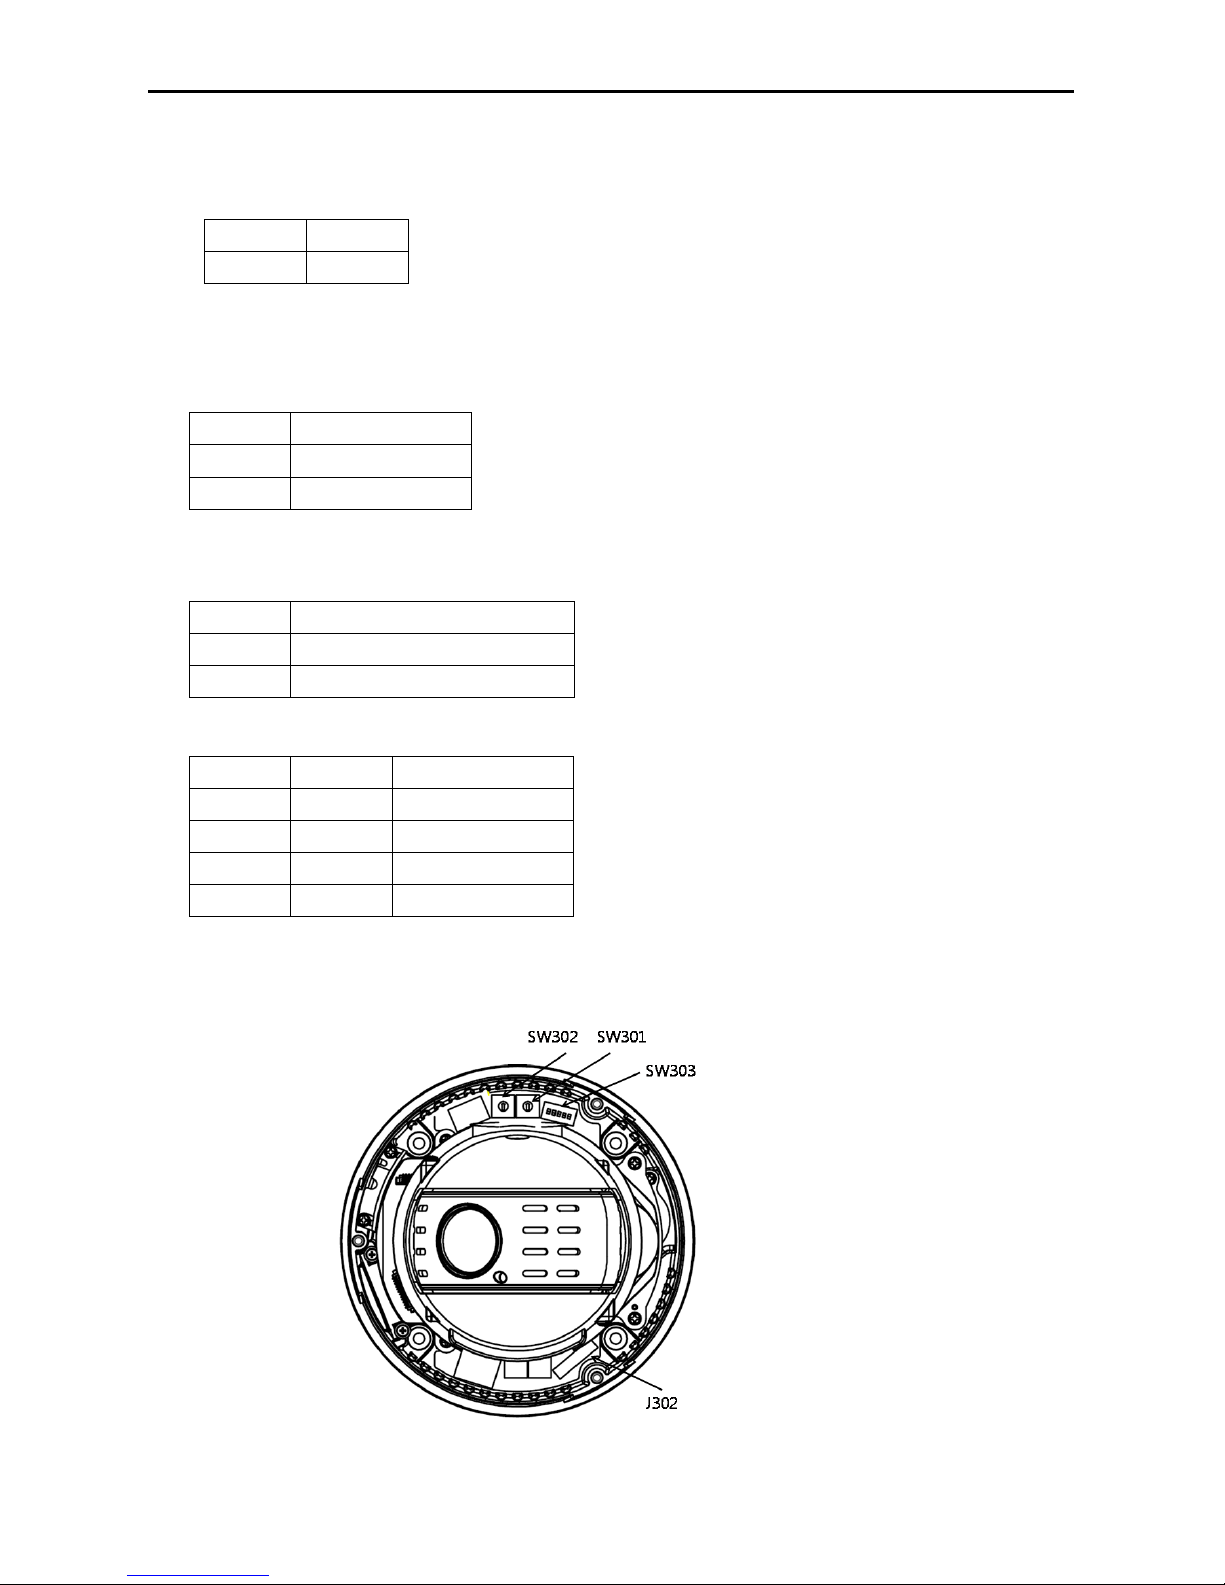
The device can comm unicate with external switching device such as m ultiplexer or DVRs by setting the Rotary
switch and Dip switch. Refer to tables below for setting the dom e c amera ID and protocol select ion. Total length
of the cable for communication should not exceed 1km.
2.4.1 Setting the address (ID) of dome camera
Page 11
11 12X Mini PTZ
Issue: 1.1
To prevent wrong operation and malfunction, each dome camera has a unique address (ID).
The default setting is 0[ID001].
Dome Camera ID Setting (Rotary Switch, SW301, SW302)
X10 X1
SW301 SW302
2.4.2 Setting the protoc o l of dome camera
Analog Composite Video (Dip Switch, SW303)
No1 Baud Rate(bps)
Off NTSC
ON PAL
Dome Camera Protocol Setting (Dip Switch, SW303)
No2 Protocol
Off Pelco D/P
ON Others(Pelco P/ Others)
Dome Camera Baud Rate Setting (Dip Switch, SW303)
No3 No4 Baud Rate(bps)
Off Off 2400
Off On 4800
On Off 9600
On On 38400
Dome Camera Termination Setting Off/ON (NO5, Dip Switch, SW303)
Page 12
12 12X Mini PTZ
Issue: 1.1
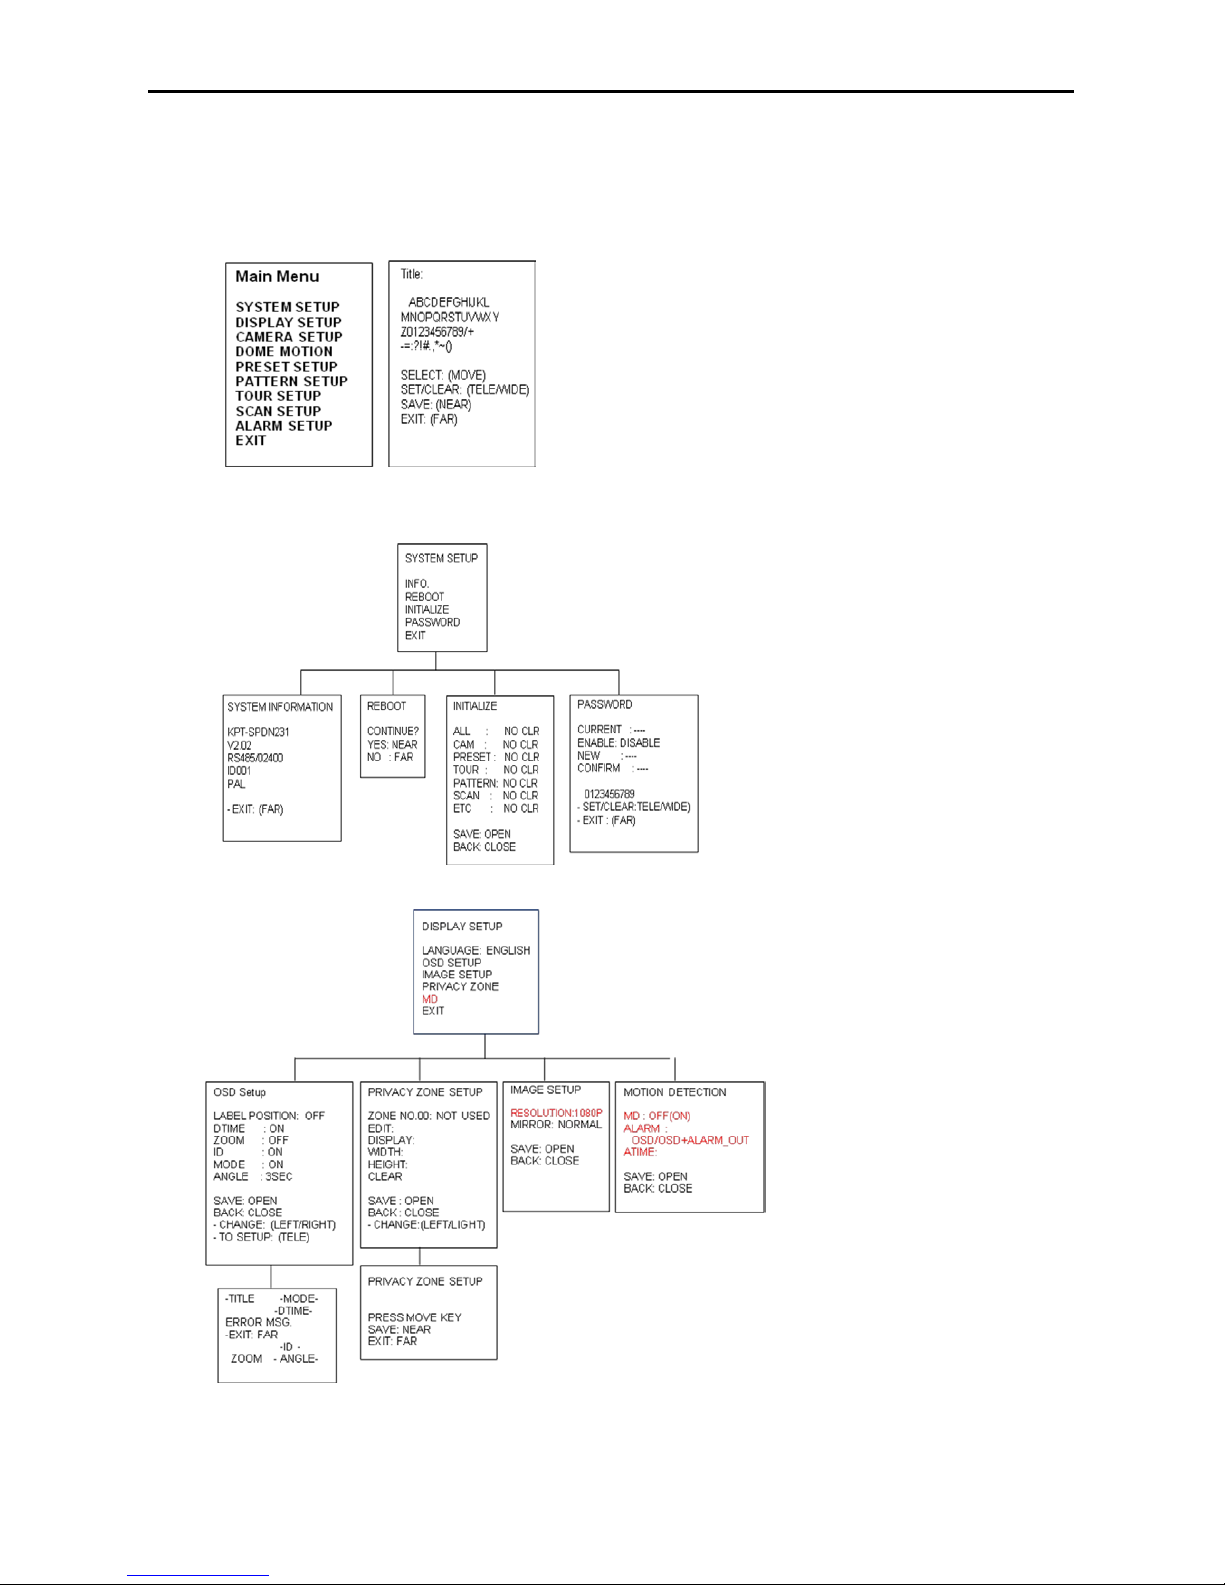
3. Program and Ope ration
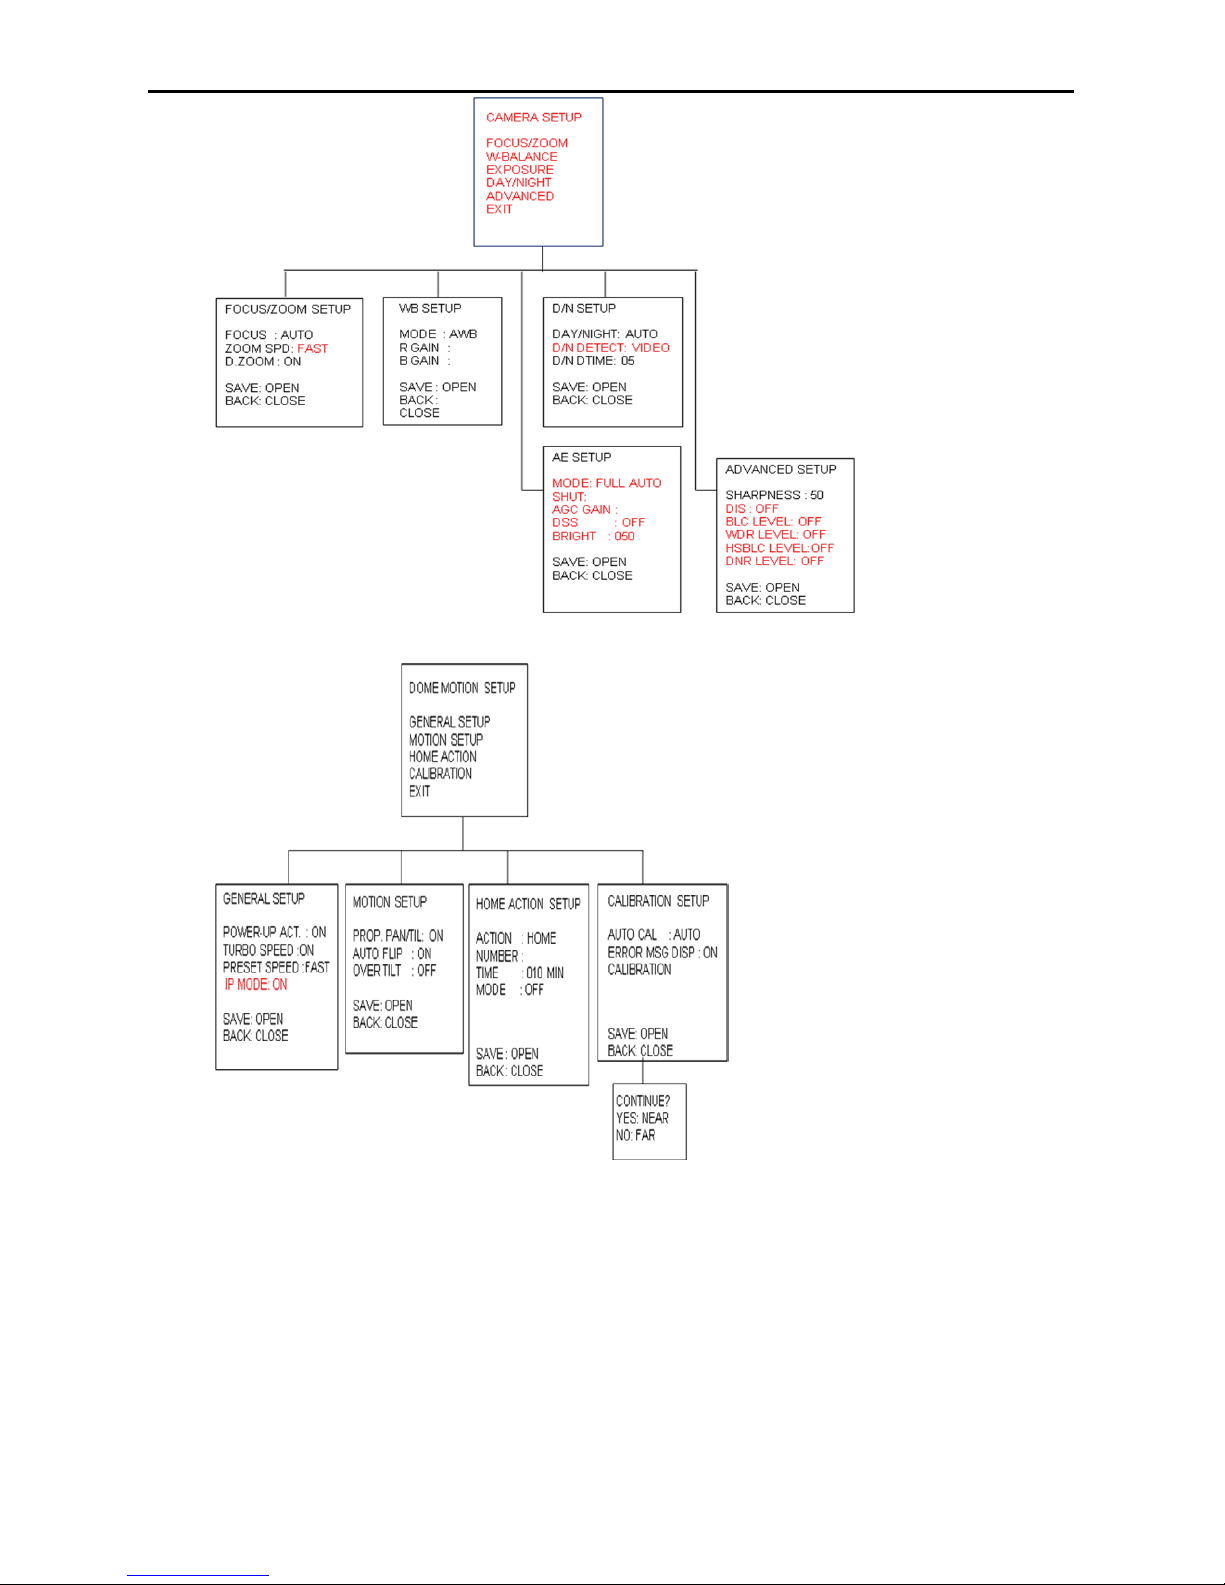
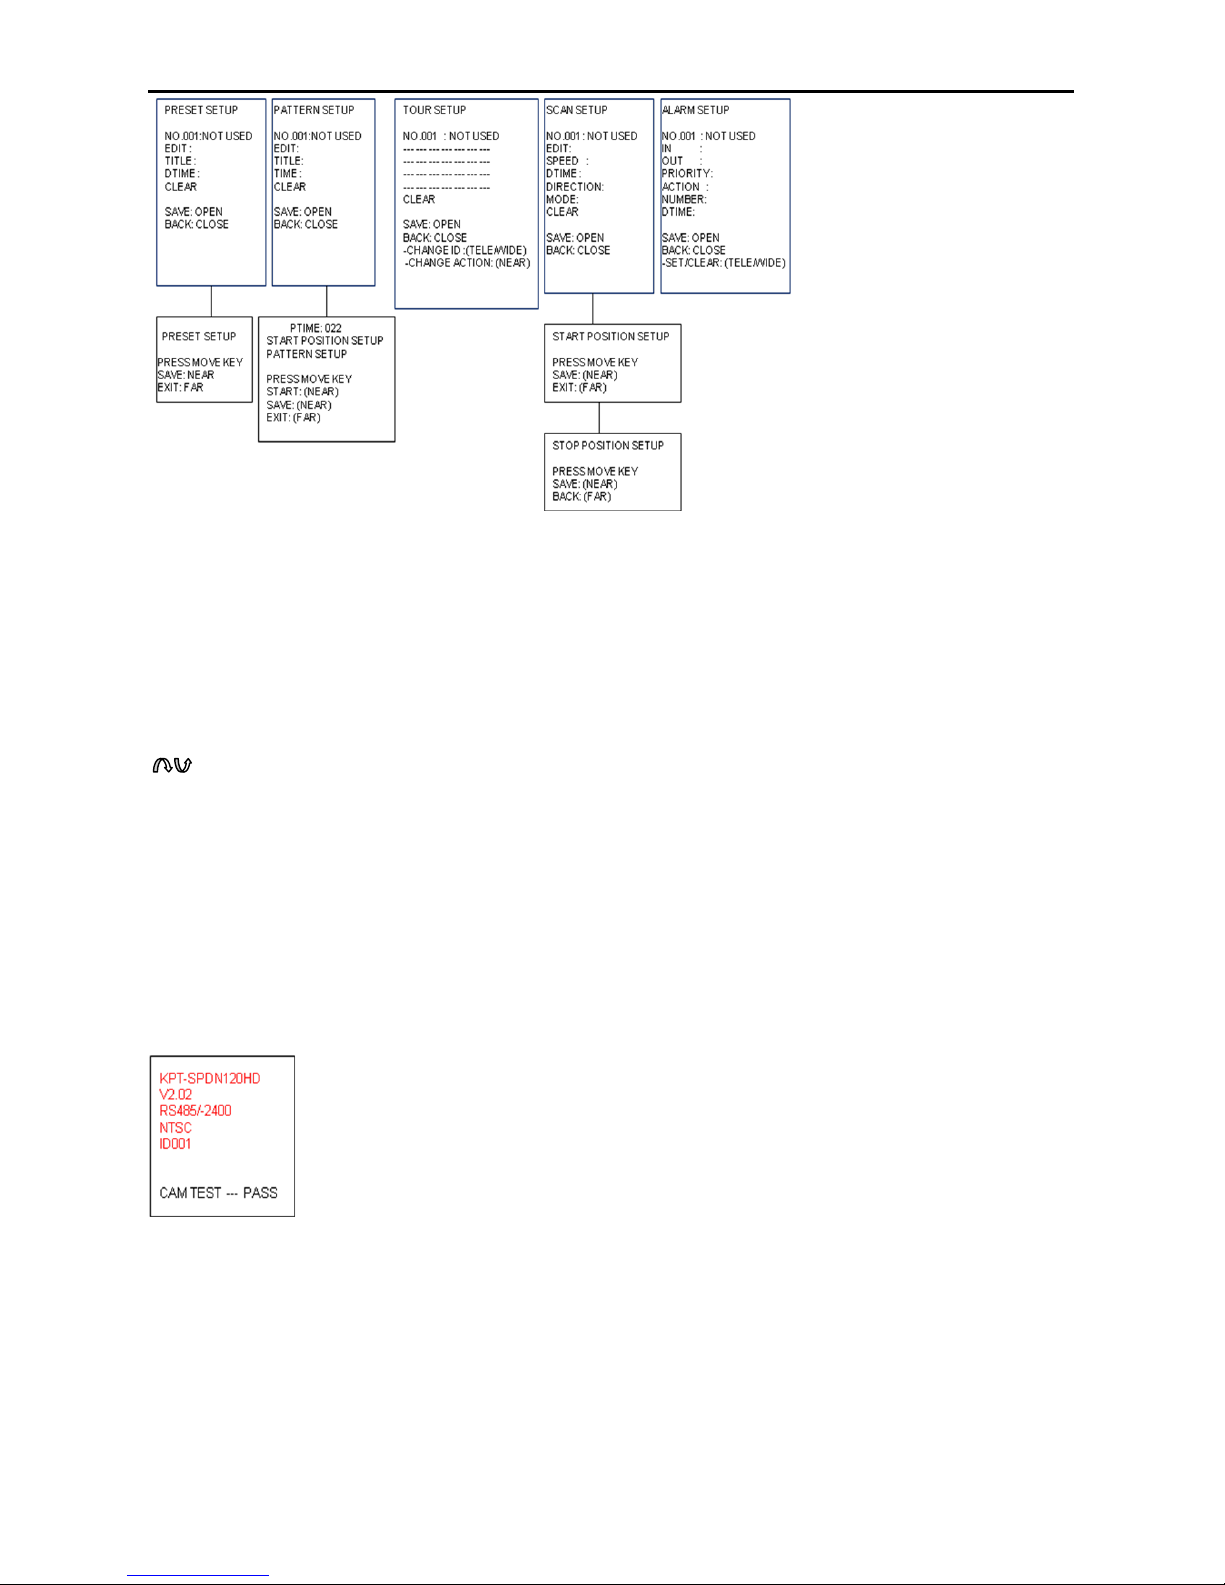
[OSD Menu Structure]
- Main Menu/Title
- Operation Menu
-Next Page Continue-
Page 13
13 12X Mini PTZ
Issue: 1.1
-Next Page Continue-
Page 14
14 12X Mini PTZ
Issue: 1.1
This manual is designed to be a reference for the programm ing and operation of the system. You can see
information about features of the dome and commands as well as an operation method.
The symbols below mean some action of the joystick controller.
▲/▼: move joystick up and down
◀/▶: move joystick left and right direction
▶: select or change settings
[Tele/Wide]: move joystick clockwise or counter-clockwise for zooming
[KEY]: press the defined key.
3.1 Getting Started
You should install and connect the dome to an interfac e device before using this operating guide. Refer to {2.
Installation and connection of this manual}.
Once installed, apply power to the dome and the start-up screen is displayed on the monitor.
Before installing and operating the dome camera, pleas e read this user’s manual c arefully. T his dome camera
can be operated using two methods:
- Use hot keys [Refer to Appendix].
- Use OSD Menu on the monitor [Read this operation manual].
*Notice: You shall check the sav ing stat e of each step at sub menu or edit menu, after editing functions
or changing settings. You may save setting one function twice.
Page 15
15 12X Mini PTZ
Issue: 1.1
For example, after {the position or t itle of Preset } is saved at ‘Sub Menu’, {the status of Preset Setup} has to be
saved at ‘Preset Setup Menu’ again.
*Notice: To stop an action, press [ESC] button or [96+Preset]. In that case, the dome goes to manual
mode or is to be paused temporarily (about 10sec in Alarm mode)
3.1.1 Accessing to MAIN MENU [95] + [Preset]/ [Menu]*
When you use Pelco-D and Pelco-P protocol with your controller, you can access to the main menu on your
monitor by pressing the key [95] + [Preset] or pressing and holding the [Menu] key for 2 seconds.
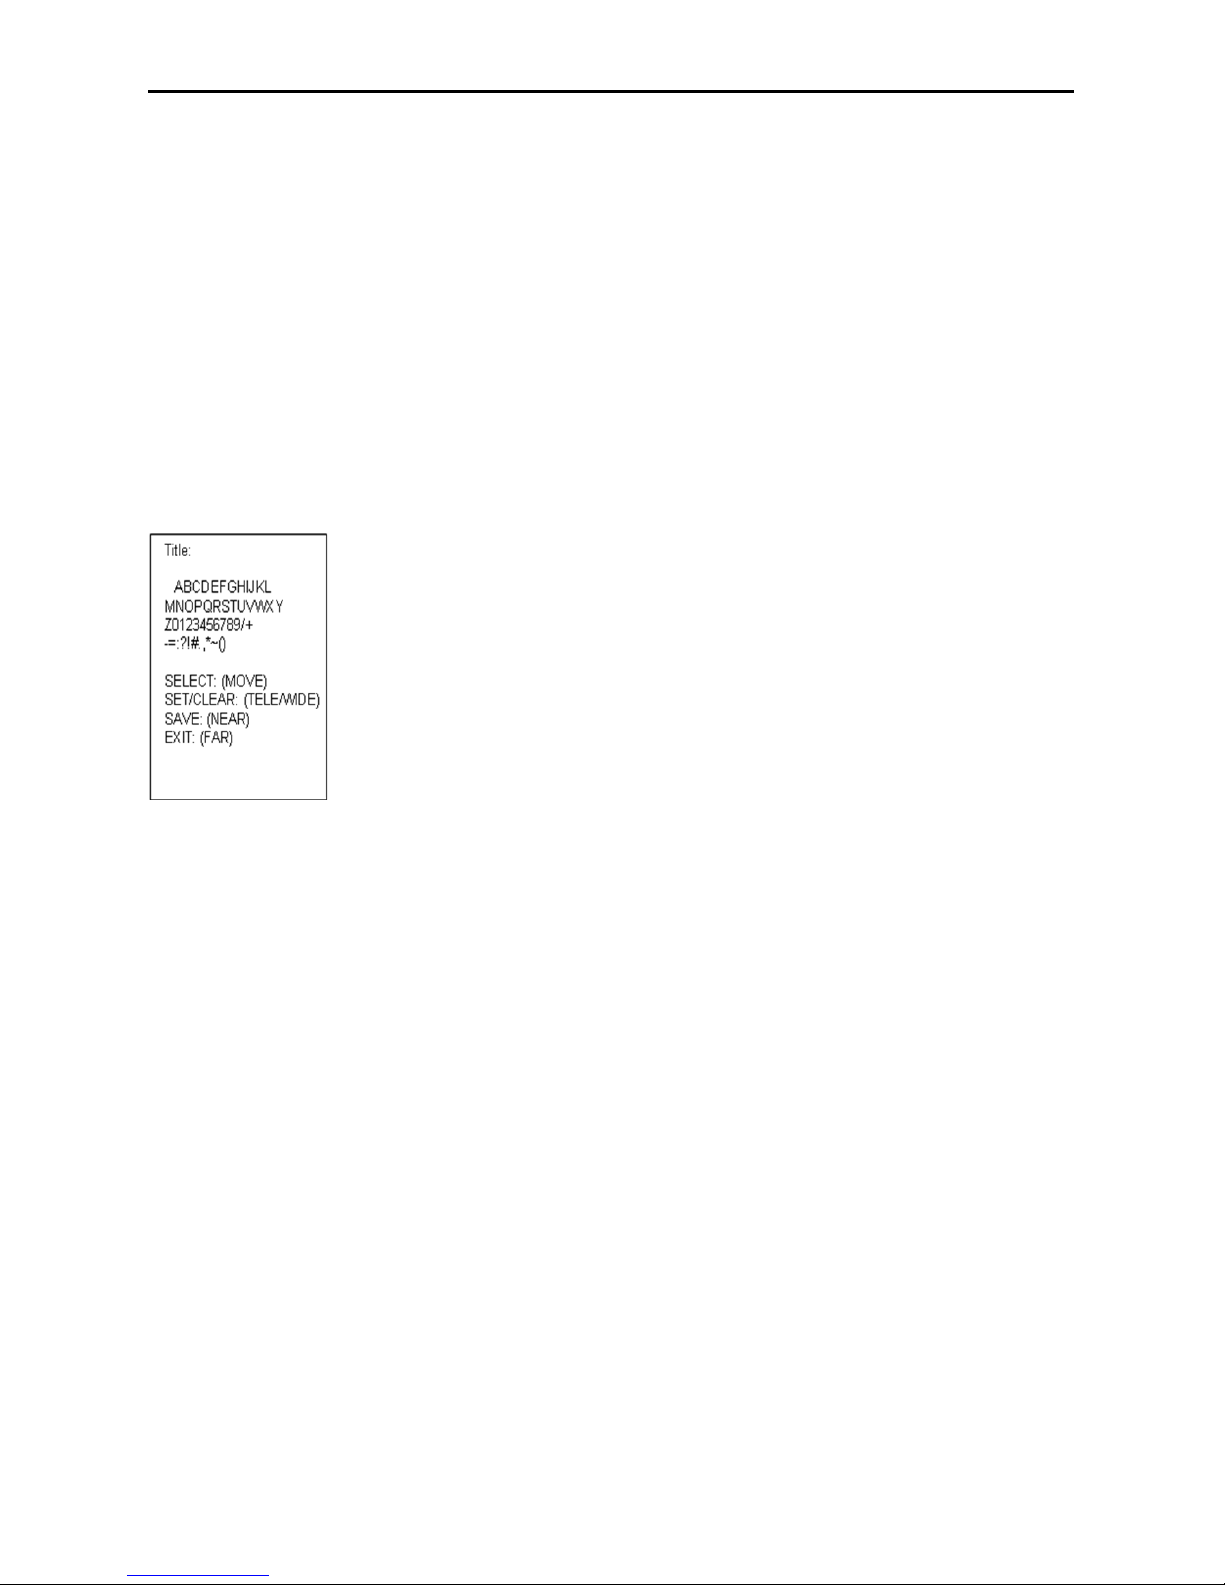
3.1.2 Editing a TITLE
The title edit menu can be used in the setup for Preset/Pattern/Tour/Scan commonly.
- Move the joystick right in Main Menu. The screen appears on the monitor:
- Move the joystick right, left, up or down to select a character.
- Press [Tele] button to input a character and [Wide] button to cancel the character.
- When the label is completed, use [Near] or move the joystick to save the selected title.
- If you want to cancel the selected title, return to the previous menu using [Far] button.
Page 16
16 12X Mini PTZ
Issue: 1.1
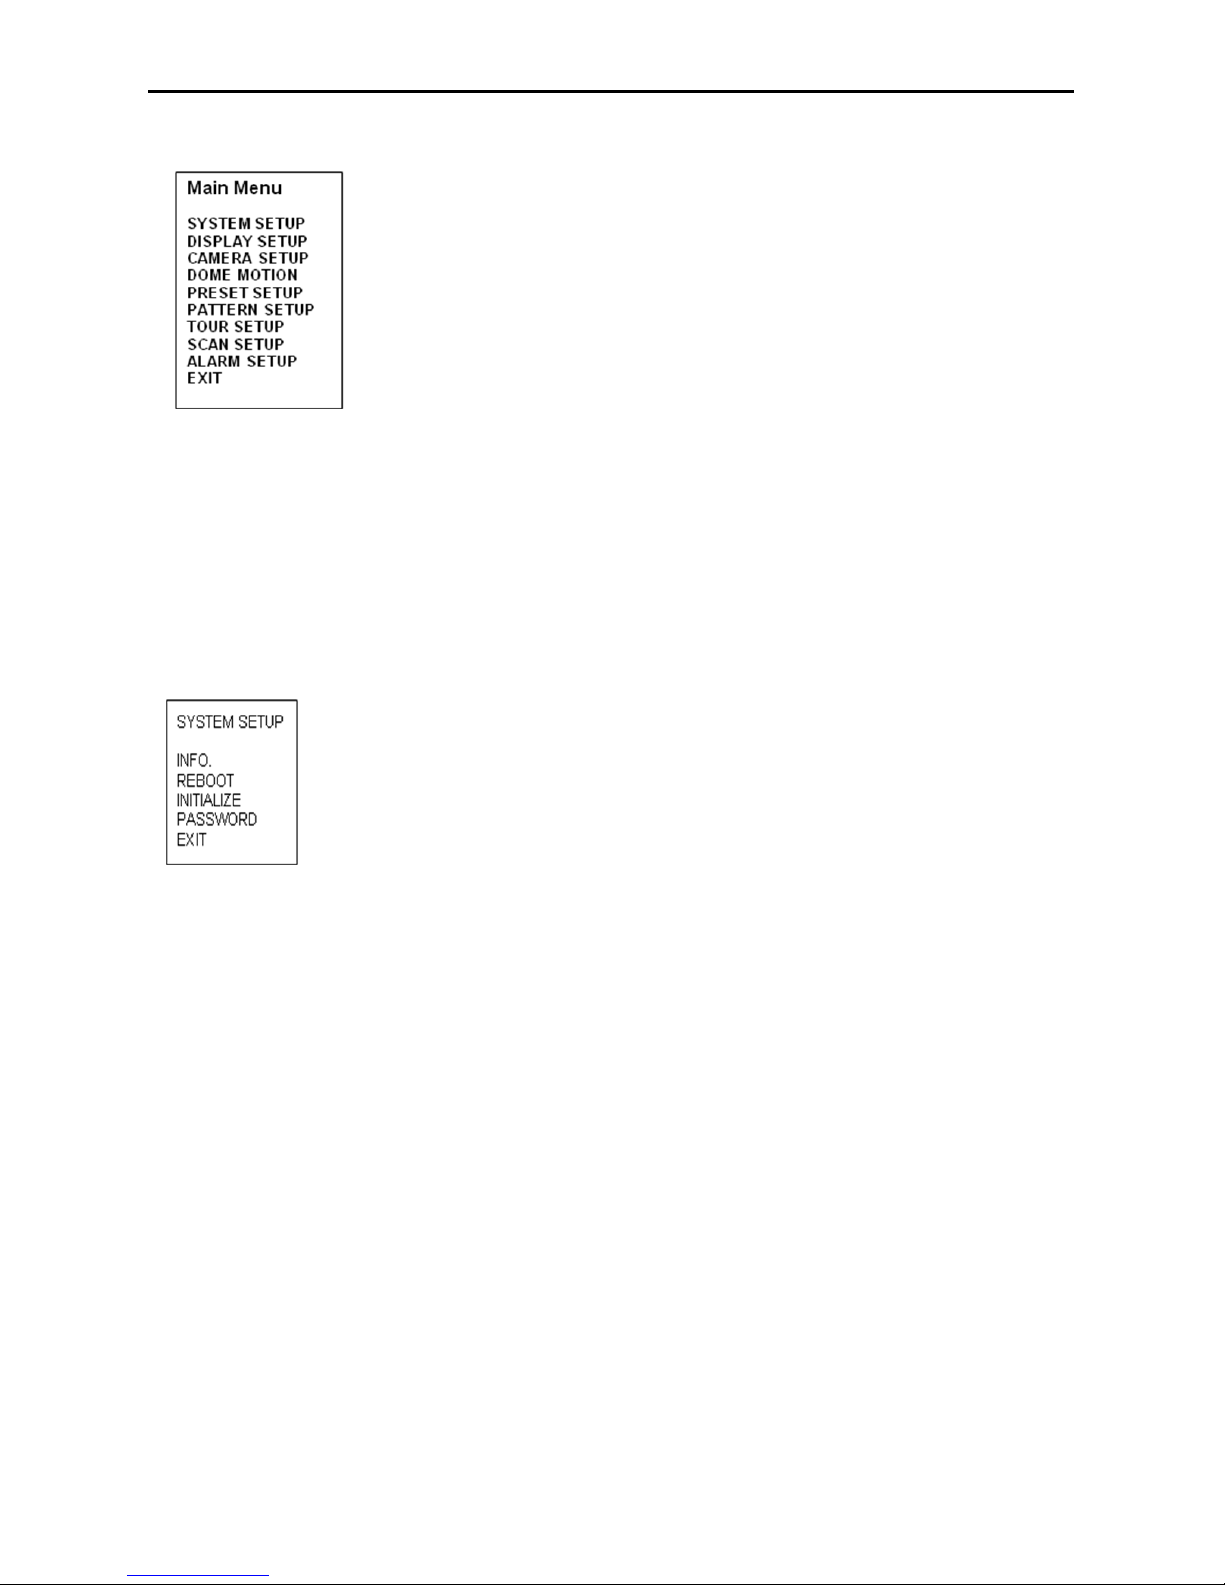
3.2 Main Menu
▲/▼: move joystick up and down for selecting an item.
◀/▶: move joystick left and right for moving an item.
▶/ [Open]/ [Near]: move joystick right to select or save settings or go to edit pages.
▶/ [Close]/ [Far]: move joystick to cancel or to exit current menu. (Back to previous menu without saving)
3.3 System Setup Menu
▲/▼: move joystick up and down for selecting an item.
◀/▶: move joystick left and right for moving an item.
▶/ [Open]/ [Near]: move joystick right to select, save settings or go to the edit page.
▶/ [Close]/ [Far]: move joystick to cancel or to exit current menu (Back).
Page 17
17 12X Mini PTZ
Issue: 1.1
3.3.1 System Information
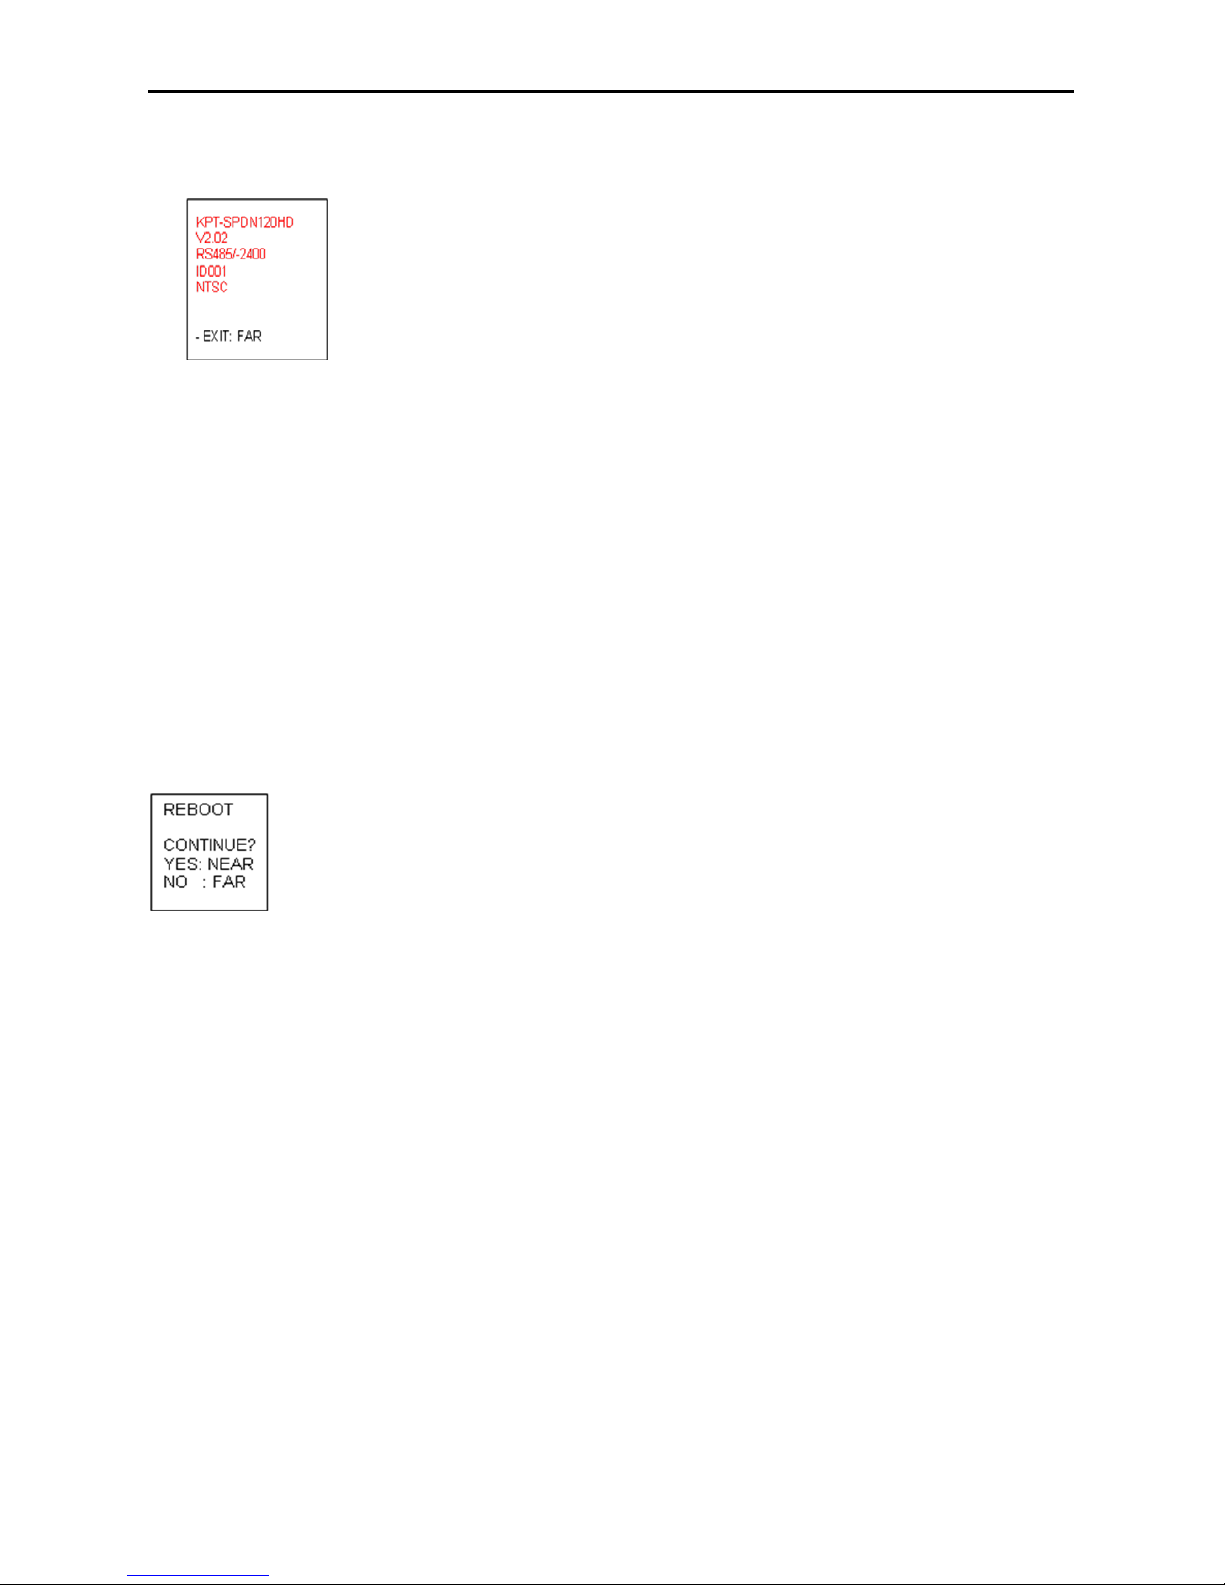
The system Information displays model name/Running Version/Protocol/Communication Type/Camera ID
No./System. It is read only for reference. Use the following steps to display the System Information screen:
Camera ID changes with respect to ID switching setting.
- Enter into {Main MENU}
- Select {System} using the joystick [
▶].
- Move the joystick right [
▶] for selecting {Info} in the sub menu of {System}.
- Press [Far] button or use joystick [
▶] to return to previous menu (Back).
3.3.2 Reboot
Reboot the system if there are some anomalous problems to control or operate the domes. Rebooting the
system will recycle power of dome and camera without changing settings of dome.
- Enter into {Main Menu} - Select {System) using joystick and move to {Reboot} in the sub menu of {System}
- To {Reboot} the system, Press [Near] key.
- To cancel Reboot, Press [Far] key.
Page 18
18 12X Mini PTZ
Issue: 1.1
3.3.3 Initialize
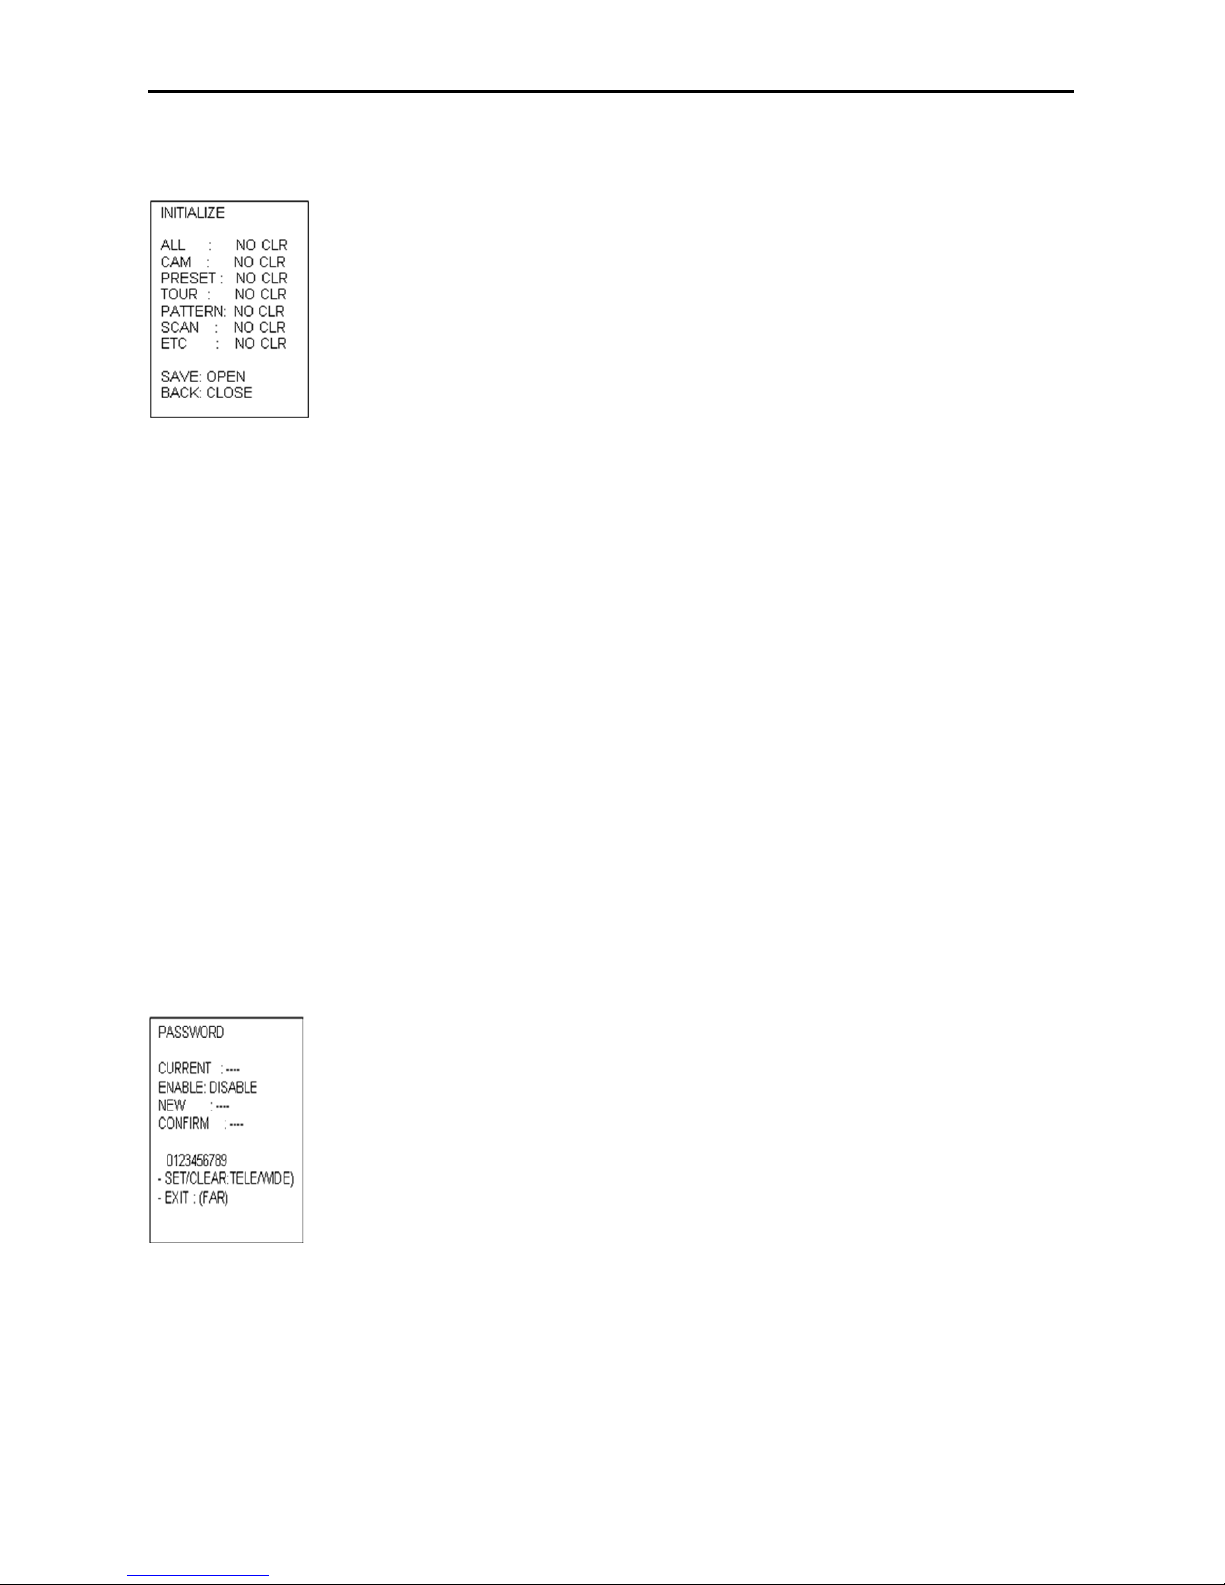
Use this function to initialize all or specific parameters of dome to factory default parameters.
- Enter into {Main Menu}
- Select {System} using joystick [
▶] and move to {Initialize} in the sub menu of {System}
- Select items to be initialized.
- Press [Near] button or use joystick [
▶] to select {Clear}
- Press [Far] button or use joystick [
▶] to return to previous menu (Back).
[ALL]: Clear All saved items (CAM/PRESET/TOUR/PATTERN/SCAN)
[CAM]: Clear Camera related settings.
[PRESET]: Clear saved presets. (To clear each preset, refer to PRESET Menu)
[TOUR]: Clear saved Tours.
[PATTERN]: Clear saved Patterns.
[SCAN]: Clear saved Scan items.
[ETC]: Clear other setting value except items of Camera & PTZs (CAM status and saved data of PRESET,
TOUR, PATTERN and SCAN)
3.3.4 Entering a Password
To prevent unauthorized changes to the dome settings, the dome have the feature of password protection. An
unauthorized operator cannot access to any of the dome settings menus. The password must be entered before
programming. The valid password with four characters must be entered to continue programming.
- Enter into {Main Menu} (refer to Accessing Main Menu)
- Select {System} and move to {Password} in the sub menu of {System} using joystick [
▶].
- Select numbers using joystick left/right and press [Tele] key.
Page 19
19 12X Mini PTZ
Issue: 1.1
- To lock the password, set Enable: Enable
Note*:
0000 is the default password.
3.4 Display Setup Menu
▲/▼: move joystick up and down for selecting an item.
◀/▶: move joystick left and right for moving an item.
▶/ [Open]/ [Near]: move joystick right to select or save settings or go to edit pages.
▶/ [Close]/ [Far]: move joystick to cancel or to exit current menu (Back).
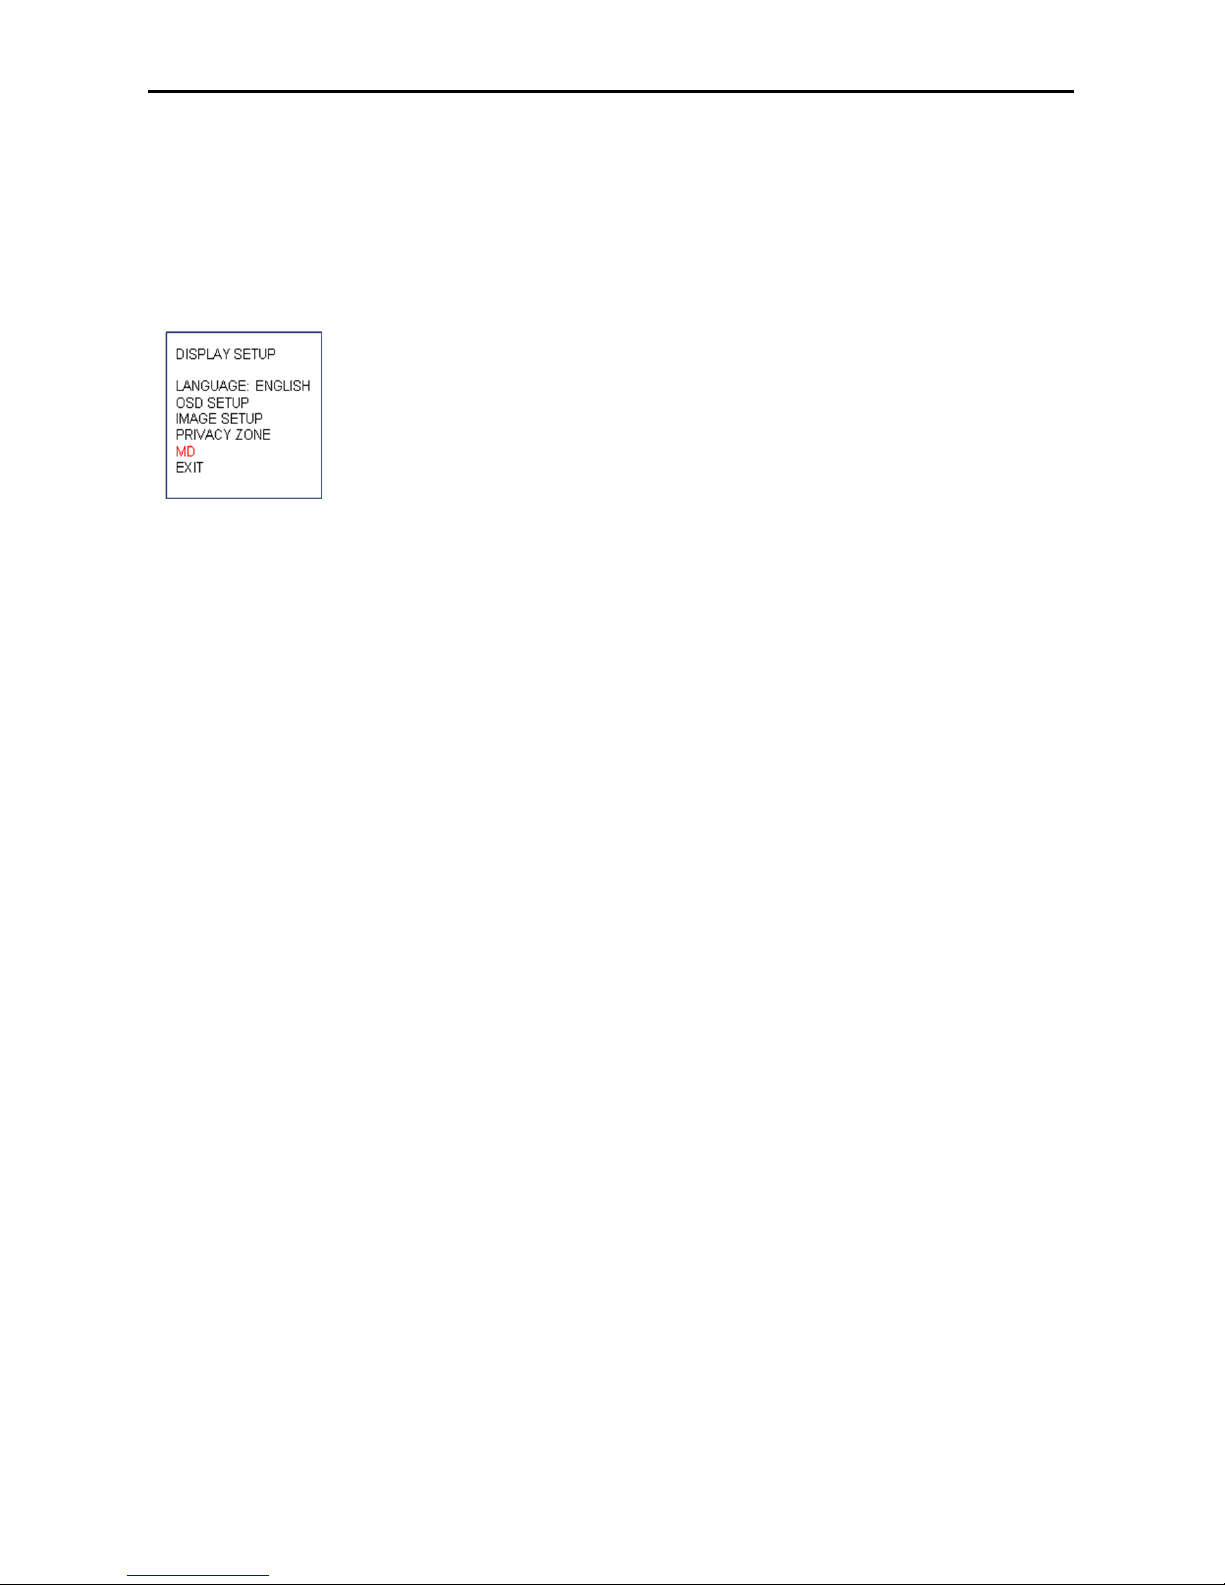
3.4.1 Language
- Select {Display Setup} and move to {Language} using joystick [
▶].
- If you want to use another language, select one
from English/Chinese/Russian/Spanish/German/Italian/French/Netherlandish.
Page 20
20 12X Mini PTZ
Issue: 1.1
3.4.2 OSD Setup
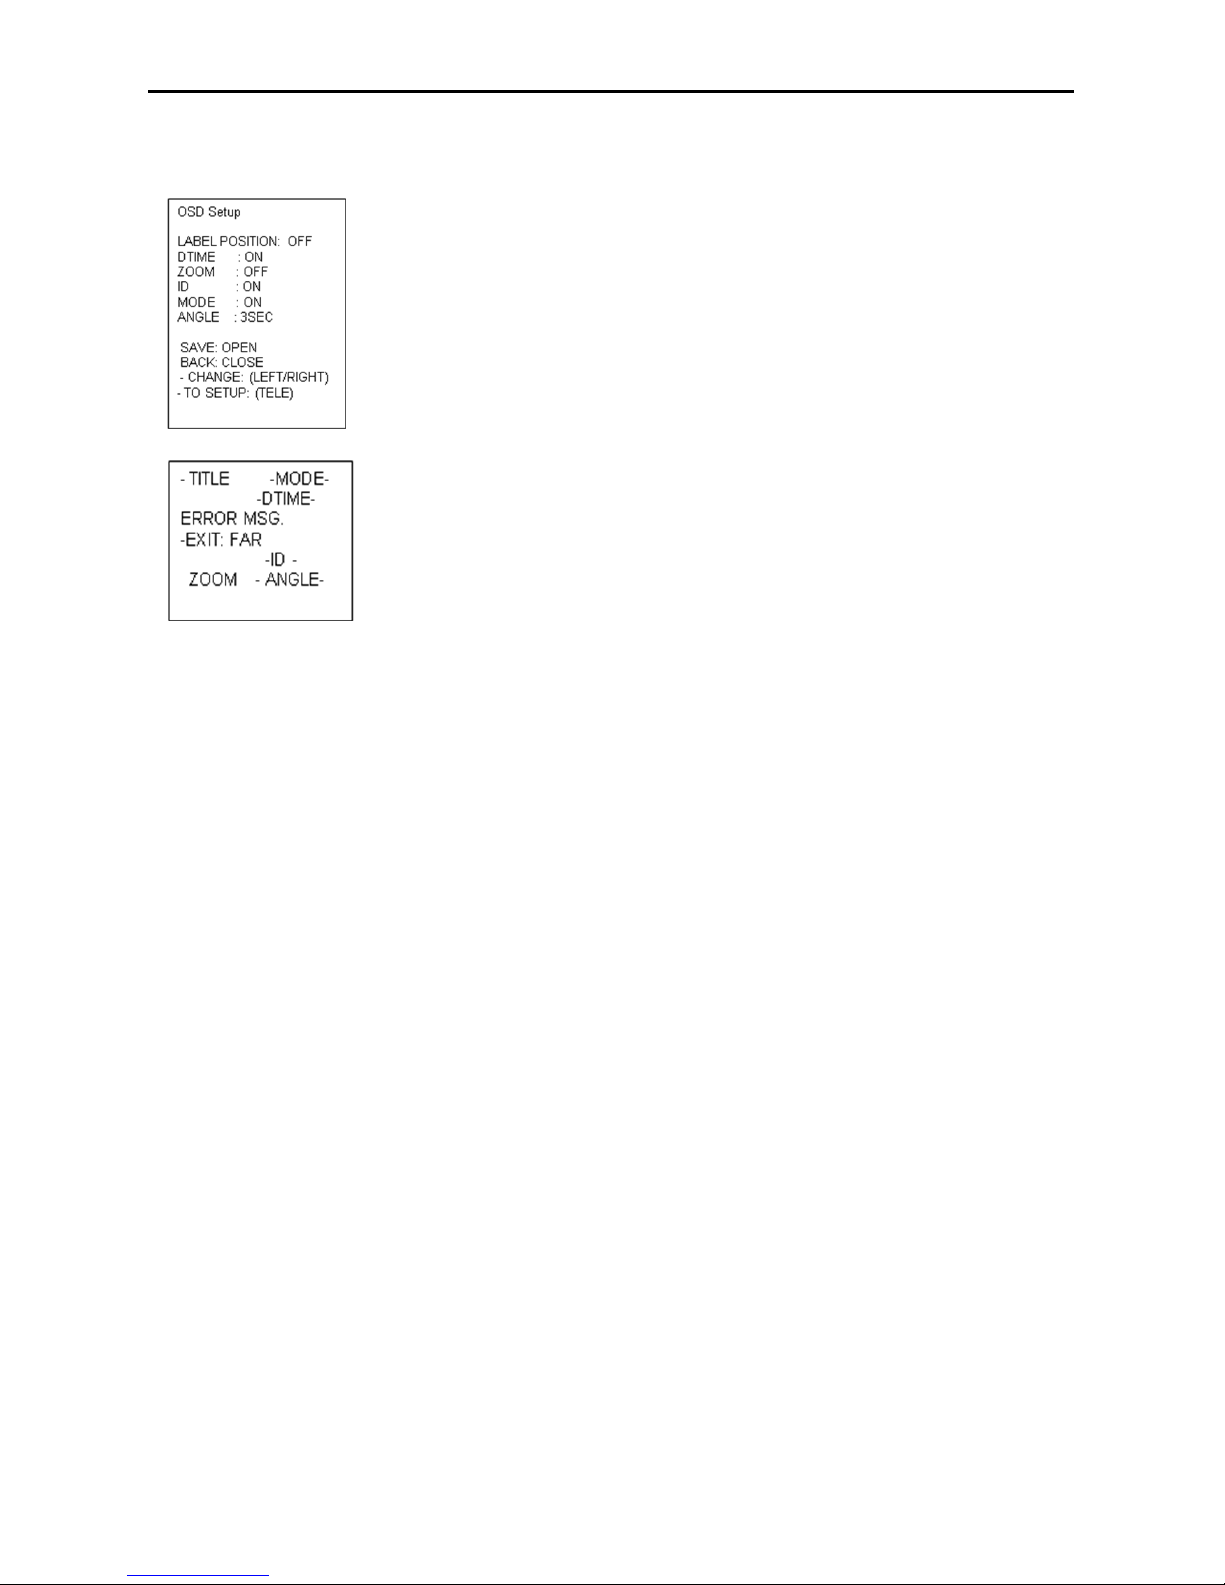
You can see only video or some character with video. Each element is able to handle.
OSD setup allows you to program how labels are displayed on the monitor.
Labels are such as Title, Dwell Time, Zoom ratio, Camera ID, Operation Mode and PTZ Angle
Label position can be set where you want to place on the monitor.
- Enter into {Main Menu}
- Select {Display} and move to {Setup} using joystick [
▶]
- Use the joystick to move the label up, down, left, and/or right.
- Press [Tele] button to edit the position of labels.
- Move the joystick right [
▶] to change the status of labels
- Other labels can be set with same method.
- Press [Far] button to return the previous menu (OSD setup).
- Press [Open] button or use joystick to save the status.
- Press [Close] button or use joystick
to return to previous menu (Back).
Page 21
21 12X Mini PTZ
Issue: 1.1
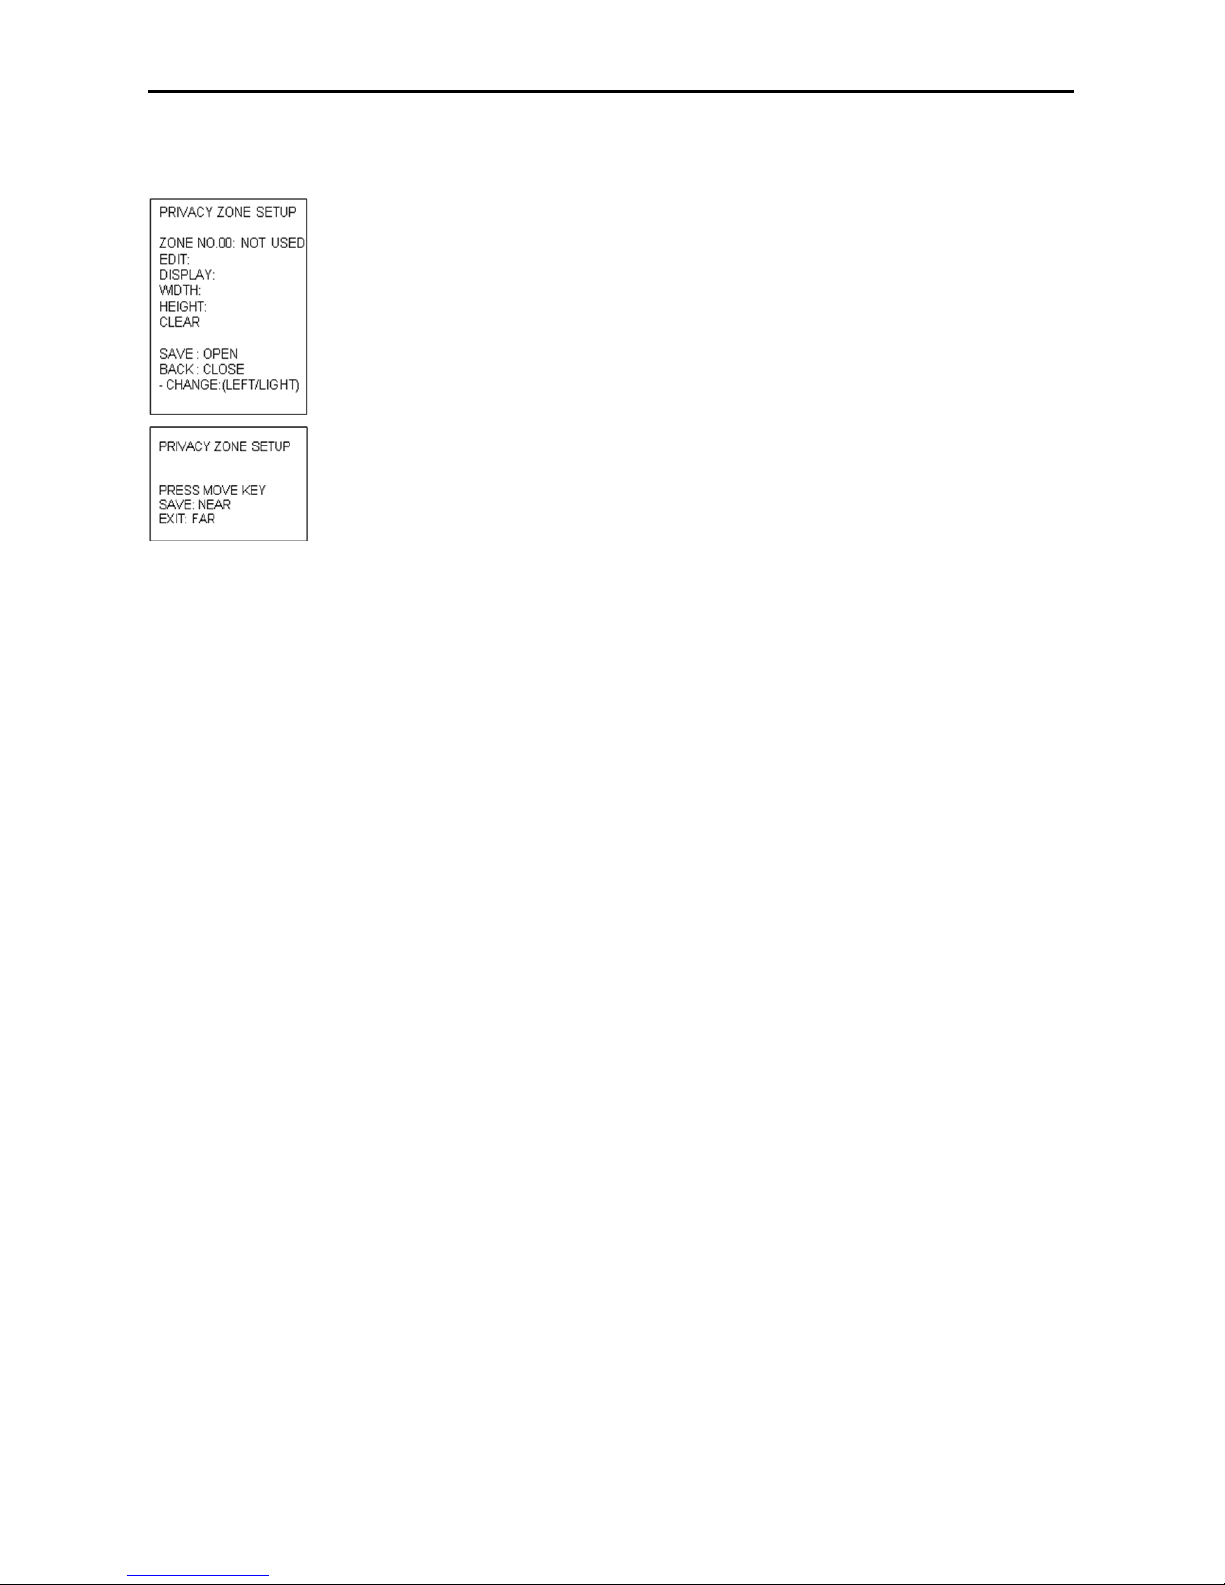
3.4.3 Privacy zone (TBD)
A Private mask zone allows an administrator to program one four-sided, user defined zone which cannot be
viewed by operators. The mask can be changed with pan angle and tilt angle using joystick and be adjusted in
size according to zoom ratio [Tele/Wide]. Maximum 15 positions can be displayed on the monitor screen. The
speed of displaying masks is proportional to the number of masks on the screen. It is recommended that you
set the size to at least twice the size of the object (height and width).
- Enter into {Main Menu}
- Select Display and Privacy Zone using joystick [
▶].
- Move the joystick left or right to select zone ID[00~14].
- To program a Privacy Zone, select Edit Mask, move to a Target (Pan/Tilt) and adjust a Mask size (Zoom).
- Press [Near] button or use joystick to save it.
- After editing a mask, you can re-size width & height using joystick [
▶]. (e.g. ~5X)
- Set display On to display saved mask.
- It is possible to clear saved zone No.xx individually.
- Press [Open] button or use joystick to save settings.
- Press [Close] button or use joystick
to return to previous menu (Back).
Page 22
22 12X Mini PTZ
Issue: 1.1
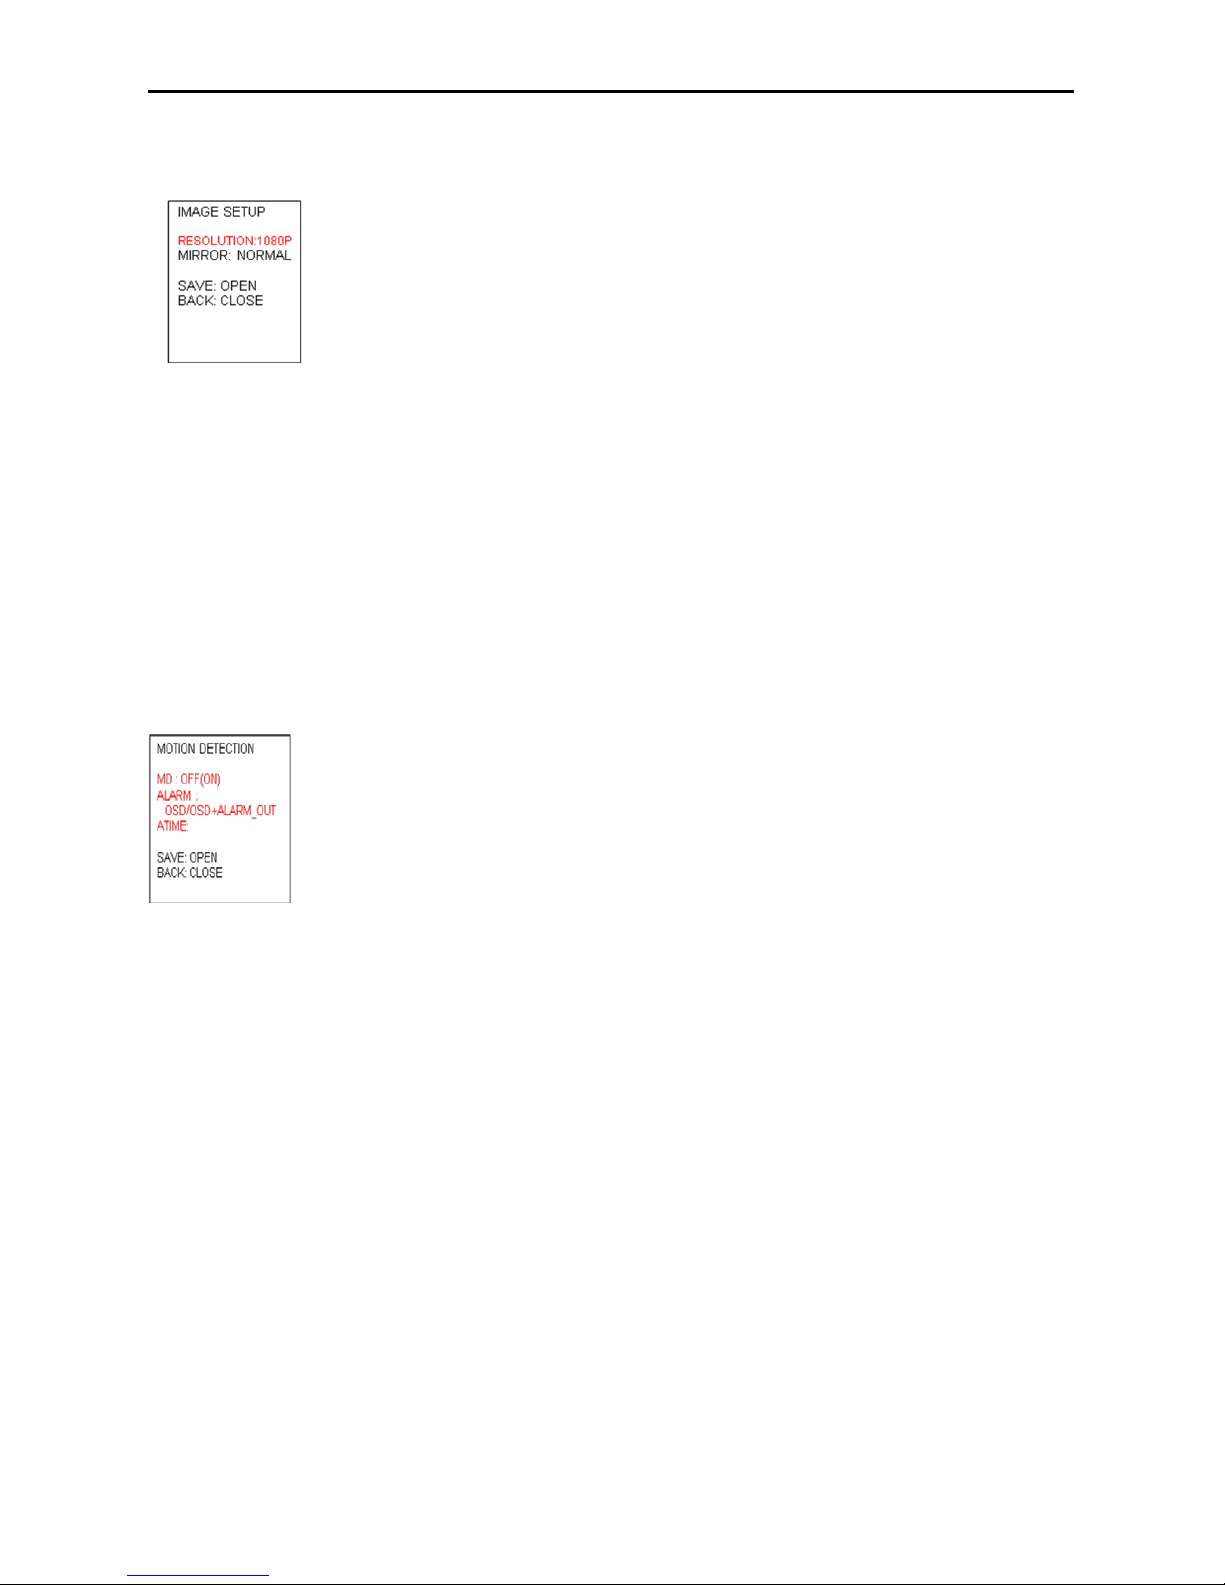
3.4.4 Image Setup
This menu is for changing displayed image settings.
- Enter into {Main Menu}
- Select {Display} and move to {Image Setup} using joystick [
▶].
- Using joystick [
▶], Normal image, Horizontal image, Vertical image or H/V image can be selected.
- Press [Open] button or use joystick to save settings.
- Press [Close] button or use joystick to return to previous menu (Back).
3.4.5 MD (Motion Detection)
The dome camera can monitor the movement of image, and it sends an alarm message with OSD and Alarm
Out action. The level for sensitivity can be changeable.
NOTE* To stop alarming temporarily (about 10sec), press [ESC] button or [96+preset].
- Set MD for Off/MD using the joystick.
- Set Alarm mode for OSD/Alarm Out/Both using the joystick.
- Press [Open] button or use joystick to save settings.
- Press [Close] button or use joystick to return to previous menu (Back).
Page 23
23 12X Mini PTZ
Issue: 1.1
3.5 Camera Setup Menu
▲/▼: move joystick up and down for selecting an item.
◀/▶: move joystick left and right for moving an item.
▶/ [Open]/ [Near]: move joystick right to select or save settings or go to edit pages.
▶/ [Close]/ [Far]: move joystick to cancel or to exit current menu (Back).
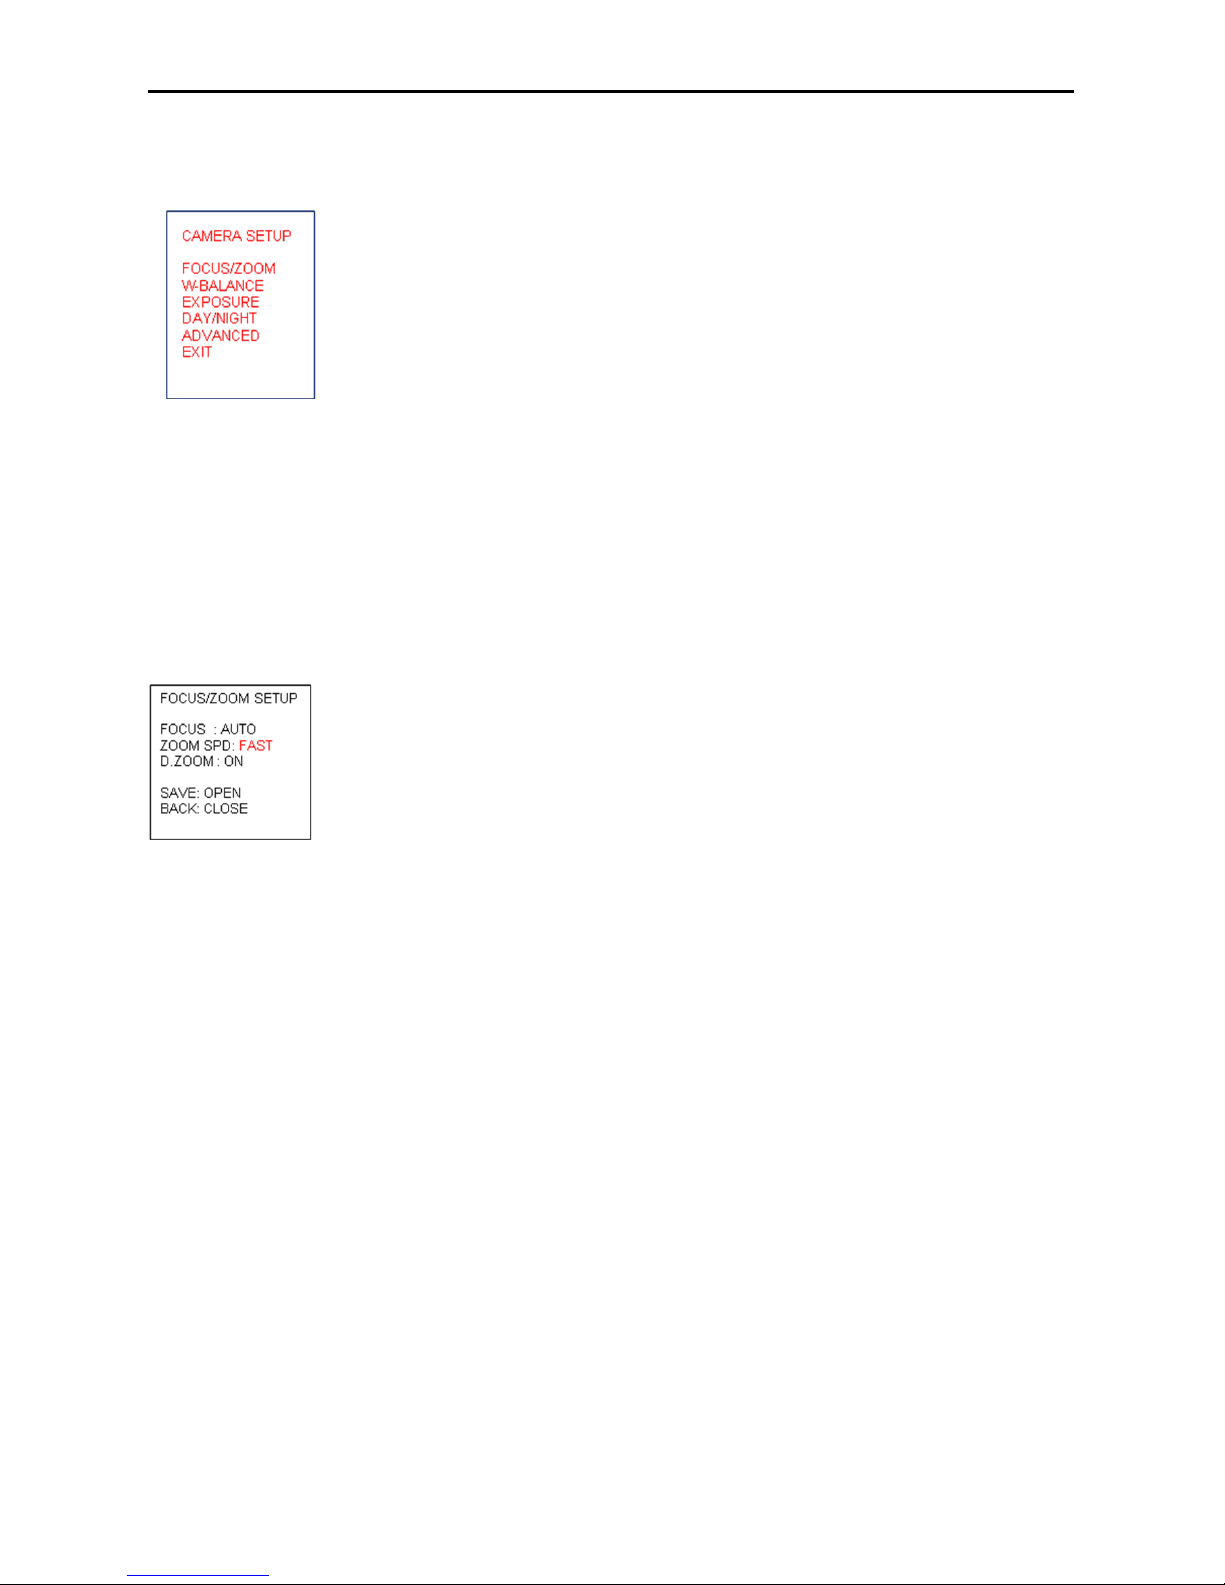
3.5.1 Focus/Zoom
Auto Focus allows the lens to remain in focus during zoom-in, zoom-out and motion functions automatically.
Zoom speed allows the user to define how fast the dome will go from full wide zoom to the 12X optical zoom.
There are four modes (Slow, Normal, and Fast). And the default setting is ‘Fast’.
D.Zoom allows the user to use Digital Zoom. Default setting is Optical Zoom without Digital Zoom
- Enter into {Main Menu}
- Select {Camera Setup} and move to {Focus/Zoom} using joystick [
▶].
- Set Focus mode for Auto, Manual, or Semi-Auto.
- Set Zoom Speed for Fast, Normal or Slow.
- Select On/Off to set a status of D.Zoom.
- Press [Open] button or use joystick to save settings.
- Press [Close] button or use joystick to return to previous menu (Back).
Page 24
24 12X Mini PTZ
Issue: 1.1
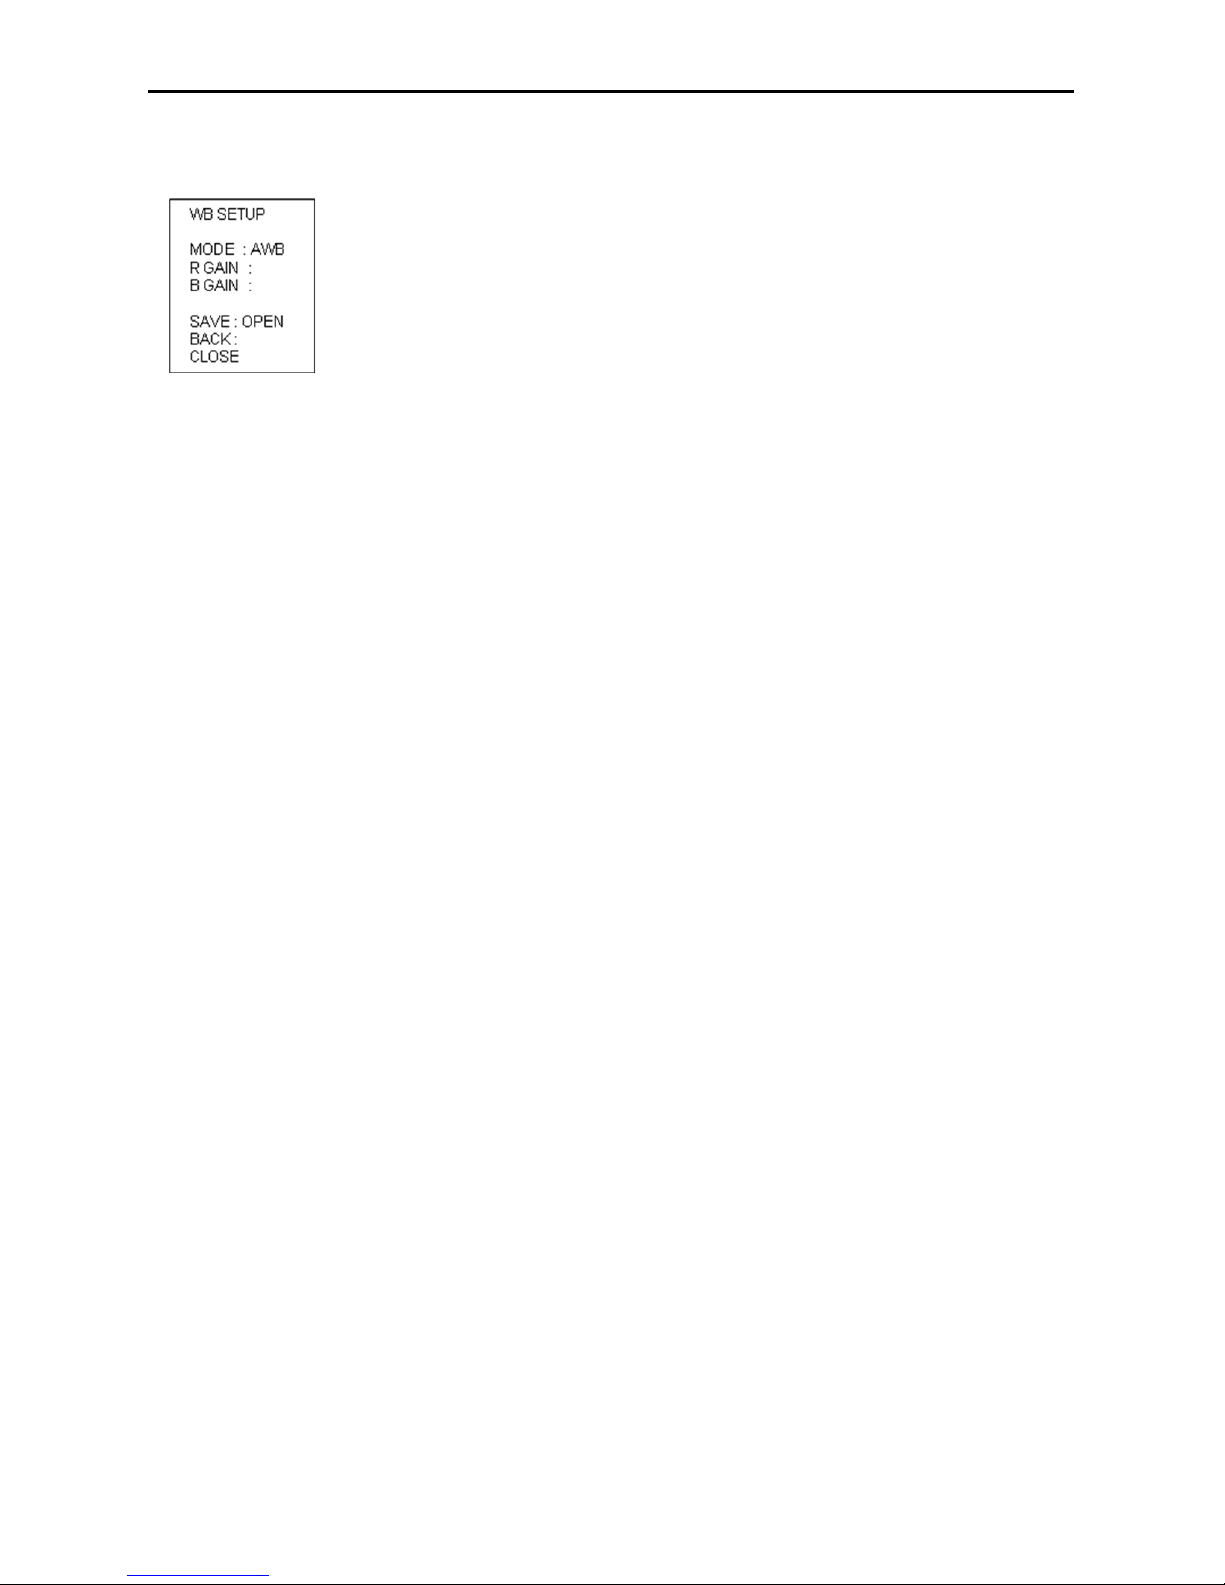
3.5.2 WB Setup (White Balance Setup)
This feature automatically processes the viewed image to retain color balance over a color temperature range.
The default setting for auto white balance is Auto mode.
In Manual mode, you can change the R or B gain value to adjust the color on a monitor.
*Auto Trace White balance (ATW): It aligns the white balance automatically. (2,300 to 11,000 K)
*Indoor: 3200 K Base Mode
* Outdoor: 5400 K Base Mode
* Push WB mode: The white balance is aligned during key input. (White balance push auto key)
* Manual WB mode: Red and Blue gain values can be set by user, 0 ~ 255
* Auto White Balance mode (AWB): Wide range auto white balance mode. In this mode, the white balance is
performed at a faster operating speed than ATW.
- Enter into {Main Manu}
- Select {Camera Setup} and move to {WB Setup} using joystick [
▶].
- Set WB mode for AWT, Indoor, Outdoor, Onepush, AWB or Manual.
- Press [Open] button or use joystick to save settings.
- Press [Close] button or use joystick to return to previous menu (Back).
Page 25
25 12X Mini PTZ
Issue: 1.1
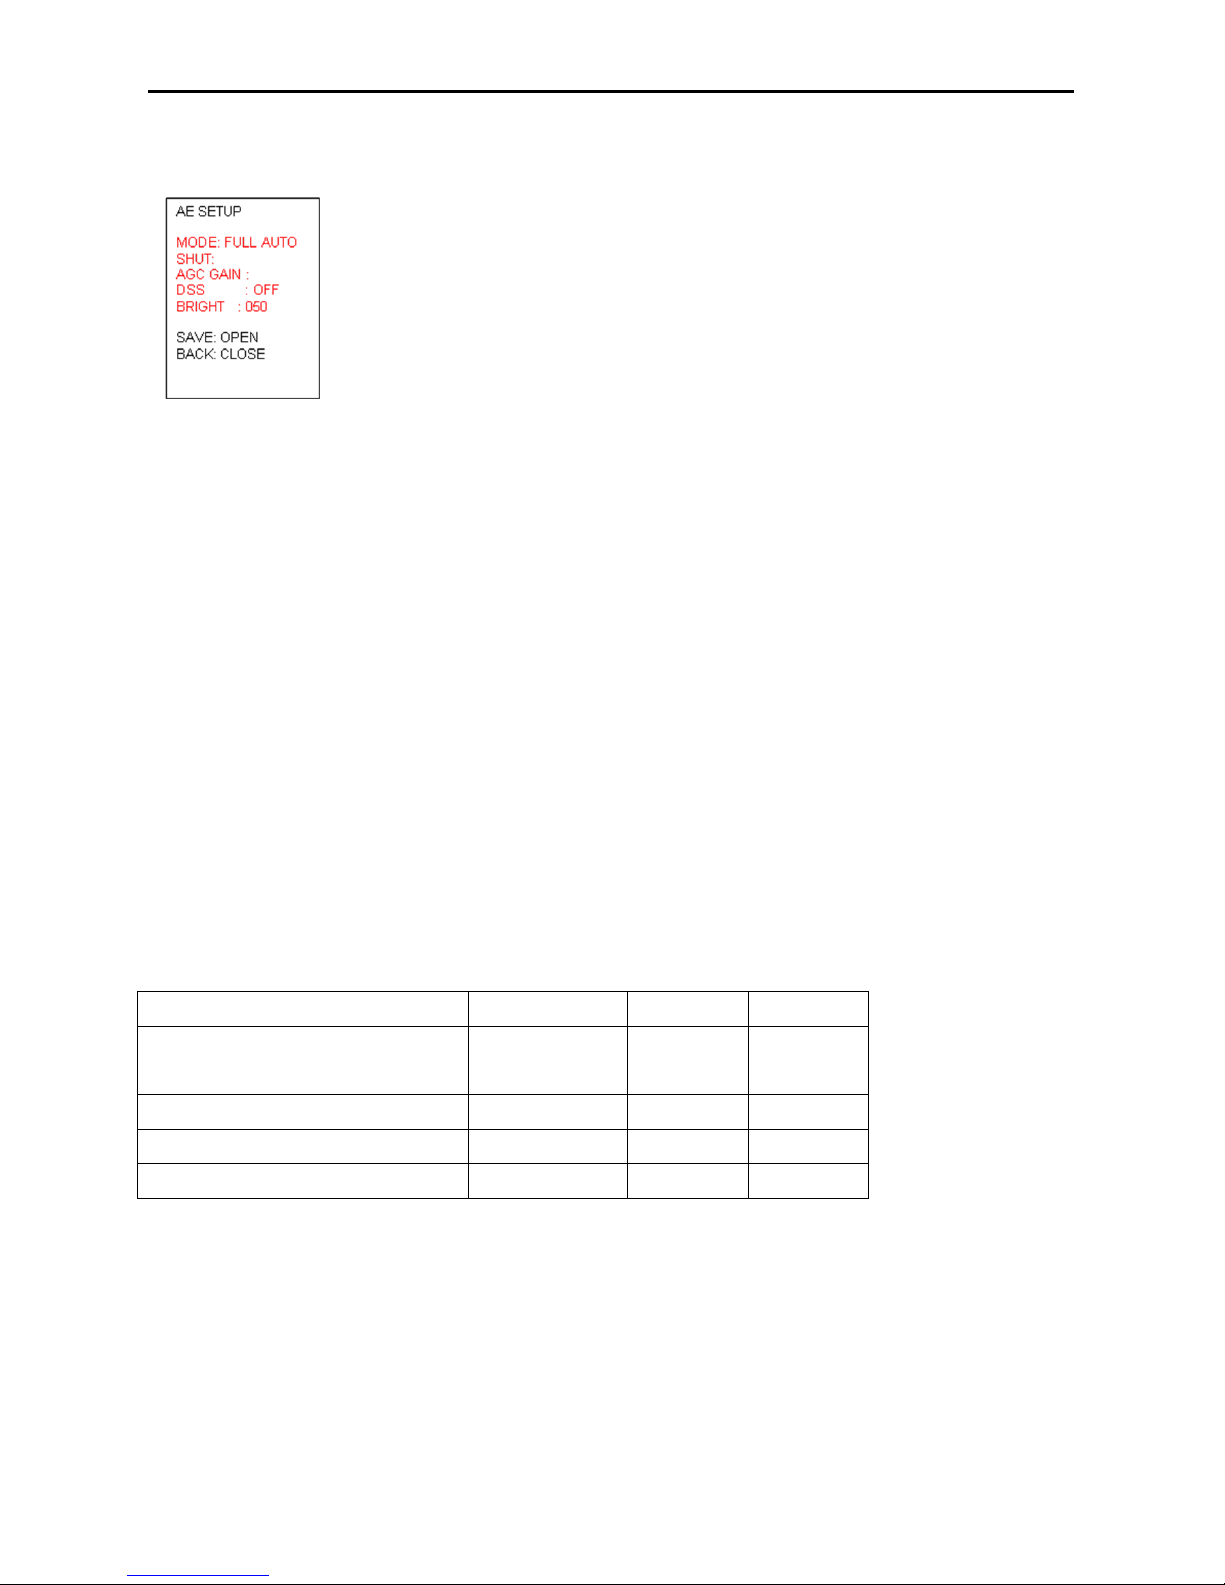
3.5.3 AE Setup (Auto Exposure Setup)
Shutter speed is the duration of the electronic shutter. Set the shutter speed to operate automatically (Auto) or
manually (Numeric Value).
The AGC (Automatic Gain Control) adjusts the brightness of the pictures. The brightness increases as the
number gets higher.
DSS enhances digital noise reduction properly. There are three settings: Low/Middle/High. When gain level is
higher, DSS will reduce the noise to make clearer image.
When Input luminance level is too dark, Slow Shutter function (DSS) is set automatically higher.
Brightness increases as the number gets higher. The backlight compensation function provides compensation
by increasing the brightness of the overall screen so that subjects being shot with a loss of dark detail due to
backlight will have just the right brightness level.
- Enter into {Main Manu}
- Select {Camera Setup} and move to {AE Setup} using joystick [
▶].
- Set AE mode for Full Auto, Manual, Shutter PRI.
- Press [Open] button or use joystick to save settings.
- Press [Close] button or use joystick to return to previous menu (Back).
AE Mode
Full Auto
Manual
SHUT PRI
Shutter
(Auto, X2~X64,1/30~1/10000)
X O (Auto) O (Auto)
AGC Gain(OFF, Low/Mid/High)
X
O (High)
X
DSS(OFF, X2~X64)
O (Off)
X
X
Bright(0~100)
O (50)
O(050)
O (50)
Page 26
26 12X Mini PTZ
Issue: 1.1
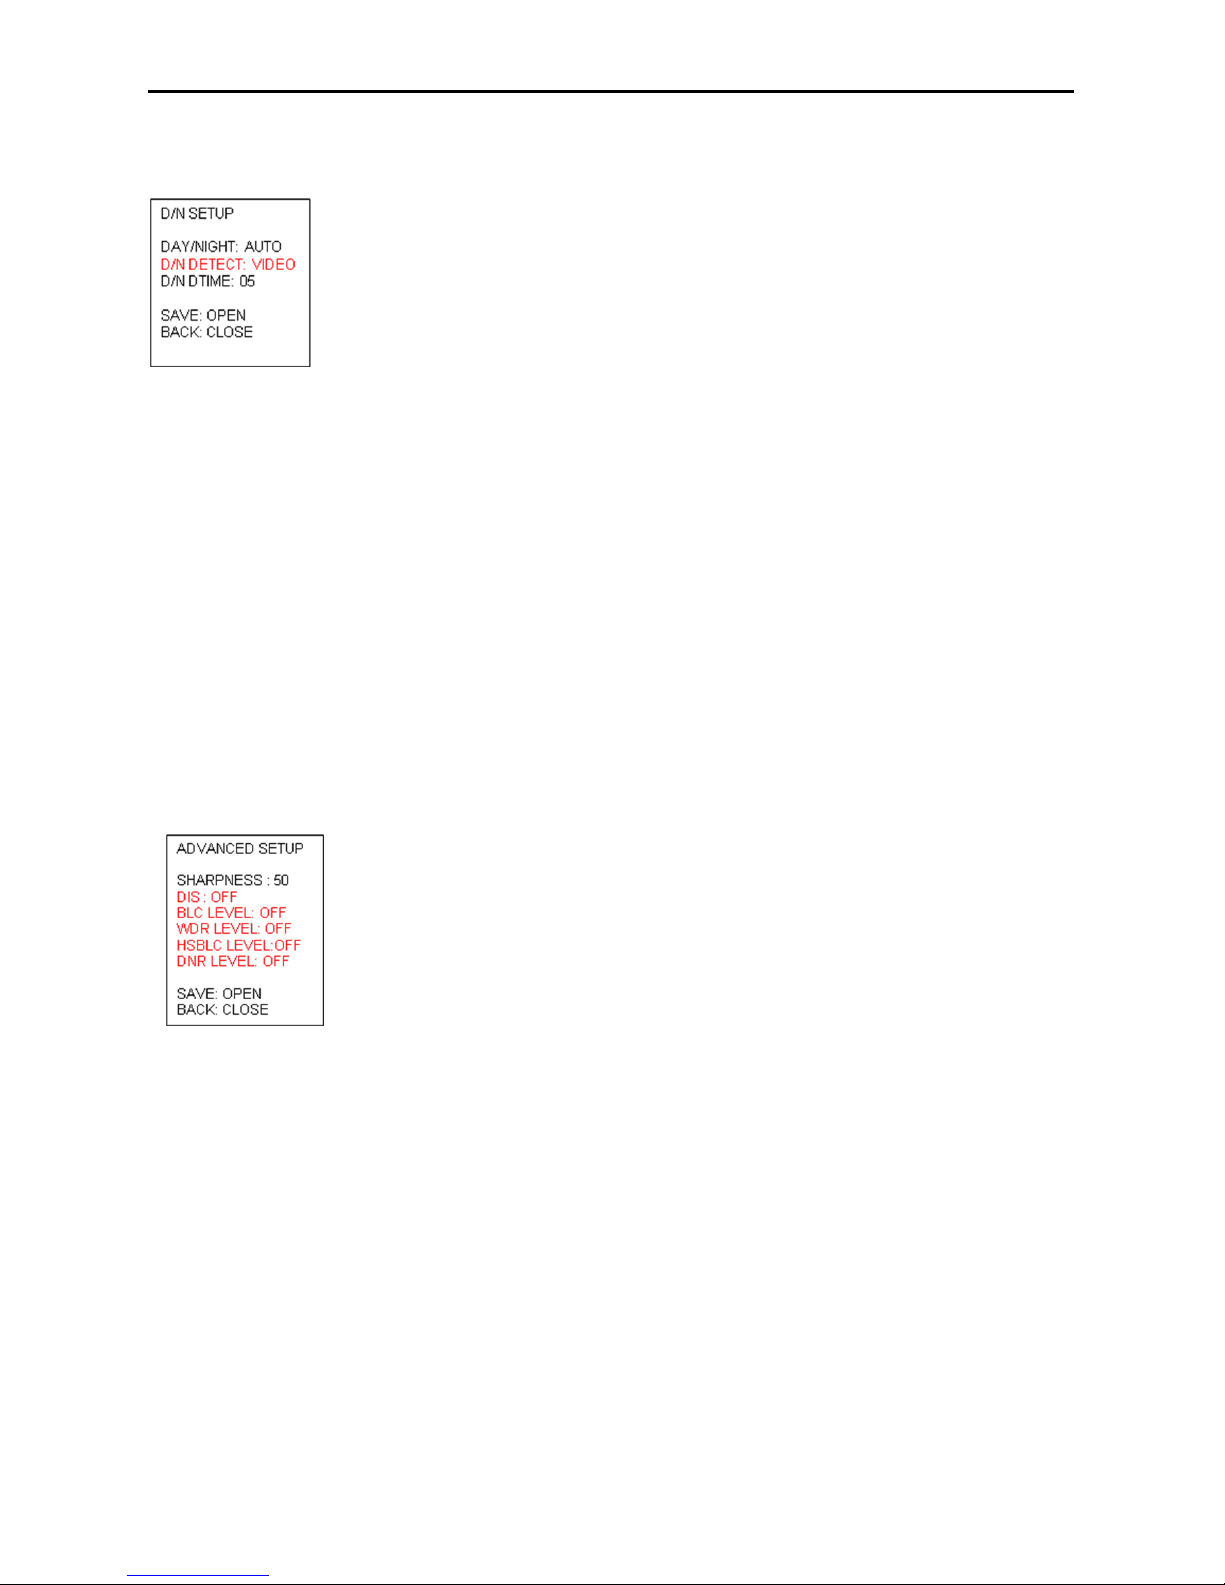
3.5.4 Day & Night Setup
The Day & Night function improves the camera’s sensitivity at night or when the brightness level of the ambient
environment. According to the luminance level, Day & Night filter is automatically switched.
- Enter into {Main Manu}
- Select {Camera Setup} and move to {Day/Night Setup} using joystick [
▶].
- Set Day/Night for Auto, Day or Night.
- Set D&N Detector for Sensor or Video.
- Set switching time that you want. Default value is 5 second.
- Press [Open] button or use joystick to save settings.
- Press [Close] button or use joystick to return to previous menu (Back).
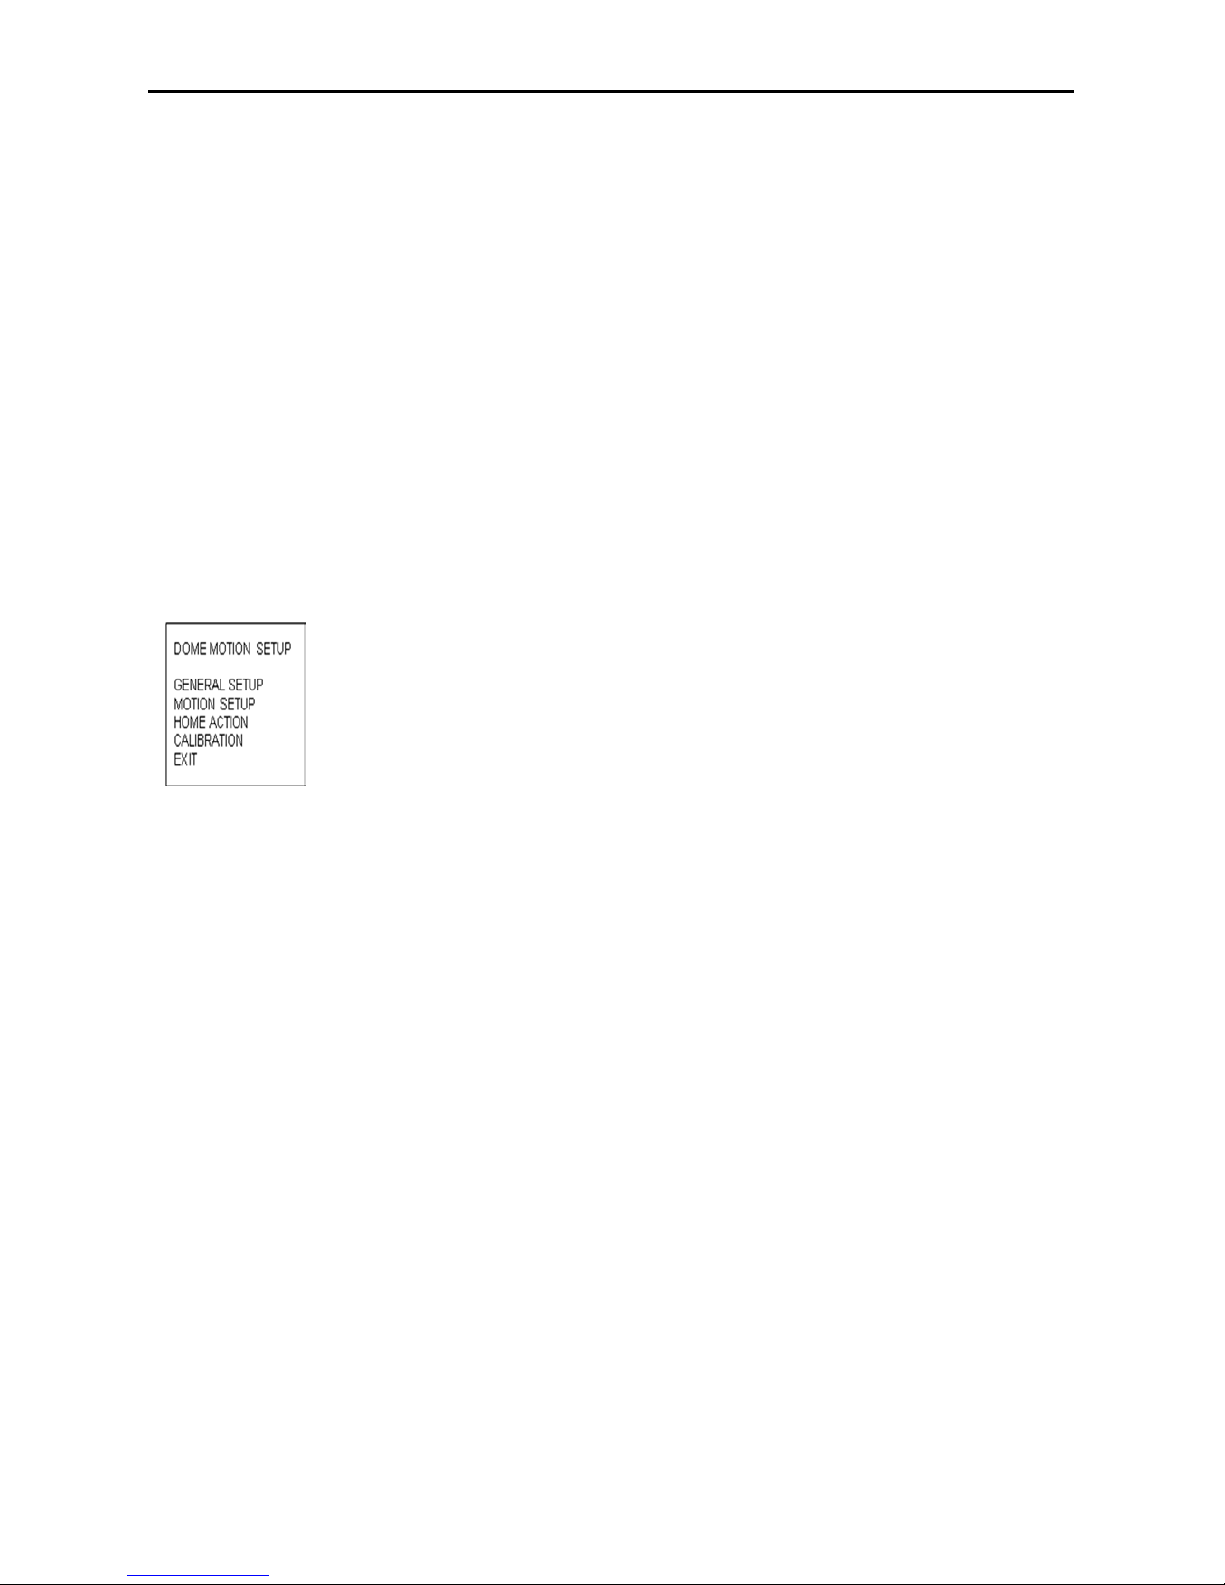
3.5.5 Advanced Setup
Sharpness enhances picture detail by increasing the aperture gain of the camera and sharpening the edges in
the picture.
Digital Image Stabilizer (DIS) function internally detects shaking of the image due to camera shaking and
performs digital compensation processing inside the DSP to suppress this shaking and stabilize the image
output. Compensation uses the electronic zoom function, so the digital zoom function cannot be set by the user
while using the DIS function.
- Enter into {Main Manu}
- Select {Camera Setup} and move to {Advanced Setup} using joystick [
▶].
- Set sharpness level and brightness and DIS on/off
- Press [Open] button or use joystick to save settings.
- Press [Close] button or use joystick to return to previous menu (Back).
Page 27
27 12X Mini PTZ
Issue: 1.1
When both high-brightness subjects and low-brightness subjects have been shot at the same time,
overexposure in the high-brightness subject s or loss of dark detail in the low-brightness subj ects may occur.
The W DR (Wide Dynamic Range) function creates im ages free from over-exposure or loss of dark detail by
combining two images after tripping the shut ter for a long exposure time and for a short ex posure time in one
field.(One mode can be selected from BLC/WDR/HSBLC/DNR)
- Enter into {Main Manu}
- Select {Camera Setup} and move to {Advanced} using joystick [
▶].
- Set WDR for On/Off and a level in ‘On’ mode.
- Set other mode for On/Off and a level in ‘On’ mode in the same way.
- Press [Open] button or use joystick to save settings.
- Press [Close] button or use joystick to return to previous menu (Back).
3.6 Dome Motion Menu
▲/▼: move joystick up and down for selecting an item.
◀/▶: move joystick left and right for moving an item.
▶/ [Open]/ [Near]: move joystick right to select or save settings or go to edit pages.
▶/ [Close]/ [Far]: move joystick to cancel or to exit current menu (Back).
Page 28
28 12X Mini PTZ
Issue: 1.1
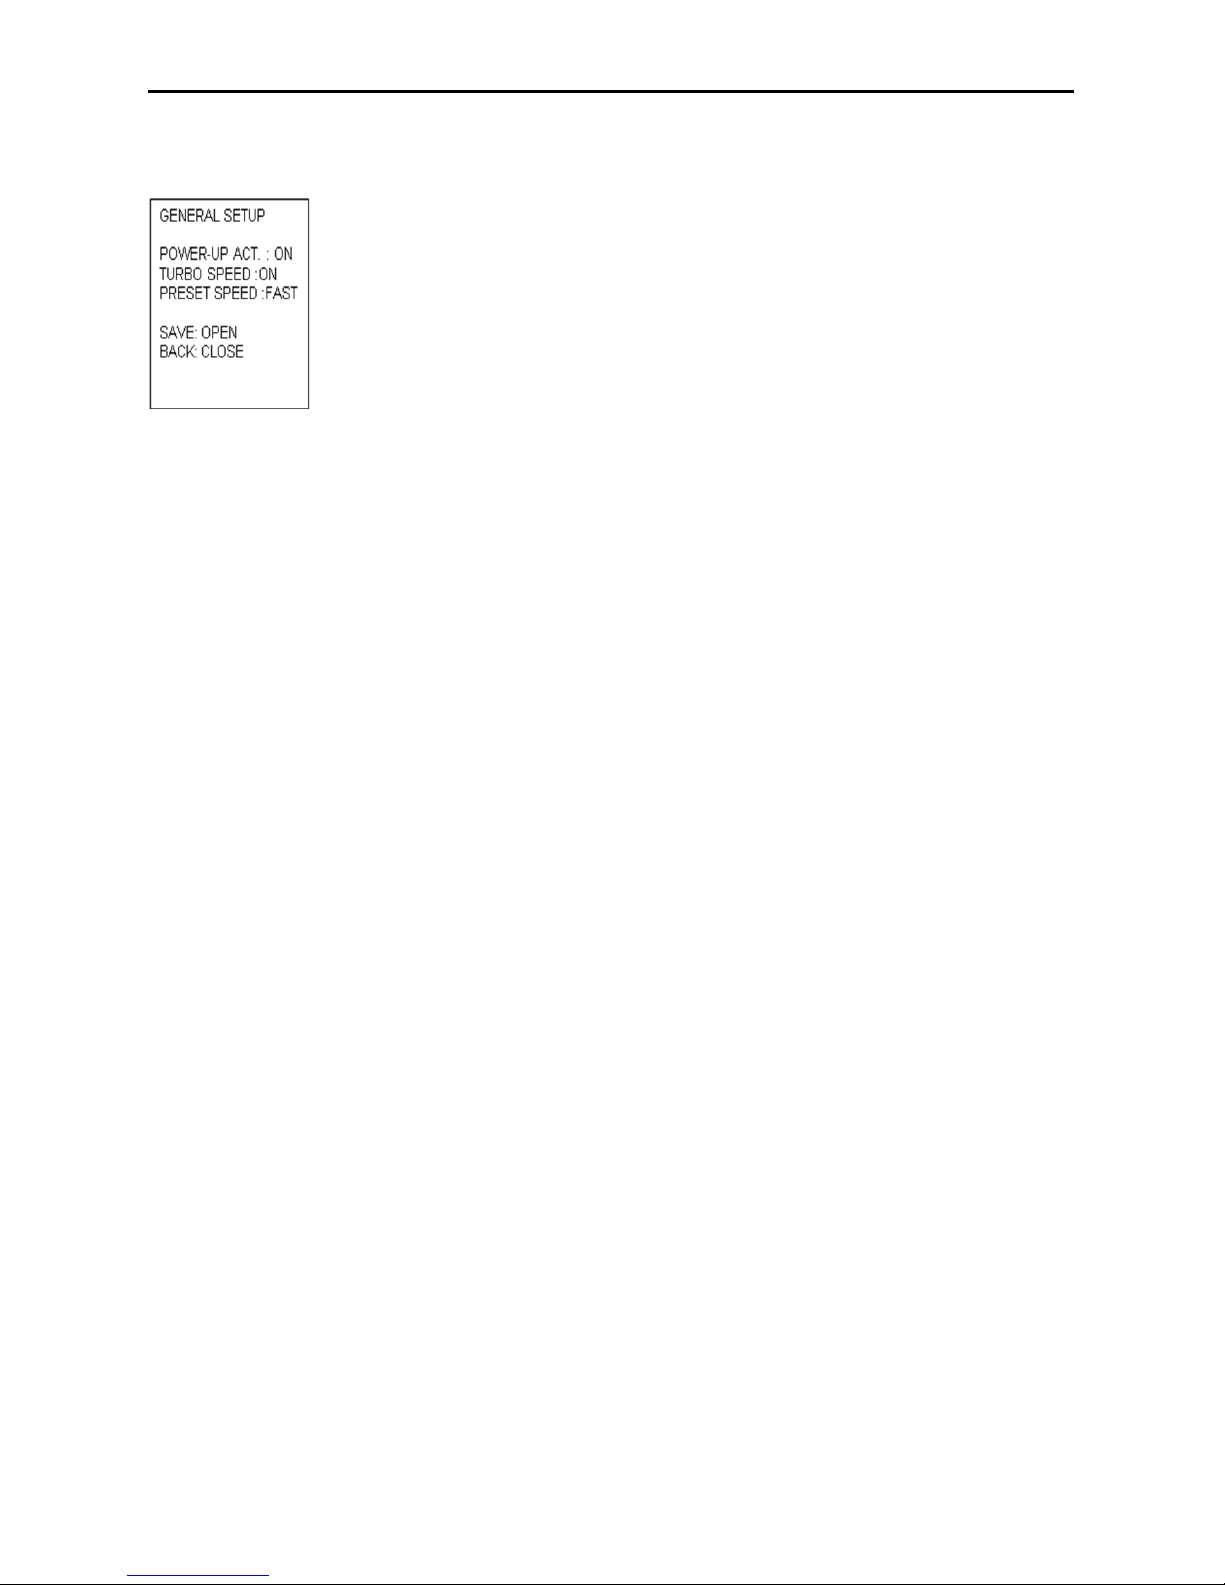
3.6.1 General Setup
This menu control general function of dome.
Power-up Action is a function (preset, tour, pattern and scan) to be performed when the power is re-cycled or
after alarm action. The following settings are available. Set the dome ‘On’ (default) to resume its prior activity.
- Use the joystick [
▶] to select On/Off
Turbo Speed defines the pan and tilt speed only for manual operation of Pan/Tilt.
- Use the joystick [
▶] to select On/Off
Preset Speed is possible to set preset speed with 3 options. : Fast, Normal, and Slow.
- Use the joystick [
▶] to select {Preset Speed}
- Press [Open] button or use joystick to save settings.
- Press [Close] button or use joystick to return to previous menu (Back).
Page 29
29 12X Mini PTZ
Issue: 1.1
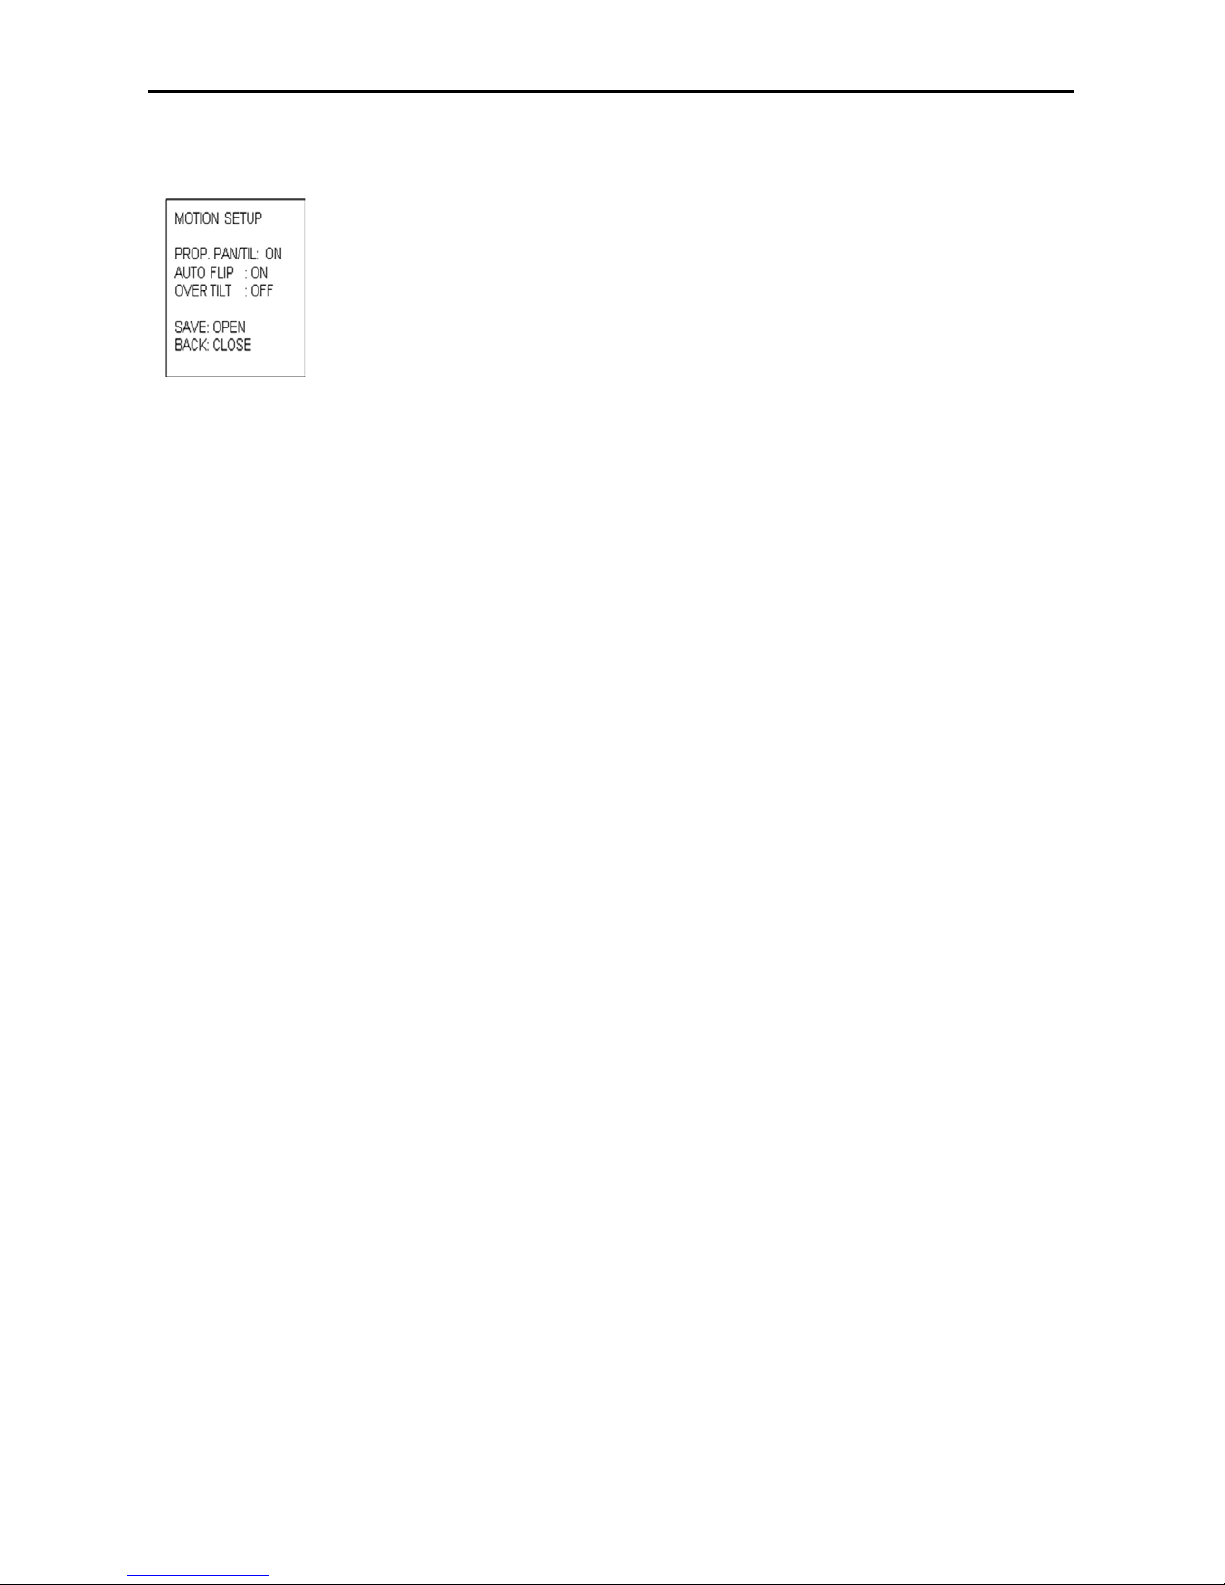
3.6.2 Motion Setup
Proportional Pan/Tilt is possible to set manual speed with Zoom.
- Use the joystick [
▶] to select On/Off
Auto-Flip is a function automatically reversing the image when zoom module camera passes
through the top of tilt direction (90 degree)
When tilt angle arrives at the top of tilt orbit (90degree), zoom camera module keep moving to opposite direction
of tilt to keep tracking targets. As soon as zoom camera module passes through the top of tilt direction
(90degree), image should be reversed automatically.
- Use the joystick [
▶] to select On/Off
Over-Tilt is for restricting vertical view angle related to the operation range of IR sensor and some blocking
view angle mechanically. When the dome is covered with window bubble, it is recommended Over-Tilt to Off.
To prevent horizontal view cut with tilt angle, it is to restrict vertical view angle.
- Use the joystick [
▶] to select On/Off
- Press [Open] button or use joystick to save settings.
- Press [Close] button or use joystick to return to previous menu (Back).
Page 30
30 12X Mini PTZ
Issue: 1.1
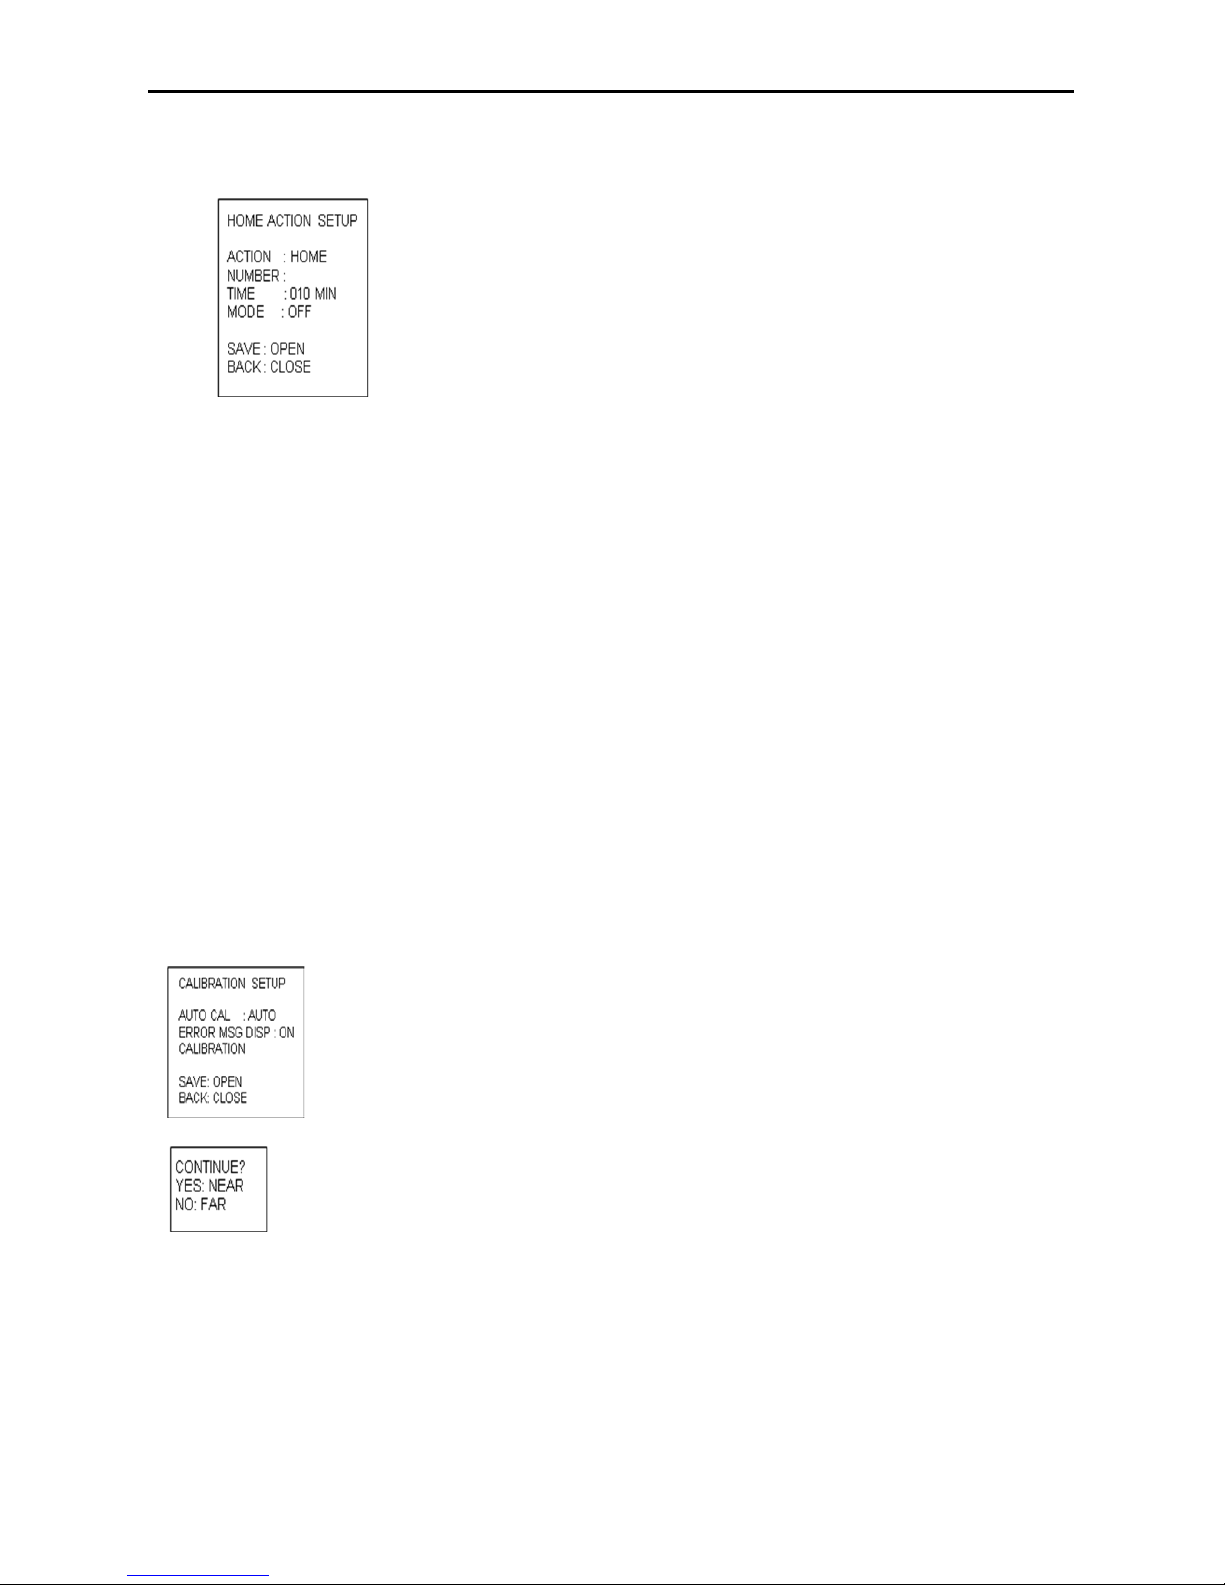
3.6.3 Home Action Setup
Home Action can be set so that the dome automatically goes to a preset, a tour or auto scan after the joystick
control has been idle for some amount of time.
The dwell time can be set from 1 minute to 60 minutes.
- Using the joystick [
▶], {Home Action} can be selected to Home (default), Preset, Scan and Tour.
- {Number} is the number of {Action}. For example, {Action: Preset/Number: 001} mean Preset [1]
- Set {Time} xx min using the joystick [
▶].
- Using the joystick [
▶] to select Auto (On)/Manual (Off).
- Press [Open] button or use joystick to save settings.
- Press [Close] button or use joystick to return to previous menu {Dome Motion Setup} (Back).
NOTE* In order to call an action (Preset, Pattern, Tour or Scan), you must save Preset, Pattern, Tour, or
Scan first.
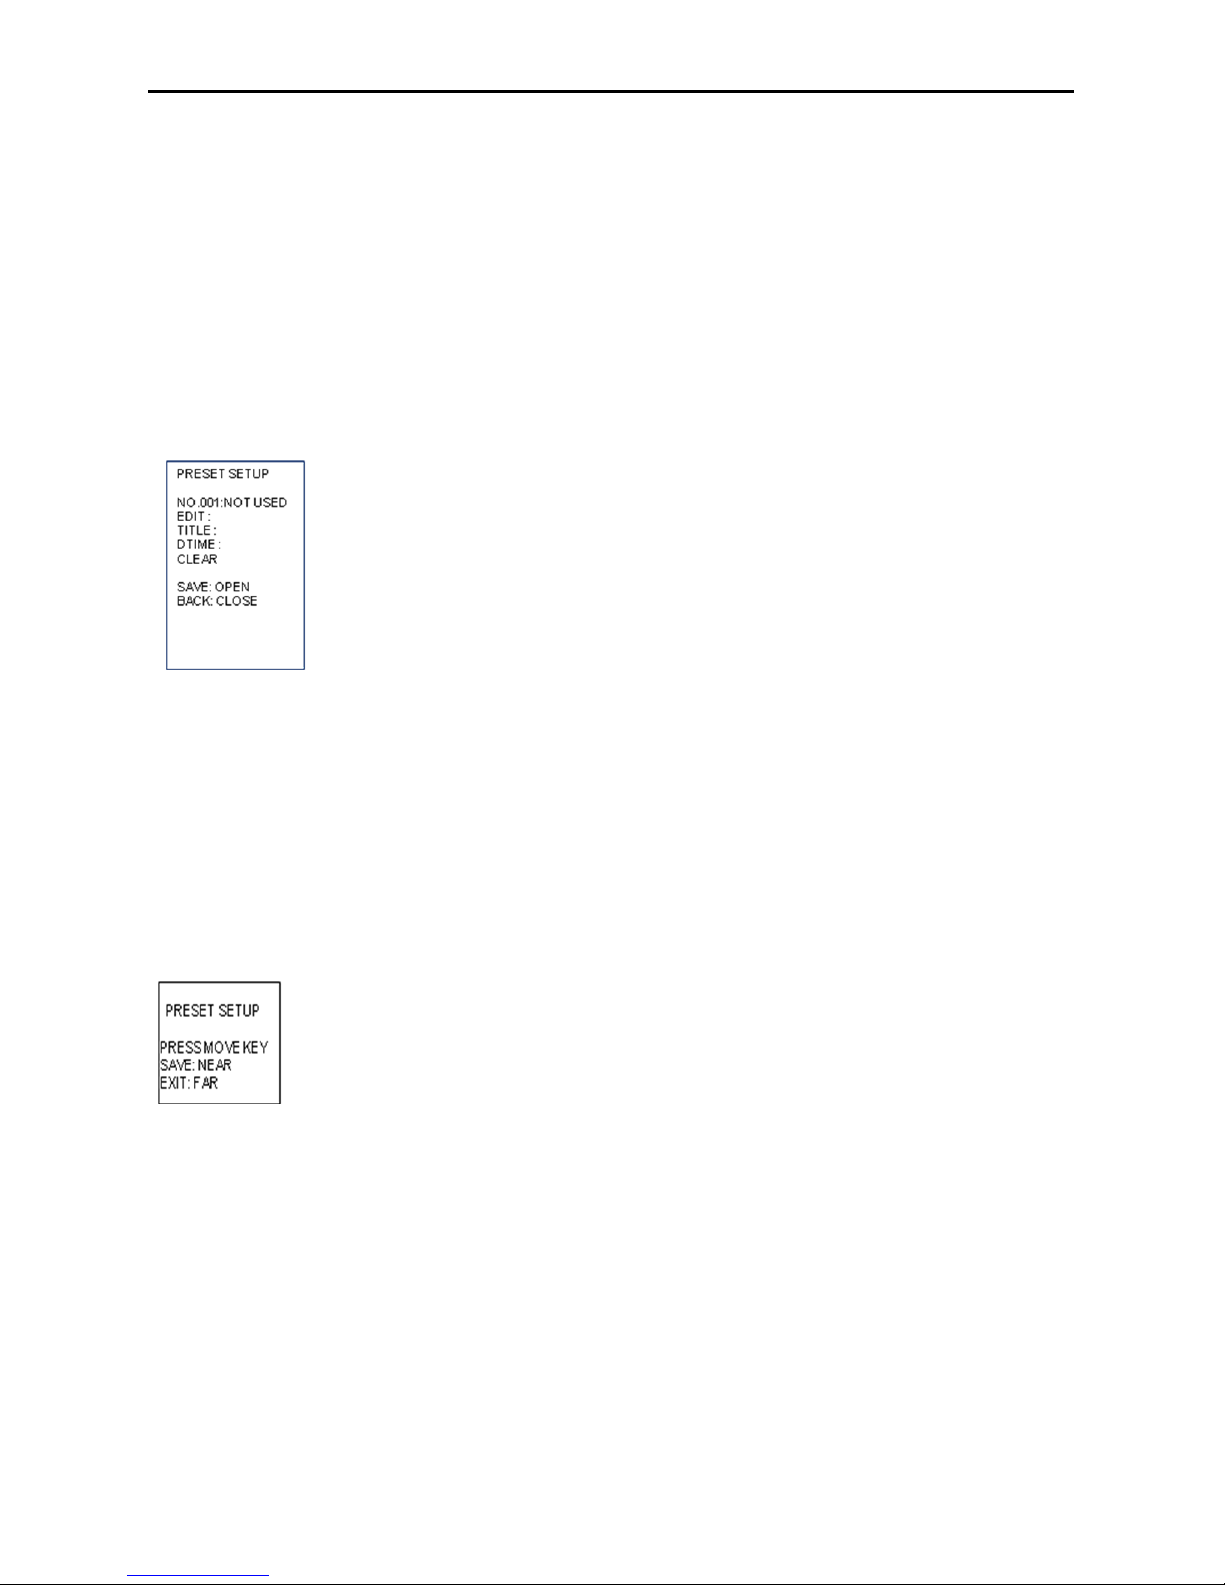
3.6.4 Calibration Setup
- Set calibration mode for Manual/Auto using the joystick [
▶].
- In manual mode, select {Calibration} to execute {Calibration} using the joystick,
and press [Near] button or use joystick to continue.
- Set {Error Message Display} for On/Off using the joystick [
▶].
- Press [Open] button or use joystick to save settings.
- Press [Close] button or use joystick to return to previous menu (Back).
Page 31
31 12X Mini PTZ
Issue: 1.1
Note: {Calibration} is a function for correcting an error on the angle of Pan/Tilt automatically.
{Calibration} can be set for Manual/Auto. In Manual mode, if there is an error on the angle of the dome, execute
{Calibration}. Press [Near] button to continue calibration or press [Far] button to cancel calibration.
In Auto mode, when there is an error on the angle of the dome, the dome is corrected automatically. The motor
of the Pan/Tilt will adjust its angle automatically.
{Error Message Display} is a function for displaying an error message to let a user know {Sensing error} on the
monitor.
3.7 Preset Menu
▲/▼: move joystick up and down for selecting an item.
◀/▶: move joystick left and right for moving an item.
▶/ [Open]/ [Near]: move joystick right to select or save settings or go to edit pages.
▶/ [Close]/ [Far]: move joystick to cancel or to exit current menu (Back).
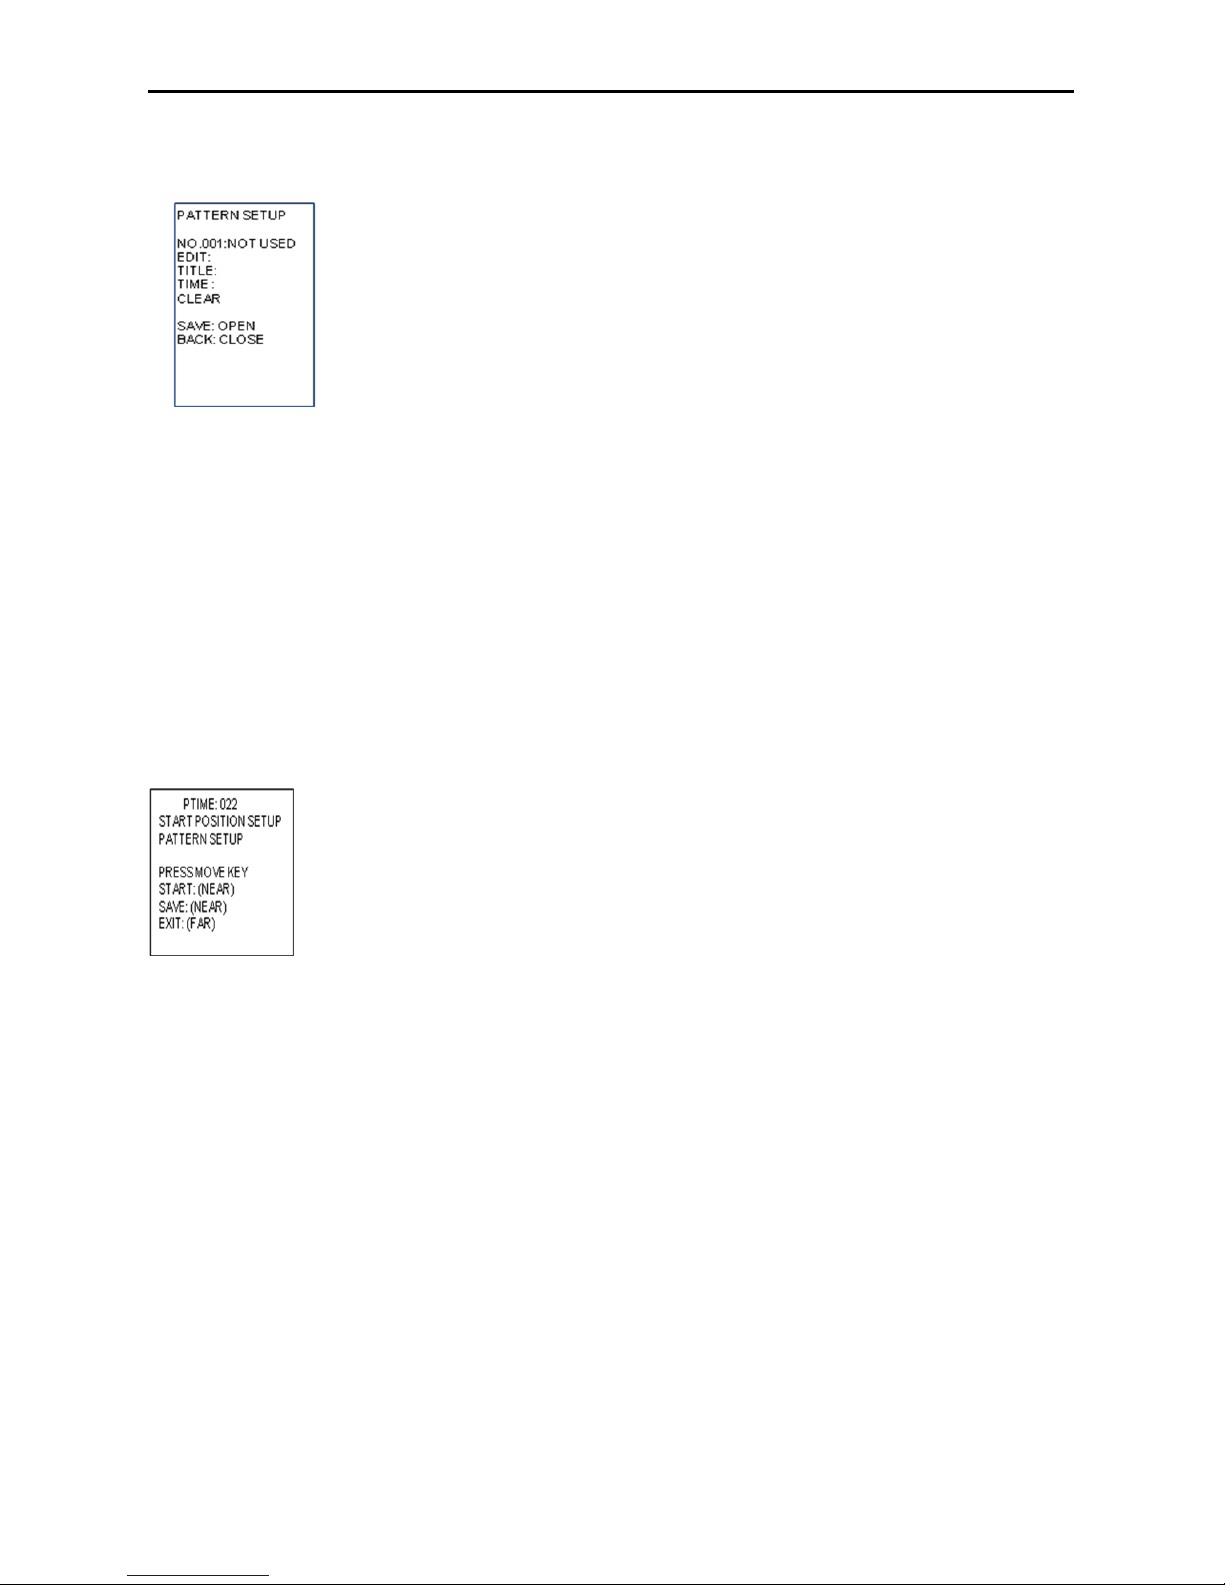
The dome has maximum 210 preset positions. Each of the user-defined presets includes Pan/Tilt/Zoom.
Use the following steps to program {Preset}.
- Enter into {Main Manu}
- Select {Preset} and Move left or right to select Preset Number.
- Move the joystick right [
▶] to edit a {Preset}
- Using the joystick, move to a desired target (Pan/Tilt/Zoom)
- Press [Near] button or use joystick to save settings.
- Press [Far] button or use joystick to return to previous menu {Preset Edit} (Back).
- To edit and clear the {Preset Title}, refer to Editing a Title section (3.2.1).
- It is possible to clear saved Preset No.xxx in the {Preset Setup Menu} individually.
- Set {Dwell Time} using the joystick [
▶]
- Press [Open] button or use joystick to save settings.
- Press [Close] button or use joystick to return to previous menu (Back).
Page 32
32 12X Mini PTZ
Issue: 1.1
3.8 Pattern Menu
▲/▼: move joystick up and down for selecting an item.
◀/▶: move joystick left and right for moving an item.
▶/ [Open]/ [Near]: move joystick right to select or save settings or go to edit pages.
▶/ [Close]/ [Far]: move joystick to cancel or to exit current menu (Back).
A {Pattern} is to display (or recall) a memorized, repeated and serial trace of pan, tilt, zoom.
The dome has maximum 8 {Patterns}. Each of the user-defined scans includes Pan/Tilt/Zoom.
Use the following steps to program {Pattern}.
- Enter into {Main Manu}
- Select {Auto Scan} and move left or right to select {Pattern} Number.
- Move the joystick right [
▶] to edit {Pattern}
- Using the joystick, move to a desired target and press [Near] button to start programming {Pattern}
- Press [Near] button or use joystick to save settings.
- Press [Far] button or use joystick to return to previous menu {Pattern Setup} (Back).
- To edit and clear {Pattern Title}, refer to Editing a Title section (3.2.1).
- It is possible to clear saved Pattern No.xxx in the {Pattern setup} Menu individually.
- Press [Open] button or use joystick to save settings.
- Press [Close] or use joystick to return to previous menu (Back).
Page 33
33 12X Mini PTZ
Issue: 1.1
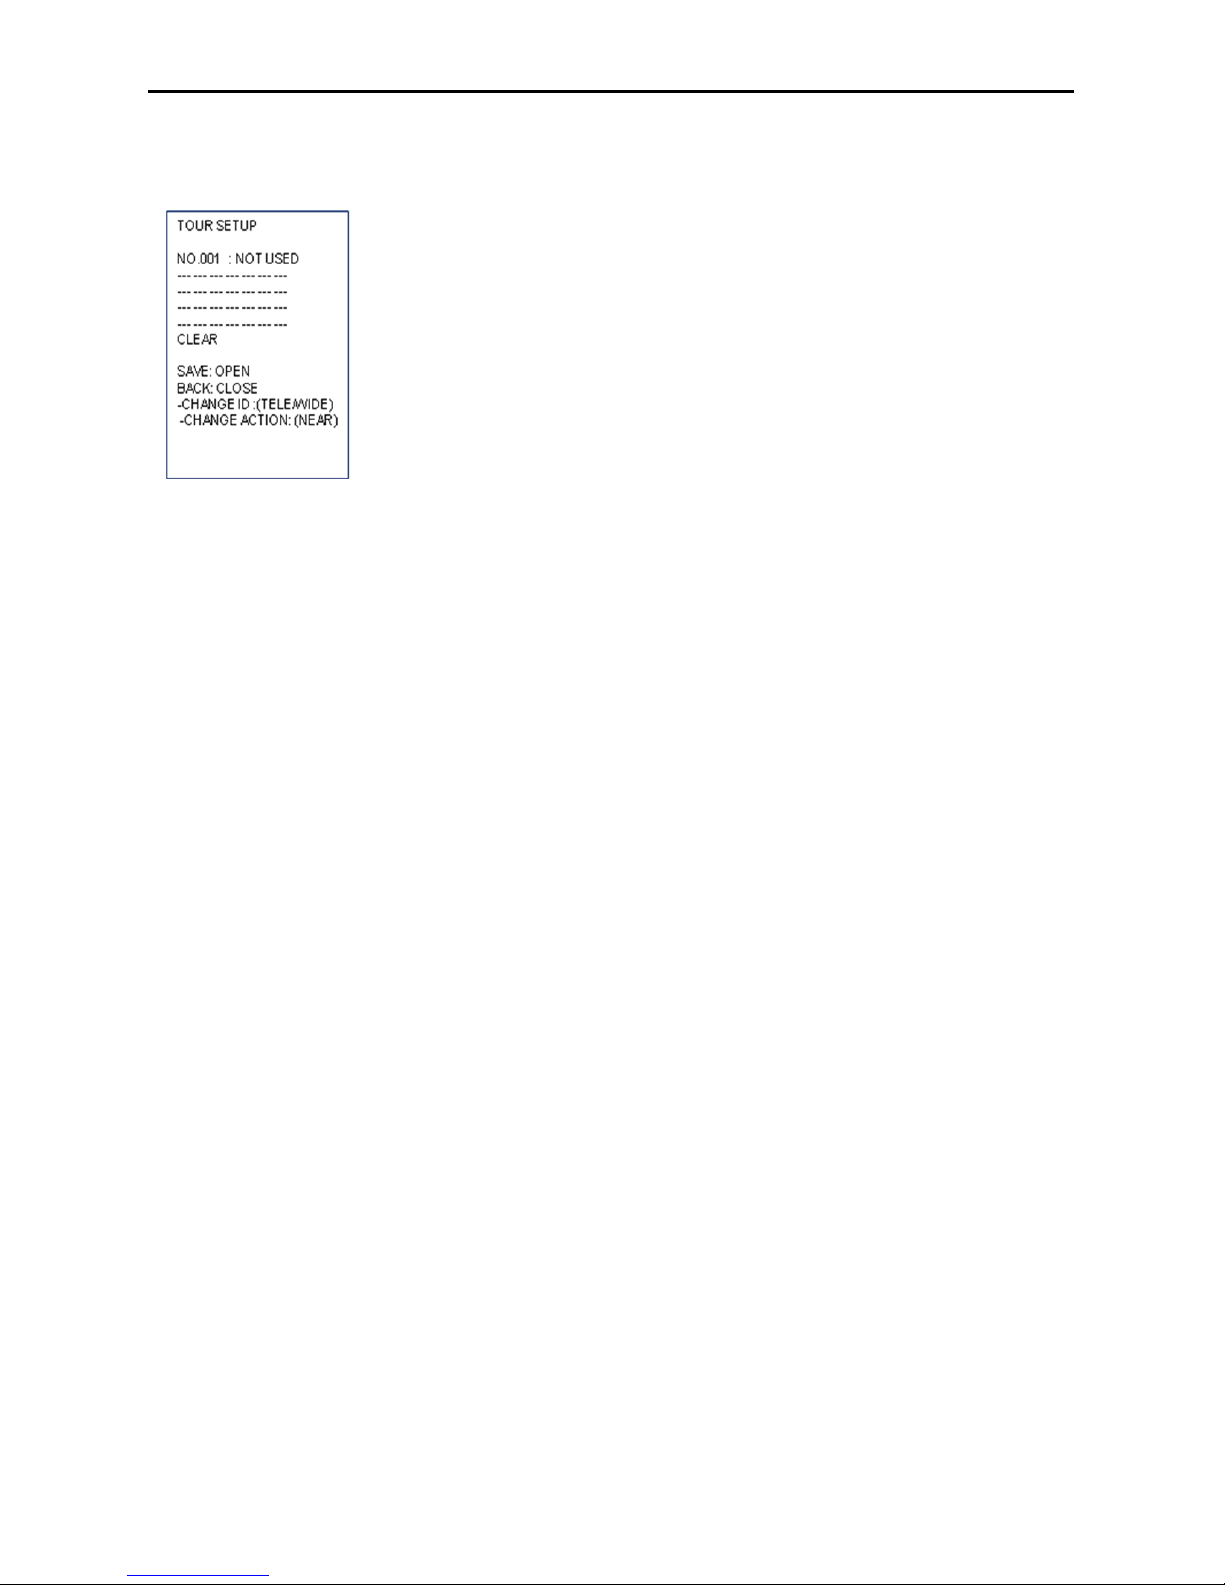
3.9 Tour Menu
▲/▼: move joystick up and down for selecting an item.
◀/▶: move joystick left and right for moving an item.
▶/ [Open]/ [Near]: move joystick right to select or save settings or go to edit pages.
▶/ [Close]/ [Far]: move joystick to cancel or to exit current menu (Back).
The dome can have 8 {Group Tours}. And each of the tour has 28 items.
Each item has pre-defined preset, pattern, and scan.
NOTE* In order to call an action (Preset, Pattern or Scan), you must save Preset, Pattern, or Scan first.
- Enter into {Main Manu}
- Select {Tour} and Move left or right to select {Tour} Number.
- Using the joystick [
▲/▼/◀/▶], move to each item.
- Select an action/number (PRESET, TOUR, PATTERN and/or SCAN), with [Tele] button or clear item with
[Wide] button and change mode using [Near] button.
- It is possible to clear saved Tour No.xxx in the {Tour Setup Menu} individually.
- Press [Open] button or use joystick to save settings.
- Press [Close] button or use joystick to return to previous menu (Back).
Page 34
34 12X Mini PTZ
Issue: 1.1
3.10 Auto Scan Menu
▲/▼: move joystick up and down for selecting an item.
◀/▶: move joystick left and right for moving an item.
▶/ [Open]/ [Near]: move joystick right to select or save settings or go to edit pages.
▶/ [Close]/ [Far]: move joystick to cancel or to exit current menu (Back).
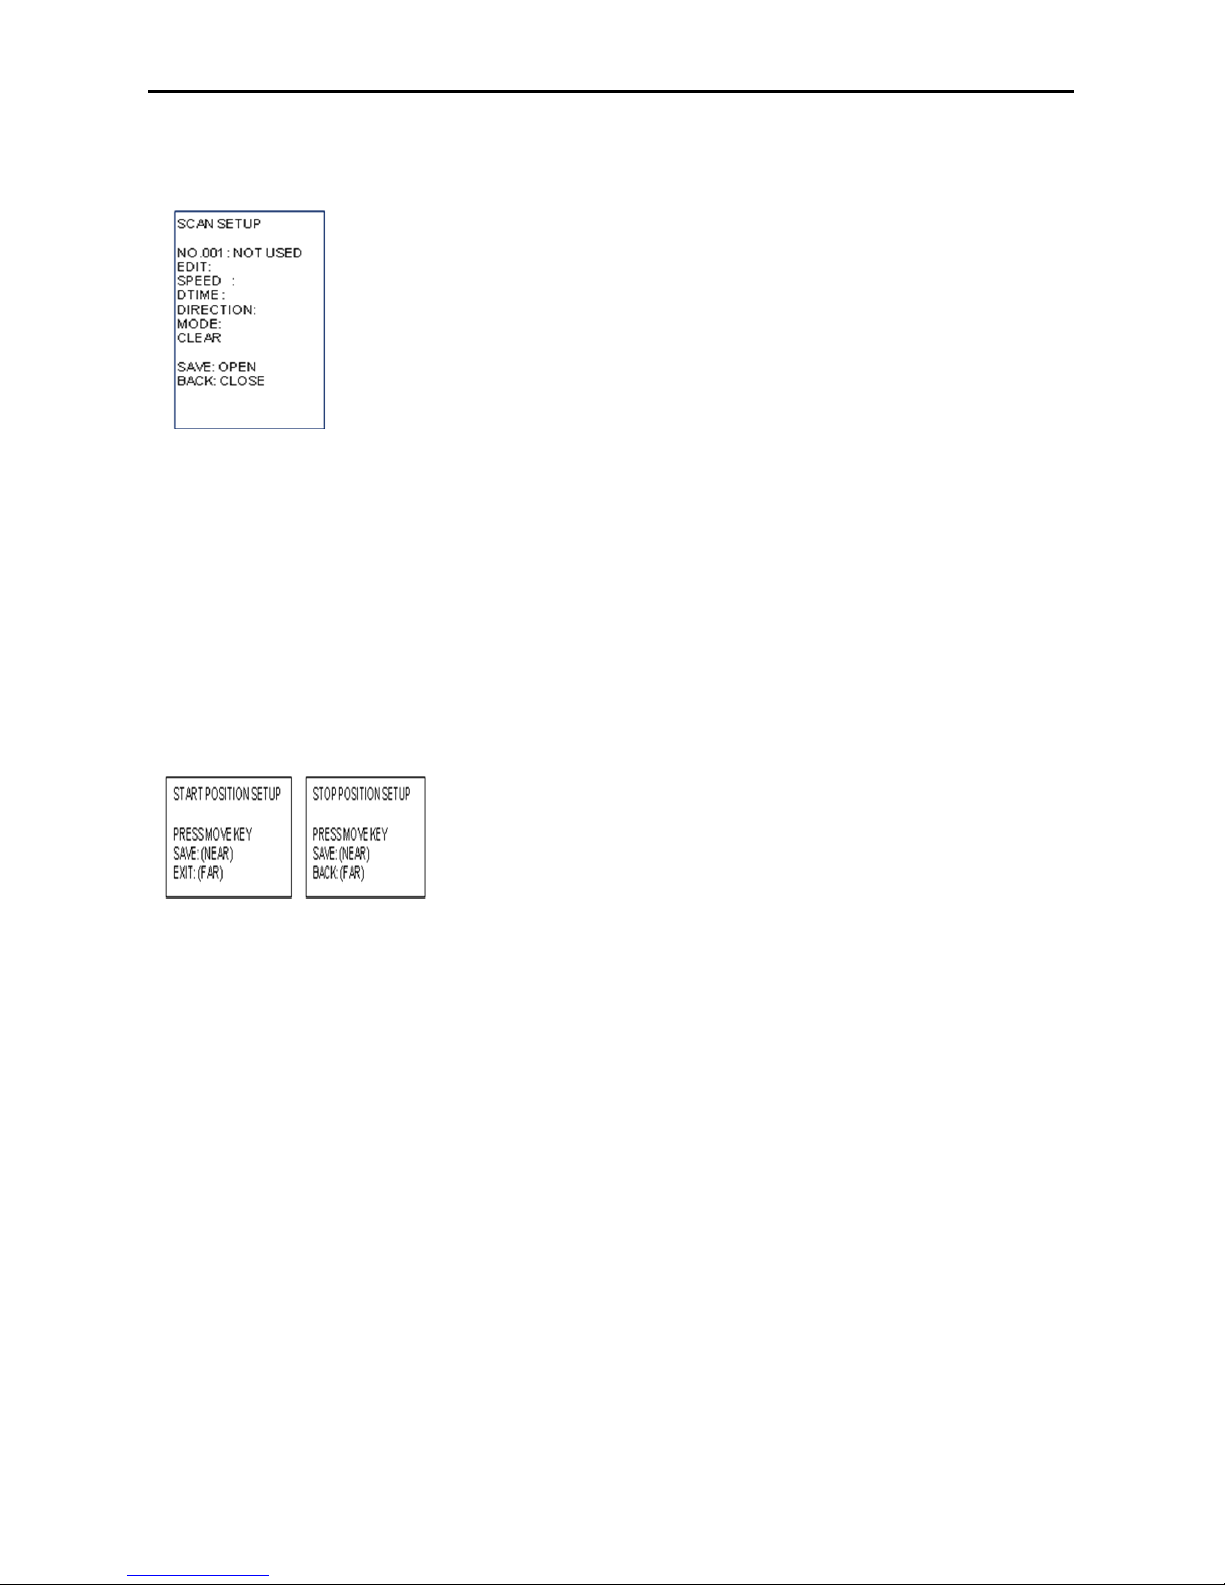
An {Auto scan} is a PTZ function that can be moved from one position to another position.
The dome has maximum 8 {Auto Scan} and {Scan Speed} can be changed from 1 to 35 degree/sec. Use the
following steps to program a {Auto Scan}.
- Enter into {Main Manu}
- Select {Auto Scan} and move left or right to select {Auto Scan} Number.
- Move the joystick right [
▶] to edit {Auto Scan}: {Edit Start Point}/ {Edit Stop Point}
- Using the joystick, move to a desired target (Pan/Tilt/Zoom) at screen of {Edit Start Point}/ {Edit Stop Point}
- Press [Near] button or use joystick to save settings.
- Press [Far] button or use joystick to return to previous menu {Scan Setup} (Back).
- To edit and clear the {Scan Title}, refer to Editing a Title section (3.2.1).
- It is possible to clear saved Scan No.xxx in the {Scan setup} Menu individually.
- Set {Dwell Time} using the joystick [
▶].
- Press [Open] button or use joystick [
▶] to save settings.
- Press [Close] button or use joystick to return to previous menu (Back).
Page 35
35 12X Mini PTZ
Issue: 1.1
3.11 Alarm Menu
▲/▼: move joystick up and down for selecting an item.
◀/▶: move joystick left and right for moving an item.
▶/ [Open]/ [Near]: move joystick right to select or save settings or go to edit pages.
▶/ [Close]/ [Far]: move joystick to cancel or to exit current menu (Back).
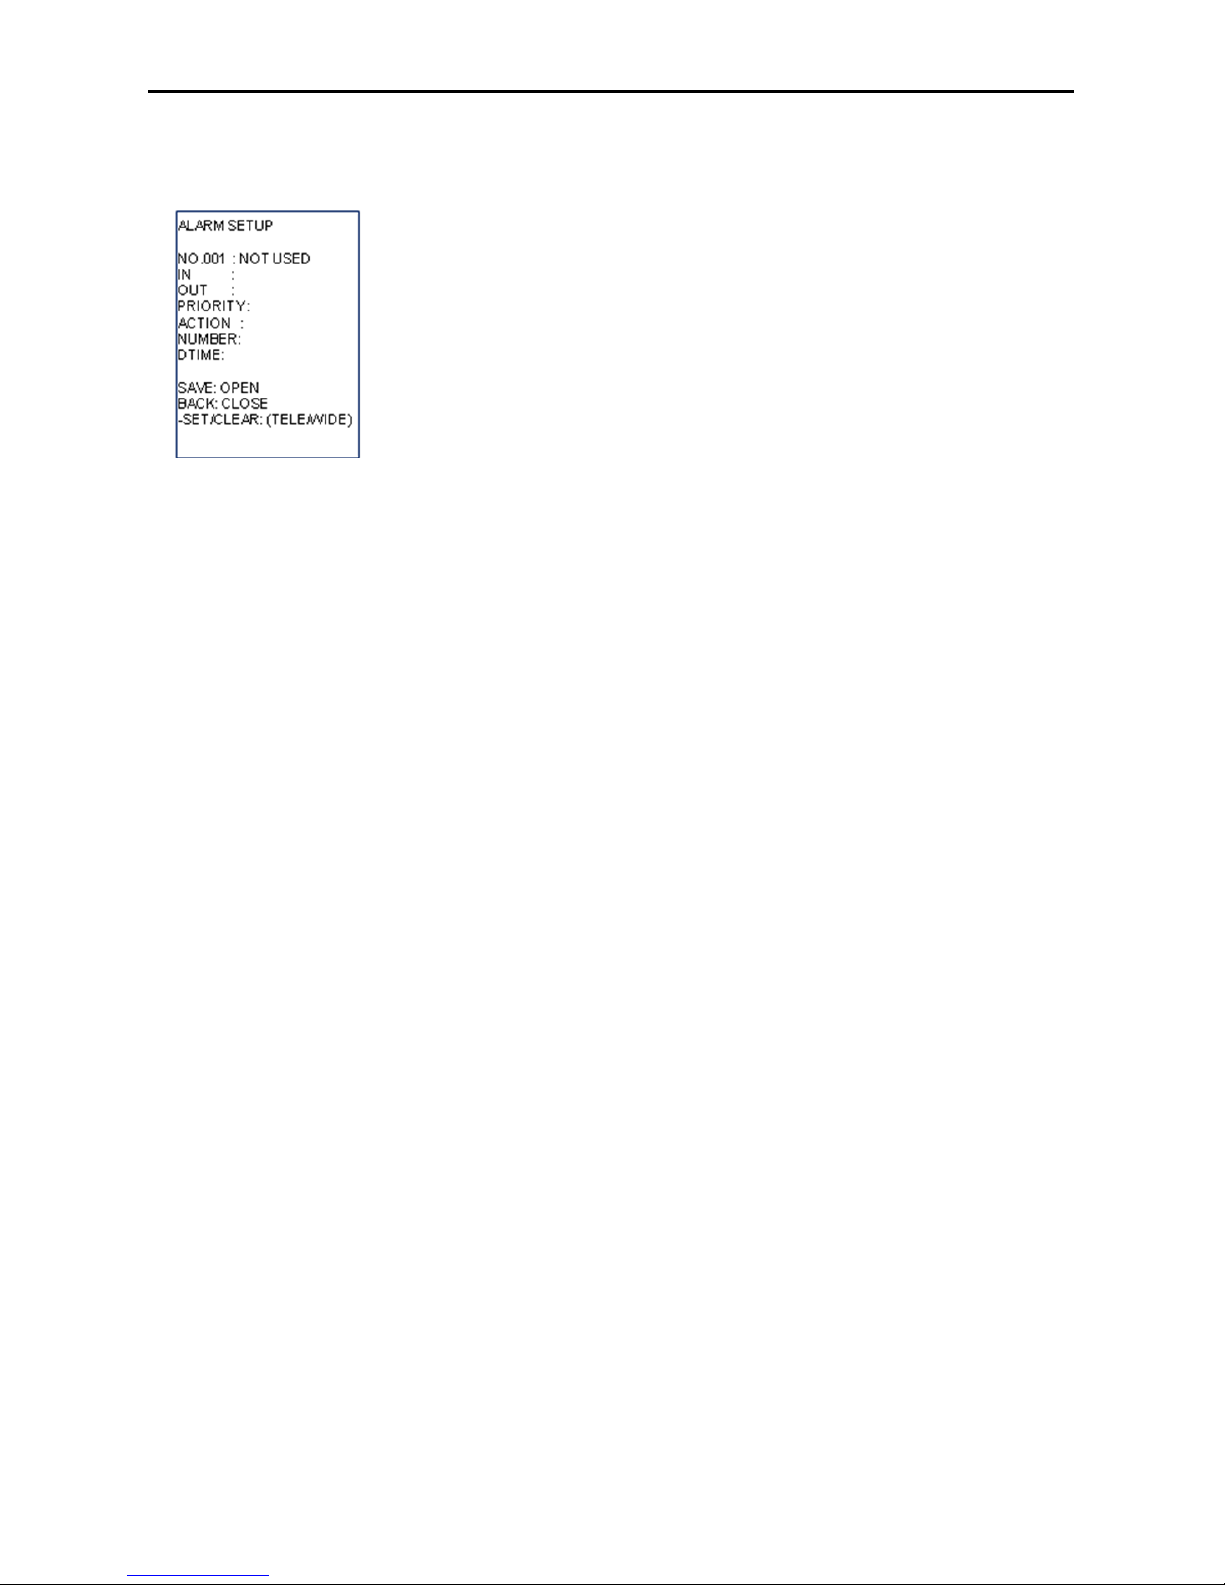
- Enter into {Main Menu}
- Using the joystick [
▶], select Alarm Input type (NO/NC).
- Using the joystick [
▶], select Alarm Output (On/Off)
- Alarm priority can be set using the joystick [
▶],
- Change an action/number {Off, Preset, Pattern, Scan, or Tour}.
- Set Alarm action time (Dwell Time): 3~60sec/On, default setting is ‘ON’.
-> Time Out (3~60sec): This is activated during a period of a selected dwell time when an alarm is triggered.
-> Momentary (On): When an alarm is triggered, the dome camera will maintain alarm activation continuously,
until it is stopped manually (96+preset or/and changing in alarm menu).
- It is possible to clear saved {Alarm No.xxx}, pressing [Wide] button at a position of {No.xxx} individually.
- Press [Open] button or use joystick [
▶] to save settings.
- Press [Close] button or use joystick to return to previous menu (Back).
NOTE* In order to call an action (Preset, Pattern, Tour or Scan), you must save Preset, Pattern, Tour, or
Scan first. To pause alarming (about 10sec) temporarily, press [ESC] button or [96+preset]
Page 36
36 12X Mini PTZ
Issue: 1.1
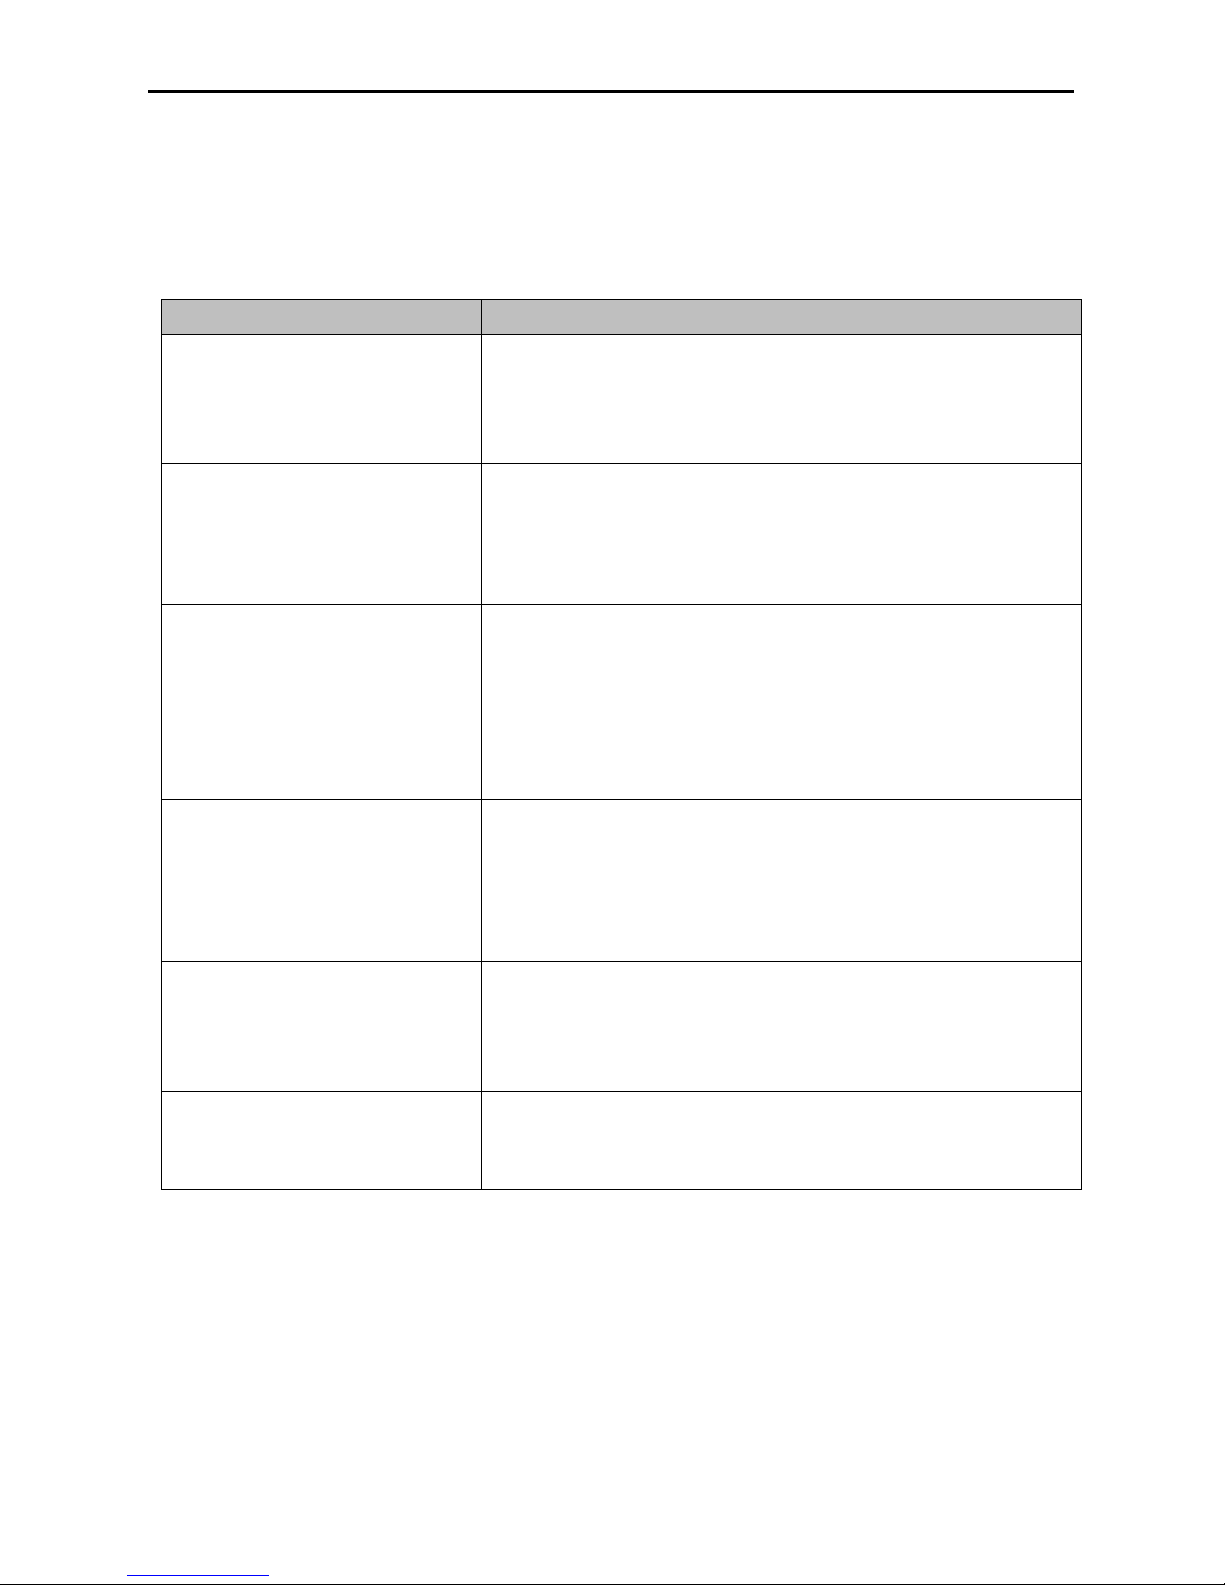
4. Troubleshooting Guide
If problems occur, check t he installation of the dome with the instructions in t his manual. And refer
to this manual for further information.
Problem
Solution
No video on the screen
- Verify that power is connected to all components in the
system.
-
- Verify that the power switches are ON.
- Verify the status of cables or connection of cables
Poor video quality.
- Check the power supply voltage (normal 24VAC
- Check the setting of camera.
- If the lens or the dome is dirty, clean up the dome windows
with a clean cloth.
Dome camera
is not working
properly (including wrong position of
dome camera)
- Re-cycle the power supply re-connecting the power code. Or
reset the dome camera
using the Dome configuration
menus. [Main>System>Reboot]
- Check that the connection of power cable and assembling
status of dome camera.
- Initialize the dome camera. [Main>System>Initialize]
The communication between
controller and cameras is not
working properly. (via 485 cable
lines)
- Check that RS-485 communication cable is not connected
correctly. [Refer to 2.3 Connection Interface and Wire cables]
- Check ID/Protocol/Baud rate/Termination Setting.
[2.4 Setting Dome Camera]
- See the configure of [1.3 Termination Settings]
The
surface of the dome case is
hot.
- Check the voltage level of the dome camera and the
assembling status of dome camera.
- Check that the dome camera is connected to the proper
power.
The image on the screen is flickers
- Does the camera face directly into the sun or fluorescent
lamp? If so, reposition the dome. Check for flicker-less
setting of the dome.
Page 37
37 12X Mini PTZ
Issue: 1.1
5. Specifications
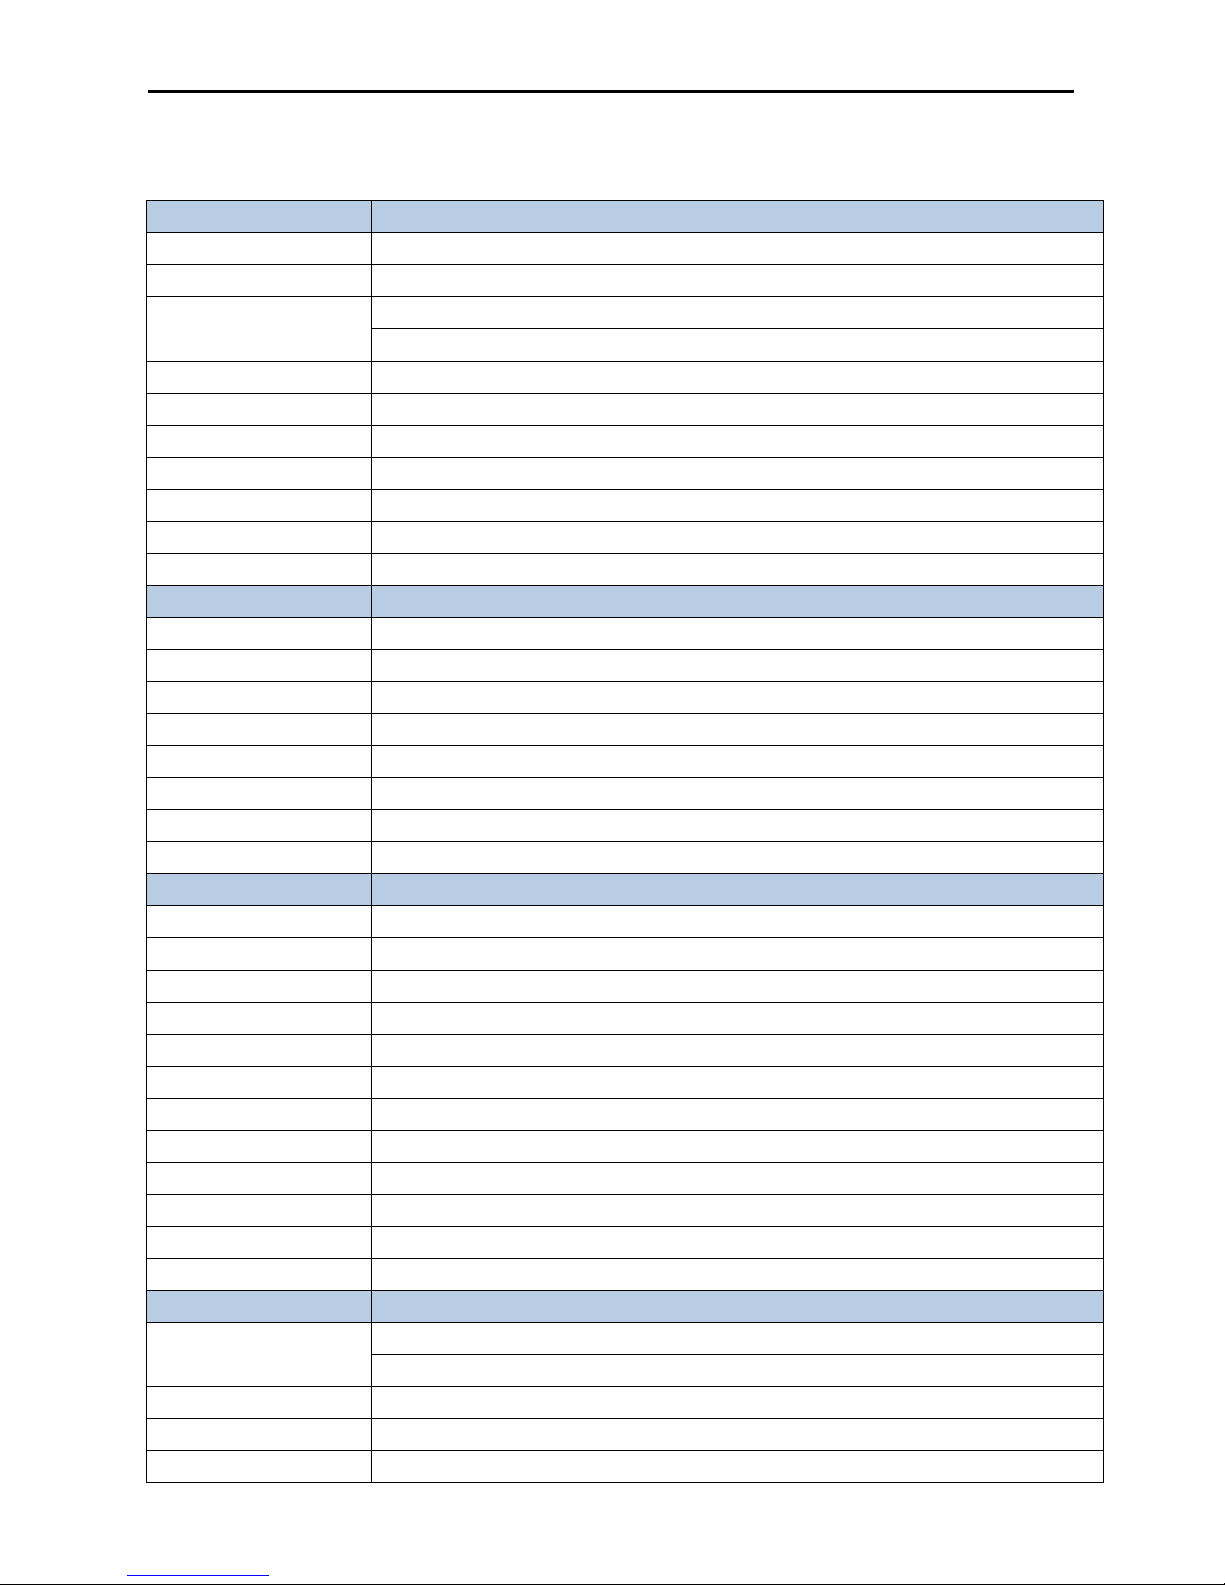
5.1 General Specifications
Model 12X Mini Speed Dome
Image Device 1/3" CMOS
Effective Pixels About 2.1Mega Pixel
Video Signal
HD: 1920*1080 (Full HD,1080P@30fps), 1280*720(HD, 720P@60fps)
SD: NTSC
Lens 12X Optical /10X Digital Zoom(Auto Focus)
View Angle Approx.
Approx.52.4° Wide end) to 4.64° (Tele end)
Min. illumination TBD
WDR On/Off
DNR 3DNR
Privacy Masking Max. 8 zones
Video Output HD-SDI, CVBS Output
Electrical
Power Supply AC24V (±10%) Normal, Built-in Power Line Surge
Power Requirement AC24VAC, 950mA (2.5A with Heater)
Power Consumption Maximum 25W(without Heater)
Alarm Output 1 Normal Relays 5VDC/40mA Max (Selectable NC/NO)
Alarm Input 4 Normal Dry Contact (Selectable NC/NO)
Control RS-485 baud rate: 2400~38.4Kbps (default: 2400bps)
Access Time 0.75 second maximum preset recall time
ID (Camera Address) Physical 99
Mechanical
Weight about 1.5Kg
Dimension Ф 154*181(H)mm(Bubble Dome 110Ф )
Pan Range 360° Continuous rotation
Tilt Range 0~180°
Speed Maximum Preset Speed: 360°/sec
Flip Rotate 180° at bottom of tilt
Auto Scan 8 Auto Scan include vector scan
Preset Position 210 Position with camera status
Tour 8 Tour (Preset, Pattern, Scan)
Pattern 8 Pattern
On Screen Display Display camera ID, Title, Mode, and Angle on screen (Multi-Language)
Multi-language OSD English, Chinese, Russian, Spanish, German, Italian, French, Netherlandish
Environment
Operating Temperature
-10 ~ +50°C
Heater On: -40°C ~ +10°C
Heater(Bult-in) On/Off: 0 ~ 10°C
Operating Humidity 80% RH
Storage Temperature -20°C ~ 60°C/~90%
Page 38
38 12X Mini PTZ
Issue: 1.1
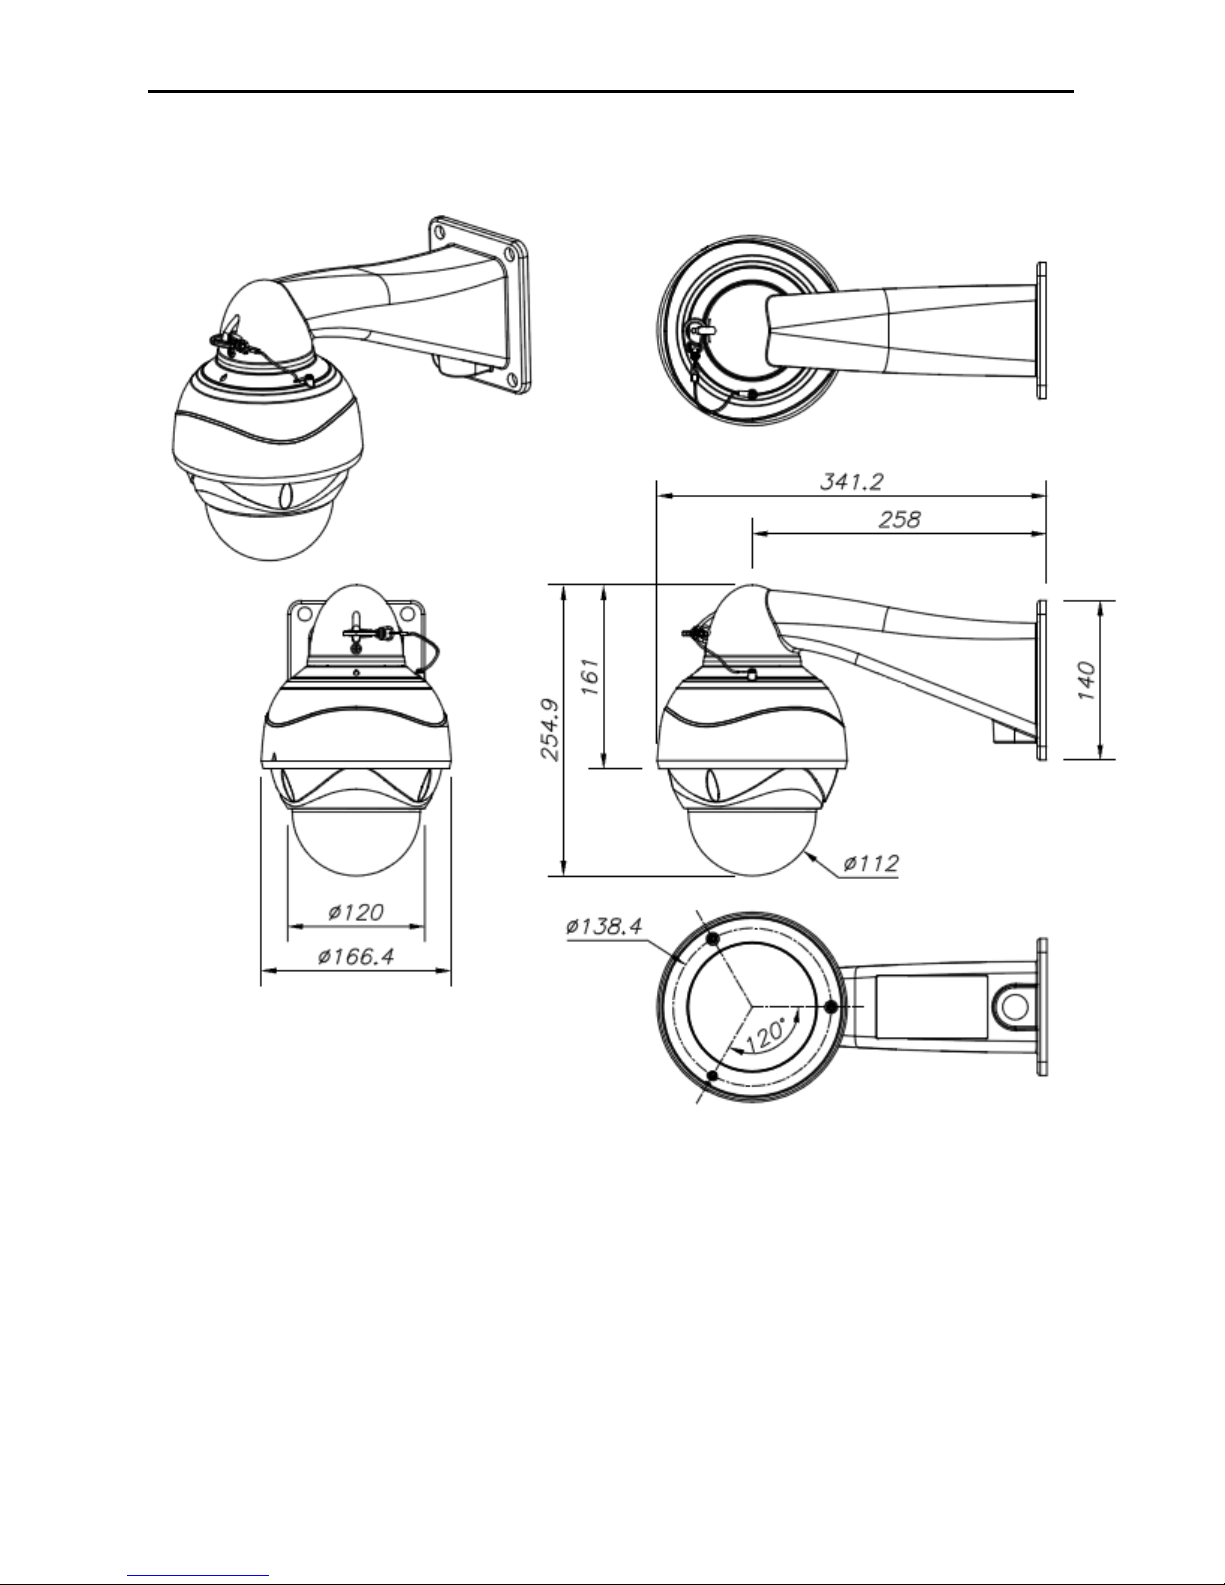
5.2 Dimensions
[Unit: mm]
 Loading...