

Page 1
SPECIFIC
A
TIONS
[5
)
g]
S
ur
al
ka
i
nebat
i
k
r
™
REQUIRE
CONTENTS
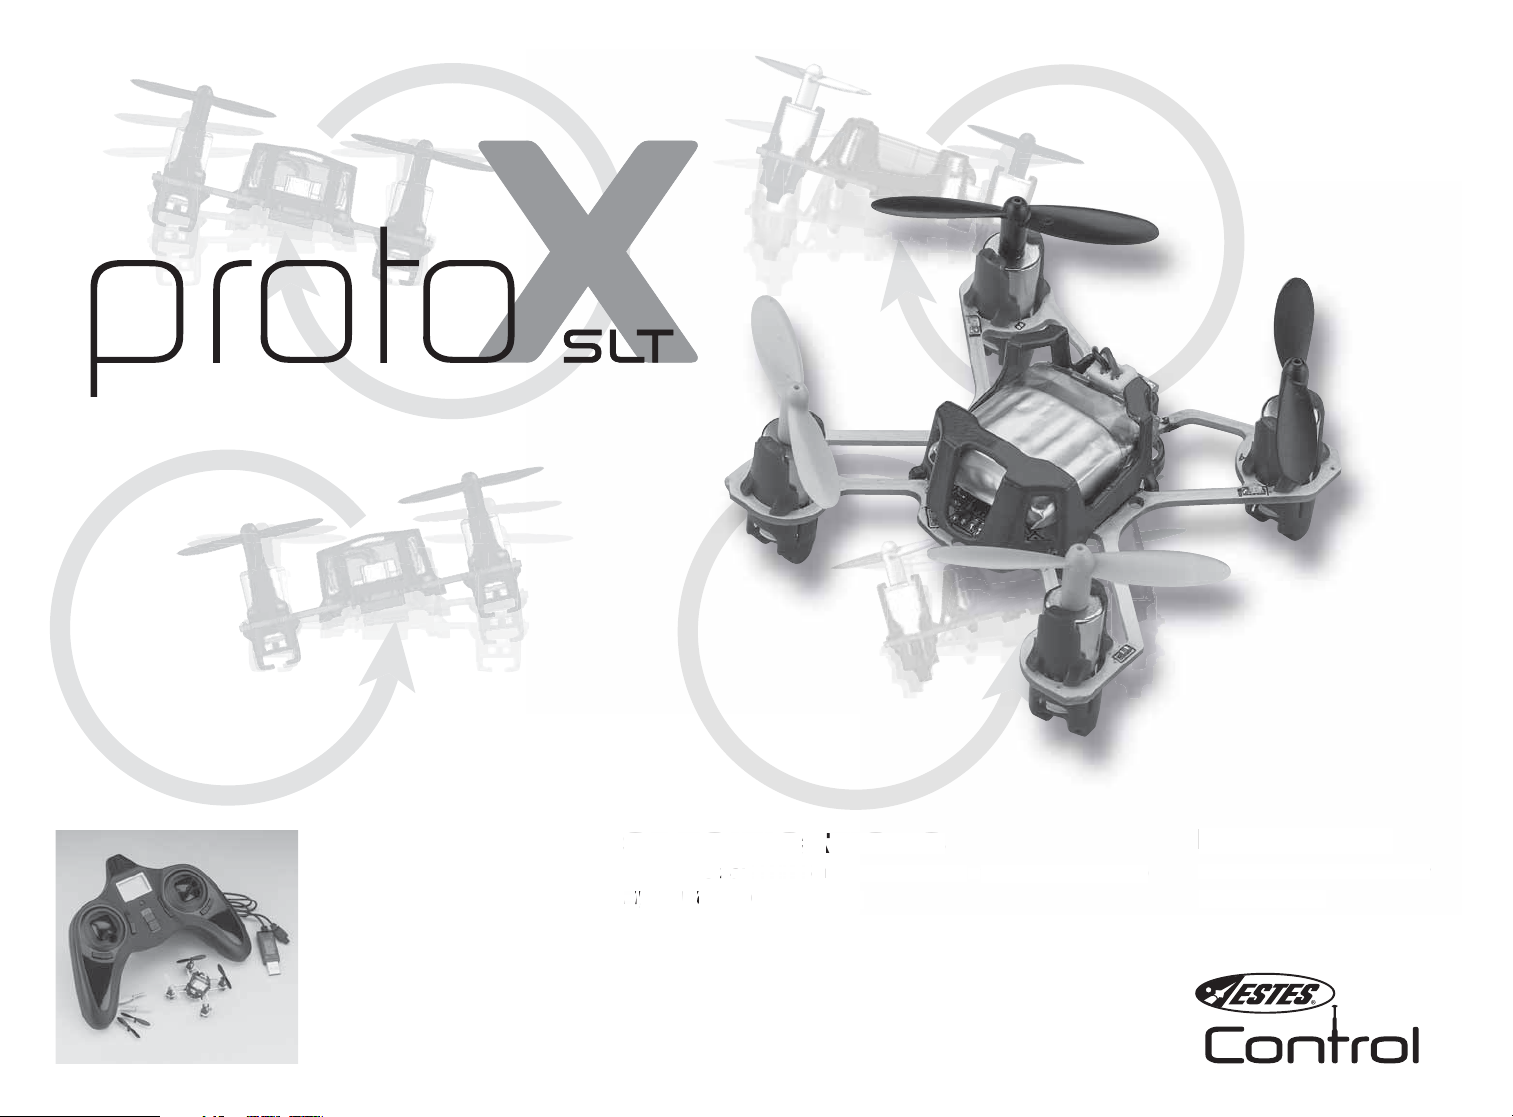
Proto-X SLT Nano Quadcopter
USB Charge Cord
LiPo Flight Battery
2.4GHz Controller
Spare Blades (2 black, 2 gray)
READ THROUGH THIS
MANUAL BEFORE
OPERATING.
te
SPECIFICATIONS
Size:
1.97" [50mm] (distance between diagonal motors)
Flying Weight:
Blade Length:
Length:
Height:
Width:
Battery:
Flight Time:
1.97"
0.4 oz [11.1 g]
0.4 oz [11.1
1.2" [30mm]
1.9" [48mm]
0.9" [23mm]
1.9" [48mm]
3.7V 100mAh LiPo
Approximately 5 minutes
m] (distance beten diagonal motors
REQUIRES
Four AAA 1.5V alkaline batteries
AAA 1
USB Output Jack
SB Output Jac
Phillips head screwdriver
V
l
r
Page 2

2
Thank you for purchasing the Proto-X SLT Quadcopter. We are certain you
will get many hours of enjoyment out of this model. If you should have any
questions or concerns please feel free to contact us at Hobby Services.
SAFETY PRECAUTIONS
Follow these safety precautions when operating this or any model helicopter.
Adult supervision required.
•
Changes or modifications to this product not expressly approved by
•
the party responsible for compliance may void the user’s authority to
operate the equipment.
Do not touch the spinning blades or fly over another person’s head.
•
Keep your face and body as well as all spectators away from the rotors
whenever the battery is connected.
Stay clear of buildings, trees and power lines. AVOID flying in or near
•
crowded areas. DO NOT fly close to people, children or pets.
Maintain a safe pilot-to-helicopter distance while flying.
•
Your Proto-X SLT quadcopter should not be considered a toy, but rather a
•
small, working model. If not operated correctly, the model could possibly
cause injury to you or spectators and damage to property.
Do not alter or modify the model, as doing so may result in an unsafe or
•
unflyable model.
You must check the operation of the model before every flight to ensure
•
that it is structurally sound.
90-DAY LIMITED WARRANTY
PLEASE DO NOT RETURN YOUR PRODUCT TO THE STORE
Proto-X will repair or replace factory defects for 90 days from the date of
purchase. This warranty specifically does not cover crash damage, misuse or
abuse. To make a warranty claim, please contact our product support team at
1-217-398-8970 option 6 or e-mail us at [email protected]
If requested by Product Support, please send your defective product to:
Hobby Services
3002 N Apollo Dr., Suite #1
Champaign, IL 61822
Please include a note about the problem, your contact information, and a
copy of the receipt.
This warranty applies only if the product is operated in compliance with the
instructions and warnings provided with each model. Proto-X assumes no
liability except for the exclusive remedy or repair of parts as specified above.
Proto-X SLT shall not be liable for consequential or incidental damages. Some
states do not allow the exclusion of consequential or incidental damages so
the above exclusion may not apply to you. This warranty gives you specific
legal rights and you may also have other rights which vary from state to state.
FCC STATEMENT AND
INDUSTRY CANADA NOTICE
1. This device complies with Part 15 of the FCC Rules and RSS-210 of
Industry Canada. Operation is subject to the following two conditions:
(1) This device may not cause harmful interference, and
(2) This device must accept any interference received, including interference
that may cause undesired operation.
2. Changes or modifications not expressly approved by the party responsible
for compliance could void the user’s authority to operate the equipment.
Remark: This device is in accordance with the digital device grade B
limitation and the 15th regulation of FCC. This limitation requires reasonable
anti-interference protection around the residence. The device can transmit
radio wave during use and can interrupt the mobile communication without
proper installment. Interruption will occur for special device. If the device do
interrupt the radio or television, please turn the device off then turn it on to
adjust. Below are some resolution for your reference:
Move the receiving antenna
•
Enlarge the distance between the device and receiver
•
Try to not connect the device and the receiver on the same circuit
•
Ask for professional help from experts
•
3. This digital apparatus does not exceed the Class B limits for radio noise
emissions from digital apparatus set out in the Radio Interference Regulations
of Industry Canada.
BATTERY PRECAUTIONS
This Proto-X SLT Nano Quadcopter uses a lithium polymer (LiPo) battery.
Follow these precautions to ensure safe and trouble-free operation.
Only use the included charger with the flight battery.
•
Do not attempt to use this charger with NiCd or NiMH battery packs.
•
Do not attempt to use a damaged battery.
•
This product contains a LiPo battery. Must be recycled or disposed of
•
properly.
Page 3
Disconnect the battery from the charger and carefully move the battery
•
to a fireproof location if the battery begins to swell or smoke!
Do not leave the charger unattended while charging. Disconnect the
•
battery and unplug the charger immediately if either becomes hot!
However, it is normal for the charger to get warm.
Never allow the battery temperature to exceed 140° F [60° C].
•
Never disassemble or modify pack wiring in any way or puncture cells.
•
Do not place the charger or any battery on a flammable surface or near
•
combustible materials while in use.
Never charge inside a vehicle.
•
Always disconnect the battery and remove the charger from the USB
•
port when not in use.
Do not attempt to charge a battery if it is swollen or hot.
•
Land your model immediately when the low-battery LEDs flash. Recharge
•
the battery before attempting another flight. A dangerous situation can
occur when attempting to recharge an over-discharged battery!
ALWAYS keep a supply of sand handy when charging. Dumping sand on
•
the battery will extinguish a LiPo chemical fire.
ALWAYS KEEP OUT OF REACH OF CHILDREN.
•
Always unplug the battery first and then turn off the controller after the
❑
flight has ended.
Beginners should find a large area free from obstacles (such as a
❑
gymnasium or a large basement with a tall ceiling). If the winds are calm,
experienced pilots may also be able to fly the Proto-X SLT outdoors.
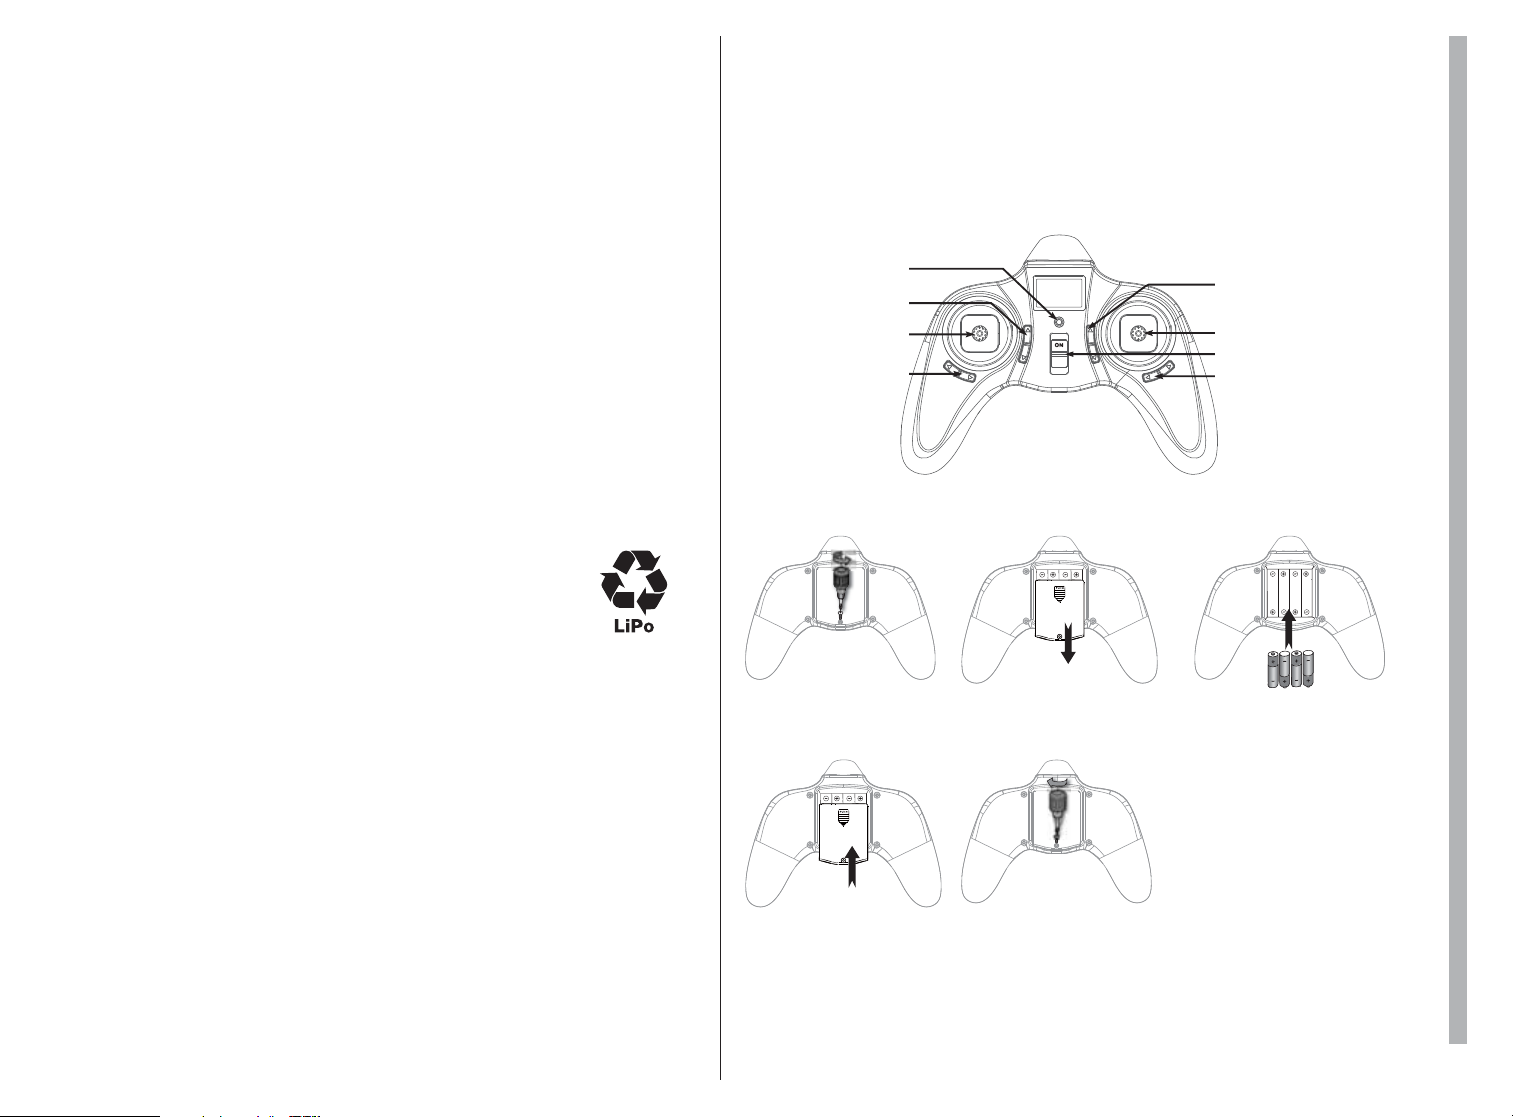
CONTROLLER
LED Indicator
Throttle Trim
Throttle/Rudder Stick
Rudder Trim
INSTALL BATTERIES
OFF
Elevator Trim
Elevator/Aileron Stick
Power Switch
Aileron Trim
CARE AND MAINTENANCE
Always remove the batteries from the controller and the quadcopter
•
when it is not being used for a long period of time.
Clean the quadcopter with a damp cloth.
•
SAFETY CHECK
Before operation, please make sure the batteries for the controller and the
quadcopter have enough charge for flying.
Carefully check the rotor blades for damage. Broken or premature parts
❑
failure may result in a dangerous situation.
Before turning on the controller, please check that the throttle stick is in the
❑
lowest position.
Always turn on the controller first, and then connect the battery to the
❑
quadcopter to start flying.
PUSH
1. Remove the screw 2. Take off the cover
PUSH
5. Re-install the screw 4. Re-install the cover
3. Install alkaline batteries
according to the
proper polarities
3
Page 4
CHARGING THE FLIGHT BATTERY
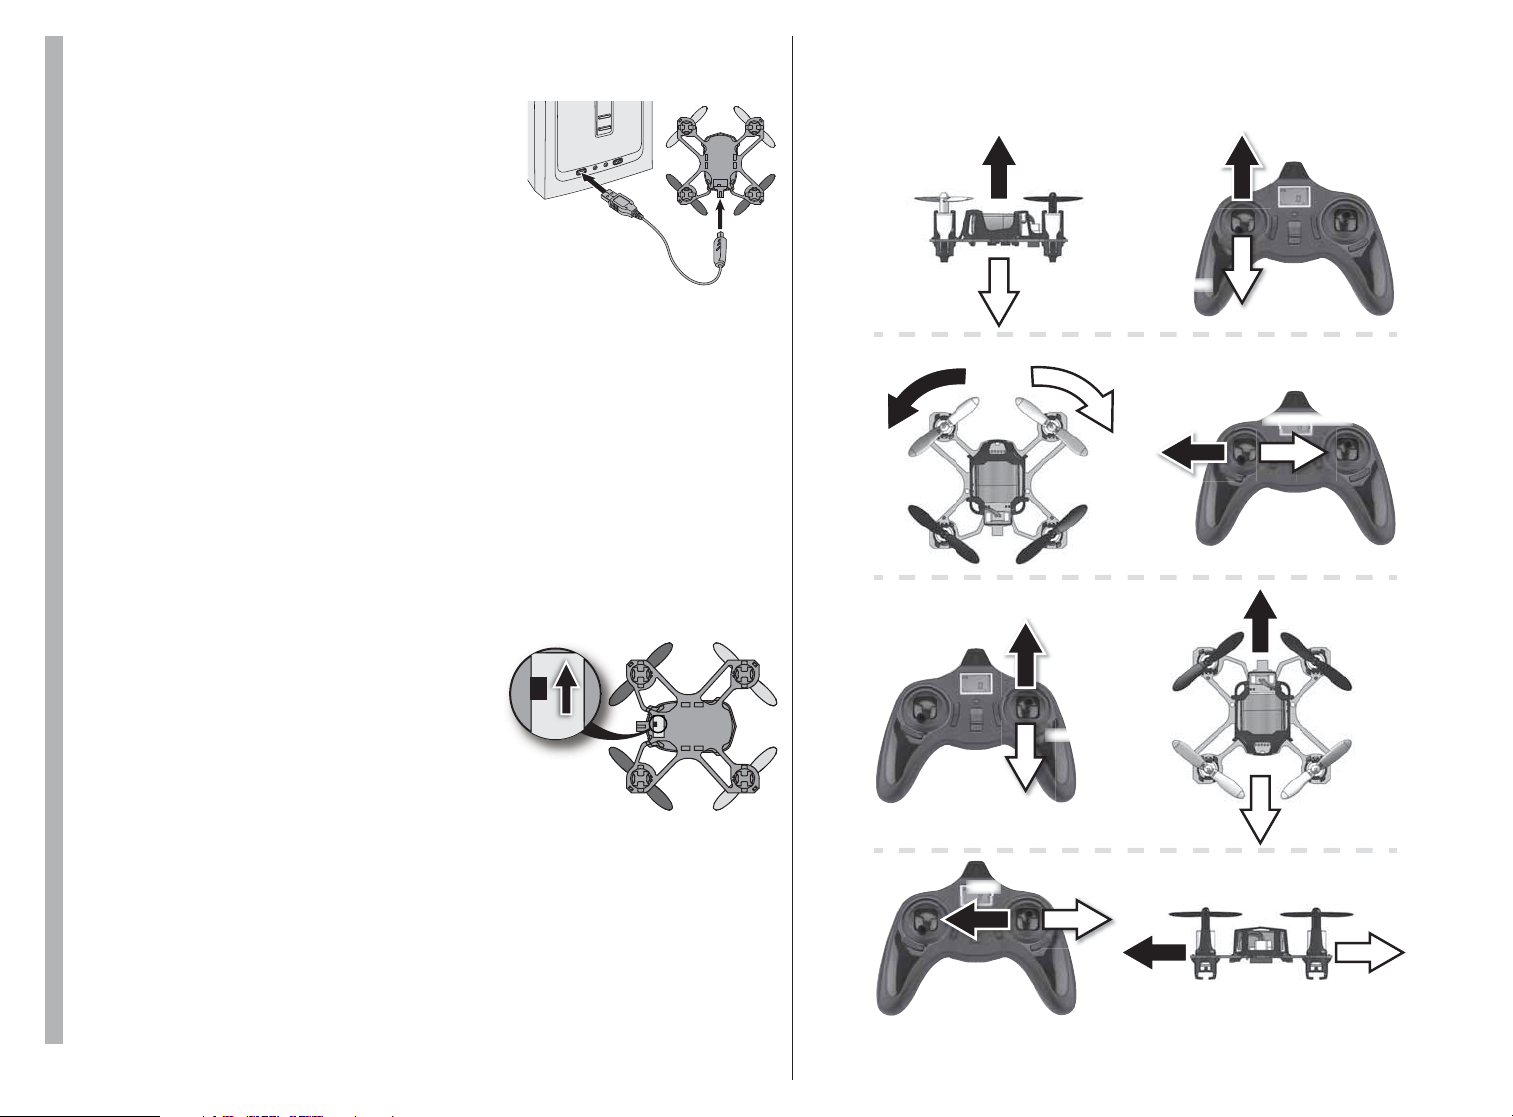
The quadcopter must be powered off before charging.
Plug the charger into a USB port on your
computer or USB AC adapter and connect the
quadcopter. The connector for the quad will
only fit one way. Do NOT force the plug onto
the connector at the back of the quadcopter.
The RED LED on the charger will be on while
the battery is being charged. When the charge
cycle is complete, the LED will turn off.
NEVER leave the quadcopter unattended while the battery is charging.
•
DO NOT allow the device powering the charger to shut down while the
•
battery is charging.
ALWAYS unplug the battery when the charge cycle is completed.
•
POWER-ON (FAIL-SAFE) PROCEDURE
Your Proto-X SLT Nano Quadcopter is fitted with a Power-On fail-safe. This
is designed to ensure that the motor will not start unless it detects a suitable
radio-control signal when the LiPo battery is connected. The correct Start-Up
sequence is as follows:
1. Move the throttle stick to the lowest position.
2. Turn on the controller.
3.
Turn on the quadcopter with the switch
on the bottom of the frame near the
connector for the charger. Set the quad
on a level surface.
ON
OFF
When the battery voltage begins to run low, the LEDs on the quadcopter will
flash. This is a warning to land before the built-in low-voltage cut-off reduces
power to the motors.
ROTATE LEFT
UP
DOWN
ROTATE RIGHT
FORWARD
BACKWARD
UP
DOWN
ROTATE LEFT ROTATE RIGHT
FORWARD
4
FLIGHT CONTROLS
NOTE:
The black propellers and RED LEDs are at the REAR of the quadcopter.
CAUTION: ALWAYS move the controls slowly!
Be ready to use a little extra throttle to maintain altitude during maneuvers.
If you see that the quadcopter is going to crash (or has already crashed),
move the throttle control to 0% as quickly as possible to avoid causing
damage to the motors or control board.
The grey propellers and BLUE LEDs are on the FRONT of the quadcopter.
LEFT
BACKWARD
RIGHT
LEFT RIGHT
Page 5
FLIGHT TRIM ADJUSTMENT
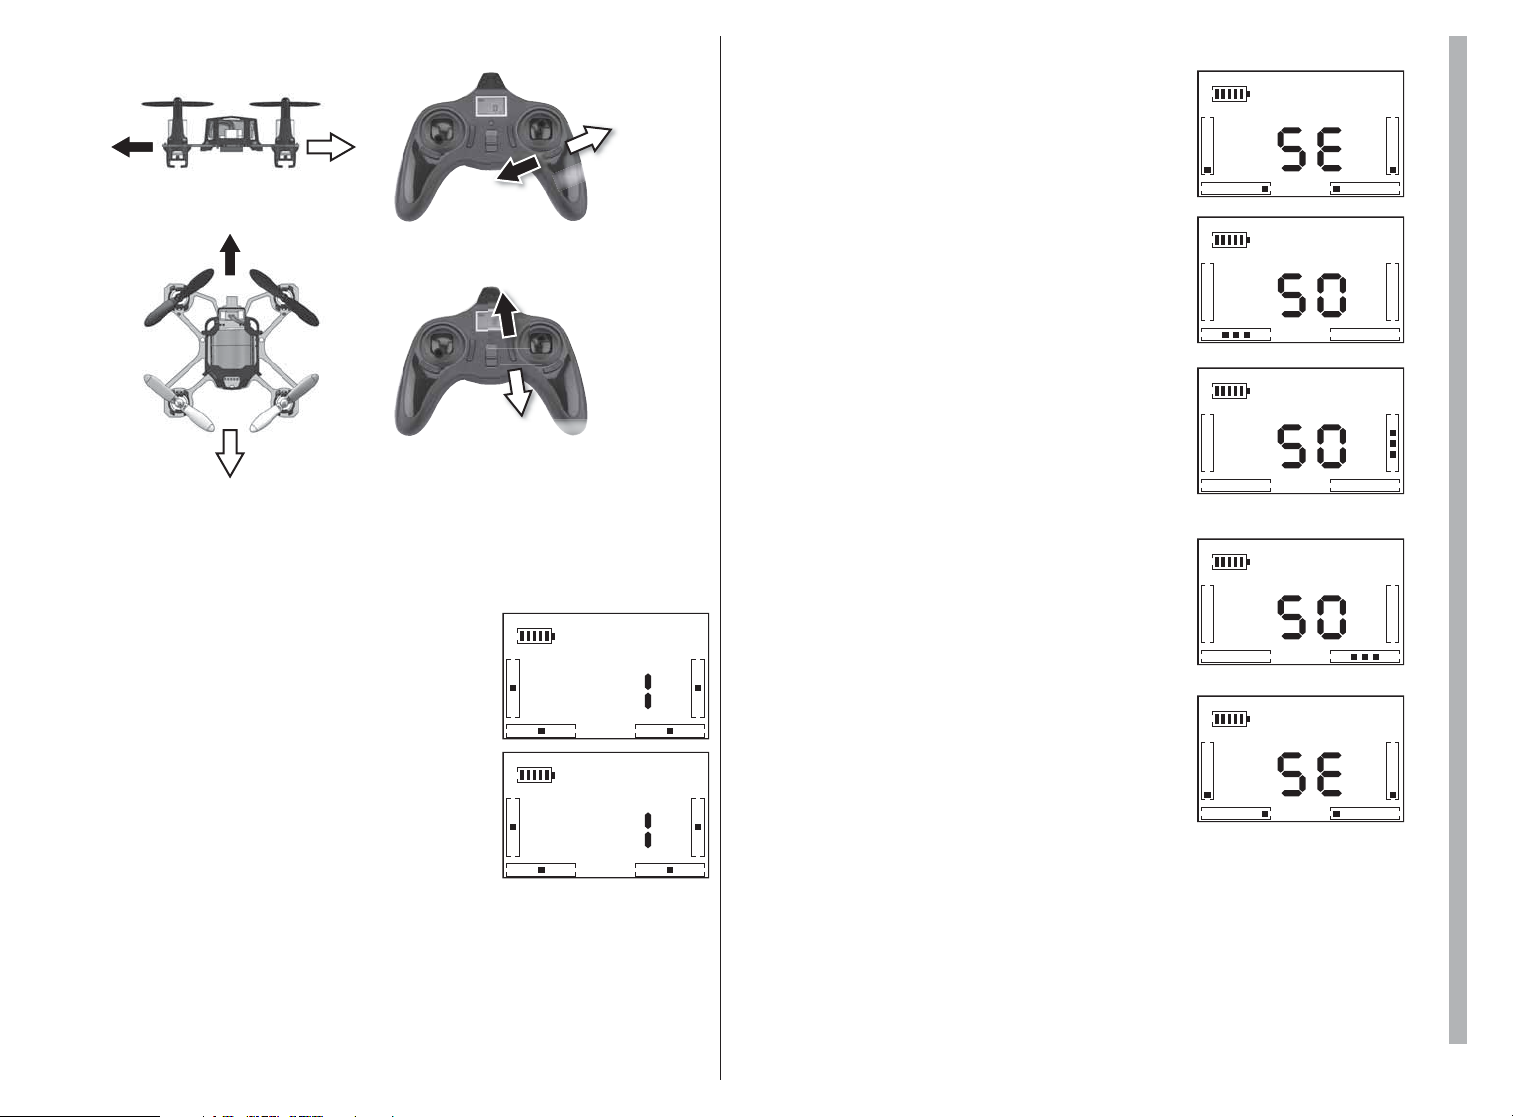
LEFT TRIM
RIGHT TRIM
LEFT TRIM
FORWARD TRIM
FORWARD TRIM
BACKWARD TRIM
BACKWARD TRIM
It is normal for the Proto-X SLT to drift slightly. However if it drifts in any
direction consistently press the trim button opposite the movement as many
times a needed to eliminate the drift.
RIGHT TRIM
FLIGHT MODES
The default flight mode is the standard mode and
the LED on the controller below the display will be
GREEN. In this mode, the Proto-X SLT is the most
stable.
To adjust the controller to EXPERT mode (most
sensitive controls) press down on the right stick one
time. The display will now have the word “EXPERT”
at the bottom of the screen and the LED below the
display will flash GREEN and RED.
EXPERT
Flip maneuvers can only be performed in EXPERT mode.
To return to normal flight mode, quickly press down on the right stick again.
M2
M2
SENSITIVITY ADJUSTMENTS
To adjust the sensitivity of the controls in the
standard flight mode, press down the right stick
and hold it until the display shows the letters SE.
Release the right stick.
Yaw/Rudder Sensitivity: Push down on the
left stick quickly. There will be 3 dots flashing in
the lower left corner of the display below the
rudder trim graph. The default setting is 50%. Use
the rudder trim buttons to raise or lower the value.
Pitch/Elevator Sensitivity: Push down on
the left stick again. The 3 dots will move to the
right side of the screen next to the elevator trim
graph. The default setting is 50 and the elevator
trim buttons should be used to raise or lower the
value.
Roll/Aileron Sensitivity: Push down on the
left stick again. The 3 dots will move to the lower
right side of the display below the aileron trim
graph. The default setting is 50 and the aileron
trim buttons should be used to raise or lower the
value.
Expert Settings: The settings can be changed
for the expert settings using the same procedure.
Enter the SE mode and quickly press down on
the right stick to change from the normal to the
expert mode.
Default Expert Settings:
Yaw/Rudder – 90
Pitch/Elevator – 100
Roll/Aileron – 100
EXPERT
M2
M2
M2
M2
M2
LEDN ON/OFF
The LEDs on the quadcopter can be toggled off and on by holding down the
throttle trim button for 2 seconds.
To exit the setting adjustment mode, press down and hold the right stick
assembly until the display returns to normal.
5
Page 6
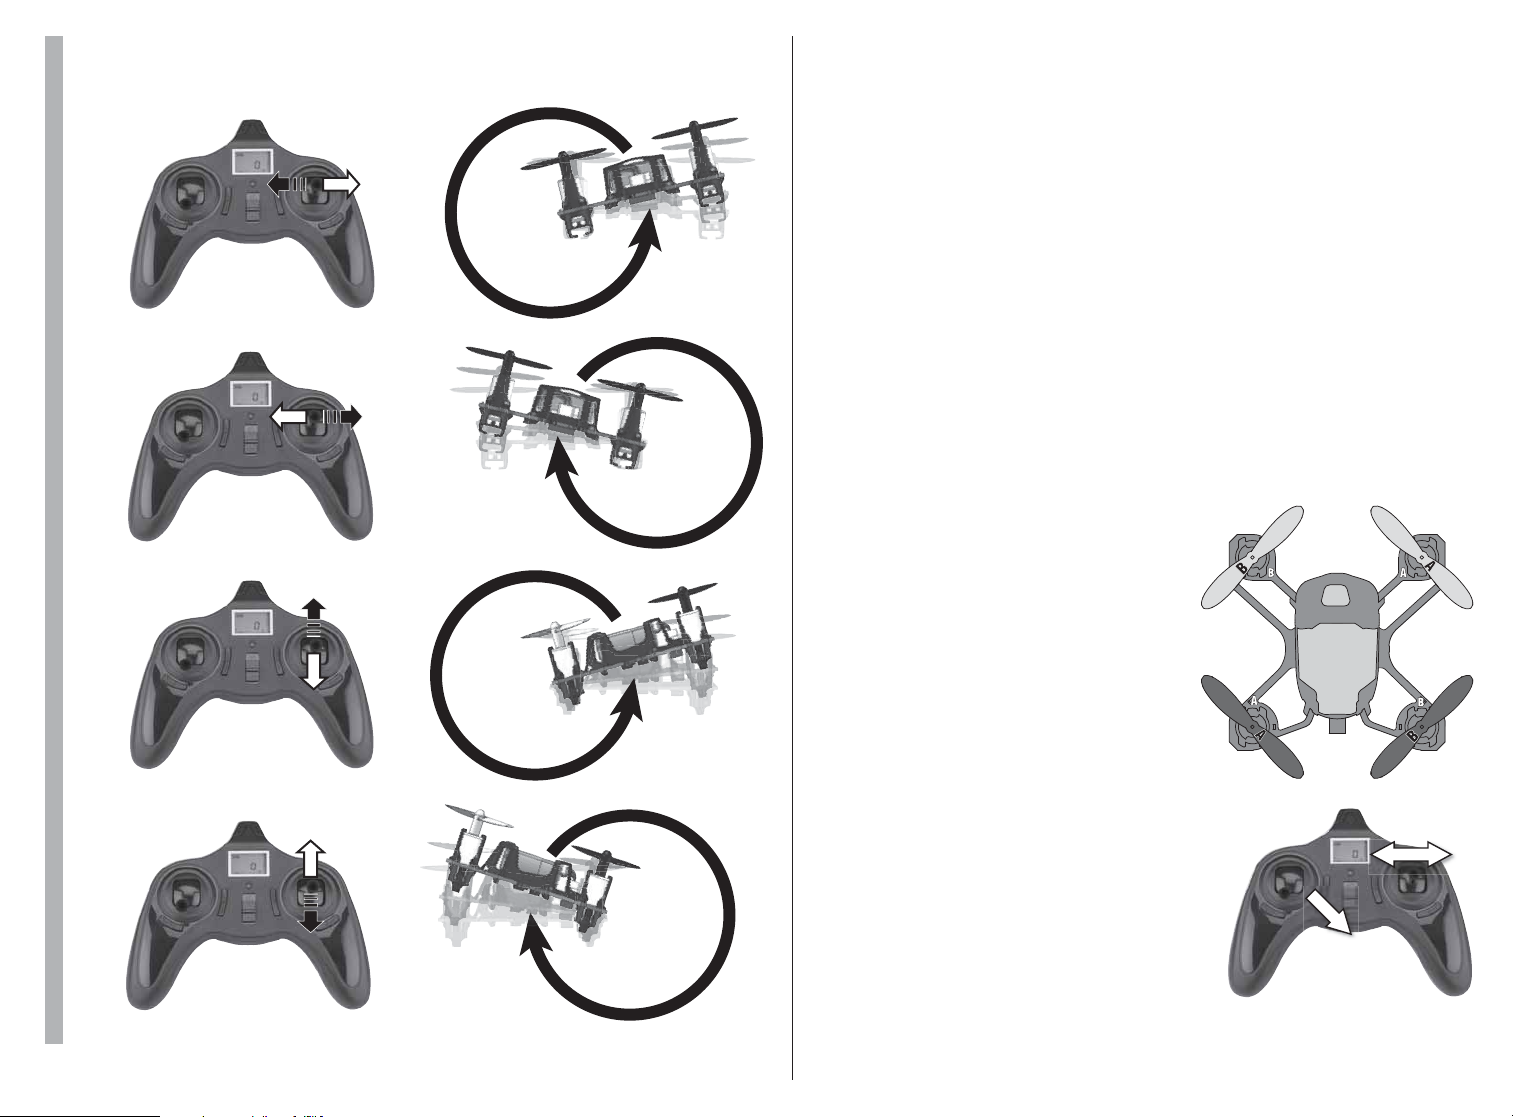
360° AERIAL FLIPS (Expert Mode Only)
Tip: Perform the flip while gaining altitude.
TROUBLESHOOTING
PROBLEM: The quadcopter will not respond to the controller.
SOLUTION:
sure that the throttle is at 0% and the throttle trim at or below center. (3) Turn
off the quadcopter for a minute and turn it back on. (4) Relink the controller and
quadcopter – See Linking the Quadcopter and Controller instructions on page 7.
PROBLEM: Red controller LED light flashing after binding.
SOLUTION: Replace with new AAA batteries.
PROBLEM: Gyro not working properly.
SOLUTION: (1) Battery voltage low. (2) Re-bind. (3) Land on to the ground
for 3 seconds and take off again.
PROBLEM: Unable to Flip.
SOLUTION: (1) Not enough power. (2) Press the elevator/aileron (right)
joystick one time to enter the expert (flip) mode.
PROBLEM: Quadcopter is shaking.
SOLUTION:
PROBLEM: Will not take off.
SOLUTION: Rotor blades incorrectly installed.
Check that the rotor blades are properly installed:
(1) Charge or change the battery on the quadcopter (2) Make
Check the canopy, chassis, motors and rotor blades for damage.
B = B A = A
6
Quickly push the stick halfway one direction and then quickly push to the
opposite direction.
A = A
PROBLEM: Quadcopter is always drifting to one direction.
SOLUTION: Calibrate the sensors.
1. Turn on the controller and the quadcopter.
Place the quadcopter on a flat surface.
2. Hold the left stick to the lower right. At the
same time, quickly move the right stick left
and right several times until the blue LEDs
flash.
Test the model to see if it will hover without drifting. If the model is still drifting, try
putting a thin piece of cardboard under the motor or motors in the same direction
that the quadcopter is drifting. Perform the sensor calibration procedure again.
B = B
Page 7
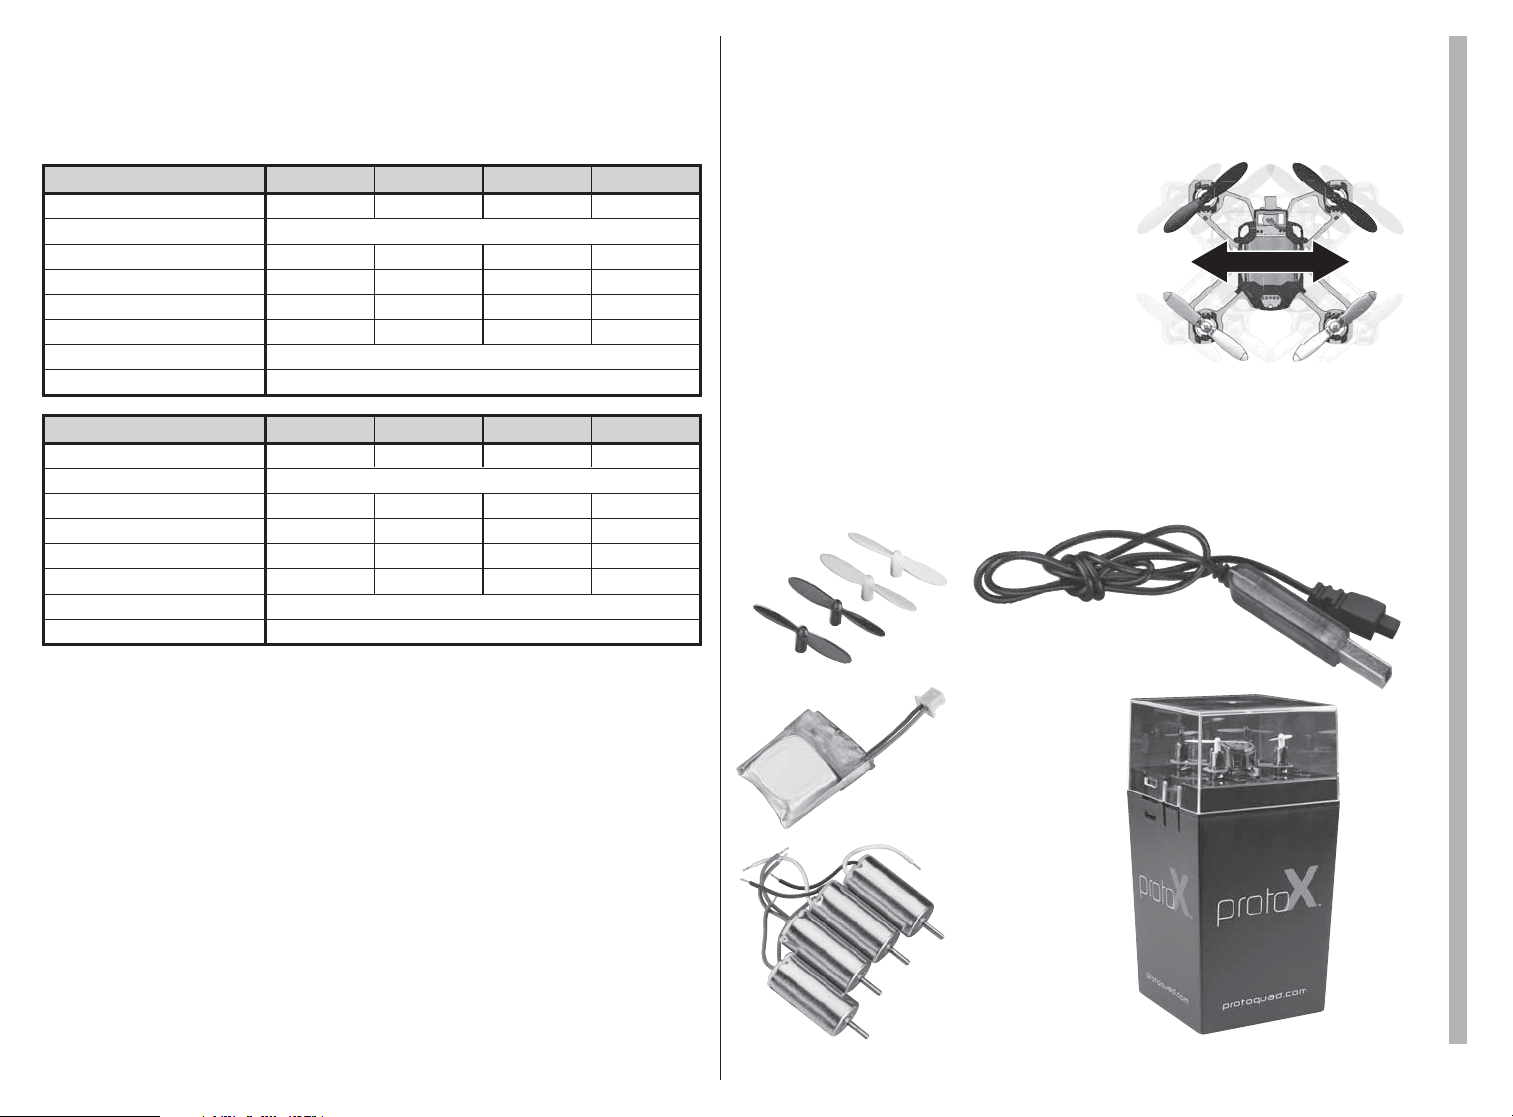
SLT SETUP
The Proto-X SLT Nano Quadcopter can be used with other SLT controllers.
If your controller has programmable settings or if it uses an ANYLINK/
ANYLINK2 adapter, please use these settings as a guide to get started.
Tactic® TX650/Futaba®
Type
Servo Reverse
Travel Adjustment
Dual Rates (D/R)
Exponential (EXPO)
Throttle Curve
Timer (TIMR)
Spektrum
Type
Servo Reverse
Travel Adjustment
Dual Rates (D/R)
Exponential (EXPO)
Throttle Curve
Timer (TIMR)
®
w/Anylink2™
Note: The LEDs cannot be toggled On/Off with an SLT controller. The
quadcopter can be flipped when the controller is on high rates.
AILE
1
NNNN
100 % 100 % 100 % 100 %
100 /50 100 /50 100 /50
–25 –25 –25
025 75100
AILE
1
RRRR
100 % 100 % 100 % 100 %
100 /50 100 /50 100 /50
+
25
025 75100
ELEV THRO RUDD
234
AIRPLANE
50
5 Min
ELEV THRO RUDD
234
AIRPLANE
+
25 0
50
5 Min
LINKING THE QUADCOPTER
AND CONTROLLER
The Proto-X SLT uses Wavelink™ technology to link it to the controller. If
all four blue LEDs are flashing and the quadcopter will not respond to any
commands, use the following procedure.
1. Turn off the controller but leave the
Proto-X SLT on.
2. Turn on the controller.
3. Immediately pick up the quadcopter and
wave it side to side for two seconds. Move
the quadcopter at a moderate speed at
least 12 inches in each direction.
4. Place the quadcopter on a level surface. The blue LEDs will flash on one
side then the other while the quadcopter is linking to the transmitter. The
LEDs will become steady when the quadcopter is linked to the controller.
SPARE/OPTIONAL PARTS
ESTE4615
Rotor Blade Set (4)
ESTE4616
USB Charge Cord
ESTE4618
LiPo 1S 3.7V 100 mAh
ESTE4622
Display Case
(Optional)
ESTE4617
Motor Set (4)
7
Page 8

ESTE49** Mnl
© 2014 Estes-Cox Corp. A subsidiary of Hobbico, Inc.
 Loading...