


PROTOUCH
Tm
IMPORTANT:
Ensure the mains supply is isolated prior to installation.
All heating mats and cables must be earthed.
Electrical work which is subject to Part P Building Regulations must be carried out by a qualified electrical engineer.
All work must conform to BS7671 and the latest 17th Edition wiring regulations.
GENERAL
• Weekly programming adopting the latest single-chip
computer control technology.
• The clock continues after a power failure and the scheduled
time settings will not be affected.
• Designed for electric underoor heating. According to
the pre-set temperature and time, the thermostat will
automatically start and stop the oor heating.
• Multiple schedule settings available: 5+2 / 6+1 / 7 days.
PROTOUCH supports dierent temperature settings
accordingly with 6 time modes daily.
• Users are free to choose manual and full automatic mode for
operation.
• Keypad lock function.
• Flame retardant, safe and easy cleaning.
Wiring details: These are printed on the back of the
thermostat casing.
The oor sensor is connected to terminals T1 & T2 (please
note there is no polarity and the twin core sensor cable can
be connected either way). The 230V electrical supply connects
to terminals L (Live) & N (Neutral). The heating mat(s) connect
to terminals L1 (Live) & N1 ( Neutral). Earth connections are
made with the back box. When the thermostat is powered
for the rst time you may see “OFF” on the screen in the lower
sub-display.
Press ON / OFF symbol to activate and turn on your
thermostat.
Keypad Lock - Press Clock symbol and Menu at the same
time for 2 seconds.
Repeat to unlock. LCD display will show the temperature value
when keypad is locked.
Technical Parameters
Power supply: 230VAC 50/60 Hz
Maximum switch power: 16A / 3,600 watts
Internal Sensor: Setting Range 5°C ~ 35°C
External Sensor: Setting Range 5°C ~ 95°C
Sensor: NTC3380, 10Kohms @ 25°C
Temperature setting steps: 0.5°C
Display type: LCD Display area: 60 x 45m
Touchscreen Thermostat User Manual
Press the power ON/OFF key to turn the thermostat ON
or OFF. The display will be as below when turning OFF.
Press Menu to choose between Manual
Mode and Automatic Mode.
Manual mode: The schedule programme is overridden
and the temperature can be adjusted to your individual
requirements. The system will control at this temperature
without any change.
Automatic mode: System will control temperature
according to the preset temperature values in dierent
time settings. The Auto symbol will show, which means
the system is running under Automatic mode.
In the Automatic mode, the main display area will alternately
display the day of the week (WEEK) and the daily schedule
stage (STAGE).
In the sub-display it will show the set temperature and time
alternately.
Press UP & DOWN arrows to adjust temperature settings and
other settings.
Setting the time and day of the week
Press the Clock symbol for 5 seconds to enter into time
adjustment. The number representing the day of the week
will icker. Press UP or DOWN to select the day of the
week, 1 = Monday, 2 = Tuesday and so on. Press Clock again and
the hours will icker. Use UP or DOWN to set the correct hour
then press clock again, the minutes icker. Press UP or DOWN
to set the correct minutes. Press Clock again to conrm.
To check the oor temperature when the thermostat is set in
ALL mode, press Clock and DOWN at the same time. Then the
large main display will show the oor temperature. The label
FLOOR icon will appear in the lower sub-display.
Schedule Settings
Press Menu for 5 seconds to enter the schedule settings
mode. The display will show the featured week e.g. 5 + 2 / 6
+ 1 or 7 days. Each period can be set for the desired time and
temperature. Six periods can be set P1, P2, P3, P4, P5 & P6.
Use UP or DOWN to adjust the hours then press Menu, the
minutes icker. Press UP or DOWN to adjust the minutes. Press
Menu then the large temperature displayed will icker. Press
UP or DOWN to adjust to the desired temperature in period
P1. Press Menu to move onto the settings for P2. Repeat this
procedure through P1 to P6. You can press the Clock icon to
go back to previous settings. Finally, press ON/OFF twice
to confirm.
If you want to turn o a period, then in the temperature
setting for the period press DOWN until OFF is displayed in
the temperature screen then press Menu to conrm.
To quickly return to the original display press ON/OFF twice.
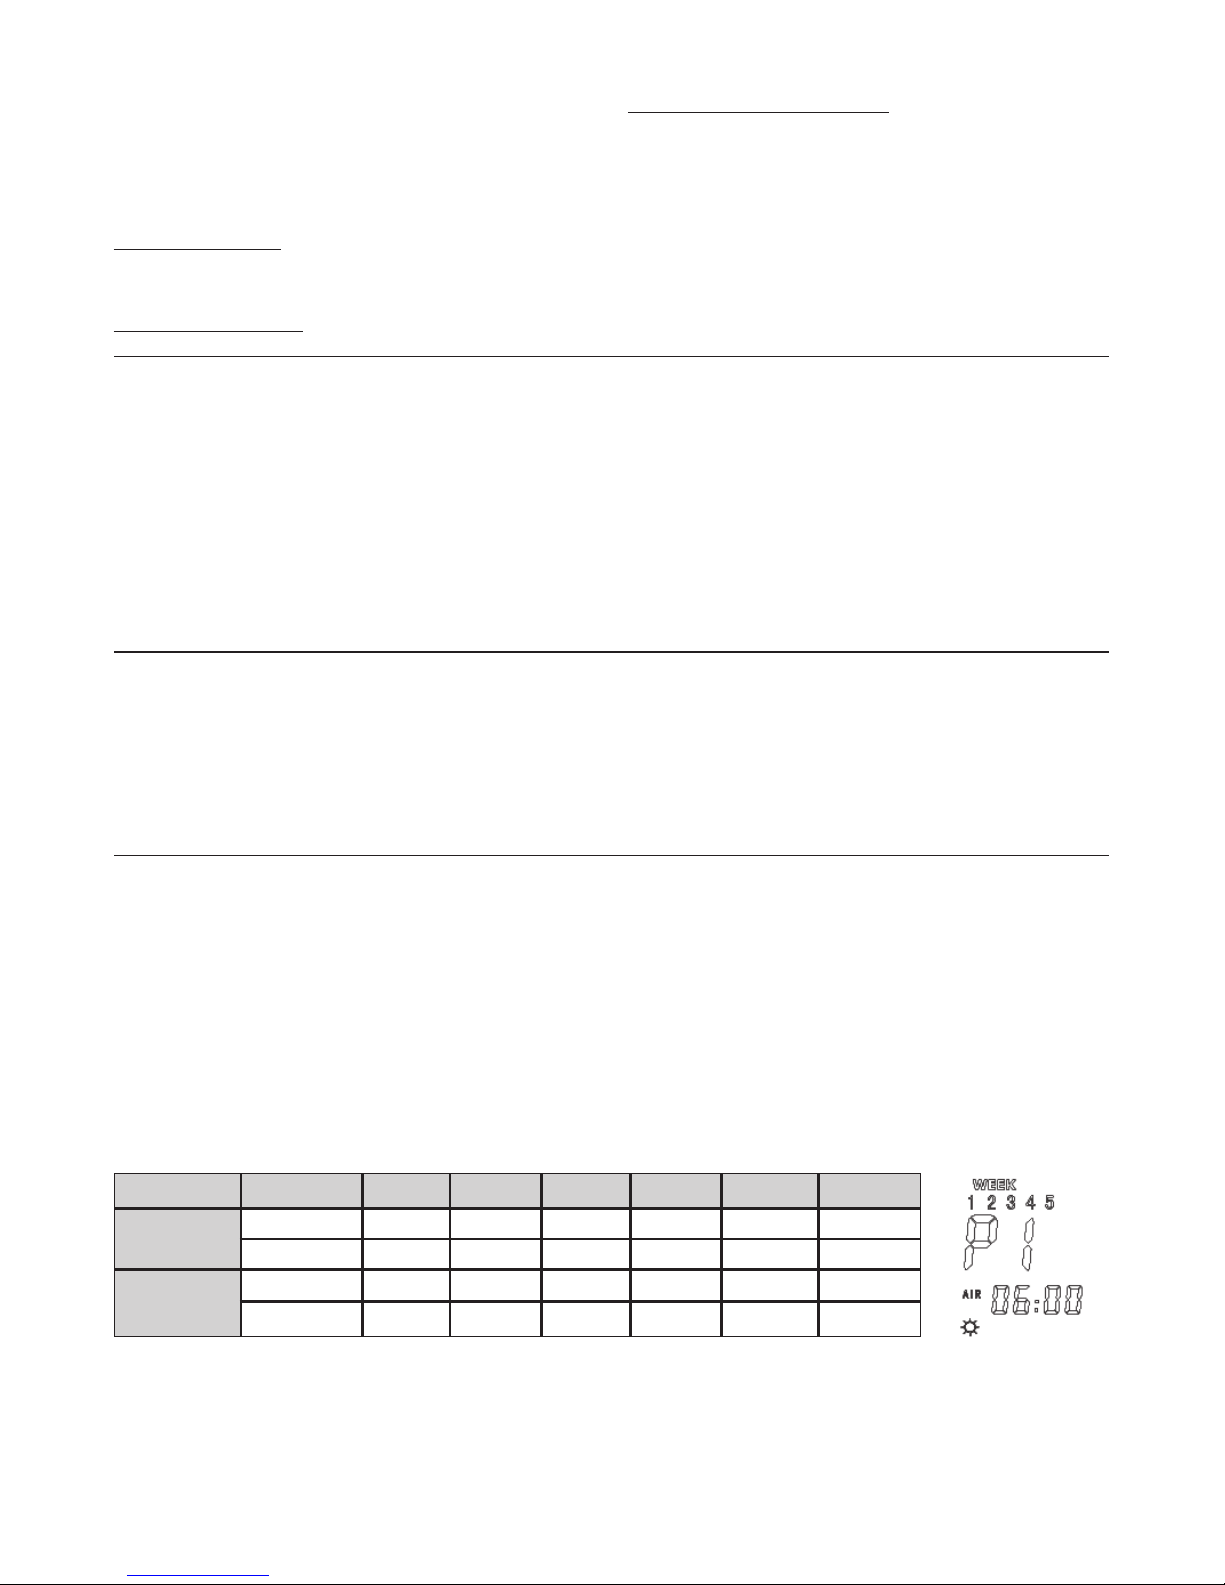
The system default is 5 + 2 and the default settings are as the
following table. For example, when the system time is Friday
08:20 under Automatic mode the display would show as
STAGE 2 and the set temperature value would be 15°C.
5+2 mode ID P1 P2 P3 P4 P5 P6
Monday to
Friday
Start time 06:00 08:00 11:30 12:30 17:00 22:00
Set value
22℃ 15℃ 15℃ 15℃ 22℃ 15℃
Saturday to
Sunday
Start time 06:00 08:00 11:30 12:30 17:00 22:00
Set value
22℃ 15℃ 15℃ 15℃ 22℃ 15℃
Temperature Override Facility –
Manual Mode Only
This allows you to override the temperature setting at any
time. For example, you arrive home early and want the
heat on. Press Menu to enter Manual mode. Assume the set
point in the schedule was 15ºC and the room temperature is
actually 18ºC. The heating will not be energised in this setting.
Press UP or DOWN to adjust the temperature above 18ºC. Let’s
say 22ºC, and the heating symbol will appear and the heating
is now ON.
Three types of Temperature Control
and Display
The thermostat can be set to operate in three dierent modes;
IN: Internal, OUT: External, ALL: combined internal and
external. The default setting is IN. Enter the advance functions
to change the mode setting.
Internal control (IN): Based on built-in sensor temperature
measurement & suitable for detection of air or room
temperature only.
External control (OUT): Based on external temperature
measurement & suitable for oor temperature control only.
Dual temperature control (ALL): Temperature control
based on built-in internal temperature sensor and external
temperature sensor (over temperature protection). Suitable
for detection of room temperature and oor temperature
monitoring. If the external sensor is over temperature, the
thermostat will shut down the heater.
When the setting is IN or ALL the main display shows air or
room temperature. When the thermostat is set in OUT mode,
the oor icon will be lit and the main screen will display oor
temperature.

SETTINGS DISPLAY ADJUSTMENT RANGE
DEFAULT
Temperature
calibraon
Adj -5°C to +5°C -2.5°C
Schedule mode PrG
5 + 2 / 6 + 1 / 7
5 + 2: Monday to Friday set the same; Saturday to Sunday set the same
6 + 1: Monday to Saturday set the same; Sunday set individually
7: Monday to Sunday set the same
5 + 2
Anfreeze LtP ON: Enable OFF: Disable OFF
Sensor /
Temperature Control
mode
Sen
IN – Built-in internal control – room sensor only
OUT – External control, oor sensor only
ALL – Dual temperature control; internal room temperature sensor and
external sensor with overheang protecon
IN
External
temperature limiter
tOP
40 to 80°C
When the sensor mode is set to ALL this sets a temperature limit on the
external sensor for overheang protecon
50°C
Internal sensor
hysteresis
dt0
0.5°C to 4°C - For example, if the
internal sensor is set to 20°C with the default set to 1°C, then at higher
than 21°C the heater turns o and at lower than 20°C the heater turns on
1°C
External sensor
hysteresis
dt1 0.5°C to 5°C 3°C
Backlight status bL
ON – Always on
OFF – Auto turn o aer 5 seconds
OFF
Status at re-power Sat
ON – The same as previous
OFF – O status every me
Keep this seng as default - OFF
OFF
Restore factory
sengs
deF Restore to factory sengs
ADVANCED FUNCTION SETTINGS
Press ON/OFF until the sub-display shows OFF,
press ON/OFF again, then immediately press Menu.
You are now in the Advanced Function Settings. The first
display will be Adj. Press Menu to navigate through the
menu items. Use UP or DOWN to change the settings.
To save the data go through the functions then exit at any
time by pressing the menu key.
WARNING: The settings are used to set some important
parameters of the system and the thermostat has already
been debugged and tested by professionals, there is no
need to reset.
Do not make any improper modifications and permit
changes only by a qualified person.
PROBLEMS AND SOLUTIONS
There is no display
a) Check power supply to thermostat.
b) Check the thermostat is wired as the wiring diagram on the
back side of the thermostat.
Display ruptured
a) Display has been subjected to abuse with hard objects or
sudden force.
Display a black screen
a) If the display surface temperature is too high. Please note
whether there is a heater nearby and if so, remove.
Displays ER0 or ER1
a) ER0: Built-in sensor is damaged. Avoid damage to the
small black dot sensor which can be found behind the
temperature sensing window of the main thermostat
panel.
b) ER1: The system is set in dual Temperature Control mode
(ALL) and the external sensor is not connected or is
damaged.
Missing segments from numbers or letters on LCD
Check whether the steel plate has been deformed during
installation. If deformed, correct it.
Large deviation of measured temperature and the
actual temperature
a) The thermostat should be installed in a ventilated room
and never in direct contact with sunlight or localised
heaters.
b) Check terminal connections, including the sensor.
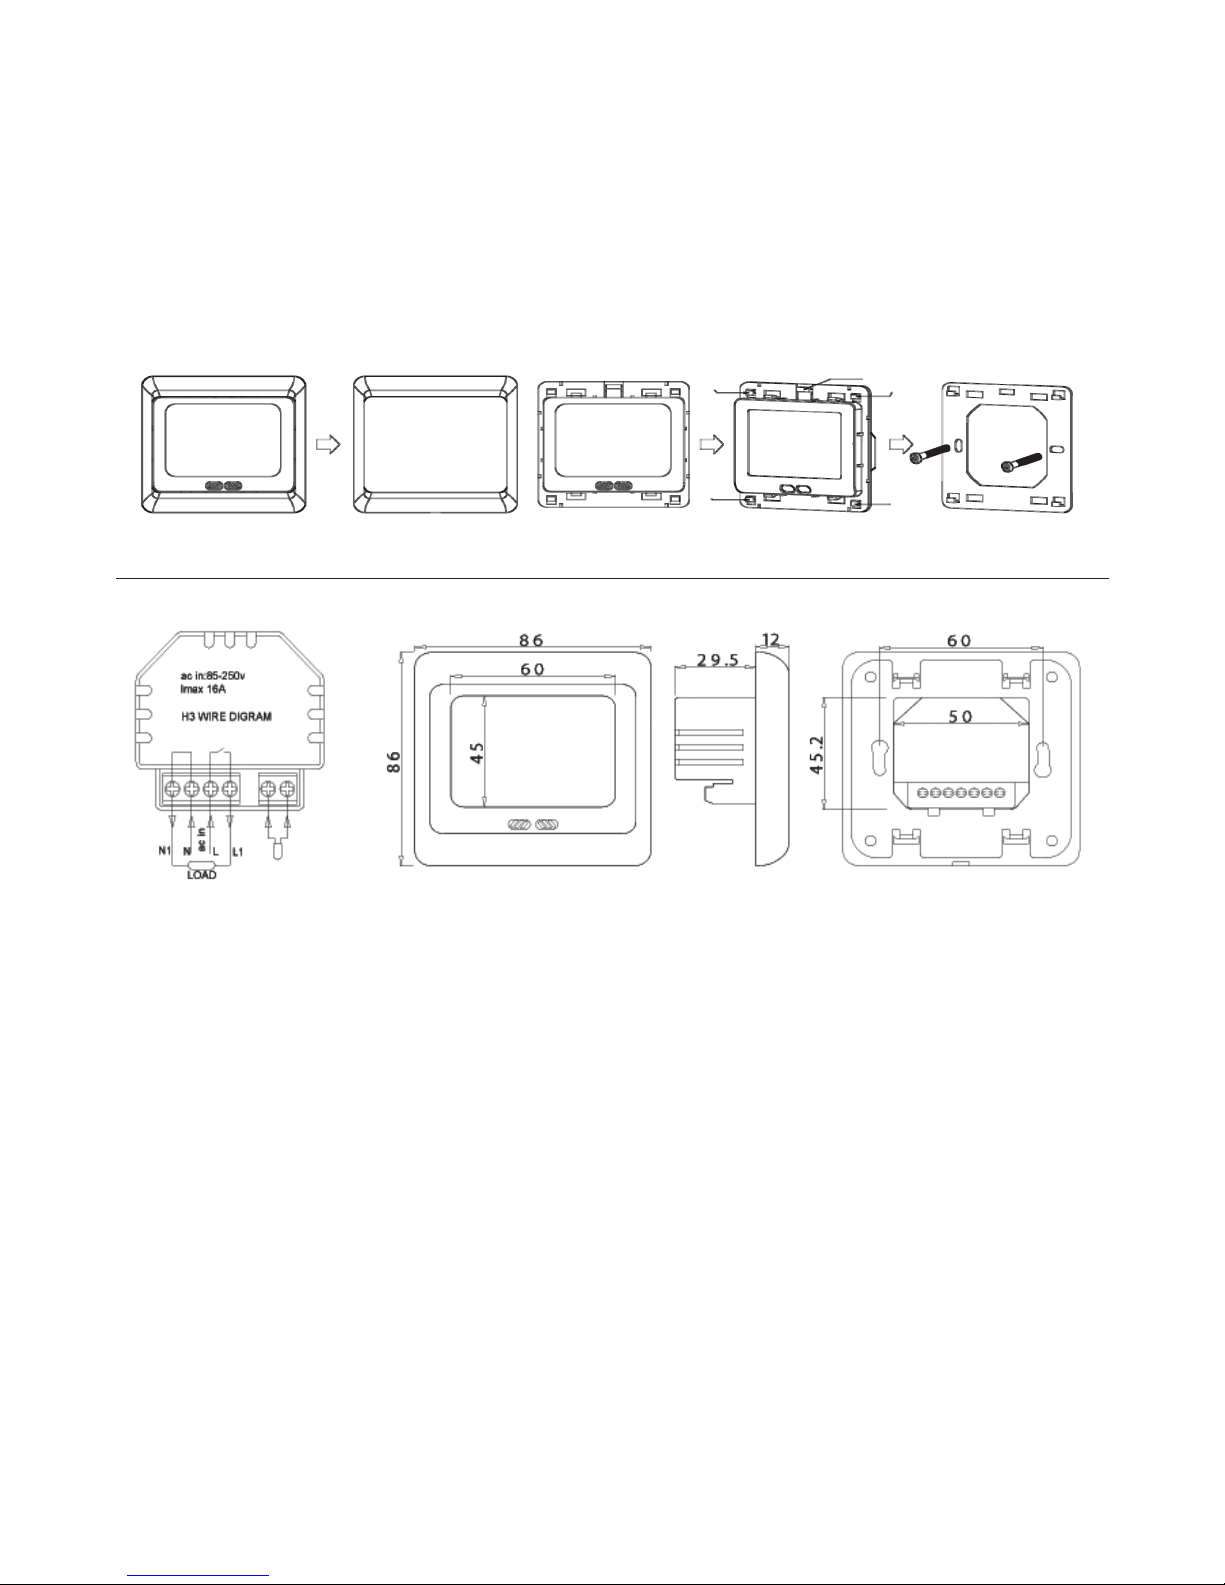
INSTALLATION
A: Hook B: Central xing lug
1. Remove the bezel to start the installation by pushing the
bezel away from the main body of the thermostat
2. Pull outwards on the central xing lug and at the same
time lift the whole body assembly so that the hooks on
the steel back plate can be released. The steel back plate
can then be removed
3. Screw the steel back plate into the back box but not too
tight to prevent deformation of the steel plate
4. Make the wire connections into the back of the
thermostat as shown in the H3 wire diagram
5. Align the four hooks and with a press down movement
click the main body of the thermostat back in position on
the steel back plate
6. Replace the bezel and the installation is complete
External
Sensor
A
A
A
B
A
 Loading...