

Page 1

INSTRUCTION MANUAL
AEROFLUX AP
DRONE with camera
TM
WWW.PROTOCOLNY.COM
Page 2
Thank you for your purchase of Protocol’s AeroFlux AP With
Camera. You are about to experience the best of what remote
control ight has to oer. We strongly recommend that you
take the time to read this manual thoroughly. It contains many
tips and instructions on how to get the most out of this aircraft
and maintain it for a long life.
As with any aircraft, this is a precision ying machine. Treat it
well and enjoy all the fun it has to oer, ight after ight.
THANK YOU.
Page 3
TABLE OF CONTENTS
01 Safety & Precautions
02 Parts
04 Remote Battery Installation
05 Installing the Blade Guard & Landing Gear
06 Charging the Drone
07 Power-On Procedure
08 Operation
10 Speed Modes
11 Trim Adjustment
12 Troubleshooting
13 Flying Outdoors
14 Shooting Photo/Video
15 Replacement Parts & Limited Warranty
�
Read and follow instructions on how to synchronize electronics
before each flight.
�
To prolong engine life, allow a cool-down period between flights.
1
Page 4
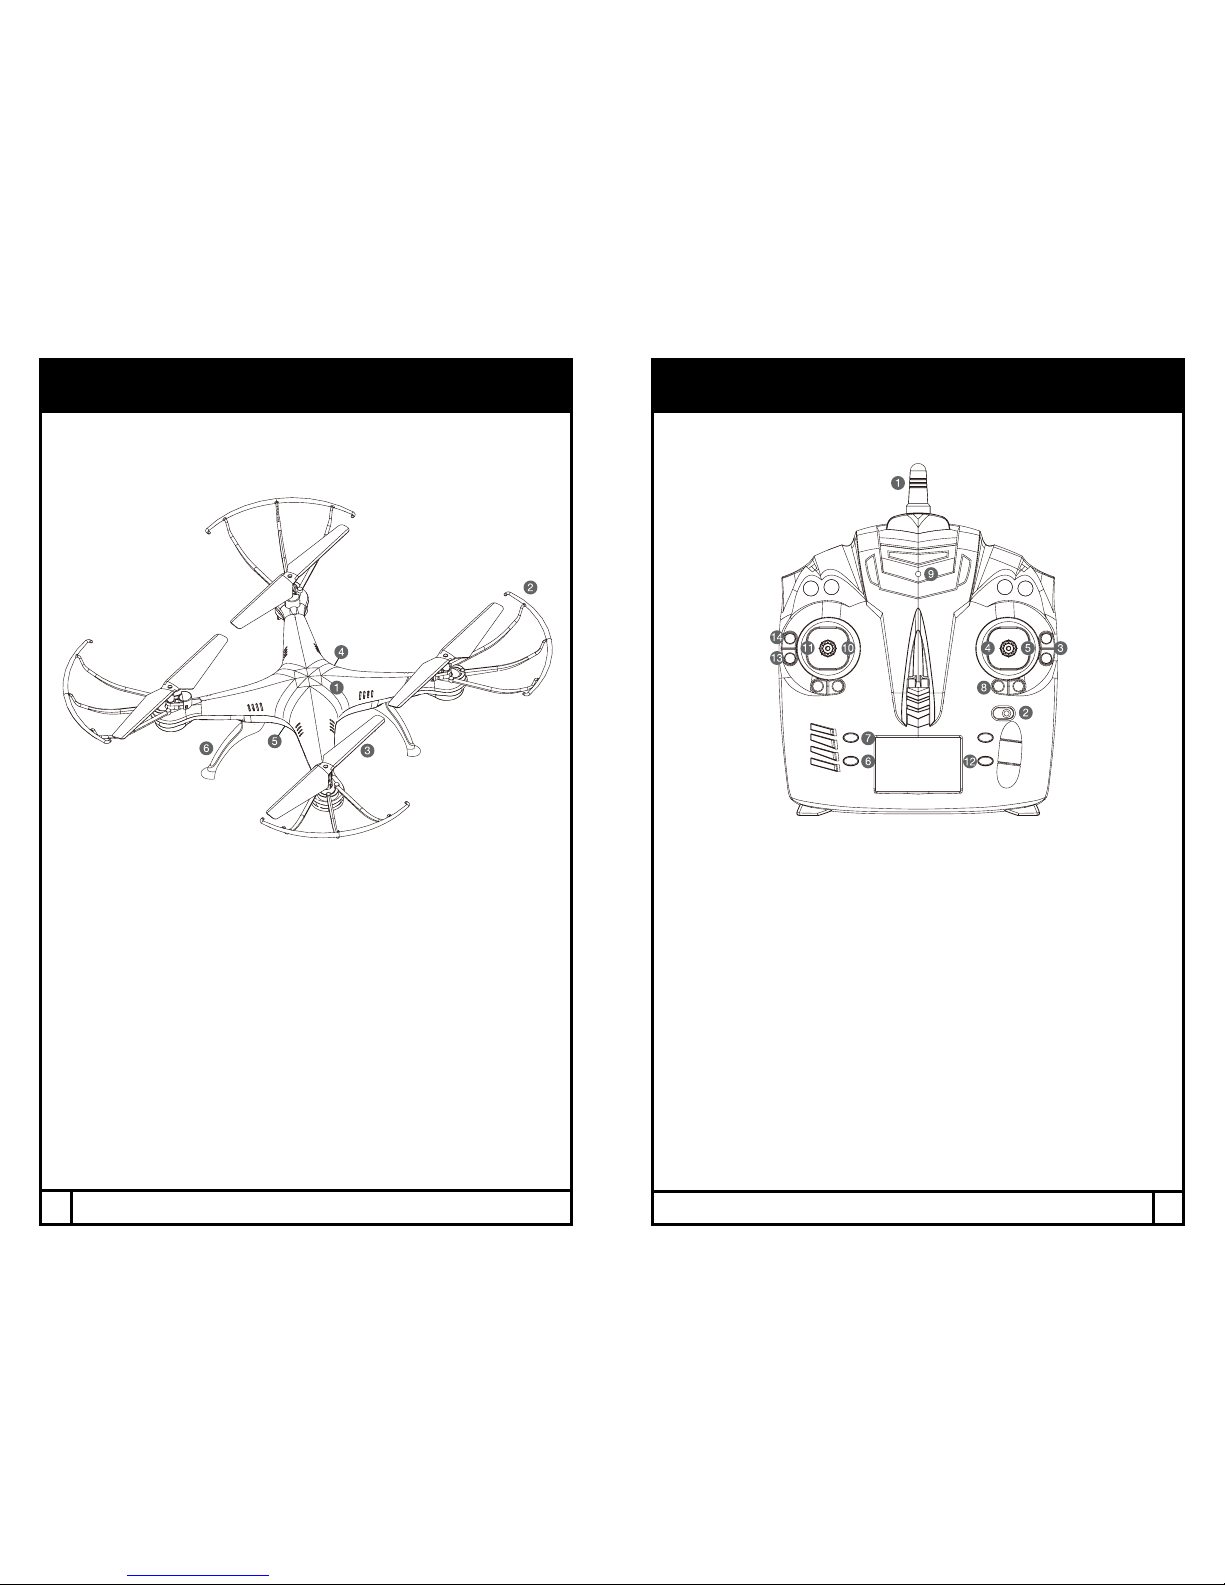
PARTSPARTS
DRONE
1. Canopy
2. Blade Guard
3. Blade
4. Battery Compartment
5. Camera
6. Landing Gear
2
3
REMOTE
1. 2.4G Antenna
2. Power Switch
3. Trim Forward/Backward
4. Forward/Backward
5. Bank Left/Right
6. Video
7. Photo
8. Trim Bank Left/Right
9. Indicator Light
10. Throttle
11. Turn Left/Right
12. Speed Mode Selector
13. Take Off/Landing
14. Engine Start/Stop
Page 5
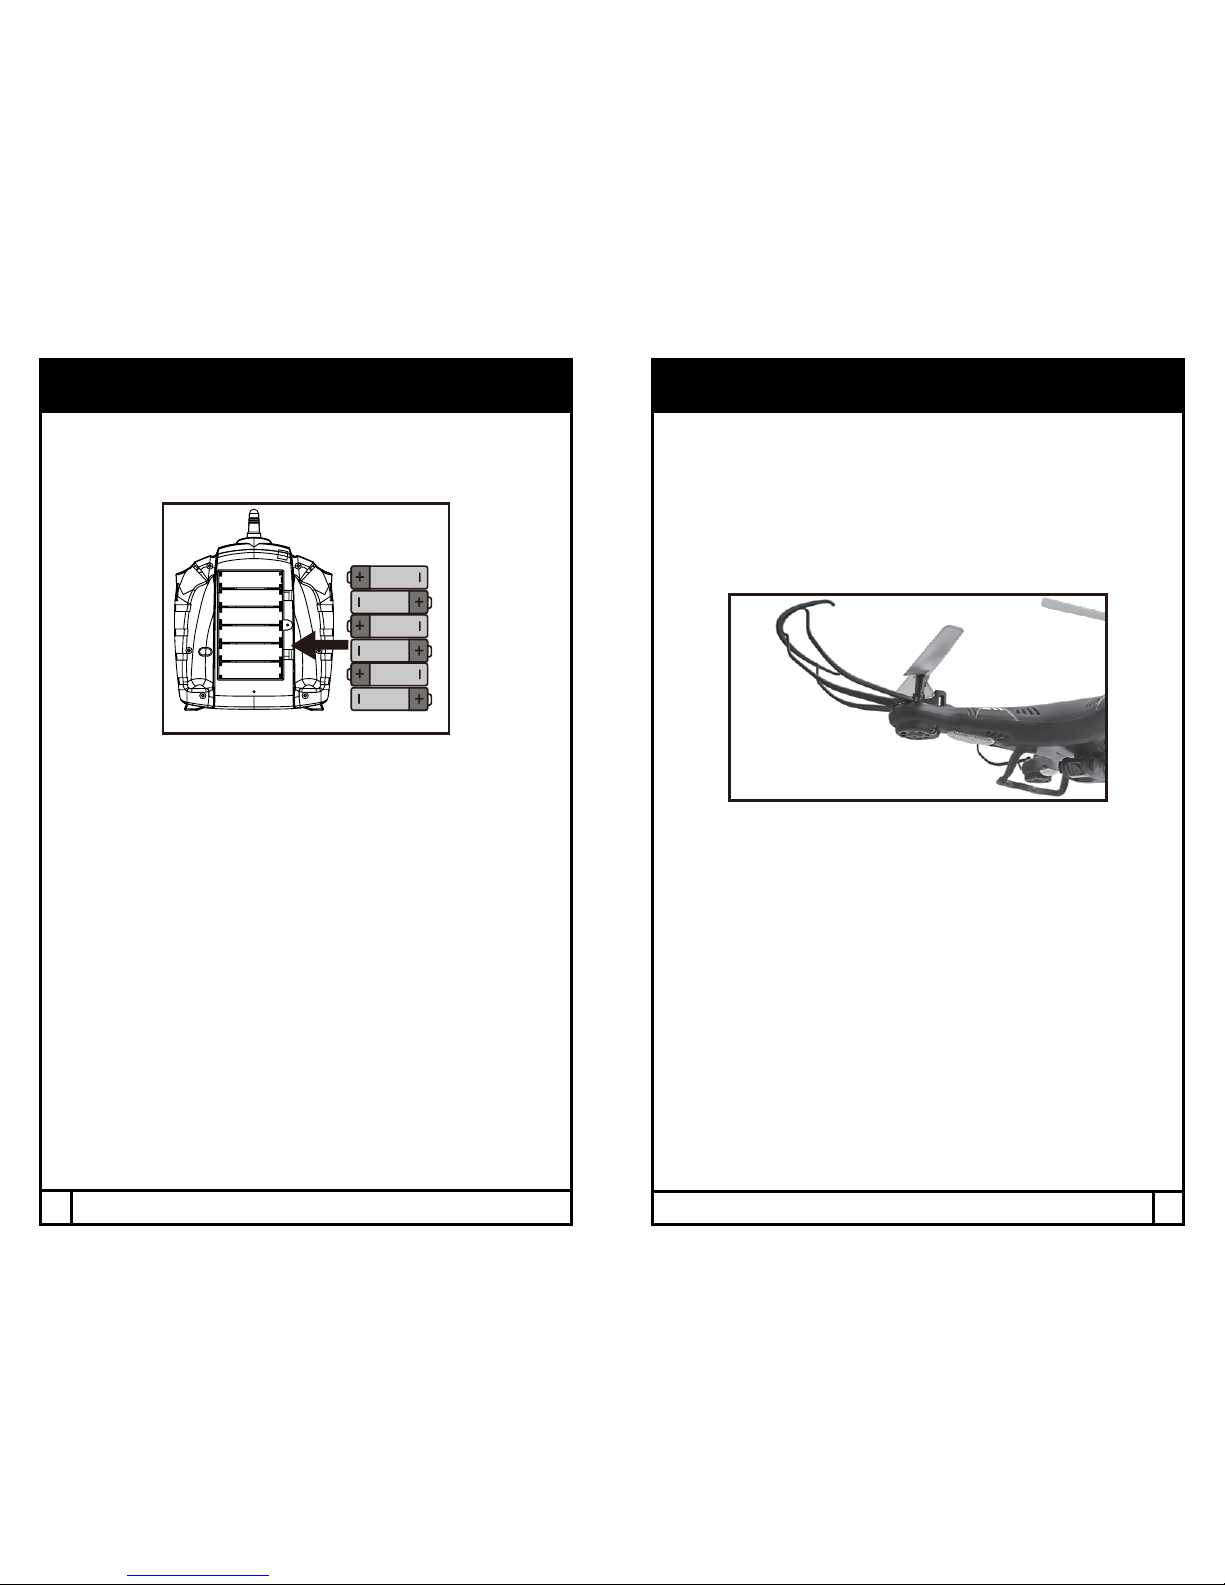
If not already installed, install the included blade guards to every corner by
snapping them in and tighten the screws at the base. Make sure the blade
guards are secure and snug.
NOTE: Loose blade guards may interfere with propeller movement and cause
a crash. If the drone crashes, double check to make sure the blade guard is
not loose. If it is, re-tighten before ying.
Install the included landing gear.
INSTALLING THE BLADE GUARD & LANDING GEAR
REMOTE BATTERY INSTALLATION
1. Install batteries carefully.
2. Do not mix old and new batteries.
3. Do not mix dierent types of batteries.
Unscrew and remove battery cover from controller. Insert 6 x ‘AA’ batteries
according to indicated polarities. Replace and screw back in battery cover.
4
5
Page 6
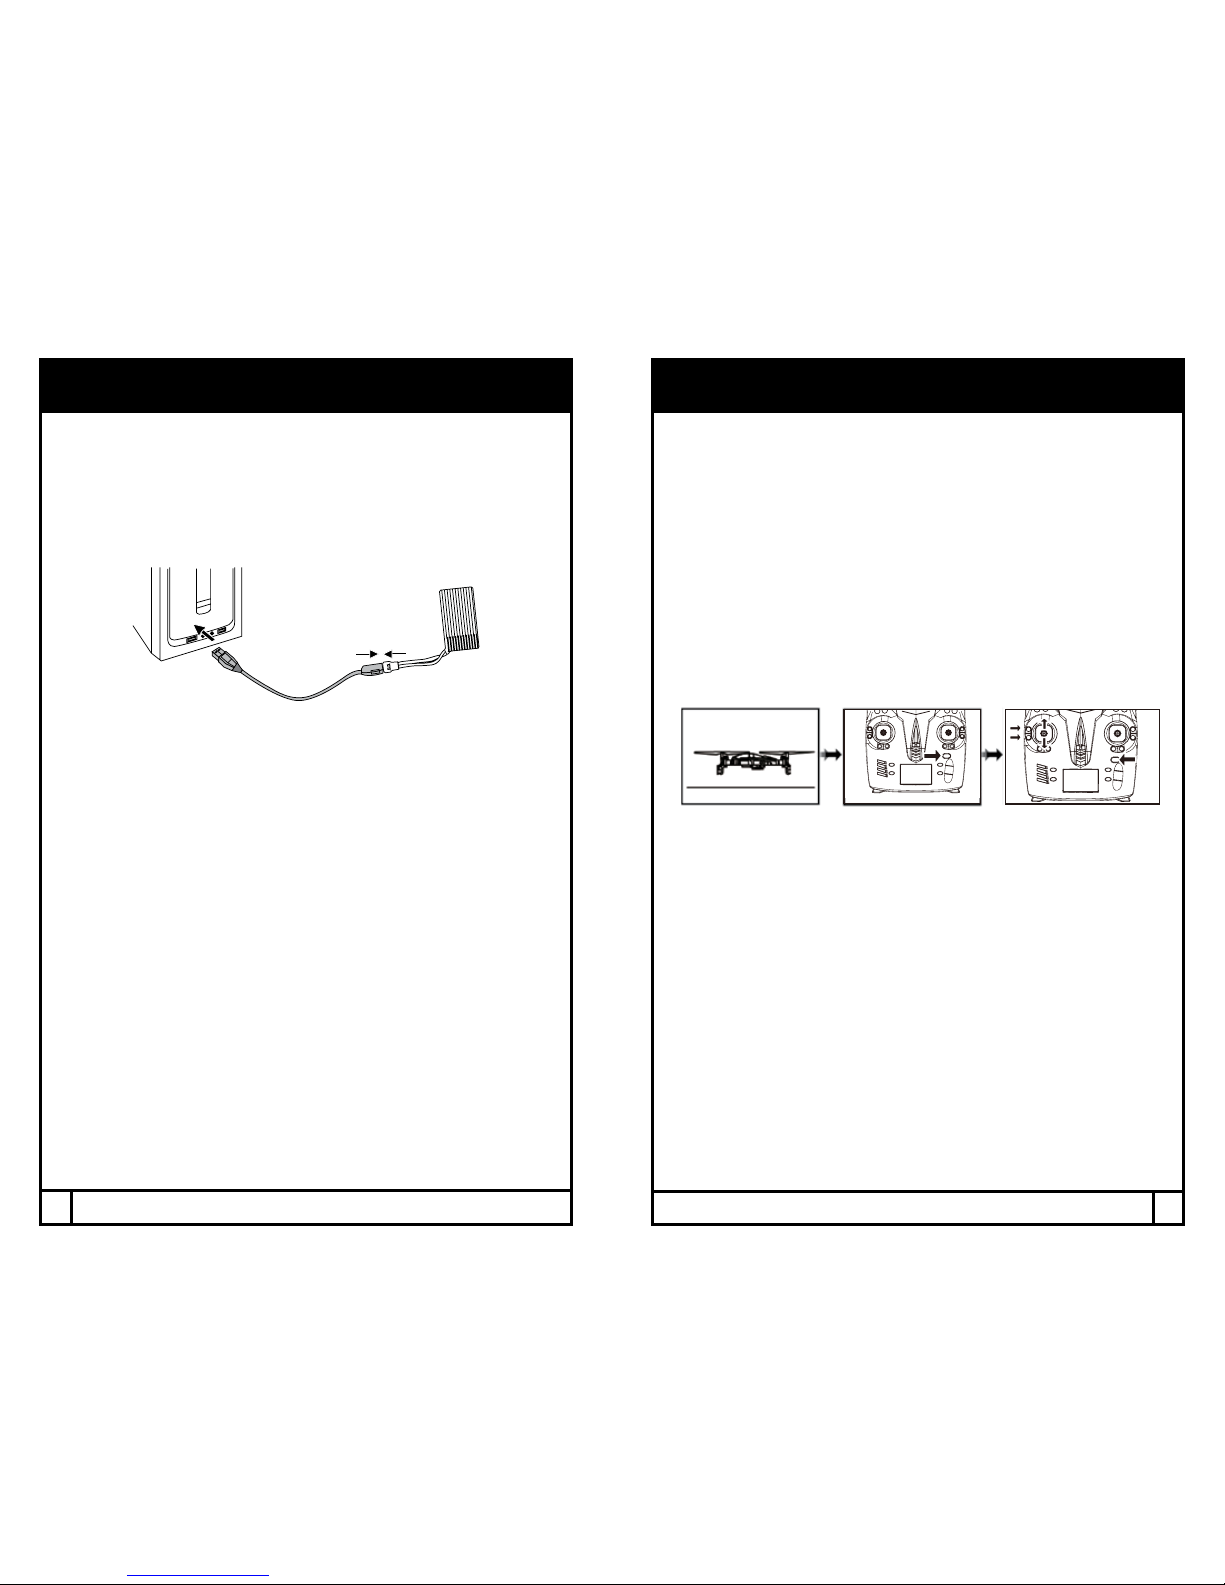
1. Make sure the drone is turned o.
2. Open the battery cover and remove the battery.
3. Connect the USB charging cable to the battery.
4. Plug the charger into a USB port. The USB light will turn o while
charging and will turn on once fully charged.
5. Plug the battery back into the drone and close the battery cover.
CHARGING THE DRONE BATTERY
CAUTION WHEN CHARGING
1. When charging, place product on a dry, well-ventilated surface and
keep away from heat sources.
2. Always use adult supervision while charging.
3. In order to increase battery longevity, avoid repeat charging and
excessive discharging.
4. As battery temperature is high immediately after ight, charge after
cooling down for higher eciency.
5. Do not strike or subject battery to hard impacts or sharp surfaces.
6. Do not use any other charger than that which is supplied with
this item.
7. Do not use or leave battery near a heat source such as re or space
heater; exposure to heat may result in reduced performance or in
some cases dangerous conditions.
8. If battery is left in charging state for an extended period of time after
being fully charged, the battery may automatically discharge.
9. Never leave the battery unattended during charging.
10. Do not disassemble battery.
11. Do not submerge battery in water.
Charging time: 90 minutes --- Flying time: approximately 7 minutes
*Battery: Li-Po, 3.7V, 550mAh
If you purchased extra batteries, allow the engines to cool between ights
in order to prolong engine life.
POWER-ON PROCEDURE
NOTE
1. If the AeroFlux AP and the remote do not sync after following the
checklist, reverse steps 1 and 2 of the process. Turn the remote and
the drone o. Then, turn on the remote rst and then the drone.
2. Turn on the controller; if, after 30 seconds, it has not recognized the
drone, turn o the controller to retry synchronization.
3. If the AeroFlux AP is unsteady in ight, it may not have been
able to calibrate horizontally. Power down both drone and remote
and restart pre-ight procedure.
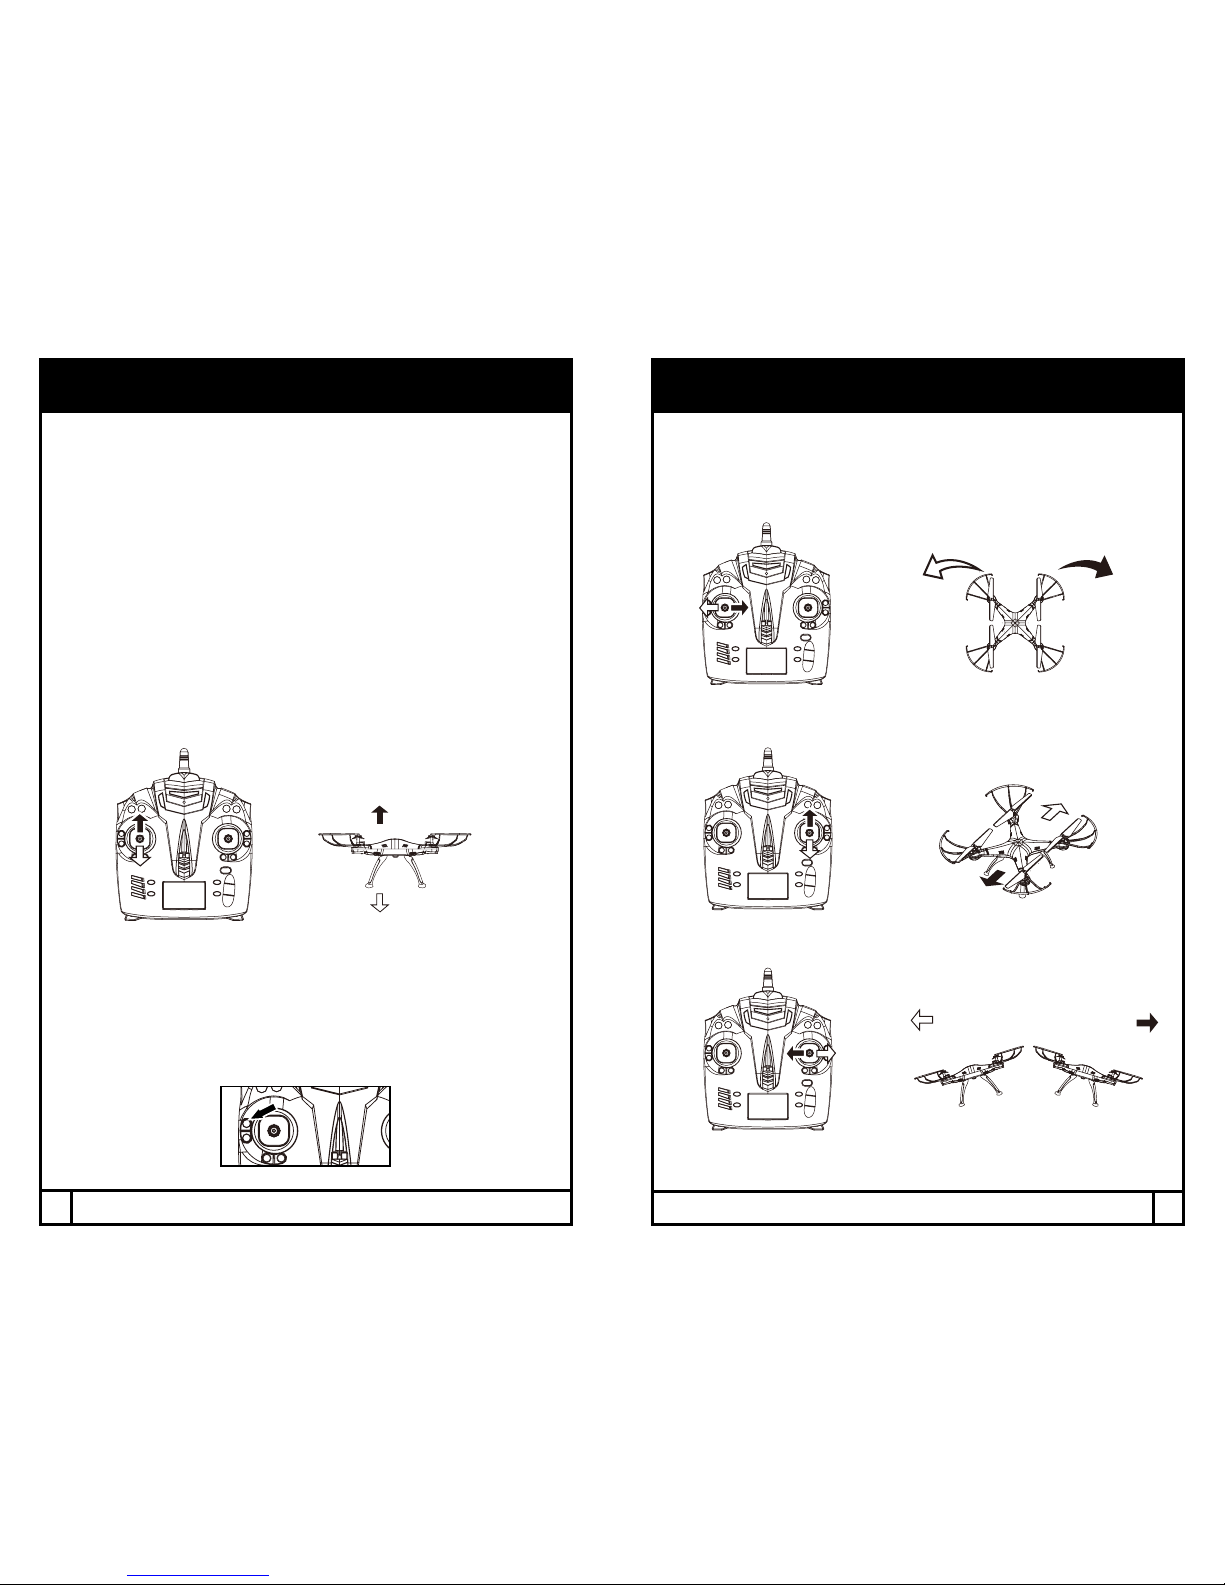
1. Turn on the drone and place it on an even surface.
2. Turn on the remote control.
3. Both indicators on the drone and the remote will ash while they
are syncing.
4. Push the throttle up and then down to sync. You will hear two beeps and
the lights will go steady after a few seconds.
Tip: When syncing your drone keep it in a horizontal position for
stable ight.
6
7
Page 7
OPERATION: FLYING THE DRONE
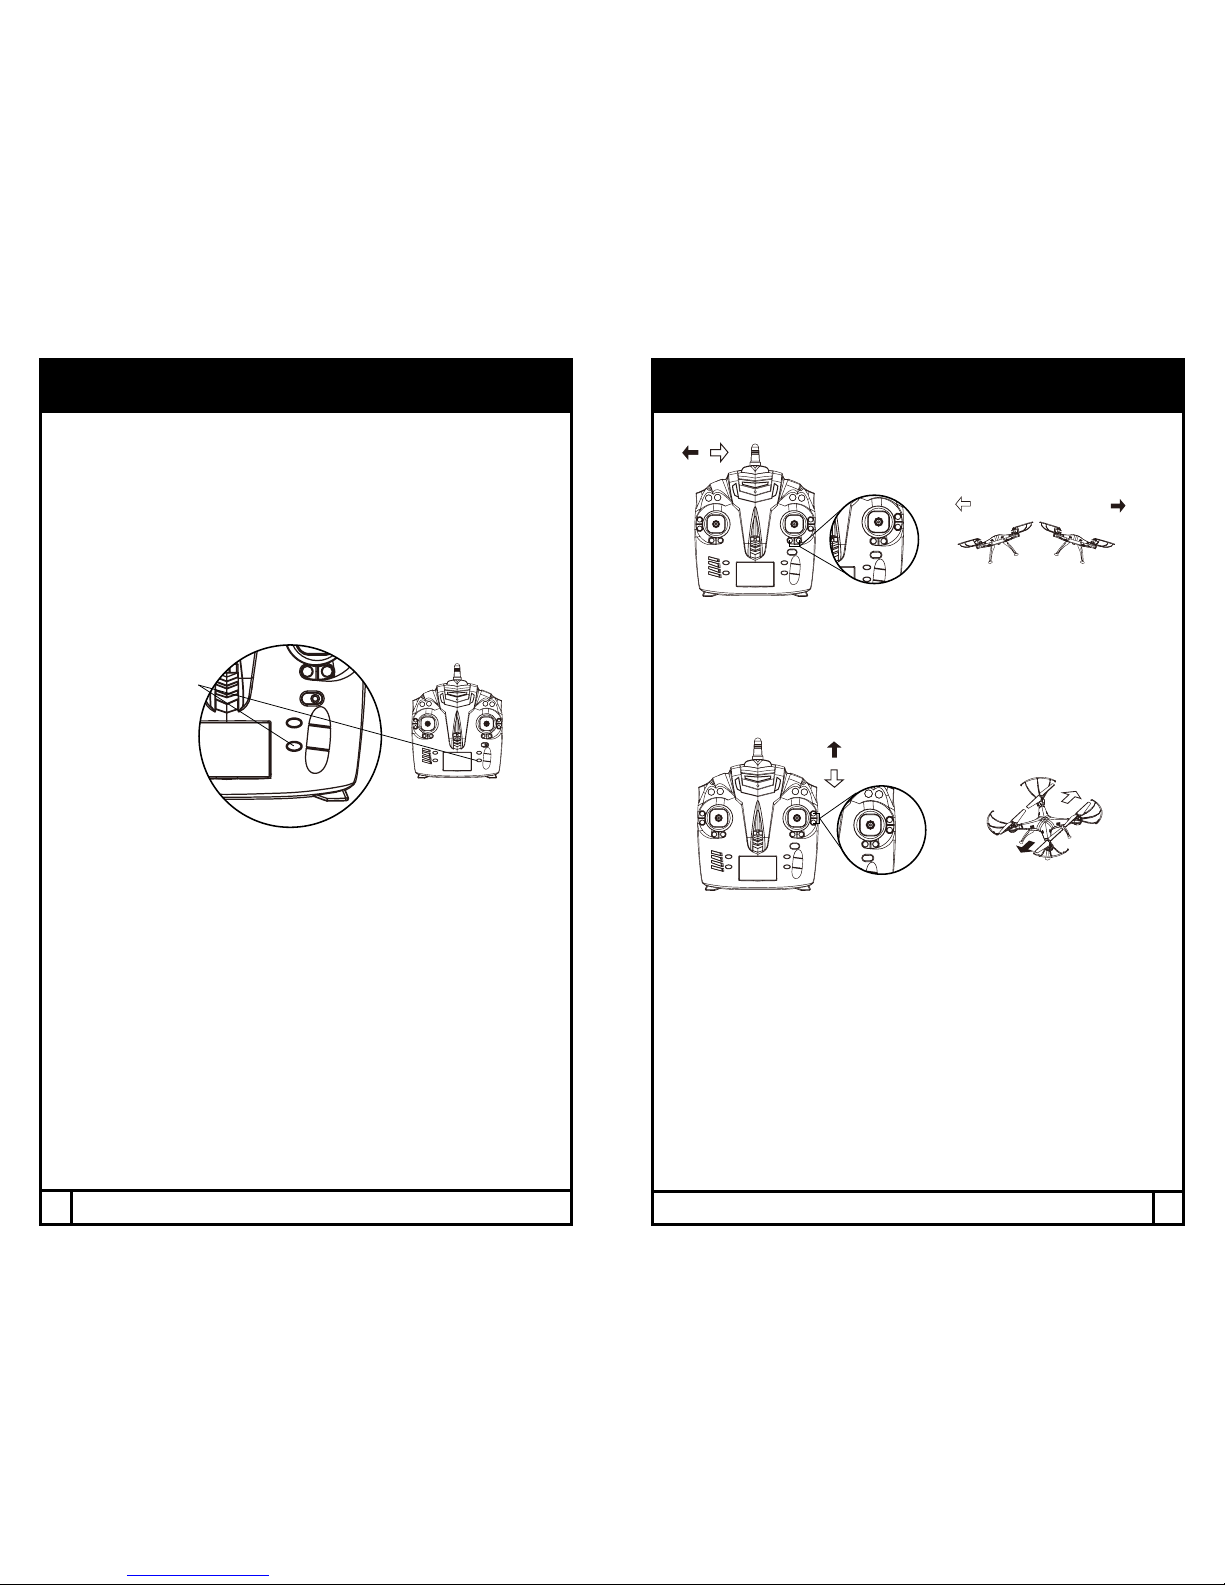
Pull the throttle left or right,
the drone turns to the left or right.
STARTING THE ENGINE; ENGINE IDLE
1. After synchronizing the drone, press the engine start button to go into
Idle mode. The blades will rotate but the drone will not lift.
TAKE–OFF:
1. Press the take o button, release, and the drone will lift o and over a
few feet o the ground. Then gently advance the throttle to a desired
height and release. The drone will hover at that height.
OR
2. From Idle mode, gently advance the throttle up to a desired height and
release. The drone will hover at that height.
LANDING:
1. Press the landing button to lower the drone to the ground.
OR
2. Push down on the throttle until the drone is on the ground.
Push the direction lever up or down,
the drone ies forward or backward.
Pull the direction lever to the left or right,
the drone banks to the left or right.
8
9
FIRST TIME FLYERS!!! TAKE YOUR TIME! GO SLOW!
Practice hovering until you are comfortable with ight before attempting
any other maneuvers. Make small movements letting the stick return to
the center. If you start to lose control, don’t panic. Just press land.
OPERATION: FLYING THE DRONE
UP
DOWN
BACKWARD
FORWARD
LEFT MOVEMENT RIGHT MOVEMENT
LEFT ROTATION RIGHT ROTATION
NOTE:
- EmergencyShutO:Wheninight,presstheEngine
StopButtonandthedronewillshuto.
* The drone may drift a bit, especially in the rst 30 seconds until the
altitude sensor gets a good x on the position. Some drift is normal.
Page 8
SPEED MODES
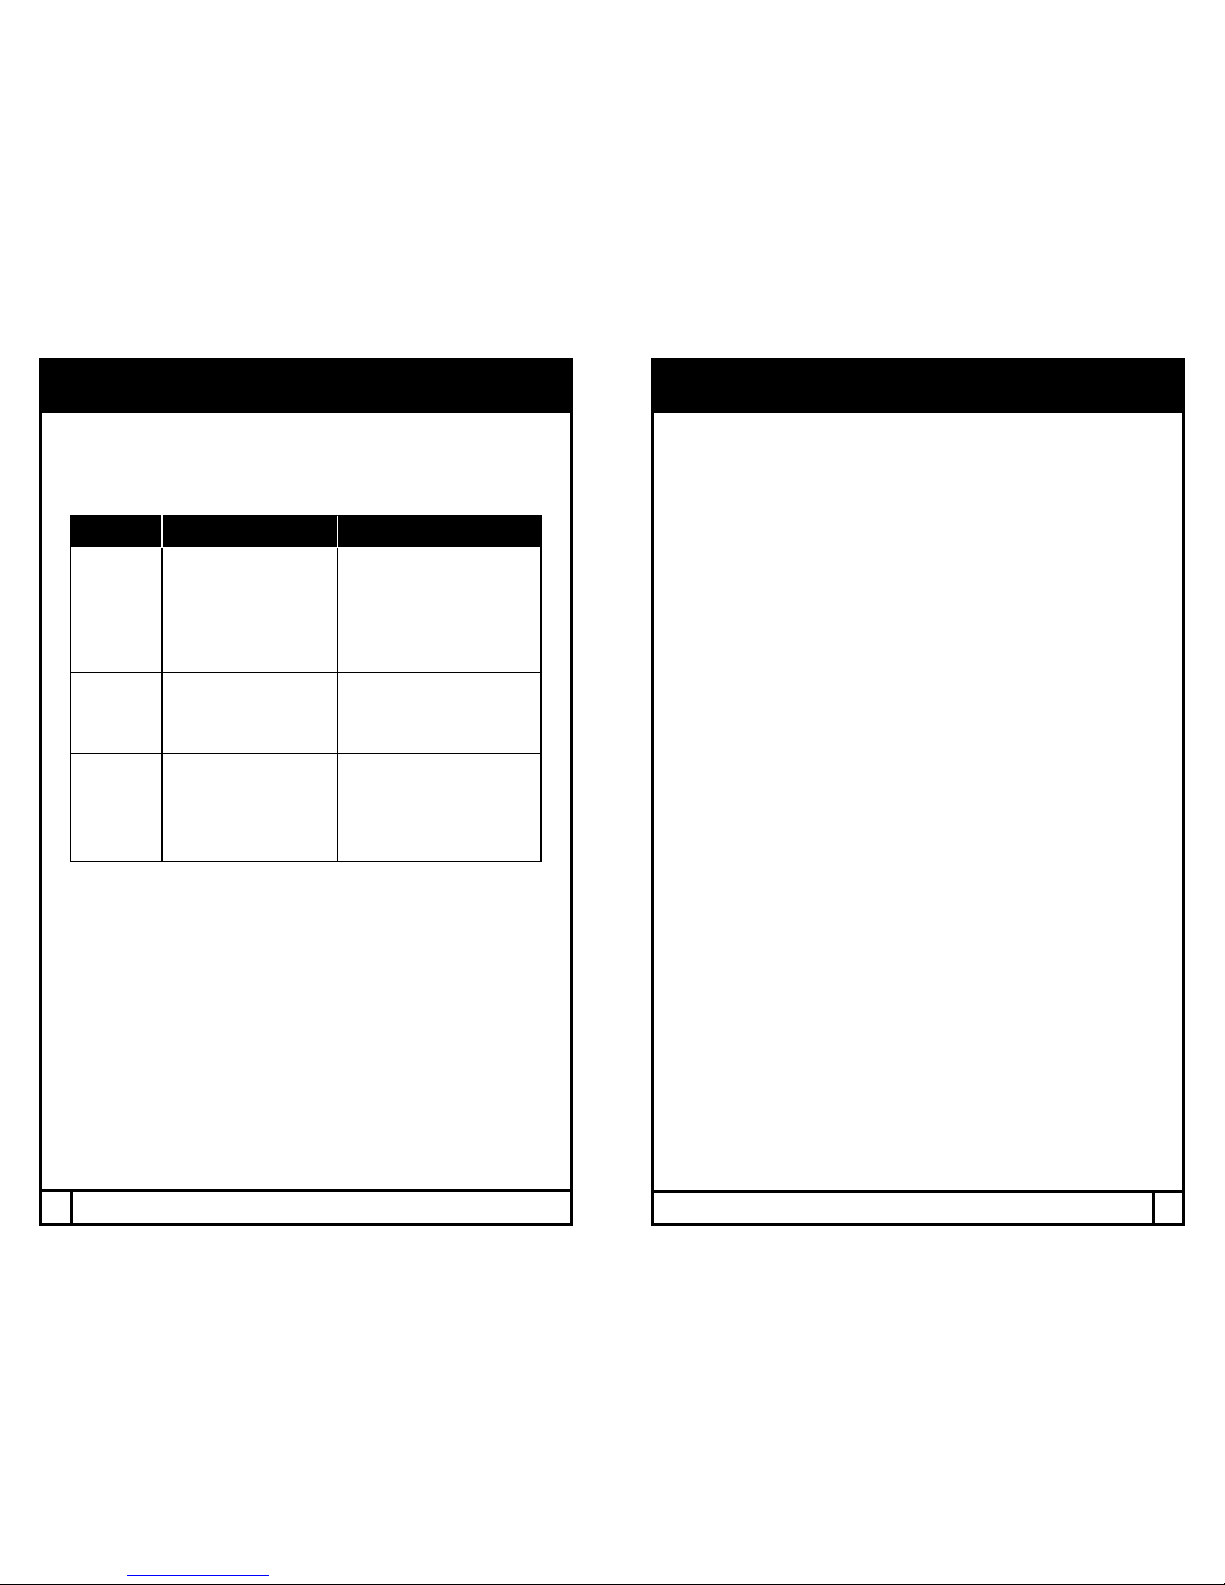
The AeroFlux AP features multiple speed modes. Choose the speed
based on ight experience and level of comfort. At higher speeds, the
drone will pitch more than at lower speeds. AeroFlux AP is quite fast
at its highest speed and requires more piloting skills to y competently.
For safety take time to develop advanced skills by practicing at lower
speeds rst. Press the Speed +/- button to change the speed mode.
The remote control indicator will beep once at slowest speed mode and
multiple times as speed mode is increased.
*Some models have up to four speeds. 4 beeps indicate maximum
speed. Press again to cycle back to slow speed (1 beep.)
TRIM ADJUSTMENT
SIDEWAYS TRIM
When the drone drifts to the left or right side unintentionally, you can
correct it by pressing the trim button in the opposite direction until it
evens out.
FORWARD/BACKWARD TRIM
When the drone drifts forward/backward unintentionally, you can correct it
by pressing the trim button in the opposite direction until it evens out.
*NOTE: Trim adjustments are designed to counter drifts not caused by wind.
10
11
Speed Button
LEFT MOVEMENT RIGHT MOVEMENT
BACKWARD
FORWARD
Page 9
TROUBLESHOOTING
POSSIBLE CAUSESYMPTOM POTENTIAL SOLUTION
AeroFlux
AP does not
respond
1. Communication between
controller and aircraft was
not synchronized during
set up
2. Battery power depleted
on aircraft, controller or
both.
1. To synchronize, turn on aircraft
rst, place it on level ground, and
then turn on controller.
2. Charge aircraft and/or replace
batteries in controller.
Response to
control inputs
intermittent or
erratic
1. Controller battery power
nearly depleted.
1. Replace batteries in controller.
AeroFlux AP
will not hover
or strafe
correctly
1. The aircraft was not
on level ground during
synchronization.
2. Trim settings are incorrect.
1. Re-synchronize aircraft and
controller.
2. Reset the trim buttons on
the controller and re-trim ight
controls.
*Allow 15 minutes to pass between full ights as this will give the motors a
chance to cool down. Failure to do so could wear out and shorten the life
of the motors.
FLYING OUTDOORS
HOW TO PREVENT FLY AWAYS
To prevent “y-away” situations (where drones seem to y away out of
control) it is important to rst test and practice within close range before
letting the drone y too far away.
Each drone is designed to land if the radio signal is lost. (But, this should
not be considered a landing procedure or normal ight practice.) It is
important to know and test the range of your drone before ying. We
recommend turning on and syncing the drone and walking away while
testing the engines. Keep walking and testing until it is obvious when
you reach the point where the signal is not controlling the drone. This will
be the control limit for the conditions in which you are ying. Distance
does vary somewhat based on environmental and weather conditions,
so testing the limit is advised. Fly in a range that is good for easy visual
operation of the drone.
IFYOUCAN’TSEEYOURDRONE,THENYOUCAN’TCONTROL
YOUR DRONE.
Fly-aways are not covered by warranty as they are overwhelmingly
caused by pilot error.
12
13
* RE-CALIBRATING THE DRONE
If the drone does not y correctly even after adjusting the trim, you can
re-calibrate. Push the throttle to the lower left corner and direction lever to
the lower right corner and hold for 3 seconds. The lights will ash and then
go steady once calibrated.
Page 10

REPLACEMENT PARTS
Thank you for your purchase of Protocol’s AeroFluxAPwithCamera.
We know that accidents can sometimes happen and that is why we oer
spare parts kits on our website: www.ProtocolNY.com.
At Protocol, we’re dedicated to bringing you innovative and well-designed
products that make living fun and easy. We stand behind all of our products
and warrant this to be free from defects in workmanship and materials for 30
days from the date of purchase. The warranty does not cover transportation
damage, misuse, accident, or similar events. Specic legal rights pertaining
to this warranty may vary by state.
For service claims or questions please consult our website
www.ProtocolNY.com.
LIMITED WARRANTY
SHOOTING PHOTO/VIDEO
1. The memory card comes pre-inserted into the camera.
SHOOTING PHOTOS AND VIDEO
1. Turn on the drone and sync.
2. Photo: Push the Photo button and the camera will take a photo. The light
on the camera will ash once as it’s taking the picture.
3. Video: Push the Video button and the camera will begin to record. The
light on the camera will ash continuously while recording. Push the Video
button again and the camera will stop recording.
4. Press the memory card to unlock and remove. Plug it into the USB card
reader. Then plug the card reader into the USB port of your computer. If
you are using Windows, the USB will come up on the removable drive.
If you are using OS, then the USB will come up as “Untitled”.
5. Open the drive and then open the Video or Photo folders to access the .AVI
or JPEG les.
6. .AVI movies can be played in several dierent formats including Quicktime,
Windows Media Player, and RealPlayer.
WARNING: Never remove the card from the video camera while the drone is
turned on.
14
15
Page 11

 Loading...