

Page 1
www.nkprotelex.com
1
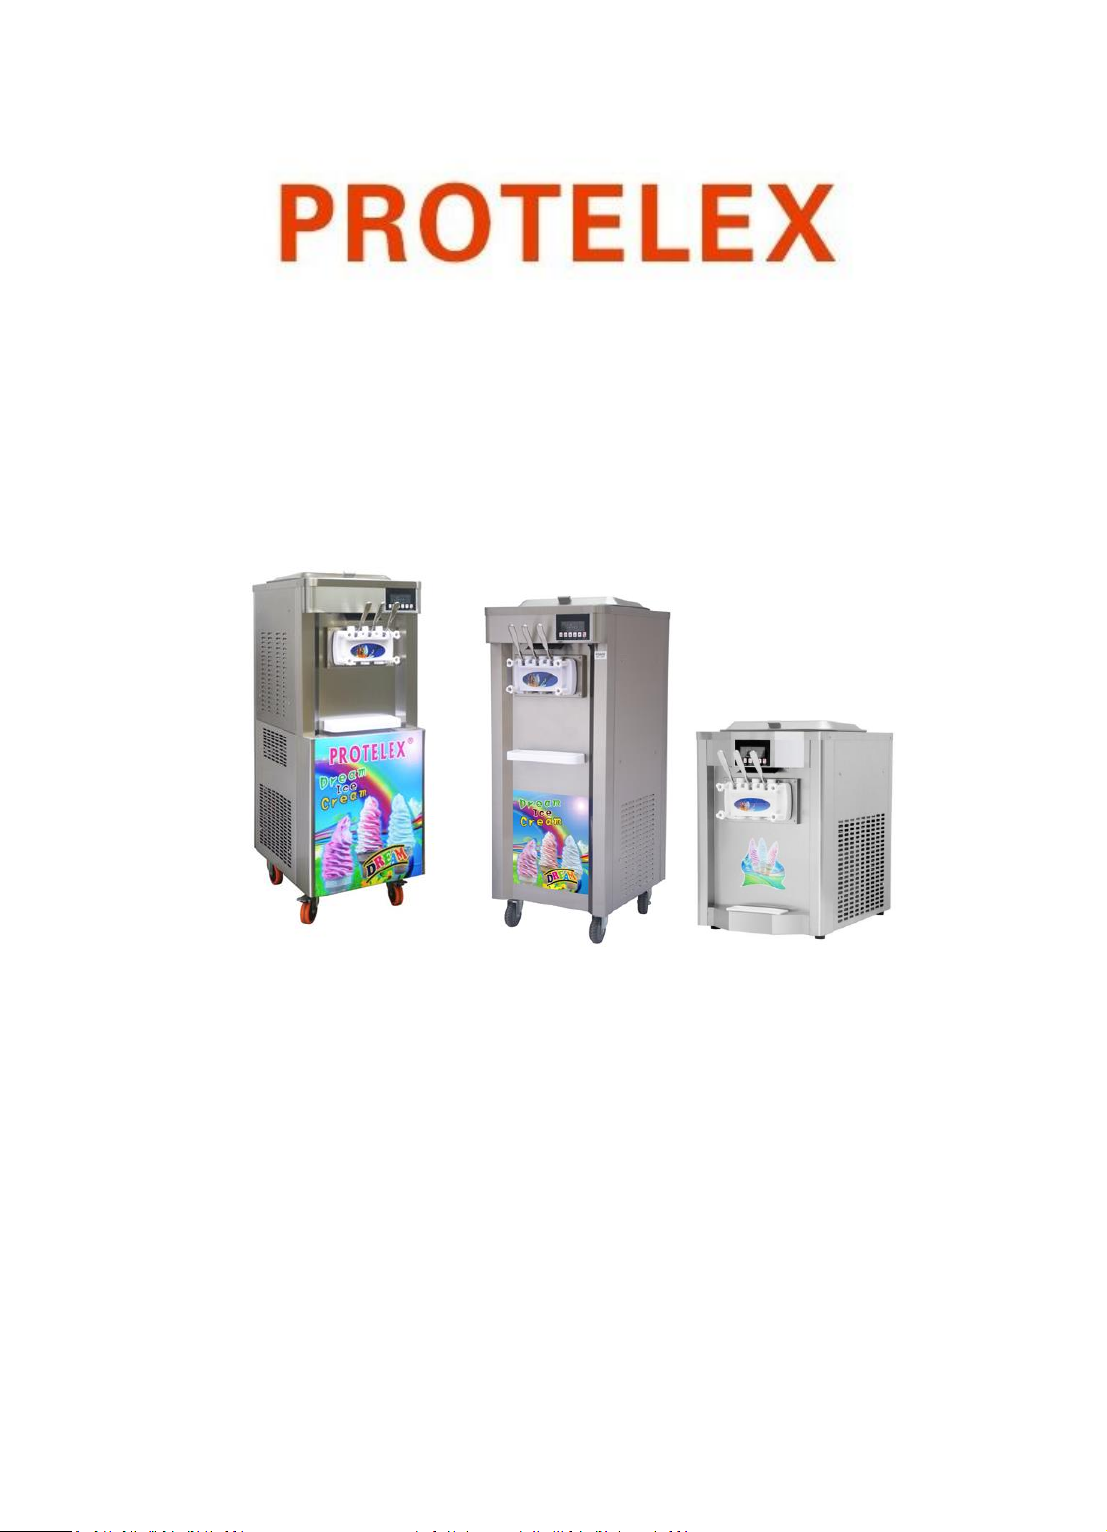
SOFT SERVE ICE CREAM MACHINE & FROZEN YOGURT MACHINE
OPERATION MANUAL
Designed in Germany from:
Engineer Jean Feuze Silatchom
Page 2
www.nkprotelex.com
2
Please read this Manual carefully before trying to operate the machine.
Thank you for your selection of our ice cream machine.
We produce a series of machines which is use of new generation designed on basis of
advanced refrigerating technology. The outward design is artistic and in good taste. All
compressors used for the machine are of international brand. Control system of
brand-new digital circuit renders operation easy and performance reliable.
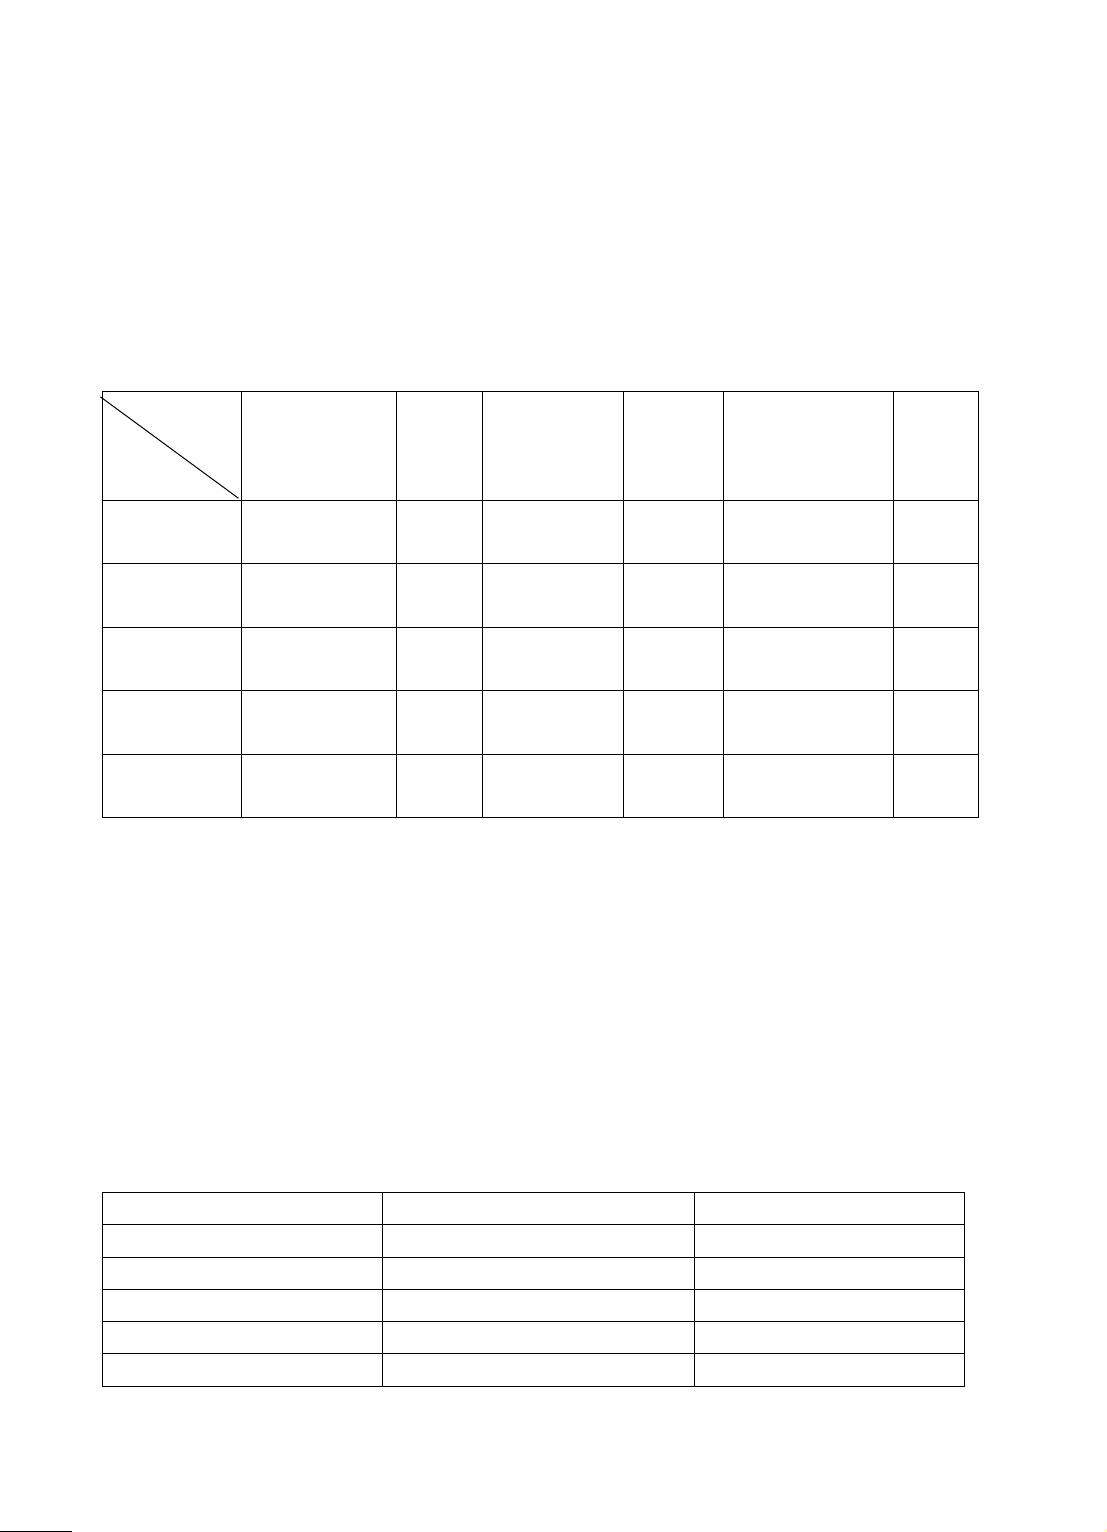
1.Technical Data
Soft Ice Cream Machine Series
Parameter
Model
Main Power
Rate
Power
(kW)
Refrigerant
output
L/H
Dimensions
(mm)
N.W.
(kg)
ICM-X19
110V/220V
50Hz/60Hz
2.2
R22/R404A
18-25
740x540x1380
140
ICM-X17
110V/220V
50Hz/60Hz
2.2
R22/R404A
18-25
720x540x800
120
ICM-X20
110V/220V
50Hz/60Hz
2.2
R22/R404A
18-25
740x540x1380
130
ICM-X22
110V/220V
50Hz/60Hz
2.2
R22/R404A
18-25
720x540x800
120
ICM-X25
110V/220V
50Hz/60Hz
2.5
R22/R404A
28-35
740x570x1450
160
Note:
1. The output of ice cream is measured under 25℃ environmental temperature and feed
stock temperature about 7℃ inside the basin (Hopper)
2. Output per hour is based on 60-70 grams per cups
3. Either R134A or R404A refrigerant can be used for all machines.
4. All models have two compressors.
The internal configuration and technical parameters of the machine are the same for all
models in the same series.
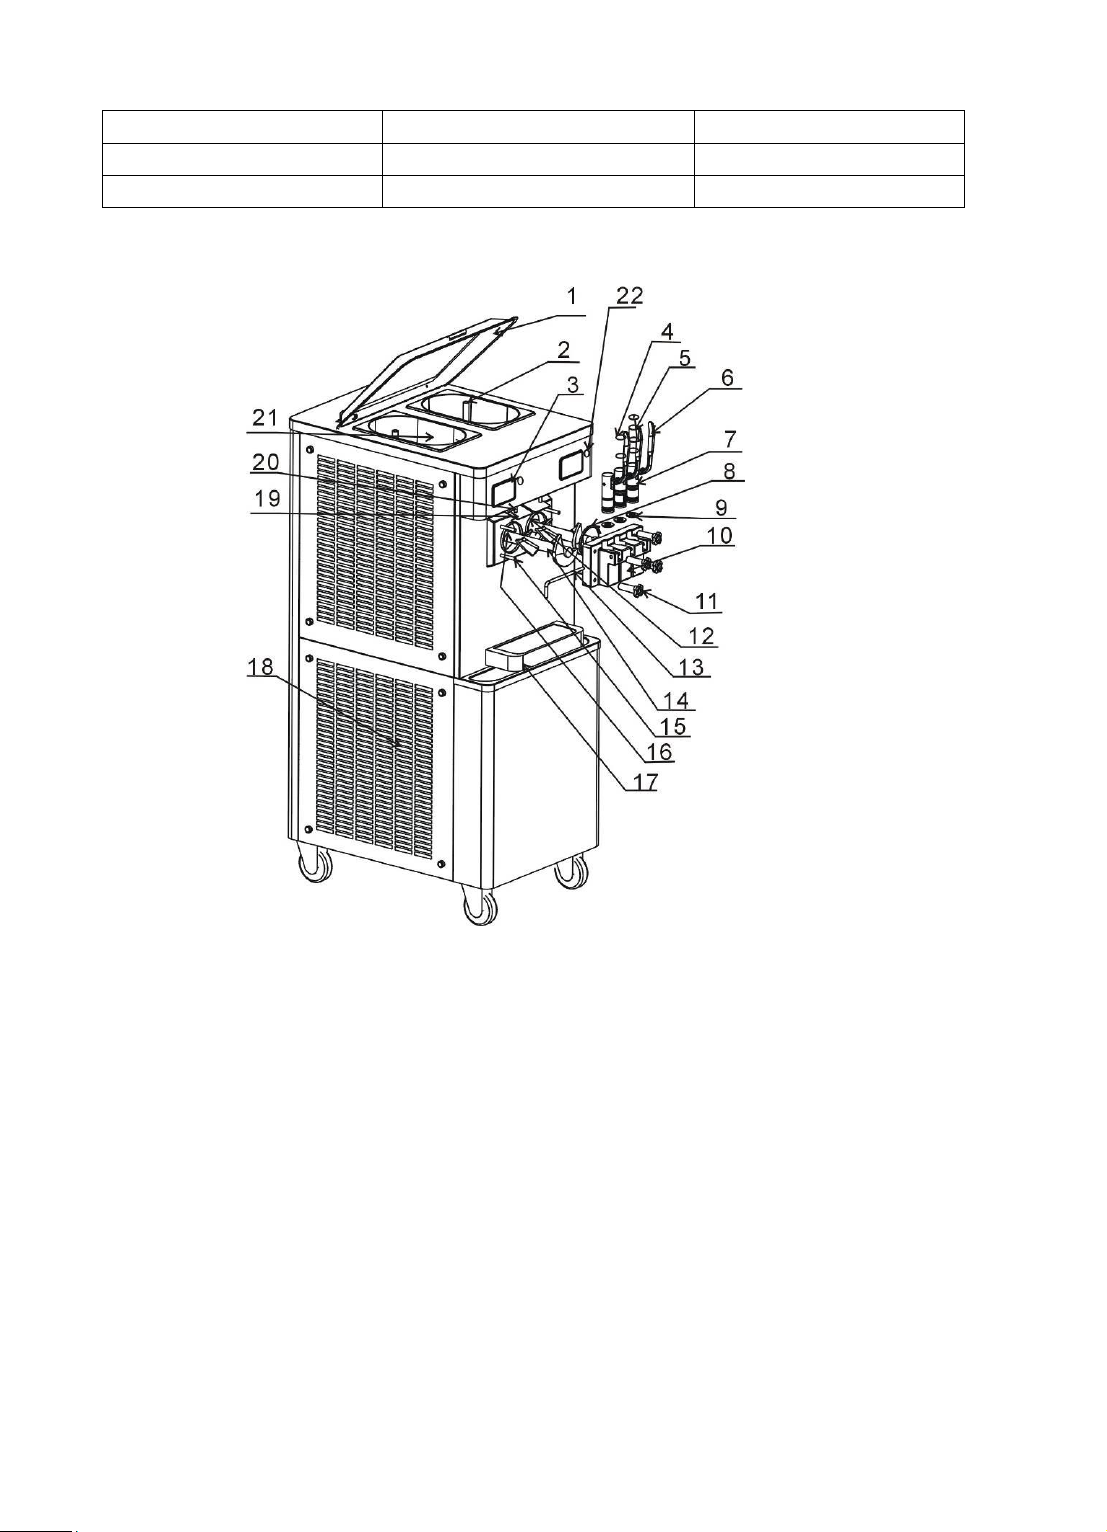
2. Schematic Structure
1. Top Cover
2. Expansion Tube
3. Control Panel
4. Piston Ring
5. Anti-cross-talk Piston Ring
6. Stainless steel Handle
7. Piston
8. Discharge Block-Drum Ring
9. Star Ring
10. Discharge Block Body
11. Plastic Nut
12.Plastic Deco-plate
13. Cross Bar
14.Stirer Shaft (Beater)
15.Discharge Block Bolt
16. Stirer Drum
17. Receive Plate
18. Hot Air Exhaust
Page 3
www.nkprotelex.com
3
(Freezer cylinder)
19. Proximity Switch Plate
20. Proximity Switch Pusher
21. Feed Basin (Hopper)
22. Electronic Lock Switch
Structure:
3. Precautions
Page 4
www.nkprotelex.com
4
Electricity
Install the earthling device according to
the National Security Standard for
electrical equipment
·Only use the feed line, method of Wiring
and equipment in conformity with the
National Security Standard for electrical
equipment.
· Be sure installing a short and leakage
protective device on the feed line.
Hygiene
·To use the machine without strict
disinfection may pollute the food which
will be dangerous to your health.
·Always keep the machine in clean
conditions.
Remove the deteriorated material
immediately away from the machine.
·Washing and disinfecting procedure must
strictly follow this Manual.
Installation
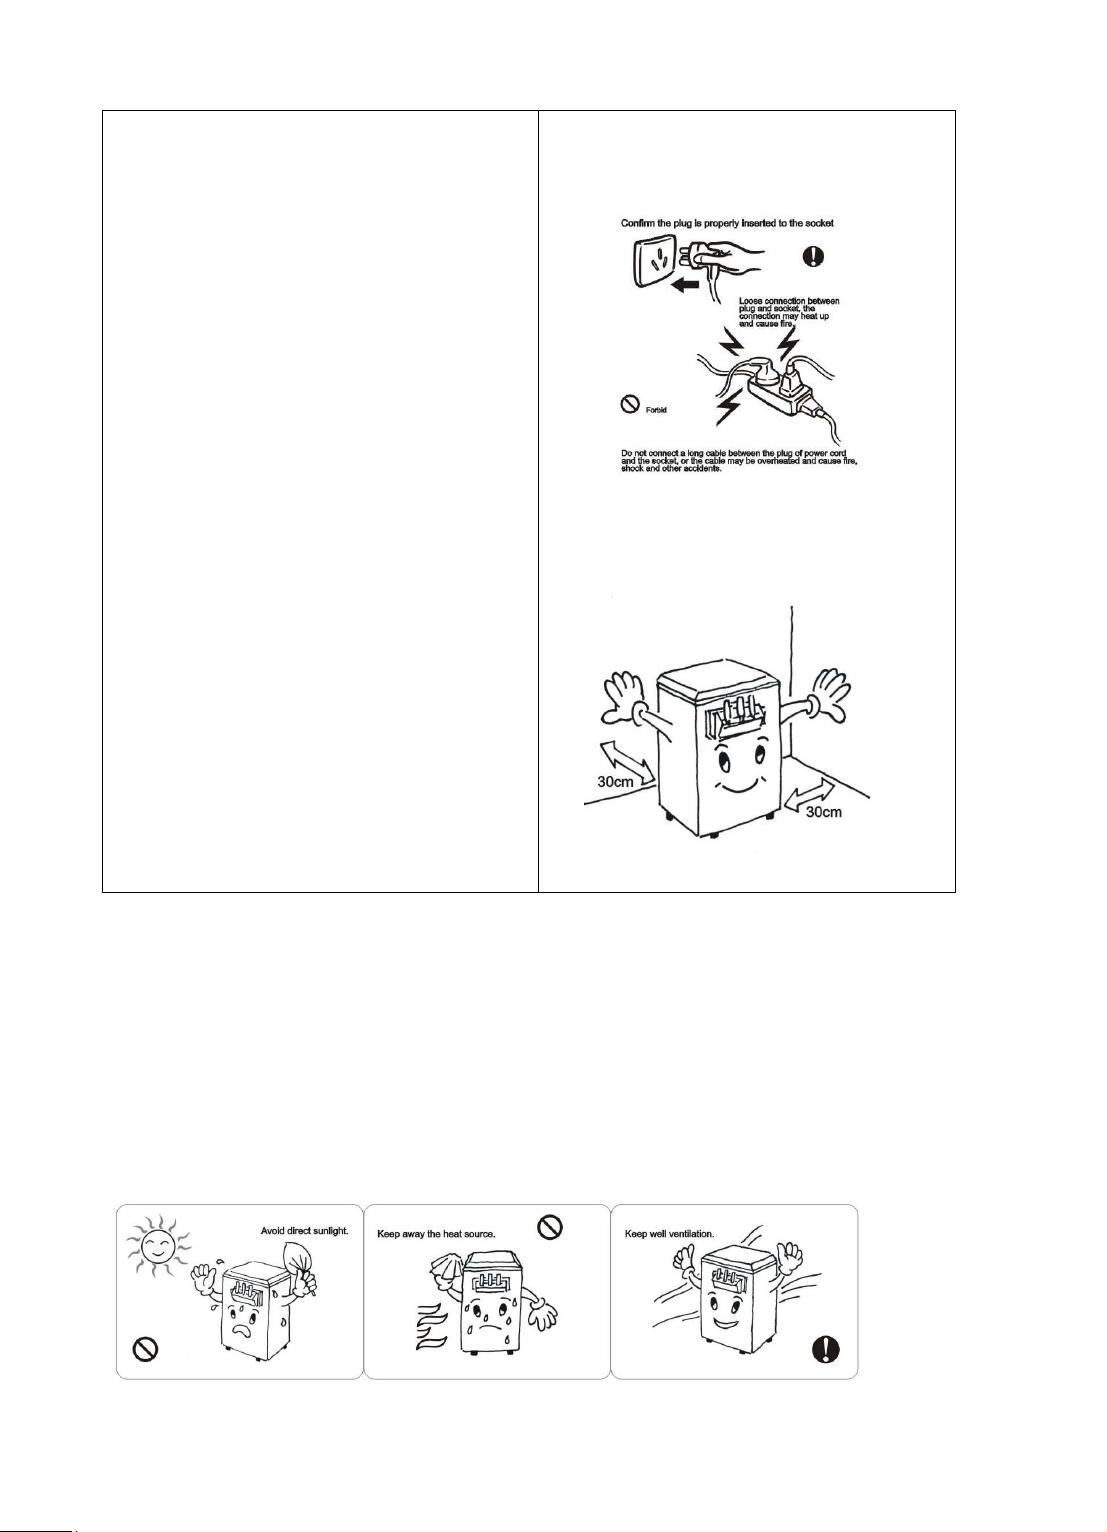
. Lay the machine on dry and firm floor. Do not lay the machine tilted. Any heat source
over 25℃ must be kept at least 50cm away round the machine. Keep the machine away
from rain and direct sunlight.
· Leave a space no less than 30cm on both sides of the machine for proper ventilation. To
ensure heat dissipation, leave a space at least 1.5m from the hot air exhaust outlet. Do
not leave any object which may be sucked by air flow, such as a plastic bag, near the hot
air exhaust outlet.
Connect to power source
Page 5

www.nkprotelex.com
5
·The power socket must have an earth line or just connect the machine metal case to the
earth.
·Power Specifications:
Single Phase: 220V/50Hz, Voltage Fluctuation: 198V-240V
Three Phase: 380V/50Hz, Voltage Fluctuation: 370V-390V
· Section area of the power conductor must be not less than 2.5mm2 or the line may be
overloaded, the voltage dropped down which may impair or even damage the machine.
Cautions:
·To avoid any adverse effect from vibration which is unavoidable during transportation, on
arrival of the machine, leave it for 24 hours before trying to run it for the first time.
· The feed stock in the Feed Basin must be cold.
· To maintain best cooling performance of the machine, wipe off dusts from the hot air
exhaust outlet regularly.
· For machine with double drum (freezer cylinder) it is prohibited to use only one drum or
feed one drum with ice cream pulp and other drum with other material (except for
machines with double-compressor set).
· For the machine with 380V power supply, you must check if the stirrer shaft turns in
clockwise direction for the first start. If the stirrer shaft turns in opposite direction, just
exchange any two power conductors from three phases.
Notice:
Your machine is designed to produce either soft ice cream or frozen yogurt and not both
together.
Either ice cream or frozen yogurt and not one drum with ice cream and other drum with
frozen yogurt
4. Operation
Page 6
www.nkprotelex.com
6
Production
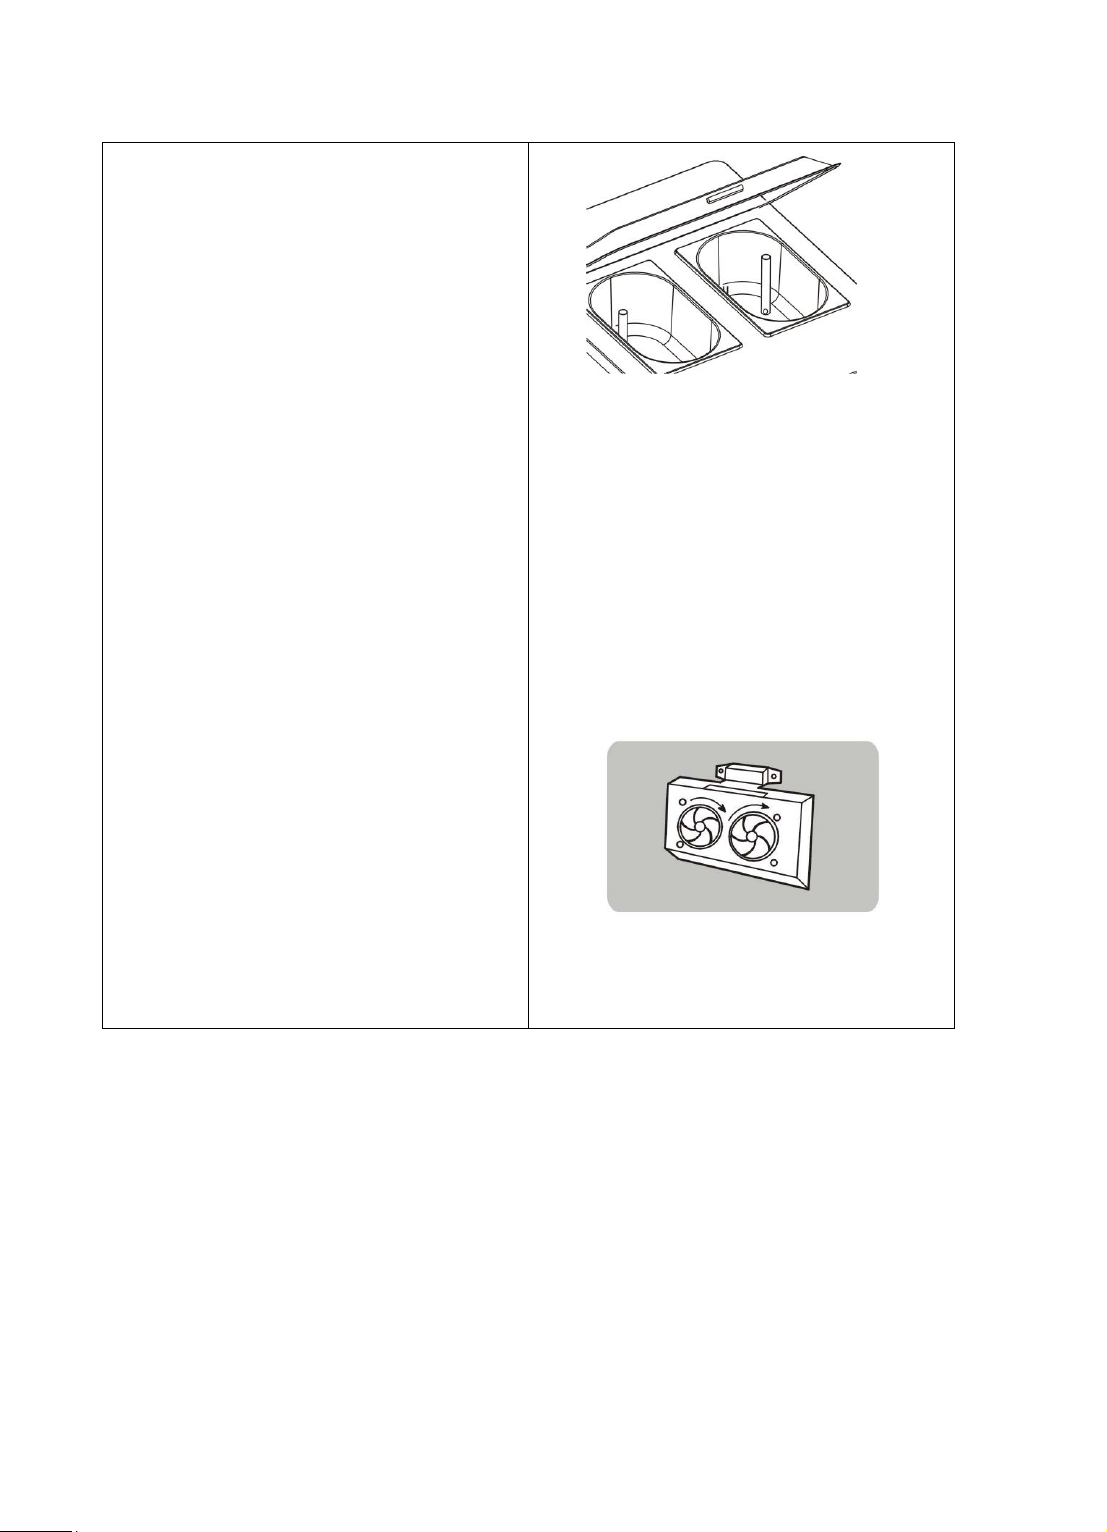
1. Insert two expansion tubes into each
feed basin respectively. For machine with
air pump, connect the Air hose to the air
outlet and expansion tubes
2. Pour the prepared ice cream pulp into
the feed basin. The pulp flows by gravity
to the stirrer drum via the lower hole of
the expansion tube
3. Wait for about 2 minutes until the ice
cream pulp has flown into the drum
4. Push on PRODUCE key to start the
machine
The stirrer motor starts first and then the
fans of compressor and condenser will be
started in 30 seconds. At this moment
the hot air flows from the outlet of the
condenser and the temperature in the
drum drops down quickly. The ice cream
is ready to discharge in 15 to 25 minutes,
when the gear shows 100% and machine
stops automatically after about 10
seconds. You can now start to dispense
your ice cream with cones by pulling the
handle.At this moment if you want to
stop production, just push on Stop key.
Machine with air pump (Not All machine)
Be sure that liquid never enter in the air outlet your air pump during ice cream production
or cleaning. That will damage the air pump. Your machine will have a short circuit when
you plug it in or the machine will stop during you discharge ice cream. In this case you
have to disconnect the air pump from the pc board to continue working with the machine
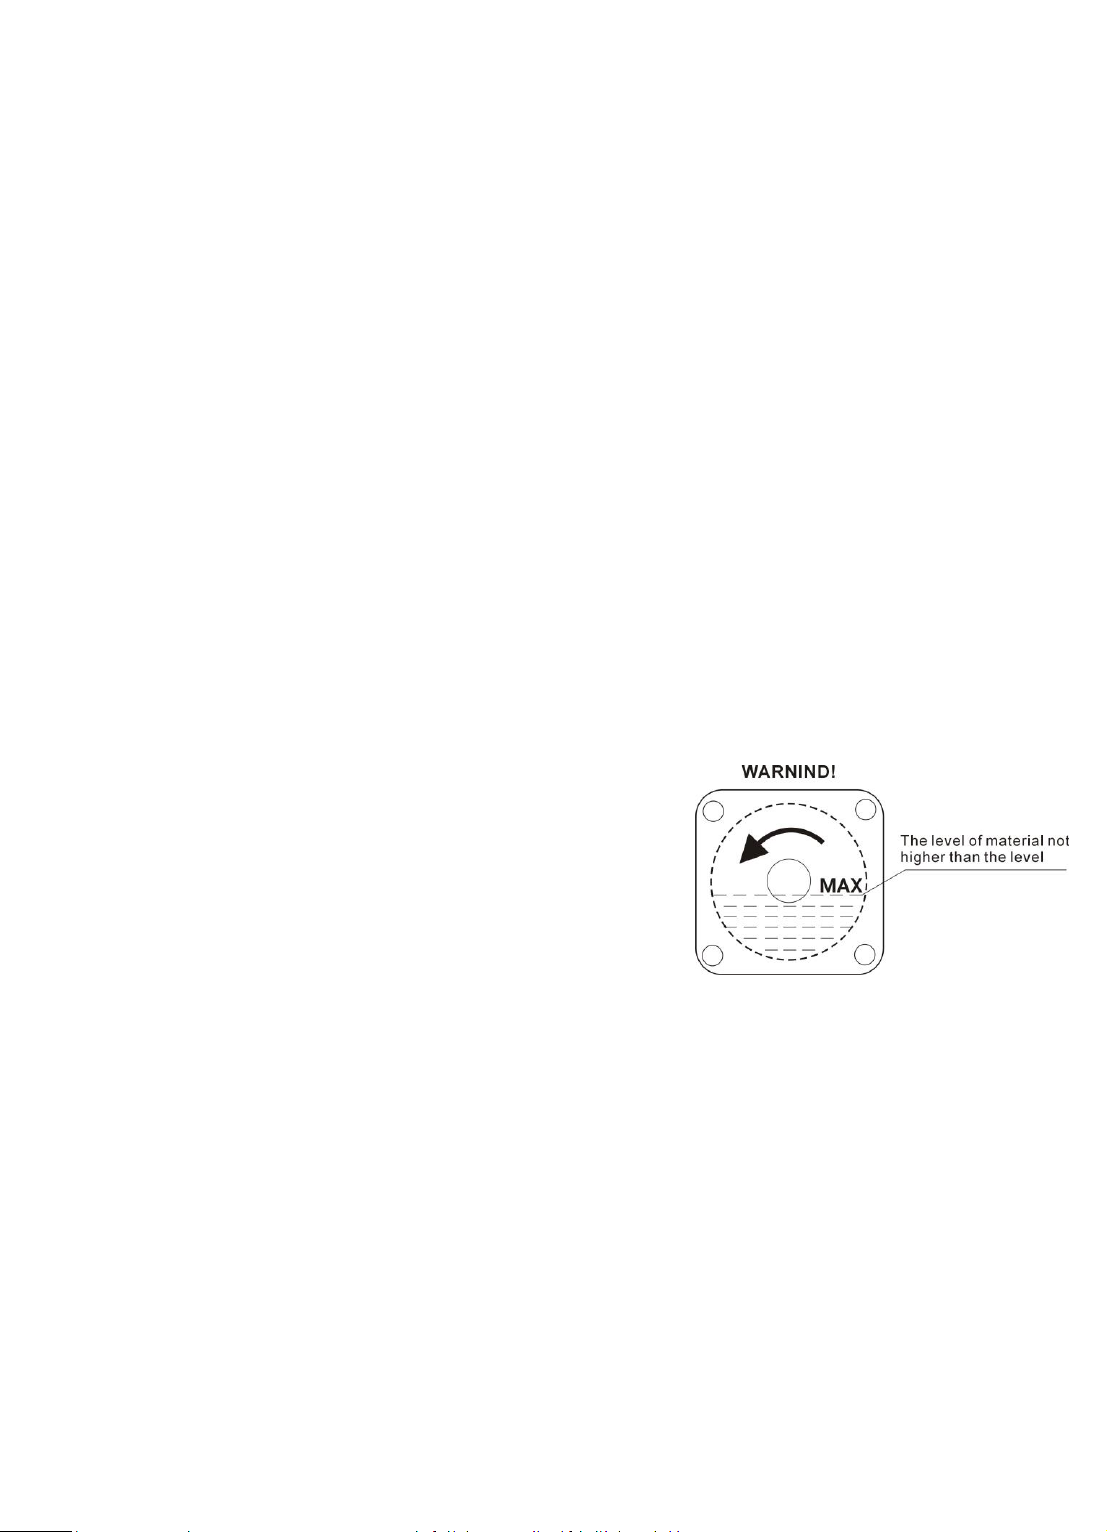
like a machine without air pump. Always fill the feed stock below the air outlet inside the
Feed Basin (Hopper)
Hopper Cooling:
Page 7

www.nkprotelex.com
7
You can start the hopper cooling by pressing the SET/PRECOOLING button. For optimum
cooling of the ice inside the feed basin (hopper), you should fill the hopper only under the
air outlet mean the refill the hopper only to 2/3. Your machine should be emptied daily
and cleaned. Machines with hopper cooling have to be also cleaned and disinfect every
day.
4. Any time when you pull one of the handles of the discharge block, the related stirrer
stops and the ice cream flows out of the discharge hole. The discharge hole on left and
right is related to the stirrer drum on left and right and the ice cream discharged is of
single color. The discharge hole in the middle is the mixture from both left and right
drums and is of double color.
Caution:
The pulp level in the stirrer drum is dropping while ice cream is discharging.
If only little remains in the drum, abnormal noise can be heard and the
stirrer shaft (Beater) may be damaged. You should check if the lower hole of
the expansion tube is chocked up whenever the abnormal noise is heard.
5. The machine will stop automatically when the ice cream reaches the preset hardness.
The OVERLOAD indicator is on (not all machine). The machine will restart about 5 minutes
automatically. If you want to continue production when the OVERLOAD is on, just push
OVERLOAD RESET key or pull any one of the handle at the discharge block (The model A11
does not have auto reset function).
Caution:
1. If you do not discharge the ice cream when it reaches the preset
hardness, do not push the OVERLOAD RESET and PRODUCE keys frequently,
or the machine may be damaged.
2. After a large quantity of ice cream has been discharged from the drum,
you have to wait a few minutes until the machine have completed
refrigerating the feed stock in the drum
6. Hardness Setting
Notice:
Before you start with the ice production adjust the hardness between 1 to 5. Please never
adjust the hardness during the machine is working or during ice cream production.
Before starting adjusts the hardness, the first you must always stop produce, fresh and
wash.
Our machine series is accommodated with different type of control Panel. Please identify
Page 8

www.nkprotelex.com
8
which control Panel is used for your particular machine model.
The principle of adjustment of hardness of ice cream is based on the fact that the load of
stirrer motor increases with the current. The control circuit reacts when the current
reaches certain point and stop the machine. Hardness has been properly set in the factory
before delivery. If you have special recipe for ice cream, it may be readjusted according to
your particular needs.
Depending on the machine model, there are two methods for hardness adjustment:
1) The models with step adjuster. For purpose of hardness adjustment, you have to open
the side penal of the machine to access the step adjuster located at the electrical box.
a. If the machine does not stop when the ice cream reaches the required hardness, push
the adjuster to a softer step until machine stops.
b. if the machine stops because of overloading and the ice cream is not hard enough,
you should push the adjuster to a harder step, when the ice cream reaches the
required harness it will stop production.
c. the machine must be allowed to run in one minute before you try to push the
adjuster to the next step, or the effect of the adjustment will be impaired.
d. The hardness adjuster has 9 steps and the hardness increases in numeral order.
7. Operation on different type of control panel
Our machine series is accommodated with different type of control Panel. Please identify
which control Panel is used for your particular machine model.
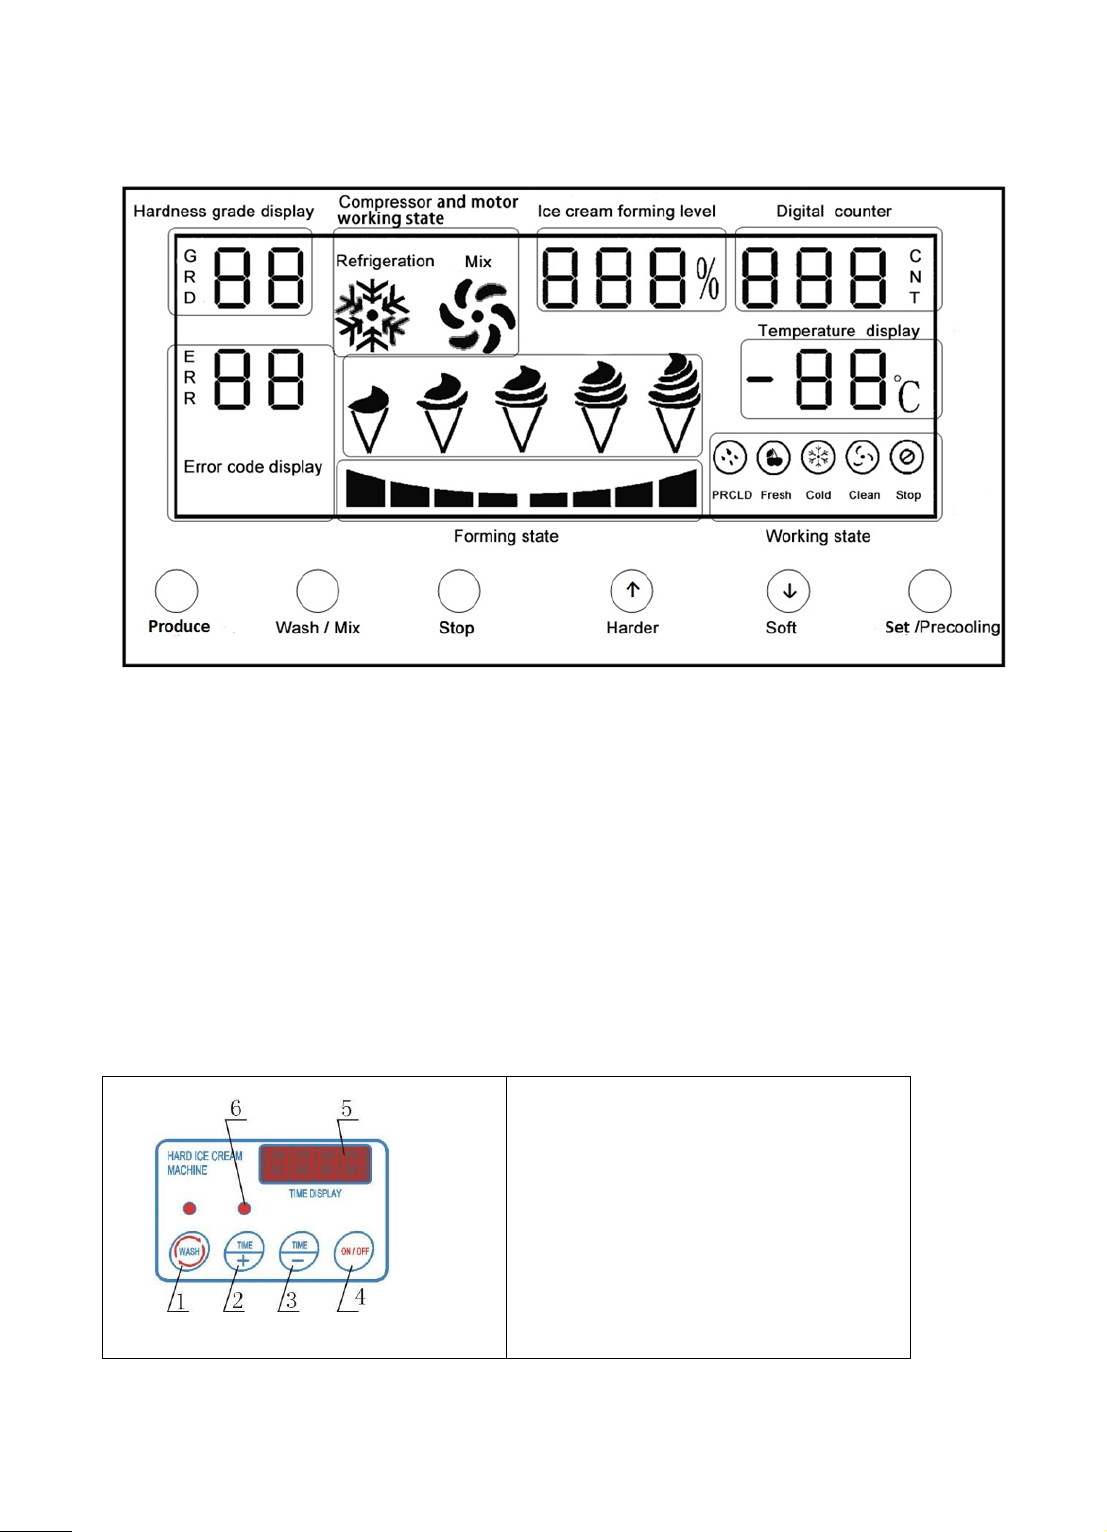
1) The models with hardness adjustment on control panel. Press the set key Hard/Soft
Press Hard the hardness increases
Press Soft the hardness decreases
There are 1 to 5 steps available for adjustment (Sometime hardness over 5 is not
available and your machine will rum for longtime a never reach 100%). The figure 5 is
the hardest and 1 is the softest. For your machine hardness can be adjust between 1 to
5 to start the ice cream production adjust your hardness to 1 or 2. The adjustment of
hardness is saving automatically.
A. The New display of your machine:
Page 9
www.nkprotelex.com
9
Notice:
We recommend that you always adjust the hardness below 4 and only in case of strong
heat above 4. Regular hardness adjustment may damage the machine
B. Electronic Key
Counter: The display of the counter counts 1 for each batch of ice cream has been
prepared or counts any time you pull on the handle after the machine reach 100% the first
time or during cleaning the machine by pulling on the handle after you press Wash key.
For reset the counter to zero “000” Press harder and softer button 6 seconds at the same
time can cleaning up ice cream number.
E. The models for hard ice cream machine
1. WASH key
2. Time+ key
3. Time — key
4. PRODUCE ON-OFF/WASH STOP key
5. Washing of the Machine
6. Produce light
5. Washing of the Machine
Page 10
www.nkprotelex.com
10
1. Washing before start production
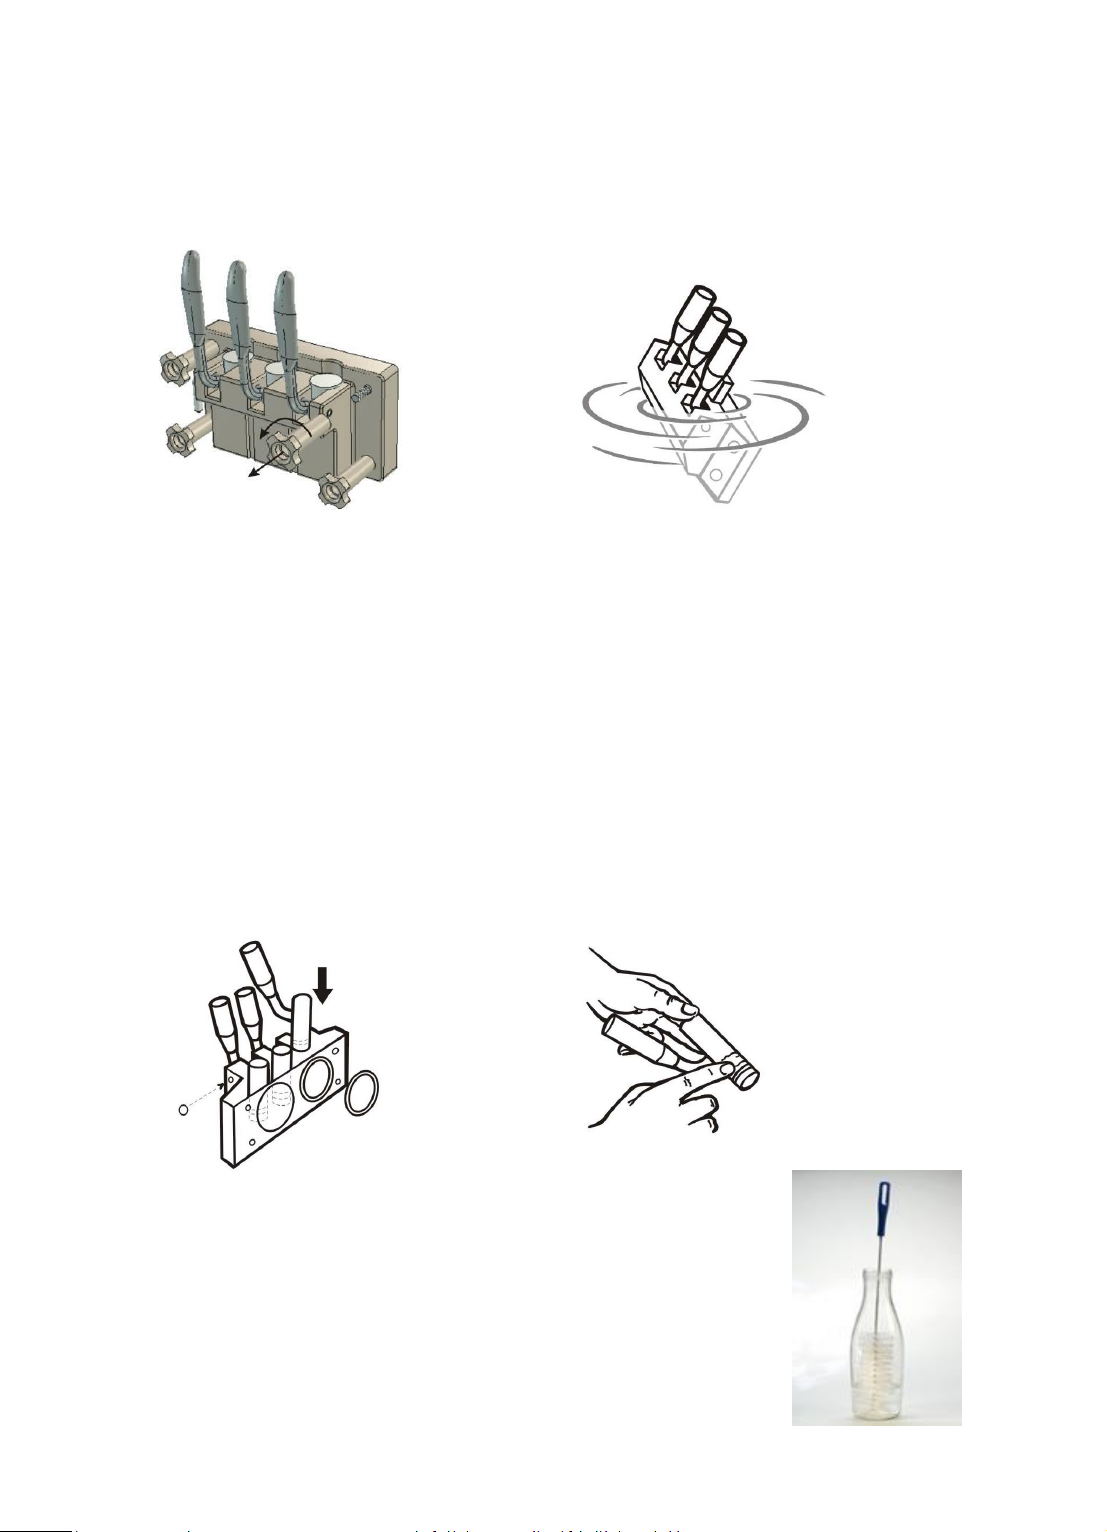
a. Turn the plastic set nuts for the discharge block, totally 4 nuts, in counter clockwise
direction, dismount the discharge block.
b. Wash the feed basin, stirrer shaft and expansion tube with detergent liquid and
disinfectant liquid.
(Please never used brush to clean the ice cream mixture hopper and never insert brush
into the hold of feed basin to clean.)
c. Put the discharge block in one of above liquids. Push and pull the handle 2 to 3 times.
Dismount the cross bar, pull the piston out from the block, clean the cross bar and piston.
Please grease the Pistons with food grease before assembly it on the discharge block.
2. Wash after Production
a. Pour tap water into the feed basin. Push on WASH key to run the
stirrer for 3 to 5 minutes until remains of ice cream in the stirrer
drum completely melted. Discharge the water from the drum by
Page 11
www.nkprotelex.com
11
pulling the handle. Repeat the above procedure several times.
b. Wash the discharge block:
Repeat above “Wash before Production” item a. and b.
6. Service and Maintenance
Notice for Service and Maintenance
1. A person must be specially assigned for management of the machine. This machine is
for food. It is important to keep the machine in clean and neat conditions after using
and before.
2. Each time when you complete the operation, clean the machine parts in contact with
the ice cream, such as discharge block, stirrer drum, stirrer shaft, expansion tube, feed
basin etc. immediately after the machine is stopped. Air dries the parts for the next
operation.
3. Check the tightness of the belts regularly. If the belt is loosen, adjust the center
distance between the pulley and the stirrer motor.
4. If the machine is laid idle for long time, put the main switch to OFF position. The
machine will be in standby condition
7. Models for Hard Ice Cream Machine (for the model H18S and H28S)
1). Production
a. Fill the pulp from the feed hole of
the discharge block to the stirrer drum.
The level to be filled should not
to be too high or too low. Adjust the
running time according to your recipe
and environmental temperature (in
Room temperature, the running time for
each batch is about 12 minutes).
b. Push on On/Off key, the machine start production. The display indicates the
countdown time. As soon as the display indicates “0”, the compressor stops and the
stirrer motor will stop after a delay of 40 seconds. Ice cream will come out by opening
the discharge hole at the discharge block.
c. While in Production mode pushes on On/Off key, the machine enters Stop mode.
2). Time Setting Operation
a. While the machine in Stop mode, push the time + or — key, the display indicates
the time value set at the last time and the figure flashes. At this moment press + key
to increase the time value in minutes and — key to decrease the time value in minute.
Page 12

www.nkprotelex.com
12
b. The time value can be set from 1 minute to 20 minutes, changing in 1 minute step for
each time you press the key.
c. While the display is flashing, if you do not press + key or — key in 5 seconds, the
system will withdraw from the time setting mode, the time value set at the last time is
saved and the display returns to “00”.
Caution:
If the time is set too long and the ice cream in the chilling drum is too hard.
The machine will stop immediately and enter into the protective mode. At
the same time, the machine will sound alarm and the display shows “L:L”.
In this case, switch the power off and on again in no less than 20 minute
Adjust the production time again.
3). Washing
Press WASH key, the machine is in WASH mode. Press On/Off key, the stirrer will be
stopped.
8. Analytical sheet for obstacle
ERROR
CODE
REASONS
ANALYSIS
SOLUTION COMMENTS
01
abnormal
voltage
input voltage is too low
Set with power voltage
regulator
02
compressor
high pressure
protection
1.compressor pressure too
high;
2.the compressor pressure
detection switch damage
1.adjust the compressor
2.replace the pressure switch
03
Insufficient
refrigeration
1.frozen cylinder
temperature sensor
installation position is not
correct;
2.refrigerant is not enough
1.adjust temperature sensor
installation location;
2.fill more refrigerant
04
Frozen cylinder
Forced refrigeration when
ice cream less
Add ice cream material
05
Hopper is
short of
material
Low ice cream inside your
hopper
1. Add ice cream, until the
display is normal 2. Replace the
lack of material testing switch
08
Ice cream
forming
1. Hardness grade too high
2. the refrigeration system
1. Adjust the appropriate
hardness grade
Page 13

www.nkprotelex.com
13
overtime
failure
2.Maintenance refrigeration
system
09
over-current
protection
1. Motor fault exists
2.Hardness grade is high,so
that ice cream is too hard
and cause jam mixer
1. Replace the motor; or adjust
the motor belt tightness;
2.Adjust the appropriate
hardness grade
No electricity
no display
after connect
power
1. Power plug is not good。
2. The motherboard
connection is not good
3. Insurance tube bad
4. Circuit board fault
1. Check the power supply if is
normal
2. To connect the display screen
and the mainboard of
connection
3. Eliminate abnormal after
replacement of the same
specifications of the insurance
tube
4. Repair PCB repair PCB must
be conducted by professionals
Machine stop after plug: check liquid has entered inside the air pump. Disconnect the air
pump from the pc board
9. Parameter Setting of Ice Cream Machine
Parameters are divided into user parameters and plant parameters.
User parameters: long press the set button or stop button to enter the user parameters.
Factory parameters: Long press the set button and stop button at the same time to enter
the factory parameters.
Paramet
er code
Parameter
type
Definition
Note
Parameter
setting
Harder /
Softer
button
User
parameters
Ice cream hardness
Normal display, press
harder or softer button.
Adjustable range: 02-05
02
n00
User
parameters
Pre cooling
temperature
Pre cooling is enabled,
the temperature of the
pre cooling can be
adjusted between 4 and
10.
04
n01
User
parameters
Clear number
Reset counter
Press harder and softer
button 6 seconds at the
same time can cleaning
up ice cream number,
Page 14

www.nkprotelex.com
14
n02
User
parameters
The time interval of
auto restart cooling
Adjustable range:
3-40minute
5
n03
User
parameters
The time interval of
auto restart fresh
Feature enable,
adjustable range:
30-120minute
n04
User
parameters
The time interval of
auto restart Pre
cooling
Feature enable,
adjustable range:
1-30minute
5
F00
Factory
parameters
Low voltage
protection
Adjustable range:
180-220V
190
F01
Factory
parameters
Motor type
37:370W
55:550W
75:750W
110:1100W
According
to motor
power
F02
Factory
parameters
Pre cooling setting
0:No pre cooling
1:Single compressor
2:Double compressor
According to
pre cooling
function
F03
Factory
parameters
Refrigerating switch
for
refrigerating
cylinder
ON: open the
preservation function
OFF: close the
preservation function
OFF
F04
Factory
parameters
Current coefficient
Adjustable range: 80-120
100
F05
Factory
parameters
Counter function
ON: open count function
OFF: turn off counting
function
ON
F06
Factory
parameters
Air pump action
delay
Adjustable range:3-30s
10
F07
Factory
parameters
Clear counting
function
ON: available to clear
the count
OFF: cannot to clear the
count
ON
F08
Factory
parameters
Action time of
pressure balancing
solenoid valve
Adjustable range:1-60s
5
Page 15
www.nkprotelex.com
15
F09
Factory
parameters
Air pump start
mode
ON: press wash or
produce key to start
OFF: start when the ice
cream discharge
ON
Warning: This parameter only applies to FSAST_GL002_03D intelligent display, all
parameters of the ice cream machine have been adjusted well, the user cannot change
the parameters unless communicate with manufacturers.
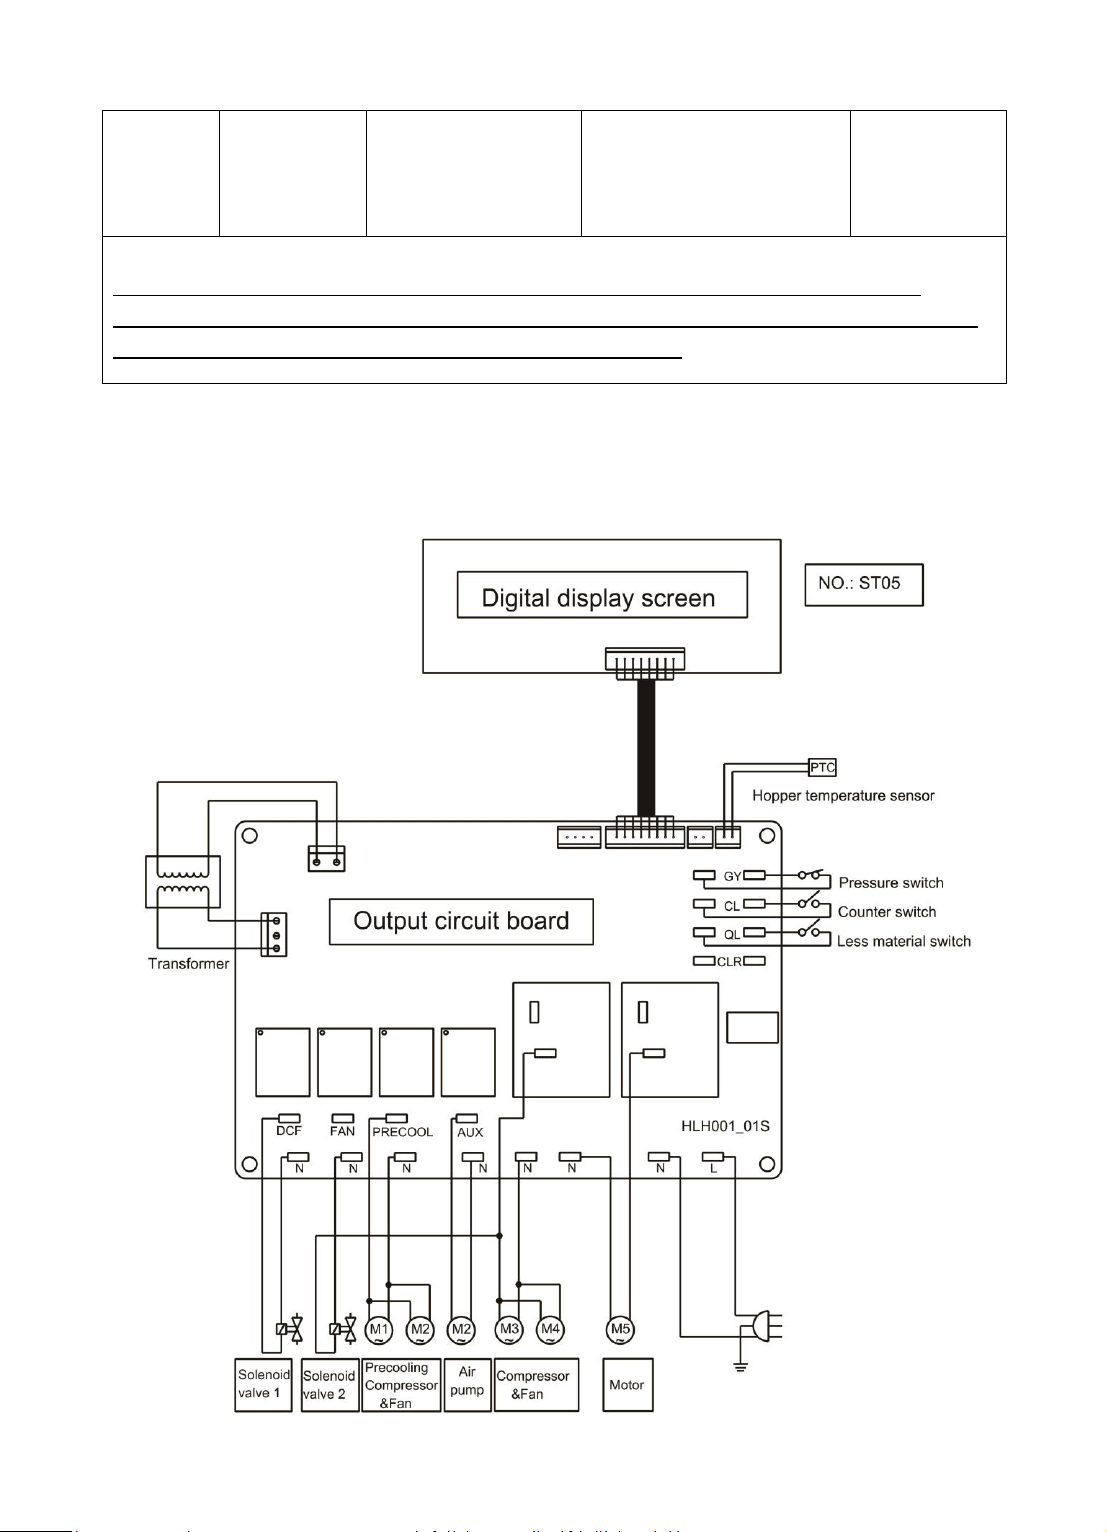
10. Ice Cream Machine Connect Line Diagram
Page 16
www.nkprotelex.com
16
11. Packing List
1. Soft Ice Cream Machine
Name
Quantity
Machine Set
1
Discharge Block-Drum Ring
2
Piston Ring
6
Anti-cross-talk Ring
1
Expansion Tube
2
Ring for Expansion Tube
4
Star Washer
3
Operation Manual
1
Plastic Bag
1
Electron lock
2
2. Hard Ice Cream Machine
Name
Quantity
Machine Set
1
Discharge Block-Drum Ring
1
Door Ring
1
Ring for Feed Basin
4
Operation Manual
1
Plastic Bag
1
 Loading...