

Page 1

T0420
Twin motor powered airplane
Instruction manual • Bouwhandleiding • Instructions de montage • Bauanleitung
Full color manual is available on
WWW.PROTECH.be
This R/C kit and the model you
WARNING !
will build is not a toy.
Only for experienced modellers.
version: 12/10/06
radiobestuurd model is geen
Enkel voor ervaren modelbouwers.
LET OP !
Deze bouwdoos van een
speelgoed.
ACHTUNG !
Dieser Bausatz eines
ferngesteuerten Modells
ist kein Spielzeug.
Nur für erfahrene Modellbauer.
Ce modèle n’est pas un jouet.
ATTENTION !
Seulement pour modélistes
expérimentés.
Page 2
Specifications / Specificaties /
Spécifications / Technische Daten
Length: 1100 mm
Wing span: 1320 mm
Wing area: 26,5 dm2
Wing loading: 51 g/dm2
Power: 2x MEGAX 400 - 6V
Flying weight: 1350 g
Radio required: 4 ch radio w/ 4x
micro servos
Lengte: 1100 mm
Spanwijdte: 1320 mm
Vleugelopp.: 26,5 dm2
Vleugelbel.: 51 g/dm2
Aandrijving: 2X MEGAX 400 - 6V
Vlieggewicht: 1350 g
Radiobesturing: 4 kanaals radio met
Kit content / Inhoud van de bouwdoos /
Contenu de la boîte / Bausatzinhalt
1. Fuselage
2. Wing / Tailplane / Rudder
3. 2x motors + prop.
4. Motormounts
5. Radioplate
6. Controlhorns / Pushrods
7. Decals
8. Instructions
1. Romp
2. Vleugel / roeren
3. 2x motoren + propeller
4. Motorsteunen
5. Radioplaat
6. Roerhoorntjes / stangen
7. Stickerset
8. Handleiding
4x micro servo’s
Longueur: 1100 mm
Envergure: 1320 mm
Surface alaire: 26,5 dm
Charge alaire: 51 g/dm
Moteur: 2X MEGAX 400 - 6V
Poids en vol: 1350 g
Radio requise: Radio 4 voies + 4
micro servos
1. Fuselage
2. Aile / Empennage
3. 2x moteurs + hélices
4. Supports moteurs`
5. Platine radio
6. Guignols et commandes
7. Autocollants
8. Instructions
Länge: 1100 mm
Spannweite: 1320 mm
2
Tragflügelinhalt: 26,5 dm
2
belastung: 51 g/dm
Antrieb: 2X MEGAX 400 - 6V
Fluggewicht: 1350 g
Funkfernsteuerung:
Gesamtflachen-
4 Kanal Steuerung mit
4x MicroServos
1. Rumpf
2. Trageflächen / Leitwerke
3. 2x Motor + Schraube
4. Motorträger
5. Servoplatine
6. Gestänge
7. Dekorbogen
8. Bauanleitung
2
2
Required for operation / Benodigdheden /
Nécessaire au fonctionnement/ Erforderliches Zübehor
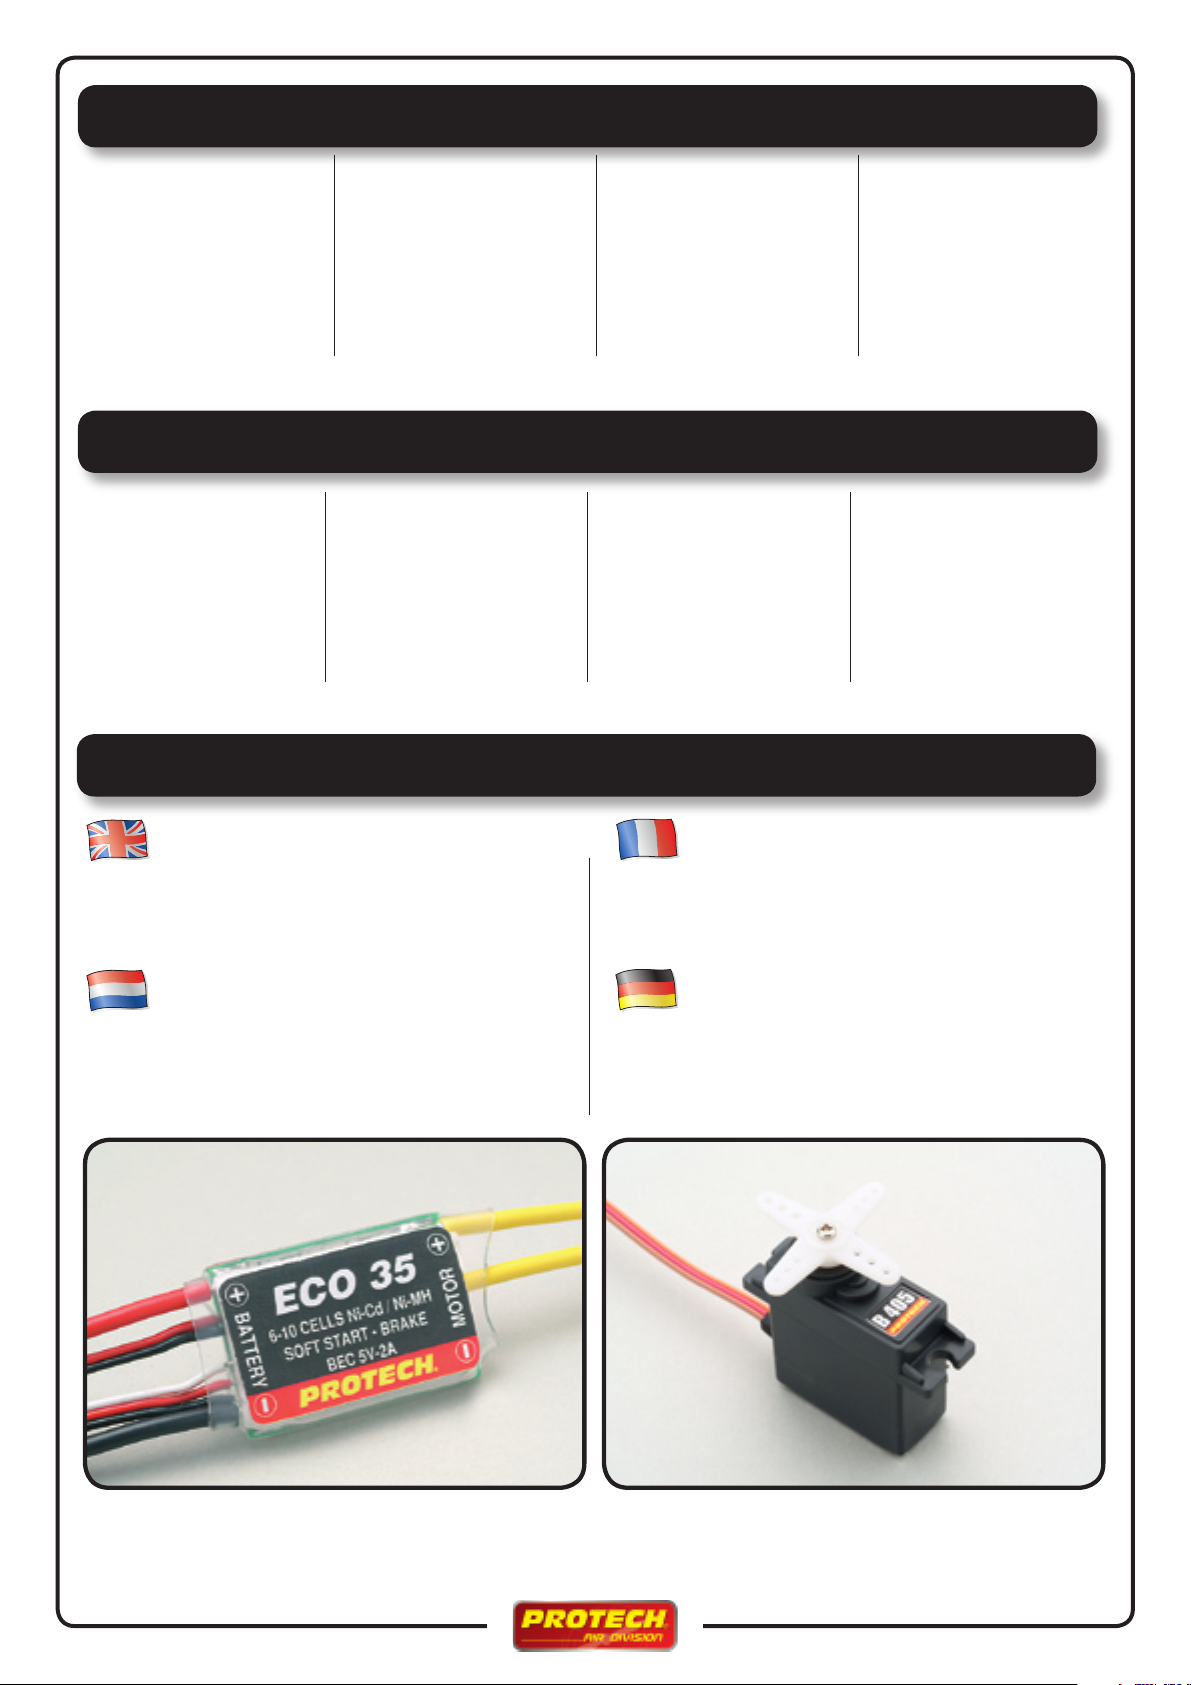
• 1x Electronic speedcontroller 35A PRO.35MPC-E
• 4- Channel radio with 4 micro servos B405
• 9.6v NiMH battery pack 3000 mAh
• 1x regelaar 35A PRO.35MPC-E
• 4- kanaals met 4 micro servos B405
• 9.6v NiMH batterij pack 3000 mAh
• 1x Variateur électronique 35A PRO.35MPC-E
• Radio 4 Voies avec 4 micro servos B405
• Accu NiMH 9.6v - 3000 mAh
• 1x Fahrtregler 35A PRO.35MPC-E
• 4 Kanal Steuerung mit 4x MicroServos B405
• Antriebsakku 9.6v NiMH - 3000 mAh
2 •
Page 3
Optional parts / Opties /
Options / Sonderzubehör
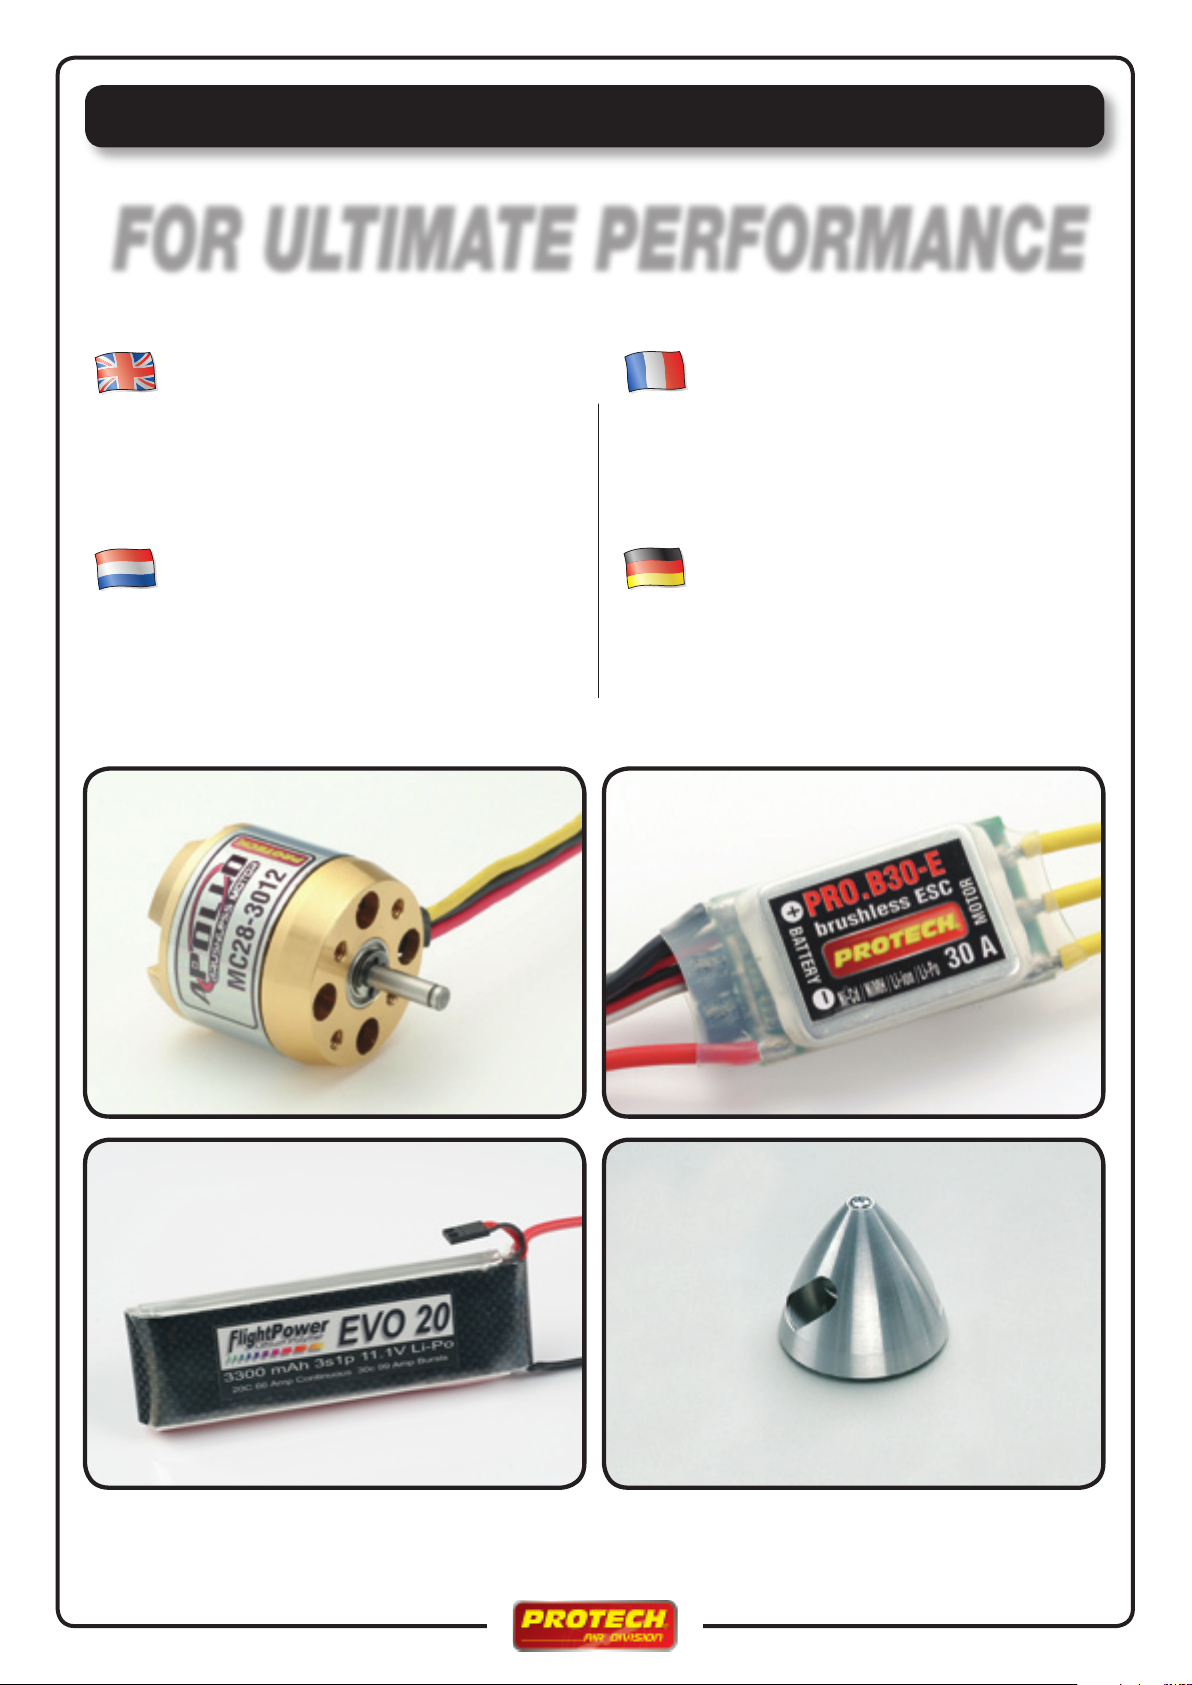
FOR ULTIMATE PERFORMANCE
• 2x Electronic speedcontroller 30A PRO.B30-E
• 2x Brushless motor: Apollo Brushless outrunner MC28-3012
• 2x Cam Slim Prop 8/6 (Graupner) 1372.20.15
• Precision Aluminium spinner ø40mm - ø3,2mm MA844
• Flightpower Lipo packs 11,1V - 3300mAh EVO33003S1P
• 2x Regelaar 30A PRO.B30-E
• 2x Brushless motor: Apollo Brushless outrunner MC28-3012
• 2x Cam Slim Prop 8/6 (Graupner) 1372.20.15
• Precision Aluminium spinner ø40mm - ø3,2mm MA844
• Flightpower Lipo packs 11,1V - 3300mAh EVO33003S1P
• 2x Variateur électronique 30A PRO.B30-E
• 2x Moteur brushless: Apollo Brushless outrunner MC28-3012
• 2x Hélice Cam Slim Prop 8/6 (Graupner) 1372.20.15
• Spinner de précision en aluminium ø40mm - ø3,2mm MA844
• Accu Flightpower Lipo packs 11,1V - 3300mAh EVO33003S1P
• 2x Fahrtregler 30A PRO.B30-E
• 2x Brushless motor: Apollo Brushless outrunner MC28-3012
• 2x Cam Slim Prop 8/6 (Graupner) 1372.20.15
• Precision Aluminium spinner ø40mm - ø3,2mm MA844
• Flightpower Lipo packs 11,1V - 3300mAh EVO33003S1P
• 3
Page 4
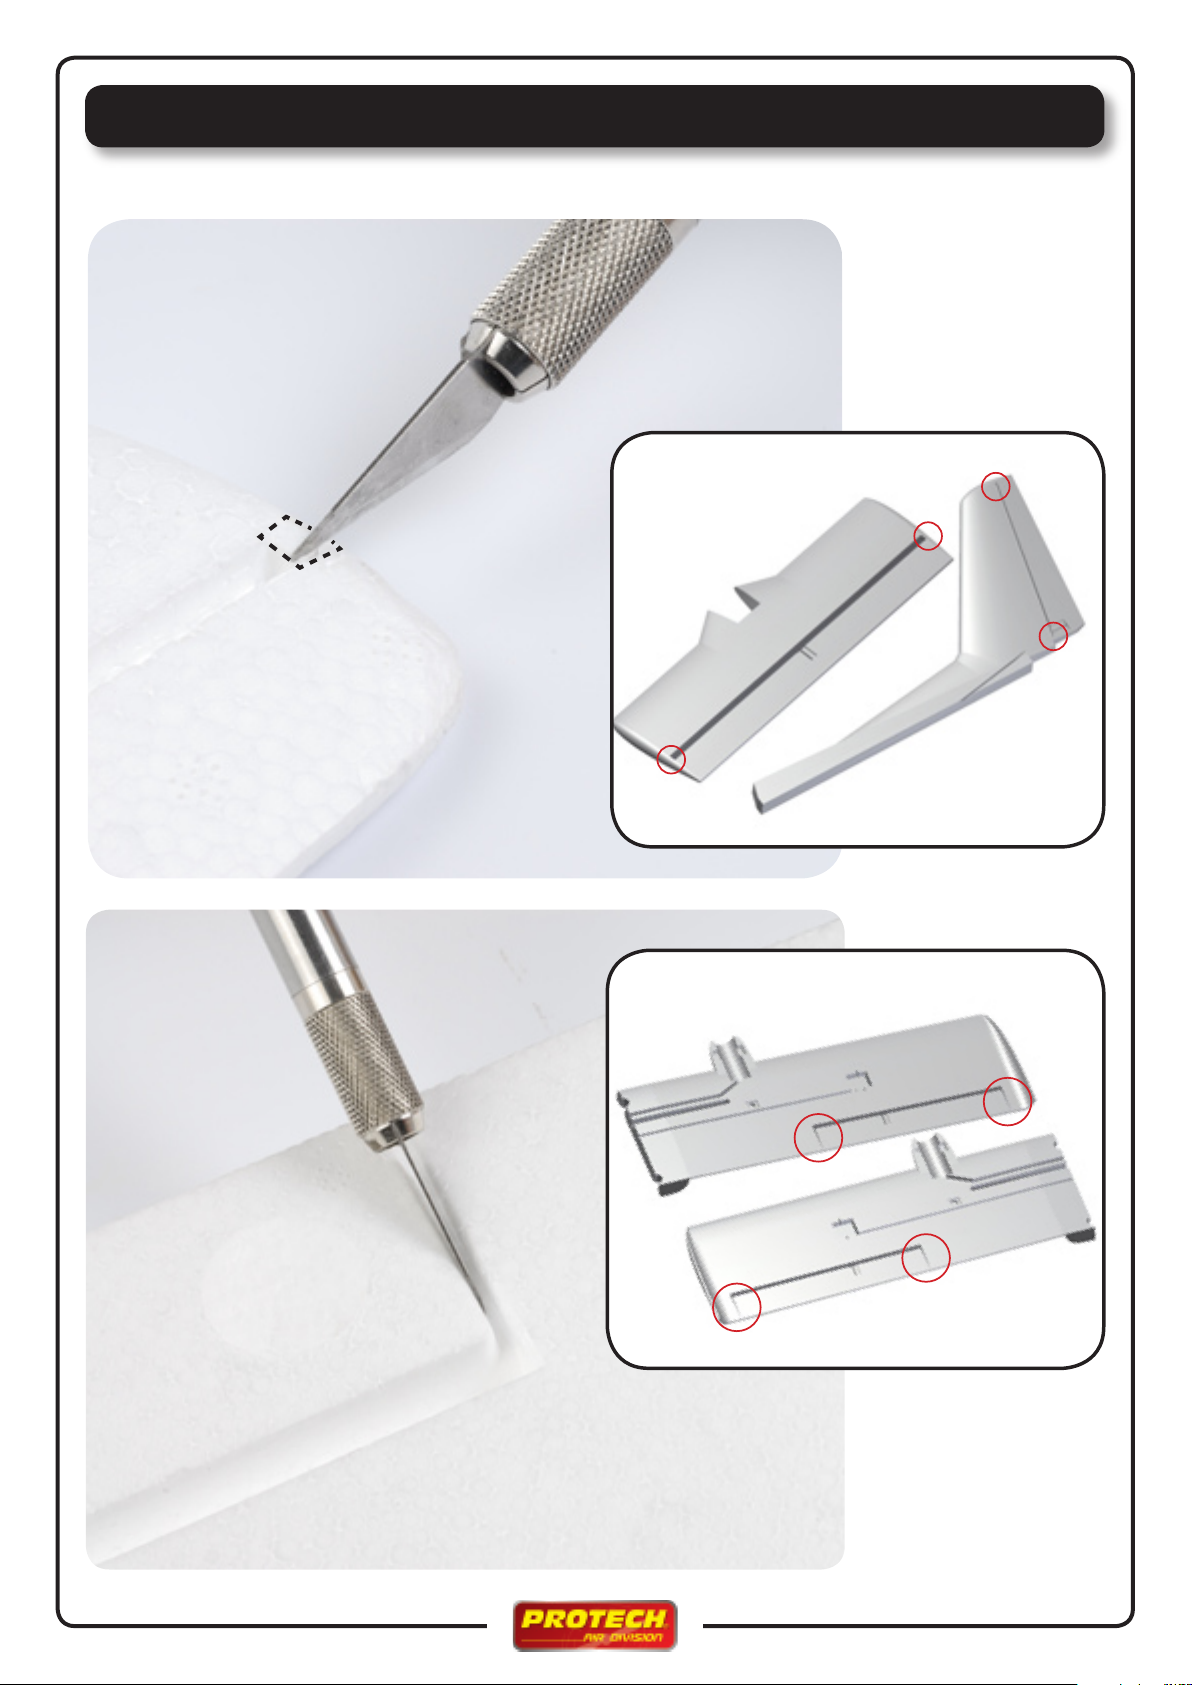
Preparing the rudder and the tailplane / Afwerking van de roeren
Préparation de la dérive et du stabilisateur / Vorbereitung von die Rudern
4 •
Page 5
1
2
• 5
Page 6
3
Only use Cyanoacrylate glue
Gebruik enkel Cyanoacrylate lijm
Utilisez seulement de la colle cyanoacrylate
Nur Sekundenkleber benützen
4
6 •
Page 7
4
• Push firmly
• Hard duwen
• Poussez fermement
• Drücken Sie Kräftig
5
• Gap
• Spatie
• Jeu
• Abstand
• Push firmly
• Hard duwen
• Poussez fermement
• Drücken Sie Kräftig
Install the plastic piece as
shown. When the plastic piece
has been glued and installed,
push firmly on both sides of
the fuselage to eliminate any
gap that might occur between
the fuselage and the piece.
Use some tape to hold the
fuselage together while the
glue sets.
Lijm het plastic plaatje in de
romp zoals afgebeeld. Duw
langs de twee kanten van de
romp totdat er geen speling
meer bestaat tussen het plaatje en de romp. (zie tekening)
Gebruik kleefband om de romp
dicht te houden tijdens het
drogen.
Appliquez la colle cyano, placez la pièce en plastique et
poussez sur les 2 flancs du
fuselage afin d’éliminer le jeu
de chaque côté de la pièce
en plastique, maintenez la
pression à l’aide de bandes
adhésives et laissez sécher
convenablement.
Installieren Sie die Kunststoffteile wie gezeigt. Wenn die
Kunststoffteile verklebt und
install ie rt sind drü ck en Sie
kräftig auf beiden Seiten des
Rumpfes um eventuelle Spalte
zwischen Rumpf und Teilen
zu beseitigen. Benutzen Sie
ein Klebeband um den Rumpf
zusammenzuhalten, während
der Kleber trocknet.
• 7
Page 8
6
1x
1x
6
8 •
Page 9
6
7
A
• 9
Page 10

7
B
7
C
10 •
Page 11

8
1x
1x
8
18mm
FREE
• 11
Page 12

8
• Gap
• Spatie
• Jeu
• Abstand
• Push firmly
• Hard duwen
• Poussez fermement
• Drücken Sie Kräftig
Install the rudder following
steps 8 and 8A. When the
rudder has been glued and
installed, push firmly on both
sides of the fuselage to eliminate any gap that might occur
between the fuselage and the
rudder. Use some tape to hold
the fuselage together while the
glue sets.
Plaats het kielvlak zoals afgebeeld in stap 8 en 8A. Wanneer
het kiel vla k gelijmd en geplaatst is, duw dan aan beide
zijden tegen de romp zodat
het kielvlak mooi aansluit met
de romp. Gebruik kleefband
om de romp dicht te houden
tijdens het drogen.
TAPE
Installez la dérive comme indiqué dans le manuel aux étapes
8 et 8A. Après avoir appliqué
la colle cyano et introduit la
dérive, pressez fortement les
2 flancs du fuselage pour éliminer le jeu qui se trouve entre
la dérive et le fuselage. Maintenez la pression à l’aide de
bandes adhésives et laissez
sécher convenablement.
• Push firmly
• Hard duwen
• Poussez fermement
• Drücken Sie Kräftig
Installieren Sie das Ruder in
dem Sie Schritt 8 und 8B folgen. Wenn das Ruder verklebt
und installiert wurde drücken
Sie kräftig auf beiden Seiten
des Rumpfes um eventuelle
Spalte zwischen Rumpf und
Ruder zu beseitigen. Benutzen
Sie ein Klebeband um den
Rumpf zusammenzuhalten,
während der Kleber trocknet.
12 •
Page 13

9
90°
9
• 13
Page 14

10
11
A
14 •
Page 15

11
B
x2
0,047
0,47
0,047
11
C
x2
• 15
Page 16

12
A
Double side tape
Dubbelzijdige kleefband
Adhésif double face
Doppelseitiges Klebeband
12
B
16 •
Page 17

12
C
13
A
• 17
Page 18

13
B
14
A
18 •
Page 19

15
A
Double side tape
Dubbelzijdige kleefband
Adhésif double face
Doppelseitiges Klebeband
15
B
• 19
Page 20

16
A
ø2,5mm
2
16
B
Consult your transmitter instructions to connect the servos.
Raadpleeg de handleiding van de zender om de servo’s aan te sluiten.
Consultez votre notice d’émetteur pour la connection des servos.
Beraten sie die Sender Anleitung um die Servos an zu schließen.
BATTERY
MOTOR
BATTERY
20 •
Page 21

17
A
17
B
x2
2
1
3
• 21
Page 22

18
A
18
B
22 •
Page 23

19
A
19
B
Rubber band
• 23
Page 24

CG (centre of gravity)
24 •
Page 25

Centre of gravity / Zwaartepunt
Centre de gravité / Schwerpunkt
The correct adjustment of your
aircraft is very important.
Check carefully that all control
surfaces move in the correct
direction. If they do not move in
the correct direction, you can reverse the servo direction on your
transmitter.
It is very important that you check
the position of the CG. Place
one finger on the wing joiner and
lift the plane. (See the following
page).
Check the CG each time before
you fly your model, a bad CG will
give serious flying problems.
Het afregelen van uw vliegtuig is
zeer belangrijk. Kijk goed na of
alle stuurbevelen juist zijn.
Uiterst belangrijk is de juiste ligging van het zwaartepunt. Plaats
uw wijsvingers langs beide zijden
van de romp op de carbon buis
zodat het model op de vingertoppen gaat balanceren.
Controleer het zwaartepunt voor
elke vlucht, een verkeerde ligging
van het zwaartepunt kan ernstige
vliegproblemen veroorzaken.
Die korrekte Justage I h re s
Flugz euges ist sehr wich tig.
Überprüfen Sie sorgfältig, ob
alle Steuerflächen in die korrekte Richtung bewegen. Wenn
sie nicht in die korrekte Richtung umziehen, können Sie die
Servorichtung auf Ihren Sender
umkehren.
Es ist sehr wichtig, daß Sie die
Position des Schwerpunkts überprüfen. Setzen Sie einen Finger
auf das Kohlefaser Rohr und
heben Sie das Modell an.
Überprüfen Sie das Schwerpunkt
immer bevor Sie Ihr Modell fliegen, ein schlechter Schwerpunkt
gibt ernste Flugprobleme.
Les rég lages de votre avion
sont très importants, contrôlez
que toutes les gouvernes bougent dans la bonne direction
par rapport aux ordres donnés. Au beso in vous pouvez
inverser le sens de rotation des
servos dans votre émet teur.
Contrôlez et respectez le centre
de gravité. Placez un doigt de
part et d’autre du fuselage sous
l’aile et sur le tube en carbone.
Soulevez l’avion et examinez la
réaction de l’avion.
(voir page suivante)
Contrôlez avant chaque vol que
le centre de gravité est correct,
un CG incorrect peut causer la
perte de l’avion.
• 25
Page 26

Centre of gravity / Zwaartepunt
Centre de gravité / Schwerpunkt
Correct
Juist
Correct
Korrekt
If the nose of the plane drops, begin by moving the battery towards the rear of the model if this is still not enough to get the model level then
you must put a small amount of lead on the rear of the fuselage ( make sure the lead is securely fixed into place)
The model is in balance when the nose of the model is (almost) level.
Als het model teveel met de neus naar beneden hangt , dan dient u de batterij in het model naar achter te verplaatsen. Bij belangrijke afwijking
kan u eventueel lood bijplaatsen, er voor zorgen dat dit goed vast is gelijmd. Als het model licht met de neus naar beneden hangt ligt het
zwaartepunt op de juiste plaats.
Si l’avion pique du nez, il est trop lourd de l’avant, dans ce cas déplacez l’accu plus en arrière. Néanmoins un léger effet de piqué n’est pas
négatif.
Wenn die Nase des Flugzeugs fällt, können Sie die Akku zur Rückseite verschieben. Wenn die Abweichung zu ernst ist können Sie etwas Blei
ims hintere des Rumpfs anbringen (überprüfen Sie daß das Blei nicht verschieben kann im Rumpf). Das Flugzeug ist in gute Balance wenn
die Nase leicht nach unten hängt.
If the rear of the plane drops, there is not enough load on the nose. Try to move the battery foward in the fuselage, or if it is necessary add
small lead in the nose for example.
Als het model teveel met de neus naar boven hangt, dan dient u de batterij naar voor te verplaatsen. Bij belangrijke afwijking kan u eventueel
lood bijplaatsen, er voor zorgend dat dit goed vast is gelijmd. Als het model licht met de neus naar beneden hangt ligt het zwaartepunt op de
juiste plaats.
Si la queue est trop basse, il n’y a pas assez de poids sur l’avant. Déplacez l’accu vers l’avant, au besoin ajoutez un poids à l’avant du fuselage.
Wenn die Nase des Flugzeugs steigt, können Sie der Akku zur Frontseite verschieben. Wenn die Abweichung zu ernst ist können Sie etwas
Blei ims vordere des Rumpfs anbringen (überprüfen Sie daß das Blei nicht verschieben kann im Rumpf). Das Flugzeug ist in gute Balance
wenn die Nase leicht nach unten hängt.
26 •
Page 27

Liability - Exclusion / Afwijzing van verantwoordelijkheid
Exclusion de responsabilité / Haftungsausschluss / schadenersatz
LIABILITY EXCLUSION / COMPENSATION
As manufacturers, we at PROTECH are not in a position to influence the way you build and set up the model, nor how you install, operate and
maintain the radio control system components. For this reason we are obliged to deny all liability for loss, damage or costs which are incurred due to
the incompetent or incorrect use and operation of our products, or which are connected with such operation in any way.
Unless otherwise prescribed by binding law, the obligation of the PROTECH company to pay compensation, regardless of the legal argument
employed, is limited to the invoice value of that quantity of PROTECH products which was immediately and directly involved in the event which
caused the damage. This does not apply if PROTECH is found to be subject to unlimited liability according to binding legal regulation on account of
deliberate or gross negligence.
AFWIJZING VAN VERANTWOORDELIJKHEID / SCHADEVERGOEDING
Als fabrikant, heeft PROTECH geen invloed op de manier waarop u het model bouwt en hanteert, noch hoe u componenten van de zendinstallatie
installeert, bedient en onderhoudt.
Daarom zijn wij genoodzaakt elke verantwoordelijkheid af te wijzen voor verlies, beschadiging of kosten die het gevolg zijn van onbekwaam of onjuist
gebruik en bediening van onze produkten, of die daarmee op gelijk welke wijze in verband gebracht worden.
Tenzij het anders voorgeschreven wordt door de wet terzake, is de verplichting van de firma PROTECH om een vergoeding uit te betalen,
onafhankelijk van de wettelijke voorschriften, beperkt tot de handelswaarde van orignele PROTECH-produkten die betrokken zijn in de gebeurtenis
die de schade veroorzaakte. Dit geldt niet wanneer de firma PROTECH door de wet aansprakelijk zou gesteld worden voor opzettelijke of grove
nalatigheid.
EXCLUSION DE RESPONSABILITÉ/DÉDOMMAGEMENTS
Le respect des instructions de montage et d’utilisation ainsi que les conditions d’installation, de fonctionnement et d’entretien de ce modèle et de
tous les éléments utilisés pour son équipement ne peuvent pas être surveillés par la Firme PROTECH.
En conséquence, nous déclinons toute responsabilité concernant la perte, les dommages et les frais résultants d’une utilisation incorrecte ainsi que
notre participation aux dédommagements d’une façon quelconque.
Tant qu’elle n’est pas impérativement contrainte par le législateur, la responsabilité de la Firme PROTECH, quelque soit la raison de droit, se limite à
la valeur marchande d’origine PROTECH impliquée dans l’accident. Ceci n’est pas valable dans la mesure où la Firme PROTECH serait contrainte
par la législation en vigueur pour une raison de grande négligence.
HAFTUNGSAUSSCHLUSS / SCHADENERSATZ
Weder die Einhaltung der Montage- und Betriebsanleitung in Zusammenhang mit dem Modell, noch die Bedienung und Methoden bei Installation,
Betrieb, Verwendung und Wartung der Fernsteuerungsanlagen können von der Firma PROTECH überwacht werden. Daher übernimmt die Fa.
PROTECH keinerlei Haftung für Verluste, Schäden oder Kosten, die sich aus der fehlerhaften Verwendung und dem Betrieb ergeben oder in
irgendeiner Weise damit zusammenhängen.
Soweit vom Gesetzgeber nicht zwingend anders vorgeschrieben, ist die Verpflichtung der Fa. PROTECH zur Leistung von Schadenersatz, gleich
aus welchem Rechtsgrund, begrenzt auf den Rechnungswert der an dem Schadenstiftenden Ereignis unmittelbar beteiligten Warenmenge der
Fa. PROTECH. Dies gilt nicht, soweit die Fa. PROTECH nach zwingenden gesetzlichen Vorschriften wegen Vorsatz oder großer Fahrlässigkeit
unbeschränkt haftet.
• 27
Page 28

VISIT OUR WEBSITE
www.protech.be
 Loading...